

Page 1
CU2W
Wet Location LED Emergency Light
IMPORTANT SAFEGUARDS
When using electrical equipment, basic safety precautions should
READ AND FOLLOW ALL SAFETY
1. Do not let power supply cords touch hot surfaces.
2. Do not mount near gas or electric heaters.
3. Equipment should be mounted in locations and at heights where it will not readily be subject
to tampering by unauthorized personnel.
4. The use of accessory equipment not authorized by the manufacturer may cause an unsafe condition.
5. Do not use this equipment for other than its intended purpose.
6. Servicing of this equipment should be performed by qualified service personnel.
7. Test cycling: the Life Safety Code (NFPA 101) requires testing of emergency lighting units once a month for a
minimum of 30 seconds, and once a year for a minimum of 90 minutes.
INSTALLER:
•SEE UNIT LABEL FOR ADDITIONAL MODEL SPECIFICATIONS
•SAVE THESE INSTRUCTIONS FOR USE BY OWNER/OCCUPANT
WARNING – This product contains chemicals known to the State of California to cause cancer, birth
defects and/or other reproductive harm. Thoroughly wash hands after installing, handling, cleaning,
or otherwise touching this product.
1. Mount the equipment securely in place using the hardware provided and
the mounting tabs on the back of the housing. If accessory mounting
devices are being utilized in this installation, follow any instructions
provided with those devices to ensure a safe installation.
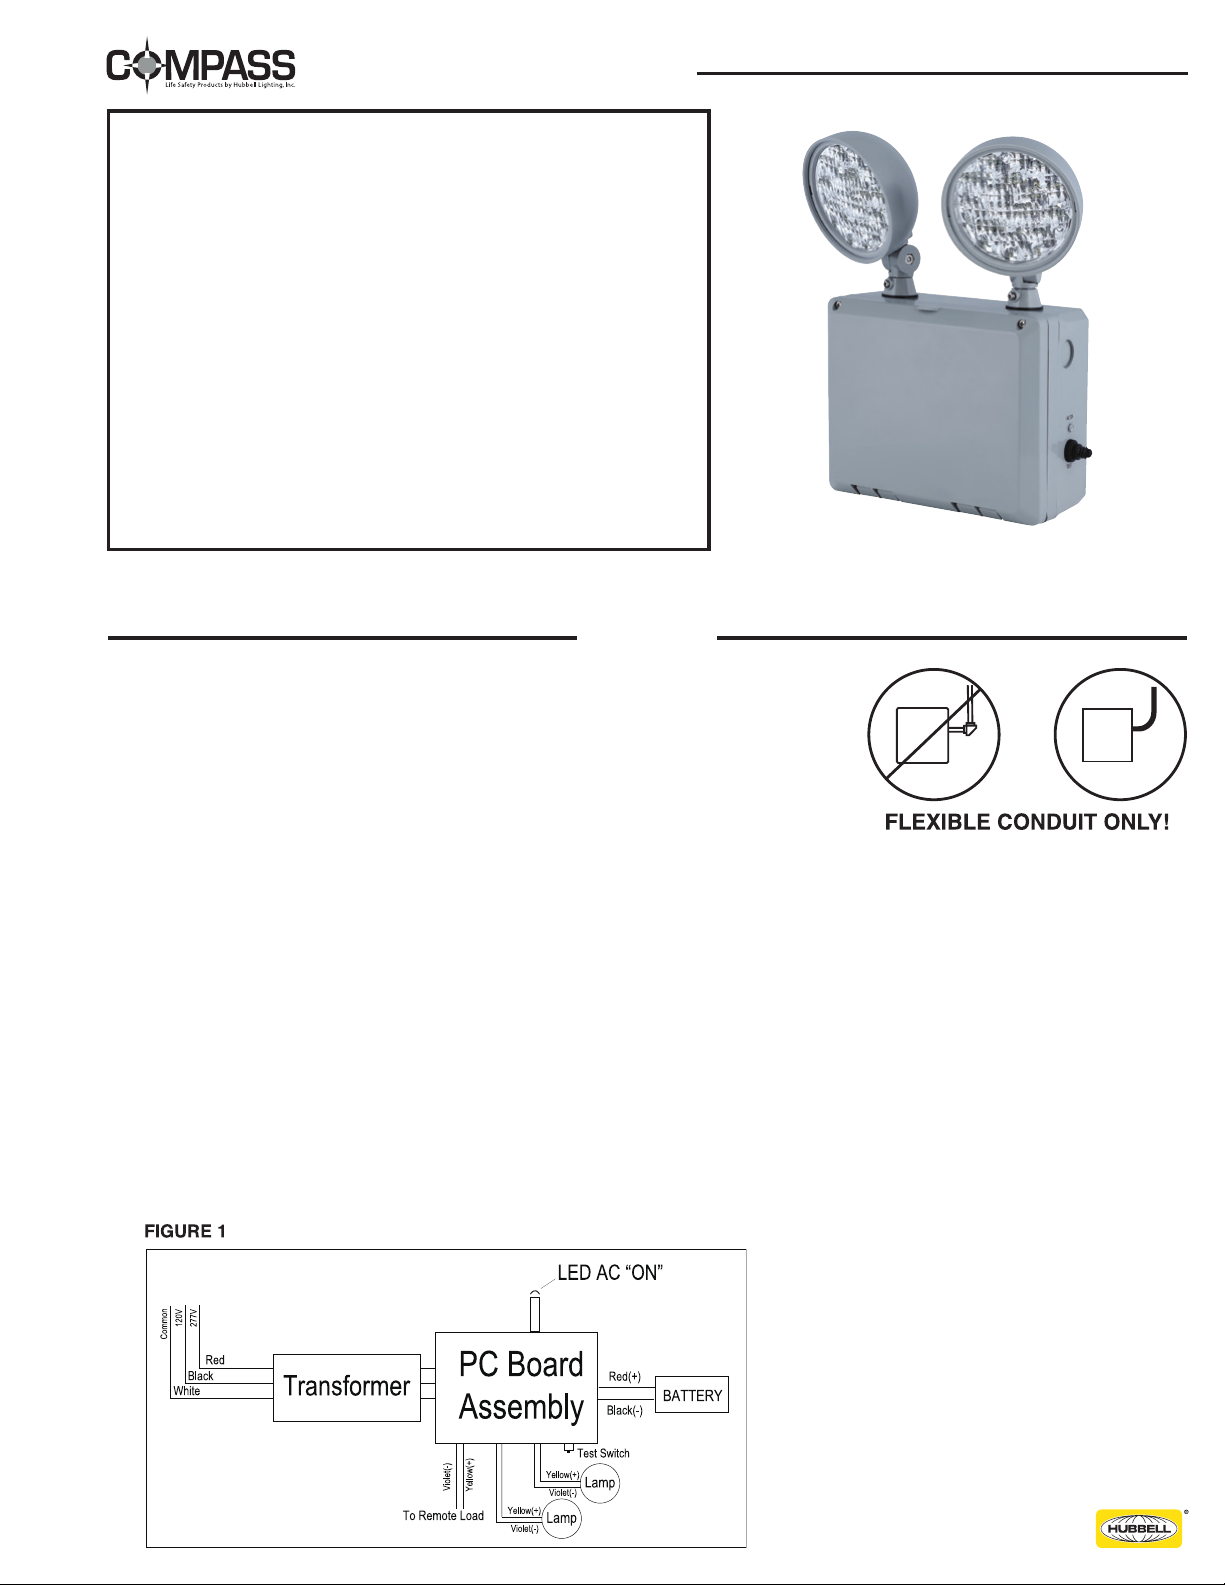
2. Extend 24-hour AC supply of rated voltage to the equipment, which
is furnished with a dual-voltage 120V/277V eld selectable input (see
Figure 1). The unit should be DRILLED for the connector in the proper
location as it relates to the location of the entry point of the power feed coming into the unit. There are
various places inside the unit that are suitable for this incoming power location. For 120V supply, connect
the line wire to the black lead. For 277V supply, connect the line wire to the red lead. Connect neutral wire
to the white lead. Connect the ground wire in accordance with local codes. A green ground lead is provided.
DO NOT energize circuit at this time.
3. CAUTION: Insulate the unused black or orange wire. Failure to insulate the unused wire will cause an
unsafe condition.
4. Connect the battery to the circuit board after the unit is installed.
5. Energize the AC supply. The CHARGE indicator will illuminate.
6. Replace the cover.
7. Adjust and focus the lighting heads a required.
always be followed including the following.
INSTRUCTIONS
INSTALLATION
CAUTION: If conduit is applied, use UL Listed Suitable for Wet Location parts.
WARNING:
UNUSED WIRES MUST
BE CAPPED USING
ENCLOSED WIRE NUTS
Page 2
OPERATION
1. To test the equipment, depress the TEST switch. The CHARGE indicator will go out and the emergency
lights will illuminate.
2. Release the TEST switch, the emergency lights will go out and the CHARGE indicator will illuminate. The
automatic charger will return and maintain the battery in a fully charged state.
NOTE: Allow the battery to charge for a minimum of 24 hours after installation or after a power failure
before conducting a 90 minute test (See TESTING section). CAUTION: This equipment is furnished with a
sophisticated solid state transfer switch which will automatically disconnect the emergency lights from the
battery if the battery has been discharged to the end of its useful output.
MAINTENANCE
CAUTION: Always turn off AC power to the equipment before servicing. Servicing should be performed only by
a qualied service technician. Use only MANUFACTURER supplied replacement parts.
1. BATTERY: The battery supplied in this equipment requires no maintenance. However, it should be tested
periodically (see TESTING section) and replaced when it no longer operates the connected xtures for the
duration of 30 seconds or 90 minute test. The battery supplied in this equipment has a life expectancy of
4-5 years when used in a normal ambient temperature of 72˚F.
2. OTHER: Clean lenses as required.
TESTING
Paragraph 31 - 1.3.7 of NFPA 101 - 1985, Life Safety Code requires that all emergency lighting equipment be
functionally tested every 30 days for a minimum of 30 seconds and tested yearly for a full 90 minute duration.
Written records of testing are to be kept for examination by the authority having jurisdiction.
TROUBLE-SHOOTING
1. The emergency lights do not operate.
a. If the charge indicator light is OFF: check that the circuit breaker for the AC supply is ON.
b. If the charge indicator light is ON:
• Check that the battery is properly connected and remote lamp heads are connected to
equipment
• Turn OFF AC supply and disconnect remote circuit wires from equipment. Turn ON AC supply
and depress the test switch. If equipment-mounted lamp heads are now ON, check remote
circuit for short or overload condition and correct as required.
• Then reconnect the circuit wires and restore AC power.
• If problem persists, replace battery.
2. Emergency lights are dim: The battery is not fully charged. Allow the battery to recharge for 24 hours and
then re-test. If lights are still dim, replace battery.
RECYCLING INFORMATION
All steel, aluminum and thermoplastic parts are recyclable.
NOTICE: Emergency units contain rechargeable batteries which
must be recycled or disposed of properly.
Compass Life Safety by Hubbell Lighting, Inc.• www.compasslightingproducts.com
Copyright© Hubbell Lighting, Inc., All Rights Reserved • Specifications subject to change without notice. • Printed in China
COMP0007_CU2W_INST_SHT 04/13
 Loading...