

Page 1
Installation Instructions F11
p
For Beacon Hall Towel Bars 84-3010, 84-3012 & 84-3015
CAUTION: FAILURE TO INSTALL THIS PRODUCT PROPERLY MAY RESULT IN PERSONAL INJURY
OR PROPERTY DAMAGE. We recommend installation by a qualified individual trained in the building trade.
This product must be installed in accordance with applicable installation code(s), by a person familiar with the
construction and o
To Install
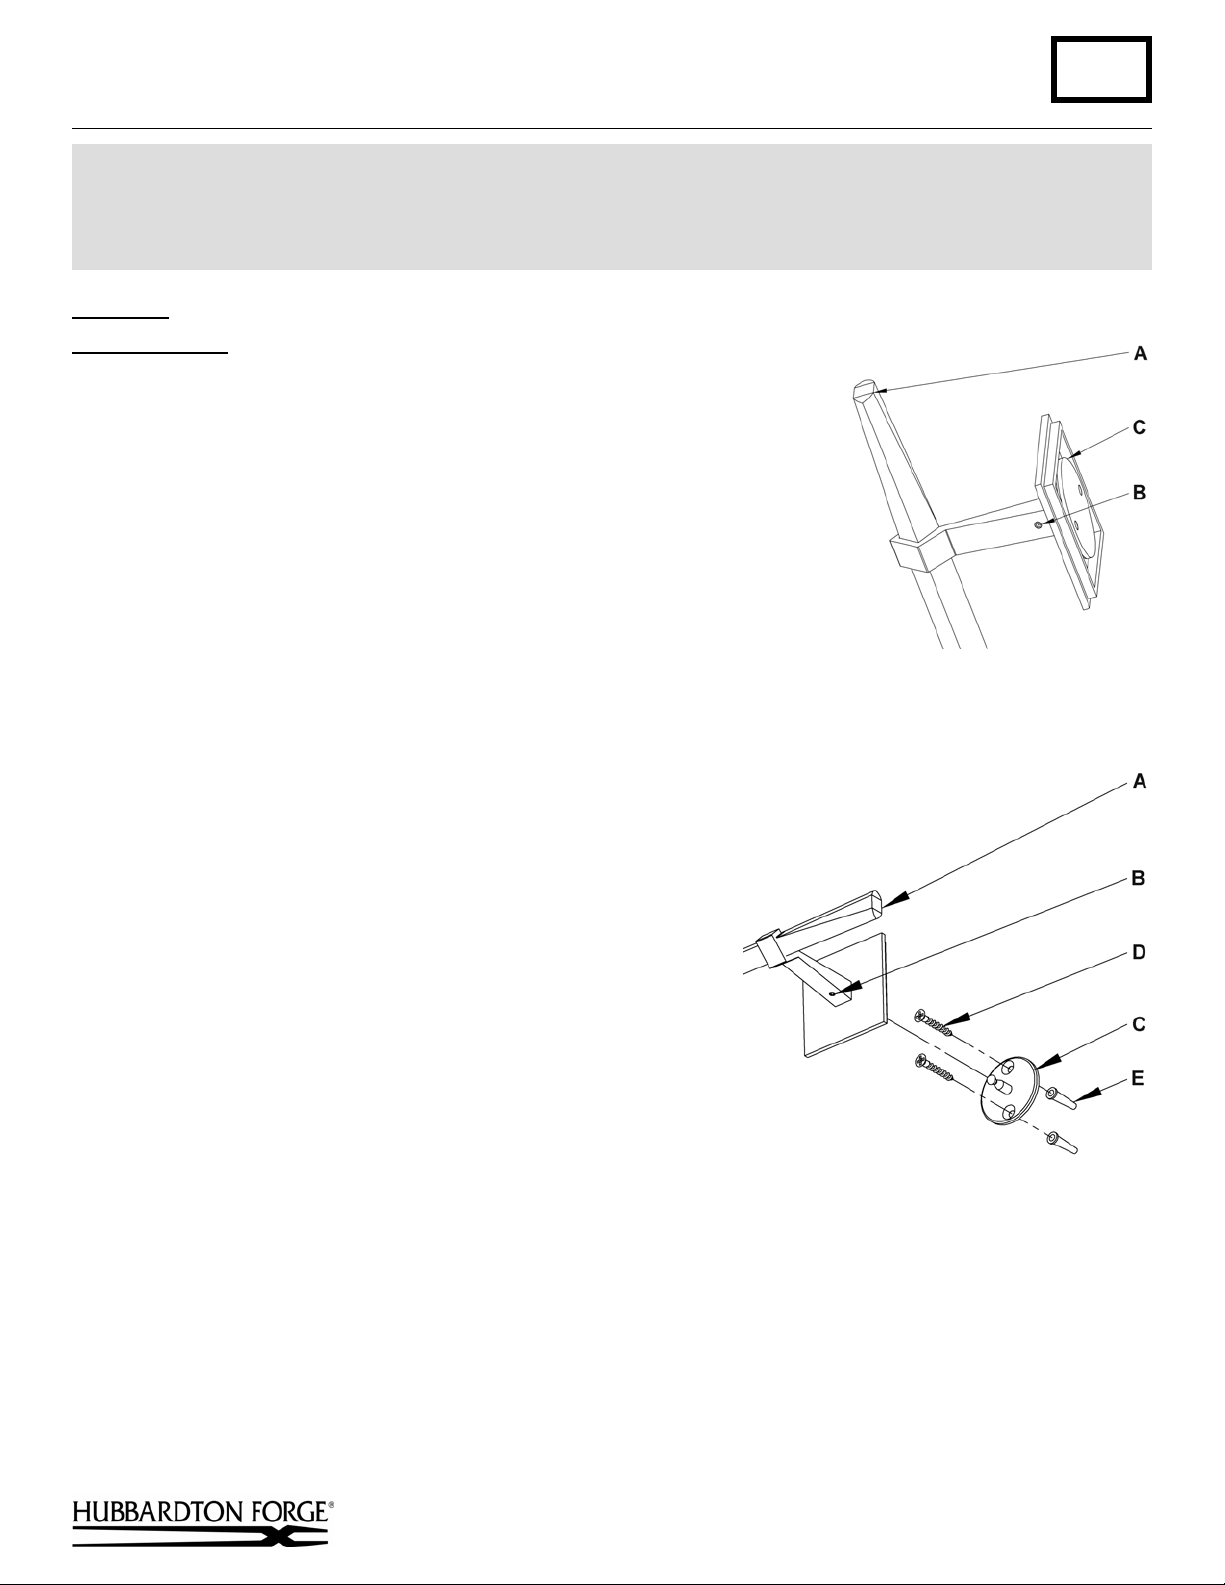
Component Parts
A Towel Bar
B Set Screw
C Wall Mount Plate (2)
1. Remove wall mount plate (C) from the towel bar (A) by loosening set
screw (B) and sliding wall mount plate (C) from fixture (A). Do this for
both ends (Figure 1).
2. Hold first wall mount plate (C) in location it is to be mounted. With a
pencil, mark the location of the top mounting hole in the wall mount
plate (C) on the wall behind.
3. Measure from the top marked hole the following distances.
84-3010 – 16”, 84-3012 – 24”, 84-3015 – 36” center to center.
4. If attaching directly to a framing member skip this step. Put the wall
mount plate down and drill 1/4" holes in the locations marked on
the wall if wall anchors (E) are to be used. For holes using
anchors, place the tapered end of the anchors (E) into the holes
and gently tap them flush to the wall using a light weight hammer.
5. Install top screws (D) through wall mount plate (C) and into each
anchor or directly into a framing member.
6. Slip towel bar (A) onto wall mount plates (C). If center to center
distance is off slight alignment can be achieved by loosening the
screws and turning the wall mount plates (C) until the center
distance allows the towel bar (A) to slide completely on the wall
mount plates (C).
7. Slide towel bar (A) off enough to mark locations of lower holes.
8. Loosen and remove screw (D) installed in the tops of the wall
mount plates (C).
9. If attaching directly to a framing member skip this step. Put the
wall mount plate down and drill 1/4" holes in the locations
marked on the wall if wall anchors (E) are to be used. For holes
using anchors, place the tapered end of the anchors (E) into the
holes and gently tap them flush to the wall using a light weight hammer.
10. Install screws (D) through wall mount plate (C) and into each anchor or directly into a framing member.
11. Slip towel bar (A) onto wall mount plates (C) until against wall.
12. Tighten set screw (B) in both arms.
If you need further assistance, or find that you are missing any parts, please contact the dealer from which you purchased
this product. We hope you enjoy your fixture!
* Hubbardton Forge will not be liable for injury or damage caused by improper installation or use of this fixture.
eration of the product and the hazards involved.*
D Screws (4)
E Wall Anchors (4)
(Figure 1)
(Figure 2)
Hand-Forged, Vermont-Made Lighting and Accessories
P.O. Box 827, 154 Route 30 South, Castleton, Vermont 05735
24245
 Loading...