

1
TECH SPECIFICATION:
Model No:
SmartDJ Flat
Voltage Input:
100-240V AC, 50/60Hz
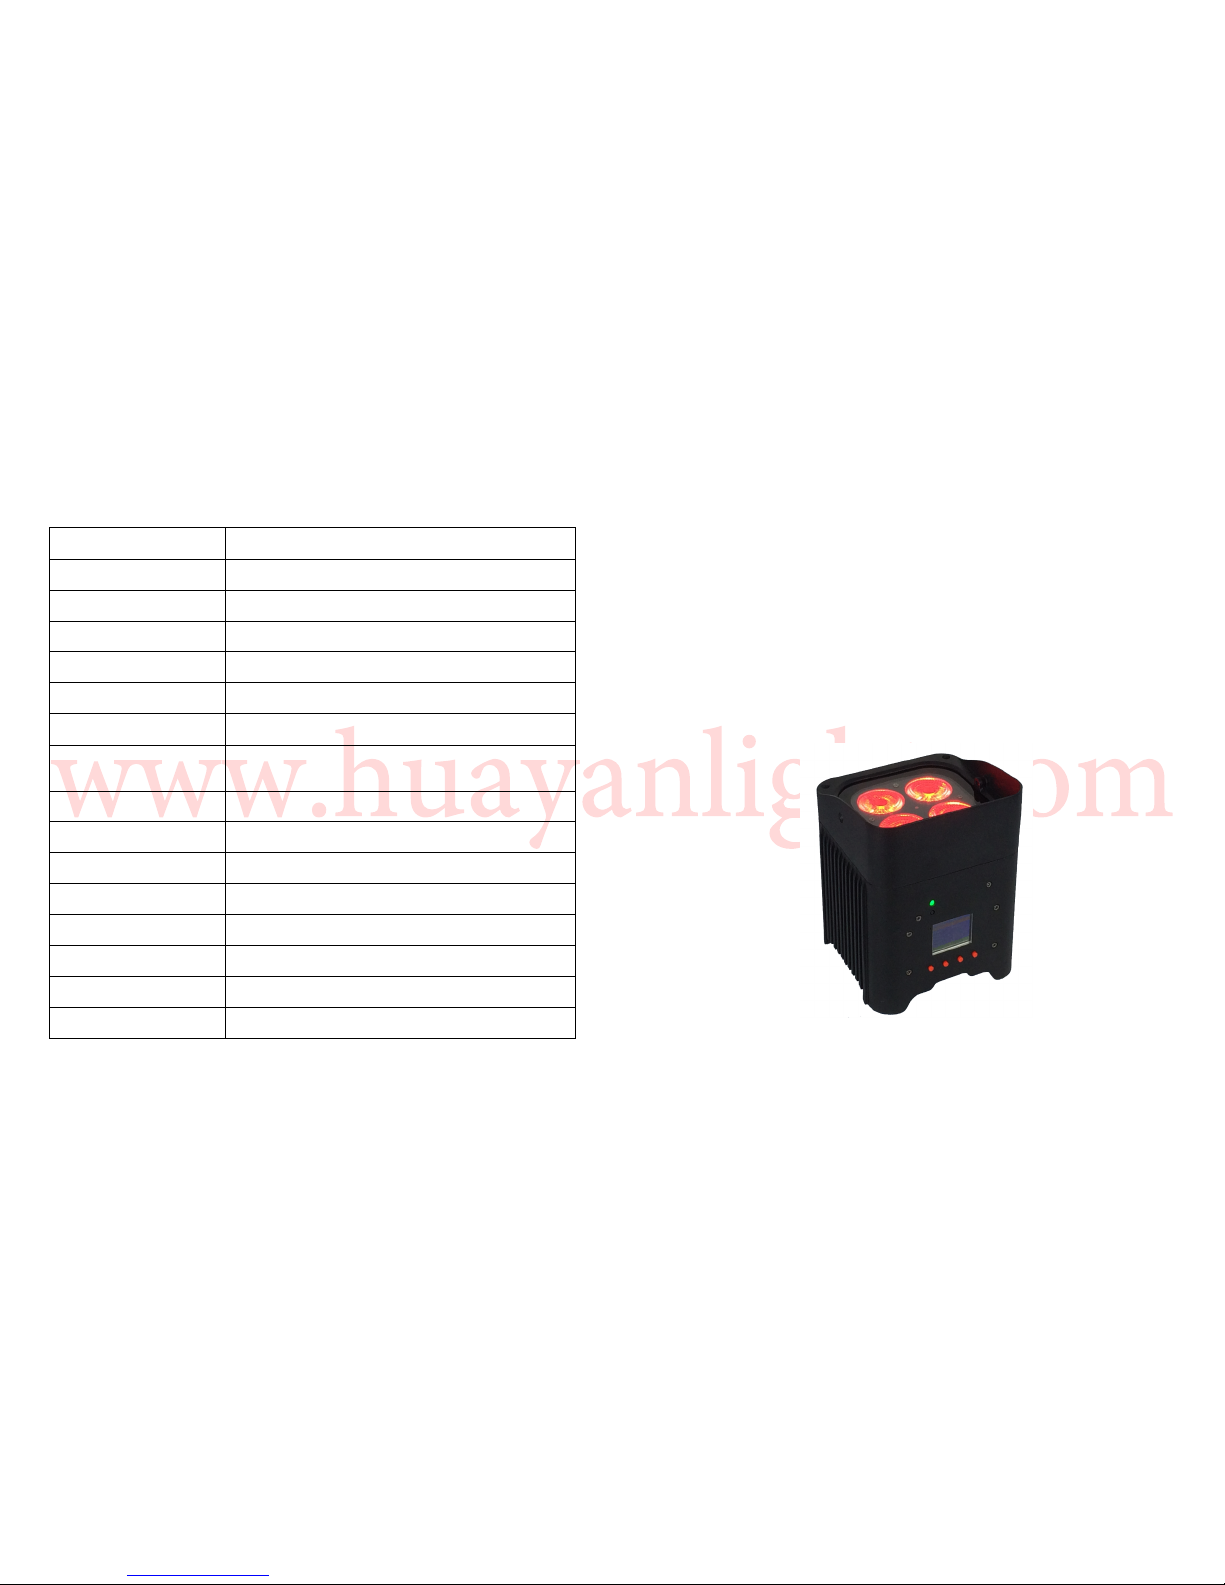
LED Type:
TianXin 6in1 LEDs
Beam Angle:
20 °
Optical Lens Size:
42mm
Protocol:
USITT DMX-512, AirDMX Wifi System
DMX Channel Mode:
6/8/11/3
Control Mode:
AirDMX, DMX-512, Standalone, Master/slave, Sound
Active, iOS or Android Smartphone
Dimmer Mode:
4 Dimming Curves
PWM Dimming:
16bit PWM Dimming at 5200HZ
Battery Powered:
14.8V x 8.8Ah = 131Wh
Wireless DMX:
2.4G Wireless DMX Transceiver
Body Material:
Aluminum Die-casting
Waterproof Grade:
IP33 Indoor Use Only
Product Size
138x144x188mm
Net Weight.:
3Kgs
New Smart DJ LED Flat
Par Battery&Wireless
User’s Manual
2
Getting Started
What’s In The Box?
• 1 x SmartDJ Flat battery powered wireless LED Uplights
• This Lovely User Manual
Getting It Out Of The Box
Congratulations on purchasing one of the brightest, best-built led uplights anywhere! Now
that you’ve got your SmartDJ Flat, you should carefully unpack the box and check the
contents to ensure that all parts are present and in good condition. If anything looks as if
it has been damaged in transit, notify the shipper immediately and keep the packing
material for inspection. Again, please save the carton and all packing materials. If a
fixture must be returned to the factory, it is important that the fixture be returned in the
original factory box and packing.
Powering Up!
All fixtures must be powered directly off a switched circuit and cannot be run off a
rheostat (variable resistor) or dimmer circuit, even if the rheostat or dimmer
channel is used solely for a 0% to 100% switch.
AC Voltage Switch - Not all fixtures have a voltage select switch, so please verify that the
fixture you receive is suitable for your local power supply. See the label on the fixture or
refer to the fixture’s specifications chart for more information. A fixture’s listed current
rating is its average current draw under normal conditions. Check the fixture or device
carefully to make sure that if a voltage selection switch exists that it is set to the correct
line voltage you will use.
The Lithium Battery System
The “SmartDJ Flat” features our proprietary Lithium-Ion internal battery system which
allows the user to operate their light without AC power for up to 20 hours.
It is powered with Lithium Battery of 14.8V 8.8Ah=131Wh
When you get the “SmartDJ Flat” at the first time, please install the 2.5A fuse into the
fuse holder on the light, which you can find in the carton box. As for air or sea shipping
safety, all battery powered fixture need designed to be off and can not been turned on at
any time during shipping.
Turn on the power switch on the The “SmartDJ Flat”, you can find the approximate
percentage of power remaining from the TFT Screen as below:
BATT: 50% TEMP: 36C
To charge the battery simply plugs the light into a power source. The battery will charge
weather the light is powered on or off. It will charge even while in use. The built-in
microprocessor of the battery system controls the charge and overall battery health, so all
you need to do is plug and play. From the TFT Screen you can see the approximate
percentage of power remaining. When after 3 hours charging, you can find the
BATT: 100% TEMP: 36C
IMPORTANT:
Please ask the professional engineer to repair if there is any quality question, or send
back to the factory, please do not repair by yourself.

3
The “AirDMX” Wifi System
1. The “AirDMX” System includes one “AirDMX Box”, and “AirDMX RECV” on
each Light, you can connect the “AirDMX Box” to DMX Controller or Smartphone
App for iOS or Android to have more fun with our “SmartDJ-Flat”
2. For each “AirDMX Box” and “AirDMX RECV”, there is 7 ID, each ID match one led
light color from Red, Green, Yellow, Blue, Violet, Cyan, White; that means you can
set up 7 groups of Wireless Transceiver System for different lights in the same Place,
and each wireless transceiver system will not disturb others.
3. Press the “ID Setting” button on the “AirDMX Box” and “AirDMX RECV” both to
select your desired operating group
4. The 7-Color Status LED will change color to indicate the current ID group:
· GROUP 1: RED
· GROUP 2: GREEN
· GROUP 3: YELLOW
· GROUP 4: BLUE
· GROUP 5: VIOLET
· GROUP 6: CYAN
· GROUP 7: WHITE
5. The status LED on the ”AirDMX Box” will flash RED until data is transmitted from
the DMX Controller or Smartphone App
6. The status LED on the ”AirDMX RECV” will flash GREEN until communication is
established with the. ”AirDMX Box”
The “AirDMX” App for iOS or Android
1. You can scan the QR code on the “AirDMX Box” to download the right app for your
smart phone
2. After installation of the app, turn on the power switch on the “AirDMX Box”,
please connect your smart phone to the wifi named as “AirDMX”.
3. Open the “AirDMX” app:
2. Standard Mode

4
2. Standard Mode
Channel
8
Ch1
000-255
Master Dimmer
Ch2
000-255
Red
Ch3
000-255
Green
Ch4
000-255
Blue
Ch5
000-255
Amber
Ch6
000-255
White
Ch7
000-255
UV
Ch8
000-255
Strobe
3. Easy Mode
Channel
6
Ch1
000-255
Red
Ch2
000-255
Green
Ch3
000-255
Blue
Ch4
000-255
Amber
Ch5
000-255
White
Ch6
000-255
UV
4. HSV Mode
Channel
3
Ch1
000-255
Hue
Ch2
000-255
Saturation
Ch3
000-255
Value

5
The Channel Modes
1. Extend Mode:
Channel
11
Ch1
000-255
Master Dimmer
Ch2
000-255
Red
Ch3
000-255
Green
Ch4
000-255
Blue
Ch5
000-255
Amber
Ch6
000-255
White
Ch7
000-255
UV
Ch8
000-255
Strobe
Ch9
000-015
016-095
096-175
176-255
None
Auto Mode
Fade Mode
Sound Active
Ch10
0-255
Speed for Ch9
Ch11
000-005
006-065
066-125
126-185
186-255
Menu Default
Linear Dimmer Mode
Curve Dimmer Mode
Theatre Dimmer Mode
Studio Dimmer Mode
The Safety Instructions
• Please keep this User Guide for future use. If you sell the unit to someone else, be sure
that they also receive this User Guide.
• ALWAYS make sure that you are connecting to the proper voltage, and that the line
voltage you are connecting to is not higher than that stated on the decal or rear panel of
the fixture
• This product is intended for indoor use only.
• To prevent risk of fi re or shock, do not expose fixture to rain or moisture.
• Make sure there are no flammable materials close to the unit while operating.
• The unit must be installed in a location with adequate ventilation, at least 20in (50cm)
from adjacent surfaces. Be sure that no ventilation slots are blocked.
• ALWAYS disconnect from the power source before servicing or replacing fuse and be
sure to replace with same fuse size and type.
• ALWAYS secure fixture using a safety chain. NEVER carry the fixture by its cord. Use
its carrying handles.
• DO NOT operate at ambient temperatures higher than 104°F (40°C).
• In the event of a serious operating problem, stop using the unit immediately; NEVER try
to repair the unit by yourself. Repairs carried out by unskilled people can lead to damage
or malfunction. Please contact the nearest authorized technical assistance center.
Always use the same type spare parts.
• NEVER connect the device to a dimmer pack.
• Make sure the power cord is never crimped or damaged.
• Never disconnect the power cord by pulling or tugging on the cord.
• Avoid direct eye exposure to the light source while it is on.
Caution! There are no user serviceable parts inside the unit. Do not open the housing or

6
attempt any repairs yourself. In the unlikely event your unit may require service, please
contact
The Menu Panel
The Control Panel
There are 4 control buttons below the LED display which allow you to navigate
through the various control panel menus.
<ESC> Is used to navigate to the previous higher-level menu item.
<DOWN> Scrolls through the menu items and numbers in descending
order.
<UP> Scrolls through the menu items and numbers in ascending order.
<ENTER> Is used to select and confirm/store the current selection
The Menu Structure
Address : 001-512
Address Setting
Channel : 6 / 8 / 11 / 3
4 Channel Modes
Slave : Master / Slave
Slave/Master
Auto : 1 -15
Auto Chase
Fade : 1-15
Auto Fade
Color : 1-31
Preset Colors
Sound : 1-10
Sound Active Mode
Red : 000
Red Dimmer
Green : 000
Green Dimmer
Blue : 000
Blue Dimmer
Amber : 000
Amber Dimmer
White : 000
White Dimmer
UV : 000
UV Dimmer
Strobe : 00
Strobe
Dimmer : 1 -4
4 Dimming Curves
Screen : ON / 30”s
Screen on or off
BATT : 100% TEMP : 36C *
Battery / Temperature
 Loading...