

Page 1

User Manual
Vodafone 845
Page 2

Reading Before Proceeding . . . . . . . . . . . . . . . . . . . . . . . . . . . . 2
Safety Precautions. . . . . . . . . . . . . . . . . . . . . . . . . . . . . . . . . . . . . . . . . . . . . . . . 2
Notice . . . . . . . . . . . . . . . . . . . . . . . . . . . . . . . . . . . . . . . . . . . . . . . . . . . . . . . . . . . . 5
Getting to Know Your Mobile Phone . . . . . . . . . . . . . . . . . . . 6
Box Clever with Your Mobile Phone . . . . . . . . . . . . . . . . . . . . . . . . . . . . . . . 6
Mobile Phone View . . . . . . . . . . . . . . . . . . . . . . . . . . . . . . . . . . . . . . . . . . . . . . . 7
Installing Your Mobile Phone . . . . . . . . . . . . . . . . . . . . . . . . . . . . . . . . . . . . . 9
Turning Your Mobile Phone On and Off . . . . . . . . . . . . . . . . . . . . . . . . . . 12
Using the Touchscreen . . . . . . . . . . . . . . . . . . . . . . . . . . . . . . . . . . . . . . . . . . 14
Locking and Unlocking the Screen . . . . . . . . . . . . . . . . . . . . . . . . . . . . . . . 15
Home Screen . . . . . . . . . . . . . . . . . . . . . . . . . . . . . . . . . . . . . . . . . . . . . . . . . . . . 17
Notifications and Status . . . . . . . . . . . . . . . . . . . . . . . . . . . . . . . . . . . . . . . . . 20
Connecting to a Computer via USB. . . . . . . . . . . . . . . . . . . . . . . . . . . . . . . 23
Calling. . . . . . . . . . . . . . . . . . . . . . . . . . . . . . . . . . . . . . . . . . . . . . . 26
Making a Call . . . . . . . . . . . . . . . . . . . . . . . . . . . . . . . . . . . . . . . . . . . . . . . . . . . . 26
Answering and Rejecting a Call . . . . . . . . . . . . . . . . . . . . . . . . . . . . . . . . . . 30
Using Call log . . . . . . . . . . . . . . . . . . . . . . . . . . . . . . . . . . . . . . . . . . . . . . . . . . . . 32
Other Operations During a Call . . . . . . . . . . . . . . . . . . . . . . . . . . . . . . . . . . . 33
Using the Airplane Mode . . . . . . . . . . . . . . . . . . . . . . . . . . . . . . . . . . . . . . . . . 35
Contacts. . . . . . . . . . . . . . . . . . . . . . . . . . . . . . . . . . . . . . . . . . . . . 36
Opening and Viewing Contacts. . . . . . . . . . . . . . . . . . . . . . . . . . . . . . . . . . . 36
Adding and Deleting Contacts . . . . . . . . . . . . . . . . . . . . . . . . . . . . . . . . . . . 41
Editing a Contact . . . . . . . . . . . . . . . . . . . . . . . . . . . . . . . . . . . . . . . . . . . . . . . . 43
Importing Contacts from a SIM Card . . . . . . . . . . . . . . . . . . . . . . . . . . . . . 45
Searching for a Contact . . . . . . . . . . . . . . . . . . . . . . . . . . . . . . . . . . . . . . . . . . 46
Communicating with Your Contacts . . . . . . . . . . . . . . . . . . . . . . . . . . . . . 46
i
Page 3

Using the Onscreen Keyboard . . . . . . . . . . . . . . . . . . . . . . . 48
Displaying the Keyboard Panel. . . . . . . . . . . . . . . . . . . . . . . . . . . . . . . . . . . 48
Customizing Keyboard Settings. . . . . . . . . . . . . . . . . . . . . . . . . . . . . . . . . . 53
Messaging . . . . . . . . . . . . . . . . . . . . . . . . . . . . . . . . . . . . . . . . . . . 57
SMS and MMS. . . . . . . . . . . . . . . . . . . . . . . . . . . . . . . . . . . . . . . . . . . . . . . . . . . . 57
Email . . . . . . . . . . . . . . . . . . . . . . . . . . . . . . . . . . . . . . . . . . . . . . . . . . . . . . . . . . . . 64
Getting Connected. . . . . . . . . . . . . . . . . . . . . . . . . . . . . . . . . . . 70
GPRS/3G . . . . . . . . . . . . . . . . . . . . . . . . . . . . . . . . . . . . . . . . . . . . . . . . . . . . . . . . 70
Wi-Fi . . . . . . . . . . . . . . . . . . . . . . . . . . . . . . . . . . . . . . . . . . . . . . . . . . . . . . . . . . . . . 71
Browser. . . . . . . . . . . . . . . . . . . . . . . . . . . . . . . . . . . . . . . . . . . . . . . . . . . . . . . . . . 72
Bluetooth. . . . . . . . . . . . . . . . . . . . . . . . . . . . . . . . . . . . . . . . . . . . . . . . . . . . . . . . 76
Connecting to a Computer via USB. . . . . . . . . . . . . . . . . . . . . . . . . . . . . . . 79
Modem Behavior. . . . . . . . . . . . . . . . . . . . . . . . . . . . . . . . . . . . . . . . . . . . . . . . . 80
Entertainment. . . . . . . . . . . . . . . . . . . . . . . . . . . . . . . . . . . . . . . 82
Taking Photos and Recording Videos . . . . . . . . . . . . . . . . . . . . . . . . . . . . 82
Using the Gallery . . . . . . . . . . . . . . . . . . . . . . . . . . . . . . . . . . . . . . . . . . . . . . . . 87
Enjoying Music. . . . . . . . . . . . . . . . . . . . . . . . . . . . . . . . . . . . . . . . . . . . . . . . . . . 89
Listening to FM Radio . . . . . . . . . . . . . . . . . . . . . . . . . . . . . . . . . . . . . . . . . . . . 94
Google Services . . . . . . . . . . . . . . . . . . . . . . . . . . . . . . . . . . . . . 97
Creating a Google Account . . . . . . . . . . . . . . . . . . . . . . . . . . . . . . . . . . . . . . 97
Using Gmail. . . . . . . . . . . . . . . . . . . . . . . . . . . . . . . . . . . . . . . . . . . . . . . . . . . . . . 98
Using Talk . . . . . . . . . . . . . . . . . . . . . . . . . . . . . . . . . . . . . . . . . . . . . . . . . . . . . 102
Using Maps . . . . . . . . . . . . . . . . . . . . . . . . . . . . . . . . . . . . . . . . . . . . . . . . . . . . 104
Using YouTube . . . . . . . . . . . . . . . . . . . . . . . . . . . . . . . . . . . . . . . . . . . . . . . . 106
Using Market . . . . . . . . . . . . . . . . . . . . . . . . . . . . . . . . . . . . . . . . . . . . . . . . . . 107
Synchronizing Information . . . . . . . . . . . . . . . . . . . . . . . . . 111
ii
Page 4

Managing Your Accounts . . . . . . . . . . . . . . . . . . . . . . . . . . . . . . . . . . . . . . 111
Customizing Your Account Synchronization . . . . . . . . . . . . . . . . . . . 114
Using the PC Suite to Synchronize . . . . . . . . . . . . . . . . . . . . . . . . . . . . . 116
Using Other Applications . . . . . . . . . . . . . . . . . . . . . . . . . . . 117
Using the Calendar . . . . . . . . . . . . . . . . . . . . . . . . . . . . . . . . . . . . . . . . . . . . 117
Using the Alarm. . . . . . . . . . . . . . . . . . . . . . . . . . . . . . . . . . . . . . . . . . . . . . . . 125
Using Sound Recorder . . . . . . . . . . . . . . . . . . . . . . . . . . . . . . . . . . . . . . . . . 128
Using the File Manager. . . . . . . . . . . . . . . . . . . . . . . . . . . . . . . . . . . . . . . . . 130
Using the Calculator . . . . . . . . . . . . . . . . . . . . . . . . . . . . . . . . . . . . . . . . . . . 134
Using the Notepad. . . . . . . . . . . . . . . . . . . . . . . . . . . . . . . . . . . . . . . . . . . . . 134
Managing Your Mobile Phone. . . . . . . . . . . . . . . . . . . . . . . 136
Setting the Date and Time . . . . . . . . . . . . . . . . . . . . . . . . . . . . . . . . . . . . . 136
Setting the Display. . . . . . . . . . . . . . . . . . . . . . . . . . . . . . . . . . . . . . . . . . . . . 137
Setting Ringers . . . . . . . . . . . . . . . . . . . . . . . . . . . . . . . . . . . . . . . . . . . . . . . . 138
Setting Phone Services . . . . . . . . . . . . . . . . . . . . . . . . . . . . . . . . . . . . . . . . 140
Setting Text-to-Speech . . . . . . . . . . . . . . . . . . . . . . . . . . . . . . . . . . . . . . . . 142
Protecting Your Mobile Phone . . . . . . . . . . . . . . . . . . . . . . . . . . . . . . . . . 143
Managing Applications. . . . . . . . . . . . . . . . . . . . . . . . . . . . . . . . . . . . . . . . . 144
Resetting Your Mobile Phone . . . . . . . . . . . . . . . . . . . . . . . . . . . . . . . . . . 146
Upgrading the Software Version . . . . . . . . . . . . . . . . . . . . . . . . . . . . . . . 147
Appendix . . . . . . . . . . . . . . . . . . . . . . . . . . . . . . . . . . . . . . . . . . . 150
Warnings and Precautions . . . . . . . . . . . . . . . . . . . . . . . . . . . . . . . . . . . . . 150
iii
Page 5

Wonderful Communication, Mobile Life.
Vodafone 845 Mobile Phone
User Guide
1
Page 6
Reading Before Proceeding
Safety Precautions
Please read the safety precautions carefully to ensure the correct
use of your mobile phone. For detailed information, refer to the
section “Warnings and Precautions” on page 150.
Do not crash, throw, or puncture your mobile phone.
Avoid the falling, squeezing, and bending of your
mobile phone.
Do not use your mobile phone in a moist
environment, such as the bathroom. Prevent your
mobile phone from being soaked or washed in liquid.
Do not switch on your mobile phone when it is
prohibited to use phones or when the phone may
cause interference or danger.
Do not use your mobile phone while driving.
2
Page 7
Follow any rules or regulations in hospitals and health
care facilities. Switch off your mobile phone near
medical apparatus.
Switch off your mobile phone in aircraft. The phone
may cause interference to control equipment of the
aircraft.
Switch off your mobile phone near high-precision
electronic devices. The phone may affect the
performance of these devices.
Do not attempt to disassemble your mobile phone or
its accessories. Only qualified personnel are allowed
to service or repair the phone.
Do not place your mobile phone or its accessories in
containers with a strong electromagnetic field.
Do not place magnetic storage media near your
mobile phone. Radiation from the phone may erase
the information stored on them.
Do not put your mobile phone in a high-temperature
place or use it in a place with flammable gas such as a
gas station.
3
Page 8
Keep your mobile phone and its accessories away
from children. Do not allow children to use your
mobile phone without guidance.
Use only approved batteries and chargers to avoid the
risk of explosions.
Observe any laws or regulations on the use of wireless
devices. Respect others’ privacy and legal righ ts when
using your wireless device.
Strictly follow the relevant instructions of this manual
while using the USB cable. Otherwise your mobile
phone or PC may be damaged.
4
Page 9

Notice
All Rights Reserved
Your phone is made exclusively for Vodafone by Huawei
Technologies.
No part of this manual may be reproduced or transmitted in any form
or by any means without prior written consent of Huawei
Technologies Co., Ltd.
Trademarks
VODAFONE, the Vodafone logos are trade marks of the Vodafone
Group. Other product and company names mentioned herein may
be trade marks of their respective owners.
Notice
The information in this manual is subject to change without notice.
Every effort has been made in the preparation of this manual to
ensure accuracy of the contents, but all statements, information,
and recommendations in this manual do not constitute a warranty of
any kind, expressed or implied.
Read the safety precautions and safety informations carefully to
ensure that you use wireless device in a correct and safe manner.
5
Page 10

Getting to Know Your Mobile
Phone
Ready to get hands-on with your touchscreen? To take every last
gadget and gizmo for a spin? Great – here is where you will get to
grips with the basics and best bits of your new mobile phone. So
thumb through our manual and get up to speed with your mobile
phone!
Box Clever with Your Mobile Phone
Take a peak in your mobile phone box and you will find much more in
there than your new mobile phone– in fact, you will have all these
handy items to play with:
• Mobile phone
• Battery
• Charger
• USB cable
• 3.5 mm headset
• Quick start guide
• Safety information
6
Page 11
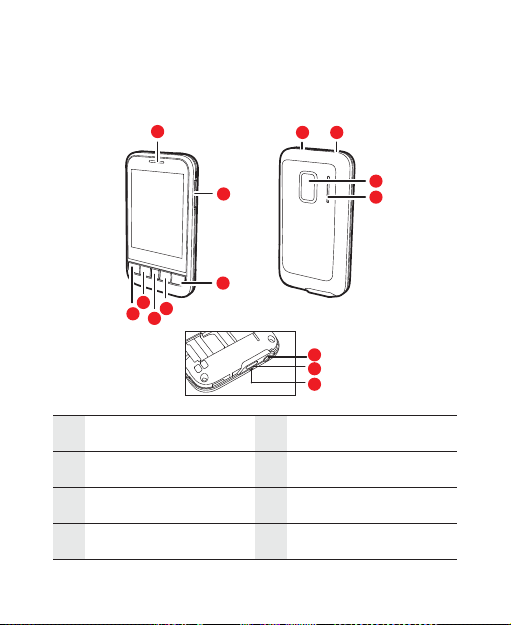
Mobile Phone View
Key features at a glance
1
2
6
7
5
3
4
8 9
12
13
14
10
11
1Earpiece 2 Volume control keys
3End key 4 Home/Back key
5 Optical Finger Navigation 6 MENU key
7Send key 8Power key
7
Page 12
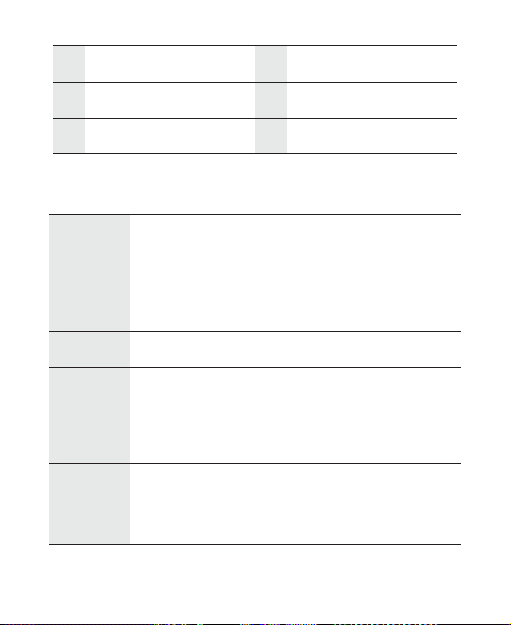
9 Connectors on the top 10 Main camera
11 Speaker 12 Headset jack
13 Charging/Data interface 14 Microphone
Key functions at your fingertips
• Press to turn on your mobile phone.
• Press and hold to open the Phone options
Power key
Send key Press to go to the Phone screen.
MENU key
Optical
Finger
Navigation
menu.
• Press to lock the screen when your mobile phone
is on.
• Press to open the menu on an active screen.
• Press and hold to open the keyboard so you can
perform quick searches.
• Press to unlock the screen.
• Drag to navigate selectable items on the screen.
• Press to select a highlighted item or action.
8
Page 13
Home/
1
2
a
b
Back key
End key
Note:
You can customize the function of the End key by selecting Settings >
General info & option > End button behavior.
• Press to return to the previous screen.
• Press to exit any application you are running.
• Press to hang up a call.
• Press to return to the Home screen.
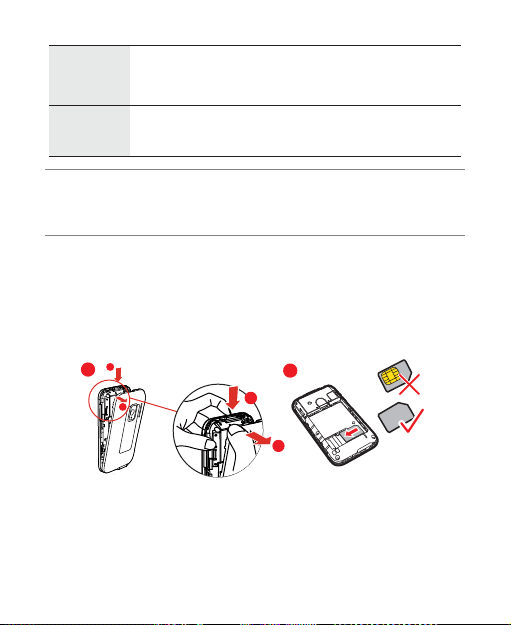
Installing Your Mobile Phone
How to slot in your SIM card
It takes just two simple steps to install your SIM card:
a
b
1. Remove the battery cover.
2. Insert the SIM card.
9
Page 14
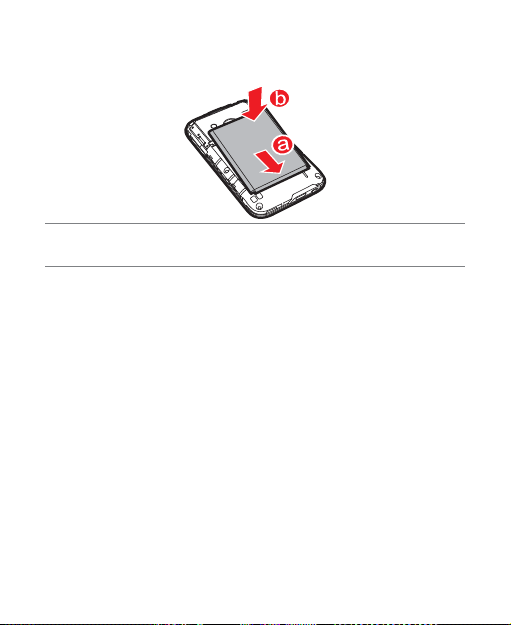
How to pop in your battery
Note:
Make sure the printed side of the battery points upwards.
1. Angle the edge labelled a (with the contact s) into the bottom
end of the battery slot.
2. Push down the edge labelled b until the battery clicks firmly into
place.
How to charge your mobile phone
Before charging the battery, make sure that the battery has been
properly inserted into your mobile phone.
Before you charge the battery, read the following instructions:
10
Page 15
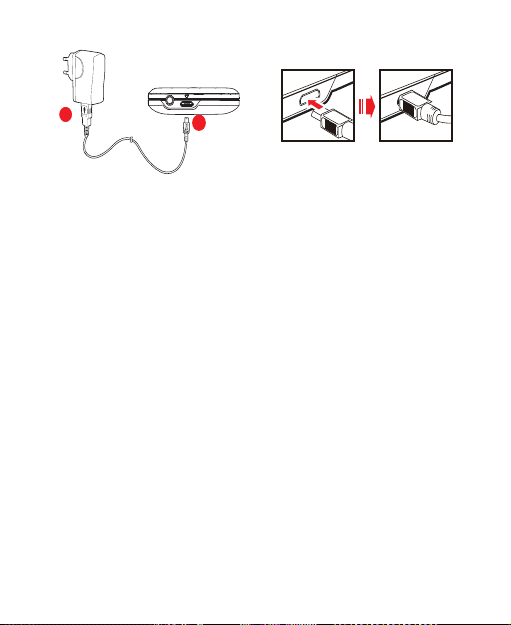
1. Connect your USB cable to your mobile phone, as shown in a.
b
a
2. Connect the other end of the ca ble to the charger, as shown in b.
3. Plug the charger into a power socket.
How to keep your battery in top shape
• If your battery has not been used for a long time, you mobile
phone might not turn on instantly when it’s on charge. Keep the
battery on charge a little longer and the mobile phone should
turn on fine.
• Over time, your battery may not last as long as it did at first. This
is down to general wear and tear and if your battery life is
noticeably shorter, it is best to get a new battery.
• Using data services will reduce the standby time significantly.
• The time your battery takes to charge is influenced by its age and
the local temperature.
11
Page 16

• When your battery is running low, your mobile phone will make a
sound and alert you on screen. When it is extremely low, your
mobile phone will turn off automatically.
Turning Your Mobile Phone On and Off
How to turn on your mobile phone
1. Press the Power key.
2. The first time you do this, you will b e asked to sign in to your
account and set up your mobile phone.
Note:
When personal identification number (PIN) protection is enabled on your mobile phone, you need to enter the PIN before using the mobile phone.
How to set up your mobile phone
1. Press the Power key to turn on the mobile phone.
2. Touch the Android image. Your mobile phone will ask you to
enable the data service. This is because some of the features on
your mobile phone need permanent data connection. Please
check you have a data tariff option before enabling the data
service. Then do one of the following:
• To enable the data service, go to step 3.
12
Page 17

• To disable the data service, go to step 6.
3. You will be prompted to view the tutorial on how to use y our
mobile phone.
• To watch the tutorial about using the onscreen keyboard,
touch Begin.
• To continue, touch Skip.
4. You will be asked to sign in to your accounts. Once you sign in, all
the emails on your account will automatically synchronize with
your mobile phone.
Note: You will need an active data connection set up on your mobile
phone to create or sign in to your account.
• If you do not have a account, you can select an account type
and follow the instructions to make one.
• You can touch Skip and save it till later.
5. After reading the setup information, touch Next.
6. When you have signed in or created an account, you will be asked
if you want to enable Google location. This service give you basic
information about your surrounding location without usin g GPS.
7. Set the date and the time. Then touch Next.
8. Touch Finish setup.
13
Page 18

How to turn off your mobile phone
1. Press and hold the Power key to open the Phone options menu.
2. Touch Power off.
3. Touch OK when prompted to turn off the mobile phone.
Using the Touchscreen
Enjoying the touchscreen at your fingertips
• Touch: Touch a desired item with your finger to confir m your
selection or start an application.
• Touch and hold: Touch and hold the screen until your mobile
phone responds. For example, you can always touch and hold the
screen to open the option menu of the active screen.
• Flick: Flick your finger vertically or horizontally across the
screen. For example, you can flick your finger left and right to
switch between pictures.
• Drag: Touch and hold your desired item with your finger. Then,
drag the item to any part of the screen to move the item. For
example, you can drag an icon on the screen to move or delete it.
Rotating your mobile phone
Now you will never get in a spin – because when you turn your
mobile phone, the screen twists too. And that means your screen is
14
Page 19

always the right way up, even if you are holding it portrait or
landscape. But watch out – for this tricksy technology to work, you
will always have to turn your mobile phone anti-clockwise.
Locking and Unlocking the Screen
How to lock the screen
• When your mobile phone is on, press the Power key to lock the
screen. When the screen is locked, you can still receive
messages and calls.
• If you leave your mobile phone undisturbed for a while, the
screen will lock automatically.
How to unlock the screen
Press the MENU, Home/Back or Power key to wake up the screen.
Then unlock it by doing any of the following:
• Press the MENU key to unlock the screen.
• Drag the unlock button from left to right.
Note:
If you have set up a screen unlock pattern, you will be prompted to draw the
pattern on the screen to unlock it.
15
Page 20
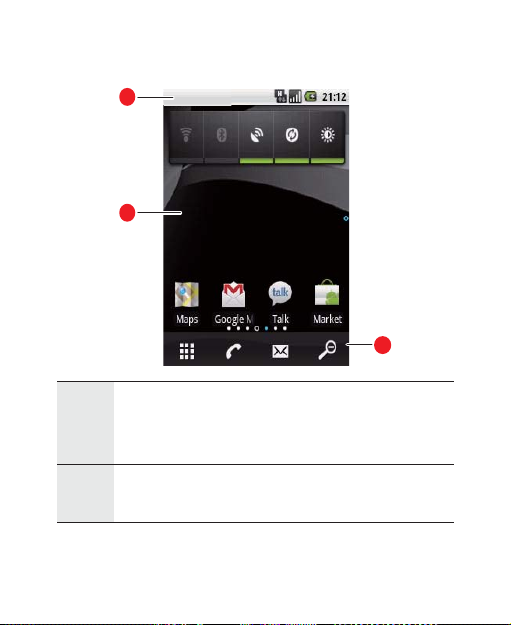
Home Screen
1
2
3
1
2
Notification bar: Displays the notifications and
status icons of your mobile phone. Flick down to
open the notification panel.
Display area: Shows the operation and display areas
of your mobile phone.
16
Page 21
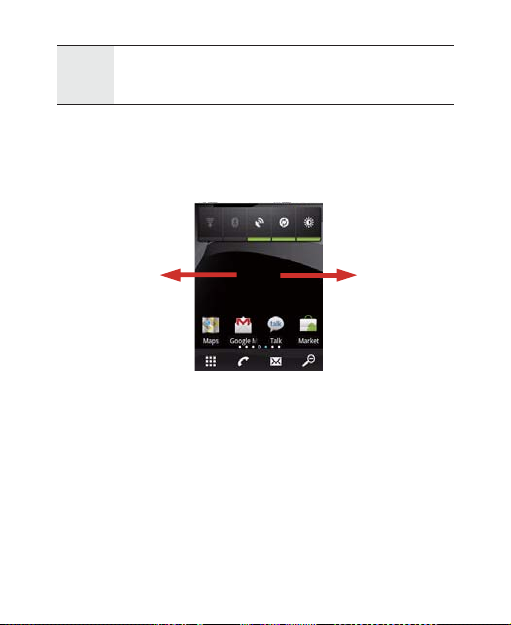
Application button: Touch to displays the
3
applications.
How to extend the Home screen
On the Home screen, flick your finger across the screen to go to the
extended Home screen.
How to customize the Home screen
To add a new screen item
1. Touch and hold the blank area on the Home screen until the Add
to Home screen menu is displayed.
2. Select the item you want to add to the Home screen.
17
Page 22

To move a screen item
1. Touch and hold an icon on the Home screen until the icon
magnifies and the mobile phone vibrates.
2. Without lifting your finger, drag the icon to the desired position
on the screen, and then release it.
To remove a screen item
1. Touch and hold an icon on the Home screen until the icon
magnifies and the mobile phone vibrates.
2. Without lifting your finger, drag the icon to the recycle bin until
the icon and the application button turn red, and then re lease it.
To change the wallpaper
1. On the Home screen, press the MENU key, and then touch
Wallpaper.
2. Do the followings:
• Touch Pictures to select a picture and set it as a wallpaper.
• Touch Wallpaper gallery to select a picture and set it as a
wallpaper.
• Touch Live Wallpaper to select an animation and set it as a
wallpaper.
18
Page 23
To create a new folder
1. On the Home screen, press MENU key.
2. Touch Add > Folders > New folder to create a new folder.
To rename a folder
1. Open a folder. Then touch and hold the folder’s title bar.
2. Enter the new name of the folder, and then touch OK.
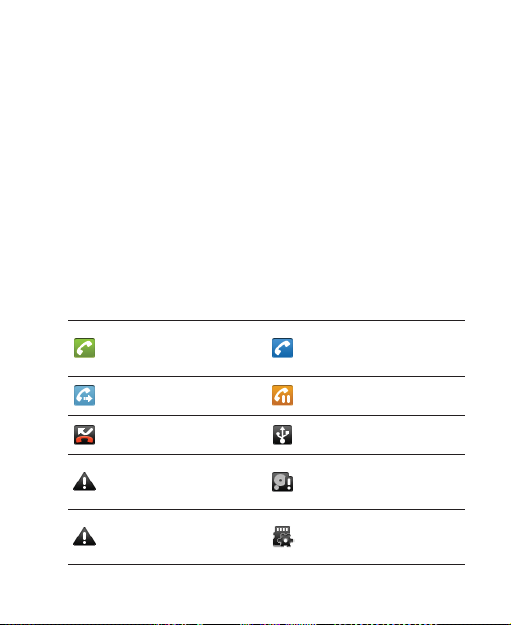
Notifications and Status
Notification and status icons
Call in progress
Call forwarding on Call on hold
Missed call Connected to a PC
System error
Problem with sign-in/
sync
19
Call via a Bluetooth
device
Memory is full
Preparing mircoSD card
Page 24
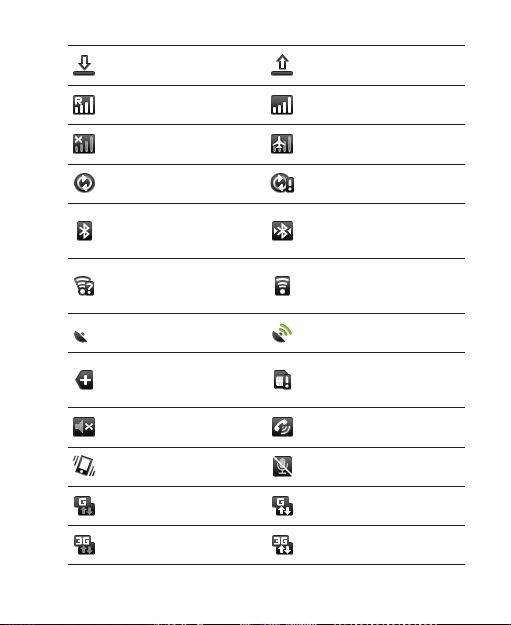
Downloading data Uploading data
Roaming Signal strength
No signal Airplane mode
Synchronizing data Sync failed
Bluetooth is on
Wi-Fi is on
Connected to another
Bluetooth device
Connected to a Wi-Fi
network
GPS is on GPS connected
More undisplayed
notifications
No SIM card
Sound off Loudspeaker on
Vibrate mode Mobile phone is mute
GPRS connected GPRS in use
3G connected 3G in use
20
Page 25
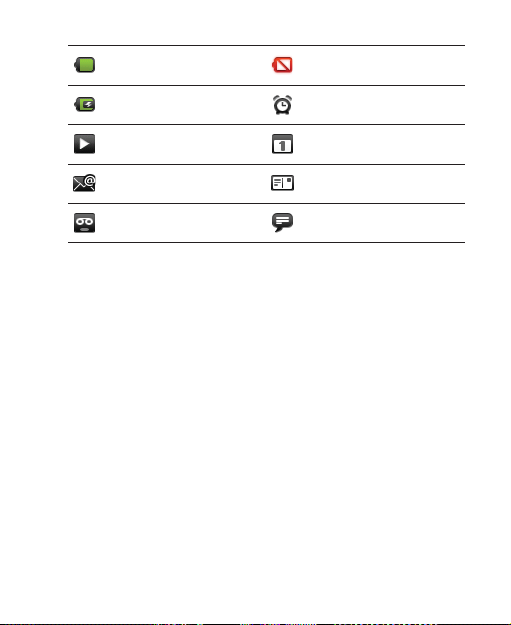
Battery is full Battery is very low
Battery is charging Alarm is set
Music is playing New calendar reminder
New email New message
New voicemail New instant message
Notification panel
Your mobile phone will tell you when you receive a new message or
when an event in your calendar is due. The notification panel also
keeps you in the loop about alarms and sett ings – for example, when
Call forwarding is activated. You can find out the wireless network
operator, view a message, reminder, or event n otification by opening
the notification panel.
To open the notification panel
1. When a new notification ic on appears on the notification bar,
touch and hold the notification bar, and then flick down to open
the notification panel.
2. On the notification panel, you can do the following:
21
Page 26
• Touch a notification to open the related application.
• Touch Clear Notifications to clear all notifications.
To close the notification panel
Touch and hold the bottom of the panel. Then flick up to close the
notification panel.
Connecting to a Computer via USB
How to install the microSD card
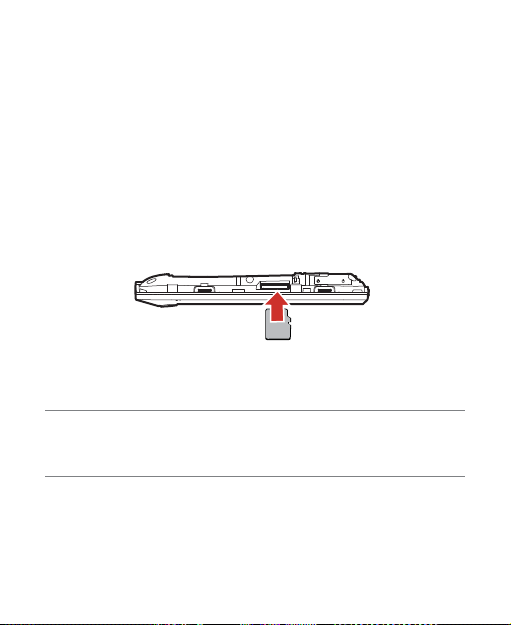
1. Remove the battery cover.
2. Insert the microSD card as shown in the diagram.
Note:
When inserting the microSD card, make sure that the golden contact is facing
downwards.
22
Page 27
Using the microSD Card as the USB Mass Storage
To transfer all your favorite music and pictures from your PC onto
your mobile phone’s microSD card, set the microSD card as the USB
mass storage.
1. Connect your mobile phone to your PC with the USB cable . Your
PC will detect the microSD card as a removable disk. You can
now transfer files from your PC to your mobile phone’s microSD
card.
2. Open the notifications panel, and then touch USB connected.
3. Touch Mount in the dialog that opens to confirm that you want
to transfer files.
Tip:
You can also touch > Settings > General info & option, and then select
the USB Mass Storage check box to use the microSD card as the USB mas s
storage.
Note:
When your microSD card acts as the USB mass storage, your mobile phone will
not use this memory space. Your PC will tell you how to safely dis connect the
USB mass storage device (that is your mobile phone by the way) when you
have finished transferring files.
23
Page 28

Removing the microSD While Your Mobile Phone Is On
1. Touch > Settings.
2. Scroll down the screen, and then touch SD card & phone
storage > Unmount SD card.
3. Carefully remove the microSD card.
24
Page 29
Calling
To place a phone call, you can dial a number or touch a number in
your contacts list, on a Web page, or from a document that contains
a phone number. When you are on a call, you can either answer
incoming calls or sen d them to your voicemail box. You can also set
up conference calls with several participants.
Making a Call
To make a call, you can use the Phone application, or select a
number from Contacts or Call log.
While you are on a call, you can press to return to the Home
screen and use other functions. To return to the calling screen, flick
the Notification bar down and touch Current Call.
Making a Call with the Dialer
1. Touch > Dialer to display the dialer.
Tip: If you are already working with Contacts or Call log, touch the Dialer
tab.
2. Touch the appropriate numerical keys to enter the phone
number.
25
Page 30
Tip: Your mobile phone supports the SmartDial function, that is, when you
touch numbers on the dialer, the phone automatically searc hes
among your contacts and lists the matching results based on the
accuracy. If no contact is matched with your entered informatio n, the
phone will not display any result.
3. Press or touch to initiate the call.
During a call, flick up the Dialpad tab to enter other numbers on the
dialpad.
Tip: If you do not use the dialpad for a while, the screen will automatically
lock to prevent the buttons from being pressed accidentally. To
unlock the screen, touch the lock icon twice.
26
Page 31
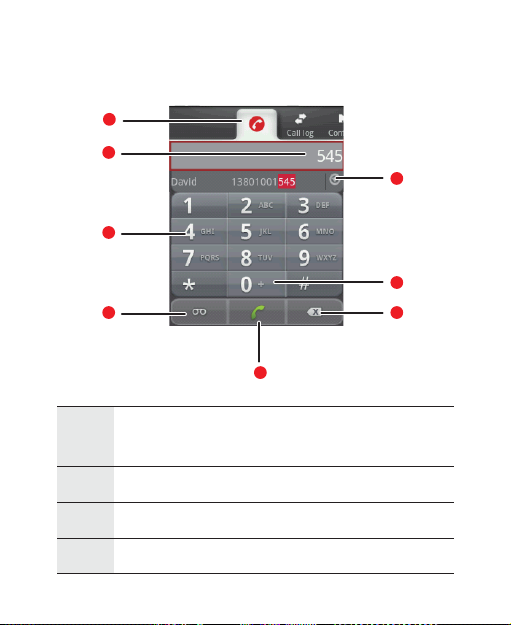
Dialing Panel
1
2
3
4
5
Touch to switch between Dialer, Call log, Contacts,
1
and Favorites.
2 Displays the number you enter.
3 Touch to enter the number.
4 Touch to make a voicemail.
27
8
7
6
Page 32
5Touch to dial.
Touch to erase each subsequent digit of a number.
6
Touch and hold to erase the entire number.
7 Touch and hold to enter +.
8 Touch to display all the matching contacts.
Making a Call from Contacts
1. Touch > Contacts to display the contact list.
Tip: If you are already working with Dialer or Call log, touch the Contacts
tab.
2. In the list, touch the contact you want to call.
3. Touch to dial the phone number.
Making a Call from Call log
1. Touch > Call log to display the call log.
Tip: If you are already working with Contacts or Dialer, touch the Call log
tab.
28
Page 33
2. Touch to the right of the log entry to dial.
Tip: If you touch and hold the log entry, to open the options menu for
communicating with that contact in other ways will open.
Answering and Rejecting a Call
Answering an Incoming Call
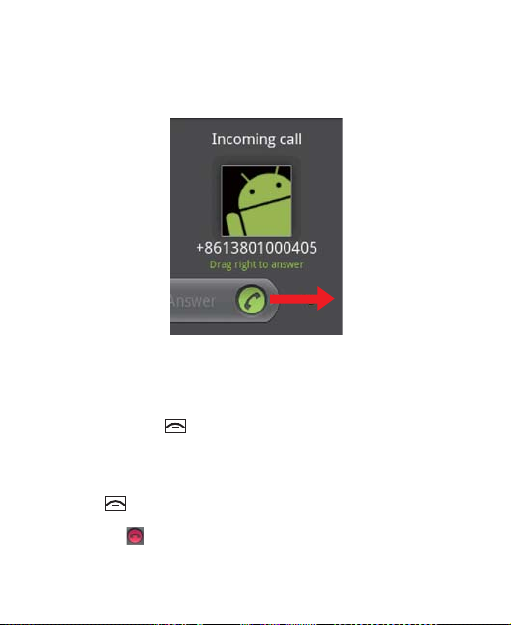
When you receive a phone call, the incoming call screen opens with
the caller ID and any additional information about the caller that you
have entered in Contacts.
• Press to answer the call.
green
• Drag the to the right.
phone
29
Page 34
Ending a Call
During a call, press to hang up.
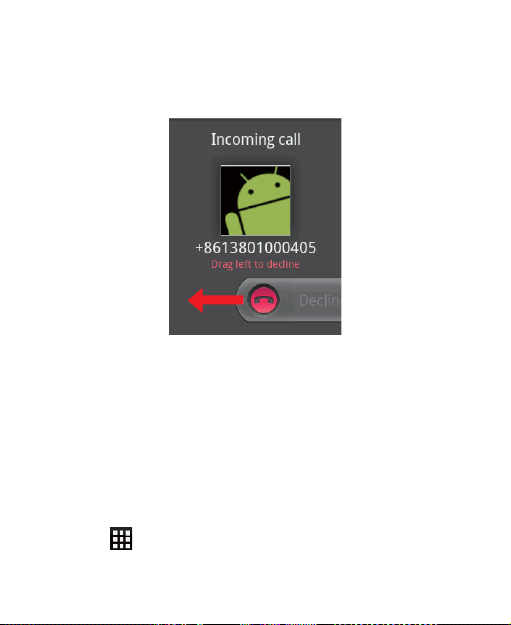
Rejecting an Incoming Call
• Press to reject a call.
• Drag the to the left.
30
Page 35
Using Call log
The Call log contains a list of the last calls that you have dialed,
received, or missed. You can use the call log to quickly find a recently
called number or add an incoming number to your contact list.
Adding an entry to Contacts
1. Touch > Call log to display the call log.
31
Page 36
2. Touch and hold the entry you want to add.
3. Touch Add to contacts in the options menu.
4. Touch Create new contact or scroll through the contact list and
touch an existing contact name.
Other Operations During a Call
Making a Conference Call
If you receive a new call while you are already on a call, you can
connect the second call to the call you are on. This feature is known
as conference calling. You can also set up a conference call with
multiple callers.
Note:
Contact your wireless service provider to learn whether it supports conference
calls and how many participants you can add.
1. To initiate a conference call, dial the number of the first person to
be on the call. While you are on that call, press , and then
touch Add call.
2. Enter the phone number of the person you want to join the
conversation and press , or select someone from your Call
log or Contacts. The first call is automatically placed on hold.
32
Page 37
3. Once you have connected to the person you have added, press
, and then touch Merge calls to begin the conference call.
4. To add more people, touch Add call and repeat steps 2 and 3.
5. To drop someone from the call or to talk privately to one person,
press , and then touch Manage conference call.
6. To end the conference call and disconn ect everyone, press .
Switching Between Calls
If you receive a new call while you are already on a call, you can
switch between the two calls.
1. While you are on two calls, press , and then touch Swap calls.
2. The current call is placed on hold a nd you are connected to the
other call.
Tip: You can also touch Call on hold icon on the notification bar to switch
to the call.
33
Page 38

Using the Airplane Mode
Some locations may require you to turn off your phone’s wireless
connections. Rather than powering off your phone, you can place it
in Airplane mode.
1. Press and hold the Power key.
2. Touch Airplane mode in the options menu.
34
Page 39

Contacts
The Contacts application enables you to save and manage
information such as phone numbers and addresses of your contacts.
After you save the contact information on your mobile phone, it
gives you easy access to the people with whom you want to
communicate.
Opening and Viewing Contacts
Opening the Contacts Application
If you have a new mobile phone and have not yet added any
contacts, Contacts displays a message with hints on how to start
adding contacts to your mobile phone.
• Touch > Contacts.
• Press , and then touch the Contacts tab.
All of your contacts are displayed alphabetically in a scrolling list.
Each contact is followed by the phone number that you have
specified as the person's default phone number.
35
Page 40

Quick Contact for Android
As you build up your list of contacts on your phone, you can use
Quick Contact for Android in many applications to quickly start a
chat, email, or text message, to place a call, or to locate your
contacts. Quick Contact for Android is a special icon that you can
touch to open a bubble with options for quickly initiating a
connection to that contact.
Contacts that you can access with Quick Contact are displayed
differently in different applications, but usually with a picture frame.
36
Page 41
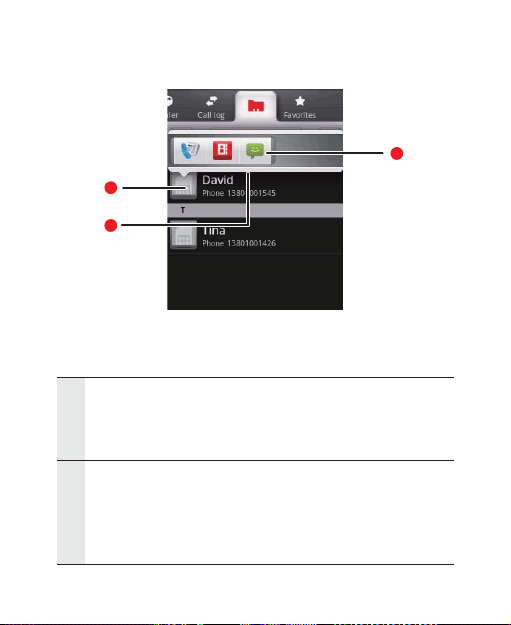
1
2
Quick Contact icon with a picture frame.
1
Touch to open a bubble with icons for all the ways you
can communicate with the contact.
A bubble with icons for all the ways you can
communicate with the contact.
2
If there are more icons than can fit in the bubble, drag the
icons left or right to view them all.
37
3
Page 42

Touch an icon to open its application, and you can start
3
communicating with your contact right away.
Opening a List of Your Favorite Contacts
The Favorites tab contains a short list of the contacts with whom
you communicate most often.
To open a list of your favorite contacts, touch the Favorites tab in
the contacts list.
Viewing Contact Details
To view contact details, touch the contact whose details you wan t to
view. Detailed information such as the phone number, e-mail
address, and physical address appears for each contact.
38
Page 43
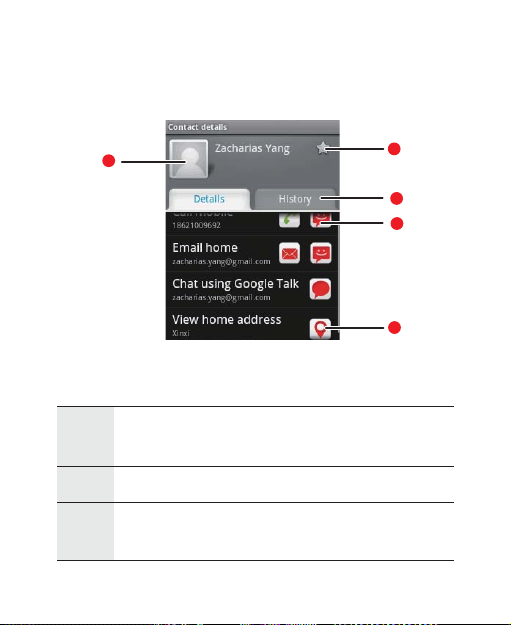
Contact details
1
Touch an icon to open Quick Contact. Please refer to
1
“Quick Contact for Android” on page 37.
2 Touch an address to view it on Google Maps.
Touch an icon to call, send a message, chat, and so
3
on.
39
5
4
3
2
Page 44
Touch the History tab to view a list of interactions
4
you have had with this contact.
5 Touch to add the contact to your favorites.
Tip:
Press , and then touch Edit contact to edit the contact’s information.
Adding and Deleting Contacts
You can add or delete contacts on your mobile phone and
synchronize them with the contacts in your accounts that support
synchronizing contacts.
Adding a Contact
1. In the contacts list, press , and then touch Create contact.
Tip: In the contacts list, you can touch to add a new contact.
2. If you have more than one account with contacts, touch the
account to which you want to add the contact.
3. Enter the contact's name, and then add any detailed information
such as phone number or address.
40
Page 45

4. When you are finished, touch Done to save the contact
information.
Deleting a Contact
1. In the contacts list, touch and hold the contact that you want to
delete, and then touch Delete contact in the options menu.
2. Touch OK to confirm that you want to delete the contact.
Adding a Contact to Your Favorites
To add a contact to your favorites, you can do any of the following
while you are in the contacts list:
• Touch and hold the contact you want to add to Favorites. Then
touch Add to favorites.
• Access the favorites list, press , and then touch Add favorites
to select the contacts you want to add to Favorites.
• Touch a contact, and then touch the star to the right of the
contact’s name. The star turns gold.
Removing a Contact from Your Favorites
To remove a contact from your favorites, you can do any of the
following while you are in the favorites list:
41
Page 46
• Touch and hold the contact you want to delete from Favorites.
Then touch Remove from favorites.
• Press , and then touch Remove favorites to select the
contacts you want to remove from Favorites.
• Touch a contact, and then touch the star to the right of the
contact’s name. The star turns gray.
Editing a Contact
You can always make changes to the information you have stored for
a contact.
1. In the contacts list, touch a nd hold the contact whose details you
want to edit, and then touch Edit contact in th e options menu.
Tip: You can also press , and then touch Edit contact while viewing a
contact’s details.
2. If you have more than one account with contacts, touch the
account in which you want to edit the contact.
3. Touch a category of contact information, such as contact’s
name, phone number or email address , to enter that kind of
information about your contact.
42
Page 47
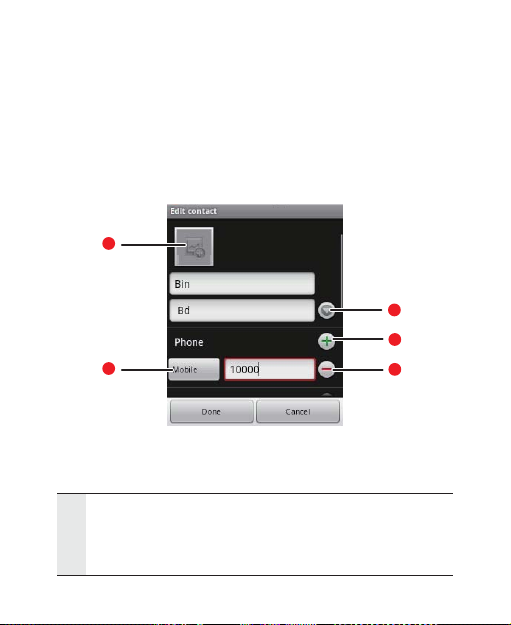
4. Make the desired changes to the contact informa tion, and then
touch Done. To cancel all changes you made to the contact
information, touch Cancel.
Contact Editing Screen
1
5
4
2
Touch the Picture Frame icon to select a picture to
1
display next to the name in your list of contacts and in
other applications.
43
3
Page 48
Touch to open a menu with preset labels, such as Mobile
2
and Work for a phone number, or touch Custom in the
menu to create your own label.
3 Touch to remove the entry from that category.
4 Touch to add more than one entry for that category.
Touch to display more text boxes for entering the name
5
details such as middle name and last name.
Importing Contacts from a SIM Card
When you open the Contacts application for the first time, you are
asked whether to import contacts from the SIM card to your phone.
Select Yes to import the contacts, or Cancel to import them later.
1. In the contacts list, press , and then touch Manage contacts.
2. Touch Copy from SIM card. Wait for the SIM card contents to be
loaded.
3. Select the check box of the contact you want to import.
Note: If you want to deselect or select all, press . Then touch
Deselect all or Select all.
44
Page 49
4. Touch Copy.
5. If you have more than one account on your phone, touch the
account into which you want to import the contacts.
Searching for a Contact
1. In the contacts list, press , and then touch Search.
Tip: In the contacts list, you can also touch to search for a contact.
2. Enter the name of the contact for which you are searching. As
you type, contacts with matching names appear below the
search box.
Communicating with Your Contacts
From the Contacts or Favorites tab, you can quickly call or send a
text (SMS) or multimedia message (MMS) to a contact’s default
phone number. You can also open details to view a list of all the ways
you can communicate with that contact. This section describes ways
to initiate communication when viewing your list of contacts.
45
Page 50

Connecting Through Quick Contact for Android
1. Touch the contact's picture or picture frame (if you have not
assigned a picture to the contact) to open Quick Contact for
Android.
2. Touch the icon for the way you want to communicate with the
contact.
Note: The icons available depend on the information you have for the
contact and the applications and accounts on your mobile phone.
Communicating with a Contact
1. In the contacts list, touch the contact that you want to
communicate.
2. In the contact’s details screen, touch the green icon to the rig ht
of the number to call or send messages.
46
Page 51

Using the Onscreen Keyboard
Displaying the Keyboard Panel
To enter text, use the onscreen keyboard. Some applications open
the keyboard automatically. In others, touch a text field to open the
keyboard. To open the keyboard, do one of the following:
• Press and hold to show the keyboard.
• Touch the space where you want to write text to show the
keyboard.
• Touch and hold the space where you usually wr ite your text to
open the options menu.
Press to hide the keyboard.
Choosing an Input Method
1. On the text screen, touch and hold the space where you usually
write your text until the Edit text menu is displayed.
2. Touch Input method.
3. Choose the input method.
The keyboard panel will be automatically displayed.
47
Page 52
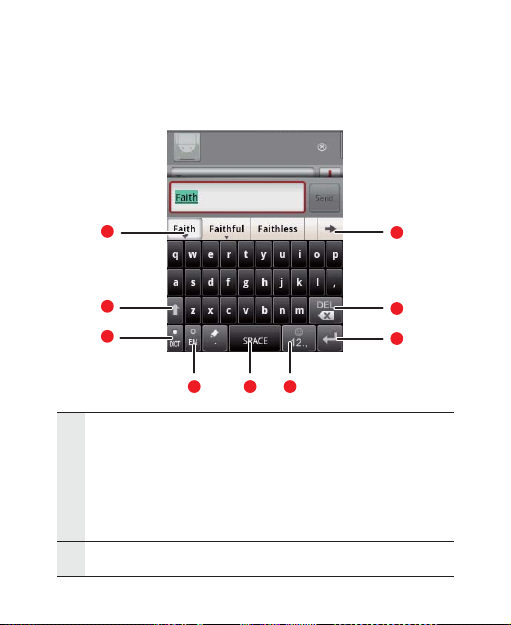
Using the TouchPal Keyboard Panel
1
2
3
4 5 6
Displays the list of candidate words. Touch a word to
insert it into your text. If word suggestions is enabled, the
1
suggested word is highlighted. To enable the function,
please refer to “Customizing Keyboard Settings” on page
53.
2 Change from uppercase to lowercase.
48
9
8
7
Page 53
3 Enable the word prediction.
Set the language for your mobile phone. To select a
language that your mobile phone supports, to >
4
Settings > Language & keyboard > TouchPal > Select
languages.
5 Touch to insert a space.
6 Switch to the numbers and symbols keyboard panel.
7 Touch to add a carriage return.
Touch to delete the character to the left side of the
8
cursor. Touch and hold to delete all characters to the left
side of the cursor.
9 Touch to see more candidate words.
Switching the Keyboard Layout
You can switch the keyboard layout only when TouchPal is selected.
There are three keyboard layouts you can choose: Full QWERTY ,
12–key PhonePad, and CooTek T+.
To switch the keyboard layout, touch and hold one side of the
keyboard panel, and then flick the panel to the edge of the screen.
49
Page 54
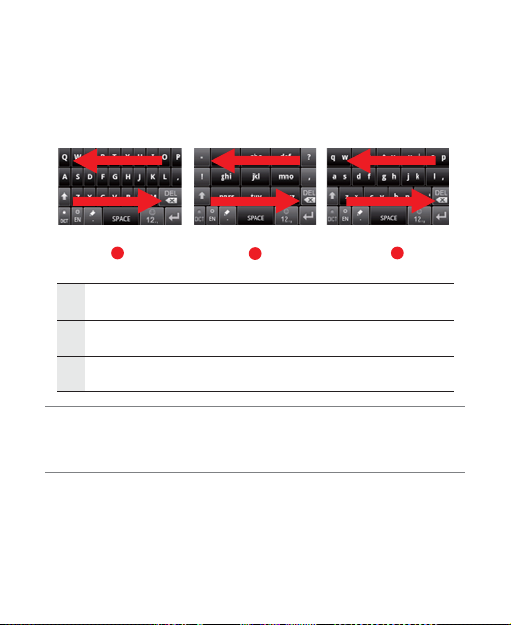
1
2
3
1 Full QWERTY.
212–key PhonePad.
3 CooTek T+.
Note:
When you switch the keyboard layout, you need to touch and hold anywhere
on the panel and then flick the panel to the edge of the screen.
50
Page 55
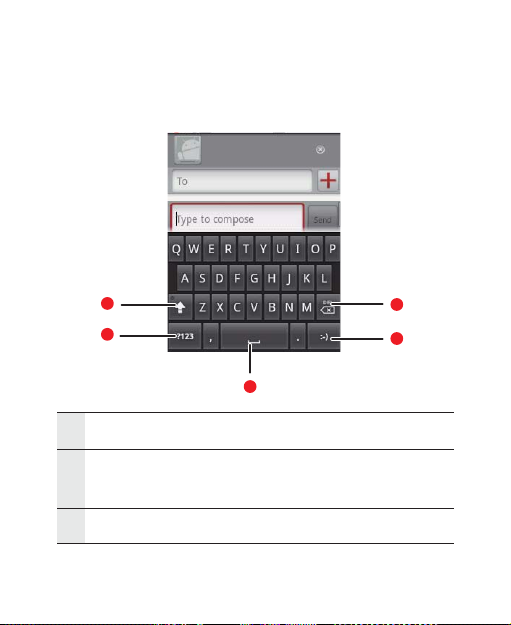
Using the Android Keyboard
1
2
3
1 Change from lowercase to uppercase.
Change from the text mode to the symbol/number
2
mode. Touch again to change back.
3 Touch to insert a space.
51
5
4
Page 56
4 Touch to insert a smile in your text.
Touch to delete a character to the left of the cursor.
5
Touch and hold to delete all characters to the left of the
cursor.
Using the Landscape Keyboard
If you find the keyboard a little inconvenient or difficult to use, turn
your mobile phone sideways to have a wider keyboard layout. The
screen will present the keyboard with a landscape orientation.
Customizing Keyboard Settings
Touch > Settings > Language & keyboard > TouchPal to
customize the TouchPal settings.
Word
prediction
Key press
sound
Select to enable the word prediction while
typing.
Select to play a brief sound each time you
touch a key on the onscreen keyboard.
52
Page 57
Key press
vibration
Select to have the phone vibrate briefly
each time you touch a key on the onscreen
keyboard.
Layout in
portrait mode
Layout in
landscape
mode
Swipe to
switch layout
Mixed
language input
Select
languages
Predict next
word
Select the layout to display in portrait
mode.
Select the layout to display in landscape
mode.
Select check box to be able to swipe
horizontally over the keyboard to switch
layout.
Select check box to enable mobile phone to
auto detect language if no more than 3
languages have been selected.
Select the languages you want to use.
Select check box to enable the ability to
predict the next word when you are typing.
53
Page 58
Correct
mistyping
Select to automatically correct some
common misspellings as you type.
Slide-down
symbols
Relevant
words
Help
Select check box to enable you to slide
down on keys to enter symbols.
Select check box to enable you to slide on
candidate words for synonyms or other
relevant.
Access the online user manual for using
TouchPal.
TouchPal View the version of TouchPal.
Touch > Settings > Language & keyboard > Android
keyboard to customize the Android keyboard settings.
Vibrate on
keypress
Sound on
keypress
Select to have the phone vibrate briefly
each time you touch a key on the onscreen
keyboard.
Select to play a brief sound each time you
touch a key on the onscreen keyboard.
54
Page 59
Autocapitalization
Select to have the onscreen keyboard
automatically capitalize the first letter of
the first word after a period, the first word in
a text field, and each word in name fields.
Quick fixes
Show
suggestions
Autocomplete
Select to automatically correct some
common misspellings as you type.
Select to show suggested words in a strip
above the onscreen keyboard as you type.
Select to automatically enter a suggested
word, highlighted in orange in the strip
above the keyboard, when you enter a
space or punctuation.
55
Page 60

Messaging
The Messaging application allows you to exchange text messages
(SMS) and multimedia messages (MMS) with your friends on their
mobile phones. With the Email application you can read and send
email.
SMS and MMS
Text messages: One text message can contain up to 160
characters. You can send a text message of any length, but every 160
characters or portion thereof will be charged as one text message.
For recipients, the message will count as just one text message.
Multimedia messages: Multimedia messages make everyday
messages extra special. You can record a message and send it as an
audio file or send a slideshow of photographs. For example, you can
sing "Happy Birthday" to someone, send them a video message, or
send photos of a special event.
Opening Messaging
• Touch on the Home screen.
• Touch > Messaging.
56
Page 61
Creating and Sending a Text Message
1. Touch > Messaging > New message.
2. Enter a phone number in the To field, or touch + to select a
number from Contacts.
Tip: As you enter the phone number, matching contacts appear. You can
touch a suggested recipient or continue entering the phone number.
3. Touch the composition text box to start entering your message.
Tip: If you press while composing a message, it is saved as a draft in
your message list. Touch the message to resume co mposing it.
4. Once you are done, touch Send.
57
Page 62
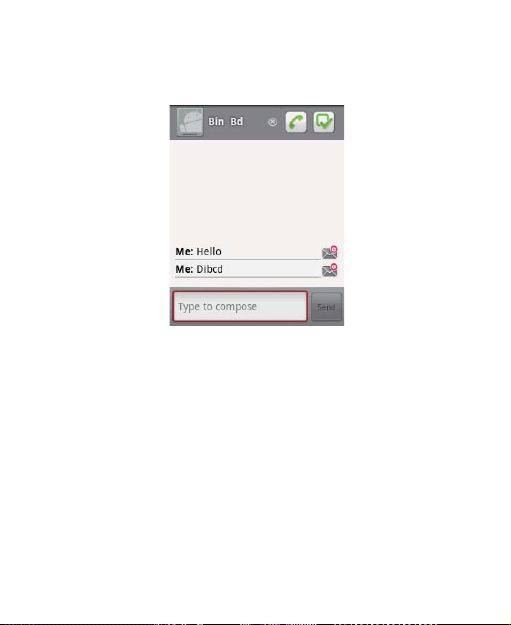
The message list opens, and your name appears in the list, followed
by the message you just sent. Responses appear in the window. As
you view and send additional messages, a message thread is created .
58
Page 63
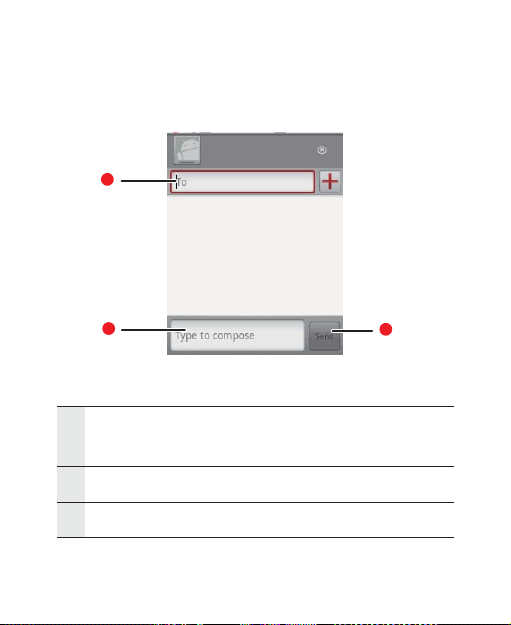
Text Message Editing Screen
1
2
Touch to enter a mobile phone number or the name of a
1
contact with a mobile number.
2 Touch to start entering your message.
3 Touch to send the message.
59
3
Page 64
Creating and Sending a Multimedia Message
1. Touch > Messaging > New Message.
2. Enter a phone number in the To field, or touch + to select a
number from Contacts.
Tip: You can also press , and then touch Add recipient to add more
recipients.
3. Touch the composition text box to start entering your message.
Tip: If you want to enter a smiley face, , and then touch Insert smiley.
4. Press to display the options panel.
5. Touch Add subject to add the message subject. Your mobile
phone is now in multimedia message mode.
6. Touch Attach to add a picture, music, or video file. Then touch
any of the following:
• Slideshow: A screen opens where you can assemble photos
into a slideshow of up to 10 slides to attach to the message.
Please refer to “Adding a Slideshow” on page 62.
• Pictures: You are prompted to touch a picture to attach it.
60
Page 65

• Capture picture: The camera opens so you can take a picture
and attach it.
• Videos: You are prompted to select a video to attach.
• Capture video: The camcorder opens so you can record a
video and attach it.
• Audio: You are prompted to select an audio file to attach.
• Record audio: A screen opens where you can record a voice
message and attach it.
7. When the message is ready to be sen t, touch Send.
Adding a Slideshow
If you want to attach more than one file to your message, use the
Slideshow option.
1. On the message editing screen, press to display the options
panel.
2. Touch Attach > Slideshow, and then select a slide to start
editing it.
3. Press , and then touch Add slide to add more slides.
Tip: You can touch the green arrow icon to switch between slides.
61
Page 66

4. Touch Done to finish composing your message and return to the
multimedia message screen.
5. To alter your multimedia message, touch Edit on the multimedia
message screen. When the message is ready to be sent, touch
Send.
Opening and Viewing a Multimedia Message
1. In the message list, touch the message thread to open it.
2. Touch the Play button at the top of a multimedia message to
view the message.
3. Press followed by Next slide to view the next slide.
Replying to a Message
1. In the message list, touch a text or multi media message thread to
open it.
2. Touch the text box to compose your message, and then touch
Send.
Customizing the Message Settings
In the message list, press , and then touch Settings to customize
the message settings.
62
Page 67

Email
Your mobile phone puts email at your fingertips, too. Using your
Email application, you can add versions of Yahoo!, AOL, and other
popular email services to your phone. These kinds of email accounts
are known as POP3, or IMAP accounts.
Adding an Email Account
When using the Email application for the first time, you must
configure your email account. The Email setup wizard helps you set
up your account for many popular email systems, so you can read
and work with the same email that you do on a computer in a web
browser, or with another email application.
1. Touch > Email.
2. To customize your email settings, answer the onscreen prompts,
and then touch Next. Or touch Manual Setup if you want to set
the mail server yourself.
Note: If you touch Manual Setup, contact your email service provider for
the values required for your account if you don't know what they
are.
63
Page 68
3. Enter the name for your account and the name you want other
people to see when they receive an email from you.
4. Touch Done.
Your mobile phone starts downloading your email messages and
you can start using the phone to send and receive messages.
Note:
After the initial setup, your email application opens to the last screen you were
viewing or, if you have not used Email recently, it displays the contents of your
Inbox or the accounts screen (when you have more than one ac count).
Adding Other Email Accounts
After creating your initial email account, press on the accounts
screen, and then touch Add account to create another email
account.
Tip:
When adding a subsequent email account, you can also select t he option to
use the new account to send all outgoing messages.
Deleting an Email Account
1. On the accounts screen, touch and hold the email account you
want to delete.
64
Page 69
2. Touch Remove account.
3. Touch OK to confirm.
Changing Email Account Settings
You can change a number of settings for an account, including how
often you check for emails, how you are notified of a new mail, and
details about the servers the account uses to s end and receive mails.
Note:
Your account’s incoming and outgoing settings depend on the kind of email
service for your account: IMAP, or POP3. You can enter the neces sary details
manually, although you will typically need to contact your email service provider to determine the right settings for the account.
1. Touch > Email.
2. On the Your accounts screen, touch and hold the email account
you want to change.
3. Touch Account settings.
4. Change Email account settings, Incoming settings, or
Outgoing settings.
65
Page 70
Viewing an Email Message
1. On the accounts screen, touch the email account you want to
use.
2. Access a folder, and then touch the message that you want to
view.
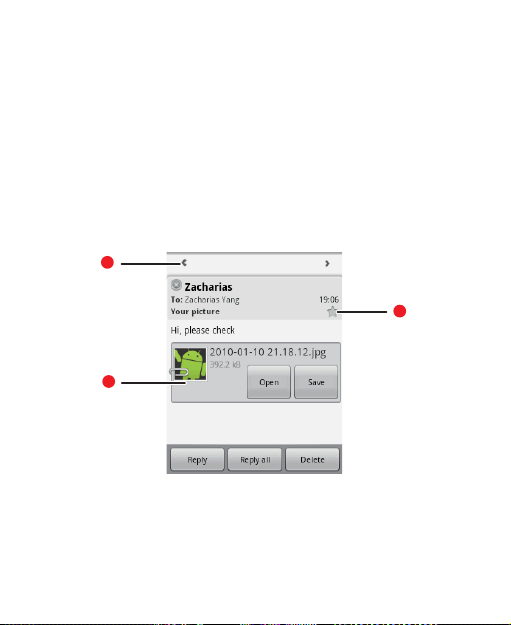
Email Message Screen
1
3
2
66
Page 71
1 Touch to read the next or previous message in the folder.
2 Touch to open an attachment.
Touch to place a star next to an important message to
3
make it easy to locate.
Creating and Sending an Email Message
1. On the Your accounts screen, touch the email account you
want to use.
2. On the Inbox screen, press , and then touch Compose in the
options panel.
3. In the To field, enter the name or the email address.
4. Write the subject and email.
Tip: To send an attachment with the message, press , and then touch
Add attachment .
5. When you are finished, touch Send.
Tip: If you are not quite ready, touch Save as draft or press to save
the message as a draft.
67
Page 72

Replying to an Email Message
1. On the Your accounts screen, touch the email account you
want to use.
2. Touch the email message you want to view and reply to.
3. Touch Reply or Reply all to reply to the email message.
68
Page 73
Getting Connected
GPRS/3G
Your mobile phone will be automatically configured to use your
wireless service provider’s GPRS/3G service when you turn on your
mobile phone (if the SIM card is inserted) for the first time.
Checking the Network Connection
1. Touch > Settings.
2. Touch Wireless & networks > Mobile networks.
3. Touch Network operators or Access Point Names to check
the network connection.
Note:
Generally your mobile phone will automatically read the access point of the
SIM card. For this reason, do not change the parameters o f the access point, or
you might not be able to access network sou rces.
Turning on the Data Service
1. Touch > Settings.
2. Touch Wireless & networks > Mobile networks.
69
Page 74

3. Select the Data Service check box to turn on the data
connection.
Wi-Fi
Wi-Fi (WLAN) gives you wireless access to broadband Internet access.
To use Wi-Fi on your mobile phone, you need access to a wireless
access point called a “hotspot”. The range of a Wi-Fi signal is affected
by the obstacles that may be in its way.
Turning On Wi-Fi
1. Touch > Settings.
2. Touch Wireless & networks, and then select the Wi-Fi check
box to turn on the Wi-Fi.
Connecting to a Wireless Network
1. After turning on the Wi-Fi, touch > Settings.
2. Touch Wi-Fi settings. You will see a list of detected Wi-Fi
networks in the Wi-Fi networks section.
3. Touch a Wi-Fi network to connect to it.
• If you select an open network, you will be automatically
connected to the network.
70
Page 75
• If you select a network that is secured with Wired Equivalent
Privacy (WEP), enter the password, and then touch Connect. If
you connect to a secured wireless network that you have
already used, you will not be prompted to enter the WEP/WPA
key again unless you reset your mobile phone to its default
settings.
Tip:
On the Wi-Fi settings screen, touch Add Wi-Fi network to add a new Wi-Fi
network.
Browser
Your mobile phone comes with a browser. You can access and
browse the Internet through Browser.
Opening the Browser
Touch > Browser to open the browser on the home page.
71
Page 76
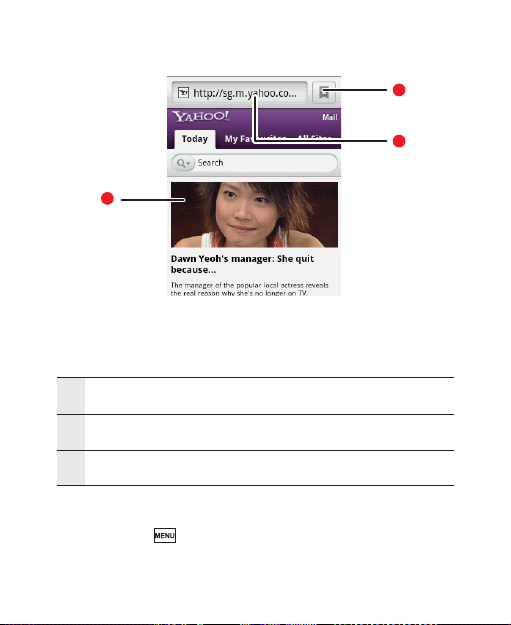
2
3
1
1 Web page view area.
2 Touch to open the Bookmarks.
3 Touch to enter the desired website.
Open the browser options menu and perform one of the following
operations, press :
• New window: Touch to open a new window.
72
Page 77

• Bookmarks: Touch to open a favorite folder.
• Windows: Touch to go to the web preview screen. You can switch
to another web page or open a new web page on the screen.
• Refresh: Touch to refresh the current page.
• Forward: Touch to browse the next web page.
• More: Touch to open other menus and perform operations such
as searching, selecting text, downloading, and setting options.
Opening a Web Page
1. On a browser window, touch the URL field at the top of the
screen.
2. Use the keyboard to enter the web page address.
3. As you enter the address, matching web page ad dresses will
appear on the screen. Touch an address to go directly to that
web page or continue entering the web page address.
4. Touch Go.
Setting a Home Page
1. On a browser window, press .
2. Touch More > Settings > Set home page.
3. Enter the home page address, and then touch OK.
73
Page 78

Managing Bookmarks
You can store as many bookmarks as you want on your mobile
phone.
Adding a Bookmark
1. On a browser screen, go to the web page you want to bookmark.
2. Press , and then touch Bookmarks > Add. The add bookmark
screen opens.
3. Edit the bookmark name if needed and then touch OK.
Opening a Bookmark
1. On a browser window, press , and then touch Bookmarks.
Tip: On the Bookmarks screen, touch the History tab to view the pages
you have visited. Or touch the Most visited tab to view the pages you
have visited most frequently.
2. Touch the bookmark you want to open.
74
Page 79

Customizing the Browser Settings
Customize the browser to suit your browsing lifestyle. Set display,
privacy, and security options when using Browser. On the browser
screen, press , and then touch More > Settings.
Bluetooth
Your mobile phone has Bluetooth, which allows you to create a
wireless connection with other Bluetooth devices so you can share
files with your friends, talk hands-free with a Bluetooth headset, or
even transfer your phone photos onto your PC.
If you are using Bluetooth, remember to stay within 10 meters of
other Bluetooth devices. Be aware that obstacles may interfere with
the connection, including walls or other electronic equipment.
Turning On Bluetooth
1. Touch > Settings.
2. Touch Wireless & networks, and then select the Bluetooth
check box to turn on Bluetooth. You will know it is on when the
Bluetooth icon appears in the notification bar.
75
Page 80

3. Touch Bluetooth settings, and then select the Discoverable
check box to make the mobile phone visible to other Bluetooth
devices.
Pairing and Connecting a Bluetooth Device
Your mobile Bluetooth lets you do the following:
• Hands Free Profile (HFP): allows you to use a h ands-free
Bluetooth device.
• Headset Profile (HSP): allows you to use a mono Bluetooth
headset.
• Object Push Profile (OPP): allows you to transfer files through
Bluetooth.
• Advanced Audio Distribution Profile (A2DP): allows you to u se a
stereo Bluetooth headset.
• A/V Remote Control Profile (AVRCP): allows you to control what
plays through the Bluetooth headset remotely.
Before you use Bluetooth, you need to pair your mobile phone with
another Bluetooth device as follows:
1. Ensure that the Bluetooth function on your mobile phone is
enabled.
2. Touch > Settings > Wireless & networks > Bluetooth
settings. Your mobile phone will then scan for Bluetooth
76
Page 81

devices in range (or touch Scan for devices to scan for
Bluetooth devices).
3. Touch the device you want to pair with your mobile phone.
4. Enter the pairing password to complete the connection.
Sending Files via Bluetooth
With Bluetooth, you can share pictures, videos, or music files with
your family and friends. To send files via Bluetooth, do as follows:
1. Touch > File Manager to open the file manager.
2. Touch and hold the file to be sent. The active options menu is
displayed.
3. Touch Share, and then touch Bluetooth to s elect a p aired
device.
Disconnecting or Unpairing a Bluetooth Device
1. Touch > Settings > Wireless & networks > Bluetooth
settings.
2. Navigate to the Bluetooth devices section, and then touch and
hold the connected device.
3. Touch Disconnect & unpair or Unpair to disconnect the device.
77
Page 82
Connecting to a Computer via USB
Using the microSD Card as USB Mass Storage
To transfer all your favorite music and pictures from your PC onto
your mobile phone’s microSD card, set the microSD card as USB
mass storage for your PC.
1. Connect your mobile phone to your PC with the USB cable . Your
PC will detect the microSD card as a removable disk. You can
now transfer files from your PC to your mobile phone’s microSD
card.
2. Open the notification panel, and then touch USB connected.
3. Touch Mount in the dialog box that opens to confirm that you
want to transfer files.
Tip:
You can also touch > Settings > General info & option, and then select
the USB Mass Storage check box to use the microSD card as the USB mas s
storage.
Note:
When your microSD card acts as USB mass storage, your mobile phone will not
use this memory space. Your PC will tell you how to safely disco nnect the USB
mass storage device (that is, your mobile phone) when you have finished trans-
78
Page 83

ferring files.
Removing the microSD while Your Mobile Phone Is on
1. Touch > Settings.
2. Scroll down the screen, and then touch SD card & phone
storage > Unmount SD card.
3. Carefully remove the microSD card from your mobile phone.
Modem Behavior
You can use the dialup software in your mobile phone to set the
mobile phone as a modem.
1. Use your USB cable to connect the mobile phone to a compute r.
2. Select the Start Mobile Modem button and follow the
inst ruction s to ins tall it o n your PC .
Making Your Mobile Phone Act As a Modem
To make your mobile phone act as a modem, do as follows:
1. Make sure your mobile phone's data connection is turn ed on.
2. Use your USB cable to connect the mobile phone to a compute r.
79
Page 84

3. Run the dialup software on your PC. For mor e information, refer
to the PC Suite help.
80
Page 85

Entertainment
In addition to being a communication device and personal assistan t,
your mobile phone also provides you with endless entertainment
possibilities. You can take photos, create videos and audio clips, and
download and listen to music.
Taking Photos and Recording Videos
The camera is a combination camera and camcorder that you can
use to shoot and share pictures and videos.
Opening Your Camera
• Touch > Camera to open the camera. The camera opens in
landscape mode, ready to take a picture or shoot a video.
• Press on the picture capture screen to close the camera.
81
Page 86
Capture Screen
1
2
3
4
5
Tip:
On the capture screen, touch the screen to show th e zoom in or out controls.
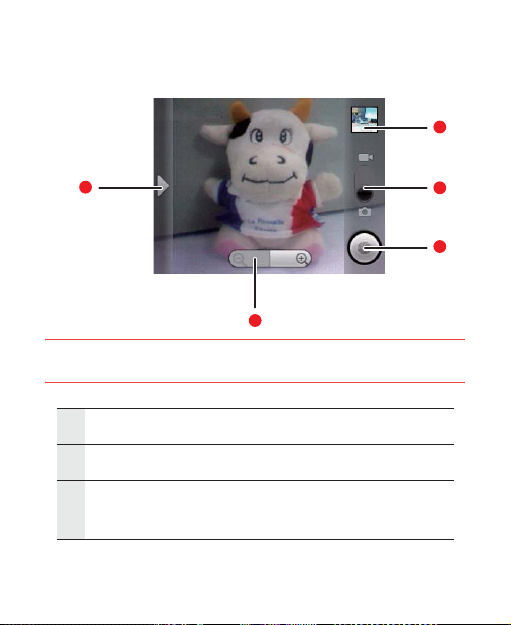
1 Touch to open the settings panel.
2 Touch to zoom in or out.
Thumbnail of last photo. Touch to preview the photos or
3
videos.
82
Page 87
Drag up to shoot videos (camcorder mode), drag down to
4
take photos (camera mode).
5 Touch to take a photo or shoot a video.
Tip:
On the capture screen, press key to show the capture pane l.
Taking a Photo
1. Open your camera, and then switch to the camera mode.
2. If necessary, open the settings panel to change the came ra
settings. The preview image changes as you change the settings.
3. On the photo capture screen, frame the p hoto within the screen.
4. Touch and holdthe Capture button. Your camera has autofocus,
and when the frame turns green, the content of the frame is in
focus.
5. Release the Capture button to take your photo.
The photo you just took is displayed for a moment. You can take
another photo or preview your photos.
83
Page 88
Viewing Your Photos
1. After taking a photo, a thumbnail of the photo you have just
taken is shown in the upper righ t corner of the Capture screen.
Touch the thumbnail to view it.
2. Touch the onscreen button to do any of the following:
• Touch DELETE to delete the photo.
• Touch SHARE to send the photo in a message or post it online.
• Touch SET AS to set the photo as a wallpaper or a contact icon.
Tip: Press , to edit the photo, view the details of the photo, or show the
photo on Maps.
3. If you want to view more photos, touch the screen, and then
touch or .
Shooting a Video
1. Open the camera, and then switch to camcorder mode.
2. If necessary, open the settings panel to change the camcord er
settings.
3. Frame the scene where you want to start.
84
Page 89
4. Touch to start recording a video. The camcorder starts
shooting the video.
5. Touch to stop shooting. You can shoot another video or
preview your videos.
Viewing Your Videos
1. After recording a video, a thumbnail of the video you have just
recorded is shown in the upper right corner of the Capture
screen. Touch the thumbnail to view it.
2. Touch the onscreen button to do any of the following:
• Touch Delete to delete the video.
• Touch SHARE to send the video in a message or post it online.
• Touch PLAY to play the video.
Tip: On the video playing screen, touch the controls to skip forward or
back or to play or pause the video.
Tip: Press to view the details of the video.
3. If you want to view more videos, touch the screen, and then
touch or .
85
Page 90

Using the Gallery
Your Gallery application can automatically search for pictures and
videos on your mobile phone and microSD card. It can also sor t them
into folders, and let you view and edit pictures, watch vide os, and set
a picture as the wallpaper or photo for a contact.
Opening the Gallery
Touch > Gallery to open the viewer.
The Gallery application categorizes your pictures and videos by
storage location and stores these files in folders. To view pictures or
videos, touch one of the folders to view pictures or videos.
Press to display the Gallery panel. On the panel, you can do the
following:
• Touch Capture pictureto open the camera and switch to the
picture capture mode.
• Touch Capture video to open the camera and switch to the
video capture mode.
• Touch Settingsto go to the Gallery setting s screen. There, you
can set the size of a picture, arrange pi ctures, specify whether to
prompt confirmation when you delete a picture, and play a
slideshow.
86
Page 91

Viewing a Picture
In Gallery, touch the album that contains the picture you want to
view.
1. Touch the folder that contains the pictures you want to view.
2. Touch the picture to view it in full-screen mode. When viewing a
picture in full-screen mode, flick the picture left or rig ht to view
the previous or next picture.
3. Touch the screen.
Then the zoom panel appears. You can zoom in or zoom out on the
picture.
Tip: The picture viewer supports the automatic rotation function. When
you rotate your mobile phone, the picture adjusts itself to the
rotation.
Rotating a Picture
1. When viewing a picture, press to display more operations
panel.
2. Touch Rotate.
3. Select either Rotate left or Rotate right. The picture is saved
with the new orientation.
87
Page 92

Cropping a Picture
1. When viewing a picture, press to display the more operations
panel, then touch Crop.
2. Use the cropping tool to select the portion of the picture to crop.
• Drag from the inside of the cropping tool to move it.
• Drag an edge of the cropping tool to r esize it to any proportion..
• Drag a corner of the cropping tool to resize it with fixed
proportions.
3. Touch Save to save the cropped picture. Or touch Rotate to
rotate the onscreen picture. Or touch Discard to discard the
changes.
Enjoying Music
You can download music files onto your PC or insert a CD and copy
the files to your microSD card so you can listen to music on your
mobile phone.
Copying Music to the microSD Card
1. Connect the phone to your computer with a USB cable and
mount the microSD card.
88
Page 93

2. On the PC, navigate to the USB drive and open it.
3. Create a folder on the root folder of the microSD card (for
example, Music).
4. Copy the music from your computer to the folder y ou have
created.
5. After copying music, unmount or eject the drive as required by
your PC’s operating system to safely remove the mobile phone.
6. Disconnect the mobile phone from the PC.
Opening the Media Library
Touch > Music to display the media library.
Library Screen
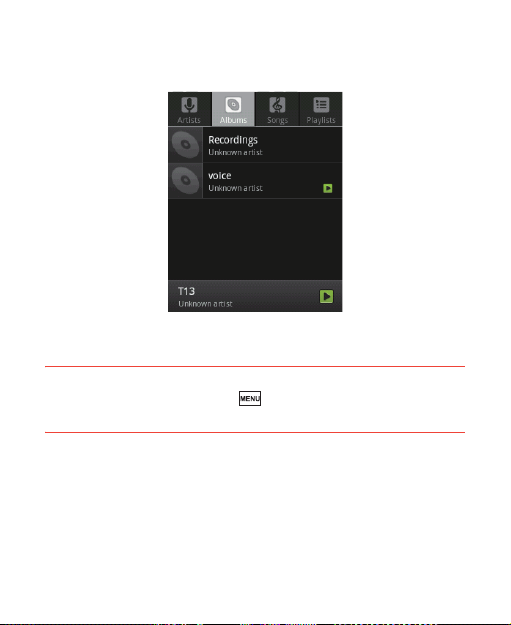
The Music application organizes your music files by storage
location. It contains four tabs: Artists, Albums, Songs and
Playlists.
89
Page 94
Tip:
To randomly play your songs, press key, and touch Party shuffle or
Shuffle all .
Playing Music
1. Touch a category on the music library screen.
2. Touch the song you want to play.
90
Page 95
Tip:
When you are listening to music, press key to use another application. Your
music continues to play. To return to th e music controls, open the notification
panel and then touch the song.
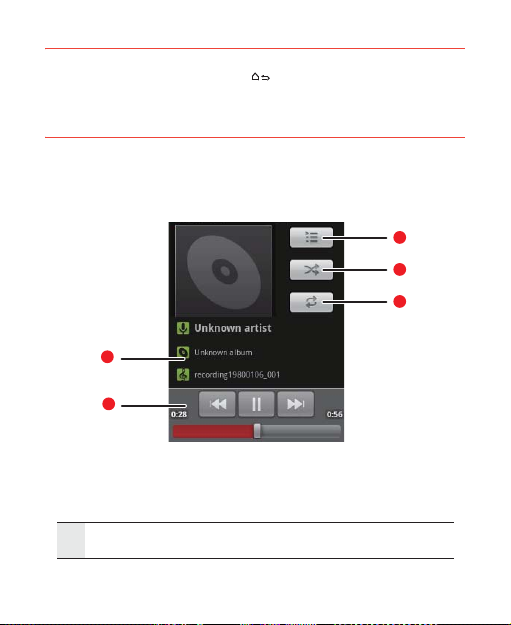
Music Player Screen
5
4
3
1
2
1 Touch and hold to search for information.
91
Page 96
2 Touch to control the music.
3 Touch to set the repeat mode.
4 Touch to turn the shuffle on or off.
5 Touch to open the current playlist.
Adding Music to a Playlist
1. Touch a category on the music library screen.
2. In the list that appear s, use the Navigator key to reach the song
you want to add to the playlist.
3. Touch and hold the song, and then touch Add to playlist in the
options menu.
• Touch Current playlist to add the song to an existing playlist.
• Touch New to create a playlist and add the song to it.
Playing a Playlist
1. Touch the Playlists tab on the music library screen.
2. Touch and hold the playlist you want to play.
3. Touch Play to play the playlist.
92
Page 97

Listening to FM Radio
FM Radio lets you listen to FM radio stations on your mobile phone.
Since FM Radio uses the provided wired stereo headset as the
antenna, connect the headset first to the audio jack of your phone
before you open the application.
Opening the FM Radio
1. Touch > FM Radio to open the application.
2. The first time you open FM Radio, touch Auto tuning, which
automatically scans for available FM channels, saves them as
presets, and plays the first FM channel found.
93
Page 98
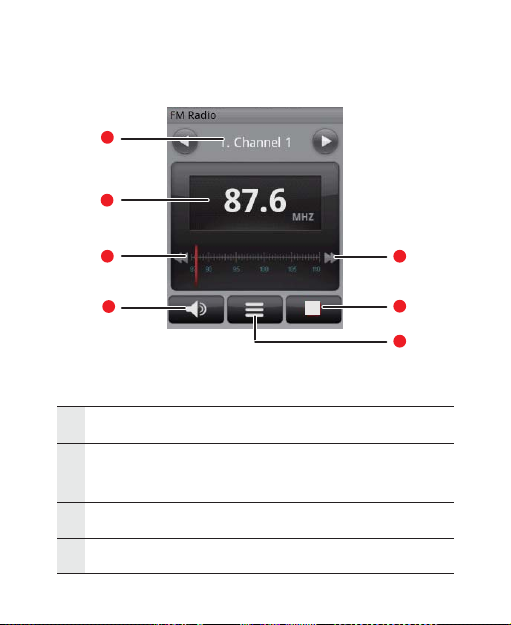
FM Radio Screen
1
3
2
4
7
6
5
1 Shows the channel name.
Touch to search the FM band for the next lower frequency
2
FM channel.
3 Shows the FM radio frequency.
4 Touch to switch between the headset and the speaker.
94
Page 99
5 Touch to view all presets list.
6 Touch to stop listening to the FM radio.
Touch to search the FM band for the next higher
7
frequency FM channel.
Press to display the operations panel and set more FM Radio
options.
Tuning the FM Radio
Open the FM Radio application, and then press to do the
following:
• Touch Inching tuning, then touch the tuning button to tune the
frequency by –0.05 MHz or +0.05 MHz, and then touch OK. After
tuning, press , and then touch Save channel to save it.
• Touch Auto tuning to automatically scan for available FM
channels.
95
Page 100

Google Services
When you turn on your mobile phone for the first time, touch the
Google services such as Talk, Gmail, and Market, and you will be
prompted to sign in to your Google account.
Note:
Ensure that your mobile phone has an active data connection (3G/GPRS) before you sign in to your Google account.
If you already have a Google account, touch Sign in and enter your
username and password.
Creating a Google Account
If you do not have a Google account, you can create one:
1. Read the setup information, and then touch Next.
2. Touch Create.
3. Enter a first name, last name and username for your Google
account, and then touch Next. The mobile phone will connect to
the Google server to check whether the username is available. If
the username you entered is already in use, you will have to think
of another one or select one from a list.
4. Enter and confirm your Google account password.
96
 Loading...