


Make the most of now.
Vodafone 835 Mobile Phone
User Manual

Notice
Copyright © 2009 Huawei Technologies Co., Ltd.
All Rights Reserved
Your phone is made exclusively for Vodafone by Huawei Technologies.
No part of this manual may be reproduced or transmitted in any form or by
any means without prior written consent of Huawei Technologies Co. Ltd.,
Trademarks
VODAFONE, the Vodafone logos are trade marks of the Vodafone Group.
Other product and company names mentioned herein may be trade marks
of their respective owners.
Notice
The information in this manual is subject to change without notice. Every
effort has been made in the preparation of this manual to ensure accuracy
of the contents, but all statements, information, and recommendations in
this manual do not constitute a warranty of any kind, expressed or implied.
Read the safety precautions and safety informations carefully to ensure
that you use wireless device in a correct and safe manner.

Huawei Technologies Co., Ltd.
Branch Address:
Huawei Technologies Deutschland GmbH, Am Seestern 24, Düsseldorf,
Germany
Postal Code: 40547
Head Office Address:
Administration Building, Huawei Technologies Co. Ltd., Bantian, Longgang
District, Shenzhen, P. R. China
Postal Code: 518129
Website: http://www.huawei.com
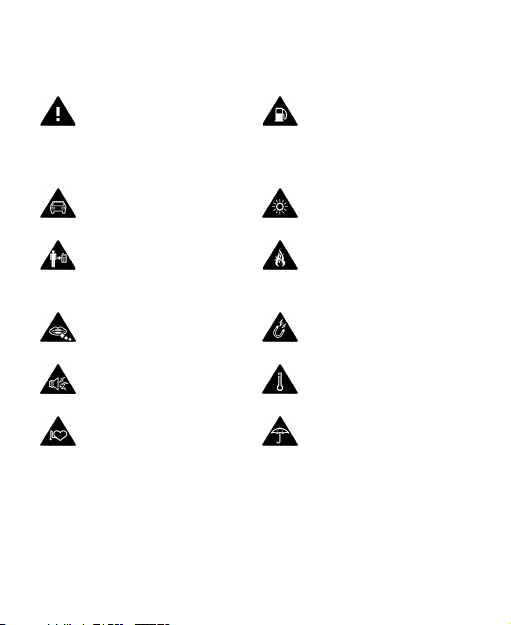
Safety Precautions
Read the Safety
Information section of
this user guide on page
41.
Do not use hand-held
while driving.
For body-worn
operation maintain a
separation of 1.5 cm.
Small parts may cause
a choking hazard.
This device may
produce a loud sound.
Keep away from
pacemakers and other
personal medical
devices.
Do not use while
re-fuelling.
This device may produce
a bright or flashing light.
Do not dispose of in a
fire.
Avoid contact with
magnetic media.
Avoid Extreme
Temperatures.
Avoid contact with
liquid, keep dry.

Switch off when
instructed in hospitals
and medical facilities.
Switch off when
instructed in aircrafts
and airports.
Switch off in explosive
environments.
Do not try to
disassemble.
Do not rely on this
device for emergency
communications.
Only use approved
accessories.

Contents
1.Introduction
Packing List . . . . . . . . . . . . . . . . . . . . 1
Your Phone . . . . . . . . . . . . . . . . . . . . 2
Security . . . . . . . . . . . . . . . . . . . . . . . . 9
Text Input . . . . . . . . . . . . . . . . . . . . . 11
2.Customized Settings
Phone Settings . . . . . . . . . . . . . . . .13
Display Settings . . . . . . . . . . . . . . .14
Network Settings . . . . . . . . . . . . . .14
GPS Settings . . . . . . . . . . . . . . . . . . 14
3.Call Function
Managing Contacts . . . . . . . . . . .15
Viewing the Call Records . . . . . .17
Setting the Call Function . . . . . .17
Making or Ending a Call . . . . . . .19
Answering or Rejecting a Call . . 21
4.Message Function
Message . . . . . . . . . . . . . . . . . . . . . .22
Email . . . . . . . . . . . . . . . . . . . . . . . . . .23
5.Connection Function
Connectivity Settings . . . . . . . . .25
USB . . . . . . . . . . . . . . . . . . . . . . . . . . .25
Bluetooth
®
. . . . . . . . . . . . . . . . . . .29
6.Entertainment Function
Music . . . . . . . . . . . . . . . . . . . . . . . . .33
Camera . . . . . . . . . . . . . . . . . . . . . . . .33
Internet . . . . . . . . . . . . . . . . . . . . . . .34
Mobile TV . . . . . . . . . . . . . . . . . . . . .35
Video . . . . . . . . . . . . . . . . . . . . . . . . . .35
Games . . . . . . . . . . . . . . . . . . . . . . . .35
7.Business Function
Calendar Management . . . . . . . .36
Tool Applications . . . . . . . . . . . . . .37
File Management . . . . . . . . . . . . . .39
Application . . . . . . . . . . . . . . . . . . . .39
8.Safety Information
RF Exposure . . . . . . . . . . . . . . . . . . .41
Distraction . . . . . . . . . . . . . . . . . . . .44
Product Handling . . . . . . . . . . . . .44
Electrical Safety . . . . . . . . . . . . . . .48
Interference . . . . . . . . . . . . . . . . . . .50
Explosive environments . . . . . . .52
9.Appendix
Abbreviations . . . . . . . . . . . . . . . . .54
File Formats . . . . . . . . . . . . . . . . . . .5
5

1. Introduction
Your Phone can operate in virtually all countries, automatically switching
between WCDMA 2100 and GSM/GPRS/EDGE 900/1800/1900 networks.
NOTE
: The services supported by your phone should be also supported by
the network from where you use the phone. For details, contact yo ur local
Vodafone customer care centre. Note that you can also access information on Vodafone services at www.vodafone.com.
Packing List
Your phone package box contains the following:
1. One mobile phone
2. One charger connector
3. One Li-ion battery
4. One User Guide
5. One Quick Start Guide
6. One USB cable
7. One Stereo headset (Optional)
1
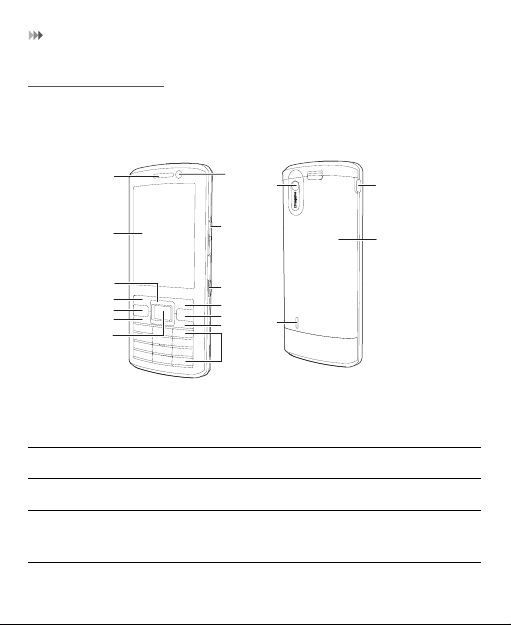
Your Phone
Your Phone
Appearance
1
2
3
4
5
6
7
14
16
13
12
11
10
15
9
8
18
17
1. Earpiece 2. Screen 3. Scroll key
4. Left function key 5. Send key 6. GPS shortcut key
7. OK key 8. Number keys 9. Clear key
10. Power/End key 11. Right function
key
12. Camera shortcut
key
2

Your Phone
13. Volume keys 14. Internal camera 15. Speaker
16. Main camera 17. Battery Cover 18. Charger
connector
/ Cable connector /
Headset Jack
GPS shortcut key Activate the GPS application.
Scroll key
• Scroll through a menu.
• Access the corresponding shortcut menu in
standby mode.
Left function key
• Activate the function indicated at the left of
the prompt bar.
• Access the main menu in standby mode.
Send key
• Make or Answer a call.
• Enter the Calls screen in standby mode.
Number keys Enter numbers or characters.
Clear key Delete a character before the cursor.
3

Your Phone
Power/End key
Right function
key
OK key
• End an ongoing call or reject an incoming
call.
• Return to the standby mode.
• Press and hold it to power on or power off the
phone.
• Activate the function indicated at the right of
the prompt bar.
• Access Vodafone live! in standby mode.
• Start the selected function in the menu.
• Access the main menu in standby mode.
SIM Card and Memory Card
Load your SIM card before using your phone. And only unload the SIM card
and the battery after power off your phone. To use the SIM card properly,
please read the following instructions carefully.
NOTE
:
• Keep the SIM card out of the reach of children.
• The SIM card and its metal contacts can be easily damaged by
scratching or bending. Ensure care when you carry , load or remove it.
• Always disconnect the charger from the phone before loading or
removing the SIM card.
Your phone supports a memory card (microSD) with a capacity up to 8 GB.
4
Your Phone
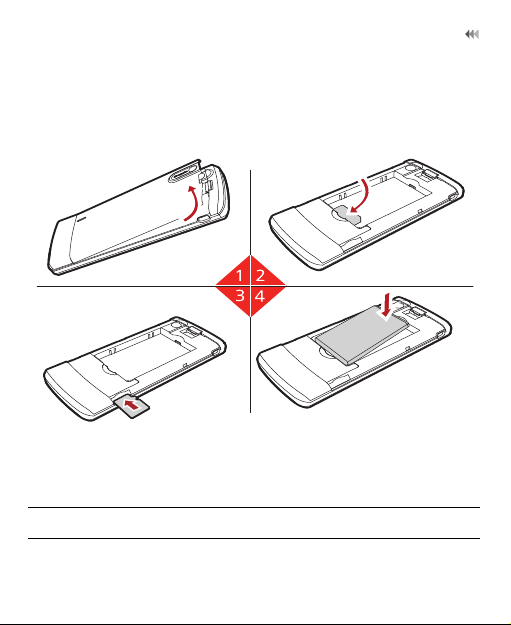
To load or remove the memory card, please remove the battery cover.
The following figure shows the installation of SIM card and memory card.
1. Remove the battery cover 2. Install the SIM card
3. Install the memory card (Optional) 4. Install the Battery
5

Your Phone
Charging the Battery
NOTE
:
• The battery discharges even while not being used. If you have not
used it for a long time, please recharge it first.
• The charging time depends on the environmental temperature and
the age of the battery.
• Do not strike, throw or cause any kind of violent shock to the battery,
otherwise liquid leakage, body damage, ov erheating, fire or explosion
may occur.
• The battery can be recharged but eventually wears out. If the battery
lasts for a shorter time period than usual after being charged
normally, replace it with a battery of the same type.
• Charge the battery by using the charger con nector and the USB cable
supplied with your phone.
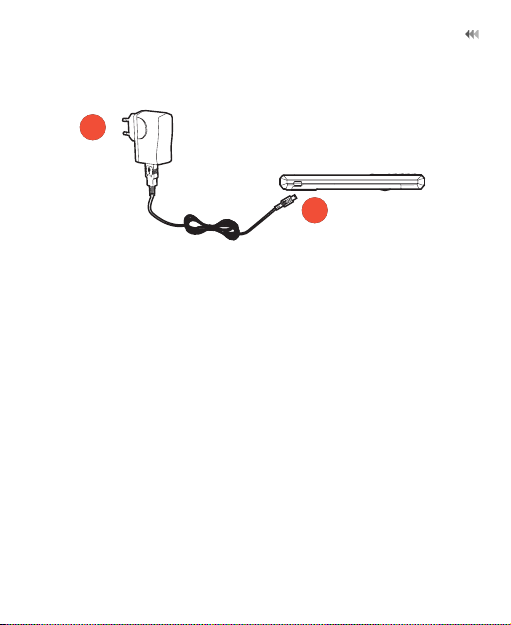
Before charging the battery, ensure that the battery has been properly
loaded into your phone.
To charge the battery, first plug in the charger connector to a power
socket, and then insert the plug of the cable into the connector of the
phone as shown in the following figure.
6
Your Phone
1
2
NOTE
:
• The plug of the cable is in trapezium shape. Reversely inserting
the plug may damage the mobile phone and the charger.
• When the battery power level is very low, the phone makes alert
sounds and displays a prompt. When the battery power level is too
low, the phone will power off automatically.
• When the battery is being charged, the charging indicator blinks
continuously. When the charging indicator stops blinking, it indicates
that the battery is full.
7
Your Phone
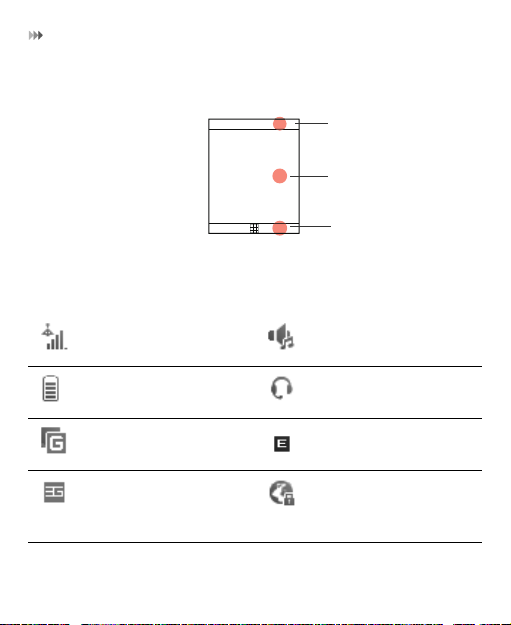
Screen
1. Icon bar
2. Desktop
3. Prompt bar
The icon bar displays the phone status. The following table illustrates the
icons that may appear on this bar.
Indicates signal strength. The normal profile is
activated.
Indicates power level of
the battery.
The phone is currently in
a GSM network.
The phone is currently in
a WCDMA network.
8
The headset is plugged
in.
The phone is currently in
an EDGE network.
Your PC connects to the
Internet through your
phone.
Security
You are using the
roaming service.
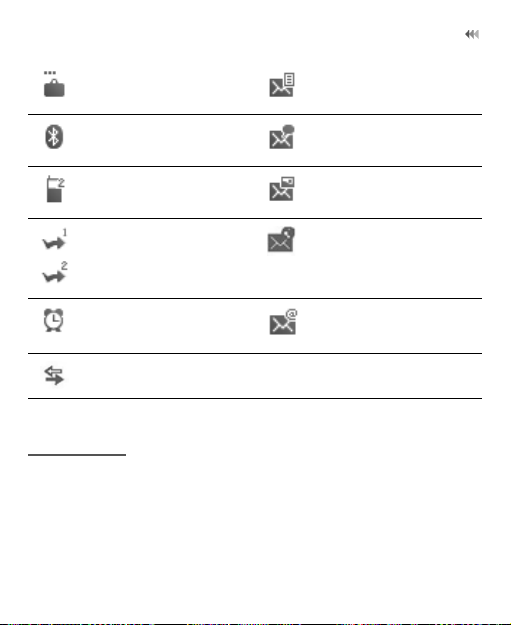
Bluetooth is enabled. You have new voice
Call line 2 is enabled
currently.
Forwarding all incoming
voice calls to line 1 or
line 2.
Alarm clock is enabled. You have new Emails.
The phone is in a call.
You have new text
messages.
mails.
You have new
multimedia messages.
You have new PUSH
messages.
Security
Phone/SIM Card Security Settings
NOTE
:
• For certain SIM cards, you need to enter the PIN2 code to use certain
special functions.
9

Security
• If you enter a wrong PIN code or wrong PIN2 code for three consecutive attempts, the SIM card is locked. To unlock the SIM card, enter the
PIN Unblocking Key (PUK) code or PUK2 code.
• The PIN code, PIN2 code, PUK code, or PUK2 code is provided
together with the SIM card. For details, consult your service provider.
• The initial phone password of the phone is 0000.
Select Settings > Security.
• Reset your phone to the factory settings.
• Enable or disable the "Phone lock" and "PIN lock".
• Modify the phone password and PIN code.
• If your SIM card supports the Fixed Dialer Number (FDN) function, you
can set the limit for phone numbers.
Digital Rights Management
Select Settings > License setting. Enter the correct phone password and
press OK key to confirm, and you can select roaming network or delete all
licenses.
Digital Rights Management (DRM) can protect the digital content from
piracy and protect the provider’s interests. The digital content includes
Java applications and multimedia content such as images, audio and
video. If the protected content cannot be accessed, it indicates that the
corresponding license is overdue or used up.
10

Text Input
Text Input
NOTE
: While entering text:
• Press the * key to switch between input methods. Press and hold the
* key to enable or disable the T9 input mode.
• Press repeatedly the * key and you will see "Abc", "abc" ,"ABC" or "123"
on the upper left corner of the screen successively. It indicates the
words to be entered will be in lower case, first letter capitalized or in
upper case.
• Press the # key to display the symbols list. Press and hold the # key to
set the input language.
• Press the clear key to delete the letter before the cursor.
T9® Input Method
With the T9 input method, you can easily and quickly enter words. T9 is a
predictive text entry mode. Press the relevant key that corresponds to the
desired letter and T9 will offer you candidate words.
Press each key carrying the desired letter once, and then the predictive
text scheme will present the candidate words composed by the letters you
have entered in the drop-down menu.
11

Text Input
Traditional Input Method
When T9 input method is off, you can use the traditional input method for
entering alphabetic characters. Repeatedly press the key that carries the
letter to be entered when it appears on the screen.
Number Input Method
In a text editing screen, press and hold the character/number keys to
enter corresponding numeric characters.
You can also press successively the * key to switch to the "123" numeric
input method, and enter corresponding numeric characters by pressing
the character/number keys.
Symbol Input Method
You can press the # key to display the symbols list and then select
symbols to input.
You can also press the key with number 1 to input the commonly-used
symbols in a text editing screen (except numeric input method).
12

2. Customized Settings
Phone Settings
Select Settings > Phone Settings. You can change the settings of the
phone.
• Set the system date and time format of the phone. If you have
removed the battery from the mobile phone, you may need set the
time after power on the mobile phone.
• Select different profiles for the phone to suit different environmental
situations.
• Set the phone language. You can select Auto. This option is used to
set the phone language to be the same as that used in your SIM card.
• Set the language used to enter text.
• Change the sound settings for the current profile.
• Set the keypad tone of the phone.
• Set the keypad lock period. If there is no operation on the phone
within a preset period of time, the keypad is locked automatically. You
can press OK key, and then press * key to unlock the keypad.
• Assign the frequently used functions to the scroll keys as shortcut
keys.
• Set your phone to power on or off automatically.
NOTE
: In the standby mode, you can press and hold the # key to switch t he
current profile to the silent profile. If the current profile is offline profile,
you cannot use this function.
13

Display Settings
Display Settings
Select Settings > Display Settings. You can change the settings for the
phone display.
• Set the wallpaper layout for the home screen.
• Set the theme of the phone.
• Set the brightness of the screen.
• Turn the keypad backlight on or off.
• Set the backlight delay time for the screen.
• Enter a greeting message that appears on the screen when you power
on your phone.
• Enter a message that appears on the screen when you power off your
phone.
Network Settings
Select Settings > Network. You can change the settings for the network.
Four options are available: Mode, Select network, Cell information, and
Operator list.
GPS Settings
Select Settings > GPS settings. You can change the settings for the built
in GPS module.
14

3. Call Function
Managing Contacts
Creating a Contact
To add a new contact, perform one of the following operations:
• Enter a number in standby mode, and then select Options > Save
number.
• Select Contacts > Add new contact.
• Select an item from Calls screen, and then select Options > Save
number.
Searching for a Contact
You can find a contact from the contacts list easily and quickly by using
this function on the Contacts screen. Select Options > Advanced >
Search contacts, and then enter the contact name you are searching for .
The contact is displayed.
You can also use quick search in the contacts list screen. You can find a
contact by entering the initials of the first name or the last name of the
contact.
Managing a Group
In the Contacts screen, press the left or right scroll key to select Groups.
And then select a group:
15

Managing Contacts
• Select Options for the following options: Details, Rename, Send
Message, Set ringtone and Remove all members.
• Press OK key to view the details. And then select Add or select
Options > Add contact to add a contact into the group. To delete a
group member, select a member from the group member list, and
then select Options > Remove.
Other Operations
In the Contacts screen, select Options for the following operations.
• View the detailed information of the contact.
• Make a voice call or a video call.
• Send a message or Email to the selected contact.
• Send a contact to other devices supporting message or bluetooth.
• Create a new contact.
• Delete the selected contact.
• Mark or unmark a record or all records in your phone and SIM card.
• Access the advanced options.
• Set the default contact list displayed in the contact screen, to sort the
contacts on the Contacts screen. You can also select Settings >
Contact Settings to set these items.
• View the memory status of both your phone and SIM card.
16

Viewing the Call Records
Viewing the Call Records
Select Calls in the main menu and then press the left or right scroll key to
select All calls, Missed, Received or Dialed . Then select Options for the
following operations.
• Send a message or MMS.
• Save the number of the selected record.
• Make a voice call or a video call.
• Delete the selected record.
• Mark or unmark a record or all records.
• Set the display mode of all records or view calls status.
Setting the Call Function
General Settings
Select Settings > Call settings. You can change the settings for making
calls.
NOTE
:
• The old call barring password is provided by your network operator if
it is the first time for you to change the password.
• The call forwarding, barring and waiting function is network-depen-
dent. For more information, contact your local Vodafone customer
care centre.
17

Setting the Call Function
• Call forwarding: This option is used to forward incoming calls. You
can set the forwarding condition and the forwarding type.
• Call barring: This option is used to set the call barring mode for the
phone. You can set the barring condition and the barring type. You
can also change the password for call barring.
• Call waiting: This option is used to enable or disable the call waiting
function.
• Save unknown number: This function is used to prompt whether to
save the number after a call ends.
• Auto redial: This function is used to auto redial the dialed number if
the dialing failed.
• Answer mode: It is used to set the mode for answering an incoming
call. Two options are available: Any key and Send key.
• Auto Answer: This option is used to select auto answering for
incoming calls. Four options are available: Immediate answer, Text
message, Recorded voice and Disable.
• Caller ID: This options allows you to select whether to display your
phone number on the phone of the party who you called. If select
Auto, whether your phone number will be shown on the called phone
depends on the network.
• Select line: This option is used to set the call line for your phone. Two
options are available: Line 1 and Line 2.
• My number: This function can be used to save your own phone
numbers on the SIM card. You can select Options to edit or delete the
records.
18

Making or Ending a Call
Video Call Settings
You can change the settings for the video call function.
• Picture mode: Set the picture mode during a video call.
• Image quality: Set the image quality for video.
• Switch Camera off: Open or close the video channel during a video
call.
• Audio off: Open or close the audio channel during a video call.
• Auto voice call: Enable the auto voice call function. The phone auto
makes a voice call, when the other party's phone does not support the
video call service.
• Send image: Select a file and send it to the other party when you hold
a video call.
• Auto answer: Auto answer an incoming video call. You can enable or
disable this function.
Making or Ending a Call
NOTE
: In the 3G network, you can make video calls, provided that the
called party has a device supporting the video call function.
1. Enter a number or select a contact. Press the send key to make a voice
call, or press the GPS shortcut key to make a video call. You can also
select Options to make a voice call or video call.
19

Making or Ending a Call
• You can make a voice call through speed dialing. Select
Contacts > Options > Advanced > Speed dial number to set
the speed dialing number (SDN). To make a call by SDN, press
and hold the number key until the phone dials the corresponding
phone number in standby mode.
2. During a call, you can select Options to perform operations in the
option list.
• During a voice call, enter the number of a third party. Then press
the send key to make a three-way call. Select Options > Confer-
ence call / Private call to switch between conference call or
private conversation.
• During a video call, press the send key to hold the call and send a
preset file to the other party. You can press the send key aga in to
resume the call. Before you use the function, you can preset a file
in Settings > Video call > Send image.
• During a video call, press the up or down scroll key to adjust the
brightness, press the left or right scroll key to zoom in or zoom
out, press the volume keys to adjust the volume, press OK key to
switch between the loudspeaker mode and the earpiece mode.
3. Press the end key to terminate the call.
20

Answering or Rejecting a Call
Answering or Rejecting a Call
1. Answer a call according to the different answer modes.
• If the answer mode is Any key, press any key except the end key.
• If the answer mode is Send key, press the send key.
• If the headset is in use, press the control key on the headset.
2. Press the end key or select Options > Reject to reject a call.
21

4. Message Function
Message
The maximum content for a single text message is 160 characters. If the
characters you enter exceed this limit, the text is divided into two or more
continuous messages when it is sent.
Message Settings
1. Select Messaging > Settings > SMS & MMS.
2. Set the parameters related to messages.
NOTE
: Select Messaging > Settings. You can also change the settings of
Push message, Broadcast or Common phrases.
Sending a Message
1. Select Messaging > Create message to access the message editing
screen.
2. During editing a message:
• You can press down scroll key to add attachment files.
• You can select Options to perform operations in the option list.
3. After editing the message, press OK key to add a recipient’s number.
4. Press OK key to send the message.
22

Email
NOTE
: Select Messaging > Templates. You can create the message
template.
Viewing a Message
Your phone provides four mailboxes for message. Inbox stores received
messages. Drafts stores created and saved messages. Outbox stores the
messages that failed to be sent. Sent stores sent messages.
1. Select a mailboxes from Messaging. And then switch between four
mailboxes and templates through the scroll key.
2. Select a message, and then select Options to perform the operations
of the option list.
NOTE
: If your phone is enabled with the broadcast function, select
Messaging > Broadcast Inbox to view broadcast messages.
Email
Email Settings
1. Select Email > Email Wizard or Settings > Message settings >
Email and select an account.
2. Select Options > Edit. You can set the related account information.
Or select Options > Set as default to activate this account.
Sending an Email
1. Select Email > Create Email to access the email editing screen.
23

Email
2. Select To and press OK key. Enter recipient or add recipient from
contacts.
3. In the email editing screen:
•Select Subject to edit the contents.
•Select Text Message to edit the content.
•Select Options to perform the operations of the option list.
4. In the email editing screen, select Options > Send to send the email.
Viewing an Email
Your phone provides five mailboxes for Email. Inbox stores received
emails. Drafts stores created and saved emails. Outbox stores the emails
failed to be send. Sent stores sent emails. Blocked stores screened
emails.
1. Select a mailboxes from Email. And then switch among five mailboxes through the scroll key.
2. Select an Email, and then select Options to perform the operations of
the option list.
24

5. Connection Function
Connectivity Settings
Select Settings > Connectivity. You can set the Bluetooth, network
access point or select data connection modes.
NOTE
:
• Your phone supports USB 2.0.
• Your phone supports plug and play function.
• The PC assistant installation programme and USB driver are
embedded in the mobile phone.
• The Vodafone PC Options software supplied on your phone will run
automatically after you connect your phone to the PC .
USB
You can synchronise data between your phone and PC, surf the Internet
with your phone and read the memory card by USB cable.
NOTE
:
• To connect your phone with a PC through USB cable, first conn ect the
USB connector to your phone, and then connect the other end of the
cable to the PC. To disconnect your phone from the PC, first disable
the Vodafone PC Assistant, then disconnect the USB connector from
the PC, and finally disconnect the USB cable from your phone.
25

USB
• If the PC cannot recognise your phone when connecting through the
USB cable, power off and restart the PC and then retry.
• Please do not plug the USB cable in and out of your phon e frequently.
USB-Based Synchronization
1. Connect your phone with a PC through USB cable delivered with yourphone.
2. The USB driver is embedded in your phone, and will be installed automatically.
•If the
• If asked to restart the PC, select
3. The
automatically. Wait for the dialog box to appear (this may take up to
30 seconds). Buttons showing
Found new hardware wizard
may happen more than once.
Vodafone PC Options
software supplied on your phone will run
fone Mobile Connect via the phone
4. Select the
PC assistant
5. You may be asked to restart the PC. This time, select
6. After restarting the PC, run the
you can operate the USB based synchronization. For details of the
operation, refer to the Help of the
PC assistant
installation for the first time.
button, and follow the guide to complete the
is shown, select
NO
.
File Transfer, PC Assistant
should be displayed.
Yes
PC Assistant
software on your PC. Now
PC Assistant.
26
Cancel
and
.
, this
Voda-

USB
NOTE
: If the dialog box does not appear in step 3, please confirm the auto-
play function of the PC is activated, and then reconnect the cable to the
phone and then the PC. The dialog box should appear after this activity. If
the dialog box still does not appear, please disconnect and reconnect the
cable as above using a different USB port on the PC. Once the dialog box
appears, continue from step 4.
USB-Based Internet Access
To access the Internet by USB, make sure that your PC supports the USB
function and your SIM card supports the Interne t access service. You may
need the username and the password. For details, please contact your
service provider.
1. Connect your phone with a PC through USB cable delivered with yourphone.
2. Wait for the dialog box to appear (this may take up to 30 seconds).
Buttons showing
Connect via the phone
3. Select the
the guide to complete the installation for the first time.
4. When this has finished, wait for the application to be configured. It
may take up to 60 seconds for this to appear.
5. You may be asked to restart the PC. This time, select
File Transfer, PC Assistant
should be displayed.
Vodafone Mobile Connect via the phone
27
and
Vodafone Mobile
button and follow
Yes
.

USB
6. After restarting the PC, the
should be ready to use.
7. For later start of
simply connect your phone to your PC via USB cable.
NOTE
:
Vodafone Mobile Connect via the phone
Vodafone Mobile Connect via the phone
, please
• Only Windows 2000, Windows XP and Windows Vista are supported.
• You can also use the built-in Internet wizard of the Windows operating system to access the internet.
microSD Card Reader
NOTE
: The function of microSD card reader and the other functions using
the USB cable are incompatible. If you enable the microSD card reader,
other functions using the USB cable are unavailable.
1. Insert the microSD card to your phone.
2. Connect your phone to the PC by using the USB cable.
Found New Hardware
3.
tion area of your PC.
Vodafone PC Options software
4. The
automatically. And then select
5. An icon for the mobile memory drive appears on your PC. Then you
can read the files saved in the microSD card directly.
and a device icon are displayed at the notifica-
supplied on your phone will run
File Transfer
28
.

®
Bluetooth
6. After reading the files, right-cl ick on the device icon at the notification
area of your PC to delete the device on your PC.
Bluetooth
You may use the built-in Bluetooth function of your phone to synchronize
data between a PC and your phone, or use the built-in modem of your
phone to access the Internet with a PC, or exchange data with other Bluetooth devices. You can also talk by using the Bluetooth headset or Bluetooth loudspeaker.
NOTE
:
®
• The Bluetooth function supported by your Phone meets the requirements of Bluetooth Specification 2.0. It can work successfully only if
you use it with compatible Bluetooth devices. For more information,
refer to the user manuals of related devices, or consult the manufacturer of related devices.
• You can select Settings > Connectivity > Bluetooth > Visibility to
set wether your phone can be found by other devices when the Bluetooth function is enabled.
Bluetooth-Based Synchronization
Your phone can respond to data synchronization requests from a PC. To
operate the Bluetooth synchronization with your phone, your PC needs to
support Bluetooth function.
1. Install the
PC Assistant
supplied on your phone.
29

®
Bluetooth
2. Select Settings > Connectivity > Bluetooth > Switch On/Off > On
to enable the Bluetooth function.
3. Run the driver software for Bluetooth on the PC, and pair the phone.
After the PC detects and recognizes the phone seria l port service, activate the Bluetooth serial port service on the phone.
4. Run the
5. You can now operate the synchronization. For details of the opera-
PC Assistant
tion, refer to the Help of the
on the PC.
PC Assistant
.
Bluetooth-Based Data Transfer
You can exchange data between your Bluetooth phone and other Bluetooth devices. If you want to exchange data between your phone and
another device, that device must support Bluetooth and the Bluetooth
function must be enabled.
1. Select Settings > Connectivity > Bluetooth > Switch On/Off > On
to enable the Bluetooth function.
2. Select Settings > Connectivity > Bluetooth > My devices. Select
Search for devices to search a Bluetooth device. When the Bluetooth device is found for the first time, authentication is required.
Now you can exchange data between your phone and the other Bluetooth
device.
30

®
Bluetooth
Bluetooth-Based Internet Access
To access the Internet by Bluetooth, make sure that your PC supports the
Bluetooth function and your SIM card supports the Inte rnet access service.
To access the Internet, you may need the username and the pas sword. For
details, please contact your service provider.
1. Select Settings > Connectivity > Bluetooth > Switch On/Off > On
to enable the Bluetooth function.
2. Select Settings > Connectivity > Modem and set the port to
Modem via Bluetooth.
3. Make sure that
your PC. Run the driver software for Bluetooth on the PC, and pair the
phone. After the PC has detected the Vodafone dial-up network
service, you can activate this service.
4. Then you can create Bluetooth-based internet access through the
built-in Internet wizard of the Windows operating system, or the
Internet wizard supplied with the Bluetooth drive suite of the PC.
NOTE
: Only Windows 2000, Windows XP and Windows Vista are supported.
Bluetooth modem
is in
Device Manager/Modem
of
The Bluetooth Headset
You can answer a call by a Bluetooth headset or Bluetooth loudspeaker.
For details, refer to the corresponding user manual of a Bluetooth headset
or loudspeaker.
31

®
Bluetooth
1. Set the Bluetooth headset to the status for detecting.
2. Select Settings > Connectivity > Bluetooth > Switch On/Off > On
to enable the Bluetooth function.
3. Select Settings > Connectivity > Bluetooth > My devices. Select
Search for devices to search a Bluetooth device. When a Bluetooth
device is found for the first time, authentication is required.
4. If a Bluetooth headset is detected and recognized for the first time, it
should be authenticated by a PIN code.
Now you can use the Bluetooth headset as the connection has been
established between your phone and the Bluetooth headset.
The Bluetooth headset should be set to the status for detecting only when
authentication is needed. Once the headset has been authenticated, you
just need to turn on your Bluetooth headset. For more information, refer
to the user manual of your Bluetooth headset.
NOTE
: The procedure for using a Bluetooth loudspeaker is similar to that
for a Bluetooth headset. For details, refer to the user manual supplied w ith
your Bluetooth loudspeaker.
32

6. Entertainment Function
NOTE
: Select Settings > Streaming settings. You can change the
settings for the streaming.
Music
Select Music. You can play kinds of music, sort music by artists, albums,
and genre, set the play list, and view the latest play list.
During music playing, you can perform the following operations:
• Follow the displayed prompts and use the scroll key to perform corresponding operations.
• Select Options to perform the operations in the list.
Select Music > FM Radio. You can select Options to tune the channel or
edit a channel list.
Camera
Select Camera to start the camera. In the camera viewfinder scr een, press
the right scroll key to switch to the video camera function.
Operations in the Viewfinder Screen
When the camera is started, you can press OK key to take a picture. Or
press the right scroll key to switch to the video camera function (when the
tool bar is closed). Then, you can press O K key to start recording the video.
33

Internet
In the viewfinder screen, you can:
• Press the up or down scroll key to adjust the brightness.
• Press the volume keys to adjust the focus.
• Select Options to display the tool bar or select Back to close the tool
bar. This tool bar is used to set the parameters of the camera or the
video camera.
Operations After Taking a Picture
After taking a picture, the picture taken are auto saved to the My
Files/Pictures directory. Or you can select Options to perform the oper-
ations of the option list.
Operations During Recording
During the recording, you can perform the following operations.
• Pause and then to start recording again.
• Cancel the recording.
Internet
The built-in browser makes it easy to browse the Vodafone live! portal. You
can access the Vodafone live! by selecting Internet from the main menu.
34

Mobile TV
Mobile TV
Select Entertainment > Mobile TV. You can access the preset link. The
link has been preset by Vodafone for you on the phone.
NOTE
: Whether your phone supports this function depends on the local
network. For details, please contact your local network operator.
Video
Select Entertainment > Video. To download one of these to the phone or
memory card, select Download videos.
Games
Select Entertainment > Games. To download one of these to the phone
or memory card, select Download Games.
35

7. Business Function
Calendar Management
Using the Alarm Clock
Select Organiser & Tools > Alarms. You can select one alarm from the
list, and then press OK key to set an alarm clock.
When it is time for an alarm clock to ring, the select ed alarm tone is played
and a prompt is displayed. You can stop the ringing and snooze by
pressing any key (except left function key and power key).
If your phone is powered off, the alarm clock will still ring. When the alarm
rings, you can choose to power on the phone.
Select an alarm clock from the list, and press the left function key to deactivate it.
Using the Calendar
Select Organiser & Tools > Calendar. You can select Options > New to
create the schedule events for the current day. The schedule prompt is
the same with alarm prompt. In the calendar view screen, you can select
Options > View to view the events.
36

Tool Applications
Creating a Task
Select Organiser & Tools > Task. To define a new task, press OK key or
select Options > New on the Tasks screen. The task prompt is the same
with alarm prompt.
Creating a Memo
Select Organiser & Tools > Memo. You can store important events on
your phone.
Tool Applications
Synchronize
Select Organiser & Tools > Synchronize. You can synchronize contacts
with your personal phone book in the Vodafone network. Before use the
synchronize function, you may need to set a profile.
1. To create a profile, select Options > New to create a profile.
2. Press the left or right scroll key to switch between Synchronize
Items, Server Setting, and Network Profile.
3. Return to the previous menu and select Options > Synchronize to
start synchronizing.
NOTE
: This service is not available in all networks. For details, contact your
local Vodafone customer care centre.
37

Tool Applications
Other Tools
Select Organiser & Tools. You can use more tools.
Calculator
You can perform addition, subtraction, multiplication, division and extraction operations on your phone.
Unit Converter
You can convert units of length and weight between different sys tems on
your phone.
Currency Converter
You can convert a value from one currency to another using your phone.
Voice Recorder
You can record voices or sounds on your phone.
World Time
You can view the time of important cities around the world.
Stopwatch
You can use the stop watch function.
Timer
You can set a timer for up to 99 hours and 59 minutes.
38

File Management
Service Dial Number
You can contact your local Vodafone customer care centre by dialing this
number.
File Management
Select My Files. You can manage the Pictures, Ringtones, Music,
Videos, Themes, and Others files conveniently. Select a file, then select
Options to perform the operations of the list.
NOTE
:
• Some sound files are protected by Digital Rights Management (DRM),
and may not be able to be used as a ringtone.
• When the phone detects and recognizes the memory card, Memory
card is displayed as a tab on the My Files screen.
Application
Select Applications from the main menu. You can run applications,
download more applications and access the web function.
Vodafone live!
Select Applications > Vodafone live! You can perform the following
operations.
39

Application
• Browse the homepage. When browsing, you can press the scroll keys
to select a link you want to access. The selected link is highlighted.
Press OK key to access the link.
• Open a new page, and then you can enter the address of the page to
be accessed.
• Save and edit the information of the websites that you often access.
Some bookmarks have been preset by Vodafone for you on the
phone.
• Access the saved webpages.
• Access the visited webpages.
• Link to the latest visited webpages.
• View or modify the settings for you to use the Vodafone service.
40

8. Safety Information
RF Exposure
General Statement on RF energy
Your phone contains a transmitter and a receiver. When it is ON, it receives
and transmits RF energy. When you communicate with your phone, the
system handling your call controls the power level at which your phone
transmits.
Specific Absorption Rate (SAR)
Your mobile device is a radio transmitter and receiver. It is designed not to
exceed the limits for exposure to radio waves recommended by international guidelines. These guidelines were developed by the independent
scientific organisation ICNIRP and include safety margins designed to
assure the protection of all persons, regardless of age and health.
The SAR limit adopted by the USA and Canada is 1.6 watts/kilogram
(W/kg) averaged over one gram of tis
to the FCC and IC for this device type when tested for use at the ear is 0.549
W/kg, and when properly worn on the body is 0.665 W/kg.
The guidelines use a unit of measurement known as the Specific Absorption Rate, or SAR. The SAR limit for mobile devices is 2 W/kg and the
highest SAR value for this device when tested at the ear was 0.508W/kg*.
*The tests are carried out in accordance with IEC standard PT62209-1.
sue. The highest SAR value reported
41

RF Exposure
As mobile devices offer a range of functions, they can be used in other
positions, such as on the body as described in this user guide**.
As SAR is measured utilising the device’s highest transmitting power, the
actual SAR of this device while operating is typically below that indicated
above. This is due to automatic changes to the power level of the device
to ensure it only uses the minimum power required to communicate with
the network.
Body worn operation
Important safety information regarding radiofrequency radiation (RF)
exposure.
To ensure compliance with RF exposure guidelines the phone must be
used with a minimum of 1.5 cm separation from the body.
Failure to observe these instructions could result in your RF exposure
exceeding the relevant guideline limits.
Limiting exposure to radio frequency (RF)
fields
For individuals concerned about limiting their exposure to RF fields, the
World Health Organisation (WHO) provides the following advice:
Precautionary measures: Present scientific information does not indicate
the need for any special precautions for the use of mobile phones. If indi-
**Please see page 42 about body worn operation.
42

RF Exposure
viduals are concerned, they might choose to limit their own or their children’s RF exposure by limiting the length of calls, or using ‘hands-free’
devices to keep mobile phones away from the head and body.
Further information on this subject can be obtained from the WHO home
page http://www.who.int/peh-emf WHO Fact sheet 193: June 2000.
Regulatory information
The following approvals and notices apply in specific regions as noted.
FCC Statement
This device complies with Part 15 of the FCC Rules [and with RSS-210 of
Industry Canada].
Operation is subject to the following two conditions:
(1) this device may not cause harmful interference, and
(2) this device must accept any interference received, including interference that may cause undesired operation.
Changes or modifications made to this equipment not exp ressly approved
by HUAWEI may void the FCC authorization to operate this equipment.
This equipment has been tested and found to comply with the limits for a
Class B digital device, pursuant to Part 15 of the FCC Rules.
43

RF Exposure
ˈ
EU regulatory conformance
Manufacturer declares that this product is in
compliance with the essential requirements and
other relevant provisions of Directive 1999/5/EC.
EU Declaration of Conformity
according to the Radio Equipment and
Telecommunications Terminal Equipment
1999/5/EC
For the following equipment
Product :
Type Designation/Trademark :
Manufacturer’s Name : Huawei Technologies Co., Ltd.
Manufacturer’s Address : Bantian, Longgang District, Shenzhen, 518129
Guangdong, P. R. China
is herewith confirmed to comply with the requirements set out in the Council
Directive1999/5/EC for radio equipment and telecommunications terminal equipment.
For the evaluation of the compliance with this Directive, the following standards
were applied:
Safety: EN 60950-1:2006
Health: EN 50360-2001;EN 62209-1:2006; IEC 62209-1;
IEC 62209-2:200X(106/162/CDV)
EMC˖ EN 301 489-1 V1.6.1;EN 301 489-7 V1.3.1;
EN 301 489-17 V1.2.1;EN 301 489-24 V1.4.1
Radio˖ EN 301 908-1 V3.2.1;EN 301 511 V9.0.2;
EN 300 328 V 1.7.1;EN 301 908-2 V3.2.1
Responsible for making this declaration is the:
; Manufacturer Authorised representative established within the EU
Person responsible for making this declaration
Name, Surname : KangYing
Position/Title : Regulatory Compliance Manager
ShenZhen 2009-04-30
(Place) (Date) (Company stamp and legal signature)
WCDMA/GPRS/GSM/EDGE Mobile Phone with
Bluetooth
Vodafone 835;V835;U6100 / Vodafone
44
Directive
HUAWEI

Distraction
Distraction
Driving
Full attention must be given to driving at all times in order to reduce the
risk of an accident. Using a phone while driving (even with a hands free kit)
causes distraction and can lead to an accident. You must comply with
local laws and regulations restricting the use of wireless devices while
driving.
Operating machinery
Full attention must be given to operating the machinery in order to reduce
the risk of an accident.
Product Handling
General Statement on handling and use
You alone are responsible for how you use your phone and any consequences of its use.
You must always switch off your phone wherever the use of a phone is
prohibited. Use of your phone is subject to safety measures designed to
protect users and their environment.
• Always treat your phone and its accessories with care and keep it in a
clean and dust-free place.
45

Product Handling
• Do not expose your phone or its accessories to open flames or lit
tobacco products.
• Do not expose your phone or its accessories to liquid, moisture or high
humidity.
• Do not drop, throw or try to bend your phone or its accessories.
• Do not use harsh chemicals, cleaning solvents, or aerosols to clean
the device or its accessories.
• Do not paint your phone or its accessories.
• Do not attempt to disassemble your phone or its accessories, only
authorised personnel must do so.
• Do not expose your phone or its accessories to extreme temperatures, minimum –10 and maximum +40 degrees Celsius.
• Please check local regulations for disposal of electronic products.
Do not carry your phone in your back pocket as it could break when you sit
down.
Small Children
Do not leave your phone and its accessories within the reach of small children or allow them to play with it.
They could hurt themselves or others, or could accidentally damage the
phone.
Your phone contains small parts with sharp edges tha t may cause an injury
or which could become detached and create a choking hazard.
46

Product Handling
Demagnetisation
To avoid the risk of demagnetisation, do not allow electronic devices or
magnetic media close to your phone for a long time.
Electrostatic discharge (ESD)
Do not touch the SIM card’s metal connectors.
Antenna
Do not touch the antenna unnecessarily.
Normal use position
When placing or receiving a phone call, hold your phone to your ear, with
the bottom towards your mouth or as you would a fixed line phone.
47

Product Handling
Air Bags
Do not place a phone in the area over an air bag or in the air bag deployment area.
Store the phone safely before driving your vehicle.
Seizures/Blackouts
This phone is capable of producing bright flashing lights.
Repetitive Motion Injuries
To minimise the risk of RSI, when Texting or playing games with your
phone:
• Do not grip the phone too tightly
• Press the buttons lightly
• Make use of the special features in the handset which minimise the
number of buttons which have to be pressed, such as message
templates and predictive text
• Take lots of breaks to stretch and relax
Emergency Calls
This phone, like any wireless phone, operates using radio signals, which
cannot guarantee connection in all condition s. Therefore, you must never
rely solely on any wireless phone for emergency communications.
48

Electrical Safety
Loud Noise
This phone is capable of producing loud noises which may damage your
hearing.
Bright Light
This phone is capable of producing flash of light or use as a torch, do not
use it too close to the eyes.
Phone Heating
Your phone may become warm during charging and during normal use.
Electrical Safety
Accessories
Use only approved accessories.
Do not connect with incompatible products or accessories.
Take care not to touch or allow metal objects, such as coins or key rings,
to contact or short-circuit the battery terminals.
Connection to a Car
Seek professional advice when connecting a phone interface to the
vehicle electrical system.
49

Electrical Safety
Faulty and Damaged Products
Do not attempt to disassemble the phone or its accessory.
Only qualified personnel must service or repair the phone or its accessory.
If your phone or its accessory has been submerged in w ater, punctured, or
subjected to a severe fall, do not use it until you have taken it to be
checked at an authorised service centre.
Battery Handling & Safety
Always switch the device off and disconnect the charger before removing
the battery.
Only use the battery and charger supplied, or manufacturer approved
replacements intended for use with your phone. Using other ba tteries and
chargers could be dangerous.
Do not disassemble or short-circuit the battery. Accidental short-circuiting
can occur if a metallic object such as a key, paper clip, or pen touches the
terminals of the battery.
Improper battery use may result in a fire, explosion, or other hazard. If you
believe the battery has been damaged, do not use it, take it to a service
centre for testing.
50

Interference
Interference
General statement on interference
Care must be taken when using the phone in close proximity to personal
medical devices, such as pacemakers and hearing aids.
Pacemakers
Pacemaker manufacturers recommend that a minimum separation of 15
cm be maintained between a mobile phone and a pacemaker to avoid
potential interference with the pacemaker. To achieve this use the phone
on the opposite ear to your pacemaker and do not carry it in a breast
pocket.
Hearing Aids
People with hearing aids or other cochlear implants may experience interfering noises when using wireless devices or when one is nearby.
The level of interference will depend on the type of hearing dev ice and the
distance from the interference source, increasing the separat ion between
them may reduce the interference. You may also consult your hearing aid
manufacturer to discuss alternatives.
51

Interference
Medical devices
Please consult your doctor and the device manufacturer to determine if
operation of your phone may interfere with the operation of your medical
device.
Hospitals
Switch off your wireless device when requested to do so in hospitals,
clinics or health care facilities. These requests are designed to prevent
possible interference with sensitive medical equipment.
Aircraft
Switch off your wireless device whenever you are instructed to do so by
airport or airline staff.
Consult the airline staff about the use of wireless devices on board the
aircraft, if your device offers a ‘flight mode’ this must be enabled prior to
boarding an aircraft.
Interference in cars
Please note that because of possible interference to electronic equipment, some vehicle manufacturers forbid the use of mobile phones in
their vehicles unless a handsfree kit with an external antenna is included
in the installation.
52

Explosive environments
Explosive environments
Petrol stations and explosive atmospheres
In locations with potentially explosive atmospheres, obey all posted signs
to turn off wireless devices such as your phone or other radio equipment.
Areas with potentially explosive atmospheres include fuelling areas,
below decks on boats, fuel or chemical transfer or storage facilities, areas
where the air contains chemicals or particles, such as grain, dust, or metal
powders.
Blasting Caps and Areas
Turn off your mobile phone or wireless device when in a blasting area or in
areas posted turn off “two-way radios” or “electronic devices” to avoid
interfering with blasting operations.
Environmental Protection
Please observe the local regulations regarding the disposal of your packaging materials, exhausted battery and old phone and please promote
their recycling. Do not dispose of an exhausted battery or old phone in
municipal waste.
This symbol indicates that the equipment carrying this mark must
NOT be thrown into general waste but should be collected separately and properly recycled under local regulations.
53

9. Appendix
Abbreviations
DRM Digital Right Management
FDN Fixed Dial Number
GPS Global Positioning System
GPRS General Packet Radio Service
GSM Global System for Mobile communication
OTA Over-The-Air
PIN Personal Identification Number
PLMN Public Land Mobile Network
PUK PIN Unblocking Key
SD Secure Digtal Card
SAR Specific Absorption Rate
STK SIM Took Kit
URL Universal Resource Locator
54

USB Universal Serial Bus
WAP Wireless Application Protocol
WCDMA Wideband Code Division Multiple Access
File Formats
The phone supports image files, video files and audio files of many
formats. For details, see the following table.
Image JPG, PNG, BMP, GIF, BCI, WBMP, SVG, and SVGZ
Audio MP3, AAC/AAC+, AMR, MID, WAV(ADPCM), MMF, QCP,
Video 3GP, MP4 and 3G2
and XMF/DLS
55
 Loading...