

Page 1
Copyright © Huawei Technologies Co., Ltd. 2017. All rights reserved.
All other trademarks and trade names mentioned in this document are the
property of their respective holders.
HUAWEI USG6306/6308/6330/6350/6360/6370/6380/6390/6390E/6507/6530/6550/6570/6620/6630
V500R001
Quick Start
Issue: 03
Part Number: 31507764
Date: 2017-06-15
1
Thank you for using Huawei USG6306/6308/6330/6350/6360/6370/6380/6390/6390E/6507/6530/6550/6570/6620/6630 products. This USG product series protects your network against Internet threats. This Quick Start shows the product appearance
and provides the essential information required for installing the device and setting up Internet access. For detailed hardware
description and installation guidelines, refer to the
Hardware Guide
. For detailed configurations, refer to the
Administrator
Guide
.
Safety Precautions
Be aware of the following safety precautions when installing the device.
•Deactivatepowerwheneverpossiblebeforeperformingmaintenanceonpowercables.
•Alwayswearaproperly-groundedwriststrapbeforetouchingthedeviceorexpansioncardsinit.
Device and Accessories
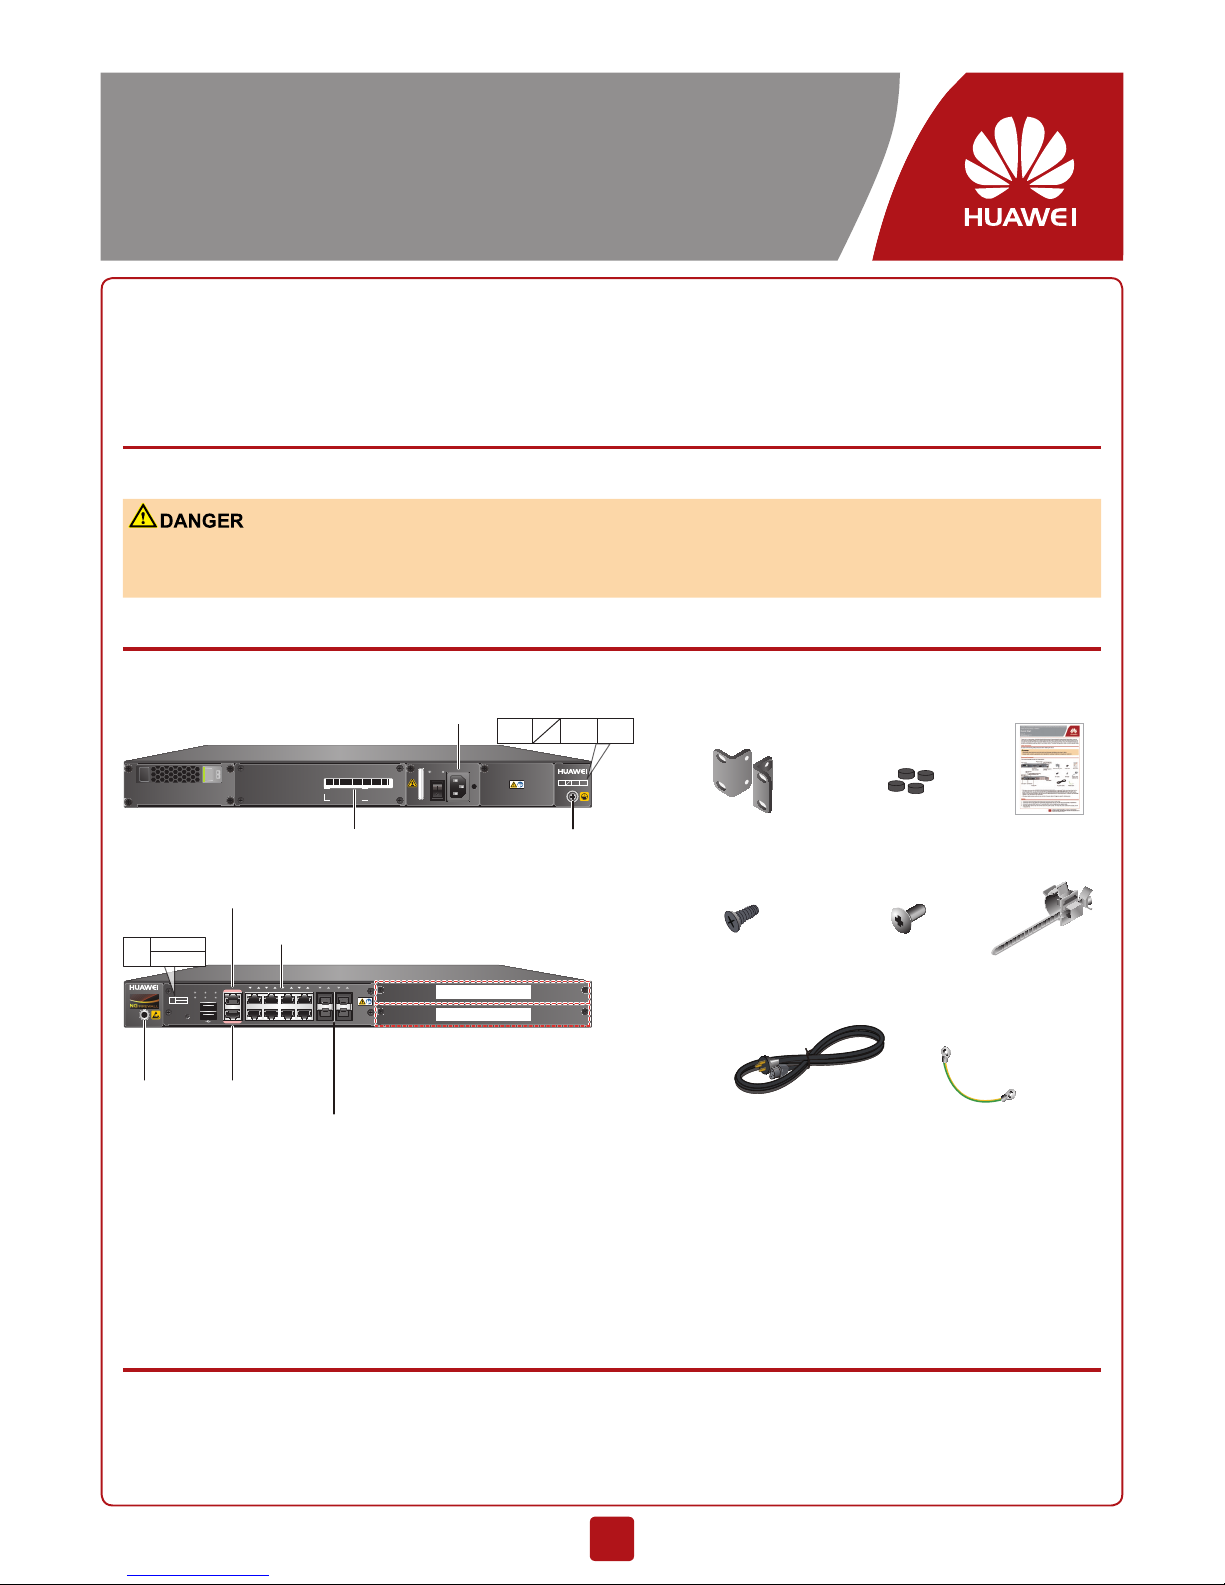
Your product package includes the following items:
Secospace USG6000
4 HDD 5 PWR6 PWR
INPUT OUTPUT
ON
OFF
~100-240V;50/60Hz;2.5A
XXXXXXXXXXXXXXXXXXXXXXXXXXX
SM-HDD-SAS300G-B
Secospace USG6000
0 1 2 3 4 5 6 7 8 9 10 11
0
1
RST
SYS
ALM
PWR
HDD
MGMT
MODE
0/1
2
3
CONSOLE
MGMT
WSIC(Slot 3)
WSIC(Slot 2)
4 HDD 5 PWR 6 PWR
4x1GE SFP
Rubber feet
Management
port
Console port
ESD jack
Protection ground
terminal
Power socket
PGND cable
Power cable
retention clip
Quick start
M4 screw
Rack-mounting ears
AC power cable
M6 screw
10/100/1000M autosensing
Ethernet electrical port
0/1
2
3
Rear panel
Front panel
SN label (including the
SN and product model)
• The figure above uses the USG6370/6380/6390/6390E/6550/6570/6620/6630 as an example. The fixed interface board
on the front panel provides 8 10/100/1000M autosensing Ethernet electrical ports, 4 GE optical ports, and 2 USB ports.
The power module on the rear panel is removable. For the USG6306/6308/6330/6350/6360/6507/6530, the fixed interface
board on the front panel provides 6 service ports (4 GE electrical ports and 2 combo ports) and 1 USB port, and the power
module on the rear panel is non-removable.
• AC power cables vary by country or area, and the AC power cable in the figure is used for reference only.
Cabling
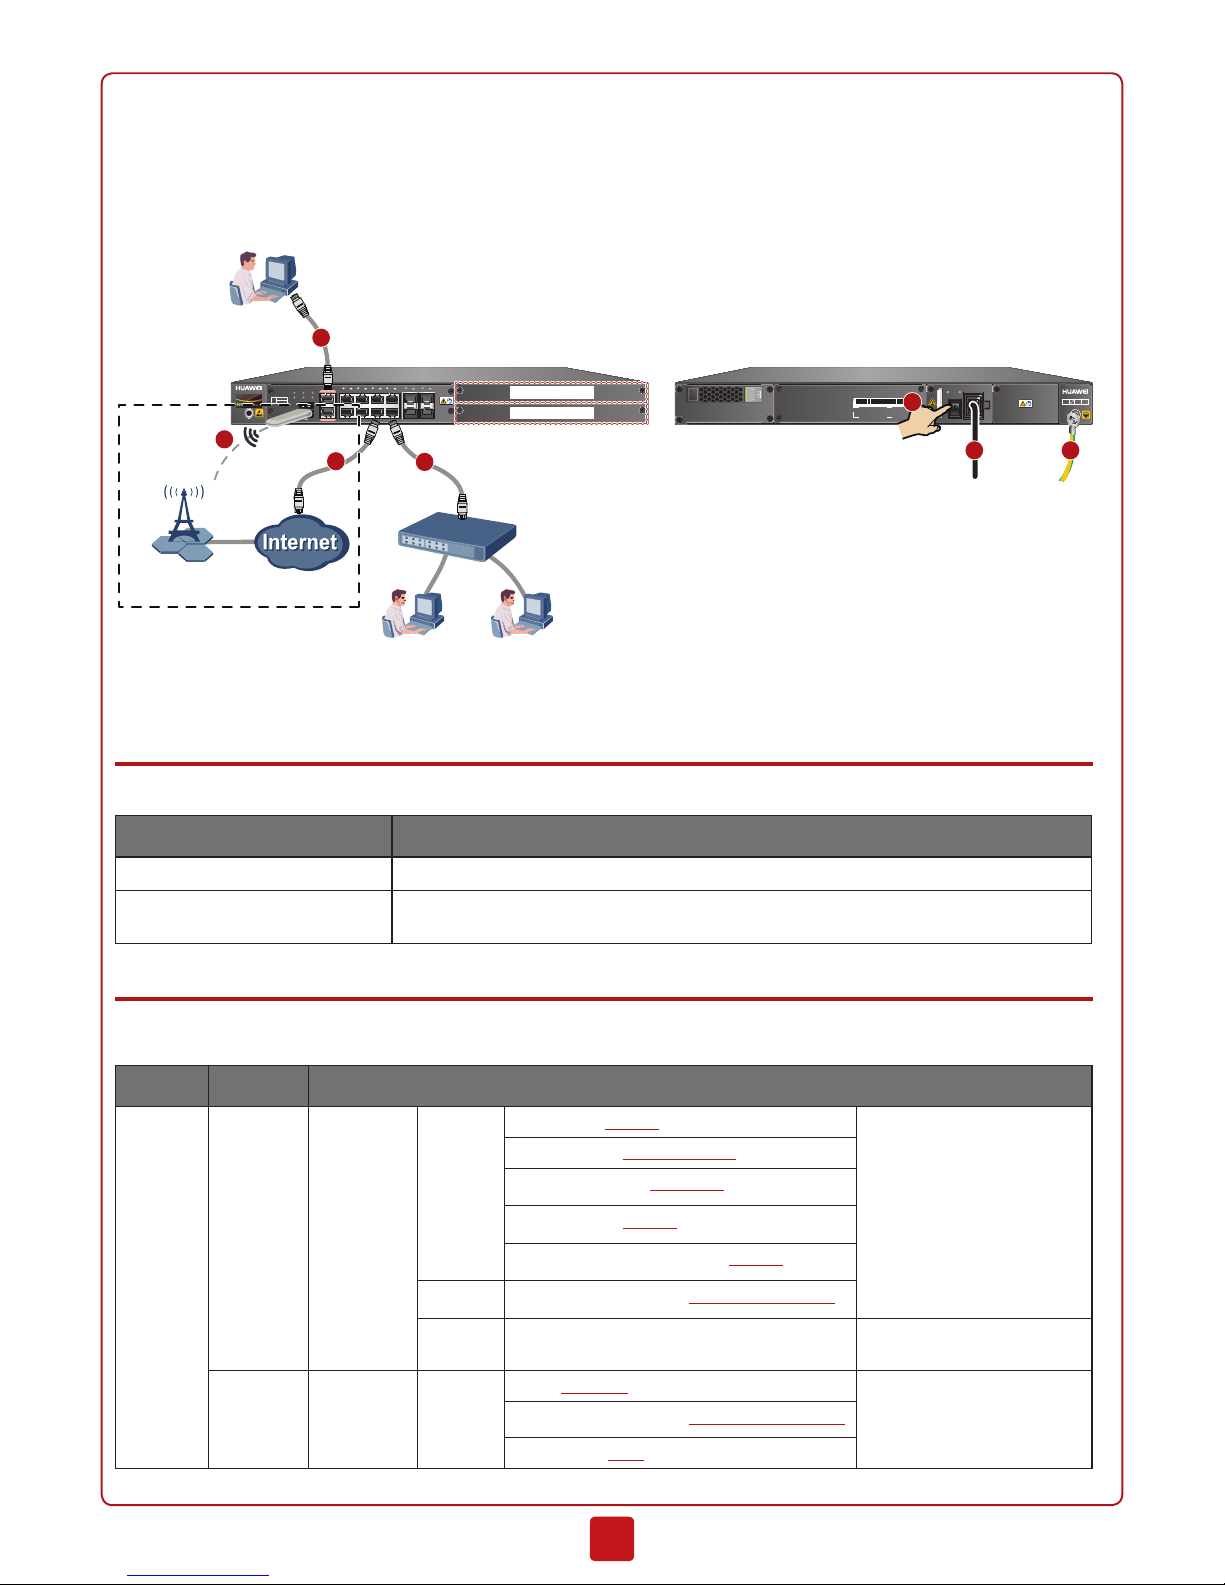
1. Connect the ground terminal on the device to the ground bar using a PGND cable.
2. Connect the device to the WAN through GE1/0/4 or by inserting an 4G LTE dongle on the USB port (the
USG6390E/6620/6630
does not support Internet access in 4G mode). Connect the device to the LAN through GE1/0/6
(GE1/0/4 and GE1/0/6 are examples, and you can use other ports as required).
Page 2
2
3. Connect the device's MGMT port to the administrator PC using a network cable.
4. Insert the cable retention clip into the hole close to the power socket. Then insert the power cable into the socket, and fix
it using the clip.
5. Turn on the power switch. When the SYS indicator on the front panel is blinking (once every two seconds), the device is
running and ready for configuration.
Secospace USG6000
4 HDD 5 PWR 6 PWR
INPUT OUTPUT
ON
OFF
~100-240V;50/60Hz;2.5A
XXXXXXXXXXXXXXXXXXXXXXXXXXX
SM-HDD-SAS300G-B
Secospace USG6000
0 1 2 3 4 5 6 7 8 9 10 11
0
1
RST
SYS
ALM
PWR
HDD
MGMT
MODE
0/1
2
3
CONSOLE
MGMT
WSIC(Slot 3)
WSIC(Slot 2)
GE0/0/0
3
5
4 1
GE1/0/6
2
Administrator
Intranet
Front panel Rear panel
Switch
GE1/0/4
2
Cellular0/0/0
2
4G station
4G access or Ethernet access
Default Configuration
The following table lists the default configuration.
Item Description
MGMT (management port) The MGMT port is numbered GE0/0/0 and assigned with IP address 192.168.0.1.
Administrator account/password You can use the default account/password (admin/Admin@123) to log in through web or
console.
Connecting to the Internet
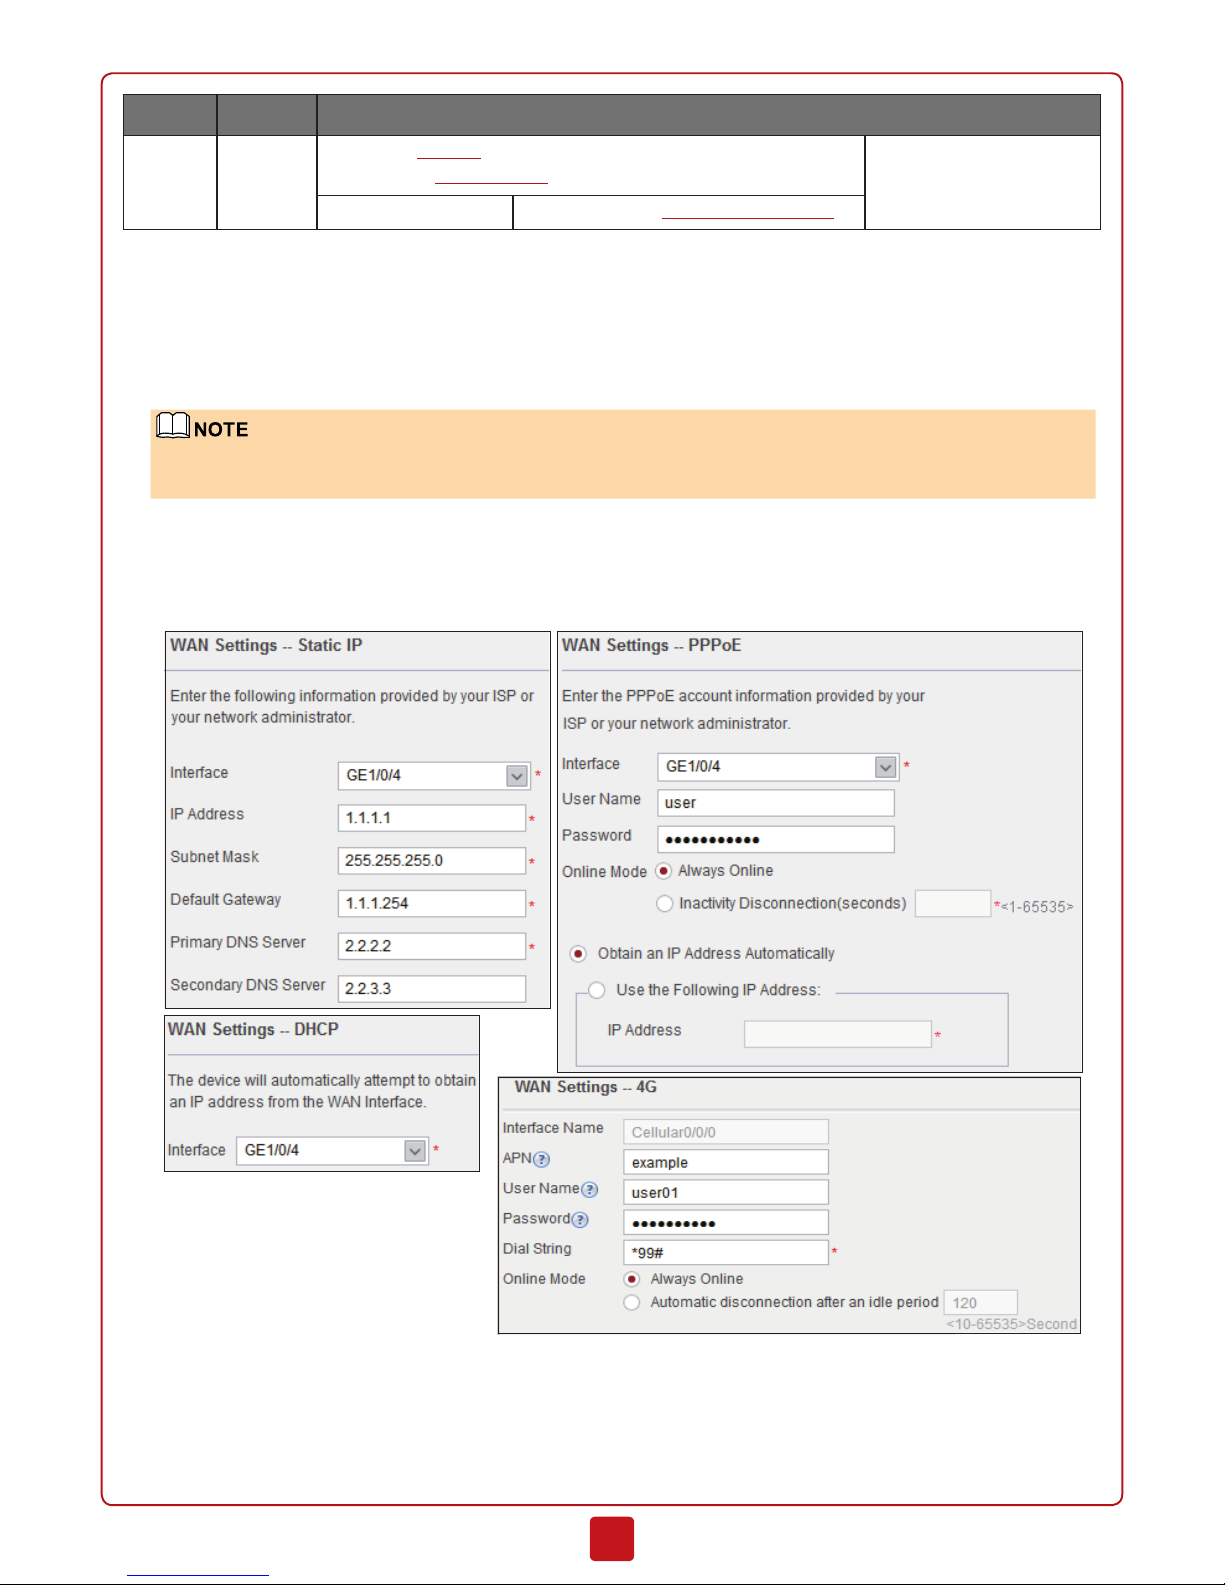
Collect the information in the following table based on the WAN mode you use and the IP address plan for the LAN. The underlined red texts in the table are examples for reference only.
Item Port Description
WAN GE1/0/4 WAN Mode Static IP IP Address: 1.1.1.1 Request your ISP or
network administrator
to provide the data.
Subnet Mask: 255.255.255.0
Default Gateway: 1.1.1.254
Primary DNS: 2.2.2.2
(Optional) Secondary DNS: 2.2.3.3
PPPoE User name/Password: user/Password123
DHCP
-
The device functions
as a DHCP client.
Cellular0/0/0
WAN Mode 4G
APN:
example
Request your ISP or
network administrator
to provide the data.
User name/Password: user01/Admin@123
Dial string:
*99#
Page 3
3
Item Port Description
LAN GE1/0/6 IP Address: 10.0.0.1
Subnet Mask: 255.255.255.0
The LAN IP address range
shall be pre-determined.
DHCP server IP address range: 10.0.0.1 to 10.0.0.254
1. Set the IP address to 192.168.0.2 (or any other in the range of 192.168.0.2 to 192.168.0.254) and subnet mask to
255.255.255.0 of the corresponding network interface on the administration PC.
2. Open a web browser and navigate to https://192.168.0.1:8443.
3. Enter the user name (admin) and password (Admin@123) in the login dialog box, and then click Login. You need to
change the user password as instructed after the first login.
4. In the Startup Wizard page that is displayed, click Next to access the Basic Configuration page. Change the device
name and click Next.
Ifthe
Startup Wizard
pageisnotdisplayed,clickthe
System
tabandchoose
Wizard > Startup Wiz-
ard
inthenavigationtree.
5. In the Time Settings step, configure the system clock of the device according to your local time zone, and click Next.
6. In the WAN Mode step, select a WAN mode and click Next. The
USG6390E/6620/6630 do not support accessing the
Internet in 4G mode.
7. In the WAN Settings step, set the parameters and click Next.
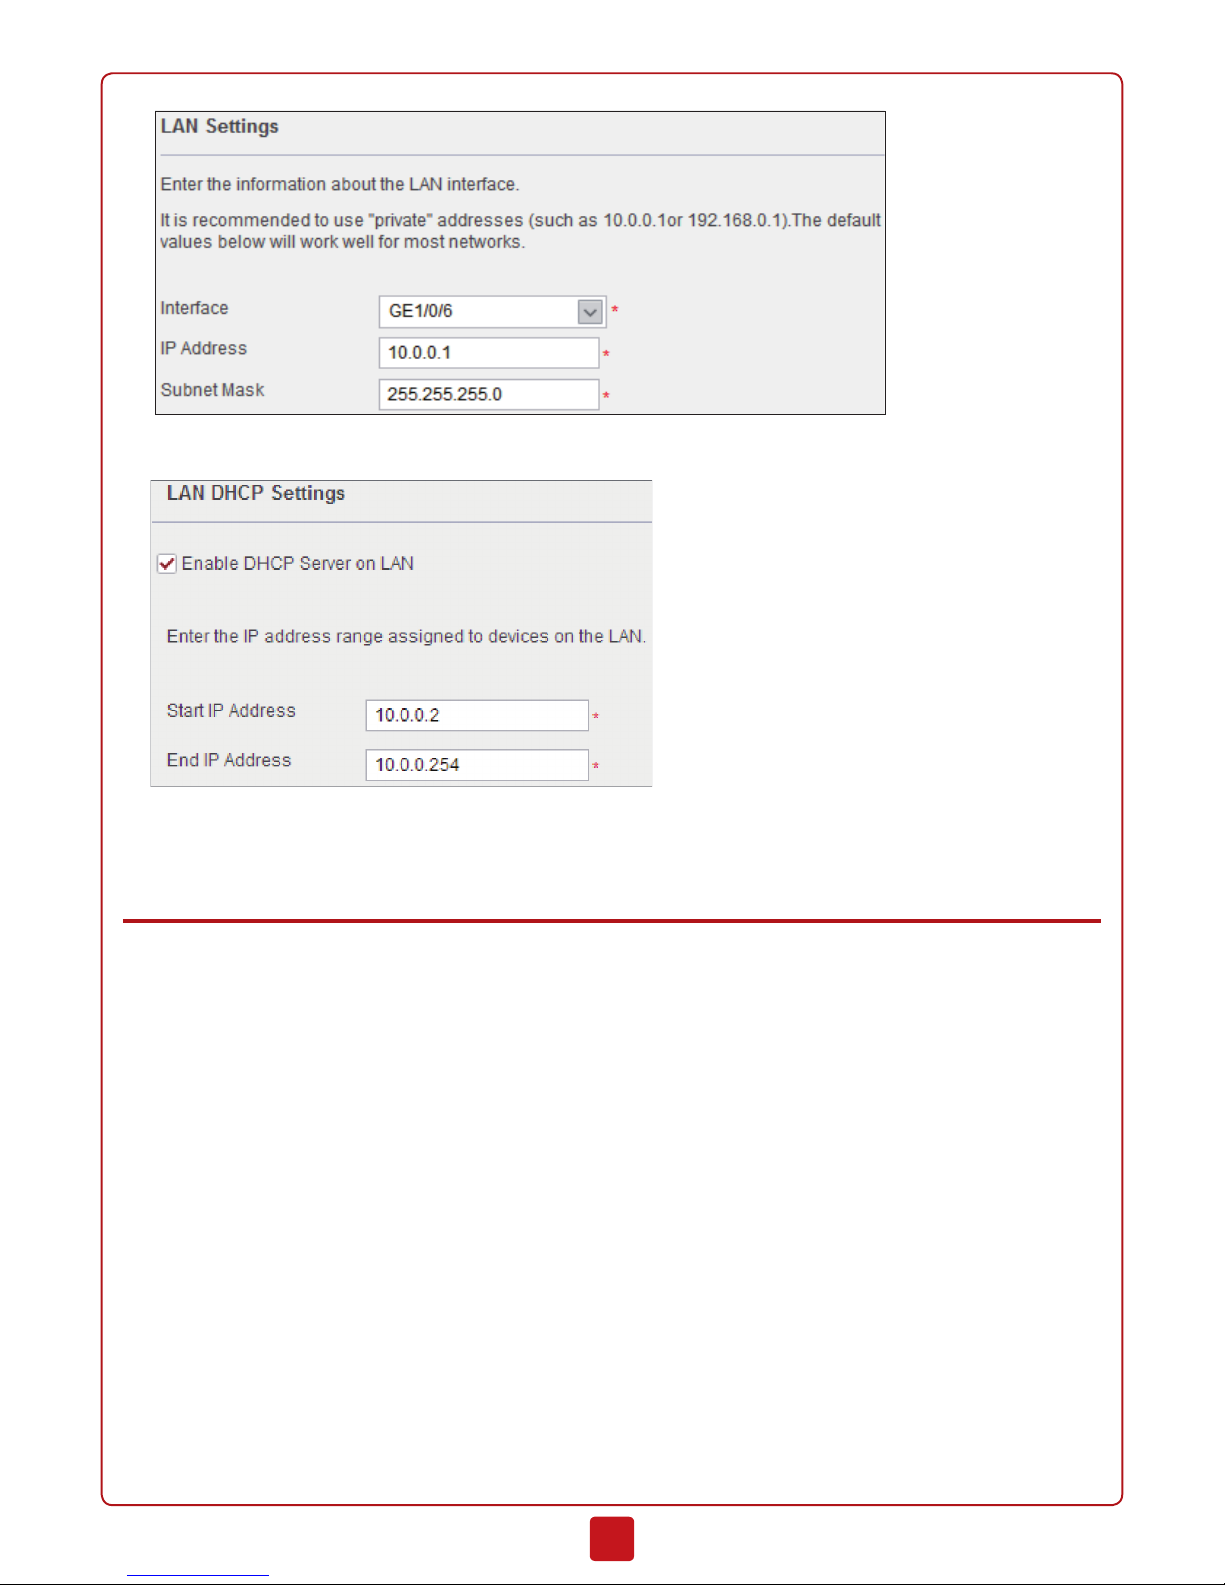
8. In the LAN Settings step, set the parameters and click Next.
Page 4
4
9. (Optional) In the LAN DHCP Settings step, set the parameters and click Next.
10. In the Summary step, confirm the previous settings and click Apply.
11. Click Finish in the Startup Wizard Complete page to complete Internet access configurations. For other settings, refer to
the
Administrator Guide
.
Appendix
• Activating Licenses
More functions of the device will be available after a license is activated. Activate a license as follows:
1. Click the System tab on the web UI, and click License Management in the navigation tree.
2. Select Automatic Online Activation in License Activation Mode.
3. Fill the domain name of the license authorization server in the License Center Domain Name field. You can also
leave the field as default.
4. Find the license authorization code in the license certificate, which is delivered with the device, and enter it in the
License Authorization Code field.
5. Click Activate to activate the license.
• Open Source Software Notice
You can access the device web UI and click Open Source Software Notice at the bottom of the UI to view details of the
open source software notice.
• Obtaining Product Documents and Technical Support
• Log in to http://support.huawei.com/enterprise, and select a specific product model and version to find its documenta-
tion.
• Log in to http://support.huawei.com/ecommunity and post your questions in the community.
Page 5
HUAWEI TECHNOLOGIES CO., LTD.
Huawei Industrial Base Bantian Longgang
Shenzhen 518129
People's Republic of China
e.huawei.com
5
Huawei Enterprise
Technical Support
• Contact your local representative for further information.
Thecontactinformationisavailableat
http://e.huawei.com/en/service-hotline
.
 Loading...