

Page 1

User Guide
Welcome to HUAWEI
Page 2
Introduction
Thank you for choosing the HUAWEI Ascend P1XL (HUAWEI
U9200E) smartphone.
Be sure to carefully read the function descriptions, operating
instructions, and safety precautions described in this document
Symbols and Definitions
The following symbols are used in this document to highlight
sections that require special attention:
Descri
Additional operation descriptions.
ption
before using your phone.
All pictures and illustrations in this document are for your
reference only. The actual appearance and display features will
depend on the specific phone purchased.
Please visit www.huaweidevice.com/worldwide/support/hotline
for recently updated hotline and email address in your country
or region.
1
Tip
Cautio
n
Help you to solve a problem quickly
and efficiently.
Warnings and precautions. If the
instructions in this document are not
followed, the device may be
damaged, or your data may be lost.
Page 3
Installation
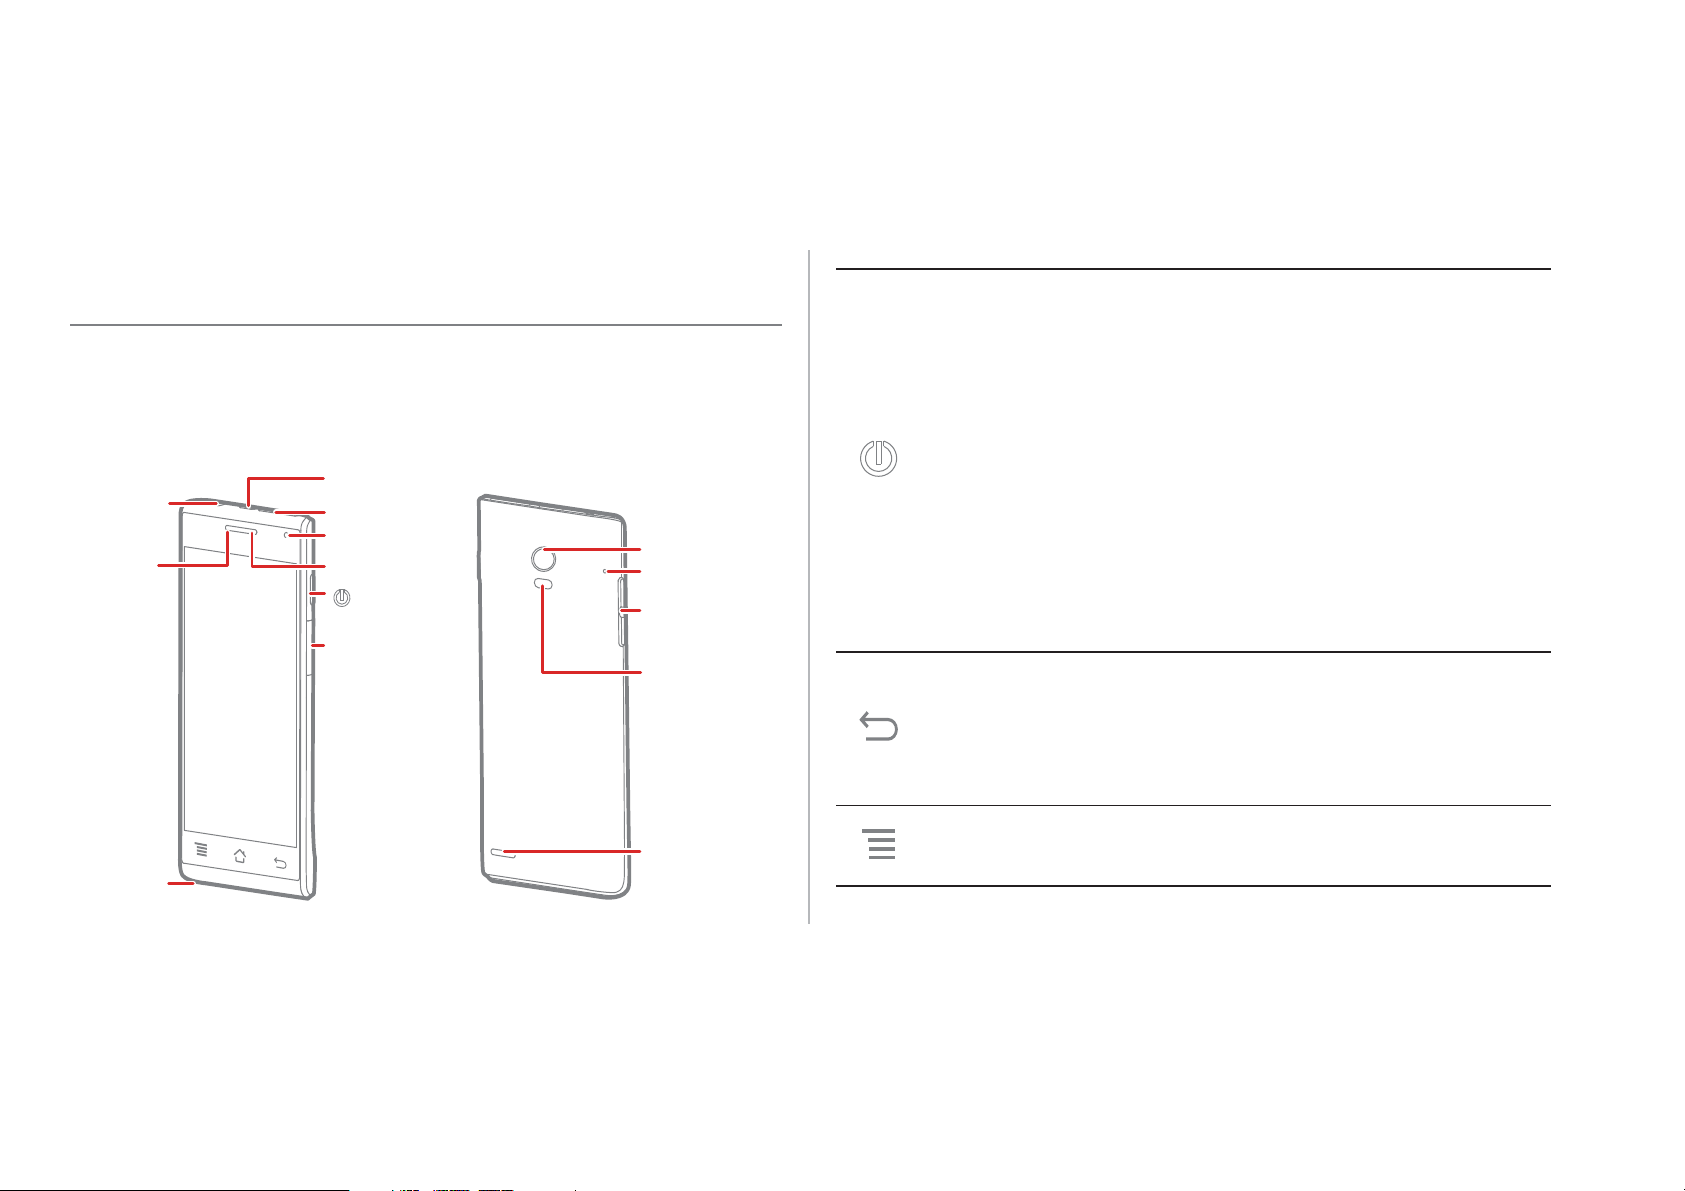
• Press and hold to power on your phone.
• Press and hold to display the options menu, from
Keys and Functions
Charger jack/USB port
Headset
jack
Earpiece
Microphone
SIM card slot
Secondary camera
Status indicator
Power key
microSD
card slot
Main camera
Noise reduction
microphone
Volume keys
Flash unit
Speaker
where you can power off the phone and perform
some shortcut operations.
• Press to lock the screen when your phone is
active.
• Press and hold for over 10 seconds to forcibly
power off the phone.
• Touch to return to the previous screen or exit the
currently running application.
• Touch to hide the keyboard.
Touch to open the menu on an active screen.
2
Page 4
• Touch to return to the Home screen.
Standard USIM card dimension:
25 mm x 15 mm x 0.76 mm (DxWxH)
• Touch and hold to view the list of recently used
applications.
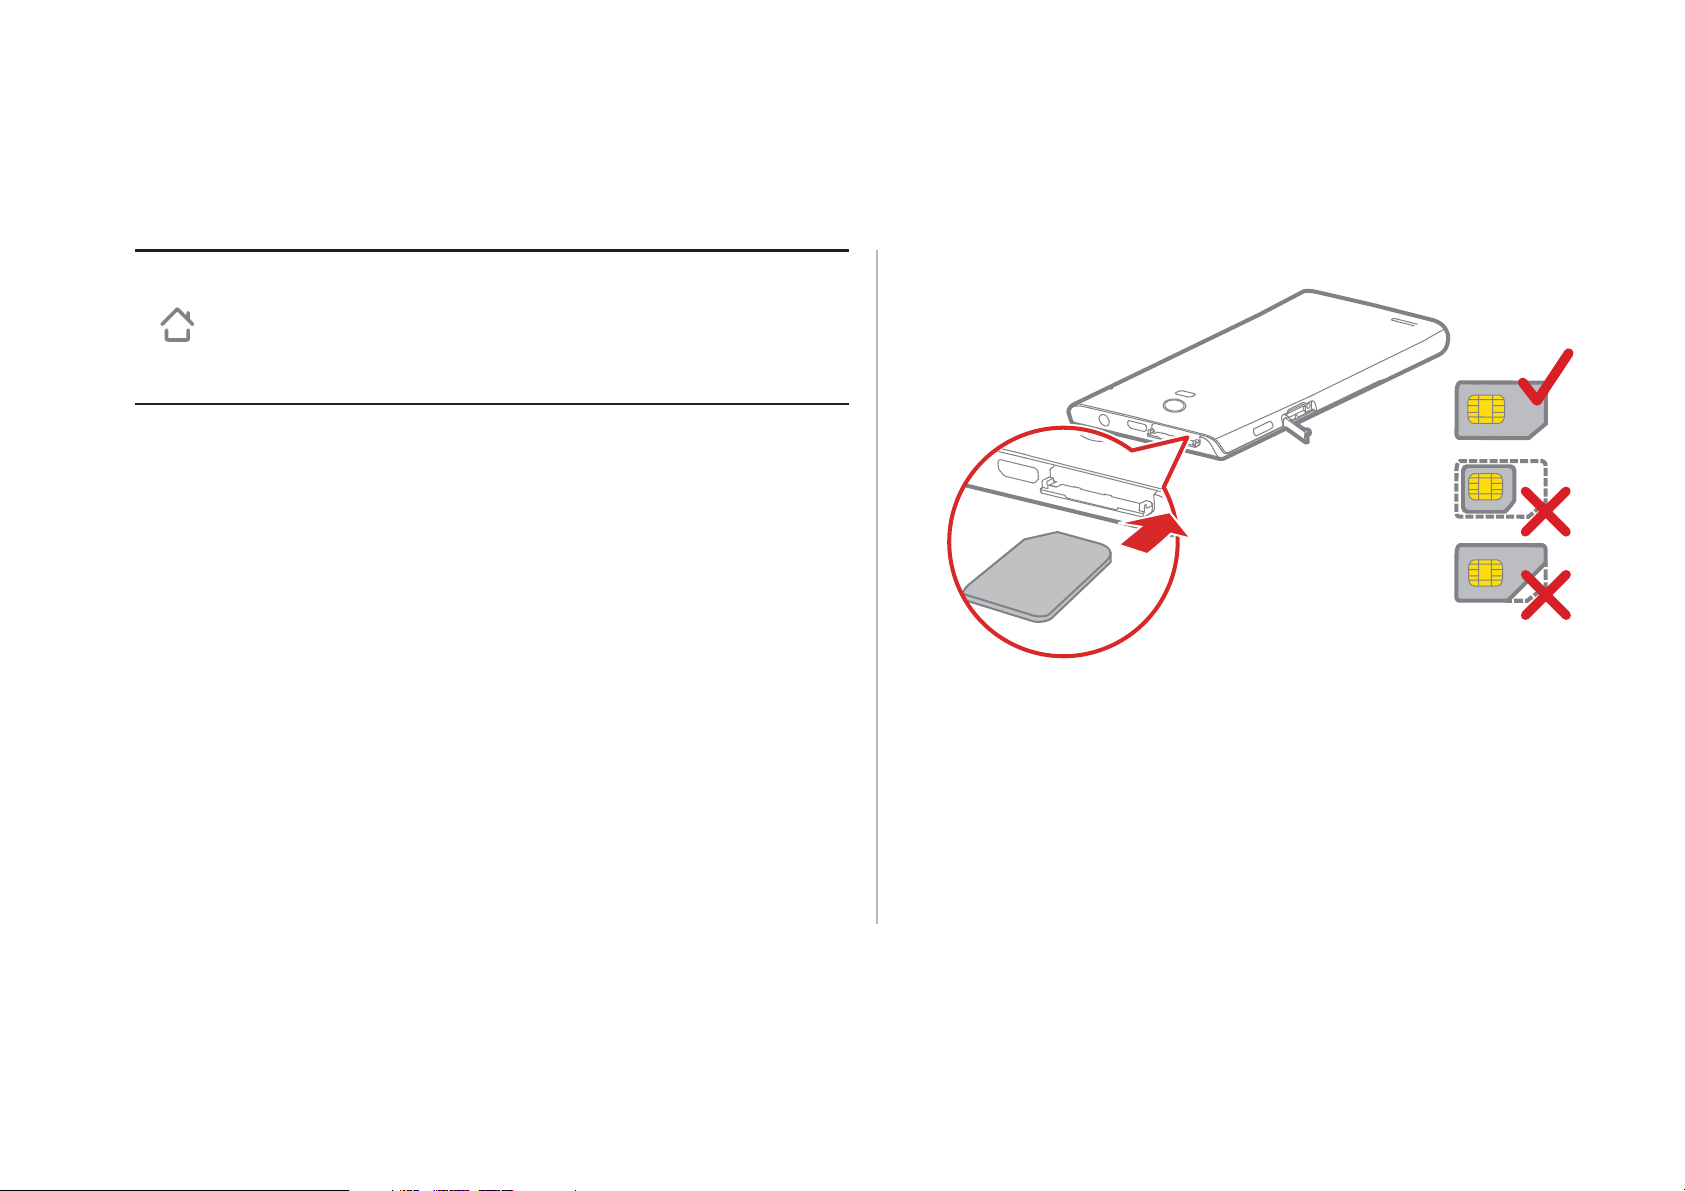
Installing a SIM Card
Install a SIM card as shown in the following diagram.
When installing the SIM card, push the card into the slot until it
clicks into place.
3
Page 5
Installing and Removing a microSD
6HWWLQJV
6WRUDJH
8QPRXQW6'FDUG
Card
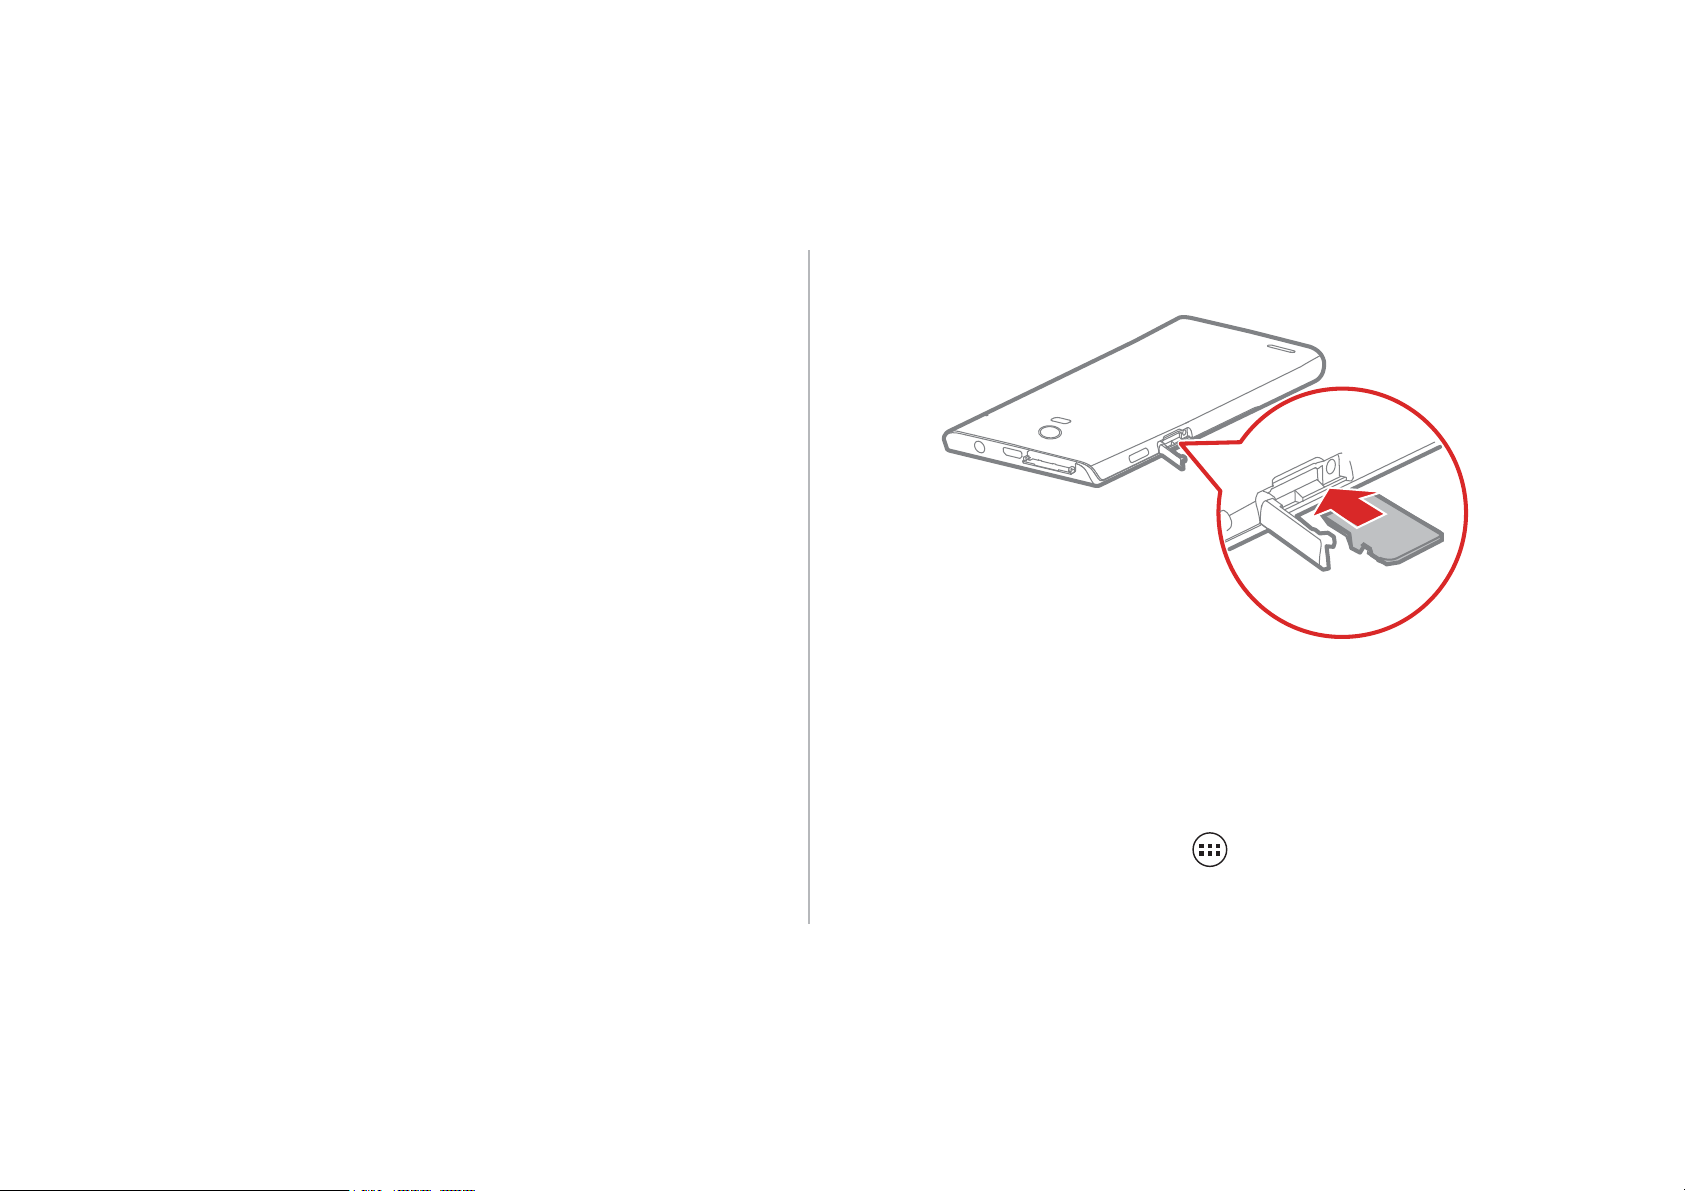
Your phone's memory capacity can be expanded by installing a
microSD card. For installation instructions, refer to the following
diagram.
When installing the microSD card, push the card into the slot
until it clicks into place.
To remove the microSD card:
4
1. On the Home screen, touch
2. Touch
!
!
.
.
Page 6
3. Remove the microSD card by gentling pushing it inwards
then releasing; the card will automatically pop out from the
slot.
Charging the Battery
Your mobile phone has an internal rechargeable battery. Do
not attempt to open the battery cover and replace the battery by
yourself. To replace the battery, contact Huawei or an
authorized service provider.
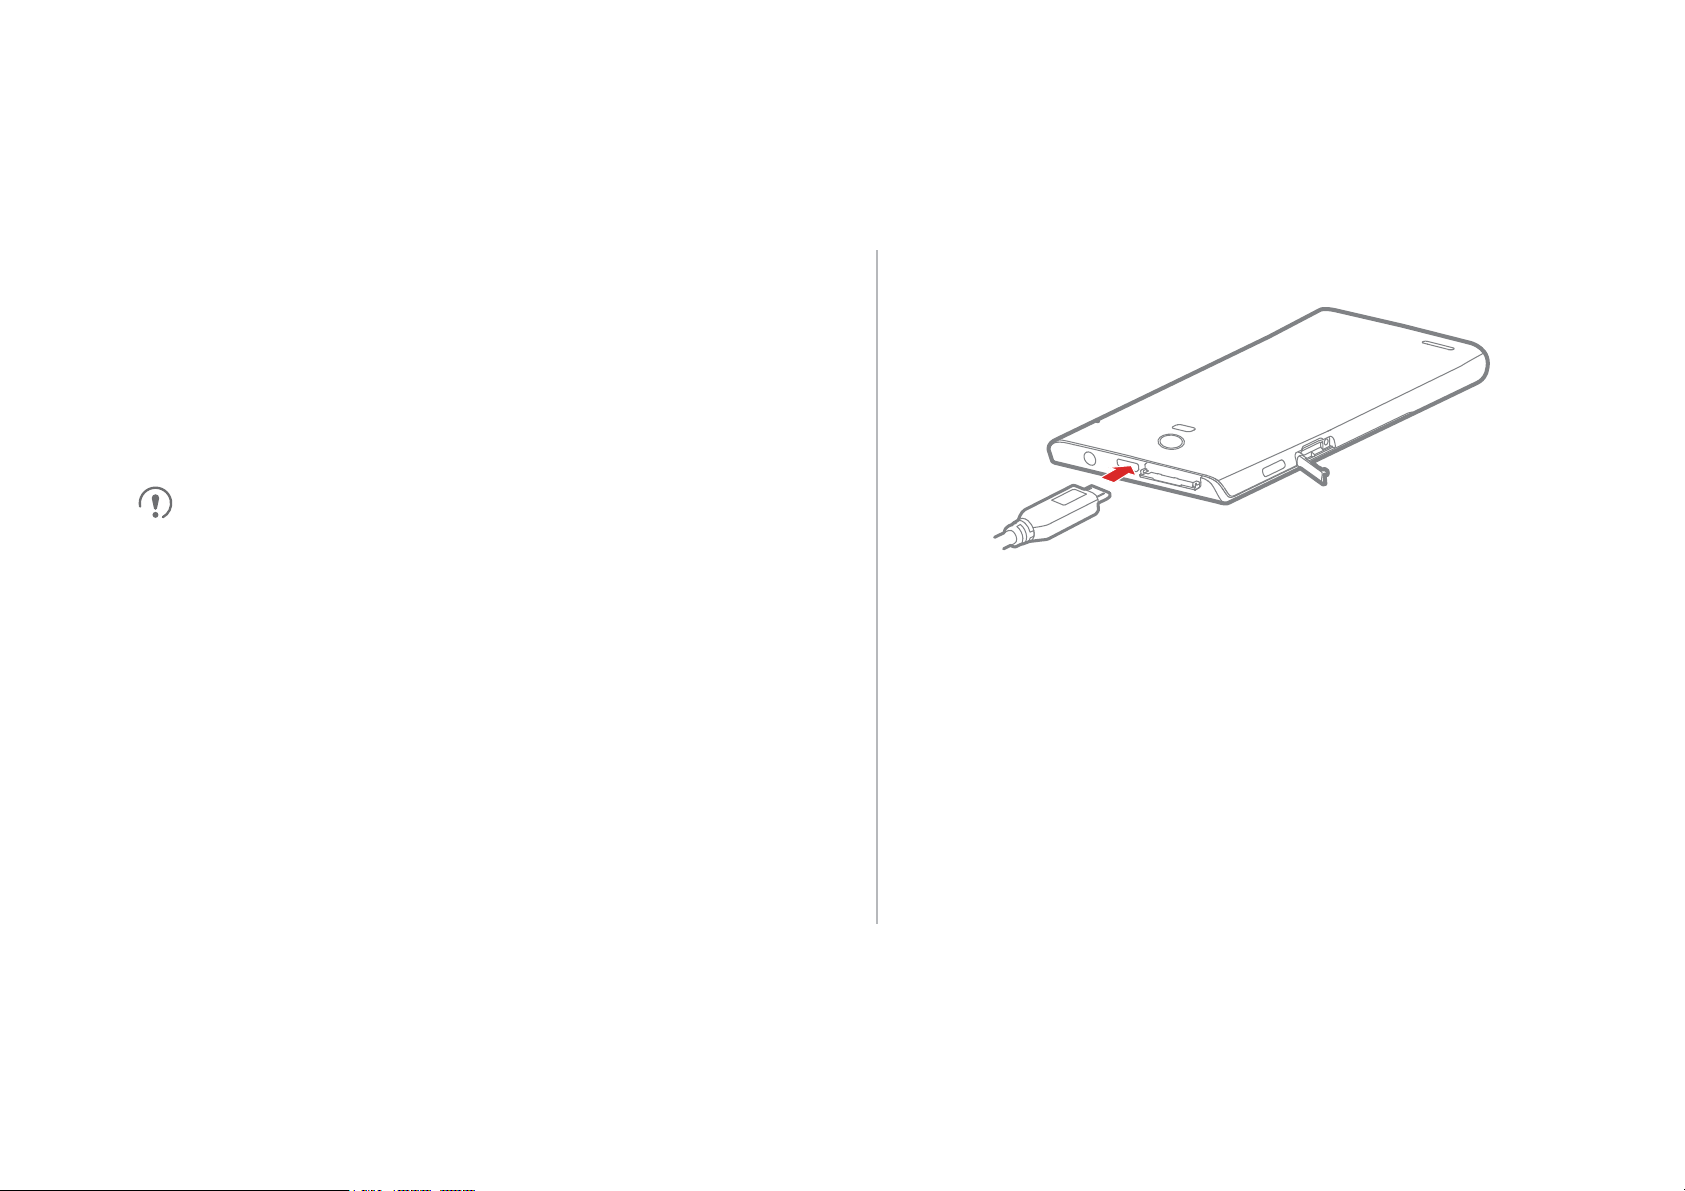
1. Connect your charger to the USB cable provided.
2. Connect the charger to a power outlet.
3. Connect the phone to the USB cable. The battery will now
start charging.
5
While the battery is charging, the status indicator shows the
battery level or charging status.
Page 7

• Steady green: The phone is charging and the battery level is
immediately after you commence charging the battery. Allow
high or full.
• Steady yellow: The phone is charging and the battery level is
higher than 10%.
• Steady red: The phone is charging and the battery level is
low.
• Blinking red: The battery level is low and the phone needs to
be charged.
If your phone is powered on, the charging icon is displayed in
the notification bar while the battery is charging. When the icon
changes to , the battery is fully charged.
Important Information About the Battery
• If the phone has not been used for a long time, or the battery
is fully depleted, you may not be able to power on your phone
the battery to charge for a few minutes with the phone
powered off before attempting to use the phone.
• Rechargeable batteries have a limited number of charge
cycles and may eventually need to be replaced. When the
battery life becomes noticeably shorter after being fully
charged, replace the battery with a new one of the same type.
• Do not attempt to replace the phone battery yourself. To
replace the battery, contact Huawei or an authorized service
provider.
• Using data services increases the phone's power
consumption and will reduce battery life.
• The time required to fully charge the battery depends on the
ambient temperature and the age of the battery.
6
Page 8
• If your phone is very low on power, it displays a message. If
8VHRQO\*
QHWZRUNV
0RELOHQHWZRUNV
'LVSOD\
%ULJKWQHVV
6OHHS
and touch , , or to disable these respective
your phone is extremely low on power, it will power off
automatically.
Battery Saving Tips
Try the following actions to reduce power consumption:
• When you do not need 3G services, select the
check box in
• When you do not need to access the Internet or to upload or
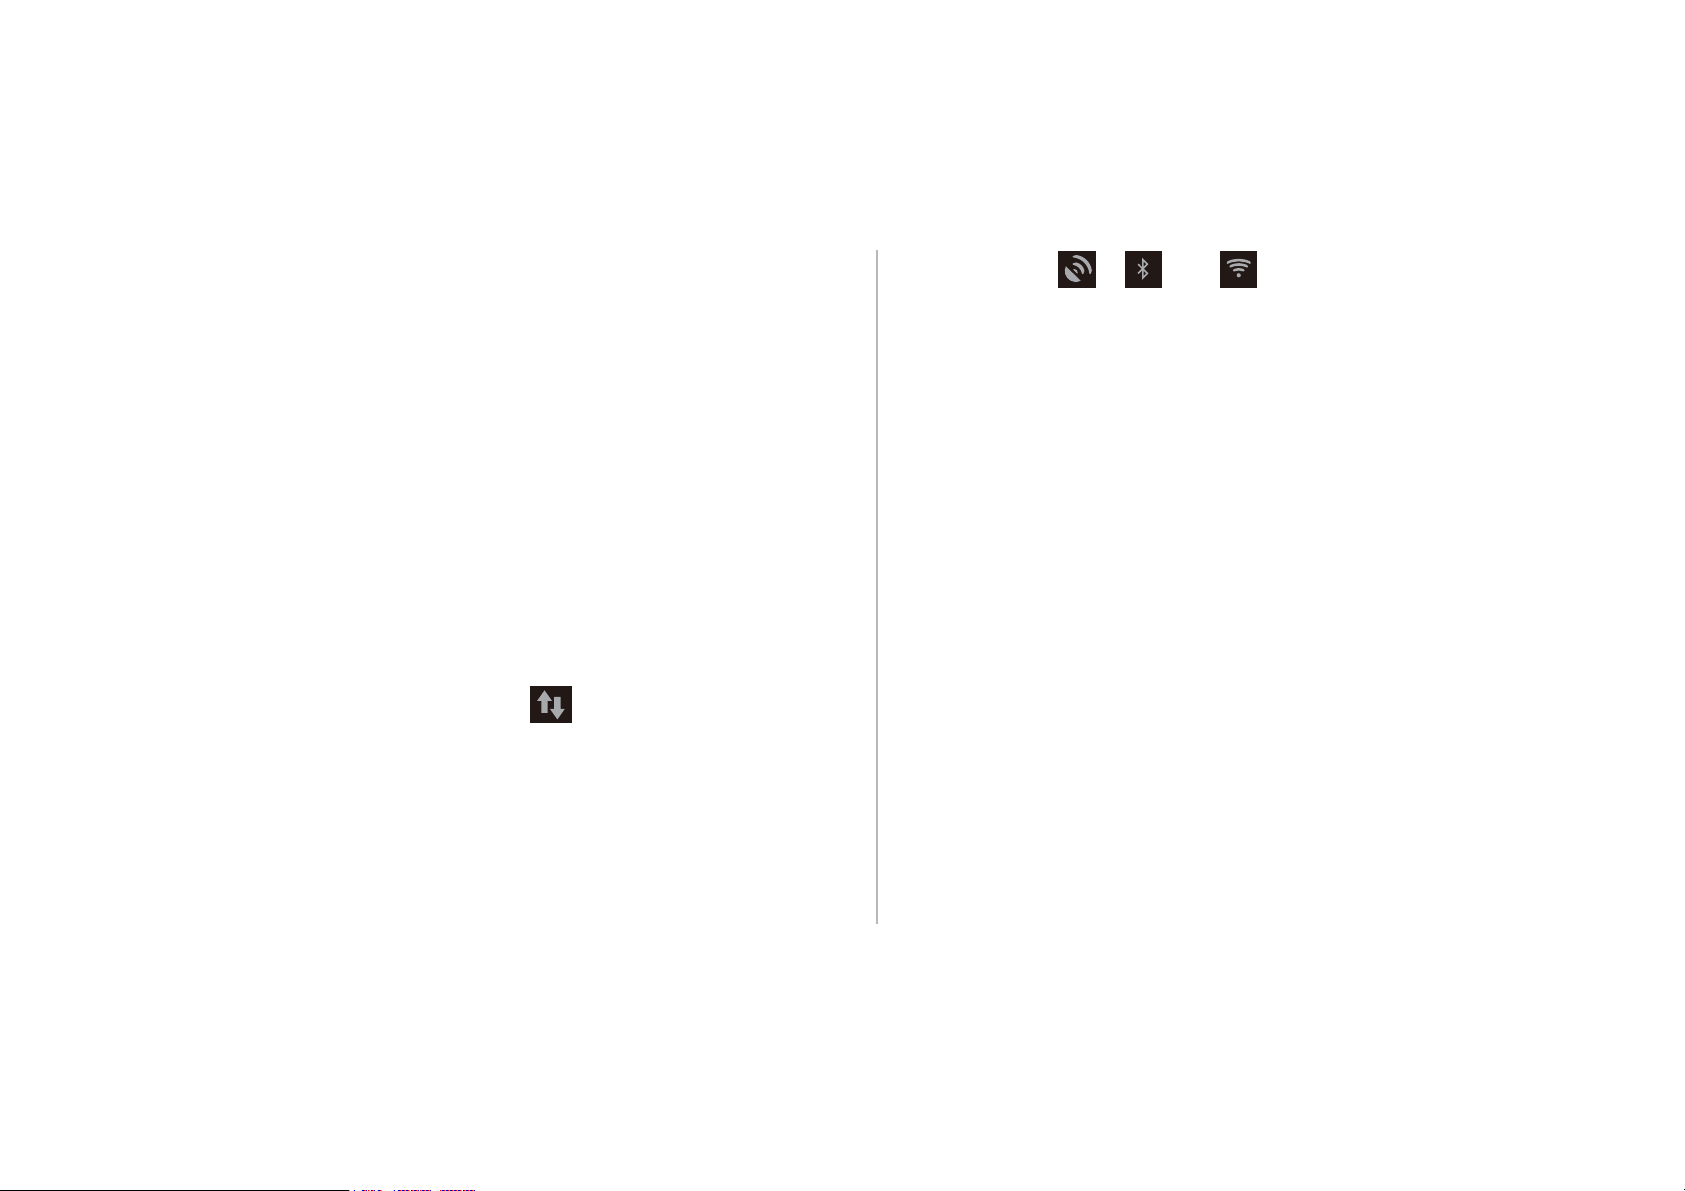
download data, flick the notification bar downwards to open
the notification panel and touch to disable your data
connection.
• When you do not need to use the phone's wireless services
such as GPS, Bluetooth, or Wi-Fi, open the notification panel,
.
functions.
• Touch
and touch
• Close applications that are no longer in use.
• Lower the volume.
!
to shorten the period until the screen locks.
to lower the screen brightness,
7
Page 9

Getting Started
6HWWLQJV
)DVWERRW
5HVWDUW
Enabling Fast Boot
Powering Your Phone On or Off
•
When your phone is off, press and hold
your SIM card is protected by a PIN, you must enter it to use
the phone.
When your phone is on, press and hold to display the options
•
menu. Touch
enters deep sleep mode. If
power your phone off when prompted.
Press and hold for over 10 seconds to forcibly power off
the phone.
Power off
. If
Fast boot
Fast boot
is disabled, touch
to power it on. If
is enabled, your phone
OK
to
1. On the Home screen, touch
2. Touch
Do not enable
Restarting Your Phone
1. Press and hold to display the options menu.
2. Touch
to enable this function.
Fast boot
!2. to restart your phone.
while traveling on an airplane.
!
.
Configuring Your Phone for the First
Time
A configuration wizard is displayed the first time the phone is
powered on. Follow the instructions to configure your phone.
8
Page 10

• Create or log in to your personal account.
6LJQLQ
0DNHLW*RRJOH
0DNHLW*RRJOH
*HWDQDFFRXQW
1H[W
1H[W
1H[W
1H[W
• Customize your phone settings.
If you do not already have a Google account, you can create
one as follows:
1. On the
screen, touch
.
Creating a Google Account
Availability of Google applications, services, and features may
vary according to your country or carrier. Please follow local
laws and regulations to use them.
When turning the phone on for the first time, you will be
prompted to log in to your Google account, which is the same
as your Gmail account (if you have one).
Ensure that your phone has an active data connection before
logging in to your Google account.
If you already have a Google account, you can touch
on the
and password.
screen, and then enter your username
2. Enter the first name and last name you want to use for your
account, and then touch
3. Enter the user name for your Google account, and then touch
.
. Your phone will connect to Google's servers to check
whether the user name is available. If the user name is
already in use, you will be prompted to enter another or select
one from a list.
4. Enter and confirm your Google account password, and then
touch
.
5. Set the recovery information to ensure that a security
question is asked before account recovery in the event of the
password being forgotten, and then touch
.
9
Page 11
6. When the
)LQLVKFUHDWLQJDFFRXQW
(QDEOHZHEKLVWRU\
,
DFFHSW
1H[W
(QDEOHSXUFKDVHV
6NLS
6DYH
%DFNXS
.HHSWKLV
SKRQHEDFNHGXSZLWKP\*RRJOH$FFRXQW
1H[W
8VH*RRJOHORFDWLRQ
1H[W
)LQLVK
the
.
screen appears, select
check box, and then touch
To use another Google account, go to the
screen by touching >
then touch
ADD ACCOUNT
Settings
to select the account type you
>
Accounts & sync
Accounts & sync
, and
7. Enter the characters that appear on the screen, and then
touch
8. When the
enter the purchase information, and then touch
9. When the
then touch
10. When the
option for Google's location service, and then touch
11. Touch
.
screen appears, select the
.
.
screen appears, touch
check box, and
screen appears, select the
.
10
, or
.
want to add.
Switching to Silent Mode or Airplane
Mode Quickly
Press and hold to open the options menu, from where you
can:
• Touch
mode,
• Touch
Airplane mode
phone are disabled.
to switch to vibrate mode, to switch to silent
to switch to sound mode.
Airplane mode
is activated, all wireless connections on your
to switch to airplane mode. When
Page 12
Wireless devices may interfere with an airplane's flight system.
Power off your phone or switch to
wireless devices are not allowed according to airline
regulations.
Airplane mode
where
Using the Touchscreen
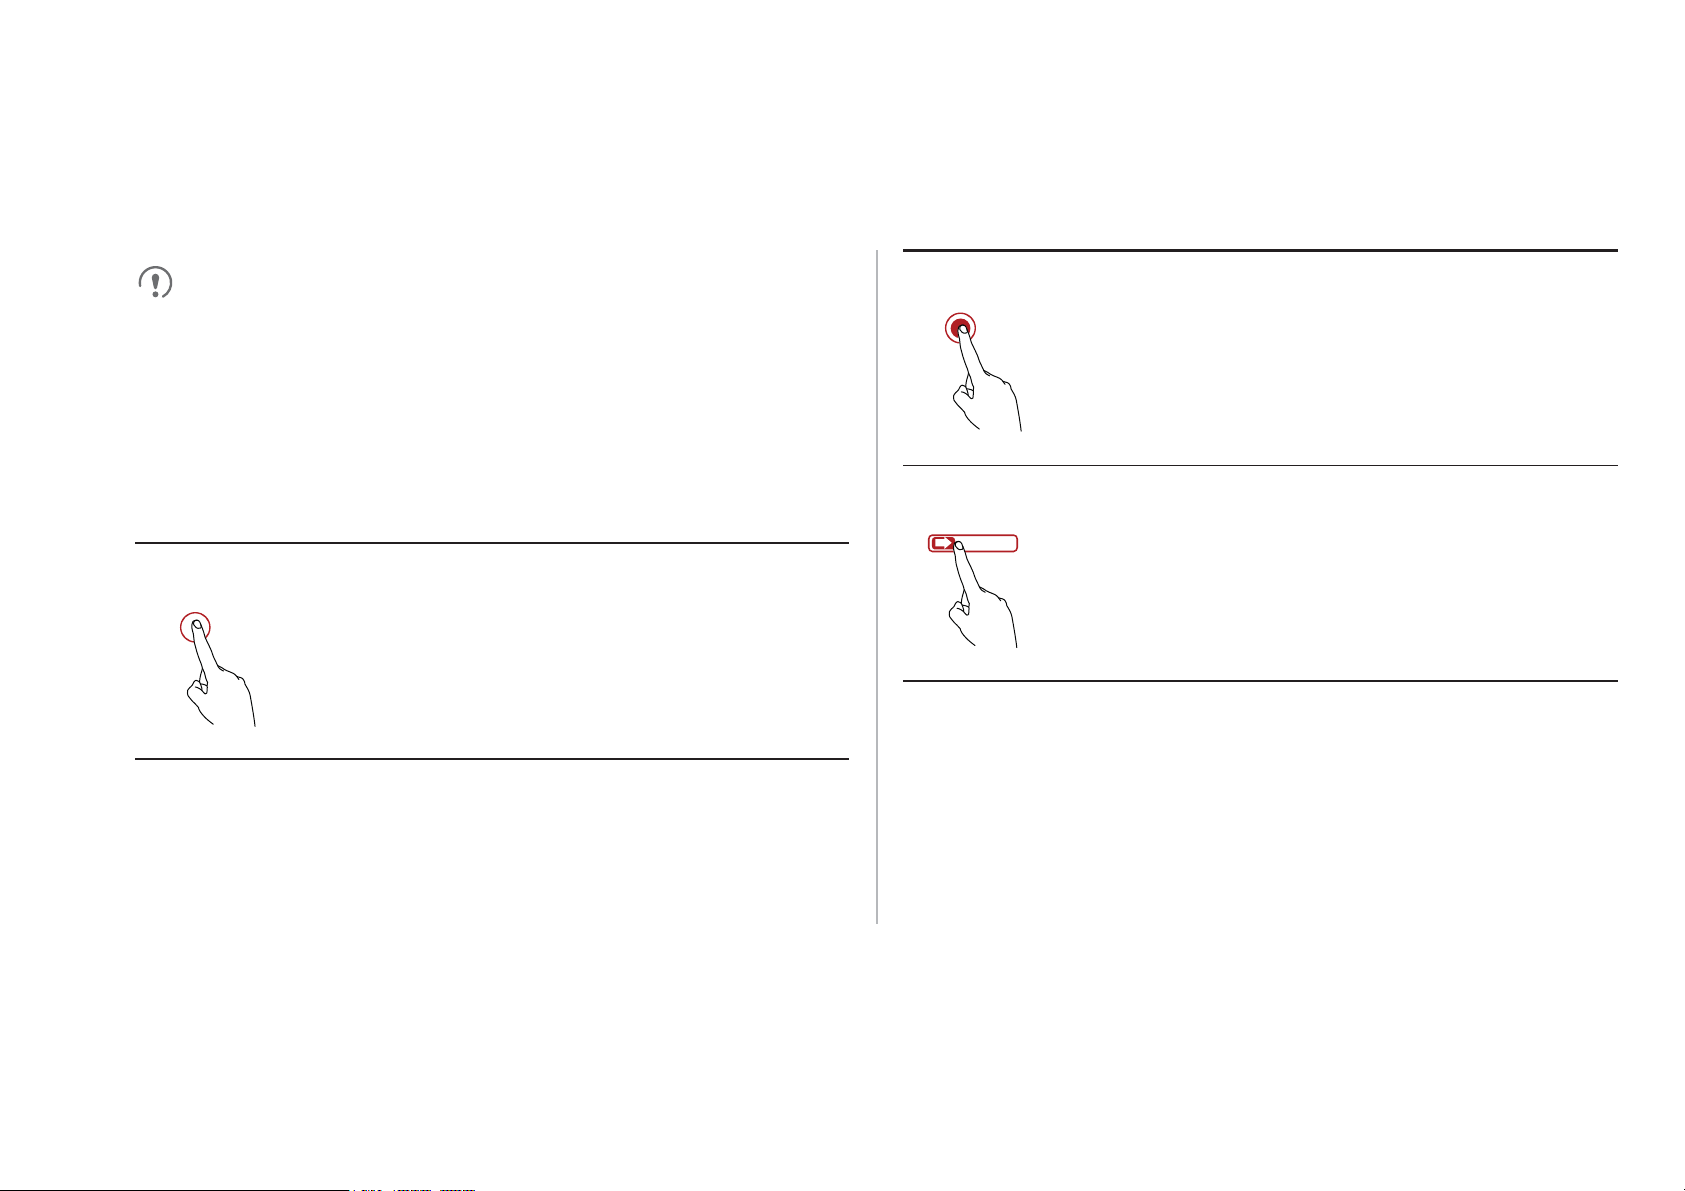
Touch: Tap the screen once with your
finger to select an item or open an
application.
Touch and hold: Touch and hold on the
current screen or the input field to display
the options menu.
Flick: Move your finger either vertically or
horizontally across the screen.
11
Page 13
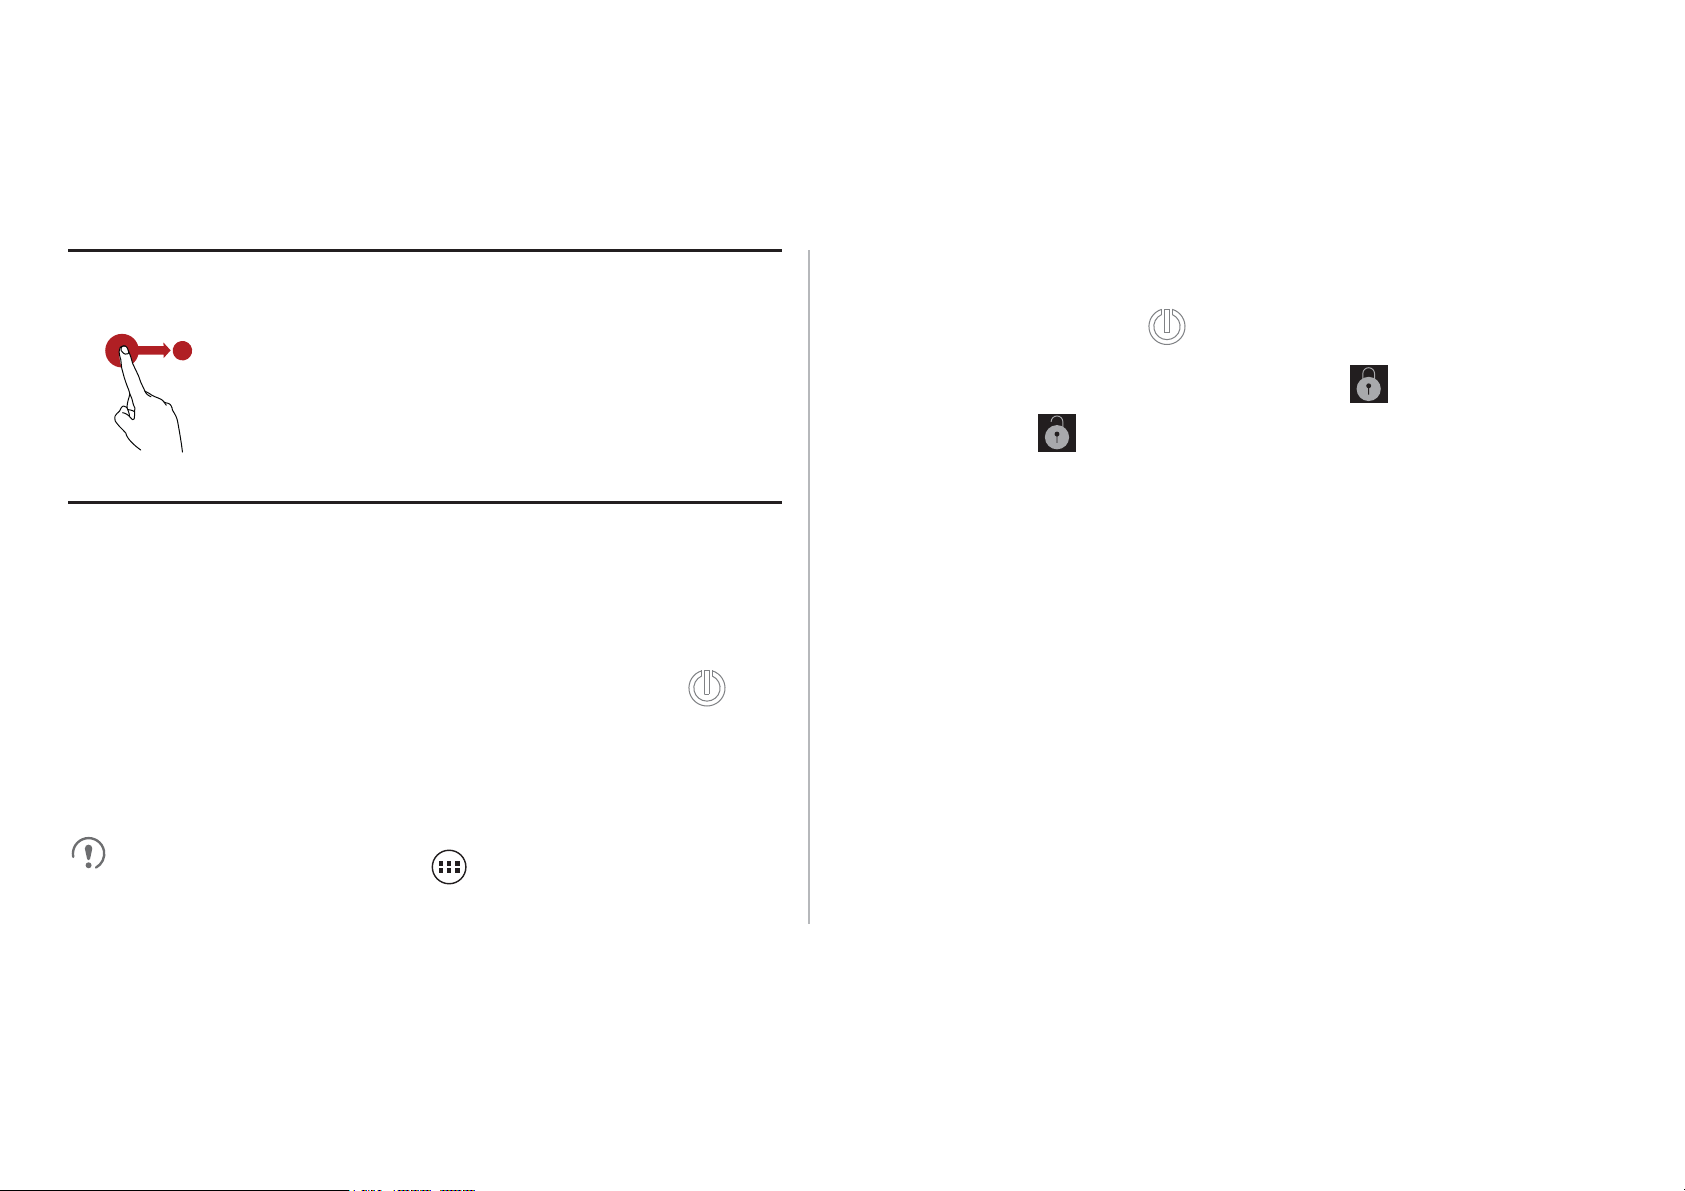
Drag: Touch and hold an item, and then
Unlocking the Screen
drag it to the desired location on the
screen. For example, on the Home screen,
you can move an icon by dragging it to
another location or remove an icon by
dragging it to the trash can.
Locking and Unlocking the Screen
Locking the Screen
• To lock the screen when the phone is active, press .
• If the phone is idle for a specified period of time, the phone
automatically locks its screen.
On the Home screen, touch >
Settings
>
Security
>
1. If the screen is off, press to turn it on.
2. Follow the onscreen instructions and drag to the right
until it reaches .
Screen lock
12
to select a method for unlocking the screen.
Page 14
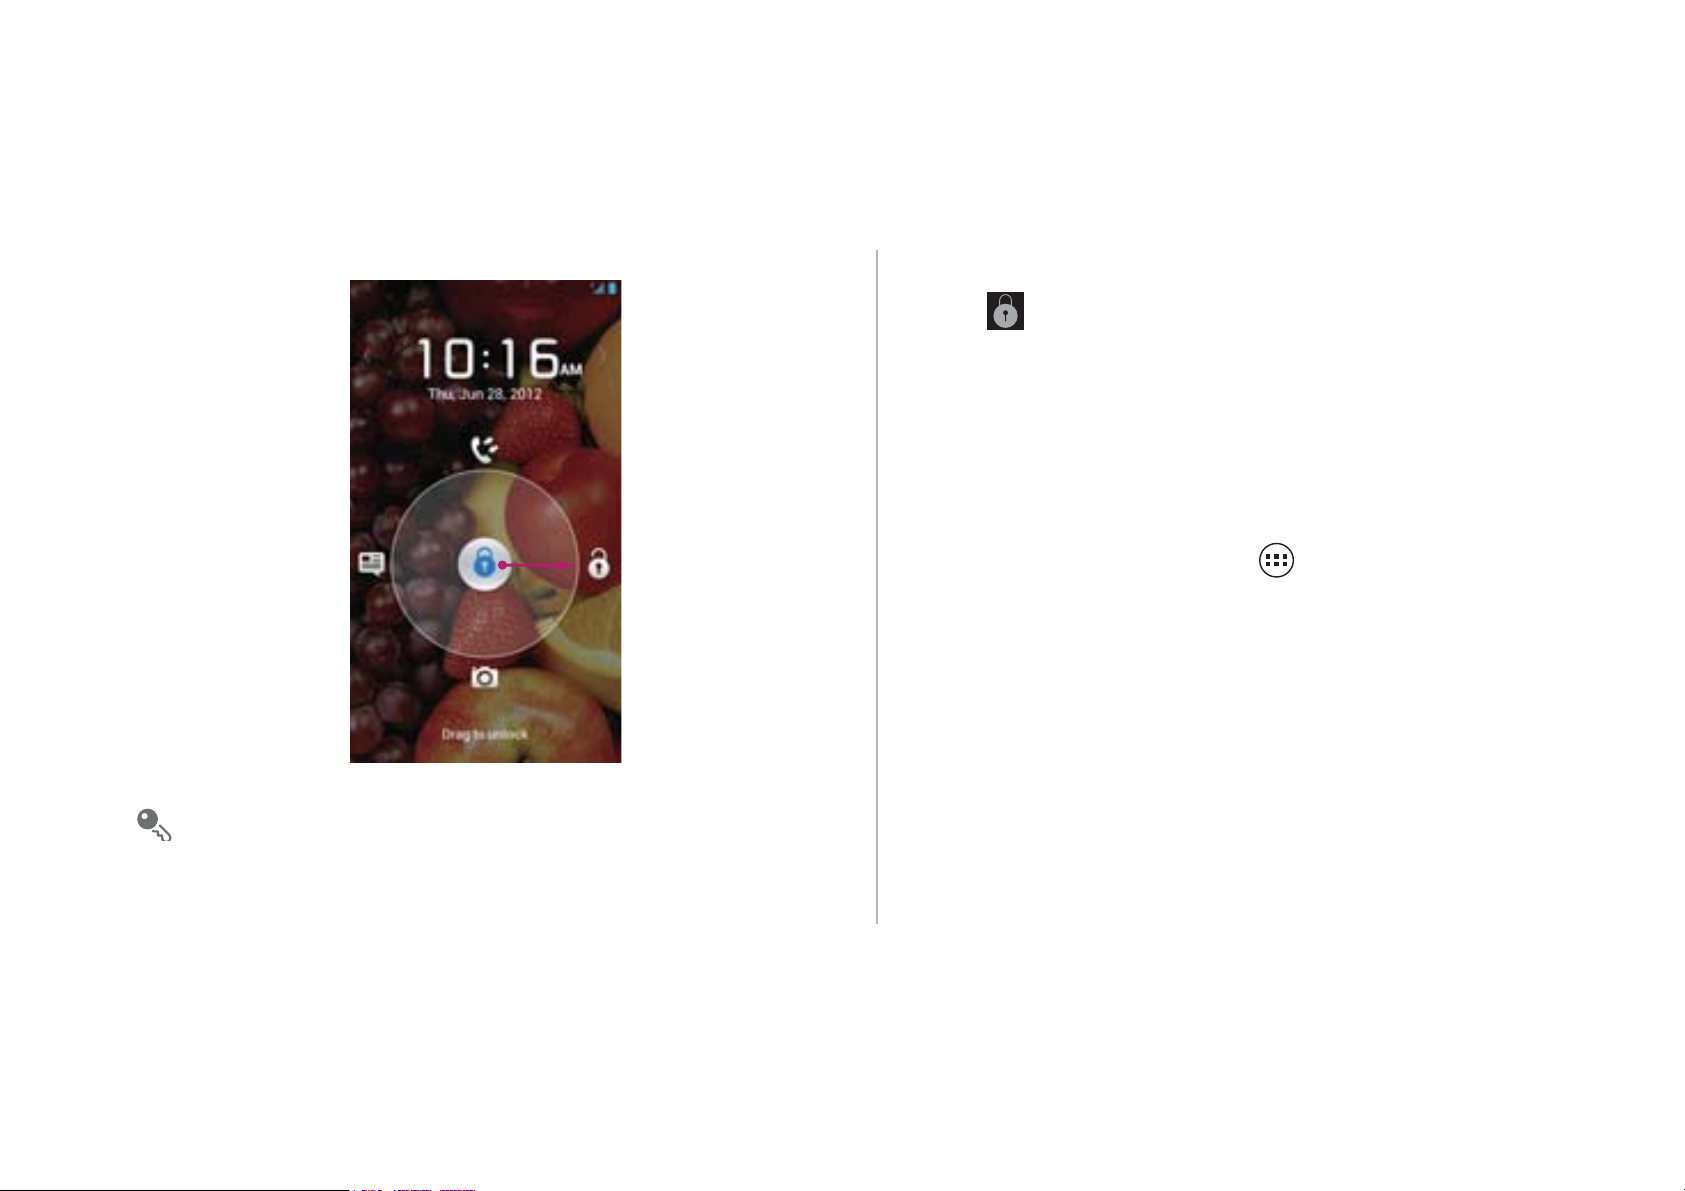
• To open certain applications quickly, drag the
)DFH8QORFN
6HWWLQJV
6HFXULW\
6FUHHQORFN
)DFH8QORFN
6HWLWXS
&RQWLQXH
&RQWLQXH
icon over the corresponding icons.
Face Unlock
You can set your phone to unlock by recognizing your face. To
enable and configure the settings of the
application:
• When the screen is locked, flick to the left or right in
the clock area to switch to
Music+
controller.
13
1. On the Home screen, touch
!
!
!
!
.
2. Read the onscreen instructions, and then touch
to take a photo.
3. Ensure that your face is at the center of the capture screen,
!
and then wait for the phone to capture a photo. After a photo
has been taken, touch
.
Page 15
4. Choose an unlock method, and configure the unlock settings.
2.
)DFH8QORFN
If face identification fails, unlock the phone using the
alternative method you have selected.
1
5. Touch
To unlock your phone using the
.
function, bring
your face to the center of the screen. Your phone will identify
your face and unlock.
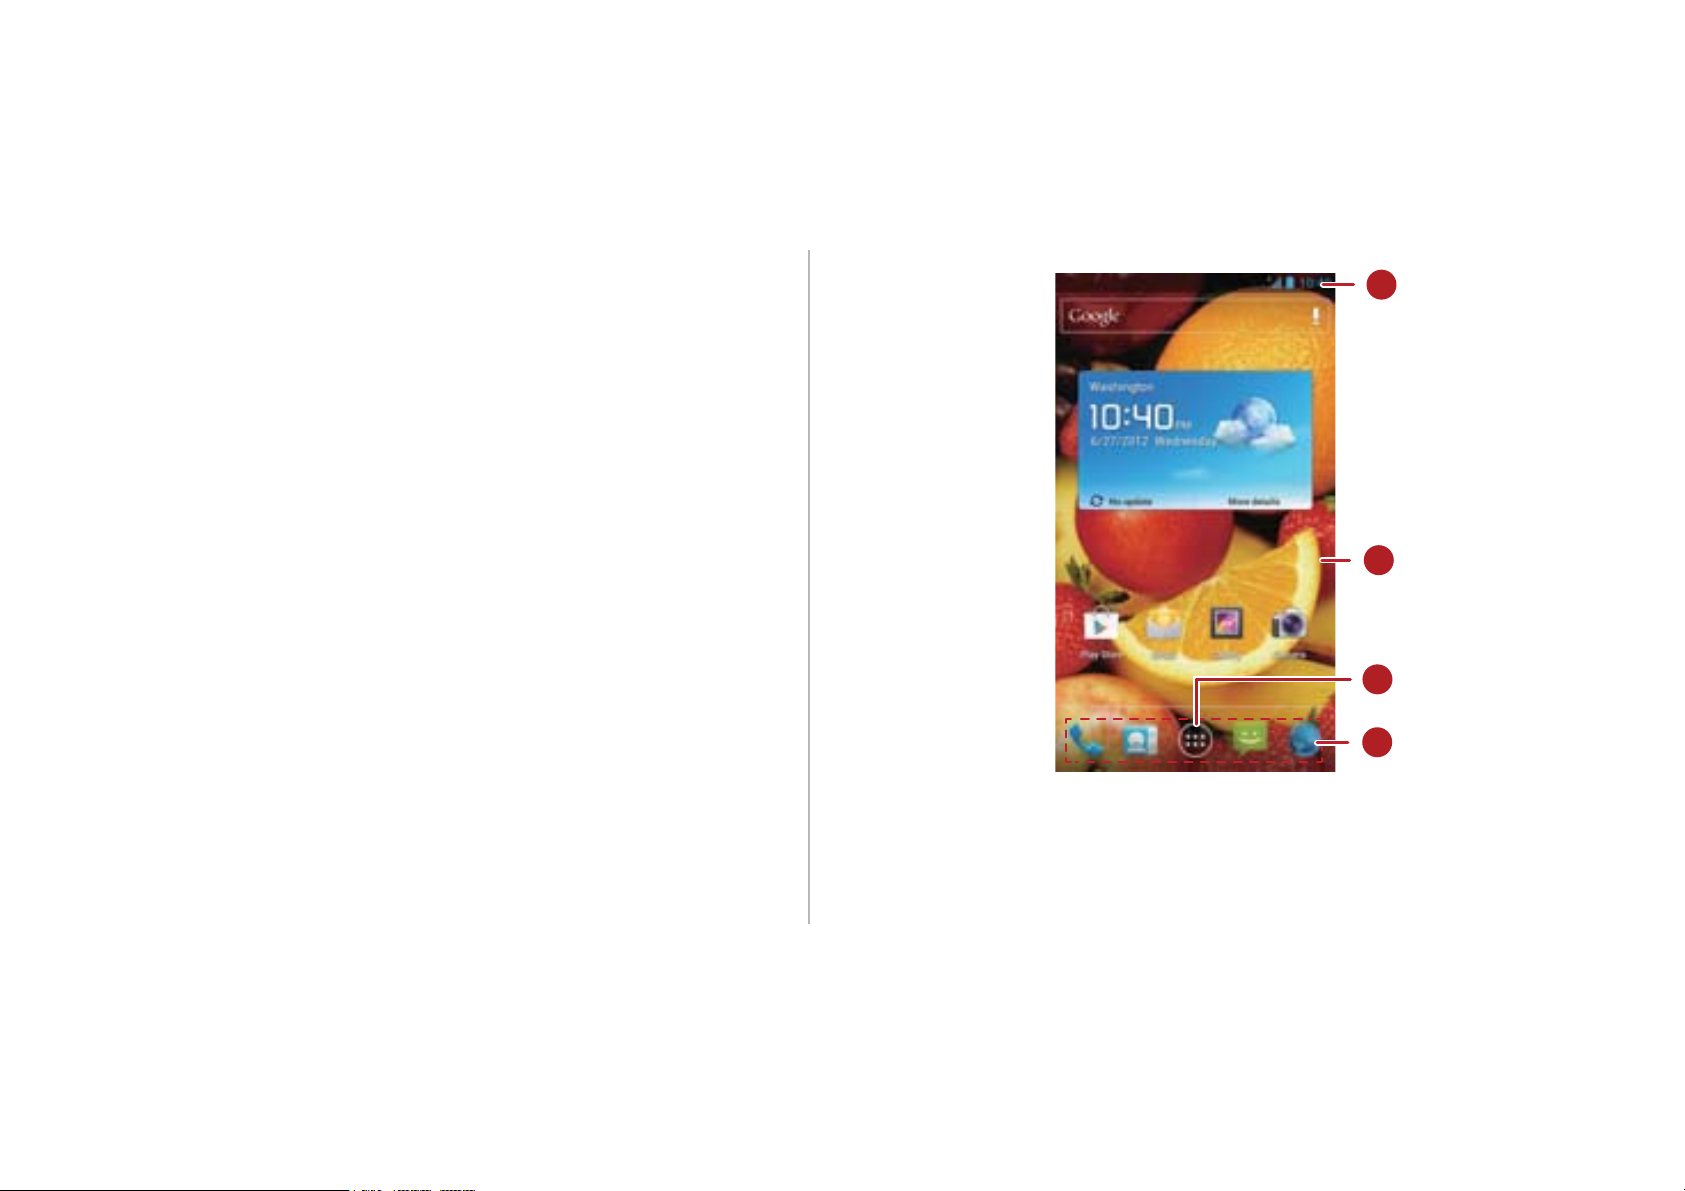
Home Screen
Your phone is preloaded with multiple themes. The screen
layout varies depending on the theme. The default theme is
used as an example in this section.
2
3
4
14
Page 16
Notification bar: Displays notifications and status
1
icons. Flick the notification bar downwards to open
the notification panel.
Notification and Status Icons
Signal strength No signal
2 Display area: The main display area of your phone.
3 Menu key: Touch to open the application list.
Shortcuts: Touch to open the corresponding
4
applications.
To move an application or widget, touch and hold its icon, and
then drag the icon to the target location. To remove an item,
drag it to the trash can.
15
GPRS network
connected
EDGE network
connected
3G network
connected
HSPA network
connected
GPRS network
in use
EDGE network
in use
3G network in
use
HSPA network
in use
Page 17
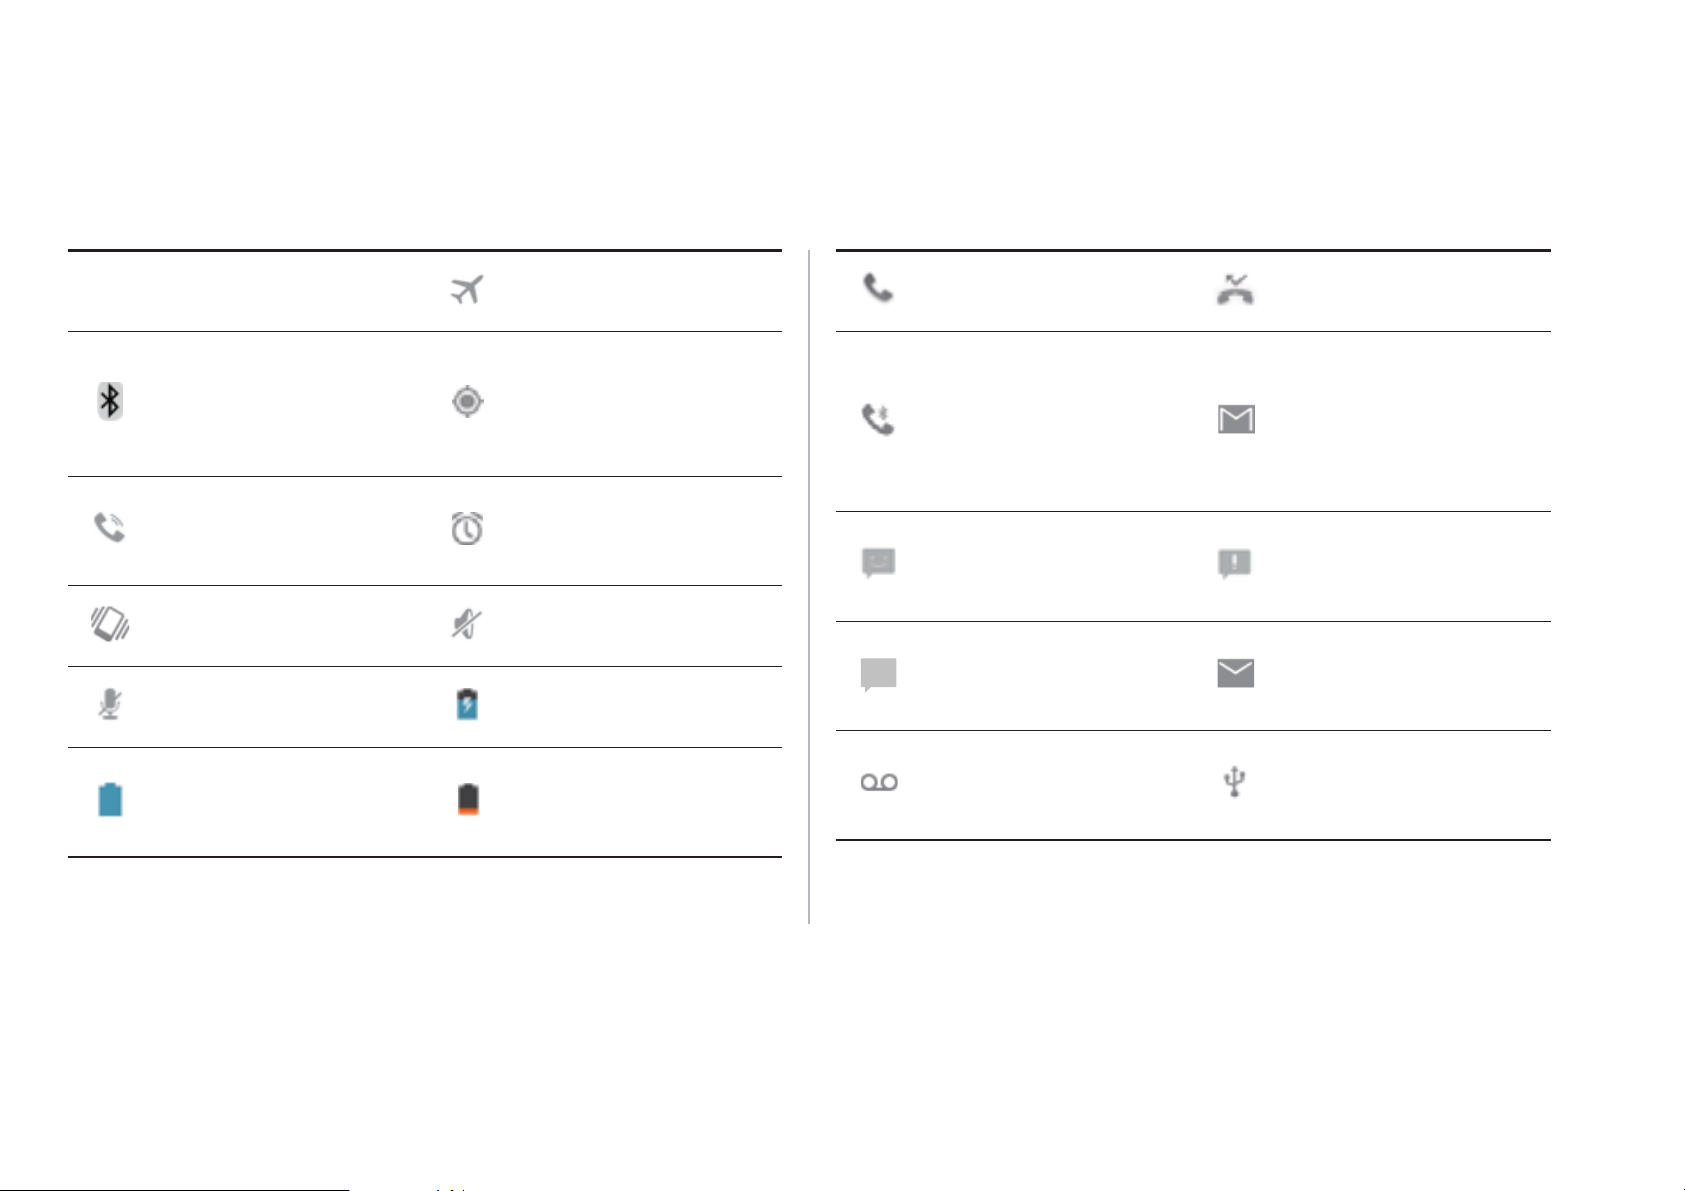
Roaming Airplane mode
5
talk
Call in progress Missed calls
Receiving
Bluetooth on
location data
from GPS
Speaker
Alarm enabled
activated
Vibration mode Silence mode
Call muted Charging
Battery
Battery full
extremely low
Call in progress
New mail in
using a
your Gmail
Bluetooth
account
headset
Message not
New message
sent
New chat
New email
message
Connected to a
New voicemail
PC
16
Page 18

Open Wi-Fi
network
available
Upcoming
event
Synchronizing
data
Portable Wi-Fi
Synchronizatio
n failed
17
Uploading Downloading
• Storage location
can be changed
Phone memory
full
Preparing the
microSD card
• Sign-in or
synchronization
problem
More
undisplayed
notifications
hotspot
activated
Connected to a
VPN
Headset
plugged in
Select input
method
USB tethering
Disconnected
from a VPN
SIM card not
found
--
Page 19
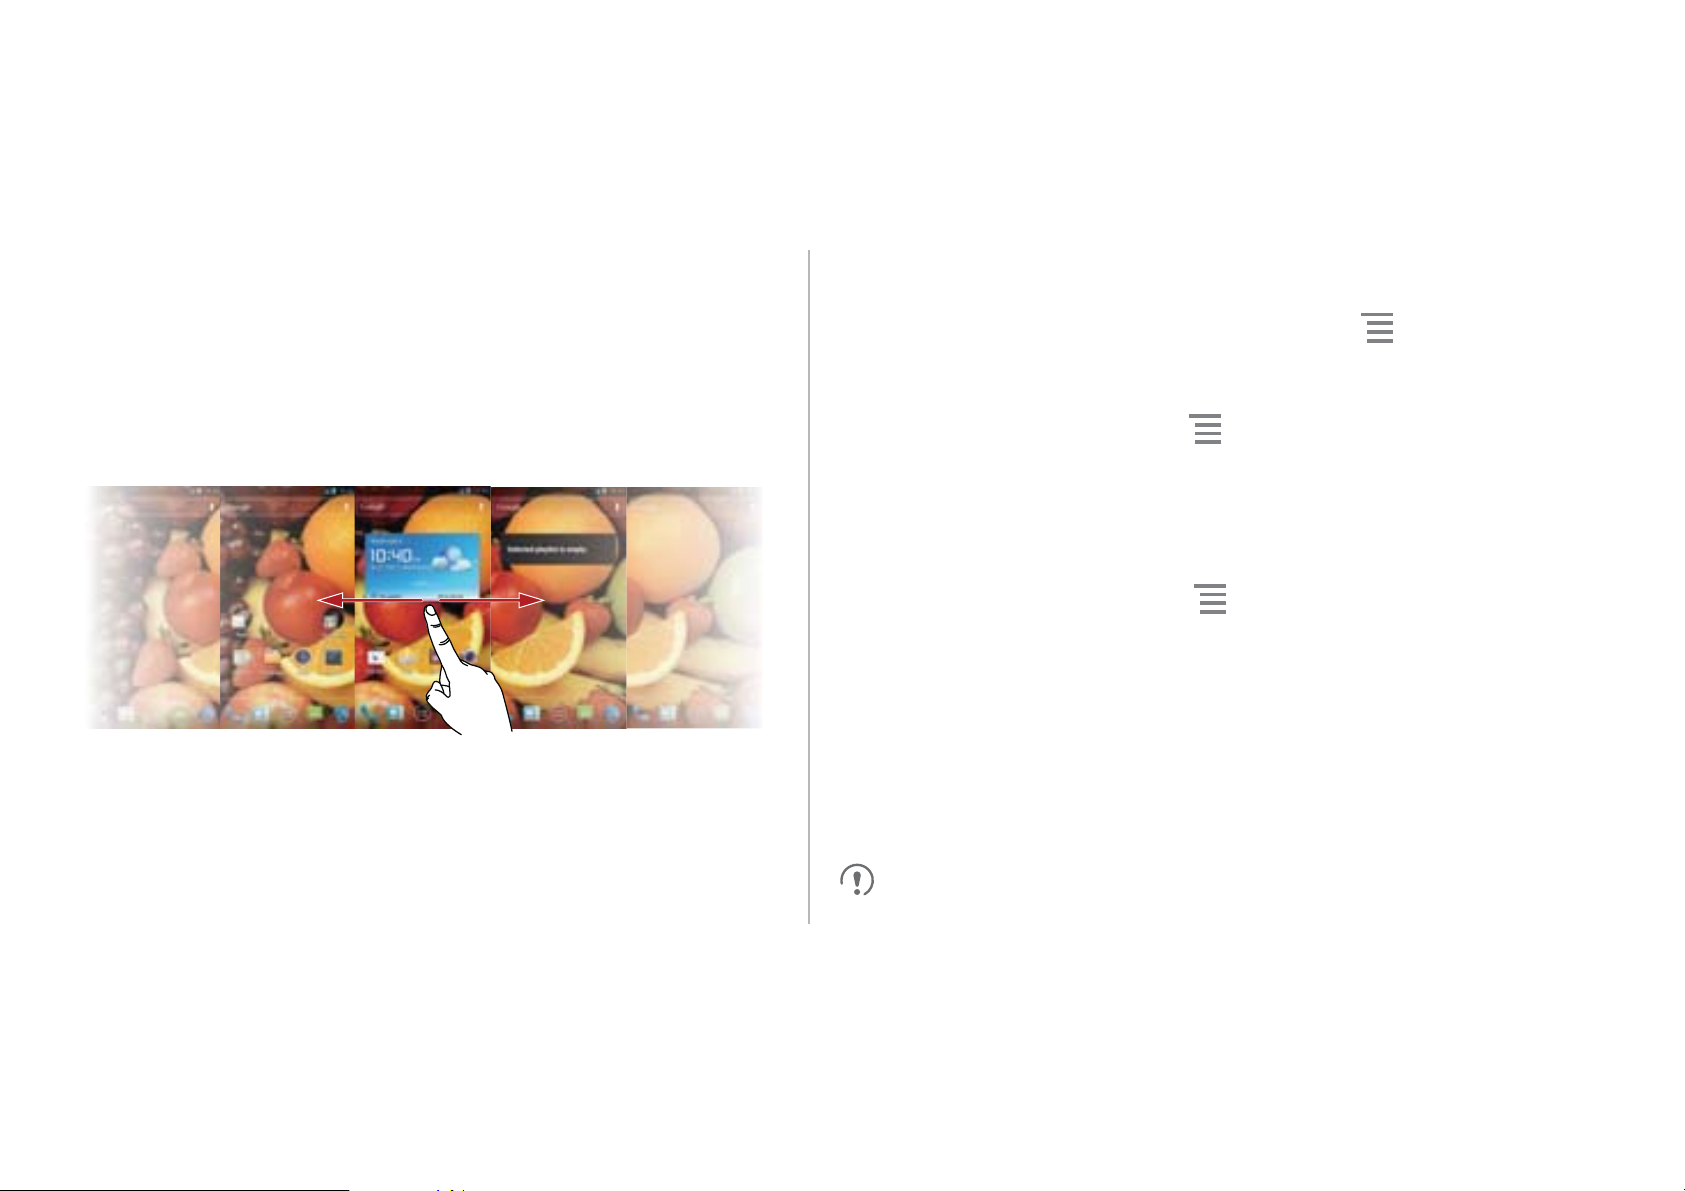
Switching Between the Home Screen and Its
7KHPH
VHWWLQJV
'+RPH
:DOOSDSHU
Changing the Theme
Extensions
Flick left or right across the screen to switch between the Home
screen and its extensions.
•
To select a theme, on the Home screen, touch
.
• Alternatively, you can touch
Home
Changing the Wallpaper
1. On the Home screen, touch
2. To set the wallpaper, select an image from:
• Gallery
• Live wallpapers
• Wallpapers
theme.
You can also touch and hold a blank area of the Home screen
!
!
!
to switch to
.
3D
18
Page 20

and select a source from the displayed options menu to set the
wallpaper.
• Quickly open or close an application.
• Flick left or right on a notification to delete it.
Using Auto-rotate Screen
If your rotate your phone when browsing a web page, viewing
an image, or composing a message, the orientation of your
screen will change to landscape or portrait view automatically.
On the Home screen, touch >
then clear the
function.
Auto-rotate screen
Settings
check box to disable this
>
Display
, and
Managing the Notification Panel
Using the notification panel, you can check your network
operator and view notifications, reminders, and events.
To open the notification panel, flick the notification bar
downward. From here you can:
• Touch
• Touch to display the settings screen.
Flick upwards to hide the notification panel.
X
to delete all notifications.
Using Shortcuts
Open the notification panel for the following shortcuts:
• Touch to turn Wi-Fi on or off.
• Touch to turn Bluetooth on or off.
• Touch to turn GPS on or off.
• Touch to turn the data connection on or off.
• Touch to turn the Auto-rotate Screen function on or off.
19
Page 21

Accessing Applications and Widgets
Managing Shortcuts and Widgets
To access the application list, on the Home screen, touch .
From the application list, you can:
• Touch an icon to open an application.
• Flick left or right across the screen to switch between
application lists.
• Touch the
WIDGETS
tab to switch to the widget list.
Viewing Recently Used Applications
To display the list of recently used applications, press and hold
. To open an application, touch the corresponding
thumbnail. To close the application, flick left or right across the
screen.
• To add a shortcut icon or widget: From the application list,
touch and hold an application icon, and then drag it to the
Home screen. From the widget list, touch and hold a widget,
and then drag it to the Home screen.
• To delete a shortcut icon or widget: On the Home screen,
touch and hold a shortcut icon or widget, and then drag it to
the trash can.
• To customize the size of a widget: You can adjust the size of
some widget icons. To do so, on the Home screen, touch and
hold a widget. Four
by moving the
• To move a shortcut icon to the shortcut bar: On the Home
screen, touch and hold a shortcut icon that you want move to
.
are displayed. Adjust the widget's size
20
Page 22

the shortcut bar, and then drag it to the shortcut bar at the
• To move a folder to the shortcut bar: On the Home screen,
bottom of the screen. If there is no available space, a folder
will be created for the overlapped icons.
Managing Folders on the Home
Screen
• To create a folder: Drag an application icon onto another
application icon to create a new folder that contains both
icons.
• To rename a folder: On the Home screen, touch a folder, and
then touch the folder name field beneath it.
• To delete a folder: On the Home screen, touch and hold a
folder, and then drag it to the trash can.
touch and hold a folder, and then drag it to the shortcut bar.
21
Page 23
Calling
3KRQH
3KRQH
3KRQH
3KRQH
To make a call, you can manually enter phone numbers on the
dialer, touch a number in your contacts list or call log, or use
Be careful not to block the microphone or the speaker to avoid
affecting the call quality.
Making a Call from Contacts
voice control. During a call, you can choose to keep the current
call on hold to answer an incoming call, forward the incoming
call to your voicemail, or start a conference call.
To open
, touch
!
.
Making a Call
1.
On the
tab.
2.
Enter a phone number.
3.
Touch to make a call.
22
Phone
screen, touch to switch to the dialer
1. On the
2. Touch a contact to place a call.
screen, touch to switch to the contacts tab.
Making a Call from the Call Log
1. On the
2. Touch to the right of an entry to place a call to that
number.
Using Voice Dialing
Calls can be placed using voice dialing. When you open the
voice dialing application, your phone's speaker will be enabled.
screen, touch to switch to the call log tab.
Page 24
Background noise will affect the accuracy of voice dialing.
9RLFH'LDOHU
1. On the Home screen, touch
2. Follow the onscreen instructions, then say your command
close to the microphone. Your phone will identify the
command and make a call.
!
.
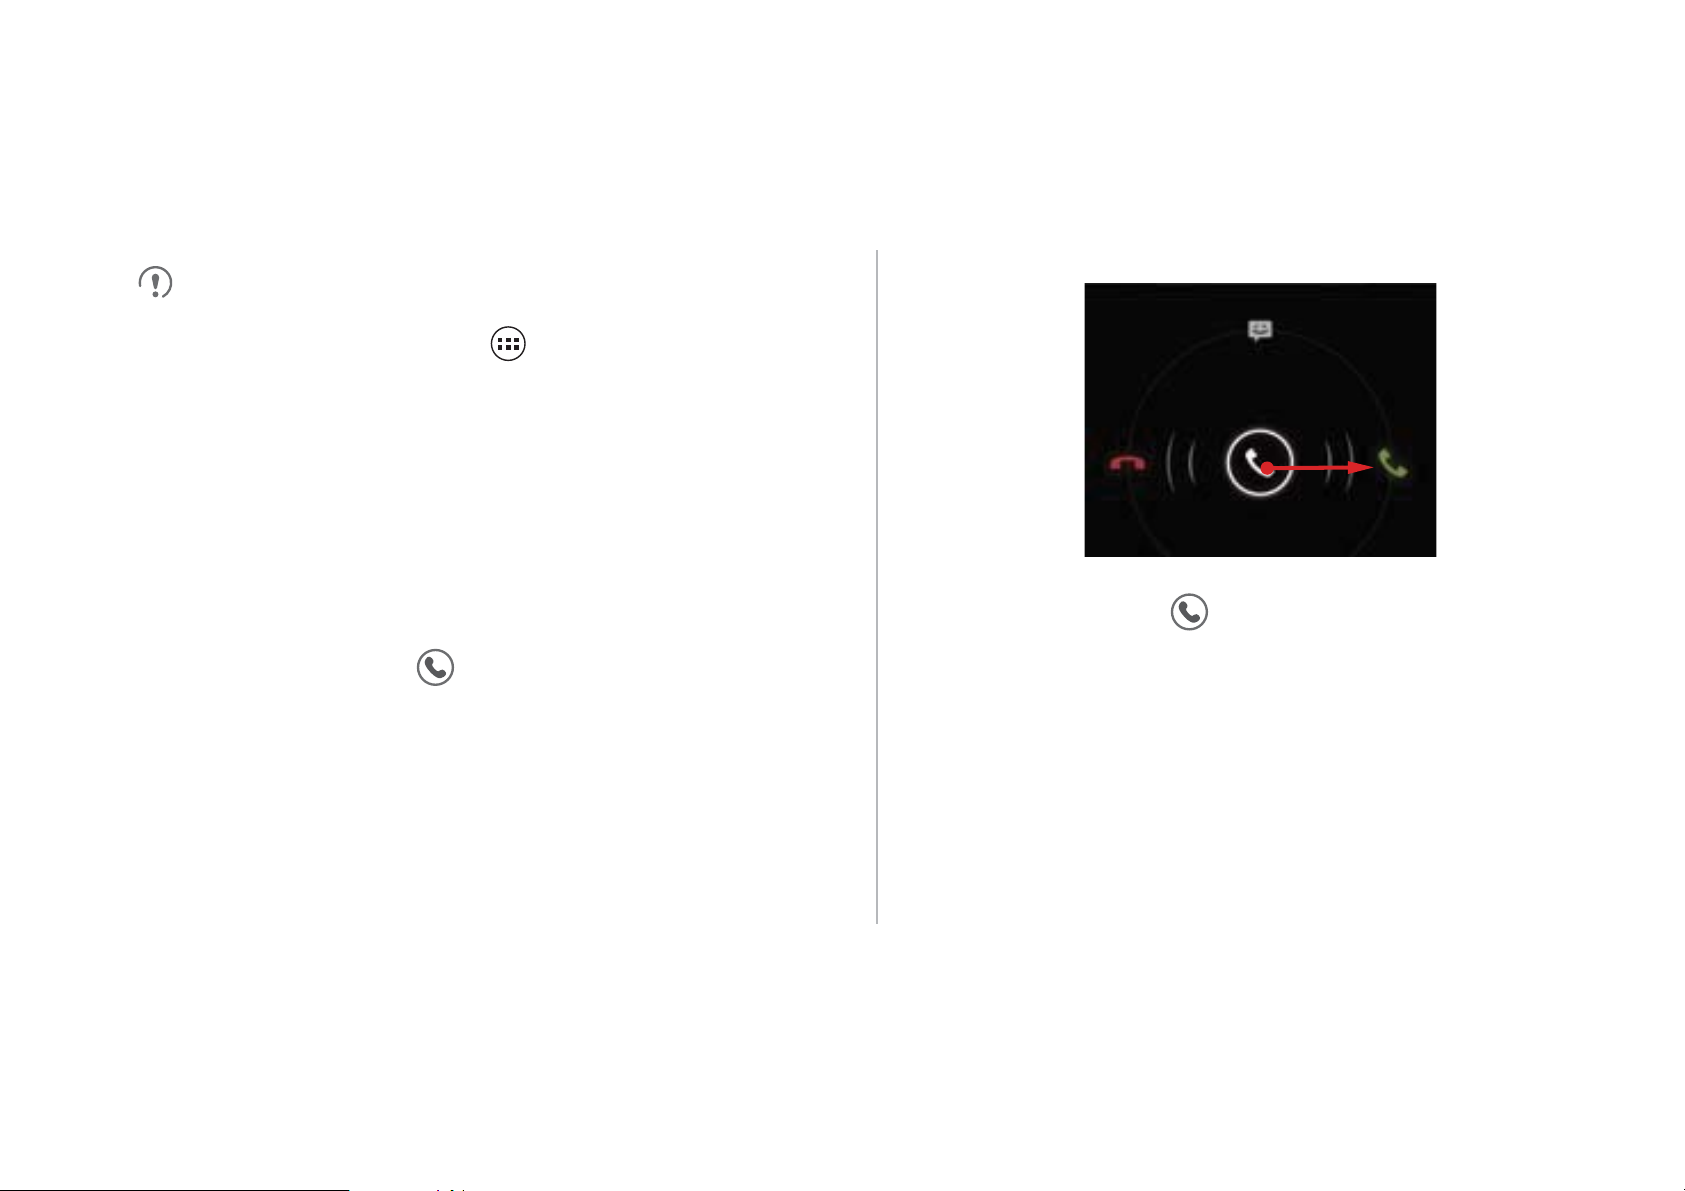
Answering or Rejecting a Call
When a call comes in, you can:
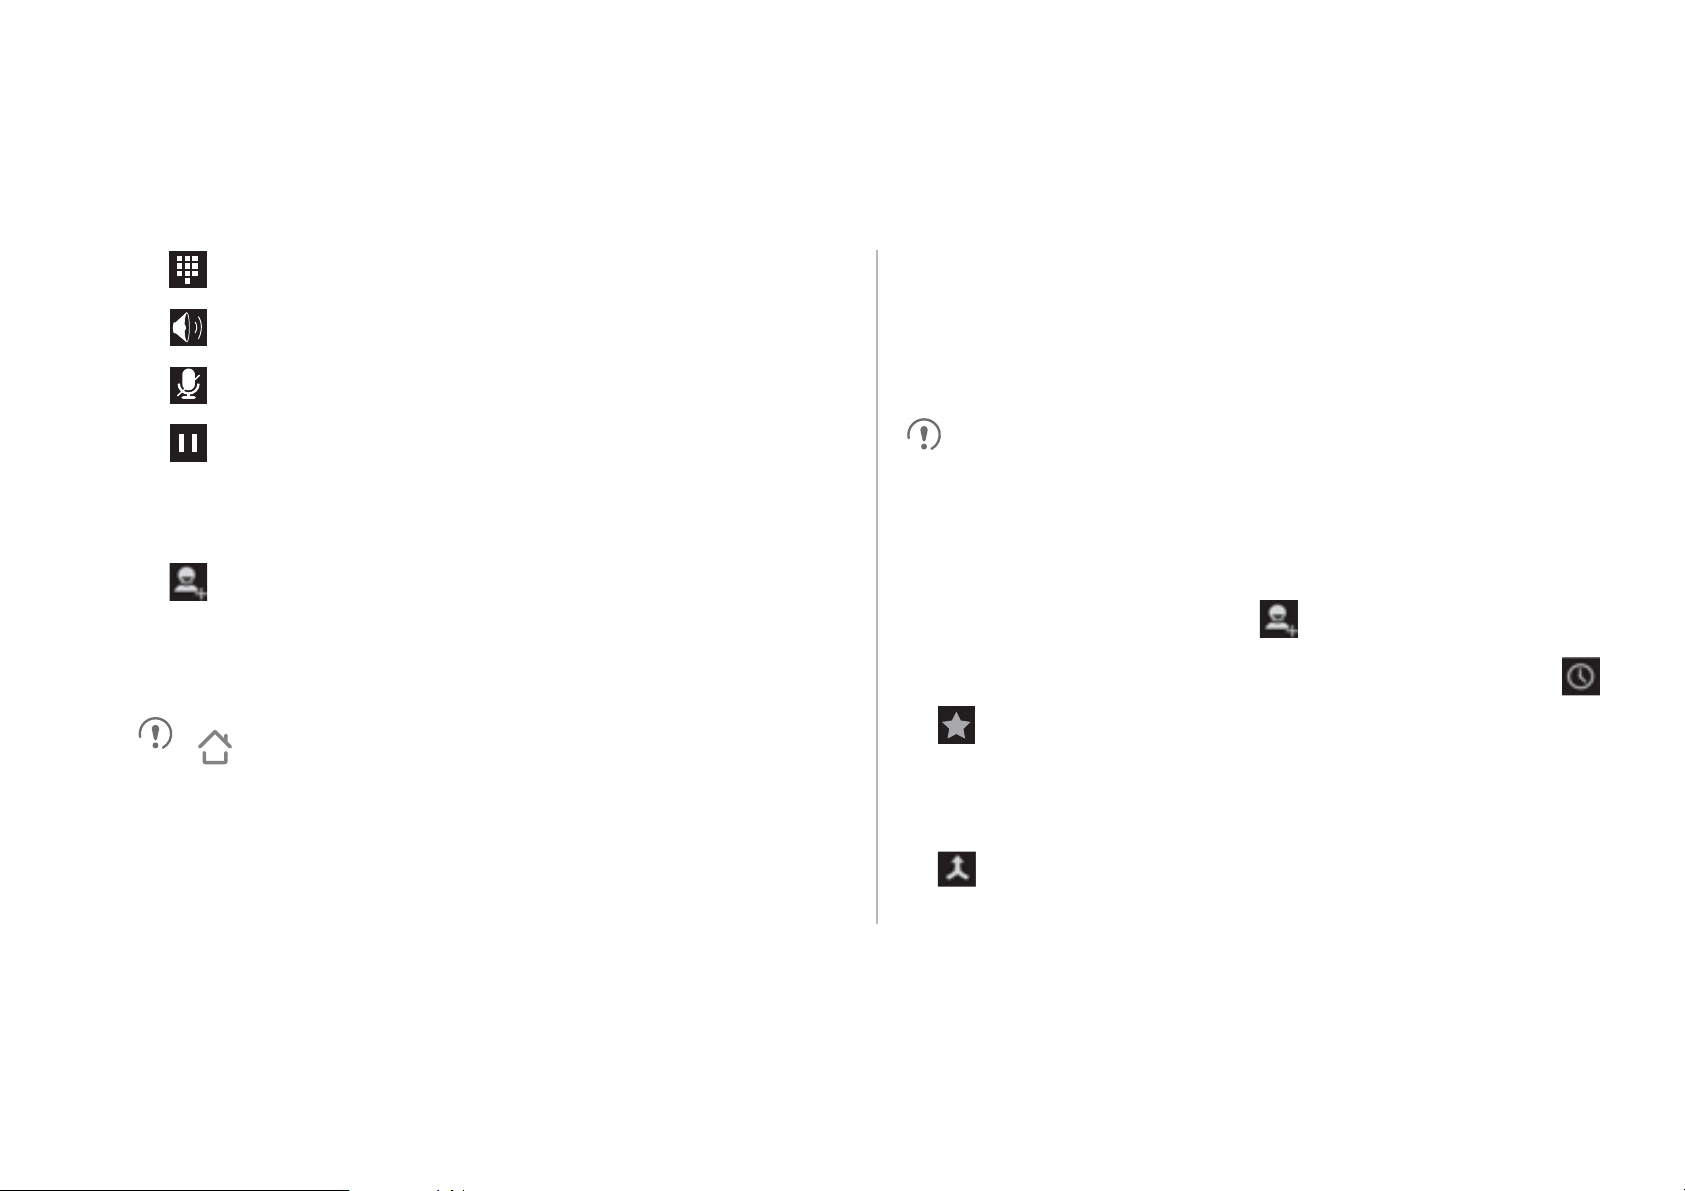
• Answer the call: Drag
to the right.
• Reject the call: Drag
to the left.
23
Page 25
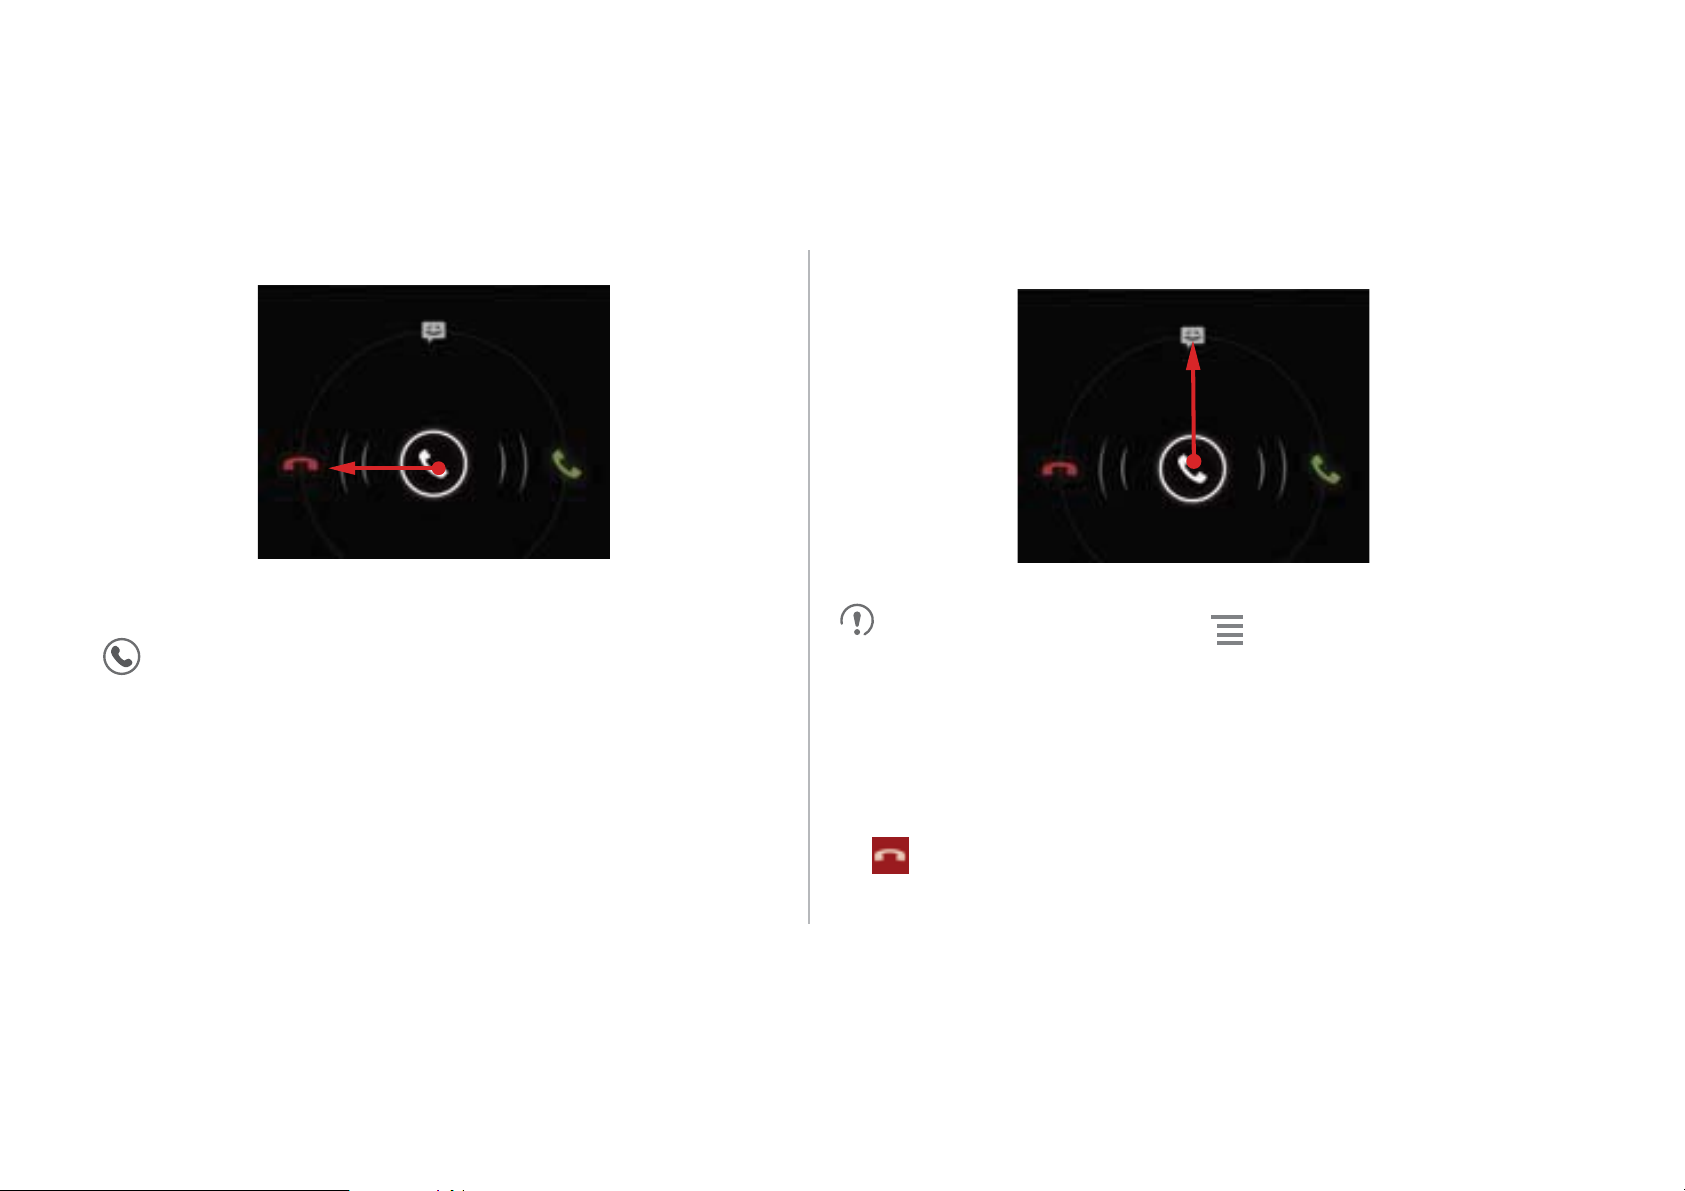
• Reject the call and send a text message to the caller: Drag
upwards.
24
On the
responses
Phone
screen, touch >
to edit the message that will be sent.
Settings
>
Quick
Operations During a Call
During an active call, you can touch any of the following buttons:
• : Ends the call.
Page 26
• : Opens the dialer for you to enter another number.
Making a Conference Call
• : Activates the speakers.
• : Mutes your microphone.
• : Places the current call on hold. This function is network
dependent. To use this service, contact your network
operator.
• : Displays your contacts list for you to select a contact to
add to the current call. This function is network dependent. To
use this service, contact your network operator.
: Returns to the Home screen, from where you can use
other functions. To return to the call screen, open the notification
panel and touch
Current call
.
Conference calls allow conversations between more than two
people at a time.
Contact your network operator to ask if conference calls are
supported and, if yes, how many parties can participate.
1. To initiate a conference call, dial the number of the first
participant. After connecting to the first participant, keep the
connection open, and touch .
2. Enter the phone number of the next participant, or touch ,
to select a phone number. The first participant is
automatically placed on hold while this process is carried out.
3. Once you have connected to the second participant, touch
to begin the conference call.
25
Page 27

4. To end the conference call, touch .
3KRQH
6HWWLQJV
&DOO
IRUZDUGLQJ
(QDEOH
Switching Between Calls
Forwarding a Call
Your phone can be set up to forward incoming calls to a new
number.
To use this service, subscribe to your operators's call switching
function. For details, contact your network operator.
If you receive an incoming call while you are already busy on a
call, you can answer the new call and place the current one on
hold. Touch to switch between the two calls.
Supplementary Services
Your phone supports multiple supplementary services,
including call forwarding and call waiting. These services are
network dependent. For details, contact your network operator.
26
1. On the
2. Select a forwarding mode, and enter the phone number to
which you want to forward your incoming calls.
3. Touch
screen, touch
.
to switch on the call forwarding function.
!
!
Call Waiting
With the call waiting function enabled, your phone plays an alert
if someone calls you when you are already busy on the phone.
The caller is also informed that you are busy and is prompted to
wait until you finish the call. You can put the current call on hold
and answer the incoming call, and switch between the two calls.
To enable Call Waiting:
Page 28

1. On the
3KRQH
6HWWLQJV
$GGLWLRQDO
VHWWLQJV
&DOOZDLWLQJ
3KRQH
6HWWLQJV
9RLFHPDLO
VHWWLQJV
9RLFHPDLOQXPEHU
2.
screen, touch
!
!
1. On the
screen, touch
!
!
.
2. Select
to enable the function.
Using the Voicemail Service
The voicemail function enables your phone to forward
unanswered calls to your voicemail inbox, including
unanswered calls when you are busy on other calls and calls
received when your phone is powered off.
To set your voicemail number:
Contact your network operator to subscribe to the voicemail
function and obtain your voicemail number. If required, enable
the call forwarding function and set all incoming calls to be
forwarded to your voicemail inbox.
.
2. Touch
and then touch
To listen to your voicemail messages, press and hold
dialer and follow the instructions.
.
to enter your voicemail number,
1
on the
27
Page 29
Contacts
3HRSOH
3HRSOH
3HRSOH
0DQDJHFRQWDFWV
&RS\IURP6,0FDUG
6(/(&7$//
&23<
'21(
5. If you have more than one account on your phone, touch the
account to which you want to import the contacts.
enables you to save and manage contacts on your
phone, including such details as your contacts' phone numbers
and addresses.
On the Home screen, touch
!
to open
.
Importing Contacts from a SIM Card
1. In the contacts list, touch
2. Touch
3. Touch one contact to import that contact individually to your
phone, or touch
phone.
4. Touch
.
!
.
to import all contacts to your
.
Creating a Contact
1. In the contacts list, touch .
2. Select an account, then edit the contact information.
3. Touch
To save a contact from your call log, touch and hold the desired
phone number to display the options menu, and then touch
Add to contacts
to save the contact.
.
28
Page 30
Communicating with a Contact
'21(
&DQFHO
Searching for a Contact
Quickly
In the contacts list, touch the contact's picture or picture frame (if
no picture is assigned to the contact) and touch one of the
displayed icons to select the method you want to use to
communicate with the contact, for example, placing a call, or
sending a text message or an email. The available icons
depend on the information you have saved for the contact, the
applications on your phone, and your accounts.
Adding a Contact to Your Favorites
In the contacts list, select a contact and touch on the right of
the contact's name. If turns white, the contact is saved to
your favorites list.
1. In the contacts list, touch .
2. Enter the first letters of the contact name in the search box.
Search results appear as you type.
To search for a contact quickly, use the scroll bar on the right of
the screen.
Editing a Contact
1. In the contacts list, touch the contact you want to edit, then
.
2. After changing contact information, touch
changes. To discard the changes, touch
to save the
!
.
29
Page 31
Deleting a Contact
'HOHWH
2.
$GGPHPEHUV
$''0(0%(56
'21(
(GLW
'21(
'21(
&DQFHO
5. Touch
to save the contact group.
1. In the contacts list, select the contact you want to delete, and
then touch
2. Touch
.
!
.
Managing Contact Groups
Creating a Contact Group
1. In the contacts list, touch to display the groups list.
2. Touch .
3. Enter the group name.
4. Touch
, select one or more contacts, then touch
.
Editing a Contact Group
You can change a contact group at any time. To update the
information or members:
1. Select a group, and touch
2. Make desired changes, such as changing the group name
and adding or deleting a contact.
3. Touch
You can also edit a single contact in a group. To do so, select
the contact you want to edit, and then touch . When your
changes are complete, touch
discard the changes, touch
!
.
to save the changes. To
!
.
.
30
Page 32

Adding a Contact to a Group
$''0(0%(56
0DQDJHMRLQHGFRQWDFWV
$GGFRQWDFW
6KDUH
0DQDJHFRQWDFWV
Select a group, touch to select the desired contact, and
contacts
X
sign
next to a contact to separate the contact.
to display the joined contacts list. Touch the cross
then touch
.
Joining Contacts
To avoid duplicate contacts in your list, join two or more contacts
together to form a single contact. Note that contacts stored in
the SIM card cannot be joined.
1. From the contacts list, touch a contact you want to join.
2. Touch
select another contact to combine with the first contact
selected.
You can also separate a contact and assign different
communication methods to the contact. From the contacts list,
select a contact you want to separate, touch
!
, and then
Manage joined
Sending a Contact
You can send contacts as a .vcf file via Bluetooth, Email,
Messaging and more.
1. In the contacts list, touch a contact.
2. Touch
3. Select your preferred method, Bluetooth
Messaging and more, for sending the selected contact.
Backing Up Your Contacts
1. In the contacts list, touch
!
.
Email
!
.
31
Page 33

2. From the displayed options menu, choose
([SRUWWR
VWRUDJH
2.
6HWWLQJV
6WRUDJH
'HIDXOW
VWRUDJHORFDWLRQ
0DQDJHFRQWDFWV
,PSRUWIURPVWRUDJH
. A message is displayed showing the storage
location to which the .vcf file of your contacts will be exported.
3. Touch
to export your phone's contacts to the storage
device. By default, the file exported will be saved in the root
directory of your phone's memory. To change the default
storage location, go to
You can copy the .vcf files on the microSD card to your
computer in case data stored on the microSD card becomes
damaged.
.
!
!
Contacts can also be restored to your phone. To restore
contacts, in the contacts list, touch
!
, and then select one or multiple .vcf files
to restore your contacts.
32
!
Page 34
Text Input
6HOHFWLQSXWPHWKRG
2. Touch
method.
to select a desired input
The keyboard layout may vary slightly depending on the input
method. Figures in this section are provided for your reference
only.
Using the Onscreen Keyboard
Text can be entered using the onscreen keyboard. To open the
onscreen keyboard, touch a text field.
To hide the onscreen keyboard, touch .
Switching Between Text Input
Methods
1. When the keyboard is displayed, open the notification panel.
You can also change the default input method. To change the
default input method, on the Home screen, touch >
Settings
desired default input method.
>
Language & input
>
Default
, and then select a
Huawei Input Method
Using the Huawei Keyboard
Slide your finger left or right across the onscreen keyboard to
switch between the QWERTY and alphanumeric keyboards.
33
Page 35
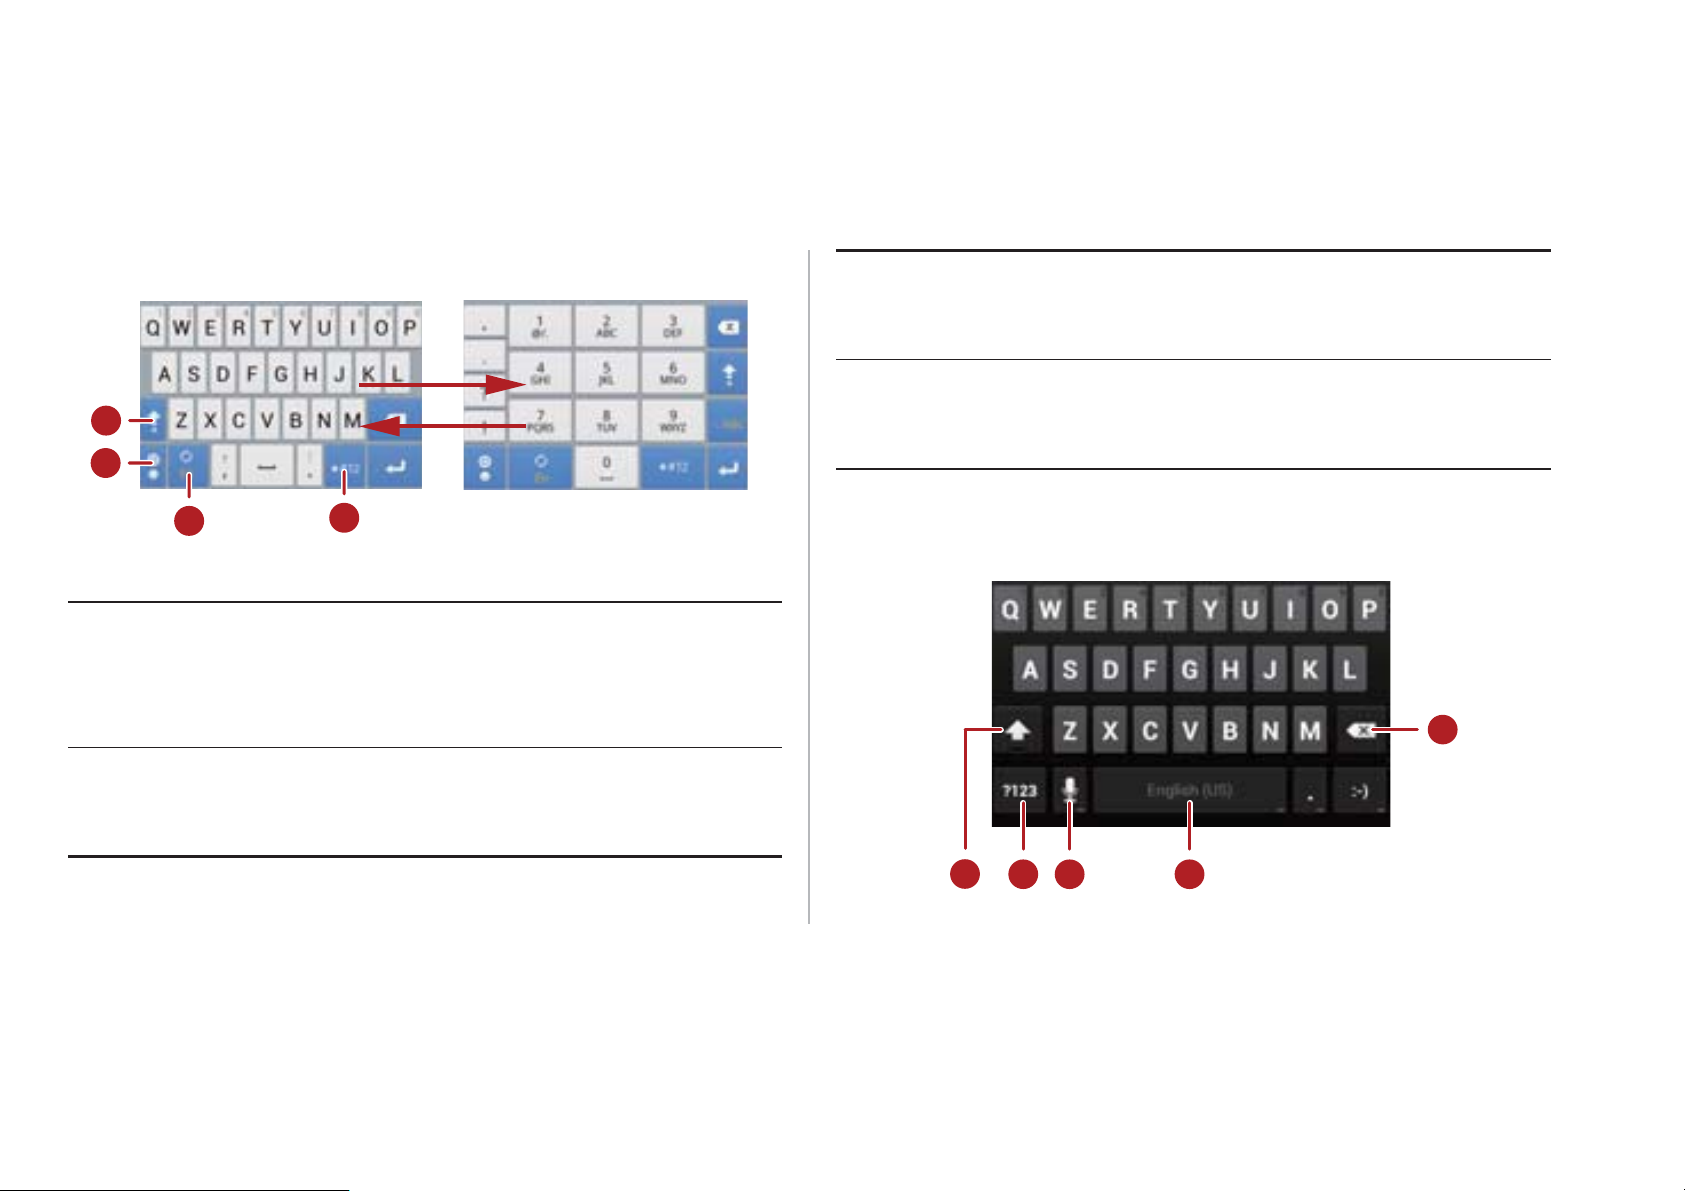
In English input mode, touch to change the input
3
language.
In English input mode, touch to switch to the
1
2
4
numbers and symbols keyboard.
1
2
34
3
4
When the text entry method is for lower-case letters,
touch to capitalize the next letter you enter, or touch
and hold to capitalize all letters you enter.
In English input mode, touch to switch to the
emoticon keyboard.
Using the Android Keyboard
5
34
2
1
Page 36
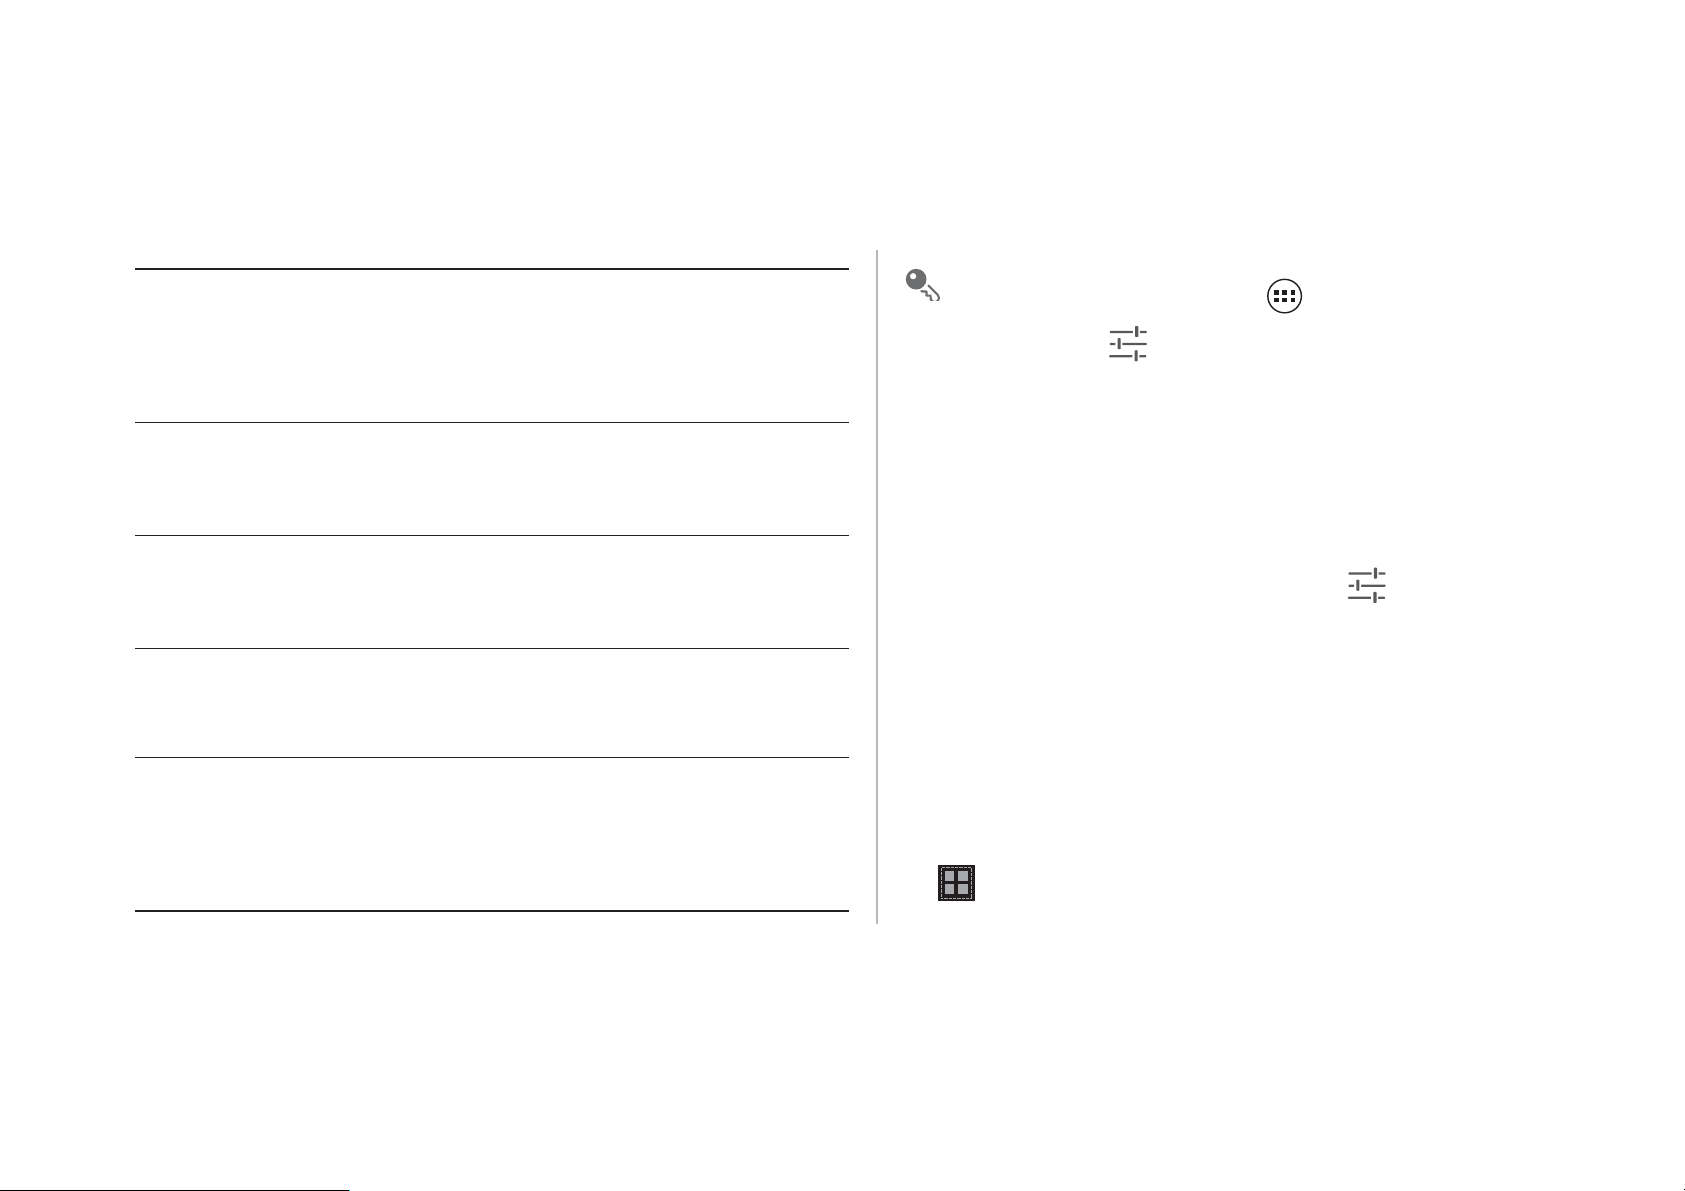
• Touch to delete the character to the left of the cursor.
On the Home screen, touch >
Settings
>
Language &
1
• Touch and hold to delete all the characters to the left
of the cursor.
• Touch to enter a space.
2
• Touch and hold to switch to another input method.
• Touch to switch to voice input.
3
• Touch and hold to go to the
Input options
screen.
Touch to switch to the number and symbol
4
keyboard.
• Touch to capitalize the next character you will enter.
5
• Touch and hold to capitalize all characters you will
enter.
. Touch to the right of
input
the
Android keyboard settings
to set whether the voice input key appears on the
key
keyboard
by selecting or deselecting
Settings
you want to use for voice input, touch to the right of
voice typing
. You can enable or disable the voice input function
>
Language & input
.
Android keyboard
screen. Touch
Google voice typing
section. To select the language
to display
Voice input
Android
in the
Google
Editing Text
To edit text quickly, touch and hold the text you have entered,
and choose the content you want to edit. You can then edit the
text quickly using icons in the upper right corner as follows:
• : Select all content.
35
Page 37
•
3$67(
3$67(
6HWWLQJV
/DQJXDJH
LQSXW
.(<%2$5',13870(7+2'6
: Cut the selected content. Touch and hold the text. Drag the
grab points to select the text you want to cut. Then touch this
button to cut the selected text. After the text is cut, touch a blank
area in the text field to display . Move to select where
Using the Landscape Keyboard
To use a wider keyboard, turn your phone sideways. Your
phone will automatically display the keyboard in landscape
mode.
you want to paste the text. Touch
previously cut text.
•
• : Move the cursor to an input position. Touch this icon to
: Copy the selected text. Touch and hold the text. Drag the
grab points to select text you want to copy. Touch this button to
copy the text. After the text is copied, touch a blank area in the text
field to display . Move to where you want to paste the
text. Touch
replace the selected content with what you just cut or copied.
!
to paste the previously copied text.
!
to paste the
36
To have the phone automatically change its screen orientation,
select
Auto-rotate screen
.
Selecting an Input Method
To customize the settings of the input method you selected.
1. On the Home screen, touch
.
2. In
method to customize its settings.
!
6
, touch next to an input
!
Page 38
Messaging
0HVVDJLQJ
6OLGHVKRZ
3UHYLHZ
$GGSLFWXUH
5HPRYHVOLGH
Adding a Slideshow
To attach more than one file to your message:
On the Home screen, touch
message application.
!
to open the
Sending a Message
1. On the messages list screen, touch .
2. Enter the recipient's phone number and compose the
message. To attach a photo or an audio file, touch .
3. When the message is ready to be sent, touch to send
the message.
After you add multimedia files, the message automatically
changes from a text message to a multimedia message.
1. On the message editing screen, touch .
2. Touch
another presentation slide.
3. When editing the slideshow, you can:
• Touch
• Touch
• Touch
You can also touch to edit the slide.
to start editing the slideshow, or add
to view the slides you have composed.
to add an image.
to remove slide.
37
Page 39

4. Touch
'RQH
6HQG
6HWWLQJV
6HWWLQJV
&KRRVH
ULQJWRQH
2.
the multimedia message screen.
to finish composing your slideshow and return to
Customizing Message Settings
To customize settings such as text message settings,
To replace an image, touch
screen.
5. When the message is ready to be sent, touch
Replace
on the slide editing
.
Replying to a Message
1. From the messages list, select the message you want to
reply to.
2. Compose your reply, and touch to send the message.
Searching for a Message
To find a message quickly: On the messages list screen, touch
and enter the message content to search for.
multimedia message settings, and message notification
ringtones, in the message list, touch
!
.
Setting the Message Ringtone
1. In the message list, touch
.
2. Select the desired ringtone.
3. Touch
.
!
!
38
Page 40

Using Talk
7DON
7DON
7DON
'21(
$FFHSW
Accepting an Invitation
is Google's instant messaging service. You can use it to
communicate in real time with other people using
phone or on the Internet.
on a
Opening Talk
To open Talk, on the Home screen, touch
Your
Talk
account is linked to the Google account you have set
up on your phone.
!
Adding a Friend
1. In your friends list, touch .
2. Enter the Gmail address of the friend you want to add.
3. Touch
.
1. If you have invited someone to chat or if someone has invited
you to chat, the invitation message is displayed in the
recipient's or your friends list.
2. To accept an invitation, touch a pending invitation, and then
touch
.
.
Starting a Chat
1. Touch a friend's name from your friends list.
2. Use the onscreen keyboard to enter a message.
3. When the message is ready, touch to send the
message.
39
Page 41

Setting Notifications for New Instant Messages
6HWWLQJV
7DON
6LJQRXW
•
Vibrate
: When the system set vibration first ,select
When you receive an instant message, your phone can play a
ringtone, vibrate, or display a notification icon.
1.
On the accounts screen, touch
2.
Select your account.
3.
In the
the following:
CHAT NOTIFICATIONS
!
section, select one of
.
IM notifications
•
notification icon on the notification bar when you
receive an instant message.
Notification ringtone
•
for new instant messages. When you receive an
instant message, your phone plays the ringtone. To
disable the ringtone, touch
: Select the check box to display a
: Touch to select a ringtone
Silent
.
the check box to set your phone to vibrate when you
receive an instant message.
Logging Out of Talk
To exit
, in the friends list, touch , then
.
40
Page 42

Data Connection
6HWWLQJV
:,5(/(661(7:25.6
0RUH
0RELOH
QHWZRUNV
'DWDHQDEOHG
6HWWLQJV
:,5(/(661(7:25.6
:L)L
:,5(/(661(7:25.6
:L)L
Turning On Mobile Data Services
services while roaming may incur additional charges. Contact
your network operator for details about data roaming charges.
• Access point settings have been configured on your phone. Note
that changing these settings may prevent you from accessing the
Internet.
1. On the Home screen, touch
2. In the
.
3. Select the
• Mobile networks services are provided by your network operator
and may incur data traffic charges. To avoid unnecessary
charges, clear the
• To turn data roaming on, on the
screen select the
Data enabled
Data roaming
section, touch
check box.
!
check box.
Mobile network settings
check box. Accessing data
.
!
41
Using Wi-Fi
Your phone can connect to a Wi-Fi network to access the
Internet.
1. On the Home screen, touch
2. In the
right of
3. In the
the settings screen. Your phone will scan for Wi-Fi hotspots
within range and display a list of detected Wi-Fi networks.
.
!
section, touch the switch on the
section, touch
.
to display
Page 43

4. Select the desired Wi-Fi network. If you select a secured
:L)L
6KRZDGYDQFHG
RSWLRQV
2II
:36
3XVK
EXWWRQ
&RQQHFW
:L)L
network, enter the password when prompted.
• If Wi-Fi and mobile network are both enabled, your phone
connects to the Wi-Fi network preferentially and switches to the
mobile network when Wi-Fi is unavailable.
Before connecting your device to a Wi-Fi hotspot, ensure that
the Wi-Fi hotspot supports the WPS function.
Using the WPS Button
1. Enable Wi-Fi, and then go to the
network list, touch the hotspot you want to connect to.
screen. In Wi-Fi
• To add a new Wi-Fi hotspot Service Set Identifier (SSID), on the
Wi-Fi
• Obstacles such as walls may block Wi-Fi signals and reduce the
signal strength.
settings screen touch
ADD NETWORK
.
Connecting to Wi-Fi Using WPS
Wi-Fi Protected Setup (WPS) is also called fast safe setup. It
simplifies the setup of Wi-Fi connection. Instead of complex
settings on the Wi-Fi hotspot management software, the WPS
function allows you to set up a safe Wi-Fi connection by
pressing the WPS button or entering the PIN.
42
2. In the displayed dialog box, select the
check box. Touch
!
3. Touch the Wi-Fi access point button. A message will be
displayed when your phone connects to the network.
WPS PIN Connection
1. Enable Wi-Fi, and then go to the
network list, touch the hotspot you want to connect to.
from the displayed options menu.
in
, and then choose
screen. In the Wi-Fi
Page 44

2. In the displayed dialog box, select the
6KRZDGYDQFHG
RSWLRQV
:36
2II
3,1IURPDFFHVVSRLQW
&RQQHFW
&RQQHFW
86%WHWKHULQJ
Sharing Your Phone's Data
check box. In the
select
options menu. The selected Wi-Fi access point will received
a PIN.
3. Enter the PIN to your phone, and touch then
phone will display a message when it connects to the
network.
You also can select
hotspot.
PIN from this device
section, touch
!
, and then
from the displayed
. Your
to connect to a Wi-Fi
Connection
To share your phone's data connection with a PC, connect your
phone to the PC using a USB cable. You can also turn your
phone into a portable Wi-Fi hotspot and share your phone's
data connection with a number of devices at the same time.
Sharing Your Phone’s Data Connection via USB
If the PC runs Windows 7, Windows Vista, or a recent version of
Linux OS (such as Ubuntu 10.4), you can use your phone's
USB tethering function without configuring any settings on the
PC. If you are running an earlier version of Windows or another
OS, your PC will identify and install a driver automatically.
To use
prepare your PC to establish a corresponding network
connection.
with different OSs, you may need to
43
Page 45

• You cannot share your phone’s data connection via
6HWWLQJV
:,5(/(661(7:25.6
0RUH
7HWKHULQJSRUWDEOHKRWVSRW
86%WHWKHULQJ
6HWWLQJV
:,5(/(661(7:25.6
0RUH
7HWKHULQJSRUWDEOHKRWVSRW
3RUWDEOH:L)LKRWVSRW
'DWDXVDJH
USB tethering
and access its microSD card as a mass
Sharing Your Phone’s Data Connection as a
Portable Wi-Fi Hotspot
storage device at the same time.
• Using
For details, contact your network operator.
1. On the Home screen, touch
2. In the
3. Select the
data connection with your PC. You can now access the
Internet from the PC.
USB tethering
will incur data traffic charges.
!
section, touch
.
check box to share your phone's
.
!
1. On the Home screen, touch
2. In the
3. Select the
mobile network.
To change the Wi-Fi hotspot's name or secure it, touch
Configure Wi-Fi hotspot
.
!
section, touch
.
check box to share your
.
!
Controlling Data Usage
With
data limit for this period. You will be notified when data usage
, you can set a data usage cycle and the mobile
44
Page 46
reaches the set limit. You can also query the data usage within
6HWWLQJV
'DWDXVDJH
2
6
4
3
1
5
a certain period or by a certain application.
On the Home screen, touch
configure the data usage settings:
!
!
to
45
Page 47

Touch
0RELOH'DWD
6HWPRELOHGDWDOLPLW
'DWDXVDJHF\FOH
&KDQJHF\FOH
6HW
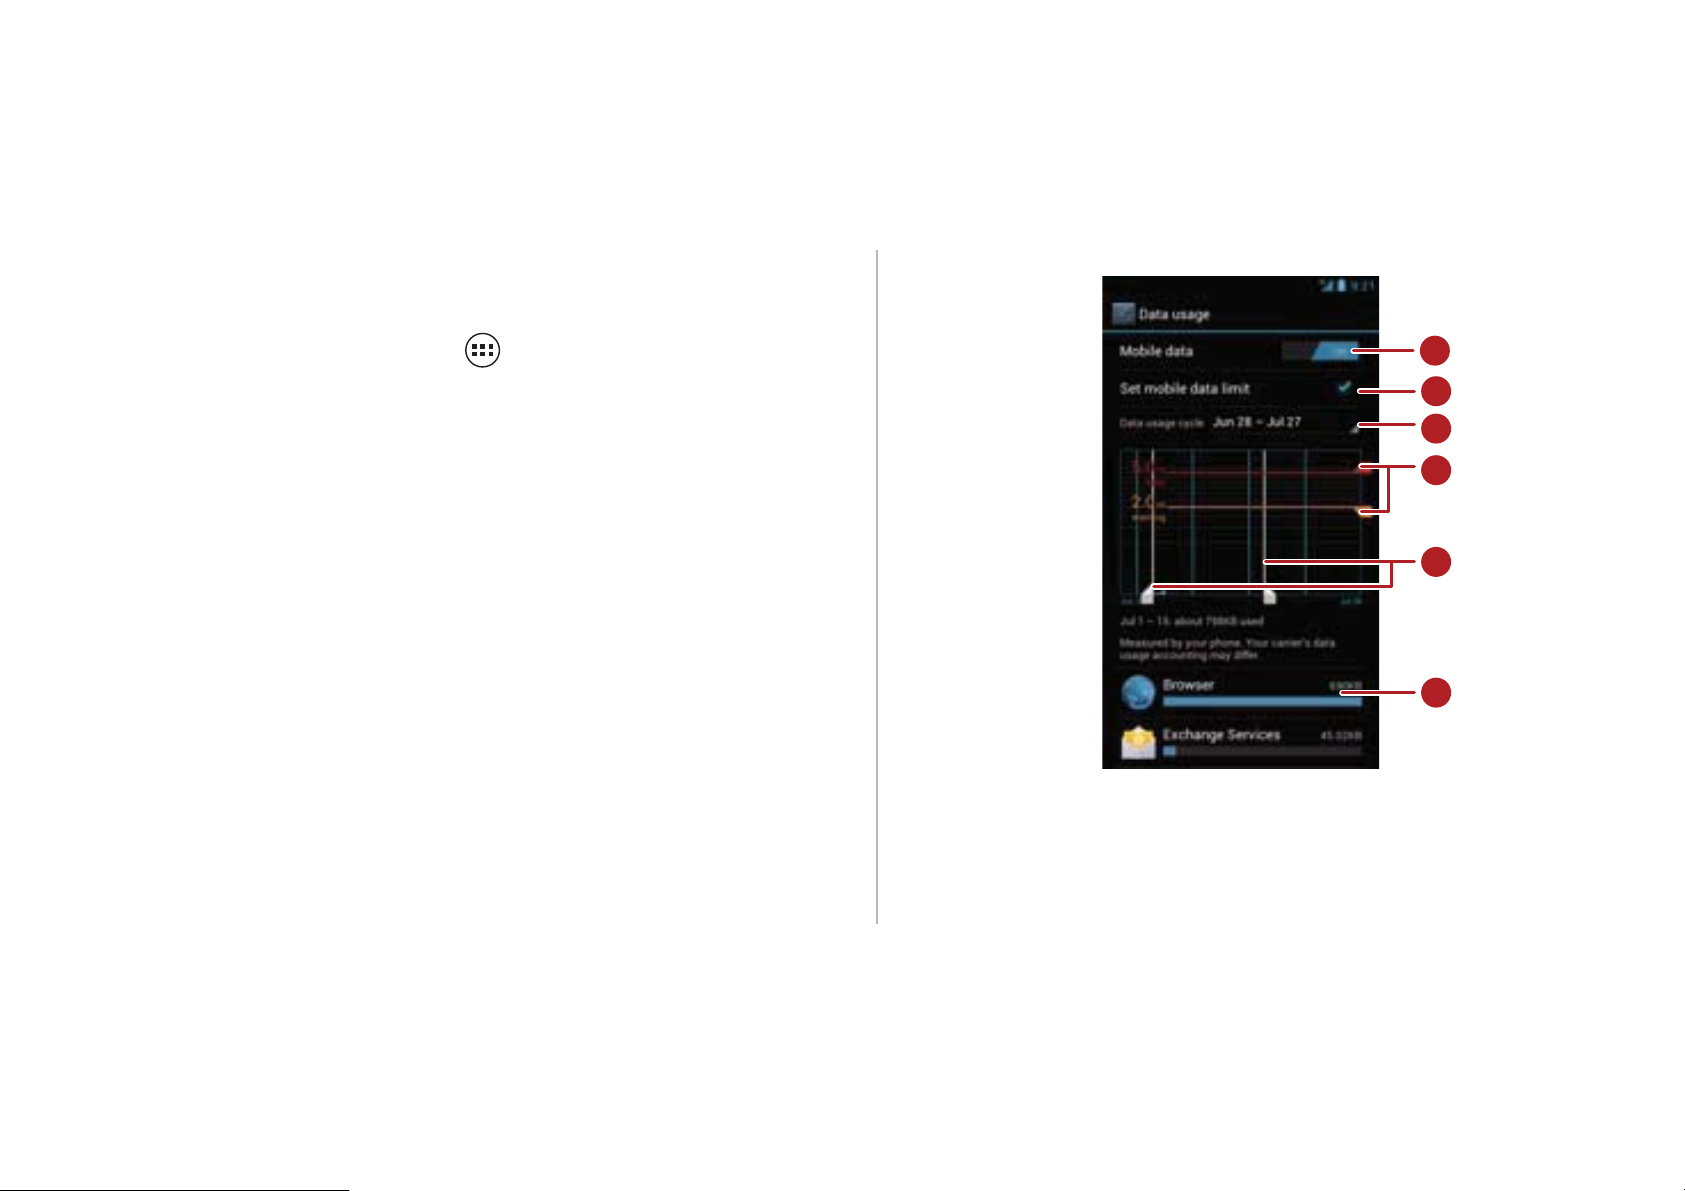
1
function. The mobile data function must be turned on
to configure data control and query data usage.
Select the
2
data traffic reaches the preset limit, your phone's
mobile data connection will be disabled.
to turn on or off the mobile data
check box. When
Drag the red line to set a data usage limit or the
orange line to set a warning limit. When data traffic
4
reaches the yellow line, you will be notified; when
data traffic reaches the red line, your phone's mobile
networks data connection will be disabled.
Scroll the white time axis to view data usage within a
5
certain period.
3
46
Touch the scroll arrow beside
then
cycle, touch
. After setting the data usage
.
,
6 Touch an application to check its data usage.
On the data usage settings screen, touch to display the
options menu and you can:
• Turn on data roaming: Select the
• Prevent background mobile data traffic: Select the
background data
check box.
Data roaming
check box.
Restrict
Page 48

• View Wi-Fi data usage: Select the
6HWWLQJV
:,5(/(661(7:25.6
%OXHWRRWK
%OXHWRRWK
Show Wi-Fi usage
check
2. In the
section, touch the switch on the
box, and a
data usage.
WI-FI
tab is displayed. Touch to tab to view Wi-Fi
Bluetooth
Your phone supports Bluetooth, which allows you to transfer
data to and from paired Bluetooth devices.
When using Bluetooth, stay within 10 meters (33 feet) of other
Bluetooth devices. Note that obstacles such as walls or other
electronic equipment may block or interfere with your Bluetooth
connection.
Turning On Bluetooth
1. On the Home screen, touch
!
.
right of
the notification bar.
3. Touch
displayed on the screen. Touch the device name and set
your device to be visible to other Bluetooth devices.
To change your device's name, touch >
, then
Rename
, and a Bluetooth icon will be displayed on
, and your device's Bluetooth name is
Rename phone
.
Scanning for and Pairing with Another Bluetooth
Device
To pair your phone with another Bluetooth device for data
transmission:
1. Check that the Bluetooth function is enabled on your phone.
47
Page 49

2. On the Home screen, touch
6HWWLQJV
:,5(/(661(7:25.6
%OXHWRRWK
3$,5(''(9,&(6
8QSDLU
)LOH0DQDJHU
6KDUH
%OXHWRRWK
'/1$
'/1$
!
.
2. From the detected Bluetooth device list, select the desired
3. In the
phone will then scan for other Bluetooth devices within range.
4. From the list of the Bluetooth devices searched, choose the
device you want to connect, and then follow the onscreen
information to pair.
To disconnect from the Bluetooth device, in the
section touch
!
section, touch
.
. Your
Transferring a File via Bluetooth
Using Bluetooth you can share pictures, videos, and audio files
stored in the
1. Touch and hold the file you want to transfer, and then choose
!
with your friends.
from the displayed options menu.
device.
DLNA
Digital Living Network Alliance (DLNA) enables users using the
same Wi-Fi network to share multimedia files easily.
Before using the DLNA function, ensure that your device and
other DLNA devices have connected to the same Wi-Fi
network and DLNA is enabled on all devices.
Touch
share pictures, videos, and audio files with other DLNA devices,
as well as view and download the multimedia files shared by
other DLNA devices.
!
'
to display the
screen. You can then
48
Page 50
Email/Gmail
(PDLO
(PDLO
2WKHUV
1H[W
1H[W
,QER[
(PDLO
Email
3. Follow the onscreen instructions to configure the account
settings.
Configure the email account based on the instructions provided
by your email service provider. For specific settings, access the
With
, you can easily send and receive emails.
Adding an Email Account
When using the Email application for the first time, set up an
email account as follows: (Note that a data connection is
required to send and receive emails).
1. On the Home screen, touch
2. Touch
touch
to enter an email address and password, then
.
49
!
.
website of your email service provider.
4. Touch
account will be displayed.
After creating your initial email account, touch >
>
ADD ANCOUNT
accounts.
, and the
on the
of the newly configured email
Inbox
screen to add more email
Adding an Exchange Account
1. On the Home screen, touch
!
Settings
.
Page 51

2. If you have already set up an email account, touch
6HWWLQJV
$''$&&2817
([FKDQJH
([FKDQJH
1H[W
$FFRXQWVHWXS
1H[W
,QER[
,QER[
,QER[
7R
,QER[
!
Switching Between Accounts
!
account. If you have not set up any email accounts, touch
to create an Exchange account.
3. Follow the instructions and enter the required information
about the Exchange account you want to add. For details,
contact the server administrator.
4. Touch
the synchronization settings for this account.
5. Touch
emails are not synchronized properly, contact the server
administrator.
to display the
to finish configuring the account settings. If
!
to add an Exchange
screen. Configure
On the
the screen, and select an email account from the displayed
email account list. The selected account's
displayed by default.
screen, touch the email address bar at the top of
is then
Creating and Sending an Email
1. On the
2. In the
3. Enter the email subject, and then compose your email.
4. When the email is ready to be sent, touch to send the
email.
screen, touch .
field, enter the recipient's email address.
Replying to and Forwarding an Email
1. In your
, touch the email you want to reply to.
50
Page 52

2. Touch or
5HSO\DOO
)RUZDUG
,QER[
,QER[
$WWDFKPHQW
6$9(
'RZQORDG
6HWWLQJV
6WRUDJH
'HIDXOWVWRUDJHORFDWLRQ
,QER[
6HWWLQJV
5HPRYHDFFRXQW
,QER[
6HWWLQJV
'$7$86$*(
127,),&$7,216(77,1*6
6(59(56(77,1*6
!
to reply to the email. You can
Deleting an Email Account
also touch
!
to forward the email.
Viewing an Email
In your
You can also touch to view more folders.
, touch the email you want to view.
Saving an Email Attachment
1. In your
2. Touch the
3. Touch
By default, downloaded files are saved to the
the phone memory. To change the default storage location,
choose
51
to download the attachment.
, touch the email you want to view.
tab to display the attachment.
!
!
folder in
1. On the
account settings screen.
2. Touch the account you want to delete.
3. From the displayed menu, choose
screen, touch
!
to display the
!2..
Customizing Email Account Settings
1. On the
account settings screen.
2. Touch the account you want to customize.
3. Change the required account settings, such as
.
screen, touch
, and
!
to display the
,
.
Page 53

Gmail
*PDLO
*PDLO
*PDLO
,QER[
*PDLO
,QER[
7R
$GG&F%FF
Switching Between Accounts
is Google's web-based email service. When you first set
up your phone, you may have to set it up to use an existing
account or create an account. The first time you open
on your phone, the
screen is displayed.
Opening Gmail
On the Home screen, touch
displayed. Any emails you keep on your phone will be stored in
your
In the email list, touch to change an email's label, or touch
to refresh your emails.
folder.
!
. The email list is
1. From the email list, touch the current account name to display
the account list.
2. Touch the account that contains the email(s) you want to
read.
Creating and Sending an Email
1. In the email list, touch .
2. In the
If you want to copy or blind copy the email to other recipients,
touch , then
field, enter recipients' email addresses.
.
52
Page 54
3. Enter the email subject, and then write your email in the
$WWDFKILOH
5HSO\DOO
)RUZDUG
5HSO\DOO
)RUZDUG
6DYHGUDIW
6HWWLQJV
*PDLO
• If you touched or selected
, add message
composition field.
If you want to send an attachment with the email, touch ,
then
4. When the email is ready to be sent, touch to send the
email.
Replying to and Forwarding an Email
1. In the email list, touch the email that you want to reply to or
forward.
2. Touch to reply. You can also touch , then
or
3. Do one of the following:
.
to select the file to be attached.
content.
• If you selected
addresses and add message content as required.
4. Touch to send, or touch
email as a draft.
, enter the recipients' email
!
to save the
Searching for an Email
1. In the email list, touch .
2. Enter appropriate keywords in the search box, and then
touch .
Customizing Your Gmail Settings
In the email list, touch
settings.
!
to customize your
53
Page 55
Managing Applications
3OD\6WRUH
3OD\6WRUH
3OD\6WRUH
3OD\6WRUH
'RZQORDG
,QVWDOO
$FFHSWGRZQORDG
;
2. Touch a category, then the application you want to download.
3. On the application details screen, read any relevant
information about the application, including its cost, rating,
Using Play Store
Android
games can be downloaded and installed on your phone.
To open the
.
When you open
Terms of Service
continue.
Installing an Application from Play Store
1. Open the
provides direct access to applications and
, on the Home screen, touch
Play Store
window will appear. Touch
application.
for the first time, the
Accept
Google Play
to
!
and user comments.
4. To install the application, touch
.
5. To check the progress of a download, open the notification
panel. Most applications are installed within seconds. To
cancel a download, touch the cross sign
After the application has been downloaded and installed on
your phone, the content download icon appears in the
notification bar.
• You can search for a desired application in
by touching .
or
.
, then
Play Store
54
Page 56
• On the application details screen, touch to share
3OD\6WRUH
0\DSSV
8QLQVWDOO
2.
$SS,QVWDOOHU
$SS,QVWDOOHU
the application.
Uninstalling an Application from Your Phone
Installing an Application from a
microSD Card
Using
, you can install an application stored on a
1. On the
downloaded applications.
2. Touch the application you want to uninstall, and then touch
.
3. When prompted, touch
your phone.
screen, touch
to remove the application from
!
to view your
55
microSD card.
To install an application that was not downloaded from Android
Play Store
screen, and then select the
before installation.
1. From the Home screen, touch
phone will automatically search the microSD card and phone
memory, and display all applications stored on it.
, touch >
Settings
Unknown sources
>
Security
!
from the Home
check box
. Your
Page 57

2. Select the application you want to install from the application
,QVWDOO
6HWWLQJV
$SSV
$//
8QLQVWDOO
list.
In the application list, touch >
the applications by size.
Sort by size
to re-arrange
Touch , then
all applications.
3. Touch
!
Select all
or
Deselect all
to install the selected application.
Viewing and Uninstalling
Applications
1. On the Home screen, touch
to view the application list.
2. Touch an application to view its details.
3. To uninstall the application, touch
onscreen instructions.
!
to select or deselect
!
and follow the
!
56
Page 58

Security Guard
6HFXULW\*XDUG
6HFXULW\*XDUG
6HWWLQJV
(QDEOH
VHUYLFH
6HWWLQJV
(QDEOHVHUYLFHDW
SKRQHVWDUWXS
blacklist or accepts only calls and messages from contacts
on the whitelist.
is integrated with your phone to provide
security functions including: blocking calls and messages;
encrypting messages, calls, and files, Password Safe; and
querying home locations of incoming calls. No charges are
incurred by the use of this application.
On the Home screen, touch
following options:
• To view calls and messages that have been blocked, touch
Blocking logs
• To view or edit the
Blacklist and whitelist
your phone blocks calls and messages from contacts on the
.
BLACKLIST
. Based on your blocking settings,
!
and
WHITELIST
for the
, touch
• To define your private contacts and view records of
messages and calls from or to them, touch
• To securely record and encrypt your account IDs and
passwords, for example, for online banking accounts and
email accounts, touch
• To encrypt or decrypt files, touch
• To specify whether to enable or disable the privacy protection
and blocking functions, go to
.
• To specify whether to enable or disable
phone startup
, go to
.
Password safe
File encryption
!
!
Privacy center
:
.
!
Enable service at
!
.
57
Page 59
Browser
%URZVHU
6DYHWRERRNPDUNV
2.
Managing Bookmarks
Adding a Bookmark
Browsing a Web Page
1. On the Home screen, touch
browser.
2. Enter a website address in the address box at the top.
• Touch to view the thumbnails of all web pages
currently open, from where you can switch between
pages.
+
• Touch
to open a new browser window.
!
to launch the
1. Launch the browser, and go to the web page you want to
save as a bookmark.
2. Touch
3. Enter the bookmark name, and then touch
!
.
.
Opening a Bookmark
1. In a browser window, touch in the upper right corner.
2. Touch and select the bookmark of the web page you
want to open.
On the
HISTORY
BOOKMARKS
tab to view the pages you have visited or touch the
screen, you can also touch the
58
Page 60

SAVED PAGES
6HWWLQJV
*HQHUDO
6HWKRPHSDJH
RWKHU
2.
6HWWLQJV
tab to view saved pages.
Setting the Home Page
1. In a browser window, touch
.
2. Select one page from the list, or touch
of the desired homepage, and then touch
!
!
to enter the URL
.
!
Customizing Browser Settings
To customize your browser setting, in a browser window, touch
!
59
.
Page 61
Maps
0DSV
0DSV
6HWWLQJV
/RFDWLRQVHUYLFHV
*RRJOHVORFDWLRQVHUYLFH,*36VDWHOOLWHV
/RFDWLRQ*RRJOHVHDUFK
0DSV
Opening Maps
enables you to find your current location, view real-time
traffic conditions (depending on availability in your area), and
get detailed directions to your destinations. You can view
satellite images, traffic maps, or other kinds of maps of your
current or other locations.
Enabling the Location Service
Enable the location service before using
location or search for places of interest.
1. On the Home screen, touch
2. Touch
3. Select the
.
check boxes.
!
to find your
.
, and
On the Home screen, touch
!
.
Searching for Places of Interest
1. On the map, touch .
2. Enter appropriate keywords in the search box, and then
touch the search icon.
3. The search results are displayed. Touch a place you are
interested in. The Maps application will shows its location on
the map.
Getting Directions
1. When viewing a map, touch .
60
Page 62

2. Enter your start point in the first text box and your destination
*(7',5(&7,216
'LUHFWLRQV
in the second.
3. Touch the icon for driving, public transit, or walking directions.
4. Touch
5. Touch a direction in the list to show it on the map.
6. When you finish viewing or following the directions, touch
!
. Directions are displayed in a list.
to reset the map.
61
Page 63
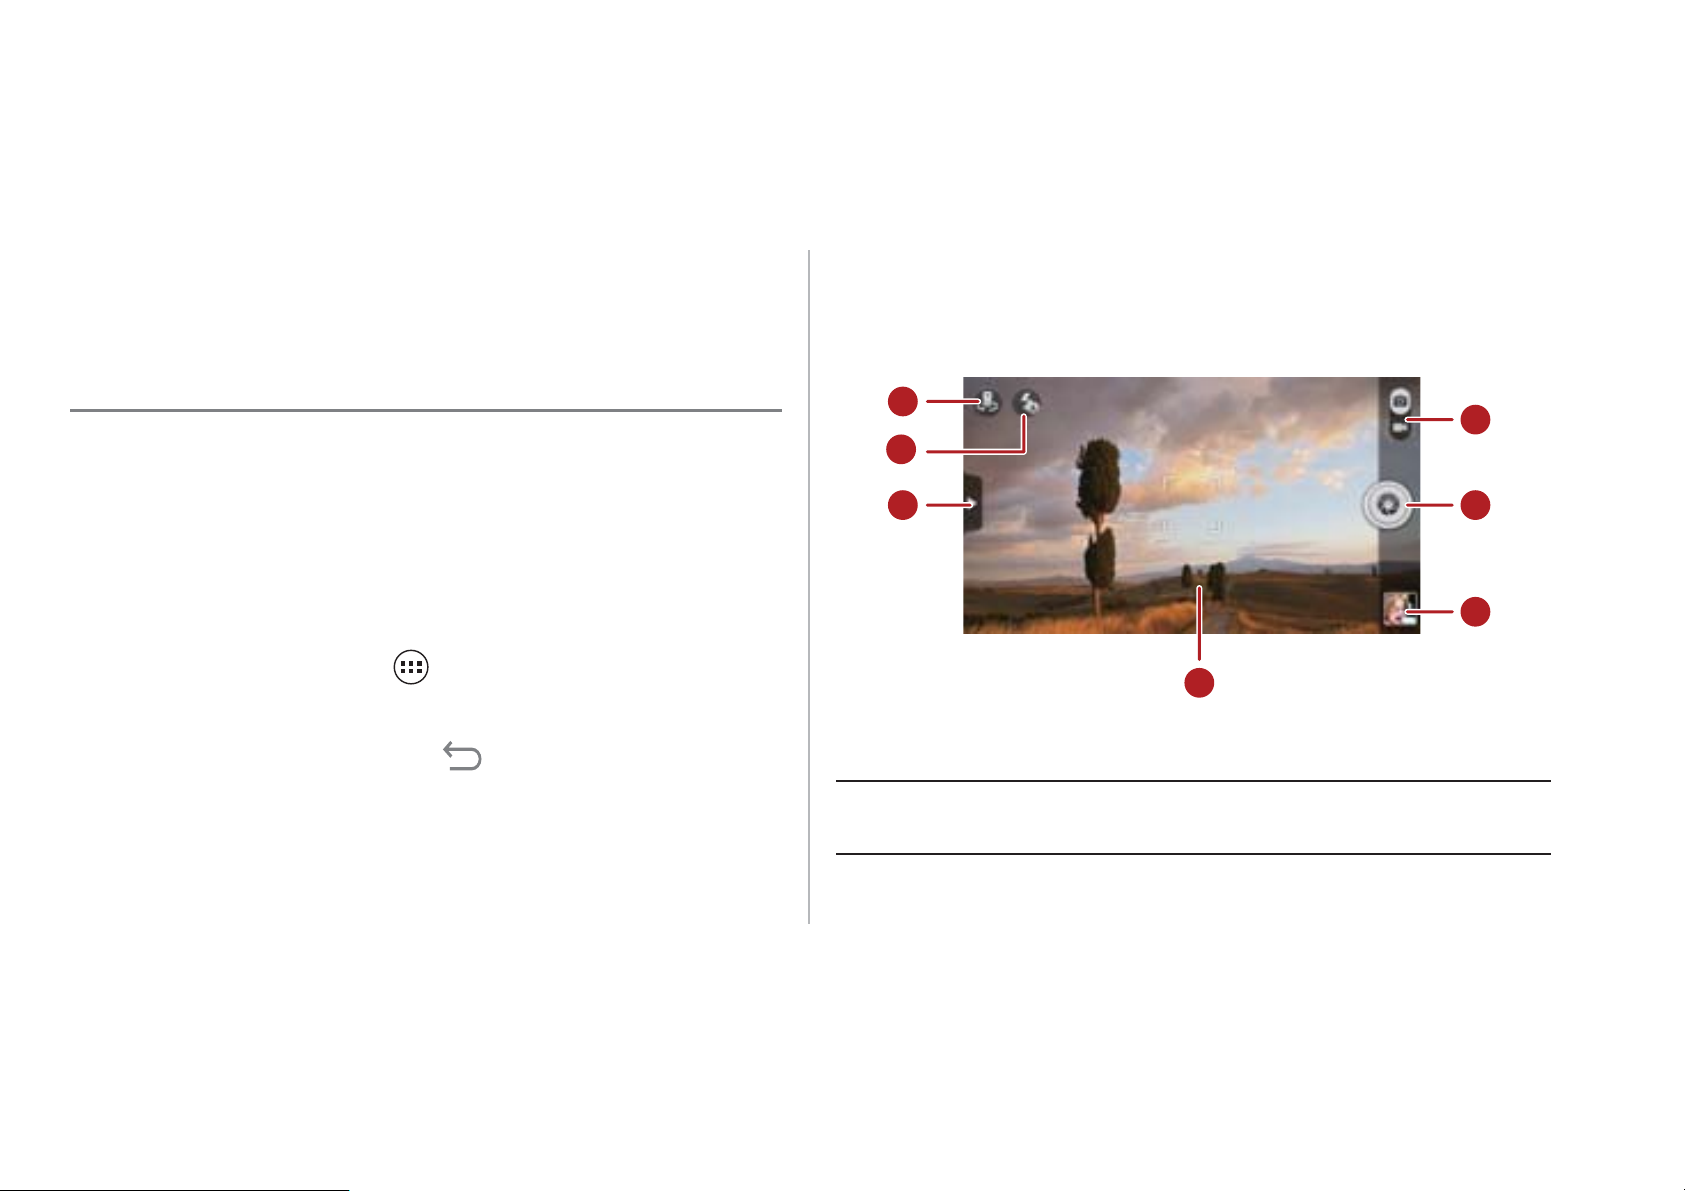
Capturing Photos and
&DPHUD
Videos
Your phone supports various capture modes and picture
Camera Mode
7
1
6
effects, with which you can take a photo, record a video, and
share the photos and videos.
Camera
On the Home screen touch
camera. You can then take a picture.
On the viewfinder screen, touch to exit the camera.
62
!
to activate the
5
4
1 Switch between camera and video capture modes.
2
3
Page 64
• Touch to take a photo.
2
• Touch and hold to focus the camera, and then release
your finger to take a photo.
Thumbnail of the previous shot. Touch to view the
3
photos you just took.
Touch to display the options menu as follows:
• : Switch the picture mode.
• : Select a filtering mode.
5
• : Select a picture effect.
• : Set the scene mode, the while balance, ISO,
4
63
Viewfinder screen. Touch anywhere to focus the
camera.
and more.
6 Set the flash mode.
7 Switch between the front and rear cameras.
Taking a Photo
1. Open the camera and frame the photo you want to take on
the viewfinder screen. Before taking a photo, you can
Page 65

customize the camera settings or select a picture effect.
'HOHWH
*36WDJ
When you are customizing the settings, the image displayed
on the viewfinder screen changes accordingly.
2. Press the volume buttons to zoom in or zoom out.
3. Touch anywhere on the viewfinder screen to focus the
camera.
• Touch to send the photo via a multimedia message, an
email, Bluetooth and more.
• Touch
• Flick left or right across the screen to scroll between photos in
the gallery.
!
to delete the photo.
4. Touch to take a photo.
You can also touch and hold to focus your camera. When
the frame in the center of the capture screen turns green, the
photo is in focus. Release your finger to take a photo.
You can then touch the thumbnail in the lower right corner of the
viewfinder screen to view the photo you just took. When viewing
a picture, you can:
• Touch to enter the gallery.
64
Enabling the GPS Tag Function
To tag location information to your photos:
1. On the viewfinder screen, touch
camera settings screen.
2. Select the
viewfinder screen.
To save location information with your photos, enable the GPS
location function on your phone. To do so, on the Home screen
!
check box. will be displayed on the
to display the
Page 66
touch
&DPHUD
>
Settings
>
Location services
, and select the
GPS
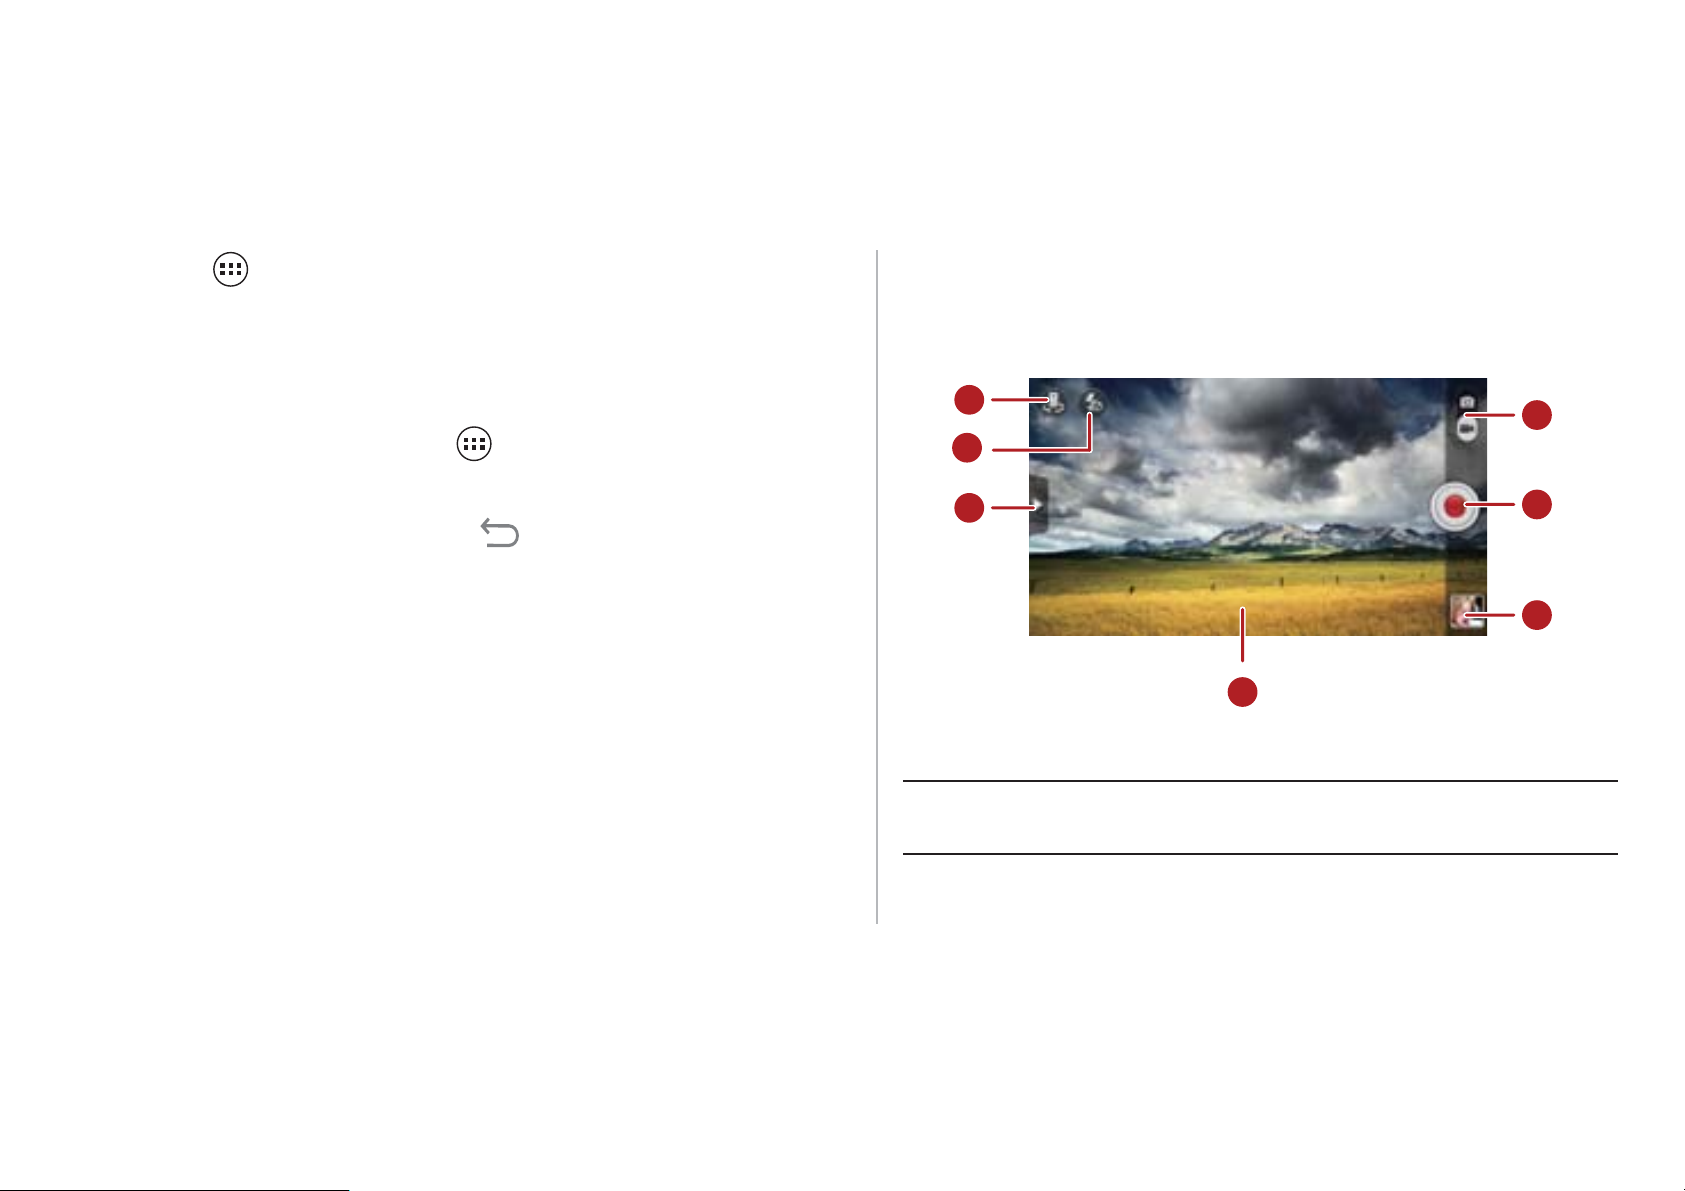
Video Camera Mode
satellites
check box.
Video Camera
On the Home screen touch
camera. Switch to camcorder mode to start recording.
On the capture screen, touch to exit the camera.
!
to activate the video
7
6
5
4
1
2
3
1 Switch between camera and video capture modes.
65
Page 67
&DPHUD
2 Touch to start recording.
1280
720
$XWR
7 Switch between the front and rear cameras.
Thumbnail of the previous recording. Touch to view
3
the video you just recorded.
4 Viewfinder screen.
Touch to display the options menu as follows:
• : Set the video size.
• : Adjust the white balance.
$XWR
5
• : Select a video effect.
•
: Enable or disable video review,
more.
GPS tag
6 Set the light mode.
, and
Recording a Video
1. Open
the video capture settings if necessary. When you are
customizing the settings, the image displayed on the
viewfinder screen changes accordingly.
2. Align the lens with the scene to be framed and customize the
settings.
3. Touch to start recording.
4. Touch to stop recording.
After recording a video, the thumbnail of the video is displayed
in the lower right corner of the capture screen. Touch the
thumbnail to view the video. When playing a video, you can:
and switch to video capture mode. Customize
66
Page 68

• Touch to enter the gallery.
'HOHWH
• Touch to send the video via a multimedia message, an
email, Bluetooth and more.
• Touch
• Flick left or right across the screen to switch between videos.
!
to delete a video.
67
Page 69
Gallery
*DOOHU\
*DOOHU\
*DOOHU\
(GLW
Your
and videos.
Viewing Photos or Videos
application is a great tool for managing photos
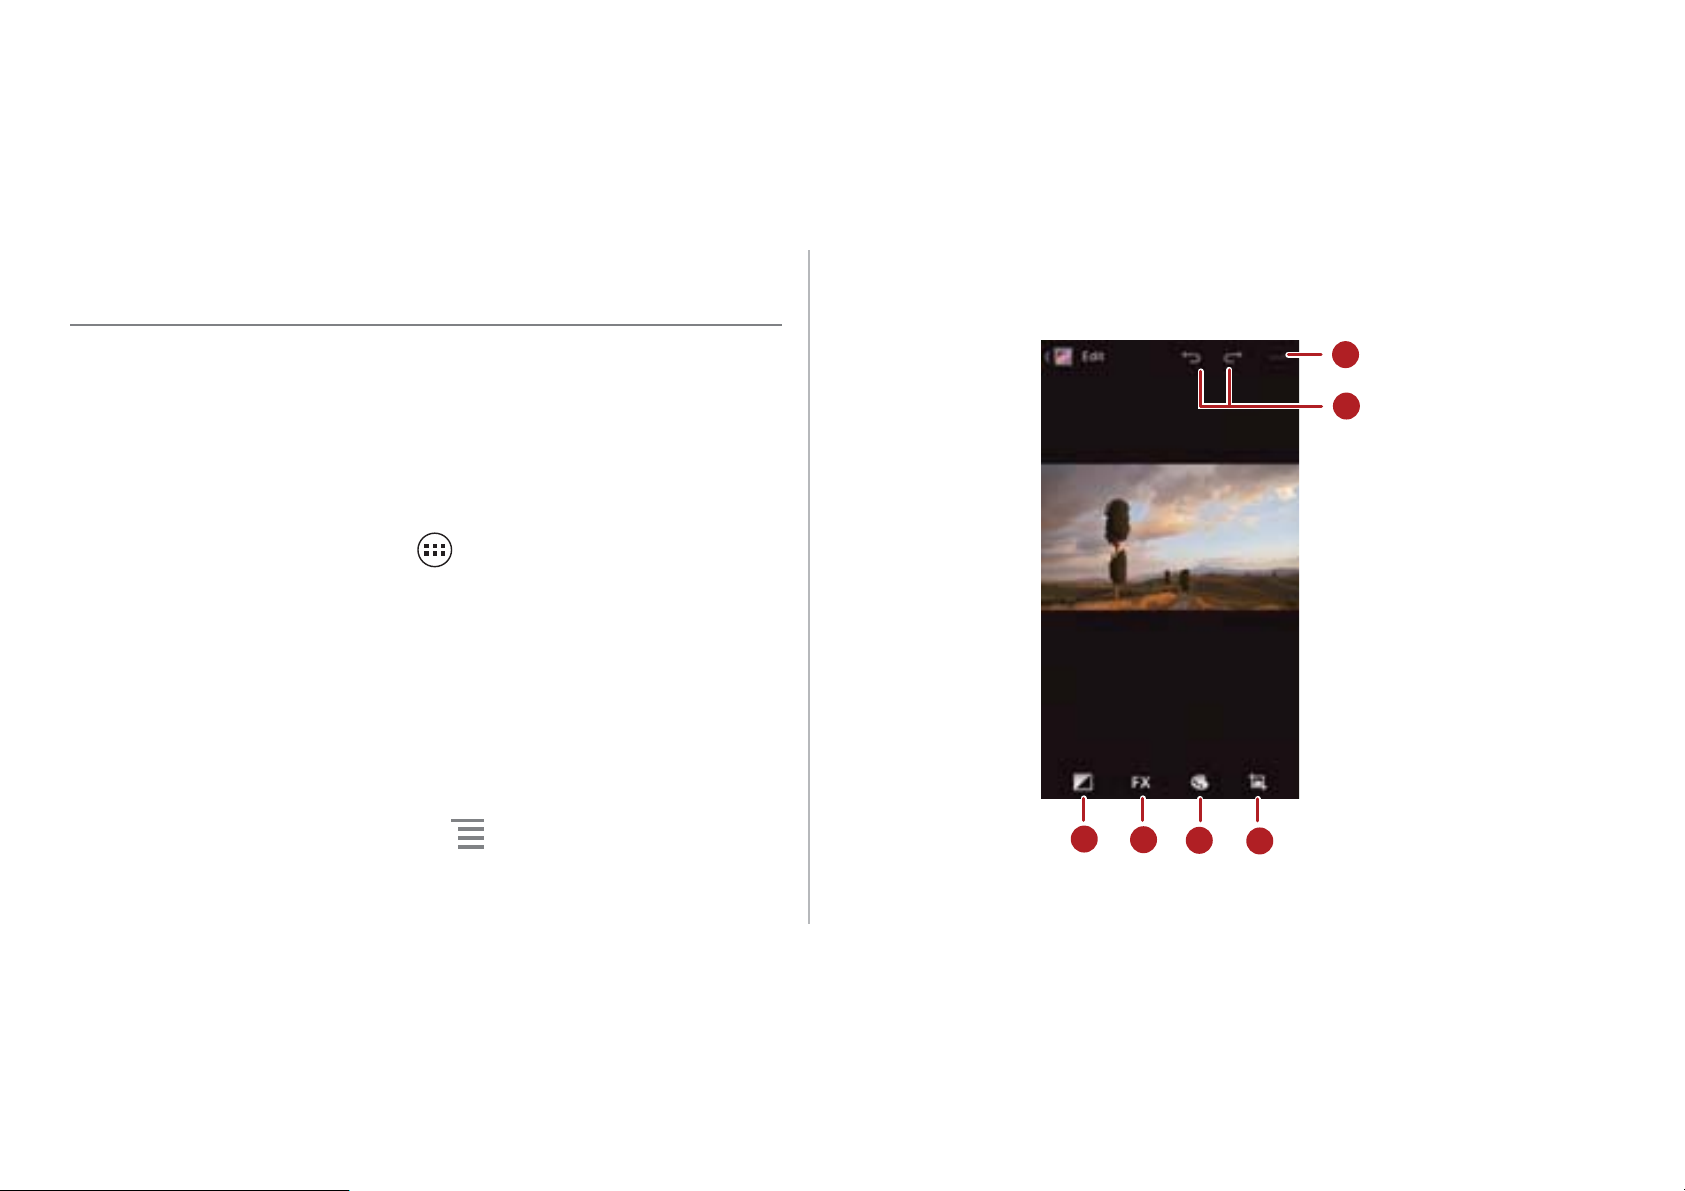
2. On the picture editing screen, you can:
1
2
1. On the Home screen touch
2. Touch the photo or video you want to view.
Editing a Picture
1. When viewing a picture, touch
68
media library. In
contents.
!
, touch the desired folder to view its
!
to open the
.
6
5
4
3
Page 70
5RWDWH/HIW
5RWDWH5LJKW
&URS
6$9(
&$1&(/
1 Save the changes.
/RPR
'RFXPHQWDU\
9LJQHWWH
2 Undo the last step or redo the canceled step.
Rotating a Picture
1. When viewing a picture, touch to display the options
menu.
69
3 Crop or rotate the picture, or remove red eye.
Adjust the hue or saturation, or set the picture to
4
black and white.
Change filtering effects such as
5
, or
Set exposure compensation, brightness, and
6
shade.
.
,
2. Touch
saved with the new orientation.
or
. The picture will be
Cropping a Picture
1. When viewing a picture, touch
2. Use the cropping tool as follows:
• Drag the inside of the cropping tool to move it.
• Drag of the cropping tool to resize the area to be
cropped.
3. Touch
or
!
to save or discard the changes.
.
Page 71

Music Player
0XVLF
0XVLF
3OD\OLVWV,$UWLVWV,6RQJV,$OEXPV,*HQUHV
)ROGHUV
$GGWRSOD\OLVW
1HZ
SOD\OLVW
With a built-in music player, your phone enables you to play
your favorite songs at any time.
Opening the Media Library
2. Touch and hold the audio file you want to add to a playlist,
and choose
menu.
• To add the audio file to a new playlist, touch
.
• To add the audio file to an existing playlist, touch the
from the displayed options
On the Home screen touch
media library.
provides seven tabs to help organize your music:
left or right across the screen to display the content of each tab.
Adding an Audio File to a Playlist
1. Choose a tab from the media library.
!
to access your
, and
. Flick
70
desired playlist.
Touch and hold an audio file and the phone displays the options
menu. From here you can:
• Send the audio file via DLNA, Compose, or Bluetooth: Touch
Share
• Set the audio file as the ringtone: Touch
.
Set as ringtone
.
Page 72
Playing a Playlist
3OD\OLVWV
3OD\
2
1. On the media library screen, touch the
2. Touch and hold the playlist you want to play.
3. From the displayed menu, touch
.
tab.
Playing an Audio File
1. Select a tab on the media library screen.
2. Select a playlist and touch the desired audio file to play.
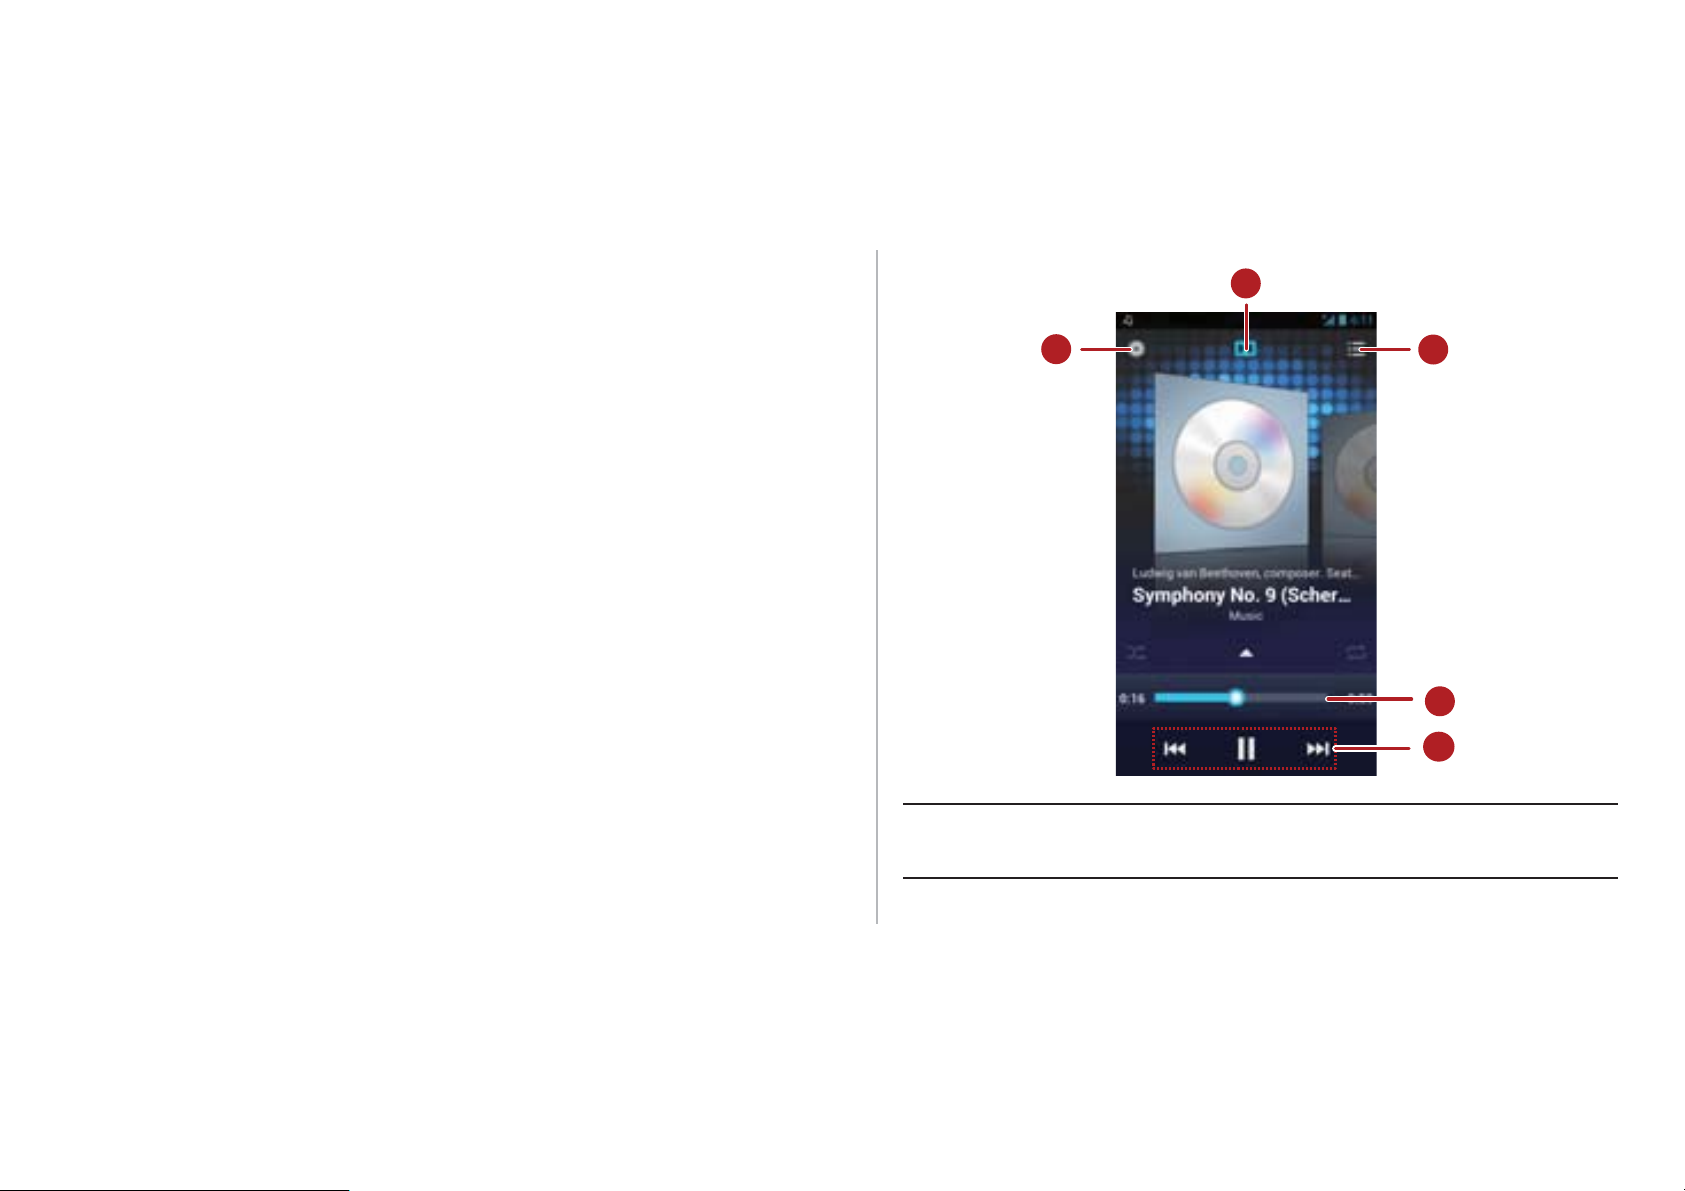
When playing the music, you can:
1
1 Enter the media library.
3
4
5
71
Page 73
&RQQHFWHGDVDQ
LQVWDOOHU
86%FRPSXWHUFRQQHFWLRQ
0HGLDGHYLFH073
2 Activate or deactivate the Dolby Mobile sound effect.
3 Display the playlist.
Progress slider, showing the playback progress of
4
the current song.
Control keys. Touch to pause, to continue,
5
to play the previous song, and to play the
next song.
Copying an Audio File
Audio files can be copied to a microSD card using MTP and
HiSuite, or by setting your phone as a mass storage device and
transferring files from your PC using a USB connection.
Copying an Audio File Using MTP
Media Transfer Protocol (MTP) is closely related to Windows
Media Player. Ensure that Windows Media Player 10 or a later
version is installed on your PC.
1. Use a USB cable to connect your phone to the PC.
2. Open the notification panel, touch
To use other applications when playing music, touch . The
song will continue to play in the background. To return to the
music playback screen, open the notification bar and select the
song being played.
72
to display the
and then select the
3. Your PC will automatically install the driver. After the
installation is complete, the MTP management page opens.
check box.
screen,
Page 74

You can access files saved in the phone memory and on the
&RQQHFWHGDVDQ
LQVWDOOHU
86%FRPSXWHUFRQQHFWLRQ
+L6XLWH
86%FRQQHFWHG
86%0DVV6WRUDJH
7XUQRQ86%
VWRUDJH
and on the microSD card from the PC and copy audio files to
microSD card from the PC and copy music to the microSD
card.
Copying an Audio File Using HiSuite
With HiSuite you can manage and synchronize data on your
phone.
1. Use a USB cable to connect your phone to the PC.
2. Open the notification panel, touch
to display the
and then select the
3. Your PC will automatically install the driver. After the
installation is complete, the HiSuite management page
appears. You can access files saved in the phone memory
check box.
screen,
the microSD card.
Copying Audio Files to USB Mass Storage
Devices
Before using this function, ensure that a microSD card is
correctly installed.
1. Use a USB cable to connect your phone to the PC.
2. Open the notification panel, touch
the
.
3. The phone will now appear as a removable storage device in
My Computer. Locate and open the device.
4. Create a folder in the root directory of the microSD card, for
example, a folder named Music.
screen, and then touch
to display
73
Page 75

5. Copy audio files from the PC to the folder you have just
7XUQRII86%VWRUDJH
86%
0DVV6WRUDJH
7XUQRII86%VWRUDJH
created.
6. When the data is transferred, open the notification panel on
your phone. Touch
screen, and then touch
to disconnect your phone from the PC.
to display the
74
Page 76

Accounts and
6HWWLQJV
$FFRXQWVV\QF
$FFRXQWVV\QF
$''$&2817
$FFRXQWVV\QF
$FFRXQWVV\QF
5HPRYHDFFRXQW
5HPRYHDFFRXQW
3. Configure the account, and set the type of data you want to
synchronize.
Synchronization
You can use certain applications to synchronize data such as
contacts and emails with Internet services.
To use an application to synchronize data, on the Home screen
touch
accounts and synchronization application.
Adding an Account
1. On the
select the account type you want to add.
2. Follow the onscreen instructions to enter account
information.
!
!
screen, touch
to open the
, and then
4. When the configuration is complete, the account is displayed
on the
The types of data you can set to synchronize to your phone
vary according to the account type.
screen.
Removing an Account
1. On the
to remove.
2. Touch
3. Touch
!
screen, touch the account you want
.
.
75
Page 77

Synchronizing Data
$FFRXQWVV\QF
$FFRXQWVV\QF
$FFRXQWVV\QF
On the
synchronization function, and your phone will synchronize your
data in the background automatically.
Changing the Account
screen, enable the account
Synchronization Settings
1. On the
synchronization settings you want to change.
2. The displayed
that can synchronized.
3. Select the items to be synchronized. Your phone will start
synchronization immediately.
screen, choose the account whose
section shows a list of data
76
Page 78
More Applications
&DOHQGDU
&DOHQGDU
1HZHYHQW
&DOHQGDU
6HWWLQJV
3. Touch to save the event.
Viewing a Calendar Event
Calendar
enables you to easily manage and arrange events.
To open the calendar, touch
screen.
Creating an Event
1. Open the calendar application, touch , and then select
from the displayed options menu.
You can also touch any date on the screen to create an event
on that date.
2. Edit event details such as the event name, time, and location.
!
on the Home
On the Calendar screen, you can touch any of the events you
want to view.
To switch between the days, weeks, months, and schedule
views, touch the time on the upper left corner of the screen.
Alternatively, you can flick your finger left or right or flick up and
down across the screen.
Customizing Calendar Settings
On the Home screen, touch
customize your calendar settings.
, then
!
to
77
Page 79

Setting an Event Reminder
$GGUHPLQGHU
&DOHQGDU
&DOHQGDUVWRGLVSOD\
&DOHQGDUVWRV\QF
)LOH0DQDJHU
)LOH0DQDJHU
)LOH0DQDJHU
)LOH0DQDJHU
,QWHUQDO
6'FDUG
1HZIROGHU
1. In any calendar view, touch
!
.
1. You can touch any event on a calendar screen to view the
event details.
2. To add a reminder for an event, touch
X
delete a reminder, touch
3. To set how long before the event you want to be reminded,
touch the reminder period, and then select a desired time
period in the displayed dialog box. You will be notified about
the event at the reminder time.
.
. To
Synchronizing and Displaying Calendar Events
Calendar events in your accounts (such as an email account)
on your phone can be synchronized to and displayed on the
application.
If you have an account to be synchronized to your phone, the
account will be displayed in the
2. Touch
synchronization function.
Calendars to display
to enable or disable the
list.
Managing File Manager
The
assistant, letting you organize, edit, and delete files and folders.
On the Home screen, touch
Creating a Folder
1. On the
Touch
application acts like a pocket-sized personal
application.
screen, select
!
!
to create a folder.
to open the
or
.
78
Page 80
2. Enter the folder name, and then touch
6DYH
,QWHUQDO
6'FDUG
&XW
&RS\
,QWHUQDO
6'FDUG
,QWHUQDO
6'FDUG
,QWHUQDO
6'FDUG
*R
*R
to save the folder.
2. Enter part or all of the desired file name, and then touch
on
Copying or Moving a File
1. On the
you want to move or copy.
2. Select
3. Select
or
move the selected file to
Touch >
touch to copy or cut the files.
or
screen, touch and hold the file
in the displayed options menu.
or
, and then touch to copy or
Select item(s)
Searching for a File
1. On the
or
screen, touch .
or
to select multiple files, and then
.
the lower right corner of the keyboard (note that
may not
be the word displayed on your keyboard depending on the
input method you are using). The phone will then search for
the file in all folders and display the search results in a list.
Compressing or Extracting Files
Your phone supports compressing files and extracting
compressed files.
Files and folders can be compressed into .zip files, but can be
extracted from both .zip and .rar files.
Compressing a File
1.
On the
Internal
File Manager
or
SD card
screen, touch to display the
list.
79
Page 81

2.
)LOH0DQDJHU
6WRUDJH
&ORFN
$GGDODUP
7LPH
5HSHDW
5LQJWRQH
Touch and hold the file you want to compress, and then
Checking the Memory Status
choose
3.
In the displayed dialog box, edit the save path and name
of the file compressed if necessary. Touch
compressing the file.
To compress multiple files, touch >
then >
Compress
Compress
from the displayed options menu.
OK
to start
Select item(s)
to compress the selected files.
Extracting a File
1.
Touch and hold the compressed file you want to extract,
and then choose
menu.
2.
In the displayed dialog box, edit the save path and name
of the file extracted if necessary. Touch
extracting the file.
Extract
from the displayed options
OK
to start
, and
On the
screen, touch
!
to check
the memory status of the phone memory and the microSD
card.
Adding an Alarm
On the Home screen, touch
1. On the alarms screen, touch
2. To set the alarm time, touch
3. To set the alarm to repeat on certain days, touch
4. To set a ringtone for the alarm, touch
set the desired intervals.
!
.
, then .
.
and
and select the
desired ringtone.
80
Page 82
5. To set your phone to vibrate when the alarm goes off, select
9LEUDWH
/DEHO
2.
6HWWLQJV
&DOFXODWRU
1RWHV
6(/(&7$//
2.
On the calculator screen, flick your finger left or right
the
6. To name the alarm, touch
7. To save your alarm, touch
The alarms will ring even when your phone is powered off.
Customizing Alarm Settings
On the alarms list screen, touch
the existing alarms.
check box.
.
.
!
Using the Calculator
1.
On the Home screen, touch
!
to customize
.
across the screen to switch between the
panel
and the
Basic panel
.
Advanced
Using the Notes
1. On the Home screen, touch
2. To create a note, touch .
3. When you finish composing the content, touch to hide
the keyboard, and then touch to save the note and return
to the Notes screen.
To delete one or multiple notes, touch on the notes screen.
To delete all notes, touch
!
.
.
81
Page 83

Weather Clock
:HDWKHU&ORFN
:HDWKHU&ORFN
:HDWKHU&ORFN
6HWDVGHIDXOWFLW\
:HDWKHU&ORFN
$GGFLW\
:HDWKHU&ORFN
&KDQJHFLW\
:HDWKHU&ORFN
:HDWKHU&ORFN
Adding a City
You can use
around the world, to get the latest weather in any city and to
share weather information with others.
On the Home screen, touch
Turn on the GPS and data service on your phone before using
Weather Clock
.
to check the date and time at cities
!
.
Setting the Default City
On the
the screen to switch between cities. To set a city as the default
city, touch
!
screen, flick your finger left or right across
.
On the
city.
When using
cities besides your current city and get weather information for
all of them.
Weather Clock
screen, touch
, you can add up to four additional
!
to add a
Changing a City
1. On the
2. Select a city from the list, or search for a city by entering its
name in the search box.
Updating Weather
ways, manually or automatically. On the
Weather information can be updated in two
screen, touch
!
screen,
.
82
Page 84
touch
5HIUHVK
:HDWKHU&ORFN
:HDWKHU&ORFN
6HWWLQJV
$XWRXSGDWH
8SGDWHLQWHUYDO
:HDWKHU&ORFN
6KDUHZHDWKHU
7R
3HRSOH
)05DGLR
$XWR
WXQLQJ
weather.
You can also set your phone to update
automatically:
1. On the
!
or to update the current city's
screen, touch
!
FM Radio
The built-in FM radio enables you to listen to radio on your
phone. Because the application uses the headset as its
antenna, connect the headset to the phone before using the
.
application.
2. Select the
3. Touch
updates.
Sharing Weather Information
1. On the
2. Enter a phone number in the
contact from
3. Touch to send weather information to the recipient.
83
check box.
to set the interval for weather
screen, touch
field, or touch to select a
.
!
Searching For and Saving Channels
1. On the Home screen touch
2. If you are using the FM radio for the first time, touch
, and your phone will then search for stations and save
them to the station list.
.
!
.
Page 85
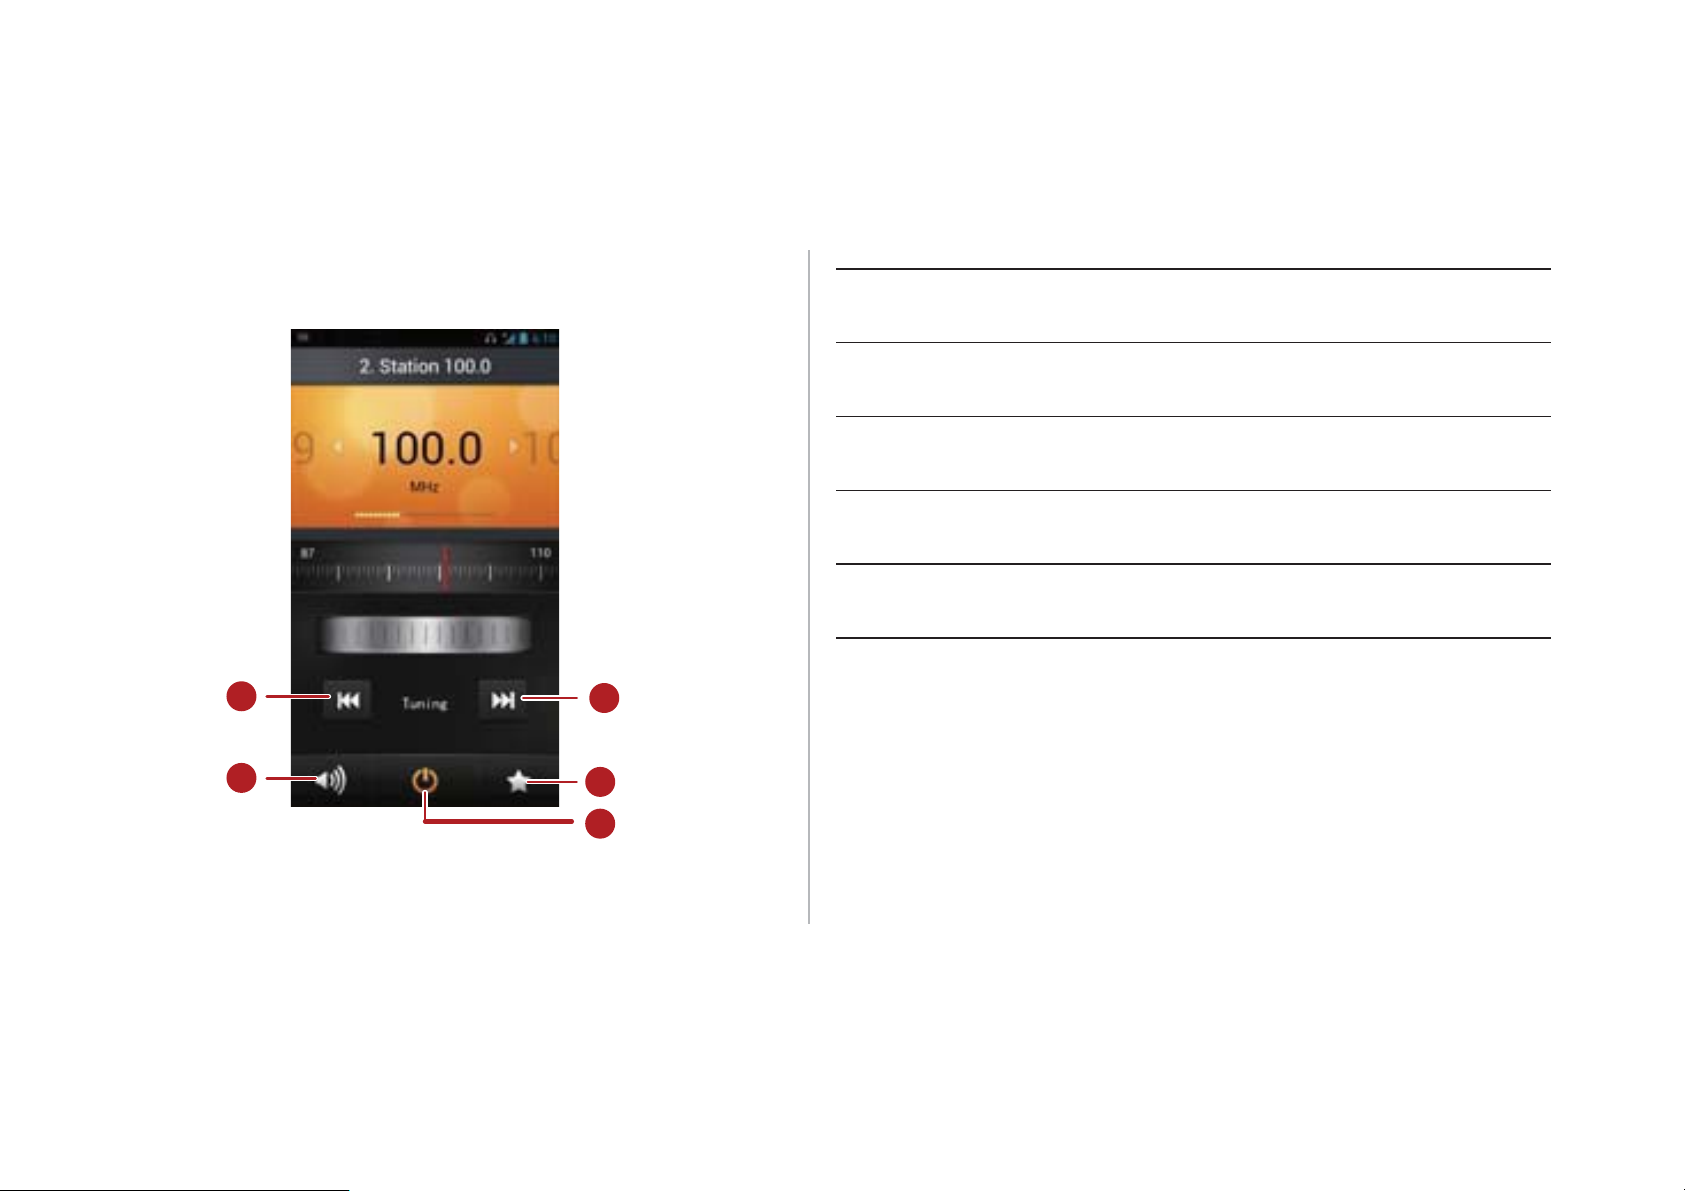
FM Radio
<RX7XEH
1 Tune the radio to the next station.
2 Access the station list.
3 Turn the FM radio on or off.
4 Activate or deactivate the speaker.
5 Tune the radio to the previous station.
84
5
1
YouTube
4
2
3
watching, searching for, and uploading videos.
is Google's free online video streaming service for
Page 86

Opening YouTube
<RX7XEH
<RX7XEH
<RX7XEH
On the Home screen, touch
!
.
Searching for a Video
1. On the
2. Enter appropriate keywords in the search box, and then
touch the search icon.
3. The search results are displayed. Touch the video you want
to watch.
screen, touch .
Sharing a Video
From the video list on the
and touch to share the videos.
screen, select a video clip
85
Page 87

Configuring Phone Settings
6HWWLQJV
6HWWLQJV
'DWHWLPH
$XWRPDWLFGDWHWLPH
$XWRPDWLFWLPH]RQH
6HWGDWH
6HW
6HWWLPH
6HW
6HOHFWWLPH]RQH
8VHKRXUIRUPDW
6HOHFWGDWHIRUPDW
6HWWLQJV
'LVSOD\
4. Touch
.
, then or to adjust the time. Touch
On the Home screen, touch
phone settings.
!
to configure your
Setting the Date and Time
When your phone is using date and time settings automatically
provided by the network, you cannot set the date, time, and
time zone manually.
1. On the
2. Clear the
check boxes.
3. Touch
.
screen, touch
and
, then or to adjust the date. Touch
.
5. Touch
zone from the list. Scroll down to view more time zones.
6. Select or clear the
between 12-hour and 24-hour time formats.
7. Touch
to be displayed.
, and then select a desired time
check box to switch
to select how you want the date
Configuring the Display Settings
On the
following:
•
Brightness
brightness
screen, touch
: Adjust the brightness. Clear the
check box to adjust the brightness manually.
to configure the
Automatic
86
Page 88

•
6HWWLQJV
6RXQG
9ROXPH
2.
6HWWLQJV
6RXQG
3KRQHULQJWRQH
5LQJWRQH
/RFDOPXVLF
2.
Wallpaper
: Change the background picture of the Home
The volume can also be adjusted as follows:
screen.
Auto-rotate screen
•
rotate your phone while browsing a webpage, viewing a
picture or composing a message, the screen display rotates
to automatically fit the new screen orientation.
Sleep
•
performed on the phone within this period, the screen turns
off.
Font size
•
: Set a sleep period for your screen. If no operation is
: Set the font size.
: If this function is enabled, when you
Adjusting the Volume
To adjust the volume, you can press the volume keys on the
Home screen or most application screens (for example, the call,
music, or video playback screens).
1. On the
2. Drag the slider left to reduce the volume, or drag it right to
increase the volume.
3. Touch
to save the settings.
screen, touch
!
.
Setting the Call Ringtone
1. On the
2. From the displayed options menu, you can:
• Touch
• Touch
3. Select the desired ringtone, and then touch
phone memory or on the microSD card.
screen, touch
to select from preset ringtones.
to select from songs stored in the
!
.
.
87
Page 89

Security Settings
6HWWLQJV
6HFXULW\
6HWXS6,0FDUG
ORFN
/RFN6,0FDUG
2.
6HWWLQJV
6HFXULW\
6FUHHQORFN
3DWWHUQ
&RQWLQXH
&RQILUP
3. Enter the SIM PIN, and then touch
.
Turning On the SIM PIN
A Personal Identification Number (PIN) protects your SIM card
from unauthorized use. If you incorrectly enter the PIN three
consecutive times, the PIN will be blocked and the phone
prompts you to enter the PIN Unblocking Key (PUK). If you
incorrectly enter the PUK 10 consecutive times, your SIM card
will become permanently invalid. If the PIN and PUK are not
provided with the SIM card or you no longer have them, contact
your network operator. When the SIM PIN is turned on, you will
have to enter the correct PIN each time the phone if powered
on.
1. On the
.
2. Select the
screen, touch
check box.
!
To change the SIM PIN, touch
Setting a Screen Unlock Pattern
To protect your data from unauthorized access, set a screen
unlock pattern and require it to be used every time your screen
is locked.
1. On the
2. Follow the onscreen instructions to set a screen unlock
pattern.
3. Touch
4. Draw the screen unlock pattern again and touch
Remember your unlock pattern.
6
.
screen, touch
.
Change SIM PIN
!
.
!
.
88
Page 90

If you have set up a Google account, unlock your screen as
6HWWLQJV
6HFXULW\
6FUHHQORFN
3,1
&RQWLQXH
2.
6HWWLQJV
%DFNXSUHVHW
)DFWRU\
GDWDUHVHW
follows if you forget the screen unlock pattern:
1. On the
.
screen, touch
!
!
• If you incorrectly draw the unlock pattern five times, a
Forgot pattern?
to open the Google account login screen. Enter your
user name and password, and then reset your screen
unlock pattern.
• If you incorrectly draw the unlock pattern 20 times, the
Google account login screen is displayed. Enter your
user name and password, and then reset your screen
unlock pattern.
button is displayed. Touch this button
Turning On PIN Protection
You can set a PIN to lock your phone. When the phone screen
is locked, the correct PIN must be entered to unlock your
phone.
2. Enter at least four digits.
3. Touch
4. Re-enter the digits and touch
To change the PIN, touch
.
.
Security
>
Screen lock
>
PIN
.
Restoring Factory Settings
Restoring your phone to its factory settings erases all your
personal data from the phone memory, including information
about your accounts, your system and application settings, and
downloaded applications.
1. On the
screen, touch
!
.
89
Page 91

2. Touch
5HVHWSKRQH
(UDVHHYHU\WKLQJ
6HWWLQJV
$ERXWSKRQH
2QOLQHXSGDWH
Touch
according to the onscreen instructions.
. The phone is reset to its factory
settings, and then restarts.
Back up important data on your phone before restoring factory
settings. To do so, on the
>
reset
Factory data reset
Settings
>
Reset phone
screen, touch
>
Backup data
Backup &
.
Online Upgrade
Your phone is preset with the online upgrade function for
applications. You will be notified when updates are available. To
• Back up your personal data before any upgrade. After the
upgrade, all personal data will be erased.
• If you have installed a microSD card, the downloaded upgrade
package will be stored in the root directory of the microSD card; if
no microSD card is available, the upgrade package will be stored
in the root directory of your phone memory. Ensure that enough
storage space is available on your microSD card or in your phone
memory for the upgrade package.
upgrade manually, on the
!
to check for updates, and then follow the
screen, touch
onscreen instructions to upgrade online.
90
Page 92
FAQs
%URZVHU
How Do I Use a microSD Card to Import Contacts from
Another Phone
More FAQs are available at
faq.do?method=index
.
www.huaweidevice.com/cn/
How Do I Free Up Phone Memory
• Move files and email attachments from your phone memory
to your microSD card.
• Open the
application, and delete locally cached
content.
• Uninstall applications you no longer use.
• Restore your phone to its factory settings.
Your phone supports only contact files in .vcf format.
1.
Save the contacts you want to import as a .vcf file and
save the file to a microSD card.
2.
Insert the microSD card into your phone and find the .vcf
file using
3.
Touch the .vcf file. The phone displays a message asking
whether you want to import the contacts.
4.
Touch
Compatibility problems may occur with .vcf files created by
other phones, and certain contact information may be lost when
contacts are imported.
You can also import contacts via Bluetooth.
Confirm
File Manager
.
.
91
Page 93

How Do I Use HiSuite to Import Contacts from Another
6HWWLQJV
'HYHORSHURSWLRQV
86%
GHEXJJLQJ
3HRSOH
0XVLF
6HWDVULQJWRQH
6HWWLQJV
'LVSOD\
$XWRURWDWHVFUHHQ
6HWWLQJV
6HFXULW\
6FUHHQORFN
3DWWHUQ
7.
Disconnect your phone from the PC after the contacts are
Phone
Your phone supports only contact files in .vcf format.
1.
Save a .vcf file to a PC.
2.
Touch
!
!
!
.
3.
Use a USB cable to connect your phone to the PC.
4.
Visit
http://www.huaweidevice.com/cn
install HiSuite on the PC.
to download and
5.
Open HiSuite and follow the instructions to complete the
installation.
6.
After the installation is complete, click
the contact list and choose
instructions and select the .vcf file from which you want to
Import
. Follow the
. Right-click
imported.
How Do I Set a Song as a Call Ringtone
In
ringtone, and then choose
, touch and hold the song you want to set as the
from the displayed
options menu.
How Do I Disable the Auto-rotate screen Function
On the Home screen, touch
then clear the
!
check box.
!
How Do I Set a Screen Unlock Pattern
On the Home screen, touch
!
, and then follow the onscreen
!
!
instructions to set a screen unlock pattern.
, and
!
import contacts.
92
Page 94

How Do I Change the Input Method
6HOHFWLQSXWPHWKRG
)RUZDUG
How Do I Hide the Keyboard
On a text-composing screen, open the notification bar and
touch
How Do I Stop the Music Playing in the Background
Open the notifications panel, touch the music playing
notification to go to the music playback screen, and then stop
playing the song.
How Do I Return to the Call Screen
Open the notifications panel, and then touch the ongoing call.
How Do I Create an Application Shortcut on the Home
Screen
Touch and hold an application icon from the application list until
the Home screen is displayed. Then drag the icon to where you
want to place it and release your finger.
to select a desired input method.
Touch to hide the keyboard.
How Do I Forward a Message
Touch and hold the message you want to forward, and then
choose
from the displayed options menu.
93
Page 95
Appendix
Safety Precautions
Please read the safety precautions carefully to ensure the
Do not switch on your mobile phone when it is
prohibited to use phones or when the phone
may cause interference or danger.
Do not use your mobile phone while driving.
correct use of your mobile phone.
Do not crash, throw, or puncture your mobile
phone. Avoid the falling, squeezing, and
bending of your mobile phone.
Do not use your mobile phone in a moist
environment, such as the bathroom. Prevent
your mobile phone from being soaked or
washed in liquid.
94
Follow any rules or regulations in hospitals and
health care facilities. Switch off your mobile
phone near medical apparatus.
Switch off your mobile phone in aircraft. The
phone may cause interference to control
equipment of the aircraft.
Switch off your mobile phone near highprecision electronic devices. The phone may
affect the performance of these devices.
Page 96
Do not attempt to disassemble your mobile
phone or its accessories. Only qualified
personnel are allowed to service or repair the
Use only approved batteries and chargers to
avoid the risk of explosions.
phone.
Do not place your mobile phone or its
accessories in containers with a strong
electromagnetic field.
Do not place magnetic storage media near your
mobile phone. Radiation from the phone may
erase the information stored on them.
Do not put your mobile phone in a hightemperature place or use it in a place with
flammable gas such as a gas station.
Keep your mobile phone and its accessories
away from children. Do not allow children to use
your mobile phone without guidance.
Observe any laws or regulations on the use of
wireless devices. Respect others’ privacy and
legal rights when using your wireless device.
Strictly follow the relevant instructions of this
manual while using the USB cable. Otherwise
your mobile phone or PC may be damaged.
Personal Information and Data
Security
The use of some functions or third-party applications on your
device could result in your personal information and data being
lost or becoming accessible to others. Several measures are
95
Page 97

recommended to help you protect personal and confidential
information.
• If you use your device to browse the Internet, avoid websites
that might pose a security risk to avoid theft of your personal
• Place your device in a safe area to prevent it from
unauthorized use.
• Set your device screen to lock and create a password or
unlock pattern to open it.
• Periodically back up personal information kept on your SIM/
UIM card, memory card, or stored in your device memory. If
you change to a different device, be sure to move or delete
any personal information on your old device.
• If you are worried about viruses when you receive messages
or emails from a stranger, you can delete them without
opening them.
information.
• If you use services such as Wi-Fi tether or Bluetooth, set
passwords for these services to prevent unauthorized
access. When these services are not in use, turn them off.
• Install or upgrade device security software and regularly scan
for viruses.
• Be sure to obtain third-party applications from a legitimate
source. Downloaded third-party applications should be
scanned for viruses.
• Install security software or patches released by Huawei or
third-party application providers.
96
Page 98

• Some applications require and transmit location information.
As a result, a third-party may be able to share your location
Legal Notice
information.
• Your device may provide detection and diagnostic
information to third-party application providers. Third party
vendors use this information to improve their products and
services.
• If you have concerns about the security of your personal
information and data, please contact [email protected].
Copyright © Huawei Technologies Co., Ltd. 2012. All
rights reserved.
No part of this document may be reproduced or transmitted in
any form or by any means without prior written consent of
Huawei Technologies Co., Ltd.
The product described in this manual may include copyrighted
software of Huawei Technologies Co., Ltd. and possible
licensors. Customers shall not in any manner reproduce,
distribute, modify, decompile, disassemble, decrypt, extract,
reverse engineer, lease, assign, or sublicense the said
software, unless such restrictions are prohibited by applicable
laws or such actions are approved by respective copyright
holders.
97
Page 99

Trademarks and Permissions
, , and are trademarks or registered
trademarks of Huawei Technologies Co., Ltd.
Third-Party Software Statement
Huawei Technologies Co., Ltd. does not own the intellectual
property of the third-party software and applications that are
delivered with this product. Therefore, Huawei Technologies
Android is a trademark of Google Inc.
Other trademarks, product, service and company names
mentioned are the property of their respective owners.
Notice
Some features of the product and its accessories described
herein rely on the software installed, capacities and settings of
local network, and therefore may not be activated or may be
limited by local network operators or network service providers.
Thus the descriptions herein may not match exactly the product
or its accessories you purchase.
Huawei Technologies Co., Ltd. reserves the right to change or
modify any information or specifications contained in this
manual without prior notice and without any liability.
98
Co., Ltd. will not provide any warranty of any kind for these thirdparty software and applications. Neither will Huawei
Technologies Co., Ltd. provide support to customers who use
these third-party software and applications, nor be responsible
or liable for the functions of these third-party software and
applications.
Third-party software and applications services may be
interrupted or terminated at any time. Huawei Technologies
Co., Ltd. does not guarantee that any content or service would
be maintained for any period during its availability. Third-party
service providers provide content and services through network
or transmission tools outside of the control of Huawei
Technologies Co., Ltd. To the greatest extent permitted by
applicable law, it is explicitly stated that Huawei Technologies
Page 100

Co., Ltd. shall not compensate or be liable for services provided
DISCLAIMER OF WARRANTIES
by third-party service providers, or the interruption or termination
of third-party contents or services.
Huawei Technologies Co., Ltd. shall not be responsible for the
legality, quality, or any other aspects of any software installed on
this product, or for any uploaded or downloaded third-party
works, such as texts, images, videos, or software. Customers
shall bear the risk for any and all effects, including incompatibility
between the software and this product, which result from
installing software or uploading or downloading the third-party
works.
This product uses the open-source Android™ platform. Huawei
Technologies Co., Ltd. has made necessary changes to the
platform. Therefore, this product may not support all the
functions that are supported by the standard Android platform
or may be incompatible with third-party software. Huawei
Technologies Co., Ltd. shall not be liable for any of such
THE CONTENTS OF THIS MANUAL ARE PROVIDED “AS
IS”. EXCEPT AS REQUIRED BY APPLICABLE LAWS, NO
WARRANTIES OF ANY KIND, EITHER EXPRESS OR
IMPLIED, INCLUDING BUT NOT LIMITED TO, THE IMPLIED
WARRANTIES OF MERCHANTABILITY AND FITNESS
FOR A PARTICULAR PURPOSE, ARE MADE IN RELATION
TO THE ACCURACY, RELIABILITY OR CONTENTS OF
THIS MANUAL.
LIMITATIONS OF LIABILITY
TO THE MAXIMUM EXTENT PERMITTED BY APPLICABLE
LAW, IN NO EVENT SHALL HUAWEI TECHNOLOGIES
CO., LTD. BE LIABLE FOR ANY SPECIAL, INCIDENTAL,
INDIRECT, OR CONSEQUENTIAL DAMAGES, OR LOST
PROFITS, BUSINESS, REVENUE, DATA, GOODWILL OR
ANTICIPATED SAVINGS.
situation.
99
 Loading...