

Page 1

U8100
AndroidTM Powered M obile Phon e
User Guide
Page 2

Wonderful Communication, Mobile Life.
HUAWEI U8100-9 Mobile Phone
User Guide
Page 3

Reading Before Proceeding . . . . . . . . . . . . . . . . . . . . . . . . . 1
Safety Precautions . . . . . . . . . . . . . . . . . . . . . . . . . . . . . . . . . . . . . . . 1
Notice and Copyright. . . . . . . . . . . . . . . . . . . . . . . . . . . . . . . . . . . . . . 4
Getting to Know Your Mobile Phone . . . . . . . . . . . . . . . . . . 7
What's in the Box . . . . . . . . . . . . . . . . . . . . . . . . . . . . . . . . . . . . . . . . 7
Mobile Phone View . . . . . . . . . . . . . . . . . . . . . . . . . . . . . . . . . . . . . . . 8
Getting Started with Your Mobile Phone. . . . . . . . . . . . . . . . . . . . . . 10
Power On or Off Your Mobile Phone. . . . . . . . . . . . . . . . . . . . . . . . . 13
Using the Touchscreen . . . . . . . . . . . . . . . . . . . . . . . . . . . . . . . . . . . 15
Locking and Unlocking the Screen . . . . . . . . . . . . . . . . . . . . . . . . . . 16
Home Screen . . . . . . . . . . . . . . . . . . . . . . . . . . . . . . . . . . . . . . . . . . 18
Canvas . . . . . . . . . . . . . . . . . . . . . . . . . . . . . . . . . . . . . . . . . . . . . . . 24
Notifications and Status Information . . . . . . . . . . . . . . . . . . . . . . . . . 30
Using a microSD Card. . . . . . . . . . . . . . . . . . . . . . . . . . . . . . . . . . . . 34
Calling . . . . . . . . . . . . . . . . . . . . . . . . . . . . . . . . . . . . . . . . . . 37
Making a Call. . . . . . . . . . . . . . . . . . . . . . . . . . . . . . . . . . . . . . . . . . . 37
Answering and Rejecting a Call . . . . . . . . . . . . . . . . . . . . . . . . . . . . 41
Using Call log . . . . . . . . . . . . . . . . . . . . . . . . . . . . . . . . . . . . . . . . . . 43
Other Operations During a Call. . . . . . . . . . . . . . . . . . . . . . . . . . . . . 44
Using the Airplane Mode. . . . . . . . . . . . . . . . . . . . . . . . . . . . . . . . . . 46
Contacts . . . . . . . . . . . . . . . . . . . . . . . . . . . . . . . . . . . . . . . . 47
Opening and Viewing Contacts. . . . . . . . . . . . . . . . . . . . . . . . . . . . . 47
Contents
i
Page 4

Adding and Deleting Contacts. . . . . . . . . . . . . . . . . . . . . . . . . . . . . . 52
Editing a Contact. . . . . . . . . . . . . . . . . . . . . . . . . . . . . . . . . . . . . . . . 54
Importing Contacts from a SIM Card. . . . . . . . . . . . . . . . . . . . . . . . . 57
Searching for a Contact. . . . . . . . . . . . . . . . . . . . . . . . . . . . . . . . . . . 58
Communicating with Your Contacts . . . . . . . . . . . . . . . . . . . . . . . . . 58
Using the Onscreen Keyboard . . . . . . . . . . . . . . . . . . . . . . 60
Displaying the Keyboard Panel. . . . . . . . . . . . . . . . . . . . . . . . . . . . . 60
Customizing Keyboard Settings . . . . . . . . . . . . . . . . . . . . . . . . . . . . 66
Messaging . . . . . . . . . . . . . . . . . . . . . . . . . . . . . . . . . . . . . . . 71
SMS and MMS . . . . . . . . . . . . . . . . . . . . . . . . . . . . . . . . . . . . . . . . . 71
Email . . . . . . . . . . . . . . . . . . . . . . . . . . . . . . . . . . . . . . . . . . . . . . . . . 78
Getting Connected. . . . . . . . . . . . . . . . . . . . . . . . . . . . . . . . 84
GPRS/3G . . . . . . . . . . . . . . . . . . . . . . . . . . . . . . . . . . . . . . . . . . . . . 84
Wi-Fi . . . . . . . . . . . . . . . . . . . . . . . . . . . . . . . . . . . . . . . . . . . . . . . . . 85
Browser. . . . . . . . . . . . . . . . . . . . . . . . . . . . . . . . . . . . . . . . . . . . . . . 86
Bluetooth. . . . . . . . . . . . . . . . . . . . . . . . . . . . . . . . . . . . . . . . . . . . . . 90
Connecting to a Computer via USB . . . . . . . . . . . . . . . . . . . . . . . . . 93
Modem Behavior. . . . . . . . . . . . . . . . . . . . . . . . . . . . . . . . . . . . . . . . 95
Entertainment. . . . . . . . . . . . . . . . . . . . . . . . . . . . . . . . . . . . 96
Taking Photos and Recording Videos. . . . . . . . . . . . . . . . . . . . . . . . 96
Using the Gallery. . . . . . . . . . . . . . . . . . . . . . . . . . . . . . . . . . . . . . . 101
Enjoying Music . . . . . . . . . . . . . . . . . . . . . . . . . . . . . . . . . . . . . . . . 104
Contents
ii
Page 5

Listening to FM Radio . . . . . . . . . . . . . . . . . . . . . . . . . . . . . . . . . . . 107
Google Services. . . . . . . . . . . . . . . . . . . . . . . . . . . . . . . . . 111
Creating a Google Account. . . . . . . . . . . . . . . . . . . . . . . . . . . . . . . 111
Using Gmail. . . . . . . . . . . . . . . . . . . . . . . . . . . . . . . . . . . . . . . . . . . 112
Using Talk . . . . . . . . . . . . . . . . . . . . . . . . . . . . . . . . . . . . . . . . . . . . 116
Using Maps . . . . . . . . . . . . . . . . . . . . . . . . . . . . . . . . . . . . . . . . . . . 119
Using YouTube . . . . . . . . . . . . . . . . . . . . . . . . . . . . . . . . . . . . . . . . 121
Using Market. . . . . . . . . . . . . . . . . . . . . . . . . . . . . . . . . . . . . . . . . . 122
Synchronizing Information . . . . . . . . . . . . . . . . . . . . . . . . 126
Managing Your Accounts . . . . . . . . . . . . . . . . . . . . . . . . . . . . . . . . 126
Customizing Your Account Synchronization . . . . . . . . . . . . . . . . . . 129
Using the PC Suite to Synchronize. . . . . . . . . . . . . . . . . . . . . . . . . 131
Using Other Applications . . . . . . . . . . . . . . . . . . . . . . . . . 132
Using the Calendar . . . . . . . . . . . . . . . . . . . . . . . . . . . . . . . . . . . . . 132
Using the Alarm. . . . . . . . . . . . . . . . . . . . . . . . . . . . . . . . . . . . . . . . 141
Using Sound Recorder . . . . . . . . . . . . . . . . . . . . . . . . . . . . . . . . . . 144
Using the File Manager. . . . . . . . . . . . . . . . . . . . . . . . . . . . . . . . . . 146
Using the Calculator . . . . . . . . . . . . . . . . . . . . . . . . . . . . . . . . . . . . 150
Using the Notepad. . . . . . . . . . . . . . . . . . . . . . . . . . . . . . . . . . . . . . 151
Managing Your Mobile Phone . . . . . . . . . . . . . . . . . . . . . . 152
Setting the Date and Time. . . . . . . . . . . . . . . . . . . . . . . . . . . . . . . . 152
Setting the Display . . . . . . . . . . . . . . . . . . . . . . . . . . . . . . . . . . . . . 153
Contents
iii
Page 6

Setting Ringers . . . . . . . . . . . . . . . . . . . . . . . . . . . . . . . . . . . . . . . . 154
Setting Phone Services. . . . . . . . . . . . . . . . . . . . . . . . . . . . . . . . . . 157
Setting Text-to-Speech . . . . . . . . . . . . . . . . . . . . . . . . . . . . . . . . . . 159
Protecting Your Mobile Phone. . . . . . . . . . . . . . . . . . . . . . . . . . . . . 160
Managing Applications . . . . . . . . . . . . . . . . . . . . . . . . . . . . . . . . . . 161
Resetting Your Mobile Phone . . . . . . . . . . . . . . . . . . . . . . . . . . . . . 163
Upgrading the Software Version . . . . . . . . . . . . . . . . . . . . . . . . . . . 164
Appendix. . . . . . . . . . . . . . . . . . . . . . . . . . . . . . . . . . . . . . . 167
Warnings and Precautions . . . . . . . . . . . . . . . . . . . . . . . . . . . . . . . 167
Contents
iv
Page 7
Reading Before Proceeding
Safety Precautions
Please read the safety precautions carefully to ensure the
correct use of your mobile phone. For detailed information, refer
to the section “Warnings and Precautions” on page 167.
Do not crash, throw, or puncture your mobile
phone. Avoid the falling, squeezing, and
bending of your mobile phone.
Do not use your mobile phone in a moist
environment, such as the bathroom. Prevent
your mobile phone from being soaked or
washed in liquid.
Do not switch on your mobile phone when it is
prohibited to use phones or when the phone
may cause interference or danger.
Do not use your mobile phone while driving.
Reading Before Proceeding
1
Page 8
Follow any rules or regulations in hospitals and
health care facilities. Switch off your mobile
phone near medical apparatus.
Switch off your mobile phone in aircraft. The
phone may cause interference to control
equipment of the aircraft.
Switch off your mobile phone near highprecision electronic devices. The phone may
affect the performance of these devices.
Do not attempt to disassemble your mobile
phone or its accessories. Only qualified
personnel are allowed to service or repair the
phone.
Do not place your mobile phone or its
accessories in containers with a strong
electromagnetic field.
Do not place magnetic storage media near
your mobile phone. Radiation from the phone
may erase the information stored on them.
Reading Before Proceeding
2
Page 9
Do not put your mobile phone in a hightemperature place or use it in a place with
flammable gas such as a gas station.
Keep your mobile phone and its accessories
away from children. Do not allow children to
use your mobile phone without guidance.
Use only approved batteries and chargers to
avoid the risk of explosions.
Observe any laws or regulations on the use of
wireless devices. Respect others’ privacy and
legal rights when using your wireless device.
Strictly follow the relevant instructions of this
manual while using the USB cable. Otherwise
your mobile phone or PC may be damaged.
Reading Before Proceeding
3
Page 10
Notice and Copyright
Copyright © Huawei Technologies Co., Ltd. 2010. All rights reserved.
No part of this document may be reproduced or transmitted in
any form or by any means without prior written consent of
Huawei Technologies Co., Ltd.
The product described in this manual may include copyrighted
software of Huawei Technologies Co., Ltd. and possible
licensors. Customers shall not in any manner reproduce,
distribute, modify, decompile, disassemble, decrypt, extract,
reverse engineer, lease, assign, or sublicense the said so ftware,
unless such restrictions are prohibited by applicable laws or
such actions are approved by respective copyright holders
under licenses.
Trademarks and Permissions
, , and are trademarks or registered trademarks
of Huawei Technologies Co., Ltd.
Other trademarks and product, service and company names
mentioned are the property of their respective owners.
Reading Before Proceeding
4
Page 11

Notice
Some features of the product and its accessories described
herein rely on the software installed, capacities and settings of
local network, and may not be activated or may be limited by
local network operators or network service providers. Thus the
descriptions herein may not exactly match the product or its
accessories you purchase.
Huawei Technologies Co., Ltd. reserves the right to change or
modify any information or specifications contained in this
manual without prior notice or obligation.
Huawei Technologies Co., Ltd. is not responsible for the
legitimacy and quality of any products that you upload or
download through this mobile phone, including but not limited to
the text, pictures, music, movies, and non-built-in software with
copyright protection. Any consequences arising from the
installation or usage of the preceding products on this mobile
phone shall be borne by yourself.
NO WARRANTY
THE CONTENTS OF THIS MANUAL ARE PROVIDED “AS IS”.
EXCEPT AS REQUIRED BY APPLICABLE LAWS, NO
Reading Before Proceeding
5
Page 12

WARRANTIES OF ANY KIND, EITHER EXPRESS OR
IMPLIED, INCLUDING BUT NOT LIMITED TO, THE IMPLIED
WARRANTIES OF MERCHANTABILITY AND FITNESS FOR A
PARTICULAR PURPOSE, ARE MADE IN RELATION TO THE
ACCURACY, RELIABILITY OR CONTENTS OF THIS
MANUAL.
TO THE MAXIMUM EXTENT PERMITTED BY APPLICABLE
LAW, IN NO CASE SHALL HUAWEI TECHNOLOGIES CO.,
LTD. BE LIABLE FOR ANY SPECIAL, INCIDENTAL,
INDIRECT, OR CONSEQUENTIAL DAMAGES, OR LOST
PROFITS, BUSINESS, REVENUE, DATA, GOODWILL OR
ANTICIPATED SAVINGS.
Import and Export Regulations
Customers shall comply with all applicable export or import laws
and regulations and will obtain all necessary governmental
permits and licenses in order to export, re-export or import the
product mentioned in this manual including the software and
technical data therein.
Reading Before Proceeding
6
Page 13

Getting to Know Your Mobile Phone
Your mobile phone can operate in almost all countries, so you'll
be able to enjoy communications wherever you are using your
mobile phone.
What's in the Box
Look. in your mobile phone box and you will find much more in
there than your new mobile phone– in fact, you will have all
these handy items:
• Mobile phone
• Battery
• Charger
• USB cable
• Quick start guide
• Safety information
Getting to Know Your Mobile Phone
7
Page 14
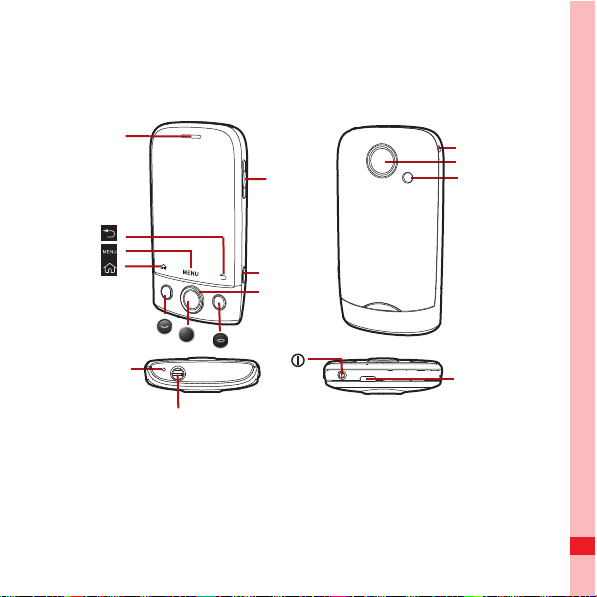
Mobile Phone View
j
Key Features at a Glance
Earpiece
ok
key
Microphone
Headset
ack
Getting to Know Your Mobile Phone
Volume
control keys
Camera key
Navigation key
Wrist strap
opening
Camera
Speaker
Charging/Data
interface
8
Page 15
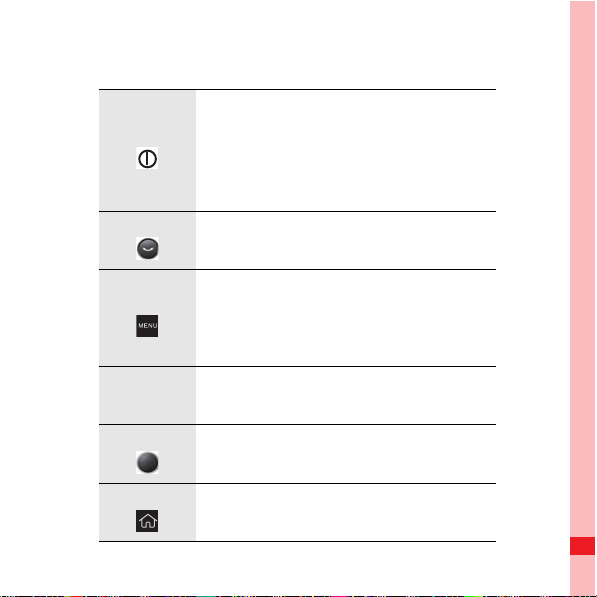
Key Functions at Your Fingertips
• Press to power on your mobile phone.
• Press and hold to open the Phone
options menu.
• Press to lock the screen when your
mobile phone is on.
• Press to go to the Call log tab.
• Press to open the menu on an active
screen.
• Press and hold to open the keyboard
so you can perform quick searches.
Navigation
key
Press to navigate selectable items on
the screen.
Press to select a highlighted item or
ok
key
action.
Press to return to the Home screen.
Getting to Know Your Mobile Phone
9
Page 16

Press to return to the previous screen or
exit the application you are running.
• Press to hang up a call.
• Press to return to the Home screen.
Note:
To customize the function of the End key, touch Settings > General i nfo
& option > End button behavior.
Getting Started with Your Mobile Phone
Installing the SIM Card
1 2
1. Remove the battery cover.
2. Insert the SIM card as shown in the diagram.
Getting to Know Your Mobile Phone
10
Page 17
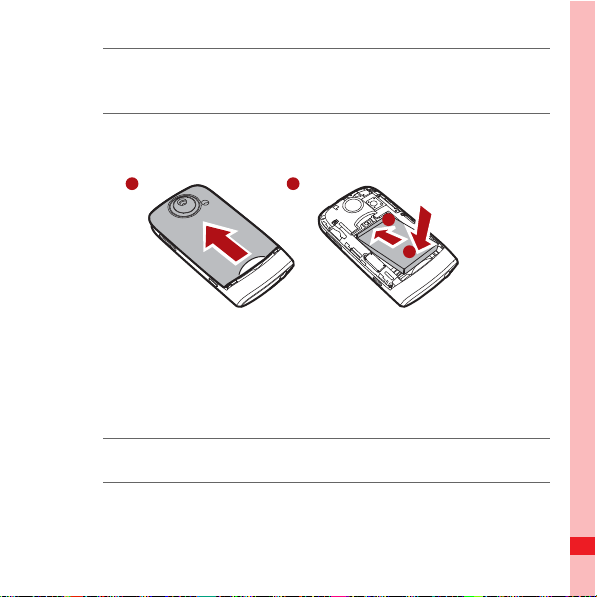
Note:
When inserting the SIM card, ensure that the golde n contact faces
downward.
Installing the Battery
1
2
a
b
1. Remove the battery cover.
2. Insert the battery at a downward angle (a) and move it slightly
forward until it snaps into place at (b).
3. Replace the battery cover.
Note:
Ensure that the printed side of the battery faces up ward.
Getting to Know Your Mobile Phone
11
Page 18
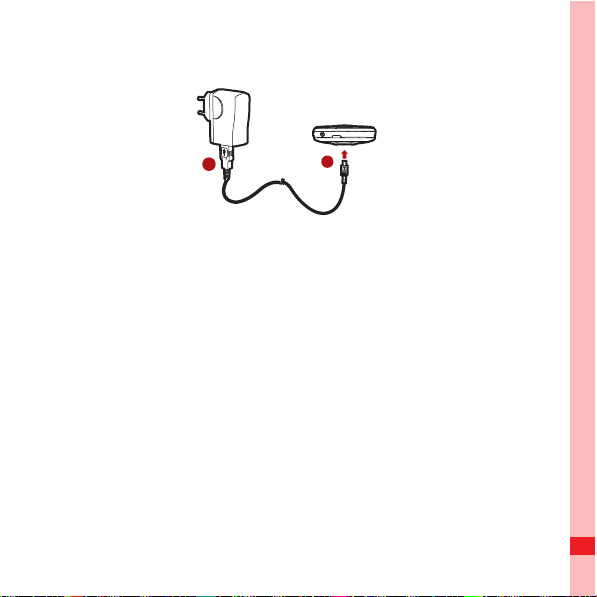
Charging the Battery
a
b
Before charging the battery, ensure that the battery has been
properly inserted into your phone.
1. Connect the USB cable that is delivered with your mobile
phone to the charger, as shown in a.
2. Connect the USB cable to your mobile phone, as shown in b.
Then, plug in the connector of the charger to an electrical
outlet.
Important Information About the Battery
• If the battery has not been used for a long time, your mobile
phone might not power on instantly when it is being charged.
Allow the battery to charge for a while, and you should be able
to power it on for use.
Getting to Know Your Mobile Phone
12
Page 19
• Over time, the battery will not hold a charge for as long as it did
when it was new. When the battery life becomes noticeably
shorter than usual after being charged properly, replace it with
a battery of the same type.
• Using data services will reduce the standby time significantly.
• The time required to charge the battery depends on the
environmental temperature and the age of the battery.
• When the battery power level is low, the phone plays an alert
and displays a prompt. When the battery is extremely low, the
phone will power off automatically.
Power On or Off Your Mobile Phone
Powering On Your Mobile Phone
Press . The first time you do this, you will be asked to sign in
to your account and set up your mobile phone.
Note:
When personal identification number (PIN) protection is enabl ed on your
mobile phone, you must enter the PIN before using t he mob ile phone .
Getting to Know Your Mobile Phone
13
Page 20

Setting up Your Mobile Phone
The first time you power on your mobile phone, the phone
displays a setup wizard to instruct you on how to set up the
phone.
The setup wizard includes the following parts:
• Using the onscreen keyboard
• Setting up your accounts
• Important settings
1. Touch the Android image to learn a few important things to get
the most out of your phone.
2. Touch Begin to start learning how to use the onscreen
keyboard.
3. Touch Skip to continue.
4. Touch the Google account, Email account, icon to access
the relevant settings.
5. After you set an email account, a check mark appears on the
relevant email icon. You can also touch Skip to set an
account later and go to the next step.
Getting to Know Your Mobile Phone
14
Page 21
6. If you want to enable the data service, select the Enable data
service check box, and then touch Next.
7. You'll be prompted whether to enable the Google location
service. This service gives you basic information about your
location without using GPS. Then touch Next to go to the next
step.
8. Set the date and time. If you want to set the time manually
rather than use the system time, clear the Automatic check
box. Touch Finish setup to finish and go to the Home screen.
Powering Off Your Mobile Phone
1. Press and hold to open the Phone options menu.
2. Touch Power off.
3. Touch OK when prompted to power off the mobile phone.
Using the Touchscreen
Touchscreen Actions
• Touch: Use the pressure of your fingertip to select an item.
Getting to Know Your Mobile Phone
15
Page 22

• Touch and hold: Use the pressure of your fingertip to select
an item and continue to press until your mobile phone
responds. For example, you can touch and hold the screen to
open the option menu of the active screen.
• Flick: Move your finger across the screen either vertically or
horizontally. For example, you can flick your finger left and
right to switch between pictures.
• Drag: Touch and hold the desired item with your finger. Then,
to move the item, drag it to any part of the screen.
Rotating Your Mobile Phone Screen
On most screens, the orientation of the screen rotates with the
phone as you turn it from upright to sideways and back again.
Locking and Unlocking the Screen
Locking the Screen
• When your mobile phone is on, press to lock the screen.
When the screen is locked, you can still receive messages and
calls.
• If you leave your mobile phone undisturbed for a while, the
screen will lock automatically.
Getting to Know Your Mobile Phone
16
Page 23
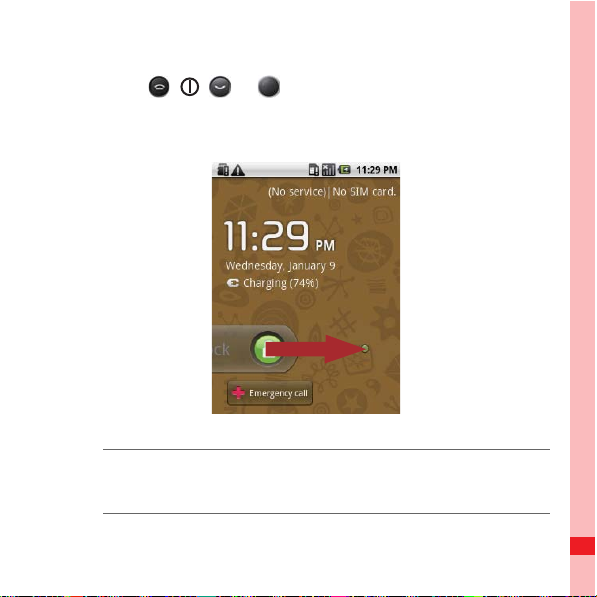
Unlocking the Screen
ok
key
Press , , , or to wake up the screen. Then drag the
lock icon from left to right to unlock the screen.
Note:
If you have set up a screen unlock pattern, you will be prompted to draw
the pattern on the screen to unlock it.
Getting to Know Your Mobile Phone
17
Page 24
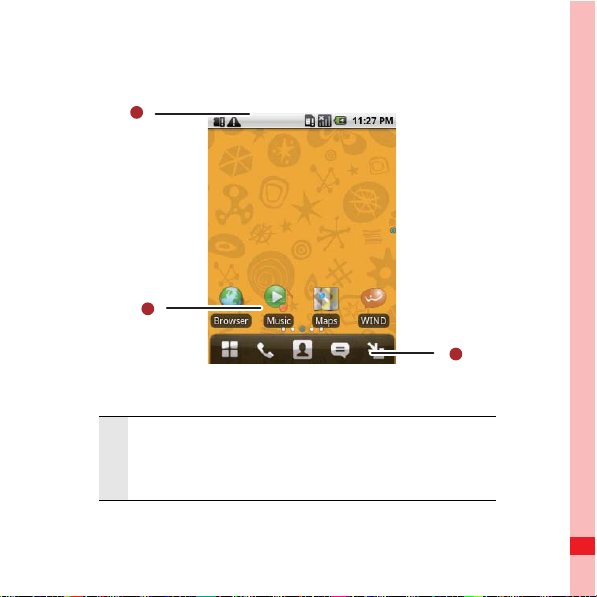
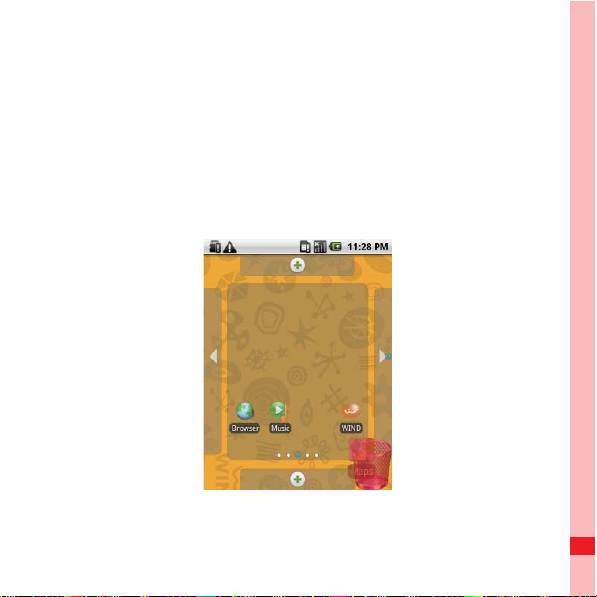
Home Screen
1
2
Notification bar: Displays the notifications and
1
status icons of your mobile phone. Flick down to
open the notification panel.
3
Getting to Know Your Mobile Phone
18
Page 25
Display area: Shows the operation and display
2
areas of your mobile phone.
Interface switching buttons: include the Main
3
Menu, Dialer, Contacts, Messages, and Zoom
buttons.
Extending the Home Screen
• On the Home screen, flick your finger across the screen to go
to the every sides of the extended Home screen.
Getting to Know Your Mobile Phone
19
Page 26
Getting to Know Your Mobile Phone
20
Page 27
• Touch Zoom button to zoom out home screen. you can slide
the screen and double click to zoom in.
Customizing the Screen
Adding a New Screen Item
1. Touch and hold the blank area on the Home screen until the
Add to Home screen menu is displayed.
Getting to Know Your Mobile Phone
21
Page 28
2. Select an item to add it to the Home screen.
Moving a Screen Item
1. Touch and hold an icon on the Home screen until the icon
magnifies and the mobile phone vibrates.
2. Without lifting your finger, drag the icon to the desired position
on the screen, and then release it.
Getting to Know Your Mobile Phone
22
Page 29
Removing a Screen Item
1. Touch and hold an icon on the Home screen until the icon
magnifies and the mobile phone vibrates.
2. Without lifting your finger off the item, drag it to the trash can.
The item and the trash can will turn red, meaning the item is
ready to be removed.
3. Release the item to remove it from the Home screen.
Getting to Know Your Mobile Phone
23
Page 30

Canvas
Getting to Know the Canvas
The Canvas is like a desktop. You can expand it and customize
it. You can:
• Expand the screen display in any direction.
• Customize the Home screen.
• Create and arrange shortcuts.
• Create and arrange widgets.
• Create and arrange folders.
• Define and switch between wallpapers.
Expanding the Canvas
To expand the Canvas, touch and hold an icon, drag it to the
edge of the Canvas, and then release it.
When you move an icon to an edge of the screen to expand, you
will see the following icons displayed on the sides of the Canvas.
Getting to Know Your Mobile Phone
24
Page 31

Expand the desktop.
The desktop cannot be expanded at this time.
Getting to Know Your Mobile Phone
25
Page 32

Widgets
A widget works as a shortcut to let you preview or use an
application. You can stick widgets on your desktop as icons or
preview windows. Besides the default widgets installed on your
phone, you can also download more from Android Market.
To add a widget to the Canvas:
1. Touch and hold the blank area on the Canvas screen.
2. In the displayed menu, select Android widgets or Emotion
widgets in which contains the widget you want to use.
3. Touch your desired widget.
Folders
Creating a Folder
1. Touch and hold the screen to open the Add to Home screen
menu, and then select Folders.
Getting to Know Your Mobile Phone
26
Page 33

2. Choose one of various types of folders to create folders.
3. To add a shortcut to the folder, touch and hold an application
or a shortcut icon to activate the move mode. Then drag it to
the top of the folder.
4. Touch the folder to open it. When the folder is opened, touch
the title bar of the folder to close it.
Getting to Know Your Mobile Phone
27
Page 34

Note:
When the move mode is activated, the item magnifies and t he phon e
vibrates.
Renaming a Folder
1. Touch the folder to open it. Then touch and hold the title bar of
the folder to open the Rename folder dialog box.
2. Enter the new folder name, and then touch OK.
Changing the Wallpaper
1. On the Home screen, press , and then touch Wallpaper.
2. Do any of the following:
Getting to Know Your Mobile Phone
28
Page 35

• Touch Live wallpapers to select a picture and set it as the
wallpaper.
• Touch Pictures to select a picture and set it as the
wallpaper.
• Touch Wallpaper gallery to select a picture and set it as the
wallpaper.
Changing a Theme
Your phone is preset with four themes. When you feel bored with
one theme, change it to another one.
1. On the Home screen, press , and then touch Themes.
2. Touch the theme you want to use. Your theme will be
changed automatically.
Getting to Know Your Mobile Phone
29
Page 36

Notifications and Status Information
Notification and Status Icons
Call in progress
Call in progress
Call forwarding on Call on hold
Missed call Connected to a PC
System error Memory is full
using a Bluetooth
device
Problem with sign-in
or synchronization
Downloading data Uploading data
Roaming Signal strength
No signal Airplane mode
Synchronizing data
Getting to Know Your Mobile Phone
Preparing mircoSD
card
Synchronization
failed
30
Page 37

Connected to
Bluetooth is on
another Bluetooth
device
Wi-Fi is on
Connected to a Wi-Fi
network
GPS is on GPS connected
More undisplayed
notifications
Sound off Speaker on
Vibrate mode Mobile phone is mute
GPRS connected GPRS in use
EDGE connected EDGE in use
3G connected 3G in use
Battery is full Battery is very low
Battery is charging Alarm is set
Getting to Know Your Mobile Phone
No SIM card
31
Page 38

Music is playing
New calendar
reminder
New email New message
New voicemail
New instant
message
Notification Panel
Your mobile phone will tell you when you receive a new
message or when an event in your calendar is due. The
notification panel also informs you about alarms and settings —
for example, when Call forwarding is activated. Open the
notification panel to see who the wireless network operator is, or
view a message, reminder, or event notification.
Opening the Notification Panel
1. When a new notification icon appears on the notification bar,
touch and hold the notification bar, and then flick down to
open the notification panel.
2. On the notification panel, you can do the following:
• Touch a notification to open the related application.
Getting to Know Your Mobile Phone
32
Page 39

• Touch Clear to clear all notifications.
Closing the Notification Panel
Touch and hold the bottom of the panel. Then flick up or touch
to close the notification panel.
Getting to Know Your Mobile Phone
33
Page 40

Using a microSD Card
Installing the microSD Card
1 2
1. Remove the battery cover.
2. Insert the microSD card as shown in the diagram.
Getting to Know Your Mobile Phone
34
Page 41

Note:
When inserting the microSD card, make sure that the golden cont act
faces downwards.
Using the microSD Card as USB Mass Storage
To transfer all your favorite music and pictures from your PC
onto your mobile phone’s microSD card, set the microSD card
as USB mass storage.
1. Connect your mobile phone to your PC with the USB cable.
2. Open the notification bar, and then touch USB connected.
3. Touch Mount in the dialog box that opens to confirm that you
want to transfer files. Your PC will detect the microSD card as
a removable disk. You can now transfer files from your PC to
your mobile phone’s microSD card.
Tip:
You can also touch > Settings > General info & option, and then
select the USB Mass Storage check box to use the microSD card as the
USB mass storage.
Getting to Know Your Mobile Phone
35
Page 42

Note:
When your microSD card acts as USB mass storage, your mobile phone
will not use this memory space. Your PC will tell you how to safely
disconnect the USB mass storage device (your mobile phone) when you
have finished transferring files.
Removing the microSD
1. Touch > Settings.
2. Scroll down the screen, and then touch SD card & phone
storage > Unmount SD card.
3. Carefully remove the microSD card.
Getting to Know Your Mobile Phone
36
Page 43

Calling
To place a phone call, you can dial a number or touch a number
in your contacts list, on a Web page, or from a document that
contains a phone number. When you are on a call, you can
either answer incoming calls or send them to your voicemail box.
You can also set up conference calls with several participants.
Making a Call
To make a call, you can use the Dialer application, or select a
number from Contacts or Call log.
While you are on a call, you can press to return to the Home
screen and use other functions. To return to the calling screen,
flick the notification bar down and touch Current call.
Note:
Do not block the microphone at the bottom of your phone if you want your
voice heard.
Calling
37
Page 44

Making a Call with the Dialer
1. Touch > Dialer to display the dialer.
If you are already working with Contacts or Call log, touch the Dialer
tab.
2. Touch the appropriate numerical keys to enter the phone
number.
Tip: Your mobile phone supports the SmartDial function, that is, when
you touch numbers on the dialer, the phone automatically
searches among your contacts and lists the matching results
based on the accuracy. If no contact is matched with your entered
information, the phone will not display any result.
3. Press or touch to initiate the call.
During a call, flick up the Dialpad tab to enter other numbers on the
dialpad.
Calling
38
Page 45

Dialing Panel
1
2
3
4
Touch to switch between Dialer, Call log,
1
Contacts, and Favorites.
2 Displays the number you enter.
3 Touch to enter the number.
Calling
8
7
6
5
39
Page 46

4 Touch to make a voicemail.
5 Touch to dial.
Touch to erase each subsequent digit of a
number. Touch and hold to erase the entire
6
number.
7 Touch and hold to enter +.
8 Touch to display all the matching contacts.
Making a Call from Contacts
1. Touch > Contacts to display the contact list.
If you are already working with Dialer or Call log, touch the Contacts
tab.
2. In the list, touch the contact you want to call.
3. Touch to dial the phone number.
Calling
40
Page 47

Making a Call from Call log
1. Touch > Call log to display the call log.
If you are already working with Contacts or Dialer, touch the Call log
tab.
2. Touch to the right of the log entry to dial.
Tip: If you touch and hold the log entry, the options menu for
communicating with that contact in other ways will open.
Answering and Rejecting a Call
Answering an Incoming Call
When you receive a phone call, the incoming call screen opens
with the caller ID and any additional information about the caller
that you have entered in Contacts.
• Press to answer the call.
• Drag the to the right.
Calling
41
Page 48

Ending a Call
During a call, press to hang up.
Rejecting an Incoming Call
• Press to reject a call.
• Drag the to the left.
Calling
42
Page 49

Using Call log
The Call log contains a list of the last calls that you have dialed,
received, or missed. You can use the call log to quickly find a
recently called number or add an incoming number to your
contact list.
Calling
43
Page 50

Adding an entry to Contacts
1. Touch > Call log to display the call log.
2. Touch and hold the entry you want to add.
3. Touch Add to contacts in the options menu.
Other Operations During a Call
Making a Conference Call
If you receive a new call while you are already on a call, you can
connect the second call to the call you are on. This feature is
known as conference calling. You can also set up a conference
call with multiple callers.
Note:
Contact your wireless service provider to l earn whether it su ppor ts
conference calls and how many participants you can add.
1. To initiate a conference call, dial the number of the f irst person
to be on the call. While you are on that call, press
then touch Add call.
, and
Calling
44
Page 51

2. Enter the phone number of the person you want to join the
conversation and press
, or select someone from your Call
log or Contacts. The first call is automatically placed on hold.
3. Once you have connected to the person you have added,
press
, and then touch Merge calls to begin the
conference call.
4. To add more people, touch Add call and repeat steps 2 and
3.
5. To drop someone from the call or to talk privately to one
person, press
, and then touch Manage conference call.
6. To end the conference call and disconnect everyone, press
.
Switching Between Calls
If you receive a new call while you are already on a call, you can
switch between the two calls.
1. While you are on two calls, press , and then touch Swap
calls.
Calling
45
Page 52

2. The current call is placed on hold and you are connected to
the other call.
Using the Airplane Mode
Some locations may require you to turn off your phone’s
wireless connections. Rather than powering off your phone, you
can place it in Airplane mode.
1. Press and hold the Power key.
2. Touch Airplane mode in the options menu.
Calling
46
Page 53

Contacts
The Contacts application enables you to save and manage
information such as phone numbers and addresses of your
contacts. After you save the contact information on your mobile
phone, it gives you easy access to the people with whom you
want to communicate.
Opening and Viewing Contacts
Opening the Contacts Application
If you have a new mobile phone and have not yet added any
contacts,Contacts displays a message with hints on how to
start adding contacts to your mobile phone.
• Touch > Contacts.
• Press , and then touch the Contacts tab.
All of your contacts are displayed alphabet ically in a scrolling list.
Each contact is followed by the phone number that you have
specified as the person's default phone number.
Contacts
47
Page 54

Quick Contact for Android
As you build up your list of contacts on your phone, you can use
Quick Contact for Android in many applications to quickly start a
chat, email, or text message, to place a call, or to locate your
contacts. Quick Contact for Android is a special icon that you
can touch to open a bubble with options for quickly initiating a
connection to that contact.
Contacts that you can access with Quick Contact are displayed
differently in different applications, but usually with a picture
frame.
Contacts
48
Page 55

2
1
Quick Contact icon with a picture frame.
1
Touch to open a bubble with icons for all the ways
you can communicate with the contact.
3
Contacts
49
Page 56

A bubble with icons for all the ways you can
communicate with the contact.
2
If there are more icons than can fit in the bubble,
drag the icons left or right to view them all.
Touch an icon to open its application, and you can
3
start communicating with your contact right away.
Opening a List of Your Favorite Contacts
The Favorites tab contains a short list of the contacts with
whom you communicate most often.
To open a list of your favorite contacts, touch the Favorites tab
in the contacts list.
Viewing Contact Details
To view contact details, touch the contact whose details you
want to view. Detailed information such as the phone number, email address, and physical address appears for each contact.
Contacts
50
Page 57

Contact details
1
Touch an icon to open Quick Contact. Please refer
1
“Quick Contact for Android” on page 48.
to
2 Touch an address to view it on maps.
Contacts
5
4
3
2
51
Page 58

Touch an icon to call, send a message, chat, and
3
so on.
Touch the History tab to view a list of interactions
4
you have had with this contact.
5 Touch to add the contact to your favorites.
Adding and Deleting Contacts
You can add or delete contacts on your mobile phone and
synchronize them with the contacts in your accounts that
support synchronizing contacts.
Adding a Contact
1. In the contacts list, press , and then touch Create contact.
Tip: In the contacts list, you can touch to add a new contact.
2. If you have more than one account with contacts, touch the
account to which you want to add the contact.
3. Enter the contact's name, and then add any detailed
information such as phone number or address.
Contacts
52
Page 59

4. When you are finished, touch Done to save the contact
information.
Deleting a Contact
1. In the contacts list, touch and hold the contact that you want to
delete, and then touch Delete contact in the options menu.
2. Touch OK to confirm that you want to delete the contact.
Adding a Contact to Your Favorites
To add a contact to your favorites, you can do any of the
following while you are in the contacts list:
• Touch and hold the contact you want to add to Favorites. Then
touch Add to Favorites.
• Access the favorites list, press , and then touch Add
favourites to select the contacts you want to add to Favorites.
• Touch a contact, and then touch the star to the right of the
contact’s name. The star turns gold.
Contacts
53
Page 60

Removing a Contact from Your Favorites
To remove a contact from your favorites, you can do any of the
following while you are in the favorites list:
• Touch and hold the contact you want to delete from Favorites.
Then touch Remove from Favorites.
• Press , and then touch Remove favourites to select the
contacts you want to remove from Favorites.
• Touch a contact, and then touch the star to the right of the
contact’s name. The star turns gray.
Editing a Contact
You can always make changes to the information you have
stored for a contact.
1. In the contacts list, touch and hold the contact whose details
you want to edit, and then touch Edit contact in the options
menu.
You can also press , and then touch Edit contact while viewing a
contact’s details.
Contacts
54
Page 61

2. If you have more than one account with contacts, touch the
account in which you want to edit the contact.
3. Touch a category of contact information, such as contact’s
name, phone number or email address, to enter that kind of
information about your contact.
4. Make the desired changes to the contact information, and
then touch Done. To cancel all changes you made to the
contact information, touch Cancel.
Contacts
55
Page 62

Contact Editing Screen
1
2
Touch the Picture Frame icon to select a picture to
1
display next to the name in your list of contacts
and in other applications.
5
4
3
Contacts
56
Page 63

Touch to open a menu with preset labels, such as
Mobile and Work for a phone number, or touch
2
Custom in the menu to create your own label.
3 Touch to remove the entry from that category.
Touch to add more than one entry for that
4
category.
Touch to display more text boxes for entering the
5
name details such as middle name and last name.
Importing Contacts from a SIM Card
When you open the Contacts application for the first time, you
are asked whether to import contacts from the SIM card to your
phone. Select Yes to import the contacts, or No to import them
later.
1. In the contacts list, press , and then touch Manage
contacts.
2. Touch Copy from SIM card. Wait for th e SIM card contents to
be loaded.
Contacts
57
Page 64

3. Select the check box of the contact you want to import.
4. Touch Copy.
5. If you have more than one account on your phone, touch the
account into which you want to import the contacts.
Searching for a Contact
1. In the contacts list, press , and then touch Search.
Tip: In the contacts list, you can also touch to search for a contact.
2. Enter the name of the contact for which you are searching. As
you type, contacts with matching names appear below the
search box.
Communicating with Your Contacts
From the Contacts or Favorites tab, you can quickly call or
send a text (SMS) or multimedia message (MMS) to a contact’s
default phone number. You can also open details to view a list
of all the ways you can communicate with that contact. This
section describes ways to initiate communication when viewing
your list of contacts.
Contacts
58
Page 65

Connecting Through Quick Contact for Android
1. Touch the contact's picture or picture frame (if you have not
assigned a picture to the contact) to open Quick Contact for
Android.
2. Touch the icon for the way you want to communicate with the
contact.
Note: The icons available depend on the information you have for the
contact and the applications and accounts on your mobile
phone.
Communicating with a Contact
1. In the contacts list, touch the contact that you want to
communicate.
2. In the contact’s details screen, touch the green icon to the
right of the number to call or send messages.
Contacts
59
Page 66

Using the Onscreen Keyboard
Displaying the Keyboard Panel
To enter text, use the onscreen keyboard. Some applications
open the keyboard automatically. In others, touch a text field to
open the keyboard. To open the keyboard, do one of the
following:
• Press and hold to show the keyboard.
• Touch the space where you want to write text to show the
keyboard.
• Touch and hold the space where you usually write your text to
open the options menu.
Press to hide the keyboard.
Choosing an Input Method
1. On the text screen, touch and hold the space where you
usually write your text until the Edit text menu is displayed.
2. Touch Input method.
Using the Onscreen Keyboard
60
Page 67

3. Choose the input method.
The keyboard panel will be automatically displayed.
Using the TouchPal Keyboard Panel
1
2
3
Using the Onscreen Keyboard
9
8
7
4
6
5
61
Page 68

Displays the list of candidate words. Touch a word
to insert it into your text. If word suggestions is
1
enabled, the suggested word is highlighted. To
enable the function, please refer to
“Customizing
Keyboard Settings” on page 66.
2 Change from uppercase to lowercase.
3 Enable the word prediction.
Set the language for your mobile phone. To select
a language that your mobile phone supports, to
4
> Settings > Language & keyboard >
TouchPal > Select languages.
5 Touch to insert a space.
Switch to the numbers and symbols keyboard
6
panel.
7 Touch to add a carriage return.
Using the Onscreen Keyboard
62
Page 69

Touch to delete the character to the left side of the
cursor. Touch and hold to delete all characters to
8
the left side of the cursor.
9 Touch to see more candidate words.
Switching the Keyboard Layout
You can switch the keyboard layout only when TouchPal is
selected.
There are three keyboard layouts you can choose: Full
QWERTY , 12–key PhonePad, and CooTek T+.
To switch the keyboard layout, touch and hold one side of the
keyboard panel, and then flick the panel to the edge of the
screen.
Using the Onscreen Keyboard
63
Page 70

1
2
3
1 Full QWERTY.
2 12–key PhonePad.
3 CooTek T+.
Note:
When you switch the keyboard layout, you need to touch and ho ld
anywhere on the panel and then flick the panel t o the edge of t he screen.
Using the Onscreen Keyboard
64
Page 71

Using the Android Keyboard
1
2
1 Change from lowercase to uppercase.
Change from the text mode to the symbol/number
2
mode. Touch again to change back.
3 Touch to insert a space.
Using the Onscreen Keyboard
5
4
3
65
Page 72

4 Touch to insert a smile in your text.
Touch to delete a character to the left of the
cursor. Touch and hold to delete all characters to
5
the left of the cursor.
Using the Landscape Keyboard
If you find the keyboard a little inconvenient or difficult to use,
turn your mobile phone sideways to have a wider keyboard
layout. The screen will present the keyboard with a landscape
orientation.
Customizing Keyboard Settings
Touch > Settings > Language & keyboard > TouchPal to
customize the TouchPal settings.
Word
prediction
Using the Onscreen Keyboard
Select to enable the word prediction
while typing.
66
Page 73

Key press
sound
Select to play a brief sound each time
you touch a key on the onscreen
keyboard.
Key press
vibration
Layout in
portrait mode
Layout in
landscape
mode
Swipe to
switch layout
Mixed
language
input
Using the Onscreen Keyboard
Select to have the phone vibrate
briefly each time you touch a key on
the onscreen keyboard.
Select the layout to display in portrait
mode.
Select the layout to display in
landscape mode.
Select check box to be able to swipe
horizontally over the keyboard to
switch layout.
Select check box to enable mobile
phone to auto detect language if no
more than 3 languages have been
selected.
67
Page 74

Select
languages
Select the languages you want to
use.
Predict next
word
Correct
mistyping
Slide-down
symbols
Relevant
words
Help
TouchPal
Select check box to enable the ability
to predict the next word when you are
typing.
Select to automatically correct some
common misspellings as you type.
Select check box to enable you to
slide down on keys to enter symbols.
Select check box to enable you to
slide on candidate words for
synonyms or other relevant.
Access the online user manual for
using TouchPal.
View the version of TouchPal.
Touch > Settings > Language & keyboard > Android
keyboard to customize the Android keyboard settings.
Using the Onscreen Keyboard
68
Page 75

Vibrate on
keypress
Select to have the phone vibrate
briefly each time you touch a key on
the onscreen keyboard.
Sound on
keypress
Select to play a brief sound each time
you touch a key on the onscreen
keyboard.
Select to have the onscreen keyboard
Autocapitalization
automatically capitalize the first letter
of the first word after a period, the first
word in a text field, and each word in
name fields.
Quick fixes
Show
suggestions
Using the Onscreen Keyboard
Select to automatically correct some
common misspellings as you type.
Select to show suggested words in a
strip above the onscreen keyboard as
you type.
69
Page 76

Autocomplete
Select to automatically enter a
suggested word, highlighted in orange
in the strip above the keyboard, when
you enter a space or punctuation.
Using the Onscreen Keyboard
70
Page 77

Messaging
The Messaging application allows you to exchange text
messages (SMS) and multimedia messages (MMS) with your
friends on their mobile phones. With the Email application you
can read and send email.
SMS and MMS
Text messages: One text message can contain up to 160
characters. You can send a text message of any length, but
every 160 characters or portion thereof will be charged as one
text message. For recipients, the message will count as just one
text message.
Multimedia messages: Multimedia messages make everyday
messages extra special. You can record a message and send it
as an audio file or send a slideshow of photographs. For
example, you can sing "Happy Birthday" to someone, send them
a video message, or send photos of a special event.
Messaging
71
Page 78

Opening Messaging
• Touch on the Home screen.
• Touch > Messaging.
Creating and Sending a Text Message
1. Touch > Messaging > New message.
2. Enter a phone number in the To field, or touch + to select a
number from Contacts.
As you enter the phone number, matching contacts appear. You can
touch a suggested recipient or continue entering the phone number.
3. Touch the composition text box to start entering your
message.
If you press while composing a message, it is saved as a draft in
your message list. Touch the message to resume composing it.
4. Once you are done, touch Send.
Messaging
72
Page 79

The message list opens, and your name appears in the list,
followed by the message you just sent. Responses appear in the
window. As you view and send additional messages, a message
thread is created.
Messaging
73
Page 80

Text Message Editing Screen
1
2
Touch to enter a mobile phone number or the
1
name of a contact with a mobile number.
2 Touch to start entering your message.
3 Touch to send the message.
Messaging
3
74
Page 81

Creating and Sending a Multimedia Message
1. Touch > Messaging > New message.
2. Enter a phone number in the To field, or touch + to select a
number from Contacts.
You can also press , and then touch Add recipient to add more
recipients.
3. Touch the composition text box to start entering your
message.
Tip: If you want to enter a smiley face, , and then touch Insert
smiley.
4. Press to display the options panel.
5. Touch Add subject to add the message subject. Your mobile
phone is now in multimedia message mode.
6. Touch Attach to add a picture, music, or video file. Then
touch any of the following:
Messaging
75
Page 82

• Slideshow: A screen opens where you can assemble
photos into a slideshow to attach to the message. Please
refer to “Adding a Slideshow” on page 76.
• Pictures: You are prompted to touch a picture to attach it.
• Capture picture: The camera opens so you can take a
picture and attach it.
• Videos: You are prompted to select a video to attach.
• Capture video: The camcorder opens so you can record a
video and attach it.
• Audio: You are prompted to select an audio file to attach.
• Record audio: A screen opens where you can record a
voice message and attach it.
7. When the message is ready to be sent, touch Send.
Adding a Slideshow
If you want to attach more than one file to your message, use the
Slideshow option.
1. On the message editing screen, press to display the
options panel.
Messaging
76
Page 83

2. Touch Attach > Slideshow, and then select a slide to start
editing it.
3. Press , and then touch Add slide to add more slides.
You can touch the green arrow icon to switch between slides.
4. Touch Done to finish composing your message and return to
the multimedia message screen.
5. To alter your multimedia message, touch Edit on the
multimedia message screen. When the message is ready to
be sent, touch Send.
Opening and Viewing a Multimedia Message
1. In the message list, touch the message thread to open it.
2. Touch the Play button at the top of a multimedia message to
view the message.
3. Press followed by Next slide to view the next slide.
Replying to a Message
1. In the message list, touch a text or multimedia message
thread to open it.
Messaging
77
Page 84

2. Touch the text box to compose your message, and then touch
Send.
Customizing the Message Settings
In the message list, press , and then touch Settings to
customize the message settings.
Your mobile phone puts email at your fingertips, too. Using your
Email application, you can add versions of Yahoo!, AOL, and
other popular email services to your phone. The se kinds of email
accounts are known as POP3, IMAP, or Exchange accounts.
Adding an Email Account
When using the Email application for the first time, you must
configure your email account. The Email setup wizard helps you
set up your account for many popular email systems, so you can
read and work with the same email that you do on a computer in
a web browser, or with another email application.
Messaging
78
Page 85

You can also set up a Microsoft Exchange ActiveSync account,
so you can read and work with the same email that you do when
using Microsoft Outlook on a computer.
1. Touch > Email.
2. To customize your email settings, answer the onscreen
prompts, and then touch Next. Or touch Manual setup if you
want to set the mail server yourself.
Note: If you touch Manual setup, contact your email service provider
for the values required for your account if you don't know what
they are.
3. Enter the name for your account and the name you want other
people to see when they receive an email from you.
4. Touch Done.
Your mobile phone starts downloading your email messages
and you can start using the phone to send and receive
messages.
After the initial setup, your email application opens to the last
screen you were viewing or, if you have not used Email recently,
Messaging
79
Page 86

it displays the contents of your Inbox or the accounts screen
(when you have more than one account).
Adding Other Email Accounts
After creating your initial email account, press on the
accounts screen, and then touch Add account to create
another email account.
Tip:
When adding a subsequent email account, you can also select t he option
to use the new account to send all outgoing messages.
Deleting an Email Account
1. On the accounts screen, touch and hold the email account
you want to delete.
2. Touch Remove account.
3. Touch OK to confirm.
Changing Email Account Settings
You can change a number of settings for an account, including
how often you check for emails, how you are notified of a new
Messaging
80
Page 87

mail, and details about the servers the account uses to send and
receive mails.
Note:
Your account’s incoming and outgoing settings depend on the kind of
email service for your account: Exchange ActiveSync, IMAP, or POP3.
You can enter the necessary details manually, alt hough you will typically
need to contact your email service provider to determine the right settings
for the account.
1. Touch > Email.
2. On the Your accounts screen, touch and hold the email
account you want to change.
3. Touch Account settings.
4. Change General settings, Notification settings, or Server
settings.
Viewing an Email Message
1. On the accounts screen, touch the email account you want to
use.
Messaging
81
Page 88

2. Access a folder, and then touch the message that you want to
view.
Creating and Sending an Email Message
1. On the Your accounts screen, touch the email account you
want to use.
2. On the Inbox screen, press , and then touch Compose in
the options panel.
3. In the To field, enter the name or the email address.
4. Write the subject and email.
To send an attachment with the message, press , and then touch
Add attachment.
5. When you are finished, touch Send.
If you are not quite ready, touch Save as draft or press to save the
message as a draft.
Replying to an Email Message
1. On the Your accounts screen, touch the email account you
want to use.
Messaging
82
Page 89

2. Touch the email message you want to view and reply to.
3. Touch Reply or Reply all to reply to the email message.
Messaging
83
Page 90

Getting Connected
GPRS/3G
Your mobile phone will be automatically configured to use your
wireless service provider’s GPRS/3G/EDGE (when available)
service when you turn on your mobile phone (if the SIM card is
inserted) for the first time.
Checking the Network Connection
1. Touch > Settings.
2. Touch Wireless & networks > Mobile networks.
3. Touch Network operators or Access Point Names to check
the network connection.
Note:
Generally your mobile phone will automatically read th e access poi nt of
the SIM card. For this reason, do not change th e par amet ers of t he
access point, or you might not be able to access network sources.
Getting Connected
84
Page 91

Turning on the Data Service
1. Touch > Settings.
2. Touch Wireless & networks > Mobile networks.
3. Select the Data Service check box to turn on the data
connection.
Wi-Fi
Wi-Fi gives you wireless access to broadband Internet access.
To use Wi-Fi on your mobile phone, you need access to a
wireless access point called a “hotspot”. The range of a Wi-Fi
signal is affected by the obstacles that may be in its way.
Turning On Wi-Fi
1. Touch > Settings.
2. Touch Wireless & networks, and then select the Wi-Fi check
box to turn on the Wi-Fi.
Connecting to a Wireless Network
1. After turning on the Wi-Fi, touch > Settings.
Getting Connected
85
Page 92

2. Touch Wi-Fi settings. You will see a list of detected Wi-Fi
networks in the Wi-Fi networks section.
3. Touch a Wi-Fi network to connect to it.
• If you select an open network, you will be automatically
connected to the network.
• If you select a network that is secured with Wired Equivalent
Privacy (WEP), enter the password, and then touch
Connect. If you connect to a secured wireless network that
you have already used, you will not be prompted to enter the
WEP/WPA key again unless you reset your mobile phone to
its default settings.
Tip:
On the Wi-Fi settings screen, touch Add Wi-Fi network to add a new
Wi-Fi network.
Browser
Your mobile phone comes with a browser. You can access and
browse the Internet through Browser.
Getting Connected
86
Page 93

Opening the Browser
1
2
3
Touch > Browser to open the browser on the Google home
page.
1 Web page view area.
2 Touch to open the Bookmarks.
Getting Connected
87
Page 94

3 Touch to enter the desired website.
Open the browser options menu and perform one of the
following operations, press :
• New window: Touch to open a new window.
• Bookmarks: Touch to open a favorite folder.
• Windows: Touch to go to the web preview screen. You can
switch to another web page or open a new web page on the
screen.
• Refresh: Touch to refresh the current page.
• Forward: Touch to browse the next web page.
• More: Touch to open other menus and perform operations
such as searching, selecting text, downloading, and setting
options.
Opening a Web Page
1. On a browser window, touch the URL field at the top of the
screen.
2. Use the keyboard to enter the web page address.
Getting Connected
88
Page 95

3. As you enter the address, matching web page addresses will
appear on the screen. Touch an address to go directly to that
web page or continue entering the web page address.
4. Touch Go.
Setting a Home Page
1. On a browser window, press .
2. Touch More > Settings > Set home page.
3. Enter the home page address, and then touch OK.
Managing Bookmarks
You can store as many bookmarks as you want on your mobile
phone.
Adding a Bookmark
1. On a browser screen, go to the web page you want to
bookmark.
2. Press , and then touch Bookmarks > Add. The add
bookmark screen opens.
Getting Connected
89
Page 96

3. Edit the bookmark name if needed and then touch OK.
Opening a Bookmark
1. On a browser window, press , and then touch Bookmarks.
On the Bookmarks screen, touch the History tab to view the pages
you have visited. Or touch the Most visited tab to vi ew the pages you
have visited most frequently.
2. Touch the bookmark you want to open.
Customizing the Browser Settings
Customize the browser to suit your browsing lifestyle. Set
display, privacy, and security options when using Browser. On
the browser screen, press , and then touch More > Settings.
Bluetooth
Your mobile phone has Bluetooth, which allows you to create a
wireless connection with other Bluetooth devices so you can
share files with your friends, talk hands-free with a Bluetooth
headset, or even transfer your phone photos onto your PC.
If you are using Bluetooth, remember to stay within 10 meters of
other Bluetooth devices. Be aware that obstacles may interfere
Getting Connected
90
Page 97

with the connection, including walls or other electronic
equipment.
Turning On Bluetooth
1. Touch > Settings.
2. Touch Wireless & networks, and then select the Bluetooth
check box to turn on Bluetooth. You will know it is on when the
Bluetooth icon appears in the notification bar.
3. Touch Bluetooth settings, and then sele ct the Discoverable
check box to make the mobile phone visible to other Bluetooth
devices.
Pairing and Connecting a Bluetooth Device
Your mobile Bluetooth lets you do the following:
• Hands Free Profile (HFP): allows you to use a hands-free
Bluetooth device.
• Headset Profile (HSP): allows you to use a mono Bluetooth
headset.
• Object Push Profile (OPP): allows you to transfer files through
Bluetooth.
Getting Connected
91
Page 98

• Advanced Audio Distribution Profile (A2DP): allows you to use
a stereo Bluetooth headset.
• A/V Remote Control Profile (AVRCP): allows you to control
what plays through the Bluetooth headset remotely.
Before you use Bluetooth, you need to pair your mobile phone
with another Bluetooth device as follows:
1. Ensure that the Bluetooth function on your mobile phone is
enabled.
2. Touch > Settings > Wireless & networks > Bluetooth
settings. Your mobile phone will then scan for Bluetooth
devices in range (or touch Scan for devices to scan for
Bluetooth devices).
3. Touch the device you want to pair with your mobile phone.
4. Enter the pairing password to complete the connection.
Sending Files via Bluetooth
With Bluetooth, you can share pictures, videos, or music files
with your family and friends. To send files via Bluetooth, do as
follows:
Getting Connected
92
Page 99

1. Touch > File Manager to open the file manager.
2. Touch and hold the file to be sent. The active options menu is
displayed.
3. Touch Share, and then touch Bluetooth to select a paired
device.
Disconnecting or Unpairing a Bluetooth Device
1. Touch > Settings > Wireless & networks > Bluetooth
settings.
2. Navigate to the Bluetooth devices section, and then touch
and hold the connected device.
You can also just touch a connected device to disconnect it.
3. Touch Disconnect or Unpair to disconnect the device.
Connecting to a Computer via USB
Using the microSD Card as USB Mass Storage
To transfer all your favorite music and pictures from your PC
onto your mobile phone’s microSD card, set the microSD card
as USB mass storage for your PC.
Getting Connected
93
Page 100

1. Connect your mobile phone to your PC with the USB cable.
2. Open the notification panel, and then touch USB connected.
3. Touch Mount in the dialog box that opens to confirm that you
want to transfer files. Your PC will detect the microSD card as
a removable disk. You can now transfer files from your PC to
your mobile phone’s microSD card.
You can also touch > Settings > General info & option,
and then select the USB Mass Storage check box to use the
microSD card as the USB mass storage.
Note:
When your microSD card acts as USB mass storage, your mobile phone
will not use this memory space. Your PC will tell you how to safely
disconnect the USB mass storage device (that is, your mobil e phone)
when you have finished transferring file s.
Removing the microSD while Your Mobile Phone Is on
1. Touch > Settings.
2. Scroll down the screen, and then touch SD card & phone
storage > Unmount SD card.
Getting Connected
94
 Loading...