

Page 1

Wonderful Communication, Mobile Life
Welcome to U550
9(H11HW) Mobile Phone from Huawei Technologies Co., Ltd.
HUAWEI U5509 (EMOBILE H11HW) Mobile Phone
User Guide
Page 2

Notice
Copyright © 2008 Huawei Technologies
Co., Ltd.
All Rights Reserved
1 No part of this manual may be reproduced or
transmitted in any form or by any means without
prior written consent of Huawei Technologies
Co., Ltd.
2
3
Trademarks
4 and HUAWEI are trademarks of Huawei
T echnologie s Co., Ltd. All other trademarks mentioned in this manual are the properties of their
respective holders.
5
6
Notice
7 The information in this manual is subject to
change without notice. Every effort has been
made in the preparation of this manual to ensure
accuracy of the contents, but all statements,
information, and recommendations in this manual do not constitute a warranty of any kind,
expressed or implied.
8 Please read the safety precautions carefully to
ensure the correct and safe use of your wireless
device. For detailed information, refer to the
9 section “Warnings and Precautions”.
Huawei Technologies Co., Ltd.
Address:
10 Administration Building, Huawei Technologies
Co., Ltd., Bantian, Longgang District, Shenzhen,
P. R. China
Postal Code: 518129
Website: http://www.huawei.com
Page 3
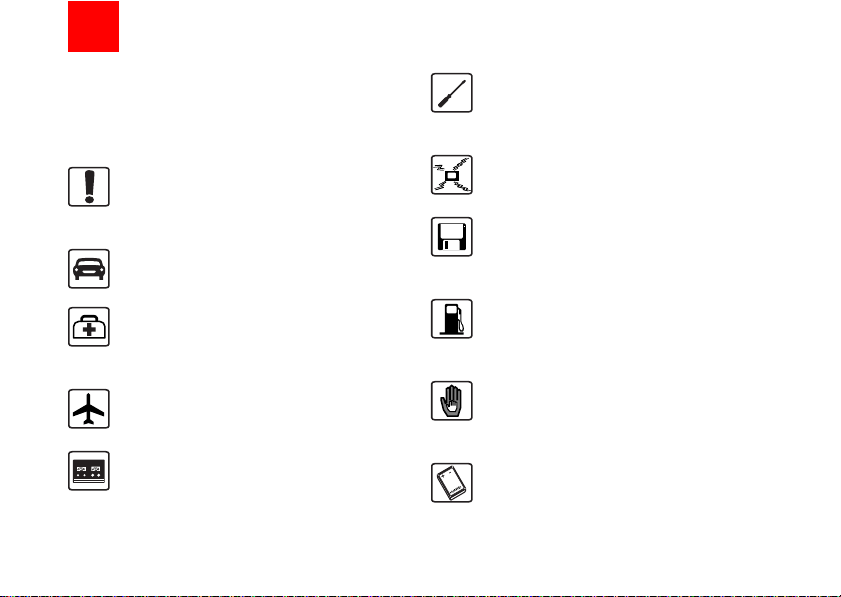
Safety Precautions
11 Please read the safety precautions carefully to
ensure the correct and safe use of your wireless
device. For detailed information, refer to the
12 section “Warnings and Precautions”.
Do not switch on your phone when it is
prohibited to use mobile phones or
when the phone may cause interference or danger.
Do not use your phone while driving.
Follow any rules or regulations in
hospitals and health care facilities.
Switch off your phone near medical
apparatus.
Switch off your phone in aircraft. The
phone may cause interference to
control signals of the aircraft.
Switch off your phone near high-precision electronic devices. The phone may
affect the performance of these
devices.
Do not attempt to disassemble your
phone or its accessories. Only qualified
personnel are allowed to service or
repair the phone.
Do not place your phone or its accessories in containers with strong electromagnetic field.
Do not place magnetic storage media
near your phone. Radiation from the
phone may erase the information stored
on them.
Do not put your phone in a hightemperature place or use it in a place
with flammable gas such as a gas
station.
Keep your phone and its accessories
away from children. Do not allow
children to use your phone without
guidance.
Use only approved batteries and
chargers to avoid the risk of explosions.
Page 4

Observe any laws or regulations on the
use of wireless device. Respect others’
privacy and legal rights when using
your wireless device.
Strictly follow the relevant instructions
on 63 of this manual while using the
USB cable. Otherwise your phone or
PC may be damaged.
Page 5

1Table of Contents
Table of Contents 1
Getting to Know Your Phone 1
Packing List........ ... .. ... ................................1
Your Phone ................................................2
Getting Started 6
Loading the SIM Card ................................6
Unloading the SIM card..............................7
Charging the Battery ..................................7
Loading/Removing a Memory Card............8
Powering On/Off.........................................9
Call Service 11
Making or Answering Calls.......................11
Operations During a Call. ... .. ... .................12
Operations During a Video Call................13
Call Log ....................................................14
Text Input 15
T9 Input Method .......................................15
Traditional Input Method ..........................15
"123" Numeric Input Method ....................16
Symbol Input Method ...............................16
Input Different Languages........................16
Contacts 17
Making Calls from the Contacts ...............17
Searching for a Contact............................17
Other Operations.................. ... .................18
Groups......................................................19
Messaging 20
Text Messages......................................... 20
Multimedia Messages ..............................23
Email........................................................27
Push Inbox...............................................30
Broadcast Inbox.......................................31
Voice Mail Number......... ... .......................31
Common Phrases ....................... .............31
Music 32
My Music........................ ... .. ... ..................32
Playlist......................................................33
Organiser & Tools 34
SIM ToolKit ..............................................34
Alarms...................................................... 34
Calendar ..................................................34
Calculator................................................. 35
Unit Converter..........................................36
Currency Converter... ............................... 36
Synchronise .............................................37
Task .........................................................37
Voice Recorder ........................... .............38
Memo Pad................................................39
World Time...............................................39
Stopwatch ................................................39
Timer........................................................ 39
Service Dial Number................................ 39
My Files 40
Browser 41
Browser.................................................... 41
1
Page 6

Enter URL.................................................41
Bookmarks ...............................................41
Internet Settings ...................... ... ..............42
Entertainment 43
Games......................................................43
Camera.....................................................43
Video Camera ..........................................44
Music........................................................45
Connections 46
Bluetooth (Optional) ................................ .46
USB..........................................................48
Settings 51
Phone Settings.........................................51
Display Settings........................................52
Message Settings.....................................52
Call Settings .............................................52
Video Call Settings...................................55
Connectivity Settings................................55
Network Settings ........................ .. ... .........56
Security Settings ......................................56
Warnings and Precautions 58
Electronic Device......................................58
Hospital ....................................................58
Storage Environment................................59
Children Safety.........................................59
Operating Environment ............................60
Cleaning and Maintenance.......................60
Environmental Protection .........................61
2
Emergency Calls......................................61
Battery......................................................61
Charger....................................................62
Using the USB Cable...............................63
Certification Information (SAR) ................ 63
Acronyms and Abbreviations 67
Appendix 68
Index 1
Page 7
1Getting to Know Your Phone
Your U5509(H11HW) phone can operate in virtually
all countries, automatically switching between
WCDMA 1700 and GSM/GPRS 900/1800/1900 networks. This allows you to enjoy communication wherever you use your mobile phone.
The services supported by your phone
Note
should be also supported by the network
from where you use the phone. For details,
please consult your service provider.
Packing List
Your phone package box contains the following articles:
1 One U5509(H11HW) mobile phone
2 One travel charger
3 One Li-ion battery
4 One user guide
5 One quick start guide
6 One headset
7 One headset converter
8 One USB cable
9 One CD-ROM disk
1
Page 8
Your Phone
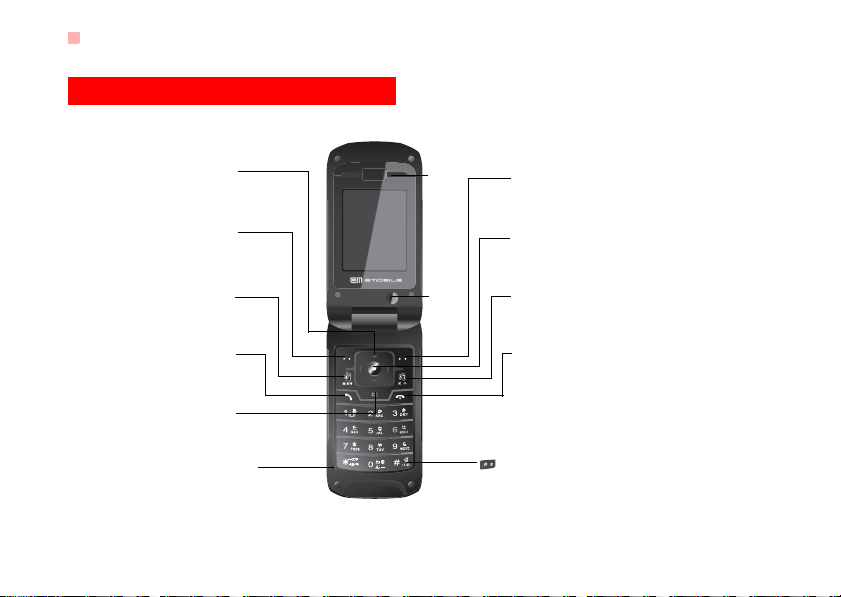
Your Phone
Scroll key
• Press this key to scroll through a menu.
• To quick access Browser, Contacts, text message
editor and My Files.
Left function key
• To activate the function indicated at the left of
the prompt bar on the screen.
• To access the main menu in standby mode.
V-P calls
• To make a video call.
• To access the Call Log screen in the
standby mode.
Send key
• To make or answer a call.
• To access the Call Log screen in t he
standby mode.
Clear key
To delete a character before the cursor in the
editing mode.
Microphone
2
Earpiece
Camera
Right function key
• To activate the function indicated at the right of the
prompt bar on the screen.
• To access Homepage in standby mode.
OK key
• To start the selected function in the menu.
• To access the main menu in standby mode.
Music key/option key
• To access the Music screen.
• To select the check box of the option item.
Power/End key
• To end an ongoing call or reject an incoming call.
• To return to the Home screen.
• Press and hold this key to power on or power off the
phone.
key
Press and hold it to switch to the meeting profile from
the current profile.
Page 9
Your Phone
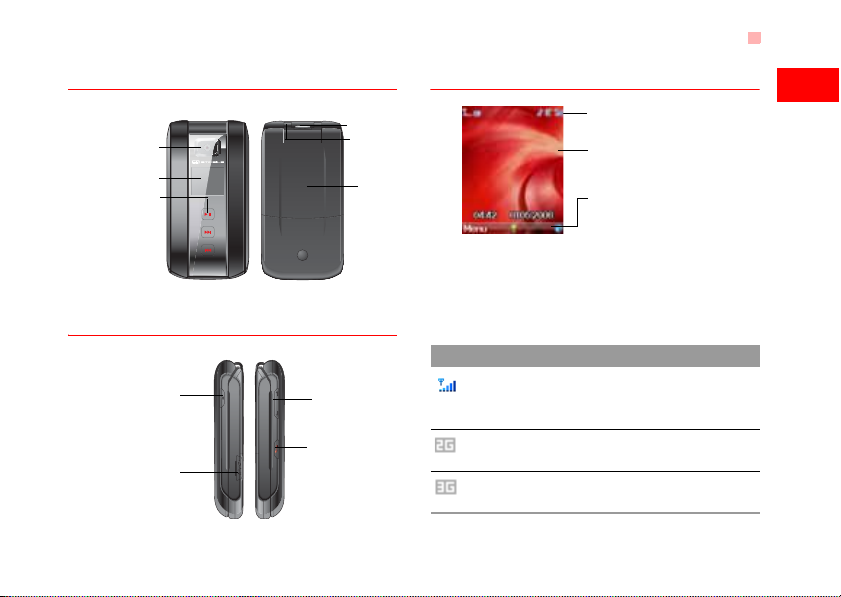
Front View and Back View
Camera
External screen
Music Touch Key
To play, stop, next/
,
last
track when audios
file
are played folded
and the music touch
key
are unlocked.
Side View
Camera key
• press and hold to activate the
camera in the standby mode.
• Press and hold to lock/unlock
the music touch key when
audio files are played.
Charge/Cable connector
Battery latch
Volume keys
Music key
Strap hole
Battery
Home Screen
Icon bar
Desktop
To display the operations and
the function options
Prompt bar
To display the operations
currently available.
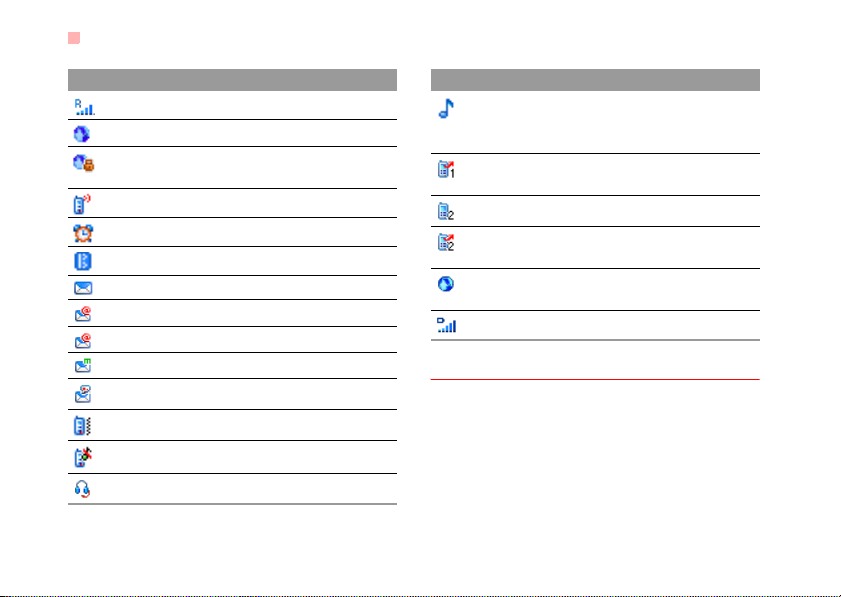
◆ Icon bar
This area displays the phone status. The following
table illustrates all the icons that may appear on this
bar.
Icon Description
Indicates signal strength. The more the
vertical bars appear, the stronger the
signal is.
The phone is currently in a GSM
network.
The phone is currently in a WCDMA
network.
1
Getting to Know Your Phone
3
Page 10
Your Phone
Icon Description
You are using the roaming service.
Indicates network connection state.
Indicates security connection state of
the network.
The phone is in a call.
Alarm clock is enabled.
Bluetooth is enabled.
You have new text messages.
You have new PUSH messages.
You have new emails.
You have new multimedia messages.
You have new voice mail.
The vibration mode is enabled.
Indicates in mute mode.
The headset is plugged in.
4
Icon Description
The normal profile is activated. The icon
that corresponding to the profile displays
when you select different profiles.
Forwarding all incoming voice calls to
line 1.
Call line 2 is enabled currently.
Forwarding all incoming voice calls to
line 2.
Your PC connects to the Internet
through your phone.
Indicates battery power level.
Introduction to the Menu
Your ph one provides an extensive range of functions.
You can use these functions by navigating the following menus: Entertainment, Music, Call Log, Browser,
Messaging, My Files, Organiser & Tools, Contacts
and Settings.
Page 11

1 In the standby mode, press to display the
main menu.
2 Press the scroll key to scroll through the menu,
and then press to select.
3 If the menu contains further submenus, repeat
step 2.
4 Use the selected function according to the
prompts on the screen.
5 Select Back to return to the previous menu.
Press to return to the standby mode.
Your Phone
1
Getting to Know Your Phone
5
Page 12
2Getting Started
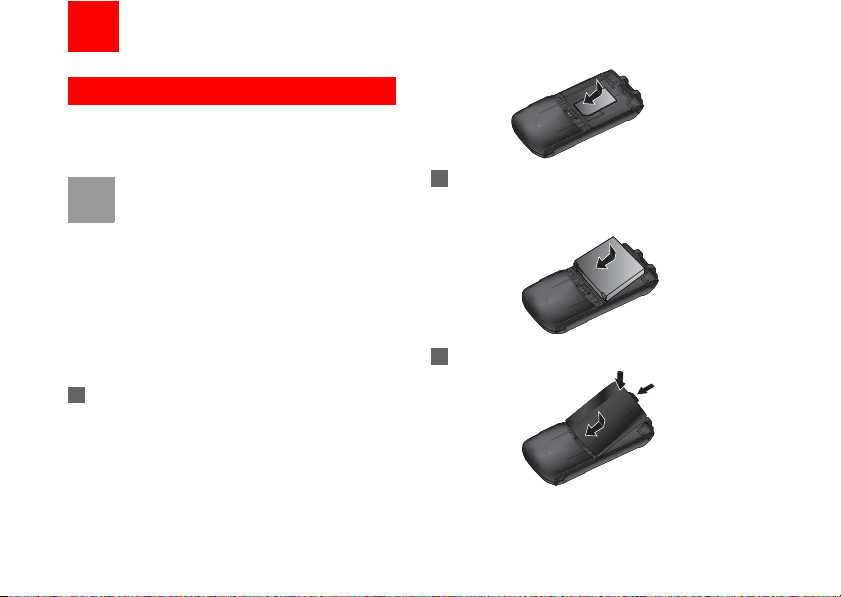
Loading the SIM Card
Load your SIM card before using your phone. To use
the SIM card properly, please read the following
instructions carefully.
• Keep the SIM card out of the reach of chil-
Note
To load the SIM card, do as follows:
1 Position the card at the card slot entrance, mak-
6
dren.
• The SIM card and its metal contacts are
easily damaged by scratching or bending.
So be careful when you carry, load or
remove it.
• Always disconnect the charger from the
phone before loading or removing the SI M
card.
ing sure it is facing the same way as shown in
the diagram below, with the notche d corner at
the bottom right. Then slide in as shown.
2 Fit the battery into the battery slot on back of th e
phone. Press the battery down until it clicks into
place.
3 Slide the back cover to the phone.
Page 13
Unloading the SIM card
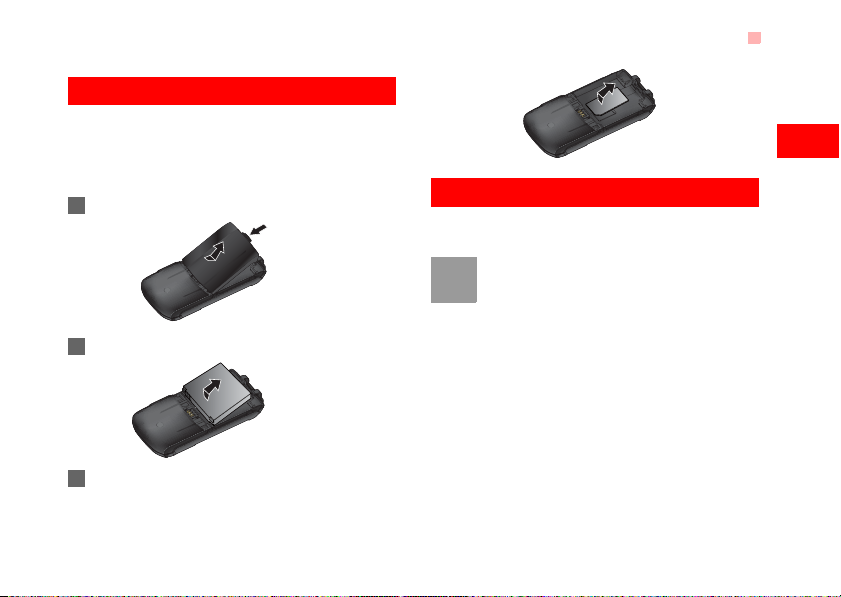
Only unload the SIM card and the battery after powering off your phone. Otherwise, your phone may be
damaged.
To unload the SIM card, do as follows:
1 Unload the back cover out of the phone.
2 Take out the battery.
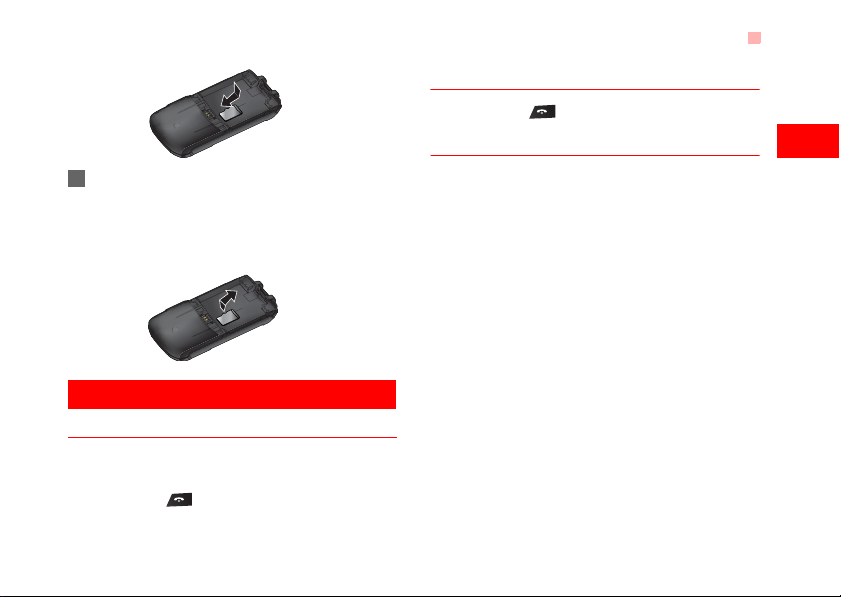
3 Press the SIM card with one finger and slide it
out of the slot.
Unloading the SIM card
Charging the Battery
Before charging the battery , please read th e following
precautions carefully.
• When you charge the battery for the first
Note
time, please charge it for a minimum of 12
hours.
• The battery discharges even while not
being used. If you haven't used it for a
long time, please recharge it first.
• The charging time depends on the environmental temperature and the age of the
battery.
• The battery can be recharged but eventually wears out. If the battery lasts for a
shorter time period than usual after being
charged normally, replace it with a battery
of the same type.
2
Getting Started
7
Page 14
Loading/Removing a Memory Card
• Do not strike, toss or cause any kind of
violent shock to the battery , otherwise liquid leakage, body damage, overheating,
explosion or fire may occur.
• Charge the battery by using the charger
supplied with your phone.
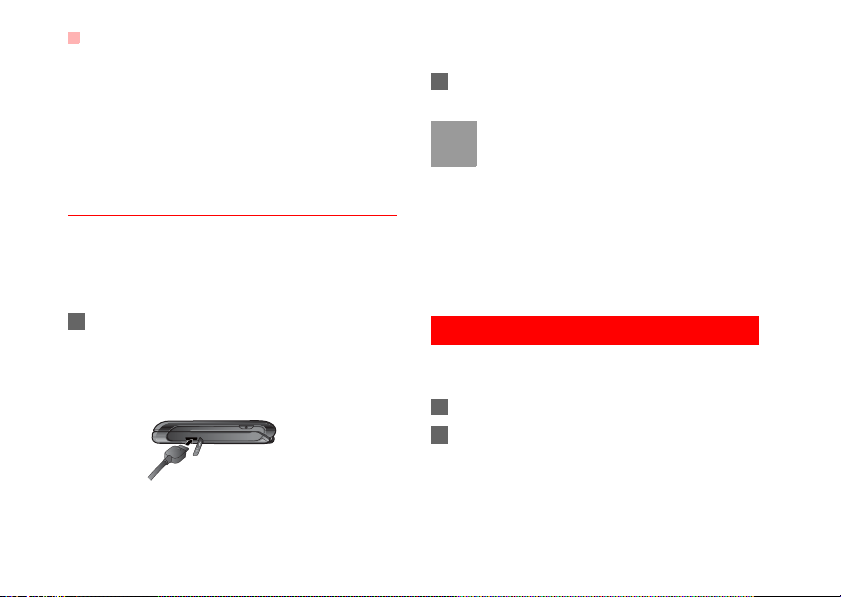
Charging with a Cable Charger
Before charging the battery with a cable charger,
ensure that the battery has been properly loaded i nto
your phone.
To charge the battery, do as follows:
1 Insert the plug of the charger into the connector
of the phone as shown in the following figure.
Before inserting the plug, ensure that the arrow
on the charger output jack points to the front side
of the phone.
8
2 Plug in the connector of the charger to a power
socket.
• When the battery power level is very low,
Note
the phone makes alert sounds and displays a prompt. When the battery power
level is too low, the phone will power off
automatically
• When the battery is being charged, the
charging indicator blinks continuously.
When the charging indicator stops blinking, it indicates that the battery is full.
Loading/Removing a Memory Card
Your mobile phone supports a memory card (microSD) with a capacity up to 1 GB.
1 Power off the phone and remove the battery.
2 Then insert the memory card into the slot, as
shown in the following figure.
Page 15
3 To remove a memory card, power off the phone
and remove the battery. Then press the memory
card gently. Now the memory card will pop up
automatically. Then take it out as shown in the
following figure.
Powering On/Off
Powering On
Ensure that the SIM card is in your phone and that
the battery has been charged.
Press and hold to power on your phone.
Powering On/Off
Switching Off
Press and hold to power off your phone.
Access Codes
If you have set the phone password and the PIN is
ON, you have to enter the corresponding access
codes when you power on your phone. For setting
and changing the access codes, please refer to "Settings/Security Settings" on page 56.
◆ Phone Password
The phone password is used to protect your phone
from unauthorized use. The phone password is
preset as 0000 for your mobile phone.
◆ PIN
The PIN (Personal Identification Number) code is
used to protect your SIM card from unauthorized use.
Usually you will be supplied with the PIN code when
you get the SIM card from your service provider. If
you have not got one or you have lost it, please consult your service provider.
2
Getting Started
9
Page 16

Powering On/Off
◆ PIN2
Some SIM cards provide PIN2 code. Some special
functions such as the "Fixed Dialer Number" are not
available until you enter the PIN2 code and, at the
same time, your SIM card must support these functions.
◆ PUK
To unlock the locked SIM card, you have to enter the
PUK (PIN Unblocking Key) code. Usually you will be
supplied with the PUK code when you get the SIM
card from your service provider. If you have not got
one or you have lost it, please consult your service
provider.
◆ PUK2
Some SIM cards provide PUK2 code which is used to
unlock the locked PIN2 code. Usually you will be supplied with the PUK2 code when you get the card from
your service provider. If you have not got one or you
have lost it, please consult your service provider.
10
Page 17
3Call Service
Making or Answering Calls
Making a Video Call
Yo u can make a video call under the 3G network with
someone whose phone also supports video calls.
1 Enter or edit a phone number in any of the fol-
lowing ways:
• Enter a phone number through the keypad.
• Select a number from the Call Log screen.
• Select a number from the Contacts screen.
2 Select Options > Call > Video Call to dial.
3 Press to end the video call.
To delete a wrong number, press
Note
once to delete the digit to the left of the cursor.
Making a Voice Call
1 Enter or edit a phone number in any of the fol-
lowing ways:
• Enter a phone number through the keypad.
• Select a number from the Call Log screen.
• Select a number from the Contacts screen.
2 Press to dial.
3 Press to end the call.
Making Voice Calls Using SDN
You ca n make a voice call throug h speed dialing. For
instructions on assigning speed dialing numbers,
refer to "Contacts/Other operations" on page18.
To make a call by speed dialing number (SDN),
press and hold the number key in the standby mode
until the phone dials the corresponding phone number.
Answering or Rejecting Calls
You can set the answer mode to Open flip, Any key
or Send key. For details, refer to "Settings/Call Settings/Answer Mode".
The following describes how to answer or reject a call
in different answer modes:
11
Page 18
Operations During a Call
Opera-
tion
Answer
a call
Reject
a call
End a call • If the headset is not in use, you can
Reply by
message
Note
• If the answer mode is Open flip, open
the phone.
• If the answer mode is Any key, open
the phone and press any key. except
• If the answer mode is Send key, press
• If the headset is in use, press the control key on the headset.
Press or select Options > Reject.
press .
• If the headset is in use, press the control key of the headset or press .
Select Options > Reply SMS to send a
predefined message to the caller.
When the phone is closed and there is no
ongoing call, you can press and hold the
Description
and .
.
12
camera key to mute the ringtone of an
incoming call. You can also press and hold
the volume keys to reject the call.
You can set the auto answer mode to Immediate
answer, Message or Recorded message. For
details, refer to “Settings/Call settings/Auto Answer”.
Operations During a Call
Icon Description
◆ Icon Description
: A call is ongoing.
: The call is on hold.
: There is a new incoming call during a call.
Operations
During a voice call, you can select Options to perform the following operations.
• Hold/Resume: To hold or resume the call during a
call.
Page 19
Operations During a Video Call
• End: To end all calls, the active call, the current
call or the on hold call.
• New Call: To make a 3-party call during a call.
• Start Recording/Stop Recording: to record or stop
recording the conversation.
• Other Applications: To access the SMS screen, the
Contacts screen or the Call Log screen.
• Answer/Reject: Your phone allows you to handle
two calls simultaneously. During a call, if there is a
new incoming call, select Options > Answer to
answer it or select Options > Reject to reject it.
• Swap: To swap between calls during a 3-party call.
• Conference call/Private call: To switch to the conference call during a 3-party call or to talk with a
party privately during a conference call.
Operations During a Video Call
Icon Description
Icon Description
Press the up/down scroll key to adjust
the brightness.
Icon Description
Press the left/right scroll key to zoom in
or zoom out.
Press the volume keys to adjust the volume.
Press to switch between the lou d-
/
speaker mode and the earpiece mode.
Operations
During a video call, you can press to hold the call
and send a preset file to the other party. You can
press again to resume the call. Before you use
the function, you can preset a file in settings/video
call/Send specific file.
During a video call, you can select Options to perform the following operations.
• Handsfree/Earpiece: Switch between the loudspeaker mode and the earpiece mode.
• Picture in Picture: T o set the P-in-P mode to off, top
left, top right, bottom right or bottom left.
• Switch picture: To switch display.
13
3
Call Service
Page 20

Call Log
• External view/Internal view: To switch between the
main lens and the assistant lens.
• Image quality: To set the image quality to best quality or more smooth.
• Camera off/Open video: To forbid or allow the video
from your side.
• Audio off/Open audio:To forbid or allow the audio
from your side.
• Play file: To play a media file.
• Record: To record a video clip. A recorded video
clip is saved to the My Files/Videos directory .
• Other Applications:To access the SMS screen, the
Contacts screen or the Call Log screen.
Call Log
The recently dialed calls, received calls and missed
calls are saved automatically.
Select Call Log in the main menu and then press
the left/right scroll key to select All calls , Missed
, Received or Dialed . Then select Options
for the following options.
14
• Edit before call: To edit the number before ma king a
call.
• Create Message: To send a SMS or MMS.
• Save number: To save the numbers of the selected
record to the phone, the SIM card, or an existing
contact.
• Call: To make a voice call or a video call.
• Display mode: Y ou can select Normal to disp lay al l
records or select Simple to ignore the repeated
records
• Delete: To delete the selected record.
• Mark/Unmark: To mark/unmark a record or all
records.
• Calls status: To display the information on voice
calls, video calls and data services. In the voice
call, video call and data page, you can select Reset
to clear all records.
Page 21
4Text Input
You can use the keypad to enter alphanumeric characters and symbols. For example, you can add
entries to the contacts, write messages or schedule
events on the calendar.
While entering text:
Note
• Press to switch between input meth-
ods, including "abc", "Abc", "ABC", and
numbers.
• Press to enable or disable T9 input
method.
• Press to display the commonly-used
symbols list. Y ou can use the scroll keys
to select.
• Press to delete the letter before the
T9 Input Method
With the T9 input method, you can easily and quickly
enter words. T9 is a predictive text entry mode, Press
the relevant key that corresponds to t he desire d lette r
and T9 will offer you candidate words.
Press each key carrying the desired letter once, and
then the predictive text scheme will present the can-
cursor.
didate words composed by the letters you have
entered in the drop-down menu.
For example, to enter the word "good" with the T9
input method, follow these steps.
1 Press successively the keys , , , and
which "g", "o", "o", and "d" belong to, and the
candidate words composed by these letters will
be shown in the drop-down menu.
2 Use the up/down scroll key to select "good".
Press repeatedly and you will see "T9
Note
abc", "T9 Abc" and "T9 ABC" on the upper
left corner of the screen successively. It indicates the words to be entered will be in
lower case, first letter capitalized or in upper
case.
Traditional Input Method
When T9 input method is off, you can use the traditional input method for entering alphabetic characters. Repeatedly press the key that carries the letter
to be entered when it appears on the screen.
For example, to enter the word "Hello" with the traditional input method, follow these steps.
15
Page 22
"123" Numeric Input Method
1 Press that carries "h" repeatedly and all let-
ters carried by this key will be displayed successively on the screen. Stop when you see an "h"
on the screen.
2 After entering the first letter, you can directly
press another key to enter the next letter. If the
next desired letter is on the same key as the current one, wait until the cursor appears to the right
of the current letter and then you can enter the
next one.
3 Enter "e", "l", "l" and "o" in the same way.
• Press repeatedly and you will see
Note
"abc", "Abc" or "ABC" on the upper left
corner of the screen successively . It indicates the words to be entered will be in
lower case, first lett e r capitalized or in
upper case.
• Press and hold number keys to enter
numbers.
16
"123" Numeric Input Method
With the "123" numeric input method, you can enter
corresponding numeric characters by pressing the
character/number keys. For example, to enter "1"
with the "123" numeric input method, you can press
. Then "1" appears on the screen.
Symbol Input Method
Your mobile phone provides an independent symbol
input method.
For example, to enter ":" with the symbol input
method, you can just press the scroll keys to select
":" in the symbol list and then press .
Input Different Languages
In a text editing screen, select Options>Input lan-
guage to set the language for the text. The indi cator
of the selected language will be displayed on the
upper left cornor of the editing screen.
Page 23
5Contacts
Contacts enables you to save and manage such
information as phone numbers and addresses of your
contacts. You can save such information in your
phone or your SIM card. You can also assign eight
frequently-used numbers to speed dialing keys for
your convenience.
Making Calls from the Contacts
You can make a voice/video call with a contact
selected from the contacts list.
1 In the Contacts screen, press the left/right
scroll key to select Phone or SIM .
2 Select a contact and select Options > Call.
Then, you can select Voice Call or Video Call to
make a call. Alternatively, you can select Edit
before call to edit the number before making the
call.
Searching for a Contact
You can find a contact from the contacts list easily
and quickly by using this function on both the Phone
screen and the SIM screen.
1 In the Contacts screen, press the left/right
scroll key to select Phone or SIM .
2 Select Options > Search.
3 Select Options > Search, and then enter the
contact name you are searching for. The contact
will be displayed.
The search result will include all matched
Note
contacts from both the phone and SIM
memories, no matter from which screen
(Phone or SIM) you start searching.
You can also use quick search in the Phone or SIM
screen:
1 In the Contacts screen, press the left/right
scroll key to select Phone or SIM .
17
Page 24
Other Operations
2 Enter a string (one or more letters or numbers)
contained in the contact name you are se arching
for (which is displayed at the bottom of the
screen). Then the contacts whose names con-
tain this string will be displayed.
You can also find a contact by entering the initials of
the first name and the last name of the contact. For
example, to find a contact named "Alice Green",
enter the initials "ag". This contact will be displayed in
the candidate list.
Other Operations
In the Contacts screen, press the left/right scroll
key to select Phone or SIM .Then select
Options for the following options.
• Details: To view the details of contact.
• Create Message: To send a message, MMS or
Email to the selected contact.
• New: To create a new contact.
• Delete: To delete the selected contact.
18
• Copy to SIM/Copy to phone: To Copy one or more
contacts from your phone to the SIM card or from
your SIM card to the phone.
• Send contact: To send a contact to ot her devices
supporting SMS or Bluetooth.
• Mark/Unmark: To mark/unmark a record or all
records in your phone and SIM card.
• My business card: To save your own information to
a Business Card. You can send the information by
SMS or Bluetooth.
• Backup contacts: To back up your contacts from
your phone to a memory card or from your memory
card to your phone.
• Speed Dial Number: To assign of ten-used numbers
to speed dialing keys "2" to "9".
• Memory status: To view the memory status of both
your phone and SIM card.
• Settings: To sort the contacts in the phone and the
SIM card or to set an alert before saving.
Page 25
Groups
You can rename a group, add group members, and
delete a group.
Adding/Deleting Group Members
You can add a member to a group in your phone or
delete a member from it.
1 In the Contacts screen, press the left/right
scroll key to select Groups.
2 Select a group and press to view the details.
3 Select Options > Add. Select a contact and
press . The member you added will be dis-
played in the group member list.
T o del ete a group member, select a member from the
group member list, and then select Options >
Delete.
Managing a Group
1 In the Contacts screen, press the left/right
scroll key to select Groups.
Groups
2 Select a group and select Options for the follow-
ing options.
• Details: to view the details of a group.
• Delete: to delete a group and all members of
the group.
• Rename: to change the name of a group.
• Create Message: to send a text message or
MMS to all members of a group.
You cannot rename or dele te any group pre-
Note
set in your phone.
19
5
Contacts
Page 26
6Messaging
Text Messages
The maximum content for a single text message is
160 English letters. If the characters you entered
exceed this limit, the text is divided into two or more
continuous messages when it is sent.
Creating a text Message
1 Select Messaging > White SMS from the
main menu.
2 In the message editing screen, select Options:
• Send: To send the message.
• T9 Switch: You can select this option to enable
or disable T9 input method.
• Input mode: You may select one of the input
methods to enter the message contents.
• Input language: You can select an input language for this message.
• Insert number: You can insert a phone number
saved on the phone or the SIM card.
20
• Common phrases: You can use this option to
speed up the text entry.
3 After editing the message, press to access
the "Edit numbers" screen.
• Enter the phone number, and then select
Options > Send or press to send the mes-
sage.
• Select Options > Group or Contacts to
choose a number and send the message.
• Select Options > Save to save the message.
SMS Mailboxes
The phone provides three mailboxes for SMS,
namely, Inbox , Drafts and Sent .
◆ Inbox
You can save the received messages in Inbox.
Icons in Inbox
Icon Description
a read message in the phone memory
Page 27
Icon Description
an unread message in the phone memory
a read message on the SIM card memory
an unread message on the SIM card
memory
a read message report
an unread message report
Viewing Messages in Inbox
1 Select Messaging > SMS > Inbox.
2 Press the up/down scroll key to view the mes-
sages and then press to view the details.
3 Reply or call back.
• Press to reply with a text message.
• Press to call back by a voice call or press
to call back with a video call.
You can select Options for the following operations.
Text Messages
• Reply: To reply the message.
• Delete: To delete the message.
• New SMS: To create a message.
• Forward: To forward the message.
• Save number: To save the numbers retrieved from
an SMS to phone or SIM memory or an existing
entry in the contacts.
• Edit before call: To edit the number.
• Copy to SIM: To back up the SMS to SIM memory.
• Extract URL: To extract URL address from an SMS
for browsing web pages or stream media.
• Save Email address: T o ret rieve email address from
an SMS and save it.
◆ Drafts
The Draft box is used to save the messages you created and saved and those which failed to send.
Icons in Drafts
: A text message saved to the phone.
: A text message saved to the SIM card.
21
6
Messaging
Page 28
Text Messages
Viewing and Editing Messages in the Drafts
1 Select Messaging > SMS > Drafts.
2 Press the up/down scroll key to select a mes-
sage and press to edit it.
◆ Sent
Sent is used to save the messages that have been
sent.
Icons in Sent
: A text message that has been sent and saved to
the phone.
: A text message that has been sent and saved to
the SIM card.
Viewing Messages in the Sent
1 Select Messaging > SMS > Sent.
2 Press the up/down scroll key to select a mes-
sage and press to view the details.
3 Forward or make a call.
• Press to forward a text message.
22
• Press to make a voice call or press to
make a video call.
You may select Options to do the same operations
as those of SMS Inbox.
SMS Settings
You can change the SMS settings by performing the
following steps.
1 Select Messaging > Settings > SMS from the
main menu.
2 Set the parameters related to messages:
• Message center: You can set your mobile
phone to retrieve the message centre number
from the SIM card or the phone. If you have
deleted the information by accident, contact
your service provider.
• Valid peri od: The time a message i s kept in the
message centre after it is sent.
• Auto save: Y ou can set whether a messa ge will
be saved automatically to Sent when it is sent.
Page 29
• Save to: To set the position for saving newly
created messages, received messages, and
sent messages.
• Signature: To set whether your signature will
be sent along with the message. You can edit
the signature while creating a new message.
• Status report: You can set it to O n or Of f. If yo u
set it to On, the network will send you the information on whether the message has reached
the recipient.
• Concatenated SMS: You can set it to On or
Off. If you set it to Off, you cannot edit and
send messages longer than the limits of a single SMS.
Multimedia Messages
You can send messages attached with images, text
and music under this mode.
Creating a Multimedia Message
1 Select Messaging > White MMS from the main
menu.
Multimedia Messages
2 Select To, Cc and Bcc.
• Select an entry from the recipients list, and
then press or select Options > Edit to enter
a phone number.
• Select a position from the recipients list, se lect
Options > Contact or Group, and then select
phone numbers.
3 Select Back to return to the Edit MMS screen,
select Subject to enter text as subject, and then
press .
4 Select Content to edit the pages.
(1) Select to access the text entry field, and
then edit text.
(2) Select to enter the image-editing field
and then you can select images or video files in
My Files.
(3) Select to enter the music- editing fiel d and
then you can select audio files in My Files.
23
6
Messaging
Page 30
Multimedia Messages
(4) Access the field indicated by and press
the left/right scroll key to select one from dif ferent pages if there are more pages.
(5) Access the field indicated by and press the
left/right scroll key to adjust the playing time of
the current page.
5 Return to the Edit MMS screen, and select
Options > send to send the multimedia
message.
If the video file is chosen in the image-edit-
Note
ing field, you cannot edit the music-editing
field any more.
MMS Mailboxes
Yo ur mobile phone pro vides four mailboxes for MMS ,
namely, Inbox , Draft s , Sent and Tem-
plates .
◆ Inbox
Inbox is used to save the multimedia messages you
have received.
24
Icons in Inbox
Icon Description
a read message
an unread message
a read notice or delivery report for MMS
an unread notice or delivery report for
MMS
Viewing Messages in Inbox
1 Select a multimedia message to view its con-
tents.
2 During the playing, you can select Stop to stop
playing.
3 Select Options for the following operations.
• Next page: to play the next page.
• Previous page: to play the previous page.
• Rewind: to return to the first page.
Page 31
• Object list: After entering the content list of this
message, you may select an item and select
Save to save the message to a corresponding
directory of the folder.
• Extract URL: To extract URL address from
MMS for browsing web pages or stream
media.
• Save number: To save the numbers retrieved
from MMS to phone or SIM memory or an
existing entry in the contacts.
• Save Email address: To retrieve email address
from MMS and save.
• Callback: to call back the sender of the
selected multimedia message.
• Reply SMS: to reply a SMS to the SMS sender.
• Reply MMS: to reply a MMS to the MMS
sender.
• Forward: to forward the MMS.
◆ Drafts
Drafts is used to save the multimedia messages you
created and saved and those which failed to be sent.
Multimedia Messages
Icons in Drafts
: A multimedia message saved after you created
it or a multimedia message failed to be sent.
Viewing and Editing Messages in Draft s
1 Access Drafts and select a multimedia mes-
sage.
2 Press to access the editing screen.
3 You can edit the message. The operations are
the same as those for creating a multimedia
message.
◆ Sent
The Sent is used to save the multimedia messages
that have been sent successfully.
Icons in Sent
: A multimedia message has been sent.
Viewing Messages in Sent
1 Select a multimedia message to view its con-
tents.
2 During playing an MMS, you can select Stop to
stop playing.
25
6
Messaging
Page 32

Multimedia Messages
3 During playing, you may select Options to do
the same operations as those of MMS Inbox.
Refer to "Messaging/MMS/MMS Mailboxes" on
page 24.
◆ Templates
To send messages quickly, you can save commonly
used multimedia messages as templates.
◆ Folder
You can categorize your multimedia messages into
different folders.
You can access Folder from the four tabs of Inbox,
Drafts, Sent or Templates.
Let us take the example of entering the Inbox
screen.
Select MMS > Inbox. Then select Options > Folder.
You can perform the following operations.
• Rename: to rename a folder .
• Select: to access a folder.
26
MMS Settings
Select Messaging > Settings > MMS, and then you
can set parameters related to multimedia messages.
It contains the following submenus.
◆ Sending
This option is used to set parameters related to sending multimedia messages.
• Valid period: The time for a multimedia message
stored in the message centre after it is sent.
• Delivery report: You have two alternatives, On and
Off. With this mode enabled (On), the network will
report on successfully sending a multimedia message.
• Reading report: To set whether to accept a read
report.
• Send limit: To set the size limit of a multimedi a message to be sent.
• Save on send: To set whether a multimedia message to the sent folder after it has been sent.
Page 33
• Sender visibility: To set whether the sender information will be displayed when a multimedia message is sent.
◆ Receving
This option is used to set parameters related to
retrieval of multimedia messages.
• Send delivery report: You have two alternatives, On
and Off. When this mode is enabled (On), the network sends a report to the sender indicating that
you have received the message.
• Send read report: To set whether to send a read
report.
• Receiving limit: To set the size limit of a multimedia
message that you can receive.
• Auto receive: To set whether the phone automatically receives multimedia messages or not.
Settings such as "Network Access Point" and "W AP
gateway" are all preset for your convenience.
Email
Email
Your mobi le phone provides four mailboxes for email,
namely, Inbox , Drafts , Outbox and
Sent .
Creating an Email
1 Select Messaging > White Email from the main
menu.
2 Select Recipients and press .
• Select one record in the recipients list and then
press to enter an email address.
• Select Options > Contact/Group/History to
select an email address.
3 In the email editing screen, select sub-
ject and press to edit the contents.
4 In the email editing screen, select the Content
text box and press to edit the content.
27
6
Messaging
Page 34

Email
5 In the email editing screen, select Attachment
to attach picture, music, video, or eBook.
6 In the email editing screen, select Options to
save or send the email. The saved emails are in
the Messaging/Email/Drafts.
Mailboxes
Your mobile phone provides four mailboxes for
Emails, namely, Inbox , Drafts , Outbox
and Sent .
◆ Inbox
All Emails received are saved in the inbox.
Icons in Inbox
: A read email.
: An unread email.
Viewing and Editing Emails in Inbox
1 Select an email and press to view the con-
tent. If only the title of this email is received, the
phone prompts whether to download other information of the email.
28
2 In the Details screen, select Options for the fol-
lowing operations:
• Reply: To reply to the email sender.
• Reply all: To reply to the email sender and all
email receivers except the replier.
• Add to contacts: To save the det ails of the
sender to the contacts.
• Forward: To forward the selected email.
• Delete: To delete the selected email.
• Call sender: To call the email sender by a voice
call or a video call.
◆ Drafts
The saved new emails are saved in the drafts.
Icons in Drafts
: Emails to be sent.
Viewing and Editing Emails in Drafts
1 Select the desired email in the drafts and press
to enter the editing screen.
2 Edit the related information. For details, perform
the same operations as those in creating an
email.
Page 35
Email
◆ Sent
The emails sent to server are saved in the sent box.
Icon for Sent
: A sent email.
Viewing and Editing Emails in Sent
1 Select an email and press to enter the edit-
ing screen.
2 Edit the related information. For details, perform
the same operations as in creating an email.
◆ Outbox
Those emails which failed to send are retained in the
outbox.
Icon for Outbox
: Emails failed to send.
Viewing and Editing Emails in Outbox
1 Select an email and press to enter the edit-
ing screen.
2 Edit the related information. For details, perform
the same operations as in creating an email.
◆ Folder
You can categorize your emails in different folders.
You can enter Folder from the inbox, drafts, outbox
and the sent box.
Here's an example, using the folder of the inbox:
Select Email > Inbox. Then select Options > Folder
for the following operations.
• Select: to enter one folder.
• Rename: to rename the folder.
Email Settings
Select Messaging > Settings > Email to set the following items.
◆ Accounts
1 Select Options > Add account and enter the
account name. Press to access the General
settings screen.
2 The related account information contains:
Account name, From name, From address, Protocol, Incoming server, User name, Password,
and Outgoing server.
29
6
Messaging
Page 36
Push Inbox
3 Select Options > Advanced settings to enter
the Advanced Settings screen.
4 Return to the Account screen. Select Options >
Activate to activate this account.
5 To delete an account, select an account and
then select Options > Delete account.
For the account settings, contact your ser-
Note
vice provider.
◆ Common Options
• Reply with history: to reply with history.
• Save sent Email: to save sent emails to the sent
box.
• Sending limit: to set the size of email.
• Receiving limit: to set the limit of the received email.
If the size of the email exceeds the limit, only the
title of the email will be received. If O nly header is
selected, only the title of the email will be received.
• Network Access Point: This option is used to select
information about the profile to be adopted when
30
you send emails. For more information, consult
your service provider.
After finishing all settings, press Back.
Push Inbox
The Push Inbox is used to save the Push messages
you have received.
You can enable or disable Wap Push via the Internet
Settings. For more information, please refer to "Internet Settings" on page 42.
Viewing Push Messages
In the Push Inbox, select a Push message, and then
press to view the details of the Push message.
◆ Icon for Push Inbox
• : A read Push message.
• : An unread Push message.
◆ Other Operations for the Push Inbox
• Load: T o st art the W AP browser and co nnect a URL
specified by the Push message.
• Delete: To delete the selected messages.
Page 37

• Unmark all: To unmark all Push messages.
• Mark all: To mark all the Push messages.
Push Inbox Settings
Select Messaging > Settings > Push messages to
set the Push inbox.
◆ Push Message Setting
You can set the acceptable push messages.
◆ Enable Push SL
You can enable or disable the push SL function by
selecting On or Off.
Broadcast Inbox
The broadcast messages are saved in the broadcast
inbox. You can set the broadcast message.
Select Messaging > Setting > Broadcast to set the
following items.
• Service: to enable or disable this service.
• Subscription: to subscribe to b roadcast channel s or
cancel the subscription.
• Language: to select the language of the broadcast.
Broadcast Inbox
• Silent alert: to specify whether a silent alert occurs
when there is a new broadcast message.
• Auto delete: to set whether to auto delete earlier
messages when the broadcast inbox memory is
full.
Voice Mail Number
To use the voice mail services, you need to apply to
your network operator.After setting the correct number provided by your network operator, if you press
and hold in standby mode, the pho ne will dial ou t
the voice mail number automatically.
Common Phrases
Your mobile phone has been preset with some commonly used phrases, sending messages while
answering a call and auto replying. You can select
Messaging > Settings > Common phrases to edit
them if you want.
31
6
Messaging
Page 38
7Music
Music enables you to manage your music files
easily and conveniently.
My Music
You can play various music files, including those supplied with the phone, recorded by using the phone,
downloaded from the Internet, and attached to email.
You can also enjoy the online audio files.
Function Options During Playing
During playing the music file, select Options for the
following operations.
• Nowplaying: To access the current playlist.
• Play Via Bluetooth: To play audio files through the
Bluetooth device.
• Mute/Unmute: To mute or unmute the music.
• Bookmarks:To access the bookmark list.
• Playlist: To access the music playlist.
• Play in background: After the background play
fuction is enabled, you can use other functions of
the phone when enjoying music.
32
• Shuffle: On/Off the random play.
• Loop: T o select to cycle play current music, play all
music or close.
• Equilibrium: To select the music style.
• Settings:To set the full screen direction, and
Streaming settings.
• Video camera:To enable the video camera function.
• History:To display the records of the played music.
• Info.:To view the information of the music files.
• Exit: To exit the music play screen.
Screen Operations During Playing
During playing the music file, you can execute t he f ollowing operations on the music file.
Opera-
tion
Press the up scroll key to access the
current playlist.
Description
Page 39
Playlist
Opera-
tion
/
Press the down scroll key to go back the
begining of the current music file. Press
to replay this music file.
Press the left scroll key to access to the
last music file. Press and hold the left
scroll key to fast backward the current
music file.
Press the right scroll key to access the
next music file. Press and hold the right
scroll key to fast forward the current
music file.
Press to pause the playing.
Press again to resume the playing.
Press the volume keys to adjust the volume.
Description
Playlist
Selecting this option, you can rename and edit the
playlist as well as play the music in the playlist.
33
7
Music
Page 40

8Organiser & Tools
This function provides you with various assistant
tools. You can access the Organiser & Tools screen
by selecting from the main menu.
SIM ToolKit
Your mobile phone supports a number of clever Sim
ToolKit (STK) functions. For more information, consult your service provider.
Alarms
Yo u can set several alarm clocks. You can also set
the prompt messages, alarm tones and the cycle
period for alarm clocks.
Setting Alarm Clocks
Enter alarm function, you can select one alarm from
the list, and then press to set an alarm clock.
In the screen for editing alarm clock, you can set the
following items: alarm time, the prompt message, the
ringtone, the alarm cycle, the snooze function, the
vibration function, the alarm tone.
34
Prompt Interface for an Alarm
When it is time for an alarm clock to ring, the selected
alarm tone is played and a prompt interface is displayed. Y ou can stop the ringing by pressing any key
. On the prompt interface, you can select to snooze or
stop the alarm prompt.
If your phone is powered off, the alarm clock can still
ring. When the alarm rings, you can choose to power
on the phone.
Stopping the Alarm Clock
Select an alarm clock from the list, and press the left
function key to deactivate it.
Calendar
With this function, you can view the calendar and
manage your schedules.
New Schedule
Enter calendar function, you can select Options >
New to create the schedule events for the current
day.
Page 41

In the screen for editing schedule, you can set th e following items: schedule title, schedule location,
schedule type, start/end time of the schedule,
whether the alarm is on, when to prompt before the
start time, alarm cycle, schedule details, alarm tone,
and image files.
You can create up to 500 schedules in total
Note
and 15 for each day. While creating a new
schedule, you need to set the alarm on
before setting the alarm time, the alarm
cycle, the alarm tone and the image.
Calendar Functions
Enter calendar function and select Options. You can
perform the following operations.
• New: To create a new schedule.
• Go to: To go to a certain date directly from the
Month view screen.
• Display event: To view all events, specified events,
Calendar files and to back up all schedules to a
memory card.
Calculator
• View mode: To view the calendar in three different
modes: month view, week view, and day view.
• Management: To manage all schedules.
• Delete event: To delete all past events, specific
period events or all events.
• Settings: To set save location, main view, week
begin day.
• Memory status: To view the memory status, including the used space and the total space.
Prompt Interface for a Schedule
When it is time to remind you of a schedule, the
selected ringtone is played and a prompt interface is
displayed. Y ou can stop the ringing by pressing any
key. On the prompt interface, you can snooze the
alarm or stop the prompt.
Calculator
You can perform addition, subtraction, multiplication,
and division operations on your phone.
• Press the number keys to enter the figures.
• Press the scroll key to enter the operators.
35
8
Organiser & Tools
Page 42
Unit Converter
• Press the left function key to clear.
• Press the right function key to exit Calculator.
• Press to enter a radix point.
• Press to delete the character on the left of th e
cursor.
• Press to perform extraction.
• Press to enter an equal mark.
Unit Converter
You can convert units of length and weight between
different systems on your phone.
1 Press the up/down scroll key to select the unit
type bar, input uni t bar or output unit bar.
2 On the unit type selection bar, press the lef t/right
scroll key to select weight or length.
3 On the From bar, press the left /right scroll key to
select the unit to be converted from.
4 On the To bar, press the left/right scroll key to
select the unit to be converted to.
36
5 Press the number keys to enter a numeric value
to be converted in the Input bar.
Then you can view the conversion result.
Press or select CE to clear the numeric values
you entered.
Currency Converter
You can convert between di fferent currencies on your
phone.
To using this function, access the Currency con-
verter screen, and then press the up/down scroll key
to switch between the setup items.
1 On the Input bar, press the number keys to ente r
a numeric value to be converted.
2 On the From bar, press the left/right scroll key to
select the currency to be converted from.
3 On the To bar, press the left/right scroll key to
select the currency to be converted to.
4 On the Rate bar, enter the currency rate.
Then you can view the conversion result.
Page 43

Press to clear the numeric values you entered.
Press Setting in the currency converter screen, and
you can select frequently used currency units. This
makes it easy to switch between selected units in the
From or To bar.
Synchronise
You can synchronise contacts with your personal
phone book stored on a network server. This service
is network dependent. Contact your service provider
for further details.
Select Synchronise from Organiser & Tools to create or edit a profile. Select Options > View log to
view the latest synchronisation log. Before you use
the synchronise function, you may need to set a profile.
1 To create a profile, select Options > New to cre-
ate a profile.
2 Press the left/right scroll key to switch between
Synchronise item, Server Setting, and Network
profile.
Synchronise
3 In the Synchronise item screen, select the item
to be synchronized and press to confirm it.
Then, enter the database path, User name,
Password of the synchronization items.
4 In the Server Setting screen, enter the user
name, password, and server address.
5 In the Network profile screen, enter the proxy
server address and the port. Then, enter the network access point and select a desired profile.
6 Return to the previous menu and select Options
> Synchronise to start synchronising.
This service is not available in all networks.
Note
Please contact your service provider for
more information.
Task
You can define and manage tasks to be conducted
before a certain time. Your phone can remind you of
these tasks and track them automatically.
37
8
Organiser & Tools
Page 44
Voice Recorder
Select Task from Organiser & Tools .The tasks are
classified into three kinds: pending, done, and all.
You can define up to 1000 tasks on your phone.
New Task
To define a new task, press or select Options >
New on the Tasks screen.
In the screen for editing task, you can set the following items: the title of the task, the deadline, the priority level, the task status, the task alert, the alert time,
the task type.
Tasks Functions
On the T asks screen, you can also perform the following operations: delete, edit, copy, mark finished,
day view, send by Message, E mail or Bluetooth, view
the memory status and delete all.
Prompt Interface for a Task
When it is time for the phone to remind you of a task,
it rings automatically and a prompt interface is displayed. Y ou can stop t he ringing by pressing any key.
38
On the prompt interface, you can select to snooze or
stop the task prompt.
Voice Recorder
You can record voices or sounds on your phone.
On the standby screen of the voice recorder, you can
select Options to set the recording duration.
• Record/Pause: Press to start the recording. During recording, press to pause, an d pr ess again
to resume.
• Stop and save: During recording, press the left
function key to stop recording.The audio file is
saved in My Files\Music automatically.
• Play an audio file instantly: After recording is complete, select Option > Play to play the audio file
instantly.
Alternatively, you can select for the follo wing operations: Send As MMS, Send As Email, Via Bluetooth,
set as ringtone and delete.
Page 45

Memo Pad
You can take down important events on your phone.
Yo u can save up to 100 such memos.
Select Memo from Organiser & Tools. If there is no
memo, you need to create one when you access the
Memo screen.
On the Memo Pad screen, you can perform the following operations: new, delete, edit, send by Message or Bluetooth, view the memory status and
delete all.
World Time
You can view the time of important cities around the
world. To switch among the time zones, press the lef t/
right scroll key.
If the daylight saving time (DST) is used in your city,
you need to set the phone to DST. Then, you can get
the right local time. To set the phone to DST, switch
to the desired time zone and then select Options >
DST.
Memo Pad
Stopwatch
You can use the stopwatch function and save up to
five records on your phone.
On the Stopwatch screen, you can perform the following operations: start, save, pause, continue, reset .
Timer
You can set a timer for up to 99 hours and 59 minutes. After you have set it, the timer is displayed on
the home screen.
Service Dial Number
With this number you can get in touch with your service provider.
39
8
Organiser & Tools
Page 46

9My Files
My Files enables you to manage the Pictures, Ring-
tones, Games, Music, Videos, Applicati ons and Others files conveniently . You can access My Files by
selecting from the main menu.
Select Pictures, Ringtones, Music or Videos
folder. You can perform the following operations on
files.
• View: To view the picture file.
• Play: To play a selected file.
• Sort by name/date: To sort the selected file by
name or by date.
• Delete: To delete the selected file.
• Send: To send the selected file by message, email
or Bluetooth.
• Set as: To set a picture as t humbnail of a contact or
the wallpaper.
• Set as ringtone: T o set a ringto ne as voice call tone,
video call tone or specific contact tone.
• Picture edit: To edit a picture file.
• Cut: To cut the selected file.
• Copy: To copy the selected file.
• Mark/Unmark: To select one or more files or cancel
the selection.
40
• Rename: To rename the selected file.
• Properties: To view the properties of one or more
files.
Some sound files are protected by Digital
Note
Rights Management (DRM), and may not be
able to be used as a ringtone.
Select Games, applications, other folder.
• Games: T o play ga mes and download more games.
The downloaded files are saved in this folder. For
more details, Please refer to "Entertainment/
games" on page 43.
• Others: To save any kind of file. You can also create
new folders in this folder to categorise your files.
• Applications: Any applications that you download
are saved in this folder.
When the phone detects and recognises the memory
card, Memory card is displayed as a tab on the top
of the My Files screen. You can perform the same
operations on the contents in the memory card as
those in the phone. Your mobile phone also provides
a function to format the memory card.
Page 47
10Browser
The built-in browser makes it easy and pleasant to
tour around the Internet. You can access the Browser
screen by selecting from the main menu.
Browser
Browsing Pre-set Web Pages
On the homepage, select a link from the page. Then
select to browse the page. When browsing, you
can press the scroll keys to select a link you want to
access. The selected link is highlighted. Press to
enter it.
Other Operations for the Homepage
After selecting Options from the homepage, yo u can
perform the following operations:
• Homepage: To access the homepage.
• Forward: To go forward when you browse web
pages.
• Bookmarks: To access the bookmark directory and
view the saved bookmarks.
• Enter URL: To enter a website address and access
it.
• Recent pages: To access pages you have browsed
recently. The recently browsed pages can be
saved.
• Save page: To save the page s in your phone. Web
pages are saved to the Saved pages.
• Save item: To save contents on the page to the
folders in your phone.
• Refresh: To refresh the current web page.
• Saved pages: To browse the saved pages offline.
• Exit: To exit the current web page.
• Settings: To change the relevant settings for the
web page.
Enter URL
Access the Enter URL screen, and then you can
enter the address of the web page to be accessed.
Bookmarks
With this option you can save and edit the informati on
of the websites that you often access.
41
Page 48

Internet Settings
Some bookmarks have been preset by service provider on the phone.
Internet Settings
These are preset for you to use the Internet service. If
you need to modify them, open the Browser and
select Internet Settings.
42
Page 49
11Entertainment
You can use the phone to run JAVA programe, play
games, take photos, and listen to online music.
Games
You can play games and download more games.
Downloaded games are saved to the My Files/
Games directory.
Available Options of Games
You can scroll the cursor to a Java game and press
or select Options > Select to launch the game.
In the Games screen, you can select Options to do
the following operations:
• Select: To launch the game.
• Update: To upgrade the game.
• Delete: To delete the game.
• Properties: To view the property of the game.
• Move: To move games saved in the phone to the
memory card and vice versa.
• Security: To set the security requirements of the
game.
• Send: To send the game to a recipient by email or
Bluetooth.
• Setting: To set the volume, vibration and internet
settings.
Camera
Press the Camera key or select Entertainment >
Camera to launch the camera.
Operations in the Viewfinder Screen
In the viewfinder screen, you can:
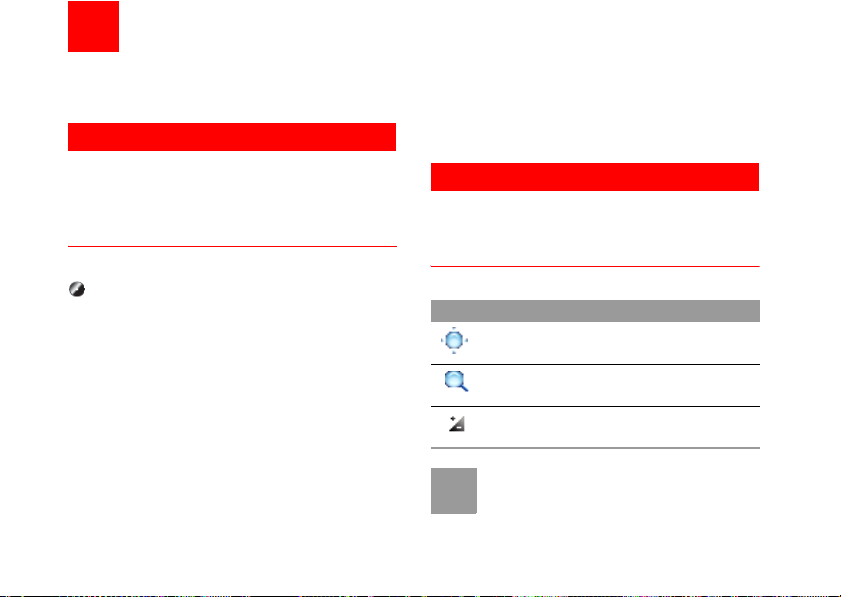
Icon Operation
Press the left/right scroll key to adjust
the brightness.
Press the up/down scroll key to zoom in
or zoom out.
Press the volume up/down key to adjust
the contrast
If you use the assistant lens and set the res-
Note
olution to 1600 × 1200, you cannot do the
operation of zoom in or zoom out.
43
Page 50
Video Camera
In the viewfinder screen, you can select Options to
choose from the following operations:
• Video camera: To record a video clip.
• Frame: To choose a frame for pictures.
• Normal size/Screen size: To set the viewfinder size.
• Go to gallery: To access the My Files/Pictures
directory to view pictures.
• White balance: The phone provides you with several modes, including auto, fluorescent, incandescent, outdoor, indoor, night mode.
• Internal/External view: To switch between the assistant lens and the main lens.
• Capture mode: To set the shooting mode.
• Self timer: To set the countdown ti me fo r th e pho ne
to take a picture automatically.
• Settings: To change the relevant settings for camera function.
Operations After Taking a Picture
In the viewfinder screen, you can press to take a
picture.
Pictures taken are auto saved to the My Files/Pic-
tures directory.
44
After taking a picture, you can select Options for the
following operations.
• Send: To send the picture through MMS, email or
Bluetooth.
• Set as: To set the picture as the wallpaper or the
image of a contact.
• Edit: To edit the picture.
• Delete: To delete the picture.
Video Camera
You can use your phone to record a video.
In the main menu, select Entertainment > Camera
> Options > Video camera to launch the video camera.
Operations in the Viewfinder Screen
In the viewfinder screen, you can:
Icon Operation
Press the left/right scroll key to adjust
the brightness.
Press the up/down scroll key to zoom in
or zoom out.
Page 51

In the viewfinder screen, you can select Options to
choose from the following operations.
• Camera: To launch the camera.
• Record: To start recording the video.
• Zoom display: To zoom in or zoom out.
• Internal/External view: To switch between the assistant lens and the main lens.
• Gallery: T o access the My Files/Videos directory to
view videos.
• Settings: To change the relevant settings for video
camera function.
• Available memory: To view the total duration of all
videos, the used space, and the free space.
Operations During Recording
In the viewfinder screen, you can press to start
recording the video.
During the recording, you can execute the following
operations:
• Pause/Record: T o p ause and then to st art recording
again.
• Stop: To stop recording.
Music
Music
Music enables you to manage your music files easily
and conveniently. It can play all kinds of music files
as well as purchase music, manage the channels and
play streaming media. For more details, please refer
to "Music" on page 32.
11
Entertainment
45
Page 52
12Connections
Yo ur mobile phone pr ovides you with ma ny dat a communication functions. You can access the Connec-
tivity screen by selecting Settings from the main
menu.
Bluetooth (Optional)
You may use the built-in Bluetooth function of your
phone to synchronise data between a PC and your
phone, or use the built-in modem of your phone to
access the Internet with a PC, or exchange data with
other Bluetooth devices. You can also talk by using
the Bluetooth headset or Bluetooth loudspeaker, or
listen to misuic by using the Bluetooth stereo headset.
The Bluetooth function supported by your
Note
mobile phone meets the requirements of
Bluetooth Specification 1.2. It ca n w o rk successfully only if you use it with compatible
Bluetooth devices. For more information,
refer to the user manuals of related devices,
or consult the manufacturer of related
devices.
46
Bluetooth-Based Synchronisation
Your mobile phone can respond to data synchronisation requests from a computer.
To operate the Bluetooth synchronisation with your
mobile phone, Your PC needs to support Bluetooth
function.
1 Install the Mobile Phone PC Assistant supplied
with your phone.
2 Select Settings > Connectivity > Bluetooth >
Switch On/Off > On to enable the Bluetooth
function.
3 Select Visibility > Visible.
4 Run the driver software for Blueto oth on the PC,
and pair the moblie phone. After the PC detects
and recognises the mobile phone serial port service, activate the Bluetooth serial port service of
the mobile phone.
5 Run the Mobile Phone PC Assistant on the PC.
Page 53

6 You can now operate the synchronisation. For
details of the operation, refer to the Help of the
Mobile Phone PC Assistant.
Bluetooth-Based Data Transfer
You can exchange data between your Bluetooth
phone and other Bluetooth devices. If you want to
exchange data between your phone and another
device, that device must support Bluetooth and the
Bluetooth function must be enabled.
1 Select Switch On/Off > On from the Bluetooth
settings screen to enable the Bluetooth function.
A Bluetooth device icon will appear on the icon
bar.
2 Select Devices.
3 Select Options > Search to search a Bluetooth
device. When a Bluetooth device is found for the
first time, authentication is required.
Now you can exchange data between your phone
and the other Bluetooth device.
Bluetooth (Optional)
Bluetooth-Based Internet Access
Connecting your phone to a PC through Bluetooth
function enables the PC to use the phone as a
modem. This helps to set up a dial-up connection to
the Internet. (This is particularly useful for laptops.)
You can create Bluetooth-based Internet access
through the Mobile Phone PC Assistant supplied wit h
your mobile phone, or the built-in Internet wizard of
the Windows operating system, or the Internet wizard
supplied with the Bluetooth drive suite of the PC.
Windows 2000 and Windows XP are sup-
Note
ported.
◆ Accessing the Internet using the U550
Mobile Phone PC Assistant
To access the Internet by Bluetooth using the Mobile
Phone PC Assistant, make sure that your PC supports the Bluetooth function and your SIM card supports the Internet access service.
1 Select Settings > Connectivity > Modem and
set the port to Modem via Bluetooth.
9(H11HW)
47
12
Connections
Page 54
USB
2 Select Settings > Connectivity > Bluetooth >
Switch On/Off > On.
3 Make sure that Bluetooth modem is in Device
Manager/Modem of your PC. Run the driver
program for Bluetooth on your PC, and then pa ir
the mobile phone. After the PC has detected th e
mobile phone dial-up network service you can
activate this service.
4 Install the Mobile Phone PC Assistant supplied
with your phone.
5 Run the U5509(H11HW) Dial-up Internet on the PC to
access the Internet.
◆ Other Bluetooth Operations
You can execute the basic settings for the Bluetooth
functions.
Select Settings > Connectivity > Bluetooth for the
following operations.
• Switch On/Off: To set the Bl uetooth de vice to On or
Off.
• Search new devices: To search for new Bluetooth
devices.
48
• Devices: To view all detected Bluetooth devices.
• Visibility: To set whether your phone can be found
by other devices when the Bluetooth function is
enabled.
• Rename: To rename your phone.
• My device information: To view the detailed information of your phone, such as the device name and
device address.
• Uninterrupted Access On/Off: When this option is
set to On, only the Bluetooth connection
requirement from the trusted device is accepted.
When it is set to Off, the Bluetooth connection
requirements from all devices are accepted.
USB
You can synchronise data between your phone and
PC, surf the Internet with your phone and read the
memory card by USB cable.
• To use USB cable , please strictly obe y the
!
!
Warning
following rules. Otherwise, your phone or
警告
PC may be damaged. To connect your
phone with a PC through USB cable, first
Page 55

connect the USB connector to your
phone, and then connect the other end of
the cable to the PC. To disconnect your
phone from the PC, first disable the
Mobile Phone PC Assistant, then disconnect the USB connector from the PC, and
finally disconnect the USB cable from your
phone.
• If the PC cannot recognise your phone
when connecting through the USB cable,
power off and restart the PC and then
retry.
• Do not plug the USB cable in and out of
your mobile phone frequently.
USB-Based Synchronisation
Your mobile phone supports the synchronisation
requests from a PC to your phone.
With USB cable and Mobile Phone PC Assistant,
your phone can communicate with a PC. You can
back up the contact entries and messages saved on
your phone and the SIM card to a PC. You can also
USB
synchronise contacts, schedule events and To Do
tasks between your phone and Outlook .
To operate the USB-based synchronisation with your
phone, do as follows.
1 Connect your phone to the PC by using the USB
cable.
2 Install the Mobile Phone PC Assistant supplied
with your phone.
3 Select Settings > Connectivity > Modem from
the main menu of your phone and set the port to
Modem via USB.
4 Run the Mobile Phone PC Assistant on the PC.
5 Now you can operate the USB-based synchro-
tion. For details of the operation, refer to the
Help of the Mobile Phone PC Assistant.
Accessing the Internet by USB
Connecting your phone to the PC with the USB cable
enables the PC to use the phone as a modem. This
helps to set up a dial-up connection to the Internet.
49
12
Connections
Page 56

USB
1 Select Settings > Connectivity > Modem and
set the port to Modem via USB.
2 Connect your phone to the PC by using th e USB
cable.
3 Install the Mobile Phone PC Assistant supplied
with your phone.
4 Ensure the USB device is shown in Device Man-
ager/Port of your PC.
5 Select one of the following methods to set up the
dial-up connection.
• Run the U550
9(H11HW) Dial-up Internet on the PC to
create the dial-up connection.
• Create Internet access through the built-in
Internet wizard of the Windows operating system.
Only Windows 2000 and Windows XP are sup-
Note
ported.
50
micro-SD Card Reader
You can read the files saved in the micro-SD card by
USB cable.
To use the micro-SD card reader, do as follows.
1 Insert the micro-SD card to your phone.
2 Connect your phone to the PC by using the USB
cable.
3 Found New Hardware is displayed on your PC,
and an icon for the mobile memory drive
appears.
The function of micro-SD card reader and
Note
the other functions using the USB cable are
incompatible. If you enable the micro-SD
card reader, other functions using the USB
cable are unavailable. If you need to
recover other USB functions, disable the
card reader function.
Page 57
13Settings
You can access the Settings screen by selecting
from the main menu.
Phone Settings
You can change the settings of the phone, including
Profiles, Phone language, Input language, Date and
time, Date format, Shortcuts, as well as Auto ON and
OFF.
Profiles
You can select different profiles for the phone to suit
different environmental situations.
You can select a profile and select Options > On to
activate this profile. You can also select Options >
Edit to edit the following settings for this profile.
In the standby mode, you can press and
Note
hold to switch the current profile to the
silent profile. If the current profile is offline,
you cannot execute this function.
Phone Language
Your mobile phone supports several languages.
Select Settings > Phone settings > Phone lan-
guage to select a language. Besides these languages, you can also select Auto. This option is
used to set the phone language to be the same as
that used in your SIM card.
Input Language
The option is used to set the language used to enter
text.
Date and Time
This option is used to change the system time for the
phone.
Date Format
This option is used to change the display format of
the date of the phone. Three formats are available:
yy.mm.dd, mm.dd.yy, and dd.mm.yy.
51
Page 58

Display Settings
Shortcuts
This option is used to assign the mostly used functions to the scroll keys as shortcut keys.
Auto ON and OFF
This option is used to set your phone to power on or
off automatically.
1 In the Auto ON and Auto OFF screen, enable
this function and set the cycle for Auto ON and
Auto OFF respectively. Then select Save.
2 Set the time for Auto ON and Auto OFF, and
then select Option > Save to save your settings.
Display Settings
You can change the settings for the phone display,
including Wallpaper, Colour themes, Brightness,
Keypad backlight, Backlight time, LCD sleep delay,
Greeting message.
• Wallpaper: To set the wallp aper layout for the home
screen.
• Colour themes: To set the colour themes.
52
• Brightness: To set the brightness of the screen.
• Keypad backlight: To turn the keypad backlight
Auto, on or off.
• Backlight time: To set the backlight delay time for
the screen.
• LCD sleep delay: To set the duration between backlight off and LCD off.
• Greeting message: To enter a greeting message
that appears on the screen when you power on
your phone.
Message Settings
You can change the message settings including
SMS, MMS, Email, Push messages, Broadcast,
Voice mail Number and Common phrases.
Call Settings
You can change the settings for making calls.
Call forwarding
This option is used to forward incoming calls.
Page 59

1 In the main screen, select Settings > Call set-
tings > Call forwarding.
2 Select the forwarding condition from All calls, If
out of reach, If busy, and If not answer.
3 Then select the forwarding type from Voice call,
Fax call, Data call and All services.
4 Select Activate or Deactivate to enable or dis-
able the service. You can also select Check status to check the status of call forwarding service.
Alternatively, you can select Disable all and then
select one from the four items: V o ice call, Fax call,
Data call and All services. Then press to disable
all call forwarding services of this type.
Call barring
This option is used to set the call barring mode for the
phone.
Select Call settings > Call barring for the following
options:
Call Settings
◆ Call Barring:
1 Select the barring condition from All outgoing
calls, International calls, International calls
except home, All incoming calls and Incoming calls when abroad.
2 Then select the barring type from Voice call,
Fax call, Data call and All services.
3 Select Activate or Deactivate to enable or dis-
able the service. You can also select Check status to check the status of call barring service.
◆ Disable All
Select one type from Voice call, Fax call, Data call
and All services, and then enter the call barring
password. Press to cancel all call barring services
of each type.
Call waiting
This option is used to enable or disable the call waiting function. You can also view whether the call waiting function is enabled by checking the status.
53
13
Settings
Page 60

Call Settings
The call waiting function is network-dependent. For
more information, please consult your service provider.
Auto redial
This function is used to auto redial the dialed number
if the dialing failed.
Answer mode
It is used to set the mode for answering an incoming
call. Three options are available: Open flip, Any key
and Send key.
Auto answer
It is used to select auto answering for incoming calls.
Select Call settings > Auto answer for the following
options.
• Immediate answer: To answer an incoming call
immediately.
• Message: To auto send a text message that is preset and chosen from the Common phrases to the
current caller.
54
• Recorded message: To answer an incoming call by
auto playing a recorded message.
• Disable: To disable the auto answer function.
Calling ID
These option allows you to select whether to display
your phone number on the phone of the party who
called you.
If select Auto, whether your phone number will be
shown on the called phone depends on the network.
Select line
It is used to set the call line for your phone. Two
options are available: Line 1 and Line 2.
My number
With this function, you can save your own phone
numbers on the SIM card. Y ou can select Options to
edit or delete the records.
Call barring password
This function is used to change the password for call
barring.
Page 61

Select Call barring p assword from the Call settings
screen. Now you can change the call barring password.
The old call barring password is provided by
Note
your network operator if it is the first time for
you to change the password.
Prompt to save
This function is used to prompt whether to save the
number when there is an incoming call. You can
enable or disable this function.
Video Call Settings
You can change the settings for the Video Call function, including Picture in picture, Switch display,
Image quality, Camera off, Audio off, Auto voice call,
Send specific file and Auto answer.
• Picture in picture: To display your image on your
phone and arrange the positions of your image.
• Switch display: To switch between image windows
during a video call.
• Image quality: To set the image quality for video.
Video Call Settings
• Camera off: To open or close the video channel
during a video call.
• Audio off: To open or close the audio channel during a video call.
• Auto voice call: To enable the auto voice call
function. The phone auto makes a voice call, when
the other party's phone does not support the video
call service.
• Send specific file: To select a file and send it to the
other party when you hold a video call.
• Auto answer: To auto answer an incoming video
call. You can enable or disable this function.
Connectivity Settings
The data connection function provides seve ral data
communication functions. You can synchronise data
between your phone and a PC through a USB cable
or Bluetooth. Your PC can use the built-in modem of
your phone to access the Internet. For detailed infor-
mation, refer to "Connections" on page 46.
55
13
Settings
Page 62
Network Settings
Network Settings
You can change the settings for the network.
Select Settings > Network for following options:
Mode, Select network, Cell information, My public
land mobile network (PLMN) list.
Security Settings
You can change settings related to the phone security.
Select Security from Settings, and then enter the
correct phone password if you have set the phone
lock to On (the initial password is 0000). Then press
to display the following security setting items:
Reset
This option is used to reset your phone to the factory
settings.
Password lock
This option is used to enable or disable the "Phone
lock" and "PIN lock".
56
1 Select Phone lock/PIN lock.
2 Press the up/down scroll key to select On or Off.
3 Set passward:
• Phone password: Enter the phone password.
• PIN password: If the desired status is the same
as the current status, just press . Con-
versely, you need to select t he desired status
and then enter the PIN code.
Change password
You can modify the phone password and PIN code.
1 Select Security > Change password.
2 Select one item from Phone password, PIN
code, and PIN2 code.
3 Enter the old password (The initial phone pass-
word of the U550
4 Enter a new password.
5 Enter the new password again to confirm.
9/H11HW is 0000).
Page 63

• To modify the PIN code, you must set the
Note
"PIN lock" to "On" first.
• If you enter the wrong PIN or PIN2 three
times, the SIM card will be locked. You
need the PUK or PUK2 code to unlock the
SIM card. If you enter the wrong PUK or
PUK2 code 10 times in total, the SIM card
will be locked permanen tl y.
• PUK or PUK2 code are delivered with the
SIM card. If you do not have one or forget
it, contact your service provider.
Fixed dialer number
If your SIM card supports the Fixed Dialer Number
(FDN) function, you can select Security > Fixed
dialer number to set the limit for phone numbers.
DRM setting
Digital Rights Management (DRM) can protect the
digital content from piracy and protect the provider’s
interests. The digital content includes Java applications and multimedia content such as images, audio
Security Settings
and video. If the protected content cannot be
accessed, it indicates that the corresponding copyright is overdue or used up.
Select Settings > Security > DRM setting. Enter the
correct phone password and press to confirm, and
you can delete all the rights.
57
13
Settings
Page 64

14Warnings and Precautions
Electronic Device
• Turn off your phone near high-precision electronic
devices. The phone may affect the performance of
these devices.
• Such devices include hearing aids, pacemakers,
fire alarm systems, automatic gates, and other
automatic-control devices. If you are using an electronic medical device, consult the device manufacturer to confirm whether the radio wave affects the
operation of this device.
• Pacemaker manufacturers recommend that a minimum separation of 15cm be maintained between a
mobile phone and a pace-maker to avoid potential
interference with the pace-maker. To achieve this
use the phone on the opposite ear to your pacemaker and do not carry it in a breast pocket.
Hospital
Pay attention to the following points in hospitals or
health care facilities:
58
• Do not take your phone into the operating room
(OR), intensive care unit (ICU), or coronary care
unit (CCU).
• Do not use your phone at places for medical treatment where phone use is prohibited.
• When using your phone near someone who is suffering from a heart disease, turn down th e ring tone
volume or vibration properly so that it does not
affect the person.
Area with Inflammables and
Explosives
In any area with inflammables and explosives, turn
off your phone and do not take out, install or charge
the battery, to avoid explosion and fire. Areas with
inflammables and explosives include, but are not limited to:
• Gas station
• Area for storing fuels (such as the bunk under the
deck of a ship)
• Device/Vehicle for transporting and storing fuels or
chemical products
Page 65

• Area with chemical substances and particles (such
as: granule, dust, metal powder) in the air
• Area with the sign of "Explosives"
• Area with the sign of "Turn off bi -direction wireless
equipment"
• Area where it is generally suggested to stop the
engine or a vehicle
Storage Environment
• Do not place magnetic storage media such as magnetic cards and floppy disks near the phone. Radiation from the phone may erase the information
stored on them.
• Do not put your phone, battery, or other accessories in containers with strong magnetic field, such
as an induction cooker and a microwave oven. Otherwise, circuit failure, fire, or explosion may occur.
• Do not leave your phone, battery, or charger in a
very hot or cold place. Otherwise, malfunction of
the products, fire, or explosion may occur.
Storage Environment
• Do not place sharp metal objects such as pins near
the earpiece. The earpiece may attract these
objects and hurt you when you are using the p hone.
• Do not subject your phone, battery, and charger to
serious collision or shock. Otherwise, battery leakage, phone malfunction, overheat, fire, or explosion
may occur.
• Do not put your phone in the back pocket of your
trousers or skirt, to avoid phone damage while
seated.
Children Safety
• Put your phone, battery, and charger in places
beyond the reach of children. Do not allow children
to use the phone, battery, or charger without guidance.
• Do not allow children to put the battery in mouth, for
electrolyte in the battery is poisonous.
• Do not allow children to touch the small fittings.
Otherwise, suffocation or gullet jam can be caused
if children swallow the small fittings.
Warnings and Precautions
14
59
Page 66

Operating Environment
Operating Environment
• he phone, battery, and charger are not water-resistant. Keep them dry . Protect the phone , battery and
charge from water or vapor . Do not touch th e phone
with a wet hand. Otherwise, short-circuit and malfunction of the product or electric shock may occur.
• Do not use the phone in dusty, damp and dirty
places or places with magnetic field. Otherwise,
malfunction of the circuit may occur.
• Do not turn on or off the phone when it is near your
ears to avoid negative impact on your health.
• When carrying or using the phone, keep the
antenna at least one inch (1.5 centimeters) away
from your body, to avoid negative impact on your
health caused by radio frequency leakage.
• If you feel uncomfortable (such as falling sick or
qualm) after playing games on your phone for a
long time, please go to see a doctor immediately.
• On a thunder stormy day, do not use your phone
outdoors or when it is being charged.
60
• Do not touch the antenna when a call is going on.
Touching the antenna may affect call quality and
cause the phone to operate with more power . As a
result, the talk time and standby time are shortened.
• The phone may interfere with nearby TV sets,
radios and PCs.
• In accordance with international standards for radio
frequency and radiation, use phone accessories
approved by the manufacturer only.
Cleaning and Maintenance
• Before you clean or maintain the phone, t urn of f the
phone and disconnect it from the charger. Otherwise, electric shock or short-circuit of the battery or
charger may occur.
• Do not use any chemical detergent, powder, or
other chemical agent (such as alcohol and benzene) to clean the phone and the charge. Otherwise, part damage or a fire can be caused. You can
clean the phone and the charger with a piece of sof t
antistatic cloth that is a little wet.
Page 67

• Keep the plug dry when you clean it, to prevent fire.
• If the phone or any of its fittings does not work, t urn
to the local authorized service center for help.
Environmental Protection
• Please observe the local regulations regarding the
disposal of your packaging materials, exhausted
battery and old phone and please promote their
recycling. Do not dispose of exhausted battery or
old phone in municipal waste.
• This HUAWEI device complies with Directive 2002/
95/EC on the restriction of the use of certain hazardous substances in electrical and electronic
equipment.
: This symbol indicates that the equipment car-
rying this mark must NOT be thrown into general
waste but should be collected separately and properly recycled under local regulations.
Environmental Protection
Emergency Calls
You can use your phone for emergency calls. However, connections in all conditions cannot be guaranteed. Y ou should never rely solely on the phone for
essential communications.
Battery
• Use the battery approved by the manufacturer only.
Otherwise, explosion may occur.
• Do not dispose of the battery in fire. Otherwise, the
battery may ignite or explode.
• Do not connect two poles of the battery with conductors such as cables, jewelries or any other
metal material. Otherwise, the battery is short-circuited and it may burn your body.
• Do not disassemble the battery or solder the battery poles. Otherwise fluid leakage, overheat, fire,
or explosion may occur.
• If there is battery leakage, smoke, or strange smell,
stop using the battery and keep it away from open
Warnings and Precautions
14
61
Page 68

Charger
flame to avoid fire or explosion. Then turn to an
authorized maintenance engineer for help.
• The battery is not fully charged when delivered.
Plug the charger cable into the bottom of the
phone, plug the power supply unit into a mains
power socket and charge for at least two hours.
• If the battery fluid contacts your skin or cloth, wash
with clean water immediately to avoid irritation to
the skin.
• If the battery fluid gets into eyes, do not rub your
eyes. Otherwise, your eyes can be hurt. Wash with
clean water and go to see a doctor immediately.
• If there is battery deformation, color change or
abnormal heating while you charge or store t he battery, take it out immediately and stop using it. Otherwise, battery leakage, overheat, explosion, or fire
may occur.
• When installing the battery, do not push the battery
by force lest battery fluid leak out or the battery
crack.
• Do not take out the battery when the phone is
turned on.
62
• If you do not use the battery for a long time, store it
in normal temperature after charging.
Charger
• Use the charger approved by the phone manufacturer only. Any violation of this rule may result in fire
or malfunction of the charger.
• Do not short-circuit the charger. Short-circuiting the
charger may cause fire or malfunction of the
charger.
• If the power cord is damaged (for example, the lea d
is exposed or broken), or the plug becomes loose,
stop using the power cord at once. Otherwise, electric shock, short-circuit of the charger, or fire may
occur.
• Keep the charger dry. Once water or other liquid
leaks into the charger, electrica l leakage or other
faults may occur.
• Do not use the charger in a dusty and damp environment.
• Keep the power cord away from any heating appliance.
Page 69

• Ensure the charger is properly plugged into the
power socket properly when charging the battery.
Improper insertion may result in electric shock, fire,
or explosion. T o unplug the charger , pull the plug of f
rather than tear off the power cord.
• Do not place any heavy object on the power cord of
the charger. Do not damage, change, or pluck the
power cord. Otherwise electric shock or fire may
occur.
• When you are charging the battery with the
charger, do not touch the plug, power cord or the
charger with a wet hand. Otherwise, electric shock
can be caused.
• Once the liquid such as water leaks into the
charger, remove the plug of the charger fr om the
socket immediately. Otherwise, overheating, fire
and other malfunction may occur.
Using the USB Cable
To use the USB cable, please strictly obey the following rules. Otherwise, your phone or PC may be damaged:
Using the USB Cable
• T o connect you r phone and PC wit h the USB cable,
connect to the phone at first, and then connect to
the PC.
• In the process of communication between your
phone and PC, it is strictly forbidden to plug or pull
out the USB cable.
• To disconnect your phone and PC from the USB
cable, disconnect from the PC at first, and then disconnect from the phone.
Certification Information (SAR)
THIS DEVICE MEETS THE GOVERNMENT'S
REQUIREMENTS FOR EXPOSURE TO RADIO
FREQUENCY ELECTROMAGNETIC FIELD.
Your mobile phone is a low-power radio transmitter
and receiver. When it is turned on, it emits low levels
of radio frequency energy (also known as radio
waves or radio frequency fields).
Governments around the world have adopted comprehensive international safety guidelines, developed
by scientific organizations, e.g. ICNIRP (Internationa l
Commission on Non-Ionizing Radiation Protection)
Warnings and Precautions
14
63
Page 70

Certification Information (SAR)
and IEEE (Institute of Electrical and Electronics Engineers Inc.), through periodic and thorough evaluation
of scientific studies. These guidelines establish permitted levels of radio wave exposure for the public.
The levels include a safety margin designed to
assure the safety of all persons, regardless of age
and health, and to account for any variations in measurements.
Specific Absorption Rate (SAR) is the unit of measurement for the amount of radio frequency energy
absorbed by the body when using a mobile phone.
The SAR value is determined at the highest certified
power level in laboratory conditions, but the actual
SAR level of the mobile phone while operating can be
well below the value. This is because the mobile
phone is designed to use the minimum power
required to reach the network.
All models of Huawei’s mobile phone are designed to
meet radio frequency exposure guidelines. Before a
phone model is available for sale to the public, it must
be tested according to the technical standard-EN
50361 and does not exceed the limit established by
64
the European Council Recommendation: 1999/519/
EC for safe exposure. The tests are performed in
using positions (that is, at the ear) as required by the
EN50361 for each model.
The SAR limit adopted by the 1999/519/EC is 2.0
watts/kilogram (W/kg) averaged over ten gram of tissue. The highest SAR value for this device type when
tested at the ear is 0.648 W/kg, and when properly
worn on the body is 0.750 W/kg.
All models of Huaweii’s mobile phone are designed to
meet radio frequency exposure guidelines. Before a
phone model is available for sale to the public, it must
be tested and certified to the FCC that it does not
exceed the limit established by the governmentadopted requirement for safe exposure. The tests are
performed in positions and locations (that is, at the
ear and worn on the body) as required by the FCC for
each model. For body worn operation, this phone has
been tested and meets FCC RF exposure guidelines
when the handset is positioned a minimum of 15 mm
from the body with an accessory that contains no
metal part. Use of other accessories may not ensure
Page 71

compliance with FCC RF exposure guidelines. SAR
compliance for body-worn operations is restricted to
belt-clips, holsters or similar accessories that have no
metallic component in the assembly and must
provide at least 1.5 cm separation between the
device and the user's body.
The SAR limit adopted by the USA and Canada is 1.6
watts/kilogram (W/kg) averaged over one gram of tissue. The highest SAR value reported to the FCC and
IC for this device type when tested for use at the ear
is 0.256 W/kg, and when properly worn on the body is
0.275 W/kg.
This device complies with Part 15 of the FCC Rules.
Operation is subject to the condition that this device
does not cause harmful interference.
FCC Statement
This equipment has been tested and found to comply
with the limits for a Class B digital device, pur suant to
Part 15 of the FCC Rules. These limits are designed
to provide reasonable protection against harmful
interference in a residential installation. This equip-
Certification Information (SAR)
ment generates, uses and can radiate radio frequency energy and, if not installed and used in
accordance with the instructions, may cause harmful
interference to radio communications. However,
there is no guarantee that interference will not occur
in a particular installation. If this equipment does
cause harmful interference to radio or television
reception, which can be determined by turning the
equipment off and on, the user is encouraged to try to
correct the interference by one or more of the following measures:
• Reorient or relocate the receiving antenna.
• Increase the separation between the equipment
and receiver.
• Connect the equipment into an outlet on a circuit
different from that to which the receiver is connected.
• Consult the dealer or an experienced radio/TV
technician for help.
This device complies with Part 15 of the FCC Rules
and with RSS-210 of Industry Canada.
Operation is subject to the following two conditions:
Warnings and Precautions
14
65
Page 72

Certification Information (SAR)
(1) This device may not cause harmful interference,
and
(2) This device must accept any interference
received, including interference that may cause
undesired operation.
Warning: Changes or modifications made to this
equipment not expressly approved by HUAWEI may
void the users' authorization to operate this equipment.
Radiofrequency radiation exposure Information:
For body worn operation, this phone has been te sted
and meets FCC RF exposure guidelines when used
with an accessory that contains no metal and that
positions the handset a minimum of 15mm from the
body. Use of other accessories may not ensure compliance with FCC RF exposure guidelines.
66
Page 73

15Acronyms and Abbreviations
DCF DRM Content Format
DRM Digital Rights Management
FDN Fixed Dial Number
GPRS General Packet Radio Service
GSM Global System for Mobile communica-
tion
OTA Over-The-Air
PIN Personal Identification Number
PLMN Public Land Mobile Network
PUK PIN Unblocking Key
SD Secure Digital Card
SAR Specific Absorption Rate
STK SIM Tool Kit
URL Universal Resource Locator
USB Universal Serial Bus
WAP Wireless Application Prot ocol
WCDMA Wideband code division multiple access
67
Page 74
16Appendix
The mobile phone supports image files, video files
and audio files of many formats. For details, see the
following table.
File type Formats
Image JPG, PNG, BMP, GIF, BCI, WBMP, SVG,
Audio MP3, AAC/AAC+, AMR, MID, WAV
68
and SVGZ.
(ADPCM), MMF, QCP, and XMF/DLS.
Video 3GP,MP4, 3G2, and PMD.
Page 75

Index
"123" Numeric Input Method.................................. 16
Access Codes.......................................................... 9
Accessing the Internet by USB .............................. 49
Adding/Deleting Group Members........................... 19
Alarms.................................................................... 34
Answer mode......................................................... 54
Answering or Rejecting Calls. ................................ 11
Available Options of Games .................................. 43
Auto answer...... ... ... ............................... ... .. ........... 54
Auto ON and OFF........ ... ....................................... 52
Auto redial......................... ................................ .. ... 54
Battery.................................................................... 61
Bluetooth (Optional) ............................................... 46
Bluetooth-Based Data Transfer ............................. 47
Bluetooth-Based Internet Access........................... 47
Bluetooth-Based Synchronisation.......................... 46
Bookmarks............................................................. 41
Broadcast Inbox..................................................... 31
Browser.................................................................. 41
Browsing Pre-set Web Pages ................................ 41
Calculator............................................................... 35
Calendar Functions................................................ 35
Calendar ................................................................ 34
Call barring password .................... ... .. ................... 54
Call barring........ ................................ .. ... ................ 53
Call forwarding..... .................................................. 52
Call Log............................. ... .. ................................ 14
Call Settings......................... .. ... ............................. 52
Call waiting............................................................. 53
Calling ID............................................................... 54
Camera.................................................................. 43
Certification Information (SAR).............................. 63
Change password.................................................. 56
Charger.................................................................. 62
Charging the Battery................................................ 7
Charging with a Cable Charger............................... 8
Children Safety...................................................... 59
Cleaning and Maintenance.................................... 60
Common Phrases.................................................. 31
Connectivity Settings............................................. 55
Creating a Multimedia Message ............................ 23
Creating a text Message........................................ 20
Creating an Email.................................................. 27
Currency Converter ............................................... 36
Date and Time....................................................... 51
Date Format........ .. .................................. ............... 51
Display Settings.................................................... . 52
DRM setting........................................................... 57
Electronic Device................................................... 58
Email Settings........................................................ 29
Email...................................................................... 27
Emergency Calls ..... ... .. ... .................................. .... 61
Enter URL.............................................................. 41
Environmental Protection ...................................... 61
FCC Statement...................................................... 65
Fixed dialer number.............. ... .. ............................ 57
Front View and Back View....................................... 3
Function Options During Playing ........................... 32
1
Page 76

Games ................................................................... 43
Groups ................................................................... 19
Home Screen....... ... ................................................. 3
Hospital.................................................................. 58
Icon Description ..................................................... 12
Icon Description ..................................................... 13
Input Different Languages....................... ............... 16
Input Language ............................... ...................... 51
Internet Settings..................................................... 42
Introduction to the Menu .......................................... 4
Loading the SIM Card.............................................. 6
Loading/Removing a Memory Card......................... 8
Mailboxes............................................................... 28
Making a Video Call............................................... 11
Making a Voice Call ............................................... 11
Making Calls from the Contacts............................. 17
Making or Answering Calls .................................... 11
Making Voice Calls Using SDN.............................. 11
Managing a Group................................................. 19
Memo Pad........................................... ... ... .. ........... 39
Message Settings ........ ............................... ... ... .. ... 52
micro-SD Card Reader .......................................... 50
MMS Mailboxes ........ ... ... ....................................... 24
MMS Settings.......... .. ... .......................................... 26
Multimedia Messages............................................ 23
Music...................................................................... 45
My Music................................................................ 32
My number............................................................. 54
Network Settings.................................................... 56
2
New Schedule ....................................................... 34
New Task.............. .................................. ............... 38
Operating Environment.......................................... 60
Operations After Taking a Picture ......................... 44
Operations During a Call ....................................... 12
Operations During a Video Call............................. 13
Operations During Recording ................................ 45
Operations in the Viewfinder Screen..................... 43
Operations in the Viewfinder Screen..................... 44
Operations............................................................. 12
Operations............................................................. 13
Other Operations for the Homepage..................... 41
Other Operations ................................................... 18
Packing List ............................................................. 1
Password lock ....................................................... 56
Phone Language .................................................. 51
Phone Settings ........................ .. ............................ 51
Playlist ................................................................... 33
Powering On............................................................ 9
Powering On/Off...................................................... 9
Profiles................................................................... 51
Prompt Interface for a Schedule............................ 35
Prompt Interface for a Task................................... 38
Prompt Interface for an Alarm ............................... 34
Prompt to save ...................................................... 55
Push Inbox Settings............................................... 31
Push Inbox............................................................. 30
Reset ..................................................................... 56
Screen Operations During Playing........................ 32
Page 77

Searching for a Contact ......................................... 17
Security Settings.................................................... 56
Select line .............................................................. 54
Service Dial Number.............................................. 39
Setting Alarm Clocks.............................................. 34
Shortcuts................................................................ 52
Side View ................................................................ 3
SIM ToolKit ............................................................ 34
SMS Mailboxes...................................................... 20
SMS Settings ......................................................... 22
Stopping the Alarm Clock .... .................................. 34
Stopwatch .............................................................. 39
Storage Environment............................................. 59
Switching Off.......................... ... ... .. .......................... 9
Symbol Input Method ............................................. 16
Synchronise ........................................................... 37
T9 Input Method..................................................... 15
Task....................................................................... 37
Tasks Functions ................................................... 38
Text Messages.......... ............................................. 20
Timer...................................................................... 39
Traditional Input Method ....................................... 15
Video Call Settings................................................. 55
Video Camera........................................................ 44
Viewing Push Messages........................................ 30
Unit Converter........................................................ 36
Unloading the SIM card ........................................... 7
Voice Mail Number................................................. 31
Voice Recorder ...................................................... 38
World Time ............................................................ 39
USB ....................................................................... 48
USB-Based Synchronisation................................. 49
Using the USB Cable.... ... ... .. ................................. 63
Your Phone......... ..................................................... 2
3
 Loading...