

Page 1

Copyright © Huawei Technologies Co., Ltd. 2014.
All rights reserved.
No part of this manual may be reproduced or transmitted in any
form or by any means without prior written consent of Huawei
Technologies Co., Ltd. and its affiliates ("Huawei").
The product described in this manual may include copyrighted
software of Huawei and possible licensors. Customers shall not in
any manner reproduce, distribute, modify, decompile, disassemble,
decrypt, extract, reverse engineer, lease, assign, or sublicense the
said software, unless such restrictions are prohibited by applicable
laws or such actions are approved by respective copyright holders.
Trademarks and Permissions
, , and are trademarks or
registered trademarks of Huawei Technologies Co., Ltd.
The
owned by
Huawei Technologies Co., Ltd. is under license.
Other trademarks, product, service and company names
mentioned may be the property of their respective owners.
®
Bluetooth
word mark and logos are registered trademarks
Bluetooth SIG, Inc.
and any use of such marks by
Notice
Some features of the product and its accessories described herein
rely on the software installed, capacities and settings of local
network, and therefore may not be activated or may be limited by
local network operators or network service providers.
Page 2

Thus, the descriptions herein may not exactly match the product
or its accessories which you purchase.
Huawei reserves the right to change or modify any information or
specifications contained in this manual without prior notice and
without any liability.
DISCLAIMER
ALL CONTENTS OF THIS MANUAL ARE PROVIDED "AS IS". EXCEPT
AS REQUIRED BY APPLICABLE LAWS, NO WARRANTIES OF ANY
KIND, EITHER EXPRESS OR IMPLIED, INCLUDING BUT NOT
LIMITED TO, THE IMPLIED WARRANTIES OF MERCHANTABILITY
AND FITNESS FOR A PARTICULAR PURPOSE, ARE MADE IN
RELATION TO THE ACCURACY, RELIABILITY OR CONTENTS OF THIS
MANUAL.
TO THE MAXIMUM EXTENT PERMITTED BY APPLICABLE LAW, IN
NO EVENT SHALL HUAWEI BE LIABLE FOR ANY SPECIAL,
INCIDENTAL, INDIRECT, OR CONSEQUENTIAL DAMAGES, OR LOSS
OF PROFITS, BUSINESS, REVENUE, DATA, GOODWILL SAVINGS OR
ANTICIPATED SAVINGS REGARDLESS OF WHETHER SUCH LOSSES
ARE FORSEEABLE OR NOT.
THE MAXIMUM LIABILITY (THIS LIMITATION SHALL NOT APPLY TO
LIABILITY FOR PERSONAL INJURY TO THE EXTENT APPLICABLE
LAW PROHIBITS SUCH A LIMITATION) OF HUAWEI ARISING FROM
THE USE OF THE PRODUCT DESCRIBED IN THIS MANUAL SHALL
BE LIMITED TO THE AMOUNT PAID BY CUSTOMERS FOR THE
PURCHASE OF THIS PRODUCT.
Page 3

Import and Export Regulations
Customers shall comply with all applicable export or import laws
and regulations and be responsible to obtain all necessary
governmental permits and licenses in order to export, re-export or
import the product mentioned in this manual including the
software and technical data therein.
Privacy Policy
Please refer to our privacy policy on our websites for the
information about how we protect your personal information.
Page 4
0B
Safety Precaution
Before using the phone, read safety precautions and inform your
children about using the phone correctly and safely. For details,
see "Warnings and Precautions".
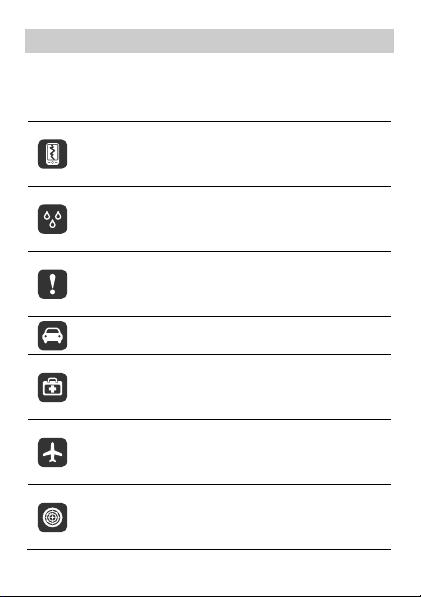
Do not crash, throw, or puncture your mobile phone.
Avoid dropping, squeezing, or bending your mobile
phone.
Do not use your mobile phone in a moist environment,
such as the bathroom. Prevent your mobile phone from
being soaked or washed in liquid.
Do not switch on your mobile phone when it is
prohibited to use phones or when the phone may cause
interference or danger.
Do not use your mobile phone while driving.
Follow any rules or regulations in hospitals and health
care facilities. Switch off your mobile phone near any
medical apparatus.
Switch off your mobile phone while on an aircraft. The
phone may cause interference to control equipment of
the aircraft.
Switch off your mobile phone near high-precision
electronic devices. The phone may affect the
performance of these devices.
Page 5
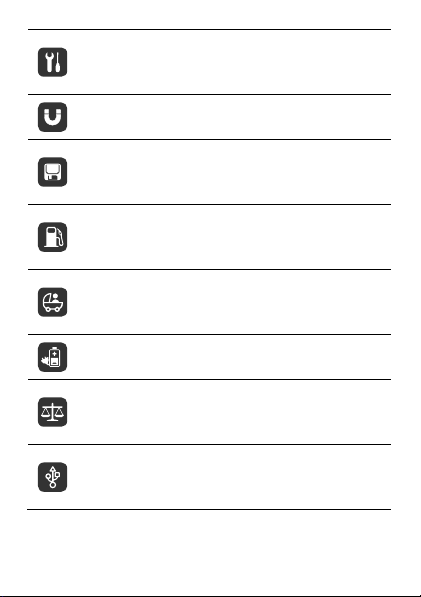
Do not attempt to disassemble your mobile phone or its
accessories. Only qualified personnel are allowed to
service or repair the phone.
Do not place your mobile phone or its accessories in
containers with a strong electromagnetic field.
Do not place magnetic storage media near your mobile
phone. Radiation from the phone may erase the
information stored on them.
Do not put your mobile phone in a high-temperature
place or use it in a place with flammable gas such as a
gas station.
Keep your mobile phone and its accessories away from
children. Do not allow children to use your mobile phone
without guidance.
Use only approved batteries and chargers to avoid the
risk of explosions.
Observe any laws or regulations on the use of wireless
devices. Respect others' privacy and legal rights when
using your wireless device.
Strictly follow the relevant instructions of this manual
while using the USB cable. Otherwise your mobile phone
or PC may be damaged.
Page 6

Contents
1 1BGetting Started ................................................................ 1
13BYour Phone ................................................................................ 1
14BInstalling the SIM Card and Battery ........................................... 2
15BInserting the microSD Card ........................................................ 3
16BCharging the Battery ................................................................. 3
17BKeys and Functions .................................................................... 4
18BStatus Icons ............................................................................... 6
2 2BCall Functions .................................................................. 8
19BMaking a Call ............................................................................ 8
20BAnswering a Call ....................................................................... 9
21BOperations During a Call.......................................................... 10
3 3BDirect Connect (DC) and DC Group ................................ 11
22BMaking a DC Call ..................................................................... 11
23BAlert ........................................................................................ 12
24BDC Group ................................................................................ 13
25BSending an Interrupt Request .................................................. 15
26BConverting a DC Call to a Voice Call ........................................ 15
27BConcurrency ............................................................................ 15
Other Operations
28B
4 4BText Input ...................................................................... 19
29BChanging the Text Input Mode ................................................ 19
30BEntering a Word ...................................................................... 19
31BEntering a Number .................................................................. 20
32BEntering a Symbol ................................................................... 20
5 5BContacts ........................................................................ 20
33BCreating a Contact .................................................................. 20
34BSearching for a Contact ........................................................... 20
..................................................................... 17
i
Page 7

6 6BMessaging ..................................................................... 21
35BCreating and Sending a Message ............................................ 21
36BVoicemail ................................................................................. 21
7 7BMultimedia .................................................................... 22
37BCamera .................................................................................... 22
38BMusic Player ............................................................................ 22
8 8BBluetooth ...................................................................... 24
39BUsing a Bluetooth Headset ...................................................... 24
40BTransferring Data ..................................................................... 24
9 9BBrowser ......................................................................... 25
41BSetting the Connection Profile ................................................. 25
42BAccessing a Web Page ............................................................. 25
10 10BSecurity ....................................................................... 25
43BKeypad Lock ............................................................................ 25
44BPhone Lock .............................................................................. 26
45BPIN and PUK ............................................................................ 26
11 11BTroubleshooting .......................................................... 27
12 12BSafety Information ...................................................... 29
ii
Page 8
1 1BGetting Started
13B
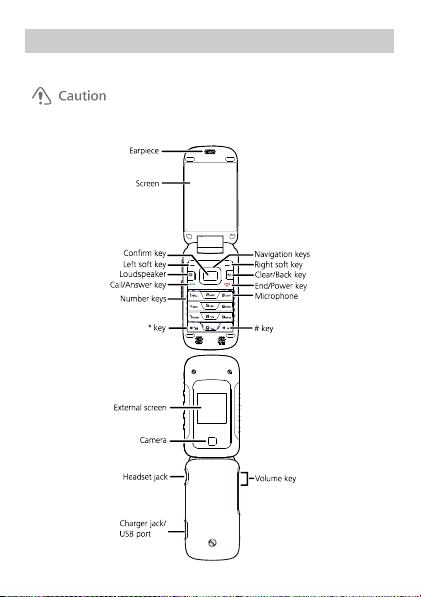
Your Phone
Don't try to wrest the screws on the phone cover, it may damage the phone.
1
Page 9
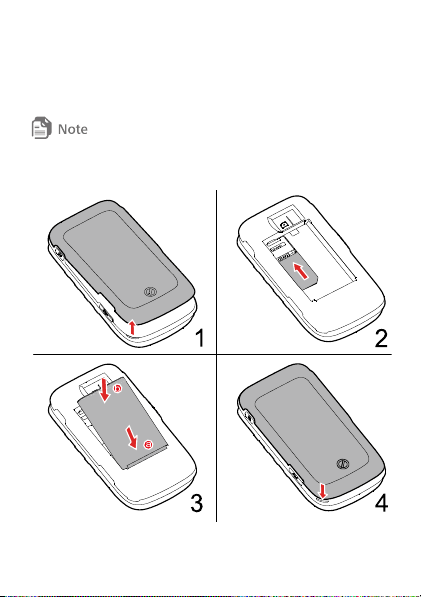
14B
Installing the SIM Card and Battery
Before you begin to use your phone, a SIM card must be inserted.
Follow the steps laid out below to insert your SIM card into the
phone.
Power off your phone before attempting to remove the battery or SIM
card.
2
Page 10

15B
Inserting the microSD Card
Your phone supports a microSD card of up to 32 GB.
No microSD cards are included in the product package. You can
purchase one separately.
16B
Charging the Battery
When the icon is displayed or the charging icon stops
blinking, the battery is fully charged.
If the battery has not been used for a long time or if the battery
power is completely depleted, the charging icon may take
several minutes to appear after you start charging.
3
Page 11
17B
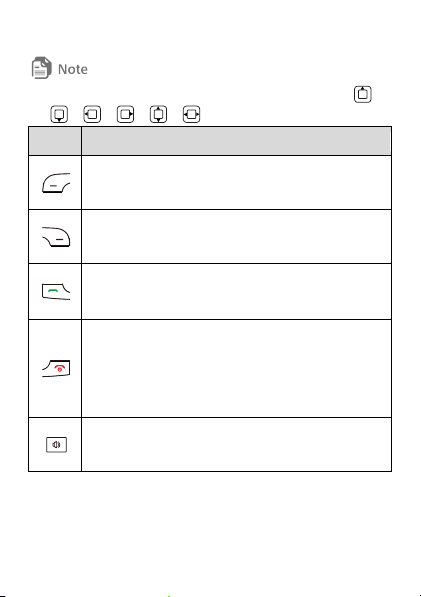
Keys and Functions
In this guide, the navigation keys on your phone are indicated by ,
, , , , .
Press To
Select the option displayed in the lower left corner of
the screen.
Select the option displayed in the lower right corner of
the screen.
Place or answer a call.
View call logs in standby mode.
Power your phone on or off (press and hold the key
for 3 or more seconds).
End or reject a call.
Return to standby mode.
Allows you to turn the loudspeaker on or off during a
call.
4
Page 12
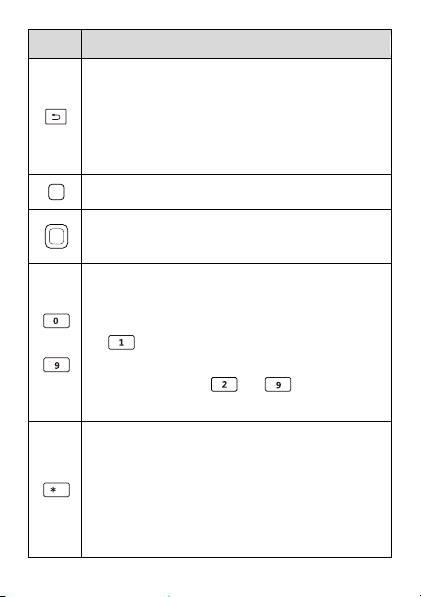
Press To
In text input mode, delete the character to the left
of the cursor. Press and hold the key for 3 or more
seconds to clear all the characters to the left of the
cursor.
Return to the previous menu.
Confirm a selection.
Access the functions assigned to the navigation keys in
standby mode.
Enter numbers, letters, and symbols in text input
mode.
Call voicemail in standby mode (press and hold
–
for 3 or more seconds).
Speed-dial phone numbers in standby mode (press
and hold the keys – for 3 or more
seconds). To set speed dial numbers.
Enter *, +, P or W when entering phone numbers.
Enable or disable the Vibration profile in standby
mode (press and hold the key for 3 or more
seconds). To configure the profile, select Menu >
Settings > Phone > Sound > Ring and vib
settings.
5
Page 13
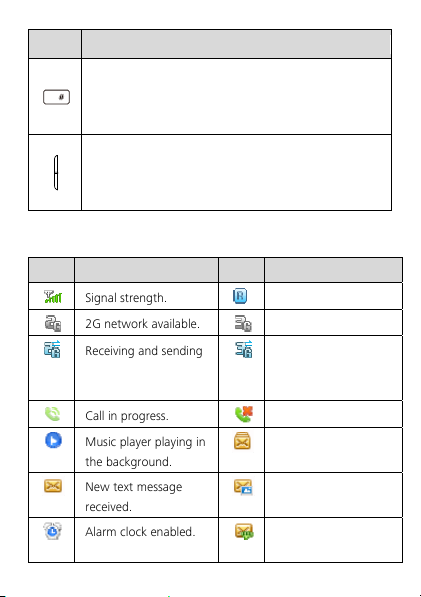
Press To
Enter #.
Lock the keypad (press and hold the key for 3 or
more seconds).
Adjust the volume.
Turn the external screen on when the clamshell is
closed and the external screen is off.
18B
Status Icons
Icon Indicates... Icon Indicates...
Signal strength. Roaming.
2G network available. 3G network available.
Receiving and sending
data on a 2G network.
Receiving and
sending data on a 3G
network.
Call in progress. Missed call.
Music player playing in
the background.
New text message
received.
Alarm clock enabled. New voicemail
No memory for
messages.
New multimedia
message received.
message received.
6
Page 14
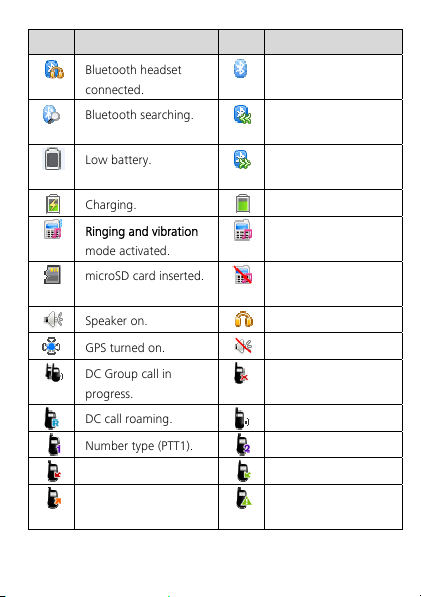
Icon Indicates... Icon Indicates...
Bluetooth headset
connected.
Bluetooth searching. Data receiving via
Low battery. Data sending via
Charging. Battery level.
Ringing and vibration
mode activated.
microSD card inserted. Silence mode
Speaker on. Headset connected.
GPS turned on. Speaker off.
DC Group call in
progress.
DC call roaming. DC call in progress.
Number type (PTT1). Number type (PTT2).
Missed DC call. Incoming DC call.
Outgoing DC call. Incoming Alert
Bluetooth on.
Bluetooth.
Bluetooth.
Ringing mode
activated.
activated.
DC service not
available.
(green).
7
Page 15

Icon Indicates... Icon Indicates...
Outgoing Alert
Missed Alert (red).
(orange).
Missed Invitation (red). Outgoing Invitation
(orange).
Incoming Invitation (in
the call log list)
(green).
Missed DC Group call
(red).
Outgoing DC Group
Incoming Invitation
(on the PTT call
screen).
Incoming DC Group
call (green).
Alert received.
call (orange).
Originator in a DC
Group call.
To add a member to
an ongoing call.
2 2BCall Functions
19B
Making a Call
1. In standby mode, enter a phone number.
To make an international call, press twice to enter the
plus sign (+). Then enter the country or region code, area
code, and phone number.
To call an extension number, enter the phone number, P or
W, and then the extension number. Press three times
to enter P and four times to enter W.
8
Page 16

2. Press to dial the number.
3. Press to end the call or cancel dialing.
If you enter P between a phone number and extension number, your
phone will automatically dial the extension number after the call is
connected.
If you enter W between a phone number and extension number, your
phone prompts you to choose whether to dial the extension number
after the call is connected.
You can also make a call through your call logs and contacts.
20B
Answering a Call
When a call comes in, press to answer it, or to
reject it.
If the any key answer function is enabled, you can press any key
except the , , , or keys to answer the call.
To enable this function, select Menu > Settings > Call > Answer
Mode > Any Key.
When the Headset Auto-Answer function is enabled and a
headset is connected to your phone, the phone automatically
answers incoming calls if they are not handled within a pre-
defined period. To enable this function, select Menu > Settings >
Call > Headset Auto-Answer.
9
Page 17

21B
Operations During a Call
To Do
Toggle speaker mode
Press or
Adjust the volume
Access Contacts
Access Messaging
Mute or unmute the
microphone
Create a memo
Press
Press to select Contacts, and
then press
Press to select Messaging, and
then press
Press to select Mute or
Unmute, and then press
Press to select Memo, and then
press
10
Page 18

3 3BDirect Connect (DC) and DC Group
With DC, you can instantly talk to another DC user or group of users
with the push of a button.
You can select Menu > Settings > Call > DC settings set the DC button and
DC-related fu nctions.
22B
Making a DC Call
You can make a DC call using one of the following methods:
46BDialing a DC Number
A DC number has three parts. When you enter a DC number, you
must separate all the three parts with an asterisk. A DC number
contains a maximum of 15 characters (including asterisks), and the
number of digits in each part of a DC number may vary; for example,
0000000*000*000 and 9999999*999*999. You must have all 3
parts when calling iDEN or 3G users.
1. In standby mode, enter a DC number directly by using the
number pad.
2. Push and hold the DC button on the left side of your phone.
Then speak after your hear the Chrip sound.
3. When you finish speaking, release the DC button to listen. The
call will end automatically if no party speaks for several seconds.
When no party is speaking during an active call, the phone displays Open
and any party can push and hold the DC button to talk when the phone
11
Page 19

displays Speak, when you are speaking do not release the DC button until
you finish speaking. When another party is speaking, the phone displays
Listen. You can hear the other party talking at this moment.
47BLast call notification
Upon completion of a DC call or a DC Group call, the Last Call
Notification screen will appear. It shows the contact name or
number on the last call, and the date and time of the call. The
screen can be cleared by pressing the indicated soft key, or it will
disappear after a period of time. Pushing the DC button from the
last call screen will attempt a restart of the last call indicated.
48BMaking a DC call from Contacts
Select Menu > Contacts. Select a contact with a DC number, and
push the DC button to start a DC call.
49BMaking a DC call from the Call Log
Select Menu > Call log or press the Send key to select the desired
number from the DC calls log. Then push the DC button to start the
DC call.
Alternatively, if you have selected Menu > Settings > Call > DC
settings > One touch DC > Call log, push the DC button to select the
required number from Call log and then push and hold the DC
button to start the DC call.
23B
Alert
Alerts enable you to notify someone that you want to communicate
with them using DC. When the other party receives an Alert, the
phone of the other party receives an Alert tone and displays your
12
Page 20

name or DC number on their screen.
50BSending a Alert
1. In standby mode, select Contacts or Call log > DC calls. Then
select a contact or a DC number.
2. Press the right soft key select Alert. Push the DC button as
prompted to send an Alert.
24B
DC Group
51BCreating a DC Group
You can create a DC Group using one of the following methods:
When you have selected Menu > Settings > Call > DC settings >
One touch DC > Call log or Contacts, push the DC button and
then select contacts from Contacts or Call log, or enter several
DC numbers on the Enter number screen to create a DC Group.
Select Menu > Contacts. Select Create New > Create DC Group
or press the left soft key to select Options > Create DC Group to
create a DC Group.
In standby mode, press Send key or select Menu > Call log to
access the call log. Press the left soft key to select Options >
Create DC Group to create a DC Group.
If you want to delete a member from a DC Group, select Contacts >
Open. Then highlight a member and press the left soft key to select
Options > Remove member.. Select Yes to confirm your operation.
52BMaking a DC Group Call
A DC Group call includes multiple DC users at the same time.
Operations during a DC Group call are similar to those during a DC
call.
13
Page 21

DC Group calls with iDEN users are not possible.
1. Select a group from Contacts or Call log, or select multiple
contacts from the contact list to create a temporary DC Group.
You can also enter the DC numbers to create a DC Group.
2. Push the DC button to start the DC Group call directly, or press
the right soft key to select Invite and push the DC button to send
an invitation to all group members. When the group members
receive the invitation, they can select Join to join the call or select
Ignore to reject the invitation.
A DC Group can contain a maximum of 25 members.
During a DC Group call, you can view the participant status of group
members, access Contacts and Messages, add a member to the call, or
write a memo.
53BAdding Members to a DC Call
During a DC call do the following to add members to the call: Select
Option > Add Member to select members from Contacts or Call log,
or directly enter DC numbers on the Enter number screen. Then
press the left soft key to select Done. An invitation will be sent to
the desired members.
54BJoining a DC Call After it has Started
If a DC Group call has ended when you receive the invitation, after
you select Join by pressing the left soft key, the phone displays "The
call is not running. Restart the call?".
If you select Ye s, the phone displays "Push DC button to start
call". Then you can push and hold the DC button to make a DC
group call to the Group.
14
Page 22

If you select No, no operation will be performed.
25B
Sending an Interrupt Request
During a DC call or a DC Group call, when another party is speaking,
you can do the following to make a speak request:
Press the left soft key to select Options > Request to speak. Then the
speaker's phone displays xxxx Request to speak. After the speaker
releases the DC button, you can push and hold the DC button to
talk.
26B
Converting a DC Call to a Voice Call
The phone supports the switch between a DC call and a voice call.
During a DC call, if you have saved the voice call number of the
other party on the phone, to convert the DC call to a voice call,
press Send key and then select Ye s when the phone displays "Switch
to voice call?"
27B
Concurrency
Receiving a Voice Call During a DC Call
When you receive a voice call during a DC call, the phone displays
the incoming voice call screen. At this moment, press the right soft
key to select Reject; press the confirm key to select Answer; press
the left soft key to select Option and then Answer or Reject.
Receiving a DC Call During a Voice Call
When you receive a DC call during a voice call, the phone displays
"Missed DC call From: xxxxxxxx." At this moment, press the right
soft key to select Ignore and continue with the voice call; press the
15
Page 23

left soft key to select Hold and the phone will display "Push DC
button to call xxxxxxxx." Then you can do the following:
Press the right soft key to select Cancel. Then press the Send key
to return to the voice call screen.
Press the left soft key to select Alert. An alert will be sent to the
other party.
Push and hold the DC button to make a DC call.
Receiving a DC Group Call During a Voice Call
When you receive a DC Group call during a voice call, the phone
displays "Missed DC Group call From: xxxxxxxx." At this moment,
press the right soft key to select Ignore and continue with the voice
call; press the left soft key to select Hold and the phone will display
"Push DC button to call xxxxxxxx." Then you can do the following:
Press the right soft key to select Cancel. Then press the Send key
to return to the voice call screen.
Press the left soft key to select Invite. An invitation will be sent to
the group members.
Push and hold the DC button to make a DC call to the group call
initiator.
Receiving an Alert During a Voice Call
When you receive an Alert during a voice call, the phone displays
"Incoming Alert From: xxxxxxxx." At this moment, press the right
soft key to select Ignore and continue with the voice call; press the
left soft key to select Hold and the phone will display "Push DC
button to call xxxxxxxx." Then you can do the following:
Press the right soft key to select Cancel. Then press the Send key
to return to the voice call screen.
16
Page 24

Press the left soft key to select Alert. An alert will be sent.
Push and hold the DC button to make a DC call to the group call
initiator.
Receiving an Invitation During a Voice Call
When you receive a DC Group invitation during a voice call, the
phone displays "Incoming invitation." At this moment, press the
right soft key to select Ignore and continue with the voice call; press
the left soft key to select Hold and the phone will ask "Join the DC
Group call?". Then you can do the following:
Press the right soft key to select No. Then press the Send key to
return to the voice call screen.
Press the left soft key to select Ye s. Then you can join the DC
Group call.
28BOther Operations
One touch DC
Contacts: Allows you to quickly access Direct Connect contacts
when the Direct Connect button is pushed from idle.
Call log: Access the call log to start a Direct Connect call.
Last call: Start a Direct Connect call with the most recent DC
caller in the call log.
Exiting a DC Group call I initiated
Select one of the following settings to allow the call to continue
when you exit a DC Group call you initiated.
Allow call to continue.
End call for everyone.
17
Page 25

Add Member to ongoing call
Select one of the following to allow a member to add a contact to a
Direct Connect or DC Group Call you initiated.
Allow Member to add contact.
Forbid Member to add contact.
Save unknown number
When you end the DC call actively, select whether you want your
phone to prompt you to save Direct Connect callers to your contact
list if you do not have them previously stored.
My DC Number
Displays your Direct Connect number.
Blocked DC list
View and modify the list of users you have blocked from making a
Direct Connect call to you.
Alert timeout
Set the length of time you want the Alert ringtone to repeat.
Invitation timeout
Set the length of time you want the Invitation ringtone to repeat.
DC button backlight
Select whether you want to turn on the Direct Connect button light
on incoming DC events.
18
Page 26

4 4BText I npu t
29B
Changing the Text Input Mode
The current text input mode is displayed in the upper right corner
of a text editing screen. Press to switch between text input
modes.
On a text editing screen, select Options > Text Input Settings to
configure text input settings, such as the default input language
and whether to enable auto-capitalization or predictive input.
30B
Entering a Word
55B
Multi-tap Input Mode
In multi-tap input mode, press the number key labeled with the
desired letter once to enter the first letter on the key, twice to
enter the second letter on the key, and so on.
If the letter you want to enter is on the same key as the one that
you have just entered, wait for the cursor to reappear, or press
to move the cursor to the right of the previous letter before
entering the next one.
56B
Predictive Input Mode
1. Press each key once according to the spelling sequence of the
desired word.
Your phone displays candidate words that may be spelled by
the keystroke sequence.
2. Press to scroll to the desired word.
3. Press to enter the word, or press to enter the
19
Page 27

word followed by a space.
31B
Entering a Number
In 123 input mode, press the desired number key.
In any input mode except 123, press and hold the
corresponding number key for 3 or more seconds to enter the
desired digit.
32B
Entering a Symbol
In any input mode, press to display a list of symbols,
press to scroll to the desired symbol, and then press
to enter the symbol.
In any input mode except 123, press once to enter a
space, twice to enter a line break, or three times to enter 0.
In multi-tap input mode, press repeatedly to switch
between commonly used symbols.
In predictive input mode, press to display the
commonly used symbols, press to scroll to the desired
symbol, and then press to enter the symbol.
5 5BContacts
33B
Creating a Contact
1. Select Menu > Contacts > Create Contact.
2. Edit the contact information.
3. Press or to save the contact.
34B
Searching for a Contact
1. Select Menu > Contacts.
20
Page 28

2. Enter a contact name, or the first few letters of the name.
3. Press to scroll to the contact.
6 6BMessaging
35B
Creating and Sending a Message
1. Select Menu > Messages > Create Message.
2. Enter a phone number, or press and then select the
recipient from Contacts.
3. Edit the message.
You can select Options > Insert attachment to attach items,
such as pictures or audio files, to the message.
4. Select Options > Send to send the message.
36B
Voicemail
Voicemail availability is subject to your region and service provider.
To subscribe to voicemail, contact your service provider.
Before you use voicemail, the phone reads your voicemail number
from the SIM card. You can also select Menu > Messages >
Voicem ail to set your voicemail number.
21
Page 29

7 7BMultimedia
37B
Camera
Select Menu > Camera, and press to take a photo.
On the Camera screen, press (Options) to configure
camera settings.
To set the default storage location, select Options > Settings >
Storage Location.
38B
Music Player
57B
Creating a Playlist
1. Select Menu > Media > Music Player > Options > Media
Library > Playlist.
2. Press (Create) to create a playlist.
If you already have existing playlists, Options is displayed
instead of Create. Select Options > Create to create another
playlist.
3. Name the playlist.
4. Scroll to the playlist and press to open it.
5. Press (Add) to add audio files to the playlist.
58B
Playing Music
Select a song and press to play it.
While a song is playing:
Press to pause or resume.
Press to switch to the next song, or press and hold
22
Page 30

to fast-forward.
Press to switch to the previous song, or press and hold
to rewind.
Press to display the currently active playlist.
Press to display the media library.
Press to adjust the volume.
Press (Minimize), to exit the music playback
screen. The song will continue to play in the background.
Select Options > Exit to exit the music player. This will stop
any ongoing playback.
23
Page 31

8 8BBluetooth
Your phone supports Bluetooth. You can transfer data between
your phone and other Bluetooth capable devices, and talk on the
phone using a Bluetooth headset.
Select Menu > Settings > Connectivity > Bluetooth, and then
toggle your Bluetooth on or off.
39B
Using a Bluetooth Headset
No Bluetooth headsets are included in the product package. You
can purchase one separately.
1. Select Search for Devices to search for available Bluetooth
devices.
2. Scroll to your Bluetooth headset from the list.
3. Press (Select).
4. Enter the password of the Bluetooth headset to pair the
headset with your phone.
When the Bluetooth headset is connected to your phone, the
headset icon is displayed on the standby screen,
indicating that you can use the headset.
40B
Transferring Data
Select Search for Devices to search for available Bluetooth
devices, and then pair your phone with the desired device. You
can then transfer data between your phone and the Bluetooth
device.
When you pair your phone with a device for the first time, a
password is required.
24
Page 32

9 9BBrowser
41B
Setting the Connection Profile
Before accessing the Internet using your phone, your account
must first be set up. Generally, the appropriate account and
information comes preset on your phone. If you want to use a
different account, contact your service provider for the account
information, and then create an account on your phone.
42B
Accessing a Web Page
After opening the browser, you can:
Select Open Homepage to display the homepage.
Select Open New Page to enter a website address.
Select Bookmarks to choose a bookmark from the list.
Select Saved Pages to open the web pages you have saved.
Select History to choose a web page from the list.
10B
10
Security
43B
Keypad Lock
To lock the keypad, press and hold for 3 or more seconds.
While the keypad is locked, you can still press to answer
incoming calls or make emergency calls.
To unlock the keypad, press then .
25
Page 33

44B
Phone Lock
Phone Lock protects your phone from unauthorized use. By
default, the function is disabled. To enable or disable Phone Lock,
select Menu > Settings > Security > Phone Lock. Once it is
enabled, you must enter a passcode each time you power on the
phone.
The preset passcode is 000000. You can select Menu > Settings >
Security > Change Phone Lock Code to change your passcode
to any numeric string of four to eight digits.
45B
PIN and PUK
The personal identification number (PIN) protects your SIM card
from unauthorized use. If you incorrectly enter the PIN a specified
number of times consecutively, the PIN is blocked and your phone
prompts you to enter the PIN unblocking key (PUK). If this occurs,
enter the PUK to unblock the blocked PIN.
If you incorrectly enter the PUK a specified number of times
consecutively, the SIM card will be permanently disabled, and you
will need to contact your network operator for a new SIM card..
Both the PIN and PUK are provided with your SIM card. For details,
contact your network operator.
26
Page 34

11B
11
Troubleshooting
If you encounter any problems while using your phone, refer to
the following table for potential solutions.
Problem Ensure That
The battery isn't
charging.
The charger is properly connected to
your phone and the power socket.
There is an adequate amount of
battery power.
My phone cannot be
powered on.
The battery is properly installed.
You press and hold for 3
or more seconds to turn on your
phone.
You are within your service
I cannot make any calls
except emergency calls.
provider's network coverage area.
The call restriction function is
disabled.
You have good reception.
Poor call quality.
If you are indoors, move near a
window for better reception.
27
Page 35

Problem Ensure That
I am not getting good
reception or my phone
is often offline.
My phone cannot find
other Bluetooth devices
or fails to send or
receive data using
Bluetooth.
The reception in that area may be
poor. Move to a location with better
reception.
The Bluetooth function on both
devices is turned on.
The distance between the two
devices is less than 10 meters.
There are no obstacles between the
two devices.
The other Bluetooth device is set to
visible.
28
Page 36

12
12
Safety information
This section contains important information about the operation of
your device. It also contains information about how to use the
device safely. Read this information carefully before using your
device.
Electronic device
Do not use your device if using the device is prohibited. Do not use
the device if doing so causes danger or interference with other
electronic devices.
Interference with medical equipment
Follow rules and regulations set forth by hospitals and health care
facilities. Do not use your device where prohibited.
Some wireless devices may affect the performance of hearing aids or
pacemakers. Consult your service provider for more information.
Pacemaker manufacturers recommend that a minimum distance of
15 cm be maintained between a device and a pacemaker to prevent
potential interference with the pacemaker. If using a pacemaker,
hold the device on the side opposite the pacemaker and do not
carry the device in your front pocket.
Protecting your hearing when using a headset
Using a headset at high volumes may damage your hearing. To
reduce this risk, lower the headset volume to a safe and comfortable
level.
29
Page 37

Exposure to high volumes while driving may cause
distraction and increase your risk of an accident.
Areas with flammables and explosives
Do not use the device where flammables or explosives are stored (in
a gas station, oil depot, or chemical plant, for example). Using your
device in these environments increases the risk of explosion or fire.
In addition, follow the instructions indicated in text or symbols.
Do not store or transport the device in containers with flammable
liquids, gases, or explosives.
Traffic security
Observe local laws and regulations while using the device. To reduce
the risk of accidents, do not use your wireless device while driving.
Concentrate on driving. Your first responsibility is to drive safely.
Do not hold the device while driving. Use hands-free accessories.
When you must make or answer a call, pull of the road safely and
park the vehicle first.
RF signals may affect the electronic systems of motor vehicles. For
more information, consult the vehicle manufacturer.
Do not place the device over the air bag or in the air bag
deployment area in a motor vehicle. Doing so may hurt you because
of the strong force when the air bag inflates.
Do not use your device while flying in an aircraft or immediately
before boarding. Using wireless devices in an aircraft may disrupt
wireless networks, present a hazard to aircraft operation, or be
illegal.
30
Page 38

Operating environment
Avoid dusty, damp, or dirty environments. Avoid magnetic fields.
Using the device in these environments may result in circuit
malfunctions.
Do not use your device during thunderstorms to protect your device
against any danger caused by lightning.
Ideal operating temperatures are 0°C to 40°C. Ideal storage
temperatures are 0°C to 40°C. Extreme heat or cold may damage
your device or accessories.
Do not expose your device to direct sunlight (such as on a car
dashboard) for prolonged periods.
To protect your device or accessories from fire or electrical shock
hazards, avoid rain and moisture.
Keep the device away from sources of heat and fire, such as a
heater, microwave oven, stove, water heater, radiator, or candle.
Do not place sharp metal objects, such as pins, near the earpiece or
speaker. The earpiece may attract these objects and result in injury.
Stop using your device or applications for a while if the device is
overheated. If skin is exposed to an overheated device for an
extended period, low temperature burn symptoms, such as red
spots and darker pigmentation, may occur.
Do not touch the device's antenna. Otherwise, communication
quality may be reduced.
Do not allow children or pets to bite or suck the device or
accessories. Doing so may result in damage or explosion.
31
Page 39

Observe local laws and regulations, and respect the privacy and legal
rights of others.
Child Safety
Comply with all precautions with regard to Child Safety. Letting
children play with the device or its accessories may be dangerous.
The device includes detachable parts that may present a choking
hazard. Keep away from children.
The device and its accessories are not intended for use by children.
Children should only use the device with adult supervision.
Accessories
Using an unapproved or incompatible power adapter, charger or
battery may cause fire, explosion or other hazards.
Choose only accessories approved for use with this model by the
device manufacturer. The use of any other types of accessories may
void the warranty, may violate local regulations and laws, and may
be dangerous. Please contact your retailer for information about the
availability of approved accessories in your area.
Charger safety
For pluggable devices, the socket-outlet shall be installed near the
devices and shall be easily accessible.
Unplug the charger from electrical outlets and the device when not
in use.
Do not drop or cause an impact to the charger.
32
Page 40

If the power cable is damaged (for example, the cord is exposed or
broken), or the plug loosens, stop using it at once. Continued use
may lead to electric shocks, short circuits, or fire.
Do not touch the power cord with wet hands or pull the power
cord to disconnect the charger.
Do not touch the device or the charger with wet hands. Doing so
may lead to short circuits, malfunctions, or electric shocks.
If your charger has been exposed to water, other liquids, or
excessive moisture, take it to an authorized service center for
inspection.
Ensure that the charger meets the requirements of Clause 2.5 in
IEC60950-1/EN60950-1 and has been tested and approved
according to national or local standards.
Connect the device only to products with the USB-IF logo or with
USB-IF compliance program completion.
Battery safety
Do not connect battery poles with conductors, such as keys, jewelry,
or other metal materials. Doing so may short-circuit the battery and
cause injuries or burns.
Keep the battery away from excessive heat and direct sunlight. Do
not place it on or in heating devices, such as microwave ovens,
stoves, or radiators. Batteries may explode if overheated.
Do not attempt to modify or remanufacture the battery, insert
foreign objects into it, or immerse or expose it to water or other
liquids. Doing so may lead to fire, explosion, or other hazards.
33
Page 41

If the battery leaks, ensure that the electrolyte does not make direct
contact with your skins or eyes. If the electrolyte touches your skins
or splashes into your eyes, immediately flush with clean water and
consult a doctor.
In case of battery deformation, color change, or overheating while
charging or storing, immediately stop using the device and remove
the battery. Continued use may lead to battery leakage, fire, or
explosion.
Do not put batteries in fire as they may explode. Damaged batteries
may also explode.
Dispose of used batteries in accordance with local regulations.
Improper battery use may lead to fire, explosion, or other hazards.
Do not allow children or pets to bite or suck the battery. Doing so
may result in damage or explosion.
Do not smash or pierce the battery, or expose it to high external
pressure. Doing so may lead to a short circuit or overheating.
Do not drop the device or battery. If the device or battery is dropped,
especially on a hard surface, and may be damaged.
If the device standby time shortens significantly, replace the battery.
Use the battery only with a charging system that is IEEE-Std-1725
standard qualified. The use of an unqualified battery or charger may
lead to fire, explosion, leakage, or other hazards.
Replace the battery only with an IEEE-Std-1725 standard qualified
battery. The use of an unqualified battery may lead to fire, explosion,
leakage, or other hazards.
34
Page 42

Do not disassemble or open, crush, bend or deform, puncture or
shred the battery. Otherwise, it may lead to electrolyte leakage,
overheating, fire, or explosion.
Do not solder battery poles or dismantle the battery. Doing so may
lead to electrolyte leakage, excessive heat, fire, or explosion.
Cleaning and maintenance
Keep the device and accessories dry. Do not attempt to dry it with
an external heat source, such as a microwave oven or hair dryer.
Do not expose your device or accessories to extreme heat or cold.
These environments may interfere with proper function and may
lead to fire or explosion.
Avoid collision, which may lead to device malfunctions, overheating,
fire, or explosion.
Before you clean or maintain the device, stop using it, stop all
applications, and disconnect all cables connected to it.
Do not use any chemical detergent, powder, or other chemical
agents (such as alcohol and benzene) to clean the device or
accessories. These substances may cause damage to parts or present
a fire hazard. Use a clean, soft, and dry cloth to clean the device and
accessories.
Do not place magnetic stripe cards, such as credit cards and phone
cards, near the device for extended periods of time. Otherwise the
magnetic stripe cards may be damaged.
35
Page 43

Do not dismantle or remanufacture the device and its accessories.
This voids the warranty and releases the manufacturer from liability
for damage. In case of damage, contact an authorized service center
for assistance or repair.
If the device screen is broken in a collision, immediately stop using
the device. Do not touch or attempt to remove the broken parts.
Promptly contact an authorized service center.
Emergency calls
The availability of emergency calls is subject to your cellular network
quality, service provider policy, and local laws and regulations. Never
rely solely on your device for critical communications like medical
emergencies.
Environmental protection
The device and its accessories (if included), such as the power
adapter, headset, and battery should not be disposed of with
household garbage.
Disposal of the device and its accessories is subject to local
regulations. Support proper collection and recycling.
FCC Regulatory Compliance
Body worn operation
The device complies with RF specifications when used near your ear
or at a distance of 1.5 cm from your body. Ensure that the device
accessories, such as a device case and device holster, are not
composed of metal components. Keep the device away from your
body to meet the distance requirement.
36
Page 44

Certification information (SAR)
This device is also designed to meet the requirements for exposure
to radio waves established by the Federal Communications
Commission (USA).
The SAR limit adopted by the USA is 1.6 W/kg averaged over one
gram of tissue. The highest SAR value reported to the FCC for this
device type complies with this limit.
The highest SAR value reported to the FCC for this device type when
using at the ear is 0.596 W/kg, and when properly worn on the
body is 0.900 W/kg.
FCC statement
This equipment has been tested and found to comply with the limits
for a Class B digital device, pursuant to Part 15 of the FCC Rules.
These limits are designed to provide reasonable protection against
harmful interference in a residential installation. This equipment
generates, uses and can radiate radio frequency energy and, if not
installed and used in accordance with the instructions, may cause
harmful interference to radio communications. However, there is no
guarantee that interference will not occur in a particular installation.
If this equipment does cause harmful interference to radio or
television reception, which can be determined by turning the
equipment off and on, the user is encouraged to try to correct the
interference by one or more of the following measures:
--Reorient or relocate the receiving antenna.
--Increase the separation between the equipment and receiver.
37
Page 45

--Connect the equipment into an outlet on a circuit different from
that to which the receiver is connected.
--Consult the dealer or an experienced radio/TV technician for help.
This device complies with Part 15 of the FCC Rules. Operation is
subject to the following two conditions: (1) this device may not
cause harmful interference, and (2) this device must accept any
interference received, including interference that may cause
undesired operation.
Caution: Any changes or modifications to this device not expressly
approved by Huawei Technologies Co., Ltd. for compliance could
void the user's authority to operate the equipment.
Please visit http://consumer.huawei.com/en/support/hotline for
recently updated hotline and email address in your country or region.
38
 Loading...