

Page 1

U5130
UMTS Mobile Phone
User Guide
Page 2

Copyright © Huawei Technologies Co., Ltd. 2013. All
rights reserved.
Trademarks and Permissions
, , and
trademarks of Huawei Technologies Co., Ltd.
The Bluetooth® word mark and logos are registered trademarks
owned by Bluetooth SIG, Inc. and any use of such marks by Huawei
Technologies Co., Ltd. is under license.
Other trademarks, product, service and company names
mentio ned are the property of their respect ive owners.
are trademarks or reg istered
Third-Party Software Statement
Huawei does not own the intell ectual property of the third-party
software and applicat ions that are delivered with this product.
Therefore, Huawei will not provide any warranty of any kind for
third party software and applicat ions. Neither will Huawei provide
support to customers who use third-party software and
applicat ions, nor be responsible or liable for the functi ons or
performance of third-party software and applic ations.
Third-party software and applicat ions services may be interrupted
or terminated at any tim e, and Huawei does not guarantee the
availability of any content or service. Third-party service providers
provide content and services through network or transmission tools
outside of the control of Huawei. To the greatest extent permitted
by applicable law, it is explicitly stated t hat Huawei shall not
compensate or be liable for services provided by third-party service
Page 3

providers, or the interrupti on or terminati on of third-party contents
or services.
Huawei shall not be responsible for the legality, quality, or any
other aspects of any software installed on t his product, or for any
uploaded or downloaded third-party works in any form, includ ing
but not limited texts, images, videos, or software etc. Customers
shall bear the risk for any and al l effects, including incomp ati bility
between the software and this product, which result from installing
software or uploading or downloading the t hird-party works.
DISCLAIMER
ALL CONTENTS OF THIS MANUAL ARE PROVIDED “AS IS”.
EXCEPT AS REQUIRED BY APPLICABLE LAWS, NO WARRANTIES
OF ANY KIND, EITHER EXPRESS OR IMPLIED, INCLUDING BUT
NOT LIMITED TO, THE IMPLIED WARRANTIES OF
MERCHANTABILITY AND FITNESS FOR A PARTICULAR PURPOSE,
ARE MADE IN RELATION TO THE ACCURACY, RELIABILITY OR
CONTENTS OF THIS MANUAL.
TO THE MAXIMUM EXTENT PERMITTED BY APPLICABLE LAW, IN
NO EVENT SHALL HUAWEI BE LIABLE FOR ANY SPECIAL,
INCIDENTAL, INDIRECT, OR CONSEQUENTIAL DAMAGES, OR
LOSS OF PROFITS, BUSINESS, REVENUE, DATA, GOODWILL
SAVINGS OR ANTICIPATED SAVINGS REGARDLESS OF WHETHER
SUCH LOSSES ARE FORSEEABLE OR NOT.
THE MAXIMUM LIABILITY (THIS LIMITATION SHALL NOT APPLY
TO LIABILITY FOR PERSONAL INJURY TO THE EXTENT
APPLICABLE LAW PROHIBITS SUCH A LIMITATION) OF HUAWEI
ARISING FROM THE USE OF THE PRODUCT DESCRIBED IN THIS
MANUAL SHALL BE LIMITED TO THE AMOUNT PAID BY
CUSTOMERS FOR THE PURCHASE OF THIS PRODUCT.
Page 4

Privacy Policy
To better understand how we protect your personal information,
please see the privacy policy at
http://consumer.huawei.com/en/privacy-policy/index.htm.
Page 5

Contents
1 Getting to know your phone ................................................ 1
Your phone at a glance ........................................................... 1
Keys and functions ................................................................. 2
Screen icons ........................................................................... 4
2 Getting started................................................................... 5
Installing t he SIM/USIM card and battery .............................. 5
Installing a mi croSD card ....................................................... 6
Charging the battery .............................................................. 6
Phone lock ............................................................................. 6
PIN and PUK .......................................................................... 7
Locking and unlocking the keypad ......................................... 7
3 Voice services ..................................................................... 9
Making a call .......................................................................... 9
Answering a call ..................................................................... 9
4 Text input ......................................................................... 10
Changing the text input mode ............................................. 10
Entering a word .................................................................... 11
Entering a digit .................................................................... 12
Entering a symbol ................................................................ 12
5 Phonebook ....................................................................... 12
Creating a contact ............................................................... 12
Searching for a contact ........................................................ 12
i
Page 6

6 File manager ..................................................................... 13
7 Camera ............................................................................. 14
8 Messaging ........................................................................ 15
Writ ing and sending a text message .................................... 15
Writ ing and sending a multimed ia message ....................... 15
9 Mult imedia ...................................................................... 17
Image viewer ................................................................ ........ 17
Video recorder ..................................................................... 17
Media player ........................................................................ 18
FM radio ............................................................................... 18
Sound recorder .................................................................... 19
10 Organizer ........................................................................ 20
Calendar ............................................................................... 20
Alarm ................................................................................... 20
Calculator ............................................................................. 20
Electronic torch .................................................................... 20
Weather ............................................................................... 20
Stopwatch ............................................................................ 21
Tasks .................................................................................... 21
Ebook reader........................................................................ 21
11 STK ................................................................................ 22
12 Facebook ........................................................................ 22
13 Services .......................................................................... 22
Network sett ings ................................................................. 22
Accessing a website ............................................................. 23
ii
Page 7

14 Internet tethering ............................................................ 23
15 Profiles ........................................................................... 24
16 Bluetooth ....................................................................... 25
Using a Bluetooth headset ................................................... 25
Transferring data.................................................................. 26
17 Java applicat ion ..............................................................26
Installing a Java appl ication ................................................. 26
Using a Java applicat ion ...................................................... 27
Uninstalling a Java appl ication ............................................ 27
18 Settings ......................................................................... 27
Phone sett ings ..................................................................... 27
Security settings .................................................................. 28
19 Warnings and precautions ................................................ 30
iii
Page 8
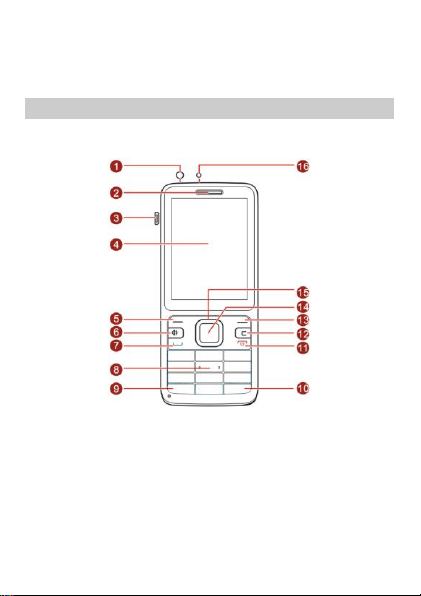
1 Getting to know your phone
1
Headset jack
9
* key 2 Earpiece
10
# key
3
Charger jack/ micro Universal
serial bus (USB) port
11
End/Power key
4
Screen
12
Delete key
5
Left soft key
13
Right soft key
6
Speaker key
14
OK/Confirm key
7
Call/Answer key
15
Navigation keys
8
Number keys
16
Torch
Your phone at a glance
The following f igure shows the appearance of your phone and is for
your reference only.
1
Page 9
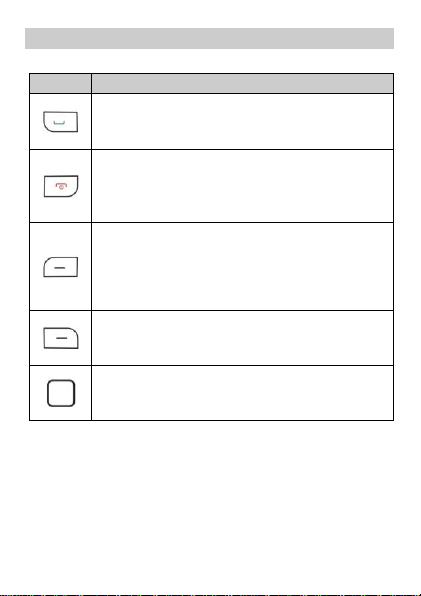
Keys and functions
Press …
To …
Make a call.
Answer an incoming call.
View the cal l log in standby mode.
Power the phone on or off (press and hold the key
for about 3 seconds).
End or reject a call.
Return to standby mode.
Select the opt ion displayed in the lower left corner
of the screen.
Access Menu in standby mode.
Unlock the keypad (must also press the right soft
key immediately after).
Select the opt ion displayed in the lower right corner
of the screen.
Access Widget in standby mode.
Access the selected shortcut (one of four on the
screen) in standby mode.
Confirm a sel ection.
2
Page 10
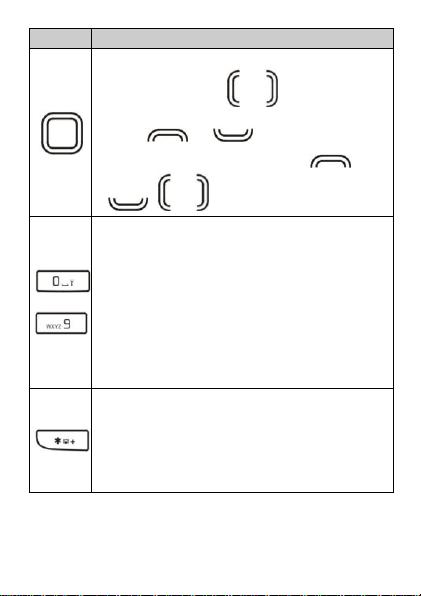
Press …
To …
Scroll through the four shortcuts on the screen in
standby mode (press or ).
Access a predefined shortcut in standby mode
(press or ).
Scroll through the main menu (press ,
, , or ).
–
Enter numbers, letters, and symbols.
Call voicemail in stand by mode (press and hold the 1
key for about 3 seconds).
Speed-dial phone numbers in stand by mode (press
and hold one of the keys from 2–9 for about 3
seconds).
Select an opt ion labeled with the corresponding
number.
Switch on or off the torch in standby mode (press
and hold the 0 key for about 3 seconds).
Enter * (press once), + (press twice), p (press three
ti mes), or w (press four times) in standby mode.
Display the symbol list when you enter text.
Switch between the Meeting p rofile and current
profi le in standby mode (press and hold the key for
about 3 seconds).
3
Page 11
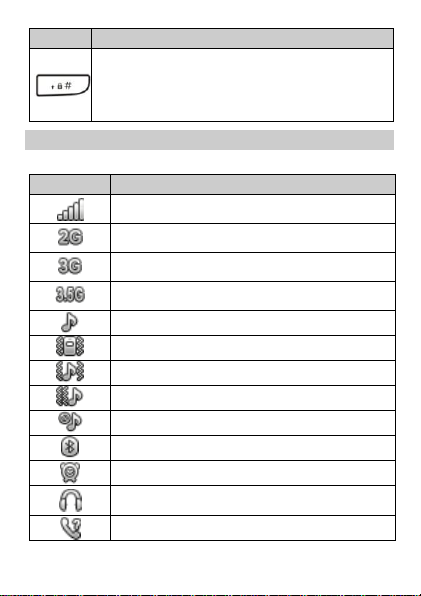
Press …
To …
Enter #.
Switch between text input methods.
Lock the keypad in standby mode (press and hold
the key for about 3 seconds).
Screen icons
Icon
Description
Signal strength
2G network available
3G network available
3.5G network available
Ring only enabled
Vib. only enabled
Vib. and ring enabled
Vib. then ring enabled
Silent mode act ivated
Bluetooth turned on
Alarms enabled
Headset connected
Missed calls
4
Page 12

Icon
Description
Call forwarding enabled
New text messages
New multimedia messages
Keypad locked
Battery level
microSD card inserted
2 Getting started
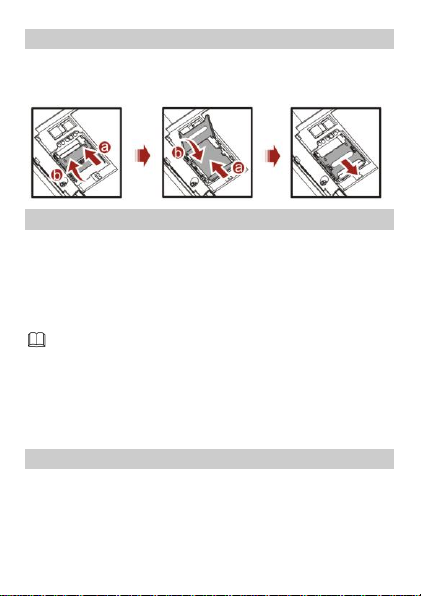
Installing the SIM/USIM card and battery
When install ing a SIM/USIM card, ensure that the gold contact area
faces down and the beveled edge of the SIM/USIM card aligns with
that of the SIM/USIM card slot.
Align the battery contacts with those in the battery compartment,
press the battery into the compartment, and close the back cover.
5
Page 13
Installing a microSD card
If the battery level is completely depleted, the charging icon
may not appear immediately after you connect the phone to
the power outlet.
When install ing a microSD card, ensure that the gold contact area
faces down and that the beveled edge of the microSD card alig ns
with that of the microSD card slot.
Charging the battery
1. Connect the charger to the phone's charger jack.
2. Connect the charger to a power outlet.
3. Charge the battery.
While the battery is charging, the charging icon blinks. When the
charging icon stops blinking, the battery is fully charged.
4. Disconnect the charger from the phone.
5. Disconnect the charger from the power outlet.
Phone lock
The phone lock protects your phone from unauthorized use. By
default, the phone lock is disabled . To enable the phone lock,
choose Menu > Settings > Security settings > Phone security and
6
Page 14

press (On). You can change the default unlock code (1234)
to any combinat ion of four to eight digits.
If you forget the unlock code, contact your service provider.
PIN and PUK
The personal ident ificat ion number (PIN) protects your SIM/USIM
card from unauthorized use. The PIN unblocking key (PUK) unlocks
a blocked PIN. Both the PIN and PUK are provided with the
SIM/USIM card. For more information, contac t your service
provider.
To enable the PIN lock:
1. In standby mode, choo se Menu > Settings > Security sett ings >
SIM security > PIN lock.
2. Enter the PIN, and press (OK) or .
If you enter the incorrect PIN a specif ied number of times (varies by
service provider), the phone prompts you to enter the PUK.
If you enter the incorrect PUK a specif ied number of times (varies
by service provider), the SIM/USIM card is permanently locked. If
this occurs, contact your service provider for a new SIM/USIM card.
Locking and unlocking the keypad
To lock the keypad, press and hold for about 3 seconds
in standby mode. To unlock the keypad, press (Unlock)
then (OK) in quick succession.
If the Auto keypad lock funct ion is enabled, the phone locks the
keypad after being idle in standby mode for a predefined period of
ti me.
7
Page 15

When the keypad is locked, you can press (Answer)
or to answer a call o r to make an emergency
call.
8
Page 16

3 Voice services
You can also make a call from the call log, contacts, or
messages.
During a call, press to adjust the in-call
volume. You can also press (Options), select
Volume, and press to adjust the volume.
Making a call
1. In standby mode, enter a phone number.
To make an international call, p ress t wice to enter
the plus sign (+). Then enter the country code or region code,
area code, and phone number.
To call an extension number, enter the phone number, press
t hree times to enter p, and enter the extension
number.
2. Press or to d ial the number.
3. Press to end the call.
Answering a call
When you receive an incoming call :
9
Page 17

Indicator
Text Input Mode
ABC, abc, Abc
Multi-tap input modes
eZi ABC, eZi abc, eZi Abc
Predictive input modes
123
Number input mode
Press or (Answer) to answer the call.
Press (Silent) to mute the speaker and then
(Reject) to reject the call.
If the Silent profi le is activated, press or
(Reject) to reject the call.
If the Any key answer function is enabled, you can press any key
except or to answer the call.
4 Text input
Changing the text input mode
The current text input mode indi cator is displayed in the upper left
corner of the screen. Press to switch between text
input modes.
10
Page 18

Press o nce to delete the last character entered.
Press and hold to delete al l the characters
entered.
In any input mode, press to display the
commonly used symbol list.
In multi-tap input mode, rep eatedly press to
select and enter commonly used symbols, press
once to enter a space, and press twice to enter
0.
In predictive input mode, press to di splay
commonly used symbols and to enter a space.
Entering a word
To enter a word in mult i-tap input mode, press the number key
labeled with the desired letter once to enter the f irst letter on the
key, twice to enter the second letter on the key, and so on.
To enter a word in predict ive input mode:
1. Press each key (labeled with a letter of the desired word) once in
the word's spelling sequence.
The phone displays candi date words.
2. Press or t o scroll to the desired word.
3. Press (Select) or to enter the desired word.
11
Page 19

Entering a digit
In number input mode, simply press the number key labeled with
the desired digit.
Entering a symbol
1. Press to d isplay the symbol list.
2. Press to scroll to the desired symbol.
3. Press (OK) or to enter the desired symbol.
5 Phonebook
Creating a contact
1. Choose Menu > Phonebook > Add new contact.
2. Ed it the contact information.
3. Press or (Options ) and select Save to save the
contact.
Searching for a contact
1. Choose Menu > Phonebook.
2. Enter the f irst letter of the contact name in the search box.
The screen then displays names that begin with t his letter.
12
Page 20

6 File manager
The File manager appl ication manages is where you can manage
fil es and folders stored in the phone's internal storage and microSD
card.
To manage files and folders:
1. Choose Menu > File manager.
2. Press to scroll to the desired folder, and press
t o open the folder or (Options) for the fol lowing
opt ions:
Open: open the folder.
New folder: create a folder.
Rename: rename the folder.
Delete: delete the folder.
Sort by: sort folders by name, type, t ime, or size.
Press to scrol l to the desired file, and press
t o open the file or press (Opt ions) for addit ional
opt ions.
The operat ions applicable to files may be d ifferent from those
applicable to folders.
13
Page 21

7 Camera
Your phone features a built-in 1.3 megapixel complementary
metal–oxide–semiconductor (CMOS) camera.
To take a photo:
1. Choose Menu > Camera.
2. On the viewf inder, you can:
Press to view pictures or configure the camera settings.
Press or to adjust the brightness.
Press or to zoom in or out.
Press the 1, 2, 4, 6, and 7 keys to quickly conf igure your camera
sett ings.
Press to switch to simplif ied mode with no setti ng
icons displayed.
3. Focus the camera, and press to take a picture.
4. Press (Back) to save the picture and return to the
viewfinder, or press (Options) a nd select Delete to
delete the picture.
14
Page 22

8 Messaging
Writing and sending a text message
1. Choose Menu > Messaging > Write message.
2. Compose a mess age.
3. Press , or press (Opt ions) and select Send to.
4. Select Enter recipient to manually enter the phone number of a
recipient, or select Add from Phonebook to select a contact
from the phonebook.
5. Press to send the message, or press (Opt ions)
for the following opt ions:
Send: send the message to the recipient.
Save: save the message to Drafts.
Writing and sending a multimedia message
1. Choose Menu > Messaging > Write message.
2. Compose a tex t message.
3. Press (Opt ions) for the following opt ions:
Switch to MMS: change your text message to a mult imedia
message.
This feature has a submenu that includes Add picture, Add
sound, Add video, and Add subject, for you to perform
corresponding operat ions.
Add picture: add a picture to the message.
Add sound: add an audio f ile to the message.
15
Page 23

For more information about multimedia messaging ,
contact your service provider.
Multimedia message attachments c annot exceed 300 KB.
Be vigilant before opening multimedia messages. Some
may contain viruses or malicious software.
Add video: add a video to the message.
Add subject: add a subject to the message.
These four opt ions share the same effect as Switch to MMS and
will change your text message to a mul timedia message
directly.
In addit ion, Messaging allows you to add slides to a message,
set the play tim e interval between slides, and preview the
message.
4. On the message ed iting screen, press , or press
(Options) and select Send to.
5. Select Enter recipient to manually enter the phone number of a
recipient, or select Add from Phonebook to select a contact
from the phonebook.
6. Press to send the message, or press (Options)
for the following opt ions:
Send: send the message.
Change to Cc: copy the message to a recipient.
Change to Bcc: blind copy the message to a recipient.
Save to Drafts: save the message to Drafts.
16
Page 24

9 Multimedia
Image viewer
1. Choose Menu > Mult imedia > Image viewer to access the
photo album.
2. Press to scroll to the desired photo and to view
it.
After you access the photo album, you can press
(Options) for ot her options, including V iew, Image
information, Browse style , Send, Use as, Rename, Delete,
Sort by, Delete all f iles, and Storage.
Video recorder
To record a video:
1. Choose Menu > Mult imedia > Video recorder.
2. When record ing a video, you can:
Press to conf igure the recorder settings.
Press to start or pause the rec ording.
Press or to zoom in or out.
Press or to adjust the brightness.
Press to stop recording and save the vi deo.
17
Page 25

Media player
Use the headset for enhanced audio effects.
The Media pl ayer plays audio and video f iles stored in the phone or
microSD card.
1. Choose Menu > Mult imedia > Media player .
2. Select an audi o or video file, press (Options) and select
Play to start playing the f ile.
When the file is playing, you can:
Press or to adjust the volum e.
Press or to go to the previous or next f ile.
Press to pause or cont inue.
3. Press to go to the previous menu.
All audio and video files o n your phone and microSD card are
automatical ly added to the Media player li st when you use this
function for the first t ime. When you change fil es on your phone or
microSD card, manually update the M edia player list.
FM radio
1. Choose Menu > Mult imedia > FM radio.
2. Press to turn the FM radio on or off.
3. On the FM radio sc reen:
Press or to adjust the volum e.
18
Page 26

When the FM radio is playing in the background, you can
turn it off in standby mode by pressing and then
(Yes).
Press or to adjust the frequency in increments of 0.1
MHz (when no channels are saved to the phone) or to switch
between channels.
Press (Opt ions) for options such as Channel l ist,
Manual input, Auto search, and Settings.
Sound recorder
1. Choose Menu > Mult imedia > Sound recorder.
2. Press or (Opt ions) and select New record.
3. Press (Pause/Cont inue) or to pause or resume
the recording.
4. Press (Stop) to stop recording and save the recorded
fil e.
19
Page 27

10 Organizer
Calendar
The Calendar applicat ion lets you record and track events.
Alarm
The Alarm applicat ion lets you set new alarms or modify exist ing
ones.
You can set the alert time, repet ition interval, and ring type.
Once an alarm has been set, the alarm icon is disp layed on the
status bar.
Calculator
The Calculator applicat ion lets you perform basic arithmetic
operati ons.
Electronic torch
The electronic torch helps you f ind your way in the dark. To switch
on or off the torch in standby mode, press and hold the 0 key for
about 3 seconds, or choose Menu > Organizer > Electronic Torch
and select (On or Off).
Weather
AccuWeather.com provides the weather application to keep you
informed about the most accurate and up-to-date weather
information for your chosen city.
20
Page 28

Stopwatch
When reading an ebook, press or to turn
pages and or to scroll between text lines.
Your phone provides Typical stopwatch and nWay stopwatch.
Tasks
The Tasks application lets you view, add, edit, and delete t asks.
Once a task has been added, the phone rings at the predef ined
ti me to remind you of the upcoming task.
Ebook reader
The Ebook reader applicat ion lets you read ebooks in .txt format.
1. Choose Menu > Organizer > Ebook reader.
The phone automat ically adds ebooks stored in the Ebook
folder to Bookshelf.
2. Select an ebook.
3. Press (Opt ions) and select Open ebook to start reading
the ebook.
You can also press (Options) and select Global settings
to set the font size, scroll type, and more.
4. Press (Back) to close the ebook.
21
Page 29

11 STK
The SIM Tool Kit (STK) function is a value-added service offered by
your service provider. You can use it to send messages, view news,
and more. For more information, contact your service provider.
To use the STK function, select Menu > STK.
12 Facebook
The embedded social networking service (SNS) applic ati on,
Facebook, allows you to social ize with friends and family. Make
sure your phone has Internet access before you attempt to use this
applicat ion.
To use Facebook:
1. Choose Menu > Fun > Fun & Games > Facebook.
2. Enter your account informat ion.
13 Services
You can access WAP sites and use WAP-based services. For more
information, contact your servi ce provider.
Network settings
Before accessing WAP sites, configure your data account and WAP
sett ings.
22
Page 30

Setting the connection profile
If your service provider already offers a data account, you do
not need to create one.
To configure the connect ion profile:
1. Choose Menu > Settings > Connect ivity > Data accounts.
2. Press (Options) and select Add PS account.
3. Set the parameters based on the information provided by your
service provider.
4. Press (OK) to save the sett ings.
Setting the WAP
1. Choose Menu > Services > Settings > Data account.
2. Select your service provider, and press (OK) to select a
data account.
Accessing a website
1. Choose Menu > Services > Search or input URL.
2. Enter a Uniform Resource Locator (URL).
3. Press to open the webpage.
14 Internet tethering
Internet tethering is a method for connect ing a computer or other
devices to the internet via an internet-capable. It will share your
phone’s internet connecti on. You may be charged for it.
23
Page 31

To use the Internet tethering:
USB tethering works with windows vista and other
windows higher versions.
If you want to use USB tethering with windows XP, you
should install a driver on the computer.
1. Connected your phone to a computer using the USB cable.
2. Choose USB Tethering.
3. Press (OK) to conf irm the pop note, and then you can
use computer to enjoy internet.
15 Profiles
Your phone provides various profiles: General, Silent, Meeting,
Outdoor, and My style. You can customize sett ings for each profile
(except Silent).
To customize a profile:
4. Choose Menu > Prof iles.
5. Press or to scroll to the desired prof ile, and
press to act ivate the profile or press (Options)
for the following opt ions:
Activate: act ivate the profile .
Customize: set the following:
- Alert type
- Ring type
- Ringtone and volume
24
Page 32

- Message tone and volume
You can rename the profile name for My style.
Bluetooth headsets must be purchased separately.
Including ringtone and volume, mess age ringtone and
volume, keypad tone and volume
- Whether to play the power on/off tones and system alert.
Reset: restore a prof ile to its default settings.
16 Bluetooth
Bluetooth enables you to exchange data with other Bluetooth
devices wirelessly and use a Bluetooth headset.
Using a Bluetooth headset
1. Choose Menu > Settings > Connect ivity > Bluetooth > Power.
Then select On to enable Bluetooth.
2. Select Search aud io device to search for Bluetooth devices in
range.
3. Select the desired Bluetooth headset, and press (Pair).
4. Enter the password when prompted.
When a Bluetooth headset connects to your phone for the f irst
ti me, a pairing password (varies by headset model) is required
for verifi cation.
After the phone connects to the headset, the headset icon is
displayed on the status bar.
25
Page 33

Transferring data
Not all Java applications are compatible with your phone.
If you have trouble installing or running a Java application,
press to return to the standby screen, and
uninstall the application.
Using Java applications requires a network connection.
Ensure your phone has network access.
1. Choose Menu > Settings > Connect ivity > Bluetooth > Power.
Then select On to enable Bluetooth.
2. Choose My device > Search new device to search for Bluetooth
devices in range.
3. Pair the phone with the desired device.
The two devices can then share data with each other.
17 Java application
Java enables you to install Java applic ati ons provided by third-party
developers.
Installing a Java application
To install a Java applicat ion:
1. Save the Java installati on package in .jar format to the Phone or
Memory card folder.
2. Select a Java installat ion f ile in the package, press
(Options), and selec t Install.
26
Page 34

3. Press (Yes) when prompted.
4. Select Phone or Me mory card to install the application.
When the installat ion is complete, Installed is d isplayed.
Using a Java application
To launch a Java application:
1. Choose Menu > Fun > Java.
2. Select an appl ication and press (Options).
3. Select Launch.
Uninstalling a Java application
To uninstall a Java applicat ion:
1. Choose Menu > Fun > Java.
2. Select an appl ication and press (Options).
3. Select Delete.
4. Press (Yes) when prompted.
When the applicat ion is deleted, Deleted is displayed.
18 Settings
Phone settings
To configure the phone sett ings:
1. Choose Menu > Settings > Phone sett ings.
2. Set the fol lowing parameters:
27
Page 35

Time and date: set the home cit y, time, date, and d isplay
format.
Schedule power on/off: set the t ime for the phone to
automatical ly power on and off.
Language: set the system language.
Pref. input method: set the preferred input method.
Display: set the wallpaper, screen switch effect, LCD backlight
ti meout duration, and whether to show the t ime and date.
Themes: set the theme.
Smart Desktop: set the shortcut icons to be displ ayed on the
standby screen.
Dedicated keys: set shortcuts for and .
Auto update time: e nable or disable thi s function.
Misc. settings: query the MRE vers ion.
Keypad back light: set the d isplay mode of the keypad
backlight.
Security settings
Changing the PIN
To change the PIN, enable PIN lock first and perform the fol lowing
steps:
1. Choose Menu > Settings > Security sett ings > SIM security >
Change PIN.
2. Enter the PIN, and press or (OK).
3. Enter a new PIN, and press or (OK).
4. Re-enter the new PIN.
28
Page 36

Changing PIN2
PIN2 is the personal ident ificat ion number that allows you to use
special funct ions provided by your service provider, such as billi ng.
To change PIN2, perform the same steps as those for changing the
PIN.
29
Page 37

19 Warnings and precautions
This sect ion contains important information about the operat ion of
your device. It also contains informat ion about how to use the
device safely. Read this information careful ly before using your
device.
Electronic device
Do not use your device if using the device is prohibited. Do not use
the device if doing so causes danger or interference with other
electronic devices.
Interference with medical equipment
Follow rules and regulat ions set forth by hospitals and health
care facilit ies. Do not use your device where prohibited.
Some wireless devices may affect the performance of hearing
aids or pacemakers. Consult your service provider for more
information.
Pacemaker manufacturers recommend that a minimum distance
of 15 cm be maintained between a device and a pacemaker to
prevent potent ial interference with the pacemaker. If using a
pacemaker, hold the device on the side opposite the pacemaker
and do not carry the device in your front pocket.
Protecting your hearing when using a headset
headset volume to a safe and comfortable level.
To prevent possible hearing damage, do not
listen at high volume levels for long periods.
Using a headset at high volumes may damage
your hearing. To reduce this risk, lower the
30
Page 38

Exposure to high volumes while driving may cause distract ion
and increase your risk of an accident.
Areas with flammables and explosives
Do not use the device where flammables or explosives are stored
(in a gas station, oil depot , or chemical plant, for example).
Using your device in these environments increases the risk of
explosion or f ire. In addit ion, follow the instructi ons indicated in
text or symbols.
Do not store or transport the device in containers with
flammable liquids, gases, or explosives.
Traffic security
Observe local laws and regulati ons while using the device. To
reduce the risk of accidents, do not use your wireless device
while driving.
Concentrate on driving. Your f irst responsibility is to drive safely.
Do not hold the device while driving. Use hands-free accessories.
When you must make or answer a call, pul l of the road safely
and park the vehicle f irst.
RF signals may affect the electronic systems of motor vehicles.
For more informati on, consult the vehicle manufacturer.
Do not place the device over the air bag or in the air bag
deployment area in a motor vehicle. Doing so may hurt you
because of the strong force when the air bag inflates.
Do not use your device while flying in an aircraft or immedi ately
before boarding. Using wireless devices in an aircraft may
disrupt wireless networks, present a hazard to aircraft operat ion,
or be illegal.
31
Page 39

Operating environment
Avoid dusty, damp, or dirty environments. Avoid magneti c fields.
Using the device in these environments may result in circuit
malfunct ions.
Do not use your device during thunderstorms to protect your
device against any danger caused by lightning.
Ideal operati ng temperatures are 0°C to 35°C. Ideal storage
temperatures are 0°C to 35°C. Extreme heat or cold may
damage your device or accessories.
Do not expose your device to direct sunl ight (such as on a car
dashboard) for prolonged periods.
To protect your device or accessories from fire or electrical shock
hazards, avoid rain and moisture.
Keep the device away from sources of heat and fi re, such as a
heater, microwave oven, stove, water heater, radiator, or candle.
Do not place sharp metal objects, such as pins, near the earpiece
or speaker. The earpiece may attract these objects and result in
injury.
Stop using your device or applicati ons for a while if the device is
overheated. If skin is exposed to an overheated device for an
extended period, low temperature burn symptoms, such as red
spots and darker pigmentation, may occur.
Do not use your device's camera flash directly in the eyes of
people or pets. Otherwise temporary loss of vision or damage to
the eyes may occur.
Do not touch the device's antenna. Otherwise, communicat ion
quality may be reduced.
Do not allow children or pets to bite or suck the device or
accessories. Doing so may result in damage or explosion.
32
Page 40

Observe local laws and regulati ons, and respect the privacy and
legal rights of others.
Child's safety
Comply with all precaut ions with regard to child's safety. Letting
children play with the device or its accessories may be dangerous.
The device includes detachable parts that may present a choking
hazard. Keep away from children.
The device and its accessories are not intended for use by
children. Children should only use the device with adult
supervision.
Accessories
Using an unapproved or incompat ible power adapter, charger or
battery may cause fi re, explosion or other hazards.
Choose only accessories approved for use with this model by the
device manufacturer. The use of any other types of accessories
may void the warranty, may violate local regulations and laws,
and may be dangerous. Please contact your retailer for
information about th e availability of approv ed accessories in
your area.
Charger safety
For pluggable devices, the socket-outlet shall be installed near
the devices and shall be easily accessible.
Unplug the charger from electrical outlets and the device when
not in use.
Do not drop or cause an impact to the charger.
If the power cable is damaged (for example, the cord is exposed
or broken), or the plug loosens, stop using it at once. Continued
use may lead to electric shocks, short circuits, or fire.
33
Page 41

Do not touch the power cord with wet hands or pul l the power
cord to disconnect the charger.
Do not touch the device or the charger with wet hands. Doing so
may lead to short circuits, malfuncti ons, or electric shocks.
If your charger has been exposed to water, other liquids, or
excessive moisture, take it to an authorized service center for
inspect ion.
Ensure that the charger meets the requirements of Clause 2.5 in
IEC60950-1/EN60950-1 and has been tested and approved
according to nat ional or local standards.
Connect the device only to products with the USB-IF logo or with
USB-IF compliance program complet ion.
Battery safety
Do not connect battery poles with conductors, such as keys,
jewelry, or other metal materials. Doing so may short-circuit the
battery and cause injuries or burns.
Keep the battery away from excessive heat and direct sunl ight.
Do not place it on or in heat ing devices, such as microwave
ovens, stoves, or radiators. Batteries may explode if overheated.
Do not attempt to modify or remanufacture the battery, insert
foreign objects into it, or immerse or expose it to water or other
liquids. Doing so may lead to f ire, explosion, or other hazards.
If the battery leaks, ensure that the electrolyte does not make
direct contact with your skins or eyes. If the electrolyte touches
your skins or splashes into your eyes, immediately flush with
clean water and consult a doctor.
In case of battery deformatio n, color change, or overheat ing
while charging or storing, immediately stop using the device and
remove the battery. Continued use may lead to battery leakage,
fire, or ex plosion.
34
Page 42

Do not put batteries in f ire as they may explode. Damaged
batteries may also explode.
Dispose of used batteries in accordance with local regulat ions.
Improper battery use may lead to f ire, explosion, or other
hazards.
Do not allow children or pets to bite or suck the battery. Doing
so may result in damage or explosion.
Do not smash or pierce the battery, or expose it to high external
pressure. Doing so may lead to a short circuit or overheat ing.
Do not drop the device or battery. If the device or battery is
dropped, especially on a hard surface, and may be damaged.
If the device standby t ime shortens significantly, replace the
battery.
Cleaning and maintenance
Keep the device and accessories dry. Do not attempt to dry it
with an external heat source, such as a microwave oven or hair
dryer.
Do not expose your device or accessories to extreme heat or cold.
These environments may interfere with proper funct ion and
may lead to fi re or explosion.
Avoid collision, which may l ead to device malfunct ions,
overheati ng, fi re, or explosion.
Before you clean or maintain the device, stop using it, stop al l
applicat ions, and disconnect all cables connected to it.
Do not use any chemical detergent, powder, or other chemical
agents (such as alcohol and benzene) to clean the device or
accessories. These substances may cause damage to parts or
present a fire h azard. Use a clean, soft, and dry cloth to clean the
device and accessories.
35
Page 43

Do not place magnet ic stripe cards, such as credit cards and
phone cards, near the device for extended periods of t ime.
Otherwise the magnet ic stripe cards may be damaged.
Do not dismantle or remanufacture the device and its
accessories. This voids the warranty and releases the
manufacturer from liabil ity for damage. In case of damage,
contact an authorized service center for assistance or repair.
If the device screen is broken in a colli sion, immediately stop
using the device. Do not touch or attempt to remove the broken
parts. Promptly contact an authorized service center.
Emergency calls
The availability of emergency cal ls is subject to your cellular
network quality, service provider policy, and local laws and
regulati ons. Never rely solely on your device for crit ical
communicat ions like medical emergencies.
Environmental protection
The device and its accessories (if included), such as the power
adapter, headset, and battery should not be disposed of with
household garbage.
Disposal of the device and its accessories is subject to local
regulati ons. Support proper collect ion and recycling.
FCC Regulatory Compliance
Body worn operation
The device complies with RF specif ications when used near your
ear or at a distance of 1.5 cm from your body. Ensure that the device
accessories, such as a device case and device holster, are not
composed of metal components. Keep the device away from your
body to meet the distance requirement.
Certif ication informat ion (SAR)
36
Page 44

This device is also designed to meet the requirements for exposure
to radio waves established by the Federal Communications
Commission (USA).
The SAR limit adopted by the USA is 1.6 W/kg averaged over one
gram of ti ssue. The highest SAR value reported to the FCC for this
device type complies with this l imit.
The highest SAR value reported to the FCC for this device type
when tested for use at the ear is 1.008 W/kg, when properly worn on
the body is 1.141 W/kg.
FCC statement
This equipment has been tested and found to comply with the
limits for a Class B digital device, pursuant to Part 15 of the FCC
Rules. These limits are designed to provide reasonable protection
against harmful interference in a resident ial installation. This
equipment generates, uses and can radiate radio frequency energy
and, if not installed and used in accordance with the instruct ions,
may cause harmful interference to radio communicati ons. However,
there is no guarantee that interference will not o ccur in a partic ular
installat ion. If this equipment does cause harmful interference to
radio or television recept ion, which can be determined by turning
the equipment off and on, the user is encouraged to try to correct
the interference by one or more of the foll owing measures:
Reorient or relocate the receiving antenna.
Increase the separation between the equipment and receiver.
Connect the equipment into an outlet on a circuit di fferent from
that to which the receiver is connected.
Consult the dealer or an experienced radi o/TV technician for
help.
This device complies with Part 15 of the FCC Rules. Operation is
subject to the following two c onditions: (1) this device may not
37
Page 45

cause harmful interference, and (2) this device must accept any
interference received, including interference that may cause
undesired operat ion.
Caution: Any changes or mod ificat ions to this device not expressly
approved by Huawei Technologies Co., Ltd. for compliance could
void the user's authority to operate the equipment.
For More Help
Please visit www.huaweidevice.com/worldwide/support/hotline for
recently updated hotline and email address in your country or
region.
38
 Loading...