

Page 1

T-Mobile Pulse
User Manual
Life's for sharing.
Page 2

Contents
Getting to Know Your Phone . . . . . . . . . . . . . . . . . . . . . . . . . . . 1
Inbox contains . . . . . . . . . . . . . . . . . . . . . . . . . . . . . . . . . . . . . . . . . . . . . . . .1
Phone View . . . . . . . . . . . . . . . . . . . . . . . . . . . . . . . . . . . . . . . . . . . . . . . . . .2
Installing the SIM Card and Battery . . . . . . . . . . . . . . . . . . . . . . . . . . . . . .3
Starting Up . . . . . . . . . . . . . . . . . . . . . . . . . . . . . . . . . . . . . . . . . . . . . . . . . . .6
Using the Touch Screen . . . . . . . . . . . . . . . . . . . . . . . . . . . . . . . . . . . . . . .8
Using Task List . . . . . . . . . . . . . . . . . . . . . . . . . . . . . . . . . . . . . . . . . . . . . . .9
Using the Phone’s mircoSD Card as the USB Mass Storage . . . . . . 10
Settings . . . . . . . . . . . . . . . . . . . . . . . . . . . . . . . . . . . . . . . . . . . . . . . . . . . . 11
Home Screen . . . . . . . . . . . . . . . . . . . . . . . . . . . . . . . . . . . . . . . . 13
Knowing the Home Screen . . . . . . . . . . . . . . . . . . . . . . . . . . . . . . . . . . . 13
Status Icons . . . . . . . . . . . . . . . . . . . . . . . . . . . . . . . . . . . . . . . . . . . . . . . . 14
Using the Notification Panel . . . . . . . . . . . . . . . . . . . . . . . . . . . . . . . . . . 17
Switching the Home Screen . . . . . . . . . . . . . . . . . . . . . . . . . . . . . . . . . . 18
Canvas . . . . . . . . . . . . . . . . . . . . . . . . . . . . . . . . . . . . . . . . . . . . . . . . . . . . . 19
MyCommunity . . . . . . . . . . . . . . . . . . . . . . . . . . . . . . . . . . . . . . . . . . . . . . 27
Changing the Wallpaper . . . . . . . . . . . . . . . . . . . . . . . . . . . . . . . . . . . . . 35
Calling . . . . . . . . . . . . . . . . . . . . . . . . . . . . . . . . . . . . . . . . . . . . . . 37
Making a Call . . . . . . . . . . . . . . . . . . . . . . . . . . . . . . . . . . . . . . . . . . . . . . . 37
Answering a Call . . . . . . . . . . . . . . . . . . . . . . . . . . . . . . . . . . . . . . . . . . . . 38
Other Operations During a Call . . . . . . . . . . . . . . . . . . . . . . . . . . . . . . . 39
Using the Call Log . . . . . . . . . . . . . . . . . . . . . . . . . . . . . . . . . . . . . . . . . . . 43
Using the Airplane Mode . . . . . . . . . . . . . . . . . . . . . . . . . . . . . . . . . . . . . 43
Messaging . . . . . . . . . . . . . . . . . . . . . . . . . . . . . . . . . . . . . . . . . . 45
SMS and MMS . . . . . . . . . . . . . . . . . . . . . . . . . . . . . . . . . . . . . . . . . . . . . . 45
Email . . . . . . . . . . . . . . . . . . . . . . . . . . . . . . . . . . . . . . . . . . . . . . . . . . . . . . 51
Google Mail . . . . . . . . . . . . . . . . . . . . . . . . . . . . . . . . . . . . . . . . . . . . . . . . 54
1
Page 3

Google Talk . . . . . . . . . . . . . . . . . . . . . . . . . . . . . . . . . . . . . . . . . . . . . . . . 55
Contacts . . . . . . . . . . . . . . . . . . . . . . . . . . . . . . . . . . . . . . . . . . . . 61
Viewing Your Contacts . . . . . . . . . . . . . . . . . . . . . . . . . . . . . . . . . . . . . . . 61
Creating a Contact . . . . . . . . . . . . . . . . . . . . . . . . . . . . . . . . . . . . . . . . . . 61
Adding Contacts from the SIM Card . . . . . . . . . . . . . . . . . . . . . . . . . . . 62
Editing the Contact Information . . . . . . . . . . . . . . . . . . . . . . . . . . . . . . . 63
Creating a Group . . . . . . . . . . . . . . . . . . . . . . . . . . . . . . . . . . . . . . . . . . . . 63
Searching for a Contact . . . . . . . . . . . . . . . . . . . . . . . . . . . . . . . . . . . . . . 64
Customizing Your Contacts . . . . . . . . . . . . . . . . . . . . . . . . . . . . . . . . . . 65
Input. . . . . . . . . . . . . . . . . . . . . . . . . . . . . . . . . . . . . . . . . . . . . . . . 67
Knowing the Keyboard Panel . . . . . . . . . . . . . . . . . . . . . . . . . . . . . . . . . 67
Inputting Text, Numbers, or Symbols . . . . . . . . . . . . . . . . . . . . . . . . . . 71
Inputting Settings . . . . . . . . . . . . . . . . . . . . . . . . . . . . . . . . . . . . . . . . . . . 74
Getting Connected . . . . . . . . . . . . . . . . . . . . . . . . . . . . . . . . . . . 77
Network Connections . . . . . . . . . . . . . . . . . . . . . . . . . . . . . . . . . . . . . . . 77
web'n'walk . . . . . . . . . . . . . . . . . . . . . . . . . . . . . . . . . . . . . . . . . . . . . . . . . 78
Browsing the Internet . . . . . . . . . . . . . . . . . . . . . . . . . . . . . . . . . . . . . . . . 79
Using Bluetooth . . . . . . . . . . . . . . . . . . . . . . . . . . . . . . . . . . . . . . . . . . . . . 87
Using the Phone as a Modem . . . . . . . . . . . . . . . . . . . . . . . . . . . . . . . . 89
Entertainment . . . . . . . . . . . . . . . . . . . . . . . . . . . . . . . . . . . . . . . 91
Music . . . . . . . . . . . . . . . . . . . . . . . . . . . . . . . . . . . . . . . . . . . . . . . . . . . . . . 91
Picture and Video . . . . . . . . . . . . . . . . . . . . . . . . . . . . . . . . . . . . . . . . . . . 96
Camera . . . . . . . . . . . . . . . . . . . . . . . . . . . . . . . . . . . . . . . . . . . . . . . . . . . 101
Game . . . . . . . . . . . . . . . . . . . . . . . . . . . . . . . . . . . . . . . . . . . . . . . . . . . . . 105
Applications . . . . . . . . . . . . . . . . . . . . . . . . . . . . . . . . . . . . . . . . 107
Alarm Clock . . . . . . . . . . . . . . . . . . . . . . . . . . . . . . . . . . . . . . . . . . . . . . . 107
Calendar . . . . . . . . . . . . . . . . . . . . . . . . . . . . . . . . . . . . . . . . . . . . . . . . . . 108
Calculator . . . . . . . . . . . . . . . . . . . . . . . . . . . . . . . . . . . . . . . . . . . . . . . . . 110
File Manager . . . . . . . . . . . . . . . . . . . . . . . . . . . . . . . . . . . . . . . . . . . . . . 111
Recorder . . . . . . . . . . . . . . . . . . . . . . . . . . . . . . . . . . . . . . . . . . . . . . . . . . 116
Using Servo Search . . . . . . . . . . . . . . . . . . . . . . . . . . . . . . . . . . . . . . . . 117
Google Service . . . . . . . . . . . . . . . . . . . . . . . . . . . . . . . . . . . . . 119
Creating a Google Mail Account . . . . . . . . . . . . . . . . . . . . . . . . . . . . . 119
Using Google Maps . . . . . . . . . . . . . . . . . . . . . . . . . . . . . . . . . . . . . . . . 120
Android Market . . . . . . . . . . . . . . . . . . . . . . . . . . . . . . . . . . . . . . . . . . . . 124
2
Page 4

YouTube . . . . . . . . . . . . . . . . . . . . . . . . . . . . . . . . . . . . . . . . . . . . . . . . . . 128
Synchronizing Information . . . . . . . . . . . . . . . . . . . . . . . . . . . 131
Introduction to Synchronization . . . . . . . . . . . . . . . . . . . . . . . . . . . . . . 131
Using the T-Mobile or Google Server to Synchronize . . . . . . . . . . . 131
Using the PC Suite to Synchronize . . . . . . . . . . . . . . . . . . . . . . . . . . . 133
Using Roadsync to Synchronize . . . . . . . . . . . . . . . . . . . . . . . . . . . . . 135
Managing Your Phone . . . . . . . . . . . . . . . . . . . . . . . . . . . . . . . 139
Setting the Date, Time Zone, and Time . . . . . . . . . . . . . . . . . . . . . . . 139
Display Settings . . . . . . . . . . . . . . . . . . . . . . . . . . . . . . . . . . . . . . . . . . . . 141
Ringer Settings . . . . . . . . . . . . . . . . . . . . . . . . . . . . . . . . . . . . . . . . . . . . 141
Phone Services . . . . . . . . . . . . . . . . . . . . . . . . . . . . . . . . . . . . . . . . . . . . 142
Protecting Your Phone . . . . . . . . . . . . . . . . . . . . . . . . . . . . . . . . . . . . . . 144
Managing Memory . . . . . . . . . . . . . . . . . . . . . . . . . . . . . . . . . . . . . . . . . 146
Resetting Your Phone . . . . . . . . . . . . . . . . . . . . . . . . . . . . . . . . . . . . . . 146
Upgrading the Software Version of Your Phone . . . . . . . . . . . . . . . . 147
Battery Saving Tips . . . . . . . . . . . . . . . . . . . . . . . . . . . . . . . . . . . . . . . . . 150
Warnings and Precautions . . . . . . . . . . . . . . . . . . . . . . . . . . . 157
Electronic Device . . . . . . . . . . . . . . . . . . . . . . . . . . . . . . . . . . . . . . . . . . 157
Medical Device . . . . . . . . . . . . . . . . . . . . . . . . . . . . . . . . . . . . . . . . . . . . 157
Potentially Explosive Atmospheres . . . . . . . . . . . . . . . . . . . . . . . . . . . 157
Traffic Security . . . . . . . . . . . . . . . . . . . . . . . . . . . . . . . . . . . . . . . . . . . . . 158
Operating Environment . . . . . . . . . . . . . . . . . . . . . . . . . . . . . . . . . . . . . 158
Preventing Hearing Damage . . . . . . . . . . . . . . . . . . . . . . . . . . . . . . . . 159
Safety of Children . . . . . . . . . . . . . . . . . . . . . . . . . . . . . . . . . . . . . . . . . . 160
Environment Protection . . . . . . . . . . . . . . . . . . . . . . . . . . . . . . . . . . . . . 160
Accessories . . . . . . . . . . . . . . . . . . . . . . . . . . . . . . . . . . . . . . . . . . . . . . . 160
Battery and Charger . . . . . . . . . . . . . . . . . . . . . . . . . . . . . . . . . . . . . . . . 160
Clearing and Maintenance . . . . . . . . . . . . . . . . . . . . . . . . . . . . . . . . . . 161
Emergency Call . . . . . . . . . . . . . . . . . . . . . . . . . . . . . . . . . . . . . . . . . . . . 162
Certification Information (SAR) . . . . . . . . . . . . . . . . . . . . . . . . . . . . . . 162
FCC Statement . . . . . . . . . . . . . . . . . . . . . . . . . . . . . . . . . . . . . . . . . . . . 163
EU regulatory conformance . . . . . . . . . . . . . . . . . . . . . . . . . . . . . . . . . 164
Troubleshooting & FAQs . . . . . . . . . . . . . . . . . . . . . . . . . . . . . 165
How to expand the desktop? . . . . . . . . . . . . . . . . . . . . . . . . . . . . . . . . 166
Appendix. . . . . . . . . . . . . . . . . . . . . . . . . . . . . . . . . . . . . . . . . . . 169
3
Page 5

Index . . . . . . . . . . . . . . . . . . . . . . . . . . . . . . . . . . . . . . . . . . . . . . 171
4
Page 6

Getting to Know Your Phone
Inbox contains
Your new phone box contains the following items:
• Mobile phone
•Battery
•Battery cover
•Charger
•USB cable
•2GB MicroSD
•2.5 mm headset
•CD-ROM including the User Guide
•Quick start guide
•Safety information
•Audio adaptor 2.5 mm to 3.5 mm
•Pouch
1
Page 7
Getting to Know Your Phone
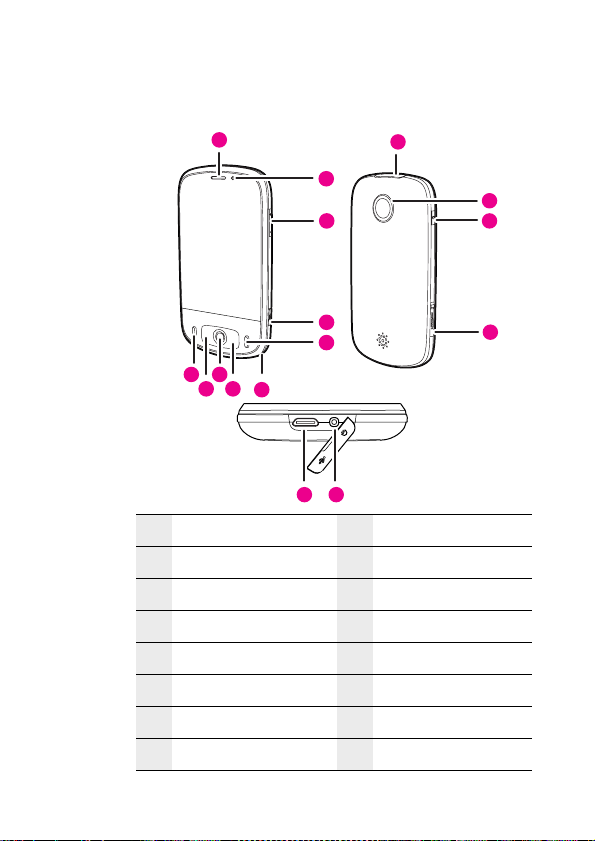
Phone View
Appearance
1
2
3
11
12
13
4
5
10
8
9
6
7
16
15
14
1 Earpiece 2 Secondary camera
3 Volume control 4 Camera capture
5 End Call/Cancel 6 Microphone
7 Home/Back 8 Trackball
9 MENU 10 Answer/Call
11 Connectors on the top 12 3.2-megapixel camera
13 Power 14 microSD card slot
15 Charging/Data interface 16 Headset jack
2
Page 8

Key Functions
Getting to Know Your Phone
Power
Answer/Call Press to go to the dialing screen.
MENU
Trackball
Home/Back
End
Call/Cancel
When the screen is locked, press the Power key, MENU key or
Home/Back key to wake up the screen.
• Press to power on your phone. Press and hold to
open the phone
• Press to lock the screen when your phone is on.
• On an active screen, press to open the menu.
• Press and hold to open the keyboard to perform
quick search operations
• Press to unlock the screen if it is locked.
• Press to zoom out of or zoom in to the screen while
on the Home screen.
• Roll the Trackball to navigate selectable items on
the screen. Press the T
highlighted item or action.
• Press to return to the previous screen or exit from
the running application.
• Press to zoom out of or zoom in to the screen while
on the Home screen.
• While on a call, press to hang up.
• By default, pressing this key will return you to the
Home screen. You can customize the function of
the End Call/Cancel key by selecting Settings >
Spare parts > End button behavior.
options menu.
.
rackball to select a
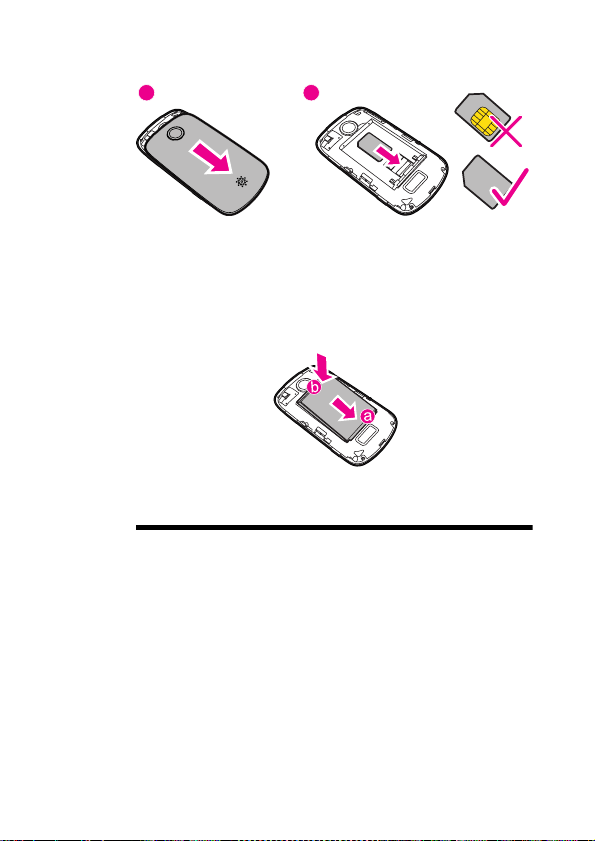
Installing the SIM Card and Battery
Installing the SIM Card
You must install your SIM (short for (Universal) Subscriber Identity
Module, provided by your network operator) card according to the
3
Page 9
Getting to Know Your Phone
following figure.
1 2
1. Remove the battery cover.
2. Insert the SIM card.
Installing the Battery
Insert the battery by first placing side a (with contacts) at the bottom
position and then smoothly pushing down side b. The printed side of
the battery must be facing upwards.
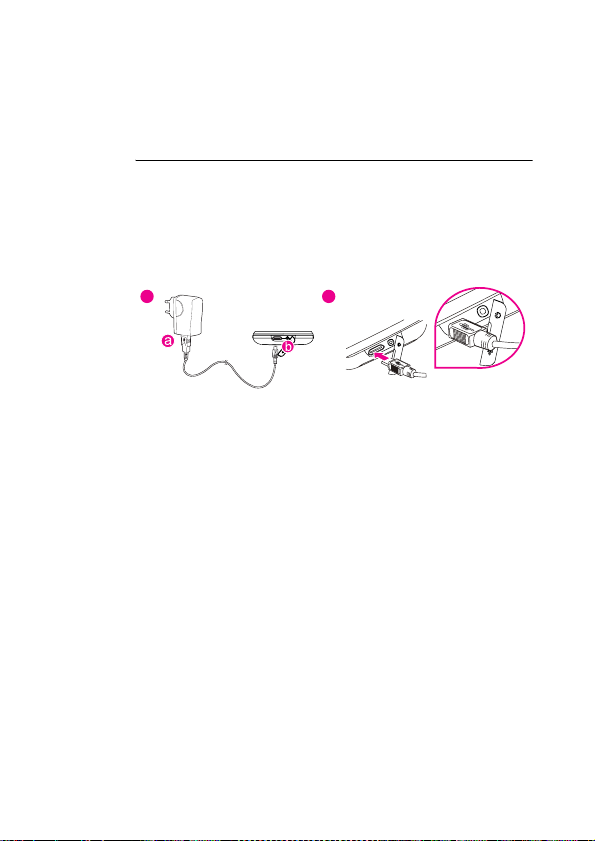
Charging Your Phone
Before you charge the battery, read the following instructions:
Note:
•If your phone battery has not been used for a long time, you may
not be ab le to s witc h on yo ur
the battery. Charge the battery for a while to recover the battery
from deep-discharged status. When your
the keypad light flashes
• The battery can be recharged but eventually will loose capacity
over time and charging cycles. After being fully charged, if the
battery lasts for a period that is significantly shorter than usual,
replace it with a battery of the same type.
• Using data services will reduce your standby time significantly.
phone immediately when recharging
phone is being charged,
.
4
Page 10
Getting to Know Your Phone
• The charging time depends on the environmental temperature
and the age of the battery.
• When the battery power level is low, the phone plays an alert and
displays a prompt. When the battery is extremely low, the phone
will power off automatically.
Before charging the battery, ensure that the battery has been properly
inserted into your phone.
1. Connect the USB cable that is delivered with your phone to your phone, as shown in b. Then, plug in the connector of the charger to a power socket.
2. Connect the USB cable to the charger, as shown in a.
1
2
5
Page 11

Getting to Know Your Phone
Starting Up
After inserting your SIM card and battery, you can turn on your phone
and start using it.
Tu r ning your Phone on and off
Turning on the Phone
1. Press the Power key to turn on the phone.
2. When you turn on the phone for the first time, you will be prompted
to sign in your account and set up your phone. For more
information, refer to “
Turning off the Phone
1. Press and hold the Power key to open the Phone options menu.
2. Touch Power off.
3. Touch OK when prompted to turn off the phone.
Setting up Your Phone for the First Time
1. Press the Power key to turn on the phone.
2. Touch the AndroidTM image. You w ill be p rompte d to ena ble th e
Data
permanent data connection. It is recommended to have a data
tariff option before you enable the data service.
•If you want to enable the data service, go to step 3.
•If you want to disable the data service, go to step 7.
3. You will be prompted to view the tutorial on how to use your phone.
•Touch Skip to proceed.
•Touch Begin to view the tutorial on how to use the onscreen
keyboard.
4. After reading the setting up information, touch Next.
5. You will be prompted to sign in to your Google Account.
•If you do not have an account, touch Create, and then follow the
instructions to create an account.
Note: Be fo re you si gn in t o o r c re ate yo ur acc ou nt , an ac ti ve dat a
connection should be set up on your phone.
Setting up your phone for the first time.”
service switch. Some of the device features require a
6
Page 12

Getting to Know Your Phone
•If you have an account, touch Sign in to enter your user name
and password.
Tip: After signing in, all emails on your Google Account will
automatically synchronize with your phone.
•If you want to set up an account later, touch Skip.
6. After signing in to or creating your account, you will be prompted
to choose whether to enable Google location or not
location service provides applications with your approximate loca
tion without using GPS.
7. Set up the date and time, and then touch Next.
8. Touch Finish setup.
. Google’s
Lock ing and Unlocking the Screen
Locking the Screen
• When your phone is on, short press the Power key to lock the
screen.
• When you leave the phone idle after a certain period of time, the
phone automatically locks the screen. For more information, refer
to “Adjusting the Time Before the Screen Turns Off”.
Note: While the screen is locked, you will still be able to receive
messages and calls.
Unlocking the Screen
Press the MENU, Home/Back or Power key to wake up the screen, and
then unlock the screen through the following methods:
• Press the MENU key to unlock the screen.
• Follow the instructions displayed on the screen, which illustrate
how to unlock the screen by moving the magenta dot upwards.
• If you h ave s et up a scre en unl ock p atte rn, yo u wil l be p rompt ed to
draw the pattern on the screen to unlock it. For more information,
refer to “Protecting Your Phone with a Screen Lock”.
-
7
Page 13
Getting to Know Your Phone
PIN Protection
If your SIM card has a PIN, you will be prompted to enter the PIN to use
the phone
with a PIN.”
Note: The PIN may have been provided by your service provider with
your SIM card. If you lost it, consult your service provider.
Using the Touch Screen
Action Description
Your phone supports the following actions. Through these actions,
you can perform operations on your
Icon Description
. For more information, refer to “Protecting Your SIM Card
phone.
Touch: Touch a desired item with your fingertip to
confirm your selection or start an application.
Touch twice: Touch a desired item twice in
succession to launch it. For example, touch the
widcard twice to launch it.
Touch and hold: Touch and hold the screen until
your
phone responds. For example, you can touch
and hold the screen to open the
the active screen in most circumstances.
Flick: To flick means to flick your finger vertically
or horizontally across the screen. For example,
you can flick your finger left and right to switch
between pictures.
Drag: Touch and hold your desired item with your
finger. Then, drag
screen to move the item. For example, you can
drag an icon on the canvas to move or delete it.
the item to any part of the
option menu of
8
Page 14

Getting to Know Your Phone
Tip: If you touch and hold certain screens, menu options are
displayed.
Rotating Your Phone
When you rotate your phone, the screen adjusts itself to the rotation.
Note: You can rotate your phone only counterclockwise.
Using Task List
On any screen, press and hold the Power key to open the phone
options. You can view the list of six applications that have been used
recently by selecting Task List. Then, you can touch the application
icon to open the desired application.
9
Page 15
Getting to Know Your Phone
Using the Phone’s mircoSD Card as the USB Mass Storage
For easy transfer of music and pictures from your PC to y our phone’s
microSD card, you can set the mircoSD card as the USB mass storage.
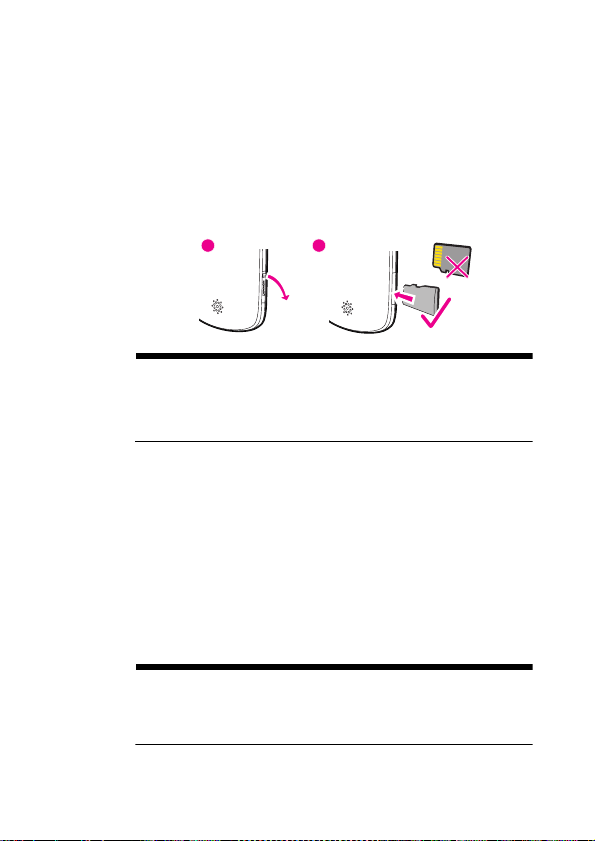
Installing the microSD Card
Remove the rubber cap from the microSD card slot. Insert the microSD
card in the correct direction.
Note:
• Insert the microSD card with the gold side facing upward.
• During normal usage, do not randomly insert or remove the
microSD card.
Using the phone’s mircoSD card as the USB mass storage
1. Touch Main Menu, and then touch Settings.
2. Scroll down the screen, then touch General info and option > USB
Mass Storage
3. Press Home/Back key thrice to return to the Home screen.
4. Connect the phone to your PC using the USB cable . Your PC will
detect the
You can now begin exchanging files between your PC and your
mircoSD card.
phone’s
Note: The phone does not utilize the mircoSD card internally when
used as a USB mass storage.
Mass Storage device(which is your phone) when you have done
exchanging files with your PC according to the instructions provided.
1 2
activate the checkbox.
mircoSD card as a removable disk.
Remember to safely disconnect the USB
10
Page 16

Getting to Know Your Phone
Removing the mircoSD card while the phone is on
Do the following if you need to remove the mircoSD card while the
phone is on.
1. Touch Main Menu, then touch Settings.
2. Scroll down the screen, then touch SD card & phone storage > Unmount SD card.
3. Remove the mircoSD card by following the instructions provided earlier in this chapter.
Settings
You can control and customise phone settings on the Settings screen.
To open the Settings screen, do any of the following:
•Touch Main Menu, and then touch Settings.
•On any Home screen, press the MENU key, and then touch
Settings.
Wireless
controls
Call settings Set up call services such as voicemail, call
Contacts
settings
Sound & display Set up the call and notification ring tones, or set
Data
synchronization
Configure the wireless connections of your
phone, such as Wi-Fi and Bluetooth, enable the
Airplane mode, or set the options for roaming,
networks, and more.
forwarding, call waiting, and caller ID.
Manage your contacts, such as copying contacts
from the SIM card
birthday reminders.
the screen brightness and screen timeout.
Select the master synchronization server. You can
also set automatic synchronisation of Google
Mail, Calendar, and Contacts.
, deleting all contacts, or setting
11
Page 17
Getting to Know Your Phone
Security &
location
Applications Manage applications and installation of new
SD card &
phone storage
Date & time Set the date, time, time zone, and date or time
Locale & text Set the operating system language and region.
About phone View the phone status such as the network type,
Select the GPS location source to use, set the
screen unlock pattern, or enable the SIM card
lock.
programs.
Check the available storage card and phone
memory, reset the phone to its factory default
settings, or format the
your
phone.
format.
You can also set on
signal strength, battery level, and network name.
You can also view the legal information and
software version of your phone.
microSD card and update
screen keyboard options.
12
Page 18
Home Screen
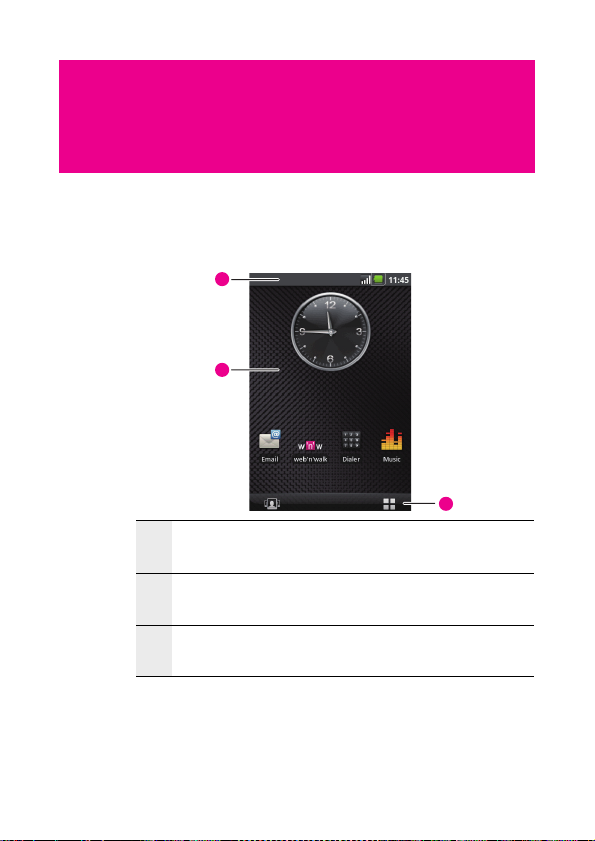
Knowing the Home Screen
1
2
Notification bar: displays the reminders and status icons of
1
your
phone. Flick down to open the notification panel.
Display area: displays the operation and display areas of your
2
phone.
Interface switching buttons: displays the MyCommunity
3
button and the Main Menu button.
3
13
Page 19
Home Screen
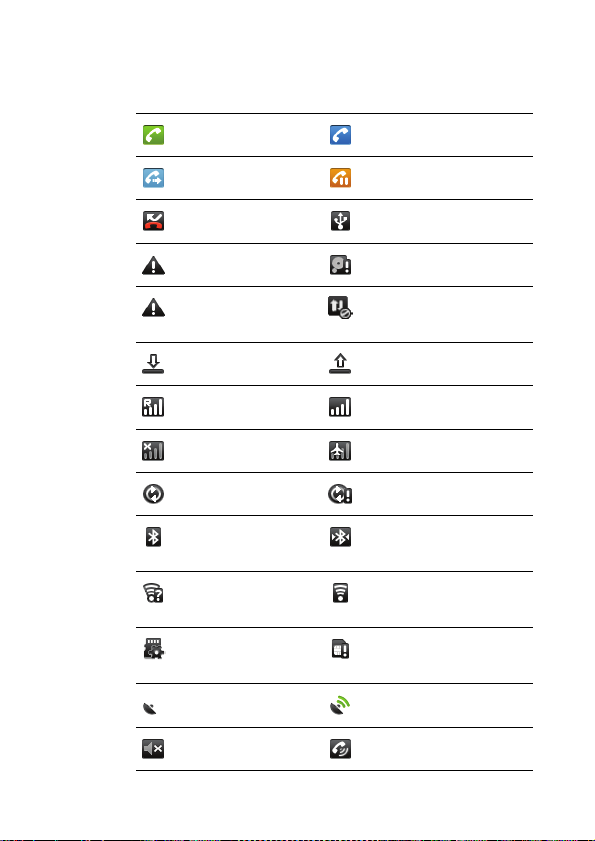
Status Icons
Call in progress Call via Bluetooth device
Call forwarding on Call on hold
Missed call Connected to PC
System error Memory is full*
14
Problem with
sign-in/sync
Downloading data Uploading data
Roaming Signal strength
No signal Airplane mode
Data is syncing Sync failed
Bluetooth is on Connected to another
Wi-Fi is on Connected to a Wi-Fi
Preparing mircoSD
card
GPS is on GPS is connected
Sound off loudspeaker on
Data switch off
Bluetooth device
network
No SIM card
Page 20

Home Screen
Vibrate mode Phone is mute
GPRS connected GPRS in use
EDGE connected EDGE in use
3G connected 3G in use
Battery is full Battery is very low
Battery is charging Alarm is set
Music is playing New calendar remind
New email New message
New voicemail New instant message
More undisplayed
notifications
*Memory is full
If your phone runs out of space, the icon indicating insufficient space
is displayed on the notification bar. In this case,
data and applications to increase your phone memory.
1. Touch and hold the notification bar, and then flick your finger
downwards to open
the notification panel.
delete unnecessary
15
Page 21
Home Screen
2. Touch Low on space to go to the file management screen of your phone.
16
3. Touch Manage applications, and then unistall unnecessary
application
s.
Page 22
Home Screen
4. Touch File Manager,and then delete unnecessary files.
Using the Notification Panel
Notifications report the arrival of new messages and calendar events,
and provide information on the status of alarms and ongoing activities,
such as when call forwarding activated or the current call status. You
can also open the notifications panel to know the wireless network
operator, or to vie
When a new notification icon is displayed in the Notification bar, touch
and hold the Notification bar, and then slide your finger downward to
open the notifications panel.
w a message, reminder, or event notification.
On the Notifications panel, you can perform the following operations:
•Touch a notification to open the related application.
17
Page 23
Home Screen
•Touch Clear Notifications to clear all notifications.
•Touch and hold the bottom of the panel, and then flick upwards to
close the notifications panel.
Switching the Home Screen
There are two buttons at the bottons of the Home screen of your
phone. You can touch either of these bottons to go to different
screens.
MyCommunity Screen
Touch to open the MyCommunity screen. Touch to return to
Canvas.
Main Menu Screen
Touch to open the Main Menu screen. Press the Home/Back key to
return to Canvas.
18
Page 24

Home Screen
Note: The figure is for reference only. The actual screen display on
your phone may be different.
Canvas
About Canvas
Canvas is a type of desktopon which you can unlimitedly expand and
freely define
• Expand your desktop to any direction
• Customize widcards
•Create and arrange shortcuts
•Create and arrange widgets
•Create and arrange folders
•Define and switch between wallpapers
Browsing the Canvas
The desktop can be expanded unlimitedly. To expand the desktop,
drag an icon to the edge of the desktop and release it.
it. Canvas is a type of desktop display on which you can:
If there are many items on the screen, you can browse through them by
pressing the Trackball.
19
Page 25
Home Screen
On the zoom-in screen, you can slide the screen in either direction
vertically or horizontally
Trackball again to zoom out of the selected area.
click the
You can touch the screen and flick your finger vertically or horizontally,
Trackball, to switch to other screens.
or roll the
Tip:
• During the browsing of the Canvas, you can press the Home/Back
key to quickly return to the default screen.
•On the Home screen, press the MENU key and touch More > Reset
Canvas. The Home screen is restored to the factory setting.
, and then touch the selected area twice or
Widcard
About Widcard
The widcard function provides a shortcut to or the preview of your
desired application. A widcard can be displayed as an icon or a
preview window. You can create the widcards of Calendar, Email,
20
Page 26
Home Screen
Music, Notepad, Picture and Video, and display these widcards on the
desktop.
When a widcard is displayed as an icon , you can touch it to access the
related program or touch the icon twice to switch to the preview
window.
When a widcard is displayed as a window, you can view the
information displayed in the preview window. If you touch the title bar
of the window twice,
Creating a Calendar Widcard
1. Touch and hold the blank area on the Canvas screen until the Add
Home screen menu is displayed.
to
2. Touch Widcard to display the widcard list.
3. Touch Calendar to create a My events window on the Canvas, and
the upcoming events will be displayed in the window.
Note: The Calendar you create is displayed on the Canvas as My
events.
the widcard is changed from a window to an icon.
-mode
21
Page 27

Home Screen
Creating an Email Widcard
1. Touch and hold the blank area on the Canvas screen until the Add
Home screen menu is displayed.
to
2. Touch Widcard to display the Widcard list.
3. Touch Email, and then select an email account. The related
widcard window shows the email messages in the Inbox folder of
the selected account. You can touch the desired title in the
widcard to view the contents.
Creating a Music Widcard
1. Touch and hold the blank area on the Canvas screen until the Add
Home screen menu is displayed.
to
2. Touch Widcard to display the Widcard list.
3. Touch Music, and then select an album, an artist, or a playlist. The
related widcard window shows the music file you select. You can
track cover of the music file to play in the background.
touch the
Creating a Notepad Widcard
1. Touch and hold the blank area on the Canvas screen until the Add
Home screen menu is displayed.
to
2. Touch Widcard to display the Widcard list.
3. Touch Notepad, and then choose to create a new note or select a
note from the note list.
•Touch Done. The new widcard is displayed on the Canvas
screen.
•Touch Share. You can define the time and contact when
creating a widcard. Your phone can send the note to the
specified contact at the specific time.
Creating a Picture/Video Widcard
1. Touch and hold the blank area on the Canvas screen until the Add
Home screen menu is displayed.
to
2. Touch Widcard to display the Widcard list.
3. Touch Picture or Video. The related widcard window that shows all
pictures or videos is displayed.
22
Page 28
Home Screen
Folders
Creating a Folder
1. Touch and hold the screen to open the Add to Home screen menu,
and then select Folders.
2. Choose New folder, All Contacts, Contacts with phone numbers,
Documents To Go Recently Used or Starred contacts to create
folders of various types.
3. To add a shortcut to the folder, touch and hold an application or a
shortcut icon to activate the move mode. Then drag it to the top of
the folder.
23
Page 29
Home Screen
4. Touch the folder to open it. When the folder is opened, touch the
title bar of the folder to close it.
Note: When the move mode is activated, the item magnifies and the
phone vibrates.
Renaming a Folder
1. Touch the folder to open it. Then touch and hold the title bar of the
folder to open the Rename folder dialog box.
2. Enter the new folder name, and then touch OK.
Other Applets
You can also add widgets or shortcuts to the Canvas screen.
Widgets
Widget is a type of icon that has special functions.
24
Page 30
Home Screen
In the widget list, you can select Analog clock, Calendar, Music,
Picture frame,
Shortcuts
Shortcut is a type of display on the Canvas screen through which you
can directly go to the related application.
In the shortcut list, you can choose to create Applications, Bookmark,
Contacts
To quickly add an application shortcut to the Home screen, set Canvas
as the defult Home screen, and then
hold an application icon and then release it.
Search or Roadsync Calendar.
, Google Mail label, or Music playlist.
touch Main Menu. Touch and
25
Page 31

Home Screen
For example, choose Shortcuts > Contacts > desired contact to create
a contact shortcut.
open the contact.
Then, you can touch the shortcut icon to directly
Removing an Item from Canvas
1. Press and hold the item on the screen to activate the move mode.
2. Without lifting your finger off the item, drag it into the Trash tab,
then release. The item and the Trash tab turn red
that the item is ready to be removed.
Note: When move mode is activated, the item magnifies and the
phone vibrates. The Trash tab is displayed at the bottom of the screen.
, which indicates
26
Page 32

Home Screen
MyCommunity
MyCommunity Service
MyCommunity is a new exclusive, person centric user interface. It is
designed to support you with your daily communication. The
enhanced phone book allows you to organize your contacts in an
many groups as you like.
not be supported in all mobile networks. Consult your service provider
for details.
MyCommunity View Modes
All Contacts View
Some of the MyCommunity features might
27
Page 33

Home Screen
MyGroups View
Contacts
Creating a Contact
1. Choose Main Menu> Contacts to access contacts.
2. Press the MENU key to open the contacts menu. Then, touch
Create contact to create a contact. You can add information such
as the name, telephone number, address, email address, IM, and
birthday for the contact. In addition, you can set a ringing tone for
the contact.
Tip: When creating a contact, you can choose Ringtone to customize
the ringtone for the contact. Select a ringtone stored on your
touching Select ringtone or download a ringtone from the Internet by
touching Download ringtone.
After a ringtone is downloaded, you need to select it from your phone,
and then set it as the ringtone for the contact.
phone by
28
Editing Contacts
You can always make changes to the information you have stored for a
contact.
1. Touch the contact to be modified in the contacts list.
2. Press the MENU key, and then touch Edit contact.
Page 34

Home Screen
3. Edit the contact information, and then touch Save. To cancel all
changes you made to the contact information,
Adding/Changing Contact Picture
touch Cancel.
1. In the Create new contact or Edit contact screen, touch the contact
picture at the top of the screen
picture, the default placeholder icon will be used.
2. You can touch Choose from my pictures to choose a picture from
Gallery, or touch Take picture to take a picture using the camera,
or touch Download icon to download a picture from Internet.
3. The cropper appears. Do any of the following operations to crop
the picture:
•To adjust the cropper size, touch and hold the cropper edge.
When the cropper arrows appear, drag your finger inward or
outward the centre of the cropper to resize it.
•To move the cropper to another area in the picture, tap and hold
inside the cropper, then drag it with your finger to the desired
position.
Viewing the Communication Screen
You can touch a contact in MyCommunity view to go to the
communication screen.
In the communication screen, you can perform the following
operations:
. If you have not added a contact
29
Page 35

Home Screen
•Make a call.
• Send messages, such as SMS, MMS, or email messages.
• Use the chat service.
• View the activity log.
• View the details of the contact.
• Open the URL in the contact details.
Viewing Activity Logs
You can touch Activity Log in the communication screen to view
activity logs.
The activity log list provides all communication activities with a
particular contact.
Activity logs can be further filtered by pressing the MENU key and then
touching Filter.
Adding Contacts from the SIM Card
You can add the contacts stored on your SIM card to the contacts list
phone.
in your
30
1. Touch Main Menu, and then touch Contacts. Your contacts list is displayed.
2. Press the MENU key, and then choose More > Settings > Copy
contacts from SIM. Wait for the SIM card contents to
3. Select the contact to be added, and then touch Next.
be loaded.
Page 36

Home Screen
Updating MyProfile
You can update your personal information in MyProfile. Your personal
information is displayed in the
of your friends.
1. Choose Main Menu > Contacts to access contacts.
2. Touch the MyProfile tab.
3. Press the MENU key, and then you can perform one of the
following options:
information.
information to your friends.
options.
Touch Send MyProfile to send your personal
MyCommunity contacts on the devices
Touch Edit MyProfile to edit your personal
Touch Settings to set the Contacts
Groups
Creating a Group
1. Choose Main Menu > Contacts to access contacts.
2. On the Contacts tab, press the MENU key.
3. Choose Create group to create a contact group.
4. You can define the group name, and set the ringtone of the incoming calls from the group or the group members.
31
Page 37

Home Screen
Note: Network groups and My Fave group cannot be created or
deleted. These groups will be automatically available based on
subscription.
Editing a Group
You can always make changes to the information you have stored for a
group.
1. Touch the group to be modified.
2. Press the MENU key, and then touch Edit group.
3. Edit the group information, and then touch Save. To cancel all
changes you made to the contact information,
Assigning a Contact to Groups
To assign a contact to groups, perform either of the following
operations:
• When editing a contact, touch Assign to groups and select the
desired groups.
• In All Contacts view, touch and hold contact, and select Add to
group from the displayed
Adding/Changing Group Picture
1. In the Create new group or Edit group screen, touch the group picture . If you have not added a group picture, the default placeholder icon will be used.
2. You can touch Choose from my pictures to choose a picture from Gallery, or touch Take picture to take a picture using the camera, or touch Download icon to download a picture from Internet.
3. The cropper appears. Do any of the following operations to crop the picture:
•To adjust the cropper size, touch and hold the cropper edge.
When the cropper arrows appear, drag your finger inward or
outward the centre of the cropper to resize it.
•To move the cropper to another area in the picture, tap and hold
inside the cropper, then drag it with your finger to the desired
position.
menu. Then, select desired groups.
touch Cancel.
your
32
Page 38

Home Screen
Changing active Group in MyGroups View
The currently displayed group on the Home screen can be changed as
follows:
1. Press the MENU key to open the option panel.
2. Touch Change group.
3. Touch the desired group in the Contacts bar displayed on the top
to change the
Reordering Members in a Group
On the Home screen, the members in the group can be reordered to
position each person at a specified UI location for easy access. This
operation can be activated by performing the following:
• Touch and hold the center polaroid, and drag it to the desired
location.
Home screen group.
33
Page 39

Home Screen
• Press the MENU key and touch Reorder members to reorder the
members.
Sending Group Messages
On the MyCommunity Home screen, you can send emails and
messages to all group members or selected members as follows:
1. Press the MENU key to open the option panel.
2. Touch Group e-mail or Group SMS/MMS.
3. Select the desired contacts from the group.
4. Compose a message or an email, and then send it.
Viewing the Information About New Events
You can view the information about new events, such as missed calls
or message notifications in
MyGroups view mode.
34
Page 40

Home Screen
Of the contacts displayed in the MyGroups view, the screen displays
the social networking tag-line for the contact displayed at the center.
Changing the Wallpaper
You can change the wallpaper of your phone to pictures that you have
purchased, pictures stored on your
Wallpaper gallery that comes with your
1. Touch and hold the screen to open the Add to Home screen menu, and then touch Wallpaper.
2. Select a picture from Pictures or the Wallpaper gallery.
3. Flick your finger on the screen or roll the Trackball to find the picture that you want to use, and then select it.
4. The cropper appears. Do any of the following:
•To adjust the cropper size, touch and hold the cropper edge.
When the cropper arrows appear, drag your finger inward or
outward from the centre of the cropper to resize it.
microSD card, or from the
phone.
35
Page 41

Home Screen
•To move the cropper to another area in the picture, touch and
hold
the inside of the cropper, and then drag it with your finger
to the desired position.
5. Touch Save to apply the new wallpaper.
36
Page 42

Calling
Making a Call
There are many ways to reach your friends and contacts using Dialer,
Contacts, and Call
Note: Do not touch the microphone at the bottom of your handset
when making or answering a call.
Making a Call on the Dialer
1. Press the Answer/Call key or choose Main Menu > Dialer to display the dialing panel.
2. Touch the desired keys on th e dialer.
3. Touch Call to dial the phone number.
log.
1
2
4
3
5
1 Displays the phone number you enter.
6
37
Page 43

Calling
2 Touch to enter the number.
3 Touch to view the call log.
Touch to clear digit one by one. Touch and hold to erase the
4
entire number.
5 Touch to dial the phone number you enter.
6 Touch to view the contacts.
Making a Call from the MyCommunity
Access the MyCommunity Home screen. Touch the desired contact
from the list. Then, touch Call.
Making a Call from the Contacts
1. Choose Main Menu > Contacts to display the contact list.
2. Touch the desired contact from the list.
3. Touch Call to dial the phone number.
Making a Call from the Call log
1. Choose Main Menu > Call log to display the call log.
2. Touch the desired contact on the list.
3. Touch Call to dial the phone number.
Answering a Call
When there is an incoming call, press the Answer/Call key to answer
the call and press the
When a call comes, press the Volume control key to mute the speaker.
During a call, you can touch the dialpad tab and flick up to open the
When you have opened the dialpad for awhile, and you have
dialpad.
not performed any operations on the phone, the screen is
End Call/Cancel key to reject the call.
38
Page 44

Calling
automatically locked to avoid accidental operations. You can touch
the icon on the screen twice to unlock the screen.
Rejecting a Call
You can press the End Call/Cancel key or Home/Back key to reject a
call.
Other Operations During a Call
Your phone also supports special call features to make
communication simple.
39
Page 45

Calling
Making a Conference Call
1. While on a call, you can press the MENU key, and then touch Add
.
call
2. Enter the phone number of the person you want to add to the
conference call and press the
log, Contacts, or Favorites tab, and then select the next
conference call participant from the list. The first call is
automatically put on hold.
3. When connected to the second conference call participants, press
MENU key, and then touch Merge calls to begin the
the
conference call.
4. To add more conference call participants, repeat steps 1, 2 and 3.
5. During a conference call, press the MENU key and touch Manage conference to drop a conference call participant or to talk privately to one of the participants.
6. To end the conference call and disconnect all call participants,
press the
End Call/Cancel key.
1 2
Answer/Call key. Or touch the Call
40
3
1 Touch to disconnect this participant from the conference.
Touch to talk privately to the participant and put other
participants on hold. To resume the conference call, press the
2
MENU key and touch Merge calls.
Page 46

Calling
3 Touch to rejoin the remaining conference call participants.
You can also choose one party in a conference call for a private
conversation.
Note: To enable multiparty calling service, consult your network
service provider.
Using Other Functions
While on a call, you can press the MENU key to open the call operation
panel. The
operations.
options on the panel enable you to perform your desired
Swap calls While holding two or more calls, touch to switch
between the calling or called parties.
Merge calls While holding two or more calls, touch to add
multiple parties into a multiparty conference call.
Add call Touch to add a new party into a multiparty
conference call.
End call Touch to end the ongoing call.
41
Page 47

Calling
Hold Touch to hold the ongoing call. Touch this key again
Mute Touch to toggle between turning the microphone on
Speaker Touch to turn the speaker on or off. The Speaker
Bluetooth Touch to toggle between using the phone speaker
While on a call, you can press the Home/Back key to return to the
Home screen and use other functions. In addition, you can press the
End Call/Cancel key to end the call.
If you need to return to the calling screen again, flick the notification
bar down and touch Current Call.
You can also press the MENU key to choose other operations.
to resume the call. When you place a call on hold,
the Hold call icon appears in the notification bar and
the words “On hold” appear above the picture of the
caller.
or off. When the microphone is turned off, the Mute
button lights up green and the mute icon appears on
the notification bar.
button lights up green and the speakerphone icon
appears on the notification bar when the
speakerphone is on.
Note: To avoid damage to your hearing, do not hold
your phone
is on.
(microphone) and the paired Bluetooth device.
close to your ear when the speakerphone
42
Page 48

Calling
Using the Call Log
The Call log tab lists all missed calls, dialed numbers, and received
calls.
Touch a name or number in the list to open a screen that gives you
options on what you can do with the contact. You can perform one of
the following operations:
• Call the contact.
• Edit a number before a call.
• Send a message to the contact.
• Add the number to contacts.
• Remove the entry from the call log.
Using the Airplane Mode
In many countries, you are required by law to turn off the phone while
on an aircraft. A way to turn off the phone function is to switch your
phone to the airplane mode. In airplane mode, all wireless radios on
your phone are turned off, including the phone function, Bluetooth,
and Wi-Fi.
You can enable or disable the airplane mode by choosing one of the
following operations:
• Press and hold the Power key, and then touch Airplane mode.
• Choose Settings > Wireless controls > Airplane mode.
43
Page 49

Calling
44
Page 50

Messaging
SMS and MMS
Messaging supports Short Message Service (SMS) and Multimedia
Messaging Service(MMS). You can send text and multimedia
message to other
You can compose a text message of up to 160 characters. If you
continue to type after the limit is reached, your message will be
delivered as one, but count
called concatenated messages.
Multimedia messages can contain text and a picture, a recorded voice,
an audio file,
Note: Your phone automatically converts a text message into a multimedia message when you add a subject or an attachment.
Creating and Sending a Text M e s sage
1. Choose Main Menu > Messaging > New Message to g o to t he message editing screen.
2. In the To field, enter the desired phone number. You can also touch + to select the desired phone number from Contacts.
3. In the Type to compose field, type your message.
4. Touch Send to send the message.
phones.
ed as more than one message. These are
and a picture slideshow.
45
Page 51

Messaging
1
2
Touch to enter the telephone number or email address of the
1
recipient.
3
4
5
2 Touch to enter the message content.
Touch to access Contacts and select the desired contact
3
number.
Displays all the messages sent to and received from the current
4
contact.
5 Touch to send the message after the editing.
Creating and Sending a Multimedia Message
1. Choose Main Menu > Messaging > New Message to go to the message editing screen.
2. In the To field, enter the intended phone number. You can also
+ to select the intended phone number from Contacts.
touch
3. Press the MENU key to display the message options menu, and touch Add subject to add the message subject. The phone is switched to the multimedia message mode.
46
Page 52

Messaging
4. Press the MENU key to display the message options menu, and touch Attach to add the attachment. You can send files such as picture files, music files, and video files.
•Slideshow: Touch to open the Edit slideshow screen.
•Pictures: Touch to open the Pictures application. Touch a
picture in the album to attach it to your message.
•Capture picture: Touch to open the Camera application. Take a
picture with the camera. After taking a picture, touch Select this
picture to attach it to your message.
•Videos: Choose a video in the album to attach it to your message
when you touch this option.
•Capture video: Touch to open the Camcorder application. Take
a video with the camera. After taking a video, touch Select this
video to attach it to your message.
•Audio: Touch to open the Tracks menu. Touch an audio file to
select.
•Record audio: Touch to open the sound recorder. After
recording a voice,
touch Use to attach the recording to your
message.
5. If you need to add multiple attachments in the message, press the
MENU key, and then choose Attach > Slideshow > Add slide to
select the desired
file.
3
1
2
4
5
47
Page 53

Messaging
1 Displays the preview of the current slide.
2 Touch to enter the text of the current slide.
3 Touch to switch to the previous or next slide.
Touch to display the preview of the inserted file. Touch
Preview to view the entire MMS; touch Replace picture to
4
replace the picture inserted into the current slide; touch
Remove slide to delete the current slide.
Touch to complete the editing and return to the message
5
sending screen.
6. On the sending screen, you can edit your multimedia message
again by touching Edit and
message by touching Send.
1
you can send your multimedia
2
3
48
1 Touch to view your multimedia message.
2 Touch to edit your multimedia message again.
3 Touch to send your multimedia message.
Page 54

Messaging
Tip: To receive delivery reports and know when a multimedia
message is received, press the
touch Settings. Below the MMS settings section, select the Delivery
reports check box.
MENU key in the message list, and then
Reading and Replying a Message
1. Choose Main Menu > Messaging to display the message list. The
messages in the list are
2. Touch the intended sender to read the message content.
3. You can enter the message content in the Type to compose field,
and then touch send to directly reply
Tip: Touch the Play button at the top of a multimedia message to view
the message, and then you can press theMENU key and touch Next
slide to view next slide.
arranged by sender.
to the sender.
Forwarding or Deleting a Message
1. Choose Main Menu > Messaging to display the message list.
Then, select the messages of a
2. Select one of the messages by using the Trackball and then touch
and hold the selected messag
Forward or Delete message from the displayed
Tip: If you need to delete all messages of a contact, touch and hold the
desired contact in the message list. Then, select Delete thread from
the displayed menu.
sender.
e or the desired message. Select
menu.
Other Operations
Choose Main Menu > Messaging to display the message list. The
messages in the list are
You can press the MENU key to open the option panel and perform
one of the following op
•Touch Compose to create a new message.
•Touch Delete threads to delete all the threads listed in Messaging.
•Touch Common phrase to edit the common phrase.
arranged by sender.
erations:
49
Page 55

Messaging
•Touch Settings to set Messaging.
You also can touch and hold a message thread to open the options
of the current thread:
menu
•Touch View thread to open the current thread to read the
message.
•Touch Add to Contacts to add the phone number to Contacts.
•Touch Delete thread to delete the current thread.
Message Settings
On the messaging screen, press the MENU key and touch Settings.
SMS settings
Delivery reports Select it to receive delivery reports.
50
Manage SIM card
messages
MMS settings
Delivery reports Select it to receive delivery reports.
Read reports Select it to receive read reports.
Auto-retrieve Select it to automatically retrieve messages.
Roaming
auto-retrieve
Notifications settings
Manage the information stored on your SIM
card, delete the information, or copy the
information to your
If you choose not to automatically retrieve a
message, your
message title when you receive a multimedia
message
. You can touch the message and
choose to download the message.
Select it to retrieve messages automatically
while roaming.
phone.
phone displays only the
Page 56

Messaging
Notifications Select it to display message notifications on
Select ringtone Select a message ringtone.
Vibrate Select it to set your phone to vibrate when a
the notification bar.
message is received.
Using Provisioning Message
By using Provisioning message, you can quickly set the network
parameters of your
The server sends a message containing configuration parameters to
the provisioning message box. Open the message. Your
automatically set
Consult your network service provider for details.
phone.
phone then
s the parameters.
The Email application comes with an email wizard that lets you add
external POP3 or IMAP email accounts from popular
service providers such as Yahoo!
phone.
Touch Main Menu, and then touch Email to start the application.
®
Mail Plus, AOL, and more, to your
Adding an Email Account
When using the email function for the first time, you need to configure
your email.
1. Choose Main Menu > Email to access the screen for configuring the email.
2. After you enter certain information such as the email account and the password according to the prompts, touch Next.
Web-based email
51
Page 57

Messaging
3. After checking the email parameters, select either of the POP3
protocol and IMAP protocol for
4. Follow the wizard to set the email box parameters.
5. After completing step 2, you also can touch Manual Setup to
configure the mail server
6. Enter the name for the account and the name you want to be displayed in the outgoing emails and then touch Done.
After creating an email account, you need to press the MENU key, and
then touch Add account to create another email account.
sending and receiving emails.
through another method.
52
Page 58

Messaging
Composing and Sending Email Messages
1. Touch Main Menu, and then touch Email.
2. On the Your accounts screen, touch the email account you want to use.
3. On the Inbox screen, press the MENU key to open the email box options panel, and then touch Compose.
4. Enter the name or email address of the desired recipient in the To field.
5. Enter the subject and content of the email message.
6. Touch Send to send the email message.
Tip: Touch Save as draft or press the Home/Back key to save the
message as a draft.
Receiving and Reading Email Messages
You can receive and read email messages on your phone as follows:
1. To read email messages, touch Email after your email account is defined. Then you can directly log in to your email box and access the Inbox folder. Touch the email title to view the email message.
2. To receive new email messages, press the MENU key and touch
Refresh to receive new email messages after you log in to the
email box. You can also
choose Account settings > Email check
53
Page 59

Messaging
frequency to set the frequency for automatically checking for new
email messages.
3. Select either of the POP3 protocol and the IMAP protocol for your email messages.
Google Mail
Google Mail groups each message you send with all the resplies you
receive. This conversation list continues to grow as new replies arrive.
Therefore, you can always
. Conversations are also referred to as message threads. A new
subject
message or a change
thread.
Note: To use Google Mail, you need a Google Mail account. You can
follow the wizard to log in to Google Mail or register with Google Mail.
Opening Google Mail
Press the Home/Back key, and then touch the Main Menu > Google
Mail. The Inbox conversation list appears. The Inbox view is your
default Google Mail view. All email
are delivered to your Inbox folder.
Creating and Sending Emails
1. In the conversation list, press the MENU key, and then touch Compose.
2. Enter the email subject and compose your message.
view your messages according to the
in the subject of a current message begins a new
s which you retrieve to your phone
54
Page 60

3. Touch Send.
Other Operations
1. In the conversations list, press the MENU key.
2. You can perform your desired operations.
Messaging
Google Talk
Google Talk is an instant messaging program developed by Google. It
lets you communicate with other people that also use
on a phone or on the Web.
the Google Talk
55
Page 61

Messaging
Touch Main Menu, and then touch Google Talk.
Note: The Google Talk account that is created is based on the Google
account that you used when you set up the phone.
Signing In and Chatting Online
1. Touch Main Menu, and then touch Google Talk.
2. In the friends list, press the MENU key and then touch Add friend.
3. Enter the Google Talk instant messaging ID or Google email
address of the friend you want to add.
Viewing and Accepting an Invitation
• In the friends list, press the MENU key and then touch Invites. All chat invitations you have sent or received are listed on the pending invitations screen.
• Touch a pending invitation, and then touch Accept or Decline.
4. Touch Send invitation.
5. After adding a friend, touch the name of a friend in the Friends list.
6. Chat with your friend by entering text through the onscreen keyboard.
7. After entering your message, touch Send.
Managing Your Friends
Friends in your friends list are sorted first by their online status, that is,
active chats, online, busy, and offline, and then sorted alphabetically.
56
Page 62

Messaging
By default, only the friends that you frequently communicate with are in
the Friends list. If you want to display all your friends, press the
key and then touch All friends.
Tip: To display only your most popular friends, press the MENU key
and then touch Most popular.
Blocking a Friend
MENU
•In the friends list, find the friend you want to block.
57
Page 63

Messaging
• Touch and hold the name of the friend, and then touch Block
friend. Your friend is removed from your friends list and is added to
the blocked
Tip: To unblock a friend, in the Friends list, press the MENU key and
then touch Blocked. In the blocked friends list, touch the name of the
friend you want to unblock, and then touch OK when prompted.
Pinning a Friend
• In the Friends list, touch and hold the name of the friend to open
the
key and then touch All friends.
•Touch Pin friend.
Tip: To unpin a friend, in the Friends list, touch and hold the friend you
want to unpin and then select Unpin friend from the options menu.
Showing a Friend in the Most Popular List
• In the Friends list, touch and hold the name of the friend to open
the
•Touch Show friend.
Tip: To prevent a friend from appearing in the most-popular list, touch
and hold the name of the friend, and then touch Hide friend on the
menu. If you have pinned the friend, the pin will be removed when you
hide the friend.
-friends list.
options menu. If you cannot see the friend, press the MENU
options menu.
Adjusting Instant Messaging Settings
Setting the Notification for New Instant Messages
You can configure your phone to play a sound, vibrate, or display a
notification icon
message.
In the Friends list, press the MENU key and then choose More >
Settings.
on the notification bar each time you receive a instant
58
Page 64

Messaging
IM
notifications
Select
ringtone
Vibrate Select the Vibrate check box to e nable you r phone
Signing in automatically
You can sign in to your Google Talk account automatically every time
switch on your phone.
you
• In the Friends list, press the MENU key and then choose More >
Settings.
• Select the Automatically sign in check box.
• Press the Home/Back key to save your settings.
Select the IM notifications check box to receive a
notification
message
Touch to select the ringtone to be used when a
new instant message
briefly plays when selected. If you do not want a
ringtone to play when you receive a new instant
message, select Silent.
to vibrate when you receive a new instant
message.
on the notification bar when a instant
is received.
is received. The ringtone
Signing Out
In the Friends list, press the MENU key and choose More > Sign out
when you want to sign out
of Google Talk.
59
Page 65

Messaging
60
Page 66

Contacts
Contacts enables you to save and manage information such as phone
number and addresses of your contacts. The Contacts application
gives you easy access to the people you want to reach.
Viewing Your Contacts
•Touch Main menu, and then touch Contacts.
• Press the Answer/Call key, and then touch Contacts.
The Contacts tab displays the names of your contacts. Touch a contact
access the contact operation details screen. Touch and hold a
to
contact to open the option
Creating a Contact
To add a contact to your phone:
1. Touch Main Menu, and then touch Contacts. A co ntacts list is displayed.
2. Press the MENU key, and then touch Create contact.
s menu.
61
Page 67

Contacts
3. Touch Create contact.
4. Enter all information you want to store for the contact. Use the Trackball or flick downwards to move among fields.
5. After adding information, touch Save, or press the MENU key, and then touch Save to save the contact.
Tip: Press the Home/Back key to hide the keyboard; touch the text
input area to show the keyboard.
You can store the Google Talk accounts of your friends in Chat service.
Adding Contacts from the SIM Card
You can add the contacts stored on your SIM card to the contacts list
phone.
in your
1. Touch Main Menu, and then touch Contacts. Your contacts list is displayed.
2. Press the MENU key, and then choose More > Settings > Copy
contacts from SIM. Wait for the SIM card contents to
be loaded.
62
Page 68

Contacts
3. Select the contact to be added, and then touch Next.
Editing the Contact Information
You can always make changes to the information you have stored for a
contact.
1. Touch the contact to be modified in the contacts list.
2. Press the MENU key, and then touch Edit contact.
3. Edit the contact information, and then touch Save. To cancel all
changes you made to the contact information,
touch Cancel.
Creating a Group
You can manage your contacts more easily by assigning groups, for
example, you can define to show only your family members in the
contacts list.
1. Touch Main Menu, and then touch Contacts. Your contacts list is displayed.
2. Press the MENU key, and then touc h Create group.
3. Enter the name and picture you want to store for the group.
4. Touch Edit member list to add members on the group list.
5. Select the contacts to be added to the group, and then touch OK.
63
Page 69

Contacts
Searching for a Contact
There are several ways to find a contact when your contacts list is long.
• Browse through your contacts by rolling the Trackball, or by
flicking your finger up and down on the screen. Rapid brush
movements in either direction accelerates
Touch the screen to stop the scrolling.
• Touch the search text box on the Contacts screen to go to the
searching screen.
the screen movement.
64
Page 70

Contacts
• Press the MENU key on the Contacts screen, and then touch
Search to go to the searching screen.
Customizing Your Contacts
You can define your contacts.
Touch Main Menu, and then choose Settings > Contacts settings.
1. Copy contacts fromthe SIM card: Import all your contacts stored
on the SIM card
2. Birthday reminder: Set the birthday remainder for all your contacts stored on the SIM card.
3. Delete all contacts: Delete all your phonebook contacts with just
touch.
one
to your phone.
65
Page 71

Contacts
66
Page 72

Input
Knowing the Keyboard Panel
Your phone supports text input through the virtual keyboard. When
you need to enter text or numbers, your
panel.
Tip:
• T ouch and hold the text inp ut a rea t o op en th e menu to select your
desired input method.
• Press the Home/Back key to hide the keyboard; touch the text
input area to show the keyboard.
Switching the Input Method
Your phone comes with two input methods, that is, TouchPal and
Android keyboard. You can switch between these input methods as
follows:
phone displays the keyboard
67
Page 73

Input
1. On the text input screen, touch and hold the text input area until
the Edit text
2. Select an input method.
menu is displayed. Then, choose Input Method.
68
Page 74

Using the TouchPal Keyboard Panel
If you select TouchPal, the related keyboard panel is automatically
displayed after you touch the input text
Switch between uppercases and lowercases.
Switch between the intelligent (T+) input mode ( )
and normal input mode ( ).
Open the panel for setting the input mode.
Switch to the number input panel.
Touch to insert a space.
area.
Input
Switch the input language. You can select a supported
language by choosing Settings > Local & text >
TouchPal > Select languages.
Add a carriage return.
69
Page 75

Input
Delete a character to the left side of the cursor. Touch
and hold to delete all the characters
the cursor.
on the left side of
Using the Android Keyboard Panel
If you select Android keyboard, the related keyboard panel is
automatically displayed after you touch the input text box.
Switch between uppercases and lowercases.
Switch between the text input mode and
/
symbol/number input mode .
Touch to insert a space.
70
Delete a character on the left of the cursor.
Touch and hold to delete all the characters
the left of the cursor.
Input a smile symbol.
on
Page 76

Switching the Keyboard Layout
Note: You can switch the keyboard layout only when TouchPal is
selected.
Your phone supports three keyboard layouts, that is, Full QWERTY,
12–key Phonepad, and
left and right to switch the
1. When the keyboard panel is on, touch and hold one side of the
, and then flick to the other side.
panel
2. You can switch among the three types of keyboard laylouts.
CooTek T+. You can flick the keyboard area
keyboard.
Input
Note: When you switch the keyboard layout, you need to touch and
hold anywhere on the panel and then
screen. Otherwise, the keyboard layout cannot be switched.
flickthe panel to the edge of the
Inputting Text, Numbers, or Symbols
With the virtual keyboard, you can conveniently enter text, numbers,
and symbols.
Tip: You can rotate your phone counterclockwise to facilitate your
input.
Inputting with T+
T+ is a correctional and intelligent input method. It features accurate
selection, intelligent correction, and predictive input.
Note: Make sure that T+ is enabled on your keyboard.
71
Page 77

Input
1. Touch a character on the keyboard. Then, the selected character is displayed above the keyboard panel.
2. Touch and hold a character on the keyboard. Then, the available character, number, and symbol are displayed above the keyboard panel.
72
With the T+ input method, you can enter words easily and quickly with
the predictive wording scheme.
1. Touch the keys with your desired letters in turn. You do not need to consider the position of the letter on the key. T+ displays predictive words above the keyboard panel according to your selection.
Page 78

2. If your desired word is not displayed, touch the arrows for more options.
Input
3. T+ has a powerful correction engine. Even if all the letters are
mistyped, TouchPal can still predict the right word. (
every letter of
predict “
“test” is mistyped as “rwdy”, TouchPal can still
test.”)
For example, if
Inputting with Normal
You can also use the normal input method to enter your desired letters,
numbers, or symbols.
1. In the Full QWERTY keyboard layout, and touch the keys with your
desired letters to enter the
words.
73
Page 79

Input
Note: For the details about how to switch the keyboard layout, refer to
“Switching the keyboard layout”.
2. You can flick upwards on a key to input an uppercase letter, or flick
wards for a symbol. For example, flick up on j to input a
down
capital J; flick down on j to input a comma (,).
3. In the 12–key Phonepad keyboard layout, touch and hold the key
with your desired
position of your desired
For example, in the Full QWERTY keyboard layout, touch the G
key, and then flick
G.
symbol, number, or letter, and then flick it to the
symbol, number, or letter to enter it.
downwards to enter ? or flick upwards to enter
Inputting Settings
You can define your desired input.
TouchPal Se t tings
To go to the screen for Touch Pal settings, you can perform one of the
following operations:
•Touch Main Menu, and then choose Settings > Locale & text >
TouchPal.
•Touch on the Touch Pal panel.
74
Basic settings
Correct mistyping Touch to enable the intelligent correction
function.
Page 80

Input
Predict next word Touch to enable the display of predictive
Enable prediction Touch to enable intelligent prediction. If you
Select layout Touch to select the keyboard layout.
Enable mixed
languag
e input
Select languages Touch to select the supported languages.
TouchPal It describes the information about the input
words. If you select this option, certain words
that are closely related to the entered word are
displayed above the keyboard panel.
select this option, the predictive words of the
possible combinations
are displayed before a word is completely
spelled.
Touch to enable the input of mixed languages.
Note: If you select more than three
languages in the Select languages option,
this option is unavailable.
method.
to the entered letters
Android Keyboard Settings
To go to the screen for Android keyboard settings, do as follows:
•Touch Main Menu, and then choose Settings > Locale & text >
Android keyboard.
Android keyboard settings
Vibrate on
keypress
Touch to enable keyboard vibration. If you
select this option, your
you touch a key.
phone vibrates when
75
Page 81

Input
Sound on keypress Touch to enable keyboard sound. If you
Auto-capitalization Touch to enable automatic capitalization. If
Word suggestion settings
Quick fixes
Show suggestings Touch to enable spelling suggestion.
Auto-complete Touch to enable the function of automatically
select this option, your
keyboard tone when you touch a key.
you select this option, the initial letter of a
sentence is automatically capitalized.
Touch to enable the quick correction
function.
adding punctuation
phone plays a
s and spaces.
76
Page 82

Getting Connected
Network Connections
GPRS/3G/EDGE
Your phone comes with the GPRS/3G/EDGE (when available)
network settings of
Internet through the services of
Checking the network connection
1. On Main Menu, touch Settings.
2. Touch Wireless Controls, and then touch Mobile network on the menu list.
3. On the Mobile network settings list, touch Network operators or Access Point Names to check the network connection.
Note: Generally, your phone automatically reads the access point of
SIM card. Therefore, do not modify the parameters of the access
the
point; otherwise, you may be unable to access network sources.
Turning on the Data Connection
1. On Main Menu, touch Settings.
2. Touch Wireless Controls, and then touch Mobile network on the
menu list.
3. Select the Data Service check box to turn on the data connection.
For more information, refer to “Phone Service.”
T-Mobile. Thus, you can directly access the
T-Mobile.
77
Page 83

Getting Connected
Wi-Fi
Wi-Fi (WLAN) provides wireless access to a fixed-line, broadband
Internet access. To use Wi-Fi on your phone, you need access to a
wireless access point or “hotspot”.
Note: The availability and range of the Wi-Fi signal depend on the
number, infrastructure, and other objects through which the signal
passes.
Turning on the Wi-Fi
Connecting to a Wireless Network
1. On Main Menu, touch Settings.
2. Touch Wireless Controls, and then select the Wi-Fi check box to turn on the Wi-Fi.
1. After turning on the Wi-Fi, touch Settings on Main Menu.
2. Touch Wi-Fi settings. The names of the detected Wi-Fi networks are displayed in the Wi-Fi networks section.
3. Touch a Wi-Fi network to connect. If you select an open network,
you will be automatically connected to the network. If you select a
network that is secured with WEP, enter the key and then t
Connect.
ouch
78
Note: The next time your phone connects to a previously accessed
secured wireless network
WEP/WPA key again, unless you reset your phone to its default factory
settings.
Tip: On the Wi-Fi settings screen, touch Add Wi-Fi network to add a
new Wi-Fi network.
, you will not be prompted to enter the
web'n'walk
You can directly access the T-Mobile homepage by touching
web’n'walk on the Home screen. You can use w'n'w as the default
homepage.
Page 84

Getting Connected
Browsing the Internet
Your phone comes with a Browser. You can access and browse the
Internet through the
Browser.
1
2
Touch to go to the Web page management view. Then, you
can switch between
1
close a
Web page.
2 Web page view area.
3 Touch to refresh the active Web page.
4 Address bar. Touch to enter the desired website.
1. On Main Menu, touch Browser to open the network browser.
2. Enter the address of a website in the address bar, and then touch Go to visit the website.
3. When browsing a Web page, you can flick the screen left and right
to open the zoom-in and zoom-out
adjust the font size. You can press
options menu and perform one of the following
browser
operations:
Web pages, open a new Web page, or
keys. Touch the desired key to
the MENU key to open the
3
4
79
Page 85

Getting Connected
Tip: When browsing a Web page, you can touch the screen twice to
quickly increase or decrease the text size on the page.
Opening the Browser
On Main Menu, touch Browser. The Browser opens the Google home
page.
Using the Browser
•Touch Go to open the address bar and enter the desired
website.
•Touch BookMarks to open the favorite folder.
•Touch Windows to go to the Web preview screen. You can
switch to another
screen.
•Touch Refresh to refresh the current page.
•Touch Forward to browse the next Web page or send the current
website.
•Touch More to open other menus. Then, you can perform
operations such as searching, text selecting, downloading, and
setting.
Web page or open a new Web page on the
1
3
2
4
80
New/Switch bar. Touch to go to the Web page management
view
1
and show the number of the current page. Then, you can
switch between
2 Address bar. Touch to enter your desired website.
Web pages or open a new Web page.
Page 86

Getting Connected
Control bar. Choose to refresh the current Web page, stop
3
loading, or forward to another
4 Area for browsing web pages.
Web page.
Browsing a Web Page
While viewing a Web page, take advantage of the following zoom and
navigation controls.
Zooming in or out on a Web Page
1 2 3
1 Touch to reset the Web page to its original size.
2 Touch to zoom in on the page.
3 Touch to zoom out of the page.
4 Quick view bar. Touch to quickly browse the page.
Tip: You can also touch the browsing area twice to zoom in on or zoom
out of the page.
4
81
Page 87

Getting Connected
Navigating on a Web Page.
Opening and Viewing multiple Web Pages
magnifying window
1. Touch the quick view bar to open the magnifying window. The Web page zooms out to fit the height of the screen.
2. Touch and hold the magnifying window, and then drag it to the
area of the page that you want to view more closely. You can also
Trackball to move t he ma gnify ing w indo w.
roll the
3. Release your finger or press the Trackball to magnify the view.
1. While viewing a Web page, touch the New/Switch bar, and then enter the new website and touch Go.
2. The website you are currently viewing minimises and the new
website opens. Repeat step
1 to open more Web pages.
82
Page 88

Getting Connected
3. To view all opened Web pages, touch the New/Switch bar, and
touch your desired Web page.
then
4. Press the Home/Back key to return to the previous Web page that you viewed.
Managing Links, History, and Downloads
Navigate the links on a page using the Trackball or your finger. Links
are enclosed in an orange box when highlighted. To open a link, press
Trackball or touch the link with your finger.
the
Links in Web Pages
unlinked
linked
Tip: When links are too small to be directly touched on the screen, you
can use the
twice and then select your desired link on the enlarged page.
Trackball to select your desired link, or touch the page
83
Page 89

Getting Connected
Adding a Bookmark
Opening a Bookmark
Editing a Bookmark
Deleting a Bookmark
Opening a Web Page from your Browsing History
1. While viewing a Web page, press the MENU key and touch Bookmarks. The bookmarks screen is displayed.
2. Touch Add bookmark to add a new bookmark, or press the MENU
and touch Bookmark to save the address of the last-viewed as
key
a bookmark
3. Enter the bookmark name and location (URL) in the dialog box, and then touch OK.
1. In Browser, press the MENU key and touch Bookmarks.
2. Touch the bookmark you want to open. Or touch and hold the
bookmark you want to open,
window from the
1. In Browser, press the MENU key and touch Bookmarks.
2. Touch and hold the bookmark you want to edit.
3. Select Edit bookmark from the options menu. The dialog box for editing the bookmark is displayed.
4. Enter your changes and touch OK.
1. In Browser, press the MENU key and touch Bookmarks.
2. Touch and hold the bookmark you want to delete, and then select
Delete bookmark from the
confirm, touch OK.
.
and then select Open or Open in new
options menu.
options menu. When prompted to
84
1. In Browser, press the MENU key and touch Bookmarks.
2. Touch History.
Viewing your Downloads
To view the applications that you have downloaded, open Browser,
MENU key, and choose More > Downloads. The download
press the
Page 90

Getting Connected
history screen is displayed with the list of downloads. If you have no
downloads, nothing is displayed on this screen.
Adjusting the Browser Settings
On the Browser screen, press the MENU key and choose More >
Settings to set the Browser preferences.
Page content settings
Set text size Touch to open the Text size menu where you
Set text encoding Touch to set text encoding.
Block pop-up
windows
Load images Select this option if you want to load images
Auto-fit pages Select this option if you want to format Web
Enable JavaScript Select this option to enable JavaScript on
Open in
background
can set the text to Tiny, Small, Normal
(default), Large, or Huge. Note that the
selected text size applies only on the text of
Web pages that are viewed using the
Browser.
Select this option if you want the Browser to
block all pop-up windows.
on Web pages. Clear this option for faster
page loading.
pages to fit the phone screen.
Web pages. Some Web pages may not work
properly when JavaScript is disabled.
Select this option if you want to open links in
new pages or in a new window in the
background.
85
Page 91

Getting Connected
Set home page Your current home page is displayed. To
Privacy settings
Clear cache Clear all cached page contents.
Clear history Clear the Browser navigation history.
Accept cookies Select this option if you want the Browser to
Clear all cookie data Clear all the browsed cookies.
Remember form
data
Clear form data Clear all saved form data.
Security settings
Remember
passwords
change your home page, touch this
enter the Web page address of your new
home page, and then touch OK.
If a Web page is not updated properly, you
may try to delete the cache.
To protect your privacy, you can delete the
history before handing your phone to others.
save cookies. Some
properly with cookies being disabled.
Select this option if you want the Browser to
remember the text you have entered in forms
so that you can select the same text
subsequently instead of entering it again.
Select this check box to save user names
and passwords to various websites.
This function is designed for convenience;
however
, it is highly recommended to
disable this function if you log
Web pages for security reasons.
Websites may not work
item,
in to sensitive
86
Page 92

Getting Connected
Clear passwords Clear all saved user names and passwords.
Show security
warnings
Advanced settings
Enable Gears Select this option to enable Gears. Gears is
Gears settings Touch to open the Gears Settings screen.
Reset to default Touch to clear all Browser data and reset all
Select this option if you want a warning to be
displayed when you are accessing an
unsecured website.
an open source project that extends the
functionality of the Browser.
Browser settings to default factory settings,
except your home page.
Using Bluetooth
Your phone supports the wireless connection through Bluetooth. You
can establish wireless connections between your
compatible devices to realize data transfer. The wireless connections
can be established between your
located at a maximum of 10 meters away. The connections through
Bluetooth may be interfered by obstacles such as a wall or other
electronic devices.
Your phone supports the following Bluetooth profiles:
• Hands Free Profile (HFP): allows you to use a hands-free Bluetooth
device.
• Headset Profile (HSP): allows you to use a mono Bluetooth
headset.
• Object Push Profile (OPP): allows you to transfer files through
Bluetooth.
• Advanced Audio Distribution Profile (A2DP): allows you to use a
stereo Bluetooth headset.
phone and the devices that are
phone and other
87
Page 93

Getting Connected
• A/V Remote Control Profile (AVRCP): allows you to remotely
Your phone supports the following Bluetooth status:
control playing through the Bluetooth headset.
• Hidden: Indicates that the Bluetooth function is enabled. In this
state, your
cannot be found by other Bluetooth devices.
•Discoverable for 120 seconds: Indicates that the Bluetooth
fun ctio n is en able d. In this s tate , your
Bluetooth devices and can be found by other Bluetooth devices.
• Alaways discoverable: Indicates that the Bluetooth function is
enabled.
phone can search for other Bluetooth devices but
phone can search for other
Turning o n Bluetooth and make the phone discoverable
1. On Main Menu, touch Settings.
2. Touch Wireless controls, and then select the Bluetooth check box to turn on Bluetooth. When on, the Bluetooth icon appears in the notifications bar.
3. Bluetooth visibility is on by default. Touch Bluetooth settings, and then select the Discoverable check box to make the phone visible to other Bluetooth devices.
Pairing and Connecting a Bluetooth Device
Before using your phone as a Bluetooth device, you need to pair your
phone with the target device as follows:
1. Make sure that the Bluetooth function on your phone is enabled.
2. Touch Bluetooth settings on the wireless control screen. Your phone starts to scan for Bluetooth devices within range.
3. Touch the desired device to be paired with.
4. Enter the password to complete the pairing.
Sending files via Bluetooth
With Bluetooth, you can share pictures, videos, or music files with your
family and friends. To send files via Bluetooth, do as follows:
1. On Main Menu, touch File Manager to op en file manage r.
88
Page 94

Getting Connected
2. Touch and hold the file to be sent. The active options menu is displayed.
3. Touch Share, and then touch Bluetooth to select the paired device from the detected Bluetooth devices.
Using the Phone as a Modem
Note: You need to install the DialUp.exe file from CD-ROM, before you
can use your phone as a modem.
the Install DialUp button and follow the instructions to install it on your
PC. It is recommened that you should intall the PC suite.
1. Make sure your phone’s data connection is turned on.
2. Connect the phone to the computer using the provided USB cable.
3. Run the DialUp.exe file on your PC. For more information, refer to the Help of the PC suite.
Note: When using the phone as a modem, the USB mass storage
feature and PC suite synchronization are disabled.
Insert the CD-ROM, and then select
89
Page 95

Getting Connected
90
Page 96

Entertainment
You can use the phone to listen to music, take photos, and play games.
Music
Opening the Music Player
Touch Main Menu, then touch Music to open the music player and
display the media library.
The player automatically starts to search for the musics in your phone
and on the MicroSD card. After the searching is complete, you can
view all available music files in the music library.
Tip: When your phone plays music in the background, you can open
the notification
playing screen.
panel and touch the music file to go to the music
91
Page 97

Entertainment
Using the Player
The music player works in album view mode or disc view mode. You
can select either mode to play music.
On the playback screen, press the MENU key to display the options
menu for the following options:
92
•Touch Browse to view the media library.
•Touch Send to send the audio file via MMS, Bluetooth, or Email.
•Touch Mobile Jukebox to open the T-Mobile Music website.
•Touch Add to playlist to add the song to your playlist.
•Touch Toggle favorite to add the song to your favorites.
Page 98

Entertainment
•Touch More, and you can view the file information, del ete the
song, or use the song as ringtone.
Tip: You can set the pictures in JPG or PNG format as album covers on
your PC.
Using the album view mode
1
2
Touch to switch between the repeat modes: repeat all songs,
1
repeat current song, and don’t repeat.
2 Shows the album cover art.
3 Touch to turn shuffle on and off.
4 Touch to adjust the volume.
Touch the corresponding icons to pause or play the previous
5
or next song.
6 Drag to jump to any part of the song.
3
4
5
6
93
Page 99

Entertainment
Using the disc view mode
1
3
4
2
Touch to cycle through the repeat modes: repeat all songs,
1
repeat current song, and don’t repeat.
5
6
2 Touch to switch to the album view mode.
3 Touch to turn shuffle on and off.
4 Touch to adjust the volume.
Shows the virtual disc. You can touch the disk image to pause
or resume playing.
5
You can flick your finger downwards on the disk image to
pause the music playing.
6 Drag to jump to any part of the song.
94
Page 100

Entertainment
Tip:
In media library, you can rotate the phone counterclockwise to go to
the album cover preview mode.
Viewing the Track Information
You can view the tack information when the music is playing. In album
view mode or disc view mode, press the MENU key and then choose
More > View file info to access the track information view.
You can view the track name, artist, album, track number, and album
art in the track information view.
Using the Media Library
The music stored in your phone is classified into the following
categories: Artists, Albums,
desired category to display the list of music files falling into this
category.
You can perform the following operations in the library view:
• Touch the desired music file for playing.
• In the Artists category, touch an artist and flick from right to left
without releasing to play all the songs of the artist.
• In the Album category, touch an album and flick from left to right
without releasing to play all the songs of the album.
Tracks, and Playlists. You can touch the
Creating a Playlist
1. Touch a category on the music library screen.
95
 Loading...