

Page 1

Scalable File Service
User Guide
Issue 06
Date 2019-05-30
HUAWEI TECHNOLOGIES CO., LTD.
Page 2

Copyright © Huawei Technologies Co., Ltd. 2021. All rights reserved.
No part of this document may be reproduced or transmitted in any form or by any means without prior
written consent of Huawei Technologies Co., Ltd.
Trademarks and Permissions
and other Huawei trademarks are trademarks of Huawei Technologies Co., Ltd.
All other trademarks and trade names mentioned in this document are the property of their respective
holders.
Notice
The purchased products, services and features are stipulated by the contract made between Huawei and
the customer. All or part of the products, services and features described in this document may not be
within the purchase scope or the usage scope. Unless otherwise specied in the contract, all statements,
information, and recommendations in this document are provided "AS IS" without warranties, guarantees
or representations of any kind, either express or implied.
The information in this document is subject to change without notice. Every eort has been made in the
preparation of this document to ensure accuracy of the contents, but all statements, information, and
recommendations in this document do not constitute a warranty of any kind, express or implied.
Issue 06 (2019-05-30) Copyright © Huawei Technologies Co., Ltd. i
Page 3

Scalable File Service
User Guide Contents
Contents
1 Permissions Management..................................................................................................... 1
1.1 Creating a User and Granting SFS Permissions............................................................................................................ 1
1.2 Creating a Custom Policy..................................................................................................................................................... 2
2 File System Management...................................................................................................... 5
3 Network Conguration.......................................................................................................... 8
3.1
Conguring VPCs..................................................................................................................................................................... 8
3.2 Conguring DNS................................................................................................................................................................... 12
4 File System Resizing............................................................................................................. 16
5 Quotas......................................................................................................................................19
6 Backup......................................................................................................................................21
7 Monitoring.............................................................................................................................. 23
7.1 SFS Metrics.............................................................................................................................................................................. 23
7.2 SFS Turbo Metrics................................................................................................................................................................. 24
8 Typical Applications..............................................................................................................27
8.1 HPC............................................................................................................................................................................................ 27
8.2 Media Processing.................................................................................................................................................................. 29
8.3 Enterprise Website/App Background............................................................................................................................. 30
8.4 Log Printing.............................................................................................................................................................................31
9 Other Operations.................................................................................................................. 33
9.1 Testing SFS Turbo Performance....................................................................................................................................... 33
9.2 Mounting a File System to an ECS Running Linux as a Non-root User.............................................................38
9.3 Data Migration...................................................................................................................................................................... 40
9.3.1 Migrating Data Using Direct Connect........................................................................................................................ 40
9.3.2 Migrating Data Using the Internet..............................................................................................................................41
A Change History...................................................................................................................... 45
Issue 06 (2019-05-30) Copyright © Huawei Technologies Co., Ltd. ii
Page 4

Scalable File Service
User Guide 1 Permissions Management
1 Permissions Management
1.1 Creating a User and Granting SFS Permissions
This chapter describes how to use IAM to implement ne-grained permissions
control for your SFS resources. With IAM, you can:
Prerequisites
Restrictions
● Create IAM users for employees based on your enterprise's organizational
structure. Each IAM user will have their own security credentials for accessing
SFS resources.
● Grant only the permissions required for users to perform a
If your account does not require individual IAM users, skip this section.
This section describes the procedure for granting permissions (see Figure 1-1).
Learn about the permissions (see
by SFS and choose policies or roles according to your requirements.
● All system-dened policies and custom policies are supported in SFS CapacityOriented
● Only system-dened policies are supported in SFS Turbo le systems and
custom policies are not supported.
le systems.
System-dened roles and policies) supported
specic task.
Issue 06 (2019-05-30) Copyright © Huawei Technologies Co., Ltd. 1
Page 5
Scalable File Service
User Guide 1 Permissions Management
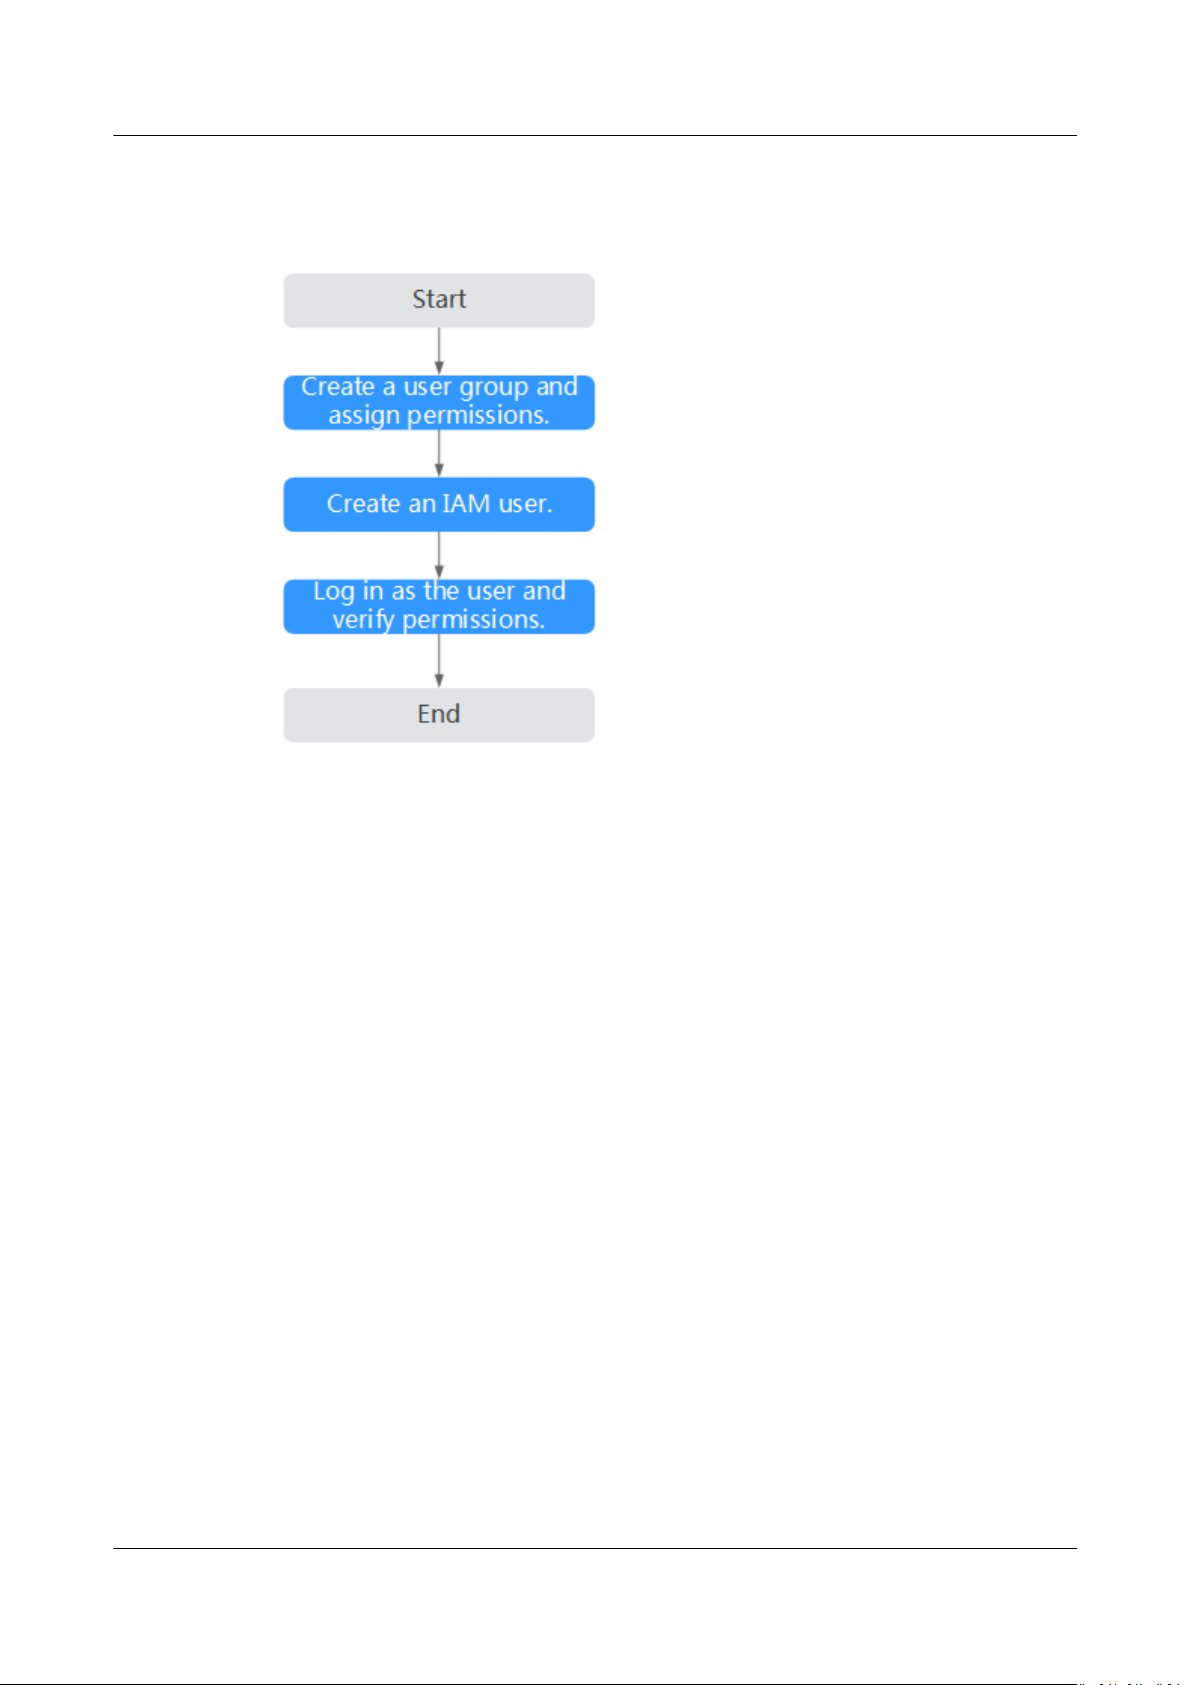
Process Flow
Figure 1-1 Process for granting SFS permissions
1. Create a user group and assign permissions to it.
Create a user group on the IAM console, and attach the SFS ReadOnlyAccess
or SFS Turbo ReadOnlyAccess policy to the group.
2. Create a user and add it to a user group.
Create a user on the IAM console and add the user to the group created in 1.
3. Log in and verify permissions.
Log in to SFS Console using the created user, and verify that the user only has
read permissions for SFS.
– Choose Scalable File Service. Click Create File System on SFS Console. If
a message appears indicating that you have
perform the operation, the SFS ReadOnlyAccess or SFS Turbo
ReadOnlyAccess policy has already taken
– Choose any other service. If a message appears indicating that you have
insucient permissions to access the service, the SFS ReadOnlyAccess or
SFS Turbo ReadOnlyAccess policy has already taken
1.2 Creating a Custom Policy
Custom policies can be created to supplement the system-dened policies of SFS.
For the actions supported for custom policies, see Permissions Policies and
Supported Actions.
insucient permissions to
eect.
eect.
You can create custom policies in either of the following two ways:
● Visual editor: Select cloud services, actions, resources, and request conditions.
This does not require knowledge of policy syntax.
Issue 06 (2019-05-30) Copyright © Huawei Technologies Co., Ltd. 2
Page 6

Scalable File Service
User Guide 1 Permissions Management
● JSON: Edit JSON policies from scratch or based on an existing policy.
For details, see Creating a Custom Policy. This section provides examples of
common custom SFS policies.
Restrictions
A custom policy applies only to SFS Capacity-Oriented le systems, not SFS Turbo
le systems.
Example Custom Policies
● Example 1: Allowing users to create le systems
{
"Version": "1.1",
"Statement": [
{
"Action": [
"sfs:shares:createShare"
],
}
]
}
● Example 2: Denying le system deletion
A policy with only "Deny" permissions must be used in conjunction with other
policies to take eect. If the permissions assigned to a user contain both
"Allow" and "Deny", the "Deny" permissions take precedence over the "Allow"
permissions.
The following method can be used if you need to assign permissions of the
SFS FullAccess policy to a user but also forbid the user from deleting
systems. Create a custom policy for denying le system deletion, and attach
both policies to the group to which the user belongs. Then, the user can
perform all operations on SFS except deleting
example of a deny policy:
{
"Version": "1.1",
"Statement": [
{
"Action": [
"sfs:shares:deleteShare"
]
}
]
}
● Example 3:
A custom policy can contain actions of multiple services that are all of the
global or project-level type. The following is an example policy containing
actions of multiple services:
{
"Version": "1.1",
"Statement": [
{
"Action": [
"sfs:shares:createShare",
"sfs:shares:deleteShare",
"sfs:shares:updateShare"
"Eect": "Allow"
le
le systems. The following is an
"Eect": "Deny",
Dening permissions for multiple services in a policy
"Eect": "Allow",
Issue 06 (2019-05-30) Copyright © Huawei Technologies Co., Ltd. 3
Page 7

Scalable File Service
User Guide 1 Permissions Management
]
},
{
"Eect": "Allow",
"Action": [
"ecs:servers:delete"
]
}
]
}
Issue 06 (2019-05-30) Copyright © Huawei Technologies Co., Ltd. 4
Page 8
Scalable File Service
User Guide 2 File System Management
2 File System Management
Viewing a File System
Procedure
Step 1 Log in to SFS Console.
Step 2 In the
You can search for
and view their basic information.
le system list, view the le systems you have created. Table 2-1 describes
the parameters of each le system.
Table 2-1 Parameter description
Parameter
Name Name of the le system, for example, sfs-name-001
AZ Availability zone where the le system is located
Status Possible values are Available, Unavailable, Frozen,
Type File system type.
Protocol Type The NFS protocol is supported.
le systems by le system name keyword or le system status,
Description
Creating, Deleting.
Used Capacity
(GB)
Maximum
Capacity (GB)
Mount Address File system mount point. The format is
Issue 06 (2019-05-30) Copyright © Huawei Technologies Co., Ltd. 5
Used space of the le system for storing data
NOTE
This information is refreshed every 15 minutes.
Maximum capacity of the le system
File system domain
name:/path
NOTE
If the mount point is too long to display completely, you can adjust
the column width.
or
File system IP address
:/.
Page 9
NO TE
Scalable File Service
User Guide 2 File System Management
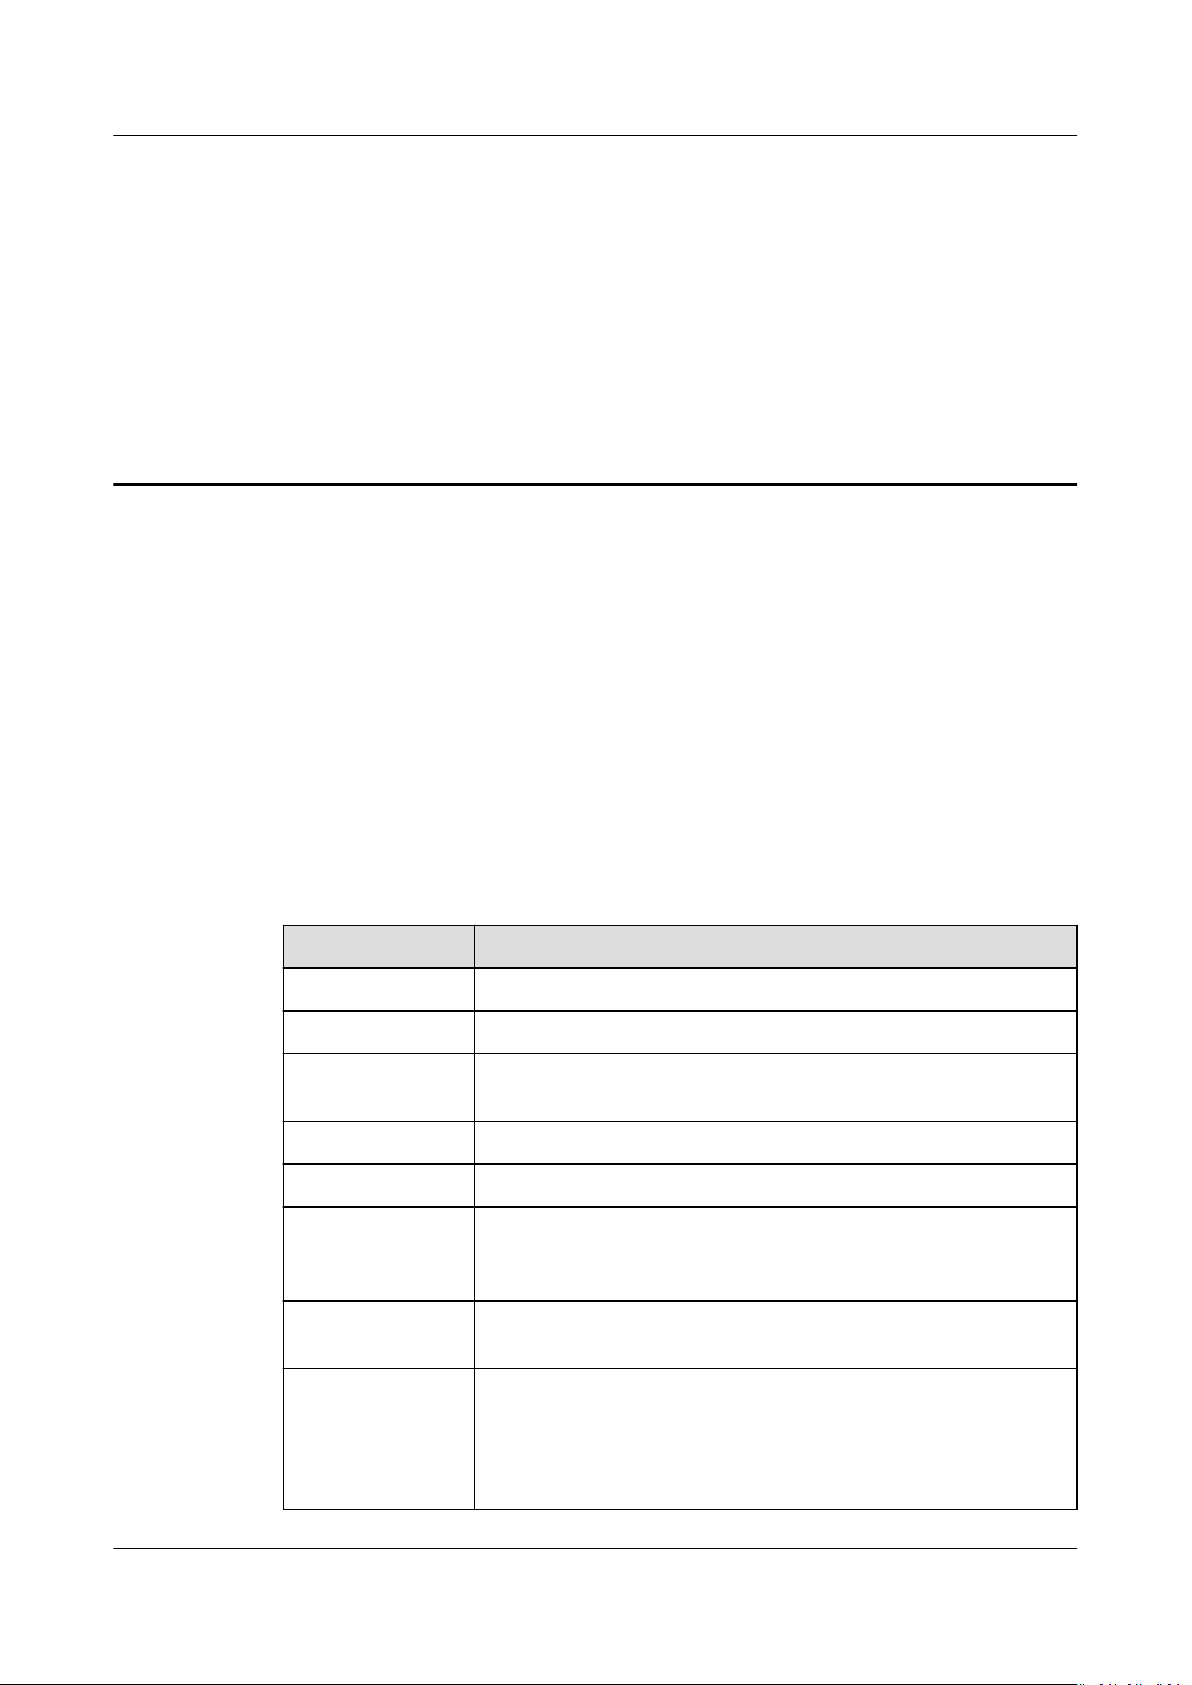
Parameter Description
Operation For an SFS Capacity-Oriented le system, operations include
resizing, deletion, and monitoring indicator viewing.
For an SFS Turbo le system, operations include capacity
expansion, deletion, and monitoring indicator viewing.
Step 3 (Optional) Search for
system status.
----End
Deleting a File System
After a le system is deleted, data in it cannot be restored. To prevent data loss,
before deleting a le system, ensure that les in it have been backed up.
Prerequisites
You have unmounted the
unmount the le system, see Unmounting a File System.
Procedure
Step 1 Log in to SFS Console.
Step 2 In the
If you want to delete more than one le system at a time, select the le systems,
and then click Delete in the upper left part of the
box that is displayed, conrm the information, enter Delete in the text box, and
then click Yes. The batch deletion function can be used to delete SFS
only.
le system list, click Delete in the row of the le system you want to delete.
le systems by le system name keyword, key ID, or le
le system to be deleted. For details about how to
le system list. In the dialog
le systems
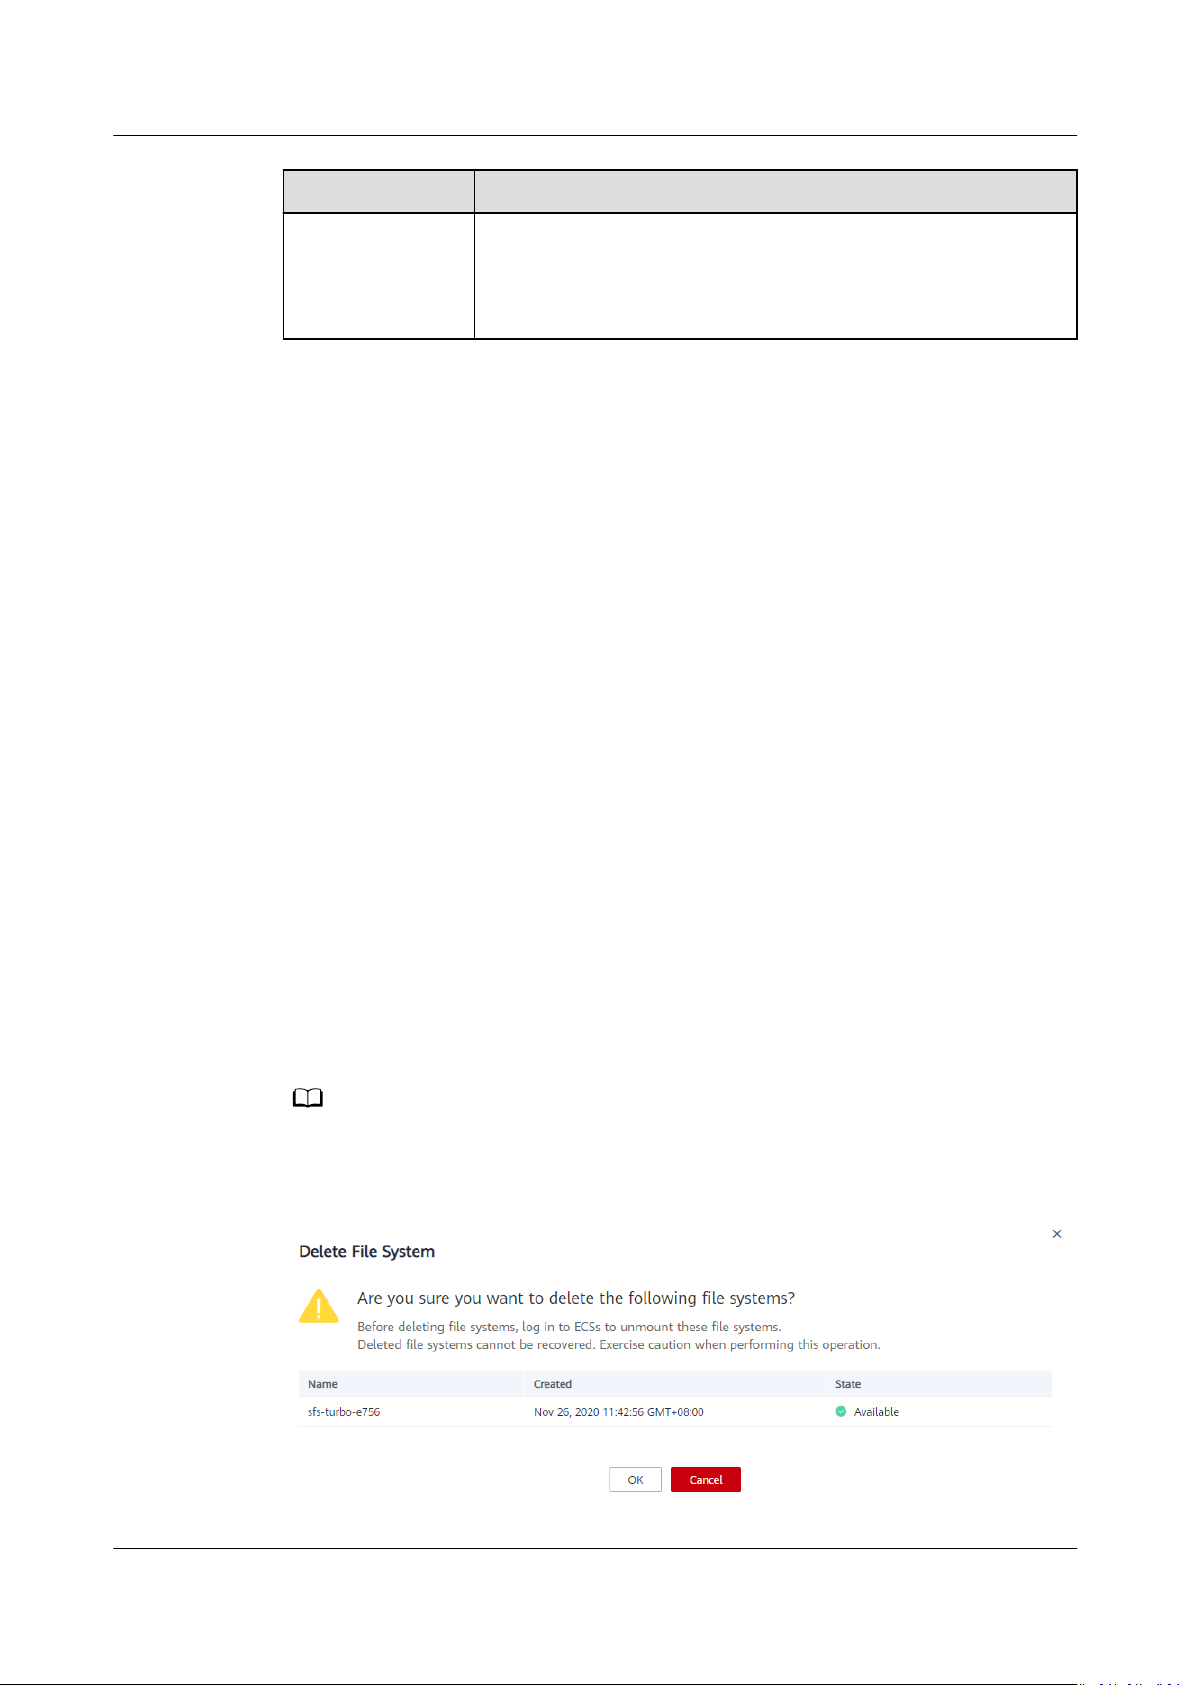
Step 3 In the displayed dialog box, as shown in Figure 2-1,
enter Delete in the text box, and then click Yes.
Only Available and Unavailable le systems can be deleted.
Figure 2-1 Deleting a le system
Issue 06 (2019-05-30) Copyright © Huawei Technologies Co., Ltd. 6
conrm the information,
Page 10

Scalable File Service
User Guide 2 File System Management
Step 4 Check the le system list to conrm that the le system is deleted successfully.
----End
Issue 06 (2019-05-30) Copyright © Huawei Technologies Co., Ltd. 7
Page 11

Scalable File Service
User Guide 3 Network Conguration
3 Network Conguration
3.1 Conguring VPCs
VPC provisions an isolated virtual network environment dened and managed by
yourself, improving the security of cloud resources and simplifying network
deployment. When using SFS, a
belong to the same VPC for le sharing.
le system and the associated ECSs need to
Scenarios
Restrictions
In addition, VPC can use network access control lists (ACLs) to implement access
control. A network ACL is an access control policy system for one or more subnets.
Based on inbound and outbound rules, it determines whether data packets are
allowed in or out of any associated subnet. In the VPC list of a
time an authorization address is added and the corresponding permissions are set,
a network ACL is created.
For more information about VPC, see the Virtual Private Cloud.
Multiple VPCs can be
ECSs belonging to
VPCs that the ECSs belong to are added to the VPC list of the le system or the
ECSs are added to the authorized addresses of the VPCs.
● You can add a maximum of 20 VPCs for each
ACL rules for added VPCs can be created. When adding a VPC, the default IP
address 0.0.0.0/0 is automatically added.
● If a VPC bound to the
IP address/address segment of this VPC in the VPC list of the le system can
still be seen as activated. However, this VPC cannot be used any longer and
you are advised to delete the VPC from the list.
● SFS Turbo
le systems do not support multiple VPCs at the moment.
congured for an SFS Capacity-Oriented le system so that
dierent VPCs can share the same le system, as long as the
le system. A maximum of 400
le system has been deleted from the VPC console, the
le system, each
Issue 06 (2019-05-30) Copyright © Huawei Technologies Co., Ltd. 8
Page 12
Scalable File Service
User Guide 3 Network Conguration
Procedure
Step 1 Log in to SFS Console.
Step 2 In the
displayed, locate the Authorizations area.
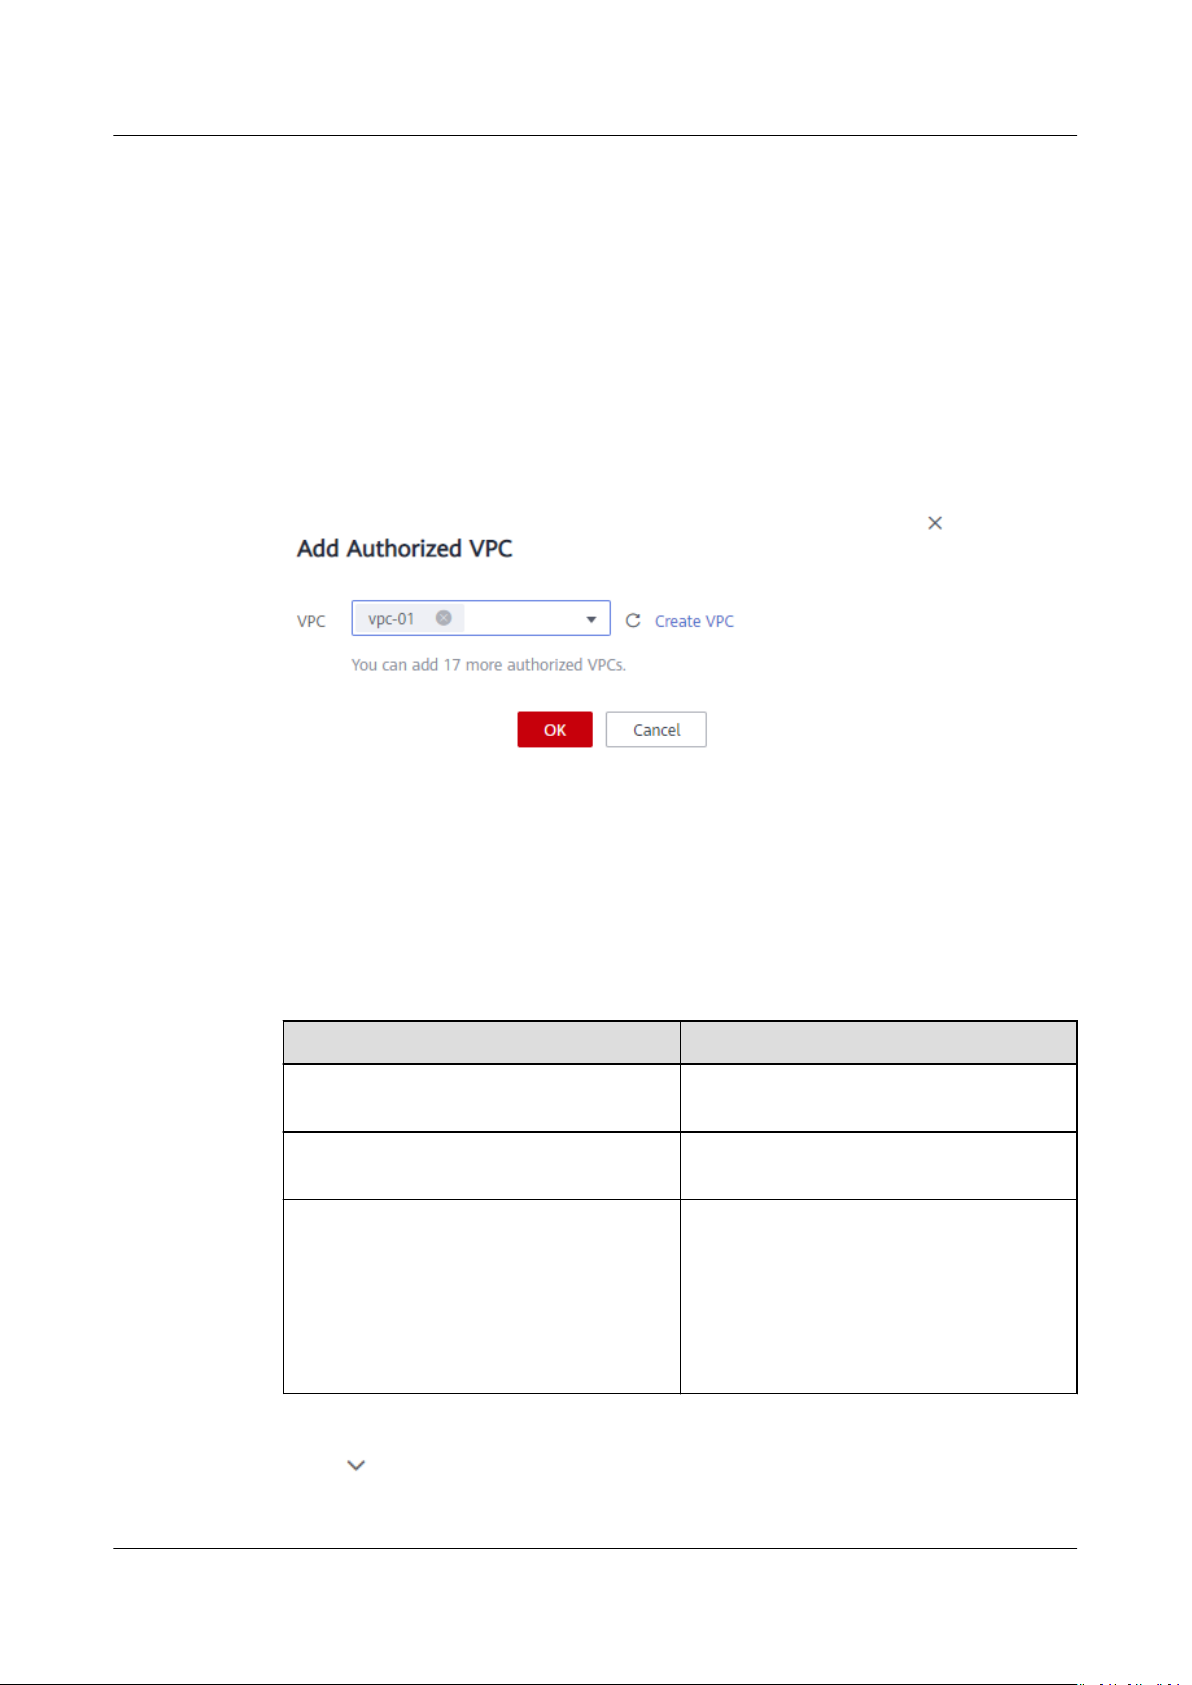
Step 3 If no VPCs are available, apply for one. You can add multiple VPCs for a
system. Click Add Authorized VPC and the Add Authorized VPC dialog box is
displayed. See Figure 3-1.
You can select multiple VPCs from the drop-down list.
Figure 3-1 Adding VPCs
Step 4 Click OK. A successfully added VPC is displayed in the list. When adding a VPC, the
default IP address 0.0.0.0/0 is automatically added. The default read/write
permission is Read-write, the default user permission is no_all_squash, and the
default root permission is no_root_squash.
le system list, click the name of the target le system. On the page that is
le
Step 5 View the VPC information in the VPC list. For details about the parameters, see
Table 3-1.
Table 3-1 Parameter description
Parameter
Name Name of the added VPC, for example,
Authorized Addresses/Segments Number of added IP addresses or IP
Operation The value can be Add or Delete. Add:
Step 6 Click on the left of the VPC name to view details about the IP addresses/
segments added to this VPC. You can add, edit, or delete IP addresses/segments. In
Description
vpc-01
address segments
Adds an authorized VPC. This
operation congures the IP address,
read/write permission, user permission,
user root permission, and priority. For
details, see Table 3-2. Delete: Deletes
this VPC.
Issue 06 (2019-05-30) Copyright © Huawei Technologies Co., Ltd. 9
Page 13
Scalable File Service
User Guide 3 Network Conguration
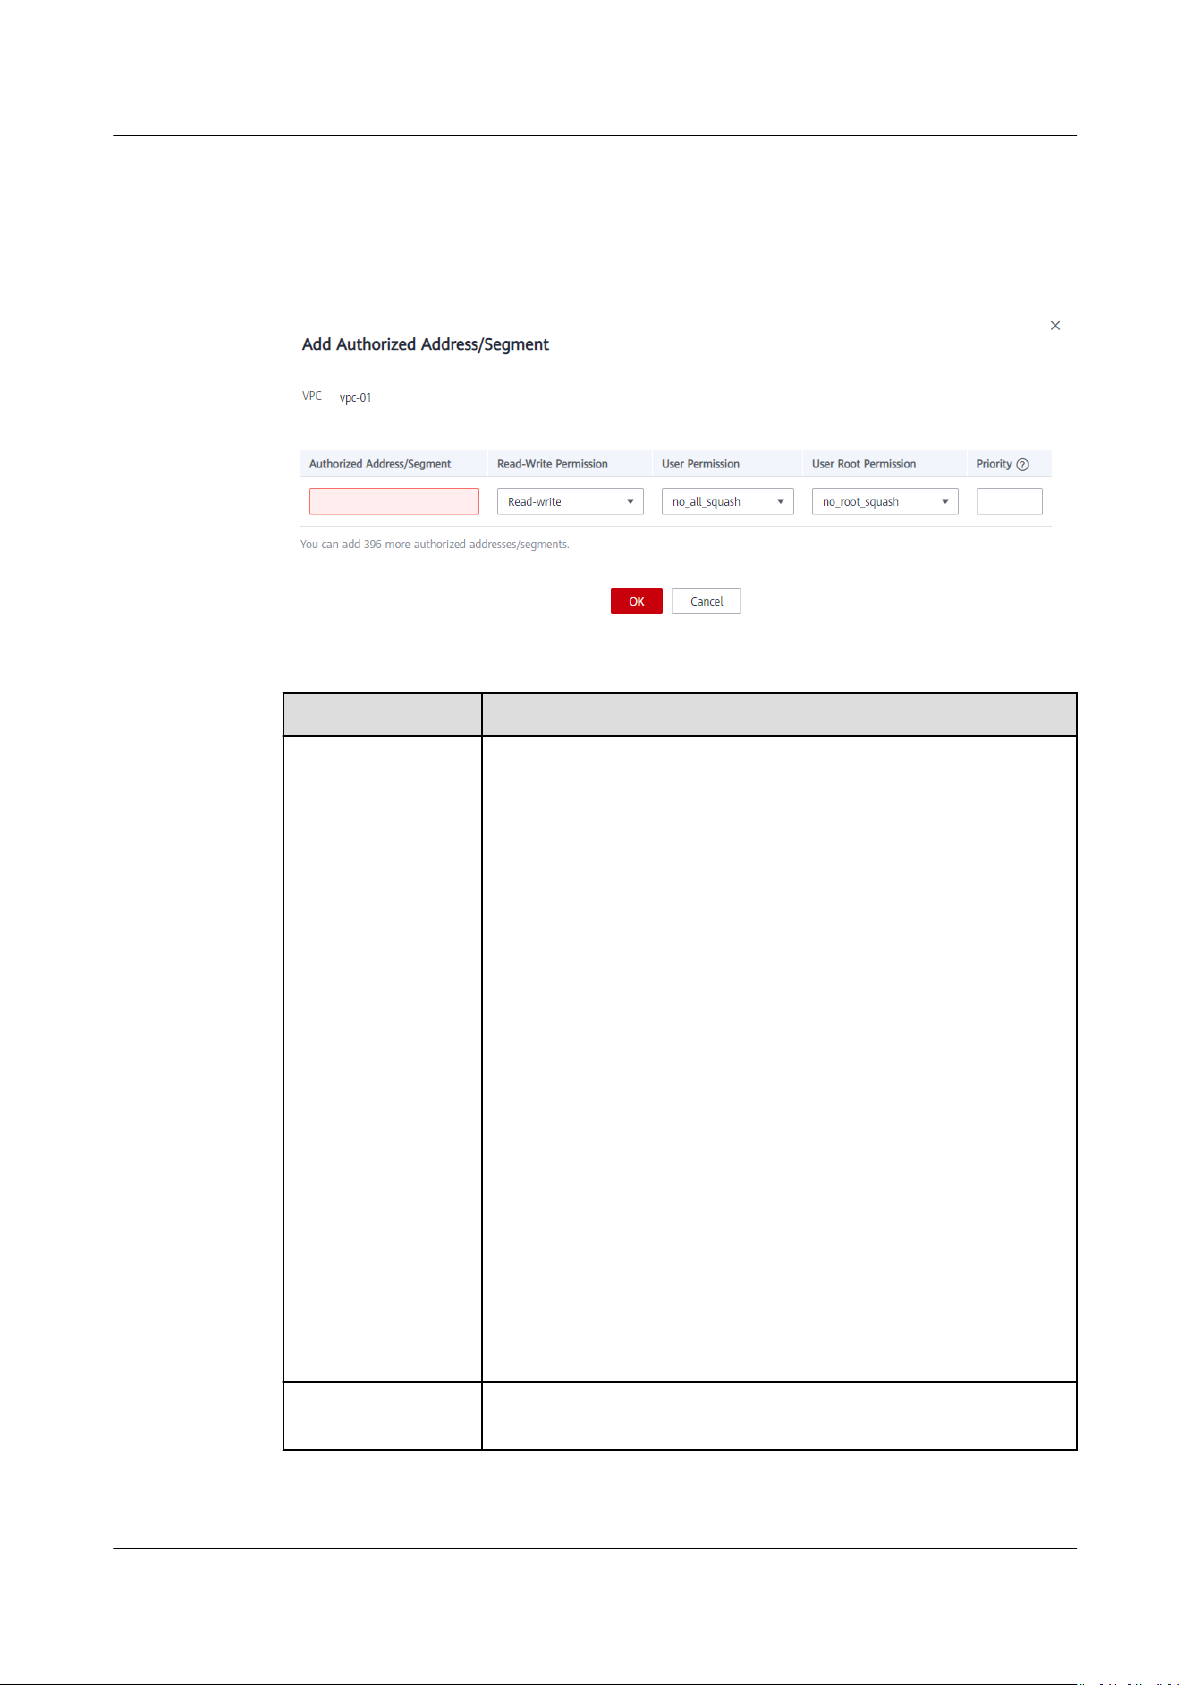
the Operation column of the target VPC, click Add. The Add Authorized
Address/Segment dialog box is displayed. See Figure 3-2. Table 3-2 describes the
parameters to be congured.
Figure 3-2 Adding an authorized address or segment
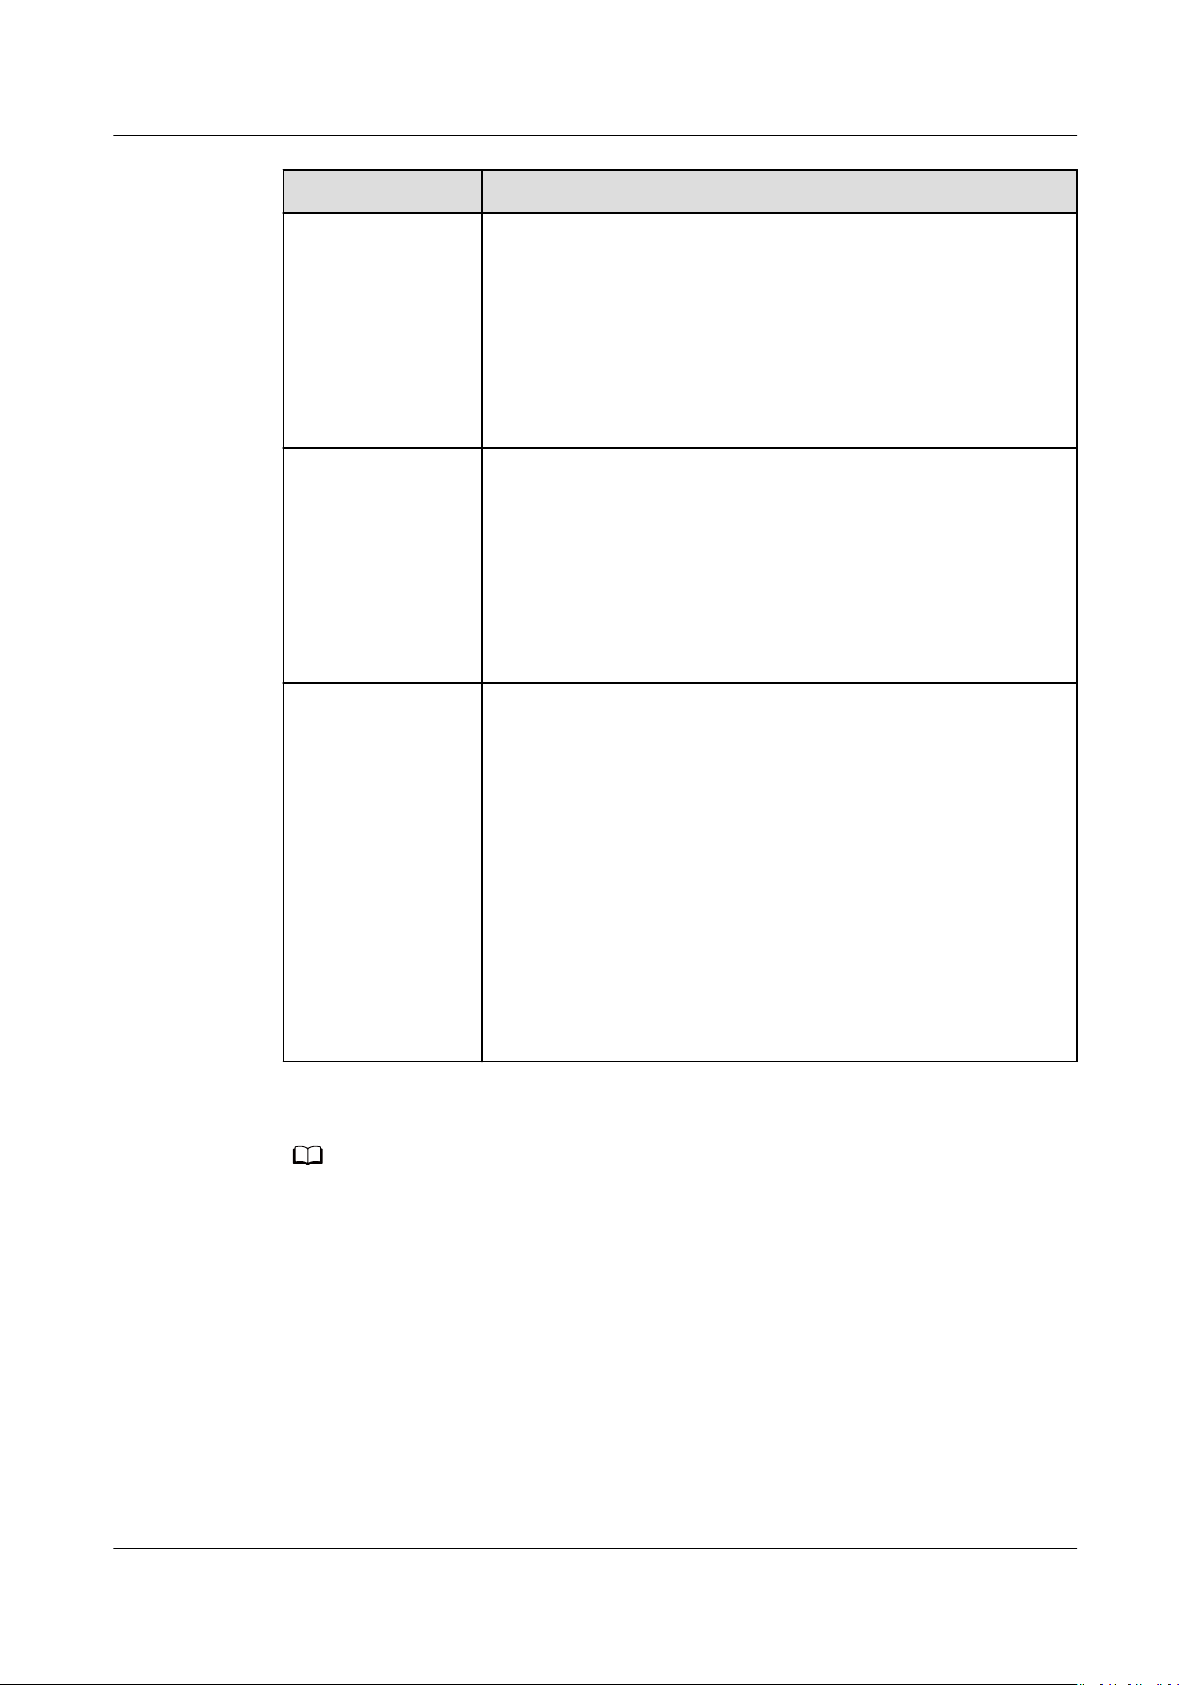
Table 3-2 Parameter description
Parameter Description
Authorized
Address/Segment
● Only one IPv4 address or address segment can be
entered.
● The entered IPv4 address or address segment must be
valid and cannot be an IP address or address segment
starting with 0 except 0.0.0.0/0. The value 0.0.0.0/0
indicates any IP address in the VPC. In addition, the IP
address or address segment cannot start with 127 or any
number from 224 to 255, such as 127.0.0.1, 224.0.0.1, or
255.255.255.255. This is because IP addresses or address
segments starting with any number from 224 to 239 are
class D addresses and they are reserved for multicast. IP
addresses or address segments starting with any number
from 240 to 255 are class E addresses and they are
reserved for research purposes. If an invalid IP address or
address segment is used, the access rule may fail to be
added or the added access rule cannot take
● Multiple addresses separated by commas (,), such as
10.0.1.32,10.5.5.10 are not allowed.
● An address segment, for example, 192.168.1.0 to
192.168.1.255, needs to be in the mask format like
192.168.1.0/24. Other formats such as 192.168.1.0-255
are not allowed. The number of bits in a subnet mask
must be an integer ranging from 0 to 31. The number of
bits 0 is valid only in 0.0.0.0/0.
eect.
Read-Write
Permission
Issue 06 (2019-05-30) Copyright © Huawei Technologies Co., Ltd. 10
The value can be Read-write or Read-only. The default
value is Read-write.
Page 14
NO TE
Scalable File Service
User Guide 3 Network Conguration
Parameter Description
User Permission Species whether to retain the user identier (UID) and
group identier (GID) of the shared directory. The default
value is no_all_squash.
● all_squash: The UID and GID of a shared directory are
mapped to user nobody, which is applicable to public
directories.
● no_all_squash: The UID and GID of a shared directory
are retained.
User Root
Permission
Species whether to allow the root permission of the client.
The default value is no_root_squash.
● root_squash: Clients cannot access as the root user.
When a client accesses as the root user, the user is
mapped to the nobody user.
● no_root_squash: Clients are allowed to access as the
root user who has full control and access permissions of
the root directories.
Priority The value must be an integer ranging from 0 to 100. 0
indicates the highest priority, and 100 indicates the lowest
priority. In the same VPC, the permission of the IP address
or address segment with the highest priority is
preferentially used. If some IP addresses or address
segments are of the same priority, the permission of the
most recently added or
modied one prevails.
For example, if the IP address for mounting is 10.1.1.32 and
both 10.1.1.32 (read/write) with priority 100 and
10.1.1.0/24 (read-only) with priority 50 meet the
requirements, the permission of 10.1.1.0/24 (read-only)
with priority 50 prevails. That is, if there is no other
authorized priority, the permission of all IP addresses in the
10.1.1.0/24 segment, including 10.1.1.32, is read-only.
For an ECS in VPC A, its IP address can be added to the authorized IP address list of VPC B,
but the le system of VPC B cannot be mounted to this ECS. The VPC used by the ECS and
the le system must be the same one.
----End
Verication
After another VPC is congured for the le system, if the le system can be
mounted to ECSs in the VPC and the ECSs can access the
conguration is successful.
Issue 06 (2019-05-30) Copyright © Huawei Technologies Co., Ltd. 11
le system, the
Page 15
Scalable File Service
User Guide 3 Network Conguration
Example
A user creates an SFS Capacity-Oriented le system A in VPC-B. The network
segment is 10.0.0.0/16. The user has an ECS D in VPC-C, using the private IP
address 192.168.10.11 in network segment 192.168.10.0/24. If the user wants to
mount le system A to ECS D and allow the le system to be read and written, the
user needs to add VPC-C to
or address segment to the authorized addresses of VPC-C, and then set Read-
Write Permission to Read-write.
The user purchases an ECS F that uses the private IP address 192.168.10.22 in the
VPC-C network segment 192.168.10.0/24. If the user wants ECS F to have only the
read permission for
D, the user needs to add ECS F's private IP address to VPC-C's authorized
addresses, set Read-Write Permission to Read-only, and set Priority to an
integer between 0 and 100 and greater than the priority set for ECS D.
le system A and its read priority to be lower than that of ECS
le system A's VPC list, add ECS D's private IP address
3.2 Conguring DNS
A DNS server is used to resolve domain names of le systems. For details about
DNS server IP addresses, see What Are the Private DNS Server Addresses
Provided by the DNS Service?
Scenarios
By default, the IP address of the DNS server used to resolve domain names of
systems is automatically congured on ECSs when creating ECSs. No manual
conguration is needed except when the resolution fails due to a change in the
DNS server IP address.
Windows Server 2012 is used as an example in the operation procedures for
Windows.
Procedure (Linux)
Step 1 Log in to the ECS as user root.
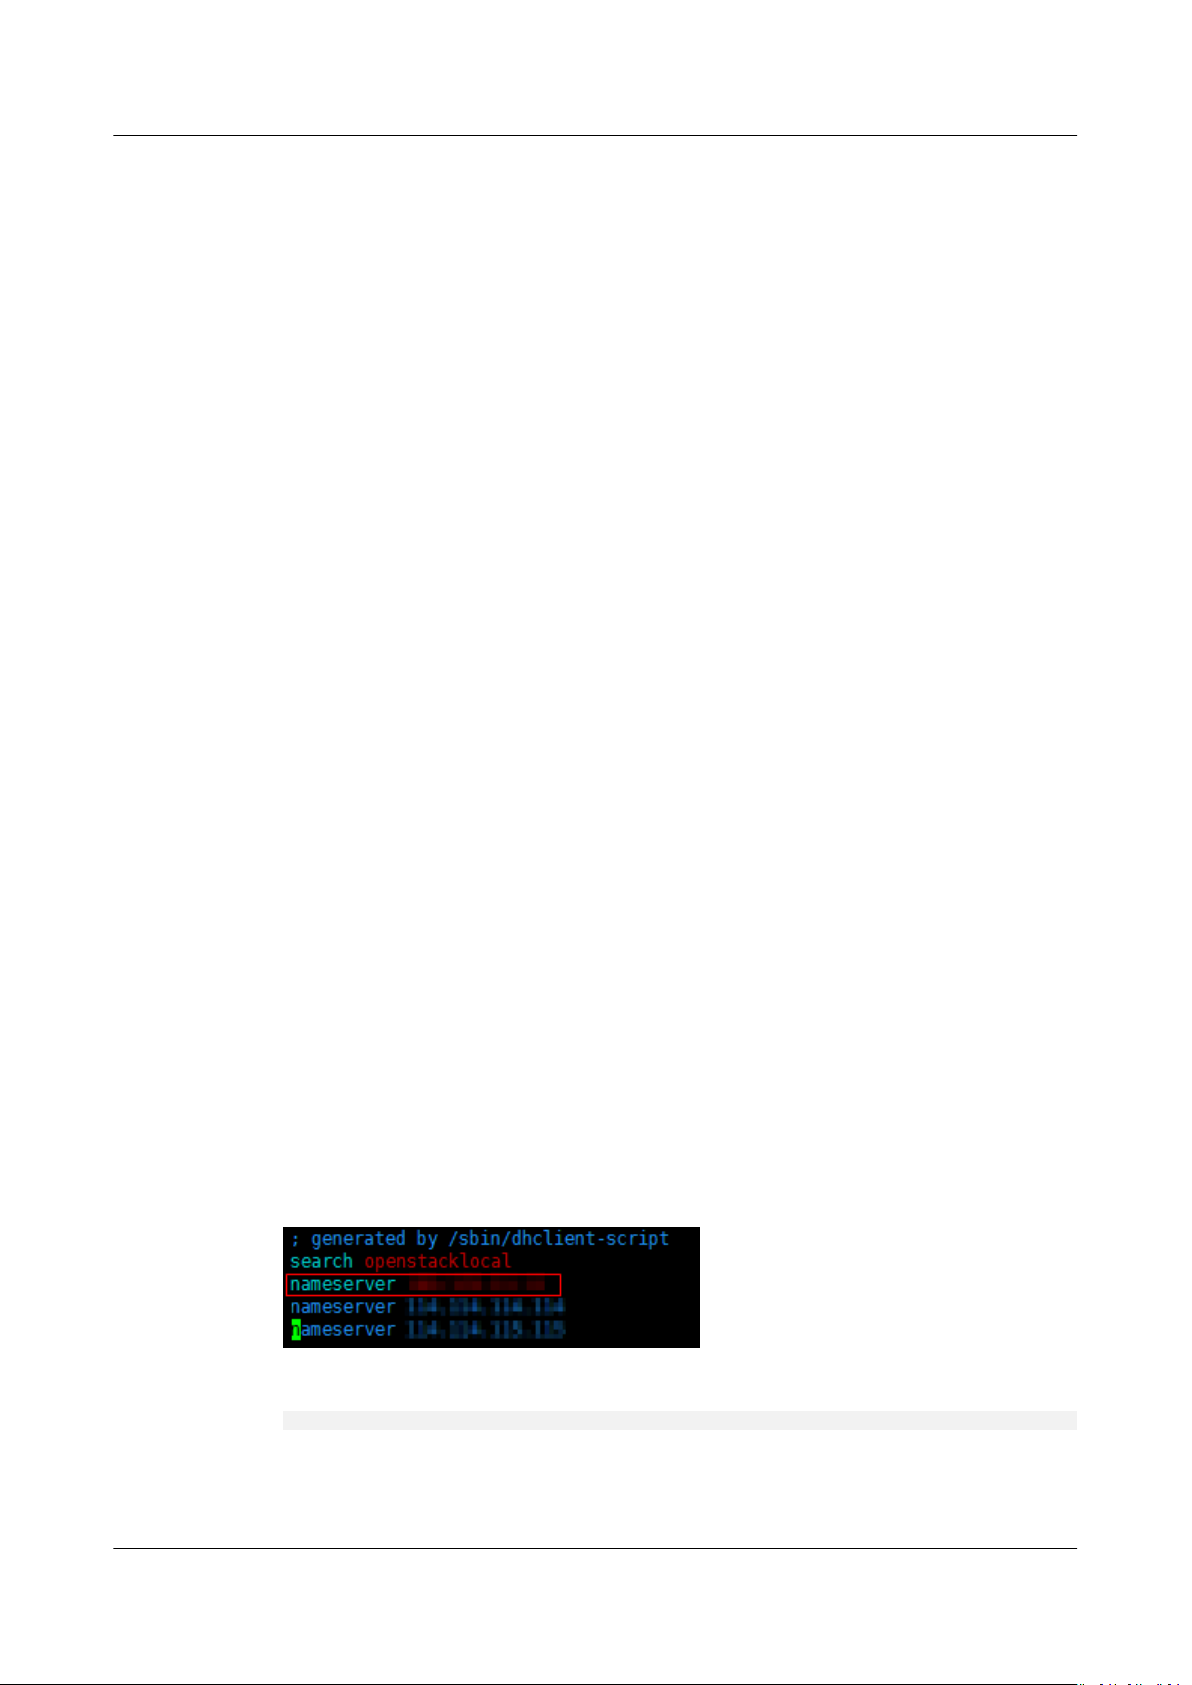
Step 2 Run the vi /etc/resolv.conf command to edit the /etc/resolv.conf
DNS server IP address above the existing nameserver information. See Figure 3-3.
Figure 3-3 Conguring DNS
le
le. Add the
The format is as follows:
nameserver 100.125.1.250
Step 3 Press Esc, input :wq, and press Enter to save the changes and exit the vi editor.
Step 4 Run the following command to check whether the IP address is successfully added:
Issue 06 (2019-05-30) Copyright © Huawei Technologies Co., Ltd. 12
Page 16

NO TE
NO TE
Scalable File Service
User Guide 3 Network Conguration
cat /etc/resolv.conf
Step 5 Run the following command to check whether an IP address can be resolved from
the le system domain name:
nslookup
Obtain the le system domain name from the le system mount point.
File system domain name
Step 6 (Optional) In a network environment of the DHCP server, edit the /etc/resolv.conf
le to prevent the le from being automatically modied upon an ECS startup,
and prevent the DNS server IP address added in Step 2 from being reset.
1. Run the following command to lock the
le:
chattr +i /etc/resolv.conf
Run the chattr -i /etc/resolv.conf command to unlock the le if needed.
2. Run the following command to check whether the editing is successful:
lsattr /etc/resolv.conf
If the information shown in Figure 3-4 is displayed, the
le is locked.
Figure 3-4 A locked le
----End
Procedure (Windows)
Step 1 Go to the ECS console and log in to the ECS running Windows Server 2012.
Step 2 Click This PC in the lower left corner.
Step 3 On the page that is displayed, right-click Network and choose Properties from
the drop-down list. The Network and Sharing Center page is displayed, as shown
in Figure 3-5. Click Local Area Connection.
Figure 3-5 Page for network and sharing center
Step 4 In the Activity area, select Properties. See Figure 3-6.
Issue 06 (2019-05-30) Copyright © Huawei Technologies Co., Ltd. 13
Page 17

Scalable File Service
User Guide 3 Network Conguration
Figure 3-6 Local area connection
Step 5 In the Local Area Connection Properties dialog box that is displayed, select
Internet Protocol Version 4 (TCP/IPv4) and click Properties. See Figure 3-7.
Figure 3-7 Local area connection properties
Step 6 In the dialog box that is displayed, select Use the following DNS server
addresses: and
congure DNS, as shown in Figure 3-8. The DNS server IP address
is 100.125.1.250. After completing the conguration, click OK.
Issue 06 (2019-05-30) Copyright © Huawei Technologies Co., Ltd. 14
Page 18

Scalable File Service
User Guide 3 Network Conguration
Figure 3-8 Conguring DNS on Windows
----End
Issue 06 (2019-05-30) Copyright © Huawei Technologies Co., Ltd. 15
Page 19

Scalable File Service
User Guide 4 File System Resizing
4 File System Resizing
Scenarios
You can expand or shrink the capacity of a
Limitations and Constraints
SFS Capacity-Oriented le systems support resizing if the auto capacity expansion
function is disabled. You can only enable the auto capacity expansion function
when creating a
you cannot reset the maximum capacity. In addition, after the auto capacity
expansion function is enabled, you cannot disable it.
SFS Capacity-Oriented
services.
SFS Turbo le systems support online capacity expansion. During capacity
expansion, I/Os are suspended for 10 to 15 seconds. You are advised to expand the
capacity during
available for some instances of earlier versions. If capacity expansion is required,
click Service Tickets in the upper right corner of the console to submit a service
ticket.
le system. After the auto capacity expansion function is enabled,
o-peak hours. The online capacity expansion button may not be
Rules for Resizing
The rules for resizing an SFS Capacity-Oriented
le system when needed.
le systems support online resizing, which does not aect
le system are as follows:
● Expanding a le system
Total capacity of a
account - Total capacity of all the other le systems owned by the cloud
account)
For example, cloud account A has a quota of 500 TB. This account has already
created three
this account needs to expand SFS2, the new capacity of SFS2 cannot be
greater than 80 TB. Otherwise, the system will display a message indicating
insucient quota and the expansion operation will fail.
an
● Shrinking a le system
Issue 06 (2019-05-30) Copyright © Huawei Technologies Co., Ltd. 16
le system after expansion ≤ (Capacity quota of the cloud
le systems: SFS1 (350 TB), SFS2 (50 TB), and SFS3 (70 TB). If
Page 20

Scalable File Service
User Guide 4 File System Resizing
– When a shrink error or failure occurs on a le system, it takes
approximately ve minutes for the le system to restore to the available
state.
– After a shrink operation fails, you can only reattempt to shrink the le
system storage capacity but cannot expand it directly.
– Total capacity of a
le system after shrinking ≥ Used capacity of the le
system
For example, cloud account B has created a
le system, SFS1. The total
capacity and used capacity of SFS1 are 50 TB and 10 TB respectively.
When shrinking SFS1, the user cannot set the new capacity to be smaller
than 10 TB.
Procedure
Step 1 Log in to SFS Console.
Step 2 In the
le system list, click Resize or Expand Capacity in the row of the desired
le system. The following dialog box is displayed. See Figure 4-1.
Figure 4-1 Resizing a le system
Step 3 Enter a new maximum capacity of the le system based on service requirements,
and click OK. Table 4-1 describes the parameters.
Table 4-1 Parameter description
Parameter
Description
Used Capacity (GB) Used capacity of the current le
system
Maximum Capacity (GB) Maximum capacity of the current le
system
New Maximum Capacity (GB) Target maximum capacity of the le
system after expanding or shrinking.
The value ranges from 1 GB to
512,000 GB.
NOTE
The new maximum capacity cannot be
smaller than the used capacity.
Issue 06 (2019-05-30) Copyright © Huawei Technologies Co., Ltd. 17
Page 21

Scalable File Service
User Guide 4 File System Resizing
Step 4 In the dialog box that is displayed, conrm the information and click OK.
Step 5 In the le system list, check the capacity information after resizing.
----End
Issue 06 (2019-05-30) Copyright © Huawei Technologies Co., Ltd. 18
Page 22

Scalable File Service
User Guide 5 Quotas
5 Quotas
What Is Quota?
Quotas are enforced for service resources on the platform to prevent unforeseen
spikes in resource usage. Quotas can limit the number or amount of resources
available to users, such as the maximum number of ECSs or EVS disks that can be
created.
If the existing resource quota cannot meet your service requirements, you can
apply for a higher quota.
How Do I View My Quotas?
1. Log in to the management console.
2. Click
3. In the upper right corner of the page, choose Resources > My Quotas.
The Service Quota page is displayed.
Figure 5-1 My Quotas
in the upper left corner and select the desired region and project.
4. View the used and total quota of each type of resources on the displayed
page.
If a quota cannot meet service requirements, apply for a higher quota.
Issue 06 (2019-05-30) Copyright © Huawei Technologies Co., Ltd. 19
Page 23

Scalable File Service
User Guide 5 Quotas
How Do I Apply for a Higher Quota?
1. Log in to the management console.
2. In the upper right corner of the page, choose Resources > My Quotas.
The Service Quota page is displayed.
Figure 5-2 My Quotas
3. Click Increase Quota.
4. On the Create Service Ticket page,
In Problem Description area, ll in the content and reason for adjustment.
5. After all necessary parameters are
to the Tenant Authorization Letter and Privacy Statement and click
Submit.
congure parameters as required.
congured, select I have read and agree
Issue 06 (2019-05-30) Copyright © Huawei Technologies Co., Ltd. 20
Page 24

Scalable File Service
User Guide 6 Backup
6 Backup
Only SFS Turbo le systems can be backed up while SFS Capacity-Oriented le
systems cannot.
The new backup function is now available. The original backup data will be
automatically cleared. Go to the CBR page and back up your data there in a timely
manner to avoid data loss.
Scenarios
Procedure
Step 1 Log in to SFS Console.
Step 2 In the
Step 3 Create a backup vault by following the instructions in Purchasing a File System
Step 4 The system automatically backs up the
A backup is a complete copy of an SFS Turbo le system at a specic time and it
records all
For example, if a le system is faulty or encounters a logical error (for example,
mis-deletion, hacker attacks, and virus infection), you can use data backups to
restore data quickly.
Ensure that the target
start. This topic describes how to manually create a le system backup.
its name. In the Operation column, click Create Backup.
Backup Vault in the
backup by following the instructions in Creating a File System Backup.
You can view the backup creation status on the Backup tab page. When the
Status of the backup changes to Available, the backup has been successfully
created.
conguration data and service data at that time.
le system is available. Otherwise, the backup task cannot
le system list, locate the SFS Turbo le system to be backed up and click
Cloud Backup and Recovery User Guide
le system.
. Then, create a
Issue 06 (2019-05-30) Copyright © Huawei Technologies Co., Ltd. 21
Page 25

Scalable File Service
User Guide 6 Backup
Step 5 If the le system is faulty, use a backup to create a new le system. For details,
see Using a Backup to Create a File System in the
User Guide
.
Cloud Backup and Recovery
----End
Issue 06 (2019-05-30) Copyright © Huawei Technologies Co., Ltd. 22
Page 26

Scalable File Service
User Guide 7 Monitoring
7 Monitoring
7.1 SFS Metrics
Function
Namespace
Metrics
This topic describes metrics reported by Scalable File Service (SFS) as well as their
namespaces and dimensions. You can use the console or APIs provided by Cloud
Eye to query the metrics generated for SFS.
SYS.SFS
Metric
read_ban
dwidth
write_ba
ndwidth
Metric
Name
Read
Bandwi
dth
Write
Bandwi
dth
Description Value
Range
Read bandwidth of a
le system within a
monitoring period
Unit: byte/s
Write bandwidth of
a le system within
a monitoring period
Unit: byte/s
≥ 0
bytes/s
≥ 0
bytes/s
Monitored
Object
SFS le
system
SFS le
system
Monitoring
Period
(Original
Metric)
4 minutes
4 minutes
rw_band
width
Issue 06 (2019-05-30) Copyright © Huawei Technologies Co., Ltd. 23
Read
and
Write
Bandwi
dth
Read and write
bandwidth of a le
system within a
monitoring period
Unit: byte/s
≥ 0
bytes/s
SFS le
system
4 minutes
Page 27

Scalable File Service
User Guide 7 Monitoring
Dimension
Key Value
share_id SFS le system
Viewing Monitoring Statistics
Step 1 Log in to the management console.
Step 2 View the monitoring graphs using either of the following methods.
● Method 1: Choose Service List > Storage > Scalable File Service. In the
system list, click View Metric in the Operation column of the target le
system.
● Method 2: Choose Management & Deployment > Cloud Eye > Cloud
Service Monitoring > Scalable File Service. In the le system list, click View
Metric in the Operation column of the target
le system.
le
Step 3 View the SFS le system monitoring data by metric or monitored duration.
Figure 7-1 shows the monitoring graphs. For more information about Cloud Eye,
see the
Figure 7-1 SFS monitoring graphs
----End
Cloud Eye User Guide
7.2 SFS Turbo Metrics
Function
This topic describes metrics reported by Elastic File Service (EFS) to Cloud Eye as
well as their namespaces and dimensions. You can use the console or APIs
provided by Cloud Eye to query the metrics generated for EFS.
.
Namespace
SYS.EFS
Issue 06 (2019-05-30) Copyright © Huawei Technologies Co., Ltd. 24
Page 28

Scalable File Service
User Guide 7 Monitoring
Metrics
Metric Metric
Name
client_con
nections
data_read
_io_bytes
data_writ
e_io_bytes
metadata
_io_bytes
total_io_b
ytes
iops IOPS I/O operations per unit
Client
Connectio
ns
Read
Bandwidth
Write
Bandwidth
Metadata
Read and
Write
Bandwidth
Total
Bandwidth
Description Value
Number of client
connections
Data read I/O load
Unit: byte/s
Data write I/O load
Unit: byte/s
Metadata read and write
I/O load
Unit: byte/s
Total I/O load
Unit: byte/s
time
Monitored
Range
≥ 0 SFS Turbo le
≥ 0
bytes/
s
≥ 0
bytes/
s
≥ 0
bytes/
s
≥ 0
bytes/
s
≥ 0 SFS Turbo le
Object
system
SFS Turbo le
system
SFS Turbo le
system
SFS Turbo le
system
SFS Turbo le
system
system
used_cap
acity
used_cap
acity_perc
ent
Used
Capacity
Capacity
Usage
Dimension
Key
efs_instance_id Instance
Viewing Monitoring Statistics
Step 1 Log in to the management console.
Step 2 View the monitoring graphs using either of the following methods.
● Method 1: Choose Service List > Storage > Scalable File Service. In the
system list, click View Metric in the Operation column of the target le
system.
Used capacity of a le
system
Unit: byte
Percentage of used
capacity in the total
capacity
Unit: Percent
Value
≥ 0
bytes
0% to
100%
SFS Turbo le
system
SFS Turbo le
system
le
Issue 06 (2019-05-30) Copyright © Huawei Technologies Co., Ltd. 25
Page 29

Scalable File Service
User Guide 7 Monitoring
● Method 2: Choose Management & Deployment > Cloud Eye > Cloud
Service Monitoring > Elastic File Service. In the le system list, click View
Metric in the Operation column of the target le system.
Step 3 View the SFS Turbo le system monitoring data by metric or monitored duration.
Figure 7-2 shows the monitoring graphs. For more information about Cloud Eye,
see the
Cloud Eye User Guide
.
Figure 7-2 SFS Turbo monitoring graphs
----End
Issue 06 (2019-05-30) Copyright © Huawei Technologies Co., Ltd. 26
Page 30

Scalable File Service
User Guide 8 Typical Applications
8 Typical Applications
8.1 HPC
Context
HPC is short for high-performance computing. An HPC system or environment is
made up of a single computer system with many CPUs, or a cluster of multiple
computer clusters. It can handle a large amount of data and perform highperformance computing that would be rather
capability in oating-point computation and can be used for compute-intensive
and data-intensive
image rendering, and heterogeneous computing. Dierent scenarios put dierent
requirements on the le system:
● Industrial design: In automobile manufacturing, CAE and CAD simulation
software are widely used. When the software is operating, compute nodes
need to communicate with each other closely, which requires high bandwidth
and low latency of the
● Bioscience: The
and be easy to expand.
– Bioinformatics: To sequence, stitch, and compare genes.
– Molecular dynamics: To simulate the changes of proteins at molecular
and atomic levels.
– New drug R&D: To complete high-throughput screening (HTS) to shorten
the R&D cycle and reduce the investment.
● Energy exploration: Field operations, geologic prospecting, geological data
processing and interpretation, and
require large memory and high bandwidth of the
● Image rendering: Image processing, 3D rendering, and frequent processing of
small les require high read/write performance, large capacity, and high
bandwidth of
● Heterogeneous computing: Compute elements may have dierent instruction
set architectures, requiring the
latency.
elds, such as industrial design, bioscience, energy exploration,
le system.
le system should have high bandwidth and large storage,
identication of oil and gas reservoirs all
le systems.
le system provide high bandwidth and low
dicult for PCs. HPC has ultra-high
le system.
Issue 06 (2019-05-30) Copyright © Huawei Technologies Co., Ltd. 27
Page 31

Scalable File Service
User Guide 8 Typical Applications
SFS is a shared storage service based on le systems. It features high-speed data
sharing, dynamic storage tiering, as well as on-demand, smooth, and online
resizing. These outstanding features empower SFS to meet the demanding
requirements of HPC on storage capacity, throughput, IOPS, and latency.
A biological company needs to perform plenty of gene sequencing using software.
However, due to the trivial steps, slow deployment, complex process, and low
eciency, self-built clusters are reluctant to keep abreast of business
development. However, things are getting better since the company resorted to
professional HPC service process management software. With massive compute
and storage resource of the cloud platform, the initial investment and cost during
O&M are greatly reduced, the service rollout time is shortened, and
boosted.
eciency is
Conguration Process
1. Organize the
2. Log in to SFS Console. Create a
sequencing.
3. Log in to the ECSs that function as the head node and compute node, and
mount the
4. On the head node, upload the
5. On the compute node, edit the les.
Prerequisites
● A VPC has been created.
● ECSs that function as head nodes and compute nodes have been created, and
have been assigned to the VPC. For details about how to upload on-premises
gene sequencing les to SFS Capacity-Oriented, see Migrating Data Using
Direct Connect.
● SFS has been enabled.
Example Conguration
Step 1 Log in to SFS Console.
Step 2 In the upper right corner of the page, click Create File System.
les of DNA sequencing to be uploaded.
le system to store the les of DNA
le system.
les to the le system.
Step 3 On the Create File System page, set parameters as instructed.
Step 4 After the conguration is complete, click Create Now.
For details about how to mount a le system to an ECS running Linux, see
Mounting an NFS File System to ECSs (Linux). For details about how to mount
a le system running Windows, see Mounting an NFS File System to ECSs
(Windows).
Step 5 Log in to the head node, and upload the
Step 6 Start gene sequencing, and the compute node obtains the gene sequencing le
from the mounted le system for calculation.
----End
Issue 06 (2019-05-30) Copyright © Huawei Technologies Co., Ltd. 28
les to the le system.
Page 32

Scalable File Service
User Guide 8 Typical Applications
8.2 Media Processing
Context
Media processing involves uploading, downloading, cataloging, transcoding, and
archiving media materials, as well as storing, invoking, and managing audio and
video data. Media processing has the following requirements on shared
systems:
● Media materials feature a high video bit rate and a large scale. The capacity
of le systems must be large and easy to be expanded.
● Acquisition, editing, and synthesis of audio and video data require stable and
low-latency
● Concurrent editing requires le systems to deliver reliable and easy-to-use
data sharing.
● Video rendering and special eects need processing small les frequently. The
le systems must oer high I/O performance.
le systems.
le
SFS is a shared storage service based on le systems. It features high-speed data
sharing, dynamic storage tiering, as well as on-demand, smooth, and online
resizing. These outstanding features empower SFS to meet the demanding
requirements of media processing on storage capacity, throughput, IOPS, and
latency.
A TV channel has a large volume of audio and video materials to process. The
work will be done on multiple editing workstations. The TV channel uses SFS to
enable
to ECSs that function as upload workstations and editing workstations. Then raw
materials are uploaded to the shared
Then, the editing workstations concurrently edit the materials in the shared
system.
le sharing among the editing workstations. First, a le system is mounted
Conguration Process
1. Organize the material les that are to be uploaded.
2. Log in to SFS Console. Create a
3. Log in to the ECSs that function as upload workstations and editing
workstations, and mount the le system.
4. On the upload workstations, upload the material les to the le system.
5. On the editing stations, edit the material
le system through the upload workstations.
le
le system to store the material les.
les.
Prerequisites
● A VPC has been created.
● ECSs that function as upload workstations and editing workstations have
been created, and have been assigned to the VPC. For details about how to
upload on-premises material les to SFS Capacity-Oriented, see Migrating
Data Using Direct Connect.
● SFS has been enabled.
Issue 06 (2019-05-30) Copyright © Huawei Technologies Co., Ltd. 29
Page 33

Scalable File Service
User Guide 8 Typical Applications
Example Conguration
Step 1 Log in to SFS Console.
Step 2 In the upper right corner of the page, click Create File System.
Step 3 On the Create File System page, set parameters as instructed.
Step 4 After the
For details about how to mount a le system to an ECS running Linux, see
Mounting an NFS File System to ECSs (Linux). For details about how to mount
a le system running Windows, see Mounting an NFS File System to ECSs
(Windows).
Step 5 Log in to the upload workstations, and upload the material
Step 6 Log in to the editing workstations, and edit the material
----End
conguration is complete, click Create Now.
8.3 Enterprise Website/App Background
Context
For I/O-intensive website services, SFS Turbo can provide shared website source
code directories and storage for multiple web servers, enabling low-latency and
high-IOPS concurrent share access. Features of such services are as follows:
● A large number of small
HTML les, JSON les, and static images.
● Read I/O intensive: Scope of data reading is large, and data writing is
relatively small.
● Multiple web servers access an SFS Turbo background to achieve high
availability of website services.
les: Static website les need to be stored, including
les to the le system.
les.
Conguration Process
1. Sort out the website
2. Log in to SFS Console. Create an SFS Turbo le system to store the website
les.
3. Log in to the ECS that functions as the compute node and mount the le
system.
4. On the head node, upload the
5. Start the web server.
les.
les to the le system.
Prerequisites
● A VPC has been created.
● ECSs that function as head nodes and compute nodes have been created, and
have been assigned to the VPC. For details about how to upload on-premises
website
Issue 06 (2019-05-30) Copyright © Huawei Technologies Co., Ltd. 30
les to SFS Turbo, see Migrating Data Using Direct Connect.
Page 34

Scalable File Service
User Guide 8 Typical Applications
● SFS has been enabled.
Example Conguration
Step 1 Log in to SFS Console.
Step 2 In the upper right corner of the page, click Create File System.
Step 3 On the Create File System page, set parameters as instructed.
Step 4 After the
For details about how to mount a
Mounting an NFS File System to ECSs (Linux). For details about how to mount
le system running Windows, see Mounting an NFS File System to ECSs
a
(Windows).
Step 5 Log in to the head node, and upload the les to the le system.
Step 6 Start the web server.
----End
8.4 Log Printing
Context
SFS Turbo can provide multiple service nodes for shared log output directories,
facilitating log collection and management of distributed applications. Features of
such services are as follows:
● A shared le system is mounted to multiple service hosts and logs are printed
concurrently.
● Large
of each log writing is small.
● Write I/O intensive: Write I/O of small blocks is the major service.
conguration is complete, click Create Now.
le system to an ECS running Linux, see
le size and small I/O: The size of a single log le is large, but the I/O
Conguration Process
1. Log in to SFS Console. Create an SFS Turbo le system to store the log les.
2. Log in to the ECS that functions as the compute node and mount the le
system.
3. Congure the log directory to the shared le system. It is recommended that
each host use
4. Start applications.
dierent log les.
Prerequisites
● A VPC has been created.
● ECSs that function as head nodes and compute nodes have been created, and
have been assigned to the VPC. For details about how to upload on-premises
les to SFS Turbo, see Migrating Data Using Direct Connect.
log
● SFS has been enabled.
Issue 06 (2019-05-30) Copyright © Huawei Technologies Co., Ltd. 31
Page 35

Scalable File Service
User Guide 8 Typical Applications
Example Conguration
Step 1 Log in to SFS Console.
Step 2 In the upper right corner of the page, click Create File System.
Step 3 On the Create File System page, set parameters as instructed.
Step 4 After the
For details about how to mount a le system to an ECS running Linux, see
Mounting an NFS File System to ECSs (Linux). For details about how to mount
le system running Windows, see Mounting an NFS File System to ECSs
a
(Windows).
Step 5
Step 6 Start applications.
Congure the log directory to the shared le system. It is recommended that each
host use dierent log les.
----End
conguration is complete, click Create Now.
Issue 06 (2019-05-30) Copyright © Huawei Technologies Co., Ltd. 32
Page 36

Scalable File Service
User Guide 9 Other Operations
9 Other Operations
9.1 Testing SFS Turbo Performance
o is an open-source I/O pressure testing tool. You can use o to test the
throughput and IOPS of SFS.
Prerequisites
o has been installed on the ECS. It can be downloaded from the ocial website
or from GitHub.
Note and Description
The test performance depends on the network bandwidth between the client and
server, as well as the capacity of the
Installing o
The following uses a Linux CentOS system as an example:
1. Download
yum install o
2. Install the libaio engine.
yum install libaio-devel
le system.
o.
3. Check the
o --version
File System Performance Data
The performance indicators of SFS Turbo le systems include IOPS and
throughput. For details, see Table 9-1.
Issue 06 (2019-05-30) Copyright © Huawei Technologies Co., Ltd. 33
o version.
Page 37

NO TE
NO TE
Scalable File Service
User Guide 9 Other Operations
Table 9-1 Sample performance data
Parameter SFS Turbo Standard SFS Turbo Performance
Maximum
32 TB 32 TB
capacity
Maximum IOPS 5,000 20000
Maximum
150 MB/s 350 MB/s
throughput
Formula used to
calculate the IOPS
IOPS = Min. (5,000, (1,200
+ 6 x Capacity))
IOPS = Min. (20,000, (1,500
+ 20 x Capacity))
IOPS Calculation Formula
● IOPS of a single le system = Min. (Maximum IOPS, (Baseline IOPS + IOPS
per GB x Capacity))
For an SFS Turbo Performance le system:
– If the le system capacity is 500 GB: IOPS = Min. (20,000, (1,500 + 20 x
500)) = 11,500
– If the le system capacity is 1,000 GB: IOPS = Min. (20,000, (1,500 + 20 x
1,000)) = 20,000
● No performance calculation formula is available for the SFS Turbo Standard Enhanced and SFS Turbo Performance - Enhanced
le systems. The IOPS of an
SFS Turbo Standard - Enhanced le system is 15,000, and that of an SFS
Turbo Performance - Enhanced
le system is 100,000.
Common Test Conguration Example
The following estimated values are obtained from the test on a single ECS. You are advised
to use multiple ECSs to test the performance of SFS.
This section uses SFS Turbo Performance as an example to describe the
specications of the ECS.
Specications: General computing-plus | c3.xlarge.4 | 4 vCPUs | 16 GB
Image: CentOS 7.5 64-bit
Mixed read/write with a read/write ratio of 7:3
● o command:
o --randrepeat=1 --ioengine=libaio --name=test -output=output.log -direct=1
--lename=
size=10240M --readwrite=rw --rwmixwrite=30 --fallocate=none
/mnt/nfs/test_o indicates the location of the le to be tested. The location must be
specic to the le name, which is the test_o le in the /mnt/nfs directory in this
example. Set it based on the site requirements.
/mnt/nfs/test_o
--bs=4k --iodepth=128 --
Issue 06 (2019-05-30) Copyright © Huawei Technologies Co., Ltd. 34
Page 38

NO TE
Scalable File Service
User Guide 9 Other Operations
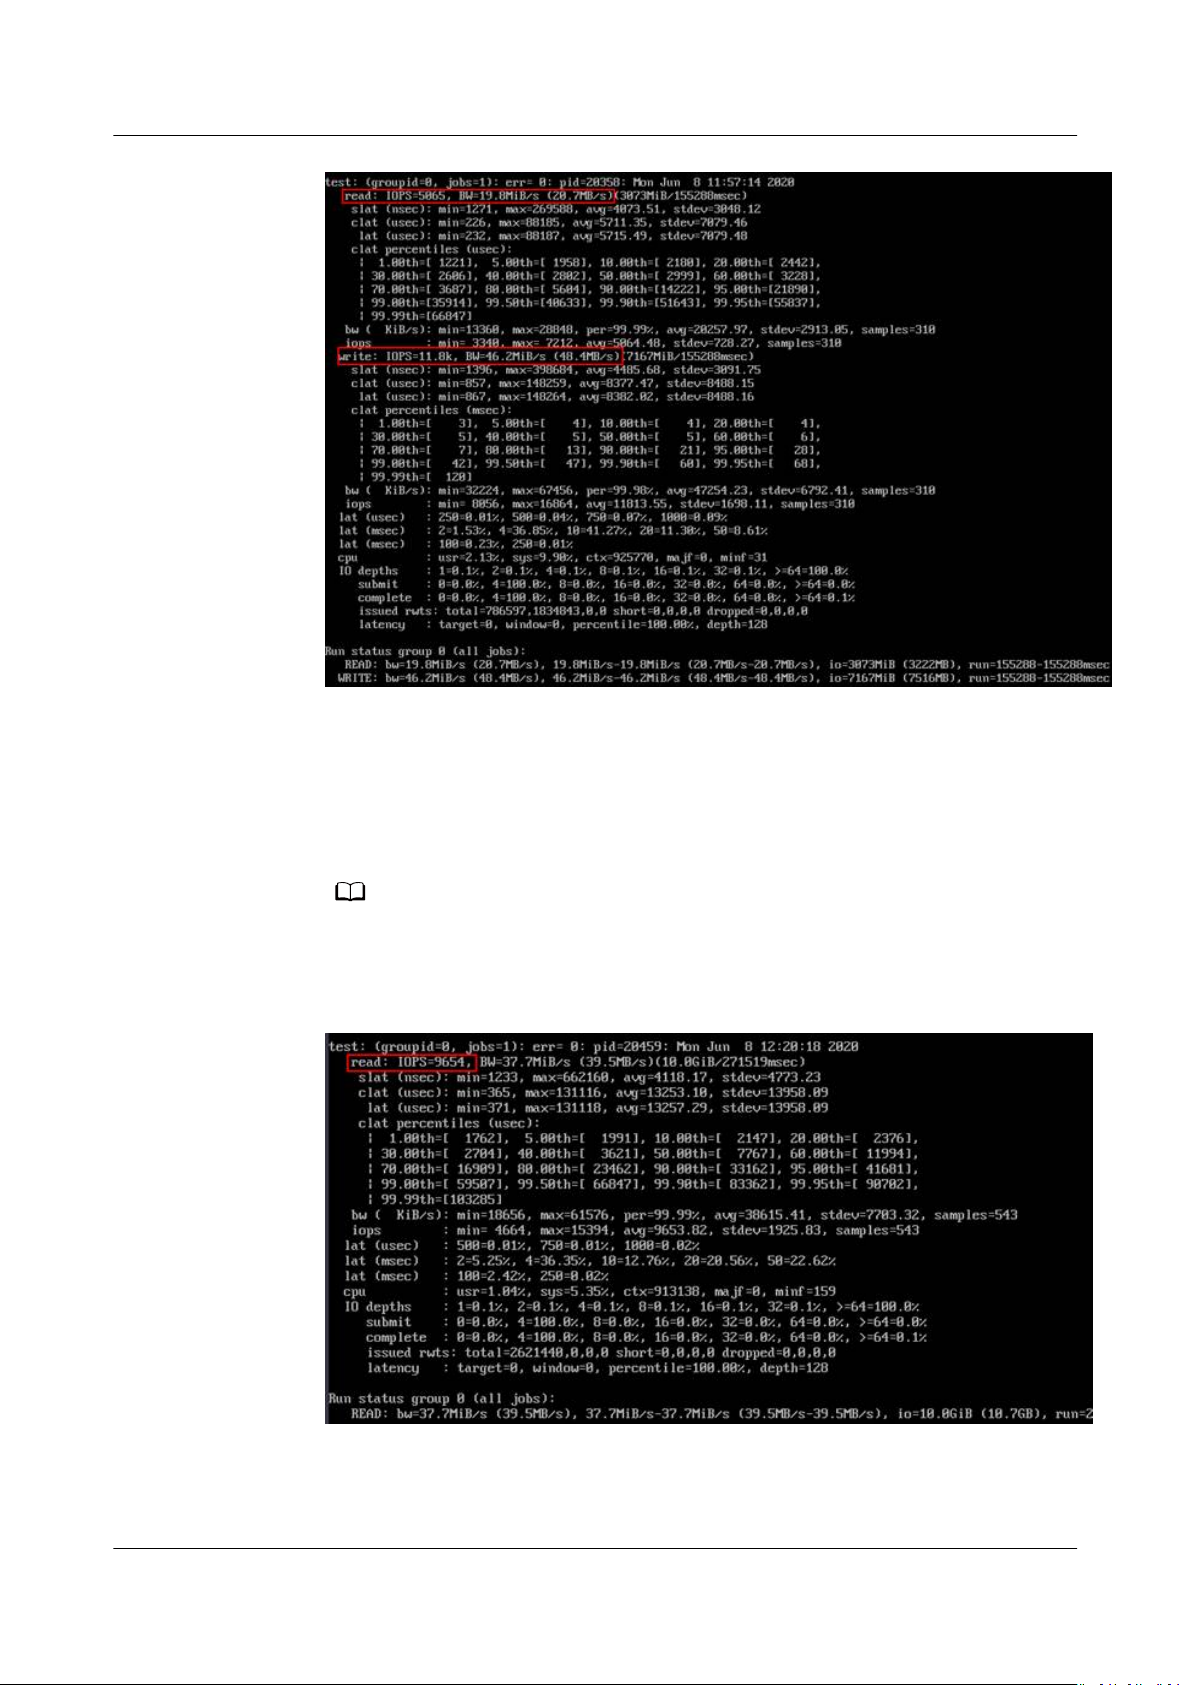
● o result:
Mixed read/write with a read/write ratio of 3:7
● o command:
o --randrepeat=1 --ioengine=libaio --name=test -output=output.log -direct=1 --lename=
/mnt/nfs/test_o
--bs=4k --iodepth=128 --
size=10240M --readwrite=rw --rwmixwrite=70 --fallocate=none
/mnt/nfs/test_o indicates the location of the le to be tested. The location must be
specic to the le name, which is the test_o le in the /mnt/nfs directory in this
example. Set it based on the site requirements.
● Results:
Issue 06 (2019-05-30) Copyright © Huawei Technologies Co., Ltd. 35
Page 39
NO TE
Scalable File Service
User Guide 9 Other Operations
Read IOPS
● o command:
o --randrepeat=1 --ioengine=libaio --name=test -output=output.log -direct=1
--lename=
/mnt/sfs-turbo/test_o
--bs=4k --iodepth=128 --
size=10240M --readwrite=read --fallocate=none
/mnt/sfs-turbo/test_o indicates the location of the le to be tested. The location
must be specic to the le name, which is the test_o le in the /mnt/sfs-turbo
directory in this example. Set it based on the site requirements.
● Results:
Write IOPS
● o command:
Issue 06 (2019-05-30) Copyright © Huawei Technologies Co., Ltd. 36
Page 40

NO TE
NO TE
Scalable File Service
User Guide 9 Other Operations
o --randrepeat=1 --ioengine=libaio --name=test -output=output.log -direct=1 --lename=
/mnt/sfs-turbo/test_o
--bs=4k --iodepth=128 --
size=10240M --readwrite=write --fallocate=none
/mnt/sfs-turbo/test_o indicates the location of the le to be tested. The location
must be specic to the le name, which is the test_o le in the /mnt/sfs-turbo
directory in this example. Set it based on the site requirements.
● Results:
Read bandwidth
o command:
●
o --randrepeat=1 --ioengine=libaio --name=test -output=output.log -direct=1
--lename=
/mnt/sfs-turbo/test_o
--bs=1M --iodepth=128 --
size=10240M --readwrite=read --fallocate=none
/mnt/sfs-turbo/test_o indicates the location of the le to be tested. The location
must be specic to the le name, which is the test_o le in the /mnt/sfs-turbo
directory in this example. Set it based on the site requirements.
● Results:
Write bandwidth
Issue 06 (2019-05-30) Copyright © Huawei Technologies Co., Ltd. 37
Page 41

NO TE
Scalable File Service
User Guide 9 Other Operations
● o command:
o --randrepeat=1 --ioengine=libaio --name=test -output=output.log -direct=1 --lename=
size=10240M --readwrite=write --fallocate=none
/mnt/sfs-turbo/test_o indicates the location of the le to be tested. The location
must be specic to the le name, which is the test_o le in the /mnt/sfs-turbo
directory in this example. Set it based on the site requirements.
● Results:
/mnt/sfs-turbo/test_o
--bs=1M --iodepth=128 --
9.2 Mounting a File System to an ECS Running Linux as a Non-root User
Description
By default, a Linux ECS allows only the root user to run the mount command for
mounting a
other common users, such users can also run the mount command for le system
mounting. The following describes how to mount a
common user. The EulerOS is used as an example.
Prerequisites
● A non-root user has been created on the ECS.
● A le system has been created and can be mounted to the ECS by the root
user.
● You have obtained the mount point of the le system.
Procedure
Step 1 Log in to the ECS as user root.
le system. However, if the permissions of user root are assigned to
le system to a Linux ECS as a
Step 2 Assign the permissions of user root to the non-root user.
1. Run the chmod 777 /etc/sudoers command to change the sudoers
editable.
Issue 06 (2019-05-30) Copyright © Huawei Technologies Co., Ltd. 38
le to be
Page 42

Scalable File Service
User Guide 9 Other Operations
2. Run the vi /etc/resolv.conf command to edit the sudoers le.
3. Add a common user under the root account. In the following gure, user
Mike is added.
Figure 9-1 Adding a user
4. Press Esc, input :wq, and press Enter to save and exit.
5. Run the chmod 440 /etc/sudoers command to change the sudoers
read-only.
Step 3 Log in to the ECS as user Mike.
Step 4 Run the following command to mount the
mounting parameters, see Table 9-2.
mount -t nfs -o vers=3,timeo=600,noresvport,nolock
Table 9-2 Parameter description
Parameter
Mount
point
Description
The format for an SFS Capacity-Oriented le system is
domain name:/Path
, for example, example.com:/share-
format for an SFS Turbo le system is
example, 192.168.0.0:/.
NOTE
x
is a digit or letter.
If the mount point is too long to display completely, expand the column to
view the full mount point.
le to be
le system. For details about the
Mount point Local path
File system
xxx
File system IP address
. The
:/, for
Local path
Local path on the ECS, used to mount the le system, for
example, /local_path.
Issue 06 (2019-05-30) Copyright © Huawei Technologies Co., Ltd. 39
Page 43

Scalable File Service
User Guide 9 Other Operations
Step 5 Run the following command to view the mounted le system.
mount -l
If the command output contains the following information, the
mounted successfully.
example.com:/share-xxx on /local_path type nfs (rw,vers=3,timeo=600,nolock,addr=)
----End
9.3 Data Migration
9.3.1 Migrating Data Using Direct Connect
Context
Users can migrate data from local Network Attached Storage (NAS) devices to SFS
Capacity-Oriented or SFS Turbo using Direct Connect.
In this solution, a Linux ECS is created to connect a local NAS device to your SFS
so you can migrate your data to the cloud.
You can also use this solution to migrate your data from the NAS in the cloud to
your SFS. For details, see Migrating Data from the NAS in the Cloud to SFS.
Limitations and Constraints
le system is
Prerequisites
Procedure
Step 1 Log in to the ECS management console.
Step 2 Log in to the created Linux ECS to access the local NAS device and the SFS or SFS
Step 3 Run the following mount command to access the local NAS storage device:
● Only ECSs running Linux can be used for data migration.
● The UID and GID of your le are no longer consistent after synchronization.
● The le access modes are no longer consistent after synchronization.
● You have enabled and congured Direct Connect. For details, see
Connect User Guide
● You have obtained a Linux ECS.
● You have created an SFS Capacity-Oriented or SFS Turbo le system and have
obtained the mount point of the
● You have obtained the mount point of the local NAS device.
Turbo
mount -t nfs -o vers=3,timeo=600,noresvport,nolock
le system.
.
le system.
Mount point of the local NAS device
Direct
/mnt/src
Step 4 Run the following mount command to access the
mount -t nfs -o vers=3,timeo=600,noresvport,nolock
Issue 06 (2019-05-30) Copyright © Huawei Technologies Co., Ltd. 40
Mount point of the le system
le system:
/mnt/dst
Page 44

NO TE
Scalable File Service
User Guide 9 Other Operations
Step 5 Run the following command on the Linux ECS to install the rclone tool:
wget https://downloads.rclone.org/rclone-current-linux-amd64.zip --no-check-certicate
unzip rclone-current-linux-amd64.zip
chmod 0755 ./rclone-*/rclone
cp ./rclone-*/rclone /usr/bin/
rm -rf ./rclone-*
Step 6 Run the following command to synchronize data:
rclone copy /mnt/src /mnt/dst -P --transfers 32 --checkers 64
The parameters are described as follows. Set transfers and checkers based on the system
specications.
● transfers: number of les that can be transferred concurrently
● checkers: number of local les that can be scanned concurrently
● P: data copy progress
After data synchronization is complete, go to the target le system to check
whether the migration is successful.
----End
Migrating Data from the NAS in the Cloud to SFS
To migrate data from a NAS device in the cloud to your SFS, ensure that the NAS
le system are in the same VPC or you can use Cloud Connect.
and
For details about how to congure Cloud Connect, see
Guide
.
9.3.2 Migrating Data Using the Internet
Context
Users can migrate data from local NAS devices to SFS Turbo using the Internet for
cloud service expansion.
In this solution, a Linux server is created in the cloud and on-premises respectively
for data migration from the local NAS devices to the cloud. The inbound and
outbound directions of port 22 on these two servers are accessible. The onpremises server is used to access the local NAS devices, and the ECS is used to
access SFS Turbo.
You can also refer to this solution to migrate data from the NAS in the cloud to
SFS Turbo. For details, see Migrating Data from Cloud NAS to SFS Turbo.
Direct Connect User
Limitations and Constraints
● Data cannot be migrated from local NAS devices to SFS Capacity-Oriented
systems using the Internet.
● Only ECSs running Linux can be used for data migration.
● The UID and GID of a
le are no longer consistent after synchronization.
● The le access modes are no longer consistent after synchronization.
● The inbound and outbound directions of port 22 are accessible.
Issue 06 (2019-05-30) Copyright © Huawei Technologies Co., Ltd. 41
le
Page 45

Scalable File Service
User Guide 9 Other Operations
Prerequisites
● A Linux server has been created on the cloud and on-premises respectively.
● The elastic IP addresses have been congured for the servers to ensure that
the two servers can communicate with each other.
● You have created an SFS Turbo le system and have obtained the mount
point of the
le system.
● You have obtained the mount point of the local NAS device.
Procedure
Step 1 Log in to the ECS management console.
Step 2 Log in to the created on-premises server client1 and run the following command
to access the local NAS device:
mount -t nfs -o vers=3,timeo=600,noresvport,nolock
Step 3 Log in to the created Linux ECS client2 and run the following command to access
the SFS Turbo le system:
mount -t nfs -o vers=3,timeo=600,noresvport,nolock
Mount point of the local NAS device
Mount point of the SFS Turbo le system
/mnt/src
/mnt/dst
Step 4 Run the following command on client1 to install the rclone tool:
wget https://downloads.rclone.org/rclone-current-linux-amd64.zip --no-check-certicate
unzip rclone-current-linux-amd64.zip
chmod 0755 ./rclone-*/rclone
cp ./rclone-*/rclone /usr/bin/
rm -rf ./rclone-*
Step 5 Run the following command on client1 to
rclone cong
No remotes found - make a new one
n) New remote
conguration password
s) Set
q) Quit cong
n/s/q> n
name> remote name (New name)
Type of storage to
Enter a string value. Press Enter for the default ("").
Choose a number from below, or type in your own value
24 / SSH/SFTP Connection
\ "sftp"
Storage> 24 (Select the SSH/SFTP number)
SSH host to connect to
Enter a string value. Press Enter for the default ("").
Choose a number from below, or type in your own value
1 / Connect to example.com
\ "example.com"
host> ip address (IP address of client2)
SSH username, leave blank for current username, root
Enter a string value. Press Enter for the default ("").
user> user name (Username of client2)
SSH port, leave blank to use default (22)
Enter a string value. Press Enter for the default ("").
port> 22
SSH password, leave blank to use ssh-agent.
y) Yes type in my own password
g) Generate random password
n) No leave this optional password blank
y/g/n> y
Enter the password:
password: (Password for logging in to client2)
Conrm the password:
password: (Conrm the password for logging in to client2)
congure.
congure the environment:
Issue 06 (2019-05-30) Copyright © Huawei Technologies Co., Ltd. 42
Page 46

Scalable File Service
User Guide 9 Other Operations
Path to PEM-encoded private key le, leave blank or set key-use-agent to use ssh-agent.
Enter a string value. Press Enter for the default ("").
key_le> (Press Enter)
The passphrase to decrypt the PEM-encoded private key le.
Only PEM encrypted key les (old OpenSSH format) are supported. Encrypted keys
in the new OpenSSH format can't be used.
y) Yes type in my own password
g) Generate random password
n) No leave this optional password blank
y/g/n> n
When set forces the usage of the ssh-agent.
key-le is also set, the ".pub" le of the specied key-le is read and only the associated key is
When
requested from the ssh-agent. This allows to avoid `Too many authentication failures for *username*` errors
when the ssh-agent contains many keys.
Enter a boolean value (true or false). Press Enter for the default ("false").
key_use_agent> (Press Enter)
Enable the use of the aes128-cbc cipher. This cipher is insecure and may allow plaintext data to be
recovered by an attacker.
Enter a boolean value (true or false). Press Enter for the default ("false").
Choose a number from below, or type in your own value
1 / Use default Cipher list.
\ "false"
2 / Enables the use of the aes128-cbc cipher.
\ "true"
use_insecure_cipher> (Press Enter)
Disable the execution of SSH commands to determine if remote
Leave blank or set to false to enable hashing (recommended), set to true to disable hashing.
Enter a boolean value (true or false). Press Enter for the default ("false").
disable_hashcheck>
Edit advanced
y) Yes
n) No
y/n> n
Remote
-------------------
[remote_name]
type = sftp
client2 ip
host=(
user=(
client2 user name
port = 22
pass = *** ENCRYPTED ***
key_le_pass = *** ENCRYPTED ***
--------------------
y) Yes this is OK
e) Edit this remote
d) Delete this remote
y/e/d> y
Current remotes:
Name Type
==== ====
remote_name sftp
e) Edit existing remote
n) New remote
d) Delete remote
r) Rename remote
c) Copy remote
conguration password
s) Set
q) Quit cong
e/n/d/r/c/s/q> q
cong? (y/n)
cong
)
)
le hashing is available.
Step 6 Run the following command to view the rclone.conf
rclone.conf
cat /root/.cong/rclone/rclone.conf
[remote_name]
type = sftp
client2 ip
host=(
:
)
le in /root/.cong/rclone/
Issue 06 (2019-05-30) Copyright © Huawei Technologies Co., Ltd. 43
Page 47

NO TE
Scalable File Service
User Guide 9 Other Operations
user=(
client2 user name
port = 22
pass = ***
key_le_pass = ***
)
Step 7 Run the following command on client1 to synchronize data:
rclone copy /mnt/src
remote_name
:/mnt/dst -P --transfers 32 --checkers 64
● Replace
● The parameters are described as follows. Set transfers and checkers based on the
system
– transfers: number of les that can be transferred concurrently
– checkers: number of local
– P: data copy progress
remote_name
specications.
in the command with the actual remote name.
les that can be scanned concurrently
After data synchronization is complete, go to the target SFS Turbo le system to
check whether the migration is successful.
----End
Migrating Data from Cloud NAS to SFS Turbo
To migrate data from the cloud NAS to SFS Turbo using the Internet, perform the
preceding steps.
Issue 06 (2019-05-30) Copyright © Huawei Technologies Co., Ltd. 44
Page 48

Scalable File Service
User Guide A Change History
A Change History
Release
Date
2020-06-08 This issue is the seventh ocial release.
2019-05-30 This issue is the sixth ocial release.
2019-02-15 This issue is the fth ocial release.
2018-11-15 This issue is the fourth ocial release.
What's New
Updated the following content:
Updated the screenshots in section "SFS Turbo Performance
Test."
Updated the following content:
● Added the description of the SFS Turbo le system.
● Added section "SFS Turbo Performance Test."
● Added section "Mounting a File System as a Non-root User."
● Added the description of managing
Updated the following content:
● Added section "Quotas."
● Changed the "Troubleshooting" section to "Scalable File
Service Troubleshooting" for separate publishing.
Updated the following content:
Split the document into several parts for release.
le system's VPCs.
Issue 06 (2019-05-30) Copyright © Huawei Technologies Co., Ltd. 45
Page 49

Scalable File Service
User Guide A Change History
Release
What's New
Date
2018-01-30 This issue is the third ocial release.
Updated the following content:
● Updated section "Conguring DNS", and changed the IP
addresses of the DNS server for resolving domain names of
le systems.
● Updated section "Limitations and Constraints", and added the
sentence "You can mount
le systems to all Elastic Cloud
Servers (ECSs) that support the NFSv3 protocol."
● Deleted "Can a File System Be Mounted to a Windows-based
ECS" from "FAQs."
● Added "Does the Security Group of VPC
● Added section "How Do I Purchase SFS?"
2018-01-11 This issue is the second ocial release.
Updated the following content:
● Updated section "SFS" and section "Deleting a File System."
● Updated section "Application Scenarios" and section
"Limitations and Constraints."
Aect SFS" in "FAQs."
2017-12-31 This issue is the rst ocial release.
Issue 06 (2019-05-30) Copyright © Huawei Technologies Co., Ltd. 46
 Loading...