


IDEOS S7 Slim
Quick Start

Contents
1
Getting to know your Tablet
2
Installation
2.1
2.2
2.3
2.4
3
Turning the Tablet on or off
3.1
3.2
3.3
4
Charging the battery
4.1
4.2
........................................................... 2
To remove the back cover
To install the SIM card
To install the battery
To install the back cover
To turn the Tablet on
PIN protection
To turn the Tablet off............................................... 4
Using the power adapter to charge the tablet
Charging Partner.................................................... 5
........................................................ 4
................................ 1
...................................... 2
............................................ 2
............................................... 2
......................................... 3
................................. 3
.............................................. 3
........................................... 4
........ 4
i
4.2.1
Charging the Charging Partner
4.2.2
Using the Charging Partner to charge the
.....................................................................5
tablet
5
Using the touchscreen
6
Locking and unlocking the screen
6.1
To lock the screen
6.2
To unlock the screen
7
Setting date and time
8
Installing or removing the microSD card
9
Connecting to or disconnecting from a computer
..................................................................8
via USB
10
Using the Hi Suite to Synchronize
11
Wireless networks
11.1
...................................................................10
Wi-Fi
........................................6
......................7
...................................................7
...............................................7
..........................................7
...........................................10
....................5
.............8
....................9

11.1.1
Opening Wi-Fi settings
11.1.2
Turning Wi-Fi on or off
11.1.3
Connecting to a Wi-Fi network
11.1.4
Adding a Wi-Fi Network
11.2
Mobile networks
11.2.1
Opening Mobile network settings
11.2.2
To create or edit an Access Point
11.3
Sharing Your Tablet's Data Connection
11.3.1
Sharing Your Tablet's Data Connection via
USB
....................................................................12
11.3.2
Sharing Your Tablet's Data Connection as a
Portable Wi-Fi Hotspot
12
Application
12.1
Browser
12.2
12.3
...................................................................13
Calls
Messaging
.................................................. 11
.......................................................13
..............................................................13
..........................................................13
.............................10
..............................10
.................10
............................ 11
.............12
.............12
...............12
........................................12
12.4
Google Services
12.4.1
Creating a Google Account
12.4.2
Using Market
13
For more help
14
Warnings and Precautions
ii
................................................. 14
...................... 14
........................................... 15
..................................................16
..............................16
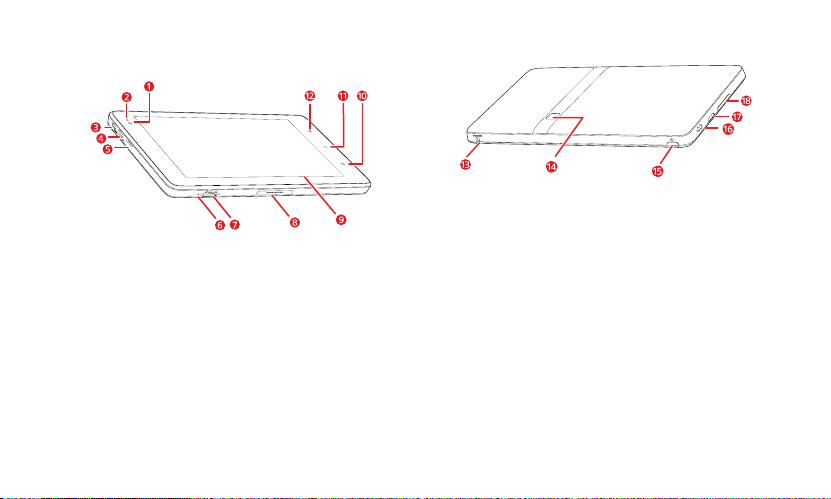
1 Getting to know your Tablet
1 Front camera lens
2 Ambient light sensor
3 HDMI interface
4 Micro USB interface
5 Speaker
6 Microphone
7 microSD card slot
8 Dock interface
9 LCD screen
Back
key 10
Menu
key 11
Home
key 12
13 Power interface
14 Rear camera lens
Power
16 Headset jack
17 Speaker
Volume Up/Down
1
key 15
key 18
2 Installation
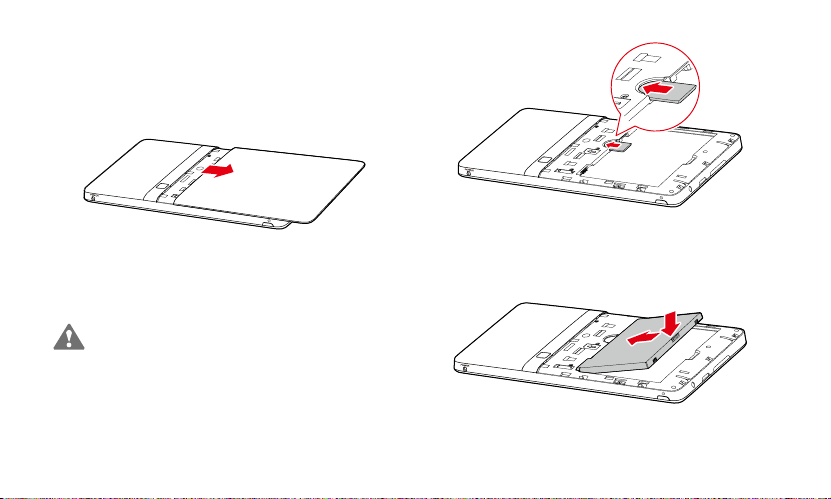
2.1 To remove the back cover
To remove the back cover, refer to the following figure.
2.2 To install the SIM card
Before installing or removing the SIM card, power off the
ablet. T
Insert your SIM card into the SIM card slot as shown in the following
figure until the SIM card is completely in position.
2.3 To install the battery
To install the battery, refer to the following figure.
2
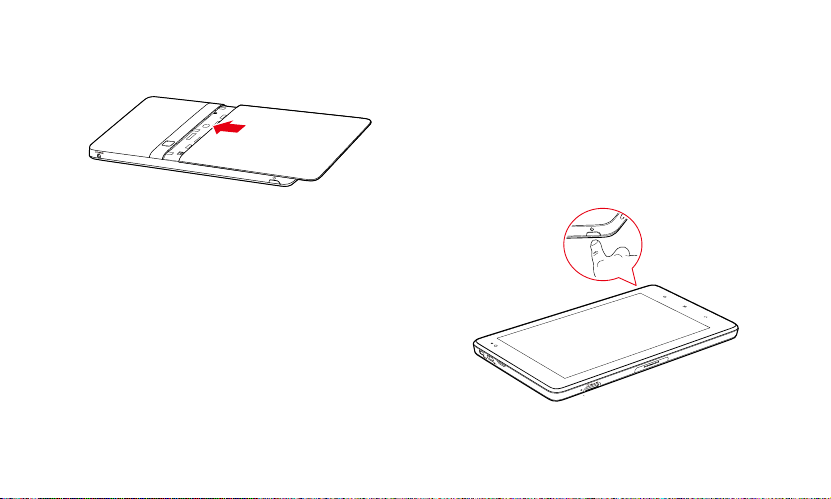
2.4 To install the back cover
To install the back cover, refer to the following figure.
3 Turning the Tablet on or off
3.1 To turn the Tablet on
Before you turn the Tablet on, ensure that the SIM card has been
correctly installed and t hat the battery is correctly installed or the
Tablet has been properly connected to the power supply.
To turn the Tablet on, press and hold the
seconds.
3
Power
key for about two

3.2 PIN protection
If your SIM card is preset with a PIN, the Tablet prompts you to enter
the PIN.
The PIN may have been provided by your service provider with
your SIM card. If you lost it, consult your service provider.
3.3 To turn the Tablet off
1. Press and hold
2. Touch
3. Touch OK to assure you want to turn your Tablet off in the dialog
that opens.
Power
Shut Down
key to open the
.
Tablet options
menu.
4 Charging the battery
Before charging the battery, ensure that the battery is properly
installed on your Tablet.
4.1 Using the power adapter to charge the
tablet
To charge the battery, you can connect the Tablet to the power supply
through the power adapter, as shown in the following figure.
4
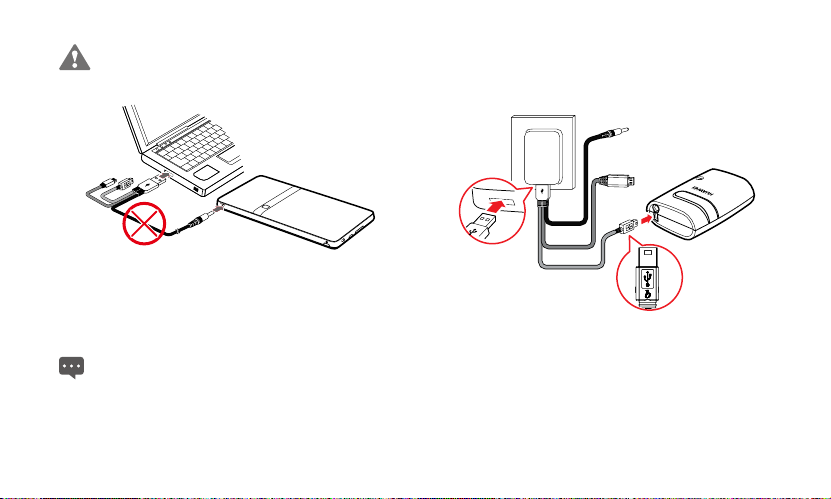
Do not connect the Tablet to a PC to charge the Tablet, as
shown in the following figure. Doing so may damage your
Tablet and the PC.
4.2.1 Charging the Charging Partner
To charge the Charging Partner, use the power adapter to connect
the Charging Partner to a power socket, as shown in the following
figure.
4.2 Charging Partner
The Charging Partner is a portable storage battery that can be used
to supply power to your Tablet.
The Charging Partner is optional. It may not be provided with
our Tablet. If you want to buy a Charging Partner, select a
y
correct model for your Tablet.
4.2.2 Using the Charging Partner to charge the tablet
You can use the Charging Partner to charge your Tablet.
Connect the Charging Partner to the Tablet, as shown in the following
figure.
5

5 Using the touchscreen
By using your finger, you can manipulate target items such as
applications and controls, and enjoy the touchscreen at your
fingertips. The Tablet supports the following actions.
Action Description
Touch Simply touch items on the screen, such as
Touch
and hold
applications and controls. For example, you can
type letters and symbols using the onscreen
keyboard.
Touch and hold an item on the screen until an
action occurs. For example, you can usually touch
and hold the screen to open the context menu of
the active item.
Action Description
Drag Touch and hold an item, and then move your finger
Flick Flick your finger vertically or horizontally across the
6
on the screen until you reach the target position.
For example, you can drag a shortcut to the trash to
delete it.
screen. For example, you can flick up and down to
manipulate a scroll bar and flick left and right to
switch between pictures.

6 Locking and unlocking the screen 7 Setting date and time
By default, the Tablet automatically uses the network provided date,
6.1 To lock the screen
When the Tablet is on, press the
screen.
When the Tablet remains idle for a time period that you have set, the
screen will automatically lock.
To save your battery or prevent accidental taps when not in use,
r when you want to wipe smudges off your touchscreen, turn
o
off and lock the screen.
Power
key to turn off and lock the
6.2 To unlock the screen
When the screen is off, you can press the
and then unlock the screen through the following steps.
1. If you have not set up a screen unlock pattern, press the
key to unlock the screen, or follow the instructions displayed on
the screen and flick upwards to unlock the screen.
2. If you have set up a screen unlock pattern, the Tablet prompts
you to draw the pattern on the screen to unlock it.
Power
key to turn on it,
Menu
time zone, and time.
When the time provided by the network is automatically used,
ou cannot set the date, time, and time zone by yourself.
y
To manually set date and time, do as the following steps.
1. Open the
2. Touch
3. Touch
4. Touch
5. Touch
6. Touch
Settings
list.
Date & time
Automatic
Set date
adjust the date, month, and year, or touch the text field of date,
month, and year to enter them. Touch
Select time zone
Scroll down the list to view more time zones.
Set time
adjust the hour and minute, or touch the text field of hour and
minute to enter them. Touch
.
to make it unchecked.
. Then touch the plus button or the minus button to
, then select the time zone in the list.
. Then touch the plus button or minus button to
Set
when finished.
7
Set
when finished.

8 Installing or removing the microSD
card
Insert your microSD card into the microSD card slot as shown in the
following figure until the microS D card clicks into position.
9 Connecting to or disconnecting from
a computer via USB
To connect your Tablet to a computer via USB, do as follows.
To remove the microSD card, slightly push the card further into
he slot, and wait for it to ejects out for about 2 mm, and then
t
remove it.
1. Use the USB cable that came with your Tablet to connect the
Tablet to a USB port on your computer. The Tablet displays a
notification indicating that the USB is connected.
2. Touch the Event button to open the
USB connected
3. Touch
that you want to transfer music, pictures, and other files between
your Tablet storage or microSD card storage and the computer.
8
in the
Notifications
Turn on USB storage
Event Manager
list.
in the dialog that opens to confirm
and touch

To disconnect your Tablet from the computer, better to carefully follow
the instructions of your computer to disconnect USB devices correctly,
to avoid losing information. And do as follows.
1. Touch the Event button to open the
2. Touch
Turn off USB storage
3. Touch
Turn off USB storage
When the Tablet is connected to your PC for the first time, an
stallation wizard will run automatically. Follow the wizard to
in
install the driver. It takes only a few minutes to finish the
installation. After the driver is successfully installed, it does not
need to be installed again the next time you connect your
Tablet to the PC. If the installation wizard does not run the first
time you connect your Tablet to your PC, open
and then the CD drive with Huawei logo. Run
launch the installation wizard.
Event Manager
in the
Notifications
in the dialog opens.
.
list.
My Computer
Setup.exe
to
10 Using the Hi Suite to Synchronize
Install the Hi Suite stored in your Tablet. Follow the instructions on
your computer to complete the installation. You can now synchronize
your contacts and calendar appointments between your PC and
Tablet. For more details, please refer to the Hi Suite hel p.
The PC Suite is designed to work on Windows XP SP2,
ndows Vista, and Windows 7. It is recommended that you
Wi
use one of these systems.
9

11 Wireless networks
Your Tablet can connect to a variety of wireless networks and devices,
including Wi-Fi data networks, and Bluetooth devices such as
headsets and mobile networks for voice and data transmission.
Using a wireless device or accessory while driving may cause
straction and may be illegal. Always obey the laws and drive
di
safely.
11.1 Wi-Fi
Wi-Fi is a wireless networking technology that can provide wireless
Internet access over distances of up to 300 feet (100 meters). The
capability of your Wi-Fi connections depends on the Wi-Fi router and
the surroundings it works. To use Wi-Fi on your Tablet, you need to
access a wireless access point or "hotspot". You can simply connect
to some open access points, and you have to configure your Tablet to
connect to the access points that are hidden or with security
protections such as authentication and encryption.
11.1.1 Opening Wi-Fi settings
You can turn Wi-Fi on or off, turn the open network notification on or
off, connect to a Wi-Fi network and add Wi-Fi networks in Wi-Fi
settings list. To open Wi-Fi settings list, do as follows.
1. Open the
2. Touch
Settings
Wireless & networks
When you are viewing the
the
Menu
see your IP settings or other Wi-Fi details.
list.
key and touch
, and then touch
Wi-Fi settings
Advanced
in the menu that opens to
Wi-Fi settings
list, you can press
11.1.2 Turning Wi-Fi on or off
To turn Wi-Fi on or off, you can open
to make it checked or unchecked.
To extend your battery life, turn Wi-Fi off when you are not
using it.
Wi-Fi settings
and touch
11.1.3 Connecting to a Wi-Fi network
When you turn Wi-Fi on, the available Wi-Fi networks found within
range are listed with the names and security scheme information,
and secured networks are indicated with a lock icon. You can view
the
Wi-Fi networks
To connect to a Wi-Fi network, touch a network you want to connect
to it in the
list by opening
Wi-Fi networks
list on the
Wi-Fi settings
Wi-Fi settings
.
screen. If the
10
.
Wi-Fi

network is open, you are prompted to confirm that you want to
connect to that network by touching
secured, you are prompted to enter a password or other credentials.
(Contact your service provider for details.)
When you are in range and Wi -Fi is on, you will automatically
econnect to available networks that you have connected to
r
previously.
When you are connected to a network, you can touch its name
n the
Wi-Fi networks
i
address, and related settings.
If "The network password you typed is not correct, please try again"
or "unable to connect to the network" is displayed after you enter a
password and connect the Tablet to a network, check whether the
encryption method, password type, password, and certificate are
correct.
When the encryption mode is set to WEP, if "Obtaining address..." is
displayed after you enter a password and connect the Tablet to a
network, check whether the password is correct. For a solution,
Please touch the network, touch
password and try again.
Connect
. If the network is
list for details about the speed, security,
Forget
, enter the correct WEP
11.1.4 Adding a Wi-Fi Network
When a Wi-Fi network with any security credentials does not
broadcast its name (SSID), or it is not in range, you can add and
connect to it when Wi-Fi is on. You need to contact the service
provider for details about the security scheme that is deployed on it
and to obtain the password or other required security credentials. The
name (SSID) and credentials are saved and you are automatically
connected to this network if it is in range and Wi-Fi is on.
When Wi-Fi is on, do as the following steps to add a Wi-Fi Network.
1. In the
Wi-Fi settings
network
.
2. Enter the name (SSID) of the network in the
field. If the network is secured, touch the
then touch to select the security scheme in the menu that opens.
3. Enter any required security credentials.
4. Touch
Save
list, flick down and touch
.
Add Wi-Fi
Network SSID
Security:
button and
11.2 Mobile networks
Your Tablet with a SIM card is configured to use the mobile networks
of your wireless service provider for voice calls and for transmitting
data.
11
text

If your Tablet does not connect to a network when you insert a
SIM card and turn it on, contact your service provider to obtain
the details of its access point.
11.2.1 Opening Mobile network settings
1. Open the
2. Touch
Settings
list.
Wireless & networks
, and then touch
Mobile networks
11.2.2 To create or edit an Access Point
If you and your wireless service provider determine that you need to
change the settings of your current access point name (APN) or to
create a new one, you must obtain the APN and detailed settings
from your provider.
1. Open the
2. Touch an existing APN to edit it. Or press the
3. When you are finished, press the
Mobile networks
GSM/UMTS Options
touch
New APN
provider by touching each setting that you need to edit.
you created a new APN, touch it in the APNs screen to start using
it.
settings screen, and touch
>
Access Point Names
. Enter the APN settings offered by your service
Menu
.
Menu
key and
key and touch
Save
. If
11.3 Sharing Your Tablet's Data Connection
You can share your Tablet's data connection with a single computer
via a USB cable: USB tetherin g. Or you can share your Tablet's data
connection with devices at the same time, by turning your Tablet into
a portable Wi-Fi hotspot.
.
11.3.1 Sharing Your Tablet's Data Connection via USB
To use USB tethering in different operating systems, you may need to
prepare your computer to establish a network connection via USB.
You can not share yourTablet‘s data connection and access SD
card via USB at the same time.
1. Use the USB cable that came with your Tablet to connect the
Tablet to a USB port on your computer.
2. Open the
3. Touch
4. Select the
11.3.2 Sharing Your Tablet's Data Connection as a
Portable Wi-Fi Hotspot
1. Open the
12
Settings
Wireless & networks
portable hotspot
USB tethering
connection.
Settings
list.
, and then touch
.
check box to share your data
list.
Tethering &

2. Touch
Wireless & networks
portable hotspot
3. Select the
Portable Wi-Fi hotspot
connection.
When
Portable Wi-Fi hotspot
rtable Wi-Fi hotspot settings
Po
or secure it.
, and then touch
is selected, you can touch
Tethering &
check box to share your data
to change its network name
12 Application
12.1 Browser
Touch
Browser
open the
12.2 Calls
1. To display the phone panel, you can touch
screen or on the Applications screen.
2. Touch the digital keys to enter the phone number.
3. Touch the key on the screen.
12.3 Messaging
1. On the
13
on the Home screen or on the Applications screen to
Browser
and start surfing the web.
Your Tablet may not support Flash. If you want to browse Flash
some Web pages, please download Flash Player from
on
Market
. For detailed information about how to download Flash
Player, refer to the section
Messaging
Market
screen, touch
.
New message
Dialer
on the home
.

2. Enter the name of a contact with a mobile number in the To field.
As you enter, matching contacts appear. You can touch a
suggested contact or continue your entering.
3. Touch the composition text field to enter your message text. If you
press the
Back
draft in your
composing it.
4. Touch
After you send a message, the following cases may occur: If
"Currently unable to send your message..." is displayed, check
whether a SIM card is installed properly. If an envelope icon
with an exclamation mark is displayed in the lower right corner,
it indicates that the message failed to be sent. Check the signal
intensity of a network and whether your Tablet charge is
overdue if a SIM card is installed properly.
key while composing a messag e, it is saved as a
Messaging
window. Touch the message to resume
Send
.
12.4 Google Services
12.4.1 Creating a Google Account
When you turn on your mobile phone for the first time, touch a
Google services such as
to your Google account.
Market
, and you will be prompted to sig n in
When creating a Google account, ensure that your Tablet is
connected to a network.
If you already have a Google account, touch
username and password.
If you do not have a Google account, you can create one:
1. After reading the setup information, touch
2. Touch
Create
.
3. Enter a first name, last name, and user name for your Google
account, and then touch
Google server to check whether the username is available. If the
username you entered is already in use, you will be prompted to
choose another one or select one from a list.
4. Enter and confirm your Google account password.
5. Select a security question from the drop down menu, and then
enter the answer.
6. Touch
Create
7. When
Google Terms of Service
Next
.
8. Enter the characters that appear on the screen, and then touch
Next
.
To use another account, go to the
Next
. The tablet will connect to the
.
Sign in
and enter your
Next
.
screen appears, touch
Accounts & sync
14
I agree,
settings

screen, and touch
accounts you want to add.
Add account
to select which type of
12.4.2 Using Market
Android Market provides direct access to applications and games
which you can download and install on your Tablet.
Searching for Applications
There are a few different ways to find applications on the Market
screen, including:
1. Featured applications.
2. List of games.
3. Search function.
Installing an Application
1. On the
Market
screen, touch
2. Touch a category, and then touch the item you want to download.
3. On the item details screen, read more about the application.
Including its cost, overall rating, and user comments. If you scroll
down to the
applications from the same developer, link to the developer's
website, or send the developer an email.
About the developer
Apps
.
section, you can see other
4. To install the item, touch
whichever is displayed.
5. To check the progress of a download, open the notification panel.
Most applications are installed within seconds. To stop an item
from downloading, touch
6. After the application has been downloaded and installed on your
tablet, the content download icon appears in the notification bar.
If you want to install a non-Market application, press the
ey and touch
k
Unknown sources
application.
Uninstalling an Application
1. On the Market screen, touch
2. Touch the application you want to uninstall, and then touch
Uninstall
.
3. When prompted, touch OK to remove the application from your
mobile phone.
4. Choose the reason for removing the application, and then touch
OK
.
FREE
(if the item is free) or
Cancel
.
Settings > Applications
to allow installation of the non-Market
Apps
, and then select the
. 4. Your downloads.
Buy
15
,
Menu

13 For more help
For more help, you can open
User Guide
on the Applications screen.
14 Warnings and Precautions
To use the device properly and safely, read these warnings and
precautions carefully and strictly observe them during operation.
Unless otherwise specified, the term "device" refers to the device and
its accessories.
Basic Requirements
z
During storage, transportation, and operation of the device, keep
it dry and prevent it from colliding with other objects.
z
Do not dismantle the device. In case of any fault, contact an
authorized service center for assistance or repair.
z
Without authorization, no organization or individual can change
the mechanical, safety, or performance design of the device.
z
When using the device, observe all applicable laws and
regulations and respect the legal rights of other people.
Environmental Requirements for Using the Device
z
Before connecting and disconnecting cables, stop using the
device, and then disconnect it from the power supply. Ensure that
your hands are dry during operation.
z
Keep the device far from sources of heat and fire, such as a
heater or a candle.
z
Keep the device far from electronic appliances that generate
strong magnetic or electric fields, such as a microwave oven or a
refrigerator.
z
Place the device on a stable surface.
z
Place the device in a cool and well-ventilated indoor area. Do not
expose the device to direct sunlight.
z
Keep the ambient temperature between 0°C and 35°C while the
device is being charged. Keep the ambient temperature between
0°C to 40°C for using the device powered by a battery.
z
Do not block the openings on the device with any object. Reserve
a minimum space of 10 cm around the device for heat dissipation.
z
Do not place any object (such as a candle or a water container)
on the device. If any foreign object or liquid enters the device,
stop using the device immediately, power it off, remove all the
cables connected to it, and then contact an authorized service
center.
z
During thunderstorms, power off the device, and then remove all
the cables connected to it to prevent it from getting damaged due
to lightning strikes.
16

Precautions for Using Wireless Devices
z
The device complies with the RF specifications when the device is
used in portable exposure conditions or at a distance of 0.5 cm
from your body.
z
Do not use the device where using wireless devices is prohibited
or may cause interference or danger.
z
The radio waves generated by the device may interfere with the
operation of electronic medical devices. If you are using any
electrical medical device, contact its manufacturer for the
restrictions on the use of the device.
z
Do not take the device into operating rooms, intensive care units
(ICUs), or coronary care units (CCUs).
Areas with Inflammables and Explosives
z
Do not use the device where inflammables or explosives are
stored, for example, in a gas station, oil depot, or chemical plant.
Otherwise, explosions or fires may occur. In addition, follow the
instructions indicated in text or symbols.
z
Do not store or transport the device in the same box as
inflammable liquids, gases, or explosives.
Accessory Requirements
z
Use only the accessories supplied or authorized by the device
manufacturer. Otherwise, the performance of the device may get
affected, the warranty for the device or the laws and regulations
related to telecommunications terminals may become null and
void, or an injury may occur.
z
Do not use the power adapter if its cable is damaged. Otherwise,
electric shocks or fires may occur.
z
Ensure that the power adapter meets the specifications indicated
on the device nameplate.
z
Ensure that the power adapter meets the requirements of Clause
2.5 in IEC60950-1/EN60950-1 and it is tested and approved
according to national or local standards.
z
For pluggable device, the socket-outlet shall be installed near the
device and shall be easily accessible.
Battery and Charger
z
Unplug the charger from the electrical plug and the device when
not in use.
z
The battery can be charged and discharged hundreds of times
before it eventually wears out. When the standby time and the talk
time are shorter than the normal time, replace the battery.
z
Use the AC power supply defined in the specifications of the
charger. An improper power voltage may cause a fire or a
malfunction of the charger.
17

z
Do not connect two poles of the battery with conductors, such as
metal materials, keys, or jewelries. Otherwise, the battery may be
short-circuited and may cause injuries and burns on your body.
z
Do not disassemble the battery or solder the battery poles.
Otherwise, it may lead to electrolyte leakage, overheating, fire, or
explosion.
z
If battery electrolyte leaks out, ensure that the electrolyte does not
touch your skin and eyes. When the electrolyte touches your skin
or splashes into your eyes, wash your eyes with clean water
immediately and consult a doctor.
z
If there is a case of battery deformation, color change, or
abnormal heating while you charge or store the battery, remove
the battery immediately and stop using it. Otherwise, it may lead
to battery leakage, overheating, explosion, or fire.
z
If the power cable is damaged (for example, the cord is exposed
or broken), or the plug loosens, stop using the cable at once.
Otherwise, it may lead to an electric shock, a short circuit of the
charger, or a fire.
z
Do not dispose of batteries in fire as they may explode. Batteries
may also explode if damaged.
z
Danger of explosion if battery is incorrectly replaced. Recycle or
dispose of used batteries according to the local regulations or
reference instruction supplied with your device.
Prevention of Hearing Damage
Using a headset at high volume can damage your hearing. To reduce
the risk of damage to hearing, lower the headset volume to a safe
and comfortable level.
Safety of Children
Keep the device and its accessories out of the reach of children.
Otherwise, they may damage the device and its accessories by
mistake, or they may swallow the small components of the device,
causing suffocation or other dangerous situations.
Maintenance
z
If the device is not used for a long time, power it off, and then
remove all the cables connected to it.
z
If any exception occurs, for example, if the device emits any
smoke or unusual sound or smell, stop using the device
immediately, power it off, remove all the cables connected to it,
and then contact an authorized service center.
z
If the device screen is broken by colliding with hard objects, do not
touch or try to remove the broken part. In this case, stop using the
device immediately, and then contact an authorized service center
in time.
z
Do not trample, pull, or overbend any cable. Otherwise, the cable
may get damaged, causing malfunction of the device.
18

z
Before cleaning the device, stop using it, power it off, and then
remove all the cables connected to it.
z
Use a clean, soft, and dry cloth to clean the device shell. Do not
use any cleaning agent or spray to clean the device shell.
Emergency Call
You can use your device for emergency calls in the service area. The
connection, however, cannot be guaranteed in all conditions. You
should not rely solely on the device for essential communications.
Certification Information (SAR)
This device meets guidelines for exposure to radio waves.
Your device is a low-power radio transmitter and receiver. As
recommended by international guidelines, the device is designed not
to exceed the limits for exposure to radio waves. These guidelines
were developed by the independent scientific organization
International Commission on Non-Ionizing Radiation Protection
(ICNIRP) and include safety measures designed to ensure safety for
all users, regardless of age and health.
The Specific Absorption Rate (SAR) is the unit of measurement for
the amount of radio frequency energy absorbed by the body when
using a device. The SAR value is determined at the highest certified
power level in laboratory conditions, but the actual SAR level of the
device when being operated can be well below the value. This is
because the device is designed to use the minimum power required
to reach the network.
The SAR limit adopted by USA and Canada is 1.6 watts/kilogram
(W/kg) averaged over one gram of tissue. The highest SAR value
reported to the FCC and IC for this device type when tested for use in
portable exposure conditions is 1.15 W/kg.
Federal Communications Commission (FCC) Statement
This device complies with part 15 of the FCC Rules. Operation is
subject to the following two conditions: (1) This device may not cause
harmful interference, and (2) this device must accept any interference
received, including interference that may cause undesired operation.
z
Reorient or relocate the receiving antenna.
z
Increase the separation between the equipment and receiver.
z
Connect the equipment into an outlet on a circuit different from
that to which the receiver is connected.
z
Consult the dealer or an experienced radio/TV technician for help.
Warning: Changes or modifications made to this device not expressly
approved by Huawei Technologies Co., Ltd. may void the FCC
authorization to operate this device.
Copyright © Huawei Technologies Co., Ltd. 2011. All rights
reserved.
19

No part of this document may be reproduced or transmitted in any
form or by any means without prior written consent of Huawei
Technologies Co., Ltd.
The product described in this manual may include copyrighted
software of Huawei Technologies Co., Ltd and possible licensors.
Customers shall not in any manner reproduce, distribute, modify,
decompile, disassemble, decrypt, extract, reverse engineer, lease,
assign, or sublicense the said software, unless such restrictions are
prohibited by applicable laws or such actions are approved by
respective copyright holders under licenses.
Trademarks and Permissions
, , and are trademarks or registered
trademarks of Huawei Technologies Co., Ltd.
Other trademarks, product, service and company names mentioned
are the property of their respective owners.
Notice
Some features of the product and its accessories described herein
rely on the software installed, capacities and settings of local network,
and may not be activated or may be limited by local network
operators or network service providers. Thus the descriptions herein
may not exactly match the product or its accessories you purchase.
Huawei Technologies Co., Ltd reserves the right to change or modify
any information or specifications contained in this manual without
prior notice or obligation.
NO WARRANTY
THE CONTENTS OF THIS MANUAL ARE PROVIDED “AS IS”.
EXCEPT AS REQUIRED BY APPLICABLE LAWS, NO
WARRANTIES OF ANY KIND, EITHER EXPRESS OR IMPLIED,
INCLUDING BUT NOT LIMITED TO, THE IMPLIED WARRANTIES
OF MERCHANTABILITY AND FITNESS FOR A PARTICULAR
PURPOSE, ARE MADE IN RELATION TO THE ACCURACY,
RELIABILITY OR CONTENTS OF THIS MANUAL.
TO THE MAXIMUM EXTENT PERMITTED BY APPLICABLE LAW,
IN NO CASE SHALL HUAWEI TECHNOLOGIES CO., LTD BE
LIABLE FOR ANY SPECIAL, INCIDENTAL, INDIRECT, OR
CONSEQUENTIAL DAMAGES, OR LOST PROFITS, BUSINESS,
REVENUE, DATA, GOODWILL OR ANTICIPATED SAVINGS.
Import and Export Regulations
Customers shall comply with all applicable export or import laws and
regulations and will obtain all necessary governmental permits and
licenses in order to export, re-export or import the product mentioned
in this manual including the software and technical data therein.
Issue: 01 (2011–03–14)
Part Number: 902XXX
20

for Android™ Android is a trademark of Google Inc. Use of this trademark is subject to Go ogle Permissions.
 Loading...