

Huawei Quidway S5000 Operation Manual - Getting Started

Operation Manual - Getting Started
Quidway S5000 Series Ethernet Switches Table of Contents
i
Table of Contents
Chapter 1 Product Overview........................................................................................................1-1
1.1 Product Overview...............................................................................................................1-1
1.2 Function Features..............................................................................................................1-2
Chapter 2 Logging in Ethernet Switch........................................................................................ 2-1
2.1 Set up Configuration Environment via the Console Port................................................... 2-1
2.2 Set up Configuration Environment through Telnet ............................................................ 2-3
2.2.1 Connect PC to Ethernet Switch through Telnet......................................................2-3
2.2.2 Telnet Ethernet Switch through Ethernet Switch .................................................... 2-5
2.3 Set up Configuration Environment through a Dial-up the Modem..................................... 2-6
Chapter 3 Command Line Interface............................................................................................. 3-1
3.1 Command Line Interface ................................................................................................... 3-1
3.2 Command Line View.......................................................................................................... 3-1
3.3 Feature and Functions of Command Line ......................................................................... 3-4
3.3.1 Online Help of Command Line................................................................................3-4
3.3.2 Displaying Characteristics of Command Line......................................................... 3-6
3.3.3 History Command of Command Line......................................................................3-6
3.3.4 Common Command Line Error Messages..............................................................3-7
3.3.5 Editing Characteristics of Command Line...............................................................3-7
Chapter 4 User Interface Configuration...................................................................................... 4-1
4.1 User Interface Overview....................................................................................................4-1
4.2 User Interface Configuration..............................................................................................4-2
4.2.1 Enter User Interface View.......................................................................................4-2
4.2.2 Configure the User Interface-supported Protocol ...................................................4-2
4.2.3 Configure the Attributes of AUX (Console) Port......................................................4-3
4.2.4 Configure the Terminal Attributes ........................................................................... 4-4
4.2.5 Manage Users.........................................................................................................4-6
4.2.6 Configure Redirection .............................................................................................4-9
4.3 Display and Debug User Interface................................................................................... 4-10
Chapter 5 System IP Configuration.............................................................................................5-1
5.1 System IP Overview ..........................................................................................................5-1
5.1.1 Management VLAN.................................................................................................5-1
5.1.2 IP Address............................................................................................................... 5-1
5.1.3 Static Route.............................................................................................................5-4
5.2 System IP Configuration.................................................................................................... 5-4
5.2.1 Create/Delete a Management VLAN Interface ....................................................... 5-4
5.2.2 Assign/Delete IP Address for/of the Management VLAN Interface ........................ 5-4

Operation Manual - Getting Started
Quidway S5000 Series Ethernet Switches Table of Contents
ii
5.2.3 Set/Delete Management VLAN Interface Description Character String ................. 5-5
5.2.4 Enable/Disable Management VLAN Interface ........................................................ 5-5
5.2.5 Configure Hostname and Host IP Address............................................................. 5-6
5.2.6 Configure a Static Route......................................................................................... 5-6
5.2.7 Configure the Default Preference of Static Routes................................................. 5-6
5.3 Display and Debug System IP...........................................................................................5-7

Operation Manual - Getting Started
Quidway S5000 Series Ethernet Switches Chapter 1 Product Overview
1-1
Chapter 1 Product Overview
1.1 Product Overview
With the rapid development of the Internet, requirements for high speed broadband
communication cannot be satisfied by the traditional low-speed services, such as
telephone, fax, telegraph, etc. High speed systems are required to carry out the
broadband services, including high-speed Internet access, video telephone, Video on
Demand (VOD), etc. The users also require the higher-speed Internet access. In such
a background, as a method of broadband access, Ethernet gains much attention on the
market for its low cost, high speed and ease of use. Accordingly, Huawei Technologies
Co. Ltd. (hereafter referred to as Huawei) launches the Quidway Series Ethernet
Switches to meet the fast growing demand for broadband network development.
Quidway S5000 Series Ethernet Switches, the L2 Gigabit Ethernet Switches
independently developed by Huawei, are a series of intelligent and network managing
switches particularly for high-speed intranet interconnection and Gigabit desktop
applications. The series include the following main types of switches:
z S5012G Ethernet Switch
z S5012T-12/10GBC Ethernet Switch
z S5024G-24/20TP Ethernet Switch
S5012G Ethernet Switch provides twelve 10/100/1000Base-T auto-sensing ports, four
Combo GBIC port and one Console port.
S5012T-12/10GBC Ethe rnet Switch pro vides ten GBIC port s, two 1 0/100 /1000B ase-T
ports, two Combo 10/100/1000Base-T ports and one Console port.
S5024G-24/20TP Ethernet Switch provides twenty 10/100/1000Base-T ports, four
GBIC ports and one Console port.
Note:
The meaning of Combo port:
The following takes S5012G Ethernet Switch as an example: In the logical sense, the Combo GBIC port
(with port ID of 9+) and the corresponding 10/100/1000BASE-T port (with port ID of 9) are in optical or
electric multiplexing relationship. You can select optical or electric multiplexing, but not both, in actual
configuration.

Operation Manual - Getting Started
Quidway S5000 Series Ethernet Switches Chapter 1 Product Overview
1-2
Quidway S5000 Series Ethernet Switches support the following services:
z Internet broadband access
z Enterprise and campus networking
z Provide multicast service function and support audio and video multicast se rvices.
Hereinafter Quidway S5000 Series Ethernet Switches are referred to as S5000 Series
Ethernet Switches.
1.2 Function Features
Table 1-1 Function features
Features Implementation
VLAN
Supports VLAN compliant with IEEE 802.1Q Standard
Supports port-based VLAN
Supports GARP VLAN Registration Protocol (GVRP)
STP protocol
Supports Spanning Tree Protocol (STP) / Multiple Spanning Tree Protocol (MSTP),
compliant with IEEE 802.1D/IEEE 802.1s Standard
Flow control
Supports IEEE 802.3x flow control (full-duplex)
Supports back-pressure based flow control (half-duplex)
Broadcast
Suppression
Supports Broadcast Suppression
Multicast
Supports GARP Multicast Registration Protocol (GMRP)
Supports Internet Group Management Protocol (IGMP) Snooping
Link aggregation Supports link aggregation
Mirror
Supports the port-based mirror
Supports the mirror based on the traffic classification
Quality of Service
(QoS)
Supports traffic classification
Supports bandwidth control
Supports priority
Supports queues of different priority on the port
Queue scheduling: supports Strict Priority Queuing (SP), Weighted Round Robin (WRR),
Round Robin (RR)
Security features
Supports Multi-level User management and password protect
Supports 802.1X authentication
Supports packet filtering
Management and
Maintenance
Supports command line interface configuration
Supports configuration via Console port
Supports remote configuration via Telnet or SSH
Supports configuration through dialing the Modem
Supports SNMP management (Supports Quidview NMS and RMON MIB Group 1, 2, 3
and 9)
Supports system log
Supports level alarms
Supports Huawei Group Management Protocol (HGMP) V2
Supports output of the debugging information
Supports PING and Tracert
Supports the remote maintenance via Telnet or Modem or SSH
Loading and update
Supports to load and upgrade software via XModem protocol
Supports to load and upgrade software via File Transfer Protocol (FTP) and Trivial File
Transfer Protocol (TFTP)
Operation Manual - Getting Started
Quidway S5000 Series Ethernet Switches Chapter 2 Logging in Ethernet Switch
2-1
Chapter 2 Logging in Ethernet Switch
2.1 Set up Configuration Environment via the Console Port
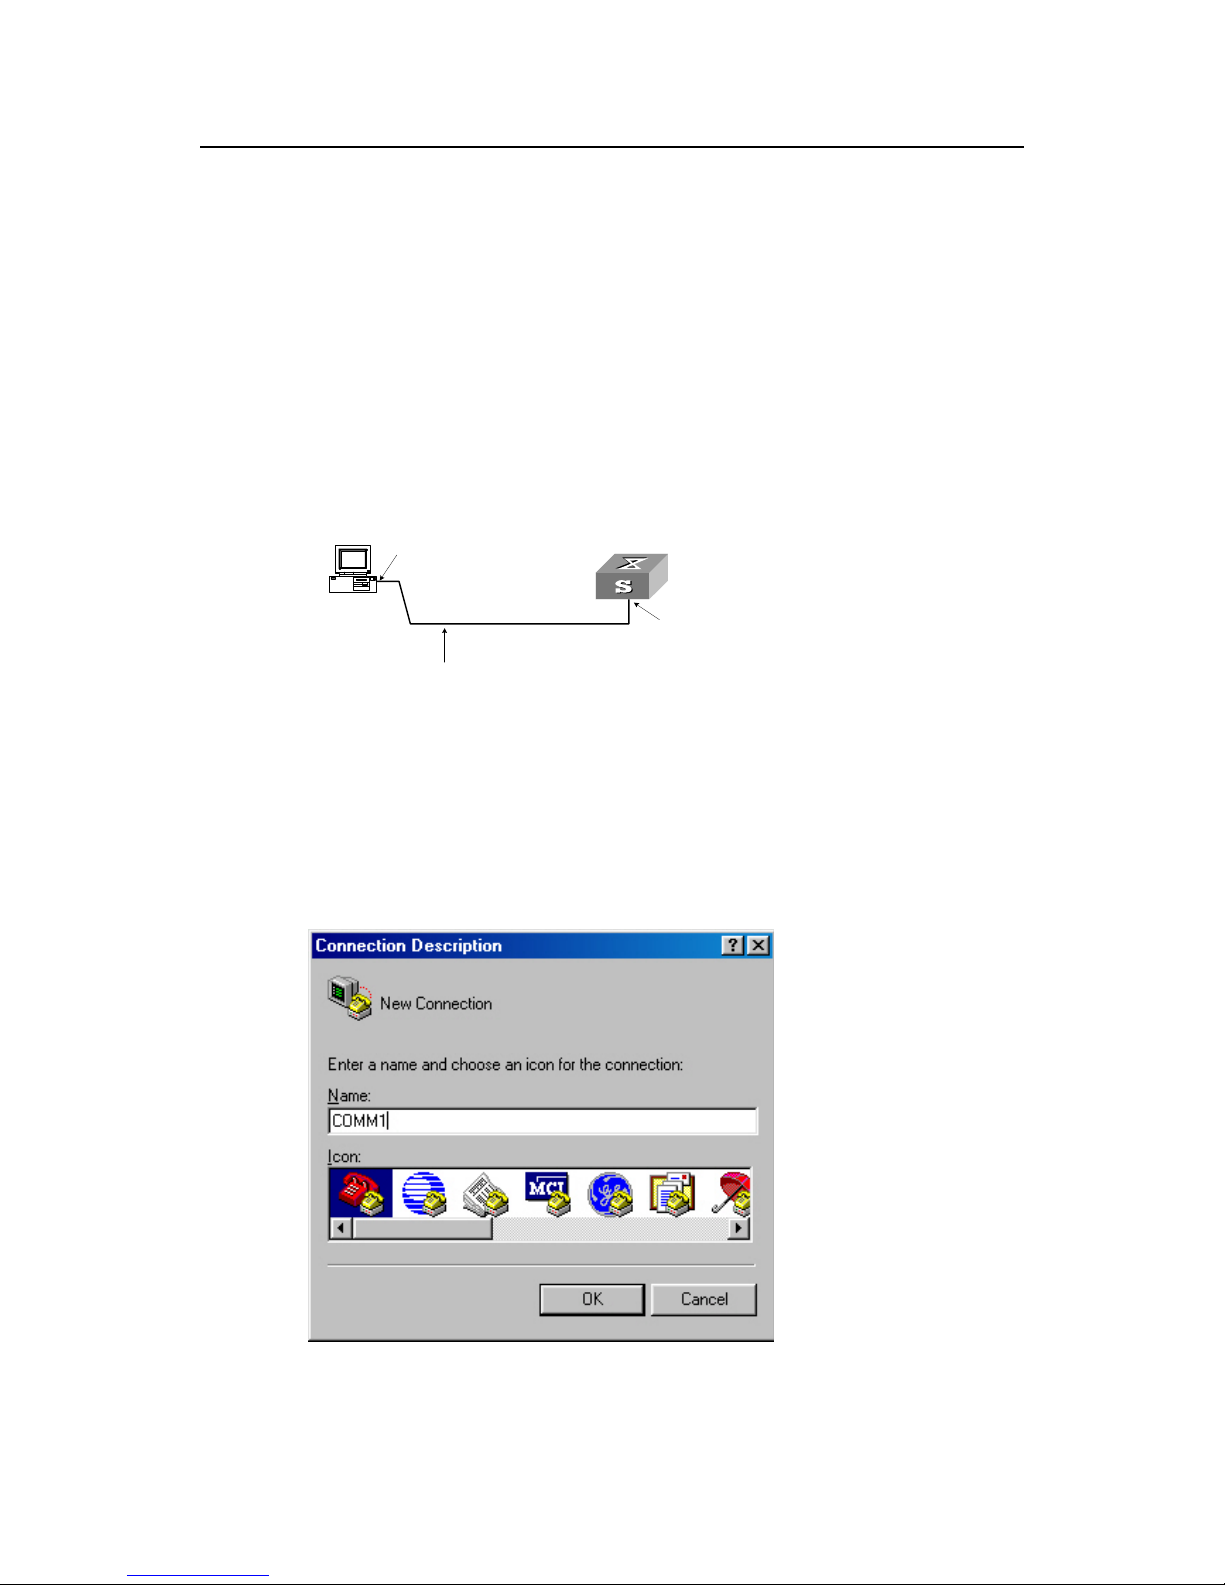
Step 1: As shown in the figure below, to set up the local configuration environment,
connect the serial port of a PC (or a terminal) to the Console port of the Ethernet switch
with the Console cable.
Console port
RS-232 Serial port
Console cable
Figure 2-1 Set up the local configuration environment via the Console port
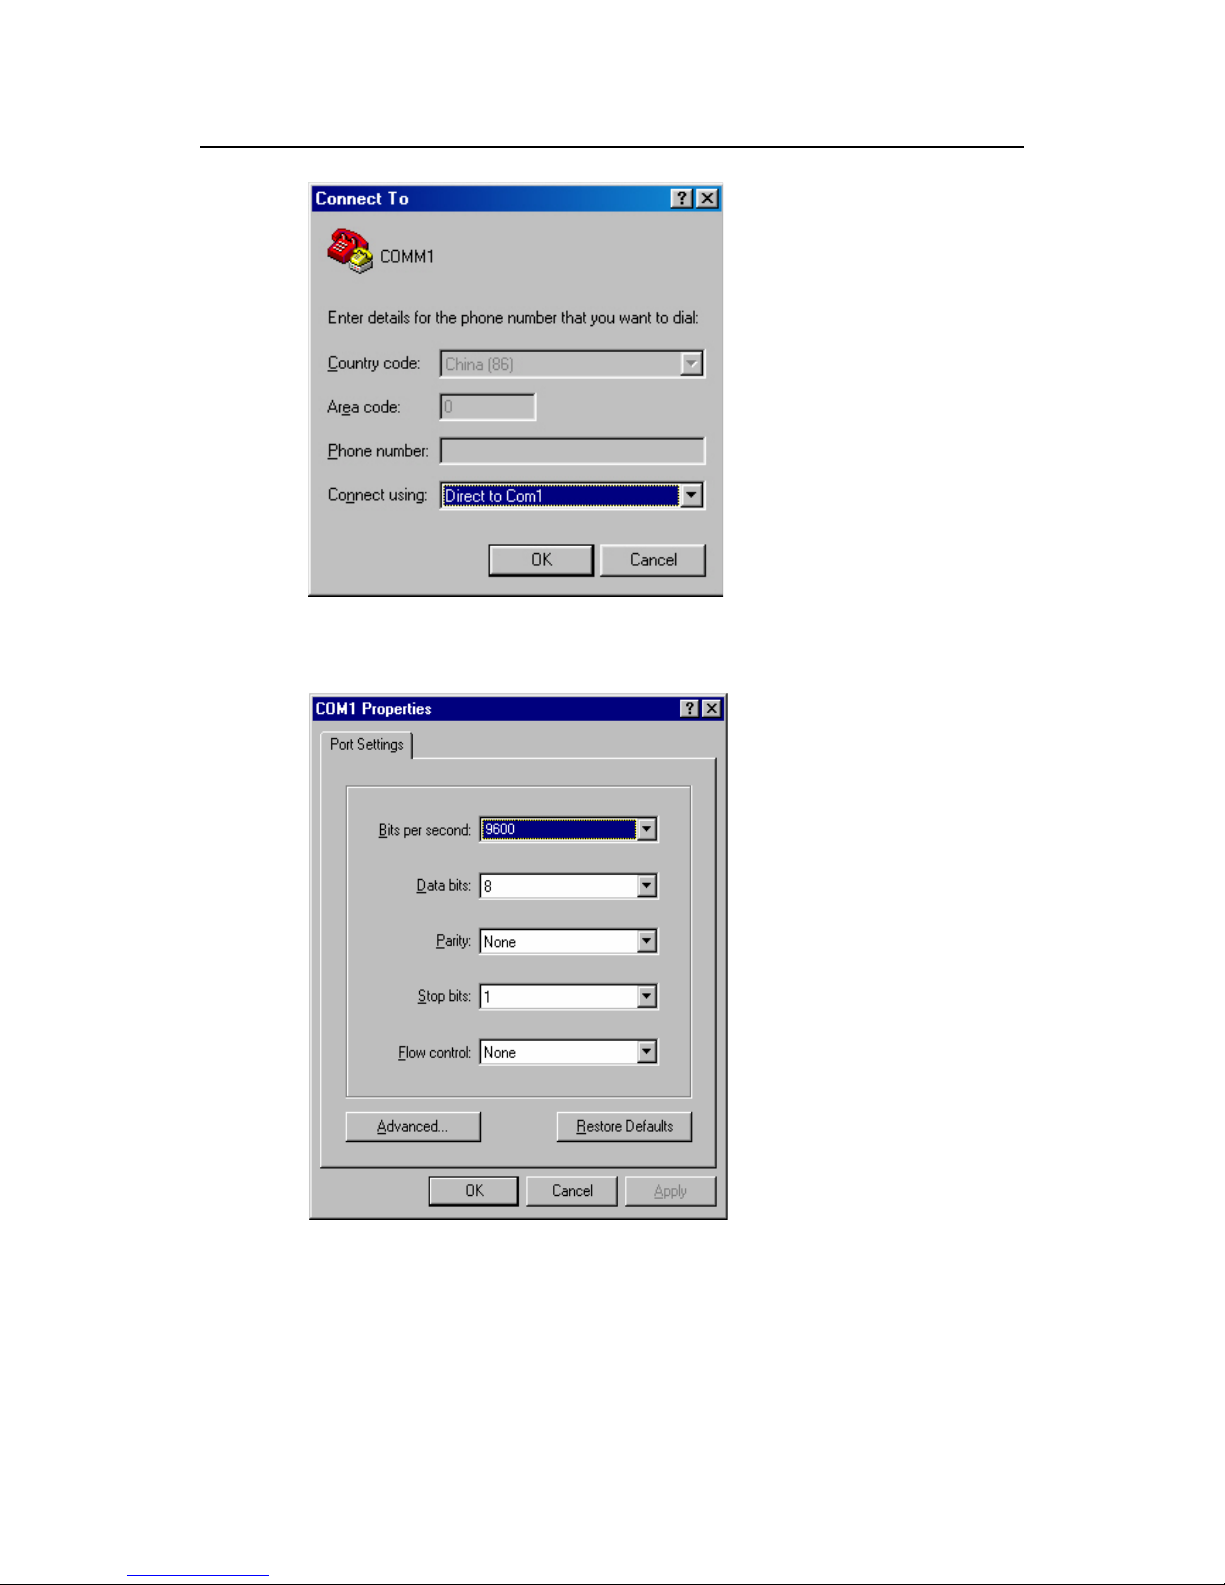
Step 2: Run terminal emul ator (such as Terminal on Windows 3X or the Hyper Terminal
on Windows 9X) on the Computer. Set the terminal communication parameters as
follows: Set the baud rate to 9600, databit to 8, parity check to none, stopbit to 1, flow
control to none and select the terminal type as VT100.
Figure 2-2 Set up new connection
Operation Manual - Getting Started
Quidway S5000 Series Ethernet Switches Chapter 2 Logging in Ethernet Switch
2-2
Figure 2-3 Configure the port for connection
Figure 2-4 Set communication parameters
Step 3: The Ethernet switch is powered o n. Display self-test information of the Ethernet
switch and prompt you to press Enter to show the command line prompt such as
<Quidway>.

Operation Manual - Getting Started
Quidway S5000 Series Ethernet Switches Chapter 2 Logging in Ethernet Switch
2-3
Step 4: Input a command to configure the Ethernet switch or view the operation state.
Input a “?” for an immediate help. For details of specific commands, refer to the
following chapters.
2.2 Set up Configuration Environment through Telnet
2.2.1 Connect PC to Ethernet Switch through Telnet
After you have correctly configured IP address of a management VLAN interface for an
Ethernet Switch via Console port (using ip address command in VLAN interface view),
and added the port (that connects to a terminal) to this VLAN (using port command in
VLAN view), you can telnet this Ethernet switch and configure it
Step 1: Authenticate the Telnet user via the Console port before the user logs in by
Telnet.
Note:
By default, the password is required for authenticating the Telnet user to log in the Ethernet switch. If a
user logs in via the Telnet without password, he will see the prompt “password required, but none set.”.
<Quidway> system-view
Enter system view , return user view with Ctrl+Z.
[Quidway] user-interface vty 0
[Quidway-ui-vty0] set authentication password simple xxxx (xxxx is the preset login
password of Telnet user)
Step 2: To set up the configuration environment, connect the Ethernet port of the PC to
that of the Ethernet switch via the LAN.

Operation Manual - Getting Started
Quidway S5000 Series Ethernet Switches Chapter 2 Logging in Ethernet Switch
2-4
Works tation
Works tation
Serv er
PC ( for configuring the swi tch
via Telnet )
Ethernet port
Ethernet
Works tation
Works tation
Serv er
PC ( for configuring the swi tch
via Telnet )
Ethernet port
Ethernet
Figure 2-5 Set up configuration environment through telnet
Step 3: Run Telnet on the PC and input the IP address of the VLAN connected to the PC
port.
Figure 2-6 Run Telnet
Step 4: The terminal displays “User Access Verification” and prompts the user to input
the logon password. After you input the corr ect pa ssword, it displays the command line
prompt (such as <Quidway>). If the prompt “Too many users!” appears, it indicates that
too many users are connected to the Ethernet through the Telnet at this moment. In this
case, please reconnect later. At most 5 Telnet users are allowed to log on to the
Quidway series Ethernet Switches simultaneously.
Step 5: Use the corresponding commands to configure the Ethernet switch or to
monitor the running state. Enter “?” to get the immediate help. For details of specific
commands, refer to the following chapters.
Note:
1) When configuring the Ethernet switch via Telnet, do not modify the IP address of it unless necessary, for
the modification might cut the Telnet connection.
2) By default, when a Telnet user logs in, he can access the commands at Level 0.
Operation Manual - Getting Started
Quidway S5000 Series Ethernet Switches Chapter 2 Logging in Ethernet Switch
2-5
2.2.2 Telnet Ethernet Switch through Ethernet Switch
After a user has logged into a switch, he or she can configure another switch through
the switch via Telnet. The local switch serves as Telnet client and the peer switch
serves as Telnet server. If the ports connecting these two switches are in a same local
network, their IP addresses must be configured in the same network segment.
Otherwise, the two switches must establish a route that can reach each other.
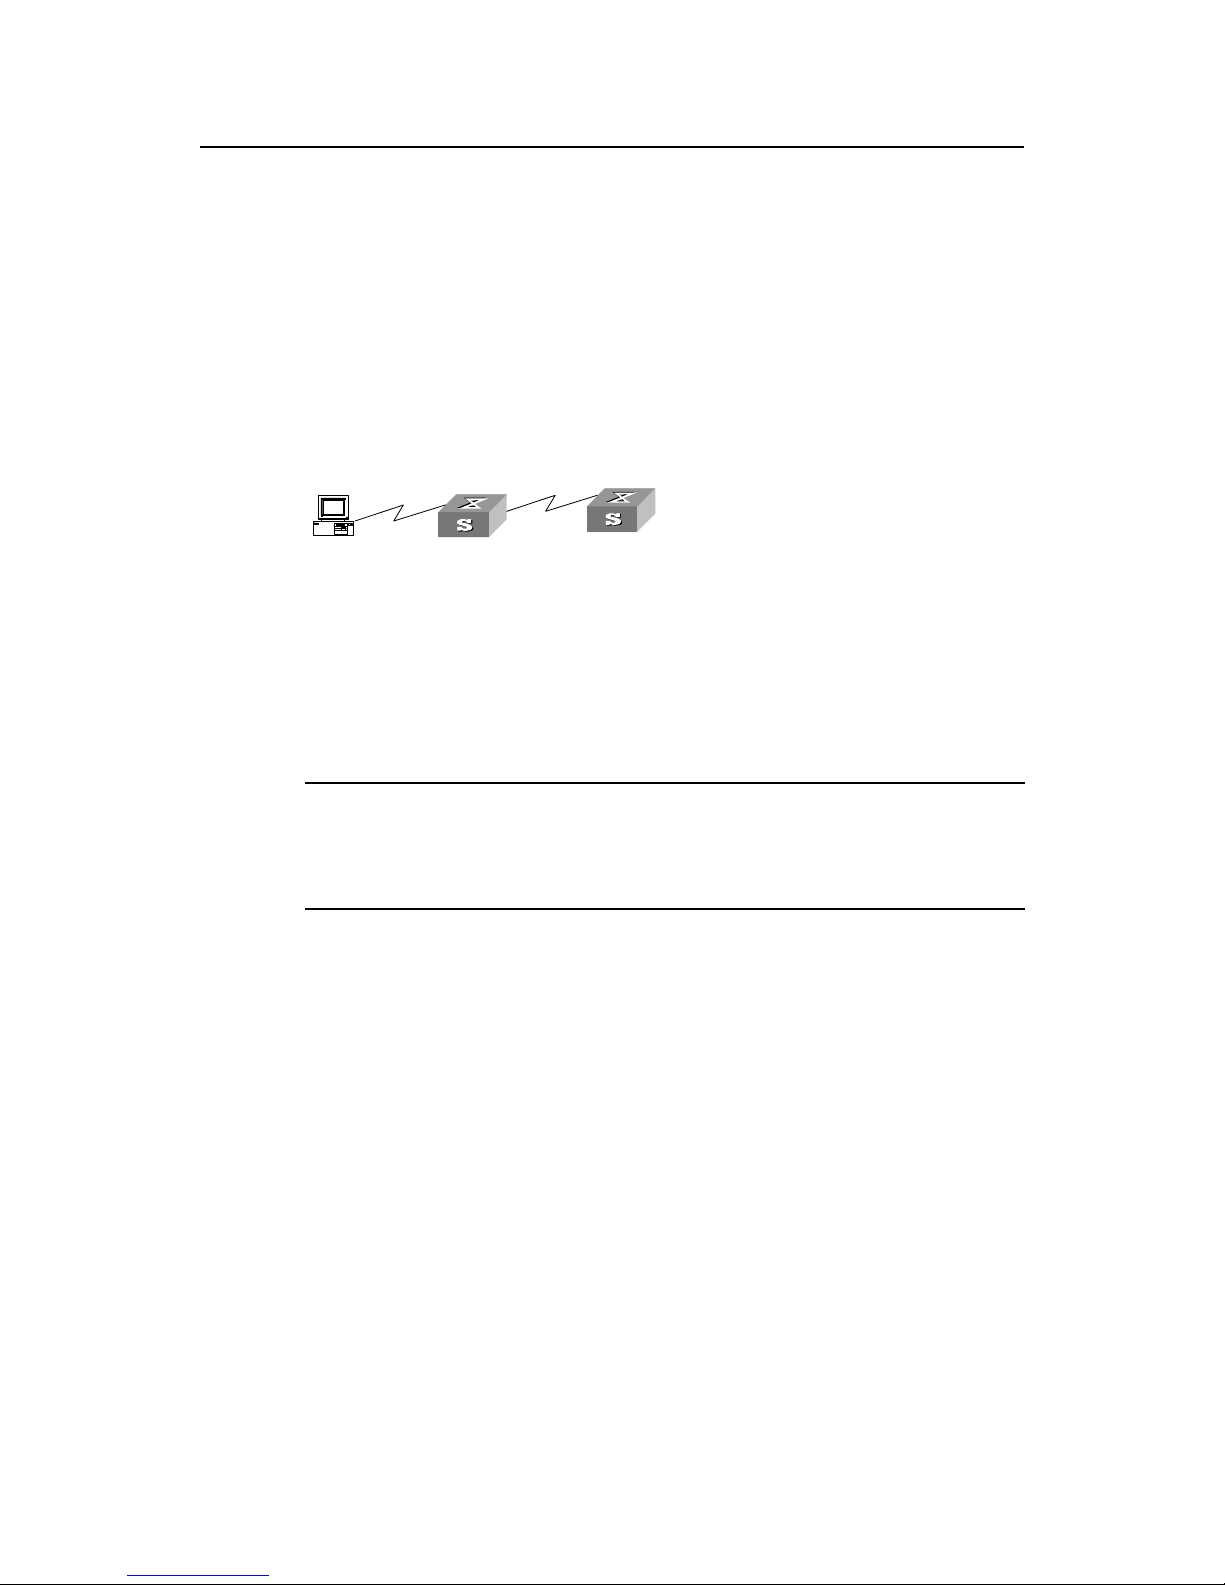
As shown in the figure below, after you telnet to an Ethernet switch, you can run telnet
command to log in and configure another Ethernet switch.
Telnet Client
PC
Telnet Server
Figure 2-7 Provide Telnet Client service
Step 1: Authenticate the Telnet user via the Console port on the Telnet Server (Ethernet
switch) before login.
Note:
By default, the password is required for authenticating the Telnet user to log in the Ethernet switch. If a
user logs in via the Telnet without password, he will see the prompt “password required, but none set.”.
<Quidway> system-view
Enter system view , return user view with Ctrl+Z.
[Quidway] user-interface vty 0
[Quidway-ui-vty0] set authentication password simple xxxx (xxxx is the preset login
password of Telnet user)
Step 2: The user logs in the Telnet Client (Ethernet switch). For the login process, refer
to the section describing “Telnet PC to Ethernet Switch”.
Step 3: Perform the following operations on the Telnet Client:
<Quidway> telnet xxxx (xxxx can be the hostname or IP address of the Telnet Server. If
it is the hostname, the switch shall have the static resolution function.)

Operation Manual - Getting Started
Quidway S5000 Series Ethernet Switches Chapter 2 Logging in Ethernet Switch
2-6
Step 4: Enter the preset login pa ssword and you will see the prompt such <Quidway>. If
the prompt “Too many users!” appears, it indicates that too many users are connected
to the Ethernet through the Telnet at this moment. In this case, please connect later.
Step 5: Use the corresponding commands to configure the Ethernet switch or view it
running state. Enter “?” to get the immediate help. For details of specific commands,
refer to the following chapters.
2.3 Set up Configuration Environment through a Dial-up the
Modem
Step 1: Authenticate the Modem use r via the Console port of the Ethernet switch before
he logs in the switch through a dial-up Modem.
Note:
By default, the password is required for authenticating the Modem user to log in the Ethernet switch. If a
user logs in via the Modem without password, he will see the prompt “password required, but none set.”.
<Quidway> system-view
Enter system view , return user view with Ctrl+Z.
[Quidway] user-interface aux 0
[Quidway-ui-aux0] set authentication password simple xxxx (xxxx is the preset login
password of the Modem user.)
Step 2: Perform the following configurations on the Modem that is dire ctly connected to
the Ethernet switch. (You are not required to configure the Modem connected to the
terminal.)
AT&F ----------------------- Reset Modem factory settings
ATS0=1 -----------------Set auto response (ring once)
AT&D ----------------------- Ignore DTR signal
AT&K0 ----------------- ------ Disable flow control
AT&R1 ----------------------- Ignore RTS signal
AT&S0 ---------------- ------- Force DSR to be high-level
ATEQ1&W --------------- -------- Bar the modem to send command response
or execution result and save the configurations
After the configuration, key in the AT&V command to verify the Modem settings.
Operation Manual - Getting Started
Quidway S5000 Series Ethernet Switches Chapter 2 Logging in Ethernet Switch
2-7
Note:
1) The Modem configuration commands and outputs may be different according to different Modems. For
details, refer to the User Manual of the Modem.
2) It is recommended that the transmission rate on the Console port must lower than that of Modem,
otherwise packets may be lost.
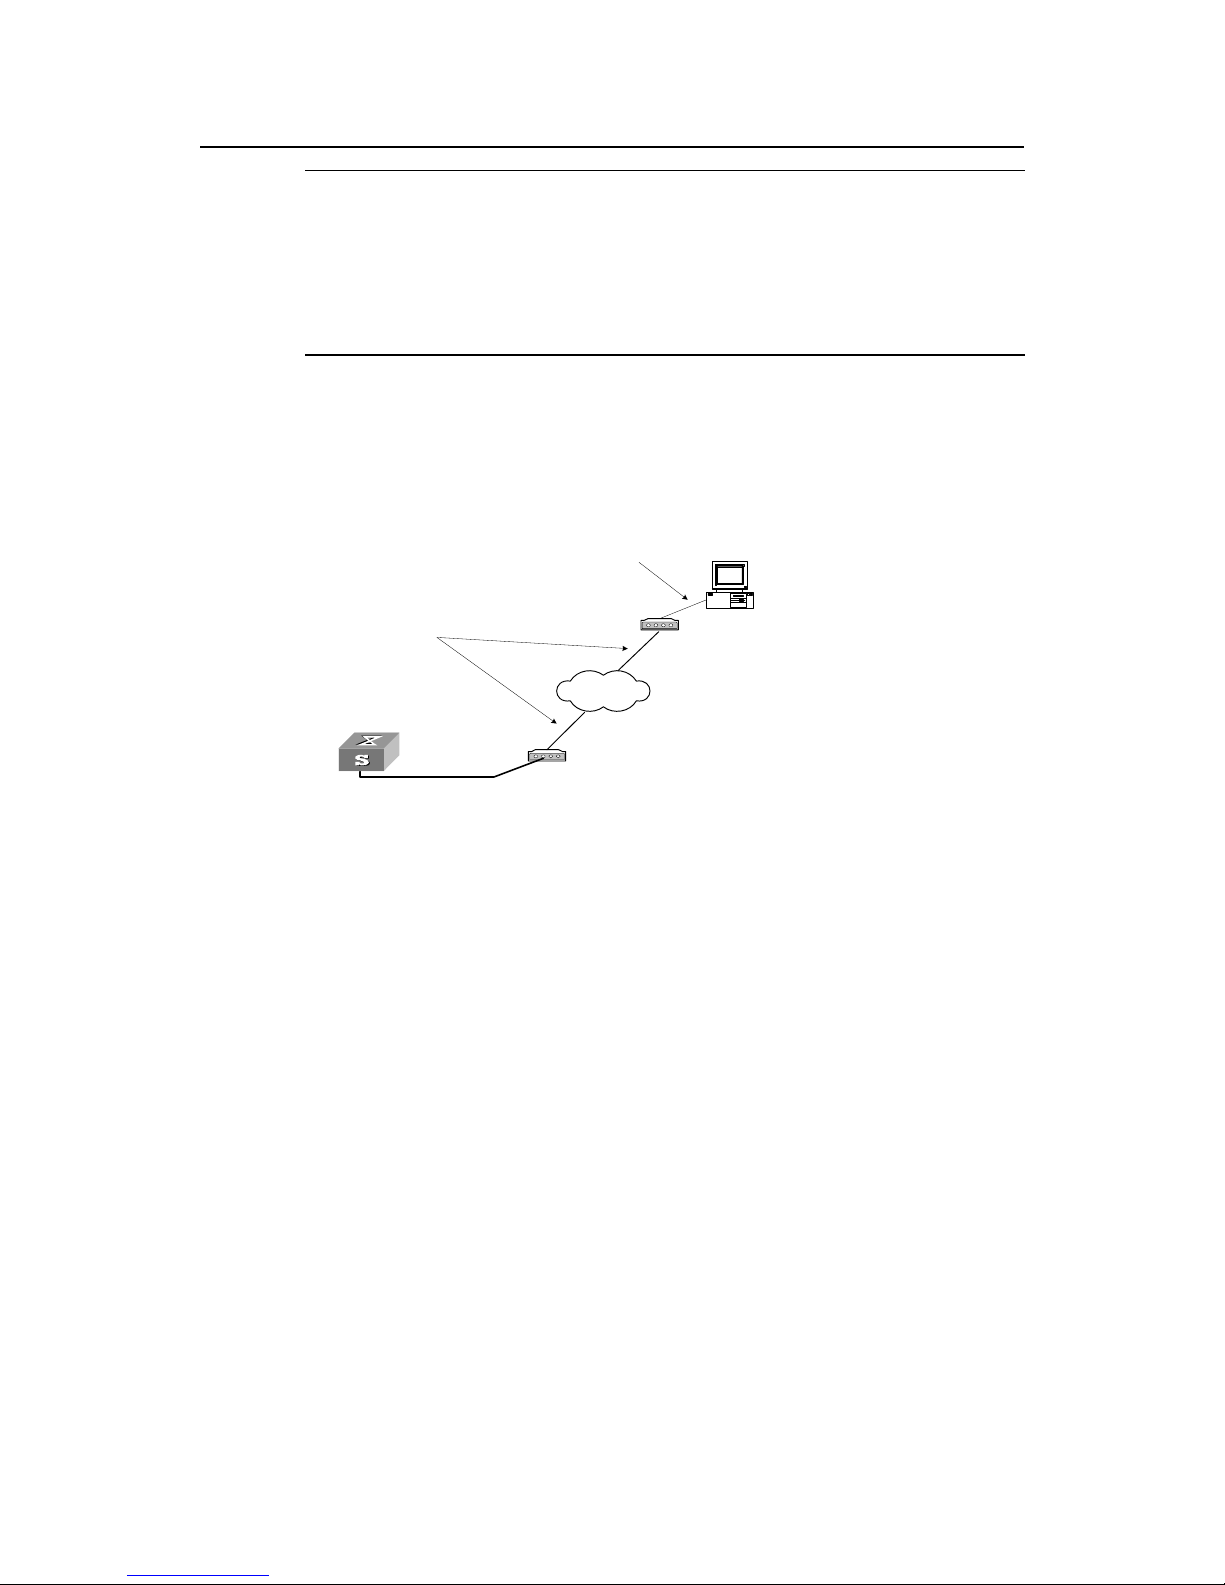
Step 3: As shown in the figure below, to set up the remote configuration environment,
connect the Modems to a PC (or a terminal) serial port and the Ethe rnet switch Console
port respectively.
Modem
Telephone line
Modem
Modem serial port line
Remote tel:
82882285
Console port
PSTN
Figure 2-8 Set up remote configuration environment
Step 4: Dial for connection to the switch, using the terminal emulat or and Modem on the
remote end. The number dialed shall be the telephone number of the Modem
connected to the Ethernet switch. See the two figures below.
 Loading...