

Page 1

Huawei Proprietary and Confidential
Copyright © Huawei Technologies Co., Ltd.
Quidway NetEngine80 Core Router
V300R005
Configuration Guide - Basic
Configurations
Issue
04
Date
2009-12-20
Part Number
00407347
Page 2

Huawei Proprietary and Confidential
Copyright © Huawei Technologies Co., Ltd.
Huawei Technologies Co., Ltd. provides customers with comprehensive technical support and service. For
any assistance, please contact our local office or company headquarters.
Huawei Technologies Co., Ltd.
Address: Huawei Industrial Base
Bantian, Longgang
Shenzhen 518129
People's Republic of China
Website: http://www.huawei.com
Email: [email protected]
Copyright © Huawei Technologies Co., Lt d. 2009. Al l right s reserved .
No part of this document may be reproduced or transmitted in any form or by any means without prior
written consent of Huawei Technologies Co., Ltd.
Trademarks and Permissions
and other Huawei trademarks are trademarks of Huawei Technologies Co., Ltd.
All other trademarks and trade names mentioned in this document are the property of their respective
holders.
Notice
The information in this document is subject to change without notice. Every effort has been made in the
preparation of this document to ensure accuracy of the contents, but all statements, information, and
recommendations in this document do not constitute the warranty of any kind, express or implied.
Page 3

Quidway NetEngine80
Configuration Guide - Basic Configurations Contents
Issue 04 (2009-12-20) Huawei Proprietary and Confidential
Copyright © Huawei Technologies Co., Ltd.
i
Contents
About This Document..................................................................................................................... 1
1 NE80 Core Router Overview....................................................................................................1-1
1.1 Introduction.................................................................................................................................................1-2
1.1.1 Overview...........................................................................................................................................1-2
1.1.2 Hardware Architecture ......................................................................................................................1-2
1.1.3 Software Architecture........................................................................................................................1-3
1.2 Characteristics of the NE80.........................................................................................................................1-5
1.2.1 Support for Flattened Network Architecture.....................................................................................1-5
1.2.2 Line-Speed Forwarding.....................................................................................................................1-6
1.2.3 Multiple Interfaces ............................................................................................................................1-6
1.2.4 Carrier-Class A vailability..................................................................................................................1-6
1.2.5 Rich Services.....................................................................................................................................1-6
1.2.6 Perfect Diff-Serv/QoS....................................................................................................................... 1-6
1.2.7 Excellent Security Mechanism..........................................................................................................1-7
1.2.8 Practical NMS...................................................................................................................................1-7
1.2.9 Flexible Networking Capabilities......................................................................................................1-8
1.3 Features List of the NE80............................................................................................................................1-8
2 Establishment of the Configuration Environment..............................................................2-1
2.1 Introduction.................................................................................................................................................2-2
2.1.1 Login Through the Console...............................................................................................................2-2
2.1.2 Login Through Telnet........................................................................................................................2-2
2.1.3 Login Through AUX Port..................................................................................................................2-2
2.2 Logging In to the Router Through the Console Port...................................................................................2-2
2.2.1 Establishing the Configuration Task..................................................................................................2-2
2.2.2 Establishing the Physical Connection ...............................................................................................2-3
2.2.3 Configuring Terminals.......................................................................................................................2-3
2.2.4 Logging In to the Router...................................................................................................................2-3
2.3 Logging In to Router Through Telnet..........................................................................................................2-4
2.3.1 Establishing the Configuration Task..................................................................................................2-4
2.3.2 Establishing the Physical Connection ...............................................................................................2-5
2.3.3 Configuring Login User Parameters..................................................................................................2-5
Page 4

Contents
Quidway NetEngine80
Configuration Guide - Basic Configurations
ii
Huawei Proprietary and Confidential
Copyright © Huawei Technologies Co., Ltd.
Issue 04 (2009-12-20)
2.3.4 Logging In from the Telnet Client.....................................................................................................2-5
2.4 Logging In to the Router Through the AUX Port........................................................................................2-5
2.4.1 Establishing the Configuration Task..................................................................................................2-5
2.4.2 Establishing the Physical Connection ...............................................................................................2-6
2.4.3 Initializing and Configuring the Modem on the Interface.................................................................2-6
2.4.4 Configuring the Connection Between the Remote Terminal and the Router.....................................2-6
2.4.5 Logging In to the Router...................................................................................................................2-7
2.5 Configuration Examples..............................................................................................................................2-7
2.5.1 Example for Logging In Through the Console Port..........................................................................2-7
2.5.2 Example for Logging In Through Telnet...........................................................................................2-9
2.5.3 Example for Logging In Through the AUX Port.............................................................................2 -11
3 CLI Overview..............................................................................................................................3-1
3.1 Introduction.................................................................................................................................................3-2
3.1.1 Command Line Interface...................................................................................................................3-2
3.1.2 Command Levels...............................................................................................................................3-2
3.1.3 Command Line Views.......................................................................................................................3-3
3.2 Online Help.................................................................................................................................................3-6
3.2.1 Full Help............................................................................................................................................3-6
3.2.2 Partial help ........................................................................................................................................3-6
3.2.3 Error Messages of the Command Line Interface...............................................................................3-7
3.3 Features of Command Line Interface..........................................................................................................3-7
3.3.1 Editing...............................................................................................................................................3-7
3.3.2 Displaying.........................................................................................................................................3-8
3.3.3 Regular Expressions..........................................................................................................................3-8
3.3.4 History Commands..........................................................................................................................3-10
3.4 Shortcut Keys............................................................................................................................................3-11
3.4.1 Classifying Shortcut Keys...............................................................................................................3-11
3.4.2 Defining Shortcut Keys...................................................................................................................3-12
3.4.3 Use of Shortcut Keys.......................................................................................................................3-13
3.5 Configuration Examples............................................................................................................................3-13
3.5.1 Example for Using Shortcut Keys...................................................................................................3-13
3.5.2 Copying Commands Using Shortcut Keys......................................................................................3-14
3.5.3 Example for Using Tab....................................................................................................................3-14
4 Basic Configuration ...................................................................................................................4-1
4.1 Introduction.................................................................................................................................................4-2
4.2 Configuring the Basic System Environment ...............................................................................................4-2
4.2.1 Establishing the Configuration Task..................................................................................................4-2
4.2.2 Switching the Language Mode..........................................................................................................4-3
4.2.3 Configuring the Equipment Name.....................................................................................................4-3
4.2.4 Configuring the System Clock..........................................................................................................4-3
4.2.5 Configuring the Header Text.............................................................................................................4-4
Page 5

Quidway NetEngine80
Configuration Guide - Basic Configurations Contents
Issue 04 (2009-12-20) Huawei Proprietary and Confidential
Copyright © Huawei Technologies Co., Ltd.
iii
4.2.6 Configuring Command Levels..........................................................................................................4-4
4.3 Configuring Basic User Environment.........................................................................................................4-5
4.3.1 Establishing the Configuration Task..................................................................................................4-5
4.3.2 Configuring the Password for Switching User Levels ......................................................................4-6
4.3.3 Switching User Levels ......................................................................................................................4-6
4.3.4 Locking User Interfaces....................................................................................................................4-7
4.4 Displaying System Status Messages............................................................................................................4-7
4.4.1 Displaying System Configuration.....................................................................................................4-8
4.4.2 Displaying System Status..................................................................................................................4-8
4.4.3 Collecting System Diagostic Information.........................................................................................4-8
5 User Management ......................................................................................................................5-1
5.1 Introduction.................................................................................................................................................5-2
5.1.1 User Interface View...........................................................................................................................5-2
5.1.2 User Management .............................................................................................................................5-3
5.2 Configuring Console User Interface............................................................................................................5-5
5.2.1 Establishing the Configuration Task..................................................................................................5-5
5.2.2 Configuring Console Interface Attributes..........................................................................................5-6
5.2.3 Setting Console Terminal Attributes..................................................................................................5-7
5.2.4 Configuring the User Interface Priority............................................................................................. 5-7
5.2.5 Configuring User Authentication......................................................................................................5-8
5.2.6 Checking the Configuration............................................................................................................5-10
5.3 Configuring AUX User Interface ..............................................................................................................5-10
5.3.1 Establishing the Configuration Task................................................................................................5-10
5.3.2 Configuring AUX Interface Attributes............................................................................................5-11
5.3.3 Configuring AUX Terminal Attributes............................................................................................5-12
5.3.4 Configuring User Priority................................................................................................................5-13
5.3.5 Configuring Modem Attributes.......................................................................................................5-13
5.3.6 Configuring User Authentication....................................................................................................5-14
5.3.7 Checking the Configuration............................................................................................................5-15
5.4 Configuring VTY User Interface...............................................................................................................5-16
5.4.1 Establishing the Configuration Task................................................................................................5-16
5.4.2 Configuring Maximum VTY User Interfaces..................................................................................5-17
5.4.3 Configuring Limits for Incoming Calls and Outgoing Calls...........................................................5-17
5.4.4 Configuring Timeout of VTY User A uthorization...........................................................................5-18
5.4.5 Configuring VTY Terminal Attributes ............................................................................................5-18
5.4.6 Configuring User Authentication....................................................................................................5-19
5.4.7 Checking the Configuration............................................................................................................5-21
5.5 Managing User Interfaces..........................................................................................................................5-21
5.5.1 Establishing the Configuration Task................................................................................................5-21
5.5.2 Sending Messages to Other User Interfaces....................................................................................5-22
5.5.3 Clearing Online User.......................................................................................................................5-22
Page 6

Contents
Quidway NetEngine80
Configuration Guide - Basic Configurations
iv
Huawei Proprietary and Confidential
Copyright © Huawei Technologies Co., Ltd.
Issue 04 (2009-12-20)
5.5.4 Checking the Configuration............................................................................................................5-22
5.6 Configuring User Management.................................................................................................................5-23
5.6.1 Establishing the Configuration Task................................................................................................5-23
5.6.2 Configuring Authentication Mode...................................................................................................5-24
5.6.3 Configuring Authentication Password.............................................................................................5-24
5.6.4 Setting Username and Password for AAA Local Authentication ....................................................5-24
5.6.5 Configuring Non-Authentication.....................................................................................................5-25
5.6.6 Configuring User Priority................................................................................................................5-26
5.6.7 Checking the Configuration............................................................................................................5-26
5.7 Configuring Local User Management.......................................................................................................5-26
5.7.1 Establishing the Configuration Task................................................................................................5-26
5.7.2 Creating Local User Account..........................................................................................................5-27
5.7.3 Configuring the Service Type of the Local User.............................................................................5-27
5.7.4 Configuring Local User Authority for FTP Directory.....................................................................5-28
5.7.5 Configuring Local User Status........................................................................................................5-28
5.7.6 Configuring Local User Priority......................................................................................................5-29
5.7.7 Configuring Access Restriction of the Local User..........................................................................5-29
5.7.8 Checking the Configuration............................................................................................................5-29
5.8 Configuration Examples............................................................................................................................5-30
5.8.1 Example for Configuring Logging In to the Router Through Password .........................................5-31
5.8.2 Example for Logging In to the Router Through AAA.....................................................................5-32
6 File System ..................................................................................................................................6-1
6.1 Introduction.................................................................................................................................................6-2
6.1.1 File System........................................................................................................................................6-2
6.1.2 Storage Devices.................................................................................................................................6-2
6.1.3 Files...................................................................................................................................................6-2
6.1.4 Directories.........................................................................................................................................6-2
6.2 Managing Storage Devices..........................................................................................................................6-2
6.2.1 Establishing the Configuration Task..................................................................................................6-2
6.2.2 Restoring Storage Devices with File System Troubles......................................................................6-3
6.2.3 Formatting Storage Devices..............................................................................................................6-3
6.3 Managing the Directory...............................................................................................................................6-4
6.3.1 Establishing the Configuration Task..................................................................................................6-4
6.3.2 Viewing the Current Directory..........................................................................................................6-5
6.3.3 Switching the Directory.....................................................................................................................6-5
6.3.4 Displaying the Directory of File........................................................................................................6-5
6.3.5 Creating a Directory..........................................................................................................................6-6
6.3.6 Deleting a Directory..........................................................................................................................6-6
6.4 Managing Files............................................................................................................................................6-6
6.4.1 Displaying Contents of Files.............................................................................................................6-7
6.4.2 Copying Files....................................................................................................................................6-7
Page 7

Quidway NetEngine80
Configuration Guide - Basic Configurations Contents
Issue 04 (2009-12-20) Huawei Proprietary and Confidential
Copyright © Huawei Technologies Co., Ltd.
v
6.4.3 Moving Files .....................................................................................................................................6-8
6.4.4 Renaming Files..................................................................................................................................6-8
6.4.5 Deleting Files....................................................................................................................................6-9
6.4.6 Deleting Files in the Recycle Bin......................................................................................................6-9
6.4.7 Undeleting Files ................................................................................................................................6-9
6.5 Running Files in Batch..............................................................................................................................6-10
6.6 Configuring Prompt Modes.......................................................................................................................6-10
6.7 Example of Configuration.........................................................................................................................6-11
7 Management of Configuration Files ......................................................................................7-1
7.1 Introduction.................................................................................................................................................7-2
7.1.1 Definitions.........................................................................................................................................7-2
7.1.2 Configuration Files and Current Configurations...............................................................................7-2
7.2 Managing Configuration Files.....................................................................................................................7-2
7.2.1 Establishing the Configuration Task..................................................................................................7-2
7.2.2 Configuring System Software for a Router to Load..........................................................................7-3
7.2.3 Configuring the Configuration File for Router to Load....................................................................7-3
7.2.4 Saving Configuration File.................................................................................................................7-4
7.2.5 Clearing Configuration Files.............................................................................................................7-4
7.2.6 Comparing Configuration Files.........................................................................................................7-5
7.2.7 Checking the Configuration..............................................................................................................7-5
8 FTP, TFTP and XModem ..........................................................................................................8-1
8.1 Introduction.................................................................................................................................................8-2
8.1.1 FTP....................................................................................................................................................8-2
8.1.2 TFTP .................................................................................................................................................8-2
8.1.3 XModem ...........................................................................................................................................8-2
8.2 Configuring the Router to be the FTP Server.............................................................................................. 8-3
8.2.1 Establishing the Configuration Task..................................................................................................8-3
8.2.2 Configuring the source address of FTP server...................................................................................8-4
8.2.3 Enabling the FTP Server ...................................................................................................................8-4
8.2.4 Configuring the Timeout Period........................................................................................................8-4
8.2.5 Configuring the Local Username and the Password..........................................................................8-5
8.2.6 Configuring Service Types and Authorization Information...............................................................8-5
8.2.7 Checking the Configuration..............................................................................................................8-6
8.3 Configuring FTP ACL.................................................................................................................................8-6
8.3.1 Establishing the Configuration Task..................................................................................................8-6
8.3.2 Enabling the FTP Server ...................................................................................................................8-7
8.3.3 Configuring the Basic ACL...............................................................................................................8-7
8.3.4 Configuring the Basic FTP ACL.......................................................................................................8-8
8.3.5 Checking the Configuration..............................................................................................................8-8
8.4 Configuring the Router to Be the FTP Client..............................................................................................8-9
8.4.1 Establishing the Configuration Task..................................................................................................8-9
Page 8

Contents
Quidway NetEngine80
Configuration Guide - Basic Configurations
vi
Huawei Proprietary and Confidential
Copyright © Huawei Technologies Co., Ltd.
Issue 04 (2009-12-20)
8.4.2 Configuring the source address of FTP Client.................................................................................8-10
8.4.3 Logging In to the FTP Server..........................................................................................................8-10
8.4.4 Configuring Data Type and Transmission Mode for the File..........................................................8-10
8.4.5 Viewing Online Help of the FTP Command...................................................................................8-11
8.4.6 Uploading or Downloading Files....................................................................................................8-11
8.4.7 Managing Directories......................................................................................................................8-11
8.4.8 Managing Files................................................................................................................................8-12
8.4.9 Changing Login Users.....................................................................................................................8-13
8.4.10 Disconnecting from the FTP Server..............................................................................................8-13
8.4.11 Checking the Configuration...........................................................................................................8-14
8.5 Configuring TFTP.....................................................................................................................................8-14
8.5.1 Establishing the Configuration Task................................................................................................8-14
8.5.2 Configuring the source address of TFTP Client..............................................................................8-15
8.5.3 Downloading Files Through TFTP..................................................................................................8-15
8.5.4 Uploading Files Through TFTP ......................................................................................................8-15
8.6 Limiting the Access to the TFTP Server....................................................................................................8-16
8.6.1 Establishing the Configuration Task................................................................................................8-16
8.6.2 Configuring the Basic ACL.............................................................................................................8-16
8.6.3 Configuring the Basic TFTP ACL...................................................................................................8-17
8.7 Configuring XModem...............................................................................................................................8-17
8.7.1 Establishing the Configuration Task................................................................................................8-17
8.7.2 Getting a File Through XModem....................................................................................................8-18
8.8 Configuration Examples............................................................................................................................8-18
8.8.1 Example for Configuring the FTP Server........................................................................................8-18
8.8.2 Example for Configuring FTP ACL................................................................................................8-21
8.8.3 Example for Configuring the FTP Client........................................................................................8-23
8.8.4 Example for Configuring TFTP ......................................................................................................8-24
8.8.5 Example for Configuring XModem................................................................................................8-26
9 Telnet and SSH...........................................................................................................................9-1
9.1 Introduction.................................................................................................................................................9-2
9.1.1 Overview of User Login....................................................................................................................9-2
9.1.2 T elnet Te rm inal Services...................................................................................................................9-2
9.1.3 SSH Terminal Services......................................................................................................................9-4
9.2 Configuring T elnet Te rminal Services.........................................................................................................9-7
9.2.1 Establishing the Configuration Task..................................................................................................9-7
9.2.2 Establishing a Telnet Connection......................................................................................................9-8
9.2.3 Establishing a Telnet Redirection Connection...................................................................................9-8
9.2.4 Scheduled Telnet Disconnection.......................................................................................................9-9
9.2.5 Checking the Configuration..............................................................................................................9-9
9.3 Configuring SSH Users.............................................................................................................................9-10
9.3.1 Establishing the Configuration Task................................................................................................9-10
Page 9

Quidway NetEngine80
Configuration Guide - Basic Configurations Contents
Issue 04 (2009-12-20) Huawei Proprietary and Confidential
Copyright © Huawei Technologies Co., Ltd.
vii
9.3.2 Creating an SSH User .....................................................................................................................9-11
9.3.3 Configuring SSH for the VTY User Interface.................................................................................9-11
9.3.4 Generating a Local RSA Key Pair...................................................................................................9-12
9.3.5 Configuring the Authentication Mode for SSH Users.....................................................................9-12
9.3.6 (Optional)Configuring the Basic Authentication Information for SSH Users.................................9-14
9.3.7 (Optional)Authorizing SSH Users Through the Command Line ....................................................9-14
9.3.8 Configuring the Service Type of SSH Users................................................................................... 9-15
9.3.9 (Optional)Configuring the Authorized Directory of SFTP Service for SSH Users.........................9-15
9.3.10 Checking the Configuration..........................................................................................................9-15
9.4 Configuring the SSH Server......................................................................................................................9-16
9.4.1 Establishing the Configuration Task................................................................................................9-16
9.4.2 Enabling the STelnet Service...........................................................................................................9-17
9.4.3 Enabling the SFTP Service..............................................................................................................9-17
9.4.4 (Optional)Enabling the Earlier Version-Compatible Function ........................................................9-17
9.4.5 (Optional)Configuring the Number of the Port Monitored by the SSH Server...............................9-18
9.4.6 (Optional) Enabling the Trap Function............................................................................................9-18
9.4.7 (Optional)Configuring the Interval for Updating the Key Pair on the SSH Server.........................9-19
9.4.8 Checking the Configuration............................................................................................................9-19
9.5 Configuring the STelnet Client Function...................................................................................................9-20
9.5.1 Establishing the Configuration Task................................................................................................9-20
9.5.2 Enabling the First-Time Authentication on the SSH Client.............................................................9-21
9.5.3 (Optional) Configuring the SSH Client to Assign the RSA Public Key to the SSH Server ............9-21
9.5.4 Enabling the STelnet Client.............................................................................................................9-22
9.5.5 Checking the Configuration............................................................................................................9-22
9.6 Configuring the SFTP Client Function......................................................................................................9-23
9.6.1 Establishing the Configuration Task................................................................................................9-23
9.6.2 Configuring the First-Time Aut hentication on the SSH Client .......................................................9-24
9.6.3 Configuring the SSH Client to Assign the RSA Public Key to the SSH Server..............................9-24
9.6.4 Enabling the SFTP Client................................................................................................................9-25
9.6.5 (Optional) Managing the Directory.................................................................................................9-25
9.6.6 (Optional) Managing the File..........................................................................................................9-26
9.6.7 (Optional)Displaying the SFTP Client Command Help..................................................................9-27
9.6.8 Checking the Configuration............................................................................................................9-27
9.7 Maintaining Telnet and SSH......................................................................................................................9-28
9.7.1 Debugging Telnet Terminal Services...............................................................................................9-28
9.7.2 Debugging SSH Terminal Services.................................................................................................9-28
9.8 Configuration Examples............................................................................................................................9-29
9.8.1 Example for Configuring Te lnet Term inal Services........................................................................9-29
9.8.2 Example for Connecting the STelnet Client to the SSH Server.......................................................9-31
9.8.3 Example for Connecting the SFTP Client to the SSH Server..........................................................9-37
9.8.4 Example for Accessing the SSH Server Through Other Port Numbers...........................................9-42
9.8.5 Example for Authenticating SSH Through RADIUS......................................................................9-49
Page 10

Contents
Quidway NetEngine80
Configuration Guide - Basic Configurations
viii
Huawei Proprietary and Confidential
Copyright © Huawei Technologies Co., Ltd.
Issue 04 (2009-12-20)
10 Router Maintenance ..............................................................................................................10-1
10.1 Introduction.............................................................................................................................................10-2
10.1.1 Online Upgrade introduction.........................................................................................................10-2
10.1.2 Device Operation Management.....................................................................................................10-2
10.1.3 Electronic Label ............................................................................................................................10-2
10.2 Upgrading the Board...............................................................................................................................10-2
10.2.1 Establishing the Configuration Task..............................................................................................10-3
10.2.2 Downloading the Board Software.................................................................................................10-3
10.2.3 Online Loading the Board Software..............................................................................................10-4
10.2.4 Upgrading the Stratum 3 Clock Board ..........................................................................................10-4
10.2.5 Resetting the Board.......................................................................................................................10-4
10.2.6 Checking the Configuration ..........................................................................................................10-4
10.3 Managing the Device Operation..............................................................................................................10-5
10.3.1 Setting the Temperature Warning T hreshold Upgradi ng the Board...............................................10-5
10.3.2 Disabling or Re-enabling the DASL Port of the LPU...................................................................10-5
10.3.3 Resetting the Device and Switching over the Channel..................................................................10-6
10.3.4 Displaying the Device Information...............................................................................................10-6
10.4 Configuring the Electronic Labelelectronic.............................................................................................10-7
10.4.1 Establishing the Configuration Task..............................................................................................10-7
10.4.2 Querying the Electronic Label.......................................................................................................10-7
10.4.3 Backing Up the Electronic Label ..................................................................................................10-7
10.5 Configuring a Cleaning Cycle for the Air Filter......................................................................................10-8
10.5.1 Establishing the Configuration Task..............................................................................................10-8
10.5.2 Configuring a Checking of the Air Filter based on the Device Temperature.................................10-8
10.5.3 Configuring a Cleaning Cycle for the Air Filter............................................................................10-9
10.5.4 Remonitoring the Cleaning Cycle of the Air Filter.......................................................................10-9
10.5.5 Checking the Configuration ..........................................................................................................10-9
11 System Software Upgrade ....................................................................................................11-1
11.1 Introduction.............................................................................................................................................11-2
11.1.1 System Software Upgrade.............................................................................................................11-2
11.1.2 License ..........................................................................................................................................11-2
11.2 Uploading the System Software and License Files..................................................................................11-3
11.2.1 Establishing the Configuration Task..............................................................................................11-3
11.2.2 Uploading the System Software and License to the Master MPU.................................................11-3
11.2.3 Copying the System Software and License to the Slave MPU......................................................11-4
11.2.4 Checking the Configuration...........................................................................................................11-4
11.3 Specifying the System Software for the Next Startup of the Router.......................................................11-5
11.3.1 Establishing the Configuration Task..............................................................................................11-5
11.3.2 Specifying the System Software for the Next Startup...................................................................11-5
11.3.3 (Optional) Configuring PA F Files.................................................................................................11-6
11.3.4 (Optional) Configuring Patch Packages ........................................................................................11-6
Page 11

Quidway NetEngine80
Configuration Guide - Basic Configurations Contents
Issue 04 (2009-12-20) Huawei Proprietary and Confidential
Copyright © Huawei Technologies Co., Ltd.
ix
11.3.5 Checking the Configuration...........................................................................................................11-7
12 Patch Management.................................................................................................................12-1
12.1 Introduction.............................................................................................................................................12-2
12.2 Checking the Running of Patch in the System........................................................................................12-3
12.2.1 Establishing the Configuration Task..............................................................................................12-3
12.2.2 Checking the Running of Patch on the MPU ................................................................................12-4
12.2.3 Checking the Running of Patch on the LPU..................................................................................12-5
12.3 Loading a Patch.......................................................................................................................................12-5
12.3.1 Establishing the Configuration Task..............................................................................................12-5
12.3.2 Uploading a Patch to the Root Directory of the Master MPU.......................................................12-6
12.3.3 Copying a Patch to the Root Directory of the Slave MPU............................................................12-6
12.4 Installing a Patch on the MPU.................................................................................................................12-7
12.4.1 Establishing the Configuration Task..............................................................................................12-7
12.4.2 Uploading the MPU Patch.............................................................................................................12-7
12.4.3 Activating the MPU Patch.............................................................................................................12-8
12.4.4 Running the MPU Patch................................................................................................................12-8
12.5 Stop Running the MPU Patch..................................................................................................................12-9
12.5.1 Establishing the Configuration Task..............................................................................................12-9
12.5.2 Deactivating the MPU Patch.........................................................................................................12-9
12.6 Unloading the MPU Patch.....................................................................................................................12-10
12.6.1 Establishing the Configuration Task............................................................................................12-10
12.6.2 Deleting the MPU Patch..............................................................................................................12-10
12.7 Installing a Patch on the LPU................................................................................................................12-11
12.7.1 Establishing the Configuration Task............................................................................................12-11
12.7.2 Uploading the LPU Patch............................................................................................................12-11
12.7.3 Activating the LPU Patch............................................................................................................12-12
12.7.4 Running the LPU Patch...............................................................................................................12-12
12.8 Stop Running the LPU Patch.................................................................................................................12-13
12.8.1 Establishing the Configuration Task............................................................................................12-13
12.8.2 Deactivating the LPU Patch........................................................................................................12-13
12.9 Unloading the LPU Patch......................................................................................................................12-13
12.9.1 Establishing the Configuration Task............................................................................................12-13
12.9.2 Deleting the LPU Patch...............................................................................................................12-14
A Glossary .................................................................................................................................... A-1
B Acronyms and Abbreviations ................................................................................................ B-1
Index ................................................................................................................................................ i-1
Page 12

Quidway NetEngine80
Configuration Guide - Basic Configurations Figures
Issue 04 (2009-12-20) Huawei Proprietary and Confidential
Copyright © Huawei Technologies Co., Ltd.
xi
Figures
Figure 1-1 Software architecture of the NE80-8...............................................................................................1-4
Figure 2-1 Networking diagram of logging in through the console port..........................................................2-7
Figure 2-2 New connection..............................................................................................................................2-8
Figure 2-3 Setting the port................................................................................................................................2-8
Figure 2-4 Setting the port communication param e ters....................................................................................2-9
Figure 2-5 Establishing the configuration environment through Telnet.........................................................2-10
Figure 2-6 Running the Telnet program on the PC.........................................................................................2-11
Figure 2-7 Establishing the remote configuration environment through AUX...............................................2-11
Figure 8-1 Networking diagram with FTP server basic functions..................................................................8-19
Figure 8-2 Networking diagram of configuring FTP ACL.............................................................................8-21
Figure 8-3 Configuring the FTP client............................................................................................................8-23
Figure 8-4 Networking diagram of configuring TFT P...................................................................................8-24
Figure 8-5 Setting the Base Directory of the TFTP server.............................................................................8-25
Figure 8-6 Specifying the file to be sent.........................................................................................................8-26
Figure 9-1 Telnet client services .......................................................................................................................9-2
Figure 9-2 Telnet redirection services...............................................................................................................9-3
Figure 9-3 Usage of Telnet shortcut keys.........................................................................................................9-3
Figure 9-4 Establishing an SSH channel in a LAN..........................................................................................9-5
Figure 9-5 Establishing an SSH channel in a WAN..........................................................................................9-5
Figure 9-6 Networking diagram of the Telnet terminal services mode...........................................................9-29
Figure 9-7 Networking diagram of connecting the STelnet client to the SSH server.....................................9-31
Figure 9-8 Networking diagram of connecting the SFTP client to the SSH server........................................9-37
Figure 9-9 Networking diagram of accessing the SSH server through other port numbers............................9-43
Figure 9-10 Networking diagram of authenticating the SSH through RADIUS............................................9-49
Figure 12-1 Conversion between the statuses of a patch................................................................................12-2
Page 13

Quidway NetEngine80
Configuration Guide - Basic Configurations T ables
Issue 04 (2009-12-20) Huawei Proprietary and Confidential
Copyright © Huawei Technologies Co., Ltd.
xiii
Tables
Table 1-1 Features list of the NE80 Series USR...............................................................................................1-8
Table 3-1 Command line views ........................................................................................................................3-4
Table 3-2 Common error messages of the command line.................................................................................3-7
Table 3-3 Keys for editing ................................................................................................................................3-7
Table 3-4 Keys for displaying...........................................................................................................................3-8
Table 3-5 Describes metacharacters..................................................................................................................3-9
Table 3-6 Access the history commands.........................................................................................................3-10
Table 3-7 System-defined shortcut keys.........................................................................................................3-11
Table 5-1 Example for the absolute numbering................................................................................................5-3
Page 14

Quidway NetEngine80
Configuration Guide - Basic Configurations Contents
Issue 04 (2009-12-20)
Huawei Proprietary and Confidential
Copyright © Huawei Technologies Co., Ltd.
i
Contents
About This Document..................................................................................................................... 1
Page 15

Quidway NetEngine80
Configuration Guide - Basic Configurations About This Document
Issue 04 (2009-12-20)
Huawei Proprietary and Confidential
Copyright © Huawei Technologies Co., Ltd.
1
About This Document
Purpose
This part describes the organization of this document, product version, intended audience,
conventions, and update history.
Related Versions
The following table lists the product versions related to this document.
Product Name Version
Quidway NetEngine80 Core Router V300R005
Intended Audience
This document is intended for:
z
Network planning engineer
z
Hardware installation engineer
z
Commissioning engineer
z
On-site maintenance engineer
z
System maintenance engineer
Organization
This document consists of twelve chapters and is orga nized as follows.
Chapter Content
1 NE80 Core Router Overview This chapter describes the architecture, functional
features and main functions of the NE80.
Page 16

About This Document
Quidway NetEngine80
Configuration Guide - Basic Configurations
2
Huawei Proprietary and Confidential
Copyright © Huawei Technologies Co., Ltd.
Issue 04 (2009-12-20)
Chapter Content
2 Establishment of the Configuration
Environment
This chapter describes the procedures to set up the
configuration environments through CON, Telnet,
and AUX.
3 CLI Overview This chapter describes the command line interface,
command levels, command views and hot keys.
4 Basic Configurtion This chapter describes how to configure the basic
system environment on the router
5 User Management This chapter describes the basic concepts of the
user interface and the user management
6 File System This chapter describes the file system and its
configuration, uploading and downloading files
through FTP, TFTP and XModem, and the
management of configuration file.
7 Management of Configuration
Files
This chapter describes how to configure the file
management.
8 FTP,TFTP and XModem This chapter describes how to configure the basic
functions of the FTP server.
9 Telnet and SSH This chapter describes how to log in to the router
through Telnet and configure the router.
10 Router Maintenance This chapter describes the principle and concepts of
the router maintenance.
11 System Software Upgrade This chapter describes the principle and concepts of
the system software upgrade.
12 Patch Management This chapter describes the principle and concepts of
patch management.
Appendix A Glossary & B
Acronyms and Abbreviations
This chapter collates glossary and frequently used
acronyms and abbreviations in this manual.
Index This chapter collates important keywords used in
this manual to help the reader to access the required
information quickly.
Conventions
Symbol Conventions
The symbols that may be found in this document are defined as follows.
Page 17

Quidway NetEngine80
Configuration Guide - Basic Configurations About This Document
Issue 04 (2009-12-20)
Huawei Proprietary and Confidential
Copyright © Huawei Technologies Co., Ltd.
3
Symbol Description
Indicates a hazard with a high level of risk, which if not
avoided, will result in death or serious injury.
Indicates a hazard with a medium or low level of risk, which if
not avoided, could result in minor or moderate injury.
Indicates a potentially hazardous situation, which if not
avoided, could result in equipment damage, data loss,
performance degradation, or unexpected results.
Indicates a tip that may help you solve a problem or save time.
Provides additional information to emphasize or supplement
important points of the main text.
General Conventions
The general conventions that may be found in this document are defined as follows.
Convention Description
Times New Roman Normal paragraphs are in Times New Roman.
Boldface
Names of files, directories, folders, and users are in
boldface. For example, log in as user root.
Italic Book title s are in italics.
Courier New
Examples of information displayed on the screen are in
Courier New.
Command Conventions
The command conventions that may be found in this document are defined as follows.
Convention Description
Boldface
The keywords of a command line are in boldface.
Italic Command arguments are in italics.
[ ] Items (keywords or arguments) in square brackets [ ] are
optional.
{ x | y | ... } Optional items are grouped in braces and separated by
vertical bars. One item is selected.
[ x | y | ... ] Optional items are grouped in brackets and separated by
vertical bars. One item is selected or no item is selected.
Page 18

About This Document
Quidway NetEngine80
Configuration Guide - Basic Configurations
4
Huawei Proprietary and Confidential
Copyright © Huawei Technologies Co., Ltd.
Issue 04 (2009-12-20)
Convention Description
{ x | y | ... } * Optional items are grouped in braces and separated by
vertical bars. A minimum of one item or a maximum of all
items can be selected.
[ x | y | ... ] * Optional items are grouped in brackets and separated by
vertical bars. Several items or no item can be selected.
&<1-n>
The parameter before the & sign can be repeated 1 to n
times.
# A line starting with the # sign is comments.
GUI Conventions
The GUI conventions that may be found in this document are defined as follows.
Convention Description
Boldface
Buttons, menus, parameters, tabs, windows, and dialog titles
are in boldface. For example, click OK.
> Multi-level menus are in boldface and separated by the ">"
signs. For example, choose File > Create > Folder.
Keyboard Operations
The keyboard operations that may be found in this document are defined as follows.
Format Description
Key
Press the key. For example, press Enter and press Tab.
Key 1+Key 2 Press the keys concurrently. For example, pressing
Ctrl+Alt+A means the three keys should be pressed
concurrently.
Key 1, Key 2 Press the keys in turn. For example, pressing Alt, A means
the two keys should be pressed in turn.
Mouse Operations
The mouse operations that may be found in this document are defined as follows.
Action Description
Click Select and release the primary mouse button without
moving the pointer.
Page 19

Quidway NetEngine80
Configuration Guide - Basic Configurations About This Document
Issue 04 (2009-12-20)
Huawei Proprietary and Confidential
Copyright © Huawei Technologies Co., Ltd.
5
Action Description
Double-click Press the primary mouse button twice continuously and
quickly without moving the pointer.
Drag Press and hold the primary mouse button and move the
pointer to a certain position.
Update History
Updates between document issues are cumulative. Therefore, the latest document issue
contains all updates made in previous issues.
Updates in Issue 04 (2009-12-20)
Fourth commercial release.
Updates in Issue 03 (2009-08-01)
Third commercial release.
Updates in Issue 02 (2008-10-20)
Second commercial release.
Updates in Issue 01 (2008-04-18)
First commercial release.
Page 20

Quidway NetEngine80
Configuration Guide - Basic Configurations Contents
Issue 04 (2009-12-20) Huawei Proprietary and Confidential
Copyright © Huawei Technologies Co., Ltd.
i
Contents
1 NE80 Core Router Overview....................................................................................................1-1
1.1 Introduction...................................................................................................................................................1-2
1.1.1 Overview..............................................................................................................................................1-2
1.1.2 Hardware Architecture.........................................................................................................................1-2
1.1.3 Software Architecture ..........................................................................................................................1-3
1.2 Characteristics of the NE80...........................................................................................................................1-5
1.2.1 Support for Flattened Network Architecture........................................................................................1-5
1.2.2 Line-Speed Forwarding........................................................................................................................1-6
1.2.3 Multiple Interfaces...............................................................................................................................1-6
1.2.4 Carrier-Class A vailability.....................................................................................................................1-6
1.2.5 Rich Services .......................................................................................................................................1-6
1.2.6 Perfect Diff-Serv/QoS..........................................................................................................................1-6
1.2.7 Excellent Security Mechanism.............................................................................................................1-7
1.2.8 Practical NMS......................................................................................................................................1-7
1.2.9 Flexible Networking Capabilities ........................................................................................................1-8
1.3 Features List of the NE80..............................................................................................................................1-8
Page 21

Quidway NetEngine80
Configuration Guide - Basic Configurations Figures
Issue 04 (2009-12-20) Huawei Proprietary and Confidential
Copyright © Huawei Technologies Co., Ltd.
iii
Figures
Figure 1-1 Software architecture of the NE80-8 ................................................................................................1-4
Page 22

Quidway NetEngine80
Configuration Guide - Basic Configurations T ables
Issue 04 (2009-12-20) Huawei Proprietary and Confidential
Copyright © Huawei Technologies Co., Ltd.
v
Tables
Table 1-1 Features list of the NE80 Series USR.................................................................................................1-8
Page 23

Quidway NetEngine80
Configuration Guide - Basic Configurations 1 NE80 Core Router Overview
Issue 04 (2009-12-20) Huawei Proprietary and Confidential
Copyright © Huawei Technologies Co., Ltd.
1-1
1 NE80 Core Router Overview
About This Chapter
The following table lists the contents of this chapter.
Section Describes
1.1 Introduction This section describes the hardware and software
architecture of the NE80
1.2 Characteristics of the This section describes the characteristics of the NE80
1.3 Features List of the This section describes the features of the NE80.
Page 24

1 NE80 Core Router Overview
Quidway NetEngine80
Configuration Guide - Basic Configurations
1-2 Huawei Proprietary and Confidential
Copyright © Huawei Technologies Co., Ltd.
Issue 04 (2009-12-20)
1.1 Introduction
This section describes the basic knowledge of the NE80 Series USR, including:
z
Overview
z
Hardware Architecture
z
Software Architecture
1.1.1 Overview
Nowadays the IP Metropolitan Area Network (MAN) has developed into a new stage. It is no
longer limited to merely supplying individual broadband internet access services, but covers
all-around services including enterprise interconnection, virtual leased line, IP telephone/
videoconferencing, content service, and security service. All these raise higher requirements
to MAN devices.
According to the development of IP MANs, Huawei launches the NE80 Series USR. The
NE80 has the following features: large capacity, high performance, high reliability, and
abundant service capability required by MANs, such as line-speed forwarding on high-speed
interface, Ethernet switching, Multi-Protocol Label Switching Virtual Private Network
(MPLS VPN), perfect Quality of Service (QoS) mechanism and carrier-class reliability, which
provide abundant service processing capabilities and flexible networking capability.
The NE80 incorporates the powerful IP service processing capability of routers and the
low-cost Ethernet switching capability of Layer 3 Ethernet switches, and serves as a powerful
core router or a Layer 3 Ethernet switch. Therefore, the NE80 is an optimal choice for new
MANs.
The NE80 is the fifth-generation router, oriented to the carrier's backbone edge networks, the
core and the convergence layer of MANs, and networks of various industries and enterprises.
The NE80 enriches and perfects the high-end router series of Huawei, for it provides
cost-effective network solutions, and offers more choices.
1.1.2 Hardware Architecture
The boards of the NE80 are classified into Switch and Routing Unit (MPU) and Line Card
(LC). The LCs include Line Processing Unit (LPU), Flexible Card Line Processing Unit
(LPUF) and service board.
MPU
The MPU completes such functions as system management, route control, data exchange, and
stratum-3 clock.
The NE80 have two MPUs for 1 + 1 redundancy. When one MPU fails, the service will be
automatically switched to the other MPU.
LPU
LPUs implement the interconnection and data forwarding with other devices. The NE80
supports the following LPUs:
z
Ethernet LPU
Page 25

Quidway NetEngine80
Configuration Guide - Basic Configurations 1 NE80 Core Router Overview
Issue 04 (2009-12-20) Huawei Proprietary and Confidential
Copyright © Huawei Technologies Co., Ltd.
1-3
z
POS LPU
z
cPOS LPU
z
ATM LPU
z
RPR LPU
z
E1 LPU
POS = Packet Over SONET/SDH
cPOS = channelized POS
ATM = Asynchronous Transfer Mode
RPR = Resilient Packet Ring
LPUF
LPUFs are LPUs whose PIM cards can be replaced. Each LPUF can hold two PIM cards. The
following PIM cards are supported:
z
10/100M auto-sensing Ethernet electrical interface PIM card
z
Gigabit Ethernet optical interface PIM PIC card
z
E1/T1 interface PIM card
z
E3 interface PIM card
z
T3 interface PIM card
Service Board
The NE80 provides Network Address Translation (NAT) service board. The NAT board
features large capacity and high performance, and can support the translation between private
and public network addresses. The NAT board is used to solve the problems like the shortage
of public network addresses and ensure the network security on the Internet.
For more information about the NE80 hardware system, refer to the Quidway NetEngiNE80
Core Router Installation Manual.
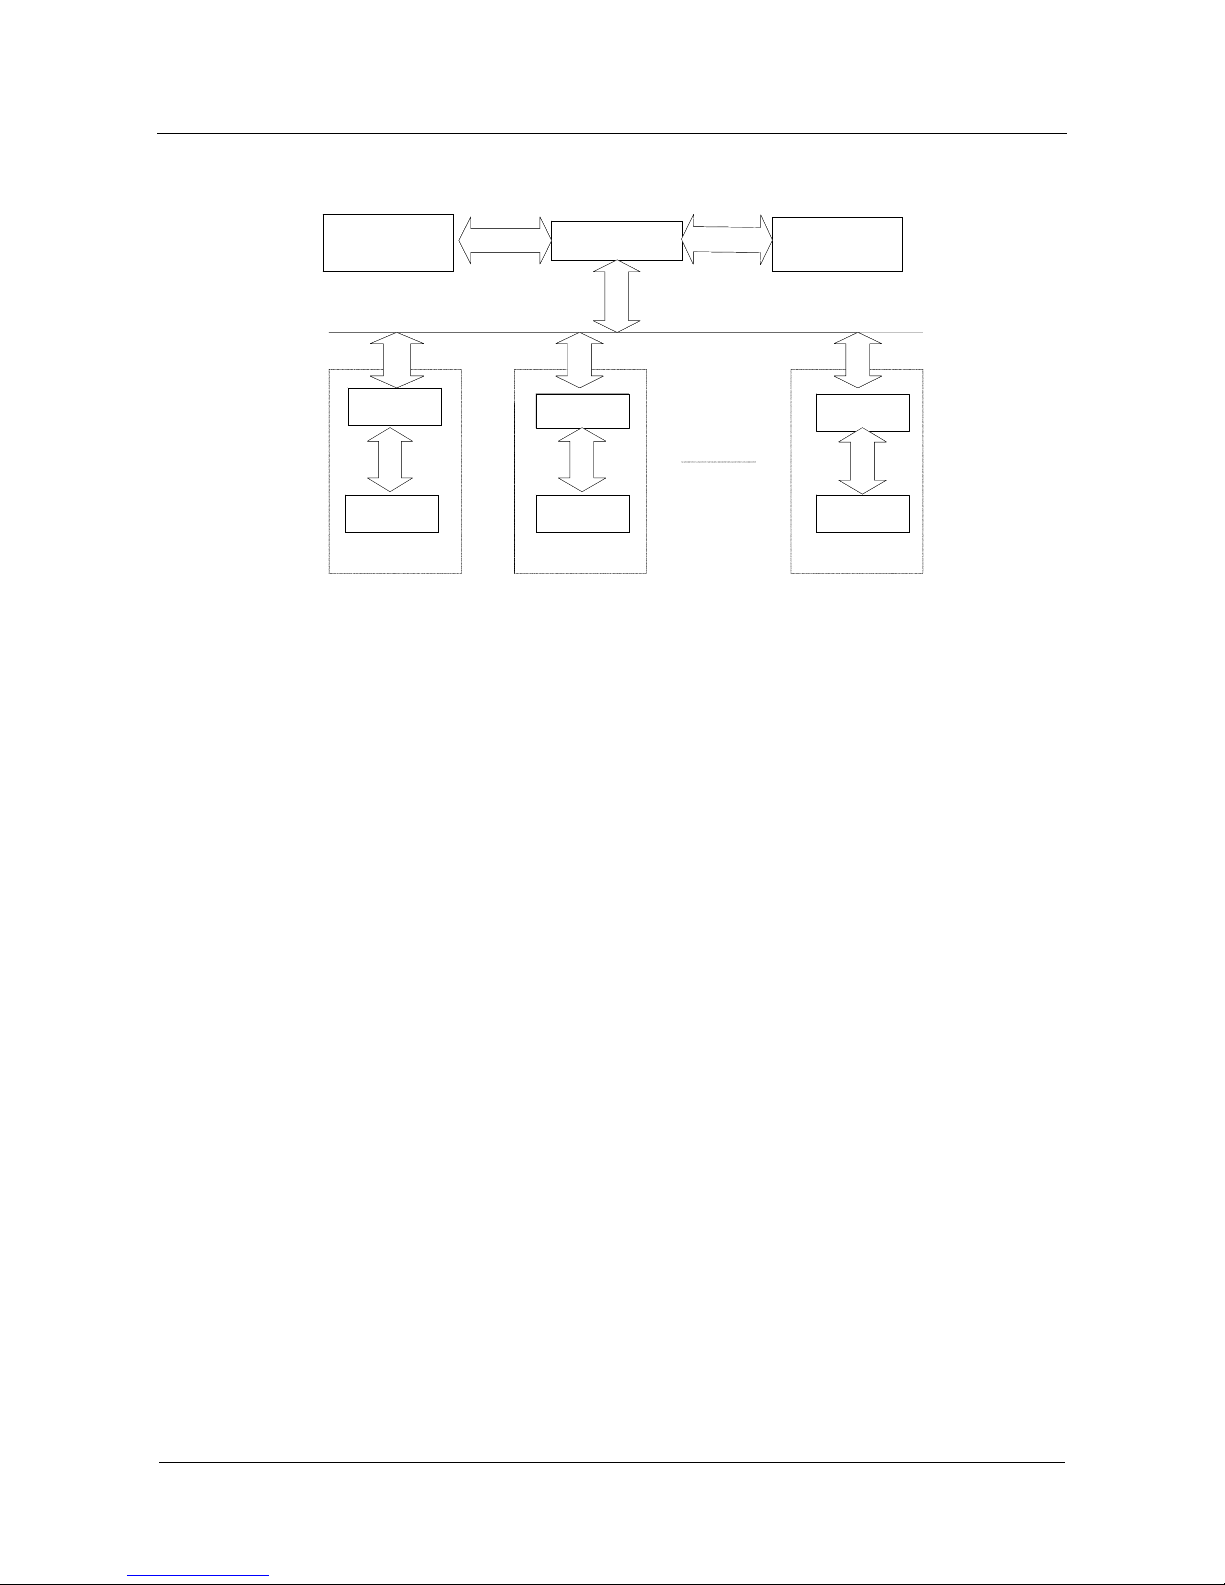
1.1.3 Software Architecture
The software system of the NE80 adopts the architecture of two physically independent
functional units, namely route control and packet forwarding. The architecture can improve
the stability and the processing performance of the system.
The system software consists of the following five parts: Network Management System
(NMS), Routing Process System (RPS), Forwarding Support Unit (FSU), Express Forwarding
Unit (EFU), Driver (DRV), and the switch fabric monitoring module running on the MPU
manages the MPU and monitors its operation.
DRV modules are distributed in the RPS, FSU and EFU for driving the hardware of the MPU
and the LPU. Figure 1-1 takes the NE80-8 for example to illustrate the NE80 software
architecture.
Page 26
1 NE80 Core Router Overview
Quidway NetEngine80
Configuration Guide - Basic Configurations
1-4 Huawei Proprietary and Confidential
Copyright © Huawei Technologies Co., Ltd.
Issue 04 (2009-12-20)
Figure 1-1 Software architecture of the NE80-8
RPS
Switch Fabric
Monitoring module
Switch Fabric
Monitoring module
FSU
EFU
Highway
FSU
EFU
Highway
FSU
EFU
Highway
Highway
Highway
Highway
Highway
Highway
Highway
RPS
Switch Fabric
Monitoring module
Switch Fabric
Monitoring module
FSU
EFU
Highway
LPU1
FSU
EFU
Highway
LPU2
FSU
EFU
LPU8
Highway
Highway
Highway
Highway
Highway
Highway
Highway
As the control and management unit of the system, the RPS runs on the active and standby
MPUs and performs the following tasks:
z
Route control
The RPS calculates and maintains the routes. In addition, it generates the Forward
Information Base (FIB) table and delivers it to each LPU for IP forwarding.
z
Label control
The RPS distributes labels, sets up and maintains the Label Switch Paths (LSPs). In addition,
it generates the FIB table and delivers it to each LPU for MPLS forwarding.
z
Traffic control
The RPS defines the traffic classification rules, configures the traffic parameters, configures
the queue resources and flow control parameters for Diff-Serv QoS.
z
Maintenance and management
The RPS maintains the devices, manages the network and devices, monitors the whole system,
diagnoses faults, and collects statistics for services.
Running on the CPU of the LPU, the FSU manages the service interfaces (configuring and
monitoring them), forwards data, controls the links, and negotiates the link parameters. In
addition, the FSU can maintain and manage local devices for LPUs and provide some system
monitoring and diagnosis services.
In addition to fast forwarding of IP packets, the EFU can provide such QoS functions as
traffic classifying, traffic measuring, traffic policing, traffic shaping, traffic scheduling, and
congestion avoiding and controlling. It can implement Diff-Serv, firewall, and Class of
Service (CoS) features according to different configuration requirements.
The Switch Fabric monitoring module monitors the internal switching network in the NE80
Series USR.
Implemented on the Huawei integrated network management platform, the NMS maintains
and controls devices uniformly.
Page 27

Quidway NetEngine80
Configuration Guide - Basic Configurations 1 NE80 Core Router Overview
Issue 04 (2009-12-20) Huawei Proprietary and Confidential
Copyright © Huawei Technologies Co., Ltd.
1-5
The NE80 applies the Versatile Ro uti ng Platform (VRP) software system. As a versatile
operating system platform for Huawei's data communications products, the VRP realizes a
modular architecture with IP services as the core. In addition to abundant functions and
features, the VRP provides some application-based capabilities such as scalability and
flexibility.
With the TCP/IP protocol stack as the core, the VRP integrates multiple crucial technologies
for data communications such as routing, QoS, VPN, and security, thus providing excellent
data forwarding capability for the routing device.
The VRP provides consistent network, user, and management interfaces for various hardware
platforms and flexible solutions for users. The VRP is open to sustainable development, which
can protect carriers' investment to its maximum extent.
1.2 Characteristics of the NE80
This section includes:
z
Support for Flattened Network Architecture
z
Line-Speed Forwarding
z
Multiple Interfaces
z
Carrier-Class A vailability
z
Rich Services
z
Perfect Diff-Serv/QoS
z
Excellent Security Mechanism
z
Practical NMS
z
Flexible Networking Capabilities
1.2.1 Support for Flattened Network Architecture
Modern telecom network has a hierarchical architecture, within which data services are
typically provided after they are processed by four vertical function layers. This classical
architecture will still exist for a certain period. This architecture reveals its deficiency
increasingly because IP services are becoming leading services in the network. Flattening of
the network architecture is the trend with the development of technolo gies an d the c han ge of
services.
The devices at the core layer of the telecom network are used with high efficiency because a
great amount of user data is processed there. Whereas, the devices out of the core layer are
used less efficiently due to sparse distribution of access users. Therefore, a flattened IP
network architecture should be employed if possible. Fewer network layers help carriers
utilize network devices more efficiently and slash the maintenance and management cost. The
operable and manageable IP network becomes the development trend of MANs and enterprise
networks at present.
The flattened network architecture puts forward higher requirements on the devices at the
convergence layer, that is, they need function as both access devices and core devices. The
NE80 is such a product that implements various services due to its abundant service features,
excellent hardware platform, and high reliability. For example, the NE80 can directly connect
downlink with Gigabit Ethernet switches or dedicated access devices, and uplink with
provincial backbone or national backbone networks. In addition, the NE80 can form a ring
network through Resilient Packet Ring (RPR) or connect to core devices through dual homing.
Page 28

1 NE80 Core Router Overview
Quidway NetEngine80
Configuration Guide - Basic Configurations
1-6 Huawei Proprietary and Confidential
Copyright © Huawei Technologies Co., Ltd.
Issue 04 (2009-12-20)
In this case, the NE80 may reduce the levels of the network construction to achieve the
flattened network, which improves the service quality and optimizes the network architecture.
1.2.2 Line-Speed Forwarding
The NE80 supports the IPv4/MPLS distributed forwarding at the line speed. Thus the NE80
can meet the bandwidth requirements when it is used as the Point of Presence (POP), the
convergence layer, or the switching node on the backbone networks.
1.2.3 Multiple Interfaces
At present, the NE80 provides the Fast Ethernet (FE) interface, Gigabit Ethernet (GE)
interface, E1/cE1 interface, E3 interface, T3 interface, Packet over SDH/SONET (POS)
interface, channelized POS (cPOS) interface, Asynchronous Transfer Mode (ATM) interface,
and RPR interface with high interface density. Users can select the cards flexibly as required
to meet the requirements for different networking solutions and network expansion.
1.2.4 Carrier-Class Availability
The key parts of the NE80 adopt redundant hot backup design, includin g system control, data
exchange, route processing system, internal management bus and power supply. All the
components are hot swappable. Thus, the router can meet the high reliability requirement
when it is used as the POP, the convergence layer, or the switching node on the backbone
networks
1.2.5 Rich Services
The IP multicast forwarding feature provides the foundation for carriers to carry on various
network voice and video services (Web TV, E-learning, telemedicine and video conference).
With the rich routing features, the router is adaptable to complex environments.
The policy service mechanism enables the system to have powerful performance optimization
capability, satisfactory attack defense capability and QoS guarantee while ensuring the line
rate processing and forwarding capability.
The application of the MPLS VPN service guarantees the delivery of services of carriers
using networks more economically and rationally with no need to increase the bandwidth.
The application of the NAT service supports addressing with public and private network
addresses mixed in the MAN to save IP addresses. In this way, the shortage of
public IP addresses can be solved.
Through Dynamic Host Configuration Protocol (DHCP) Relay and built-in DHCP Server, IP
addresses can be dynamically assigned to users and be managed.
1.2.6 Perfect Diff-Serv/QoS
The NE80 realizes the QoS feature when carrying the integrated service including the
real-time service. In particular, the NE80 provides various standard-based supports to
Diff-Serv, including:
z
Traffic classification
z
Traffic policing
Page 29

Quidway NetEngine80
Configuration Guide - Basic Configurations 1 NE80 Core Router Overview
Issue 04 (2009-12-20) Huawei Proprietary and Confidential
Copyright © Huawei Technologies Co., Ltd.
1-7
z
Traffic shaping
z
Queue management
z
Queue Scheduling
Therefore, the NE80 can implement six groups of Per-Hop Behaviors (PHBs) defined in the
standard such as EF, AF1 to AF4 and BE as well as the other services.
The NE80 enables the network carriers to provide users with different QoS guarantee and
makes the Internet become the integrated network that carries data, voice and video services
simultaneously.
1.2.7 Excellent Security Mechanism
The NE80 provides the packet filtering/Access Control List (ACL) mechanism to prevent
illegal accesses and attacks of malicious packets.
The NE80 supports Unicast Reverse Path Forwarding (URPF) to prevent network attacks
based on the source address spoofing.
The NE80 supports port mirroring to analyze the traffic of a certain interface.
The NE80 provides multiple authentication methods (such as plain text authentication and
MD5) for key routing protocols, such as Open Shortest Path First (OSPF), Intermediate
System-Intermediate System (IS-IS), Routing Information Protocol (RIP) and Border
Gateway Protocol version 4 (BGP4).
The NE80 supports two user authentication modes: local authentication and Remote
Authentication Dial-In User Service (RADIUS) authentication to prevent illegal configuration
of the device.
The NE80 achieves the hardware-implemented NAT.
In addition, the NE80 provides abundant statistics including statistics of various types of
traffic, traffic sampling and NAT information statistics.
1.2.8 Practical NMS
Huawei Quidview NMS can manage Huawei's data communication products, supporting
Simple Network Management Protocol (SNMP) V1/V2c/V3 and the Client/Server model. It
can run on multiple operating systems, such as Windows NT/2000 and Unix (SUN, HP, and
IBM). The Quidview NMS can provide multi-language support and Graphic User Interface
(GUI).
The Quidview NMS can also be seamlessly integrated with the Huawei-dev el ope d n etw ork
management systems of other fixed network communication devices to achieve centralized
management of multiple devices. The Quidview NMS can also be integrated with the present
popular universal NMSs of the industry, such as HP OpenView, IBM NetView, What's up
Gold and SNMPc, to provide means of centralized management of devices from multiple
manufacturers.
The Quidview NMS provides the functions of managing the network topology (in real time),
faults, the performance, the configuration, device logs, security and users, QoS policy, and
VPN service. The Quidview NMS can also perform such functions as downloading, saving,
modifying and uploading NE80 configuration files and upgrading the NE80 software.
Page 30

1 NE80 Core Router Overview
Quidway NetEngine80
Configuration Guide - Basic Configurations
1-8 Huawei Proprietary and Confidential
Copyright © Huawei Technologies Co., Ltd.
Issue 04 (2009-12-20)
1.2.9 Flexible Networking Capabilities
The NE80 has the capability of forwarding packets at the line speed, provides abundant access
means and rich service features, and offers switching capacities from 16 Gbit/s to 64 Gbit/s
for users.
The NE80 is suitable for multiple applications from the backbone core network to the edge
convergence network. The NE80 can be deployed in an IP backbone network, Intranet and
MAN core. The NE80 can also provide powerful service and flexible networking at the edge
network and the MAN convergence layer.
Diversified entire network solutions from the access network to the core network can be
provided for users when the NE80 is cooperated with Huawei's multi-service switches,
Quidway Series routers, broadband access series, LAN Switch Series, and Metro transmission
Series.
1.3 Features List of the NE80
Table 1-1 Featur es lis t of t he N E80 S eries US R
Attribute Description
LAN protocol Ethernet_II
VLAN (802.1Q)
Network
interconnection
Link layer
protocol
PPP and MP
HDLC
FR
IP over ATM
RPR
STP/RSTP/MSTP
Q-in-Q
VLANIF
Layer 2 VLAN
VLAN sub-interface
Network protocol IP service ARP
DHCP Relay
DHCP Server
IP Unnumbered
Policy routing
Page 31

Quidway NetEngine80
Configuration Guide - Basic Configurations 1 NE80 Core Router Overview
Issue 04 (2009-12-20) Huawei Proprietary and Confidential
Copyright © Huawei Technologies Co., Ltd.
1-9
Attribute Description
IPv4 Static routing management
Dynamic unicast routing protocol
RIP-1/RIP-2
OSPF
BGP
IS-IS
Route policy
MPLS MPLS LDP
Basic forwarding
LSPM
VPLS/HVPLS
MPLS TE
RSVP TE
VPN VPN MPLS/BGP VPN, serving as PE/P
Hierarchical VPN (HoVPN)
Multi-AS VPN
MPLS L2VPN (Martini and Kompella)
VPLS/HVPLS
PWE3
AAA service CHAP authentication
PAP authentication
RADIUS
Other security
features
NAT
Port mirroring
Port traffic sampling
Flow control on the service LC and the
MPU
IP packet filtering
URPF
MAC address learning limit
HWTACAS+
SSH V1.5
Network security
Hierarchical protection of the command line, so as to prevent
unauthorized users from accessing the router
Reliability of the
device
Hot standby
for redundancy
MPU 1:1 redundancy (applied to NE80-8 and
NE80-4)
Power supply module 1:1 redundancy
System management bus 1:1 redundancy
System data bus 1:1 redundancy
Page 32

1 NE80 Core Router Overview
Quidway NetEngine80
Configuration Guide - Basic Configurations
1-10 Huawei Proprietary and Confidential
Copyright © Huawei Technologies Co., Ltd.
Issue 04 (2009-12-20)
Attribute Description
Other features Route consistency checking (route aging)
IP fast rerouting
VRRP
Traffic
classification
Supports simple traffic classification
Supports the complex traffic classification of the
integrated packets of Layer 2, Layer 3 and Layer 4
Traffic
policing and
shaping
CAR
srTCM algorithm and trTCM algorithm
Traffic policing and shaping for such
services as EF and AF that are based on
Diff-Serv
Policy-based
routing
IP route redirection
LSP explicit route distribution of MPLS
QoS
MPLS QoS Mapping between EXP and DSCP on the area edge
Command line
interface
Local configuration through Console port
Local or remote configuration through Aux port
Local or remote configuration through Telnet
Hierarchical protection for the command, so as to
prevent unauthorized users from accessing the router
Detailed debugging information helpful in the
diagnosis of network faults
Network testing tools such as Tracert and Ping
command for quick network diagnosis
Telnet command for direct logon to manage other
routers
FTP Server/Client for downloading and uploading
the configuration file and application program
TFTP Client for downloading and uploading the
configuration file and application program
XModem protocol for local downloading of the
configuration file and application program.
Log function
Virtual file system
User-interface configuration, providing various
authentication and authorization functions for the
logon users
Time service NTP Server and NTP Client
Timezone
Summer Time
Configuration
management
On-line
service
On-line loading
On-line upgrading
Page 33

Quidway NetEngine80
Configuration Guide - Basic Configurations 1 NE80 Core Router Overview
Issue 04 (2009-12-20) Huawei Proprietary and Confidential
Copyright © Huawei Technologies Co., Ltd.
1-11
Attribute Description
Information
processing
center
Three types of information: alarm information, log
information and debugging information
Eight grades of information: emergences, alert,
critical, error, warning, notification, informational
and debugging
Information outputted to the log host and user
terminal. Alarm information and log information
can be outputted through SNMP Agent and the
cache
Network
Management
SNMP V1/V2c/V3
RMON
others NQA
NOTE
HDLC = High-level Data Link Control
RPR = Resilient Packet Ring
URPF = Unicast Reverse Path Forwarding
AAA = Authorization, Authentication and Accounting
VRRP = Virtual Router Redundancy Protocol
CAR = Committed Access Rate
srTCM = Single Rate Three Color Marker
trTCM = Two Rate Three Color Marker
Page 34

Quidway NetEngine80
Configuration Guide - Basic Configurations Contents
Issue 04 (2009-12-20) Huawei Proprietary and Confidential
Copyright © Huawei Technologies Co., Ltd.
i
Contents
2 Establishment of the Configuration Environment..............................................................2-1
2.1 Introduction...................................................................................................................................................2-2
2.1.1 Login Through the Console.................................................................................................................2-2
2.1.2 Login Through Telnet ..........................................................................................................................2-2
2.1.3 Login Through AUX Port....................................................................................................................2-2
2.2 Logging In to the Router Through the Console Port.....................................................................................2-2
2.2.1 Establishing the Configuration Task....................................................................................................2-2
2.2.2 Establishing the Physical Connection..................................................................................................2-3
2.2.3 Configuring Terminals.........................................................................................................................2-3
2.2.4 Logging In to the Router......................................................................................................................2-3
2.3 Logging In to Router Through Telnet............................................................................................................2-4
2.3.1 Establishing the Configuration Task....................................................................................................2-4
2.3.2 Establishing the Physical Connection..................................................................................................2-5
2.3.3 Configuring Login User Parameters ....................................................................................................2-5
2.3.4 Logging In from the Telnet Client........................................................................................................2-5
2.4 Logging In to the Router Through the AUX Port..........................................................................................2-5
2.4.1 Establishing the Configuration Task....................................................................................................2-5
2.4.2 Establishing the Physical Connection..................................................................................................2-6
2.4.3 Initializing and Configuring the Modem on the Interface....................................................................2-6
2.4.4 Configuring the Connection Between the Remote Terminal and the Router.......................................2-6
2.4.5 Logging In to the Router......................................................................................................................2-7
2.5 Configuration Examples................................................................................................................................2-7
2.5.1 Example for Logging In Through the Console Port.............................................................................2-7
2.5.2 Example for Logging In Through Telnet..............................................................................................2-9
2.5.3 Example for Logging In Through the AUX Port ...............................................................................2-11
Page 35

Quidway NetEngine80
Configuration Guide - Basic Configurations Figures
Issue 04 (2009-12-20) Huawei Proprietary and Confidential
Copyright © Huawei Technologies Co., Ltd.
iii
Figures
Figure 2-1 Networking diagram of logging in through the console port............................................................2-7
Figure 2-2 New connection................................................................................................................................2-8
Figure 2-3 Setting the port..................................................................................................................................2-8
Figure 2-4 Setting the port communication parameters......................................................................................2-9
Figure 2-5 Establishing the configuration environment through Telnet...........................................................2-10
Figure 2-6 Running the Telnet program on the PC...........................................................................................2-11
Figure 2-7 Establishing the remote configuration environment through AUX ................................................2-11
Page 36

Quidway NetEngine80
Configuration Guide - Basic Configurations 2 Establishment of the Configuration Environment
Issue 04 (2009-12-20) Huawei Proprietary and Confidential
Copyright © Huawei Technologies Co., Ltd.
2-1
2 Establishment of the Configuration
Environment
About This Chapter
The following table shows the contents of this chapter.
Section Description
2.1 Introduction This section describes the working modes of establishing
configuration environments.
2.2 Logging In to the Router
Through the Console
This section describes how to establish configuration
environments through the console port.
See Example for Logging In Through the Console Port.
2.3 Logging In to Router
Through Telnet
This section describes how to establish configuration
environments through Telnet.
See Example for Logging In Through Telnet.
2.4 Logging In to the Router
Through the AUX Port
This section describes how to establish configuration
environments through the AUX port.
See Example for Logging In Through the AUX.
2.5 Configuration Examples This section provides several examples of establishing
configuration environments.
Page 37

2 Establishment of the Configuration Environment
Quidway NetEngine80
Configuration Guide - Basic Configurations
2-2 Huawei Proprietary and Confidential
Copyright © Huawei Technologies Co., Ltd.
Issue 04 (2009-12-20)
2.1 Introduction
2.1.1 Login Through the Console
In the following cases, use only the console port to configure the router:
z
The router is powered on for the first time.
z
The configuration environment cannot be established through Telnet or the AUX port.
2.1.2 Login Through Telnet
Pre-configure the IP addresses of interfaces on the router, the user account, the login
authentication and the incoming and outgoing call restriction. Also, ensure that there are
directly-connected or reachable routes between terminals and the router.
The destination router authenticates the user based on the configured parameters in three
modes:
z
Password authentication: indicates the login user should enter the correct password.
z
AAA local authentication: indicates the login user should enter the correct user name and
password.
z
Non-authentication: indicates the login user need not enter the user name or password.
If the login succeeds, a command line prompt such as <Quidway> appears on the Telnet client
interface.
Enter the command to check the running status of the router or to configure the router.
Enter "?" for help.
Do not modify the IP address of the router when you configure the router through Telnet because the
modification may disconnect Telnet. If necessary, set up the connection again after entering a new IP
address.
2.1.3 Login Through AUX Port
If you cannot configure the router by local login and there is no reachable route to other
routers, you can connect PC to the router that to be configured through AUX port in PSTN.
Pre-enable the Modem dialup of the AUX port through the console port and configure the
username and password.
2.2 Logging In to the Router Through the Console Port
2.2.1 Establishing the Configuration Task
Applicable Environment
If you log in to the router for the first time or perform the local configuration, you need to log
in to the router through the Console port.
Page 38

Quidway NetEngine80
Configuration Guide - Basic Configurations 2 Establishment of the Configuration Environment
Issue 04 (2009-12-20) Huawei Proprietary and Confidential
Copyright © Huawei Technologies Co., Ltd.
2-3
Pre-configuration Tasks
Before configuring the router through the console port, complete the following tasks:
z
Preparing the PC/terminal (including serial port and RS-232 cable)
z
Installing terminal emulation program on the PC (such as Windows XP hyper terminal)
Data Preparation
To configure the router through the Console port, you need the following data.
No. Data
1 Terminal communication parameters (including baud rate, data bit, parity, stop
bit and flow control)
Configuration Procedures
To configure the router through the Console port, complete the following configuration
procedures.
No. Procedure
1 Establishing the Physical Connection
2 Configuring Terminals
3 Logging In to the Router
2.2.2 Establishing the Physical Connection
Do as follows on the router:
Step 1 Connect the COM port on the PC and the console port on the router by cable.
Step 2 Power on all devices to perform a self-check.
----End
2.2.3 Configuring Terminals
Do as follows on the PC:
Step 1 Run the terminal emulation program on the PC, setting the communication parameter of the
terminal to 9600 bps, data bit to 8, stop bit to 1. Specify no parity and no flow control.
----End
2.2.4 Logging In to the Router
Do as follows on the PC:
Page 39

2 Establishment of the Configuration Environment
Quidway NetEngine80
Configuration Guide - Basic Configurations
2-4 Huawei Proprietary and Confidential
Copyright © Huawei Technologies Co., Ltd.
Issue 04 (2009-12-20)
Step 1 Press Enter until a command line prompt such as Quidway appears. Now enter the
configuration environment in the user view.
----End
2.3 Logging In to Router Through Telnet
2.3.1 Establishing the Configuration Task
Applicable Environment
If you know the IP address of the router, you can log in to the router through Telnet for local
or remote configuration.
Pre-configuration Tasks
Before configuring the router through Telnet, complete the following tasks:
z
Powering on devices and performing a self-check
z
Preparing the PC (including the serial port and Ethernet crossover/direct network cable
Data Preparation
To log in to the router through Telnet, you need the following data.
No. Data
1 IP address of the PC
2 IP address of the Ethernet interface on the router
3 User information accessed through Telnet (including user name, password and
authentication mode)
Configuration Procedures
To configure the router through Telnet, complete the following procedures.
No. Procedure
1 Establishing the Physical Connection
2 Configuring Login User Parameters
3 Logging In from the Telnet Client
Page 40

Quidway NetEngine80
Configuration Guide - Basic Configurations 2 Establishment of the Configuration Environment
Issue 04 (2009-12-20) Huawei Proprietary and Confidential
Copyright © Huawei Technologies Co., Ltd.
2-5
2.3.2 Establishing the Physical Connection
Connect the router and the PC directly or connect the router and the PC respectively to the
network through the network cable.
2.3.3 Configuring Login User Parameters
Do as follows on the router:
Step 1 Configure the authentication mode of login users.
Step 2 Configure the authority limitation of login user.
For details, refer to Chapter 5 "User Management" in the Quidway NetEngine80 Core Router
- Basic Configurations.
----End
2.3.4 Logging In from the Telnet Client
Do as follows on the PC:
Step 1 Run the Telnet client program on the PC, and input the IP address of the interface on the
destination router that provides the Telnet service.
Step 2 Enter the user name and password in the login window. After authentication, a command line
prompt such as <Quidway> appears. Now enter the configuration environment in the user
view.
----End
2.4 Logging In to the Router Through the AUX Port
2.4.1 Establishing the Configuration Task
Applicable Environment
If you cannot configure the router by local login and there is no reachable route to other
routers, connect the serial port of the PC and the AUX port of the router through the Modem.
Pre-configuration Tasks
Before configuring the router through the AUX port dialup, complete the following tasks:
z
Preparing the PC/terminal (including the serial port and RS-232 cable)
z
Preparing the PC terminal emulation program (such as Windows XP hyper terminal)
z
Preparing two Modems
Data Preparation
To configure the router, you need the following data.
Page 41

2 Establishment of the Configuration Environment
Quidway NetEngine80
Configuration Guide - Basic Configurations
2-6 Huawei Proprietary and Confidential
Copyright © Huawei Technologies Co., Ltd.
Issue 04 (2009-12-20)
No. Data
1 Type of terminals
2 Terminal communication parameters
3 Modem communication parameters
Configuration Procedures
To configure the router by dialup through the AUX port, complete the following procedures.
No. Procedure
1 Establishing the Physical Connection
2 Initializing and Configuring the Modem on the Interface
3 Configuring the Connection Between the Remote Terminal and the Router
4 Logging In to the Router
2.4.2 Establishing the Physical Connection
Do as follows on the login router:
Step 1 Connect the Modem with the PC and the network.
Step 2 Connect the Modem with the router through the AUX port and the network.
----End
2.4.3 Initializing and Configuring the Modem on the Interface
Do as follows on the router:
z
Configure the authentication mode of login user
z
Configure the authority limitation of login user
For details, refer to the Quidway NetEngine80 Core Router Configuration Guide - Security.
2.4.4 Configuring the Connection Between the Remote Terminal
and the Router
Do as follows on the terminal PC:
Step 1 Run the terminal emulation program on the PC (such as Windows XP HyperTerminal) to
enter the Connection Description window.
Step 2 Enter the connection name of the PC and the router, such as Dial.
Step 3 Click OK to enter the Connect To window.
Page 42

Quidway NetEngine80
Configuration Guide - Basic Configurations 2 Establishment of the Configuration Environment
Issue 04 (2009-12-20) Huawei Proprietary and Confidential
Copyright © Huawei Technologies Co., Ltd.
2-7
Step 4 Enter the parameters and select options.
Step 5 Click OK to enter the Connect window.
Step 6 Click Dial.
----End
2.4.5 Logging In to the Router
Do as follows on the login router:
Step 1 Enter the user name and password in the login window.
After configuration, a command line prompt such as <Quidway> appears. Now enter the
configuration environment in the user view.
----End
2.5 Configuration Examples
2.5.1 Example for Logging In Through the Console Port
Networking Requirements
Initialize the configuration of the router when the router is powered on for the first time.
Figure 2-1 Networking diagram of logging in through the console port
Router
PC
Configuration Roadmap
The configuration roadmap is as follows:
1. Connect the PC and the router through the console port
2. Configure the login on the PC end
3. Log in to the router
Data Preparation
To complete the configuration, you need the terminal communication parameters (including
baud bit, data bit, parity, stop bit and flow control).
Page 43
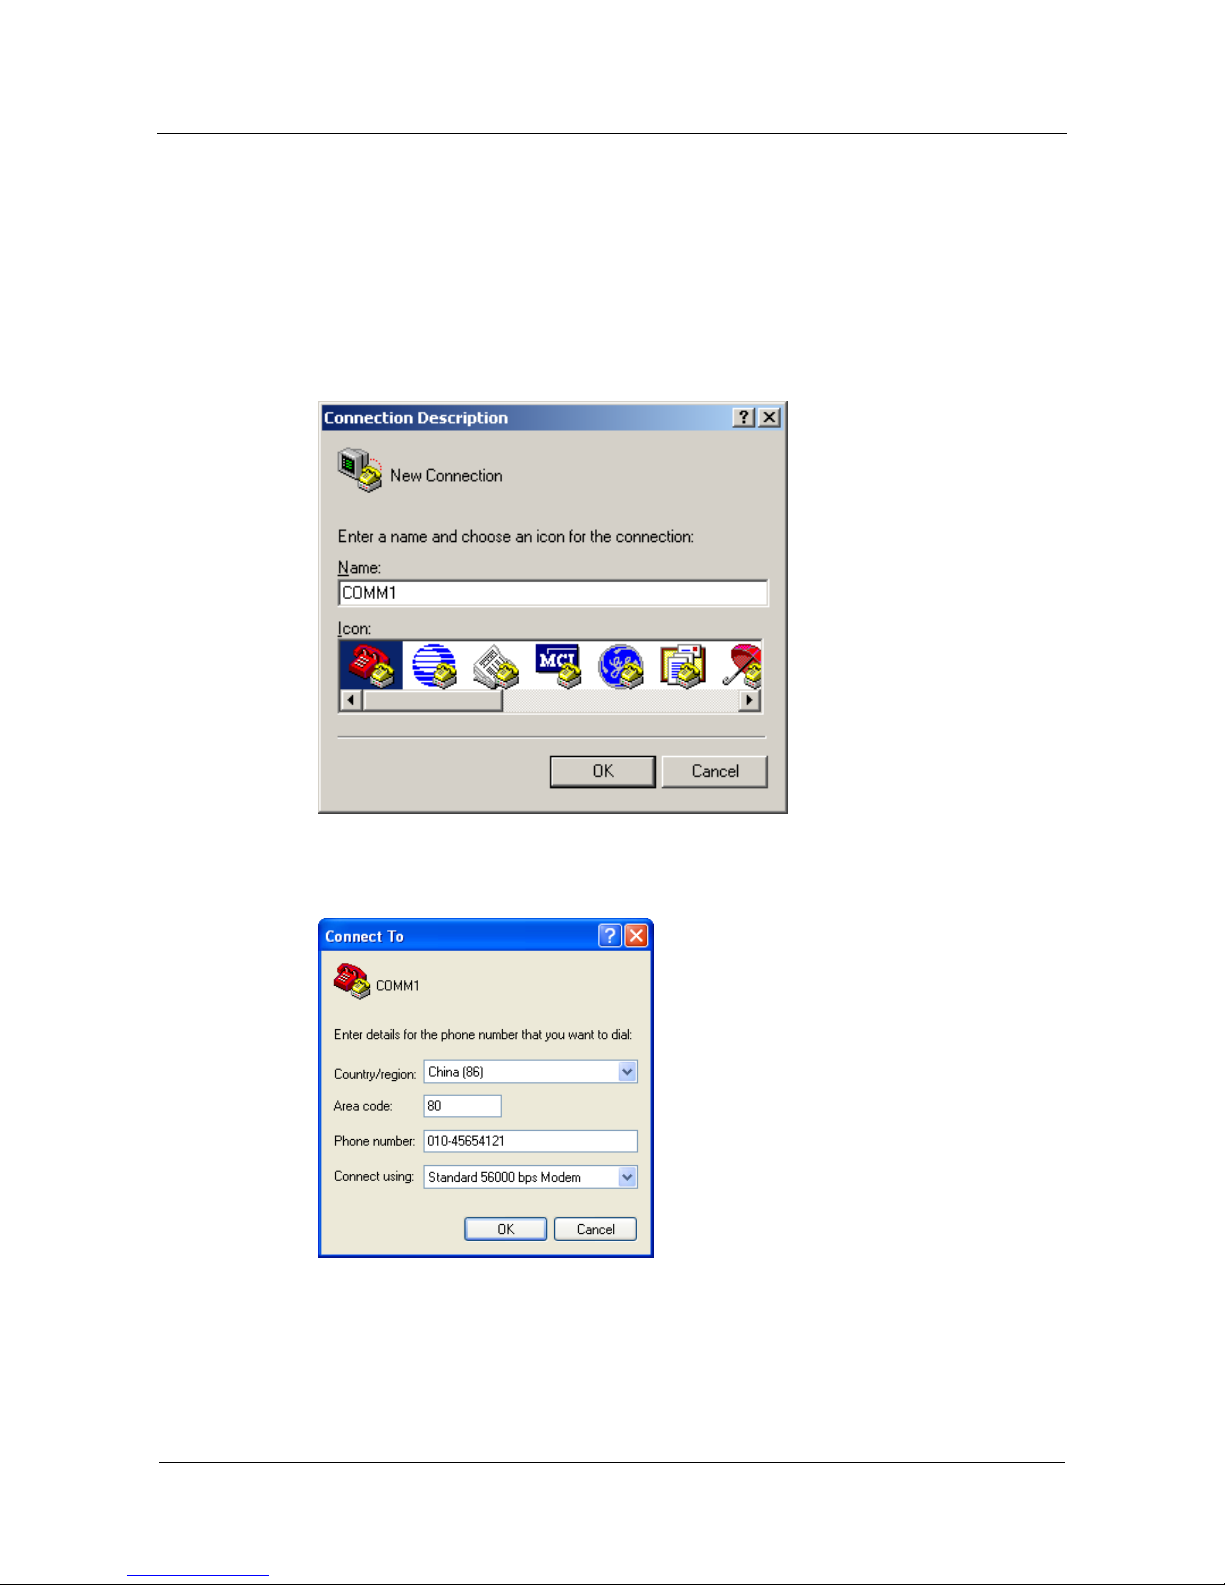
2 Establishment of the Configuration Environment
Quidway NetEngine80
Configuration Guide - Basic Configurations
2-8 Huawei Proprietary and Confidential
Copyright © Huawei Technologies Co., Ltd.
Issue 04 (2009-12-20)
Configuration Procedure
Step 1 Connect the serial port of the PC (or terminal) to th e con sole port of the router throu gh
standard RS-232 configuration cable. The local configuration environment is established.
Step 2 Run the terminal emulation program on the PC. Set the terminal communication parameters to
be 9600 bps, data bit to be 8, stop bit to be 1. Specify no parity and no flow control as shown
from Figure 2-2 to Figure 2-4.
Figure 2-2 New connection
Figure 2-3 Setting the port
Page 44
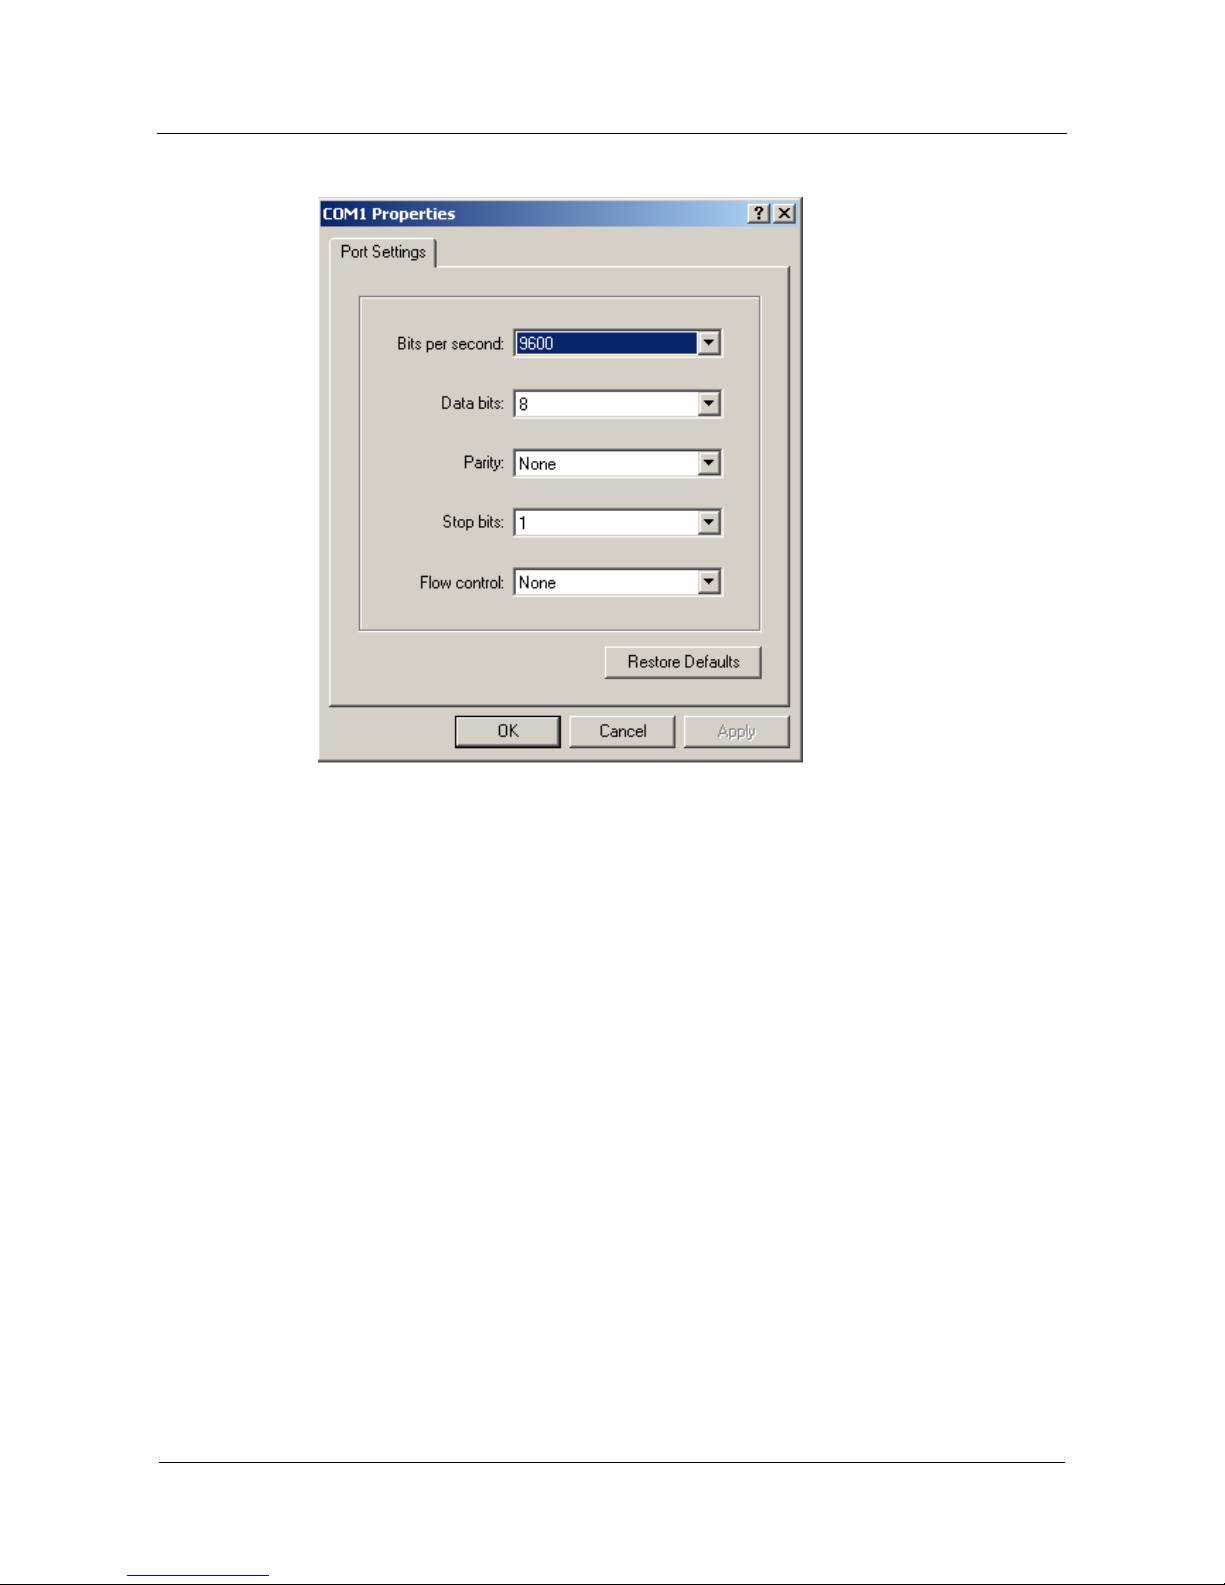
Quidway NetEngine80
Configuration Guide - Basic Configurations 2 Establishment of the Configuration Environment
Issue 04 (2009-12-20) Huawei Proprietary and Confidential
Copyright © Huawei Technologies Co., Ltd.
2-9
Figure 2-4 Setting the port communication parameters
Power on the router to perform a self-check and the system performs automatic configuration.
When the self-check ends, you are prompted to press Enter until a command line prompt
such as
Quidway appears.
Enter the command to check the running status of the router or configure the router.
Enter "?" for help.
For details, refer to the following chapters.
----End
2.5.2 Example for Logging In Through Telnet
Networking Requirements
You can log in to the router on other network segments through the PC or other terminals to
perform remote maintenance.
Page 45

2 Establishment of the Configuration Environment
Quidway NetEngine80
Configuration Guide - Basic Configurations
2-10 Huawei Proprietary and Confidential
Copyright © Huawei Technologies Co., Ltd.
Issue 04 (2009-12-20)
Figure 2-5 Establishing the configuration environment through Telnet
PC Router
Target
Router
WAN
GE1/0/0
202.38.160.92/16
Configuration Roadmap
The configuration roadmap is as follows:
1. Establish the physical connection
2. Configure user login parameters
3. Logging in to the router from the client side
Data Preparation
To complete the configuration, you need the following data
z
IP address of the PC
z
IP address of the Ethernet interface on the router
z
User information accessed through Telnet (including the user name, password and
authentication mode)
Configuration Procedure
Step 1 Connect the PC and the router respectively to the network.
Step 2 Configure login user parameters.
# Configure the login address
<Quidway> system-view
[Quidway] interface GigabitEthernet 1/0/0
[Quidway-GigabitEthernet1/0/0] ip address 202.38.160.92 255.255.0.0
[Quidway-GigabitEthernet1/0/0] quit
# Configure login authentication mode
[Quidway] aaa
[Quidway-aaa] local-user huawei password cipher test2
[Quidway-aaa] local-user huawei service-type telnet
[Quidway-aaa] local-user huawei level 3
[Quidway-aaa] quit
[Quidway] user-interface vty 0 4
[Quidway-ui-vty0-14] authentication-mode aaa
Step 3 Configure the client login.
Run the Telnet on the PC, as shown in Figure 2-6.
Page 46
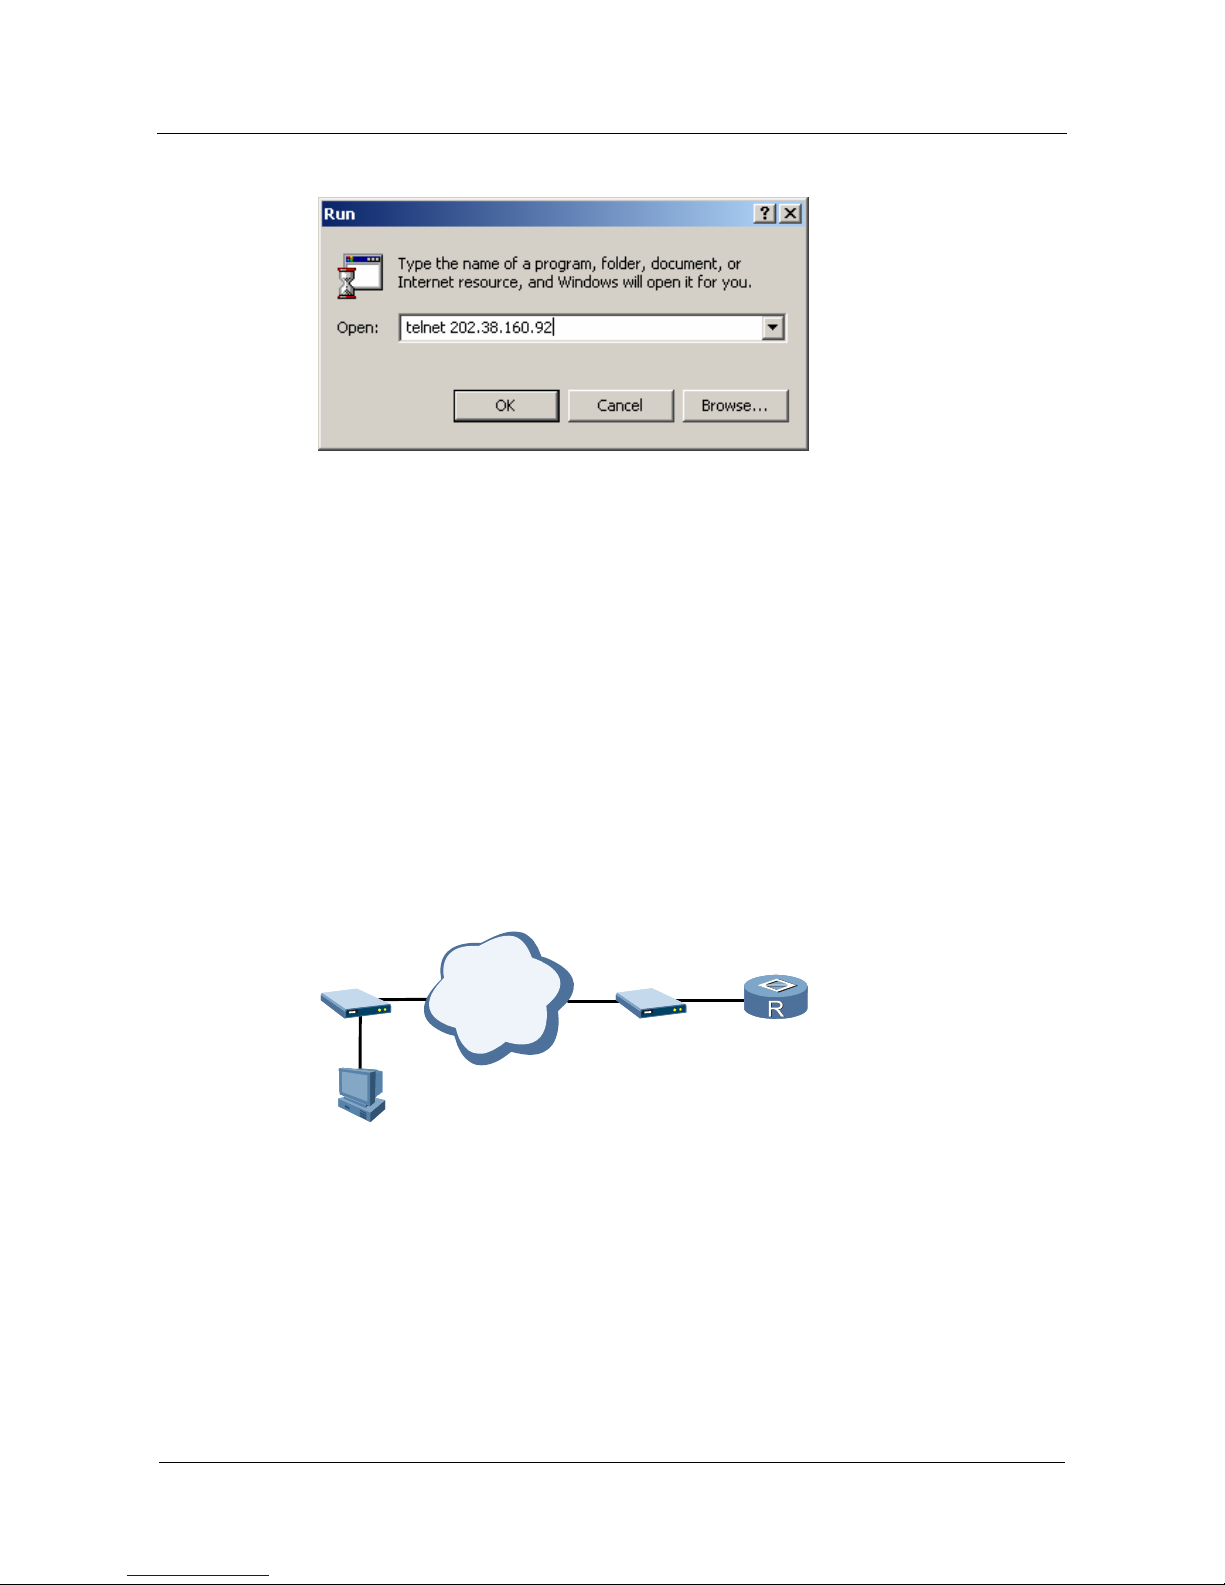
Quidway NetEngine80
Configuration Guide - Basic Configurations 2 Establishment of the Configuration Environment
Issue 04 (2009-12-20) Huawei Proprietary and Confidential
Copyright © Huawei Technologies Co., Ltd.
2-11
Figure 2-6 Running the Telnet program on the PC
Click OK.
Enter the user name and password in the login window. After authentication, a command line
prompt such as <Quidway> appears. Now enter the configuration environment in the user
view.
----End
2.5.3 Example for Logging In Through the AUX Port
Networking Requirements
If you cannot configure the router by local login and there is no reachable route to other
routers, connect the serial port of the PC and the AUX port of the router through the Modem.
The detailed configuration environment is shown as Figure 2-7.
Figure 2-7 Establishing the remote configuration environment through AUX
Modem
Router
PC
COM
AUX
Modem
PSTN
Configuration Roadmap
The configuration roadmap is as follows:
1. Establish the physical connection
2. Configure Modem parameters
3. Configure the AUX port to support the Modem dialup
Page 47

2 Establishment of the Configuration Environment
Quidway NetEngine80
Configuration Guide - Basic Configurations
2-12 Huawei Proprietary and Confidential
Copyright © Huawei Technologies Co., Ltd.
Issue 04 (2009-12-20)
Data Preparation
To complete the configuration, you need the following data:
z
Type of terminals
z
Terminal communication parameters
z
Modem communication parameters
Configuration Procedure
Step 1 Establish the physical connection as shown in Figure 2-7.
Step 2 Configure the AUX port to support the Modem dialup.
<Quidway> system-view
[Quidway] aaa
[Quidway-local-aaa-server] local-user huawei password cipher test1
[Quidway-local-aaa-server] local-user huawei service-type terminal
[Quidway-local-aaa-server] local-user huawei level 3
[Quidway-local-aaa-server] quit
[Quidway] user-interface aux 0
[Quidway-ui-aux0] authentication-mode aaa
[Quidway-ui-aux0] modem both
Step 3 Configure Modem parameters.
# Run the PC emulation terminal, see 2.4.4 Configuring the Connection Between the Remote
Terminal and the Router.
Press Enter on the PC emulation terminal or terminal until a command line prompt of the
Modem such as ">" appears.
Configure the Modem to meet the requirements of AUX communication.
For details, see Modem descriptions.
Step 4 Log in to the router.
Enter the user name and password in the remote terminal emulation program.
After authentication, a command line prompt such as <Quidway> appears.
Enter the command to check the running status of the router or configure the router.
Enter "?" for help.
For detailed operations, refer to the following chapters.
----End
Page 48

Quidway NetEngine80
Configuration Guide - Basic Configurations Contents
Issue 04 (2009-12-20) Huawei Proprietary and Confidential
Copyright © Huawei Technologies Co., Ltd.
i
Contents
3 CLI Overview..............................................................................................................................3-1
3.1 Introduction...................................................................................................................................................3-2
3.1.1 Command Line Interface .....................................................................................................................3-2
3.1.2 Command Levels .................................................................................................................................3-2
3.1.3 Command Line Views..........................................................................................................................3-3
3.2 Online Help...................................................................................................................................................3-6
3.2.1 Full Help ..............................................................................................................................................3-6
3.2.2 Partial help ...........................................................................................................................................3-6
3.2.3 Error Messages of the Command Line Interface..................................................................................3-7
3.3 Features of Command Line Interface............................................................................................................3-7
3.3.1 Editing..................................................................................................................................................3-7
3.3.2 Displaying............................................................................................................................................3-8
3.3.3 Regular Expressions.............................................................................................................................3-8
3.3.4 History Commands ............................................................................................................................3-10
3.4 Shortcut Keys..............................................................................................................................................3-11
3.4.1 Classifying Shortcut Keys..................................................................................................................3-11
3.4.2 Defining Shortcut Keys......................................................................................................................3-12
3.4.3 Use of Shortcut Keys .........................................................................................................................3-13
3.5 Configuration Examples..............................................................................................................................3-13
3.5.1 Example for Using Shortcut Keys......................................................................................................3-13
3.5.2 Copying Commands Using Shortcut Keys.........................................................................................3-14
3.5.3 Example for Using Tab ...................................................................................................................... 3-14
Page 49

Quidway NetEngine80
Configuration Guide - Basic Configurations Tables
Issue 04 (2009-12-20) Huawei Proprietary and Confidential
Copyright © Huawei Technologies Co., Ltd.
iii
Tables
Tab l e 3 -1 Command line views ..........................................................................................................................3-4
Tab l e 3 -2 Common error messages of the command line...................................................................................3-7
Tab l e 3 -3 Keys for editing ..................................................................................................................................3-7
Tab l e 3 -4 Keys for displaying.............................................................................................................................3-8
Tab l e 3 -5 Describes metacharacters ...................................................................................................................3-9
Tab l e 3 -6 Access the history commands........................................................................................................... 3-10
Tab l e 3 -7 System-defined shortcut keys ........................................................................................................... 3-11
Page 50

Quidway NetEngine80
Configuration Guide - Basic Configurations 3 CLI Overview
Issue 04 (2009-12-20) Huawei Proprietary and Confidential
Copyright © Huawei Technologies Co., Ltd.
3-1
3 CLI Overview
About This Chapter
The following table shows the contents of this chapter.
Section Description
3.1 Introduction This section describes the basic concepts of the command
line.
3.2 Online Help This section describes how to use the online help of the
command line.
3.3 Features of Command
Line Interface
This section describes the error messages of the command
line.
3.4 Shortcut Keys This section describes how to use shortcut keys.
3.5 Configuration Examples This section provides examples for using shortcut keys.
Page 51

3 CLI Overview
Quidway NetEngine80
Configuration Guide - Basic Configurations
3-2 Huawei Proprietary and Confidential
Copyright © Huawei Technologies Co., Ltd.
Issue 04 (2009-12-20)
3.1 Introduction
3.1.1 Command Line Interface
When a prompt appears, you enter the command line interface (CLI) and interact with routers
through CLI.
The system provides a series of configuration commands. You can configure and manage the
router by entering commands on CLI.
A CLI features as follows:
z
Local or remote configuration through AUX port.
z
Local configuration through the console port.
z
Local or remote configuration through Telnet or Secure Shell (SSH).
z
Remote configuration by logging in to the an asynchronous serial interface on a router
through Modem dialup.
z
A user interface view for specific configuration management.
z
Hierarchical command protection for users of different levels, that is running the
commands based on the corresponding level.
z
Local authentication, password authentication and Authentication, Authorization and
Accounting (AAA) to prevent the unauthorized user from accessing the router.
z
Entering "?" for online help at any time.
z
Network testing commands such as tracert and ping for rapidly diagnosing a network.
z
Abundant debugging information to help in diagnosing the network.
z
The telnet command for directly logging in to and manage other routers.
z
FTP service for the file uploading and downloading.
z
Running a history command, like DosKey.
z
A command line interpreter provides intelligent command resolution methods such as
key word fuzzy match and context conjunction. These methods make it easy for users to
enter their commands.
z
The system supports the command with 255 characters at most. The command can be in an
incomplete form.
z
The system saves the incomplete command to the configuration files in the complete form; therefore,
the command may have more than 255 characters. However, when the system is restarted, the
incomplete command cannot be restored. So, pay attention to the length of the incomplete command.
3.1.2 Command Levels
The system adopts a hierarchical protection mode that has 16 command levels.
The default command level are as follows:
z
Level 0-Visit level: Commands of this level include commands of network diagnosis tool
(such as ping and tracert) and commands that start from the local device and visit
external device (including Telnet client side, SSH client side and Rlogin) and so on.
Page 52

Quidway NetEngine80
Configuration Guide - Basic Configurations 3 CLI Overview
Issue 04 (2009-12-20) Huawei Proprietary and Confidential
Copyright © Huawei Technologies Co., Ltd.
3-3
z
Level 1-Monitoring level: Commands of this level, including the display commands and
the debugging commands, are used for system maintenance, service fault diagnosis, and
so on.
z
Level 2-Configuration level: Commands of this level are service configuration
commands that provide direct network service to the user, including routing and network
layer commands.
z
Level 3-Management level: Commands of this level are commands that influence basis
operation of the system and provide support to the service. They include file system
commands, FTP commands, TFTP commands, XModem downloading commands,
configuration file switching commands, power supply control commands, backup board
control commands, user management commands, level setting commands, system
internal parameter setting commands, and so on.
To implement the refined management, you can increase the command levels to 0-15. For the
increase in the command levels, refer to Chapter 4 "Basic Configuration" in the Quidway
NetEngine80 Configuration Guide - Basic Configurations.
z
The default command level may be higher than the command level defined according to the
command rules in application.
z
Login users have the same 16 levels as the command levels. The login users can use only the
command of the levels that are equal to or lower than their own levels. For details of login user
levels, refer to section 5.1.2 "User Management" in Chapter 5 "User Login."
3.1.3 Command Line Views
The command line interface has different command views. All the commands must register in
one or more command views. You can run a command only when you enter the corresponding
command view.
# Establish connection with the router. If the router adopts the default configuration, you can
enter the user view with the prompt of <Quidway>.
# Type system-view, and you can enter the system view.
<Quidway> system-view
[Quidway]
# Type aaa in the system view, and you can enter the AAA view.
[Quidway] aaa
[Quidway-aaa]
The prompt <Quidway> indicates the default router name. The prompt <> indicates the user view and
the prompt [ ] indicates other views.
Some commands that are implemented in the system view can also be implemented in the
other views. But the function implemented associate with the command view. For example,
the mpls command (for starting MPLS) can be run in the system view to enable the MPLS
capability globally. It can also be run in the interface view to enable the MPLS capability on
this interface.
Different command line views are shown in Table 3-1.
Page 53

3 CLI Overview
Quidway NetEngine80
Configuration Guide - Basic Configurations
3-4 Huawei Proprietary and Confidential
Copyright © Huawei Technologies Co., Ltd.
Issue 04 (2009-12-20)
Table 3-1 Command line views
View Description
aaa AAA view
aaa-accounting AAA accounting view
aaa-authen AAA authentication view
aaa-author AAA authorization view
aaa-domain AAA domain view
aaa-recording AAA recording view
acl-adv Advanced ACL view
acl-basic Basic ACL view
acl-if ACL view based on interface
Atm-pvc ATM PVC view
aux AUX interface view
bgp BGP view
bgp-af-l2vpn BGP AF L2VPN view
bgp-af-vpnv4 BGP AF VPNV4 view
bgp-af-vpn-instance BGP AF VPN instance view
vpls-family VPLS address family view
cpos CPOS interface view
dhcp DHCP address pool view
e1 E1 interface view
e3 E3 interface view
ethernet Ethernet interface view
explicit-path Explicit path view
fr-class Frame relay view
ftp-client FTP client view
GigabitEthernet GE interface view
hwtacacs HWTACACS view
ike-proposal IKE view
ipsec-policy-isakmp IPSEC policy Isakmp view
ipsec-policy-manual IPSEC policy manual view
ipsec-policy-template IPSEC policy template view
Page 54

Quidway NetEngine80
Configuration Guide - Basic Configurations 3 CLI Overview
Issue 04 (2009-12-20) Huawei Proprietary and Confidential
Copyright © Huawei Technologies Co., Ltd.
3-5
View Description
ipsec-proposal IPSEC view
isis IS-IS view
l2tp L2TP view
loopback Loopback interface view
mp-group Mp-group interface view
mpls MPLS view
mpls-l2vpn MPLS-L2VPN view
mpls-ldp MPLS-LDP view
null Null interface view
ospf OSPF view
ospf-area OSPF area view
policy-based-route Policy-based route view
pos POS interface view
radius RADIUS view
rip RIP view
rip-af-vpn-instance RIP AF VPN instance view
ripng RIPng view
route-policy Route policy view
rsa-key-code RSA key code view
rsa-public-key RSA public key view
serial Serial interface view
shell Shell view
system System view
t1 T1 interface view
t3 T3 interface view
tunnel Tunnel interface view
tunnel-policy Tunnel policy view
user-interface User interface view
virtual-ethernet Virtual Ethernet interface view
virtual-template Virtual template interface view
vpn-instance VPN instance view
Page 55

3 CLI Overview
Quidway NetEngine80
Configuration Guide - Basic Configurations
3-6 Huawei Proprietary and Confidential
Copyright © Huawei Technologies Co., Ltd.
Issue 04 (2009-12-20)
View Description
aaa AAA view
aaa-accounting AAA accounting view
aaa-authen AAA authentication view
3.2 Online Help
The command line interface provides the two online helps:
z
Full help
z
Partial help
3.2.1 Full Help
You can obtain the full help of the command line in the following ways:
z
Enter "?" in any command line view to display all the commands and their simple
descriptions.
<Quidway> ?
z
Enter a command and "?" separated by a space. If the key word is at this position, all
key words and their simple descriptions are displayed. For example:
<Quidway> language-mode ?
Chinese Chinese environment
English English environment
Chinese and English are keywords; Chinese environment and English environment describe
the keywords respectively.
z
Enter a command and "?" separated by a space, and if a parameter is at this position, the
related parameter names and parameter descriptions are displayed. For example:
Quidway] ftp timeout ?
INTEGER<1-35791> Specify FTP timeout minutes
[Quidway] ftp timeout 35 ?
<cr>
In the preceding display, INTEGER<1-35791> describes the parameter value; Specify FTP
timeout minutes is a simple description of the parameter usage; <cr> indicates that no
parameter is at this position. The command is repeated in the next command line. You can
press Enter to run the command.
3.2.2 Partial help
You can obtain the partial help of the command line in the following ways:
z
Enter a character string and "?" separated by a space to display all commands that begin
with this character string.
<Quidway> d?
debugging delete dir display downlpu
Page 56

Quidway NetEngine80
Configuration Guide - Basic Configurations 3 CLI Overview
Issue 04 (2009-12-20) Huawei Proprietary and Confidential
Copyright © Huawei Technologies Co., Ltd.
3-7
z
Enter a command with "?" closely following it to display all the key words that begin
with this character string.
<Quidway> display v?
version virtual-access vlan vlan-group voltage vpls vrrp vsi
version vlan vpls vpn-group vrrp vsi
z
Enter the first several letters of a key word in the command and then press Tab to display
the complete key word on the condition that the letters uniquely identify the key word.
Otherwise, if you continue to press Tab, different key words are displayed. You can
select the needed key word.
3.2.3 Error Messages of the Command Line Interface
All the commands entered by the user are run correctly, if the grammar check has been passed.
Otherwise, error messages are reported to the user. See Table 3-2 for the common error
messages.
Table 3-2 Common error messages of the command line
Error messages Cause of the error
The command cannot be found Unrecognized command
The key word cannot be found
Parameter type error Wrong parameter
The parameter value exceeds the limit
Incomplete command Incomplete command inputted
Too many parameters Too many parameters inputted
Ambiguous command Indefinite parameters inputted
3.3 Features of Command Line Interface
3.3.1 Editing
The command line supports multi-line edition. The maximum length of each command is 255
characters.
Keys for editing often used are shown in Ta b l e 3-3.
Table 3-3 Keys for editing
Key Function
Common key Inserts a character in the current position of the cursor if the
editing buffer is not full and the cursor moves rightward.
Otherwise an alarm is generated.
Page 57

3 CLI Overview
Quidway NetEngine80
Configuration Guide - Basic Configurations
3-8 Huawei Proprietary and Confidential
Copyright © Huawei Technologies Co., Ltd.
Issue 04 (2009-12-20)
Key Function
Backspace Deletes the character on the left of the cursor and the cursor
moves leftward.
When the cursor reaches the head of the command, an alarm
is generated.
Left cursor key ← or
Ctrl+B
Moves the cursor leftward by the space of a character. When
the cursor reaches the head of the command, an alarm is
genarated.
Right cursor key → or
Ctrl+F
Moves the cursor rightward by the space of a character.
When the cursor reaches the end of the command, the alarm
bell rings.
Tab Press Tab after typing the incomplete key word and the
system runs the partial help:
z
If the matching key word is unique, the system replaces the
typed one with the complete key word and displays it in a
new line with the cursor a space behind.
z
If there are several matches or no match at all, the system
displays the prefix first. Then you can press Tab to view
the matching key word one by one. In this case, the cursor
is closely follows the word end and you can type a space to
enter the next word.
z
If a wrong key word is input, press Tab and your input is
displayed in a new line.
3.3.2 Displaying
You can control to display on CLI as follows:
z
Display prompt and help information in both Chinese and English.
z
When the information displayed exceeds a full screen, it provides the pause function. In
this case, the user has three choices as shown in Table 3-4.
Table 3-4 Keys for displaying
Key Function
Ctrl+C Stops the display and running of the command.
Space Continues to display the information on next screen.
Enter Continues to display the information on next line.
3.3.3 Regular Expressions
When a lot of information is output, you can filter the display through regular expressions.
Page 58

Quidway NetEngine80
Configuration Guide - Basic Configurations 3 CLI Overview
Issue 04 (2009-12-20) Huawei Proprietary and Confidential
Copyright © Huawei Technologies Co., Ltd.
3-9
The regular expression is a tool for matching and replacing modes. Users should construct the
matching mode based on certain rules, and then match the mode with the target object.
To help users construct the matching mode flexibly, regular expressions provide some special
characters that are called metacharacters. Metacharacters are used to define the modes of
other characters in the target object.
Metacharacters are described in Table 3 - 5 .
Table 3-5 Describes metacharacters
Metacharacter Connotation
\ Escape character
. Matches any single character including space except for \n.
* Characters on the left of it appear for 0 or many times continuously
in the target object.
+ Characters on the left of it appear for 1 or many times continuously
in the target object.
| Or relationship exists between characters on the left and right
sides of it.
^ Characters on the right of it must appear at the beginning of the
target object.
$ Characters on the left of it must appear at the end of the target
object.
[xyz] Matches the character listed in the square character.
[^xyz] Matches any character that is not listed in the square bracket (^ is on
the left of the character).
[a-z] Matches any character within the specified range.
[^a-z] Matches any character that is not within the specified range.
{n} The matches appear for n times (n is a non-negative integer).
{n,} The matches appear for at least n times (n is a non-negative integer).
{n,m} The matches appear for n-m times (m and n are non-negative
integer and n is smaller than or equal to m).
Note that there is no space between n and m.
For example:
^ip: matches the target object that begins with the character string "ip".
ip$: matches the target object that ends with the character string "ip".
The simplest regular expressions do not contain any metacharacter. For example, when a
regular expression is defined as "hello", it matches only the character string "hello".
NE80 supports two ways of applying regular expression in filtering.
Page 59

3 CLI Overview
Quidway NetEngine80
Configuration Guide - Basic Configurations
3-10 Huawei Proprietary and Confidential
Copyright © Huawei Technologies Co., Ltd.
Issue 04 (2009-12-20)
Specifying a Filtering Mode in Command
For the commands supporting regular expressions, there are three filtering methods:
z
| begin regular-expression: displays the information that begins with the line that
matches regular expression.
z
| exclude regular-expression: displays the information that excludes the lines that match
regular expression.
z
| include regular-expression: displays the information that includes the lines that match
regular expression.
Specify a Filtering Mode when Information is Displayed
When a lot of information is output and displayed, you can specify a filtering mode in the
prompt "---- More ----".
z
/regular-expression: displays the information that begins with the line that matches
regular expression.
z
-regular-expression: displays the information that excludes lines that match regular
expression.
z
+regular-expression: displays the information that includes lines that match regular
expression.
Regular expressions are used to filter the output, such as the metacharacter {}. If the number
of matching times exceeds the scope specified in {}, the matching times out and the
information cannot be displayed normally. Thus, ensure to avoid repeating regular expressions.
Different products have different scopes.
3.3.4 History Commands
The command line interface automatically saves the history command entered by the user.
This function is similar to the Doskey. The user can invoke and run the saved history
command at any time.
By default, the system saves 10 history commands at most for each user. The operations are as
shown in Table 3-6.
Table 3-6 Access the history commands
Action Key or Command Result
Display the
history
commands.
display
history-command
Display the history commands entered by users.
Access the last
history
command.
Up cursor key
↑ or Ctrl+P
Display the last history command if there is an
earlier history command
Otherwise, an alarm is generated.
Page 60

Quidway NetEngine80
Configuration Guide - Basic Configurations 3 CLI Overview
Issue 04 (2009-12-20) Huawei Proprietary and Confidential
Copyright © Huawei Technologies Co., Ltd.
3-11
Action Key or Command Result
Access the
next history
command.
Down cursor key ↓
or Ctrl+N
Display the next history command if there is a
later history command.
Otherwise, the command is cleared and the alarm
bell rings.
On the HyperTerminal of Windows 9X, cursor key ↑ is invalid. Because the HyperTerminals of
Windows 9X define the keys differently. In this case, you can replace the cursor key ↑ with Ctrl+P.
When you use the history command, note the following:
z
The saved history commands are the same as that those input by users. For example, if
the user inputs an incomplete command, the saved command also is incomplete.
z
If the user runs the same command for several times, the earliest command is saved. If
the command is input in different forms, they are considered as different commands.
z
For example, if the display ip routing-table command is run for several times, only one
history command is saved. If the disp ip routing command and the display ip
routing-table command are run, two history commands are saved.
3.4 Shortcut Keys
3.4.1 Classifying Shortcut Keys
The shortcut keys in the system are classified into the following types:
z
User-oriented and user-defined shortcut keys: CTRL_G, CTRL_L, and CTRL_O. The
user can correlate these shortcut keys with any commands. When the shortcut keys are
pressed, the system automatically runs the corresponding command. For the details of
defining the shortcut keys, see Defining Shortcut Keys.
z
System-defined shortcut keys: These shortcut keys with fixed functions are defined by
the system. Table 3-7 lists the system-defined shortcut keys.
Different terminal software defines these keys differently. Therefore, the shortcut keys on the terminal
may be different from those listed in this section.
Table 3-7 System-defined shortcut keys
Key Function
CTRL_A The cursor moves to the beginning of the current line.
CTRL_B The cursor moves leftward by the space of a character.
CTRL_C Terminates the running function.
CTRL_D Deletes the character where the cursor lies.
CTRL_E The cursor moves to the end of the current line.
Page 61

3 CLI Overview
Quidway NetEngine80
Configuration Guide - Basic Configurations
3-12 Huawei Proprietary and Confidential
Copyright © Huawei Technologies Co., Ltd.
Issue 04 (2009-12-20)
Key Function
CTRL_F The cursor moves rightward by the space of a character.
CTRL_H Deletes one character on the left of the cursor.
CTRL_K Terminates the outbound connection.
CTRL_N Displays the next command in the history command buffer.
CTRL_P Displays the previous command in history command buffer.
CTRL_R Redisplays the information of the current line.
CTRL_SHIFT_V Pastes the contents on the clipboard.
CTRL_T Kill outgoing connection when connecting.
CTRL_U Delete all characters up to the cursor.
CTRL_W Deletes a character string or character on the left of the cursor.
CTRL_X Deletes all the characters on the left of the cursor.
CTRL_Y Deletes all the characters on the right of the cursor.
CTRL_Z Returns to the user view.
CTRL_] Terminates the inbound or redirection connections.
ESC_B The cursor moves leftward by the space of a word.
ESC_D Deletes a word on the right of the cursor.
ESC_F The cursor moves rightward to the next word end.
ESC_N The cursor moves downward to the next line.
ESC_P The cursor moves upward to the previous line.
ESC_SHIFT_< Sets the position of the cursor to the beginning of the
clipboard.
ESC_SHIFT_> Sets the position of the cursor to the end of the clipboard.
3.4.2 Defining Shortcut Keys
When defining the shortcut keys, use double quotation marks to define the command if this command
contains several commands words. That is, spaces exist in the command.
Configure as follows in the system view.
Action Command
Define shortcut
keys.
hotkey { CTRL_G | CTRL_L | CTRL_O } command-text
Page 62

Quidway NetEngine80
Configuration Guide - Basic Configurations 3 CLI Overview
Issue 04 (2009-12-20) Huawei Proprietary and Confidential
Copyright © Huawei Technologies Co., Ltd.
3-13
By default, CTRL_G, CTRL_L and CTRL_O correspond to the following commands
respectively:
z
CTRL_G: display current-configuration
z
CTRL_L: display ip routing-table
z
CTRL_O: undo debugging all
3.4.3 Use of Shortcut Keys
z
You can press the shortcut keys wherever you can type a command. Then the system
displays the full corresponding command.
z
If you have typed part of a command and have not pressed Enter, you can press the
shortcut keys to clear the input and display the full corresponding command. This
operation has the same effect with that deleting all commands and then re-entering the
complete command.
z
The shortcut keys are run as the commands, the syntax is recorded to the command
buffer and log for fault location and querying.
The terminal in use may affect the functions of the shortcut keys. For example, if the customized
shortcut keys of the terminal conflict with those of the router, the input shortcut keys are captured by the
terminal program and hence the shortcut keys do not function.
Run the following command in any view to display the use of shortcut keys.
Action Command
View the use of shortcut keys.
display hotkey
3.5 Configuration Examples
3.5.1 Example for Using Shortcut Keys
Defining Shortcut Keys
Step 1 Correlate Ctrl_G with the display ip routing-table command and run the shortcut keys.
<Quidway> system-view
[Quidway] hotkey ctrl_u display ip routing-table
Step 2 Press Ctrl+G when the prompt Quidway appears.
[Quidway] display ip routing-table
Route Flags: R - relay, D - download to fib
-----------------------------------------------------------------------------Routing Tables: Public
Destinations : 5 Routes : 5
Destination/Mask Proto Pre Cost Flags NextHop Interface
51.51.51.9/32 Direct 0 0 D 127.0.0.1 InLoopBack0
Page 63

3 CLI Overview
Quidway NetEngine80
Configuration Guide - Basic Configurations
3-14 Huawei Proprietary and Confidential
Copyright © Huawei Technologies Co., Ltd.
Issue 04 (2009-12-20)
100.2.0.0/16 Direct 0 0 D 100.2.150.51 GigabitEthernet0/0/0
100.2.150.51/32 Direct 0 0 D 127.0.0.1 InLoopBack0
100.2.255.255/32 Direct 0 0 D 127.0.0.1 InLoopBack0
127.0.0.0/8 Direct 0 0 D 127.0.0.1 InLoopBack0
----End
3.5.2 Copying Commands Using Shortcut Keys
Step 1 Enter the command in any view.
# Move the cursor to the beginning of the command and press ESC_SHIFT_<. Move the
cursor to the end and press ESC_SHIFT_>. Then, press CTRL_Cf for copying.
<Quidway> display ip routing-table
Step 2 Run the display clipboard command to view the contents on the clipboard.
<Quidway> display clipboard
---------------- CLIPBOARD----------------display ip routing-table
Step 3 Press Ctrl+Shift+V to paste the contents of clipboard.
<Quidway> display ip routing-table
----End
3.5.3 Example for Using Tab
There are three cases in using Tab as shown in the following example:
z
The matching key word is unique after the incomplete key word is typed in.
Step 1 Type the incomplete key word.
[Quidway] info-
Step 2 Press Tab.
[Quidway] info-center
The system replaces the typed one with the complete key word and displays it in a new line
with the cursor a space behind
----End
z
There are several matches or no match at all after the incomplete key word is typed in.
# info-center can be followed by three key words.
[Quidway] info-center log?
logbuffer logfile loghost
Type the incomplete key word.
[Quidway] info-center l
Step 1 Press Tab.
Page 64

Quidway NetEngine80
Configuration Guide - Basic Configurations 3 CLI Overview
Issue 04 (2009-12-20) Huawei Proprietary and Confidential
Copyright © Huawei Technologies Co., Ltd.
3-15
[Quidway] info-center log
The system displays the prefix first. The prefix in this example is "log".
Step 2 Continue to press Tab. The cursor is closely following the word end.
[Quidway] info-center loghost
[Quidway] info-center logbuffer
[Quidway] info-center logfile
Stop pressing Tab after the key word logfile that you need is displayed.
Step 3 Type a space to enter the next word "channel".
[Quidway] info-center logfile channel
----End
z
A wrong key word is typed in.
Step 1 Type a wrong key word "loglog".
[Quidway] info-center loglog
Step 2 Press Tab.
[Quidway] info-center loglog
The wrong input "loglog" is displayed in a new line.
----End
Page 65

Quidway NetEngine80
Configuration Guide - Basic Configurations Contents
Issue 04 (2009-12-20) Huawei Proprietary and Confidential
Copyright © Huawei Technologies Co., Ltd.
i
Contents
4 Basic Configuration ...................................................................................................................4-1
4.1 Introduction...................................................................................................................................................4-2
4.2 Configuring the Basic System Environment.................................................................................................4-2
4.2.1 Establishing the Configuration Task ....................................................................................................4-2
4.2.2 Switching the Language Mode.............................................................................................................4-3
4.2.3 Configuring the Equipment Name.......................................................................................................4-3
4.2.4 Configuring the System Clock.............................................................................................................4-3
4.2.5 Configuring the Header Text................................................................................................................4-4
4.2.6 Configuring Command Levels.............................................................................................................4-4
4.3 Configuring Basic User Environment...........................................................................................................4-5
4.3.1 Establishing the Configuration Task ....................................................................................................4-5
4.3.2 Configuring the Password for Switching User Levels.........................................................................4-6
4.3.3 Switching User Levels.........................................................................................................................4-6
4.3.4 Locking User Interfaces....................................................................................................................... 4-7
4.4 Displaying System Status Messages.............................................................................................................4-7
4.4.1 Displaying System Configuration........................................................................................................4-8
4.4.2 Displaying System Status.....................................................................................................................4-8
4.4.3 Collecting System Diagostic Information............................................................................................4-8
Page 66

Quidway NetEngine80
Configuration Guide - Basic Configurations 4 Basic Configuration
Issue 04 (2009-12-20) Huawei Proprietary and Confidential
Copyright © Huawei Technologies Co., Ltd.
4-1
4 Basic Configuration
About This Chapter
The following table shows the contents of this chapter.
Section Description
4.1 Introduction This section describes the basic configurations.
4.2 Configuring the Basic
System Environment
This section describes how to configure the basic system
environment on the router.
4.3 Configuring Basic User
Environment
This section describes the configuration of the basic user
configuration environment on the router.
4.4 Displaying System Status
Messages
This section describes the display commands for
displaying basic system configuration.
Page 67

4 Basic Configuration
Quidway NetEngine80
Configuration Guide - Basic Configurations
4-2 Huawei Proprietary and Confidential
Copyright © Huawei Technologies Co., Ltd.
Issue 04 (2009-12-20)
4.1 Introduction
Before configuring the services, users often need to perform basic configurations for actual
operation and maintenance.
The product provides configurations of two kinds of basic environments:
z
Basic system environment: mainly includes the language mode, host name, system name,
system time, header text, command level for actual environment.
z
Basic user environment: mainly includes password for changing levels and the terminal
lock.
4.2 Configuring the Basic System Environment
4.2.1 Establishing the Configuration Task
Applicable Environment
Before configuring the services, you need to configure the basic system environments to meet
the requirements of the practical environments.
By default, the product supports commands of Level 0 to Level 3, namely, visit level,
monitoring level, configuration level, and management level.
If the user needs to define more levels, or refine manage privilege on the device, the user can
extend the range of command line level from the range of Level 0 to Level 3 to the range of
Level 0 to Level 15.
Pre-configuration Tasks
Before configuring basic system environment, power on the router.
Data Preparation
To configure basic system environment, you need the following data.
No. Data
1 Language mode
2 System time
3 Host name
4 Login information
5 Command level
Page 68

Quidway NetEngine80
Configuration Guide - Basic Configurations 4 Basic Configuration
Issue 04 (2009-12-20) Huawei Proprietary and Confidential
Copyright © Huawei Technologies Co., Ltd.
4-3
Configuration Procedures
No. Procedure
1 Switching the Language Mode
2 Configuring the Equipment Name
3 Configuring the System Clock
4 Configuring the Header Text
5 Configuring Command Levels
4.2.2 Switching the Language Mode
Do as follows on the router:
Step 1 Run:
language-mode { chinese | english }
The language mode is switched.
----End
By default, the English mode is used. The help information on the router can be in English
and in Chinese. When you need the help information in Chinese, run this command to switch
the language mode.
4.2.3 Configuring the Equipment Name
Do as follows on the router:
Step 1 Run:
system-view
The system view is displayed.
Step 2 Run:
sysname host-name
The equipment name is set.
----End
You can change the name of the router that appears in the command prompt.
4.2.4 Configuring the System Clock
Do as follows on the router:
Step 1 Run:
clock datetime HH:MM:SS YYYY/MM/DD
Page 69

4 Basic Configuration
Quidway NetEngine80
Configuration Guide - Basic Configurations
4-4 Huawei Proprietary and Confidential
Copyright © Huawei Technologies Co., Ltd.
Issue 04 (2009-12-20)
The UTC standard time is set.
Step 2 Run:
clock timezone time-zone-name { add | minus } offset
The time zone is set.
Step 3 Run:
clock daylight-saving-time time-zone-name one-year start-time start-data end-time
end-data offset
Or:
clock daylight-saving-time time-zone-name repeating start-time { start-year month
{ first | second | third | fourth | fifth | last } weekday | start-date } end-time { end-year
month { first | second | third | fourth | fifth | last } weekday | end-date } offset
The daylight time is set.
To guarantee cooperation with other devices, you need to accurately set the system time. The
product supports setting the time zone and daylight time.
----End
4.2.5 Configuring the Header Text
Do as follows on the router:
Step 1 Run:
system-view
The system view is displayed.
Step 2 Run:
header login { information text | file file-name }
The header text is set during login.
Step 3 Run:
header shell { information text | file file-name }
The header text is set after the login.
----End
Header text is the prompt displayed by the system when users connect to the router, log in or
start interactive configuration. Configure the header text to provide detailed indication.
4.2.6 Configuring Command Levels
Do as follows on the router:
Step 1 Run:
system-view
Page 70

Quidway NetEngine80
Configuration Guide - Basic Configurations 4 Basic Configuration
Issue 04 (2009-12-20) Huawei Proprietary and Confidential
Copyright © Huawei Technologies Co., Ltd.
4-5
The system view is displayed.
Step 2 Run:
command-privilege level rearrange
Update the command level in batch.
When no password for level 15 user is configured, the system prompts the user to set a
super-password for the level 15 user. At the same time, the system asks if the user wants to
continue to update the command line level. Then, just select "N" to set a password. If you
select "Y", the command level can be updated in batch directly. This results in that the user
that does not log in through the Console port fails to update the level.
Step 3 Run:
command-privilege level level view view-name command-key
The command level is configured. With the command, you can specify the level and view for
multiple commands at one time (command-key)..
----End
If the user does not adjust a command level separately, after the command level is updated, all
originally-registered command lines adjust automatically according to following rules:
z
The commands of Level 0 and Level 1 remain still.
z
The command Level 2 is updated to Level 10 and Level 3 is updated to Level 15.
z
No command lines exist in Level 2 to Level 9 and Level 11 to Level 14.The user can
adjust the command lines to these levels separately to refine the management of
privilege.
From Level 2 to Level 10 and from Level 3 to Level 15, this is not a two-step process, but one-step by
batch.
4.3 Configuring Basic User Environment
4.3.1 Establishing the Configuration Task
Applicable Environment
The user can log in to a router with lower level, perform simple configurations or view
configurations. When the configuration is complicated, the user needs to change to a high
identity level. Thus, it requires the user to configure the basic environment for changing
levels.
Pre-configuration Tasks
Before configuring the basic environment for the user, complete the following task:
z
Powering on the router properly
Page 71

4 Basic Configuration
Quidway NetEngine80
Configuration Guide - Basic Configurations
4-6 Huawei Proprietary and Confidential
Copyright © Huawei Technologies Co., Ltd.
Issue 04 (2009-12-20)
Data Preparation
To configure the basic environment for the user, you need the following data:
No. Data
1 Password for the user level switching
Configuration Procedures
No. Procedure
1 Configuring the Password for Switching User Levels
2 Switching User Levels
3 Locking User Interfaces
4.3.2 Configuring the Password for Switching User Levels
When simple is used, the password is saved in the configuration files in simple text. Login
users with lower level can get the password by viewing the configuration. This may cause
security problems. Therefore, cipher is used to save the password in encrypted text.
Do as follows on the router:
Step 1 Run:
system-view
The system view is displayed.
Step 2 Run:
super password [ level user-level ] { simple | cipher } password
The password for switching user levels is configured.
----End
When users log in to the router with a lower user level, they switch to a super user level to
perform advanced operations by entering the corresponding password. The password needs to
be configured beforehand.
4.3.3 Switching User Levels
Do as follows on the router:
Page 72

Quidway NetEngine80
Configuration Guide - Basic Configurations 4 Basic Configuration
Issue 04 (2009-12-20) Huawei Proprietary and Confidential
Copyright © Huawei Technologies Co., Ltd.
4-7
Step 1 Run:
super [ level ]
User levels are switched.
Step 2 Follow the prompt and enter a password.
If the password input is correct, the user can switch to a higher level. If the user inputs a
password incorrectly for three times successively, the user remains the current login level and
the user view is returned.
----End
An accurate password must be entered when the user is switched from a lower level to a
higher level.
When configuring the switchover of user levels on the router, users can perform HWTACACS
Authentication. For detailed configurations, refer to the Quidway NetEngine80Core
RouterConfiguration Guide - Security.
When the login user of lower levels is switched to the user of higher level through super, the system
automatically sends trap messages records the switchover in the log. When the switched level is lower
than that of the current level, the system only records the switchover in the log.
4.3.4 Locking User Interfaces
Do as follows on the router:
Step 1 Run:
lock
The user interface is locked.
Step 2 Follow the system prompt and input an unlock password, and then confirm.
<Quidway> lock
Enter Password:
Confirm Password:
After configuration, the message "locked !" is displayed.
----End
When you leave the operation terminals for the moment, you can lock the user interface in
case unauthorized users operate the interface. You must enter the correct password to unlock
the user interface.
4.4 Displaying System Status Messages
Using the display commands to get the following status messages:
z
System configuration message
z
System working status message
Page 73

4 Basic Configuration
Quidway NetEngine80
Configuration Guide - Basic Configurations
4-8 Huawei Proprietary and Confidential
Copyright © Huawei Technologies Co., Ltd.
Issue 04 (2009-12-20)
z
System statistics message
z
Restart message on the AMB
See the related sections for display commands about protocols and interfaces. The following
only shows the system display commands.
Run the following commands in all views.
4.4.1 Displaying System Configuration
Run one or more of following commands according to your needs:
z
Run the display version command to display the system edition.
z
Run the display clock command to display the system time.
z
Run the display users [ all ] command to display the terminal user.
z
Run the display saved-configuration command to display the original configuration.
z
Run the display current-configuration command to display the current configuration.
4.4.2 Displaying System Status
Run one or more of following commands according to your needs:
z
Run the display debugging [ interface interface-type interface-numb er ]
[ module-name ] command to display the debugging status.
z
Run the display this command to display the configuration of the current view.
4.4.3 Collecting System Diagostic Information
Run the following command according to your needs:
Run the display diagnostic-information [ file-nme ] command to display the system
diagnosis information.
When the system fails or performing the routine maintenance, you need to collect a lot of
information to locate the fault. But you cannot collect enough information, because there are
many display commands. You can use the display diagnostic-information command to
collect the running information about the current modules in the system.
The display diagnostic-information command collects the information for once after
running the following commands, including display clock, display version, display cpu,
display interface, display current-configuration, display saved-configuration, display
history-command and so on.
Page 74

Quidway NetEngine80
Configuration Guide - Basic Configurations Contents
Issue 04 (2009-12-20) Huawei Proprietary and Confidential
Copyright © Huawei Technologies Co., Ltd.
i
Contents
5 User Management ......................................................................................................................5-1
5.1 Introduction...................................................................................................................................................5-2
5.1.1 User Interface View .............................................................................................................................5-2
5.1.2 User Management ................................................................................................................................5-3
5.2 Configuring Console User Interface..............................................................................................................5-5
5.2.1 Establishing the Configuration Task ....................................................................................................5-5
5.2.2 Configuring Console Interface Attributes ............................................................................................5-6
5.2.3 Setting Console Terminal Attributes ....................................................................................................5-7
5.2.4 Configuring the User Interface Priority ...............................................................................................5-7
5.2.5 Configuring User Authentication.........................................................................................................5-8
5.2.6 Checking the Configuration...............................................................................................................5-10
5.3 Configuring AUX User Interface ................................................................................................................5-10
5.3.1 Establishing the Configuration Task ..................................................................................................5-10
5.3.2 Configuring AUX Interface Attributes ............................................................................................... 5-11
5.3.3 Configuring AUX Terminal Attributes...............................................................................................5-12
5.3.4 Configuring User Priority ..................................................................................................................5-13
5.3.5 Configuring Modem Attributes..........................................................................................................5-13
5.3.6 Configuring User Authentication.......................................................................................................5-14
5.3.7 Checking the Configuration...............................................................................................................5-15
5.4 Configuring VTY User Interface................................................................................................................. 5-16
5.4.1 Establishing the Configuration Task ..................................................................................................5-16
5.4.2 Configuring Maximum VTY User Interfaces ....................................................................................5-17
5.4.3 Configuring Limits for Incoming Calls and Outgoing Calls..............................................................5-17
5.4.4 Configuring Timeout of VTY User Authorization .............................................................................5-18
5.4.5 Configuring VTY Terminal Attributes ...............................................................................................5-18
5.4.6 Configuring User Authentication.......................................................................................................5-19
5.4.7 Checking the Configuration...............................................................................................................5-21
5.5 Managing User Interfaces ...........................................................................................................................5-21
5.5.1 Establishing the Configuration Task ..................................................................................................5-21
5.5.2 Sending Messages to Other User Interfaces.......................................................................................5-22
5.5.3 Clearing Online User .........................................................................................................................5-22
5.5.4 Checking the Configuration...............................................................................................................5-22
Page 75

Contents
Quidway NetEngine80
Configuration Guide - Basic Configurations
ii Huawei Proprietary and Confidential
Copyright © Huawei Technologies Co., Ltd.
Issue 04 (2009-12-20)
5.6 Configuring User Management...................................................................................................................5-23
5.6.1 Establishing the Configuration Task ..................................................................................................5-23
5.6.2 Configuring Authentication Mode .....................................................................................................5-24
5.6.3 Configuring Authentication Password ...............................................................................................5-24
5.6.4 Setting Username and Password for AAA Local Authentication ....................................................... 5-24
5.6.5 Configuring Non-Authentication.......................................................................................................5-25
5.6.6 Configuring User Priority ..................................................................................................................5-26
5.6.7 Checking the Configuration...............................................................................................................5-26
5.7 Configuring Local User Management.........................................................................................................5-26
5.7.1 Establishing the Configuration Task ..................................................................................................5-26
5.7.2 Creating Local User Account.............................................................................................................5-27
5.7.3 Configuring the Service Type of the Local User................................................................................ 5-27
5.7.4 Configuring Local User Authority for FTP Directory........................................................................5-28
5.7.5 Configuring Local User Status...........................................................................................................5-28
5.7.6 Configuring Local User Priority ........................................................................................................5-29
5.7.7 Configuring Access Restriction of the Local User.............................................................................5-29
5.7.8 Checking the Configuration...............................................................................................................5-29
5.8 Configuration Examples..............................................................................................................................5-30
5.8.1 Example for Configuring Logging In to the Router Through Password ............................................5-31
5.8.2 Example for Logging In to the Router Through AAA .......................................................................5-32
Page 76

Quidway NetEngine80
Configuration Guide - Basic Configurations Tables
Issue 04 (2009-12-20) Huawei Proprietary and Confidential
Copyright © Huawei Technologies Co., Ltd.
iii
Tables
Table 5-1 Example for the absolute numbering..................................................................................................5-3
Page 77

Quidway NetEngine80
Configuration Guide - Basic Configurations 5 User Management
Issue 04 (2009-12-20) Huawei Proprietary and Confidential
Copyright © Huawei Technologies Co., Ltd.
5-1
5 User Management
About This Chapter
The following table shows the contents of this chapter.
Section Description
5.1 Introduction This section describes the basic concepts of the user
interface and the user management.
5.2 Configuring Console User
Interface
This section describes how to configure the user interface
on console port.
5.3 Configuring AUX User
Interface
This section describes how to configure the user interface
on AUX port.
5.4 Configuring VTY User This section describes how to configure the user interface
of VTY.
5.5 Managing User Interfaces This section describes how to send messages and clear
users between interfaces.
5.6 Configuring User
Management
This section describes how to manage and authenticate
the user that logs in to the router.
5.7 Configuring Local User
Management
This section describes how to configure and authenticate
the local user.
5.8 Configuration Examples This section provides examples for logging in to the
router in different ways.
Page 78

5 User Management
Quidway NetEngine80
Configuration Guide - Basic Configurations
5-2 Huawei Proprietary and Confidential
Copyright © Huawei Technologies Co., Ltd.
Issue 04 (2009-12-20)
5.1 Introduction
5.1.1 User Interface View
The user interface view is a command line view provided by the system. It is used to
configure and manage all the physical and logical interfaces in the asynchronous mode.
User Interfaces Supported by the System
z
Console port (CON)
The console port is a serial port provided by the main control unit of the router provides the
console port.
The main control unit provides one EIA/TIA-232 DCE console port for local configuration by
directly connecting a terminal to a router.
z
Auxiliary port (AUX)
The main control unit of a router provides the auxiliary port that is a line device port. The
main control unit has one EIA/TIA-232 DTE AUX port, and is used by a terminal to access
the router through the Modem.
z
Virtual type line (VTY)
The virtual port is a logical terminal line. A virtual type line (VTY) is the Telnet connection
with the router through a terminal. It is used for local or remote access to the router.
User Interface Numbering
The following are user interface numbering methods:
z
Relative numbering
The format of the relative numbering is user interface type + number.
All type of user interfaces use relative numbering. It is used only in a single or a group of
specified type of user-interfaces. It must comply with the following rules:
− Number of the console port: CON 0
− Number of the auxiliary port: AUX 0
− Number of the VTY: VTY 0 for the first line, VTY 1 for the second line and so on.
z
Absolute numbering
This specifies a user interface or a group of user interfaces.
The starting number is 0 and the rest is in the sequence of CON -> AUX -> VTY. There is
only a single console port and an AUX port and there are 0-15 VTY interfaces. You can use
the user-interface maximum-vty command to set the maximum number of user interfaces.
The default number is five.
By default, the system supports three types of user interfaces: CON, AUX, and VTY.
Tabl e 5 - 1 Shows the absolute numbers of the user interfaces in this system.
Page 79

Quidway NetEngine80
Configuration Guide - Basic Configurations 5 User Management
Issue 04 (2009-12-20) Huawei Proprietary and Confidential
Copyright © Huawei Technologies Co., Ltd.
5-3
Table 5-1 Example for the absolute numbering
Absolute number User-interface
0 CON0
33 AUX0
34 The first virtual interface (VTY0)
35 The second virtual interface (VTY1)
36 The third virtual interface (VTY2)
37 The fourth virtual interface (VTY3)
38 The fifth virtual interface (VTY4)
For different types of devices, the absolute numbers of the AUX interface and the VTY interface may be
different.
The numbers from 1 to 32 are reserved for the TTY user interfaces.
Run the display user-interface command to view the absolute number of user interfaces.
5.1.2 User Management
The username and the password are not configured when a router is powered on for the first
time.
In such a condition, any user can configure the router by connecting a PC with it through the
console port.
The remote user accesses the router through Telnet if the router is configured with the IP
address of the MCU or that of the interface board. The remote user accesses the network by
establishing a PPP connection with the router.
Configure the usernames and the user password for the router to ensure network security and
to ease user management.
User Classification
Based on the services obtained, users of a router are classified as follows:
z
HyperTerminal users: They access the router through the console port or the AUX port.
z
Telnet users: They access the router through Telnet.
z
File Transfer Protocol (FTP) users: They establish FTP connections with the router to
transfer files.
z
Point-to-Point Protocol (PPP) users: They establish PPP connections (such as dialing
and PPPoA) with the router to access the network.
z
Secure Shell (SSH) users: They establish SSH connections with the router to access the
network.
Page 80

5 User Management
Quidway NetEngine80
Configuration Guide - Basic Configurations
5-4 Huawei Proprietary and Confidential
Copyright © Huawei Technologies Co., Ltd.
Issue 04 (2009-12-20)
User Level
The system provides hierarchical management to HyperTerminal users and Telnet users.
The login user has the same 16 levels like the command. They are Visit, Monitoring,
Configure and Management, and are marked from 0 to15. The higher the mark is, the higher
the priority is.
A user can access a command depending on the user level.
z
In the case of non-authentication or password authentication, the level of the command
that can be accessed by the login user depends on the level of the login user interface.
z
In the case of AAA authentication, the level of the command that can be accessed by the
login user depends on the level of the local user in the AAA configuration.
The user can access the commands with the level equal to or smaller than the user level. For
example, if the user level is 2, the user can access the commands with level 0, 1, or 2. The
user with the level 3 can access all the commands.
For details of command level, refer to section 3.1.2 "Command Level" in Chapter 3 "Command Line
Introduction."
User Authentication
After the user configuration, the system authenticates users when they access the router.
The four types of user authentication are as follows:
z
Non-authentication: In this type, a user accesses the router without the username and
password. This is not recommended due to security reasons
z
Password authentication: In this type, a user accesses the router only with the password
rather than the username. This is safer when compared to non-authentication.
z
Authentication, Authorization and Accounting (AAA) local: This scheme needs both the
username and the password.
z
AAA authentication scheme: This scheme cooperates with AAA server, which
authenticates PPP users.
AAA local authentication authenticates the Telnet and HyperTerminal users.
User Planning
The network administrator provides the user plan based on the actual requirements.
z
At least one HyperTerminal user is created on a router
z
A Telnet user is created for remote access.
z
An FTP user uploads or downloads files on a router from the remote.
z
A PPP user can access networks through PPP connections.
Page 81

Quidway NetEngine80
Configuration Guide - Basic Configurations 5 User Management
Issue 04 (2009-12-20) Huawei Proprietary and Confidential
Copyright © Huawei Technologies Co., Ltd.
5-5
z
For the configuration of FTP user, refer to the Chapter 8 "FTP, TFTP and XModem."
z
For the configuration of PPP user, refer to Quidway NetEngine80 Core Router Configuration Guide
- Security.
5.2 Configuring Console User Interface
5.2.1 Establishing the Configuration Task
Applicable Environment
If you need to maintain a router on a local device, the console user interface is required.
Pre-configuration Tasks
Before configuring console user interface, complete the following tasks:
z
Powering on the router
z
Connecting the PC with the router properly
Data Preparation
To configure console user-interface, you need the following data.
No. Data
1 Transmission rate, flow-control mode, checksum mode, stop bit, and data bit
2 Idle timeout period for user, screen length of terminal, and the size of history
command buffer
3 User priority
4 User authentication method, user name, and password
All the default values of the data are stored on the router and does not need additional configuration.
Configuration Procedures
To configure a console interface, complete the following procedures.
No. Procedure
1 Configuring Console Interface Attributes
2 Setting Console Terminal Attributes
3 Configuring the User Interface Priority
4 Configuring User Authentication
Page 82

5 User Management
Quidway NetEngine80
Configuration Guide - Basic Configurations
5-6 Huawei Proprietary and Confidential
Copyright © Huawei Technologies Co., Ltd.
Issue 04 (2009-12-20)
No. Procedure
5 Checking the Configuration
You can configure one or more user interfaces simultaneously in any view.
5.2.2 Configuring Console Interface Attributes
Do as follows on the router that the user logs in to:
Step 1 Run:
system-view
The system view is displayed.
Step 2 Run:
user-interface [ ui-type ] first-ui-number [ last-ui-number ]
The user interface view is displayed.
Step 3 (Optional) Run:
speed speed-value
The transmission rate is set.
By default, the transmission rate is 9600 bit/s. By default, the value is 9600 bit/s.
Step 4 (Optional) Run:
flow-control { hardware | none | software }
The flow control mode is set. By default, the flow-control mode is none.
Step 5 (Optional) Run:
parity { even | mark | none | odd | space }
The parity mode is set.
By default, the value is none.
Step 6 (Optional)Run:
stopbits { 1.5 | 1 | 2 }
The stop bit is set.
By default, the value is 1 bit.
Step 7 (Optional)Run:
databits { 5 | 6 | 7 | 8 }
The data bit is set.
By default, the data bit is 8.
----End
Page 83

Quidway NetEngine80
Configuration Guide - Basic Configurations 5 User Management
Issue 04 (2009-12-20) Huawei Proprietary and Confidential
Copyright © Huawei Technologies Co., Ltd.
5-7
When the user logs in to a router through a console interface, the configured attributes for the
console interface on the super terminal should accord with the attributes of the interface on
the router. Otherwise, the user cannot log in to the router.
5.2.3 Setting Console Terminal Attributes
Do as follows on the router that the user logs in to:
Step 1 Run:
system-view
The system view is displayed.
Step 2 Run:
user-interface [ ui-type ] first-ui-number [ last-ui-number ]
The user interface view is displayed.
Step 3 Run:
Shell
The terminal service is started.
Step 4 Run:
idle-timeout minutes [ seconds ]
The timeout period is set.
By default, idle timeout period for users on the user interface is 10 minutes.
Step 5 Run:
screen-length screen-length
One-screen length of the terminal screen is set.
Step 6 Run:
history-command max-size size-value
The buffer of the history command is set.
----End
5.2.4 Configuring the User Interface Priority
Do as follows on the router that the user logs in to:
Step 1 Run:
system-view
The system view is displayed.
Step 2 Run:
user-interface [ ui-type ] first-ui-number [ last-ui-number ]
The user interface view is displayed.
Page 84

5 User Management
Quidway NetEngine80
Configuration Guide - Basic Configurations
5-8 Huawei Proprietary and Confidential
Copyright © Huawei Technologies Co., Ltd.
Issue 04 (2009-12-20)
Step 3 Run:
user privilege level level
The priority of the user interface is set.
The priority of the user is set.
This process is to set the priority for a user who logs in through the console interface. A user
can only use the command of proper level corresponding to the user level.
----End
For more information about the command priority, see section 3.1.2 "Command Level" in
Chapter 3 "CLI Overview".
5.2.5 Configuring User Authentication
Three user authentication modes are available on the router:
z
AAA authentication: requires the user name and password.
z
Password authentication: needs no user name but a password. Otherwise, the user cannot
log in to the router through the console interface.
z
Non-authentication: requires the user name and password. No authentication is needed
when the user logs in to the router.
Configuring AAA Authentication
Do as follows on the router:
Step 1 Run:
system-view
The system view is displayed.
Step 2 Run:
user-interface console 0
The console user interface view is displayed.
Step 3 Run:
authentication-mode aaa
The authentication mode is set to AAA.
Step 4 Run:
quit
Exit from the console user interface view.
Step 5 Run:
aaa
The AAA view is displayed.
Step 6 Run:
Page 85

Quidway NetEngine80
Configuration Guide - Basic Configurations 5 User Management
Issue 04 (2009-12-20) Huawei Proprietary and Confidential
Copyright © Huawei Technologies Co., Ltd.
5-9
local-user user-name password { simple | cipher } password
Name and password of the local user are created.
----End
Configuring Password Authentication
Do as follows on the router:
Step 1 Run:
system-view
The system view is displayed.
Step 2 Run:
user-interface console 0
The console user interface view is displayed.
Step 3 Run:
authentication-mode password
You can set authentication mode as password authentication.
Step 4 Run:
set authentication password { cipher | simple } password
A password for authentication is set.
----End
Configuring Non-Authentication
Do as follows on the router:
Step 1 Run:
system-view
The system view is displayed.
Step 2 Run:
user-interface console 0
The console user interface view is displayed.
Step 3 Run:
authentication-mode none
The authentication mode is set to non-authentication.
----End
Page 86

5 User Management
Quidway NetEngine80
Configuration Guide - Basic Configurations
5-10 Huawei Proprietary and Confidential
Copyright © Huawei Technologies Co., Ltd.
Issue 04 (2009-12-20)
5.2.6 Checking the Configuration
Run the following commands to check the previous configuration.
Action Command
View the information about the
user interface use.
display users [ all ]
View physical attributes and
configurations of the user interface
display user-interface console 0 [ summary ]
View the local user list
display local-user
View online users
display access-user
5.3 Configuring AUX User Interface
5.3.1 Establishing the Configuration Task
Applicable Environment
When the user needs to maintain a remote router, AUX user interface is required.
Pre-configuration Tasks
Before configuring AUX user interface, complete the following tasks:
z
Powering on the router
z
Connecting the PC with the router properly
Data Preparation
Before configuring AUX user interface, you need the following data.
No. Data
1 Transmission rate, flow-control mode, checksum mode, stop bit, and data bit
2 Idle timeout period for user, screen length of terminal, and the size of history
command buffer
3 User priority
4 Modem attributes
5 (Optional) Auto-execute commands
6 User authentication method, user name, and password
Page 87

Quidway NetEngine80
Configuration Guide - Basic Configurations 5 User Management
Issue 04 (2009-12-20) Huawei Proprietary and Confidential
Copyright © Huawei Technologies Co., Ltd.
5-11
All data above have default values on the router, and generally you do not need to specify them.
Configuration Procedures
To configure an AUX user interface, complete the following procedures.
No. Procedure
1 Configuring AUX Interface Attributes
2 Configuring AUX Terminal Attributes
3 Configuring User Priority
4 Configuring Modem Attributes
5 Configuring User Authentication
6 Checking the Configuration
5.3.2 Configuring AUX Interface Attributes
Do as follows on the router:
Step 1 Run:
system-view
The system view is displayed.
Step 2 Run:
user-interface aux 0
The AUX user interface view is displayed.
Step 3 (Optional) Run:
speed speed-value
The transmission rate is set.
By default, the transmission rate is 9600 bit/s.
Step 4 (Optional) Run:
flow-control { hardware | none | software }
The flow control mode is set.
By default, the flow-control mode is none.
Step 5 Run:
parity { even | mark | none | odd | space }
The checksum bit is set.
By default, the checksum bit is none.
Page 88

5 User Management
Quidway NetEngine80
Configuration Guide - Basic Configurations
5-12 Huawei Proprietary and Confidential
Copyright © Huawei Technologies Co., Ltd.
Issue 04 (2009-12-20)
Step 6 (Optional) Run:
stopbits { 1.5 | 1 | 2 }
The stop bit is set.
By default, the stop bit is 1 bit.
Step 7 (Optional) Run:
databits { 5 | 6 | 7 | 8 }
The data bit is set.
By default, the data bit is 8.
----End
When the user logs in to a router through an AUX port, the configured attributes for the
console port on the super terminal should accord with the attributes of the port on the router.
Otherwise, the user cannot log in to the router.
5.3.3 Configuring AUX Terminal Attributes
Do as follows on the router:
Step 1 Run:
system-view
The system view is displayed.
Step 2 Run:
user-interface aux 0
The AUX user interface view is displayed.
Step 3 Run:
shell
AUX terminal service is enabled.
Step 4 Run:
idle-timeout minutes [ seconds ]
User idle timeout is enabled.
By default, idle timeout period for users is 10 minutes.
Step 5 Run:
screen-length screen-length
The screen length of the terminal screen is set.
By default, the length of the terminal screen is 24 lines.
Step 6 Run:
history-command max-size size-value
Page 89

Quidway NetEngine80
Configuration Guide - Basic Configurations 5 User Management
Issue 04 (2009-12-20) Huawei Proprietary and Confidential
Copyright © Huawei Technologies Co., Ltd.
5-13
The size of the history command buffer is configured.
By default, the size of history command buffer on user interface is 10 history commands.
----End
5.3.4 Configuring User Priority
Do as follows on the router:
Step 1 Run:
system-view
The system view is displayed.
Step 2 Run:
user-interface aux 0
The AUX user interface view is displayed.
Step 3 Run:
user privilege level level
The user priority is set.
----End
5.3.5 Configuring Modem Attributes
Do as follows on the router that the user logs in to:
Step 1 Run:
system-view
The system view is displayed.
Step 2 Run:
user-interface aux 0
The AUX user interface view is displayed.
Step 3 Run:
modem timer answer seconds
Set the period since the system receives the ring signal until waits for CD_UP, that is, the time
since the establishment of calling, from picking up to detecting carrier.
Step 4 Run:
modem auto-answer
Enable auto answer.
Step 5 Run:
modem [ both | call-in ]
Page 90

5 User Management
Quidway NetEngine80
Configuration Guide - Basic Configurations
5-14 Huawei Proprietary and Confidential
Copyright © Huawei Technologies Co., Ltd.
Issue 04 (2009-12-20)
The switch of incoming call or outgoing call is set.
----End
5.3.6 Configuring User Authentication
The router supports user authentication of three types:
z
AAA authentication: requires the user name and password.
z
Password authentication: requires no user name but a password must be set. Otherwise,
the user cannot log in to the router through the console interface.
z
None: requires neither user name nor password. No authentication is needed when the
user logs in to the router.
Configuring AAA Authentication
Do as follows on the router:
Step 1 Run:
system-view
The system view is displayed.
Step 2 Run:
user-interface aux 0
The AUX user interface view is displayed.
Step 3 Run:
authentication-mode aaa
Authentication mode is set to AAA.
Step 4 Run:
quit
Exit from the AUX user interface view.
Step 5 Run:
aaa
The aaa view is displayed.
Step 6 Run:
local-user user-name password { simple | cipher } password
Local user and password are configured.
----End
Configuring Password Authentication
Do as follows on the router:
Page 91

Quidway NetEngine80
Configuration Guide - Basic Configurations 5 User Management
Issue 04 (2009-12-20) Huawei Proprietary and Confidential
Copyright © Huawei Technologies Co., Ltd.
5-15
Step 1 Run:
system-view
The system view is displayed.
Step 2 Run:
user-interface aux 0
The AUX user interface view is displayed.
Step 3 Run:
authentication-mode password
Authentication mode is set to password.
Step 4 Run:
set authentication password { cipher | simple } password
Step 5 Set password for this mode.
----End
Configuring Non-Authentication
Do as follows on the router:
Step 1 Run:
system-view
The system view is displayed.
Step 2 Run:
user-interface aux 0
The AUX user interface view is displayed.
Step 3 Run:
authentication-mode none
Authentication mode is set to none.
----End
5.3.7 Checking the Configuration
Run the following commands to check the previous configuration.
Action Command
View usage information of the user
interface
display users [ all ]
View physical attributes and
configurations of the user interface
display user-interface console 0 [ summary ]
Page 92

5 User Management
Quidway NetEngine80
Configuration Guide - Basic Configurations
5-16 Huawei Proprietary and Confidential
Copyright © Huawei Technologies Co., Ltd.
Issue 04 (2009-12-20)
Action Command
View the local user list
display local-user
View online users
display access-user
5.4 Configuring VTY User Interface
5.4.1 Establishing the Configuration Task
Applicable Environment
If you want to configure and manage Telnet or log in to the router through SSH, you need to
configure the VTY user interface.
Pre-configuration Tasks
Before configuring VTY user interface, complete the following tasks:
z
Powering on the router
z
Correctly connecting PC and router
Data Preparation
To configure the VTY user interface, you need the following data.
No. Data
1 Maximum VTY user interfaces
2 (Optional) ACL code to limit VTY user interface to call in and out
3 (Optional) Timeout of command line authentication
4 Idle timeout period for user, screen length of terminal, and the size of history
command buffer
5 User authentication method, user name, and password
Configuration Procedures
To configure a VTY user interface, complete the following procedures.
No. Procedure
1 Configuring Maximum VTY User Interfaces
2 Configuring Limits for Incoming Calls and Outgoing Calls
Page 93

Quidway NetEngine80
Configuration Guide - Basic Configurations 5 User Management
Issue 04 (2009-12-20) Huawei Proprietary and Confidential
Copyright © Huawei Technologies Co., Ltd.
5-17
No. Procedure
3 Configuring Timeout of VTY User Authorization
4 Configuring VTY Terminal Attributes
5 Configuring User Authentication
5.4.2 Configuring Maximum VTY User Interfaces
Do as follows on the router that the user logs in to:
Step 1 Run:
system-view
The system view is displayed.
Step 2 Run:
user-interface maximum-vty number
Set the maximum VTY user interfaces that can log in to the router at the same time.
----End
If the number of maximum VTY user interfaces to be configured is smaller than the number
of current maximum interfaces, this parameter needs not be configured if.
If the number of maximum VTY user interfaces to be configured is larger than the number of
current maximum interfaces, the authentication mode and password need to be configured for
newly added user interfaces.
For newly added user interfaces, the system applies password authentication by default. The
prompt is shown as follows:
Warning:Login password has not been set!
For example, a maximum of five users are allowed online. To allow 15 VTY users online at
the same time, you need to run the authentication-mode command and the set
authentication password command to configure authentication modes and passwords for
VTY user interface 5 to interface 14, shown as follows:
<Quidway> system-view
[Quidway] user-interface maximum-vty 15
[Quidway] user-interface vty 5 14
[Quidway-ui-vty5-14] authentication-mode password
[Quidway-ui-vty5-14] set authentication password cipher huawei
5.4.3 Configuring Limits for Incoming Calls and Outgoing Calls
Do as follows on the router that the user logs in to:
Step 1 Run:
system-view
The system view is displayed.
Step 2 Run:
Page 94

5 User Management
Quidway NetEngine80
Configuration Guide - Basic Configurations
5-18 Huawei Proprietary and Confidential
Copyright © Huawei Technologies Co., Ltd.
Issue 04 (2009-12-20)
user-interface [ ui-type ] first-ui-number [ last-ui-number ]
The user interface view is displayed.
Step 3 Run:
acl acl-number { inbound | outbound }
Configure the limits to calling in/out of VTY user interface.
When you need to prevent a user of certain address or segment address from logging in to the
router, use the inbound command; when you need to prevent a user who logs in to a router
from accessing other routers, and use the outbound command.
----End
5.4.4 Configuring Timeout of VTY User Authorization
Do as follows the router that the user logs in to:
Step 1 Run:
system-view
The system view is displayed.
Step 2 Run:
user-interface vty first-ui-number [ last-ui-number ]
The VTY user interface view is displayed.
Step 3 Run:
authorization-cmd timeout timeout-value
The timeout of command line authorization I set.
----End
The product supports to authorize HWTACACS command line to login users according to
user level or SSH user name.
When the user logs in to the router and needs command line authorization, each command the
user inputs must be authorized by the HWTACACS server. When authorization is passed, the
command can be run.
If the user receives no authorization from the HWTACACS server within the timeout limit
time, the command cannot be run.
5.4.5 Configuring VTY Terminal Attributes
Do as follows on the router:
Step 1 Run:
system-view
The system view is displayed.
Step 2 Run:
Page 95

Quidway NetEngine80
Configuration Guide - Basic Configurations 5 User Management
Issue 04 (2009-12-20) Huawei Proprietary and Confidential
Copyright © Huawei Technologies Co., Ltd.
5-19
user-interface vty number1 [ number2 ]
The VTY user interface view is displayed.
Step 3 Run:
shell
VTY terminal service is enabled.
Step 4 Run:
idle-timeout minutes [ seconds ]
User disconnection after timeout is enabled.
Step 5 Run:
screen-length screen-length
The screen length of the terminal screen is set.
Step 6 Run:
history-command max-size size-value
Step 7 Set the size of the history command buffer.
----End
5.4.6 Configuring User Authentication
Three authentication modes are available on a router:
z
AAA authentication: requires the user name and password.
z
Password authentication: requires no user name but a password must be set. Otherwise,
the user cannot log in to the router through console interface.)
z
None: requires neither user name nor password. No authentication is needed when the
user logs in to the router.
Configuring AAA Authentication
Do as follows on the router:
Step 1 Run:
system-view
The system view is displayed.
Step 2 Run:
user-interface vty number1 [ number2 ]
The VTY user interface view is displayed.
Step 3 Run:
authentication-mode aaa
Set the authentication mode as AAA.
Page 96

5 User Management
Quidway NetEngine80
Configuration Guide - Basic Configurations
5-20 Huawei Proprietary and Confidential
Copyright © Huawei Technologies Co., Ltd.
Issue 04 (2009-12-20)
Step 4 Run:
quit
Exit from the VTY user interface view.
Step 5 Run:
aaa
The AAA view is displayed.
Step 6 Run:
local-user user-name password { simple | cipher } password
Create local user and password.
----End
Configuring Password Authentication
Do as follows on the router:
Step 1 Run:
system-view
The system view is displayed.
Step 2 Run:
user-interface vty number1 [ number2 ]
The VTY user interface view is displayed.
Step 3 Run:
authentication-mode password
Set the authentication mode as password.
Step 4 Run:
Set authentication password { simple | cipher } password
Set a password for this authentication mode.
----End
Configuring Non-Authentication
Do as follows on the router:
Step 1 Run:
system-view
The system view is displayed.
Step 2 Run:
user-interface vty number1 [ number2 ]
Page 97

Quidway NetEngine80
Configuration Guide - Basic Configurations 5 User Management
Issue 04 (2009-12-20) Huawei Proprietary and Confidential
Copyright © Huawei Technologies Co., Ltd.
5-21
The VTY user interface view is displayed.
Step 3 Run:
authentication-mode none
The authentication mode is set to none.
----End
5.4.7 Checking the Configuration
Run the following commands to check the previous configuration.
Action Command
View the usage information of the user
interface
display users [ all ]
View the number of maximum VTY user
interfaces
display user-interface maximum-vty
View the physical attributes and
configurations of the user interface
display user-interface
[ ui-typeui-number | number| summary ]
5.5 Managing User Interfaces
5.5.1 Establishing the Configuration Task
Applicable Environment
To ensure the operator can manage routers safely, you need to send messages between user
interfaces and clear designated user and so on.
Pre-configuration Tasks
Before managing the user interface, complete the following tasks:
z
Powering on the router
z
Connecting the PC with the router properly
Data Preparation
To manage the user interface, you need the following data:
No. Data
1 Type and number of the user interface
2 Contents of the message to be sent
Page 98

5 User Management
Quidway NetEngine80
Configuration Guide - Basic Configurations
5-22 Huawei Proprietary and Confidential
Copyright © Huawei Technologies Co., Ltd.
Issue 04 (2009-12-20)
Configuration Procedures
To configure a user interface, complete the following procedures.
No. Procedure
1 Sending Messages to Other User Interfaces
2 Clearing Online User
3 Checking the Configuration
5.5.2 Sending Messages to Other User Interfaces
Do as follows on the router:
Step 1 Run:
send { all | interface-type interface-number | number }
You can enable message sending between user interfaces.
Following the prompt, you can enter the message to be sent. You can press Ctrl+Z or Enter
key to end.
----End
5.5.3 Clearing Online User
Do as follows on the router:
Step 1 Run:
free user-interface { ui-number | ui-type ui-number1 }
Online users are cleared.
Upon the prompts, you can confirm whether to clear designated online users.
----End
5.5.4 Checking the Configuration
Run the following commands to check the previous configuration.
Action Command
Display the usage information of the user interface display users [ all ]
Check the online user
display access-user
Page 99

Quidway NetEngine80
Configuration Guide - Basic Configurations 5 User Management
Issue 04 (2009-12-20) Huawei Proprietary and Confidential
Copyright © Huawei Technologies Co., Ltd.
5-23
5.6 Configuring User Management
5.6.1 Establishing the Configuration Task
Applicable Environment
This section describes how to configure the user priority and the authentication.
To access the network, remote users can log in to the router to access networks through Telnet
or establish a PPP connection with the router. This can be done if the router is configured with
the IP address of the MCU or that of the interface board. Remote users access the network by
establishing PPP connection with the router. To ensure network security and ease user
management, configure a username and the user password for the router.
Pre-configuration Tasks
Before configuring a user interface, complete the following tasks:
z
Powering on the router
z
Connecting the PC with the router properly
Data Preparation
To configure a user, you need the following data.
No. Data
1 Authentication mode
2 Username and password
3 User priority
Configuration Procedures
To configure user management, complete the following procedures.
No. Procedure
1 Configuring Authentication Mode
2 Configuring Authentication Password
3 Setting Username and Password for AAA Local Authentication
4 Configuring Non-Authentication
5 Configuring User Priority
6 Checking the Configuration
Page 100

5 User Management
Quidway NetEngine80
Configuration Guide - Basic Configurations
5-24 Huawei Proprietary and Confidential
Copyright © Huawei Technologies Co., Ltd.
Issue 04 (2009-12-20)
5.6.2 Configuring Authentication Mode
Do as follows on the router that the user logs in to:
Step 1 Run:
system-view
The system view is displayed.
Step 2 Run:
user-interface [ ui-type ] first-ui-number [ last-ui-number ]
The user interface view is displayed.
Step 3 Run:
authentication-mode { aaa | password | none }
The user authentication mode is configured.
----End
5.6.3 Configuring Authentication Password
Do as follows on the router that the user logs in to:
Step 1 Run:
system-view
The system view is displayed.
Step 2 Run:
user-interface [ ui-type ] first-ui-number [ last-ui-number ]
The user interface view is displayed.
Step 3 Run:
set authentication password { cipher | simple } password
The authentication password is configured.
----End
The default authentication mode is the password authentication.
5.6.4 Setting Username and Password for AAA Local
Authentication
Do as follows on the router that the user logs in to:
Step 1 Run:
system-view
 Loading...