

Page 1

Copyright © Huawei Technologies Co., Ltd. 2012 .
All rights reserved.
Trademarks and Permissions
, , and are trademarks or
registered trademarks of Huawei Technologies Co., Ltd.
The Bluetooth
trademarks owned by Bluetooth SIG, Inc. and any use of such
marks by Huawei Technologies Co., Ltd. is under license.
Other trademarks, product, service and company names
mentioned are the property of their respective owners.
®
word mark and logos are registered
NO WARRANTY
THE CONTENTS OF THIS MANUAL ARE PROVIDED “AS IS”.
EXCEPT AS REQUIRED BY APPLICABLE LAWS, NO WARRANTIES
OF ANY KIND, EITHER EXPRESS OR IMPLIED, INCLUDING BUT
NOT LIMITED TO, THE IMPLIED WARRANTIES OF
MERCHANTABILITY AND FITNESS FOR A PARTICULAR PURPOSE,
ARE MADE IN RELATION TO THE ACCURACY, RELIABILITY OR
CONTENTS OF THIS MANUAL.
TO THE MAXIMUM EXTENT PERMITTED BY APPLICABLE LAW,
IN NO CASE SHALL HUAWEI TECHNOLOGIES CO., LTD BE
LIABLE FOR ANY SPECIAL, INCIDENTAL, INDIRECT, OR
CONSEQUENTIAL DAMAGES, OR LOST PROFITS, BUSINESS,
REVENUE, DATA, GOODWILL OR ANTICIPATED SAVINGS.
Page 2

Contents
1 Getting to Know Your Phone ................................................1
Your Phone........................................................................................... 1
Keys and Functions ........................................................................... 2
Main Screen Icons .............................................................................2
2 Getting Started .......................................................................4
Installing the SIM Card and Battery........................................... 4
Removing the Battery and the SIM Card................................. 4
Installing and Removing a microSD Card................................ 5
Charging the Battery ........................................................................ 5
Calibrating the Screen .....................................................................6
Accessing Applications.................................................................... 6
Navigating with the Main Menu .................................................7
Phone Lock........................................................................................... 8
Mass Storage....................................................................................... 8
PIN and PUK ........................................................................................ 9
Locking the Screen.......................................................................... 10
3 Voice Services ...................................................................... 11
Making a Call..................................................................................... 11
Answering a call ...............................................................................11
3 Text Input ............................................................................. 13
Changing the Text Input Mode..................................................13
Entering a Word ............................................................................... 14
Page 3

Entering Numbers ...........................................................................14
Entering Symbols.............................................................................15
4 Messaging ............................................................................ 15
Writing and Sending a Text Message .....................................15
Writing and Sending a Multimedia Message ......................16
5 Voice Mail............................................................................. 18
6 Phonebook ........................................................................... 18
Creating a Contact ..........................................................................18
Searching for a Contact ................................................................19
Setting the Preferred Storage..................................................... 19
Copying Contacts ............................................................................19
Contact Group...................................................................................20
7 Multimedia ........................................................................... 22
Camera.................................................................................................22
Video Recorder.................................................................................22
Media Player ......................................................................................23
Image Viewer ....................................................................................25
FM Radio .............................................................................................25
Sound Recorder................................................................................ 26
Mobile TV............................................................................................ 27
8 WAP Browser ....................................................................... 28
Editing a Data Account .................................................................28
Connecting to a WLAN .................................................................29
Configuring WAP Settings ...........................................................29
Accessing a Website....................................................................... 30
ii
Page 4

9 Bluetooth.............................................................................. 30
Connecting a Bluetooth Headset to Your Phone............... 30
Transferring Data .............................................................................31
10 File Manager ...................................................................... 32
11 Tools.................................................................................... 32
Alarms...................................................................................................32
Calendar...............................................................................................32
Tasks...................................................................................................... 33
Calculator ............................................................................................33
12 Java ..................................................................................... 33
Installing a Java Application........................................................ 34
Running a Java Application .........................................................34
Removing a Java Application......................................................34
13 Chat Functions ................................................................... 35
14 Warnings and Precautions ............................................... 36
iii
Page 5
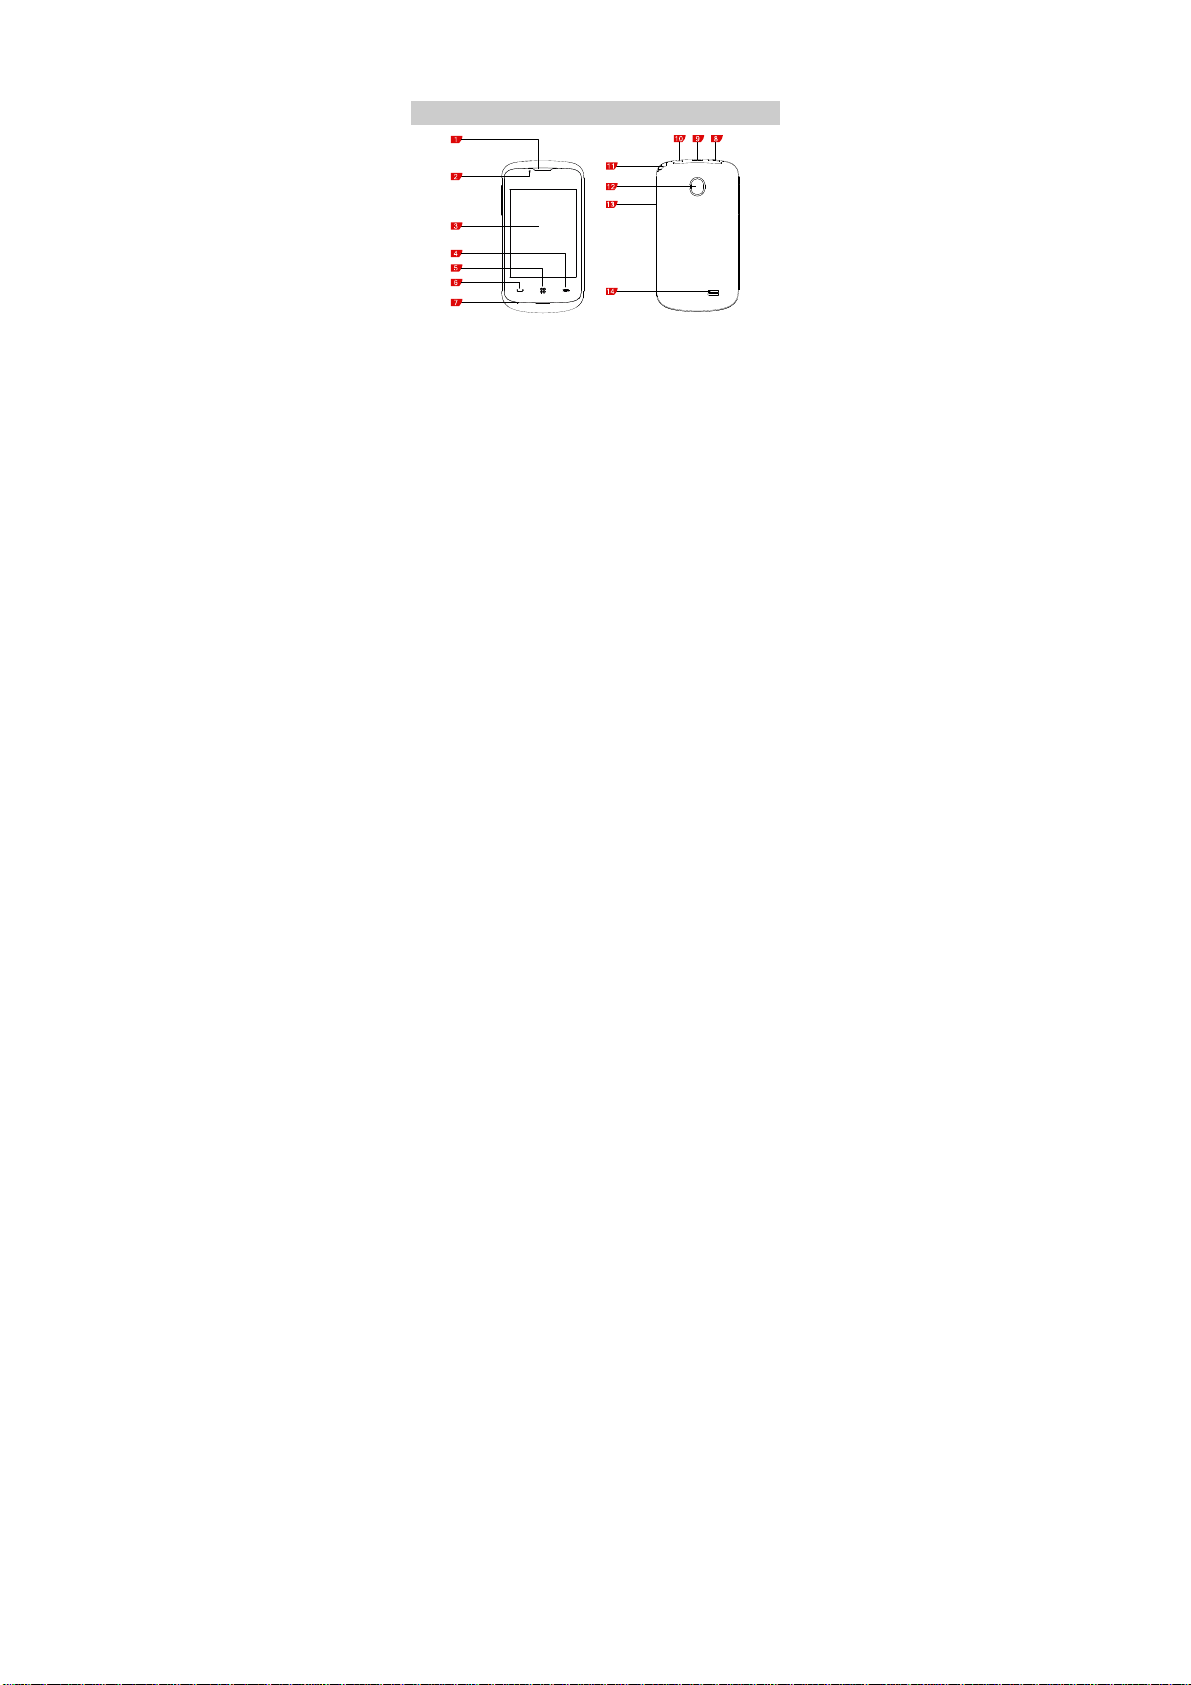
1 Getting to Know Your Phone
Your Phone
1 Earpiece 8 Power key
2 Indicator light 9
3 Screen 10 Headset jack
4 Back key 11 Telescopic antenna
5 Home key 12 Camera
6 Call/Answer key 13 Volume keys
7 Microphone 14 Speaker
Charger jack/micro
Universal serial bus (USB)
port
1
Page 6

Keys and Functions
Press… To…
z
Make a call.
z
Answer a call.
z
End or reject a call.
z
Return to standby mode.
Access the main menu in standby mode.
z
Power the phone on or off (press and hold this
key for about 3 seconds).
z
End or reject a call.
z
Return to standby mode.
z
Lock the screen in standby mode. And when the
screen is locked, press the key to access the
unlock interface.
Increase the volume (press
volume (press
).
Main Screen Icons
Icon Indicates…
Signal strength.
2
) or decrease the
Page 7
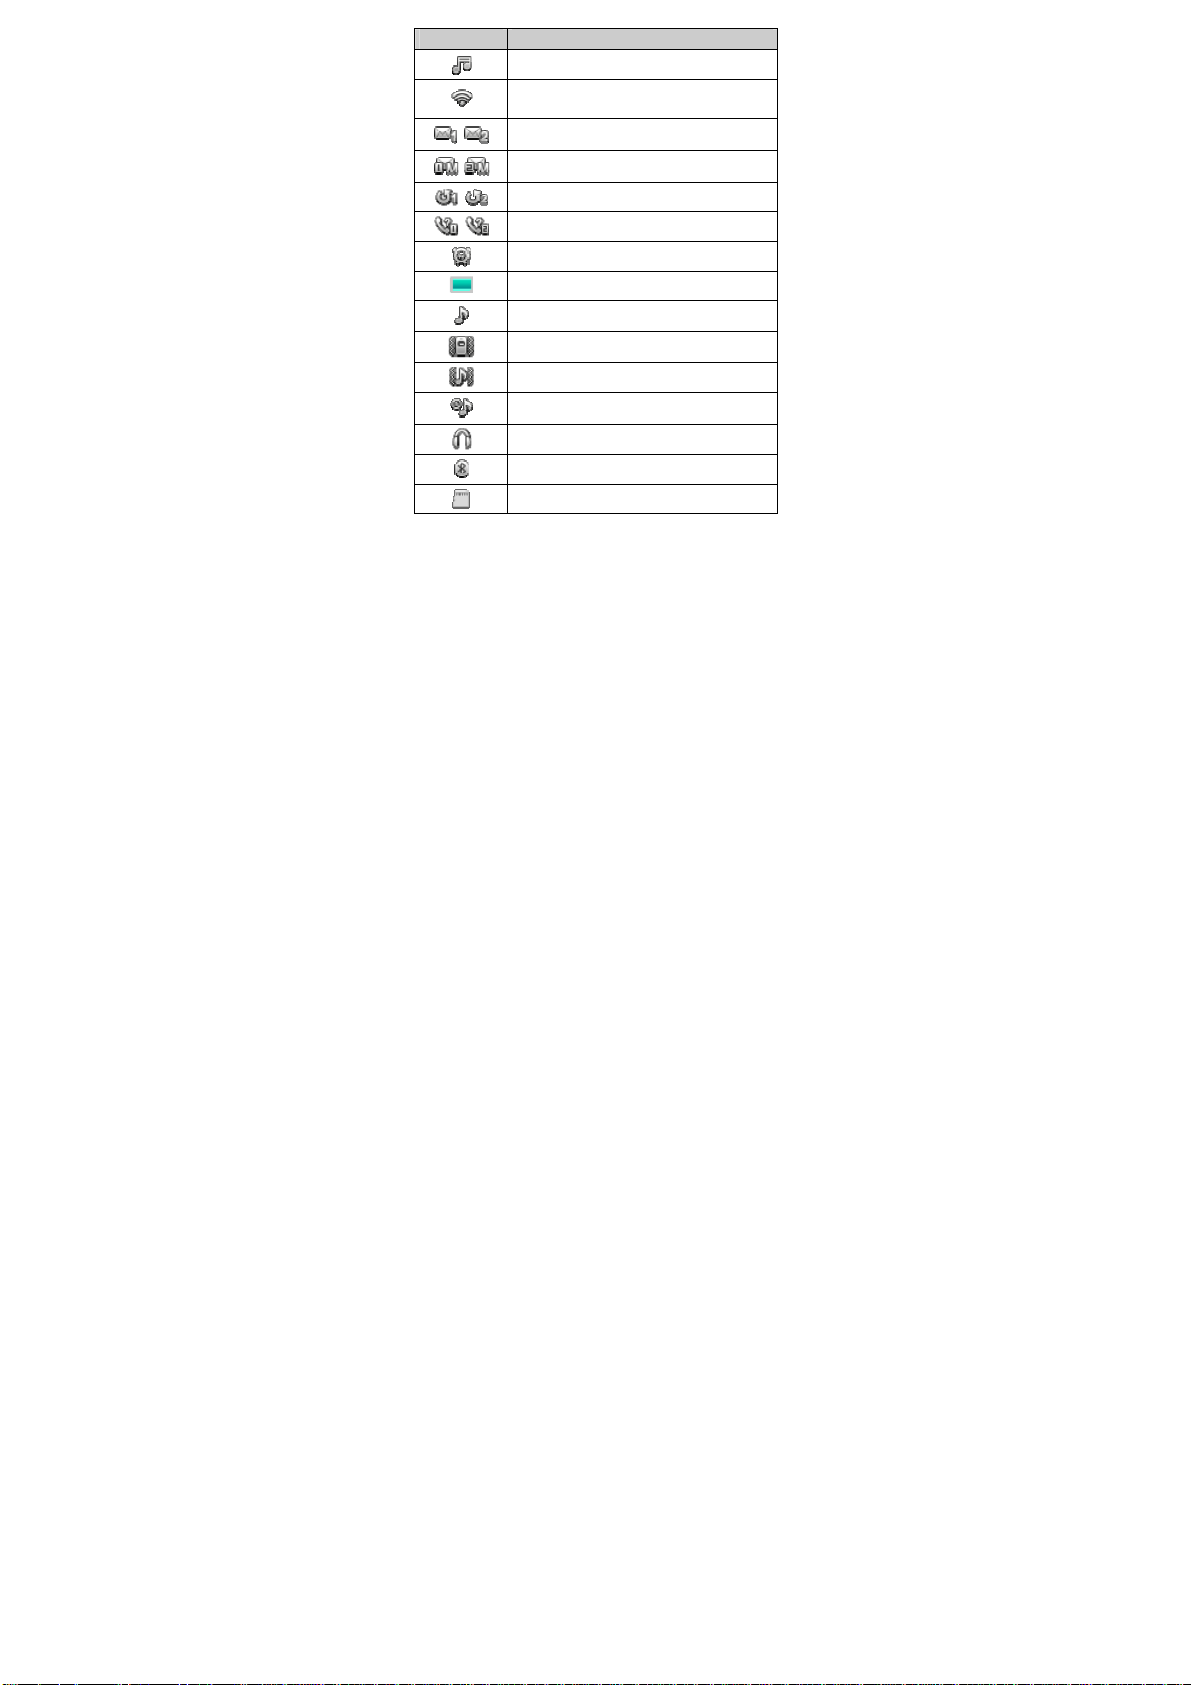
Icon Indicates…
Media player enabled.
Wireless local area network (WLAN)
connected.
New text messages.
New multimedia messages.
Call forwarding enabled.
Missed calls.
Alarms enabled.
Battery level.
General or My style profile activated.
Meeting profile activated.
Outdoor profile activated.
Silent profile activated.
Headset connected.
Bluetooth turned on.
microSD card installed.
3
Page 8
2 Getting Started
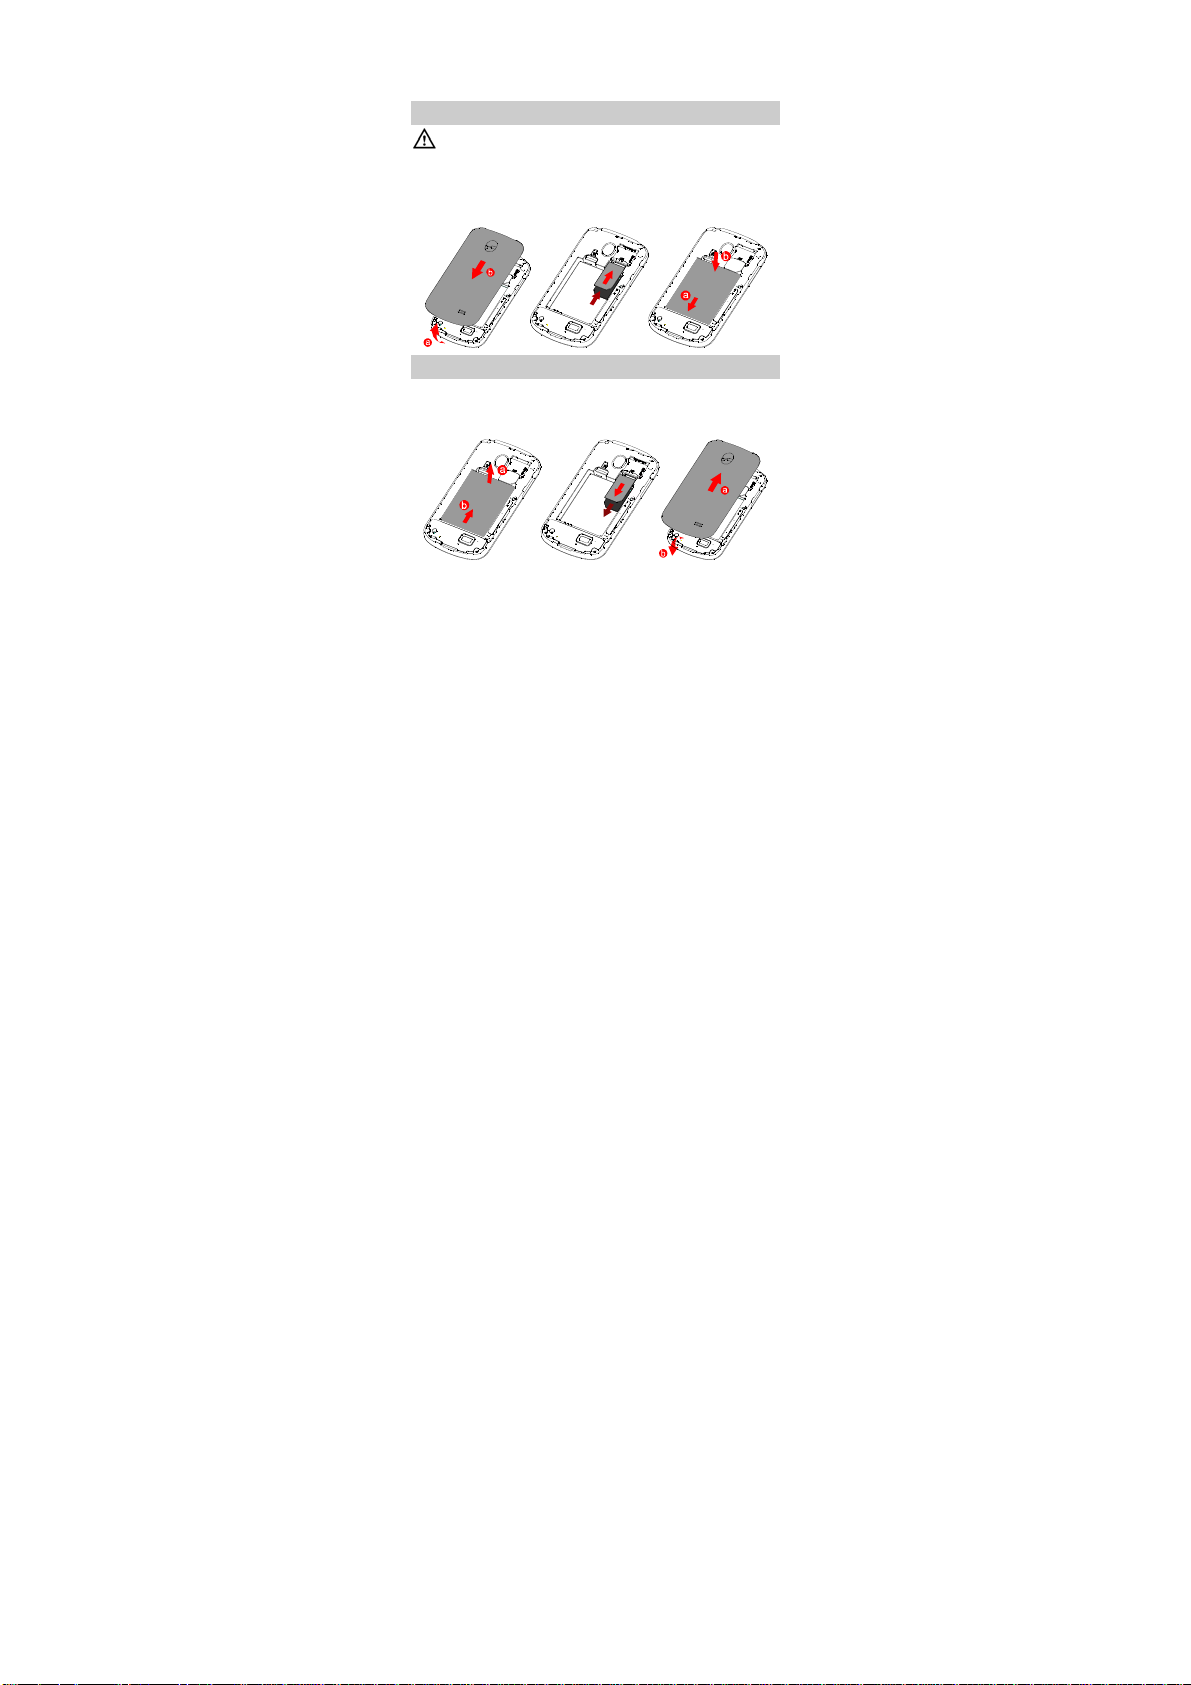
Installing the SIM Card and Battery
When installing the SIM card, ensure that the chip of SIM
1 faces down and the chip of SIM 2 faces up.
Before installing the subscriber identity module (SIM) card,
ensure that the battery is removed.
Removing the Battery and the SIM Card
Before removing the battery and the SIM card, ensure that your
phone is powered off. And before removing the SIM card,
ensure that the battery is removed.
4
Page 9
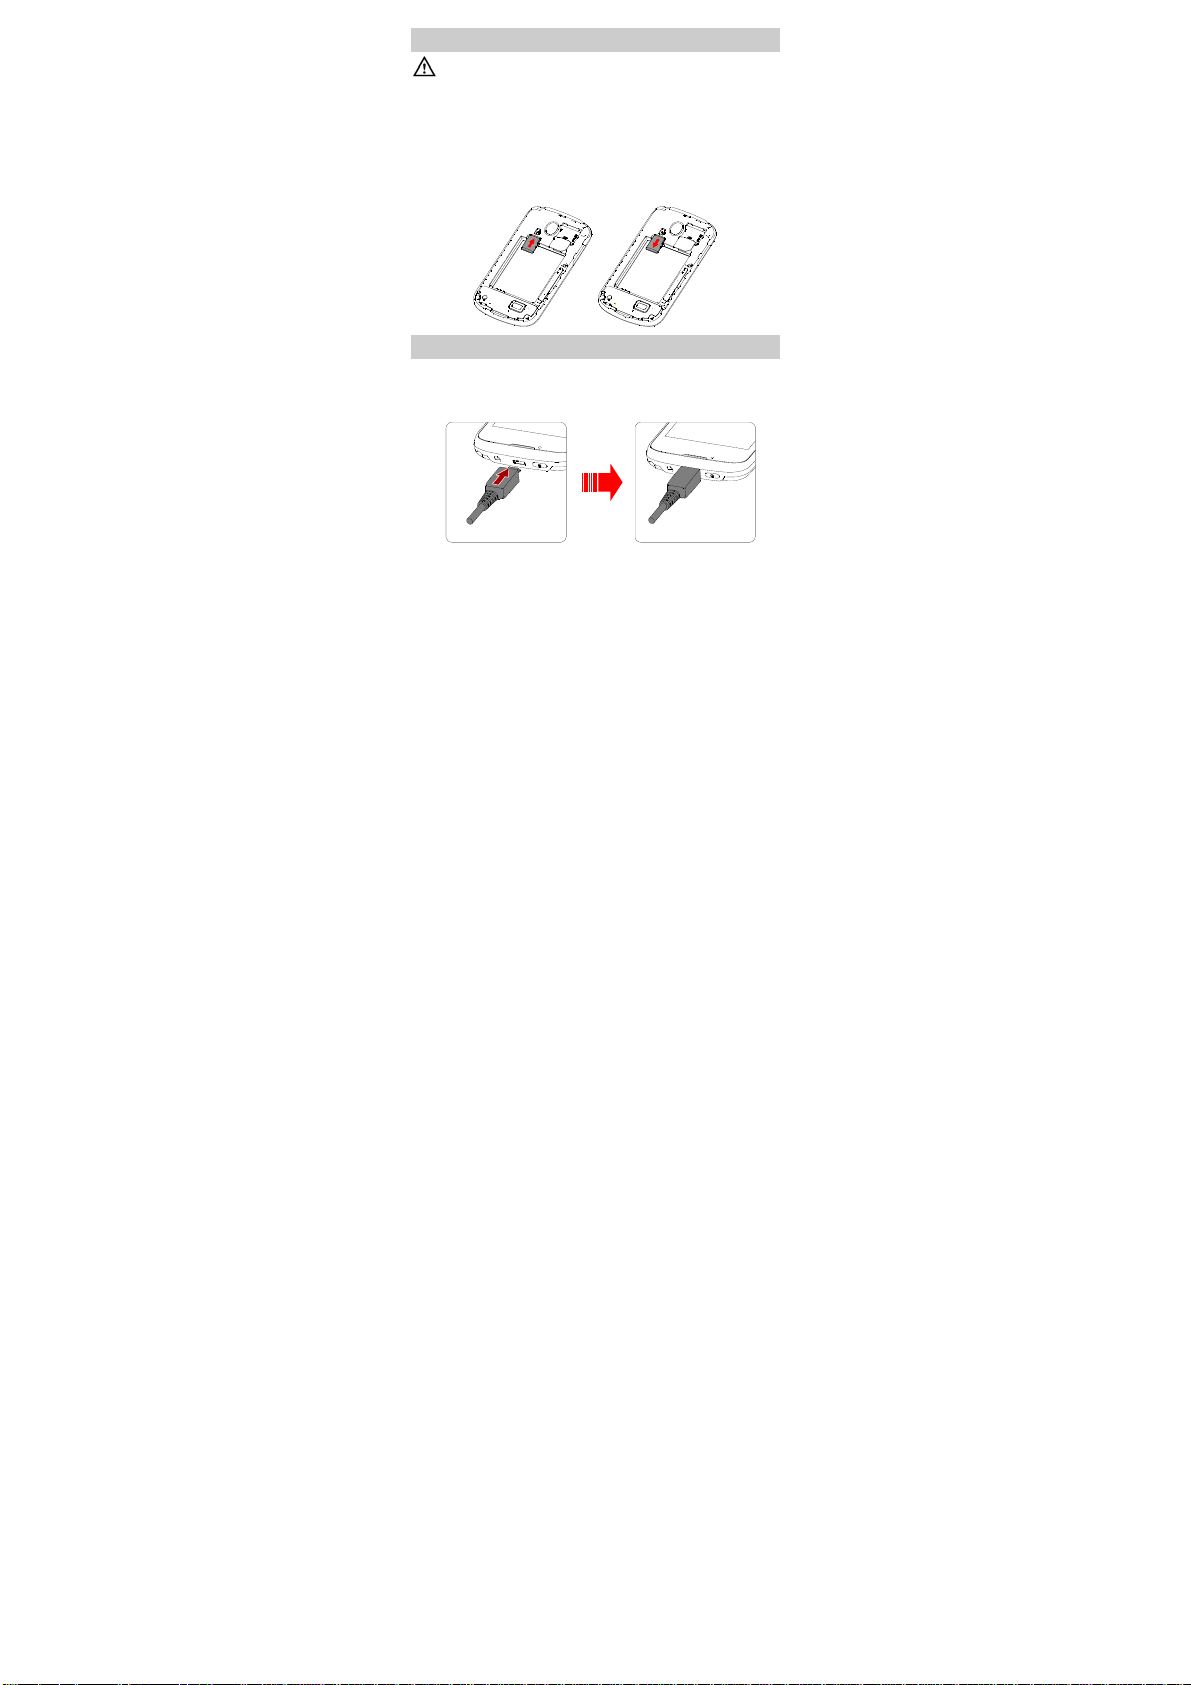
Installing and Removing a microSD Card
Before installing or removing a microSD card, power the
phone off. When the phone is powered back on, it
indicates whether the microSD card has been installed
correctly.
You can expand your phone's memory capacity by installing a
microSD card. When installing a microSD card, ensure that the
gold contact area faces down.
Charging the Battery
1. Connect the small end of the USB cable to the phone’s
charger jack and the larger end to the charger.
2. Connect the charger to a power socket.
5
Page 10

3. Wait until the battery is fully charged.
While the battery is charging, the charging icon blinks. When
the charging icon is stops blinking, the battery is fully
charged.
4. Unplug the charger from the power socket and the USB
cable from the phone.
Calibrating the Screen
Press and hold when power on the phone, forced calibration
will be started. Once calibrated, the phone responds more
accurately to your touch on the screen.
1. In standby mode, tap and select > Phone
settings > Pen calibration. During the calibration, a series
of icons are displayed on the screen.
2. During the calibration, a sequence of are displayed on
the screen. Tap the center of each
screen to complete the calibration.
During the calibration, tap each
ensure that the phone will respond accurately to your
touch.
that appears on the
in a normal way to
Accessing Applications
In standby mode, flick your finger left or right to access the
following applications.
6
Page 11

z
Dialer
Make a call, send a message, add a contact, or replace an
existing contact from a call record.
z
Messaging
Write a text message or a multimedia message. Read the
current messages. Tap the relevant icon below the current
message to write, reply to, or delete a message.
z
Phonebook
Add a new contact or a new group. Edit a contact or a group.
You can also make a call or send a message to a contact.
z
Media player
Access the media player. You can tap
relevant settings, and tap
z
Widgets
to play audio clips.
to configure the
Tap Widgets to access the widget tab.
Navigating with the Main Menu
To navigate with the main menu:
1. In standby mode, tap .
2. Flick your finger left or right, and tap the desired application.
3. Flick your finger up or down, and tap the desired option.
4. Tap Back to return to the previous screen, press to
return to the main menu in an application screen or press
to return to standby mode in the main menu.
7
Page 12

Phone Lock
The phone lock protects your phone from unauthorized use.
The preset phone unlock code is 1234. By default, the phone
lock is disabled. Once the phone lock is enabled, you must
enter the phone unlock code each time you powered on the
phone.
To enable the phone lock:
1. Tap and select > Security settings > Phone
security > Phone lock.
2. Tap the text box to access the on-screen keypad.
3. Enter the phone code, and tap OK.
To change the present phone unlock code:
1. Tap and select > Security settings > Phone
security > Change password.
4. Tap the text box to access the on-screen keypad.
5. Enter the present phone unlock code, tap OK.
6. Enter a new phone unlock code, and tap OK.
7. Enter the new phone unlock code again to confirm it.
Mass Storage
When the phone is connected to a personal computer (PC)
using a USB cable, Mass storage is displayed on the phone
screen.
In Mass storage mode, you can manage the files stored on the
phone and its microSD card from PC’s file manager utility.
8
Page 13

The phone and its microSD card are displayed as removable
disks on the PC. You can perform the following operations:
z
Double-click a disk to open it.
z
Copy, paste, or delete files.
z
Disconnect the phone from the PC.
z Ensure that you connect and disconnect the USB cable
properly.
z Do not run the formatting command on the PC to
format the phone memory; doing so may permanently
damage the phone memory.
z You can transfer data and charge the battery by
connecting the phone to the PC with the USB cable.
PIN and PUK
The personal identification number (PIN) protects your SIM
card from unauthorized use. The PIN unblocking key (PUK)
unlocks a blocked PIN. Both the PIN and the PUK are provided
with the SIM card. For details, contact your service provider.
To enable the PIN lock:
1. Tap and select > Security settings > SIM 1
security or SIM 2 security > PIN lock.
2. Tap the text box to access the on-screen keypad.
3. Enter the PIN, and tap OK.
If you enter the incorrect PIN a specified number of times the
phone prompts you to enter the PUK. If you enter the incorrect
PUK a specified number of times, the SIM card will become
9
Page 14

permanently invalid. If this occurs, contact your service provider
for a new SIM card.
Locking the Screen
To lock the screen, press in standby mode.
To unlock the keypad, slide
to the up/ left/ right side to access the relevant
application.
If the Screen auto lock function is enabled and the phone is in
standby mode for a preset period, the phone automatically
locks the keypad.
To enable the Screen auto lock function, tap
> Phone settings > Display > Screen auto lock, and
select the desired duration.
When the screen is locked, you can press
answer a call.
to . You can also slide
and select
to
10
Page 15

3 Voice Services
Making a Call
1. Tap and select to access the onscreen keypad.
2. Enter a phone number.
z
To make an international call, tap key twice to enter the
plus sign (+). Then enter the country or region code, area
code, and phone number.
z
To call an extension number, enter the phone number, tap
three times to enter P, or four times to enter W, and
enter the extension number.
3. Press to dial the number.
4. Press to end the call.
z You can also make a call from Call logs, Phonebook,
or Messaging screen.
z During a call, you can press to adjust the in-call
volume.
Answering a call
When there is an incoming call, do the following:
z
Press or tap Answer to answer the call.
11
Page 16

z
Tap Options and select Answer to answer the call.
z
Press or tap Reject to reject the call.
z
Tap Silent to mute the ringtone.
12
Page 17

3 Text Input
Changing the Text Input Mode
The current text input mode indicator is displayed in the upper
left corner of the screen. Tap
between text input modes.
Indicator Text Input Mode
s ABC, s abc and s
Abc
123 Number input mode
on the input screen to switch
Predictive input mode
13
Page 18

z Tap to hide the on-screen keyboard and tap the
text box to access the on-screen keyboard.
z Tap once to delete the last character entered, or
tap and hold
z Tap and hold , then tap to switch
to delete all the characters.
between the alphanumeric input screen and the
QWERTY input screen.
z On the QWERTY input screen, tap to start a new
paragraph and tap
z On the alphanumeric input screen, tap to
to enter a space.
access the number/symbol keypad and tap
enter a space.
Entering a Word
To enter a word on the QWERTY input screen, tap the keys
labeled with the letters that spell the word.
Entering Numbers
z
On the QWERTY input screen, tap to access the
number/symbol keypad, and enter the desired numbers.
z
On the alphanumeric input screen, tap to access
the number/symbol keypad, and enter the desired numbers.
z
In number input mode, tap the desired number keys.
14
to
Page 19

Entering Symbols
z
On the QWERTY input screen, tap to access the
symbol/number keypad to display commonly used symbols.
If the symbol you want is not shown, tap
to access the complete symbol keypad to display all
available symbols.
z
On the alphanumeric input screen, tap to access the
symbol keypad, tap
complete symbol keypad to display all available symbols.
/ / to access the
/ /
4 Messaging
By default, messages are stored in SIM card.
Writing and Sending a Text Message
1. Tap and select > Write message > Tex t
message.
2. Write the text message.
3. Tap phone number input box to enter the recipient's phone
number. To add a recipient from the phonebook, tap
Options > Send, tap
To add multiple recipients, repeat this step.
or tap directly.
15
Page 20

4. Tap to send the message directly or tap Options for
the following options:
z
Send: sends the message to the recipient.
z
Add recipient: allows you to add the recipient.
z
Insert symbol: allows you to insert symbols.
z
Input method: allows you to change the input method.
z
Input method settings: allows you to configure the relevant
settings of input method.
z
Insert template: allows you to add SMS templates to the
message.
z
Advanced: allows you to insert numbers or names in the
phonebook to the message.
z
Save: saves the message to Drafts and exits the Write
message screen.
Writing and Sending a Multimedia
Message
1. Tap and select > Write message > Multimedia
message.
2. Write the multimedia message.
3. Tap phone number input box to enter the recipient's phone
number. To add a recipient from the phonebook, tap
Options > Send , tap
To add multiple recipients, repeat this step.
or tap directly.
16
Page 21

4. Tap to send the message directly or tap Options for
the following options:
z
Send: sends the message to the recipient.
z
Add recipient: allows you to add the recipient.
z
Insert symbol: allows you to insert symbols.
z
Input method: allows you to change input method.
z
Input method settings: allows you to configure the relevant
settings of input method.
z
Header info: allows you to select the Cc or Bcc function or
to add a subject.
z
Add picture: adds a picture to the message.
z
Add sound: adds an audio clip to the message.
z
Add video: adds a video clip to the message.
z
Preview MMS: allows you to preview the message.
z
Slide options: adds a presentation slide to the message or
sets the playing interval between presentation slides.
z
Advanced: allows you to insert numbers or names in the
phonebook to the message.
z
Save: saves the message to Drafts and exits the Write
message screen.
17
Page 22

z Contact your service provider to determine the
availability of the Multimedia Messaging Service (MMS)
and how to subscribe to the service.
z Your phone supports multimedia messages up to 300
KB.
z Open multimedia messages with caution. Objects in
multimedia messages may contain viruses and
malicious software that can damage your phone.
5 Voice Mail
1. Tap and select > Message settings > Te xt
message > SIM 1 or SIM 2 > Voicemail server.
2. Tap the voicemail number, or select Options > Call.
You can also call voicemail by tapping
mode. Then tap and hold the 1 key.
in standby
6 Phonebook
Creating a Contact
1. Tap and select > Add new contact.
18
Page 23

2. Enter the contact information.
3. Save the contact.
Searching for a Contact
1. Tap and select .
2. Enter the first letter of the contact name in the search bar.
Contacts who have names that start with that letter will be
displayed.
Setting the Preferred Storage
1. Tap and select > Options > Phonebook
settings > Preferred storage.
2. Scroll to SIM 1, SIM 2, Phone, or All as desired.
3. Tap OK.
Copying Contacts
You can copy contacts to the phone, the SIM card, or a file.
Copying One Contact
1. Tap and select .
2. Enter the first letter of the contact name in the search bar.
Contacts who have names that start with that letter will be
displayed.
3. Tap the desired contact.
4. Select Options > Copy.
19
Page 24

5. Select To ph one, To S IM 1 , To SIM 2 , or To file to copy the
contact to the desired location.
Copying Multiple Conta c t s
1. Tap and select > Options > Phonebook
settings > Copy contacts.
2. Tap the desired option, such as From phone, From SIM 1 or
From SIM 2. Then tap the destination option, such as To
phone, To SIM 1 or To SIM 2 .
3. Tap the desired contacts to mark them, and tap Options >
Copy marked.
4. Tap Yes to copy contacts to the desired location.
Contact Group
You can create a contact group, such as family, classmates, or
workmates, and add relevant contacts to the group. The
members in the group share certain features, such as Caller
ringtone and Caller picture.
To create a contact group:
1. Tap > Phonebook, then tap > Groups > Add
new group.
2. Set Group name, Caller picture, and Caller ringtone.
3. Select Options > Save.
To add contacts to a contact group:
1. Tap > Phonebook, then tap > Groups.
2. Scroll to the contact group, and select Options > View
members.
20
Page 25

3. Tap Add and select the desired contact from Phonebook
stored in the phone.
4. Tap Options > Add marked to add the contacts to the
contact group.
Tap Options > Add members to add multiple contacts to
the contact group, repeat steps 3 and 4.
21
Page 26

7 Multimedia
Camera
The phone features a built-in 0.3-megapixel complementary
metal-oxide-semiconductor (CMOS) camera.
To t ake a p i c t ure:
1. Tap and select .
2. On the viewfinder screen, tap to configure the relevant
settings:
z
Tap to adjust the exposure value.
z
Tap to set Scene mode.
z
Tap to set Self-timer.
3. Focus the camera and tap to take a picture.
4. Tap to delete the picture or forward it.
5. Tap to exit the camera interface or tap to return
to the standby mode.
Video Recorder
To record a video clip:
1. Tap and select .
22
Page 27

2. Tap and to switch Video recorder.
3. In video recording mode, tap to configure the relevant
settings:
z
Tap to adjust the exposure value.
z
Tap to set Scene mode.
z
Tap to set White balance.
z
Tap to set Effects.
z
Tap to set Record limit.
z
Tap to do advance settings like Storage, Video
quality, Contrast, Anti-flicker and Restore default
settings.
4. Tap to start recording.
5. Tap and to pause or continue.
6. Tap to stop recording and save the video clip.
Media Player
The media player plays audio and video clips stored in the
phone memory or on the microSD card.
If you want to hear the audio clips with enhanced quality sound,
listen to them using the headset.
To play a clip:
23
Page 28

1. Tap and select .
2. Select an audio or video clip, and tap to start playing
the clip.
When the clip is being played, you can:
z
Press to adjust the volume.
and to advance or go back to the previous
Tap
one or to the next clip.
When playing a song, tap and hold
and to fast
forward and fast backward.
z
Tap or to pause or continue.
3. Tap to:
z
Current playlist: allows you to view the current playlist.
z
Go to library: allows you to go back to the media player
interface.
z
Settings: allows you to make player settings, audio settings
and video settings.
z
Details: allows you to view more information of currentfile.
4. Tap to return to the previous screen, press to
return to the main menu or press
to return to standby
mode.
All audio and video clips can be automatically added to Media
player when you first use this function.
24
Page 29

Media player only supports audio and video clips
in .mp4, .3gp and .avi formats.
Image Viewer
Tap then select to access Image viewer.
The image viewer allows you to manage all pictures stored in
the phone memory or on the microSD card.
Tap
to:
z
View, rename, and delete a picture.
z
View picture information.
z
Set the picture browsing style.
z
Send a picture as MMS or via Bluetooth.
z
Use a picture as the home screen wallpaper or lock screen
wallpaper
z
Sort pictures by name, type, time, or size.
z
Delete all pictures.
z
Select the preferred storage for pictures.
to view pictures in landscape mode.
Tap
FM Radio
The headset cable also functions as an antenna when the
frequency modulation (FM) radio is turned on. To ensure good
radio reception, do not disconnect the headset from the phone
or severely bend the headset cable.
25
Page 30

To listen to the radio:
1. Connect the headset to the phone.
2. In standby mode, tap and select .
When listening to the radio, you can:
z
Tap to turn the FM radio on or off.
z
Press to adjust the volume.
z
Tap or to switch between channels in the saved
channel list.
z
Tap to switch the headset mode and the loud speaker
mode.
z
Tap to view the channel list.
z
Tap to configure settings, such as viewing or editing
the channel list, manually setting a frequency and
automatically searching for channels.
Sound Recorder
The sound recorder functions as a digital recorder.
To record an audio clip:
1. Tap and select .
26
Page 31

2. Tap to start recording.
While the recording, you can tap
to pause or to
continue.
3. Tap to stop recording and tap Ye s to save the recorded
clip as instructed.
to configure settings, such as adding a new
Tap
recorded clip, viewing the list of recorded clips, and setting
the format or preferred storage for recorded clips.
Mobile TV
To ensure reception of TV programs, pull out the TV & FM
radio antenna.
1. In standby mode, tap and select , select your
country in Select location interface.
2. In channel list interface, tap Options to:
z
Play: allows you to play the current channel.
z
Search: allows you to reselect the country.
z
Rename: allows you to rename the channel.
z
Delete: allows you to delete the channel.
z
Settings: allows you to configure relevant settings of
mobile TV.
3. When watching the TV, you can do the following:
z
Press to adjust the volume.
z
Tap the playing screen to return to the channel list.
27
Page 32

z
Tap to return to the main menu or tap to return
to standby mode.
8 WAP Browser
You can use your phone to access Wireless Application Protocol
(WAP) sites and use WAP-based services. To browse WAP pages,
you must to subscribe to corresponding service from your
service provider and configure your phone's relevant settings.
For details about services and charges, contact your service
provider.
You do not need to configure your data account and WAP
settings to access WAP sites.
Editing a Data Account
Data accounts supported by your ser vice provider already exist.
To edit a data account:
1. Tap and select > Data accounts > SIM 1 or SIM
2.
2. Select a data account.
3. Select Options > Edit.
4. Configure the relevant settings based on the information
provided by your service provider.
5. Tap Options > Save.
28
Page 33

Connecting to a WLAN(optional)
1. Tap and select .
2. Tur n on W i-F i.
If this is the first time you are connecting to a WLAN, you are
prompted to turn on Wi-Fi.
If this is not the first time you are connecting to a WLAN, go
to the next step.
3. Select the desired WLAN.
If you have turned on WLAN, your phone automatically
searches for available WLANs.
4. Tap Options, for the following options:
z
Connect: connects to the selected WLAN.
z
Add: manually adds a WLAN.
z
Define access point: allows you to view and edit WLAN list.
z
WLAN status: allows you to view your phone’s Media
Access Control (MAC) address.
z
Disable WLAN: turns off WLAN.
z
Settings: configures relevant settings of WLAN.
z
Power save mod e: select relevant power save mode.
z
Refresh: searches for available WLAN.
Configuring WAP Settings
To configure WAP settings:
1. Tap and select .
2. Tap Settings > Data account > SIM 1 or SIM 2.
29
Page 34

3. Select an account.
4. Tap OK.
Accessing a Website
To access a website:
1. Tap and select > Search or input URL.
2. Enter the URL of the desired website.
3. Tap Options > Done.
9 Bluetooth
Your phone supports Bluetooth. You can transfer data between
your phone and other Bluetooth devices, and talk on the phone
using a Bluetooth headset.
You can turn on Bluetooth by configuring Bluetooth
settings.
Connecting a Bluetooth Headset to Your
Phone
To connect a Bluetooth headset to your phone, do the
following:
1. Tap and select > Power > On to turn on
Bluetooth.
30
Page 35

2. Select Search audio device to search for available Bluetooth
headsets.
3. Scroll to the desired Bluetooth headset and tap Pair.
4. Enter the password to pair the Bluetooth headset with your
phone.
When the Bluetooth headset is connected to your phone, the
headset icon is displayed on the standby screen, indicating that
you can use the headset.
A Bluetooth headset is not included in the product
package and you must purchase it separately.
Transferring Data
To transfer data, do the following:
1. Tap and select > Power > On to turn on
Bluetooth.
2. Select My device > Search new device to search for
available Bluetooth devices.
3. Scroll to the desired Bluetooth device and tap Pair.
When you pair your phone with the device for the first time,
a password is required.
4. Transfer data between your phone and the Bluetooth device.
31
Page 36

10 File Manager
Your phone provides a file manager. You can use File manager
to organize files stored on your phone and microSD card. You
can also use the manager to view the pictures, listen to music,
and watch videos.
To access File manager, tap
and select .
11 Tools
Alarms
You can set up to five alarms on your phone.
To set an alarm:
1. Tap and select .
2. Scroll to the desired alarm, enable the alarm, and set the
alert time, repeat mode and alert type.
Once the alarm is enabled, the alarm icon is displayed on the
standby screen.
Calendar
You can add events to the calendar to keep track of important
events.
To access Calendar, tap
and select .
32
Page 37

Tasks
You can add tasks to the phone. You can also view, edit, and
delete tasks as needed.
To access Tas ks , tap
Once a task is added, the phone rings at the preset time as a
reminder of the task.
and select .
Calculator
To access Calculator, tap and select .
Enter the numbers to add, subtract, multiply, or divide by
tapping the corresponding keys. Tap
result.
to obtain the
12 Java
To access Java, tap and select .
You can install third-party Java applications to expand your
phone's application and game capabilities.
z Not all Java applications are compatible with your
phone. If you have trouble installing or running a Java
application, press
mode, and remove the application from your phone.
z Certain Java applications require network connections.
Therefore, ensure that your phone has network access.
to return to the standby
33
Page 38

Installing a Java Application
1. Select a Java installation file in .jar or .jad format from Phone
or Memory card, tap Options, and select Install to start the
installation.
2. Tap Yes to confirm the certification information.
3. Select Phone or Memory card to install the Java application.
When the installation is complete, the message "Installed" is
displayed.
Running a Java Application
1. Tap and select the Java application.
2. Scroll to the desired Java application.
3. Select Options > Launch to run the Java application.
Removing a Java Application
1. Tap and select the Java application.
2. Select and hold the desired Java application.
3. Select it again and the message "Uninstall?" is displayed,
select Yes .
34
Page 39

13 Chat Functions
The built-in social networking service (SNS) applications
Facebook and Twit ter on your phone allow you to send instant
messages and files any time.
To u se Faceb ook:
1. Tap and select Facebook.
2. Enter your registered email address and password.
z Check that your phone has Internet access before you
using the chat applications.
z Before saving the chat history, ensure that a microSD
card has been inserted.
z Follow the same procedure to use Twitter.
35
Page 40

14 Warnings and Precautions
This section contains important information pertaining to the
operating instructions of your device. It also contains
information about how to use the device safely. Read this
information carefully before using your device.
Electronic Device
Power off your device if using the device is prohibited. Do not
use the device when using the device causes danger or
interference with electronic devices.
Medical Device
z
Follow rules and regulations set forth by hospitals and
health care facilities. Do not use your device when using the
device is prohibited.
z
Pacemaker manufacturers recommend that a minimum
distance of 15 cm be maintained between a device and a
pacemaker to prevent potential interference with the
pacemaker. If you are using a pacemaker, use the device on
the opposite side of the pacemaker and do not carry the
device in your front pocket.
Potentially Explosive Atmosphere
Power off your device in any area with a potentially explosive
atmosphere, and comply with all signs and instructions. Areas
that may have potentially explosive atmospheres include the
areas where you would normally be advised to turn off your
vehicle engine. Triggering of sparks in such areas could cause
36
Page 41

an explosion or a fire, resulting in bodily injuries or even deaths.
Do not power on your device at refueling points such as service
stations. Comply with restrictions on the use of radio
equipment in fuel depots, storage, and distribution areas, and
chemical plants. In addition, adhere to restrictions in areas
where blasting operations are in progress. Before using the
device, watch out for areas that have potentially explosive
atmospheres that are often, but not always, clearly marked.
Such locations include areas below the deck on boats, chemical
transfer or storage facilities, and areas where the air contains
chemicals or particles such as grain, dust, or metal powders.
Ask the manufacturers of vehicles using liquefied petroleum
gas (such as propane or butane) whether this device can be
safely used in their vicinity.
Traffic Security
Observe local laws and regulations while using the device. In
addition, if using the device while driving a vehicle, comply with
the following guidelines:
z
Concentrate on driving. Your first responsibility is to drive
safely.
z
Do not talk on the device while driving. Use hands-free
accessories.
z
When you have to make or answer a call, park the vehicle at
the road side before using your device.
z
RF signals may affect electronic systems of motor vehicles.
For more information, consult the vehicle manufacturer.
z
In a motor vehicle, do not place the device over the air bag
or in the air bag deployment area. Otherwise, the device
37
Page 42

may hurt you owing to the strong force when the air bag
inflates.
z
Do not use your device while flying in an aircraft. Power off
your device before boarding an aircraft. Using wireless
devices in an aircraft may cause danger to the operation of
the aircraft and disrupt the wireless telephone network. It
may also be considered illegal.
Operating Environment
z
Do not use or charge the device in dusty, damp, and dirty
places or places with magnetic fields. Otherwise, it may
result in a malfunction of the circuit.
z
The device complies with the RF specifications when the
device is used near your ear or at a distance of 1.5 cm from
your body. Ensure that the device accessories such as a
device case and a device holster are not composed of metal
components. Keep your device 1.5 cm away from your body
to meet the requirement earlier mentioned.
z
On a stormy day with thunder, do not use your device when
it is being charged, to prevent any danger caused by
lightning.
z
When you are on a call, do not touch the antenna. Touching
the antenna affects the call quality and results in increase in
power consumption. As a result, the talk time and the
standby time are reduced.
z
While using the device, observe the local laws and
regulations, and respect others' privacy and legal rights.
z
Keep the ambient temperature between 0°C and 40°C while
the device is being charged. Keep the ambient temperature
38
Page 43

between 0°C to 40°C for using the device powered by a
battery.
Prevention of Hearing Damage
Using a headset at high volume can damage your hearing. To
reduce the risk of damage to hearing, lower the headset
volume to a safe and comfortable level.
Safety of Children
Comply with all precautions with regard to children's safety.
Letting the child play with your device or its accessories, which
may include parts that can be detached from the device, may
be dangerous, as it may present a choking hazard. Ensure that
small children are kept away from the device and accessories.
Accessories
Use the accessories delivered only by the manufacturer. Using
accessories of other manufacturers or vendors with this device
model may invalidate any approval or warranty applicable to
the device, result in the non-operation of the device, and cause
danger.
Battery and Charger
z
Unplug the charger from the electrical plug and the device
when not in use.
z
The battery can be charged and discharged hundreds of
times before it eventually wears out. When the standby time
and the talk time are shorter than the normal time, replace
the battery.
39
Page 44

z
Use the AC power supply def ined in the specifications of the
charger. An improper power voltage may cause a fire or a
malfunction of the charger.
z
Do not connect two poles of the battery with conductors,
such as metal materials, keys, or jewelries. Otherwise, the
battery may be short-circuited and may cause injuries and
burns on your body.
z
Do not disassemble the battery or solder the battery poles.
Otherwise, it may lead to electrolyte leakage, overheating,
fire, or explosion.
z
If battery electrolyte leaks out, ensure that the electrolyte
does not touch your skin and eyes. When the electrolyte
touches your skin or splashes into your eyes, wash your eyes
with clean water immediately and consult a doctor.
z
If there is a case of battery deformation, color change, or
abnormal heating while you charge or store the battery,
remove the battery immediately and stop using it. Otherwise,
it may lead to battery leakage, overheating, explosion, or
fire.
z
If the power cable is damaged (for example, the cord is
exposed or broken), or the plug loosens, stop using the
cable at once. Otherwise, it may lead to an electric shock, a
short circuit of the charger, or a fire.
z
Do not dispose of batteries in f ire as they may explode.
Batteries may also explode if damaged.
z
Danger of explosion if battery is incorrectly replaced. Recycle
or dispose of used batteries according to the local
regulations or reference instruction supplied with your
device.
40
Page 45

z
Notice: For pluggable equipment, the socket-outlet shall be
installed near the equipment and shall be easily accessible.
Cleaning and Maintenance
z
The device, battery, and charger are not water-resistant.
Keep them dry. Protect the device, battery, and charger from
water or vapor. Do not touch the device or the charger with a
wet hand. Otherwise, it may lead to a short circuit, a
malfunction of the device, and an electric shock to the user.
z
Do not place your device, battery, and charger in places
where they can get damaged because of collision. Otherwise,
it may lead to battery leakage, device malfunction,
overheating, fire, or explosion.
z
Do not place magnetic storage media such as magnetic
cards and floppy disks near the device. Radiation from the
device may erase the information stored on them.
z
Do not leave your device, battery, and charger in a place
with an extreme high or low temperature. Other wise, they
may not function properly and may lead to a fire or an
explosion. When the temperature is lower than 0°C,
performance of the battery is affected.
z
Do not place sharp metal objects such as pins near the
earpiece. The earpiece may attract these objects and hurt
you when you are using the device.
z
Before you clean or maintain the device, power off the
device and disconnect it from the charger.
z
Do not use any chemical detergent, powder, or other
chemical agents (such as alcohol and benzene) to clean the
device and the charger. Otherwise, parts of the device may
41
Page 46

be damaged or a fire can be caused. You can clean the
device and the charger with a piece of damp and soft
antistatic cloth.
z
Do not dismantle the device or accessories. Otherwise, the
warranty on the device and accessories is invalid and the
manufacturer is not liable to pay for the damage.
Emergency Call
You can use your device for emergency calls in the service area.
The connection, however, cannot be guaranteed in all
conditions. You should not rely solely on the device for
essential communications.
Certification Information (SAR)
This device meets guidelines for exposure to radio waves.
Your device is a low-power radio transmitter and receiver. As
recommended by international guidelines, the device is
designed not to exceed the limits for exposure to radio waves.
These guidelines were developed by the independent scientific
organization International Commission on Non-Ionizing
Radiation Protection (ICNIRP) and include safety measures
designed to ensure safety for all users, regardless of age and
health.
The Specific Absorption Rate (SAR) is the unit of measurement
for the amount of radio frequency energy absorbed by the
body when using a device. The SAR value is determined at the
highest certified power level in laboratory conditions, but the
actual SAR level of the device when being operated can be well
below the value. This is because the device is designed to use
the minimum power required to reach the network.
42
Page 47

The SAR limit adopted by USA and Canada is 1.6
watts/kilogram (W/kg) averaged over one gram of tissue. The
highest SAR value reported to the FCC and IC for this device
type when tested for use at the ear is 0,5
89 W/kg, and when
properly worn on the body is 1,290 W/kg.
The SAR limit also adopted by Europe is 2.0 W/kg averaged
over 10 grams of tissue. The highest SAR value for this device
type when tested at the ear is 0,393 W/kg, and when properly
worn on the body is 1,300 W/kg.
FCC Statement
This equipment has been tested and found to comply with the
limits for a Class B digital device, pursuant to Part 15 of the FCC
Rules. These limits are designed to provide reasonable
protection against harmful interference in a residential
installation. This equipment generates, uses and can radiate
radio frequency energy and, if not installed and used in
accordance with the instructions, may cause harmful
interference to radio communications. However,there is no
guarantee that interference will not occur in a particular
installation.If this equipment does cause harmful interference
to radio or television reception,which can be determined by
turning the equipment off and on, the user is encouraged to try
to correct the interference by one or more of the following
measures:
z
Reorient or relocate the receiving antenna.
z
Increase the separation between the equipment and
receiver.
z
Connect the equipment into an outlet on a circuit different
from that to which the receiver is connected.
43
Page 48

z
Consult the dealer or an experienced radio/TV technician for
help.
This device complies with Part 15 of the FCC Rules. Operation is
subject to the following two conditions: (1) this device may not
cause harmful interference, and (2) this device must accept any
interference received, including interference that may cause
undesired operation.
Warni ng: Changes or modifications made to this device not
expressly approved by Huawei Technologies Co., Ltd. may void
the FCC authorization to operate this device.
EU Regulatory Conformance
Hereby, Huawei Technologies Co., Ltd. declares that this device
is in compliance with the essential requirements and other
relevant provisions of Directive 1999/5/EC.
For the declaration of conformity, visit the Web site
www.huaweidevice.com/certification.
Notice: Observe the national local regulations in the location
where the device is to be used. This device may be restricted for
use in some or all member states of the European Union (EU).
Norway: This subsection does not apply for the geographical
area within a radius of 20 km from the centre of Ny-Ålesund.
To protect your hearing, avoid listening to audio at
loud levels for prolonged periods of time.
44
Page 49

Please visit www.huaweidevice.com/worldwide/support/hotline
for recently updated hotline and email address in your country
or region.
Version: 01 NO.:
45
 Loading...