

Page 1

Huawei IP Phone eSpace 6830
User Manual
HUAWEI TECHNOLOGIES CO., LTD.
Page 2

Huawei IP Phone eSpace 6830
V100R001
User Manual
Issue
01
Date
2011-07-01
Huawei Technologies Proprietary
Page 3

Huawei Technologies Co., Ltd. provides customers with comprehensive
technical support and service. Please feel free to contact our local office or
company headquarters.
Huawei Technologies Co., Ltd.
Address: Huawei Industrial Base
Bantian, Longgang
Shenzhen 518129
People's Republic of China
Website: http://www.huawei.com
Email: [email protected]
Copyright © Huawei Technologies Co., Ltd. 2011. All rights
reserved.
No part of this document may be reproduced or transmitted in any form or
by any means without prior written consent of Huawei Technologies Co.,
Ltd.
Trademarks and Permissions
.
and other Huawei trademarks are trademarks of Huawei
Technologies Co., Ltd.
All other trademarks and trade names mentioned in this document are the
property of their respective holders.
Notice
The information in this document is subject to change without notice. Every
effort has been made in the preparation of this document to ensure
accuracy of the contents, but all statements, information, and
recommendations in this document do not constitute the warranty of any
kind, express or implied.
Huawei Technologies Proprietary
Page 4

User Manual Contents
Contents
1 Safety Precautions..................................................................................... 2
2 Product Overview...................................................................................... 5
Packing List.........................................................................................................5
Features................................................................................................................6
Hardware specifications.......................................................................................7
Technical specifications.......................................................................................8
3 Installing the eSpace 6830....................................................................... 11
Cable Connections of the eSpace 6830..............................................................11
Starting the eSpace 6830....................................................................................12
Safety Compliance.............................................................................................12
Warranty of Quality...........................................................................................12
4 Configuring the eSpace 6830.................................................................. 14
Configuring the Phone Through the Keypad.....................................................14
Configuring the Phone Through Web Browser..................................................17
Accessing the Web Configuration Menu..................................................17
Configuration Page............................................................................................18
Saving the Configuration Changes...........................................................22
Rebooting the eSpace 6830 Remotely......................................................23
5 Using the eSpace 6830............................................................................. 24
Getting to Know the Keyboard..........................................................................24
Instructions of Using the Phone.........................................................................26
i
Page 5

User Manual Contents
Handset, Speakerphone, and Headset Modes ...........................................26
Multiple SIP Accounts and Lines.............................................................26
Making a Call...........................................................................................26
Making a Call by Using an IP Address.....................................................28
Quick IP Call Mode..................................................................................28
Answering a Call......................................................................................29
Do-Not-Disturb.........................................................................................29
Call Waiting/Call Holding........................................................................29
Muting...................................................................................................... 29
Call Transfer.............................................................................................29
Three-Way Conference Call.....................................................................30
Voice Messages........................................................................................31
6 Restoring Factory Default Settings........................................................ 34
7 FAQs......................................................................................................... 35
ii
Page 6

User Manual 1 Safety Precautions
Huawei IP Phone eSpace 6830
User Manual
Thank you for purchasing the Huawei IP Phone eSpace 6830 (the eSpace 6830 for
short).
eSpace 6830 is an high-quality IP phone.
1
Page 7

User Manual 1 Safety Precautions
1 Safety Precautions
General Requirements:
z
Before you install and use the device, read these safety precautions carefully and
observe them during operation.
z
During storage, transportation, and operation of the device, keep the device dry.
z
During storage, transportation, and operation of the device, avoid collision and
crash of the device.
z
Never attempt to dismantle the device by yourself. In case of any fault, contact the
appointed maintenance center for repair.
z
Without prior written consent, no organization or individual is permitted to make
any change to the structure or safety design of the device. Huawei Technologies Co.,
Ltd. is not liable to any consequences or legal issues due to such changes.
z
While using the device, observe all applicable laws, directives and regulations, and
respect the legal rights of other people.
Environmental Requirements:
z
Place the device at a well-ventilated place. Do not dispose the device to direct
sunlight.
z
Keep the device clean and free of dusts.
z
Place the device on a stable platform.
z
Do not place any object on top of the device. Otherwise, the device may be too hot
during operation. It can even be deformed or damaged by the heavy load.
z
Keep at least 10 cm between the device and the closest object for heat dissipation.
z
Do not place the device on or near any object that can easily catch fire, such as
something made of rubber.
z
Keep the device far away from any heat source or bare fire, such as a candle or an
electric heater.
z
Keep the device far away from any household appliance with strong magnetic field
or electromagnetic field, such as a microwave oven or a refrigerator.
2
Page 8

User Manual 1 Safety Precautions
Operating Requirements:
z
Do not let a child operate the device without guidance.
z
Do not let a child play with the device or any acces sory. Swallowing the accessories
may lead to peril.
z
Use the accessories provided or authorized by the manufacturer only.
z
The power supply of the device shall meet the requirements of the input voltage of
the device. Use the provided lightning protection power socket only.
z
Before plugging or unplugging any cable, shut down the device and disconnect it
from the power supply.
z
While plugging or unplugging any cable, make sure that your hands are completely
dry.
z
Do not tread on, pull, or over-bend any cable. Otherwise, the cable may be damaged,
leading to malfunction of the device.
z
Do not use an old or a damaged power cable.
z
During lightning weather, stop using the device and disconnect it from the power
supply. Unplug the power plug and the ADSL(Asymmetric Digital Subscriber
Line) twisted pair (the radio frequency cable) to avoid lightning strike.
z
If the device is not used for a long time, disconnect it from the power supply and
unplug the power plug.
z
Do not look directly into the optical interface and the laser-transmitting inter face on
the device, or the infrared transmitting interface on the remote control with your
eyes. Otherwise, your eyes may be injured.
z
In any of the following cases, stop using the device, disconnect it from the power
supply, and unplug the power plug immediately: there is smoke emitted from the
device, or there is some abnormal noise or smell. Contact the specified maintenance
center for repair.
z
Avoid any object (such as metal shavings) from entering the device from the heat
dissipation intakes.
z
Before connecting any other cable, connect the grounding cable of the device first.
Do not disconnect the grounding cable until you disconnect all other cables.
z
Make sure that the three-phase power socket is grounded reliably. The neutral line
and the live line shall not be connected inversely.
z
Do not scratch or abrade the shell of the device. This may lead to malfunctions of
the device. The shed painting material may also lead to skin allergy.
3
Page 9

User Manual 1 Safety Precautions
Cleaning Requirements:
z
Before cleaning the device, stop using it and disconnect it from the power supply.
z
Use a piece of soft dry cloth to clean the device.
z
Keep the power plug clean and dry. Using a dirty or wet power plug may lead to
electric shock or other perils.
4
Page 10

User Manual 2 Product Overview
2 Product Overview
Packing List
The following items are included in the eSpace 6830 package. Ver ify the packing items.
Contact your distributor immediately if any one is missing.
Table 2-1 Packing items
Item Quantity
Main case 1
Handset 1
Coiled handset cord 1
Specialized power adapter 1
Straight-through cable 1
Phone Stand 1
Wall-mount bracket 1
eSpace 6830 Quick Start 1
CD 1
Warranty card 1
Certificate of quality 1
5
Page 11

User Manual 2 Product Overview
Product Picture Product Overview
The eSpace 6830 is a
next-generation enterprise IP
phone. The eSpace 6830
provides rich functions, is
easy to use, and supports
integrated PoE and HD Voice.
Features
Table 2-2 Key features of the eSpace 6830
Feature Description
Open standard compatibility
High audio quality
Traditional features
SIP 2.0, TCP/IP/UDP, RTP/RTC, HTTP/HTTPS,
ARP/RARP, ICMP, DNS (A record and SRV
record), DHCP, PPPoE, TFTP, NTP and Telnet.
Adopting the advanced DSP technology, mute
restriction, voice activity detector, comfort noise
generator, and auto gain control.
Standard voice features including caller ID
display, call waiting, call holding, call transferring,
call forwarding, call blocking, call rejecting, mute,
autodial, and off-hook autodial.
6
Page 12

User Manual 2 Product Overview
Feature Description
Advanced functions Supporting the following functions:
z Multi-lines
z Headset enabled
z Backlit graphic LCD
z Five navigation keys
z Function keys such as call holding, headset
mode, call forward, three-party conference, do
not disturb, address book, voice message box,
Intercom, and mute
z Seven multi-purpose keys
Advanced features
z Customized ring tones
Download of ring tones
Download of address book in xml format and
screensaver files
z SRTP voice call encrypted with the Advanced
Encryption Standard (AES)
Setting of dialing rule and advance business
functions, such as INTERCOM, BLF, and
BroadSoft SCA
z For details of advanced features, see the
Huawei IP Phone eSpace
6810&6830&6850&6870 Administrator
Manual
Hardware specifications
Table 2-3 Hardware specifications
Item Specification
Ethernet ports
Graphic LCD display Pixel:180x90
Headset port RJ22 headset port and 2.5 mm earphone jack
Providing two Ethernet ports of 10/100 Mbit/s
and full/half duplex
Ethernet polarity can be automatically
detected.
7
Page 13

User Manual 2 Product Overview
Item Specification
LED
LED indicators that can be on in two colors
(green and red)
PoE
The build-in automatic detector obtains the
PoE that is based on the IEEE 802.3af standard.
Universal switching Input: 100–240 V AC 50 Hz or 60 Hz
Power adapter Output: +5 V DC, 1200 mA, UL certified
Dimension (W × H × D) 222 mm × 210mm × 93 mm
Weight 0.98 kg
Temperature 0°C to 40°C
Humidity 10% to 90% (non-condensing)
Compliance FCC/CE/C-Tick
Technical specifications
Table 2-4 Technical specifications of the eSpace 6830
Item Specification
Lines Four straight-through lines
Supported protocol
Function keys
Supporting the SIP 2.0, TCP/UDP/IP, HTTP, HTTPS,
PPPoE, RTP/RTCP, SRTP by SDES, HTTP, ARP/RARP,
ICMP, DNS, DHCP, NTP, TFTP, NTP/SNTP, and
SIMPLE/PRESENCE protocols
Supporting RFC3903, RFC3856, RFC3863, and RFC4235
Supporting RFC 3428
Up to 50 incoming IM messages can be stored. If more than
50 incoming IM messages are present, the system drops the
latest IM message.
z Eleven dedicated keys: Hold, SEND, SPEAKER,
Headset Mode, TRNF (transfer), CONF (conference),
MUTE/DEL, DND, INVTERCOM, Phone Book, and
MSG (message)
z Five navigation keys
z Seven multi-purpose keys and four XML
programmable soft keys.
8
Page 14

User Manual 2 Product Overview
Item Specification
Device management
Supporting the upgrade of the NAT-friendly remote
software (through TFTP or HTTP) for the devices that are
deployed behind the firewall or the NAT
Supporting the address book function
Audio features
Handset, Hands-free, and headset modes in full duplex
Advanced DSP
Dynamic negotiation of codec and voice payload length
HD Voice
Supporting the G.723.1 (6.3K or 5.3K), G.729A/B, G.711
µ/A, G.726-32K, G.722 (broadband), and iLBC CODECs
In-band and out-of-band DTMF (in audio, RFC2833, or SIP
INFO mode)
Echo Cancellation
Supporting the sidetone cancellation, advanced jitter buffer
control, and packet delay and loss concealment.
Telephony features
Intuitive GUI, download of the phone book (XML), voice
mail indicator, download of custom ring tones
Call holding, call transferring (attended/blind),
Do-Not-Disturb, call forwarding, call waiting, call waiting
mute, redial, call log, volume control, caller ID display,
multi-party conference call, dialing with a prefix, off-hook
autodial, automatic answer, and dialing.
Network and
provisioning
Supporting manual configuration for static network through
keyboard and LCD, or by logging in to the Web page.
Dynamic network parameters are provided by the DHCP
server.
Supporting NAT traversal by using IETF STUN and
symmetric RTP
Supporting AES-based IP phone configuration file update
Supporting unified IP phone configuration through the
BroadSoft XML Provision server
Supporting 802.1x-based network accessing authentication
Supporting the IEEE 802.1p/q tagging (VLAN) and Layer 3
ToS protocols
9
Page 15

User Manual 2 Product Overview
Item Specification
Software upgrade
Supporting firmware upgrade through TFTP or HTTP and
authentication of configuration files before changing
Providing the specific URL for users to download
configuration files and upgrade files
Advanced server
features
Security
Message waiting indicator light
Supporting DNS SRV query
Supporting DIGEST authentication and encryption by using
MD5, MD5-sess, and SRTP
10
Page 16
User Manual 3 Installing the eSpace 6830
3 Installing the eSpace 6830
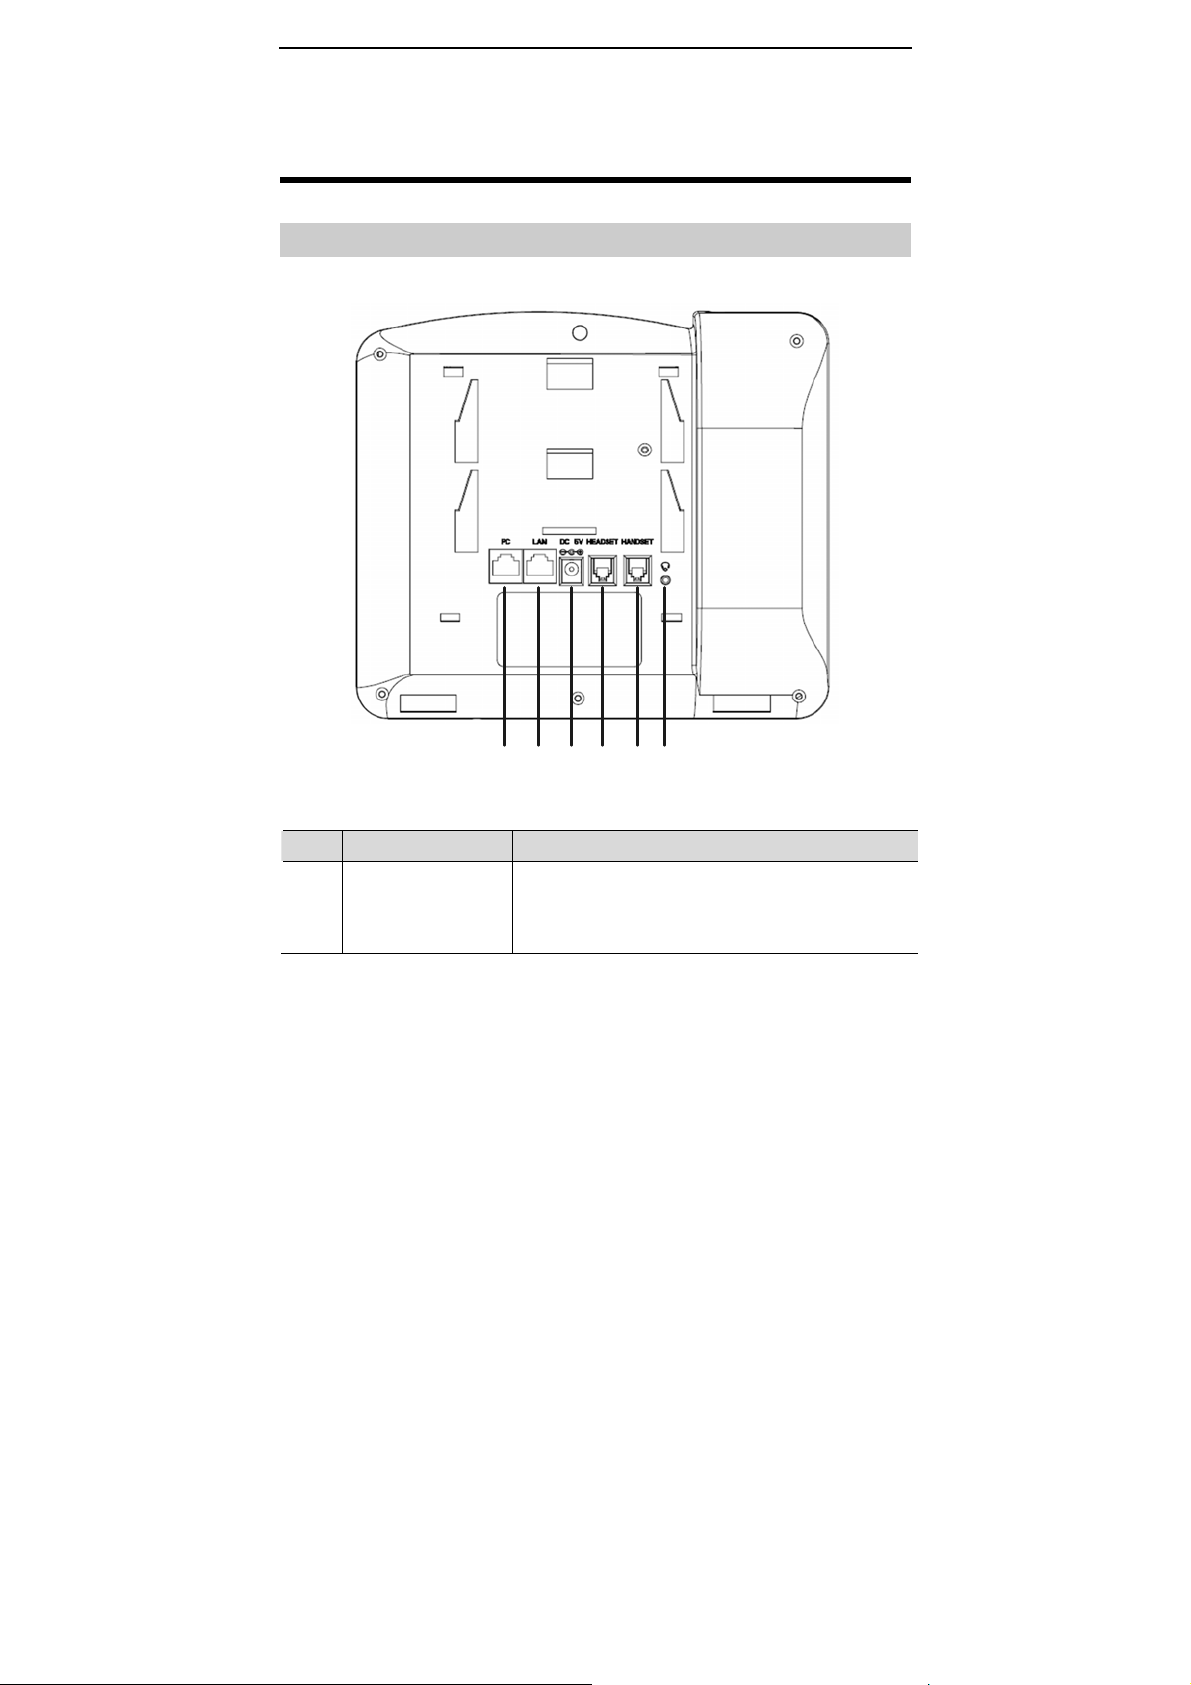
Cable Connections of the eSpace 6830
Figure 3-1 Connecting the eSpace 6830
(1) (2) (3) (4) (5) (6)
Table 3-1 Description of the connectors
No. Connector Description
(1) PC port
The port is the 10/100 Mbit/s RJ-45 PC port. You can
use the straight-through cable to connect the PC port.
When using the PC phone, you can configure the port.
(Optional)
11
Page 17

User Manual 3 Installing the eSpace 6830
No. Connector Description
(2) LAN port
(3) Power port
(4) Headset port
(5) Handset port
(6) Earphone jack
The port is the 10/100 Mbit/s RJ-45 LAN port. You
need to use the straight-through cable to connect the
LAN port to the Ethernet port.The phone supports
PoE (802.3af) power. In this case, you must connect
the port to the switch supporting PoE power.
5Vpower port. After the network cable connection is
complete, use the special power adapter of the phone
to connect the power port and power to switch on the
phone.
RJ-22 port. If you want to use the headset for
communication, install the headset socket to the port.
RJ-22 port. If you want to use the headset for
communication, install the headset socket to the port.
A 2.5 mm jack in convenience of talk with an
earphone.
Starting the eSpace 6830
After the eSpace 6830 is powered on, a progress bar is displayed on its screen. This
progress bar disappears after the startup page is accessed.
Safety Compliance
The eSpace 6830 complies with the Federal Communications Commission (FCC),
Confermite Europeenne (CE), China Compulsory Certification (CCC), and various
safety standards. The eSpace 6830 specialized power adapter is compliant with the
Underwriter Laboratories (UL) standard. Use only the matching power adapter
provided with the package. The manufacture r’s warranty does not cover damages to the
phone caused by unsupported power adapters.
Warranty of Quality
If you purchased the eSpace 6830 from a distributor, contact the distributor for
replacement, repair, or refund. If you purchased the product directly from Huawei,
contact Huawei sales and service representatives for a return materials authorization
12
Page 18

User Manual 3 Installing the eSpace 6830
(RMA) number before you return the product. Huawei reserves the right to remedy the
warranty policy without prior notification.
Use a power adapter provided by the eSpace 6830; otherwise, damages can
be caused to the products and the manufacturer warranty is void.
13
Page 19

User Manual 4 Configuring the eSpace 6830
4 Configuring the eSpace 6830
Configuring the Phone Through the Keypad
To enter the configuration menu, press MENU. View the menu by pressing UP,
DOWN, LEFT, or RIGHT. Press MENU to confirm the selection of a menu item, and
delete an entry by pressing BackSpace. The phone automatically exits the menu when
an incoming call comes or the phone is off-hook. If no keypad operation is performed
within one minute, the IP phone automatically displays the standby image.
Table 4-1 Keypad configuration menu
Menu Configuration Description
Call History
Status
Phone Book Displays the phone book and related option.
Displays history records of received, dialed, transfered and missed
calls.
Displays the network status, account status, software version,
MAC address, and hardware version of the phone.
z [New Entry]
Add a phone book record.
After the fields such as Name, Family name, Number, and
Acct are set or selected, select Confirm Add and press
MENU to confirm the operation. Select Cancel & Return
and press MENU to cancel the added information and return
to the previous menu.
z [Download Phonebook]
Select Download Phonebook and press MENU. Then the
phone downloads the updated phone book from the TFTP or
HTTP server. This requires corresponding configuration of
the download items of the phone book on the Web page.
z [Delete All Entries]
Delete all contacts in the phone book.
14
Page 20

User Manual 4 Configuring the eSpace 6830
Menu Configuration Description
Direct IP call
The input field of the destination IP address is provided when
Direct IP call is selected. Type th e destinat ion IP addres s such as
10.10.10.2, press OK soft key to confirm the operation and send
the call; press the Cancel soft key to cancel the call and return to
previous menu. If the input information is incorrect, press
BackSpace soft key to delete it.
Preference
Displays the preference submenus of a user.
z [Do Not Disturb]
Choose this menu to enable or disable the DND function.
z [Ring Tone]
Choose this menu to set different ring tones.
z [Ring Volume]
Press MENU to hear the selected ring volume. Pre ss LEFT or
RIGHT to turn up or turn down the volume.
z [LCD Contrast]
Choose this menu to set the LCD screen contrast.
z [LCD Brightness]
Set the LCD brightness of the IP phone in active and idle
states. The value ranges from 0 to 8.
z [Download SCR XML]
Send a request to the HTTP/TFTP server for downloading a
screen saver to replace the original one. For details on how to
configure this service, see the Huawei IP Phone eSpace
6810&6830&6850&6870 Administrator Manual or contact
the administrator.
z [Erase Custom SCR]
Restore the factory setting for the standby image.
z Display Language
Choose this menu to select the language.
z [Time Settings]
Set the date and time of the IP phone.
Press LEFT or select Back to return to the main menu.
15
Page 21

User Manual 4 Configuring the eSpace 6830
Menu Configuration Description
Config
Display the configuration submenus.
z [SIP]
Set the SIP server for each account, including account, SIP
proxy, Outbound proxy, SIP user ID, SIP Auth ID, SIP
password, SIP transport, and Audio CODECs.
z [Upgrade]
Configure the firmware server and the file download server.
Select either TFTP or HTTP to upgrade the firmware or
configure the phone.
z [Factory Reset]
Type the MAC address on back of the phone. Press OK
softkey to restore the factory reset settings. Factory reset
clears all configurations and restores the phone to factory
settings.
z [Layer 2 QoS]
Configure the 802.1Q VLAN tag and 802.1P priority.
Press LEFT or select Back to return to the main menu.
Factory
Functions
These items are used for factory testing and not r ecomm ended for
users.
z [Audio Loopback]
Speak to the handset. If you hear your voice in the handset,
your audio works well. Press MENU to exit the mode.
z [Diagnostic Mode]
All LEDs are on. Press any key on the keypad to display the
key name on the LCD. Pick up the handset or press MENU to
exit the diagnostic mode.
Press LEFT or select Back to return to the main menu.
Network
Enable or disable the DHCP protocol. Set the IP address, subnet
mask, and gateway address by using the keypad if the static IP
mode is selected.
Reboot Reboot the device.
Exit Exit the menu.
16
Page 22

User Manual 4 Configuring the eSpace 6830
Configuring the Phone Through Web Browser
The Web server embedded in the eSpace 6830 responds to the HTTP, HTTPS GET, or
POST requests. Embedded HTML pages allow a user to configure the IP phone through
any Web browser such as Microsoft Internet Explorer or Mozilla Firefox.
Accessing the Web Configuration Menu
Connect the phone and computer on a reachable network. Do as follows:
Connect the computer to the same hub or switch as the phone is connected to. In
absence of a hub/switch (or free ports on the hub/switch), connect the computer dire ctly
to the phone by using the PC port on the phone. Make sure that the phone is powered on
and displays the IP address.
To access the Web configuration menu of the phone, do as follows:
Step 1
Step 2
Step 3
Start the Web browser on your computer.
Enter the IP address of the phone in the address box of the browser. If the
phone is properly connected to a working Internet. The format of the address
is xxx.xxx.xxx.xxx, in which xxx stands for a number from 0-255. You can use
this number to access the Web configuration menu. For example, if the phone
displays
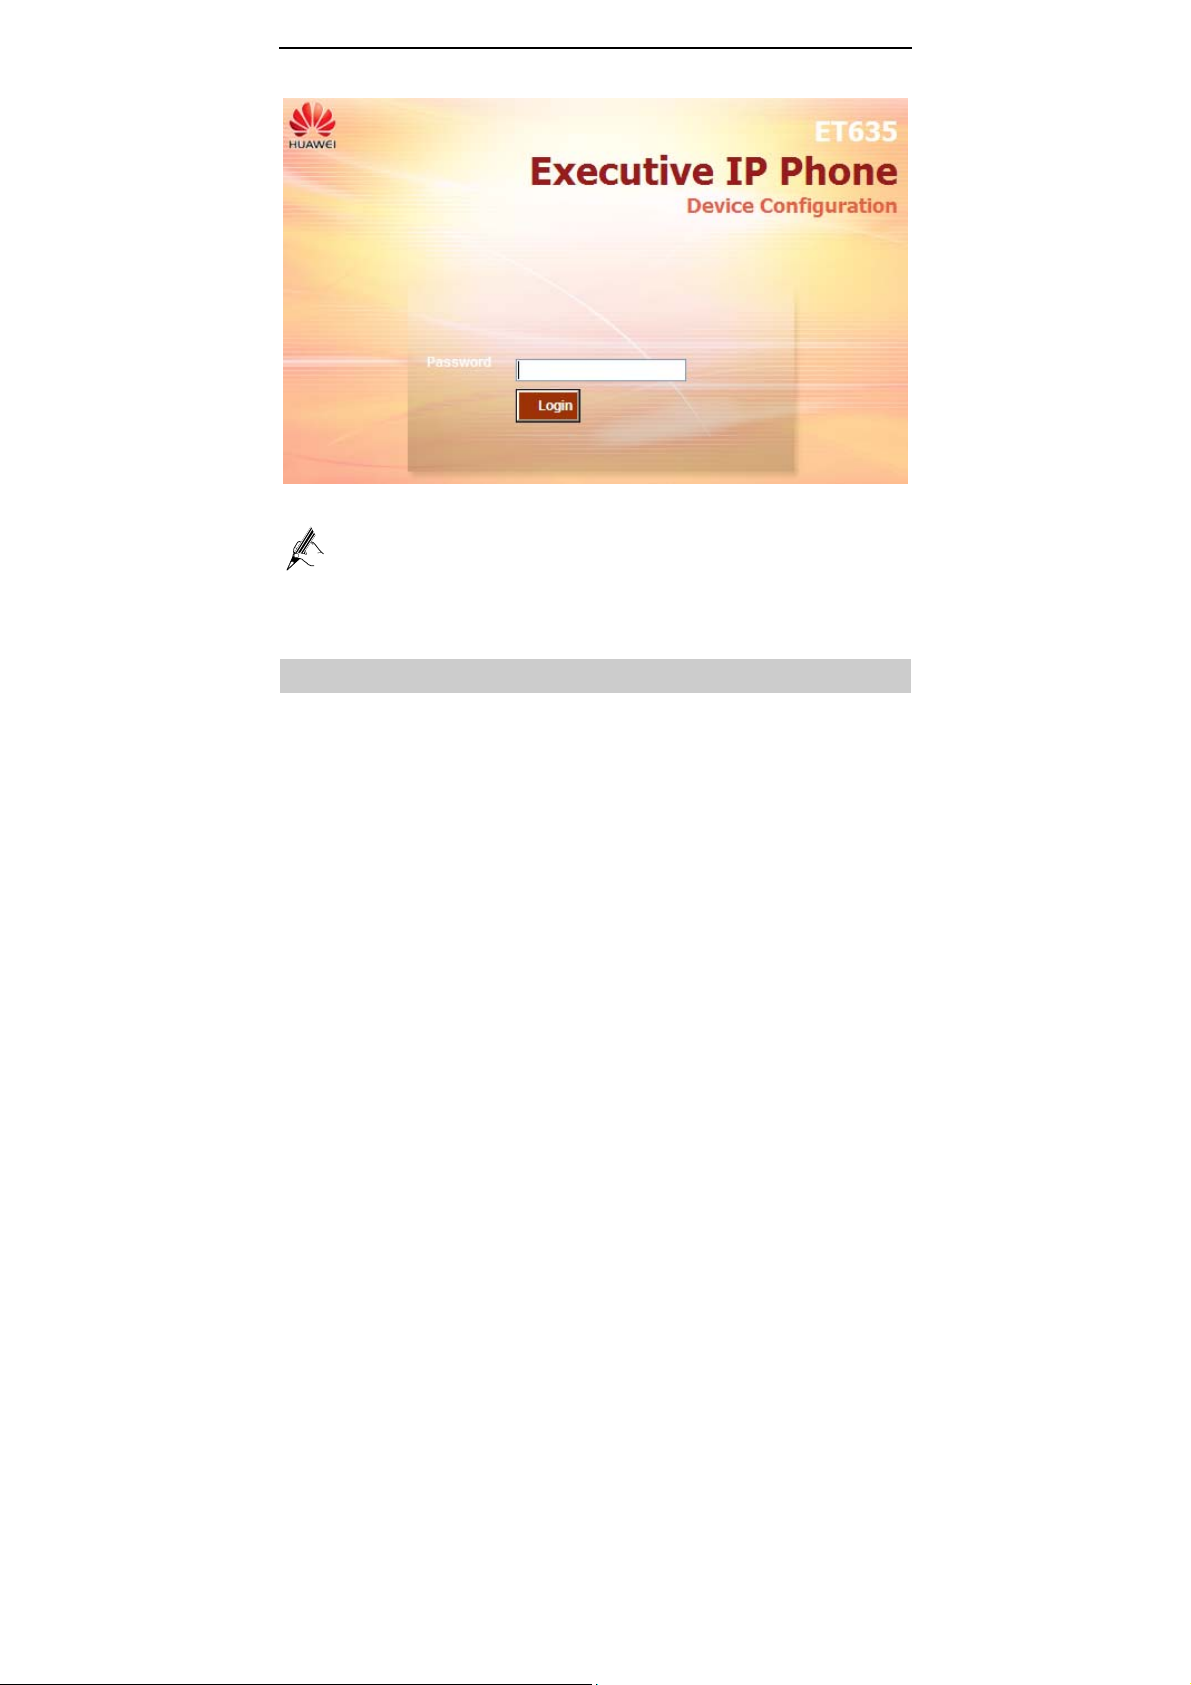
Enter the administrator password(the default password is
the Web configuration menu.
10.10.10.1
, enter
http://10.10.10.1
in the address box of the browser.
.) to access
admin
17
Page 23
User Manual 4 Configuring the eSpace 6830
Figure 4-1 Login page
After changing the settings, click Update on the bottom of the page to save
the change. If you want to change an item after submitting the settin g, click a
tab to access the configuration page. Then click Reboot to reboot the phone,
and all the changes take effect.
Configuration Page
This section describes the options of Status and Basic Settings on the Web
configuration page.
The functions available for the end user are as follows:
z
Status: Display the network status, account status, software version, and MAC
address of the phone.
z
Basic Settings: Basic preferences such as date and time settings.
18
Page 24
User Manual 4 Configuring the eSpace 6830
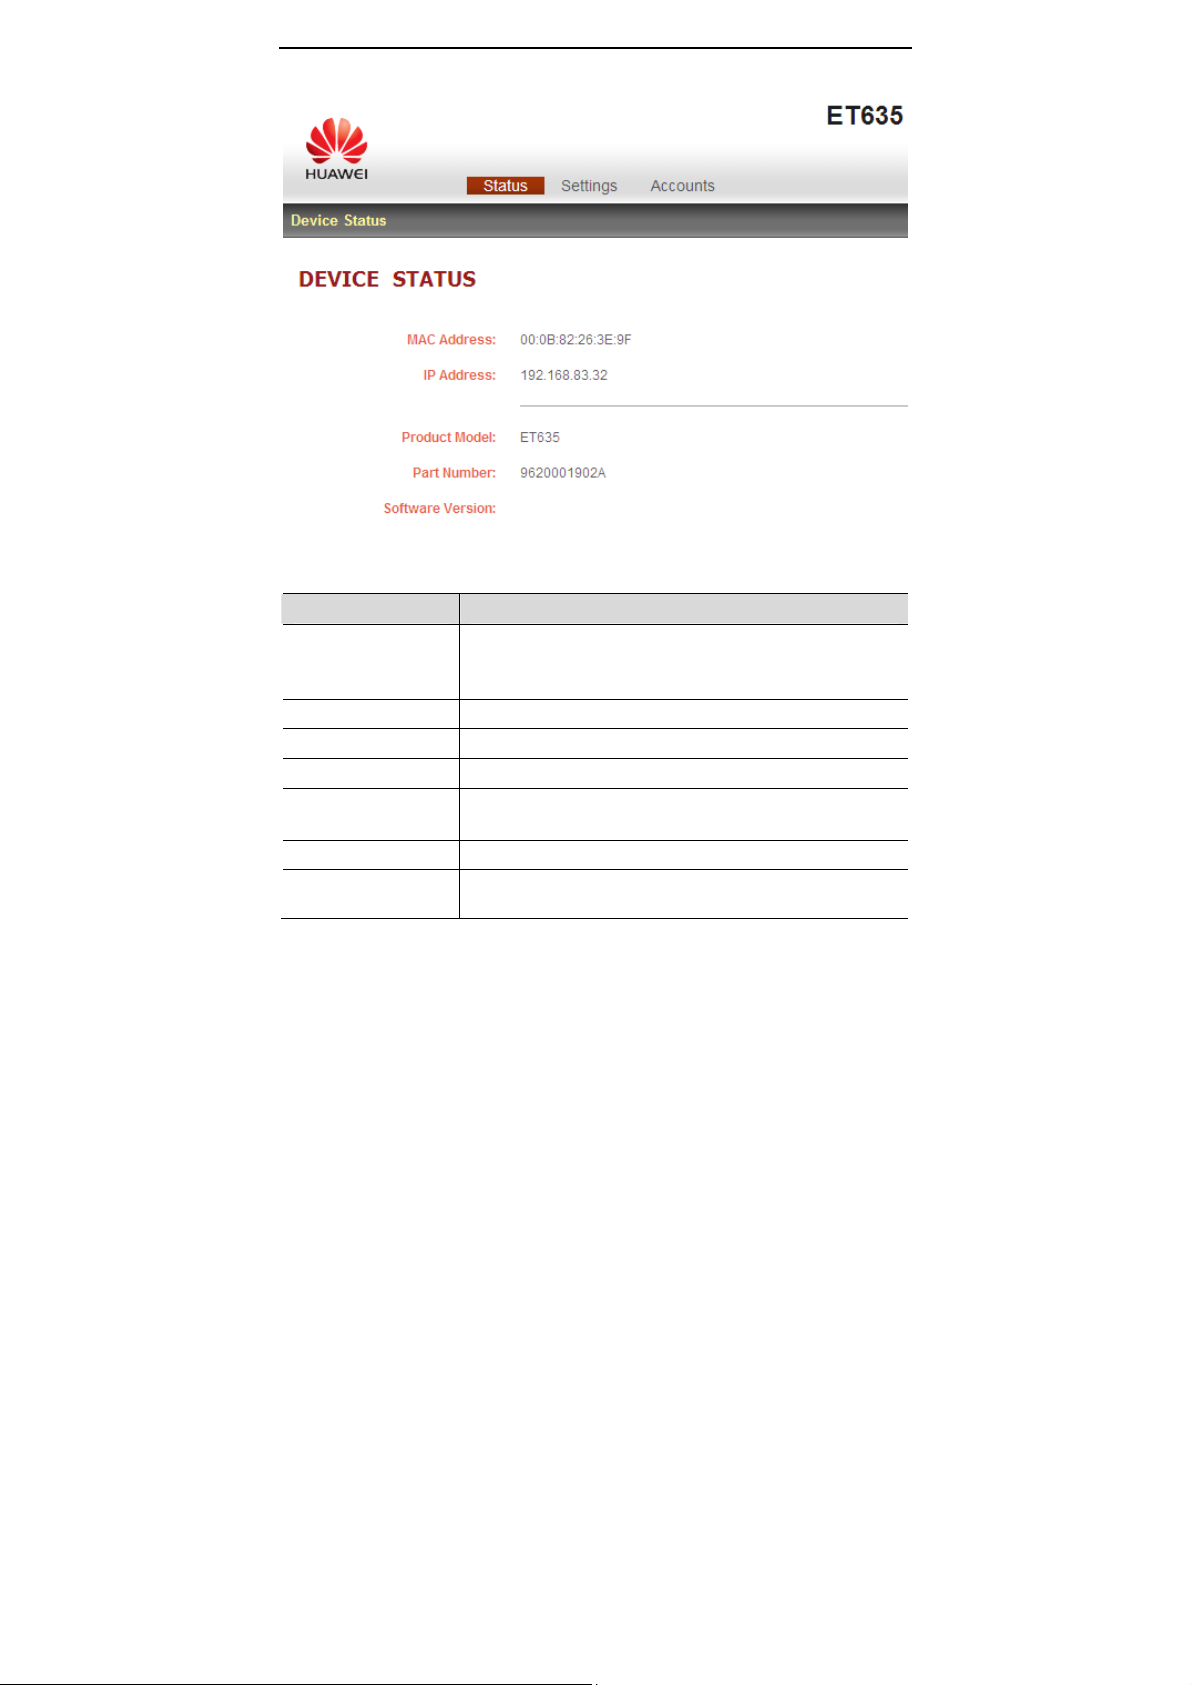
Figure 4-2 Status page
Table 4-2 Device configuration on the Status tab page
Field Description
MAC Address The device ID in the hexadecimal format.
This is an important ID for service provider to solve
problems.
IP Address The IP address of the eSpace 6830.
Part Number The code of a product.
Product Model The product model.
Software Version
Information about the current software version. The value
of prog indicates the main version number.
System Up Time The power-on duration since the last reboot.
System Time The current time of the system.
19
Page 25
User Manual 4 Configuring the eSpace 6830
Field Description
Registered
Whether accounts are registered on the related SIP
server(s).
The eSpace 6830 supports four unique SIP accounts.
PPPoE Link Up
Whether the PPPoE connection is enabled when the phone
is connected to a DSL modem.
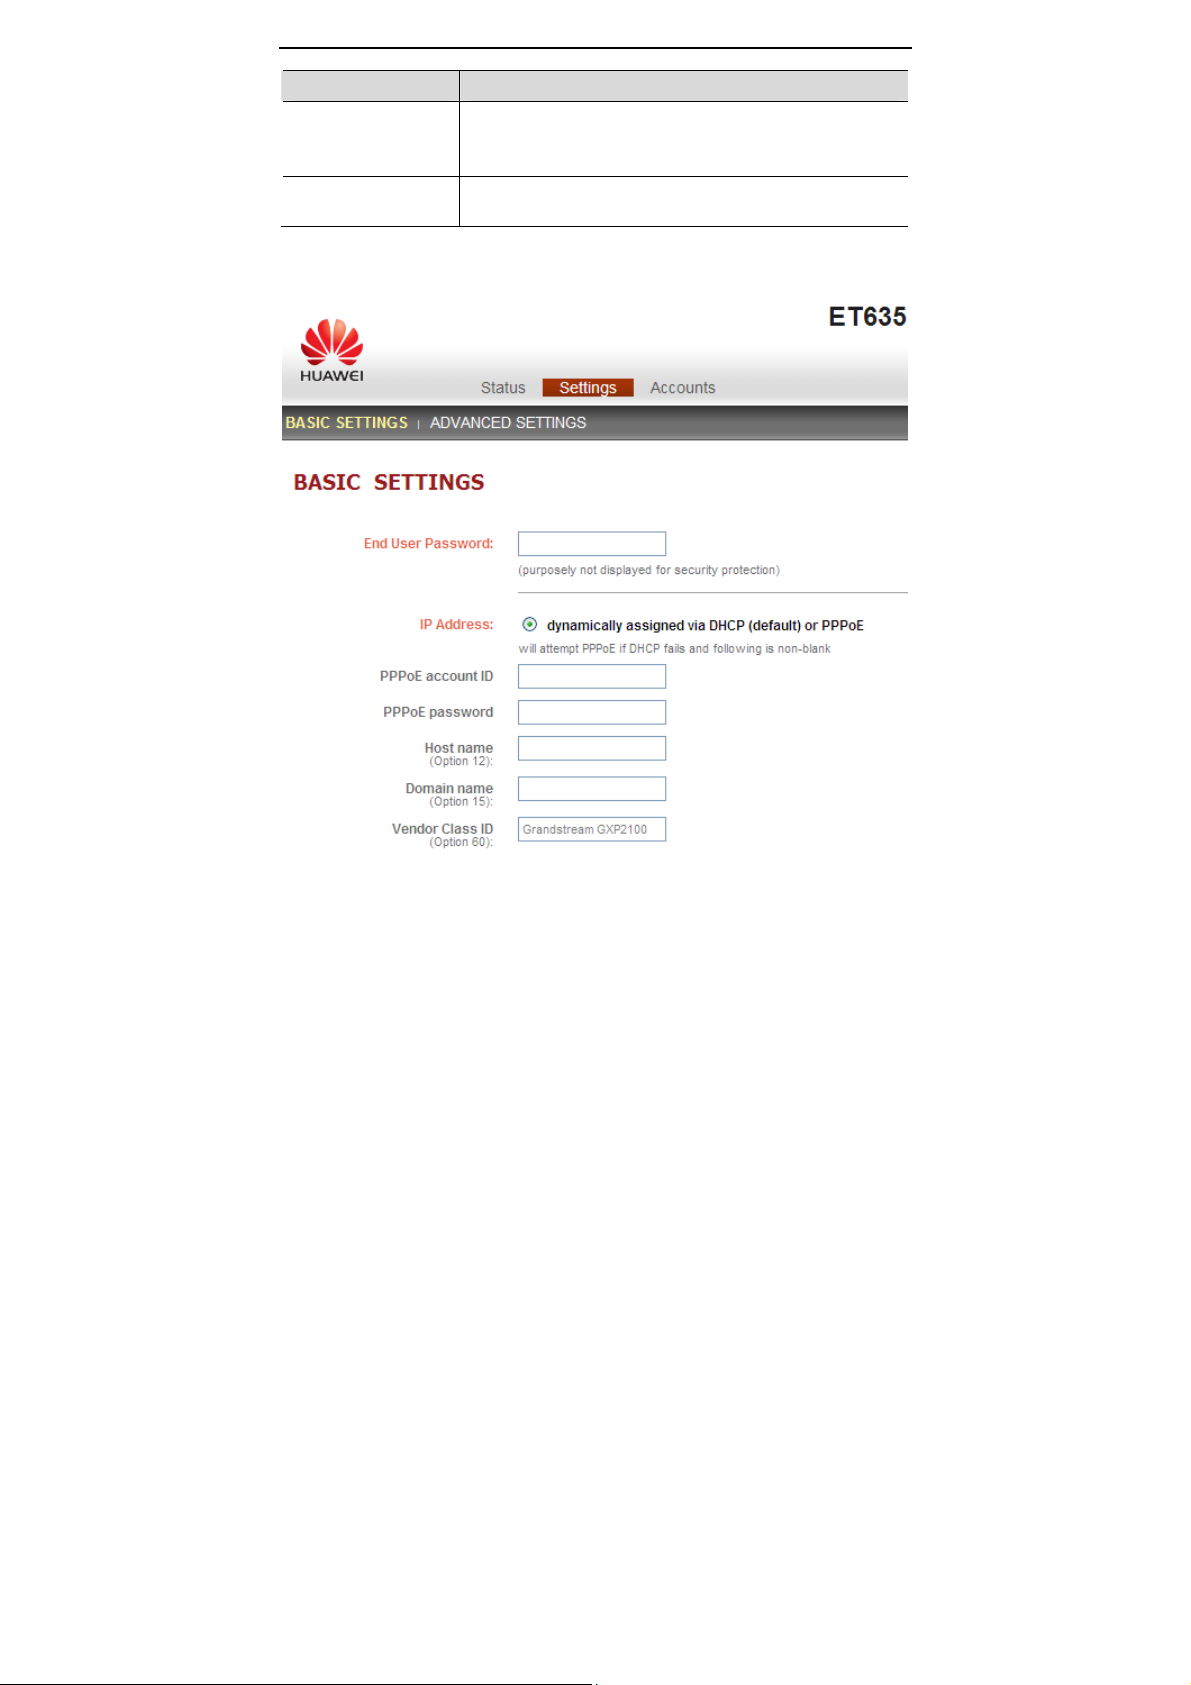
Figure 4-3 Basic setting page
20
Page 26

User Manual 4 Configuring the eSpace 6830
Table 4-3 Description of the basic setting page
Field Description
End User Password
This parameter allows changing the login password of an end
user.
This field is case sensitive with a maximum length of 30
characters.
IP Address The eSpace 6830 operates in two modes:
z DHCP/PPPoE Mode:
All the field values for the static IP mode are not
available even though they are stored in the Flash
memory. The eSpace 6830 acquires its IP address from
the first DHCP server that the eSpace 6830 detects on its
LAN. To use the PPPoE feature, set the PPPoE account.
The eSpace 6830 establishes a PPPoE session if any of
the PPPoE fields are set.
Host Name and Domain Name: The special DHCP
options that are added to the DHCP Discover and DHCP
Request after configuration.
Preferred DNS: The eSpace 6830 uses the DNS server if
Preferred DNS is configured
z Static IP Mode:
Configure all of the following fields: IP address, Subnet
Mask, Gateway, Default Router IP address, DNS
Server 1 (primary), and DNS Server 2 (secondary). The
fields are set to 0 by default except that the IP address is
set to 192.168.0.160 by default.
802.1X mode
This parameter is set to perform the 802.1X authentication
when the IP phone is connected to a switch. You can click
Disable to disable the authentication function, and click
EAP-MD5 to perform the registration authentication.
z Identify
ID used during the 802.1x authentication
z MD5 Password
MD5 password used during the 802.1X authentication
Iine Keys
This parameter is set for specifying function modes of line
keys. By default, the value of Key Mode is Line, which is
used by common lines. If the value of Key Mode is Shared
Line, it indicates that the BroadSoft SCA functions are
enabled and that accounts scattered in various areas can share
the line.
21
Page 27
User Manual 4 Configuring the eSpace 6830
Field Description
Multi-Purpose Keys
Time Zone
LCD Backlight
Brightness
LCD Contrast LCD contrast. The value ranges from 0 to 20.
Time Display
Format
Disable in-call
DTMF display
Disable Missed Call
Backlight
HEADSET Key
Mode
The optional values are Speed Dial, Busy Lamp
Field(BLF), Presence Watacher, eventlist BLF, Speed
Dail via active acc o unt, and Dial DTMF.
Each key corresponds to an account, that is, a user number is
set for each key.
This parameter controls the date and time display according
to the specified time zone. If the DHCP Option 2 is enab led,
the DHCP server overrides and centrally controls the setting
of Time Zone in the phone. The feature functions on the
phone only when you set the NTP server correctly.
This parameter is set for adjusting the LCD brightness of the
IP phone in active and idle states. The value ranges from 0 to
8.
The LCD time is displayed in 12-hour or 24-hour format.
The default value is No. If the parameter is set to Yes, the
DTMF digits that are pressed during the call will not be
displayed on the LCD for security reasons.
The default value is No. By default, the LCD backlight is on
when a missed call exists.
Select default answering or dialing mode as the headset
mode. When selecting a default mode, press HEADSET to
enter the headset dialing status. If you press HEADSET
when setting Toggle Headset/Speaker, the headset icon is
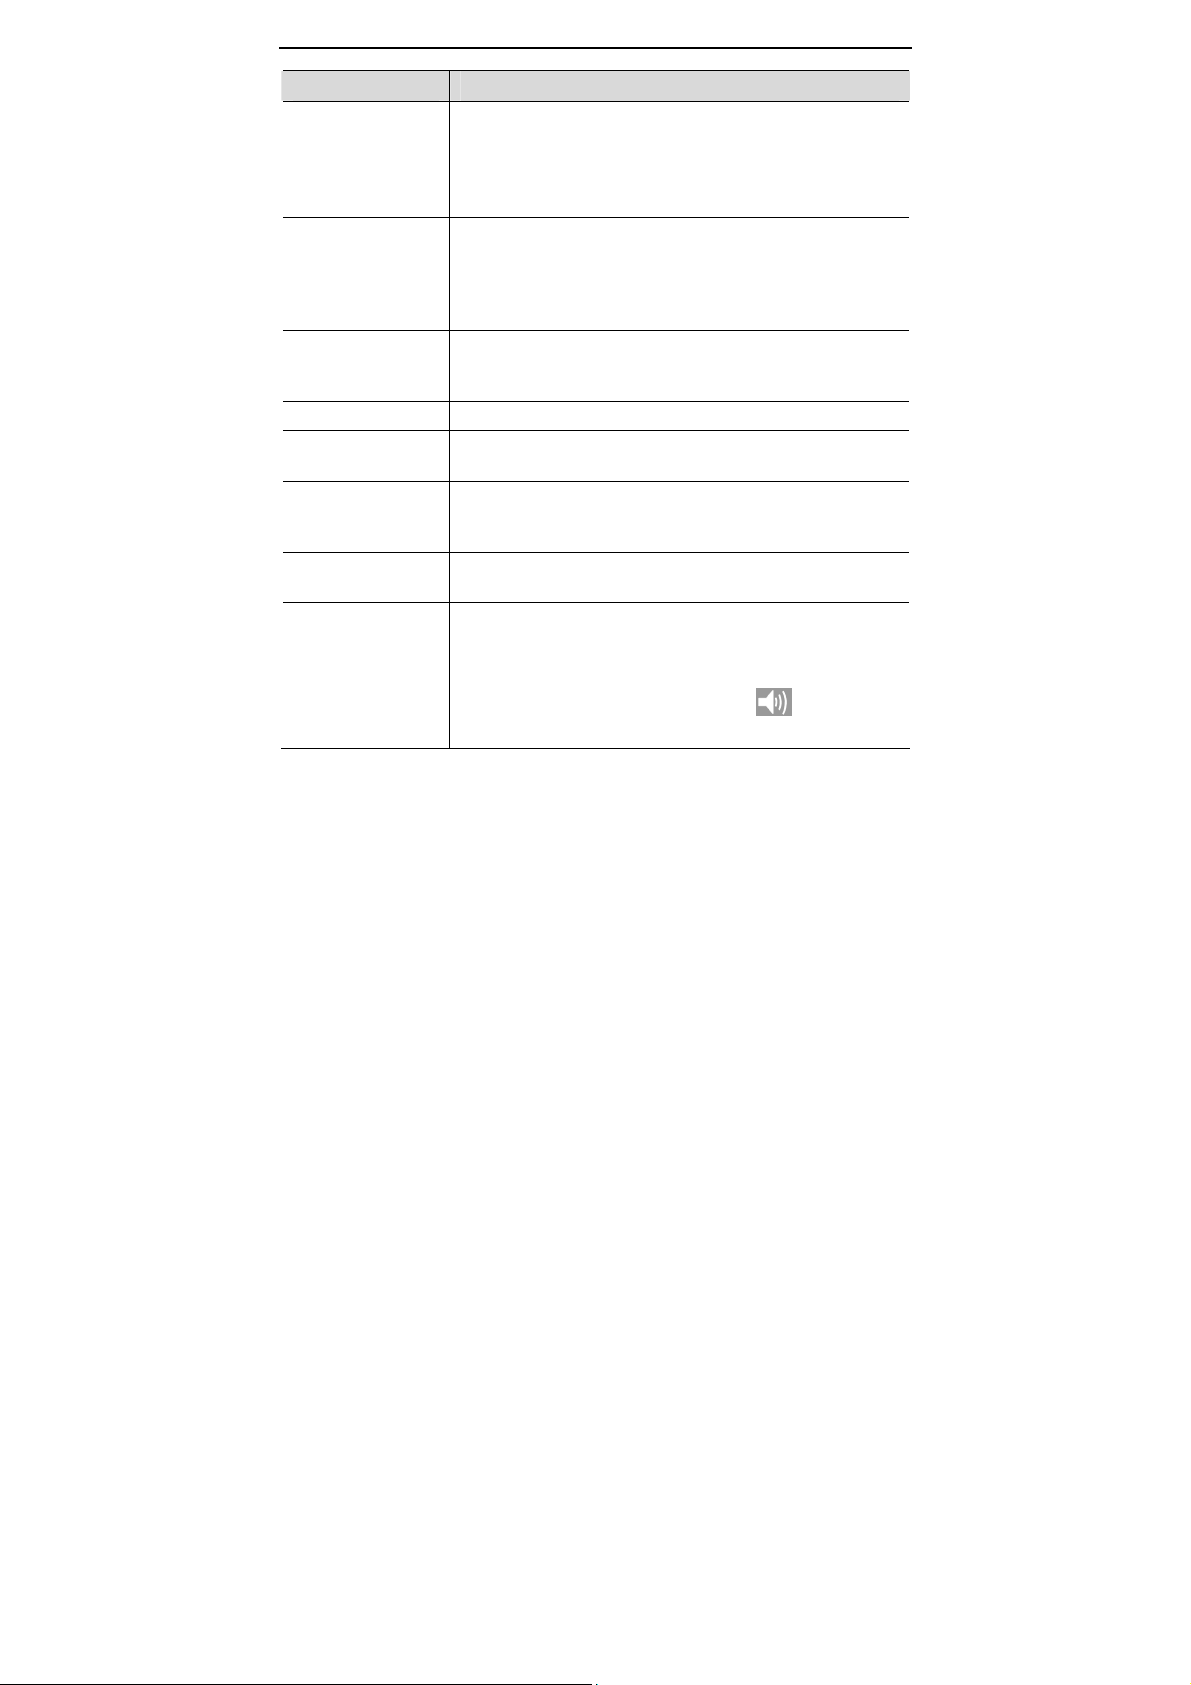
displayed on the LCD. In this case, press
a call or answer a call in Headset mode.
, you can make
Saving the Configuration Changes
After changing the settings, click Update on the bottom of the p age to s ave th e change.
If you want to change an item after submitting the setting, click a tab to access the
configuration page. Then click Reboot to reboot the phone, and all the changes take
effect.
22
Page 28

User Manual 4 Configuring the eSpace 6830
Rebooting the eSpace 6830 Remotely
Click Reboot in the configuration menu to reboot the eSpace 6830 remotely. Wait 60
seconds to log in again.
23
Page 29
User Manual 5 Using the eSpace 6830
5 Using the eSpace 6830
Getting to Know the Keyboard
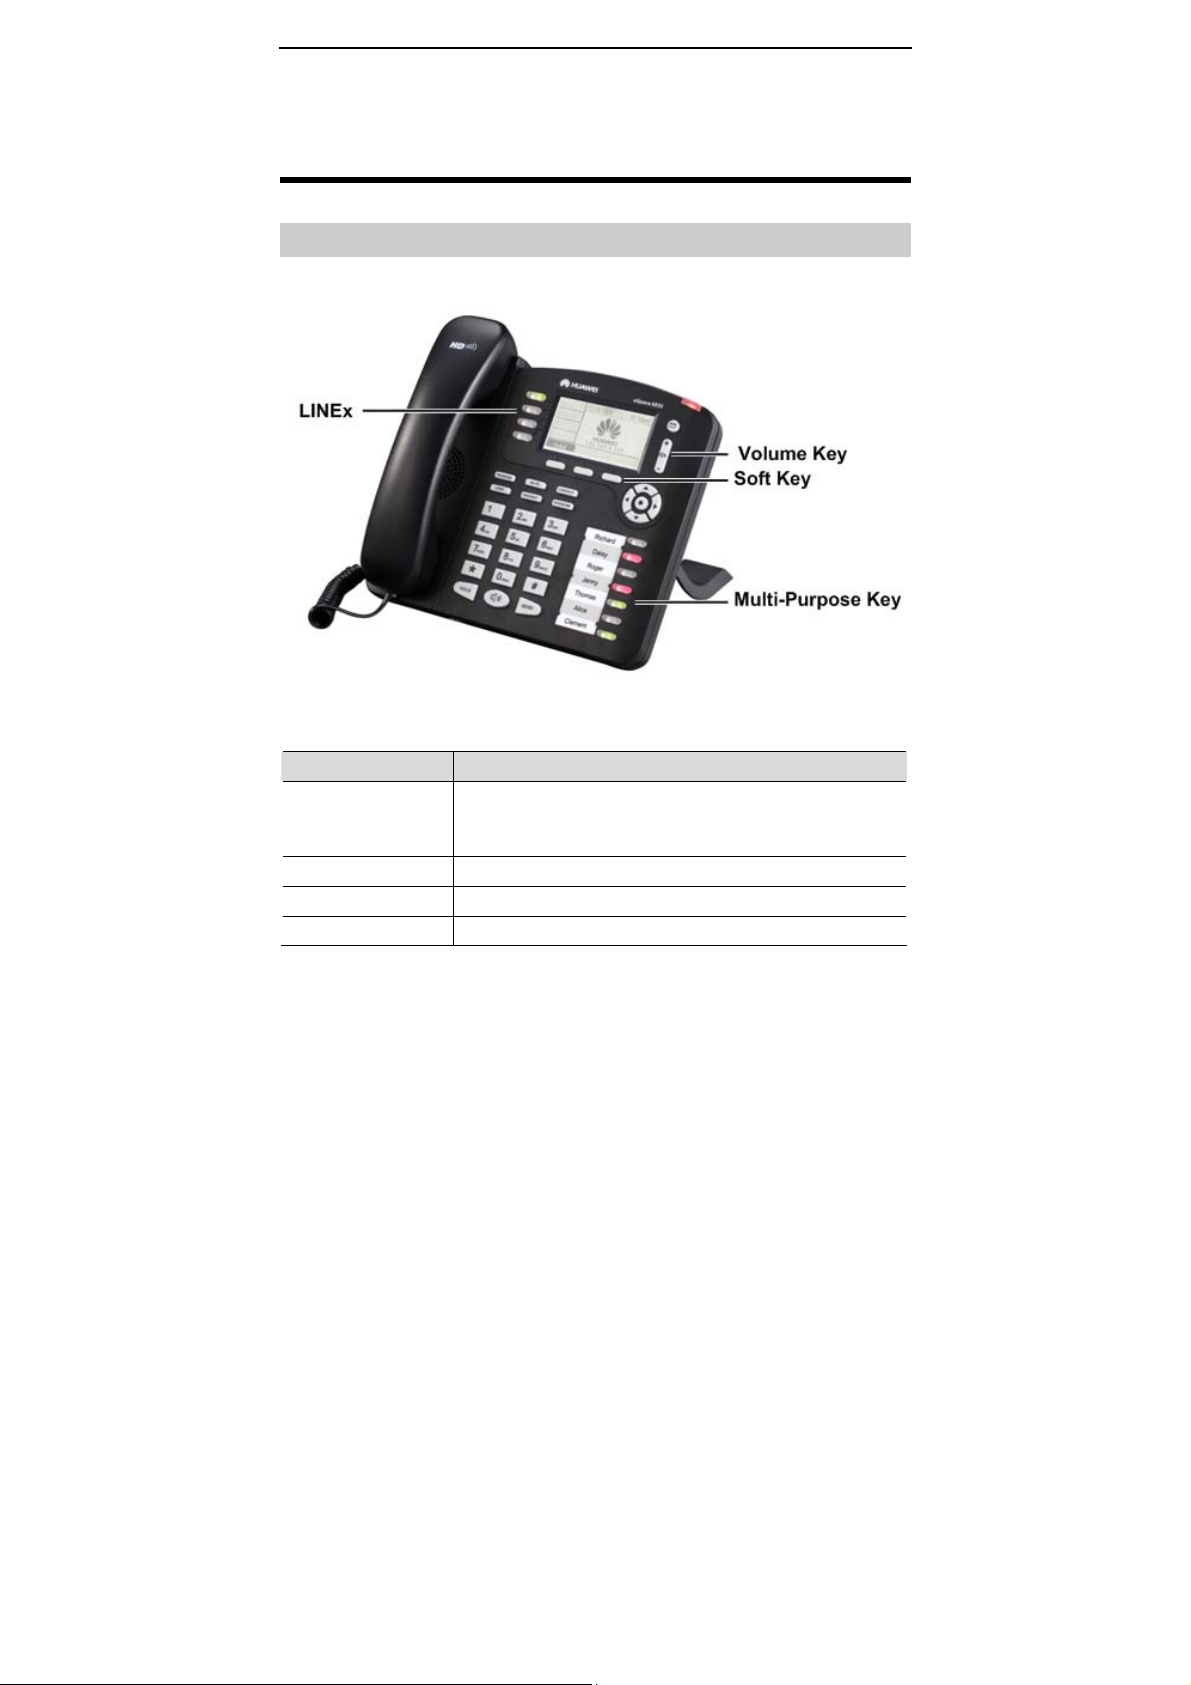
Figure 5-1 Getting to know the keypad
Table 5-1 eSpace 6830 keypad
Key Description
LINEx
TRANSFER Transfer the current call to another number.
CONF Set up a three-party conference call for the caller and callee.
MUTE Mute the call (the other party cannot hear your voice).
z Four line keys with dual-color LED indicator lights.
Each line key supports an independent SIP account.
z The four line keys provide the hands-free feature.
24
Page 30
User Manual 5 Using the eSpace 6830
Key Description
INTERCOM
Initiate a call to the specified INTERCOM number. The c all
is answered automatically.
HOLD
Hold the current call, and press the corresponding LINE key
to resume the call.
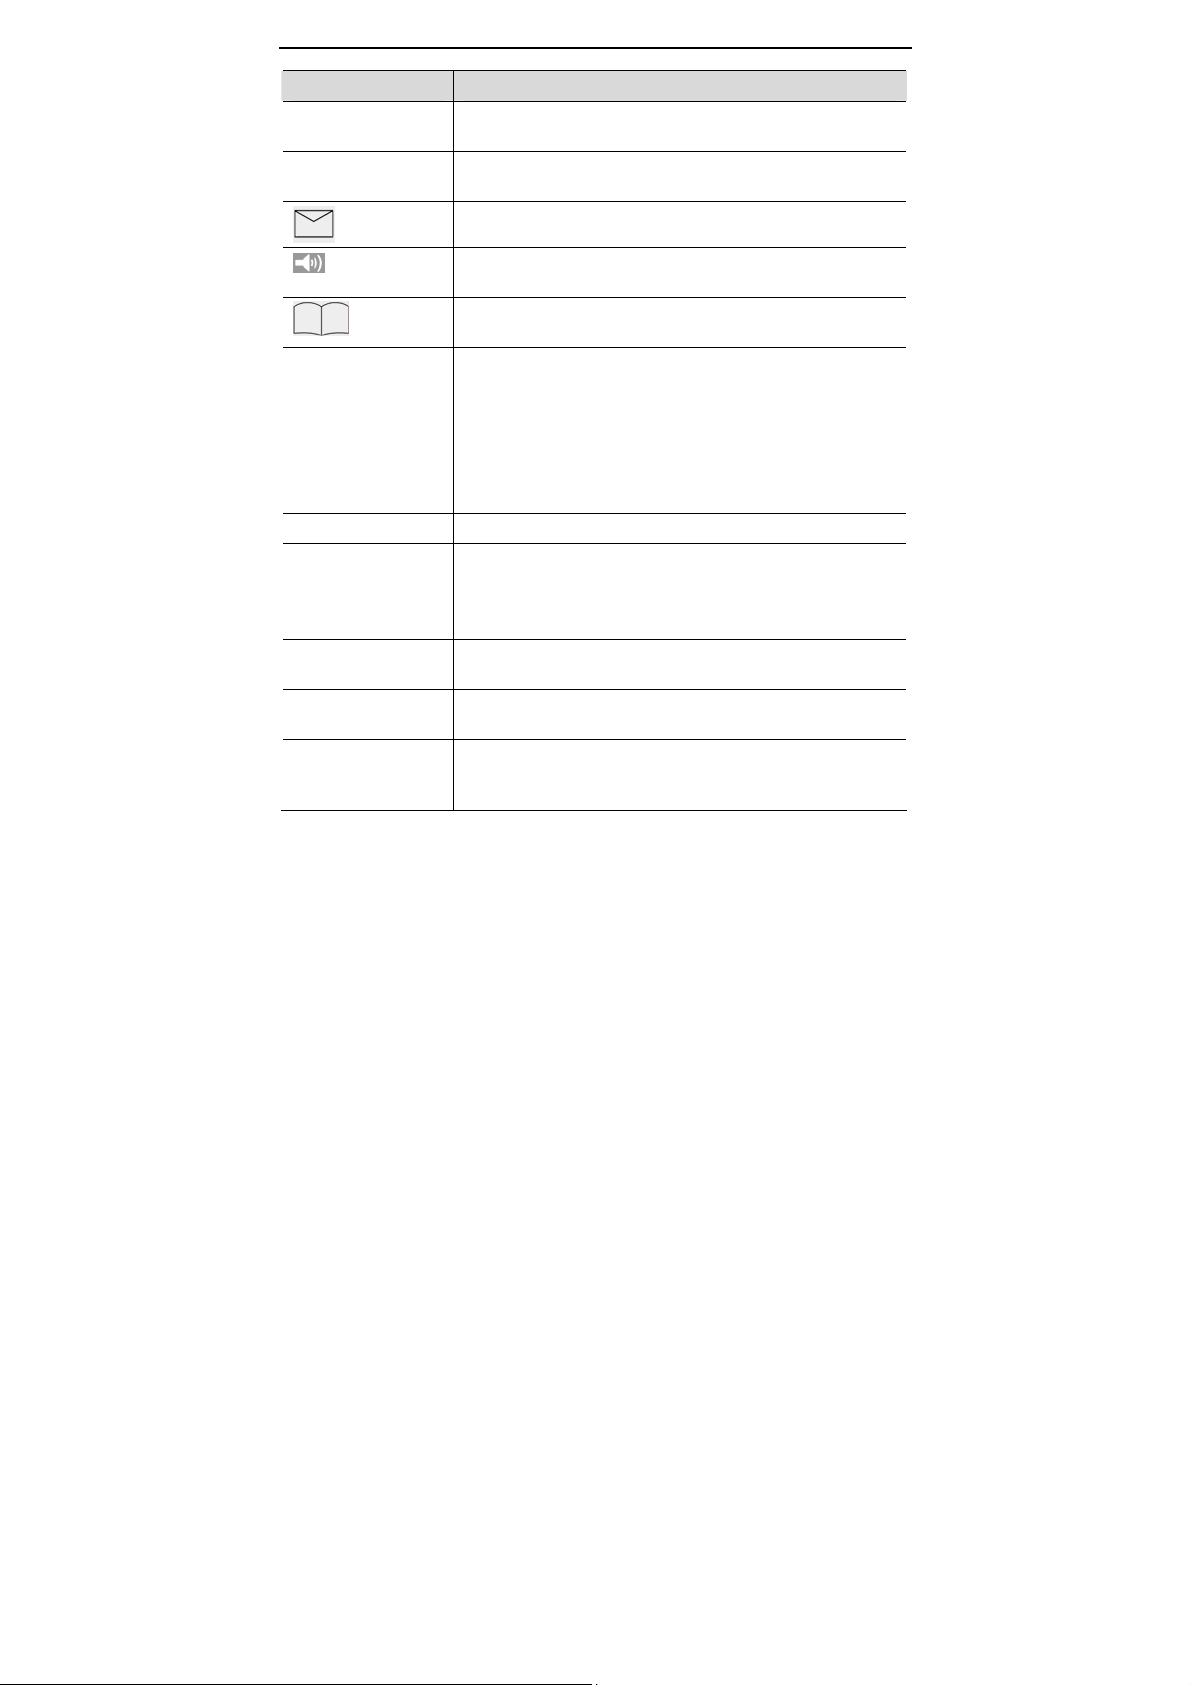
Press the key to receive voice mails or other messages.
Press the key to enter the hands-free mode. Press it again to
exit the hands-free mode.
Press the key to display the phone book and associated
SEND
items.
Press the key to send a call after you have dialed phone
numbers.
Note:
If you do not press SEND, the number will be sent after a
pre-configured time delay.
After the phone is off-hook, press the key to redial the last
dialed number.
HEADSET Dial or answer with the headset.
MENU
z Enter the keypad configuration MENU mode when the
phone is in idle mode.
z Use as MENU key to confirm the operation during
keypad configuration.
<0>–<9>,<*>, and
<#>
Soft keys 1-4
Standard phone pad: 10 digits, the corresponding 26
alphanumeric letters, and special characters.
XML soft keys, which can provide different functions, such
as BackSpace and Cancel.
Multi-Purpose Keys
Implement functions of Speed Dial, Busy Lamp Field,
Presence Watacher, and Eventlist BLF. You can also
configure other functions on the Web page.
25
Page 31

User Manual 5 Using the eSpace 6830
The operation of pressing SEND is effective only in the specified dialing
time
Instructions of Using the Phone
Handset, Speakerphone, and Headset Modes
You can switch the modes among handset, speakerphone, and headset.
z
To switch between the handset and speakerphone modes, press SPEAKER, that is,
.
z
To switch between the handset and headset modes, press HEADSET.
z
To switch between the speakerphone and headset modes, press HEADSET or
SPEAKER, that is,
Multiple SIP Accounts and Lines
The eSpace 6830 supports four independent SIP accounts. Each SIP account matches
with a SIP server, users, and NAT. Each of the four line keys matches with one SIP
account. In off-hook state, when you press the corresponding LINE key or continuously
press the same LINE key, the phone will switch among the four accounts. If the name of
an account is configured, then the name is displayed on the LCD.
For example, set the account name of the two SIP accounts as VoIP 1 and VoIP 2.
Ensure that each account is activated and registered. When LINE1 is pressed, you will
hear a dial tone and see "VoIP 1" on the LCD. When LINE2 is pressed, you will hear a
dial tone and see "VoIP 2" on the LCD. When LINE1 is pressed, the LCD displays
"VoIP 1." If LINE1 is pressed twice continuously(The setting of LINE1 and LINE2 are
the same), the LCD displays "VoIP 2" and it indicates that the SIP account 2 VoIP 2 is
used.
z To make a call, select the line you wish to us e. You can switch lines before dialing
any number.
z When the phone is idle, press the corresponding key to answer the incoming call
that is designated to an account.
z If the line is occupied, the LED of the next available LINE key blinks to remind
you of an incoming call. This feature should be supported by the SIP server.
.
Making a Call
Dialing
26
Page 32

User Manual 5 Using the eSpace 6830
You can use headset and handset or press
Step 1
Pick up the handset; or press
to make a phone call.
, or enable the headset. Or press a LINEx
key to activate the speakerphone. The corresponding LED is on.
Step 2
Hear a dial tone. The LED light of the first line (LINE1) LED is on. You can
also select another SIP account by pressing the corresponding LINE key.
Step 3
Enter the phone number and press
SEND or Dial
soft key.
Redialing
You can press SEND or the Redial soft key to redial the last dialed phone number. For
the redialed number, the phone will use the same SIP account for dialing the last p hone
number.
Dialing Through the Call History
Call a phone number from the phone’s call history. When you dial a call from the
history, the phone uses the same SIP account that is used for this call last time.
Step 1
Step 2
Step 3
Step 4
Press
Select
Select
Forwarded Calls
to access the main menu.
MENU
Call History
and press
MENU
to confirm.
Answered Calls, Dialed Calls, Missed Calls,Transferred Calls or
depending on your requirements and press
confirm.
Select a phone number by using arrow keys and press
number.
MENU
soft key to dial the
Dial
to
Dialing Through the Phone Book
You can call a number through the phone book.
Each entry in the phone book can be assigned with an individual SIP account. The
phone uses the SIP account to make a phone call.
Step 1
Step 2
Step 3
Access the phone book by:
z Pressing DOWN.
z Pressing .
z Pressing MENU. Then select Phone book and press MENU.
Select a phone number by using arrow keys and press
Select
Dial
and press
to dial the number.
MENU
MENU
27
to confirm.
Page 33

User Manual 5 Using the eSpace 6830
Making a Call by Using an IP Address
Direct IP calls allow two phones to talk to each other in a special way without a SIP
proxy. VoIP calls can be made between two phones when:
z
Both phones have public IP addresses.
z
Both phones obtain the private or public IP addresses on the same LAN or VPN
network.
z
Both phones can be connected through a router by using public or private IP
addresses (with a valid port or DMZ).
All the necessary ports on the two phones must be enabled.
To make a direct IP call, do as follows:
Step 1
Step 2
Step 3
Step 4
Step 5
Press
Select
Press
Type the destination IP address.
Press the
to access the main menu.
MENU
Direct IP Cal
MENU
OK
l by using the UP and
to confirm.
soft key to initiate a call.
DOWN
keys.
For example, if the destination IP address is 10.10.10.1, type 10*10*10*1. The * key
represents the dot.
Quick IP Call Mode
Dial an IP address in the same LAN or VPN network by typing the last octet of the IP
address. This simulates a PBX function using the CMSA or CD without a SIP server. In
this mode, the controlled static IP address is recommended.
On the Advanced Settings page, set Use Quick IP-call Mode to Yes. When #xxx is
dialed (The range of x is 0–9 and xxx cannot be larger than 255.), a direct IP call is
initiated as aaa.bbb.ccc.XXX. aaa.bbb.ccc is the local IP address regardless of the
subnet mask. The numbers #xx or #x are also valid.
The following is an example.
z
0.10.10.2 calls 10.10.10.3 — dial #3, followed by SEND.
To call 10.10.10.3, 192.168.0.2 can dial #3; #03; or #003.
z
10.10.10.2 calls 10.10.10.23 –– dial #23, followed by SEND.
z
10.10.10.2 calls 10.10.10.123 –– dial #123, followed by SEND.
28
Page 34

User Manual 5 Using the eSpace 6830
If the SIP server is configured, a direct IP-IP call still works. If you use the
STUN, the direct IP-IP call also uses the STUN. Set Use Random Port to
No when completing direct IP calls.
Answering a Call
z
An incoming call: The phone rings. The corresponding account LINEx blinks. Pick
up the handset, press
answer the call.
z
Multiple incoming calls: The call waiting tone is played. The next available line
will blink in red. Answer an incoming call by pressing the LINEx key.
, enable the headset, or press the blinking LINEx key to
Do-Not-Disturb
To block all incoming calls, you can enable the Do-Not-Disturb (DND) function. The
phone will not ring when an incoming call comes.
Method 1: When the phone is in idle mode, press DND to enable the DND function and
press DND again to disable the DND function.
Method 2: Toggle the DND function as follows:
Step 1
Step 2
Step 3
Step 4
Press
MENU
Select
Preference
Select
Do Not Disturb
Select
Enable DND
.
by pressing the arrow keys, and then press
by pressing the arrow keys and press
or
Disable DND
and press
MENU
.
MENU
MENU
.
.
Call Waiting/Call Holding
z
Hold: Keep a call on hold by pressing HOLD.
z
Resume: Resume the call by pressing the corresponding LINEx key with a blinking
LED.
z
Multiple calls: Automatically keep an active call on hold by selecting another
available LINEx key or answering another call. If an incoming call comes when all
lines are in use, the call waiting tone (discontinuous tone) is displayed.
Muting
To enable or disable the muting function during a call, press MUTE. Then "LINEx:
MUTE" is displayed on the LCD for the muted call.
Call Transfer
The eSpace 6830 supports both blind and attended (or supervised) transfer:
29
Page 35

User Manual 5 Using the eSpace 6830
Blind transfer:
Step 1
Step 2
Step 3
Pick up the handset; press
to establish a conversation.
Press
TRANSFER
Dial the number of a third party and press
for a dial tone.
, or enable the headset by pressing
to transfer the active call.
SEND
HEADSET
Attended (or supervised) transfer:
To transfer calls by one account, the other one must be unoccupied.
Step 1
Step 2
Step 3
Step 4
Pick up the handset; press
to establish a conversation.
Press another available LINE key for a dial tone.
Dial the number of a third party and press
If the call is established, press
the transfer is finished.
z If the call is not established, press the previous LINE key to return to the
previous conversation.
z If the call is canceled and terminated before the call of the third party is
connected, the eSpace 6830 rings, indicating that a call is held.
To transfer calls across different SIP domains, the VoIP service providers
must support this feature.
, or enable the headset by pressing
.
SEND
TRANSFER
and select the previous LINE key,
HEADSET
Three-Way Conference Call
eSpace 6830 can host conference calls and support three-way conference calls.
Initiating a Conference Call
Step 1
Step 2
Step 3
Pick up the handset, press
to establish a call.
Press another available LINE key to wait for the dial tone. Dial the phone
number of the third party and press
to initiate a three-way conference call. If the call is not established,
CONF
press LINEx key to resume the previous call.
Press the previous LINE key to enable the call to join the conference.
, or enable the headset by pressing
. If the call is established, press
SEND
30
HEADSET
Page 36

User Manual 5 Using the eSpace 6830
Ending a Conference Call
Press HOLD to pause the conference call and put all parties on hold. If you want to
speak to an individual party, select the corresponding blinking LINEx key.
If the caller hangs up, the other two parties hang up automatically and the conference
ends. If either the second party or the third party h angs up, the r est two par ties estab lish
the two-way conversation.
If both the second party and the third party hang up, the caller will hang up
automatically. In this case, the conference ends.
Voice Messages
A blinking red message waiting indicator (MWI) indicates a message is waiting. This
function takes effective only when the Subscribe for MWI field is set to Yes. The
default value is No. Press the
response (IVR) system prompts the user to retrieve the message. Press a specific LINEx
to retrieve messages for a specific line account.
Each line has a separate voice mail account. Each account requires a
voice mail portal number to be configured through the Voice Mail User
ID field.
The ways to check voice messages are as follows:
z
Press to check the voice message of the primary account.
z
Check each line for waiting tone (discontinuous).
key to retrieve the message. The interactive voice
Manager and Secretary Function
After a line of the manager's phone is bound to a line of the secretary's phone, all calls
to the manager will be connected to the secretary's phone at the same time. The
secretary determines whether to transfer the call to the manager.
Assume that manager A's phone has two lines. LINE 1 is bound to LINE 1 of
secretary B's phone, and LINE 2 is a private line. The following describes the
manager and secretary function's process.
31
Page 37

User Manual 5 Using the eSpace 6830
For details on how to configure the manager and secretary service, see the
Huawei IP Phone eSpace 6810&6830&6850&6870 Administrator
Manual or contact the administrator.
Step 1
Customer C calls manager A.
The phone of secretary B rings. The LINE 1 indicator on both manager A's
phone and secretary B's phone blinks.
Step 2
Step 3
Secretary B presses the
Secretary B presses the soft key
LINE1
key and answers the call.
SeizeLine
soft key and enters the number of
the manager A's private line to call manager A.
The call between secretary B and customer C is held.
Step 4
Step 5
Manager A presses the
Manager A presses the
key and answers the call from secretary B.
LINE2
key and talks with customer C.
LINE1
The call between manager A and secretary B is held. If secretary B hangs up,
the call ends.
Step 6
Manager A or customer C hangs up.
The call ends, and the LINE 1 indicator is off.
z eSpace 6830 allows one manager's phone to be bound to a maximum of
two secretaries' phones, and one secretary's phone to be bound to a
maximum of four managers' phones.
z If two secretaries serve a manager, only one secretary answers the call
and transfers it to the manager.
BLF Function
After the BLF function is enabled for eSpace 6830, you can press the corresponding
DSS key to check the status of the monitored phone. You can press this key to directly
make a call to the specified number.
For details on how to configure the BLF service, see the Huawei IP Phone
eSpace 6810&6830&6850&6870 Administrator Manual or contact the
administrator.
A user assigns the BLF function to a DSS key on phone A, and configures phone B as
the monitored phone. The mapping between the phone B status and the BLF key on
phone A is as follows:
32
Page 38

User Manual 5 Using the eSpace 6830
z
When phone B is idle, the BLF key is steady green.
z
When phone B is ringing, the BLF key is blinking red.
z
When phone B is in a conversation, the BLF key is steady on.
z
When phone A failed to detect the phone B status, the BLF key is off.
33
Page 39

User Manual 6 Restoring Factory Default Settings
6 Restoring Factory Default Settings
Restoring the factory default settings can clear all configuration information
about the eSpace 6830. Back up or print all the settings before you restore
factory default settings. Huawei is not responsible for parameter loss or
failier to connect to your VoIP service provider due to the operation of
restoring the factory default settings.
To restore the factory default settings, do as follows:
Step 1
Step 2
For example, if the MAC address is 0018820E3956, type 00188203333956. The LCD
displays the entered MAC address 0018820E3956.
Press
Press
Table 4-1.
Type the MAC address that is printed on the bottom of the sticker by using the
following rules:
z 0–9: 0–9
z A: 22 (Press the 2 key twice and A is displayed on the LCD.)
z B: 222
z C: 2222
z D: 33 (Press the 3 key twice and D is displayed on the LCD.)
z E: 333
z F: 3333
to access the keypad configuration UI menu, and select
MENU
to access submenus, and select
MENU
Factory Reset
Config
. For details, see
.
Step 3
If digits are duplicate in the MAC address, for example, 22, you need to
press RIGHT to move the cursor or wait for four seconds for typing
another 2.
Press the OK soft key.
34
Page 40

User Manual 7 FAQs
7 FAQs
Question: What codecs are supported by the eSpace 6830?
Answer:The eSpace 6830 supports a wide range of codecs: G711 a/µ, G729, G723.1,
G726-32k, G722 (broadband), GSM, and iLBC.
Question: How many VoIP accounts are supported on the eSpace 6830?
Answer:The eSpace 6830 IP phone supports four different SIP (VoIP) accounts.
These accounts can be on the same server or different servers of different service
providers.
Question: How to reject an incoming call?
Answer:Press Reject softkey when receiving an incoming call or press DND to
enable the DND function when the phone is idle. The call is rejected and forwarded to
your voice mailbox if you configure the voice mailbox.
Compliance
This device complies with part 15 of the FCC Rules. Operation is
subject to the following two conditions:
(1) This device may not cause harmful interference, and (2) this
device must accept any interference received, including
interference that may cause undesired operation.
Any Changes or modifications not expressly approved by the party
responsible for compliance could void the user's authority to operate
the equipment.
35
Page 41

User Manual 7 FAQs
FCC 15.105 Class B
(b) For a Class B digital device or peripheral, the instructions fu rnished
the user shall include the following or similar statement, placed in a
prominent location in the text of the manual:
Note: This equipment has been tested and found to comply with the
limits for a Class B digital device, pursuant to part 15 of the FCC Rules.
These limits are designed to provide reasonable protection against
harmful interference in a residential installation. This equipment
generates, uses and can radiate radio frequency energy and, if not
installed and used in accordance with the instructions, may cause
harmful interference to radio communications. However, there is no
guarantee that interference will not occur in a particular installation. If
this equipment does cause harmful interference to radio or television
reception, which can be determined by turning the equipment off and
on, the user is encouraged to try to correct the interference by one or
more of the following measures:
—Reorient or relocate the receiving antenna.
—Increase the separation between the equipment and receiver.
—Connect the equipment into an outlet on a circuit different from
that to which the receiver is connected.
—Consult the dealer or an experienced radio/TV technician for
help.
36
Page 42

HUAWEI TECHNOLOGIES CO., LTD.
Huawei Industrial Base
Bantian, Longgang
Shenzhen 518129
People's Republic of China
www.huawei.com
 Loading...