

Page 1

Copyright © 2007 Huawei Technologies Co., Ltd.
All Rights Reserved
No part of this document may be reproduced or transmitted in any form or by any means without
prior written consent of Huawei Technologies Co., Ltd.
Trademarks and Permissions
and other Huawei trademarks are trademarks of Huawei Technologies Co., Ltd.
All other trademarks and trade names mentioned in this document are the property of their
respective holders.
Notice
The information in this document is subject to change without notice. Every effort has been made in
the preparation of this document to ensure accuracy of the contents, but all statements,
information, and recommendations in this document do not constitute the warranty of any kind,
express or implied.
i
Page 2

Table of Contents
What Is in Your Package................................................................................. 1
Getting to Know Your E169 ...........................................................................2
Preparation ....................................................................................................4
Installation/Removal Guide ............................................................................. 5
Warnings and Precautions.............................................................................. 7
Acronyms and Abbreviations........................................................................ 13
ii
Page 3

Thank you for choosing Huawei E169 HSDPA USB Stick
(hereinafter referred to as the E169). With the E169, you can
access the Internet through wireless network at a high speed.
Note: This manual describes the appearance, installation and removal of the E169. For the
operation of the management program, refer to the User Manual.
What Is in Your Package
The package of your E169 contains the following items:
One E169
One Quick Start
One USB cable
1
Page 4
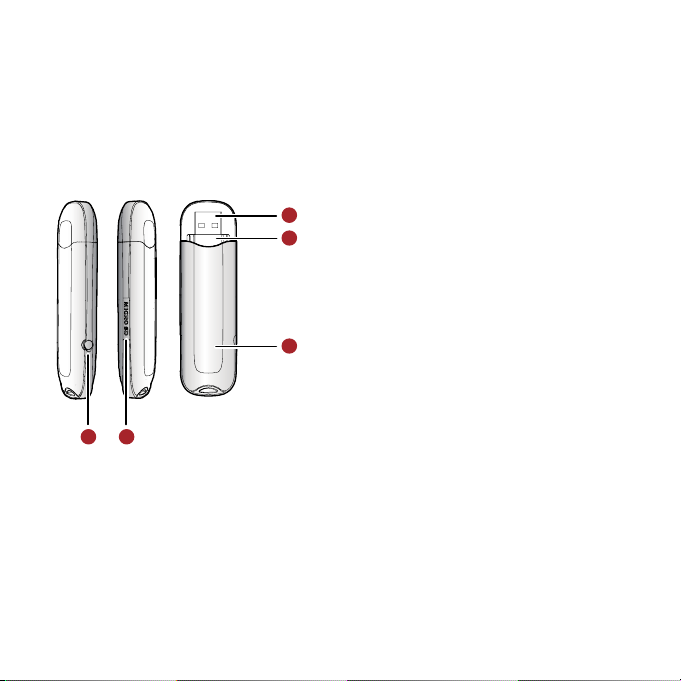
Getting to Know Your E169
The following figure shows the appearance of the E169. It is only for your reference. The actual
product may differ.
1
2
3
45
n USB Interface
It connects the E169 to a computer.
o SIM/USIM Card Slot
It is where you insert the subscriber identity module/UMTS subscriber identity module (SIM/USIM)
card.
2
Page 5

p Indicator
It indicates the status of the E169.
Colour Status Meaning
Green Blinking (on for 100ms and off
for 100ms; then on for 100ms
and off for 2700ms)
Green Blinking (on for 100ms and off
for 2900ms)
Blue Blinking (on for 100ms and off
for 2900ms)
Green On The E169 is connected to a GPRS network.
Blue On The E169 is connected to a WCDMA
Cyan On The E169 is connected to a HSDPA network.
- Off The E169 is removed.
The E169 is powered on.
The E169 is registered to a GPRS
(GSM/GPRS/EDGE) network.
The E169 is registered to a UMTS
(WCDMA/HSDPA) network.
network.
q Micro SD Card Slot
It is where you insert the Micro Secure Digital Memory (SD) card
r External antenna jack
It connects the E169 to an external antenna.
3
Page 6

Preparation
Requirements for the Computer
To use the E169, the computer must meet the following requirements:
USB Type A Receptacle, Compatible with USB 2. 0 Full Speed.
CPU: 133 MHz or above. 500 MHz or above is recommended.
Memory: 128 MB RAM or above.
Free space on the hard disk: 50 MB or above.
Windows XP/2000/Vista is installed.
Resolution for the display: 800 × 600 or above. 1024 × 768 is recommended.
Getting Your E169 Ready
Remove the UMTS USIM/SIM card slot from the E169.
Insert the USIM/SIM card into the card slot.
Insert the card slot into the E169.
4
Page 7

Installation/Removal Guide
On different operating systems (OSs), the installation and removal procedures may differ. Follow the
system prompts during operation.
Connecting the E169 with a Computer
Note: First, power on the computer. Then connect the E169 with the computer. Otherwise, the
E169 cannot be installed as normal.
Plug the E169 into the USB interface of the laptop or desktop computer.
You can connect the E169 to a laptop or desktop computer using the USB cable for better
signals.
5
Page 8

The OS automatically detects and recognises new hardware and starts the installation wizard.
Follow the prompts of the installation wizard.
After the program is installed, a shortcut icon for the E169 management program is displayed
on the desktop.
Starting the Management Program
Double-click the shortcut icon on the desktop to start the management program of the E169.
Enter the personal identity number (PIN) code if you have enabled the PIN lock.
Removing the E169
Remove the E169 directly.
Removing the Management Program
Click Start Menu.
Click Control Panel.
Click Add/Remove Program to remove the management program of the E169.
Note: Before removing the management program, exit the management program.
6
Page 9

Warnings and Precautions
Please read the safety information carefully to ensure the correct and safe use of your wireless
device.
General Recommendations for Use
Always handle your wireless device with care and keep it in a clean and dust-free place. Do not
expose your wireless device to open flames or lit tobacco products.
Always keep your wireless device dry.
Do not drop, throw or try to bend your wireless device.
Do not paint or scratch your wireless device.
Do not attempt to disassemble your wireless device. Doing so will void warranty. Only
authorized personnel are allowed to do so.
Use approved accessories only. Do not connect your wireless device to any incompatible
products.
Laws and Regulations
Do not operate your wireless device where it may be unsafe to do so or where you are
required not to do so.
To deactivate your wireless device, stop all applications using the wireless device first and then
remove the wireless device from your PC.
Obey all local laws, regulations, rules, orders, signs and notices while using the wireless device.
Signs about the use of mobile phones should also be obeyed as referring to other wireless
equipment including wireless devices provided by Huawei.
7
Page 10

Electronic Device
Deactivate your wireless device near high-precision electronic devices. The wireless device may
affect the performance of these devices.
Pacemaker manufacturers recommend that a minimum separation of 15 cm be maintained
between a wireless device and a pacemaker to avoid potential interference with the
pacemaker. Deactivate your wireless device, if it may have disturbance to the pacemaker.
Deactivate in Explosive Areas
Deactivate your wireless device where the air is potentially explosive. It is rare, but your PC could
generate sparks.
Deactivate in Blasting Areas
Deactivate your wireless device where blasting is in progress. Remote-controlled radio frequency (RF)
devices are often used at construction sites to set off blasting.
Deactivate in Aircrafts
Deactivate your wireless device before boarding or in any aircraft. Wireless devices may cause
interference in aircrafts.
Deactivate at Hospitals
Obey regulations or rules at hospitals. Deactivate your wireless device near medical equipment.
Wireless devices can cause interference to cardiac pacemakers, implanted defibrillators or other
medical equipment.
Deactivate near Hearing Devices
Deactivate your wireless device near hearing devices. People with hearing aids may experience
interfering noise near wireless devices.
8
Page 11

Recommendations for Children
Do not allow children to play with your wireless device. They could hurt themselves or others, or
could accidentally damage the wireless device. Your wireless device contains small parts with sharp
edges that may cause an injury or a choking hazard.
Deactivate While Driving
Do not use the wireless device while driving.
Immunity to Interference
Your wireless device is immune to interferences caused by audible signals.
Cleaning and Maintenance
Before you clean or maintain the wireless device, stop all applications using the wireless device
and remove your wireless device from your PC.
Clean your wireless device with a piece of soft antistatic cloth.
If the wireless device or any of its accessories does not work, turn to an authorized service
centre for help.
Environmental Protection
Observe the local regulations regarding the disposal of your packaging materials, old wireless device
and its accessories. Please promote their recycling.
Agency/Regulatory Information
The wireless device is approved for use in many regions of the world. In these regions, the device
meets all radio frequency exposure requirements. The following approvals and notices apply in
specific regions as noted.
9
Page 12

CE Approval (European Union)
The wireless device is approved to be used in the member states of the EU. Huawei declares that the
wireless device is in compliance with the essential requirements and other relevant provisions of the
Radio and Telecommunications Terminal Equipment Directive 1999/5/EC (R&TTE Directive).
Radio Frequency Exposure Warning
To ensure compliance at all times with the R&TTE Directive* 1999/5/EC, this product requires a
minimum distance of 1.5 cm from the body when in operation.
* The general public RF exposure limits referenced in the R&TTE Directive are consistent with the
published Guidelines of the International Commission on Non-Ionising Radiation Protection (ICNIRP)
1998. ICNIRP is a formally recognized non-governmental organization in Non-Ionising Radiation
Protection for the World Health Organisation (WHO), the International Labour Organisation (ILO)
and the European Union (EU). For more information, visit the ICNIRP website at www.icnirp.de.
Certification Information (SAR)
THIS DEVICE MEETS THE GOVERNMENT'S REQUIREMENTS FOR EXPOSURE TO RADIO FREQUENCY
ELECTROMAGNETIC FIELD.
Your wireless device is a low-power radio transmitter and receiver. When it is running, it emits low
levels of radio frequency energy (also known as radio waves or radio frequency fields).
Governments around the world have adopted comprehensive international safety guidelines,
developed by scientific organizations, e.g. ICNIRP (International Commission on Non-Ionising
Radiation Protection) and IEEE (Institute of Electrical and Electronics Engineers Inc.), through periodic
and thorough evaluation of scientific studies. These guidelines establish permitted levels of radio
wave exposure for the public. The levels include a safety margin designed to assure the safety of all
persons, regardless of age and health, and to account for any variations in measurements.
Specific Absorption Rate (SAR) is the unit of measurement for the amount of radio frequency energy
absorbed by the body when you use a wireless device. The SAR value is determined at the highest
certified power level in laboratory conditions, but the actual SAR level of the wireless device while
operating can be well below the value. This is because the wireless device is designed to use the
minimum power required to reach the network.
10
Page 13

All models of Huawei's wireless device are designed to meet radio frequency exposure guidelines
such as European Council Recommendation and Federal Communications Commission Notice
(United States).
European Council Recommendation: Before a wireless device model is available for sale to the
public, it must be tested according to the technical standard-EN 50361 and not exceed the limit
established by the European Council Recommendation: 1999/519/EC for safe exposure.
The SAR limit adopted by the 1999/519/EC is 2.0 watts/kilogram (W/kg) averaged over ten gram of
tissue. The highest SAR value for this device type when tested complies with the requirement.
[EN 50361 scope states "This basic standard applies to any electromagnetic field (EM) transmitting
devices intended to be used with the radiating part of the equipment in close proximity to the
human ear including mobile phones, cordless phones, etc. The frequency range is 300 MHz to 3
GHz. Therefore, the above text does not address primary use of the wireless device product.]
Federal Communications Commission Notice (United States): Before a wireless device model is
available for sale to the public, it must be tested and certified to the FCC that it does not exceed the
limit established by the government-adopted requirement for safe exposure.
The SAR limit adopted by the USA and Canada is 1.6 watts/kilogram (W/kg) averaged over one
gram of tissue. The highest SAR value for this device type when tested complies with the
requirement. [There is no reference to the specific reference standard or its applicability to the
intended use of the product.]
FCC Statement
This device complies with Part 15 of the FCC Rules. Operation is subject to the following two
conditions: (1) this device may not cause harmful interference, and (2) this device must accept any
interference received, including interference that may cause undesired operation.
*This equipment should be installed and operated with a minimum distance of 20 cm between the
radiator and your body when using it via USB cable.
Class B Digital Device
This equipment has been tested and found to comply with the limits for a Class B digital device,
pursuant to Part 15 of the FCC Rules. These limits are designed to provide reasonable protection
11
Page 14

against harmful interference in a residential installation. This equipment generates, uses and can
radiate radio frequency energy and, if not installed and used in accordance with the instructions,
may cause harmful interference to radio communications. However, there is no guarantee that
interference will not occur in a particular installation.
If this equipment does cause harmful interference to radio or television reception, which can be
determined by turning the equipment off and on, the user is encouraged to try to correct the
interference by one or more of the following measures:
Reorient or relocate the receiving antenna.
Increase the separation between the equipment and receiver.
Connect the equipment into an outlet on a circuit different from that to which the receiver is
connected.
Consult the dealer or an experienced radio/TV technician for help.
Warning : Changes or modifications made to this equipment not expressly approved by
HUAWEI may void the FCC authorization to operate this equipment.
12
Page 15

Acronyms and Abbreviations
3G The Third Generation
CPU Central Processing Unit
EDGE Enhanced Data Rates for GSM Evolution
GPRS General Packet Radio Service
GSM Global System for Mobile Communications
HSDPA High Speed Downlink Packet Access
OS Operating System
PIN Personal Identification Number
RAM Random-Access Memory
SAR Specific Absorption Rate
SIM Subscriber Identity Module
UMTS Universal Mobile Telecommunications System
USB Universal Serial Bus
USIM UMTS Subscriber Identity Module
WCDMA Wideband Code Division Multiple Access
Version: V100R001_01 Part Number: 31018653
13
 Loading...