

Huanso SF001W Quick Manual
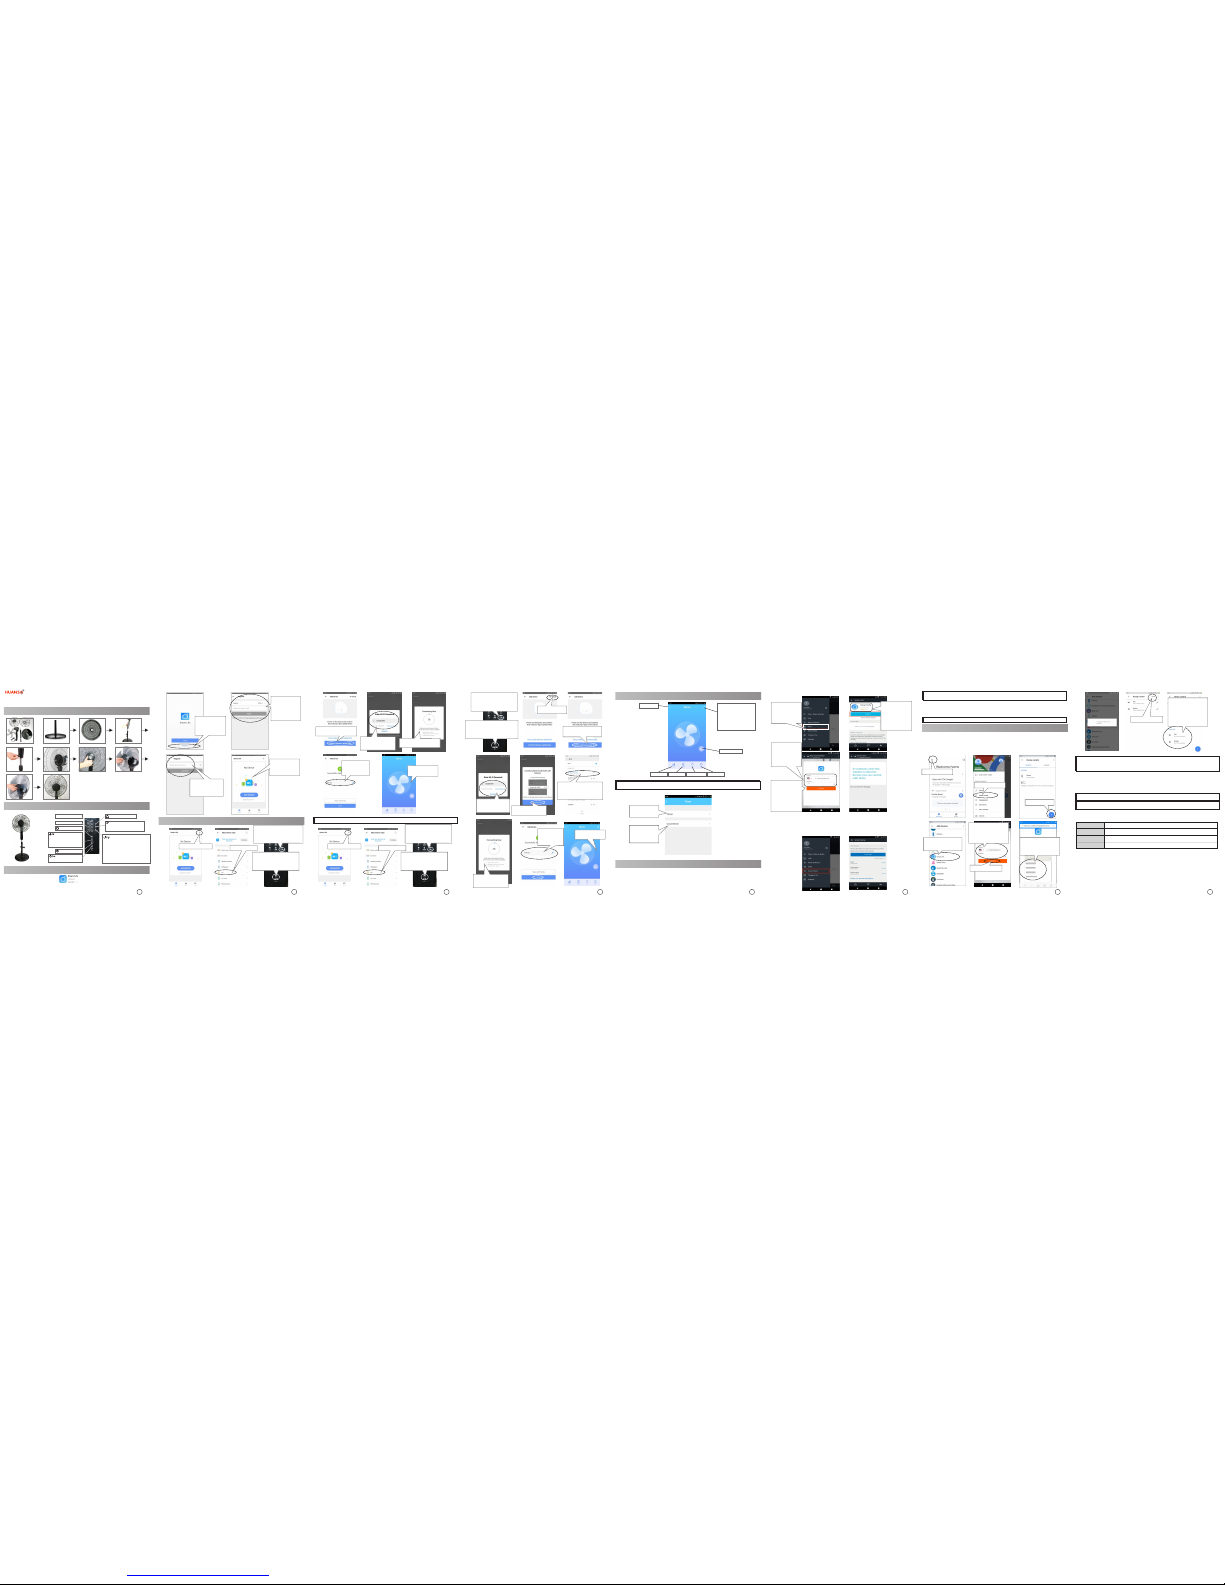
1. Insta llati on
1 3 7
8
Qui ck Guid e
FS180629 -2
5
4 6
3. Insta ll the Ap p
Download the App ‘ ’ fr om ‘Goo gle Pla y Stor e’ or ‘Ap p Store ’,
and instal l on smar t phone .
Smart Lif e
Note: If use r can’t s etup de vice in a bove wa y, user ca n try bel ow AP setup .
Note: Sle ep win d is eve ry hal f hour drops 1 spee d from r ecent speed until drops to the
lowest spe ed.
2. Intro ducti on
Timer indica tor lig ht
Speed Indica tor lig ht
Oscillatin g Indic ator
Oscillatin g Butto n
Spe ed b utton , L ong
press 5 sec onds to sw itch
between sleep m ode and
normal mode
Timer button
On/Off butto n, Long
press to setup W i-Fi
Sleep mode ind icato r light .
Light on is slee p wind
Light off is nor mal win d.
Wi-Fi Indica tor lig ht.
Light always o n is Wi-F i setup s ucce ed
and c onnec ted t o rou ter.Li ght o ff is
WiFi setu p suc ce ed but loo se
connection o f rout er.Lig ht rap idly b link
twice per se cond i s in ‘S martc onfig ’
setup m ode. L ight s lowly blink o nce
per 2 seconds is i n AP setup mo de.
1,Ope n Smar t
Life APP a nd
click ‘Reg ister ’.
2. Choo se y our
reg i o n, in p ut
Mobile Numbe r
or e ma i l an d
click ‘Nex t’.
5. APP cont rol
4. Add dev ice to sm art pho ne
2
3. Inpu t you r lo gin
pa s sw o r d an d
click Conf irm.
4. APP w ill a uto
lo g i n af t e r
registra tion.
1. Click ‘+’ b utton .
2. Choose ‘F an’
3. Aft er po we r on t he
device, long pre ss Wi-Fi
button for 5 se conds u ntil
device Bee p and rel ease.
4. W i-Fi indic ator light wil l
rapidly blink s twic e per seco nd
to e nte r ‘Sm art con fig ’se tup
mode.
1. Click ‘+’ b utton .
2. Choose ‘F an’
3. Aft er po we r on t he
device, long pre ss Wi-Fi
button for 5 se conds u ntil
device Bee p and rel ease.
4. Wi- Fi i ndica tor light wi ll
rapidl y blin ks twi ce per
second to ready to con nect
network.
7. Wait unti l conne ction
finished .
5. C l i ck ‘ Co n f i rm
indicato r rapid ly blin k’.
8. Input dev ice
name and cli ck
‘Done’ but ton.
9. Enter dev ice
control in terfa ce.
5. W hen Wi -Fi in dicat or lig ht
rapidly b links , long p ress Wi -Fi
button for 5 seco nds again
until devi ce Beep a nd rele ase.
6. Wi- Fi i ndica tor light wi ll
slowly blinks once per 2
seco nd s and ent er AP
setup mode .
7. Click AP Mod e.
8. C li c k ‘C o nf i rm
indicato r slowl y blink ’.
12 . Wa i t un t i l
c o n n e c t i o n
finished .
10. Click ‘C onnec t
Now’.
11. Cho ose Wi-F i h otspo t
‘Sma rt Lif e_ xxx x’ . Aft er
conne cte d to th e WiF i
hotspot, r eturn t o the APP.
13 . I n p u t
devic e nam e
an d c l i c k
‘Done’ but ton.
14. Enter de vice
control in terfa ce.
6. Amazo n Alexa Voi ce cont rol
Back
On/OFF
Before con troll ing our s mart de vice by Am azon Ale xa, us er shou ld prep are Ech o
device like Ec ho or E cho Tap or Echo Dot or Ech o S how, Amazo n Ale xa A PP and
Amazon Alex a accou nt.
Enable our s kill in A lexa APP.
More: Mod ify de vice
nam e, Che ck th e
ne tw o r k, De v i ce
sharing, Dev ice Info ,
Check for fi rmwar e
update and s o on.
Wind Type
Timer
Speed
Timer: set o n or
off schedu le.
Countdow n: To
se t t ur n o f f
dev i ce af t er
1/2/3/4 ho urs.
1, Ope n Alex a
APP and logi n
A m a z o n
account. Cho ose
‘Skills’ .
2, Sea rch ‘Sma rt
Life’ and ch oose
‘Smart Life’ s kill
in t he se ar ch
re s u l t . C l i c k
‘ENABLE’ button
to enable Sk ill.
3, Ch oose your
co u n t r y a n d
input you r ‘Sma rt
L i f e ’ A P P
ac c o u n t an d
password .
4, Cl ic k ‘ Li nk
Now’ but ton to
link yo ur ‘S mart
Life’ accoun t t o
your echo . Click
✘ bo t t o m t o
return to A lexa
APP.
Firstly u ser sho uld say to your E cho: ‘A lexa, disco ver dev ices’ . Alexa w ill sta rt to fi nd
devices b een ad ded in ‘ Smart Life’ AP P. It will t ake ab out 20 secon ds to sh ow res ult.
User can al so clic k ‘DISC OVER’ bu tton i n Alexa APP ’s ‘Sma rt Home ’ inter face, f ound
device wil l be show n in the li st.
Discover d evice i n Alexa AP P
Note: Ever y time u ser cha nge de vice na me in Sm art Lif e APP, Echo s hould r e-dis cover
device aga in, oth erwis e Alexa ca n not con trol de vice.
Voice contr ol Smar t Fan by Ama zon Ale xa
➢Alexa, dis cover d evice s
➢Alexa, tur n on/of f ‘Smar t Fan’.
➢Alexa, set ‘ Smart F an’ to on e/two /thre e
Note: ‘Sma rt Fan’ i s the dev ice nam e user ad d to ‘Sma rt Life ’ APP.
7. Googl e Home Voi ce Cont rol
Link Smart L ife acc ount in H ome Con trol
Make sure Go ogle Ho me is con necte d to netw ork.
Before con troll ing our sma rt devic e b y Googl e H ome, use r s hould p repar e G oogle
Home de vice like Goog le Ho me o r Goo gle H ome Mini, Goog le H ome AP P or Goog le
APP for Andro id and Go ogle ac count .
Voice contr ol Smar t Fan by Go ogle Ho me
➢Ok Google , sync ne w devic es
➢ Ok Google, t urn on/ off ‘Sm art Fan ’.
➢Ok Google , set ‘Sm art Fan ’ to 30/60 /100 pe rcent
1.Click thi s butto n
2. Choose ‘H ome
3.Click ‘+ ’ butto n
4. Find ‘ Smart Life’ in
the ski ll li st and
select to op en it.
5. Ch o o s e yo u r
cou nt ry a nd i np ut
your ‘S mart Life’ APP
a c c o u n t a n d
password .
6. Click ‘Li nk Now’ .
7. A fter clic k ‘Lin k
Now’ if it sh ows th is
interfac e, use r shou ld
choose ‘Sm art Lif e’.
9. De vice lis t c an be
controll ed by Go ogle
Home, s ay t o G oogle
Home: ‘OK Go ogle,
sync new devi ces’ to
find and a dd n ew
devices.
8. Click ‘Do ne
Note: Af ter ad d new devic e in t he APP, s ay to the Go ogle H ome:’ sync new de vices ’
to voice cont rol ne w dev ices. If it can’ t find new d evice , use r can find A ction ‘Smar t
Life’ in Goo gle Hom e APP to disa ble and L ink aga in to voi ce cont rol new d evice s.
Note: ‘Sma rt Fan’ i s the dev ice nam e user ad d to ‘Sma rt Life ’ APP.
3 speeds, sp eed 1=9 60rpm , speed 2 =1100r pm, spe ed 3=12 00rpm
1hour/2h our/3 hour/ 4hour /netw ork tim er
AC110V~130 V or AC 220V ~240V
60W
Specif icati on
Wind Speed :
Timer:
Voltage:
Power rati ng:
9. E n t er W i- F i
Password and clic k
‘Confirm ’butt on.
Oscillat ing
6. E n t er W i- F i
password an d cl ick
‘Confirm ’ butto n.
Note: 30 per cent is s peed 1, 6 0 perce nt is spe ed 2, 100 p ercen t is spee d 3.

FCCCaution
Thisdevicecomplieswithpart15oftheFCCRules.Operationissubjecttothe
followingtwoconditions:(1)Thisdevicemaynotcauseharmfulinterference,and(2)
thisdevicemustacceptanyinterferencereceived,includinginterferencethatmay
causeundesiredoperation.
AnyChangesormodificationsnotexpresslyapprovedbythepartyresponsiblefor
compliancecouldvoidtheuser'sauthoritytooperatetheequipment.
Note: ThisequipmenthasbeentestedandfoundtocomplywiththelimitsforaClass
Bdigitaldevice,pursuanttopart15oftheFCCRules.Theselimitsaredesignedto
providereasonableprotectionagainstharmfulinterferenceinaresidentialinstallation.
Thisequipmentgeneratesusesandcanradiateradiofrequencyenergyand,ifnot
installedandusedinaccordancewiththeinstructions,maycauseharmfulinterference
toradiocommunications.However,thereisnoguaranteethatinterferencewillnot
occurinaparticularinstallation.Ifthisequipmentdoescauseharmfulinterferenceto
radioortelevisionreception,whichcanbedeterminedbyturningtheequipmentoff
andon,theuserisencouragedtotrytocorrecttheinterferencebyoneormoreofthe
followingmeasures:
-Reorientorrelocatethereceivingantenna.
-Increasetheseparationbetweentheequipmentandreceiver.
-Connecttheequipmentintoanoutletonacircuitdifferentfromthattowhichthe
receiverisconnected.
-Consultthedealeroranexperiencedradio/TVtechnicianforhelp.
ThisequipmentcomplieswithFCCradiationexposurelimitssetforthforan
uncontrolledenvironment.Thisequipmentshouldbeinstalledandoperatedwith
minimumdistance20cmbetweentheradiator&yourbody.
 Loading...