

Page 1
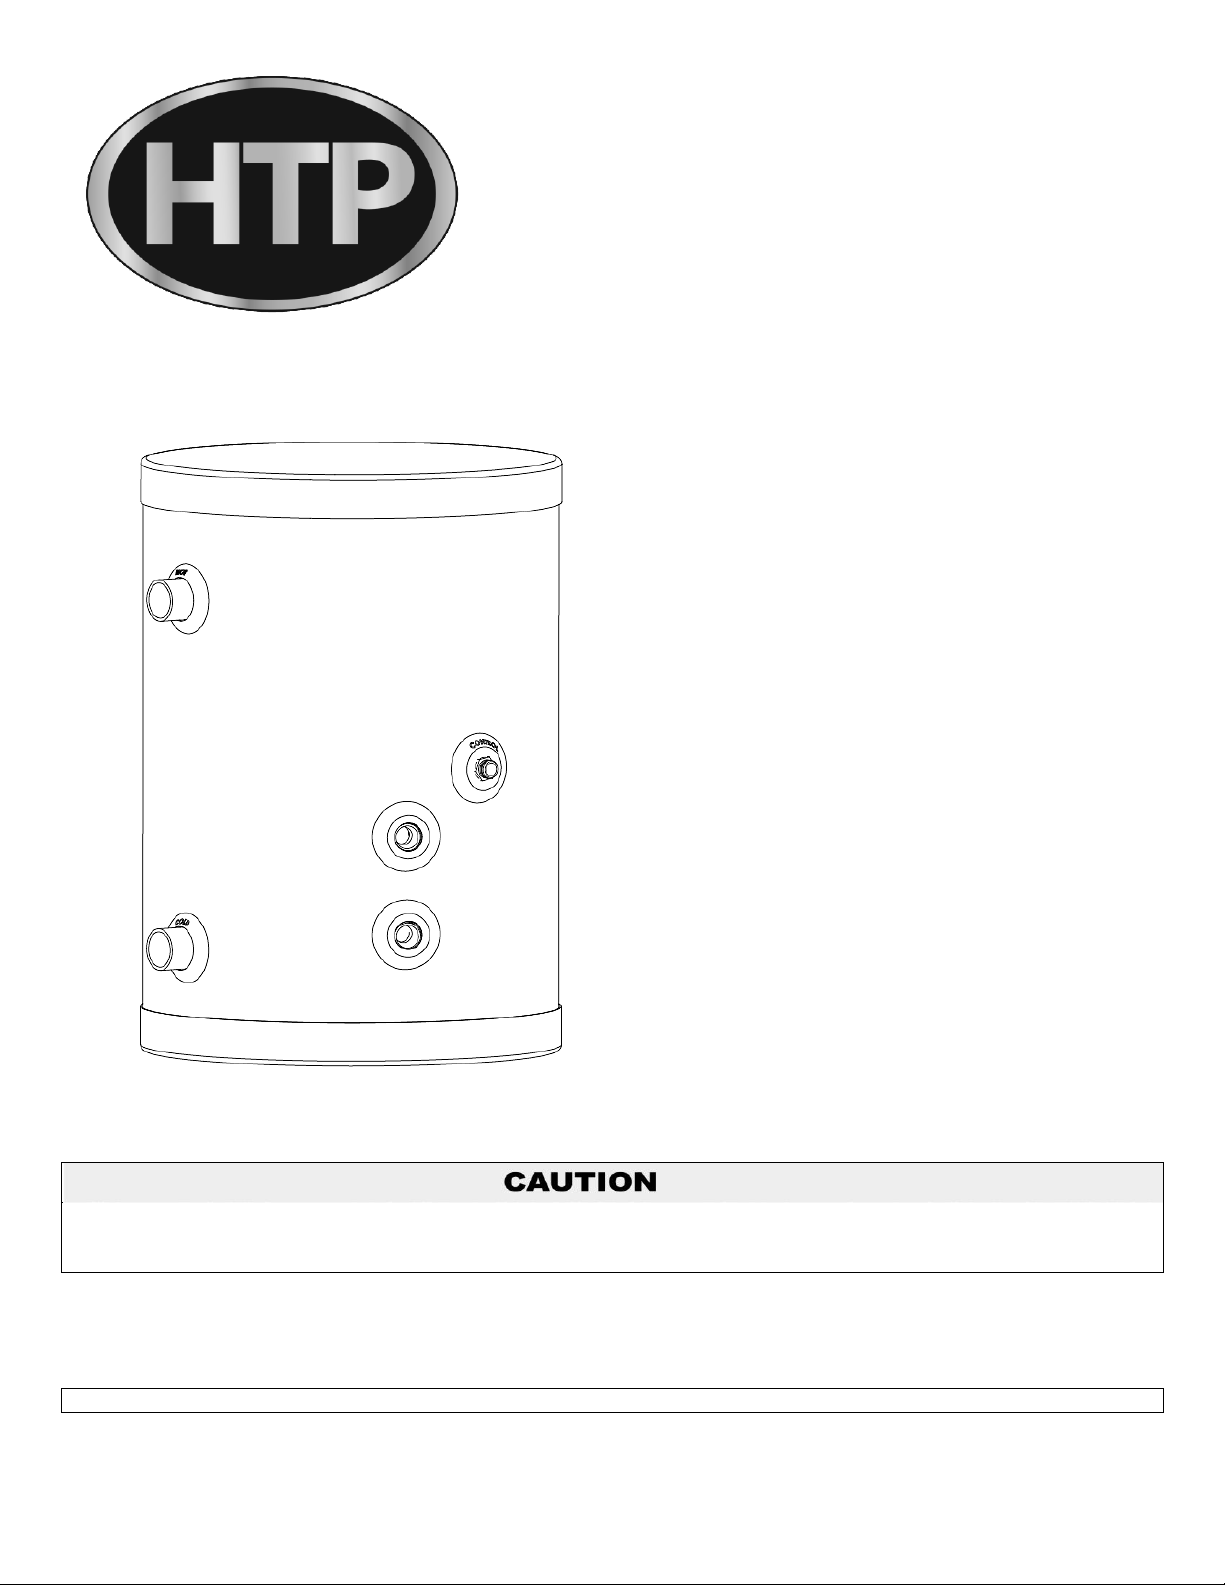
SuperStor
The use of a salt chlorine generator is prohibited in a system serviced by this pool heater. Salinated water will cause
corrosive damage to the pool heater tank and component parts, and possibly lead to premature failure. Such failure is
NOT covered by warranty. Please seek an alternative sanitation method.
NOTE TO CONSUMER: PLEASE KEEP ALL INSTRUCTIONS FOR FUTURE REFERENCE.
Pool Heater
INSTALLATION
START-UP
MAINTENANCE
PARTS
Model SSU-20PH
NOTICE: HTP reserves the right to make product changes or updates without notice and will not be held liable for
typographical errors in literature.
120 Braley Rd. P.O. Box 429 East Freetown, MA 02717-0429 www.htproducts.com
LP-21A Rev. 3.24.14
Page 2
2
The following defined terms are used throughout this manual to bring attention to the presence of hazards of
various risk levels, or to important product information.
DANGER indicates an imminently hazardous situation which, if not avoided, will result in death or serious injury.
WARNING indicates a potentially hazardous situation which, if not avoided, could result in death or serious injury.
CAUTION indicates a potentially hazardous situation which, if not avoided, may result in minor or moderate injury.
CAUTION used without the safety alert symbol indicates a potentially hazardous situation which, if not avoided, may
result in property damage.
This manual must only be used by a qualified heating installer/service technician. Read all instructions in this manual
before installing. Perform steps in the order given. Failure to comply could result in substantial property damage, severe
personal injury, or death.
FOREWORD
This manual is intended to be used in conjunction with other literature provided with the SuperStor Pool Heater. This
includes all related control information. It is important that this manual, all other documents included with this system, and
additional publications including the Code for the Installation of Heat Producing Appliances (latest version), be reviewed in
their entirety before beginning any work.
Installation should be made in accordance with the regulations of the local code authorities which pertain to this type of
water heating equipment.
FOR THE INSTALLER
This water heater must be installed by qualified and licensed personnel. The installer should be guided by the instructions
furnished with the water heater, and with local codes and utility company requirements.
INSTALLATIONS MUST COMPLY WITH:
Local, state, provincial, and national codes, laws, regulations and ordinances.
The latest version of the National Electrical Code, NFPA No. 70. In Canada, refer to Canadian Electrical Code C 22.1,
from Canadian Standards Association, 5060 Spectrum Way, Suite 100, Mississauga, Ontario, Canada L4W 5N6.
TABLE OF CONTENTS
PART 1 – GENERAL SAFETY INFORMATION ....................................................................................................... 3
A. PRECAUTIONS ........................................................................................................................................................ 3
B. WHEN SERVICING THE WATER HEATER ............................................................................................................ 3
C. HEATER WATER ..................................................................................................................................................... 4
LP-21A Rev. 3.24.14
Page 3
INSTALLER – Read all instructions in this manual before installing. Perform steps in the order given.
USER – This manual is for use only by a qualified heating installer/service technician. Have this heater serviced/inspected
by a qualified service technician annually.
FAILURE TO ADHERE TO THE GUIDELINES ON THIS PAGE CAN RESULT IN SUBSTANTIAL PROPERTY
DAMAGE, SEVERE PERSONAL INJURY, OR DEATH.
NOTE: If the heater is exposed to the following, do not operate until all corrective steps have been made by a qualified
serviceman:
1. FIRE
2. DAMAGE
3. WATER
Any claims for damage or shortage in shipment must be filed immediately against the transportation company by the
consignee.
PART 2 – PREPARE THE WATER HEATER ........................................................................................................... 4
A. DIMENSIONS AND SPECIFICATIONS .................................................................................................................... 4
B. LOCATING THE WATER HEATER .......................................................................................................................... 4
PART 3 – HEATER PIPING ...................................................................................................................................... 5
A. PIPING TO THE POOL FILTER ............................................................................................................................... 5
B. PIPING TO THE BOILER .......................................................................................................................................... 5
C. PIPING DETAIL ........................................................................................................................................................ 6
PART 4 – HEATER CONTROL ................................................................................................................................. 6
A. WIRING THE CONTROL .......................................................................................................................................... 6
B. SENSOR INSTALLATION ........................................................................................................................................ 7
PART 5 – SIZING THE POOL HEATER ................................................................................................................... 8
PART 6 – MAINTENANCE ........................................................................................................................................ 8
HTP CUSTOMER INSTALLATION RECORD FORM ..................................................................................................... 9
3
PART 1 – GENERAL SAFETY INFORMATION
This pool heater and control are intended to be connected to an existing/new boiler. Basic operation requires a boiler that
has adequate BTU capacity and a properly sized circulator to transfer the BTUs to the pool heater.
An optional control is available to monitor pool water temperature when the pool filter pump is on. This system won’t
operate if the boiler or pool filter pump is not operating.
Optional pool control with sensor and transformer – Part # SP-30-GL-235-x284
A. PRECAUTIONS
DO NOT USE THIS WATER HEATER IF ANY PART HAS BEEN UNDERWATER. Immediately call a qualified service
technician.
B. WHEN SERVICING THE WATER HEATER
To avoid electric shock, disconnect electrical supply before performing maintenance.
To avoid severe burns, allow heater to cool before servicing.
LP-21A Rev. 3.24.14
Page 4

UNCRATING HEATER – Any claims for damage or shortage in shipment must be filed immediately against the
transportation company by the consignee.
COLD WEATHER HANDLING – If the heater has been stored in a very cold location (BELOW 0oF) before installation,
handle with care until the plastic components come to room temperature.
C. HEATER WATER
Do not use petroleum-based cleaning or sealing compounds in a water heating system. Gaskets and seals in the
system may be damaged. This can result in substantial property damage.
Do not use “homemade cures” or “heater patent medicines”. Damage to heater, substantial property damage,
and/or serious personal injury may result.
PART 2 – PREPARE THE WATER HEATER
Remove all sides of the shipping crate to allow the heater to be moved into its installation location.
A. DIMENSIONS AND SPECIFICATIONS
4
Figure 1
B. LOCATING THE WATER HEATER
If the pool heater is to be located outdoors, it must be in a covered area, protected from the rain and sun.
LP-21A Rev. 3.24.14
Page 5

Locate the water heater where any leakage from the related piping, tank, or connections will not result in damage to
surrounding areas or lower floors. HTP WILL NOT be held liable for leakage damages.
This water heater must not be located near flammable liquids such as gasoline, butane, liquefied propane, adhesives,
solvents, paint thinners, etc., as the controls of this water heater could ignite these vapors and cause an explosion,
resulting in property damage, severe personal injury, or death.
High heat sources (sources generating heat 100oF / 37oC or greater, such as stove pipes, space heaters, etc.) may
damage plastic components of the water heater as well as plastic vent pipe materials. Such damages ARE NOT covered
by warranty. It is recommended to keep a minimum clearance of 8” from high heat sources. Observe heat source
manufacturer instructions, as well as local, state, provincial, and national codes, laws, regulations and ordinances when
installing this water heater and related components near high heat sources.
For winterizing, the pool heater must be completely drained and have one gallon of non-toxic, food-grade propylene
glycol, FDA rated as GRAS (Generally Recognized As Safe) pumped into the heat exchanger to prevent freezing.
Choose a location for the water heater as centralized to the piping and electrical system as possible. Carefully consider
how boiler and pool piping will be routed before choosing final pool heater location. Place the water heater so that the
drain, controls, and inlets/outlets are easily accessible for service.
This water heater must be installed vertical on a level surface.
5
PART 3 – HEATER PIPING
It is mandatory that all plumbing be done in accordance with federal, local, and state plumbing codes and practices.
Failure to properly install the water heater WILL VOID the warranty. It is also necessary to use both thread tape and pipe
dope on all mechanical plumbing connections.
A. PIPING TO THE POOL FILTER
The pool water side piping (pool in and pool out, see Figure 2) is recommended to be 1 ½” PVC. A bypass will be
necessary between the inlet and outlet of the pool heater (see Figure 2). The bypass will allow the boiler to keep up with
the pool heater. If the bypass is not installed, the boiler may not be able to provide adequate temperature.
B. PIPING TO THE BOILER
Piping between the boiler and pool heater should be 1 ¼” copper. It is very important to properly size the boiler circulator
to match total system flow rates, pressure drop (feet of head), and boiler output (see Table 1). For example, if the boiler is
100,000 BTU/H, the system requires a 6 GPM flow rate through the heat exchanger. If the boiler is 125,000 BTU/H, the
system requires a 7 GPM flow rate through the heat exchanger.
To achieve proper flow rates, calculate friction loss for the length of piping, plus the number of fittings, elbows, tees, pool
heat exchanger, etc. Pool heat exchanger friction loss is 4.5’ at 6 GPM, 7’ at 7 GPM, and 9.2’ at 8 GPM. The minimum
boiler temperature must be maintained at 160oF or higher. Low boiler temperature will dramatically reduce the life of the
boiler.
LP-21A Rev. 3.24.14
Table 1 – Pressure Drop through the Heat Exchanger
Page 6

Use two wrenches when tightening water piping at heater. Use one wrench to prevent the heater return or supply line from
turning. Failure to prevent piping connections from turning could cause damage to heater components.
Figure 3 – Control Wiring
C. PIPING DETAIL
6
Figure 2 – Water Heater Piping
PART 4 – HEATER CONTROL
A. WIRING THE CONTROL
If the pool heater control is to be located outdoors, it must
be located in a covered area, protected from the rain and
sun. However, the control transformer must be kept
indoors. A ground fault outlet is mandatory. The control
probe needs to be installed onto the inlet line of the pool
heater. This probe monitors incoming water temperature
to the pool heater only when the pool filter is running.
See Figure 3 for control wiring.
At the beginning of the season, it may be necessary
during start-up to leave the pool filter on for a few days to
heat the pool. See Table 2 to determine actual heating
time.
LP-21A Rev. 3.24.14
Page 7

7
Figure 5 – Sensor Mounting and Installation
Figure 4 – Pool Heater Control to Boiler Control Wiring
B. SENSOR INSTALLATION
Proper sensor installation is critical
for reliable and efficient operation.
The sensor should be located as
close to the inlet of the pool heater
(pipe running from the pool filter) as
possible.
Mount sensor by following
instruction in Figure 4. If the wiring
needs to be longer, use commonly
available thermostat “TT” wire on
the transformer line to the boiler. If
a standard control is used, install a
tee in the inlet line and use a
standard aquastat well to mount the
control bulb.
LP-21A Rev. 3.24.14
Page 8

PART 5 – SIZING THE POOL HEATER
8
Table 2 – Water Heating Sizing - *Depending on Chart
NOTE: THE SSU-20PH CAN TRANSFER A MAXIMUM OF 200,000 BTU FROM THE BOILER. PLEASE MAKE SURE
TO CORRECTLY SIZE THE CIRCULATOR OFF THE BOILER (SEE TABLE 1).
NOTE: The following is presented as a guide to determine the heating time in hours for water heaters used to heat
swimming pools and baptisteries:
EXAMPLE FORMULA TO ESTABLISH RECOVERY OF POOL:
Boiler 84,000 (BTU/hour) divided by pool capacity (gallons) = factor
TO FIND POOL CAPACITY IN GALLONS
1. Find volume of pool (or baptistery tank) in cubic feet. Length x width x average depth = cubic feet of water.
2. Convert cubic feet of water to gallons = multiply by 7.5.
3. Use SSU-20PH, i.e. 84,000 BTU/h.
4. To determine how long it is going to take to heat up pool, divide 84,000 (BTU/h using SSU-20PH) into pool
capacity (in gallons). The answer should be matched with the figures in the above chart under the required
temperature rise column.
Example:
7500 gallon pool needs to be heater from 40oF to 70oF (30oF rise) = 84,000 BTU divided by 7500 gallons = 11.2*
(*see table above) under 30oF rise columns. In less than 48 hours, this temperature rise can be accomplished.
5. The boiler must supply enough BTUs for the gross output of the selected SuperStor. Once the pool is at
temperature (70oF in this example), the SuperStor will require very few BTU/h to maintain the pool at that
temperature.
PART 6 – MAINTENANCE
When heater is not used during winter months, turn off power to heater and drain water from the tank and piping to
prevent freezing.
For winterizing, disconnect tank and pump one gallon of non-toxic, food-grade propylene glycol, FDA rated as GRAS
(Generally Recognized As Safe) into the heat exchanger to prevent freezing.
LP-21A Rev. 3.24.14
Page 9

Customer’s Name:
Installation Address:
Date of Installation:
Installer’s Code/Name:
Product Serial Number(s):
Comments:
Installer’s Phone Number:
Signed by Installer:
Signed by Customer:
HTP CUSTOMER INSTALLATION RECORD FORM
The following form should be completed by the installer for you to keep as a record of the installation in case of a warranty
claim. After reading the important notes at the bottom of the page, please also sign this document.
9
IMPORTANT:
Customer: Please only sign after the installer has reviewed the installation, safety, proper operation, and maintenance of the
system. In the case that the system has any problems, please call the installer. If you are unable to make contact, please
contact your HTP Sales Representative.
Distributor/Dealer: Please insert contact details.
LP-21A Rev. 3.24.14
 Loading...