

Page 1

User Manual
Thank you for choosing HTJ AUTO Night Vision Camera. This user manual is
designed to detail the HTJ-DVR2 functions and features. In order to operate your
product with ease as soon as possible and get the best service, please read the
manual carefully and save it for future reference, thank you!
This manual is subject to copyright protection. Our company reserves the right to
modify the product specifications and related information mentioned by the
manual. Any modifications or changes of the product specifications and related
information mentioned by this manual will have no prior notice. Without the written
permission of our company, any form of reproduction, modification, use,
dissemination or publication of this manual is illegal.
Catalog
1, Illustration
2, Button functions
3, Installation and diagram
4, App download
5, Features
6, MirrorLink setting
7, App features
8, Parameters and specifications
Page 2
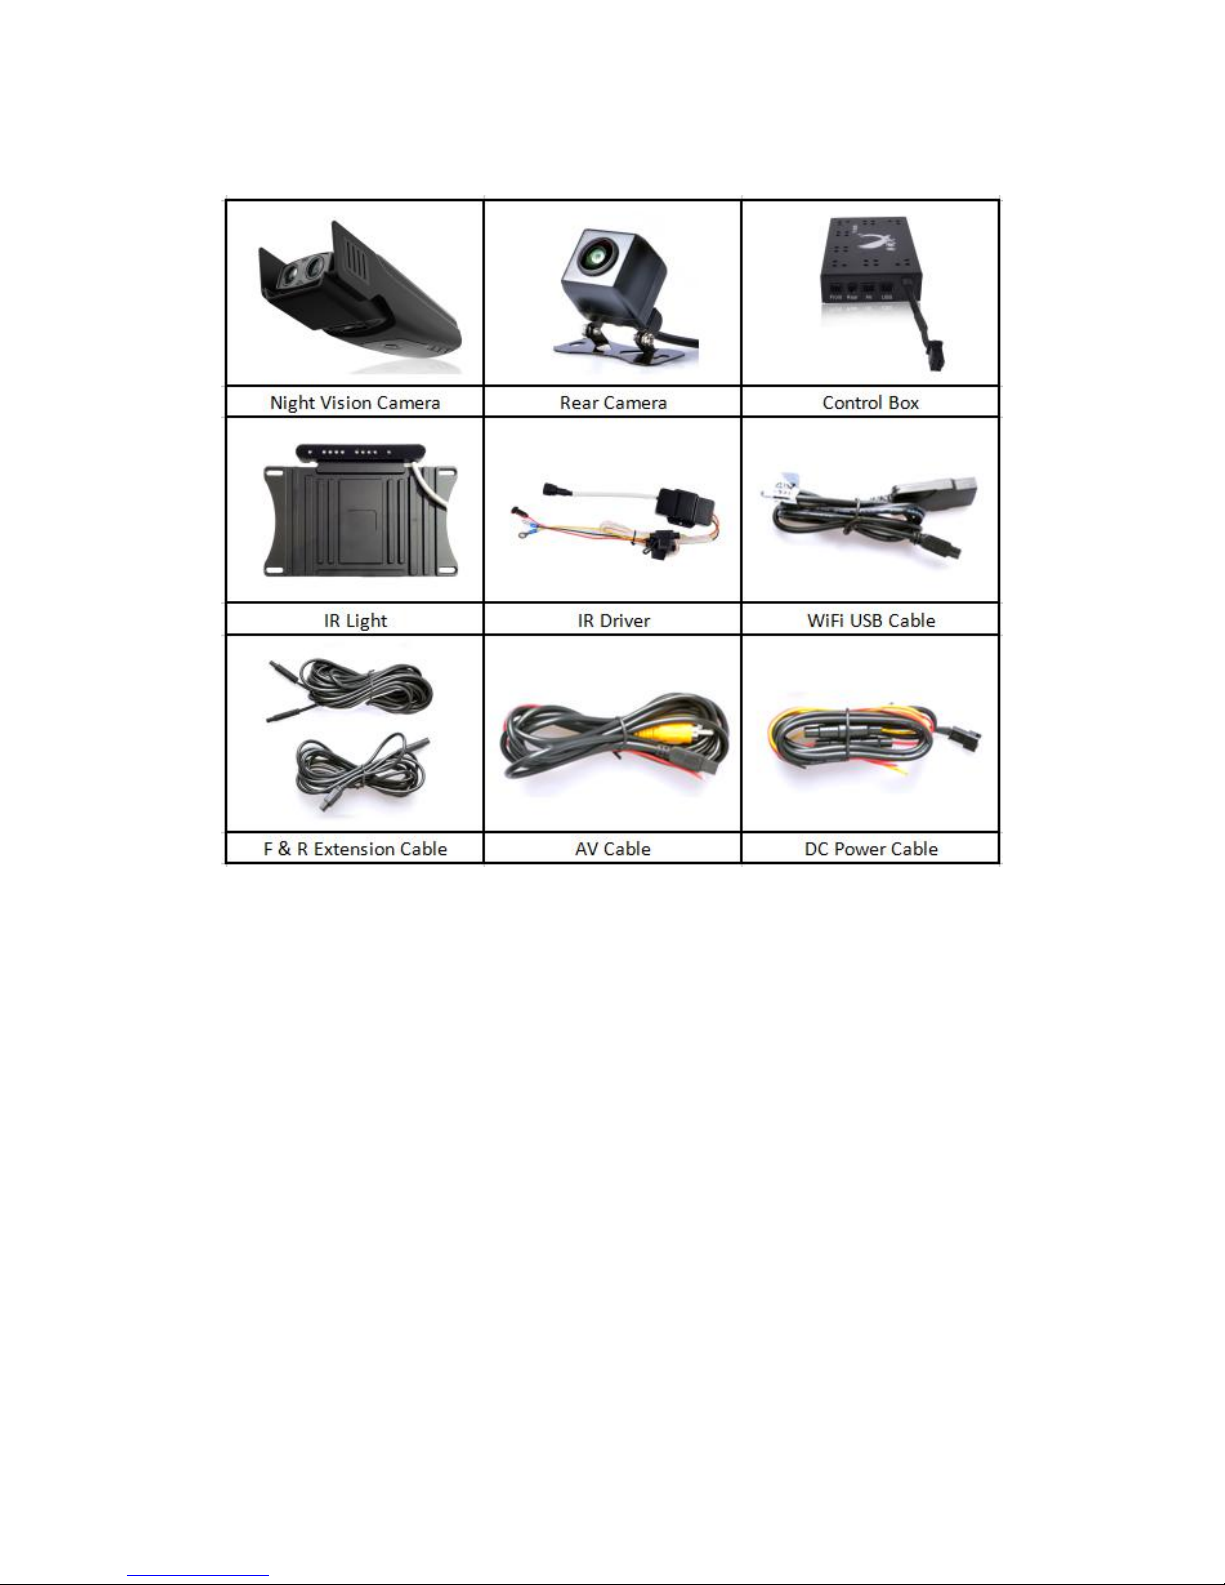
1, Illustration
Figure 1
2, Button Function
1, Power / Switch Button
Function 1: Turn on/off the image
Function2: Switch front/ rear view/ turn off
2, Button [ M ] temporarily NOT in use
NOTE:
The switch button can NOT work until the night vision camera connected to car
monitor!
3, Installation and diagram
3.1, Installation:
Step 1, Turn off the car engine,
Page 3
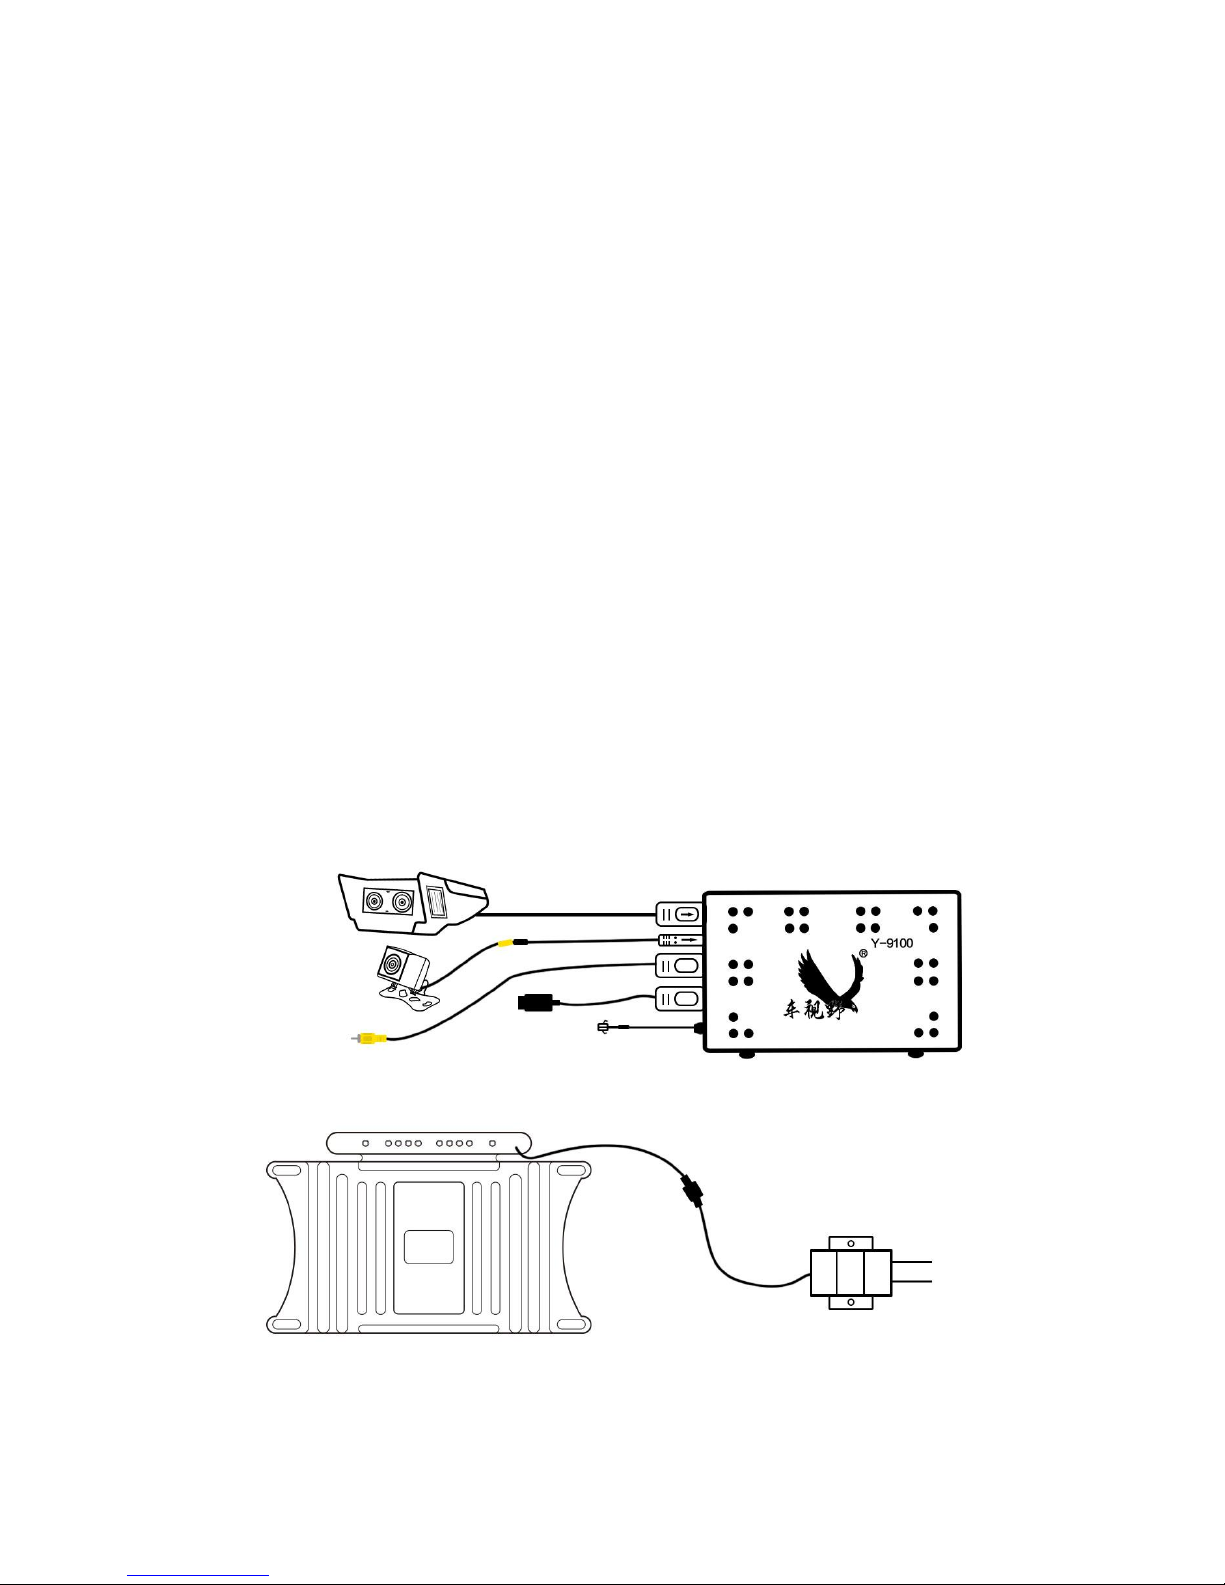
Step 2, Connect IR light and IR driver, yellow to B+, red to ACC, (or to positive of car
headlamps), black to GND. (Installation location shows in figure 3),
Step 3, Connect control box power cable, yellow to B+, red to ACC, black to GND.
All unit should be connected with control box (show in figure 2),
NOTE: Ensure that the night vision camera system is connected with car DVD GPS
NAV..
Step 4, Connected rear camera extension cable, white to reverse detection line,
Step 5, Turn on ACC,
Step 6, Check the image to ensure that night vision camera orientation is correct,
then stick it behind the original rear view mirror on windshield, then wire it as figure
3,
Step 7, Check the image to ensure that the rear camera is installed properly, then
install it near to car bumper or license plate frame, then the rear camera extension
cable can be wired along the roof of the car (Show in figure 3).
NOTE:
1, If the camera is properly installed, the control box indicator will light, therefore,
the camera will automatically turn on and enter into record status, so the recording
indicator will flash, then check if the image on the screen is normal, if it shows as
reversed image, please don’t hesitate to contact us!
3.2, Diagram:
Figure 2
Page 4
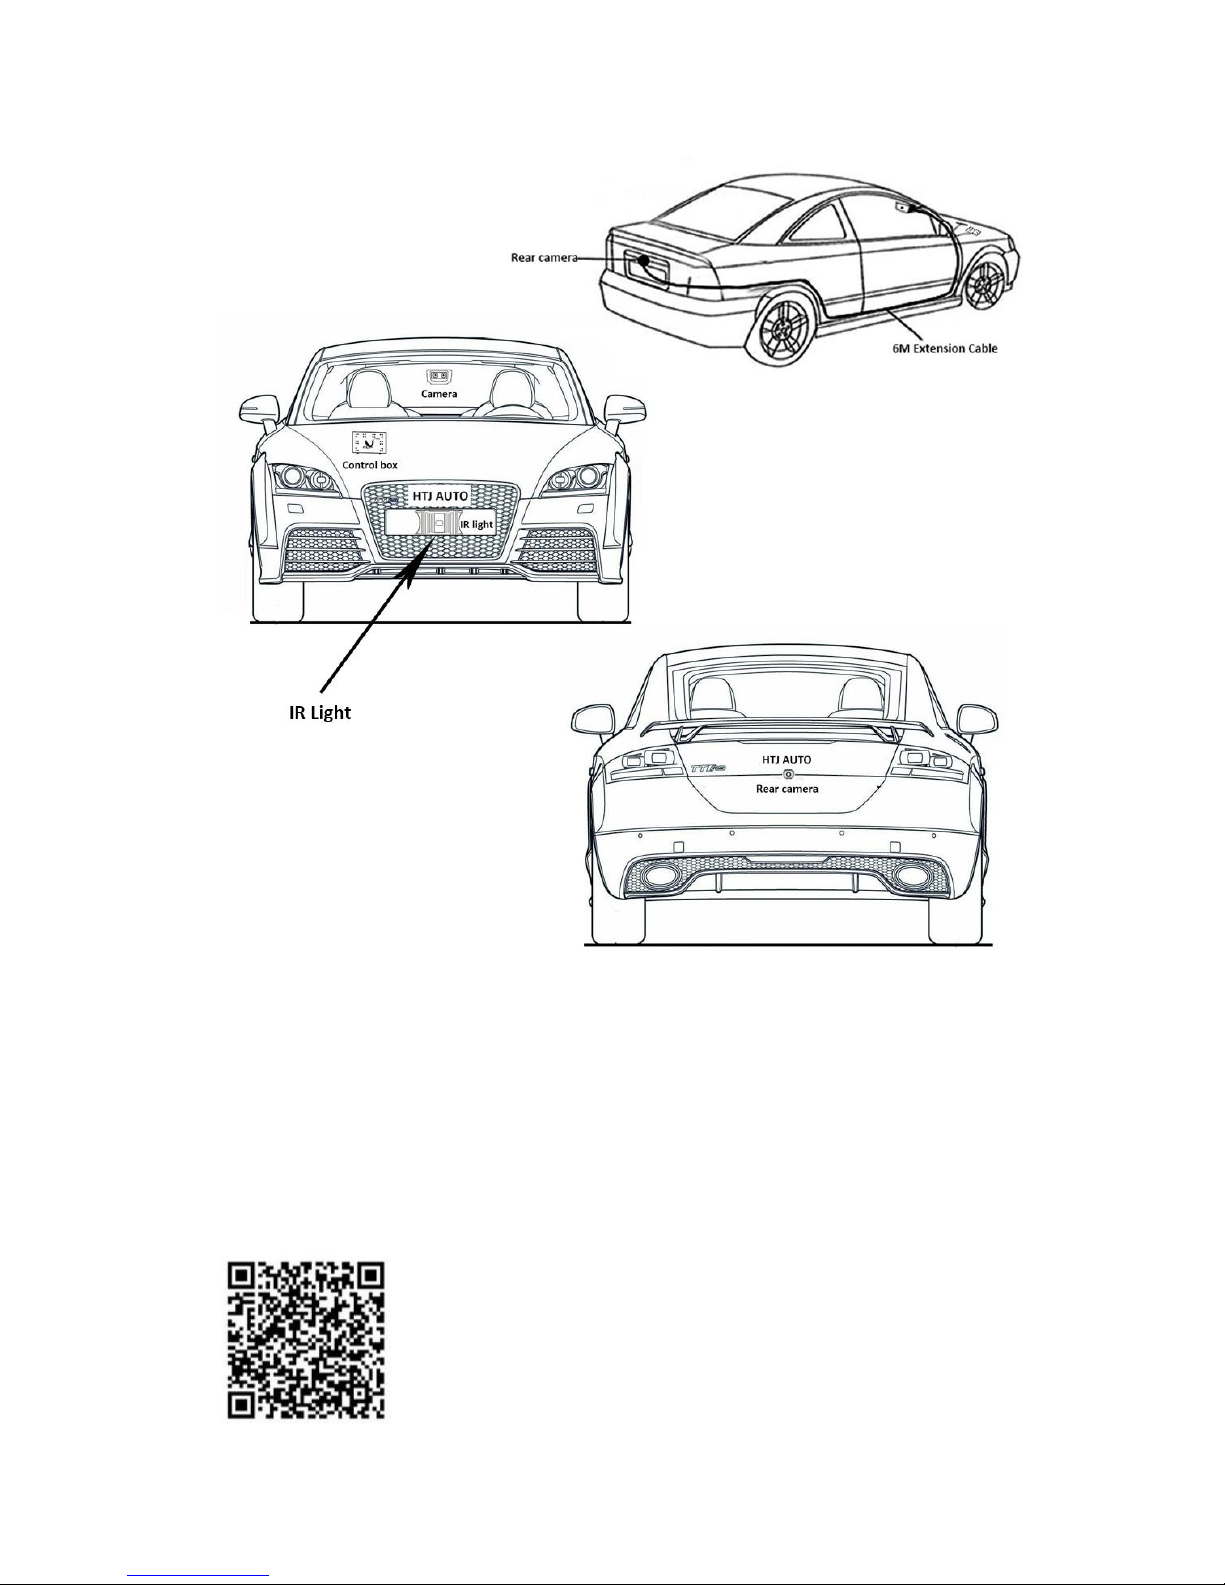
Figure 3
4, App download
In App store, please scan QR code to download App just for iOS (for Android, we will
send you app separately) .
Page 5
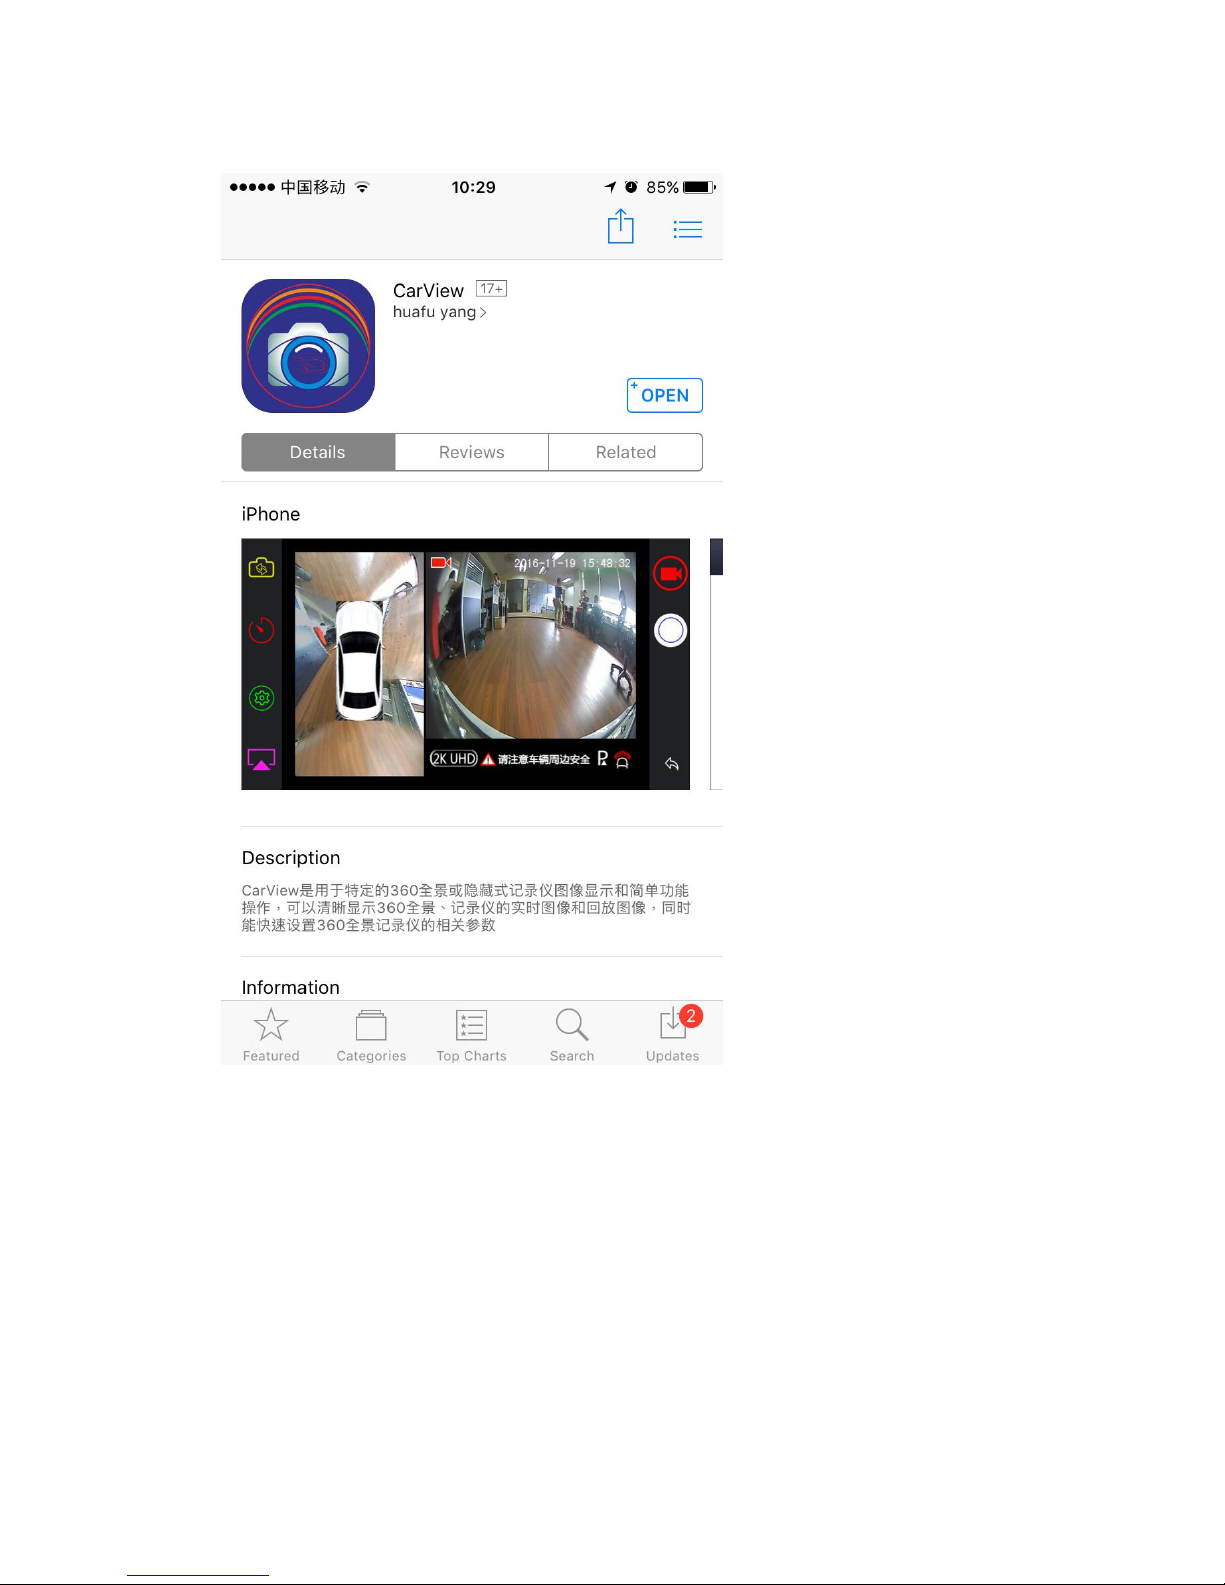
It will automatically enter into App download interface:
NOTE:
This app is for 360 urround view monitor system as well.
5, Features:
1), Laser night vision
It will help you see 100-200m remote night vision range at dark night without street
light.
2) Reversing
In any state, if you put the reverse gear, the display automatically switches to the rear
Page 6

view, after reversing completed, the display automatically switches to the front view.
3), Strong fog penetrating
When driving at strong fog day, for your safety, it is recommended to switch to night
vision camera interface, it will see objects outside of 200 meters clearly (up to 500
meters).
4), Strong light inhibition
The laser camera lens has strong light inhibition function, if the opposite car coming
over at night, you can still see a clear video image.
5), G-sensor
If collision happened, the file recorded will be locked automatically,
6), MirrorLink (Car play)
iOS and Android system supported
7), Automatic loop recording
Turn on ACC, the camera will automatically turn on and start to record, if ignition off,
it will automatically save the files to USB flash drive and automatically off, when the
storage of USB flash drive is full, the old video file will be deleted, and save the new
ones.
NOTE:
It can NOT start to record before insert USB flash drive!
8), Parking monitoring (Optional)
A low-power protector should be installed if you need to add parking monitoring,
because this function is harmful for your car battery. (It is recommended to turn on
motion detection).
9), Motion detection (Optional)
At standby mode, enter into app settings, turn on motion detection, when an object
moves within the sensing area, the camera will start to record.
6 , MirrorLink setting
To ensure that the smart phone can be access to the mobile network during
connecting to the night vision camera, personal hotspot should be set to connect to
the device, after connection completed, you can control the camera through your
smart phone, the step is as follows:
a, Connect all related cables to the control box(Especially the WiFi USB cable),
and power on the device.
Page 7
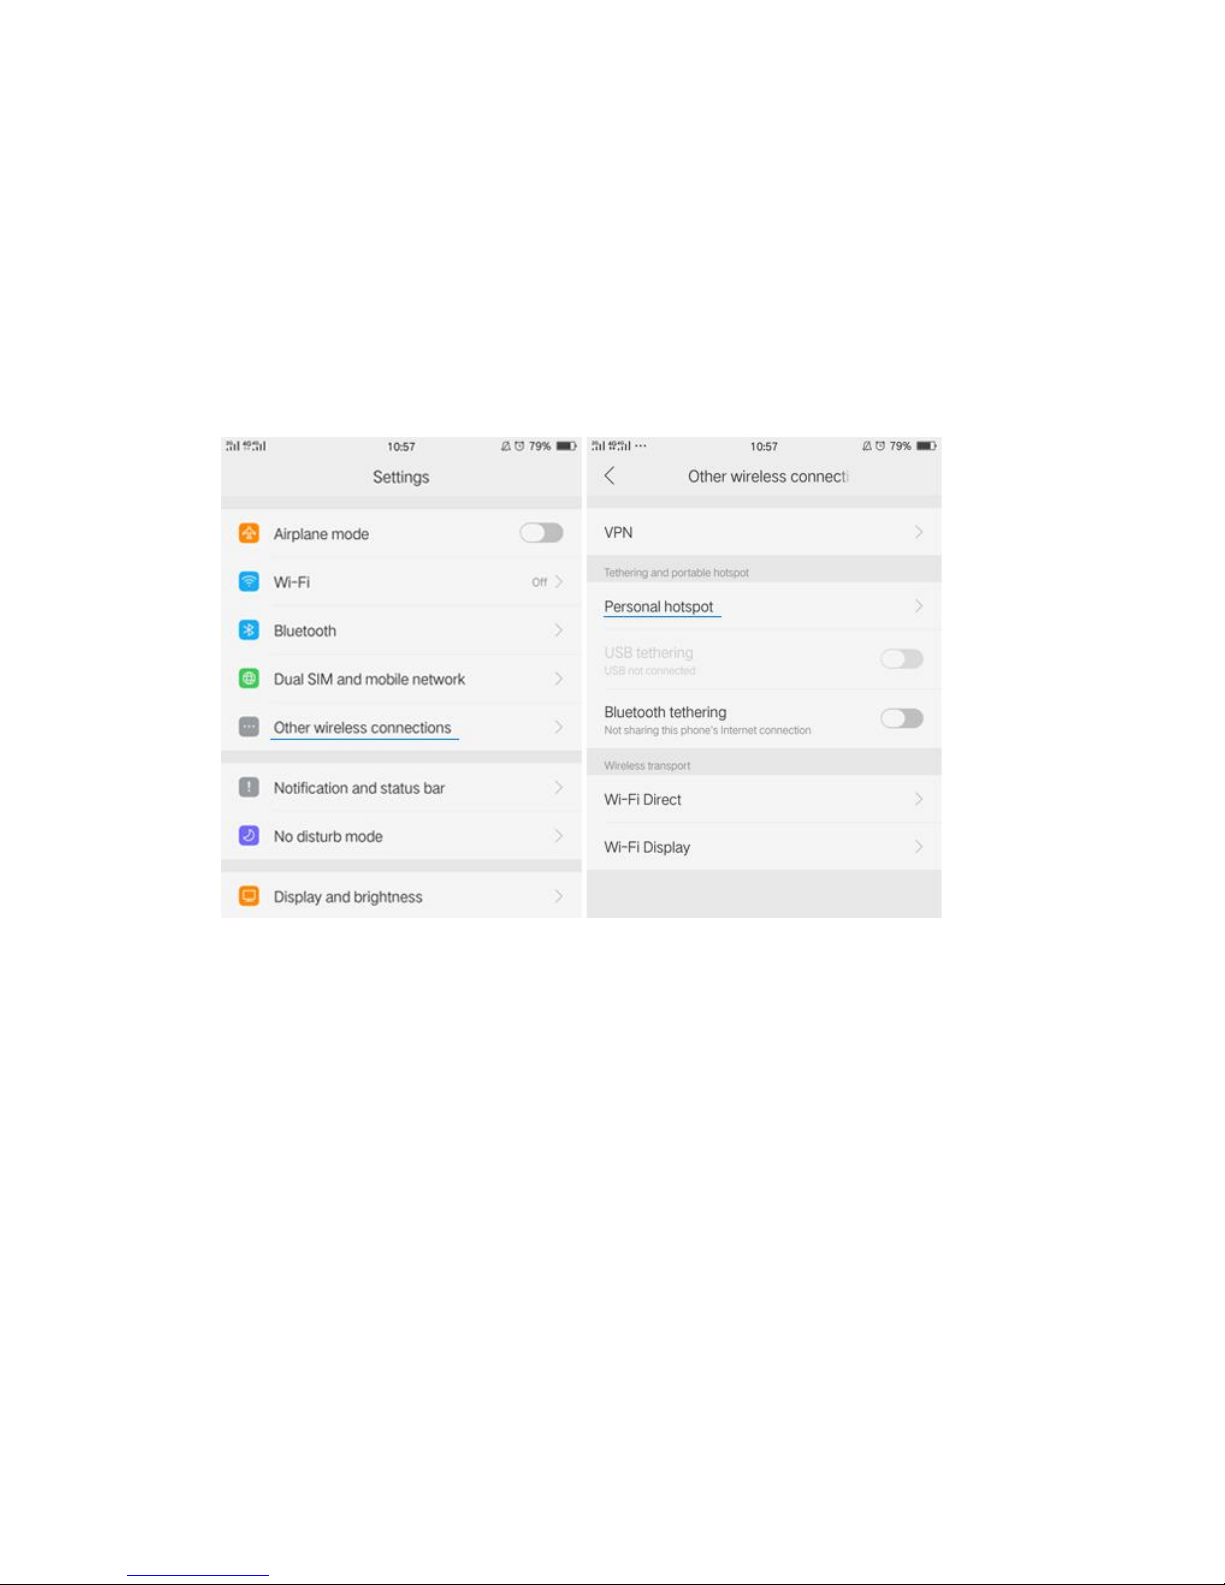
b, Set smart phone personal hotspot (The control box default WiFi name is
"car_0001", password 12345678, set your smart phone personal hotspot and name it
as "car_0001",
password 12345678, then the control box will connect with smart phone
automatically)
For Android:
Step 1, Enter into " Setting", click "Other wireless connections",
Step 2, Enter into "Other wireless connections", click “Personal hotspot”,
Step 3, Enter into “Personal hotspot”, enable personal hotspot
Step 4, Enter into “User name and password setting” to set Name and password as
below.
Step 5, Click “OK” to finish setting.
Page 8
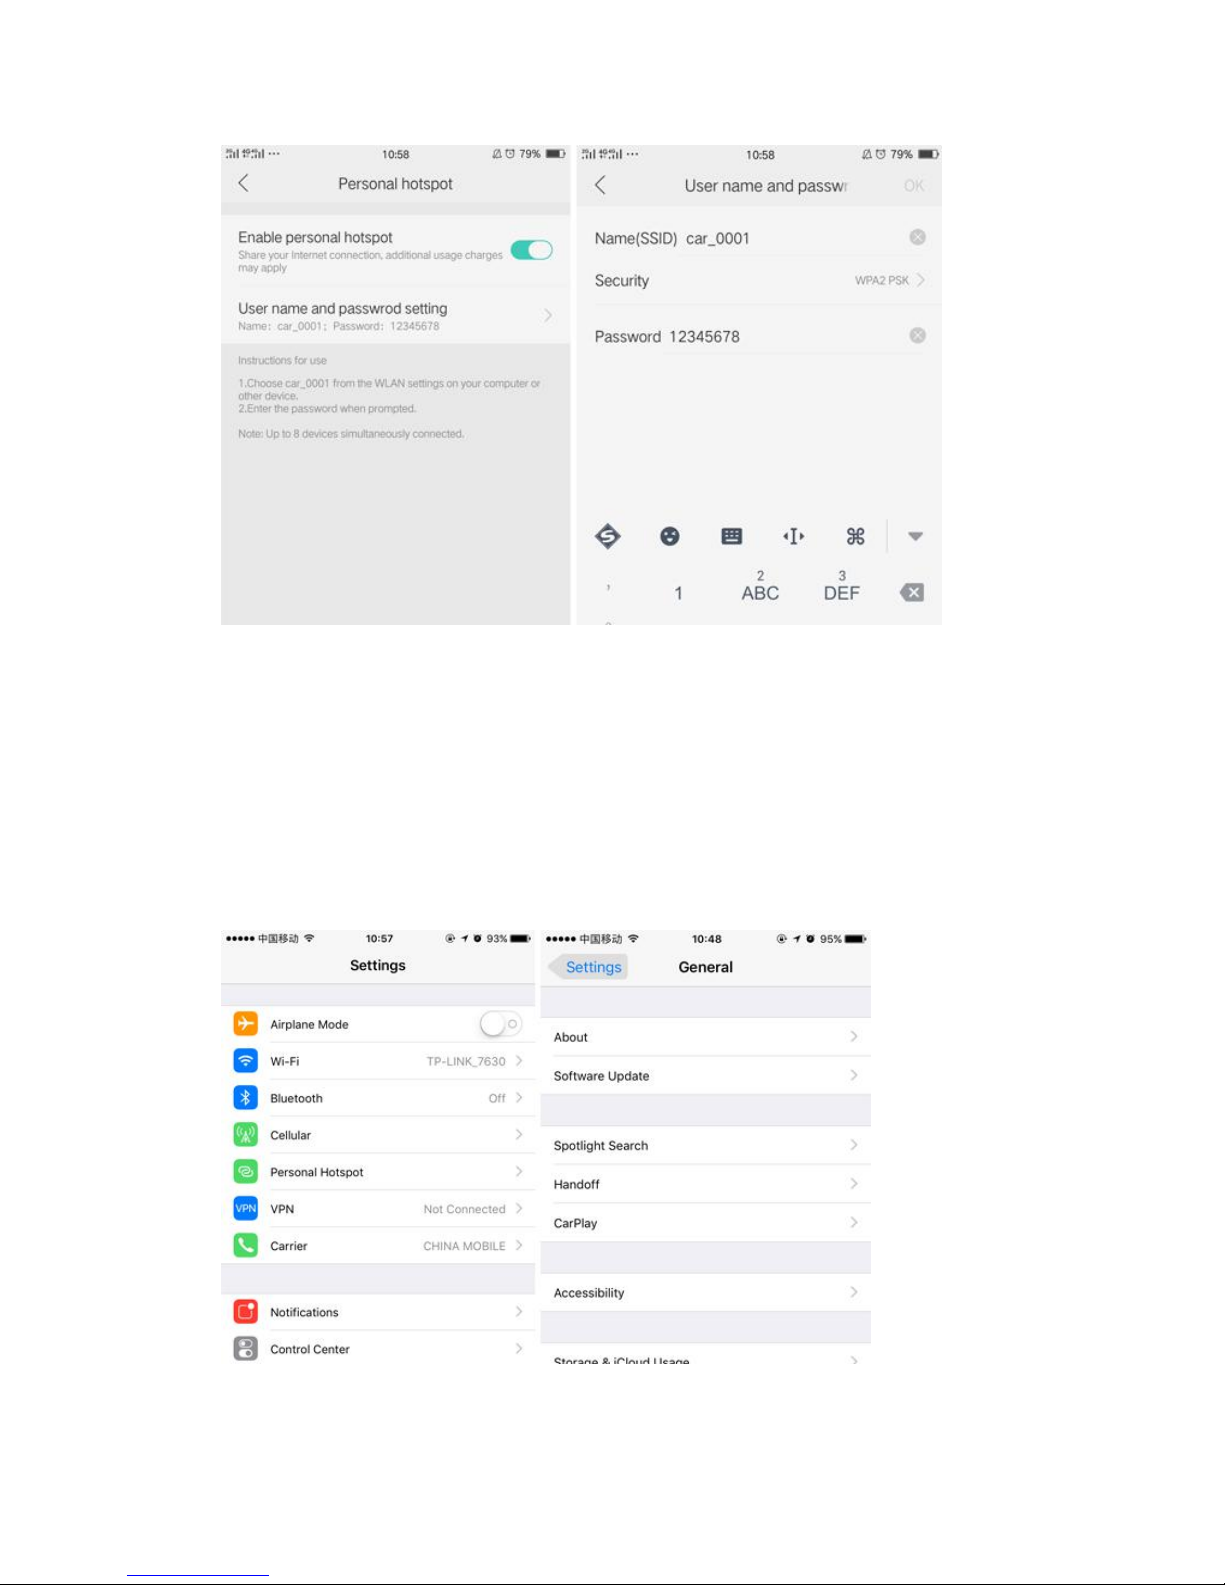
For iOS:
Step 1, Enter into "Setting", click "General",
Step 2, Enter into "About", set the name as "car_0001",
Step 3, Return to "Setting", click "Personal Hotspot", rename the WiFi password as
12345678,
Step 4, Enable personal hotspot and wait 10 seconds, the control box will be
connected with smart phone automatically.
Step 5, Click “Done” to finish setting.
Page 9
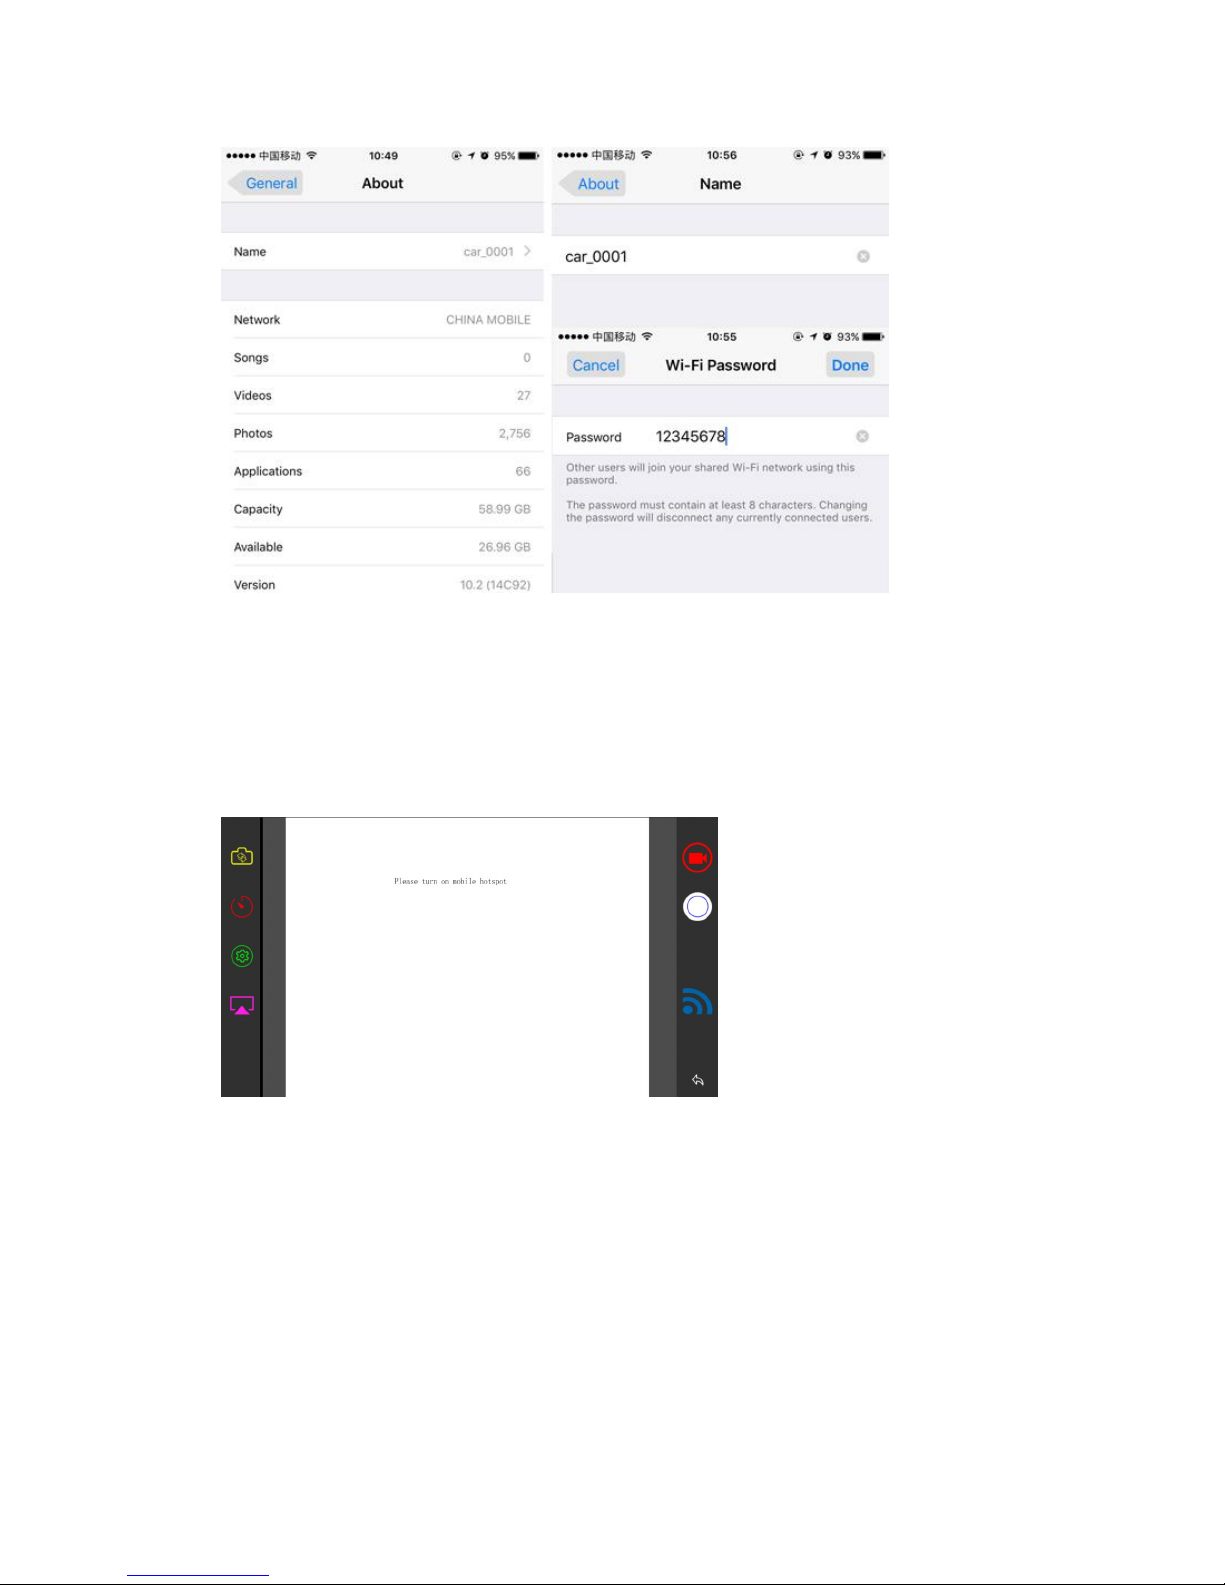
c, After smart phone personal hotspot connected, turn App to operate the control
box, you can realize functions, like view switch, time sync, setting, smart phone sync,
video playback, screenshot, WiFi setting, etc.
Android:
iOS:
Page 10
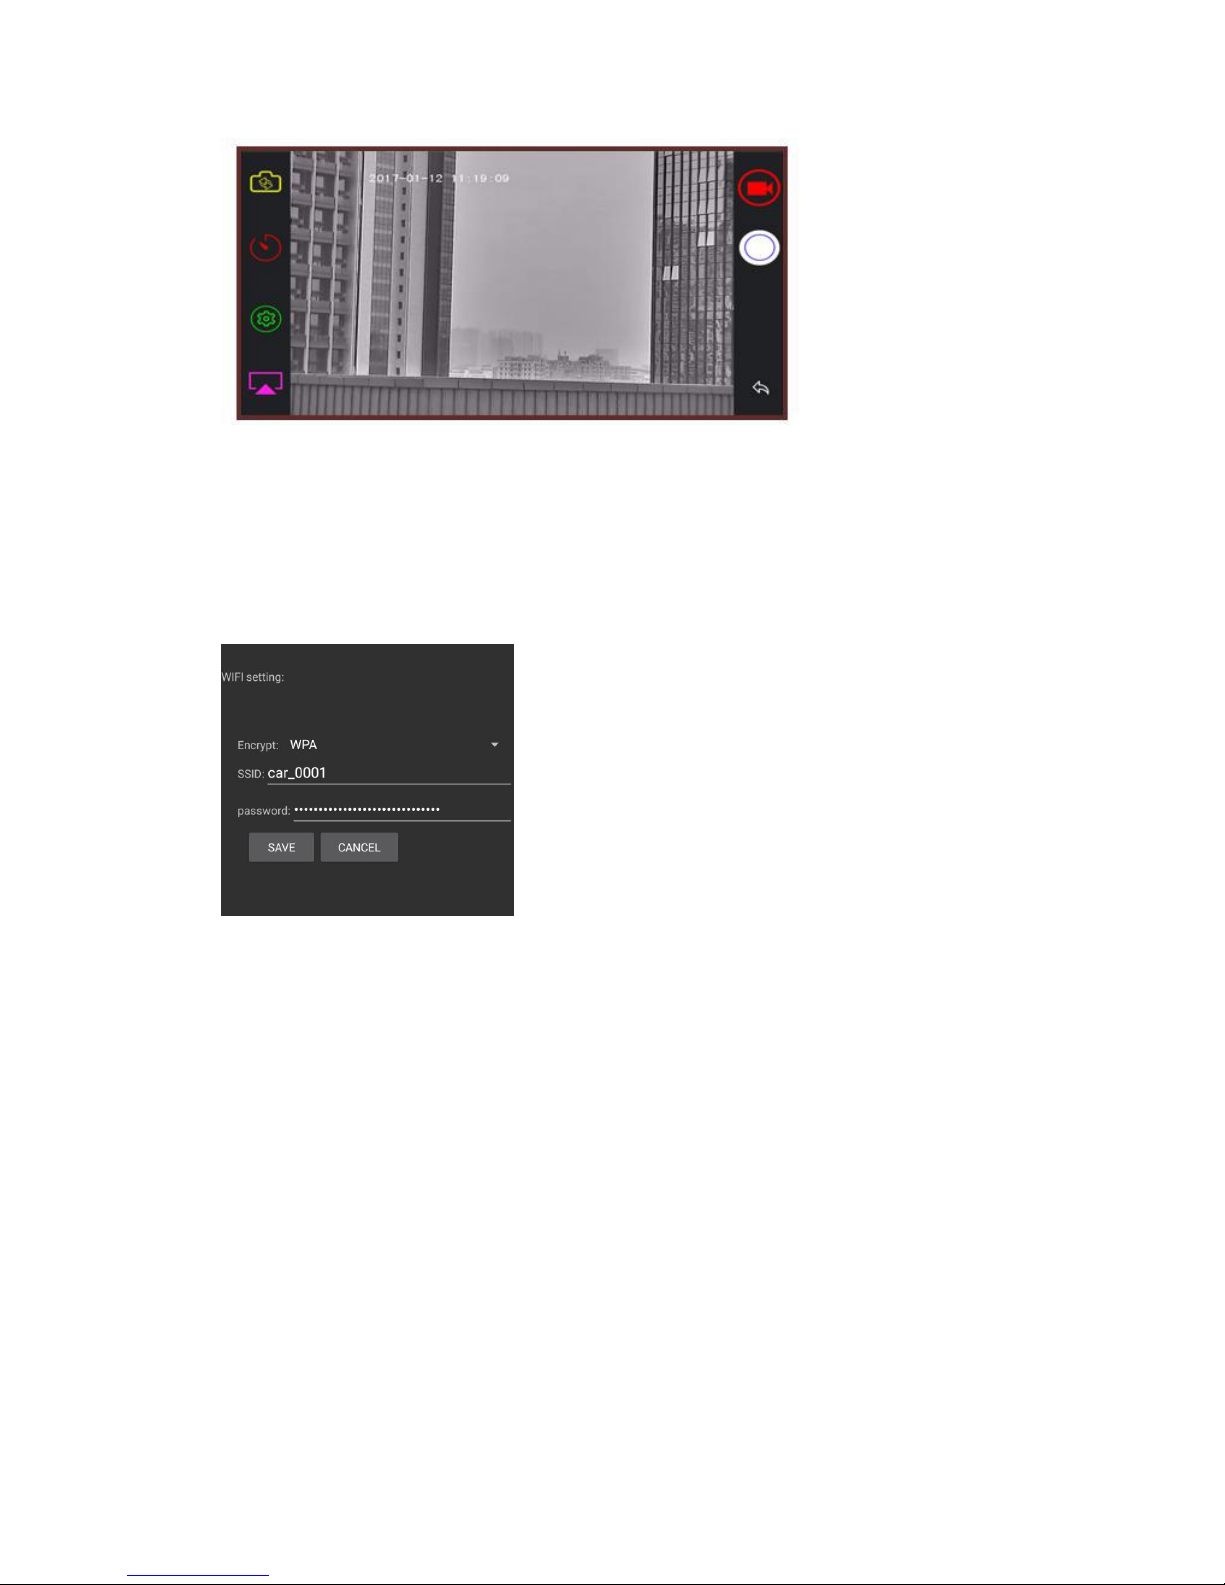
d, To protect personal privacy and avoid multi control boxes exists which causing WiFi
conflict, we can change the WiFi name and password, enter into App, and click WiFi,
set the control box WiFi name and password as personal setting, and save it. The
control box will reboot and only connect the setting WiFi, so the smart phone WiFi
name and password needs to be reset the same parameters as control box.
NOTE: If you forgot the password, you should reset the WiFi name and password
through computer, please take follows procedures below:
Step 1, Turn on your computer,
Step 2, Create a blank text document, name it as wifi_reset.cmd,
Step 3, Copy it to your USB flash drive, then connect USB flash drive to control box,
Step 4, Power the control box, reset finished.
Step 5, Follow step 1 ~ 5 (chapter 2 of Mobile Internet) to set new WiFi name and
password.
7, App features:
Page 11
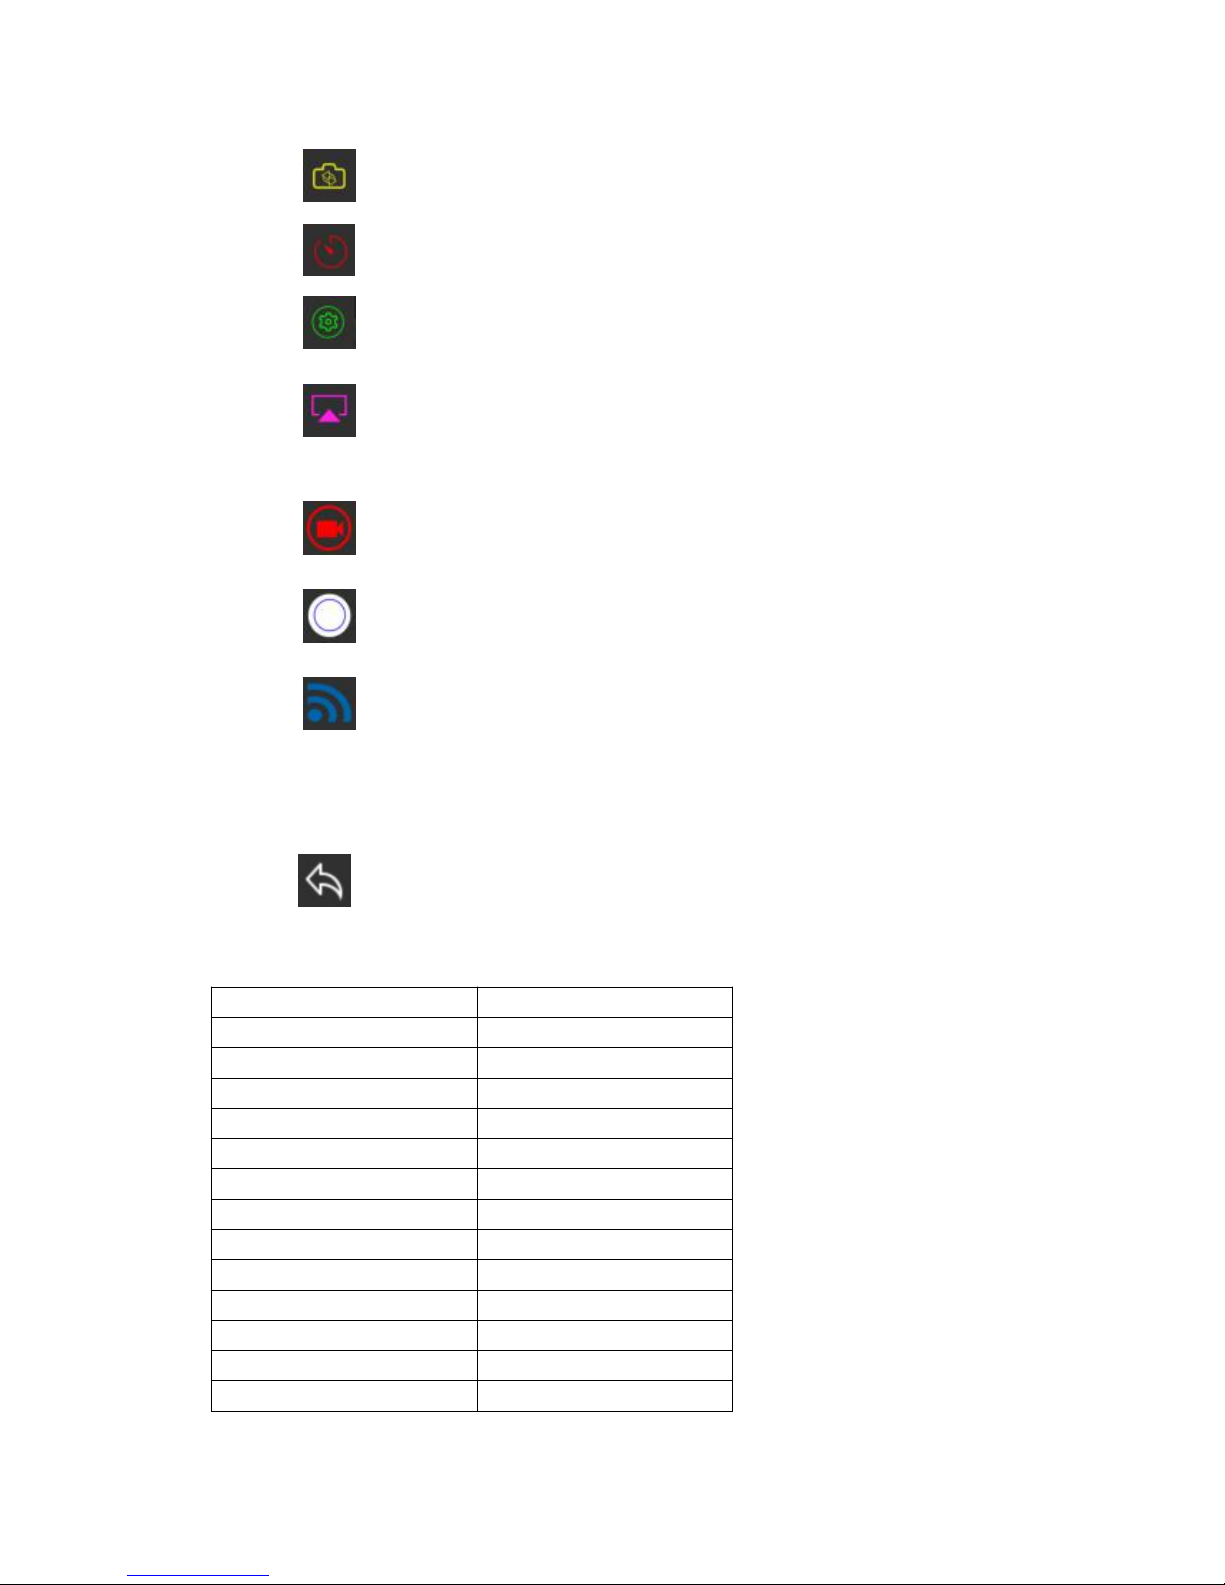
1), Click to switch night vision camera/HD camera and rear camera.
2), Click to synchronize time and date,
3), Click to setting, resolution, video standard, rearview reversal etc.,
4), Click to enable MirrorLink, you can share your smart phone to car screen,
like watch movie, play music, share GPS navigation, etc.,
5), Click to playback, you can choose file recorded you want to play back,
6), Click to take screenshot,
7), Click to change WiFi SSID and password if you don’t like default setting
car_0001, password 12345678,
NOTE: If you changed SSID and password, your personal hotspot should be changed
as the same as well, otherwise, the device can NOT be connected.
8) Click to exit the app.
8, Product parameters and specifications
Working voltage
DC 12V
Working current
< 500 mA
Lens angle
120 degree
Front video resolution
1920*1080P
Night vision resolution
1280*720P
Rear video resolution
1280*720P
Reversing
Support
H.264
Support
Video format
H.264
Image format
JPEG
Language
Chinese/English
Loop recording
Support
Parking monitoring
Optional
Motion detection
Optional
 Loading...