

HT Italia HT14D User Manual

HT14D
Release EN 1.00 - 26/11/2014
EN - 1
HT14D POCKET DIGITAL MULTIMETER
User manual
1. SAFETY PRECAUTIONS AND PROCEDURES
Avoid doing that in humid or wet places
Avoid doing that in rooms where explosive gas, combustible gas, steam or excessive dust is present
Keep you insulated from the object under test
Do not touch exposed metal parts such as test lead ends, sockets, fixing objects, circuits etc
Avoid doing that if you notice anomalous conditions such as breakages, deformations, fractures, leakages of battery liquid, blind
display etc
Be particularly careful when measuring voltages exceeding 20V to avoid risks of electrical shocks
The following symbols are used:
CAUTION - refer to the instruction manual - an improper use may damage the instrument or its components
Double insulated meter
AC Voltage
DC Voltage or Current
CAUTION: this symbol indicates that equipment, the battery and its accessories shall be subject to a separate collection
and correct disposal
2. GENERAL DESCRIPTION
The HT14D instrument performs the herewith measurements:
DC Voltage AC sine voltage
Detection of AC voltage without contact
DC Current Resistance
Diode test
9V battery test
3. INSTRUMENT DESCRIPTION
CAPTION:
1. LCD display
2. ON/OFF key
3. HOLD key
4. Functions selector
5. COM input jack
6. VmAA
input jack
7. Red LED for AC voltage detection
8. Battery cover
Fig. 1: Instrument description
4. OPERATING INSTRUCTIONS
4.1. DC VOLTAGE MEASUREMENT
1. Switch on the desired measurement range among the options: 200mV , 2000mV , 20V , 200V , 500V
2. Insert the test leads into the jacks, the red plug into VmAA
jack and black plug into COM jack and connect the red and black
test leads to the positive and negative poles of the circuit under test respectively. The voltage value is displayed. Press the HOLD
key to fix the result at display. The symbol "-" on the instrument display indicates that voltage has opposite direction with regard to
the connection performed
3. If the message "OL" is displayed the higher range is reached
4.2. AC VOLTAGE MEASUREMENT
1. Turn on the instrument in any position of the ro tary switch, approach it closest to AC source and note the turn on of red LED which
is placed to the top (see Fig.1 – part 7) which detect the AC voltage
2. Switch on the desired measurement range between the options: 200V
, 500V
3. Insert the test leads into the jacks, the red plug into VmAA
jack and black plug into COM jack and connect the red and black
test leads to the circuit under test. The voltage value is displayed. Press the HOLD key to fix the result at display
4. If the message "OL" is displayed the higher range is reached
HT14D
Release EN 1.00 - 26/11/2014
EN - 2
4.3. DC CURRENT MEASUREMENT
1. Power off the circuit under test
2. Switch on the desired measurement range between the options: 2000A
, 200mA
3. Insert the test leads into the jacks, the red plug into VmAA
jack and black plug into COM jack. Connect the red and the black
plugs in series with the circuit whose current is to be measured respecting the polarities. Energize the circuit under test. The
current value will be displayed. Press the HOLD key to fix the result at display. The symbol "-" on the instrument display indicates
that current has opposite direction with regard to the connection performed
4. If the message "OL" is displayed the higher range is reached
4.4. RESISTANCE MEASUREMENT
1. Switch on the desired measurement range among the options: 2000k, 200k, 20k, 2000, 200
2. Insert the test leads into the jacks, the red plug into VmAA
jack and black plug into COM jack and connect the red and black
test leads to the circuit under test. The resistance value is displayed. Press the HOLD key to fix the result at display
3. If the message "OL" is displayed the higher range is reached
4.5. DIODE TEST
1. Switch on the position
1. Insert the test leads into the jacks, the red plug into VmAA
jack and black plug into COM jack and connect the red test lead
and the black test lead on the anode and cathode of the diode respectively. The threshold voltage value (mV) is displayed
2. If the message "OL" is displayed the diode terminals are reversed or the diode P-N junction is damaged
4.6. BATTERY TEST
1. Switch on the position 9V BATTERY
2. Insert the test leads into the jacks, the red plug into VmAA
jack and black plug into COM jack and connect the red test lead
and the black test lead on positive and negative pole of a 9V (IEC 6F22) battery respectively. The voltage value is displayed
5. BATTERY REPLACEMENT
1. Turn off the instrument by means ON/OFF key
2. Disconnect the test leads from the input terminals
3. Remove the fixing screw from the battery cover and detach it
4. Replace the battery with a new one of the same type (12V MN21) observing the proper polarities
5. Replace the battery cover and screw
6. Use the appropriate battery disposal methods for your area
6. INTERNAL FUSE REPLACEMENT
1. Turn off the instrument by means ON/OFF key
2. Disconnect the test leads from the input terminals
3. Remove the fixing screws from the back case and detach it
4. Replace the fuse with a new one of the same type (200mA/600V, Fast)
5. Replace the back case and screws
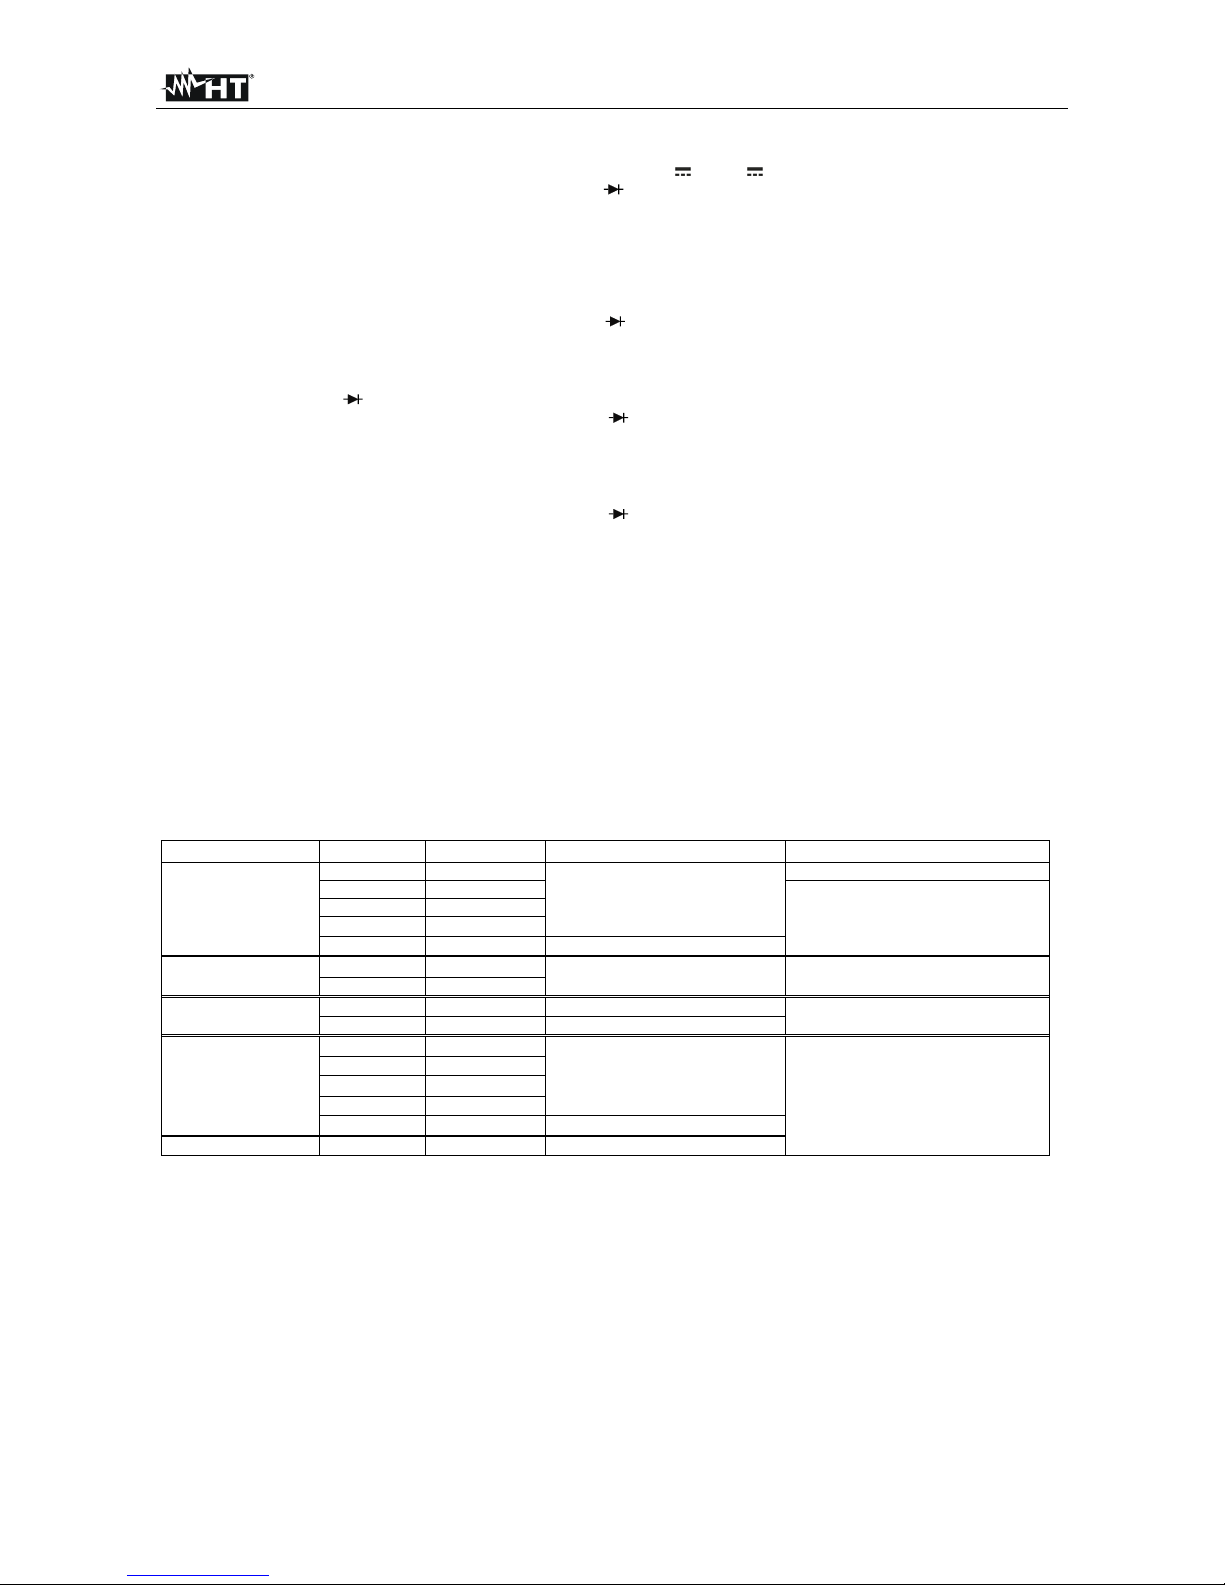
7. TECHNICAL SPECIFICATIONS
The accuracy is indicated as [% rdg + (num. dgt* resolution)] at 18°C 28°C, <75%RH
Function Range Resolution Accuracy Overload protection
DC Voltage
200.0mV 0.1mV
±(0.5%rdg + 2 dgt)
200Vrms
2000mV 1mV
500V DC/AC
20.00V 0.01V
200.0V 0.1V
500V 1V ±(0.5%rdg + 4 dgt)
AC Voltage
(50/60Hz)
200.0V 0.1V
±(1.2%rdg + 10dgt) 500V AC
500V 1V
DC Current
2000A 1A
±(1.2%rdg + 2 dgt)
Fuse fast 200mA/600V
200.0mA 0.1mA ±(1.5%rdg + 2 dgt)
Resistance
200.0
0.1
±(0.8%rdg + 4 dgt)
250Vrms for 15s max
2000 1
20.00k 0.01k
200.0k 0.1k
2000k 1k
±(1.5%rdg + 2 dgt)
Battery test 9V 10mV ±(1.2%rdg + 2 dgt)
8. GENERAL SPECIFICATIONS
Input impedance: 1M
Diode test: Max test current 1mA, open voltage 2.8V DC (typical)
Over range indication: “OL” symbol at display
Display: LCD, 3½ dgt, 2000 counts + symbol and decimal point
Sampling rate: 2 times/second
Low battery indication: “BAT” symbol at display
Power supply: 1x12V battery type MS21 / MN21
Protection fuse: Fast, 200mA/600V, 5x20mm (“mA” and “A” inputs)
Safety: IEC/EN61010-1
Insulation: double insulation
Pollution degree: 2
Measurement category: CAT III 300V, CAT II 600V
Max height of use: 2000m (7000ft)
Dimensions (L x W x H): 105 x 50 x 25mm (4 x 2 x 1in)
Weight (included battery): 100g (4 ounces)
Standard accessories: couple of test leads, battery, user manual
 Loading...