

Page 1
User manual
Manuale d'uso
HT309
Manuel d’utilisation
Bedienungsanleitung
Manual de instrucciones
Copyright HT ITALIA 2012 Release 1.01 - 06/02/2012
Page 2

Indice generale
General index
Índice general
Inhalt
Table des matiéres
ITALIANO ......................... IT – 1
ENGLISH ........................ EN – 1
ESPAÑOL ....................... ES – 1
DEUTSCH ....................... DE – 1
FRANÇAIS ....................... FR - 1
Page 3

ITALIANO
Manuale d’uso
Copyright HT ITALIA 2012 Versione IT 1.01 - 06/02/2012
Page 4

HT309
INDICE:
1. PRECAUZIONI E MISURE DI SICUREZZA .................................................................... 2
1.1. Istruzioni preliminari ............................................................................................... 2
1.2. Durante l’utilizzo .................................................................................................... 2
1.3. Dopo l’utilizzo ........................................................................................................ 2
2. DESCRIZIONE GENERALE ............................................................................................ 3
3. PREPARAZIONE ALL’UTILIZZO .................................................................................... 3
3.1. Controlli iniziali ....................................................................................................... 3
3.2. Alimentazione dello strumento .............................................................................. 3
3.3. Taratura ................................................................................................................. 3
3.4. Conservazione ....................................................................................................... 3
4. ISTRUZIONI OPERATIVE ............................................................................................... 4
4.1. Descrizione dello strumento .................................................................................. 4
4.2. Descrizione dei tasti funzione ................................................................................ 5
4.2.1. Tasto HOLD/L.S. (Light Source) ................................................................................... 5
4.2.2. Tasto LX/FC/CD ............................................................................................................ 5
4.2.3. Tasto MEM/READ ......................................................................................................... 6
4.2.4. Cancellazione memoria interna ..................................................................................... 6
4.2.5. Funzioni MAX/MIN/AVG ................................................................................................ 6
4.2.6. Disabilitazione funzione Auto Power OFF ..................................................................... 6
4.2.7. Tasto ZERO .................................................................................................................. 6
4.3. Operazioni di misura .............................................................................................. 7
4.3.1. Misura di Illuminamento ................................................................................................ 7
4.3.2. Misura dell’intensità luminosa ....................................................................................... 7
5. MANUTENZIONE ............................................................................................................ 8
5.1. Sostituzione batteria .............................................................................................. 8
5.2. Pulizia dello strumento .......................................................................................... 8
5.3. Fine vita ................................................................................................................. 8
6. SPECIFICHE TECNICHE ................................................................................................ 9
6.1. Caratteristiche tecniche ......................................................................................... 9
6.1.1. Risposta spettrale .......................................................................................................... 9
6.1.2. Sensore ......................................................................................................................... 9
6.1.3. Caratteristiche generali ............................................................................................... 10
6.2. Ambiente ............................................................................................................. 10
6.2.1. Condizioni ambientali di utilizzo .................................................................................. 10
6.3. Accessori ............................................................................................................. 10
6.3.1. Accessori in dotazione ................................................................................................ 10
7. ASSISTENZA ................................................................................................................ 11
7.1. Condizioni di garanzia ......................................................................................... 11
7.2. Assistenza ........................................................................................................... 11
8. APPENDICE A: LIVELLI DI ILLUMINAMENTO RACCOMANDATI ............................... 12
IT - 1
Page 5
HT309
1. PRECAUZIONI E MISURE DI SICUREZZA
Lo strumento è stato progettato in conformità alle direttive di sicurezza relative agli
strumenti di misura elettronici. Per evitare di danneggiare lo strumento, La preghiamo di
seguire le procedure descritte nel presente manuale e di leggere con particolare
attenzione tutte le note precedute dal simbolo . Prima e durante l’esecuzione delle
misure attenersi scrupolosamente alle seguenti indicazioni:
• Non effettuare misure in presenza di gas o materiali esplosivi, combustibili o in
ambienti polverosi
• Non effettuare misure in ambienti umidi
• Non effettuare alcuna misura qualora si riscontrino anomalie come, deformazioni,
rotture, fuoriuscite di sostanze, assenza di visualizzazione sul display, ecc
• Non toccare il sensore fotodiodo durante l’esecuzione della misura per prevenire
danneggiamenti allo strumento causati da elettricità statica o contaminazioni
Nel presente manuale è utilizzato il seguente simbolo:
Attenzione: attenersi alle istruzioni riportate nel manuale d’uso. Un uso
improprio può danneggiare lo strumento e/o i suoi componenti.
1.1. ISTRUZIONI PRELIMINARI
• Al fine di evitare letture non corrette sostituire la batteria quando compare
all’accensione il simbolo “ ” a display
1.2. DURANTE L’UTILIZZO
La preghiamo di leggere attentamente le raccomandazioni e le istruzioni seguenti.
ATTENZIONE
La mancata osservazione delle Avvertenze e/o Istruzioni può danneggiare
lo strumento e/o i suoi componenti o essere fonte di pericolo per l’operatore.
• Se, durante una misura, il valore o il segno della grandezza in esame rimangono
costanti controllare se è attivata la funzione HOLD
1.3. DOPO L’UTILIZZO
• Quando le misure sono terminate, spegnere lo strumento
• Se si prevede di non utilizzare lo strumento per un lungo periodo rimuovere la batteria.
IT - 2
Page 6

HT309
2. DESCRIZIONE GENERALE
Lo strumento HT309 è un luxmetro digitale di precisione per la misura principalmente
dell’illuminamento sia di sorgenti di luce bianca sia di sorgenti LED di vari colori espresso
in Lux (Lx) o Fotocandele (Fc). Lo strumento è conforme alle normative CIE (Commissione
Internazionale sull’Illuminazione) sulla risposta spettrale ed effettua la correzione secondo
il coseno dell’angolo di incidenza della luce. Il sensore a fotodiodo al silicio garantisce
stabilità della misura.
Le seguenti funzioni sono disponibili:
• Misura di Illuminamento fino a 400kLux / 40kFc
• Misura dell’intensità luminosa (espressa in Candele)
• Selezione unità di misura: Lx/Fc/CD
• Sorgente di luce: bianca e sorgenti LED nel loro spettro visibile
• Alta precisione e rapida esecuzione della misura
• Funzione Data HOLD
• Funzioni MAX/MIN/AVG
• Azzeramento valore a display
• Impostazione fattori di correzione della risposta spettrale
• Memoria interna per salvataggio risultati di misura
• Auto Power OFF
• Autorange
3. PREPARAZIONE ALL’UTILIZZO
3.1. CONTROLLI INIZIALI
Lo strumento, prima di essere spedito, è stato controllato dal punto di vista elettrico e
meccanico. Sono state prese tutte le precauzioni possibili affinché lo strumento potesse
essere consegnato senza danni.
Tuttavia si consiglia comunque di controllare sommariamente lo strumento per accertare
eventuali danni subiti durante il trasporto. Se si dovessero riscontrare anomalie contattare
immediatamente lo spedizioniere.
Si consiglia inoltre di controllare che l’imballaggio contenga tutte le parti indicate al § 6.3.1.
In caso di discrepanze contattare il rivenditore. Qualora fosse necessario restituire lo
strumento, si prega di seguire le istruzioni riportate al § 7.
3.2. ALIMENTAZIONE DELLO STRUMENTO
Lo strumento è alimentato con un 1x9V batteria alcalina tipo NEDA1604, JIS006P,
IEC6F22 inclusa nella confezione. Allo scopo di evitarne lo scaricamento preventivo, la
batteria non è montata nello strumento. Per l’inserimento della batteria seguire le
indicazioni del § 5.1. Quando la batteria è scarica appare il simbolo “ ”. Per sostituire
la batteria seguire le istruzioni riportate al § 5.1
3.3. TARATURA
Lo strumento rispecchia le caratteristiche tecniche riportate nel presente manuale. Le
prestazioni dello strumento sono garantite per 12 mesi.
3.4. CONSERVAZIONE
Per garantire misure precise, dopo un lungo periodo di immagazzinamento in condizioni
ambientali estreme, attendere che lo strumento ritorni alle condizioni normali (vedi le
specifiche ambientali elencate al § 6.2.1).
IT - 3
Page 7

HT309
4. ISTRUZIONI OPERATIVE
4.1. DESCRIZIONE DELLO STRUMENTO
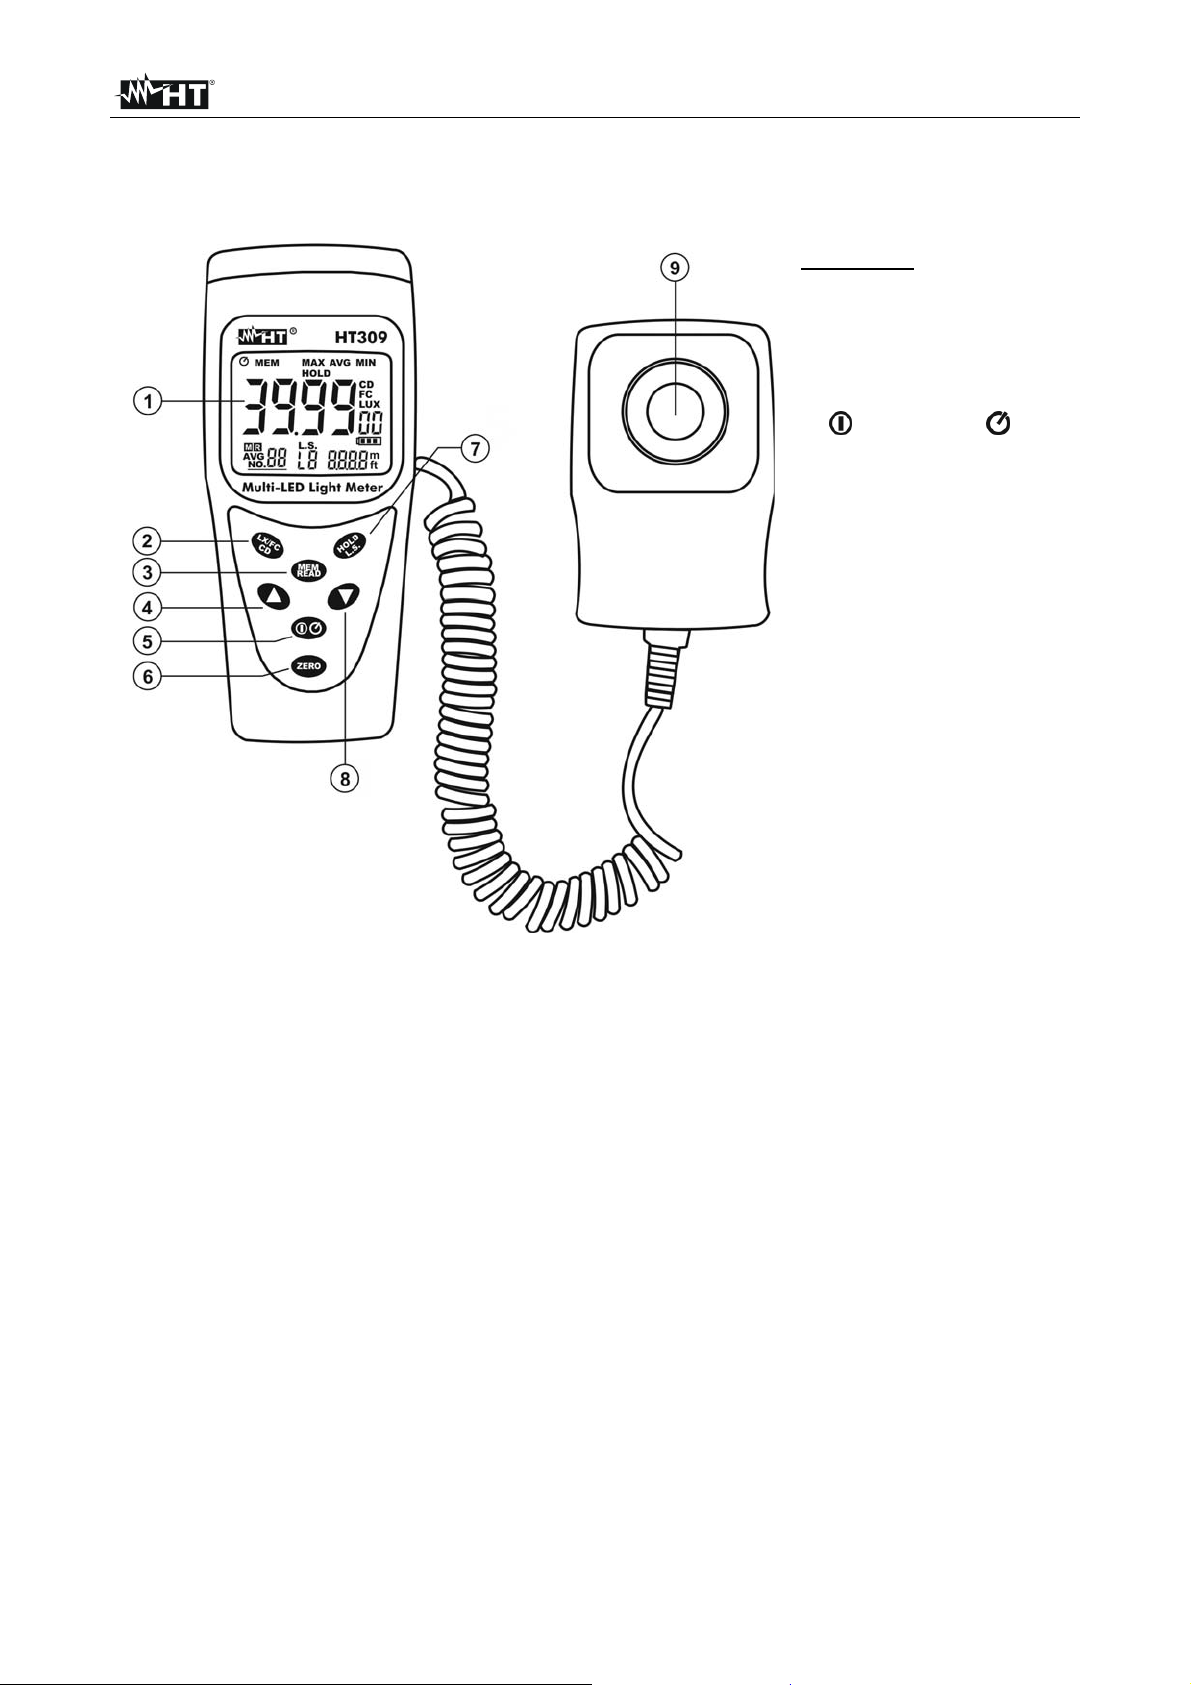
LEGENDA:
1. Display LCD
2. Tasto
3. Tasto
4. Tasto freccia S
5. Tasto (ON/OFF) /
6. Tasto
7. Tasto
8. Tasto freccia T
9. Sensore fotodiodo
LX/FC/CD
MEM/READ
(Auto Power OFF)
ZERO
HOLD/L.S.
Fig. 1: Descrizione dello strumento
IT - 4
Page 8
HT309
4.2. DESCRIZIONE DEI TASTI FUNZIONE
Alcuni tasti funzione presenti sul pannello frontale hanno un doppio utilizzo che è attivabile
mantenendo premuto il tasto per oltre 1 secondo.
4.2.1. Tasto HOLD/L.S. (Light Source)
¾ Premere il tasto HOLD/L.S per attivare il mantenimento del valore della grandezza in
misura a display. Il simbolo “HOLD” appare a display. Premere nuovamente il tasto
HOLD/L.S. per uscire dalla funzione
¾ Premere il tasto HOLD/L.S. per oltre 1 secondo per la selezione della sorgente
luminosa in esame. Operare come segue:
1. Osservare nel sotto-display il lampeggio del simbolo “Lx” in cui 0 < x < 9 indica il
numero della sorgente
2. Usare i tasti freccia S o T per selezionare la sorgente desiderata tra le opzioni L0 ÷
L9 disponibili (vedere Tabella 1)
3. Premere il tasto HOLD/L.S. per l’eventuale impostazione del fattore correttivo sulla
lettura dello strumento (solo per le sorgenti personalizzabili L7, L8 e L9). L’indicazione
del valore del parametro lampeggia a display. Usare i tasti freccia S o T per
l’impostazione (mantenere premuti i tasti per una rapida operazione) del valore
compreso tra 0.001 e 1.999. I valori delle sorgenti L0 ÷ L5 non sono modificabili
Simbolo a display Tipo sorgente Fattore correttivo
L0 Luce standard 1.000
L1 LED bianco 0.990
L2 LED rosso 0.516
L3 LED giallo 0.815
L4 LED verde 1.216
L5 LED blu 1.475
L6 LED viola 1.148
L7 Personalizzabile 1.000
L8 Personalizzabile 1.000
L9 Personalizzabile 1.000
Tabella 1: Elenco sorgenti disponibili
4. Premere per oltre 1 secondo il tasto HOLD/L.S. per confermare l’operazione. I simboli
smettono di lampeggiare a display
4.2.2. Tasto LX/FC/CD
¾ Premere il tasto LX/FC/CD per selezionare l’unità di misura dell’illuminamento
scegliendo tra le opzioni “LUX” e “FC” (1Fc = 10.764Lux ; 1Lux = 0.09290Fc)
¾ Premere per oltre 1 secondo il tasto LX/FC/CD per la selezione della misura di
intensità luminosa (vedere § 4.3.2)
IT - 5
Page 9

HT309
4.2.3. Tasto MEM/READ
¾ Premere il tasto MEM/READ per salvare nella memoria interna il dato presente a
display. L’indicazione della locazione di memoria (max 99 locazioni) e il simbolo “M”
sono mostrate istantaneamente nella parte bassa sinistra del display. Il comando non è
attivo con funzione HOLD inserita. Con funzione “AVG” attivata, la pressione del tasto
MEM/READ salva in memoria il valore medio (AVG) del dato presente a display
¾ Premere per oltre 1 secondo il tasto MEM/READ per attivare la funzione di richiamo a
display dei dati salvati nella memoria interna. I simboli “MEM” e “R” insieme al numero
dell’ultima locazione di memoria utilizzata sono mostrati a display. Usare i tasti freccia
T o S per selezionare le locazioni di memoria. Il valore salvato corrispondente è
presente a display. Premere il tasto MEM/READ per uscire dalla funzione
4.2.4. Cancellazione memoria interna
Per la cancellazione della memoria interna operare come segue:
1. Spegnere lo strumento tramite il tasto ON/OFF
2. Mantenere premuto il tasto MEM/READ mentre si accende lo strumento con il tasto
ON/OFF. I messaggi “MEM” e “CLr” sono presenti per qualche secondo a display e il
numero della locazione di memoria è riportato al valore “01”
4.2.5. Funzioni MAX/MIN/AVG
Premere il tasto freccia S per la visualizzazione dei valori Minimo, Massimo e Medio della
grandezza misurata. I valori sono continuamente aggiornati e si presentano in maniera
ciclica ad ogni nuova pressione del medesimo tasto. I simboli “MIN”, “MAX” e “AVG” sono
mostrati a display. Premere per oltre 1 secondo il tasto freccia S per uscire dalla funzione
4.2.6. Disabilitazione funzione Auto Power OFF
Al fine di preservare la batteria interna lo strumento si spegne automaticamente dopo circa
5 minuti di non utilizzo. Il simbolo “ ” appare a display. Per disattivare l’autospegnimento
operare come segue:
• Accendere lo strumento
• Premere per oltre 1 secondo il tasto ON/OFF. Il simbolo “
• Spegnere e riaccendere lo strumento per abilitare automaticamente la funzione
4.2.7. Tasto ZERO
Premere il tasto ZERO per eseguire l’azzeramento automatico del valore a display qualora
posizionando il coperchio di protezione sul sensore a fotodiodo non fosse presente
l’indicazione “000”.
Il messaggio “AdJ” è mostrato a display durante l’operazione. Il messaggio “CAP” è fornito
a display qualora si premesse il tasto ZERO con coperchio di protezione non posizionato
sul sensore. Inserire il coperchio e ripetere eventualmente l’operazione
” scompare a display
IT - 6
Page 10

HT309
4.3. OPERAZIONI DI MISURA
4.3.1. Misura di Illuminamento
1. Inserire il coperchio di protezione sul sensore a fotodiodo
2. Accendere lo strumento tramite il tasto ON/OFF
3. Eseguire eventuale azzeramento del display premendo il tasto ZERO (vedere § 4.2.7)
4. Selezionare l’unità di misura Lux o Fc sullo strumento premendo il tasto LX/FC/CD
(vedere § 4.2.2)
5. Selezionare il tipo di sorgente in esame premendo il tasto HOLD/L.S. per oltre 1
secondo (vedere § 4.2.1). La sorgente standard è il tipo “L0”
6. Posizionare il sensore orizzontalmente e in direzione perpendicolare alla sorgente in
esame. Il valore dell’illuminamento è mostrato a display con cambio automatico della
scala
7. Premere eventualmente il tasto HOLD/L.S. (vedere § 4.2.1) per congelare il dato a
display
8. Premere il tasto MEM/READ per salvare in memoria il dato letto in tempo reale a
display
9. Ricoprire il sensore e spegnere lo strumento al termine delle operazioni
4.3.2. Misura dell’intensità luminosa
L’intensità luminosa, espressa in Candele (Cd), è calcolata dallo strumento in base alla
seguente formula:
Intensità luminosa (Cd) = Illuminamento (Lux/Fc) x distanza dalla sorgente (m2/ft2)
1. Inserire il coperchio di protezione sul sensore a fotodiodo
2. Accendere lo strumento tramite il tasto ON/OFF
3. Eseguire eventuale azzeramento del display premendo il tasto ZERO (vedere § 4.2.7)
4. Selezionare l’unità di misura sullo strumento premendo per oltre 1 secondo il tasto
LX/FC/CD. Il simbolo “CD” è presente a display
5. Usare i tasti freccia S o T per la selezione dell’unità di misura della distanza (m o ft) e
confermare con il tasto LX/FC/CD
6. Impostare il valore della distanza del punto di misura dalla sorgente luminosa (solo di
tipo “L0” standard) usando i tasti freccia S o T (mantenere premuto i tasti freccia per
una rapida impostazione) e confermare con il tasto LX/FC/CD
7. Posizionare il sensore orizzontalmente e in direzione perpendicolare alla sorgente in
esame. Il valore dell’intensità luminosa è mostrato a display con cambio automatico
della scala
8. Premere eventualmente il tasto HOLD/L.S. (vedere § 4.2.1) per congelare il dato a
display
9. Premere il tasto MEM/READ per salvare in memoria il dato letto in tempo reale a
display
10. Ricoprire il sensore e spegnere lo strumento al termine delle operazioni
IT - 7
Page 11
HT309
5. MANUTENZIONE
ATTENZIONE
• Solo tecnici qualificati possono effettuare le operazioni di manutenzione.
Prima di effettuare la manutenzione rimuovere tutti i cavi dai terminali di
ingresso
• Non utilizzare lo strumento in ambienti caratterizzati da elevato tasso di
umidità o temperatura elevata. Non esporre direttamente alla luce del sole
• Spegnere sempre lo strumento dopo l’utilizzo. Se si prevede di non
utilizzarlo per un lungo periodo rimuovere la batteria per evitare fuoruscite
di liquidi da parte di quest’ultima che possano danneggiare i circuiti interni
dello strumento
5.1. SOSTITUZIONE BATTERIA
Quando sul display appare il simbolo “
” occorre sostituire la batteria.
1. Spegnere lo strumento con il tasto ON/OFF
2. Premere sul coperchio del vano batterie e spingere nella direzione della freccia
3. Rimuovere la batteria esaurita e sostituirla con una nuova dello stesso tipo (vedere §
6.1.3)
4. Riposizionare la copertura del vano batterie
5. Non smaltire le batterie con rifiuti domestici. Secondo le direttive europee le batterie
usate devono essere smaltite separatamente e sottoposte ad un sistema di riciclaggio
ecologico
5.2. PULIZIA DELLO STRUMENTO
Per la pulizia dello strumento utilizzare un panno morbido e asciutto. Non usare mai panni
umidi, solventi, acqua, ecc. La lente di plastica bianca del sensore può essere pulita se
necessario con un panno inumidito.
5.3. FINE VITA
ATTENZIONE: il simbolo riportato sullo strumento indica che l'apparecchiatura
la batteria ed i suoi accessori devono essere raccolti separatamente e trattati in
modo corretto.
IT - 8
Page 12

HT309
(
)
6. SPECIFICHE TECNICHE
6.1. CARATTERISTICHE TECNICHE
L’incertezza è riferita alle seguenti condizioni atmosferiche: temperatura 23°C ± 5°C con
umidità relativa < 70%HR.
Lo strumento è calibrato per la sorgente di luce bianca standard con una lampada ad
incandescenza alla temperatura/colore di 2856°K in accordo alla Classe A
La calibrazione per le sorgenti LED (aventi risposte spettrali diverse da quella della luce
bianca standard) sono ottenute sulla base della calibrazione per la sorgente di luce
bianca standard in Classe A con l’uso di opportuni fattori correttivi (vedere Tabella 1)
Misura di Illuminamento (Autorange)
Fondo scala (Lux) 40 400 4000 40k 400k
Risoluzione (Lux) 0.01 0.1 1 10 100
Incertezza ± (3%lettura)
Fondo scala (Fc) 40 400 4000 40k
Risoluzione (Fc) 0.01 0.1 1 10
Incertezza ± (3%lettura)
NOTE1: 1Fc=10.76Lux, 1Klux=1000Lux, 1Kfc=1000Fc
NOTA2 : per temperatura/colore diversa dal riferimento la precisione passa al 6%lettura
Campo distanza per misura di intensità luminosa: 0.01 ÷ 30.47m / 0.01 ÷ 99.99ft
Precisione sulla deviazione angolare dalla caratteristica del coseno
30° ± 2%
60° ± 6%
80° ± 25%
6.1.1. Risposta spettrale
La risposta spettrale del fotodiodo con filtro è pressoché identica alla curva CIE foto-ottica
V(λ) come mostrato nel grafico seguente.
100
90
80
%
70
60
50
40
30
20
10
Sensibilità relativa
0
380 440 500 560 62 0 680 740
V(λ)
V(?)
HT309
HT307
Lunghezza d’onda (nm)
Fig. 2: Curva CIE V(λ).
6.1.2. Sensore
Il sensore è un fotodiodo al silicio con filtro sulla risposta spettrale
IT - 9
Page 13

HT309
6.1.3. Caratteristiche generali
Caratteristiche meccaniche
Dimensioni: 130(L) x 55(La) x 38(H)mm
Dimensioni sensore: 80(L) x 55(La) x 25(H)mm
Lunghezza cavo: circa 1.5m
Peso (batteria inclusa): 250g
Alimentazione
Tipo batteria: 1x9V batteria tipo NEDA 1604 IEC 6F22
Indicazione batterie scariche: simbolo “ ” a display
Durata batterie: circa 200 ore
Display
Caratteristiche: LCD, 6 cifre, 4000 punti più punto decimale
Indicazione fuori scala: simbolo “OL” a display
Velocità di campionamento: 2.5 misure/s
Normative considerate
Standard di riferimento: JIS C 1609:1993 e CNS 5119 specificazione
generale in Classe A
Livello di inquinamento: 2
6.2. AMBIENTE
6.2.1. Condizioni ambientali di utilizzo
Temperatura di riferimento: 23° ± 5°C
Temperatura di utilizzo: 5° ÷ 40°C
Umidità relativa ammessa: <80%RH
Temperatura di immagazzinamento: -10° ÷ 60°C
Umidità di immagazzinamento: <70%RH
Max altitudine di uso: 2000m
Questo strumento è conforme ai requisiti della direttiva EMC 2004/108/EC
6.3. ACCESSORI
6.3.1. Accessori in dotazione
• Borsa per trasporto
• Batteria (non inserita)
• Manuale d’uso
IT - 10
Page 14

HT309
7. ASSISTENZA
7.1. CONDIZIONI DI GARANZIA
Questo strumento è garantito contro ogni difetto di materiale e fabbricazione, in conformità
con le condizioni generali di vendita. Durante il periodo di garanzia, le parti difettose
possono essere sostituite, ma il costruttore si riserva il diritto di riparare ovvero sostituire il
prodotto.
Qualora lo strumento debba essere restituito al servizio post - vendita o ad un rivenditore,
il trasporto è a carico del Cliente. La spedizione dovrà, in ogni caso, essere
preventivamente concordata.
Allegata alla spedizione deve essere sempre inserita una nota esplicativa circa le
motivazioni dell’invio dello strumento.
Per la spedizione utilizzare solo l’imballo originale; ogni danno causato dall’utilizzo di
imballaggi non originali verrà addebitato al Cliente.
Il costruttore declina ogni responsabilità per danni causati a persone o oggetti.
La garanzia non è applicata nei seguenti casi:
• Riparazione e/o sostituzione accessori e batterie (non coperti da garanzia).
• Riparazioni che si rendono necessarie a causa di un errato utilizzo dello strumento o
del suo utilizzo con apparecchiature non compatibili.
• Riparazioni che si rendono necessarie a causa di un imballaggio non adeguato.
• Riparazioni che si rendono necessarie a causa di interventi eseguiti da personale non
autorizzato.
• Modifiche apportate allo strumento senza esplicita autorizzazione del costruttore.
• Utilizzo non contemplato nelle specifiche dello strumento o nel manuale d’uso.
Il contenuto del presente manuale non può essere riprodotto in alcuna forma senza
l’autorizzazione del costruttore.
I nostri prodotti sono brevettati e i marchi depositati. Il costruttore si riserva il diritto
di apportare modifiche alle specifiche ed ai prezzi se ciò è dovuto a miglioramenti
tecnologici.
7.2. ASSISTENZA
Se lo strumento non funziona correttamente, prima di contattare il Servizio di Assistenza,
controllare lo stato della batteria e sostituirla se necessario.
Se lo strumento continua a manifestare malfunzionamenti controllare se la procedura di
utilizzo dello stesso è conforme a quanto indicato nel presente manuale.
Qualora lo strumento debba essere restituito al servizio post - vendita o ad un rivenditore,
il trasporto è a carico del Cliente. La spedizione dovrà, in ogni caso, essere
preventivamente concordata.
Allegata alla spedizione deve essere sempre inserita una nota esplicativa circa le
motivazioni dell’invio dello strumento.
Per la spedizione utilizzare solo l’imballaggio originale; ogni danno causato dall’utilizzo di
imballaggi non originali verrà addebitato al Cliente.
IT - 11
Page 15

HT309
8. APPENDICE A: LIVELLI DI ILLUMINAMENTO RACCOMANDATI
In Tabella 2 sono presenti i valori di illuminamento raccomandati (espressi in Lux, dividere
per 10.76 per ottenere i corrispondenti valori in fc) per diversi tipi di ambienti:
AMBIENTE AMBIENTE
LAVORATIVO
•
Sala conferenze, reception 200
Luogo di culto 700
Ufficio 1000
LUX LUX
NEGOZIO
•
750 Scala interna, corridoio 150
~
1500 Vetrina, bancone 750
~
2000 Oltre la vetrina 1500
~
~
~
~
200
1500
3000
FABBRICA
•
Linea di produzione 300
Verifica prodotto 750
Assemblaggio parti eletroniche 1500
Entrata/uscita merci 150
HOTEL
•
Salotto, sala TV, guardaroba 100
Reception 200
Cassa 750
Tabella 2: valori di illuminamento raccomandati.
OSPEDALE
•
750 Camere di degenza, magazzino 100
~
1500 Ambulatorio medico 300
~
3000 Sala operatoria 750
~
300 Pronto soccorso 750
~
SCUOLA
•
200 Auditorium, palestra 100
~
500 Aula 200
~
1000 Laboratorio, biblioteca 500
~
200
~
750
~
1500
~
1500
~
300
~
750
~
1500
~
IT - 12
Page 16

Page 17

ENGLISH
User manual
Copyright HT ITALIA 2012 Release EN 1.01 - 06/02/2012
Page 18

HT309
TABLE OF CONTENTS:
1. PRECAUTIONS AND SAFETY MEASURES .................................................................. 2
1.1. Preliminary instructions ......................................................................................... 2
1.2. During use ............................................................................................................. 2
1.3. After use ................................................................................................................ 2
2. GENERAL DESCRIPTION .............................................................................................. 3
3. PREPARATION FOR USE .............................................................................................. 3
3.1. Initial checks .......................................................................................................... 3
3.2. Instrument power supply ....................................................................................... 3
3.3. Calibration ............................................................................................................. 3
3.4. Storage .................................................................................................................. 3
4. OPERATING INSTRUCTIONS ........................................................................................ 4
4.1. Instrument description ........................................................................................... 4
4.2. Description of function keys ................................................................................... 5
4.2.1. HOLD/L.S. (Light Source) key ....................................................................................... 5
4.2.2. LX/FC/CD key ............................................................................................................... 5
4.2.3. MEM/READ key ............................................................................................................ 6
4.2.4. Deleting the internal memory ........................................................................................ 6
4.2.5. MAX/MIN/AVG functions ............................................................................................... 6
4.2.6. Disabling the Auto Power OFF function ........................................................................ 6
4.2.7. ZERO key ...................................................................................................................... 6
4.3. Measuring operations ............................................................................................ 7
4.3.1. Illuminance measurement ............................................................................................. 7
4.3.2. Luminous intensity measurement .................................................................................. 7
5. MAINTENANCE .............................................................................................................. 8
5.1. Battery replacement .............................................................................................. 8
5.2. Cleaning the instrument ......................................................................................... 8
5.3. End of life .............................................................................................................. 8
6. TECHNICAL SPECIFICATIONS ..................................................................................... 9
6.1. Technical characteristics ....................................................................................... 9
6.1.1. Spectrum response ....................................................................................................... 9
6.1.2. Sensor ........................................................................................................................... 9
6.1.3. General characteristics ................................................................................................ 10
6.2. Environment ........................................................................................................ 10
6.2.1. Environmental conditions for use ................................................................................ 10
6.3. Accessories ......................................................................................................... 10
6.3.1. Accessories provided .................................................................................................. 10
7. SERVICE ....................................................................................................................... 11
7.1. Warranty conditions ............................................................................................. 11
7.2. Service ................................................................................................................ 11
8. APPENDIX A: RECOMMENDED ILLUMINANCE LEVELS ........................................... 12
EN - 1
Page 19
HT309
1. PRECAUTIONS AND SAFETY MEASURES
The instrument has been designed in compliance with the safety directives relevant to
electronic measuring instruments. In order to prevent damaging the instrument, please
carefully follow the procedures described in this manual and read all notes preceded by
the symbol with the utmost attention. Before and after carrying out the measurements,
carefully observe the following instructions:
• Do not carry out any measurements in case gas, explosive materials or flammables are
present, or in dusty environments
• Do not carry out any measurement in humid environments
• Do not carry out any measurement in case you find anomalies such as deformation,
breaks, substance leaks, absence of display on the screen, etc.
• Do not touch the photodiode sensor while carrying out measurements, in order to
prevent any damage to the instrument caused by static electricity or contamination
The following symbol is used in this manual:
Caution: observe the instructions given in this manual. Improper use could
damage the instrument and/or its components.
1.1. PRELIMINARY INSTRUCTIONS
• In order to prevent incorrect reading, replace the battery when the symbol “ ”
appears on the display when switching on the instrument.
1.2. DURING USE
Please carefully read the following recommendations and instructions.
CAUTION
Failure to comply with the Caution notes and/or Instructions may damage
the instrument and/or its components or be a source of danger for the
operator.
• While measuring, if the value or the sign of the quantity being measured remain
unchanged, check if the HOLD function is enabled.
1.3. AFTER USE
• When measurement is complete, switch off the instrument.
• If the instrument is not to be used for a long time, remove the battery.
EN - 2
Page 20

HT309
2. GENERAL DESCRIPTION
The instrument HT309 is a precision digital luxmeter, mainly used for measuring
illuminance of both white light sources and LED sources of various colours, expressed in
Lux (Lx) or Foot-candles (Fc). The instrument complies with CIE (International
Commission on Illumination) standards on spectrum response and corrects according to
the cosine of the angle of incidence of light. The silicon photodiode sensor guarantees
measurement stability.
The instrument has the following functions:
• Illuminance measurement up to 400kLux / 40kFc
• Luminous intensity measurement (expressed in Candles)
• Selection of the measuring unit: Lx/Fc/CD
• Light source: white light source and LED sources in their visible spectrum
• High-precision and rapid measurements
• Data HOLD function
• MAX/MIN/AVG functions
• Zeroing of the displayed value
• Setting of correction factors of spectrum response
• Internal memory for saving measurement results
• Auto Power OFF
• Autorange
3. PREPARATION FOR USE
3.1. INITIAL CHECKS
Before shipping, the instrument has been checked from an electric as well as mechanical
point of view. All possible precautions have been taken so that the instrument is delivered
undamaged.
However, we recommend generally checking the instrument in order to detect possible
damage suffered during transport. In case anomalies are found, immediately contact the
forwarding agent.
We also recommend checking that the packaging contains all components indicated in §
6.3. In case of discrepancy, please contact the Dealer. In case the instrument should be
returned, please follow the instructions given in § 7
3.2. INSTRUMENT POWER SUPPLY
The instrument is powered by a single 9V alkaline battery type NEDA1604, JIS006P,
IEC6F22 included in the package. In order to prevent battery discharge, it has not been
inserted in the instrument. For battery installation, follow the instructions given in § 5.1.
The “ ” symbol appears when the battery is flat. Replace the battery by following the
instructions given in § 5.1.
3.3. CALIBRATION
The instrument has the technical specifications described in this manual. The instrument’s
performance is guaranteed for 12 months.
3.4. STORAGE
In order to guarantee precise measurement, after a long storage time under extreme
environmental conditions, wait for the instrument to come back to normal condition (see
the environmental specifications contained in § 6.2.1 before use).
EN - 3
Page 21
HT309
4. OPERATING INSTRUCTIONS
4.1. INSTRUMENT DESCRIPTION
CAPTION:
1. LCD display
2.
LX/FC/CD
3.
MEM/READ
4. S arrow key
5. (ON/OFF) / (Auto
Power OFF) key
6.
ZERO
7.
HOLD/L.S.
8. T arrow key
9. Photodiode sensor
key
key
key
key
Fig. 1: Instrument description
EN - 4
Page 22
HT309
4.2. DESCRIPTION OF FUNCTION KEYS
Some of the function keys on the front panel have a double function, which can be
activated by pressing and holding the key for more than 1 second.
4.2.1. HOLD/L.S. (Light Source) key
¾ Press the HOLD/L.S key to freeze the value of the measured quantity on the display.
The symbol “HOLD” appears on the display. Press the HOLD/L.S. key again to exit the
function.
¾ Press and hold the HOLD/L.S. key for more than 1 second to select the light source to
be measured. Proceed as follows:
1. On the sub-display, observe the flashing symbol “Lx”, where 0 < x < 9 indicates the
source number.
2. Use the arrow keys S or T to select the desired source among the available options
L0 ÷ L9 (see Table 1)
3. Press the HOLD/L.S. key to set a possible correction factor on the instrument’s reading
(only for custom sources L7, L8 and L9). The indication of the parameter value flashes
on the display. Use the arrow keys S or T to set (press and hold the keys for rapid
operation) the value between 0.001 and 1.999. The values of the sources L0 ÷ L5
cannot be modified.
Symbol on the
display
Source type Correction factor
L0 Standard light 1.000
L1 White LED 0.990
L2 Red LED 0.516
L3 Yellow LED 0.815
L4 Green LED 1.216
L5 Blue LED 1.475
L6 Purple LED 1.148
L7 Custom 1.000
L8 Custom 1.000
L9 Custom 1.000
Table 1: List of available sources
4. Press and hold the HOLD/L.S. key for more than 1 second to confirm the operation.
The symbols stop flashing on the display.
4.2.2. LX/FC/CD key
¾ Press the LX/FC/CD key to select the measuring unit of illuminance, choosing between
the two available options “LUX” and “FC” (1Fc = 10.764Lux ; 1Lux = 0.09290Fc).
¾ Press and hold the LX/FC/CD key for more than 1 second to select the measuring unit
of luminous intensity (see § 4.3.2).
EN - 5
Page 23

HT309
4.2.3. MEM/READ key
¾ Press the MEM/READ key to save the datum shown on the display in the internal
memory. The indication of the memory location (max. 99 locations) and the symbol “M”
appear at the bottom of the display on the left. The control is not active when the HOLD
function is activated. With activated “AVG” function, pressing the MEM/READ key
saves the average (AVG) value of the datum on the display in the memory.
¾ Pressing and holding the MEM/READ key for more than 1 second allows recalling the
data saved in the internal memory on the display. The symbols “MEM” and “R” together
with the number of the last memory location used are shown on the display. Use the
arrow keys T or S to select memory locations. The display shows the corresponding
saved value. Press the MEM/READ key to exit the function.
4.2.4. Deleting the internal memory
To delete the internal memory, proceed as follows:
1. Switch off the instrument using the ON/OFF key.
2. Press and hold the MEM/READ key while switching on the instrument with the ON/OFF
key. The messages “MEM” and “CLr” are shown on the display for a few seconds and
the number of the memory location is taken back to “01”.
4.2.5. MAX/MIN/AVG functions
Press the arrow key S to view the Minimum, Maximum and Average values of the
measured quantity. The values are constantly updated and are displayed cyclically every
time the same key is pressed. The symbols “MIN”, “MAX” and “AVG” appear on the
display. Press and hold the S key for more than 1 second to exit the function.
4.2.6. Disabling the Auto Power OFF function
In order to preserve the instrument’s internal battery, the instrument switches automatically
off approximately 5 minutes after it was last used. The symbol “ ” appears on the display.
To disable the Auto Power Off function, proceed as follows:
• Switch on the instrument.
• Press and hold the ON/OFF key for more than 1 second. The symbol “
from the display.
• Switch off and then on again the instrument to automatically enable the function.
4.2.7. ZERO key
Press the ZERO key to carry out the automatic zeroing of the value on the display in case
the indication “000” should be absent when placing the protection cover onto the
photodiode sensor.
The message “AdJ” is shown on the display during this operation. The message “CAP” is
shown on the display in case the ZERO key is pressed with the protection cover not
positioned on the sensor. Insert the cover and repeat the operation, if necessary.
” disappears
EN - 6
Page 24

HT309
4.3. MEASURING OPERATIONS
4.3.1. Illuminance measurement
1. Insert the protection cover onto the photodiode sensor.
2. Switch on the instrument using the ON/OFF key.
3. If necessary, zero the display by pressing the ZERO key (see § 4.2.7).
4. Select the measuring unit Lux or Fc on the instrument by pressing the LX/FC/CD key
(see § 4.2.2).
5. Select the type of source to be tested by pressing and holding the HOLD/L.S. key for
more than 1 second (see § 4.2.1). Standard source is type “L0”.
6. Position the sensor horizontally and perpendicularly with respect to the source to be
tested. The illuminance value is shown on the display, with automatic scale change.
7. Press the HOLD/L.S. key, if necessary (see § 4.2.1) to freeze the value shown on the
display.
8. Press the MEM/READ key to save the datum, read in real time and shown on the
display, in the memory.
9. Cover the sensor and switch off the instrument at the end of measurement.
4.3.2. Luminous intensity measurement
Luminous intensity, expressed in Candles (Cd), is calculated by the instrument according
to the following formula:
Luminous intensity (Cd) = Illuminance (Lux/Fc) x Distance from source (m2/ft2)
1. Insert the protection cover onto the photodiode sensor.
2. Switch on the instrument using the ON/OFF key.
3. If necessary, zero the display by pressing the ZERO key (see § 4.2.7).
4. Select the measuring unit on the instrument by pressing and holding the LX/FC/CD key
for more than 1 second. The symbol “CD” is shown on the display.
5. Use the arrow keys S or T to select the measuring unit of distance (m or ft) and
confirm with LX/FC/CD.
6. Set the value of the distance between the measured point and the light source (only of
standard type “L0”) using the arrow keys S or T (press and hold the arrow keys for a
quick setting) and confirm with the LX/FC/CD key.
7. Position the sensor horizontally and perpendicularly with respect to the source to be
tested. The value of luminous intensity is shown on the display, with automatic scale
change.
8. Press the HOLD/L.S. key, if necessary (see § 4.2.1) to freeze the value shown on the
display.
9. Press the MEM/READ key to save the datum, read in real time and shown on the
display, in the memory.
10. Cover the sensor and switch off the instrument at the end of measurement.
EN - 7
Page 25

HT309
5. MAINTENANCE
CAUTION
• Only expert and trained technicians should perform maintenance
operations. Before carrying out maintenance operations, disconnect all
cables from the input terminals.
• Do not use the instrument in environments with high humidity levels or
high temperatures. Do not expose to direct sunlight.
• Always switch off the instrument after use. In case the instrument is not to
be used for a long time, remove the battery to avoid liquid leaks that could
damage the instrument’s internal circuits.
5.1. BATTERY REPLACEMENT
When the display shows the “ ” symbol, replace the battery.
1. Switch off the instrument using the ON/OFF key.
2. Press the battery compartment cover and slide it in the direction of the arrow.
3. Remove the old battery and replace it with a new battery of the same type (see § 6.1.3)
4. Restore the battery compartment cover to its position.
5. Do not dispose of the batteries together with household waste. According to European
Directives, old batteries must be disposed of separately and recycled.
5.2. CLEANING THE INSTRUMENT
Use a soft and dry cloth to clean the instrument. Never use wet cloths, solvents, water, etc.
The white plastic lens of the sensor may be cleaned, if necessary, with a wet cloth.
5.3. END OF LIFE
CAUTION: the symbol on the instrument indicates that the appliance, the battery
and its accessories must be collected separately and correctly disposed of.
EN - 8
Page 26

HT309
y
(
)
6. TECHNICAL SPECIFICATIONS
6.1. TECHNICAL CHARACTERISTICS
Accuracy is referred to the following reference conditions: temperature 23°C ± 5°C with
relative humidity < 70%RH.
The instrument is calibrated for a standard white light source consisting of an incandescent
lamp, at a temperature/colour of 2856°K in compliance with Class A.
Calibration for LED sources (with spectrum response different from that of standard white
light) is based on the calibration for standard white light source in Class A using the
appropriate correction factors (see Table 1)
Illuminance measurement (Autorange)
Full scale (Lux) 40 400 4000 40k 400k
Resolution (Lux) 0.01 0.1 1 10 100
Accuracy ± (3%reading)
Full scale (Fc) 40 400 4000 40k
Resolution (Fc) 0.01 0.1 1 10
Accuracy ± (3%reading)
NOTE 1: 1Fc=10.76Lux, 1Klux=1000Lux, 1Kfc=1000Fc
NOTE 2: for temperature/colours different from the reference one, accuracy becomes 6%reading
Distance range for luminous intensity measurement: 0.01 ÷ 30.47m / 0.01 ÷ 99.99ft
Accuracy on angular deviation from cosine characteristic
30° ± 2%
60° ± 6%
80° ± 25%
6.1.1. Spectrum response
The spectrum response of the photodiode with filter is almost identical to the CIE photooptical curve V(λ) as shown in the following graph.
100
90
80
%
70
60
50
40
30
20
10
Relative sensitivit
0
380 440 500 560 62 0 680 740
Wavelength (nm)
V(λ)
V(?)
HT309
HT307
Fig. 2: CIE curve V(λ).
6.1.2. Sensor
The sensor is a silicon photodiode with filter on the spectrum response.
EN - 9
Page 27

HT309
6.1.3. General characteristics
Mechanical characteristics
Size (LxWxH): 130x55x38mm (5x2x1 in)
Sensor size (LxWxH): 80x55x25mm (3x2x1 in)
Cable length: approx 1.5m (39 in)
Weight (battery included): 250g (9 ounces)
Power supply
Battery type: 1x9V battery type NEDA 1604 IEC 6F22
Low battery indication: the display shows symbol “ ”
Battery life: approx. 200 hours
Display
Characteristics: LCD, 6 digits, 4000 dots plus decimal point
Over range indication: the display shows symbol “OL”
Sampling rate: 2.5 measurements/s
Considered standards
Reference standard: JIS C 1609:1993 and CNS 5119 general
specification in Class A
Pollution level: 2
6.2. ENVIRONMENT
6.2.1. Environmental conditions for use
Reference temperature: 23° ± 5°C (73° ± 41°F)
Operating temperature: 5° ÷ 40°C (41° ÷ 104°F)
Allowable relative humidity: < 80%RH
Storage temperature: -10° ÷ 60°C (14° ÷ 140°F)
Storage humidity: < 70%RH
Max operating altitude: 2000m (6562 ft)
This instrument satisfies the requirements of Directives EMC 2004/108/EC
6.3. ACCESSORIES
6.3.1. Accessories provided
• Carrying bag
• Battery (not inserted)
• User manual
EN - 10
Page 28

HT309
7. SERVICE
7.1. WARRANTY CONDITIONS
This instrument is warranted against any material or manufacturing defect, in compliance
with the general sales conditions. During the warranty period, defective parts may be
replaced. However, the manufacturer reserves the right to repair or replace the product.
Should the instrument be returned to the After-sales Service or to a Dealer, transport will
be at the Customer’s charge. However, shipment will be agreed in advance.
A report will always be enclosed to a shipment, stating the reasons for the product’s return.
Only use original packaging for shipment; any damage due to the use of non-original
packaging material will be charged to the Customer.
The manufacturer declines any responsibility for injury to people or damage to property.
The warranty shall not apply in the following cases:
• Repair and/or replacement of accessories and batteries (not covered by warranty).
• Repairs that may become necessary as a consequence of an incorrect use of the
instrument or due to its use together with non-compatible appliances.
• Repairs that may become necessary as a consequence of improper packaging.
• Repairs which may become necessary as a consequence of interventions performed
by unauthorized personnel.
• Modifications to the instrument performed without the manufacturer’s explicit
authorization.
• Use not provided for in the instrument’s specifications or in the instruction manual.
The content of this manual cannot be reproduced in any form without the manufacturer’s
authorization.
Our products are patented and our trademarks are registered. The manufacturer
reserves the right to make changes in the specifications and prices if this is due to
improvements in technology.
7.2. SERVICE
If the instrument does not operate properly, before contacting the After-sales Service,
please check the conditions of the battery and replace it, if necessary.
Should the instrument still operate improperly, check that the product is operated
according to the instructions given in this manual.
Should the instrument be returned to the After-sales Service or to a Dealer, transport will
be at the Customer’s charge. However, shipment will be agreed in advance.
A report will always be enclosed to a shipment, stating the reasons for the product’s return.
Only use original packaging for shipment; any damage due to the use of non-original
packaging material will be charged to the Customer.
EN - 11
Page 29

HT309
8. APPENDIX A: RECOMMENDED ILLUMINANCE LEVELS
Reports the recommended illuminance values (expressed in Lux; divide by 10.76 to obtain
the corresponding values in Fc) for the different types of environments:
ENVIRONMENT ENVIRONMENT
•
AT WORK
Conference hall, reception hall 200
Place of worship 700
Office 1000
LUX LUX
•
SHOP
750 Internal stairs , corridor 150
~
1500 Shop window, counter 750
~
2000 Further than the shop window 1500
~
~
~
~
200
1500
3000
•
FACTORY
Production line 300
Product verification 750
Assem bly of electronic parts 1500
Goods entry/exit 150
HOTEL
•
Lounge, TV hall, cloakroom 100
Reception hall 200
Cash desk 750
Table 2: Recommended illuminance values
•
HOSPITAL
750 Patients' rooms, store 100
~
1500 Ambulatory clinic 300
~
3000 Oper ating room 750
~
300 Emergency room 750
~
SCHOOL
•
200 Auditorium, gymnasium 100
~
500 Classroom 200
~
1000 Laboratory, library 500
~
200
~
750
~
1500
~
1500
~
300
~
750
~
1500
~
EN - 12
Page 30

Page 31

ESPAÑOL
Manual de instrucciones
Copyright HT ITALIA 2012 Versión ES 1.01 - 06/02/2012
Page 32

HT309
INDICE:
1. PRECAUCIONES Y MEDIDAS DE SEGURIDAD ........................................................... 2
1.1. Instrucciones preliminares ..................................................................................... 2
1.2. Durante la utilización ............................................................................................. 2
1.3. Después de la utilización ....................................................................................... 2
2. DESCRIPCIÓN GENERAL .............................................................................................. 3
3. PREPARACIÓN A LA UTILIZACIÓN .............................................................................. 3
3.1. Controles iniciales ................................................................................................. 3
3.2. Alimentación del instrumento ................................................................................ 3
3.3. Calibración ............................................................................................................ 3
3.4. Conservación ......................................................................................................... 3
4. INSTRUCCIONES OPERATIVAS ................................................................................... 4
4.1. Descripción del instrumento .................................................................................. 4
4.2. Descripción de las teclas función .......................................................................... 5
4.2.1. Tecla HOLD/L.S. (Light Source) .................................................................................... 5
4.2.2. Tecla LX/FC/CD ............................................................................................................ 5
4.2.3. Tecla MEM/READ ......................................................................................................... 6
4.2.4. Borrado de la memoria interna ...................................................................................... 6
4.2.5. Funciones MAX/MIN/AVG ............................................................................................. 6
4.2.6. Deshabilitación de la función Autoapagado .................................................................. 6
4.2.7. Tecla ZERO ................................................................................................................... 6
4.3. Operaciones de medida ........................................................................................ 7
4.3.1. Medida de Iluminación .................................................................................................. 7
4.3.2. Medida de la intensidad luminosa ................................................................................. 7
5. MANTENIMIENTO .......................................................................................................... 8
5.1. Sustitución de las pilas .......................................................................................... 8
5.2. Limpieza del instrumento ....................................................................................... 8
5.3. Fin de vida ............................................................................................................. 8
6. ESPECIFICACIONES TÉCNICAS .................................................................................. 9
6.1. Características técnicas ........................................................................................ 9
6.1.1. Respuesta espectral ...................................................................................................... 9
6.1.2. Sensor ........................................................................................................................... 9
6.1.3. Características generales ............................................................................................ 10
6.2. Ambiente ............................................................................................................. 10
6.2.1. Condiciones ambientales de utilización ...................................................................... 10
6.3. Accesorios ........................................................................................................... 10
6.3.1. Accesorios en dotación ............................................................................................... 10
7. ASISTENCIA ................................................................................................................. 11
7.1. Condiciones de garantía ...................................................................................... 11
Asistencia ....................................................................................................................... 11
8. APÉNDICE A: NIVELES DE ILUMINACIÓN RECOMENDADOS ................................. 12
ES - 1
Page 33

HT309
1. PRECAUCIONES Y MEDIDAS DE SEGURIDAD
El instrumento ha sido diseñado en conformidad con las directivas EN 61010-1, relativas a
los instrumentos de medida electrónicos.
Por seguridad y para evitar daños en el instrumento, las rogamos que siga los
procedimientos descritos en el presente manual y que lea con particular atención todas
las notas precedidas por el símbolo .
Antes y durante la ejecución de las medidas aténgase a las siguientes indicaciones:
• No efectúe medidas en ambientes húmedos.
• No efectúe medidas en presencia de gas o materiales explosivos, combustibles o en
presencia de polvo.
• No efectúe ninguna medida si se encontraran anomalías en el instrumento como,
deformaciones, roturas, salida de sustancias, ausencia de visión en el visualizador,
etc.
• No toque el sensor fotodiodo durante la ejecución de la medida para evitar daños al
instrumento causados por electricidad estática o contaminación
En el presente manual se utiliza el siguiente símbolo:
Atención: aténgase a las instrucciones reportadas en el manual de
instrucciones. Un uso incorrecto puede dañar el instrumento y/o sus
componentes.
1.1. INSTRUCCIONES PRELIMINARES
• A fin de evitar lecturas incorrectas sustituya la pila cuando aparece en el encendido el
símbolo “ ” en el visualizador
1.2. DURANTE LA UTILIZACIÓN
Le rogamos que lea atentamente las recomendaciones y las instrucciones siguientes.
ATENCIÓN
La falta de observación de las Advertencias y/o Instrucciones puede dañar
el instrumento y/o a sus componentes o ser fuente de peligro para el
usuario.
• Si, durante una medida, el valor o el signo de la magnitud en examen se mantienen
constantes controle si está activada la función HOLD
1.3. DESPUÉS DE LA UTILIZACIÓN
• Cuando haya terminado las medidas, apague el instrumento
• Si se prevé no utilizar el instrumento durante un largo período retire la pila.
ES - 2
Page 34

HT309
2. DESCRIPCIÓN GENERAL
El instrumento HT309 es un luxómetro digital de precisión para la medida principalmente
de iluminación tanto de fuentes de luz blanca como de fuentes LED de varios colores
expresado en Lux (Lx) o Fotocandelas (Fc). El instrumento está conforme con las
normativas CIE (Comisión Internacional sobre Iluminación) respecto a la respuesta
espectral y efectúa la corrección según el coseno del ángulo de incidencia de la luz. El
sensor de fotodiodo de silicio garantiza la estabilidad de la medida.
Las siguientes funciones están disponibles:
• Medida de Iluminación hasta 400kLux / 40kFc
• Medida de la intensidad luminosa (expresada en Candelas)
• Selección de la unidad de medida: Lx/Fc/CD
• Fuente de luz: blanca y fuentes LED en sus espectros visibles
• Alta precisión y rápida ejecución de la medida
• Función Data HOLD
• Funciones MAX/MIN/AVG
• Puesta a cero del valor en el visualizador
• Configuración de factores de corrección de la respuesta espectral
• Memoria interna para guardado de los resultados de la medida
• Autoapagado
• Autorango
3. PREPARACIÓN A LA UTILIZACIÓN
3.1. CONTROLES INICIALES
El instrumento, antes de ser enviado, ha sido verificado desde el punto de vista eléctrico y
mecánico. Han sido tomadas todas las precauciones posibles para que el instrumento
pueda ser entregado sin daños.
Aún así se aconseja que controle someramente el instrumento para descartar eventuales
daños sufridos durante el transporte. Si tuvieran que encontrar anomalías contacte
inmediatamente al distribuidor.
Se aconseja además que controle que el embalaje contenga todas las partes indicadas en
el § 6.3.1. En caso de discrepancias contacte al distribuidor. Si fuera necesario devolver el
instrumento, se ruega que siga las instrucciones reportadas en el § 7
3.2. ALIMENTACIÓN DEL INSTRUMENTO
El instrumento se alimenta con una pila alcalina de 9V del tipo NEDA1604, JIS006P,
IEC6F22 incluida en dotación. A fin de evitar la descarga, la pila no viene montada en el
instrumento. Para la inserción de la pila siga las indicaciones del § 5.1. Cuando la pila
está descargada aparece el símbolo “ ”. Para sustituir la pila siga las instrucciones
referidas en el § 5.1
3.3. CALIBRACIÓN
El instrumento refleja las características técnicas reportadas en el presente manual. Las
prestaciones del instrumento están garantizadas por 12 meses.
3.4. CONSERVACIÓN
Para garantizar medidas precisas, después de un largo período de almacenamiento en
condiciones ambientales extremas, espere a que el instrumento vuelva a las condiciones
normales (vea las especificaciones ambientales listadas en el § 6.2.1).
ES - 3
Page 35

HT309
4. INSTRUCCIONES OPERATIVAS
4.1. DESCRIPCIÓN DEL INSTRUMENTO
LEYENDA:
1. Visualizador LCD
2. Tecla
3. Tecla
4. Tecla flecha S
5. Tecla (ON/OFF) /
6. Tecla
7. Tecla
8. Tecla flecha T
9. Sensor fotodiodo
LX/FC/CD
MEM/READ
(Auto Power OFF)
ZERO
HOLD/L.S.
Fig. 1: Descripción del instrumento
ES - 4
Page 36

HT309
4.2. DESCRIPCIÓN DE LAS TECLAS FUNCIÓN
Algunas teclas función presentes sobre el panel frontal tienen una doble función que es
activable manteniendo pulsada la tecla durante al menos 1 segundo.
4.2.1. Tecla HOLD/L.S. (Light Source)
¾ Pulse la tecla HOLD/L.S para activar el bloqueo del valor de la magnitud medida en el
visualizador. El símbolo “HOLD” aparece en el visualizador. Pulse nuevamente la tecla
HOLD/L.S. para salir de la función
¾ Pulse la tecla HOLD/L.S. durante al menos 1 segundo para la selección de la fuente
luminosa en examen. Opere como sigue:
1. Observe en el visualizador el parpadeo del símbolo “Lx” en el cual 0 < x < 9 indica el
número de la fuente
2. Utilice las teclas flecha S o T para seleccionar la fuente deseada entre las opciones
L0 ÷ L9 disponibles (vea Tabla 1)
3. Pulse la tecla HOLD/L.S. para la eventual configuración del factor correctivo sobre la
lectura del instrumento (sólo para las fuentes personalizables L7, L8 y L9). La
indicación del valor del parámetro parpadea en el visualizador. Utilice las teclas flecha
S o T para la configuración (mantenga pulsadas las teclas para una rápida
operación) del valor comprendido entre 0.001 y 1.999. Los valores de las fuentes L0 ÷
L5 no son modificables
Símbolo en el
visualizador
Tipo fuente Factor correctivo
L0 Luz estándar 1.000
L1 LED blanco 0.990
L2 LED rojo 0.516
L3 LED amarillo 0.815
L4 LED verde 1.216
L5 LED azul 1.475
L6 LED violeta 1.148
L7 Personalizable 1.000
L8 Personalizable 1.000
L9 Personalizable 1.000
Tabla 1: Lista de fuentes disponibles
4. Pulse durante al menos 1 segundo la tecla HOLD/L.S. para confirmar la operación.
Los símbolos dejan de parpadear en el visualizador
4.2.2. Tecla LX/FC/CD
¾ Pulse la tecla LX/FC/CD para seleccionar la unidad de medida de la iluminación
eligiendo entre las opciones “LUX” y “FC” (1Fc = 10.764Lux ; 1Lux = 0.09290Fc)
¾ Pulse durante al menos 1 segundo la tecla LX/FC/CD para la selección de la medida
de intensidad luminosa (vea § 4.3.2)
ES - 5
Page 37

HT309
4.2.3. Tecla MEM/READ
¾ Pulse la tecla MEM/READ para guardar en memoria el dato presente en el
visualizador. La indicación de la posición de memoria (max 99 posiciones) y el símbolo
“M” son mostradas automáticamente en la parte inferior izquierda del visualizador. El
comando no está activo con función HOLD activada. Con la función “AVG” activada, la
pulsación de la tecla MEM/READ guarda en memoria el valor medio (AVG) del dato
presente en el visualizador
¾ Pulse durante al menos 1 segundo la tecla MEM/READ para activar la función de
rellamado en el visualizador de los datos guardados en el memoria interna. Los
símbolos “MEM” y “R” junto al número de la última posición de memoria utilizada son
mostrados en el visualizador. Utilice las teclas flecha T o S para seleccionar las
posiciones de memoria. el valor guardado correspondiente se muestra en el
visualizador. Pulse la tecla MEM/READ para salir de la función
4.2.4. Borrado de la memoria interna
Para el borrado de la memoria interna operar como sigue:
1. Apague el instrumento mediante la tecla ON/OFF
2. Mantenga pulsada la tecla MEM/READ mientras se enciende el instrumento con la
tecla ON/OFF. Los mensajes “MEM” y “CLr” se muestran durante algunos segundos
en el visualizador y el número de la posición de memoria pasa al valor “01”
4.2.5. Funciones MAX/MIN/AVG
Pulse la tecla flecha S para la visualización de los valores Mínimo, Máximo y Medio de la
magnitud medida. Los valores se actualizan automáticamente y se presentan de modo
cíclico a cada nueva pulsación de la misma tecla. Los símbolos “MIN”, “MAX” y “AVG” se
muestran en el visualizador. Pulse durante al menos 1 segundo la tecla flecha S para
salir de la función
4.2.6. Deshabilitación de la función Autoapagado
A fin de conservar la pila interna el instrumento se apaga automáticamente después de
aproximadamente 5 minutos sin utilizar. El símbolo “
desactivar el autoapagado operare como sigue:
• Encienda el instrumento
• Pulse durante al menos 1 segundo la tecla ON/OFF. El símbolo “
visualizador
• Apague y vuelva a encender el instrumento para habilitar automáticamente la función
4.2.7. Tecla ZERO
Pulse la tecla ZERO para ejecutar la puesta a cero automática del valor en el visualizador
posicionando la tapa de protección sobre el sensor a fotodiodo si no estuviera presente la
indicación “000”.
El mensaje “AdJ” se muestra en el visualizador durante la operación. El mensaje “CAP” se
muestra en el visualizador si se pulsa la tecla ZERO con la tapa de protección no situada
sobre el sensor. Inserte la tapa y repita eventualmente la operación
” aparece en el visualizador. Para
” desaparece en el
ES - 6
Page 38

HT309
4.3. OPERACIONES DE MEDIDA
4.3.1. Medida de Iluminación
1. Inserte la tapa de protección sobre el sensor a fotodiodo
2. Encienda el instrumento mediante la tecla ON/OFF
3. Ejecute la eventual puesta a cero del visualizador pulsando la tecla ZERO (vea §
4.2.7)
4. Seleccione la unidad de medida Lux o Fc en el instrumento pulsando la tecla
LX/FC/CD (vea el § 4.2.2)
5. Seleccione el tipo de fuente a examen pulsando la tecla HOLD/L.S. durante al menos
1 segundo (vea § 4.2.1). La fuente estándar es el tipo “L0”
6. Posicione el sensor horizontalmente y en dirección perpendicular a la fuente en
examen. El valor de la iluminación se muestra en el visualizador con cambio
automático de la escala
7. Pulse eventualmente la tecla HOLD/L.S. (vea § 4.2.1) para congelare el dato en el
visualizador
8. Pulse la tecla MEM/READ para guardar en memoria el dato leído en tiempo real en el
visualizador
9. Vuelva a cubrir el sensor y apague el instrumento al acabar las operaciones
4.3.2. Medida de la intensidad luminosa
La intensidad luminosa, expresada in Candelas (Cd), la calcula el instrumento en base a
la siguiente fórmula:
Intensidad luminosa (Cd) = Iluminación (Lux/Fc) x distancia de la fuente (m2/ft2)
1. Inserte la tapa de protección sobre el sensor a fotodiodo
2. Encienda el instrumento mediante la tecla ON/OFF
3. Ejecute la eventual puesta a cero del visualizador pulsando la tecla ZERO (vea §
4.2.7)
4. Seleccione la unidad de medida en el instrumento pulsando durante al menos 1
segundo la tecla LX/FC/CD. el símbolo “CD” se muestra en el visualizador
5. Utilice las teclas flecha S o T para la selección de la unidad de medida de la distancia
(m o ft) y confirme con la tecla LX/FC/CD
6. Configure el valor de la distancia del punto de medida de la fuente luminosa (sólo de
tipo “L0” estándar) usando las teclas flecha S o T (mantenga pulsadas las teclas
flecha para una rápida configuración) y confirmar con la tecla LX/FC/CD
7. Posicione el sensor horizontalmente y en dirección perpendicular a la fuente en
examen. El valor de la intensidad luminosa se muestra en el visualizador con cambio
automático de la escala
8. Pulse eventualmente la tecla HOLD/L.S. (vea § 4.2.1) para congelar el dato en el
visualizador
9. Pulse la tecla MEM/READ para guardar en memoria el dato leído en tiempo real en el
visualizador
10. Vuelva a cubrir el sensor y apague el instrumento al término de las operaciones
ES - 7
Page 39

HT309
5. MANTENIMIENTO
ATENCIÓN
• Sólo técnicos cualificados pueden efectuar las operaciones de
mantenimiento. Antes de efectuar el mantenimiento retire todos los cables
de los terminales de entrada
• No utilice el instrumento en ambientes húmedos o de temperatura
elevada. No exponga directamente a la luz solar
• Apague siempre el instrumento después de la utilización. Si se prevé no
utilizarlo por un largo período retire la pila para evitar derrame de líquidos
del instrumento que puedan dañar los circuitos internos del instrumento
5.1. SUSTITUCIÓN DE LAS PILAS
Cuando en el visualizador aparece el símbolo “ ” hace falta sustituir la pila.
1. Apague el instrumento con la tecla ON/OFF
2. Pulse sobre la tapa de las pilas y empuje en la dirección de la flecha
3. Retire la pila agotada y sustitúyala con una nueva del mismo tipo (vea § 6.1.3)
4. Vuelva a poner la tapa de las pilas
5. No deseche las pilas junto con residuos domésticos. Según las directivas europeas las
pilas tienen que ser desechadas separadamente y en un sistema de reciclaje
ecológico
5.2. LIMPIEZA DEL INSTRUMENTO
Para la limpieza del instrumento utilice un paño suave y seco. No utilice nunca paños
húmedos, solventes, agua, etc. La lente de plástico blanco del sensor puede ser limpiada
si fuera necesario con un paño humedecido.
5.3. FIN DE VIDA
ATENCIÓN: el símbolo reportado en el instrumento indica que la
instrumentación, la pila y los accesorios deben ser reciclados por separado y
tratados en modo correcto.
ES - 8
Page 40

HT309
(
)
6. ESPECIFICACIONES TÉCNICAS
6.1. CARACTERÍSTICAS TÉCNICAS
La incertidumbre se refiere a las siguientes condiciones atmosféricas: temperatura 23°C ±
5°C con humedad relativa < 70%HR.
El instrumento se calibra para la fuente de luz blanca estándar con una lámpara
incandescente a temperatura/color de 2856°K de acuerdo con la Clase A
La calibración para las fuentes LED (con respuestas espectrales distintas de la de la luz
blanca estándar) se obtienen sobre la base de la calibración para la fuente de luz blanca
estándar en Clase A con el uso de factores correctivos (vea la Tabla 1)
Medida de Iluminación (Autorango)
Fondo escala
(Lux)
40 400
Resolución (Lux) 0.01 0.1 1 10 100
Incertidumbre ± (3%lectura)
Fondo escala (Fc) 40 400 4000 40k
Resolución (Fc) 0.01 0.1 1 10
Incertidumbre ± (3%lectura)
NOTA1: 1Fc=10.76Lux, 1Klux=1000Lux, 1Kfc=1000Fc
NOTA2: para temperatura/color distinta de la referencia la precisión pasa al 6% de la lectura
Campo de distancia para medida de intensidad luminosa: 0.01 ÷ 30.47m / 0.01 ÷ 99.99ft
Precisión sobre la desviación angular de la característica del coseno
30° ± 2%
60° ± 6%
80° ± 25%
6.1.1. Respuesta espectral
La respuesta espectral del fotodiodo con filtro es prácticamente idéntica a la curva CIE
foto-óptica V(λ) según se muestra en el gráfico siguiente.
4000 40k
400k
100
90
%
80
70
60
50
40
30
20
10
Sensibilidad relativa
0
380 440 500 560 620 680 740
V(λ)
V(?)
HT309
HT307
Longitud de onda (nm)
Fig. 2: Curva CIE V(λ).
6.1.2. Sensor
El sensor es un fotodiodo de silicio con filtro sobre la respuesta espectral
ES - 9
Page 41

HT309
6.1.3. Características generales
Características mecánicas
Dimensiones: 130(L) x 55(an) x 38(H)mm
Dimensiones sensor: 80(L) x 55(an) x 25(H)mm
Largo del cable: aproximadamente 1.5m
Peso (pila incluida): 250g
Alimentación
Tipo de pila: 1x9V pilas tipo NEDA 1604 IEC 6F22
Indicación de pilas descargadas: símbolo “ ” en el visualizador
Duración de las pilas: aproximadamente 200 horas
Visualizador
Características: LCD, 6 cifras, 4000 puntos más punto decimal
Indicación fuera de rango: símbolo “OL” en el visualizador
Velocidad de muestreo: 2.5 medidas/s
Normativas consideradas
Estándar de referencia: JIS C 1609:1993 y CNS 5119 especificación
general en Clase A
Nivel de polución: 2
6.2. AMBIENTE
6.2.1. Condiciones ambientales de utilización
Temperatura de referencia: 23° ± 5°C
Temperatura de utilización: 5° ÷ 40°C
Humedad relativa admitida: <80%HR
Temperatura de almacenamiento: -10° ÷ 60°C
Humedad de almacenamiento: <70%HR
Max altitud de uso: 2000m
Este instrumento está conforme con los requisitos de la norma EMC 2004/108/EC
6.3. ACCESORIOS
6.3.1. Accesorios en dotación
• Bolsa para transporte
• Pila (no insertada)
• Manual de instrucciones
ES - 10
Page 42

HT309
7. ASISTENCIA
7.1. CONDICIONES DE GARANTÍA
Este instrumento está garantizado contra cada defecto de materiales y fabricaciones,
conforme con las condiciones generales de venta. Durante el período de garantía, las
partes defectuosas pueden ser sustituidas, pero el fabricante se reserva el derecho de
repararlo o bien sustituir el producto.
Siempre que el instrumento deba ser reenviado al servicio post - venta o a un distribuidor,
el transporte será a cargo del cliente. La expedición deberá, en cada caso, ser
previamente acordada.
Acompañando a la expedición debe ser incluida una nota explicativa sobre los motivos del
envío del instrumento.
Para la expedición utilice sólo en embalaje original, cada daño causado por el uso de
embalajes no originales será a cargo del cliente.
El constructor declina toda responsabilidad por daños causados a personas u objetos.
La garantía no se aplica en los siguientes casos:
• Reparaciones y/o sustituciones de accesorios y pilas (no cubiertas por la garantía).
• Reparaciones que se deban a causa de un error de uso del instrumento o de su uso
con aparatos no compatibles.
• Reparaciones que se deban a causa de embalajes no adecuados.
• Reparaciones que se deban a la intervención de personal no autorizado.
• Modificaciones realizadas al instrumento sin explícita autorización del constructor.
• Uso no contemplado en las especificaciones del instrumento o en el manual de uso.
El contenido del presente manual no puede ser reproducido de ninguna forma sin la
autorización del fabricante.
Nuestros productos están patentados y las marcas registradas. El fabricante se
reserva en derecho de aportar modificaciones a las características y a los precios si
esto es una mejora tecnológica.
ASISTENCIA
Si el instrumento no funciona correctamente, antes de contactar con el Servicio de
Asistencia, controle el estado de las pilas, de los cables y sustitúyalos si fuese necesario.
Si el instrumento continúa manifestando un mal funcionamiento controle si el
procedimiento de uso del mismo es correcto según lo indicado en el presente manual.
Si el instrumento debe ser reenviado al servicio post venta o a un distribuidor, el
transporte es a cargo del Cliente. La expedición deberá, en cada caso, previamente
acordada.
Acompañando a la expedición debe incluirse siempre una nota explicativa sobre el
motivo del envío del instrumento.
Para la expedición utilice sólo el embalaje original, daños causados por el uso de
embalajes no originales serán a cargo del Cliente.
ES - 11
Page 43

HT309
•
8. APÉNDICE A: NIVELES DE ILUMINACIÓN RECOMENDADOS
En la Tabla 2 aparecen los valores de iluminación recomendados (expresados en Lux,
dividir por 10.76 para obtener los correspondientes valores en fc) para distintos tipos de
ambientes:
AMBIENTE AMBIENTE
•
TRABAJO
Sala de conferencias, recepción 200
Lugar de culto 700
Oficina 1000
LUX LUX
•
NEGOCIO
750 Escaleras, corredor 150
~
1500 Escaparate, mostrador 750
~
2000 Detrás del mostrador 1500~3000
~
~
~
200
1500
FABRICA
•
Línea de producción 300
Verificación de producto 750
Montaje de piezas electrónicas 1500
Entrada/salida de materiales 150
HOTEL
•
Sala, sala TV, guardarropas 100
Recepción 200
Caja 750
Tabla 2: valores de iluminación recomendados.
HOSPITAL
•
750 Habitaciones, almacén 100
~
1500 Am bulatorio médico 300
~
3000 Sala de operaciones 750~1500
~
300 Primeros auxilios 750
~
ESCUELA
200 Auditorio, gimnasio 100
~
500 Aula 200
~
~
~
~
~
~
200
750
1500
300
750
~ 1000 Laboratorio, biblioteca 500 ~ 1500
ES - 12
Page 44

Page 45

DEUTSCH
Benutzerhandbuch
Copyright HT ITALIA 2012 Ausführung DE 1.01 - 06/02/2012
Page 46

HT309
INHALTSVERZEICHNIS:
1. SICHERHEITSVORKEHRUNGEN UND VERFAHREN .................................................. 2
1.1. Vorwort .................................................................................................................. 2
1.2. Während der Anwendung ...................................................................................... 2
1.3. Nach Gebrauch ..................................................................................................... 2
2. ALLGEMEINE BESCHREIBUNG .................................................................................... 3
3. VORBEREITUNG FÜR DIE VERWENDUNG ................................................................. 3
3.1. Vorbereitende Prüfung .......................................................................................... 3
3.2. Versorgung des Gerätes ....................................................................................... 3
3.3. Kalibration ............................................................................................................. 3
3.4. Lagerung ............................................................................................................... 3
4. BEDIENUNGSANLEITUNG ............................................................................................ 4
4.1. Gerätebeschreibung .............................................................................................. 4
4.2. Beschreibung der Funktionstasten ........................................................................ 5
4.2.1. HOLD/L.S. (Light Source) Taste ................................................................................... 5
4.2.2. LX/FC/CD Taste ............................................................................................................ 5
4.2.3. MEM/READ Taste ......................................................................................................... 6
4.2.4. Löschung des internen Speichers ................................................................................. 6
4.2.5. MAX/MIN/AVG Funktionen ............................................................................................ 6
4.2.6. Deaktivierung der Auto Power OFF Funktion ................................................................ 6
4.2.7. ZERO Taste .................................................................................................................. 6
4.3. Messung ................................................................................................................ 7
4.3.1. Messung der Beleuchtungsstärke ................................................................................. 7
4.3.2. Messung der Lichtstärke ............................................................................................... 7
5. WARTUNG UND PFLEGE .............................................................................................. 8
5.1. Batteriewechsel ..................................................................................................... 8
5.2. Reinigung .............................................................................................................. 8
5.3. LEBENSENDE ...................................................................................................... 8
6. TECHNISCHE DATEN .................................................................................................... 9
6.1. Technische Eigenschaften .................................................................................... 9
6.1.1. Spektrum-Antwort .......................................................................................................... 9
6.1.2. Sensor ........................................................................................................................... 9
6.1.3. Allgemeine Eigenschaften ........................................................................................... 10
6.2. Umweltbedingungen ............................................................................................ 10
6.2.1. Klimabedingungen für den Gebrauch .......................................................................... 10
6.3. Zubehör ............................................................................................................... 10
6.3.1. Mitgeliefertes Zubehör ................................................................................................. 10
7. SERVICE ....................................................................................................................... 11
7.1. Garantiebedingungen .......................................................................................... 11
7.2. Service ................................................................................................................ 11
8. ANHANG A: EMPFOHLENE BELEUCHTUNGSSTÄRKE............................................. 12
DE - 1
Page 47

HT309
1. SICHERHEITSVORKEHRUNGEN UND VERFAHREN
Dieses Gerät entspricht den Sicherheitsnormen für elektronische Messgeräte. Zur
Sicherheit des Gerätes müssen Sie den Verfahren folgen, die in dieser
Bedienungsanleitung beschrieben werden, und müssen besonders alle Notizen lesen,
denen folgendes Symbol voran gestellt ist. Achten Sie bei Messungen mit äußerster
Sorgfalt auf folgende Bedingungen:
• Benutzen Sie das Messgerät nicht in Umgebungen mit explosivem oder brennbarem
Gas oder Material, Dampf oder Staub
• Führen Sie keine Messungen in feuchter oder nasser Umgebung durch
• Benutzen Sie das Messgerät nicht, wenn es sich in einem schlechten Zustand befindet,
z.B. wenn Sie eine Unterbrechung, Deformierung, Bruch, fremde Substanz, keine
Anzeige, und so weiter feststellen
• Berühren Sie die Photodiode nicht während der Messung, um Beschädigungen des
Gerätes durch statische Elektrizität oder Kontamination zu vermeiden
In dieser Bedienungsanleitung wird folgendes Symbol benutzt:
Vorsicht: Beziehen Sie sich auf die Bedienungsanleitung. Falscher
Gebrauch kann zur Beschädigung des Messgerätes und/oder seiner
Bestandteile führen.
1.1. VORWORT
• Um falsche Ablesungen zu vermeiden, ersetzen Sie die Batterie, wenn das Symbol
“ ” im Display erscheint.
1.2. WÄHREND DER ANWENDUNG
Lesen Sie die folgenden Empfehlungen und Anweisungen sorgfältig.
Das Nichtbefolgen der Verwarnungen und/oder der Gebrauchsanweisungen
kann das Gerät und/oder seine Bestandteile beschädigen und eine Gefahr
für den Benutzer darstellen.
• Wenn sich während der Messung der Wert der Anzeige nicht verändert, prüfen Sie, ob
die HOLD-Funktion aktiv ist.
1.3. NACH GEBRAUCH
• Wenn die Messungen abgeschlossen sind, schalten Sie das Gerät aus.
• Wenn das Gerät für eine lange Zeit nicht benutzt wird, entfernen Sie die Batterie.
WARNUNG
DE - 2
Page 48

HT309
2. ALLGEMEINE BESCHREIBUNG
Das Gerät HT309 ist ein digitales Präzisions-Luxmeter, das hauptsächlich für die Messung
der Beleuchtungsstärke sowohl von weißen Lichtquellen als auch von LED-Quellen von
verschiedenen Farben geeignet ist, die in Lux (Lx) oder Footcandle (Fc) ausgedrückt wird.
Das Gerät entspricht den CIE (Internationale Beleuchtungs-kommission) Normen über die
Spektrum-Antwort und korrigiert nach dem Kosinus des Einfallswinkels des Lichtes. Der
Silicium-Photodioden-Sensor garantiert die Messungsstabilität.
Es stehen folgende Funktionen zur Verfügung:
• Messung der Beleuchtungsstärke bis 400kLux / 40kFc
• Messung der Lichtstärke (in Candela ausgedrückt)
• Auswahl der Messeinheit: Lx/Fc/CD
• Lichtquelle: Weiße Lichtquellen und LED-Quellen in ihrem sichtbaren Spektrum
• Hochpräzise und schnelle Messung
• Data HOLD Funktion
• MAX/MIN/AVG Funktionen
• Nullstellung des Werts im Display
• Einstellung der Korrekturfaktoren der Spektrum-Antwort
• Interner Speicher zur Abspeicherung der Messergebnisse
• Auto Power OFF
• Automatische Bereichswahl
3. VORBEREITUNG FÜR DIE VERWENDUNG
3.1. VORBEREITENDE PRÜFUNG
Die gesamte Ausrüstung ist vor dem Versand mechanisch und elektrisch überprüft
worden. Es wurde dafür Sorge getragen, dass das Messgerät Sie unbeschädigt erreicht.
Dennoch ist es ratsam, einen Check durchzuführen, um einen möglichen Schaden zu
entdecken, der während des Transportes verursacht worden sein könnte. Sollten Sie
Anomalien feststellen, wenden Sie sich bitte sofort an den Lieferanten.
Überprüfen Sie den Inhalt der Verpackung, der in § 6.3 aufgeführt wird. Bei Diskrepanzen
verständigen Sie den Händler. Sollte es notwendig werden, das Gerät zurückzuschicken,
bitte folgen Sie den Anweisungen in § 7
3.2. VERSORGUNG DES GERÄTES
Die Stromversorgung des Gerätes erfolgt durch eine 9V alkalische Batterie des Modells
NEDA1604, JIS006P, IEC6F22, im Lieferumfang enthalten. Um eine Batterieentladung
vermeiden, wurde die Batterie nicht ins Gerät eingelegt. Zum Einlegen der Batterie, folgen
Sie den Anweisungen in § 5.1. Das Symbol “ ” erscheint, wenn die Batterie erschöpft
ist. Um die Batterie zu ersetzen, folgen Sie den Anweisungen in § 5.1.
3.3. KALIBRATION
Das Gerät erfüllt die technischen Merkmale, die in diesem Handbuch beschrieben werden.
Die Einhaltung der Spezifikationen wird für 12 Monate garantiert.
3.4. LAGERUNG
Um die Genauigkeit der Messungen nach einer Zeit der Lagerung unter äußersten
Umgebungs-Bedingungen zu garantieren, warten Sie eine Zeit lang, damit das Gerät zu
den normalen Messbedingungen zurückkehrt (lesen Sie in den Angaben zu den
Umgebungs-Spezifikationen in § 6.2).
DE - 3
Page 49

HT309
4. BEDIENUNGSANLEITUNG
4.1. GERÄTEBESCHREIBUNG
LEGENDE:
1. LCD-Anzeige
2.
LX/FC/CD
3.
MEM/READ
4. S Pfeiltaste
5. Taste (ON/OFF) /
(Auto Power OFF)
6.
ZERO
7.
HOLD/L.S.
8. T Pfeiltaste
9. Photodioden-Sensor
Taste
Taste
Taste
Taste
Abb. 1: Gerätebeschreibung
DE - 4
Page 50

HT309
4.2. BESCHREIBUNG DER FUNKTIONSTASTEN
Einige Funktionstasten an der Frontplatte des Gerätes haben eine doppelte Funktion, die
Sie aktivieren können, indem Sie die Taste mehr als 1 Sekunde gedrückt halten.
4.2.1. HOLD/L.S. (Light Source) Taste
¾ Drücken Sie die HOLD/L.S Taste, um den Wert der gemessenen Größe auf der
Anzeige einzufrieren. Das Symbol “HOLD” erscheint auf dem Display. Drücken Sie die
HOLD/L.S. Taste wieder zum Verlassen der Funktion.
¾ Drücken und Halten Sie die HOLD/L.S. Taste für mehr als 1 Sekunde zur Auswahl der
zu messenden Lichtquelle. Verfahren Sie wie folgt:
1. Im unteren Display, betrachten Sie das blinkende Symbol “Lx”, wo 0 < x < 9 die
Nummer der Quelle angibt.
2. Mit den Pfeiltasten S oder T wählen Sie die gewünschte Quelle unter den
verfügbaren Optionen L0 ÷ L9 aus (siehe Tabelle )
3. Drücken Sie die HOLD/L.S. Taste zur Einstellung des eventuellen Korrekturfaktors für
die Ablesung des Gerätes (nur für die personalisierbaren Quellen L7, L8 und L9). Die
Angabe des Werts des Parameters blinkt im Display. Verwenden Sie die Pfeiltasten S
oder T für die Einstellung (drücken und halten Sie die Tasten für eine schnellere
Auswahl) des Werts zwischen 0.001 und 1.999. Der Wert der Quellen L0 ÷ L5 kann
nicht geändert werden.
Symbol im Display Quellentyp Korrekturfaktor
L0 Standard-Licht 1.000
L1 Weiße LED 0.990
L2 Rote LED 0.516
L3 Gelbe LED 0.815
L4 Grüne LED 1.216
L5 Blaue LED 1.475
L6 Violette LED 1.148
L7 Personalisierbar 1.000
L8 Personalisierbar 1.000
L9 Personalisierbar 1.000
Tabelle 1: Liste der verfügbaren Quellen
4. Drücken und Halten Sie die HOLD/L.S. Taste für mehr als 1 Sekunde zur Bestätigung
der Operation. Die Symbole im Display hören auf zu blinken.
4.2.2. LX/FC/CD Taste
¾ Drücken Sie die LX/FC/CD Taste zur Auswahl der Messeinheit der Beleuchtungsstärke
unter den Optionen “LUX” und “FC” (1Fc = 10.764Lux ; 1Lux = 0.09290Fc).
¾ Drücken und Halten Sie die LX/FC/CD Taste für mehr als 1 Sekunde zur Auswahl der
Messung der Lichtstärke (siehe § 4.3.2).
DE - 5
Page 51

HT309
4.2.3. MEM/READ Taste
¾ Drücken Sie die MEM/READ Taste zur Abspeicherung des Datums im Display im
internen Speicher. Die Angabe der Speicherstelle (max. 99 Stellen) und das Symbol
“M” werden sofort an der unteren linken Ecke des Displays angezeigt. Die Steuerung
ist nicht aktiv, wenn die HOLD-Funktion aktiv ist. Mit aktivierter “AVG”-Funktion, durch
Drücken der MEM/READ Taste können Sie den durchschnittlichen Wert (AVG) des
Datums im Display abspeichern.
¾ Drücken und Halten Sie die MEM/READ Taste für mehr als 1 Sekunde, um die im
inneren Speicher des Geräts gespeicherten Daten im Display aufzurufen. Die Symbole
“MEM” und “R” zusammen mit der Nummer der letzten benutzten Speicherstelle
werden im Display angezeigt. Mit den Pfeiltasten T oder S wählen Sie die
Speicherstellen aus. Der entsprechende abgespeicherte Wert erscheint auf dem
Display. Drücken Sie die MEM/READ Taste zum Verlassen der Funktion.
4.2.4. Löschung des internen Speichers
Zur Löschung des internen Speichers, wie folgt vorgehen:
1. Schalten Sie das Gerät mit der ON/OFF Taste aus.
2. Drücken und Halten Sie die MEM/READ Taste während Sie das Gerät mit der ON/OFF
Taste einschalten. Die Meldungen “MEM” und “CLr” erscheinen kurz im Display und
die Nummer der Speicherstelle kehrt zu “01” zurück.
4.2.5. MAX/MIN/AVG Funktionen
Drücken sie die Pfeiltaste S zur Anzeige des Maximalen, Minimalen und
Durchschnittlichen Werts der gemessenen Größe. Die Werte werden ständig aktualisiert
und erscheinen zyklisch jedes Mal, dass Sie dieselbe Taste erneut drücken. Die Symbole
“MIN”, “MAX” und “AVG” erscheinen auf der Anzeige. Drücken und Halten Sie die
Pfeiltaste S für mehr als 1 Sekunde zum Verlassen der Funktion.
4.2.6. Deaktivierung der Auto Power OFF Funktion
Um die interne Batterie nicht unnötig zu belasten, schaltet sich das Gerät ca. 5 Minuten
nach der letzten Funktionswahl automatisch aus. Das Symbol “
Display. Zur Deaktivierung der automatischen Ausschaltung, gehen Sie wie folgt vor:
• Schalten Sie das Gerät ein.
• Drücken und Halten Sie die ON/OFF Taste für mehr als 1 Sekunde. Das Symbol “
verschwindet von der Anzeige.
• Schalten Sie das Gerät aus und wieder ein, um die Funktion automatisch zu aktivieren.
4.2.7. ZERO Taste
Sollte die Anzeige “000” auf dem Display nicht angezeigt sein wenn Sie den Schutzdeckel
auf den Photodioden-Sensor stellen, drücken Sie die ZERO Taste zur automatischen
Nullstellung des Werts im Display.
Die Meldung “AdJ” wird während dieses Verfahrens im Display angezeigt. Die Meldung
“CAP” wird im Display angezeigt, wenn Sie die ZERO Taste drücken und der
Schutzdeckel nicht auf dem Sensor gestellt ist. Bringen Sie den Schutzdeckel in Stellung
und wiederholen Sie das Verfahren, wenn nötig.
” erscheint auf dem
”
DE - 6
Page 52

HT309
4.3. MESSUNG
4.3.1. Messung der Beleuchtungsstärke
1. Legen Sie den Schutzdeckel auf den Photodioden-Sensor.
2. Schalten Sie das Gerät mit der ON/OFF Taste ein.
3. Eventuell stellen Sie das Display auf Null durch Drücken der ZERO Taste (siehe §
4.2.7).
4. Wählen Sie die Messeinheit Lux oder Fc im Gerät durch Drücken der LX/FC/CD Taste
aus (siehe § 4.2.2).
5. Wählen Sie den zu messenden Quellentyp durch Drücken und Halten der HOLD/L.S.
Taste für mehr als 1 Sekunde (siehe § 4.2.1). Die Standard-Quelle ist Typ “L0”.
6. Stellen Sie den Sensor in horizontaler Position und senkrecht gerichtet mit Bezug auf
die zu messende Quelle. Der Wert der Beleuchtungsstärke wird im Display angezeigt,
mit automatischer Skala-Änderung.
7. Eventuell drücken Sie die HOLD/L.S. Taste (siehe § 4.2.1) zum Einfrieren des Datums
im Display.
8. Drücken Sie die MEM/READ Taste zur Abspeicherung des Datums, gelesen in
Echtzeit und im Display angezeigt, im Speicher.
9. Decken Sie den Sensor wieder ab und schalten Sie das Gerät aus, wenn Sie mit der
Messung fertig sind.
4.3.2. Messung der Lichtstärke
Die Lichtstärke, in Candela (Cd) ausgedrückt, wird vom Gerät nach der folgenden Formel
berechnet:
Lichtstärke (Cd) = Beleuchtungsstärke (Lux/Fc) x Abstand von der Quelle (m2/ft2)
1. Legen Sie den Schutzdeckel auf den Photodioden-Sensor.
2. Schalten Sie das Gerät mit der ON/OFF Taste ein.
3. Eventuell stellen Sie das Display auf Null durch Drücken der ZERO Taste (siehe
§ 4.2.7).
4. Wählen Sie die Messeinheit im Gerät durch Drücken und Halten der LX/FC/CD Taste
für mehr als eine Sekunde aus. Das Symbol “CD” erscheint auf dem Display.
5. Mit den Pfeiltasten S oder T wählen Sie die Messeinheit des Abstands (m oder ft) aus
und bestätigen Sie mit der LX/FC/CD Taste.
6. Stellen Sie den Wert des Abstands des Messpunktes von der Lichtquelle (nur vom
Standard-Typ “L0”) mithilfe der Pfeiltasten S oder T ein (drücken und halten Sie die
Pfeiltasten für eine schnelle Einstellung) und bestätigen Sie mit der LX/FC/CD Taste.
7. Stellen Sie den Sensor in horizontaler Position und senkrecht gerichtet mit Bezug auf
die zu messende Quelle. Der Wert der Lichtstärke wird im Display angezeigt, mit
automatischer Skala-Änderung.
8. Eventuell drücken Sie die HOLD/L.S. Taste (siehe § 4.2.1) zum Einfrieren des Datums
im Display.
9. Drücken Sie die MEM/READ Taste zur Abspeicherung des Datums, gelesen in
Echtzeit und im Display angezeigt, im Speicher.
10. Decken Sie den Sensor wieder ab und schalten Sie das Gerät aus, wenn Sie mit der
Messung fertig sind.
DE - 7
Page 53

HT309
5. WARTUNG UND PFLEGE
WARNUNG
• Nur Fachleute oder ausgebildete Techniker sollten dieses WartungsVerfahren durchführen. Entfernen Sie alle Kabel aus den EingangsAnschlüssen, bevor Sie die Wartung durchführen.
• Benutzen Sie das Gerät nicht in Umgebungen mit hohem
Luftfeuchtigkeitspegel oder hohen Temperaturen. Setzen Sie es nicht
direktem Sonnenlicht aus.
• Schalten Sie das Gerät nach Gebrauch wieder aus. Falls das Gerät für
eine längere Zeit nicht benutzt werden wird, entfernen Sie die Batterie, um
Flüssigkeitslecks zu vermeiden, die die innere Schaltkreise des Gerätes
beschädigen könnten.
5.1. BATTERIEWECHSEL
Wenn im Display das Symbol “ ” erscheint, muss die Batterie gewechselt werden.
1. Schalten Sie das Gerät mit der ON/OFF Taste aus.
2. Drücken Sie auf den Deckel des Batteriefaches und drücken Sie in die Richtung des
Pfeils.
3. Entfernen Sie die leere Batterie und ersetzen Sie mit einer neuen Batterie desselben
Typs (siehe § 6.1.2).
4. Bringen Sie den Deckel des Batteriefaches wieder in Stellung.
5. Entsorgen Sie die Batterien nicht zusammen mit Hausmüll. Gemäß den europäischen
Richtlinien müssen sie getrennt entsorgt und recycelt werden.
5.2. REINIGUNG
Zum Reinigen des Gerätes kann ein weiches trockenes Tuch verwendet werden.
Benutzen Sie keine feuchten Tücher, Lösungsmittel oder Wasser, usw. Wenn nötig,
können Sie die Linse aus weißem Kunststoff mit einem feuchten Tuch reinigen.
5.3. LEBENSENDE
WARNUNG: Dieses Symbol zeigt an, dass das Gerät, die Batterie und die
einzelnen Zubehörteile fachgemäß und getrennt voneinander entsorgt werden
müssen.
DE - 8
Page 54

HT309
p
(
)
6. TECHNISCHE DATEN
6.1. TECHNISCHE EIGENSCHAFTEN
Die Genauigkeit bezieht sich auf folgende Umweltbedingungen: Temperatur 23°C ± 5°C
mit einer relativen Luftfeuchtigkeit von < 70%RH.
Das Gerät ist für eine weiße Standard-Lichtquelle mit Glühlampe bei einer Temperatur /
Farbe von 2856°K entsprechend der Klasse A kalibriert.
Die Kalibration für LED-Quellen (mit anderen Spektrum-Antworten als die Antwort des
weißen Standard-Lichts) wird mit Bezug auf die Kalibration für die weiße StandardLichtquelle in der Klasse A mithilfe von geeigneten Korrekturfaktoren berechnet (siehe
Tabelle )
Messung der Beleuchtungsstärke (Autorange)
Messbereich (Lux) 40 400 4000 40k 400k
Auflösung (Lux) 0.01 0.1 1 10 100
Genauigkeit ± (3%Anzeige)
Messbereich (Fc) 40 400 4000 40k
Auflösung (Fc) 0.01 0.1 1 10
Genauigkeit ± (3%Anzeige)
ANMERKUNG 1: 1Fc=10.76Lux, 1Klux=1000Lux, 1Kfc=1000Fc
ANMERKUNG 2: bei anderen Temperaturen/Farben als den Bezugs-Temperaturen/Farben wird die Genauigkeit zu
6%Anzeige.
Abstandsbereich für die Messung der Lichtstärke: 0,01 ÷ 30,47m / 0.01 ÷ 99.99ft
6.1.1. Spektrum-Antwort
Die Spektrum-Antwort der Photodiode mit Filter ist fast identisch mit der CIE photooptischen Kurve V(λ), wie im folgenden Graph gezeigt.
Genauigkeit mit Bezug auf die Winkelabweichung von der Kosinus-Charakteristik
30° ± 2%
60° ± 6%
80° ± 25%
100
90
%
80
70
60
50
40
findlichkeit
30
20
10
0
Relative Em
380 440 500 560 620 680 740
Wellenlänge (nm)
V(λ)
V(?)
HT309
HT307
Abb. 2: CIE Kurve V(λ).
6.1.2. Sensor
Der Sensor ist eine Silicium-Photodiode mit Filter auf der Spektrum-Antwort.
DE - 9
Page 55

HT309
6.1.3. Allgemeine Eigenschaften
Mechanische Eigenschaften
Abmessungen: 130 (L) x 55 (B) x 38 (H) mm
Abmessungen des Sensors: 80 (L) x 55 (B) x 25 (H) mm
Kabellänge: ca. 1,5m
Gewicht (inklusive Batterie): 250g
Stromversorgung
Batterietyp: 1x9V Batterie Typ NEDA 1604 IEC 6F22
Batteriewarnanzeige: Das Symbol “ ” erscheint auf dem Display
Batterielebensdauer: ca. 200 Stunden
Anzeige
Eigenschaften: LCD, 6 Ziffern, 4000 Punkte plus Dezimalpunkt
Überlastanzeige: Das Symbol “OL” erscheint auf dem Display
Abtastrate: 2,5 Messungen/Sek.
Bezugsnormen
Bezugs-Standard: JIS C 1609:1993 und CNS 5119 allgemeine
Spezifikation in der Klasse A
Verschmutzungsgrad: 2
6.2. UMWELTBEDINGUNGEN
6.2.1. Klimabedingungen für den Gebrauch
Bezugstemperatur: 23° ± 5°C
Betriebstemperatur: 5° ÷ 40°C
Zulässige Betriebs-Luftfeuchtigkeit: < 80%RH
Lagertemperatur: -10° ÷ 60°C
Lager-Luftfeuchtigkeit: < 70%RH
Maximale Betriebshöhe: 2000m
Dieses Gerät ist konform im Sinne der Richtlinien EMC 2004/108/EG.
6.3. ZUBEHÖR
6.3.1. Mitgeliefertes Zubehör
• Transporttasche
• Batterie (nicht eingelegt)
• Benutzerhandbuch
DE - 10
Page 56

HT309
7. SERVICE
7.1. GARANTIEBEDINGUNGEN
Für dieses Gerät gewähren wir Garantie auf Material- oder Produktionsfehler,
entsprechend unseren allgemeinen Geschäftsbedingungen. Während der Garantiefrist
behält sich der Hersteller das Recht vor, das Produkt wahlweise zu reparieren oder zu
ersetzen.
Falls Sie das Gerät aus irgendeinem Grund für Reparatur oder Austausch einschicken
müssen, setzen Sie sich bitte zuerst mit dem lokalen Händler in Verbindung, bei dem Sie
das Gerät gekauft haben. Transportkosten werden vom Kunden getragen.
Vergessen Sie nicht, einen Bericht über die Gründe für das Einschicken beizulegen
(erkannte Mängel).
Verwenden Sie nur die Originalverpackung. Alle Schäden beim Versand, die auf
Nichtverwendung der Originalverpackung zurückzuführen sind, hat auf jeden Fall der
Kunde zu tragen.
Der Hersteller übernimmt keine Haftung für Personen- oder Sachschäden.
Von der Garantie ausgenommen sind:
• Reparatur und/oder Ersatz von Zubehör und Batterien (nicht durch die Garantie
gedeckt)
• Reparaturen, die aufgrund unsachgemäßer Verwendung oder durch unsachgemäße
Kombination mit inkompatiblen Zubehörteilen oder Geräten erforderlich werden.
• Reparaturen, die aufgrund von Beschädigungen durch ungeeignete
Transportverpackung erforderlich werden.
• Reparaturen, die aufgrund von vorhergegangenen Reparaturversuchen durch
ungeschulte oder nicht autorisierte Personen erforderlich werden.
• Geräte, die modifiziert wurden, ohne dass das ausdrückliche Einverständnis des
Herstellers dafür vorlag.
• Gebrauch, der den Eigenschaften des Gerätes und den Bedienungsanleitungen nicht
entspricht.
Der Inhalt dieser Bedienungsanleitung darf ohne das Einverständnis des Herstellers in
keiner Form reproduziert werden
Unsere Produkte sind patentiert und unsere Warenzeichen eingetragen. Wir
behalten uns das Recht vor, Spezifikationen und Preise aufgrund eventuell
notwendiger technischer Verbesserungen oder Entwicklungen zu ändern.
7.2. SERVICE
Für den Fall, dass das Gerät nicht korrekt funktioniert, stellen Sie vor der
Kontaktaufnahme mit Ihrem Händler sicher, dass die Batterie korrekt eingesetzt ist und
funktionieren, und sie ersetzen, wenn nötig.
Stellen Sie sicher, dass Ihre Betriebsabläufe der in dieser Betriebsanleitung
beschriebenen Vorgehensweise entsprechen.
Falls Sie das Gerät aus irgendeinem Grund für Reparatur oder Austausch einschicken
müssen, setzen Sie sich bitte zuerst mit dem lokalen Händler in Verbindung, bei dem Sie
das Gerät gekauft haben. Transportkosten werden vom Kunden getragen.
Vergessen Sie nicht, einen Bericht über die Gründe für das Einschicken beizulegen
(erkannte Mängel). Verwenden Sie nur die Originalverpackung. Alle Schäden beim
Versand, die auf Nichtverwendung der Originalverpackung zurückzuführen sind, hat auf
jeden Fall der Kunde zu tragen.
DE - 11
Page 57

HT309
8. ANHANG A: EMPFOHLENE BELEUCHTUNGSSTÄRKE
In der Tabelle 2: Empfohlene Beleuchtungsstärke sind die empfohlenen Werte der
Beleuchtungsstärke (in Lux ausgedrückt; Teilen Sie durch 10,76 für die entsprechenden
Werte in Fc) für die verschiedenen Umgebungstypen angegeben:
UMGEBUNG UMGEBUNG
ARBEITSPLATZ
•
Konferenzraum, Rezeption 200
Aufenthaltsraum 700
Büro 1000
LUX LUX
GESCHÄFT
•
750 Innere Treppe, Flur 150
~
1500 Schaufenster, Ladentisch 750~1500
~
2000 Schaufenster 1500~3000
~
~
200
•
FABRIK
Herstellungslinie 300
Produktprüfung 750
Einbau elektronischer Teile 1500
Waren-Eingang/Ausgang 150
•
HOTEL
Wohnzimmer, TV-Raum,
Garderobe
Rezeption 200
Kasse 750
100
Tabelle 2: Empfohlene Beleuchtungsstärke
•
KRANKENHAUS
750 Patientenzimmer, Lager 100
~
1500 Arztpraxis 300
~
3000 Operat ionssaal 750
~
300 Notaufnahme 750
~
•
SCHULE
200 Auditorium, Turnhalle 100
~
500 Klassenzimmer 200
~
1000 Labor, Bibliothek 500~1500
~
~
~
~
~
~
~
200
750
1500
1500
300
750
DE - 12
Page 58

Page 59

FRANÇAIS
Manuel d’utilisation
Copyright HT ITALIA 2012 Version FR 1.01 - 06/02/2012
Page 60

HT309
TABLE DES MATIÈRES :
1. PRECAUTIONS ET MESURES DE SECURITE ............................................................. 2
1.1. Instructions préliminaires ....................................................................................... 2
1.2. Pendant l’utilisation ................................................................................................ 2
1.3. Après l’utilisation .................................................................................................... 2
2. DESCRIPTION GENERALE ............................................................................................ 3
3. PREPARATION A L'UTILISATION .................................................................................. 3
3.1. Vérification initiale .................................................................................................. 3
3.2. Alimentation de l'instrument ................................................................................... 3
3.3. Etalonnage ............................................................................................................ 3
3.4. Conservation ......................................................................................................... 3
4. MODE D'UTILISATION ................................................................................................... 4
4.1. Description de l’instrument .................................................................................... 4
4.2. Description des touches de fonction ...................................................................... 5
4.2.1. Touche HOLD/L.S. (Light Source ou source de lumière) .............................................. 5
4.2.2. Touche LX/FC/CD ......................................................................................................... 5
4.2.3. Touche MEM/READ ...................................................................................................... 6
4.2.4. Effacement de la mémoire interne ................................................................................ 6
4.2.5. Fonctions MAX/MIN/AVG .............................................................................................. 6
4.2.6. Désactivation de la fonction Auto Power OFF ............................................................... 6
4.2.7. Touche ZERO ............................................................................................................... 6
4.3. Opérations de mesure ........................................................................................... 7
4.3.1. Mesure d'éclairement .................................................................................................... 7
4.3.2. Mesure de l’intensité lumineuse .................................................................................... 7
5. ENTRETIEN .................................................................................................................... 8
5.1. Remplacement de la pile ....................................................................................... 8
5.2. Nettoyage de l'instrument ...................................................................................... 8
5.3. Fin de la durée de vie ............................................................................................ 8
6. SPECIFICATIONS TECHNIQUES .................................................................................. 9
6.1. Spécifications techniques ...................................................................................... 9
6.1.1. Réponse spectrale ........................................................................................................ 9
6.1.2. Capteur .......................................................................................................................... 9
6.1.3. Caractéristiques générales .......................................................................................... 10
6.2. Environnement .................................................................................................... 10
6.2.1. Conditions environnementales d'utilisation ................................................................. 10
6.3. Accessoires ......................................................................................................... 10
6.3.1. Accessoires fournis ..................................................................................................... 10
7. ASSISTANCE ................................................................................................................ 11
7.1. Conditions de garantie ......................................................................................... 11
7.2. Assistance ........................................................................................................... 11
8. APPENDICE A : NIVEAUX D'ECLAIREMENT RECOMMANDES ................................. 12
FR - 1
Page 61

HT309
1. PRECAUTIONS ET MESURES DE SECURITE
Cet instrument a été conçu conformément aux directives de sécurité relatives aux
instruments de mesure électroniques. Afin d’éviter tout endommagement de l’instrument,
veuillez suivre avec précaution les instructions décrites dans ce manuel et lire
attentivement toutes les remarques précédées du symbole . Avant et pendant
l’exécution des mesures, veuillez respecter scrupuleusement ces indications :
• Eviter d’utiliser l’instrument en la présence de gaz ou matériaux explosifs, de
combustibles ou dans des endroits poussiéreux.
• Ne pas effectuer de mesures dans des endroits humides.
• Ne pas effectuer de mesures si vous détectez des anomalies telles qu’une
déformation, une cassure, des fuites de substances, une absence d’affichage de
l’écran, etc.
• Ne pas toucher le capteur photodiode pendant l'exécution de la mesure afin d'éviter
tout endommagement de l'instrument provoqué par l'électricité statique ou des
contaminations.
Dans ce manuel, on utilisera le symbole suivant :
Attention : s'en tenir aux instructions dont au manuel d'utilisation. Une
utilisation inappropriée peut endommager l'instrument et/ou ses
composants.
1.1. INSTRUCTIONS PRELIMINAIRES
• Afin d'éviter toute lecture incorrecte, remplacer la batterie lorsque le symbole « »
s'affiche à l'écran lors de l'allumage.
1.2. PENDANT L’UTILISATION
Veuillez lire attentivement les recommandations et instructions suivantes.
ATTENTION
Le non-respect des avertissements et/ou instructions pourrait endommager
l’instrument et/ou ses composants et mettre en danger l’utilisateur.
• Si une valeur mesurée ou le signe d’une grandeur sous test restent constants pendant
la mesure, contrôler si la fonction HOLD (Verr) est activée.
1.3. APRES L’UTILISATION
• Lorsque les mesures sont terminées, éteindre l'instrument.
• Si l’instrument n’est pas utilisé pendant longtemps, retirer la batterie.
FR - 2
Page 62

HT309
2. DESCRIPTION GENERALE
L'instrument HT309 est un luxmètre numérique de précision pour mesurer principalement
l'éclairement tant de sources de lumière blanche que de sources DEL de couleurs
différentes exprimé en Lux (Lx) ou Photocandela (Fc). L'instrument est conforme aux
réglementations CIE (Commission Internationale de l'Éclairage) pour ce qui est de la
réponse spectrale et effectue la correction selon le cosinus de l'angle d'incidence de la
lumière. Le capteur à photodiode au silicium garantit la stabilité de la mesure.
Voici les fonctions disponibles :
• Mesure d'éclairement jusqu'à 400kLux / 40kFc
• Mesure de l'intensité lumineuse (exprimée en Candela)
• Sélection de l'unité de mesure : Lx/Fc/CD
• Source de lumière : blanche et sources DEL dans leur spectre visible
• Haute précision et exécution rapide de la mesure
• Fonction Data HOLD
• Fonctions MAX/MIN/AVG
• Mise à zéro de la valeur affichée
• Réglage des facteurs de correction de la réponse spectrale
• Mémoire interne pour la sauvegarde des résultats de mesure
• Auto Power OFF
• Autorange
3. PREPARATION A L'UTILISATION
3.1. VERIFICATION INITIALE
L’instrument a fait l’objet d’un contrôle mécanique et électrique avant d’être expédié.
Toutes les précautions possibles ont été prises pour garantir une livraison de l’instrument
en bon état.
Toutefois, il est recommandé d’effectuer un contrôle rapide afin de détecter des
dommages qui auraient pu avoir lieu pendant le transport. En cas d’anomalies, n’hésitez
pas à contacter votre commissionnaire de transport.
S’assurer que l’emballage contient tous les accessoires listés à la § 6.3.1. Dans le cas
contraire, contacter le revendeur. S’il était nécessaire de renvoyer l’instrument, veuillez
respecter les instructions dont à la § 7.
3.2. ALIMENTATION DE L'INSTRUMENT
L'instrument est alimenté par 1 pile alcaline de 9V de type NEDA1604, JIS006P, IEC6F22
incluse dans l'emballage. Afin d'éviter qu'elle se décharge, la pile n'est pas montée sur
l'instrument. Pour l’introduction de la pile, veuillez suivre les instructions de la §. Lorsque la
pile est déchargée, le symbole « » s'affiche. Remplacer la pile en suivant les
instructions de la § 5.1.
3.3. ETALONNAGE
L’instrument est conforme aux spécifications techniques décrites dans ce manuel. Ses
performances sont garanties pendant 12 mois.
3.4. CONSERVATION
Afin d’assurer la précision des mesures, après une longue période de stockage en
conditions environnementales extrêmes, il est conseillé d’attendre le temps nécessaire
afin que l’instrument revienne aux conditions normales (voir Conditions environnementales
à la § 6.2.1).
FR - 3
Page 63

HT309
4. MODE D'UTILISATION
4.1. DESCRIPTION DE L’INSTRUMENT
LEGENDE :
1. Afficheur LCD
2. Touche
3. Touche
4. Touche flèche S
5. Touche (ON/OFF)
/
OFF)
6. Touche
7. Touche
8. Touche flèche T
9. Capteur photodiode
LX/FC/CD
MEM/READ
(Auto Power
ZERO
HOLD/L.S.
Fig. 1 : Description de l’instrument
FR - 4
Page 64

HT309
4.2. DESCRIPTION DES TOUCHES DE FONCTION
Certaines touches de fonction sur le panneau frontal ont une double utilisation qui peut
être activée en gardant cette touche appuyée pendant plus d'une seconde.
4.2.1. Touche HOLD/L.S. (Light Source ou source de lumière)
¾ Appuyer sur la touche HOLD/L.S pour activer le verrouillage de la valeur de la
grandeur affichée à l'écran. Le symbole « HOLD » s'affiche à l'écran. Appuyer à
nouveau sur la touche HOLD/L.S. pour quitter cette fonction.
¾ Appuyer sur la touche HOLD/L.S. pendant plus d'une seconde pour sélectionner la
source lumineuse sous test. Suivre cette procédure :
1. Remarquer dans le sous-afficheur le clignotement du symbole « Lx » où 0 < x < 9
montre le numéro de la source.
2. Utiliser les touches flèche S ou T pour sélectionner la source souhaitée parmi les
options disponibles L0 ÷ L9 (voir Tableau 1).
3. Appuyer sur la touche HOLD/L.S. pour le réglage éventuel du facteur de correction sur
la lecture de l'instrument (seulement pour les sources personnalisables L7, L8 et L9).
L’indication de la valeur du paramètre clignote à l'écran. Utiliser les touches flèche S
ou T pour le réglage (garder les touches appuyées pour une opération rapide) de la
valeur comprise entre 0.001 et 1.999. Les valeurs des sources L0 ÷ L5 ne peuvent pas
être modifiées.
Symbole à l'écran Type de source Facteur de correction
L0 Lumière standard 1.000
L1 DEL blanche 0.990
L2 DEL rouge 0.516
L3 DEL jaune 0.815
L4 DEL verte 1.216
L5 DEL bleue 1.475
L6 DEL violette 1.148
L7 Personnalisable 1.000
L8 Personnalisable 1.000
L9 Personnalisable 1.000
Tableau 1 : Liste des sources disponibles
4. Appuyer pendant plus d'une seconde sur la touche HOLD/L.S. pour confirmer
l’opération. Les symboles cessent de clignoter à l'écran.
4.2.2. Touche LX/FC/CD
¾ Appuyer sur la touche LX/FC/CD pour sélectionner l'unité de mesure de l'éclairement
en choisissant entre les options « LUX » et « FC » (1Fc = 10.764Lux ; 1Lux =
0.09290Fc).
¾ Appuyer pendant plus d'une seconde sur la touche LX/FC/CD pour sélectionner la
mesure de l'intensité lumineuse (voir la § 4.3.2).
FR - 5
Page 65

HT309
4.2.3. Touche MEM/READ
¾ Appuyer sur la touche MEM/READ pour sauvegarder dans la mémoire interne la
donnée affichée à l'écran. L’indication de l'emplacement de mémoire (99
emplacements maxi) et le symbole « M » sont affichés instantanément dans la partie
inférieure gauche de l'écran. La commande n'est pas active avec la fonction HOLD
activée. Avec la fonction « AVG » activée, la pression de la touche MEM/READ
sauvegarde en mémoire la valeur moyenne (AVG) de la donnée affichée à l'écran.
¾ Appuyer pendant plus d'une seconde sur la touche MEM/READ permet d'activer la
fonction de rappel à l'écran des données sauvegardées dans la mémoire interne. Les
symboles « MEM » et « R » avec le numéro du dernier emplacement de mémoire
utilisé sont montrés à l'écran. Appuyer sur les touches flèche T ou S pour
sélectionner les emplacements de mémoire. La valeur sauvegardée correspondante
apparaît à l’écran. Appuyer sur la touche MEM/READ pour quitter cette fonction.
4.2.4. Effacement de la mémoire interne
Pour l'effacement de la mémoire interne, suivre cette procédure :
1. Eteindre l'instrument par la touche ON/OFF
2. Garder la touche MEM/READ enfoncée pendant l'allumage de l'instrument par la
touche ON/OFF. Les messages « MEM » et « CLr » s'affichent à l'écran pendant
quelques secondes et le numéro d'emplacement de mémoire est ramené à la valeur
« 01 ».
4.2.5. Fonctions MAX/MIN/AVG
Appuyer sur la touche flèche S pour afficher les valeurs Minimum, Maximum et Moyenne
de la grandeur mesurée. Les valeurs sont continuellement mises à jour et se présentent
cycliquement à chaque nouvelle pression de la même touche. Les symboles « MIN »,
« MAX » et « AVG » sont affichés à l'écran. Appuyer pendant plus d'une seconde sur la
touche flèche S pour quitter cette fonction.
4.2.6. Désactivation de la fonction Auto Power OFF
Pour ne pas décharger la pile interne, l'instrument s'éteint automatiquement après presque
5 minutes d'inutilisation. Le symbole « » s'affiche à l'écran. Pour désactiver l'arrêt auto,
suivre cette procédure :
• Allumer l'instrument.
• Appuyer pendant plus d'une seconde sur la touche ON/OFF. Le symbole «
disparaît de l'écran.
• Eteindre et rallumer l'instrument pour valider automatiquement cette fonction.
4.2.7. Touche ZERO
Appuyer sur la touche ZERO pour effectuer la mise à zéro automatique de la valeur
affichée au cas où, en positionnant le couvercle de protection sur le capteur à photodiode,
l'indication « 000 » ne serait pas présente.
Le message « AdJ » est affiché à l'écran pendant l'opération. Le message « CAP »
s'affiché à l'écran si on appuie sur la touche ZERO sans couvercle de protection placé sur
le capteur. Mettre le couvercle et le cas échéant répéter à nouveau l'opération.
»
FR - 6
Page 66

HT309
4.3. OPERATIONS DE MESURE
4.3.1. Mesure d'éclairement
1. Introduire le couvercle de protection sur le capteur à photodiode.
2. Eteindre l'instrument par la touche ON/OFF.
3. Effectuer la mise à zéro éventuelle de l'afficheur en appuyant sur la touche ZERO (voir
la § 4.2.7).
4. Sélectionner l'unité de mesure Lux ou Fc sur l'instrument en appuyant sur la touche
LX/FC/CD (voir la § 4.2.2).
5. Sélectionner le type de source sous test en appuyant sur la touche HOLD/L.S. pendant
plus d'une seconde (voir la § 4.2.1). La source standard est le type « L0 ».
6. Positionner le capteur horizontalement et perpendiculairement à la source sous test. La
valeur d'éclairement est montrée à l'écran avec le changement automatique de
l'échelle.
7. Appuyer le cas échéant sur la touche HOLD/L.S. (voir la § 4.2.1) pour verrouiller cette
donnée à l'écran.
8. Appuyer sur la touche MEM/READ pour sauvegarder en mémoire la donnée lue en
temps réel à l'écran.
9. Recouvrir le capteur et éteindre l'instrument une fois les opérations terminées.
4.3.2. Mesure de l’intensité lumineuse
L’intensité lumineuse, exprimée en Candela (Cd), est calculée par l'instrument sur la base
de cette formule :
Intensité lumineuse (Cd) = éclairement (Lux/Fc) x distance de la source (m2/ft2)
1. Introduire le couvercle de protection sur le capteur à photodiode.
2. Eteindre l'instrument par la touche ON/OFF.
3. Effectuer la mise à zéro éventuelle de l'afficheur en appuyant sur la touche ZERO (voir
la § 4.2.7).
4. Sélectionner l'unité de mesure sur l'instrument en appuyant sur la touche LX/FC/CD
pendant plus d'une seconde. Le symbole « CD » s'affiche à l'écran.
5. Utiliser les touches flèche S ou T pour sélectionner l'unité de mesure de la distance
(m ou pieds ft) et confirmer par la touche LX/FC/CD.
6. Régler la valeur de la distance du point de mesure de la source lumineuse (de type
« L0 » standard seulement) à l'aide des touches flèche S ou T (garder les touches
flèche appuyées pour un réglage rapide) et confirmer par la touche LX/FC/CD.
7. Positionner le capteur horizontalement et perpendiculairement à la source sous test. La
valeur d'intensité lumineuse est montrée à l'écran avec le changement automatique de
l'échelle.
8. Appuyer le cas échéant sur la touche HOLD/L.S. (voir la § 4.2.1) pour verrouiller cette
donnée à l'écran.
9. Appuyer sur la touche MEM/READ pour sauvegarder en mémoire la donnée lue en
temps réel à l'écran.
10. Recouvrir le capteur et éteindre l'instrument une fois les opérations terminées.
FR - 7
Page 67

HT309
5. ENTRETIEN
ATTENTION
• Seuls des techniciens qualifiés peuvent effectuer les opérations
d'entretien. Avant d'effectuer l'entretien, retirer tous les câbles des bornes
d'entrée.
• Ne pas utiliser l’instrument dans des endroits ayant un taux d’humidité
et/ou de température élevé. Ne pas exposer l’instrument en plein soleil.
• Toujours éteindre l’instrument après utilisation. Si l’instrument ne doit pas
être utilisé pendant une longue période, veuillez retirer la pile afin d’éviter
toute fuite de liquides qui pourraient endommager les circuits internes de
l’instrument.
5.1. REMPLACEMENT DE LA PILE
Lorsque le symbole «
» clignote sur l'afficheur, il faut remplacer la batterie.
1. Eteindre l'instrument par la touche ON/OFF.
2. Appuyer sur le couvercle du logement des piles et pousser dans le sens de la flèche.
3. Retirer la pile déchargée et la remplacer par une nouvelle du même type (voir la §
6.1.3).
4. Remettre en place le couvercle du logement des piles.
5. Ne pas traiter les piles avec les déchets ménagers. Conformément aux directives
européennes, les piles usées doivent être soumises à un tri sélectif et éliminés
convenablement par un système de recyclage écologique.
5.2. NETTOYAGE DE L'INSTRUMENT
Utiliser un chiffon doux et sec pour nettoyer l’instrument. Ne jamais utiliser de solvants, de
chiffons humides, de l’eau, etc. Le cas échéant, le verre en plastique blanc du capteur
peut être nettoyé à l'aide d'un chiffon humide.
5.3. FIN DE LA DUREE DE VIE
ATTENTION : ce symbole indique que l’instrument, ses accessoires et la pile
doivent être soumis à un tri sélectif et éliminés convenablement.
FR - 8
Page 68

HT309
(
)
6. SPECIFICATIONS TECHNIQUES
6.1. SPECIFICATIONS TECHNIQUES
L'imprécision se réfère aux conditions environnementales suivantes : température de 23°C
± 5°C, avec un taux d'humidité relative <70%HR.
L'instrument est calibré pour la source de lumière blanche standard avec une ampoule à
incandescence à température/couleur de 2856°K selon la Classe A.
L'étalonnage pour les sources DEL (ayant des réponses spectrales autres que celle de la
lumière blanche standard) est obtenu sur la base de l'étalonnage pour la source de
lumière blanche standard en Classe A en utilisant des facteurs de correction opportuns
(voir Tableau 1).
Mesure d'éclairement (Autorange)
Fin d'échelle (Lux) 40 400 4000 40k 400k
Résolution (Lux) 0.01 0.1 1 10 100
Imprécision ± (3%lecture)
Fin d'échelle (Fc) 40 400 4000 40k
Résolution (Fc) 0.01 0.1 1 10
Imprécision ± (3%lecture)
REMARQUE1 : 1Fc=10.76Lux, 1Klux=1000Lux, 1Kfc=1000Fc
REMARQUE2 : pour température/couleur autre que celle de la référence, la précision passe à 6%lecture
Echelle distance pour mesure d'intensité lumineuse : 0.01 ÷ 30.47m / 0.01 ÷ 99.99ft
Précision sur la déviation angulaire de la caractéristique du cosinus
30° ± 2%
60° ± 6%
80° ± 25%
6.1.1. Réponse spectrale
La réponse spectrale de la photodiode avec filtre est presque identique à la courbe CIE
photo-optique V(λ) comme il est montré dans le graphique suivant.
100
90
80
%
70
60
50
40
30
20
10
Sensibilité relative
0
380 440 500 560 620 680 740
V(λ)
V(?)
HT309
HT307
Longueur d’onde (Nm)
Fig. 2 : Courbe CIE V(λ).
6.1.2. Capteur
Le capteur est une photodiode au silicium avec filtre sur la réponse spectrale.
FR - 9
Page 69

HT309
6.1.3. Caractéristiques générales
Caractéristiques mécaniques
Dimensions : 130 (L) x 55 (La) x 38 (H) mm
Dimensions capteur : 80 (L) x 55 (La) x 25 (H) mm
Longueur câble : environ 1.5m
Poids (avec pile) : 250g
Alimentation
Type de pile : 1 pile de 9V type NEDA 1604 IEC 6F22
Indication de pile déchargée : symbole « » à l'écran
Autonomie piles : 200 heures environ
Afficheur
Caractéristiques : LCD, 6 chiffres, 4000 points plus point décimal
Indication hors échelle : symbole « OL » à l'écran
Vitesse d’échantillonnage : 2.5 mesures/s
Normes considérées
Standard de référence : JIS C 1609:1993 et CNS 5119 spécification
générale en Classe A
Degré de pollution : 2
6.2. ENVIRONNEMENT
6.2.1. Conditions environnementales d'utilisation
Température de référence : 23° ± 5°C
Température d’utilisation : 5° ÷ 40°C
Humidité relative autorisée : <80%HR
Température de stockage : -10° ÷ 60°C
Humidité de stockage : <70%HR
Altitude d'utilisation maximale : 2000m
Cet instrument est conforme aux conditions de la directive EMC 2004/108/CE
6.3. ACCESSOIRES
6.3.1. Accessoires fournis
• Sac de transport
• Pile (non insérée)
• Manuel d’utilisation
FR - 10
Page 70

HT309
7. ASSISTANCE
7.1. CONDITIONS DE GARANTIE
Cet instrument est garanti contre tout défaut de matériel ou de fabrication, conformément
aux conditions générales de vente. Pendant la période de garantie, toutes les pièces
défectueuses peuvent être remplacées, mais le fabricant se réserve le droit de réparer ou
de remplacer le produit.
Si l’instrument doit être renvoyé au service après-vente ou à un revendeur, le transport est
à la charge du Client. Cependant, l’expédition doit être convenue d’un commun accord à
l'avance.
Le produit retourné doit toujours être accompagné d’un rapport qui établit les raisons du
retour.
Pour l’envoi, n’utiliser que l’emballage d’origine ; tout endommagement causé par
l’utilisation d’emballages non originaux sera débité au Client.
Le fabricant décline toute responsabilité pour les dommages provoqués à des personnes
ou à des objets.
La garantie n’est pas appliquée dans les cas suivants :
• Toute réparation et/ ou remplacement d’accessoires ou de batteries (non couverts par
la garantie).
• Toute réparation pouvant être nécessaire en raison d’une mauvaise utilisation de
l’instrument ou son utilisation avec des outils non compatibles.
• Toute réparation pouvant être nécessaire en raison d’un emballage inapproprié.
• Toute réparation pouvant être nécessaire en raison d’interventions sur l’instrument
réalisées par une personne sans autorisation.
• Toute modification sur l’instrument réalisée sans l’autorisation du fabricant.
• Utilisation non présente dans les caractéristiques de l’instrument ou dans le manuel
d’utilisation.
Le contenu de ce manuel ne peut être reproduit sous aucune forme sans l’autorisation du
fabricant.
Nos produits sont brevetés et leurs marques sont déposées. Le fabricant se réserve
le droit de modifier les caractéristiques des produits ou les prix, si cela est dû à des
améliorations technologiques.
7.2. ASSISTANCE
Si l’instrument ne fonctionne pas correctement, avant de contacter le service d’assistance,
veuillez vérifier l'état de la pile et la remplacer si besoin en est.
Si l’instrument ne fonctionne toujours pas correctement, vérifier que la procédure
d’utilisation est correcte et qu’elle correspond aux instructions données dans ce manuel.
Si l’instrument doit être renvoyé au service après-vente ou à un revendeur, le transport est
à la charge du Client. Cependant, l’expédition doit être convenue d’un commun accord à
l'avance.
Le produit retourné doit toujours être accompagné d’un rapport qui établit les raisons du
retour.
Pour l’envoi, n’utiliser que l’emballage d’origine ; tout endommagement causé par
l’utilisation d’emballages non originaux sera débité au Client.
FR - 11
Page 71

HT309
XLUX
8. APPENDICE A : NIVEAUX D'ECLAIREMENT RECOMMANDES
Au Tableau 2 on affiche les valeurs d'éclairement recommandées (exprimées en Lux, les
diviser par 10.76 afin d'obtenir les valeurs correspondantes en Fc) pour des types
d'environnements différents :
MILIEU MILIEU
•
DE TRAVAIL
Salle de conférences, réception 200
Lieu de culte 700
Bureau 1000
LU
•
MAGASIN
750 Escalier interne, couloir 150
~
1500 Vitrine, comptoir 750
~
2000 Au-delà de la vitrine 1500
~
200
~
1500
~
3000
~
USINE
•
Ligne de production 300
Contrôle produit 750
Assemblage parties électron. 1500
Entrée/sortie marchandises 150
HOTEL
•
Salon, salle TV, vestiaire 100
Réception 200
Caisse 750
Tableau 2 : Valeurs d'éclairement recommandées.
HOPITAL
•
750 Chambres des malades, entrepôt 100
~
1500 Ambulatoire médical 300
~
3000 Salle d'opération 750
~
300 Urgences 750
~
ECOLE
•
200 Auditorium, salle de gym 100
~
500 Classe 200
~
1000 Laboratoire, bibliothèque 500
~
200
~
750
~
1500
~
1500
~
300
~
750
~
1500
~
FR - 12
Page 72

Via della Boaria, 40
48018 – Faenza (RA)- Italy
Tel: +39-0546-621002 (4 linee r.a.)
Fax: +39-0546-621144
Email: ht@htitalia.it
http://www.ht-instruments.com
 Loading...