

Page 1

ENGLISH
Instruction manual
© Copyright HT ITALIA 2011 Release EN 1.04 - 17/10/2011
Page 2

HT2234N
Index:
1. PRELIMINARY AND SAFETY .................................................................................... 2
1.1. PRELIMINARY INSTRUCTION ............................................................................ 2
1.2. DURING USE ....................................................................................................... 2
1.3. AFTRE USE .......................................................................................................... 2
2. INSTRUMENT DESCRIPTION .................................................................................... 3
3. PREPARING TO USE ................................................................................................. 3
3.1. INITIAL ................................................................................................................. 3
3.2. SUPPLY
VOLTAGE .............................................................................................. 3
3.3. CALIBRATION ...................................................................................................... 3
3.4. STORAGE ............................................................................................................ 3
4. INSTRUMENT DESCRIPTION .................................................................................... 4
4.1. FRONT PANEL ..................................................................................................... 4
4.2. KEYS
DESCRIPTION ........................................................................................... 4
4.3. AUTOPOWEROFF FUNCTION ............................................................................ 5
4.4. EMITTING/RECEIVING UNIT ............................................................................... 5
5. OPERATING INSTRUCTIONS .................................................................................... 6
5.1. SPEED MEASURE WITHOUT CONTACT ........................................................... 6
5.2. SPEED MEASURE WITH CONTACT ................................................................... 7
5.3. SPEED MEASURES ON SURFACES (M/MIN, FT/MIN, YD/MIN) ............................... 8
5.4. EVENTS COUNTER WITH EXTERNAL LIGHT SOURCE .................................... 9
5.5. EVENTS COUNTER WITH INTERNAL EMITTING UNIT ................................... 10
5.6. MEASURES ON SLOW ROTATING OBJECTS ................................................. 10
6. MAINTENANCE ........................................................................................................ 11
6.1. GENERAL INFORMATION ................................................................................. 11
6.2. BATTERIES REPLACEMENT ............................................................................ 11
6.3. CLEANING ......................................................................................................... 11
6.4. END OF LIFE ...................................................................................................... 11
7. TECHNICAL SPECIFICATIONS ............................................................................... 12
7.1. TECHNICAL
CHARACTERISTICS ..................................................................... 12
7.2. GENERAL CHARACTERISTICS ........................................................................ 12
7.3. ACCESSORIES .................................................................................................. 12
8. SERVICE ................................................................................................................... 13
8.1. WARRANTY CONDITION .................................................................................. 13
8.2. AFTER-SALE SERVICE ..................................................................................... 13
EN - 1
Page 3
HT2234N
1. PRELIMINARY AND SAFETY
This instrument conforms with safety Standard EN 61010-1 related to electronic measuring
instruments. For your own safety and to avoid damaging the instrument follow the
procedures described in this instruction manual and read carefully all notes preceded by
this symbol .
When taking measurements:
• Avoid doing that in rooms where explosive gas, combustible gas, steam or excessive
dust is present.
• Avoid doing that if you notice anomalous conditions such as breakages, deformations,
fractures, leakages of battery liquid, blind display etc.
For your own safety as well as that of the apparatus you are recommended to
follow the procedures described in this instruction manual and carefully read all
the notes preceded by the symbol .
1.1. PRELIMINARY INSTRUCTION
• Only the accessories supplied with the instrument guarantee compliance with the
safety standards. They must be in good conditions and must be replaced, if necessary,
with identical models.
• Do not effect any measurement under conditions beyond the limits specified in chapter
7.
• Check that batteries have been placed correctly.
1.2. DURING USE
Carefully read the following recommendations and instructions:
CAUTION
CAUTION
No compliance with the Warnings and/or Instructions may damage the
apparatus and/or its components or injure the operator.
If the symbol “
batteries following the procedure described under paragraph 6.2.
B
” is displayed during use interrupt testing and replace
CAUTION
1.3. AFTRE USE
• When the measurements are completed switch OFF the instrument.
• Remove batteries when the apparatus remains unused for long periods.
EN - 2
Page 4

HT2234N
2. INSTRUMENT DESCRIPTION
The HT2234N meter performs the hereunder tests:
• RPM and RPS speed measures with and without contact
• m/min, ft/min and yd/min surface speed measures
• Events counter
• MAX/MIN/AVE functions
3. PREPARING TO USE
3.1. INITIAL
This instrument has been checked mechanically and electrically prior to shipment. Every
care has been taken to ensure that the instrument reaches you undamaged.
However, it is wise to carry out a rapid check in order to detect any possible damage which
might have been caused during transport. Should this be the case, immediately enter the
usual claims with courier.
Check the packaging contained according to packaging list reported in paragraph 7.3. In
case of discrepancies contact the dealer.
In the event of re-shipment of the equipment please follow the instructions reported in
chapter 8.
3.2. SUPPLY VOLTAGE
The instrument is battery supplied. It uses four battery model 1.5V AA UM3 type included
in the packaging. When the batteries are low the symbol "
batteries follow the instructions indicated in chapter 6.2.
3.3. CALIBRATION
The instrument fulfils the technical characteristics listed in this manual. The performance of
the specifications are guaranteed for one year.
3.4. STORAGE
In order to guarantee the accuracy of the measurements, after a period of storage in
extreme environment condition, wait for the time necessary so that the apparatus returns
to normal measuring conditions (see environments specifications paragraph 7.2).
B
" is displayed. To replace
EN - 3
Page 5
HT2234N
4. INSTRUMENT DESCRIPTION
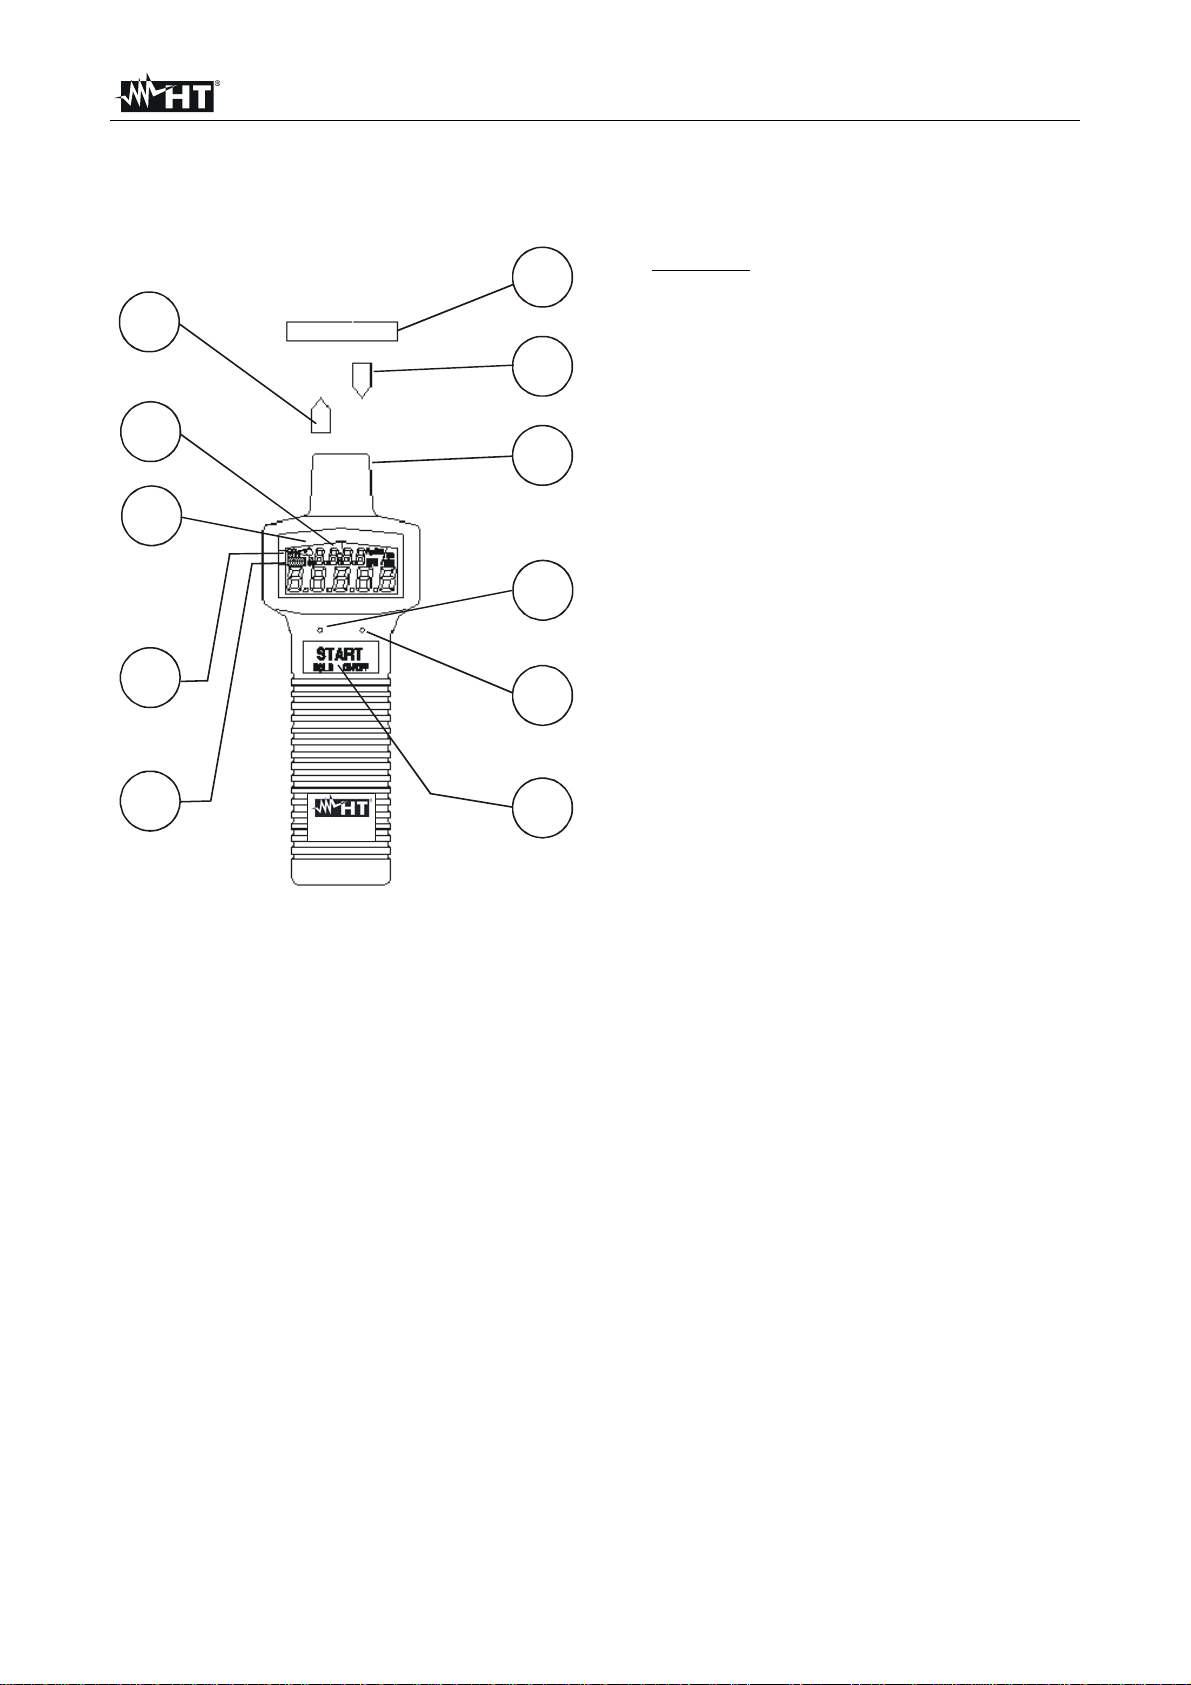
4.1. FRONT PANEL
11
10
9
1
2
3
4
LEGEND:
1. Reflecting tape.
2. Reflecting signal light beam.
3. Emitting / Receiving units.
4. UNIT key.
5. FUNCTION key.
6. START / STOP / HOLD key.
7. MAX/MIN/AVE symbols.
8. Low battery indication.
9. Start measure symbol.
10. Results display (bottom) and clock
display (top) for Hours:Minutes.
11. Emitting signal light beam.
8
5
7
HT2234N
4.2. KEYS DESCRIPTION
• UNIT key
Press ciclycally UNIT key to select the followed units:
RPM: speed measure without contact
RPM /: speed measure with contact
m/min: meter/minute
ft/min: feet/minute
yd/min: yards/minute
R/S: frequency (Hz)
NO.: events counter with external or internal light source
6
Fig. 1: front panel
EN - 4
Page 6

HT2234N
∑
•
FUNCTION key
Press ciclycally
FUNCTION
key to select the Maximum (MAX), Minimum (MIN) and
Average (AVE) values of measured parameters at display, except for events counter
results.
MAX, MIN
and
are shown at display. These functions allow users to analyze
AVE
the stability of rotational speed. Average value is calculated as:
1
= nrpm)(
RPMAVE
∑
n
32
;
2)( nrpm
n<65535
<
If the sum of average value is overrange, or number of counting values n > 65535, the last
average RPM will be used as initial value for successive calculation and n will be reset to 1.
Pressing
FUNCTION
HOLD
key the MAX/MIN/AVE values are still stored in memory. Press
key to review the values at display.
Press
FUNCTION
key at least 2s to return to normal mode.
•
START/STOP/HOLD key
¾
¾
¾
Press
Press
Press
ON/OFF
START
START
key to turn ON the meter.
key to activate any measures. “ ” symbol is shown at display.
key again to stop measures and hold the data at display. “H” symbol is
shown at display.
Press and hold
¾
ON/OFF
key at least 2s to turn OFF the meter. “
” symbol is shown
OFF
for a while.
4.3. AUTOPOWEROFF FUNCTION
With AutoPowerOFF mode is enabled the clock meter shows Minutes only and the
¾
instruments is automatically OFF after about 30 minutes from last operation. When the
meter is turn ON AutoPowerOFF is always enabled.
To disable AutoPOwerOFF function press and hold
¾
key at least 2s. Internal clock
UNIT
meter shows Hours and Minutes.
4.4. EMITTING/RECEIVING UNIT
The HT2234N meter is composed by two internal units which performing all
measurements. The Emitting unit emits a light from a red LED (left side) which is reflected
by reflecting tape applied on the surface of the object on test and is received by Receiving
unit (right side). It is recommenced that the reflecting surface is perpendicular to the
emitting/receiving unit for best measurement.
EN - 5
Page 7

HT2234N
5. OPERATING INSTRUCTIONS
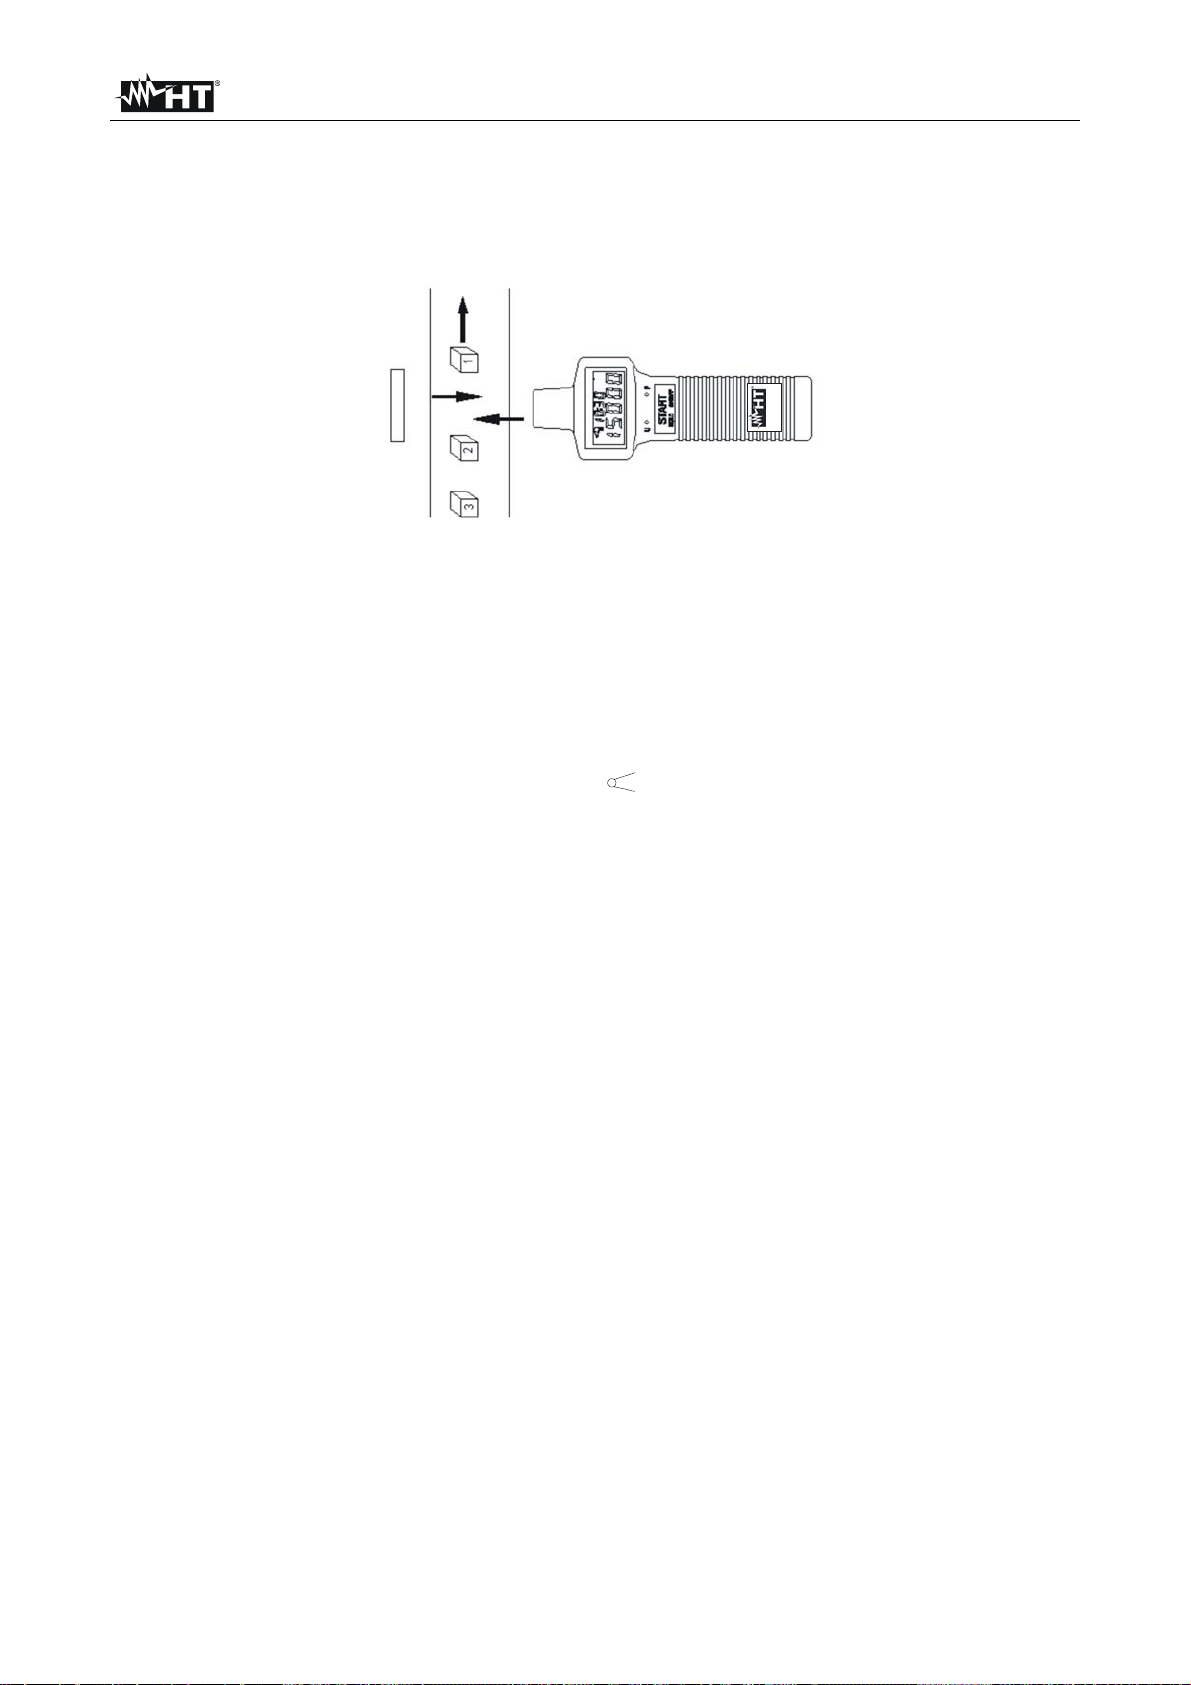
5.1. SPEED MEASURE WITHOUT CONTACT
1. Cut off a piece of reflective tape of size 1.0 cm x 1.4 cm (optimal size).
2. Wipe off oil or stains from the surface where reflective tape will be adhered.
3. Stick the self-adhesive reflective tape on the object whose rotational speed is to be
measured. The reflective tape should be attached as close to the outer edge of the
object to be measured as possible.
4. Press
5. Press
ON/OFF
UNIT
6. Aim the meter to the object on test (see Fig. 2):
key to turn ON the meter.
key to select unit, RPM or R/S.
Fig. 2: speed measure without contact (RPM)
7. Press
START
aimed to reflective tape.
8. Press
START
key once and confirm that the red emitting LED lamp lights up and
symbol is shown at display.
key again to stop the measure. "H” symbol is shown at display.
9. The result of test and his duration is shown at display.
CAUTION
• If the rotational speed is less than 60 rpm, it may take about 1 to 6 seconds
to measure (60 rpm takes 1 second, and 10 rpm takes 6 seconds).
• The reading will be held for 6 seconds, if you aim the photoelectric probe at
a 0 speed object right after one measurement.
• If the speed is less than 999.99 rpm, the red LED is turned on all the time to
detect speed. If the speed is great than 999.99, the unit goes into powersaving mode. The LED is turned on for a very short period of time, then
turned off for most of the time to save power.
N
4
3
2
2
T
H
EN - 6
Page 8

HT2234N
5.2. SPEED MEASURE WITH CONTACT
1. Insert the proper rubber head on the mechanical adapter.
2. Attach the mechanical adaptor to the unit and fasten the screw (see Fig. 3):
Fig. 3: attach of mechanical adaptor
3. Press ON/OFF key to turn ON the meter.
4. Press UNIT key to select RPM / unit.
5. Press against the shaft of the object to be measured. Do not press against the shaft too
hard to avoid hazardus situation for operator.
6. Press START key once to enable measure. symbol is shown at display.
7. Press START key again to stop measure. "H” symbol is shown at display.
8. The result of test and his duration is shown at display.
CAUTION
• Do not exceed the speed limit of 29999 rpm when using mechanical
adaptor.
EN - 7
Page 9

HT2234N
5.3. SPEED MEASURES ON SURFACES (m/min, ft/min, yd/min)
1. Attach the mechanical adaptor to the unit and fasten the screw.
2. Press ON/OFF key to turn ON the meter.
3. Press UNIT key to select the desired m/min, ft/min or yd/min unit .
4. Place the mechanical adaptor in contact with the surface on test, like is shown on Fig.
4:
START
HOLD ON/OFF
HT2234N
Fig. 4: speed measure on surfaces
5. Press START key once to enable measure. symbol is shown at display.
6. Press START key again to stop measure. "H” symbol is shown at display.
7. The result of test and his duration is shown at display.
EN - 8
Page 10

HT2234N
5.4. EVENTS COUNTER WITH EXTERNAL LIGHT SOURCE
1. Place the external light source strictly close to Receiving unit (right side) like is shown
in Fig. 5:
HT2234N
Fig. 5: events counter with external light source
2. Press ON/OFF key to turn ON the meter.
3. Press cyclically UNIT key until selecting “NO.” unit at display. On this condition the
meter shows values clear for each displays. Internal clock (with Hours and Minutes)
start the counter and AutoPowerOFF function is automatically disabled.
4. Press START key once to enable counter. symbol is shown at display.
5. Press START key again to stop counter. "H” symbol is shown at display.
6. The result of counters and his duration is shown at display.
7. Press FUNCTION key to reset counter.
EN - 9
Page 11
HT2234N
5.5. EVENTS COUNTER WITH INTERNAL EMITTING UNIT
1. Place, if necessary, a piece of reflective tape on external surface which should be
interested by red LED and place the meter like shown in Fig. 6:
HT2234N
Fig. 6: events counter with Emitting unit
2. Press ON/OFF key to turn ON the meter.
3. Press cyclically UNIT key until selecting “NO.” unit at display. On this condition the
meter shows values clear for each displays. Internal clock (with Hours and Minutes)
start the counter and AutoPowerOFF function is automatically disabled.
4. Press START key once to enable counter. symbol is shown at display.
5. Press START key again to stop counter. "H” symbol is shown at display.
6. The result of counters and his duration is shown at display.
7. Press FUNCTION key to reset counter.
5.6. MEASURES ON SLOW ROTATING OBJECTS
• If the rotating speed of the object on test is very slow, it is recommended that you use a
tripod to hold the tachometer in place and use multiple pieces of tape for more accurate
result.
• If multiple pieces of tape are used, each piece of tape should be located at the same
distance to each other on the object. Any number of pieces of tape are acceptable. But
you need to divide the reading by the number of pieces to obtain the correct result.
Example
: 4 pieces of tape and reading is 12 rpm
Correct Speed is 12 / 4 = 3 rpm
EN - 10
Page 12

HT2234N
6. MAINTENANCE
6.1. GENERAL INFORMATION
1. This meter is a precision instrument. Whether in use or in storage, please do not
exceed the specifications to avoid any possible damage or danger during use.
2. Do not keep this meter at high temperatures and/or humidity or expose to direct
sunlight.
3. Be sure to turn the meter off after use. For long term storage, remove the battery to
avoid leakage of battery fluid that can damage the internal components.
6.2. BATTERIES REPLACEMENT
When battery is low, the symbol “
followed steps:
1. Turn OFF the meter with ON/OFF key.
2. Open the battery cover.
3. Replace the old batteries.
4. Insert new ones of the same 1,5V AA UM-3 type.
5. Reposition the battery cover.
6.3. CLEANING
To clean the instrument use a soft dry cloth. Never use wet clothes, solvents or water, etc.
6.4. END OF LIFE
B
“is displayed to require replacement. Consider the
CAUTION: this symbol indicates that equipment and its accessories shall be
subject to a separate collection and correct disposal.
EN - 11
Page 13

HT2234N
7. TECHNICAL SPECIFICATIONS
7.1. TECHNICAL CHARACTERISTICS
Accuracy is indicated as [% of reading + number of dgts]. It is referred to the following
reference conditions: 23°C ± 5°C with RH <75%.
Speed without contact
Function Range Resolution Accuracy
RPM (Giri/min)
RPS (Hz)
10.00 ÷ 99999
0.200 ÷ 2000.0
0.01 / 0.1 / 1
0.001 / 0.01 / 0.1
±(0.04% rdg +2 dgt)
Speed with contact
Function
RPM /
m/min
ft/min
yd/min
Range Resolution Accuracy
20.00
2.000 ÷ 2999.9
÷ 29999
6.00 ÷ 10000
4.00
÷ 3000
0.01 /0.1 / 1
0.001 / 0.01 / 0.1
0.01 / 0.1 / 1
0.01 / 0.1 / 1
±(0.04% rdg +2 dgt)
Events Counter
Range Maximum input frequency
0 ÷ 99999
7.2. GENERAL CHARACTERISTICS
Display: 5 digits 99999 counts
Sampling Rate: 0.7 second (> 60 rpm)
> 1 second (10 to 60 rpm)
Measuring Distance: 50 to 300 mm
Time Base: 4.0 MHz Quartz Crystal
Range Selection: Automatic
Battery: 4 x 1.5V batteries (type AA, UM-3)
AutoPowerOFF: 30 minutes
Operating temperature: 0 ÷ 50°C (32 to 122°F)
Dimensions: (172 x 63 x 36) mm
Weight : 190g (included batteries)
7.3. ACCESSORIES
• HT2234N meter • Rubber leads for measures
• Mechanical adapter • Batteries
• Fixed screw for mechanical adapter • Carrying case
• Reflective tape • Instruction manual
• Rubber O-ring
10KHz. with 5% duty cycle
EN - 12
Page 14

HT2234N
8. SERVICE
8.1. WARRANTY CONDITION
This instrument is guaranteed against material or production defects, in accordance with
our general sales conditions. During the warranty period the manufacturer reserves the
right to decide either to repair or replace the product.
Should you need for any reason to return back the instrument for repair or replacement
take prior agreements with the local distributor from whom you bought it.
Do not forget to enclose a report describing the reasons for returning (detected
fault). Use only original packaging.
Any damage occurred in transit due to non original packaging will be charged anyhow to
the customer.
The manufacturer will not be responsible for any damage to persons or things.
The warranty doesn’t apply to:
• Accessories and batteries (not covered by warranty).
• Repairs made necessary by improper use (including adaptation to particular
applications not foreseen in the instructions manual) or improper combination with
incompatible accessories or equipment.
• Repairs made necessary by improper shipping material causing damages in transit.
• Repairs made necessary by previous attempts for repair carried out by non skilled or
unauthorized personnel.
• Instruments for whatever reason modified by the customer himself without explicit
authorization of our Technical Dept.
The contents of this manual may not be reproduced in any form whatsoever without the
manufacturer’s authorization.
Our products are patented and our logotypes registered. We reserve the right to
modify specifications and prices in view of technological improvements or
developments which might be necessary.
8.2. AFTER-SALE SERVICE
Shouldn’t the instrument work properly, before contacting your distributor make sure that
batteries are correctly installed and working, check the test leads and replace them if
necessary. Make sure that your operating procedure corresponds to the one described in
this manual.
Should you need for any reason to return back the instrument for repair or replacement
take prior agreements with the local distributor from whom you bought it. Do not forget to
enclose a report describing the reasons for returning (detected fault). Use only original
packaging. Any damage occurred in transit due to non original packaging will be charged
anyhow to the customer.
The manufacturer will not be responsible for any damage to persons or things.
EN - 13
 Loading...