

Page 1
Dongguan Xintai Instrument Co.,Ltd.
Add: Building F, No. 22 Yuhua Street, Hongye Industrial Zone,
Tangxia Town, Dongguan City, Guangdong Province
Postcode:523710
Tel:+86-769-82612006
Fax:+86-769-82612005
Website:www.hytechcn.com.cn www.xintest.com.cn
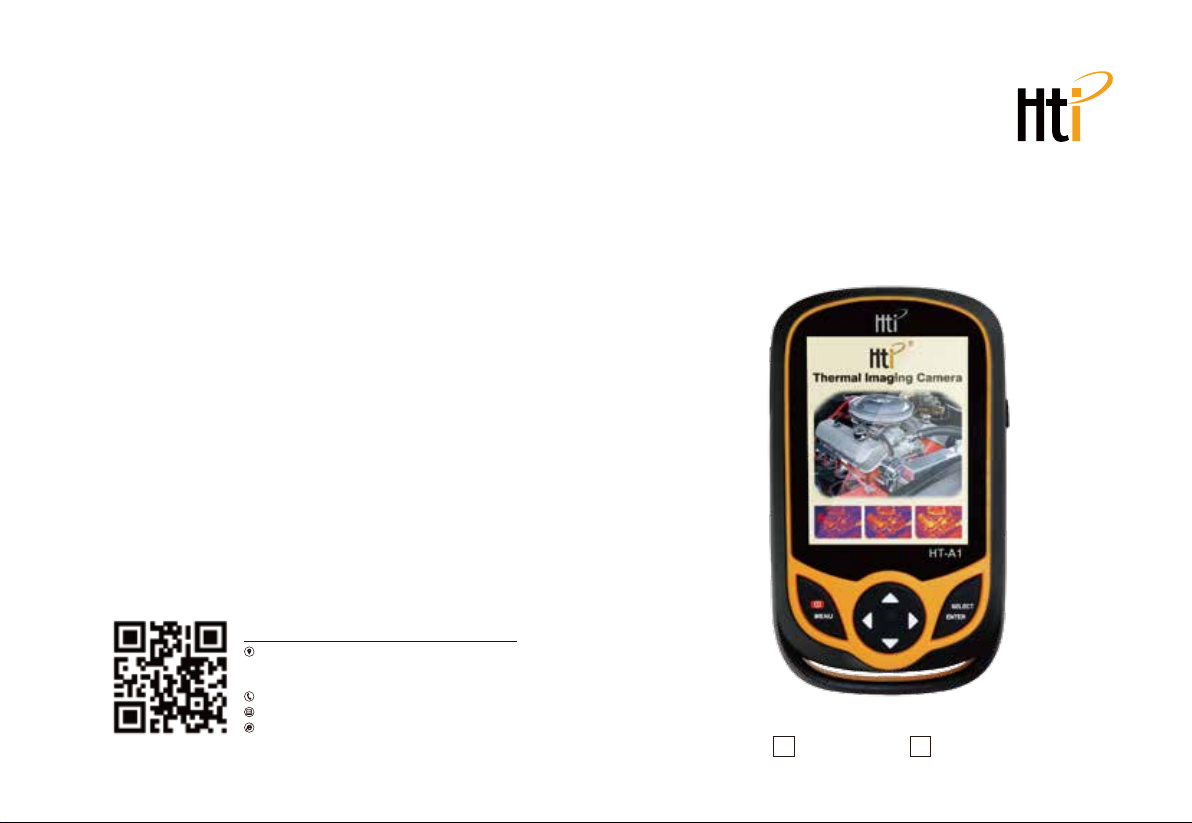
Thermal Imaging Camera
Instruction Manual
HT-A1 HT-A2
Page 2
Contents
1. Overview
2. Considerations and Safety Maintenance
3. Performance index
4. Product Description
4.1. Instruction to structure
4.2. Key Description
4.3. Key Description
5. Initial Operation
6. Introduction to “image” sub-menu
6.1. View image
6.2. Delete images
7. Introduction to “color palette” sub-menu
7.1 Color Palette Description
7.2 Application of color palette
8. Introduction to “emissivity” sub-menu
8.1 Emissivity Description
8.2. Emissivity setting
8.3 The Emissivity Value of Common Materials
9. Introduction to “Setting” Sub-menu
9.1 Time Setting
9.2. Enable/disable of the highest and lowest temperature cursor
10
10
10
11
12
13
14
15
1. Overview
1
2
3
4
4
5
6
7
8
8
8
9
9
This product is an inferred camera that integrates surface temperature
measurement and real-time thermal image. The traditional inferred
thermometer needs to measure every component one by one while it is not
necessary for infrared imaging camera, thus saving time. The potential
problems may be displayed on color display screen clearly. Moreover, the
central point measurement cursor is used to locate quickly and accurately
to measure the temperature of the target object.
In order to increase the differentiation, the product is provided with a visible
light camera. The thermal images and visible images are stored in the
device and can be read through USB or stored in a computer to generate a
report or for print. The supported operating system through verification
includes: win XP, win7, win 8, win10, Apple system. It is suggested to use
the attached USB cable or USB cable with higher quality.
The product can be used in fields of medical treatment, fire fighting,
archaeology, traffic, agriculture, geology, energy, smelting, electronic
manufacture, etc and is the ideal selection for electrician and maintenance
personnel and technicians and can be used to find the problem area
quickly.
The following major functions increase the product’s accuracy and usability:
The radiation coefficient may be adjusted to increase the measurement
accuracy of objects with half reflection surface.
The highest temperature and lowest temperature cursor may guide the
users to the areas with highest and lowest temperature of the thermal
images.
The selectable color palette.
www.xintest.com.cn www.xintest.com.cn
1
Page 3
2. Considerations and Safety Maintenance
Please read the instruction for use carefully in order to ensure correct
measurement result:
Don’t use the device in explosive, flammable or corrosive environment.
The product belongs to precision electronic and sensitive optical devices.
Don’t impact and drop it to avoid damage.
Don’t dismantle and remodel the products.
When the product works, there is light sound of clicking every several
seconds. This is normal phenomenon that the lens captures images.
Please use damp cloth or weak soap to clean the enclosure of the device.
Don’t use abradant, isopropanol or solvent to clean. Special optical lens
cleaner is used to clean the screen.
3. Performance index
Type
Display screen
Infrared image resolution
visible image resolution
Field angle/shortest focus length
Thermal sensitivity
Temperature measurement range
Measurement accuracy
Emissivity
Frame rate of thermal images
Wavelength coverage
Focus mode
Color palette
View option
Storage medium
File format
USB
Power supply
Automatic power-off time
Product size
(length × width × height)
Product weight
Work temperature
Storage temperature
Relative humidity
HT-A1 HT-A2
3.2 ″ full angle TFT
display screen
220x160 320x240
640x480(300,000 pixel) 640x480(300,000 pixel)
35°x26°/4.0mm 56°x42°/4.0mm
0.07℃
-20℃ to 300℃ (-4°F to 572°F)
±2% / ±2℃
Adjustable from 0.01 to 1.0
9Hz
8-14um
Fixed
Rainbow, iron oxide red, cold color,
black & white, white & black
The integration of thermal image with
25% step length and visible image.
Built-in 3G
JPG
Micro USB 2.0
Built-in chargeable 1800 battery
Selectable: 5 minutes/20 minutes/
not power off automatically
140mm×80mm×28mm
208g
0℃to 45℃
-40℃ to 60℃
< 85%RH
3.2 ″ full angle TFT
display screen
www.xintest.com.cn
2
3
www.xintest.com.cn
Page 4
4. Product Description
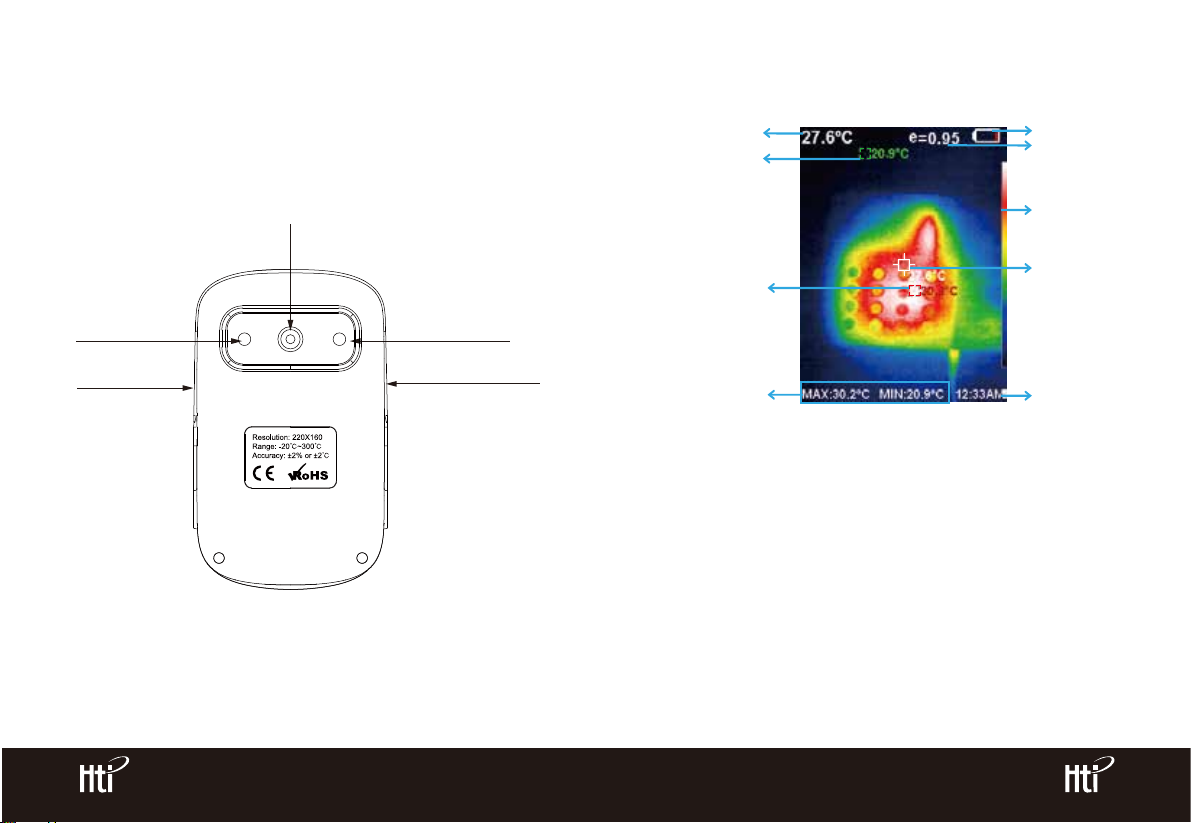
4.2. Key Description
4.1. Instruction to structure
Infrared imaging sensor
Visible light camera
Micro USB
Back
LED lighting lamp
Image capture key
Central point
temperature
The lowest
temperature cursor
The highest
temperature cursor
Maximum value/
minimum value of
field temperature
1. Color code: used to mark the color corresponding to the relative temperature from low to high in the field of version.
2. The central point temperature cursor: used to indicate the central position
in the screen area. The cursor color displays white. The temperature value is
displayed top left corner of the screen.
3. The highest temperature cursor: used to indicate the highest temperature position in the screen area. It will move with the movement of the
highest temperature. The cursor displays red. The temperature value is
displayed at bottom left corner of the screen.
Battery power
Current emissivity
Color code
Temperature
cursor at
central point
Time
www.xintest.com.cn
4
5
www.xintest.com.cn
Page 5
4. The lowest temperature cursor: used to indicate the lowest temperature
position in the screen area. It will move with the movement of the lowest
temperature. The cursor displays red. The temperature value is displayed at
the central position of the screen.
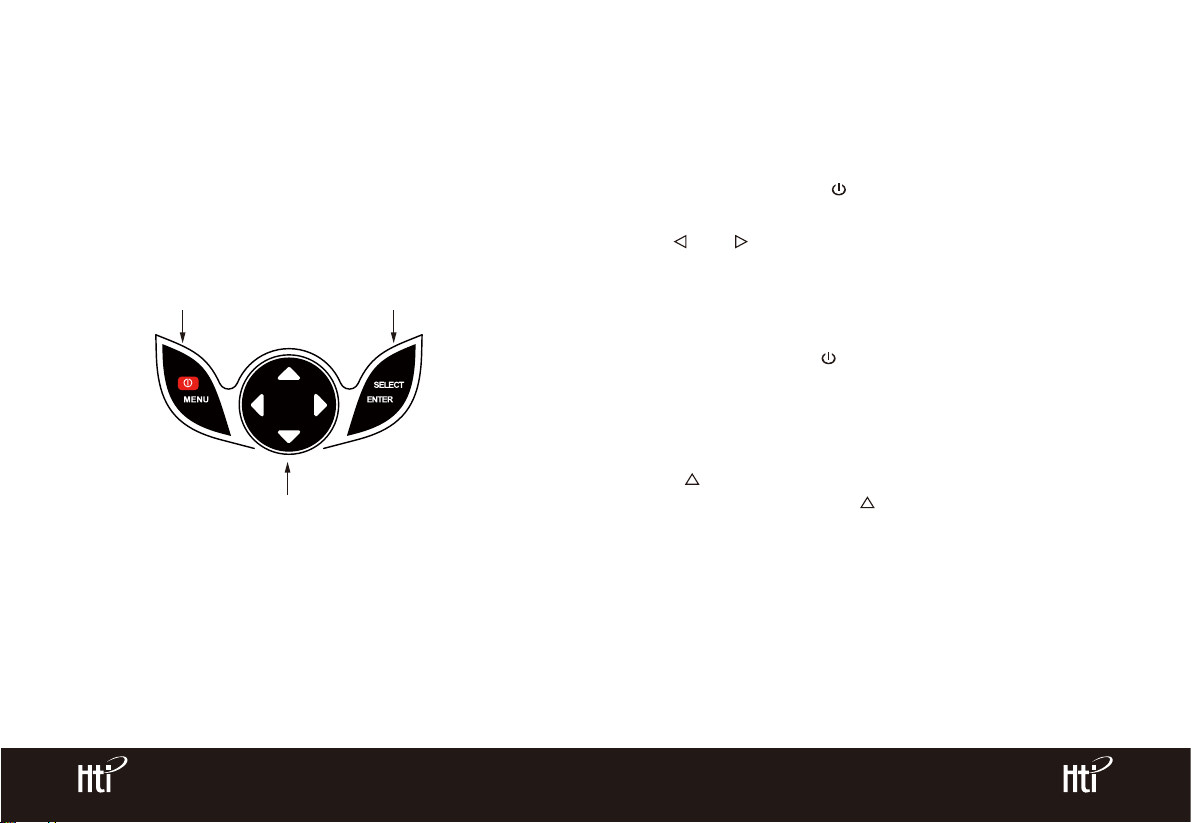
4.3. Key Description
On/off key/Menu key Selection key/Entry key
Navigation key: Up, down, left and right
5. Initial Operation
5.1 Charging: the product is provided with built-in 1800 lithium battery.
When the battery power is not sufficient, please charge it through Micro
USB interface in time.
5.2 On/off key: hold down “ /MENU ” key to power on /off.
5.3 Switching between infrared thermal image and visible image: press
“ ” or “ ” key to switch the degree of fusion between inferred
thermal images and visible images (the degree of fusion is 0%, 25%,
50%, 75% and 100%).
5.4 Image capture: press the image capture key. When the capture is
successful, the screen will display “store photo?” prompt. If “yes” is
selected, please press “ /MENU” key to determine to save the image.
If “no” is selected, press “SELECT/ENTER” key to determine not to save
the image.
5.5 The function to hide highest/lowest temperature column at the
screen bottom: under the operation after normal start up, press
“ ” key and the screen bottom will display highest/lowest
temperature column. Press “ ” can also hide it.
5.6 Image output: The saved images through capture may be checked
and output by connecting with a computer through Micro USB.
www.xintest.com.cn
6
7
www.xintest.com.cn
Page 6
6. Introduction to “image” sub-menu
7. Introduction to “color palette” sub-menu
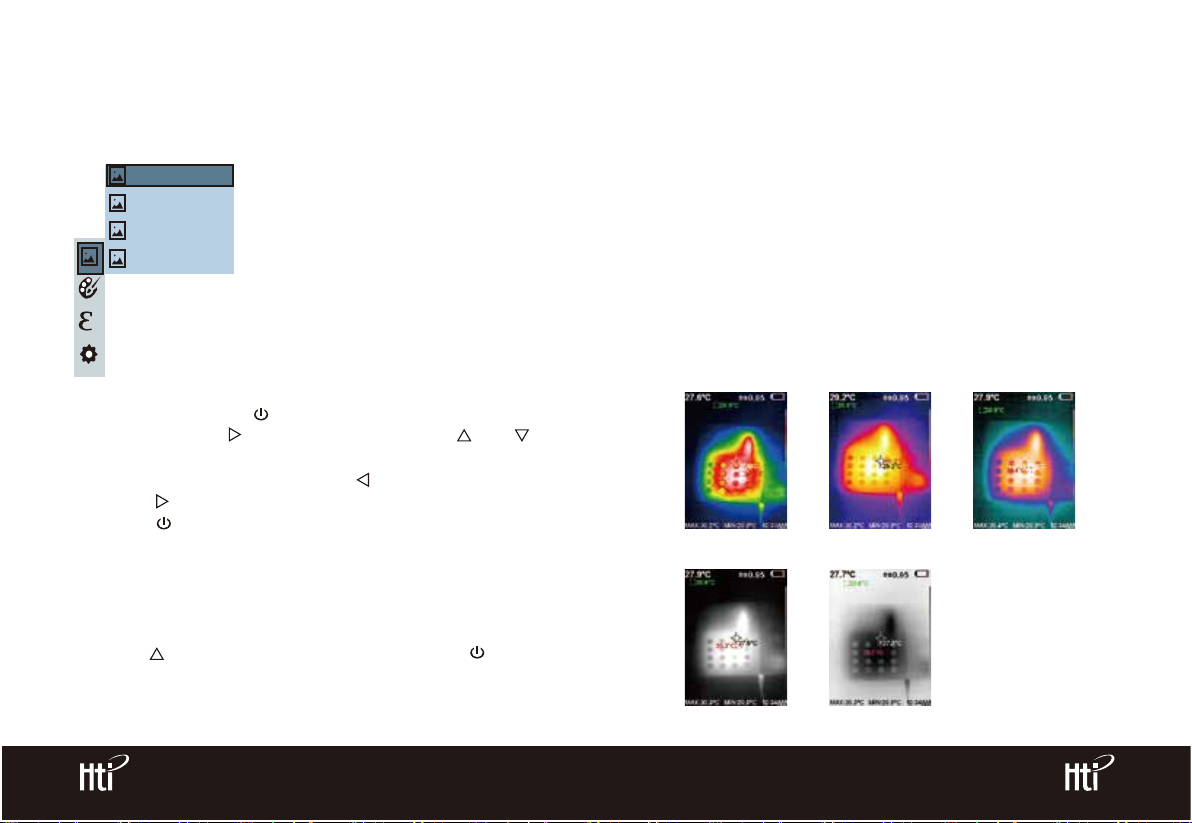
6.1. View image
171229-105030
171229-105031
171229-105032
171229-105033
As shown in the figure, press “ /MENU” key to select “image” option in the
main menu. Then press “ ” key to enter image list. Press “ ”or “ ”
key in navigation to select the image. Then press “SELECT/ENTER” key to
view image. When viewing the images, press “ ” key to view the precious
image. Press “ ” to view the next image. Press “SELECT/ENTER” key to
return. Press “ /MENU ” key to exit from the menu.
6.2. Delete images
When viewing the images, the screen will show the prompt of “Delete photo?
” by pressing “ ” key. If “yes” is selected at the moment, press “ /MENU”
key to determine to delete the image. If “no” is selected, press
“SELECT/ENTER” key to determine not to delete the image.
7.1 Color Palette Description
The menu of color palette can change the false color of infrared thermal
image. The product provides five types of color palette: rainbow, iron oxide
red, cold color, white heat and black heat.
Suitable selection of color palette displays the details of the target objective
better. Rainbow, iron oxide red and cold color palettes focus on display of
color. Such color palettes are very suitable for high heat contrast and are
used to improve the color contrast between high temperature and low
temperature. But the black & white and white & black color palettes provide
even linear color.
The following is the image of the same object with selection of different
color palettes.
Iron oxide redRainbow Cold color
White heat Black heat
www.xintest.com.cn
8
9
www.xintest.com.cn
Page 7
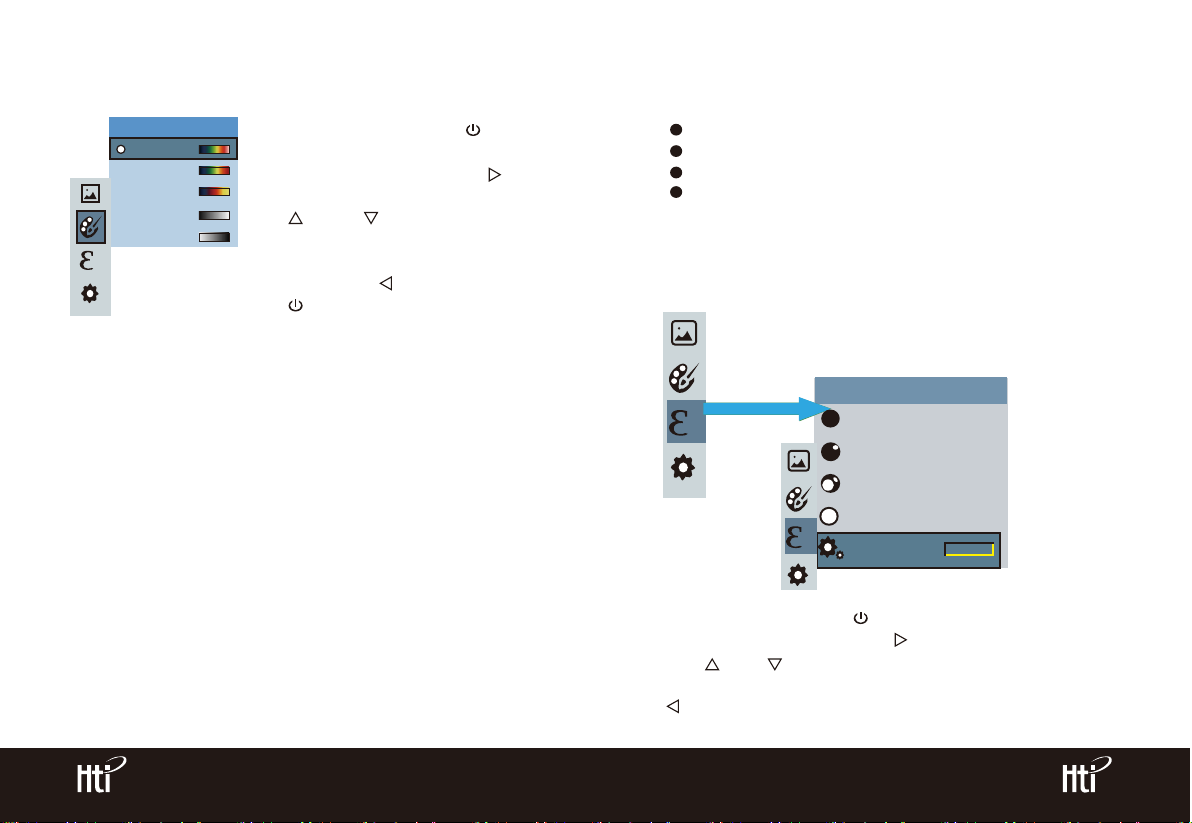
7.2 Application of color palette
Color palette
Spectra
Iron
Cool
White
Black
As shown in the figure, press “ /MENU”
key to enter the main menu and select
“color palette” option and press “ ”
key to enter the color palette list. Press
“ ” and “ ” keys in navigation to
select the color palette. Then press
“SELECT/ENTER” key to select the color
palette. Press “ ” to return. Press
“ /MENU” key to exit from the menu.
8.2. Emissivity setting
The product is provided with four types of object measurement modes:
Coarse object (0.95)
Semi-matte object (0.85)
Semi-shiny object (0.60)
Shiny object (0.30)
According to the characteristics of the measured objects, users may set the
emissivity value through the “self-define” option (please refer to the table of
“emissivity of common materials”).
The operating step is as the following:
8. Introduction to “emissivity” sub-menu
8.1 Emissivity Description
The emissivity of the product can be adjusted from 0.01 to 1.00 with the
default value of 0.95. Many common objects and materials (such as timber,
water, skin and textile fabric) can reflect the heat energy effectively. So it is
easy to obtain relatively correct measurement value. The emissivity is usually
set as 0.95 when the coarse objects that are easy to give out energy. For
semi-matte objects that give out less energy, the emissivity is usually about
0.85 and the emissivity of semi-gloss objects is 0.6. The shiny objects are
divided into materials with low radiation coefficient. The emissivity is usually
set as 0.3 at the time of measurement. Correct setting of the value of
emissivity is very important for you to carry out the most correct temperature
measurement. The surface emissivity will produce giant impact on surface
temperature measured by the product. Understanding the surface emissivity
will enable you to obtain correct temperature measurement result.
www.xintest.com.cn
10
Emissivity
Matt (e=0.95)
Semi-matt (e=0.85)
Semi-glossy (e=0.60)
Glossy (e=0.30)
Custom
As shown in the figure, press “ /MENU” key to enter the main menu and
select “emissivity” option and press “ ” key to enter the emissivity list.
Press “ ” and “ ” keys in navigation key to select the emissivity. Then
press “SELECT/ENTER” key to determine selection of the emissivity. Press
“ ” key again to return.
11
www.xintest.com.cn
0.01
Page 8
If to select “self-defined” emissivity, please press “SELECT/ENTER” key to
enter the edit state. Press “ ” and “ ” keys to select the number
to be changed. After the change is completed, press “SELECT/ENTER”
key to enter. Then press “ ” and “ ” keys to change the value.
Press“ /MENU” key to exit from the menu.
9. Introduction to “Setting” Sub-menu
Press “ /MENU” key to select the “setting” option in the main menu.
Press “ ” key again to enter the “setting” sub-menu.
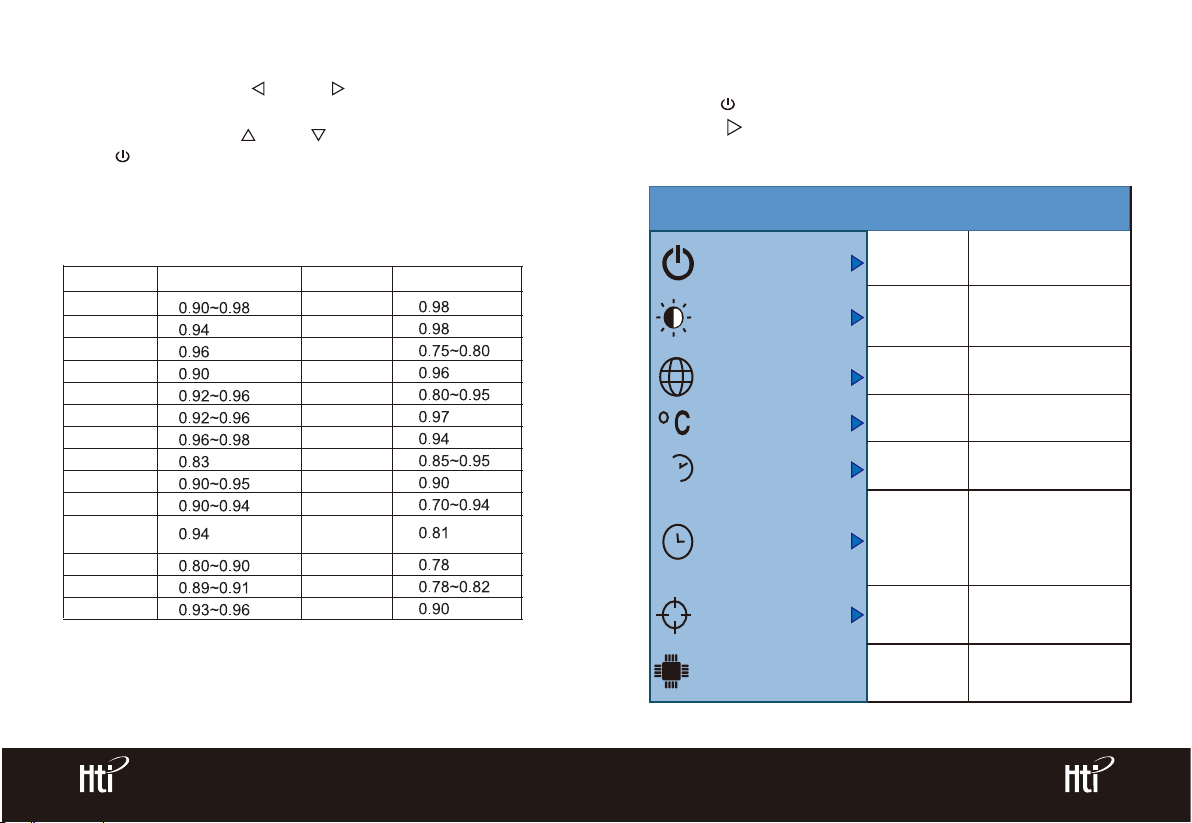
8.3 The Emissivity Value of Common Materials
Substance
Bitumen
Concrete
Cement
Sand
Earth
Water
Ice
Snow
Glass
Ceramics
Marble
Gypsum
Mortar
Brick
Thermal radiation
www.xintest.com.cn
Substance
Black cloth
Human skin
Foam
Charcoal dust
Paint
Matte paint
Black rubber
Plastic
Timber
Paper
Chromium
hemitrioxide
Copper oxide
Ferric oxide
Textile
Thermal radiation
12
Settings
Auto shutdown
Intensity
Language
Unit
Time format
24h
Set time
Spot
Version
13
Auto
shutdown
Intensity
Language
Unit
Time Format
Set time
Spot
Version
NO
5min
20min
Low
Medium
Hight
English
Chinese
Celsius
Fahrenheit
24 hour
AM/PM
Year
Month
Day
Hour
Minute
Second
Off
On
V2.1.0
www.xintest.com.cn
2017
12
28
15
15
15
Page 9
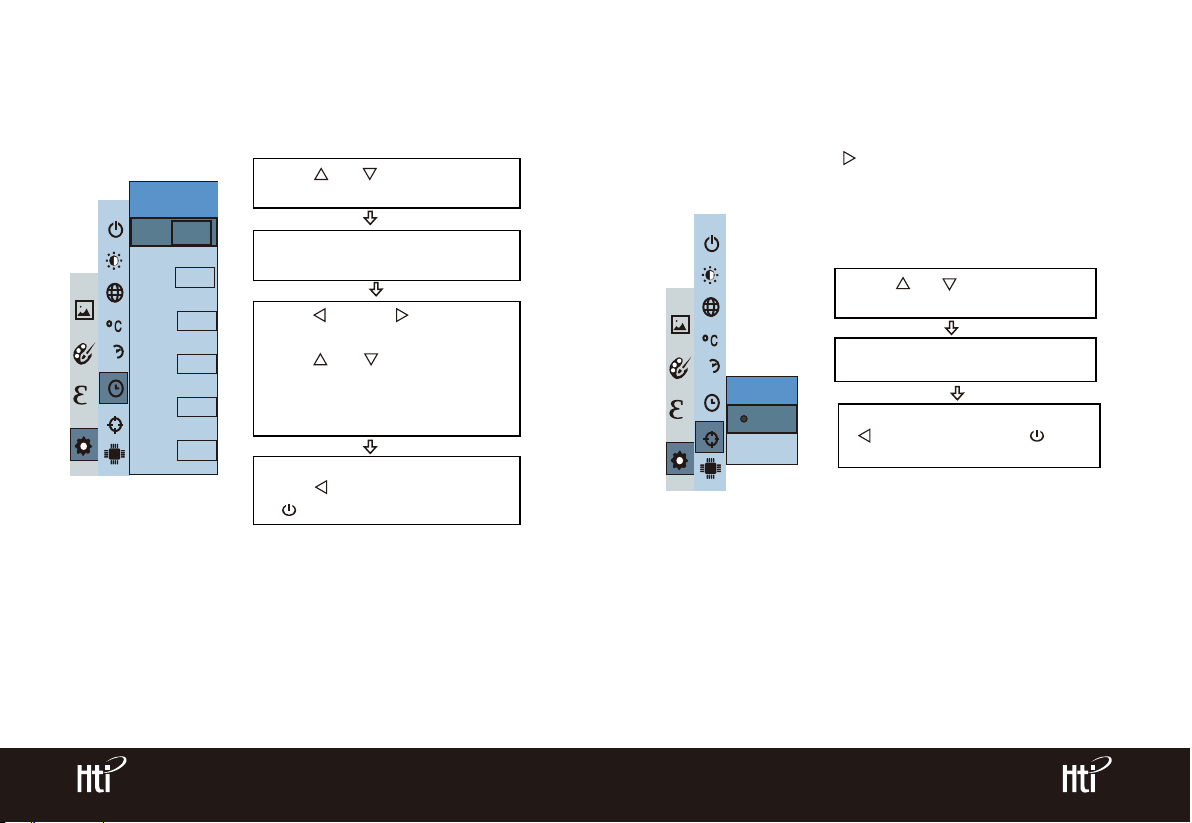
9.1 Time Setting
Set time
2016
Year
Month
Day
24h
Hour
Minute
Second
9.2. Enable/disable of the highest and lowest
temperature cursor
As shown in the figure, after entering the “setting” sub-menu, select the
Press “ ”/“ ” to select year/
month/day/hour/minute.
After selecting, press “SELECT/ENTER”
9
9
11
33
33
key to enter the edit state.
Press“ ” and “ ” keys to select
the figure to be changed.
Press“ ” /“ ” key to change
the value. After completing the
change, press “SELECT/ENTER”
to enter.
After the time setting is completed,
press “ ” key to return. Press
“ /MENU” exit from the menu.
cursor point (spot). Press “ ” key in the navigation key to enter cursor
point (spot) setting.
Press “ ” /“ ” key to select
“enable” or “disable” the option
24h
Spot
Off
On
Then press “SELECT/ENTER” key to
determine selection
After the setting is completed, press
“ ” key to return. Press “ /MENU”
key to exit from the menu
www.xintest.com.cn
14
15
www.xintest.com.cn
 Loading...