

Page 1
1
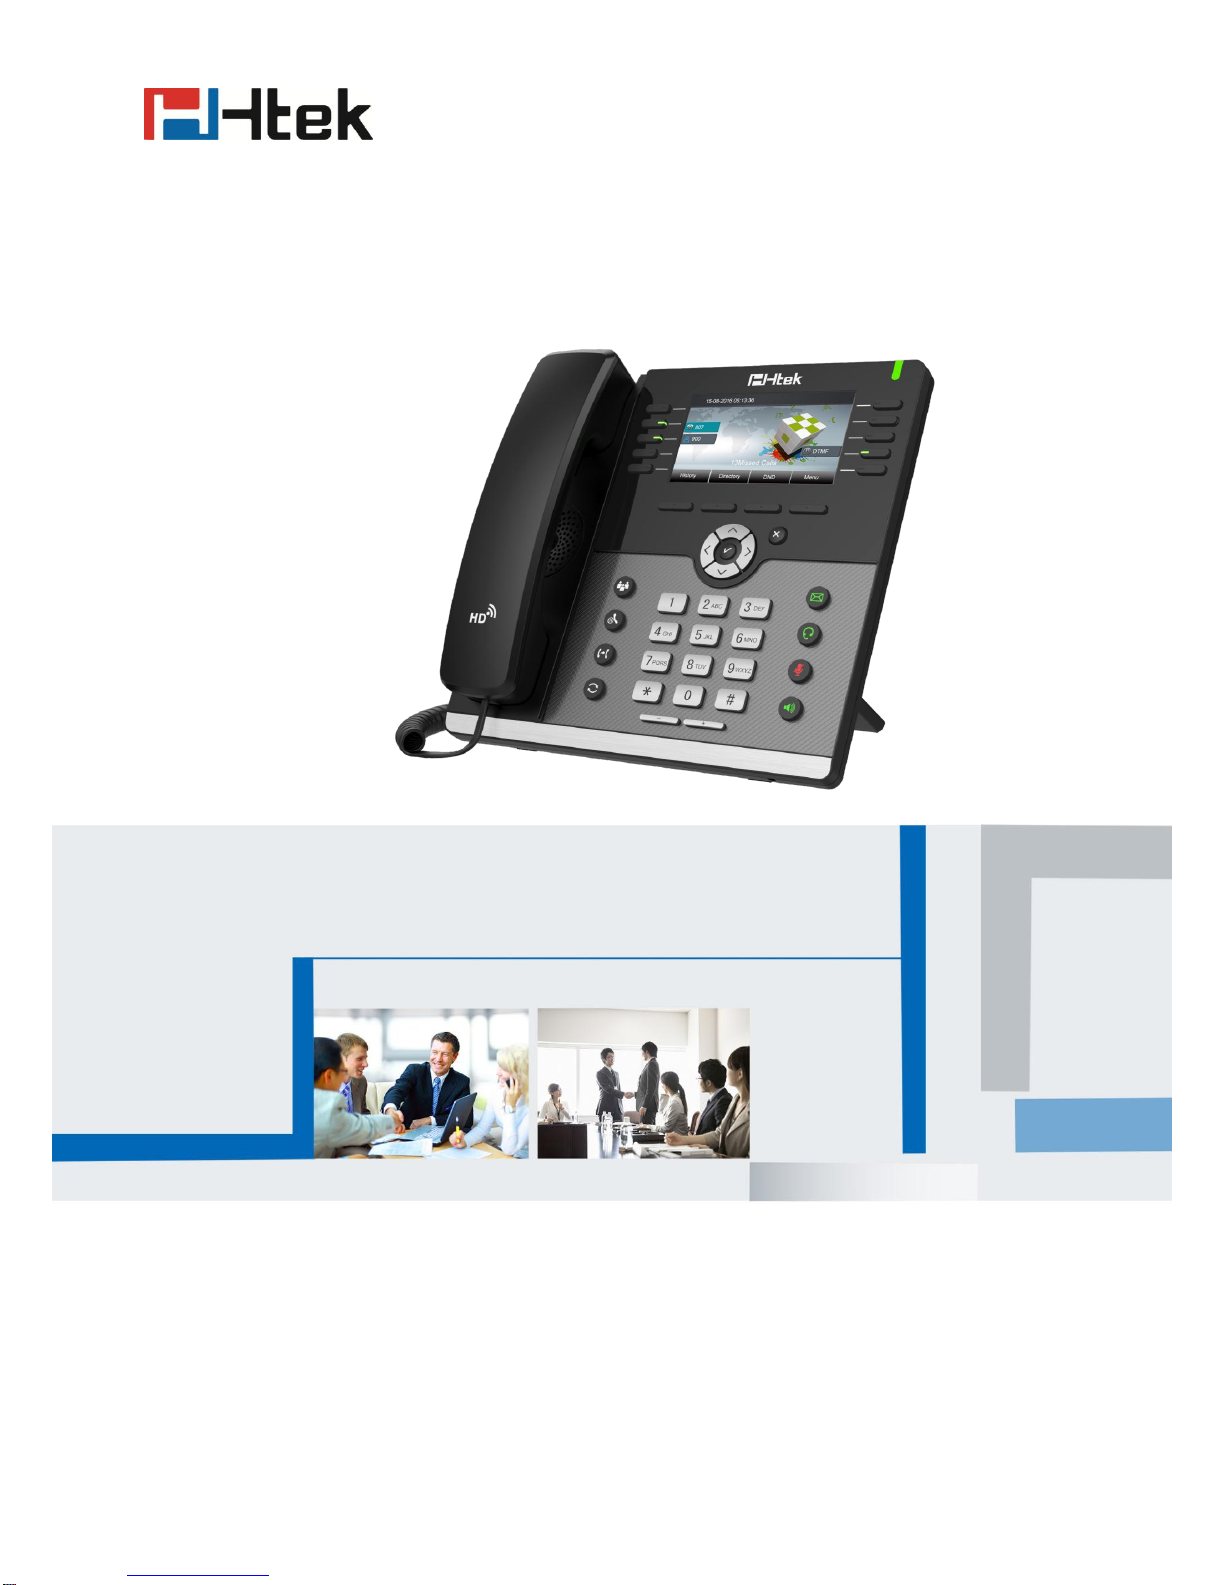
Htek UC9xx Series IP Phones
Auto Provision User Guide
Version 2.0.4.4.24
Feb. 2018
Page 2

2
Table of Contents
1. Introduction ................................................................................................................. 1
2. Manage Configuration ................................................................................................. 1
2.1 Obtain configuration files ................................................................ .................... 3
2.2 Obtain phone information ................................................................................... 3
2.3 Manage configuration files .................................................................................. 3
2.4 How to edit cfg000x.xml file ................................................................................ 3
2.5 How to edit cfg$mac file...................................................................................... 3
2.6 How to edit cfgMAC.xml file ................................................................................ 6
3. Encrypt Configuration Files.......................................................................................... 9
3.1 How to encrypt the XML configuration file ........................................................... 9
4. Customize Resource Files ......................................................................................... 11
4.1 Customize ring tone.......................................................................................... 11
4.2 Customize LCD language ................................................................................. 11
4.3 Customize web language ................................................................................. 13
4.4 Customizing wallpaper...................................................................................... 14
4.5 Customizing screensaver ................................................................................. 14
4.6 Customizing weblogo........................................................................................ 15
5. Upgrade resource files............................................................................................... 15
5.1 How to configure URL for hlpres.tar .................................................................. 15
5.2 How to configure URL for Language.tar ............................................................ 15
5.3 How to configure URL for exp_pres.tar ............................................................. 15
5.4 How to configure Path for ringx.bin ................................................................... 16
5.5 How to configure URL for Screensaver ............................................................. 16
5.6 How to configure URL for Wallpaper................................ ................................ . 16
6. Upgrade Firmware................................................................ ..................................... 17
6.1 Configuring HTTP Server ................................................................................. 17
6.2 How to Configuring HTTP Server...................................................................... 17
7. Obtain Provisioning Server's Address ........................................................................ 20
8. Update mode................................................................................................ ............. 22
9. Download and Verify Configurations .......................................................................... 24
9.1 Download configuration files ............................................................................. 24
9.2 Resolve and Update configurations .................................................................. 24
9.3 Verify configurations ................................ ......................................................... 24
10. Firmware and Configuration File Prefix and Postfix .................................................. 27
11. Firmware Server and Configuration File Server........................................................ 29
12. Manage Firmware and Download Configuration File ................................................ 30
13. Pre_Configuration and Configuration Redirection .................................................... 31
14. Automatic Provisioning Within LAN .......................................................................... 32
15. Troubleshooting ....................................................................................................... 33
16. Glossary .................................................................................................................. 35
17. How to Edit cfg000x.xml .......................................................................................... 36
18. Generate Configuration File with Htek Provision Tool and Upgrade the Configuration
Page 3

3
File via HTTP/HTTPS/FTP/TFTP................................................................................... 40
18.1 Generate the configuration file for Htek IP Phones.......................................... 40
18.2 Upgrade cfgMAC file via HTTP/TPFP/FTP/HTTPS ......................................... 46
18.2.1 Upgrade cfgMAC file via Htek Provision Tool ........................................ 46
18.2.2 Upgrade cfgMAC file via configuring Htek IP Phone.............................. 51
19. Making Ringtone Notes ........................................................................................... 56
20. LCD and Web Language Custom Guide .................................................................. 58
20.1 LCD Language custom guide ......................................................................... 58
20.2 Web Language custom guide ......................................................................... 60
21. LCD and Web GUI custom Guide ................................ ............................................ 64
21.1 How to custom the wallpaper1-wallpaper6? .................................................... 64
21.2 How to custom the screensaver1- screensaver3?........................................... 64
21.3 How to custom the weblogo? .......................................................................... 64
21.4 How to custom the eights menus(.png)in the main menu? .............................. 64
21.5 How to custom the ...Icon.png?....................................................................... 64
21.6 How to custom the lcdlogo_color.png? ........................................................... 65
21.7 How to customthe lcdlogo_bw.png?................................................................ 65
22. Firmware Upgrade ................................................................................................... 66
22.1 Upgrade through HTTP .................................................................................. 66
22.2 Upgrade through TFTP ................................................................................... 67
22.3 Upgrade through FTP ..................................................................................... 70
22.4 Upgrade through HTTPS ................................................................................ 71
23. Parameter List ................................................................ ................................ ......... 73
Page 4
1
1. Introduction
Please note: 9xx including all models:
UC601/ UC901/ UC902/ UC903/ UC912/ UC912G/ UC912GM/ UC923/ UC924/ UC924E/
UC926/ UC926E
Htek IP Phone could be plugged directly into an IP network and be used without any
manual configuration.
This guide provides instructions on how to provision Htek IP Phone with the minimum
settings. Htek IP Phone supports FTP, TFTP, HTTP, and HTTPS for auto provisioning and
are configured by default to use the HTTP.
This guide is a basic guidance for provisioning on Htek IP phones, including the models:
Htek UC601/ UC901/ UC902/ UC903/ UC912/ UC912G/ UC912GM/ UC923/ UC924/
UC924E/ UC926/ UC926E
Note:The auto provision just applies to FW 1.0.3.70 or FW after 1.0.3.70. For the latest
FW, please download from our website www.htek.com.
2. Manage Configuration
Htek IP Phone could be configured via Web Interface and via Configuration File that
download through TFTP/FTP/HTTP/HTTPS. All devices support a configuration file in
proprietary binary format. Products like UC9xx, Unicorn3xxx and Unicorn6xxx accept
configuration files in XML format in legacy proprietary binary format. The XML provisioning
implementation also allows generic XML configuration file on top of the MAC based
configuration file.
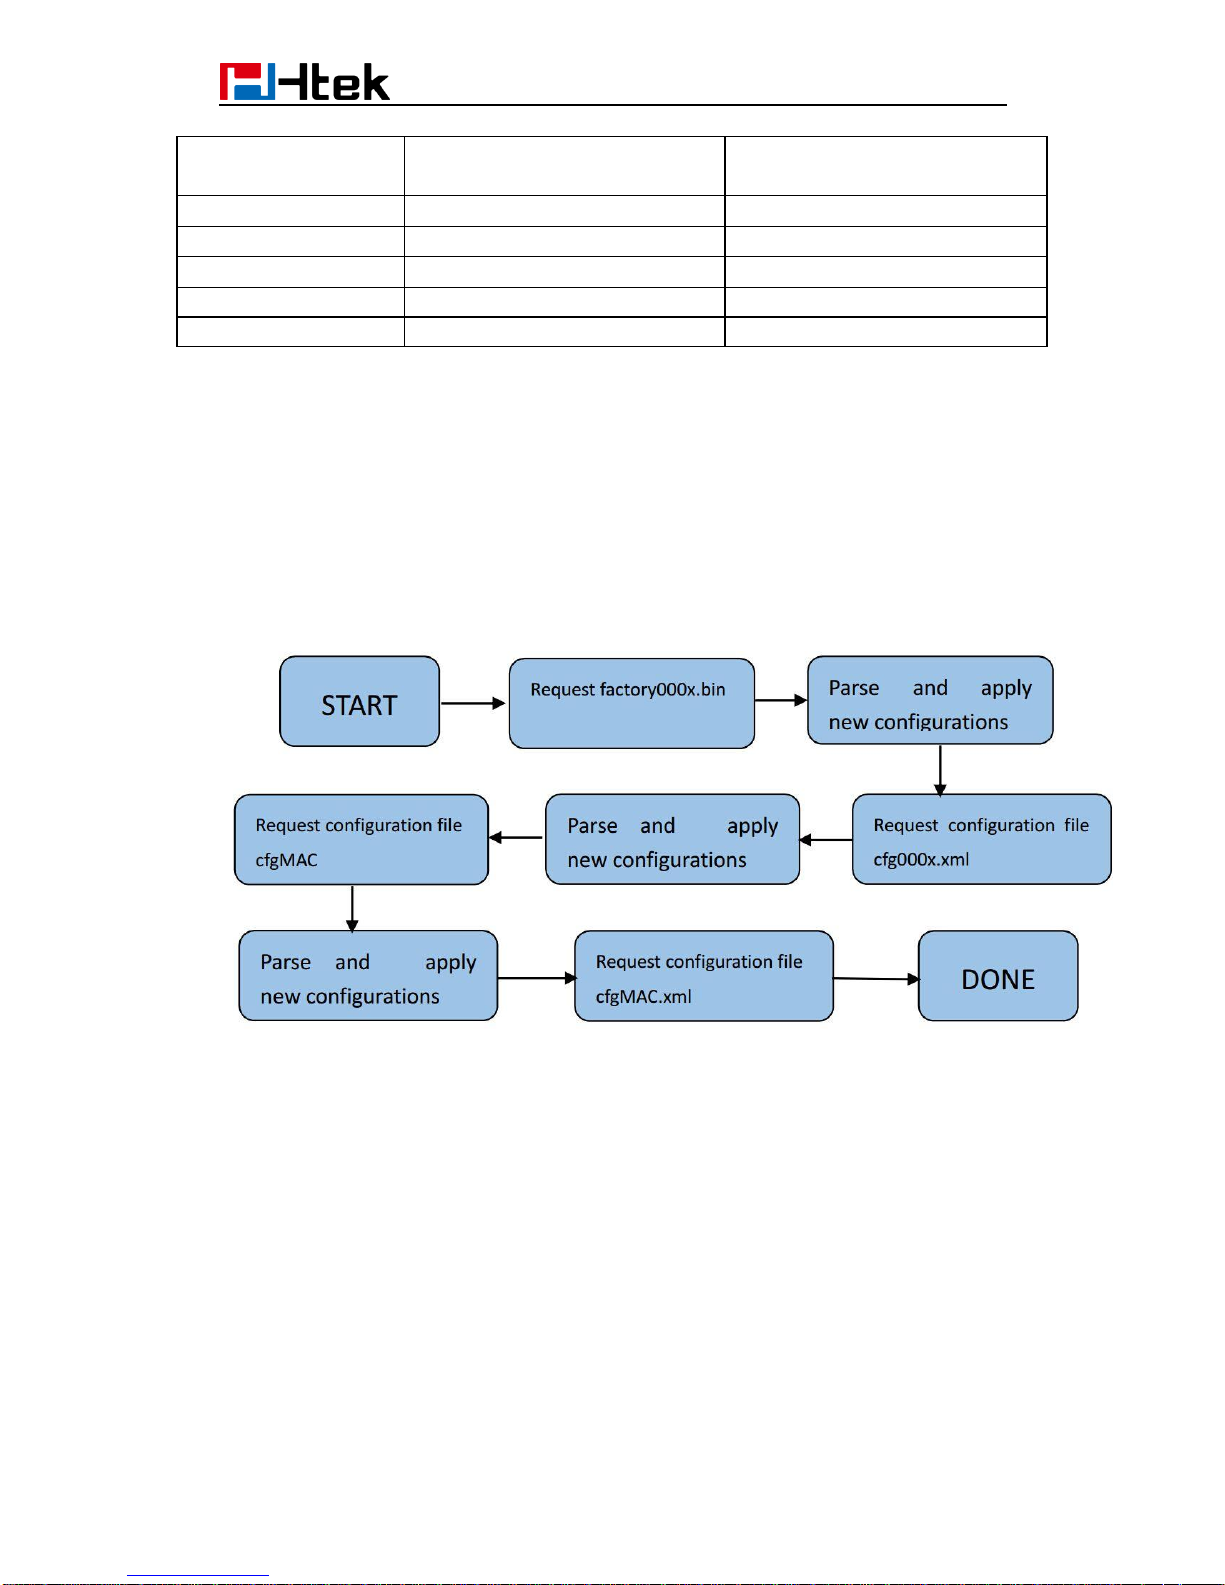
When Htek IP Phone boots up or reboots, it will issue a request for these configuration
files named “factory000x.bin” --> “cfg000x.xml” --> “cfgMAC” --> “cfgMAC.xml ”, in which
“000x” is the Device Code. Take UC924 for example, the configuration file name should be
factory0012.xml. You can refer to the <<Device Type and file list>>. This “MAC” is
the device Mac address, for example “cfg001fc10608ab”. The configuration file name
should be in lower case. The file “cfgMAC” is a proprietary binary format configuration file
that must be generated by Htek configuration tools.
Device type, Device code and file list:
Device Type
Device Code
Device file
UC601
0111
factory0111.bin/cfg0111.xml
UC901
0018
factory0018.bin/cfg0018.xml
UC902
0017
factory0017.bin/cfg0017.xml
UC903
0016
factory0016.bin/cfg0016.xml
Page 5
2
UC912/UC912G/
UC912GM
0019
factory0019.bin/cfg0019.xml
UC923
0013
factory0013.bin/cfg0013.xml
UC924
0012
factory0012.bin/cfg0012.xml
UC924E
0112
factory0112.bin/cfg0112.xml
UC926
0010
factory0010.bin/cfg0010.xml
UC926E
0110
factory0110.bin/cfg0110.xml
Process of Htek products are as follows:
factory000x.bin -----used for factory default configuration for ODM/OEM
cfg000x.xml ----- used for update the common configuration which doesn’t include the
account information.
cfg001fc1xxxxxx ---- this file is a private format for each device
cfg001fc1xxxxxx.xml------used for configuration for each device. xml format
Provisioning Flow Chart:
Picture 1: Provisioning Flow Chart
Note: The provisioning program will apply and reload the settings after downloading the
new configuration files. It means that a provision/re-direction server can redirect the
device to a provision server without reboot. It can also be used to send the XML
encryption password.
If factory000x.bin file does not download successfully, the provision program will
download the cfg000x.xml file, or download the cfgMAC file. If the cfgMAC file does not
download successfully, the provision program will download the cfgMAC.xml file.
Page 6

3
2.1 Obtain configuration files
Before provisioning, first you need to obtain the configuration file. There are three CFG
template files, cfg000x.xml, cfg$mac and cfgMAC.xml. The cfg000x.xml is a common
configuration file which doesn’t include the account information. The “ mac” only takes
effect for specific phone. The file name is the 12-digit mac address of phone. For example,
if the phone's mac address is 001fc11a0012, the cfg$mac file name must be
cfg001fc11a0012; The cfgMAC.xml file name must be cfg001fc11a0012.xml.
The phone will try to download these CFG files from the server during provisioning.
Note: The IP Phones that in FW 1.0.3.70 or FW after 1.0.3.70 would only recognize CFG
files which use UTF-8 or ANSI encoding.
2.2 Obtain phone information
Before provisioning, you need the phone information, like MAC address, SIP account of
the phone.
MAC Address: The unique 12-digit serial number of the phone. You can obtain it from the
back of the phone.
SIP Account Information: It may include SIP credentials, like user name, password and
IP address of the SIP server. Contact your system administrator for SIP account
information.
2.3 Manage configuration files
Auto provision enables Htek IP Phone to update automatically via downloading
configuration files. Before provisioning, you may need to edit and customize your
configuration file which is composed of many configuration parameters. A configuration
parameter is associated with particular field in the web configuration page. A parameter
consists of a Capital letter P and 2 to 5 digit numeric numbers. i.e., P2 is associated with
“Admin Password” in the Advanced Page. For detailed parameter list, please refer to
<<parameter list>> in page 68.
2.4 How to edit cfg000x.xml file
You can customize configuration parameters by editing XML configuration file
“cfg000x.xml”, and different device would use different file name. you can refer to<< How
to Edit cfg000x.xml>> in page 40.
2.5 How to edit cfg$mac file
Cfg$mac file is a binary format configuration. It contains configuration parameters which
Page 7

4
apply to all phone models.
The line beginning with “#” is considered to be the annotation, and easy to understand
each P value.
The parameters commonly edited in the cfg$mac file are described as follows:
#######################################################################
#############
## Configuration template for UC924 firmware version 1.0.3.70
#######################################################################
#############
#######################################################################
#############
# Account Settings
#######################################################################
#############
#--------------------------------------# Account 1--basic setting
#---------------------------------------
# Account Active (In Use). 0 - No, 1 - Yes
# Number: 0, 1
# Mandatory
P271 = {$line_active.line.1|1}
# Primary SIP Server(eg:sip.mycompany.com or IP address)
# String
P47 = {$server_host.line.1}
# Failover SIP Server(Optional, used when primary server no response)
# String
P967 =
# Second Failover SipServer(Optional, used when Failover SIP Server no response)
P8851 =
# Prefer Primary SIP Server(Yes-will register to Primary SIP Server if Failover registration
expires )
# Prefer Primary SIP Server (In Use). 0 - No, 1 - Yes
# Number: 0, 1
# Mandatory
P4567 = 0
# Outbound Proxy(proxy.myprovider.com, or IP address, if any)
# string
P48 =
Page 8

5
# Backup Outbound Proxy(This is Usually Set as IP addr)
P20047 =
# SIP Transport
# 0 - UDP, 1 - TCP, 2 - TLS
P130 = 0
# NAT Traversal. 0 - No, 1 - STUN 2 - No,but send keep alive
#Number: 0-2
# Mandatory
P52 = 2
# Label(This name will be displayed on the device's LCD)
P20000=
# SIP User ID
P35 = {$username.line.1}
# Authenticate ID
P36 = {$username.line.1}
# Authenticate password
P34 = {$secret.line.1}
# Name
P3 = {$displayname.line.1}
# DNS Mode. 0 - A Record, 1 - SRV, 2 - NAPTR/SRV
# Number: 0-2
# Mandatory
P103 = 0
# User ID Is Phone Number.0 - No, 1 - Yes
# Number:0, 1
P63 = 0
# SIP Registration. 0 - No, 1 - Yes
# Number:0, 1
# Mandatory
P31 = 1
# Unregister On Reboot.0 - No, 1 - Yes
# Number:0, 1
Page 9

6
# Mandatory
P81 = 1
# Register Expiration(in minutes. default 1 hour, max 45 days)
P32 = 15
# Outgoing Call Without Registration.0 - No, 1 - Yes
# Number:0, 1
# Mandatory
P109 = 1
# Local SIP Port(default 5060)
P40 = 5060
# Use Random Port.0 - No, 1 - Yes
# Number:0, 1
# Mandatory
P78 = 0
# Voice Mail UserID(UserID for voice mail system)
P33 =
# RPort.0 - No, 1 - Yes
P136 = 0
# RFC 2543 Hold.0 - No, 1 - Yes
P1100 = 1
We offer free Configuration File generator software in both Linux/Unix and Windows
platform.
You can refer to << Generate Configuration Files with HLLiteTool >> in the page 45.
2.6 How to edit cfgMAC.xml file
General XML syntax consists of a list of name-value pairs. P-Value is the element and
value of the element represents the value for a particular configuration which P-Value
represents corresponding.
Method 1:
You need to download cfg.xml file from IP Phone webpage(Management->Configuration
->Download xml file) or download this cfgMAC.xml file from website www.htek.com, then
change the file name to cfgMAC.xml(mac is IP Phone address), and open the cfgMAC.xml,
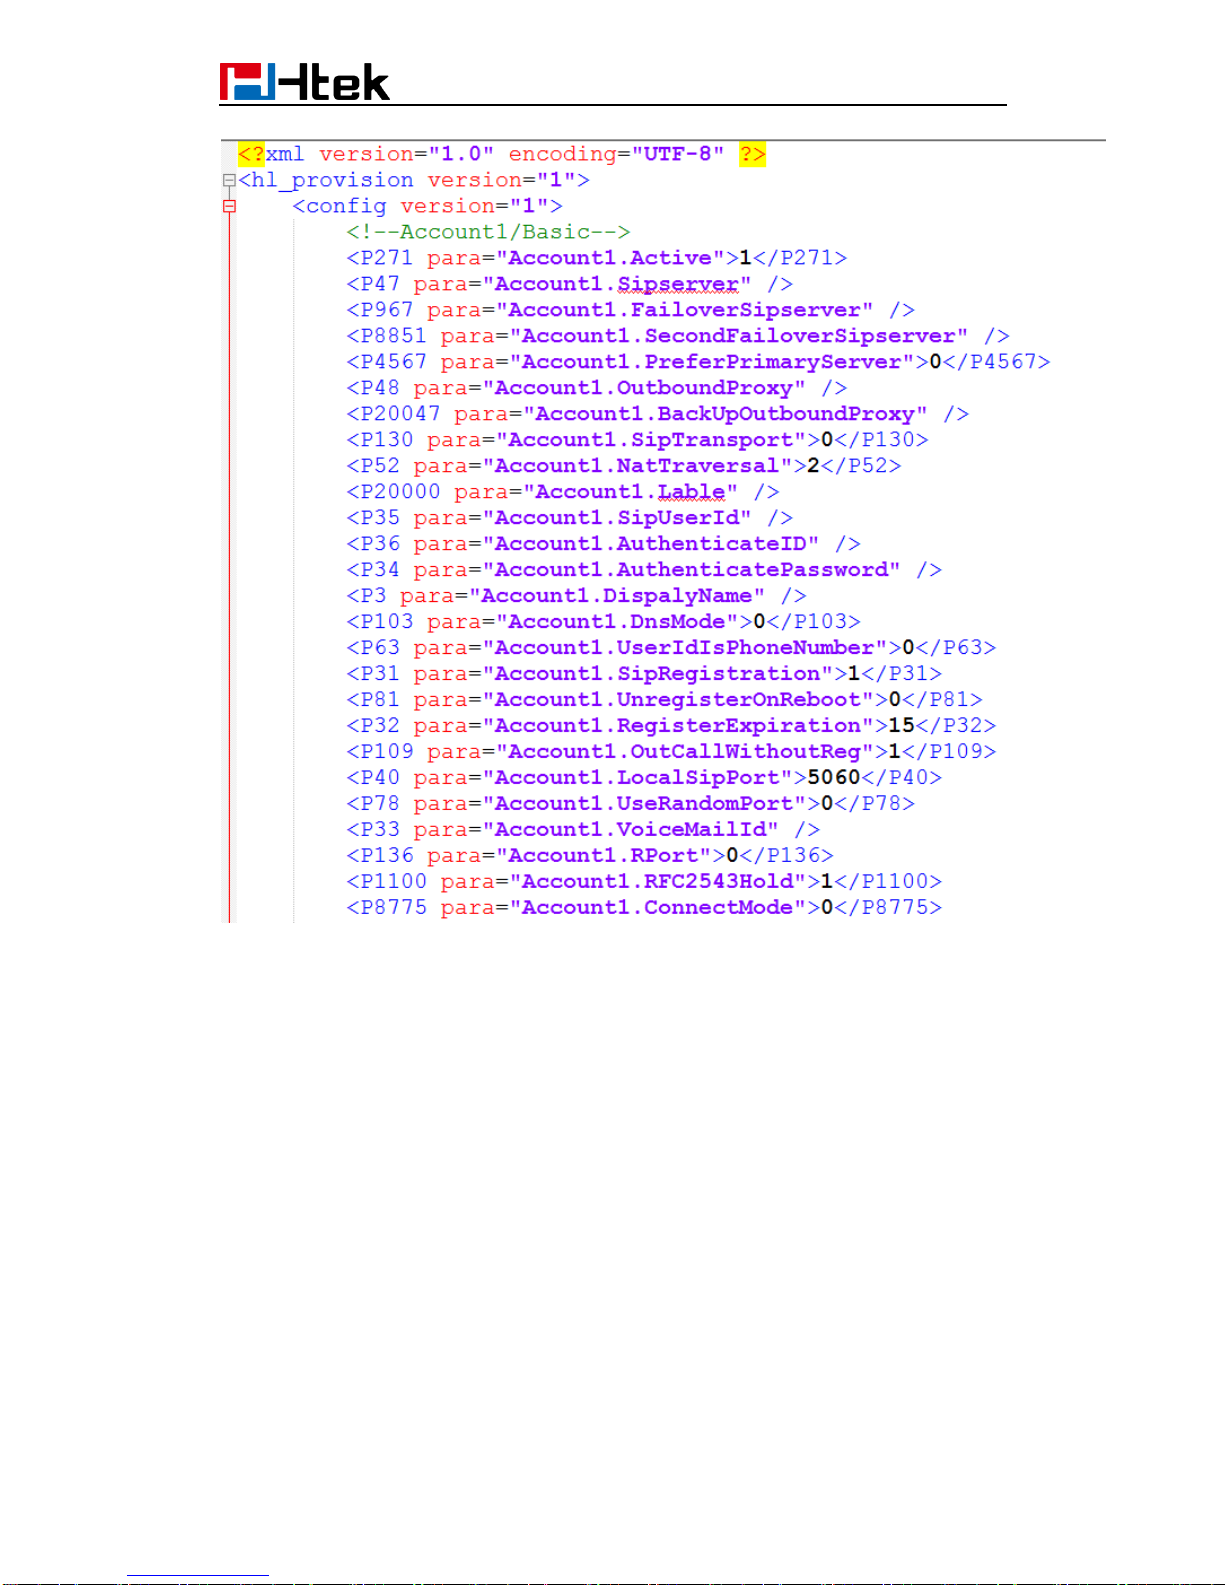
See the below screen shot:
Page 10
7
The parameters edited in the cfgMAC.xml file are described as follows:
<?xml version="1.0" encoding="UTF-8" ?>
<hl_provision version="1">
<config version="1">
<!--Account1/Basic-->
<P271 para="Account1.Active">1</P271>
<P47 para="Account1.Sipserver" />
<P967 para="Account1.FailoverSipserver" />
<P8851 para="Account1.SecondFailoverSipserver" />
<P4567 para="Account1.PreferPrimaryServer">0</P4567>
<P48 para="Account1.OutboundProxy" />
<P20047 para="Account1.BackUpOutboundProxy" />
<P130 para="Account1.SipTransport">0</P130>
<P52 para="Account1.NatTraversal">2</P52>
<P20000 para="Account1.Lable" />
<P35 para="Account1.SipUserId" />
Page 11
8
<P36 para="Account1.AuthenticateID" />
<P34 para="Account1.AuthenticatePassword" />
<P3 para="Account1.DispalyName" />
<P103 para="Account1.DnsMode">0</P103>
<P63 para="Account1.UserIdIsPhoneNumber">0</P63>
<P31 para="Account1.SipRegistration">1</P31>
<P81 para="Account1.UnregisterOnReboot">0</P81>
<P32 para="Account1.RegisterExpiration">15</P32>
<P109 para="Account1.OutCallWithoutReg">1</P109>
<P40 para="Account1.LocalSipPort">5060</P40>
<P78 para="Account1.UseRandomPort">0</P78>
<P33 para="Account1.VoiceMailId" />
<P136 para="Account1.RPort">0</P136>
<P1100 para="Account1.RFC2543Hold">1</P1100>
<P8775 para="Account1.ConnectMode">0</P8775>
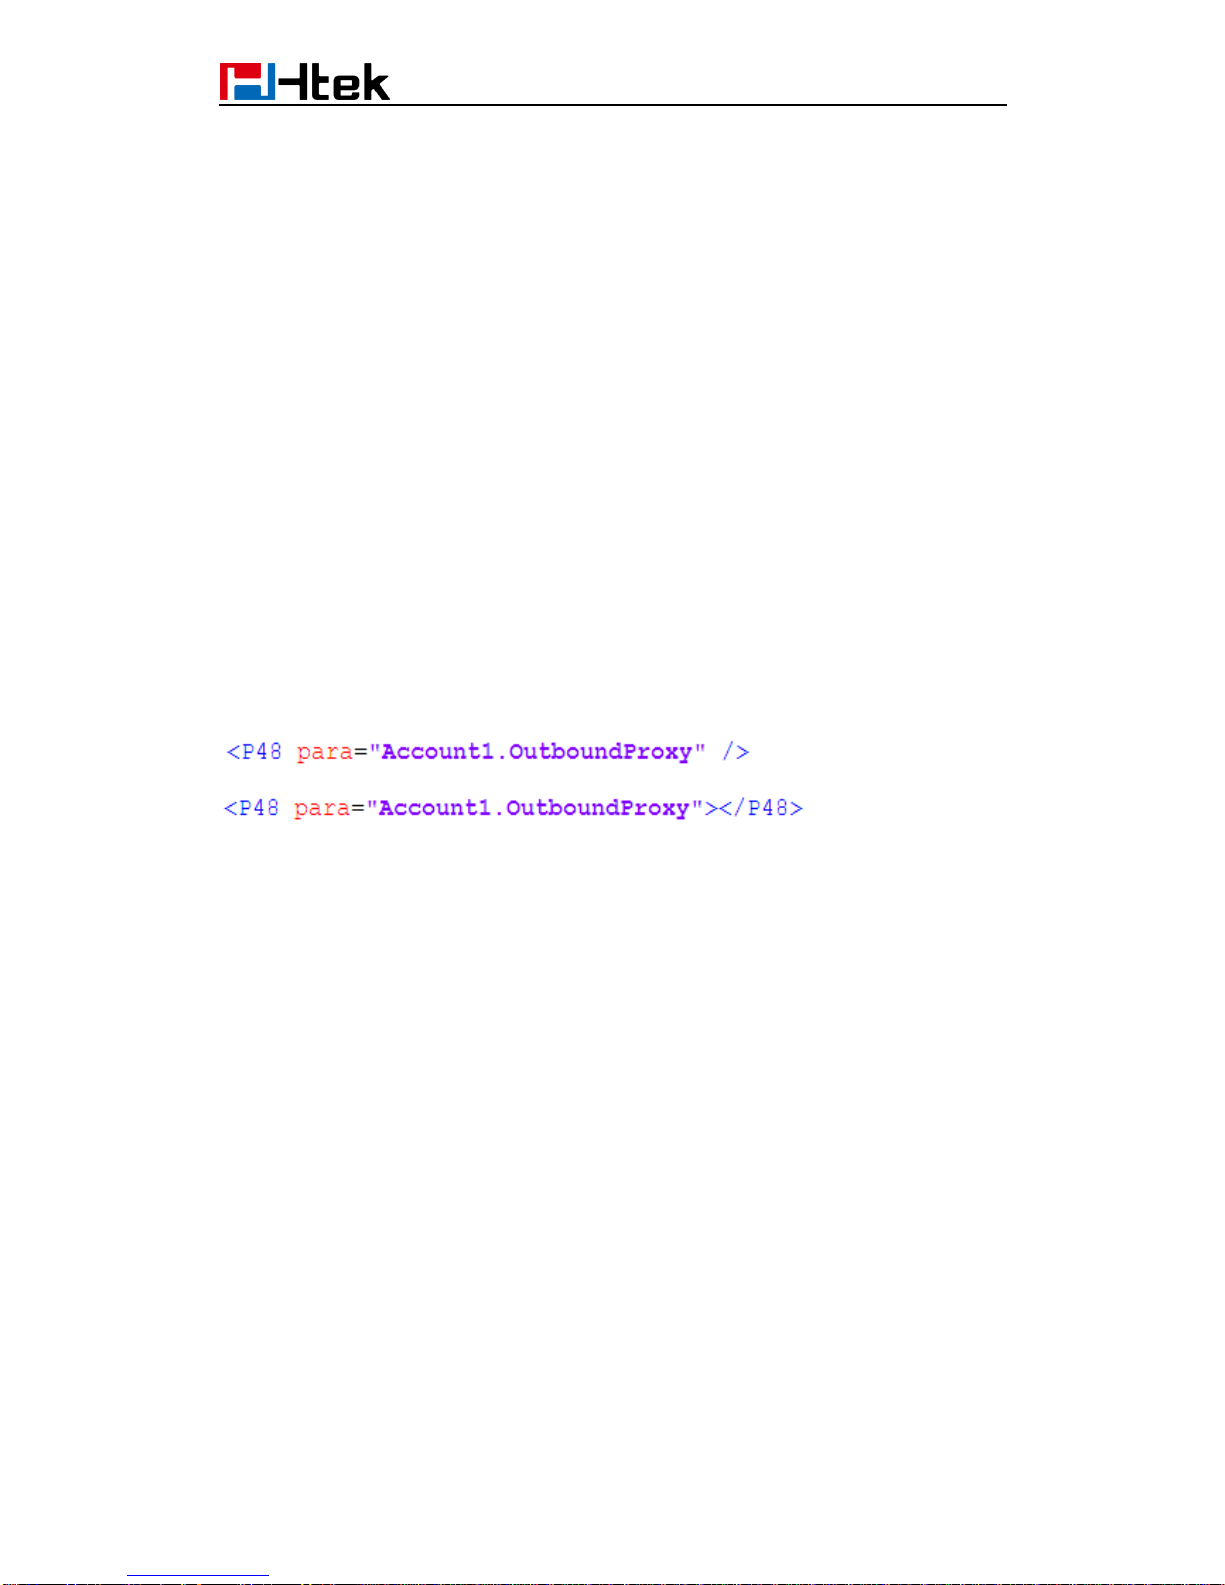
You can edit the value in <></>field.
For example: The phone’s SIP Server is 192.168.0.100, you need to edit the <P47
para="Account1.Sipserver">192.168.0.100</P47>.
If you want to configure others, for example:
, you need to change it as
, only in this way you
can change the value.
Method 2:
Login phone webpage, configure each item you want (like, account information,
programmable keys, firmware upgrade path...). Management ->Configuration, download
XML file, then change the name to cfgMAC.xml.
Page 12
9
3. Encrypt Configuration Files
Htek Configuration Generator allows user to encrypt the generated configuration file with
AES 128-bit encryption. It allows user to choose not to encrypt the configuration file in
Windows version, but it is recommended to use encryption for security reason.
3.1 How to encrypt the XML configuration file
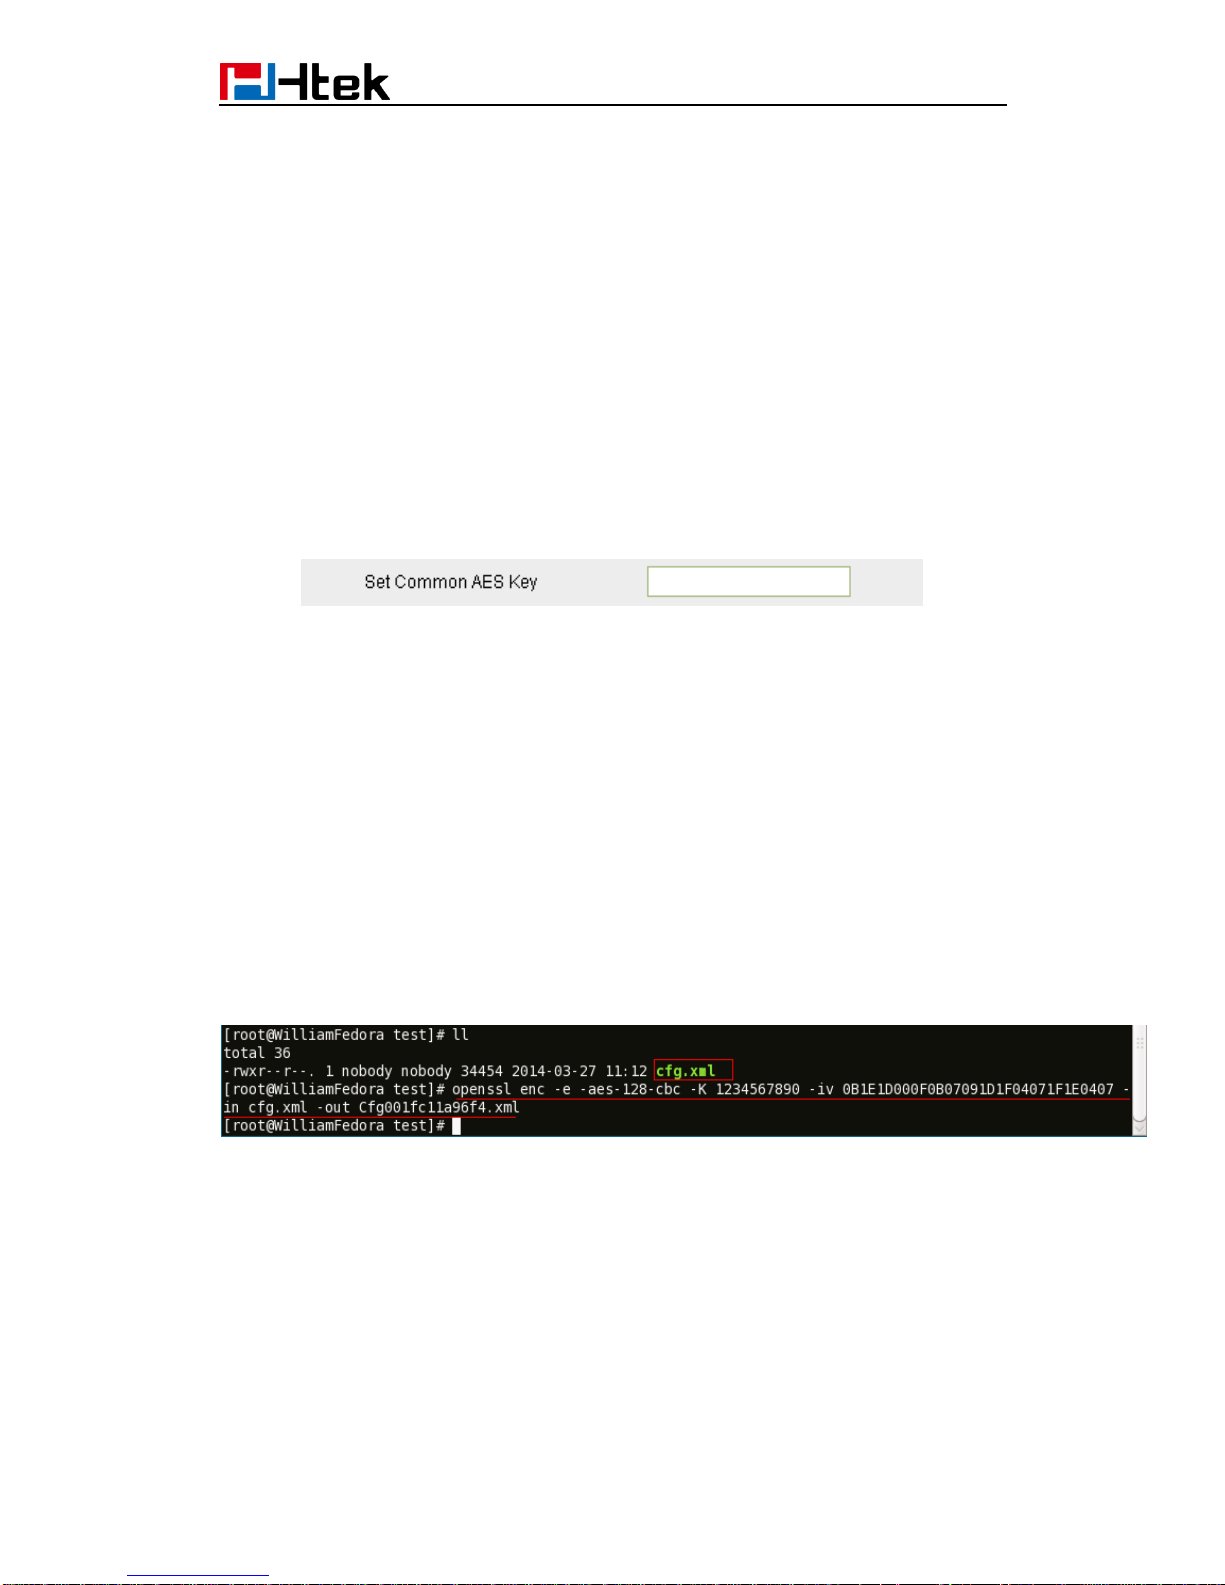
The XML configuration file could be encrypted in AES-128-CBC algorithm. The encryption
password is defined in P8631 (Management->Auto Provision->Set Common AES Key) of
the configuration file.
The Password length is from 1-16, and password must be [ 0-9, A-F]
THE SHARED IV: 0B1E1D000F0B07091D1F04071F1E0407
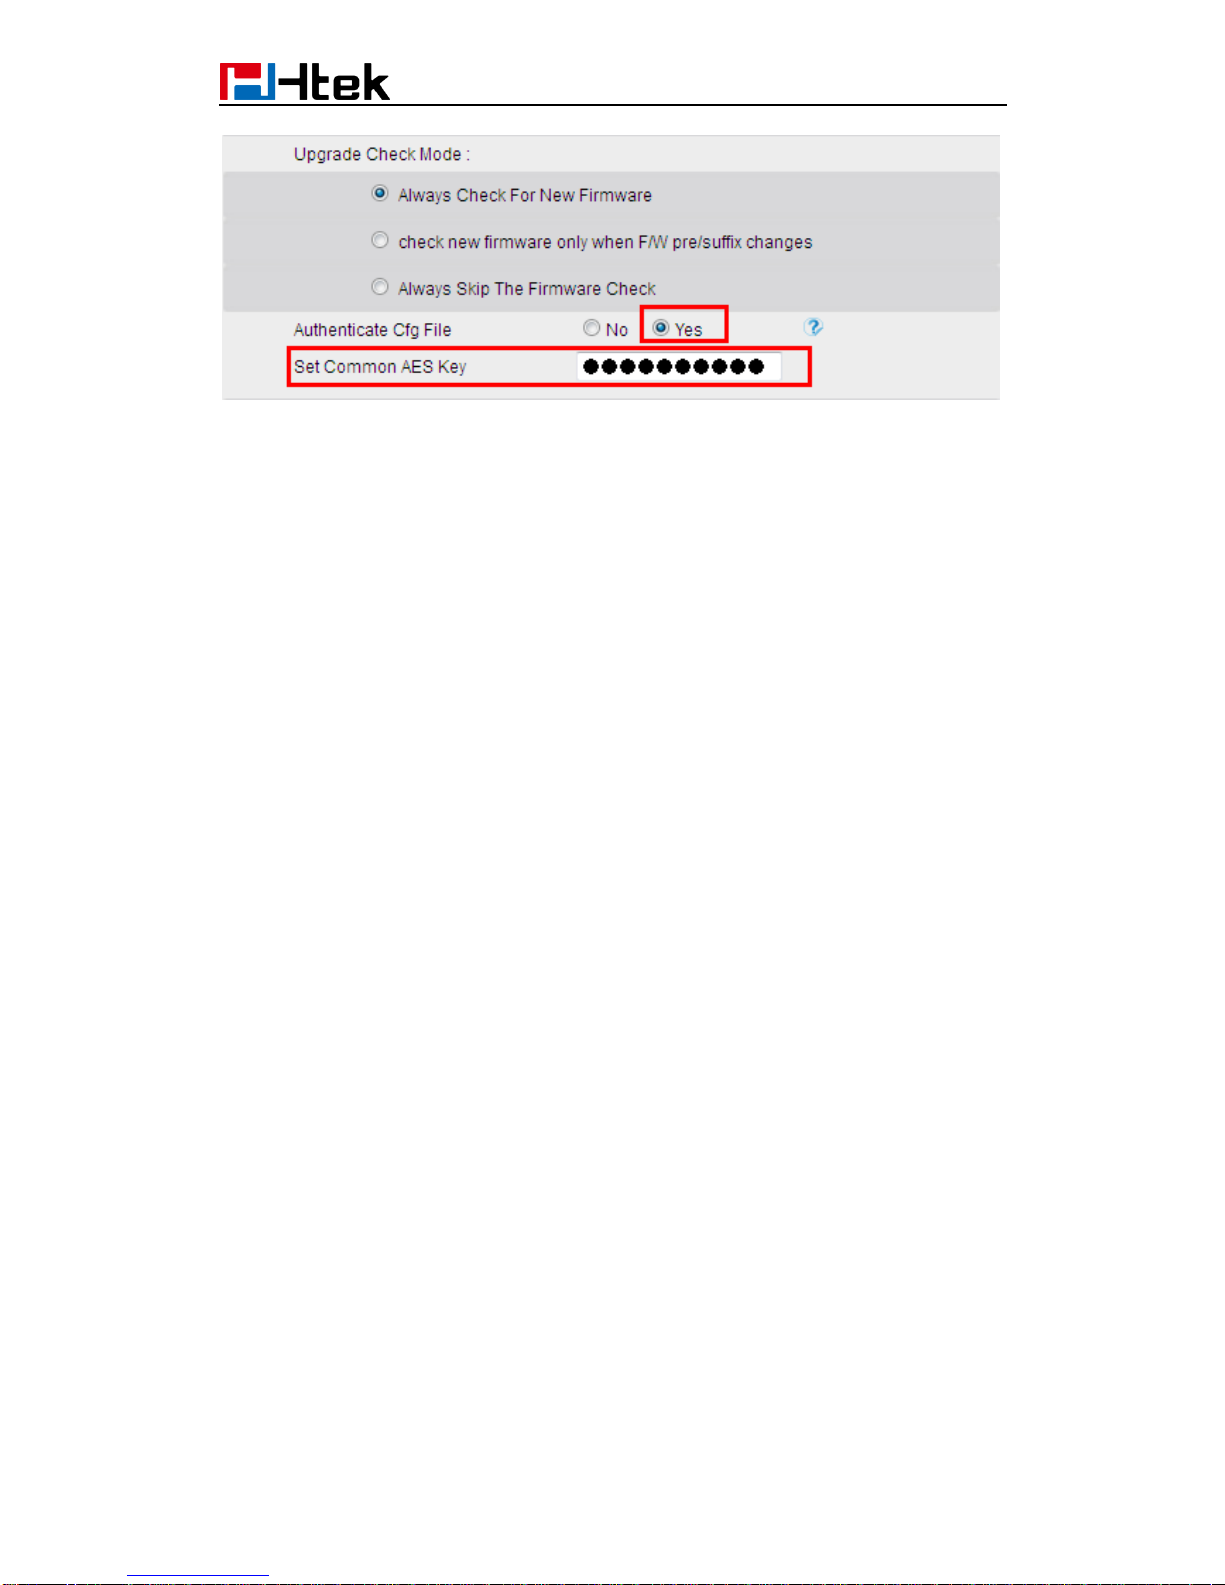
The OpenSSL command-line to encrypt the file is as follows:
Openssl enc –e –aes-128-cbc –K <password>-iv
0B1E1D000F0B07091D1F04071F1E0407 –in cfg.xml –out cfgxxxxxxxxxxxx.xml
When the XML configuration file is encrypted in this method, Phone would only be able to
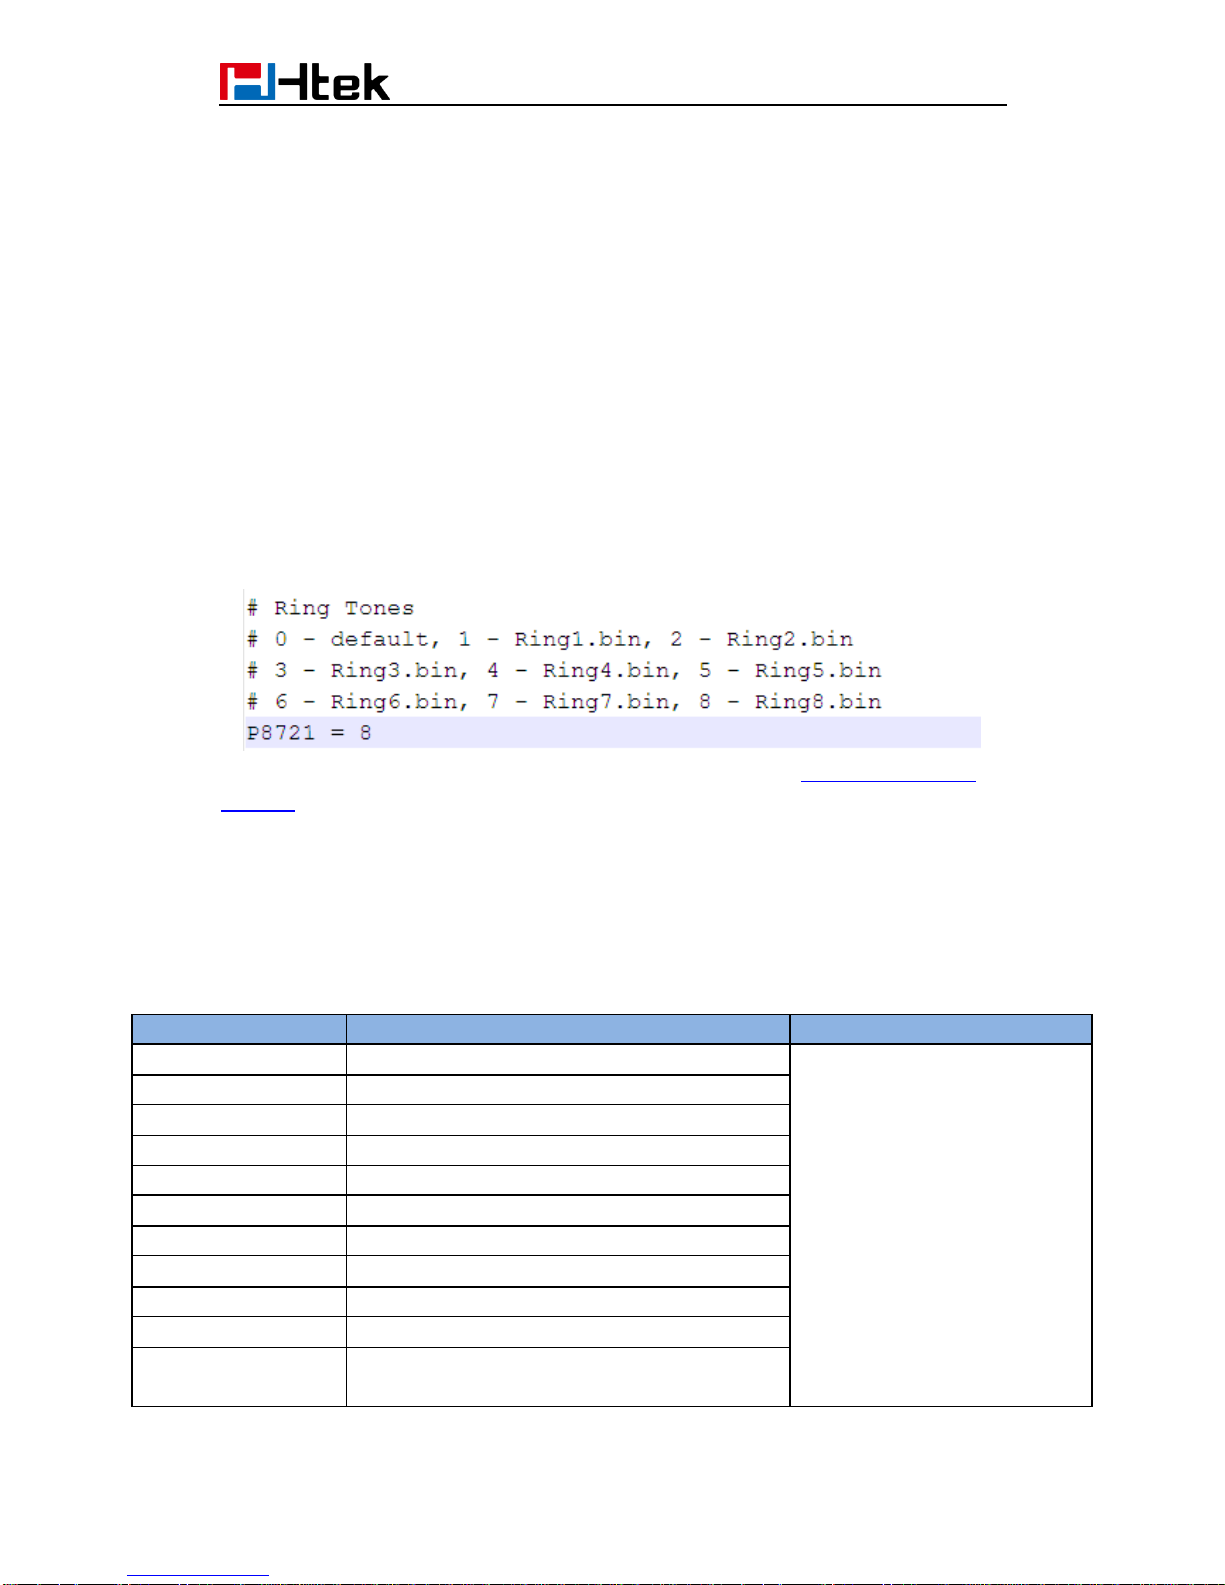
decrypt and parse the file if user set the XML Config File Password in P8631 of binary
configuration file or in the web UI.
Detailed steps:
Step 1: Login webpage, click ManagementConfiguration, download cfg.xml file, then run,
input” Openssl enc –e –aes-128-cbc –K<password>-iv
0B1E1D000F0B07091D1F04071F1E0407 –in cfg.xml –out Cfgxxxxxxxxxxxx.xml”
(xxxxxxxxxxxx is the MAC address)
THE SHARED IV: 0B1E1D000F0B07091D1F04071F1E0407
Step 2: Put the Cfgxxxxxxxxxxxx.xml under upgrade server path
Step 3: You must set the AES Key: ManagementAuto Provision: AES Key:
Page 13
10
Page 14
11
4. Customize Resource Files
Htek IP Phone allows to customize some resource files, like ring tone file, language
package file and logo files. For how to customize resource files, as follows:
4.1 Customize ring tone
Htek IP Phone has several factory-default ring tones (Ring1, Ring2, Ring3). You can
customize Ring4, Ring5, Ring6, Ring7 and Ring8 tone and upload them to the phone via
auto provisioning.
You can change the ring tone configuration parameter to personalize ring tone:
For example: P8721 = 8
For more information on customizing ring tone file, please refer to <<Making Ringtone
Notes>> in page 53.
4.2 Customize LCD language
Htek IP Phone supports multiple language,you can modify the language and add a new
language to the phone. The following table lists all available languages, associated
language files and language template file:
Available language
Associated language files
Language template file
English
(Default, can't be customized)
LCD_English_Template.xml
French
1_Français(French).xml
German
2_Deutsch(German).xml
Spanish
3_Español(Spanish).xml
Portuguese
4_Português(Portuguese).xml
Russian
5_русский(Russian).xml
Italian
6_Italiano(Italian).xml
Polish
7_Polski(Polish).xml
Turkish
8_Türk(Turkish).xml
Serbian
9_Srpski(Serbian).xml
ChinesSimplified
10_简体中文(ChineseSimplified).xml
Page 15
12
ChineseTraditional
11_繁体中文(ChineseTraditional).xml
Slovenian
13_Slovenščina(Slovenian).xml
Persian
14_Persian(Farsi).xml
Hebrew
15_תירבע(Hebrew).xml
Slovak
16_Slovak.xml
Czech
17_Czech.xml
JapaneseSimplified
18_日本語(JapaneseSimplified).xml
Dutch
19_Nederlands(Dutch).xml
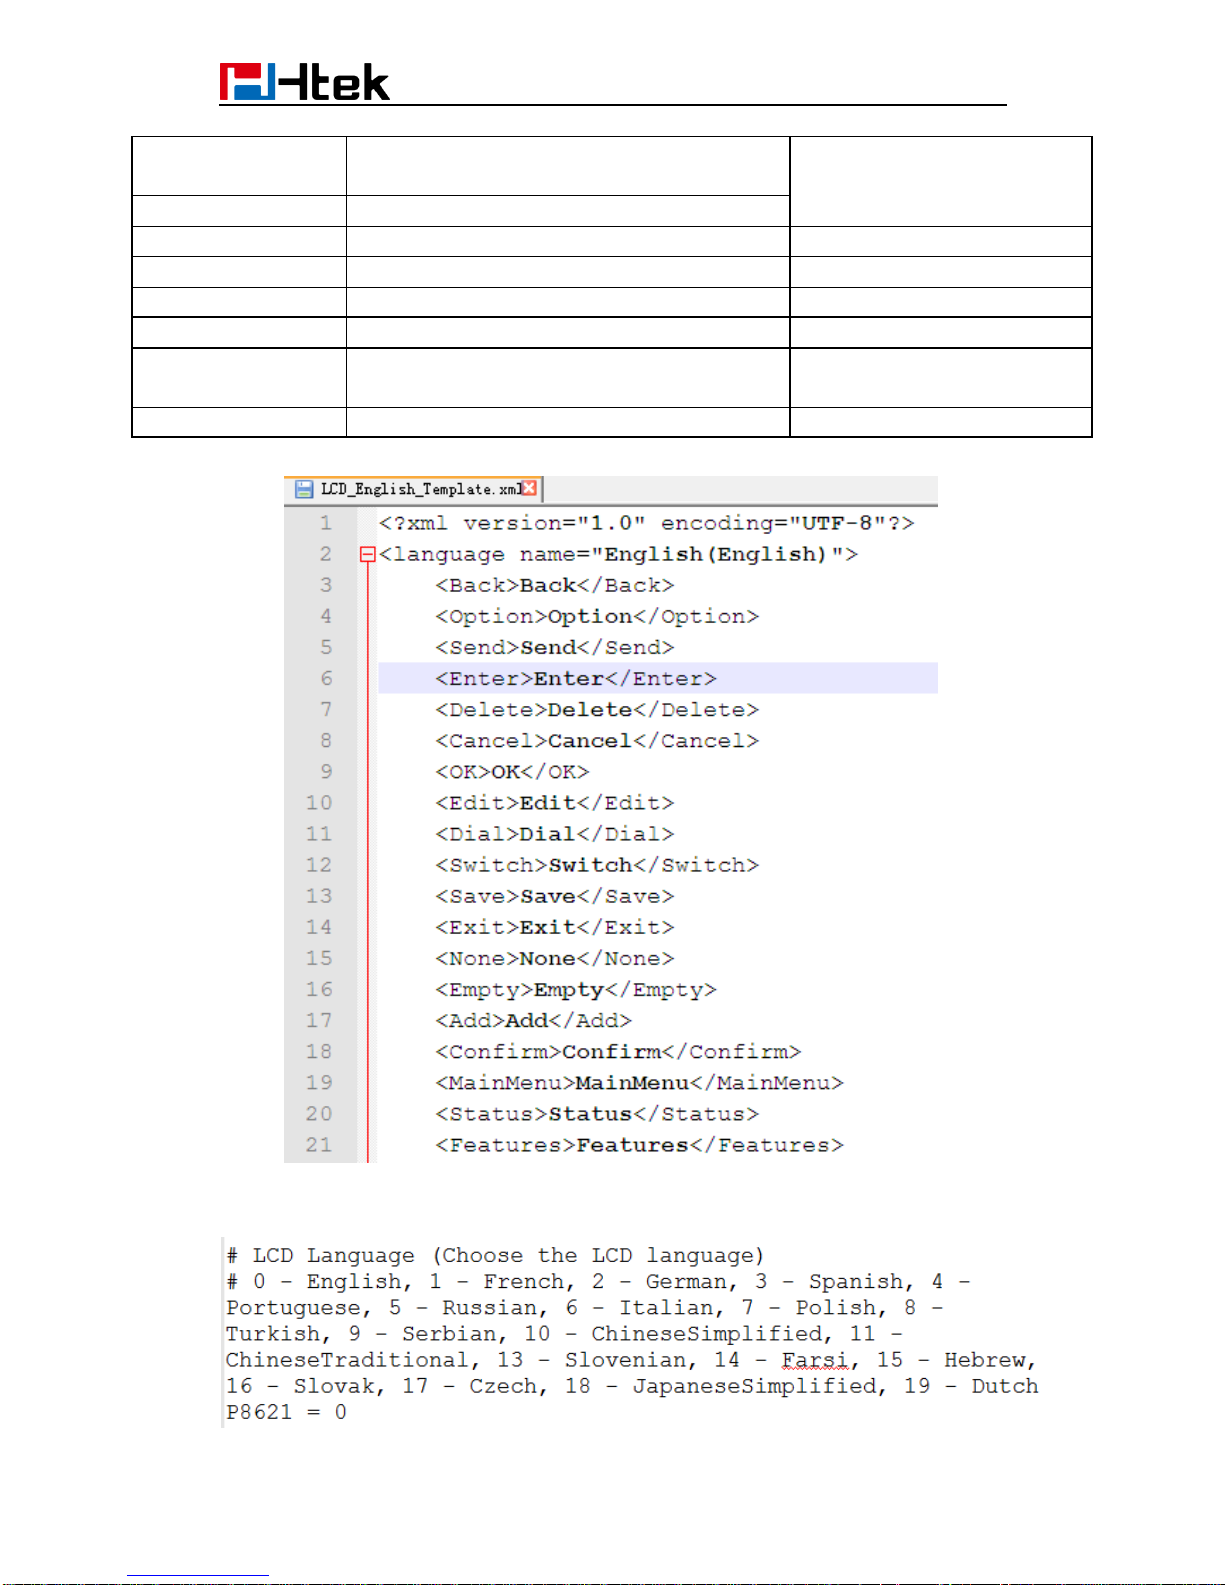
Below picture shows a portion of LCD_English_Template.xml file:
English is the default language, you can change configuration parameter to other
languages:
Page 16
13
For more information on customizing an LCD language, please refer to <<LCD Language
custom guide>> in page 56.
4.3 Customize web language
Htek IP Phone supports multiple language,you can modify the language and add a new
language to the phone’s webpage. The following table lists all available languages,
associated language files and language template file:
Available language
Associated language files
Language template file
English
(Default, can't be customized)
Web_English_Template.js
French
1_French.js
German
2_German.js
Spanish
3_Spanish.js
Portuguese
4_Portuguese.js
Russian
5_Russian.js
Italian
6_Italian.js
Polish
7_Polish.js
Turkish
8_Turkish.js
ChineseSimplified
10_ChineseSimplified.js
ChineseTraditional
11_ChineseTraditional.js
Dutch
19_Dutch.js
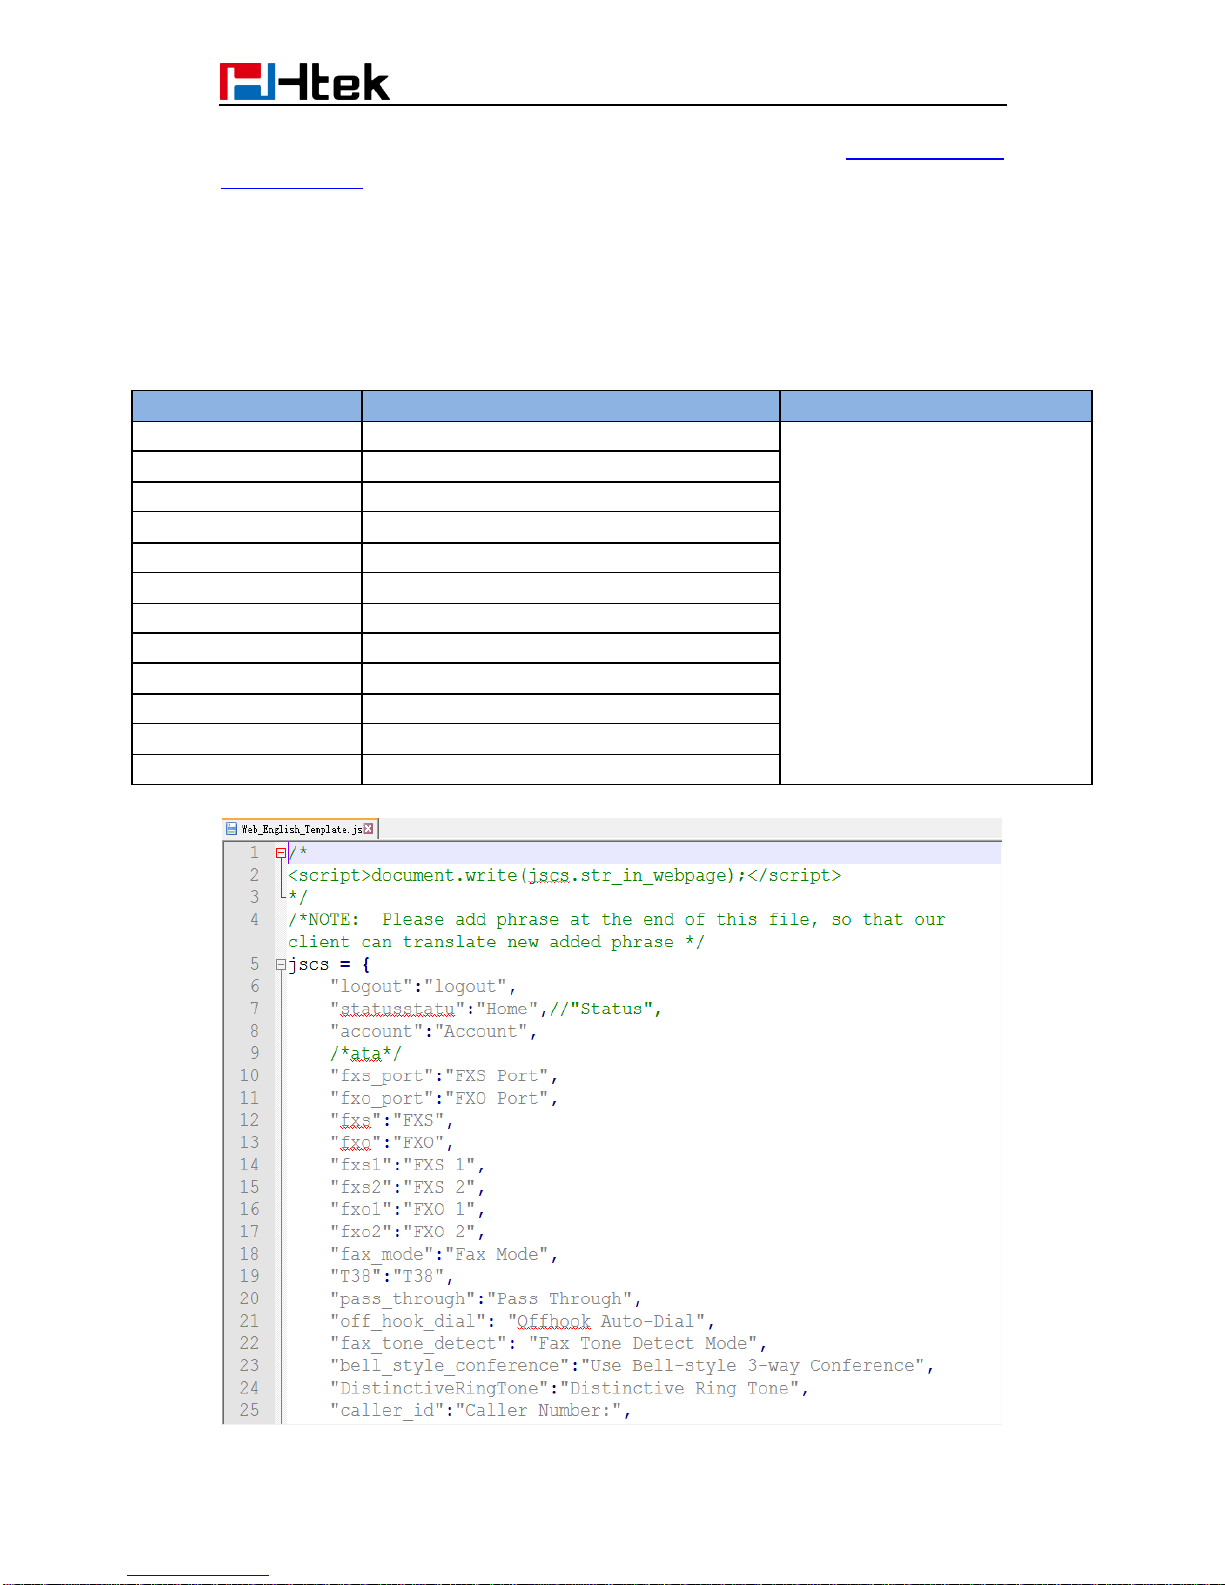
Below picture shows a portion of Web_English_Template.js file:
Page 17
14
English is the default language,you can change configuration parameter to other
languages:
For more information on customizing web language file, please refer to << Web Language
custom guide>> in page 58.
4.4 Customizing wallpaper
You can customize Htek UC923/UC924/UC926 IP phones' wallpaper.
Below table shows wallpaper's format and resolution for UC923/UC924/UC926 IP phones:
Phone model
Photo format
Resolution
One file size
Photo number
UC923
.jpg, .bmp
320*240
<=2M
3
UC924
.jpg, .bmp
480*320
<=2M
3
UC924E
.jpg, .bmp
480*320
<=2M
3
UC926
.jpg, .bmp
480*272
<=2M
3
UC926E
.jpg, .bmp
480*272
<=2M
3
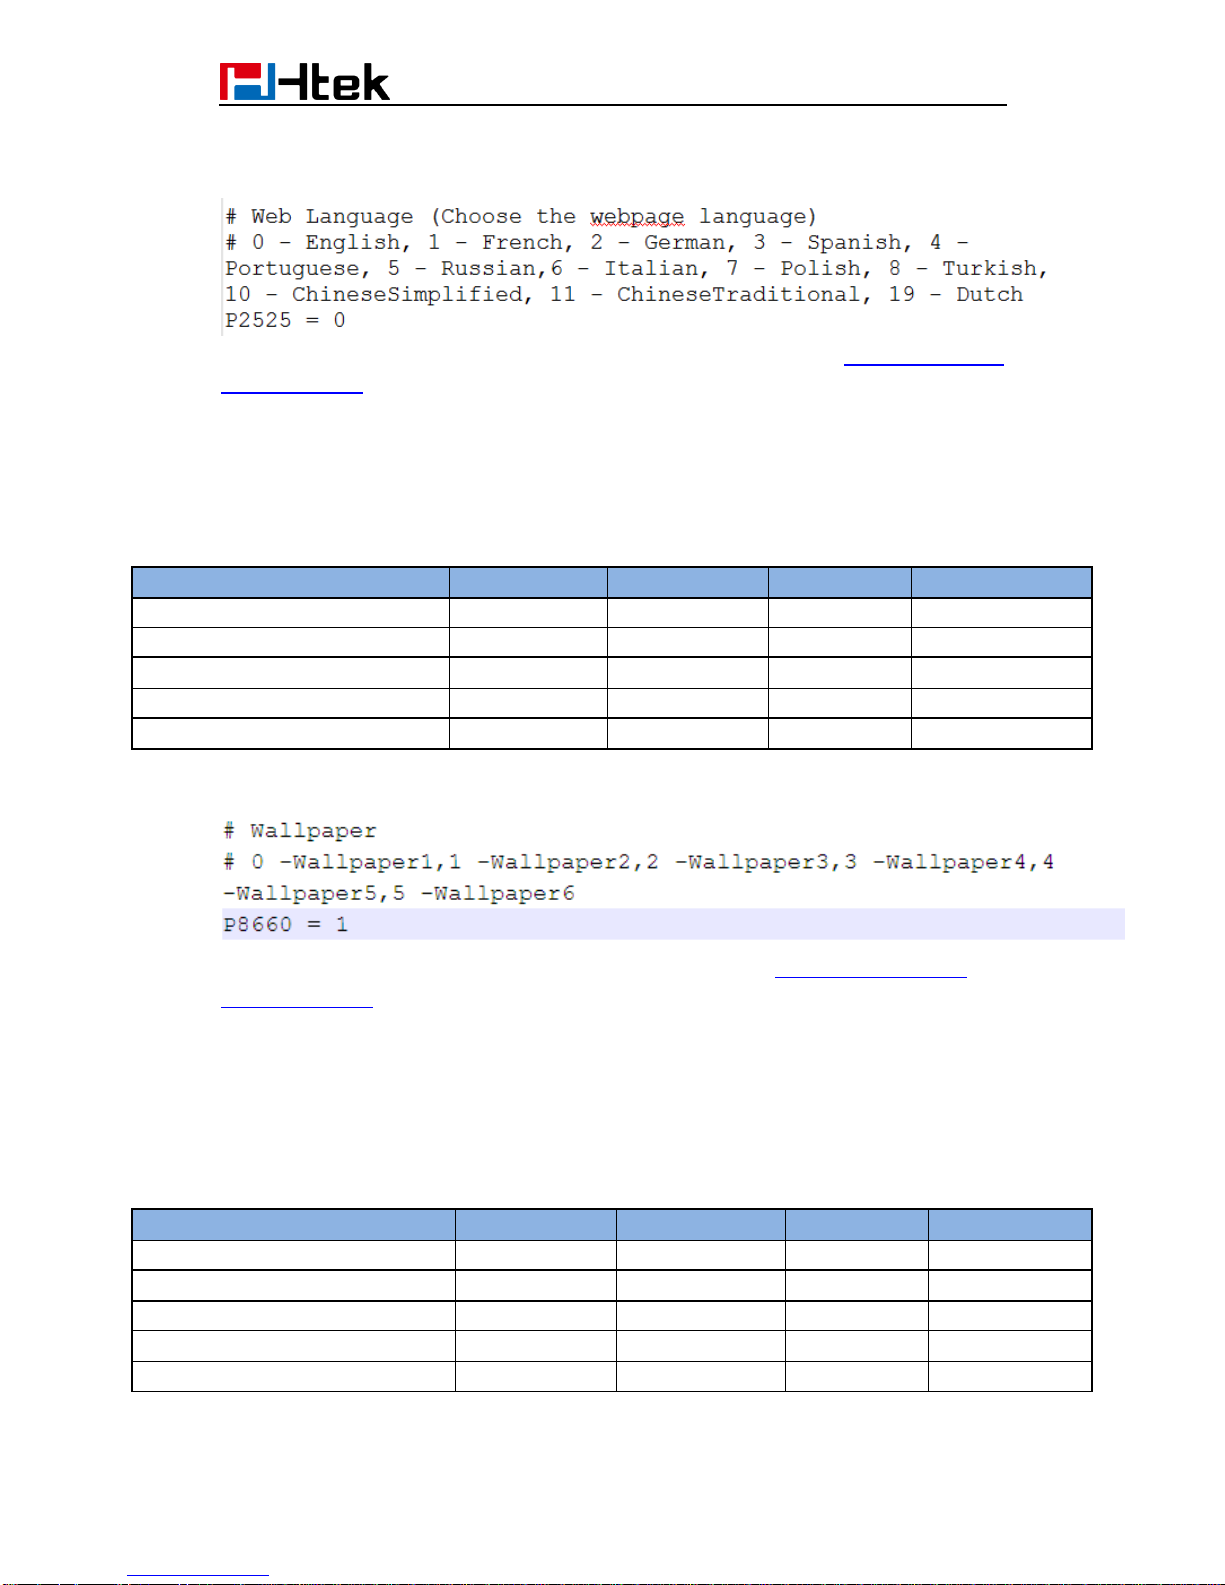
Wallpaper2 is default wallpaper, you can change configuration parameter to other
wallpaper:
For more information on customizing wallpaper, please refer to <<LCD and Web GUI
custom Guide >> in page 60.
4.5 Customizing screensaver
You can customize Htek UC923/UC924/UC926 IP phones' screensaver.
Below table shows screensaver's format and resolution for UC923/UC924/UC926 IP
phones:
Phone model
Photo format
Resolution
One file size
Photo number
UC923
.jpg, .bmp
320*240
<=2M
3
UC924
.jpg, .bmp
480*320
<=2M
3
UC924E
.jpg, .bmp
480*320
<=2M
3
UC926
.jpg, .bmp
480*272
<=2M
3
UC926E
.jpg, .bmp
480*272
<=2M
3
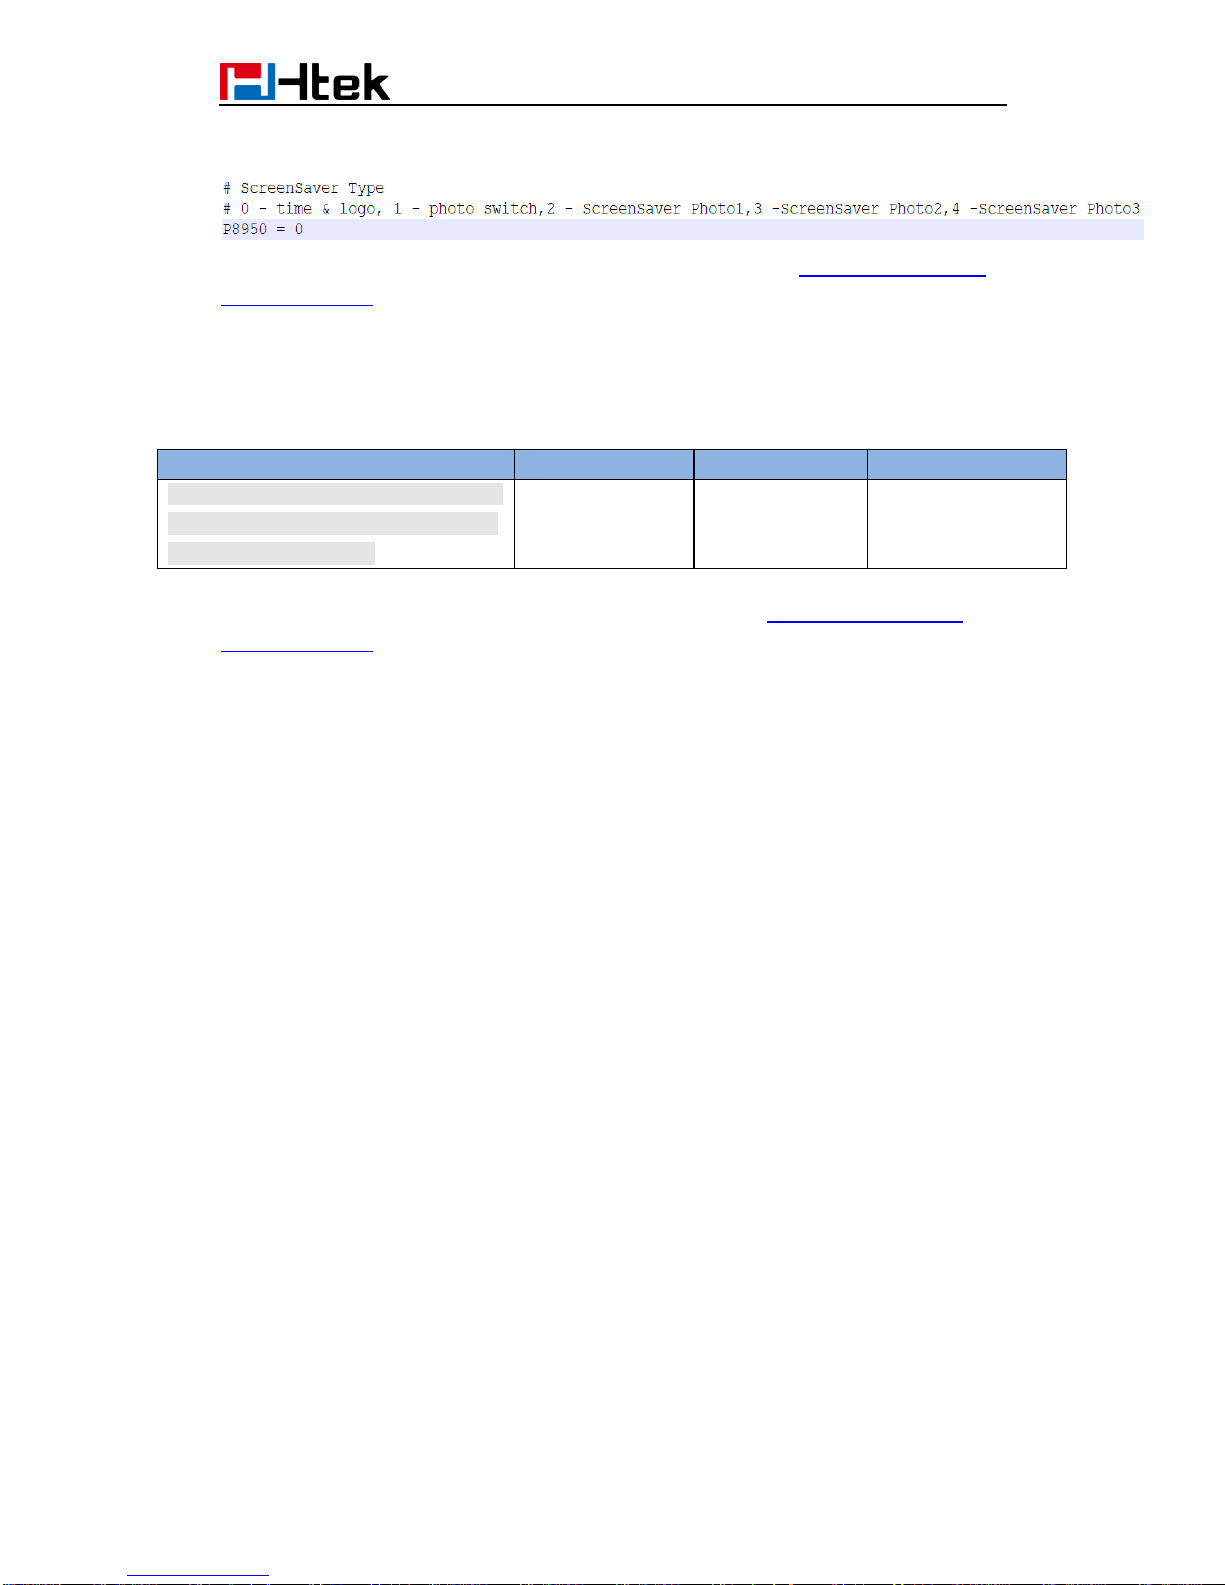
Screensaver default is Off, you can change configuration parameter to activate the
Page 18
15
Screensaver :
For more information on customizing screensaver, please refer to <<LCDand Web GUI
custom Guide >> in page 61.
4.6 Customizing weblogo
You can customize Htek all phone models' weblogo on webpage.
Phone model
Photo format
Resolution
File size
UC601/UC901/UC902/UC903/UC912/
UC912G/UC912GM/UC923/UC924/U
C924E/UC926/UC926E
.jpg
225*93
<=2M
For more information on customizing weblogo, please refer to << LCD and Web GUI
custom Guide >> in page 61.
5. Upgrade resource files
Htek IP phone supports upgrade resource files through URL (support HTTP(s) server).
The files contain hlpres.tar, Language.tar, ring4.bin, ring5.bin, ring6.bin, ring7.bin,
ring8.bin, exp_pres.tar, Screensaver and Wallpaper. For how to configure these files URL
as follow:
5.1 How to configure URL for hlpres.tar
You can change the hlpres server configuration parameter to locate the file:
P20176=http(s)://192.168.0.254/hlpres.tar
5.2 How to configure URL for Language.tar
You can change the Language server configuration parameter to locate the file:
P20175=http(s)://192.168.0.254/Language.tar
5.3 How to configure URL for exp_pres.tar
You can change the exp_pres server configuration parameter to locate the file:
P20177=http(s)://192.168.0.254/exp_pres.tar
Page 19

16
5.4 How to configure Path for ringx.bin
You can change the Ring server configuration Path, and IP Phone will get the files:
ring4.bin, ring5.bin, ring6.bin, ring7.bin, ring8.bin automatically:
P20174=http(s)://192.168.0.254
5.5 How to configure URL for Screensaver
This parameter is only applicable to UC923, UC924, UC924E, UC926, UC926E.
You can change the Screensaver server configuration to locate the file:
P20051=http(s)://192.168.0.254/Screensaver.jpg
Note: 1. Screensaver file phone gets from server will cover the screensaver photo1.
2. Only support format .jpg, .bmp.
5.6 How to configure URL for Wallpaper
You can change the Wallpaper server configuration to locate the file:
P20052=http(s)://192.168.0.254/wallpaper.jpg
Note: 1. Wallpaper file phone gets from server will cover the wallpaper6.
2. Only support format .jpg, .bmp.
Page 20

17
6. Upgrade Firmware
Version number and support files list:
Note:
When the phone which version is 1.0.3.71 or older upgrade to 1.0.3.73, phone will
upgrade img_9xx.bin then automatically upgrade fw9xx.rom. fw9xx.rom is all-in-one
firmware file. After upgrading to the 1.0.3.73 firmware, in the next time, phone will only
need upgrade one file fw9xx.rom.
6.1 Configuring HTTP Server
Htek IP Phone supports using FTP, TFTP, HTTP and HTTPS protocols to obtain the
address of provision server. Default way is HTTP. For how to configure a HTTP server, as
follows:
You can download a free HTTP server from http://httpd.apache.org/ or use Microsoft IIS
web server. Then setup HTTP server.
For more information on how to configure TFTP, FTP and HTTPS servers, please refer to
Upgrade through TFTP in page 63, Upgrade through FTP in page 66 and Upgrade
through HTTPS in page 67.
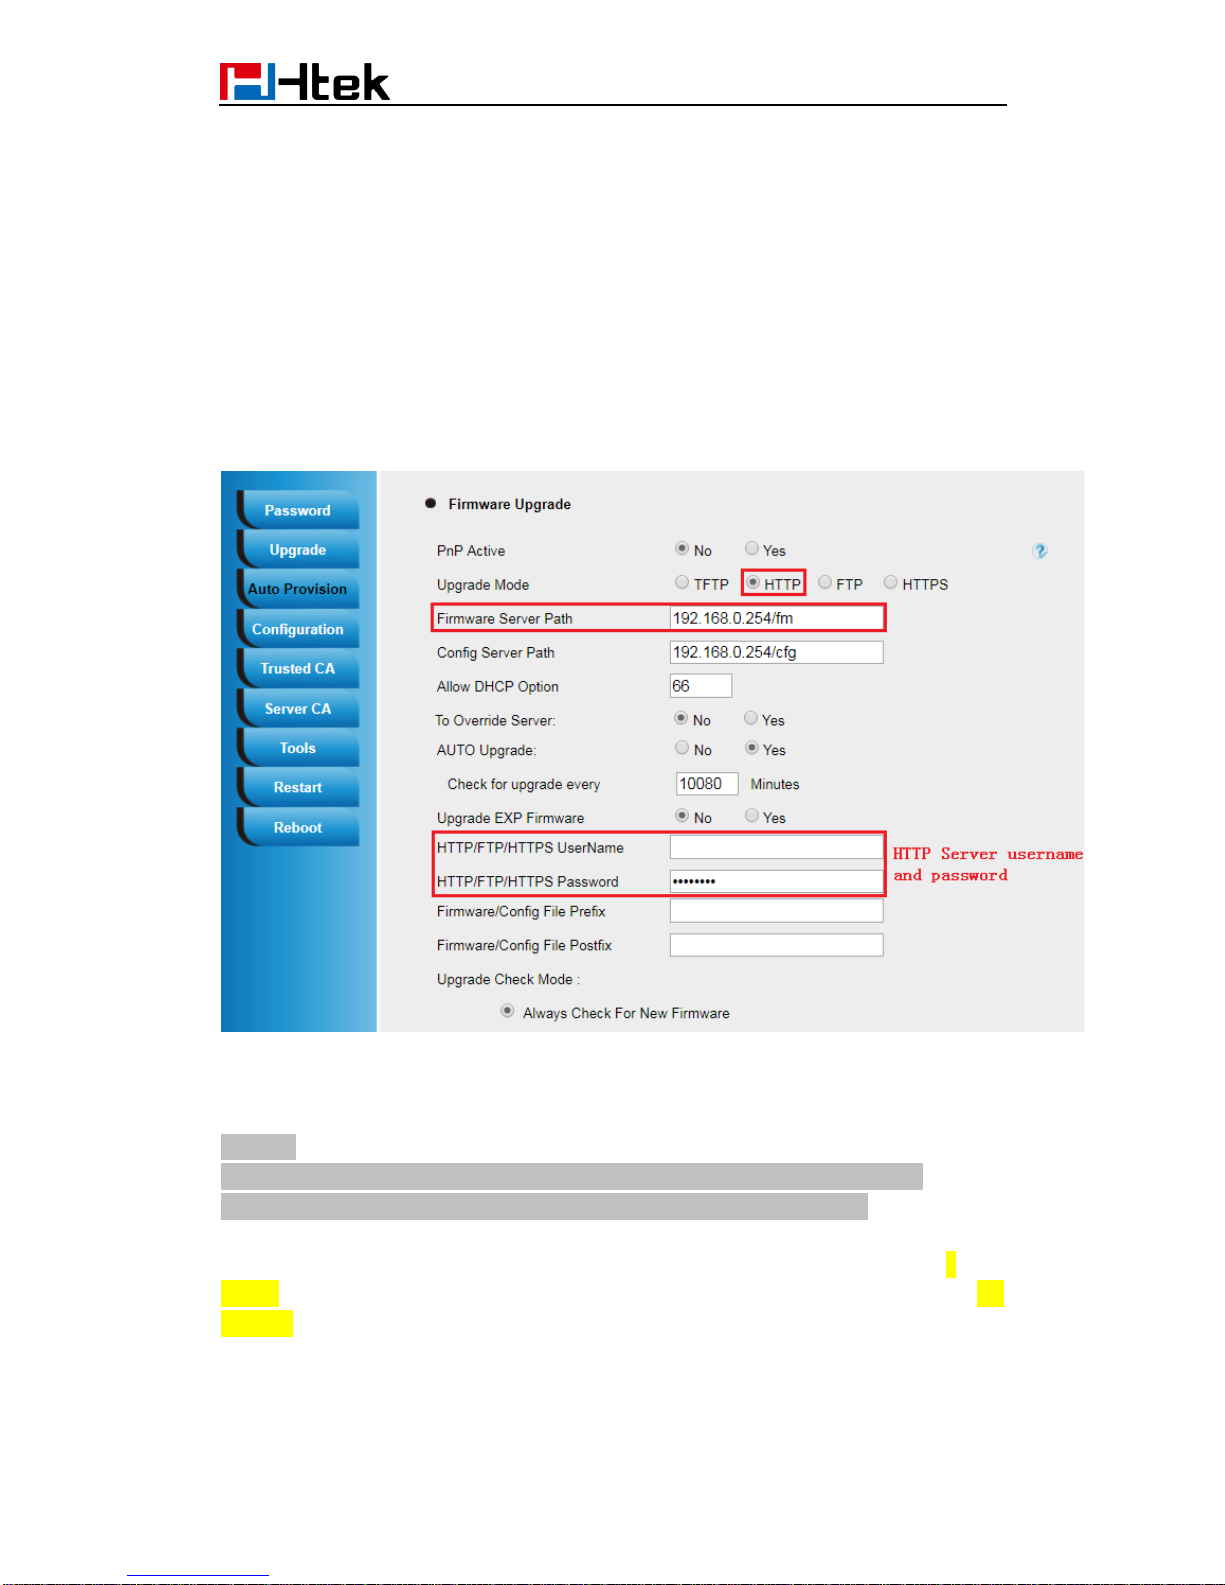
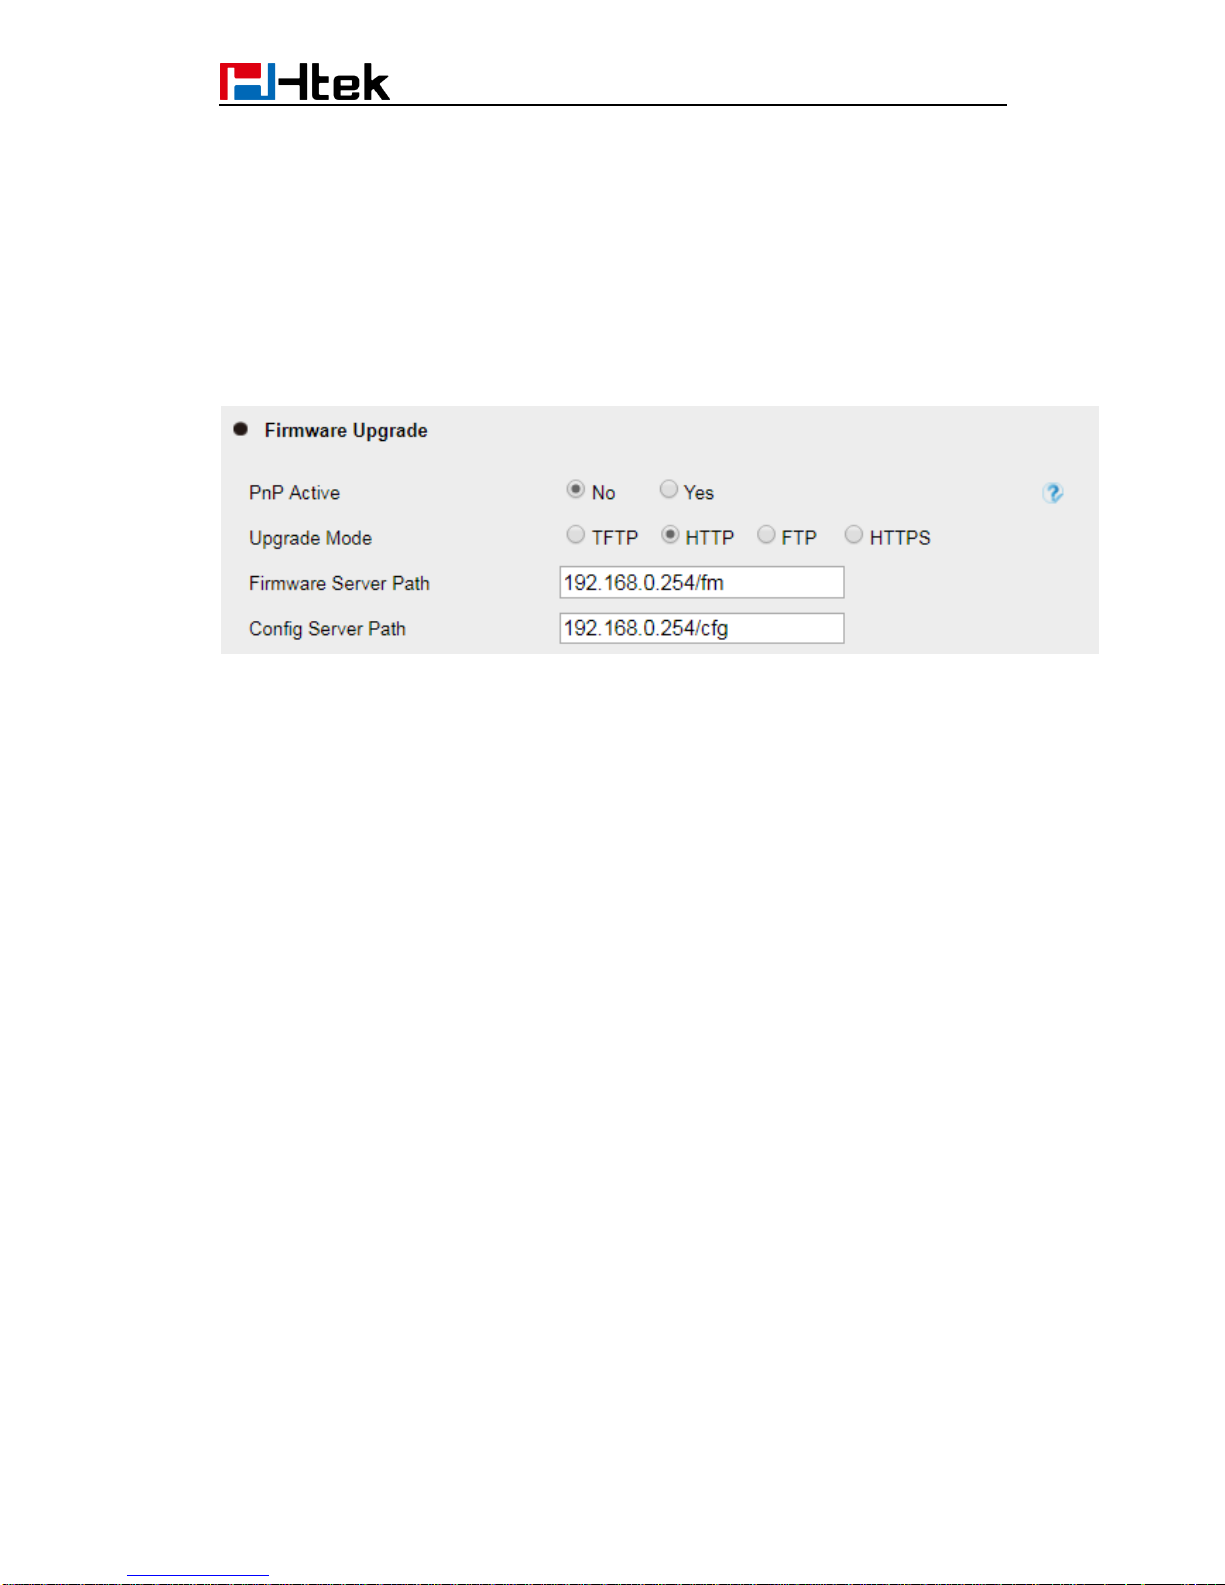
6.2 How to Configuring HTTP Server
Login webpage, “Management” -> “Auto Provision” -> ”Firmware Upgrade” -> “Upgrade
Mode” needs to be set to HTTP. “Firmware Server Path” needs to be set to be a valid URL
of a HTTP server, and server name can be in either FQDN or IP address format. Below
are examples of some valid URLs.
e.g. firmware.mycompany.com:5688/Htek
1.0.3.58-1.0.3.72
1.0.3.73 or later
boot_9xx.bin
img_9xx.bin
hlpres.tar
Language.tar
ring4.bin
ring5.bin
ring6.bin
ring7.bin
ring8.bin
fw9xx.rom
Page 21
18
e.g. www.mycompany.com:5688/fm/Htek
e.g. 218.2.83.110
Below are Instructions for FW upgrade via HTTP:
(1) You can download a free HTTP server from http://httpd.apache.org/ or use Microsoft
IIS web server. Then setup HTTP server.
(2) Unzip the firmware file and put the files under the root/fm directory of the HTTP server.
(3) Visiting “http://192.168.0.254/fm/fw924.rom on localhost by browser” to verify the
HTTP Server. If visiting “http://192.168.0.254/fm/fw924.rom on another computer is no
prompt to download fw924.rom file, please check the firewall (Suggest to close the
firewall).
(4) Change the setting of UC9xx (192.168.0.254 is HTTP server):
Click “SaveSet”.
(5) Restart the UC9xx, IP Phone will restart and automatically get firmware files from
HTTP server.
NOTES:
(1) We recommend you to use Htek HTTP server, or you can also use your own
TFTP/HTTP/FTP/HTTPS server for upgrade and provisioning procedures.
(2) You need to update the settings and restart the IP Phone after “Firmware Server Path”
is set. If the configured firmware server is found and a new code image is available,
UC9xx IP Phone will attempt to retrieve the new image files by downloading them into the
UC9xx’s SDRAM. During this stage, the phones LEDs will blink more frequently until the
checking/downloading process is finished. Upon verification of checksum, the new code
image will be saved into the Flash. If TFTP/HTTP/FTP/HTTPS fails for any reason (e.g.
TFTP/HTTP/FTP/HTTPS server is not responding, there are no code image files available
Page 22

19
for upgrade, or checksum test fails, etc.), the phone will stop the TFTP/HTTP/FTP/HTTPS
process and simply boot using the existing code image in the flash.
(3) Firmware upgrade takes 3 to 8 minutes over Internet, or just 1 minute on a LAN. We
recommend you to upgrade the FW in a controlled LAN environment.
Page 23
20
7. Obtain Provisioning Server's
Address
Htek IP Phone supports to obtain the provisioning server address in below 3 ways:
Plug and Play (PnP) Server
DHCP Options
Phone Flash
The priority of obtaining the provisioning server address: PNP Server (SIP PnP MCAST)
--> DHCP Option 128 or 150 or 66 --> Configuration in Flash.
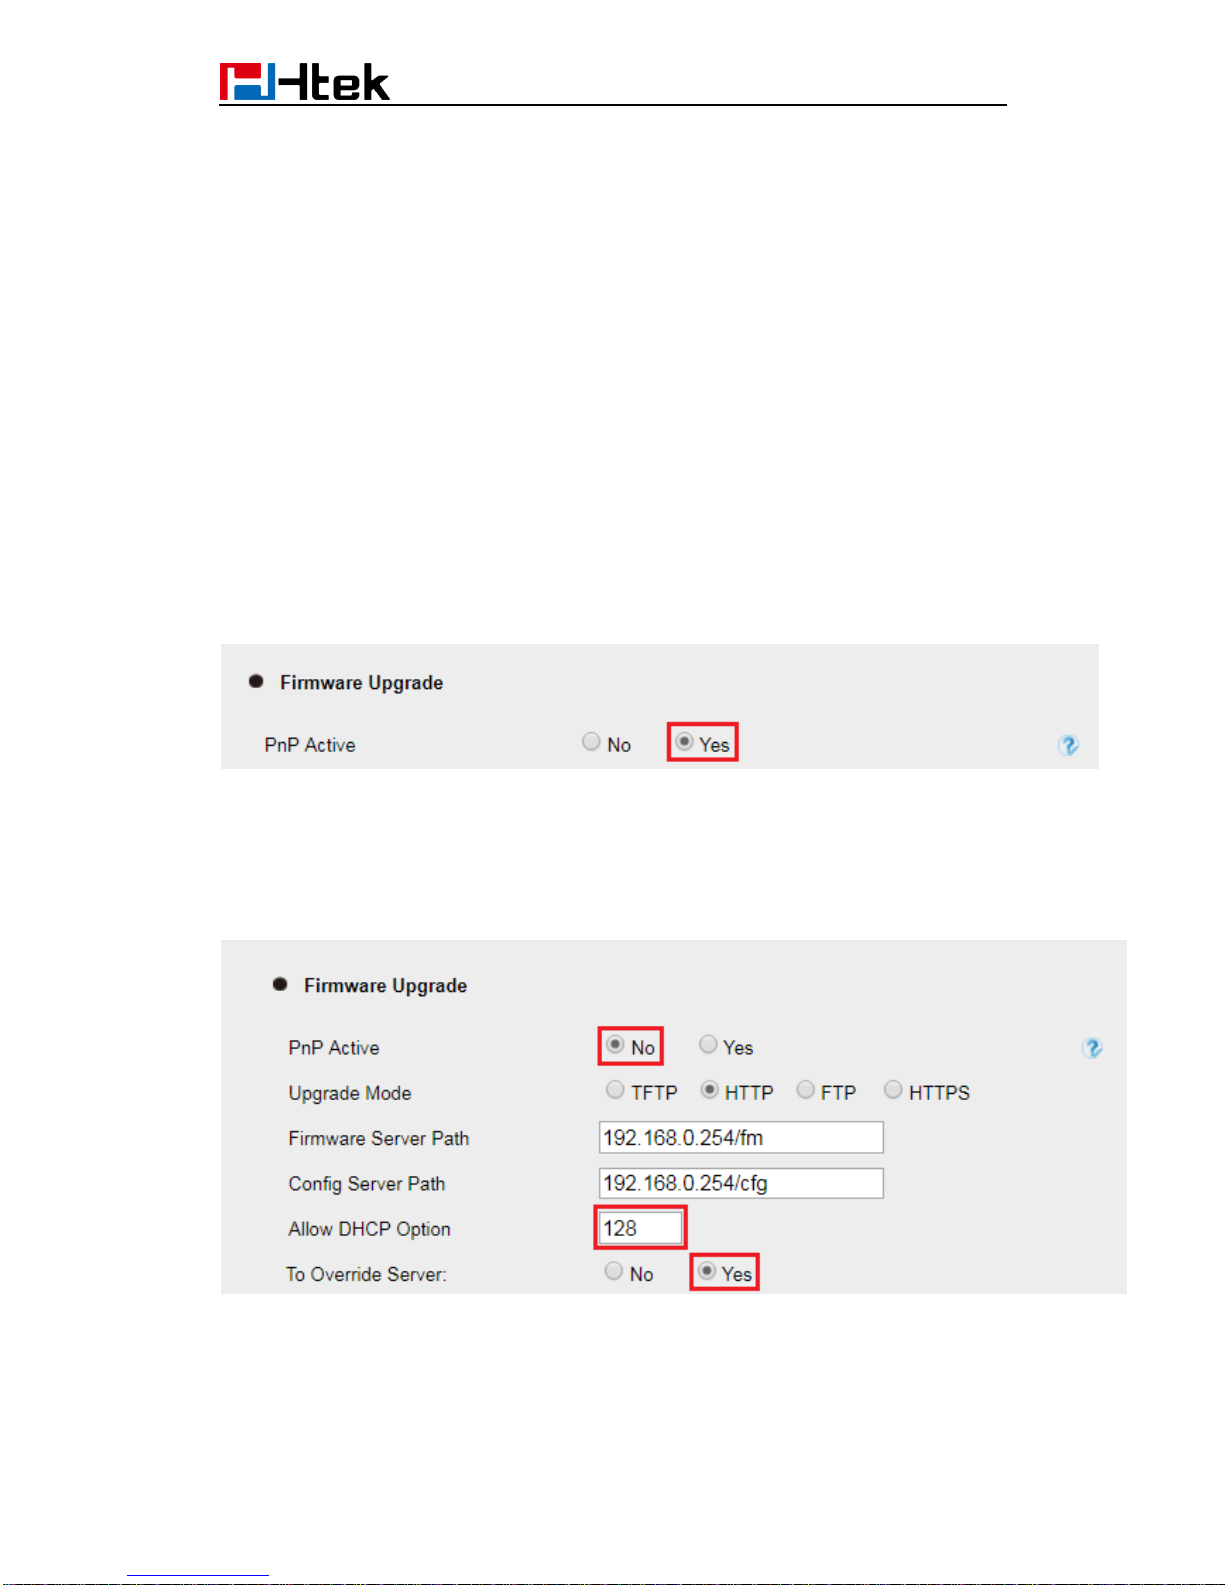
1) The PNP Server feature is enable default.
Webpage --> Management --> Auto Provision --> PnP Active: No/Yes
If you set “Yes”, the Phone will obtain the provisioning server address from the PnP
Server.
2) Setting of "DHCP Option 128 or 150 or 66":
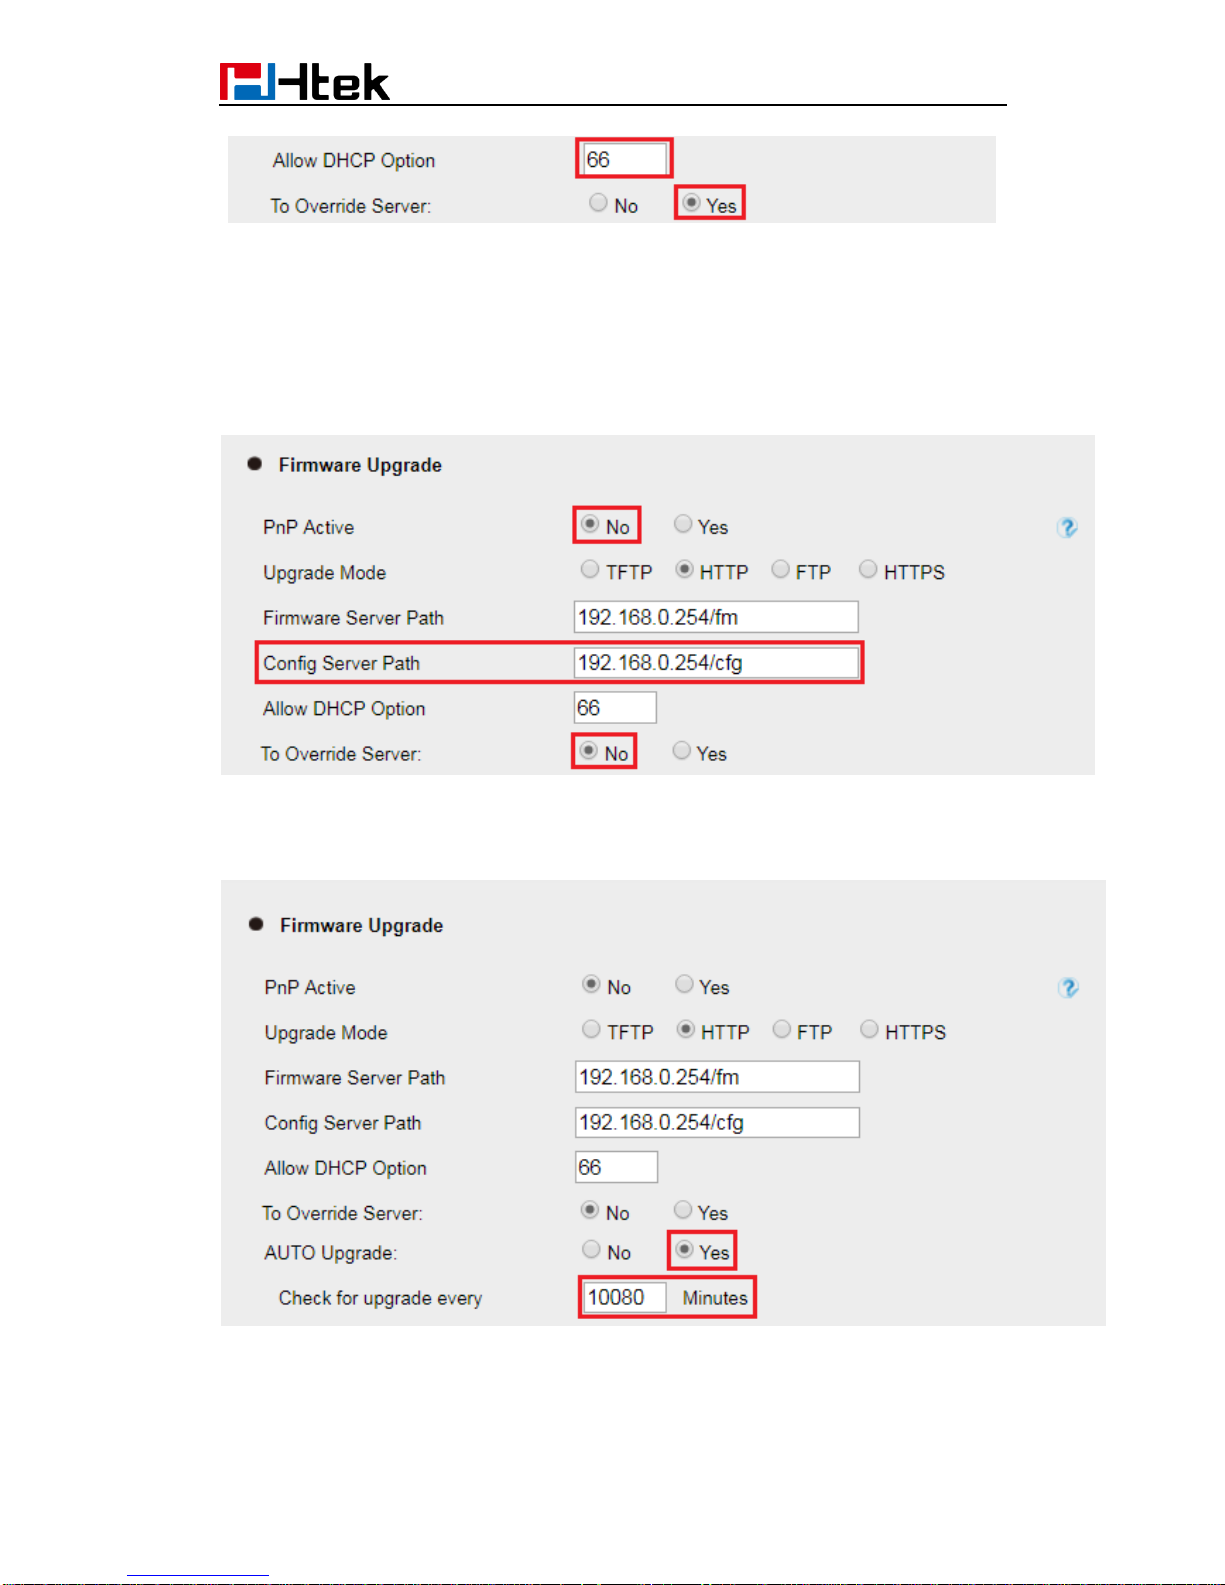
If you set "PnP Active" to "No", login Webpage --> Management --> Auto Provision -->
Allow DHCP Option (128 or 150 or 66) To Override Server: No/Yes
If you set "To Override Server" to “Yes”, the Phone will obtain the provisioning server
address from the DHCP Option (128). For examples:
DHCP option 128 is tftp://192.168.1.240/cfg, the phone will get the configuration file from
192.168.1.240/cfg through TFTP protocol.
If the default setting is:
Page 24
21
DHCP option 66 is http://192.168.1.240/cfg, the phone will get the configuration file from
192.168.1.240/cfg through HTTP protocol.
3) Configuration in Flash.
If you set both "PnP Active" and "To Override Server" to “No”, or don’t set DHCP option
128/66/150 in your DHCP server, the phone will obtain the provisioning server address
from the setting “Config Server Path”.
For examples, when the setting is:
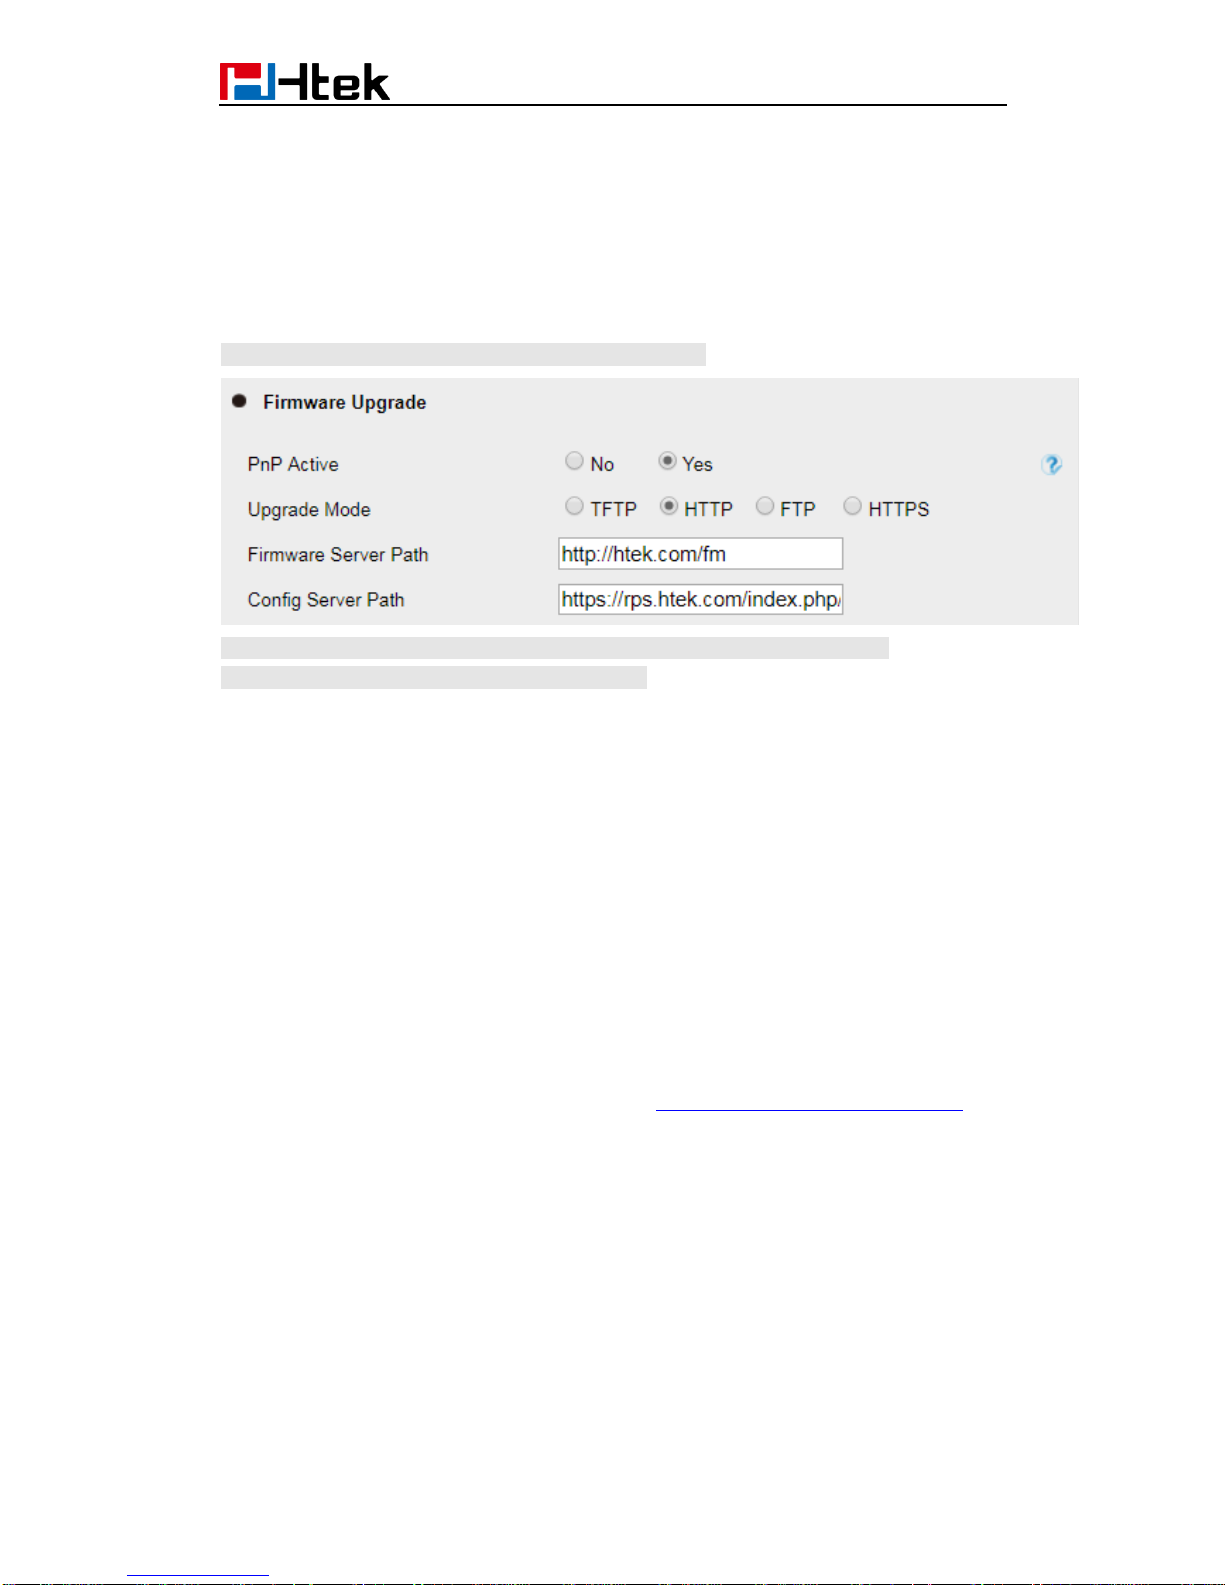
The phone will get the configuration file from 192.168.0.254/cfg through HTTP protocol.
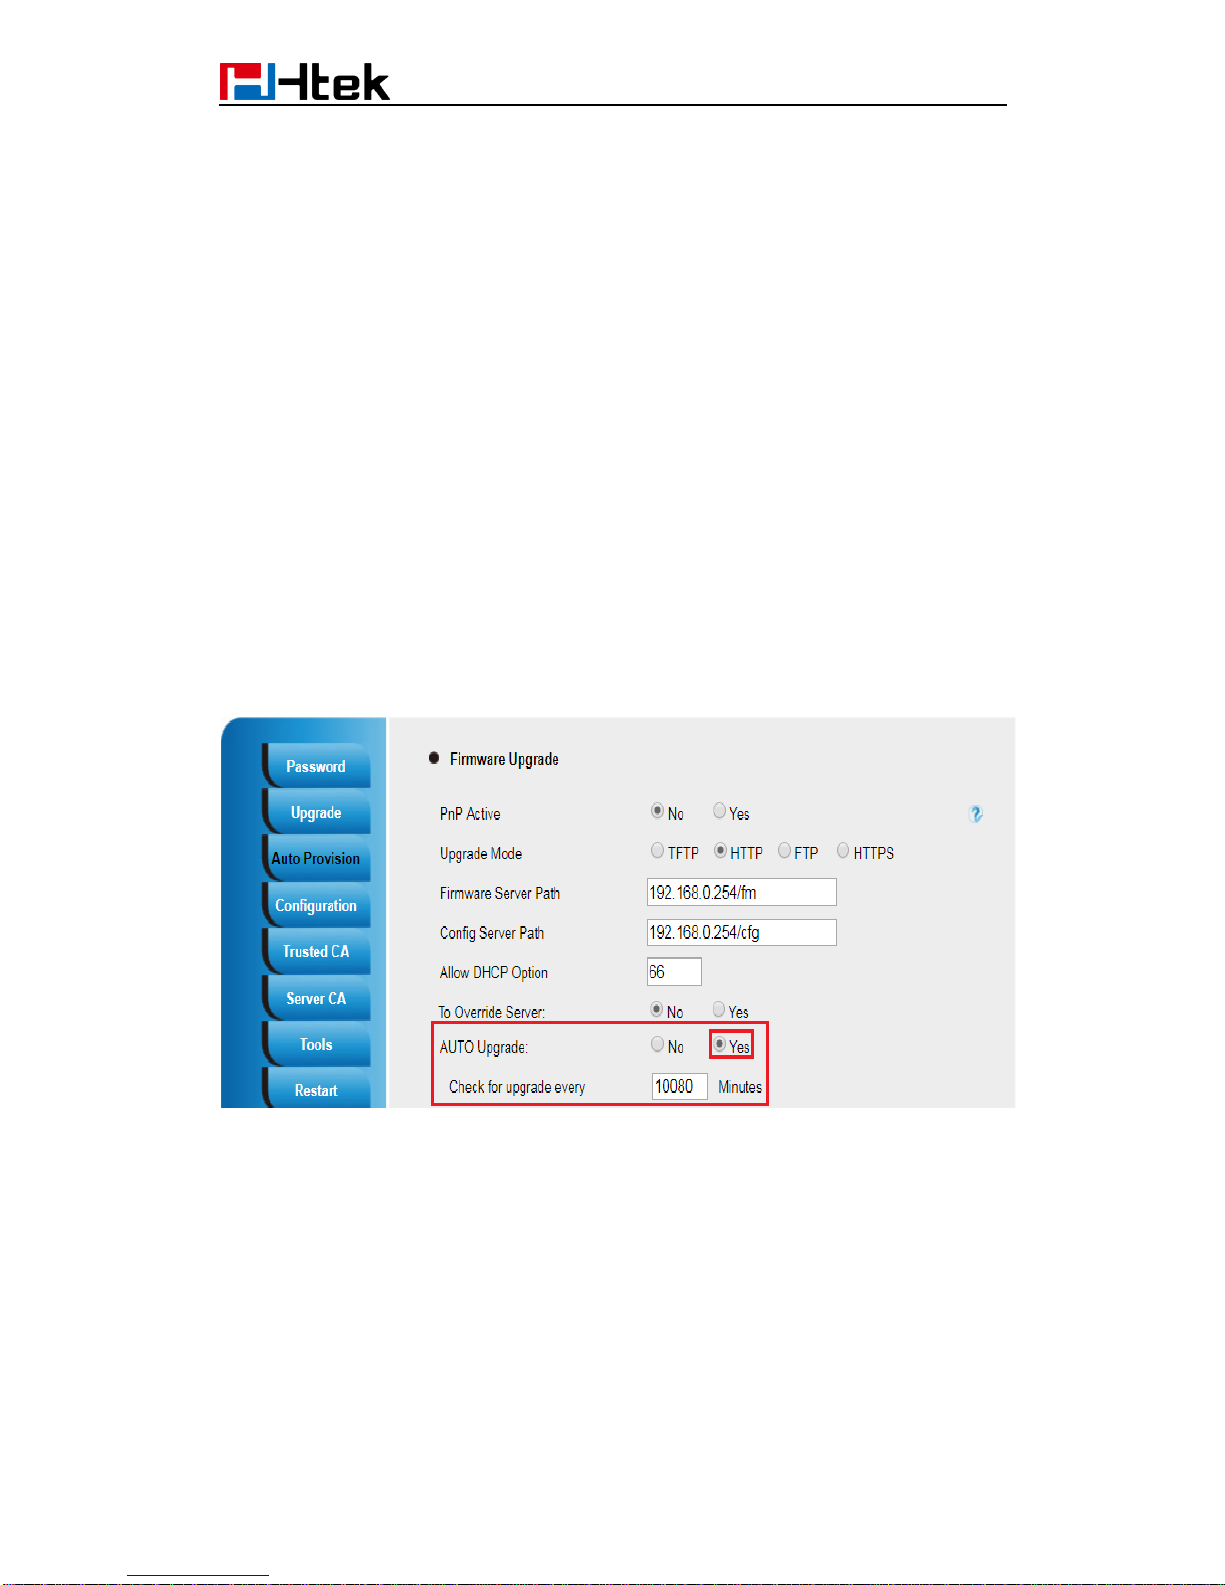
Note: You can set the phone to automatically upgrade every certain time:
For examples:
The phone will check the configuration file and the firmware every 10080 minutes (7 days).
If there are the new cfg files or the new firmware, the phone will upgrade automatically.
Page 25
22
8. Update mode
Update mode sets the desired time frames for phone to perform the auto provisioning
process.
Below is the introduction of the 3 updating modes in detail:
Power On
Repeatedly
SIP NOTIFY Message
Power On
Power On mode is set as default. The phone will perform auto provisioning process when
it is power on.
Repeatedly
The phone performs auto provisioning process at a regular interval. You can configure the
interval for the Repeatedly mode. The default interval is 10080 minutes.
To activate the Repeatedly mode via web user interface:
1.Click the Management->Auto Provision:
2.AUTO Upgrade set Yes:
3.Click the “SaveSet” button to save the change.
SIP NOTIFY Message
The phone will perform auto provisioning process when receiving a SIP NOTIFY message
which contains the header “Event: check-sync”. If the header of the SIP NOTIFY message
contains an additional string “reboot=true”, the phone will reboot immediately and then
perform the auto provisioning process. For this update mode, it requires the server
supports.
Below picture shows the message flow:
Page 26
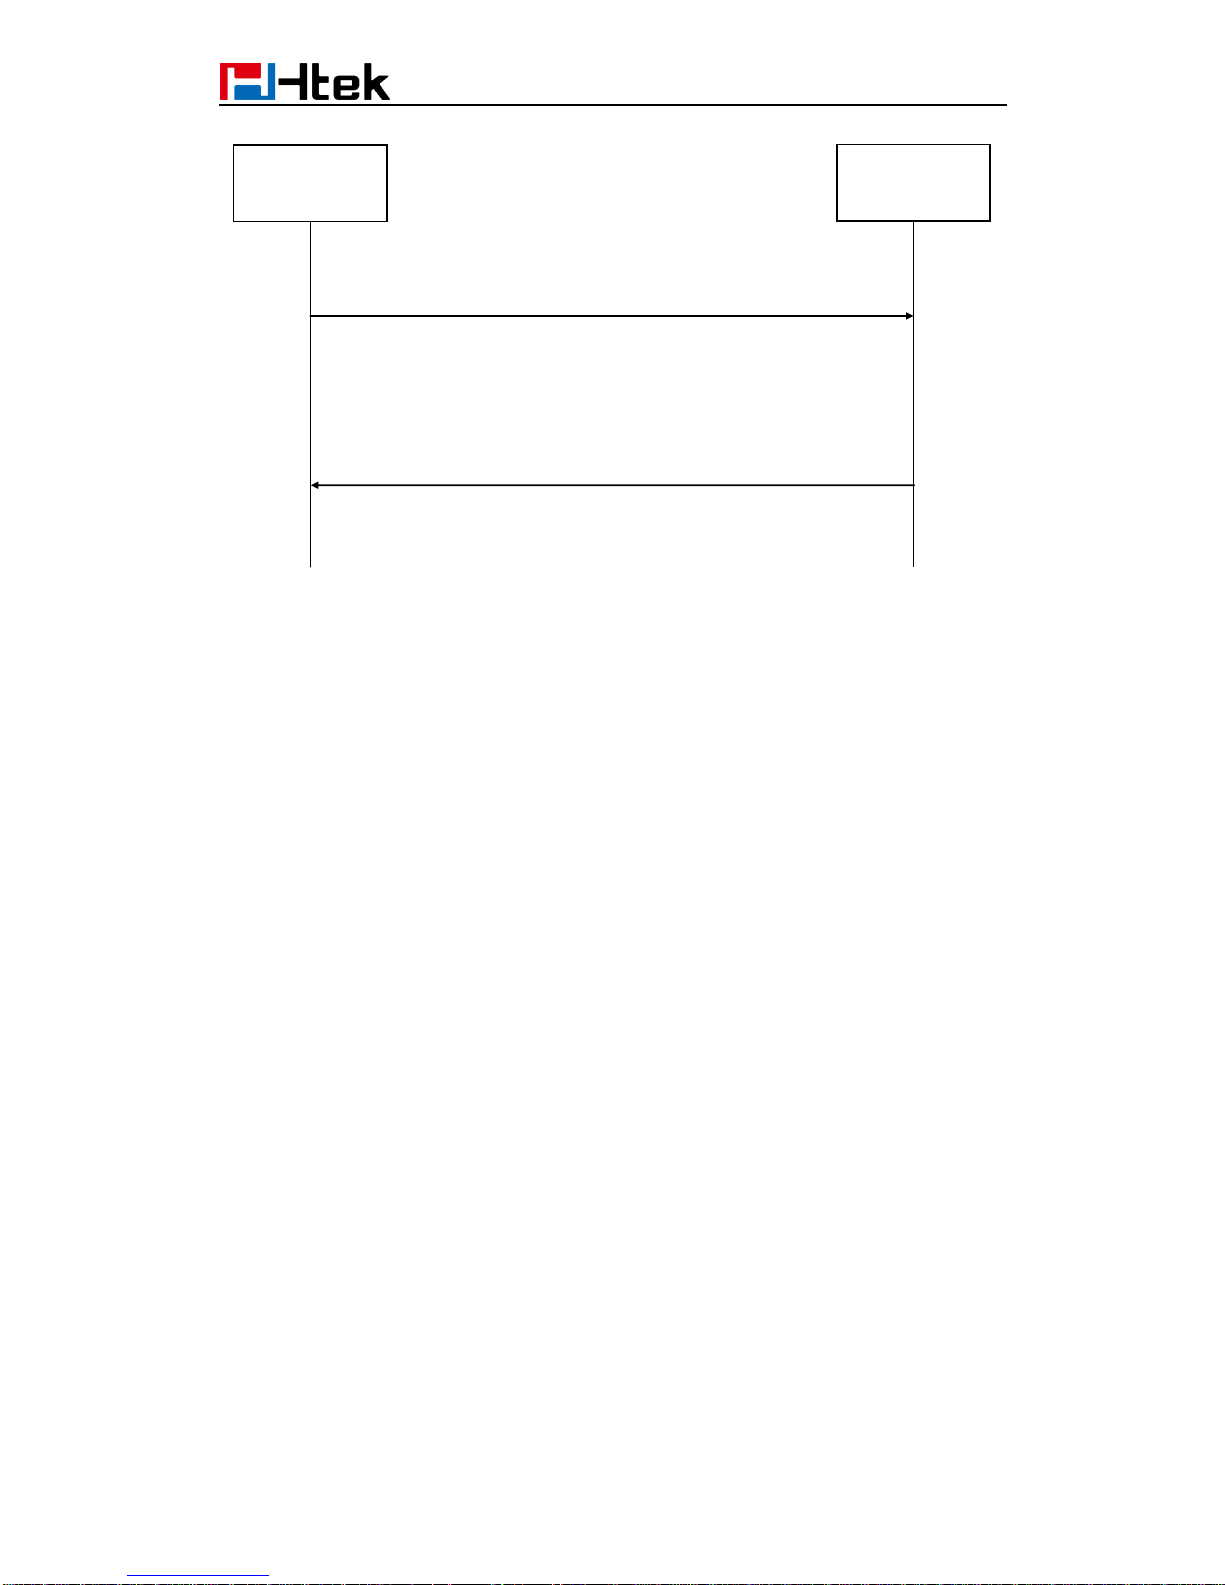
23
Server
Phone
Notify
Event: check-sync; reboot=true
200 OK
Page 27

24
9. Download and Verify Configurations
9.1 Download configuration files
Once obtaining a provisioning server address in one of the ways introduced above, the
phone will connect to the provisioning server and download configuration files. During the
auto provisioning process, the phone will try to download the common configuration file
cfg000x.xml firstly, and then try to download the cfgMAC.xml file from the provisioning
server.
9.2 Resolve and Update configurations
The phone will resolve the configuration files after downloading, then update the
configurations to the phone flash. Generally, the phone will reboot to make the
configurations effective after the auto provisioning process is finished.
9.3 Verify configurations
You can verify the update via phone user interface after auto provisioning, or you can
verify it via web user interface
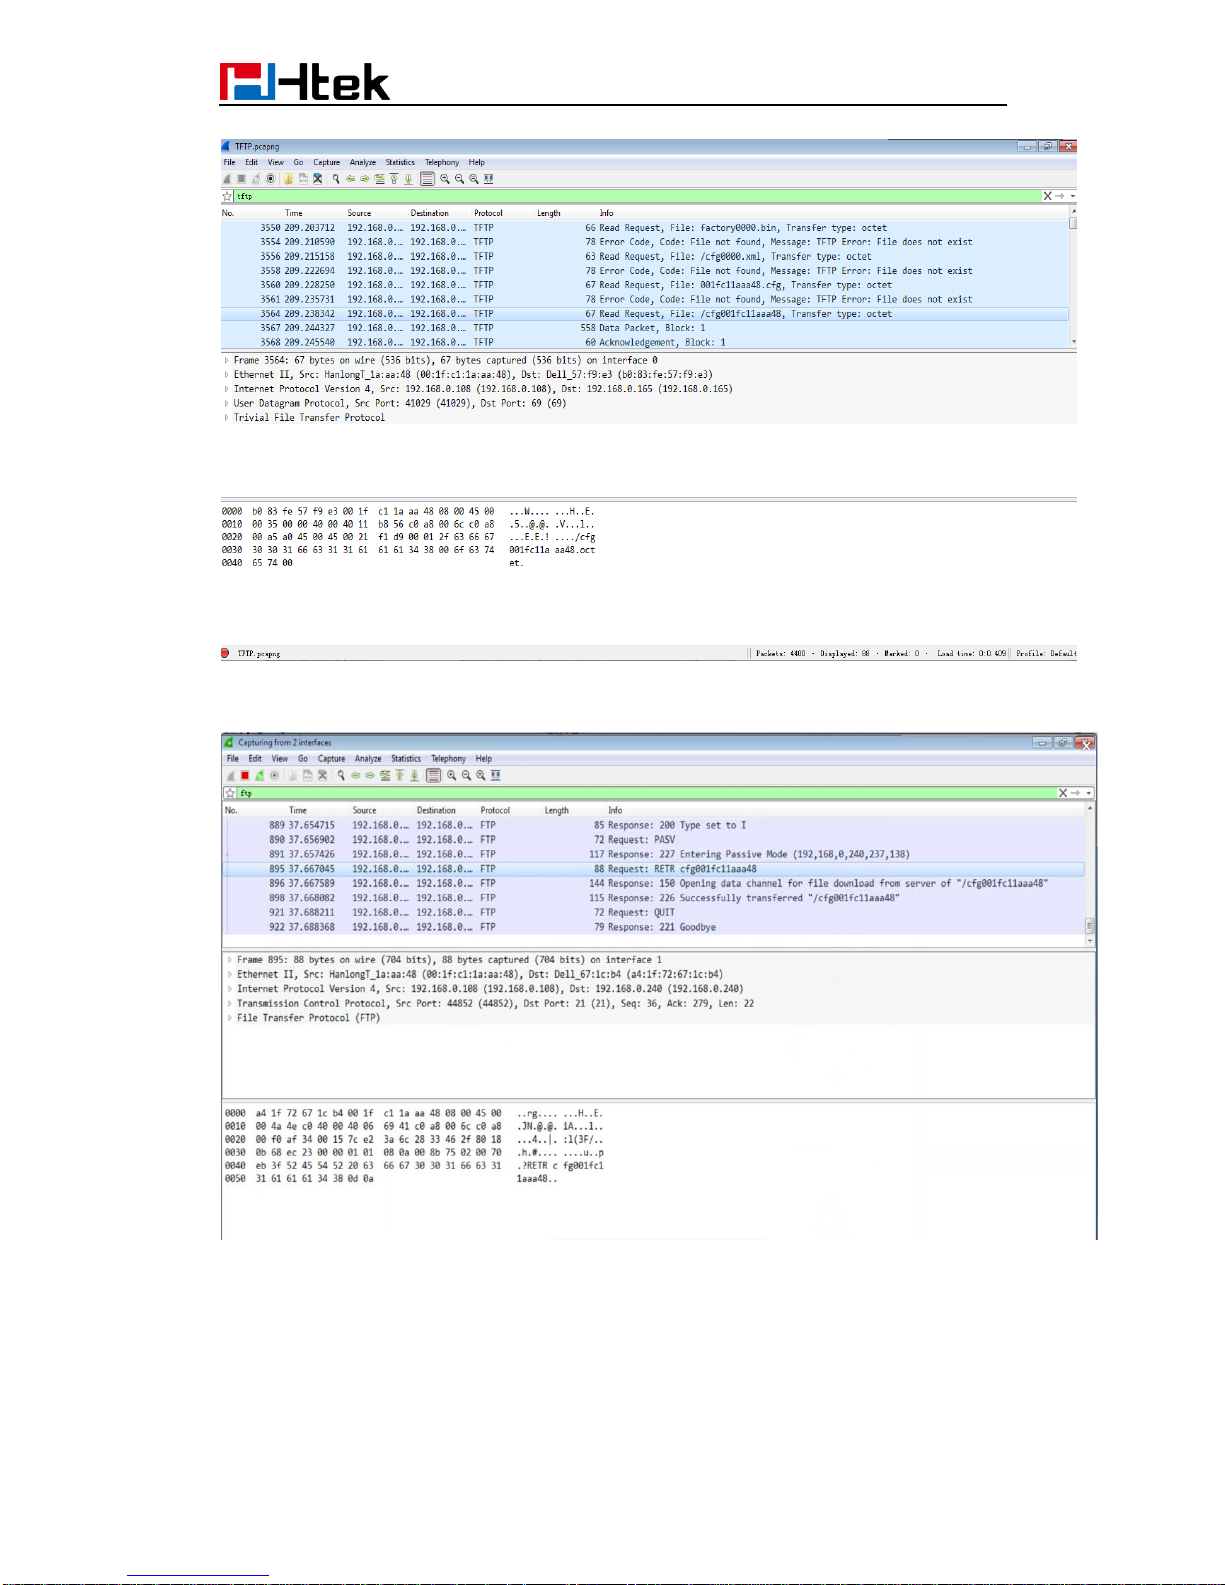
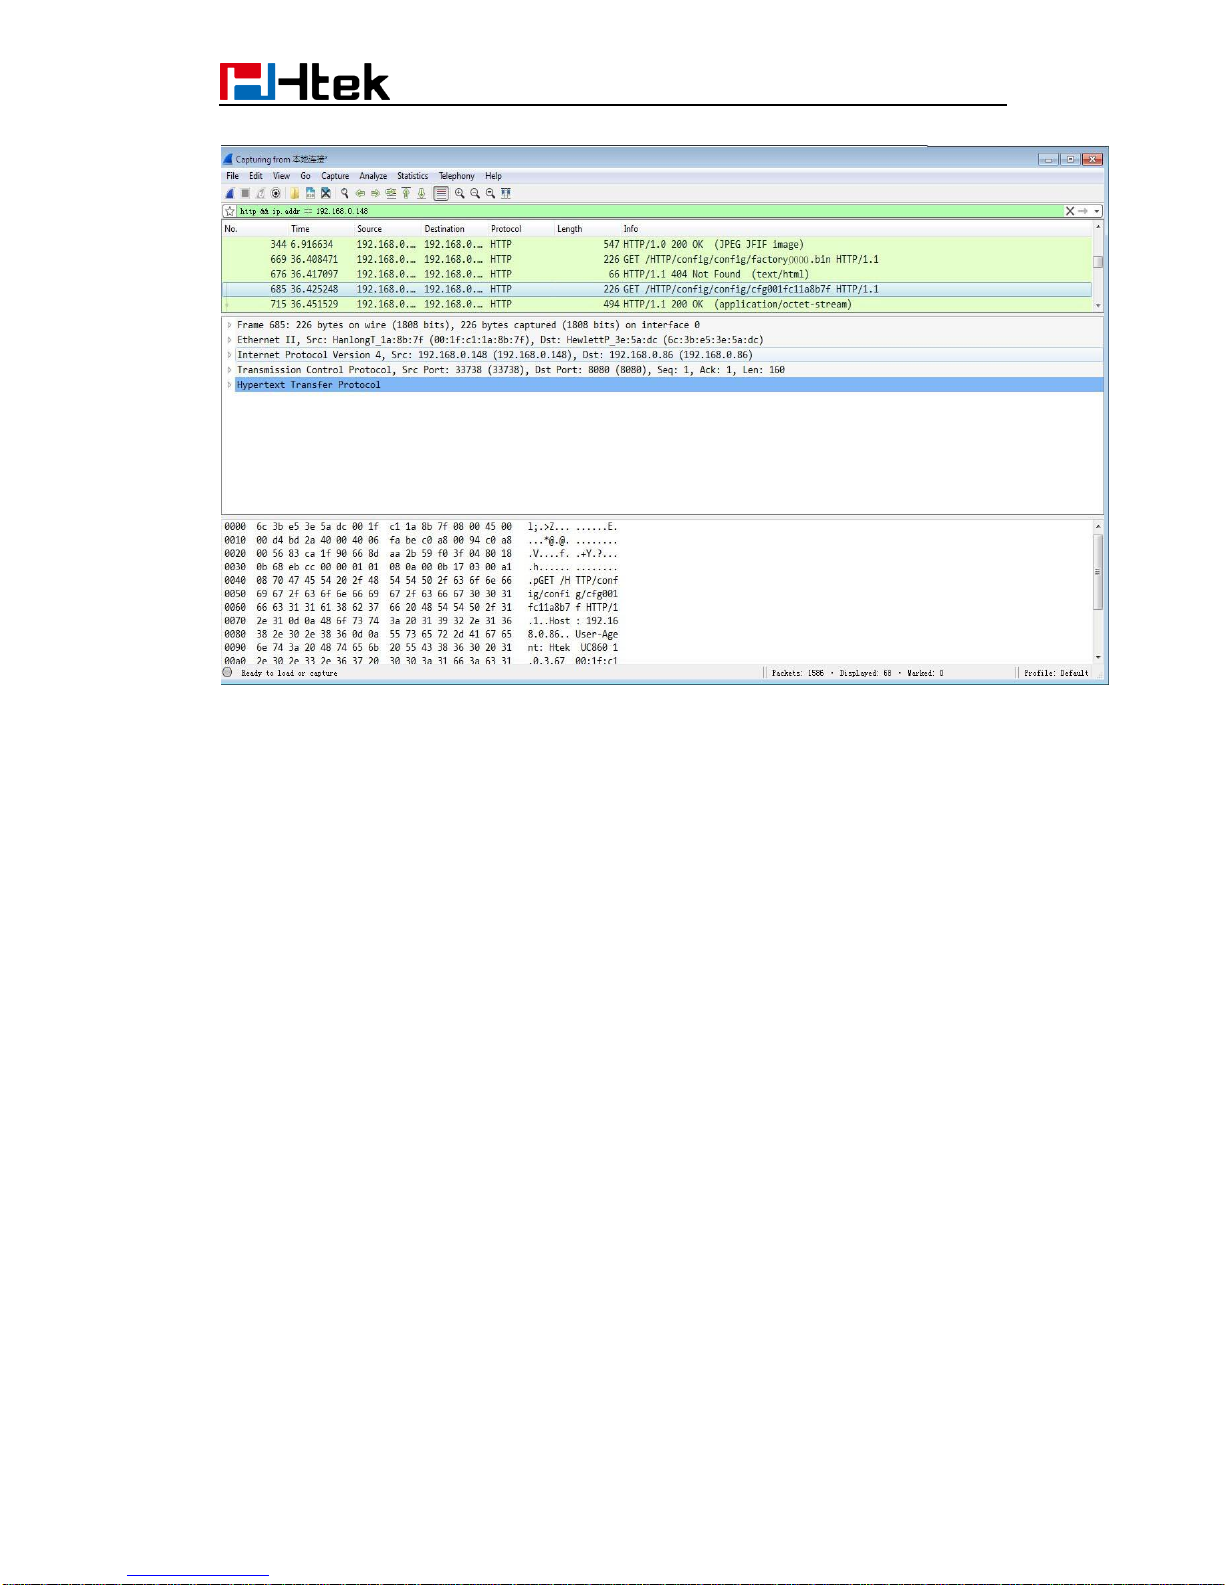
During the auto provisioning process, you can monitor the downloading requests and
response messages by a wireshark tool.
Some examples show as follows:
Example1: Htek UC924 IP Phone downloads configuration files from TFTP server.
Page 28
25
Example2: Htek UC924 IP Phone downloads configuration files from FTP server .
Example3: Htek UC924 IP Phone downloads configuration files from HTTP server .
Page 29
26
Page 30

27
10. Firmware and Configuration File
Prefix and Postfix
Htek IP Phone supports Prefix and Postfix for both firmware and configuration files.
Parameter P232 and P233 are for Prefix and Postfix for Firmware, respectively.
Parameter P234 and P235 are for Prefix and Postfix for Configuration file, respectively.
Firmware Prefix and Postfix allows device to download the firmware name with the
matching Prefix and Postfix.
In addition, when Parameter P238 (Check New Firmware only when F/W pre/suffix
changes) is set to 1, the device will only issue the Firmware Upgrade request if there are
changes in the firmware Prefix or Postfix.
Below are the firmware BASIC NAMES that are related to UC924P:
If the firmware version is earlier than 1.0.3.73, the firmware BASIC NAMES as follows:
boot_924.bin
img_924.bin
ring4.bin
ring5.bin
ring6.bin
ring7.bin
ring8.bin
Language.tar
hlpres.tar
Service provider can use “hl_” as prefix, and “_1.0.3.70” as postfix, the above files will be
changed to:
hl_boot_924.bin_1.0.3.70
hl_img_924.bin_1.0.3.70
hl_ring4.bin_1.0.3.70
hl_ ring5.bin_1.0.3.70
hl_ ring6.bin_1.0.3.70
hl_ ring7.bin_1.0.3.70
hl_ ring8.bin_1.0.3.70
hl_ Language.tar _1.0.3.70
hl_ hlpres.tar _1.0.3.70
Page 31

28
If the firmware version is 1.0.3.73 or later than 1.0.3.73, the firmware BASIC NAME as
follows:
fw924.rom
Service provider can use “hl_” as prefix, and “_1.0.3.73” as postfix, the above files will be
changed to:
hl_ fw924.rom _1.0.3.73
In this way, all of the firmware with different version could be stored in one single directory,
and they could be differentiated by using prefix or postfix, i.e., all files with a postfix of
“_1.0.3.73” belong to the firmware version 1.0.3.73.
Same rule applies to configuration files, i.e., for configuration file named
“cfg001fc1001708”, there could be 3 versions: “hl_ cfg001fc1001708_cfg001”, “hl_
cfg001fc1001708_cfg002”, and “hl_ cfg001fc1001708_cfg003”. The BASIC NAME of the
configuration file is “cfg001fc1001708”, but there are 3 different versions, the one that will
be accepted is the one with matching prefix and postfix specified in the current
configuration.
Page 32
29
11. Firmware Server and Configuration
File Server
Beside the Prefix and Postfix for firmware and configuration files, different server paths for
firmware upgrade or Configuration File Server can be specified in different FQDN, i.e.:
The parameters are P192 and P237 for Firmware and Config Server
Page 33

30
12. Manage Firmware and Download
Configuration File
When parameter P194 (Auto Upgrade) is set to 1, Service Provider can use P193 (Auto
Check Interval) to have the devices periodically check with either Firmware Server or
Config Server, whenever they are defined. This allows the device periodically check if
there are any new changes need to be taken on a scheduled time. By defining different
intervals in P193 for different devices, Service Provider can distribute the Firmware or
Configuration File download schedule to reduce the Firmware or Provisioning Server load
at any given time.
Page 34
31
13. Pre_Configuration and
Configuration Redirection
Please note:If your phone default setting is as below:
Currently Htek Phone does not support pre_configuration and configutration
Redirection, please refer to section 6 in page 24.
For mass deployment, we provide TFTP/HTTP redirection service. By default, all Htek
products point to our provisioning system. When a unit is powered up, it will automatically
contact our provisioning server. Our provisioning server will redirect the unit to customer’s
TFTP/FTP/HTTP/HTTPS server. The unit will reboot and send further provisioning request
to ask for configuration file (or firmware file) from customer’s TFTP/FTP/HTTP/HTTPS
server.
Below is the information that we need from service providers for TFTP/HTTP redirection:
1. MAC address range, this should be printed on the carton box
2. Your TFTP/FTP/HTTP/HTTPS server IP address
3. Your company name and address
Here are the things that service providers should do:
1. Create configuration files for all the devices and put them on your TFTP/HTTP
server.
2. Download the latest official release from http://www.htek.com/download.php and
put them on your TFTP/FTP/HTTP/HTTPS server (same directory as above)
3. After we inform you that the devices have been entered into our central
provisioning database, please take out a few devices to test. Upon powering up, they
should contact our provisioning server https://rps.htek.com/index.php/fn/g first, and then
get redirected to your TFTP/FTP/HTTP/HTTPS server and pull out the configuration files
and the firmware files. They will be upgraded to the latest firmware with your
configurations.
Page 35
32
14. Automatic Provisioning Within LAN
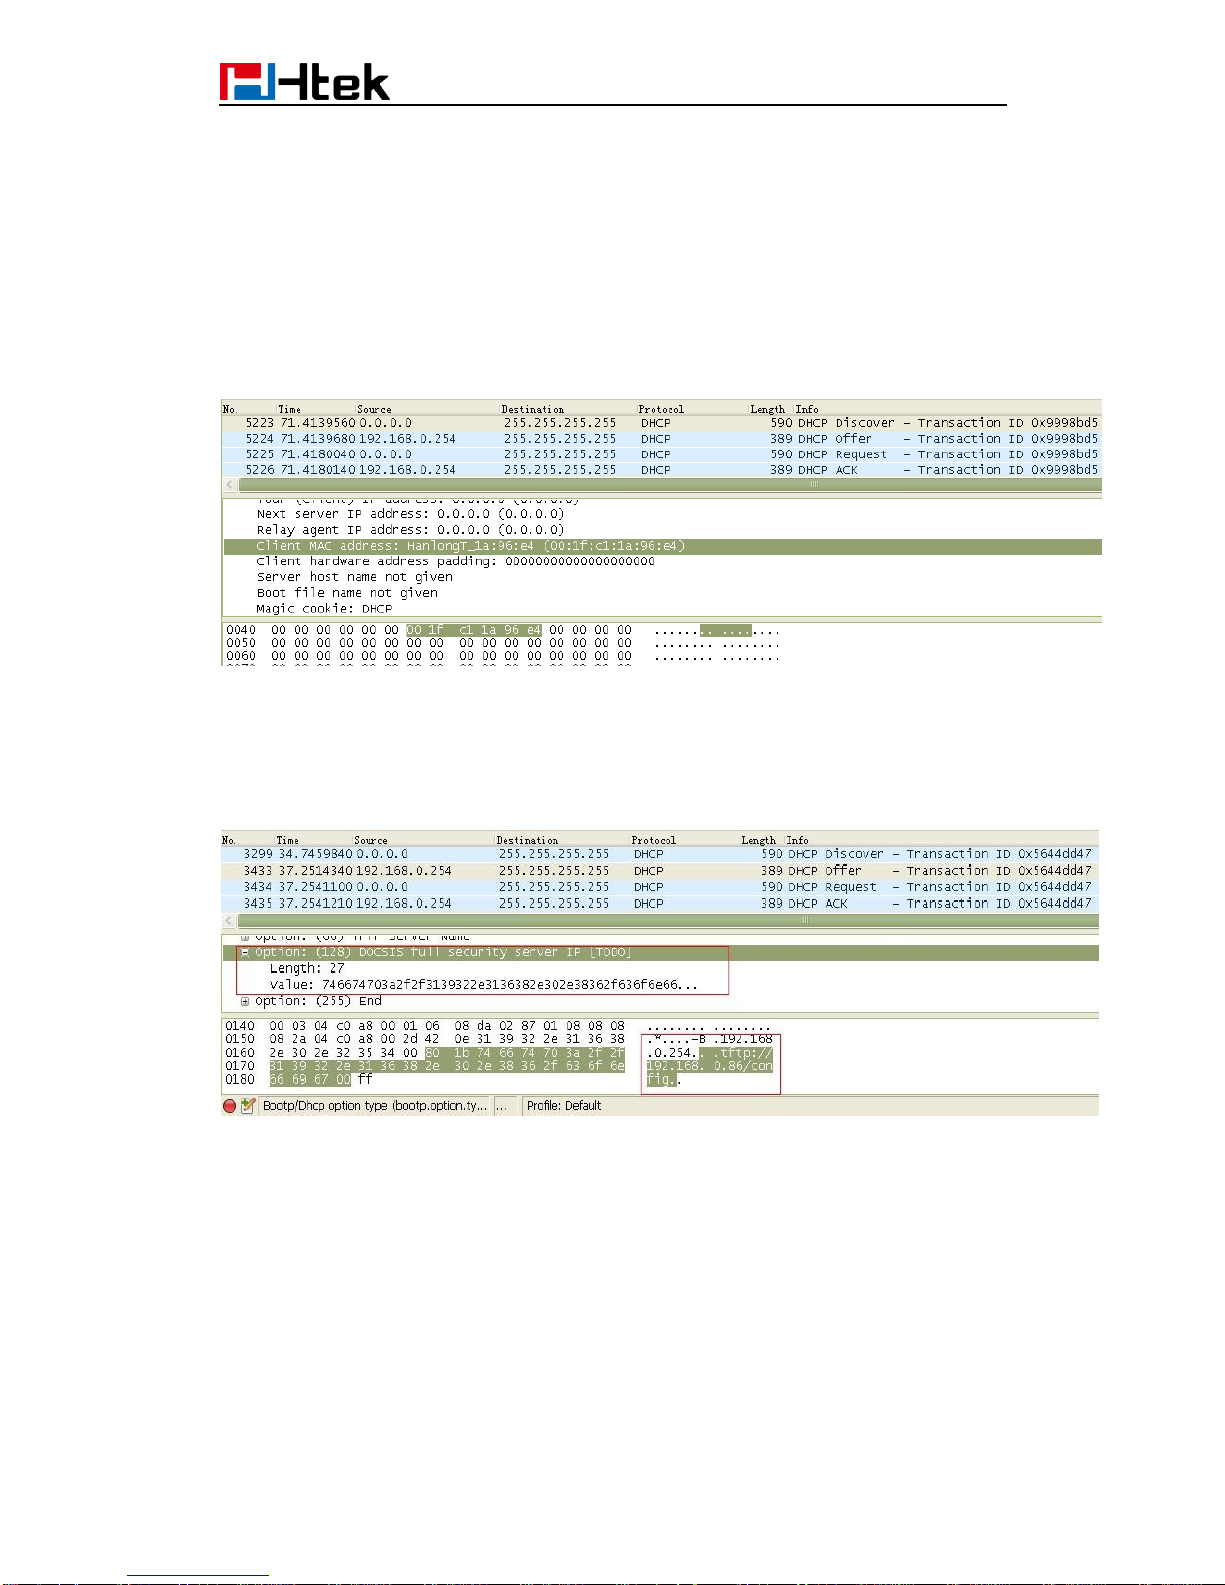
Htek products support DHCP Option 66 or 128 or 150 for automatic provisioning within a
Local Area Network. The provisioning server URL is embedded inside standard option 66
or 128 or 150 of DHCP responses.
Htek IP Phones send DHCP DISCOVER with the following information:
DHCP Server can be configured to send the following information in its DHCP OFFER.
Please notice that in this example, an HTTP://URL is provided in the Option 66 “TFTP
Server Name” field or Option 128 “TFTP server IP address” or Option 150 “TFTP server
address”. Device will then issue HTTP requests instead of the traditional TFTP requests to
the server. This design makes more flexible in device provisioning.
Page 36

33
15. Troubleshooting
This part provides guidance to help you solve problems you might encounter when
deploying phones.
If you require additional information or assistance with the deployment, please contact
your system administrator.
Why does the phone fail to download configuration files?
Ensure that auto provisioning feature is configured properly.
Ensure that the provisioning server and network are reachable.
Ensure that authentication credentials configured on the phone are correct.
Ensure that configuration files exist on the provisioning server.
Why does the provisioning server return HTTP 404?
Ensure that the provisioning server is properly set up.
Ensure that the access URL is correct.
Ensure that the requested files exist on the provisioning server.
Why does the phone display "Network Down"?
Ensure that the Ethernet cable is plugged into the Internet port on the phone and the
Ethernet cable is not loose.
Ensure that the switch or hub in your network is operational.
Ensure that the configurations of network are properly set in the configuration files.
Why is the permission denied when uploading files to the root directory of the FTP
server?
Ensure that the complete path to the root directory of the FTP server is authorized.
Check security permissions on the root directory of the FTP server, if necessary,
change the permissions.
Why doesn’t the phone obtain the IP address from the DHCP server?
Ensure that settings are correct on the DHCP server.
Ensure that the phone is configured to obtain the IP address from the DHCP server.
Why doesn’t the phone display the Language, only display English on LCD and
Web?
Ensure that the name of the language is correct.
Ensure that the network is available and the root directory is right for downloading.
Ensure that the parameters are correctly set in the configuration files.
Ensure that the language’s Coding format is UTF-8.
Why doesn’t the phone display the wallpaper or ScreenSaver or the weblogo of
webpage?
Page 37

34
Ensure that the file format of the wallpaper, ScreenSaver and weblogo is *.jpg.
Ensure that the size of the wallpaper, ScreenSaver and weblogo file is not larger than
that the phone supports, or check the hlpres.tar is not larger than 2M.
Ensure that the name of the wallpaper, ScreenSaver and weblogo are correct.
Ensure that the network is available and the root directory is right for downloading.
Ensure that the wallpaper, ScreenSaver and weblogo files in the hlpres.tar file.
Why doesn’t the phone update configurations?
Ensure that the configuration files are different from the last ones.
Ensure that the phone has downloaded the configuration files.
Ensure that the parameters are correctly set in the configuration files.
Page 38

35
16. Glossary
MAC Address: A Media Access Control address (MAC address) is a unique identifier
assigned to network interfaces for communications on the physical network segment.
DHCP: Dynamic Host Configuration Protocol (DHCP) is a network configuration protocol
for hosts on Internet Protocol (IP) networks. Computers that are connected to IP networks
must be configured before they can communicate with other hosts.
FTP: File Transfer Protocol (FTP) is a standard network protocol used to transfer files
from one host to another host over a TCP -based network, such as the Internet. It is often
used to upload web pages and other documents from a private development machine to a
public web-hosting server.
HTTP: The Hypertext Transfer Protocol (HTTP) is an application protocol for distributed,
collaborative, hypermedia information systems. HTTP is the foundation of data
communication for the World Wide Web.
HTTPS: Hypertext Transfer Protocol Secure (HTTPS) is a combination of Hypertext
Transfer Protocol (HTTP) with SSL/TLS protocol. It provides encrypted communication
and secure identification of a network web server.
TFTP: Trivial File Transfer Protocol (TFTP) is a simple protocol to transfer files. It has
been implemented on top of the User Datagram Protocol (UDP) using port number 69.
AES: Advanced Encryption Standard (AES) is a specification for the encryption of
electronic data.
URL: A uniform resource locator or universal resource locator (URL) is a specific
character string that constitutes a reference to an Internet resource.
XML: Extensible Markup Language (XML) is a markup language that defines a set of rules
for encoding documents in a format that is both human-readable and machine-readable.
Page 39
36
17. How to Edit cfg000x.xml
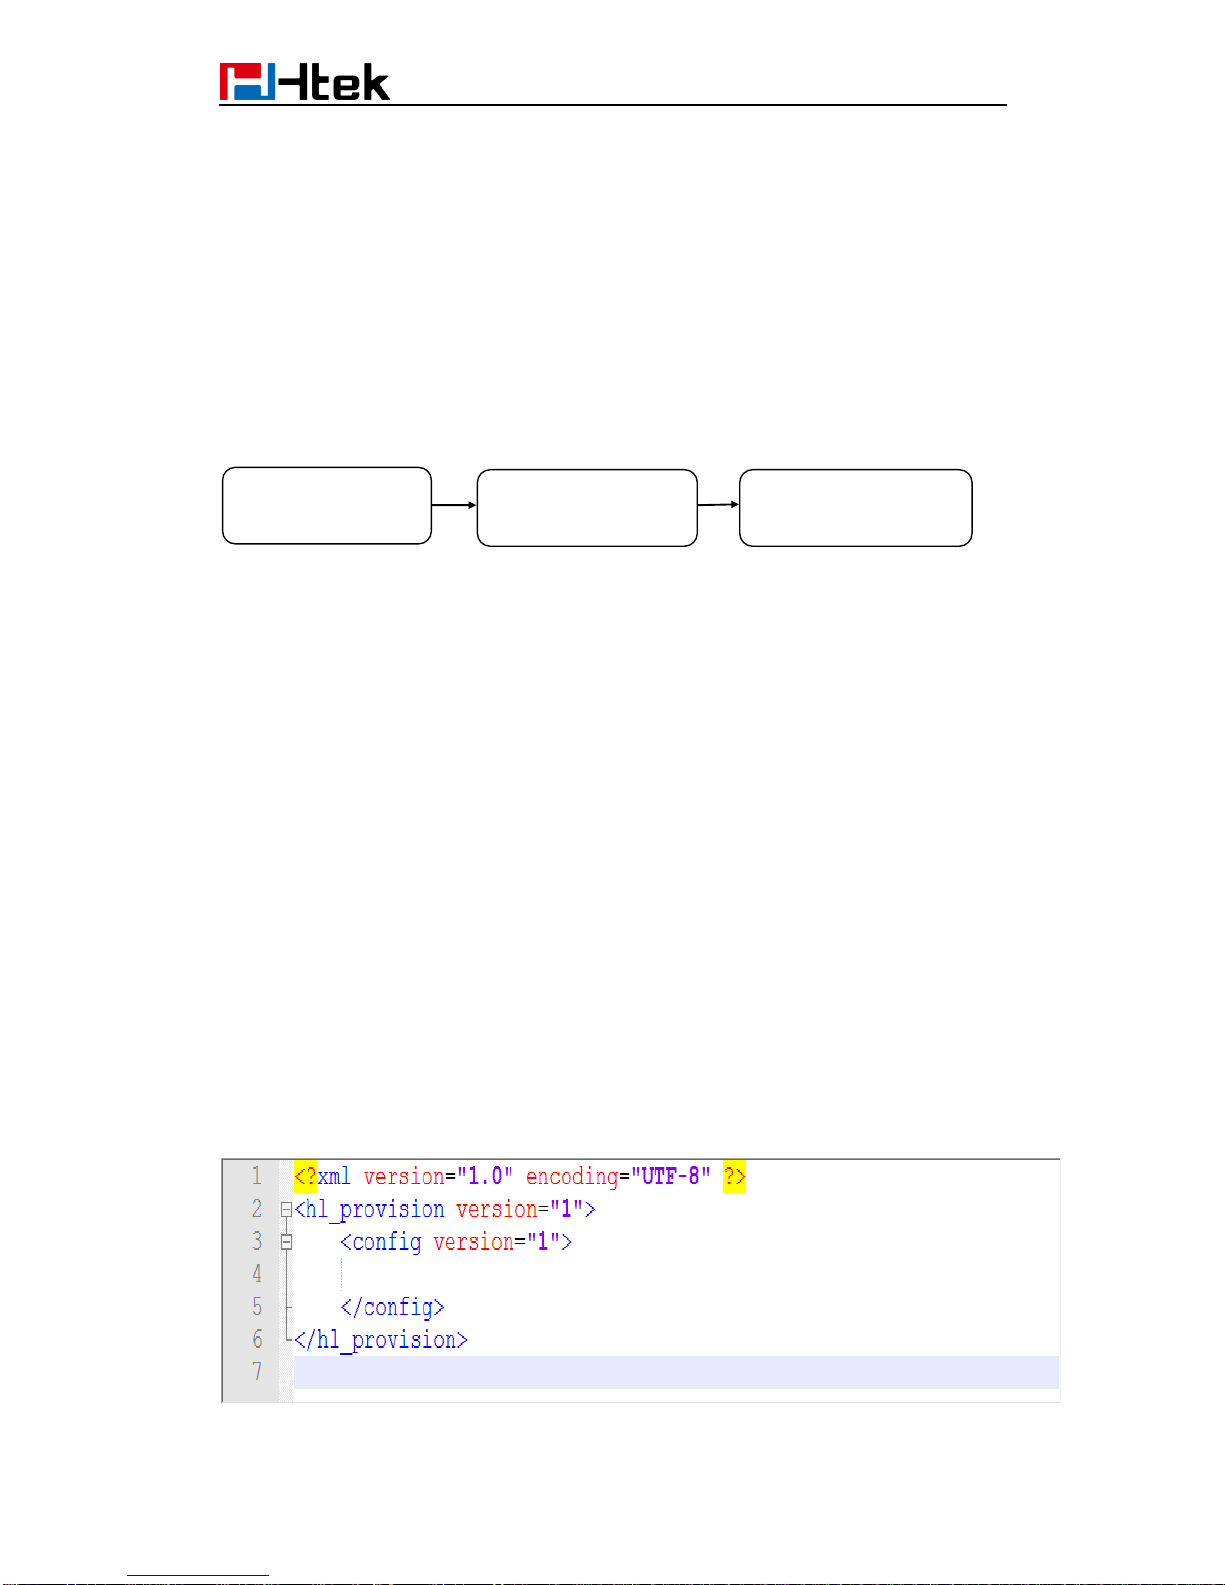
When Htek device boots up or reboots, it will generate a request for a XML configuration
file named “cfg000x.xml”. It is a common configuration, all Htek device can get this
configuration file. Then Htek device will request for a binary format configuration file
named ”cfgMAC” and another XML configuration file named “cfgMAC.xml”, in which
“MAC” is the MAC address of the device. Configuration files cfgMAC and cfgMAC.xml can
only be obtained from Htek device which has mac address.
You can customize configuration parameters by editing XML configuration file
“cfg000x.xml”, and different device would use different file name.
Device Type file name
UC601 ------> cfg0111
UC901 ------> cfg0018
UC902 ------> cfg0017
UC903 ------> cfg0016
UC912/UC912G ------> cfg0019
UC912GM ------> cfg0019
UC923 ------> cfg0013
UC924 ------> cfg0012
UC924E ------> cfg0112
UC926 ------> cfg0010
UC926E ------> cfg0110
For example, if you have a Htek device UC924 and you want to configure its Line key 1 as
BLF to monitor extension 1002, you can realize this by following two methods.
1.Create a new XML file and add configuration parameters.
Step 1: Create a new XML file entitle it as cfg0000.xml. If your Htek device is UC924, you
should entitle it as cfg0012.xml
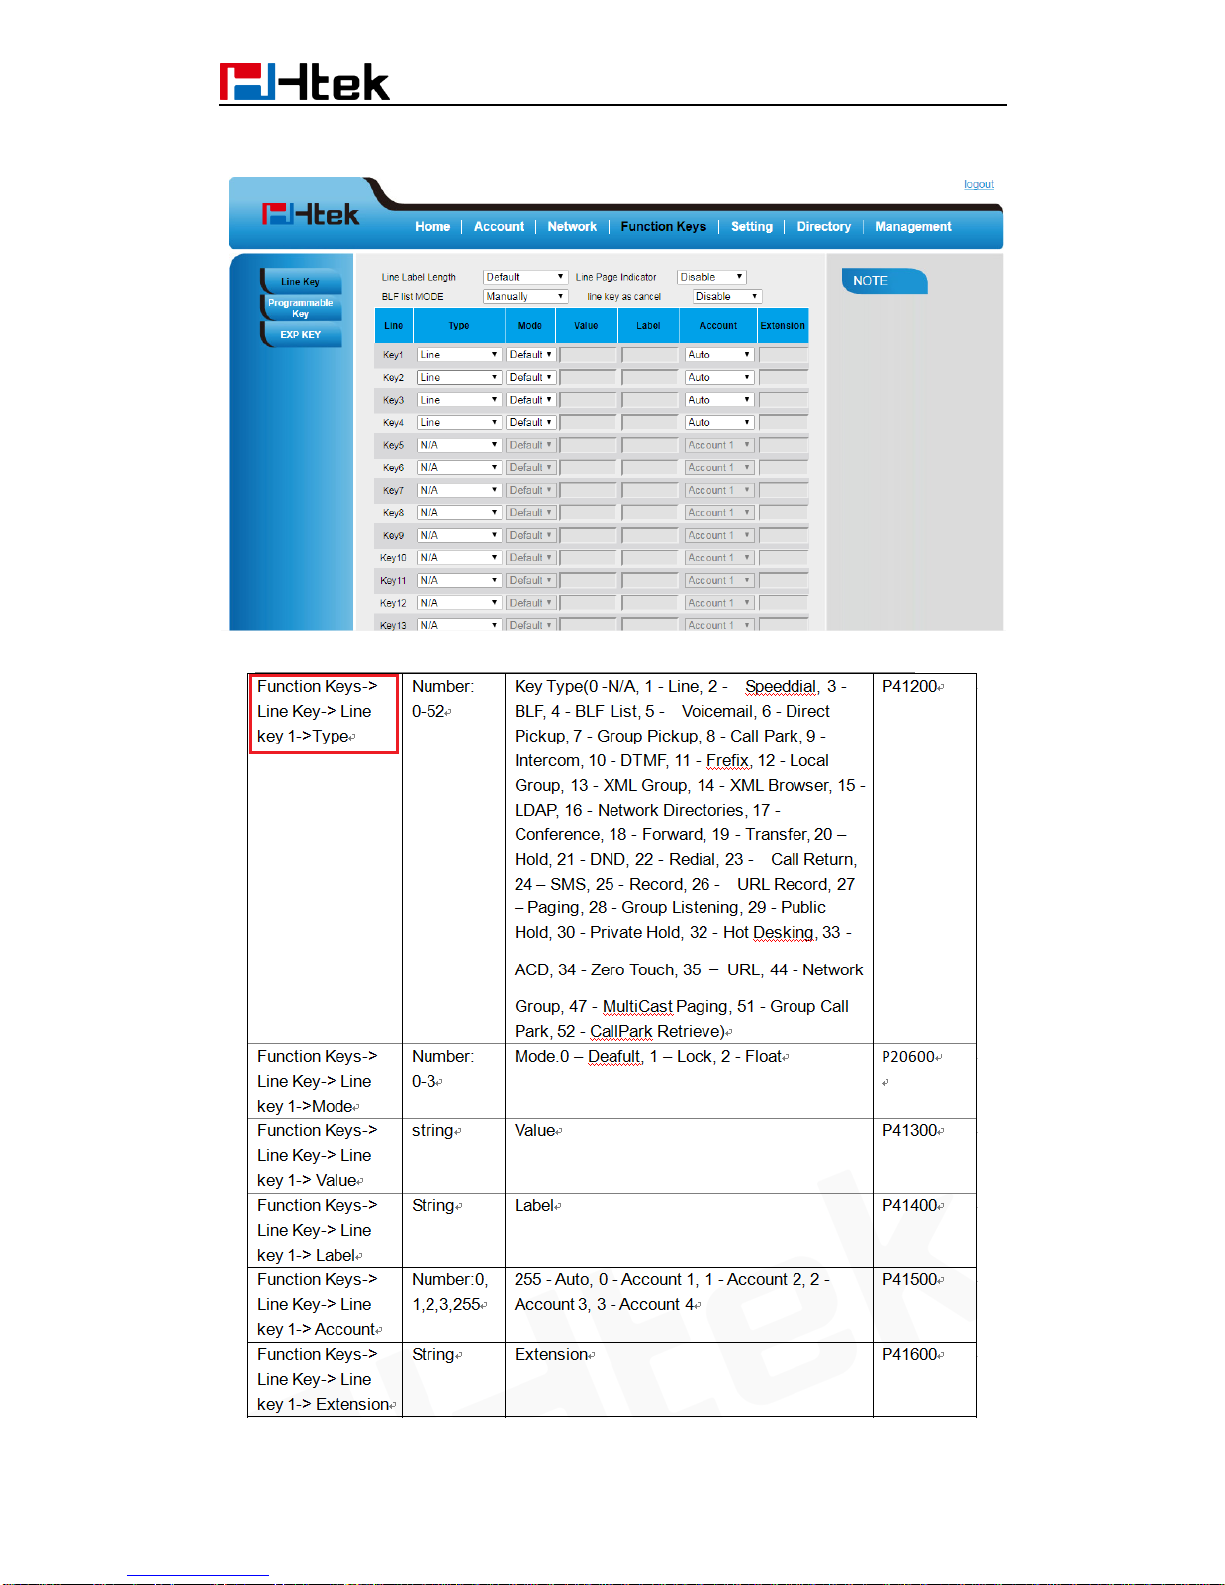
Step 2: Login webpage, find out Web Setting Path of line key1. Function Keys-Line
Request configuration
file 000x.xml
Request configuration
file
Request configuration file
cfgMAC.xml
Page 40
37
Key-Key1
Step 3: Refer to << parameter list >>, you can get detailed description of this parameter.
Page 41
38
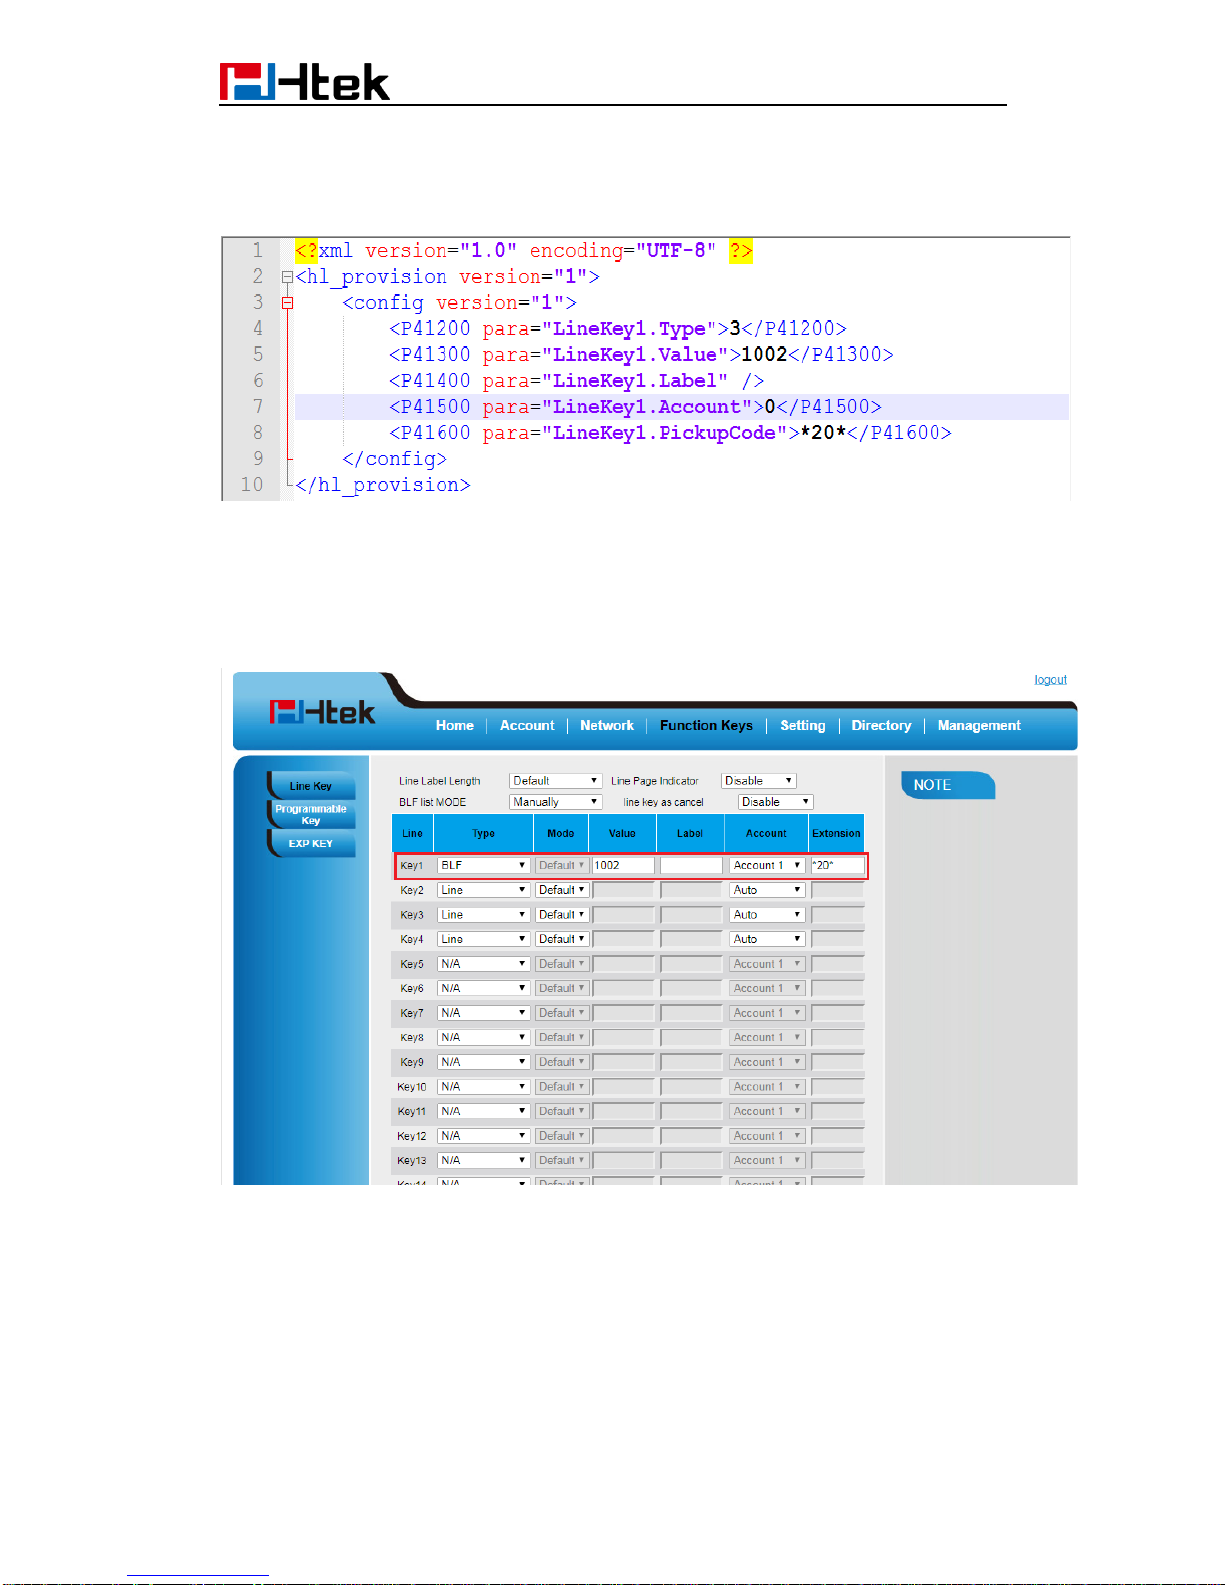
According to description of parameter, we know parameter P41200 should be 3,
parameter P41300 should be 1002 and parameter P41600 should be *20*.
Step 4: Edit cfg0012.xml as follow
Step 5: Put this XML configuration file in your config server path.
Step 6: Restart phone to apply to the settings.
2.Edit relevant parameter in the template file(template.xml)
Step 1: Login webpage, enter Function Keys -> Memory Key
Step 2 : Configure options you want, for example
Step 3: click “saveset” button to save the configuration.
Step 4: Enter Management -> Configuration
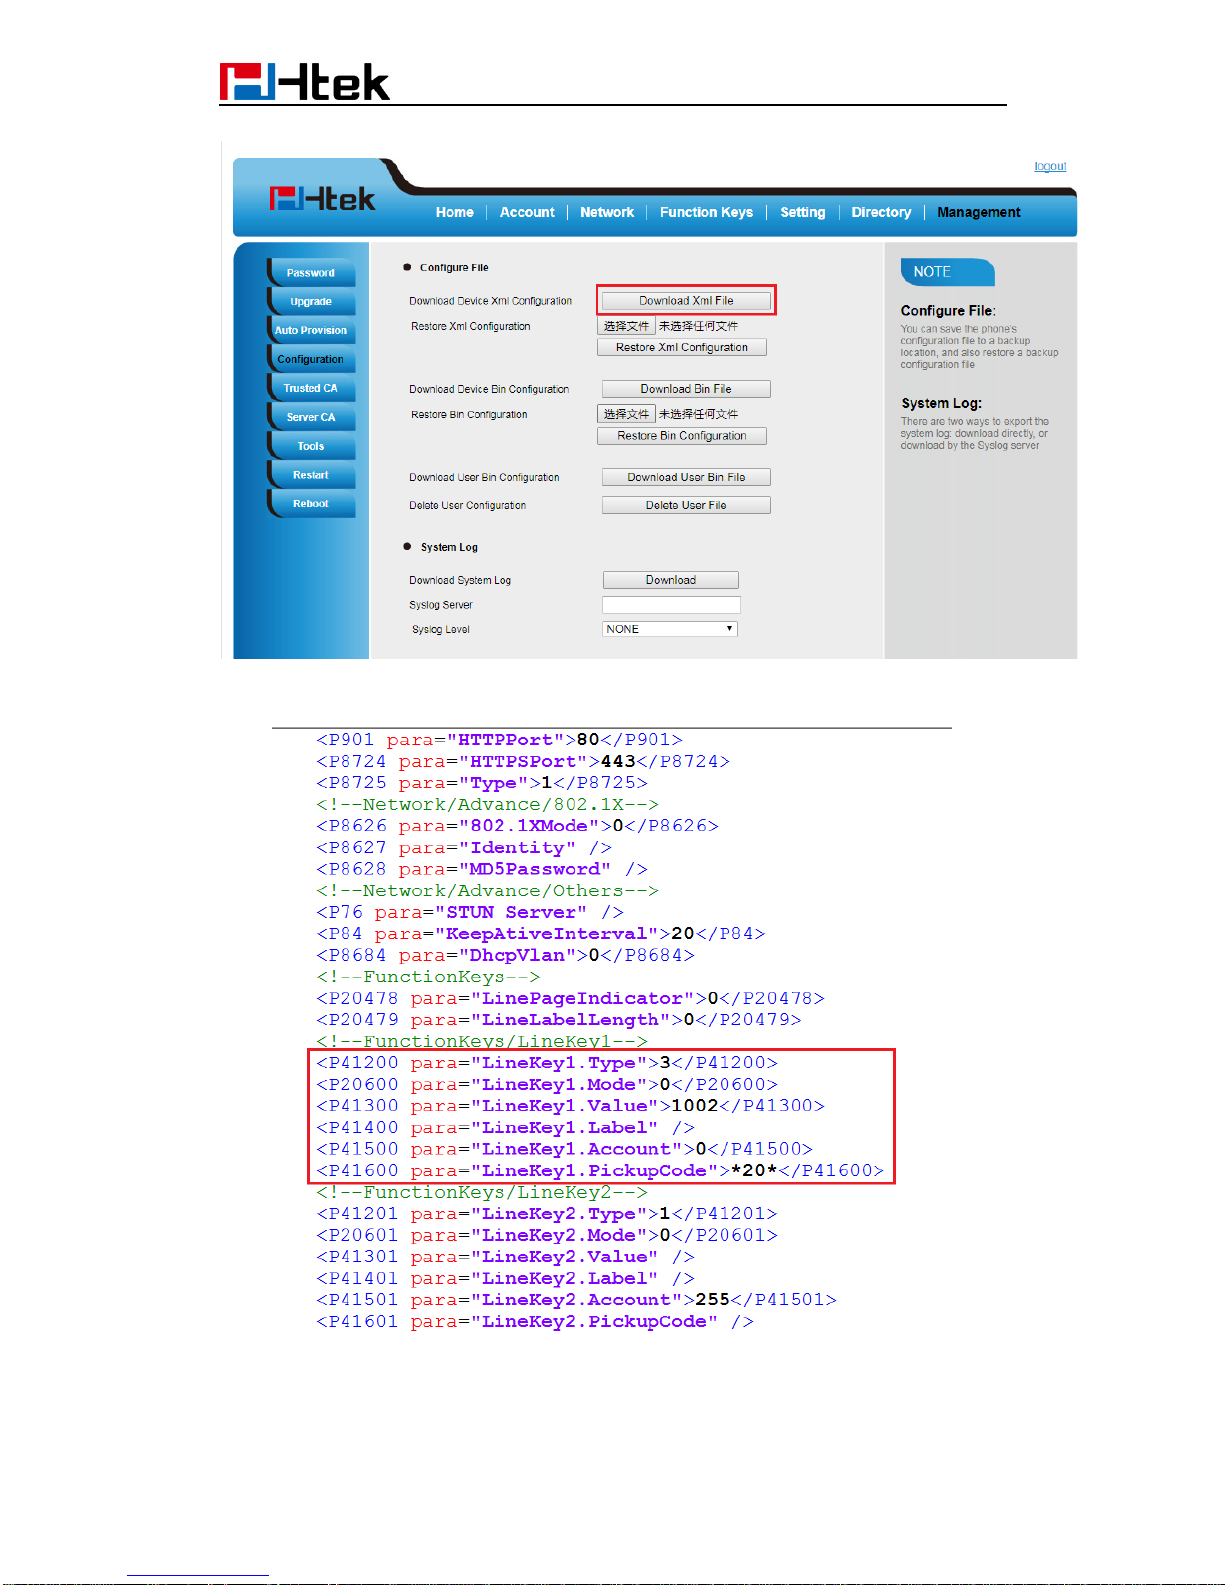
Click “Download Xml File” button to download the configuration Xml file. This file includes
all parameters of this phone.
Page 42
39
Step 5: Open the Xml file that you downloaded, you can find that the parameter has been
changed.
Step 6: Change the xml file’s name to cfg0012.xml.
Step 7: Put this XML configuration file in your config server path.
Step 8: Restart phone to apply to the settings.
Page 43
40
18. Generate Configuration File with
Htek Provision Tool and Upgrade the
Configuration File via
HTTP/HTTPS/FTP/TFTP
Operating Environment
System
Windows 7 and later versions
Display
Minimum: 1280 X 800 pixels
Network
The computer running the software needs to be in the same network
segment of the same area as the phone to be provisioned
Server:
HTTP Server: 192.168.0.106
HTTPS Server: 192.168.0.106
FTP Server: 192.168.0.106
TFTP Server: 192.168.0.106
Tool: HtekPT-1.1.1beta.exe
18.1 Generate the configuration file for Htek IP Phones
HPT can batch generate cfg files in a Keyword-replace manner.
In MAC mode, the first column must be "MAC" column, where only MAC addresses
allowed in the form like "001fc1aabbcc" (lowercase).
“Keyword-replace” means to replace the item content (P value) by the exact keyword . To
do this, the item to be replaced need to set its content (P value) to a unique string, such
as "$$userId_1". If the CSV file contained a column whose head is just “$$userId_1”, then
all cfg files generated will substitute “$$userId_1” with the string in the cell of the column
(specific row is determined by the MAC column).
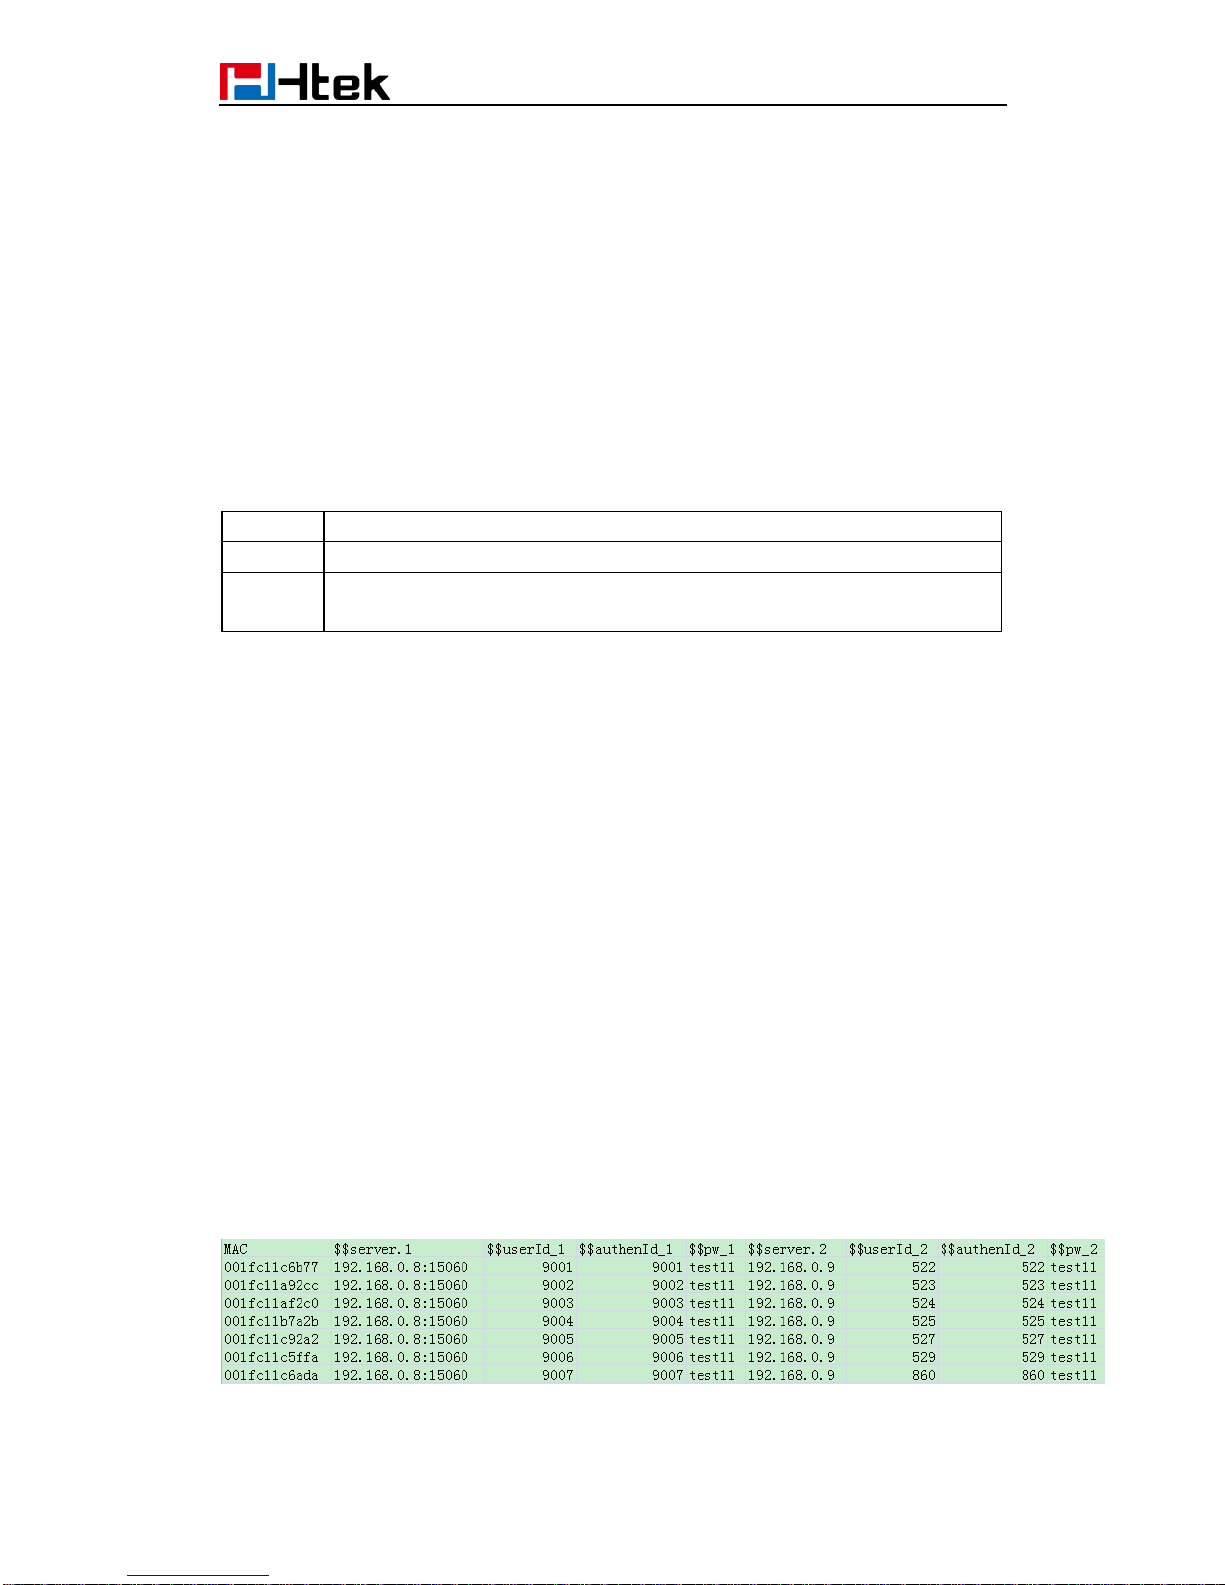
Step 1. Prepare a CSV File (Sample path: \samples\MacModeSample.csv. Two rows
at least needed. )
Define the Keyword you want to write into the CFG file. Such as:
MAC: MAC address of the phone
Page 44
41
$$server.1: Primary SIP Server of Account 1
$$userId_1: SIP User ID of Account 1
$$authenId_1: Authenticate ID of Account 1
$$pw_1: Authenticate Password of Account 1
$$server.2: Primary SIP Server of Account 2
$$userId_2: SIP User ID of Account 2
$$authenId_2: Authenticate ID of Account 2
$$pw_2: Authenticate Password of Account 2
The corresponding item contents are shown as below:
Page 45
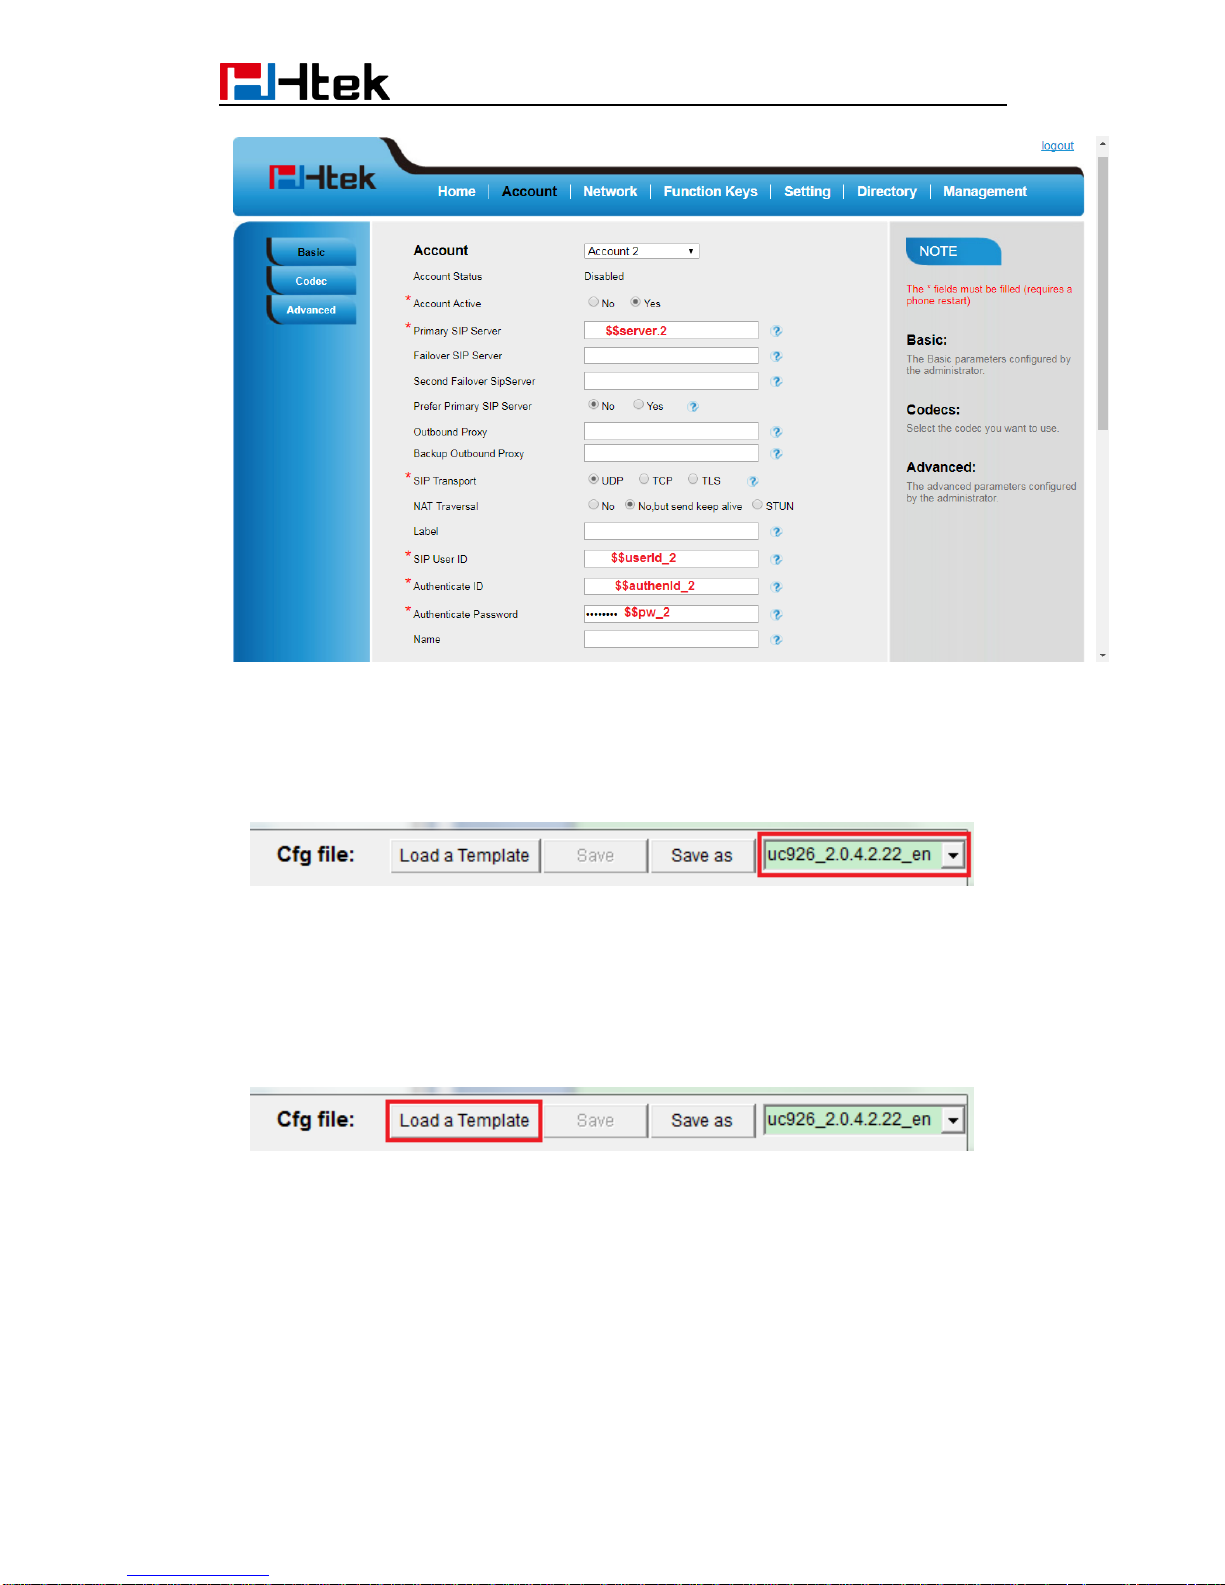
42
Step 2. Edit Cfg File
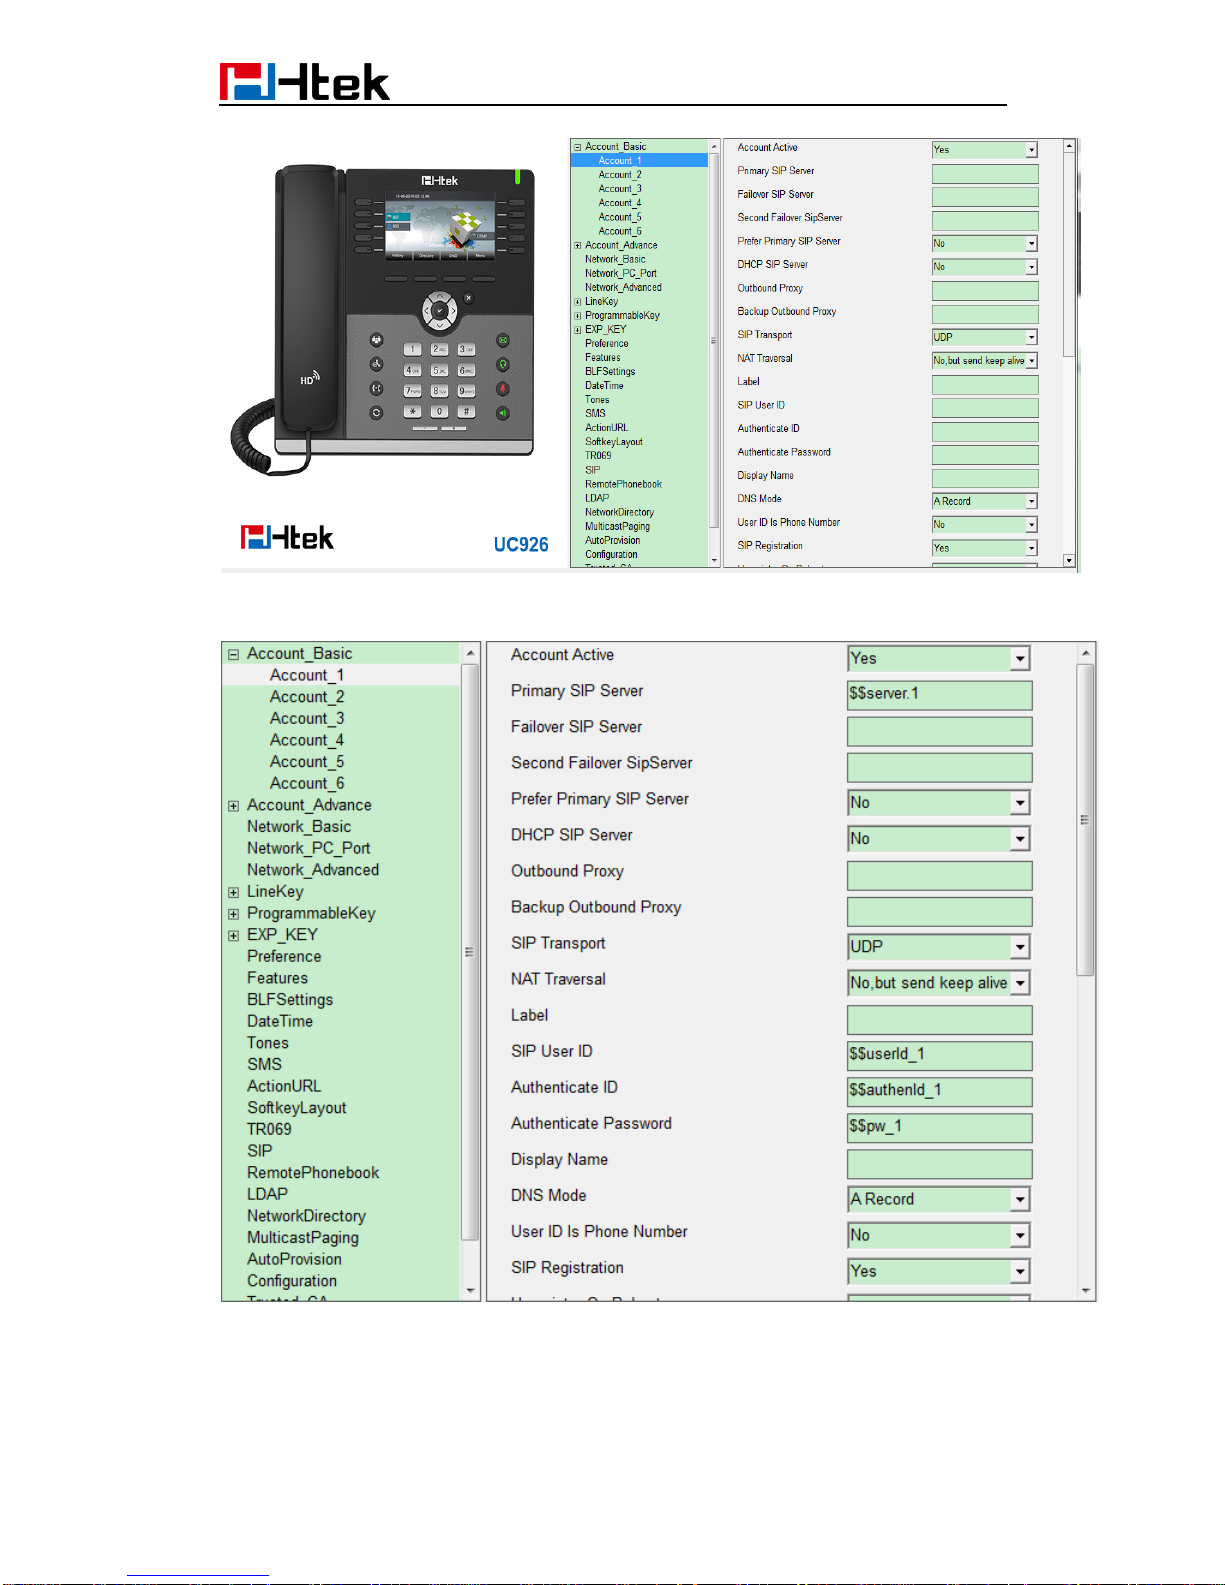
1. Select Device: Click the drop-down box to select the device for visual editing. ( If there
isn't your device or version in the drop-down box, you can choose a similar device or
choose UC926. However, if so, the following edits may present a risk of conflict. )
2. Load the configuration file template: By default, the software automatically selects
the default cfg file of the current device (Default cfg file of a device is in the device
directory, named as “$devCfg.bin”).
You can also click "Load a Template" button to load a bin format cfg file as template. After
loading, loaded cfg file will automatically rewrite the information in the Phone
Configuration page.
3. Switch to "Phone Configuration" page.
This page is divided to 3 areas. Left area shows the phone image, keys that can be set
can be clicked. Middle area is the outline of all the configurable items. Right area shows
details where you edit the exact configuration here.
Page 46
43
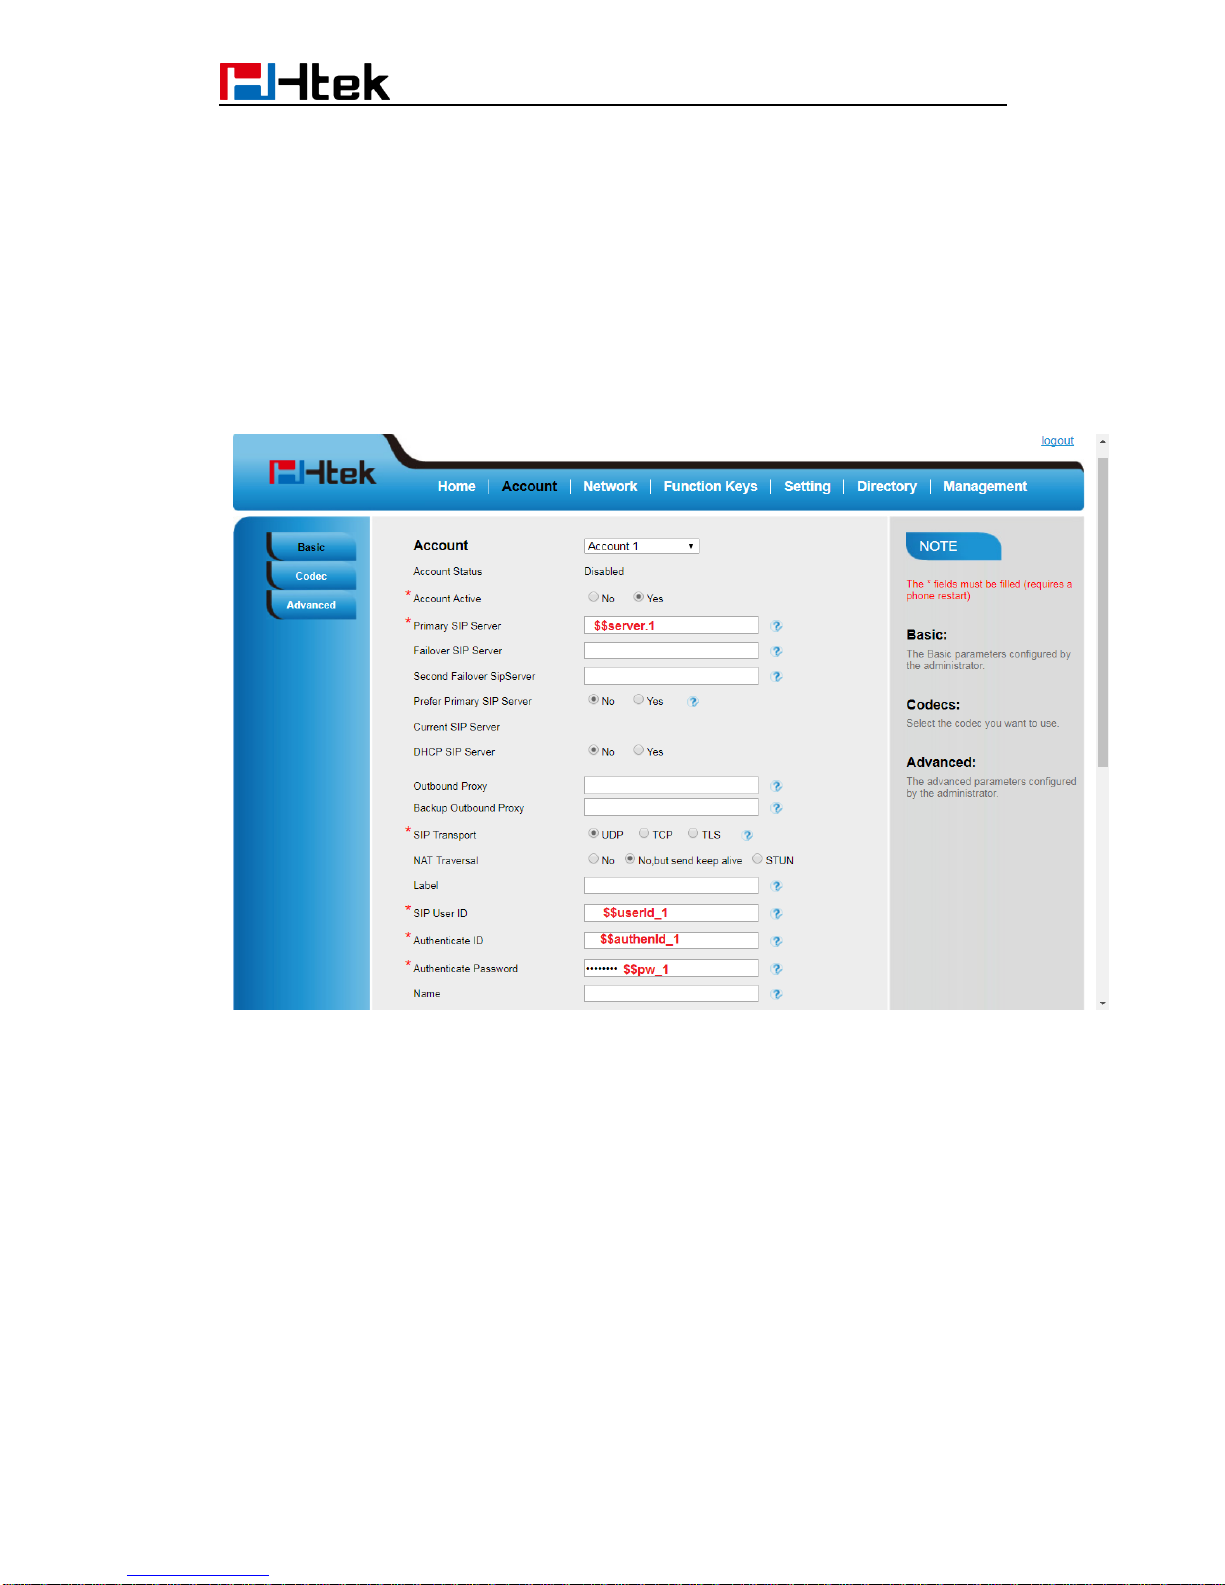
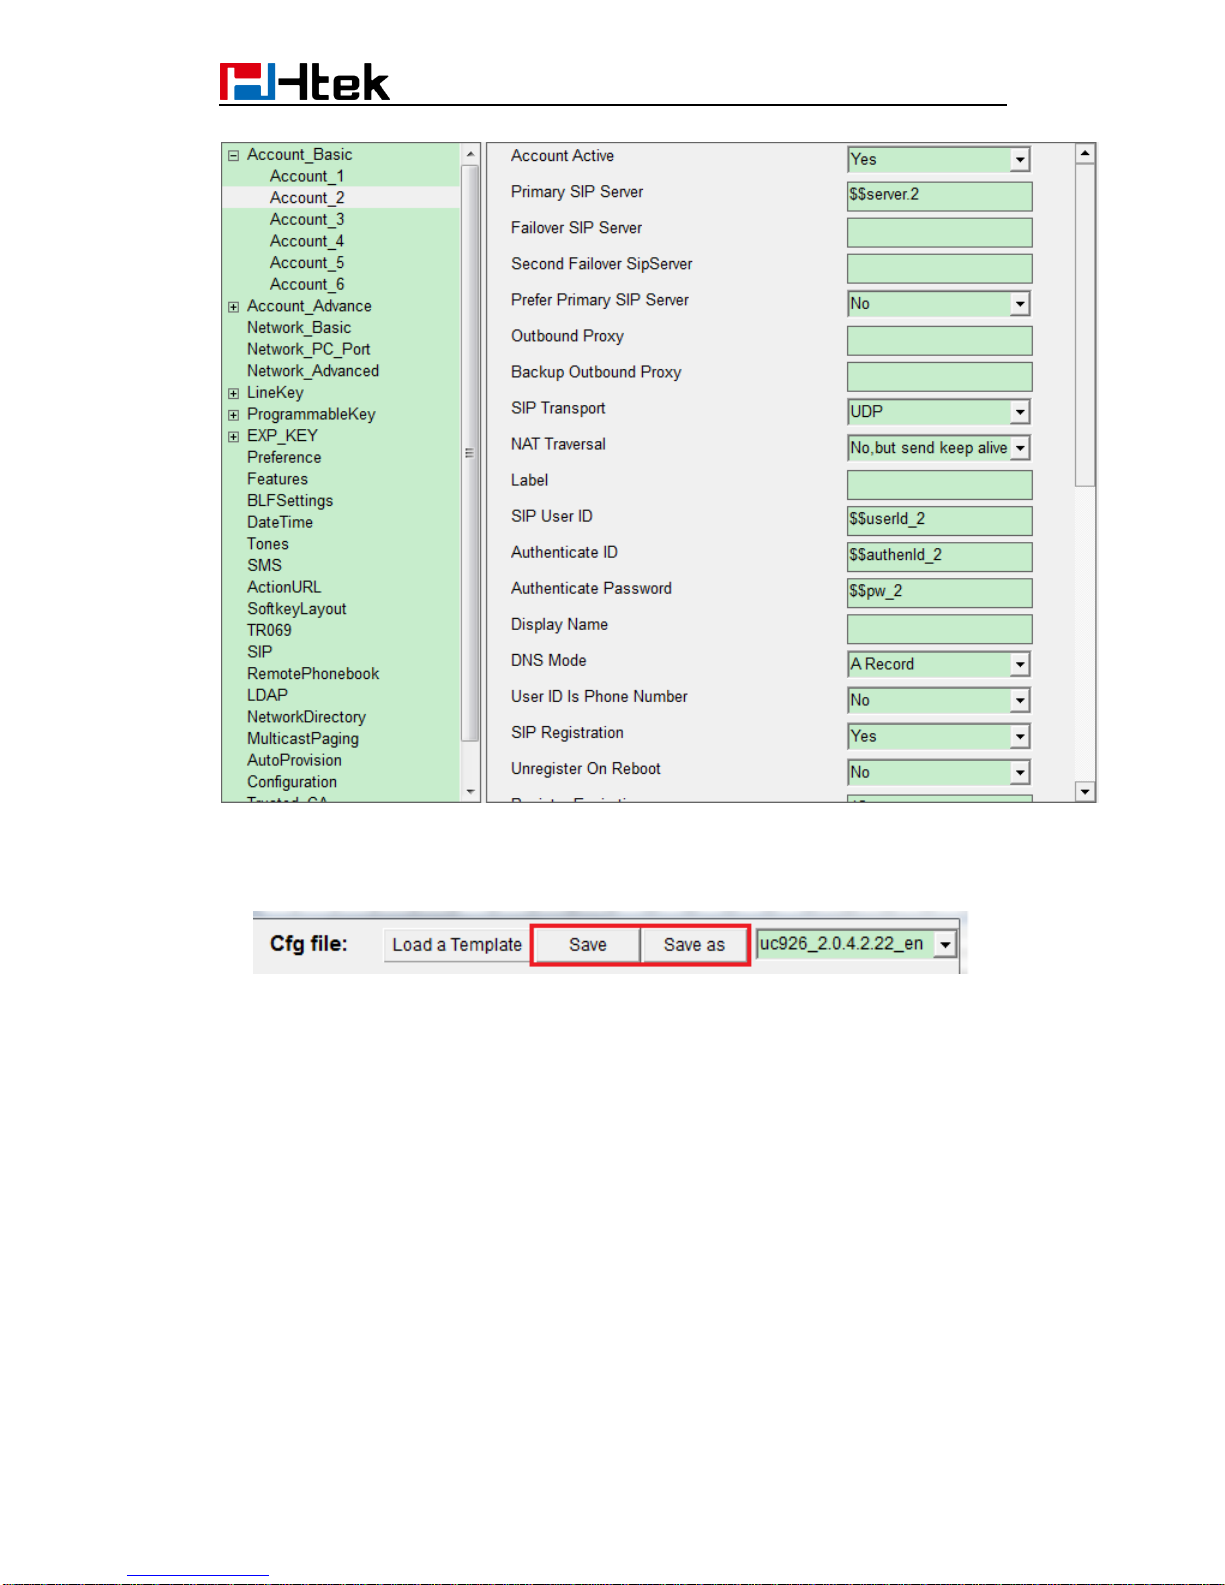
Fill the right items with the right keywords.
Page 47
44
4. In the process of editing, the software will automatically remember changes, so you can
switch directly among the outline items. All the changes are kept temporally. You can click
“Save” or “Save as” button to save these changes. Or let them alone.
Step 3. Load CSV File and Generate Cfg Files
Page 48
45
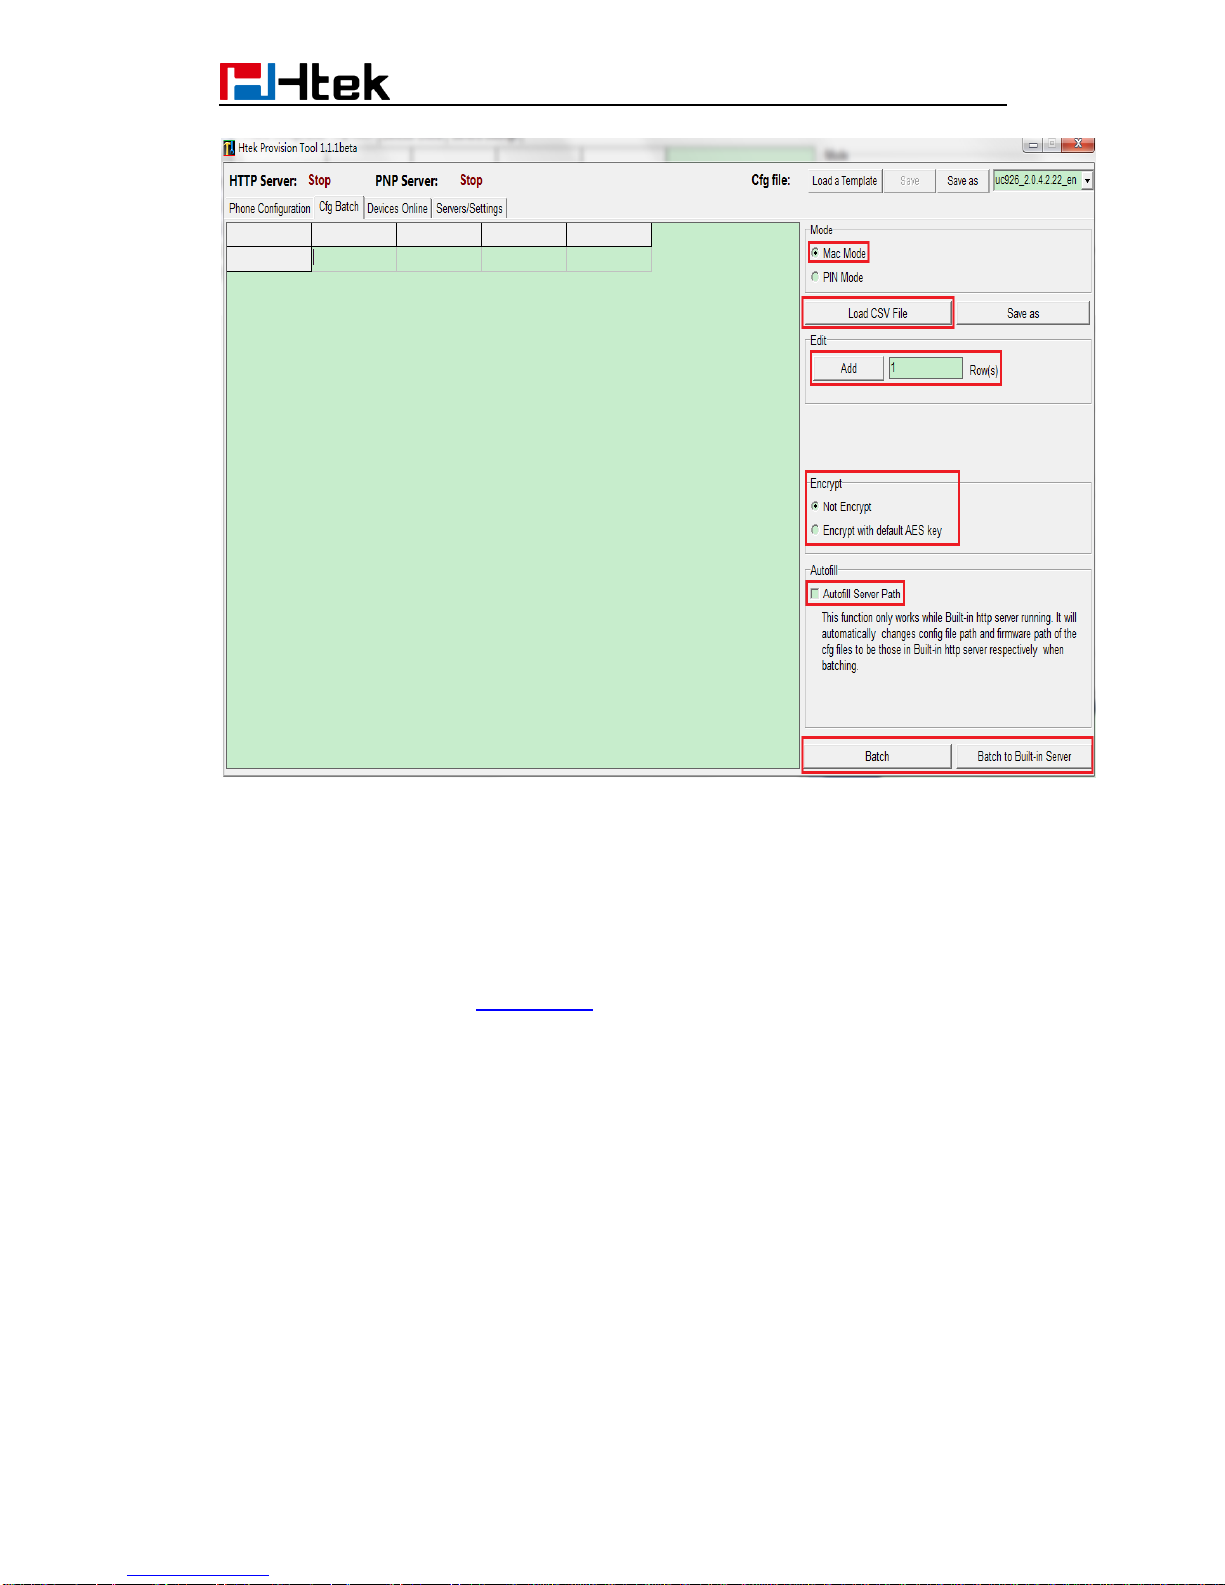
1. Click “Load CSV File” to load CSV file. All the content will be shown on the table.
NOTE: For many CSV editor, opened file is exclusively occupied. You need to close this
file first, then load it with HPT.
2. Modify csv file if need. You can add rows, edit content or save this table as another file.
3. Choose to encrypt the generate files or not.
4. If built-in HTTP server has started, you can check “Autofill Server Path” to autofill the
cfg server path and firmware server path. If you want to learn about how to start built-in
HTTP server, please refer to 18.2.1 Step 1.
5. Click “Batch” to generate cfg files and save them in the desired directory, or click “Batch
to Built-in Server” to generate and store them in the built-in HTTP server file directory
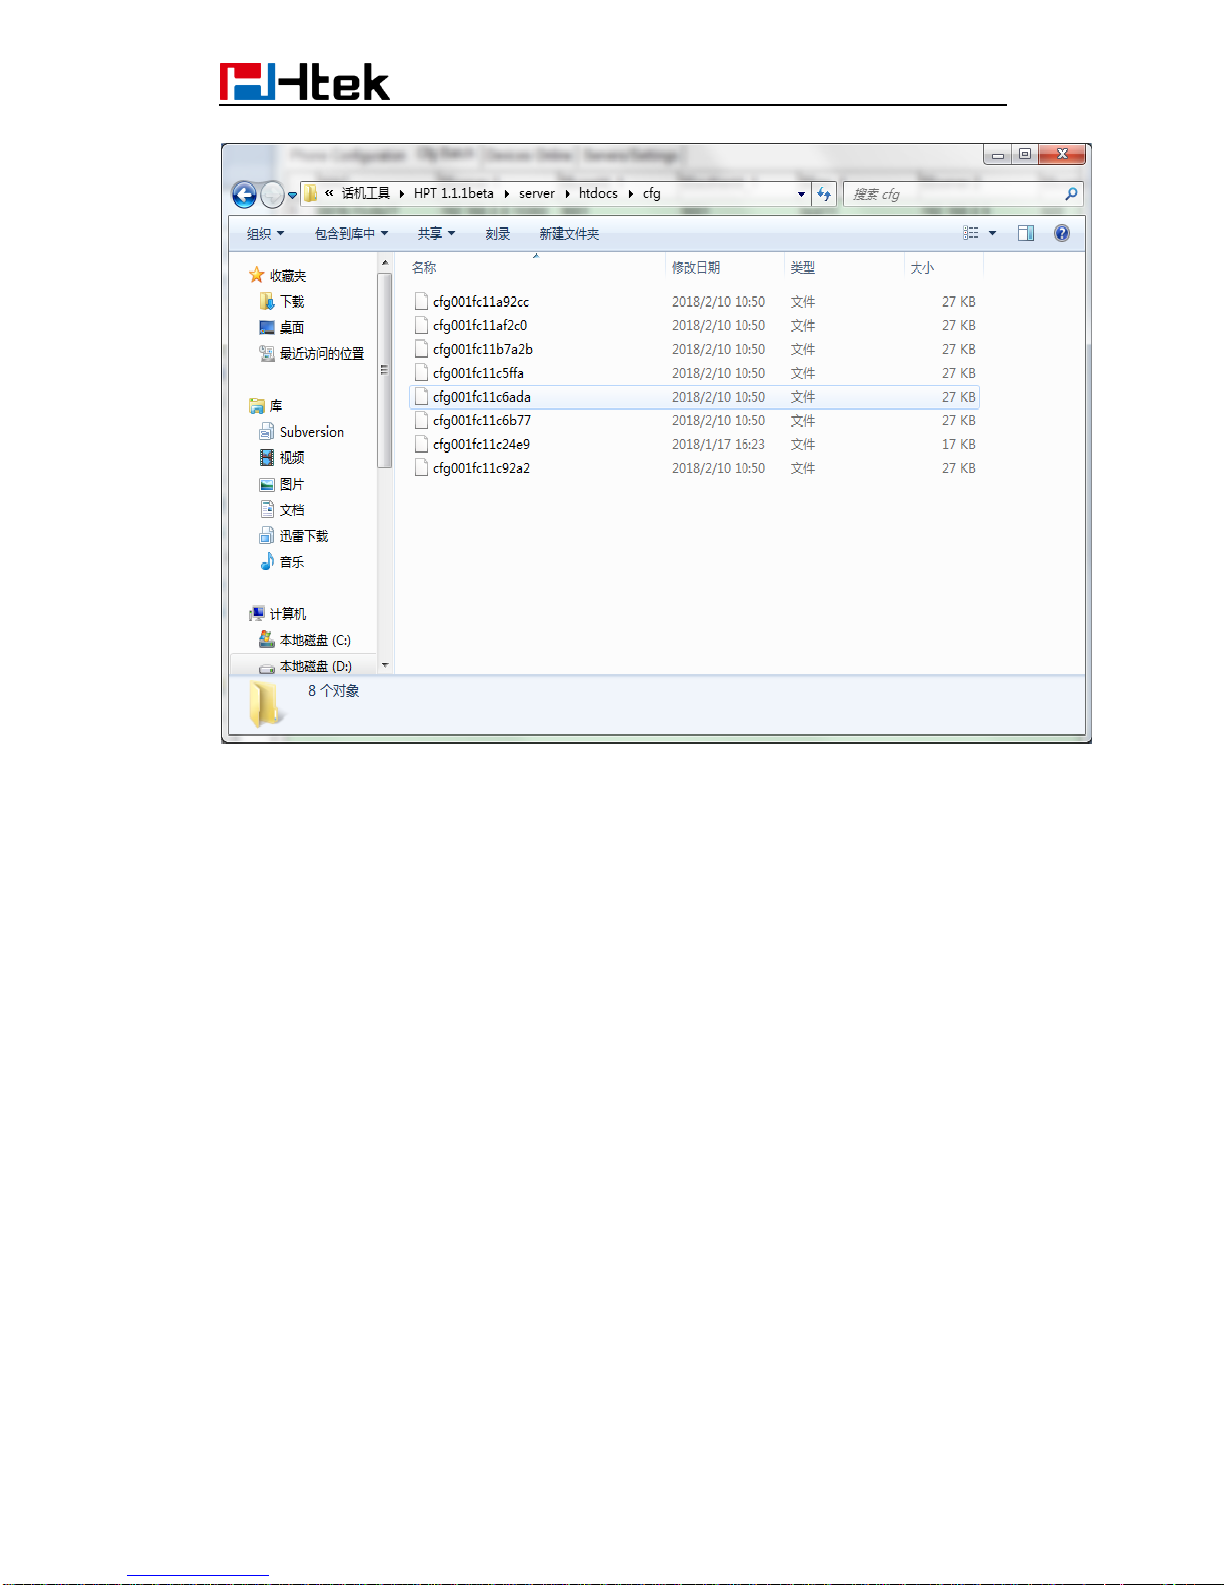
(\server\htdocs\cfg and \server\htdocs\fw).
Page 49
46
18.2 Upgrade cfgMAC file via HTTP/TPFP/FTP/HTTPS
18.2.1 Upgrade cfgMAC file via Htek Provision Tool
Step 1. Open servers
In general, to fully use all of the capabilities of Htek Provision Tool, you need to configure
and start relevant servers first (Skip this step only when you just want to edit cfg files).
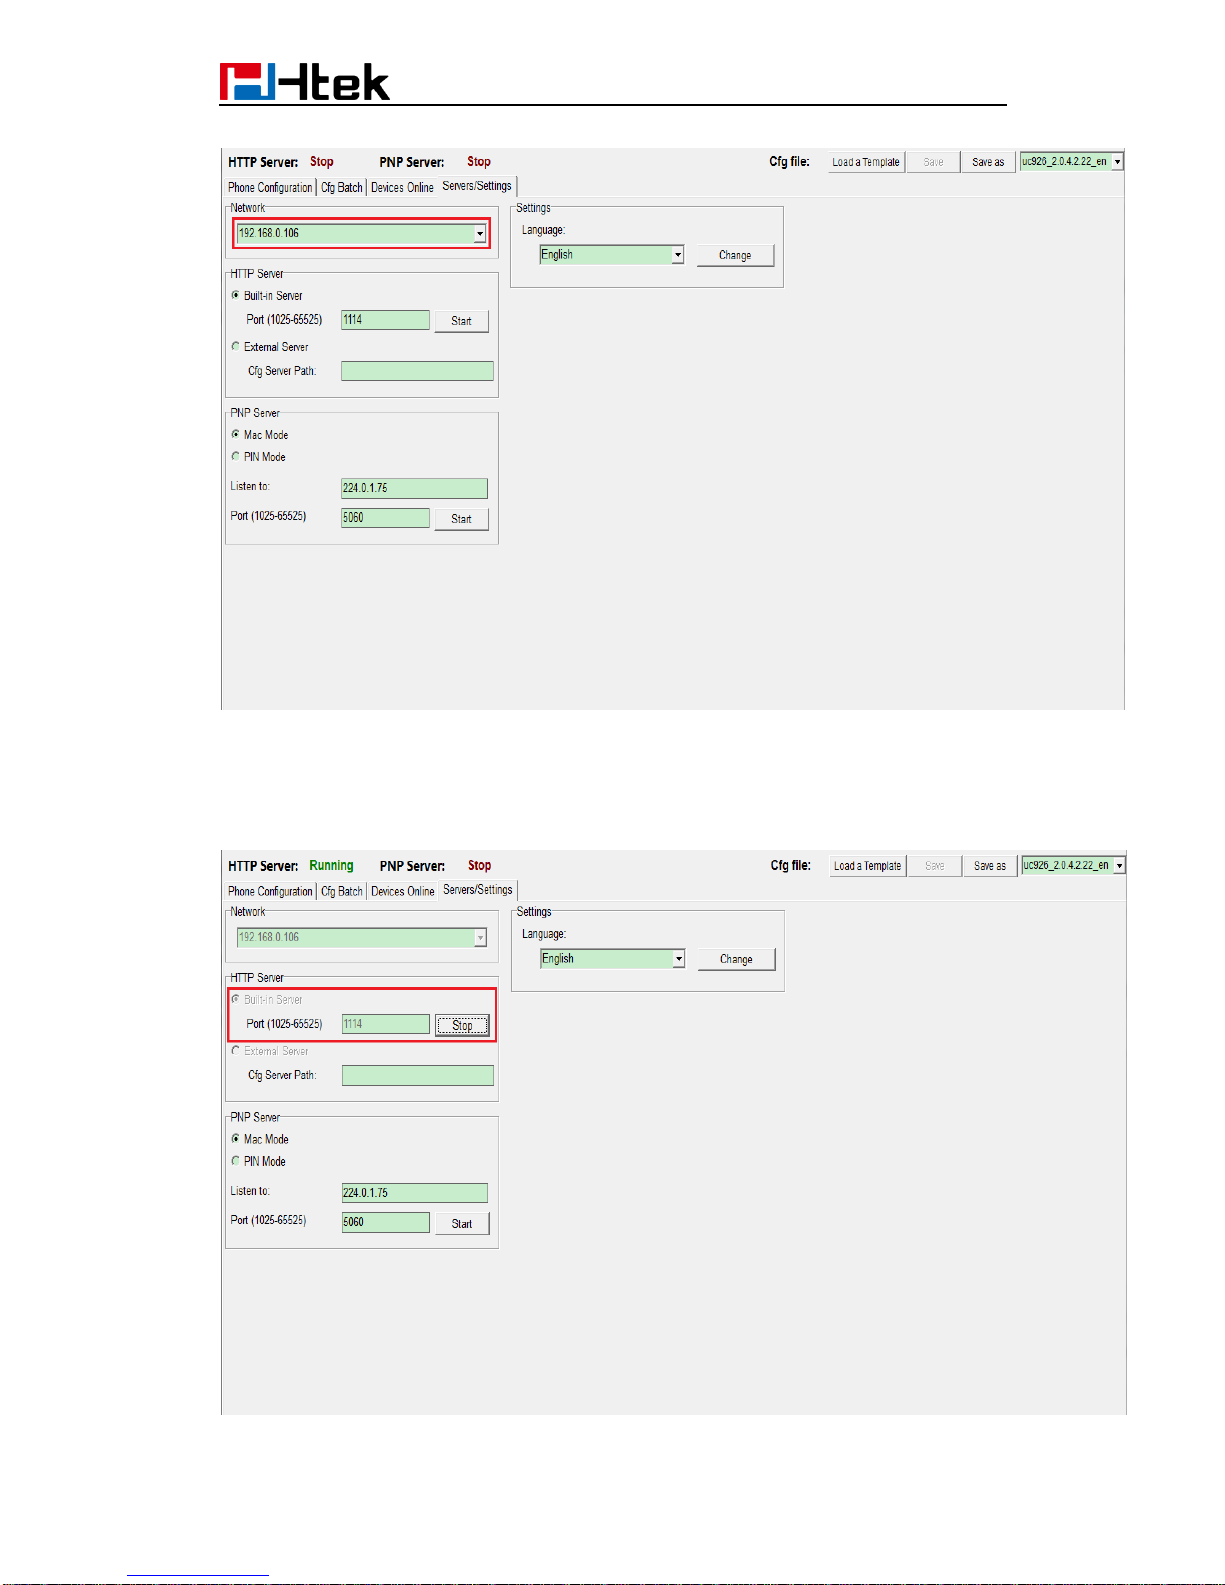
1. Switch pages to "Servers".
2. Select the right network interface, which can be accessed by other devices on the same
network segment.
Page 50
47
NOTE: For HTTP servers, you can choose build-in or external one. PNP server cannot be
turned on until you have selected the external HTTP server or started built-in HTTP server.
3. To start build-in HTTP server, you need to fill in the port edit area with appropriate port,
and then click "Start" to run. If the port is not available, it needs to be modified.
Page 51
48
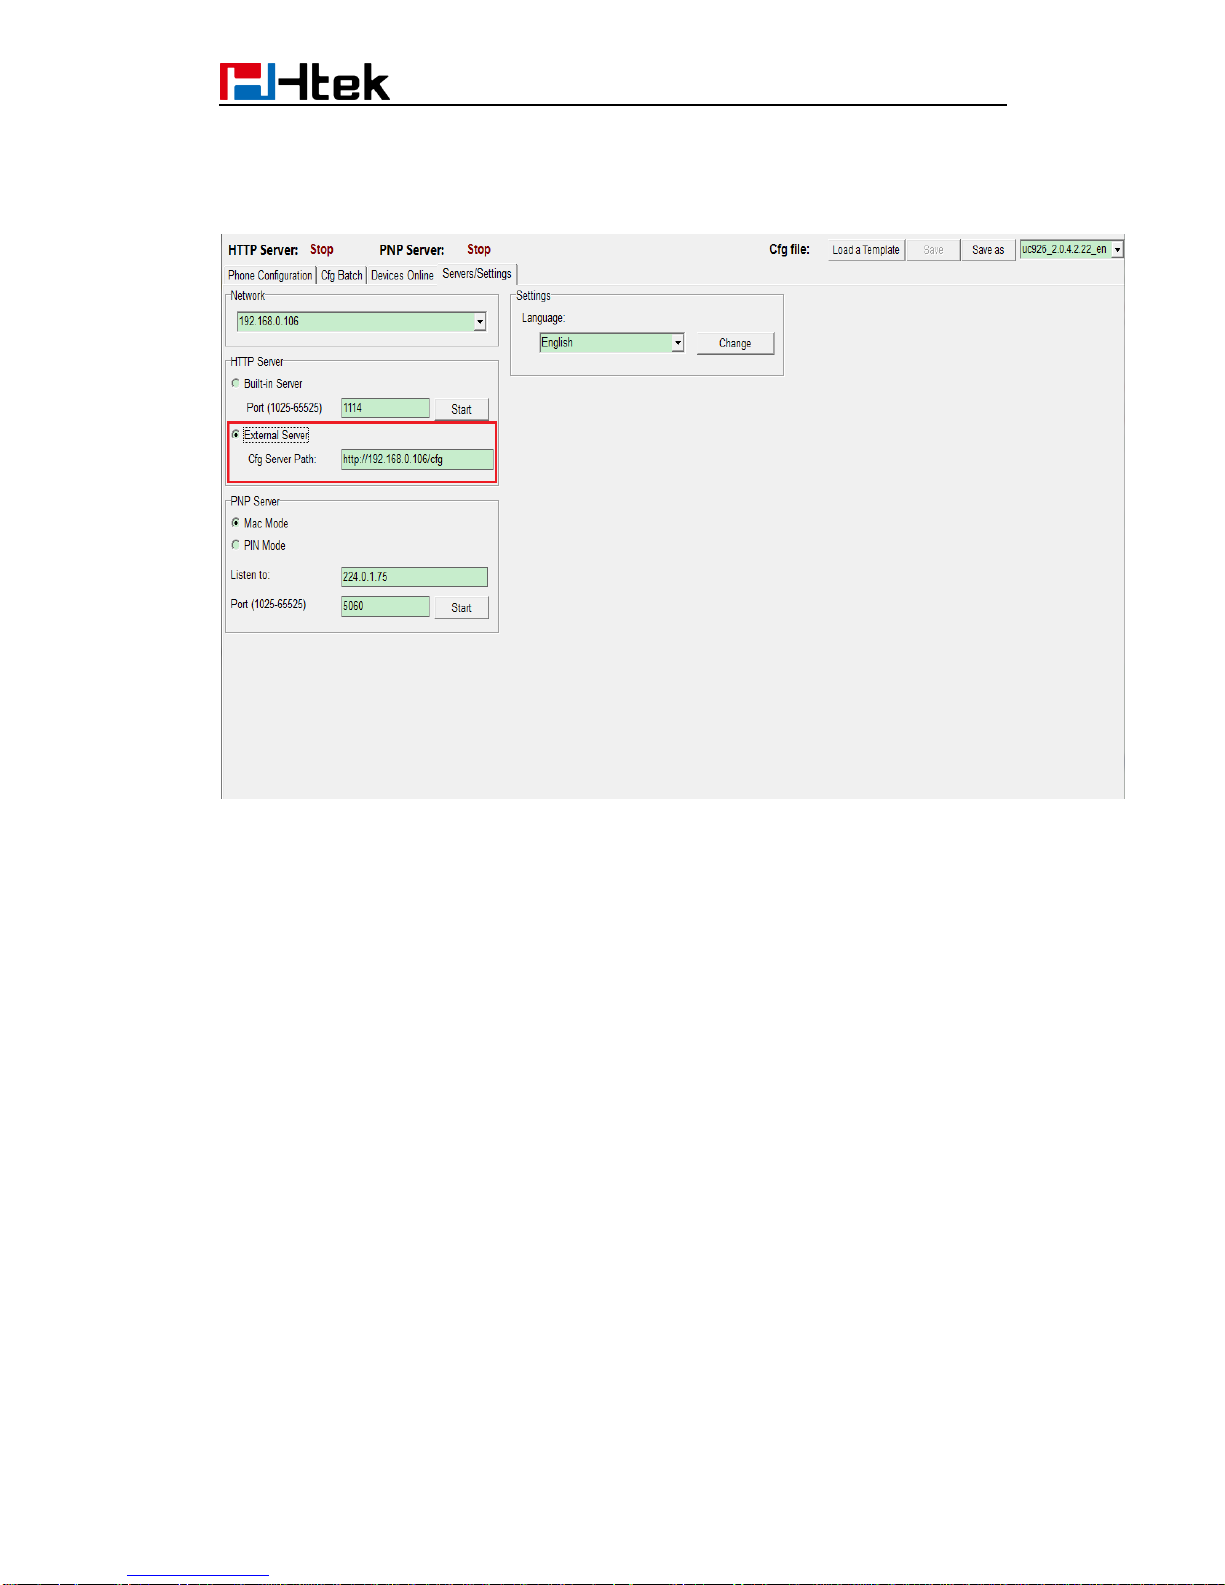
4. While choosing external Server, you need to fill in a configuration file server address
(Cfg Server Path), such as "http://192.168.0.106/cfg" (without "/" at the end). Make sure
that this path is accessible.
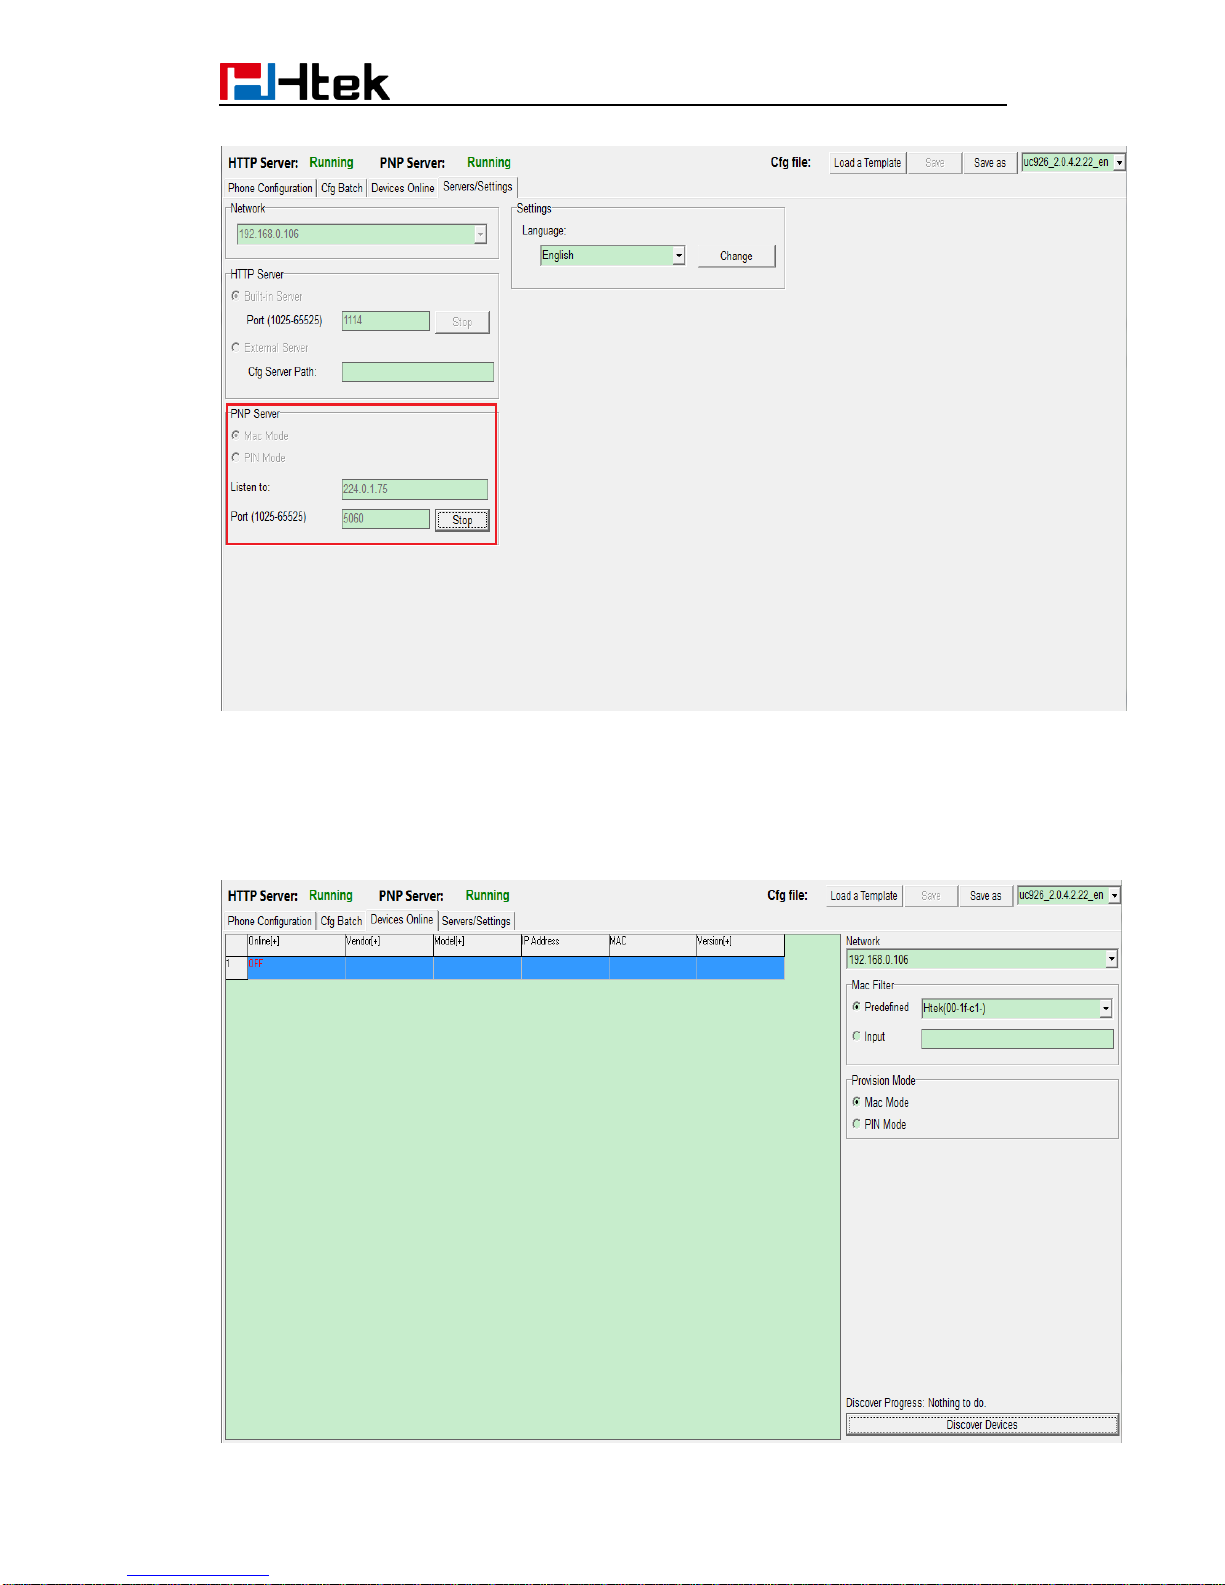
5. Start PNP server. For the Htek phones, fill “Listen to” box with “224.0.1.75” and fill “Port”
box with “5060”. Do Not Change These Two Parameters If You Do Not Know What
These Mean. If you cannot start PNP server, please handle the problem
according to the error message.
Page 52
49
Step2. provision devices
1. If you want to provision the phone via PNP, just restart the phone now and it will be
successfully provisioned.
2. If you want to provision directly, you can operate as follows:
Page 53
50
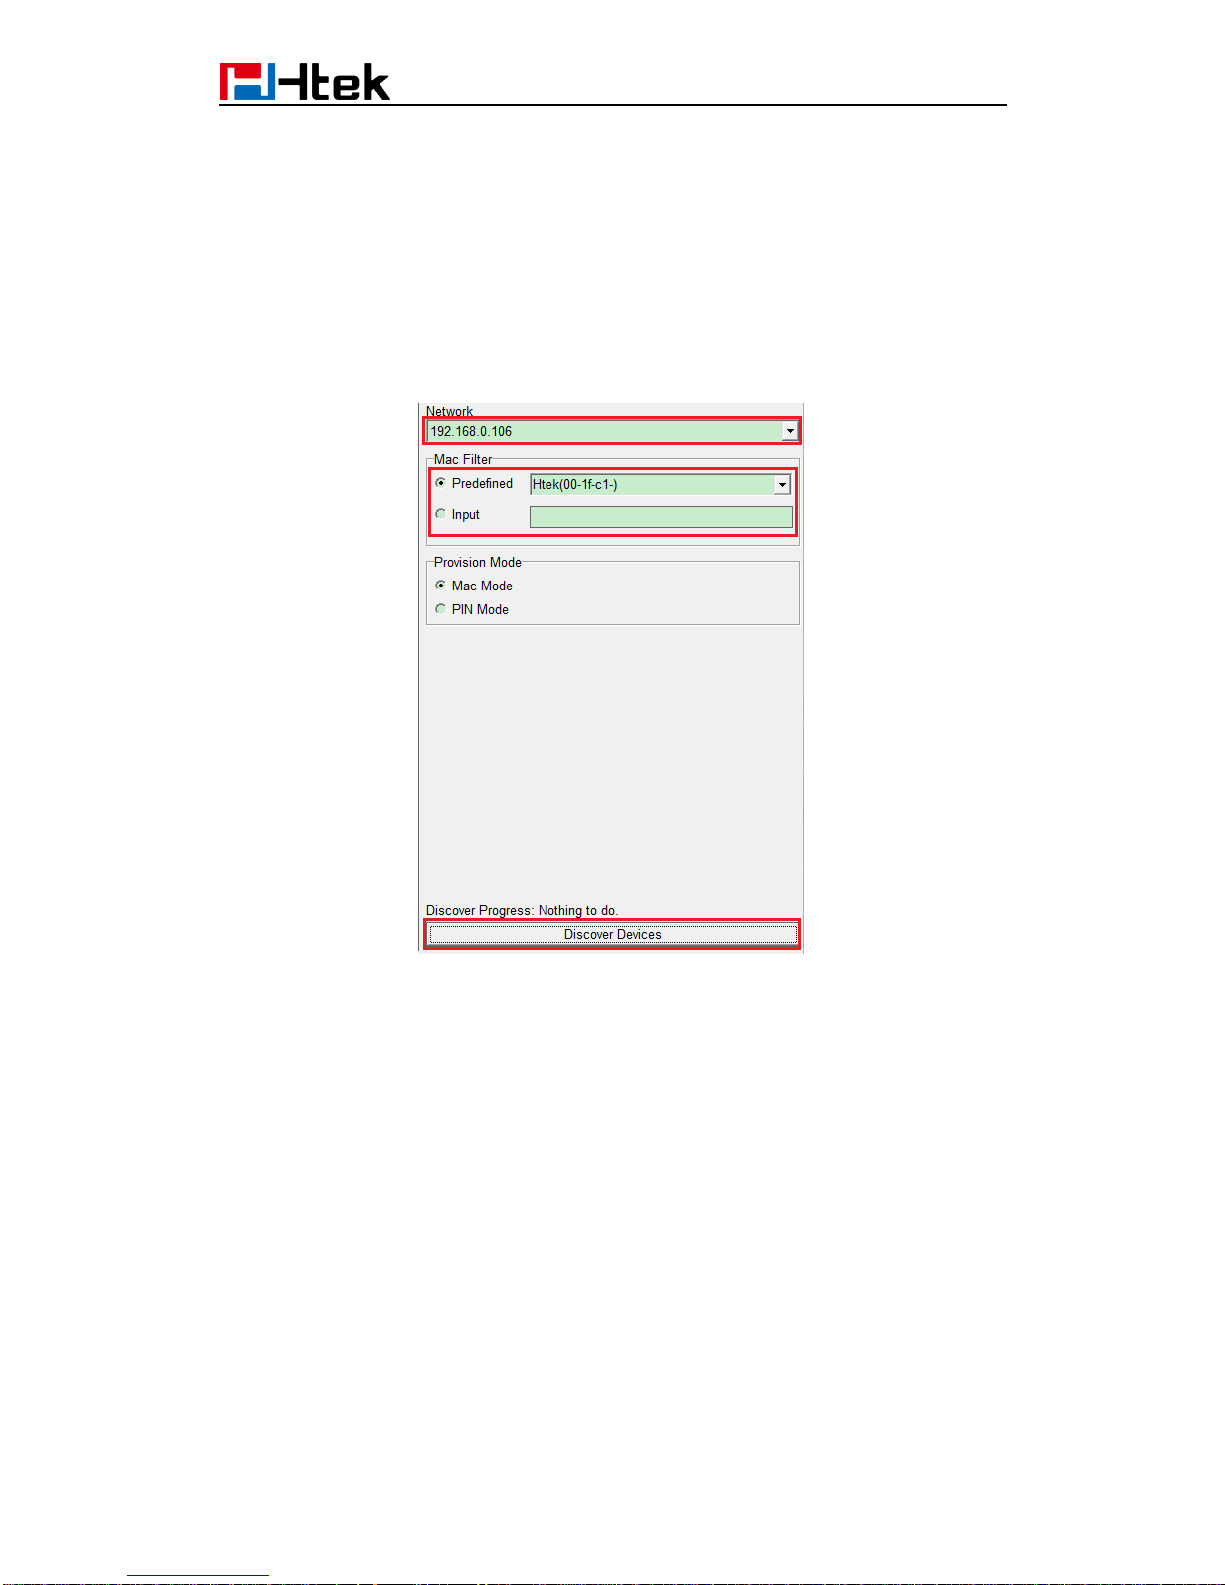
Switch pages to "Devices Online".
On this page, you can search for devices on the same network segment within the LAN
and provision them.
(1) Select the right network interface, which can be accessed by other devices on the
same network segment.
(2) Select a Mac address filter or input one (Input filter format: 00-1f, 00-1f -, 00-1f - c,
00-1f - c1-11-22 - , etc.).
(3) Click "Discover Devices" to start search. When the desired content has been found,
click this button to end search, or wait for it to end on its own.
Page 54
51
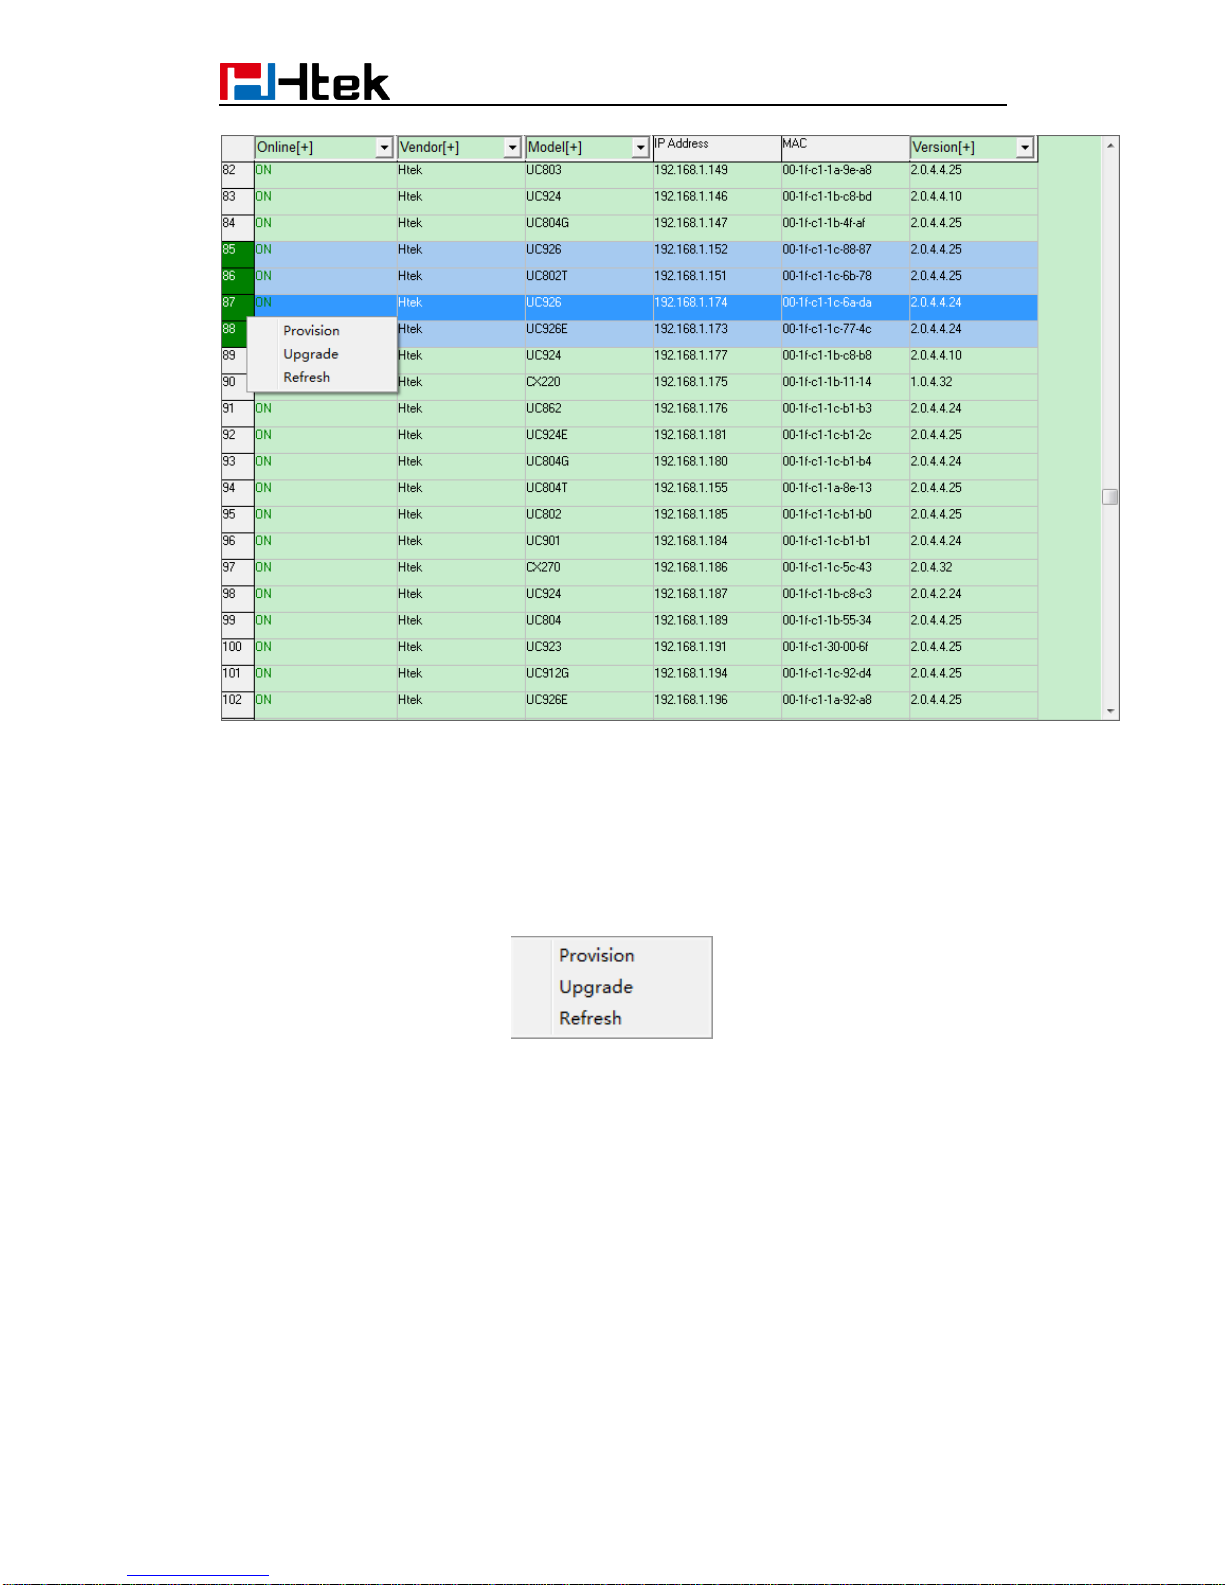
The results of the search are presented as shown in the table above. The head can be
used for the screening of device model and version number.
Click the most left num column, you can select a device, or you can select multiple
devices by hold pressing left mouse key and dragging. Click the top left corner of the form
to select all the devices of the current table. Left-click on the selected device, which will
cancel the selection.
Right click, quick menu will pop up. There are three commands:
"Provision": This command ask phones to fetch cfg file from the HTTP server where
you defined on Page “Servers”.
"Upgrade": Same as “Provision” on current HPT version.
"Refresh" : Check if the phones selected are still online.
All the selected phones will execute the command.
18.2.2 Upgrade cfgMAC file via configuring Htek IP
Phone
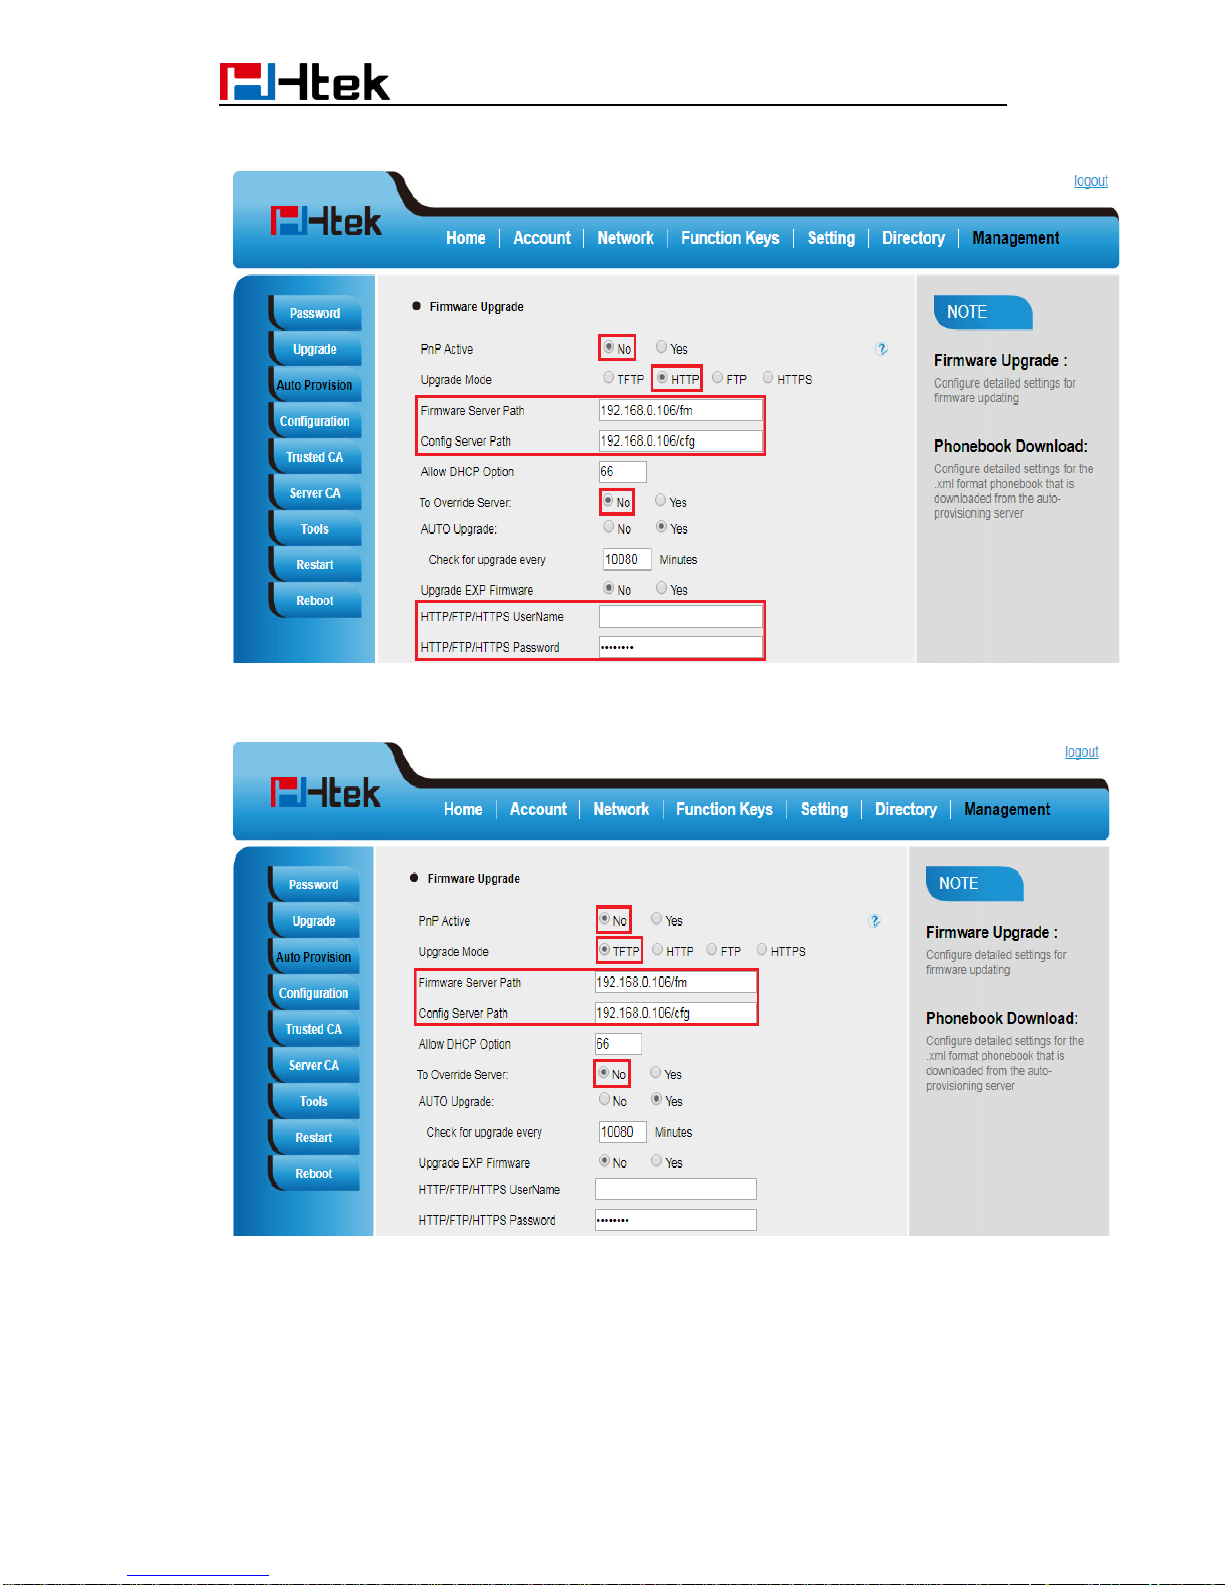
Step 1: Login Htek IP device’s webpage, ManagementAuto Provision:
Page 55
52
Via HTTP mode:
Via TFTP mode:
Via FTP mode:
Page 56
53
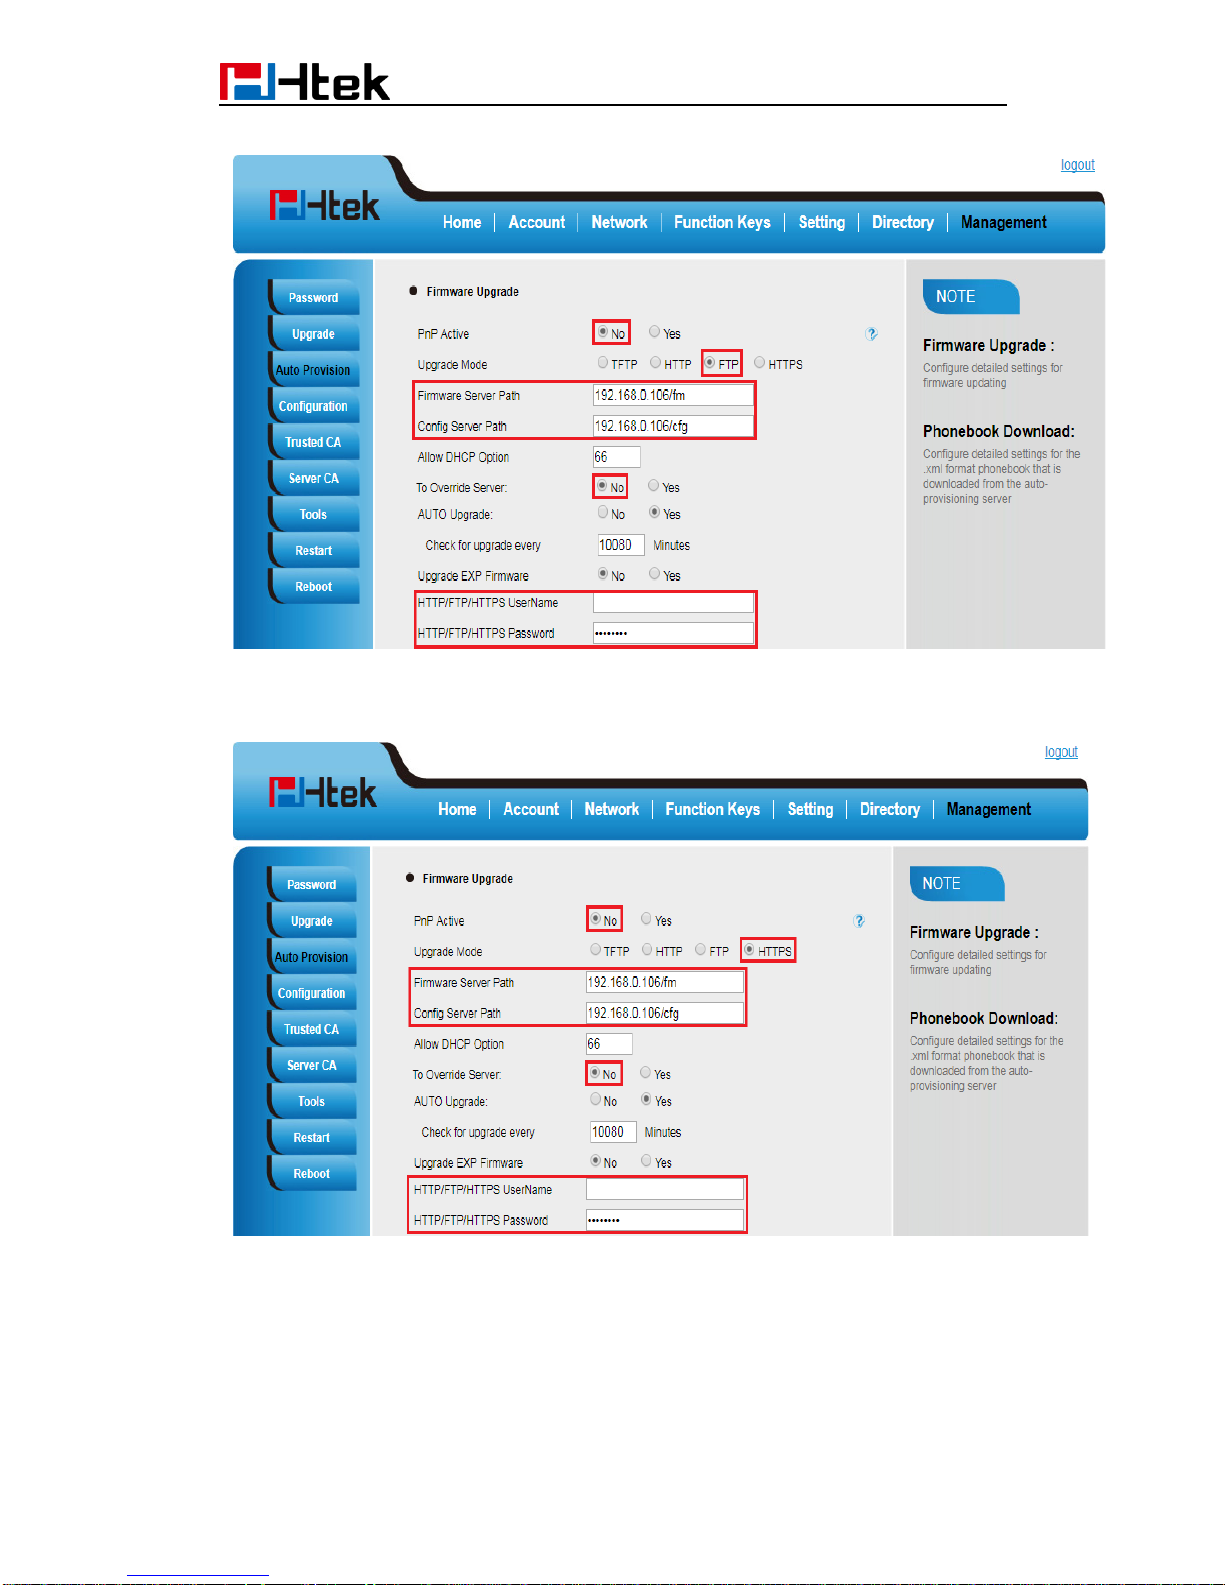
Via HTTPS mode:
You can select the upgrade Mode what you want.
Step 7: Restart the Htek IP device.
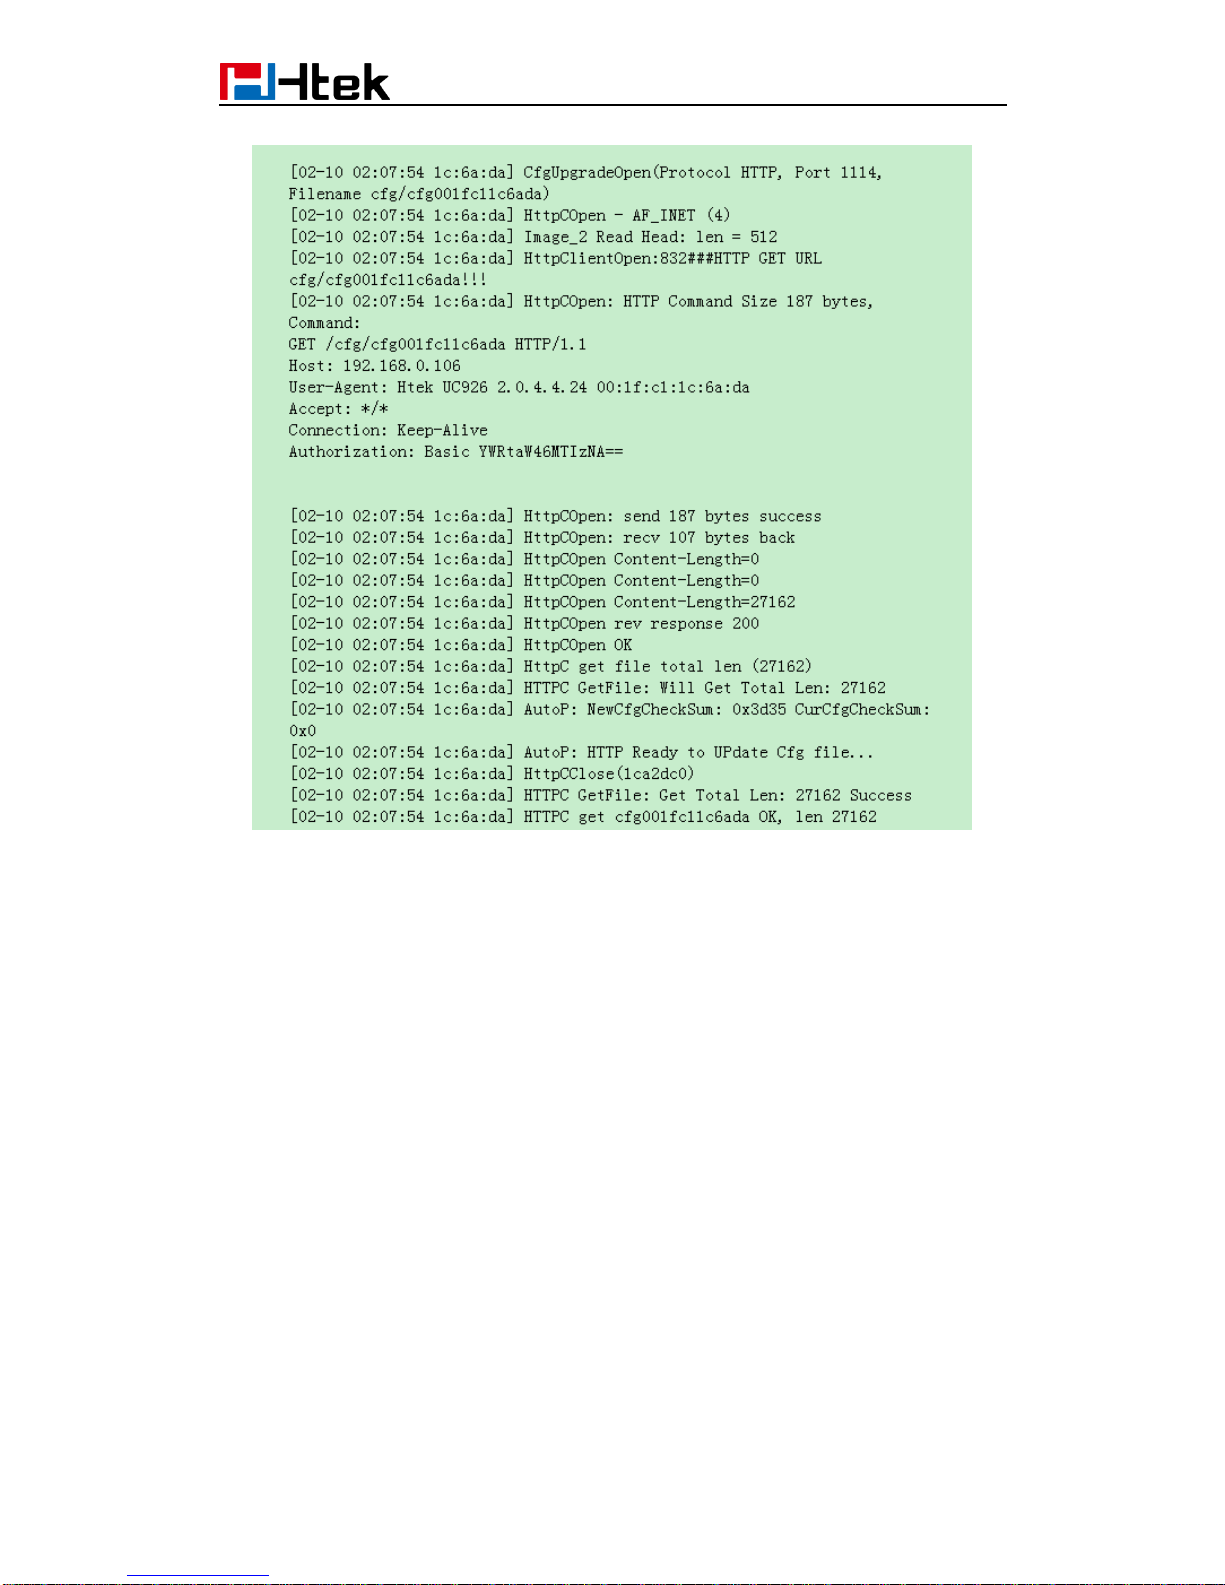
e.g: You can see the request logs on the server:
Page 57
54
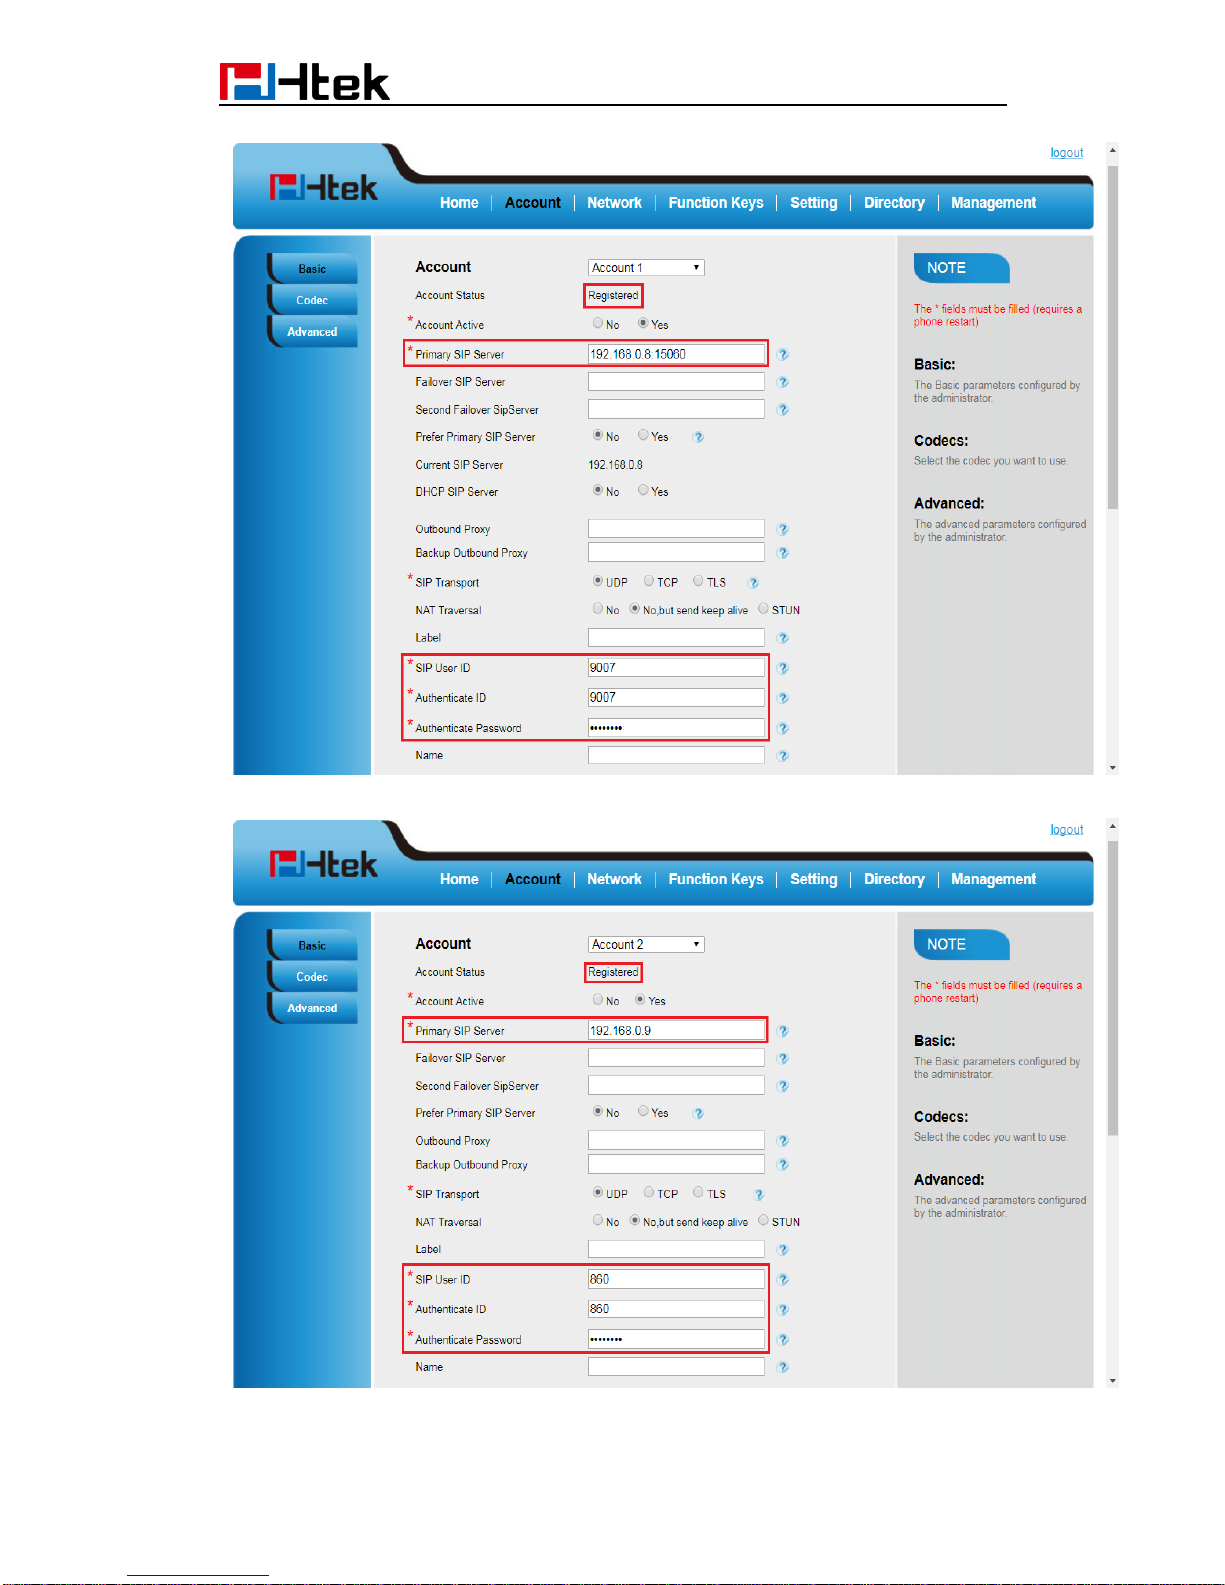
1. Test result:
Page 58
55
Page 59
56
19. Making Ringtone Notes
Prepare:
Tool: ringtool.exe
Ring file format: pcm
1. To make ring tone for UC9xx
1.1 Double click ringtool.exe
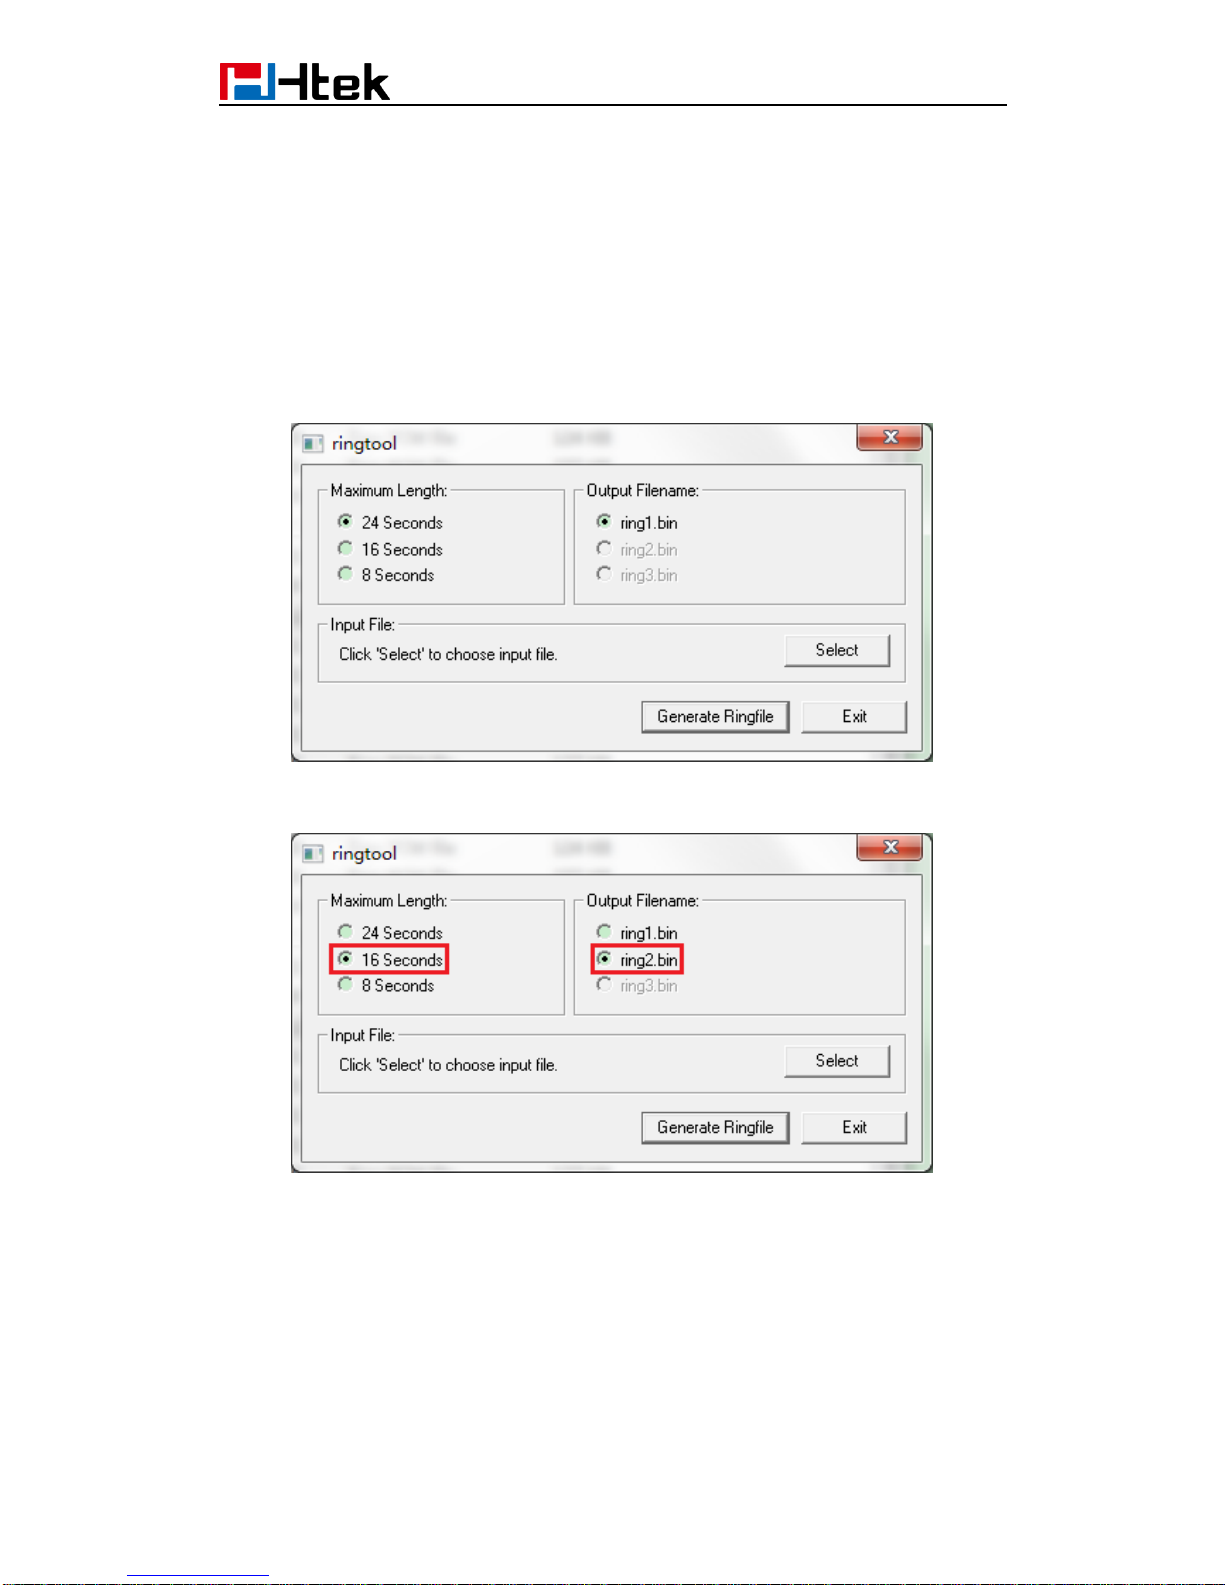
1.2 Select the Maximum Length and Output Filename:
For example, 16 seconds, ring 2.bin
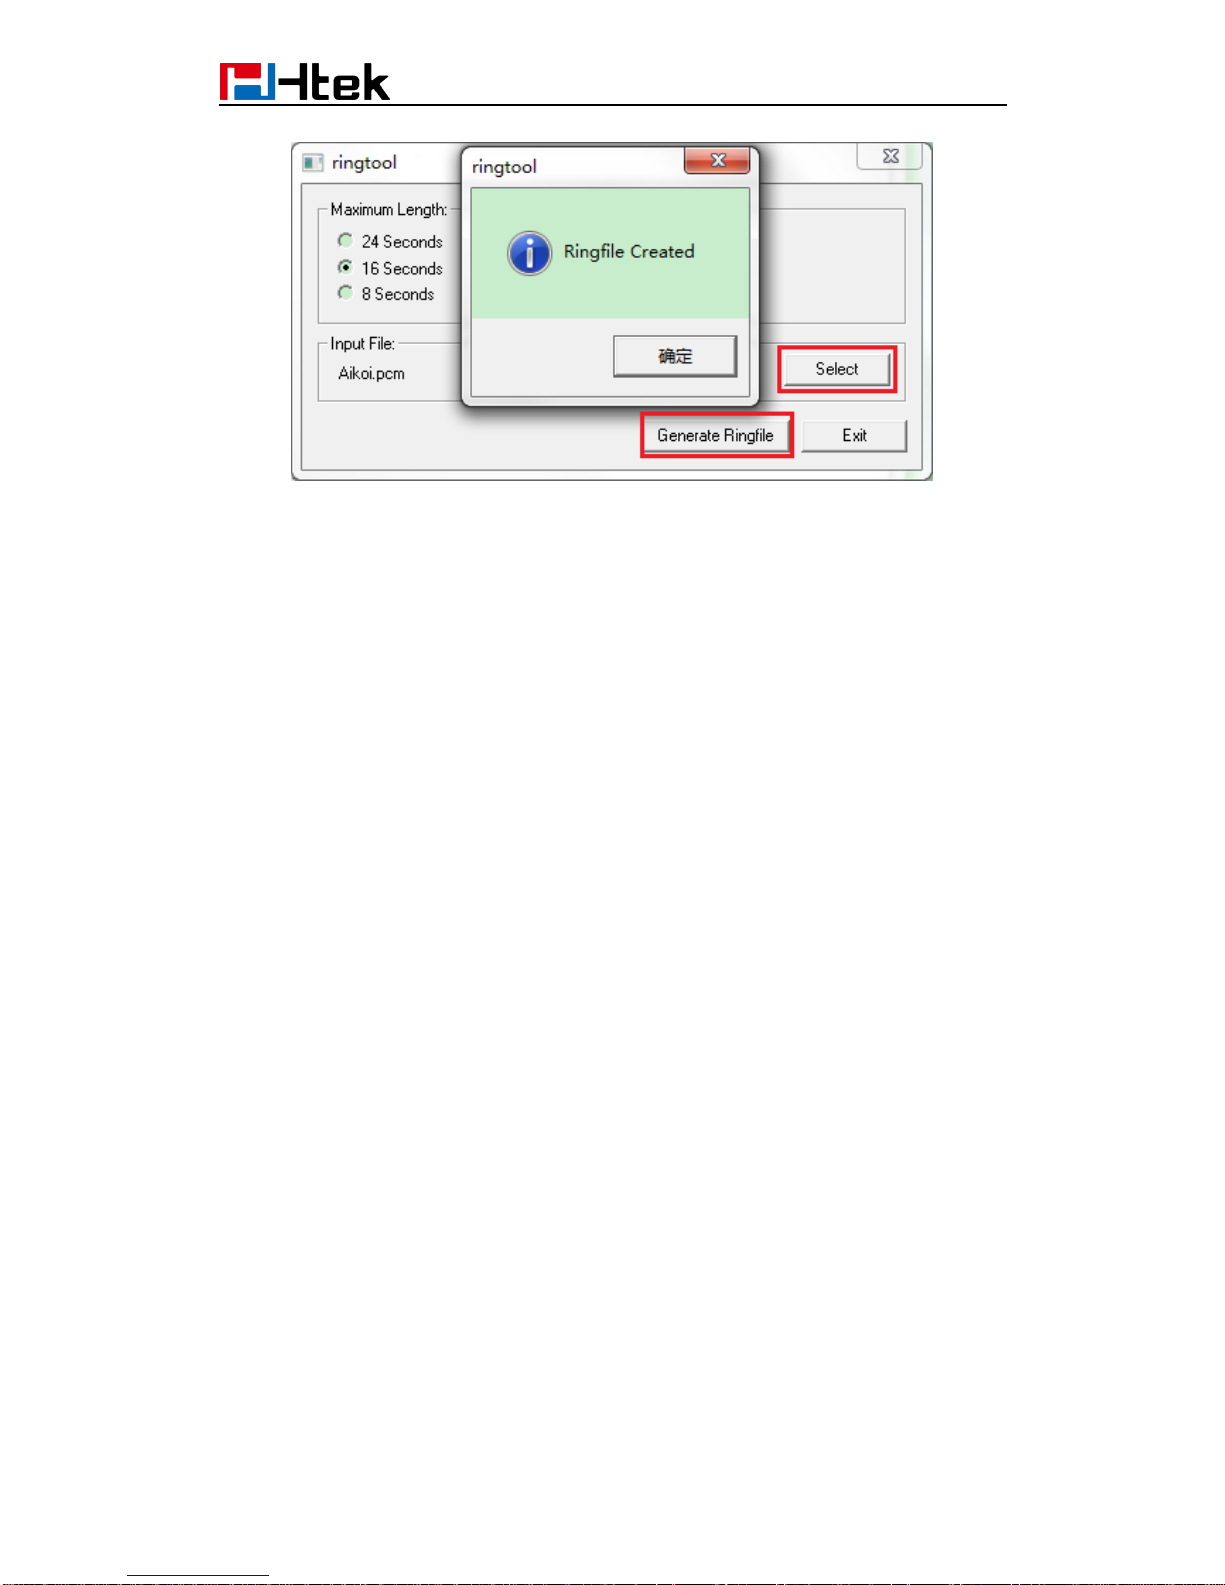
1.3 Click Select to Input the desired ring tone file, and then click Generate Ringfile.
Then, you will get Ringfile Created.
Page 60
57
1.4 Now, you get the ring2.bin, also you can rename it as ring5.bin, or other the one you
want to replace.
1.5 Upload the ring file by TFTP or HTTP, the ringtone is replaced successfully.
Page 61
58
20. LCD and Web Language Custom
Guide
20.1 LCD Language custom guide
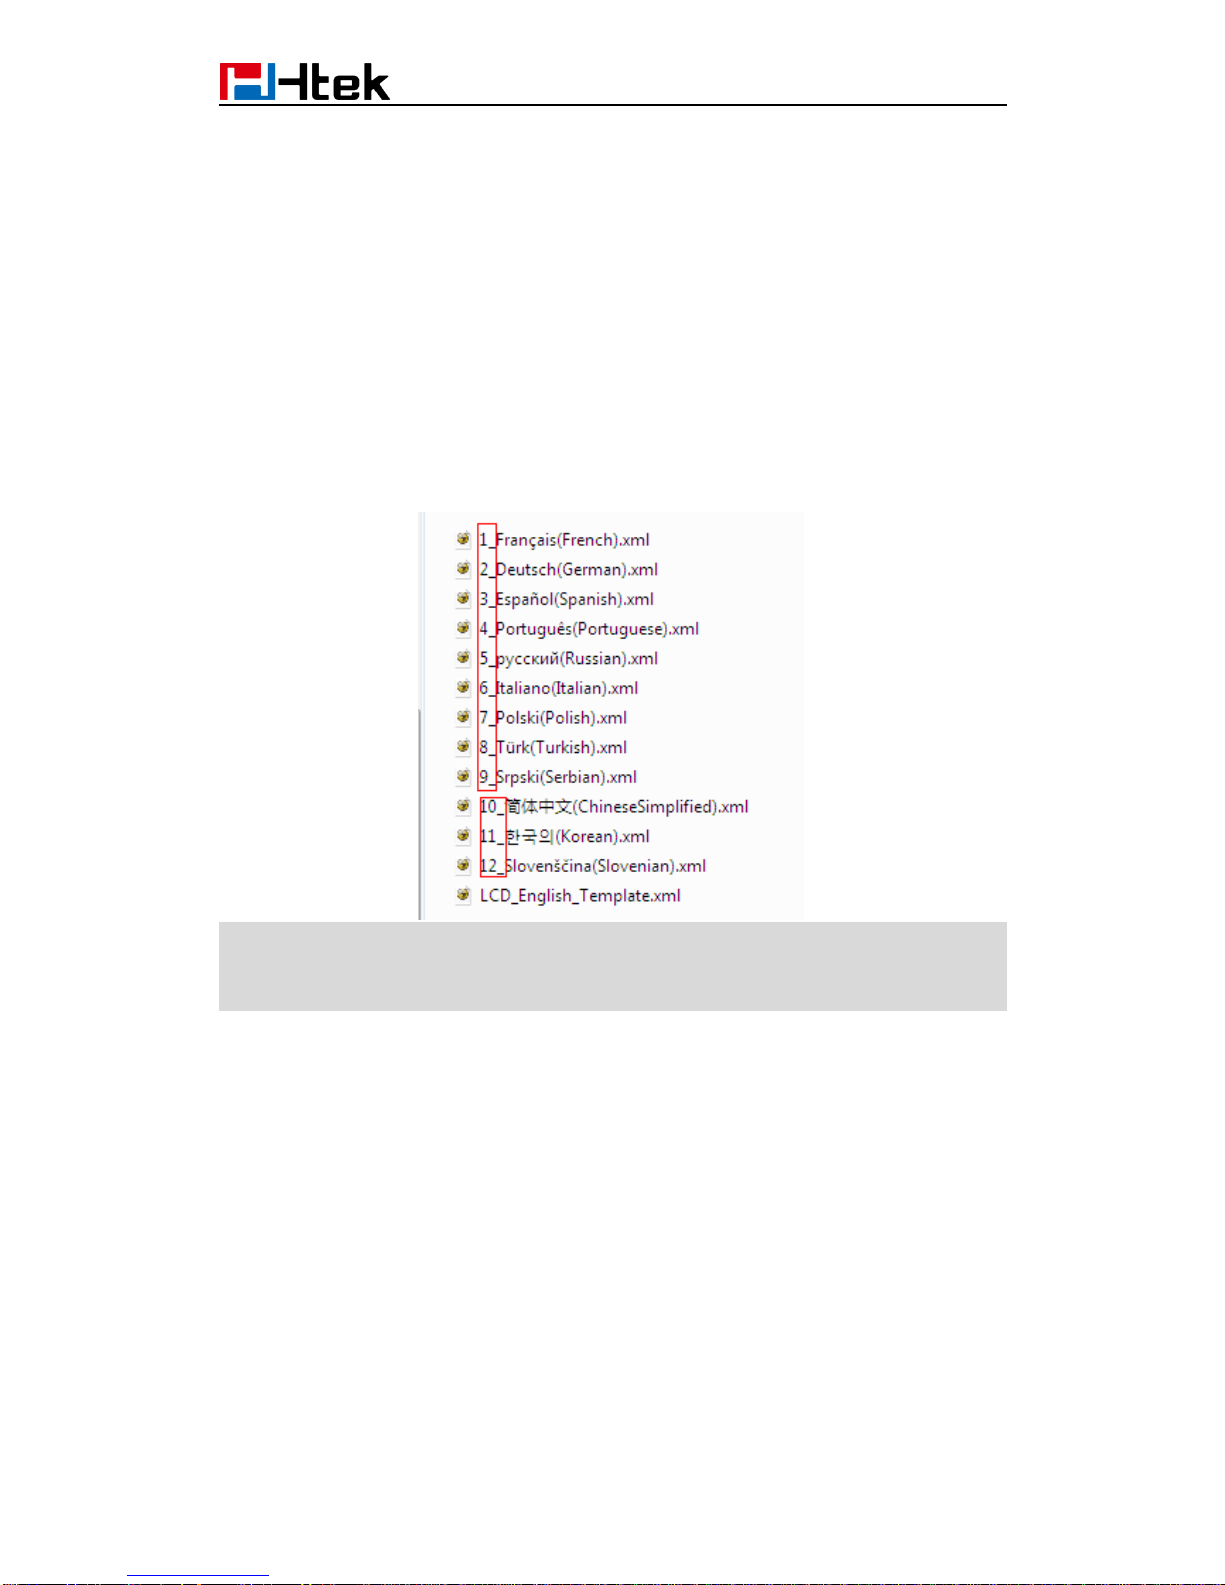
1. You need to contact us about how to obtain the Language.tar file.
2. Unzip the Language.tar using 7-zip tool.
3. Open the Language folder:
Note:
The file name must be " digital_" at the beginning,the format of the file name is the order of
the on the LCD.
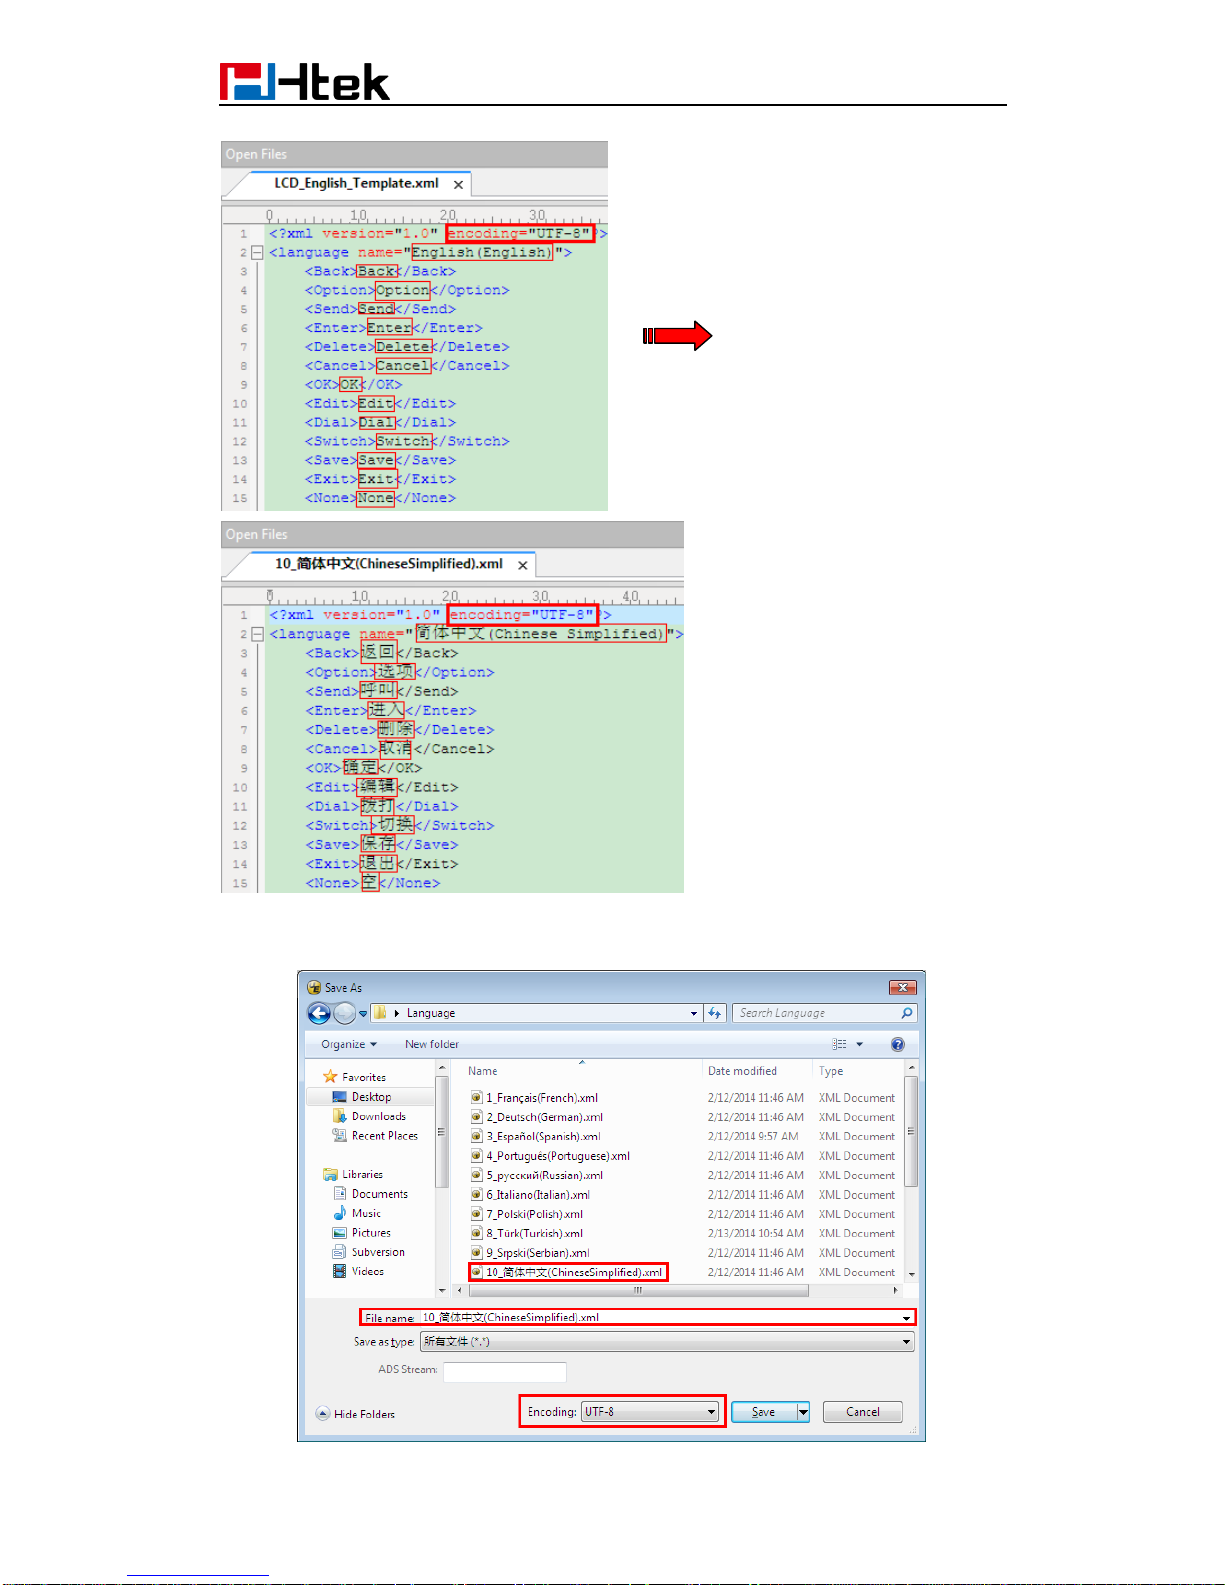
4. For example, custom Chinese Language
If your country's language is not existing in the language folder, you can new a xml file with
correct naming format. [e.g. 13_xxx(xxx).xml]
If your country's language in the folder, you can custom directly your language.
Open the LCD_English_Template.xml with UltraEdit Translate English into Chinese
(Can't leave out any items, otherwise the upgrade failed) save as 10_简体中文
(ChineseSimplified).xml in Language folder (Coding format is UTF-8)
Page 62
59
Select the Language folder Compress Language.tar package using 7-zip tool and
Cover the originalDelete the Language folder
Page 63
60
Note:
If you use UltraEdit, it can generate.xml.bak file after saved. So you need to
delete.xml.bak file.
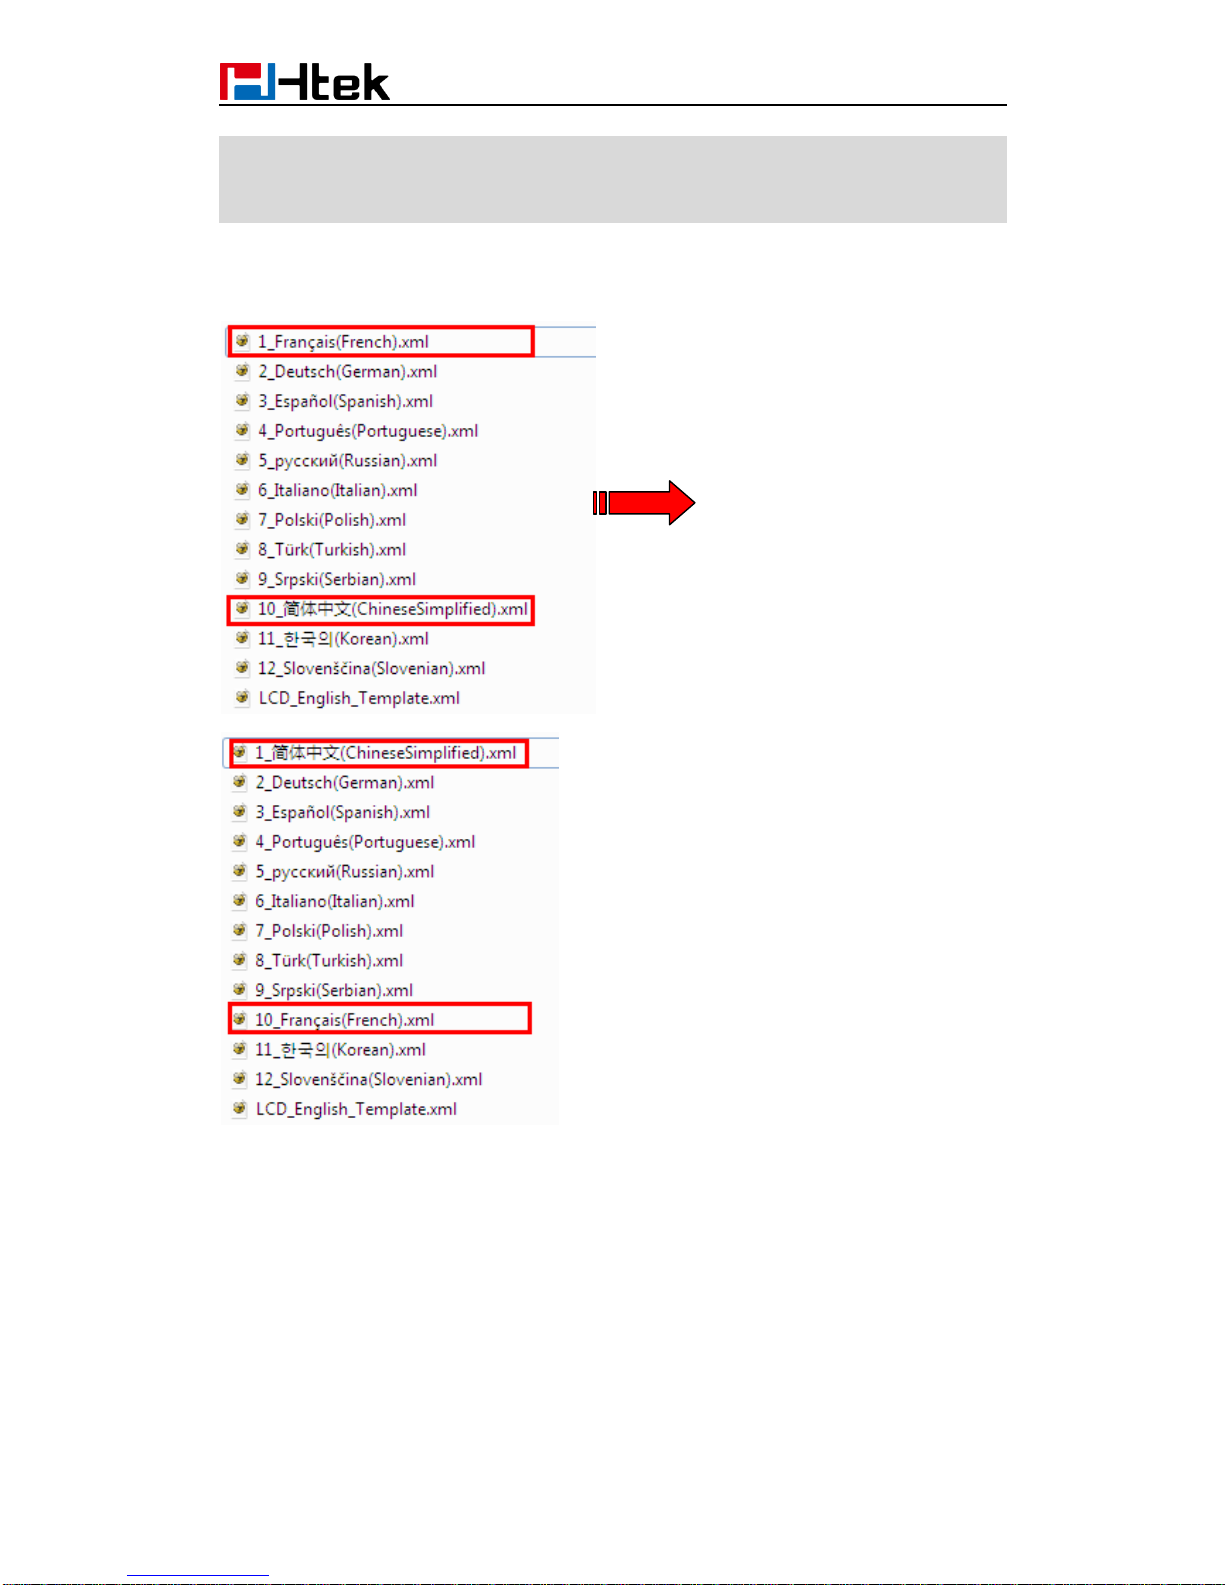
If you want to put your language on the front of other languages, you can also rename the
file, for example:
20.2 Web Language custom guide
1. You need to contact us about how to obtain the Language.tar file
2. Unzip the Language.tar using 7-zip tool.
3. Open the Language folder:
Page 64
61
Note:
The file name must be " digital_letter" at the beginning. The format of the file name is the
order of that on the Web.
4. For example, custom Chinese Language
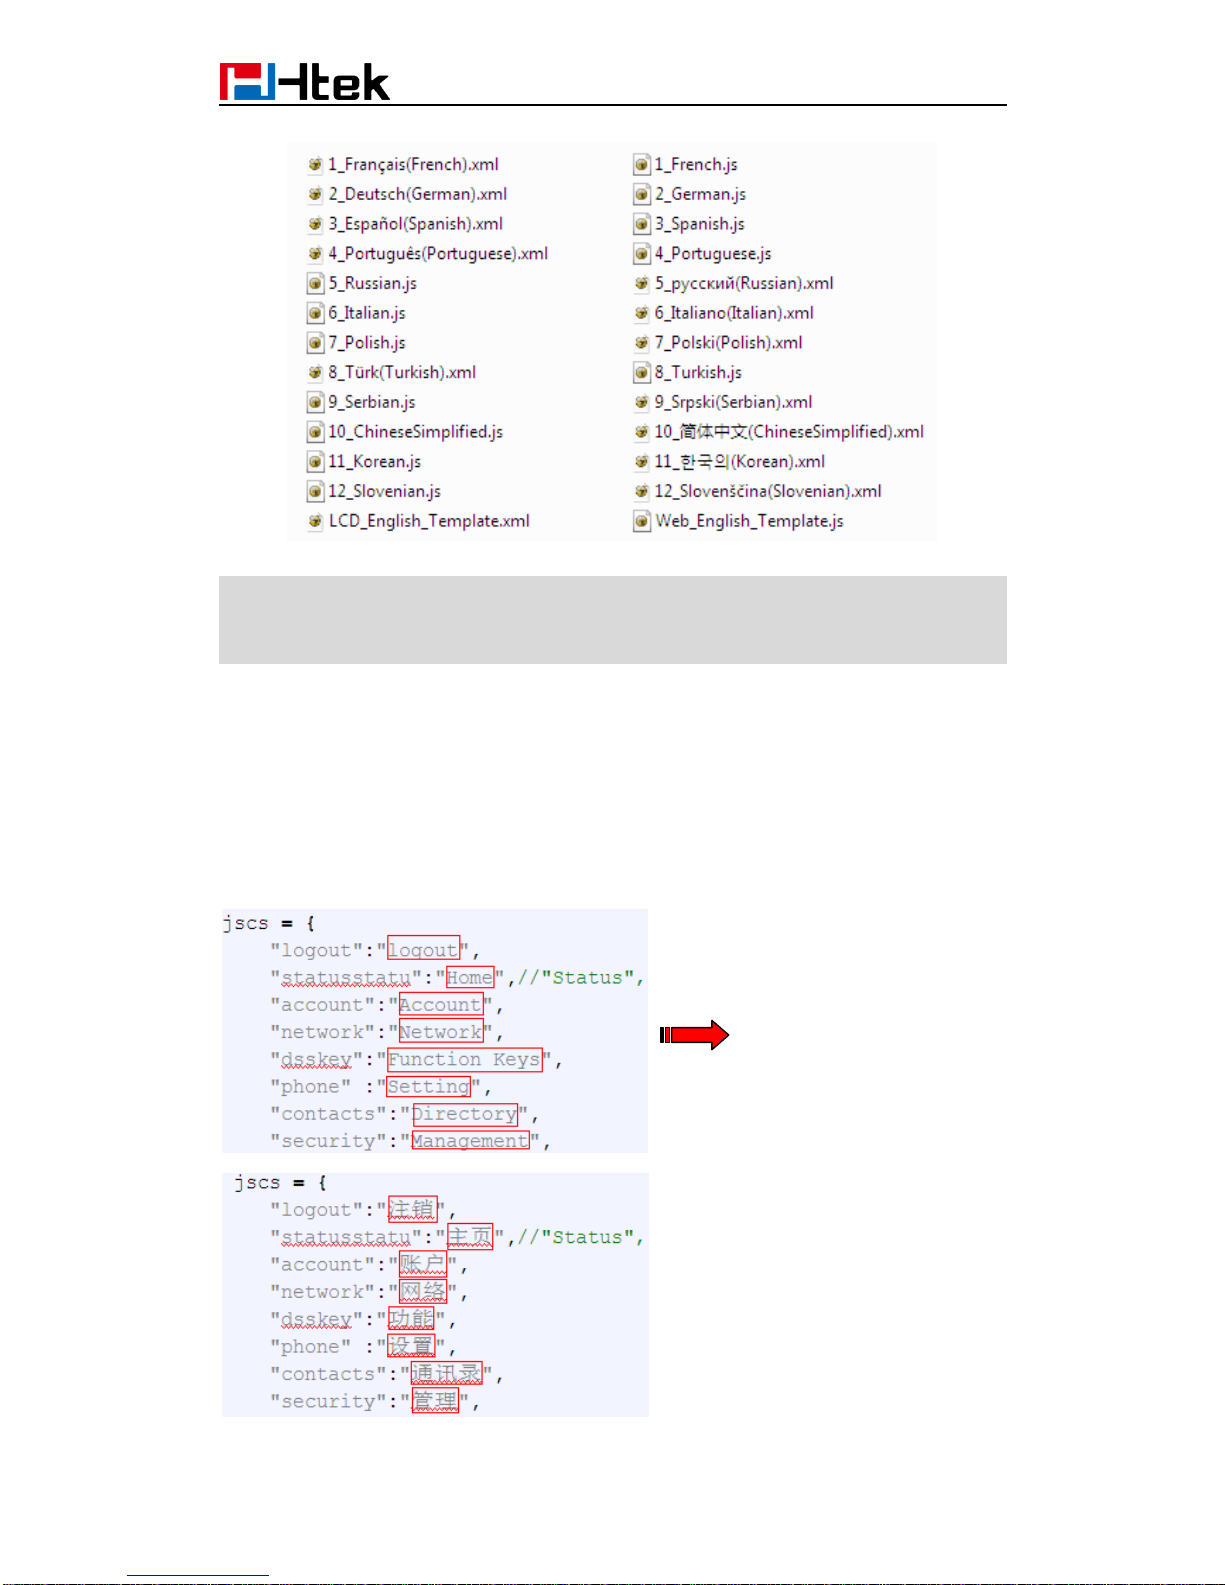
If your country's language is not existing in the language folder, you can new a xml file with
correct naming format. [e.g. 13_xxx.js]
If your country's language in the folder, you can custom directly your language reference
Web_English_Template.js.
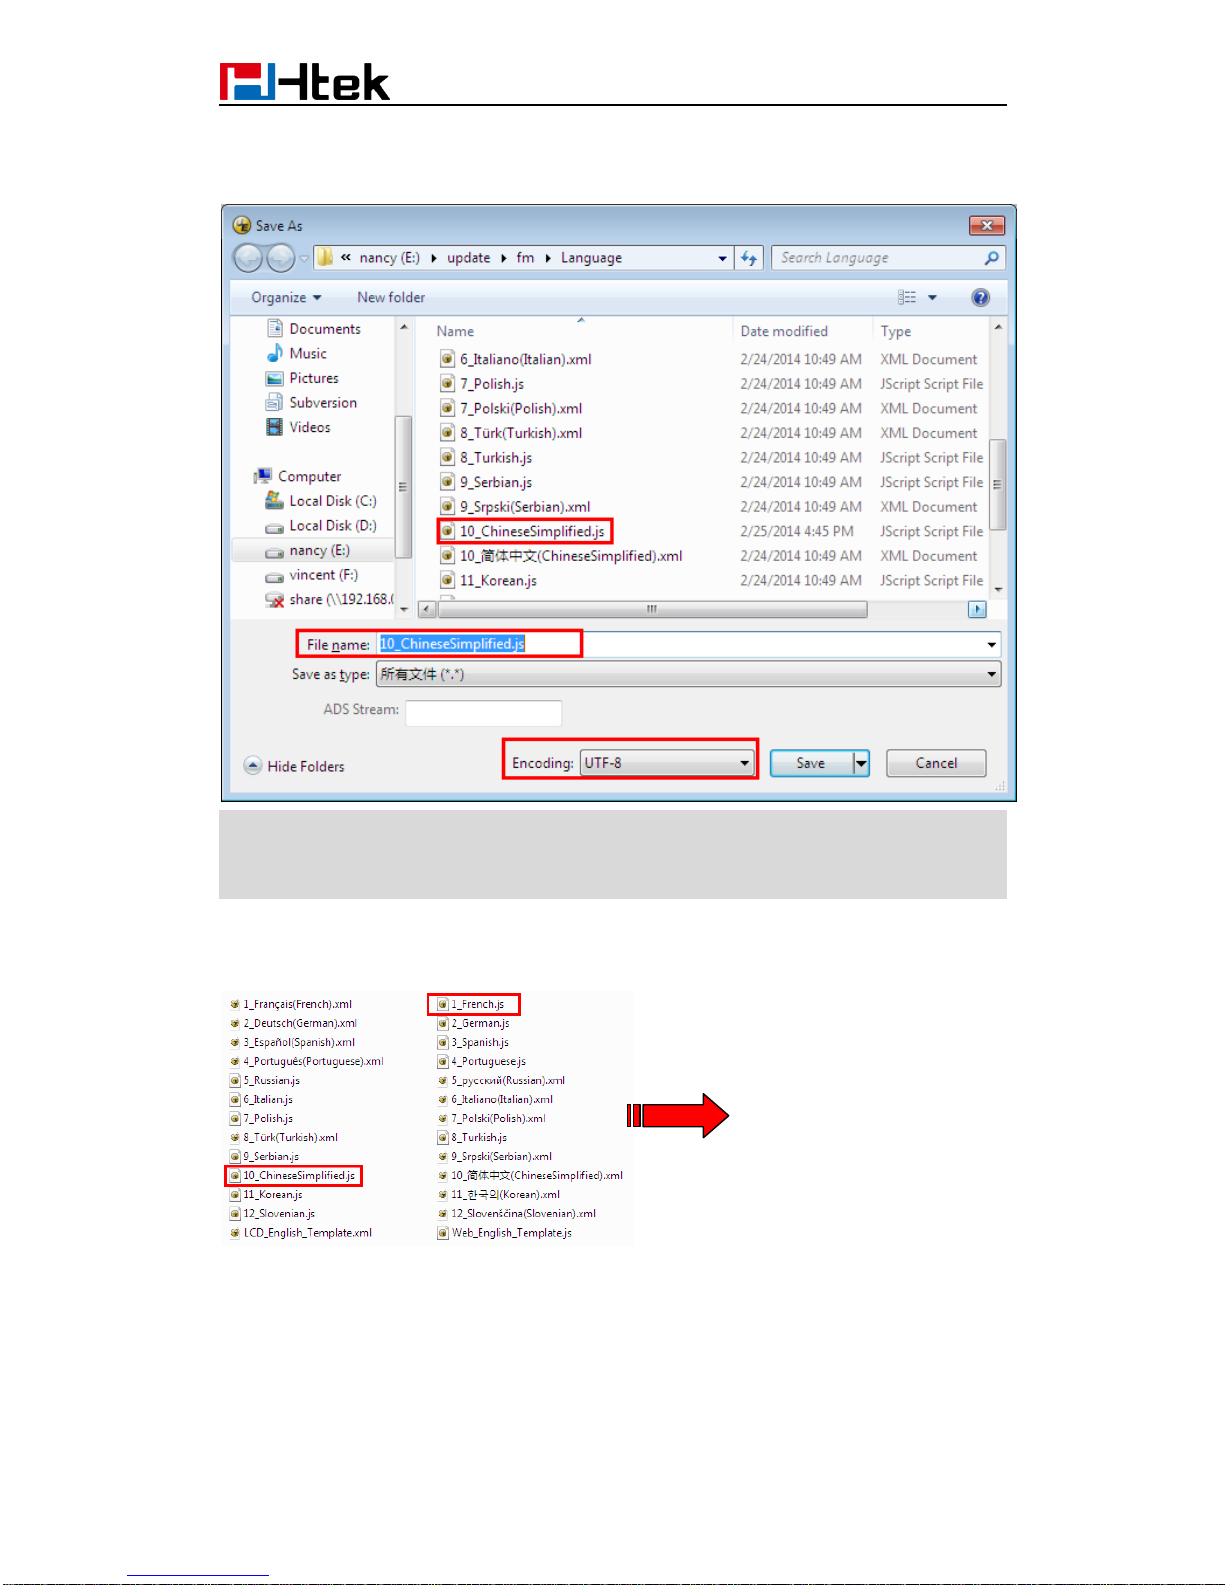
Open the Web_English_Template.js with UltraEdit Translate English into Chinese (Can't
leave out any items, otherwise the upgrade failed) save as 10_ChineseSimplified.js in
Language folder (Coding format is UTF-8)
Page 65
62
Select the Language folder Compress Language.tar package using 7-zip tool and
Cover the originalDelete the Language folder
Note:
If you use UltraEdit, it can generate.xml.bak file after saved. So you need to
delete.xml.bak file.
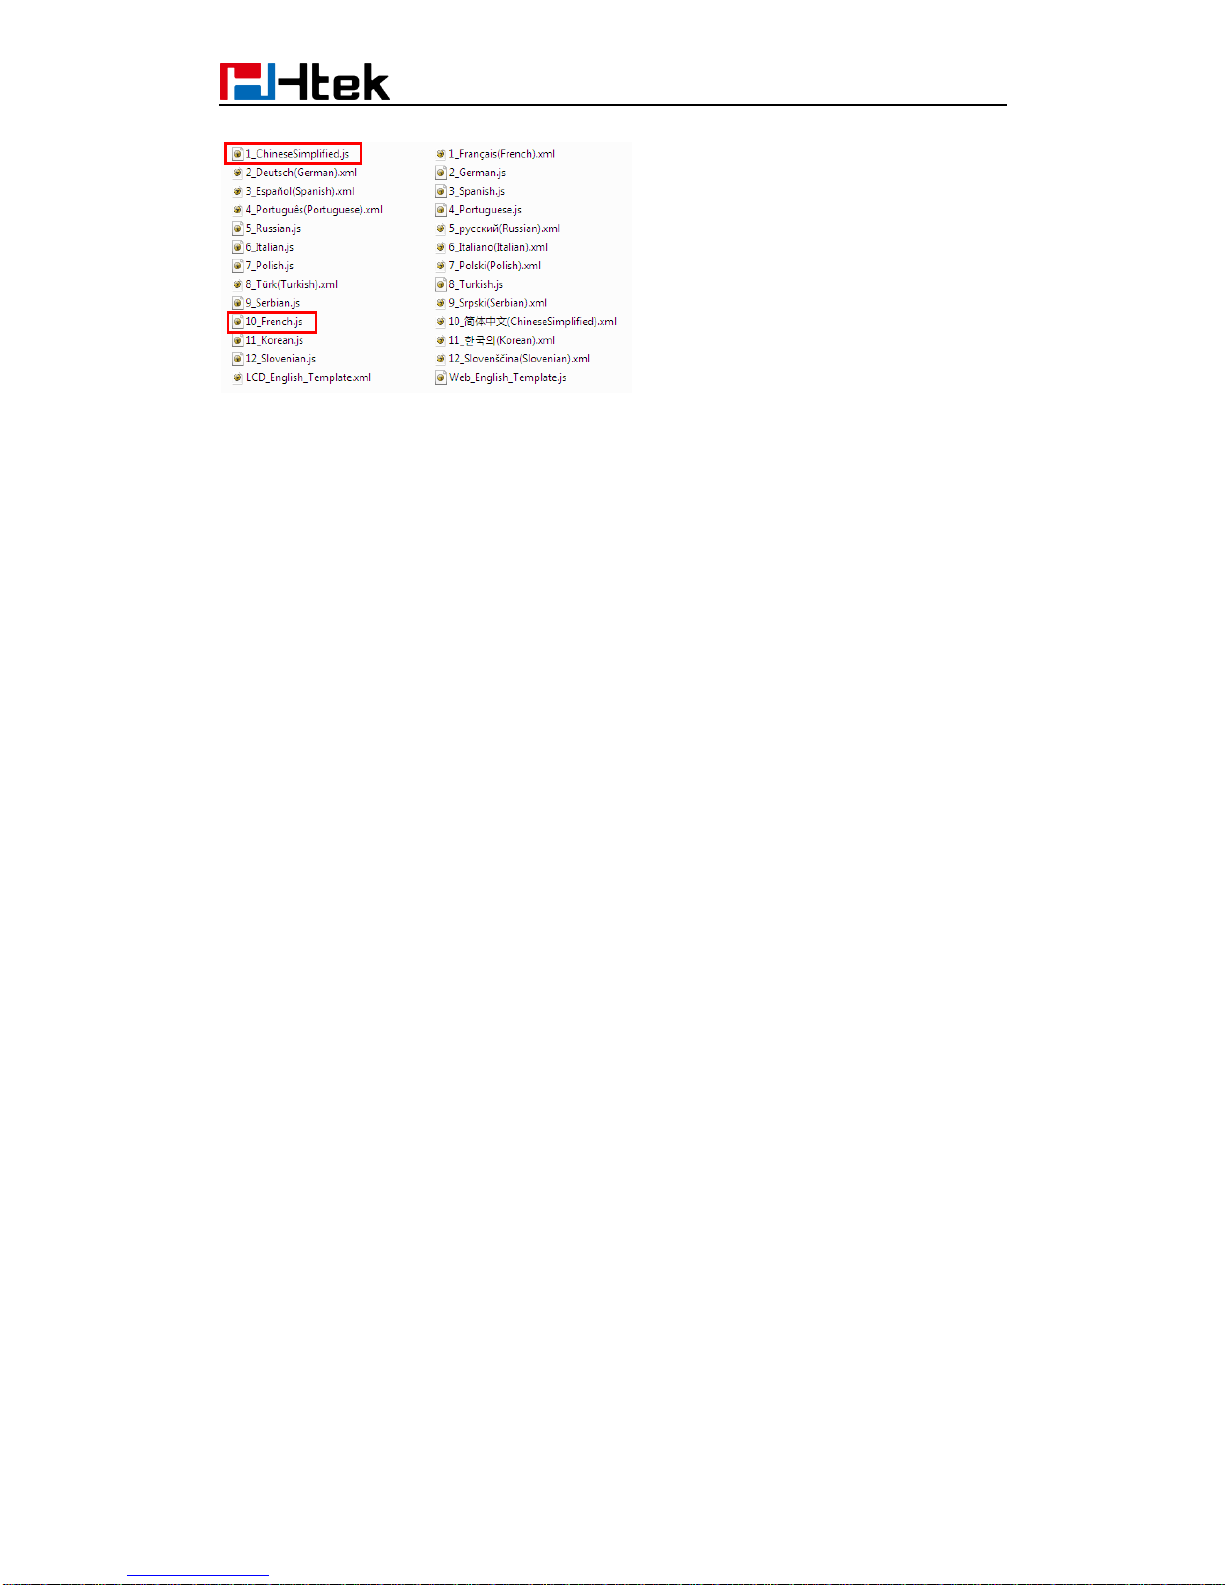
If you want to put your language on the front of other languages, you can also rename the
file, for example:
Page 66
63
When you finish the Language.tar, you must send the Language.tar package to us, then
we provide the firmware to you.
Page 67

64
21. LCD and Web GUI custom Guide
Unzip the hlpres.tar package (Need to contact us to obtain the hlpres.tar package)
You can replace some file in the hlpres to finish the customization of 1.1 to 1.7
21.1 How to custom the wallpaper1-wallpaper6?
Open hlpres folderyou can custom the wallpaper4.jpg-wallpaper6.jpg
(dimension:480*320 size: through Photoshop tools make the size smallerSelect the
hlpres folderCompress hlpres.tar package
21.2 How to custom the screensaver1- screensaver3?
Open hlpres folderyou can custom the screensaver1.jpg-screensaver3.jpg
(dimension:480*320 size:through Photoshop tools make the size smaller) Select the
hlpres folderCompress hlpres.tar package
21.3 How to custom the weblogo?
Open hlpres folderyou can custom the weblogo.jpg (dimension:225*93 size: through
Photoshop tools make the size smaller) Select the hlpres folderCompress hlpres.tar
package
21.4 How to custom the eights menus(.png)in the main
menu?
Open hlpres folderyou can custom the .png(dimension:65*65 size: through Photoshop
tools make the size smaller) Select the hlpres folderCompress hlpres.tar package
21.5 How to custom the ...Icon.png?
Open hlpres folderyou can custom the ...Icon.png (dimension:65*65 size: through
Photoshop tools make the size smaller) Select the hlpres folderCompress
hlpres.tarpackage
Page 68
65
21.6 How to custom the lcdlogo_color.png?
This logo is only applicable to UC923, UC924,UC924E, UC926, UC926E.
Open hlpres folderyou can custom the lcdlogo_color.png (dimension:400*42 size:
through Photoshop tools make the size smaller) Select the hlpres folderCompress
hlpres.tar package.
Enter MenuDisplayScreensaver Time-out:1min; Screensaver Type: Time &
LogoSave, this logo displays correctly.
21.7 How to customthe lcdlogo_bw.png?
This logo is only applicable to UC601, UC901, UC902, UC903, UC912/G/GM.
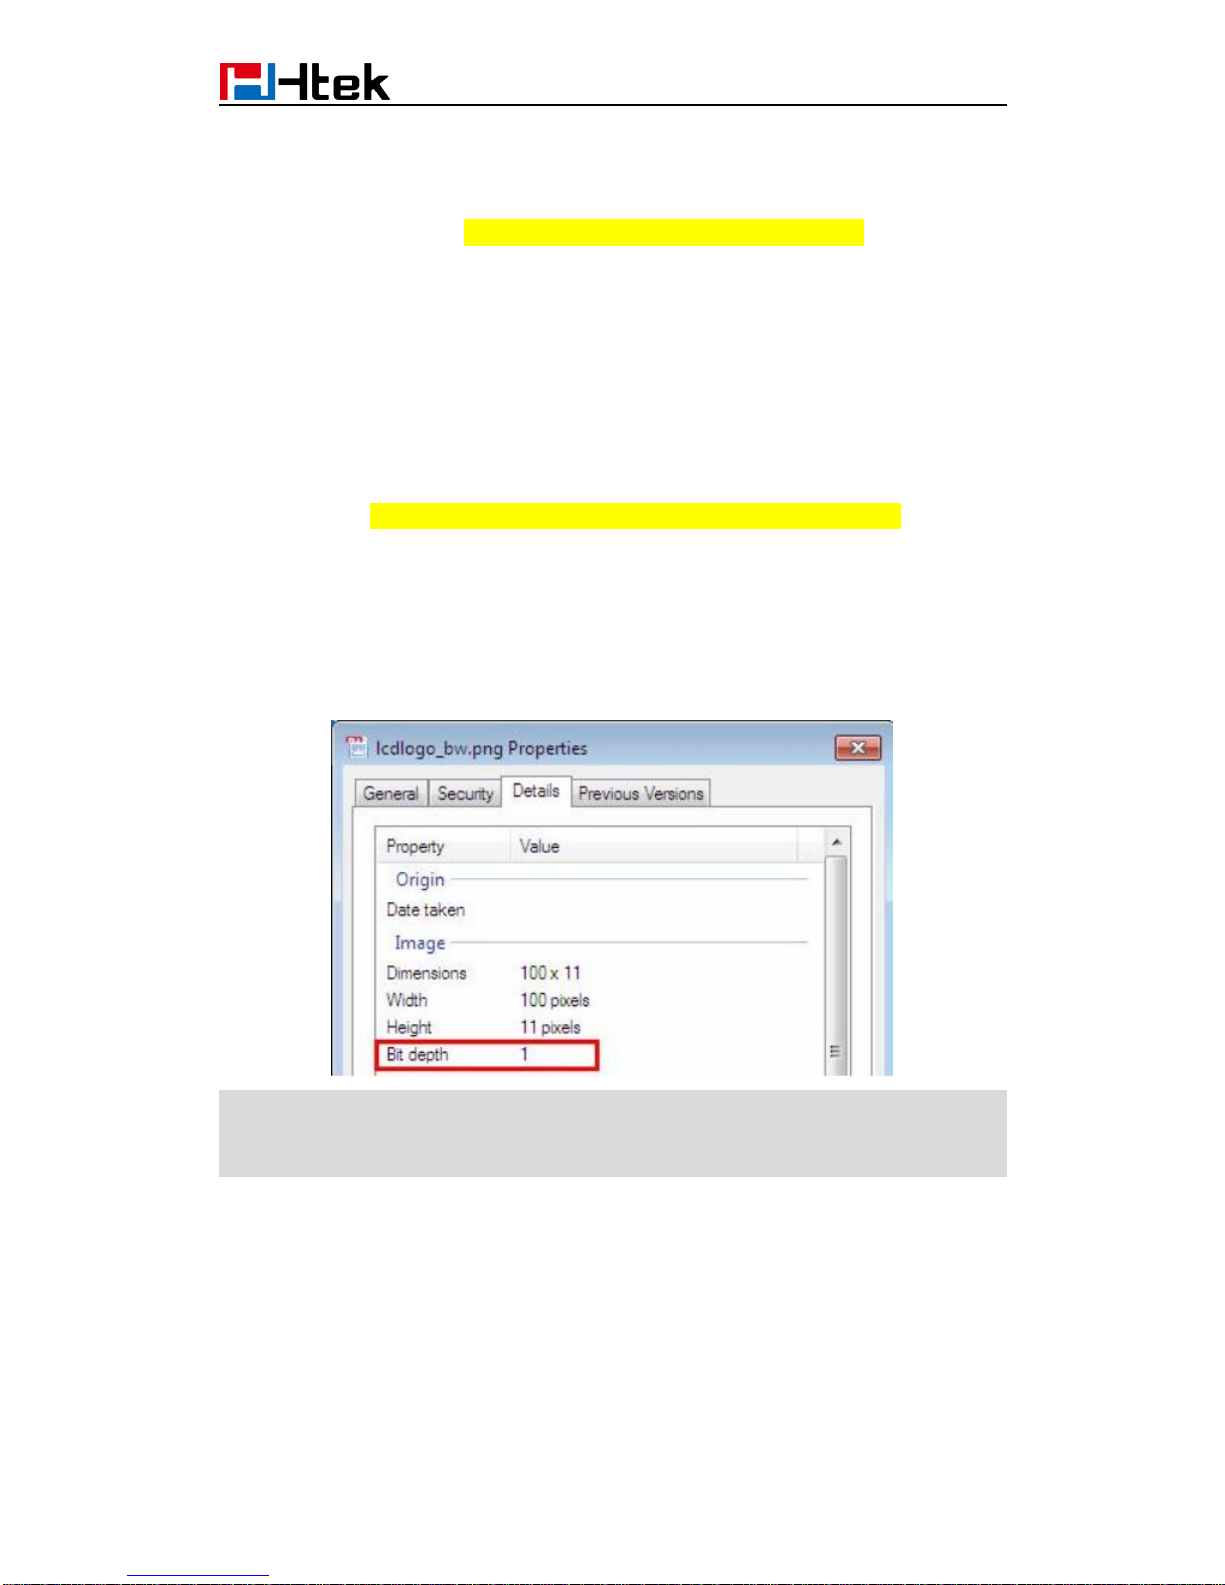
Open hlpres folderyou can custom the lcdlogo_bw.png (dimension:100*11 size: through
Photoshop tools make the size smaller) Select the hlpres folderCompress hlpres.tar
package.
Enter MenuDisplay->Screensaver Time-out:1min; Scrrensaver Type:Time &
LogoSave, this logo display correctly.
The lcdlogo_bw.png’s property must be the following standard:
Note:
The photo’s name and format must be the same as before;
The size of hlpres file is not more than 2M.
When you finish the hlpres.tar, you must send the hlpres.tar package to us, then we
provide the firmware to you.
Page 69

66
22. Firmware Upgrade
Please note: When the phone whose firmware version is 1.0.3.62 or earlier upgrades to
1.0.3.73, you must put the upgrade files(include fw8xx.rom/ fw9xx.rom and img_8xx.bin/
img_9xx.bin ) into the server path and the phone will upgrade img_8xx.bin/ img_9xx.bin
then automatically upgrade fw8xx.rom/ fw9xx.rom.
After upgrading to the new firmware, in the next time, you will only need to put one file
fw8xx.rom/ fw9xx.rom into the server path. Upgrade steps of later than 1.0.3.73 version
and earlier than 1.0.3.73 version is the same.
22.1 Upgrade through HTTP
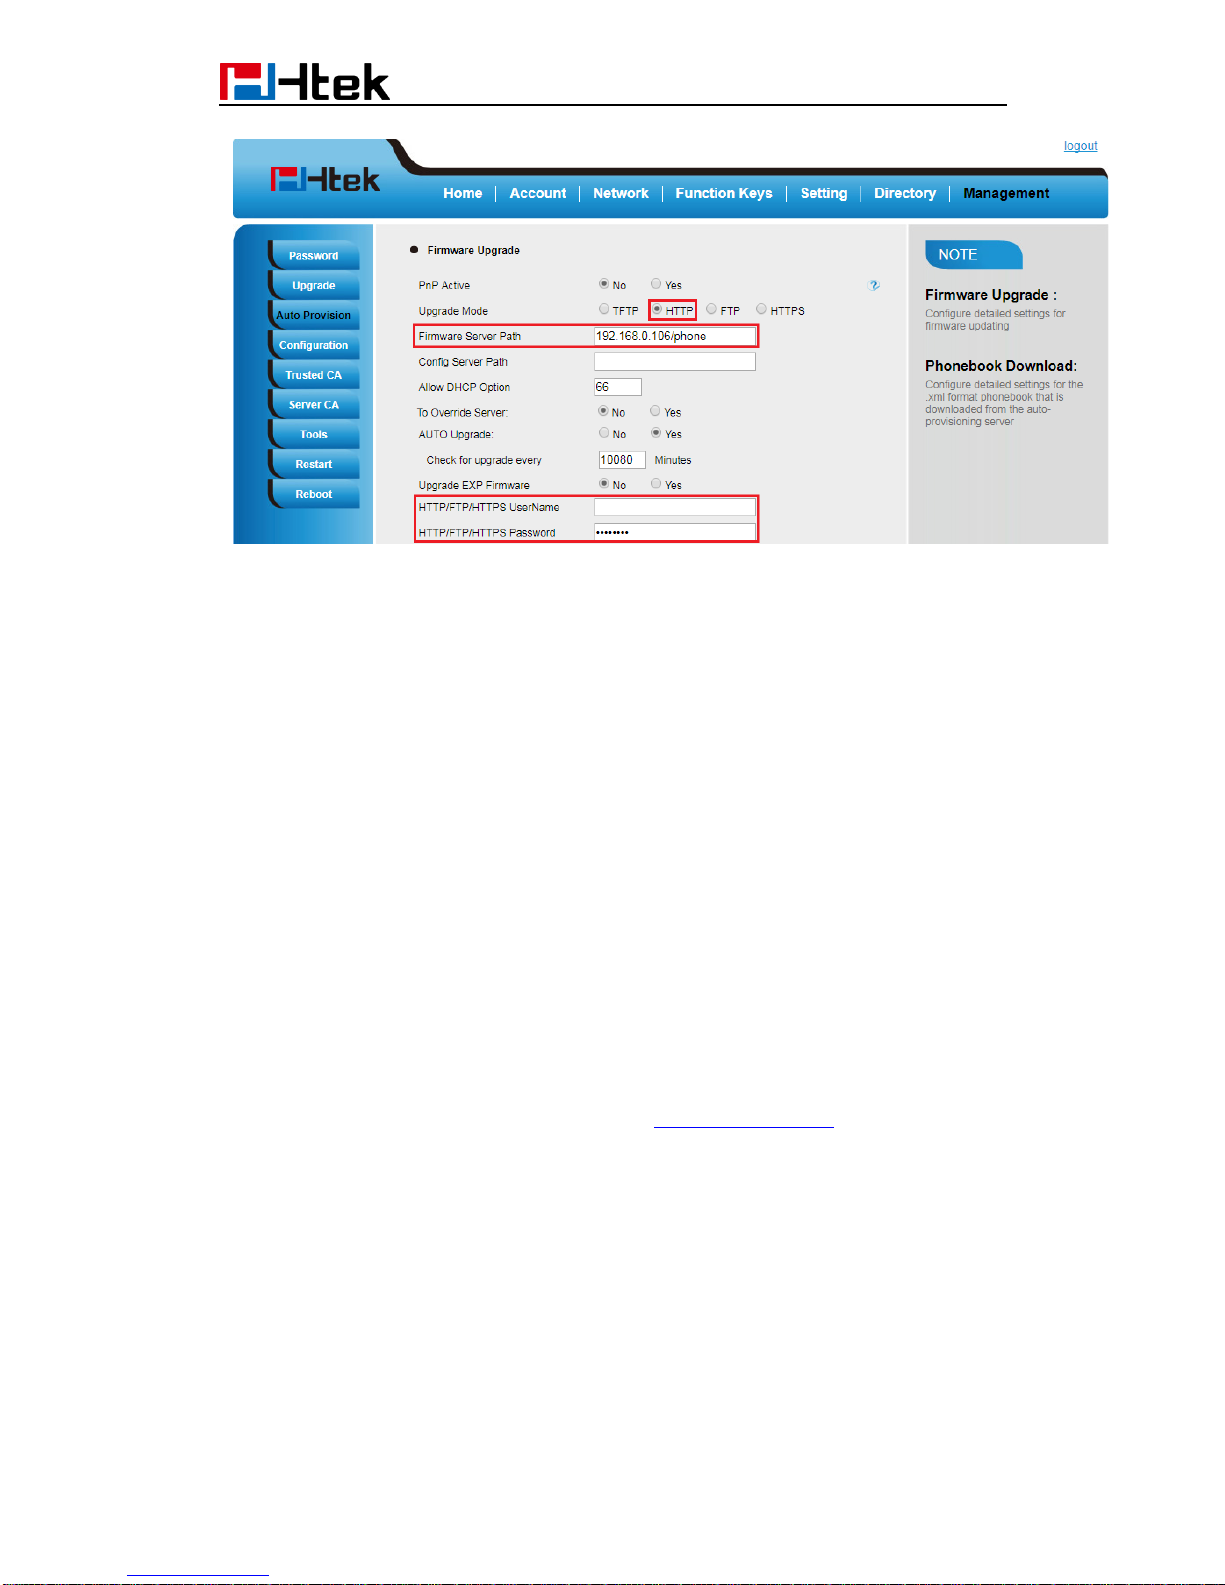
To upgrade via HTTP, the “Management”->“Auto Provision” ->”Firmware Upgrade” ->
“Upgrade Mode” field needs to be set to HTTP, respectively. “Firmware Server Path”
needs to be set to a valid URL of a HTTP server, server name can be in either FQDN or IP
address format. Here are examples of some valid URL.
e.g. firmware.mycompany.com:5688/Hanlong
e.g. www.mycompany.com:5688/fm/Hanlong
e.g. 218.2.83.110
Instructions for firmware upgrade via HTTP:
(1) End users can choose to download the free HTTP server from http://httpd.apache.org/
or use Microsoft IIS web server. Then set up HTTP server.
(2) Unzip the firmware file and put all of them under the root/phone directory of the HTTP
server.
(3) Visit “http://192.168.0.106/phone/fw924.rom" on localhost by browser to verify the
HTTP Server. If visiting “http://192.168.0.106/phone/fw924.rom" on other computer is no
prompt to download fw924.rom file, please check the firewall (Suggest close the firewall).
(4) Change the setting of the IP Phone (192.168.0.106 is HTTP server):
Page 70
67
Click “SaveSet”.
(5) Restart the IP Phone, and it will restart and auto-get firmware files from HTTP server.
NOTES:
Htek recommends end-user use the Htek HTTP server. For large companies, we
recommend to maintain their own TFTP/HTTP/FTP/HTTPS server for upgrade
and provisioning procedures.
Once a “Firmware Server Path” is set, user needs to update the settings and
restart the IP Phone. If the configured firmware server is found and a new code
image is available, the IP Phone will attempt to retrieve the new image files by
downloading them into the IP Phone’s SDRAM. During this stage, the IP Phone’s
LEDs will blink fastly until the checking/downloading process is completed. Upon
verification of checksum, the new code image will then be saved into the Flash. If
TFTP/HTTP/FTP/HTTPS fails for any reason (e.g. TFTP/HTTP/FTP/HTTPS
server is not responding, there are no code image files available for upgrade, or
checksum test fails, etc), the IP Phone will stop the TFTP/HTTP/FTP/HTTPS
process and simply boot using the existing code image in the flash.
Firmware upgrade may take as long as 3 to 8 minutes over Internet, or just 1
minutes if it is performed on a LAN. It is recommended to conduct firmware
upgrade in a controlled LAN environment if possible.
Hanlong’s latest firmware is available at http://www.htek.com/ Support
Document & Firmware.
Oversea users are strongly recommended to download the binary files and
upgrade firmware locally in a controlled LAN environment.
22.2 Upgrade through TFTP
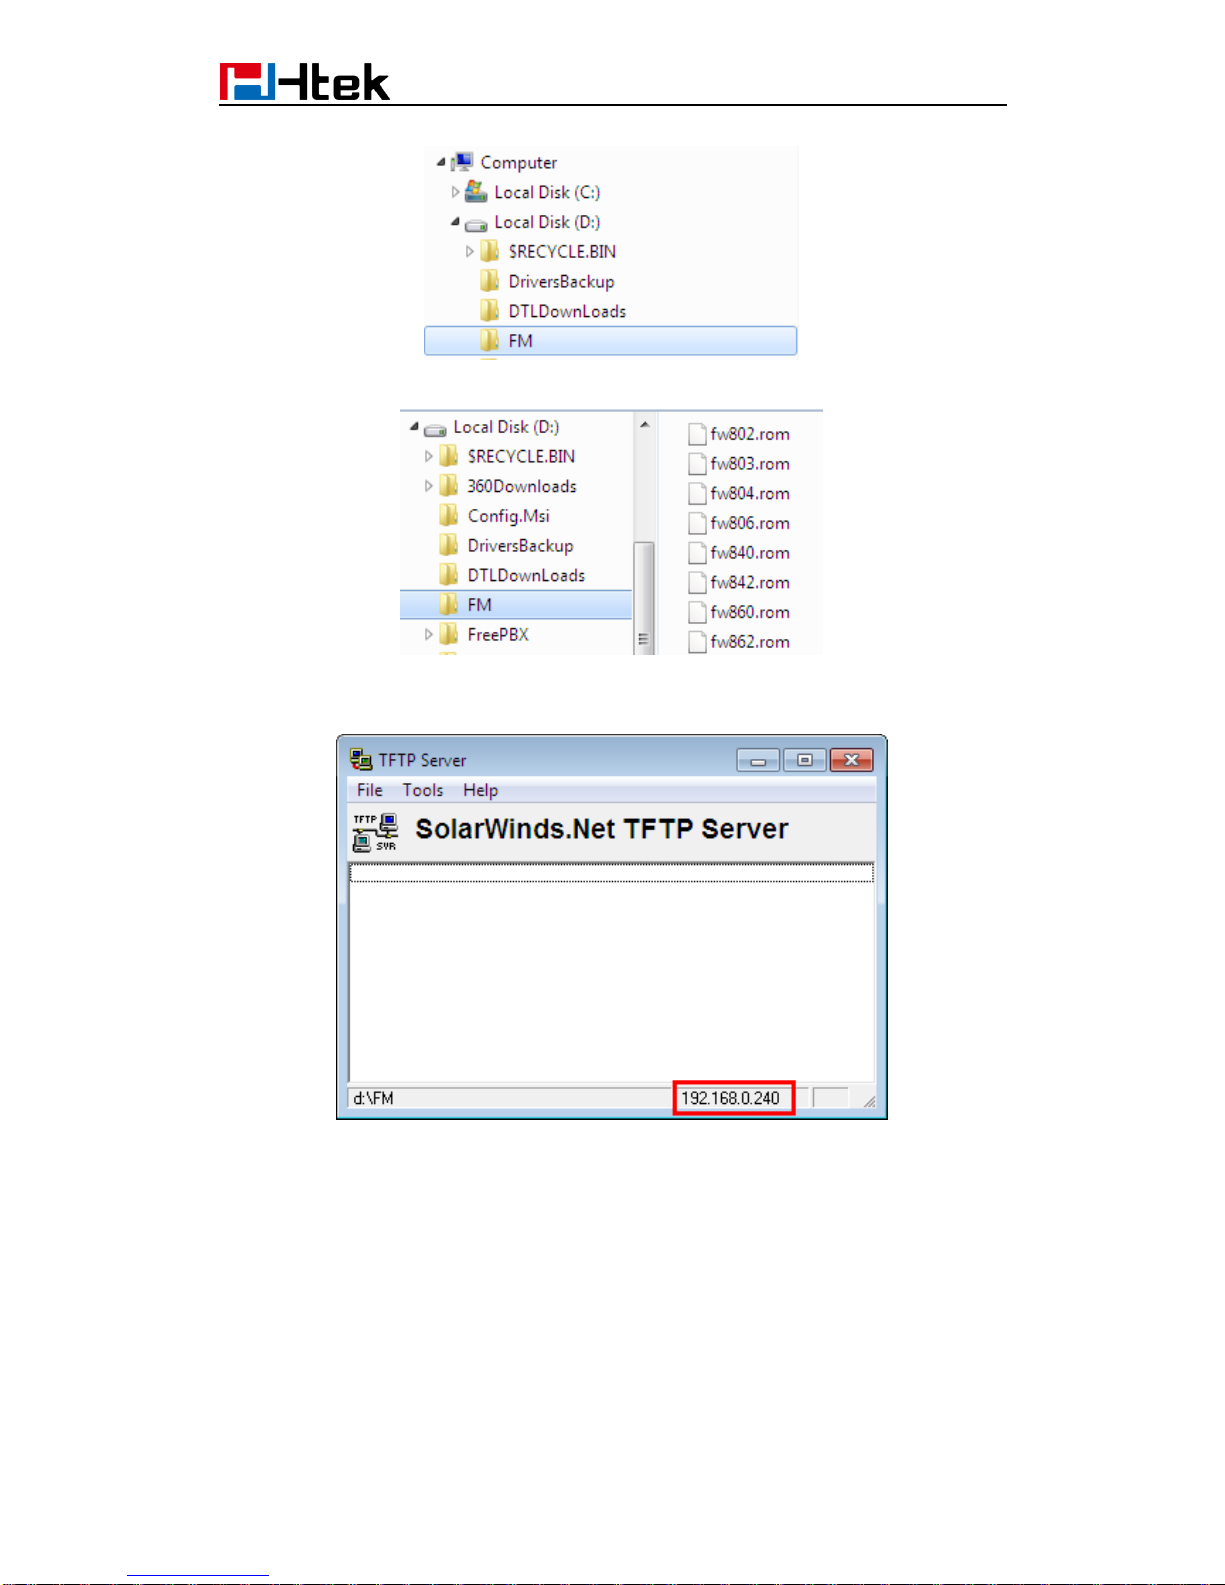
(1) We recommend that you can install a TFTP Server(e.g. SolarWinds -TFTP
-Server.exe).
(2) Make a new directory, such as D:\FM.
Page 71
68
(3) Unzip the firmware file and put all of them under the directory D:\FM.
(4) The PC running the TFTP server and the IP Phone should be in the same LAN
segment.
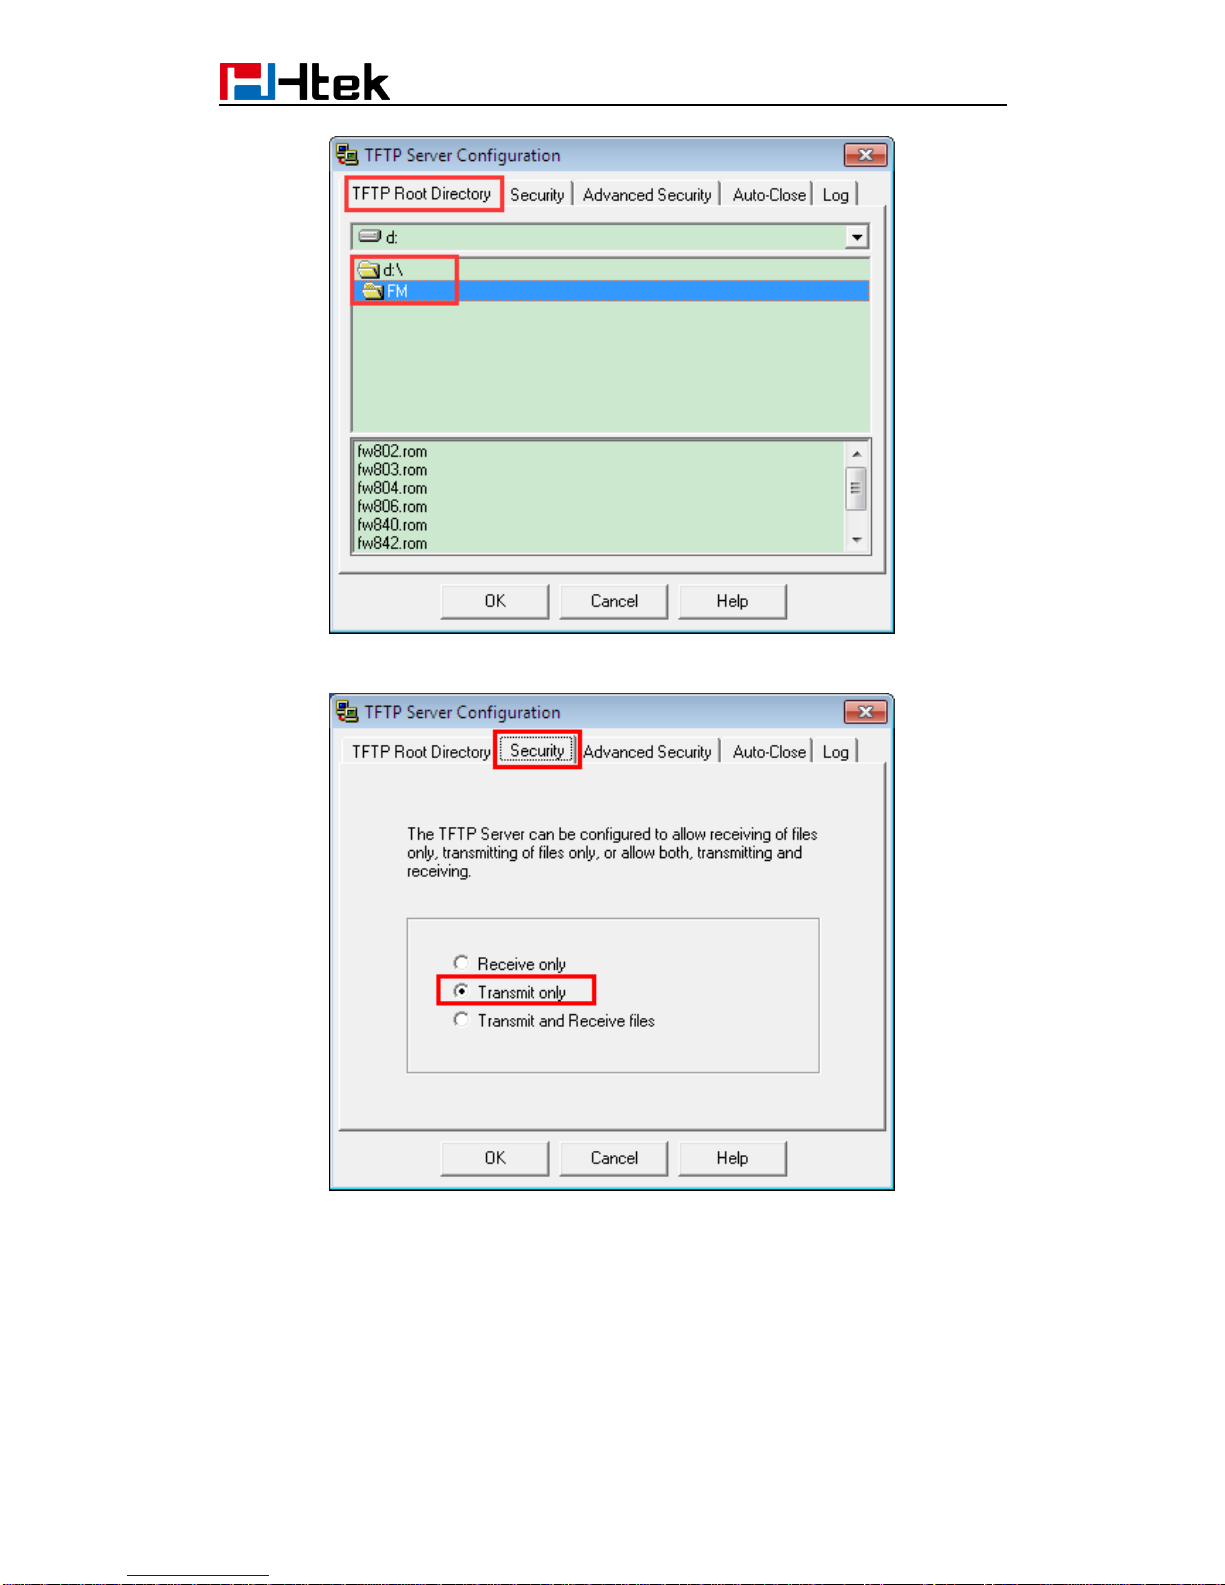
(5) Set TFTP Root Directory to D:\FM.
TFTP SERVER File Configure
Page 72
69
(6) Go to File -> Configure -> Security to change the TFTP server's default setting from
"Receive Only" to "Transmit Only" for the firmware upgrade.
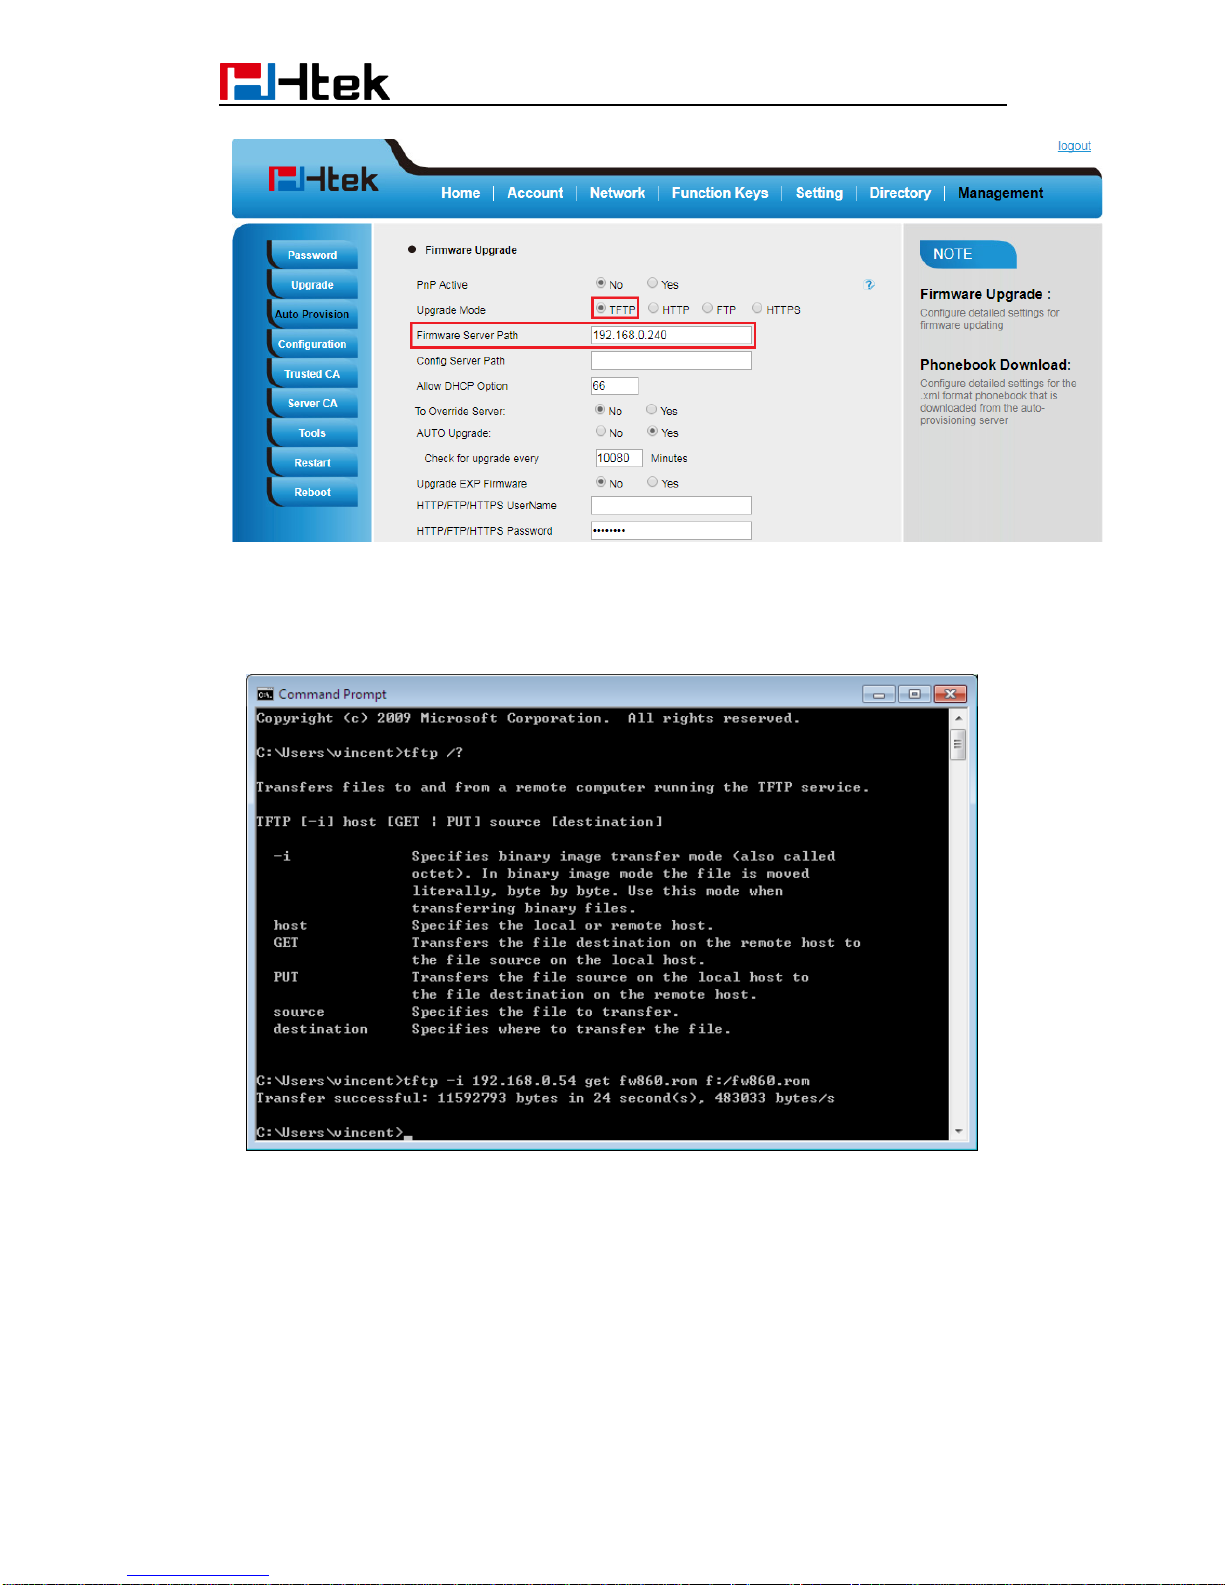
(7) Start the TFTP server, Configure the Firmware Server Path with the IP address
(192.168.0.240 is TFTP server) in the IP Phone’s web configuration page.
Page 73
70
(8) Save the change and restart the IP Phone.
(9) You can test your TFTP server by other PC which is in the same LAN segment.
For examples, in PC which IP address is 192.168.0.126, type command:
TFTP -i 192.168.0.240 get fw924.rom f:/fw924.rom
If your TFTP server is OK, something like “Transfer successful: ” will be printed in
command windows.
22.3 Upgrade through FTP
(1) Setup a FTP Server(e.g. FileZilla Server).
(2) Unzip the firmware file and put all of them under the root/phone directory of the FTP
Server.
(3) Configure the FTP Server.
Page 74
71
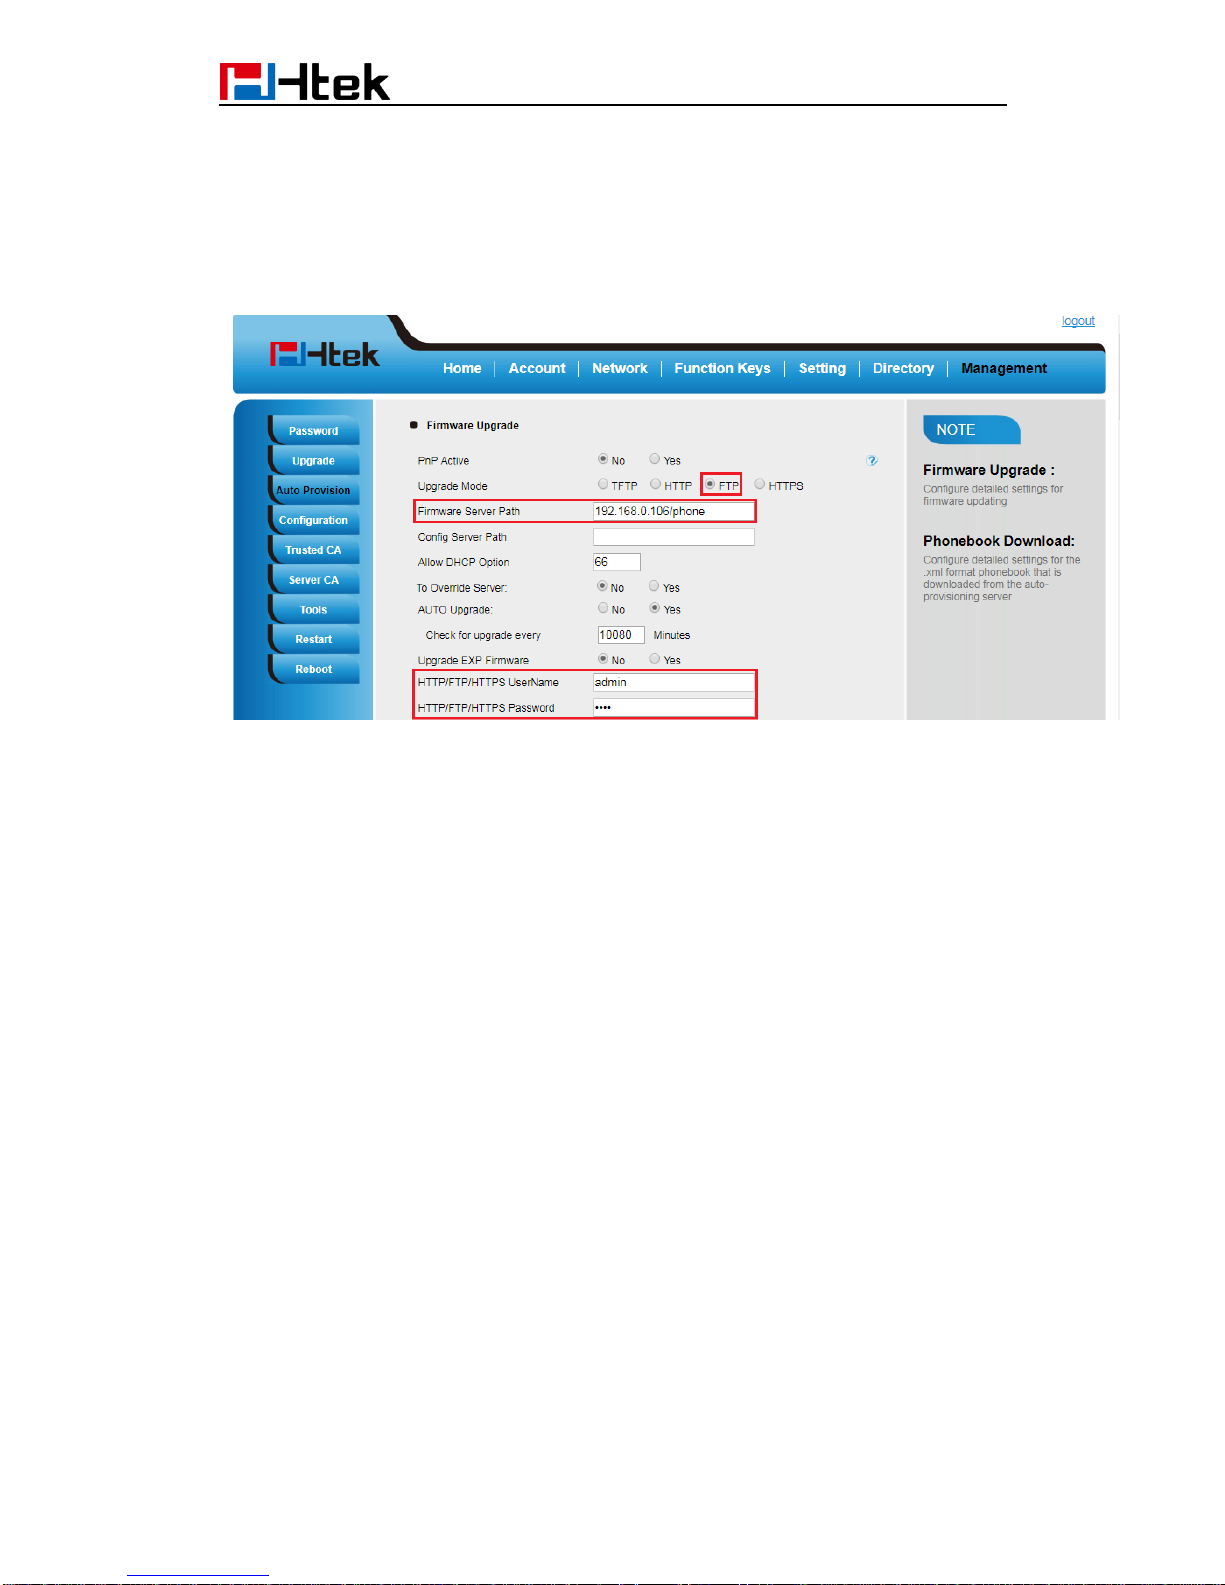
(4) Visit ftp://192.168.0.106/phone/fw924.rom on localhost by browser, enter username
and password, and you will view upgrade file. If visiting
ftp://192.168.0.106/phone/fw924.rom on other computer is no prompt to download
fw924.rom file, please check the firewall (Suggest close the firewall).
(5) Configure the Firmware Server Path in the IP Phone’s web configuration
page.( 192.168.0.106 is FTP server)
(6) Click the "SaveSet" and then click "Restart" in the webpage.
22.4 Upgrade through HTTPS
(1) Install and configure an Apache HTTPS Server in local computer.
(2) Unzip the firmware file and put all of them under the root/phone directory of the HTTPS
Server.
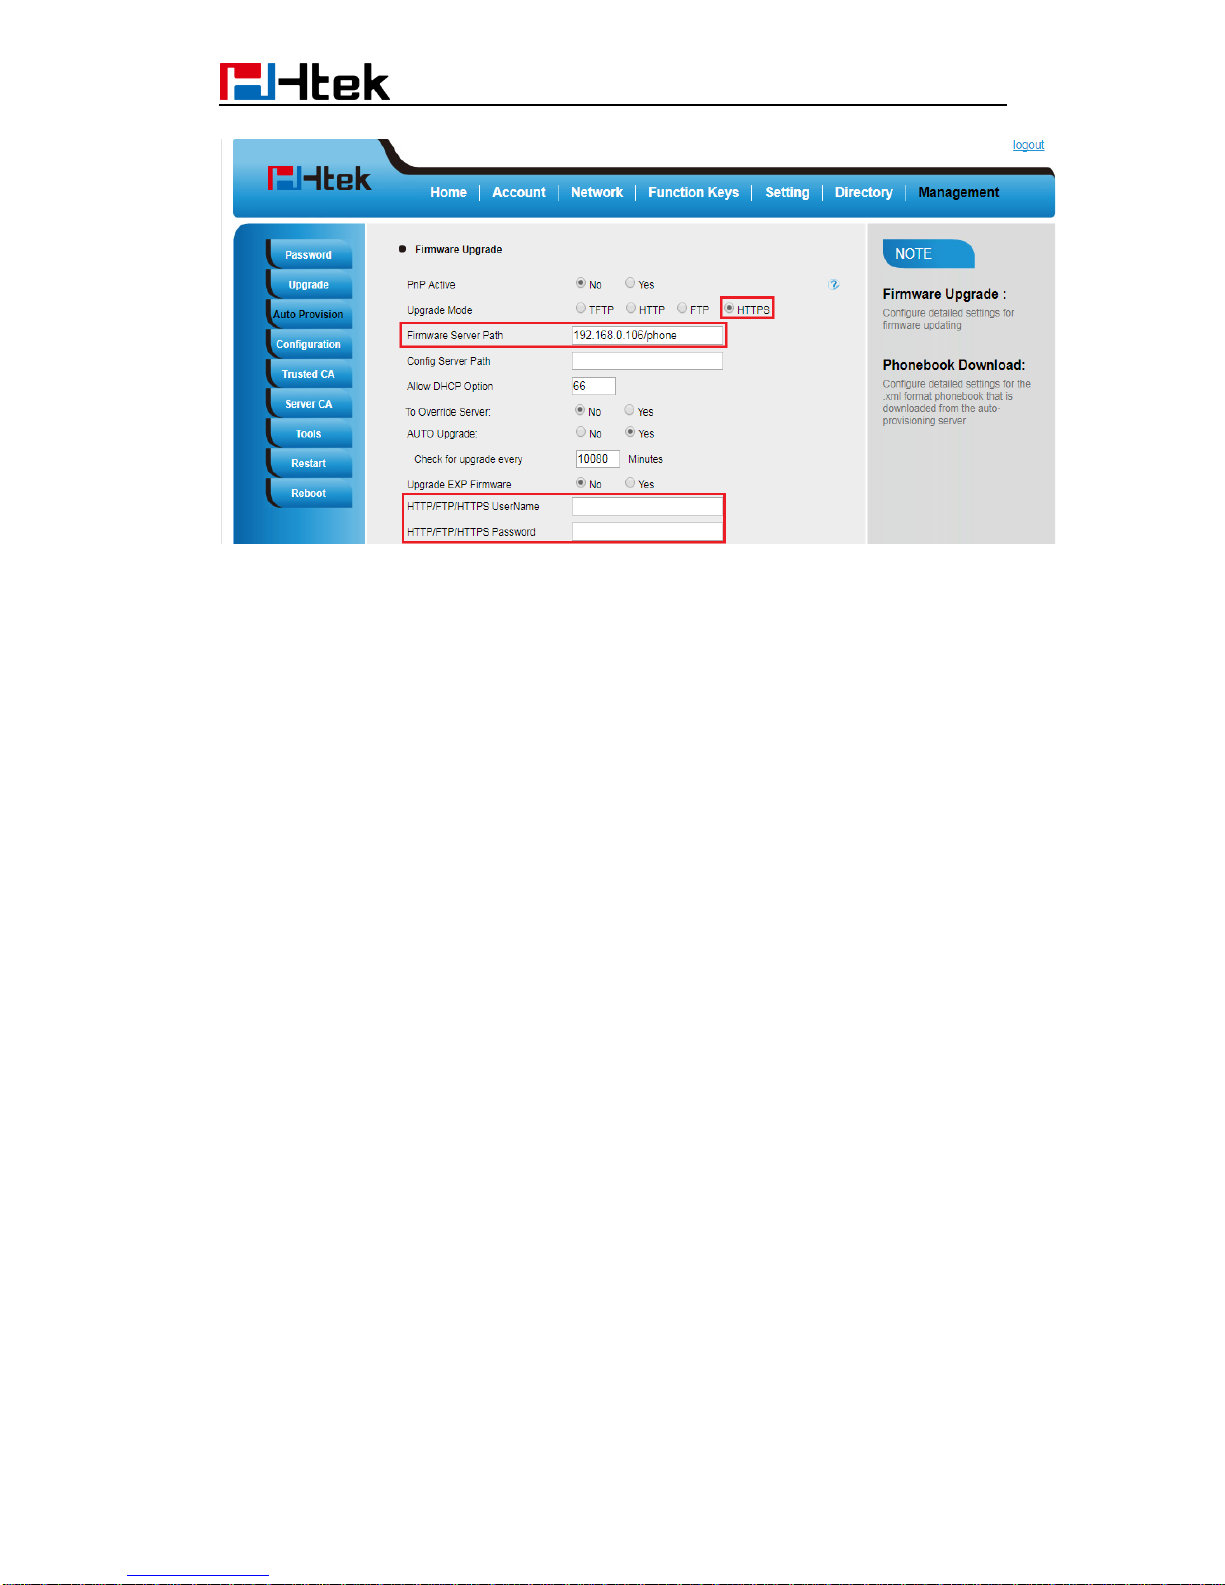
(3) Visit “https://192.168.0.106/phone/fw924.rom” on localhost by browser to verify the
HTTPS Server. If visiting “https://192.168.0.106/phone/fw924.rom" on other computer is
no prompt to download fw924.rom file, please check the firewall (Suggest close the
firewall).
(4) Configure the Firmware Server Path in the IP Phone’s web configuration page.
(192.168.0.106 is HTTPS server)
Page 75
72
(5) Click the "SaveSet" and then click "Restart" in the webpage.
Page 76

73
23. Parameter List
Web Setting Path
Permitted
Values
Descriptions
Parameter
601
924
926
Account(1)->basic
->Account Active
Number:
0, 1
Account Active (In
Use). 0 - No, 1 - Yes
P271
√ √ √
Account(1)->basic
->Primary SIP
Sserver
Primary
SIP
Server(eg:s
ip.mycomp
any.com or
IP address)
It configures the
primary SIP server
when the network is
locallan 、remotestun
or SBC.
P47
√ √ √
Account(1)->basic
->Failover SIP
Server
String
Failover SIP
Server(Optional,
used when primary
server no response)
P967
√ √ √
Account(1)->basic
->Second Failover
SIP Server
String
Second Failover
SipServer(Optional,
used when Failover
SIP Server no
response)
P8851
√ √ √
Account(1)->basic
->Prefer Primary
SIP Sserver
Number:
0, 1
Prefer Primary SIP
Server (In Use). 0 No, 1 - Yes
P4567
√ √ √
Account(1)->basic
->DHCP SIP
Server
Number:
0, 1
DHCP SIP Server. 0 No, 1 - Yes
P24065
√ √ √
Account(1)->basic
->Outbound Proxy
string
Outbound
Proxy(proxy.myprovid
er.com, or IP
address, if any)
P48
√ √ √
Account(1)->basic
->Backup
Outbound Proxy
String
Backup Outbound
Proxy(This is Usually
Set as IP addr)
P20047
√ √ √
Account(1)->basic
->SIP Transport
Number:
0-2
0 - UDP, 1 - TCP, 2 TLS
P130
√ √ √
Account(1)->basic
->NAT Traversal
Number:
0-2
0 - No, 1 - STUN 2 No,but send keep
alive
P52
√ √ √
Account(1)->basic
->Label
String
The name showing o
n the LCD of current
P20000
√ √ √
Page 77
74
device
Account(1)->basic
->SIP User ID
string
the user part of an
SIP address
P35
√ √ √
Account(1)->basic
->Authenticate ID
String
can be identical to or
different from SIP
User ID
P36
√ √ √
Account(1)->basic
-> Authenticate
Password
String
purposely not
displayed for
securityprotection
P34
√ √ √
Account(1)->basic
-> Name
String
The Local phone
name showing on the
other phone when
calling
P3
√ √ √
Account(1)->basic
->DNS Mode
Number:
0-2
DNS Mode ( 0 - A
Record, 1 - SRV, 2 NAPTR/SRV)
P103
√ √ √
Account(1)->basic
->Call Message
Format
Number:
0, 1, 2
Call Message
Format. 0 - Regular,1
- User=Phone , 2 - Tel
P63
√ √ √
Account(1)->basic
->SIP Registration
Number:
0, 1
SIP Registration. 0 No, 1 - Yes
P31
√ √ √
Account(1)->basic
-> Unregister On
Reboot
Number:
0, 1
Unregister On
Reboot.0 - No, 1 Yes
P81
√ √ √
Account(1)->basic
-> Register
Expiration
number
Register Expiration(in
minutes. default 1
hour, max 45 days)
P32
√ √ √
Account(1)->basic
-> Outgoing Call
Without
Registration
Number:
0, 1
Outgoing Call
Without
Registration.0 - No, 1
- Yes
P109
√ √ √
Account(1)->basic
-> Local SIP Port
number
Local SIP
Port(default 5060)
P40
√ √ √
Account(1)->basic
-> Use Random
Port
Number:
0, 1
Use Random Port.0 No, 1 - Yes
P78
√ √ √
Account(1)->basic
-> Voice Mail
UserID
String
Voice Mail
UserID(UserID for
voice mail system)
P33
√ √ √
Account(1)->basic
-> RPort
Number:
0, 1
Enable/Disable
RPort.0 - No, 1 - Yes
P136
√ √ √
Account(1)->basic
-> RFC 2543 Hold
Number:
0, 1
RFC 2543 Hold.0 No, 1 - Yes
P1100
√ √ √
Page 78

75
Account(1)->Code
c-> Preferred
Vocoder In listed
order
Number:
0, 2, 3, 4, 8,
9, 18, 20,
120
Preferred Vocoder In
listed order. choice 1.
0 - PCMU, 2 - G.726-32,
3 - GSM_FR,4 -
G.723.1, 8 - PCMA, 9 -
G.722, 18 G.729A/B,20 - iLBC, 120
- OPUS.
P57
√ √ √
Account(1)->Code
c-> Preferred
Vocoder In listed
order
Number:
0, 2, 3, 4, 8,
9, 18, 20,
120
Preferred Vocoder In
listed order. choice 2.
0 - PCMU, 2 G.726-32, 3 GSM_FR,4 - G.723.1,
8 - PCMA, 9 - G.722,
18 - G.729A/B,20 iLBC, 120 - OPUS.
P58
√ √ √
Account(1)->Code
c-> Preferred
Vocoder In listed
order
Number:
0, 2, 3, 4, 8,
9, 18, 20,
120
Preferred Vocoder In
listed order. choice 3.
0 - PCMU, 2 G.726-32, 3 GSM_FR,4 - G.723.1,
8 - PCMA, 9 - G.722,
18 - G.729A/B,20 iLBC, 120 - OPUS.
P59
√ √ √
Account(1)->Code
c-> Preferred
Vocoder In listed
order
Number:
0, 2, 3, 4, 8,
9, 18, 20,
120
Preferred Vocoder In
listed order. choice 4.
0 - PCMU, 2 G.726-32, 3 GSM_FR,4 - G.723.1,
8 - PCMA, 9 - G.722,
18 - G.729A/B,20 iLBC, 120 - OPUS.
P60
√ √ √
Account(1)->Code
c-> Preferred
Vocoder In listed
order
Number:
0, 2, 3, 4, 8,
9, 18, 20,
120
Preferred Vocoder In
listed order. choice 5.
0 - PCMU, 2 G.726-32, 3 GSM_FR,4 - G.723.1,
8 - PCMA, 9 - G.722,
18 - G.729A/B,20 iLBC, 120 - OPUS.
P61
√ √ √
Account(1)->Code
c-> Preferred
Vocoder In listed
order
Number:
0, 2, 3, 4, 8,
9, 18, 20,
120
Preferred Vocoder In
listed order. choice 6.
0 - PCMU, 2 G.726-32, 3 -
P62
√ √ √
Page 79
76
GSM_FR,4 - G.723.1,
8 - PCMA, 9 - G.722,
18 - G.729A/B,20 iLBC, 120 - OPUS.
Account(1)->Code
c-> PTimes(ms)
Number:
1,2,3,4,5,6
1 – 10, 2 – 20, 3 – 30,
4 – 40, 5 – 50, 6 - 60
P37
√ √ √
Account(1)->Code
c-> G723 Rate
Number:
0, 1
G723 Rate(0 -
6.3kbps encoding
rate, 1 - 5.3kbps
encoding rate)
P49
√ √ √
Account(1)->Code
c-> iLBC mode
Number:
0, 1
iLBC mode.0 - 20ms
mode,1 - 30ms mode
P394
√ √ √
Account(1)->Code
c-> iLBC Payload
Type
Number:
96 to 127
iLBC Payload
Type(from 96 to 127,
default is 97)
P390
√ √ √
Account(1)->Code
c-> OPUS
Payload Type
Number:
96 to 127
OPUS Payload Type
(from 96 to 127,
default is 120)
P402
√ √ √
Account(1)->Adva
nced-> DTMF
Payload Type
Number:
96-127
DTMF Payload Type,
default is 101
P79
√ √ √
Account(1)->
Advanced ->
DTMF Type
Number:
0, 1,2
0 – RFC2833, 1 – IN
Audio, 2 – SIP INFO
P20166
√ √ √
Account(1)->
Advanced -> Send
Flash Event
Number:
0, 1
Send Flash Event.0 no, 1 - yes
P74
√ √ √
Account(1)->
Advanced ->
Enable Call
Features
Number:
0, 1
Enable Call
Features.0 - no, 1 yes
P191
√ √ √
Account(1)->
Advanced ->
Proxy Require
string
Proxy Require
P197
√ √ √
Account(1)->
Advanced ->Use
NAT IP
String
Used in SIP/SDP
message if specified
P101
√ √ √
Account(1)->
Advanced ->ZRTP
Encryption
Number:
0, 1
ZRTP Encryption.0 no, 1 - yes
√ √ √
Account(1)->
Advanced ->
SRTP Mode
Number:
0-2
SRTP Mode 0 =
Disabled, 1 =
Enabled but not
forced, 2 = Enabled
P183
√ √ √
Page 80

77
and forced
Account(1)->
Advanced -> VAD
Enable
Number:
0, 1
VAD Enable.0 - no, 1
- yes
P50
√ √ √
Account(1)->
Advanced ->
Symmetric RTP
Number:
0, 1
Symmetric RTP.0 no, 1 - yes
P291
√ √ √
Account(1)->
Advanced -> Jitter
Buffer Type
Number:
0, 1
Jitter Buffer Type.0 fixed, 1 - adaptive
P133
√ √ √
Account(1)->
Advanced -> Jitter
Buffer Length
Number:
0-2
Jitter Buffer Length.0
- low, 1 - medium, 2 high
P132
√ √ √
Account(1)->
Advanced ->
Account Ring
Tone
Number
0,1,2,3,4,5,
6,7,8
Account Ring Tone(0
- default, 1 Ring1.bin, 2 Ring2.bin, 3 Ring3.bin, 4 Ring4.bin, 5 Ring5.bin, 6 Ring6.bin, 7 Ring7.bin, 8 Ring8.bin)
P104
√ √ √
Account(1)->
Advanced -> Ring
Timeout
Number:
10 - 300
Ring Timeout(10-300
seconds , default is
60 seconds)
P185
√ √ √
Account(1)->
Advanced -> Use
# As Dial Key
Number:
0, 1
Use # As Dial Key.0 no, 1 - yes
P72
√ √ √
Account(1)->
Advanced -> Dial
Plan
string
Dial plan (dial plan
prefix string)
P4200
√ √ √
Account(1)->
Advanced ->
Subscribe for MWI
Number:
0, 1
Subscribe for MWI.0 no,do not send
SUBSCRIBE for
Message Waiting
Indication, 1 yes,send periodical
SUBBSCRIBE
for ,Message Waiting
indication
P99
√ √ √
Account(1)->
Advanced
->Subscribe MWI
Number:
0, 1
Subscribe MWI To
Voice Mail.0 - no, 1 yes(Enables or
P24759
√ √ √
Page 81

78
To Voice Mail
disables the IP phone
to subscribe the
message waiting
indicator to the voice
mail number for
account X)
Account(1)->
Advanced -> Send
Anonymous
Number:
0, 1
Send Anonymous,0 –
no,1 – yes
P65
√ √ √
Account(1)->
Advanced ->
Anonymous Call
Rejection
Number:
0, 1
Anonymous Call
Rejection.0 - no, 1 yes
P129
√ √ √
Account(1)->
Advanced ->
Check SIP User
ID
Number:
0, 1,2
Check SIP User ID.0
– Don’t Check, 1 –
Always Check, 2 Automatic
P258
√ √ √
Account(1)->
Advanced -> Auto
Answer
Number:
0, 1
Auto Answer.0 - no, 1
- yes
P90
√ √ √
Account(1)->
Advanced -> Allow
Auto Answer By
Call-Info
Number:
0, 1
Allow Auto Answer
By Call-Info.0 - no, 1 yes
P298
√ √ √
Account(1)->
Advanced -> Turn
off Speaker on
remote disconnect
Number:
0, 1
Turn off Speaker on
remote disconnect.0 no, 1 - yes
P299
√ √ √
Account(1)->
Advanced ->
Session Expiration
Number
Session
Expiration(default is
180 seconds)
P260
√ √ √
Account(1)->
Advanced ->
Min-SE
Number
Min-Session-Expirati
on(default and
minimum is 90
seconds)
P261
√ √ √
Account(1)->
Advanced ->
Caller Request
Timer
Number
Caller Request Timer
(Request for timer
when making
outbound calls) 0 No, 1 - Yes
P262
√ √ √
Account(1)->
Advanced
->Callee Request
Timer
Number:
0, 1
Callee Request Timer
(when caller supports
timer but did not
request one) 0 - No, 1
P263
√ √ √
Page 82

79
- Yes
Account(1)->
Advanced ->
Force Timer
Number:
0, 1
Force Timer (use
timer even when
remote party does not
support) 0 - No, 1 Yes
P264
√ √ √
Account(1)->
Advanced ->UAC
Specify Refresher
Number:
0-2
UAC Specify
Refresher. 1 - UAC, 2
- UAS, 0 omit(Recommended)
P266
√ √ √
Account(1)->
Advanced -> UAS
Specify Refresher
Number:
1, 2
UAS Specify
Refresher. 1 - UAC, 2
- UAS(When UAC did
not)
P267
√ √ √
Account(1)->
Advanced ->
Force INVITE
Number:
0, 1
Force INVITE
(Always refresh with
INVITE instead of
UPDATE ) 0 - No, 1 Yes
P265
√ √ √
Account(1)->
Advanced -> Hook
Flash Timing->
Minimum
Number
Minimum Hook Flash
Timing
P251
√ √ √
Account(1)->
Advanced -> Hook
Flash Timing->
Maximum
Number
Maximum Hook Flash
Timing
P252
√ √ √
Account(1)->
Advanced ->
Special Feature
Number
100, 104,
106
100 - Standard, 104 World Call, 106 NETHID
P198
√ √ √
Account(1)->
Advanced ->
Share Line
Number:
0-2
Share Line. 0 Disable, 1 Broadsoft, 2 - BLA
P8771
√ √ √
Account(1)->
Advanced -> SCA
Barge-In
Number:
0-1
SCA Barge-In. 0 Disable, 1 – Enable.
Enables or disables the
BroadSoft SCA Barge-In
feature
P20976
√ √ √
Account(1)->
Advanced ->
Conference Type
Number:
0-1
Conference Type. 0 Local, 1 – Enable.
Enables or disables the
BroadSoft SCA Barge-In
feature
P20004
√ √ √
Page 83

80
Account(1)->
Advanced ->
Conference URI
string
Conference URI
P20008
√ √ √
Account(1)->
Advanced -> SIP
Server Type
Number:
0, 1
SIP Server Type. 0 Default, 1 - BroadSoft
P8791
√ √ √
Account(1)->
Advanced -> 100
reliable
retransmission
Number:
0, 1
Disable/Enable 100
reliable
retransmission.
0 : Disable , 1:
Enable
P8811
√ √ √
Account(1)->
Advanced ->
Early-Session
Number:
0, 1
Disable/Enable
Early-Session. 0 Disable, 1 - Enable
P8841
√ √ √
Account(1)->
Advanced ->
Refuse-Return-Co
de
Number:
0-2
Refuse-Return-Code.
0 -BUSY-486, 1 NOT-FOUND-404, 2 REFUSE-603
P8845
√ √ √
Account(1)->
Advanced ->Direct
Call Pickup Code
string
Direct Call Pickup
Code
P4705
√ √ √
Account(1)->
Advanced
->Group Call
Pickup Code
string
Group Call Pickup
Code
P4706
√ √ √
Account(1)->
Advanced ->
Feature Key Sync
Number:
0, 1
Feature Key Sync. 0 Disable, 1 - Enable
P8633
√ √ √
Account(1)->
Advanced -> SIP
Send Mac
Number:
0, 1
SIP Send Mac.0 Disable,1 - Enable
P20053
√ √ √
Account(1)->
Advanced ->Caller
Display Source
Number:
0, 1,2,3,4
Caller Display
Source.0 – From
Only, 1 – PAI-FROM,
2 – PAI-RPID-FROM,
3 –
RPID-PAI-FROM,4 –
RPID-FROM
P20157
√ √ √
Account(2)->basic
->Account Active
Number:
0, 1
Account Active (In
Use). 0 - No, 1 - Yes
P401
× √ √
Account(2)->basic
->Primary SIP
Sserver
Primary
SIP
Server(eg:s
ip.mycomp
It configures the
primary SIP server
when the network is
P747
× √ √
Page 84

81
any.com or
IP address)
locallan 、remotestun
or SBC.
Account(2)->basic
->Failover SIP
Server
String
Failover SIP
Server(Optional,
used when primary
server no response)
P987
× √ √
Account(2)->basic
->Second Failover
SIP Server
String
Second Failover
SipServer(Optional,
used when Failover
SIP Server no
response)
P8852
× √ √
Account(2)->basic
->Prefer Primary
SIP Sserver
Number:
0, 1
Prefer Primary SIP
Server (In Use). 0 No, 1 - Yes
P4568
× √ √
Account(2)->basic
->Outbound Proxy
string
Outbound
Proxy(proxy.myprovid
er.com, or IP
address, if any)
P748
× √ √
Account(2)->basic
->Backup
Outbound Proxy
string
Backup Outbound
Proxy(This is Usually
Set as IP addr)
P20048
× √ √
Account(2)->basic
->SIP Transport
Number:
0-2
0 - UDP, 1 - TCP, 2 TLS
P830
× √ √
Account(2)->basic
->NAT Traversal
Number:
0-2
0 - No, 1 - STUN 2 No,but send keep
alive
P730
× √ √
Account(2)->basic
->Label
String
The name showing o
n the LCD of current
device
P20001
× √ √
Account(2)->basic
->SIP User ID
string
the user part of an
SIP address
P735
× √ √
Account(2)->basic
->Authenticate ID
String
can be identical to or
different from SIP
User ID
P736
× √ √
Account(2)->basic
-> Authenticate
Password
String
purposely not
displayed for
securityprotection
P734
× √ √
Account(2)->basic
-> Name
String
The Local phone
name showing on the
other phone when
calling
P703
× √ √
Page 85
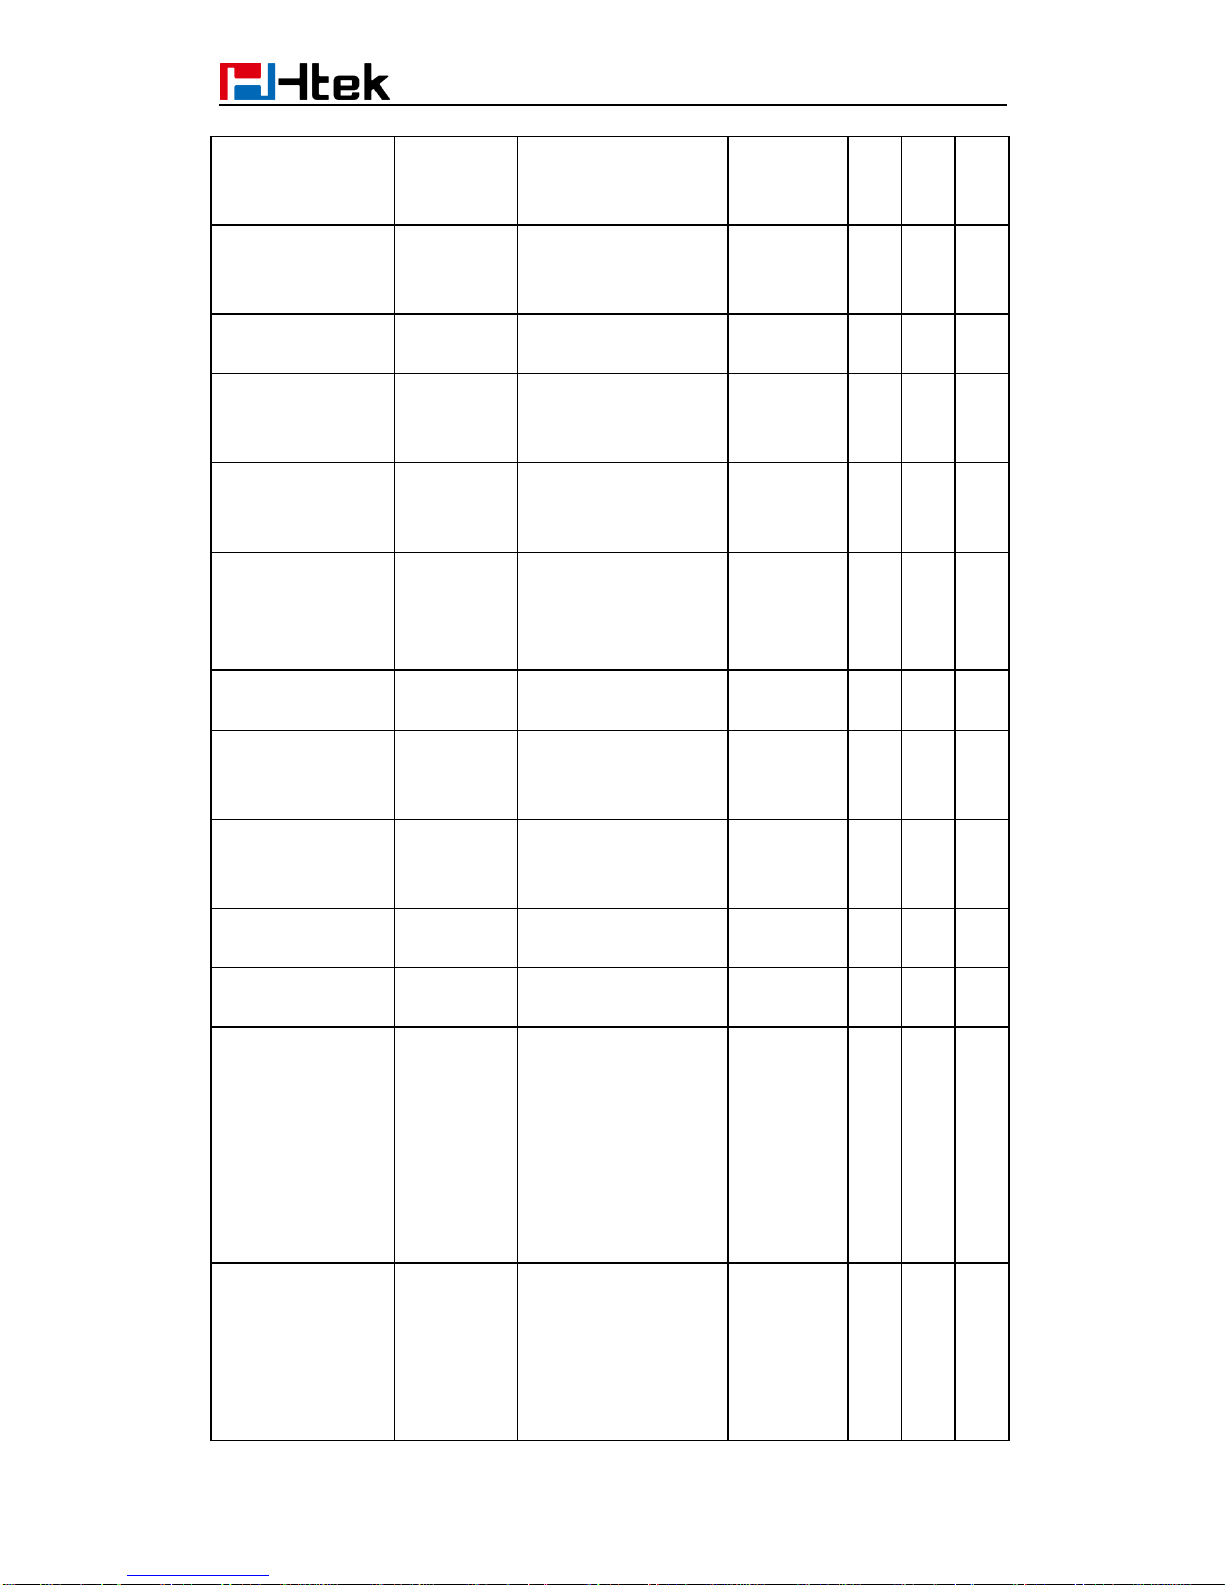
82
Account(2)->basic
->DNS Mode
Number:
0-2
DNS Mode ( 0 - A
Record, 1 - SRV, 2 NAPTR/SRV)
P702
× √ √
Account(2)->basic
-> Call
Message Format
Number:
0, 1
Call Message
Format.0 - Regular,1
- User=Phone , 2 - Tel
P763
√ √ √
Account(2)->basic
->SIP Registration
Number:
0, 1
SIP Registration. 0 No, 1 - Yes
P731
× √ √
Account(2)->basic
-> Unregister On
Reboot
Number:
0, 1
Unregister On
Reboot.0 - No, 1 Yes
P752
× √ √
Account(2)->basic
->Register
Expiration
number
Register Expiration(in
minutes. default 1
hour, max 45 days)
P732
× √ √
Account(2)->basic
->Out
Number:
0, 1
Outgoing Call
Without
Registration.0 - No, 1
- Yes
P813
× √ √
Account(2)->basic
-> Local SIP Port
number
Local SIP
Port(default 5060)
P740
× √ √
Account(2)->basic
-> Use Random
Port
Number:
0, 1
Use Random Port.0 No, 1 - Yes
P778
× √ √
Account(2)->basic
-> Voice Mail
UserID
number
Voice Mail
UserID(UserID for
voice mail system)
P426
× √ √
Account(2)->basic
-> RPort
Number:
0, 1
Enable/Disable
RPort.0 - No, 1 - Yes
P137
× √ √
Account(2)->basic
-> RFC 2543 Hold
Number:
0, 1
RFC 2543 Hold.0 No, 1 - Yes
P1101
× √ √
Account(2)->Code
c-> Preferred
Vocoder In listed
order
Number:
0, 2, 3, 4, 8,
9, 18, 20,
120
Preferred Vocoder In
listed order. choice 1.
0 - PCMU, 2 G.726-32, 3 GSM_FR,4 - G.723.1,
8 - PCMA, 9 - G.722,
18 - G.729A/B,20 iLBC, 120 - OPUS.
P757
× √ √
Account(2)->Code
c-> Preferred
Vocoder In listed
order
Number:
0, 2, 3, 4, 8,
9, 18, 20,
120
Preferred Vocoder In
listed order. choice 2.
0 - PCMU, 2 G.726-32, 3 GSM_FR,4 - G.723.1,
8 - PCMA, 9 - G.722,
P758
× √ √
Page 86

83
18 - G.729A/B,20 iLBC, 120 - OPUS.
Account(2)->Code
c-> Preferred
Vocoder In listed
order
Number:
0, 2, 3, 4, 8,
9, 18, 20,
120
Preferred Vocoder In
listed order. choice 3.
0 - PCMU, 2 G.726-32, 3 GSM_FR,4 - G.723.1,
8 - PCMA, 9 - G.722,
18 - G.729A/B,20 iLBC, 120 - OPUS.
P759
× √ √
Account(2)->Code
c-> Preferred
Vocoder In listed
order
Number:
0, 2, 3, 4, 8,
9, 18, 20,
120
Preferred Vocoder In
listed order. choice 4.
0 - PCMU, 2 G.726-32, 3 GSM_FR,4 - G.723.1,
8 - PCMA, 9 - G.722,
18 - G.729A/B,20 iLBC, 120 - OPUS.
P760
× √ √
Account(2)->Code
c-> Preferred
Vocoder In listed
order
Number:
0, 2, 3, 4, 8,
9, 18, 20,
120
Preferred Vocoder In
listed order. choice 5.
0 - PCMU, 2 G.726-32, 3 GSM_FR,4 - G.723.1,
8 - PCMA, 9 - G.722,
18 - G.729A/B,20 iLBC, 120 - OPUS.
P761
× √ √
Account(2)->Code
c-> Preferred
Vocoder In listed
order
Number:
0, 2, 3, 4, 8,
9, 18, 20,
120
Preferred Vocoder In
listed order. choice 6.
0 - PCMU, 2 G.726-32, 3 GSM_FR,4 - G.723.1,
8 - PCMA, 9 - G.722,
18 - G.729A/B,20 iLBC, 120 - OPUS.
P762
× √ √
Account(2)->Code
c-> PTimes(ms)
Number:
1,2,3,4,5,6
1 – 10, 2 – 20, 3 – 30,
4 – 40, 5 – 50, 6 - 60
P737
× √ √
Account(2)->Code
c-> G723 Rate
Number:
0, 1
G723 Rate(0 -
6.3kbps encoding
rate, 1 - 5.3kbps
encoding rate)
P749
× √ √
Account(2)->Code
c-> iLBC mode
Number:
0, 1
iLBC mode.0 - 20ms
mode,1 - 30ms mode
P395
× √ √
Account(2)->Code
c-> iLBC Payload
Number:
96 to 127
iLBC Payload
Type(from 96 to 127,
P391
× √ √
Page 87
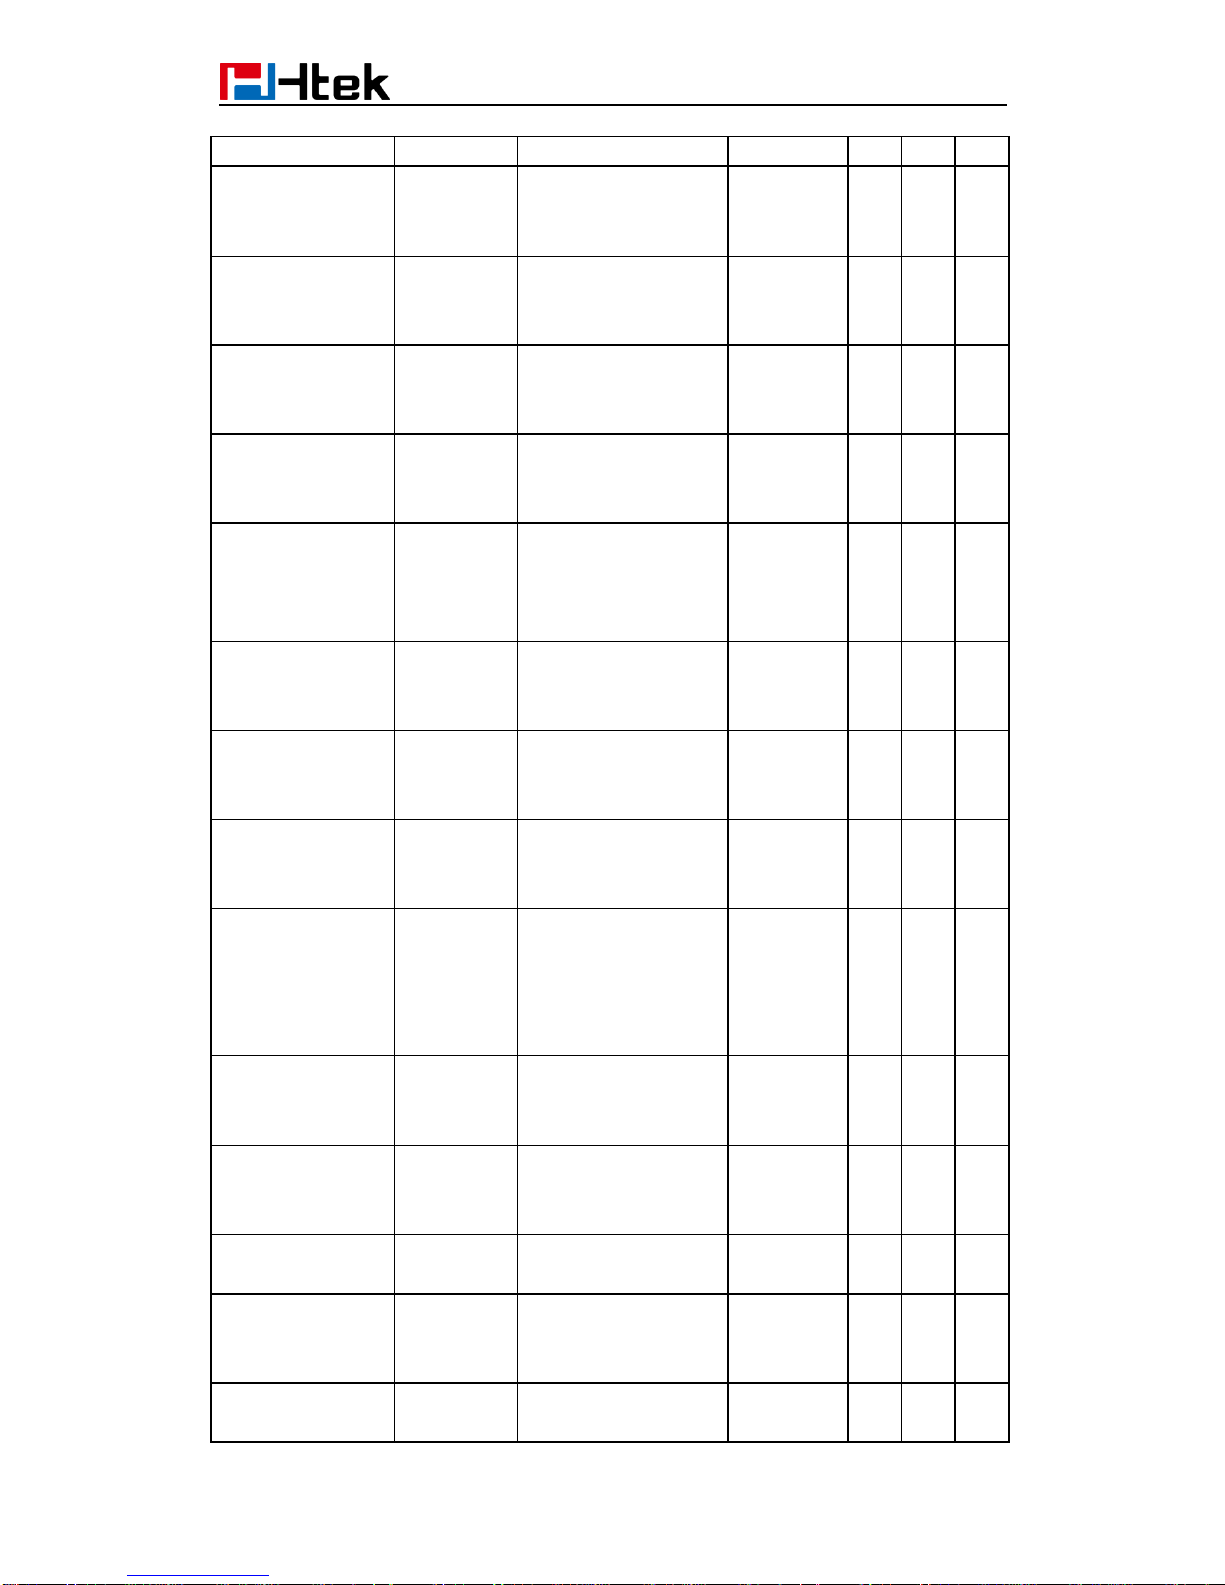
84
Type
default is 97)
Account(2)->Code
c-> OPUS
Payload Type
Number:
96 to 127
OPUS Payload Type
(from 96 to 127,
default is 120)
P403
√ √ √
Account(2)->Adva
nced-> DTMF
Payload Type
Number:
96-128
DTMF Payload Type,
default is 97
P779
× √ √
Account(2)->
Advanced ->
DTMF Type
Number:
0, 1,2
0 – RFC2833, 1 – IN
Audio, 2 – SIP INFO
P20167
× √ √
Account(2)->
Advanced -> Send
Flash Event
Number:
0, 1
Send Flash Event.0 no, 1 - yes
P774
× √ √
Account(2)->
Advanced ->
Enable Call
Features
Number:
0, 1
Enable Call
Features.0 - no, 1 yes
P751
× √ √
Account(2)->
Advanced ->
Proxy Require
string
Proxy Require
P792
× √ √
Account(2)->
Advanced ->
Use NAT IP
string
used in SIP/SDP mes
sage if specified
P866
× √ √
Account(2)->
Advanced ->ZRTP
Encryption
Number:
0, 1
ZRTP Encryption.0 no, 1 - yes
P20647
× √ √
Account(2)->
Advanced ->
SRTP Mode
Number:
0-2
SRTP Mode 0 =
Disabled, 1 =
Enabled but not
forced, 2 = Enabled
and forced
P443
× √ √
Account(2)->
Advanced -> VAD
Enable
Number:
0, 1
VAD Enable.0 - no, 1
- yes
P750
× √ √
Account(2)->
Advanced ->
Symmetric RTP
Number:
0, 1
Symmetric RTP.0 no, 1 - yes
P460
× √ √
Account(2)->
Advanced ->
Number:
0, 1
Jitter Buffer Type.0 fixed, 1 - adaptive
P831
× √ √
Account(2)->
Advanced -> Jitter
Buffer Length
Number:
0-2
Jitter Buffer Length.0
- low, 1 - medium, 2 -
high
P832
× √ √
Account(2)->
Advanced ->
Number
0,1,2,3,4,5,
Account Ring Tone(0
- default, 1 -
P423
× √ √
Page 88

85
Account Ring
Tone
6,7,8
Ring1.bin, 2 Ring2.bin, 3 Ring3.bin, 4 Ring4.bin, 5 Ring5.bin, 6 Ring6.bin, 7 Ring7.bin, 8 Ring8.bin)
Account(2)->
Advanced -> Ring
Timeout
Number
10 - 300
Ring Timeout(10-300
seconds , default is
60 seconds)
P816
× √ √
Account(2)->
Advanced -> Use
# As Dial Key
Number:
0, 1
Use # As Dial Key.0 no, 1 - yes
P772
× √ √
Account(2)->
Advanced -> Dial
Plan
string
Dial plan (dial plan
prefix string)
P4201
× √ √
Account(2)->
Advanced ->
Subscribe for MWI
Number:
0, 1
Subscribe for MWI.0 no,do not send
SUBSCRIBE for
Message Waiting
Indication, 1 yes,send periodical
SUBBSCRIBE
for ,Message Waiting
indication
P709
× √ √
Account(2)->
Advanced
->Subscribe MWI
To Voice Mail
Number:
0, 1
Subscribe MWI To
Voice Mail.0 - no, 1 yes(Enables or
disables the IP phone
to subscribe the
message waiting
indicator to the voice
mail number for
account X)
P24761
√ √ √
Account(2)->
Advanced -> Send
Anonymous
Number:
0, 1
Send Anonymous,0 –
no,1 – yes
P421
× √ √
Account(2)->
Advanced ->
Anonymous Call
Rejection
Number:
0, 1
Anonymous Call
Rejection.0 - no, 1 yes
P446
× √ √
Account(2)->
Advanced ->
Number:
0, 1,2
Check SIP User ID.0
– Don’t Check, 1 –
P458
× √ √
Page 89

86
Check SIP User
ID
Always Check, 2 Automatic
Account(2)->
Advanced -> Auto
Answer
Number:
0, 1
Auto Answer.0 - no, 1
- yes
P425
× √ √
Account(2)->
Advanced -> Allow
Auto Answer By
Call-Info
Number:
0, 1
Allow Auto Answer
By Call-Info.0 - no, 1 yes
P438
× √ √
Account(2)->
Advanced -> Turn
off Speaker on
remote disconnect
Number:
0, 1
Turn off Speaker on
remote disconnect.0
– no, 1 – yes
P439
× √ √
Account(2)->
Advanced ->
Session Expiration
Number
Session
Expiration(default is
180 seconds)
P434
× √ √
Account(2)->
Advanced ->
Min-SE
Number
Min-Session-Expirati
on(default and
minimum is 90
seconds)
P427
× √ √
Account(2)->
Advanced ->
Caller Request
Timer
Number
Caller Request Timer
(Request for timer
when making
outbound calls) 0 No, 1 - Yes
P428
× √ √
Account(2)->
Advanced
->Callee Request
Timer
Number:
0, 1
Callee Request Timer
(when caller supports
timer but did not
request one) 0 - No, 1
- Yes
P429
× √ √
Account(2)->
Advanced ->
Force Timer
Number:
0, 1
Force Timer (use
timer even when
remote party does not
support) 0 - No, 1 Yes
P430
× √ √
Account(2) ->
Advanced ->UAC
Specify Refresher
Number:
0-2
UAC Specify
Refresher. 1 - UAC, 2
- UAS, 0 -
omit(Recommended)
P432
× √ √
Account(2)->
Advanced -> UAS
Specify Refresher
Number:
1, 2
UAS Specify
Refresher. 1 - UAC, 2
- UAS(When UAC did
not)
P433
× √ √
Page 90

87
Account(2)->
Advanced ->
Force INVITE
Number:
0, 1
Force INVITE
(Always refresh with
INVITE instead of
UPDATE ) 0 - No, 1 Yes
P431
× √ √
Account(2)->
Advanced -> Hook
Flash Timing->
Minimum
Number
Minimum Hook Flash
Timing
P811
× √ √
Account(2)->
Advanced -> Hook
Flash Timing->
Maximum
Number
Maximum Hook Flash
Timing
P812
× √ √
Account(2)->
Advanced ->
Special Feature
Number
100, 104,
106
100 - Standard, 104 World Call, 106 NETHID
P767
× √ √
Account(2)->
Advanced ->
Eventlist BLF URL
String
Eventlist BLF URL
P444
× √ √
Account(2)->
Advanced ->
Share Line
Number:
0-2
Share Line. 0 Disable, 1 Broadsoft, 2 - BLA
P8772
× √ √
Account(2)->
Advanced -> SCA
Barge-In
Number:
0-1
SCA Barge-In. 0 Disable, 1 – Enable.
Enables or disables the
BroadSoft SCA Barge-In
feature
P20977
× √ √
Account(2)->
Advanced ->
Conference Type
Number:
0-1
Conference Type. 0 Local, 1 – Enable.
Enables or disables the
BroadSoft SCA Barge-In
feature
P20005
× √ √
Account(2)->
Advanced ->
Conference URI
string
Conference URI
P20009
× √ √
Account(2)->
Advanced -> SIP
Server Type
Number:
0, 1
SIP Server Type. 0 Default, 1 - BroadSoft
P8792
× √ √
Account(2)->
Advanced -> 100
reliable
retransmission
Number:
0, 1
100 reliable
retransmission. 0 Disable, 1 - Enable
P8812
× √ √
Account(2)->
Advanced ->
Number:
0, 1
Early-Session. 0 Disable, 1 - Enable
P8842
× √ √
Page 91

88
Early-Session
Account(2)->
Advanced ->
Refuse-Return-Co
de
Number:
0-2
Refuse-Return-Code.
0 -BUSY-486, 1 NOT-FOUND-404, 2 REFUSE-603
P8846
× √ √
Account(2)->
Advanced ->Direct
Call Pickup Code
string
Direct Call Pickup
Code
P4715
× √ √
Account(2)->
Advanced
->Group Call
Pickup Code
string
Group Call Pickup
Code
P4716
× √ √
Account(2)->
Advanced ->
Feature Key Sync
Number:
0, 1
Feature Key Sync. 0 Disable, 1 - Enable
P8634
× √ √
Account(2)->
Advanced -> SIP
Send Mac
Number:
0, 1
SIP Send Mac.0 Disable,1 - Enable
P20054
× √ √
Account(2)->
Advanced ->Caller
Display Source
Number:
0, 1,2,3,4
Caller Display
Source.0 – From
Only, 1 – PAI-FROM,
2 – PAI-RPID-FROM,
3 –
RPID-PAI-FROM,4 –
RPID-FROM
P20158
× √ √
Account(3)->basic
->Account Active
Number:
0, 1
Account Active (In
Use). 0 - No, 1 - Yes
P501
× √ √
Account(3)->basic
->Primary SIP
Sserver
Primary
SIP
Server(eg:s
ip.mycomp
any.com or
IP address)
It configures the
primary SIP server
when the network is
locallan 、remotestun
or SBC.
P502
× √ √
Account(3)->basic
->Failover SIP
Server
String
Failover SIP
Server(Optional,
used when primary
server no response)
P988
× √ √
Account(3)->basic
->Second Failover
SIP Server
String
Second Failover
SipServer(Optional,
used when Failover
SIP Server no
response)
P8853
× √ √
Account(3)->basic
->Prefer Primary
Number:
0, 1
Prefer Primary SIP
Server (In Use). 0 -
P4569
× √ √
Page 92
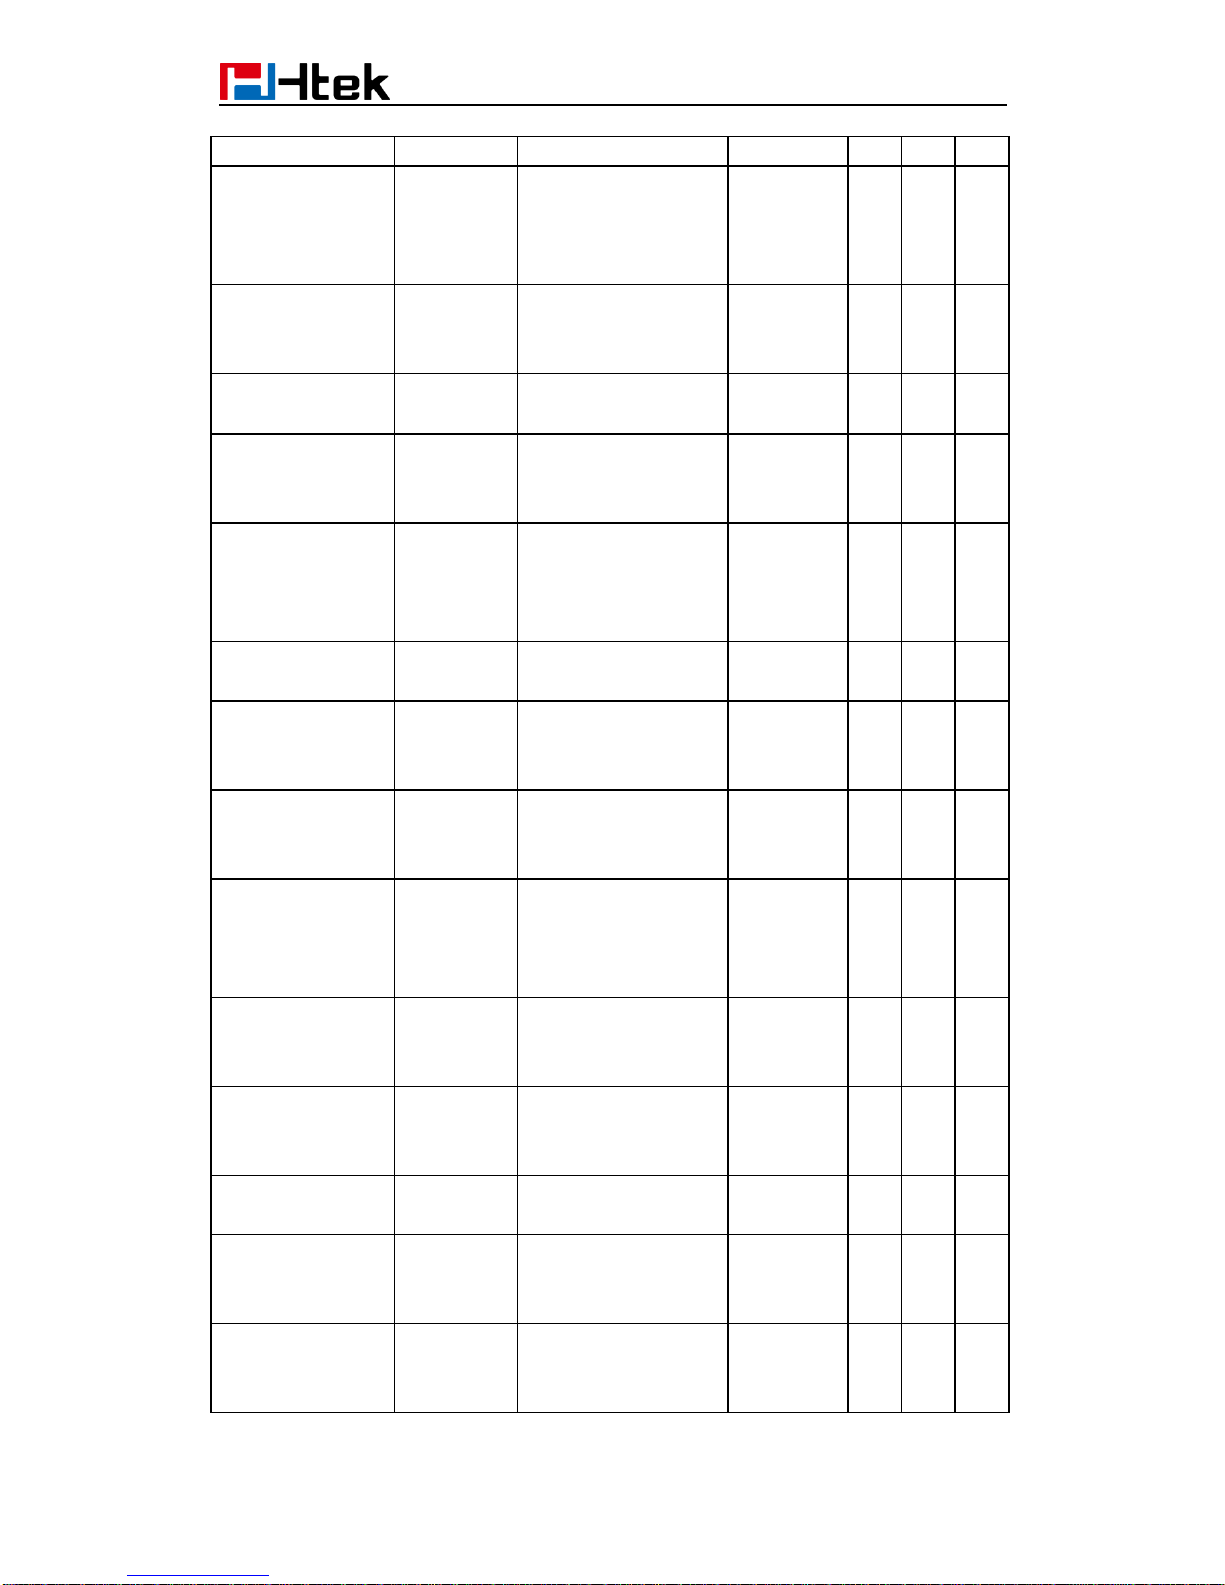
89
SIP Sserver
No, 1 - Yes
Account(3)->basic
->Outbound Proxy
string
Outbound
Proxy(proxy.myprovid
er.com, or IP
address, if any)
P503
× √ √
Account(3)->basic
->Backup
Outbound Proxy
string
Backup Outbound
Proxy(This is Usually
Set as IP addr)
P20049
× √ √
Account(3)->basic
->SIP Transport
Number:
0-2
0 - UDP, 1 - TCP, 2 TLS
P930
× √ √
Account(3)->basic
->NAT Traversal
Number:
0-2
0 - No, 1 - STUN 2 No,but send keep
alive
P514
× √ √
Account(3)->basic
->Label
String
The name showing o
n the LCD of current
device
P20002
× √ √
Account(3)->basic
->SIP User ID
string
the user part of an
SIP address
P504
× √ √
Account(3)->basic
->Authenticate ID
String
can be identical to or
different from SIP
User ID
P505
× √ √
Account(3)->basic
-> Authenticate
Password
String
purposely not
displayed for
securityprotection
P506
× √ √
Account(3)->basic
-> Name
String
The Local phone
name showing on the
other phone when
calling
P507
× √ √
Account(3)->basic
->DNS Mode
Number:
0-2
DNS Mode ( 0 - A
Record, 1 - SRV, 2 NAPTR/SRV)
P508
× √ √
Account(3)->basic
->Call Message
Format
Number:
0, 1
Call Message
Format.0 - Regular,1
- User=Phone , 2 - Tel
P509
× √ √
Account(3)->basic
->SIP Registration
Number:
0, 1
SIP Registration. 0 No, 1 - Yes
P510
× √ √
Account(3)->basic
-> Unregister On
Reboot
Number:
0, 1
Unregister On
Reboot.0 - No, 1 Yes
P511
× √ √
Account(3)->basic
-> Register
Expiration
number
Register Expiration(in
minutes. default 1
hour, max 45 days)
P512
× √ √
Page 93
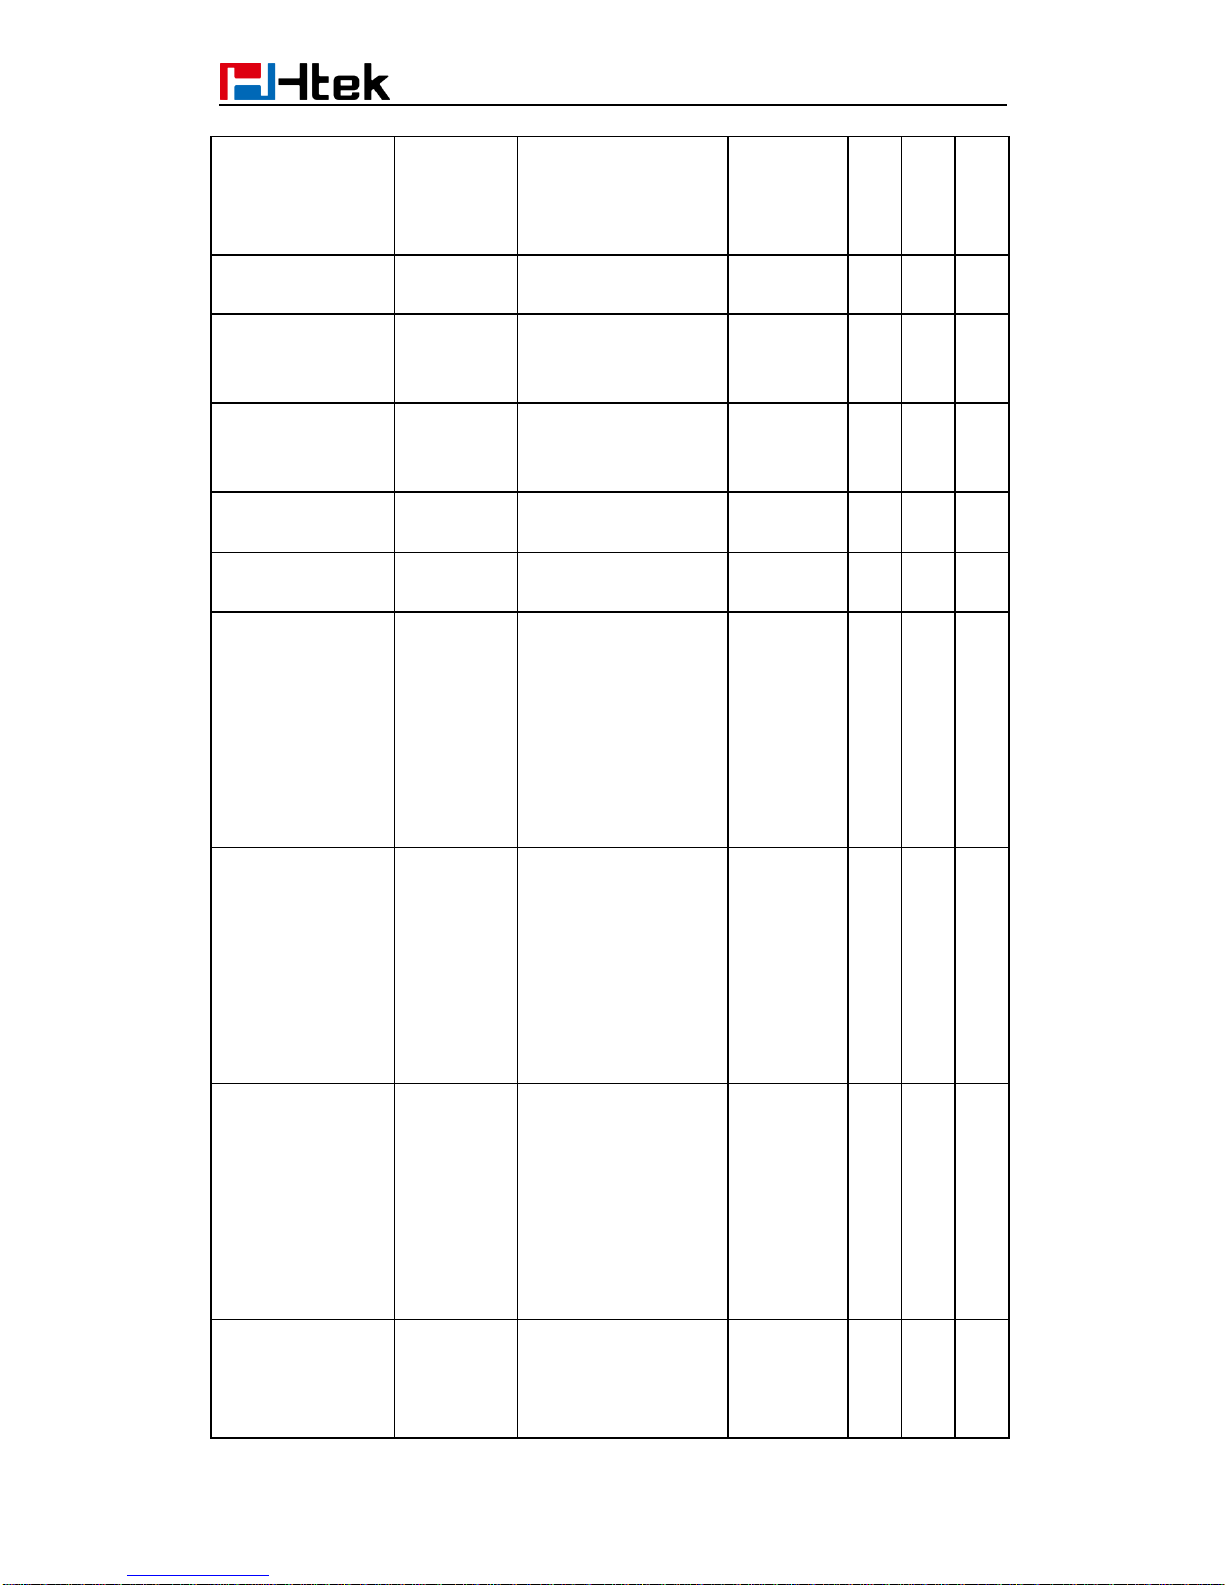
90
Account(3)->basic
->Out
Number:
0, 1
Outgoing Call
Without
Registration.0 - No, 1
- Yes
P913
× √ √
Account(3)->basic
-> Local SIP Port
number
Local SIP
Port(default 5060)
P513
× √ √
Account(3)->basic
-> Use Random
Port
Number:
0, 1
Use Random Port.0 No, 1 - Yes
P578
× √ √
Account(3)->basic
-> Voice Mail
UserID
number
Voice Mail
UserID(UserID for
voice mail system)
P526
× √ √
Account(3)->basic
-> RPort
Number:
0, 1
Enable/Disable
RPort.0 - No, 1 - Yes
P138
× √ √
Account(3)->basic
-> RFC 2543 Hold
Number:
0, 1
RFC 2543 Hold.0 No, 1 - Yes
P1102
× √ √
Account(3)->Code
c-> Preferred
Vocoder In listed
order
Number:
0, 2, 3, 4, 8,
9, 18, 20,
120
Preferred Vocoder In
listed order. choice 1.
0 - PCMU, 2 G.726-32, 3 GSM_FR,4 - G.723.1,
8 - PCMA, 9 - G.722,
18 - G.729A/B,20 iLBC, 120 - OPUS.
P551
× √ √
Account(3)->Code
c-> Preferred
Vocoder In listed
order
Number:
0, 2, 3, 4, 8,
9, 18, 20,
120
Preferred Vocoder In
listed order. choice 2.
0 - PCMU, 2 G.726-32, 3 GSM_FR,4 - G.723.1,
8 - PCMA, 9 - G.722,
18 - G.729A/B,20 iLBC, 120 - OPUS.
P552
× √ √
Account(3)->Code
c-> Preferred
Vocoder In listed
order
Number:
0, 2, 3, 4, 8,
9, 18, 20,
120
Preferred Vocoder In
listed order. choice 3.
0 - PCMU, 2 G.726-32, 3 GSM_FR,4 - G.723.1,
8 - PCMA, 9 - G.722,
18 - G.729A/B,20 iLBC, 120 - OPUS.
P553
× √ √
Account(3)->Code
c-> Preferred
Vocoder In listed
order
Number:
0, 2, 3, 4, 8,
9, 18, 20,
120
Preferred Vocoder In
listed order. choice 4.
0 - PCMU, 2 G.726-32, 3 -
P554
× √ √
Page 94

91
GSM_FR,4 - G.723.1,
8 - PCMA, 9 - G.722,
18 - G.729A/B,20 iLBC, 120 - OPUS.
Account(3)->Code
c-> Preferred
Vocoder In listed
order
Number:
0, 2, 3, 4, 8,
9, 18, 20,
120
Preferred Vocoder In
listed order. choice 5.
0 - PCMU, 2 G.726-32, 3 GSM_FR,4 - G.723.1,
8 - PCMA, 9 - G.722,
18 - G.729A/B,20 iLBC, 120 - OPUS.
P555
× √ √
Account(3)->Code
c-> Preferred
Vocoder In listed
order
Number:
0, 2, 3, 4, 8,
9, 18, 20,
120
Preferred Vocoder In
listed order. choice 6.
0 - PCMU, 2 G.726-32, 3 GSM_FR,4 - G.723.1,
8 - PCMA, 9 - G.722,
18 - G.729A/B,20 iLBC, 120 - OPUS.
P556
× √ √
Account(3)->Code
c-> PTimes(ms)
Number:
1,2,3,4,5,6
1 – 10, 2 – 20, 3 – 30,
4 – 40, 5 – 50, 6 - 60
P737
× √ √
Account(3)->Code
c-> G723 Rate
Number:
0, 1
G723 Rate(0 -
6.3kbps encoding
rate, 1 - 5.3kbps
encoding rate)
P559
× √ √
Account(3)->Code
c-> iLBC mode
Number:
0, 1
iLBC mode.0 - 20ms
mode,1 - 30ms mode
P396
× √ √
Account(3)->Code
c-> iLBC Payload
Type
Number:
96 to 127
iLBC Payload
Type(from 96 to 127,
default is 97)
P392
× √ √
Account(3)->Code
c-> OPUS
Payload Type
Number:
96 to 127
OPUS Payload Type
(from 96 to 127,
default is 120)
P404
√ √ √
Account(3)->Adva
nced-> DTMF
Payload Type
Number:
96-127
DTMF Payload Type,
default is 97
P579
× √ √
Account(3)->
Advanced ->
DTMF Type
Number:
0, 1,2
0 – RFC2833, 1 – IN
Audio, 2 – SIP INFO
P20168
× √ √
Account(3)->
Advanced -> Send
Flash Event
Number:
0, 1
Send Flash Event.0 -
no, 1 - yes
× √ √
Page 95

92
Account(3)->
Advanced ->
Enable Call
Features
Number:
0, 1
Enable Call
Features.0 - no, 1 yes
P1891
× √ √
Account(3)->
Advanced -> Use
NAT IP
String
Use NAT IP(use in
SIP/SDP message if
specified)
P566
× √ √
Account(3)->
Advanced ->
Proxy Require
string
Proxy Require
P518
× √ √
Account(3)->
Advanced ->ZRTP
Encryption
Number:
0, 1
ZRTP Encryption.0 no, 1 - yes
P20648
× √ √
Account(3)->
Advanced ->
SRTP Mode
Number
0-2
SRTP Mode 0 =
Disabled, 1 =
Enabled but not
forced, 2 = Enabled
and forced
P543
× √ √
Account(3)->
Advanced -> VAD
Enable
Number:
0, 1
VAD Enable.0 - no, 1
- yes
P550
× √ √
Account(3)->
Advanced ->
Symmetric RTP
Number:
0, 1
Symmetric RTP.0 no, 1 - yes
P591
× √ √
Account(3)->
Advanced ->Jitter
Buffer Type
Number:
0, 1
Jitter Buffer Type.0 fixed, 1 - adaptive
P1133
× √ √
Account(3)->
Advanced -> Jitter
Buffer Length
Number
0-2
Jitter Buffer Length.0
- low, 1 - medium, 2 -
high
P1132
× √ √
Account(3)->
Advanced ->
Account Ring
Tone
Number
0,1,2,3,4,5,
6,7,8
Account Ring Tone(0
- default, 1 -
Ring1.bin, 2 Ring2.bin, 3 Ring3.bin, 4 Ring4.bin, 5 Ring5.bin, 6 Ring6.bin, 7 Ring7.bin, 8 Ring8.bin)
P523
× √ √
Account(3)->
Advanced -> Ring
Timeout
Number
10 - 300
Ring Timeout(10-300
seconds , default is
60 seconds)
P1885
× √ √
Page 96

93
Account(3)->
Advanced -> Use
# As Dial Key
Number:
0, 1
Use # As Dial Key.0 no, 1 - yes
P1672
× √ √
Account(3)->
Advanced -> Dial
Plan
string
Dial plan (dial plan
prefix string)
P4202
× √ √
Account(3)->
Advanced ->
Subscribe for MWI
Number:
0, 1
Subscribe for MWI.0 no,do not send
SUBSCRIBE for
Message Waiting
Indication, 1 yes,send periodical
SUBBSCRIBE
for ,Message Waiting
indication
P515
× √ √
Account(3)->
Advanced
->Subscribe MWI
To Voice Mail
Number:
0, 1
Subscribe MWI To
Voice Mail.0 - no, 1 yes(Enables or
disables the IP phone
to subscribe the
message waiting
indicator to the voice
mail number for
account X)
P24763
√ √ √
Account(3)->
Advanced -> Send
Anonymous
Number:
0, 1
Send Anonymous,0 –
no,1 – yes
P521
× √ √
Account(3)->
Advanced ->
Anonymous Call
Rejection
Number:
0, 1
Anonymous Call
Rejection.0 - no, 1 yes
P1846
× √ √
Account(3)->
Advanced ->
Check SIP User
ID
Number:
0, 1,2
Check SIP User ID.0
– Don’t Check, 1 –
Always Check, 2 Automatic
P567
× √ √
Account(3)->
Advanced -> Auto
Answer
Number:
0, 1
Auto Answer.0 - no, 1
- yes
P525
× √ √
Account(3)->
Advanced -> Allow
Auto Answer By
Call-Info
Number:
0, 1
Allow Auto Answer
By Call-Info.0 - no, 1 yes
P538
× √ √
Account(3)->
Advanced -> Turn
Number:
0, 1
Turn off Speaker on
remote disconnect.0
P539
× √ √
Page 97

94
off Speaker on
remote disconnect
– no, 1 – yes
Account(3)->
Advanced ->
Session Expiration
Number
Session
Expiration(default is
180 seconds)
P534
× √ √
Account(3)->
Advanced ->
Min-SE
Number
Min-Session-Expirati
on(default and
minimum is 90
seconds)
P527
× √ √
Account(3)->
Advanced ->
Caller Request
Timer
Number
Caller Request Timer
(Request for timer
when making
outbound calls) 0 No, 1 - Yes
P528
× √ √
Account(3)->
Advanced
->Callee Request
Timer
Number:
0, 1
Callee Request Timer
(when caller supports
timer but did not
request one) 0 - No, 1
- Yes
P529
× √ √
Account(3)->
Advanced ->
Force Timer
Number:
0, 1
Force Timer (use
timer even when
remote party does not
support) 0 - No, 1 Yes
P530
× √ √
Account(3) ->
Advanced ->UAC
Specify Refresher
Number:
0-2
UAC Specify
Refresher. 1 - UAC, 2
- UAS, 0 -
omit(Recommended)
P532
× √ √
Account(3)->
Advanced -> UAS
Specify Refresher
Number:
1, 2
UAS Specify
Refresher. 1 - UAC, 2
- UAS(When UAC did
not)
P533
× √ √
Account(3)->
Advanced ->
Force INVITE
Number:
0, 1
Force INVITE
(Always refresh with
INVITE instead of
UPDATE ) 0 - No, 1 Yes
P531
× √ √
Account(3)->
Advanced -> Hook
Flash Timing->
Minimum
Number
Minimum Hook Flash
Timing
P1811
× √ √
Account(3)->
Advanced -> Hook
Flash Timing->
Number
Maximum Hook Flash
Timing
P1812
× √ √
Page 98

95
Maximum
Account(3)->
Advanced ->
Special Feature
Number
100, 104,
106
100 - Standard, 104 World Call, 106 NETHID
P524
× √ √
Account(3)->
Advanced ->
Eventlist BLF URL
string
Eventlist BLF URL
P544
× √ √
Account(3)->
Advanced ->
Share Line
Number:
0-2
Share Line. 0 Disable, 1 Broadsoft, 2 - BLA
P8773
× √ √
Account(3)->
Advanced -> SCA
Barge-In
Number:
0-1
SCA Barge-In. 0 Disable, 1 – Enable.
Enables or disables the
BroadSoft SCA Barge-In
feature
P20978
× √ √
Account(3)->
Advanced ->
Conference Type
Number:
0-1
Conference Type. 0 Local, 1 – Enable.
P20006
× √ √
Account(3)->
Advanced ->
Conference URI
string
Conference URI
P20010
× √ √
Account(3)->
Advanced -> SIP
Server Type
Number:
0, 1
SIP Server Type. 0 Default, 1 - BroadSoft
P8793
× √ √
Account(3)->
Advanced -> 100
reliable
retransmission
Number:
0, 1
100 reliable
retransmission. 0 Disable, 1 - Enable
P8813
× √ √
Account(3)->
Advanced ->
Early-Session
Number:
0, 1
Early-Session. 0 Disable, 1 - Enable
P8843
× √ √
Account(3)->
Advanced ->
Refuse-Return-Co
de
Number:
0-2
Refuse-Return-Code.
0 -BUSY-486, 1 NOT-FOUND-404, 2 REFUSE-603
P8847
× √ √
Account(3)->
Advanced ->Direct
Call Pickup Code
string
Direct Call Pickup
Code
P4725
× √ √
Account(3)->
Advanced
->Group Call
Pickup Code
string
Group Call Pickup
Code
P4726
× √ √
Account(3)->
Advanced ->
Number:
0, 1
Feature Key Sync. 0 Disable, 1 - Enable
P8635
× √ √
Page 99

96
Feature Key Sync
Account(3)->
Advanced -> SIP
Send Mac
Number:
0, 1
SIP Send Mac.0 Disable,1 - Enable
P20055
× √ √
Account(3)->
Advanced ->Caller
Display Source
Number:
0, 1,2,3,4
Caller Display
Source.0 – From
Only, 1 – PAI-FROM,
2 – PAI-RPID-FROM,
3 –
RPID-PAI-FROM,4 –
RPID-FROM
P20159
× √ √
Account(4)->basic
->Account Active
Number:
0, 1
Account Active (In
Use). 0 - No, 1 - Yes
P601
× √ √
Account(4)->basic
->Primary SIP
Sserver
Primary
SIP
Server(eg:s
ip.mycomp
any.com or
IP address)
It configures the
primary SIP server
when the network is
locallan 、remotestun
or SBC.
P602
× √ √
Account(4)->basic
->Failover SIP
Server
String
Failover SIP
Server(Optional,
used when primary
server no response)
P989
× √ √
Account(4)->basic
->Second Failover
SIP Server
String
Second Failover
SipServer(Optional,
used when Failover
SIP Server no
response)
P8854
× √ √
Account(4)->basic
->Prefer Primary
SIP Sserver
Number:
0, 1
Prefer Primary SIP
Server (In Use). 0 No, 1 - Yes
P4570
× √ √
Account(4)->basic
->Outbound Proxy
string
Outbound
Proxy(proxy.myprovid
er.com, or IP
address, if any)
P603
× √ √
Account(4)->basic
->Backup
Outbound Proxy
string
Backup Outbound
Proxy(This is Usually
Set as IP addr)
P20050
× √ √
Account(4)->basic
->SIP Transport
Number:
0-2
0 - UDP, 1 - TCP, 2 TLS
P1030
× √ √
Account(4)->basic
->NAT Traversal
Number:
0-2
0 - No, 1 - STUN 2 No,but send keep
alive
P614
× √ √
Page 100
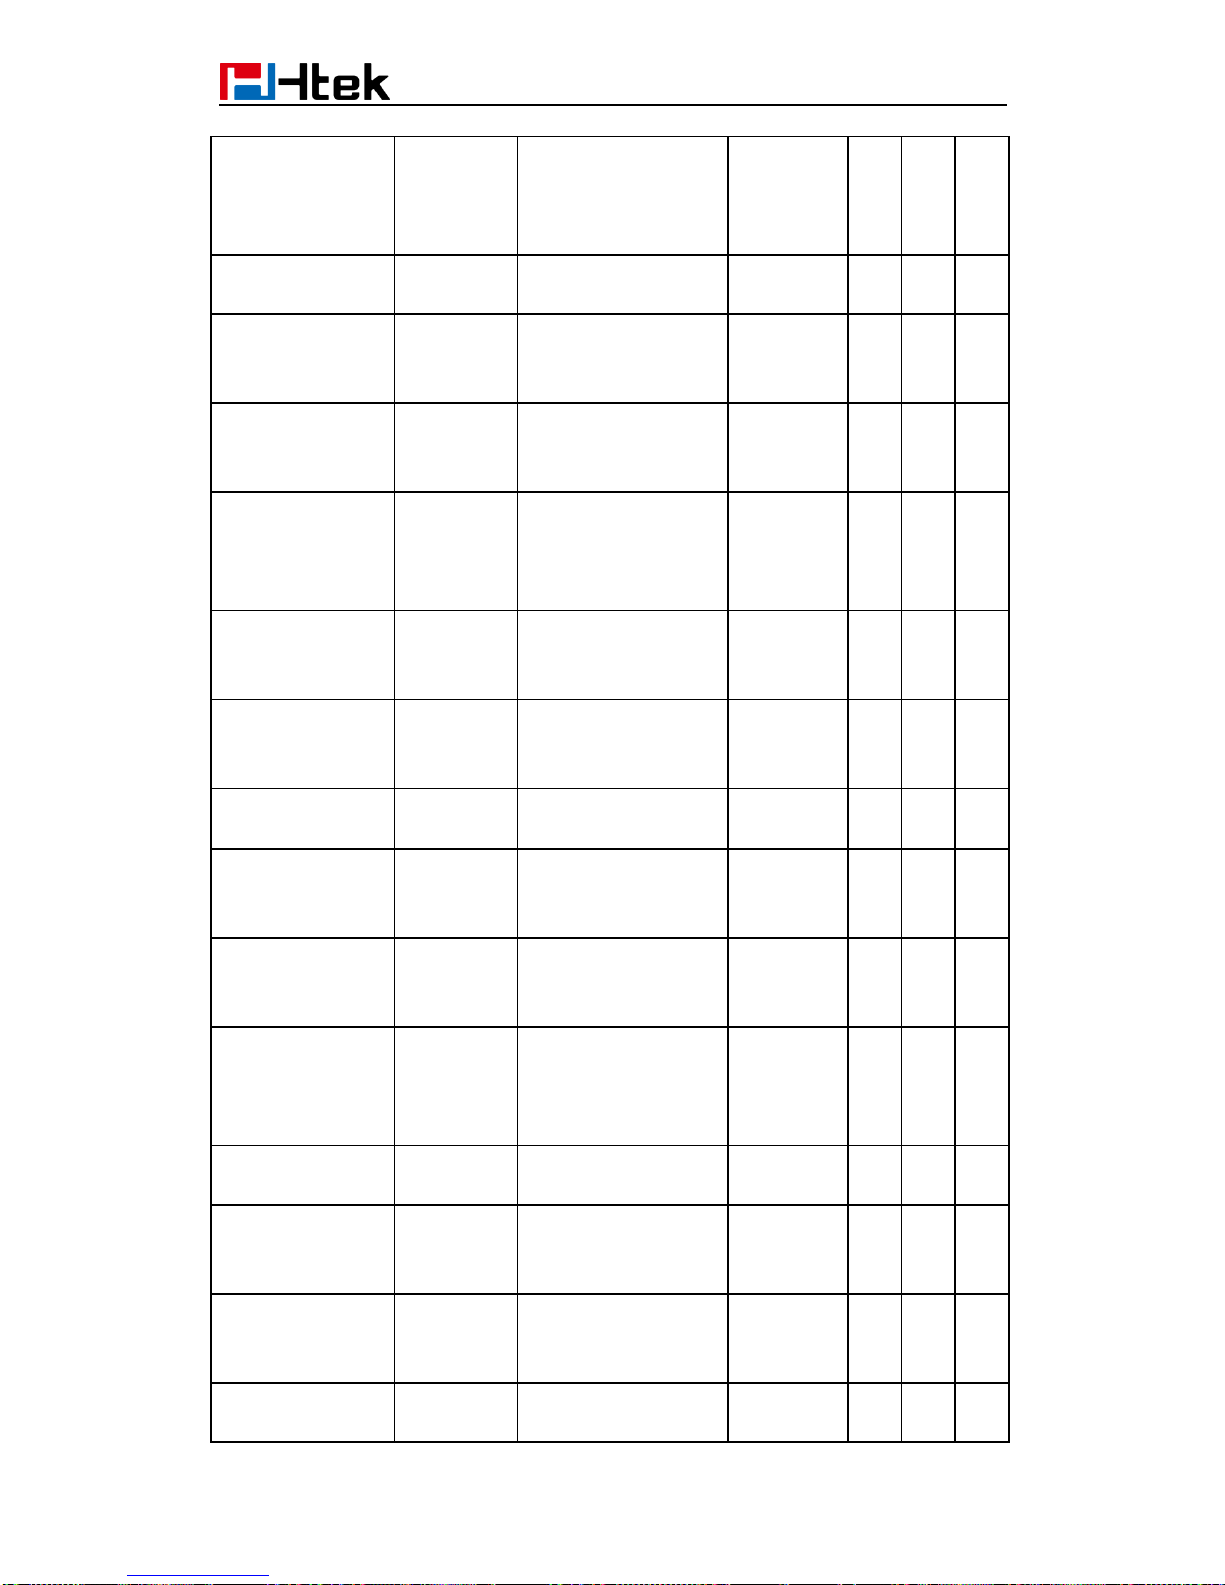
97
Account(4)->basic
->Label
String
The name showing o
n the LCD of current
device
P20002
× √ √
Account(4)->basic
->SIP User ID
string
the user part of an
SIP address
P604
× √ √
Account(4)->basic
->Authenticate ID
String
can be identical to or
different from SIP
User ID
P605
× √ √
Account(4)->basic
-> Authenticate
Password
String
purposely not
displayed for
securityprotection
P606
× √ √
Account(4)->basic
-> Name
String
The Local phone
name showing on the
other phone when
calling
P607
× √ √
Account(4)->basic
->DNS Mode
Number:
0-2
DNS Mode ( 0 - A
Record, 1 - SRV, 2 NAPTR/SRV)
P608
× √ √
Account(4)->basic
->Call Message
Format
Number:
0, 1
Call Message
Format.0 - Regular,1
- User=Phone , 2 - Tel
P609
× √ √
Account(4)->basic
->SIP Registration
Number:
0, 1
SIP Registration. 0 No, 1 - Yes
P610
× √ √
Account(4)->basic
-> Unregister On
Reboot
Number:
0, 1
Unregister On
Reboot.0 - No, 1 Yes
P611
× √ √
Account(4)->basic
-> Register
Expiration
number
Register Expiration(in
minutes. default 1
hour, max 45 days)
P612
× √ √
Account(4)->basic
->Out
Number:
0, 1
Outgoing Call
Without
Registration.0 - No, 1
- Yes
P1013
× √ √
Account(4)->basic
-> Local SIP Port
number
Local SIP
Port(default 5060)
P613
× √ √
Account(4)->basic
-> Use Random
Port
Number:
0, 1
Use Random Port.0 No, 1 - Yes
P678
× √ √
Account(4)->basic
-> Voice Mail
UserID
number
Voice Mail
UserID(UserID for
voice mail system)
P626
× √ √
Account(4)->basic
-> RPort
Number:
0, 1
Enable/Disable
RPort.0 - No, 1 - Yes
P139
× √ √
 Loading...