

Page 1

UC903 Usermanual
1
Page 2

Notices Information
Notices Information
Copyright
Copyright © 2005 - 2017 Nanjing Hanlong Technology CO., LTD. All rights reserved.
Nanjing Hanlong Technology CO., LTD. owns all the right to revise and change this document at
any time. And all the illustrations and instructions in this paper are subject to the copyright
protection of legal law. No parts of this document may be used or reproduced, transmitted by the
third parties for any purposes without the express written permission of Nanjing Hanlong
Technology CO., LTD.
When this document is made available on www.htek.com , Hanlong Technology Co., LTD. gives
its right to download and print copies of this content only for private use as a user manual. No
parts shall have the right to alter, modify or use as commercial means without the express written
permission of Nanjing Hanlong Technology CO., LTD.
Safety cautions
To use the Phone follow the instructions in this manual.
To use the power adapter that delivered with the phone. Other power adapters may damage
the phone.
The phone is only for indoor use. And also avoid in high humidity, water and some other
liquids.
Do not use the phone during thunderstorms.
CE
FCC
WEEE Warning
To avoid the potential effects on the environment and human health as a result of the
presence of hazardous substances in electrical and electronic equipment, end users of
electrical and electronic equipment should understand the meaning of the
crossed-out wheeled bin symbol. Do not dispose of WEEE as unsorted municipal
waste and have to collect such WEEE separately.
2
Page 3

Notices Information
Cleaning
To clean the device, use an anti-static cloth. Please avoid cleaning liquids as they might damage
the surface or internal electronics of the phone.
FCC Statement
1. This device complies with Part 15 of the FCC Rules. Operation is subject to the following two
conditions:
(1) This device may not cause harmful interference.
(2) This device must accept any interference received, including interference that may cause
undesired operation.
2. Changes or modifications not expressly approved by the party responsible for compliance could
void the user's authority to operate the equipment.
NOTE: This equipment has been tested and found to comply with the limits for a Class B digital
device, pursuant to Part 15 of the FCC Rules. These limits are designed to provide reasonable
protection against harmful interference in a residential installation.
This equipment generates uses and can radiate radio frequency energy and, if not installed and
used in accordance with the instructions, may cause harmful interference to radio communications.
However, there is no guarantee that interference will not occur in a particular installation. If this
equipment does cause harmful interference to radio or television reception, which can be
determined by turning the equipment off and on, the user is encouraged to try to correct the
interference by one or more of the following measures:
Reorient or relocate the receiving antenna.
Increase the separation between the equipment and receiver.
Connect the equipment into an outlet on a circuit different from that to which the receiver is
connected.
Consult the dealer or an experienced radio/TV technician for help.
3
Page 4

Summary of
changes
Summary of changes
This section describes the changes to this user manual for each release and user manual version.
Change for Release x.0.4.2,Manual version x.0.4.2
Major updates have occurred to the following sections:
IPv6
IPv4&IPv6
Change for Release x.0.4.0.10,Manual version x.0.4.0.10
Major updates have occurred to the following sections:
Label Scroll
Change for Release x.0.3.98.O,Manual version x.0.3.98.O
Major updates have occurred to the following sections:
Reboot in Talking
Change for Release x.0.3.98.A,Manual version x.0.3.98.A
Major updates have occurred to the following sections:
Auto Logout Time
Change for Release x.0.3.98,Manual version x.0.3.98
Major updates have occurred to the following sections:
Daylight Saving Time
Change for Release x.0.3.93,Manual version x.0.3.93
Major updates have occurred to the following sections:
Check-Syn With Authenticate
Call Back
4
Page 5

Summary of
changes
Change for Release x.0.3.88,Manual version x.0.3.88
Major updates have occurred to the following sections:
Detect IP Conflict
Change for Release x.0.3.72,Manual version x.0.3.72
Major updates have occurred to the following sections:
Voice Mail Tone
Backup NTP Server
Intercom Barge
Change for Release x.0.3.65,Manual version x.0.3.65
Major updates have occurred to the following sections:
Redial Mode
Change for Release x.0.3.63,Manual version x.0.3.63
Major updates have occurred to the following sections:
Suppress DTMF Display
Suppress DTMF Display Delay
Change for Release x.0.3.62,Manual version x.0.3.62
Major updates have occurred to the following sections:
Auto Redial
5
Page 6

Table of Content
Table of Content
Notices Information ........................................................................................................................ 2
Copyright .................................................................................................................................. 2
Safety cautions .......................................................................................................................... 2
WEEE Warning ......................................................................................................................... 2
Cleaning .................................................................................................................................... 3
FCC Statement .......................................................................................................................... 3
Summary of changes ..................................................................................................................... 4
Change for Release x.0.4.2,Manual version x.0.4.2 .................................................................. 4
Change for Release x.0.4.0.10,Manual version x.0.4.0.10 ........................................................ 4
Change for Release x.0.3.98.O,Manual version x.0.3.98.O ...................................................... 4
Change for Release x.0.3.98.A,Manual version x.0.3.98.A ...................................................... 4
Change for Release x.0.3.98,Manual version x.0.3.98 .............................................................. 4
Change for Release x.0.3.93,Manual version x.0.3.93 .............................................................. 4
Change for Release x.0.3.88,Manual version x.0.3.88 .............................................................. 5
Change for Release x.0.3.72,Manual version x.0.3.72 .............................................................. 5
Change for Release x.0.3.65,Manual version x.0.3.65 .............................................................. 5
Change for Release x.0.3.63,Manual version x.0.3.63 .............................................................. 5
Change for Release x.0.3.62,Manual version x.0.3.62 .............................................................. 5
Table of Content ............................................................................................................................. 6
Getting Started .............................................................................................................................. 10
Packing List ............................................................................................................................ 10
Phone Installation .................................................................................................................... 12
1. Attach the Foot stand ................................................................................................... 12
2. Connect the Handset and optional Headset ................................................................. 12
3. Connect the Network and Power ................................................................................. 13
Initialization ............................................................................................................................ 13
Status ....................................................................................................................................... 14
Registration ............................................................................................................................. 15
Idle Screen .............................................................................................................................. 17
Getting Familiar with Your Phone............................................................................................... 18
Hardware Components Preview .............................................................................................. 18
Icon Preview ........................................................................................................................... 20
LED Instruction....................................................................................................................... 21
Power Indicator LED ...................................................................................................... 21
Line LED:(Line or Line Key set as Line) ....................................................................... 22
BLF or BLF List Key LED :( Line/Line Key set as BLF) .............................................. 22
Shared Line Key LED: .................................................................................................... 22
Other Key Led ................................................................................................................. 23
User Interface .......................................................................................................................... 23
Line Key Function Overview .................................................................................................. 25
6
Page 7

Table of Content
Basic Features Configuration ..................................................................................................... 27
General Settings ...................................................................................................................... 27
Web Login ....................................................................................................................... 27
Administrator Password .................................................................................................. 28
Language ......................................................................................................................... 29
Screen Saver .................................................................................................................... 30
Gray Level....................................................................................................................... 32
Time and Date ................................................................................................................. 32
LED Status Setting .......................................................................................................... 37
Key as Send ..................................................................................................................... 37
Network Setting ...................................................................................................................... 38
IPv4 ................................................................................................................................. 38
IPv6 ................................................................................................................................. 41
IPv4&IPv6 ...................................................................................................................... 43
PC Port ............................................................................................................................ 44
Contact Settings ...................................................................................................................... 45
Local Directory ............................................................................................................... 45
Remote Phonebook ......................................................................................................... 49
LDAP Phonebook ........................................................................................................... 49
Search Contact ................................................................................................................ 52
Call History Settings ............................................................................................................... 53
Call History ..................................................................................................................... 53
Audio settings ......................................................................................................................... 56
Ring Tone ........................................................................................................................ 56
Volume ............................................................................................................................ 57
Voice Mail Tone .............................................................................................................. 58
Play Hold Tone ................................................................................................................ 58
Play Hold Tone Delay ..................................................................................................... 58
System Settings ....................................................................................................................... 59
Dial Plan .......................................................................................................................... 59
Dial-Now Timeout .......................................................................................................... 60
No Key Entry Timeout .................................................................................................... 61
Emergency Call ............................................................................................................... 61
Label Scroll ..................................................................................................................... 62
Show Missed Calls .......................................................................................................... 63
Auto Logout Time ........................................................................................................... 63
Reboot in Talking ............................................................................................................ 63
Detect IP Conflict ............................................................................................................ 64
Redial Mode .................................................................................................................... 64
Keypad Lock ................................................................................................................... 64
Suppress DTMF Display ................................................................................................. 66
Suppress DTMF Display Delay ...................................................................................... 66
Check-Syn With Authenticate ......................................................................................... 66
Other features settings ................................................................................................................ 67
7
Page 8

Table of Content
Action URL ............................................................................................................................. 67
Softkey Layout ........................................................................................................................ 67
Programmable Key ................................................................................................................. 69
Basic Call Features ...................................................................................................................... 69
Place a Call ............................................................................................................................. 69
End a Call ................................................................................................................................ 71
Receive a Call ......................................................................................................................... 72
Incoming Call Show Mode ..................................................................................................... 72
Auto Answer ........................................................................................................................... 73
Call Hold ................................................................................................................................. 74
Call Transfer ............................................................................................................................ 75
Call Conference....................................................................................................................... 78
Call Forward ........................................................................................................................... 79
Call Return .............................................................................................................................. 82
Call Back ................................................................................................................................. 83
Call Waiting Tone .................................................................................................................... 83
Hide Caller ID ......................................................................................................................... 85
Reject Anonymous .................................................................................................................. 85
Call Mute ................................................................................................................................ 86
DND ........................................................................................................................................ 86
Keypad Lock ........................................................................................................................... 87
Hot Line .................................................................................................................................. 88
Auto Redial ............................................................................................................................. 89
Function Key Features Settings ................................................................................................. 90
Line ......................................................................................................................................... 90
Speed Dial ............................................................................................................................... 91
BLF ......................................................................................................................................... 92
BLF List .................................................................................................................................. 93
Voice Message ......................................................................................................................... 95
Direct Pickup .......................................................................................................................... 95
Group Pickup .......................................................................................................................... 96
Call Park .................................................................................................................................. 97
Intercom .................................................................................................................................. 98
Intercom Barge ........................................................................................................................ 99
DTMF ................................................................................................................................... 100
Prefix ..................................................................................................................................... 101
Local Group .......................................................................................................................... 102
XML Group ........................................................................................................................... 103
LDAP .................................................................................................................................... 104
Broadsoft Group .................................................................................................................... 105
Conference ............................................................................................................................ 105
Forward ................................................................................................................................. 106
Transfer ................................................................................................................................. 107
Hold....................................................................................................................................... 108
8
Page 9

Table of Content
Group Listening .................................................................................................................... 108
DND ...................................................................................................................................... 109
Redial .................................................................................................................................... 110
SMS....................................................................................................................................... 110
Send SMS ...................................................................................................................... 110
Set SMS Line Key ......................................................................................................... 111
Record ................................................................................................................................... 112
URL Record .......................................................................................................................... 112
Paging ................................................................................................................................... 113
Shared Line ........................................................................................................................... 114
Public Hold ........................................................................................................................... 115
Private Hold .......................................................................................................................... 116
Share line .............................................................................................................................. 116
Hot Desking .......................................................................................................................... 118
ACD ...................................................................................................................................... 119
Zero Touch ............................................................................................................................ 120
Multicast Paging ................................................................................................................... 121
Sending RTP Stream ..................................................................................................... 122
Receiving RTP Stream .................................................................................................. 122
Upgrade ....................................................................................................................................... 124
Factory Reset ........................................................................................................................ 124
Pcap Feature .......................................................................................................................... 125
System Log ........................................................................................................................... 126
Upgrade ................................................................................................................................. 126
Configuration File ................................................................................................................. 128
Troubleshooting .......................................................................................................................... 129
Why is the phone LCD screen blank? ................................................................................... 129
Why does the phone display "Network Unavailable"? ......................................................... 129
Why can’t I get a dial tone? .................................................................................................. 129
Where to set the tone? ........................................................................................................... 130
How to download XML Configuration? ............................................................................... 130
How to Import Trusted CA certificate? ................................................................................. 130
How to Import Server CA certificate? .................................................................................. 131
How to use Vlan? .................................................................................................................. 131
How to use LLDP? ................................................................................................................ 132
How to Set LCD and Web GUI? ........................................................................................... 132
How to Upgrade via FTP? .................................................................................................... 132
How to make Ringtone? ........................................................................................................ 132
How to use Open VPN? ........................................................................................................ 132
Provisioning Guide on Free PBX .......................................................................................... 132
Redundancy Server ............................................................................................................... 132
How to Use Auto Provision Phonebook? .............................................................................. 133
All Documents ...................................................................................................................... 133
9
Page 10
Getting Started
Getting Started
Packing List
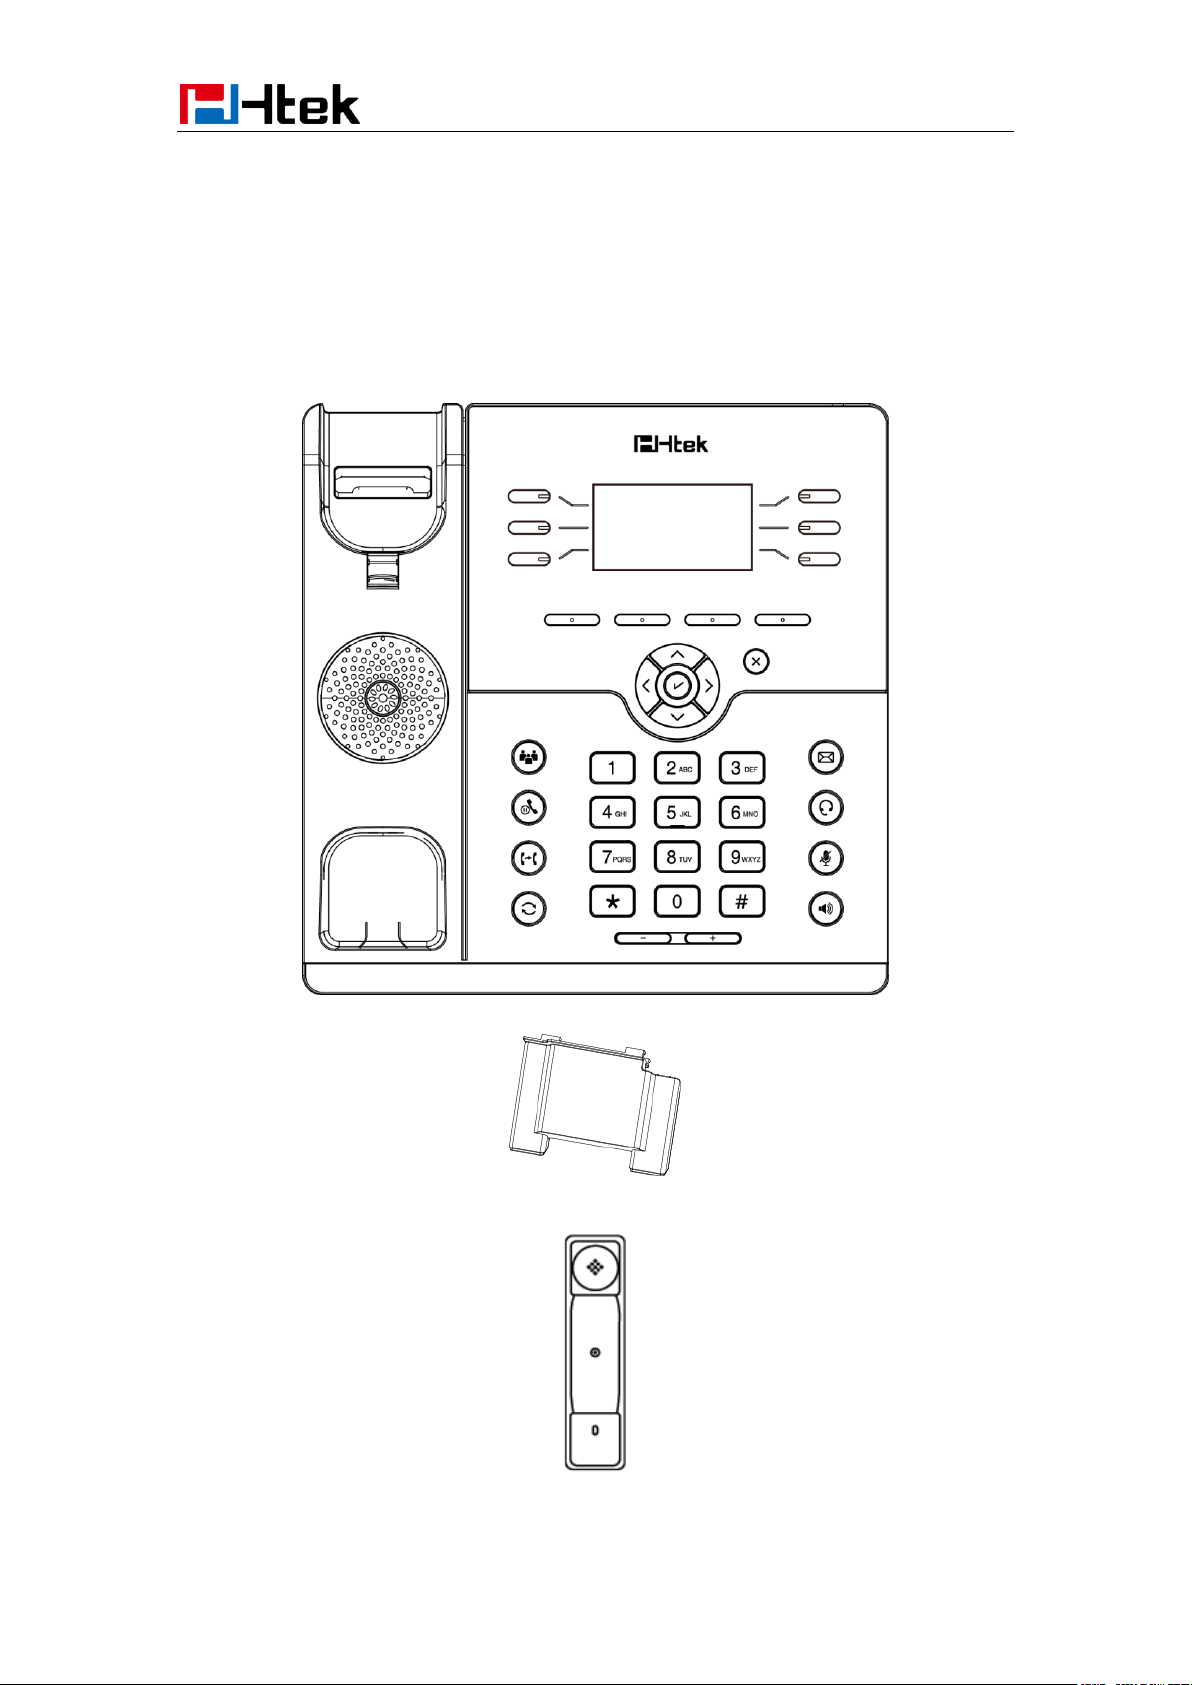
The package contains the following parts, please check if all the items are not missed:
1. The phone device
2. The footstand
3. Handset
10
Page 11
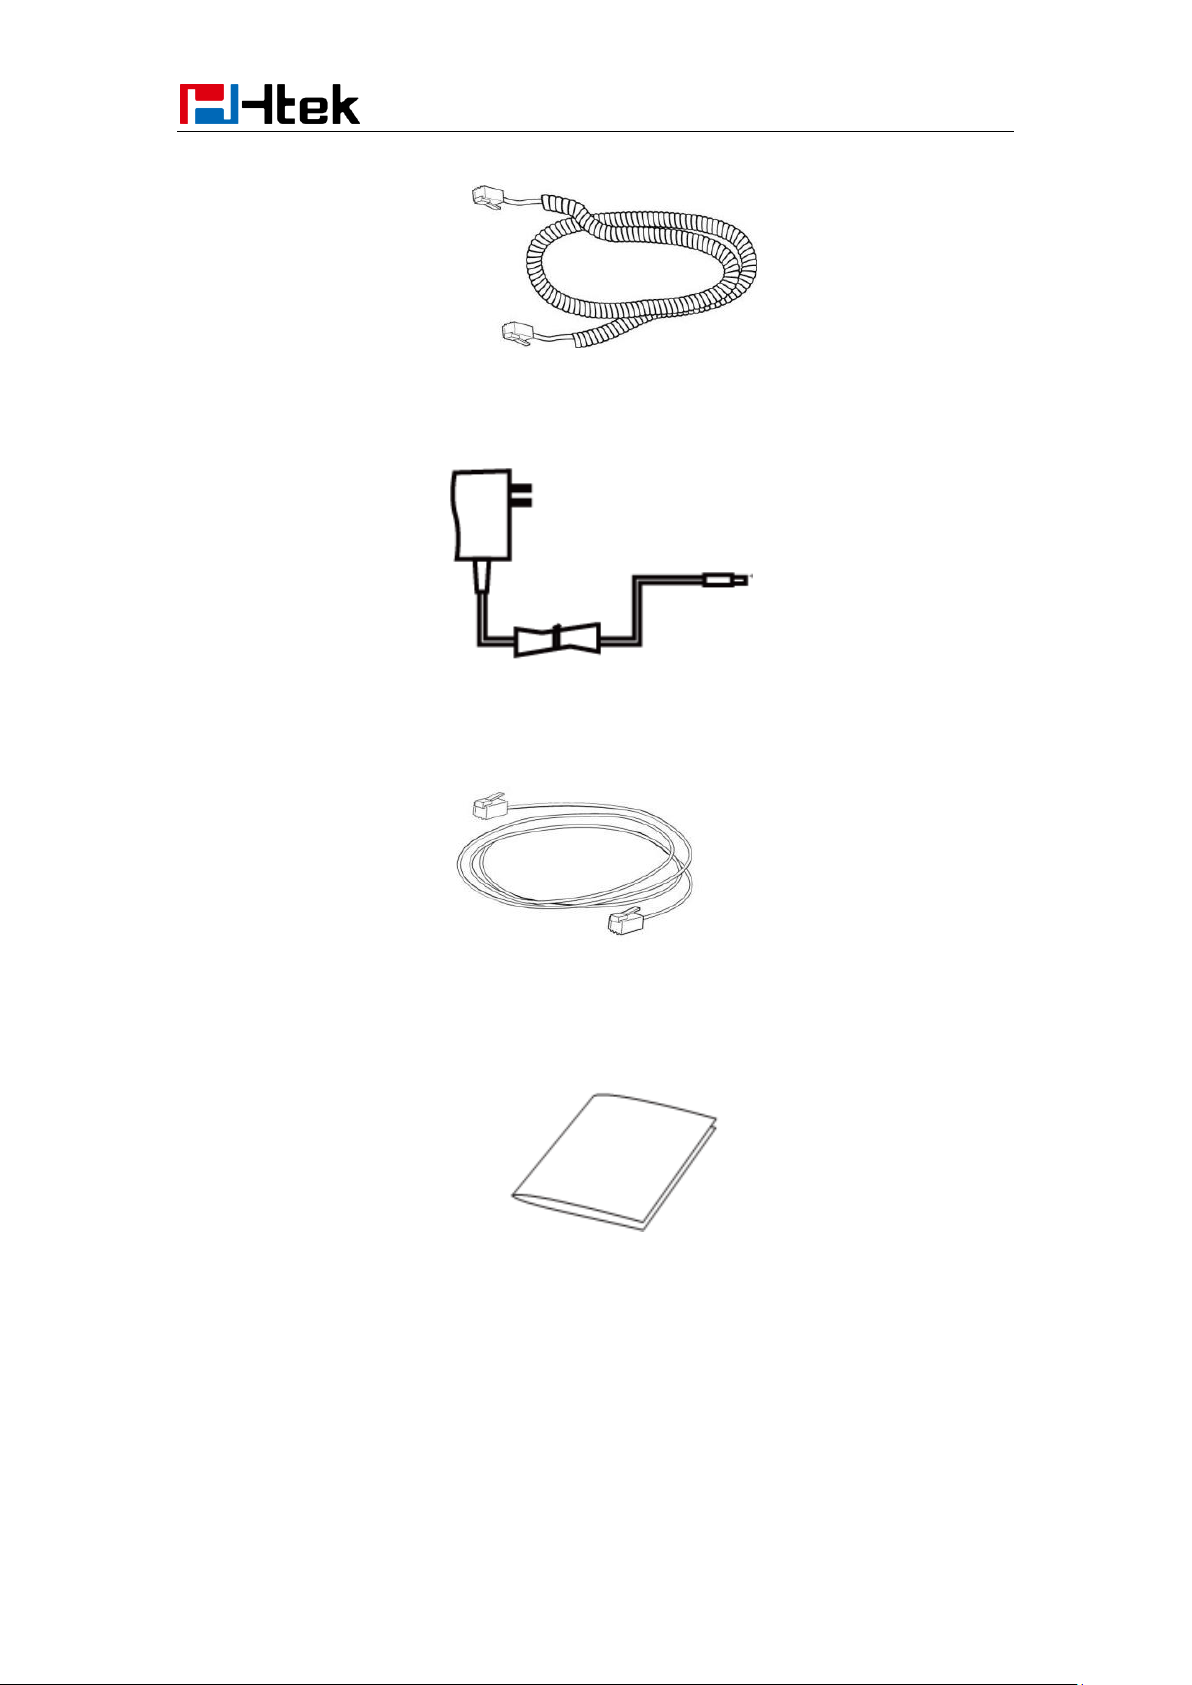
4. Headset cord
5. Power adapter
6. Ethernet cable
Getting Started
7. Quick installation reference
11
Page 12
Getting Started
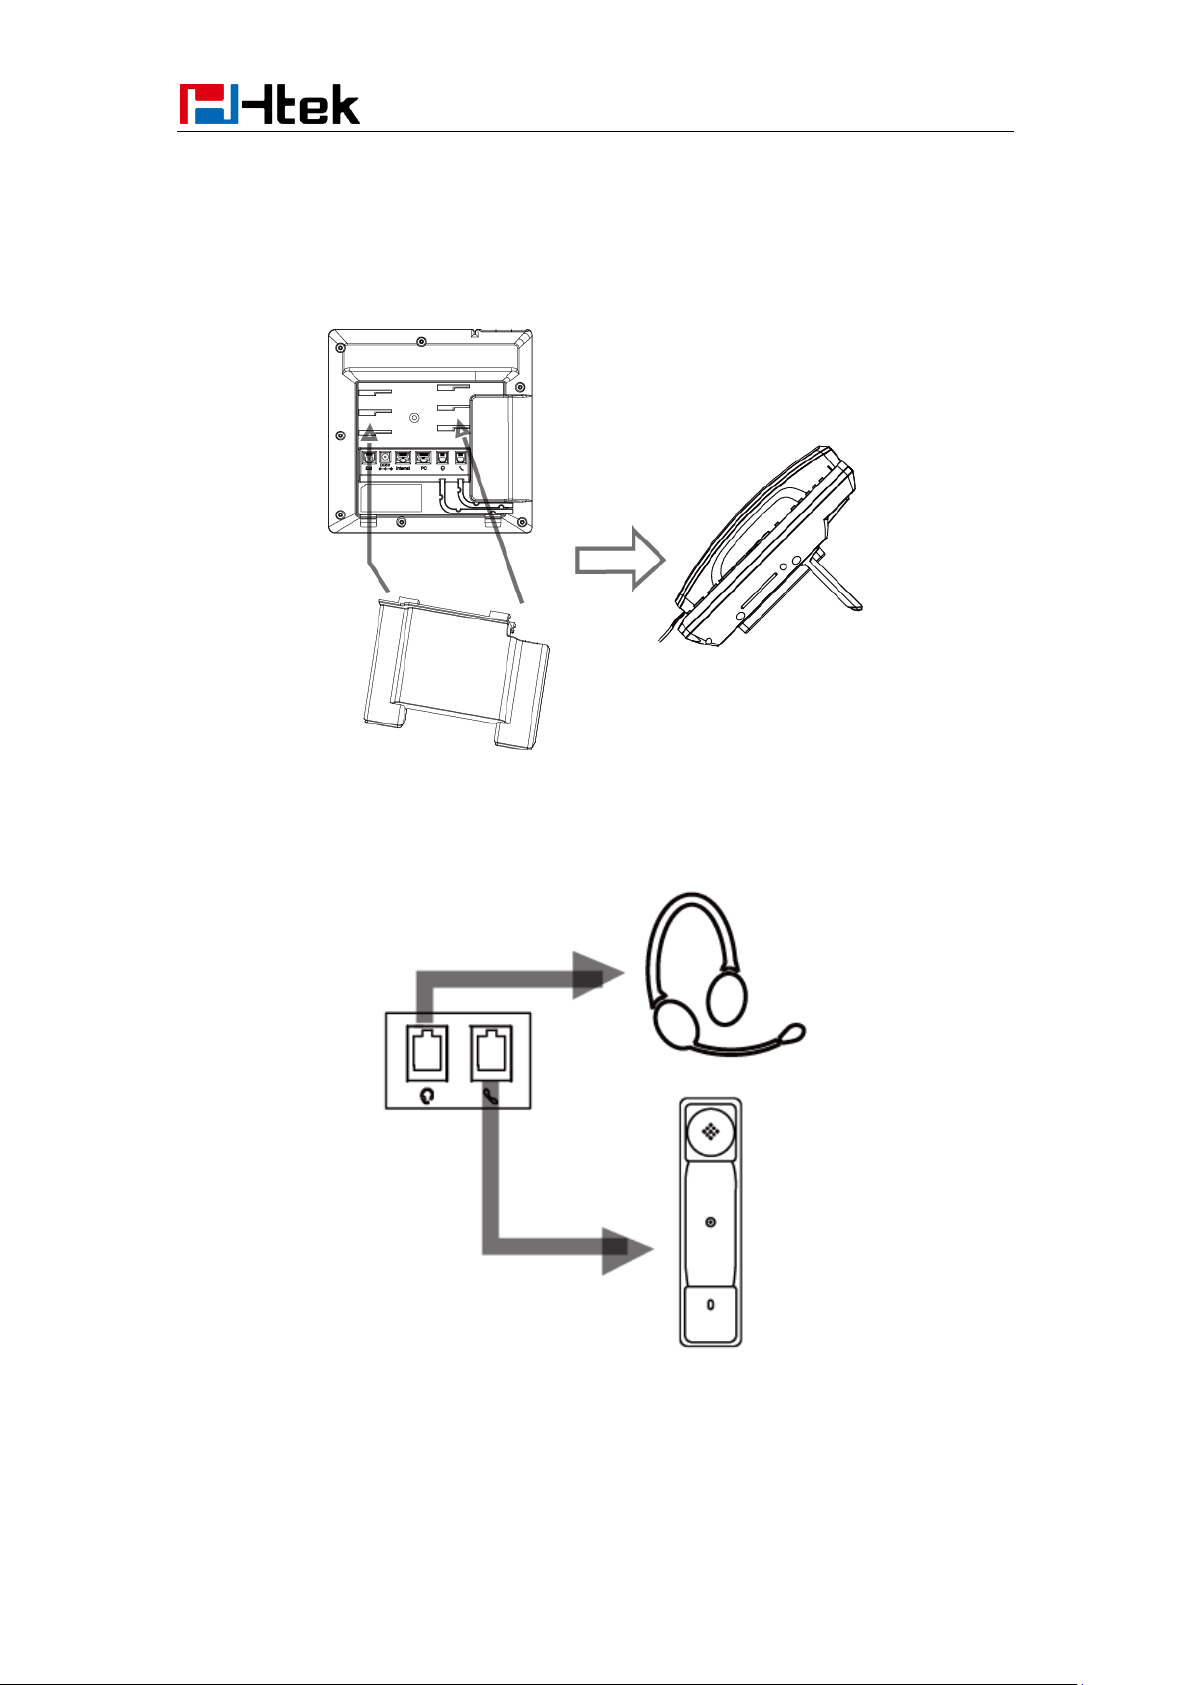
Phone Installation
1. Attach the Foot stand
2. Connect the Handset and optional Headset
12
Page 13
Getting Started
3. Connect the Network and Power
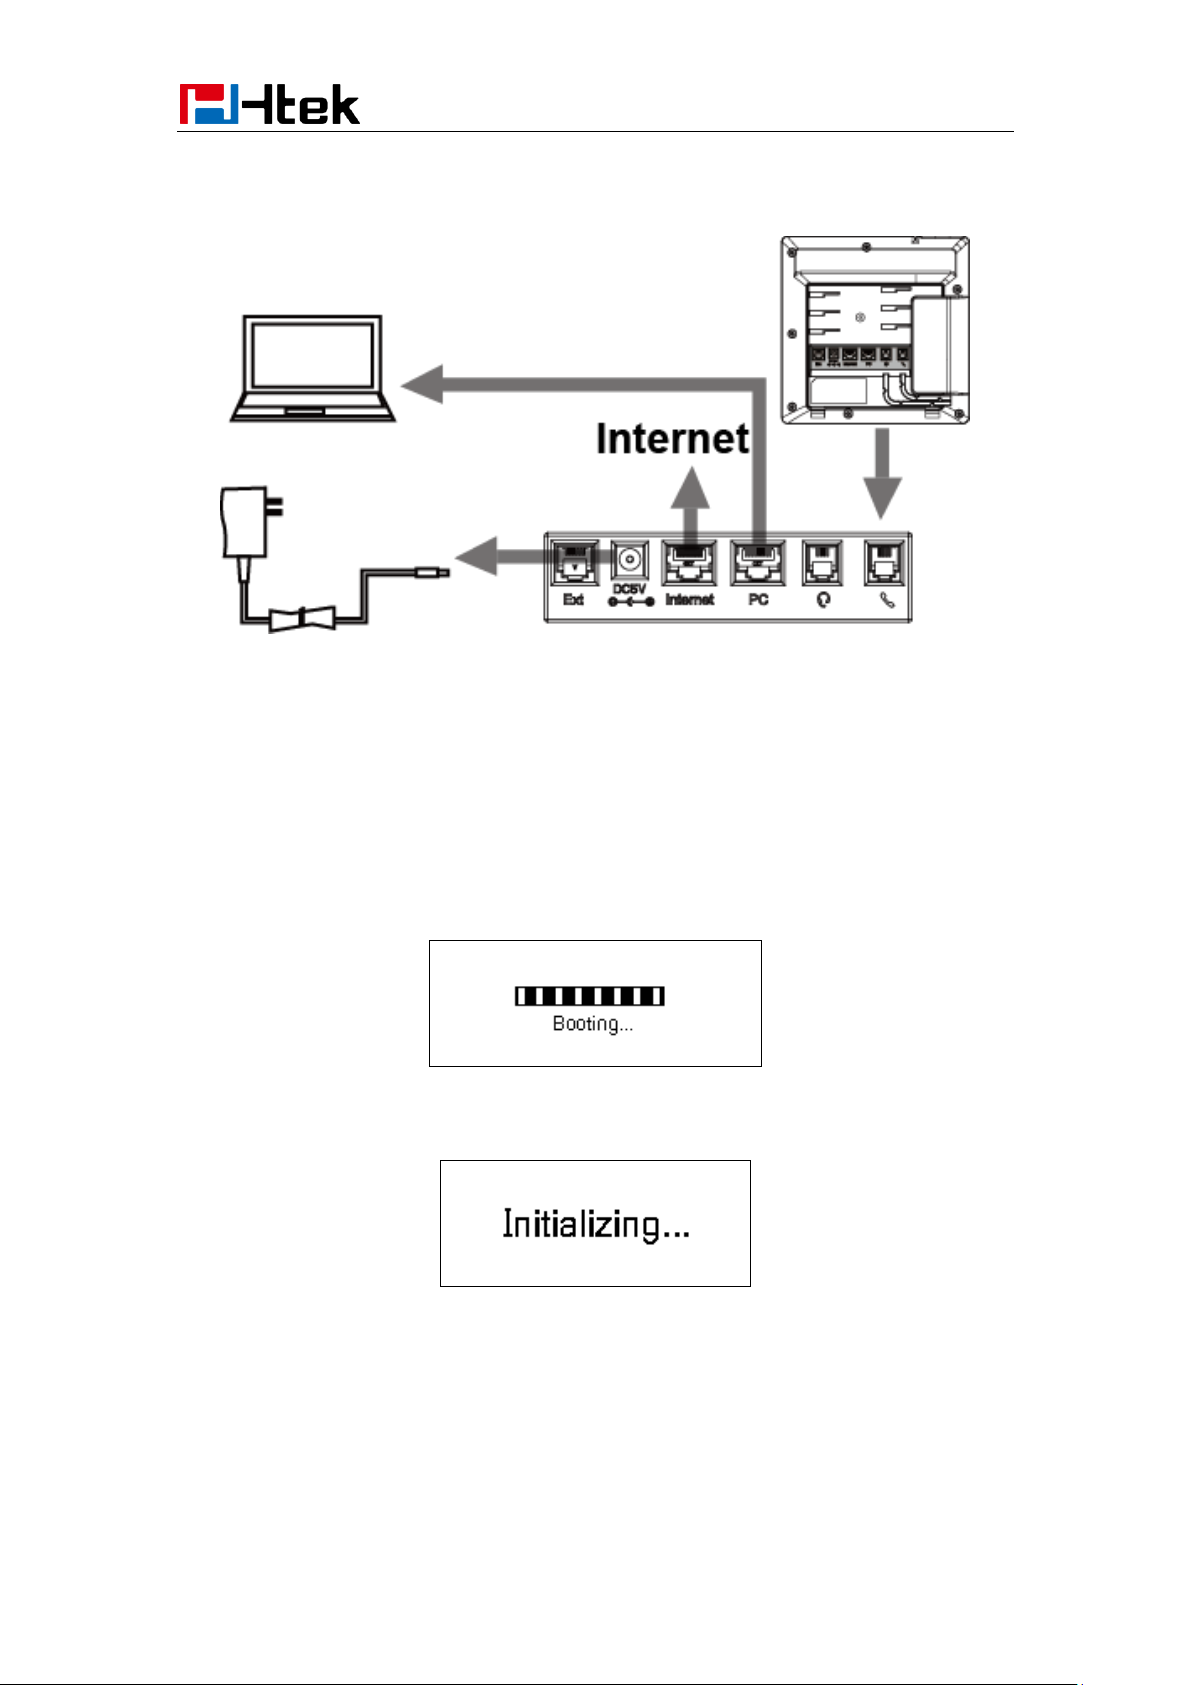
Initialization
After your phone has been powered up, the system boots up and performs the following steps:
Automatic Phone Initialization
The phone finishes the initialization process by loading the saved configuration. The phone LCD
screen will display "Booting"
And then show “Initializing “during the initialization.
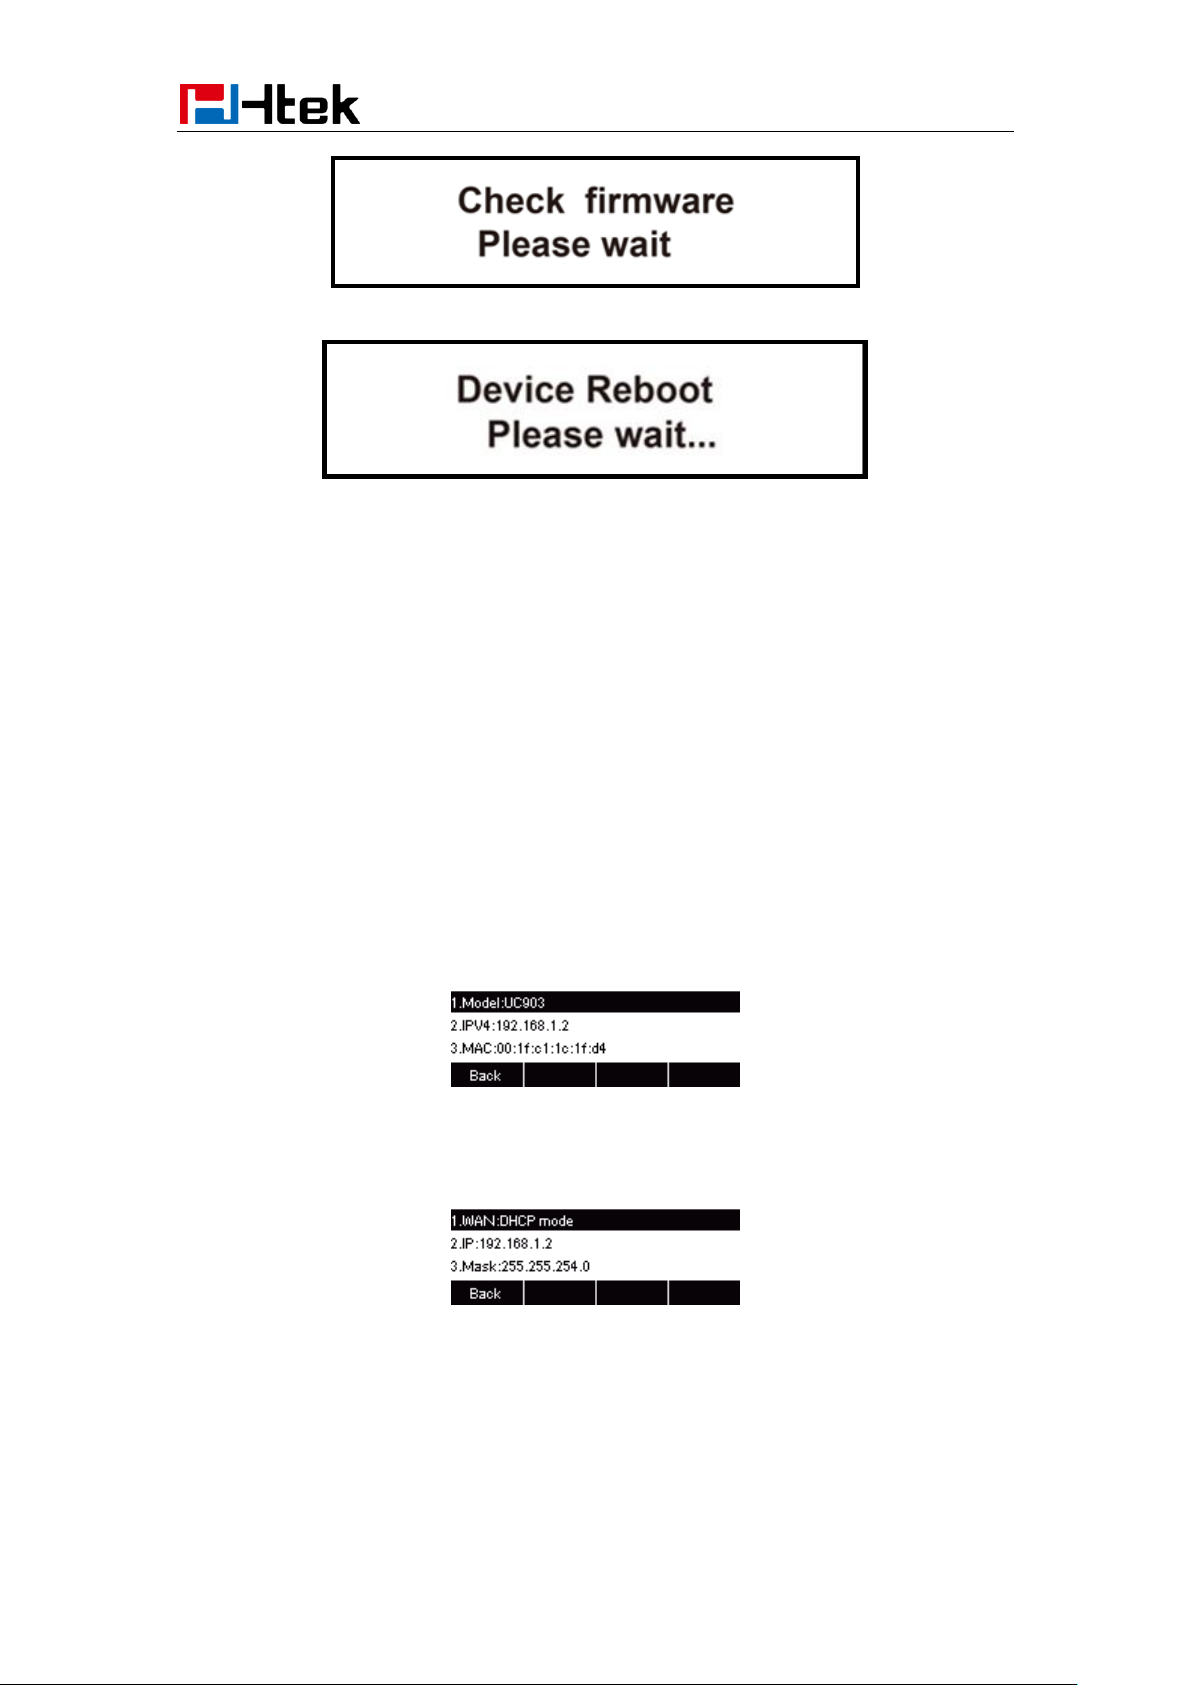
The IP Phone will upgrade the firmware if there is a new firmware on your server. And the IP
Phone will show “Check firmware, please waiting…“ after initialization.
13
Page 14
Getting Started
Then IP Phone will show Reboot information:
By default the phone attempts to contact a DHCP server in your network in order to obtain its
valid network settings, e.g. IP address, subnet mask, default gateway, DNS server.
Status
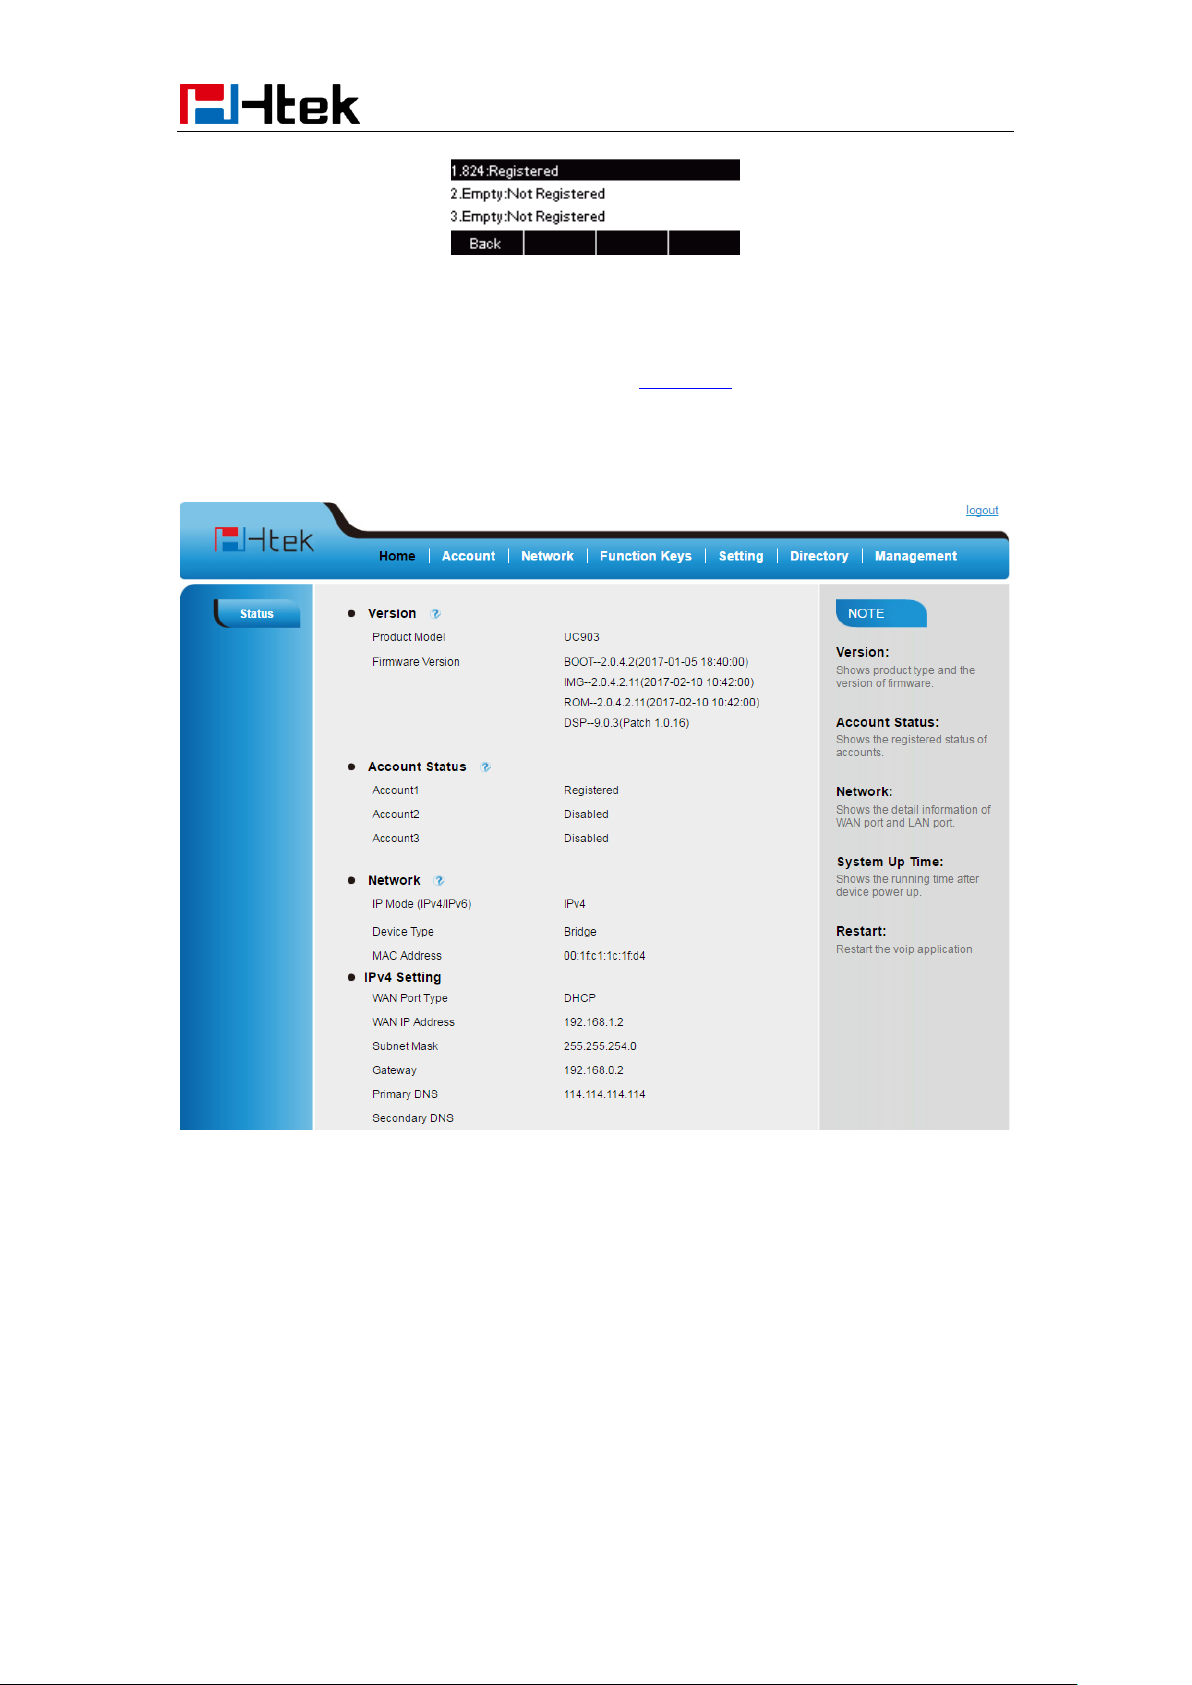
You can view the system status of your phone via phone user interface or web user interface. The
information of phone status includes: Information(e.g., Model, IP, MAC, Firmware, Hardware),
Network(e.g., WAN Type, IP, Mask, LAN Type, Gateway, DNS… )Account (e.g., register status
of accounts)
To view the phone status via phone interface:
1. Press Menu →Status →Information
2. Press Menu →Status →Network
3. Press Menu →Status →Accounts
14
Page 15
Getting Started
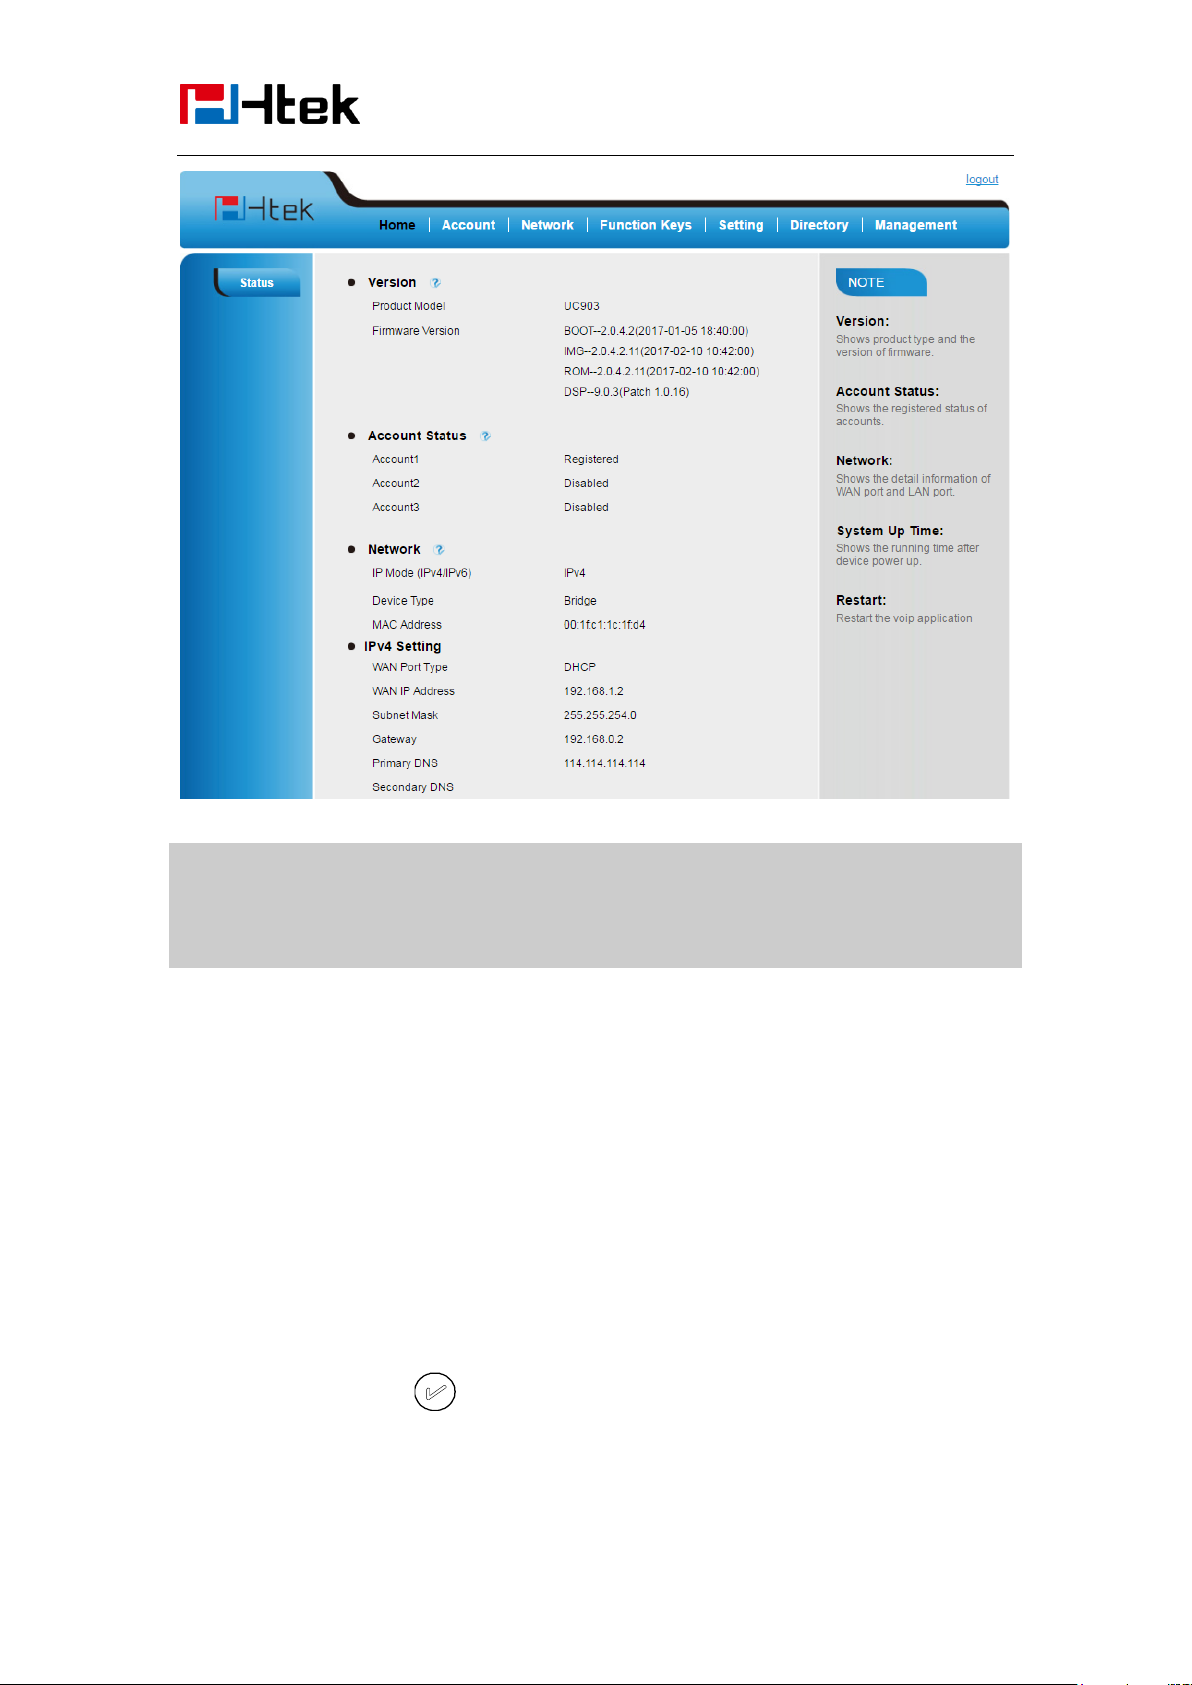
To view the phone status via Web interface:
1. Login webpage (For How to login, please refer to Web Login)
2. View the information of Version, Account and Network.
Registration
To register via phone interface:
1. Press Menu SettingAdvanced settings (default password: admin)Accounts
2. Select the desired account
3. Select Enable for Account active
15
Page 16

Getting Started
4. Filled the SIP Server
5. Filled the Failover SIP server if need (Optional)
6. Filled the Outbound Proxy (Optional)
7. Filled the SIP User ID, Authenticate ID
8. Filled the password, Name (shown on LCD) and Ringtone.
9. Press Save to save the configuration.
Note:
If there is a port of sip server, you need to press “1” on the keypad, then you will find the “:”.
Additional Information:
When the current input method is ABC/abc/2ab,
Pressing “1”, you will find “, . ?:;”
Pressing “0”, you will find “ < >(){}[]”
Pressing “*”, you will find “*/”!@$”
Pressing “#”, you will find “#’%&*|”
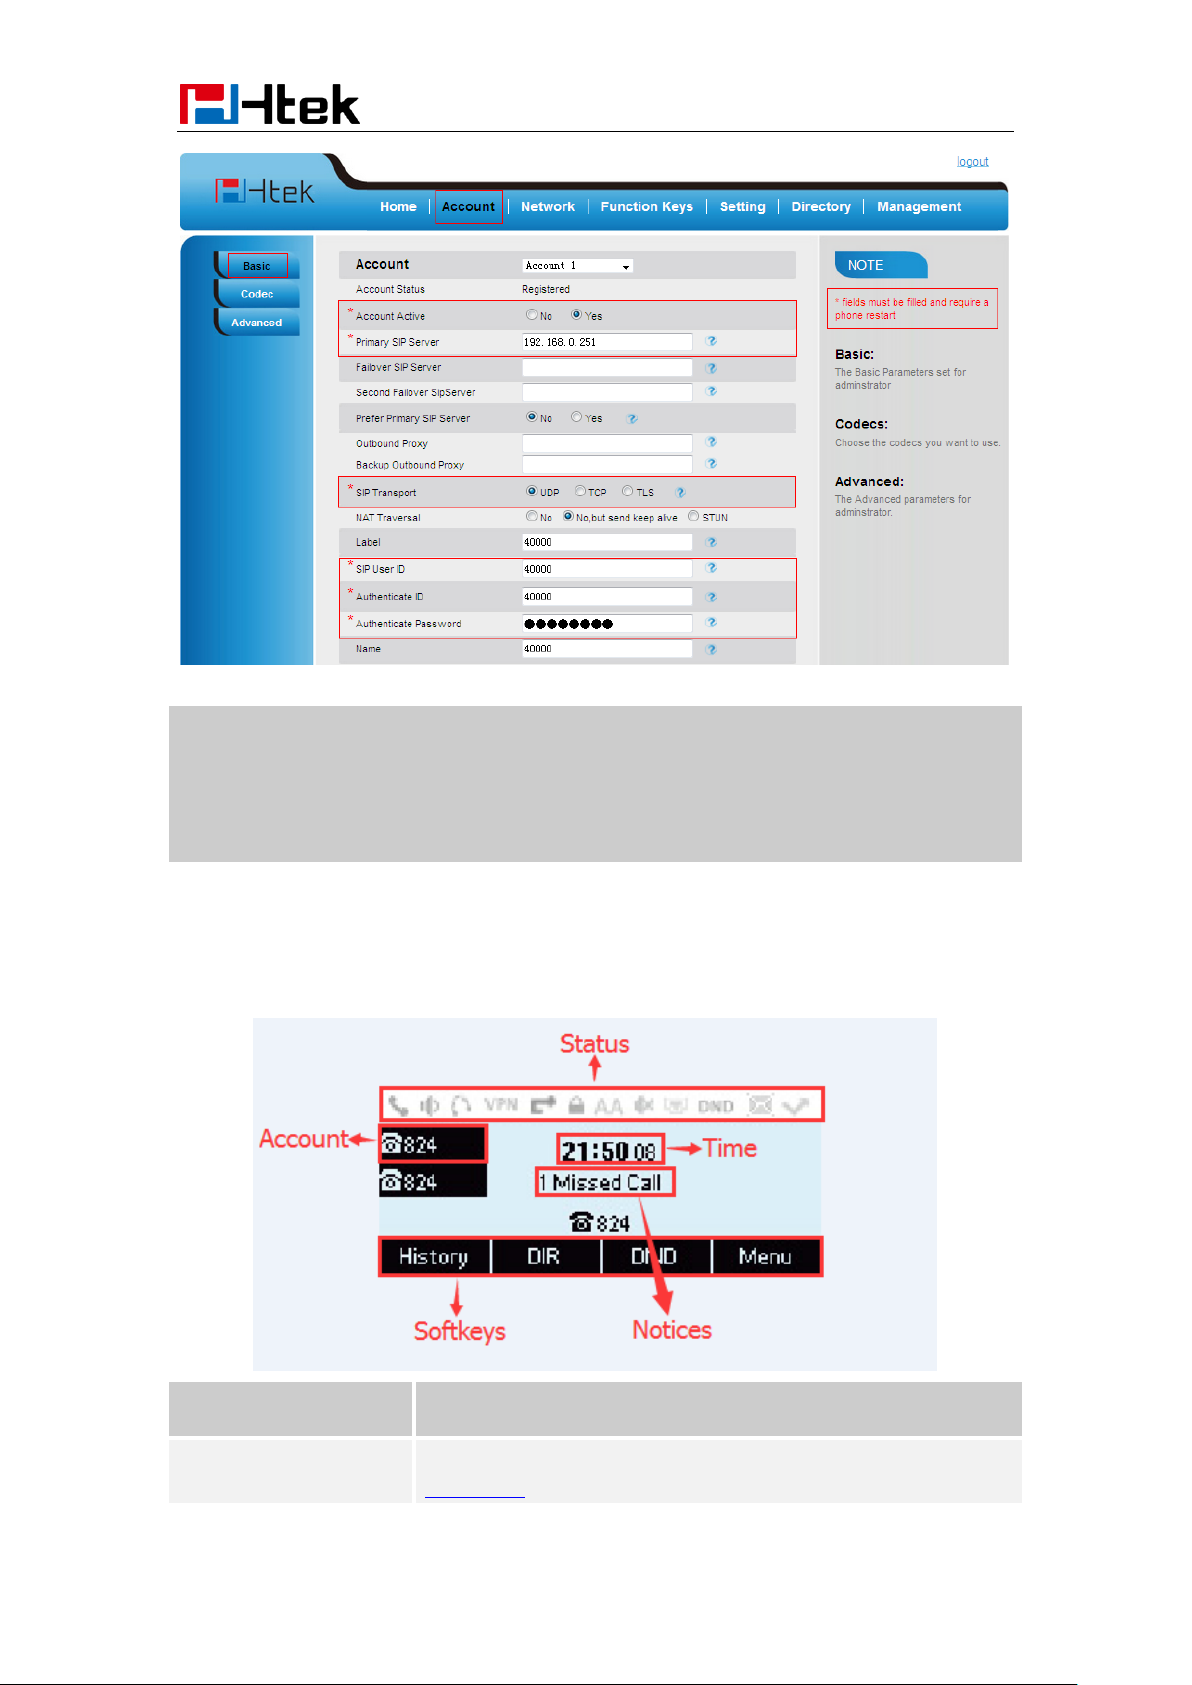
To register via web interface:
1. Login webpage and Click AccountBasic
2. Select the desired Account
3. Select Yes for Account Active
4. Filled the Primary SIP SERVER and other account information
5. Click to save the configuration.
16
Page 17
Getting Started
Note:
1. All fields with * must be filled. If changed, it requires a phone restart.
2. Account Status says the account registered successfully or not.
3. When change the account information via phone, it will shown Restart note when back
to idle page.
Name
Description
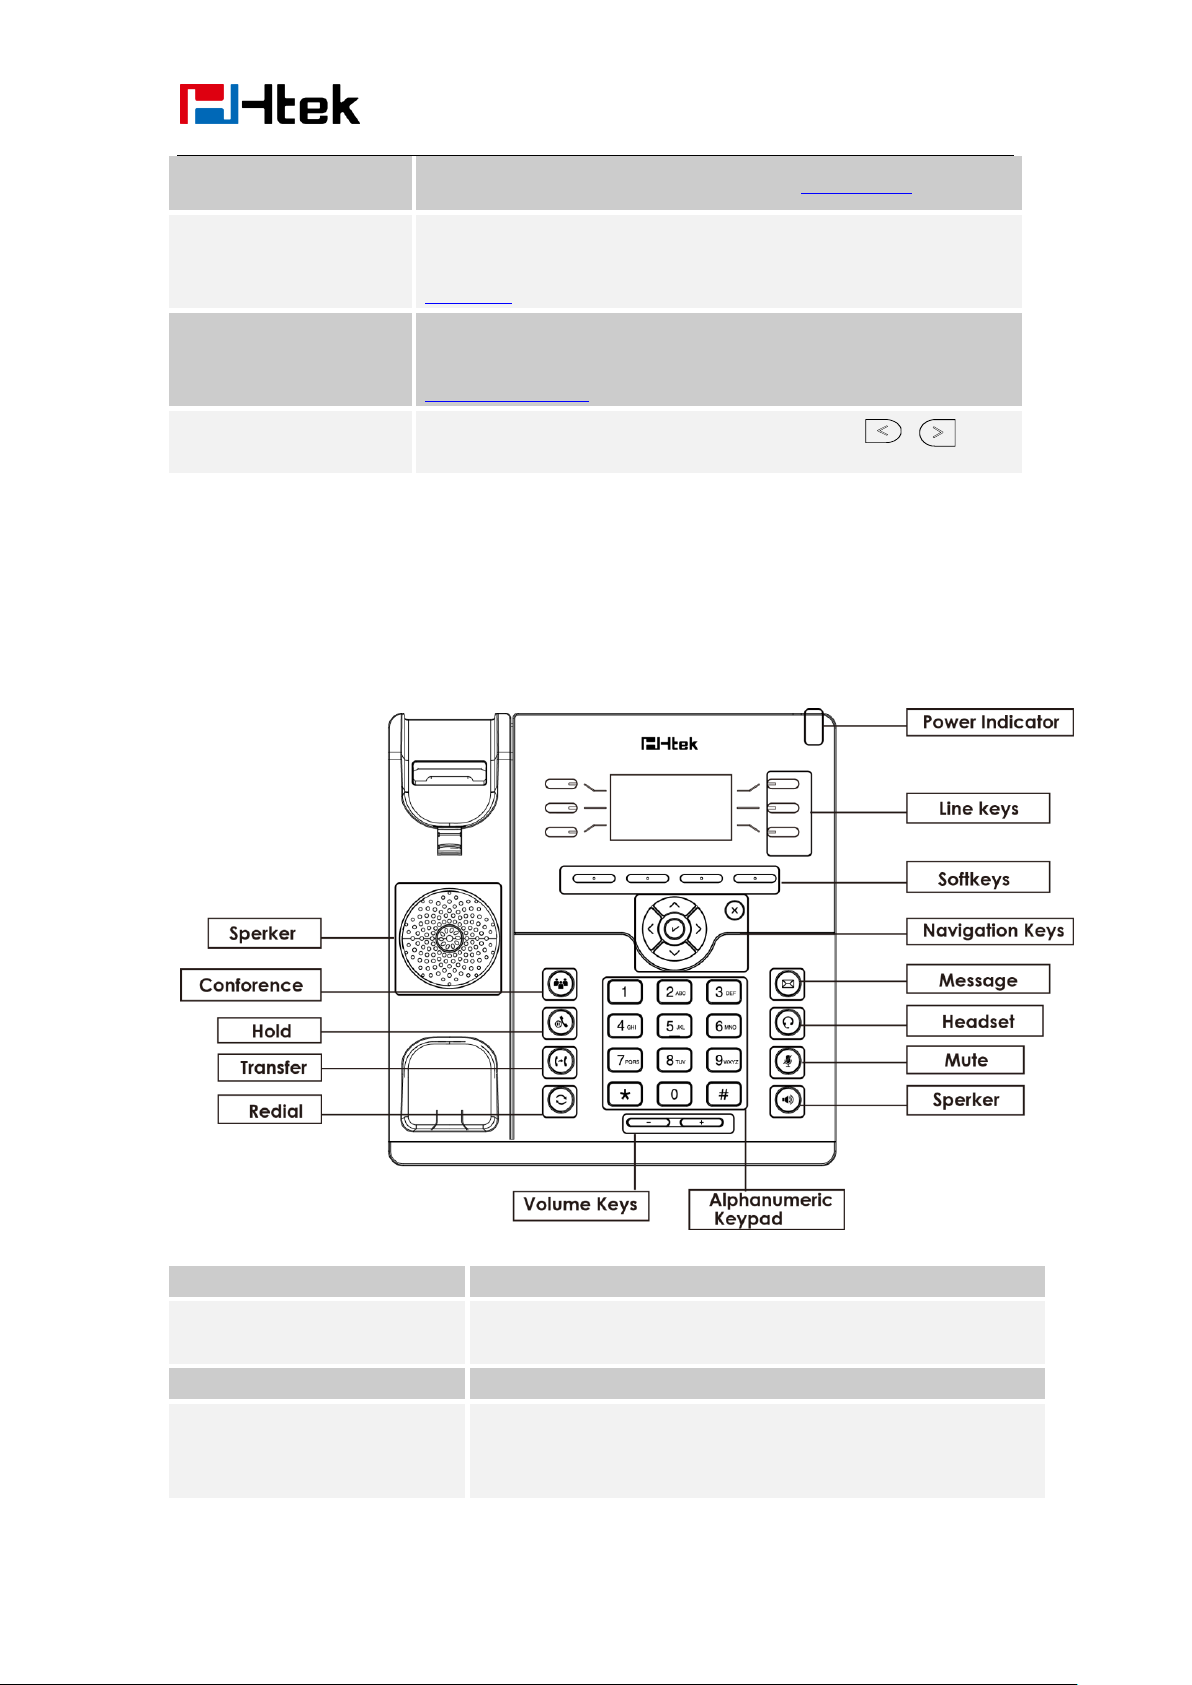
1. Date& Time
It shows the phone’s time & date. For Date& time setting, see
Time&Date
Idle Screen
17
Page 18
Getting Familiar
2. Notice
It shows the phone features status, More see Icon Preview
3. Line Keys
This area shows the four line key labels. Line keys are also can be
used as other function keys. For more information you can refer to
Line Keys
4. Soft Key
This area shows the soft key labels. The default soft key labels are
“History”, “Directory”, “DND” and “Menu”. More to see
Programmable Key
5. Default Account
This shows the current use account. User can use to
change the default use account.
Item
Description
LCD screen
To Presentation all information about the date& time, accounts,
soft keys, messages, calls and other some information.
Power Indicator LED
To indicate the power status
Line keys
The phone supported up to 4 accounts
1. Steady green: idle interface, during a call..
2. Blink red: a call incoming
with Your Phone
Getting Familiar with Your Phone
Hardware Components Preview
18
Page 19

with Your Phone
Soft keys
Labels automatically to identity their context-sensitive features.
Navigation keys
1. OK.
Up arrow key: To move up of the selection shows on the
screen.
Right arrow key: To move right of the selection
shows on the screen.
Left arrow key: To move left of the selection shows on
the screen.
Down arrow key: To move down of the selection shows
on the screen.
1. To return to idle screen.
2. To cancel the information or call on the screen.
Mute key
1. To mute the voice during the call (green light).
2. To un-mute the call.
Line Keys
To be configured as different function as:
1. Line
2. Speed Dial
3. BLF
4. BLF List
5. Voice mail
6. Direct Pickup
7. Group Pickup
8. Call Park
9. Intercom
10. DTMF
11. Prefix
12. Hold
13. Conference
14. DND
15. Redial
16. Transfer
17. SMS
18. Hot -desking
19. Call Return
20. Paging
21. Record
22. Shared Line
The LED lights status when set as Shared line:
Getting Familiar
19
Page 20
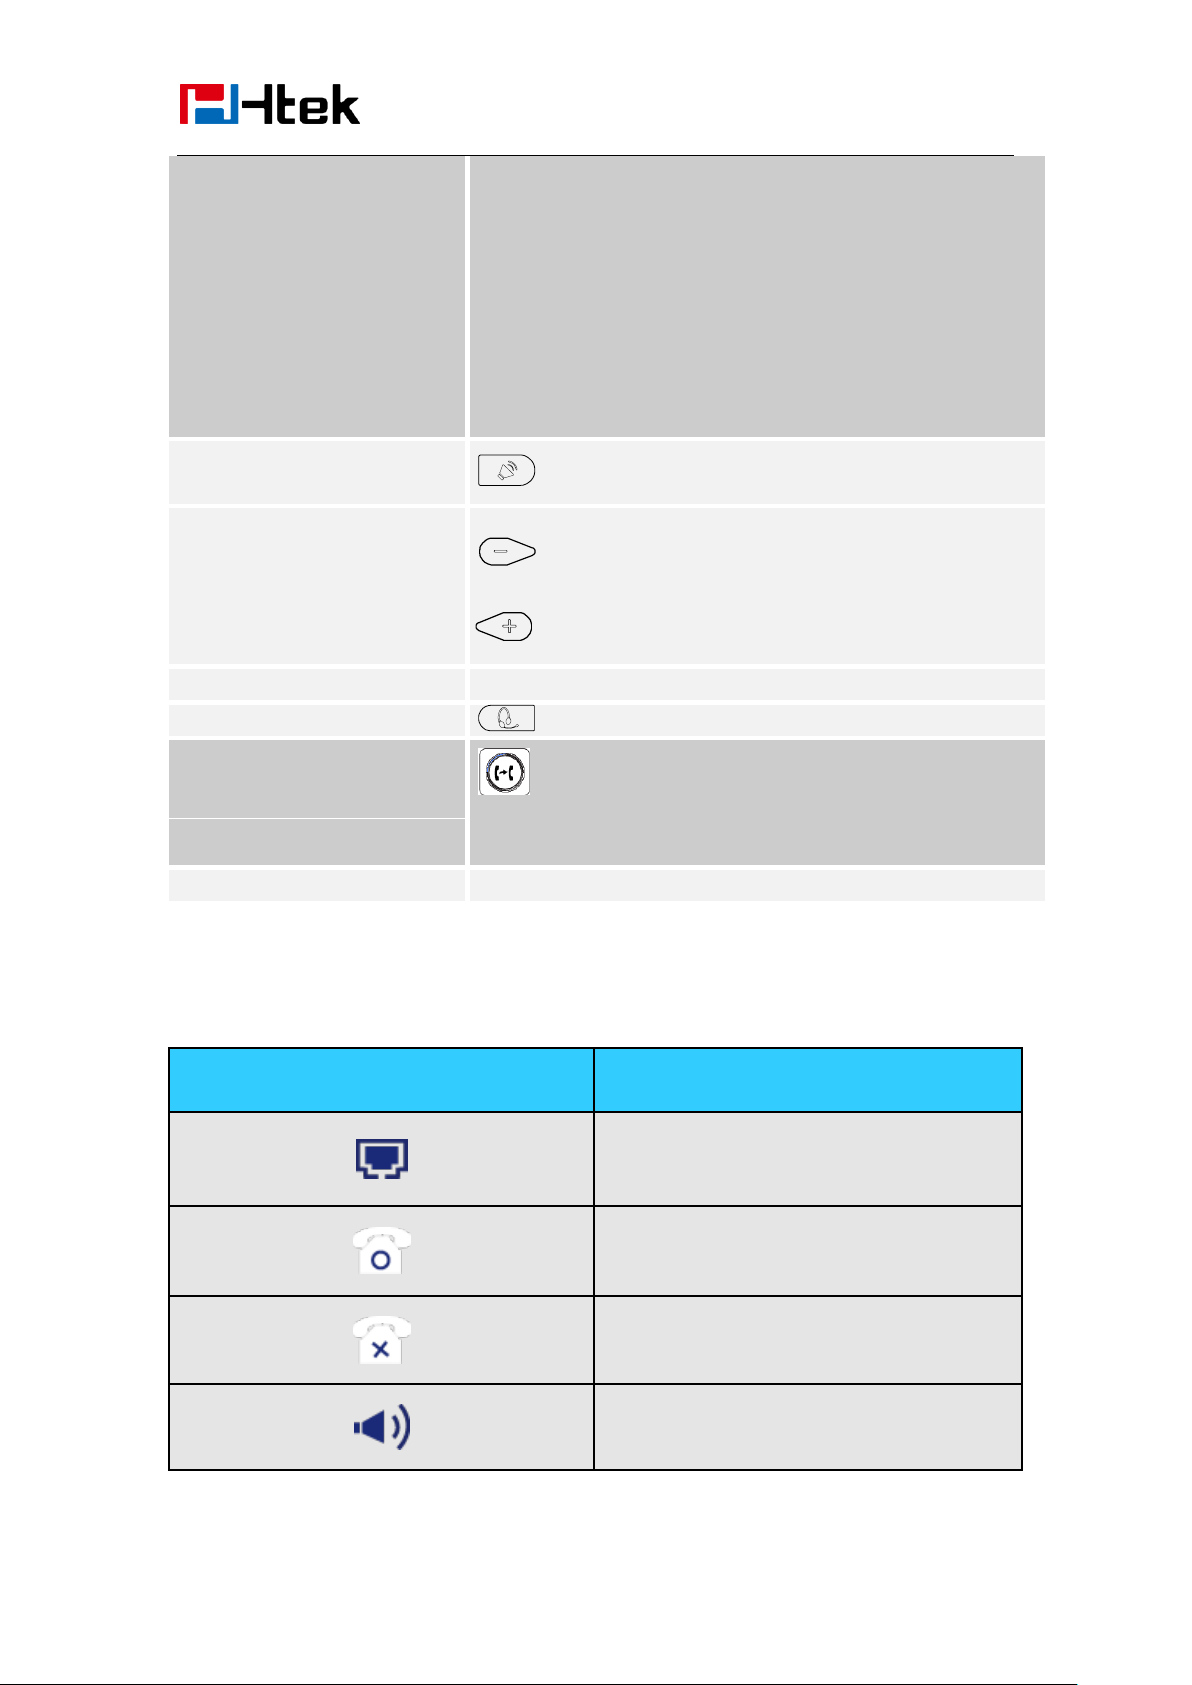
with Your Phone
Stay green: Idle
Stay red: Busy
Blinked green: Ring Back
Blinked red: A call incoming
Steady orange: During a call
Blinked orange: Public Hold
Blinked green: Private Hold
Light Drown: Unregistered
Speaker
Press this button to place a call in hands-free mode.
Volume
To decrease the volume.
To increase the volume.
Alphanumeric keypad
To enter the phone numbers, letters and so on.
Headset
To indicate that the phone is or not in Headset mode.
Transfer
To transfer a call to a third party.
To enable or disable Forward feature during the idle page.
Icon
Description
Network
Registered succeed
Unregistered
Speakerphone mode
Getting Familiar
Icon Preview
20
Page 21
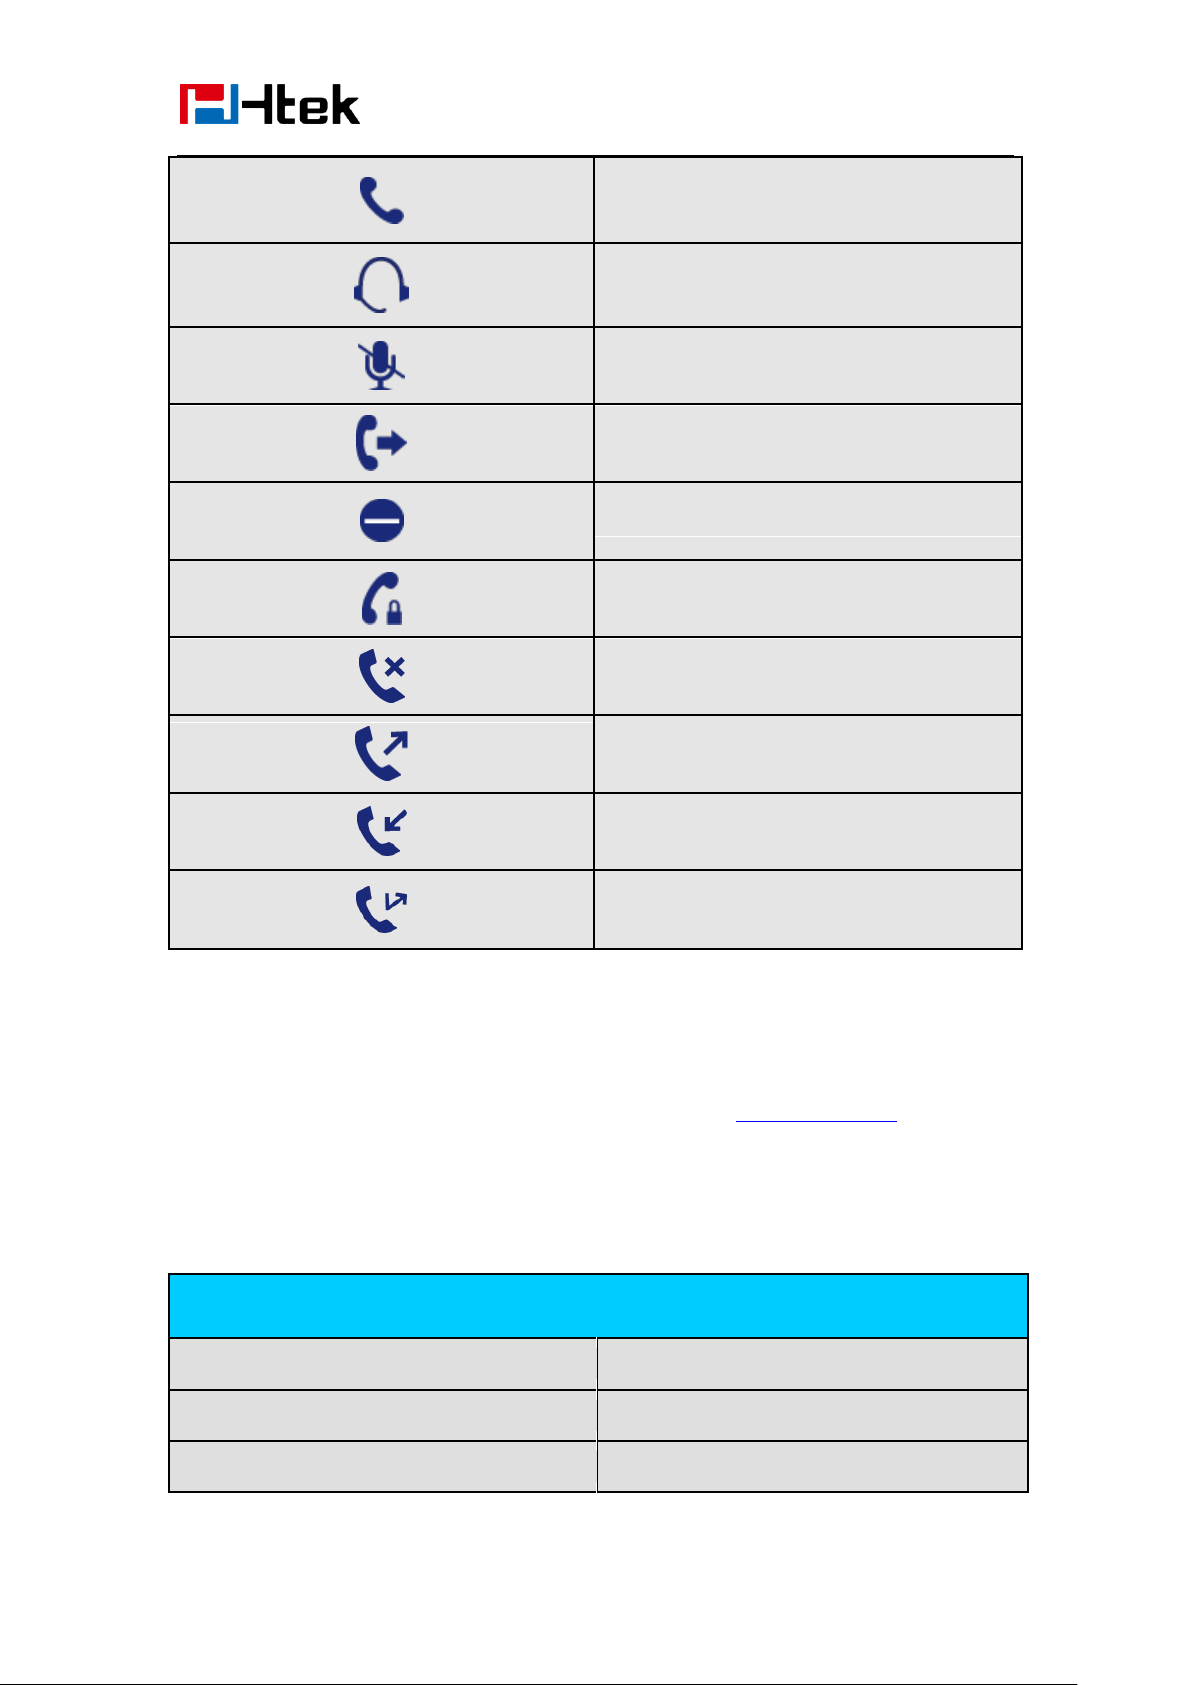
with Your Phone
Handset mode
Headset mode
Mute
Forward
Do Not Disturb
SRTP
Received calls
Dialed Calls
Missed calls
Forward calls
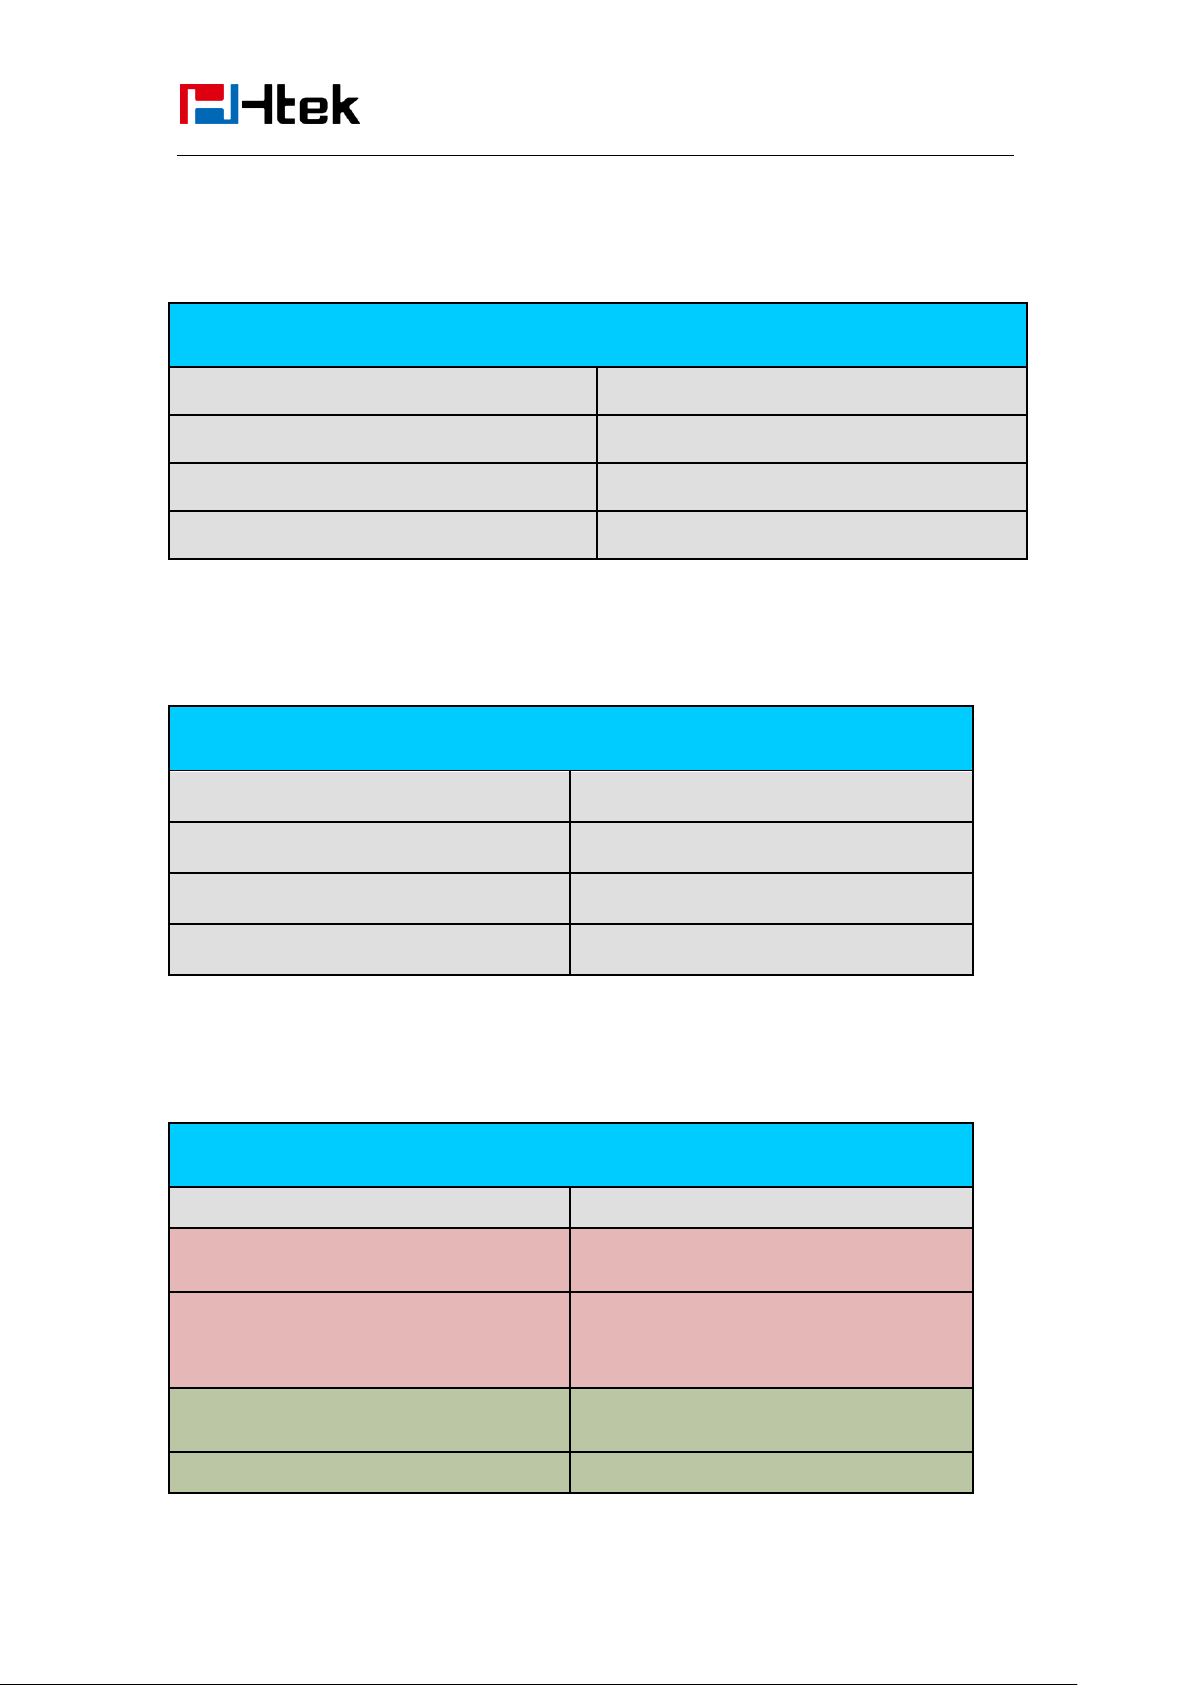
LED Status
Description
Blinked green
Ringing or have missed call
Steady Green
Idle status(Power on)
Off
Powered off.
Getting Familiar
LED Instruction
This part mainly instructs the LED status. The Power LED Status describe on the premise that the
LED setting all set as Yes. For LED status setting, please refer to: LED Status Setting
Power Indicator LED
21
Page 22
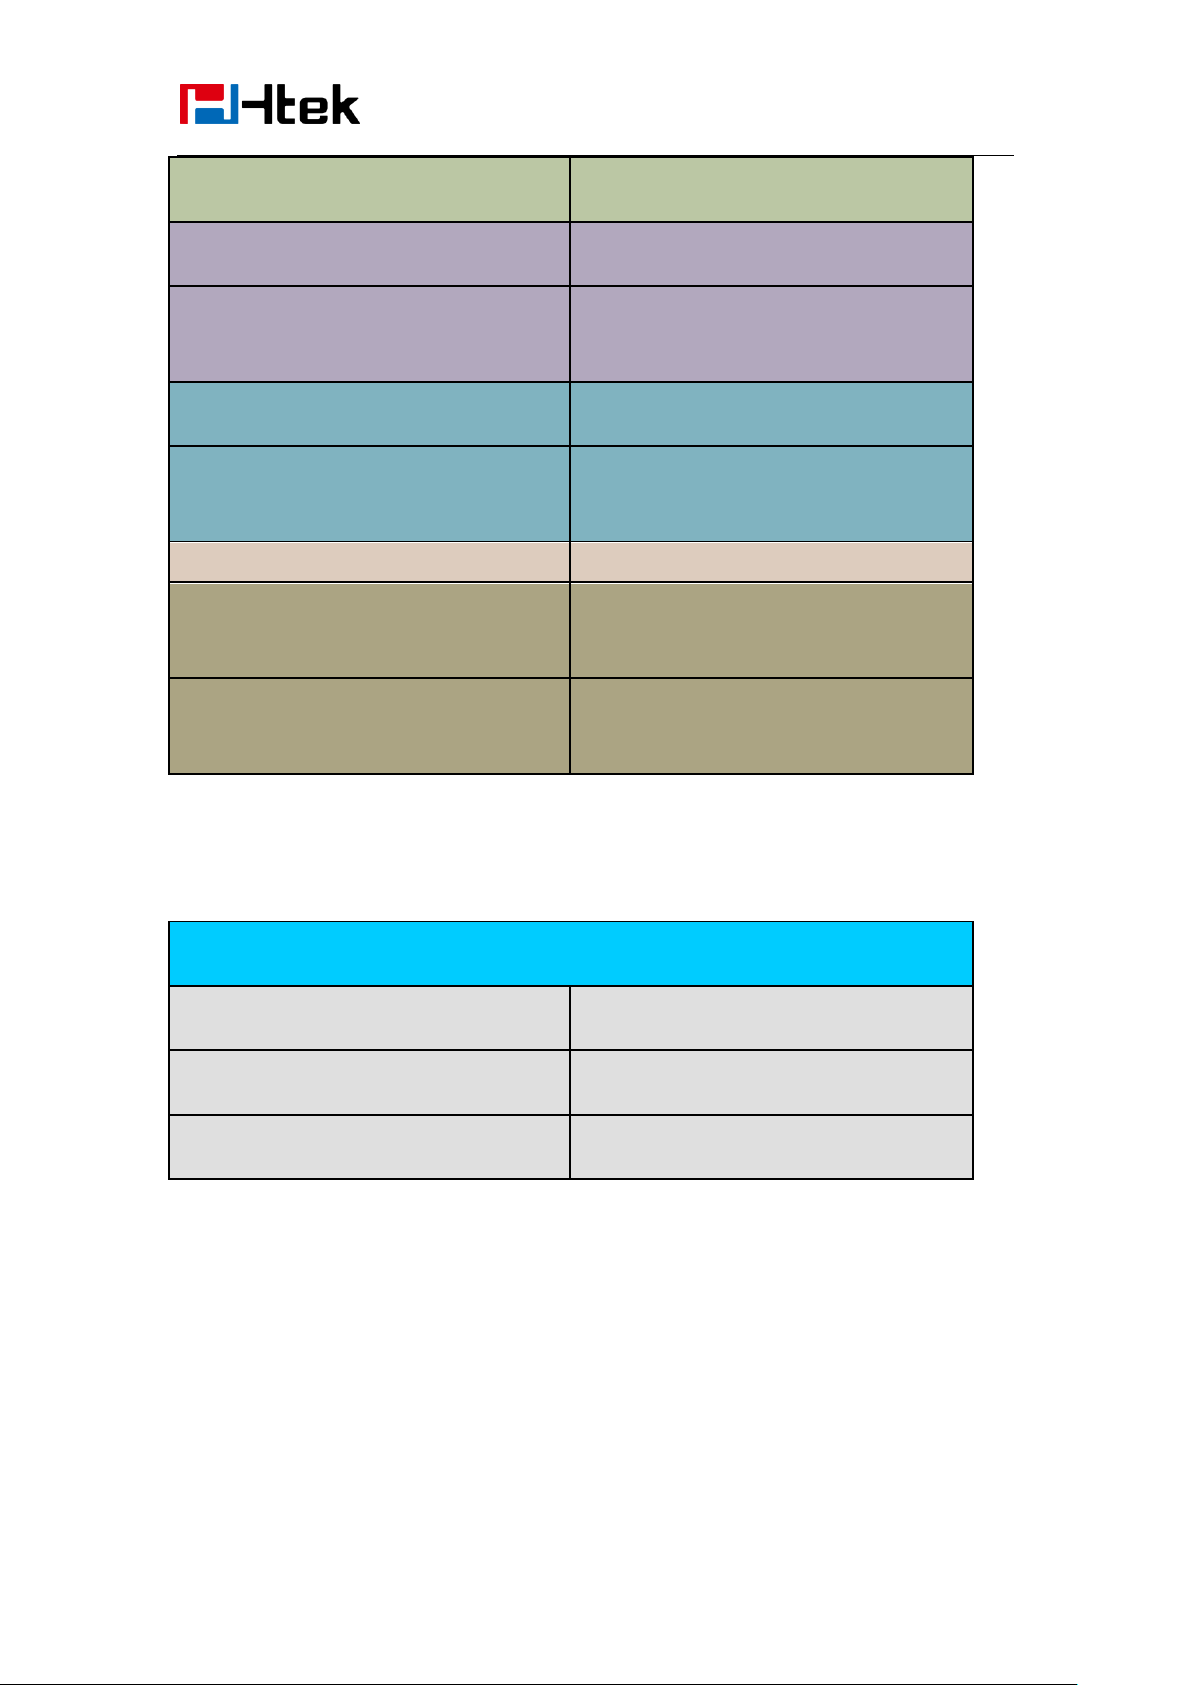
Getting Familiar
LED Status
Description
Steady Green
Idle status for the monitored line
Steady Red
The monitored line is calling or during a call
Blinked red
The monitored line is ringing.
Off
All other unknown status
LED Status
Description
Steady Green
Hold
Steady Green
Off hook or during a conversation.
Blinked red
Ringing.
Off
Idle status
LED Status
Description
off
Idle status
Stay green
a member of the SCA group in off-hook
status
Stay red
Other member of the SCA group’s led status
when a member of the SCA group in
off-hook status
Blinked green every 500ms
a member of the SCA group in Private hold
status.
Stay red
Other member of the SCA group’s led status
with Your Phone
Line LED:(Line or Line Key set as Line)
BLF or BLF List Key LED :( Line/Line Key set as BLF)
Shared Line Key LED:
22
Page 23
with Your Phone
when a member of the SCA group in Private
hold status
Blinked green every 500ms
a member of the SCA group in public hold
status
Blinked red every 500ms
Other member of the SCA group’s led status
when a member of the SCA group in public
hold status
Blinked green every 500ms
a member of the SCA group in progressing
status
Stay red
Other member of the SCA group’s led status
when a member of the SCA group in
progressing status
Blinked red every 100ms
Alerting
Stay green
a member of the SCA group in active
status when there is an incoming call
designated for the SCA group
Stay red
Other member of the SCA group’s led status
when a member of the SCA group in active
status
Key
Description
Headset Key
When use in headset mode, the led is steady
green or the LED is off.
Message Key
Blinked green when there is new messages
or the LED is off.
Mute Key
Red when the mute the call, or the LED is
off.
Getting Familiar
Other Key Led
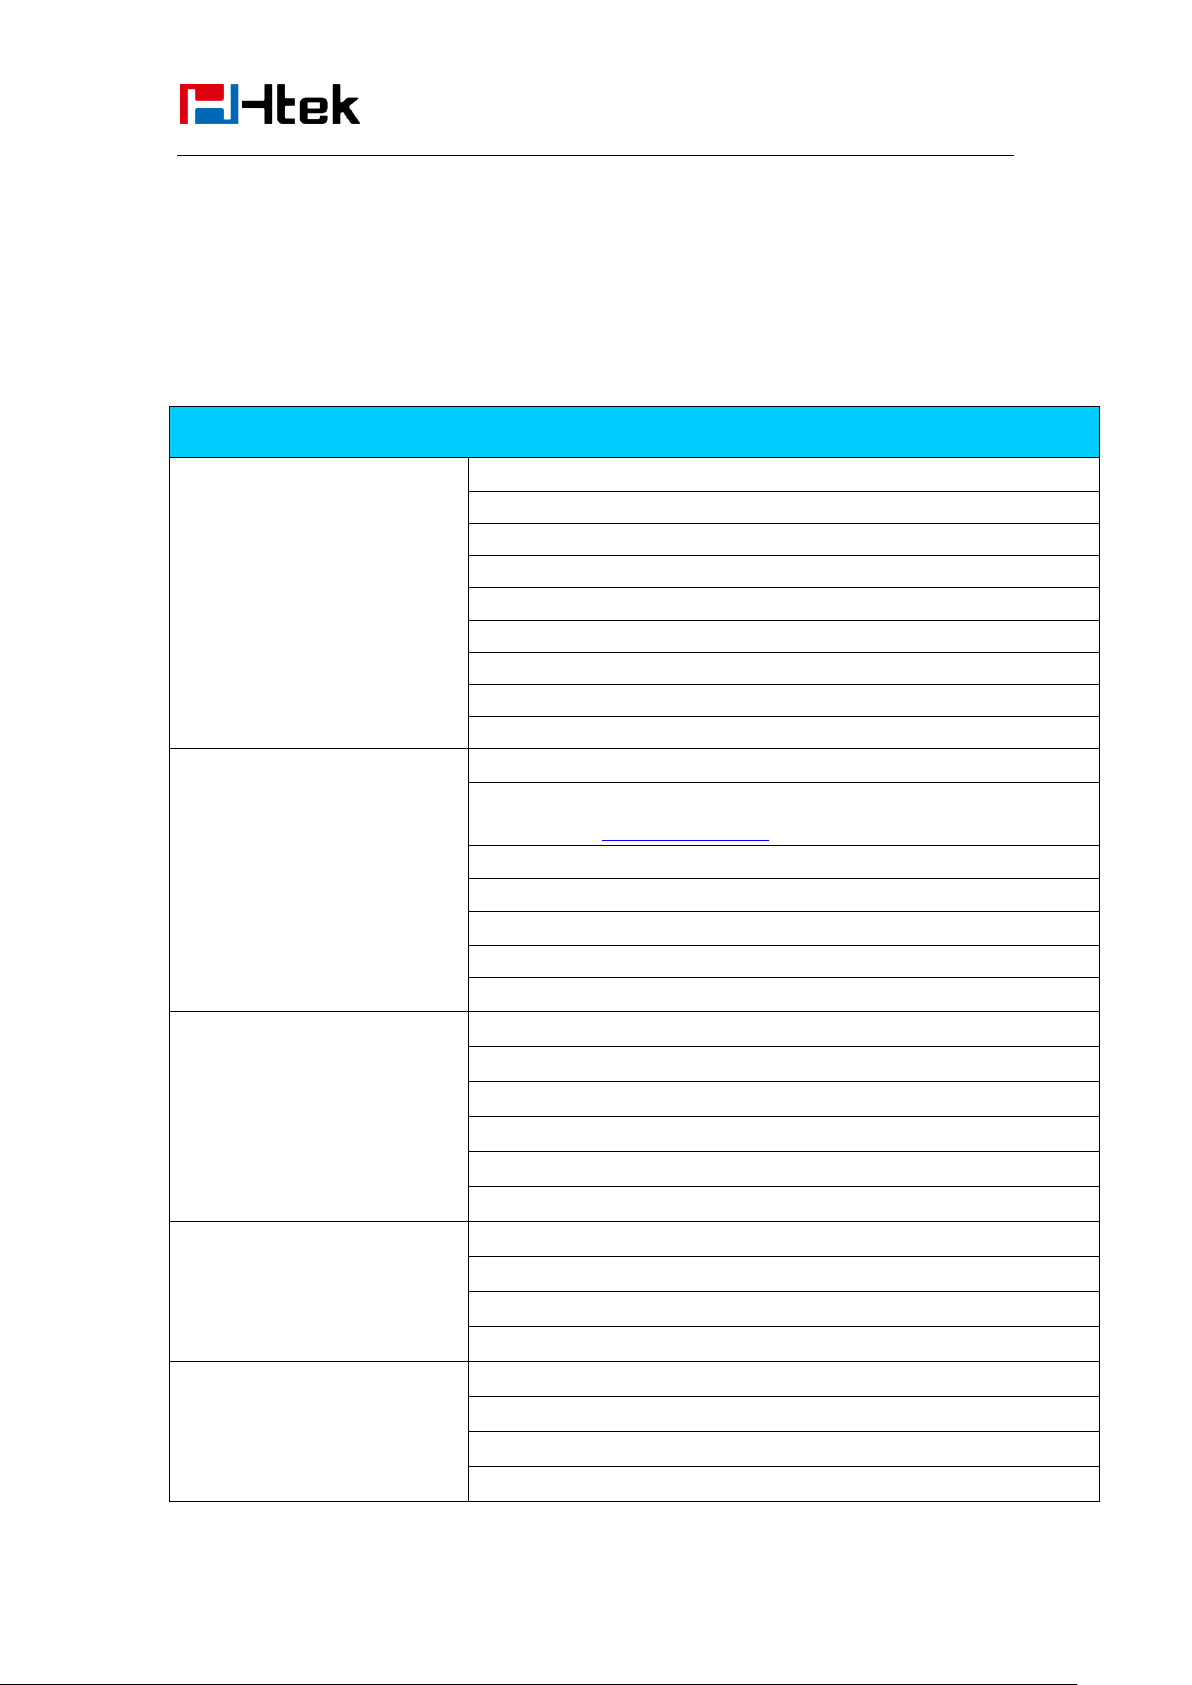
User Interface
There are two ways to customize specific configurations on your IP phone:
The user interface on the IP phone
The user interface in a web browser on your PC
The hardware components keypad and LCD screen constitute the phone user interface, which
23
Page 24
Getting Familiar
Option
Status
Model
IP
MAC
Firmware
Hardware
Network
Account
Device Cert
Language
Features
Call Forward
Function Key(Line and Line Key setting)
More Key see Line Key Overview
Key as Send
Hot Line
Anonymous Call
DND
History Setting
Basic Settings
Language
Time & Date
Time & Date Format
DHCP Time
Ring tone
Screensaver…
Advanced Settings
Account Registration
Network
Factory Reset
Auto provision
Directory
All Contacts
Local Contacts
Remote Contacts
Broadsoft Contacts
with Your Phone
allows the user to execute all call operation tasks and basic configuration changes directly on the
phone. In addition, you can use the web user interface to access all configuration settings. In many
instances, it is possible to use both the phone user interface and the web user interface to operate
the phone and change settings. However, in some instances, it is only possible to use the phone or
the web user interface.
Phone Interface Overview
24
Page 25
Getting Familiar
Blacklist Contacts
AP Contacts
History
Local History
Network CallLog
Message
Voice Mail set and View. Text Message view and set.
Others
Factory Function
System Restart
Device Reboot
Pcap Feature
Line
Speed Dial
BLF
BLF List
Voice Mail
Direct Pick Up
Group Pick Up
Call Park
Intercom
DTMF
Prefix
Local Group
with Your Phone
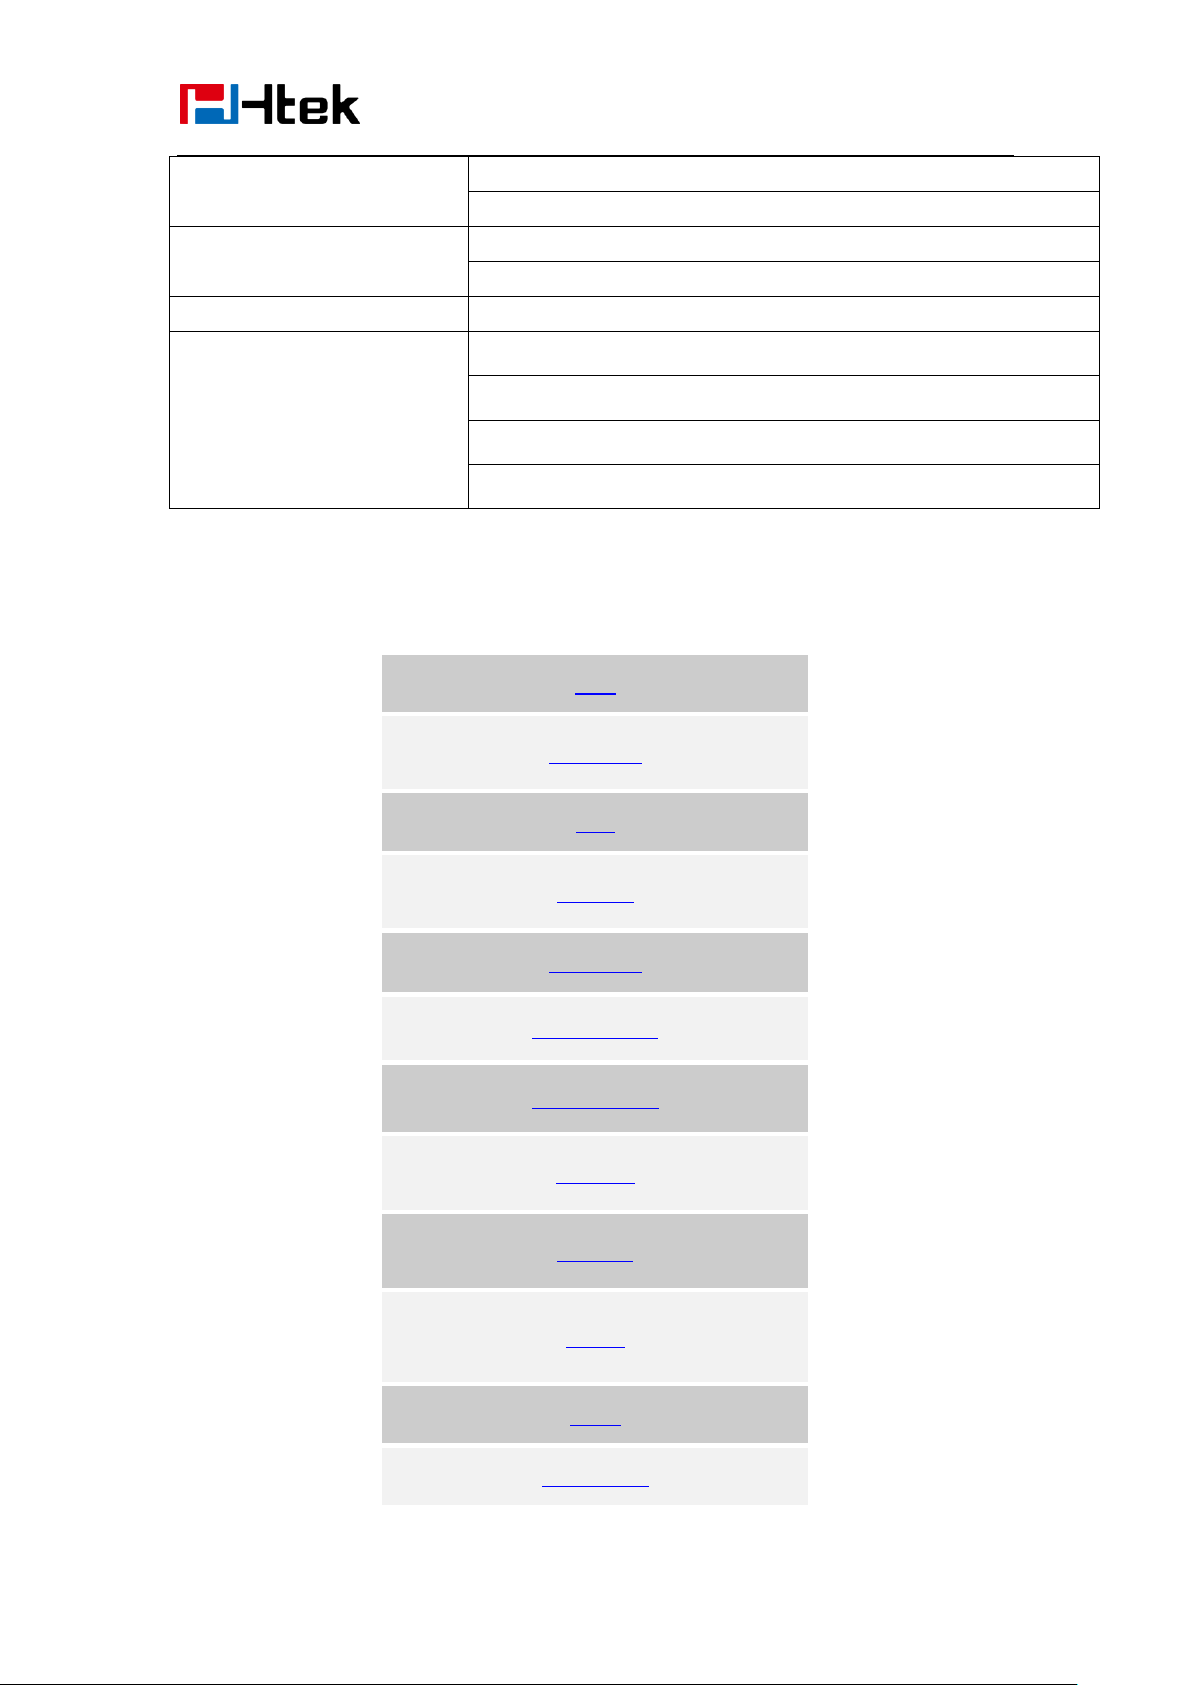
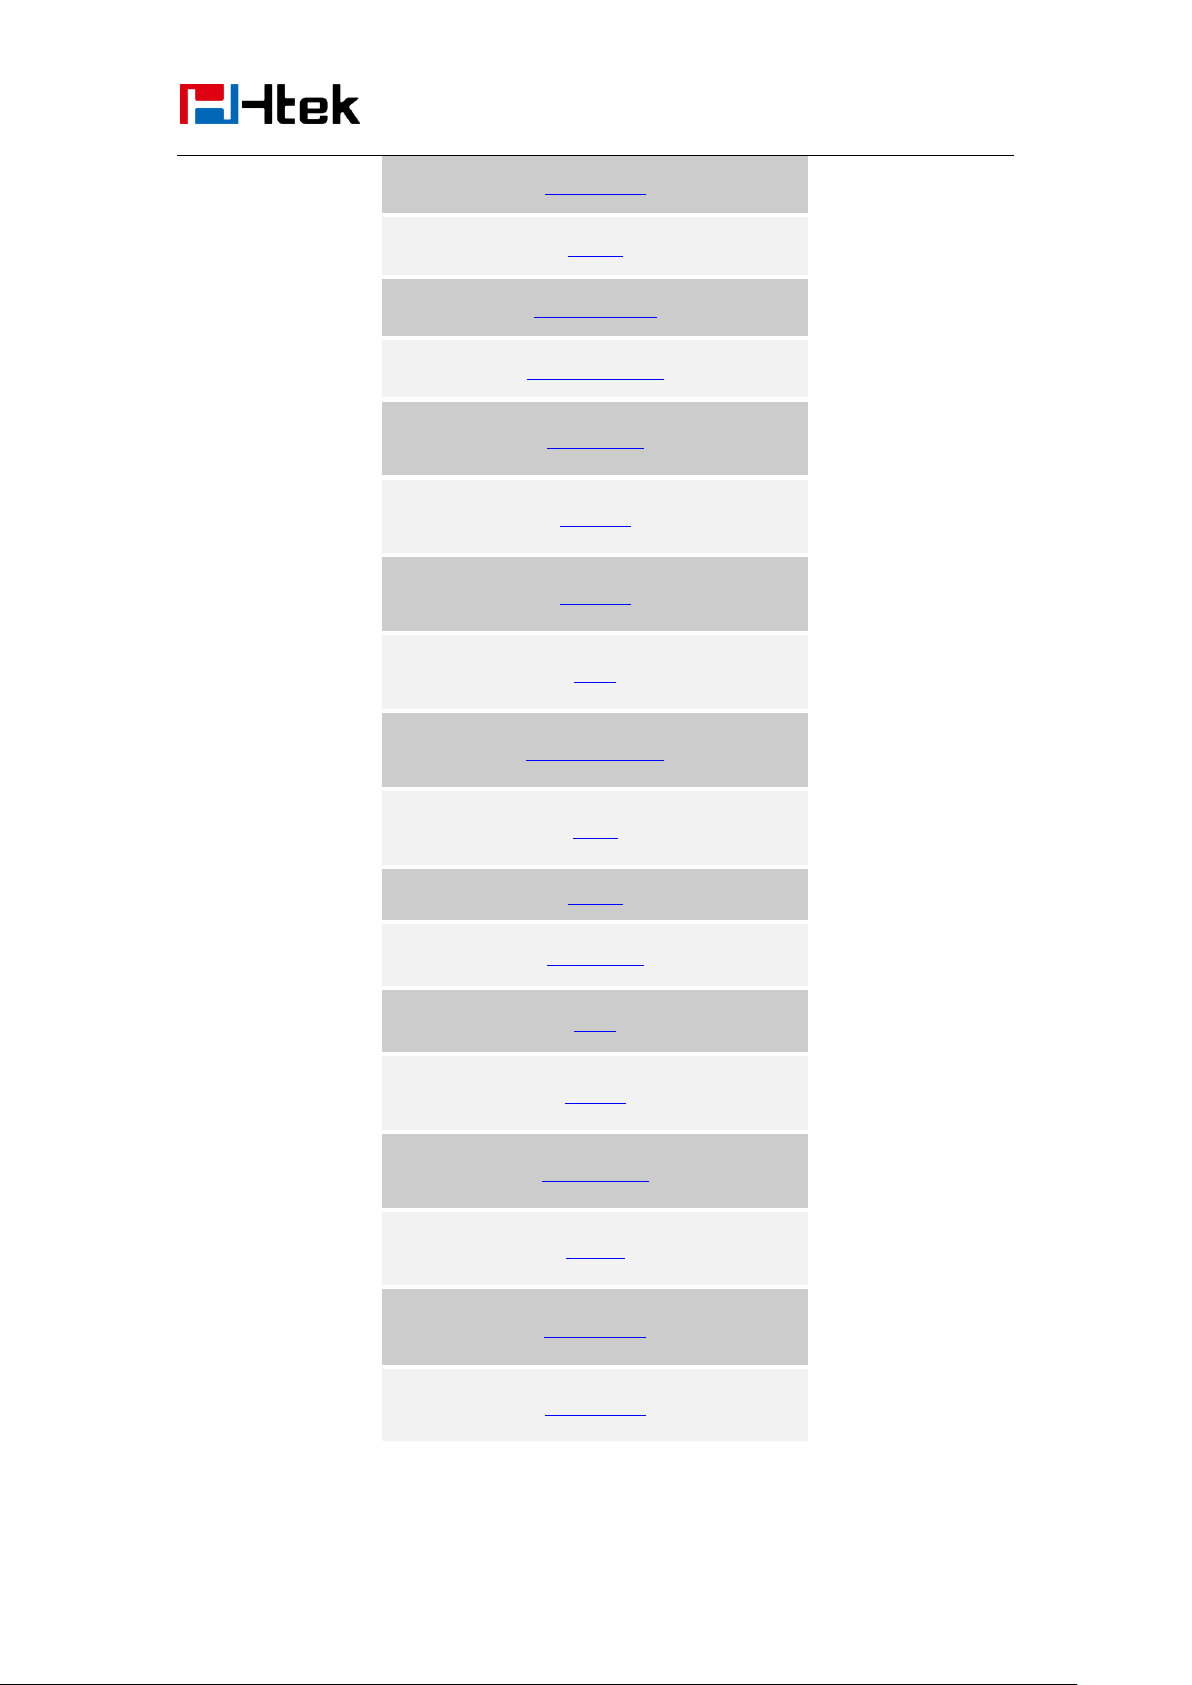
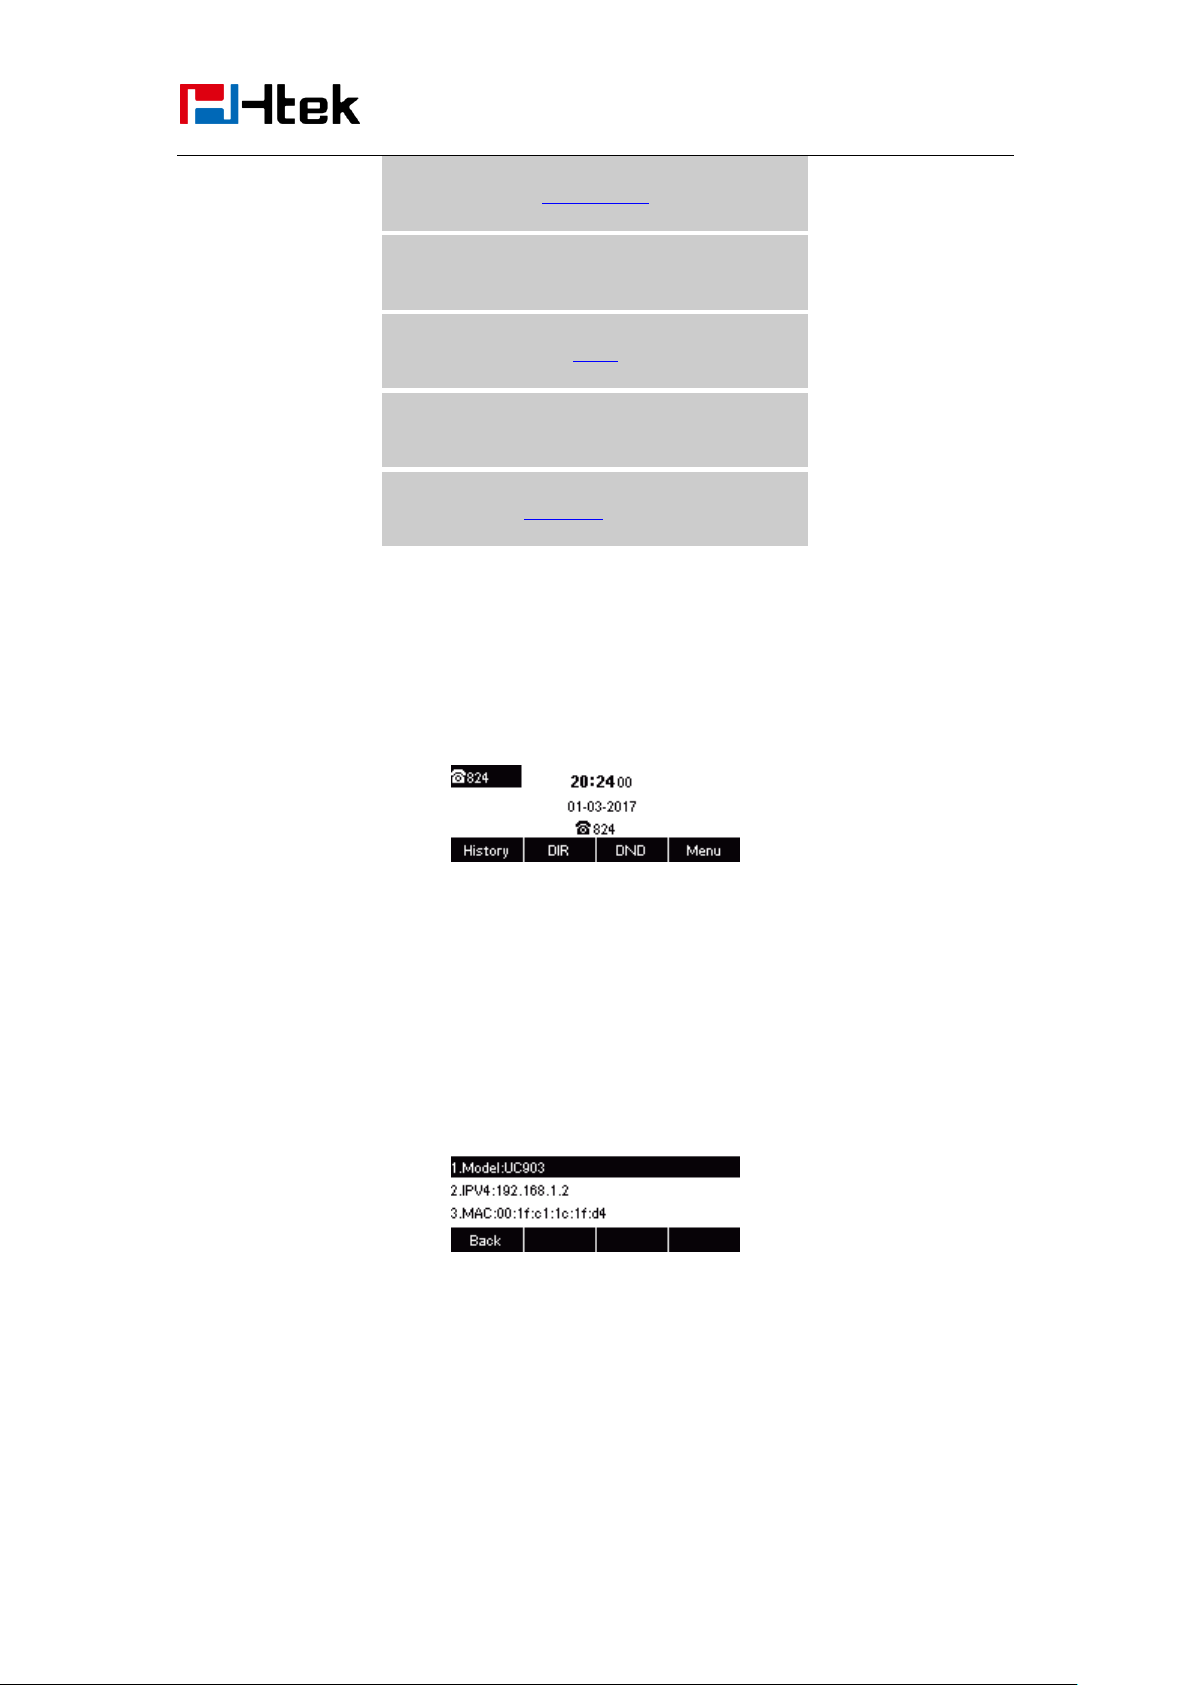
Line Key Function Overview
25
Page 26
with Your Phone
XML group
LDAP
XML Browser
Broadsoft group
Conference
Forward
Transfer
Hold
Group Listening
DND
Redial
Call Return
SMS
Record
URL Record
Paging
Shared Line
Public Hold
Getting Familiar
26
Page 27
Basic Features
Private Hold
Hot Desking
ACD
Zero Touch
Multicast Paging
Configuration
Basic Features Configuration
This part will mainly introduce the basic configuration as the Time, Language, and Volume…
General Settings
Web Login
1. Get the IP address: Press Menu →Status→ Information
2. Input the IP Address in the web browser.
3. Input the user name (default is admin), password (default is admin).
4. Login successfully.
27
Page 28
Configuration
Note:
The PC and phone should be in the same segment.
When register the accounts in web and the server port is not “5060”, then “SIP Server”
should be set as “SIP Server’s IP address: server port.”, for example, “192.168.0.122: 5090”.
Basic Features
Administrator Password
The password is mainly used for login the web interface or set the advanced settings through
phone interface. And the default password of the administrator is: admin
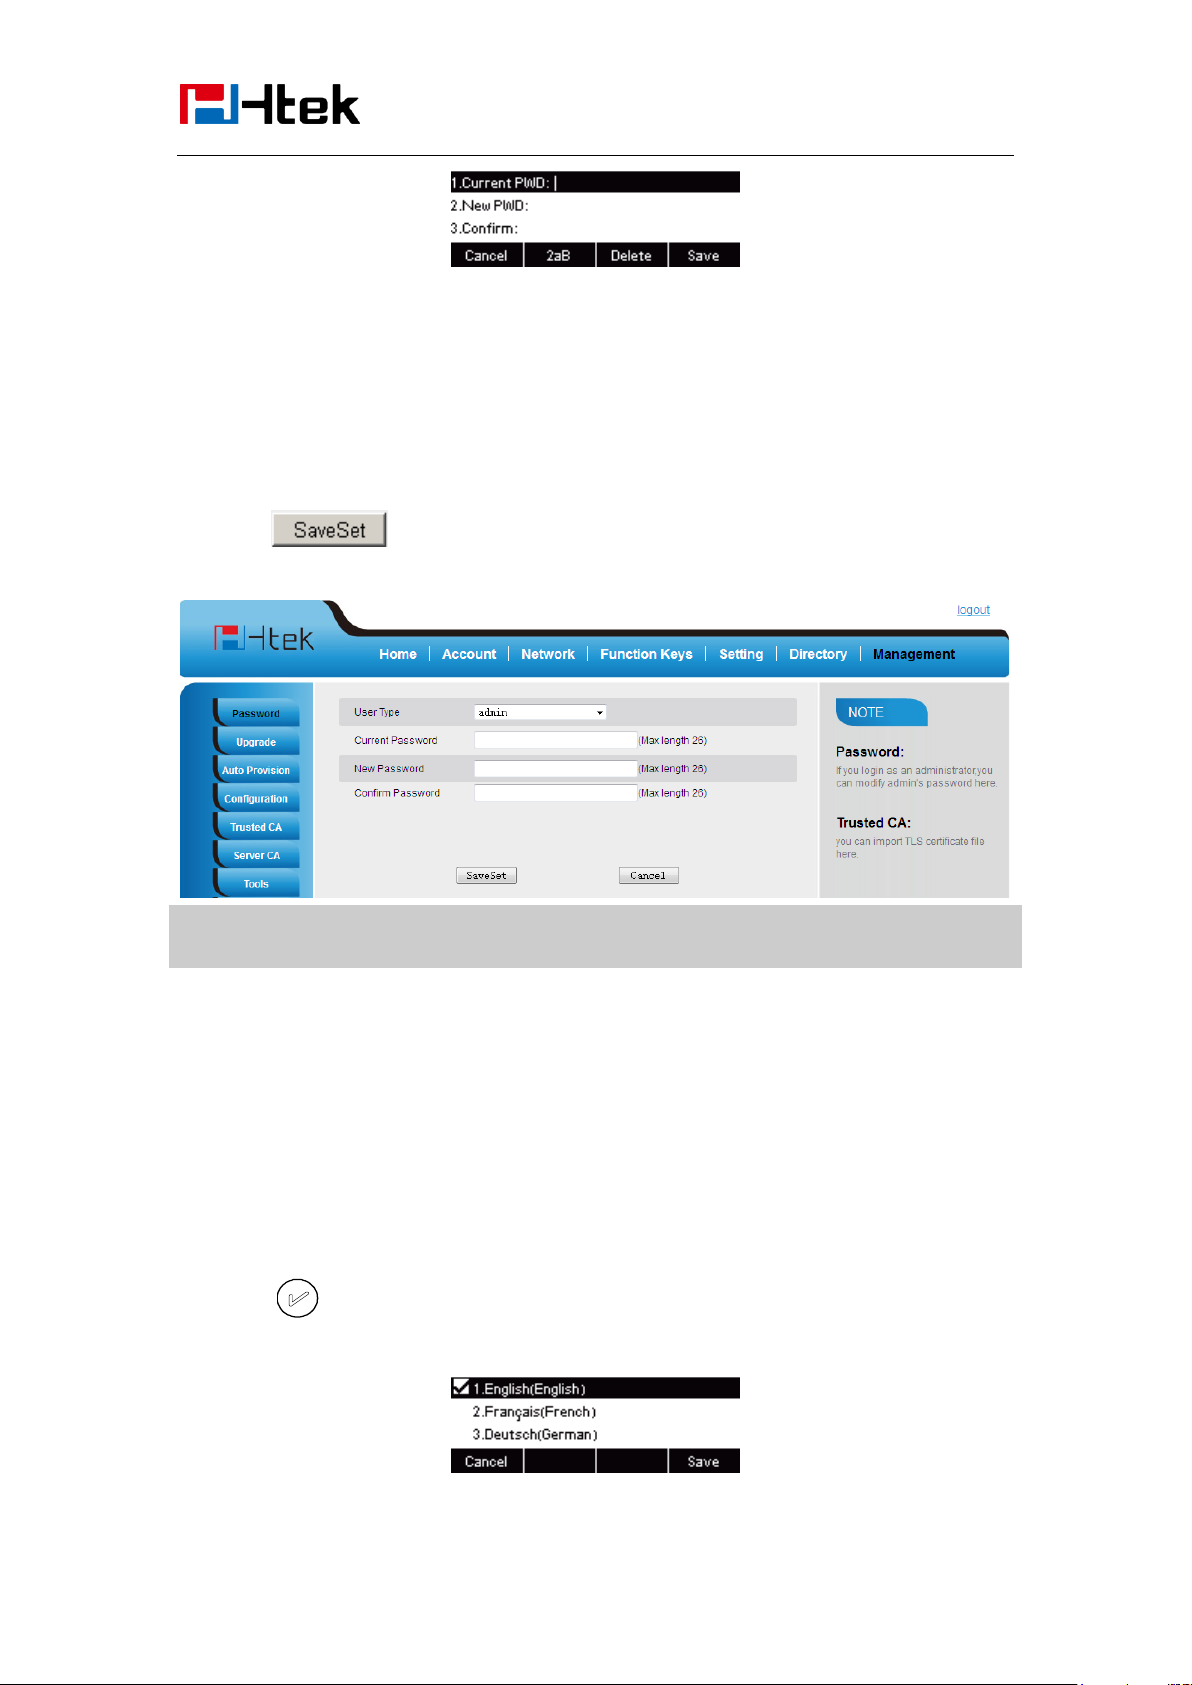
To change to password via Phone Interface
1. Press Menu → setting → Advanced settings → password (default admin) → Phone
Setting → Set Password
2. Enter the current PWD (password), new password and confirm the new password.
3. Press save soft key or to save the new password.
28
Page 29
Basic Features
Note:
When you use the web interface: user name: admin password: admin(default)
Configuration
To change to password via Web Interface
1. Management → Password
2. Fill the value
3. Click to save the configuration.
Language
The default Phone interface language is English.
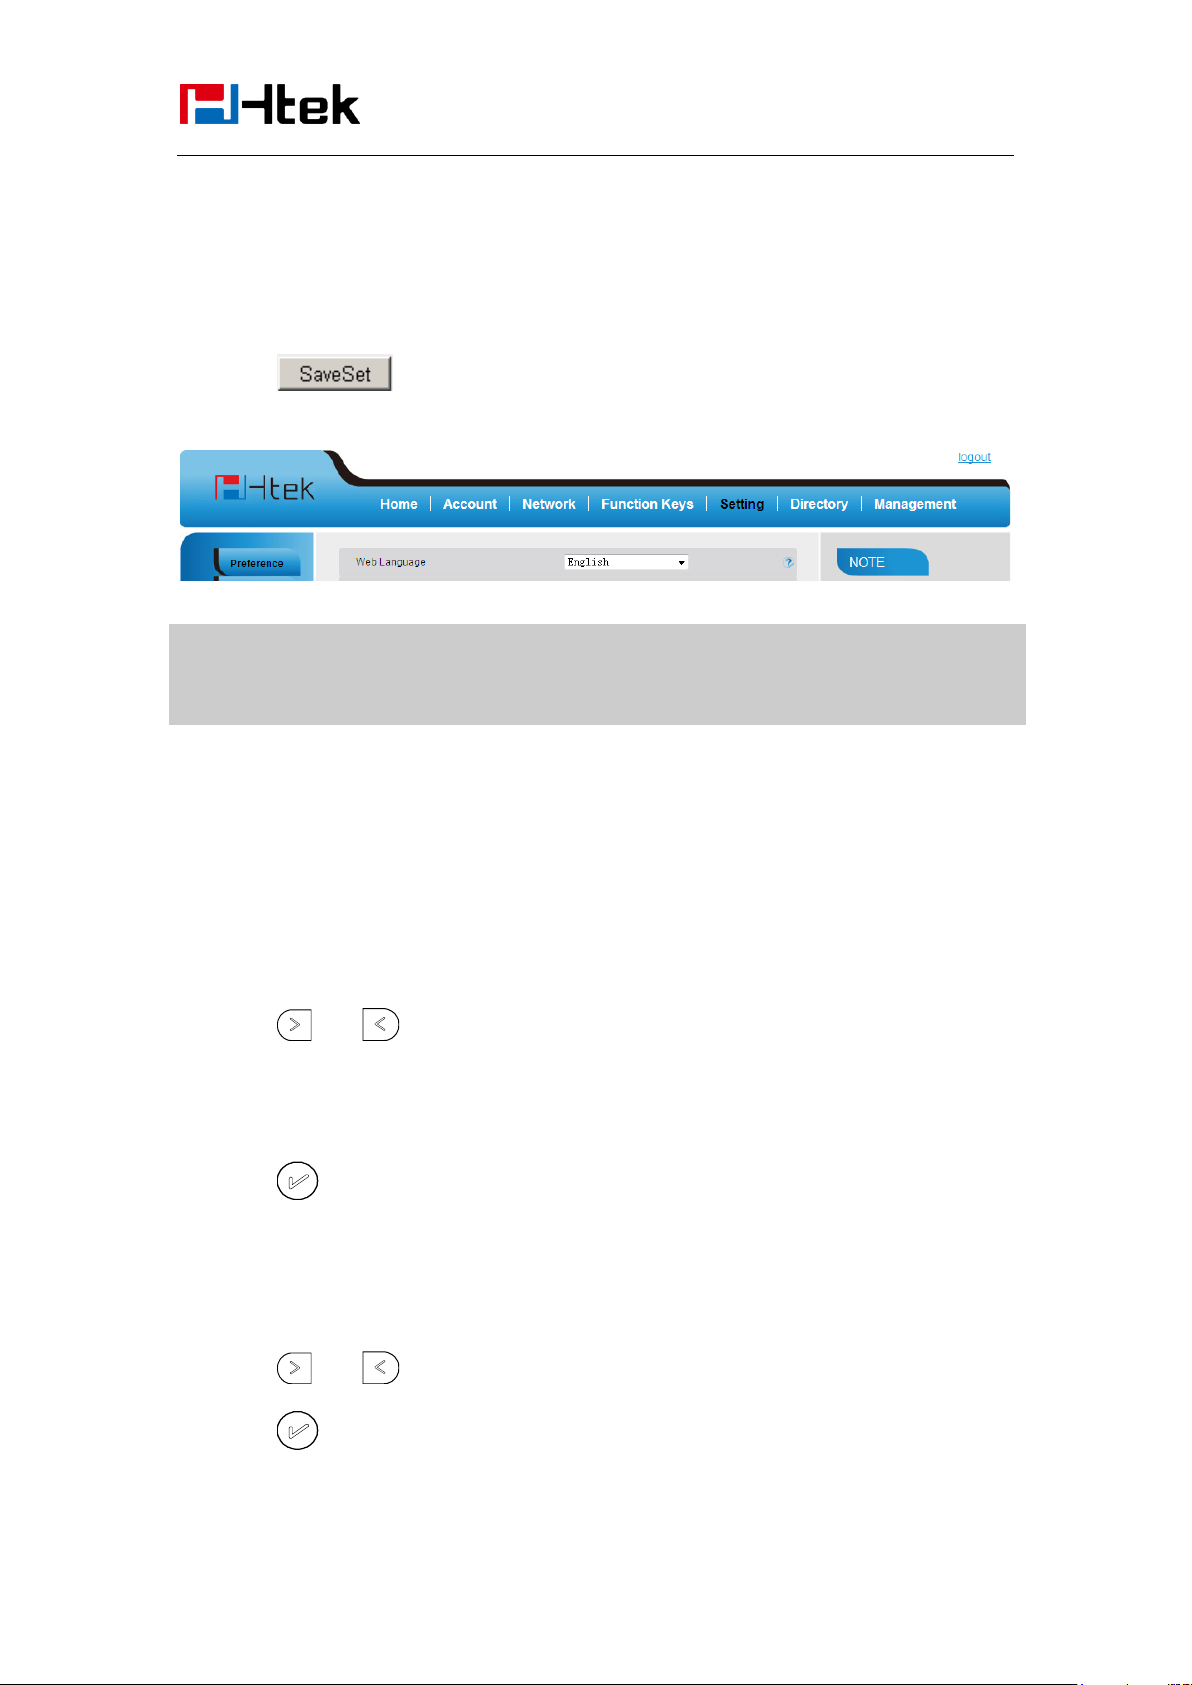
To change the language via Phone interface
1. Press Menu → Setting → Basic Settings → Language.
2. Press or Save soft key to save the configuration.
29
Page 30
Basic Features
Note:
All languages may not be available for selection. The available languages depend on the
language packs currently loaded to the IP phone.
Configuration
To change the language via Web Interface
1. Setting → Preference →Web Language
2. Select the necessary one.
3. Press to save the configuration.
Screen Saver
There are two types of screen saver: Backlight off, Time & Logo .
To enable screen saver via Phone
1. To press Menu → Setting → Basic Setting → Screensaver...
2. Press and or press Switch soft key to Choose the Time-out as 1 min or 2/5/10/30
minute, then press the Save button.
3. Enter the Screensaver Type to choose one of the type: Logo only, Time & Logo.
4. Press or Save soft key to save the selected configuration.
To disable screen saver via Phone
1. To press Menu → Setting → Basic Setting → Screensaver...
2. Press and or press Switch soft key to Choose the Time-out as off.
3. Press or Save soft key to save the selected configuration.
30
Page 31
Basic Features
Configuration
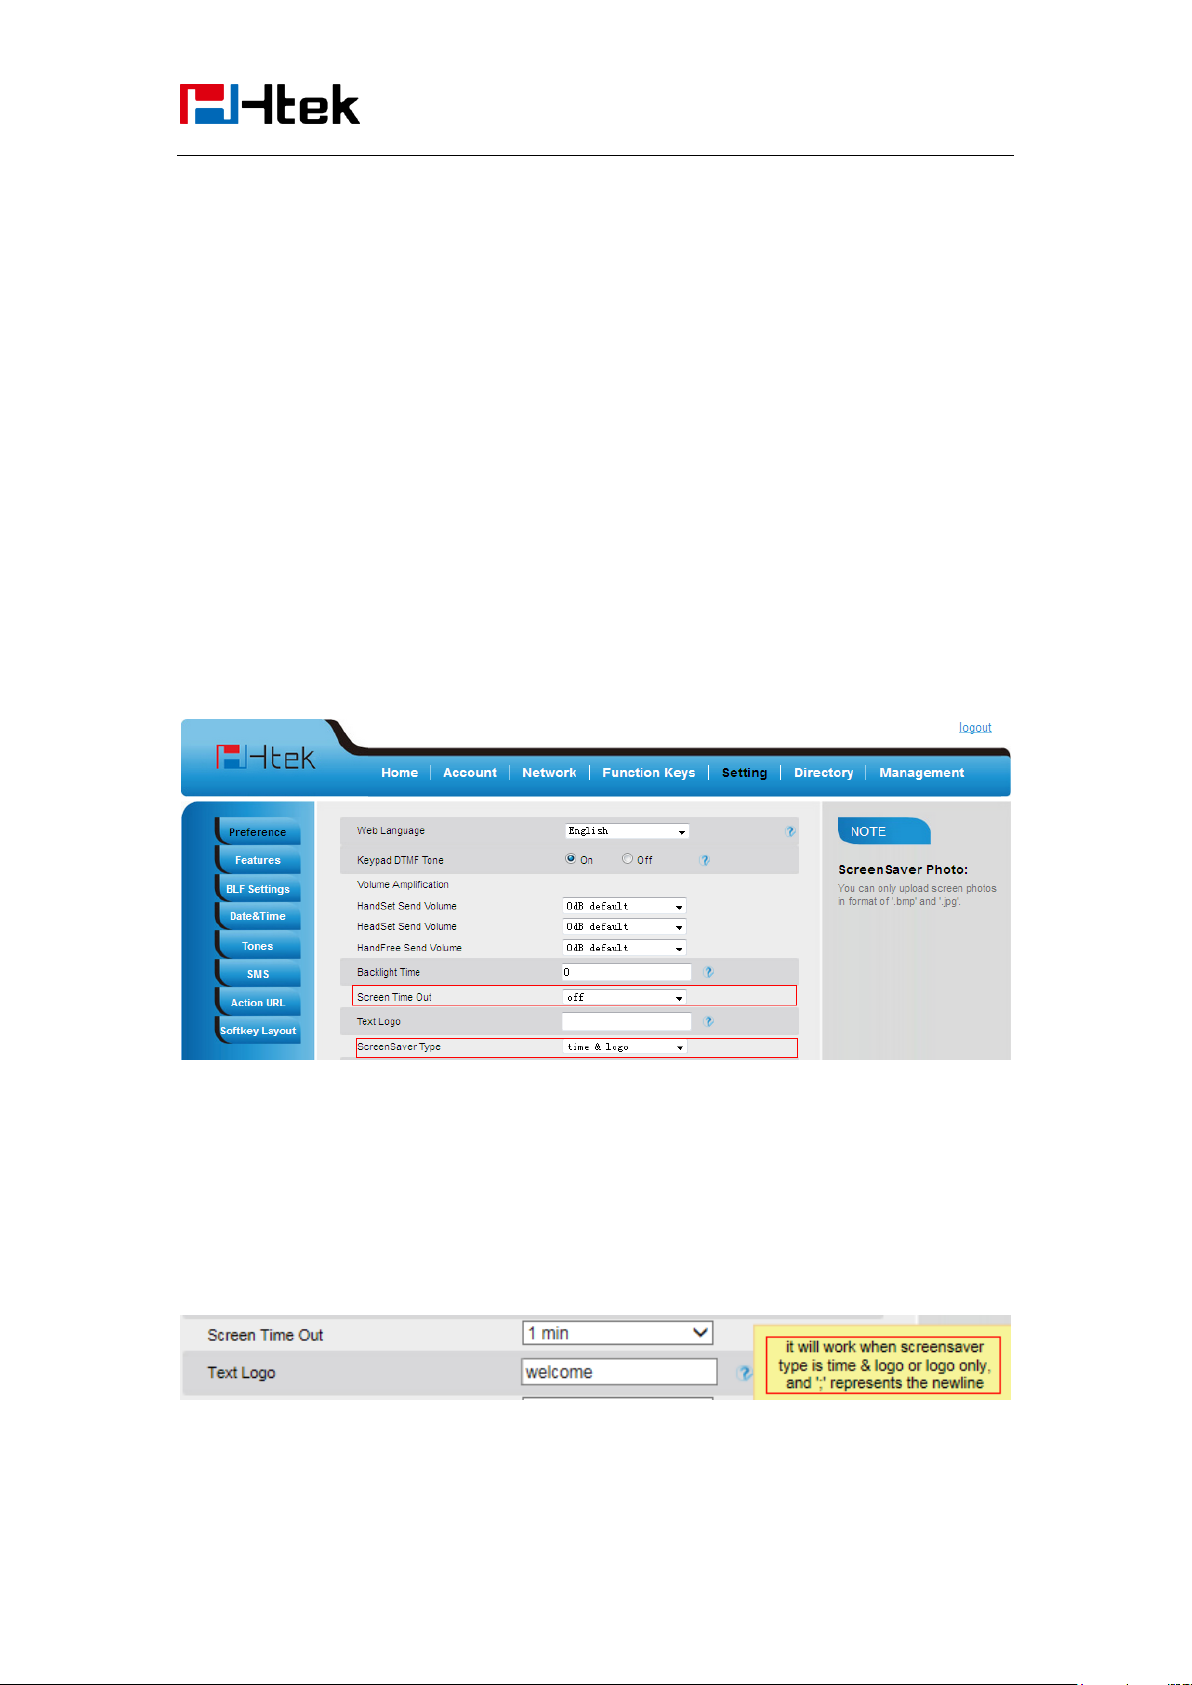
To Enable screen saver via Webpage
1. To Click Setting → Preference
2. To choose the Time-out as 1 min or 2/5/10/30 minute.
3. To select the screen Type as Backlight off or time & logo.
4. Click Saveset to save the configuration.
To Disable screen saver via Webpage
1. To Click Setting → Preference
2. To choose the Time-out as Off
3. Click Saveset to save the configuration.
To custom text logo via web interface:
1. Click SettingPreference.
2. choose the Time-out as 1 min or 2/5/10/30 minute.
3. Enter the desired value in the Text Logo field.
4. Click Saveset to save the configuration.
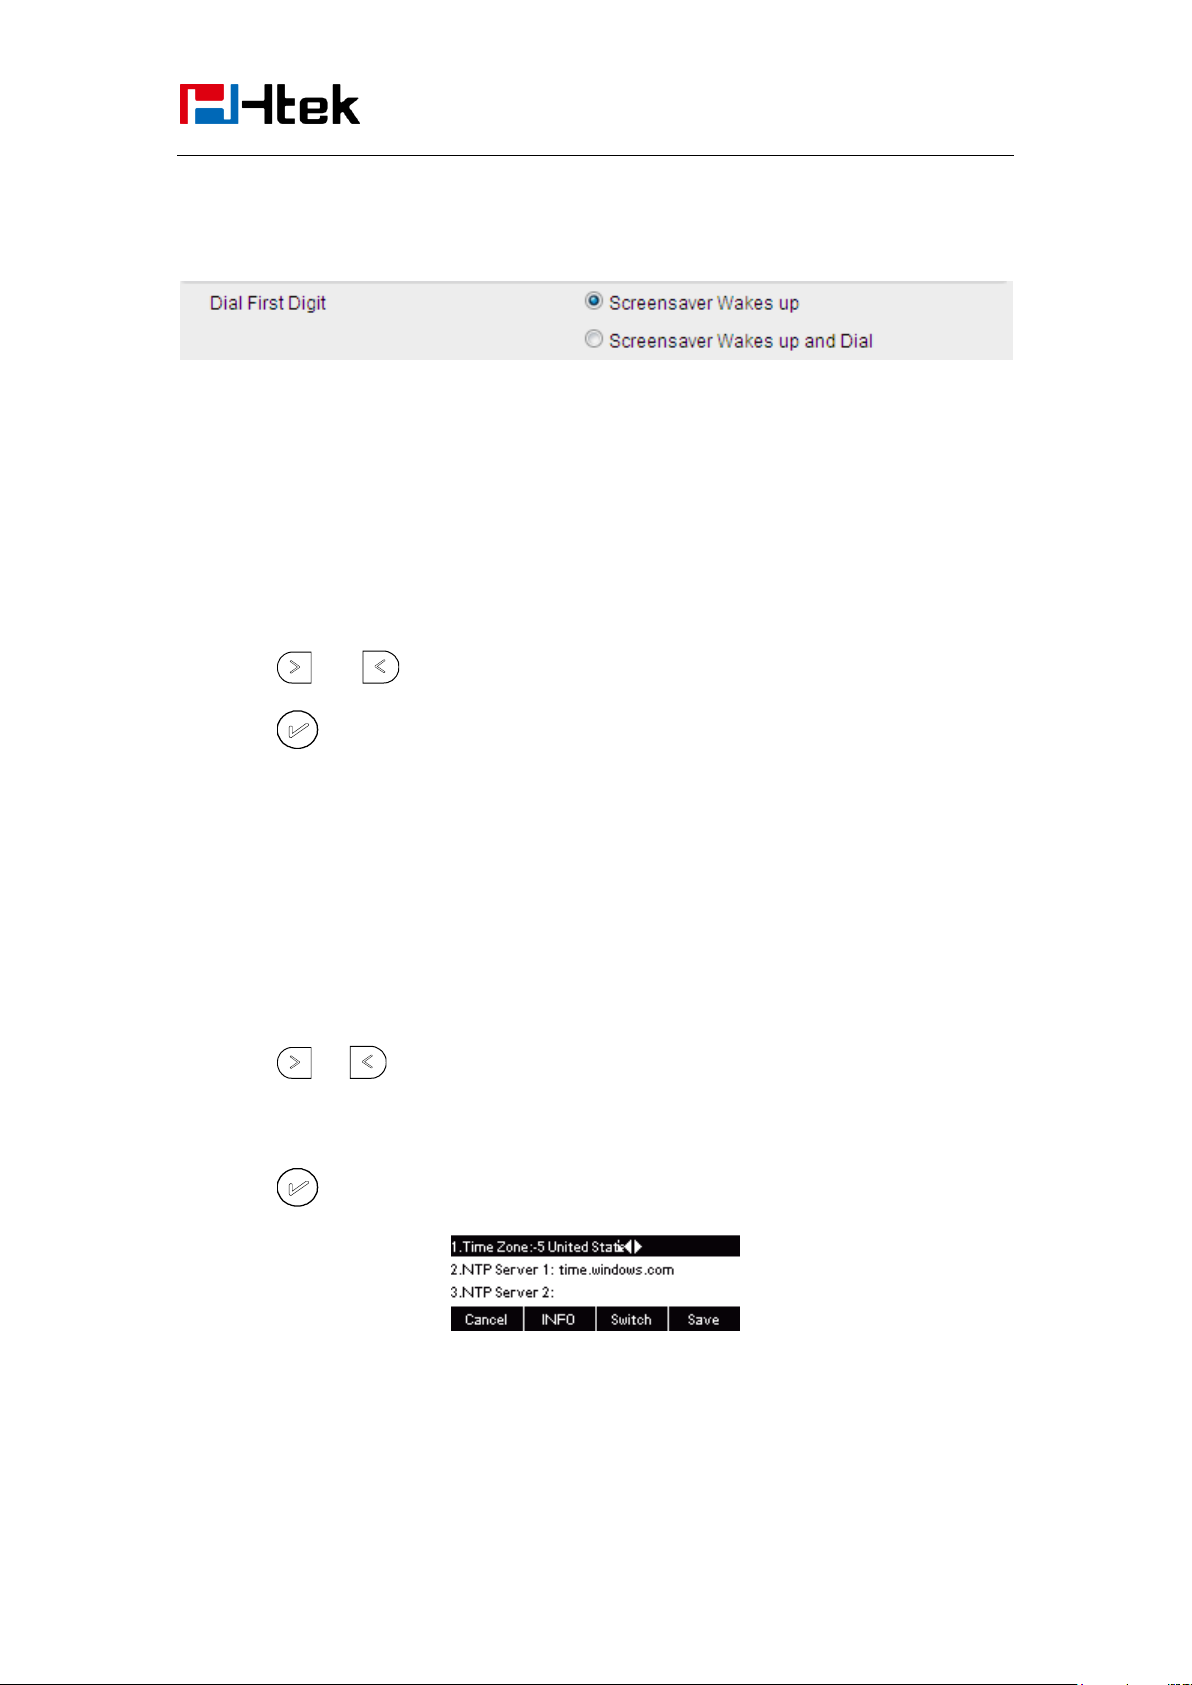
To wake up screen saver via Web interface:
31
Page 32
Basic Features
Configuration
1. Click Setting → Preference
2. Choose Dial First Digit: Screensaver Wakes up or Screensaver Wakes up and Dial
Gray Level
There are 12 levels. you can change the LCD’s brightness according to your visual perception
To change the gray level via Phone
5. To press Menu → Setting → Basic Setting → Gray level
6. Press and or press Switch soft key to Choose the level from 1 to 20
7. Press or Save soft key to save the selected configuration
Time and Date
The time and date show on the idle page, and it can be set and change by SNTP server
automatically or manual setting.
To configure the time and Date by SNTP setting
1. To press Menu → Setting → Basic setting → Time & Date → SNTP Settings
2. Press or , or info soft key to change the Time zone.
3. Fill the NTP server1, NTP Server2, and Daylight Saving.
4. Press or Save soft key to save the configuration.
To configure time and date manually
1. To press Menu → Setting → Basic setting → Time & Date → Manual Settings
32
Page 33

Basic Features
Configuration
2. Press and or change the right time, or you can input the right time.
3. Press or Save soft key to save the configuration.
To configure the Time & Date Format
1. To press Menu → Setting → Basic setting → Time & Date Format
2. Press and or press Info to change between 12 Hour or 24 Hour.
3. Press and or press Info to change among Y-M-D(year-month-day),
M-D-Y(month-day-year), D-M-Y(day-month-year).
4. Press or Save soft key to save the configuration.
To configure the DHCP time
1. To press Menu → Setting → Basic setting → DHCP time
2. Press and or press Info to change between Disable and Enable.
3. Press or Save soft key to save the configuration.
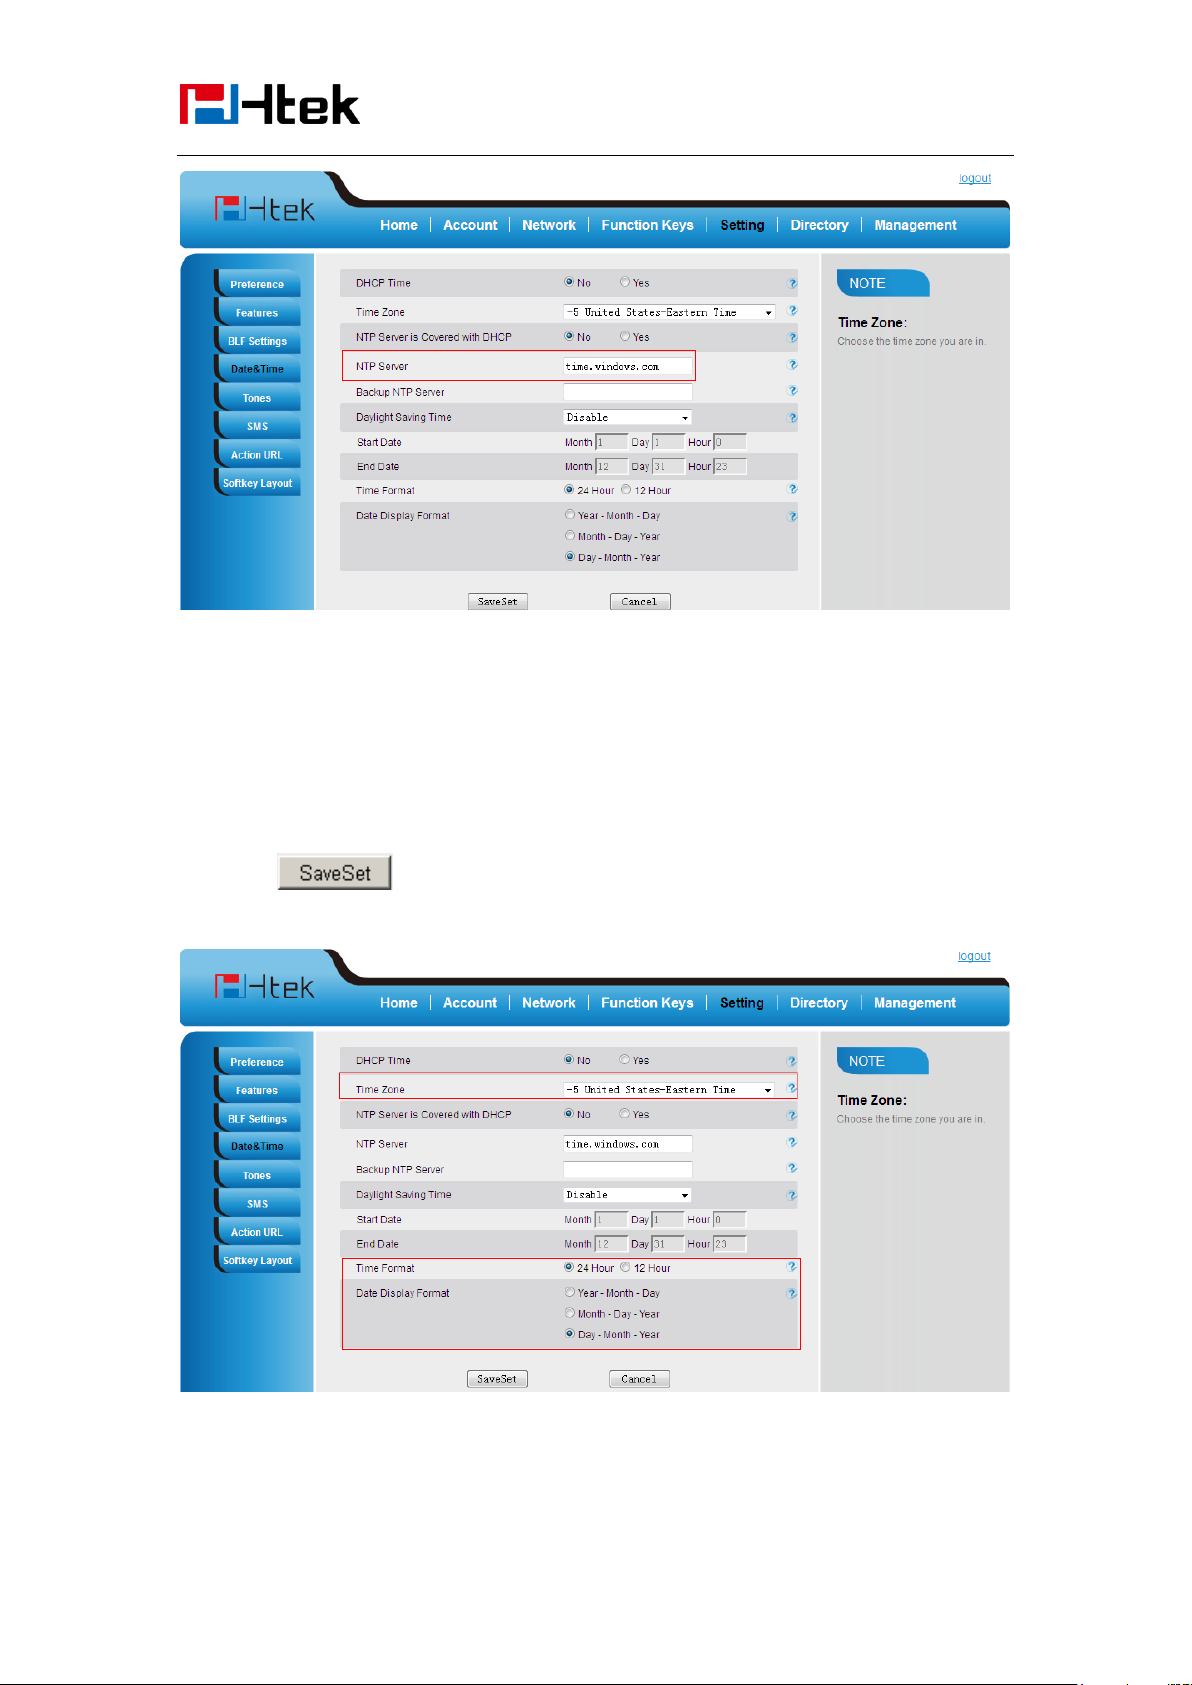
To configure the NTP Server by web interface
1. Login
a) Login name: admin, password: admin (default)
2. Setting → Date &Time →NTP Server
3. Fill the value in the blank.
33
Page 34
Basic Features
Configuration
To change the Time Zone and Date Display Format via web interface
1. Setting → Date &Time
2. Select the necessary one.
3. Press to save the configuration.
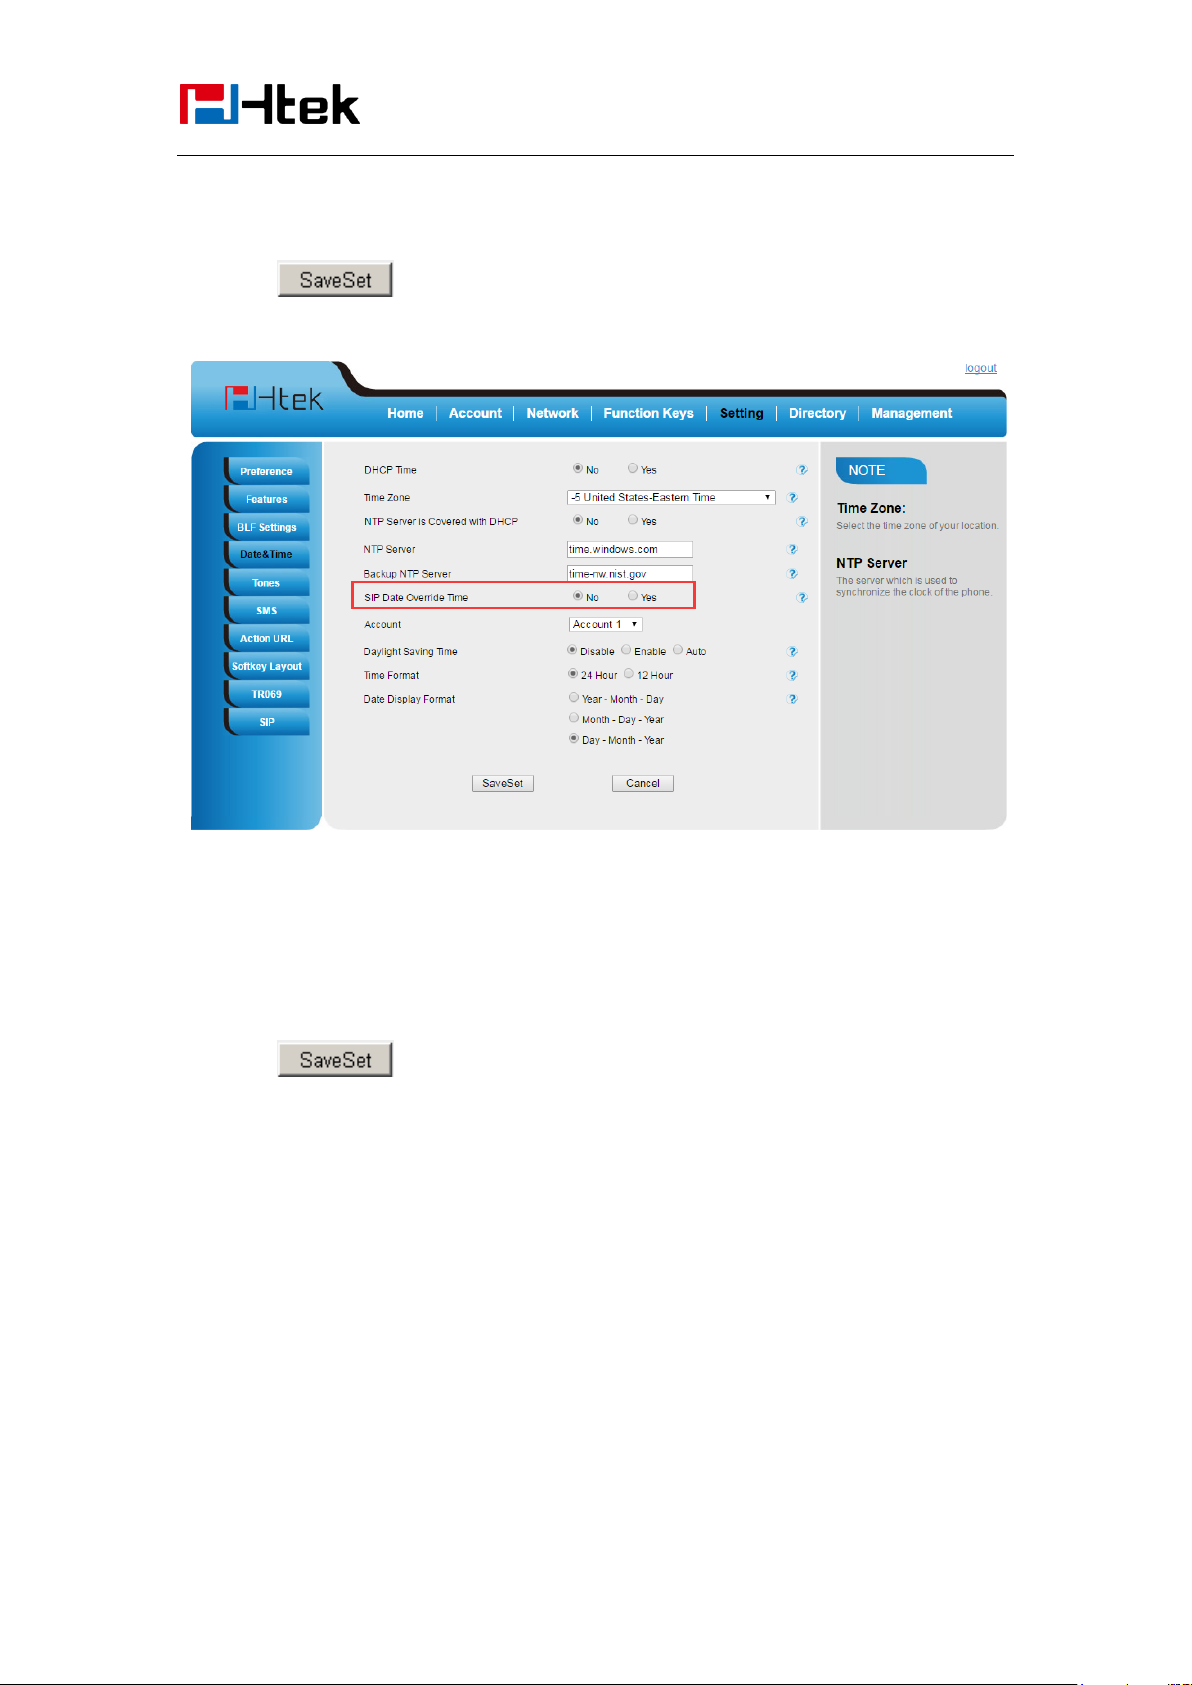
To change the SIP Date Override Time via web interface
1. Setting → Date &Time→Account
34
Page 35
Basic Features
Configuration
2. Select On or Off for SIP Date Override Time .
3. Click to save the configuration.
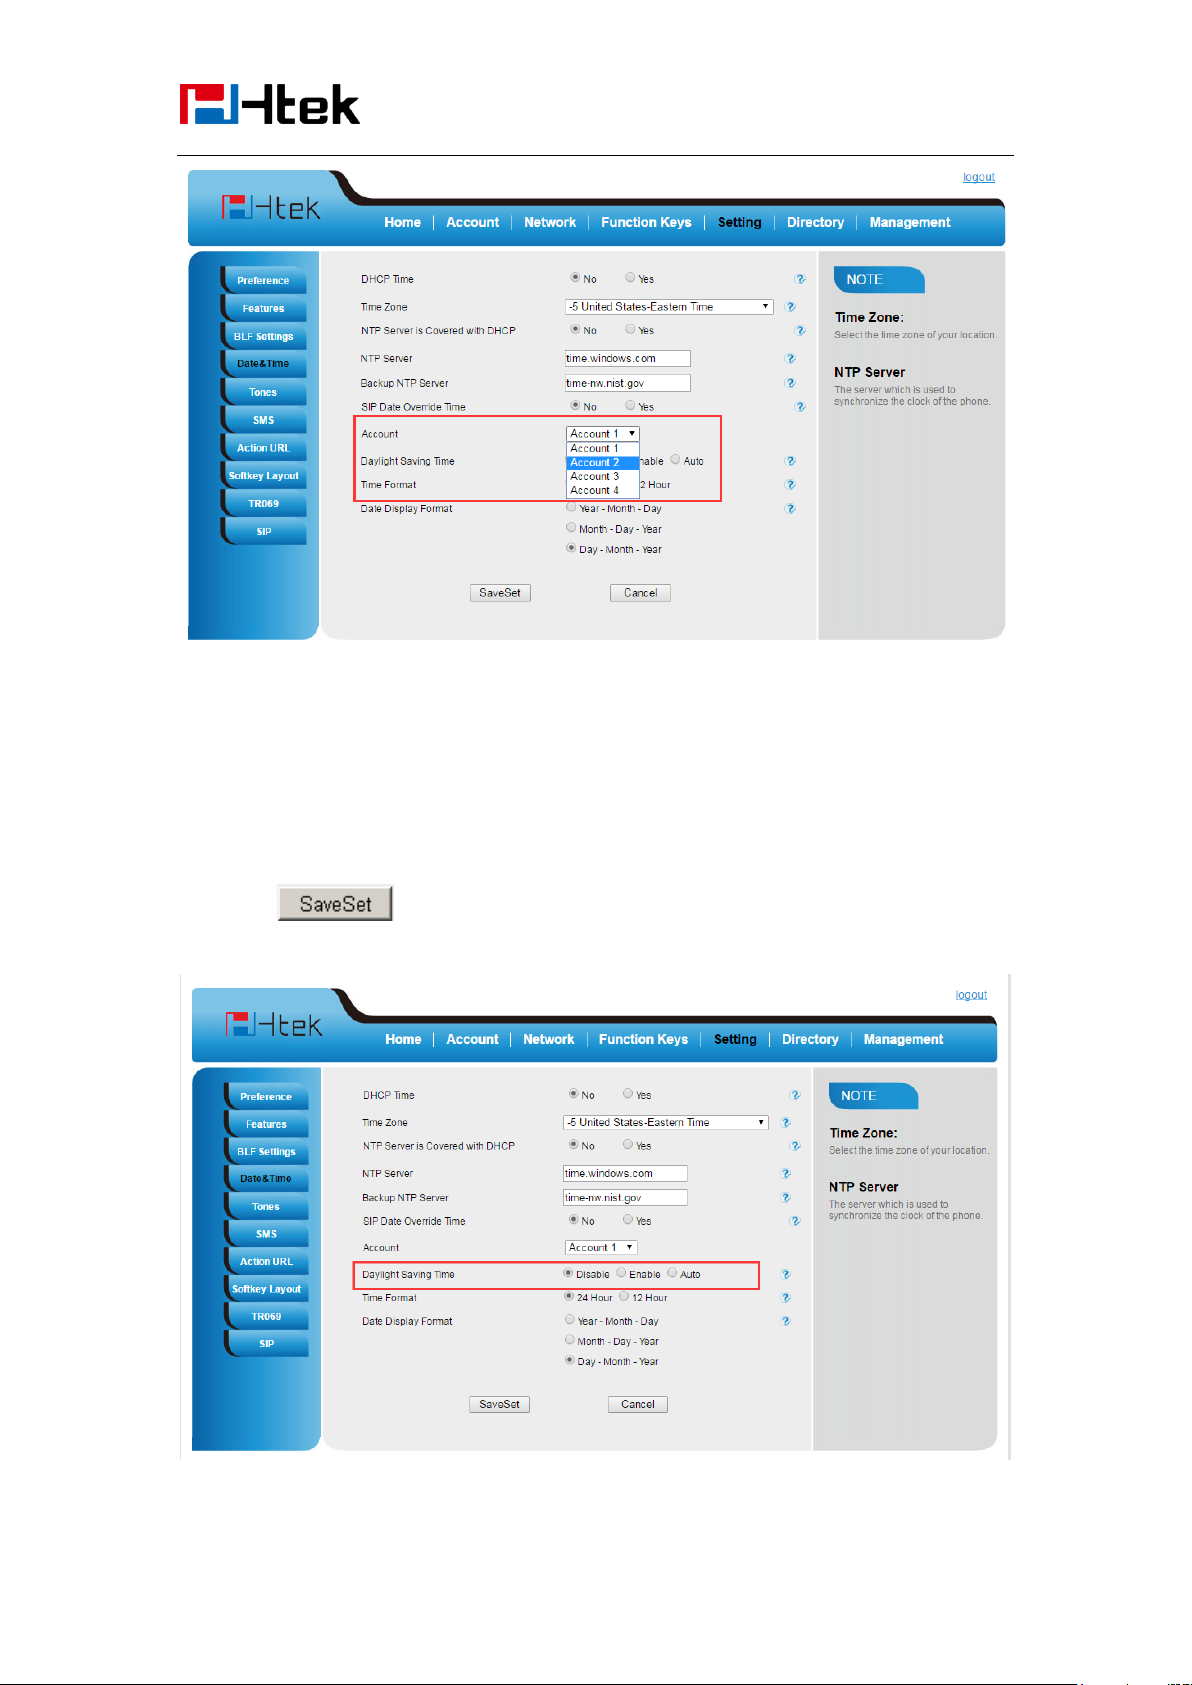
To change the Account via web interface
1. Setting → Date &Time→Account.
2. Select desired Account.
3. Click to save the configuration.
35
Page 36
Basic Features
Configuration
To change the Daylight Saving Time via web interface
1. Setting → Date &Time→Daylight Saving Time
2. Select Disable or Enable or Auto for Daylight Saving Time.
3. Click to save the configuration.
36
Page 37
Basic Features
Note:
If the IP Phone cannot obtain the time and date from the Simple Network Time Protocol
(SNTP) server, please contact your system administrator for more information.
Configuration
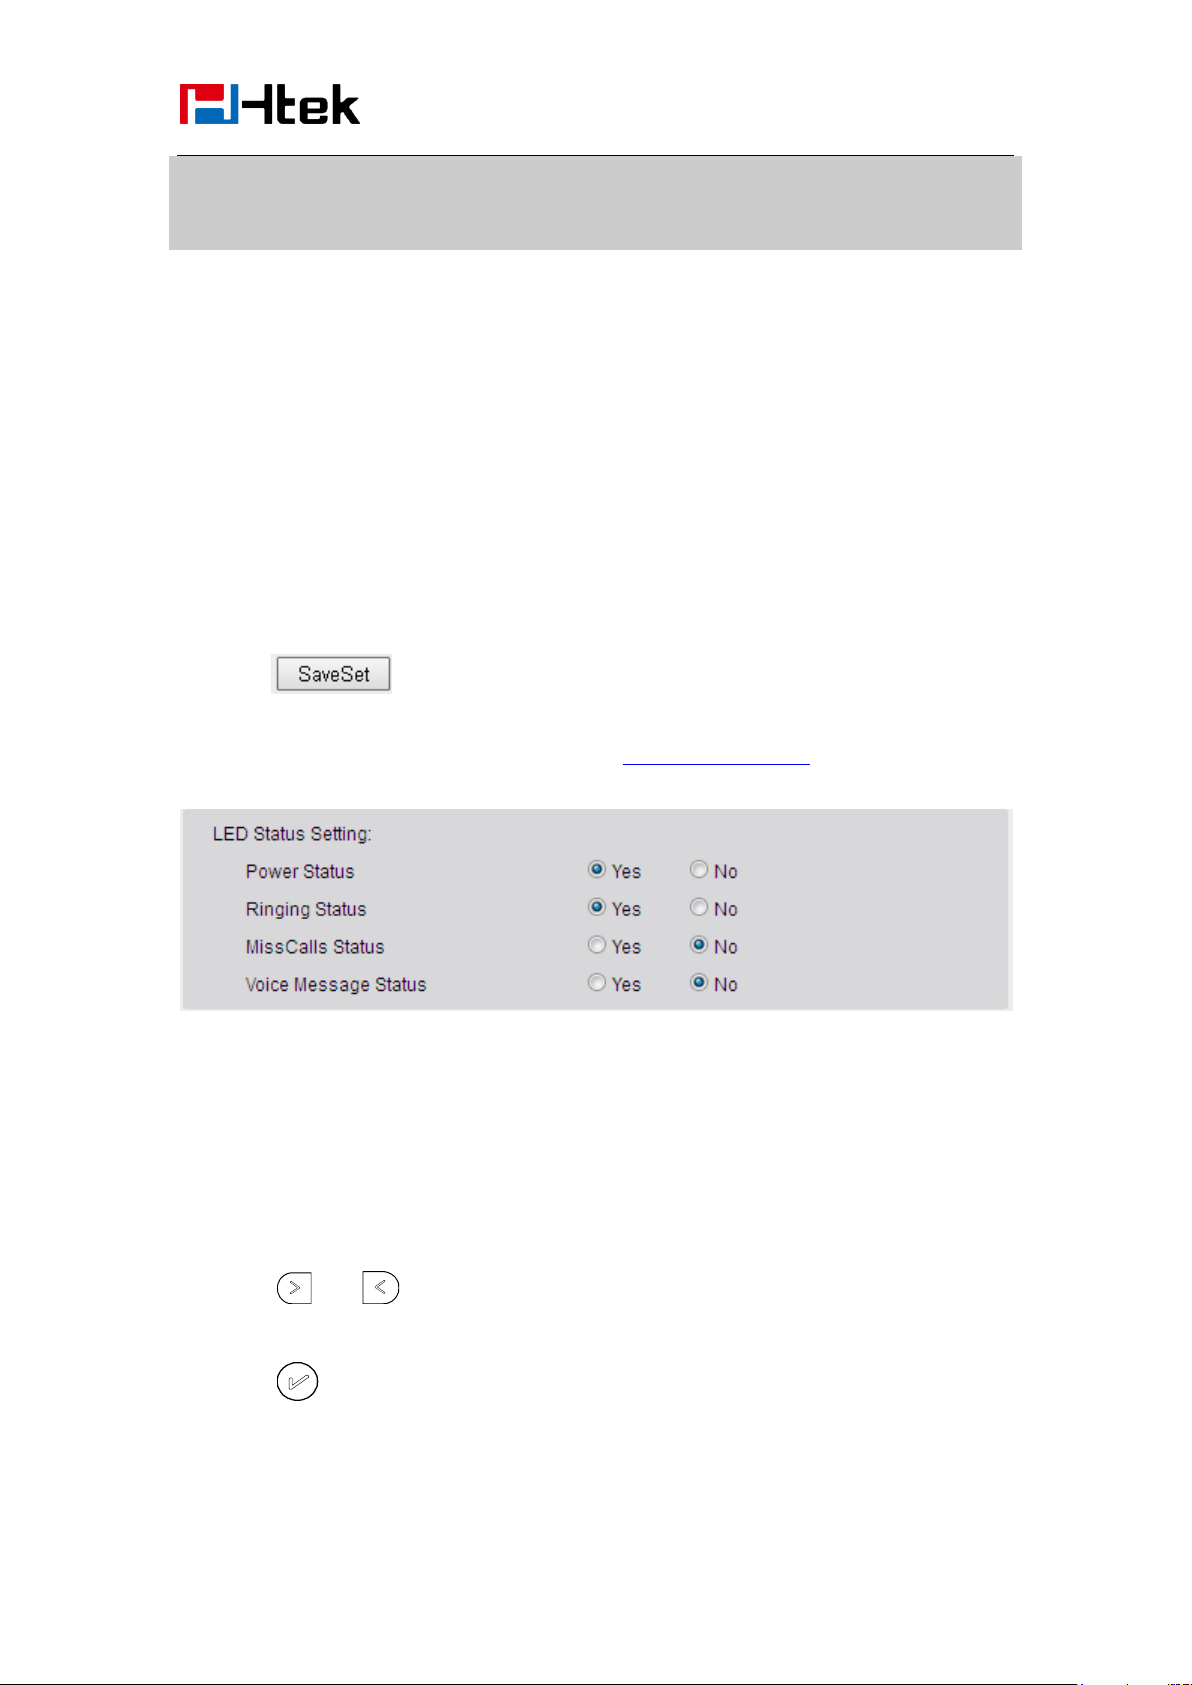
LED Status Setting
The LED Status setting mainly defines the power indicator LED.
To configure LED Status via web interface:
1. Click SettingPreference
2. Select Yes or No for Power Status, Ringing Status, Miss Calls Status and Voice Message
Status.
3. Click for the setting.
For the LED status description, see: LED Instruction Power Indicator LED
Key as Send
To configure Key as Send
1. Press Menu →Features → Key as Send
2. Press and or press info/switch soft key to select the enable choice.
3. Press or Save soft key to save the configuration
To cancel # Key as Send
37
Page 38
Basic Features
Configuration
1. Press Menu →Features → Key as Send
2. Press and or press info/switch soft key to select the disable choice.
3. Press or Save soft key to save the configuration.
Network Setting
Htek IP Phone supports IPv4、IPv6、IPv4&IPv6.They have three mode of Network: DHCP, Static,
and PPPoE. The default mode is DHCP, it will obtain IP address and other information
automatically.
If your phone cannot contact a DHCP server for any reason, you need to configure a static IP
address manually.
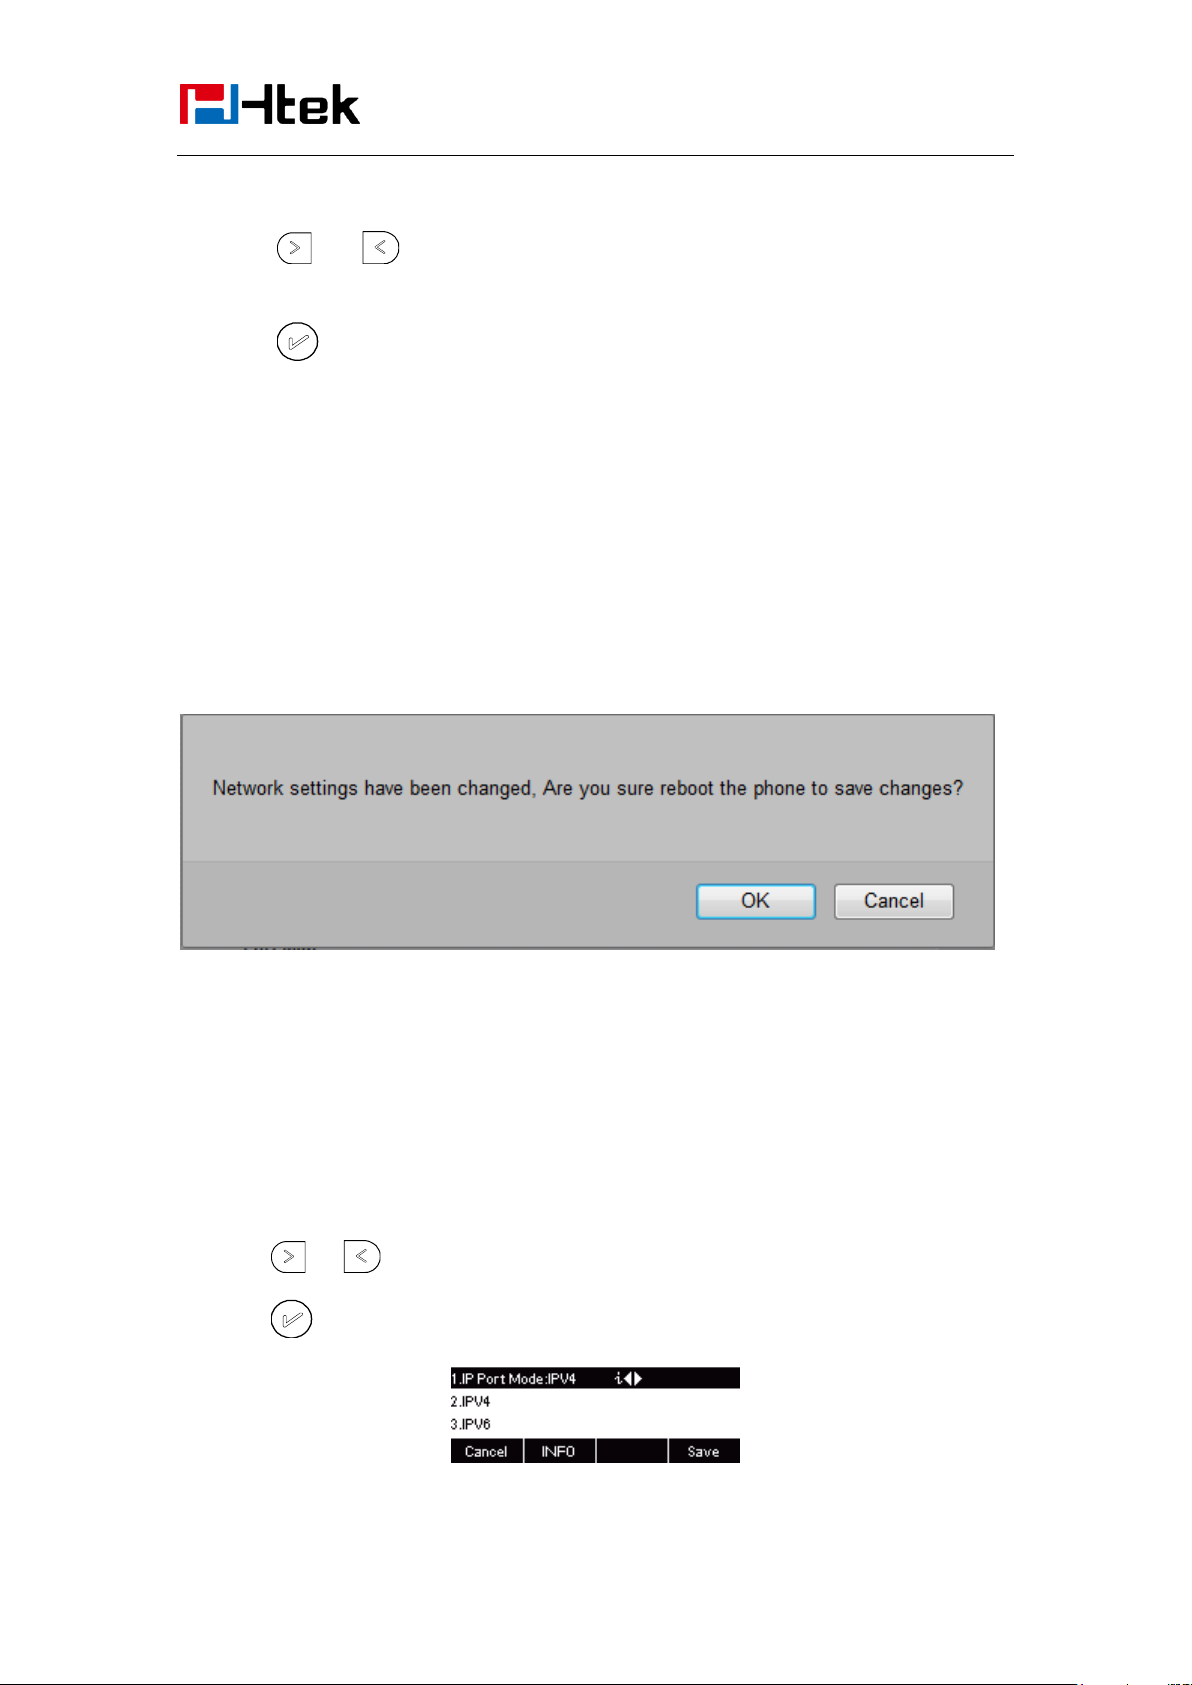
When switch DHCP, Static IP and PPPoE to each other, or change the Static IP on webpage, it
will show the warning of restart as following.
IPv4
If you set IP Mode to IPv4,IP phone will use IPv4 address. IPv4 has three network modes: DHCP,
Static, and PPPoE
To configure IPv4 via phone interface:
1. Press MenuSettingAdvanced Settings (password: admin) NetworkWANPort IP
Port Mode.
2. Press or to change the IP Port Mode..
3. Press or Save soft key to save the configuration.
To configure IPv4 via Web interface:
38
Page 39
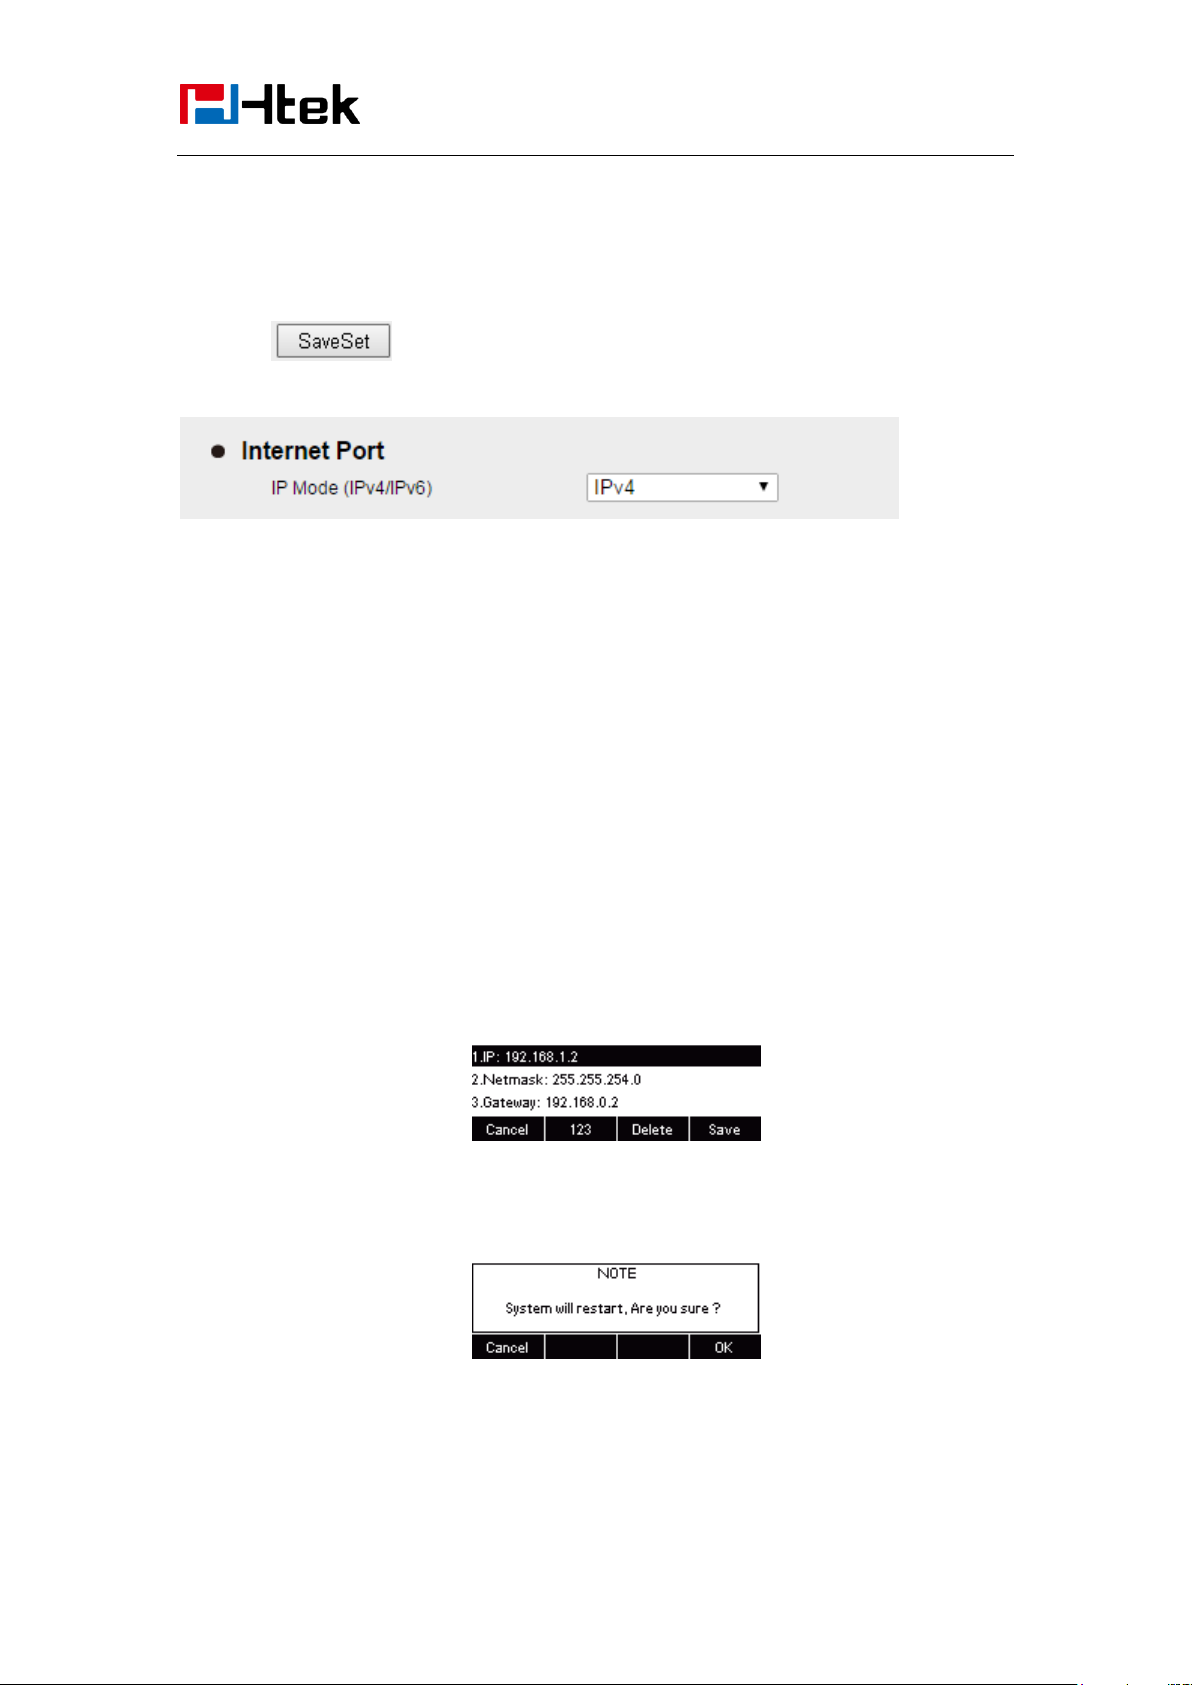
Basic Features
Configuration
1. Click NetworkBasic Internet Port
2. Select IPv4 for Internet Port
3. Click for the setting.
To configure DHCP via phone interface:
1. Press MenuSettingAdvanced Settings (password: admin) NetworkWAN Port
IPv4DHCP mode.
2. Click Save and restart the phone.
To configure a static IP address via phone interface:
1. Press MenuSettingAdvanced Settings (password: admin) NetworkWANPort
IPv4 Static mode.
2. Enter the parameters: IP, Netmask, Gateway, Pri. DNS(primary dns), sec. DNS(second DNS)
in the corresponding fields.
3. Click Save and restart the phone.
Press the Save soft key to accept the change or the Cancel soft key to cancel. If you are using an
xDSL modem, you can connect your phone to the Internet via PPPoE mode. You can set a WAN
port to be a PPPoE port. The PPPoE port will perform a PPP negotiation to obtain the IP address.
39
Page 40

Basic Features
Configuration
Contact your system administrator for the PPPoE user name and password.
To configure PPPoE via phone interface:
1. Press MenuSettingAdvanced Settings (password: admin) NetworkWANPort
PPPoE mode.
2. Enter the User ID and password
3. Click Save and restart the phone.
To configure Network via web interface:
1. Click NetworkBasicIPv4 setting
2. Select the desired Type: DHCP, Static or PPPoE
3. Filled the necessary information.
4. Click the SaveSet and restart the phone.
40
Page 41
Configuration
Basic Features
IPv6
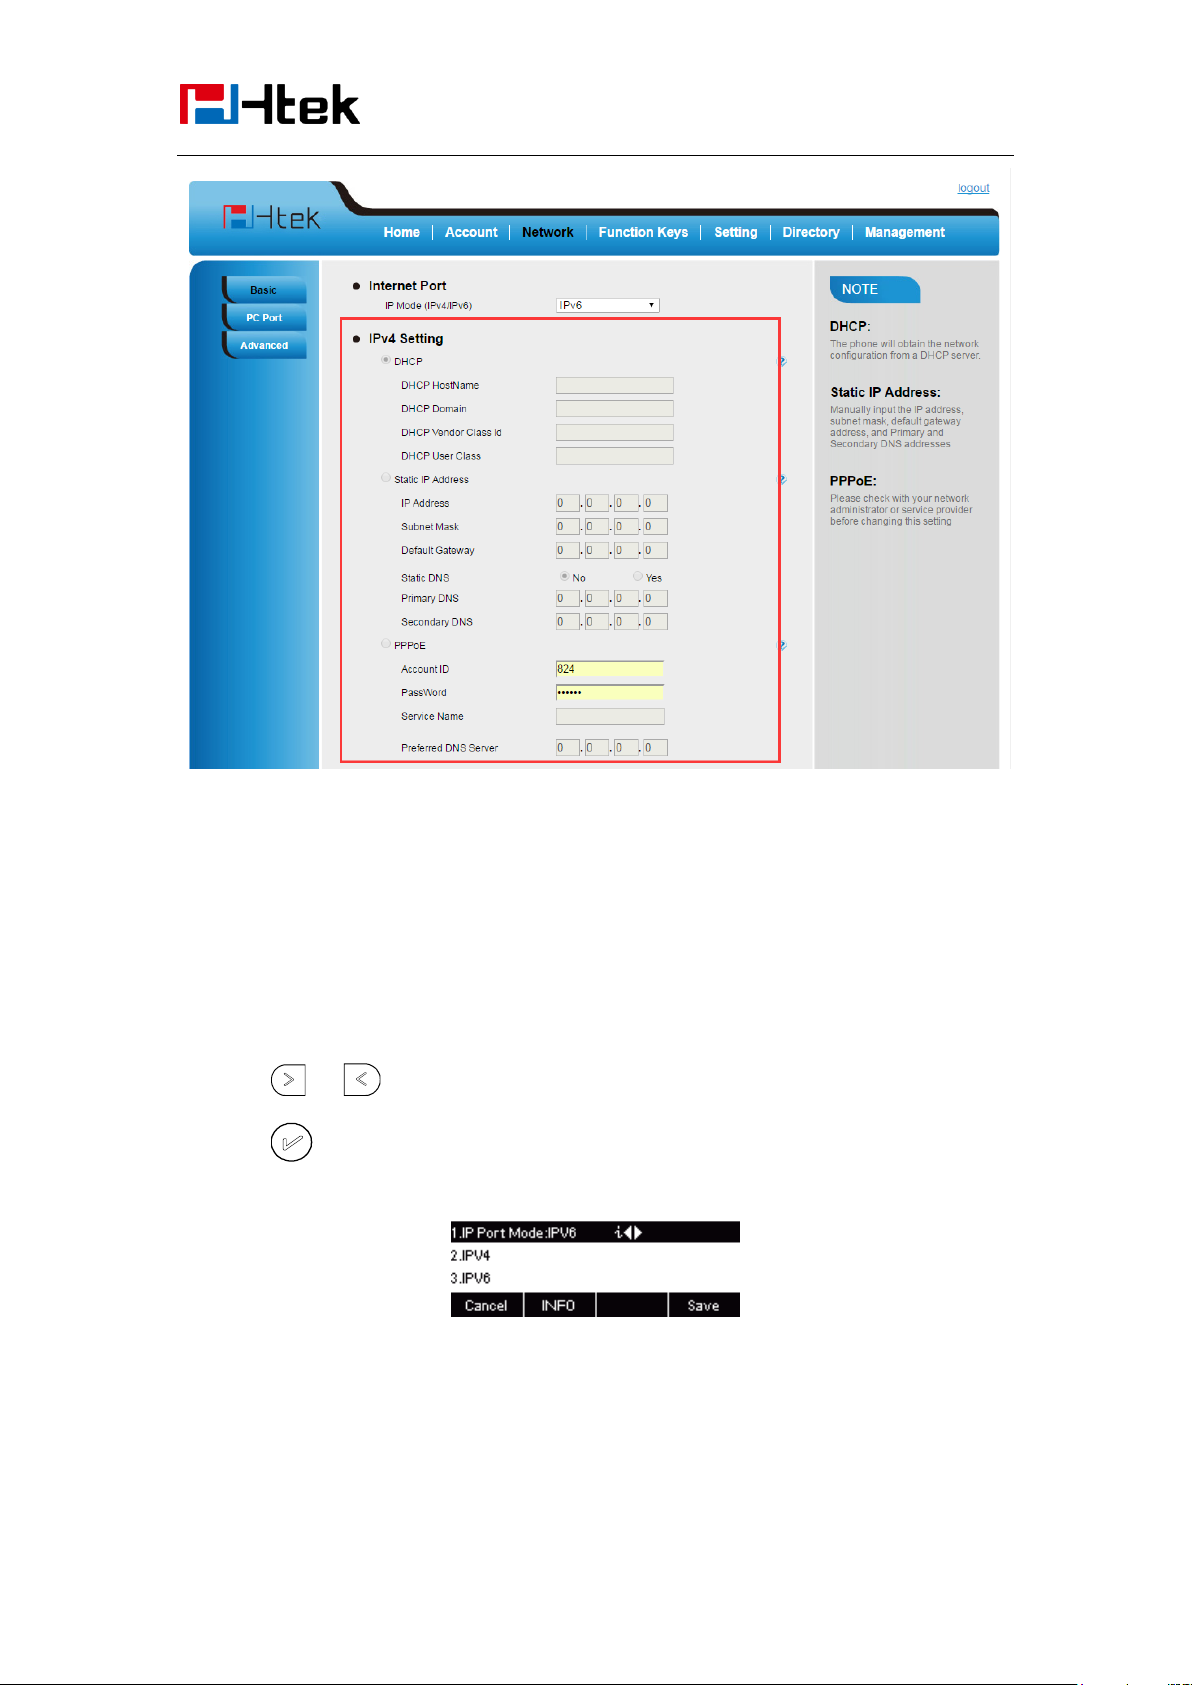
If you set IP Mode to IPv6,IP phone will use IPv6 address. IPv4 has two network modes: DHCP,
Static
To configure IPv6 via phone interface:
1. Press MenuSettingAdvanced Settings (password: admin) NetworkWANPort IP
Port Mode.
2. Press or to change the IP Port Mode..
3. Press or Save soft key to save the configuration.
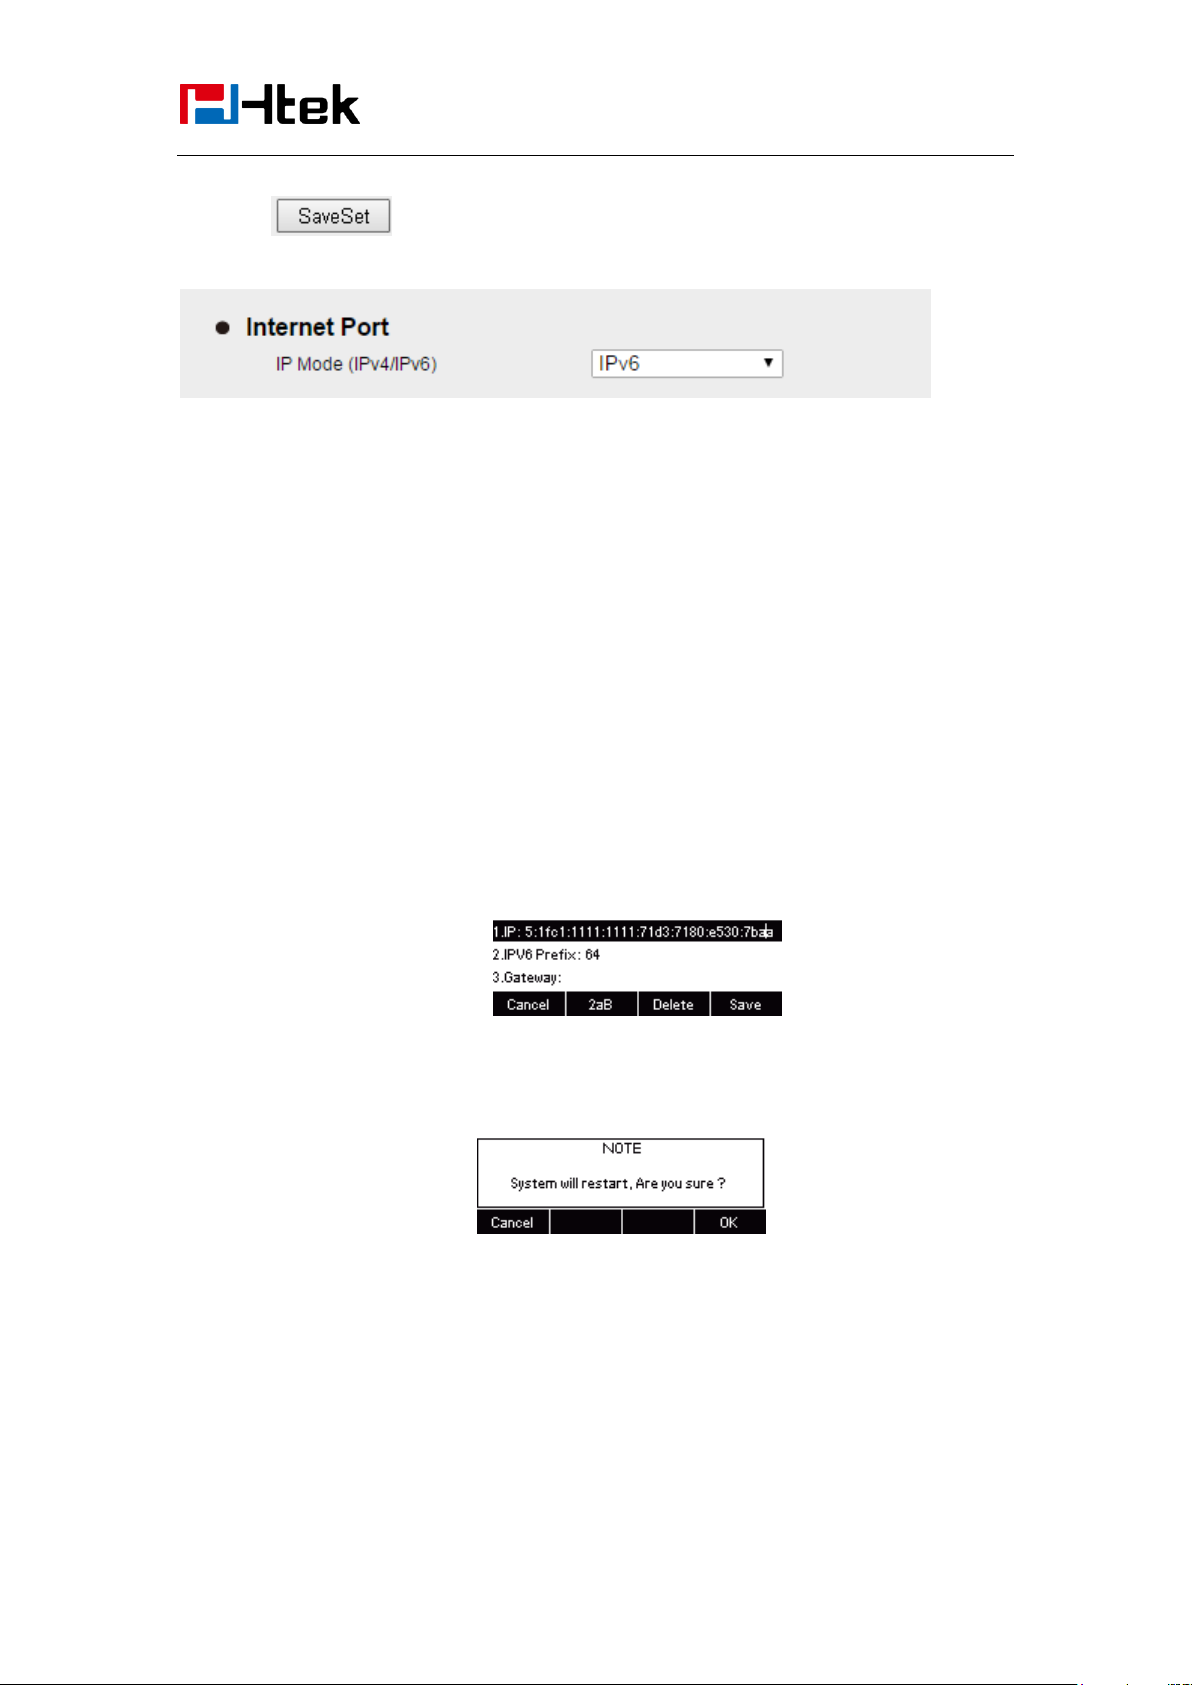
To configure IPv6 via Web interface:
1. Click NetworkBasic Internet Port
2. Select IPv6 for Internet Port
41
Page 42
Basic Features
Configuration
3. Click for the setting.
To configure DHCP via phone interface:
1. Press MenuSettingAdvanced Settings (password: admin) NetworkWAN Port
IPv6DHCP mode.
2. Click Save and restart the phone.
To configure a static IP address via phone interface:
1. Press MenuSettingAdvanced Settings (password: admin) NetworkWANPort
IPv6 Static mode.
2. Enter the parameters: IP, IPV6 Prefix, Gateway, Pri. DNS(primary dns), sec. DNS(second
DNS) in the corresponding fields.
3. Click Save and restart the phone.
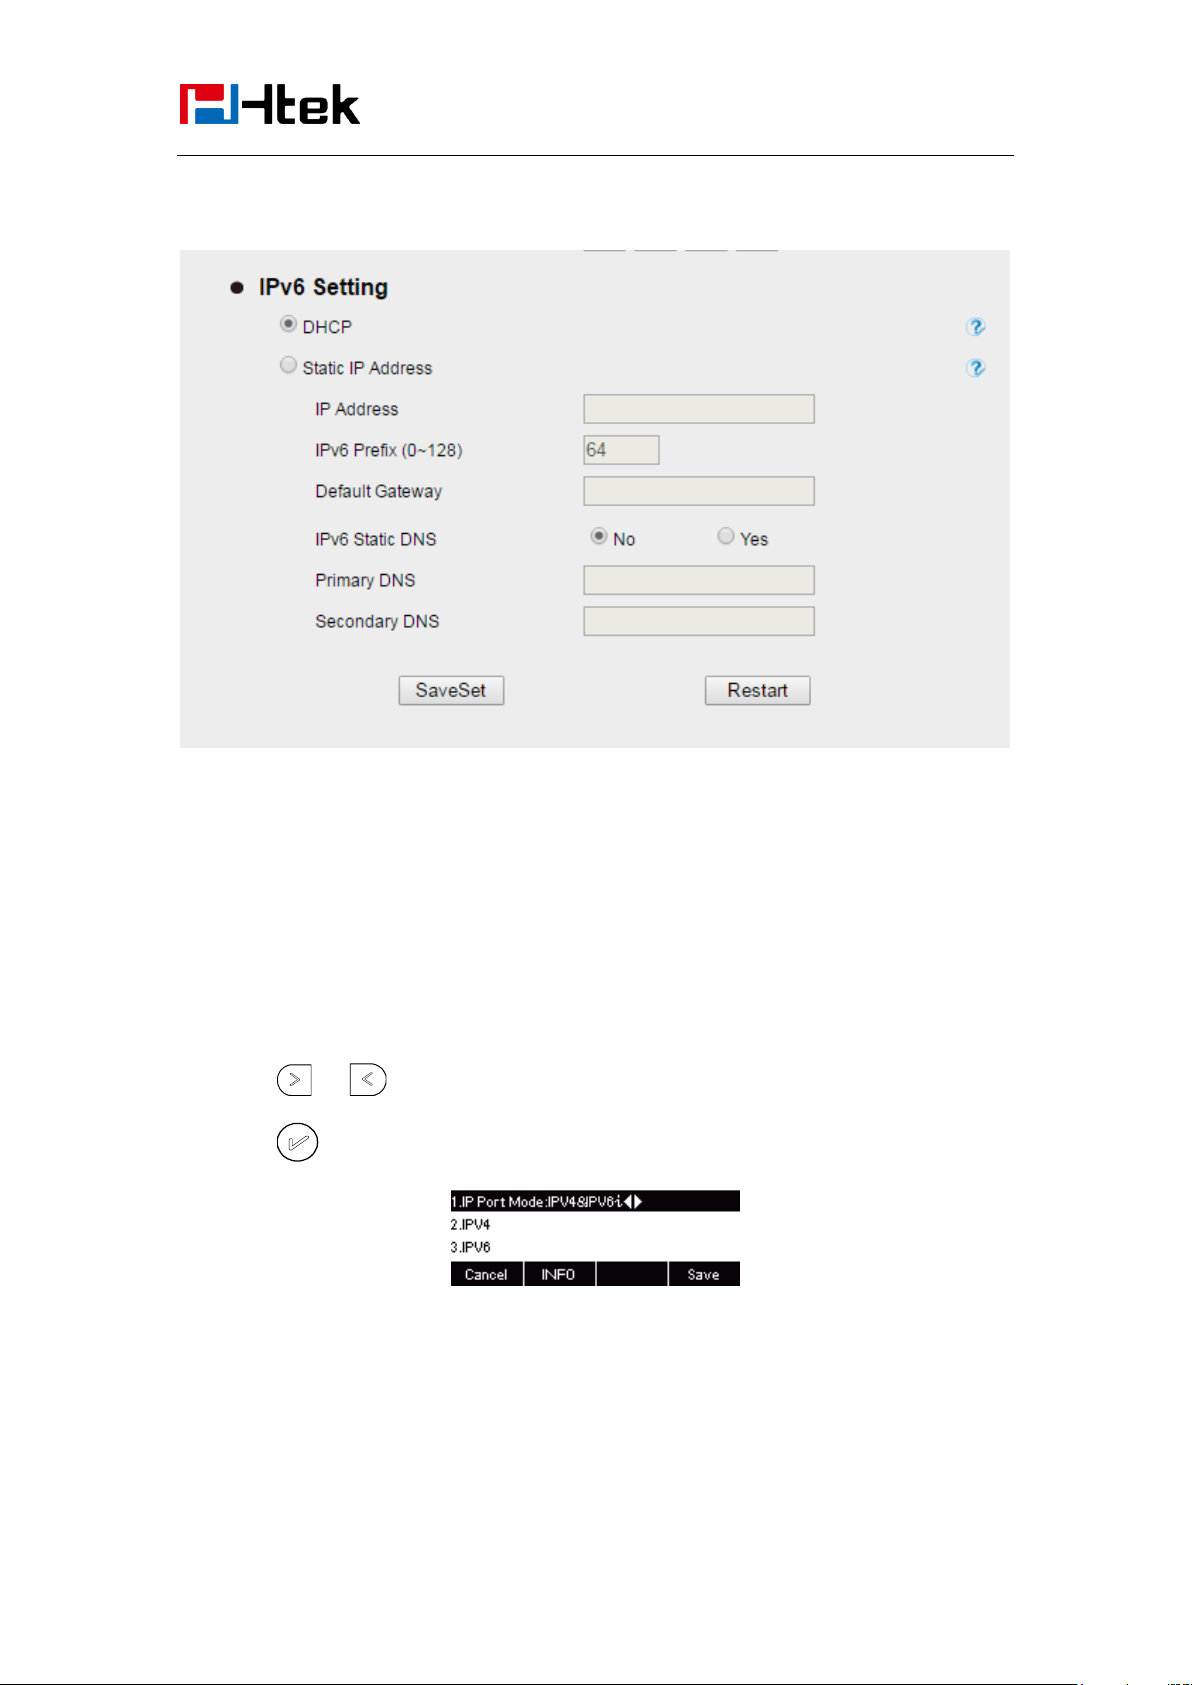
To configure Network via web interface:
1. Click NetworkBasicIPv6 setting
2. Select the desired Type: DHCP, Static
3. Fill required fields.
42
Page 43
Basic Features
Configuration
4. Click the SaveSet and restart the phone.
IPv4&IPv6
If you set IP Mode to IPv4&IPv6,IP phone will support both IPv4 and IPv6 address. The settings
of DHCP, Static, and PPPoE are same as above.
To configure IPv4&IPv6 via phone interface:
1. Press MenuSettingAdvanced Settings (password: admin) NetworkWANPort IP
Port Mode.
2. Press or to change the IP Port Mode..
3. Press or Save soft key to save the configuration.
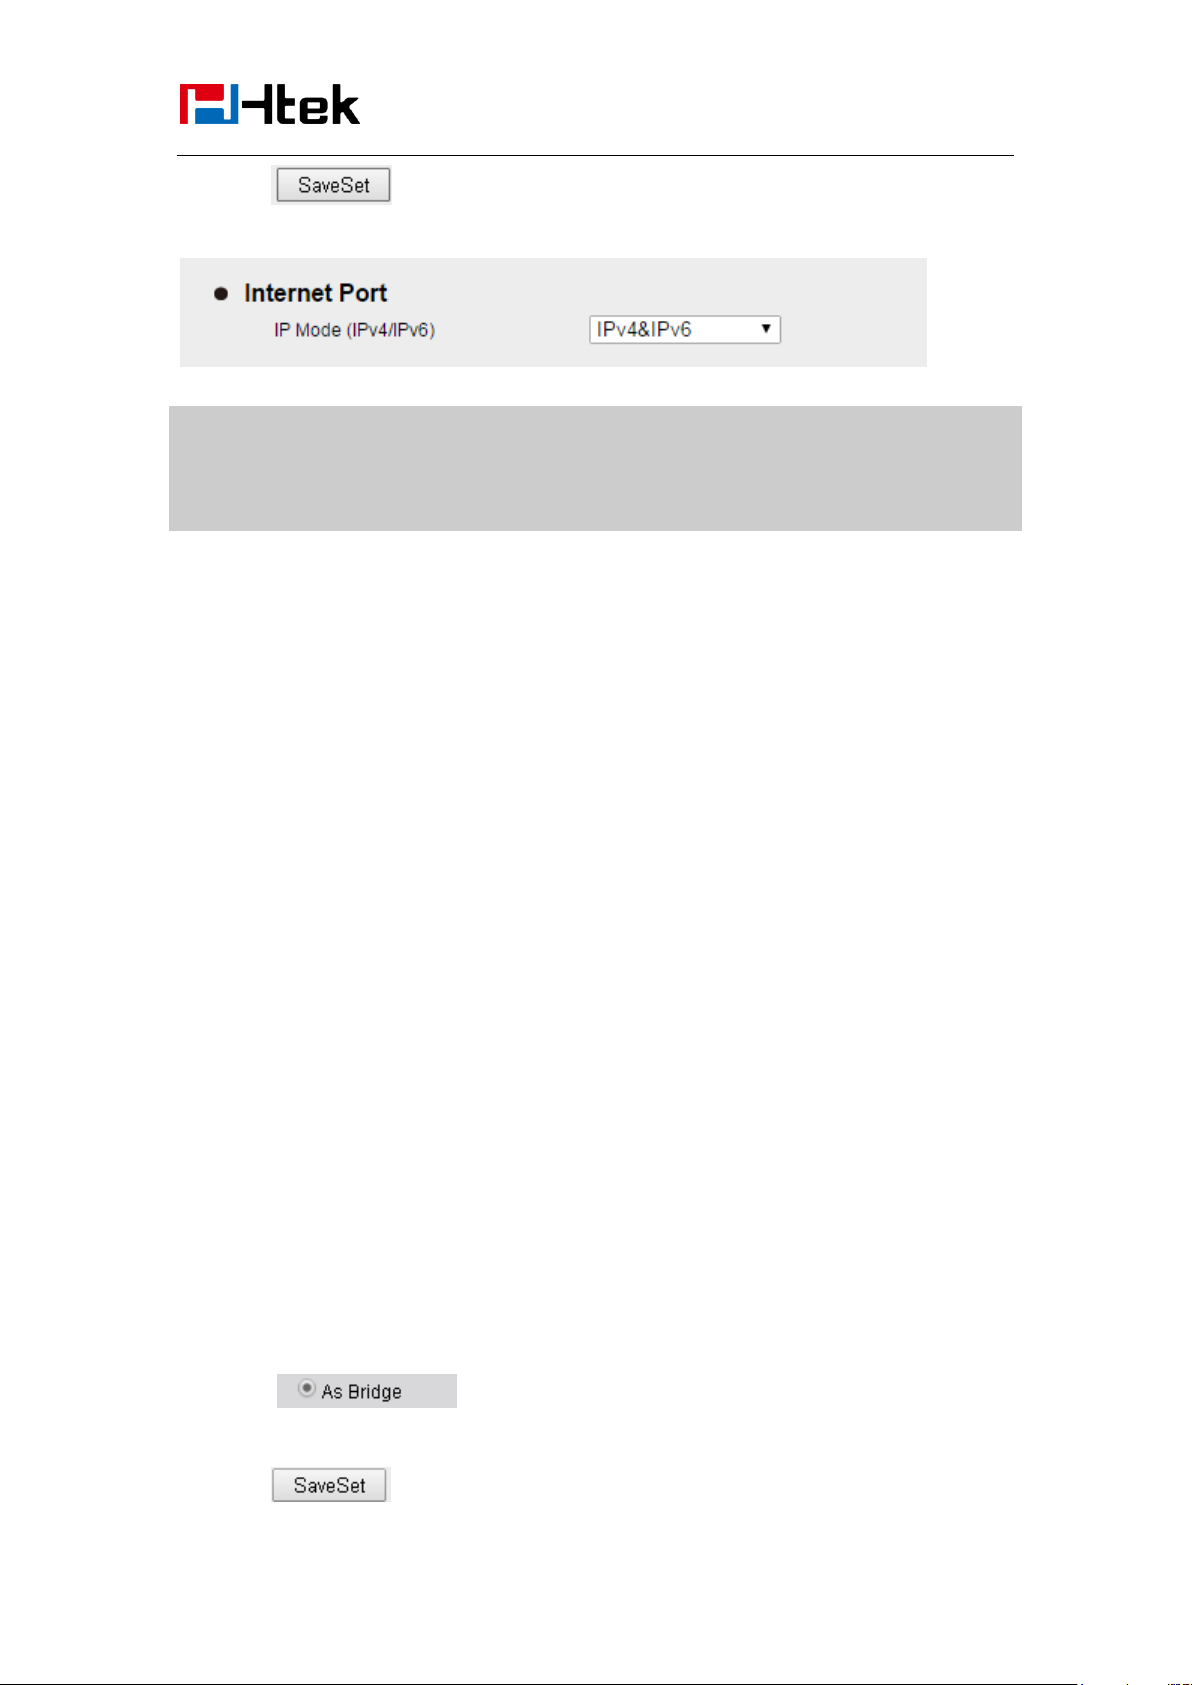
To configure IPv4&IPv6 via Web interface:
1. Click NetworkBasic Internet Port
2. Select IPv4&IPv6 for Internet Port
43
Page 44
Basic Features
Note:
Wrong network parameters may result in inaccessibility of your phone and may also have
an impact on your network performance. For more information about these parameters,
contact your system administrator.
Configuration
3. Click for the setting.
PC Port
Two modes for PC port: bridge and router.
To configure PC Bridge via Phone interface:
1. Press MenuSettingAdvanced Settings (password: admin) NetworkPC Port Bridge
mode.
2. Click Save and restart the phone.
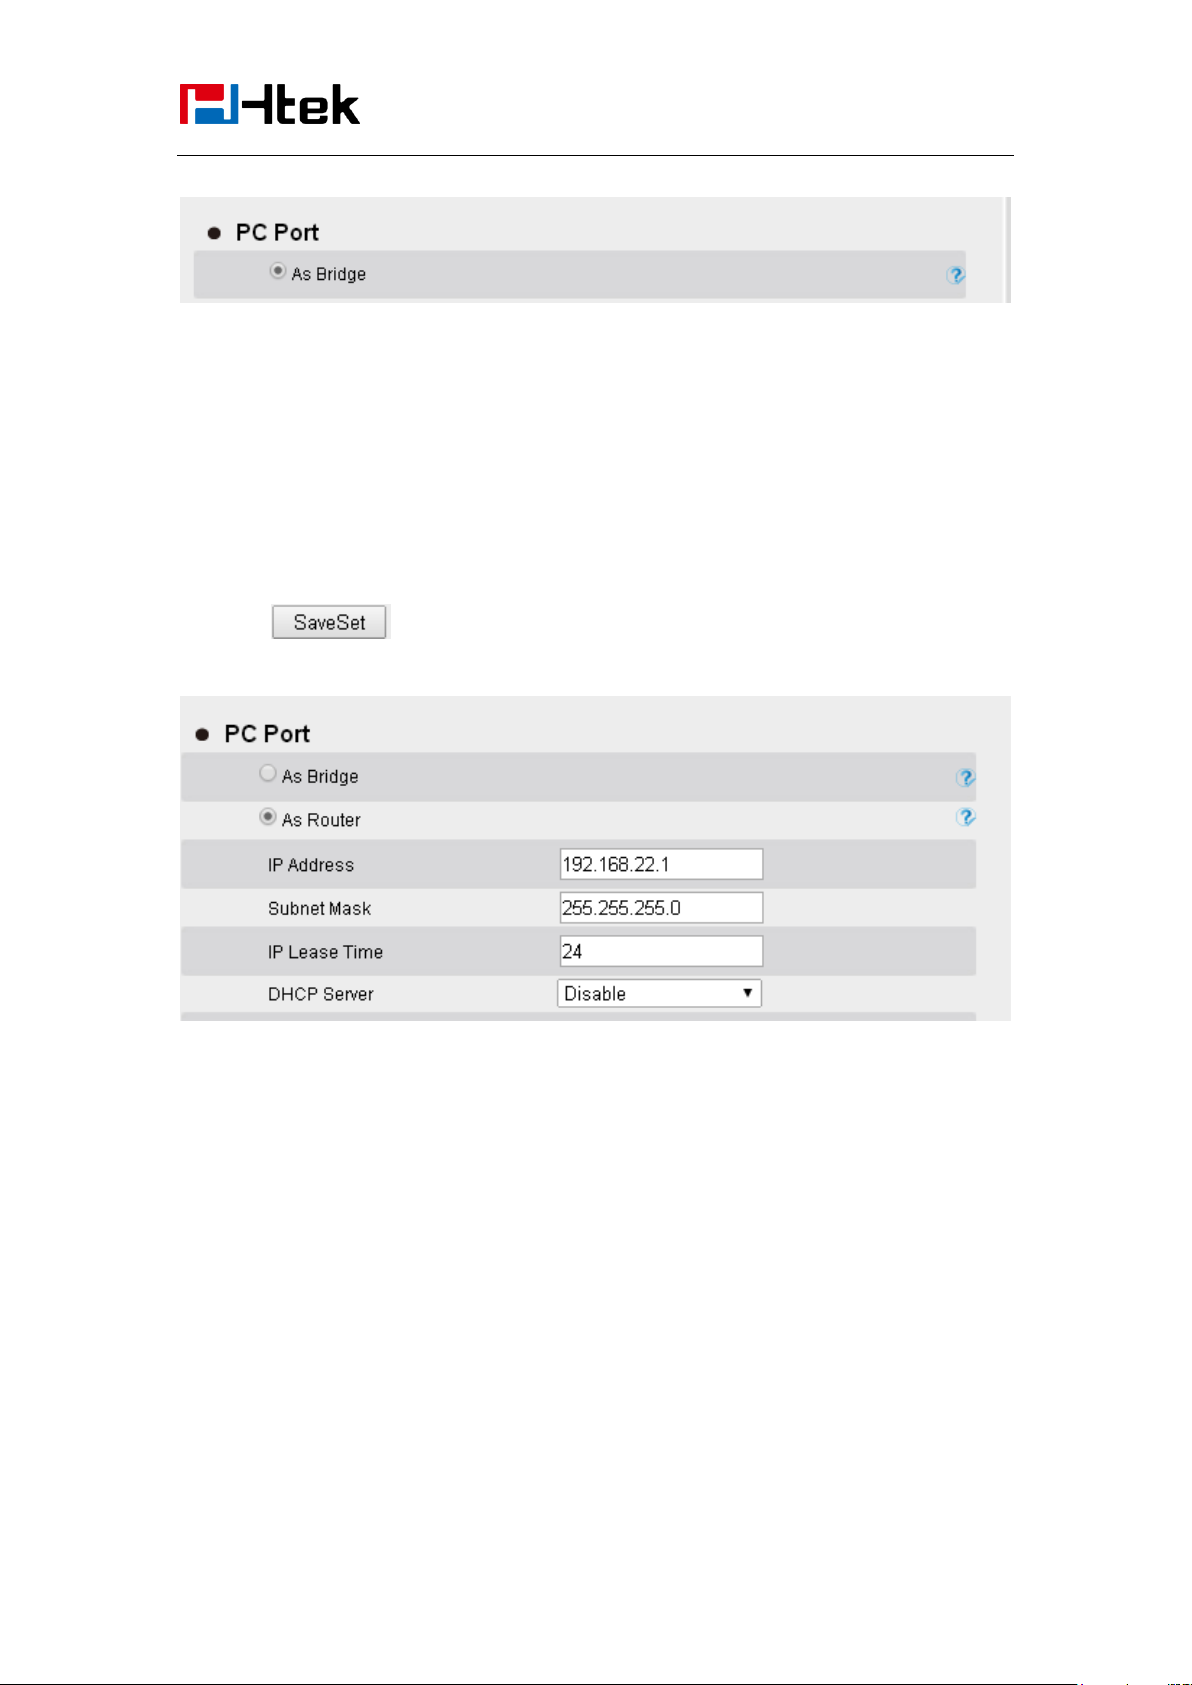
To configure PC router via Phone interface:
1. Press MenuSettingAdvanced Settings (password: admin) NetworkPC Port Router
mode.
2. Enter the IP, Netmask and DHCP server
3. Click Save and restart the phone.
To configure Bridge via web interface:
1. Click NetworkBasic
2. Select
3. Click and restart the phone
44
Page 45
Basic Features
Configuration
To configure Router via web interface:
1. Click NetworkBasic
2. Select As Router
3. Fill the IP address and other necessary information.
4. Click and restart the phone
Contact Settings
This section provides the operating instructions for managing contacts. The topics include:
Local Directory
Remote Phonebook
LDAP
Search Contact
Local Directory
In the directory, you can add or delete your friends, business partner or anyone others’ phone No.
so you will not forget their number. Or put some anonymous phone No. in the blacklist to prevent
from being disturbed. The local Directory can add up to 1000 contacts.
45
Page 46
Basic Features
Configuration
A. To add contacts list into local directory
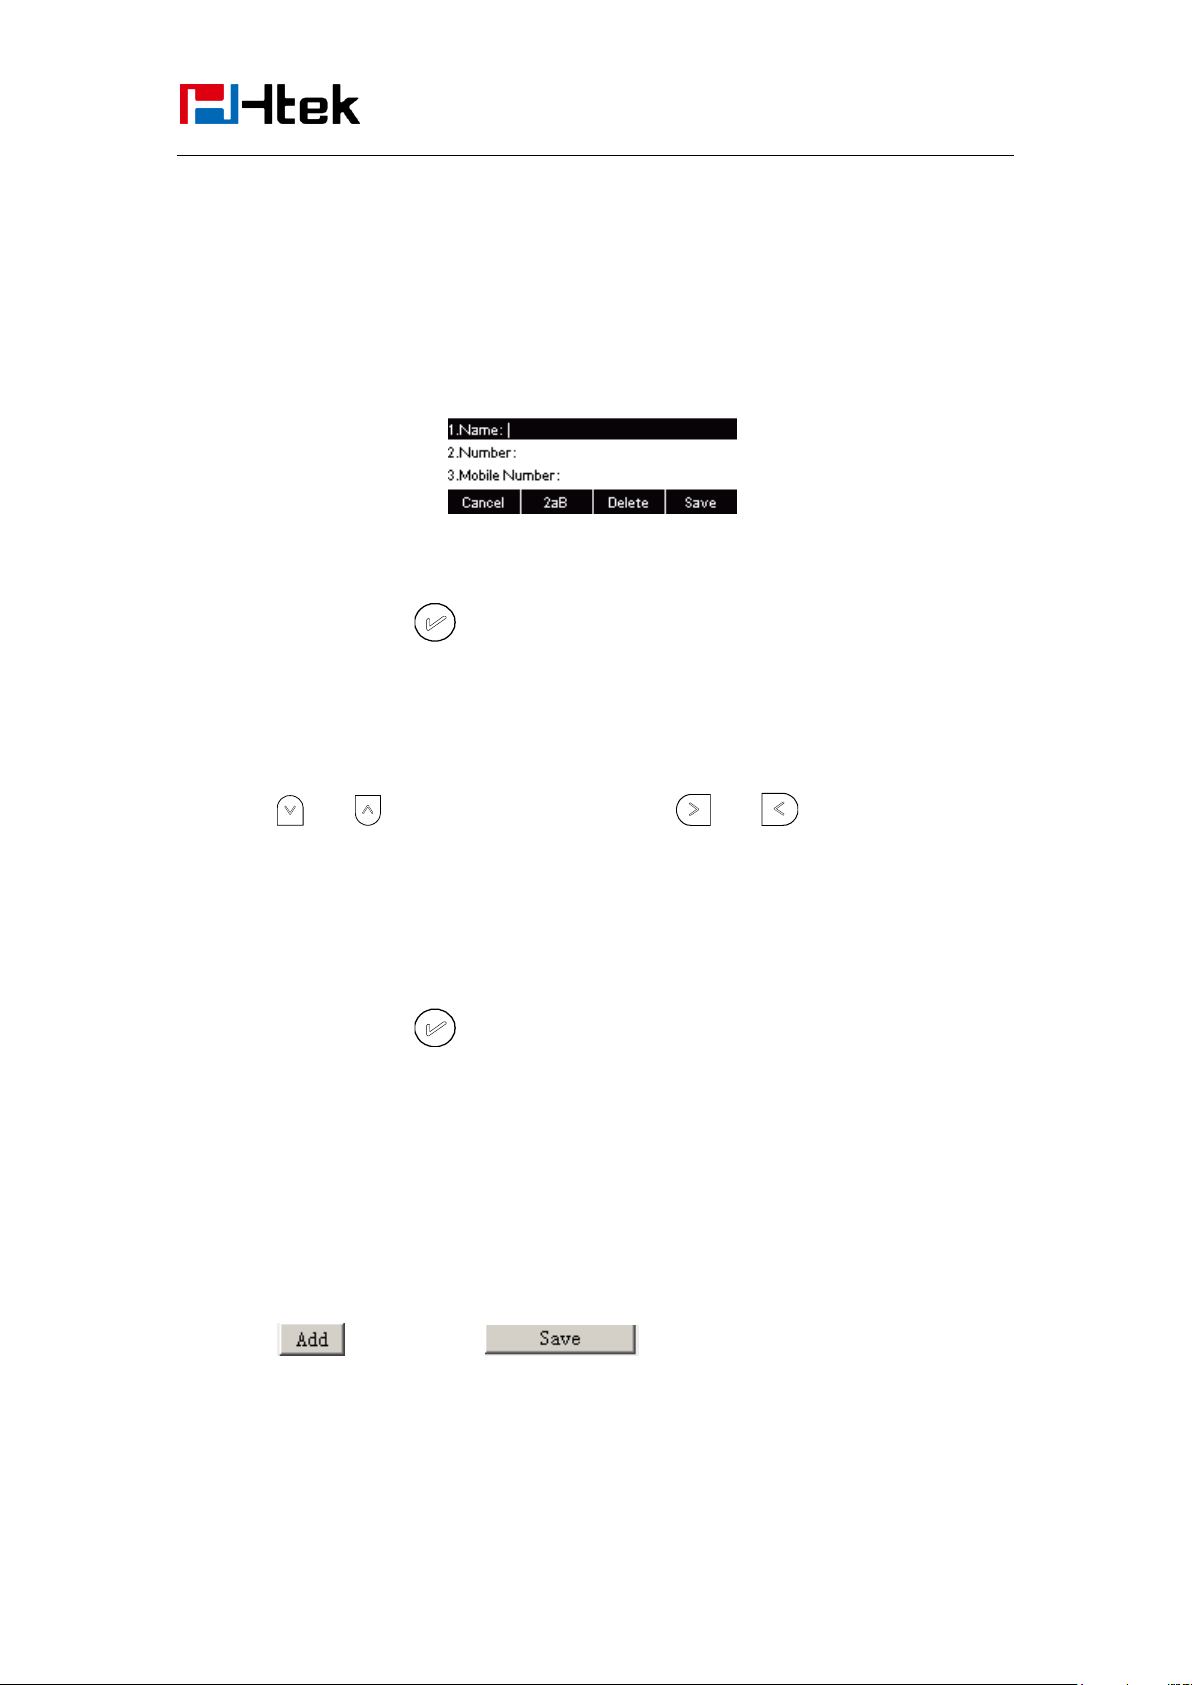
To add contacts manually
1. Press Menu → DIR→ Local Contacts
2. Press Add soft key
3. Enter the necessary information as Name, Phone number…
4. Press save soft key or to add the contacts successfully.
To add contacts from History
1. Press History soft key or press Menu →History
.
2. Press and to select the targeted one. (Press and switched among the All
calls, Dialed calls, Received calls, Missed Calls and Forward Calls).
3. Press Option soft key → Add to Contacts
4. Edit the necessary information as Name, Phone number…
5. Press save soft key or to add the contacts successfully.
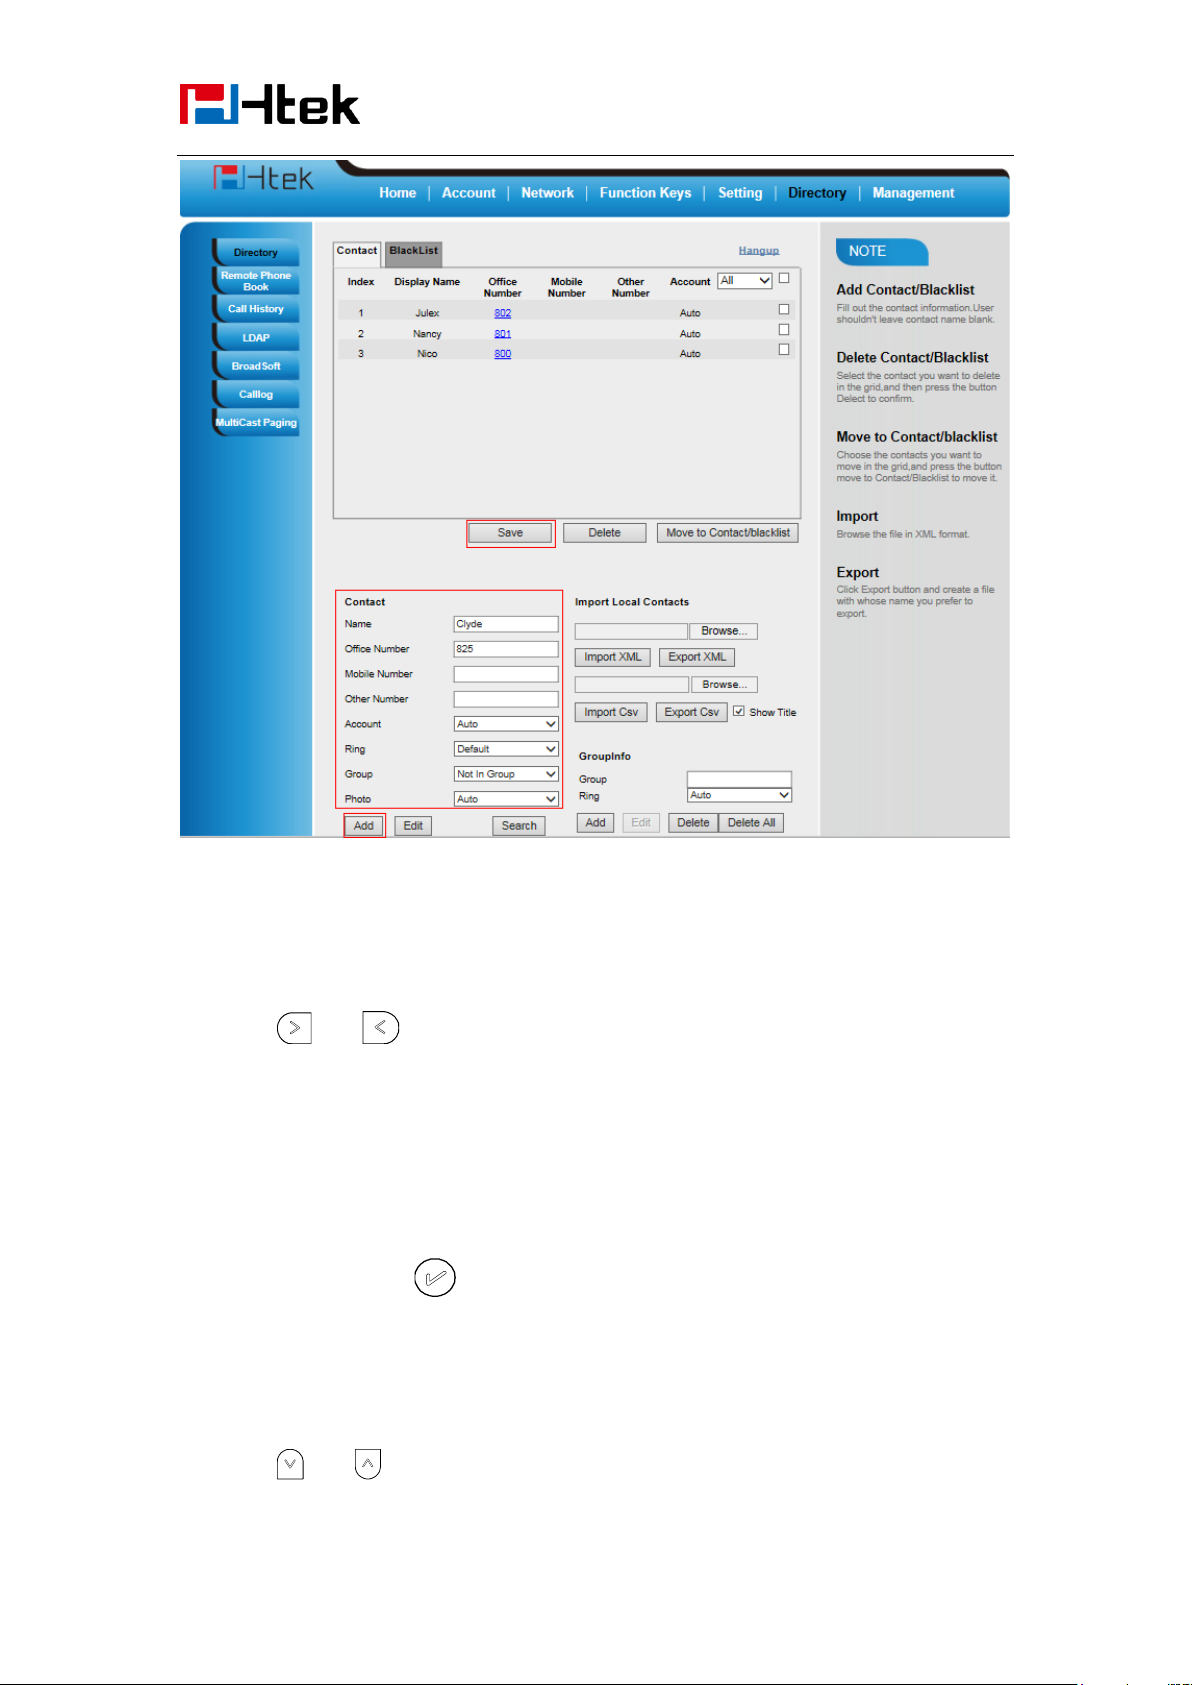
To add contacts via web interface
1. Click DirectoryDirectory
2. Enter the name, number and some other information.
3. Press and then press button.
46
Page 47
Configuration
Basic Features
B: To add contacts into blacklist
To add blacklist manually
1. Press Menu → DIR
2. Press and or press Switch soft key to Choose the Local Contact.
3. Press More soft key.
4. Press More soft key.
5. Press Option soft key. Add to blacklist.
6. Press save soft key or to add the contacts successfully.
To add blacklist from history
1. Press History soft key or press Menu → History → Local history
2. Press and to select the targeted one.
47
Page 48

Basic Features
Configuration
3. Press Option soft key → Add to Blacklist
4. Edit the necessary information as Name, Phone number…
5. Press save soft key or to add successfully.
To import or export the contact list
You can manage your phone’s local directory via phone or web user interface. But you can only
import or export the contact list via web interface.
To import an XML file of contact list via web interface:
1. Click on Directory
2. Click Browse to select a contact list file (file format must be .xml) from your local system.
3. Click Import XML to import the contact list.
To export an XML file of contact list via web interface:
1. Click on Directory
2. Click Export XML to export the contact list.
To import a CSV file of contact list via web interface:
1. Click on Directory
2. Click Browse to select a contact list file (file format must be .csv) from your local system.
3. Click Import Csv to import the contact list.
To export a CSV file of contact list via web user interface:
1. Click on Directory
2. Click Export Csv to export the contact list.
Note:
If the xml file and CSV file more than 1000 contacts, the phone will only upload 1000 contacts.
48
Page 49
Basic Features
Configuration
Remote Phonebook
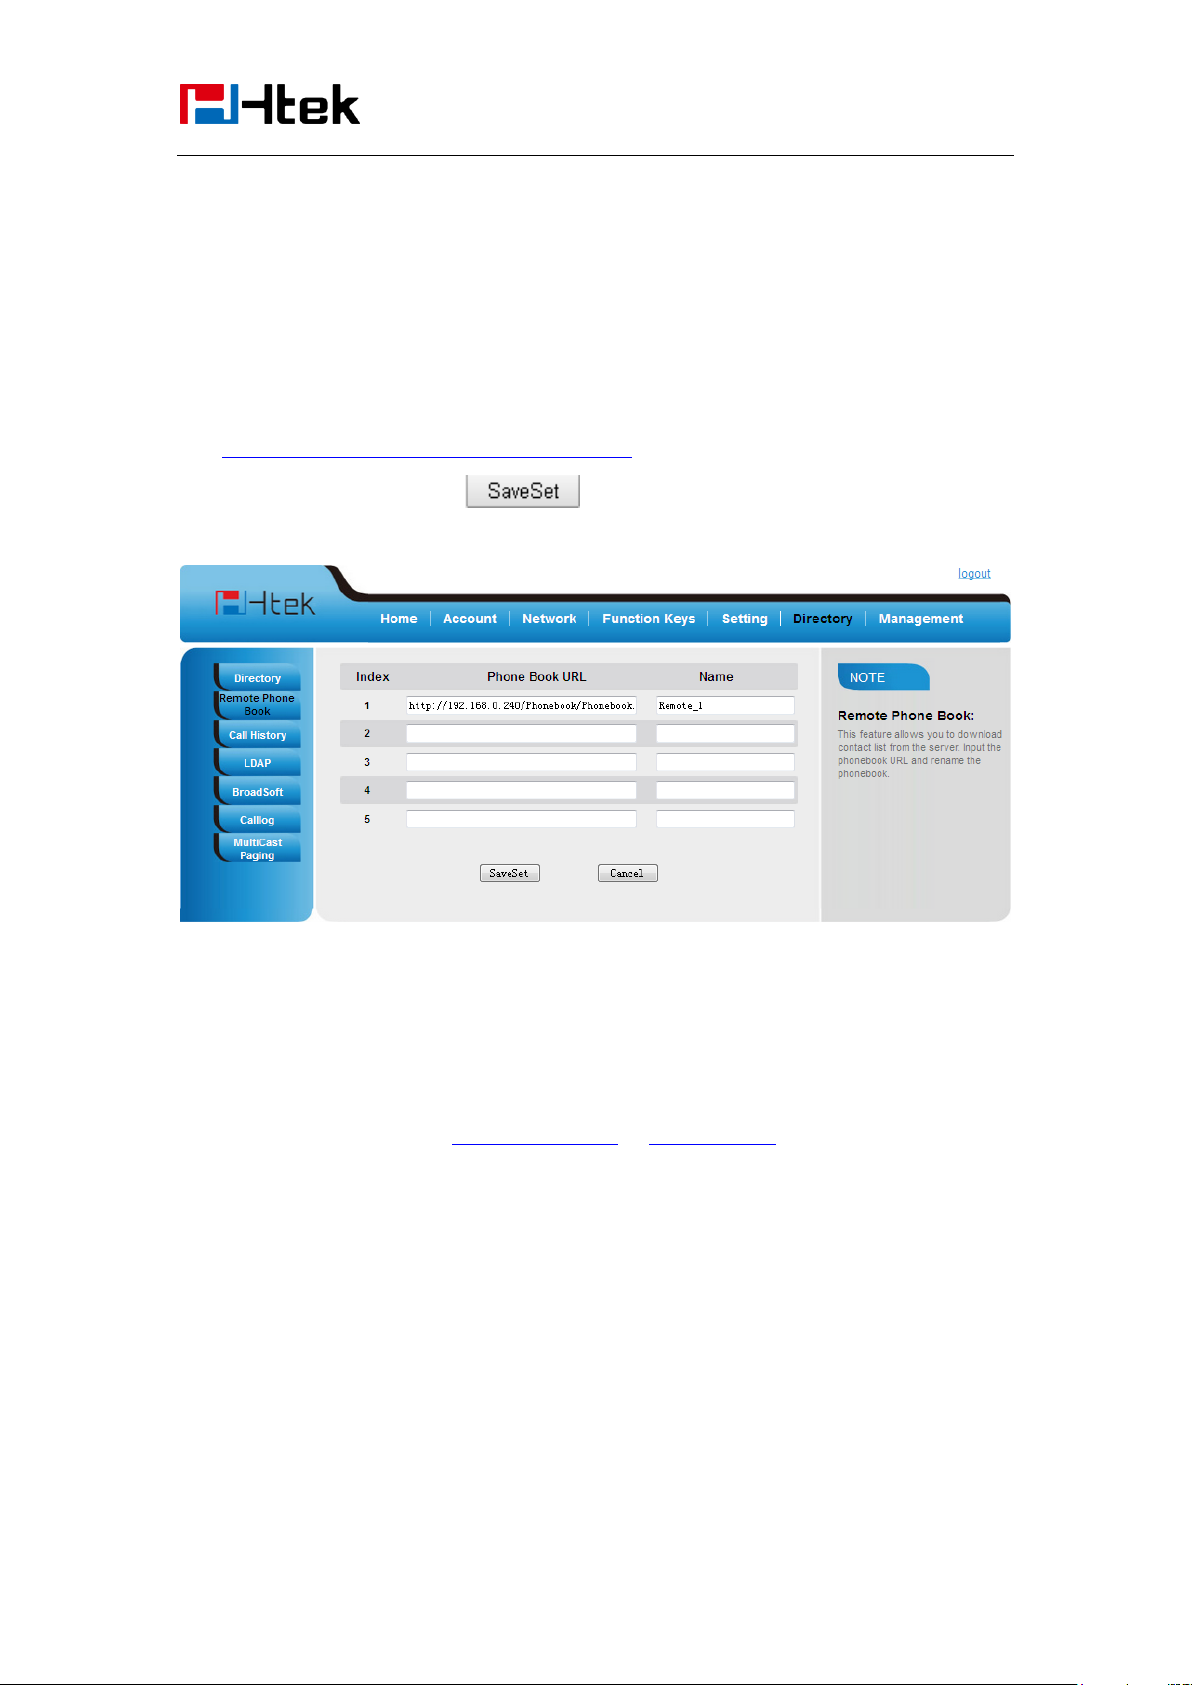
To set Remote Phonebook via web interface:
1. Login the webpage and click DirectoryRemote Phone Book
2. Fill the path of the remote file in the Phone Book URL field.
For example,
http://192.168.0.240/Phonebook/Phonebook.xml
3. Fill the Name and then click to save the configuration.
To check the contacts via phone interface:
Press DirectoryLeft ButtonLeft Button, and then you can see the item you set, press enter you
will find the detail.
For More detail, please refer to: Remote Phonebook on www.htek.com .
Note:
Every remote contact only support 1000 contacts.
LDAP Phonebook
When use the LDAP feature, you can get the LDAP Phonebook directly.
To configure LDAP via web interface:
1. Login webpage and click DirectoryLDAP
2. Filled the LDAP Name Filter:
49
Page 50
Basic Features
Configuration
a) This parameter specifies the name attributes for LDAP searching. The “%” symbol in
the filter stands for the entering string used as the prefix of the filter condition.
b) For example (cn=%), when the name prefix of the cn of the contact record matches the
search criteria, the record will be displayed on the IP PHONE LCD.
3. Filled LDAP Number Filter:
This parameter specifies the number attributes for LDAP searching.
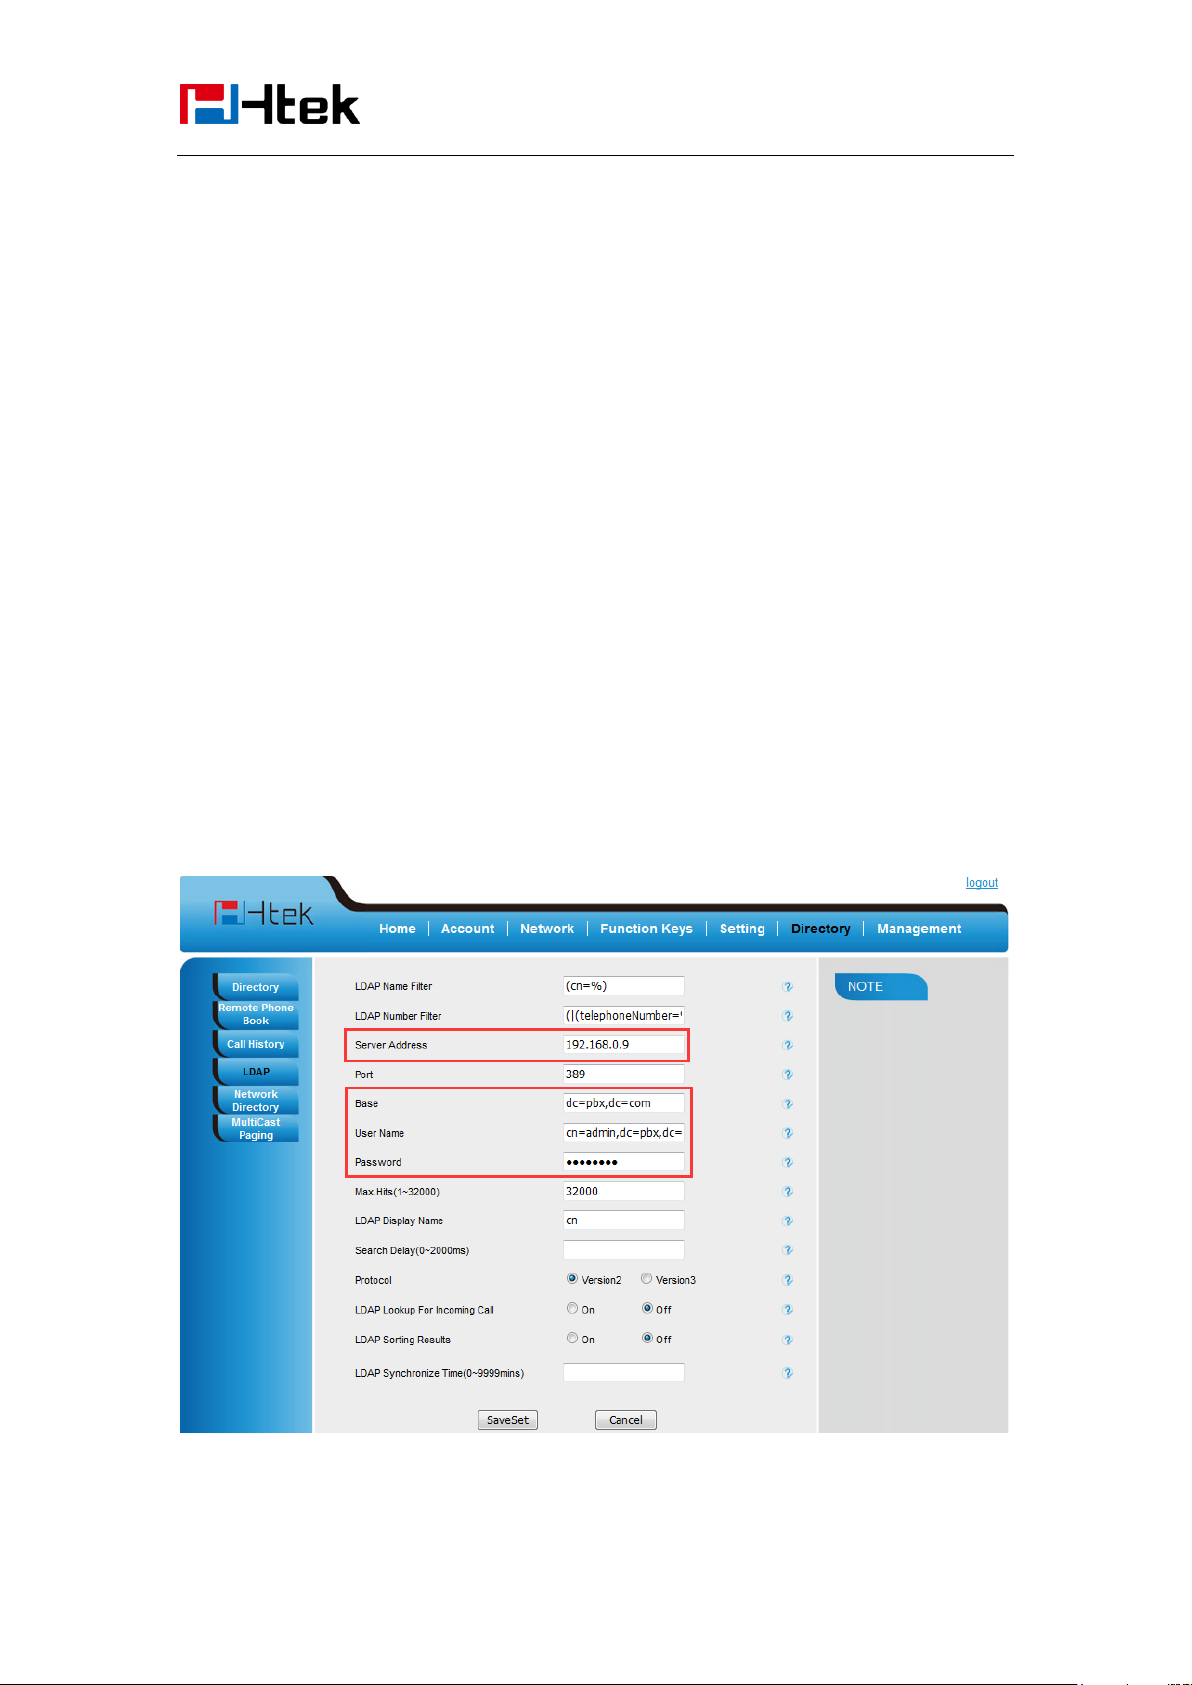
4. Filled Server Address: Fill the domain name or IP address of the LDAP Server.
For example: 192.168.0.124
5. Port(the port of the LDAP Serve) Base, User Name, Password
6. Max.Hits(1-32000): the maximum number of the search results to be returned by the LDAP
server.
7. LDAP Display Name: the display name of the contact record displayed on the LCD screen.
8. Filled the relative value and then click save button the save the settings.
Following is the example screenshot for the configuration.
To Configure LDAP Key
50
Page 51
Basic Features
Configuration
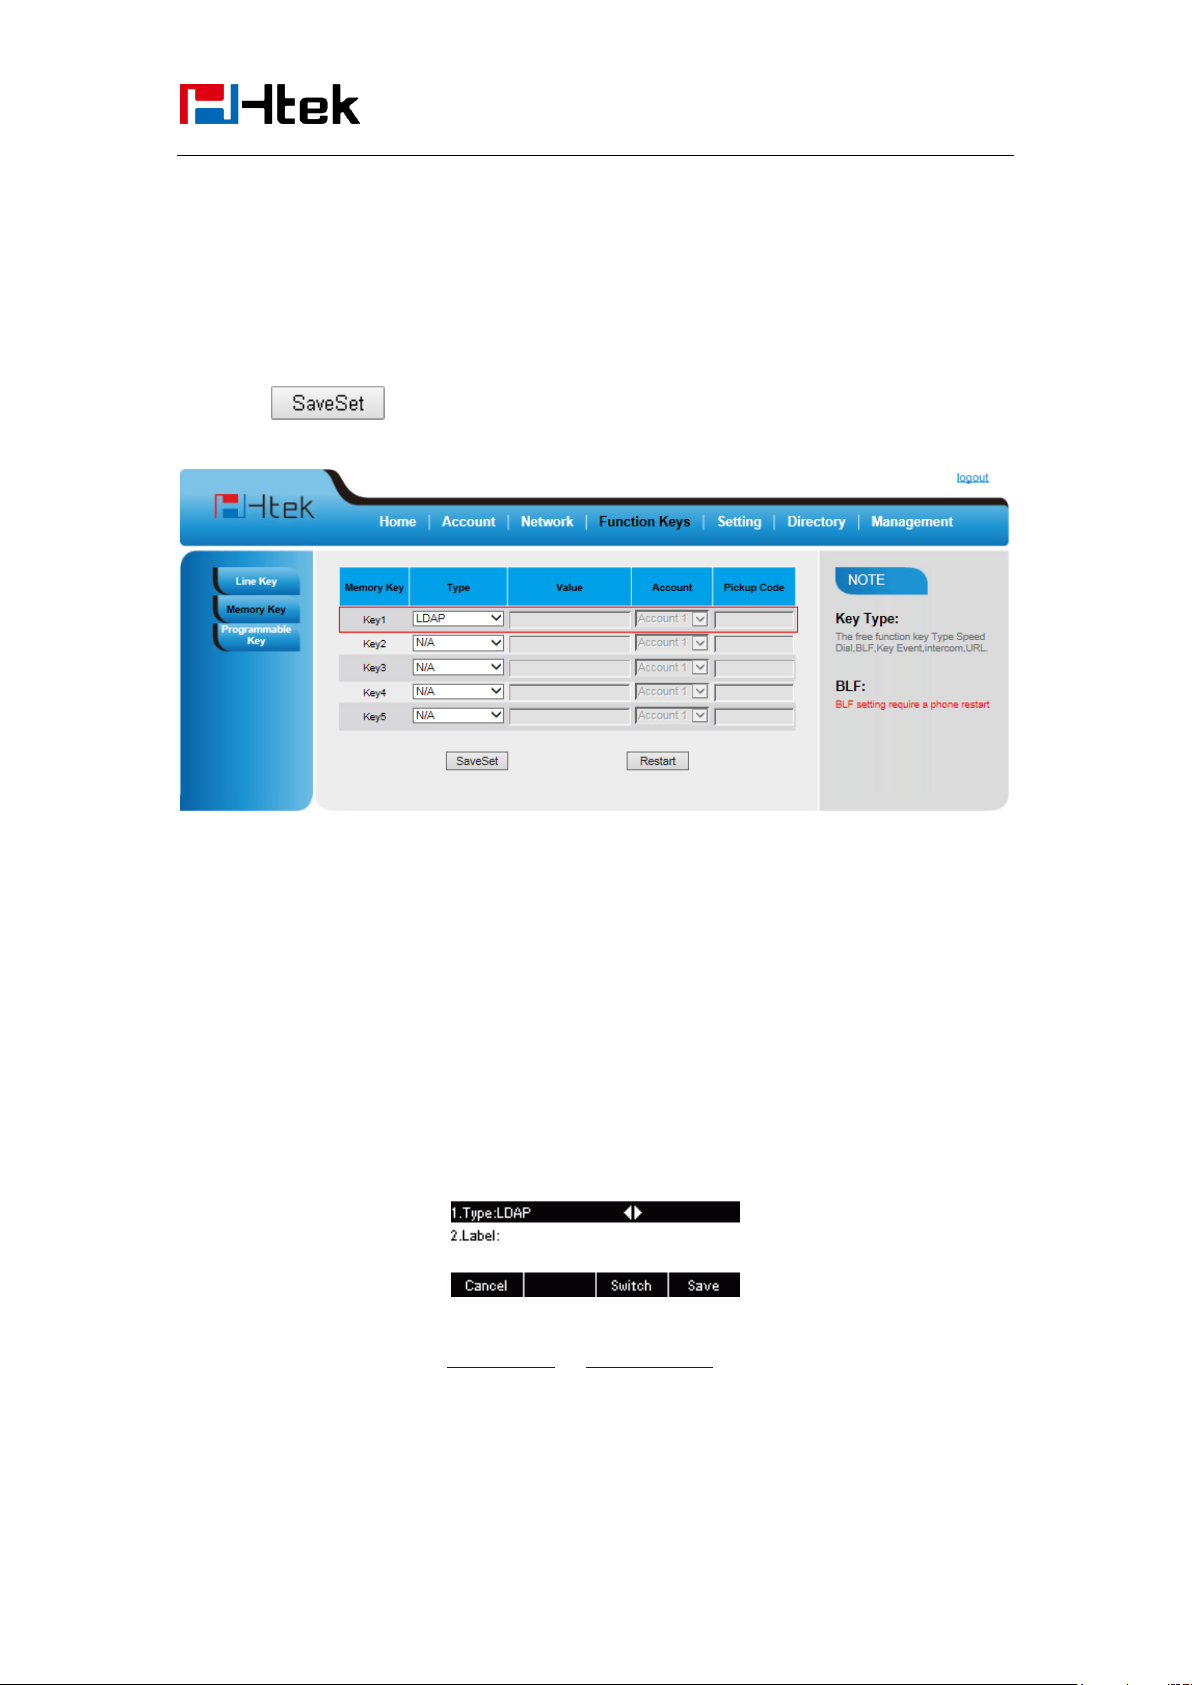
To configure LDAP Key via web interface:
1. Click Function KeyLine Key choose Line Key 1(for example)
2. Select LDAP in the Type field.
3. Click to save the configuration.
To Configure LDAP Key via phone interface:
1. Press MenuFeatureFunction KeysLine Keys as Function KeysLine Key 1
2. Select LDAP in the Type field
3. Press save or OK key to save the configuration.
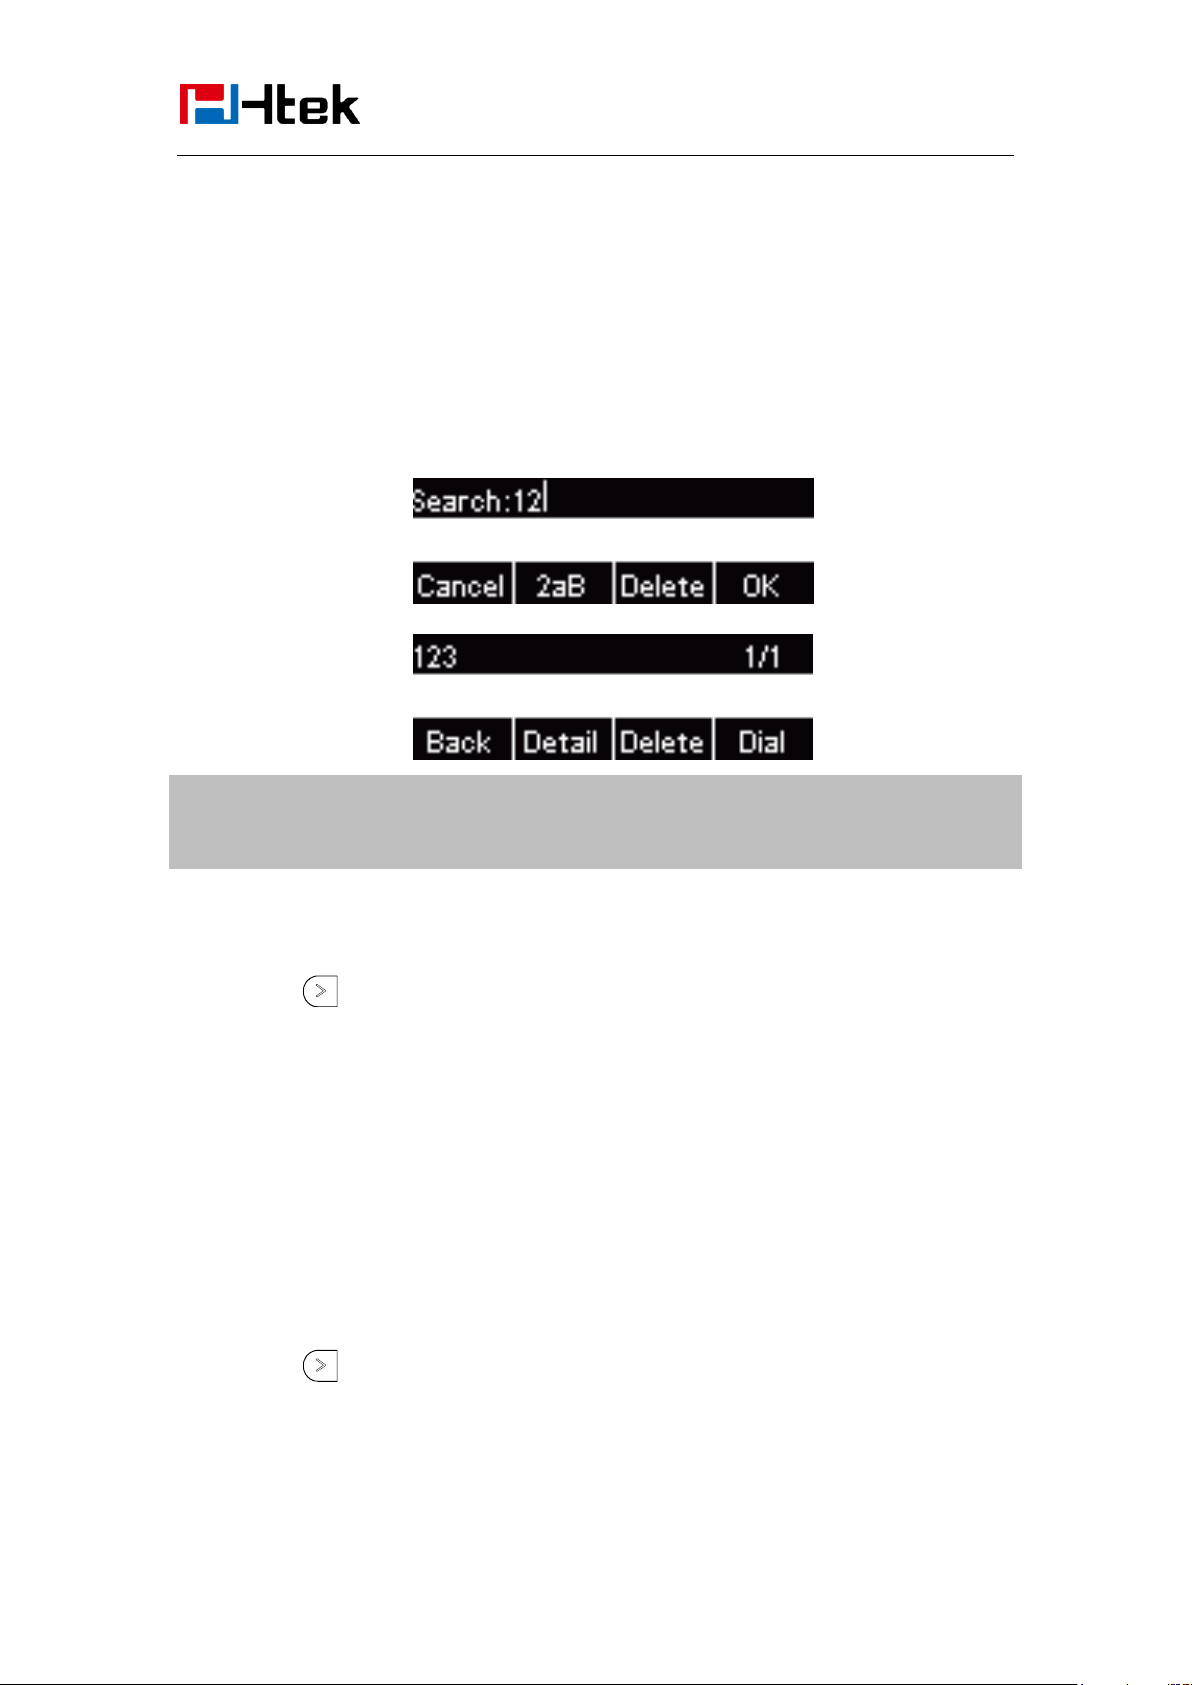
When press the LDAP Key the LCD will display as following:
For More detail, please refer to LDAP Notes on www.htek.com
51
Page 52
Basic Features
Note:
If you don’t click the OK softkey, then IP Phone will display the relevant contacts
automatically within 5 seconds
Configuration
Search Contact
You can search contact in all contacts, local contacts, remote contacts and LDAP contact.
To search contact in all contacts:
1. Click the Directory softkey on Idle interface.
2. Click the More Softkey, then you can see the Search softkey
3. Click the Search softkey, you can enter the desired part of name or part of number.
4. Click Ok softkey, then with the search content to match the contact will be displayed on the
LCD.
To search contact in Local contacts:
1. Click the Directory softkey on Idle interface.
2. Click the button and select the Local contacts list.
3. Click the More Softkey, then you can see the Search softkey
4. Click the Search softkey, you can enter the desired part of name or part of number.
5. Click Ok softkey, then with the search content to match the contact will be displayed on the
LCD.
Note:
If you don’t click the OK softkey, then IP Phone will display the relevant contacts automatically
within 5 seconds
To search contact in Remote contacts:
1. Click the Directory softkey on Idle interface.
2. Click the button and select the remote contacts list.
3. Select the desired the remote contact and click Enter softkey.
4. Click the Search softkey, you can enter the desired part of name or part of number.
5. Click Ok softkey, then with the search content to match the contact will be displayed on the
52
Page 53

Basic Features
Configuration
LCD.
Note:
If you don’t click the OK softkey, then IP Phone will display the relevant contacts automatically
within 5 seconds
To search contact in LDAP contacts:
1. Click the LDAP function key.
2. Enter the first character or more of contact’s name.
3. Select the desired the remote contact and click Enter softkey.
4. Then IP Phone will display the relevant contacts automatically within Search Delay.
Call History Settings
Call History
This phone maintains call history lists of Dialed Calls, Received Calls, Missed Calls and
Forwarded Calls. The call history list supports up to100 entries in all on phone interface and more
than 1500 items. You can check the call history, dial a call, add a contact or delete an entry from
the call history list. You should enable the history record feature in advance.
To enable the history record feature via phone interface:
1. Press MenuFeatureHistory Setting
2. Press and or Switch soft key to enable History record.
3. Press Save soft key to save the configuration.
To check the call history via phone interface:
1. Press the History soft key. The LCD screen displays All Calls list.
2. Press Right or Left Key to switch among All Calls, Missed Calls, Received Calls, Dialed
Calls and Forwarded Calls.
3. Press to select the desired entry.
4. Press the Option soft key, and then select Detail from the prompt list.
53
Page 54

Basic Features
Configuration
5. The detailed information of the entry appears on the LCD screen.
To delete an entry from the call history list via phone interface:
1. Press the History soft key.
2. Press Right or Left Key to switch among All Calls, Missed Calls, Received Calls, Dialed Calls
and Forwarded Calls.
3. Press UP or DOWN key to select the desired entry.
4. Press the Delete soft key.
To delete all entries from the call history list via phone interface:
1. Press the History soft key.
2. Press Right or Left Key to switch among All Calls, Missed Calls, Received Calls, Dialed Calls
and Forwarded Calls.
3. Press the Option soft key, and then select Delete All from the prompt list.
4. Press the OK soft key.
5. Press the OK soft key to confirm the deleting or the Cancel soft key to cancel.
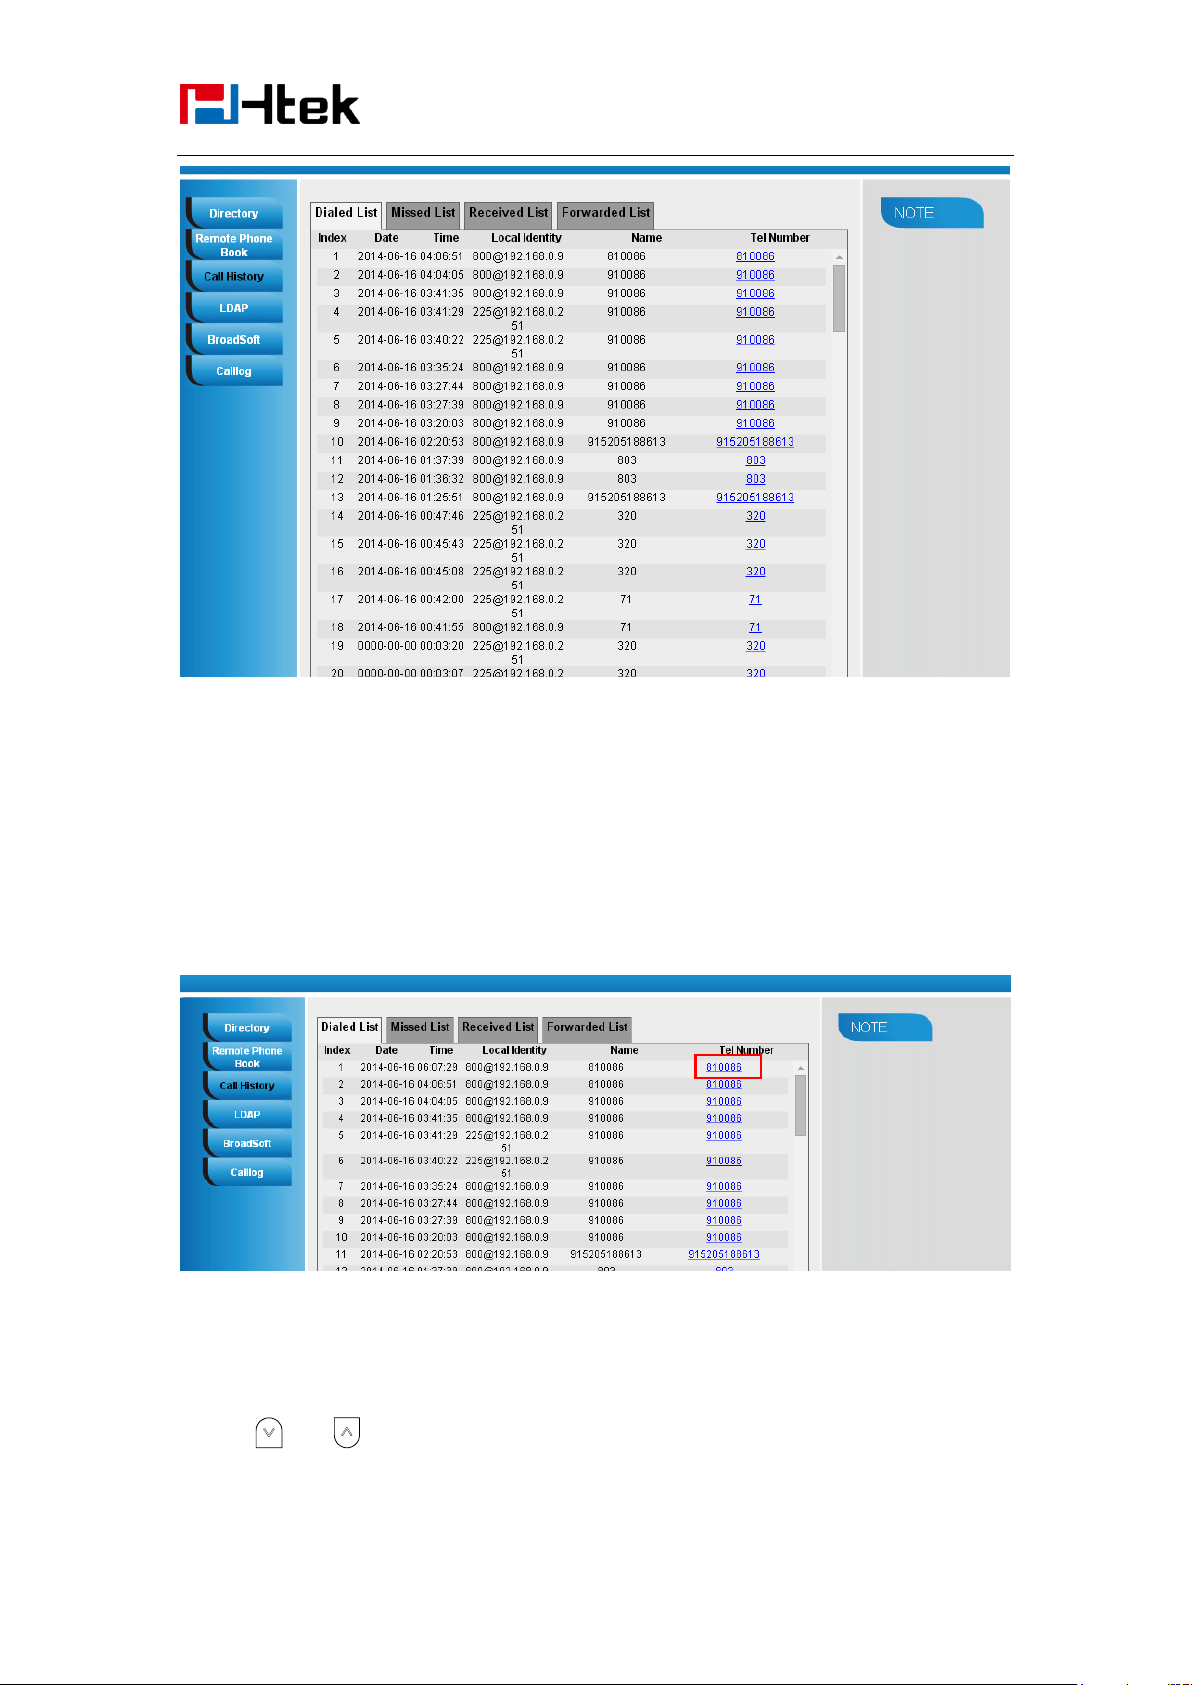
To check the call history via web interface:
1. Click Directory Call History
2. Click Dialed List, Missed List, Received List, Forwarded List then you can see the history
list.
54
Page 55
Basic Features
Configuration
To dial a call from Call History via web interface:
1. Click DirectoryCall History
2. Select the desired history item, and click Tel Number.
3. Then the call is dialed on phone.
To Dial a call from Call History via phone interface:
1. Press History soft key or press Menu → History → Local history
2. Press and to select the targeted one.
55
Page 56
Basic Features
Configuration
3. Press the Send soft key, or , or , or the corresponding line key.
Audio settings
Ring Tone
You can adjust the type and volume of the ring tone.
To adjust the Ring Tone Type via Phone interface
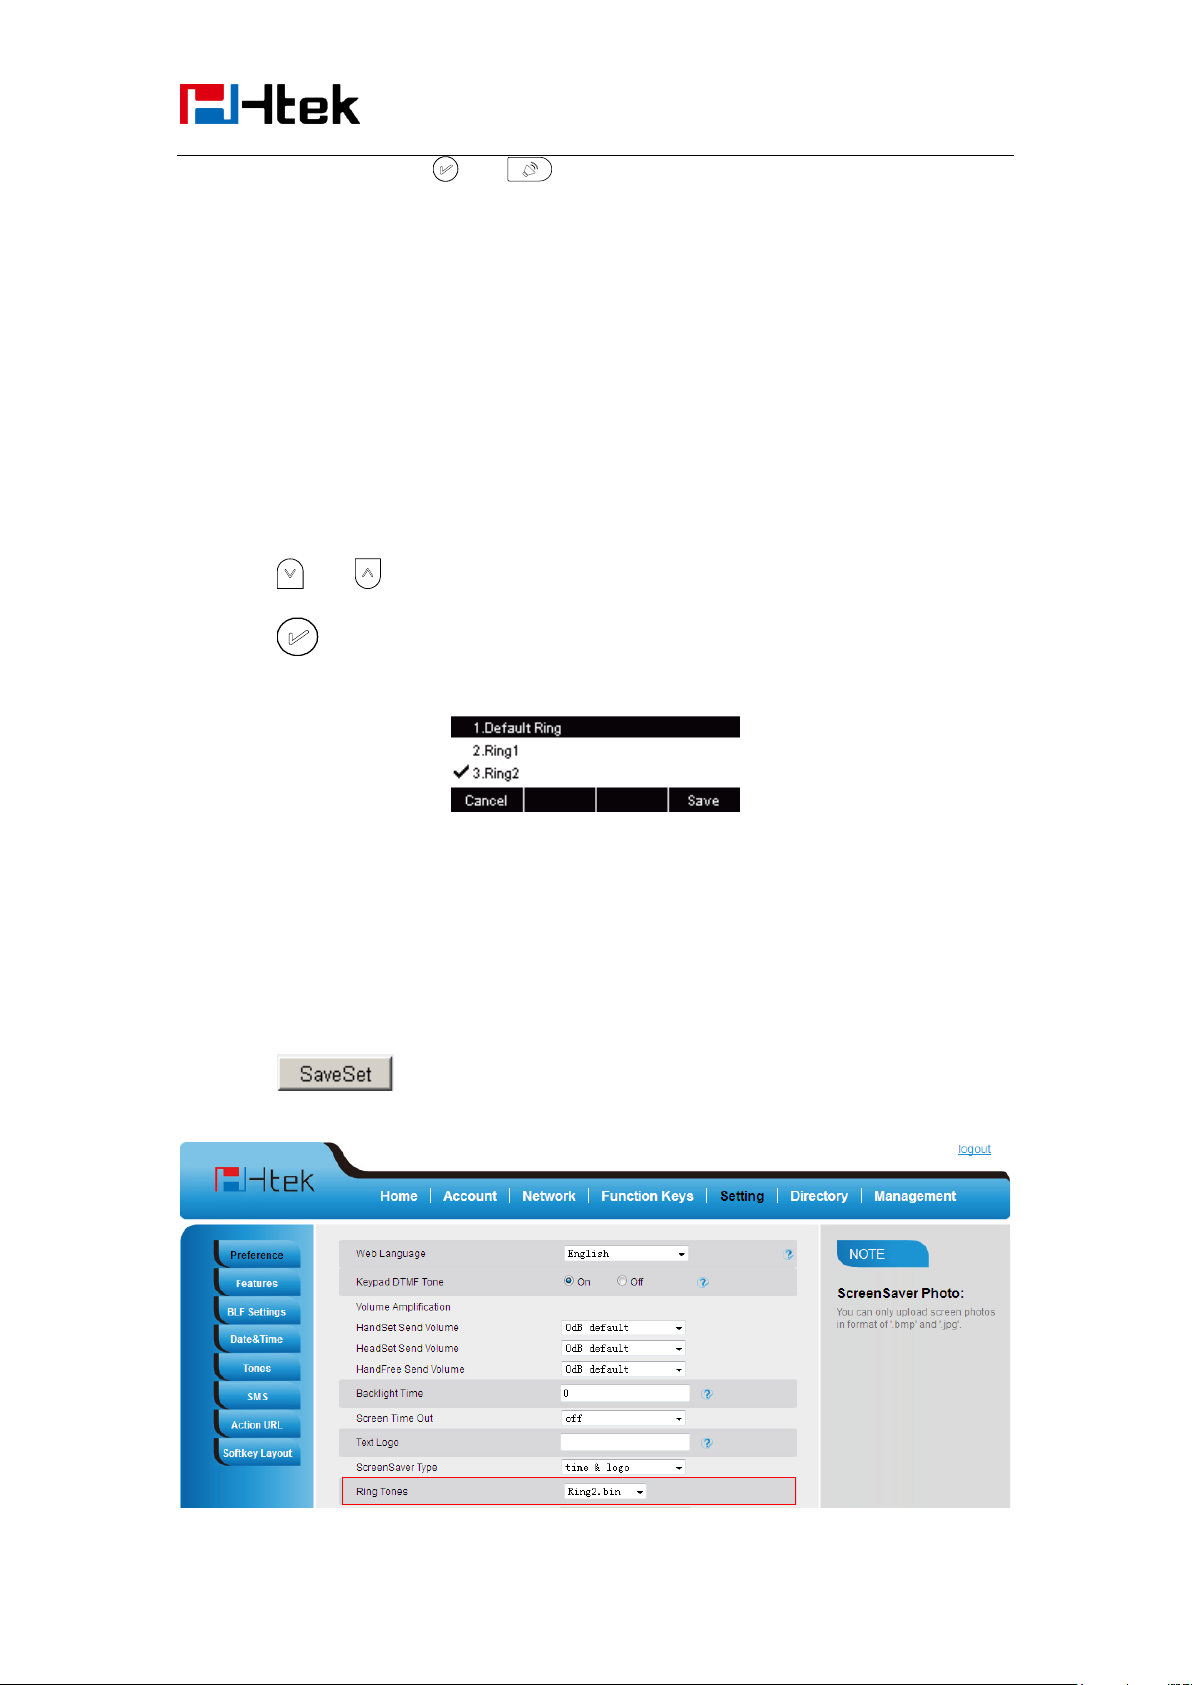
1. Press Menu → Setting → Basic Settings → Ring Tone.
2. Press and to select the aimed one.
3. Press or Save soft key to save the configuration.
To adjust the Ring Tone Type via Web Interface
1. Setting → Preference →Ring Tone
2. Select the wanted one
3. Click to save the configuration.
56
Page 57
Basic Features
Configuration
To configure Distinctive Ring Tone via Phone Interface
1. Press Directory
2. Select the target contact
3. Press Detail soft key to edit the contact.
4. Press and to select the wanted Ring Tone for the contact
5. Press Save soft key to save the contact.
Volume
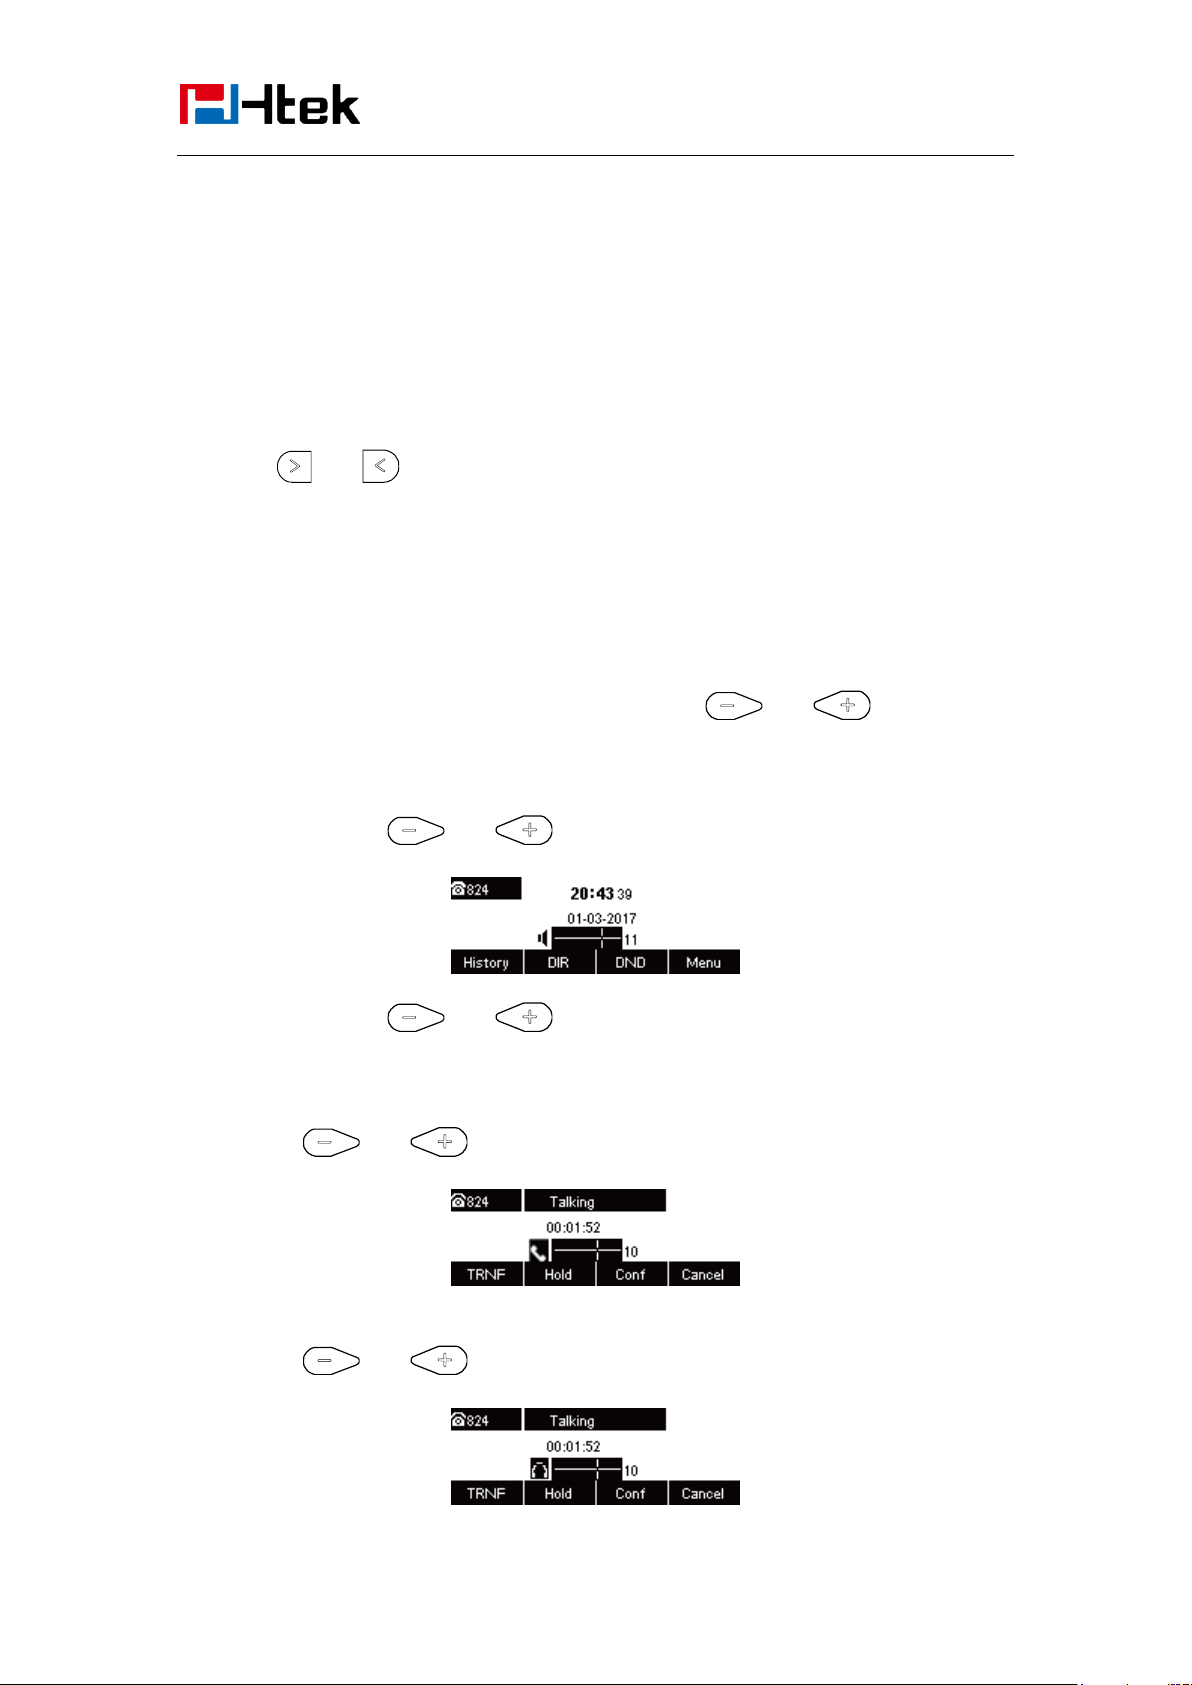
You can adjust the volume for the phone by the volume keys: and .
To adjust the Ring tone volume
1. Option 1: To press and on the idle page
2. Option 2: To press and during the call is ringing.
To adjust the handset volume
To press and during a call in handset mode.
To adjust the headset volume
To press and during a call in headset mode.
57
Page 58
Basic Features
Configuration
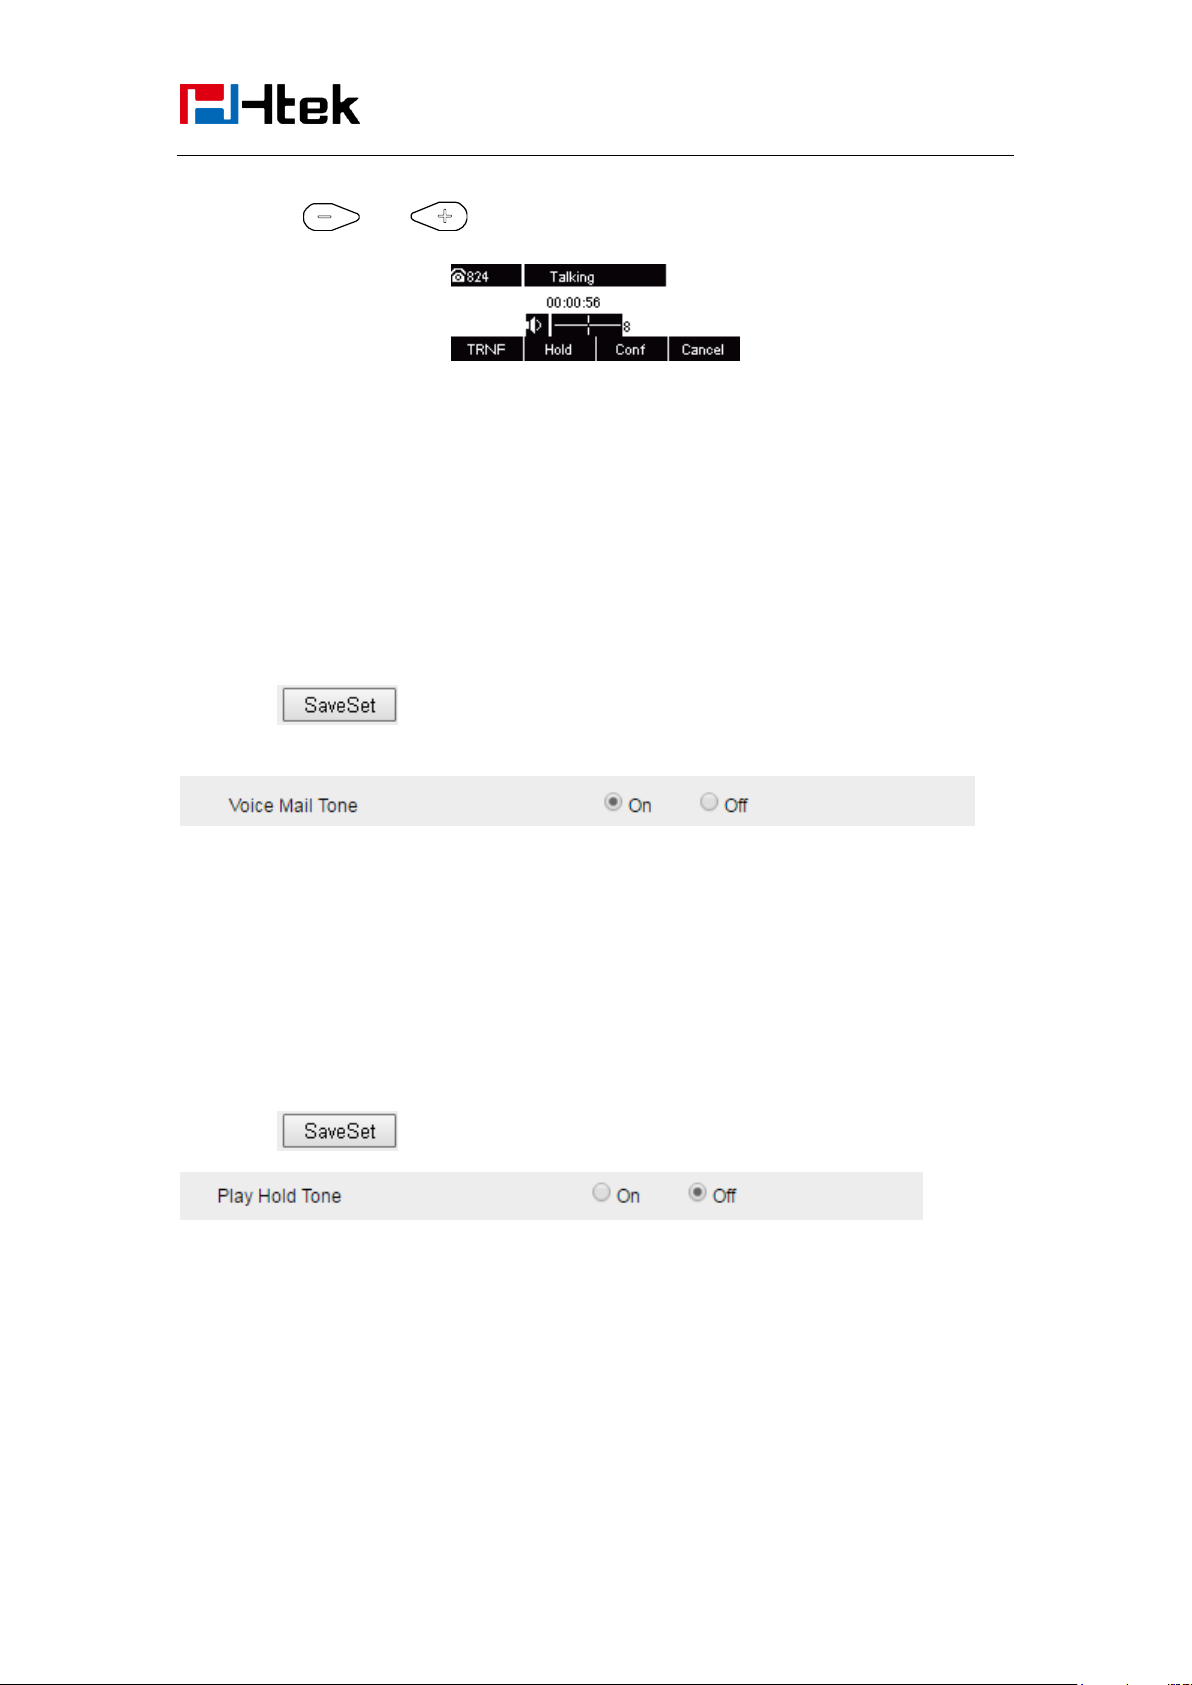
To adjust the speaker Volume
To press and during a call in speaker mode.
Voice Mail Tone
This option can set whether to play the beep for phone's voice mail
1. Click the Setting Preference
2. Select On or Off for Voice Mail Tone.
3. Click for the setting.
Play Hold Tone
When you hold the phone, Whether to play hold tone
1. Click the Setting Preference
2. Set On or Off for Play Hold Tone.
3. Click for the setting.
Play Hold Tone Delay
When you hold the phone. How many seconds to play beep?
1. Click the Setting Preference
2. Set Enable or Disable for Play Hold Tone Delay.
58
Page 59

Basic Features
Grammer
Description
x
any digit from 0-9;
xx+
at least 2 digit number;
^
exclude;
,
hear dial tone;
[3-5]
any digit of 3, 4, or 5;
[147]
any digit 1, 4, or 7;
<2=011>
replace digit 2 with 011 when dialing.
Configuration
3. Click for the setting.
System Settings
Dial Plan
Dial plan is a string of characters that governs the way this phone processes the inputs received
from your phone keypad. This phone supports dial plan with following accept digits:
1,2,3,4,5,6,7,8,9,0,*,#
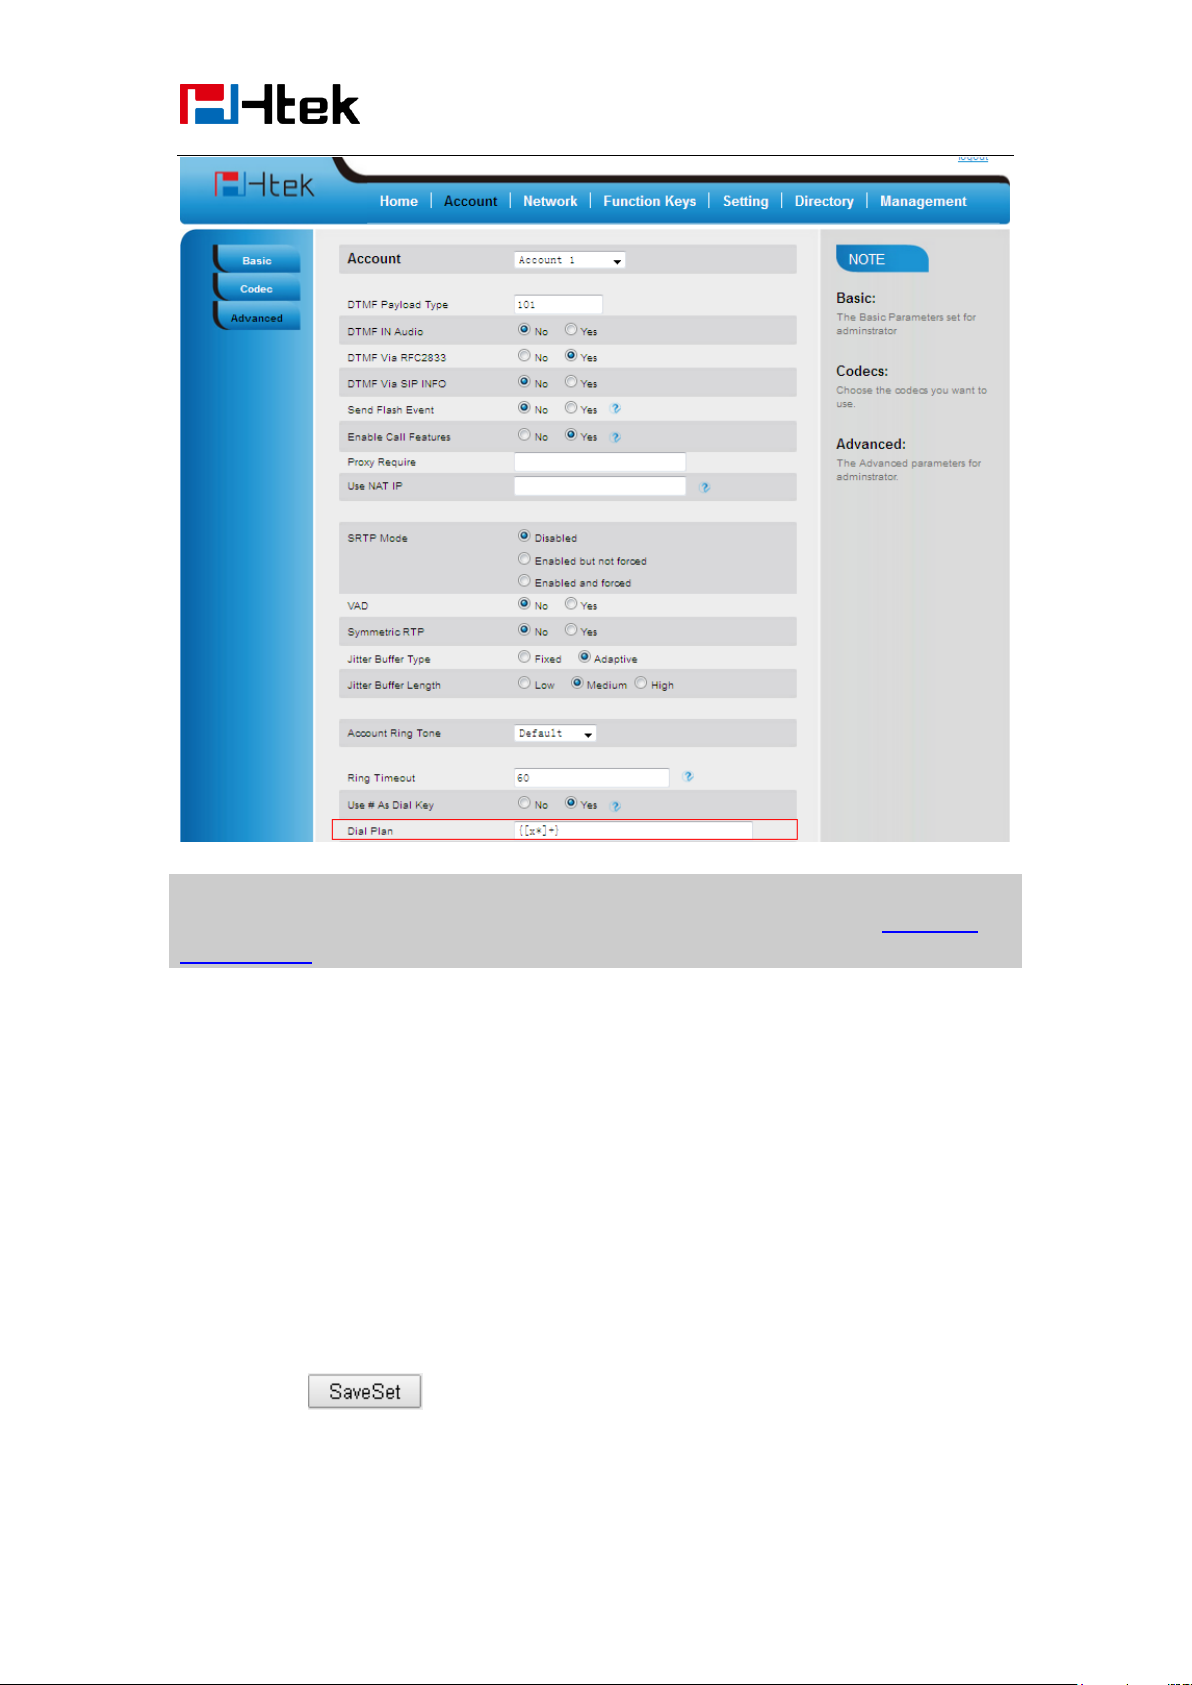
To configure dial plan via web interface:
1. Click Account—Advanced—Dial Plan.
2. Filled the value in dial plan field.
3. Click SaveSet to save the configuration.
59
Page 60
Configuration
Note:
Illegal input will fall back to default: {[x*]+}. For More, please refer to dial plan on
www.htek.com
Basic Features
Dial-Now Timeout
Dial-Now Timeout means that when you entry the number which matching with dial plan, it will
dial out automatically after some time when you stop enter the number.
To configure Dial-Now Timeout via web interface:
1. Click Webpage Setting → Preference
2. Fill the blank of Dial-Now Timeout: for example 5(seconds).(0 means dial out immediately).
3. Click the button to save the configuration
60
Page 61
Basic Features
Configuration
No Key Entry Timeout
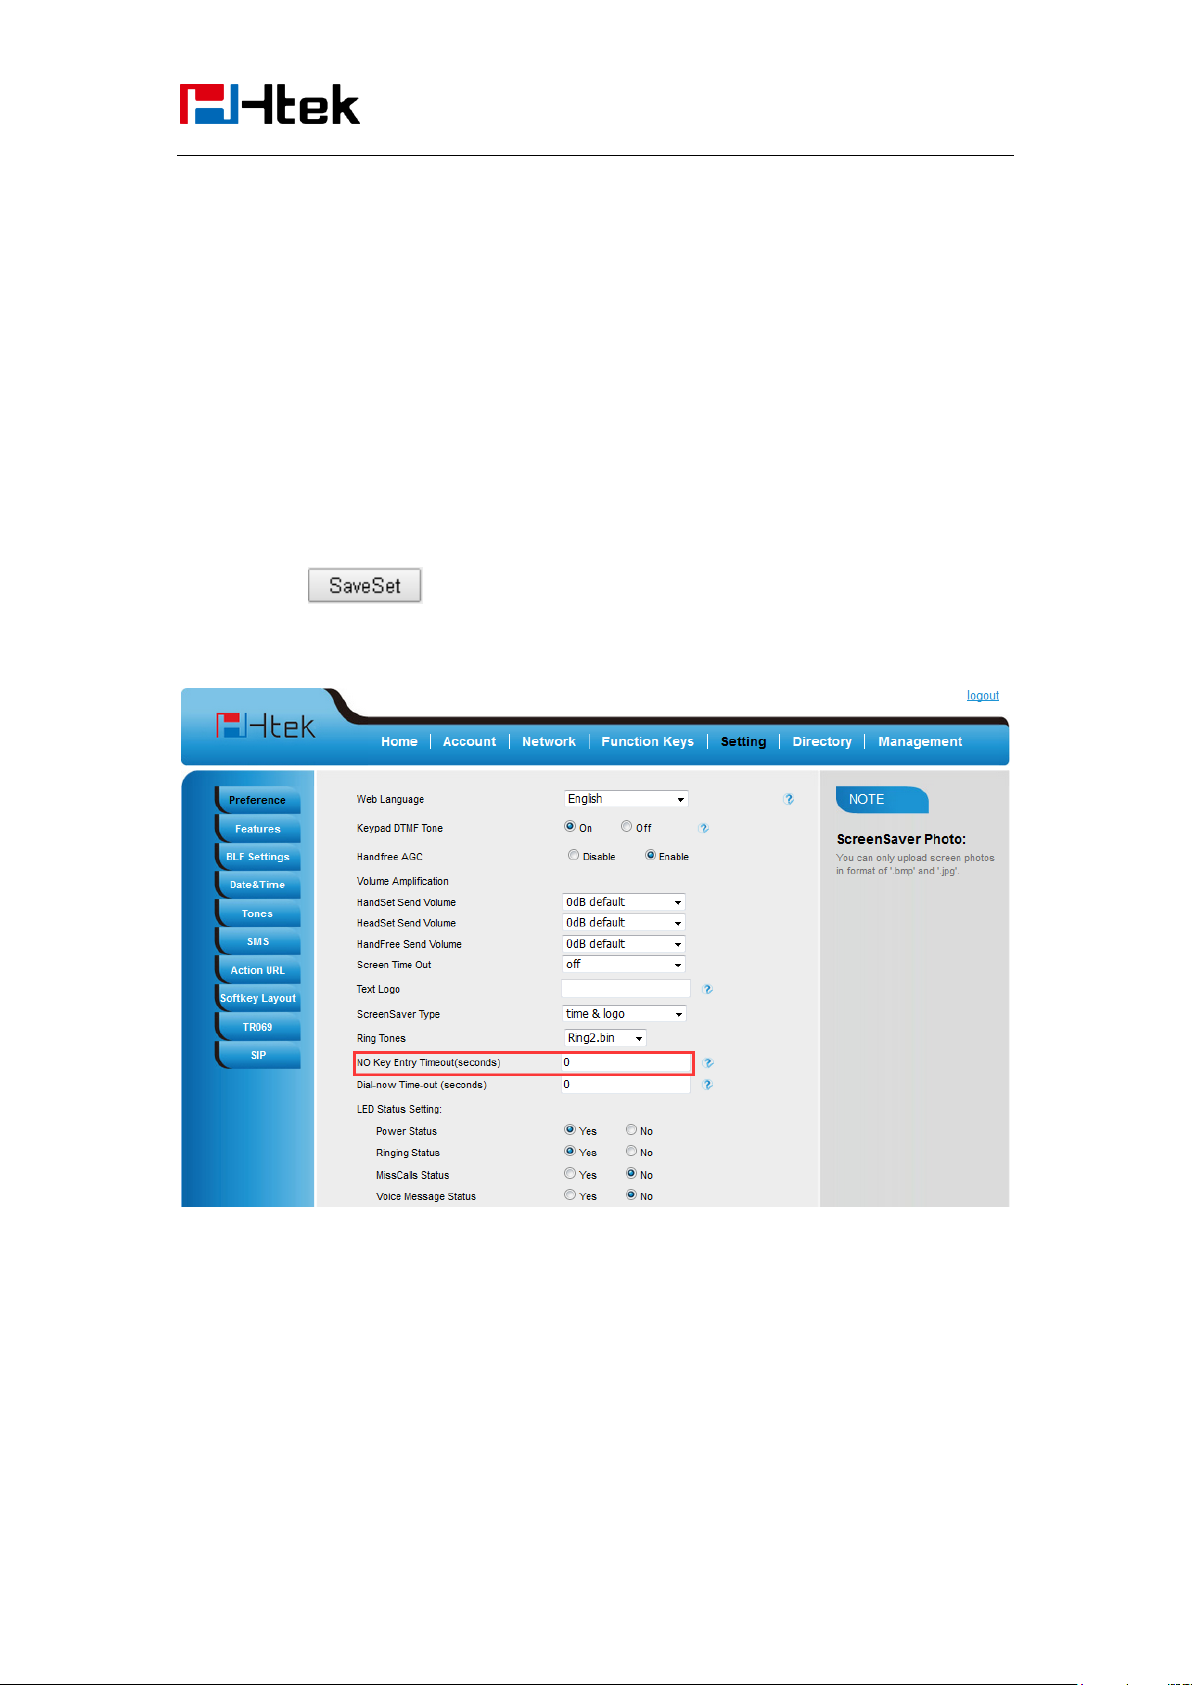
No Key Entry Timeout means that when you entry the number, it will dial out automatically after
some time when you stop enter the number.
To configure No Key Entry Timeout
1. Click Webpage Setting → Preference
2. Fill the blank of No Key Entry Timeout: for example 5(seconds).(0 means never timeout, you
should press the send key the dial out the number.
3. Click the button to save the configuration.
Emergency Call
Public telephone networks in countries around the world have a single emergency telephone
number (emergency services number), that allows a caller to contact local emergency services for
assistance when required. The emergency telephone number may differ from country to country. It
is typically a three-digit number so that it can be easily remembered and dialed quickly. Some
countries have a different emergency number for each of the different emergency services.
61
Page 62
Basic Features
Configuration
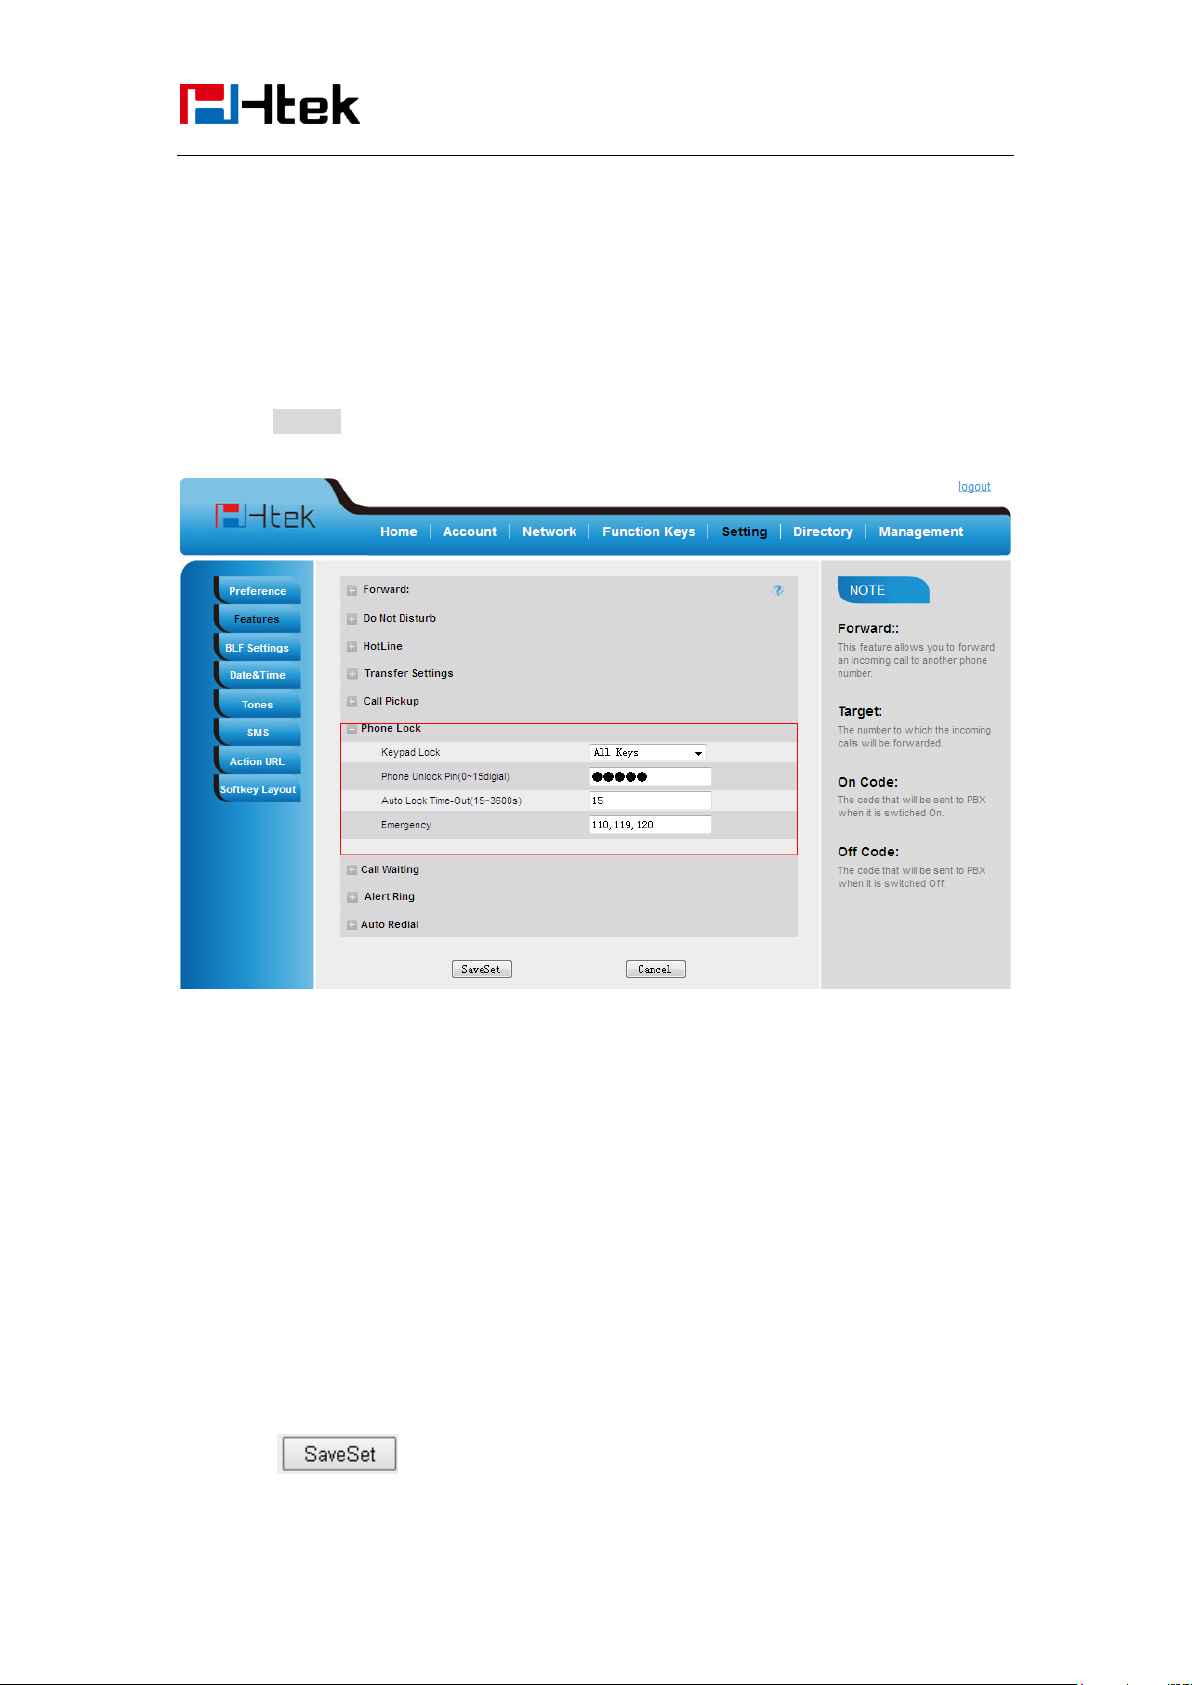
You can specify the emergency telephone numbers on the IP phone for contacting the emergency
services in an emergency situation.
To configure emergency call via web interface:
1. Click SettingFeaturesPhone Lock
2. Enter the emergency services number in the Emergency field
3. Click SaveSet to save the configuration.
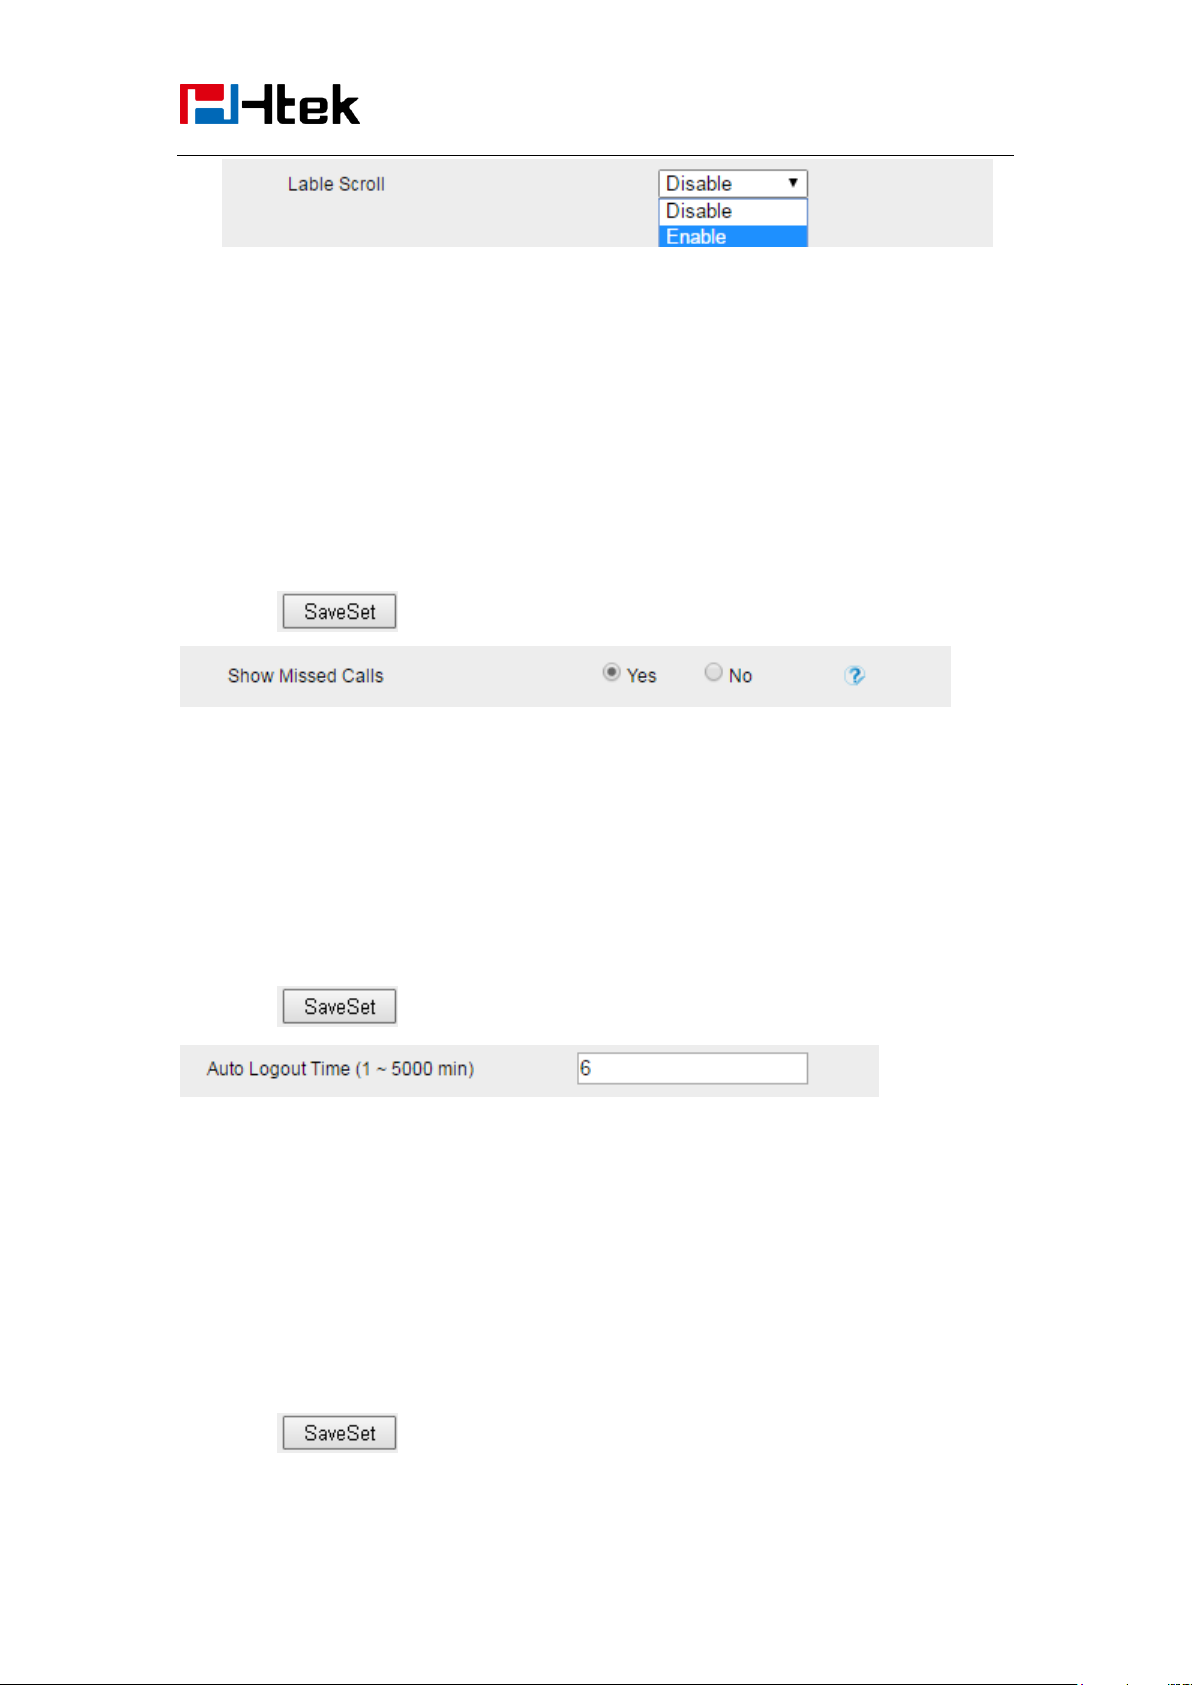
Label Scroll
When setting function keys, you need to set the label of the function keys. If the words are too
long to show on the label, you can use this function to make labels scroll. Another approach is to
set the labels to long label mode.
To configure Label Scroll via web interface:
1. Click the Setting Preference
2. Select Enable or Disable for Label Scroll.
3. Click for the setting.
62
Page 63
Basic Features
Configuration
Show Missed Calls
Whether to show missed call notification on LCD
To configure Label Scroll via web interface:
1. Click the Setting Preference
2. Select Yes or No for Show Missed Calls.
3. Click for the setting.
Auto Logout Time
Set the Web login timeout
1. Click the Setting Preference
2. Set number 1~5000 min for Auto Logout Time.
3. Click for the setting.
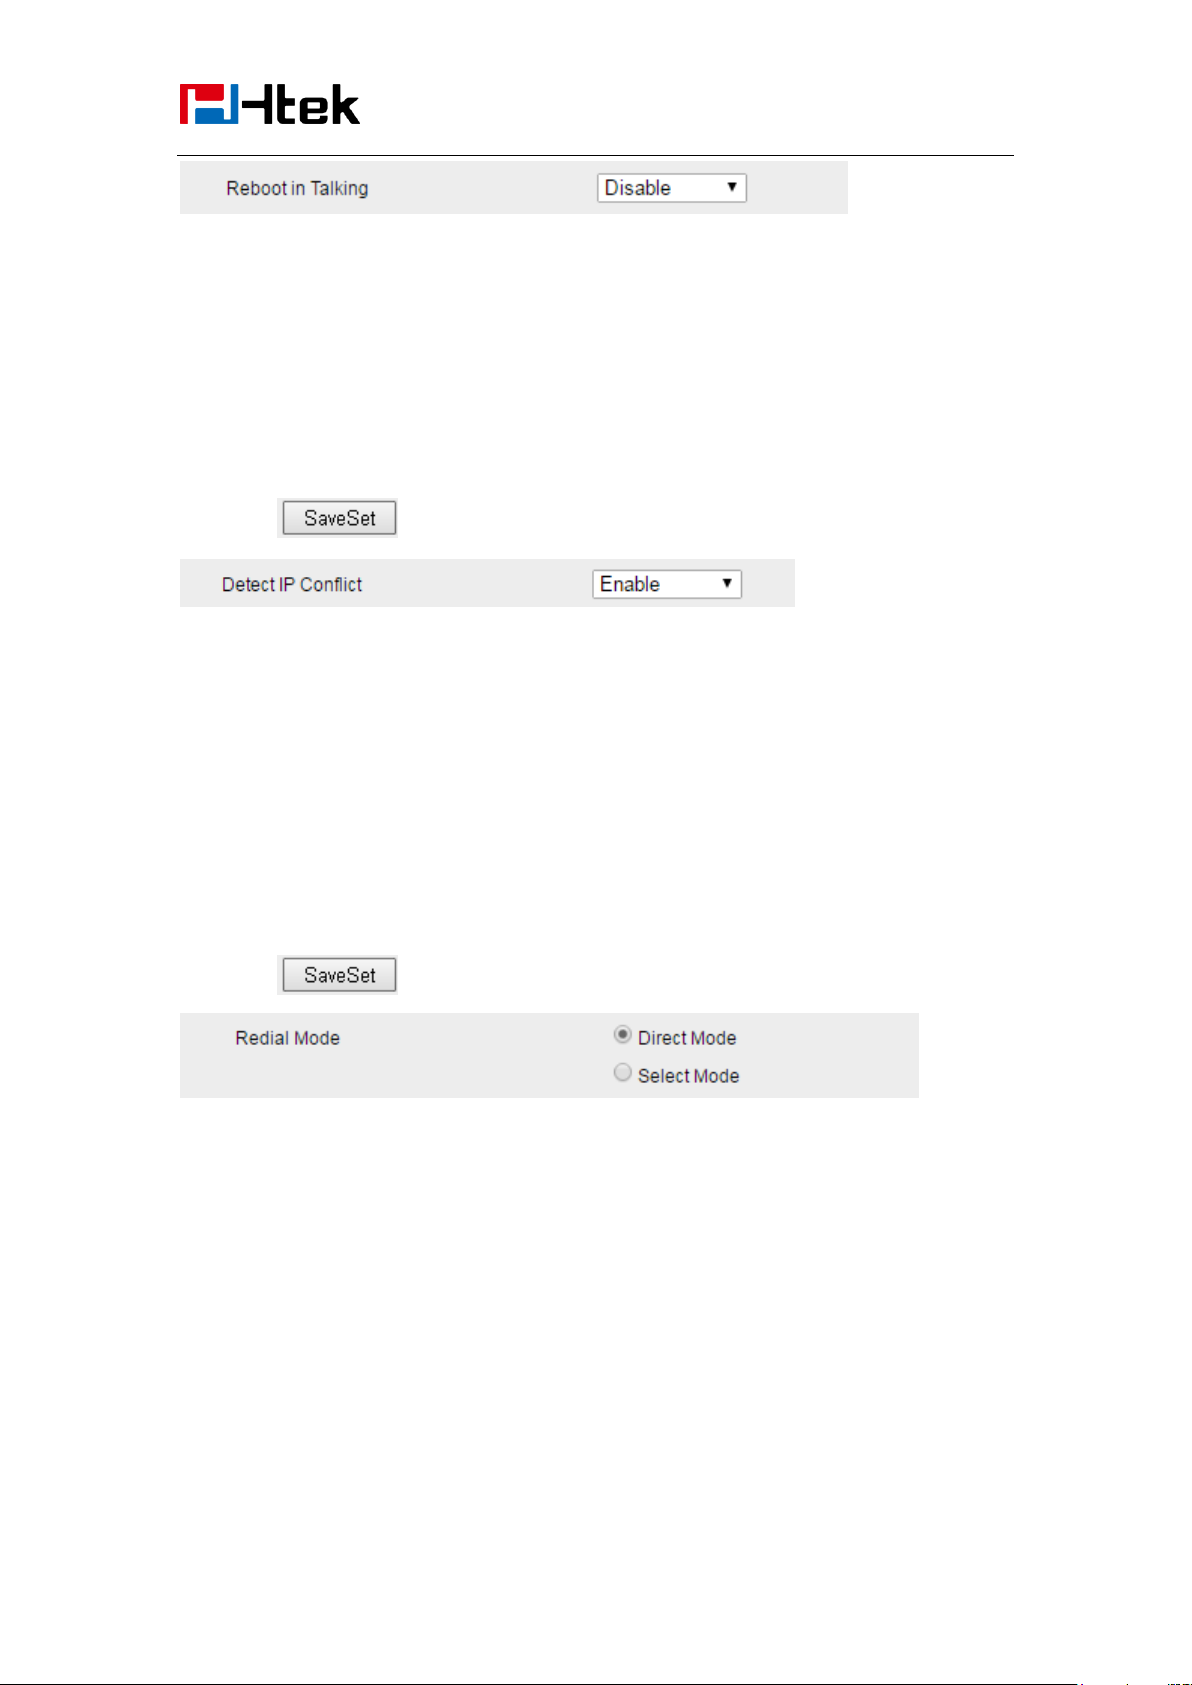
Reboot in Talking
This function is to allow reboot during the calls or not
1. Click the Setting Preference
2. Set Enable or Disable for Reboot in Talking.
3. Click for the setting.
63
Page 64
Basic Features
Configuration
Detect IP Conflict
LCD can display message when IP conflict
1. Click the Setting Preference
2. Set Enable or Disable for Detect IP Conflict.
3. Click for the setting.
Redial Mode
Call redial has two ways:(1) To redial the last placed call from the IP Phone (2) To redial the call
from all calls list
1. Click the Setting Preference
2. Set Direct Mode or Select Mode for Redial Mode.
3. Click for the setting.
Keypad Lock
To enable Keypad Lock via Phone
1. Press Menu--Settings--Advanced Setting--Phone Setting--Lock
2. Press Info or Switch to change choose lock type: All Keys Menu Key Function Key Lock &
Answer
3. Press Save or OK key to save the configuration.
64
Page 65
Basic Features
Configuration
To disable Keypad Lock via Phone
1. Press Menu--Settings--Advanced Setting--Phone Setting--Lock
2. Press Info or Switch to change to choose Off.
2. Press Save or OK key to save the configuration.
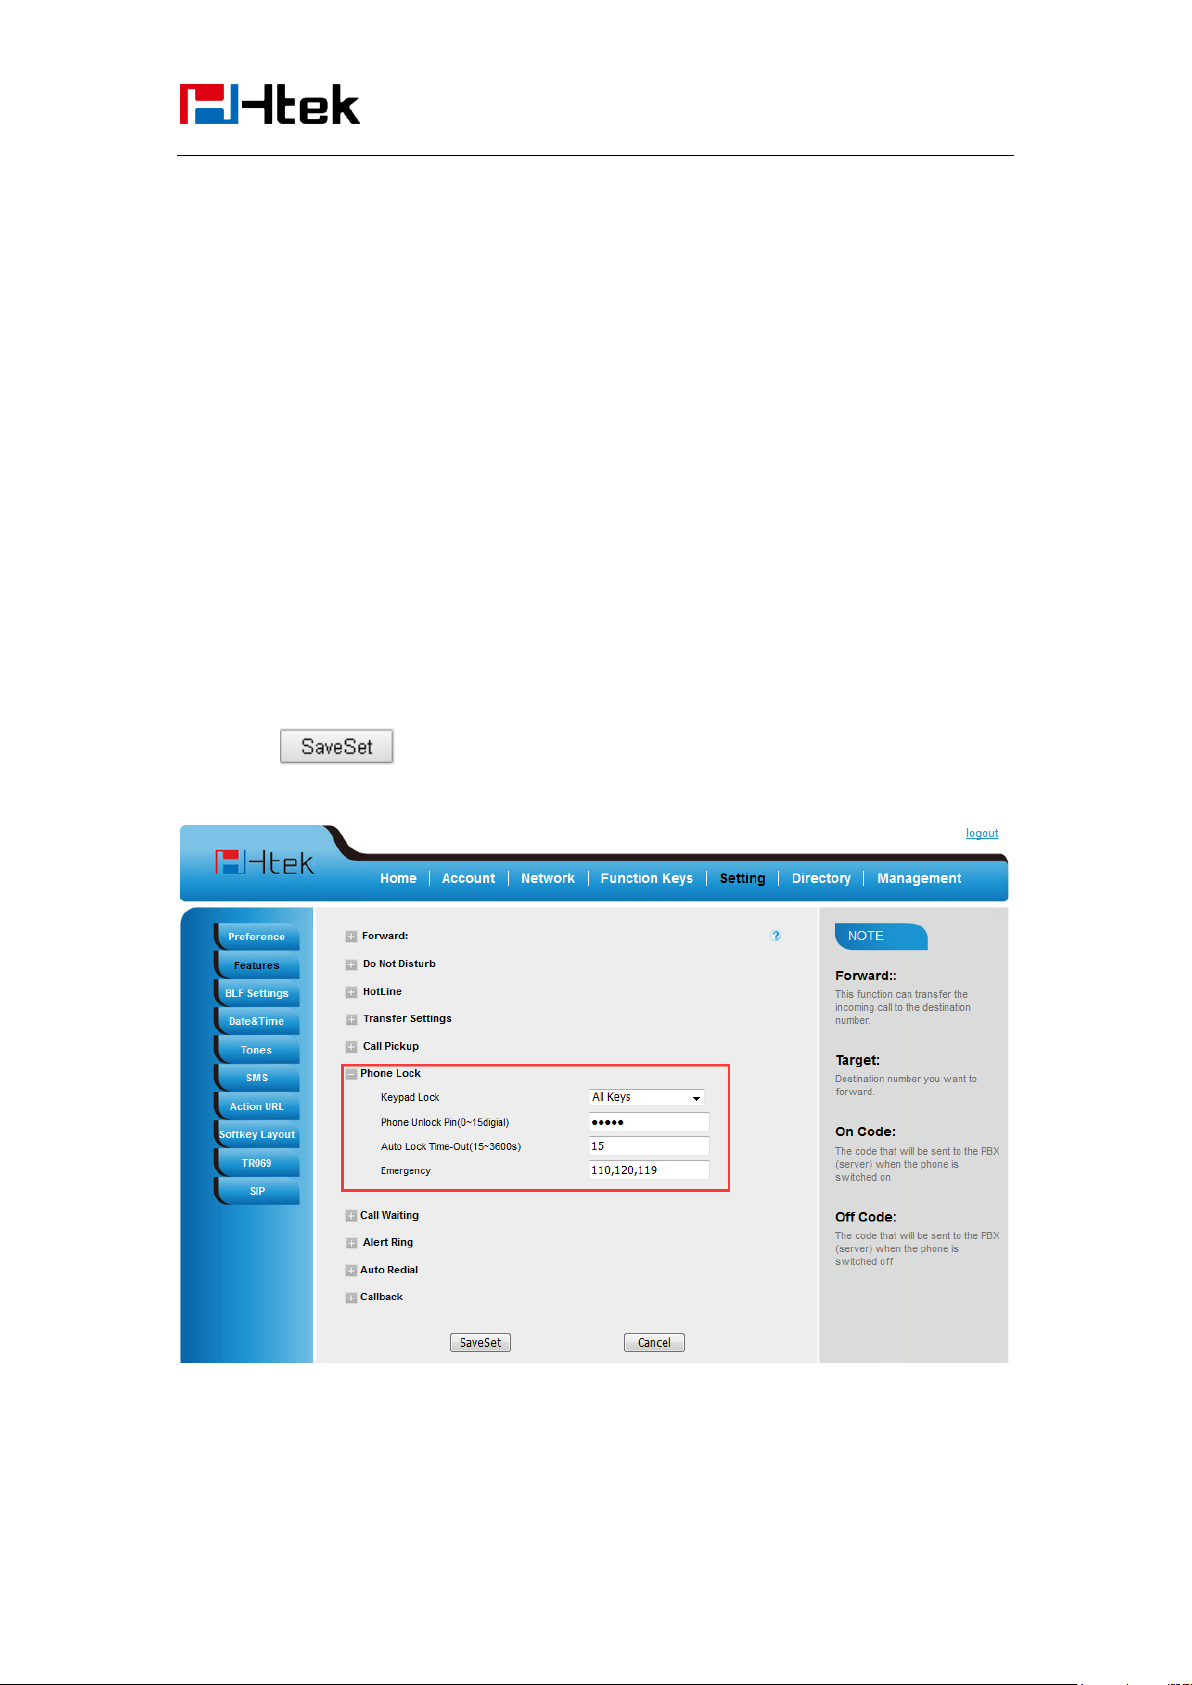
To enable Keypad Lock via Webpage
1. Click Webpage Setting → Features
2. To choose the Phone Lock.
3. To fill the unlock PIN and auto lock time
4. Fill the Emergence Number, when the phone is Lock, only Emergency Number can be sent.
5. To click to save the configuration.
To Disable Keypad Lock via Webpage
1. Click Webpage Setting →Features
65
Page 66
Basic Features
Configuration
2. To choose Disable for the Phone Lock.
3. To click to save the configuration.
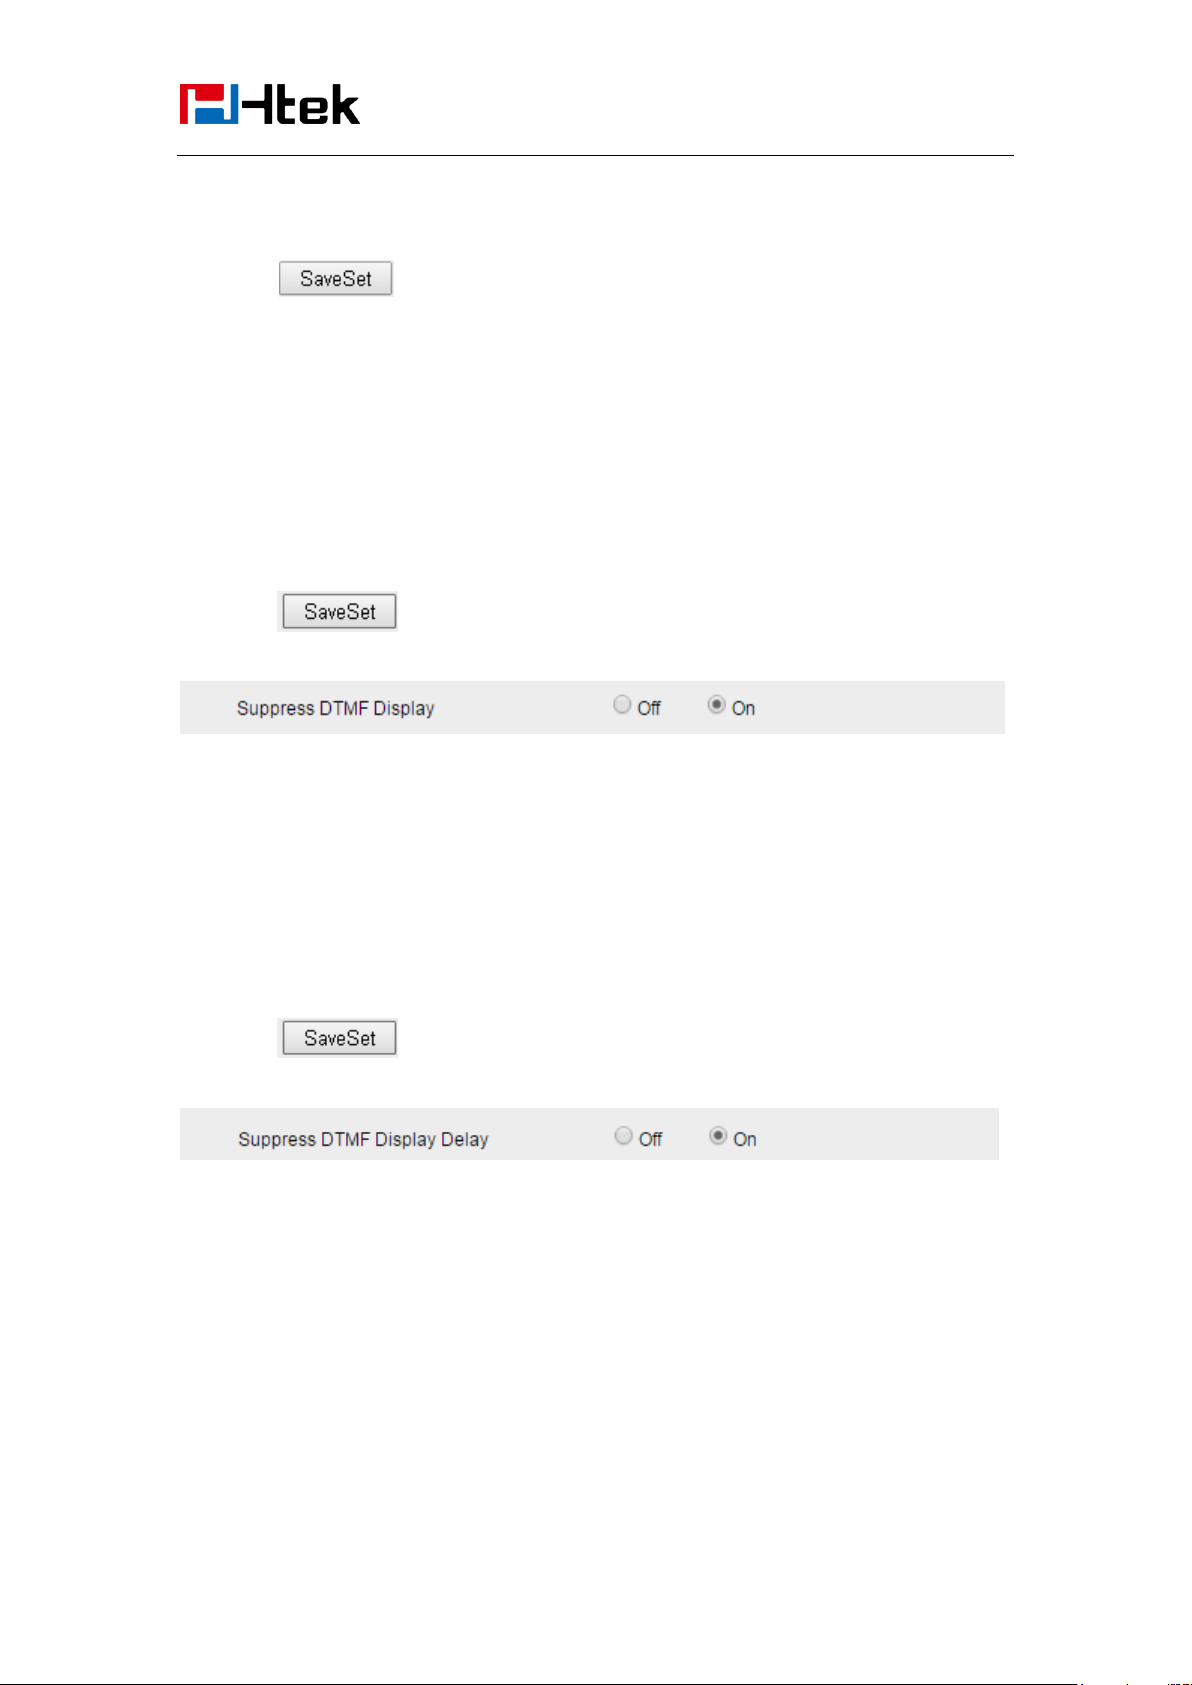
Suppress DTMF Display
In order to ensure safety in Call process, you can choose whether to hide DTMF
1. Click the Setting Preference
2. Select On or Off for Suppress DTMF Display.
3. Click for the setting.
Suppress DTMF Display Delay
In order to ensure safety in Call process, you can choose whether to hide DTMF
1. Click the Setting Preference
2. Select On or Off for Suppress DTMF Display Delay.
3. Click for the setting.
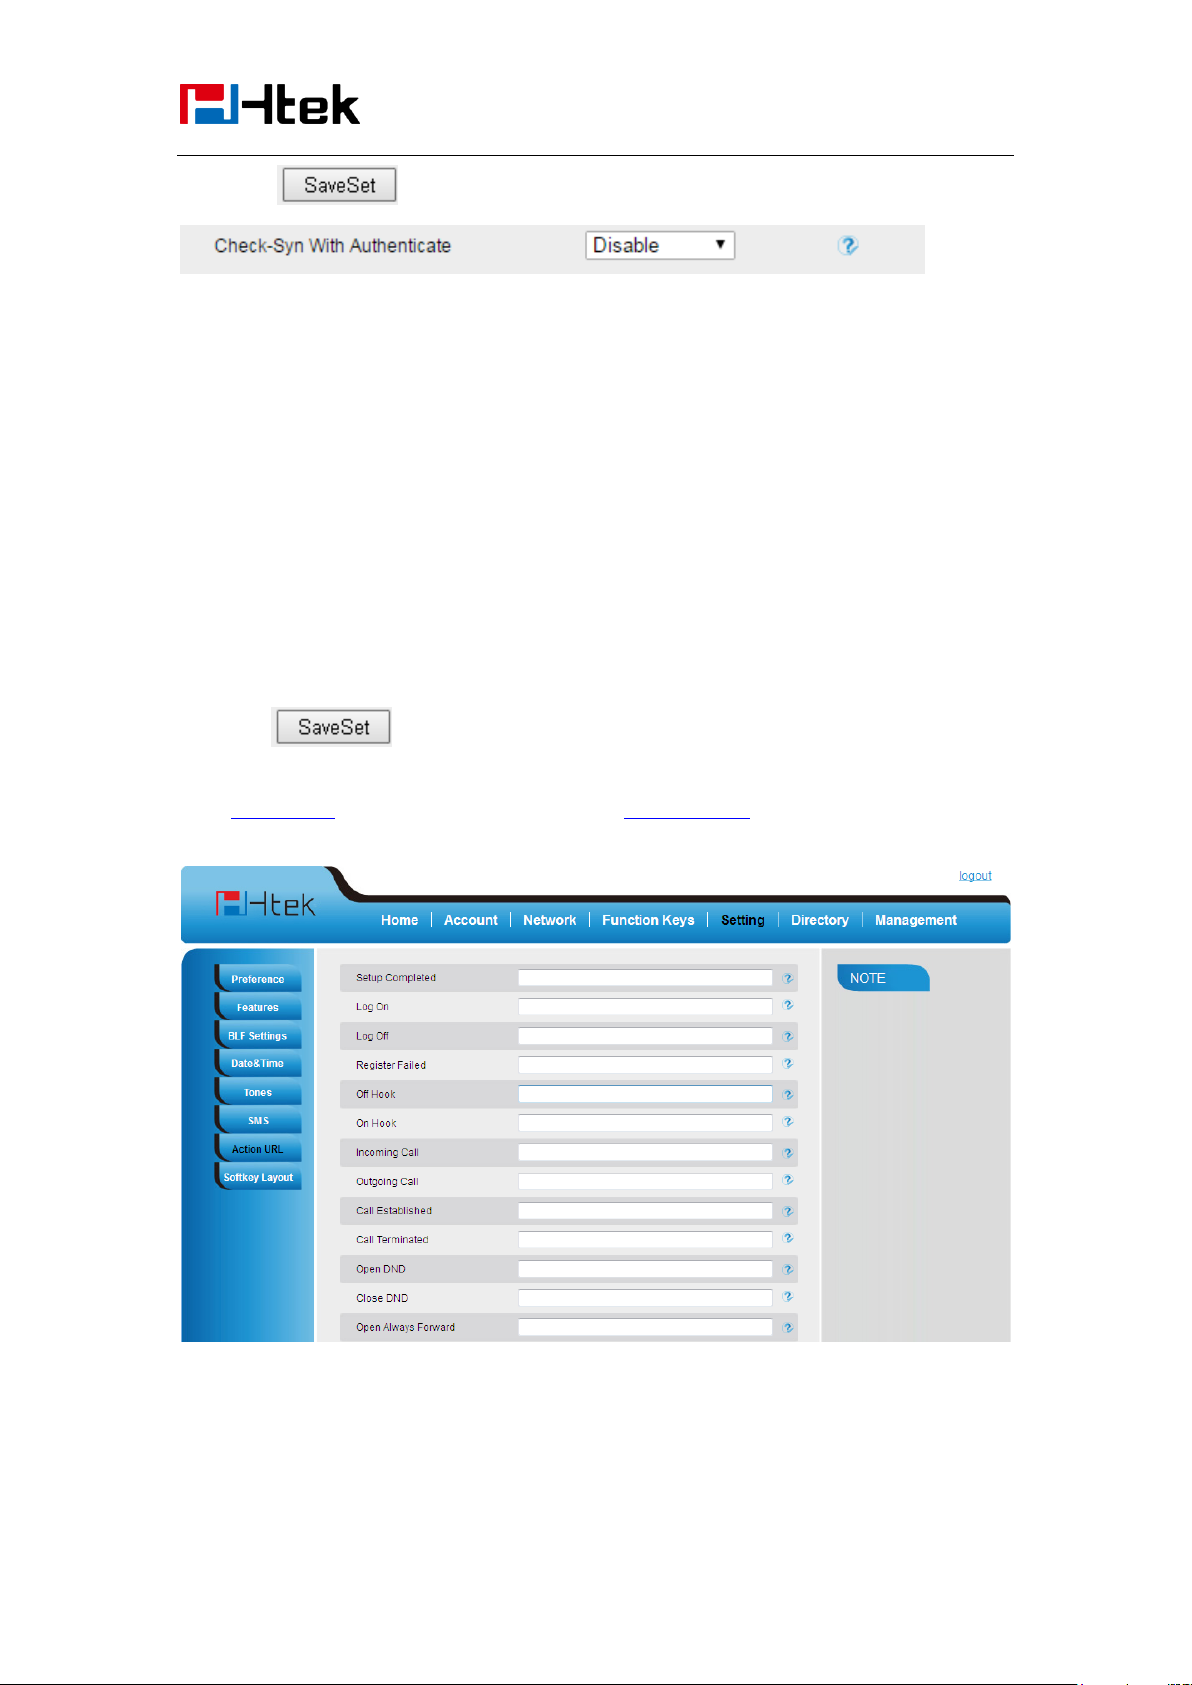
Check-Syn With Authenticate
If this option is enabled, the server needs to be authenticated before the phone agrees to
synchronize.
1. Click the Setting Preference
2. Set Enable or Disable for Check-Syn With Authenticate.
66
Page 67
Other features
settings
3. Click for the setting.
Other features settings
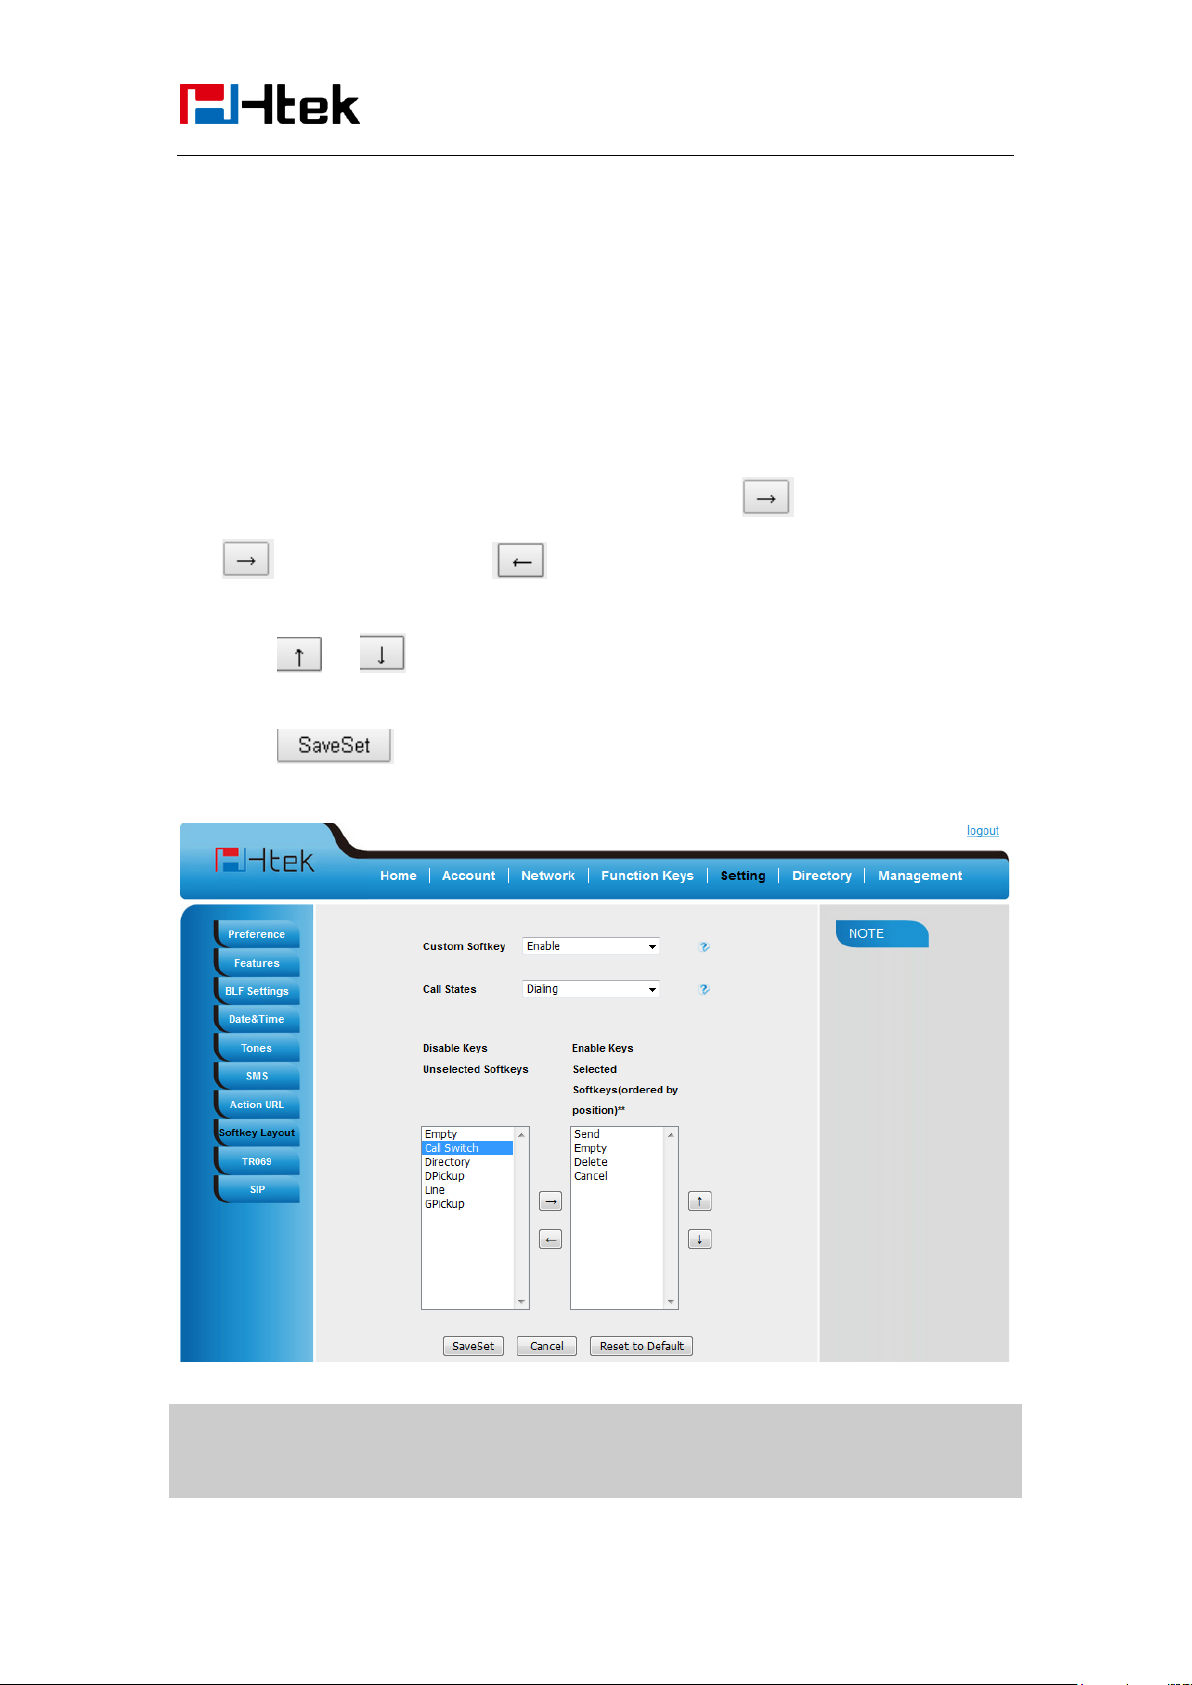
Action URL
To configure action url via web interface:
1. Click SettingAction URL
2. Filled the needed value in the necessary blank.
3. Click to save the setting.
Click Action URL for more how to use, or check on www.htek.com
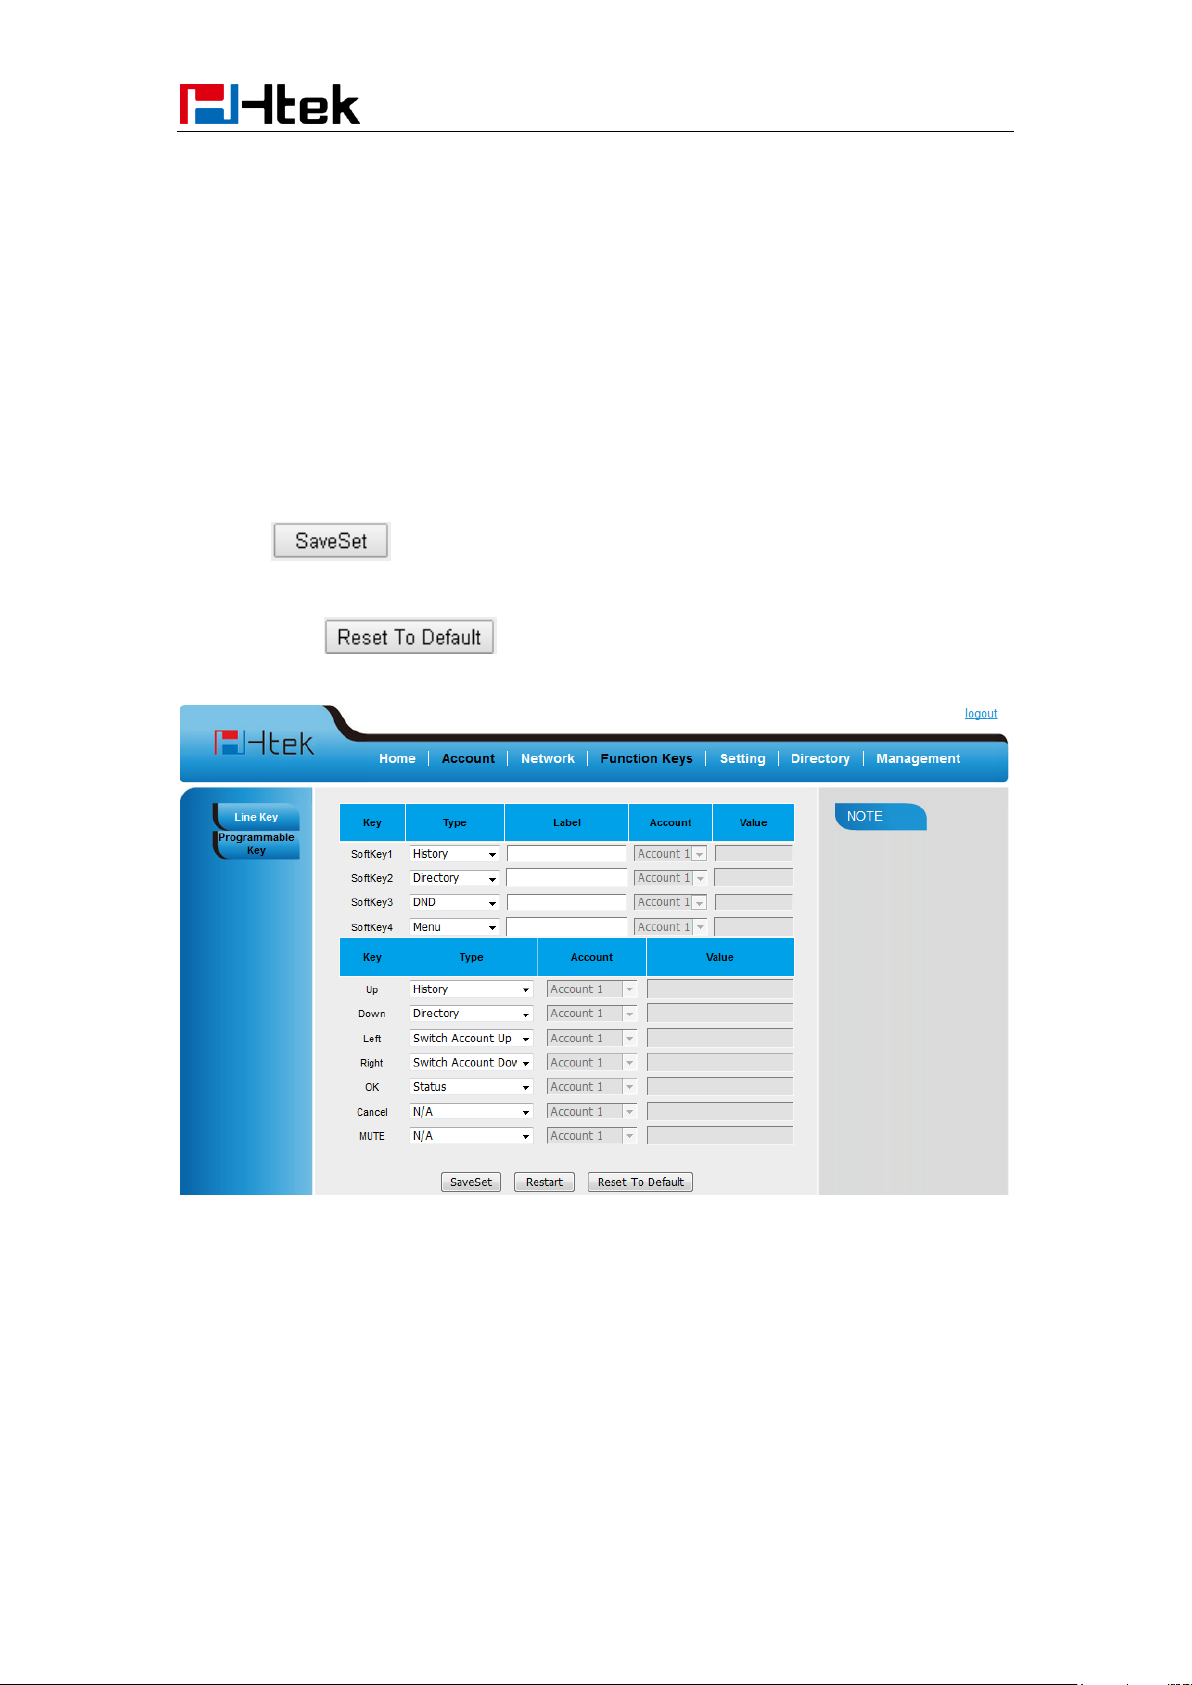
Softkey Layout
This feature mainly defines which shown on the soft key in some status. For example, what the
67
Page 68
Other features
Note:
1. When there more than 5 items in the Enable field, the last softkey will display More, and
last two item will show in the next page softkey, you can check by press more.
settings
soft key displays when dialing, or talking.
To configure Soft key via web interface:
1. Click SettingSoftkey Layout
2. Select Enable for Custom Softkey
3. Select call States.
4. Select the feature form the disable key to enable key field by
Disable to Enable field. Delete the Enable, and it will back to Disable field.
5. Click or to change to position or each feature.
6. Click to save the configuration.
68
Page 69
Basic Call Features
Programmable Key
For the default keys as Soft keys, Navigation keys and so on, you can define them as some
specific feature, and it works only on the idle page.
To configure Programmable Key via web interface:
1. Click Function KeysProgrammable Keys
2. Select the desired Key to set.
3. Click to save the setting.
4. By clicking , all setting of the keys will be back to default.
Basic Call Features
Place a Call
There are three ways to dialing a call: Handset, Headset and Hands-free speakerphone.
69
Page 70
Basic Call Features
To place a call by Handset
1. Pick up the handset, or press a line key and dial the necessary number.
2. Press or press the send softkey, then the call is sending.
To place a call by Headset:
1. Press the ( light is Green)
2. Enter the desired number.
3. Press or press the Send softkey, then the call is sending.
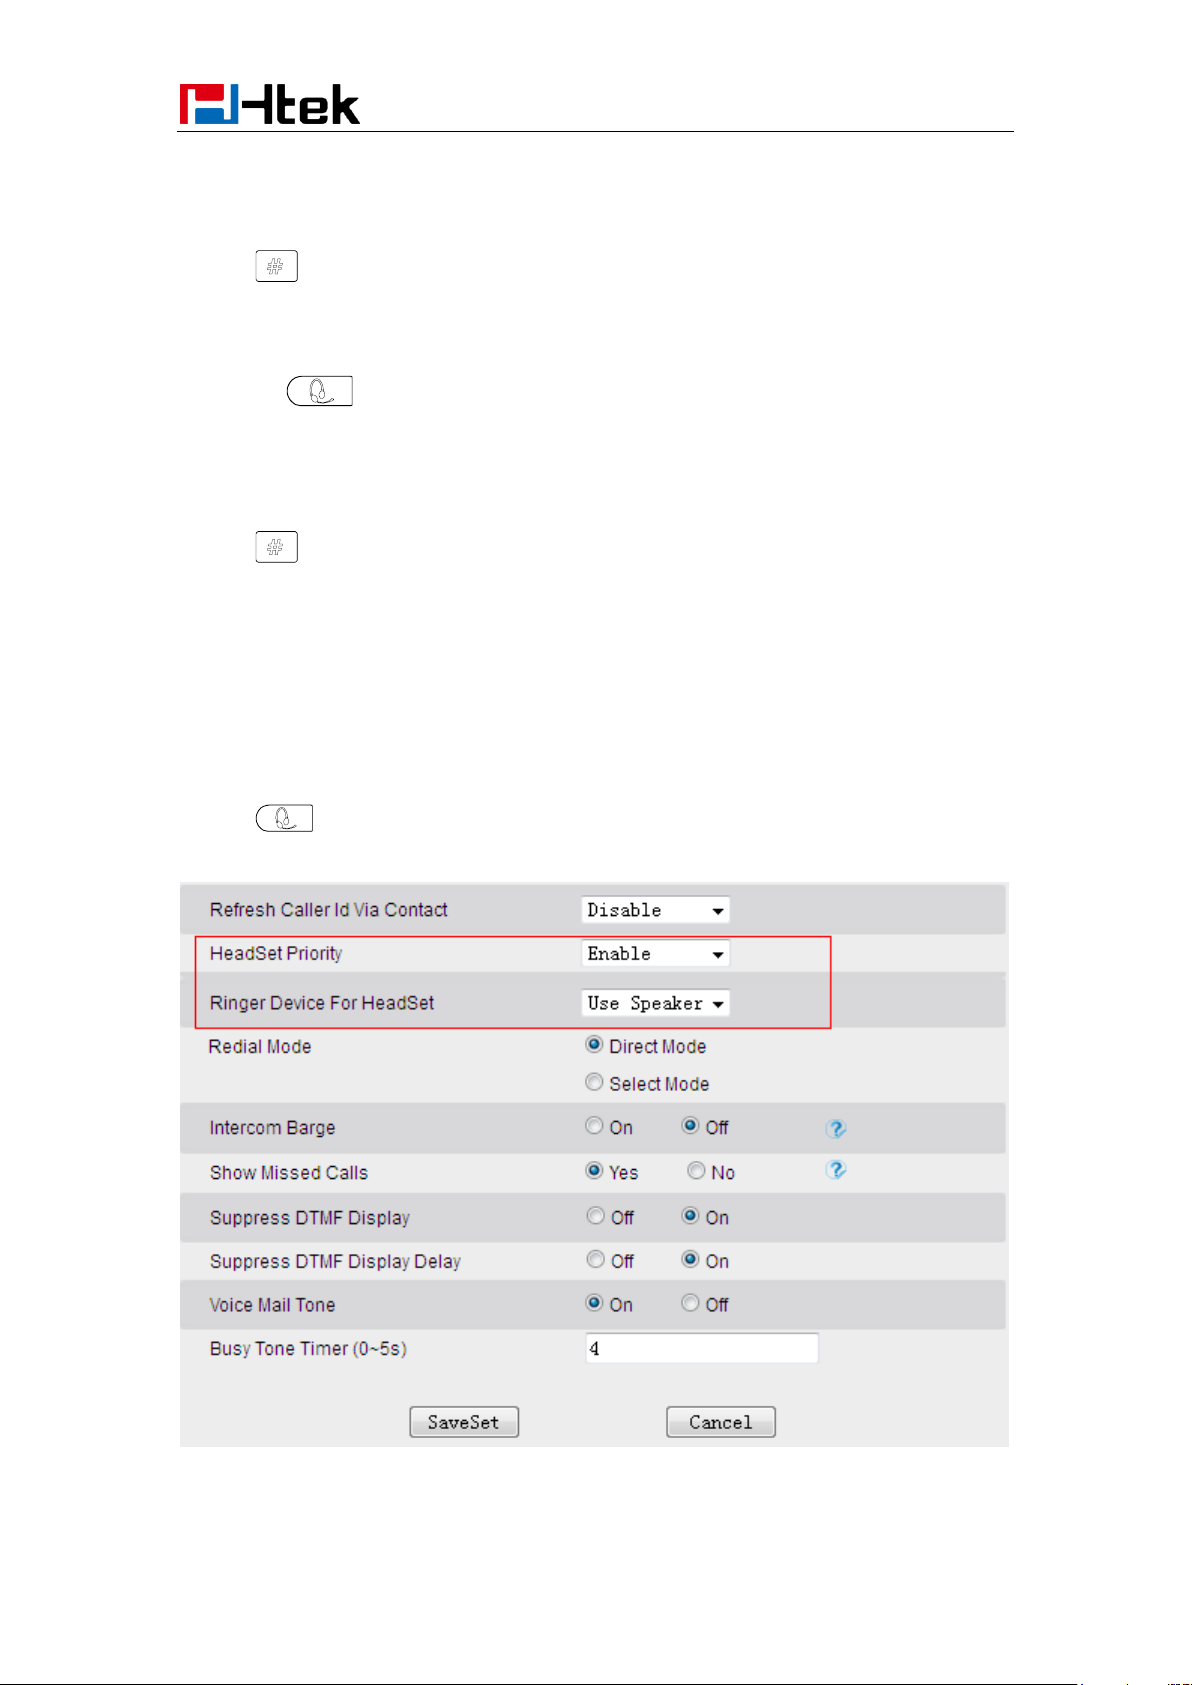
Using headset to place and answer calls for all time
1. Click webpage Setting Preference
2. HeadSet Priority Enable
3. Ring Device For HeadSet User Headset
4. Press
70
Page 71

Basic Call Features
Note:
1. The key is set to be a send key. For more information, refer to the Key as Send on
page
2. During the call, you can also change among Headset, Handset or Free-speaker mode.
Placing a call by hands-free speakerphone
1. Press the , or press the Line key, then you can hear the dial tone.
2. Press the number.
3. Press or press the Send soft key, then the call is sending.
To place a call by call history or Directory
1. Press the History soft key (On the idle page) or Menu → History /Directory
2. Press and to select the targeted one.
3. Press Send soft key to make the call.
Making two calls with one line and one account
1. Press a line key and dial one phone number, then make a call.
2. Press the corresponding line key
3. Dial another phone number,
4. Press the Send soft key, or , then make the second call.
End a Call
Here shows to end a call during three modes:
To end a call by Handset
Press the Cancel soft key or hang up the handset, or press
To end a call under Headset Mode
71
Page 72

Basic Call Features
Note:
During the conference, to end the call is same as mentioned above.
Press the Cancel soft key or press , or press .
To end a call under hands-free speakerphone Mode
Press the Cancel soft key or press , or press .
Receive a Call
There are three ways to receive a call when the phone is ringing:
To receive a call by handset
Pick up the handset the conversation is built.
To receive a call by headset
Press and now the conversation is built.
To receive a call by hands-free speaker
1. Option 1: Press directly.
2. Option 2: Press Answer soft key.
3. Option 3: Press the Line key (flashes red).
Moreover, some other action can be done by soft key when the call is coming.
1. To press the Reject soft key to reject the call. Or press to reject the current call.
2. To press Forward softkey to forward to another phone.
3. To press Silence soft key, and then the call will keep silent, no ring tone display.
Incoming Call Show Mode
There are two incoming call show modes for this phone:
72
Page 73
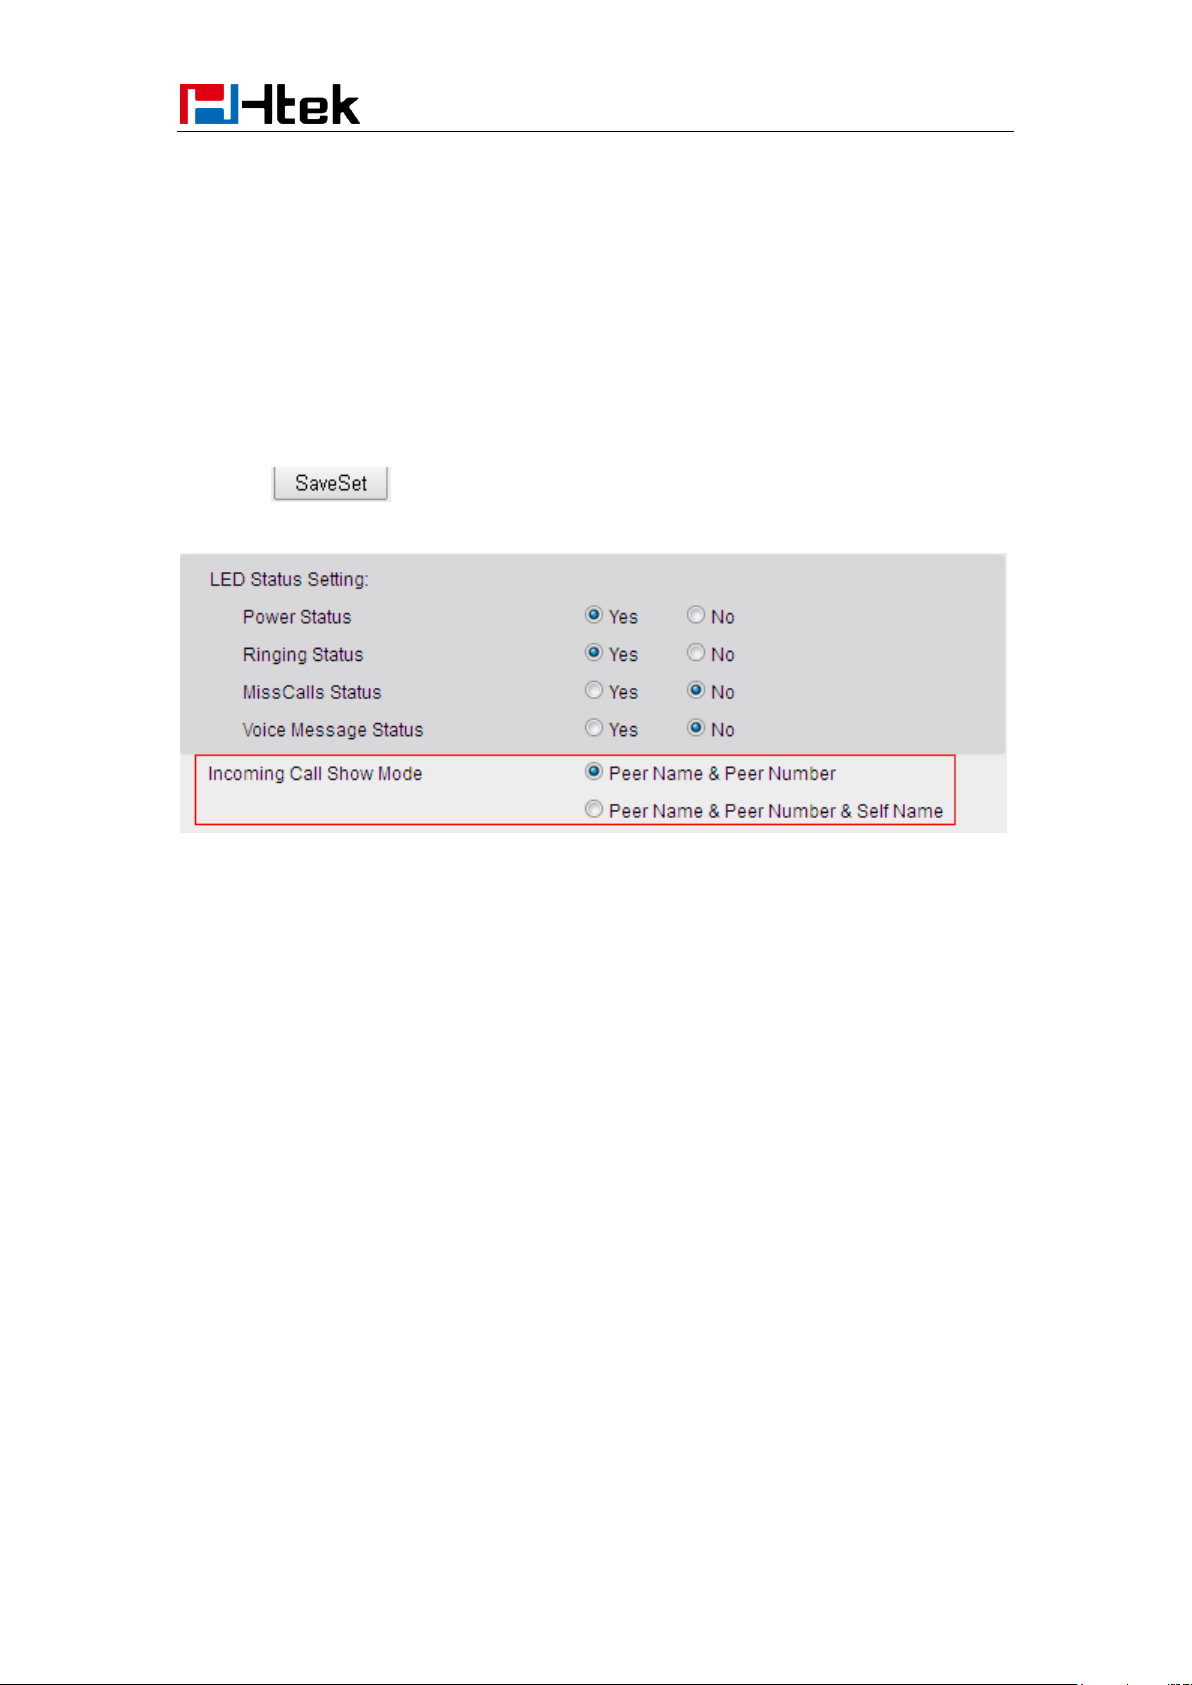
Basic Call Features
1. name and number of the contacts
2. name and number of the incoming call and the account which is connecting
To set incoming call show mode via web interface:
1. Click setting preference
2. Select the desire mode for the incoming call show mode
3. Click to save the setting.
Auto Answer
Enable auto answer feature, you will answer all incoming call automatically.
To enable Auto Answer via Webpage
1. To Click Account → Advanced
2. To choose Yes for the Auto Answer.
3. To click Saveset to save the configuration.
73
Page 74
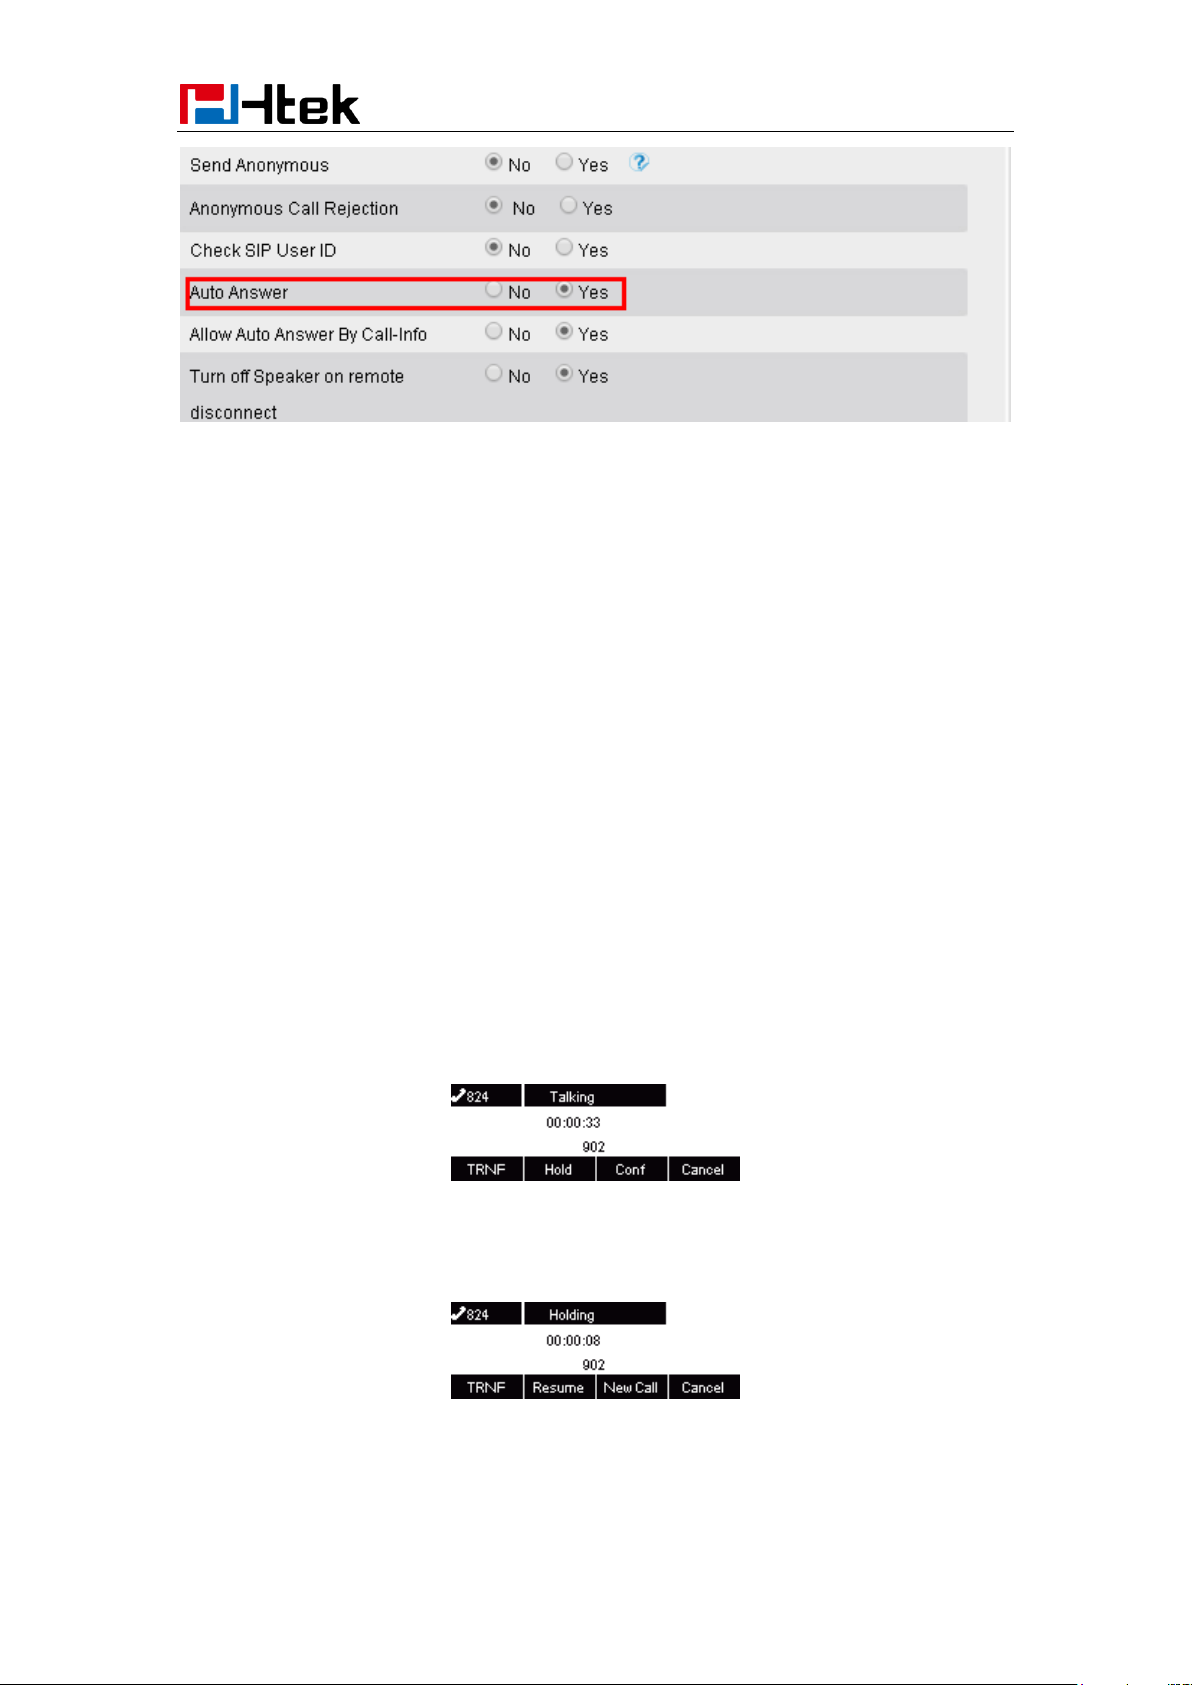
Basic Call Features
To Disable Auto Answer via Webpage
1. To Click Account → Advanced
2. To choose No for the Auto Answer.
3. To click Saveset to save the configuration.
Call Hold
When use hold feature, the Hold icon will show on the display.
To make a call on hold during three modes:
To hold a call under handset mode:
1. Press Hold soft key to hold the current call.
2. Press Resume soft key to resume the call on hold.
To hold a call under headset mode:
74
Page 75

Basic Call Features
NOTE:
1. Press Hold soft key to hold the current call.
2. Press Resume soft key to resume the call on hold.
To hold a call during the speaker mode:
1. Press Hold soft key to hold the current call.
2. Press Resume soft key to resume the call on hold.
Call Transfer
This phone supports blind, attended and Semi-Attended Transfer.
Blind Transfer
When you use this feature, you can transfer
1. Press Transfer soft key during the conversation, the call is on hold now.
2. Enter the number that transfers to.
3. Press Transfer soft key , and now the blind transfer completed.
Attended Transfer
When you use this feature, you can
1. Press transfer soft key during the conversation, the call is on hold now.
2. Enter the number that transfer to, and press the send soft key or .
3. Start the second conversation, press the transfer soft key, then, transfer completed.
75
Page 76
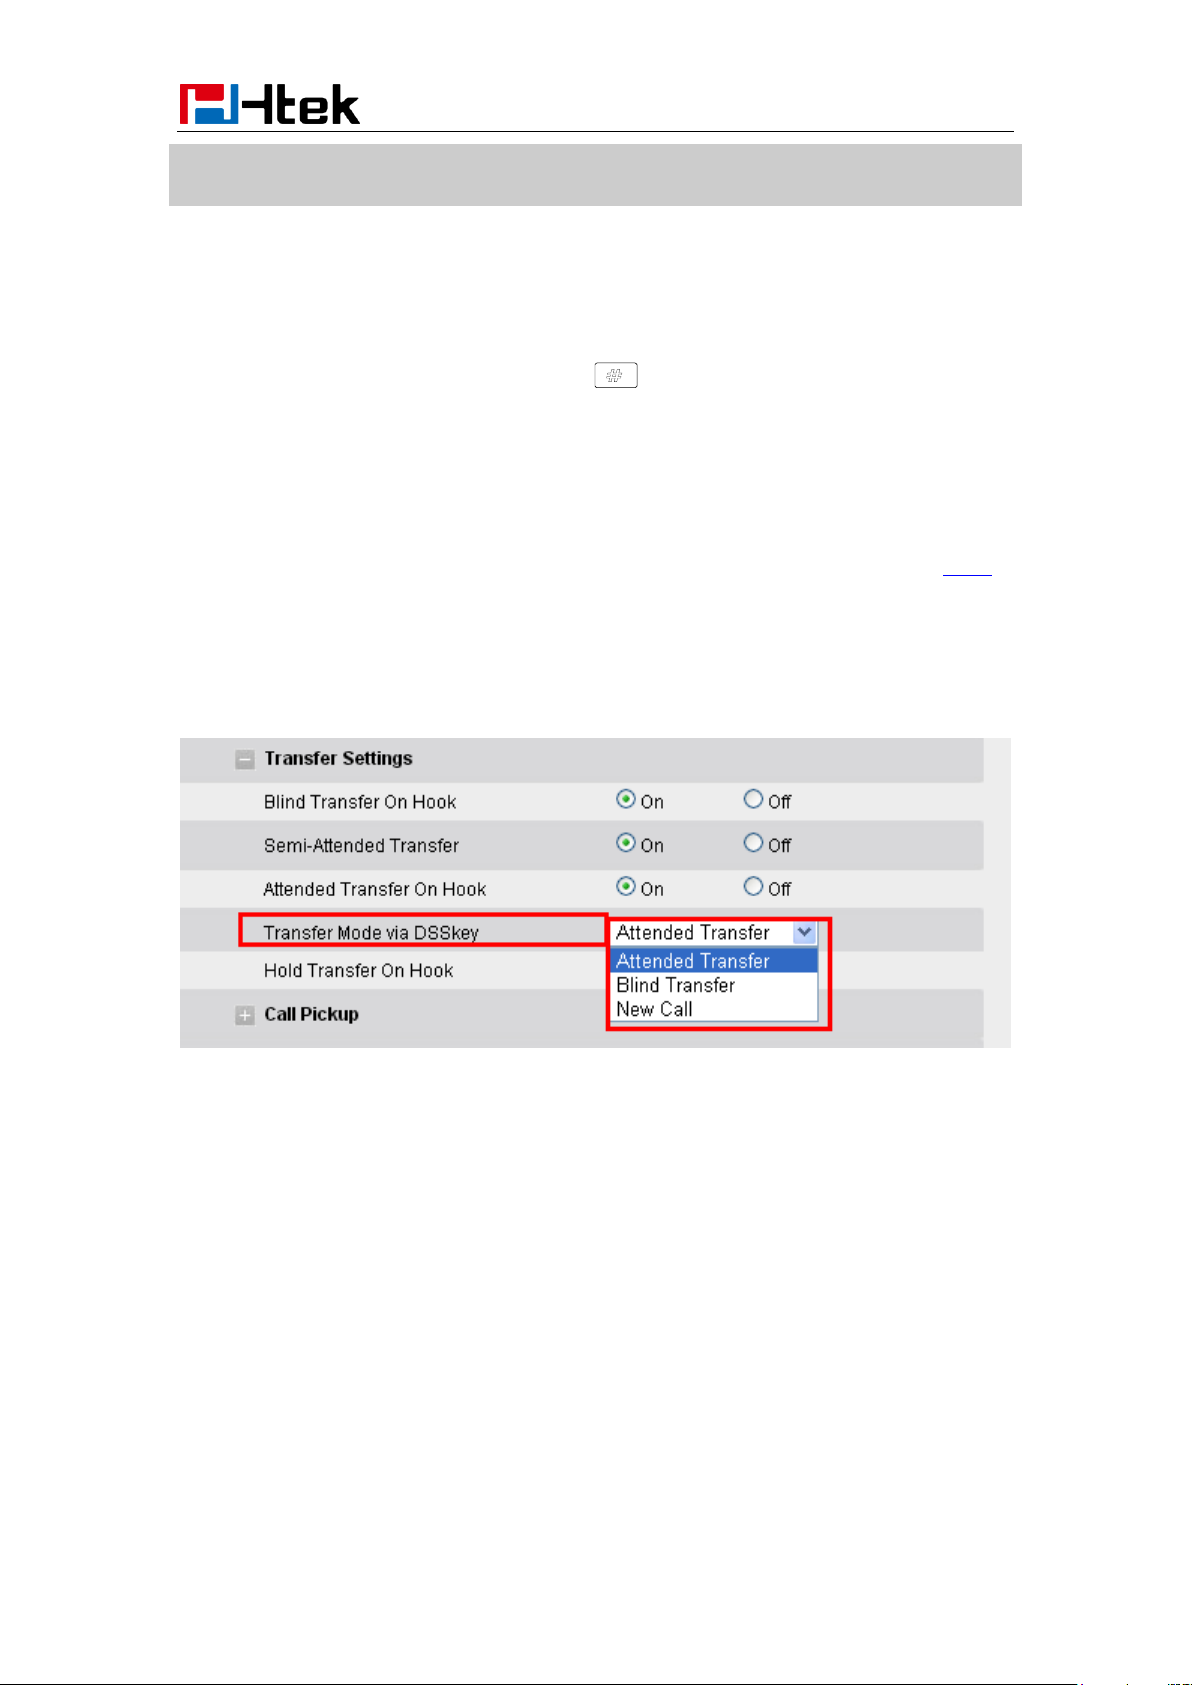
Basic Call Features
To transfer calls across SIP domains, SIP service providers must support transfer across SIP
domains. Blind transfer will usually use the primary account SIP profile.
Semi-Attended Transfer
1. Press the transfer soft key during the conversation, the call is on hold now.
2. Enter the number transfer to, and then press , then you can hear the ring tone.
3. Press the Transfer soft key, and now the Semi-attended transfer completed.
BLF Transfer
1. Set a Programmable Key or line key is set as BLF. For how to set BLF, please refer to BLF
2. Press the transfer soft key during the conversation, the call is on hold now.
3. Press BLF key then realize blind, attended and Semi-Attended Transfer.
(Webpage--Setting--Features)
Hold transfer on hook:
Setting Features Transfer Setting: Hold Transfer On Hook: ON.
A place a call to B, B answer, A press the hold softkey and place a call to C, A cancel the call
when C is ringing or answering, then C and B in the same call and the transfer is successful.
76
Page 77
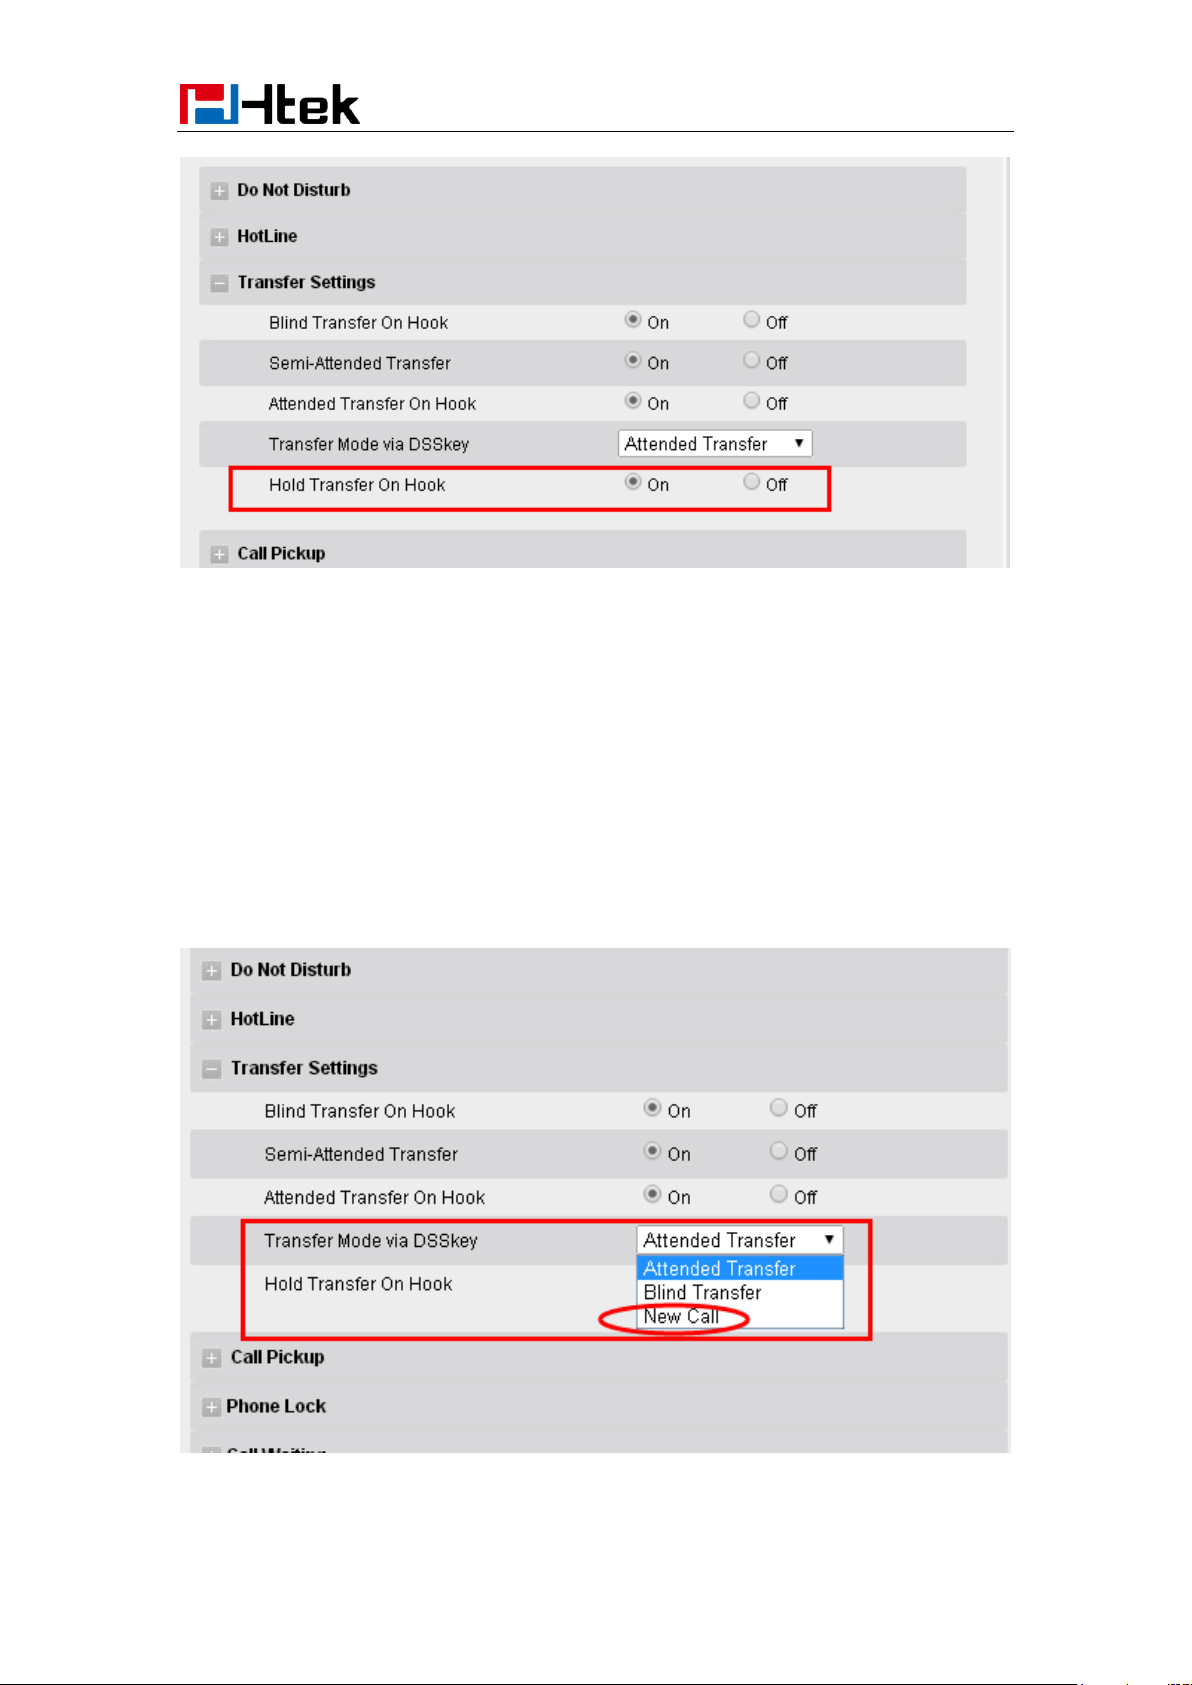
Basic Call Features
Transfer to New Call via web interface
1. Click Setting → Feature
2. Select Transfer Mode via DSS key → New Call
3. Select the desired Line or Line Key and select Transfer in the Type.
4. Enter the phone number in the Value field.
77
Page 78
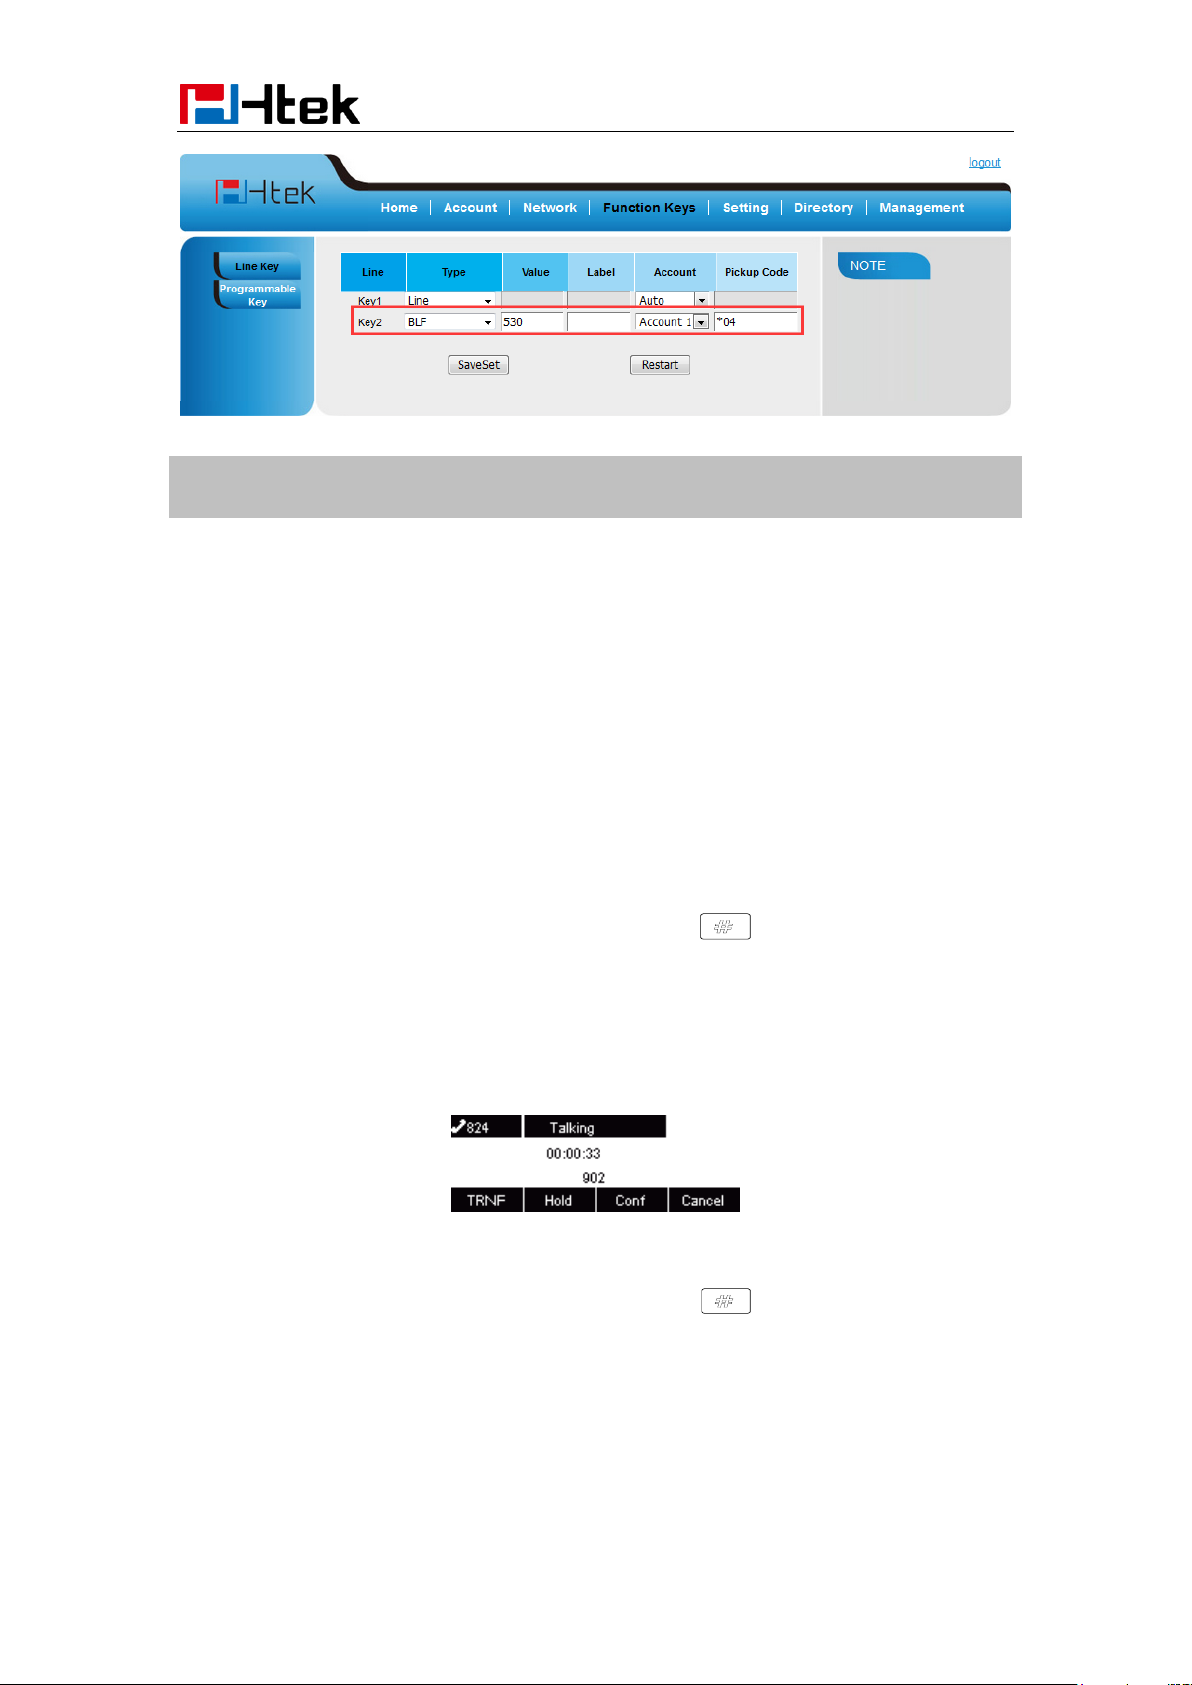
Basic Call Features
Note: if the person that wanted to be spoken to do not want to answer the call, then the
person that answered the coming call could use this function.
Call Conference
This IP Phone supports up to 5-way conference.
5-way conference
1. Assuming that call party A and B are in conversation. A wants to bring C, D and E in a
conference
2. A press line 2 key, the call is placed on hold.
3. A enter the number of C and then press send soft key or .
4. C answering the call.
5. A press conference soft key, then A, B and C are now in a conference.(and now this is 3-way
conference)
6. A press line key 3, the current 3-way conference is placed on hold.
7. A enter the number of D and then press send soft key or .
8. D answering the call.
9. A press the conference soft key, then A, B, C and D are now in a conference.(and now this is
4-way conference)
78
Page 79

Basic Call Features
Note:
1. If C does not answer the call, A can back to continue the conversation with B;
2. Once A hangs up the call, the conference is ended, while if B or C drops the call, A&C or
A&B conversation continues.
3. The conference feature is not available on all servers. For more information, contact
your system administrator.
4. To realize the 5 way conference, the line should be all available.
10. A press line key 4, the call is placed on hold.
11. A enter the number of E and then press send soft key or .
12. E answering the call.
13. A press the conference soft key, then A, B, C, D and E are now the 5-way conference is built.
14. A end the call, the conference is finished.
Call Forward
This phone supports static forward (always forward, busy forward and no answer forward) and
dynamic forward
To configure static forward
To configure always forward
With this feature, all incoming calls will forward immediately to configured number.
1. Press Menu → Features → Call forward →Always Forward.
2. Press and or press info soft key to select the enable choice
3. Enter the forward to number and on code (optional), off code (optional).
4. Press or Save soft key to save the configuration.
79
Page 80

Basic Call Features
To configure busy forward
With this feature, the incoming calls are immediately forwarded if the phone is busy.
1. Press Menu →Features → Call forward →Busy forward.
2. Press and or press info soft key to select the enable choice.
3. Enter the forward to number and on code (optional), off code (optional).
4. Press or Save soft key to save the configuration.
To configure no answer forward
No Answer Forward: Incoming calls are forwarded if not answered after some time.
1. Press Menu →Features → Call forward →No answer forward.
2. Press and or press info soft key to select the enable choice
3. Enter the forward to number and on code (optional), off code (optional).
4. Press or Save soft key to save the configuration.
When the Forward feature is enabled, the Forward Icon will display on Top of the LCD.
To configure Forward via Web Interface
1. Setting → Features
2. Click On for the Always/Busy/No Answer
3. Fill the Forward to Number
4. (Optional) fill the on/off code
5. Click to save the configuration
80
Page 81
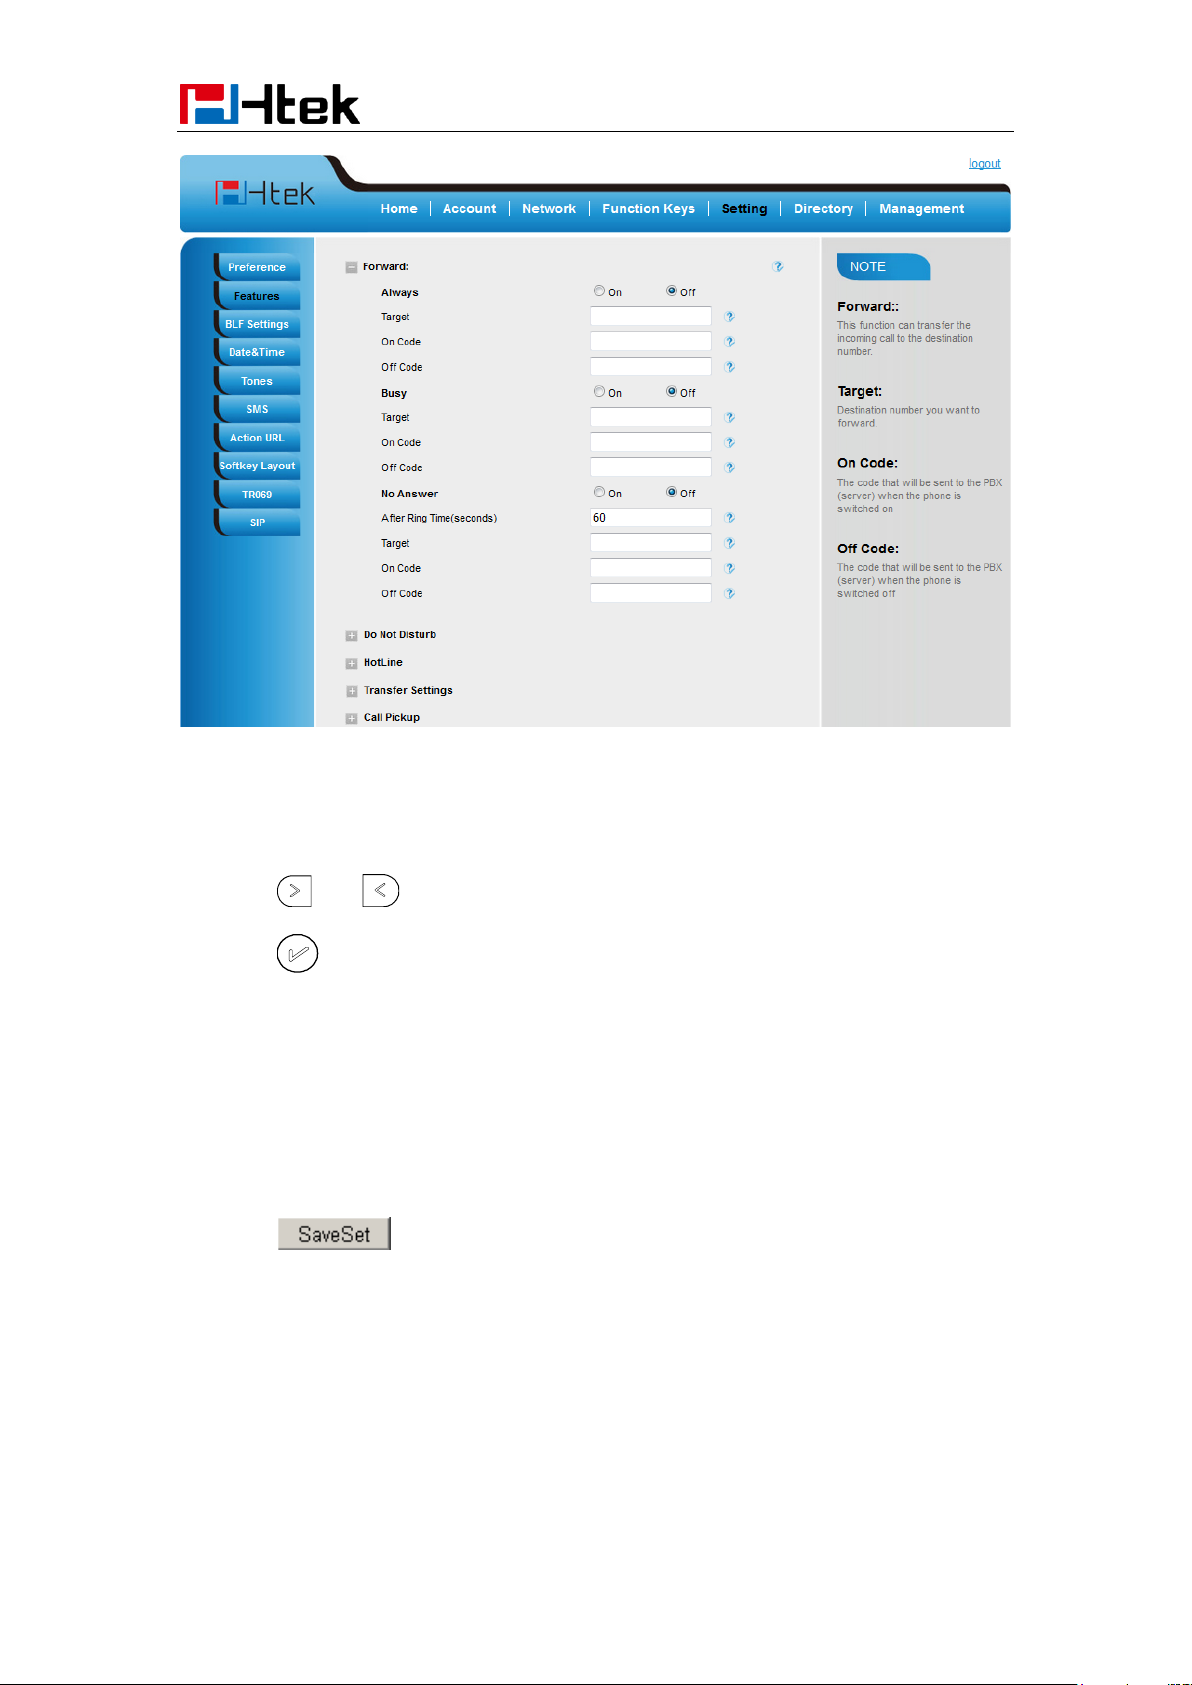
Basic Call Features
To cancel the forward feature via Phone Interface
1. Press Menu →Features → Call forward→Always/Busy/No answer Forward
2. Press and or press info soft key to select the disable choice
3. Press or Save soft key to save the configuration.
To cancel the forward feature via Web Interface
1. Setting → Features
2. Click Off for the Always/Busy/No Answer
3. Click to save the configuration
To configure dynamic forward
Forward an incoming call during the ringing.
1. When the phone is ringing, press Forward soft key.
81
Page 82

Basic Call Features
Note:
If the Programmable Key or line key is set as BLF, when an incoming call ringing, press this
BLF key directly to realize the dynamic forward.
You can choose a desired forward number from the Directory when you press the Forward
key.
2. Enter the forward number or select the desired number from Directory softkey (Precondition:
local directory has a or more contacts).
3. Press or press the send soft key, then the call is forwarded.
Call Return
This feature allows you to dial the last phone call you received.
To configure the Call Return via phone interface
1. Press Menu →Features →Function Keys→Line or Line Keys as Function Keys → Line
Key1(for example)
2. Select the wanted Line or Line Key.
3. Press and or press info soft key to select the Key Event in the type field.
4. Press and or press info soft key to select the Call Return.
5. Press or Save soft key to save the configuration
To configure the Call Return via Web interface
1. Click Function keys → Line or Line Key.
2. Select the desired Line or Line Key and select Call Return in the Type.
3. Click the button to save the configuration.
82
Page 83
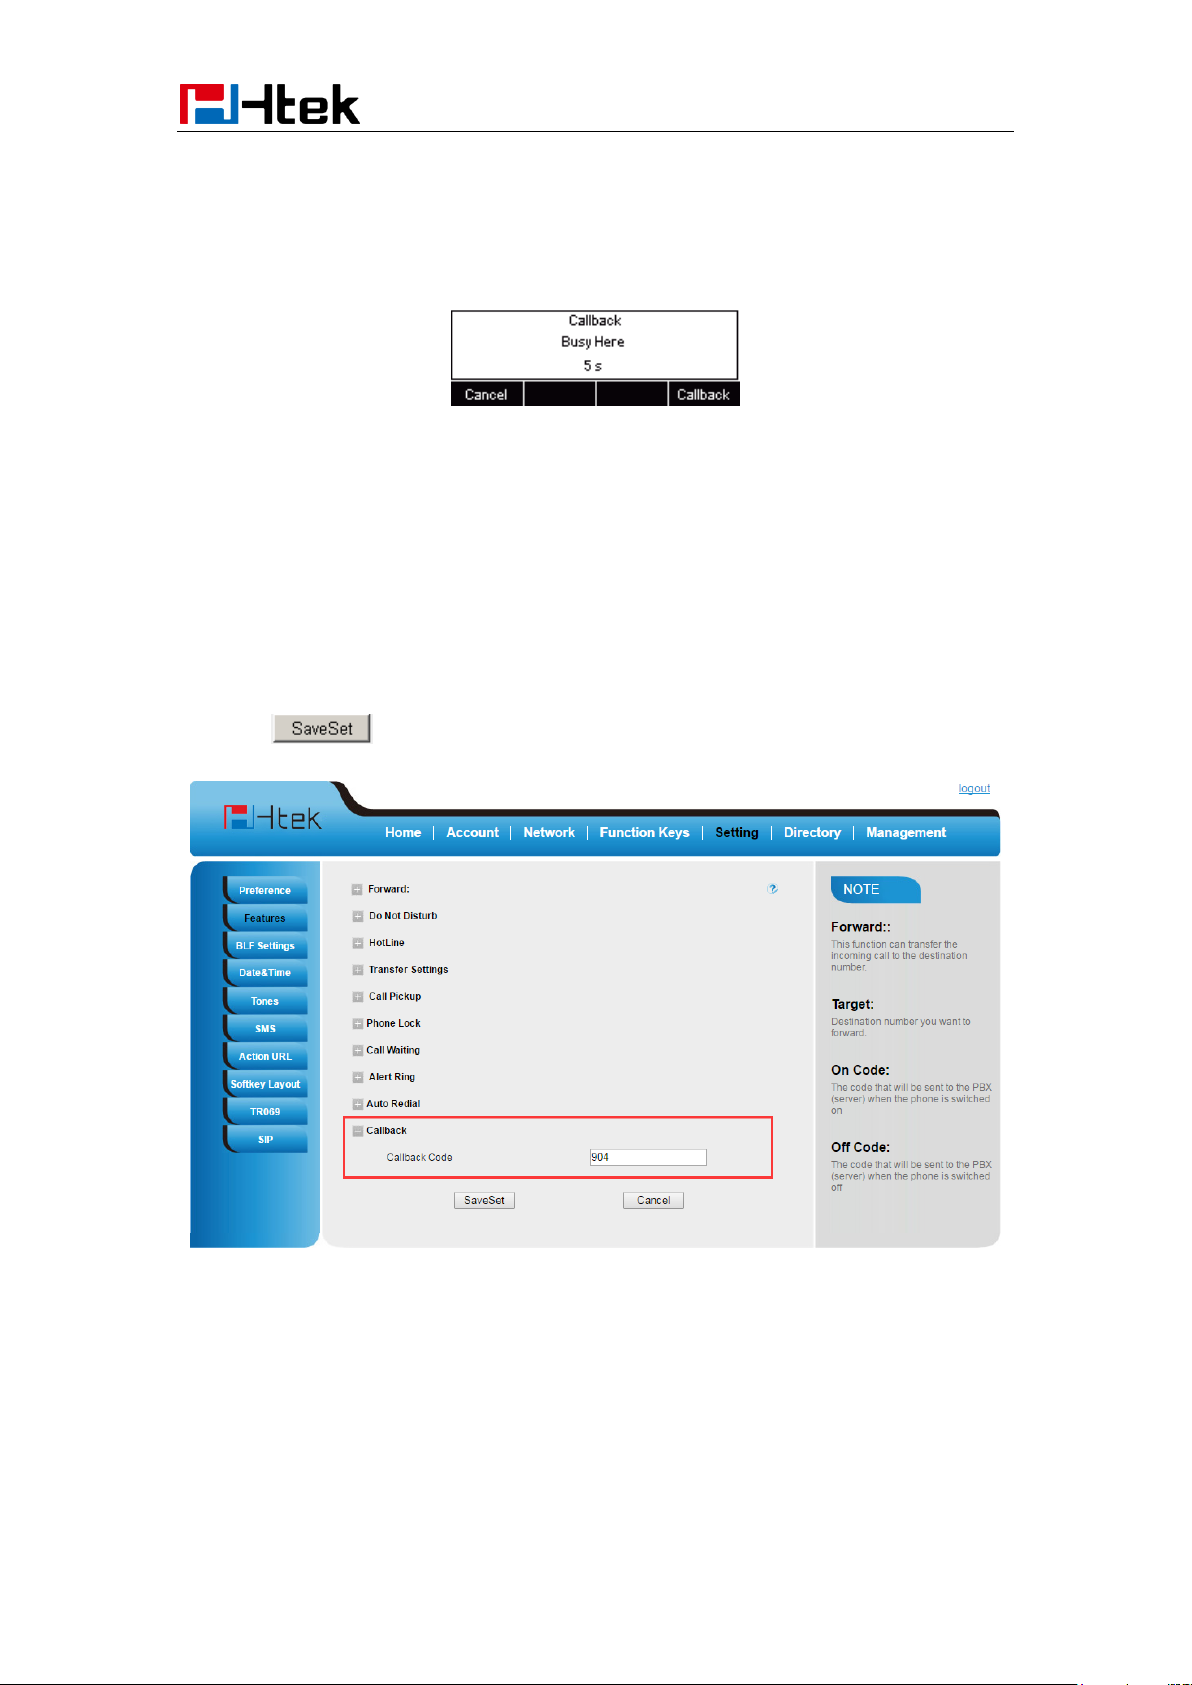
Basic Call Features
Call Back
When this option is set, if the phone you call is busy and does not set call waiting or voice mail,
your LCD screen will prompt for call-back, as shown in figure
If you press the callback, the phone will dial the Callback phone number.
To configure the Call Back via Web interface
1. Click Setting →Features →Callback .
2. Fill the Callback phone number.
3. Click to save the configuration.
Call Waiting Tone
1. Click Setting → Features
2. Select Call Waiting: On and Call Waiting Tone: On
83
Page 84
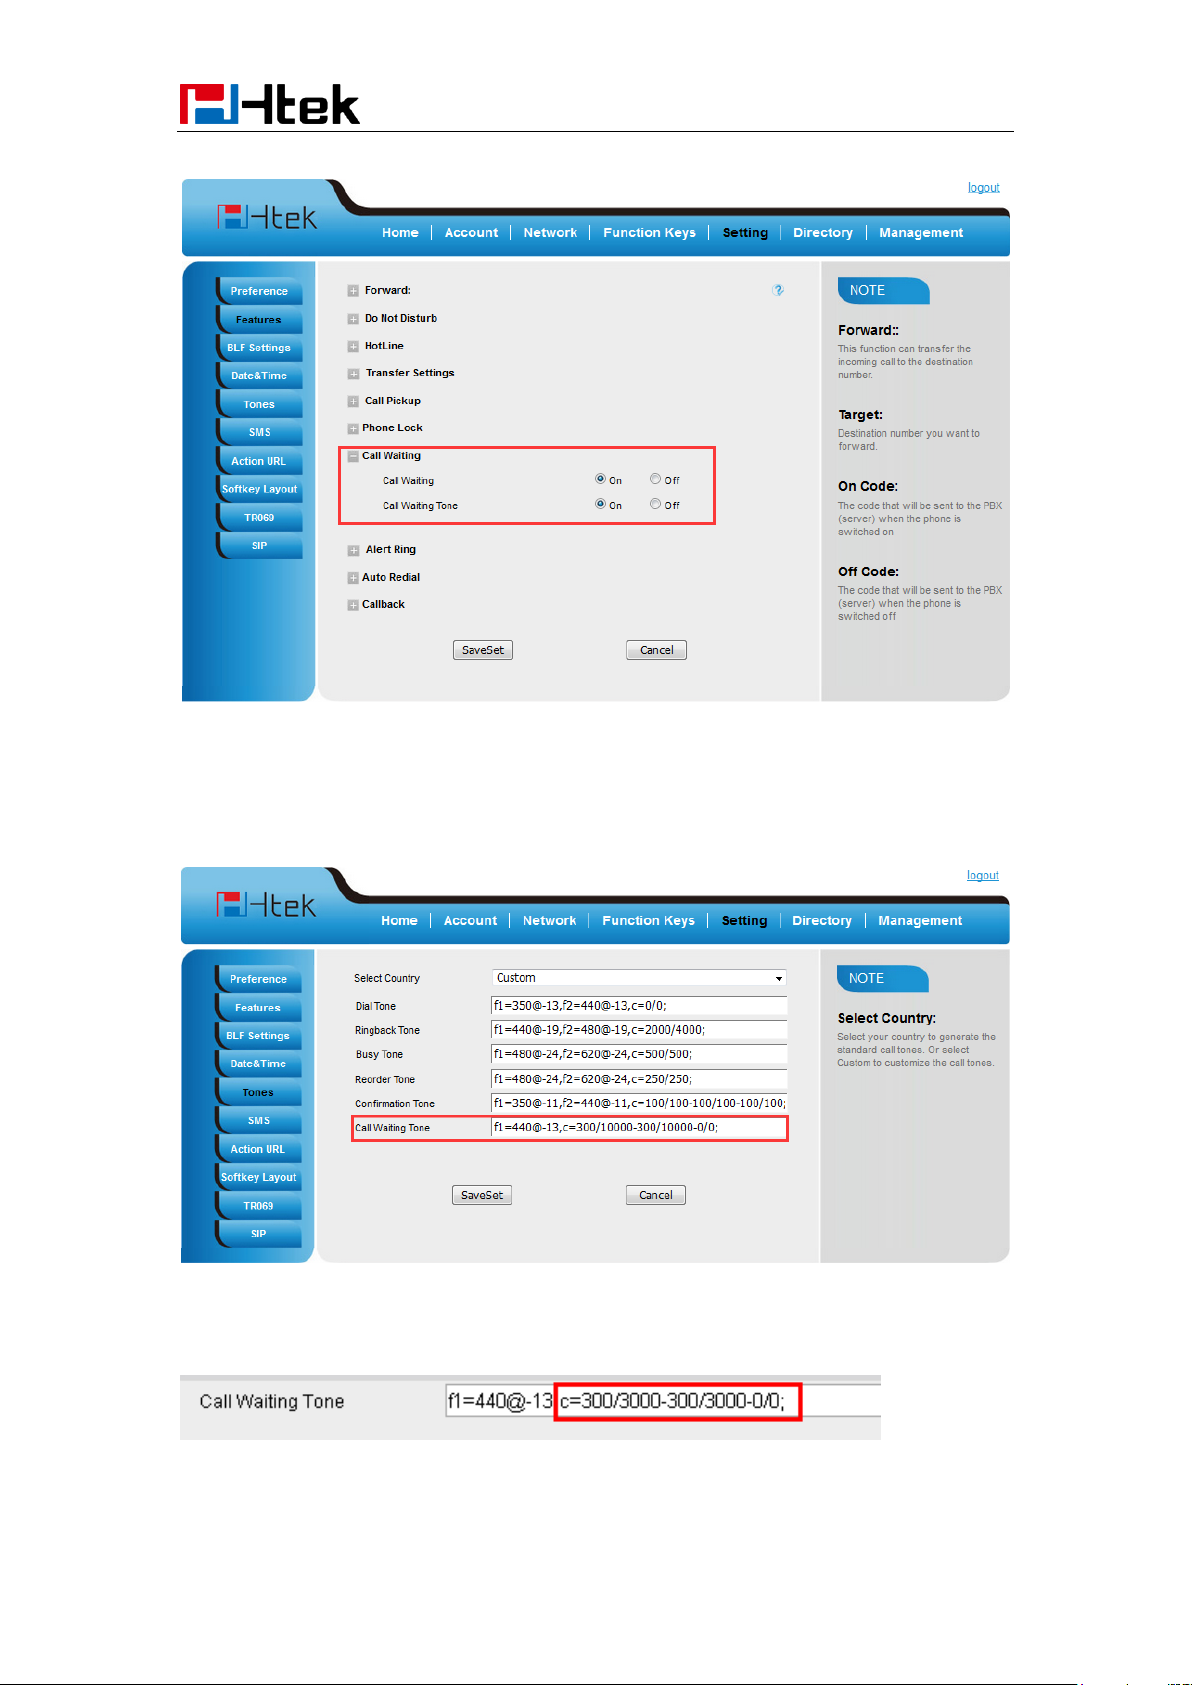
Basic Call Features
To Change the Call Waiting Tone time via Web interface
1. Click Setting → Tones
2. Change the Tone Time as you want (for example 3s)
84
Page 85

Basic Call Features
Hide Caller ID
Just enable the anonymous call feature, you can set your ID do not appear on the other phone that
you called.
To configure anonymous call
1. Press Menu →Features →Anonymous Call
2. Press and or press info soft key to change the Line ID
3. Press and or press info soft key to select the enable choice in Anonymous Call
filed.
4. Enter the call on code (optional), call off code (optional).
5. Press or Save soft key to save the configuration.
To cancel anonymous call feature
1. Press Menu →Features →Anonymous Call
2. Press and or press info soft key to select the disable choice in Anonymous Call
filed.
3. Press or Save soft key to save the configuration.
Reject Anonymous
If you do not want to be disturb by anonymous calls, you can set the reject anonymous call
features, so you will not hear the unknown calls
To configure rejecting anonymous call
1. Press Menu →Features →Anonymous Call
2. Press and or press info soft key to change the Line ID
85
Page 86
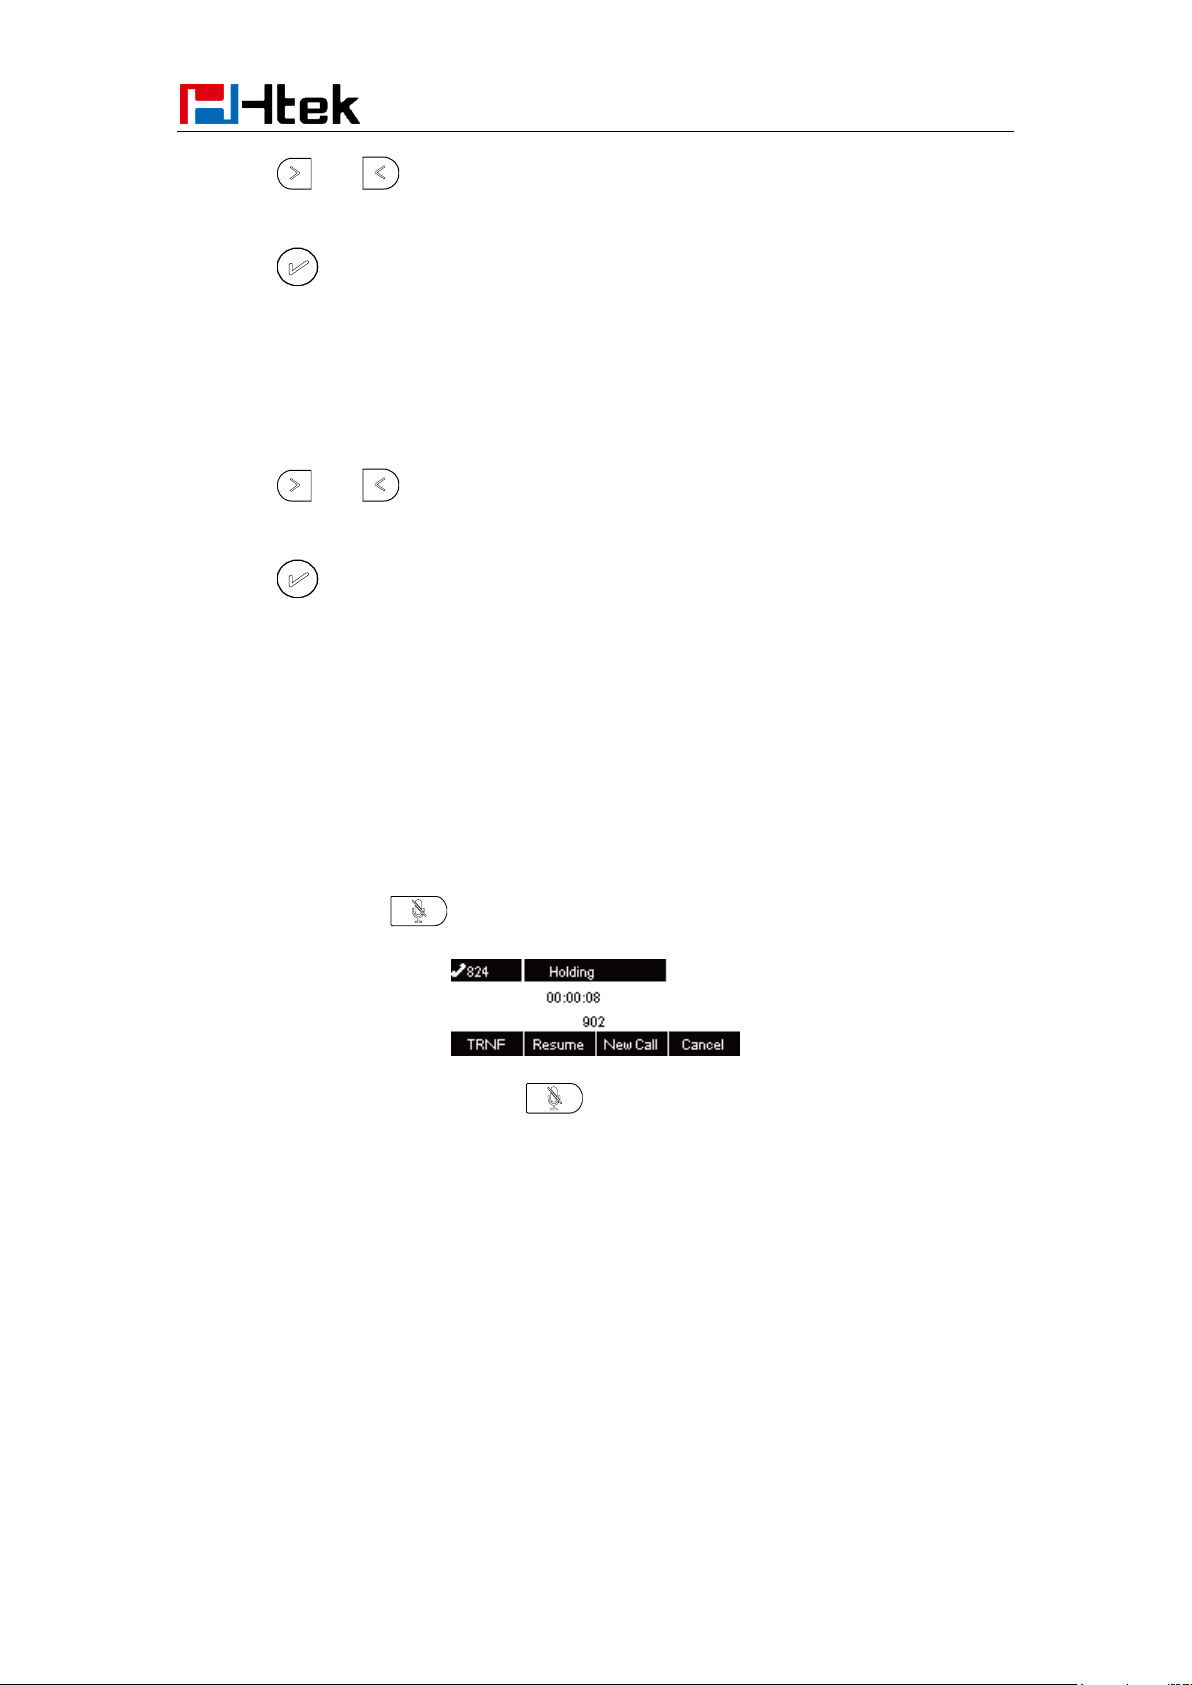
Basic Call Features
3. Press and or press info soft key to select the enable choice in Rejection filed.
4. Press or Save soft key to save the configuration
To cancel rejecting anonymous call
1. Press Menu →Features →Anonymous Call
2. Press and or press info soft key to select the disable choice in Rejection filed.
3. Press or Save soft key to save the configuration.
Call Mute
When you use the Mute feature, the other parties will not hear your voice while you can hear their
voice. Call mute applies to all modes (handset, headset, and speakerphone).
To mute the call during a call (including a conference call)
1. Press the mute key , then the mute key glows green, and the LCD display Mute Icon.
2. To disable the mute function, press again.
DND
When you use the DND feature, the phone is to reject all incoming calls automatically and you
can see the DND icon shown on the Top of the LCD on idle page.
To enable DND feature
Press the DND soft key when the phone is idle, and then DND icon shown on the LCD.
To disable DND feature
86
Page 87

Basic Call Features
Press the DND soft key again, and then there is no DND icon on the LCD.
Keypad Lock
To enable Keypad Lock via Phone
1. Press Menu--Settings--Advanced Setting--Phone Setting--Lock
2. Press Info or Switch to change choose lock type: All Keys Menu Key Function Key Lock &
Answer
3. Press Save or OK key to save the configuration.
To enable Keypad Lock via Phone
1. Press Menu--Settings--Advanced Setting(Password: admin)--Phone Setting--Lock
2. Press Info or Switch to change choose Off.
3. Press Save or OK key to save the configuration.
To enable Keypad Lock via Webpage
1. Click Webpage Setting → Preference
2. To choose the Lock keys.
3. To fill the unlock PIN and auto lock time
4. Fill the Emergence Number, when the phone is Lock, only Emergency Number can be sent.
5. To click Saveset to save the configuration.
87
Page 88
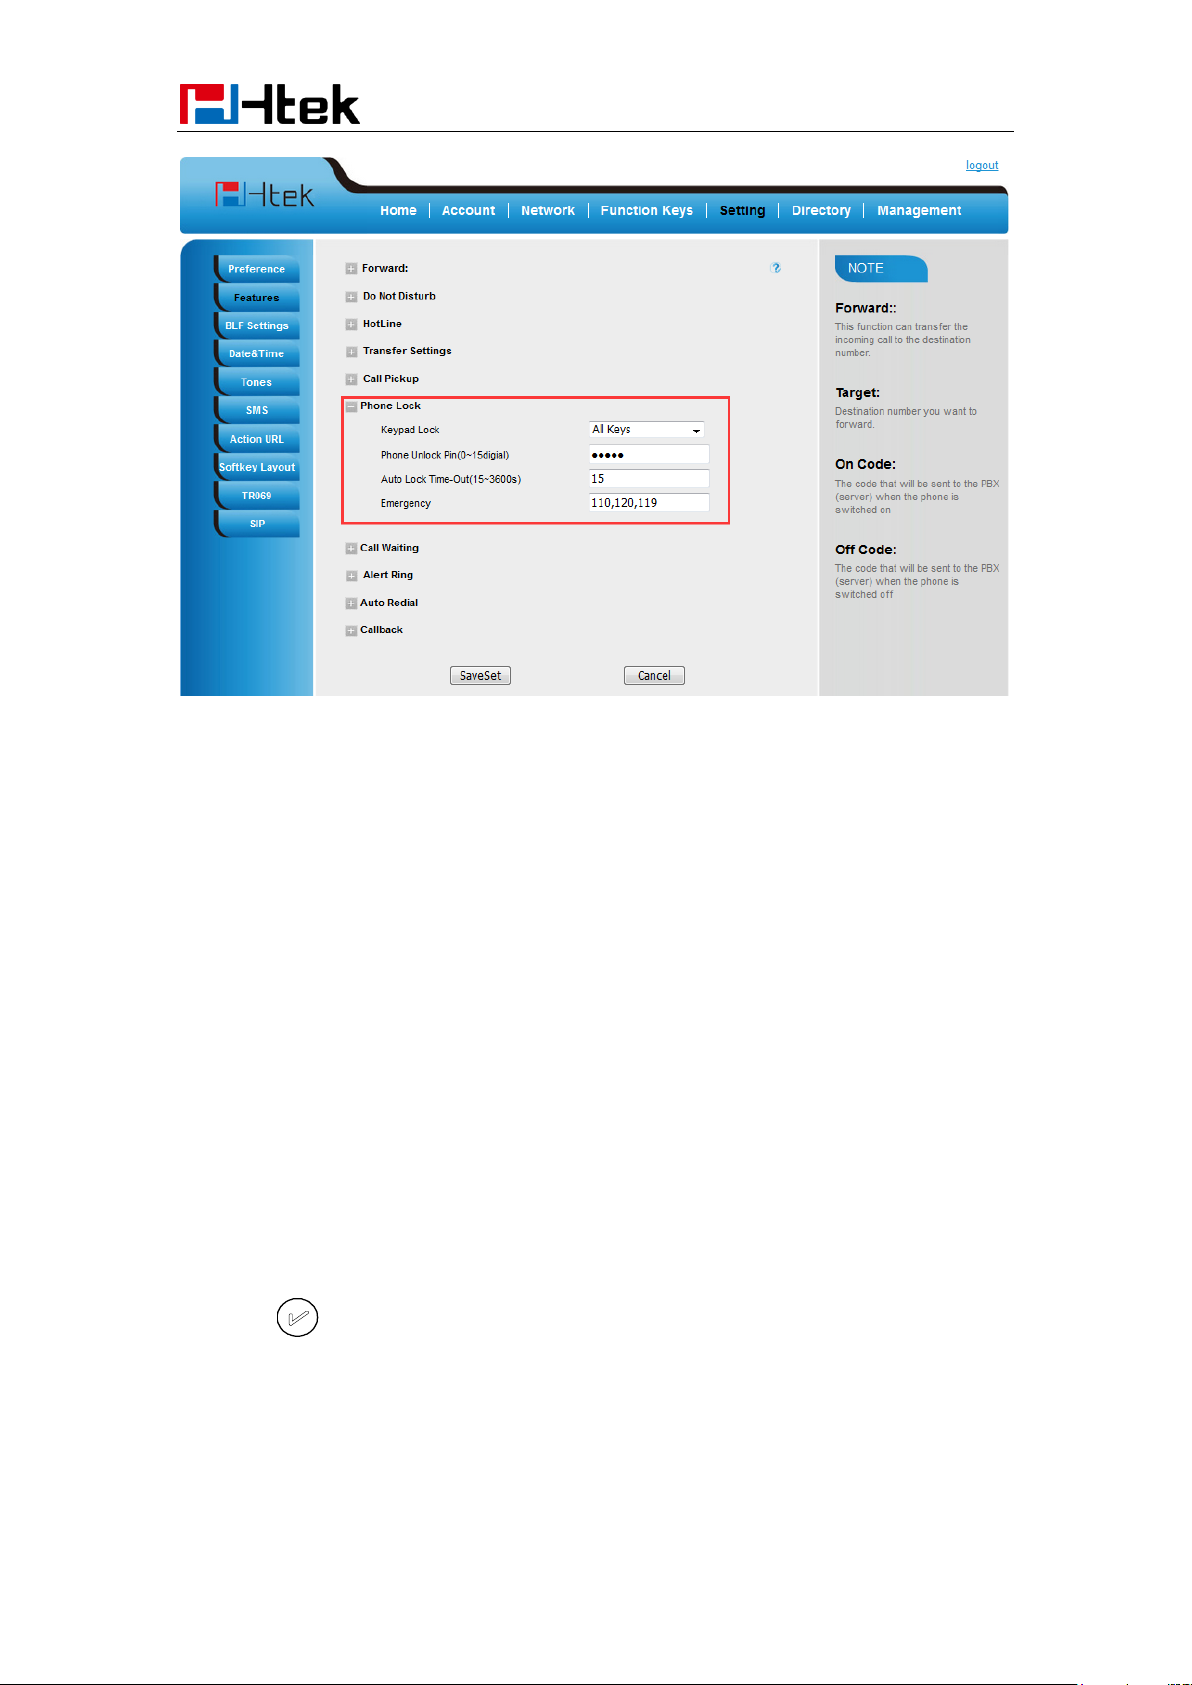
Basic Call Features
To Disable Keypad Lock via Webpage
1. Click Webpage Setting → Preference
2. To choose Disable for the Phone Lock.
3. To click Saveset to save the configuration.
Hot Line
To configure Hot Line
1. Press Menu →Features → Hot Line
2. Enter the Number and delay time (as present, we support off hook auto dial).
3. Press or Save soft key to save the configuration
To configure Hotline auto dial via Web Interface
1. Setting → Features.
88
Page 89
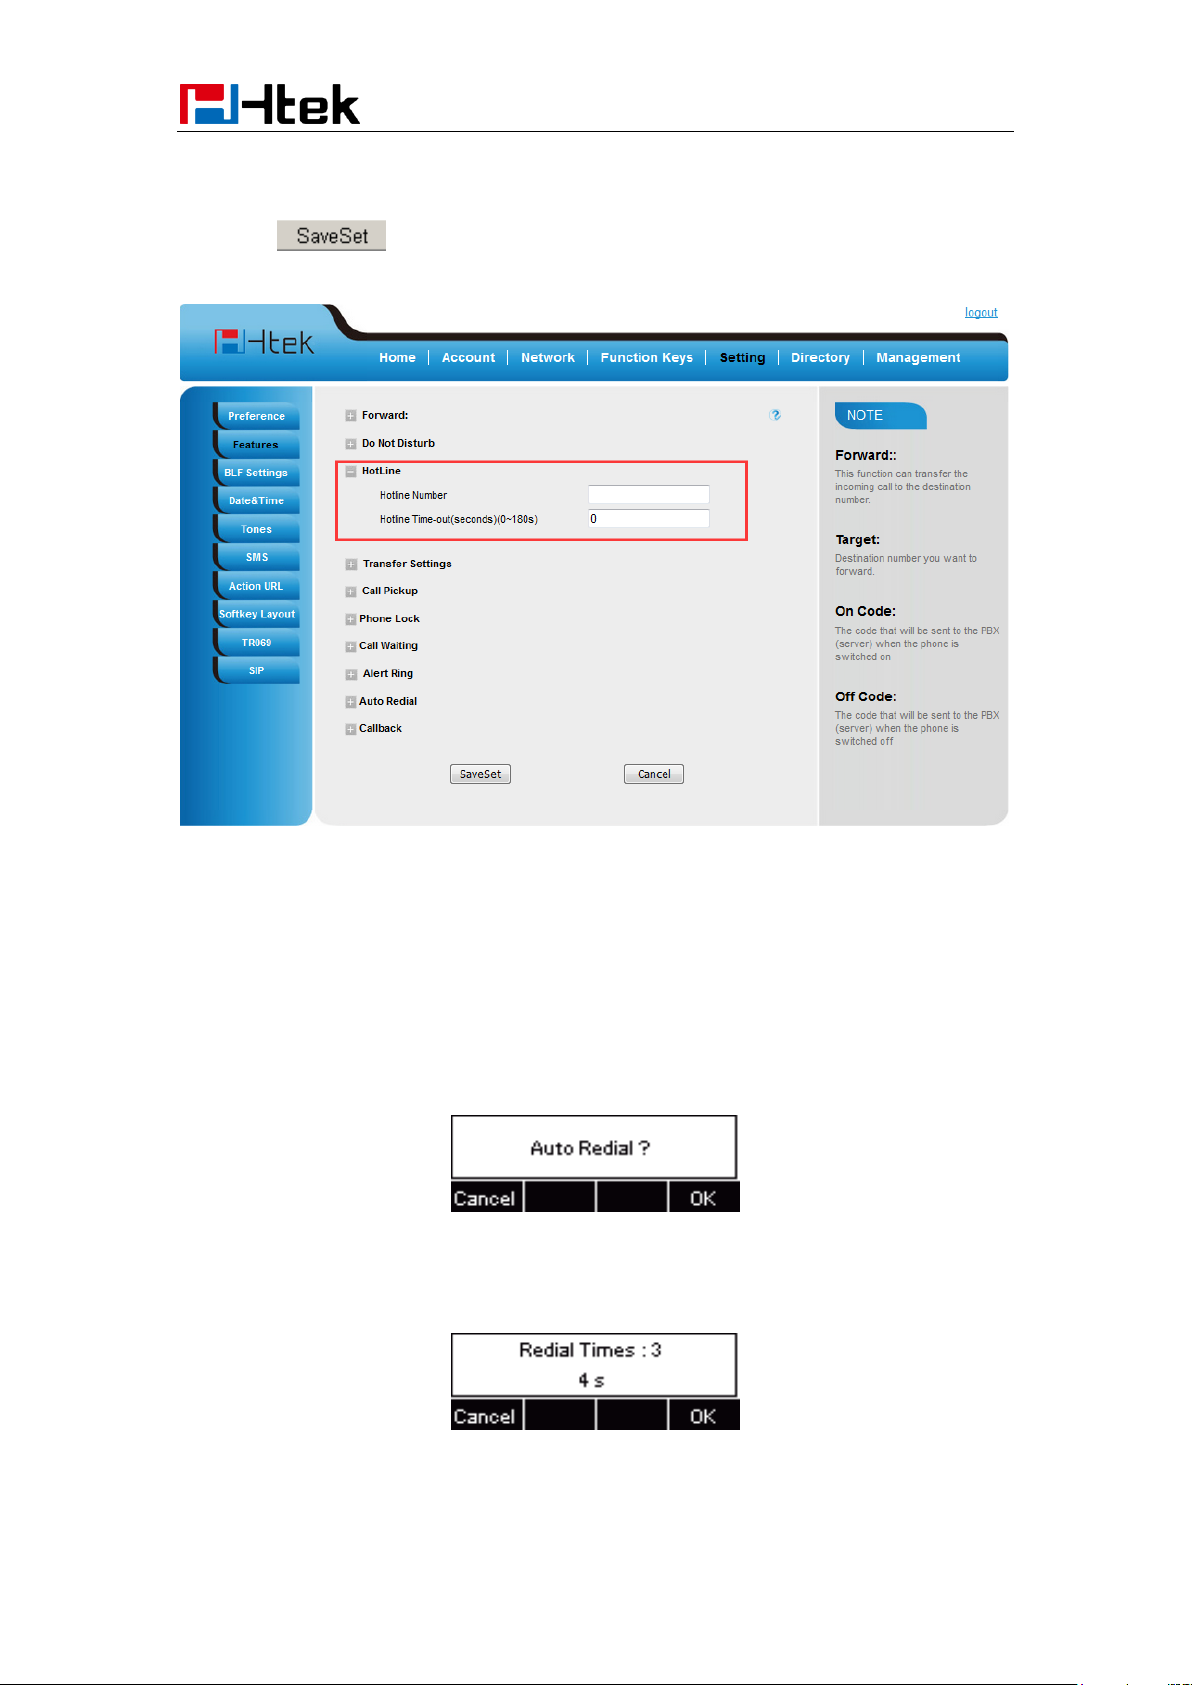
Basic Call Features
2. Fill the number in the Hotline Number and Hotline Time-out.
3. Click to save the configuration.
Delete the hotline number and save the configuration, and then now the Hotline auto dial is
cancelled.
Auto Redial
When this option is set, if the phone you call is busy and does not set call waiting or voice mail,
your LCD screen will prompt for Auto Redial, as shown in figure.
If you press OK, your LCD will prompt Auto Redial Interval and Auto Redial Times
To configure Auto Redial via Web Interface
89
Page 90
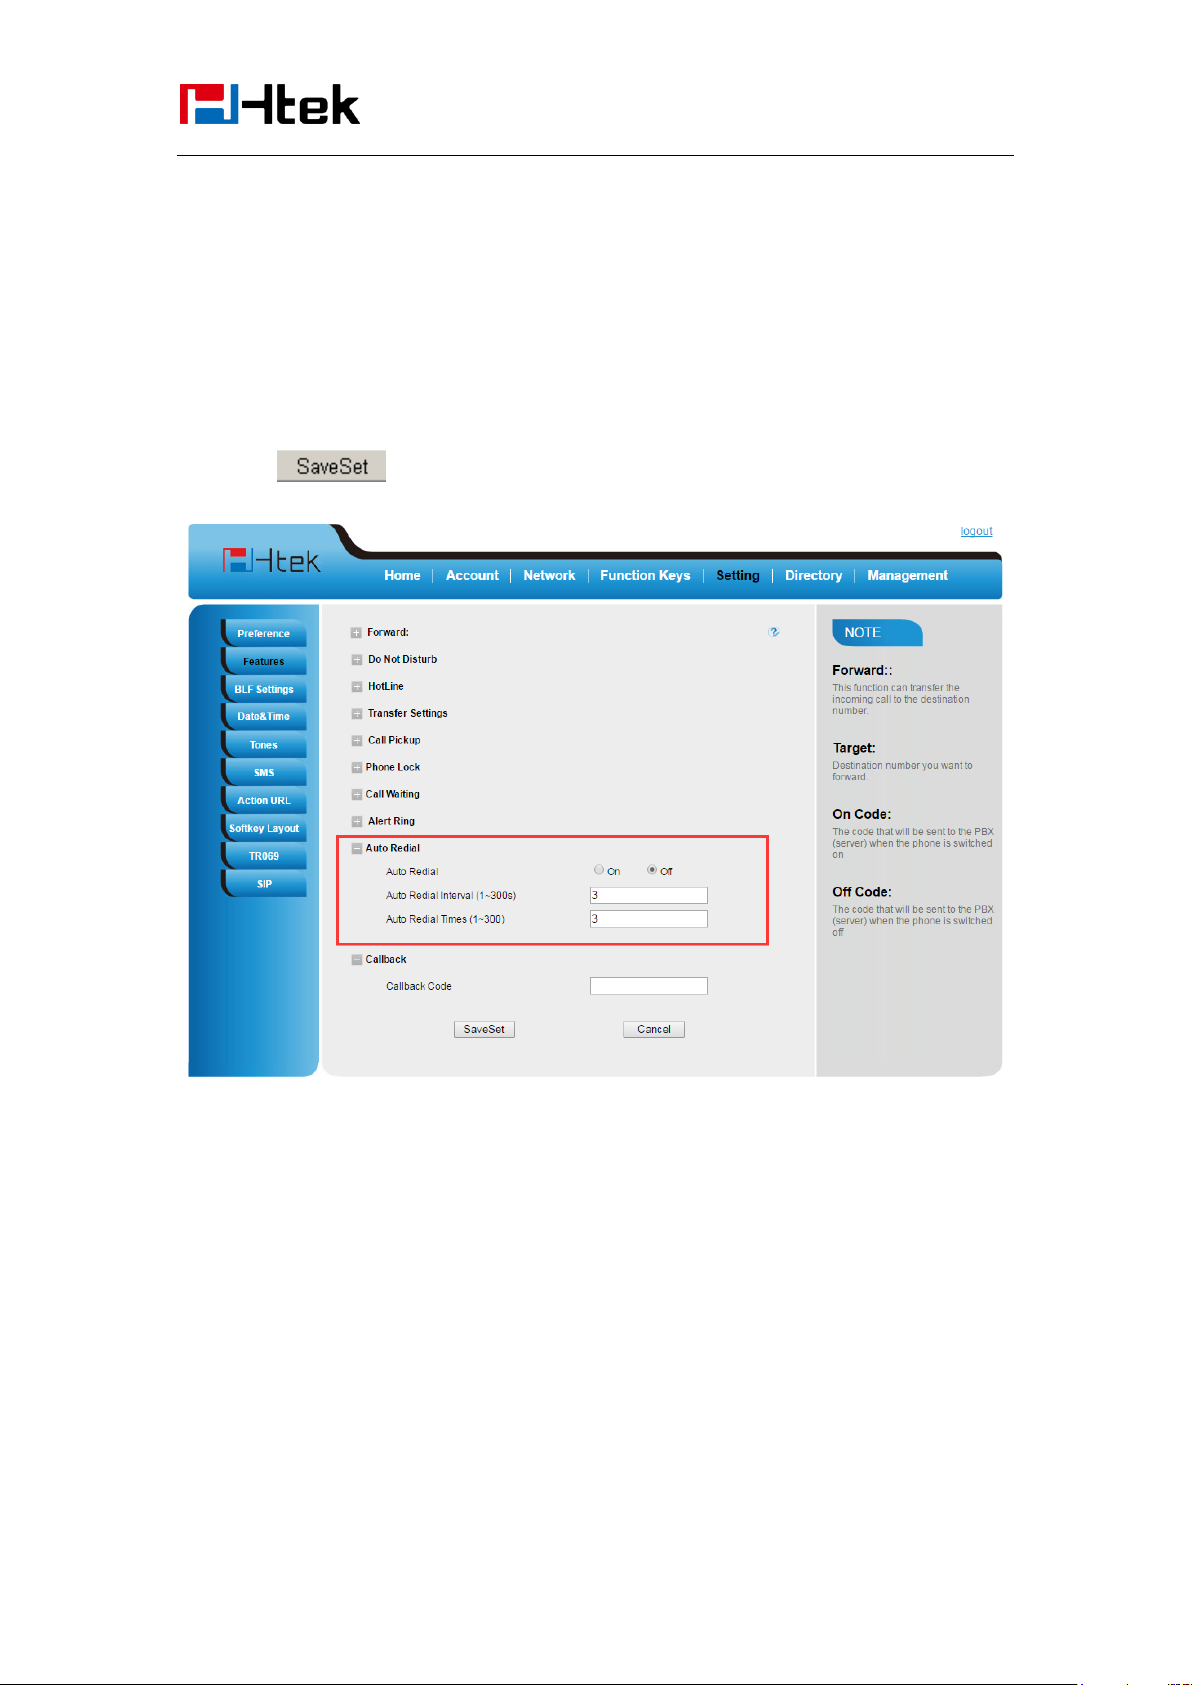
Function Key
Features Settings
1. Click Setting →Features → Auto Redial
2. Select On or Off for Auto Redial.
3. Fill the number 1~300 seconds for the Auto Redial Interval.
4. Fill the number 1~300 times for the Auto Redial Times.
5. Click to save the configuration.
Function Key Features Settings
Line
It works same as Line keys.
To configure Line Feature via Web Interface
1. Click Function keys → Line or Line Key.
90
Page 91
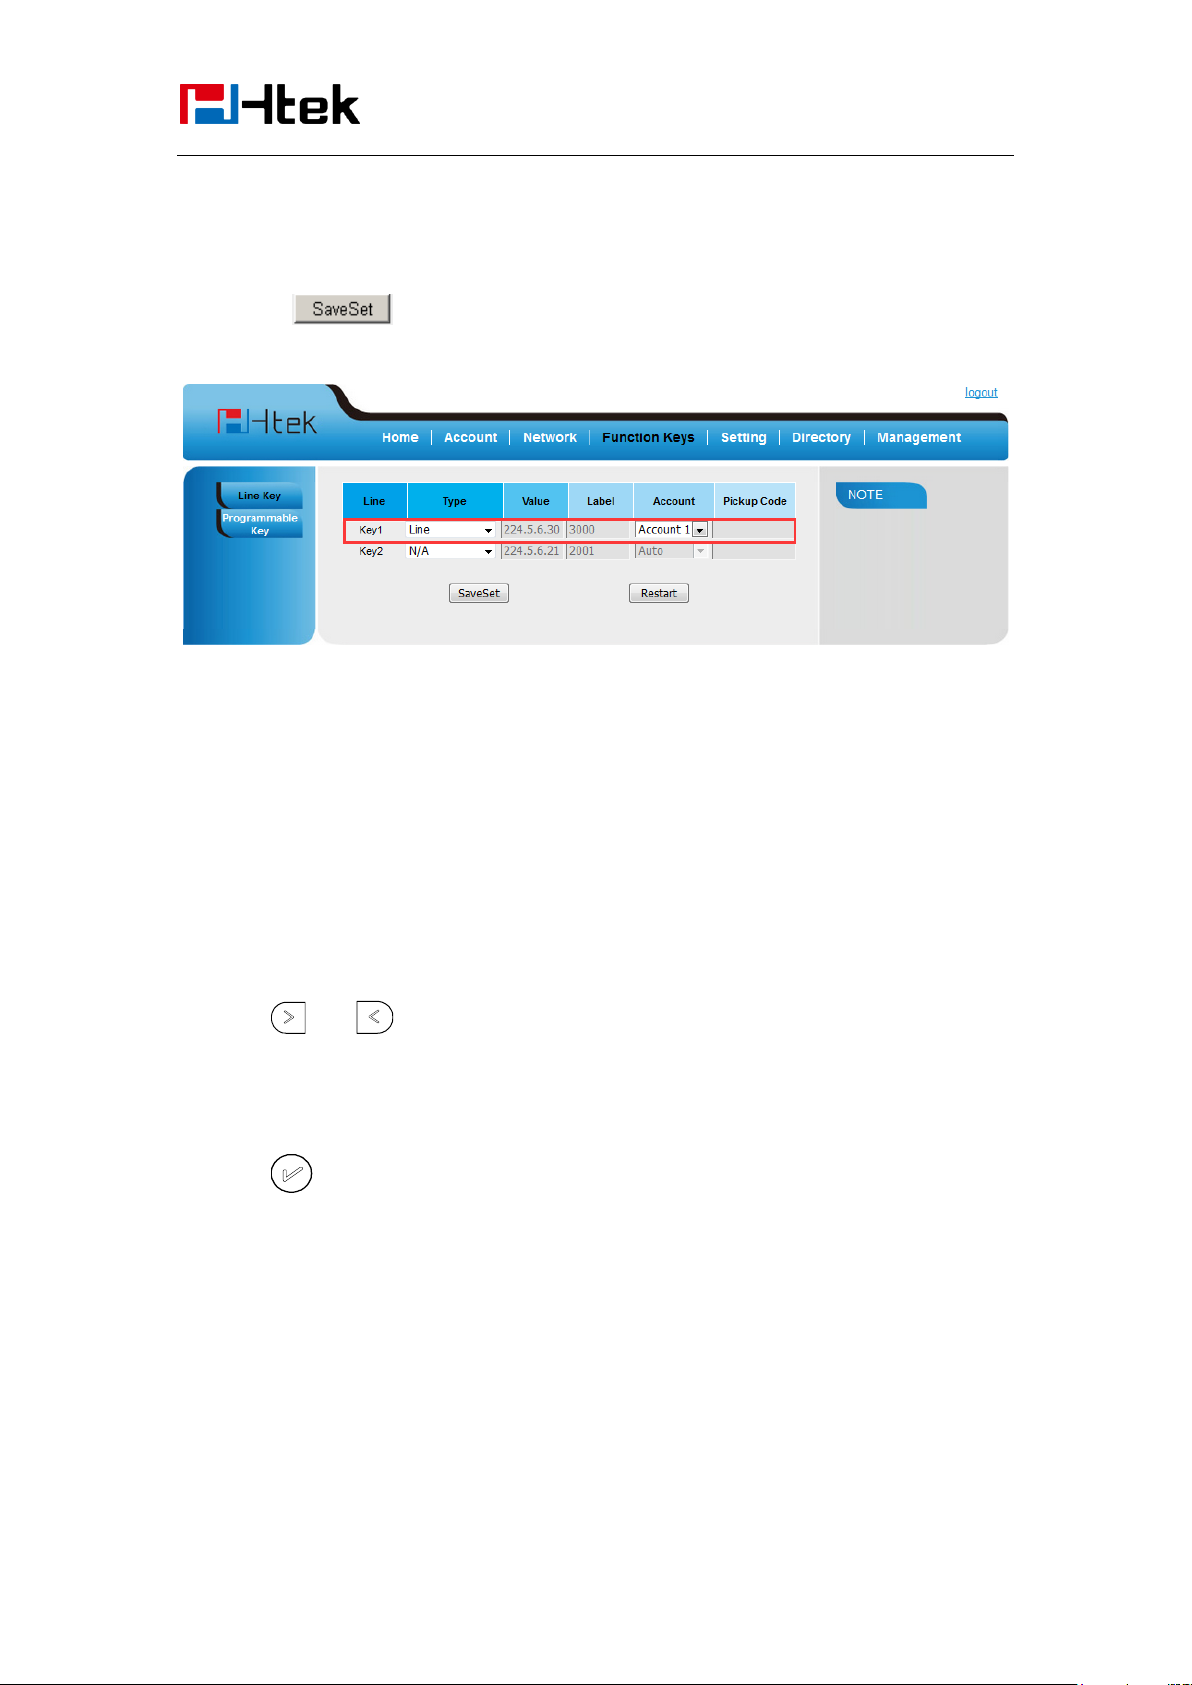
Function Key
Features Settings
2. Select the wanted Key and set as Line.
3. Select the Account.
4. Click the button to save the configuration.
Speed Dial
With this feature, you can dial one directory by press the definite key.
To configure Speed Dial feature via phone interface
1. Press Menu →Features →Function Keys→Line or Line Keys as Function Keys → Line
Key1(for example)
2. Press and key to select the Speed Dial in the type field.
3. Enter the targeted Number.
4. Press or Save soft key to save the configuration
Then the selected Line or Line Key will work as Speed Dial.
To configure Speed Dial feature via Web Interface
1. Click Function keys → Line or Line Key.
2. Select the wanted Line or Line Key and set as Speed Dial.
3. Enter the desired phone number in the Value field.
91
Page 92
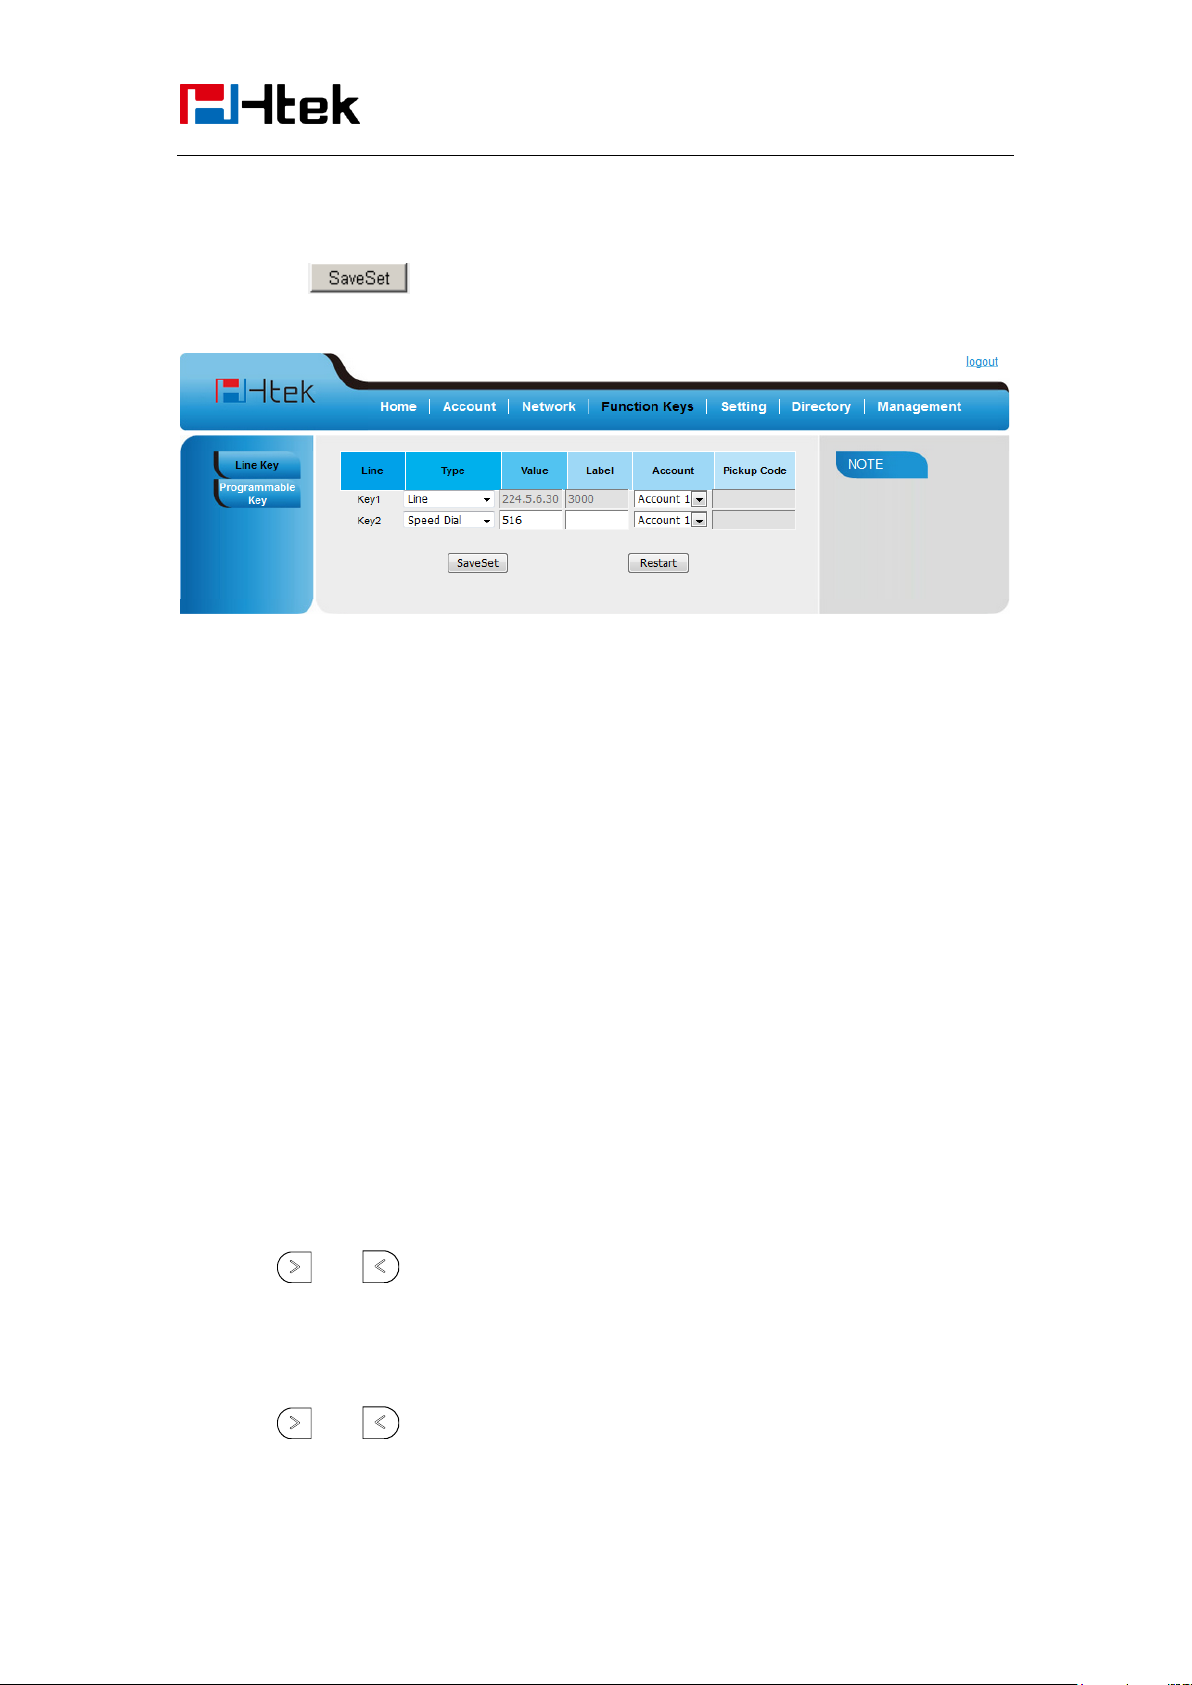
Function Key
Features Settings
4. Select the Account ID
5. Click the to save the configuration.
BLF
You can use the BLF (Busy Lamp Field) feature to monitor a specific one whether his phone is
busy or free.
1. When the monitored line is idle, the light is steady green.
2. When the monitored line is ringing, the light is blinking red, press the BLF key to pick the
phone up directly.
3. When the monitored line is calling or in a conversation, the light is steady red.
To configure a BLF key by phone
1. Press Menu →Features →Function Keys→Line or Line Keys as Function Keys → Line
Key1(for example).
2. Select the targeted Line or Line Key.
3. Press and or press info soft key to select the BLF in the type field.
4. Enter the targeted Value Number.
5. Press and to select the Account ID.
6. Enter the Pickup Code.
92
Page 93

Function Key
Note:
This feature is not available on all servers. For more information, contact your system
administrator.
After setting the BLF key, do not need to restart the phone.
Features Settings
7. Press or Save soft key to save the configuration
To configure a BLF key by web
1. Click Function keys → Line or Line Key.
2. Select the desired Line or Line Key and select BLF in the Type.
3. Enter the monitored phone number in the Value field.
4. Select the Account ID
5. Filled the Pickup code.
6. Click the to save the configuration and then restart.
BLF List
To configure BLF List via web interface:
1. Login and click Account
93
Page 94
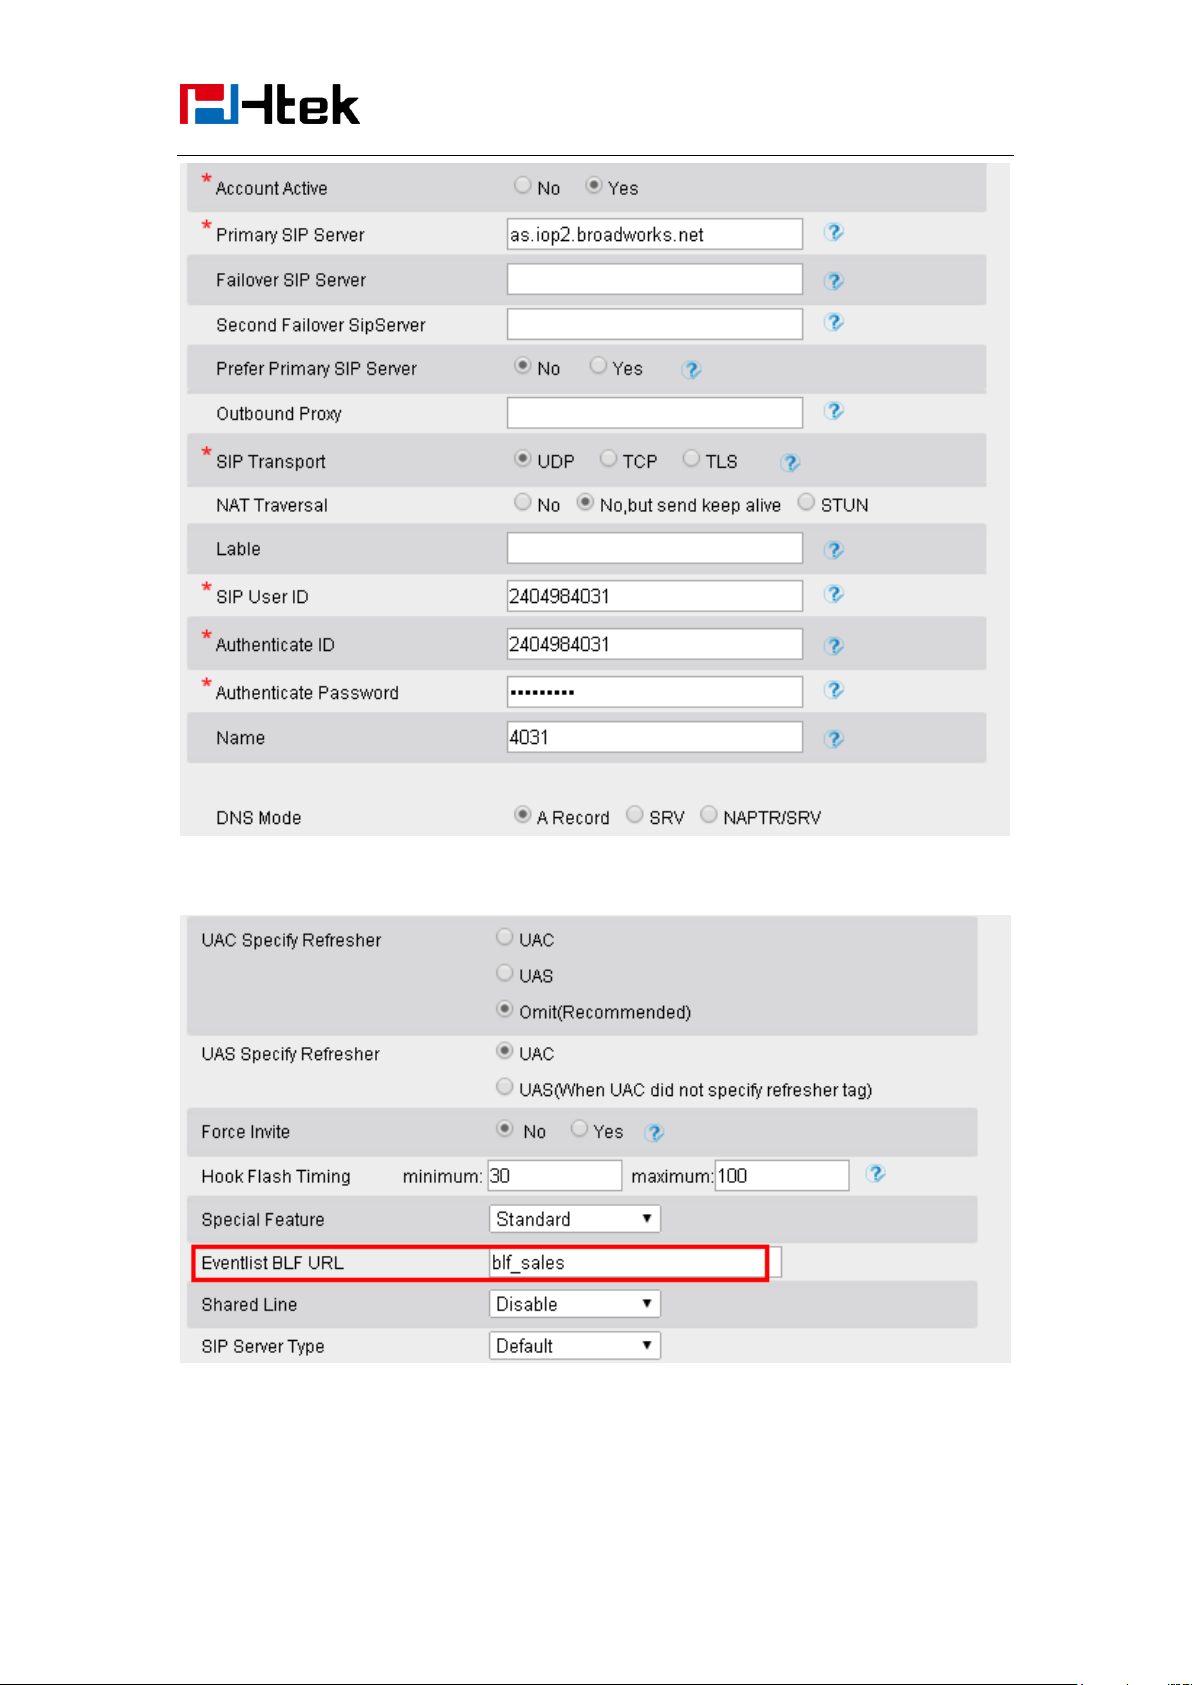
Features Settings
Function Key
2. Click Advanced and then fill the Eventlist BLF URL.
3. To configure BLF List Keys
3.1 ClickFunction KeysLine Key
94
Page 95

Function Key
Note:
This feature is not available on all servers. For more information, contact your system
administrator.
Features Settings
3.2 Select the BLF List in the Type Field.
3.3. Select Account
3.4 Click Saveset to save the configuration and then restart the Phone.
For more information, please check BLF list Note on www.htek.com web.
Voice Message
To configure the Voice mail feature
1. Press Menu→Messages→Voice Mail→Set Voice Mail.
2. Enter the Account1/2/3/4 NO.
3. Press or Save soft key to save the configuration
Direct Pickup
With this feature, you can pick up the set line when it ringing.
To configure Direct Pickup feature via phone interface
1. Press Menu →Features →Function Keys→Line or Line Keys as Function Keys → Line
Key1(for example)
2. Press and key to select the Speed Dial in the type field.
3. Enter the value.
95
Page 96
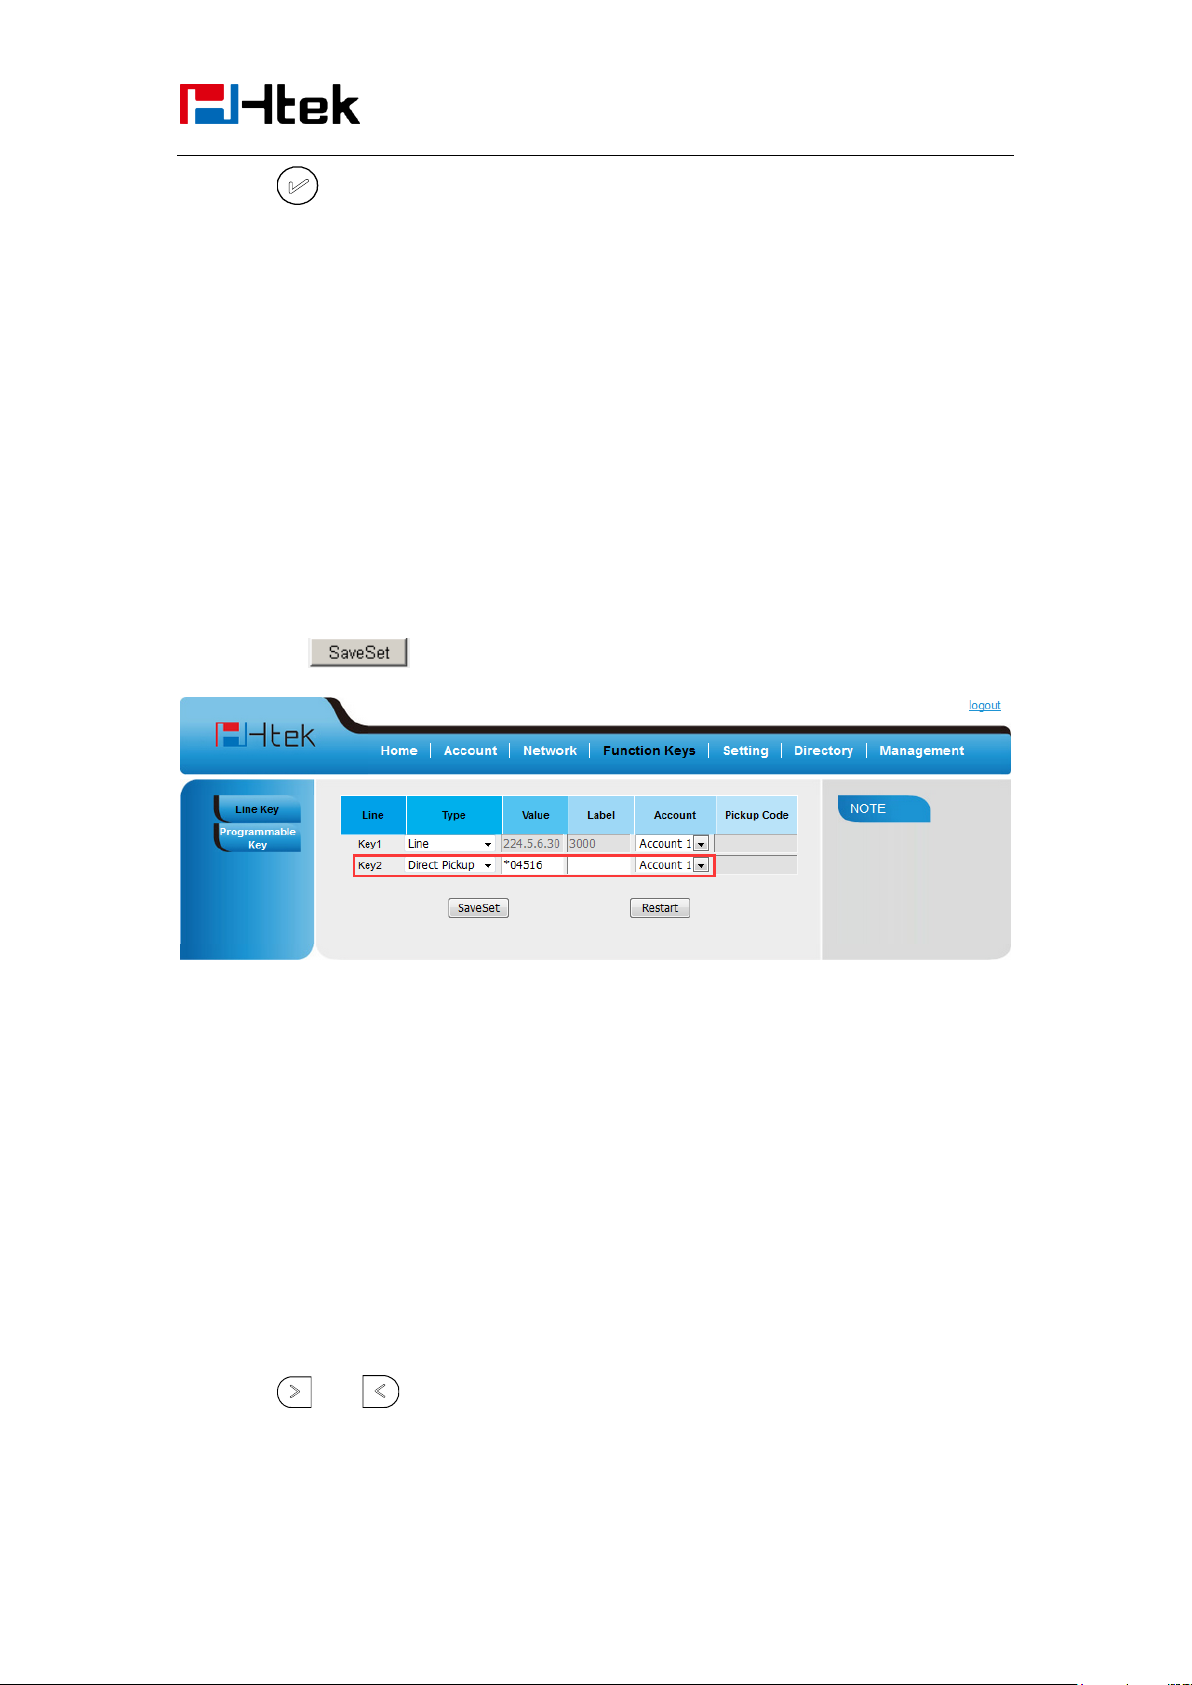
Function Key
Features Settings
4. Press or Save soft key to save the configuration
Then the selected Line or Line Key will work as Direct Pickup.
To configure Direct Pickup feature via Web Interface
1. Click Function keys → Line or Line Key.
2. Select the wanted Line or Line Key and set as Direct Pickup.
3. Enter the pickup code and followed the desired phone number in the Value field.
4. Select the Account ID
5. Click the button to save the configuration.
Group Pickup
With this feature, you can pick up the specified group that you want incoming calls.
To configure the Pick up via phone interface
1. Press Menu →Features →Function Keys→Line or Line Keys as Function Keys → Line
Key1(for example)
2. Select the wanted Line or Line Key.
3. Press and or press info soft key to select the Group Pickup in the type field.
4. Enter pickup code and followed the desired group number
96
Page 97
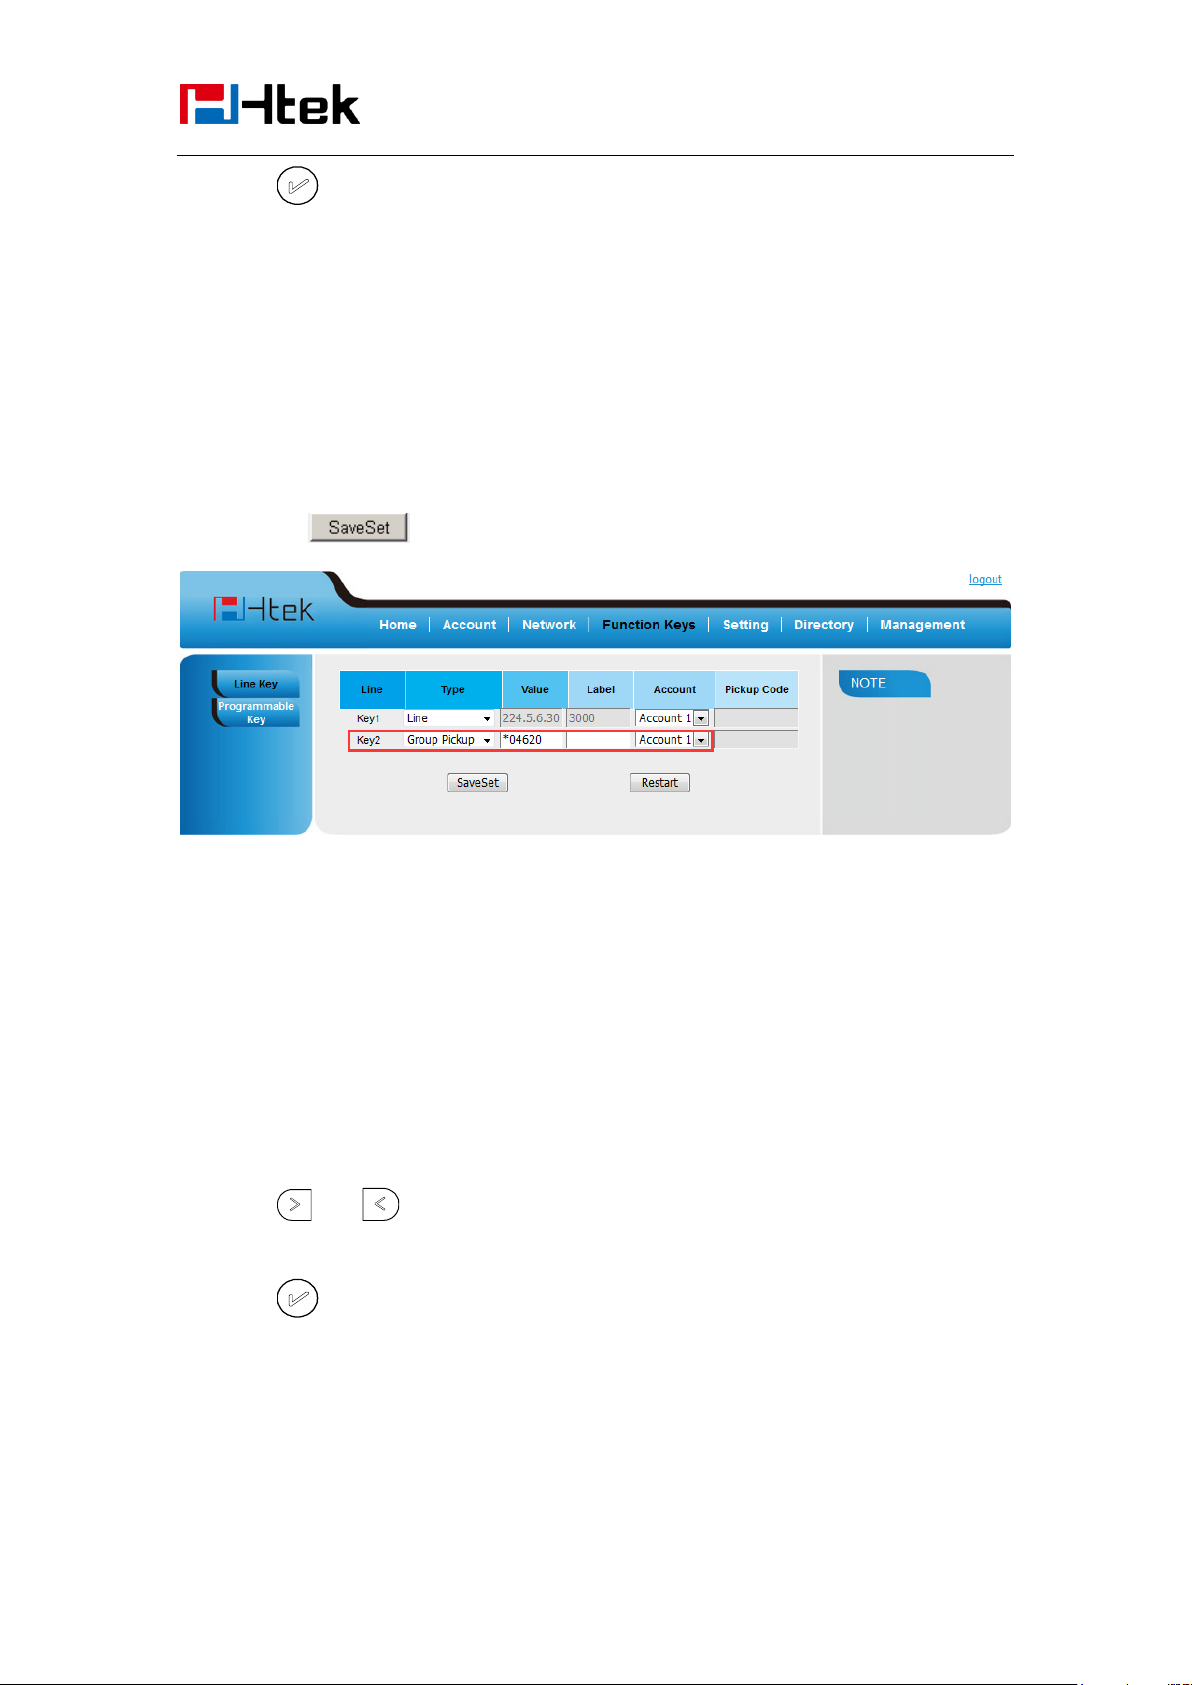
Function Key
Features Settings
5. Press or Save soft key to save the configuration
To configure the Group Pick up via Web interface
1. Click Function keys → Line or Line Key.
2. Select the desired Line or Line Key and select Group Pickup in the Type.
3. Enter the pickup code and followed the desired Group number in the Value field.
4. Click the to save the configuration.
Call Park
With this feature, you can put a call on hold and continue the conversation from another phone.
To configure the Call Park via phone interface
1. Press Menu →Features →Function Keys→Line or Line Keys as Function Keys → Line
Key1(for example)
2. Press and or press Switch soft key to select the Call Park type.
3. Press or Save soft key to save the configuration
To configure the Call Park via Web interface
1. Click Function key → Line or Line Key.
2. Select the desired Line or Line Key and select Call park in the Type.
97
Page 98
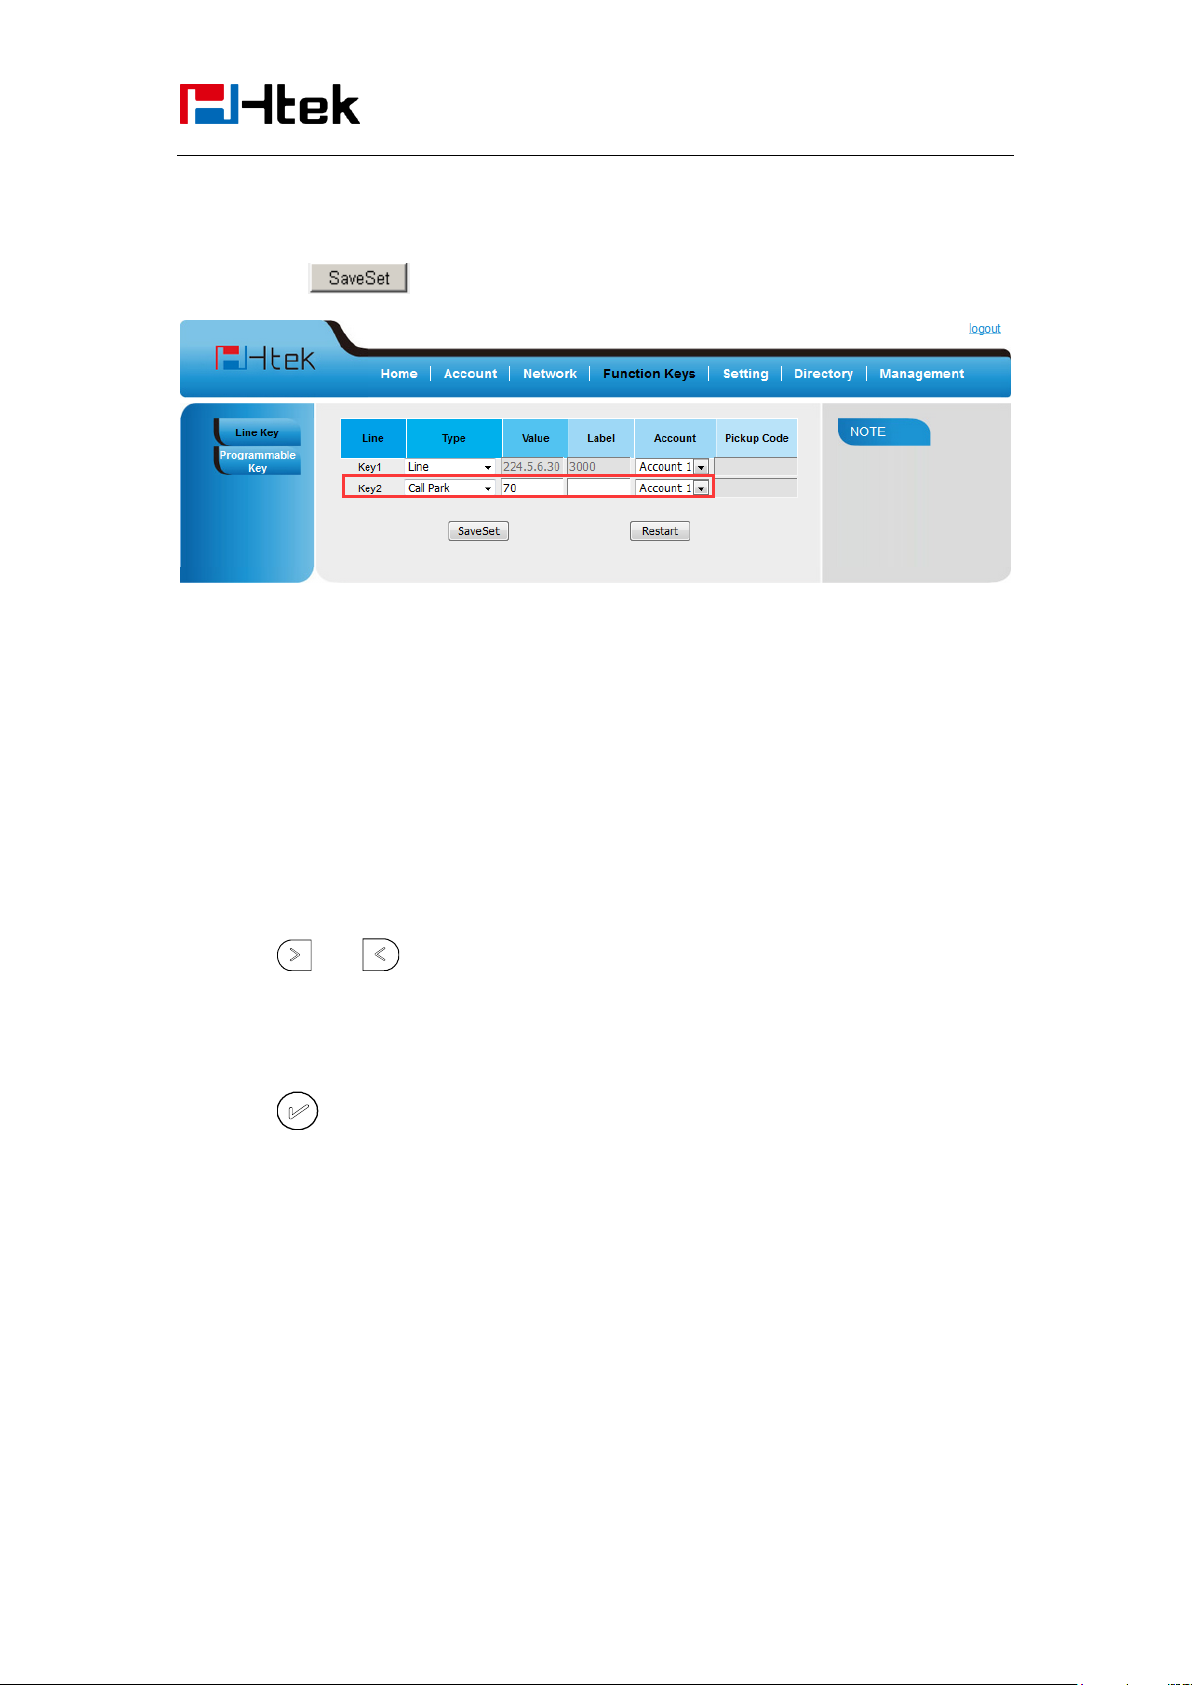
Function Key
Features Settings
3. Enter the call park code in the value field.
4. Click the button to save the configuration.
Intercom
When use the intercom feature, you can quickly get access connect to the configured one.
To configure intercom feature via phone interface
1. Press Menu →Features →Function Keys→Line or Line Keys as Function Keys → Line
Key1(for example)
2. Press and or press info soft key to select the intercom in the type field.
3. Enter the targeted Number.
4. Press or Save soft key to save the configuration
Then the selected Line or Line Key will work as intercom.
To configure Intercom feature via Web Interface
1. Click Function keys → Line or Line Key.
2. Select the wanted Line or Line Key.
3. Enter the desired phone number in the Value field.
4. Select the Account ID
98
Page 99
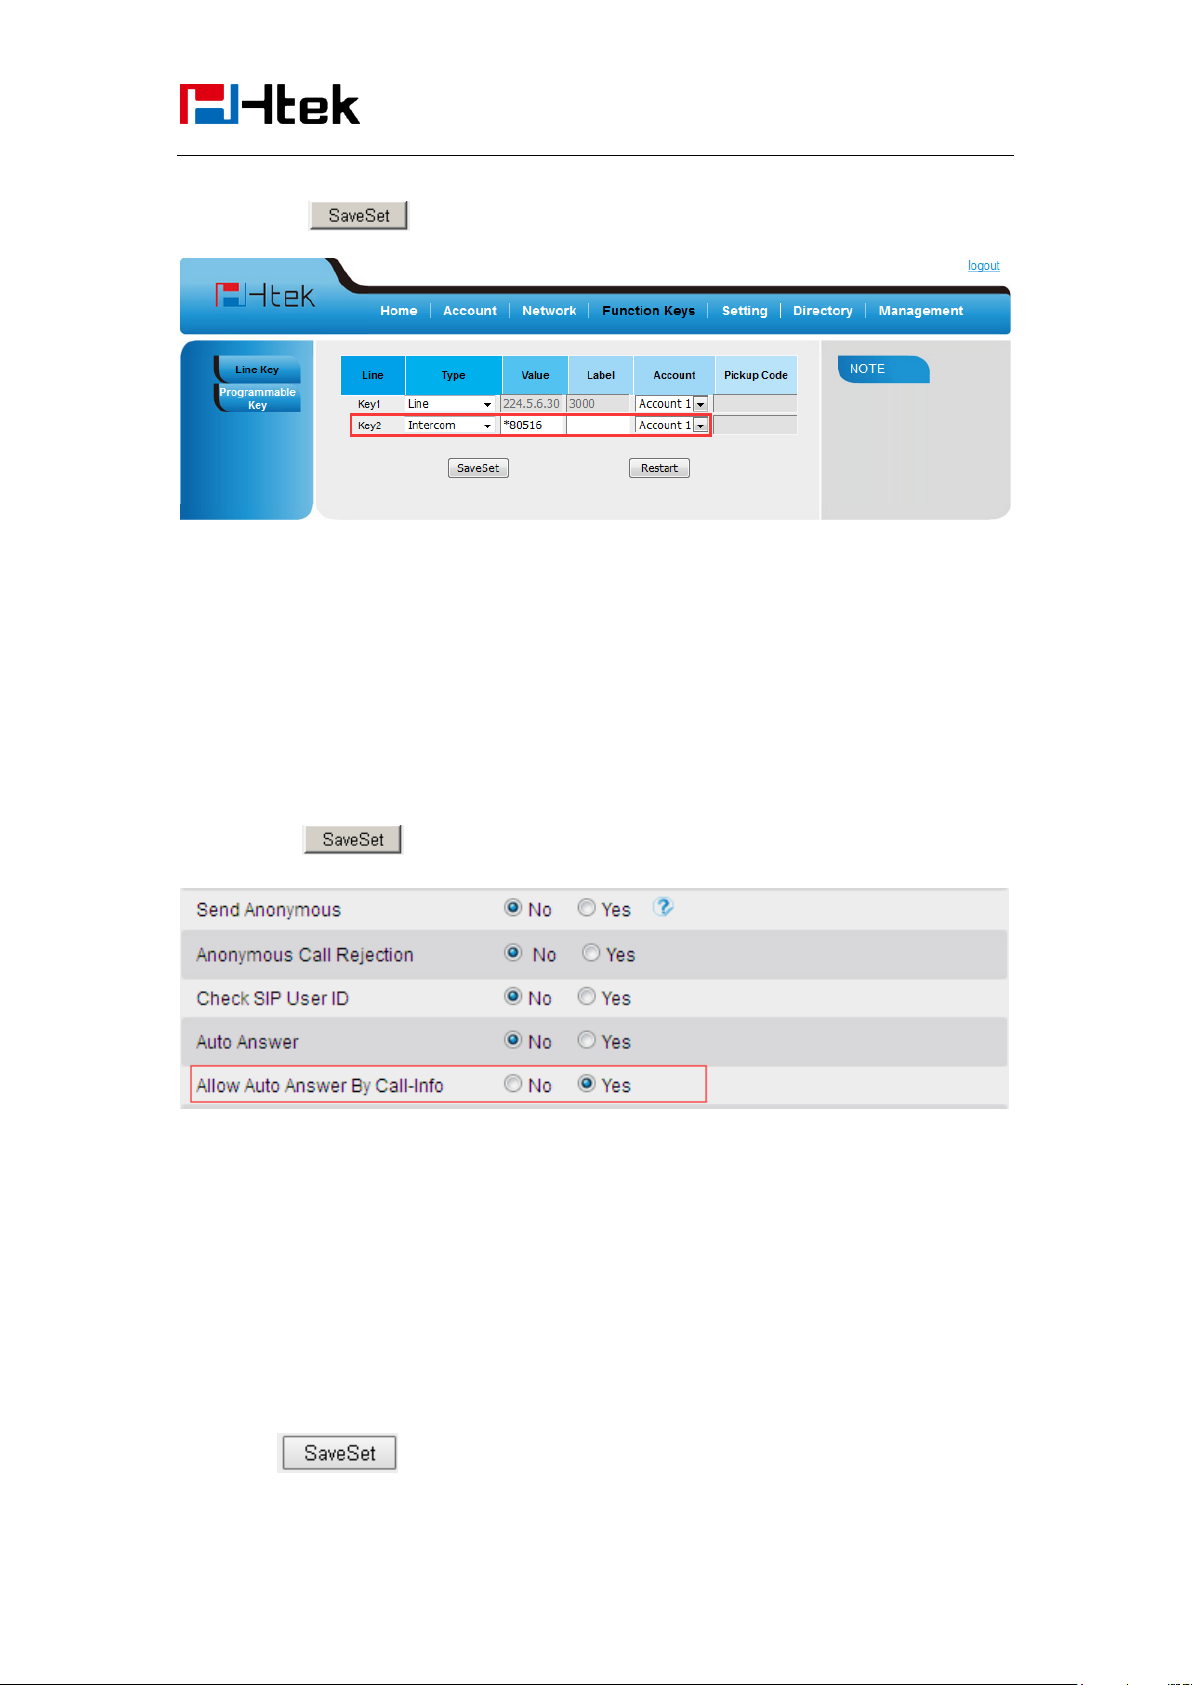
Function Key
Features Settings
5. Click the button to save the configuration.
If you want to achieve the intercom feature, you must enable the “Allow Auto Answer By
Call-Info”
1. Click the account
2. Select the desired account from the pull-down list of Account in the Account field.
3. Click the advanced
4. Enable the “Allow Auto Answer By Call-Info”
5. Click the button to save the configuration.
Intercom Barge
If this option is enabled, when there is an active call and an incoming intercom call arrives, the
previous call will be put on hold and the intercom call will be answered
1. Click the Setting Preference
2. Set On or Off for Intercom Barge.
3. Click for the setting.
99
Page 100
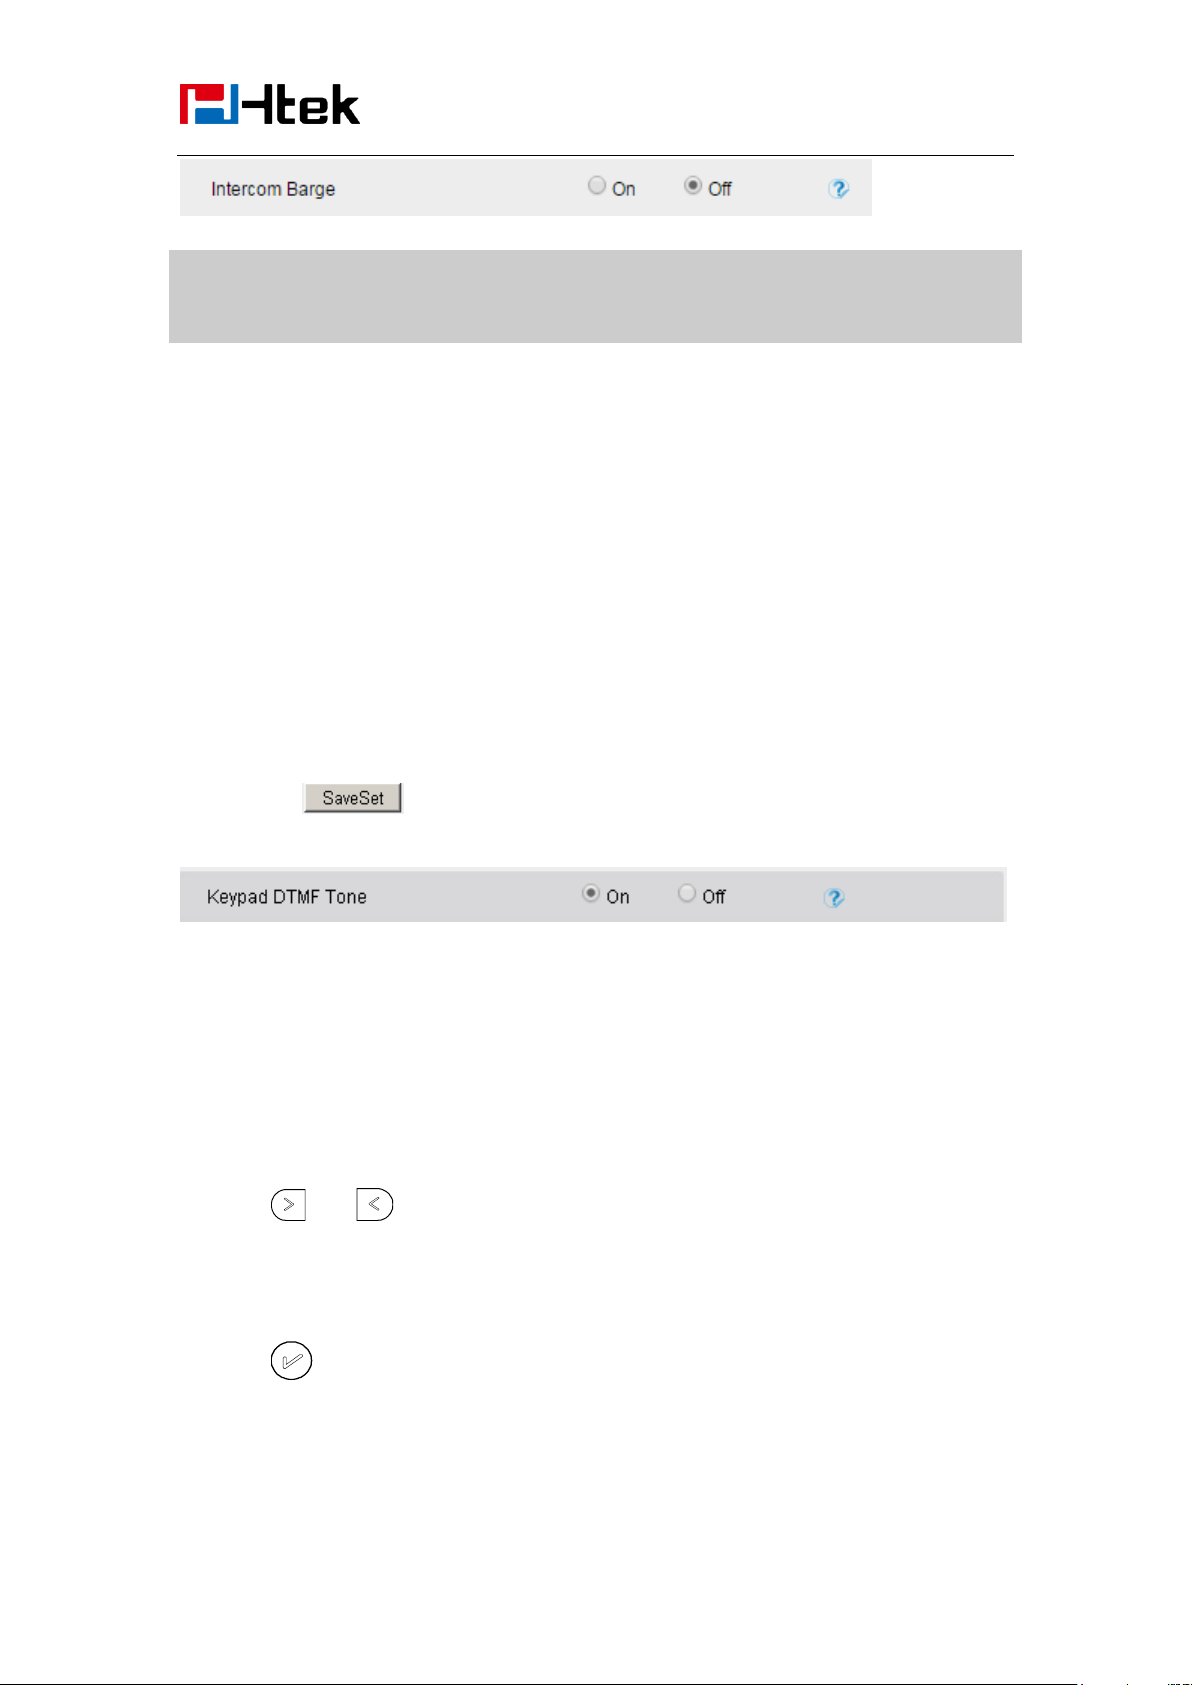
Function Key
Note:
This feature is not available on all servers. For more information, contact your system
administrator.
Features Settings
DTMF
When the key is configured as DTMF key, you are allowed to send out the desired DTMF number
during the conversation.
To use this feature, you should sure that the DTMF Tone is on.
To configure the DTMF via Phone Interface
1. Click SettingPreference
2. Select On for Keypad DTMF Tone.
3. Click the button to save the configuration.
To configure the DTMF via Phone Interface
1. Press Menu →Features →Function Keys→Line or Line Keys as Function Keys → Line
Key1(for example)
2. Select the wanted Line or Line Key.
3. Press and key to select the DTMF in the type field.
4. Enter the value with the Desired DTMF number
5. Press or Save soft key to save the configuration
To configure the DTMF via Web interface
100
 Loading...