

HTD SZA-2A Owner's Manual
POWER
Sub-Zone Amplifier SZA-2A
VOLUME
Min
Max
Protect
L 4 Ω Minimum
AC 120V~60Hz
Power Consumption: 135W
R
POWER
Sub-Zone Amplifier SZA-2A
VOLUME
Min
Mono
ON
MINMAX
AUTO
POWER
DELAY
AUTO-SWITCH
INPUT 1 2
SPEAKERS
+
_
Stereo
L
R
12
Max
Protect
INPUT
SZA-2A
Owner’s Manual
Thank you for giving Home Theater Direct the chance to win your business! We are condent you
will nd that HTD offers an outstanding combination of performance and value in everything we
make. To ensure you get the most out of your new equipment, please take a moment to read this
manual before you get started. Should you lose this manual, you can always download or print a
copy from www.htd.com.
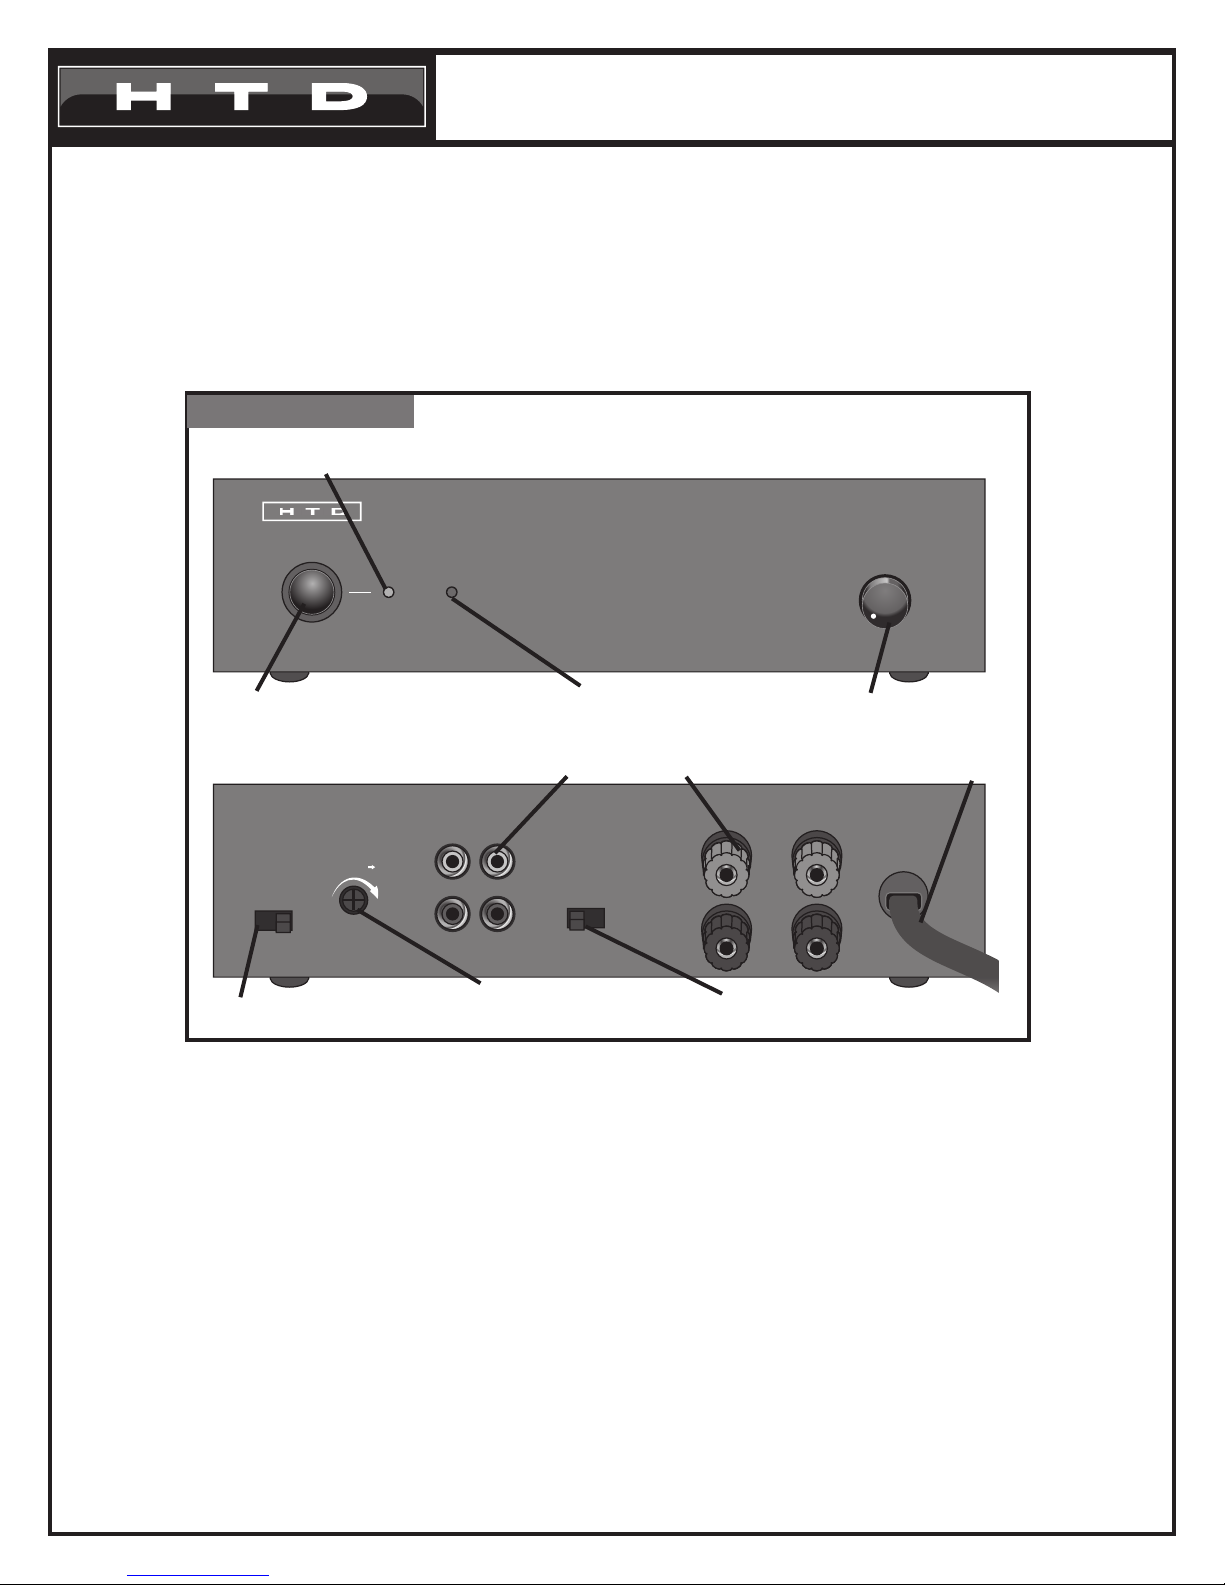
SZA-2A Features
Power Indicator Light
Power Button
Source Input Connections
Mono/Stereo Switch
Amplier Protection Light
Delay Knob
Speaker Terminals
Power Switch
Front
Volume Control
6’ Power Cable
Back
Speaker Terminals
• 5-way binding post terminals provide multiple options for how you connect speaker cable to the SZA-2A. These terminals accept bare wire, spade connectors, and multiple types of banana plugs. You can safely connect one pair of 4-8
ohm speakers, or two pairs of 8 ohm speakers in parallel.
Mono/Stereo Switch
• Set to Stereo when your two speakers are placed in the same room and not spread too far apart. This will cause the
speaker(s) connected to the Left Speaker Terminals to hear the signal from the Left inputs and the speaker(s) connected to the Right Speaker Terminals to hear the signal from the Right inputs. When your speakers are spread far apart
in a large room or when your speakers are placed in separate rooms, set to Mono. When set to mono, all speakers
attached to the SZA-2A will receive the same signal which is the sum of the Left and Right inputs.
V.12.22.17
SZA-2A Features
1

Power Button
• The amplier will only operate when this button is pressed in. Use this button to turn the amplier on or off.
Power Switch
• When set to ON and the Power Button is pressed in, the amplier will always be fully powered on.
• When set to AUTO and the Power Button is pressed in, the amplier will be in stand-by mode until a signal is sensed in
either Input 1 or 2. The amplier will return to stand-by mode automatically whenever a signal has not been sensed in
either input for a long period of time. In stand-by mode, the amplier only draws enough power to operate the auto-on
circuit.
The recommended setting is to have the POWER Button pressed in and have the POWER Switch set to
AUTO. In this way, the amplier will automatically fully power on when a signal is present in either Input
1 or 2, and return to stand-by mode when no signal has been present for a long period of time. However,
if you often listen at very low volumes where the input signal is too low to be detected by the auto-on
circuit, you may achieve better results with the Power Switch set to On
Power Indicator Light
• Blue indicates the amplier is fully powered on.
• Amber indicates the amplier is in stand-by mode.
Volume Control
• Adjusts the volume level being sent to the attached speakers. For most uses, this knob should be set one time and
then left alone. This is because most of today’s audio sources have their own, independent volume control. To set,
start with the volume knob positioned around 10:00. Play one of your sources at maximum volume and gradually turn
the volume knob up (clockwise) until you reach the desired maximum listening level within the room.
Source Input Connections
• You can connect up to two sources into the SZA-2A with Input 1 having priority over Input 2. With this feature, by
adjusting the source signal of your two sources, you are able to control which source gets amplied and heard through
your speakers. There is no need to manually select between sources at the amplier.
How it works: The SZA-2A includes a proprietary circuit that will automatically switch to Input 1 whenever its audio signal reaches a minimum threshold (around 7mV). The amp will switch back to Input 2
whenever this threshold is not met over a specic period of time. When both input sources are simultaneously playing, the auto-switching works best when the Input 1 signal is consistently above the threshold.
Delay Knob
• Use this knob to adjust the amount of time required for no source to be detected at Input 1 before the amp will switch
to Input 2. When set all the way counter-clockwise, when just half second of silence is detected at Input 1, the amplier will switch to Input 2. Rotate clockwise to increase the delay time up to nearly ten minutes. Note that the amplier
will always switch to Input 1 immediately upon sensing its signal.
Amplier Protection Light
• This light will only when a problem exists that triggers the built-in protection mode. The amplier will shut down until the
problem is resolved.
2
 Loading...