

Page 1

SDX In-Wall/In-Ceiling Speakers
Owner’s Manual
Thank you for giving Home Theater Direct the chance to win your business! We are condent you will nd that HTD offers an
outstanding combination of performance and value in everything we make. To ensure you get the most out of your new speakers,
please take a moment to read this manual before you get started. Should you lose this manual, you can always download or print
a copy from www.htd.com.
HTD In-Wall / In-Ceiling Speakers are designed to accurately reproduce soundtracks from both music and video sources,
including today’s demanding surround formats. Mounted ush to the wall or ceiling, in-wall / in-ceiling speakers are ideal for many
applications where traditional cabinet-style speakers would be impractical or impossible. They are well suited for both distributing
sound throughout a home as well as more performance-oriented surround sound systems.
Please read the following tips before installing your in-wall / in-ceiling speakers
• All of the speakers in our SDX line can be mounted in a wall or ceiling.
• All in-wall / in-ceiling speakers will sound thin or “tinny” until positioned inside the wall or ceiling. Adding damping material or
insulation behind the speaker will usually improve performance and is highly recommended. If you use insulation make sure
it is the “rolled-in” or bat type. Do not use “blown-in” insulation as it can interfere with the movement of the speaker driver,
negatively impacting performance, and may eventually cause permanent damage.
• Your new in-wall / in-ceiling speakers come packaged with the press-t grille already attached. To remove this grille prior to
installation, press the “dog ears” (or swing arms) from the back of the speaker into the grille. You may need to gently work your
way around each swing arm in order to work the grille free.
• The press-t grille is designed for a very tight t. A tight t ensures that the speaker grille does not vibrate or fall out during
operation. Make sure the swivel tweeter is aimed appropriately, and the +/- tweeter switch is in the position you prefer before
installing the grille. If you do need to remove the grille after installation, use a sharp pick or awl to grab the grille near the edge,
then slowly work the grille out.
• If you decide to paint your in-wall / in-ceiling speakers, be careful not to apply paint to the rim of the grille or the inside rim of
the speaker frame. Too much paint can make installing the grille, which is already designed for a tight t, very difcult. The
best results are achieved by spraying on the paint. Rolling or brushing paint onto the grille often lls in the holes, negatively
impacting performance. Please be sure to remove the acoustically transparent cloth insert prior to painting. This insert uses a
self-stick adhesive and can be re-attached after painting if preferred.
Painting options include using an airbrush, traditional spray paint (can), or a dedicated paint spray gun. Guidelines for thinning
the paint are included with the spray gun, although we have found that thinning the paint a little more than recommended
actually works best. For latex paint (the most common), we recommend mixing one part water with one part paint. Regardless
of the method used, multiple thin coats usually produce better results than one thick coat.
• Allow at least 1” of clearance between the cut-out edge and any studs or joists for the mounting hardware to work properly. A
minimum mounting depth (varies by speaker model) measured from the front surface of the drywall is also required.
The speaker location and associated mounting hardware should not conict with any existing wires, plumbing, or framing.
Check for obstructions before you cut the hole. If necessary, drill a small hole in the center of the area you plan to mount the
speaker. Cut a piece of coat hanger wire and bend it with a 90-degree angle. Insert the wire into the small hole and sh around
to make sure that no pipes, studs, or other objects will get in the way. If you do nd something, you can easily patch the small
hole you drilled. Otherwise, cut the big hole with condence!
All HTD speakers carry a ve-year parts and labor warranty. Warranty registration occurred automatically at the time
your order was placed. There is no need to complete or mail in additional paperwork.
Additional information, including detailed specications for each model,
can be found on our website, www.htd.com. Thank you for choosing HTD!
[email protected] or toll free 1-866-HTD-AUDIO (866-483-2834)
V.05.11.18
Warranty
If you have any questions, we can be reached at...
1
© Home Theater Direct, Inc.
Page 2
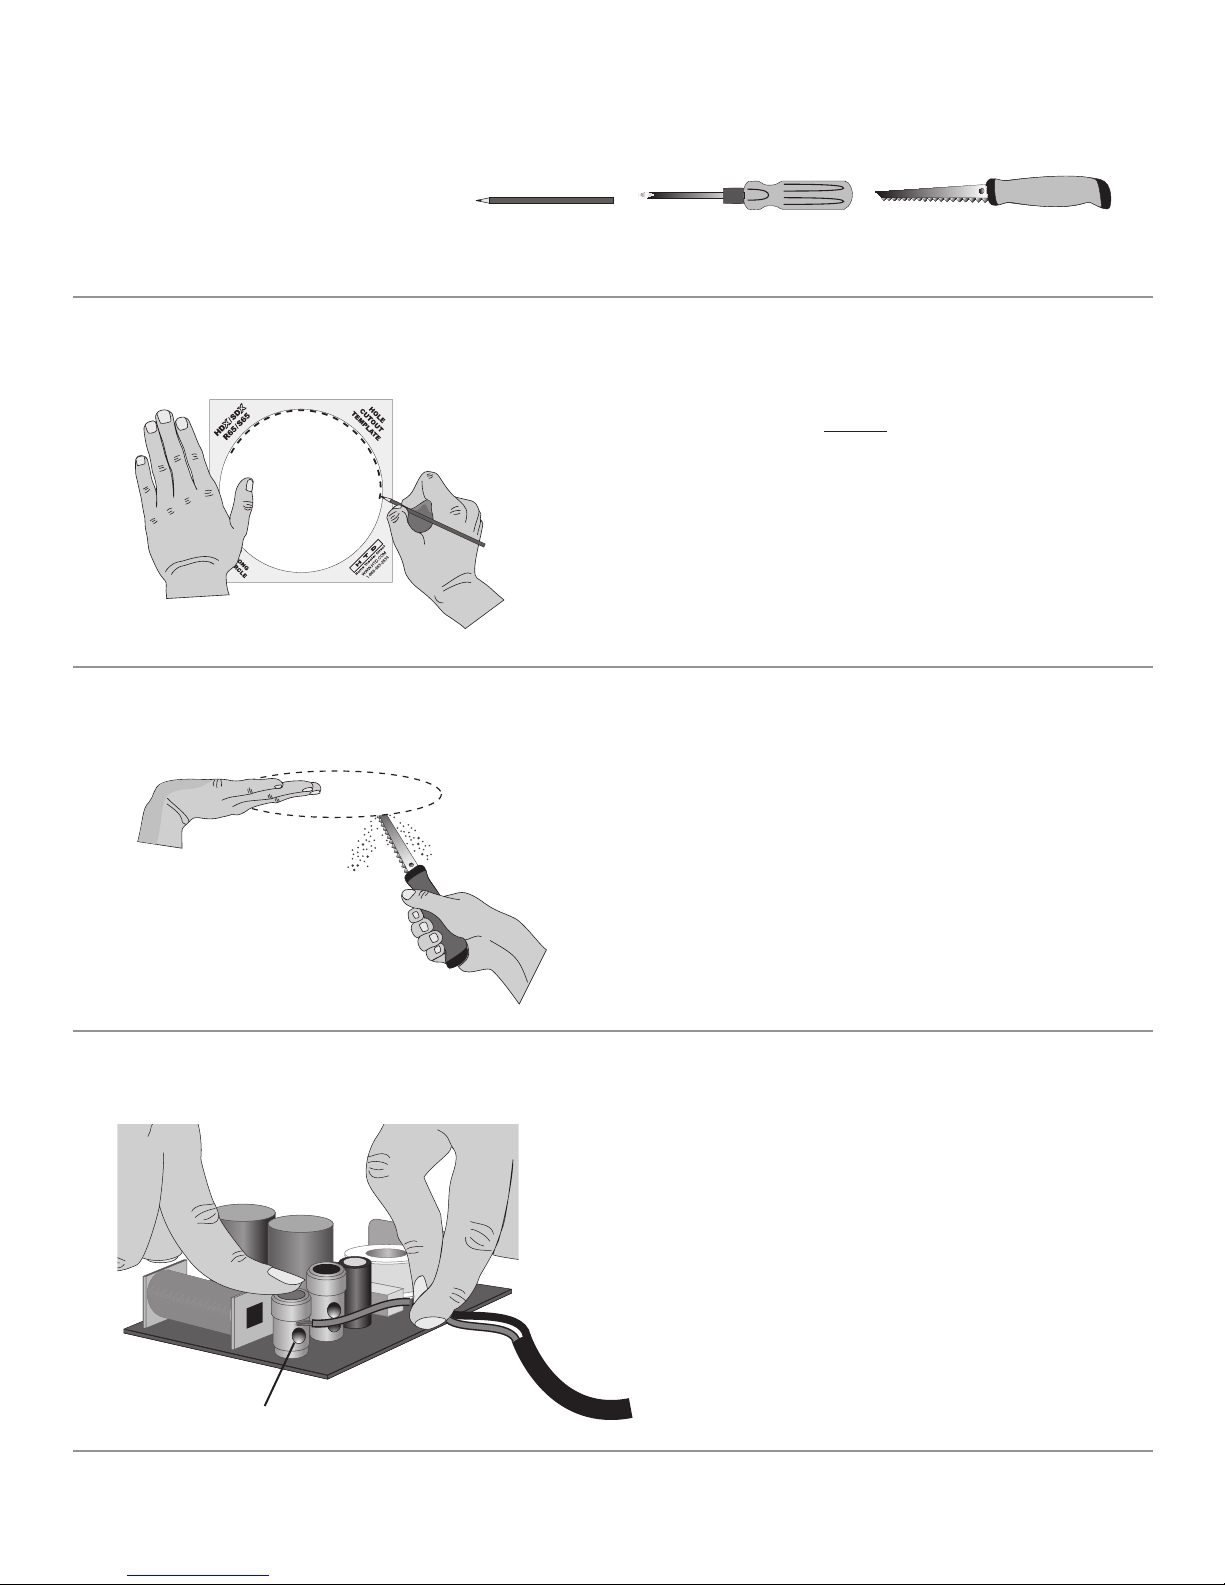
Quick Steps: Installing In-Wall / In-Ceiling Speakers
You will need the following tools:
STEP 1
STEP 2
Pencil
Phillips Head
Screwdriver
Drywall Saw
After checking for stud locations and conrming
there are no obstructions hidden behind the wall,
position the cardboard “Hole Cutout Template”
and trace along the inside edge.
TIP: Check for obstructions before you cut the hole. Drill a
small hole in the center of the area you plan to mount the
speaker. Cut a piece of coat hanger wire and bend it with a
90 degree angle. Insert the wire into the small hole and sh
around to make sure that no pipes, studs, or other objects
will get in the way. If you do nd something, you can easily
patch the small hole you drilled. Otherwise, cut the big hole
with condence!
Cut along the traced line using a drywall saw.
TIP: Use a drywall saw to cut the hole. A rotary tool or util-
ity knife will also work but may be more difcult to control
for beginners. A simple, inexpensive drywall saw (around
$10 at your local hardware store) is usually the best bet for
beginners. The speaker frame will overlap the hole slightly
to help hide the rough edges.
STEP 3
Eye
Further detail and information is included on page 1 and 4 of this manual.
Pull the speaker cable into place leaving an extra two feet – this will make it easier to make the
connections. Strip back approximately 1/2 inch of
the speaker cable insulation and twist the copper
wires tightly. Then, on the back of the speaker,
press in the compression terminals (to reveal the
“eye”) and insert the speaker cables maintaining correct polarity (more detailed information on
page 4).
2
Page 3
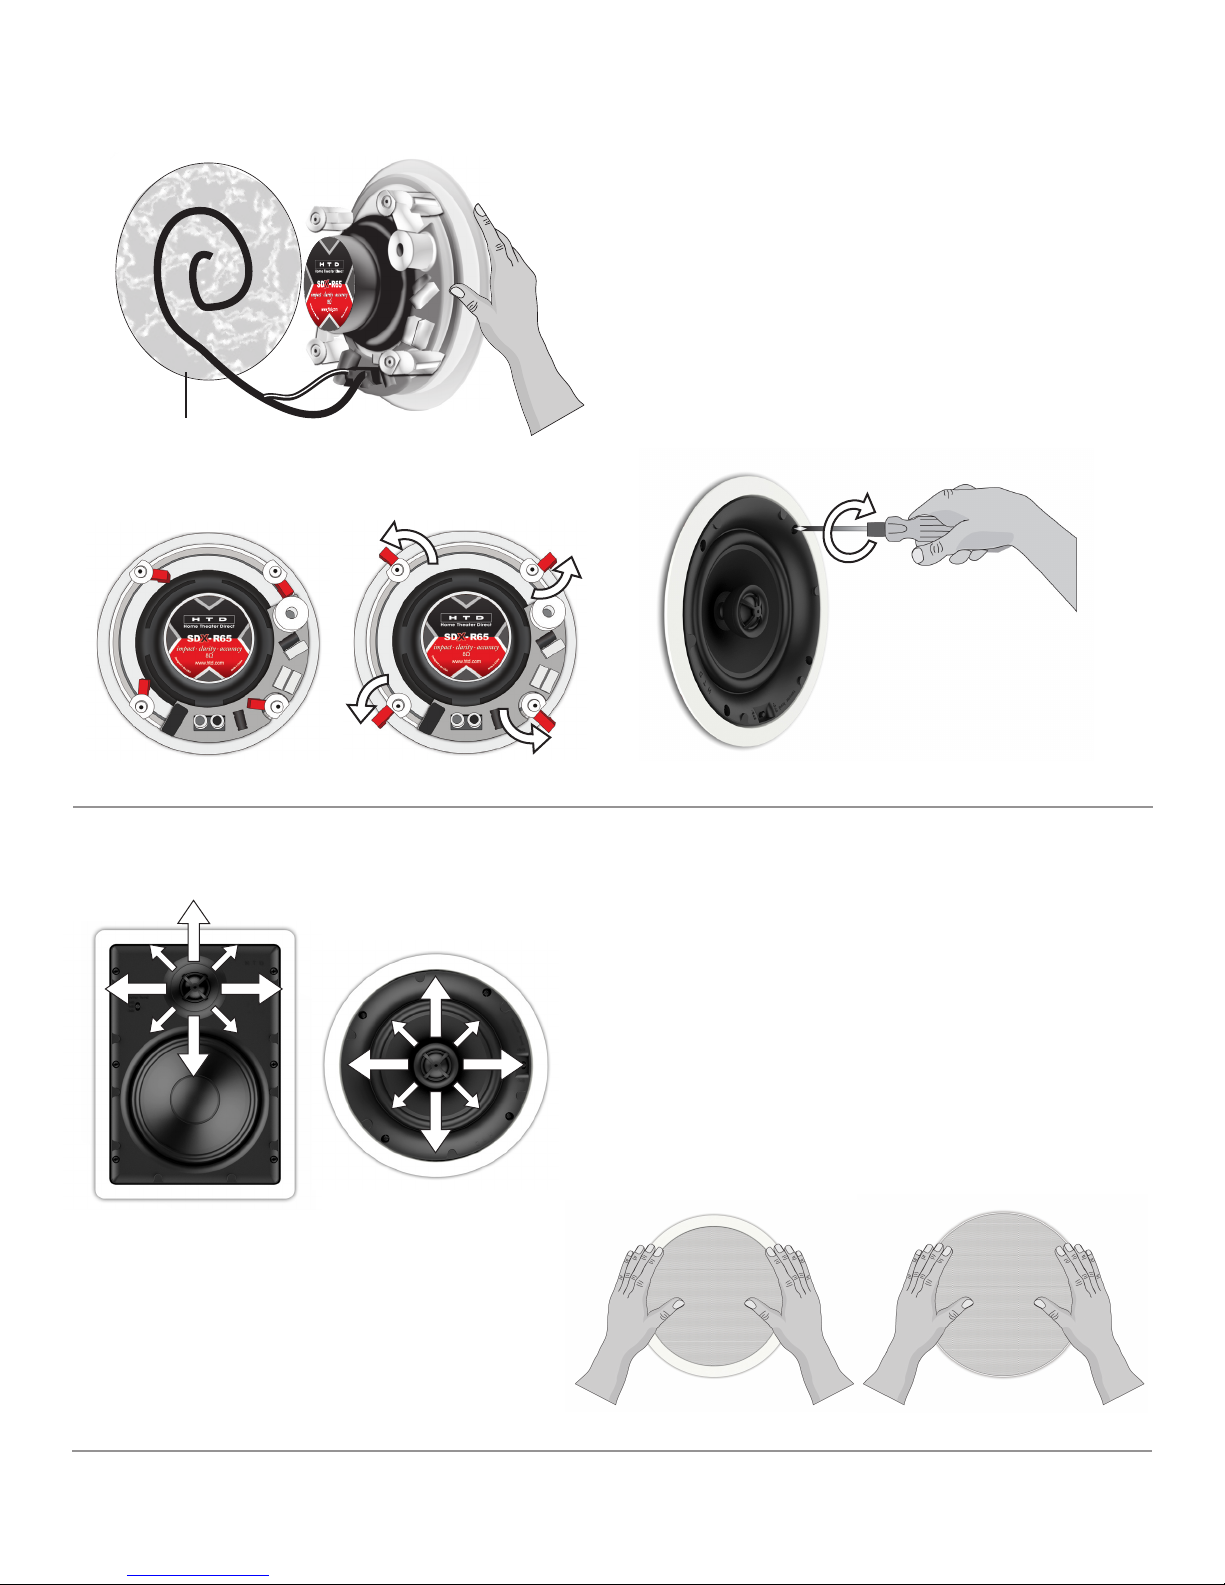
Insulation
STEP 4
Make sure the dog-ears (swing arms) are loose
and turned inward before placing the speaker in
the wall, then position the speaker into the hole
directly against the insulation.
Use a Phillips head screwdriver to turn the screws
slowly clockwise. The quick-turn mounting system and frame will “sandwich” or clamp around
the wall to hold the speaker securely in place. Do
not over-tighten.
Loose (turned inward)
STEP 5
Closed (turned out)
Aim the swivel tweeter to the center of the
listening area. Before replacing the grille, listen
to the speaker with the +/- tweeter switch in each
position to determine what sounds best to you.
Install the grille. The press-t aluminum grille
is recommended for any speakers that will be
installed in an exterior application due to its
oxidation resistance. The magnetic steel grille
is installed by simply placing over the speaker
frame.
Further detail and information is included on page 1 and 4 of this manual.
3
Page 4

Speaker Placement
Once installed, in-wall / in-ceiling speakers are not easily moved or repositioned. Take a little extra time to carefully consider a good
speaker location before you begin. As a general rule, the speakers should be mounted close to, or above, ear level and at least
one-third of the distance from the corner of the room to the center of the wall or ceiling in which you will mount them. For further
assistance, see our web site for speaker placement guidelines in both surround sound and whole-house applications.
Unlike traditional speakers, in-wall / in-ceiling speakers mount ush, and most cannot be angled or aimed back into the listening
area from the corner of a room. While most of the frequency range diffuses evenly, high frequencies reproduced by the tweeter
are slightly more directional. Because they feature a pivoting tweeter, our HTD SDX In-Wall / In-Ceiling Speakers address this
issue by allowing you to aim these high frequencies directly toward the primary listening area while still maintaining a ush-mount
appearance.
Placement can also impact the overall performance of a speaker. In general, the closer to a wall or corner you place a speaker,
the more the lower frequencies are enhanced. Some listeners will prefer the added bass, others might classify the sound as too
“boomy”. HTD SDX In-Wall / In-Ceiling speakers allow you to compensate for the impact of speaker placement. This is done by
slightly increasing or decreasing the output level of the higher (tweeter) frequencies using a +/- 3dB tweeter switch. This switch is
located on the front bafe of the speaker for easy access. Adjust this level to suit your room and listening taste prior to installing
either of the included grille options.
Connecting the Speaker Cable
The terminals will easily accommodate up to 14-gauge speaker wire, which should be used for longer connections (greater than 50
feet). For shorter distances, 16-gauge wire may sufce, although we still recommend 14-gauge for best performance. For behindthe-wall/ceiling installations, we recommend using UL Class 3 approved cable (marked “CL3”) for compliance with local building
codes. Please consider using high quality HTD cable for all of your home theater and whole-house audio installations. HTD cable
offers the extra benet of being shielded, with exceptional performance, and of course is priced signicantly lower than retail.
HTD recommends leaving at least two feet of extra wire at the speaker end to make installation and positioning of the speaker
easier. Do not use staples, nails or other metal objects to secure the speaker wire. The resulting short could affect your system’s
performance, and potentially damage other components in your system, especially the amplier. You will get the best sound
quality and help to reduce hum by keeping the speaker wires at least 18 inches away from other electrical wires and cables. When
possible, always cross speaker wires with other cable at a 90-degree angle, and avoid running speaker cable in parallel with any
electrical wiring.
When connecting a speaker, it is very important to maintain the correct polarity. To do this, be sure that the wire attached to the
red (+/positive) terminal on the speaker connects to the red (+/positive) terminal on the other component (usually the amplier).
Similarly, the black (-/negative) terminal on the speaker must connect to the respective black (-/negative) terminal on the other
component (usually the amplier).
Mounting the Speaker (if you are unsure, consult a professional contractor)
Carefully detach the “Paint Shield” section from the cardboard “Hole Cutout Template” at the perforated edge. Next, position the
Hole Cutout Template where you have chosen to mount the speaker and trace along the inside edge.
Make your cut along this line. HTD recommends using a drywall saw to cut the hole. A rotary tool or utility knife will also work but
may be more difcult to control for beginners. Try to keep the cuts neat and follow the template closely; however the frame will
overlap the hole slightly to help hide the rough edges. Pull the speaker wires into position and leave at least two feet of extra wire
at the opening.
Remove the grille from the frame by pressing the dog-ear (swing arm) mounting screws from the back of the speaker into the
grille. Attach the speaker wires to the speaker terminals. Turn all of the dog-ears (swing arms) inward and with the grille removed,
insert the speaker into the mounting hole directly against the insulation. Use a Phillips head screwdriver to turn the screws slowly
clockwise. The quick-turn mounting system and frame will clamp around the drywall/mounting surface to hold the speaker securely
in place. Be careful not to over-tighten, as this may damage the speaker.
Before replacing the grille:
1. Position the swivel tweeter so that it points toward your primary listening position.
2. Listen to the speaker with the +/- tweeter switch in each position to determine what sounds best to you. The “0” position will
usually be best for most situations.
Painting/Installing the Grille
Both the press-t aluminum grille and magnetic steel grille, as well as the polymer frame, can be painted to match any decor. If you
choose to paint them, do so before attaching the grille to the speaker. Please be sure to remove the acoustically transparent cloth
insert prior to painting.
A paint shield has been included (attached to the “Hole Cutout Template”) to assist with the painting process. Simply detach it from
the included template, then place a staple at all locations indicated. These staples will align with the magnets embedded in the
frame, and hold the paint shield in place during painting. The paint shield should be centered on the speaker, covering the internal
area while leaving the bezel of the speaker uncovered.
4
 Loading...