

HTC Floor Systems 280 Operator's Manual

EN Operator's manual 2-18
ES-MX Manual del usuario 19-36
FR-CA Manuel d’utilisation 37-54
HTC 280
Contents
Introduction..................................................................... 2
Safety..............................................................................4
Operation........................................................................ 8
Maintenance................................................................. 14
Introduction
Owner responsibility
WARNING: Cutting, especially when DRY
cutting, generates dust that comes from the
material being cut, which frequently contains
silica. Silica is a basic component of sand,
quartz, brick clay, granite and numerous
other minerals and rocks. Exposure to
excessive amount of such dust can cause:
Respiratory disease (affecting your ability to
breath), including chronic bronchitis, silicosis
and pulmonary fibrosis from exposure to
silica. These diseases may be fatal;
Skin irritation and rash.
Cancer according to NTP* and IARC* */
National Toxicology Program, International
Agency for Research on Cancer.
Take precautionary steps:
Avoid inhalation of and skin contact with
dust, mist and fumes.
Wear and ensure that all bystanders wear
appropriate respiratory protection such as
dust masks designed to filter out
microscopic particles. (See OSHA 29 CFR
Part 1926.1153)
To minimize dust emissions, wet cut when
feasible. If dry cutting is necessary, use an
appropriate dust extractor.
Troubleshooting............................................................ 15
Transportation and storage...........................................16
Technical data.............................................................. 18
read and understood the Operator’s Manual. They must
be aware of:
• The products’s safety instructions.
• The products’s range of applications and limitations.
• How the product is to be used and maintained.
National/Local regulations could restrict the use of this
product. Find out what regulations are applicable where
you work before you start using the product.
Product description
The product is a power grinder for concrete surfaces of
different hardness. The grind range is from rough
surfaces through to smoother finish.
For example, the product has these functions:
• A frame that can be folded for easier transport.
• A grinding head cover that adjusts the movement to
the surface layer.
• The product can be used to grind at edges.
• The power plug can be changed to 1-phase or 3phase.
• A grind area of 280 mm.
Intended use
Use the product to grind concrete surfaces with different
hardness such as terazzo and stone tiles.
The product is used for light commercial operations at
private properties and small commercial spaces.
It is the owner’s/employer’s responsibility that the
operator has sufficient knowledge about how to use the
product safely. Supervisors and operators must have
2 917 - 001 -
WARNING: Do not use the product for other
tasks.
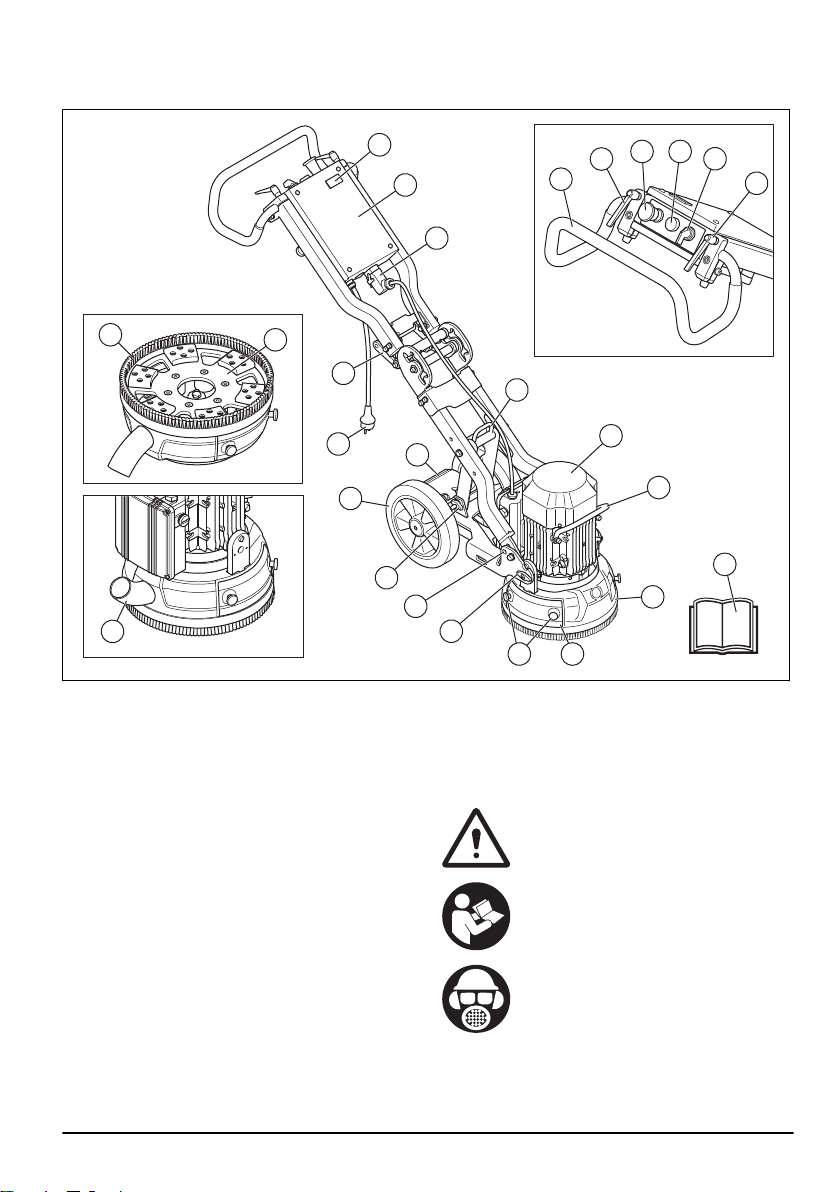
Product overview
22
23
24
4
5
2
3
2
1
9
10
12
6
7
8
21
14
11
15
19
18
20
25
13
16
17
1. Handle/Handlebar
2. Lock knobs for handlebar adjustment
3. Emergency stop
4. Overload lamp
5. ON/OFF switch
6. Hour meter
7. Electrical enclosure
8. Connection for motor cable
9. Angle joint handle
10. Power plug
11. Rubber wheels
12. Foot pedal
13. Lock knob
14. Lock function
15. Lock bolt to attach the motor/grinding head
16. Edge grinder, screws
17. Edge grinder, hatch
18. Grinding head cover
19. Lift handle, motor
20. Electric motor
21. Lifting eye
22. Brush strip
23. Tool plate
24. Connection, vacuum hose
25. Operator's manual
Symbols on the product
917 - 001 - 3
WARNING: Not careful or incorrect use can
result in injury or death to the operator or
others.
Read the manual carefully and make sure
that you understand the instructions before
you use the product.
Always put on hearing protection, eye
protection and breathing protection.
WARNING! The dust can cause breathing
problems. Use breathing protection. Do not
breathe exhaust fumes. Always make sure
that there is good airflow.
Note: Other symbols/decals on the product refer to
special certification requirements for some markets.
Product liability
As referred to in the product liability laws, we are not
liable for damages that our product causes if:
• the product is incorrectly repaired.
• the product is repaired with parts that are not from
the manufacturer or not approved by the
manufacturer.
• the product has an accessory that is not from the
manufacturer or not approved by the manufacturer.
• the product is not repaired at an approved service
center or by an approved authority.
Safety
Safety definitions
Warnings, cautions and notes are used to point out
specially important parts of the manual.
WARNING: Used if there is a risk of injury or
death for the operator or bystanders if the
instructions in the manual are not obeyed.
CAUTION: Used if there is a risk of damage
to the product, other materials or the
adjacent area if the instructions in the
manual are not obeyed.
Note: Used to give more information that is necessary in
a given situation.
General safety instructions
WARNING: Read the warning instructions
that follow before you use the product. Save
all warnings and instructions. Refer to the
warnings and instructions for future work, if it
is necessary.
• The safety section gives basic directions on how to
use the product correctly. This information is not an
alternative for professional knowledge and
experience. If you are in a situation where you do not
feel safe, stop and get professional support. Speak
to your dealer, service agent or an operator with
experience. Do not try a task where you do not feel
sure.
• Keep work area clean and bright, this will decrease
the risk of accidents.
Safety instructions for operation
WARNING:
that follow before you use the product. Save
all warnings and instructions for future
operations.
Read the warning instructions
WARNING: Overexposure to vibration can
cause circulatory damage or nerve damage
to persons with decreased blood circulation.
Get medical aid if you have symptoms of
overexposure to vibration. These symptoms
include numbness, loss of feeling, tingling,
pricking, pain, loss of strength, changes in
skin color or condition. These symptoms
usually show in the fingers, hands or wrists.
• Only use the product for operations that are given in
this manual. Refer to
• Use personal protective equipment. Refer
to
Personal protective equipment on page 5
• Do not go away from the product when the motor is
on.
• Connect the motor cable to the electrical enclosure
before you connect the plug.
• Do not let other operators use the product if they
have not read and understood the contents of this
operators manual.
• Only start the product with the brush strip attached.
Brush strip must seal tightly to the surface,
especially during dry surface operations.
• Make sure that the brush strip is not damaged and is
clean. Replace damaged brush strip.
• Keep the motor on until the fan comes to a complete
stop.
• Lift the grinding head if a check of the start
procedure is necessary.
• Only start the product when the grinding head is put
on the surface.
• Make sure that only approved persons are in the
work area.
• Do not use the product in areas where fire or
explosions can occur.
• Always disassemble the diamond tool after each
operation.
• Make sure that the tool plate does not rotate if you
lift up the product. The tool plate continues to rotate
for a while after the motor stops.
Intended use on page 2
.
.
4
917 - 001 -

• When you remove diamond tools, let the product
become cool and use protective gloves. Diamond
tools are very hot after use.
• Make sure to connect the product to a dust extractor
for removal of the dust.
• Make sure that the product is assembled correctly.
• To lift the product always use the lifting eye of the
product.
• Do not use the product if there are signs of damage.
• Only start the product when the grinding head
touches the surface, unless you do a check of the
ON/OFF switch.
• Only operate the product from behind with your 2
hands on the handle.
• Do not operate the product unless you receive
training before use. Make sure that all operators
receive training.
• Make sure that only approved persons are in the
work area, because there is a risk of serious injury.
• Make sure that clothing, long hair and jewelry do not
get caught in moving parts.
• Make sure that you are in a safe and stable position
during operation.
• Sudden appearance of persons and animals can
prevent safe operation of the product. Always
operate the product carefully and be prepared to
stop the product if it is necessary.
• Do not let children use or come near the product.
• Make sure that there is always one more person
near when you use the product. If an accident
occurs, you can receive help when it is necessary.
• Do not operate this product when you are tired, ill, or
if you use alcohol, drugs or medicine. This can
decrease your vision, your judgment or your
coordination.
• Do not use a product that has been changed from its
factory specification.
• Always use approved accessories. Speak to your
dealer for more information.
Personal protective equipment
WARNING: Read the warning instructions
that follow before you use the product.
• Always use correct personal protective equipment
when you operate the product. The personal
protective equipment does not erase the risk of
injury. The personal protective equipment decreases
the grade of injury if an accident occurs. Let your
dealer help you select the right equipment.
• Use approved eye protection while you operate the
product.
• Do not use loose, heavy and not applicable clothing.
Use clothes that let you move freely.
• Use approved protective gloves that enables a solid
hold.
• Use rubber protective gloves that prevents skin
irritation from wet concrete.
• Use an approved protective helmet.
• Always use approved hearing protection while you
operate the product. Noise for a long period can
cause noise-induced hearing loss.
• The product makes dust and fumes that contain
dangerous chemicals. Use an approved breathing
protection.
• Use boots with steel toe-caps and non-slip soles.
• Make sure that you have a first aid kit near.
• Sparks can occur when you operate the product.
Make sure that you have a fire extinguisher near.
Electrical safety
WARNING: There is always a risk of shocks
from electrical products. Do not use the
product in bad weather conditions. Do not
touch lightning conductors and metal
objects. Always use the product as given in
this operator’s manual to prevent injury.
CAUTION: The product obeys the
requirements in EN61000-3-11 and is a
subject for conditional connection to the
power mains. Speak with the supply
authority for instructions on how to connect
the product.
Only connect the product to the power
mains with resistance lower than 0.28 Ω.
Get the interface point of the system
resistance from the supply authority.
If the power mains has higher system
resistance, short voltage drop can occur
when the product is started. This can
influence the operation of other products, for
example flicker on the lights.
• Make sure that the power, fuse and mains voltage
are the same as the voltage shown on the rating
plate of the product.
• Always stop the product before you disconnect the
power plug.
• Do not use the product if the cord or plug is
damaged. Hand it in to an approved service center
for repair. A damaged cable can cause serious injury
and death.
• Use the cord correctly. Do not use the cord to move,
pull or disconnect the product. Hold the plug to
disconnect the power cord.
• Do not operate the product in water depths where
the equipment of the product gets wet. The
equipment can be damaged and the product can
become live and cause injury.
• Do not get more moisture into the product than that
is supplied by the water system. Prevent rain to
917 - 001 -
5
come in touch with the product. Water that enters a
power tool increases the risk of electrical shock.
• Always have the power cord disconnected when you
connect or disconnect the connection for the motor
cable and the electrical enclosure.
Safety devices on the product
WARNING: Read the warning instructions
that follow before you use the product.
Grounded product instructions
WARNING: Incorrect connection can result
in electrical shock. Speak to an approved
electrician if you are not sure if the product
is correctly grounded.
Do not change the power plug from its
factory specification. If the power plug is not
correct for the mains outlet, let an approved
electrician install a correct mains outlet.
Obey local regulations and laws.
If you do not fully understand the
instructions about the grounded product,
speak to an approved electrician.
The product has a grounded cord and power plug.
Always connect the product to a grounded mains outlet.
This decreases the risk of electrical shock if there is a
malfunction.
Do not use adapters with the product.
Extension cables
• The mark on the extension cable must be the same
or higher than the value written on the rating plate of
the product.
• Use grounded extension cables.
• When you operate a power tool outdoor, use
extension cable that is applicable for outdoor
operation. Use of a power cord applicable for
outdoor operations decreases the risk of electrical
shock.
• Keep the connection to the extension cable dry and
off the ground.
• Keep cable away from heat, oil, sharp edges or
moving parts. Damaged or too large cable increases
the risk of electrical shock.
• Check that the cables are not damaged and in good
condition. Do not use the product if a cable is
damaged. Let an approved service center repair the
product.
• To prevent overheating, do not use the extension
cable while it is folded.
• Make sure that the power cord is behind you when
you use the product. This is to prevent damage to
the power cord.
• If you use an extension cable, use only approved
extension cables with sufficient length.
• Do not use a product with defective safety devices.
• Do a check of the safety devices regularly, refer to
Daily maintenance on page 14
are defective, speak to your HTC Floor Systems
approved service agent.
• Do not change the safety devices.
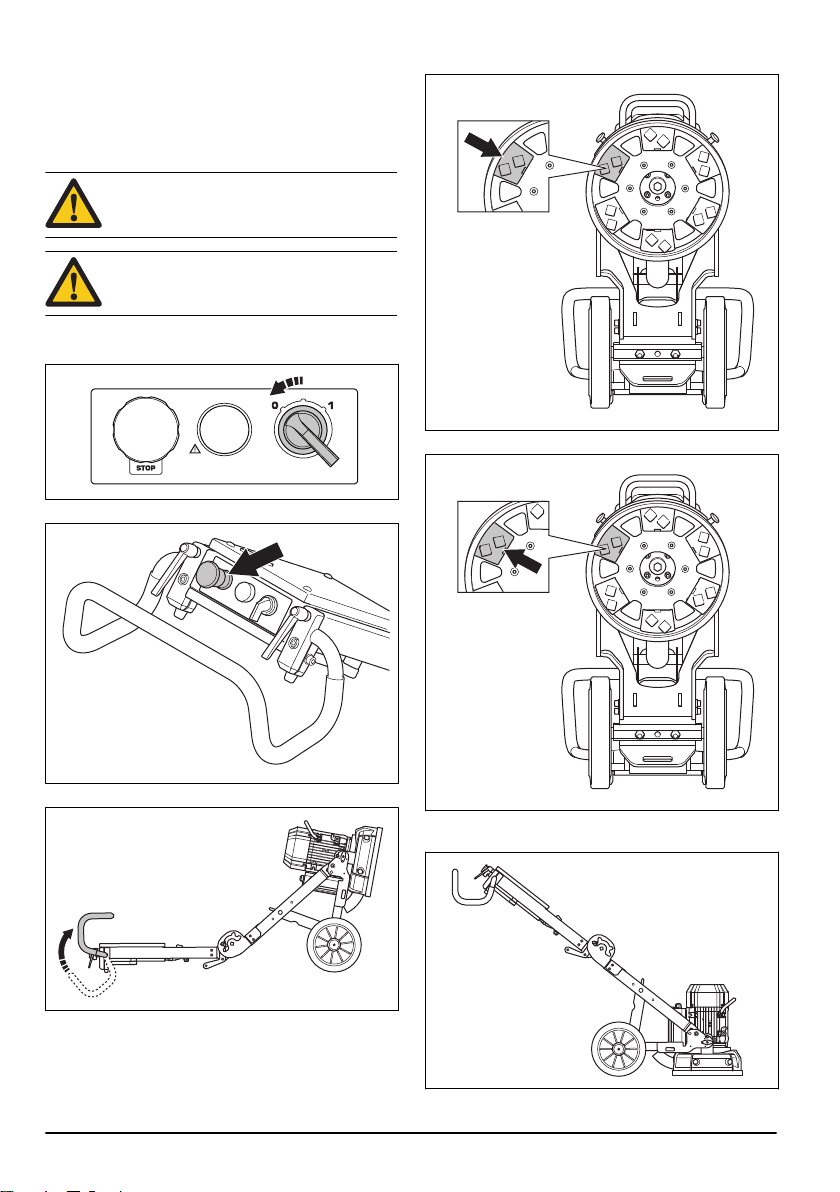
ON/OFF switch
The ON/OFF switch is used to start and stop the
product.
To do a check of the ON/OFF switch
1. Turn the emergency stop button clockwise to make
sure that emergency stop button is disengaged.
. If the safety devices
6
917 - 001 -
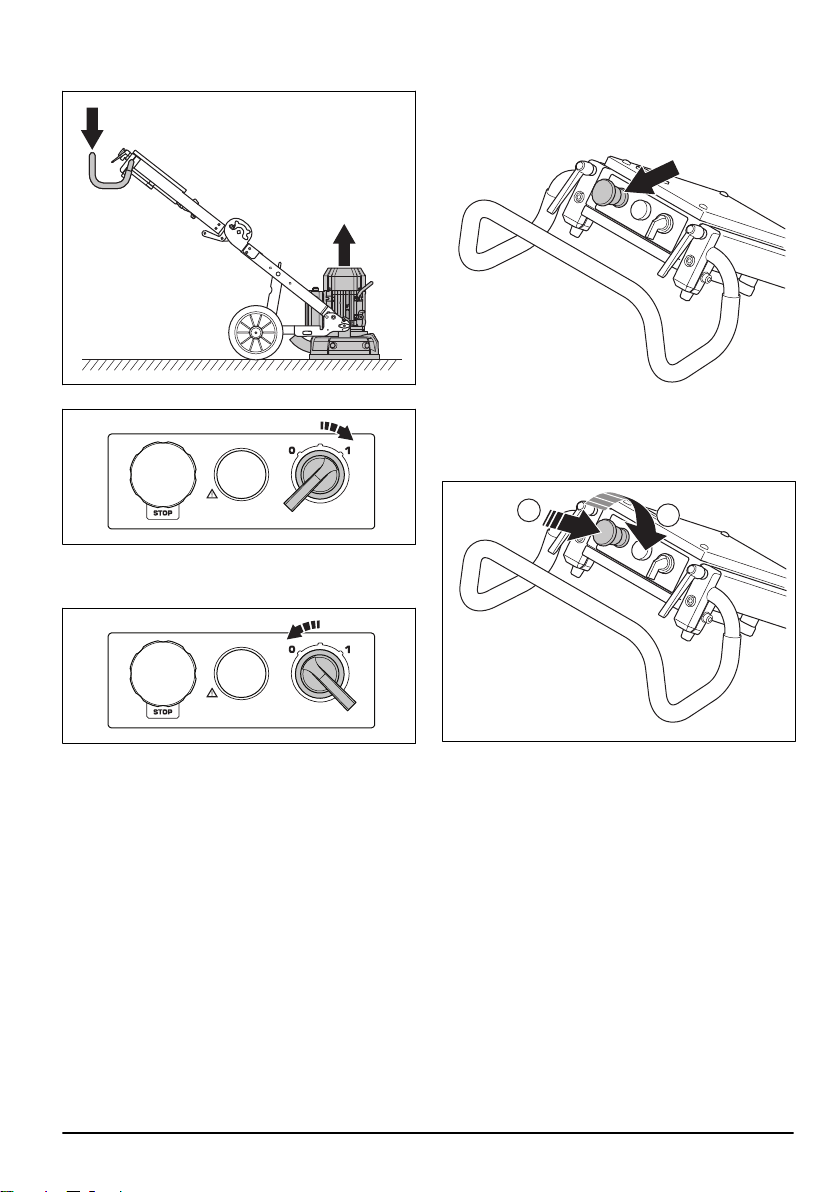
2. Push down the handle to lift the grinding head from
A
B
the floor.
3. Turn the ON/OFF switch to 1 to start the product.
4. Wait for 5 seconds, this is to let the product operate
at the idle speed.
5. Turn the ON/OFF switch to 0 to stop the product.
Emergency stop
The emergency stop is used to quickly stop the motor.
The emergency stop at the product breaks the mains
power supply.
To do a check of the emergency stop
1. Push the emergency stop button (A) and make sure
that the motor stops.
917 - 001 -
2. Turn the emergency stop button clockwise (B) to
disengage.
Safety instructions for maintenance
• Keep all parts in good condition and make sure that
all fixtures are correctly tightened.
• Do not use a product that is defective. Do the safety
checks, maintenance and the servicing as given in
this manual. All other maintenance work must be
done by an approved service agent.
• Stop the product when you replace the diamond
tools. Turn the ON/OFF switch to 0 and push the
emergency stop button.
• Do the inspection and/or maintenance with the motor
stopped and the power plug disconnected.
• Do the maintenance to make sure that the product
operates correctly. Refer to
Maintenance on page
14
7
Introduction
WARNING: Before you operate the product,
you must read and understand the safety
chapter.
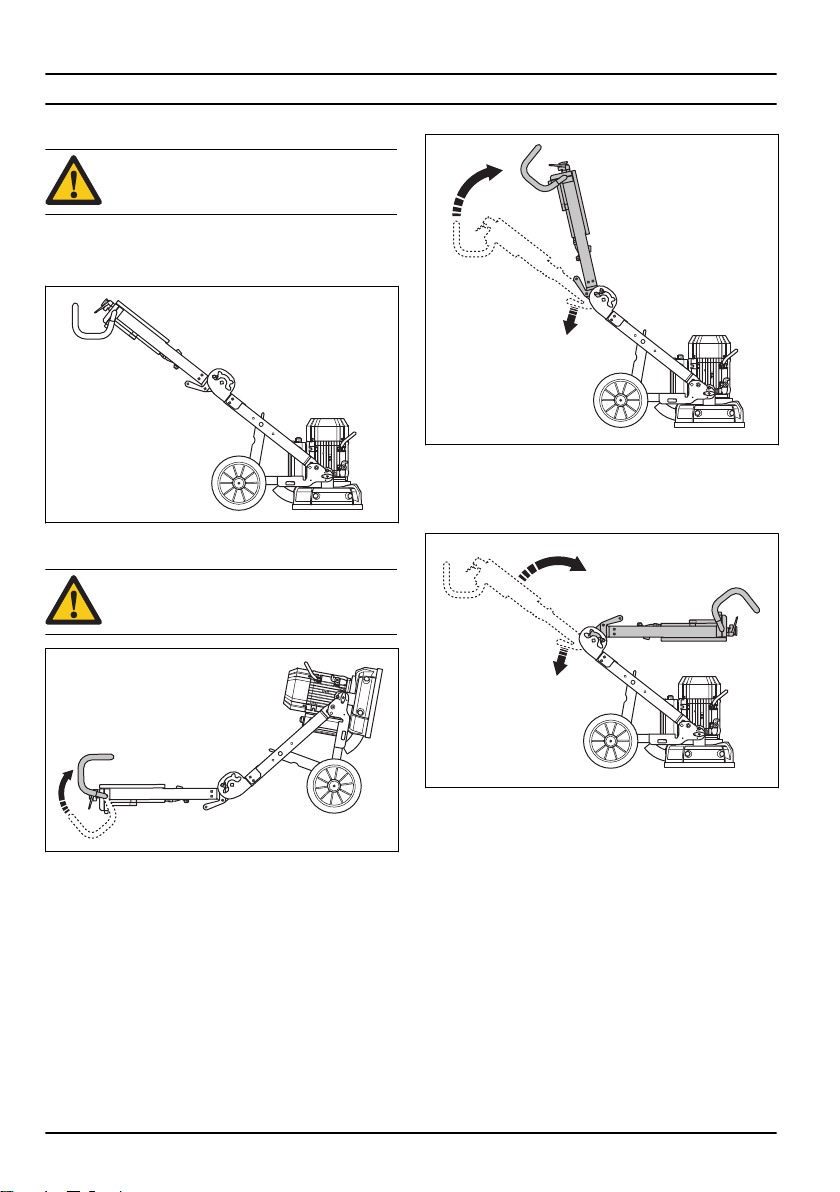
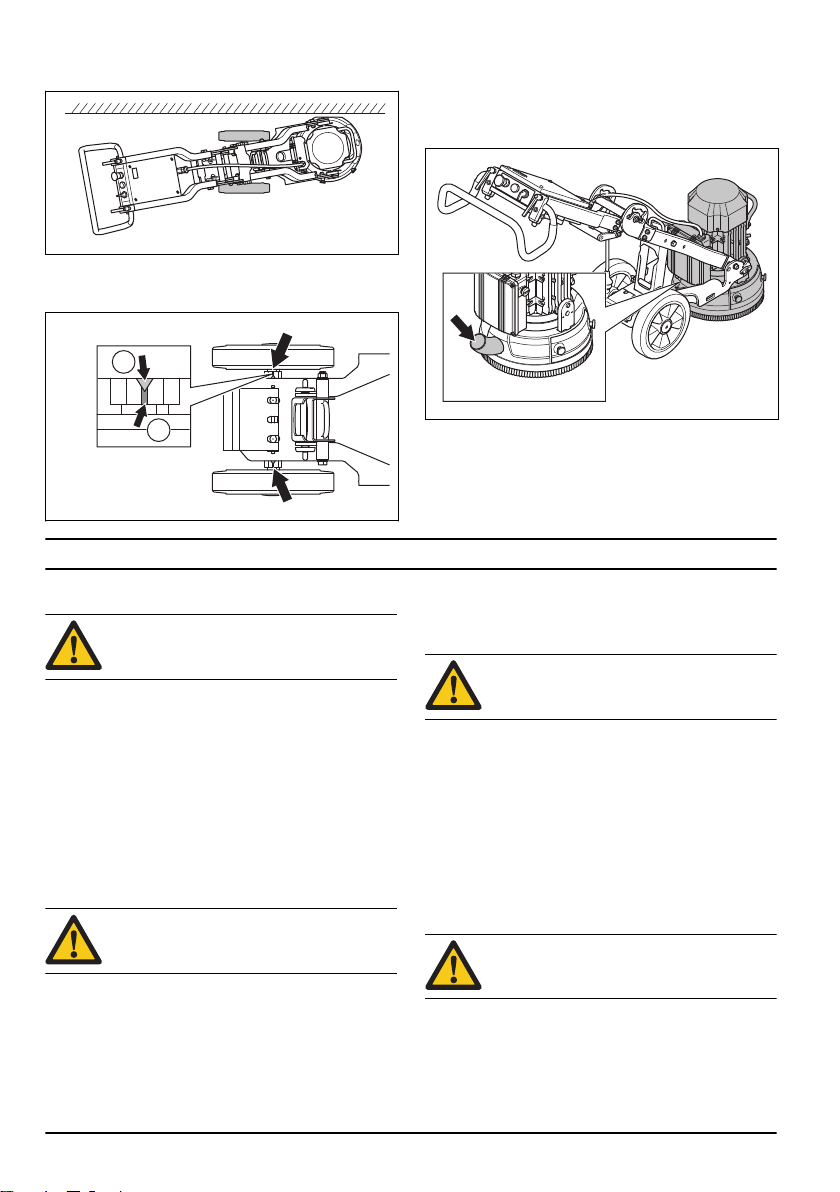
Product positions
Operation position
Servicing position
CAUTION: Only put the product in the
servicing position on a horizontal surface.
Operation
Tilted transport position
Lift transport position
Put a protection between the motor and the electrical
enclosure to prevent damage to the product.
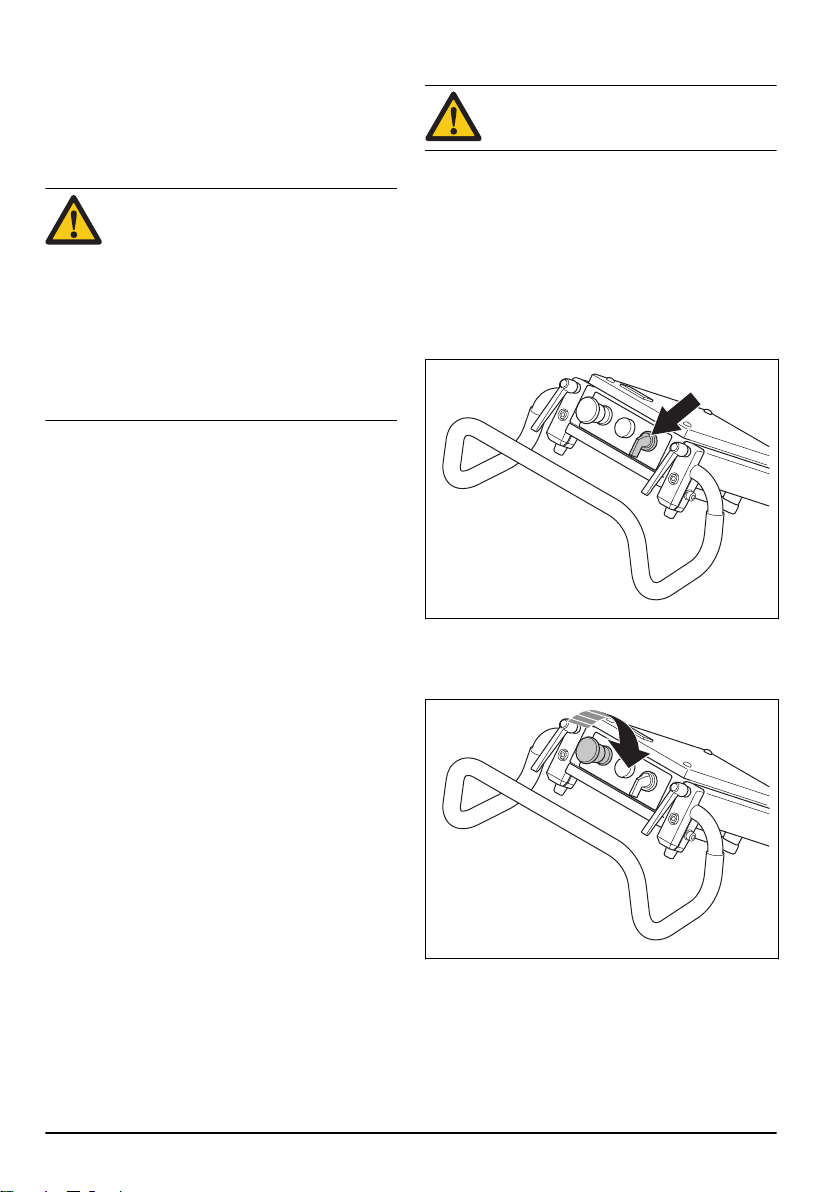
To adjust the handlebar
The handle lock knobs are operated clockwise,
counterclockwise or put in idle position.
8
917 - 001 -
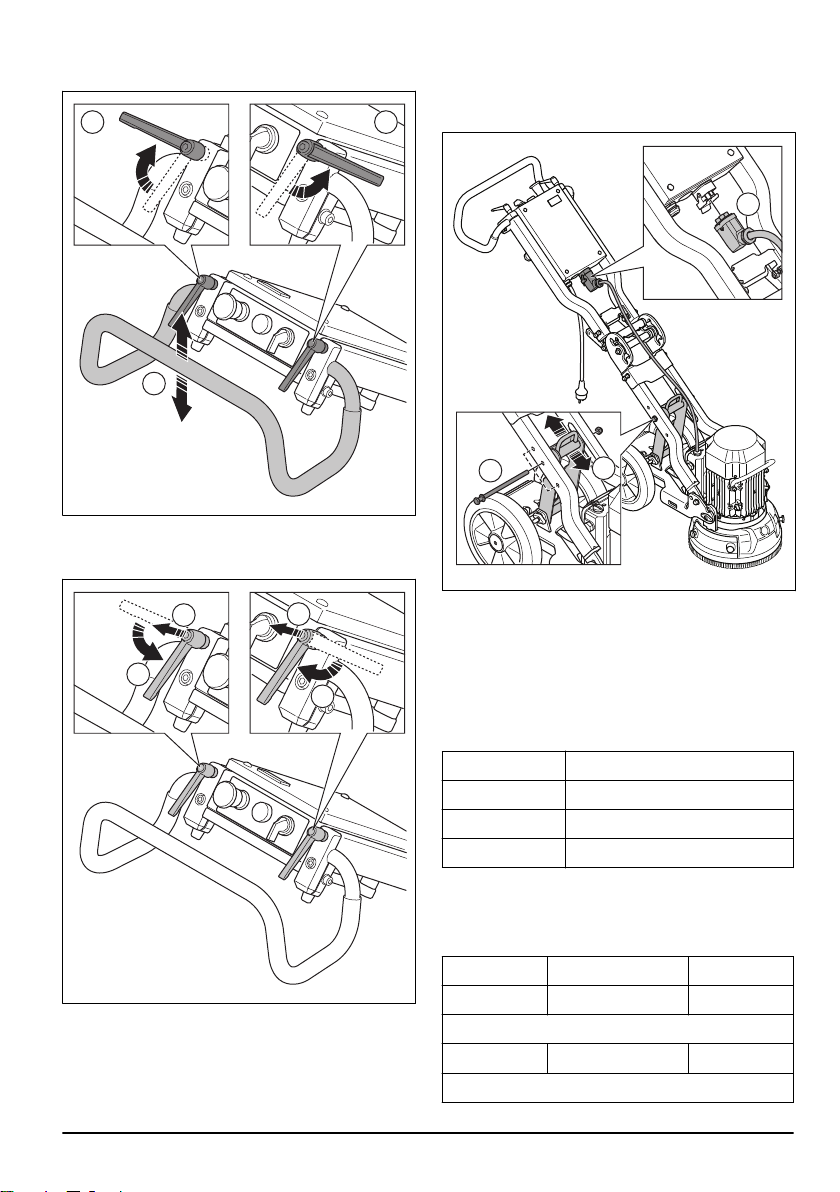
1. Loosen the lock knobs (A) and adjust the handle (B)
A
B
A
A
B
A
B
B
A
C
to idle position.
2. Tighten the lock knobs to set the position.
3. When the handle position is set, pull the handle lock
knobs up (A) and put them into idle position (B).
Adjust the angle to set up a good work position for
different operators.
1. Disconnect the motor cable (A) from the electrical
enclosure.
2. Remove the lock knob (B).
3. Select the applicable position (C) for the operation
and put the lock knob (B) in correct hole. The bottom
hole increases the grinding pressure and the height
of the handlebar. The top hole decreases the
grinding pressure and the handlebar.
Handle heights
Hole position
To adjust the frame height
The angle of the frame can be changed to divide the
weight of the chassis. This is to decrease or increase
the grinding pressure against the surface.
917 - 001 - 9
Top 835/33
Center 925/36
Lower 1000/39
Grinding pressure
Refer to the tables for the grinding pressure against the
surface for each hole position.
Low, kg/lbs
23/51 25/55* 27/60
With accessory counterweight
17/37 20/44* 23/51
*Factory setting
Handle height, mm/inch
Center, kg/lbs Top, kg/lbs
Diamond tools
There are many types of diamond tools for the product.
Speak to your approved service center or go to
www.htc-floorsystems.com to select correct diamond
tool.
Installation of the diamond tools
The installation of the diamond tools on the tool plate
has effect on the performance of the product. The
diamond tool type together with the number of segments
on the diamond tool is important.
Use metal bond diamond tools with 2 segments for
usual grind operations, to make the surface level or light
removal.
Use metal bond diamond tools with 1 diamond segment
to increase the diamond tool pressure. This installation
is for heavy removal with much force.
For the heaviest removal, we recommend to use tools
that only run in one direction with PCD diamond tops.
Note: T-Rex tools are made to run only in one direction.
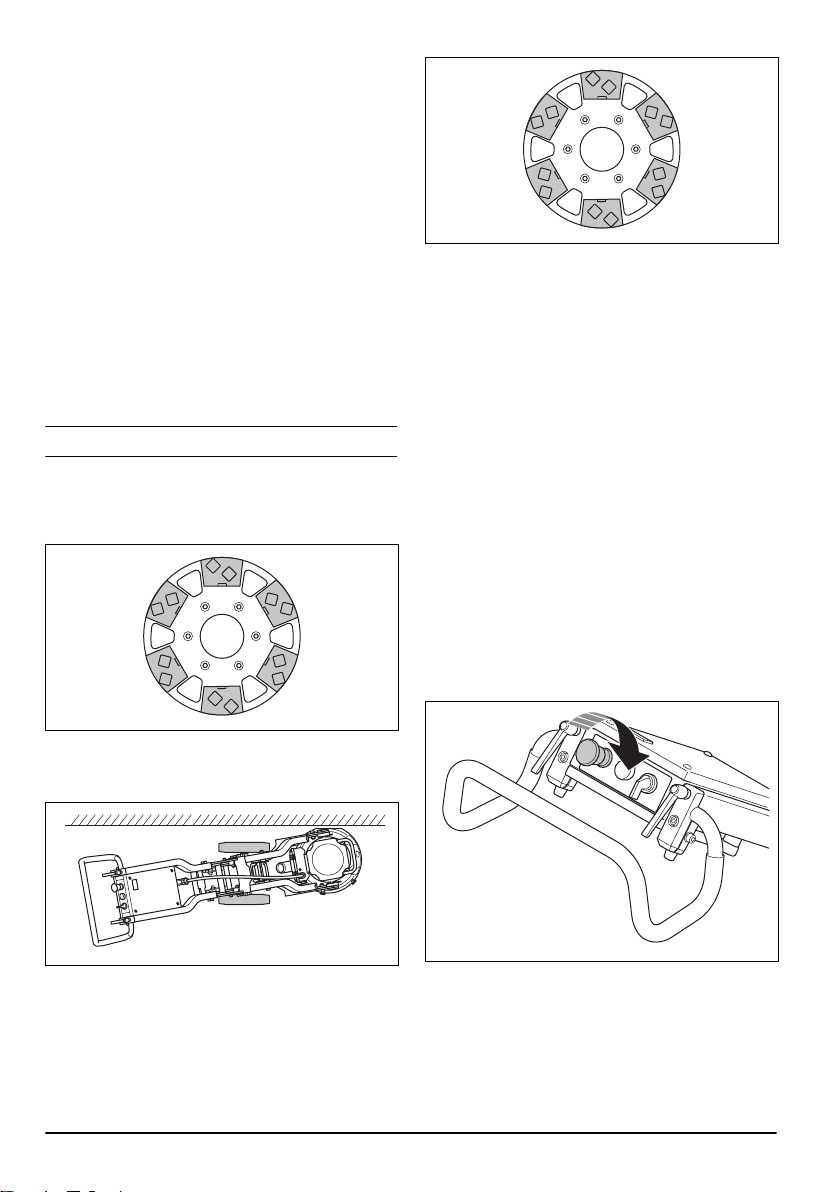
Metal bond diamond tools
• Full set - outer row. This installation removes the
surface layer with much force.
To do before you operate the product
1. Read the operator's manual carefully and make sure
that you understand the instructions.
2. Do daily maintenance. Refer to
on page 14
3. Make sure that the product is assembled correctly
and is not damaged.
4. Put the product on the work area.
5. Make sure that there are diamond tools on the tool
plate and that they are tightly attached.
6. Connect the dust extractor to the product. Refer to
.
To connect a dust extractor on page 14
7. Adjust the handlebar to set the necessary work
height.
8. Make sure that the motor cable is connected to the
electrical enclosure before the product is connected
to an electric socket.
9. Connect the power plug of the product into the mains
outlet.
10. Turn the emergency stop button clockwise to make
sure that the emergency stop is disengaged.
Daily maintenance
Installation for edge grinding
This product can grind at an edge.
• Full set - outer row.
10
11. Make sure that you know in which direction the
motor rotates.
917 - 001 -

To change in which direction the motor rotates
CAUTION: The T-Rex tools are made to
rotate in only one direction.
1. Look at the arrow to see in which direction the motor
rotates.
To start the product
1. Push down the handle lightly to lift the grinding head
from the surface, approximately 1 mm. This
decreases the pressure against the surface. Do not
lift the grinding head fully from the surface.
2. Turn the 2 pins in the power plug in the opposite
direction to change in which direction the motor
rotates. This is only applicable for 3-phase.
2. Turn the ON/OFF switch to 1 to start the product. In
less than 5 seconds the product operates at the idle
speed.
To stop the product
CAUTION:
surface when you stop the motor. The tool
plate rotates for a while after the motor
stops. Much off the dust can blow off in to
the air and the surface can be damaged.
CAUTION: If you grind adhesive asphalt,
paint or equivalent material, lift up the front
of the product slightly when the tool plate
stops. The product can attach to the
adhesive surface if not lifted.
1. Turn the ON/OFF switch to 0 to stop the motor.
Do not lift the tool plate from the
917 - 001 -
11
2. Keep the tool plate against the surface. Make sure
that the tool plate does not rotate before you lift up
the front.
3. Pull out the power plug.
To replace the diamond tools
WARNING: Disconnect the power plug.
WARNING: Use protective gloves, as
diamond tools can become very hot.
1. Turn the ON/OFF switch to 0 and disconnect the
power plug to stop the product.
2. Push the emergency stop.
4. Use a hammer to remove the diamond tools.
5. Attach new diamond tools on the tool plate.
3. Put the product into servicing position.
12
6. When the diamond tools are replaced, put the
product into operation position.
917 - 001 -

To grind at an edge
A
B
1. Remove the screws (A) and the hatch (B).
2. Attach the hatch onto the holder.
3. A guard behind the hatch prevents damage to the
wall. Remove the 2 screws and the guard if it is
necessary to grind near the wall.
4. Lift the foot pedal.
5. Use your foot to give the wheels the right angle.
917 - 001 -
6. If it is necessary to grind on the right side, the
wheels must point in the left direction.
13
7. If it is necessary to grind on the left side, the wheels
A
B
must point in right direction.
8. For straight wheel direction, align the red mark on
the wheel axle (A) with the red mark on the frame
(B).
Maintenance
Introduction
WARNING: Before you do maintenance,
you must read and understand the safety
chapter.
For all servicing and repair work on the product, special
training is necessary. We guarantee the availability of
professional repairs and servicing. If your dealer is not a
service agent, speak to them for information about the
nearest service agent.
Daily maintenance
Daily maintenance means that you clean the product.
Also that you do a check of the electrical supply, the
brush strip and the grind holder.
To clean the product
CAUTION: A blocked air intake decreases
the performance of the product and can
cause the motor to become too hot.
• Always pull out the plug from the mains outlet before
you clean, do maintenance or assemble the product.
• Always clean all the equipment at the end of the
work day. Do not use a high pressure washer to
clean the product.
To connect a dust extractor
Use a HTC Floor Systems dust extractor system.
1. Connect the dust extractor to the product. Use a 50
mm (2 inch) hose.
2. Make sure that the filters in the dust extractor are
clean and not damaged. Monitor the dust during the
operation.
• Remove blockage from all air openings. The product
must always have sufficiently cool temperature.
To do a check of the electrical supply
WARNING: Do not use damaged cables. A
damaged cable can cause serious injury or
death.
• Make sure that the power cord and extension cable
are not damaged and in good condition.
• Do not use the product if the power cord is
damaged. Let an approved service center repair the
product.
To do a check of the brush strip
• Make sure that the brush strip is full.
• Make sure that the brush strip touches the surface.
To do a check of the grind holder
CAUTION: The condition of the grind holder
is important for the performance and the
safety.
• Remove the tool plate (A).
14 917 - 001 -
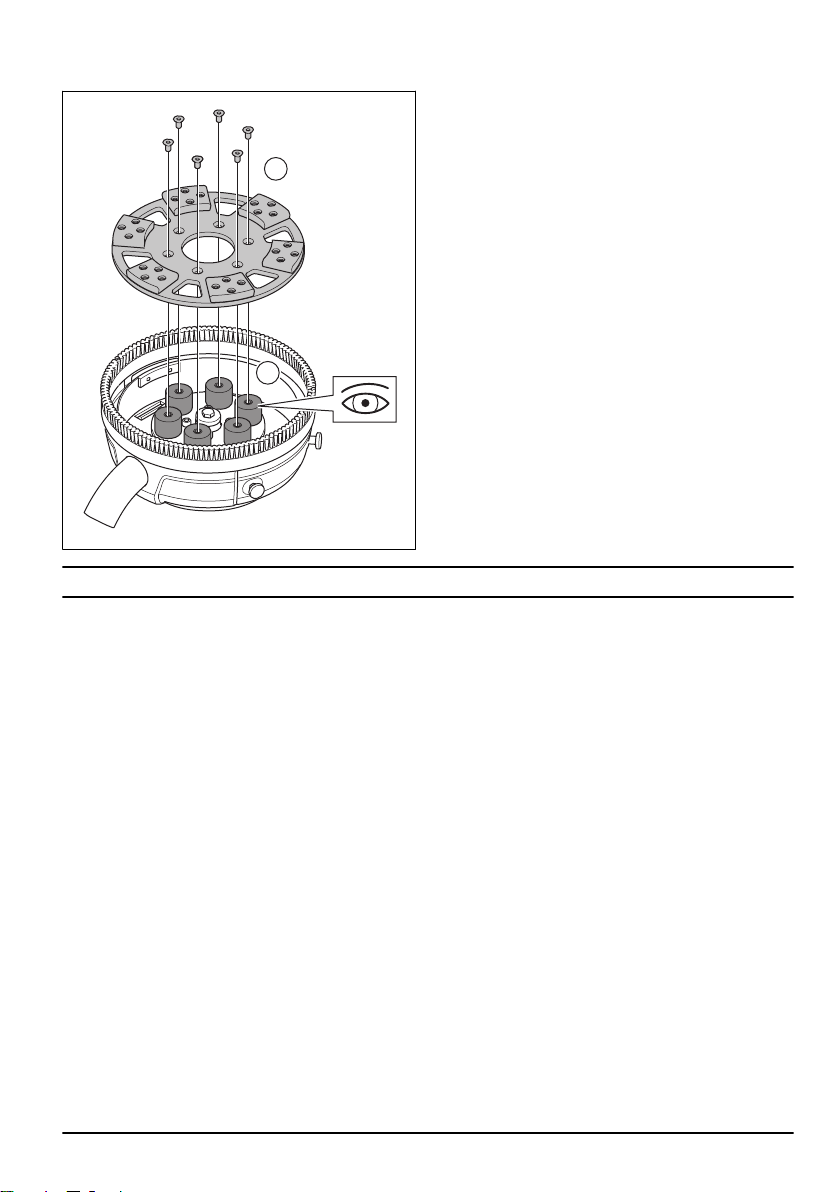
• Examine the grind holder for damages and the wear
A
B
of the rubber cylinders (B).
Troubleshooting
• Replace the rubber cylinders if it is necessary.
The product does not start
• Make sure that the power supply and the power
cords are not damaged.
• Examine the emergency stop button, turn the button
clockwise to release the emergency stop.
• Examine the overload lamp. If the overload lamp is
on, let the motor cool down for some minutes until
the product is automatically reset.
The product is not easy to hold on to
• Too small number of diamond tools are installed on
the product.
• The selected type of diamond tool is not correct for
the surface.
• High current is used by the motor for the operation.
• Use the number of diamond tools that is
recommended to decrease the force on the product
and the operator. Refer to
on page 10
Metal bond diamond tools
.
The product has sudden movements
• Make sure that all diamond tools are installed
correctly and that all have the same height.
917 - 001 - 15
The product stops after only a while
• If the product overloads, the overload protection
engages and stops the motor.
• Decrease the load. The lower hole is for a higher
handlebar and increased grind pressure. The top
hole is for a lower handlebar and decreased grind
pressure.
• The product restarts after approximately a minute,
when the temperature of the motor is decreased to
usual level.
• Make sure that the extension cables are not too
short.
The product stops during startup
Correct voltage supply is necessary for a good motor
performance. Too long extension cables and/or a too
small gage decreases the power of the motor during
operation.
• If the motor overloads, the overload lamp comes on.
Wait 2 minutes and try again. When this does not
help, speak to an approved service workshop.
• Make sure that the extension cables are not too
short.
Transportation and storage
B
A
C
D
A
B
C
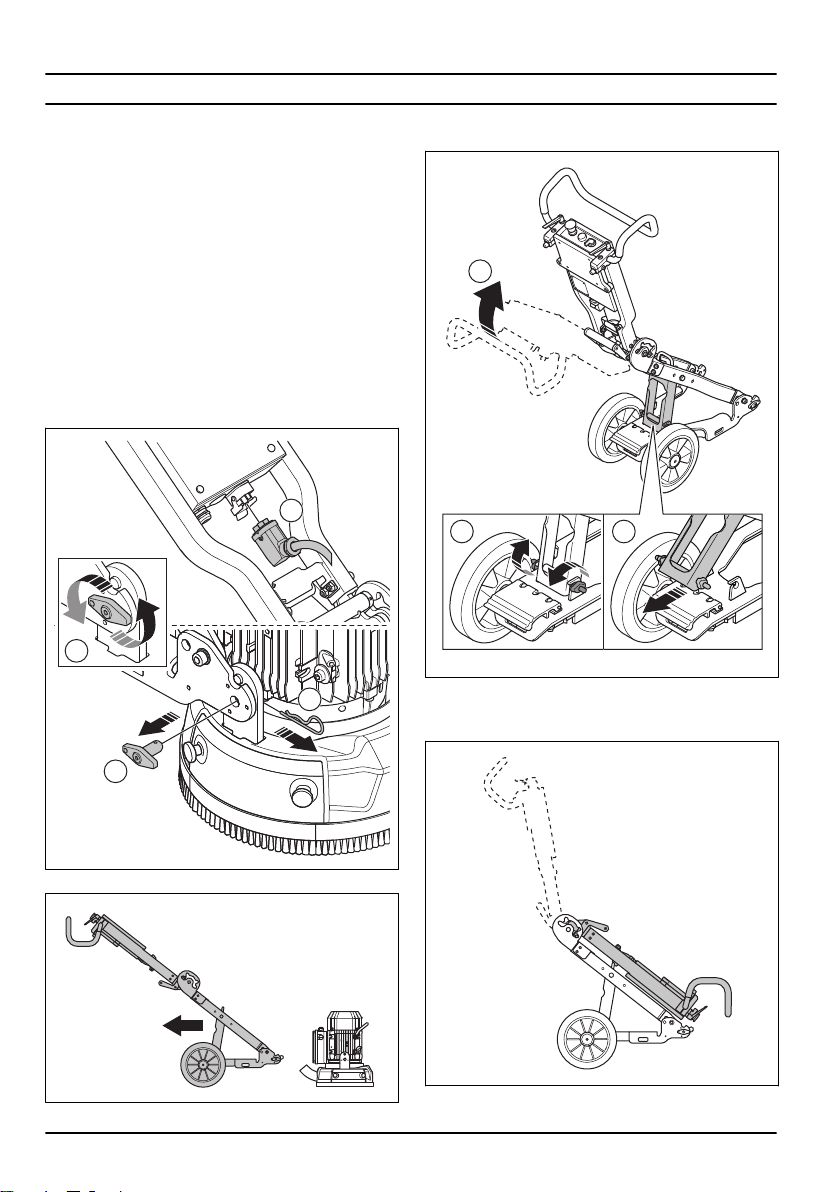
To set the product in transport position
Put some type of protection on the product during
transportation. The protection keeps natural elements
such as rain and snow away from the product.
The product can be divided into 2 components. This
makes the transportation easier.
Always move the product with the lifting eye and the
handlebar.
1. Disconnect the motor cable from the electric
enclosure (A).
2. Loosen the lock bolts some turns to release the
pressure (B).
3. Pull out the lock pins (C) and remove the lock bolts
(D) on each side of the grinding head.
5. Put the product in tilted transport position (A).
Loosen the lock knobs (B) on the support foot.
4. Remove the wheel chassis from the grinding head.
16
6. Fold the support foot (C).
7. Hold down the handle on the angle joint. At the same
time push the top part of the frame carefully forward.
917 - 001 -
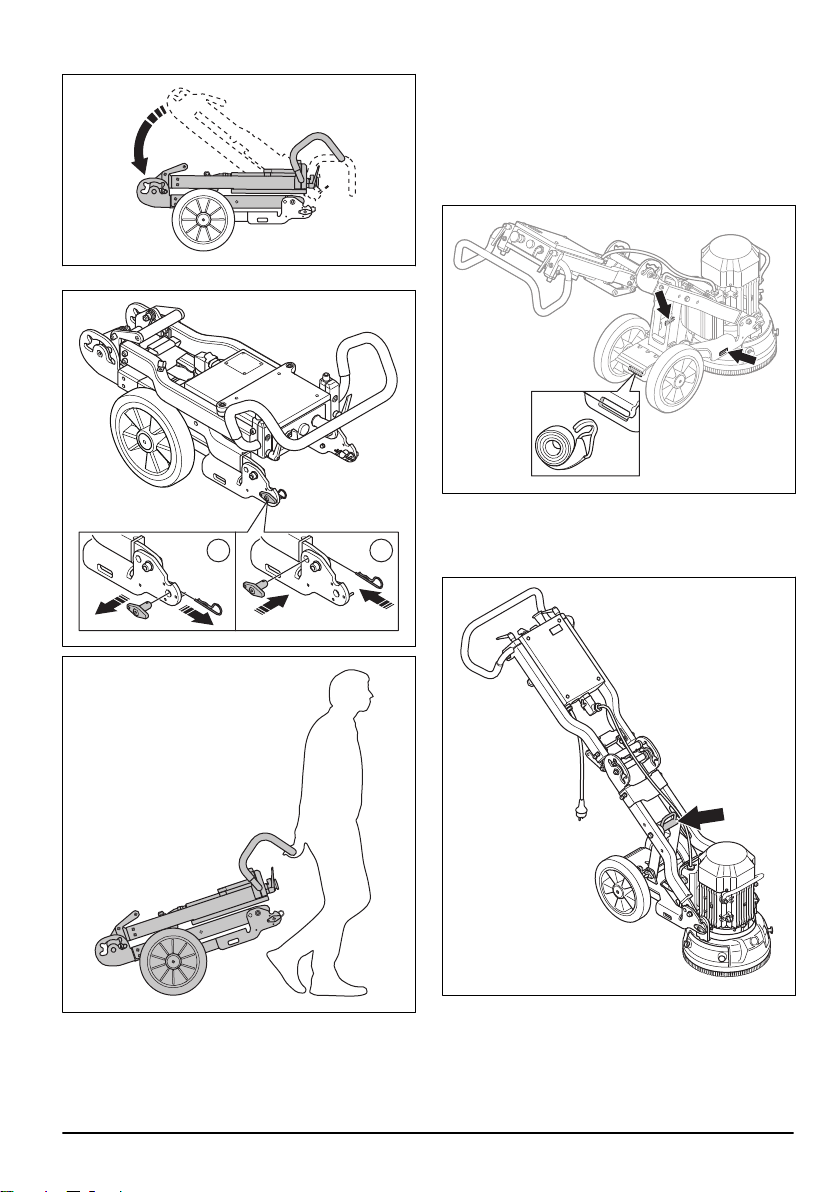
8. Fold down the product carefully.
A B
3X
9. Lock the product with the lock pin and bolt (B).
To attach the product to a vehicle for transportation
Attach the product during transportation in order to
prevent accidents and damage to the equipment. The
product has holes that are used with straps to attach the
product to the vehicle.
1. Attach the strap into the holes.
2. Attach and tighten the strap to the vehicle.
To lift the product
1. Use the lifting eye to lift the product.
917 - 001 -
2. Make sure that the product is balanced when you lift
it. Let a bystander help you when you lift the product.
17
 Loading...