

Page 1

guide
to using your SPV C500
Page 2

This guide will get you up and running with your SPV C500
in no time.
Before using your SPV C500, please remember to register
with Orange.
Once registered, switch your phone on. The getting started
section will take you through key features.
Finally, to learn more about specific features or services, simply
use the contents to take you to the information you need.
the future’s bright, the future’s Orange
welcome
Page 3

3 messaging
create a text messages or email ...... 48
standard text input .......................... 49
predictive text input ......................... 49
numeric text input ............................ 50
message options ............................. 50
receiving text messages ................... 50
inserting text templates .................... 50
inserting voice recordings ................ 52
receiving meeting requests .............. 52
receiving complete emails ................ 52
receiving message attachments ....... 52
viewing your message folders .......... 53
using the Inbox menu options .......... 54
what are the Inbox menu options? ... 54
deleting emails from your SPV C500 .. 55
save your sent emails ...................... 55
set your incoming message size ...... 56
display your messages your way ...... 56
send emails manually ....................... 57
MSN Messenger .............................. 57
4 Orange Photo Messaging
customising your Album ................... 62
take a photograph ........................... 62
explore your Album .......................... 63
compose your own melody or send
a recording you’ve made ................. 65
add a photograph to your message ... 65
Orange Photo Messaging options .... 66
sending your message ..................... 66
5 video messaging
video messaging .............................. 68
receiving video messages ................ 69
get the freshest clips on the web
from Orange .................................... 70
6 Orange multi media services
browsing the web on the move ....... 72
Internet Explorer .............................. 73
bookmark your favourite sites .......... 74
your SPV C500 online ...................... 75
stored or cached web pages ........... 75
what are the options in the Internet
Explorer menu? ............................... 75
enjoy new software wirefree™
with Downloads .............................. 76
secure your information Back Up ..... 77
read or listen to news, jokes, weather
and more ......................................... 77
access information direct from your
phone’s Orange Plus menu .............. 78
Orange Plus ..................................... 78
Orange Internet ............................... 82
register with Orange Internet ............ 82
contents
getting started
register with Orange ......................... 10
insert your SIM Card and battery ...... 12
insert your mini memory card............ 13
getting to know your phone .............. 14
outside your SPV C500 ................... 15
the Home screen .............................. 17
explore the menus ............................ 18
the Accessories menu ...................... 20
make your first call............................ 21
send your first text message ............. 22
create your first contact .................... 23
store your information safely ............. 24
transfer your contacts....................... 25
visit your first website ....................... 26
get started with email ....................... 27
send your first email.......................... 28
receive your first email ...................... 28
connect your phone to your PC ........ 30
take your first photograph................. 31
record your first video clip................. 32
play your first tune ............................ 33
receive software direct to your phone.. 34
1 manage your contacts
store contacts ................................. 36
what are the abbreviations in my
contact cards? ................................ 36
create contact cards ........................ 37
Orange Directory Enquiries ............... 37
finding a contact in your contacts list .. 38
using the contact menu options ....... 39
contact card menu options .............. 39
add photos to your contacts ............ 40
speed dial ....................................... 40
Memory Mate .................................. 42
2manage your calls
what happens when you get an
Answer Phone message? ................ 44
personalising your Answer Phone
greeting ........................................... 44
Answer Phone shortcuts .................. 44
Answer Phone PIN .......................... 44
Answer Phone Call Return................... 44
listen from another phone .................. 45
call divert ......................................... 46
Page 4

synchronising contacts and tasks .. 116
Orange Wirefree Server .................. 117
setting up Server ActiveSync ......... 117
remote synchronisation schedule ... 118
synchronising remotely .................. 119
ActiveSync errors ........................... 119
add programs using ActiveSync .... 120
11 security
what if I enter the wrong PIN? ........ 124
keep your SPV C500 secure .......... 124
locking the SPV C500 .................... 124
what are the security codes for? .... 125
locking the SIM Card ..................... 125
control the numbers that can be
called from your SPV C500 ............ 126
call barring .................................... 126
Orange Care .................................. 127
protecting your phone .................... 127
12 International services
for pay monthly customers ............. 130
pay monthly check list ................... 130
what are the international dialling
codes ............................................ 131
for pay as you go customers ......... 131
pay as you go check list ................ 132
select your partner network ........... 133
using your Answer Phone abroad .. 133
using GPRS abroad ....................... 133
13 reference
safety ............................................. 136
radio waves and your phone ........... 142
paperwork ...................................... 143
Orange Care terms and conditions ... 144
pay monthly terms and conditions.... 154
pay as you go terms and conditions . 174
downloadable games terms and
conditions ....................................... 182
Orange Value Promise terms and
conditions ....................................... 184
Declaration of conformity ................188
contact Orange
contact Orange................................189
index
index ...............................................192
manage your Orange phone account
online ............................................... 82
Windows Media™ Player ................. 83
your Try Card ................................... 84
play games on your phone .............. 85
setting your connection ................... 86
Orange GPRS .................................. 87
Orange MMS ................................... 87
Orange WAP ................................... 87
7 additional features
conference calling ............................ 90
Line 2 .............................................. 90
Orange Answer Fax ......................... 91
laptop Internet access on the move ... 92
use Bluetooth®for wirefree™
communication ................................ 93
symbols ........................................... 95
manage your phone’s performance .. 96
Task Manager................................... 96
Space Maker .................................. 96
8 personalise your phone
download a ringtone ...................... 100
viewing and changing your settings .. 101
Home screen ................................. 102
phone ............................................ 103
sounds .......................................... 103
switch profiles ................................ 104
using the quick list ......................... 104
about settings ................................ 105
accessibility ................................... 105
beam and Bluetooth®.................... 105
data connections ........................... 105
date and time ................................ 105
owner information .......................... 106
power management ....................... 106
regional settings ............................. 106
remove programs .......................... 107
security ......................................... 107
choosing your regional settings ...... 107
phone settings options .................. 108
9 manage your time and calls
using the calendar ......................... 110
to view an appointment .................. 110
importing calendar information ....... 111
the Tasks list .................................. 111
voice notes .................................... 112
infrared and Bluetooth®................. 112
call history ..................................... 113
calculator ...................................... 114
10 synchronising
using ActiveSync ........................... 116
synchronising the Inbox ................. 116
Page 5

getting started
Page 6

After you register
Orange will update your SIM Card over the air with a text message. When you first turn on your phone you
will see the SIM update message. You can leave it in your inbox until you are ready to delete it. Turn your
phone off and on again for the update to take effect.
And lastly
When you apply to register on the Orange network, you and Orange agree to be bound by the Orange
terms and conditions set out in this guide. You may want to take time to read and consider them before
you register.
11
register with Orange
1 Find the IMEI number inside your SPV C500. You may need the number in future if your SPV C500
is lost or stolen.
2 Find the SIM Card number on the back of your SIM Card.
3 If you are already with Orange when you register, you will be asked for your Orange password. If you
are new to Orange you should have a new password ready.
4 Contact Orange Customer services to register. If you are already with Orange and wish to register an
upgraded phone, call 0800 079 0027.
If you are new to Orange and will be paying monthly call 07973 100 980.
If you are new to Orange with pay as you go call 0800 079 0006.
You can also register online at orange.co.uk/payasyougo/registration
Note: If you’ve upgraded your phone you must insert your new SIM Card to use multi media messaging.
Your Orange phone number will not change.
10
register with Orange
SIM Card
Page 7

13
Mini memory cards can be used in your SPV C500.
These are primarily used to store media files like
music and video clips, but can also be used to
backup or transfer files and data. Insert your new Try
Card mini memory card into your phone and enjoy
exploring the features of your phone straight away.
Orange is developing other memory cards containing
content and applications to help make your SPV
C500 even more useful and fun. Please enquire at
your nearest Orange shop or visit www.orange.co.uk
for more information.
To insert your mini memory card you will need to
switch your phone off and remove the battery. Insert
the mini memory card as shown.
insert your mini memory card
To insert your SIM Card:
1 Remove the battery cover using the release
catch on the back.
2 Remove the battery by lifting it up from the
bottom edges.
3 Lift the SIM Card metal holder and insert your
SIM Card, making sure the cut-off corner is
inserted last, and the gold contact points are
face down.
4 Push the holder down so it clicks securely in place.
5 Insert the battery from the top as shown.
6 Slide the battery cover back onto the phone and
you are ready to charge your battery.
7 The first charge must be for a minimum of 3 hours
in order to achieve optimum performance.
Subsequent charges should be 2.5 hours if the
battery is completely flat. You can make calls while
your phone is charging.
12
insert your SIM Card and battery
step 3
step 5
step 7
Page 8

1514
# key
Press and hold to switch
between Line 1 and Line 2.
back key
Moves to the previous
screen, or backspaces over
one or more characters
when you are in a text field.
outside your SPV C500
indicator light
Flashes red when battery is
low, shows solid red when
charging and flashes green
when on a call or in idle mode.
soft keys
The functions of these two
keys change according to what
you are doing.
call key
Press to answer a call or after
entering a number when
making an outgoing call.
Home key
Press to return to the Home screen.
Action key
Use the key to move up,
down and sideways in
menus. Press it inward to
confirm that you want to
carry out the function
highlighted on the display.
end key
Press to end a call or, if your
phone is ringing, to reject
a call and divert it to your
Orange Answer Phone.
Alternatively, press and hold
it to lock the keypad.
headphone socket
Insert your headphone here to listen to
music or use your phone handsfree.
switch on
Hold the button for approximately three
seconds to turn on your SPV C500.
warm up
You will see the Orange logo, followed by the
Smartphone 2004 screen. A few moments
later the Orange Home screen will appear.
dark screen
After 10 seconds the screen will darken. This
is called ‘backlight timeout’ and is a battery-
saving measure. Pressing any key will return
to a bright screen.
blank screen
The screen will go completely blank if you
don’t press a key for over a minute. Press the
key to return to a bright screen.
getting to know your phone
universal connector
Attach your cable here when synchronising with
your PC. Insert the plug on the end of your battery
charger’s cable here to charge your phone.
Page 9

1716
shortcuts
These symbols link you to five of
the most frequently used features
on the SPV C500. These are:
■
Contacts
■
Call History
■
Inbox
■
Calendar
■
Camera
■
Orange World
shortcut options
When you have selected a shortcut
symbol by highlighting it and pressing
right with the Action key, a number
of options will appear next to it.
These options will change,
depending on which shortcut icon
you have highlighted.
For example, if you have selected the
Orange World icon, you will be offered
links to different pages within the
Orange World site. And if you have
selected the Inbox icon, you will have
the option to write a New Message, or
read your messages.
soft keys
From the Home screen, the left
soft key launches the Start
menu. The function of the right
soft key will vary, depending on
what activities have occurred
on your phone. Usually, it will
open your Contacts. However,
if you have missed a call, it will
link to your Call History.
the Home screenoutside your SPV C500
camera lens
Capture images or
video clips.
car antenna connector
Allows you to attach your
phone to the car antenna
for better reception. Simply
peel off the rubber cap
and connect the antenna
jack. Replug the cap if
unconnected.
self portrait mirror
Position the phone until
the desired image fits into
the mirror to capture.
volume
Press to turn the
volume of a call up
or down.
camera key
Launches the camera
viewfinder. Press to
capture a picture if
already in camera
mode.
Page 10

Configurations
View your ActiveSync setup
information.
1918
explore the menus
ActiveSync
Synchronise your contacts, emails
and appointments.
Internet Explorer
Browse the Internet and wap sites
straight from your phone, even while
on the move.
Accessories
See the accessories menu on the
following page.
Java
TM
View the JavaTMapplications you have
stored on your phone.
Tasks
Create tasks and set alarms to remind
yourself of events.
Voice Notes
Record your thoughts as they occur,
and save them to play back later.
Windows Media
TM
Play music and watch video
clips either from your phone or via
the Internet.
These programs appear in loops in the menu. This means that you don’t have to scroll all the way down to
the last one on the page, but can scroll up as well. Also, to access the programs quickly, simply press the
corresponding number on your keypad.
MSN Messenger
Sign in and send instant messages to
your friends.
Below are the main features of the Start menu. To access this menu, press Start in the Home screen.
To access an item, scroll to the one you want and press the Action key. As this menu is dynamic, it will
change as you add or remove applications of your own.
explore the menus
Inbox
Read and compose text messages,
MMS messages or emails.
Contacts
Opens your contacts list alphabetically.
Calendar
Record your important events
and set up alarms to remind you of
appointments.
Settings
Change the way your phone behaves to
personalise it and suit how you use it.
Multimedia Album
View and organise all your images,
photos and video clips.
Call History
Find out who has called you and when,
then return the call or save their details.
Video Recorder
Shoot video clips to store on your
phone and send as video messages
in the future (see chapter 5 for more
information).
Games
Play games stored on your phone and
download new games as they are released.
Camera
Take photos using the viewfinder on
the back of your phone.
Orange
The Orange folder contains applications
created specially for your SPV C500,
including Back Up and Downloads, as
well as links to pages on Orange World
and your Try Card.
PV Player
Download and watch videos on
your phone.
Page 11

2120
1 From the Home screen, start entering the number you want to call. The
dialler screen will show. If you have contacts already in your SPV C500 or
on your SIM Card, it will start matching the letters and numbers of the
keys you have pressed to the names and phone numbers of your
contacts. The more keys you press, the more accurate the match will be.
2 When you have entered the number or found the contact you want, press
to make the call.
3 You can also call a contact by choosing it from the Contacts list. From the
Home screen press the soft key under Contacts.
4 Within a few seconds, any numbers stored on your SIM Card, shown by
the symbol, and phone memory will show. Use the Action key to scroll
to the contact you wish to call, then press .
To use the speakerphone, enabling you use your SPV C500 handsfree,
press and hold while on your call.
To end the call press .
make your first callthe Accessories menu
Below are the main features of the Accessories menu. To access this menu, press Start in the Home
screen. To access an item, scroll to the one you want and press the Action key. As this menu is dynamic,
it will change as you add or remove applications of your own.
Calculator
Perform calculations using the Action
key to work through your sums.
Clear Storage
Reset all your phone settings to the
default. Use with care as this will delete
ALL your data.
Modem Link
Use when you have synchronised your
SPV C500 with your PC with
ActiveSync.
Space Maker
View the available space on your
phone memory and delete data
if necessary.
File Manager
All your information is stored in a series
of files on your phone. Work through
the file menu tree to access folders and
sub-folders.
Task Manager
View a list of your recently used
applications.
SIM Manager
All your contacts stored on your SIM
Card are listed here.
Speed Dial
Set up handy speed dials to your
favourite contacts so you only have to
press one key to call them.
Page 12
2322
learn more... about Messaging in chapter 3
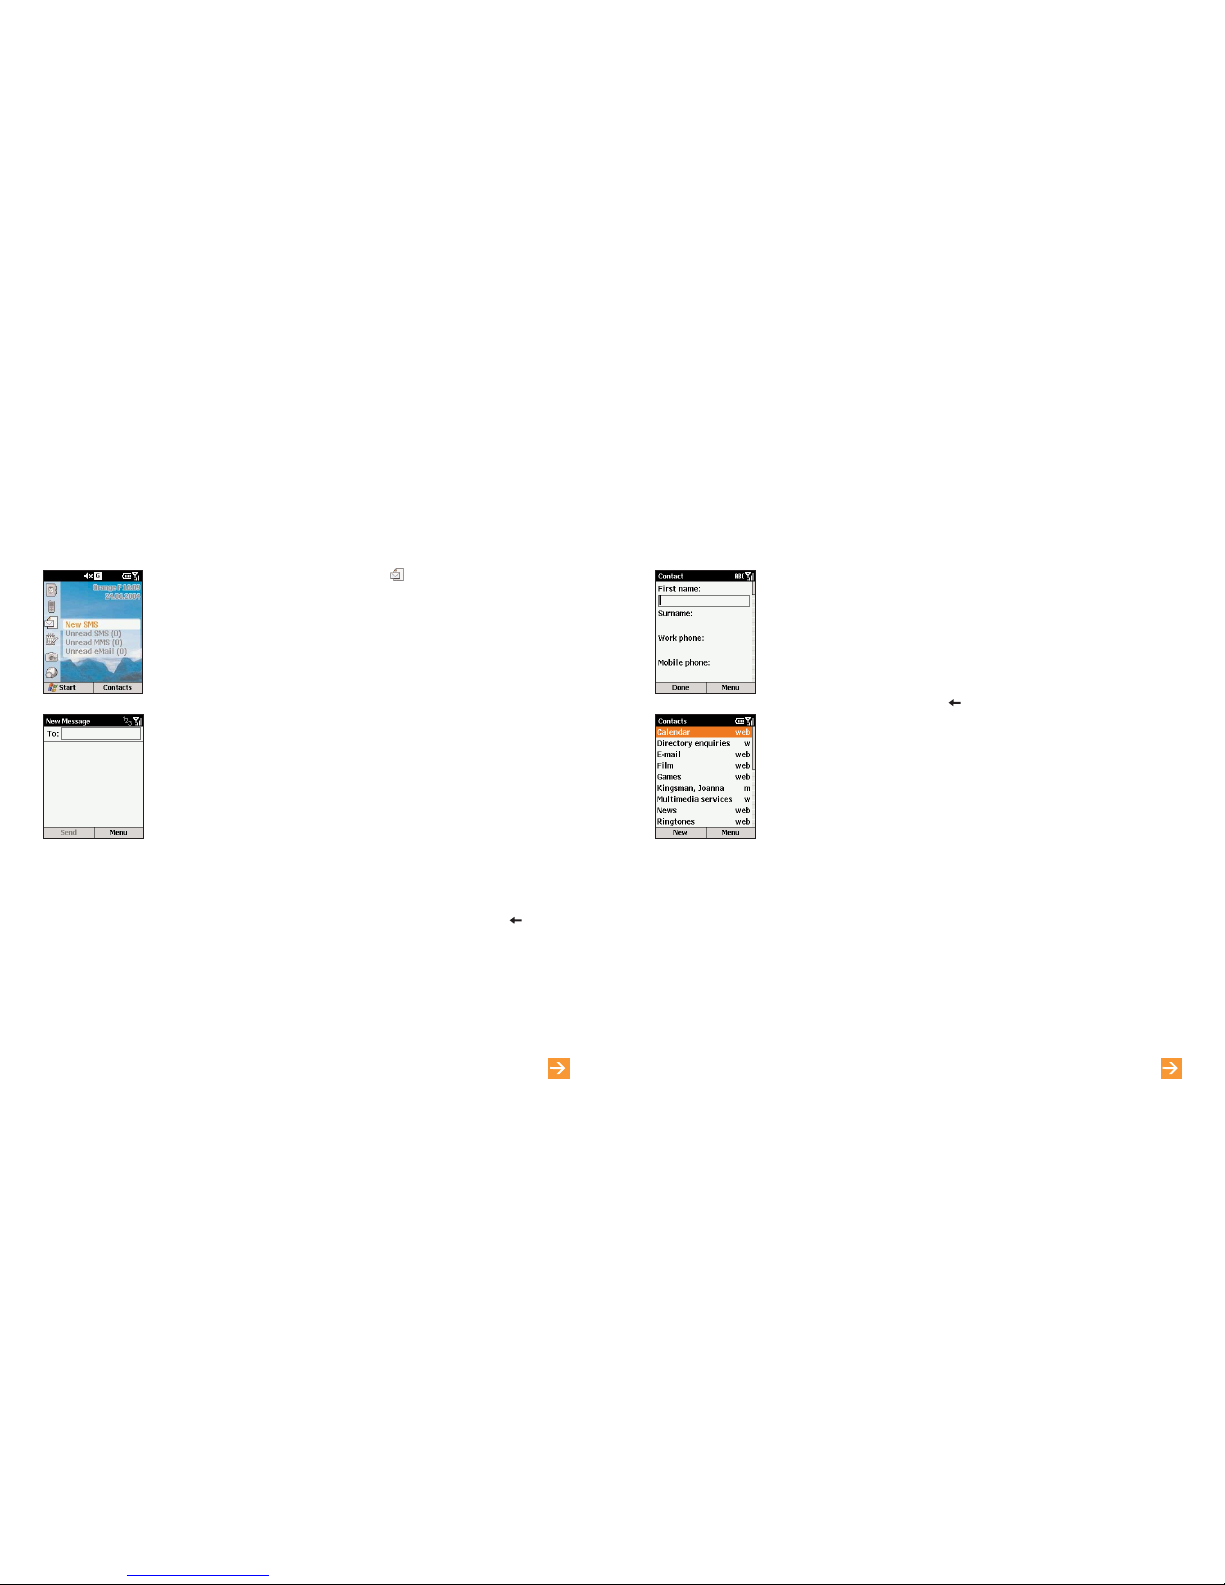
1 To add a new contact to your phone’s memory, press Contacts in the Home
screen. Press Menu then select New Contact.
2 Enter the information for the new contact in the fields. It may be worthwhile
entering contact numbers in the international form, ie, +44 then the number
minus the initial 0, so that you can use them abroad. To enter + for
international calls press and hold # then press Done when you have
highlighted the + sign. Press to delete a character. Do not include
spaces or brackets, ie, +447912345678. While entering the contact’s details,
press # for a space and *to change between upper case and lower case.
To enter a symbol press and hold the # key.
3 When you have finished, press Done to save the new contact. The Contacts
list displays an abbreviation reminding you which is the default contact point.
For instance, if it’s the person’s home number, h will be shown, if it’s their
mobile, m will show. These are the same field names used by Microsoft
Outlook. If you’ve entered more than one contact point, you can change the
one your SPV selects. Select the contact and press the Action key, select
the contact point you want your SPV to remember, select Menu and choose
Set as Default.
create your first contact
learn more... about your contacts in chapter 1
1 In the Home screen, scroll to and select , then select SMS Messages and
press New.
2 A new text message will open, and you will see the flashing cursor in
the To: field.
3 Enter the phone number of the person that you want to send the text
message to, or press the Action key to choose a name from your contacts.
Remember, you can only send a text message to a contact if you have saved
a mobile number for them.
4 Scroll down to the body of the screen, where you can enter your new
message. Using predictive text (T9) is the quickest way – press and hold
*
to switch to this mode. This means that your phone predicts the word as you
enter it, so you need only press each key once. For example, to get the word
orange, you would press 67 2 6 4 and 3 once only each. Press and hold the
*
key to bring up the text options menu. To toggle between predictive text
input modes, such as lower case, upper case and initial caps, press, but
don’t hold, the *key. To insert a symbol press and hold # and to insert a
carriage return press the Action key. To delete a character press .
5 When you have finished entering your message, simply press the soft key
under the word Send.
send your first text message
Page 13

2524
Not only can you save all the contacts on your SIM Card to your new
SPV C500, you can also transfer the contacts stored on your old phone
memory using Contact Wizard.
1 Activate the infrared port on the phone that contains your contacts. You may
need to consult your old user guide to discover how to do this, but usually
the option appears in the Settings menu on most phones.
2 Once the infrared port is active on your old phone, press Start in the
SPV C500 Home screen, and scroll to Orange. Press the Action key, scroll to
and select Help. Select Communicate and press the Action key. Scroll right
to page 2 and Try it to launch Contact Wizard. Press the Action key again.
3 Align the infrared ports of the two phones and press Next on your SPV C500.
4 Your contacts will be transferred to the memory of your SPV C500.
transfer your contacts
learn more... about your contacts in chapter 1
Back Up secures a copy of your data, such as contacts and calendar on a
remote server. Should anything happen to your phone, all your data will
immediately be available to restore on your new phone. You can also set your
phone to automatically backup information on a regular basis, as well as to
select which information is copied.
1 From the Home screen, press Start, scroll to Orange and select Back Up
with the Action key. To use Back Up you will need to register first.
2 Press Menu. Scroll to Create New Account. You will need to enter a
username and password (between 6 and 32 characters long). These can be
anything you choose. They need not necessarily be those that you use on
other Orange accounts. Press OK when you have entered all of your details,
and your SPV C500 will dial to create your account.
3 When you have created an account, follow the on-screen prompts.
store your information safely
learn more... about Back Up in chapter 6
Page 14
2726
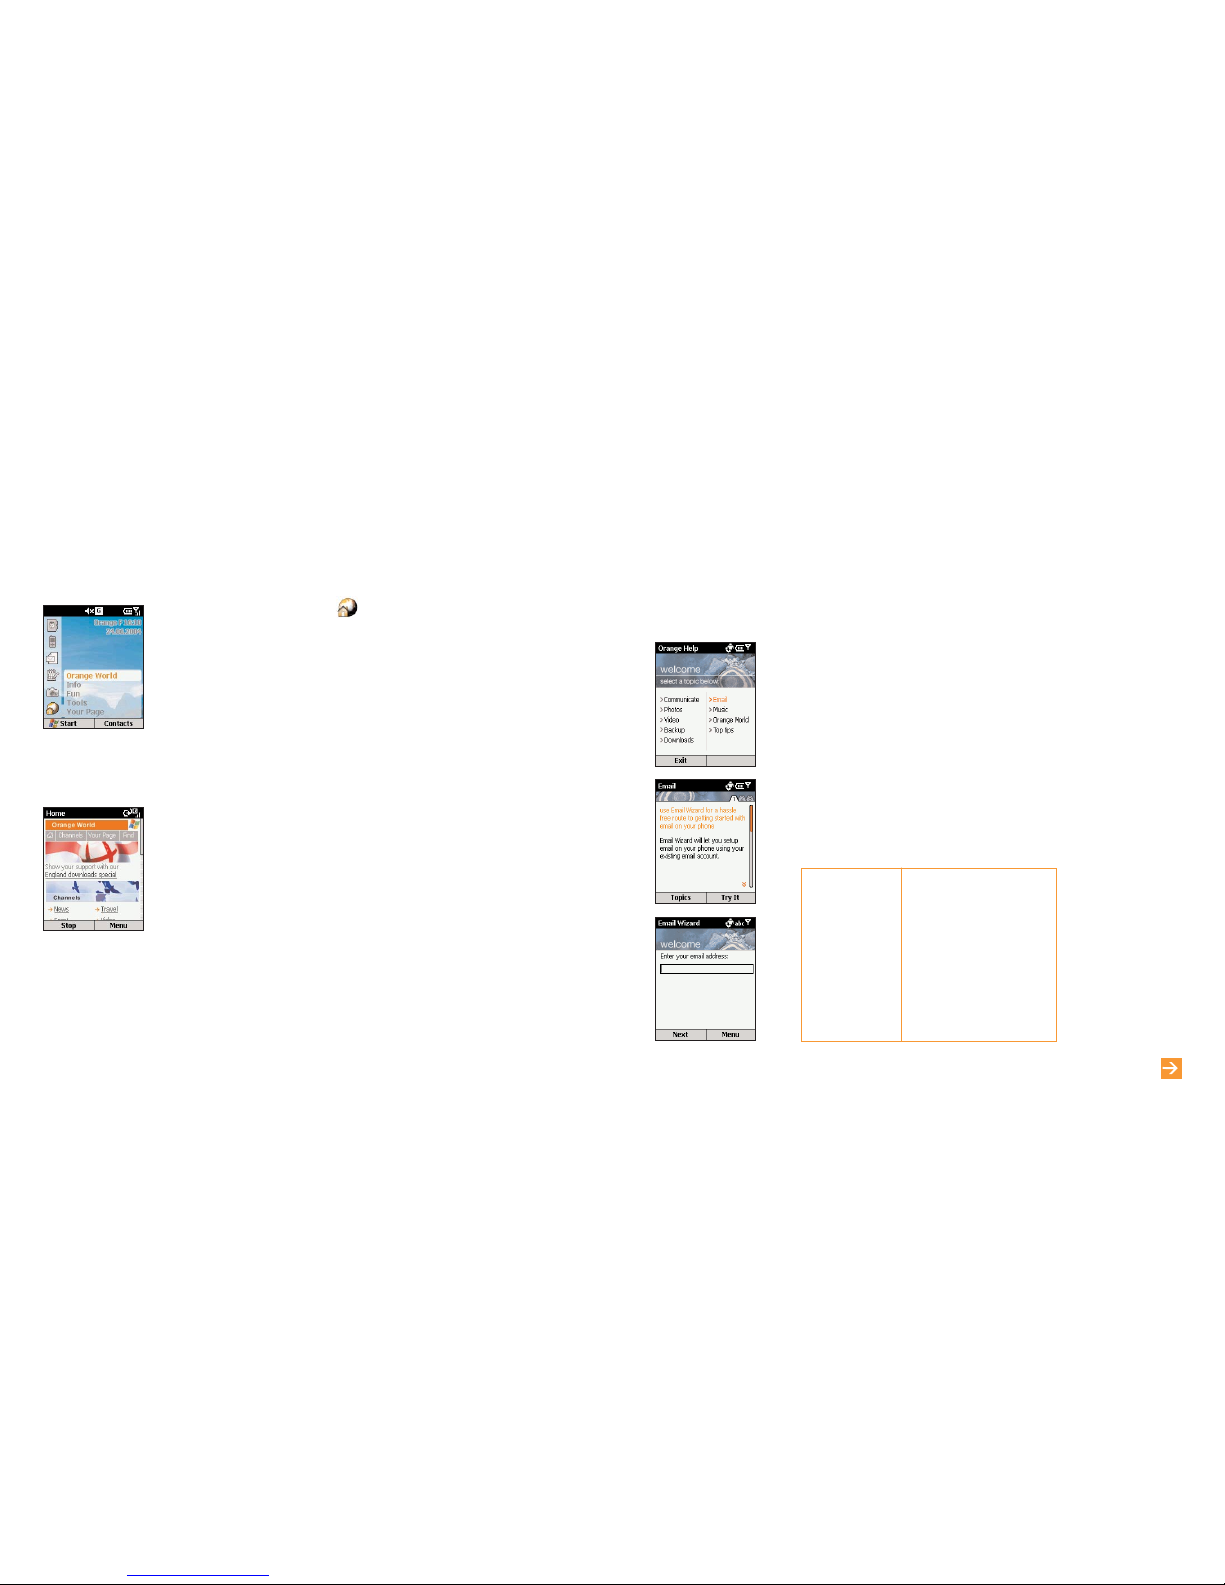
Before you send your first email you need set up your email account on your
SPV C500. To use a corporate account, ask your IT manager to provide the
necessary details.
1 Press Start in the Home screen and scroll to and select Orange with the
Action key. Select Help, then scroll to and select Email with the Action key.
2 Email Wizard is an application developed by Orange to make setting up your
email accounts simple. You will be prompted to enter your email address.
From this, Email Wizard will attempt to complete your outstanding settings.
If your ISP is not recognised by Email Wizard, you will have to enter these
settings manually. You will also need to enter your password and verify your
username. All of these settings are available from your ISP (Internet Service
Provider – the company that you use to access the Internet). If you have an
Orange Internet email account, all the settings you need to use it on your
SPV C500 are included in the table below.
* If you have an Orange
email account you
will have received
these settings when
you first subscribed
to Orange Internet.
get started with email
learn more... about email in chapter 1
Your name _____________
Email address _____________*@email.com
Server type POP3
Incoming mail server pop.orange.net
Outgoing mail server smtp.orange.net
Network The Internet
Username _______________
*
Password _______________
*
Domain 193.35.131.195
*
A quick way to access the Internet is via the Orange World homepage.
1 In the Home screen, scroll to and press the Action key.
2 A list of Channels will appear in the menu. Choose from, for instance:
■
ringtones
■
wallpapers
■
the latest games
■
info
■
fun
■
tools
3 Choose the link you want to explore and press the Action key. Internet
Explorer will open and your SPV C500 will connect. Within moments the link
you chose will appear on your display.
visit your first website
learn more... about Internet Explorer in chapter 6
Page 15
2928
There are two ways to receive email. You can either receive them on your
SPV C500 over the air from your email server, or you can receive them by
synchronising your SPV C500 and your PC.
1 Once you have set up your email, press Start. Inbox is highlighted. Press the
Action key and select your email account. Press Menu, scroll to
Send/Receive and press the Action key.
2 Your phone will connect to your email server and download parts of the
waiting emails. Simply scroll to the email you now wish to read and press the
Action key. You can receive emails via synchronisation. These emails, though
received differently, will still appear in your Inbox and can be read in the
same way as other emails. Please read chapter 10 for detailed information
on synchronisation.
receive your first email
learn more... about email in chapter 1
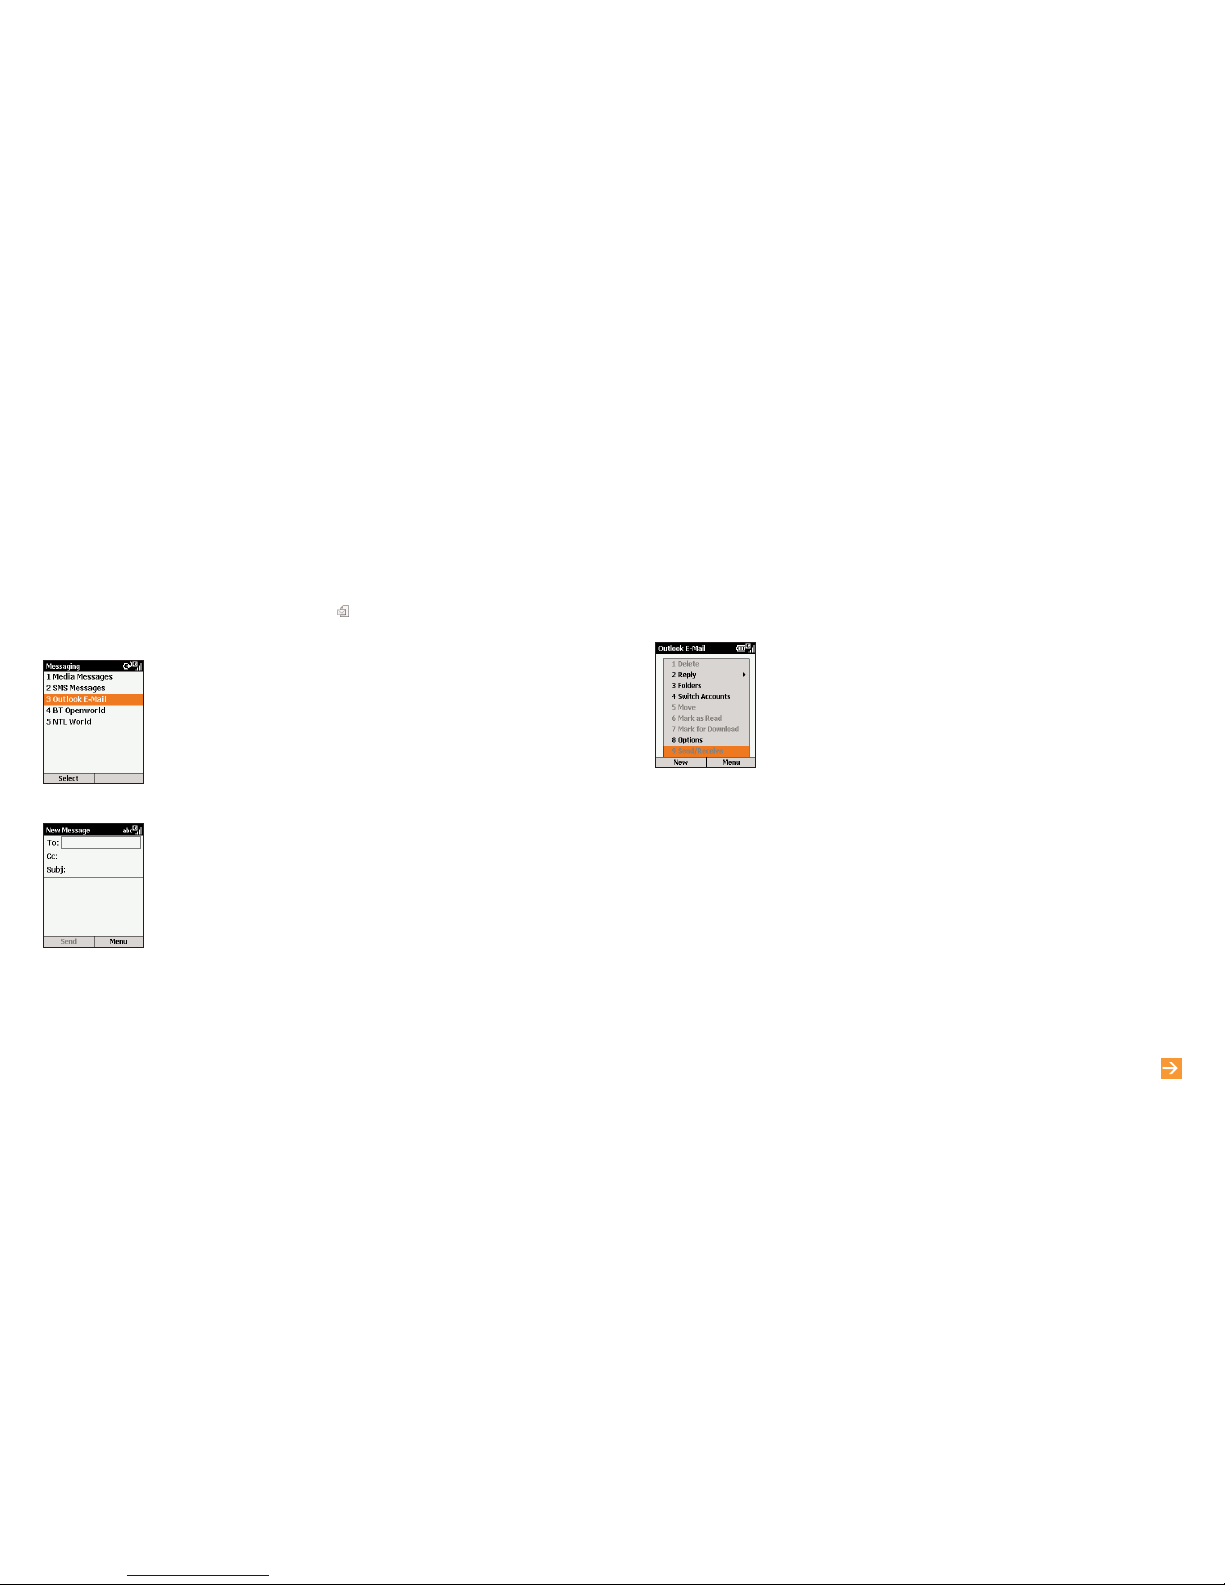
Once you have set up your email accounts, sending email couldn’t be simpler.
1 In the Home screen, scroll to and select New SMS from the menu with
the Action key.
2 Scroll to and select your email account with the Action key. Your account
name will vary depending on your settings. Press New.
3 A new email will open, with the cursor in the To: field. Either write in the
address of the recipient using the keypad, or press Menu and Insert Contact
to pick a name from your Contacts list. You can send the email to multiple
recipients; each recipient’s name will be separated by a ; automatically. You
can also copy the email to people by filling their details in the Cc: field.
4 Fill in a subject and then write the text for your email using the keypad as you
did sending your first text message. When you have finished, press Send to
send the message. This will move your email to your Outbox, from where it will
be sent either when you next manually send emails, or when your phone next
automatically sends and receives emails. To manually send your email, simply
press Menu from your Inbox, scroll to Send/Receive Email and press the
Action key.
Note: In order to keep all of your information up to date across all of your
devices, emails deleted from your SPV C500 will also be deleted from your
Outlook folders the next time that you synchronise with your PC.
send your first email
Page 16

3130
learn more... about synchronisation in chapter 10
1 Press Start from the Home screen and scroll to
Camera, and the viewfinder will open
automatically. Alternatively, press the camera
key on the side of your phone and the
viewfinder will open automatically.
2 Depending on the Capture size, you can zoom
in or out of the image by scrolling up or down
with the Action key. To change the Capture
size, press Menu, choose Options then choose
Modes. You can use the zoom with 160 x 120
and 320 x 240 sizes only.
3 Press the Action key or the camera key on the
side of your phone to take your photo. When
you have taken your photo, you will see the
final image. You can delete this if you’re not
happy with pressing Menu and selecting
Delete. If you don’t delete it, it is automatically
saved into your Multimedia Album.
take your first photograph
learn more... about Photo Messaging in chapter 4
By synchronising your phone and your PC, you can make sure that all of your important information, like emails
and contacts, is kept up to date. You can also use synchronisation to add new programs to your phone.
First, you will need to install Outlook 2000 (if you don’t have this already) and the new version of
Microsoft®ActiveSync 3.7 from the Companion CD that came with your SPV C500, as earlier versions will
not work with your SPV C500.
Do not attach your phone and PC yet.
1 Insert the SPV C500 Companion CD into the CD-ROM drive of your desktop computer. Don’t attach
your SPV C500 to your PC yet. The CD will autostart. Simply follow the on-screen instructions for
installing Microsoft®Outlook 2000 and Microsoft®ActiveSync 3.7.
2 Restart your computer, then connect your SPV C500 using the cradle or USB connection cable.
ActiveSync will autostart when it detects your phone, and the connection wizard will open. Work
through each screen of the wizard, completing information as necessary.
3 At this stage you can decide whether you wish
to create an exclusive Standard partnership
with the PC you are working on, or only a
temporary Guest partnership (for example, if
you are using a borrowed laptop or friend’s
computer). When you have finished, your PC
and SPV C500 will synchronise.
connect your phone to your PC
Page 17
3332
learn more... about Video Messaging in chapter 5
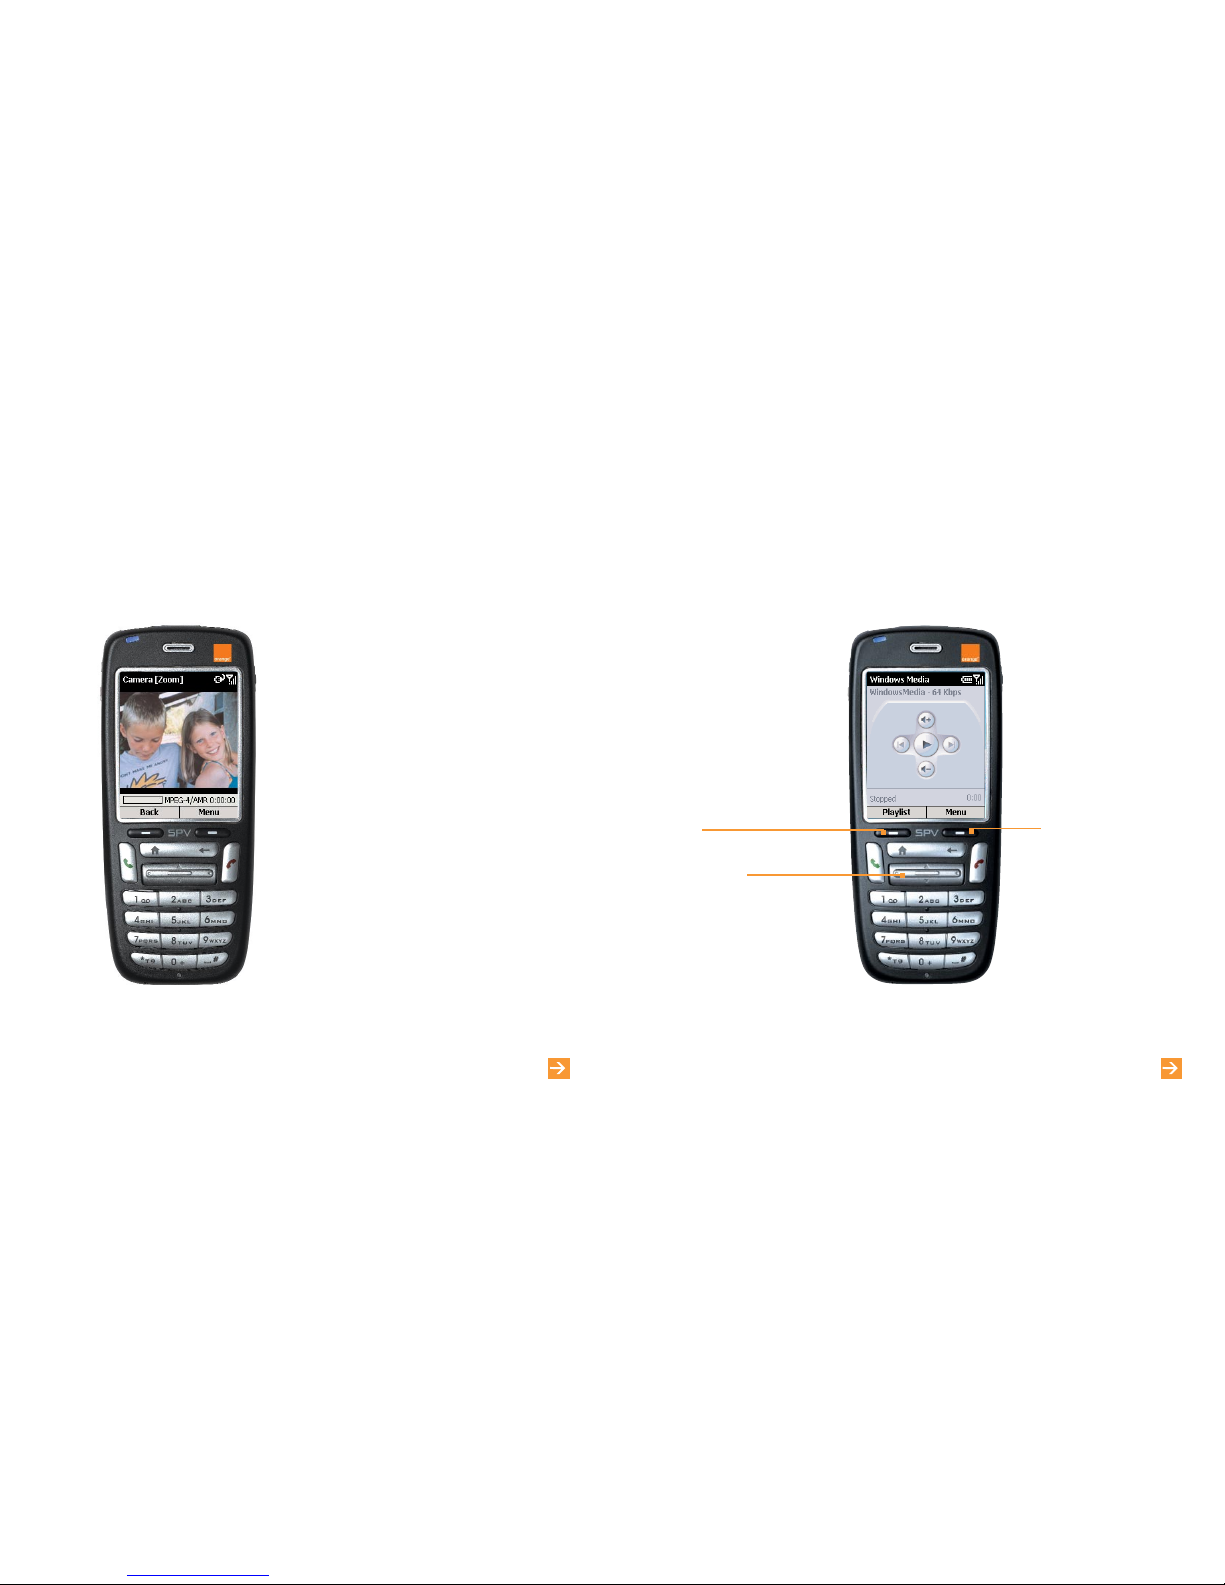
play your first tune
learn more... about Windows Media PlayerTMin chapter 6
playlist
Press to access other media files.
Using Windows MediaTMPlayer you can play Windows MediaTMand MP3 audio files on your SPV C500.
Menu
Access the Media menu
where you will see new
options for your file.
the Action key
Press:
■ Press in to play the clip
■ up or down to increase or
decrease the volume
■ left once to go back to the
beginning of the clip; twice to go
to the previous clip
■ right once to go to the end of the
clip; twice to skip to the next clip.
1 Press Start from the Home screen and select
More. Then scroll to Video Recorder and press
the Action key and the viewfinder will open
automatically.
2 You can zoom in and out by scrolling up and
down with the Action key. To begin recording,
press Capture or the Action key; a red dot
flashes in the bottom right corner while
recording is in progress. To stop, press the
Action key again.
3 You can now play the clip back. Press Menu
then Play to watch it. If don’t like it, press Menu
and then Delete. If you don’t delete it, it is
automatically saved to your Multimedia Album.
record your first video clip
Access your Windows
MediaTMPlayer from the main
menu by pressing Start in the
Home screen. Scroll down
and select More, then Select
Windows MediaTMPlayer.
Page 18

1
34
learn more... about Downloads in chapter 6
manage your
contacts
Downloads allows you to receive the latest Orange software direct to your
phone, over the air. Downloads is very quick and easy to use, so why not make
a regular check for new software?
Before you travel abroad, why not download a currency converter to help you
with the currency, or even a new game to play on your journey.
1 Press Start, scroll to and select Orange, then select Downloads with the
Action key. You will enter the Downloads screen.
2 New downloads is highlighted. Press the Action key. Your SPV C500 will
connect to Orange and open a list of new features available to download.
This may take a few seconds.
3 Follow the on-screen prompts.
receive software direct to your phone
Page 19

create contact cards then call or email
your contacts without having to remember
the number or the email address
You can store hundreds of contacts on your
phone’s memory, but the exact number will
depend on how much of your memory you are
using for other features.
To create a new contact:
1 Press Contacts.
2 Press New. You can now enter the information
for the new contact in the fields. You must enter
contact numbers in the international form, ie,
+44 then the number minus the initial 0. Do not
include spaces or brackets, ie, +447912345678.
3 While entering the details, press # for a space
and *to change between upper case and lower
case. To enter a symbol press and hold the #
key. To enter + for international calls press
and hold 0. Press to delete a character.
4 When you have finished, press Done to save
the new contact.
For a full explanation of all the text input options on
the SPV C500, including predictive text input, see
chapter 3 of this guide.
Note: When you create a new contact on your
SPV C500, you can synchronise contacts with your
PC to keep your contact information up to date on
both devices. Similarly, if you have Microsoft
®
Outlook contacts on your PC, using ActiveSync
you can copy them directly to your phone.
37
store the names and numbers of your
family, friends and colleagues in your
contacts list
Your phone has two contact memories, one on
your phone and the other on your SIM Card. When
you save a new contact it is automatically saved to
your phone. If you are using a SIM Card that
already holds contacts stored on another phone,
these will appear at the bottom of your contacts list
with the symbol next to them.
Your contacts list enables you to store information
about people and businesses you communicate
with. A contact card is created for each entry.
To open your contact list press Contacts from
the Home screen.
The contacts list displays the names of your
contacts alphabetically, along with an abbreviation
reminding you whether it’s the person’s work phone
number {‘w’) or Home phone number (‘h’). This
makes it easy to reach the contact using the
method you prefer. Other abbreviations are shown
in the grey box opposite.
When you open the contact you want to view,
you can see all of the information stored on the
contact card.
To open a contact card:
1 Scroll to the contact you want to view and
press the Action key.
2 You will see information such as the name of
the person or business, phone numbers, email
addresses, and more.
36
manage your contacts
Orange Directory Enquiries
The new number for Directory Enquiries is 118
000. So save 118 000 to your phone now, and it’ll
be there the next time you’re out and about and
need a number in a hurry.
Otherwise, it’s the same convenient service from
Orange. Simply call 118 000 and tell the operator
the name or place you are looking for and they will
tell you the number (you can request three
numbers per call). Then, they will send a text
message to your phone at no extra cost, allowing
you to call the number directly from the message
or add it straight to your phonebook.
manage your contacts
What are the abbreviations in my
contact cards?
w Work phone w2
Second work phone
h Home phone h2
Second home phone
m Mobile phone pgr
Pager
car Car phone wfx Work Fax
hfx Home fax ast Assistant
Phone
rdo Radio phone e
email address
e2 Second email e3
Page 20

2 Select a filter (Business, Miscellaneous or
Personal), and press the Action key. The filter
categories are the same as those used by
Microsoft®Outlook on your PC.
using the contact menu options
Using the contact menu options, you can quickly
apply a speed dial to the contact, change the first
(default) method of communicating with the
contact, beam the contact card to another mobile
device or a PC using infrared, delete the entire
contact card or edit the contact card information.
To view the contact menu options:
1 Open a contact in your contacts list by scrolling
to their name and pressing the Action key.
2 Press Menu and the options list will open. You
can see the options in the grey box opposite.
Note: These options are only available to contacts
stored on your phone memory.
3938
manage your contacts
What are the contact card menu options?
Remember, these options are only available for
contacts stored on your phone memory.
Add Speed Dial Enables you to create a
shortcut to a phone number,
email address, or web URL
by assigning one or two
numbers as a speed dial.
Send SMS Send a text message to
the contact.
Add Voice Tag Save a voice tag to your
contact for voice dialling.
Save to SIM Save your contact on your
SIM Card memory.
Set As Default Makes the selected phone
number or email address the
default communication
method for the contact.
Beam Contact Sends the contact card to
another mobile device or a
PC using infrared.
Delete Removes the contact card
from the contacts list.
Edit Lets you modify contact
information.
Once you have opened a contact card, you can
call or email the contact directly
1 Scroll to the number you want and press to
dial the number.
2 To email the contact, scroll to and select their
email address using the Action key. Press the
Action key again to go to the Messaging menu.
Scroll to and select Outlook E-Mail to begin
composing a message.
To edit a contact:
1 On the Home screen, press Contacts.
2 Select the contact to edit, and press the Action
key to open the contact card.
3 Press Edit.
4 Make the changes, and press Done.
At this stage you can also set the default number
for the contact. This is the number that your phone
will call automatically should you select the contact,
unless you specify otherwise.
1 In the contacts list, scroll to the contact you
wish to alter and press the Action key.
2 Scroll to the number you want to set as the
default and press Menu.
3 Scroll to Set as Default and press the Action key.
A dot will appear to the left of the default number.
Note: If the contact details include a work phone
number, your SPV C500 will automatically set it as
the default number to call.
To delete a contact select the contact to delete,
press Menu, select Delete, and then press the Action
key. Press Yes to confirm your choice.
finding a contact in your contacts list
In the contacts list, you can enter the first few letters
of the contact’s name and your SPV C500 will
search through the contact list and display the
name.
This works with predictive text, so you don’t need
to press the key for each letter more than once.
So, to write orange you would simply press the
keys 6, 7, 2, 6, 4 and 3 once each. You can also
sort your contacts list to suit how you use it.
1 In the contacts list, press Menu, then scroll to
Filter. Press right on the Action key to go to the
filter menu.
manage your contacts
Page 21

To make a call using a speed dial:
1 Press and hold the number on the keypad
that you have assigned as a speed dial for
a number.
2 If the keypad assignment is 2 digits long,
press the first digit then press and hold the
second digit.
To view the speed dials you have created:
1 Press Start, then scroll to and select More.
Select More again, then select Accessories
2 Scroll to and select Speed Dial. A list of all your
speed dials will be shown.
Once you have set up speed dials you can view or
delete all of your speed dials in the speed dials list.
To view and delete speed dials:
1 Press Start, then scroll to and select More.
Select More again, then select Accessories.
2 Scroll to and select Speed Dial. A list of all of your
speed dials will appear. Scroll to the shortcut to
delete, press Menu, then select Delete.
3 Confirm your choice by pressing Yes.
41
add photos to your contacts
You can add photos to your contacts so that
when a friend calls, a picture, perhaps of them or
something that reminds you of them, appears on
the screen.
1 From the Home screen, press Start and scroll
to and select the Orange folder. Select Caller
Photo ID and press the Action key.
2 Scroll through your contacts and when you
reach one you wish to add a photo to, press
Assign Photo.
3 Your Multimedia Album will open up with your
images as a series of thumbnails.
4 Scroll through your images and when you have
chosen the one you want to assign, press the
Action key. Alternatively,press Menu and select
New from Camera to take a new photo.
5 Press Done to confirm and this image will be
assigned to your chosen contact.
call your favourite numbers without
having to enter your contacts list
You can create speed dials, also known as
shortcuts, to dial frequently dialled phone numbers
by simply pressing and holding one or two keys. You
may choose speed dial entries from 2 to 99 as the 1
key is preset as a shortcut to your Answer Phone.
To create a speed dial:
1 Select Contacts and scroll to the contact you
want to add a speed dial to. Press the Action key.
2 Scroll to the phone number you want to set up
as a speed dial, then press Menu.
3 Add Speed Dial is highlighted. Press the
Action key.
4 Scroll to Keypad assignment, then enter the
speed dial number you want to assign to the
phone number, and press Done.
Note: You can also create speed dials for web and
email addresses that are stored in Contacts and for
programs that you often use. To store a program
as a speed dial scroll to it in the Start menu and
press Menu, then select Add Speed Dial.
40
manage your contactsmanage your contacts
Page 22

Back Up your SIM Card address book
Make sure that losing your phone doesn’t also
mean losing all of the important contact information
stored on your SIM Card.
Memory Mate is a new service that ensures that
the details you have stored on your SIM Card for all
of your friends, colleagues and family are safely
backed up. So, if the worst happens, they will still
be available to you.
For a low one-off charge you can purchase a
Memory Mate card from any Orange shop that will
back up your SIM Card address book. Then, simply
return to your Orange shop regularly to have any
new information backed up at no additional cost.
And, if you’re joining Orange from another network,
Memory Mate can be used to transfer the contacts
and text messages saved on your old SIM Card to
your new Orange SIM Card, keeping your move
totally hassle-free.
For more information, visit your nearest Orange
shop and one of our representatives will be happy
to assist you.
42
2
manage your calls
manage your contacts
Page 23

what happens when you get an Answer
Phone message?
When someone leaves a message on your Answer
Phone, the symbol will appear on your
phone’s display. This symbol will remain until the
message has been saved or deleted. Answer
Phone messages that have not been listened to
will be saved for up to 21 days.
You will be alerted when you receive a new
Answer Phone message. Simply press and hold
the 1 key to save, listen to or delete messages.
You can save messages that you have listened to
for up to seven days.
personalising your Answer Phone greeting
Your Answer Phone comes with a standard greeting
but you can record your own personal greeting so
your callers know they’ve got through to you.
1 Call your Answer Phone by pressing and
holding the 1 key. Listen to the simple steps
and select option 3, then option 1, then option
1 again.
2 Record your greeting followed by the # key.
3 Press 2 to save it.
use Answer Phone shortcuts to manage
your messages efficiently
Your Answer Phone is quick to use as there are
several single key presses to help you move
through your messages.
When listening to your messages press:
1 to listen to your message again
2 to save your message
3 to delete your message
7 to rewind 10 seconds
8 to skip to the next message
9 to fast forward 10 seconds
# to return the call
set up an Answer Phone PIN
For added Answer Phone security, you can set up
your Answer Phone to request a PIN each time you
want to listen to your messages.
1 Call your Answer Phone by pressing and
holding the 1 key.
2 Select option 3, then option 2.
3 Enter your chosen Answer Phone PIN which
should be between four and ten digits long,
followed by the # key. Then press 1 to save it.
44
listen to your Answer Phone messages
from another phone
If you do not have access to your Orange phone,
you can listen to your Answer Phone messages
from any other phone. To use this service you
need to have set up an Answer Phone PIN.
1 Call 07973 100 123 from any phone.
2 Enter your Orange number followed by
the # key.
3 Enter your Answer Phone PIN followed by
the # key.
4 Follow the simple steps to listen to your
messages.
Note: The cost to call your Answer Phone depends
on your Service Plan and, if you are calling from
abroad, the rate will vary depending on the service
provider you are using.
manage your calls
Answer Phone Call Return
You can use Answer Phone Call Return to return
a call after someone has left a message on your
Answer Phone, without having to remember or
make a note of their number.
To use Answer Phone Call Return:
1 Listen to your Answer Phone message as
normal.
2 When you have finished, if you want to return
the call, simply press # while you are still
connected.
3 Orange Answer Phone will automatically dial
the caller’s number and connect you.
Note: Answer Phone Call Return is only available
if the network you are calling supports this service.
You are charged your standard call rate.
manage your calls
45
Page 24

3
messaging
46
when you can’t take your calls, why not
divert them?
not available to pay as you go customers
Call Divert allows you to divert different types of
calls to different numbers. So, you might choose to
divert fax calls to your office fax machine, but voice
calls to your Answer Phone.
You can set up call diverts with the following settings:
■
Divert all voice calls
■
Divert if not available
■
Divert all fax calls
■
Divert all data calls
■
Cancel all diverts
To activate a divert:
1 Press Start, then scroll to and select Settings.
2 Phone is highlighted. Press the Action key.
3 Scroll to Call Forwarding and press the
Action key.
4 Choose the circumstances for the divert.
■
Unconditional
Diverts all calls.
■
No reply
Diverts unanswered calls.
■
Busy
Diverts calls that you reject, or calls that come
through while you are using the phone.
■
Unavailable
Diverts calls that come through when you are
out of the Orange service area.
5 Press the action key. Make sure that the check
box is ticked, then enter the number that you
want to forward calls to. For Answer Phone,
simply enter 07973 100 123.
6 Press Done.
Note: There is no charge to set up or cancel a
divert. You are charged your normal Service Plan
rate. If you are calling or diverting your calls abroad,
the rate will vary depending on the zone you are in.
The availability of the Call Divert service depends
upon the partner network.
To check a divert status, or cancel a divert:
1 Follow the steps above, and select the
condition that you want to check or cancel the
divert for.
2 Simply check or uncheck the box, and press Done
manage your calls
Page 25

49
Before beginning this section, please refer to
the getting started section at the front of this
guide, where you will learn how to set up your
email accounts.
you can create text messages and emails
in several different ways
When a phone call is inappropriate, or you only
want to convey a short and simple message, you
can send a text message. Alternatively, send emails
to arrive on computers, PDAs or other phones.
Before you can send emails, you must set up your
email account. You can learn how to do this in the
Getting Started section at the front of this guide.
1 Press Start. Messaging is highlighted. Press the
Action key.
2 Select SMS Messages to send a text message
or Outlook E-Mail to send an email, and press
the Action key. Press New to start a new SMS
message or email.
3 The To: field is highlighted. To write a text
message, either enter the phone number of the
person you want to send the message to, or
press the Action key to access your contacts
list. To write an email, enter the email address of
the person you want to send the email to, or
press the Action key to select a contact from
your contacts list.
4 To pick a contact from your contacts list, simply
scroll to the name you want and press the
Action key. However, for Text Messaging you
can only use a contact that has a phone
number saved in the Mobile field. Other
numbers can’t be used. For email, the contact
must have an email address saved to it.
5 If the contact has more than one email address
or mobile number, you will be asked to choose
which you wish to use. Scroll to the one you
want and press the Action key.
6 You will be returned to the message screen,
where the contact’s details will be inserted in
the To: field.
7 Scroll down to enter information in any of the
other fields required. Finally, complete the main
text of your message. There are two methods
for entering text, and you can rotate through
them by pressing and holding the *key:
■
predictive text input, shown as English T9
■
standard text input, shown as ABC
To enter a number in your SMS message, press
and hold the correct key.
8 When you have finished entering your email or
text message, simply press Send.
48
You can add multiple recipients by separating each
address or phone number with a semicolon (press
the # key, then scroll to and select a semicolon). If
you are choosing names from your contacts list,
then the semicolon appears automatically each
time you add a new contact.
Note: The cost of sending a text message depends
on your Service Plan. You are charged for each
person the message is sent to.
entering text using standard text input
To enter text using standard text input
mode you press each key the right number of times
to get the letter you want. So, to get an O you
would press the 6 key three times. For an A you
would press the 2 key once.
Press # for a space. The first letter of a sentence is
automatically capitalised.
The letter entered most recently is underlined until
you have completed the key presses for that letter
and moved on to the next letter. When entering
letters on the same number key, pause after
entering the first letter and wait for the underline to
disappear before entering the next letter.
To increase the speed at which you can enter text:
1 Press Start, select Settings, and then select
Accessibility.
2 Under Multipress time out, select the time
interval you want between key presses and
press Done.
save time using predictive text input
Predictive text input uses a dictionary to recognise
certain combinations of letters and predicts the
word you want to write. To enter text using
predictive input you only need to press the key for
a letter once. So, for example, to write the word
orange you would press 6, 7, 2, 6, 4 and 3. You
will see that the word does not appear on screen
immediately – don’t worry, that’s how it works.
When you have finished pressing all of the keys,
the word should appear on the screen.
To enter text using the predictive text method:
1 Press and hold the *key to display the text
input menu.
2 Scroll to and select English T9.
3 Press each key once for the word you want.
messagingmessaging
Page 26

receiving text messages
When you receive a text message on your phone,
the symbol will appear. To read the message
press Message in the Home screen. Alternatively:
1 Press Start.
2 Messaging is highlighted. Press the Action key.
3 Select SMS Messages, then scroll to the latest
message and press the Action key to open it.
Hint: When you’re in your text message (SMS)
inbox, you can quickly go to either your Media
Messages or Outlook Email inbox by simply
scrolling left or right with the Action key.
inserting text templates into messages
Save time when composing your email or text
messages by inserting text templates into your
messages.
You can edit the pre-defined text to create words
or phrases that you frequently use in messages.
1 Press Start, then select Messaging.
2 Scroll to and select SMS Message.
3 Press New. Scroll to the body text field, then
press Menu. Select Insert Text.
4 Select the pre-defined text to insert into your
message and press Insert.
To edit your pre-defined text messages:
1 Press Start, then select Messaging.
2 Select SMS Messages. Press Menu, then
select Options.
3 Select Edit My Text.
4 Select and modify the text you want to change,
and press Done.
51
4 Press the # key to accept the word and enter a
space after it, or scroll Up or Down with the
Action key to move through the available words.
5 If you do not see the correct word, erase the
word by pressing , and then press and hold
the *key to change to standard, Multipress
mode and manually enter the word.
Having trouble entering a word in predictive
text mode?
Predictive text cannot always find the word you
want in the dictionary. In these cases, change to
standard text input. After you have entered the
word in standard text input, it will be added to the
predictive text dictionary.
To enter punctuation in predictive text mode,
press 1, then scroll UP and DOWN using the
Action Key to move through a list of common
punctuation marks.
entering numbers using Numeric
text input
When you are in 123 mode, just press the number
you want to enter on the keypad. If a field permits
a numerical entry only, such as the Work phone
field in Contacts, the input mode will automatically
change to the Numeric mode.
message options
To request a delivery receipt for a text message:
1 Before you send the text message, press Menu,
select Message Options, and then press the
Action key.
2 Press the Action key to select the Request
message delivery notification check box, then
press Done.
50
messagingmessaging
Page 27

53
inserting voice recordings into messages
Inserting a voice recording into a message is easy,
and useful when you want to verbally explain
information that is contained in the message.
1 Press Start and select Messaging. You cannot
insert a voice recording into a text message.
2 Open a new message and in the body text field
press Menu, and then select Insert Recording.
3 Press Record to start recording, and press Stop
to stop recording.
4 Press Done to insert the recording into your
message.
receiving meeting requests
When you accept a meeting request that arrives in
your Inbox, the meeting will appear in Calendar on
your SPV C500 when you next synchronise, and a
message will be sent back to the meeting
organiser. For more information about
synchronising Calendar, see chapter 9.
1 Press Start, select Messaging, and then press
the Action key.
2 Select the meeting request, press the Action
key, and then press Accept.
receiving complete emails
You can specify that emails be received in full,
instead of receiving only the first 500 characters.
1 Press Start, then select Messaging.
2 Select the message to receive in full, press
Menu, select Mark for Download, and then
press the Action key. The complete message
will be retrieved the next time you synchronise
or connect to your email server.
receiving message attachments
You can download message attachments to your
SPV C500. Attachments are displayed as a list of
hyperlinks at the bottom of the email message, and
are preceded by an attachment icon.
The text of the hyperlink contains the file name
followed by the size of the attachment, thereby
helping you to determine whether you want to
download the attachment.
Note: On POP3 messages, the attachment size is
not shown.
52
There are three different icons for attachments:
Not downloaded
Downloaded
Marked for download
To download an attachment:
1 In an open message containing an attachment
for downloading, select the attachment and
press the Action key.
2 The attachment will be downloaded when you
synchronise or request to send and receive
emails.
To view a downloaded attachment, select the
attachment and press the Action key.
Note: You can view attachments only for file types
that are supported by your SPV C500.
viewing your message folders
Your SPV C500 stores messages in the
following folders.
■
Deleted Items
Messages that you delete are stored here until
you empty the folder.
■
Drafts
Messages that you save before sending are
stored here.
■
Inbox
All messages that you receive arrive here.
■
Outbox
Sent email messages are stored here until you
synchronise or connect to your email server.
■
Sent Items
Copies of email messages that you send are
stored here.
To view message folders:
1 Press Start, then select Messaging.
2 Select Media Messages, SMS Messages or
Outlook E-Mail.
3 Press Menu, then select Folders.
messagingmessaging
Page 28

55
Note: If your email account supports folders, you
can view multiple folders to reflect the folder
structure that you have created on your email
server. Messages you download from the server
will then be placed automatically in the
appropriate folders on your SPV C500.
Hint: When you’re in one of the inboxes, you can
quickly go to another by simply scrolling left or right
with the Action key.
using the Inbox menu options
It’s easy to carry out many messaging tasks from
your Inbox. Press New to compose a new
message, or press Menu to forward, delete or reply
to messages, access your Inbox options and more.
1 Press Start, then select Inbox.
2 Select Media Messages, SMS Messages or
Outlook E-Mail.
3 Press Menu, then select an option from the
menu (shown below).
54
deleting emails from your SPV C500
When you synchronise data between your
SPV C500 and your PC, ActiveSync ensures that
the same information appears on both devices.
To ensure consistency, this means that if you
delete an email from your SPV C500, it will also
be deleted from your Outlook inbox the next time
you synchronise.
If you don’t want your emails deleted from your
Outlook inbox, you must make sure that they are
not in the Deleted items folder on your phone
before you synchronise.
1 In your inbox, scroll to the email that you wish
to delete.
2 Press Menu and select Delete. The email will be
deleted from your inbox.
3 To stop the email from also being deleted from
your PC, you need to remove it entirely from
the memory of your SPV C500. To do this,
press Menu again and scroll to Show folders.
Press Select.
4 You will see the folder tree. Scroll to Deleted
items and press Select.
5 A list of all of your deleted emails and text
messages will appear. At this point, scroll to the
message you want to erase permanently and
press Menu. Alternatively, simply press Menu
from anywhere if you wish to delete all of the
messages.
6 Select either Delete or Empty Folder and press
the Action key.
7 Now that the email has been removed from the
memory, it will not be erased from your PC
when you next synchronise.
save your sent emails
It may be useful to keep a copy of your emails for
later reference. Once set up, all the emails you
send will be moved to your Sent Items folder.
1 Press Start, select Inbox with the Action key
and press Menu.
2 Scroll to Options and press the Action key.
Scroll to Sending and press the Action key.
3 Scroll to Save copies of sent items and press
the Action key so that a tick appears in the box.
4 You can also choose whether to include a copy
of the original message when replying to email.
Simply scroll to it and press the Action key so a
tick appears in the box.
5 When you are finished press Done to save your
selection.
messagingmessaging
What are the Inbox menu options?
Delete Deletes the message.
Reply Replies to the sender of a
message only.
Reply All Replies to all the recipients
of a message.
Forward Forwards the message.
Folders Displays all message
folders.
Switch Accounts Move between your
inboxes.
Move Moves the message.
Mark as Read Displays the header text of
a message in the Inbox in
lightface, indicating that the
message has been read.
Mark for Download Retrieves the entire email
the next time you connect.
Options Displays a list of Inbox
options you can customise.
Send/Receive Connects to your email
server to send and receive
messages.
Page 29

4 Choose whether you want your messages
ascending or descending.
5 Press Done to save your selection.
send emails manually
If you only send a few emails, you may prefer to
send them manually after writing them.
While you are getting used to your email account
we recommend the following procedure:
1 Write your email as normal, and press Send.
This moves your email to the Outbox.
2 You are returned to your Inbox. Press Menu,
scroll to Show Folders and press the Action
key. Scroll to Outbox and press the Action key.
3 Your emails will appear in consecutive order.
Press Menu, scroll to Send/Receive Email and
press the Action key.
4 Along the top of your screen you will see
Dialling... As your emails are sent you will see:
■
Connecting...
■
Logging In...
■
Sending and Receiving
■
Sending Mail
■
1 of 1 receiving
This lets you see what stage of sending and
receiving you are at.
5 As your messages are sent they will disappear
from your Outbox.
When you are more comfortable with using email
on your SPV C500, from anywhere in the Inbox
press Menu, select Send/Receive Emails and press
the Action key. Your SPV C500 will then send all
the messages in your Outbox and receive any
emails from your account.
keep in touch with your colleagues and
friends in real time, using MSN Messenger
You can use MSN Messenger to send instant
messages. It provides the same type of chat
environment as MSN Messenger on your PC.
For instance you can:
■
Send and receive instant messages.
■
See the status of others in your Messenger
contacts list, or change your own status, for
example, available, busy, out to lunch.
■
Invite other people to a chat conversation.
■
Block contacts from seeing your status or
sending you messages.
57
To view your sent emails:
1 From your Inbox press Menu, scroll to
Accounts/Folders and press the Action key.
2 Scroll to Sent Items and press the Action key to
open a list of all the messages you have sent.
set your incoming message size
You can choose how much of each message is
initially downloaded. If you use GPRS you are
charged for the amount of data you download, so
setting the right size is important to achieve the
balance between cost and efficiency.
Your SPV C500 is preset to download the first 500
bytes of each email. If emails contain attachments
you will see Mark for Download and you can
choose to download the full item. If you don’t want
to download the full attachment, simply leave it.
To set your incoming message size:
1 From the Inbox press Menu, scroll to Options
and press the Action key. Scroll to Receiving
and press the Action key.
2 Use the left and right navigation keys to select
how much of each message your SPV C500
will initially download.
3 Press Done.
display your messages your way
You can choose how your emails are arranged.
1 From the Inbox press Menu, scroll to Options
and press the Action key. Select Display and
press the Action key.
2 Select whether you want to see the date and
time in the message list by pressing the Action
key. If there is a tick in the box, they will appear.
3 Choose the order in which you want your
messages to be displayed, from:
■
Date received
■
Sender
■
Subject
56
messagingmessaging
Page 30

To invite a contact to an ongoing chat press
Menu, select Invite, and then select a contact.
To see who is already chatting press Menu, and
select Chats.
To accept or change between chats press Menu,
select Chats, and then select the contact to begin
chatting.
To add a contact to a chat, press Menu in the
Messenger contacts list, select Add Contact, and
then follow the directions on the screen.
To delete a contact select the contact name in the
Messenger contacts list, press Menu, and then
select Delete Contact.
To block or unblock a contact from seeing your
status and sending you messages, select the
contact name in the Messenger contacts list, press
Menu, and then select Block or Unblock.
To change your status:
1 In the Messenger contacts list, select your
name, and press the Action key.
2 Select a status description, such as Away, and
press the Action key.
Note: You must be signed in to MSN Messenger to
change your displayed name.
59
To use MSN Messenger you will need a Microsoft
®
.NET Passport account unless you already have a
Hotmail account.
To set up a Microsoft®.NET Passport account,
go to: http://www.passport.com
Once you have this account, you will need to sign
into MSN Messenger using your Microsoft .NET
Passport.
To sign in and out of MSN Messenger:
1 Press Start, then scroll to and select MSN
Messenger. Press Sign In.
2 Enter your sign-in name, for example
name_123@hotmail.com, and password, and
then press Sign In.
3 To sign out, press Menu and select Sign Out.
Note: If you do not sign out of MSN Messenger,
you will remain on a data connection. This may
result in additional charges on your bill.
To send an instant message:
1 Sign in to MSN Messenger.
2 Select the person in MSN Messenger to whom
you want to send an instant message, and
press Send.
3 Enter your message, and press Send.
Note: To quickly add common messages, press
Menu, select My Text, and then select the text you
want to use in the message.
58
messagingmessaging
Page 31

60
4
Orange Photo
Messaging
Page 32

To adjust your camera settings:
1 Press Start, then select Camera.
2 Press Menu, then scroll to and select Options.
Choose to adjust:
■
General
Decide where you want to store your images –
on the Storage Card or on the Internal
Memory, and adjust the camera’s flicker
setting. You can also choose to review photos
after they are taken, and enable or disable the
shutter sound.
■
Counter
The counter keeps track of how many images
or videos you have recorded.
■
Photo
Adjust the JPEG quality, change the photo
filename prefix and choose where you want to
store your Template folder.
■
Video
Adjust the capture size of the video clip,
whether you want audio on or off and the
filename of the video clip.
■
Modes
Change your camera’s Capture mode.
Choose between Photo, Video, MMS Video,
Photo ID and Picture Theme.
You can take a self-portrait:
1 Turn your phone around so you are facing the
lens. You will be able to see your face in the mirror.
2 Arrange yourself as appropriate. When you are
ready to take your shot, press the camera
button on the side of your phone.
store and browse through the images in
your Album
Your SPV C500 has an Album application so you
can view your images. You can view the files as
thumbnails, zoom in and out and watch them in a
slide show.
To view your images in the Album:
1 Press Start. then scroll to and select
Multimedia Album.
63
take a photograph
Please see page 29 for how to take a photograph
with your phone’s camera. Photographs are
automatically saved to your Multimedia Album.
Before taking a photograph, press Menu to access
the following further options:
■
Capture Mode
Select this to switch between several image
and video modes.
■
Zoom
Use the Action key to zoom in and out of your
image.
■
Ambience
Select this to adjust the lighting of your shot.
■
Options
See opposite.
■
Album
See all the photos and videos stored on
your phone.
62
Orange Photo MessagingOrange Photo Messaging
What are the options for customising
your Album?
General To adjust the general
Album settings such as
the backlight and mute
the sounds.
Slide Show Customise your Slide Show
settings, how long an image
is viewed, the direction of
rotation and play order.
Transition Effects Decide how you want your
slide show to appear and
fade from image to image.
Sort By Order your images by date,
size, type and name.
Thumbnail Adjust the thumbnail size,
number your thumbnails
and show image
information.
Association Choose the file type for
your image.
About Album information and
version number.
Page 33

compose your own melody or send a
recording you’ve made
1 Press Start, then select Messaging.
2 Select Media Messages, SMS Messages or
Outlook E-Mail, then press New.
3 Press Menu and select Insert Recording.
Note: you cannot insert recordings into text
messages.
4 Press Record and record your own tune or
voice message to send.
5 The sound file you have created will
automatically be given a name.
6 Press Done when you have finished naming the
recording. Your new melody will be shown in
the Sound thumbnail library.
add a photograph to your photo message
1 Select Start then Messaging.
2 Select Media Messages, then press New.
3 Enter a contact number in the To: field. You can
also choose to add a brief description of the
message in the Subj. field.
4 Scroll to Insert Picture and press the Action key.
5 The Album will show. Decide whether you want
to take a new photograph by selecting the
camera, which is highlighted, or select an
existing image.
6 Select the camera. You will go straight to
the viewfinder.
7 Press capture to take your photograph and it
will be added to your Album as a thumbnail.
8 Press Select to add the picture directly to
your message.
65
2 Your Album will open up with the images and
videos displayed as a series of thumbnails.
3 To organise the images in your album,
highlight an image, press Menu and choose
from the following options:
■
Send
To send your image in a photo message or via
email.
■
Delete
To delete your image.
■
Save as
To save your image as a caller ID photo.
■
Rename
To personalise the name of the image.
■
Properties
To view the image properties, for instance the
image name, storage position, size, type and
date of creation.
■
Slide Show
To view all the images in your Album as a
slideshow.
■
Options
View the image options. See the grey box on
the previous page.
■
Change folder
Re-assign the storage folder for your image in
the file manager.
■
New
To take a new image.
4 To view the individual image options,
highlight an image, press the Action key and
then press Menu. Choose from:
■
Send
To send your image in a photo message or
via email.
■
Delete
To delete the image. Press the Action key and
press Yes to confirm deletion
■
Save As
Save the image as a Caller ID Photo or as
your Home Screen.
■
Rename
Rename the image with a name of
your choice.
■
View
To view the image properties, zoom in and out
and rotate.
■
Camera
To go directly to the viewfinder to take
another shot.
■
Thumbnails
To r eturn to the thumbnail view of all
your images.
64
Orange Photo MessagingOrange Photo Messaging
Page 34

Orange Photo Messaging options
1 While you are creating your photo message,
you can select from a number of message
options.
2 Press Menu and choose from:
■
Add Recipient
This opens your Contacts so you can select a
recipient for your photo message.
■
Insert
To insert text, pictures and sound.
■
Remove Object
To r emove an object from your message.
■
Preview
To have a look at your message before you
send it.
■
Pages
Add or remove a page.
■
Background Colour
Select a colour for the background of your
message.
■
Message Options
Adjust the priority and message type.
■
Postpone Message
Save the message to send later.
■
Send Message
Send your photo message.
■
Cancel Compose
To cancel the message and return to the Inbox.
sending your message
When you have added a recipient, a subject, an
image and sound to your photo message and you
are happy to send it, simply press Send.
It’s on its way!
66
5
video messaging
Orange Photo Messaging
Page 35

69
if a picture speaks a thousand words, a
video tells a great deal more
Video Messaging is the latest way to share
scenes from your life. Shoot a video using your
SPV C500’s built-in video camera, then save it to
your phone to watch any time you like.
To record a video clip:
1 Press Start then More from the Home screen
and scroll to Video Recorder. Press the Action
key and the viewfinder will open automatically.
2 You can zoom in and out by scrolling up and
down with the Action key.
3 To begin recording, press Capture; a red dot
flashes in the bottom right corner while
recording is in progress. To stop recording,
press Stop.
4 You can now play the clip back. Press Menu
then Play to watch it. If you don’t like it, press
Menu and then Delete. If you don’t delete it, it is
automatically saved to your Multimedia Album.
Video clips are automatically saved to your phone’s
Multimedia Album.
Note: You must obey all local laws governing the
taking of videos. Do not use this video recorder illegally.
Before you begin shooting videos you may want to
look at how your video is set up.
To adjust your Video Recorder settings:
1 Press Start, then More and select Video
Recorder.
2 Press Menu and then Options. Choose to adjust:
■
General
Decide where you want to store your images
on the Storage Card or on the Internal
Memory and adjust the camera’s flicker
setting. You can also choose to review photos
after they are taken, and enable or disable the
shutter sound.
■
Counter
The counter keeps track of how many images
or videos you have recorded.
■
Photo
Adjust the JPEG quality, change the photo
filename prefix and choose where you want to
store your Template folder.
68
■
Video
Adjust the capture size of the video
clip,whether you want audio on or off and the
filename of the video clip.
■
Modes
Change your camera’s Capture mode.
Choose between Photo, Video, MMS Video,
Photo ID and Picture Theme.
Once you have recorded a video clip it will be
saved to your Multimedia Album and marked with
a V to indicate that the file is a video file. Press Menu
and select Album then Menu again to choose from
the following:
■
Send
via Email
■
File
Choose from Delete, Move to and Copy to.
■
Save As
You can save your video as a Caller ID image.
■
Rename
Rename the video clip so that it is easier to
locate in the Multimedia Album.
■
Properties
Lists the image properties.
■
Slide Show
Creates a slide show of the clips stored in
your Multimedia Album.
■
Options
You can adjust the options for the following:
■
Change folder
Move to a different folder.
■
New
Choose from:
■
Photo from Camera
■
Video from Camera
■
Voice note
receiving video messages
1 When you receive a video message it will be
placed in your Inbox and will appear on
your Home screen.
2 To r ead the message select Message on your
Home screen.
3 To open the video, press Menu then Play.
video messagingvideo messaging
Page 36

get the freshest clips on the web
from Orange
Why not make the most of your phone’s video
player and download great new clips from Orange?
Orange is constantly expanding the online library of
video clips available to customers. Simply follow
these instructions to find out more:
1 In the Home screen, scroll to . Scroll to
Orange World and press the Action key. Your
phone will connect, then display the Orange
World homepage.
2 In the homepage, scroll down to select video
and press the Action key.
3 Once the video page appears, choose your clip
from a wide range of videos. Simply click the
title and it will be streamed to Windows
MediaTMPlayer, where you can watch it.
Remember: Come back to this area often, as the
videos available change all the time. From classic
comedy clips to the latest release trailers, Orange is
bringing video straight to your phone.
70
6
Orange multi
media services
video messaging
Page 37

navigating in Internet Explorer
With Internet Explorer, the Favourites list is
displayed as the main offline screen. You can add
your own favourites to this list for quick access to
web sites you frequently visit. You can access the
list from any web page by pressing Favourites.
When you open Internet Explorer for the first time
from the Start menu, the Favourites list will appear.
To view a favourite:
1 Press Start and scroll down to More. Select
Internet Explorer.
2 Internet Explorer will display the last page that
you viewed; if you have not used Explorer since
switching your phone on, Favourites will be
shown. If another page is displayed, simply
press the Favourites soft key.
3 Select a favourite to view, and press Go.
Surfing the Internet is about making your own way,
and Orange lets you explore all of the sites you
want. If you know the address of a website that
you want to view, enter it in the address bar:
1 Press Start, then select Internet Explorer.
2 Press Menu and select Address Bar.
3 Enter the web address, and press Go.
To return to a web page you previously visited in
the same session press repeatedly until you
see it again.
73
browsing the web on the move has never
been easier
Internet Explorer allows you to surf the web online
or download web pages to read when you’re
offline. It supports HTML (Web), iMode and many
wap sites, allowing you to surf, shop or trade on
virtually any site.
The Internet Explorer web browser makes the most
of your GPRS connections, while giving you the
choice of what to download. Your homepage is the
Orange World homepage. Looking for key headlines
from your favourite news site, but not interested in
downloading all those graphic files?
No problem. Switch off pictures and read text only.
If you want up-to-the-minute news and sport,
the latest games and downloads, or pictures and
sounds to brighten up your SPV C500 or your
photo messages, plus a wide range of interactive
services from Orange World, visit
wap.orange.co.uk/orangeSPV C500
You’ll also find a constantly updated directory of
the best sites for browsing on your SPV C500.
Alternatively, scroll to in the Home screen and
select a link from the dynamic panel, or check the
Orange folder in the Start menu for links to exciting,
downloadable content from Orange World.
use Internet Explorer in a way that
suits you
You can change the way web pages are displayed
on your SPV C500.
To view Internet Explorer options:
1 Press Start and scroll down to More. Select
Internet Explorer.
2 Press Menu, then select Options. You will see
a list of options as shown in the grey box on
page 72.
3 To disconnect from the Internet press .
72
Orange multi media servicesOrange multi media services
Page 38

7574
your SPV C500 online
Visit web.orange.co.uk/yourphone/ on your PC or
wap.orange.co.uk/r/spvc500/yourphone/ on your
SPV C500 to learn even more about your phone.
Here you can see demonstrations of how to use
the applications on your SPV C500, learn more
about the features on your phone and see how
Orange helps you get more from your SPV C500
with services such as Downloads and the Try Card.
stored or cached web pages
Your SPV C500 stores web pages as they are
downloaded until its memory store, or cache, is full.
If you go to a page that is already stored on your
SPV C500, you will see the stored version when
you select the page. Choose Refresh from the
menu to see the latest web content for that page.
To refresh a web page you have recently visited:
1 Press Start and scroll down to More. Select
Internet Explorer.
2 Select the web page to revisit from your
Favourites list or History list, and press Go.
3 Press Menu and select Refresh.
Orange multi media services
What are the options in the Internet
Explorer menu?
General To change the way web pages are
downloaded and displayed.
For example, you can stop images
displaying, turn off sound, fit the
web page to the screen, request a
warning before moving from
secure web pages to non-secure
web pages, allow cookies, or
change the language.
Connections To change the network you
connect to. For example, change
from ‘The Internet’ to ‘My
Corporate Network’.
Memory Enables you to clear temporary
Internet files, cookies, and your
web history to keep your phone
confidential should it be used by
anyone else.
To view your most recently visited Web pages:
1 Press Start and scroll down to More. Select
Internet Explorer.
2 Press Menu and select Address Bar.
3 Scroll to View History and press Go.
To visit a web page on the History list scroll to its
URL and press Go.
Note: While you are connected to the Internet, you
can change between Internet Explorer and other
programs on your SPV C500 by pressing . This
will not close your Internet connection. To return to
the page you were viewing, press .
bookmark your favourite sites
If you find a web page that you will want to visit
another time, mark it as a favourite. Then, the
next time you want to visit that web page, just
select it from your Favourites list.
1 Press Start and scroll down to More. Select
Internet Explorer.
2 Press Menu and select Address Bar.
3 Enter the web URL, and press Go.
4 When the web page is displayed, press Menu,
then select Add Favourite.
5 Enter a name for the web site as you want it to
appear on your Favourites list, and press Add.
To create a new folder in Favourites:
1 Press Start and scroll down to More. Select
Internet Explorer.
2 Select Favourites. Press Menu, then select
Add Folder.
3 Under Name, enter a name for the folder and
press Add.
To delete a favourite:
1 Press Start and scroll down to More. Select
Internet Explorer.
2 Scroll to the favourite you want to delete. Press
Menu and select Delete. Press Yes to confirm
your choice.
Orange multi media services
Page 39

keep your information secure
with Back Up
As explained on page 24, you can set your phone
to automatically backup information on a regular
basis, as well as choose which information is
copied. This keeps your personal data secure, so
that if anything should go wrong, you can always
retrieve it from the secure Orange server.
To Back Up your data manually:
1 Press Start, then select Orange.
2 Scroll to and select Back Up.
3 Back Up will be highlighted.
Press the Action key.
4 Select the items you would like to store using
the Action key.
5 Press Send to start saving your data on the
remote server.
To set your SPV C500 to automatically Back Up
your data:
1 Press Start, then select Orange.
2 Scroll to and select Back Up.
3 Scroll to 1.Options and press the Action key.
Schedule backups will be highlighted. Press the
Action key so that a tick appears in the box.
4 Scroll to the next field and use the Action key to
select Daily, Weekly or Monthly backup.
5 Use the keypad to set the time that you want to
send your information to be stored.
6 Use the Action key to select or deselect which
information you want backed up.
7 Press OK when you have finished and your SPV
C500 will now automatically send your
information to be stored at the time and
frequency you have set.
Note: You will be charged for each call you make
to Back Up at your standard service charge.
7776
Orange multi media services
To delete your browsing records:
1 Press Start, then select Internet Explorer.
2 Press Menu and select Options.
3 Scroll down to Memory and press the
Action key.
4 Select whether you wish to delete
information from:
■
Temporary Files
■
Cookies
■
History
5 Press Clear to empty that folder and Yes to
confirm your choice.
enjoy new software wirefree™
with Downloads
Orange Downloads allows Orange to send updated
software direct to your phone.
To activate Orange Downloads:
1 Press Start, then select Orange.
2 Scroll to and select Downloads.
Before you download an application in the
Downloads screen, there are a number of options
you can choose from.
■
Scroll to Check for Updates, then press Menu.
Choose one of the following options:
■
Check for Updates
Connects to Orange to see if there are any new
updates or applications available.
■
About Downloads
Information about the Downloads software.
■
Exit
Quits Downloads.
3 Scroll to and select View Downloads. This
shows the current applications that have been
installed on your phone.
Orange multi media services
Page 40

access information direct from your
phone’s Orange Plus menu
Your additional options can be found by pressing
the Menu button on your phone and choosing
Orange Plus. You can:
■
easily get in touch with Orange
■
always be up to date with Orange Information
Orange Plus Information enables you
to check…
■
sports, news and results
■
lottery, horoscopes, weather and jokes
■
stocks, indices and foreign exchange rates
What is Orange Information?
Orange Information is ideal for finding out up to the
minute information such as sports results and
lottery numbers. You can check the news, business
and weather, or even read your horoscope.
How much does it cost?
Text messages to request information are free.
Receipt of each Orange Information text message
costs 12p except for Financial and Stock Market
messages, which cost 30p.
To access Orange Information:
1 Press Menu, scroll to Orange Plus and
press Select.
2 Choose or enter the subject you are
interested in.
3 You will be offered a further list of options. Scroll
to the one you want and press Select.
4 Choose from the following three options:
■
Latest
■
Sends you a single text message with the
latest information.
■
All future
■
Requests that you are sent regular updates
on your chosen subject.
■
No more
■
Cancels the All future option.
5 You will then have two further choices:
■
Get information
Requests that information be sent to your
phone immediately
■
to menu
Your SIM Card saves the information you’ve
entered so you don’t need to re-enter it.
7978
Orange multi media services
To restore the information from the remote
server to your phone:
1 Press Start, then select Orange.
2 Scroll to and select Back Up.
3 Scroll to 2.Restore and press the Action key.
4 Select which items you would like restoring to
your phone using the Action key. Items with a
tick next to them will be restored.
5 Press Next then Send when you have finished
and your SPV C500 will now automatically send
your information to be stored at the time and
frequency you choose.
Note: You will be charged for each call you make
to Back Up at your standard service charge.
read or listen to news, jokes, weather
and more
To set up an Orange text alert simply call 277 free
from your Orange phone:
1 Call 277.
2 Follow the voice prompts.
After setting up an alert, you’ll receive a text
message every time there’s an update about the
subject you’ve chosen.
To cancel an alert dial 277 and follow the prompts.
Note: You can receive text alerts when roaming but
you cannot set them up.
When you call 177, you can listen to up to date
information on a variety of subjects.
1 Call 177.
2 Simply follow the voice prompts to hear the
information you want.
Orange multi media services
Page 41

3 Yo u will receive a text message. Press the
Cancel key until you return to the main menu
and then choose Messages. The message in
your inbox will tell you your balance.
To Top-up your talk time using your
nominated card:
1 Press the Menu key and select Orange Plus.
2 Choose Payasyougo.
3 Choose Top-up.
4 Choose Voucher.
5 Enter your Orange Top-up Voucher number and
press OK.
6 Yo u will receive a message asking if you want to
proceed. Scroll to read the full message and
press OK. Choose Yes to proceed.
7 Yo u will receive a text message. Press the
Cancel key until you return to the main menu
and choose Messages. The message in your
inbox will tell you that your Voucher has been
redeemed, and gives you your new balance.
To Top-up your talk time using your credit or
debit card:
To use the Top-Up service you will first need to
nominate your card with Orange. To register, call
451 and choose option 1.
1 Press the Menu key and select Orange Plus.
2 Choose Payasyougo.
3 Choose Top-up.
4 Select credit or debit card as appropriate
5 You will automatically be connected to
Customer Services to complete the transaction.
To link an Orange Top-up Swipe Card to
your account:
1 Press the Menu key and select Orange Plus.
2 Choose Payasyougo.
3 Choose Top-up.
4 Scroll to Swipe Card and press OK.
5 Enter your Orange Top-up Swipe Card number,
which is the number following 894412, and
press OK.
81
Orange Plus Call Orange enables you to…
■
speak to Customer Services
■
listen to your Answer Phone messages
■
listen to traffic news using Text Alerts
■
call Orange Directory Enquiries
■
call Orange International Directory Enquiries
■
request update of breaking news by setting up
Orange Text Alerts
To call Orange:
1 Press Menu, scroll to Orange Plus and
press Select.
2 Scroll to Call Orange and press Select.
3 Select one of the following:
■
Customer Services
■
Answer Phone
■
Voice Media
■
Traffic News
■
Text Media
■
Directory Enquiries
■
International Directory Enquiries
■
Breaking News
4 Scroll to read the message from Orange, then
press OK.
5 Choose Call to dial the number.
Orange Plus Payasyougo enables you to...
only available to pay as you go customers
■
check your balance
■
top-up your talk time by Orange Top-up Voucher
■
link your phone to an Orange Top-up Swipe Card
What can I do with Pay as you go?
Pay as you go gives you control of your phone
expenses, and provides flexible options for topping
up your balance.
How much does it cost?
Balance and Top-up menu items are free, although
some restrictions may apply.
To check your balance:
1 Press the Menu key and select Orange Plus.
2 Choose Payasyougo.
3 Choose Balance.
80
Orange multi media servicesOrange multi media services
Page 42

83
6 A message will appear confirming the Orange
Top-up Swipe Card number (scroll to read the
full message), and asking if you want to
proceed. Press OK and choose Yes to proceed.
7 You will receive a text message. Press the
Cancel key until you return to the main menu
and then choose choose Messages. The
message in your inbox will tell you that your
Orange Top-up Swipe Card has been linked to
your Pay as you go account.
An Orange Top-Up Swipe Card enables you to
Top-up your talk time at any registered outlet. For
more information please see www.orange.co.uk
access Orange Internet from your PC for
all these features
■
Personal email address and free email alerts
When you’re out and about, you can receive a
text message on your Orange phone to alert
you to emails you’ve received.
■
Personal diary and free alerts
Receive a text message on your Orange phone
as a reminder of dates and events that are
important to you.
■
Send 30 free text messages when online every
month to UK digital mobile phones.
■
Receive information as a text message on your
Orange phone on the latest news, weather,
sport, directory, entertainment and lifestyle
updates. This is not available to some pay as
you go customers.
register with Orange Internet
To r egister with Orange Internet just visit
www.orange.co.uk/register
manage your Orange phone account
online
not available to pay as you go customers
■
Check how many inclusive minutes you have
remaining
■
View your latest bill
■
Set up a Direct Debit or pay by credit card
securely
■
Change your Service Plan
For more information on multi media services call
the Orange Literature Request Line on 150o r, if
you are a pay as you go customer, 451 from your
Orange phone.
82
download and listen to music on the
move using Windows Media
™ Player on
your SPV C500
Using Windows Media™ Player 9 series (which
comes on your SPV C500) or later, you can play
Windows Media audio files and MP3 audio files on
your SPV C500. You can also copy digital music
directly from your PC to your SPV C500 by using
Media Player or ActiveSync. For more information
about copying files to your SPV C500, see the
Media Player Help on your PC.
There are two ways to play files. You can either
stream the file over the Internet, or save the file to
your phone’s memory and play it from there.
To play a media file stored on your phone:
1 Press Start, then More. Scroll to Windows
Media and press the Action key.
2 You will enter a screen that shows all of the
available media files on your phone. This is
called the Local Content screen. Simply scroll to
the file you wish to play, and press Play.
To play a streaming media file over the Internet:
1 In the Local Content screen press Menu, then
scroll to and select Open URL.
2 Enter the web URL that you want to stream the
media from, and press Play.
Note: Some music may have a copyright license.
Orange multi media servicesOrange multi media services
Page 43

To delete an application:
1 Press Start in the Home screen.
2 Select Settings, scroll down to More and then
press the Action key.
3 Select Remove Programs.
4 A list of installed applications will appear. Scroll
to the one that you wish to delete and press the
Action key.
5 Press Yes to delete the program, or No to
cancel.
If you have any questions or queries about your Try
Card or any applications contained on it, please call
Customer Services on 150 from your Orange phone.
To check that you have enough memory space
to install a new application:
1 Press Start and select Settings.
2 Select About and press the Action key.
3 Scroll down until you can see:
Available Memory: x MB.
This will tell you if there’s enough memory available
for you to download your new application.
play games on your phone
There are two games options on your phone. You
can play games online, or choose from Jawbreaker
and Solitaire, which are stored on your phone.
The object of
Jawbreaker is to
clear the screen by
selecting groups of
the same colour balls
and destroying them.
You win the game
when all the balls
have disappeared.
The object of
Solitaire is to use
all the cards in the
deck to build up
the four suit stacks
in ascending order,
beginning with
the aces.
85
You can listen to a media file over the Internet
by streaming via your phone’s media player, and
then add it to the Favourites list. The next time you
want to listen to the file it will be on your
SPV C500. Simply select it from Favourites.
To add a streaming media file to Favourites:
1 Connect to a streaming media file on the Internet.
2 While the media file is playing, press Menu and
select Add to Favourites.
To play a favourite:
1 On the Local Content screen, press the Menu
soft key, select Favourites, and then press the
Action key.
2 Select an item, and press the Play soft key.
To delete a favourite simply select it, press the
Menu soft key, select Delete, and then press the
Action key.
install applications with your Try Card
Your Try Card contains a selection of content from
Orange that you can install on your phone,
increasing its capacity and adding to the extensive
features already available for you to use.
You will have received the Try Card with your
SPV C500. Simply insert it into the Mini Memory
Card slot inside your phone before you switch your
phone on. To open the Try Card press Start and
select Orange, then Try Card.
1 Scroll to the file that you wish to open and
press the Action key.
2 Simply scroll to the application that you want to
install and press the Action key.
3 Follow the on-screen prompts. Once installed,
the application will appear in the relevant folder
on your phone.
Note: To keep your phone operating at its optimum
level, you should not attempt to install all of the
applications on your phone at any one time as this
will cause memory problems. Instead, install
applications as you need them, and delete those
that you no longer use.
84
Orange multi media servicesOrange multi media services
Page 44

It is possible to connect to the Internet via your
corporate server. To do this, you will need to get
certain information regarding your corporate
network from your IT department so you can
complete the necessary settings.
1 Press Start, then select Settings. Scroll dow n
to and press More. Select Data Connections.
2 Press Menu, select Edit Connections, and then
press the Action key.
3 Dial-up Connections is highlighted. Depending
on your network capabilities, you may wish to
create either a VPN (virtual private network)
connection or a Dial-up connection. Select the
one you want and press the Action key.
4 Press Menu, then select Add.
5 Now fill in the details using the information
supplied by your IT department.
87
setting your connection
Your SPV C500 can access a world of information
on the move, all at the touch of a few keys.
It is set to Orange GPRS by default. However, you
can check or change the settings easily.
1 Press Start, then scroll to and select Settings.
2 Scroll down to More. Select Data Connections
and press the Action key.
3 Internet connection is highlighted. It will
normally display Orange GPRS. To change
your settings, press Menu and Edit
Connections.
4 When you have finished, press Done.
If you should ever lose your Orange settings, you
can re-enter them by following these directions, and
copying the information from the table on table
opposite.
1 Press Start, then scroll to and select Settings.
2 Scroll to and select More, then select Data
Connections.
3 Internet connection is highlighted. Press Menu
and select Edit Connections.
4 Choose GPRS Connections and press the
Action key.
5 If you have lost all of your settings, the screen
will appear blank. You will now need to create
new accounts by pressing Menu then Add.
6 Create the following accounts using the table
opposite.
Your phone also comes preset with wap dial-up
settings, and will use these to connect if GPRS is
not working.
86
Orange multi media servicesOrange multi media services
Orange GPRS
Connects to The Internet
Access point orangeinternet
Leave the rest of the settings blank.
Orange MMS
Connects to MMS Network
Access point orangemms
Leave the rest of the settings blank.
Orange WAP
Connects to The Internet
Access point orangewap
Leave the rest of the settings blank.
Page 45

88
7
additional features
Page 46

2 Phone is highlighted. Press the Action key, then
scroll to and select Call Options.
3 Scroll down to Current outgoing line, and scroll
right to select 2. Press Done.
4 Alternatively, press and hold the # key
The following tariffs are not available on Line 2:
■
Orange Everytime 20 if it includes an option to
call other networks
■
Orange Everytime 400
■
Orange Everytime 1000
■
Orange Talk 150
■
Orange Talk 200
■
Orange Talk 500
When you receive a call on Line 2, your phone will
ring without you having to have Line 2 selected.
You can receive but not send text messages from
Line 2.
You receive a separate Answer Phone for your
Line 2 which you can also personalise. Call your
Answer Phone in the usual way but remember to
switch to Line 2 first.
If you call your Line 2 Answer Phone but have no
messages, you will automatically be connected to
your Line 1 Answer Phone if you have messages.
Note: Line 2 is not available while roaming and
does not support Fax and Data.
91
speak with up to five other people at the
same time
not available to pay as you go customers
Conference Calling is a great way to chat with up
to five other people while you’re out and about.
To activate Conference Calling call Customer
Services on 150 from your Orange phone or
07973 100 150 from any other phone.
There is no charge but you may be asked for a
refundable deposit. You will receive a SIM update
when the service has been activated. Turn your
phone off and back on again.
To start a conference call:
1 Call someone in the usual way. The display will
show a name (if stored in the memory).
2 Press Menu and select Hold.
3 Make another call in the usual way while the
first call is on hold.
4 Select Conference.
5 Repeat steps 2 to 4 to add more people to your
conference.
6 Press to end your whole Conference call.
Note: If you are abroad the availability of this
service depends on the network you are using.
You will be charged for each call you make at
standard talk plan rates.
keep your business and personal lives
separate by using two different lines
not available to pay as you go customers
With Line 2 you can keep business and personal
calls separate.
To activate Line 2, call Customer Services on 150
from your Orange phone or 07973 100 150 from
any other phone.
There is a one-off connection charge and you
receive a reduced monthly charge on your Line 2
Service Plan. You will receive a SIM update when
the service has been activated.
To switch from Line 1 to Line 2 in order to make
a call on Line 2:
1 Press Start and scroll to Settings. Press the
Action key.
90
additional features
Orange Answer Fax
not available to pay as you go customers
If you spend a lot of time away from the office, you can still keep
on top of your faxes with Orange Answer Fax.. This service
enables your Orange phone to store faxes until it is convenient
for you to print them. Whenever a colleague or friend sends you
a fax on your personal Answer Fax number, you will receive a
text message that tells you how many pages there are and the
number it was sent from. You can then use your Orange phone
to retrieve and print your faxes using any fax machine that is
convenient to you. Simply call your Answer Phone by pressing
and holding the 1 key, and follow the simple prompts to retrieve
your faxes.
To connect to Orange Answer Fax, call 150 from your Orange
phone.
Note: The availability of Orange Answer Fax when you are
abroad is dependent upon the network you are using. You are
charged a standard data call charge.
additional features
Page 47

93
your SPV C500 gives your laptop PC
Internet access on the move
Use your SPV C500 as an external modem for your
laptop PC using the INF file on the CD that came in
your box. It's also available to download from
www.orange.co.uk
To set up an infrared or USB modem
connection:
1 Make sure that your SPV C500 is not
connected to another device.
2 Press Start, then More and More again. Then
scroll to and select Accessories.
3 Select Modem Link.
4 Under Connection, select USB or IrCOMM
infrared, press Menu, then select Activate.
5 Connect your SPV C500 to the device with
which you want to use your SPV C500 as a
modem.
To activate the modem link, first make sure that if
you are using a USB or serial connection, your
SPV C500 and PC are connected.
1 Press Start, then More and More again. Then
scroll to and select Accessories.
2 Select Modem Link.
3 Press Menu and select Activate.
4 If you are using infrared, align the SPV C500’s
infrared (IR) port or connect the cable to the
device.
To deactivate the modem link:
1 Press Start, then More and More again. Then
scroll to and select Accessories.
2 Select Modem Link.
3 Press Menu and select Deactivate.
92
use Bluetooth®for wirefree™
communication with another device
Bluetooth®is a new radio technology that enables
you to make wireless connections between your
phone and other electronic devices. This allows for
the easy exchange of information like contacts and
diary appointments and will allow you to connect to a
laptop to use your phone as a modem, for example.
For the most effective Bluetooth®communication,
always keep the Bluetooth®devices within 10
metres of each other.
When you first activate Bluetooth®the phone will
ask for the device name of your phone. You can
accept the default name or change it. Once you
have accepted the name, Name Saved is shown.
Before your phone can communicate with another
device, you need to pair your phone with a
device. Your phone can be paired with up to 10
other Bluetooth®devices.
To pair your phone with another Bluetooth
®
device:
1 Make sure that Bluetooth®is active or
discoverable on the other device.
2 To activate Bluetooth®on your phone, press
Start and select Settings. Scroll to and select
Bluetooth®.
3 Select Bluetooth®again, then press Menu.
Bonded Devices is selected. Press the Action key.
4 You’ll see a list of devices currently paired with
your phone. A paired device is not necessarily
connected to your phone, but can be
connected because a paired relationship has
been set up between the two devices.
5 If there are no devices on the list, or to add a
device, press Menu and select New.
6 Your phone will search for any active
Bluetooth®devices in the area. When it has
found them, they will be displayed in a list.
Scroll to the one that you want create a
partnership with, and press Add.
additional featuresadditional features
Page 48

symbols
Symbols are displayed along the very top of your
SPV C500’s display.
Shown below are common symbols and their
meanings.
GPRS available
New email or text message
New Answer Phone message.
When you receive a new Answer Phone
message on Line 2, you will have to
switch to Line 2 to listen to it
New message from Instant Messenger
when you are in another application
Voice call active
Data call active
Call forwarding
Call on hold
Missed call
Line 1
Line 2
Battery level
Low battery
Battery charging
No battery
Signal strength
Radio off
No signal
GPRS in use
Roaming
Sync error
Ringer off
Bluetooth®active
abc Conventional text input, lower case
ABC Conventional text input, upper case
ABC Conventional text input, caps lock
t9 Predictive text input, lower case
T9 Predictive text input, upper case
T9 Predictive text input, caps lock
123 Numeric input mode
An email attachment which has been
downloaded
An email attachment which has not
been downloaded
An email attachment awaiting download
Message has not downloaded
95
7 Enter a PIN; this number is only for the specific
relationship between your SPV C500 and the
device. The device might already have a PIN
(printed in the user guide, for example) that you
will need to use. Otherwise, make up your own
number and enter it into your SPV C500.
8 If you have made up a PIN, the other device
will prompt you to enter the same PIN.
9 You can now give the device a name on your
SPV C500; this is the name that will appear in
your Bonded Devices list. The other device will
also ask for a name for your SPV C500.
10 Your phone will now be paired with the new
device, and the device will appear in the Bonded
Devices list. The next time you wish to connect
to it, simply scroll to it in the list and press the
Action key.
Sometimes, another device may wish to pair with
your SPV C500. In order for this to happen, your
phone must be in Discoverable mode.
1 Press Start and select Settings. Scroll to and
select Bluetooth®.
2 Select Bluetooth®again.
3 In the box shown on the screen, scroll to
Discoverable, then press Done. Other devices
will now be able to see you and initiate
partnerships.
When Bluetooth®is active, you will see in the
Home screen.
Note: Another device cannot pair with your SPV
C500 without your permission. Whenever another
device attempts to pair, you will receive a notification
message.
Note: In some countries there may be restrictions
on using Bluetooth®devices. Check with your local
service provider.
94
additional featuresadditional features
Page 49

■
Erase SMS
Choose to delete all of your text messages, or
choose Read to go through them and delete
them individually.
■
Erase Call History
Delete the record of your most recent made,
received and missed calls.
■
Erase Speed Dial
Delete your speed dials.
■
Erase Voice Notes
Delete any voice recordings you have made.
■
Erase All
Delete all of the above.
■
Refresh
Once you have deleted information, choose
Refresh to see your phone’s new memory
status.
■
About
Information on Space Maker.
97
manage your phone’s performance
Keeping applications open while you’re not using
them takes up unnecessary memory, slowing your
phone down. It’s a good idea to check what you
have open and close what you don’t need, using
Task Manager.
To use your Task Manager:
1 From the Home screen, press Start, then scroll
to and select Accessories.
2 Select Task Manager.
3 You will see a list of open applications.
4 You can scroll to individual applications that you
wish to close, and then close them by pressing
Menu and selecting Stop. Or, you can simply
press Menu and select Stop All to shut down all
of the current applications.
5 Alternatively, scroll to an application that you
wish to keep open, press Menu and select Stop
All But Selected.
6 To go to one of the applications in the list,
simply scroll to it and press the Action key.
It’s easy to let your phone’s memory get cluttered
up with unnecessary emails, text messages and
other information. Using Space Maker, you can
now monitor memory usage, and delete any data
that you no longer need.
Note: Before using Space Maker, it is advisable
that you use Back Up to save all your personal
information to the Orange server. This way, should
you accidentally delete something, you can retrieve
it via Restore.
Note: Space Maker deletions are not reversible.
To use your Space Maker:
1 From the Home screen, press Start, then scroll
to and select Accessories.
2 Select Space Maker and press the Action key.
3 The bar will tell you how much free memory
your phone has.
4 Press Menu to choose from the following
options:
■
Erase E-mail
Choose to delete all of your Emails, or only
those from selected folders. You can also
select Read to go through them and delete
them individually.
96
additional featuresadditional features
Page 50

98
8
personalise
your phone
Page 51

101
download a ringtone
There are several ways to download a new ringtone
to your SPV C500. You can use Internet Explorer
or, if you receive a ringtone via multi media
Messaging or email, you can download it straight
to your phone. You can also use ActiveSync to
transfer files from your PC.
To download a ringtone simply means to copy the
file from its original location to your phone. When
the sound file is stored on your phone you can use
it for many different things, for example as a
ringtone or as an alarm.
To use Inter net Explorer:
1 Press Start, then scroll to and select More.
2 Select Internet Explorer, then scroll to Ringtones
in your Favourites list and press Go.
3 Scroll to the sound you wish to download and
press the Action key.
4 You will be asked to confirm your choice. Press
Yes or No.
5 Press Stop to stop the file transfer.
To download a ringtone received as a multi
media message:
1 Open the message containing the ringtone.
2 Press Menu and select Save Objects then press
the Action key.
3 Highlight the sound you received and press
Save.
4 You can give your file a new name if you wish,
using the key to delete characters. Press
Done when you are finished.
5 You will see Info Object successfully saved.
Press OK.
6 Press to return to the Home screen.
To download a ringtone received as an
attachment to an email:
1 Open the email containing the attachment and
scroll down to highlight the line . Mark for
Download. Press the Action key.
2 Press to return to your Inbox. Press Menu
and select Send/Receive Email to receive the
full sound attachment.
3 When your SPV C500 has finished downloading
your emails, open up the email containing the
sound file again.
4 Highlight the sound file and press the Action
key to hear the attachment.
100
5 When it has finished playing press Menu. Save
Sound is highlighted. Press the Action key.
6 You will see a screen confirming the sound has
been saved. Press OK.
To download a file using ActiveSync:
1 Connect your SPV C500 to your PC using
ActiveSync. For more information see
chapter 10.
2 Click on Explore on your PC and open the
Storage folder.
3 If you have a Sounds folder in the Storage
folder, use this to store your ringtone. If you
don’t have a sounds folder, you may wish to
create one to store ringtones.
4 Drop your ringtone .wav file into the sounds
folder and it will then transfer to your SPV C500
when you synchronise.
Now that the file you received is saved to your
phone you can set it as a ringtone.
1 Press Start, then scroll to and select Settings.
2 Scroll to Sounds and press the Action key.
3 Ring tone for Line 1 is highlighted. Scroll left or
right through the list until you reach the name of
the file you downloaded.
4 When your file is selected, press Done.
You can also use your own sounds for alerts,
such as text message or email alerts.
viewing and changing your settings
There are several settings that you can alter in order
to change the way that your phone looks and
behaves.
To view the main Settings menu:
1 Press Start, then select Settings.
2 Choose an option from the following pages.
personalise your phonepersonalise your phone
Page 52

phone
Phone settings are primarily used to set options
for calls you receive, such as Call Forwarding, Call
Waiting and Caller ID. Page 108 outlines what
settings are available to change in this submenu.
sounds
Sounds settings are used to personalise the
sounds for ring tones, alerts, and reminders.
To create your own sounds:
1 Go to where the sound file is stored on your
PC and copy the file. The file format must be in
.wav or .mid format. However, some .wav
formats (such as 4kbit) are not supported.
2 In ActiveSync on your PC, click Explore and
double-click Storage. Paste the file into the
relevant folder. If you don’t have a Sounds
folder in your Storage folder, you may find it
useful to create one to store sound files.
3 On the Home screen on your SPV C500, press
Start, select Settings, select Sounds, and then
press the Action key.
4 Select the item to customise, and scroll Left or
Right to select the sound you want. Press Done.
Note: Make sure that the SPV C500 is connected
to your PC via USB before you open ActiveSync to
transfer the sound file. If the sound file is not in a
.wav or .mid format you may be able to convert the
file into the correct format using Windows Media
Encoder at www.microsoft.com/windowsmedia on
your PC.
103
Home screen
Home screen settings are used to change the
Home screen layout, the colour scheme, the
background image, and the time delay before the
Home screen appears when the SPV C500 is idle.
1 Press Start and select Settings.
2 Select Home Screen.
To customise the Home screen with your
own image:
1 Go to where your image file is stored on your
PC and copy the image file. The file format
must be .gif, .jpg, or .bmp.
2 In ActiveSync on your PC, click Explore,
double-click IPSM, double-click Application
Data, double-click Home, and then paste the
image file into the Home folder.
3 On the Home screen on your SPV C500, press
Start, select Settings, select Home Screen, and
then press the Action key.
4 Select Background image, and press Left or
Right to select your image. Press Done.
Note: You can also select an image by selecting
Background image and pressing the Action key.
This will show you the complete list of images to
choose from.
Note: Make sure that your SPV C500 is connected
to your PC via a USB cable before you open Active
Sync to paste the image file. For best results, use
images that are 176 x 200 pixels in size, as this will
fit best on the screen. If the image file is not in a
.gif, .bmp or .jpg format you may be able to
convert the file into the correct format using an
image editing program, such as Paint on your PC.
102
personalise your phonepersonalise your phone
Page 53

■
Device lock
Select how soon your device will lock after the
last key press.
■
Profiles
A list of the profiles to change them quickly.
about settings
About displays information about the SPV C500’s
operating system, including version numbers,
copyright information and memory status.
1 Press Start and select Settings.
2 Scroll to and select About.
accessibility
Accessibility settings are used to configure the
system font size, multipress time out, confirmation
time out, and in-call alert volume.
1 Press Start and select Settings.
2 Scroll to and select Accessibility.
Beam and Bluetooth
®
Use these options to alter your infrared and
Bluetooth®settings.
1 Press Start and select Settings.
2 Scroll to and select Beam or Bluetooth®.
data connections
Data Connections settings enable you to set up
Dial-up, Virtual Private Network (VPN), Proxy and
General Packet Radio Service (GPRS) connections
so you can connect to the Internet or your
corporate network.
date and time
Date and Time settings enable you to change the
local time zone, the current date and time, and to
set the alarm.
Press Start, then Settings, and scroll to and select
More. Select Date and Time, then enter the correct
details and press Done.
105104
personalise your phone
switch profiles and change the way your
phone behaves
A profile is a phone setting that determines how
your phone behaves when, for example, you
receive new text messages or Answer Phone
messages. You may want your SPV C500 to ring
louder if a client is calling, or you may not want the
SPV C500 to ring at all, but want to hear calendar
reminders. The default profile for your SPV C500 is
the Normal profile. The name of the current profile
is displayed on the Home screen.
To view Profiles settings press Start, select
Settings, then select Profiles.
There are several preset profiles that allow you to
change your phone to suit your circumstances or
environment.
1 From the Home screen, press the Power key
and scroll to and select Profile: Type.
2 Select the profile you want, press the Action
key to set the profile, and then press Done.
You can change the names of some of the profiles.
In the Profiles menu, simply highlight the profile you
want to change, then select Menu and Edit.
To change a profile in the Settings menu:
1 Press Start, select Settings, then select Profiles.
2 Select the profile to modify, press Menu, and
then select Edit.
3 Modify the settings, and press Done.
Match your profile to your calendar by setting your
profile to Automatic. In Automatic mode your
phone will switch to Silent mode whenever you
have a meeting saved in your Calendar. If you have
an all-day meeting, your SPV C500 will remain in
Silent mode all day.
using the quick list
The Quick List displays a list of options for when
you need very quickly to change the way your
phone behaves.
1 Press and release the Power key.
2 The Quick List will open to display the following
options as well as a series of sound profiles:
■
Power off
Select to switch your phone off safely.
■
Flight mode
Select when travelling on an aircraft.
■
Key lock
Locks the keypad.
personalise your phone
Page 54

107106
remove programs
Remove Programs settings are used to remove
applications that you have downloaded to your
SPV C500. This is useful if your memory is getting full
and you would like to download a new application.
Press Start, then Settings and scroll to and select
More. Select Remove Programs. Scroll to and
highlight the program you want to remove, then
press Menu and select Remove.
Security
Security settings are used to enable phone lock
or SIM lock and to set the phone lock password.
Press Start, then Settings and scroll to and select
More. Select Security.
choosing your regional settings
Set your SPV C500 to match local settings when
you travel abroad.
1 Press Start, then scroll to and select Settings.
2 Scroll to and select More, then select Regional
Settings.
3 You can then set the language your phone
uses, as well as any local dialects. You need
to turn your phone off and back on again to
activate the new language settings.
4 You can also choose how the date and time
are displayed.
5 Positive/Negative number lets you choose how
you prefer longer numbers to appear, while
Positive/negative currency lets you choose how
you prefer sums of money to be displayed.
6 When you have made all your changes
press Done.
personalise your phone
owner information
Owner Information settings are used to enter and
display personal information, such as your name,
phone number and email address. This is helpful,
for example, in the event that you lose your SPV
C500 so that you can be contacted if it is found.
Press Start, then Settings and scroll to and select
More. Select Owner Information, then enter your
details and press Done.
choose your power management settings
To save battery power and increase the battery
usage time, your SPV C500 has a number of
adaptable power management settings.
You may have already noticed the screen going
dark or blank while you are using your SPV C500.
This is because it has been preset to conserve
battery power by reducing the supply needed to
display the Home screen.
If you would like to change your power
management settings:
1 Press Start and select Settings. Scroll to More,
and again select More.
2 Select Power Management and then edit the
settings you wish to change by scrolling left or
right with the Action key.
You can also check to see how charged your
battery is in the Power Management settings.
personalise your phone
Page 55

108
9
manage your time
and calls
personalise your phone
What are the phone settings options?
Call Barring to block incoming or
outgoing calls.
Call Forwarding to forward all or selected
calls to another number.
Call Options to change your outgoing line
from Line 1 to Line 2.
Call Waiting to turn Call Waiting on or off.
Caller ID to let your identification be
known to all callers, only your
contacts, or no callers.
Channels to select the language.
Fixed Dialling to limit your calling area to
one or more specific phone
numbers and/or area codes.
Networks identifies your Orange
network and changes your
network selection from
Automatic to Manual.
Page 56

■
week view
The Week view shows your schedule for a
chosen week. It allows you to get a quick
indication of your free and busy time, and easily
allows you to create an appointment at any
time. The Week view displays the week in one-
hour rectangles moving from the left side of the
screen. You can scroll up or down to show the
hours before or after those displayed.
■
month view
This gives an overview of your monthly
schedule. The arrows pointing upwards to the
left represent morning appointments, and the
arrows pointing downward to the right represent
afternoon appointments. An all-day event is
indicated by a box inside the calendar day.
importing calendar information
You can import calendar information via infrared
from another calendar program using iCal or vCal
format if both phones provide this format.
the Tasks list
The Tasks list shows your ‘things to do’ list.
An item is followed by an exclamation mark if it has
been marked as high priority and a down arrow if it
has been marked as low priority. Overdue tasks are
displayed bold and red. Completed tasks are
displayed with the check box selected.
You can use your Task Manager to keep track of all
the tasks in your Tasks list and in your calendar.
Note: If you synchronise tasks with your PC,
completed tasks are removed from your SPV C500
after synchronisation. They are then displayed on
your PC in grey with a line through.
To create a new task:
1 Press Start, then select More.
2 Select Tasks. Enter the task in the Enter new
task here field by pressing the Up key to clear
the box, entering your task and then pressing
the Action key.
Note: When you create a new task on your SPV
C500, you can synchronise tasks with your PC to
keep your Tasks list up to date in both locations.
111
using the calendar
The calendar enables you to make a note of and
view appointments, and then view your schedule
by day, week or month.
To create a new appointment:
1 Press Start, then scroll to and select More.
2 Select Calendar, then press Menu and
select New.
3 Enter information in the fields displayed.
4 Press Done when your appointment
is complete.
Note: When you create a new appointment on
your SPV C500, you can synchronise the Calendar
with your PC or a server to keep your schedule
information up to date in all locations.
To view an appointment:
1 Press Start, then scroll to and select More.
2 Select Calendar. Scroll to the appointment you
want to view, and press the Action key.
To edit or delete an appointment:
1 Press Start, then scroll to and select More.
2 Select Calendar. Scroll to the appointment you
want to edit, press Menu, then Edit or delete.
3 Make the changes and press Done, or press
Yes to delete the appointment.
Match your profile to your calendar by setting
your profile to Automatic. In Automatic mode your
phone will switch to Silent mode whenever you
have a meeting saved in your calendar. If you have
an all-day meeting, your SPV C500 will remain in
Silent mode all day.
You can view your schedule in your calendar in
three different ways: Agenda, Week, and Month.
■
agenda view
The Agenda view in your calendar is the
standard setting for calendar information. This
view displays meetings and appointments
scheduled for the current day. The appointments
are shown in chronological order according to
start time. All-day appointments are shown as a
single line at the top of the Agenda view. Up to
three all-day events will be displayed.
110
manage your time and callsmanage your time and calls
Page 57

3 For infrared, select IR and align the infrared
ports so that they are not more than one metre
apart. Press Beam to send your contact.
4 To use Bluetooth®, make sure that the other
device is Discoverable, then select it from the list
that appears. Press Beam to send the contact.
Status information will then be displayed, indicating
the name of the device your SPV C500 is sending
information to, and whether the beaming process is
pending, done, or has failed.
To send an appointment:
1 Press Start, then select More.
2 Select Calendar.
3 Scroll to the appointment to send, and press
the Action key to open the appointment.
4 Press Menu, scroll to Beam Appointment, and
then press the Action key.
5 For infrared, select IR and align the infrared
ports so that they are not more than one metre
apart. Press Beam to send your appointment.
6 To use Bluetooth®, make sure that the other
device is Discoverable, then select it from the list
that appears. Press Beam to send the
appointment.
find out who has called you and when
Using Call History and Call Timers, you can view
information about phone calls you have made and
received, such as who has called you recently and
how much time you have spent on your SPV C500.
■
Call History
Call History displays the last 25 calls you have
made, received, and missed. Each entry in Call
History contains the start time of the call, the
duration, the caller’s name, if available, and the
caller’s number. The oldest calls are automatically
deleted from the list to make room for the
newest calls.
To view Call History:
1 Press Start, then select Call History.
2 You can return a call to any number in the list
by scrolling to it and pressing .
113
If you create a new task with a reminder on your
PC, you can synchronise tasks so you see or hear
the reminder on your SPV C500 as well.
To mark a task as complete, incomplete or to
delete a task:
1 Press Start, then select More.
2 Select Tasks. Scroll to and highlight the completed
task, then press Complete, Activate or Delete.
keep a record of a conversation or make
a recorded memo with voice notes
You can use your phone to record, save and listen
to voice notes and conversations. Voice notes are
used to create short voice recordings. Recordings
are included in the All Notes list and are named
consecutively Recording 1, Recording 2, and so on.
To create a voice note:
1 Press Start, then select More.
2 Select Voice Notes.
3 Hold the SPV C500’s microphone near
your mouth.
4 Press Record to begin recording your voice note.
5 Press Stop to stop recording your voice note.
To rename a recording:
1 Scroll to the recording you want to the rename.
2 Press Menu, then select Rename.
3 Under Name, enter a new name for the
recording, and press Done.
Note: When recording a conversation, you are
required by law to inform the other person that you
are recording their speech.
sending and receiving information via
infrared or Bluetooth
®
You can use the infrared port on your SPV C500 to
send and receive calendar appointments and
contact cards between your SPV C500 and
another mobile device or a PC that has an infrared
port and supports vCards and vCal. If you have
paired your SPV C500 with the device you want to
send the contact to, you can also use Bluetooth®.
To send a contact:
1 Press Start, then select Contacts.
2 Select the contact to send, press Menu, then
select Beam Contact.
112
manage your time and callsmanage your time and calls
Page 58

To view contact information from Call History:
1 Scroll to the entry for the contact and press
Menu.
2 Find Contact is highlighted. Press the Action key.
To create a new contact from a number in Call
History, select the contact, press Menu, select
Save to Contacts, and then press the Action key.
To remove an item from Call History Select the
item, press Menu, then select Delete. Press Yes to
confirm.
■
Call Timers
Call Timers contains detailed information
regarding the length of your last call, the total
number of calls made and received, calls by
type (incoming, outgoing, roaming and data),
and a lifetime counter. Call Timers is useful when
you want to keep track of your calling patterns,
to help you estimate your monthly billing.
To view Call Timers:
1 Press Start. Scroll to Call History and press the
Action key.
2 Press Menu, then select View Timers.
3 To r eset your call timers press Menu and select
Reset Timers. Press Yes to confirm.
calculator
You can use Calculator to perform any of the
standard operations for which you would normally
use a handheld calculator.
1 Press Start, then select More.
2 Select More again, then scroll to Accessories
and press the Action key. Select Calculator.
3 Use the keypad to enter numbers and perform
calculations.
4 Press the # key to cycle through the available
mathematical symbols. Press the *key to enter
a decimal point. You can also use the Action
key to scroll through the available mathematical
symbols. Press Up for the plus sign (+), press
Down for the minus sign (–), press Left for the
division sign (/), and press Right for the
multiplication sign (X).
5 Press Clear to delete the characters on screen.
6 Press to clear the last digit when you have
entered several numbers in a row.
7 Press Options and select Equals.
114
10
synchronising
manage your time and calls
Page 59

117
using ActiveSync
Once you have set up a partnership by following
the instructions in the getting started section at the
front of this guide, you are ready to synchronise
your devices.
To start and stop synchronisation:
1 Press Start, then More. Select ActiveSync.
2 To start synchronisation press Sync. To stop
synchronisation, press Stop.
synchronising the Inbox
When you select Inbox for synchronisation in Active
Sync, email messages synchronise as part of the
process. The following will also occur:
■
Messages are copied from the Outlook Inbox
folder on your PC to the Inbox folder on your
SPV C500.
■
When you synchronise Inbox information with
your PC, you receive messages from the last
three days and the first 500 characters of each
new message. You can choose whether to
download attachments or not.
■
The messages on your SPV C500 and on your
PC are linked. When you delete a message on
your SPV C500, it is deleted from your PC the
next time you synchronise, and vice versa.
■
If you have any subfolders set up in Outlook,
messages in those folders will only be
synchronised if you have specifically selected
the folders for synchronisation with your
SPV C500.
Note: Text messages and photo or video
messages are not synchronised.
synchronising contacts and tasks
Contacts and tasks are automatically synchronised
between your SPV C500 and Outlook on your PC.
So, if you create a new contact or task on your
SPV C500, it will appear in your PC contact or task
list the next time you synchronise, and vice versa.
Similarly, if a contact or task is deleted from one
device, it will also be deleted from the other when
you next synchronise in order to ensure that all
information is up to date on both your PC and your
SPV C500.
116
Orange Wirefree Server
Orange Wirefree Server is an innovative service
developed by Orange in conjunction with Microsoft
to deliver a whole new range of wirefree™ services.
The first of these provides mobile access to your
Microsoft®Outlook®inbox, outbox, calendar,
tasks and contacts. If you are an Exchange®2000
user, these options are all available to you while on
the move.
Orange Wirefree Server enables you to receive and
respond to important emails immediately wherever
you are, using your SPV C500, without the
inconvenience of having to synchronise your device
through a desktop or laptop computer.
If your account is on an Exchange®2000 server,
you can receive text messages alerting you of
urgent emails, new or changed diary entries and
any new tasks, sent direct to your SPV C500.
Orange Wirefree Server can be set up to suit the
way you work, and you are able to change your
notification settings to suit your situation.
setting up Server ActiveSync
Before you can begin to synchronise information
with a server, you may need to request server
configuration information, such as your username,
password, and the name of the Orange Wirefree
Server, from your corporate network administrator.
This configuration information may have already
been set up on your SPV C500, or you may have
already been given this information.
To set up Server ActiveSync:
1 Press Start, then select More.
2 Select ActiveSync. Press Menu, then select
Options.
3 Select Server Settings, then Connection, and
press the Action key.
4 Under Username, enter your Microsoft
Exchange username.
5 Under Password, enter your Microsoft
Exchange password.
6 Under Domain, enter the name of the domain
for your Microsoft Exchange Server (if required).
7 Select Save password if you want your SPV
C500 to save your password so that you need
not enter it repeatedly.
synchronisingsynchronising
Page 60

5 You’ll return to the Mobile Schedule screen. In
the Peak time sync area, choose how often to
synchronise during your preferred Peak times. In
the Off-peak time sync, choose how frequently to
synchronise the rest of the time. You can also set
a time period for synchronising while Roaming.
6 Press Done.
synchronising remotely
Once you have decided on a Mobile Schedule, you
can synchronise remotely with your PC.
1 Press Start, then select More.
2 Select ActiveSync. Press Menu, then select
Options.
3 Select PC Settings. Beneath Use: scroll to
the connection that you wish the setting to
apply to.
4 Scroll to and select Use mobile schedule to
sync with this PC. Your SPV C500 will now
connect to the specified PC remotely according
to the settings you have entered in the Mobile
Schedule screen.
5 To start synchronisation, press Sync.
Note: To synchronise remotely with a PC, it must
be turned on.
To synchronise remotely with a server you must
have completed the server settings. If you have
completed these settings, your phone will
automatically synchronise with your server, based
on your Mobile Schedule.
ActiveSync errors
Whenever ActiveSync cannot successfully
synchronise your information it displays an error on
your SPV C500.
Press the Action key when the error text is
displayed. ActiveSync will then display more
information about the error that occurred.
Note: Some types of errors can interfere with
automatic synchronisation. If you suspect that a
scheduled automatic synchronisation has not
occurred, you should attempt to manually
synchronise your information. Successfully
completing manual synchronisation will reset
automatic synchronisation.
119118
synchronising
8 In Server name, enter the name of the Microsoft
Mobile Information Server to which you want to
connect.
9 Press Done three times. To begin synchronising
with the server, press Sync.
Note: You can also set up a connection to
synchronise remotely with a server when you first
create a partnership between your SPV C500 and
your PC.
You can amend which type of information you
want to synchronise between your SPV C500 and
your server from your SPV C500. However, to
change which type of information you want to
synchronise between your SPV C500 and your PC,
you will need to change the synchronisation
settings on your PC. For more information about
synchronisation, see ActiveSync Help on your PC.
To stop synchronisation with a server:
1 Press Start, then select More.
2 Select ActiveSync. Press Menu, then
select Options.
3 Select Server Settings and then select the
information type that you no longer want to
synchronise with a server, such as Calendar,
Contacts or Inbox.
4 Clear the check box next to the information
type that you no longer want to synchronise
with a server by pressing the Action key, and
press Done.
creating a remote synchronisation
schedule
You can create a remote synchronisation
schedule so that your information is automatically
synchronised wirefree™ with the server or your PC
at time intervals that you specify.
1 Press Start, then select More.
2 Select ActiveSync.
3 Press Menu, select Options, then select Mobile
Schedule.
4 Press Menu and select Peak Times. This allows
you to set the time bands that you will use to
decide how frequently you want your SPV C500
to synchronise with your PC or Server. You can
choose the Peak and Off Peak times depending
on your service plan, your work days or your
preferred working hours. When you have
finished, press Done.
synchronising
Page 61

4 While your SPV C500 and PC are connected, the
program will then be copied straight into your
SPV C500 Program menu or other relevant folder.
Working with non-installer files:
1 If the file you have downloaded or copied will
not run on your PC, it is not an installer file.
2 Synchronise your PC and your SPV C500.
3 Using the Explore option in ActiveSync, open
up \Storage\Windows\Start Menu\Accessories.
4 Simply drag the new file into it, and it will be
copied immediately to your SPV C500. It will
appear in the Accessories folder of the Program
menu, and you can simply click on it to run it.
Once you have installed the file on your SPV C500,
you can start using the program immediately.
You can also remove programs that you have
added from your SPV C500 whenever you like.
1 Press Start, then scroll to and select Settings.
Scroll to More and press the Action key. Scroll
to and select Remove Programs.
2 Scroll to the program you want to remove and
press Menu. Highlight Remove and press the
Action key. Confirm your choice by pressing Yes.
Note: You can’t remove core programs that came
with the SPV C500, such as Contacts, Calendar
and Internet Explorer.
Remember that other ways of installing programs
on your phone include:
■
Downloading them over the Internet
Using Internet Explorer, go to the relevant
website and select the file to download. It will
appear in your Accessories folder in the Start
menu in a compressed format. Simply click on
it to unpack it, then click on the new program
to run it.
■
Installing them from your Try Card
If you have the Add On CD, simply install the
application by synchronising. If you are using
the Add On Card, simply highlight the file you
want to install on your phone and press the
Action key. Follow the on-screen prompts.
Note: If you are installing applications from your Try
Card, it is recommended that you install no more
than half at any one time in order to avoid memory
problems.
121120
synchronising
add programs to your SPV C500 using
ActiveSync and expand its abilities
Using the Explore option in the ActiveSync window
on your PC, you can add new programs to your
SPV C500 at any time. Once you start
synchronising your SPV C500 and your PC, you
can add and remove programs as you please.
To add a new program by synchronisation, the file
must be compatible with your SPV C500. There are
three types of program files for your SPV C500.
■
Compressed files, usually with the extension
.cab, will install once you have copied them to
your SPV C500.
■
Installer files are run from your PC while
ActiveSync is operating. The file is unpacked
and its components copied to the relevant parts
of your SPV C500.
■
Non-installer files written for the SPV C500 will
not work on your PC and must be copied to
your SPV C500 using the Explore option in
ActiveSync.
Working with .cab files:
1 Synchronise your SPV C500 and your PC.
2 Click on the Explore button in ActiveSync. The
file structure for your SPV C500 will open. Work
through the folders and go to
\Storage\Windows\Start Menu\Accessories.
3 Copy the file to this folder. You can then
disconnect your SPV C500 from your PC.
4 Now, on your SPV C500, press Start, and scroll
to Accessories. Press the Action key.
5 You will see the .cab file that you copied from
your PC. Scroll to it and press the Action key.
6 The file will decompress and install on your SPV
C500. The program will then appear in the Start
menu or relevant folder. To run it, simply scroll
to it and press the Action key.
Working with installer files:
1 Synchronise your SPV C500 and your PC.
2 Copy the file you want to install to your PC,
then double click on it. If it is not an installer file,
you will get an error message. In this case, see
below.
3 If it is an installer, the file will open and begin to
unpack the program.
synchronising
Page 62

122
security
11
Page 63

To turn off the phone lock:
1 Press Start and select Settings.
2 Select More, then select Security. Scroll to and
select Disable Phone Lock.
3 Enter your password and press Done.
locking the SIM Card
Locking the SIM Card prevents you and others
from using the SPV C500 unless the correct
password is entered. You can still make emergency
calls when the SIM Card is locked. The PIN is
preset to 1111.
1 Press Start, select Settings and select More.
Select Security, then Enable SIM Lock.
2 Enter your PIN1 password, which is preset to
1111, and press Done.
To unlock the SIM Card:
1 Press Start, then select Settings.
2 Select Security. Select Disable SIM Lock.
3 Enter your PIN1 password, which is set to 1111
by default, and press Done.
You can change your PIN when the SIM Lock
is activated.
1 Press Start, then select Settings.
2 Select More, then enter your old PIN which is
set to 1111 by default. Enter your new PIN,
retype your new PIN and then press Done.
Note: When choosing a new SIM Card PIN, please
don’t use a number that includes the numbers 999,
112 or 911 as your phone may mistake these for
emergency numbers.
125
keep your SPV C500 secure
You can customise the level of security you want to
have on your SPV C500 by locking the keypad, the
entire SPV C500 or the SIM Card.
locking the SPV C500
Locking the SPV C500 prevents anyone else from
accessing your personal data. When you switch
this feature on, your SPV C500 will automatically
lock after a specified time of inactivity. A screen will
be displayed requiring your SPV C500 lock
password before access is granted.
Note: You can still receive calls and make
emergency calls when the SPV C500 is locked.
1 Press the Power key quickly to display the Quick
List, select Device lock, then press Select.
2 In the Lock phone after field, select the amount
of time the SPV C500 is inactive before it
automatically locks.
3 Under Password, enter the password you want
to use to access the SPV C500 when it is
locked.
4 Under Confirm password, enter the password
again, and press Done.
Note: After you have selected the time delay and
created a password, you can then quickly lock your
SPV C500 from the Quick List, without having to
view these settings. To unlock your SPV C500
press Unlock then enter your password. Press
Unlock again.
124
security
What are the security codes for?
Your Orange phone comes with a number of preset
security codes. Each code controls one of your
phone’s features. Use the table below to identify
which code you need to activate each feature.
security feature preset code
SIM Card PIN (PIN1) 1111
Fixed dialling (PIN2) 1111
Call barring 1111
Lock code 12345
security
What if I enter the wrong PIN?
If you enter an incorrect SIM Card PIN or PIN2
three times in a row, your SIM Card will block.
You will need a PUK (personal unblocking key)
to unblock your SIM Card.
Call customer services on 07973 100 150 if you
are a pay monthly customer or 07973 100 451
if you are a pay as you go customer for details
on how to unblock your phone.
Do not attempt to guess the PUK code. If you
enter your PUK code incorrectly 10 times in a row,
you will permanently block your SIM Card and you
may have to return your phone to Orange.
Page 64

Orange Care
Life’s difficult enough, without having to worry
about the expense and hassle of replacing
your phone.
To get Pay Monthly Orange Care call 434 free
from your Orange phone.
with Orange Care you get:
■
Worldwide cover for 12 months against loss,
theft, accidental or malicious damage and
handset breakdown.
■
A replacement phone of the same model
despatched within 24 hours of our acceptance
of your claim, to any UK address.
■
The same number and the same service on your
replacement Orange phone that you enjoyed on
your old one, so you’re never out of touch for long.
■
Great value cover for £5 per month.
Note: Orange Care includes insurance and
warranty which is subject to terms and conditions
and exclusions as stated in the reference section.
To find out if you are covered by Orange Care
or for more information call 150 free from your
Orange phone.
protecting your phone
Accidents happen – which is why we offer Orange
Care. However, we do ask that you take good care
of your phone and follow just a few basic steps to
help protect your phone:
■
Don’t leave your phone unattended in a
public place.
■
Don’t leave your phone in a vehicle. If this can’t
be avoided, please, make sure it’s locked in the
boot or locked in the glove compartment.
■
Never loan your phone to someone else.
how to claim
■
Report the loss, theft or damage to Orange as
soon as possible.
■
Loss, theft or malicious damage claims must be
reported to the police immediately (or as soon
as possible within 24 hours of discovery).
127
control the numbers that can be called
from your SPV C500
Fixed dialling allows you to limit the use of your
phone (typically by a friend or family member) to
only the numbers stored in your contacts list, while
Call barring blocks certain types of call. Before you
can use it, you must set up a Fixed dialling list.
1 Press Start, select Settings, select Phone, and
then select Fixed Dialling.
2 Check Enable fixed dialling by pressing the
Action key and press Done.
3 Enter your SIM PIN 2, which is set to 1111 by
default, and press Done.
Once Fixed dialling has been turned on, you can
begin to store Fixed dialling numbers.
1 Press Start, select Settings, select Phone, and
then select Fixed Dialling. Press Menu.
2 Select Edit Numbers and press the Action key.
3 Press Menu, select Add and press the
Action key.
4 Enter the number and press OK.
Call barring can be used selectively to bar
outgoing and incoming calls
The Call barring password is preset to 1111.
Emergency calls to 999 or 112 can be made while
Call barring is on.
1 Press Start, then select Settings. Phone is
highlighted. Press the Action key and press it
again to select Call Barring.
2 Choose whether to bar the following types of calls:
■
Block incoming calls
■
Off
■
When roaming
■
All calls
■
Block outgoing calls
■
International except to home country
■
International calls
■
All calls
■
Off
3 Press the Action key.
4 Press Done when you are finished.
126
securitysecurity
Page 65

■
To make a claim or to have your phone barred
to prevent unauthorised use, simply call Orange
Customer Services on 07973 100 150, or if you
are abroad call +44 7973 100 250.
■
To speed up your claim make a note of the key
facts before calling, eg, time of theft, where you
lost it, how it got damaged and what the
damage is, steps taken to recover your phone
and any other relevant details. You must provide
any assistance and/or information that Orange
reasonably requests in connection with the
replacement of your phone.
■
Remember, if your phone is stolen or
maliciously damaged we need a crime reference
number or a lost property number if it is lost.
■
Once your claim is agreed, Orange will
despatch your replacement phone. Please see
the reference section in the Orange Care terms
and conditions for more information.
Small Business customers opening an Orange
account receive Orange Care free of charge. Small
Business customers will receive a free replacement
of lost, stolen and damaged phones sent out within
24 hours of our acceptance of your claim.
128
12
international
services
security
Page 66

131
Orange international services for pay
monthly customers
Whether it’s two weeks in the sun or a quick
business trip, take Orange with you when you go
abroad and have the reassurance that it’s the
affordable way to keep talking.
You can call or send text messages from abroad
by simply adding the international dial code before
the number you call or text. Press and hold 0 for
the international prefix (+).
If you call or send a text message or Photo
Messages abroad from the UK it makes sense
to use your Orange phone. Orange’s low fixed
price rates make it simple to work out exactly
what you will be charged, so now you can stay in
touch around the world.
Note: The availability of Text Messaging, multi
media services and other Orange services and
products is dependent upon the partner network.
When travelling abroad, always try to keep safety
at the front of your mind. For safety and security,
always pack your Orange phone in your hand
luggage and switch it off before boarding a plane.
Let others know you are abroad so they can
expect a different ring tone when they call you, or
they might hear a recorded message in a foreign
language if you are out of coverage.
pay monthly check list before you travel
1 Call Customer Services on 159 from your
Orange phone or 07973 100 159 from any
other phone to activate your phone so you can
make and receive calls abroad.
2 If you want to use Answer Fax abroad you must
have it activated on your account at least 24
hours before you leave the UK. Call 150 from
your Orange phone or 07973 100 150 from any
other phone for details. The availability of this
service is dependent upon the partner network.
3 Remove any temporary bars on international
calls using the menu options on your phone.
4 Set up any diverts on your Orange phone
before you leave the UK as you will not be able
to do it when you are abroad. Refer to section 3
for more information on call diverts.
5 Make sure you pack your charger and a
three-pin adaptor so you can charge your
phone while abroad.
130
6 Make sure that the frequently used numbers in
your contacts list are saved with the
international dialling codes you need, ie +44,
without the leading zero from the area code for
calls back to the UK.
Note: Roaming needs to be activated at least 24
hours before going abroad.
Orange international services for pay as
you go customers
Whether it’s two weeks in the sun or a quick
business trip, take Orange with you when you go
abroad and have the reassurance that it’s the
affordable way to keep talking.
You can call or send Text Messages from
abroad by simply adding the international dial code
before the number you call or text. Press and hold
0 for the international prefix (+).
If you call or send a text message or photo
messages abroad from the UK it makes sense to
use your Orange phone. Orange’s low fixed price
rates make it simple to work out exactly what you
will be charged, so now you can stay in touch
around the world.
To find out your account balance call 453. A text
message with your balance will be sent directly to
your phone.
international services
What are the international dialling codes
I need to add to numbers when I am
calling to or from the UK?
*includes the Canary and Balaeric islands.
country code
Austria +43
Belgium +32
Cyprus +357
Denmark +45
France +33
Germany +49
Greece +30
Italy +39
Luxembourg +352
Netherlands +31
Northern Cyprus +905
Portugal +351
Rep. of Ireland +353
Spain and islands* +34
Sweden +46
UK +44
international services
Page 67

when you go abroad, you need to select
the partner network to use
Orange has partnerships with a range of networks
in 126 countries worldwide. Your SPV C500 is
configured to automatically search for a local
network when it is switched on. In some countries
you may need to change the band before your
phone can find a network.
When you go abroad, you may need to manually
tell your phone to select a network.
1 In the Home screen, press Start, then
select Settings.
2 Select Phone, then Networks.
3 Scroll to Network selection. Select Automatic for
your phone to automatically select a local
network.
4 Select Manual to choose from a selection of
local networks.
For more information on International services,
call the Orange Literature Request Line on
07973 973 970 or if you are a pay as you go
customer 650 from your Orange phone.
Alternatively, visit our website at
www.orange.co.uk/international
using your Answer Phone abroad
While abroad, you can use your Answer Phone as
easily as you do while in the UK.
1 Simply press and hold the 1 key.
2 You will be connected to your Answer Phone.
Now just press:
1 to listen to your message again
2 to save your message
3 to delete your message
7 to rewind 10 seconds
8 to skip to the next message
9 to fast forward 10 seconds
# to return the call
using GPRS abroad
You can connect to GPRS services as easily as if
you are in the UK. Call Customer Services on 159
from your Orange phone or 07973 100 159 from
any other phone to get an up to date list of foreign
operators that support GPRS Roaming and the
tariffs applicable to your service plan.
133
When travelling abroad, always try to keep safety at
the front of your mind.
1 For safety and security, always pack your
Orange phone in your hand luggage and switch
it off before boarding a plane.
2 Let others know you are abroad so they can
expect a different ring tone when they call you,
or, they might hear a recorded message in a
foreign language if you are out of coverage.
pay as you go check list before you travel
1 Remove any temporary bars on international
calls using the menu options on your phone.
2 Top up your Talk T ime by:
■
Credit or debit card
Register your card 72 hours before you go
and you can then call 450 from your Orange
phone to top up your talk time.
■
Orange Top-up Swipe Card
Use your Orange Top-up Swipe Card to top
up before you go, at Orange shops or
wherever you see the top up symbol in the UK
■
Orange vouchers
Buy £20 and £50 vouchers from any Orange
shop or selected stockist. Orange top-up
vouchers are not currently available abroad.
Only UK vouchers will be redeemed. The
availability of Orange products and services
when roaming is dependent upon the partner
network you are using.
3 Make sure you pack your charger and a three-
pin adaptor so you can charge your phone
while abroad.
4 Make sure that the frequently used numbers in
your contacts list are saved with the
international dialling codes you need, ie +44,
without the leading zero from the area code for
calls back to the UK.
Note: Roaming needs to be activated at least 24
hours before going abroad.
132
international servicesinternational services
Page 68

134
13
reference
Page 69

reference
137
safety
1 network services
The mobile phone described in this guide is
approved for use on the Orange network. A
number of features included in this guide are called
Network Services. These are special services that
you can arrange through Orange. Before you can
take advantage of the Network Services, you must
subscribe to them through Orange. Instructions for
these services are included in this guide.
2 everyday use of your phone
Hold your phone as you would any other telephone,
with the antenna pointing up and over your
shoulder. If your phone has an extendible antenna,
extend it fully. Do not touch the antenna
unnecessarily when the phone is switched on, as
this will affect call quality and may cause the phone
to operate at a higher power level than is needed.
As with any other radio transmitting equipment, you
are advised that for the satisfactory operation of
your phone and for your own safety, you should use
your phone only in the normal operating position.
3 using your Orange phone in a vehicle
Safety comes first, and is the ultimate responsibility
of the driver. Therefore:
■
Orange recommend that you do not use your
phone when driving, unless you are using a
wired personal handsfree kit or personal
handsfree car kit.
■
If you need to make or receive a call and you
have a personal handsfree kit or personal
handsfree car kit, make sure it is done sensibly
using speed dialling or voice activation where
possible, and keeping calls brief and to a
minimum.
■
If you don’t have a personal handsfree kit or
personal handsfree car kit, stop and park your
vehicle safely with the engine off before using
your phone, although never on a motorway slip
road or hard shoulder even if it is urgent.
■
Do not store or carry inflammable liquids, gases
or explosive materials in the same compartment
as your phone, its parts or accessories and
always store your phone safely and securely.
■
You should always use a phone holder in your
car to secure your phone safely. Never place
the phone on the passenger seat or where it
can break loose in a collision or sudden stop.
Remember: Always give your full attention to
driving. There is a personal handsfree kit and
personal handsfree car kit available for most
Orange phones which you can purchase separately
reference
136
by calling the Orange Accessories Hotline on 0500
178 178 or by visiting your local stockist.
4 car kit installation
■
Only qualified personnel should install or service
the personal handsfree car kit or the phone in a
vehicle. Faulty installation or service may be
dangerous and may invalidate any warranty
which may apply to the unit.
■
For vehicles equipped with an air bag,
remember that an air bag inflates with great
force. Do not place objects, including both
installed or portable wireless equipment, in the
area over the air bag or in the air bag
deployment area. If a personal handsfree car kit
is improperly installed and the air bag inflates,
serious injury could result.
■
Check regularly that all mobile phone
equipment in your vehicle is mounted and
operating properly.
Your mobile phone is a low power radio transmitter
and receiver. When it is switched on, it receives
and sends out radio frequency (RF) signals. Most
modern electronic equipment is shielded from RF
signals. However, RF signals may affect improperly
installed or inadequately shielded electronic
systems in motor vehicles (eg electronic fuel
injection, electronic anti-lock braking, electronic
speed control or air bag systems, etc). Check with
the manufacturer or its representative regarding
your vehicle. You should also consult the
manufacturer of any equipment that has been
added to your vehicle.
5fuse replacement
■
Always replace a blown fuse with a fuse of the
same type and size. Never use a fuse of a
higher rating.
6 emergency calls
If your phone offers the features listed below, and if
you have restricted or barred outgoing calls from your
phone, calls to emergency numbers (999 or 112 in
the UK) may still be possible. The features are:
■
Restricted dialling lists
■
Call barring
■
Fixed dialling lists
■
Calls to closed user groups
■
Keypad locking
Ensure the phone is switched on and in service.
Give your location to the operator.
Page 70

reference
139
reference
138
8 operating environment
Remember to follow any special regulations in force
in any area, and always turn off your phone
wherever it is forbidden to use it, or when it may
cause interference or danger. When connecting the
phone or any accessory to another device, read its
user guide for detailed safety instructions.
Do not connect incompatible products.
9 pacemakers
■
Pacemaker manufacturers recommend that a
minimum separation of 16 cm (6 inches) be
maintained between a handheld phone and a
pacemaker to avoid potential interference with
the pacemaker. These recommendations are
consistent with the independent research of
and recommendations of Wireless Technology
Research. Users with pacemakers should
therefore:
■
Always keep your phone at least 20 cm (8
inches) away from your pacemaker when the
phone is switched on.
■
Never carry your phone in your breast
pocket.
■
Use the ear opposite to the pacemaker to
minimise the potential for interference.
■
Switch off your phone immediately if you
suspect that interference is being caused.
10 hearing aids
Certain hearing aids can be interfered with by your
mobile phone. If this occurs, please consult the
hearing aid manufacturer.
11 other medical equipment
Operation of any radio transmitting equipment,
including mobile phones, may interfere with the
working of other inadequately protected medical
devices. Consult a physician or the manufacturer of
the medical device if you have any questions.
Always switch off your phone in health care
facilities when any regulations posted in these
areas instruct you to do so.
12 aircraft safety
Using your phone while in the air is prohibited.
Switch off your phone before boarding any aircraft.
The use of mobile telephones in an aircraft may be
dangerous to the operation of the aircraft, disrupt
the mobile telephone network, and is illegal.
Note: Failure to observe this instruction may lead
to suspension or denial of Orange phone services
to the offender, or legal action or both.
To make an emergency call:
1 If the phone is not on, switch it on. Check for
adequate signal strength.
2 From the main display key in the emergency
number for your location (eg 999, 112 or other
official emergency number).
When making an emergency call, remember to give
all the necessary information as accurately as
possible. Remember that your phone may be the
only means of communication at the scene of an
accident - do not cut off the call until given
permission to do so by the operator.
7 one touch emergency dialling
If your phone supports preprogrammed one touch
emergency dialling, using the 9 key to call the
emergency number may not be possible when you
have restricted or barred outgoing calls from your
phone. This depends on the type of restriction you
have chosen, and the type of barring option you
have selected.
One touch emergency dialling does not operate
when certain other features are in use (such as
keypad locking and others).
Note: Official emergency numbers (e.g 999, 112 or
other official emergency number) may vary by
location. However, only one official emergency
number is programmed into your phone, which
may be incorrect if you are using your phone
overseas. Please check with our Partner Network
abroad for the emergency number that is used in
that location. Your Orange phone, like any mobile
phone, operates using radio signals, mobile and
fixed line networks which cannot always guarantee
connection in all conditions. Therefore never rely
solely upon your mobile phone for essential
communication such as medical emergencies. Do
not hang up during an emergency call until you are
told to do so by the operator.
Note: When using voice dialling you must say the
name exactly as you said it when you recorded it,
which may be difficult in, for example, a noisy
environment or during an emergency. Do not rely
solely upon voice dialling in all circumstances.
Note: A valid SIM Card must be inserted in your
phone in order to make emergency calls. Pay as
you go customers do not need to have talk time
available, but need to have used the phone in the
previous six months.
Page 71

reference
141
reference
140
15 phone and battery care
Warning: Use only batteries, charger and
accessories approved for use with this particular
phone model. The use of any other types may
invalidate any approval or warranty applying to the
phone, and may be dangerous.
■
Do not charge the battery when either of your
phone’s covers are removed.
■
Keep the phone and all its parts and
accessories out of children’s reach.
■
Your phone is not water resistant. Keep it dry.
Precipitation, humidity and all types of liquids or
moisture can contain minerals that will corrode
electronic circuits.
■
Do not use your phone in dusty, dirty areas. Its
moving parts can be damaged.
■
Your phone is powered by a rechargeable
battery. Note that a new battery’s full
performance may only be achieved after two or
three complete charge and discharge cycles.
■
The battery can be charged and discharged
hundreds of times but it will eventually wear out.
When the operating time (talk time and standby
time) is noticeably shorter than normal, it is time
to buy a new battery.
■
Temperature extremes may affect the ability of
your battery to charge: allow it to cool down or
warm up first.
■
Never use any charger or battery which is
damaged or worn out.
■
Always unplug the charger when not in use. Do
not leave the batteries connected to the charger
for longer than a week, since overcharging may
shorten its lifetime. If left unused, a fully charged
battery will discharge itself over time.
■
Do not paint your phone as this can clog its
moving parts and prevent operation.
■
Only use the antenna supplied or an approved
replacement antenna. Unauthorised antennae,
modifications or attachments could damage the
phone and may violate regulations governing
use of mobile phones.
■
Keep all SIM Cards out of children’s reach.
■
Use your phone battery only for its intended
purpose, and never use any charger or battery
which is damaged or worn out.
■
Never allow the battery terminals to short
circuit, as this can cause damage to the battery
or to the connecting object (a short circuit can
occur if a metallic object such as a coin, clip or
pen causes direct connection between the +
and - terminals of the battery). Therefore,
always take adequate precautions when
carrying a spare battery in a purse or pocket.
13 explosive materials
■
You are advised to switch off your phone when
at a petrol station or other refuelling point. You
must observe restrictions on the use of radio
equipment in fuel depots (fuel storage and
distribution areas); chemical plants or where
blasting operations are in progress.
■
Areas with a potentially explosive atmosphere
are often but not always clearly marked. They
include: below deck on boats; chemical transfer
or storage facilities; vehicles using liquefied
petroleum gas (such as propane or butane);
areas where the air contains chemicals or
particles, such as grain, dust or metal powders;
and any other area where you would normally
be advised to turn off your vehicle engine.
Note: The functioning of your phone can be
affected by localised conditions, and we cannot
guarantee coverage inside buildings. If you have
difficulty in making or receiving calls, you should
contact Orange customer services.
14 general safety information
■
When changing your phone’s cover, always
switch off the power and disconnect the phone
from the charger or any other device. Always
store the phone with the covers attached.
Never use a phone without a cover.
■
Remember to always make backup copies of all
important data.
■
Your phone must be switched on to access
games, ring tone composer, calendar,
calculator, wap, infrared, timer and other similar
features. Do not switch your phone on when
mobile phone use is prohibited or when it may
cause interference or danger.
■
The information or services you have accessed
using wap are stored in the cache of your
phone, which is a memory used to store data
temporarily.
You should empty the cache of your phone
after each use to ensure that any confidential
information cannot be accessed by anyone
using your phone.
■
Parts of the phone are magnetic. Metallic
materials may be attracted to the phone. Always
secure the phone in its holder because metallic
materials may be attracted by the earpiece. Do
not place credit cards or other magnetic storage
media near the phone, because information
stored on them may be erased.
■
Always switch your phone off in any facility
where posted notices so require.
Page 72

paperwork
14-day phone return
The 14-day phone return only applies to new
phones and excludes upgrades and reconditioned
phones. If you are unsatisfied with our service in any
way, you can return your phone within 14 days of
purchase, and we will reimburse you the cost of
purchase and your connection charge. All we
request is that you pay for the calls you’ve already
made and a percentage of the monthly subscription.
Simply fill in the form supplied with your phone and
take it along with your phone to your stockist. You
should retain the form for your records.
data protection
We will use the personal information you supply us
to help manage your Orange account efficiently, for
example, to assist in handling queries, sending bills
(excluding pay as you go) or to send you
information on products and services which may
be of particular interest to you. From time to time,
we may pass information about you to third parties
or government agencies. Full details are given in
the terms and conditions booklet.
Please call Orange customer services on
07973 100 150 or, if you are a pay as you go
customer, on 07973 100 451 if you do not wish to
receive any marketing materials related to Orange
and its services, or if you do not wish us to pass
on your details to any other reputable organisations
for sales and marketing purposes.
direct debit
Paying by Direct Debit is a convenient way to pay.
If you’re a pay monthly customer you will still be
sent a detailed monthly statement but won’t have
to remember to send a cheque each month. To set
up a Direct Debit payment call 150 from your
Orange phone.
If you’re a pay as you go customer you can
combine control with peace of mind, topping up
from as little as £10 a month to £100. You can
change or cancel your Direct Debit anytime, just
give 14 days notice. To set up a Direct Debit
payment call 450 from your Orange phone .
reference
143
reference
142
■
Batteries must be recycled or disposed of
properly and according to your local regulations,
and must never be disposed of in household
waste. Never dispose of batteries in a fire.
■
When you disconnect the power cord of any
accessory, including the charger, grasp and pull
the plug, not the cord.
■
For good operation times, discharge
an NiMH battery from time to time by leaving
your phone switched on until it turns itself off.
■
Do not attempt to open the casing on your
phone or its battery. Non-expert handling may
damage it.
■
Do not drop, knock or shake the phone. Rough
handling can break the internal circuit boards.
■
Do not use harsh chemicals, cleaning solvents,
or strong detergents to clean your phone. Wipe
it with a soft cloth slightly dampened in a mild
soap and water solution.
■
Do not store it in hot areas. High temperatures
can shorten the life of electronic devices, damage
batteries and warp or melt certain plastics.
■
Do not store your phone in cold areas. When it
warms up (to its normal temperature) moisture
can form inside the phone which may damage
electronic circuit boards.
All of the above suggestions apply equally to your
phone, battery, charger or any accessory. If any of
them is not working properly, contact Orange
customer services on 07973 100 150 or, if you are
a pay as you go customer, on 07973 100 451,
from any other phone for assistance.
radio waves and your phone
Specific absorbtion rate, or SAR, is an
internationally accepted way of measuring how
much radio frequency (RF) energy is absorbed by
the body when a mobile phone is used.
All phones on the Orange network are designed by
the phone manufacturers to comply with the
relevant recommendations and standards. Orange
believes that new and existing customers should
be fully informed about SAR.
The SAR value for your SPV C500 is 0.297w/kg.
Note: The SAR value for your phone has been
provided to Orange by the manufacturer. By acting
as facilitator for conveying this information to our
customers, Orange is fulfiling its duty as a
responsible retailer.
Page 73

originally supplied as part of the standard
package.
2.3 The Insurance is arranged with an authorised
insurer whose details are available upon
request to HSBC Insurance Brokers Limited,
Quay West, Trafford Wharf Road, Manchester,
M17 1PL.
2.4 The following paragraphs describe the
conditions and cover provided under the
terms of this Insurance which forms part of a
master policy arranged by HSBC Insurance
Brokers Limited on behalf of Orange. This
Insurance is subject to the terms and
conditions of the master policy, a copy of
which can be obtained from HSBC Insurance
Brokers Limited. Requests should be made in
writing, stating your Orange phone number.
3 cover for lost stolen and damaged phones
Your phone which must be in your possession or in
the possession of an authorised user is insured
worldwide subject to the terms and conditions of
the Insurance policy (see clause 6.14 in respect of
conditions outside the United Kingdom). If your
phone (or parts there of) is lost, stolen or damaged
you will be entitled to a replacement or repair “free
of charge” subject to payment of the administration
fee as detailed in clause 9.6, subject to compliance
with all the following terms and conditions of the
policy. For your information an authorised user is
the Orange registered customer, other users
officially notified to Orange by the customer and
authorised by Orange, the registered customer’s
spouse/partner, members of his/her immediate
family, all of whom would normally reside at the
registered customer’s address and employees of
the registered customer who use the phone with
permission of the customer.
3.1 Loss, theft or malicious damage claims must
be reported to the Police immediately but in
any event within 24 hours of discovery of the
occurrence. In respect of claims arising
outside the United Kingdom please refer to
Clause 6.14.
3.2 Your claim must be reported to Orange as
soon as possible but in any event not more
than 24 hours after you discover the loss,
theft or damage. In respect of claims arising
outside the United Kingdom please refer to
Clause 6.14. To make a claim you must
provide the following:
3.2.1 the crime reference number in respect
of theft or malicious damage claims or
the lost property reference number if
the phone has been lost;
reference
145
reference
144
allowing access to your Orange account
It can sometimes be useful for someone else to
have access to your account, for example if you
have more than one Orange phone in your name.
As an account holder you can choose to allow
information only access and access which will
allow changes to be made. Please call customer
services who will send you a form.
Orange useful booklets
If you would like to receive a free booklet
containing useful information on an Orange product
or service call Orange Customer services on 07973
973 150 or, if you are a pay as you go customer,
450 from your Orange phone.
Orange Care terms and
conditions
1 interpretation
1.1 In these terms and conditions Insurance refers
to the provisions of clause 3 and Warranty to
the provisions of clause 7, together Insurance
and Warranty are referred to as Orange Care.
1.2 Orange Care is subject at all times to the
provisions of these terms and conditions and
does not apply and cannot be purchased in
relation to any second line activated on your
Orange phone. (Orange Care only applies to
approved and Orange branded phones).
1.3 To check whether your chosen service plan
includes Orange Care or requires Orange
Care to be purchased as an optional extra
please call 150 from your Orange pay monthly
phone or 07973 100 150 from any other
phone. Small Business customers should call
345 from their Orange phone or 07973 100
345 from any other phone and Business
Solutions customers should call 158 from their
Orange phone or 07973 100 158 from any
other phone. Pay as you go customers can
purchase Orange Care by calling 450 from
their Orange phone or 07973 100 450 from
any other phone.
2 insurance terms
2.1 Orange Personal Communications Services
Limited (Orange) is monitored by HSBC
Insurance Brokers Limited which is a member
of the General Insurance Standards Council.
2.2 Orange is authorised by the insurer to collect
premiums, to accept or decline claims, to
arrange repairs and issue replacement phones
on behalf of the insurer. For the purposes of
this Insurance “phone" means handset,
standard battery, SIM card and charger,
Page 74

reference
147
reference
146
4.1.12 damage resulting from pressure waves
caused by aircraft or other aerial devices
travelling at sonic or supersonic speeds;
4.1.13 war and hostilities;
4.1.14 loss, destruction or damage in Northern
Ireland due to civil commotion unlawful
or wanton act committed maliciously in
connection with any unlawful
association;
4.1.15 radioactive contamination;
4.1.16 loss or theft of a phone from
temporary premises is covered only
where there is evidence of forcible
and violent entry or exit.
4.2 A replacement or repair will not be provided if:
4.2.1 Orange has reason to believe you have
made a fraudulent claim;
4.2.2 you do not make reasonable efforts to
recover any lost or stolen items;
4.2.3 the phone is not registered and
connected to the Orange network in
your name;
4.2.4 at the time of loss, theft or damage the
phone was not being used or in the
possession of you or an authorised user.
5 premium payment
Insurance cover will cease if any premium is not
paid on the due date unless such delay is due to a
processing error by any clearing bank or similar.
Your phone will not be replaced or repaired if any
sum is due by you to Orange.
6 general
6.1 It is a condition of this policy that the
replacement of any phone will only be made
with an Orange product. Wherever possible,
reasonable efforts will be made to ensure that
the replacement phone is of the same or
similar specification.
6.2 Replacement phones may be supplied from
refurbished stock that have been tested and
are fully functional.
6.3 In the event of a claim you are only entitled to
repair or replacement (at the option of Orange)
of your phone. There is no entitlement to any
monetary settlement under the terms of the
Orange Care Insurance policy.
6.4 The Insurance period will be unaffected by the
replacement of your phone and will continue
to apply from the date the Insurance first
came into force.
3.2.2 full details of how the loss, theft or
damage occurred; and
3.2.3 any other information and evidence as
may reasonably be requested by
Orange regarding the cause of loss or
damage.
3.3 Orange will arrange repair or replacement on
behalf of the insurers.
3.4 Lost, stolen or damaged antennas will be
repaired/replaced, where appropriate, free of
charge once only.
3.5 You or any authorised user of the phone must
at all times act with due care in looking after
the phone and take all reasonable precautions
to safeguard it against loss, theft or damage.
4 exclusions
4.1 A replacement or repair will not be provided
under the terms of the Insurance where the
loss or damage is caused by or consists of:
4.1.1 normal wear and tear or deterioration,
depreciation, rusting or oxidisation,
atmospheric or climatic conditions or
other gradually operating cause;
4.1.2 confiscation or detention;
4.1.3 improper maintenance, repair or
modification;
4.1.4 defective materials or workmanship
covered by the manufacturer’s
warranty;
4.1.5 breakdown of or interruption to the
network service;
4.1.6 loss of use or consequential loss of any
kind;
4.1.7 cosmetic damage which does not
impair the normal functions of the
phone;
4.1.8 loss of or theft of items left unattended
in a public place;
4.1.9 theft of items from an unattended
vehicle unless the item was in a locked
boot or locked glove compartment and
the vehicle itself was securely locked;
4.1.10 any wilful act, neglect or failure to take
reasonable care by you or any
authorised user or any wilful act or
neglect carried out at the direction or
instigation of you or any authorised user;
4.1.11 disregard of manufacturer’s and/or
operating instructions;
Page 75

reference
149
reference
148
6.15 Where a replacement phone is issued under
the warranty the original phone must be
returned to Orange.
6.16 You may be charged the recommended retail
price of any battery charger or antenna
returned to Orange which is shown not to be
that originally supplied with the phone or of
any phone returned to Orange which is shown
to have been deliberately damaged.
6.17 If your phone is lost or stolen, or maliciously
or accidentally damaged so that it is no longer
operable and such lost theft or damage falls
outside these terms and conditions then
Orange may entirely at its discretion agree to
sell you a replacement phone at prevailing
replacement phone prices. The charge for any
replacement phone so supplied will be applied
to your Orange account.
6.18 Orange will use its reasonable endeavours to
dispatch any replacement phone to you within
24 hours of agreeing to issue such
replacement, however, for reasons beyond
our control this may not always be possible.
6.19 Orange will arrange with you a place and time
period for any replacement phone to be
delivered, on payment of the administration
fee detailed in clause 9.6. We reserve the right
to impose a delivery charge if you are
unavailable for the delivery as agreed.
6.20 Any replacement phone received under either
clause 3 or clause 7 will not attract a further
period of Insurance or warranty. For the
avoidance of doubt (subject to the provisions
of clause 6) the periods stated in clauses 8.1,
9.1 and 10.2 as appropriate will continue to
apply from the date such cover originally
came into effect.
6.21 Any claim accepted under Orange Care
purchased as an optional extra with your Pay
Monthly service plan will be subject to an
administration fee. See clauses 9.6, 9.6.1,
and 9.6.2. for details
7 warranty – defective materials or
workmanship
7.1 If your phone (or parts thereof) becomes
defective due to faulty materials or
workmanship Orange will (at its option) repair
or replace it at no charge (on payment of the
administration fee, if applicable, as detailed in
clause 9.6) provided that:
7.1.1 it has been used in accordance with
the operating instructions;
7.1.2 any repairs which may have been, or
are to be undertaken have been
arranged by Orange;
6.5 Should you find a phone that you have
reported lost or stolen before you have
received a replacement, you must report this
to Orange immediately so that the delivery of
the replacement can be cancelled. If you fail
to do so we reserve the right to impose a
charge for any attempt to deliver the
replacement.
6.6 When a replacement phone has been
supplied due to accidental or malicious
damage the original phone must be returned
to Orange.
6.7 When a replacement phone has been
supplied because of loss or theft, if the
original phone is subsequently recovered it
must be returned to Orange as it is the
property of the insurer.
6.8 If there is reason to believe that you have not
taken reasonable care of your phone any
claim may be referred to Chartered Loss
Adjusters in order to carry out a special
investigation into the circumstances of the
claim. No free replacement or repair will be
provided unless and until the adjusters
confirm your claim is acceptable under the
terms of the policy
6.9 If Orange believes that you have persistently
failed to take reasonable care of your phone
your cover will be cancelled.
6.10 Orange may at its option require you to return
your phone for examination before a
replacement is supplied.
6.11 If Orange has reasonable cause to believe you
have made a fraudulent claim your cover will
be cancelled.
6.12 You must provide any assistance and/or
information that Orange reasonably requests
in connection with the replacement of your
phone.
6.13 A replacement item will be refused or you will
be charged for any replacement if you have
not complied with the terms of the Insurance
policy and of Orange Care.
6.14 If your phone is lost or stolen or maliciously
damaged whilst you are abroad you must
report the loss or theft to the relevant local
authority and to Orange as soon as possible
but in any event as soon as reasonably
practicable after you discover loss theft or
malicious damage. A replacement phone will
not be sent to you until you return to the
United Kingdom.
Page 76

9.4 In the event that any tax payable on premiums
should be increased or any new tax imposed
then such increase or new tax may be passed
onto you.
9.5 Where phones share an Orange Group
service plan then Orange Care must be
purchased separately for each phone.
9.6 Any claim accepted under Orange Care will
be subject to an administration fee charged to
your account in advance of any repair or
replacement being undertaken. Details of the
current administration fee are available on
request from Orange and are published in our
periodically updated price guide. The
administration fee is subject to change and is
payable in respect of all accepted claims
made under Orange Care with the exception
of those set out in clause 9.6.1.
9.6.1 The administration fee will not be
payable in respect of a claim for
defective material or workmanship of a
new phone (including standard battery
and charging unit but excluding
reconditioned and/or second hand
phones) where the defective material or
workmanship has been brought to
Orange’s attention within 6 months of
the date of purchase of the phone.
9.6.2 For the avoidance of doubt the
administration fee is not refundable.
9.7 You may terminate Orange Care on or after
the minimum term by giving not less than 10
days notice before a bill date. As a
concession, if you are also terminating your
Orange account then you may terminate
Orange Care within the minimum term and it
will not be necessary for the notice to expire
on your bill date but in such event you will not
be entitled to a refund of any premiums paid.
9.8 Orange will negotiate renewals of the
Insurance policy on your behalf and may
change Insurer. The Insurer and Orange may
vary the terms of the policy from time to time
but will give you 90 days notice of any such
changes. If your rights under the policy are
restricted or removed you may terminate
Orange Care on giving not less than 10 days
notice ending on an invoice date. If you do
not give notice within one month of
notification of any changes you will be taken
to have accepted the changes.
reference
151
reference
150
7.1.3 you have complied with the foregoing
terms and conditions;
7.1.4 the Orange phone is registered and
connected to the Orange network in
your name;
7.2 This Warranty is an extra benefit and is
additional to your legal rights;
7.3 Batteries only have a 12-month warranty.
8 term & payments - Service Plan inclusive
of Orange Care
8.1 Where you are connected to a service plan
which includes Orange Care the Insurance
and Warranty will come into force when you
register the phone on the Orange network.
The Insurance and Warranty will remain in
effect for a period of 12 months, unless you
switch to a different service plan as indicated
in clauses 11.2 and 11.6.
8.2 Orange Care cover may be purchased
separately once the initial period of 12 months
has expired.
8.3 Where phones share an Orange Group
service plan then each phone will be covered
separately.
9 term & payments – pay monthly Service
Plan with optional Orange Care
9.1 Where you are connected to a service plan
which requires Orange Care to be purchased
as an optional extra the Insurance and
Warranty will come into force 24 hours after
you call to request cover or 24 hours after we
receive your written request for cover and will
each have a minimum term of 12 months.
Your confirmation of Insurance cover will be
sent to you within 30 working days after the
end of the month in which cover becomes
effective.
9.2 Premiums will be invoiced monthly by Orange
on behalf of the Insurer on your Orange
account and must be paid along with your
Orange charges.
9.3 Premiums may be varied at any time and will
be effective 90 days after you have been
notified in writing or other durable form, unless
the premium is varied at the annual renewal
date of the policy. If your premium is
increased you may terminate this policy on
not less than 10 days notice (before your bill
date). If you do not give notice within one
month of notification of any increase you will
be taken to have accepted the increase.
Page 77

service plan which requires Orange Care to be
purchased as an optional extra Orange Care
will automatically cease. Orange will refund to
you a pro rata proportion of the premium for
the balance of each complete month
remaining of that period unless you have
already made a claim on the policy in which
event no refund will be due.
11.5 In the event you switch from a pay as you go
service plan to a pay monthly service plan
which includes Orange Care then from the
date such switching takes effect you will be
covered by Orange Care for the unexpired
balance (if any) of any period under clause 8.1
calculated from the day your phone was first
registered on the Orange network.
11.6 In the event you switch from a pay monthly
service plan inclusive of Orange Care to a pay
as you go service plan Orange Care will
automatically cease.
11.7 In the event that you wish to switch from a
pay monthly service plan for which Orange
Care has been purchased as an optional extra
Orange Care will automatically cease but in
such event you will not be entitled to any
refund of premiums paid.
12 claims
12.1 To make a claim under this Insurance you
should call 150 from your Orange pay monthly
phone or 07973 100 150 from any other
phone if you are a pay monthly customer. Pay
as you go customers should call 451 from
their Orange phone or 07973 100 451 from
any other phone. Small Business customers
should call 345 from their Orange phone or
07973 100 345 from any other phone and
Business Solutions customers should call 158
from their Orange phone or 07973 100 158
from any other phone. Your claim will be
handled fairly and promptly.
12.2 In certain circumstances, particularly where
there is a dispute over your claim Orange may
refer the matter to independent Chartered
Loss Adjusters for investigation and review.
reference
153
reference
152
10 term and payments – pay as you go
Service Plan
10.1 When you are connected to a pay as you go
service plan which requires Orange Care to be
purchased as an optional extra the premium
must be paid in advance.
10.2 The policy only applies to approved and
branded Orange pay as you go phones and
may be purchased for any phone within the
current pay as you go range. If you pay by
credit card or debit card the policy will come
into force 24 hours after your call to request
cover. If you pay by cheque then the policy
will come into force within 24 hours of
clearance of your cheque. The Insurance and
warranty within the policy will each have a
term of 12 months. Your confirmation of
Insurance cover will be sent to you within 30
working days after the end of the month in
which cover becomes effective.
10.3 You may request that the policy is terminated at
any time during the 12 month period in which
event Orange will refund to you a pro rata
proportion of the premium for the balance of
each complete month remaining of that period
unless you have already made a claim on the
policy in which event no refund will be due.
11 switching between Service Plans
11.1 In the event that you wish to switch from one
pay monthly service plan to another both of
which include Orange Care, or, from one pay
monthly service plan to another both of which
require Orange Care to be purchased as an
optional extra then Orange Care will continue
unaffected.
11.2 In the event that you wish to switch from a
pay monthly service plan which includes
Orange Care to a pay monthly service plan
which requires Orange Care to be purchased
as an optional extra the inclusive Orange Care
will automatically cease.
11.3 In the event that you wish to switch from a
pay monthly service plan which requires
Orange Care to be purchased as an optional
extra to a pay monthly service plan which
includes Orange Care then from the date such
switching takes effect you will be covered by
Orange Care for the unexpired balance (if any)
of any period under clause 8.1 calculated
from the day your phone was first registered
on the Orange network.
11.4 In the event that you wish to switch from a
pay as you go service plan for which Orange
Care has been purchased to a pay monthly
Page 78

Bar
a block placed by us on some or all of the Services
you normally use (except for calls to emergency
services). It may include us restricting the Service
whereby you will automatically be re-directed into
Orange when you attempt to make an outgoing call
from your Device
Billing Date
the day on which your billing statement will be
issued after you have been connected.
Charges
all charges for Services, as published in our
periodically updated Price Guide. These include
any reasonable administration charges.
Connection
the process of giving you access to a Service.
"Disconnection" and "Re-connection" have
corresponding meanings.
Content
information, communications, images and sounds,
software or any other material contained on or
available through the Services.
Contract
these terms and conditions which are binding on
both you and Orange for each Device you connect
to the Orange Network.
Customer Communication
information made available to you by Orange which
provides information on Orange Services. It may be
made available on your Device or provided
electronically or distributed with new Devices or in
mailings to some or all Orange Customers.
Deposit
refundable amount that Orange may ask you to pay
before we Connect or Re-connect you to the
Network or before providing any Service.
Device
a mobile telephone, device or data card (excluding
Accessories) which is approved by Orange for
connection to its Network.
Line One and Line Two
Line One is the primary means by which you have
access to the Services. Line Two is a second line
on the same Device with its own phone number.
Minimum Term
the minimum period for the supply of Services as
specified in your Service Plan commencing on the
date of Registration; where no period is specified in
the Service Plan a minimum period of 12 months
from the date of Registration will apply.
Network
the electronic communications system by
which Orange makes Services available in the
United Kingdom.
reference
155
reference
154
13 complaints
13.1 If you have any queries or complaints
regarding this Insurance you should in the first
instance address this to Orange. Call 150
from your Orange pay monthly phone or
07973 100 150 from any other phone. Pay as
you go customers should call 451 from their
Orange phone or 07973 100 451 from any
other phone. Small Business customers
should call 345 from their Orange Phone or
07973 100 345 from any other phone and
Business Solutions customers should call 158
from their Orange phone or 07973 100 158
from any other phone.
13.2 If your queries or complaints regarding this
Insurance are not satisfied, you can in the
second instance write to Product Insurance,
Orange PCS, Senhouse Road, Darlington,
DL1 4YG.
13.3 If you are not satisfied with the way a
complaint has been dealt with you should
write to HSBC Insurance Brokers Limited,
Quay West, Trafford Wharf Road, Manchester,
M17 1PL.
13.4 If you remain dissatisfied, HSBC Insurance
Brokers as a member of the General
Insurance Standards Council is also a
member of a registered independent dispute
resolution scheme. They will advise you how
you can contact this scheme.
13.5 Insofar as general Insurance products are
concerned Orange is monitored by HSBC
Insurance Brokers Limited who are members
of the General Insurance Standards Council.
pay monthly terms and
conditions
1 definitions
The following words and expressions shall have the
following meanings:
Accessories
Products approved by Orange which you use in
conjunction with your Device. They include (without
limitation) batteries, chargers, car kits, headsets
and carry cases.
Account
our records of your payments and outstanding
Charges, plus your personal details.
Age Restricted Services
any Services which are specified for use only by
customers over a specific age.
Page 79

what happens when the minimum term ends
2.2 After the Minimum Term ends, we will
continue to supply you with Services as
normal until your Contract is terminated in any
of the ways described in Section 4.
3 provision of Services
what we aim to provide in the UK
3.1 We will take all reasonable steps to make the
Services available to you at all times. The
Services are only available within the range of
the base stations that make up our Network.
We cannot guarantee a continuous fault-free
service. Please note that:
3.1.1 the quality and availability of Services
may sometimes be affected by factors
outside our control, such as local
physical obstructions, atmospheric
conditions, other causes of radio
interference, features or functionality of
your Device, the number of people
trying to use the network at the same
time, and faults in other
telecommunication networks to which
the Network is connected
3.1.2 the quality of our Services may not be at
its best inside buildings or below ground.
3.2 When you move outside the Orange
enhanced service area this may result in:
3.2.1 the call being terminated if you are on a
video call
3.2.2 the speeds at which data is
downloaded being affected.
3.3 Any coverage maps are our best estimate but
not a guarantee of service coverage, which
may vary from place to place.
Services may sometimes be affected by
maintenance and upgrading
3.4 The Network and the Services may from time
to time require upgrading, modification,
maintenance or other works. These may result
in some or all of the Services becoming
temporarily unavailable. In such cases, we’ll
do everything we can to keep the period of
non-availability to a minimum. However, some
interruption may be inevitable.
reference
157
reference
156
Orange Additional Services
optional Services (including but not limited to
Roaming, International Calling, Premium Rate
Services and Content provided by Orange) which
may cost extra whether they are supplied in
conjunction with Service Plans or outside Service
Plans.
Orange
Orange Personal Communications Services
Limited, or any organisation that may succeed it as
the assignee of this Contract. Referred to in this
Contract from time to time as “we” “us” or “our”.
Price Guide
a list of our current Charges which is updated from
time to time and is available from us upon request.
Registration
our acceptance of your application for Services and
our record of your data and any User data prior to
Connection. "Register" has a corresponding
meaning.
Roaming
An optional Service that allows you to use your
Device on other operators’ networks, usually in
foreign countries.
Services
Network and other Services, including Orange
Additional Services, provided or procured by us for
you to use.
Service Plan
a number of products which shall include but not
be limited to bundles of airtime, text, and/or
Orange Additional Services and/or additional
discounts offered by Orange for an agreed monthly
or other periodic payment.
SIM
a card or other device which shall for the avoidance
of doubt include a USIM which contains your
personal telephone number and which is
programmed to allow you to access the Network.
Suspension
the temporary disconnection of Services.
“Suspend" has a corresponding meaning.
User
you, or another person named by you, who is
authorised to incur Charges to your Account.
2 your Contract and the Minimum Term
your Contract runs for at least the
Minimum Term
2.1 For each Device you own, your Contract
starts on the date of Registration and will
continue for the Minimum Term and thereafter
you have limited rights to terminate your
Contract during the Minimum Term as
described in Section 4.
Page 80

communication is unsolicited you agree
we may but are not obliged to block such
communication.
roaming Services outside the UK
3.9 Roaming relies on the telecommunications
systems of foreign networks, over which we
have no control. We cannot therefore offer any
guarantees about Roaming services.
3.10 If you use Services from a country outside the
UK your use of the Services may be subject
to different laws and regulations that apply in
that other country. Orange is not liable for
your failure to comply with those laws or
regulations.
Storage and transmission of information
on our Network
3.11 We may establish limits concerning the use of
the Services, for example the maximum size
of an email message that may be sent or
receive and the maximum capacity allocated
to you for storage of Content on the Network
which you access via the Services.
3.12 You agree that Orange has no responsibility
for the deletion, corruption or failure to store
any Content maintained or transmitted by the
Network.
3.13 While Orange has no responsibility to monitor
the use of the Services if you exceed the use
limits we reserve the right to refuse to store or
send Content on your behalf.
access to the Services and Content
3.14 Under no circumstances will Orange, or any of
the other parties involved in the provision of
Orange Content, be liable for any losses,
damages, costs or expenses arising from or in
any way connected with any errors, defects,
interruptions, malfunctions or delays in
Content or the provision of Content. Orange
agrees to rectify any such problems in the
Content which are notified to Orange as soon
as Orange reasonably can. If you do notice a
fault or error in the Content, please notify the
fault to Orange.
3.15 Orange accepts no liability for the loss, late
receipt or non-readability of any download,
transmission or other communications. The
Content, which is obtained from a large range
of sources, is supplied to you on an “as is”
basis and Orange does not warrant that the
Content is of satisfactory quality, fit for a
particular purpose, suitable, reliable, accurate,
complete, secure or is free from error.
reference
159
reference
158
suspension of Services
3.5 We may suspend some or all of the Services
you use, without giving you notice, if:
3.5.1 we have good reason to believe that
you haven’t complied with one or more
of the terms of your Contract
3.5.2 you don’t pay your bill within the time
stipulated in Condition 6.2; we reserve
the right to place a Bar on some or all
of the Services from your Device (with
the exception of calls to the emergency
services). This Bar will remain in force
until you’ve paid everything you owe
us. At our discretion, we may charge
you for Reconnection and removal of
the Bar
3.5.3 a complaint has been made against
you. The complaint will be thoroughly
investigated, and Services will remain
suspended until we know the results of
that investigation. Any complaint you
make will similarly be thoroughly
investigated
3.5.4 we have good reason to believe that
your mobile phone number is being
used for fraudulent or improper
purposes
3.5.5 we suspect on reasonable grounds that
information has been supplied to us
without the knowledge of the person
named or that an application is
unauthorised or contains false
particulars
3.5.6 you notify us that your Device has been
lost or stolen
3.5.7 we are require d by the emergency
services or other government
authorities to suspend your Services.
3.6 You will remain liable for all monthly or other
periodic Charges during any period of
Suspension.
suspension of Orange Additional Services
3.7 We reserve the right to change, suspend or
withdraw part or all of any Orange Additional
Service on giving reasonable notice.
monitoring the Services you use
3.8 For the purposes of good management and
security and to make sure we follow your
instructions correctly and to improve our
service to you through training of our staff, or
to monitor instances of unsolicited messages
we may monitor or record communications.
Where we have good reason to believe such
Page 81

reference
161
reference
160
4.2.2 a lump sum equivalent to the total of all
the monthly or other periodic Charges
still remaining on your initial Minimum
Term agreement (except in the
circumstances set out in Conditions 4.3
and 15.1). You’ll be entitled to a rebate of
5% of that total if you terminate your
Contract up to and including the first day
of the last month of the Minimum Term.
terminating your Contract because Orange
has changed its terms
4.3 You may also terminate your Contract if we
vary its terms, resulting in an excessive
increase in the Charges or changes that alter
your rights under this Contract to your
detriment. In such cases you would need to
give us at least 14 days’ written notice prior to
your Billing Date (and within one month of us
telling you about the changes). However this
option does not apply if:
4.3.1 we have increased the Charges by an
amount equal to or less than the
percentage increase in the All Items
Index of Retail Prices published by the
Central Statistical Office in the Monthly
Digest of Statistics in any 12- month
period; or
4.3.2 the variations we have made have been
imposed on us as a direct result of new
legislation, statutory instrument,
government regulation or licence; or
4.3.4 the variation relates solely to an Orange
Additional Service, in which case you
may cancel that Orange Additional
Service in accordance with Condition
15.1.
terminating your contract because
Orange is no longer able to provide
access to the Network
4.4 If, for reasons beyond our control, we are no
longer able to provide Network Services, we
will at our discretion either:
4.4.1 make arrangements for you to be
supplied with equivalent Services by
another network at no extra cost to
you, or
4.4.2 accept written notice from you that you
wish to terminate your Contract. In
such cases we will refund any pre-paid
Charges that have not been used up.
access to the third party services and
the Internet
3.16 We have no control over the value or quality
of goods, services or Content offered by third
parties on or through the Services. As a result
we cannot be responsible or liable in any way
for, and do not endorse, any of these goods,
services or Content.
3.17 The Services may be used by you to access
websites and networks worldwide. Orange
accepts no responsibility for the Content or
services in respect of these and you agree to
conform with the instructions issued by those
websites and networks relating to your use of
those services.
3.18 Accessing the Internet, which is not a secure
environment, or using third party services may
leave you vulnerable to unwanted programs or
material or viruses that may be downloaded
to your Device without your knowledge which
may give unauthorised access to, or damage,
your Device and the information stored on it.
Orange is not liable or responsible in any way
for such unauthorised access, damage to or
loss of information on your Device.
Age Restricted Services
3.19 You are not permitted to access our Age
Restricted Services (if any) if you are below
the age specified to access the Services. If
you are allowed to access the Age Restricted
Services by virtue of the fact that you are the
specified age or older you must not show or
send Content from the Age Restricted
Services to anyone below the specified age. If
you let anyone under the specified age use
your Device, you must ensure you deactivate
access to the Age Restricted Services.
4 your rights to terminate this Contract
terminating your Contract after the
Minimum Term
4.1 You may terminate your Contract to expire at
anytime after the Minimum Term by giving us
at least one month’s notice. You are free to
restore your Contract throughout this notice
period, should you change your mind.
terminating your Contract during the
Minimum Term
4.2 You may terminate your Contract before the
Minimum Term has expired if you pay us:
4.2.1 all Charges that are due, plus
Page 82

reference
163
reference
162
what to do after Termination of your Contract
5.2 Termination of your Contract is subject to you
paying us any money you owe us and us
paying you any money we owe you. After
termination, it is your responsibility to cancel
any direct debits, standing orders, credit card
mandates or other authorisations you may
have given for periodic payments to be made
to us by third parties.
6 your responsibilities
when your payments are due
6.1 Ordinarily we will invoice you monthly in
advance for monthly charges which are non-
refundable and monthly in arrears for call and
message charges, but we reserve the right to
amend the invoicing period and submit interim
invoices to you. The Connection charge will be
included on your first invoice. Charges in
respect of Services not supplied directly by us,
eg Roaming, may be invoiced several months
in arrears. VAT will be added to all invoices at
the relevant rate where applicable. Payment is
due when you receive your invoice.
6.1.1 You will be responsible for paying all
Charges on your Account, whether or
not they have been accrued by you
personally. You will also be responsible
for any extraordinary costs incurred in
administering your Account, including
collecting any payments. If your
Service has been Disconnected, either
at your request or ours, you will
remain responsible for paying any
outstanding Charges.
6.1.2 You must make your payment when
you receive your invoice and by one of
the payment methods stated on your
invoice subject to clause 6.3. However
we may also submit an interim bill or
require an immediate payment if we
think you have exceeded a reasonable
limit on your Account.
penalties for overdue payments
6.2 If payment is not made within 14 days of its
due date, we may charge interest on all sums
outstanding at the rate of 2% above the base
rate of National Westminster Bank. This
interest will be charged on a per annum basis
calculated daily.
termination of your Contract by Orange
4.5 We may terminate your Contract immediately
at any time in respect of any or all the Devices
owned by you, in whole or in part, by giving
you written notice if:
4.5.1 you fail to pass any credit assessments
which we may reasonably consider to
be necessary from time to time
4.5.2 you fail to pay any of your bills from
Orange on time
4.5.3 we have good reason for believing that
any information you have given us is
false or misleading
4.5.4 you become insolvent within the
meaning of Section 123 of the
Insolvency Act 1986, or bankrupt, or
make any arrangement with creditors or
go into liquidation or become subject to
an administration order or a receiver is
appointed over any of your assets or if
we have good reason for believing that
you are unable to pay the Charges
4.5.5 in addition, we may terminate your
Contract at any time after the Minimum
Term has expired by giving you at least
one month’s written notice.
termination of your contract by Orange
without written notice
4.6 We reserve the right to terminate your
contract immediately at any time in respect of
any or all of the Devices owned by you, in
whole or in part without notice to you if
4.6.1 we have good reason for believing that
you have breached Conditions 6.4.2,
6.4.3, 6.4.4, or 6.4.5, 6.4.8, 6.4.9,
6.4.10, or 6.4.11 or
4.6.2 you haven’t complied with one or more
of the terms of your Contract and do
not correct the breach within 7 days of
being asked by us in writing to do so.
termination and Line Two
4.7 Termination of your Contract for any reason
connected with Line One will result in
automatic termination of Line Two.
5 effect of Termination of the Agreement
5.1 When this Agreement is terminated, your
Device will be Disconnected and you will no
longer be able to use the Services.
Page 83

6.4.7 comply with any reasonable
instructions issued by us which
concern your use of the Services, and
co-operate with us in our reasonable
security and other checks (which may
include us making phone calls to you)
6.4.8 not send or upload anything that is
copyright protected (unless you have
permission) or which in any way
breaches the intellectual property rights
of any third party
6.4.9 not copy, modify, store, forward,
publish or distribute the Services or
their Content without our express
permission
6.4.10 only use Content for your own personal
use and not for any commercial
purposes or distribute it commercially
6.4.11 not to re-sell, re-supply or otherwise
distribute the Services or Devices
without the prior written agreement
of Orange
6.4.12 not to circumvent the Age Restricted
Service mechanisms.
7 multiple users
7.1 Where there are one or more Users other than
you under your Contract, you remain
responsible :
7.1.1 for ensuring the Services are used in
accordance with this Contract; and
7.1.2 for all Charges incurred to your
Account by those Users.
8 Line Two - limitations on usage
Suspension of Services
8.1 If we Suspend Services on Line One,
Services on Line Two will automatically be
Suspended also.
electronic messages
8.2 It is not possible to send electronic
messages on Line Two. This shall include
but not be limited to, text, video and multi
media messages.
Service Plan
8.3 You may not have a higher Service Plan on
Line Two than you have on Line One.
reference
165
reference
164
payment methods
6.3 Ordinarily we will accept payment of Charges
by credit card, debit card, cheque, direct
debit and electronic transfer, but we reserve
the right to refuse any payment method if we
have reasonable cause to believe such
payment will be dishonoured.
6.3.1 We reserve the right to charge an
administration fee each month for
payments not made by direct debit.
6.3.2We may arrange for invoices to be
issued by a third party on our behalf.
Invoices issued by such third party shall
be binding on you and payment of such
invoices in full to the third party will be a
valid discharge of your liability to pay
such invoices under this Agreement.
things that you agree to do
6.4 Recognising that good management and
security of the Services is important to all
Orange customers, you agree that you will:
6.4.1 provide whatever proofs of your identity
and address we consider reasonably
necessary from time to time. While
photocopy or fax copies are usually
acceptable we do reserve the right to
request the original document
6.4.2 keep confidential, and not disclose to
any third party, your Account password
or any personal identification code,
number or name issued by us
permitting access to the Services
6.4.3 not use the Services for any improper,
immoral, fraudulent or unlawful
purposes or for the sending of any
communication or storing any data
which is of an offensive, abusive,
indecent, obscene or menacing nature
6.4.4 not cause, nor knowingly allow others
to cause, any nuisance, annoyance
or inconvenience, whether to us or
to any of our customers, by any
means including the use of the
Network for persistently sending
unsolicited communications without
reasonable cause
6.4.5 not act in a way, whether knowingly or
otherwise, which will impair the
operation of the Network or any part of
it, or put it in jeopardy
6.4.6 use only Devices and Accessories
approved for use with the Network, and
comply with all relevant legislation or
regulation relating to their use
Page 84

reference
167
reference
166
Connect you. If you believe our assessment of
you is incorrect, we will review your eligibility.
However, we cannot accept responsibility for
the accuracy of information provided from the
databases of credit reference agencies. Nor
can we accept any liability for the
consequences of our declining to Connect you.
10.2 We will also check your details with a fraud
prevention agency who will record details of
any false or inaccurate information provided
by you where we suspect fraud. We or other
organisations may use and search these
records to:
10.2.1 help make decisions about credit and
credit related services, for you and
members of your household
10.2.2 help make decisions on motor,
household, credit, life and other
insurance claims, for you and members
of your household
10.2.3 trace debtors, recover debt, prevent
fraud, and to manage your Accounts or
insurance policies
10.2.4 check your identity to prevent money
laundering, unless you furnish us with
other satisfactory proof of identity.
10.3 We may also disclose details of how you
conduct your Account to such agencies. The
information will be used by other credit
grantors for making credit decisions about
you and the other members of your
household, for fraud prevention, debt
recovery, money laundering prevention,
tracing debtors and Account management.
For these purposes we or they may make
further searches. Although these searches will
be added to your record they will not be
shared by others.
10.4 Please contact us if you would like details of
these credit reference and fraud prevention
agencies from whom we obtain and to whom
we pass information about you. You have a
legal right to this information.
11 deposits
deposits are held for 12 months
11.1 We may request a Deposit from you:
a) before Connection
b) before making Orange Additional Services
available to you, or
c) before reinstating the Services after
Suspension, or.
9 information supplied by you
the details you give us must be correct
9.1 By applying for Registration or for Orange
Additional Services, you undertake to provide
your correct name, address and other factual
information. You also confirm that:
9.1.1 the person stated to be authorised to
sign for a company or firm is duly
authorised
9.1.2 any individual applying as a member of
a company is of full contractual
capacity and is able both to pay for the
Services he or she has requested and
to meet his or her other obligations
under your Contract
9.1.3 You will also tell us if your details
change.
what happens if we suspect the details
you give us aren’t correct
9.2 If we suspect, on reasonable grounds, that
information has been supplied to us without
the knowledge of the person named, or that
an application is unauthorised or contains
false particulars, we may delay Connection or
Suspend Services to your Device while we
investigate further. Following our investigation,
we will Connect or reinstate the Services
unless we have grounds to terminate. You
acknowledge that you will have no claim
against us in respect of any delay or
Disconnection caused as a result of the
operation of this Condition.
10 credit assessments
your application is subject to credit status
10.1 All applications for Registration and Orange
Additional Services are subject to credit
assessment before we can connect you to the
Network. In considering your application we
will search your record at the licensed credit
reference agencies. They will add to your
record details of our search and your
application. We will use credit scoring or other
automated decision making systems when
assessing your application. If our assessment
of you does not meet our normal
requirements we reserve the right to decline to
Connect you or to supply Orange Additional
Services or to decide an appropriate credit
limit on your Account. Alternatively, we may
ask you to lodge a Deposit with us before we
Page 85

13 directory and Caller id
what to do if you want your number to
remain private
13.1 We will enter your Orange number in Orange
and third party directories, and our Network
will allow the display of your Orange number
on receiving Devices. If you prefer not to allow
either of these options, please let us know in
writing. Your mobile phone number and the
approximate location of your Device will
always be sent if calling the emergency
services.
14 Devices
your Device is not a part of your Contract
14.1 Your Device and Accessories are acquired by
you outside the terms of your Contract.
15 changes to your Contract
we reserve the right to make changes to
your Contract
15.1 When you Register you are asked to choose a
Service Plan and to indicate which Orange
Additional Services you require. You may
switch to a higher Service Plan at any time.
You may switch to a lower Service Plan as
often as you like after 6 months following your
Connection to the Network. In the event you
do switch Service Plan and add to or cancel
Orange Additional Services you must give us
not less than 10 days’ notice before your
Billing Date (subject to the terms of any
promotional offers you have accepted). We
do, however, reserve the right to vary the
terms of this Contract from time to time and
to make changes to your Service Plan. We
acknowledge that if we do increase the
Charges, withdraw Orange Additional
Services or introduce new mandatory Charges
- or if your contractual rights are affected to
your detriment - you may terminate your
Contract in accordance with Condition 4.3. If
you do not give notice within one month of
our notifying you of any change(s), you will be
taken to have accepted the change(s).
15.2 In exceptional circumstances a government
authority may require the reallocation or
change of phone numbers in which case we
may have to change your mobile phone
number for the Services
reference
169
reference
168
d) if you fail to pass any credit assessments
which we reasonably consider to be
necessary from time to time
11.2 Deposits will be held for 12 months from the
date of receipt and then refunded upon
request. We do not pay interest on Deposits.
If you owe us money, we may set off Deposits
against the amount due to us. If there is a
balance left over in such cases, we will remit
this to you or credit your Account.
12 SIM Card
it’s your responsibility to keep your SIM
Card safe
12.1 Any SIM Card we supply to you remains our
property, but it is your responsibility to keep it
safe. SIM Cards are easily damaged and
should be handled with care. We will replace
free of charge any SIM Card found to be
defective through faulty design or
workmanship. In any other circumstances,
however, we may charge for replacing it. We
reserve the right to recall any SIM Card from
you at any time to enhance or maintain the
quality of the Services.
what to do if your SIM Card is lost, stolen
or damaged
12.2 You must inform us immediately if the SIM
Card supplied to you is lost, stolen or
damaged. You will remain liable for all
Charges incurred until you do so. We will
send you a replacement SIM Card as soon as
reasonably practicable, but we reserve the
right to charge you for doing so.
your SIM Card and other networks
12.3 The SIM Card supplied with your Device
enables the Device to work on our Network
only with the exception of Devices which can
access Roaming Services. However, after the
Minimum Term we will lift this restriction at
your request, provided all your payments of
Charges are up to date and you pay the
current administration charge. The software
in the SIM Card and the Device is either
owned by or licensed to Orange which grants
you a non-exclusive licence to use it for
accessing the Services for the duration of
your Contract and not otherwise.
Page 86

18 liability
circumstances in which neither of us
accepts liability
18.1 Except as provided in this Condition 18,
neither party shall be liable to the other,
whether in contract or tort nor otherwise, for
any loss or damage which is:
a) not the fault of the other party
b) indirect and/or not reasonably foreseeable
c) loss of business, profits, savings, revenue,
use or goodwill, or for any loss or
corruption of data whether caused to the
other party through any breach of your
Contract or any matters arising under it.
Neither party excludes liability for negligent
acts or omissions causing death or
personal injury to any person.
maximum liability of Orange
18.2 Subject to Condition 18.1, we limit our legal
liability up to a maximum of three thousand
pounds per claim or a series of related claims
for any loss or damage which is:
a) direct financial loss
b) direct physical damage to or loss of property
resulting from our breach of contract or
negligence while providing Services.
factors beyond our control
18.3 We will not be liable to you if we are unable to
perform an obligation or provide the Services
to you because of any factor outside our
control, including but not limited to Acts of
God, industrial action, default or failure of a
third party, war, terrorist act, governmental
action, or by any act or decision made by a
court of competent jurisdiction.
your maximum liability
18.4 Subject to Condition 18.1, your liability is
limited to payment of all outstanding Charges
due in accordance with the provisions of your
Contract.
19 general
changes to your Contract
19.1 Subject to Condition 15, your Contract may
be varied or amended only by the express
mutual agreement of both parties. A party
seeking to rely on such variation or
amendment must produce evidence of the
other party’s agreement to it.
reference
171
reference
170
new services
15.3 We are continuously enhancing our existing
Services as well as adding new services,
particularly Orange Additional Services.
Charges for, and any special terms and
conditions attached to, Orange Additional
Services will be notified in Customer
Communication. The terms of your Contract,
including Charges current on the date when
you take up the offer of any Orange Additional
Service, will apply to it, subject to any special
promotional offer made by us and accepted
by you.
16 Customer Communication
please read all the information we
send you
16.1 We update our Customer Communication
from time to time. Information on various
topics is mailed to Customers with their
monthly billing statements and is available on
request from us. You are asked to read your
Customer Communications and to keep those
which are mailed to you until they are
superseded. We regard you as having been
given any information if it is:
a) included in a mailing addressed to you
b) by voicemail, email text or other form of
electronic message sent by us to your
Device
c) communicated directly by any means.
17 assignment of Contract and change of
ownership of Device
your Contract is personal to you
17.1 Your Contract is personal to you and you may
not assign it. However, we may at our
discretion (not to be unreasonably withheld)
allow you to:
a) nominate a User other than yourself while
you remain primarily liable to us under your
Contract
b) terminate your Contract on short notice if
you have transferred title to your Device to
a new customer who has Connected the
Device to our Network.
17.2 We may assign our rights to your Contract
only if such assignment is on terms which are
at least as advantageous to you as those set
out in your Contract.
Page 87

19.6 You have a right to ask for a copy of your
information (for which we charge a small fee)
and to correct any inaccuracies.
19.7 When you give us information about another
person you confirm that they have appointed
you to act for them, to consent to the
processing of their personal data, and to the
transfer of their information abroad and to
receive on their behalf any data protection
notices.
19.8 For details of the Orange Group of Companies
please visit our website.
delivering communications to you
19.9 All notices to be served in accordance with
your Contract must be served by post or
facsimile. We can in addition serve notice to
you by voicemail, email text or other form of
electronic message. They will be deemed
served 48 hours after they are sent, or on
earlier proof of delivery. All invoices and
notices served by post will be sent to the
address given by you on Registration unless
you notify us of a change to this address. Any
waiver, concession or extra time we may allow
you is limited to the specific circumstances in
which it is given and does not affect our rights
in any other way.
disputes between you and us
19.10 You may request that disputes between you
and us are referred to arbitration under our
Code of Practice for Consumer Affairs. We
will supply a copy of our Code of Practice for
Consumer Affairs to you on request.
miscellaneous
19.11 I f either party delays or does not take action
to enforce their rights under the contract this
does not prevent either party from taking
action later.
19.12 If any of t he t erm s in thi s co ntr act are not
valid or legally enforceable the other terms
will not be affected. We may replace any term
that is not legally effective with a similar term
that is.
Orange company details
19.13 Our Company Registration Number is
2178917 and our Registered Office is at St
James Court, Great Park Road, Almondsbury
Park, Bradley Stoke, Bristol, BS32 4QJ.
governing law
19.14 Your Contract is to be interpreted in
accordance with the Laws of England
and Wales.
reference
173
reference
172
disclosure of information to third parties
19.2 You agree to the disclosure to any
telecommunications company, debt collection
agency, credit reference agency, credit or
fraud monitoring scheme, security agency or
credit provider of:
a) any information relating to your Contract,
including your personal financial information
and details of how you have performed in
meeting your obligations under your
Contract
b) any disclosure as may be within our Data
Protection Act registration
c) any disclosure required as a result of an
order of any court of competent jurisdiction
or by statutory authority.
Your information
19.3 Orange or its Group companies will use your
information which you provide to us together
with other information for administration,
marketing, credit scoring, customer services,
tracking your Device and web use preferences,
and profiling your purchasing preferences. We
will disclose your information to our service
providers and agents to help us with these
purposes. We will keep your information for a
reasonable period after your contract with us
has finished in case you decide to use our
Services again and we may contact you about
our Services during this time.
19.4 You consent to us sharing your information
with other companies in the Orange Group
and companies outside the Orange Group
who are our business partners. They or we
may contact you by mail, telephone,
electronic messaging services, fax or email to
let you know about any goods, services or
promotions which may be of interest to you.
Please call customer services if you do not
wish to receive such information from us, or if
you do not wish to receive information from
our business partners, but remember that this
will preclude you from receiving any of our
special offers or promotions or those of our
business partners.
19.5 By registering your Device on the Network
you consent to our transferring your
information to countries which do not provide
the same level of data protection as the UK if
necessary for providing you services you
require. If we do make such a transfer, we will
put a contract in place to ensure your
information is protected.
Page 88

reference
175
pay as you go terms and
conditions
The following words and expressions shall have the
following meanings:
Accessories
goods designed for use with but not part of
Phones and approved by Orange, including
(without limitation) batteries, chargers, car kits,
headsets and carry cases.
Charges
the charges for pay as you go as published in our
periodically updated list of charges (defined herein
as ‘Price Guide’)
Connection
the process we carry out to enable your phone to
access the Services. ‘Disconnection’ and ‘Re-
connection’ have a corresponding meaning.
Literature
printed matter providing information on Services
published by Orange and distributed with new
Phones or in mailings to Customers, whether or not
supplied automatically to all Customers.
pay as you go Voucher
a voucher representing the cash value of airtime
allowing access to the Services which must be
paid for in advance which expression includes
airtime purchased direct from Orange by credit or
debit card.
Network
the public telecommunications system by which
Orange makes Services available in the United
Kingdom.
Orange
Orange Personal Communications Services
Limited, and any successor in business or
assignee.
Phone
mobile telephone (excluding Accessories but
including charging unit and SIM which remains the
property of Orange) approved by Orange for
connection to its Network.
Price Guide
publication listing our current Charges, updated
from time to time.
Registration
our acceptance of your application to register
individual pay as you go Voucher, Register has a
corresponding meaning.
reference
174
Roaming
a service which allows you to use your Phone on
other operator’s networks, usually in foreign
countries.
Services
Network and other services, provided by us and
made available for your use.
SIM
card or other device, bearing a unique telephone
number programmed to allow a Phone to access
Network Services.
Suspension
the temporary discontinuance of Services.
User
you or another person notified by you to us as
authorised to use your Phone.
2provision of services
2.1 We will use reasonable efforts to make the
Services available to you at all times. The
Services are available only within the range of
base stations which form the Network. Quality
and availability of the Services may be
affected by factors outside our control such
as local physical obstructions, atmospheric
conditions and other causes of radio
interference or faults in other
telecommunication networks to which the
Network is connected.
2.2 The Network and the Services may from time
to time require upgrading, modification,
maintenance and other works (including but
not limited to works required for security
reasons), or may be affected by unforeseen
events which may result in the partial or
complete non availability of the Services.
We will use all reasonable efforts to provide
back-up Services and to keep all such
periods of non availability to a minimum but
some interruption may be inevitable. You
Register in the knowledge of this and accept
our obligation to carry out works from time to
time in the interests of all our customers.
2.3 We may from time to time tape conversations
between you and our customer services for
training purposes only. For the purposes of
good management and security, we may
need to monitor the contents of any text
message you send from time to time.
2.4 We may Suspend the Services in whole or
part at any time without notice if you do not
comply with any of these terms and
conditions or if any money owed by you to
us, whether in relation to Services or not,
remains unpaid.
Page 89

reference
177
reference
176
capable of remedy you have not taken
such remedial steps as we shall have
required within 7 days of our giving you
notice of such failure; or
4.1.2 for whatever reason we are unable to
provide the Services.
5 your responsibilities
5.1 Recognising that good management and
security of the Services is important to all
Orange customers you agree that you will:
5.1.1 not use the Services for any improper,
immoral, fraudulent or unlawful
purposes or for the sending of any
communication which is of an offensive,
abusive, indecent, obscene or
menacing nature;
5.1.2 not cause, nor knowingly allow others
to cause, any nuisance annoyance or
inconvenience whether to us or to any
of our customers which shall include the
use of the Network for the persistent
sending of unsolicited communications
without reasonable cause;
5.1.3 not act in a way, whether knowingly or
otherwise, such that the operation of
the Network or any part of the Network
will be jeopardised or impaired;
5.1.4 only use a Phone and Accessories
approved for use with the Network and
comply with all relevant legislation or
regulation relating to its use;
5.1.5 comply with any reasonable
instructions issued by us which
concern your use of the Services and
co-operate with us in our reasonable
security and other checks (which may
include us making phone calls to you).
6 supplied by you
6.1 By applying for Registration you represent to us
that the name, address and other factual
information which you provide to us are correct.
6.2 You acknowledge that if we suspect on
reasonable grounds that information has been
supplied to us without the knowledge of the
person named or that an application is
unauthorised or contains false particulars, for
the protection of our Customers and the
Network, we may delay Connection or
Disconnect Services to your Phone while we
investigate further. If our suspicions prove
groundless we will Connect or Re-connect
Services immediately. You acknowledge that
2.5 We shall investigate all complaints made
whether by or against you and reserve the
right to Suspend the Services if a complaint
has been made against you pending the
results of investigation of the complaint.
3 pay as you go Vouchers
3.1 Free airtime given to the customer on initial
registration of their new pay as you go phone
(if any) shall be valid for the periods set out in
the Price Guide and/or Customer Literature
current as at the date of Registration.
3.2 In the event that the cash value of airtime
forming part of free airtime given to a
Customer in accordance with 3.1 above is
not used within the relevant validity period
stated in Condition 3.1 such unused airtime
will be forfeited.
3.3 Notwithstanding that you use all of a pay as
you go Voucher or that the free airtime given
to a Customer in accordance with 3.1 above
expires your Phone will continue to be capable
of receiving incoming calls for the periods set
out in the Price Guide and/or Customer
Literature current as at the date of expiry.
3.4 We will disconnect your phone if during the
previous six months you have not Registered
a new pay as you go Voucher or you have not
made chargeable calls from your phone or
received incoming calls on your phone. For
the avoidance of doubt calls shall include but
not be limited to voice calls, data calls and
text messaging. On disconnection your mobile
telephone number will be reassigned. On
reconnection you will be assigned a new
mobile telephone number.
Any remaining credit on your pay as you go
Voucher will be reinstated if you reconnect.
You can reconnect your phone without having
credit on your pay as you go Voucher.
3.5 No cash credits will be given for unused pay
as you go Vouchers. Credit or Debit card
payments are subject to our policy on
acceptance in force from time to time.
4 our rights to terminate your service
4.1 We may Disconnect your phone and refuse to
Re-connect it at any time in whole or in part
immediately by notice in writing to you if:
4.1.1 you fail to comply with clause 2.4, 2.5,
5 and 6 of these terms and conditions
provided that where such failure is
Page 90

provisions of Condition 9.4 you may inform us
if at any time your Phone requires repair.
9.4 Upon receipt of notification under Condition 9.3
we may at your request Suspend Services for a
maximum period of 30 days whilst you make
arrangements to obtain an alternative phone.
9.5 In the event that you fail to make a request as
permitted by Condition 9.4 then any current
pay as you go Voucher will lapse when you
report the loss or theft of your Phone or if you
do so make a request on the expiry of the
30-day period if you do not during that period
request the re-instatement of the pay as you
go Voucher.
10 changes
10.1 We reserve the right to vary these terms and
conditions and the Charges from time to time.
11 customer literature
11.1 We update our Customer Literature from
time to time. You are asked to read your
Customer Literature and to keep it until it
is superseded. We regard you as having
been properly notified of any information
if it is either included in a mailing
addressed to you or in a text message
sent by us to your Phone. You are asked
to ensure that when contacting Orange
customer services with queries you rely
on current Customer Literature.
11.2Orange cannot accept responsibility for
offers related to the provision of its
Services made elsewhere than in its own
advertisements or publications or for any
promises, representations, waivers,
indulgences or other purported variations
of these terms and conditions unless
confirmed in writing by an authorised
employee of Orange.
If you are in any doubt as to whether any
statement or representation is properly
authorised you should contact Orange
customer services immediately.
reference
179
reference
178
you will have no claim against us in respect of any
delay or Disconnection caused as a result of the
operation of this Condition 6.2.
7 SIM Card
7.1 Any SIM Card we supply to you remains our
property but it is your responsibility to keep it
safe. SIM Cards are easily damaged and
should be handled with care. We will replace
any SIM Card found to be defective by reason
of faulty workmanship or design free of charge
but may charge for replacing or renewing a
SIM card in any other circumstances. We
reserve the right to recall any SIM Card from
you at any time to enhance or maintain the
quality of the Services.
7.2 You must inform us immediately in the event
that a SIM Card is damaged. We will send
you a replacement SIM Card as soon as
reasonably practicable but we reserve the
right to charge you for doing so.
7.3 The software in the SIM and the Phone is
either owned by or licensed to Orange which
grants you a non-exclusive licence to use it
for accessing the Services and not otherwise.
7.4 The SIM Card supplied with your Phone
enables the Phone to work on our Network
only. We will lift this restriction at your request,
subject to our current policy relating to the
same and provided you pay the current
administration charge.
8 directory and caller ID
8.1 Unless you inform us otherwise when you
Register your first pay as you go Voucher, we
may make appropriate directory entries and
our Network may allow the display of your
telephone number on receiving handsets.
9 phones
9.1 Your Phone and Accessories are acquired
by you outside of the operation of these terms
and conditions and, as between you and
Orange, are your property.
9.2 Any insurance or warranty relating to your
Phone must be purchased by you separately
of these terms and conditions. Any insurance
or warranty arranged by us of which you may
previously have had the benefit will no longer
be valid.
9.3 You must inform us immediately in the event
that the SIM Card or your Phone is lost or
stolen. In order to take advantage of the
Page 91

reference
181
reference
180
14 general
14.1 Subject to Condition 10 these terms and
conditions may only be varied or amended
only by the express mutual agreement of both
parties and the party seeking to rely on such
variation or amendment must produce
evidence of the other party’s agreement to it.
14.2 You agree to the disclosure to any
telecommunications company, debt collection
agency, credit reference agency, credit or
fraud monitoring scheme, security agency or
credit provider of:
14.2.1any information relating to your
Contract, including your personal
financial information and details of how
you have performed in meeting your
obligations under your Contract;
14.2.2any disclosure as may be within our
Data Protection Act registration.
14.2.3any disclosure required as a result of an
order of any court of competent
jurisdiction or by statutory authority.
14.3 All notices under these terms and conditions
will be sent to the address given by you on
Registration unless you notify us of a change
to this address. Any notice from us to you will
be deemed served 48 hours after posting or
an earlier proof of delivery.
14.4 All notices to be served in accordance with
these terms and conditions must be served
by text message, electronic mail or by post or
facsimile.
14.5 Any waiver, concession or extra time we may
allow you is limited to the specific
circumstances in which it was given. It does
not affect our rights under these terms and
conditions in any other way.
14.6 You may request that certain disputes
between you and us are referred to arbitration
under our Code of Practice for Consumer
Affairs, except for all disputes concerning the
operation of Condition 10 of these terms and
conditions which shall always be referred to
arbitration. We will supply a copy of the Code
to you on request.
14.7 Our Company Registration Number is
2178917 and our Registered Office is at St
James Court, Great Park Road, Almondsbury
Park, Bradley Stoke, Bristol, BS32 4QJ.
14.8 The operation of these terms and conditions
shall be interpreted in accordance with the
Laws of England and Wales.
12 assignment and change of ownership
of phone
12.1 For your security, we will not knowingly Re-
connect a Phone owned by you to our
Network at the request of someone other than
you unless it is at least six months since you
last Registered a pay as you go Voucher or
the person requesting Re-connection is able
to correctly identify your account password.
12.2 We may assign our rights and obligations
under these terms and conditions only if such
assignment is on terms which are at least as
advantageous as those set out herein.
13 liability
13.1 Except as provided in this Condition 13,
neither party shall be liable to the other,
whether in contract or tort or otherwise, for
any loss or damage which is:
13.1.1 not the fault of the other party;
13.1.2 i ndir ect and/or not reasonably
foreseeable.
13.1.3 loss of business, profits, savings,
revenue, use or goodwill whether
caused to the other party through any
breach of your Contract or any matters
arising under it.
Neither party excludes liability for negligent
acts or omissions causing death or personal
injury to any person.
13.2 Subject to Condition 13.1, we limit our legal
liability up to a maximum of three thousand
pounds per claim or a series of related claims
for any loss or damage which is:
13.2.1 d irect financial loss.
13.2.2 d irect physical damage to or loss of
property resulting from our breach of
contract or negligence while providing
Services.
13.3 We will not be liable to you if we are unable to
perform an obligation or provide the Services
to you because of any factor outside our
control, including but not limited to Acts of
God, industrial action, default or failure of a
third party, war, governmental action, or by
any act or decision made by a court of
competent jurisdiction.
13.4 Subject to Condition 13.1, your liability is
limited to payment of all outstanding Charges
due in accordance with the provisions of
your Contract.
Page 92

reference
183
downloadable games terms
and conditions
1 eligibility
1.1 Each downloadable mobile phone game from
Orange Games (“the Game”) is open to any
UK resident age 16 years or over who has
phone of a type which is both listed on the
orange.co.uk/games website and registered
on the Orange network in the United Kingdom
(“the Phone”).
1.2 Only one player can be registered for the
Game per phone.
1.3 By downloading the Game the player agrees
to be bound by these Terms and Conditions
1.4 You can only download the Game in the
United Kingdom, the Game may be
downloaded in some foreign countries,
however this is dependent on this service
being supported by the foreign network.
2 cost
2.1 The cost of downloading each Game in its
basic form is currently charged at £1.50. For
certain games, additional levels or stages may
be available for download and these will be
charged at 50p per level or stage, any
downloading of the Game outside the UK will
be subject to additional charges.
2.2 The charges for submitting your high score
are based on messages sent from the player’s
phone, which are currently charged at 10p
per message whilst in the UK. This charge will
apply even if you have SMS remaining in a
monthly or other bundle. Any submission of
high score whilst outside the UK will be
subject to additional charges at the foreign
network rates. Similar charges may apply in
respect of certain actions such as unlocking
an individual character or feature.
2.3 Orange reserves the right to change these
costs, and will publish any changes on
www.orange.co.uk/games Any continued use
of the Game after such publication means
that you will be deemed to have accepted
such changes. You will only be charged for
complete downloads. If your download should
not be completed you will not be charged.
3 the prizes
Certain Games may have prizes for those with
highest scores, or who win tournaments. Details of
any such prizes will be displayed at
reference
182
www.orange.co.uk/games Orange’s decisions
regarding prize winners shall be final and no
correspondence will be entered into by Orange.
Details of winners will be made available by Orange
on written request. You must not enter into any
unlawful, inaccurate, vulgar or inappropriate detail
at the point of registration for the prizes.
4 conditions attaching to Prizes
Prizes are not transferable. All prize descriptions
not illustrative and not definitive. Further details
available on written request submitted to Orange
with a stamped self-addressed envelope.
Orange reserves the right to offer an alternative
prize of equal or greater value at any time. The
prizes may themselves be subject to other terms
and conditions, depending upon their nature. No
cash alternative is available in whole or part.
5 general
5.1 Under no circumstances will Orange or any of
the other parties involved in the provision of
the Game, be liable for any losses, damages,
costs or expenses arising from or in any way
connected with any errors, defects,
interruptions, malfunctions or delays in the
provision of the Game. We agree to rectify any
such problems in the Game which are notified
to us as soon as we reasonably can. If you do
notice a fault or error in the Game, please
notify Orange customer services.
5.2 Orange accepts no liability for the temporary
non-availability of its network, loss, late receipt
or non-readability of any transmission or other
communications.
5.3 Orange reserves the right to amend these
Terms and Conditions from time to time. Any
alteration or addition to these Terms shall take
effect immediately once posted on
www.orange.co.uk/games. Any continued use
of the Game after such publication means
that you will be deemed to have accepted
such changes.
5.4 We reserve the right to cease provision of the
Game at any time.
5.5 Only one Game may be stored on your phone
at any time, in addition to the Game already
stored on your phone at the time it is
registered to the Orange network.
5.6 The downloading of the Game is subject to
availability and may be affected by the volume
of users from time to time or by network
congestion. Orange’s Standard Network
Page 93

connections and close the Service Plan to
customers switching Service Plan.
2.5 We reserve the right to discontinue a currently
available or a ‘closed’ OVP Plan and move
existing customers to the nearest equivalent
currently available Service Plan. We will write
to the account holder to notify such changes.
2.6 OVP Plans are not available on Orange
Line Two.
2.7 OVP does not apply to pay as you go, pay up
front or shared tariffs.
2.8 OVP does not offer discounted rates or
schemes for calls between nominated or
frequently called numbers.
2.9 OVP does not apply to Competitor’s
promotional tariffs but we reserve the right to
offer a competitor’s promotional tariff and may,
from time to time, offer our own promotional
variants of OVP Plans.
2.10 We reserve the right not to offer any
Competitor tariff containing elements of
services or functions that the Orange Network
does not currently offer or to omit those
elements of services or functions.
3 Charges
3.1 We will make reasonable endeavours to
ensure that OVP Plan charges are the
equivalent of the Competitor tariff published
charges.
3.2 In the event that a Competitor makes any
changes to a Competitor tariff, subject to the
provisions of these terms and conditions we
will make reasonable endeavours to
implement any published changes to existing
OVP Plans as soon as is reasonably practical.
3.3 If you are connecting to Orange on an OVP
Plan you will be charged the equivalent of the
Competitor’s standard connection charge.
3.4 We reserve the right to apply Competitor’s
charges for changing OVP Service Plan.
3.5 Subject to point 3.4 above, you may switch
between Orange Value Promise Service Plans,
Orange Talk Plans or other Orange Service
Plans
3.6 You may switch between OVP Plans or to an
Orange Talk Plan by giving us at least 5 days
notice before your Monthly Billing Date.
185
Terms and Condition continue to apply in
parallel with these Terms and Conditions.
5.7 You must only use the Game for your own
personal use, and not for any commercial
purpose.
5.8 You agree only to access, download and use
the Game in accordance with Orange’s security
measures relating to its network and billing,
and the source code of the Game, and will not
attempt to circumvent such security measures.
All trademarks and trade names are the properties
of their respective owners. All rights are reserved by
the respective owners.
Orange Value Promise Terms
and Conditions
1 Definitions
Competitor tariff
A popular published, currently available, monthly
paid contract digital tariff available in the UK from
O2 (UK) Limited (formerly British
Telecommunications Mobile Communications Ltd),
Vodafone Retail Ltd & T-Mobile (formerly One 2
One). For the avoidance of doubt this excludes O2
(Online) Limited tariffs.
OVP
Orange Value Promise
Service Plan
The scale of charges for using a mobile phone
Additional Services
Optional services which cost extra whether they are
supplied in conjunction with competitor tariffs or
outside competitor tariffs
2 Scope
2.1 OVP applies to Competitors’ tariffs for voice,
answerphone, standard WAP and standard
person to person text messaging on other UK
digital networks. It includes standard data
calls at 9.6 kb per second. OVP excludes
High Speed Data at 28.8 kb per second and
GPRS calls.
2.2 Services will provide generally the same
functionality of the Competitor’s product but
specifications may differ. Competitor’s own
branded e-commerce and Additional Services
are not offered with OVP
2.3 For a list of current OVP tariffs please visit
www.orange.co.uk/cgi-bin/ovp/costs.pl
2.4 Once our Competitors close an OVP
equivalent tariff for new connections, we may
at our choice withdraw the OVP Plan for new
reference
184
reference
Page 94

187
reference
186
reference
6 Insurance Products & Orange Care
6.1 Competitors’ insurance products are not
offered under OVP.
6.2 Orange Care is not included in any OVP Plan,
but you may purchase it separately. If you do
not purchase Orange Care then you will only
get the benefit of the manufacturer’s warranty
on a new phone.
7 Final Points
7.1 We reserve the right to move each phone on
an OVP Plan to a separate account and to bill
you separately for each such phone.
7.2 Service is subject to the Orange Terms &
Conditions for the supply of Network
Services, a copy of which can be found at the
back of your Orange phone user guide.
7.3 We reserve the right to vary these terms &
conditions at any time. Please call Orange
Customer Services to confirm the current
terms & conditions.
3.7 OVP Plans will replicate the charging structure
& minimum call charges of the Competitor’s
tariff including, but not limited to, service
charges for itemised billing, non-direct debit
payment, access charges for short message
service, and charges for calls to Customer
Service, 0800 & 0500 numbers
3.8 International direct dialled and Roaming calls
will be charged at standard Orange rates
4 Charges for Mobile to Mobile calls
4.1 OVP Plan charges, for calls entirely on the
Orange Network, will be the equivalent of the
Competitor’s tariff charges for calls made
entirely on their network, subject to point 2.8
above. These are known as ‘On Net calls’.
4.2 OVP Plan charges, for calls made to phones
on the Competitor’s network, will be the
equivalent of the Competitor tariff charges for
calls made from their Network to phones on
the Orange Network, subject to point 2.8
above. These are known as ‘Mobile to Mobile
Off Net calls’. For example, if ‘Y tariff’, on
‘network X’, charges 25p per minute to call
another mobile phone on its network and
charges 50p per minute to call a mobile
phone on any other network, the OVP
equivalent Plan will charge 25p per minute to
call another Orange phone and 50p per
minute to call a mobile phone on ‘network X’
or any other mobile network.
5 Other Benefits
5.1 OVP offers rollover on minutes and text
messages on all OVP Plans with an inclusive
bundle where the competitor tariff offers
rollover on minutes or text messages. Rollover
on minutes or text messages is not available
on Service Plans with an inclusive value
bundle. Unused inclusive minutes and/or text
messages from one month may be rolled over
for use in the next. If the rolled over minutes
and/or text messages are not used in that
month they will be lost. We reserve the right
to offer rollover as a promotion on certain
OVP plans where rollover is not offered by the
competition.
5.2 The Orange Network Performance Promise
applies to OVP Plans, subject to its terms
and conditions.
Page 95

189188
contact Orange
pay monthly customers
Billing Enquiries 152†
Orange Care 434
Customer Services 150†
International Directory
Enquiries 118 880*
Literature Request Line 07973 973 970*†
Lost or Stolen 07973 100 150†
Orange Multi Media 177* or 277*
all Orange customers
Orange Accessories Line 0500 178 178
Directory Enquiries 118 000*
Emergency Services 999 or 112
Operator Services 100†
Orange Business Customer
Services 158
pay as you go customers
Customer Services (Enquiries) 451*†
Information Line 452
Literature Request Line 650*
Lost or Stolen 07973 100 451†
Orange Care 434
Orange Multi Media 177* or 277*
Registration 0800 079 0006
Talk Time balance 453
To top up your Talk Time 450†
Orange services
International Calling Helpline 159
Every Phone 330
Wildfire
TM
Activation Line 435
Wirefree
TM
Enquiry Line 156
Orange Customer Services are available 24 hours a day, seven days a week, 365 days a year. Alternatively, visit the
Orange website at www.orange.co.uk for more details. The three-digit numbers in Orange can be called from any phone
by adding the prefix 07973 100.
reference
Declaration of conformity
For the following equipment:
Product name: Smartphone ST20A
Company name: High Tech Computer Corp.
Address: 23 Hsin Hua Rd., Taoyuan 330, Taiwan
is herewith confirmed to apply with the
requirements set out in the Council Directive on the
Approximation of the Laws of the Member States
relating to Electromagnetic Compatibility Directive:
Low Voltage Directive and Radio &
Telecommunications Terminal Equipment Directive
(R&TTE)
Reference No. Title
• 89/336/EEC Electromagnetic Compatibility
(EMC directive)
• 73/23//EEC Low Voltage Directive (LVD)
• 1995/5/EC Radio & Telecommunications Terminal
Equipment Directive (R&TTE)
The following manufacturer/importer or authorized
representative established within the EUT is
responsible for this declaration:
Company name: High Tech Computer Corp.
Address: 23 Hsin Hua Rd., Taoyuan 330, Taiwan
Person responsible for making this declaration:
Dalton Chunag
(Name/Surname)
EMC & Telecom Regulatory Manager
(Position /Title)
Legal Signature:
Date: 24 June 2004
Page 96

190
14
index
contact Orange
www.orange.co.uk
Visit the Orange website to find out more about
Orange products and services, buy accessories
from the Orange shop and, if you are a pay as you
go customer, register with Orange online.
helpful booklets
If you would like to receive a free booklet
containing useful information on an Orange product
or service call the Orange Literature request line on
07973 973 970 from any phone or if you are pay
as you go customer 650 from your Orange phone.
The following booklets are available:
Orange Explain Answer Phone
Orange Explain Answering Services
Orange Explain Care Terms and Conditions
Orange Explain International Services
Orange Explain Orange Data Access
Orange Explain Services and Charges
Orange Explain Text Messaging
Page 97

193192
i
Infrared 112
Information menu
see Orange Information menu
International services
pay monthly customers 130
pay as you go customers 131
network selection 133
Internet Explorer 73
Inbox 54
l
Line 2 90
Lock the SIM Card 125
Lock the SPV C500 124
m
Memory Mate 42
MSN Messenger 57
Music 83
o
Orange 177 77
Orange Answer Fax 91
Orange Answer Phone 44
Answer Phone Call Return 44
Answer Phone PIN 44
checking from any other phone 45
messages 44
personal greeting 44
Orange Care 127
Orange Directory Enquiries 37
Orange Internet 82
Orange Information 78
Orange Memory Mate 42
Orange Multi Media Messaging 62, 68
Orange Plus 78
Orange Text Media services 77
Orange Update 76
Orange Wirefree Server 117
index
a
ActiveSync 116
Album 62
Answer Phone
see Orange Answer Phone
b
Backing up your SIM Card 42
Bluetooth™ 93, 105, 112
Bookmarks 74
Back Up 77
c
Calculator 114
Calendar 110
Calls
Barring 126
Length 114
Make a 21
Call diverts 46
Call history 113
Call timers 113
Camera 62
Conference calling 90
Contacts
List 36
Cards 36
Edit 38
Delete 38
d
Dialling
Fixed 126
Speed 40
Directory Enquiries
see Orange Directory Enquiries
e
Emails 28, 48
Attachment 52
Receiving 52
Save your sent emails 55
Emergency calls 137
f
Fax and data
see Orange Fax and Data
Fixed dialling 124
g
Games 85
GPRS 87
GPRS abroad 133
index
Page 98

195194
p
Photo Messaging 62
Photographs 31, 62
Profiles 104
Predictive text input 49
q
Quick List 104
r
Review your calls 113
Ring tones
Compose 65
Download 103
s
Safety 136
Schedule 118
Security settings 124
Space Maker 96
Speed dialling 40
Store a name and number 36
Sound settings 103
Synchronising 116
Symbols on your display 95
t
Taking a second call 103
Task Manager 96
Tasks 111
Text Media
see Orange Text Media
Text messages
Insert 50
Send 48
Write 49
Receive 50
Try Card 84
v
Video
Record a video clip 32
Send a video message 68
Receive a video message 69
Voice recordings 52
w
Windows Media Player 33, 83
indexindex
Page 99

For further information about Orange
products and services please visit our
website at the address below.
The information contained in this user guide is correct at the time of
going to press, but Orange reserves the right to make subsequent
changes to it and services may be modified, supplemented or
withdrawn. June 2004.
© Orange Personal Communications Services Limited 2004. Orange
and wirefree™ and any other Orange product or service names
referred to in this user guide are trade marks of Orange Personal
Communications Services Limited.
Orange Personal Communications
Services Limited.
PO Box 10
Patchway
Bristol
BS32 4BQ
www.orange.co.uk
OPMXXXX/06/03 PCN –D0472 ISSUE 1 Z : h 15
Produced by Clear®the explanation agency
 Loading...