

Page 1

Your HTC Smart
User guide
Page 2

2
Before you do anything else, please read this
Charge the battery
The battery in your phone hasn’t been charged yet. While your phone is
charging, it’s important that you do not remove the battery pack. Doing so can
damage your phone. Also, please don’t try to take your phone apart. (If you do,
it may invalidate your warranty.)
Choose a rate plan wisely
Your phone can use up a lot of Internet bandwidth really quickly. Before you
use your phone, we strongly recommend that you talk to your mobile operator
about data rates. If you’re on a standard data plan, the costs could really add up.
Switching to a flat-rate plan could be a lot cheaper.
Know about privacy laws
Some countries have strict laws about how and when you can record phone
conversations. For example, you may need to tell the person you’re speaking to
before you start recording. It’s a good idea to find out what the laws are where
you live before you use your phone’s recording feature.
And finally, a few important words from our legal team
(LIMITATION OF DAMAGES)
To the maximum extent permitted by applicable law, in no event shall HTC or
its affiliates be liable to you, any user, or third party for any indirect, special,
consequential, incidental or punitive damages of any kind, arising in contract,
tort, or otherwise, including, but not limited to, injury, loss of revenue, loss
of goodwill, loss of business opportunity, loss of data, and/or loss of profits,
regardless of the foreseeability thereof or whether HTC or its affiliates have
been advised of the possibility of such damages. And in no event shall the total
liability of HTC or its affiliates exceed the amount received from you, regardless
of the legal theory under which the cause of action is brought. The foregoing
does not affect any statutory rights which may not be disclaimed.
Page 3

Please also read the Safety and regulatory guide that is included in the box for
information on the proper usage of your phone to prevent injuries and to avoid
damaging your phone. You can also refer to this guide for regulatory information
about your phone.
You can also visit our support website at www.htc.com/support to download
the Safety and regulatory guide and to access other helpful resources for your
phone.
Trademarks and copyrights
Copyright © 2010 HTC Corporation. All Rights Reserved.
The HTC logo, the HTC quietly brilliant logo, HTC Smart, HTC Sense, ExtUSB,
HTC Sync, and HTC Care are trademarks of HTC Corporation.
Bluetooth and the Bluetooth logo are trademarks owned by Bluetooth SIG, Inc.
microSD is a trademark of SD Card Association.
Google, the Google logo, and Gmail are trademarks of Google Inc.
Java, J2ME and all other Java-based marks are trademarks or registered
trademarks of Sun Microsystems, Inc. in the United States and other countries.
Copyright © 2010, Sun Microsystems, Inc. All Rights Reserved.
Facebook is a trademark of Facebook, Inc.
Twitter is a trademark of Twitter, Inc., and is used under license.
Licensed by QUALCOMM Incorporated under one or more of the following
patents:
4,901,307 5,490,165 5,056,109 5,504,773 5,101,501 5,778,338
5,506,865 5,109,390 5,511,073 5,228,054 5,535,239 5,710,784
5,267,261 5,544,196 5,267,262 5,568,483 5,337,338 5,659,569
5,600,754 5,414,796 5,657,420 5,416,797
Brew is a trademark of Qualcomm Incorporated.
3
Page 4

4
All other company, product and service names mentioned herein are trademarks,
registered trademarks or service marks of their respective owners.
HTC shall not be liable for technical or editorial errors or omissions contained
herein, nor for incidental or consequential damages resulting from furnishing
this material. The information is provided “as is” without warranty of any kind
and is subject to change without notice. HTC also reserves the right to revise the
content of this document at any time without prior notice.
No part of this document may be reproduced or transmitted in any form or
by any means, electronic or mechanical, including photocopying, recording or
storing in a retrieval system, or translated into any language in any form without
prior written permission of HTC.
Page 5

Contents
Chapter 1 Getting Started
1.1 Inside the Box ......................................................................................................... 13
1.2 Getting to Know Your Phone ..........................................................................13
Top panel .......................................................................................................................13
Bottom panel ..............................................................................................................13
Front panel ...................................................................................................................14
Back panel ....................................................................................................................16
Left panel ......................................................................................................................16
Right panel ...................................................................................................................16
1.3 Before Turning On Your Phone ..................................................................... 17
Removing the back cover ..................................................................................... 17
Removing the battery .............................................................................................17
Inserting the SIM card .............................................................................................18
Inserting the battery ................................................................................................18
Inserting the microSD card ..................................................................................19
Putting back the back cover ...............................................................................19
1.4 Charging the Battery .........................................................................................20
1.5 Starting Up ............................................................................................................. 21
Setting up your phone for the first time ........................................................21
1.6 Getting Around Your Phone ........................................................................... 23
Tap ...................................................................................................................................23
Double-tap ..................................................................................................................23
Press and hold ...........................................................................................................23
Drag ................................................................................................................................23
Slide or swipe .............................................................................................................23
Flick .................................................................................................................................23
5
Page 6

6
1.7 The Onscreen Keyboard ................................................................................... 24
Choosing a keyboard layout ...............................................................................24
Entering text using the Phone Keypad .........................................................25
Entering text using QWERTY.............................................................................27
Enabling multiple keyboard languages .........................................................28
Using word prediction ...........................................................................................28
Text input settings ...................................................................................................29
Chapter 2 Phone Basics
2.1 Getting to Know the Home Screen ..............................................................30
Main Home screen .................................................................................................... 31
People ............................................................................................................................32
Friend Stream ............................................................................................................33
Messages ..................................................................................................................... 34
Mail ..................................................................................................................................35
Photos ............................................................................................................................36
Music ..............................................................................................................................36
Weather ........................................................................................................................ 37
Calendar........................................................................................................................39
Internet ..........................................................................................................................39
2.2 Personalizing the Home Screen .................................................................. 40
Personalizing with scenes ...................................................................................40
Filling the Home screen with features that you want .............................41
Adding and removing Home shortcuts .........................................................42
Changing the home wallpaper ......................................................................... 43
Changing the lock screen wallpaper ............................................................. 43
2.3 Accessing Applications in the All Programs Panel ...............................44
2.4 Phone Status and Notifications....................................................................45
Status icons ................................................................................................................ 45
Notification icons ....................................................................................................46
Notification popup ................................................................................................. 46
Notifications panel .................................................................................................. 46
Page 7

2.5 Connecting Your Phone to a Computer .................................................... 47
Copying files to or from your storage card ................................................ 48
About HTC Sync ...................................................................................................... 48
2.6 Adjusting the Volume.......................................................................................49
2.7 Getting the Most Out of Your Battery .......................................................50
Switching to Sleep mode ......................................................................................51
Locking and unlocking the screen ....................................................................51
Turning the power off ............................................................................................. 51
Chapter 3 Phone Calls
3.1 Making Calls .......................................................................................................... 52
Dialing a number or a contact ...........................................................................52
Using Speed dial .......................................................................................................53
Directly making calls from received messages .........................................55
3.2 Answering or Rejecting Calls ........................................................................ 55
3.3 Handling Multiple Calls ....................................................................................56
Setting up a conference call ...............................................................................57
3.4 Checking the Call History ...............................................................................58
3.5 Call Settings .........................................................................................................59
Chapter 4 Staying Close
4.1 Opening the People Application ..................................................................60
4.2 Adding and Managing Contacts ................................................................... 61
Creating new contacts on your phone ...........................................................61
Adding contacts to your SIM card ...................................................................62
Finding contacts .......................................................................................................62
Editing contact details...........................................................................................63
Sharing contact cards ............................................................................................63
Deleting a contact ...................................................................................................63
7
Page 8

8
4.3 Contact Groups ..................................................................................................64
Creating a group ..................................................................................................... 64
Editing a group.........................................................................................................64
Sending photos and messages to groups .................................................. 64
4.4 Linking to Your Contacts’ Facebook Profiles .........................................65
Manually linking to contacts’ Facebook profiles .......................................65
Viewing Facebook updates of a contact..................................................... 66
4.5 Friend Stream .....................................................................................................66
Opening Friend Stream .........................................................................................67
Logging in to your social networks .................................................................67
Connecting with your friends in Facebook ................................................ 68
Following tweets ..................................................................................................... 68
Uploading wall photos in Facebook .............................................................. 69
Updating your status message ........................................................................ 69
4.6 Viewing Contact Details and Exchange of Communications With
the Contact .......................................................................................................... 69
Chapter 5 Exchanging Messages
5.1 Text and Multimedia Messages ......................................................................70
Opening the Messages application ................................................................ 70
Sending text messages .......................................................................................... 71
Sending multimedia messages .......................................................................... 72
Viewing conversations with a contact ........................................................... 73
Viewing a multimedia message ........................................................................74
Replying to a message ..........................................................................................74
Forwarding messages ............................................................................................75
Copying a message to your SIM card ............................................................75
Deleting a message or a whole conversation ............................................75
Message settings ......................................................................................................76
Page 9

5.2 Email Messages .................................................................................................. 77
Setting up your email accounts ........................................................................77
Sending email messages ..................................................................................... 80
Viewing email messages ........................................................................................81
Replying to an email message ...........................................................................82
Downloading attachments ..................................................................................82
Forwarding email messages ...............................................................................82
Setting how often and how much email to sync to your phone ......83
Switching to other folders ...................................................................................83
Deleting an email account ...................................................................................83
Chapter 6 Getting Connected
6.1 Browsing the Web ..............................................................................................84
Opening your phone’s web browser.............................................................. 84
Searching the web .................................................................................................. 84
Going to a website ..................................................................................................85
Moving around a web page ................................................................................85
Navigating to the previous or next web page .......................................... 86
Adding bookmarks and revisiting bookmarked sites ............................ 86
Working with links on a web page ................................................................. 86
Working with images on a web page ............................................................87
6.2 When There’s a Problem Connecting to the Internet .......................... 88
Checking your current network connection settings ............................ 88
Adding a new access point ................................................................................ 88
6.3 Using Bluetooth..................................................................................................89
Turning Bluetooth on or off ............................................................................... 89
Changing the phone name ................................................................................. 89
Making your phone discoverable to other Bluetooth devices ..........90
Connecting a Bluetooth headset for the first time...................................91
Sending information and media files using Bluetooth...........................93
Receiving information and media files via Bluetooth............................94
Disconnecting and reconnecting a Bluetooth device ............................95
9
Page 10

10
Chapter 7 Camera and Multimedia
7.1 Using the Camera ................................................................................................96
Taking a photo .......................................................................................................... 96
Shooting videos ........................................................................................................97
After taking a photo or video ............................................................................97
Turning the camera flash on or off ................................................................. 98
Onscreen controls ................................................................................................... 99
Camera settings ..................................................................................................... 100
7.2 Viewing Photos and Videos .......................................................................... 101
Opening the Photos application ...................................................................... 101
Viewing photos ........................................................................................................ 101
Viewing photos as a slideshow .......................................................................102
Watching videos ..................................................................................................... 102
Sharing photos or videos ...................................................................................103
7.3 Listening to Music ............................................................................................ 103
Opening the Music application ........................................................................103
The Library and Music player ...........................................................................104
Working with playlists ..........................................................................................104
Chapter 8 More Apps
8.1 Weather ................................................................................................................ 106
Adding cities.............................................................................................................107
Deleting cities ..........................................................................................................107
Weather settings ....................................................................................................107
8.2 Calendar ..............................................................................................................108
Opening Calendar ..................................................................................................108
Adding an event .....................................................................................................108
Viewing an event ....................................................................................................109
Changing Calendar views ..................................................................................109
Editing an event ....................................................................................................... 110
Page 11

Viewing event reminders .....................................................................................110
Sending event details ..............................................................................................111
Deleting an event ......................................................................................................111
8.3 Alarm .......................................................................................................................111
Setting an alarm ........................................................................................................111
Editing an alarm ....................................................................................................... 112
Deleting an alarm .................................................................................................... 112
8.4 File Browser .........................................................................................................112
Opening folders and files .................................................................................... 112
Creating a folder ...................................................................................................... 112
Copying folders or files ........................................................................................ 113
Moving folders or files .......................................................................................... 113
Deleting folders or files ........................................................................................ 113
Sorting files ................................................................................................................ 113
Sending files .............................................................................................................. 114
8.5 Java ........................................................................................................................ 114
Downloading and installing MIDlets/MIDlet suites ................................. 114
Copying and installing MIDlets/MIDlet suites on your phone ........... 115
Running a MIDlet/MIDlet suite .......................................................................... 115
Uninstalling a MIDlet/MIDlet suite ................................................................... 115
8.6 FM Radio ...............................................................................................................116
Minimizing or turning off FM Radio ................................................................117
8.7 Flashlight ...............................................................................................................117
Chapter 9 Managing Your Phone
9.1 Changing the Phone’s Basic Settings .........................................................118
Changing the time zone, date, and time ..................................................... 118
Selecting a phone profile .................................................................................... 119
Changing your ringtone ....................................................................................... 119
Switching to Airplane mode .............................................................................. 119
11
Page 12

12
9.2 Protecting Your Phone .................................................................................. 120
Protecting your phone with a lock password .......................................... 120
Protecting your SIM card with a PIN ............................................................. 121
Unblocking a SIM card that has been locked out ................................... 121
Removing the SIM card properly ..................................................................... 121
9.3 Settings on Your Phone ..................................................................................122
Personalize ................................................................................................................ 122
Wireless controls .................................................................................................... 122
Call settings .............................................................................................................. 122
Sound ........................................................................................................................... 123
Display ......................................................................................................................... 123
Data services ............................................................................................................ 124
Security ....................................................................................................................... 124
Date & time ............................................................................................................... 125
Locale & text ............................................................................................................. 125
USB to PC .................................................................................................................. 125
About phone ............................................................................................................ 125
9.4 Factory Resetting .............................................................................................126
Performing a factory reset via settings ....................................................... 126
Performing a factory reset while phone is turned off .......................... 126
Specifications 127
Index 129
Page 13
Chapter 1
Getting Started
1.1 Inside the Box
You will find the following inside the box:
Phone
•
Battery (preinstalled)
•
USB cable
•
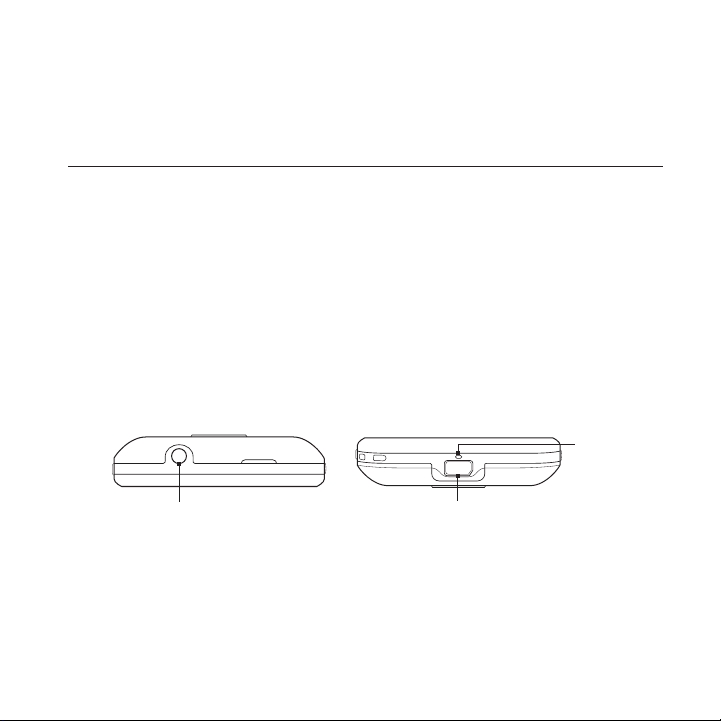
1.2 Getting to Know Your Phone
Top panel Bottom panel
Power adapter
•
3.5mm stereo headset
•
Quick start guide
•
Microphone
Audio Jack
Connect a 3.5 mm wired
headset for hands-free
conversation or for listening
to music.
USB Connector
Connect the power adapter to recharge
the battery or the USB cable to transfer
files to or from a computer.
Page 14
14 Chapter 1 Getting Started
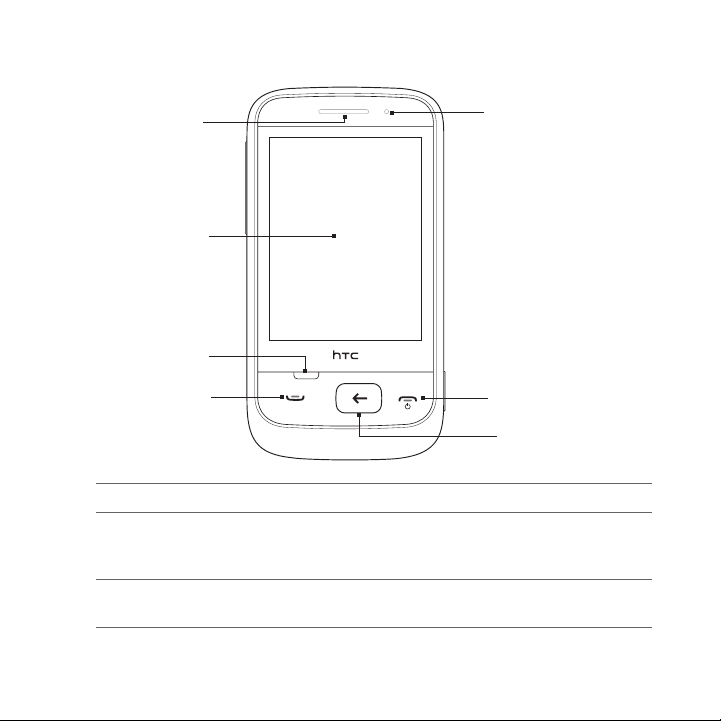
Front panel
Earpiece
Touch Screen
MENU
CALL
Notification LED
END CALL/POWER
BACK/HOME
Earpiece Listen to a phone call from here.
Touch Screen Tap the display to control and move around your
phone. For details, see “Getting Around Your Phone”
in this chapter.
MENU Press to see more actions that you can do on the
current screen.
Page 15

Chapter 1 Getting Started 15
CALL Press to answer a call or dial out.
•
During a call, press to put a call on hold or
•
switch to another call. Press and hold to turn
the speakerphone on or off.
BACK/HOME From the main Home screen, press to access
•
the applications of your phone.
While on the extended part of the Home screen,
•
press to go back to the main Home screen.
While using an application, press to go back to
•
the previous screen, or press and hold to return
to the main Home screen.
END CALL/
POWER
During a call, press to end the call.
•
Press to turn the display on or off.
•
Press and hold to turn the power on.
•
While the phone is on and the screen is
•
unlocked, press and hold to open the Phone
options screen and choose whether to power
off or switch your phone to silent, vibration, or
airplane mode.
Notification
LED
This LED shows a:
Solid green light when the battery is fully
•
charged.
Solid amber when the battery is charging.
•
Flashing amber when the battery level is low.
•
Flashing green when there’s a pending
•
notification.
Page 16
16 Chapter 1 Getting Started
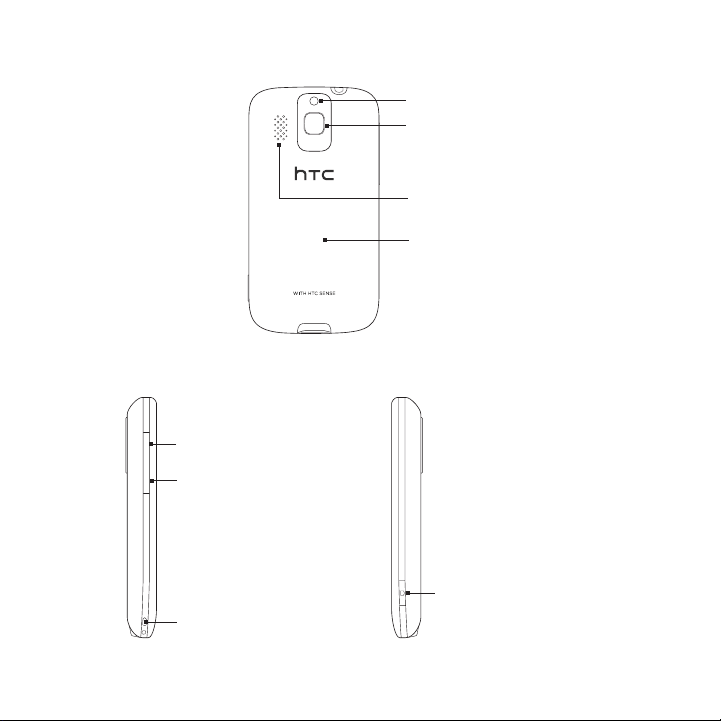
Back panel
Left panel Right panel
VOLUME UP
Press to increase the
ringer or media volume.
VOLUME DOWN
Press to decrease the
ringer or media volume.
Strap Holder
Flashlight
Camera
Speaker
Back Cover
CAPTURE
Press to open the
camera. Press again
to take a photo or
video.
Page 17

Chapter 1 Getting Started 17
1.3 Before Turning On Your Phone
When you take your phone out of the box, you’ll find that the battery
is inside the phone with a thin film attached. Remove this film and
reinsert the battery before charging or turning the phone on.
Also insert your SIM card. If you purchased a microSD™ card, insert it,
too, before you turn the phone on.
Removing the back cover
Put your fingertip into the narrow
Narrow
opening
Removing the battery
If this is your first time to remove the battery, you’ll see the upper
flap of a thin film wrapped over the upper half of the battery. Pull the
upper flap of the film to loosen and remove the battery.
Groove
opening at the top of the phone. Lift off
the top left side of the back cover, and
then push it to the right to remove the
back cover completely.
You can also put your fingertip
into the small groove located
at the right side of the battery
compartment, and then lift the
battery out.
Note Make sure to peel off the thin film
from the battery.
Page 18

18 Chapter 1 Getting Started
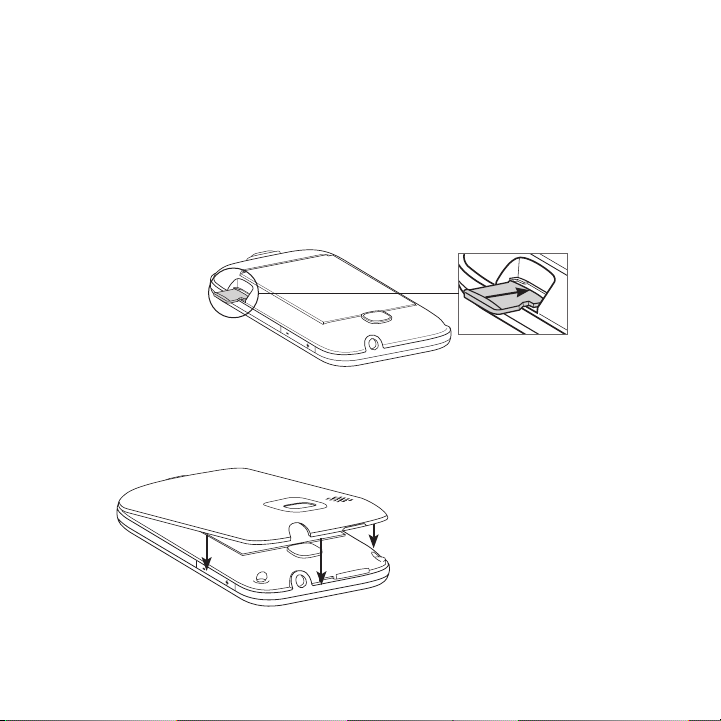
Inserting the SIM card
1. Locate the SIM card slot, and then insert the SIM card with its
gold contacts facing down and its cut-off corner facing out.
2. Slide the SIM card completely into the slot.
Notes • Some legacy SIM cards may not function with your phone. You should
• If you need to remove your SIM card, see “Removing the SIM card
consult with your mobile operator for a replacement SIM card. There
may be fees for this service.
properly” in Chapter 9.
Inserting the battery
After inserting your SIM card, put the battery back in.
Important If you have not yet removed the thin from the battery, make sure to
peel it off before reinserting the battery.
1
2
1. Align the battery’s exposed
copper contacts with the
battery connectors inside the
battery compartment.
2. Insert the contacts side of the
battery first, and then gently
push the battery into place.
Page 19
Chapter 1 Getting Started 19
Inserting the microSD card
If you have a microSD card, you can insert and use it to store photos,
videos, and songs on your phone.
1. Locate the storage card slot which is at the lower-right side of
the battery compartment.
2. Insert the microSD card into the slot with its gold contacts facing
down.
3. Push the microSD card in until it clicks into place.
Putting back the back cover
After the thin film has been removed, and the SIM card and battery
have all been inserted, put back the back cover.
1. Secure the bottom part of the
back cover first by aligning it
into the two openings located
at the bottom part of the back
of the phone.
2. Press the sides and the top
part of the back cover down
to lock the back cover in place.
Before you turn your phone on, charge the battery first. For details,
see “Charging the Battery” in this chapter.
Page 20

20 Chapter 1 Getting Started
1.4 Charging the Battery
Connect the USB connector of the power adapter to the phone, and
then plug in the power adapter to an electrical outlet.
Important • Only the power adapter and USB cable provided with your phone
• Do not remove the battery from the phone while you are
• As a safety precaution, the battery stops charging before it
As the battery is being charged, the notification LED shows a solid
amber light. The light turns to solid green when the phone is fully
charged.
When you charge the battery while your phone is turned on, the
status bar or lock screen shows the following:
•
•
Warning! To reduce risk of fire or burns:
• Do not attempt to open, disassemble, or service the battery pack.
• Do not crush, puncture, short external contacts, or dispose of in fire
• Do not expose to temperatures above 60oC (140oF).
• Replace only with the battery pack designated for this product.
• Recycle or dispose of used battery as stipulated by local
must be used to charge the battery.
charging it.
overheats.
Battery charging icon ( ) when the battery is charging.
Full battery icon ( ) when the battery is fully charged.
or water.
regulations.
Page 21

Chapter 1 Getting Started 21
1.5 Starting Up
After installing your SIM card and battery and charging the battery,
you are now ready to power on and start using your phone.
1. Press and hold the END CALL/POWER button.
2. If your SIM card is preset with a PIN (Personal Identification
Number), enter the PIN, and then tap OK to proceed.
Note Entering the wrong PIN for three times blocks the SIM card. To find
out how to unlock the SIM card, see “Unblocking a SIM card that has
been locked out” in Chapter 9.
Setting up your phone for the first time
The first time you turn your phone on, you’ll get to choose some basic
phone settings and set up your online accounts such as email and
Facebook®. You may skip the setup if you prefer to do it at another
time.
1. Select a language.
Slide your finger upward to scroll down and see available
languages. Tap a language you want to use and then tap Next.
Note Available languages depend on where you purchased the phone.
2. Choose whether to use location service.
Location service helps determine your current location when
you’re using applications such as Weather. Tap Agree to use
location service so that it can collect your location information. If
you’d rather not, tap Disagree.
Note You can ask your mobile operator to find out whether there are data
charges when you turn this feature on. You can enable or disable
this service later in Settings.
Page 22

22 Chapter 1 Getting Started
3. Set up your email account. First, tap the type of your email
account or tap Other.
Note If you selected Other, you may need to enter more account
information, such as the email server settings. Obtain these details
from your email account provider.
4. Tap the Email address and Password items onscreen one at a
time to display the onscreen keyboard and use it to enter your
email address and password.
Tip Tap to switch the onscreen keyboard layout to QWERTY or
Phone Keypad. To find out how to use these keyboard layouts, see
“The Onscreen Keyboard” in this chapter.
After entering your email address and password, tap Next.
5. Tap Account name if you want to change the display name of
your email account. You can also tap Your name to change your
display name.
6. Tap Save.
Your phone then connects to the Internet and verifies your email
account information. If your account information is accurate, your
email account is then set up successfully on your phone.
7. Tap New account and follow steps 3 to 6 if you want to set up
another email account, or tap Next to proceed to the next step.
8. Set up your social network accounts such as Facebook and
Twitter. For each account, enter your username or email address
and password, and then tap Login.
After setting up your social network accounts, tap Next.
9. Choose whether to automatically download and update your
current location and the weather information. Tap the On/Off
buttons to turn automatic updates on or off, and then tap Next.
Note You need to accept the location service agreement to be able to
automatically update your location (see step 2).
Page 23
Chapter 1 Getting Started 23
10. Your phone detects the current time zone and sets your local
time automatically. This may be network-provided or through
location service (if enabled).
If these settings can’t be auto-detected, manually set the current
time, date, and time zone, and then tap Done.
1.6 Getting Around Your Phone
Use these easy finger gestures to move around your phone.
Tap
Touch an onscreen item with
your finger.
Slide or swipe
Move your finger vertically or
horizontally across the screen.
Double-tap
Quickly touch the screen twice.
Press and hold
Touch an area or item without
lifting your finger immediately.
Drag
Press and hold an item, and then
move your finger with some
pressure. Do not release it until
you have reached the target
position.
Flick
Move your finger up or down in
light, quicker strokes.
Page 24
24 Chapter 1 Getting Started
1.7 The Onscreen Keyboard
When you tap an item and it requires you to enter text or numbers,
the onscreen keyboard becomes available.
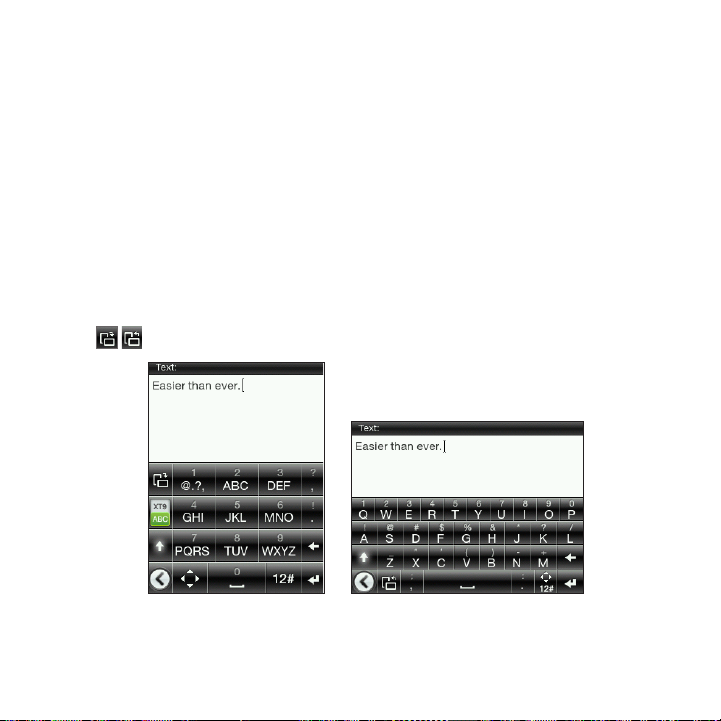
Choosing a keyboard layout
When entering text, you can choose between these keyboard layouts:
Phone Keypad. This layout resembles the traditional mobile
•
phone keypad. When you select this keyboard layout, the whole
screen becomes Portrait orientation.
QWERTY. This layout is similar to a computer keyboard. When
•
you select this keyboard layout, the whole screen becomes
Landscape orientation.
Tap these keys to switch between Phone Keypad and QWERTY.
Phone Keypad QWERTY
Note Some keys may change when multiple keyboard languages are enabled.
For details, see “Enabling multiple keyboard languages” in this chapter.
Page 25

Entering text using the Phone Keypad
To Do this
Chapter 1 Getting Started 25
Choose an input
mode
Enter letters Tap a key once to enter the first letter, twice to
Enter numbers,
symbols, and
accented
characters
Tap to switch between XT9 predictive mode
and ABC mode. For details on using XT9, see
“Using word prediction” in this chapter.
enter the second letter, or three times to enter
the third letter that is shown on the key.
Note Make sure that the ABC input mode is enabled.
Press and hold a key to enter a number that is
shown on the upper half of the key.
Press and hold to display a selection bar
of commonly used punctuation marks and
symbols. Drag your finger to the punctuation
mark or symbol that you want to select and
insert to your text.
If you only have one keyboard language
enabled, tap to switch to the numeric and
symbol keyboard. Tap to enter letters again.
If you have enabled multiple keyboard
languages, tap to switch to the numeric
and symbol keyboard. Tap to enter letters
again.
Page 26

26 Chapter 1 Getting Started
Enter letters in
uppercase
Delete a character
Create a new line
Move the text
cursor
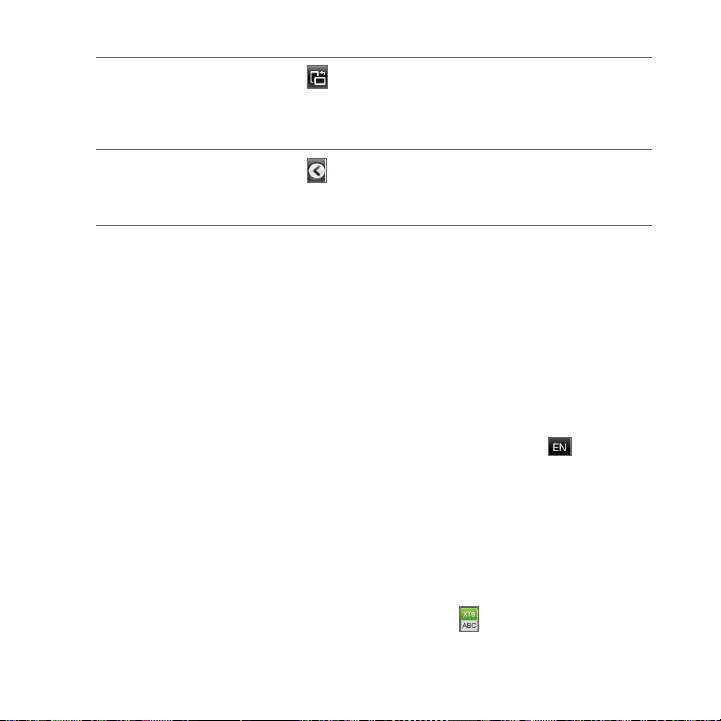
Change keyboard
layout
Hide the keyboard
Tap the Shift key ( ) to enter an uppercase
letter.
Tap the Shift key ( ) twice to turn Caps Lock
on.
Tap the Delete key ( ) to erase the previous
character entered.
Tap the Enter key ( ).
If a text field does not allow multiple lines,
tapping this key closes the onscreen keyboard.
If you only have one keyboard language
enabled, tap . Use the onscreen arrow keys
to move the text cursor.
If you have enabled multiple keyboard
languages, press and hold . Use the
onscreen arrow keys to move the text cursor.
Tap to switch to QWERTY (displayed only
in landscape orientation). For details, see
“Entering text using QWERTY” in this chapter.
Tap when you’re done typing and you want
to close the onscreen keyboard.
Tip You can also press the BACK/HOME button.
Page 27

Chapter 1 Getting Started 27
Entering text using QWERTY
To Do this
Enter letters Tap a letter shown on the lower half of a key.
Enter numbers and
symbols
Enter accented
characters
associated with a
letter
Enter letters in
uppercase
Delete a character
Create a new line
Move the text
cursor
Press and hold a key to enter a punctuation
mark, symbol, or number that is shown on the
upper half of the key.
Tap to switch to the numeric and symbol
keyboard. Tap to enter letters again.
Press and hold a key to display a selection bar
(if accented characters are available). Drag
your finger to the accented character that you
want to select and insert to your text.
Tap the Shift key ( ) to enter an uppercase
letter.
Tap the Shift key ( ) twice to turn Caps Lock
on.
Tap the Delete key ( ) to erase the previous
character entered.
Tap the Enter key ( ).
If a text field does not allow multiple lines,
tapping this key closes the onscreen keyboard.
Press and hold , and then use the onscreen
arrow keys to move the text cursor.
Page 28
28 Chapter 1 Getting Started
Change keyboard
layout
Hide the keyboard
Tap to switch to Phone Keypad (displayed
only in portrait orientation). For details, see
“Entering text using the Phone Keypad” in this
chapter.
Tap when you’re done typing and you want
to close the onscreen keyboard.
Tip You can also press the BACK/HOME button.
Enabling multiple keyboard languages
If there are multiple keyboard languages available on your phone, you
can choose which languages to enable in the onscreen keyboard so
that you can switch to these languages and use them to enter text.
1. While on the main Home screen, press MENU, and then tap
Settings > Locale & text > Text input settings > Keyboard
languages.
2. Tap one or more languages.
After enabling languages, you’ll see a Language key at the
bottom row of the onscreen keyboard (for example, for
English). Tap the Language key to switch to another language.
Note Available languages depend on where you purchased the phone.
Using word prediction
Word prediction helps you enter text faster. As you type, word
suggestions appear so you can just select the right word from the list.
1. Switch to predictive text input:
When using Phone Keypad, tap XT9 ( ).
•
When using QWERTY, Prediction is enabled by default.
•
Page 29

Chapter 1 Getting Started 29
Tip To turn QWERTY’s word prediction on or off, go to Settings >
Locale & text > Text input settings > Input options > QWERTY
Keypad > Prediction.
2. Start entering the first few letters of a word. As you enter each
letter, suggested words are displayed.
If you don’t see the word that you want, tap the down arrow icon
( ) to see more suggestions.
3. Tap a word to insert it into your text. You can also tap the Space
key ( ) to accept the highlighted word in the suggestion list
and insert it to your text.
Text input settings
You can set various options for the onscreen keyboard. From the main
Home screen, press MENU, and then tap Settings > Locale & text >
Text input settings.
Setting Description
Keyboard languages Select one or more languages that the keyboard
Input options Choose what text input features to enable or disable
Sound feedback Turn the typing sound on or off.
Vibrate feedback Choose whether to make the keys vibrate when you
Tutorial Learn the basics of using the onscreen keyboard with
uses when Prediction, Word completion, and Spell
correction are enabled.
in each keyboard layout. You can turn on or off
Prediction, Word completion, and Spell correction.
tap them.
the interactive tutorial.
Page 30
Chapter 2
Phone Basics
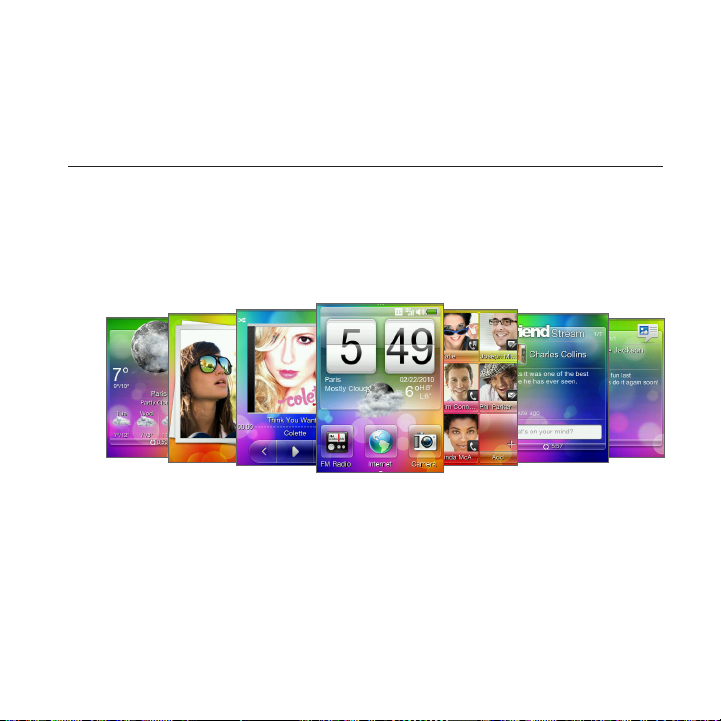
2.1 Getting to Know the Home Screen
Essential features that you need from your phone are right upfront on
the Home screen. Simply slide your finger left and right to go to the
other Home screen panels and see your new messages, check weather
forecasts, listen to music, and more.
The Home screen is customizable. You can remove, replace, or add
features that fit your lifestyle. You can also change the wallpaper. To
find out how to customize the Home screen, see “Personalizing the
Home Screen” in this chapter.
Page 31

Chapter 2 Phone Basics 31
Main Home screen
On the main Home screen, you can check the time, date, and weather
of your current location, or add shortcuts to your favorite applications.
1
1 Status bar. For details, see
“Phone Status and Notifications”
in this chapter.
2
2 Weather clock. Tap the time in
the weather clock to set up the
clock with alarms. For details,
see “Alarm” in Chapter 8.
3 Current weather. Tap to update
3
4
Slide your finger up the screen to show more Home shortcut slots so
you can add more shortcuts. For details, see “Adding and removing
Home shortcuts” in this chapter.
Returning to the main Home screen
If you’re on another part of the Home screen, simply press the BACK/
HOME button to return to the main Home screen.
If you’re in an application or a settings screen, you can press and hold
the BACK/HOME button to directly go to the main Home screen.
Tip Pressing the BACK/HOME button while on the main Home screen opens
the All programs panel. For details, see “Accessing Applications in the
All Programs Panel” in this chapter.
the weather information.
4 Home shortcuts. Your one-
touch access to frequently-used
applications.
Page 32
32 Chapter 2 Phone Basics
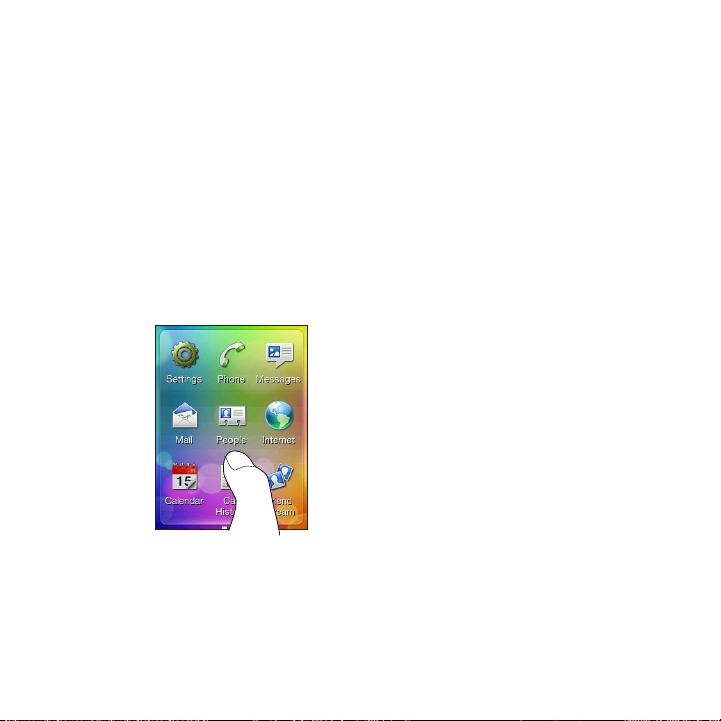
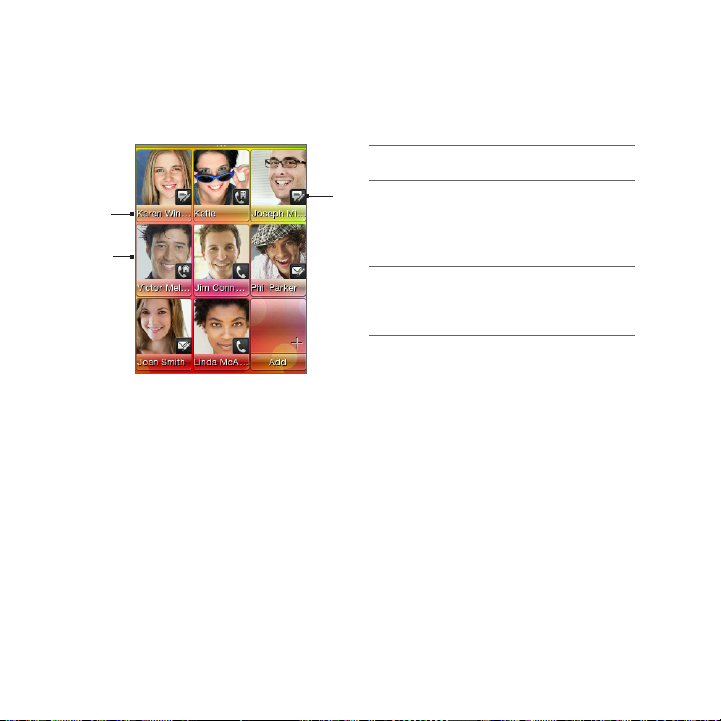
People
Add the people who matter most to you on the People screen so you
can quickly make calls or send text and email messages without going
through your contacts list.
1 Tap the contact’s name to open
his or her contact card.
2 Depending on the
1
3
2
Adding favorite contacts to the People screen
You need to have contacts already stored on your phone before you
can add them as favorite contacts to the People screen. If there are no
existing contacts, add them first to your phone. To find out how, see
“Adding and Managing Contacts” in Chapter 4.
Note SIM card contacts cannot be added as favorite contacts.
1. From the main Home screen, slide to the People screen.
2. Tap an empty slot.
3. Select a contact.
4. On the Default action screen, choose what contact method to
use for the favorite contact (phone call, text message, or email).
You can add up to nine favorite contacts to the People screen.
communication method you
have set for a favorite contact,
tap a contact photo to call or
send a message.
3 Indicates the type of
communication method you’ve
selected as default for this
contact.
Page 33
Chapter 2 Phone Basics 33
Tips • To remove a favorite contact, press and hold a contact photo, drag it
• While on the People screen, press MENU, and then tap All to open the
away from its current slot, and then release.
People application and access your complete list of contacts. To know
more about the People application, see Chapter 4.
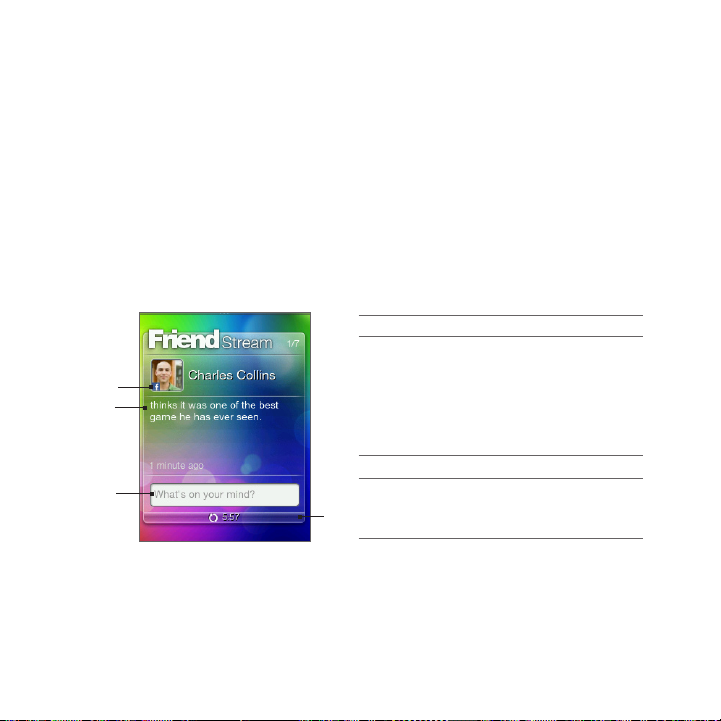
Friend Stream
Find out what everyone is saying in your social networks. From the
main Home screen, slide to the Friend Stream screen. Right on Friend
Stream, catch the latest buzz in Facebook, follow tweets on Twitter,
and update your status to these social networks simultaneously.
Note You need to be connected to the Internet and logged in to at least one
social network to download status updates.
1 Shows the type of social network.
2 Displays a friend’s latest Facebook
or Twitter status update. Tap
1
2
3
4
Slide up or down the Friend Stream screen to view the next or
previous Facebook or Twitter update. While viewing a status update,
you can do the following:
If the current update displayed is from Facebook, press MENU to
•
view comments, or post your own comment.
it to open the Friend Stream
application and do more with your
social network account. To know
more about this application, see
“Friend Stream” in Chapter 4.
3 Tap to enter your status message.
4
Indicates the time the Friend
Stream screen was last updated.
Tap this bar to refresh the screen.
Page 34

34 Chapter 2 Phone Basics
If the current update displayed is from Twitter, press MENU to
•
reply to the tweet or send a direct message (DM) to the person
who posted the tweet.
Posting your status message
1. On the Friend Stream screen, tap the box that says “What’s on
your mind?”.
2. Enter your status message.
3. When prompted, tap OK.
Friend Stream will post your status message simultaneously to the
social network accounts that you have signed in on your phone.
Tip If you do not want your status message to be sent to a certain social
network, press MENU while on the Friend Stream screen, tap Settings,
and then clear the check box of that social network.
Messages
Browse through received text and multimedia messages on this
screen.
Tap to open
the Messages
Tap the current
message displayed
to open and read the
message as well as
previous messages
between you and the
sender.
application.
Page 35

Chapter 2 Phone Basics 35
On the Messages screen, you can slide up or down the screen to view
the next or previous message. You can also press MENU, and then
choose whether to compose a new message, go to the inbox, or to
reply to, forward, or delete the current message onscreen. For details
about working with text and multimedia messages, see Chapter 5.
After you have set up your webmail or a POP3/IMAP email account
on your phone, you can use the Mail screen to browse through your
received email messages.
Note If you have set up several email accounts, the Mail screen displays the
email messages from your default email account.
Tap to open the
Mail application.
Tap the email to
open and read
the complete
email message.
On the Mail screen, slide up or down the screen to view the next or
previous email. You can also press MENU, and then choose whether to
refresh the screen, compose a new email, go to the inbox, or to reply
to, forward, or delete the current email onscreen. For details about
working with email, see Chapter 5.
Page 36

36 Chapter 2 Phone Basics
Photos
The Photos screen displays the most recently
viewed photo on your phone. You can tap the
photo to open the Photos application and view
more photos and videos stored on your phone
and storage card.
When you press MENU while on the Photos
screen, you can:
Share or delete the current photo.
•
Assign the current photo to a contact or
•
set it as the lock screen wallpaper.
Music
Enjoy listening to music on the go. Copy songs and music albums to
your storage card and listen to them right on the Music screen. For
details on copying files, see “Copying files to or from your storage
card” in this chapter.
Shuffle mode
Playback controls
Repeat mode
Tap to open the Music
application. For details,
see “Listening to
Music” in Chapter 7.
Page 37

Chapter 2 Phone Basics 37
After copying songs to your storage card, slide to the Music screen,
and then use the playback controls to play, pause, or go to the
previous or next song.
You can also:
Tap the Shuffle mode icon to toggle between turning the Shuffle
•
mode on or off.
Tap the Repeat mode icon and choose whether to repeat the
•
current track ( ), repeat all tracks in the current album or
playlist ( ), or not to repeat (the Repeat mode icon is grayed
out).
Weather
The Weather screen displays your current weather information and
weather forecasts for the next four days of the week.
Tap today’s weather
information to
open the Weather
application. For
details, see “Weather”
in Chapter 8.
Indicates the time the
Weather screen was
last updated.
Tap this bar to
download the latest
weather information.
Note You need to be connected to the Internet to download weather
information.
Page 38

38 Chapter 2 Phone Basics
Adding a city
1. On the Weather screen, tap the text that says “Tap to select a
city”.
2. Enter the first few letters of a country or city name. The screen
then displays a matching list of locations.
3. Scroll through the list, and then tap the name of the desired city.
Tip To switch to another city on the Weather screen, press MENU, tap Select
a city, and then tap a city to display. You need to add more cities first in
the Weather application. To find out how, see “Weather” in Chapter 8.
Updating weather information automatically
1. From the Weather screen, press MENU, and then tap Settings.
2. Turn on Download weather automatically, if it’s off. When
prompted, tap Yes.
3. Tap Update frequency, and then select a time interval.
Note Turn on Download weather when roaming only when you want to use
this feature. This may incur additional data charges.
Page 39

Calendar
The Calendar screen displays a month
calendar with markers to inform you of the
dates that have scheduled and events.
Tap a date to open view its scheduled
•
events. You can also press MENU to
create an event or view your agenda.
Slide up or down the screen to display
•
the next or previous month. Press MENU,
and then tap Today to display the current
month again.
To know more about the Calendar application,
see “Calendar” in Chapter 8.
Internet
Easily search for information on the Web. Slide
to the Internet screen, and then tap the globe
image to open your phone’s web browser.
Tap Bookmarks to open a list of
•
bookmarks stored on your phone.
Press MENU to open your set home page
•
or view your browsing history.
To know more about the Internet application,
see Chapter 6.
Chapter 2 Phone Basics 39
Page 40

40 Chapter 2 Phone Basics
2.2 Personalizing the Home Screen
Make your phone look just the way you want it. Personalize the Home
screen with a different wallpaper and customize it with the features
that you want.
Personalizing with scenes
Your phone becomes multiple phones in one when you use scenes.
Scenes are personalized Home screen configurations that you can
quickly apply to your phone to suit your mood - be it for work or play.
You can even create your own scene to fit your lifestyle and daily
needs.
Choosing a scene
There are preset scenes that you can directly apply to your Home
screen. Each one is preconfigured with a different wallpaper and
collection of features.
To select and apply a scene, do one of the following:
From the main Home screen, press MENU and tap Scenes. Then
•
tap the scene you want to use.
Go to any part of the Home screen. Slide open the Notifications
•
panel from the top of the screen, and then tap a scene under
Scene selection. For information about the Notifications panel,
see “Notifications panel” in this chapter.
Creating and saving a new scene
You can make changes to the Home screen and lock screen, and save
your customization as a new scene.
1. Start from a preset scene, or select Clean slate if you want to
design your own scene. To find out how to select a scene, see
“Choosing a scene”.
Page 41

Chapter 2 Phone Basics 41
2. You can do the following to customize your scene:
Add shortcuts to frequently-used applications. For details, see
•
“Adding and removing Home shortcuts”.
Customize the Home screen with features that you need for
•
your day-to-day use. For details, see “Filling the Home screen
with features that you want”.
Change the Home screen wallpaper and the lock screen
•
wallpaper. To find out how, see “Changing the home
wallpaper” and “Changing the lock screen wallpaper”.
3. When you are done designing your scene, return to the main
Home screen. Then press MENU and tap Scenes.
4. Under My scenes, make sure the Current(unsaved) option is
selected.
5. Press MENU, tap Save, and then enter a new scene name.
Filling the Home screen with features that you want
Except for the main Home screen, you can
add or change what features you want to
use on the other six Home screen panels.
1. From the main Home screen, press
MENU, and then tap Customize.
2. Choose what features you want to
add or remove on the Home screen by
selecting or clearing their check boxes.
3. Tap OK.
Note You can add or remove features on the
Home screen panels, but their order
cannot be arranged.
Page 42

42 Chapter 2 Phone Basics
Adding and removing Home shortcuts
Home shortcuts give you one-touch access to your favorite
applications. You can add up to nine shortcuts.
On the
main Home
screen,
slide up
to access
available
slots for
adding
shortcuts.
Tip You can also add or remove Home shortcuts in Settings > Personalize >
Home shortcuts.
Adding a Home shortcut
1. Slide your finger up on the main Home screen, and then tap an
empty slot.
2. Browse through the list of applications, and then tap a favorite
application to add.
Note Shortcuts cannot be replaced. If you want to change a slot with another
shortcut, you need to remove the shortcut that occupies that slot first,
and then add the new shortcut.
Slide down
to show the
weather
clock again.
Page 43

Chapter 2 Phone Basics 43
Removing a Home shortcut
1. Press and hold the shortcut that you want to remove.
2. When the screen dims out, drag the shortcut away from its slot.
3. Release your finger when the icon is outside the slot.
Changing the home wallpaper
1. From the main Home screen, press MENU, and then tap
Wallpaper.
2. Tap Home, and then browse for the photo you want to use.
3. Crop the part of the photo that you
want to set as the wallpaper.
While cropping, you can:
Change the orientation of the
•
photo. Press MENU, and then tap
Rotate left or Rotate right.
Zoom in or out using the
•
onscreen zoom bar.
Drag the photo to frame a part of
•
it within the crop box. Everything
outside the crop box will be
discarded.
4. Tap OK.
Changing the lock screen wallpaper
1. From the main Home screen, press MENU, and then tap
Wallpaper > Lock screen.
2. Select a photo, crop as needed, and then tap OK.
Page 44

44 Chapter 2 Phone Basics
2.3 Accessing Applications in the All Programs Panel
See what applications your phone has in store for you in the All
programs panel.
1. From the main Home screen, press the BACK/HOME button.
Tip If you’re in an application or a settings screen, you can press and
hold the BACK/HOME button to directly go to the main Home
screen.
2. Slide left to scroll the panel sideways and access more
applications.
The small horizontal
bars at the bottom of
the panel indicate that
there are several pages
of applications. They
show you which page
you’re currently in.
3. Tap an application to open it.
Page 45

Chapter 2 Phone Basics 45
2.4 Phone Status and Notifications
Below are some of the status icons and notification icons that you
may see in the status bar and on the lock screen.
Status icons
Full battery Bluetooth on
Battery charging Bluetooth visible
Low battery Bluetooth stereo headset connected
Very low battery Bluetooth stereo music only
Maximum signal strength Bluetooth hands-free only
Roaming Sound on
Phone connection is off Silent mode on
No SIM card inserted Vibration mode on
3G available Call is in progress
3G connected Call on hold
EDGE available Calls are forwarded
EDGE connected Mute
HSDPA available Wired headset connected
HSDPA connected Speakerphone on
GPRS available Alarm is set
GPRS connected Airplane mode
No data connection
Page 46

46 Chapter 2 Phone Basics
Notification icons
Missed call New mail
New voicemail Upcoming event
New SMS/MMS
General notification
(appears in the status bar only)
Notification popup
When you have a missed call, new SMS/MMS, new voicemail, or
upcoming event, a notification popup appears on the upper side of
the screen. Tap the notification to check it, or tap to dismiss the
notification.
Notification
popup
Notifications panel
The Notifications panel shows you how many new notifications you
have. It also displays the current status of ongoing processes, such as
the duration of an ongoing phone call, upload and download status
messages, music playback duration, and more.
Open the Notifications panel from the Home screen. Slide your finger
downward, starting from the topmost part of the Home screen.
Page 47

Chapter 2 Phone Basics 47
Drag this thin border
down to open the
Notifications panel.
Drag this bar
up to close the
Notifications panel.
Notifications panel
Tap to clear all notifications in the Notifications panel.
Tip You can also press the BACK/HOME button to close the
Notifications panel.
2.5 Connecting Your Phone to a Computer
Whenever you connect your phone to a computer using the USB
cable, a selection screen opens on your phone and prompts you
to choose the type of USB connection. You can select one of the
following choices:
Mount SD card. This option is available only when you have
•
inserted a microSD card on your phone. Select this option to
connect your phone’s storage card to your computer as a USB
drive so you can copy files between the storage card and your
computer.
Page 48

48 Chapter 2 Phone Basics
HTC Sync. Select this option to use the HTC Sync software on
•
your computer to sync with your phone. For details, see “About
HTC Sync”.
Charge only. Select this option if you just want to charge the
•
phone’s battery using your computer.
Copying files to or from your storage card
1. Connect your phone to your computer using the USB cable that
came with your phone.
2. On the USB connected screen, tap Mount SD card, and then tap
OK.
3. On your computer, the connected phone is recognized as a
removable disk (just like any USB drive). Open this removable
disk so you can see what’s inside the microSD card.
Note While the phone’s storage card is connected to the computer as a
USB drive, you won’t be able to use applications on your phone to
access the storage card.
4. Copy files from your computer to your phone’s storage card, or
copy files from the storage card to your computer.
5. After copying, unmount the removable disk (that is, the
connected phone) as required by your computer’s operating
system to safely remove your phone.
About HTC Sync
You can use HTC Sync™ to synchronize Outlook contacts and calendar
or Outlook Express contacts between your computer and your phone.
Go to www.htc.com/support to download and install the following
HTC Sync software to your computer: HTC Sync™ for Brew® MP.
Note Visit the HTC support website (www.htc.com/support) from time to
time to download and install the most recent HTC Sync upgrade.
Page 49

Chapter 2 Phone Basics 49
2.6 Adjusting the Volume
To Do this
Adjust the system
volume
(volume level of the
phone ringtone and
sound notifications)
Adjust the media
volume
(volume level of music
or video)
Adjust the voice
volume
(in-call volume level)
Note The Volume screen automatically closes. You can also tap an empty area
of the Volume screen to close it.
Press the VOLUME UP/DOWN button
(except during a call or when playing
music/video). Slide up or down the volume
bars or continue pressing the VOLUME
UP/DOWN button to increase or decrease
the system volume.
Tip Tap Silent to mute the volume or Vibrate
to switch the phone to Vibration mode.
Press the VOLUME UP/DOWN button
when playing music or watching a video.
Slide up or down the volume bars or
continue pressing the VOLUME UP/DOWN
button to increase or decrease the media
volume
Press the VOLUME UP/DOWN button
during a call. Slide up or down the volume
bars or continue pressing the VOLUME
UP/DOWN button to increase or decrease
the in-call volume
Page 50

50 Chapter 2 Phone Basics
2.7 Getting the Most Out of Your Battery
When you’re on the go, it’s not always easy to charge your phone’s
battery as often as you’d like. Follow these tips to extend the time
between charges:
Switch the phone to Sleep mode when not in use (see “Switching
•
to Sleep mode”).
Turn the power off, if you won’t be using your phone for
•
extended periods of time (see “Turning the power off“).
Turn Bluetooth off immediately after you’re done using it. For
•
details, see “Turning Bluetooth on or off” in Chapter 6.
Lower the screen brightness. From the main Home screen, press
•
MENU, tap Settings > Display > Brightness, and then decrease
the brightness.
Cut down on activities such as Internet browsing which consume
•
a lot of power.
Avoid making very long phone calls or using the camera for
•
extended periods of time.
Try to carry a spare battery in times when you can’t charge your
•
battery for an extended period.
Batteries gradually lose capacity over time. Replace your battery
•
when you notice that the battery life is decreasing.
Page 51

Chapter 2 Phone Basics 51
Switching to Sleep mode
Switching to Sleep mode turns the display off and automatically locks
the screen to avoid accidental key presses.
Briefly press the END CALL/POWER button.
•
Your phone also automatically goes into Sleep mode when the
•
screen timeout is set and you leave the phone idle after a certain
period of time. For details on setting the screen timeout, see
“Display” in Chapter 9.
Note Press the END CALL/POWER button again to wake up the phone.
Locking and unlocking the screen
The screen automatically locks when
•
phone is in Sleep mode.
To unlock the screen, briefly press the
•
END CALL/POWER button to wake up
the phone, and then drag down the bar
on the lock screen.
Note The phone screen automatically
unlocks when you receive a call.
Turning the power off
1. Press and hold the END CALL/POWER button.
2. Tap Power off.
Page 52
Chapter 3
Phone Calls
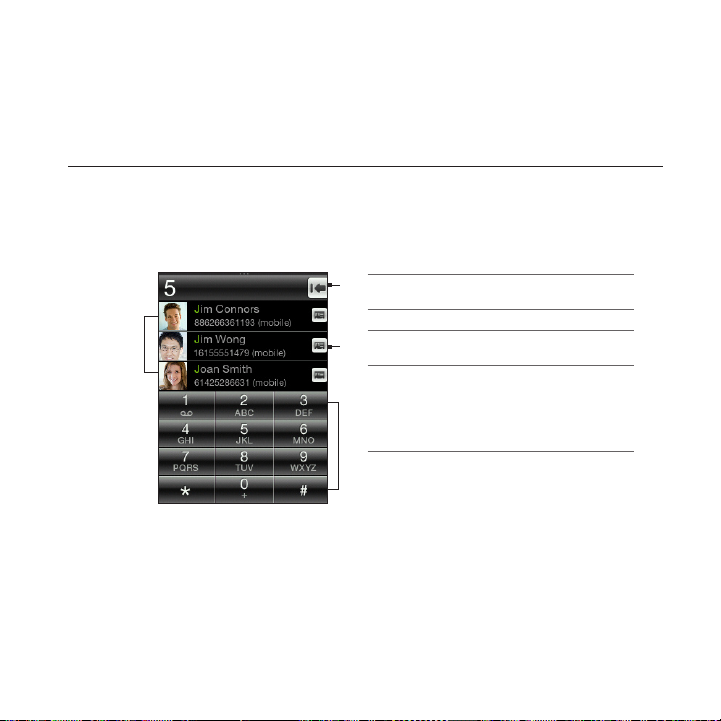
3.1 Making Calls
Press the CALL button to open and use the Phone dialer to place your
calls. You can enter a phone number, call a stored contact, or check
the Call History.
1 Lists the search results based
4
1
Tip You can also open the Phone dialer by tapping Phone from the All
programs panel.
3
2
Dialing a number or a contact
You can either dial a number directly, or you can use the Phone
dialer’s Smart Dial feature to quickly place a call to a stored contact or
a number in the Call History.
on the entered keys.
2 Keypad
3 Tap to open the person’s
contact card.
4 If you entered a wrong digit,
•
tap this button to erase it.
Press and hold this button to
•
erase the entire number and
start all over again.
Page 53

Chapter 3 Phone Calls 53
1. Press the CALL button to open the Phone dialer.
2. Begin entering the first few digits or characters. As you enter
numbers or letters, you’ll see matching names from the stored
contacts in your phone and SIM card as well as numbers from the
Call History.
You can
view more
matching
results
when you
slide down
the filtered
list to hide
the keypad.
Press MENU,
and then
tap Keypad
to show
the keypad
again.
3. To call a number or contact, do one of the following:
Tap a contact or number from the filtered list.
•
If you are calling a phone number that’s not stored in your
•
phone, enter the complete number, and then press the CALL
button.
Using Speed dial
Use Speed Dial to quickly call frequently-dialed numbers.
Note The number 1 speed dial key is pre-assigned to your voicemail. You
cannot delete Voicemail from the Speed dial list.
Page 54

54 Chapter 3 Phone Calls
Assigning a speed dial number to a contact
1. Press the CALL button to open the Phone dialer.
2. Press MENU, and then tap Speed dial.
Tip You can also press and hold an unassigned numeric key.
3. Tap an unused numeric key, and then do any of the following:
Tap Name, select a contact list type, and then tap a contact.
•
Tap OK.
Note If the stored contact has multiple phone numbers, make sure
to select the frequently-dialed phone number shown under the
contact’s name.
If the phone number you want to assign to the speed dial key
•
is not stored in your phone or SIM contacts, tap Phone, and
then enter the complete number.
4. Press MENU, and then tap Save.
Calling a speed dial number
Press and hold an assigned speed dial key on the Phone dialer to dial
the associated contact’s number.
Editing or deleting a speed dial number
1. Press the CALL button to open the Phone dialer.
2. Press MENU, tap Speed dial, and then do any of the following:
To Do this
Edit a speed dial
entry
Delete a speed dial
number assignment
Tap the assigned speed dial key, and then
tap the Name or Phone field to choose or
enter another number.
Tap the assigned speed dial key, press
MENU, and then tap Clear.
Page 55

Chapter 3 Phone Calls 55
Delete all speed dial
assignments
On the Speed dial screen, press MENU,
and then tap Clear. When prompted, tap
OK.
Directly making calls from received messages
While viewing a text or multimedia message, press MENU, and then
tap Call to directly place a call to the sender without opening the
Phone dialer.
If you are viewing an email message, press the CALL button. The
Phone dialer screen then opens, with the sender’s phone number
automatically filled in. Press the CALL button again to dial the number.
For details on viewing text and email messages, see Chapter 5.
Note When placing a call from a received email, make sure that the contact’s
email address and phone number are already stored in your phone.
3.2 Answering or Rejecting Calls
When you receive a call, an incoming voice call screen shows you the
contact’s name, phone number, and photo (if available).
To Do this
Answer a call Press the CALL button.
Mute the ring without
rejecting the call
Reject a call Press the END CALL/POWER button.
Press the VOLUME DOWN button.
Page 56

56 Chapter 3 Phone Calls
During a call, you can do any the following:
To Do this
Put a call on hold Press the CALL button. You can also press
Unhold a call When a call is on hold, press the CALL
End a call Press the END CALL/POWER button.
Access the Phone
dialer keypad
MENU, and then tap Hold call.
button. You can also press MENU, and then
tap Unhold call.
When you need to access the Phone dialer
keypad (for example, if you want to enter
an extension number), tap Keypad ( ).
3.3 Handling Multiple Calls
When there is another incoming call while
you are already in a call, you will hear a
notification sound from the earpiece and see
a new incoming voice call screen.
Page 57

Chapter 3 Phone Calls 57
To Do this
Answer the second call Press the CALL button. This puts the first
call on hold.
Reject the second call Press the END CALL/POWER button.
Switch calls After answering both calls, press the CALL
button to switch from one call to another.
Tip You can also press MENU, and then tap
Switch call.
Merge calls After answering both calls, press MENU,
and then tap More > Merge calls.
Dial a number or
contact while in a call
While in a call, press MENU, and then do
any of the following:
• Place a second call. Tap People to select
a contact to call, or tap Keypad to dial a
phone number.
• Start a conference call by tapping
Add call. For details, see “Setting up a
conference call” in this chapter.
Note Placing another call puts the ongoing call
on hold.
Setting up a conference call
Before starting a conference call, make sure your SIM card is enabled
with conference calling service.
1. Press the CALL button to open the Phone dialer.
2. Make a call to the first conference call participant.
Page 58

58 Chapter 3 Phone Calls
3. When connected, press MENU, and then tap Add call.
4. To dial the second participant, do any of the following:
Enter the phone number, and then press the CALL button.
•
Press MENU, and then tap People. Tap a contact list type,
•
select a contact, and then tap the number you want to call.
Calling the second participant puts the first call on hold.
5. Press MENU, and then tap More > Merge calls.
6. Add more participants by repeating steps 3 to 5.
7. During a call, you can press MENU, and then do one of the
following:
Tap Speaker on to turn on the speakerphone.
•
Tap Mute to turn off the microphone.
•
3.4 Checking the Call History
The Call History logs all dialed, received, and missed calls. This lets you
easily return a missed call or save a new phone number listed.
To open Call History, you can:
Tap a missed call notification from the Notifications panel.
•
Press the CALL button to open the Phone dialer, press MENU,
•
and then tap Call history.
Open the All programs panel, and then tap Call History.
•
To Do this
Return a call Tap a contact in Call History, and then tap the
number to call.
Or, tap an unsaved phone number, and then tap
Call (phone number).
Page 59

Chapter 3 Phone Calls 59
Save a phone
number
Tap the phone number in Call History, and then
select Save to new contact or Add to existing
contact. For details, see “Adding and Managing
Contacts” in Chapter 4.
Filter call logs On the Call History screen, press MENU, and then
tap View. Select the type of calls you want to
display.
Delete one or
more call logs
On the Call History screen, press MENU, and then
tap Delete. Select one or more entries, and then
tap OK.
3.5 Call Settings
You can enable or disable various phone services from your mobile
operator. Press the CALL button to open the Phone dialer, press
MENU, and then tap Settings.
Setting Description
Fixed dialing number Restrict outgoing calls to a fixed set of numbers. To
Call forwarding Select how you want your phone to handle busy,
Call barring Choose whether to block various categories of
Additional call
settings
Voicemail number Change the voicemail number stored on the phone.
enable this feature you must know your SIM card’s
PIN2 code.
unanswered, and unreachable calls. You can also set
the call forwarding option for all incoming calls.
incoming and outgoing calls.
Enable or disable operator services such as caller ID
and call waiting.
Page 60

Chapter 4
Staying Close
4.1 Opening the People Application
In People, you can easily manage your communications with contacts.
To open the People application, you can:
From the main Home screen, slide to the People screen. Press
•
MENU, and then tap All.
Open the All programs panel, and then tap People.
•
While you’re using the Phone dialer, press MENU, and then tap
•
People.
Last call log
is displayed
(if available).
Contact lists
Page 61

Chapter 4 Staying Close 61
4.2 Adding and Managing Contacts
Create new contacts on your phone or import existing ones from your
SIM card.
Note When you open the People application for the first time, you will be
asked whether to import SIM card contacts to your phone. Tap OK to
import.
Creating new contacts on your phone
1. Open the People application.
2. Press MENU, and then tap New contact.
3. Tap Phone to create a new contact on your phone.
4. Tap Add name, enter the contact’s first and last name, and then
tap OK.
5. Tap Add photo, select an album, and then do any of the
following:
Tap an existing photo for the contact.
•
Tap the Camera icon ( ). Press the CAPTURE button to
•
take a photo, and then tap Save.
Crop the photo as needed, and then tap OK.
6. Tap Add phone. Select a phone number type, and then enter the
contact’s phone number.
If the contact has multiple phone numbers, you can tap Add
phone again to add another one.
7. Fill in other details, such as the email address, postal address, and
ringtone to use for the contact.
8. When contact details are complete, tap OK.
Page 62
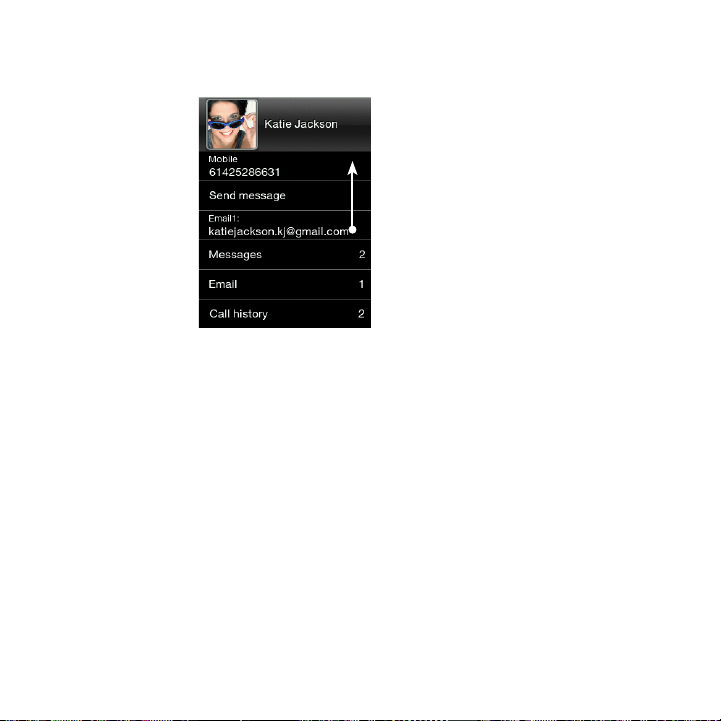
62 Chapter 4 Staying Close
A new contact card is added. Tapping a contact in People lets
you view his or her contact card.
Adding contacts to your SIM card
1. Open the People application.
2. Press MENU, and then tap New contact.
3. Tap SIM to create a new contact on your SIM card.
4. Enter the contact’s details, and then tap OK.
Tips • You can also copy the contacts stored in your phone to your SIM
card. Open a contact card, press MENU, and then tap Save to SIM.
• To access your SIM card contacts, open the People application, press
MENU, and then tap SIM manager.
Finding contacts
1. Open the People application, and then tap All people.
2. Press MENU, and then tap Search people.
3. Begin entering the first few digits or characters of a phone
number or a name. A search results panel displays matching
names from the stored contacts in your phone.
Slide your finger up to view
more contact details or open
exchanged messages with this
contact.
Page 63

Chapter 4 Staying Close 63
Note Search people uses the same search behavior of Smart Dial. For
details, see “Dialing a number or a contact” in Chapter 3.
4. Tap a contact to open his or her contact card.
Editing contact details
1. Open the People application.
2. Select a contact list type, and then tap a contact.
3. Press MENU, and then tap Edit.
4. Tap an item to edit, and then enter the new information.
5. Tap the contact photo to choose another photo.
Note When you have linked to your contact’s Facebook profile, you can
select to use his or her Facebook profile photo.
6. On the Edit contact screen, tap OK to save your changes.
Sharing contact cards
1. Open the People application.
2. Select a contact list type, and then tap a contact.
3. Press MENU, and then tap Send contact.
4. Choose how you want to share the contact card. For more
information, see “Text and Multimedia Messages” in Chapter 5
and “Using Bluetooth” in Chapter 6.
Deleting a contact
1. Open the People application.
2. Select a contact list type, and then tap a contact.
3. Press MENU, and then tap Edit.
4. Scroll down the Edit contact screen, and then tap Delete contact.
5. When prompted, tap Delete.
Page 64

64 Chapter 4 Staying Close
4.3 Contact Groups
By organizing contacts into groups, sending messages to several
contacts is a lot easier. Using groups to categorize contacts is also a
way of filtering the contacts list so that browsing and finding contacts
can be faster and easier.
Creating a group
1. Open the People application, and then tap Groups.
2. Press MENU, and then tap New.
3. Tap Name, and then enter a group name.
4. Tap Add people, select the contacts you want to include, and
then tap OK.
5. After entering the group name and members, tap OK.
Editing a group
1. Open the People application, and then tap Groups.
2. Tap a group.
3. Press MENU, and then tap Edit.
4. Edit the group’s name or modify its members.
Note You can also delete a group on the Edit group screen. Deleting a
group does not delete its members’ contact details.
5. Tap OK to save your changes.
Sending photos and messages to groups
1. Open the People application, and then tap Groups.
2. Tap a group.
Page 65

Chapter 4 Staying Close 65
3. Press MENU, and then tap any of the following:
Send message. When sending a text or multimedia message,
•
the message will be addressed to the Mobile number (by
default) of each contact. For details, see “Text and Multimedia
Messages” in Chapter 5.
Send mail. Make sure that all group members have saved email
•
addresses. If there are multiple email addresses, Email1 will be
used by default. For details, see “Email Messages” in
Chapter 5.
Send photo. You can take a photo or choose an existing one
•
on your phone. This will be added as an attachment to your
multimedia message. For details, see “Text and Multimedia
Messages” in Chapter 5.
4.4 Linking to Your Contacts’ Facebook Profiles
When you have set up your Facebook account on your phone,
matching contacts are automatically linked to their Facebook profiles
to keep you updated of the latest buzz from your friends.
Contacts are matched when their names in People are the same with
your friends in Facebook.
Note You need to be logged in to your Facebook account.
Manually linking to contacts’ Facebook profiles
1. Open the People application.
2. Select a contact list type, and then tap a contact.
3. Scroll down the screen, and then tap Link to Facebook.
Page 66

66 Chapter 4 Staying Close
4. Do any of the following:
If suggested matches are found, you can tap a Facebook
•
friend from the list.
Tap Search, enter your friend’s first name and last name, and
•
then tap Save. On the Matched Facebook link screen, tap a
Facebook friend.
Note Tapping Save without entering a name displays all of your Facebook
friends.
Viewing Facebook updates of a contact
1. Open the People application.
2. Select a contact list type, and then tap a contact.
3. Scroll down the screen, and then tap View updates. The contact’s
recent Facebook updates are then displayed.
4.5 Friend Stream
Friend Stream simplifies the way that you tend to your social
networks. Your interaction with friends in multiple social networks like
Facebook and Twitter are brought into a single stream of updates.
You can also conveniently post the same status message to your
social network accounts.
Note You need to be logged in to your social network accounts to download
Friend Stream updates.
Page 67

Chapter 4 Staying Close 67
Opening Friend Stream
Do any of the following:
Open the All programs panel, and then tap Friend Stream.
•
From the main Home screen, slide to the Friend Stream screen
•
(if it is available or you’ve added it to the Home screen). Tap the
status message or tweet currently displayed to open the Friend
Stream application.
1 Twitter update
2 Facebook update
1
2
3 Tap to view more options. For
details, see “Connecting with
your friends in Facebook” and
“Following tweets” in this chapter.
Slide up and down the screen to view
more Facebook or Twitter updates.
Press MENU, and then tap Refresh to
3
manually download recent Friend Stream
updates.
Logging in to your social networks
If you did not set up your social networks when you were setting up
your phone for the first time, you can still log in to social network
accounts such as Facebook and Twitter.
1. From the main Home screen, press MENU, and then tap
Settings > Data services.
2. Tap a social network account.
Page 68

68 Chapter 4 Staying Close
3. The screen shows whether you are logged in or not. To open a
login page, tap the social network name.
4. Enter your username or email address and password, and then
tap Login.
Connecting with your friends in Facebook
1. Open Friend Stream.
2. On the All updates screen, tap a Facebook update.
3. Do any of the following:
Option Description
View
comments
Like/Unlike Tap to let the person know you like his or her status
Comment Tap to post your comment. Enter your comment, and then
View wall Tap to open the person’s wall in a web browser.
Following tweets
1. Open Friend Stream.
2. On the All updates screen, tap a tweet.
3. Do any of the following:
Option Description
Reply Tap to reply to the tweet.
Send direct
message
Tap to open the Facebook update with comments on the
person’s wall.
message. Tap Unlike to undo liking it.
tap OK.
Tap to send a private message to the Twitter
user.
Page 69

Chapter 4 Staying Close 69
Retweet Tap to repost the tweet.
Add to my favorite Tap to mark the tweet as a favorite.
Show profile Tap to open the person’s profile in a web
browser.
Uploading wall photos in Facebook
1. Open Friend Stream.
2. On the All updates screen, press MENU, and then tap Upload
photos.
3. Open the album containing the photos to upload.
4. Tap one or more photos, and then tap OK. The photos will then
be uploaded to your wall in Facebook.
Updating your status message
1. Open Friend Stream.
2. On the All updates screen, press MENU, and then tap Status.
3. Enter your status message.
4. When prompted, tap OK.
4.6 Viewing Contact Details and Exchange of Communications With the Contact
Interactions such as phone calls and messages are neatly organized
by people, not by applications. When you open a friend’s contact
card, it gives you one-touch access to all of his or her contact details,
messages, email, call logs, and Facebook updates.
Page 70

Chapter 5
Exchanging Messages
5.1 Text and Multimedia Messages
Keep in touch with important people in your life. When you open the
Messages application, all your received messages are neatly grouped
by conversations per contact.
Each entry here
contains the
Indicates there’s
a new text or
multimedia message
received from the
contact.
Note To see a list of your message drafts, press MENU while on this screen,
and then tap Drafts.
Opening the Messages application
From the main Home screen, slide to the Messages screen, and
•
then tap the Messages icon on the upper-right side of the screen.
Open the All programs panel, and then tap Messages.
•
conversations
with a contact.
Page 71

Chapter 5 Exchanging Messages 71
Sending text messages
Send text messages (SMS) to other mobile phones. If you exceed the
limit on the number of characters for a single text message, your text
message will be delivered as one but will be billed as more than one
message.
1. Open the Messages application.
2. Press MENU, and then tap New.
3. Tap the To field, and then do any of the following:
•
Enter the first few characters of a contact’s name, and then
tap a contact from the search results panel. Repeat this step
to add more people.
•
Tap People ( ). Select a contact list type, tap one or more
contacts, and then tap OK.
•
Enter a mobile phone number.
4. Tap the message area, enter your message, and then tap Send.
1 Indicates the number of
1
2
3
recipients you’ve added. Tap
this text box again see a list of
your recipients.
2 Indicates the number of
characters entered.
3 Tap the message area to open
the onscreen keyboard and
enter your message.
Tip To save the message first and send it at another time, press MENU,
and then tap Save as draft.
Page 72
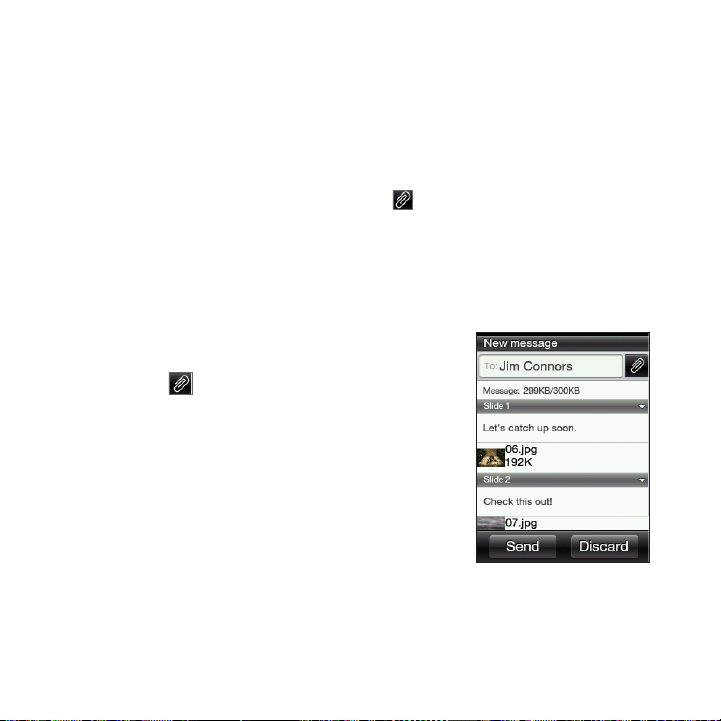
72 Chapter 5 Exchanging Messages
Sending multimedia messages
When composing multimedia messages, make sure that the size of the
attachment is within the limits allowed by your mobile operator.
1. Create a new message by following steps 1 to 3 in “Sending text
messages”.
2. Tap the message area, and then enter your message.
3. To include a file attachment, tap , and then choose the type of
attachment. Browse and select the file to attach.
4. To add a subject, press MENU, and then tap Add subject.
5. When you have finished composing your multimedia message,
tap Send.
Creating a slideshow in your multimedia message
1. Create a new message by following
steps 1 to 3 in “Sending text messages”.
2. Tap to include attachments, and then
tap Photo.
3. Select an album, and then tap a photo to
attach.
4. On the message area, tap the text that
says “Tap to add text”, and then enter a
caption for the attached photo.
5. To add another slide, press MENU, and
then tap Slide options > Add slide.
6. On the message area, tap the slide bar that appears after adding
a new slide. You can then choose to add a photo or audio, edit
your caption, and more.
7. To add another slide, repeat steps 5 and 6 to add a photo or
other attachments.
Page 73

Chapter 5 Exchanging Messages 73
8. To view your slideshow, press MENU, and then tap Preview.
9. Press the BACK/HOME button to return to the New message
screen.
10. When you are done with your slideshow, tap Send.
Viewing conversations with a contact
Open the Messages application and tap a conversation to view all the
messages between you and a contact.
If you received a new message from a contact, you can also slide
open the Notifications panel, and then tap the message notification to
read the new message and the other messages between you and the
contact.
1 Sent message indicator
2 Received message indicator
1
2
3 Tap to see more message
options.
4 Attachment indicator
Slide up and down the screen to view
more messages in the conversation.
4
3
Page 74

74 Chapter 5 Exchanging Messages
Viewing a multimedia message
1. Open the Messages application.
2. Multimedia messages are marked with an MMS icon ( ). Tap a
multimedia message you want to open.
3. Tap the attachment indicator. The media attachment, such as a
photo, video, audio, or slideshow, is then played.
4. While viewing the multimedia message, you can:
Use the onscreen buttons to pause,
•
play, or to move forward and
backward in a slideshow.
If there’s a contact card attachment,
•
tap ( ). To save the contact
information to your phone, tap the
contact, and then tap Save.
5. To save the media attachments to
your phone, press the BACK/HOME
button to go back to the conversation
between you and the contact.
6. Tap the multimedia message (not the attachment indicator), and
then tap Save content.
7. Select one or more files, and then tap Save.
Note Downloaded multimedia attachments are saved in the Downloads
folder of your phone storage.
Replying to a message
1. Open the Messages application.
2. Tap the contact you want to reply to.
Page 75

Chapter 5 Exchanging Messages 75
3. Press MENU, and then tap Reply.
4. Enter your response, and then tap Send.
Forwarding messages
1. Open the Messages application.
2. Tap the contact whose message you want to forward.
3. Tap a message within the conversation, and then tap Forward.
4. On the New message screen, tap the To field, and then enter one
or more contacts.
5. When done, tap Send.
Copying a message to your SIM card
1. Open the Messages application.
2. Tap the contact whose message you want to save to your SIM
card.
3. Tap a message within the conversation, and then tap Copy to
SIM.
Deleting a message or a whole conversation
Deleted messages and conversations are only moved to the Deleted
items list and you can still recover them, or permanently remove them
from your phone.
Deleting messages within a conversation
1. Open a conversation with a contact.
2. Press MENU, and then tap Delete selected.
3. Select one or more messages to remove from the conversation,
and then tap Delete.
Page 76

76 Chapter 5 Exchanging Messages
Deleting a whole conversation
1. On the main Messages screen, press MENU, and then tap Delete.
2. Select one or more conversations, and then tap Delete.
Clearing the Deleted items list
1. On the main Messages screen, press MENU, and then tap Deleted
items.
2. Deleted messages and conversations are then displayed. Press
MENU, and then tap Clear all.
Message settings
On the main Messages screen, press MENU, and then tap Settings.
Setting Description
Message options You can enable message settings, such as delivery
MMS server Select from a list of preconfigured MMS settings.
Cell broadcast Enable or disable receipt of cell broadcast messages
Edit quick text Select from a list of quick text templates to edit.
reports and validity period of messages.
from your service provider.
Page 77

Chapter 5 Exchanging Messages 77
5.2 Email Messages
The Mail application lets you send and receive email messages from
your webmail or other accounts, using POP3 or IMAP.
To open the Mail application, open the All programs panel, and then
tap Mail.
Email accounts list
Setting up your email accounts
Before you can send and receive email messages, you need to set up
one or more of your email accounts on your phone. If you did not set
up email when you were setting up your phone for the first time, you
can still add your email accounts.
Setting up your first email account
1. Open Mail.
2. Tap an email account type. If your email account type is not in
the list, see “Setting up other POP3/IMAP email accounts” in this
chapter.
3. Enter your email address and password, and then tap Next.
Page 78

78 Chapter 5 Exchanging Messages
4. Tap Account name if you want to change the display name of
your email account. Tap Your name to change your display name.
5. Tap Save. After login is successful, Mail then downloads new
messages from your email account.
Note If synchronization does not start automatically, press MENU, and
then tap Refresh.
Setting up multiple email accounts
1. Open Mail.
2. After setting up your first email account, notice that the inbox
of your first email account is displayed. Press the BACK/HOME
button to go back to the email accounts list.
3. Press MENU, and then tap New account.
4. Set up another email account by following steps 2 to 4 in
“Setting up your first email account”.
Note When setting up an account with the same email provider, you need
to save the second email account with a different account name.
5. If you’ll be setting up multiple email accounts, choose whether to
make this account your default email account.
6. Tap Save. After login is successful, Mail then downloads new
messages from your email account.
Note If synchronization does not start automatically, press MENU, and
then tap Refresh.
Page 79

Chapter 5 Exchanging Messages 79
Setting up other POP3/IMAP email accounts
You may need to enter more information, such as incoming and
outgoing servers, that you can get from your email provider.
1. Open Mail.
If you have an email account already set up, press the
BACK/HOME button to go back to the email accounts list first.
Press MENU, and then tap New account.
2. Tap Other.
3. Enter your email address and password, and then tap Next.
4. Enter additional account details, and then tap Next.
5. Tap Account name if you want to change the display name of
your email account. Tap Your name to change your display name.
6. If you have multiple accounts, choose whether to make this
account your default email account.
7. Tap Save. After login is successful, Mail then downloads new
messages from your email account.
Note If synchronization does not start automatically, press MENU, and
then tap Refresh.
Editing an email account
1. Open Mail.
2. Do any of the following:
If you have only one email account set up, press MENU, and
•
then tap Edit account.
If you have multiple email accounts, press MENU while in the
•
email accounts list, and then tap Edit account. Select the email
account to modify.
3. Tap a field to edit, enter the new information, and then tap Save.
Page 80

80 Chapter 5 Exchanging Messages
Sending email messages
1. Open Mail.
If you have multiple email accounts, select the email account in
the email account list.
2. In your inbox, press MENU, and then tap New.
3. Tap the To field, and then do any of the following:
Enter the first few characters of a contact’s name, and then
•
tap a contact from the search results panel. Repeat this step
to add more people.
Tap People ( ). Select a contact list type, tap one or more
•
contacts, and then tap OK.
Enter one or more email addresses.
•
Note If you want to send a carbon copy (Cc) or a blind carbon copy
(Bcc) of the email to other people, press MENU, and then tap Show
cc/bcc.
4. Enter a subject.
Tap to view more
recipients you’ve
added.
Attachment
indicator
5. Tap the message area, and then enter your message.
Page 81

Chapter 5 Exchanging Messages 81
6. Tap to include attachments to your email message. Browse
and select one or more files to attach, and then tap OK.
Tip To remove an attachment, tap the attachment indicator, select an
attachment, and then tap Remove.
7. Tap Send.
Note You can also press MENU, and then tap Save as draft. To open the
Drafts folder, see “Switching to other folders” in this chapter.
Viewing email messages
Open your mail inbox, and then tap an email you want to read. When
viewing an email message, you can:
Tap to view the recipients in the
•
loop. If you want to save a new email
address, tap the email address, and then
choose whether to create a new contact
or add it to a stored contact.
If available, tap the More button to
•
continue downloading the complete
email message.
Call the sender of the email. For details,
•
see “Directly making calls from received
messages” in Chapter 3.
Page 82

82 Chapter 5 Exchanging Messages
Replying to an email message
1. Open Mail.
2. Tap an email to open it.
3. Press MENU, and then tap Reply. Or, if there are other recipients
included in the email, tap Reply all.
4. Tap the message area, and then enter your response.
5. Tap Send.
Downloading attachments
1. Open Mail.
2. Tap an email that contains one or more attachments, and then
tap the attachment indicator.
3. On the Attachment screen, tap an attached file to download, and
then tap Save.
4. Browse for a folder where you want to save the file, and then tap
Save.
Forwarding email messages
1. Open Mail.
2. Tap an email to open it.
3. Press MENU, and then tap More > Forward.
4. On the Forward mail screen, tap the To field, and then enter one
or more contacts.
5. When done, tap Send.
Page 83

Chapter 5 Exchanging Messages 83
Setting how often and how much email to sync to your phone
1. Open Mail.
If you have multiple email accounts, select the email account in
the email accounts list.
2. Press MENU, and then tap Edit account > Check frequency.
3. Select a time interval for downloading email messages.
4. Tap Advanced settings > Download options, and then select how
many days of email messages to download. You can also tap All
to always download all your email messages.
5. Tap Next to go to the next screen, and then tap Save.
To refresh your inbox and sync email using the new settings,
press MENU, and then tap Refresh.
Switching to other folders
1. Open Mail.
If you have multiple email accounts, select the email account in
the email accounts list.
2. Press MENU, and then tap Folders.
3. Tap a folder you want to open.
Deleting an email account
If you have only one email account on your phone, open Mail,
•
press MENU, and then tap Delete account.
If you have multiple email accounts on your phone, press MENU
•
while in the email accounts list, and then tap Delete account.
Select the email account to delete, and then tap OK.
Page 84

Chapter 6
Getting Connected
6.1 Browsing the Web
It’s simple. When you turn your phone on for the first time (with the
SIM card inserted), it should connect automatically to your mobile
operator’s data service. You can start browsing the web straight away.
Note Do not change the connection settings as this may cause services to
stop working. If you’re having problems connecting to the Internet and
you really need to change some settings, see “When There’s a Problem
Connecting to the Internet” in this chapter to find out how to change
them. Please contact your mobile operator for the proper settings.
Opening your phone’s web browser
Do one of the following:
Tap the Internet icon if you see it on the main Home screen.
•
Open the All programs panel and then tap Internet.
•
If you added the Internet feature to your Home screen, slide to
•
the Internet screen and then tap the globe image to open the
web browser.
Searching the web
1. While on the browser screen, press MENU, and then tap More >
Web search.
2. Enter a word or phrase to search. When search results are
displayed, tap a link to go to the corresponding website.
Page 85

Chapter 6 Getting Connected 85
Going to a website
On the browser screen, tap the address bar, and then enter a web
address. As you enter the first few characters, popular web addresses
are then listed. You can tap an address from the list or continue
entering the complete web address that you want.
Tip The address bar is always on the top of the web page you are viewing.
After you scrolled down a web page, you can access the address bar by
pressing MENU.
Moving around a web page
Press MENU, and then tap Landscape or Portrait to change the
•
screen orientation.
•
Drag your finger in any direction to move around the web page.
Slightly slide your finger on the screen to display the zoom bar.
•
Drag right or left across the zoom bar to gradually zoom in or
out.
•
Double-tap a part of the web page to quickly zoom in and out.
Double tap
an area to
quickly zoom
in or out.
Page 86

86 Chapter 6 Getting Connected
Navigating to the previous or next web page
Press the BACK/HOME button to go to the previous web page
•
visited.
Press MENU, and then tap Previous or Next to go backward or
•
forward to recently visited web pages.
Adding bookmarks and revisiting bookmarked sites
1. While viewing the website that you want, press MENU, and then
tap Add bookmark.
2. Tap Label, enter a new name if needed, and then tap Done.
3. To revisit a bookmarked site, press MENU while on the browser
screen, tap Bookmarks, and then tap the site that you want.
Tip While on the Bookmarks list, press MENU and then tap Edit to
remove or make changes to a bookmark.
Working with links on a web page
To Do this
Open a linked
web page
Bookmark a
linked web page
Email a link Press and hold an active link, and then tap Send
Send a link as a
text message
Tap an active link. (After tapping and selecting a
link, it will be enclosed in a colored box).
Press and hold an active link, tap Save as a
bookmark, and then tap Done.
via email. For details about sending email, see
Chapter 5.
Press and hold an active link, and then tap Send
via message. For details about sending a text
message, see Chapter 5.
Page 87

Chapter 6 Getting Connected 87
Working with images on a web page
To Do this
Download an
image and save
on your phone
Forward an image
as an MMS or
email attachment
Choose whether
to display images
when loading
web pages
Press and hold an image, and then tap Save
image. Choose whether to save it on the
phone’s built-in storage or your storage card.
Then choose a folder where to save it, and then
tap Save.
Press and hold an image, and then tap Send
image via email or Send image via mms. For
details about sending messages, see Chapter 5.
While on the browser screen, press MENU, and
then tap More > Settings > Display setting. Tap
Load image to switch between turning this
option on and off.
Page 88

88 Chapter 6 Getting Connected
6.2 When There’s a Problem Connecting to the Internet
Checking your current network connection settings
Your phone has been set to connect automatically to the Internet
through your mobile operator’s data service. If you don’t get a
connection automatically, check your network connection settings.
1. From the main Home screen, press MENU, and then tap
Settings > Wireless controls > Mobile network settings.
2. Check the following:
•
Automatic setup is turned on.
The name of your mobile operator is displayed in the Network
•
operators item.
•
The right mobile network is displayed in the Access point
names item. If it’s not the right network, tap the Access point
names item and then select the network that your phone
should connect to.
Adding a new access point
If your mobile operator has changed their network connection
settings, obtain their access point name and other settings (including
username and password if required) and add them to your phone.
1. From the main Home screen, press MENU, and then tap
Settings > Wireless controls > Mobile network settings > Access
point names.
2. Press MENU, and then tap New.
3. Enter the APN settings, and then tap Save. On the Access point
names screen, make sure that the new APN is selected.
Page 89

Chapter 6 Getting Connected 89
6.3 Using Bluetooth
When Bluetooth is turned on, you can:
Connect and use Bluetooth accessories, such as a hands-free
•
stereo headset or car kit phone.
Exchange information with other Bluetooth-capable devices
•
(such as your computer or another phone) over a distance of up
to eight meters.
Turning Bluetooth on or off
1. From the main Home screen, press MENU, and then tap
Settings > Wireless controls.
2. Tap Bluetooth’s On/Off switch to switch between turning this
feature on and off.
When Bluetooth is on, you’ll see the Bluetooth icon ( ) in the status
bar or on the lock screen of your phone.
Note Turn Bluetooth off when not in use to save battery power, or in places
where using a wireless device is prohibited, such as on board an aircraft
and in hospitals.
Changing the phone name
The phone name identifies your phone to other Bluetooth devices. You
can use the preset name or change it.
1. From the main Home screen, press MENU, and then tap
Settings > Wireless controls.
2. Tap Bluetooth settings > Device name.
3. Enter the name you want for your phone.
Page 90

90 Chapter 6 Getting Connected
Making your phone discoverable to other Bluetooth devices
For other people using a Bluetooth-capable phone or computer to
be able to search and see your phone, you need to make your phone
discoverable.
1. From the main Home screen, press MENU, and then tap
Settings > Wireless controls > Bluetooth settings.
2. If Bluetooth is not yet turned on, tap Bluetooth.
3. Tap Discoverable.
4. Tap Always or choose a time limit for your phone’s Bluetooth
visibility.
After setting your phone to be discoverable, you’ll see the Bluetooth
visible icon ( ) in the status bar or on the lock screen whenever
Bluetooth is turned on.
Tip To disable discoverable mode on your phone, go to Settings > Wireless
controls > Bluetooth settings, tap Discoverable, and then select
Invisible.
Page 91

Chapter 6 Getting Connected 91
Connecting a Bluetooth headset for the first time
Listen to music using a Bluetooth stereo headset, or have hands-free
conversations using a compatible Bluetooth headset.
1. Turn on the Bluetooth headset and make sure that it is set to
discoverable mode.
To find out how to set it to discoverable mode, see the
documentation that came with the headset.
2. On your phone, turn Bluetooth on. (See “Turning Bluetooth on or
off” in this chapter).
3. On the Wireless controls screen, tap Bluetooth settings.
4. Press MENU and then tap Scan.
Your phone starts searching for Bluetooth devices within range
and displays all detected devices.
5. Tap the name of the headset.
6. Enter the passcode supplied with your headset.
Tip You can try “0000” as the passcode. If that does not work, look for
the correct passcode in the headset documentation.
Your phone then tries to connect to the headset. After it’s connected,
you’ll see the name of your headset in your phone’s Bluetooth device
list.
Tip The steps for connecting your phone with a computer or another phone
that has Bluetooth are just about the same as connecting to a Bluetooth
headset. One difference is, you can specify your own passcode to use
for connecting, and the same passcode needs to be entered in the
computer or other phone.
Page 92

92 Chapter 6 Getting Connected
Turning hands-free or stereo music capability off
If what you’re using is a Bluetooth stereo headset, you’ll see the
icon on the main Home screen’s status bar and on the lock screen,
which means that you can use your headset both for listening to
music and for hands-free phone conversations.
You can choose to use your headset purely for listening to music or
only for hands-free phone conversations, if you want to.
1. From the main Home screen, press MENU, and then tap
Settings > Wireless controls > Bluetooth settings > Bluetooth
device list.
2. Tap the name of your headset.
3. Press MENU and then do one of the following:
Tap Disconnect phone to turn off the hands-free capability
•
of your headset. (To turn hands-free back on, tap Connect
phone.)
Tap Disconnect media to turn off stereo music in your
•
headset. (To turn stereo music back on, tap Connect media.)
When only stereo music capability is on, you’ll see the status icon
on the main Home screen and on the lock screen. When only hands-
free capability is on, you’ll see the icon.
Page 93

Chapter 6 Getting Connected 93
Sending information and media files using Bluetooth
You can use Bluetooth to send contact information, calendar events,
and media files from your phone to your computer or another phone
that has Bluetooth.
Note If you’re sending information or files to another phone, that phone must
support the Object Push Profile (OPP) of Bluetooth.
1. Set the receiving device (your computer or the other phone) to
discoverable mode.
Note On your computer, you may also need to set it to “Receive Beams”
or “Receive Files”. See the online help of your computer’s Bluetooth
software for instructions on receiving information over Bluetooth.
2. On your phone, open the application that contains the
information or files you want to send.
To send Do this
Contact card 1. Open the People application and then tap
Calendar
event
All people.
2. Tap the contact you want to send.
3. Press MENU and then tap Send contact >
Bluetooth.
1. Open the Calendar application.
2. On the month calendar, tap the date that
has the event that you want.
3. Tap the event you want to send.
4. Press MENU and then tap Send > Send via
Bluetooth.
Page 94

94 Chapter 6 Getting Connected
To send Do this
Photos, videos
and music files
3. Your phone automatically turns Bluetooth on and then starts
searching for Bluetooth devices within range. Tap the name of
the receiving device.
Note If you have not connected with the receiving device before, you
will be prompted by your phone to enter a passcode. Then on
the receiving device, accept the connection and enter the same
passcode.
4. On the receiving device, accept the information or file(s).
Receiving information and media files via Bluetooth
When someone sends you a contact card, calendar event, or media
file via Bluetooth, your phone displays a full-screen notification.
Accept the connection and the information or file, and save it to your
phone.
Note If you have not connected with the other Bluetooth device before, you
may be prompted to authorize the connection and enter a passcode.
1. Open the File Browser.
2. Go to the folder containing the photos,
videos, or music files to send.
3. Press MENU, and then tap More > Send >
By Bluetooth.
4. Select the files to send and then tap OK.
Tip You can also send a captured photo using
the Camera application, or use the Photos
application to send several photos and videos
at the same time.
Page 95

Chapter 6 Getting Connected 95
If you received a contact card, it is directly added to the People
application on your phone. A calendar event you received is also
directly saved to your phone’s Calendar application.
If you received a media file, you’ll find it in the Bluetooth folder
on your phone’s storage. You can use File Browser to locate the
Bluetooth folder and access the file. For information about using File
Browser, see Chapter 8.
Disconnecting and reconnecting a Bluetooth device
After you have connected with a Bluetooth device and it is added
to your phone’s Bluetooth device list, you can easily disconnect and
reconnect with the device anytime.
1. From the main Home screen, press MENU, and then tap Settings
> Wireless controls.
2. Tap Bluetooth settings > Bluetooth device list.
The Device list screen then opens.
3. To disconnect a Bluetooth device, tap the Disconnect button
( ) next to the device name.
To reconnect, make sure the Bluetooth device is on. Then on
your phone, tap the Connect button ( ) next to the Bluetooth
device name on the Device list screen.
Page 96

Chapter 7
Camera and Multimedia
7.1 Using the Camera
When something amazing happens right before your eyes, have your
phone camera ready to instantly capture fun shots or record it on
video.
Press the CAPTURE button located at the lower right side of your
phone to open the Camera application. Also use this button as the
shutter release.
Capture
mode switch
Flash
button
Viewfinder screen
Taking a photo
1. Press the CAPTURE button.
2. If the Camera is not in Photo mode ( ), tap the Capture mode
switch.
Page 97

Chapter 7 Camera and Multimedia 97
3. Point the camera at your subject. You can press MENU to access
more camera controls and settings. For details, see “Onscreen
controls” in this chapter.
4. Press the CAPTURE button to take a photo.
Shooting videos
1. Press the CAPTURE button.
2. Tap the Capture mode switch to set to Video mode ( ).
3. Point the camera at your subject. You can press MENU to access
more camera controls and settings. For details, see “Onscreen
controls” in this chapter.
4. Press the CAPTURE button to start recording video. Press this
button again to stop recording.
After taking a photo or video
After capturing, choose what you want to do with the photo or video.
Option Description
Photos. Tap to open and use the Photos application to view the
photos and videos in the phone storage or storage card.
Share. Tap to share the captured photo or video via email,
multimedia message, Bluetooth, or Facebook.
Delete. Tap to delete the photo or video.
Set as. Tap to set the captured photo as a contact photo, lock screen
wallpaper, or home wallpaper.
Play. Tap to view the captured video.
Page 98

98 Chapter 7 Camera and Multimedia
Turning the camera flash on or off
Your phone has a built-in flashlight that helps to light up your subject
when you’re taking photos and videos under poor lighting conditions.
On the Camera’s Viewfinder screen, tap the onscreen Flash button to
switch between three flash modes.
Mode Description
Auto (in Photo mode only). When there is not enough environmental
light, the camera flash turns on automatically when you take a photo.
On. The camera flash turns on every time you take a photo or video.
Off. The flash is always off.
Camera flash doesn’t turn on?
Using the flash eats up much battery power. To save battery power,
your phone disables the flash (even when you have set the camera
flash mode to Auto or On) when one of the following occurs:
You have an incoming call The flash will be disabled temporarily when you
Your phone’s battery level
reaches 10% or lower
Cold weather may lower
battery performance
which affects the flash
have an incoming call. After the call ends, you’ll
be able to use the flash again (when set to On or
Auto).
Recharge the battery so that the camera can have
enough battery power to use the flash.
To make sure the camera has enough battery
life to power up the flash, keep your phone
warm when not in use and try to avoid sudden
temperature changes that may affect battery
performance.
Page 99

Chapter 7 Camera and Multimedia 99
Onscreen controls
Before you start capturing photos and videos, you can press MENU to
access more camera controls and settings.
Option Description
Photos. Tap to open and use the Photos application to view the
photos and videos in the phone storage or storage card.
Zoom. Drag the slider to the left or right to zoom in or out when
capturing a photo or video.
Note In Photo mode, zooming is not available when the maximum
resolution is used for taking photos.
Effect. Choose a special effect such as grayscale, sepia, or negative
to apply to your photos and videos.
Note White Balance cannot be applied if an effect has already been
selected. For details, see “Camera settings” in this chapter.
Brightness. Tap to adjust the exposure setting of the camera.
Contrast. Tap to adjust the contrast properties of the camera.
Settings. Access more camera settings. For details, see “Camera
settings” in this chapter.
Page 100

100 Chapter 7 Camera and Multimedia
Camera settings
While on the camera’s viewfinder, press MENU, and then tap Settings
( ).
Setting Description
Review after
capture
Resolution Select the resolution to use.
White balance Select the white balance settings according to the current
Video format Select whether to use MPEG4 or H.263 for capturing video.
Quality (Available only in Photo mode) Specify the image quality.
Save to Select where you want to save captured photos and videos.
Timer If you need to take a self-portrait or group photo, set the
Shutter sound Turn on to play a shutter sound when you press the
Metering mode Set how the camera measures the amount of light to
Tap to turn on or off. When turned on, the captured photo
or video is displayed after pressing the CAPTURE button.
lighting condition to capture colors more accurately.
You can save the files to the phone storage or storage card
(if inserted).
timer to either 2 or 10 seconds to give yourself time to
position yourself in front of the camera after pressing the
CAPTURE button.
CAPTURE button.
calculate the best exposure. Choose one of these modes:
Center area mode allows the camera to measure light in
•
the center.
Average mode allows the camera to measure light in the
•
entire image.
 Loading...