

Page 1

www.htc.com
User Manual
Page 2

2
Please Read Before Proceeding
THE BATTERY IS NOT CHARGED WHEN YOU TAKE IT OUT OF THE BOX.
DO NOT REMOVE THE BATTERY PACK WHEN THE DEVICE IS CHARGING.
YOUR WARRANTY IS INVALIDATED IF YOU OPEN OR TAMPER WITH THE
DEVICE’S OUTER CASING.
PRIVACY RESTRICTIONS
Some countries require full disclosure of recorded telephone conversations, and
stipulate that you must inform the person with whom you are speaking that the
conversation is being recorded. Always obey the relevant laws and regulations of
your country when using the recording feature of your PDA Phone.
INTELLECTUAL PROPERTY RIGHT INFORMATION
Copyright © 2008 HTC Corporation. All Rights Reserved.
, , , ExtUSB, and HTC Care are trademarks and/or service marks
of HTC Corporation.
Microsoft, MS-DOS, Windows, Windows NT, Windows Server, Windows Mobile,
Windows XP, Windows Vista, ActiveSync, Windows Mobile Device Center, Internet
Explorer, MSN, Hotmail, Windows Live, Outlook, Excel, PowerPoint, Word, OneNote
and Windows Media are either registered trademarks or trademarks of Microsoft
Corporation in the United States and/or other countries.
Bluetooth and the Bluetooth logo are trademarks owned by Bluetooth SIG, Inc.
microSD is a trademark of SD Card Association.
Java, J2ME and all other Java-based marks are trademarks or registered trademarks
of Sun Microsystems, Inc. in the United States and other countries.
Copyright © 2008, Adobe Systems Incorporated. All Rights Reserved.
Page 3

Opera® Mobile from Opera Software ASA. Copyright 1995-2008 Opera Software
ASA. All Rights Reserved.
YouTube is a trademark of Google, Inc.
Sprite Backup is a trademark or service mark of Sprite Software.
Copyright © 2001-2008, Spb Software House. All Rights Reserved.
Copyright © 2008, Esmertec AG. All Rights Reserved.
Copyright © 2003-2008, ArcSoft, Inc. and its licensors. All Rights Reserved. ArcSoft
and the ArcSoft logo are registered trademarks of ArcSoft, Inc. in the United States
and/or other countries.
Copyright © 2004-2008, Ilium Software, Inc. All Rights Reserved.
All other company, product and service names mentioned herein are trademarks,
registered trademarks or service marks of their respective owners.
HTC shall not be liable for technical or editorial errors or omissions contained
herein, nor for incidental or consequential damages resulting from furnishing this
material. The information is provided “as is” without warranty of any kind and is
subject to change without notice. HTC also reserves the right to revise the content
of this document at any time without prior notice.
No part of this document may be reproduced or transmitted in any form or by any
means, electronic or mechanical, including photocopying, recording or storing in a
retrieval system, or translated into any language in any form without prior written
permission of HTC.
3
Page 4

4
Disclaimers
THE WEATHER INFORMATION, DATA AND DOCUMENTATION ARE PROVIDED “AS
IS” AND WITHOUT WARRANTY OR TECHNICAL SUPPORT OF ANY KIND FROM
HTC. TO THE MAXIMUM EXTENT PERMITTED BY APPLICABLE LAW, HTC AND ITS
AFFILIATES expressly disclaim any and all representations and warranties, express
or implied, arising by law or otherwise, regarding the Weather Information, Data,
Documentation, or any other Products and services, including without limitation
any express or implied warranty of merchantability, express or implied warranty of
fitness for a particular purpose, non-infringement, quality, accuracy, completeness,
effectiveness, reliability, usefulness, that the Weather Information, Data and/or
Documentation will be error-free, or implied warranties arising from course of
dealing or course of performance.
Without limiting the foregoing, it is further understood that HTC and its Providers
are not responsible for Your use or misuse of the Weather Information, Data and/or
Documentation or the results from such use. HTC and its Providers make no express
or implied warranties, guarantees or affirmations that weather information will
occur or has occurred as the reports, forecasts, data, or information state, represent
or depict and it shall have no responsibility or liability whatsoever to any person or
entity, parties and non-parties alike, for any inconsistency, inaccuracy, or omission
for weather or events predicted or depicted, reported, occurring or occurred.
WITHOUT LIMITING THE GENERALITY OF THE FOREGOING, YOU ACKNOWLEDGE
THAT THE WEATHER INFORMATION, DATA AND/OR DOCUMENTATION MAY INCLUDE
INACCURACIES AND YOU WILL USE COMMON SENSE AND FOLLOW STANDARD
SAFETY PRECAUTIONS IN CONNECTION WITH THE USE OF THE WEATHER
INFORMATION, DATA OR DOCUMENTATION.
Page 5

Limitation of Damages
TO THE MAXIMUM EXTENT PERMITTED BY APPLICABLE LAW, IN NO EVENT SHALL
HTC OR ITS PROVIDERS BE LIABLE TO USER OR ANY THIRD PARTY FOR ANY
INDIRECT, SPECIAL, CONSEQUENTIAL, INCIDENTAL OR PUNITIVE DAMAGES OF ANY
KIND, IN CONTRACT OR TORT, INCLUDING, BUT NOT LIMITED TO, INJURY, LOSS OF
REVENUE, LOSS OF GOODWILL, LOSS OF BUSINESS OPPORTUNITY, LOSS OF DATA,
AND/OR LOSS OF PROFITS ARISING OUT OF, OR RELATED TO, IN ANY MANNER,
OR THE DELIVERY, PERFORMANCE OR NONPERFORMANCE OF OBLIGATIONS, OR
USE OF THE WEATHER INFORMATION, DATA OR DOCUMENTATION HEREUNDER
REGARDLESS OF THE FORESEEABILITY THEREOF.
Important Health Information and Safety Precautions
When using this product, the safety precautions below must be taken to avoid
possible legal liabilities and damages.
Retain and follow all product safety and operating instructions. Observe all
warnings in the operating instructions on the product.
To reduce the risk of bodily injury, electric shock, fire, and damage to the
equipment, observe the following precautions.
ELECTRICAL SAFETY
This product is intended for use when supplied with power from the designated
battery or power supply unit. Other usage may be dangerous and will invalidate
any approval given to this product.
SAFETY PRECAUTIONS FOR PROPER GROUNDING INSTALLATION
CAUTION: Connecting to an improperly grounded equipment can result in an
electric shock to your device.
This product equipped with a USB Cable for connecting with desktop or notebook
computer. Be sure your computer is properly grounded (earthed) before
connecting this product to the computer. The power supply cord of a desktop or
5
Page 6
6
notebook computer has an equipment-grounding conductor and a grounding
plug. The plug must be plugged into an appropriate outlet which is properly
installed and grounded in accordance with all local codes and ordinances.
SAFETY PRECAUTIONS FOR POWER SUPPLY UNIT
• Use the correct external power source
A product should be operated only from the type of power source indicated
on the electrical ratings label. If you are not sure of the type of power source
required, consult your authorized service provider or local power company.
For a product that operates from battery power or other sources, refer to the
operating instructions that are included with the product.
• Handle battery packs carefully
This product contains a Li-ion battery. There is a risk of fire and burns if the
battery pack is handled improperly. Do not attempt to open or service the
battery pack. Do not disassemble, crush, puncture, short external contacts or
circuits, dispose of in fire or water, or expose a battery pack to temperatures
higher than 60˚C (140˚F).
WARNING: Danger of explosion if battery is incorrectly replaced. To reduce risk
of fire or burns, do not disassemble, crush, puncture, short external contacts,
expose to temperature above 60° C (140° F), or dispose of in fire or water.
Replace only with specified batteries. Recycle or dispose of used batteries
according to the local regulations or reference guide supplied with your
product.
• Take extra precautions
• Keep the battery or device dry and away from water or any liquid as it may
cause a short circuit.
Page 7

• Keep metal objects away so they don’t come in contact with the battery or
its connectors as it may lead to short circuit during operation.
• Do not use a battery that appears damaged, deformed, or discolored, or
the one that has any rust on its casing, overheats, or emits a foul odor.
• Always keep the battery out of the reach of babies and small children, to
avoid swallowing of the battery. Consult the doctor immediately if the
battery is swallowed.
• If the battery leaks:
• Do not allow the leaking fluid to come in contact with skin or clothing.
If already in contact, flush the affected area immediately with clean
water and seek medical advice.
• Do not allow the leaking fluid to come in contact with eyes. If already
in contact, DO NOT rub; rinse with clean water immediately and seek
medical advice.
• Take extra precautions to keep a leaking battery away from fire as
there is a danger of ignition or explosion.
SAFETY PRECAUTIONS FOR DIRECT SUNLIGHT
Keep this product away from excessive moisture and extreme temperatures. Do not
leave the product or its battery inside a vehicle or in places where the temperature
may exceed 60°C (140°F), such as on a car dashboard, window sill, or behind a glass
that is exposed to direct sunlight or strong ultraviolet light for extended periods
of time. This may damage the product, overheat the battery, or pose a risk to the
vehicle.
PREVENTION OF HEARING LOSS
CAUTION: Permanent hearing loss may occur if earphones or
headphones are used at high volume for prolonged periods
of time.
7
Page 8

8
NOTE: For France, Earphone (listed below) for this device have been tested to comply
with the Sound Pressure Level requirement laid down in the applicable NF EN 503321:2000 and/or NF EN 50332-2:2003 standards as required by French Article L. 5232-1.
• Earphone, manufactured by HTC, Model HS S300.
SAFETY IN AIRCRAFT
Due to the possible interference caused by this product to an aircraft’s navigation
system and its communications network, using this device’s phone function on
board an airplane is against the law in most countries. If you want to use this
device when on board an aircraft, remember to turn off your phone by switching to
Airplane Mode.
ENVIRONMENT RESTRICTIONS
Do not use this product in gas stations, fuel depots, chemical plants or where
blasting operations are in progress, or in potentially explosive atmospheres such
as fuelling areas, fuel storehouses, below deck on boats, chemical plants, fuel or
chemical transfer or storage facilities, and areas where the air contains chemicals or
particles, such as grain, dust, or metal powders. Please be aware that sparks in such
areas could cause an explosion or fire resulting in bodily injury or even death.
EXPLOSIVE ATMOSPHERES
When in any area with a potentially explosive atmosphere or where flammable
materials exist, the product should be turned off and the user should obey all signs
and instructions. Sparks in such areas could cause an explosion or fire resulting in
bodily injury or even death. Users are advised not to use the equipment at refueling
points such as service or gas stations, and are reminded of the need to observe
restrictions on the use of radio equipment in fuel depots, chemical plants, or where
blasting operations are in progress. Areas with a potentially explosive atmosphere
are often, but not always, clearly marked. These include fueling areas, below deck
on boats, fuel or chemical transfer or storage facilities, and areas where the air
contains chemicals or particles, such as grain, dust, or metal powders.
Page 9

ROAD SAFETY
Vehicle drivers in motion are not permitted to use telephony services with
handheld devices, except in the case of emergency. In some countries, using handsfree devices as an alternative is allowed.
SAFETY PRECAUTIONS FOR RF EXPOSURE
• Avoid using your phone near metal structures (for example, the steel frame of
a building).
• Avoid using your phone near strong electromagnetic sources, such as
microwave ovens, sound speakers, TV and radio.
• Use only original manufacturer-approved accessories, or accessories that do
not contain any metal.
• Use of non-original manufacturer-approved accessories may violate your
local RF exposure guidelines and should be avoided.
INTERFERENCE WITH MEDICAL EQUIPMENT FUNCTIONS
This product may cause medical equipment to malfunction. The use of this device is
forbidden in most hospitals and medical clinics.
If you use any other personal medical device, consult the manufacturer of your
device to determine if they are adequately shielded from external RF energy. Your
physician may be able to assist you in obtaining this information.
Turn your phone OFF in health care facilities when any regulations posted in
these areas instruct you to do so. Hospitals or health care facilities may be using
equipment that could be sensitive to external RF energy.
HEARING AIDS
Some digital wireless phones may interfere with some hearing aids. In the event
of such interference, you may want to consult your service provider, or call the
customer service line to discuss alternatives.
9
Page 10
10
NONIONIZING RADIATION
Your device has an internal antenna. This product should be operated in its normaluse position to ensure the radiative performance and safety of the interference.
As with other mobile radio transmitting equipment, users are advised that for
satisfactory operation of the equipment and for the safety of personnel, it is
recommended that no part of the human body be allowed to come too close to the
antenna during operation of the equipment.
Use only the supplied integral antenna. Use of unauthorized or modified antennas
may impair call quality and damage the phone, causing loss of performance and
SAR levels exceeding the recommended limits as well as result in non-compliance
with local regulatory requirements in your country.
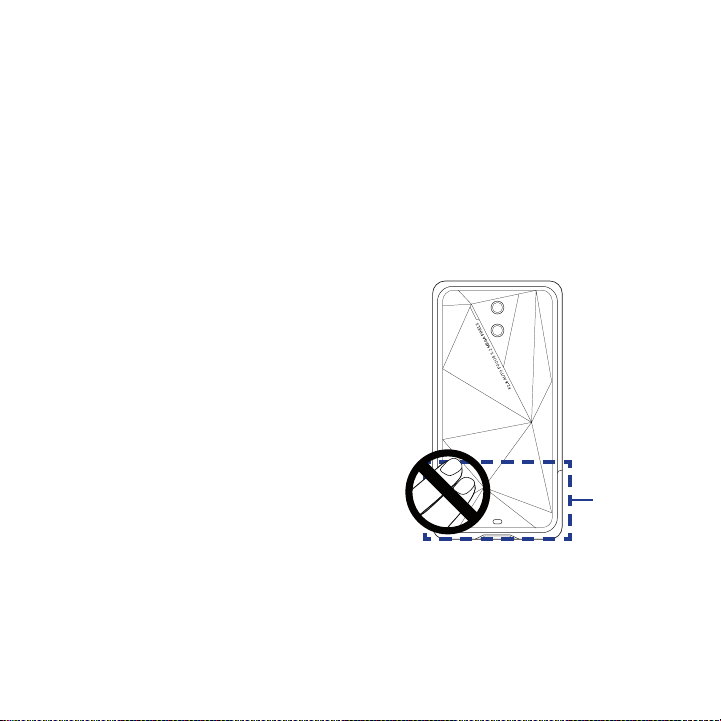
To assure optimal phone performance
and ensure human exposure to RF
energy is within the guidelines set
forth in the relevant standards, always
use your device only in its normal-use
position. Contact with the antenna
area may impair call quality and cause
your device to operate at a higher
power level than needed. Avoiding
contact with the antenna area when the
phone is IN USE optimizes the antenna
performance and the battery life.
Antenna
location
Page 11

General Precautions
• Avoid applying excessive pressure to the device
Do not apply excessive pressure on the screen and the device to prevent
damaging them and remove the device from your pants’ pocket before sitting
down. It is also recommended that you store the device in a protective case
and only use the device stylus or your finger when interacting with the touch
screen. Cracked display screens due to improper handling are not covered by
the warranty.
• Device getting warm after prolonged use
When using your device for prolonged periods of time, such as when you’re
talking on the phone, charging the battery or browsing the web, the device
may become warm. In most cases, this condition is normal and therefore
should not be interpreted as a problem with the device.
• Heed service markings
Except as explained elsewhere in the Operating or Service documentation, do
not service any product yourself. Service needed on components inside the
device should be done by an authorized service technician or provider.
• Damage requiring service
Unplug the product from the electrical outlet and refer servicing to an
authorized service technician or provider under the following conditions:
• Liquid has been spilled or an object has fallen onto the product.
• The product has been exposed to rain or water.
• The product has been dropped or damaged.
• There are noticeable signs of overheating.
• The product does not operate normally when you follow the operating
instructions.
• Avoid hot areas
The product should be placed away from heat sources such as radiators, heat
registers, stoves, or other products (including amplifiers) that produce heat.
11
Page 12

12
• Avoid wet areas
Never use the product in a wet location.
• Avoid using your device after a dramatic change in temperature
When you move your device between environments with very different
temperature and/or humidity ranges, condensation may form on or within
the device. To avoid damaging the device, allow sufficient time for the
moisture to evaporate before using the device.
NOTICE: When taking the device from low-temperature conditions into a warmer
environment or from high-temperature conditions into a cooler environment,
allow the device to acclimate to room temperature before turning on power.
• Avoid pushing objects into product
Never push objects of any kind into cabinet slots or other openings in the
product. Slots and openings are provided for ventilation. These openings
must not be blocked or covered.
• Mounting accessories
Do not use the product on an unstable table, cart, stand, tripod, or bracket.
Any mounting of the product should follow the manufacturer’s instructions,
and should use a mounting accessory recommended by the manufacturer.
• Avoid unstable mounting
Do not place the product with an unstable base.
• Use product with approved equipment
This product should be used only with personal computers and options
identified as suitable for use with your equipment.
• Adjust the volume
Turn down the volume before using headphones or other audio devices.
• Cleaning
Unplug the product from the wall outlet before cleaning. Do not use liquid
cleaners or aerosol cleaners. Use a damp cloth for cleaning, but NEVER use
water to clean the LCD screen.
Page 13

Contents
Chapter 1 Getting Started 23
1.1 Getting to Know Your Touch Phone and Accessories .....................................24
Left panel ..................................................................................................................................... 24
Right panel .................................................................................................................................. 24
Front panel ................................................................................................................................25
Back panel ...................................................................................................................................26
Top panel .....................................................................................................................................27
Bottom panel..............................................................................................................................27
Accessories ..................................................................................................................................28
1.2 Installing the SIM Card, Battery, and Storage Card ........................................ 28
SIM card ........................................................................................................................................29
Battery...........................................................................................................................................29
Storage card ................................................................................................................................31
1.3 Charging the Battery ........................................................................................32
1.4 Using the Strap Holder .....................................................................................33
1.5 Starting Up ........................................................................................................ 34
Turn your device on and off ..................................................................................................34
Auto configure the data connection settings ................................................................35
Switch to Sleep mode when not in use ............................................................................ 35
1.6 Navigating Your Device ....................................................................................36
Finger-touch control ................................................................................................................36
Stylus ............................................................................................................................................. 38
Navigation Control ...................................................................................................................38
1.7 Home Screen ..................................................................................................... 40
Tasks screen ................................................................................................................................ 41
1.8 Status Icons ....................................................................................................... 41
1.9 Start Menu ......................................................................................................... 45
13
Page 14

14
1.10 Quick Menu ..................................................................................................... 46
1.11 LED Alerts ........................................................................................................47
1.12 Adjusting the Volume ..................................................................................... 48
1.13 Using your Device as a USB Drive .................................................................. 49
Chapter 2 Using Phone Features 51
2.1 Using the Phone ................................................................................................ 52
The Phone screen .....................................................................................................................52
Enter your PIN ............................................................................................................................52
2.2 Voice Call ...........................................................................................................53
Make a call ................................................................................................................................... 53
Answer a call ...............................................................................................................................54
End a call ..................................................................................................................................... 57
Call History ..................................................................................................................................58
Speed Dial ...................................................................................................................................58
Turn the phone function on and off ..................................................................................59
2.3 Video Call ........................................................................................................... 60
Make a video call .......................................................................................................................60
Answer a video call...................................................................................................................60
End a video call .........................................................................................................................61
Change settings ........................................................................................................................61
2.4 Smart Dial ..........................................................................................................64
Make a call or send a text message using Smart Dial .................................................. 65
2.5 Setting Up Bluetooth SIM Access for Car Kit Phones .....................................66
Chapter 3 TouchFLO™ 3D 67
3.1 About TouchFLO™ 3D ........................................................................................ 68
3.2 Using the TouchFLO 3D Home Screen .............................................................68
Home .............................................................................................................................................70
People ........................................................................................................................................... 72
Messages .....................................................................................................................................74
Page 15

Mail.................................................................................................................................................75
Internet .........................................................................................................................................76
Photos and Videos ....................................................................................................................77
Music .............................................................................................................................................78
Weather ........................................................................................................................................82
Settings .........................................................................................................................................84
Programs ......................................................................................................................................84
3.3 Finger Gestures ................................................................................................. 85
Finger scrolling .......................................................................................................................... 85
Finger zooming .........................................................................................................................86
Finger panning ..........................................................................................................................86
Chapter 4 Entering Text 87
4.1 Entering Information ........................................................................................ 88
QWERTY keyboard ...................................................................................................................88
On-screen input methods......................................................................................................88
4.2 Using the Hardware Keyboard .........................................................................90
4.3 Using the Full QWERTY ..................................................................................... 91
4.4 Using the Compact QWERTY ............................................................................ 92
4.5 Using the Phone Keypad ..................................................................................93
4.6 Using Multitap and T9 Modes .......................................................................... 94
Multitap mode ........................................................................................................................... 94
T9 mode .......................................................................................................................................94
4.7 Using Numeric and Symbol Mode ...................................................................96
4.8 Using Block Recognizer .................................................................................... 97
4.9 Using Letter Recognizer ...................................................................................98
4.10 Using Transcriber ............................................................................................ 98
Chapter 5 Synchronizing Information With Your Computer 101
5.1 About Synchronization ..................................................................................102
5.2 Setting Up Windows Mobile® Device Center on Windows Vista® ................103
15
Page 16

16
Set up synchronization in Windows Mobile Device Center.................................... 104
Use Windows Mobile Device Center ............................................................................... 105
5.3 Setting Up ActiveSync® on Windows® XP ......................................................106
Install ActiveSync ................................................................................................................... 106
Set up synchronization in ActiveSync ............................................................................ 106
5.4 Synchronizing With Your Computer ..............................................................107
Start and stop synchronization ......................................................................................... 107
Change which information is synchronized ................................................................108
Troubleshoot sync connection problem ....................................................................... 108
5.5 Synchronizing via Bluetooth .........................................................................109
5.6 Synchronizing Music and Video .....................................................................110
Chapter 6 Exchanging Messages 111
6.1 Messaging ....................................................................................................... 112
6.2 Text Messages .................................................................................................113
Create a new text message ................................................................................................113
Compose and send a text message ................................................................................ 114
Manage text messages ........................................................................................................ 114
6.3 MMS .................................................................................................................117
Change MMS settings .......................................................................................................... 117
Create and send MMS messages ...................................................................................... 118
View and reply to MMS messages ................................................................................... 121
6.4 Types of E-mail Accounts ................................................................................ 122
Set up your device to synchronize Outlook e-mail with the computer ............. 123
Add an e-mail account ......................................................................................................... 123
6.5 E-mail Setup Wizard ........................................................................................124
Set up an Internet e-mail account ................................................................................... 124
Set up a custom domain e-mail........................................................................................ 127
6.6 Using E-mail .....................................................................................................128
Create a new e-mail message............................................................................................ 128
Compose and send an e-mail ............................................................................................ 129
Page 17

Filter the Inbox message list .............................................................................................. 129
View and reply to messages .............................................................................................. 130
Synchronize e-mails .............................................................................................................. 132
Customize e-mail settings ..................................................................................................132
Chapter 7 Working With Company E-mails and Meeting Appointments 135
7.1 Synchronizing with the Exchange Server .....................................................136
Set up an Exchange Server connection ......................................................................... 136
Start synchronization ........................................................................................................... 137
7.2 Working With Company E-mails .................................................................... 138
Automatic synchronization through Direct Push ...................................................... 138
Scheduled synchronization ............................................................................................... 139
Instant download through Fetch Mail ........................................................................... 139
Search for e-mails on the Exchange Server .................................................................. 140
Flag your messages ............................................................................................................... 141
Out-of-office auto-reply ...................................................................................................... 142
7.3 Managing Meeting Requests .........................................................................142
7.4 Finding Contacts in the Company Directory.................................................144
Chapter 8 Internet 147
8.1 Ways of Connecting to the Internet ...............................................................148
Wi-Fi ............................................................................................................................................ 148
GPRS/3G .................................................................................................................................... 152
Dial-up ....................................................................................................................................... 153
8.2 Starting a Data Connection ............................................................................ 154
8.3 Using Opera Mobile™ ......................................................................................154
View web pages ..................................................................................................................... 156
Opera Mobile menu .............................................................................................................. 157
8.4 Using YouTube™ ..............................................................................................158
Browse for videos ................................................................................................................... 158
Watching videos ..................................................................................................................... 160
17
Page 18

18
Bookmarks ................................................................................................................................ 162
History ........................................................................................................................................ 162
8.5 Using Streaming Media ..................................................................................163
8.6 Using Windows Live™ ......................................................................................165
Set up Windows Live™ .......................................................................................................... 165
The Windows Live™ interface ............................................................................................ 167
Windows Live™ Messenger ................................................................................................ 167
Launch Messenger and sign in .........................................................................................168
Add Windows Live™ contacts ............................................................................................ 169
8.7 Using Your Device as a Modem (Internet Sharing) ....................................... 170
8.8 Using RSS Hub ................................................................................................. 173
Subscribe to and organize news channels ................................................................... 173
View and organize headlines............................................................................................. 175
View the news summary ..................................................................................................... 176
Chapter 9 Bluetooth 179
9.1 Bluetooth Modes ............................................................................................ 180
9.2 Bluetooth Partnerships ..................................................................................181
9.3 Connecting a Bluetooth Hands-free or Stereo Headset ..............................182
9.4 Beaming Information Using Bluetooth .........................................................183
9.5 Bluetooth Explorer and Bluetooth File Sharing ...........................................185
9.6 Printing Files via Bluetooth ............................................................................ 186
Chapter 10 Navigating on the Road 189
10.1 Guidelines and Preparation for Using GPS ................................................. 190
10.2 Downloading Satellite Data via QuickGPS .................................................191
Download options ................................................................................................................. 192
Chapter 11 Experiencing Multimedia 193
11.1 Taking Photos and Videos ............................................................................194
Capture modes ....................................................................................................................... 194
Camera controls ..................................................................................................................... 196
Page 19

On-screen controls and indicators .................................................................................. 196
Menu Panel ..............................................................................................................................198
Zooming.................................................................................................................................... 199
The Review screen ................................................................................................................. 201
Advanced Options ................................................................................................................. 202
11.2 Viewing Photos and Videos Using Album ...................................................205
Select a photo or video to view ........................................................................................ 206
View an image ......................................................................................................................... 206
Play back video ....................................................................................................................... 210
Close Album............................................................................................................................. 210
11.3 Using Windows Media® Player Mobile ........................................................211
About the controls ................................................................................................................ 212
About the screens and menus .......................................................................................... 212
Synchronize video and audio files ................................................................................... 213
Play media ................................................................................................................................ 215
Playlists ...................................................................................................................................... 216
Troubleshooting ..................................................................................................................... 216
11.4 Using FM Radio .............................................................................................217
FM Radio controls .................................................................................................................. 217
Device controls used in FM Radio .................................................................................... 219
Save presets ............................................................................................................................. 219
FM Radio Main Menu ............................................................................................................ 220
11.5 Using Audio Booster .....................................................................................221
11.6 Using MP3 Trimmer ......................................................................................222
Chapter 12 Programs 225
12.1 Programs on your Device ............................................................................. 226
12.2 Adding and Removing Programs ................................................................230
12.3 Adobe® Reader® LE .......................................................................................231
12.4 Calendar ........................................................................................................232
19
Page 20

20
Create appointments ........................................................................................................... 232
View appointments ............................................................................................................... 234
Send appointments .............................................................................................................. 235
12.5 Contacts ........................................................................................................236
Add new contacts .................................................................................................................. 236
Organize and search contacts ........................................................................................... 238
Share contact information .................................................................................................. 239
12.6 Comm Manager ............................................................................................. 240
12.7 JETCET™ PRINT .............................................................................................. 241
Open JETCET PRINT ............................................................................................................... 241
Set up a printer ....................................................................................................................... 242
Print a file .................................................................................................................................. 242
Print a web page .................................................................................................................... 243
12.8 Microsoft® Office Mobile ..............................................................................243
12.9 Notes .............................................................................................................. 245
12.10 JBlend ........................................................................................................... 246
Install and launch MIDlets or MIDlet suites .................................................................. 246
Manage MIDlets and MIDlet suites ................................................................................. 247
12.11 SIM Manager ...............................................................................................249
12.12 Spb GPRS Monitor ......................................................................................251
Install GPRS Monitor ............................................................................................................. 251
The GPRS Monitor icon and pop-up window .............................................................. 251
Set up monitoring and notification ................................................................................ 252
View charts and reports....................................................................................................... 253
12.13 Sprite Backup .............................................................................................. 254
12.14 Tasks ............................................................................................................257
12.15 Voice Commander ....................................................................................... 258
Open Voice Commander ..................................................................................................... 258
Create a voice tag for a contact ........................................................................................ 259
Create a voice tag for a program ...................................................................................... 260
Page 21

12.16 Voice Recorder ............................................................................................260
12.17 WorldCard Mobile ....................................................................................... 262
Capture and export business card information .......................................................... 263
12.18 ZIP ................................................................................................................265
Chapter 13 Managing Your Device 267
13.1 Copying and Managing Files .......................................................................268
13.2 Settings on your Device ...............................................................................269
Personal tab ............................................................................................................................. 269
System tab ................................................................................................................................ 270
Connections tab ..................................................................................................................... 273
13.3 Changing Basic Settings ...............................................................................274
Date and time.......................................................................................................................... 274
Regional settings ................................................................................................................... 274
Display settings ...................................................................................................................... 275
Device name ............................................................................................................................ 276
Ringer settings ........................................................................................................................ 276
Alarms and notifications .....................................................................................................277
Phone services ........................................................................................................................ 278
13.4 Using Connection Setup ...............................................................................278
13.5 Using Task Manager ...................................................................................... 280
13.6 Connecting to an External Display .............................................................. 282
Connect the device to an external display ................................................................... 282
13.7 Protecting Your Device .................................................................................283
Protect your SIM card with a PIN ...................................................................................... 283
Protect your device with a password.............................................................................. 283
Encrypt files on your storage card ................................................................................... 284
13.8 Managing Memory .......................................................................................285
13.9 Resetting Your Device ...................................................................................286
Soft reset ................................................................................................................................... 286
Hard reset ................................................................................................................................. 286
21
Page 22

22
Clear Storage ........................................................................................................................... 287
13.10 Windows Update .........................................................................................288
13.11 Battery Saving Tips ..................................................................................... 289
Appendix 291
A.1 Specifications ..................................................................................................292
A.2 Regulatory Notices .........................................................................................295
Index 303
Page 23

Chapter 1
Getting Started
1.1 Getting to Know Your Touch Phone and Accessories
1.2 Installing the SIM Card, Battery, and Storage Card
1.3 Charging the Battery
1.4 Using the Strap Holder
1.5 Starting Up
1.6 Navigating Your Device
1.7 Home Screen
1.8 Status Icons
1.9 Start Menu
1.10 Quick Menu
1.11 LED Alerts
1.12 Adjusting the Volume
1.13 Using your Device as a USB Drive
Page 24
24 Getting Started
1.1 Getting to Know Your Touch Phone and Accessories
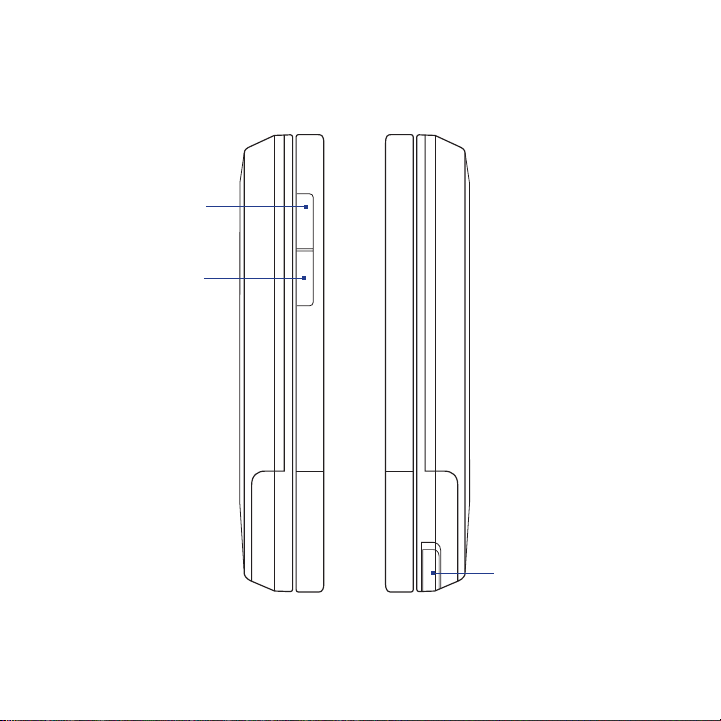
Left panel Right panel
VOLUME UP
During a call or when
playing music, press
this button to increase
the volume.
VOLUME DOWN
During a call or when
playing music, press
this button to lower
the volume.
Stylus
(See “Stylus” in this
chapter for details.)
Page 25
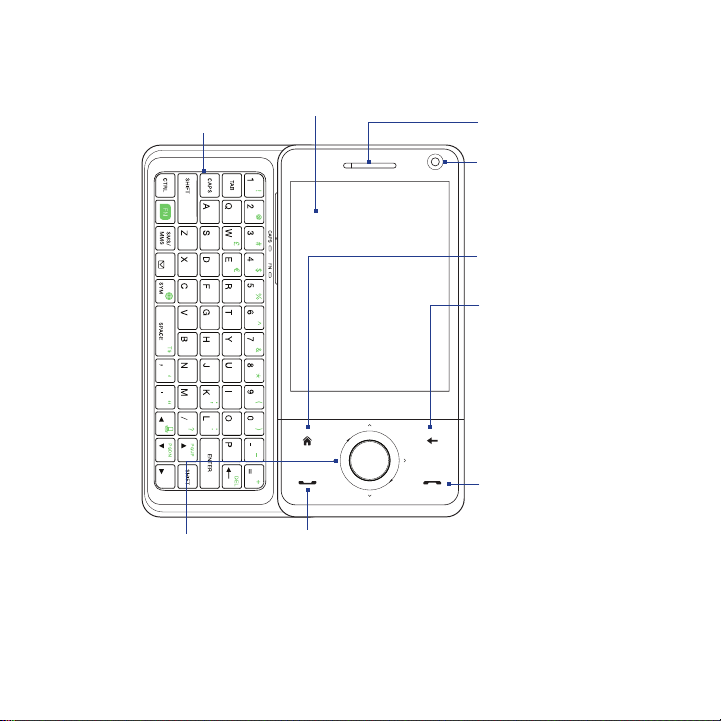
Front panel
Hardware Keyboard
See Chapter 4 for
details.
Navigation Control
This Navigation Control
is both press-sensitive
and touch-sensitive.
See “Navigation Control”
later in this chapter for
details.
Touch Screen
TALK/SEND
Press to answer an incoming call or dial a number.
•
During a call, press and hold to toggle the
•
speakerphone on and off.
Earpiece
Listen to a phone
call from here.
Second Camera
Use this camera for
video call conversations
or to take a self-portrait.
HOME
Press to return to the
Home screen. See
Chapter 3 for details.
BACK
Press to return to the
previous screen.
END
• Press to end a call or
return to the Home
screen.
• Press and hold to lock
the device.
(See “Long Press End
Key” under “Settings on
your Device” in Chapter
13 for details.)
Getting Started 25
Page 26
26 Getting Started
Notes When using the four buttons — HOME, BACK, TALK/SEND, and END — and the
Navigation Control, please observe the following precautions:
• Make sure to press on the icons of the four buttons for the best accuracy. When
• For best results, press with your fingertip. Do not wear gloves.
pressing on the Navigation Control, make sure to press the outer areas near the
ENTER button for directional control.
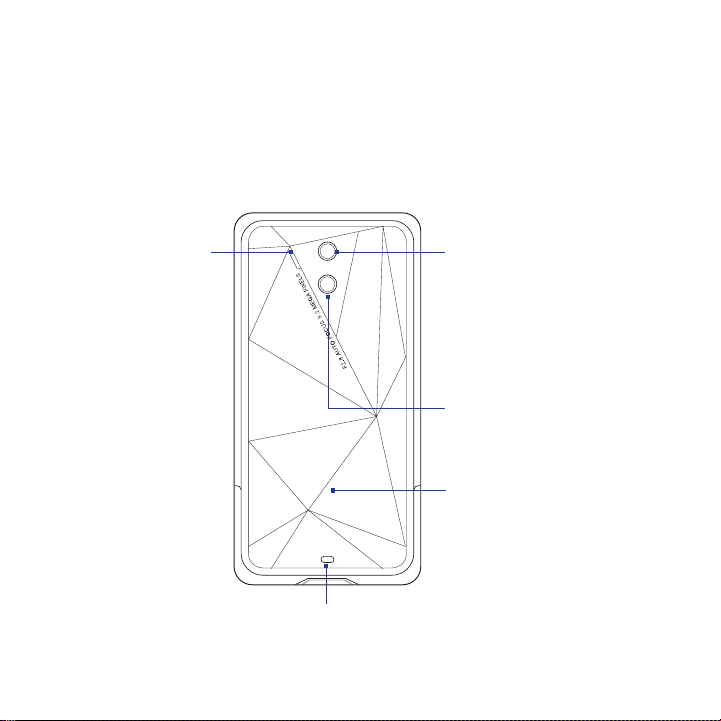
Back panel
Speaker
3.2 Megapixel Camera
See “Taking Photos and
Videos” in Chapter 11
for details.
Flash Light
Back Cover
Push the back cover
upward to remove it.
Strap Holder
See “Using the Strap Holder” in
this chapter for details.
Page 27
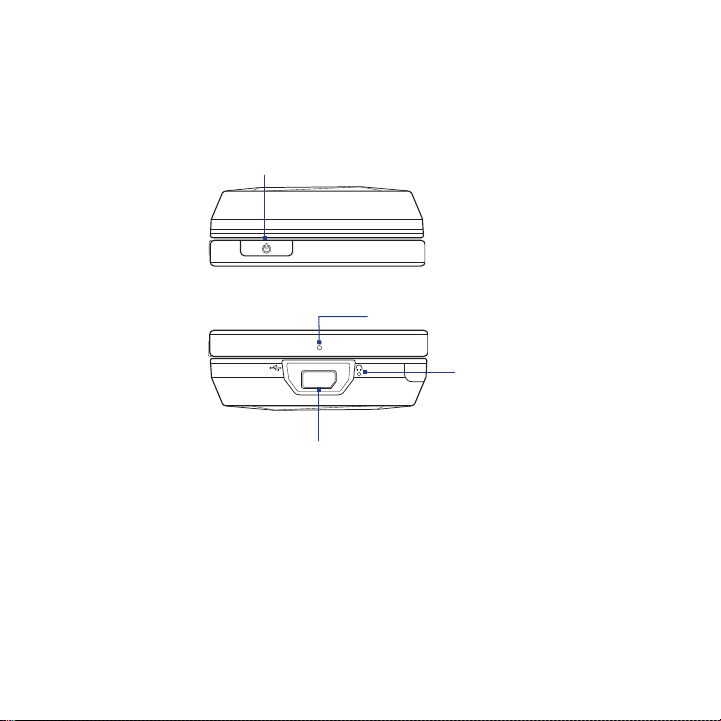
Top panel
POWER
Press to turn off the display temporarily. To turn off
the power, press and hold for about 5 seconds.
For more information, see “Starting Up” in this chapter.
Getting Started 27
Bottom panel
Sync Connector/Earphone Jack/TV Out
Connect the supplied USB cable to synchronize information or plug in the AC
•
adapter to recharge the battery.
Connect the supplied USB stereo headset for hands-free conversation or for
•
listening to audio media.
Connect an HTC composite video and audio cable (purchased separately) to
•
output the device screen contents and device audio to an external viewing
device.
Microphone
Reset
With the stylus, press the
Reset button to soft-reset
the device.
Page 28
28 Getting Started
Accessories
The product package includes the following items and accessories:
•
Battery
AC adapter
•
•
Screen protector
•
Stereo headset
USB sync cable
•
•
Pouch
Quick Start Guide and TouchFLO 3D Guide
•
•
Getting Started and Application discs
Extra stylus
•
1.2 Installing the SIM Card, Battery, and Storage Card
Always turn off your device before installing or replacing the SIM card, battery, and
storage card. You also need to remove the back cover before you can install these
components.
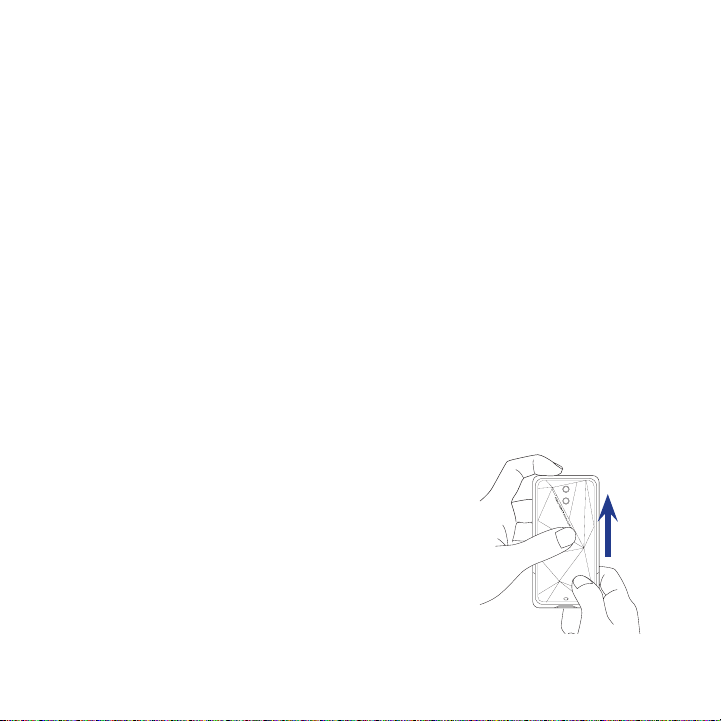
To remove the back cover
Make sure your device is turned off.
1.
Hold the device with both hands and the front
2.
panel facing down.
Push the back cover up with your thumb until it
3.
disengages from the device and then slide it up
to remove.
Page 29
Getting Started 29
SIM card
The SIM card contains your phone number, service details, and phonebook/
message memory. Your device supports both 1.8V and 3V SIM cards.
Note Some legacy SIM cards may not function with your device. You should consult with
your service provider for a replacement SIM card. There may be fees for this service.
To install the SIM card
Make sure your device is turned off.
1.
Locate the SIM card slot, then insert
2.
the SIM card with its gold contacts
facing down and its cut-off corner
facing out the card slot.
Slide the SIM card completely into
3.
the slot.
To remove the SIM card
Remove the battery if it is installed.
1.
Slide the SIM card out from the SIM card slot with your thumb.
2.
Cut-off corner
Battery
Your device comes with a rechargeable Lithium-ion or Lithium-ion polymer
battery and is designed to use only manufacturer-specified original batteries and
accessories. Battery performance depends on many factors, including network
configuration, signal strength, the temperature of the environment in which you
operate your device, the features and/or settings you select and use, items attached
to connecting ports, and your voice, data, and other program usage patterns.
Page 30
30 Getting Started
Battery life estimates (approximations):
Standby time: Up to 367 hours for GSM
•
Up to 462 hours for WCDMA
Talk time: Up to 419 minutes for GSM
•
Up to 378 minutes WCDMA
Video call time: Up to 189 minutes for WCDMA
•
Note Battery life is subject to network and phone usage.
Warning! To reduce risk of fire or burns:
• Do not attempt to open, disassemble, or service the battery pack.
• Do not crush, puncture, short external contacts, or dispose of in fire or
water.
• Do not expose to temperatures above 60oC (140oF).
• Replace only with the battery pack designated for this product.
• Recycle or dispose of used battery as stipulated by local regulations.
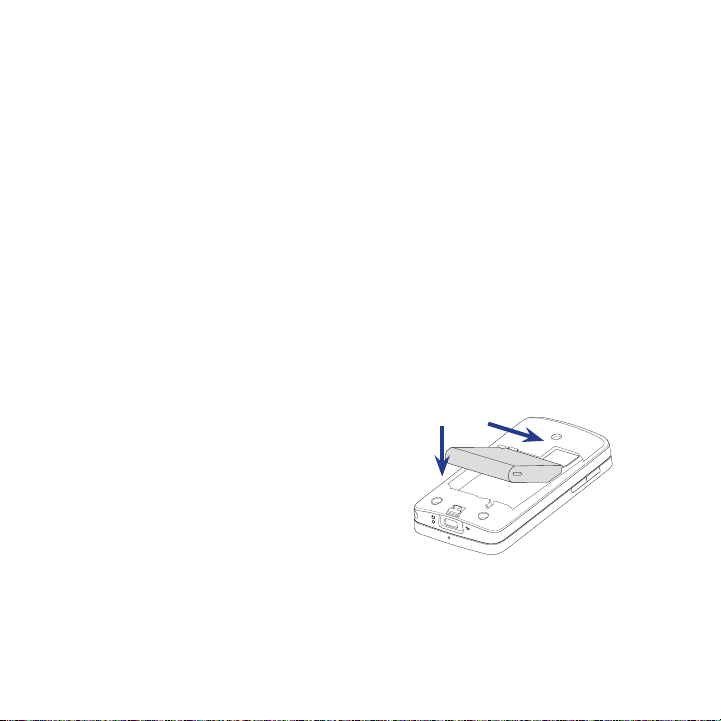
To install the battery
Align the battery’s exposed
1.
copper contacts with the battery
connectors inside the battery
compartment.
Insert the contact’s side of the
2.
battery first and then gently push
the battery into place.
Replace the back cover.
3.
Page 31

Getting Started 31
To remove the battery
Make sure your device is turned off.
1.
Remove the back cover.
2.
The bottom right side of the
3.
battery has a protruding grip. Lift
the protruding grip to remove the
battery.
Battery grip
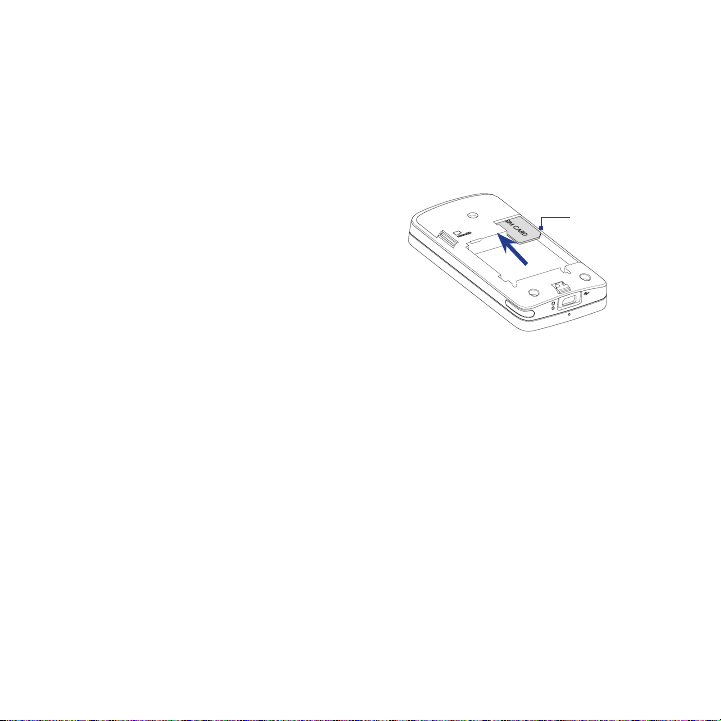
Storage card
To have additional storage for your images, videos, music, and files, you can
purchase a microSD™ card and install it into your device.
To install a microSD card
Insert the microSD card into the slot with
its gold contacts facing down.
Note To remove the microSD card, press it
to eject it from the slot.
Page 32

32 Getting Started
1.3 Charging the Battery
New batteries are shipped partially charged. Before you start using your device, it is
recommended that you install and charge the battery. Some batteries perform best
after several full charge/discharge cycles.
To charge the battery
Connect the USB connector of the AC adapter to the sync connector on your
1.
device.
Plug in the AC adapter to an electrical outlet to start charging the battery.
2.
Note Only the AC adapter and USB sync cable provided with your device must be used to
charge the device.
Charging is indicated by a “breathing” white light around the Navigation Control. As
the battery is being charged while the power is on, a charging icon also appears
in the title bar of the Home screen. After the battery has been fully charged,
the Navigation Control LED shows a solid white light and a full battery icon
appears in the title bar of the Home screen.
For more information about the Navigation Control LED, see “LED Alerts” in this
chapter.
Warning! • Do not remove the battery from the device while you are charging it using
the AC or car adapter.
• As a safety precaution, the battery stops charging when it overheats.
Page 33

1.4 Using the Strap Holder
The strap holder at the bottom panel of your device allows you to attach a wrist
strap, neck lanyard, or string accessory.
To attach a strap, lanyard or string accessory to the strap holder
1. Remove the back cover.
2. Insert the loop of the strap, lanyard
or string accessory through the
strap holder hole on the back
cover.
Tip To pass through the strap
holder hole easier, push the
loop into the strap holder hole
using a pointed object such as a
needle or toothpick.
3. Attach the loop over the small
T-shaped hook at the bottom of
the device.
4. Secure the strap, lanyard or string
string accessory on the T-shaped
hook as shown in the illustration
on the right.
5. Replace the back cover.
Getting Started 33
Page 34

34 Getting Started
1.5 Starting Up
After installing your SIM card and battery and charging the battery, you can now
power on and start using your device.
Turn your device on and off
To turn on the power
Press and hold the POWER button for a few seconds.
1.
When you turn on your device for the first time, a Quick Start Wizard guides
2.
you to set up regional settings, date and time, and password. For more
information about these settings, see Chapter 13. After the Quick Start Wizard
finishes, the device installs customization settings, then restarts.
Note After the device restarts, you may be prompted to set up an e-mail account. For
instructions on how to set up an e-mail account, see Chapter 6.
To turn off the power
Press and hold the POWER button for a few seconds.
1.
Tap Yes when a message prompts you to choose whether or not to turn off
2.
the device completely.
Page 35

Getting Started 35
Auto configure the data connection settings
The first time you power on your device, you will
see a notification message from Connection
Setup. Connection Setup automatically configures
your device’s data connections, such as 3G/GPRS,
WAP, and MMS, so that you do not need to enter
the settings manually for your device.
To automatically configure data connection
settings
1. When you see the notification message from
the Connection Setup, tap Yes.
Note If you do not see the notification message, tap the title bar to display the System
Status screen, then tap on the title bar to display the message.
2. If your SIM card supports multiple network operator profiles, a message will
appear with network profile choices. Select the profile you want to use and
tap OK.
3. Connection Setup then starts to configure your device’s data connection
settings.
4. After the Connection Setup completes the configuration, tap Restart.
For more information about Connection Setup, see Chapter 13.
Switch to Sleep mode when not in use
Press and immediately release the POWER button to turn off the display temporarily
and switch your device to Sleep mode. Sleep mode suspends your device to a low
power state while the display is off in order to save battery power.
Your device automatically goes into Sleep mode when you leave the device idle
after a certain period of time. You will still be able to receive messages and calls
while your device is in Sleep mode. Pressing the POWER button again, removing
the stylus, or incoming calls/messages will wake up your device.
Page 36

36 Getting Started
1.6 Navigating Your Device
There are different ways you can navigate and interact with the interface of your
device.
Finger-touch control
A quick and easy way to interact with the home screen and the whole interface
of your device is by touch. Basically, the following are the types of actions, called
finger gestures, you would use when interacting with your device:
Touch or tap
When selecting items on the screen, such as the Home screen tabs, Start menu,
programs and settings icons, and large on-screen buttons, simply touch them with
your finger. Apply some pressure with your finger pad when touching an item on
the screen.
Tapping means to touch lightly and quickly with your finger pad or fingertip. On
screens that display smaller-size items, you can more accurately select an item by
tapping it with your fingertip.
Swipe
To swipe means to drag your finger vertically or horizontally across the screen. The
following are some instances when you would use swiping:
Flipping on the Home screen
•
Swipe your finger vertically to flip through favorite contacts, messages, music
albums, photos, and more. For more information, see “Using the TouchFLO 3D
Home Screen” in Chapter 3.
Scrolling
•
When browsing the contacts list, web pages, documents, and certain
selection lists on the Home screen (such as the All Programs list), slowly
swipe your finger vertically across the screen to scroll. This allows you to scroll
by page and to view the content or available selections as you scroll.
Page 37

Getting Started 37
The direction of swiping resembles the way you move a printed document as
you are reading it. For detailed instructions, see “Finger scrolling” in Chapter 3.
Slide
Sliding on the touch screen also involves dragging with your finger, but you need
to press and hold your finger with some pressure before you start to drag. While
dragging, do not release your finger until you have reached the target position.
The following are some instances when you would use sliding:
Switching between Home screen tabs
•
Slide your finger left and right to switch between the Home screen tabs. For
more information, see “Using the TouchFLO 3D Home screen“ in Chapter 3.
Advancing playback
•
In players that have a progress bar, such as the Home screen’s Music tab
and Windows Media® Player Mobile, slide your finger horizontally on their
progress bar to advance forward or move backward in the music or video you
are playing.
For more information about the Home screen’s Music tab, see “Music” in
Chapter 3.
For more information about Windows Media® Player Mobile, see “Using
Windows Media® Player Mobile” in Chapter 11.
Flick
Flicking the screen is similar to swiping, except that you need to swipe your finger
in light, quicker strokes. This finger gesture is always in a vertical direction, such as
when flicking the contacts list. See “Finger scrolling” in Chapter 3 for details.
Finger zooming and panning
In programs such as Album and Opera Mobile, you can use finger gestures when
zooming and panning. See Chapter 3, 8 and 11 for details.
Page 38

38 Getting Started
Stylus
You can use the stylus to navigate and interact
with the touch screen. To use the stylus, pull it
out from the stylus compartment at the bottom
of the right panel of your device. If the backlight
is off, removing the stylus automatically turns the
backlight back on.
The stylus is magnetic and sticks to the side when held close to the device. This
prevents you from accidentally losing or misplacing the stylus.
Basically, you tap with the stylus to open programs and select items on the screen,
and you tap and hold on the screen to open a shortcut menu. You can also use the
stylus the same way as what you do with finger gestures, such as swiping, sliding
and flicking on the screen.
Navigation Control
On the home screen and in many programs on your device, you can use the
Navigation Control for directional control. Press the directional arrows to navigate
up, down, left, and right on the screen. When an item has been selected on the
screen, press the ENTER button (the center button) to confirm your selection.
Page 39
Getting Started 39
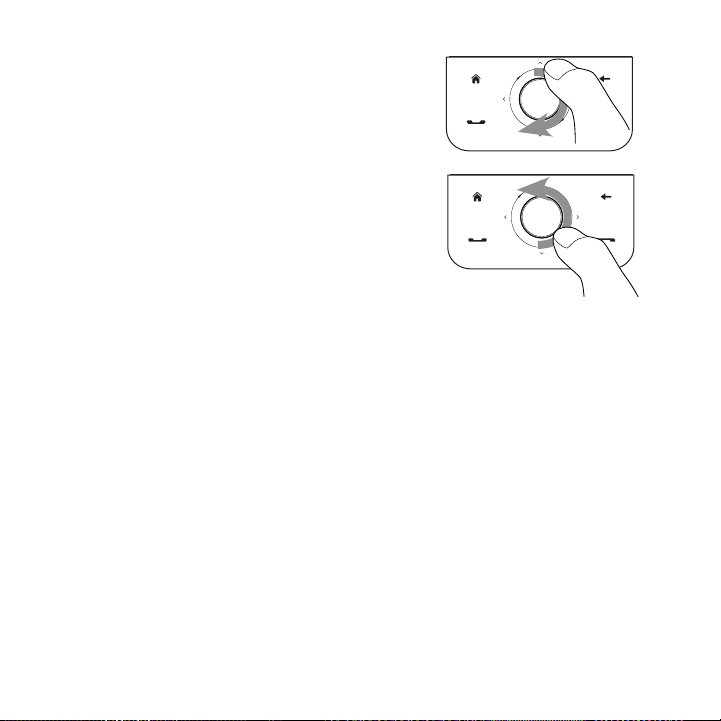
The Navigation Control is also touch sensitive
and can be used for zooming. Slide your finger
clockwise around the Navigation Control to
zoom in, counterclockwise to zoom out.
The following programs allow you to use the
Navigation Control for zooming:
Album
•
Camera
•
Opera Mobile
•
Word Mobile and Excel Mobile
•
Tip If you purchase and install GPS navigation software on your device, you can also use
the Navigation Control for zooming in the GPS software.
Sliding your finger clockwise
Sliding your finger
counterclockwise
On the Home screen’s Music tab, you can advance forward in the music you are
playing by sliding clockwise around the Navigation Control. To move backward in
the music, slide counterclockwise. See “Music” in Chapter 3 for details.
Page 40

40 Getting Started
1.7 Home Screen
The default home screen of the device is the TouchFLO™ 3D Home screen which
allows finger-touch access to the most important functions such as contacts, text
messages, e-mail, Internet, and more.
For more information about using the TouchFLO 3D Home screen, see Chapter 3.
Connection status
Start menu
TouchFLO 3D
Home screen
Open the Phone screen
(See Chapter 2 for details)
Signal strength
Notification
Adjust volume
Battery status
Quick menu
Go to the Programs tab to
access favorite programs
Page 41
Getting Started 41
Tasks screen
When you open the hardware keyboard
while on the Home screen, a screen is
shown letting you quickly start a task
such as writing an e-mail or SMS message,
creating a new appointment, opening the
web browser, and more.
Note If you do not have an e-mail account set up on your device, the E-mail setup wizard
will open when you tap Email.
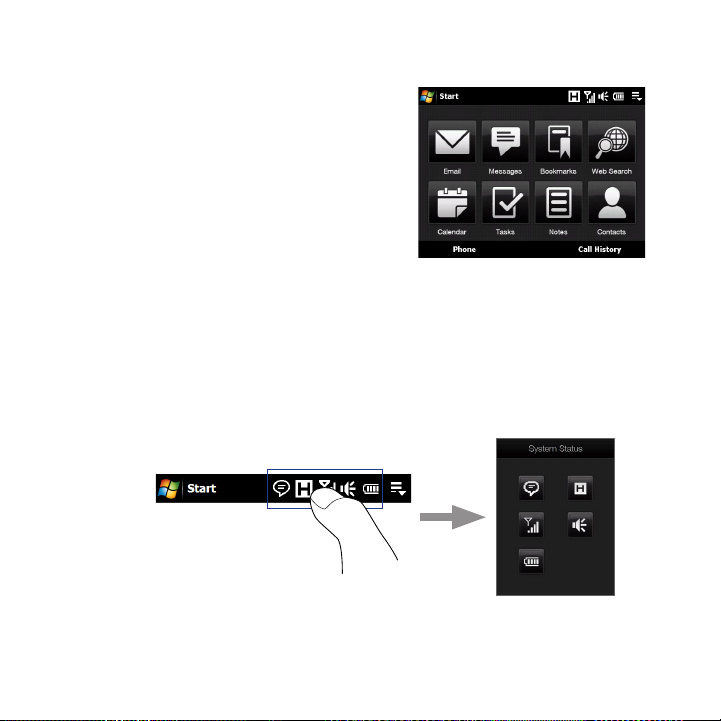
1.8 Status Icons
When you touch or tap the icon area of the title bar, the System Status screen opens
and displays larger status icons so you can touch them with your finger more easily
and accurately.
Tip The System Status screen can be disabled in TouchFLO settings. See “Settings on your
Device” in Chapter 13 for details.
Page 42
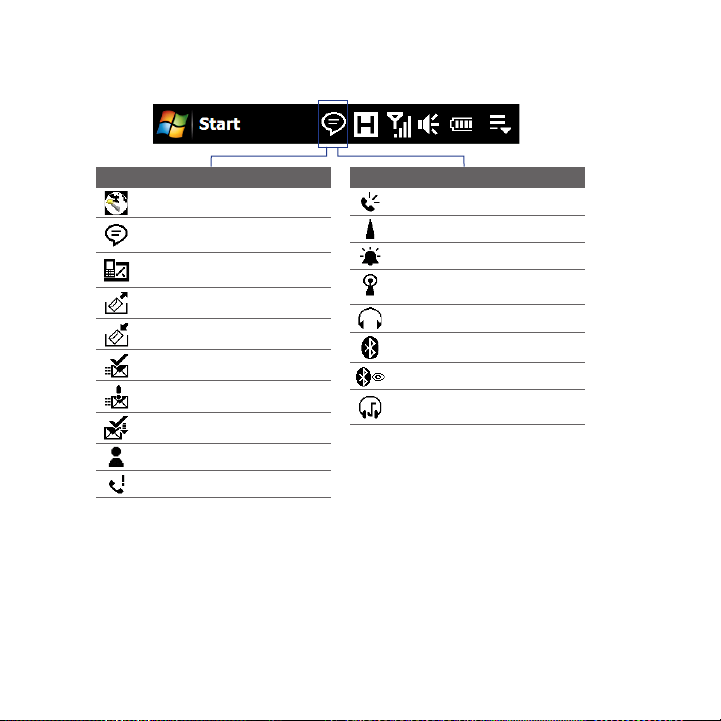
42 Getting Started
The following are some of the status icons that you may see on the device.
Icons that appear in this area
Connection Setup
Multiple notifications; tap the
icon to view all
New text messages;
SMS notification of voice mail
Sending MMS
Receiving MMS
MMS sent
Cannot send MMS
New incoming MMS
New Windows Live™ message
Missed call
Icons that appear in this area
Speakerphone on
Roaming
Alarm
Other wireless network(s)
detected
Wired headset connected
Bluetooth on
Bluetooth visible mode on
Bluetooth stereo headset
connected
Page 43

Icons that appear in this area
GPRS available
EDGE available
HSPA available
WCDMA/UMTS available
Connected to a wireless network
Connection is active
Connection is not active
Synchronization in progress
Getting Started 43
Page 44

44 Getting Started
Icons that appear in this area
GPRS connecting
GPRS in use
EDGE connecting
EDGE in use
HSPA connecting
HSPA in use
WCDMA/UMTS connecting
WCDMA/UMTS in use
Maximum signal strength
No signal
Phone is turned off
No phone service
Searching for phone service
Voice call in progress
Call on hold
Calls are forwarded
Dialing while no SIM card is inserted
No SIM card inserted
Icons that appear in this area
Vibrate mode
Sound on
Sound off
Icons that appear in this area
Battery charging
Battery full
Battery low
Page 45

Getting Started 45
1.9 Start Menu
The Start menu, which can be opened from the top left corner of the screen, gives
you access to all the programs and settings of your Windows Mobile-powered
device. Touch or tap to select an item on the Start menu.
Open the Start menu.
Open a recently-used program.
When you are on another
screen, touch or tap this item
to return to the TouchFLO 3D
Home screen.
Open a program.
Access more programs.
View and change settings.
View Help information for the
current screen.
By default, the Start menu is displayed in a large size to make it easier for you to
touch menu items with your finger when selecting them from the Start menu. The
Start menu can also be displayed in a smaller size, if preferred. Tap Start >
Settings > System tab > TouchFLO and then clear the Enable large Start menu
check box to display a smaller Start menu.
Page 46

46 Getting Started
1.10 Quick Menu
The Quick menu, which can be opened from the top right corner of the screen,
shows the currently running programs. You can quickly switch between running
programs, stop programs, and see how much program memory is being used.
Customize Task Manager settings.
(See “Using Task Manager” in
Chapter 13
Stop all
currently
running
programs.
.)
Touch this icon to open
the Quick Menu.
Shows the total percentage
of program memory in use.
Touch to open the Memory
settings screen.
• To switch to a running
program, touch the
program name.
• To stop a running
program, touch .
Page 47

1.11 LED Alerts
The buttons below the touch screen and the exterior edge of the Navigation
Control which is an LED ring will light up in the following situations:
Controls Light Behavior
SEND button Light flashes when there is an incoming call.
END button Light stays solid when there is an incoming call.
Navigation Control The LED ring shows a “breathing” white light when the battery is
The LED ring, HOME, BACK, SEND, and END buttons will flash a white light once
when one of the buttons or Navigation Control is pressed.
•
being charged.
The LED ring shows a solid white light when the battery is fully
•
charged.
The LED ring flashes a white light once when the battery level is
•
low and reaches down to about 10%.
The top and bottom parts of the LED ring flashes a white light
•
twice when there is a new e-mail, voice mail, or meeting reminder.
A white light goes around the LED ring counterclockwise twice
•
starting from the top when there is a missed call or new SMS or
MMS message.
Getting Started 47
Page 48

48 Getting Started
1.12 Adjusting the Volume
Adjusting the system volume changes the volume level of sound notifications and
audio/video playback, whereas adjusting the ring volume affects only the volume
of the phone ring. The system volume and ring volume can be separately adjusted.
1. Touch the icon area in the title bar and then touch the Speaker icon ( ) on
the System Status screen.
2. To switch between the Ring Volume and System Volume screens, touch
Ring or System on top of the screen.
3. On either screen, you can do the following:
• To increase or decrease the volume level, drag your finger up or down the
volume bars. You can also press the VOLUME UP/DOWN buttons on the
left panel of your device.
Volume
bars
• Touch Vibrate to switch both System and Ring to Vibrate mode.
• Touch Silent to mute both the system and ring volume.
4. The System Volume or Ring Volume screen automatically closes. You can also
manually close the screen by touching the screen.
Page 49

Getting Started 49
Note On certain screens that do not show the volume status icon on the title bar, you need
to use the VOLUME UP/DOWN buttons on the left panel of your device to adjust the
volume. Also use these buttons to adjust the conversation phone volume during an
ongoing call.
1.13 Using your Device as a USB Drive
To easily carry media and other files with you, you can use your device’s storage
card as a USB flash drive. Touch Start > Settings > Connections tab > USB to PC
and then select Disk Drive mode. This allows you to copy files from your computer
to the device’s storage card and vice versa faster.
Note You need to have a storage card installed on your device to be able to use your device
as a disk drive.
When Disk Drive mode is used:
You will not be able to use your device to access files from the storage card
•
or run applications that are installed on the storage card while the device is
connected to your PC.
Your PC will only connect to the device’s storage card. When you access your
•
device from the PC, you will only see the contents of the device’s storage card.
Remember to change back to ActiveSync mode when you need to synchronize
data between your device and your PC.
Page 50

50 Getting Started
Page 51

Chapter 2
Using Phone Features
2.1 Using the Phone
2.2 Voice Call
2.3 Video Call
2.4 Smart Dial
2.5 Setting Up Bluetooth SIM Access for Car Kit Phones
Page 52

52 Using Phone Features
2.1 Using the Phone
Like a standard mobile phone, you can use your device to make, receive, and keep
track of calls and send messages.
The Phone screen
To open the Phone screen, do one of the following:
• On the Home screen, tap
Phone.
• Press the TALK/SEND button.TALK/SEND button.
Enter your PIN
Most SIM cards are preset with a PIN (personal identification number) that is
provided by your wireless service provider.
1. Enter the preset PIN assigned by your wireless service provider.
2. Tap Enter.
Note If you entered the wrong PIN three times, the SIM card will be blocked. If this happens,
you can unblock it with the PUK (PIN Unblocking Key) obtained from your wireless
service provider.
TALK/SEND
button
Page 53

Using Phone Features 53
2.2 Voice Call
Make a call
To make a call from the Phone screen
1. On the Home screen, tap Phone.
2. Tap the keys on the keypad to enter the
phone number.
Tip If you tapped a wrong number, tap to
erase each subsequent digit of a number. To
erase the entire number, tap and hold .
3. Press the TALK/SEND button to place the call.TALK/SEND button to place the call.
Tip When in a call, use the VOLUME UP/DOWN
buttons on the side of the device to adjust
the phone volume.
Note After tapping 6 keys and the number you are dialing is not in your contacts, a Save
to Contacts? button will appear above the keypad. Tap it to save the number to your
Contacts.
To make a call from Contacts
On the Home screen, tap Start > Contacts to open the Contacts screen.
Do one of the following:
• Select the contact to call and then press TALK/SEND.
Note If the contact has more than one number stored, press NAVIGATION Right/Left to
select the number you want to call before pressing TALK/SEND.
• Tap the contact to open the contact details and then tap the phone number
you want to call.
• Tap and hold the contact you want to call and then from the menu, select
Call Work, Call Home, or Call Mobile.
Page 54

54 Using Phone Features
To make a call from the TouchFLO 3D Home screen
Refer to Chapter 3 to learn how to make a call from the TouchFLO 3D Home screen.
To make an emergency call
Enter the international emergency number for your locale, and press the TALK/
SEND button on your device.
Tip Additional emergency numbers may be included in your SIM card. Contact your
wireless service provider for details.
To make an international call
1. Tap and hold the number 0 key on the Phone screen until the plus (+) sign
appears.
The plus (+) sign replaces the international prefix of the country that you are
calling.
2. Enter the full phone number you want to dial, and press the TALK/SEND
button on your device. The full phone number includes the country code,
area code (without the leading zero, if any), and phone number.
To call voice mail
Number 1 is generally reserved for your voice mail. Tap and hold this button on the
Phone screen keypad to call voice mail and retrieve your voice mail messages.
Answer a call
When you receive a phone call, a message will appear, giving you the option to
either answer or ignore the incoming call. The TALK/SEND button will also flash
when you receive a call.
Page 55

Using Phone Features 55
To answer or reject an incoming call
• To answer the call, tap Answer, or press the TALK/SEND button.
• To reject the call, tap Ignore, or press the END button.
• To mute the ringing sound without rejecting the call, tap Mute Ring.
Tip You can also place your phone face down on a table to mute the ring without
rejecting the call.
To reject a call and send a text message
When you reject a call, you can choose to automatically send a text message to the
mobile phone of the caller.
1. On the Phone screen, tap Menu > Options > Advanced tab.
2. Select the Reject call with text message check box.
3. Change the default text message if needed, then tap OK.
When Reject call with text message is enabled, tap Send Text to reject the call
and send the text message to the caller.
Page 56

56 Using Phone Features
To put a call on hold
Your device notifies you when you have another incoming call, and gives you the
option of rejecting or accepting the call. If you are already on a call and accept the
new call, you can choose to switch between the two callers, or set up a conference
call between all three parties.
1. Tap Answer to take the second call, and put the first one on hold.
2. To end the second call and return to the first call, tap End Call or press END
on your device.
To switch between two calls
During a call, tap .
To set up a conference call
1. Either put a call on hold, and dial a second number; or, accept a second
incoming call when you already have one in progress.
Tip To dial a second number, tap on the screen.
2. Tap .
Note Not all mobile phone networks support conference calling. Contact your wireless
service provider for details.
To turn on and off the Speakerphone
During a call, tap to toggle between turning on or off the speakerphone. The
speakerphone icon
Tip You can also press and hold TALK/SEND to toggle between turning on or off the
speakerphone.
Warning! To avoid damage to your hearing, do not hold your device against your ear when
the Speakerphone is turned on.
appears in the title bar when the speakerphone is on.
Page 57

Using Phone Features 57
To mute the microphone during a call
Tap to toggle between turning on or off the microphone. When the
microphone is turned off, the mute icon appears on the screen.
To open Notes while in a call
Tap or pull out the stylus.
To vibrate the device when the call is established
You can set the device to vibrate once to alert you that the call has been established
with the other party.
1. On the Phone screen, tap Menu > Options >Advanced tab.
2. Select the Vibrate device when connection is established check box and
then tap OK.
End a call
When a call is in progress, tap End Call or press the END button to hang up.
To add a new phone number to Contacts after a call
If the phone number of the person who called is not in Contacts, you can choose to
save the number after you hang up.
1. On the Phone screen, tap Menu > Options > Advanced tab.
2. Select the Add new phone number to Contacts at end of call check box,
then tap OK.
When you enable this option, a pop-up message appears after you end the phone
call and lets you add the phone number to Contacts.
Page 58

58 Using Phone Features
To check a missed call
You will see the icon in the title bar when you missed a call. To check who the
caller was, do one of the following:
• Tap the title bar, then tap and then tap View.
• On the Phone screen, tap Menu > Call History and then tap .
Call History
Use Call History to check for missed calls, dialed numbers, and calls received. To
open the Call History screen, tap Menu > Call History on the Phone screen.
Speed Dial
Use Speed Dial to call frequently-used numbers with a single tap. For example,
if you assign a contact to the location 2 in Speed Dial, you can tap and hold the
number 2 key on the Phone screen keypad to dial the contact’s number.
To create a Speed Dial entry
1. On the Phone screen, tap Menu > Speed Dial.
2. Tap Menu > New.
3. Tap a contact, then select the phone number of the contact that you want
assigned to the speed dial key.
4. In Location, select an available key to use as the speed dial key.
5. Tap OK.
Tips • To create a Speed Dial entry from Contacts or SIM card contacts, tap the contact,
• To delete a Speed Dial entry, in the Speed Dial list, tap and hold the desired entry,
select the number you want to add to Speed Dial, then tap Menu > Add to Speed
Dial.
then tap Delete.
Page 59

Using Phone Features 59
Turn the phone function on and off
In many countries, you are required by law to turn off the phone while on board an
aircraft.
To enable or disable the phone function
1. Tap Start > Programs > Comm Manager.
2. On the Comm Manager screen, tap the Phone button to enable or disable
the phone function. When enabled, the ON indicator is activated.
To enable or disable Airplane Mode
Another way to turn off the phone function is to switch your device to Airplane
Mode.
When you enable Airplane Mode, all wireless radios on your device are turned off,
including the phone function, Bluetooth, and Wi-Fi.
When you disable Airplane Mode, the phone function is turned back on and the
previous state of Bluetooth and Wi-Fi are restored.
1. Tap Start > Programs > Comm Manager.
2. On the Comm Manager screen, tap the Airplane Mode button to enable or
disable Airplane Mode. When enabled, the ON indicator is activated.
Page 60

60 Using Phone Features
2.3 Video Call
Your device lets you make video calls when you are within a 3G network coverage
area. You need to use a 3G-enabled SIM card to make video calls.
Make a video call
Do one of the following:
• On the Phone keypad, tap the phone number to call, then tap Menu > Video
Call to start a video call.
• From Contacts, tap and hold the desired contact, and tap Video Call.
• From Call History, tap and hold the desired phone number or contact, and tap
Video Call.
Note The other party’s image will appear on the screen about 3 to 5 seconds after a
connection is established, depending on the signal strength. The streaming images
quality may also be influenced by the signal.
When the video call is unsuccessful, a message pops up asking you if you want to
try again, make a voice call instead, or send an SMS/MMS message.
Answer a video call
To answer or reject an incoming video call
• To answer the video call, tap Answer, or press TALK/SEND on your device.
• To reject the video call, tap Ignore, or press END on your device.
• To mute the ringing sound without rejecting the call, tap Mute Ring.
When Reject call with text message is enabled in Phone settings, tap Send Text to
reject the call and send the text message to the caller.
Tip You can also place your phone face down on a table to mute the ring without
rejecting the call.
Page 61

Using Phone Features 61
End a video call
Once a video call is in progress, tap End Call to hang up.
Change settings
While on a video call, you can change certain settings such as the size of the image,
brightness of the video image, the camera to use, and more.
The following shows the Video Call screen and control buttons during an ongoing
call.
1 Image display area. Displays your image
and the other party's image, depending
5
1
2
4
3
on the selected Swap View setting.
2 Camera. Tap to toggle between turning
on/off the camera. When the camera is
turned off, the image displayed depends
on the Video Call options you have set.
See “Video call options” for details.
3 Main/Second. Tap to toggle between
using the Main (back) and Second (front)
camera.
4 Swap View. Tap to toggle between the 2
view options. You can choose to have the
other party’s image small or large.
5 Status area. Displays phone number or
contact name and call timer.
Page 62

62 Using Phone Features
Brightness
To adjust the brightness of the live image,
press NAVIGATION Right to make it brighter or
press NAVIGATION Left to make it less bright.
When you press NAVIGATION Left or Right
during a video call, a brightness bar appears
on the screen.
Notes • You can also tap Menu > Brightness to
adjust the brightness of the live image.
• You cannot adjust the brightness for a
still image.
Brightness bar
Video call options
On the Phone screen, or on the screen of the ongoing video call, you can also tap
Menu > Video Call Options and set the following options:
Video Call Options: Services tabVideo Call Options: General tab
Page 63

Using Phone Features 63
General tab
• Show still image. Select the image you want to display when you turn off the
camera.
• Preset (female). Displays a female picture in place of your image.
• Preset (male). Displays a male picture in place of your image.
• Custom image. Lets you use an image file as your display picture. WhenWhen
this option is selected, the is selected, the, the File Name box and the Browse button will be
enabled, allowing you to select an image file., allowing you to select an image file.
• Last video frame. Uses the last video frame before you stopped the
camera as your display image.
• Video screen preference. Change how your image and the other party’s
image are displayed on the screen, select your preference from the Video
screen preference list or tap the View button on the Video Call screen.
• Camera options:
• Flip the 2nd camera video. Select this check box if you are going to show
a text document to the other party using the second camera.
• Switch camera off when answering video call. Select this check box
to not send a video feed of yourself to the other party when answering
a video call. Instead, the option you selected in Show still image will be
displayed.
• Switch camera off when making video call. Select this check box to not
send a video feed of yourself to the other party when making a video call.
Instead, the option you selected in Show still image will be displayed.
• Display info:
• Show call timer. Select this check box to display the call period in the
status area.
• Show phone number or name. Select this check box to display the other
party’s phone number or name in the status area.
Page 64

64 Using Phone Features
Services tab
To set up further calling options for Video Call, tap the Services tab. On the Services
screen, select the desired service from the list, then tap Get Settings to access its
settings.
2.4 Smart Dial
Smart Dial makes it easy for you to dial a
phone number.
When you start entering a phone number
or contact name, Smart Dial automatically
searches and sorts the contact entries on
the SIM card, in Contacts, and the phone
numbers in Call History (including incoming,
outgoing, and missed calls). You can then
select the desired number or contact from
the filtered list to dial.
To find a contact name or number
You can just enter the first letter of the name or number of a contact. Smart Dial will
search for contact phone numbers and the first character of a contact name as well
as from the character that appears after a space, dash, or underscore in a contact
name. For example, if you tap number “2” on the phone keypad, which is associated
with [a, b, and c] on the Phone keypad, contact names such as the following will
be considered matches: “Ben Miller”, “George Adams”, “John-Carter”, “Carter, Ellen”,
“Dixon, Allan”, “Thomas_Clark”, “JaneCampbell”.
Smart Dial
panel
Page 65

Using Phone Features 65
If the matching list is long and you want to narrow down the search further, enter
another letter. Using the same example above, if you continue to tap “3” which is
associated with [d, e, f], the matching list will be narrowed down to the following
names: “Ben Miller”, “George Adams”, “Carter, Ellen”, “Dixon, Allan”.
Make a call or send a text message using Smart Dial
1. On the Home screen, tap Phone.
2. Begin entering the first few numbers or characters.
When you start entering a number or letter, the Smart Dial panel will display
matches found.
Tip Tap to close the phone keypad and to see if there are more matching contacts.
3. In the Smart Dial panel, flick and slide your finger on the touch screen or
press NAVIGATION Up/Down to browse the list or select a contact.
4. You can do one of the following:
• Tap the contact to call the selected contact.
• To send a text message to the selected contact, tap Menu > Send Text
Message.
• To call a different phone number associated with the selected contact,
select the contact and then press NAVIGATION Left/Right to select the
number to call.
Page 66

66 Using Phone Features
2.5 Setting Up Bluetooth SIM Access for Car Kit Phones
Bluetooth car kits that support the SIM Access Profile (SAP) can connect to your
device and access its SIM card via Bluetooth. Once a SAP connection has been
established, you can download SIM contacts from your device to the car kit phone.
You can also use the car kit phone to answer and make calls using your device’s SIM
card.
Note To enable downloading contacts onto the car kit, ensure that all contacts on the
device are stored in the SIM card and not in the device memory. Configure the car kit
to download contacts only from the SIM card.
1. On your device, make sure that Bluetooth is turned on and set to visible
mode. For information about turning on Bluetooth and enabling visible
mode, see “Bluetooth Modes” in Chapter 9.
2. On the Home screen, slide to the Settings tab and then tap Menu >
Bluetooth Devices > SIM Access tab.
3. Select the Remote SIM Access check box, then tap OK.
4. Connect the car kit phone to your device via Bluetooth. To learn how to
connect, consult your car kit phone’s manual.
5. If this is the first time you are pairing the car kit phone with your device, enter
the car kit’s passcode on your device.
6. A pop-up message should appear on your device saying that a connection
has been established between your device and car kit phone. Tap OK.
7. On the Bluetooth screen, tap the SIM Access tab, then tap Connect.
Note You will not be able to make/receive calls, send/receive messages or perform related
activities on your device when the SIM Access Profile connection is active. You’ll be
able to do all these from the car kit phone during this time. After the connection is
disconnected, you will be able to use your device as before.
Page 67

Chapter 3
TouchFLO™ 3D
3.1 About TouchFLO™ 3D
3.2 Using the TouchFLO 3D Home Screen
3.3 Finger Gestures
Page 68

68 TouchFLO™ 3D
3.1 About TouchFLO™ 3D
TouchFLO™ 3D gives you touch control over your Windows Mobile-powered
device. TouchFLO 3D provides the following features:
A Home screen that allows finger-touch access to the most widely-used
•
functions, such as People, Messages, Mail, Music, Internet, and more
•
Allows you to use finger gestures to navigate screens
3.2 Using the TouchFLO 3D Home Screen
The TouchFLO 3D Home screen have the following tabs:
Home
People
Messages
Mail
Internet
Photos and
Videos
Music
Weather
Programs
Settings
Page 69

TouchFLO™ 3D 69
To switch between the tabs of the Home screen
Do one of the following:
Touch or tap the desired tab on the Home screen.
•
Press NAVIGATION Right or Left to move to the next or previous tab.
•
Press and hold your finger on the active tab, then slide your finger right or left
•
over the tabs. Release when you have selected the desired tab.
Note Apply some pressure when pressing and holding on the active tab to be able to
slide over the tabs.
Page 70

70 TouchFLO™ 3D
Swipe left across the screen to move to the next tab, and swipe right across
•
the screen to move to the previous tab.
Home
The Home tab displays the current date, a flip-style clock, and an Alarm icon that
indicates whether the alarm is on or off. Missed calls and your upcoming calendar
appointments are also shown on the Home tab.
To select an item on the Home tab
Touch the item; or
•
Press NAVIGATION Up or Down first to navigate to the item you want to select
•
and then press ENTER.
Page 71

Touch the date or the flip
clock to open the Clock &
Alarms screen where you
can set the date, time, and
alarm.
(See Chapter 13 for details.)
Touch this area to view
details about missed calls
in the Call History.
(See Chapter 2 for details.)
One all-day appointment
and up to two timed
appointments can be
displayed. Touch this area
to create, edit or view an
appointment.
(See “Calendar” in Chapter
12 for details.)
TouchFLO™ 3D 71
Swipe upward
on the screen to
display the smaller
digital clock
and view more
appointments.
Home tab with flip clock
Swipe downward
on the screen to
change back to
the flip clock.
Home tab with smaller digital clock
Page 72

72 TouchFLO™ 3D
People
On the People tab, you can add favorite contacts who you most frequently
communicate with. This allows you to quickly make calls, send text messages, and
send e-mails to your favorite contacts.
Tip You can add up to 15 favorite contacts on the People tab.
To add favorite contacts
You should already have created or synchronized contacts on your device before
you can add them to the People tab.
1. On the Home screen, slide your finger to the People tab.
2. Touch the small or big Plus icon, or touch Add Favorite.
3. On the Select a Contact screen, touch the name of the desired contact.
Tips • To create a new contact, touch Menu > New Contact. See “Contacts” in
Chapter 12 for details.
• SIM contacts cannot be added as favorite contacts.
4. Select a phone number or e-mail address to associate to the favorite contact.
Note If there is no picture associated with the contact, the next screen prompts you to
assign a picture to the contact.
Page 73

TouchFLO™ 3D 73
5. To add another favorite contact, touch the small Plus icon ( ) at the right
side of the screen and repeat steps 3 and 4.
To choose from your favorite contacts
Do any of the following:
•
To flip through the contact pictures one at a
time, swipe your finger up or down the screen.
You can also press NAVIGATION Up or Down to
flip through the contact pictures.
On the picture strip at the right side of the
People screen:
Touch the picture of the desired favorite
•
contact; or
Press and hold on the currently selected
•
contact picture to display a slide-out bar,
and then slide up or down the picture
strip. Release your finger when the
desired favorite contact is selected.
After selecting a favorite contact, touch the icon on the left side of the contact
•
name. The icon shown will depend on the contact information chosen for the
contact. For example, ( ) will be shown if a phone number is selected.
Page 74

74 TouchFLO™ 3D
Touch the picture of the contact on the center screen to access his or her
•
contact card. On the contact card, you will see the last outgoing or incoming
call as well as contact details such as phone numbers, e-mail address, and
more.
Tips • On the People tab, touch All People to access SIM contacts and all contacts that
• To remove the current favorite contact, touch Menu > Remove Favorite.
are stored on your device.
Messages
On the Messages tab, you can read SMS text messages as they arrive and create a
new SMS text message. You can also view the text of received MMS messages on
this tab.
When there are new incoming SMS/MMS messages, the icon on the Messages tab
will show the number of new messages. For example, indicates that there is a
new message received.
Touch this icon to create
a new SMS text message.
To view the entire
message thread from the
sender and reply, touch
the message on the
screen.
Touch All Messages to
access all text messages
in your inbox and other
folders.
To flip through received
SMS/MMS messages,
swipe your finger
upward/downward,
touch the Up/Down
arrow on the screen,
or press NAVIGATION
Up/Down.
Touch Menu to remove
the current message and
access more options.
Page 75

TouchFLO™ 3D 75
For more information about working with SMS and MMS messages, see “Text
Messages” and “MMS” in Chapter 6.
Mail
The Mail tab is where you send and receive e-mail messages. Including Outlook
E-mail, you can add up to four POP3/IMAP4 and web-based e-mail accounts in this
tab.
To add an e-mail account
1. On the Home screen, slide your finger to the Mail tab.
2. If this is your first time to add an e-mail account, touch New Account on the
bottom-right side of the screen.
3. Set up your e-mail account using the E-mail Setup wizard.
4. To add another e-mail account, touch Menu > Accounts > New Account and
use the E-mail Setup wizard to set up your account.
For detailed instructions on setting up e-mail accounts using the E-mail Setup
wizard, see Chapter 6.
To check e-mail
When there are new e-mails, the icon on the Mail tab and the respective icons of
the e-mail accounts will show the number of newly received messages.
Page 76
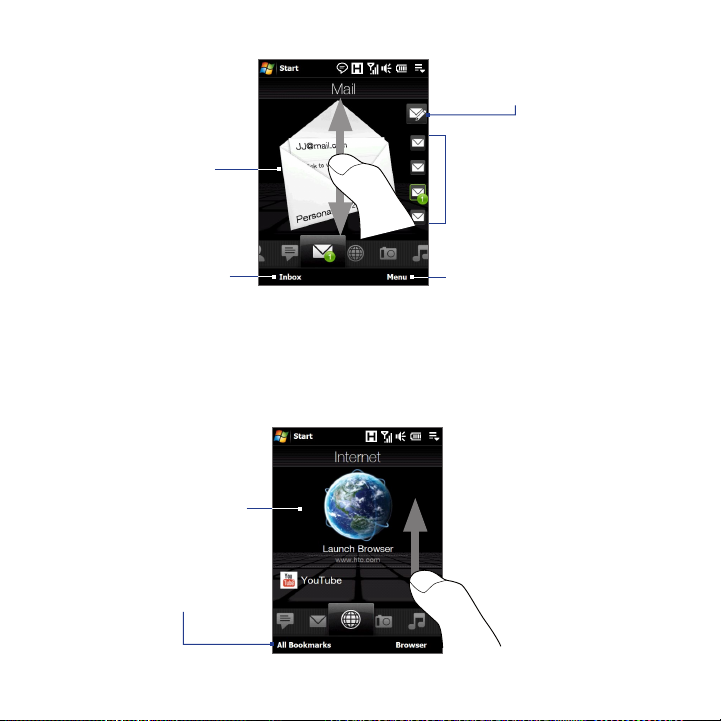
76 TouchFLO™ 3D
To browse through
•
received e-mails,
swipe up or down on
the envelope image
or press NAVIGATION
Up/Down.
Touch the e-mail
•
on the screen to
open and read the
message.
Touch Inbox to access
all e-mail messages of
the currently selected
account.
After selecting an e-mail account,
touch this icon to create and send
a new e-mail message.
These are your e-mail
accounts. Touch an
icon to select an e-mail
account and view the
new e-mails received in
that account.
Touch Menu to access
more options.
For more information about working with e-mails, see Chapter 6 and 7.
Internet
On the Internet tab, you can open Opera Mobile™ to browse the web and add web
favorites for one-touch access to your favorite web sites.
Touch here to browse the
web using Opera Mobile.
Touch All Bookmarks to
open Opera Mobile and add,
view or delete web favorites.
Swipe upward or press
NAVIGATION Down to
scroll down the screen
and access more web
favorites.
For more information about using Opera Mobile, see Chapter 8.
Page 77

TouchFLO™ 3D 77
Photos and Videos
The Photos and Videos tab lets you visually flip through your photos and video
clips and view them in full screen. From this tab, you can also activate the Camera
so you can take pictures and record video clips.
The Photos and Videos tab displays pictures and video files from the current
favorite album. By default, the Camera Shots album which stores the pictures and
videos that you captured using the device camera is set as the favorite. You can
change to another favorite album, if preferred.
To set an album as a Favorite
1. On the Photos and Videos tab, touch Album to open the Album program.
2. Touch Albums and then select one of the listed favorite albums.
3. Tap Menu > Set as Favorite. and then tap OK on the confirmation screen.
To view photos and videos
Touch here to take a
photo.
Touch here to shoot
Touch the photo or
video on the screen
to view or play it in
full screen.
Touch here to open
the Album program.
(See “Viewing Photos
and Videos Using
Album” in Chapter 11
for details.)
video.
To flip through photos and
videos, swipe upward/
downward, touch the
Up/Down arrow, or press
NAVIGATION Up/Down.
Touch Slideshow to
view the photos as a
slideshow. If a video is
selected, touch Play.
Tips • For more information about viewing in full screen, see “View an image” and “Play
back video” in Chapter 11. The file formats that can be viewed on the Photos and
Videos tab are the same as the Album program.
Page 78

78 TouchFLO™ 3D
• To transfer media files from a computer and view them on the Photos and Videos
tab, copy or synchronize them to a folder under \My Device (the device memory)
or \Storage Card (if a microSD card is installed).
Music
The Music tab allows you to visually browse through albums and music tracks and
play music. The albums and music tracks that you see on the Music tab are from the
Now Playing list of the Library.
Note Your device searches for all music files that have the following audio formats: AMR-
NB/WB (.awb), MP3 (.mp3), WMA (.wma), AAC/AAC+/eAAC+ (.aac), and MPEG-4 (.m4a).
It searches for music from the following locations:
Device: \My Music (including all subfolders)
\My Documents (including all subfolders)
Storage Card: \Storage Card (including all subfolders)
To play music
On the Music tab, flip through albums and all the music in each album, then touch
the Play icon on the middle-right side of the screen to start playback.
Swipe upward/
downward on the
screen or press
NAVIGATION Up/
Down to flip through
albums and the music
or songs in an album.
Touch here to
access the Library.
Touch here to go to the
previous album or the
previous music in the
current album.
Touch here to play or pause.
You can also press the ENTER
button to play or pause.
Touch here to go to the next
album or the next music in
the current album.
Touch Menu to set music
playback to Repeat, turn
Shuffle on or off, and more.
Page 79

TouchFLO™ 3D 79
To advance forward or backward in the music
Do one of the following:
Touch and hold on the thin bar below the album art to display the progress
•
bar:
Drag your finger right or left on the progress bar to move forward or
backward in the current music.
Slide your finger around the Navigation Control as follows:
•
Slide your finger clockwise to
advance forward in the music.
To move backward in the music,
slide your finger counterclockwise.
To set repeat and shuffle modes
Touch Menu > Repeat and choose whether to repeat once, repeat all, or do not
repeat. To toggle shuffle mode on and off, touch Menu > Shuffle and then select
Shuffle On or Shuffle Off.
The icons on the upper-right side of the Music tab show whether repeat and
shuffle modes are enabled.
Repeat [One] Repeat [All] Shuffle [On]
Page 80

80 TouchFLO™ 3D
To browse and play music in the Library
The Library organizes music into categories, such as Now Playing, Artists, Albums,
Genres, All Songs, and more. When you add more albums or music tracks to your
device, go to the Library to locate and play the new albums or music tracks.
On the Music tab, touch Library to open the Library screen.
1.
The tabs at the bottom of the Library screen correspond to the different
2.
categories. To browse music under a certain category, slide to the tab that
corresponds to the desired category.
Tap a music track to play it.
3.
Note When you select a category in the Library such as Artists and play its music, the Now
Playing list will be replaced with the music tracks from that category.
To use playlists
You can group your favorite music into a playlist and then play back the playlist.
To create a new playlist:
•
Select the desired music on the Music tab or the Library.
1.
Touch Menu > Add to Playlist.
2.
Touch <New Playlist>, enter a Playlist name and then touch OK.
3.
To add more music files to a playlist:
•
On the Playlists tab, touch a playlist to open it.
1.
Touch Menu > Edit.
2.
Touch Menu > Add.
3.
Select the check boxes of the music you want to add to the playlist, or
4.
touch Menu > Select All to choose all the music.
Touch OK three times and then touch Up to return to the Playlists tab.
5.
To play back a playlist:
•
On the Playlists tab, touch a playlist to open it.
1.
Page 81

TouchFLO™ 3D 81
Touch the first song in the playlist. The Music tab starts playing the first
2.
song. After each song, the next one in the playlist will be played.
Note Playlists are not automatically updated when music files have been deleted from
the device memory or storage card.
There are two types of playlists that can be shown on the Playlists tab:
Custom playlists. Playlists that are created on the Music tab.
•
Windows Media® Player playlists. Playlists that are in Windows Media®
•
Player Mobile’s Library (which is synchronized with Windows Media® Player
on your computer). They are indicated by the Windows Media® Player icon
( ). These playlists cannot be edited.
Custom playlists
Windows Media®
Player playlists
Note If a Windows Media® Player playlist contains a combination of music, video and image
files, only music files in the playlist will be synchronized to your device and other
media types will be filtered out.
Page 82

82 TouchFLO™ 3D
Weather
The Weather tab shows you the current weather as well as weather information for
the next five days of the week.
To add a city
The Weather tab can display weather information of your local city and other
added cities. Follow the steps below to add a city on this tab.
Tip You can add up to 10 cities on the Weather tab.
On the Weather tab, touch Menu > Add Location.
1.
The Select Country screen then appears. Flick your finger on the screen or use
2.
the Quick Scroll bar on the right of the screen to choose the country. You can
also slowly scroll through the country list by dragging your finger upward on
the screen. Touch the desired country to select it.
The Select City screen then appears. Flick your finger on the screen or use
3.
the Quick Scroll bar on the right of the screen to choose the city. You can
also slowly scroll through the city list by dragging your finger upward on the
screen. Touch the desired city to select it.
To view weather information
Your device automatically connects to the Internet via the 3G/GPRS/EDGE data
connection or Wi-Fi to download and display weather information. The current
temperature, temperature range, type of weather (sunny, cloudy, showers, or
others), and the time of day (daytime or nighttime) are shown on the Weather tab.
To see the weather information for the next five days of the week, touch 5-day at
the bottom-left side of the screen.
Page 83

Touch to see the
weather information
for the next five days
of the week.
To choose download options
1. On the Weather tab, touch Menu > Settings.
Tip You can also slide to the Settings tab and then touch Data.
2. You can choose from the following options:
Download weather automatically. When this option is selected, weather
•
information is automatically downloaded from the AccuWeather web site
whenever you select the Weather tab, if the data has not been updated
within the last three hours. Weather data is also downloaded every time
an ActiveSync connection is established (through over-the-air or USB
connections).
Clear this option if you prefer to manually download weather information.
Download weather when roaming. Select this option only if you want to
•
allow automatic download of weather data when roaming. This may incur
additional costs.
TouchFLO™ 3D 83
Shows the last weather
update. Touch this item
to download the latest
weather information.
To switch between
cities, swipe your finger
upward/downward, touch
the Up/Down arrow
on the screen, or press
NAVIGATION Up/Down.
Touch Menu to add or
delete a city, change the
temperature to Celsius or
Fahrenheit, and more.
Page 84
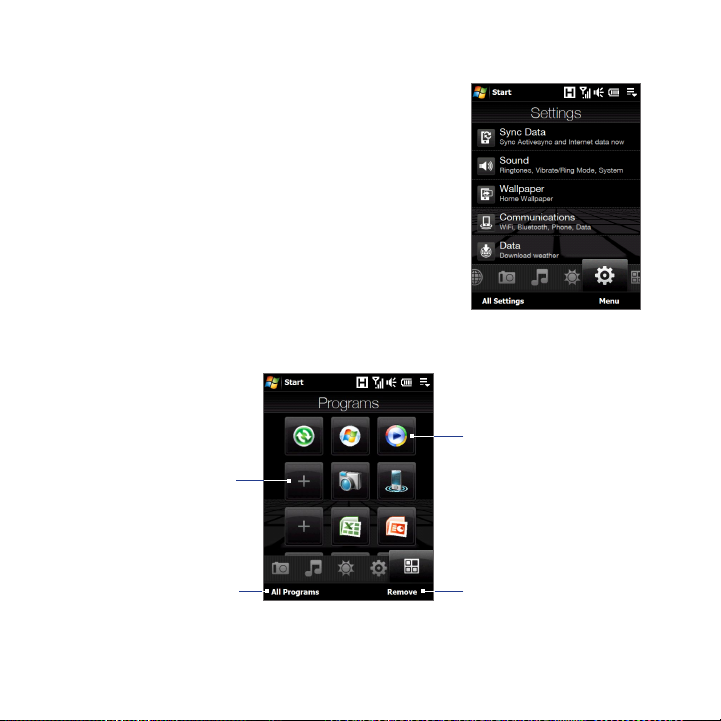
84 TouchFLO™ 3D
Settings
The Settings tab allows you to synchronize
information with your computer or the Exchange
Server, change sound settings such as the ring
tone, and choose a different wallpaper for the
Home tab. You can also easily turn on and off the
communications features of your device such as Wi-Fi,
Bluetooth, and more.
Programs
The Programs tab allows you to add your favorite programs for one-touch access.
Touch a program
icon to open the
corresponding
Touch an empty
slot to add a
favorite program.
Touch All Programs
to access all the
programs of your
device.
program.
Touch Remove to
choose which program
to remove from the
Programs tab.
Page 85

TouchFLO™ 3D 85
When you have filled up the screen with programs, scroll down the Programs tab
to access more empty slots and add more programs. To scroll down, press and hold
on the screen and then drag your finger upward. You can add up to 18 favorite
programs.
To scroll back up, press and hold on the screen and then drag your finger
downward.
Note To replace a slot with another program, you must delete the occupying program
shortcut first and then add your desired program.
3.3 Finger Gestures
You can use finger gestures to scroll, zoom and pan on the touch screen.
Finger scrolling
Finger scrolling can be used to scroll up and down web pages, documents, and lists
such as the contacts list, file list, message list, calendar appointments list, and more.
When finger
scrolling, swipe or
flick your finger on
the touch screen.
To scroll up and down
To scroll down, swipe your finger upward on the touch screen.
•
To scroll up, swipe your finger downward on the touch screen.
Page 86

86 TouchFLO™ 3D
To auto-scroll, flick your finger upward or downward on the touch screen.
•
Touch the screen to stop scrolling.
To scroll left and right
To scroll towards the right, swipe your finger to the left.
•
To scroll towards the left, swipe your finger to the right.
To auto-scroll, flick your finger left or right. Touch the screen to stop scrolling.
•
Finger zooming
The type of finger gesture to use when zooming varies in different programs.
To zoom in on a web page in Opera Mobile, tap your finger twice on the
•
screen. See “Using Opera Mobile” in Chapter 8 for details.
To zoom in on a photo in Album, make a full-circle swipe on the touch screen.
•
See “Viewing Photos and Videos Using Album” in Chapter 11 for details.
Finger panning
You can use finger panning to move to and view other
parts of a zoomed photo, web page, document, or an
e-mail. To pan, touch and hold on the touch screen
and then drag your finger in any direction.
Tip To enable or mute finger scrolling and panning
sound, touch Start > Settings > System tab >
TouchFLO, and then select or clear the Enable
sound when finger scrolling and panning check
box.
Page 87

Chapter 4
Entering Text
4.1 Entering Information
4.2 Using the Hardware Keyboard
4.3 Using the Full QWERTY
4.4 Using the Compact QWERTY
4.5 Using the Phone Keypad
4.6 Using Multitap and T9 Modes
4.7 Using Numeric and Symbol Mode
4.8 Using Block Recognizer
4.9 Using Letter Recognizer
4.10 Using Transcriber
Page 88

88 Entering Text
4.1 Entering Information
When you start a program or select a field that requires text or numbers, you can
either use the QWERTY keyboard or one of the on-screen input methods to enter
information.
QWERTY keyboard
Your device comes with a QWERTY keyboard,
which is similar to a standard keyboard on your
PC.
To use the keyboard, slide the screen panel
to the right to reveal the keyboard. The
screen orientation automatically switches to
landscape mode when the keyboard is opened.
On-screen input methods
When you start a program or select a field that requires text or numbers, the Input
Panel icon becomes available on the menu bar.
Tap the Input Selector arrow (that appears next to the Input Panel icon) to open a
menu where you can select a text input method and customize input options. After
selecting a text input method, the corresponding Input Panel is displayed, which
you can use to enter text.
Tip Select Other Input Methods to display more input methods.
To show or hide the Input Panel, tap the Input Panel icon.
Page 89

Input Panel
(Full QWERTY)
Key when
pressed
Input Panel icon
Input Selector
arrow
Text input methods
Icon Input method Icon Input method
Full QWERTY
Compact QWERTY Transcriber
Phone Keypad Keyboard
Letter Recognizer or
Block Recognizer
Entering Text 89
Notes • Some text input methods may not be available in certain language versions of the
• When in landscape mode, the Compact QWERTY and Phone Keypad are not
device.
available.
Page 90

90 Entering Text
4.2 Using the Hardware Keyboard
You can do the following with the hardware keyboard:
• To type lowercase letters and numbers, press the keys using your thumbs or
fingers.
• To use all uppercase letters, press . To change back to all lowercase letters,
press again.
• To use a single uppercase letter, press and then press the
corresponding key.
• To enter the symbol or punctuation mark, or launch the program that
is printed at the upper right corner of a key, press , then press the
corresponding key.
• To open the Symbol Pad, press .
• Press to insert a hard return while typing.
• Press the arrow keys / / / for directional movement.
Page 91
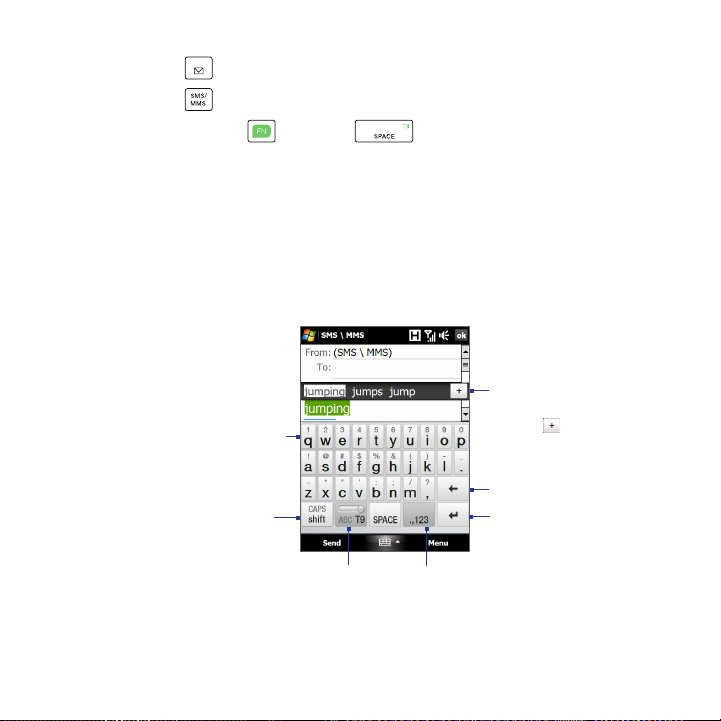
• Press to open the Messaging program.
• Press to open your SMS/MMS messaging account.
• Press and hold , then press to open the T9 menu.
4.3 Using the Full QWERTY
The Full QWERTY is a full on-screen QWERTY keyboard layout similar to a desktop
PC keyboard.
Tip You can also use the Windows Mobile on-screen keyboard which also has a QWERTY
keyboard layout by selecting Keyboard (or Other Input Methods > Keyboard) on
the Text input method menu.
• Tap to enter letters
or symbols.
• Tap and hold
to enter a
punctuation mark,
symbol, or number
that appears on
top of a key.
• Tap to enter an
uppercase letter.
• Tap twice to turn
on Caps Lock.
Tap to toggle between using Normal
or T9 mode.
Tap to open a keyboard layout
that lets you easily enter numbers
and symbols. See “Using Numeric
and Symbol Mode” for details.
Displays the word
candidate list in T9
mode. Tap a word
to insert it into your
text. Tap to add
a word to the T9
dictionary.
Tap to delete the
previous character.
Tap to create a
new line.
Entering Text 91
Page 92
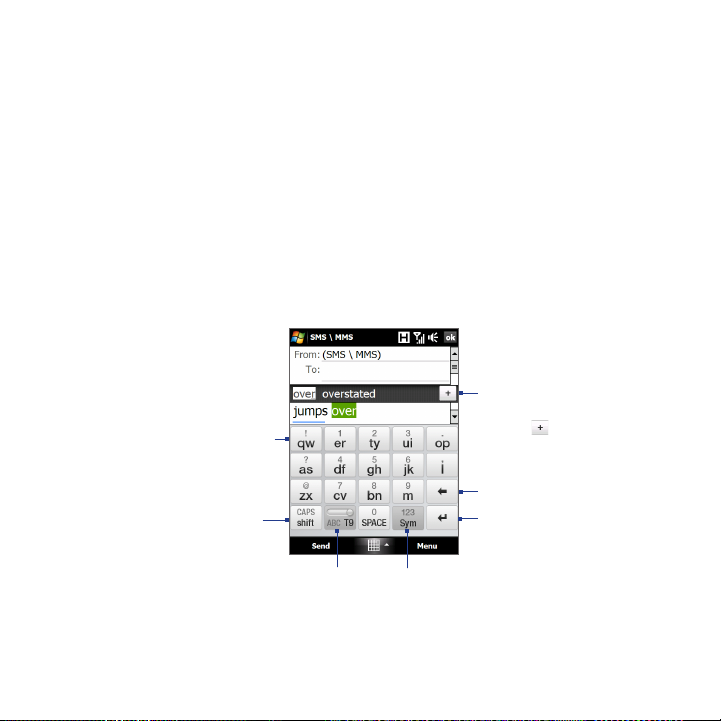
92 Entering Text
To enter text using the Full QWERTY
1. Start a program that accepts text input, such as Word Mobile.
2. Tap the Input Selector arrow, then tap Full QWERTY.
3. Start tapping keys on the keyboard as you would on a PC keyboard to enter
your text. To learn how to enter text using T9 mode, see “Using Multitap and
T9 Modes” in this chapter.
4.4 Using the Compact QWERTY
The Compact QWERTY is a type of on-screen keyboard which features 20 keys.
With its large, touch-friendly keys and enhanced features such as T9 predictive
input, you can enter text faster and more accurately.
• Tap to enter letters
or symbols.
• Tap and hold
to enter a
punctuation mark,
symbol, or number
that appears on
top of a key
• Tap to enter an
uppercase letter.
• Tap twice to turn
on Caps Lock.
Tap to toggle between using
Multitap or T9 mode.
Displays the word
candidate list in T9
mode. Tap a word
to insert it into your
text. Tap to add
a word to the T9
dictionary.
Tap to delete the
previous character.
Tap to create a
new line.
Tap to open a keyboard layout
that lets you easily enter numbers
and symbols. See “Using Numeric
and Symbol Mode” for details.
Page 93

Entering Text 93
Tip You can tap and hold to immediately open the numeric keyboard.
To enter text using the Compact QWERTY
1. Start a program that accepts text input, such as Word Mobile.
2. Tap the Input Selector arrow, then tap Compact QWERTY.
3. Start tapping keys on the keyboard to enter your text. To learn how to enter
text using Multitap or T9 mode, see “Using Multitap and T9 Modes” in this
chapter.
4.5 Using the Phone Keypad
The Phone Keypad is a 12-key on-screen keypad that has a layout similar to mobile
phone keypads, plus some additional keys. The Phone Keypad has large keys and
enhanced input features such as T9 predictive input, which makes it faster for you
to enter text in your messages and documents.
• Tap to enter letters
or symbols.
• Tap and hold
to enter a
punctuation mark,
symbol, or number
that appears on
top of a key
• Tap to enter an
uppercase letter.
• Tap twice to turn
on Caps Lock.
Tap to toggle between using Multitap
or T9 mode.
Tap to open a keyboard layout that lets
you easily enter numbers and symbols.
See “Using Numeric and Symbol Mode”
for details.
Displays the word
candidate list in T9 mode.
Tap a word to insert it
into your text. Tap
to add a word to the T9
dictionary.
Tap to open the input
settings.
Tap to delete the previous
character.
Tap to create a new line.
Page 94

94 Entering Text
Tip You can tap and hold to immediately open the numeric keyboard.
To enter text using the Phone Keypad
1. Start a program that accepts text input, such as Word Mobile.
2. Tap the Input Selector arrow, then tap Phone Keypad.
3. Start tapping keys on the keyboard to enter your text. To learn how to enter
text using Multitap or T9 mode, see “Using Multitap and T9 Modes” in this
chapter.
4.6 Using Multitap and T9 Modes
When using the on-screen keyboards, you can choose to enter text using Multitap
or T9 mode.
Multitap mode
In Multitap mode (for Compact QWERTY and Phone Keypad), enter a character by
tapping a key until the desired character is displayed on the screen.
• To enter the first letter that shows on a key, tap the key once. To enter the
second letter, tap twice.
• To enter a punctuation mark, symbol, or number that appears on top of a key,
tap and hold the key.
T9 mode
T9 is a predictive text input mode which displays a word candidate list as you enter
the first few characters so you just select the word that you want.
To enter text using T9 mode
1. Start entering the first few letters of a word. As you enter each letter,
predicted words will appear above the keyboard.
2. Tap the desired word to immediately insert it to your text.
Page 95

Entering Text 95
Note Navigate through the word candidate list if there are more words to choose from.
To add a word to the T9 dictionary
If the word that you have entered is not found in the dictionary, you can add it to
the dictionary.
1. While in T9 mode, type a letter and then tap on right side of the word
candidate list.
2. Type the word you want to add and then tap ADD.
Tap to not add the word.
To customize Touch Input settings
1. Tap the Input Selector arrow, then tap Touch Input Settings.
2. On the Touch Input Settings screen, select or clear the following options
according to your preferences:
• Spell Correction. Lets you correct typographical errors by selecting from
a list of possible words that reflect the characters of the keys you have
tapped as well as characters of nearby keys.
• Word Completion in T9 mode. Lets you select from a list of possible
words based on the keys that you have tapped and on the words available
in the dictionary.
• Word Completion in ABC mode. Lets you select from a list of possible
combinations based on the characters that appear on the keys that you
tapped.
• Auto-Substitution. Automatically inserts an apostrophe when you type
common contracted words (for example, “dont” automatically becomes
“don’t”).
3. Tap Done.
Page 96

96 Entering Text
4.7 Using Numeric and Symbol Mode
Switch to Numeric and Symbol mode to let you easily enter numbers and common
symbols such as parentheses, braces, currency signs, punctuation marks, special
characters, and more. Numeric and Symbol mode is available when using the Full
QWERTY, Compact QWERTY, and Phone Keypad.
Tap a number or symbol
to insert it into your text.
Tap to go to the previous
or next page of symbols.
See “To lock the keyboard in
Numeric and Symbol mode.”
Tap to switch to the
numeric keyboard
Compact QWERTY and
Phone Keypad
To switch to Numeric and Symbol mode
1. While using Full QWERTY, Compact QWERTY, or Phone Keypad, tap / .
2. Locate the number or symbol, then tap it to insert it into your text.
To lock the keyboard in Numeric and Symbol mode
You can lock the keyboard in Numeric and Symbol mode so you can continuously
enter symbols and numbers.
1. Tap the Input Selector arrow and then tap Other Input Methods > Options.
2. In the Input Method tab, select a Touch input method in the Input method
list, then tap Options.
3. Clear the Turn on one-touch symbol entry check box.
Tap to switch back to the
letter keyboard layout.
Full QWERTY
Page 97

Tip In Compact QWERTY and Phone Keypad, tap / to toggle between locking
the keyboard in Numeric and Symbol mode and switching back to the letter keyboard
layout after tapping a symbol or number.
4.8 Using Block Recognizer
With Block Recognizer, you use a single stroke to write letters, numbers, symbols,
and punctuation, which are then converted into typed text.
To use Block Recognizer
1. From a program, tap the Input Selector arrow and then tap Other Input
Methods > Block Recognizer.
2. Write characters, numbers, and symbols in the designated writing area.
• Enter letters by writing in the abc (left) area of the box.
• Enter numbers by writing in the 123 (right) area of the box.
• Enter symbols and punctuation by tapping the left or right area of the box
(a gray dot appears), then writing the desired character.
Tip For help with writing characters, tap the question mark near the writing area.
Entering Text 97
Page 98

98 Entering Text
4.9 Using Letter Recognizer
With Letter Recognizer, you can write individual letters, numbers, and punctuation
marks, which are then converted into typed text.
To use Letter Recognizer
1. From a program, tap the Input Selector arrow and then tap Other Input
Methods > Letter Recognizer.
2. Write characters, numbers, and symbols in the designated writing area.
• Enter uppercase letters by writing in the ABC (left) area of the box.
• Enter lowercase letters by writing in the abc (middle) area of the box.
• Enter numbers by writing in the 123 (right) area of the box.
• Enter punctuation and symbols by writing the desired character in the
123 (right) area of the box.
Tip For help with writing characters, tap the question mark near the writing area.
4.10 Using Transcriber
Transcriber is a handwriting recognition program that enables you to write in
cursive, print, or a combination of both.
To write using Transcriber
1. Open a program that accepts user input, such as Word Mobile.
2. Tap the Input Selector arrow and then tap Other Input Methods >
Transcriber. The Transcriber introductory screen appears. Read the
introduction and tap OK.
3. Position the cursor where you want text to appear.
4. Use the stylus to write anywhere on the screen. The handwriting will be
converted to text shortly after you lift the stylus from the screen.
Page 99

Entering Text 99
To enter punctuation and symbols
Transcriber comes with an on-screen keyboard that provides an easy way to add
punctuation or a special symbol to existing text. To use this on-screen keyboard, tap
on the Transcriber toolbar.
The keyboard remains visible until you tap the button again.
Tips • To reposition the keyboard, tap and hold the title bar, then drag to the desired
• When no text is selected, you can open the keyboard by using the gesture (draw
location.
a line straight down and then straight up). For more information about using
Transcriber gestures, see Help on your device.
To edit text
1. In a program, draw a line from left to right across the text you want to edit.
2. After you lift the stylus from the screen, the line disappears and the selected
text will be highlighted.
3. Do either of the following:
• Rewrite the text.
• Use gestures to capitalize letters, insert a space, and so on. For information
about using Transcriber gestures, see Help on your device.
Page 100

100 Entering Text
 Loading...