

Page 1
Quickstart
Page 2
Welcome to AT&T
• Please use this Quickstart to get a brief overview of the major features and
services available with your new smartphone
OR
• Access the on-device tutorial at any time for instructions on setting up
and customizing your device and performing common tasks. On the Home
screen, slide to the Programs tab and touch Getting Started.
OR
• Use our interactive Web tutorial available at
att.com/tutorials
for the most complete and up-to-date information available to set up your
device and services. The on-line tutorials include step-by-step instructions
and screen shots to assist your learning as well as providing an easy search
function.
Your device controls are
shown on this foldout.
2
Page 3

Table of Contents
What’s in the box 5
Device setup 6
Insert the SIM card 6
Insert the battery 6
Charge the battery 7
Turn on your HTC PURE™ 7
Install a microSD card (sold separately) 8
Sleep Mode 8
TouchFLO™ 3D 9
TouchFLO 3D: Learn the gestures for TouchFLO 3D 9
TouchFLO 3D: G-Sensor 10
TouchFLO 3D Tabs 11
TouchFLO 3D: Zooming 12
Enter Text 13
Enter text using the keyboard 13
Check device status, make calls, and set up voice
Before making a call 14
Make a phone call 15
Set up your voicemail 15
Video Share 16
Start a Video Share call 16
Accept a Video Share call 16
End a Video Share Call 16
People 17
Add a contact to your device 17
Copy all SIM card contacts to your device 17
Link your contacts to their Facebook accounts 18
Find and use your contacts 18
Favorites 19
Add a favorite on the People tab 19
Appointments 20
Schedule an appointment 20
mail 14
3
Page 4

Table of Contents
View your appointments on the Home screen 20
Ringtones 21
Personalize your device ringtone 21
Text Messages 22
Compose and send a text message 22
Camera 23
Take a contact picture 23
Take and send a picture 23
Multimedia Message 24
Capture and send a video 24
Internet 25
Email 26
About email 27
Set up an email account 27
Send and receive personal email 28
Set up IT managed corporate email 29
AT&T Navigator 30
Start AT&T Navigator 30
Get directions 30
Bluetooth and Wi-Fi 31
Connect a Bluetooth headset 31
Connect to Wi-Fi 31
Connect to an AT&T Wi-Fi Hot Spot 31
AT&T Services 32
Use Mobile Web to access the Web and shop online 33
AT&T Music 34
Open AT&T Music 34
Music Player 35
Transfer music 35
Frequently Asked Questions 36
Tips and Tricks 37
4
Page 5
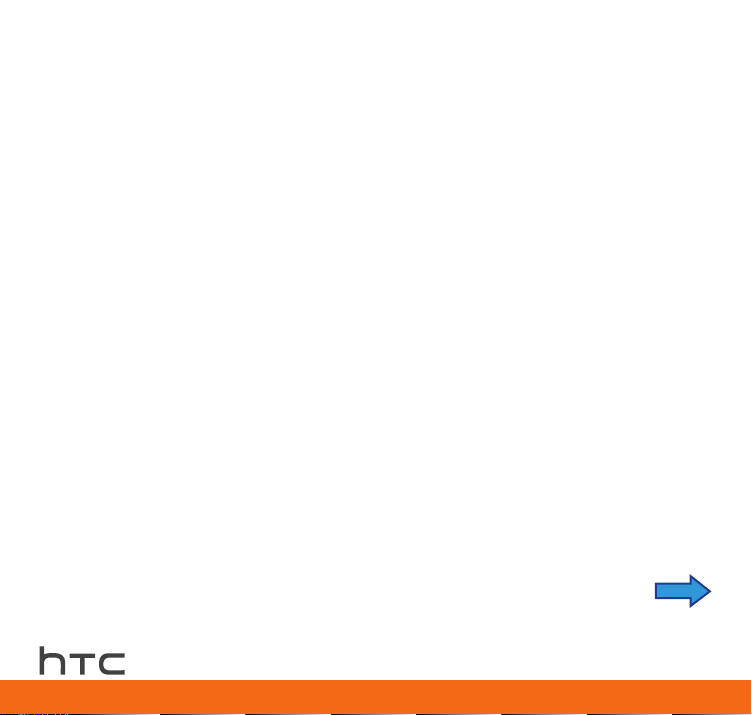
What’s in the box
AC Charger
HTC PURE™
Rechargeable Battery
Extra Stylus
USB Sync Cable
3.5 mm Audio Adapter
5
Page 6
Device setup
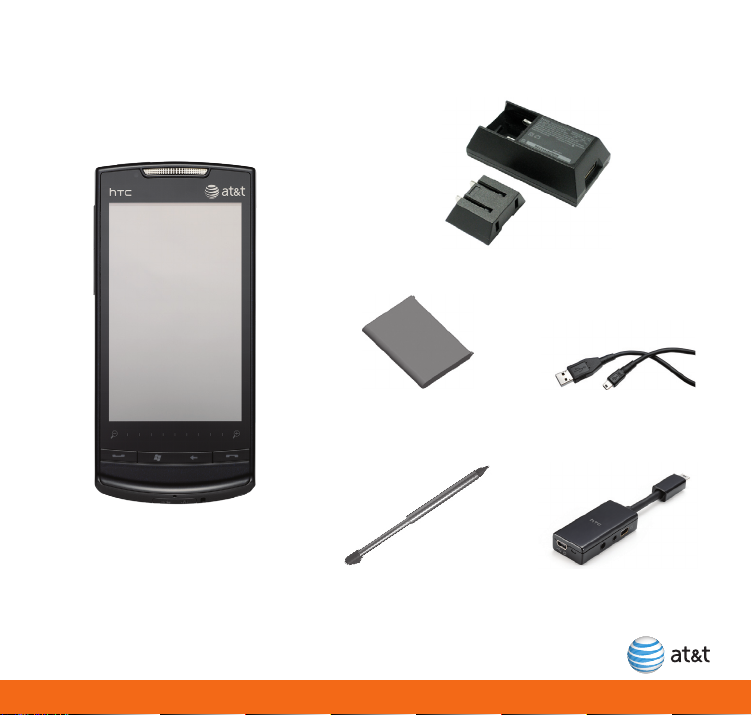
Insert the SIM card
The SIM card contains your phone number,
service details, and phonebook/message
memory. Make sure that your device is turned
off before you remove the back cover.
1. Hold the device with both hands and the
front panel facing down.
2. Push the back cover up with your thumbs
until it disengages from the device and
then slide it up to remove.
3. Locate the SIM card slot, then insert the
SIM card with its gold contacts facing down
and its cut-off corner facing out of the card
slot.
4. Slide the SIM card completely into the slot.
2
Cut-off
corner
Note: To remove the SIM card, press down theTo remove the SIM card, press down the
tab in front of the SIM card slot opening
with one finger, and slide the SIM card
out from the slot with another finger.
Insert the battery
Your device comes with a rechargeable
Lithium-ion or Lithium-ion polymer battery and
is designed to use only manufacturer-specified
original batteries and accessories.
1. Align the battery’s
exposed copper
contacts with the
battery connectors
inside the battery
compartment.
2. Insert the contact’s side of the battery
first and then gently push the battery into
place.
3. Replace the back cover.
To remove the battery
1. Make sure your device is turned off.
2. Remove the back cover.
3
3. The upper right side of the battery has
a notch. Lift the battery by the notch to
remove it.
Notch
6
Page 7
Charge the battery
New batteries are shipped partially charged.
Before you start using your device, it is
recommended that you charge the battery.
To charge the battery
• Connect the USB connector of the AC
adapter to the PC and to the sync connector
on your device, or
• Plug in the AC adapter to an electrical outlet
to start charging the battery.
Note: Only the AC adapter and USB sync
cable provided with your device must be
used to charge the device.
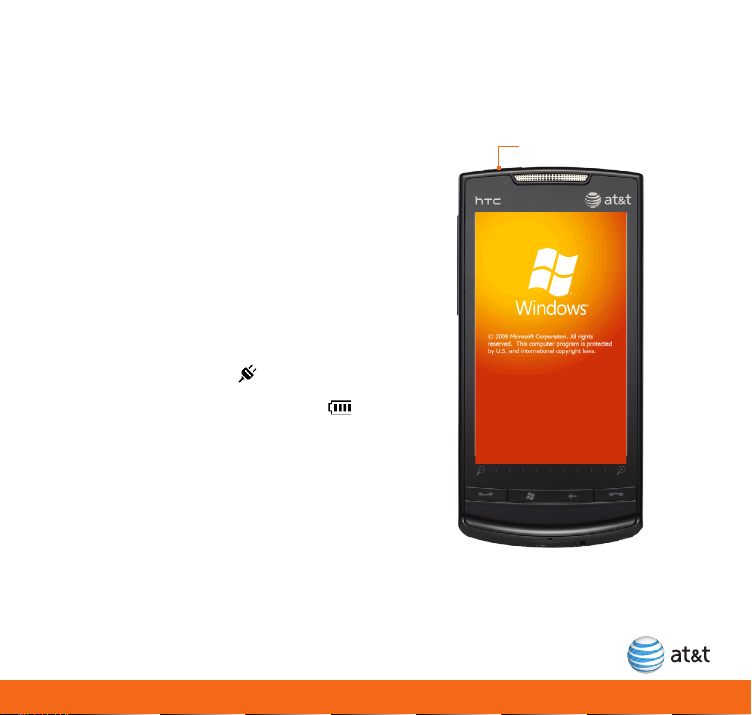
As the battery is being charged while the
power is on, a charging icon appears in the
title bar of the Home screen. After the battery
has been fully charged, a full battery icon
appears in the title bar of the Home screen.
Warning! Do not remove the battery from
the device while you are charging it
using the AC or car adapter.
Turn on your HTC PURE™
Press the POWER button to turn on the device.
Power button
It may take several minutes for the TouchFLO
3D interface to load during initial setup. Do not
press any buttons or turn off
the device until the device
completes the startup.
7
Page 8

Device setup
Install a microSD card (sold separately)
To have additional storage for your images,
videos, music, and files, you can purchase a
microSD™ card and install it into your device.
Insert the microSD card into the slot with its
gold contacts facing down, and then replace
the back cover.
Note: To remove the microSD card, press it to
eject it from the slot.
Sleep Mode
Your device will go to Sleep Mode after 30
seconds or more of inactivity. Sleep Mode
suspends your device to a low power state
while the display is off to save battery power.
You will still be able to receive messages and
calls while your device is in Sleep Mode. To
wake up your device, press the POWER button
again. Incoming calls will also wake up your
device from Sleep Mode.
Note: You can change the delay before your
device goes into Sleep Mode. On the
Home screen, slide to the Settings tab,
and then touch All Settings > System >
Power > Advanced tab.
8
Page 9
TouchFLO™ 3D
TouchFLO™ 3D gives you touch control over your HTC PURE™. TouchFLO allows you to use
finger gestures to navigate screens and provides a Home screen that lets you access your most
important information and most-used applications quickly and easily.
Note: For detailed information about gestures and screen navigation, refer to the User Manual on For detailed information about gestures and screen navigation, refer to the User Manual onFor detailed information about gestures and screen navigation, refer to the User Manual on
the Getting Started CD.
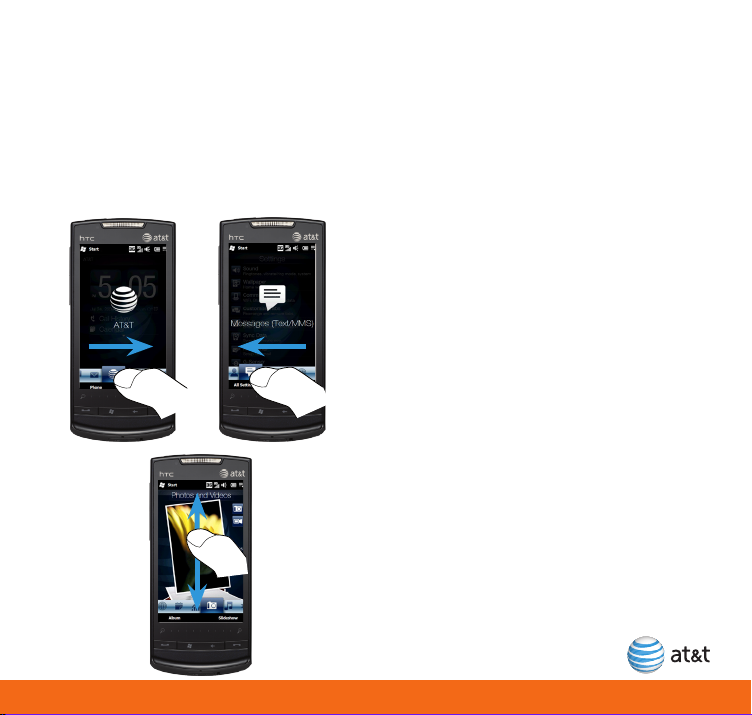
TouchFLO 3D: Learn the gestures for TouchFLO 3D
Touch, Hold and Slide
To navigate the Home screen, touch and hold
your finger on the active tab, then slide your
finger right or left over the tabs. Release when
you have selected the desired tab.
Note: Apply some pressure when touching and
holding on the active tab to be able to
slide over the tabs.
Up/Down Navigation
Inside each tab, to browse through pictures,
emails, and more, slide your finger up or down
on the item on the screen.
9
Page 10
TouchFLO™ 3D
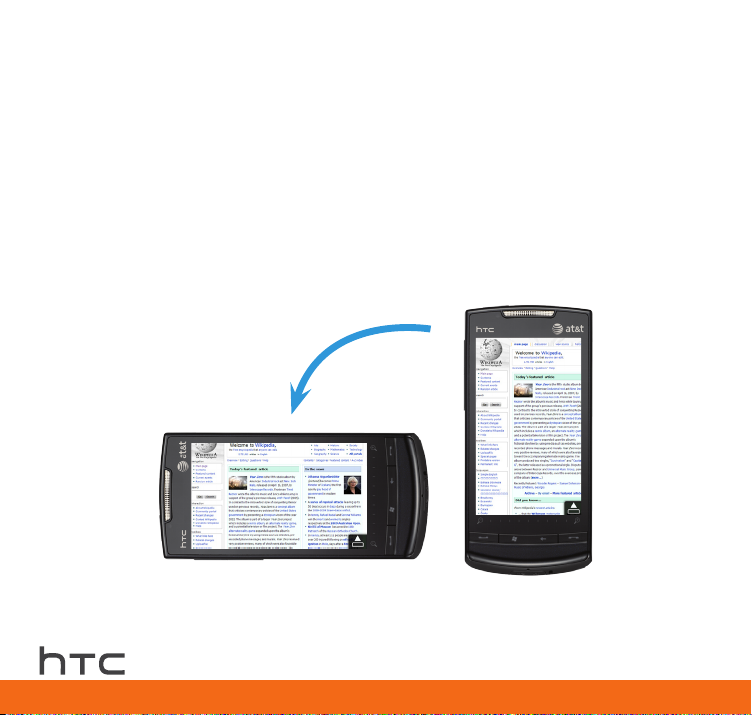
TouchFLO 3D: G-Sensor
The HTC PURE™ comes with a built in G-Sensor (aka motion sensor) that can change the screen
view based on the position of the device.
Applications or features that use the G-Sensor include:
• Web browser (Opera® Mobile)Opera® Mobile)
• Teeter game
For example, in the Web browser (Opera® Mobile), go to a Web site to get a full portrait view and
then move the device counter-clockwise to change to landscape view.
10
Page 11
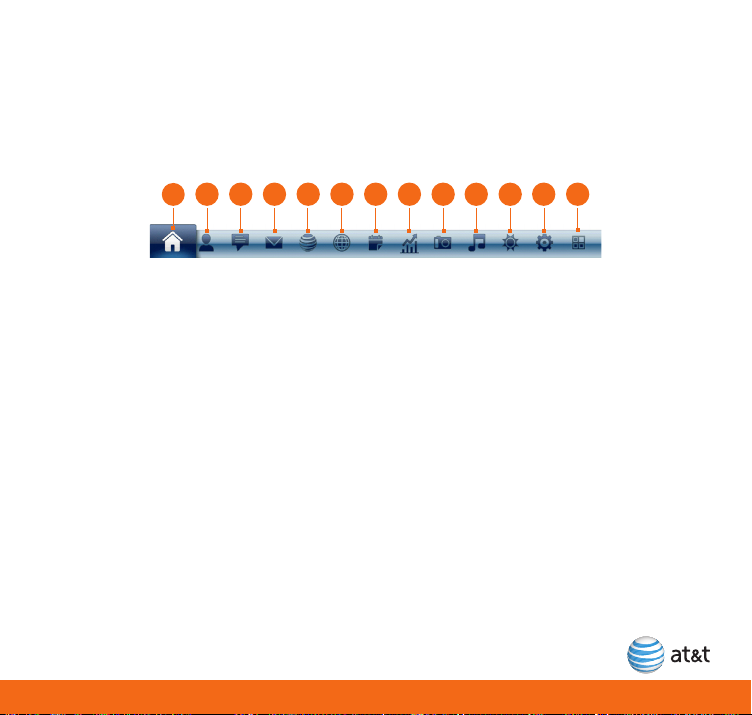
TouchFLO 3D Tabs
The TouchFLO 3D tabs gives you instant access to various information and applications such as
your favorite contacts, email, text messages, AT&T services, Music Player, and more right on the
Home screen.
2 3 4 5126 7 8 9
1
10 11
13
1. Home. Check the date and time,
appointments, and call history.
2. People. Communicate with your favorite
contacts. See page 17.
3. Messages (Text/MMS). Read, send, and
receive text messages. See page 22.
4. Email. Read, send, and receive emails from
up to 4 email accounts. See page 26.
5. AT&T Services. Access AT&T services such
as Mobile Web, AppCenter, AT&T Music, and
more. See page 32.
6. Internet. Open Push pages and browse the
Internet using the Web browser (Opera®
Mobile). See page 25.
7. Calendar. Keep track of your appointments
and add new ones. See page 20.
8. Stocks. Add, view, and analyze stocks and
stock market movements using updated
financial information.
9. Photos and Videos. Visually browse photos
and videos that are in your favorite album.
See page 23.
10. Music Player. Flip through music albums
and play back songs. See page 35.
11. Weather. Check the current weather
conditions and the 5-day weather forecast
for up to 10 cities.
12. Settings. Adjust device settings such
as ringtone, device profile, Home tab
wallpaper, and more.
13. Programs. Add up to 30 program shortcuts
to quickly access them.
11
Page 12
TouchFLO™ 3D
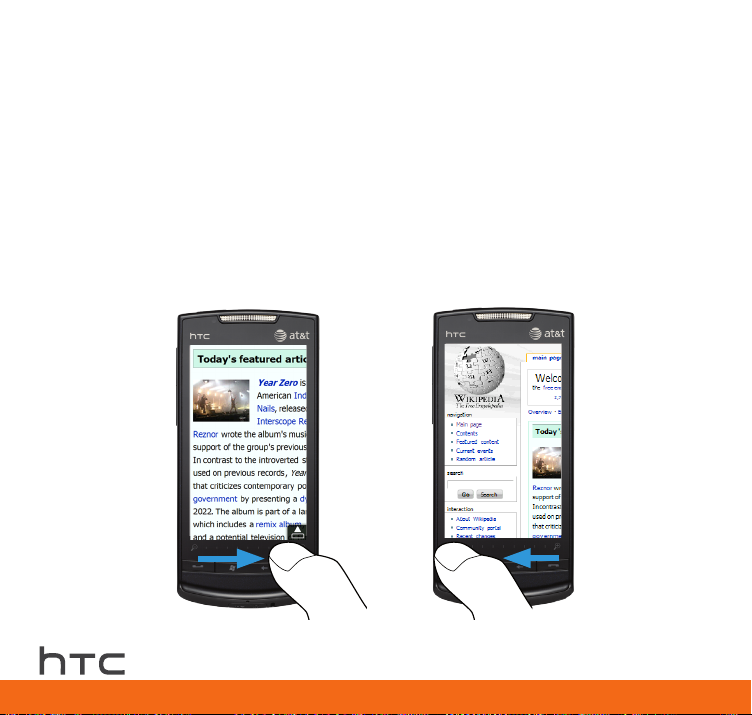
TouchFLO 3D: Zooming
The Zoom bar located below the touch screen is a handy zoom control that is unique on your
device. When you are viewing a web page in Opera Mobile or a photo in Album, you can zoom in
by sliding your finger from left to right across the Zoom bar or zoom out by sliding from right to
left.
What’s more, you can also instantly enlarge or shrink the text size when you open and read
messages, Word documents, or Excel documents. Slide your finger from left to right across the
Zoom bar to increase the text size, or slide from right to left to decrease. To increase or decrease
the text size more, slide across the Zoom bar again.
Note: Maintain a slight pressure with your finger when using the zoom bar.
12
Zooming in
Zooming out
Page 13
Enter Text
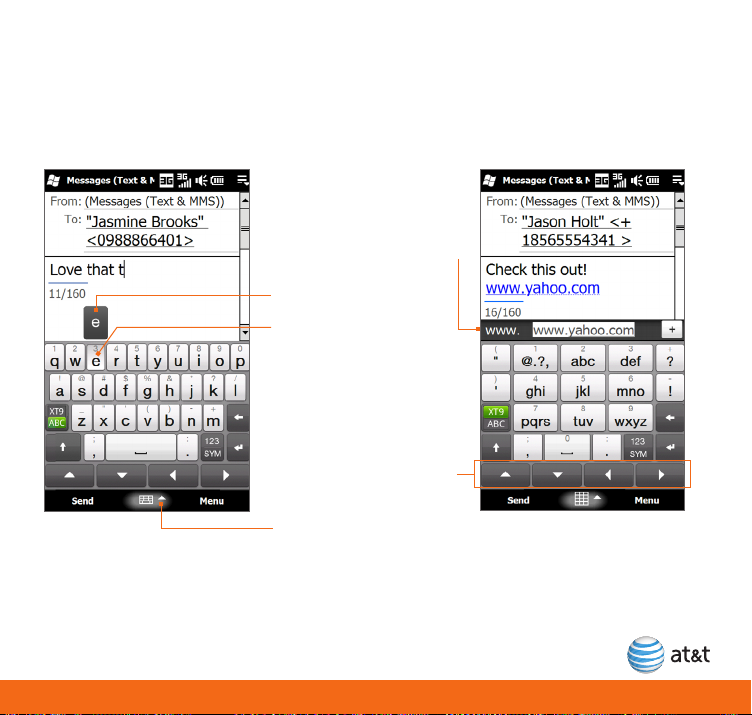
Enter text using the keyboard
When you need to enter text, the Full QWERTY and Phone Keypad on-screen keyboards come
with large keys and enhanced input features such as context-sensitive keys, and XT9 predictive
text input which make it faster for you to enter text in your messages and documents.
Word candidate bar
Activated character
Tap and hold to open the
accented characters bar
and insert an accented
letter.
Tap the Navigation
Control keys at the
bottom of the keyboard
for directional control.
Full QWERTY Phone Keypad
To enter text, simply tap the keys on the onscreen keyboard. Depending on the keyboard layout
selected, you may need to tap the same key more than once to select the desired character.
For instructions on using the keyboard to compose text messages on your device, see page 22.
Note: When using XT9 predictive mode, tap the Enter
or Space key to select the first word in the
word candidate bar.
Tap to choose another
onscreen input method.
13
Page 14

Check device status, make calls, and set up voice
mail
Before making a call
Before you make a call, check that your device is receiving a wireless signal and the status of the
other icons in the title bar. The title bar contains important status icons that display the current
status of your wireless signal, connection type and signal strength, battery power remaining, and
any alerts received.
Title Bar Status Icons
GPRS available.
EDGE available. No signal.
3G available.
Connected to the
3G network.
14
Status Indicators
Maximum signal
strength.
Phone function
is off.
No wireless
service.
Refer to Chapter 1 of the User Manual (on the
CD) for a complete list of status icons.
Notifications
When you touch or tap the icon area of the
title bar, the Notifications screen opens to
display your connection status and lists all
your pending notifications including missed
calls, new SMS/MMS messages, and more.
Touch an item on the Notifications screen to
open the related screen or TouchFLO 3D tab.
Page 15

Make a phone call
1. From any screen, press the TALK/SEND
button to open the Phone screen.
2. On the Phone screen, enter the desired
phone number using the Phone keypad.
3. Press the TALK/SEND button to make the
call.
4. To end the call, touch End Call on the
screen or press the END button.
Did you know? Normally, AT&T 3G allows
you to maintain your data
connection when connected
to a voice call.
Note: When the device is face up and you
receive an incoming call, silence the
ringer by turning the device over.
Set up your voicemail
From any screen, press the TALK/SEND button,
and then touch and hold the 1 key for several
seconds. You will be connected to the voicemail
system, which will then ask you to:
1. Create your password.
2. Record your name.
3. Record a greeting.
Check your voicemail messages from
your device
1. Touch and hold the 1 key.
2. Follow the voice prompts.
15
Page 16

Video Share
Share events the moment they happen. Video Share allows you to stream one-way live or prerecorded video while on a mobile-to-mobile voice call. Video Share is a one-way video, two-way
audio connection. Only the sender is charged.
Start a Video Share call
1. Make a normal voice call.
2. Once the call is connected, if Video Share is
available, the Video Share button becomes
available on each device. The button will
only become available if both parties are
in 3G coverage and have a Video Share
feature.
3. Slide down the shade, and then touch the
Video Share button to invite the called
party to view video from your device.
5. Your device will initiate the video and send
an invitation to the connected party to
accept the video stream.
Accept a Video Share call
1. When receiving a Video Share invitation,
the name or number of the person
initiating the call will appear on the screen
with the prompt “…wants to share video
with you.”
2. Select Yes and the Video Share session will
begin automatically.
End a Video Share Call
• To end a Video Share session and continue
the voice call, touch the Video icon ( )
and continue talking.
• To end both the Video Share session and
the voice call, press the END button.
Note: Only the person who initiated the Video
Share is charged.
Note: Video Share is a one way video and two
way audio connection between two
Video Share devices. Both devices must
be provisioned for Video Share and be in
3G service areas (a 3G icon must appear
by the signal bars prior to a call being
placed).
16
Page 17

People
Use the People tab to add favorite contacts (up to 15) you most frequently communicate with.
Flip through the contact pictures and quickly
make a call, send a text message, or send
an email to a favorite contact. You can also
touch a contact picture to open the Contact
Details screen and view details of your
communications with the contact as well as
his or her Facebook updates and upcoming
events.
Touch and
hold on the
photo strip,
then slide
up or down
Touch the
contact
picture
to access
detailed
contact
information.
Touch one
of these
icons to call,
send a text
message
or send an
email to your
contact.
Touch to open the Contact
Details screen, add a
contact, or change the
contact picture.
to scroll
through
your favorite
contacts.
Add a contact to your device
1. On the Home screen, touch Contacts.
2. Touch New > Outlook Contact.
3. Enter the contact details for the person.
You can associate a photo with the contact
by touching Select a picture.
4. When you have finished entering the
contact details, touch OK.
Copy all SIM card contacts to your device
1. On the Home screen, touch Contacts >
Menu > SIM Manager.
2. Touch Menu > Select All.
3. Touch Menu > Save to Contacts.
17
Page 18

People
Link your contacts to their Facebook accounts
You can log in to your Facebook account to
receive notifications of your contacts’ updates
and events. When you link your contacts to
their Facebook accounts, you can choose to
use their Facebook profile pictures as their
contact pictures on your device.
1. On the Home screen, slide to the People
tab.
2. Touch All People > Me.
3. On the My Contact Card screen, touch Link,
enter your Facebook login information,
touch Done, and choose whether to save
your photo and birthday to My Contact
Card.
4. Touch Save.
5. To link your contacts to their Facebook
accounts, slide to the Updates and Events
tab of the People screen, and then touch
Link Profiles.
18
Find and use your contacts
You can find your contacts easily on the
People screen. To open the People screen, on
the Home screen, slide to the People tab, and
then touch All People.
Show or hide the search
box. Use the search box
to search for contacts on
Create a new
contact.
Edit or update
My Contact
Card
SIM card
contact
Open the
Contact Details
screen, where
you can:
• Call or
message the
contact.
• View stored
contact
information.
your device.
Quick
Scroll bar.
Touch and
hold, and
then slide
your finger
downward.
Return to the
People tab.
Page 19

Favorites
Use the People tab to add favorite contacts (up to 15) you most frequently communicate with.
Add a favorite on the People tab
1. On the Home screen, slide to the People
tab, then touch the small Plus icon ( ).
2. On the Select a Contact screen, touch the
name of the desired contact.
1
2
3. Select a phone number or an email address
to associate with the favorite contact.
When finished, the People tab displays your
favorite contact.
Note: If there is no photo associated with
the contact, you will be asked to pick a
photo in your device or you can choose
to take a photo using the device’s
camera.
Open the
People
screen
and view
all your
contacts.
Add a
favorite.
Open a menu
where you
can view,
add, remove,
and edit the
favorite.
19
Page 20

Appointments
Schedule an appointment
1. On the Home screen, touch Calendar.
2. Touch Menu > New.
3. Enter a subject for the appointment.
4. Enter the other appointment details and
then touch OK when you are finished.
20
View your appointments on the Home screen
The Home tab displays your upcoming
calendar appointments.
Swipe upward
on the screen to
display the smaller
digital clock
and view more
appointments.
Touch this area to
create, edit or view
an appointment.
Page 21

Ringtones
Personalize your device ringtone
1. On the Home screen, slide to the Settings tab and then touch Sound.
2. Scroll down and then touch Ringtone.
3. Select the ringtone you want to use.
4. Touch Done.
Note: You can use *.wav, *.mid, *.mp3, *.wma, or other types of sound files that you downloaded
from the Internet or copied from your computer as ringtones.
You can also purchase ringtones from AppCenter. On the Home screen,
slide to the AT&T tab, then touch the AppCenter icon. Select Shop Tones.
21
Page 22

Text Messages
On the Messages (Text/MMS) tab, you can read text messages as they arrive and create a new
text message. You can also view the text of received multimedia messages on this tab.
Create
and send
a new text
Displays
the
received
message.
Open the
SMS/MMS
Inbox.
When there is a message, you can do the
following:
To flip
through
received
text and
multimedia
messages,
hold and
slide upward
or downward
on the
screen.
Touch the message on
the screen to read and
reply to the message.
22
message.
Create a
new text
message,
or reply to,
forward, or
delete the
displayed
message.
Compose and send a text message
1. Touch the New Message icon .
2. Enter the mobile phone number of one
or more recipients, separating them with
a semicolon. To access mobile phone
numbers from Contacts, touch To.
3. Enter your message.
• To quickly add common messages, touch
Menu > My Text and touch a desired
message.
• To check the spelling, touch Menu > Spell
Check.
4. Touch Send.
3
4
Page 23

Camera
Take a photo or video and browse your stored photos and video clips. View your photos in full
screen or as a slideshow.
Take a contact picture
1. Slide to the Photos and Videos tab, then
touch .
2. Frame your contact on the screen, and
then touch the Virtual Camera button ( )
to activate auto-focus and take the shot.
3. You can now associate the picture with the
contact and add the contact in the People
tab. Refer to the People tab on page 21 for
more information.
Take and send a picture
1. Slide to the Photos and Videos tab, then
touch .
2. Touch the Virtual Camera button ( ) to
activate auto-focus and take the shot.
3. On the Review screen, touch , select
Send via MMS, then touch Send.
4. In the To: field, enter the phone number
of your message recipient. To add mobile
phone numbers from Contacts, touch To.
5. Enter the message subject, then compose
the multimedia message.
6. Touch Send.
23
Page 24

Multimedia Message
You can use your device’s camera to capture photos and videos, then send these as multimedia
messages.
Capture and send a video
1. Slide to the Photos and Videos tab, then
touch .
2. Touch the Virtual Camera button ( ) to
activate auto-focus and start recording. To
stop recording, press the virtual camera
button again.
3. On the Review screen, touch , select
Send via MMS, then touch Send.
4. In To: , enter the phone number of your
message recipient. To add mobile phone
numbers from Contacts, touch To.
5. Enter the message subject, then compose
the multimedia message.
6. Touch Send.
While viewing your photos in full screen mode,
you can use finger gestures or the Navigation
Control to browse, pan, and zoom your photos.
Refer to the TouchFLO 3D section on page 15.
Displays the
photo or
video clip.
Open
Album to
view all
your photos
and videos.
To flip
through
photos and
videos, hold
and slide
upward or
downward
on the
center of
the screen.
Touch the photo or video
on the screen to view or
play it in full screen.
Open Camera.
Open
Camera in
Video mode.
View your
photos as a
slideshow.
24
Page 25

Internet
The Internet tab is the quickest method to access the Internet. On the Internet tab, you can open
the Web browser (Opera® Mobile) and browse the Web.
Add a Push
web page.
Open all
bookmarks.
Search the
Internet
directly.
Open the
Web browser
(Opera®
Mobile).
Configure
Push Internet
schedule and
data settings,
or remove a
Push page.
Create a bookmark for Web sites that you
frequently visit. This lets you access that Web
site faster in the future.
1. On the Home screen, slide to the Internet
tab, then touch the globe on the screen.
2. Touch the URL field and then enter the URL
of the Web site you want to add as a
bookmark. Touch .
3. At the bottom of the screen, touch .
4. On the Bookmarks screen, touch .
5. Enter the name for the bookmark and
select the folder where you want to save
the bookmark.
6. Touch .
25
Page 26

The Email tab is where you set up email accounts (up to 4) and send and receive email messages.
Enjoy the convenience of not having to enter a password to access your mailbox.
1
Displays the
email message.
Open the
inbox of the
selected email
account.
Create a new email, add
a new email account, or
send and receive email
on the selected account.
2
Hold and
slide up or
down on the
envelope
image to
browse
through
received
emails.
Create and
send a new
email.
Displays
the email
accounts
that have
been set
up in your
device.
Touch the
envelope
to switch to
that email
account.
3
There are two methods for opening and
reading an email. Option A, from the envelope
view you can do the following:
Touch the email on the screen to open and
read and reply to the message.
Option B, you can open your inbox, and then
from the inbox, touch the email to open and
read it.
26
Page 27

About email
Choose the best email option for you. Your
Windows Mobile powered smartphone can
connect to:
• Personal Email Accounts Personal email
syncs email directly with your internet
service provider (ISP) like Yahoo!, AOL or
Hotmail to your Windows Mobile powered
smartphone.
• Corporate Email Accounts Corporate
email accounts from Microsoft® Exchange
Server, IBM Lotus Domino, or Novell
GroupWise are typically managed by an IT
organization. To set up wireless corporate
email synchronization on your HTC PURE™,
you can use IT Managed set up with
Microsoft® Direct Push.
Set up an email account
1. On the Home screen, slide to the Mail tab.
2. Tap Menu > Accounts > New Account. The
Mail Setup screen then opens, guiding you
to set up your email account.
3. On the Mail Setup screen, enter your email
address and password, then tap Next.
4. Enter your name and account display name,
then tap Next. Mail Setup then searches for
the email provider settings on your device.
Note: If the settings are not found, you
will be prompted to enter the email
account settings manually. Obtain the
email account settings from your email
provider.
5. Tap the Automatic Send/Receive time, and
then choose how frequently you want email
messages to be automatically sent and
downloaded on your device.
6. Tap Done.
27
Page 28

Email
Send and receive personal email
1. On the Home screen, slide to the Email tab, touch an email account icon, then touch Inbox.
2. Touch Menu > Send/Receive to download your emails.
3. To compose a new email, touch Menu > New.
3
2
4. When you have finished composing your message, touch Send.
28
Page 29

Set up IT managed corporate email
To set up IT managed corporate wireless email on your HTC PURE™, you will need a server
address from your corporate IT organization. Contact your IT administrator for more information
about Microsoft® Direct Push support for the HTC PURE™.
Microsoft® Direct Push provides wireless access to your corporate email, contacts, calendar
and tasks for Microsoft® Exchange Server. Contact your IT administrator for set up instructions.
Activate a data plan on your AT&T account before using Microsoft® Direct Push.
For detailed information on how to use this application to synchronize information between your
device and your PC, consult the User Manual in the Getting Started CD.
29
Page 30

AT&T Navigator
Turn your HTC PURE™ into a GPS navigation system.
Start AT&T Navigator
1. On the Home screen, slide to the AT&T tab,
and then touch AT&T Navigator.
2. Tap Accept to agree to the terms and
conditions of use.
3. Enter your mobile phone number and your
first and last name, and then tap Login.
4. On the Login screen, tap Go.
5. Read the warning, and then tap Go. You
will be offered a on-screen tour of AT&T
Navigator features.
6. After viewing the tour, or if you chose not
to view the tour, the main AT&T Navigator
screen is displayed.
Note: You must be outdoors to establish a
GPS connection. Eligible wireless service
plan required.
30
Get directions
1. On the AT&T Navigator screen, tap Drive To
> Address.
2. You can either type or speak the address.
To type the address, tap Type It.
3. Enter the address of your destination, and
then tap Done. AT&T Navigator attempts to
validate the address.
4. Once the address for your destination is
confirmed, tap Go to generate your route.
Page 31

Bluetooth and Wi-Fi
Connect a Bluetooth headset
1. Turn on and make visible the Bluetooth
headset and place it within close range.
Refer to the headset’s documentation to
learn how to set it to visible mode.
2. On the Home screen, slide to the Settings
tab, and then touch Communications >
Bluetooth.
3. Touch Add new Bluetooth headset. The
device scans for Bluetooth headsets within
range.
4. Touch the name of the Bluetooth headset
in the list to automatically pair it with your
device. When the headset is paired with
the device, the icon will show on the
title bar.
Note: Windows Mobile will automatically try
one of the preconfigured passcodes
(0000, 8888) to pair the Bluetooth
headset with the device. If this fails, you
have to enter the passcode delivered
with your headset manually.
You can use a Bluetooth headset to
listen to music on your device.
Connect to Wi-Fi
1. On the Home screen, slide to the Settings
tab, then touch Communications.
2. Touch Wi-Fi. Detected wireless networks
are displayed on the screen.
3. Tap the desired Wi-Fi network. If you select
an open (unsecured) network, you are
automatically connected to the network.
If you select a secured network, enter the
security key and then tap Done. You are
then connected to the network.
Note: Wi-Fi networks are self-discoverable,
which means no additional steps are
required for your device to connect to
a Wi-Fi network. It may be necessary to
provide a username and password for
secured wireless networks.
Connect to an AT&T Wi-Fi Hot Spot
To connect to an AT&T Wi-Fi Hot Spot when
you are within range, on the Home screen,
slide to the AT&T tab, tap AT&T Wi-Fi, and then
follow the on-screen instructions.
31
Page 32

AT&T Services
AT&T Music Opens the AT&T Music screen
where you can log on to XM radio, shop for
music, songs, music videos, and streaming
media, open the music player, and more. See
page 34.
Messaging Opens the Messaging screen
where you can send and receive email,
multimedia, and text messages.
Note:
You can download an instant
messaging client for your device
from AppCenter. Access your Yahoo!®
Messenger, AOL® Instant Messenger™,
and Windows Live™ Messenger
accounts from one handy program.
AT&T Navigator Provides you with turn-byturn directions to the destination of your
choice. See page 30.
Mobile Video Opens the browser to the
Mobile Video Web site where you can select
and watch streaming video clips on-demand.
AT&T Wi-Fi Allows you to connect
automatically to AT&T Wi-Fi Hot Spots.
Apps Opens the Apps folder where you can
find value-added programs for your device.
Tools Opens the Tools folder where you can
find value-added utilities for your device.
Games Opens the Games folder where you
can find games for your device
.
MobiTV Watch TV on your device.
The AT&T tab is your portal to AT&T features and services that are available for your device.
Displays the
available
applications.
Refer to the
table below.
Go to the
Home tab.
Mobile Web Opens the browser to
the ATT.net page where you can access
various information.
See page 33.
AppCenter Opens the AppCenter screen
where you can access the Web to shop
online for games, ringtones, graphics,
multimedia, goodies and other applications.
See page 33.
32
Go to the
Programs
tab.
For detailed information on how to use AT&T
features and services, refer to the User Manual on
the Getting Started CD.
Page 33

Use Mobile Web to access the Web and shop online
Access the Web on your device using ATT.netccess the Web on your device using ATT.net from AT&T as your default home page.
You can customize your ATT.net page with your favorite content.
To browse the Web with Mobile Web
1. On the Home screen, slide to the AT&T tab,
then touch the Mobile Web icon ( )..
2. Scroll and touch the content you want to
browse.
3. Touch Edit to customize your ATT.net Home
page for quicker access.
Note: Refer to the TouchFLO 3D topic on page
15 to learn how to use finger gestures
to zoom in and out and navigate the
Web page.
If you do not have a data plan
associated with your device go to
wireless.att.com/support or call 611
from your wireless device (1-800-8887600 from a landline) to add, upgrade,
or change your data plan.
To browse other Web sites
1.
On the Home screen, slide to the AT&T tab,
then touch the Mobile Web icon ( )..
2. In the address bar that appears at the top
of the screen, enter the address (URL) of the
Web site, then touch the arrow or press the
ENTER button.
Shop via AppCenter
AppCenter is your launch pad for shopping for
several types of content for your device, like
applications, games, graphics, ringtones and
other multimedia content.
Access AppCenter
1. On the Home screen, slide to the AT&T tab,On the Home screen, slide to the AT&T tab,
then touch the AppCenter icon ( )..
2. Touch the icon on the screen for the type
of content you are interested in.
Note: On your device, you can
look up information on
the Web while you’re
on a call.
33
Page 34

AT&T Music
AT&T Music ( ) provides the ultimate music experience with just a touch of a button. Listen to
your favorite music, watch the latest video, and stay in the know with music, news and more.
• Access music from your PC over the air at any time with Music Sync.
• Transfer and listen to your music with Windows Media.
• Purchase and load tracks from digital music stores like Napster® to your device.
• Personalize with ringtones and Answer Tones™ under Shop Music.
• Instantly ID the title and artist of a song with Music ID.
• Stream dozens of commercial free XM music stations with XM Radio.
Open AT&T Music
On the Home screen, slide to the AT&T tab, and then touch the AT&T Music icon ( ).
34
Page 35

Music Player
The Music Player tab allows you to visually browse through music albums and play music.
Shuffle and
Repeat
Displays the
album art.
Music
progress bar
Open the
music library.
Touch to play, to pause.
To move
forward/
backward in
the song, touch
and hold to
display the
progress bar
and then slide
right or left.
Touch to set music playback
to repeat and turn shuffle
mode on or off.
For more information on how to create playlists and
play music in the music library, refer to the User
Manual on the Getting Started CD.
indicators
Playback
controls
Hold and slide
your finger
upward or
downward
on the album
covers or touch
the arrow icons
to flip through
music tracks.
Transfer music
To play a song, first copy some music files to
your device. To copy the songs to your device,
you will need the following:
• Music on your PC in one of these formats:
MP3, WMA, AAC.
• A microSD™ card is preferable to copy songs
to your device for extra storage (1GB or larger
is recommended).
• Windows Mobile® Device Center or Microsoft®
ActiveSync® software loaded onto your PC.
During the setup process, choose Connect
without setting up your device for Windows
Mobile Device Center or click Cancel when
the Sync Setup Wizard opens for ActiveSync.
• Windows Media® Player 11.
You are now ready to transfer music to your
device.
1. Connect the device to the PC using the
USB sync cable.
2. On the PC, open Windows Media Player 11
and click on the Sync tab.
3. Drag the audio files you want to load on your
device to the Sync list. (You can load MP3,
WMA, and AAC music files from your PC.)
4. Click Start Sync to start loading the music
files on to your device.
35
Page 36

Frequently Asked Questions
How long should it take to charge my battery?
Your battery can take up to 3 hours to fully
charge using the AC charger. It will take much
longer using the USB cable.
Why won’t my device power on?
Your battery may be drained or is not seated
correctly. Try removing and reinserting the
battery. If no success, try charging the device
using the AC charger. The notification LED next to
the earpiece shows a solid amber light when the
battery is being charged.
When I try to download a lot of songs, I always
get timed out and the download stops.
If you are downloading 50 or more songs to your
device, it may timeout. To bypass this, touch Start
> Settings > Connections > USB to PC. Select the
Enable faster data synchronization check box and
touch OK. You may want to deselect this box if
you are getting corporate email, as it may cause
issues with VPNs and servers.
What is needed to use the built in GPS on my
device?
AT&T supports AT&T Navigator with a monthly
subscription but the device is capable of
supporting any GPS application.
Which GPS applications are supported by AT&T?
AT&T Navigator is currently the only GPS solution
that has been tested and certified for use with
this device.
How do I turn on/off Wi-Fi?
Slide to the Settings tab, then touch
Communications. At the right side of the Wi-Fi
item, touch the OFF/ON slider.
What is a soft reset and how is it performed?
A soft reset of your device clears all active
program memory and shuts down all active
programs.
to press the Reset button.
What is a hard reset and how is it performed?
A hard reset restores the device to its default
settings — the way it was when you first
purchased it. A hard reset should only be
performed after all other troubleshooting options
have been exhausted.
To perform a hard reset:
1. Touch Start > Settings > System > Clear
2. Enter “1234” in the box, and then touch Yes.
OR
1. With the device turned off, press and hold the
2. Continue pressing the Volume Up and
3. Press the Volume Up button.
To perform a soft reset,
Storage.
Volume Up and Volume Down buttons, and
then briefly press the POWER button.
Volume Down buttons until you see the Reset
message.
use the stylus
36
Page 37

Tips and Tricks
Change the Home tab background:
1. On the Home screen, slide to the Settings
tab, then touch Wallpaper.
2. On the My Wallpapers screen, touch the
desired picture.
Set an MP3 file as your ringtone:
1. Copy the MP3 file to the My Ringtones
folder on your device.
2. On the Home screen, slide to the Settings
tab and then touch Sound.
3. Scroll down and then touch Ringtone.
4. In the Ringtones list, select the MP3 file as
your ringtone.
Assign a picture to a contact:
1. On the Home screen, slide to the People
tab and then touch All People.
2. Touch a contact to open the Contact
Details screen.
3. Touch Edit Contact.
4. Touch the default contact picture to the
right of the contact’s name.
5. Choose whether to use the contact’s photo
on Facebook, a photo from Album, or a
photo you take with the Camera.
Assign a ringtone to a contact:
1. On the Home screen, slide to the People
tab and then touch All People.
2. Touch a contact to open his/her contact
card.
3. Touch Edit Contact.
4. Scroll down and touch the Ringtone field.
5. Select the desired ringtone, and then touch
Done.
Assign a shortcut button to a program:
1. On the Home screen, slide to the Settings
tab, then touch All Settings > Personal >
Buttons.
2. On the Program Buttons tab, touch a
button you want to reassign.
3. In the Assign a program box, touch the
program or shortcut command you want to
assign to the button.
4. Touch OK.
37
Page 38

Frequently used application icons
Icon
AppCenter
AT&T Music Shop for music, songs, music videos, streaming media, and access AT&T's music
player.
AT&T Wi-Fi AT&T Wi-Fi provides access to over 20,000 AT&T Wi-Fi Hot Spots. Included with
your data plan.
ActiveSync Synchronize information between your device and a PC or the Exchange Server.
Calendar Keep track of your appointments and create meeting requests.
Contacts Keep track of your friends and colleagues.
Opera Browser Browse Web and WAP sites as well as download new programs and
files from the Internet.
Mobile Web Open the ATT.net page where you can access various information
including international, sports, financial, and entertainment news, weather, chat, and
more.
Messaging Send and receive email, multimedia, and text messages.
Office Mobile Use the complete suite of Microsoft® Office applications for your mobile
device.
Phone Make and receive calls, switch between calls, and set up conference calling.
Windows Media Player Mobile Play back audio and video files.
Shop for games, ringtones, graphics, multimedia, goodies and other applications.
Description
Page 39

Some features may require monthly access and/or per use charges. Visual Images are simulated.
Talk Time and Standby Time are approximate and depend on network configuration, signal
strength, features selected and customer usage patterns. Video Share is not available in all areas.
Kit contains components from various places of origin as marked within. The Bluetooth wordmark
and logos are owned by the Bluetooth SIG, Inc. and any use of such marks by AT&T is under
license. Microsoft, Windows, Windows Mobile and Microsoft Office are registered trademarks or
trademarks of Microsoft Corporation in the United States and/or other countries. The GSM letter
mark is a trademark of the GSM Association. Adobe is a trademark of Adobe Systems Incorporated.
© 2009 AT&T Intellectual Property. All rights reserved. AT&T, the AT&T logo and all other AT&T marks
contained herein are trademarks of AT&T Intellectual Property and/or AT&T affiliated companies. All
other marks contained herein are the property of their respective owners. HTC and TouchFLO are
trademarks of HTC Corporation. All other brand and product names are or may be trademarks of,
and are used to identify products or services of their respective owners.
HTC PURE™ September 2009 Quickstart
Page 40

Status Indicators
See page 14 for information.
Time
Adjust the time or
set alarms.
Open Call History.
Open Calendar.
Open Phone.
TALK/SEND
Press to answer
an incoming call
or dial a number.
START
Open the Start screen
and access more
programs and settings.
BACK
Press to return
to the previous
screen.
Open the Quick
menu.
TouchFLO 3D tabs
See page 11 for information.
Open Contacts.
HOME/END
Press to end a call or
return to the Home screen.
Page 41

HTC PURE™ Features
VOLUME UP
During a call or
when playing music,
press this button to
increase the volume.
VOLUME DOWN
During a call or
when playing music,
press this button to
lower the volume.
EARPIECE
Listen to a phone
call from here.
SPEAKER
TOUCH SCREEN
START
Open the Start
screen.
TALK/SEND
• Press to answer
an incoming call
or dial a number.
• During a call,
press and hold
to toggle the
speakerphone on
and off.
• Press to open
the Phone
screen.
ZOOM BAR
Slide right to zoom in and
left to zoom out of web
pages, photos, messages, and
documents.
BACK
Press to return
to the previous
screen.
END
• Press to end a
call or return
to the Home
screen.
• Press and hold
to lock the
device.
STYLUS
Page 42

91H01359-00M Rev.A
Find More Information
On the Web
• Interactive Web tutorials, tips & tricks and FAQs are available at
att.com/tutorials. Select Manufacturer: HTC and Model: PURE from the drop down
menus.
• Detailed support information including device specifications, user manual,
troubleshooting, user forums and knowledgebase articles are available at
att.com/DeviceSupport.
• Enterprise and Government customers can go to wireless.att.com/businessupport
for device tutorials, device setup, and on-line technical support chat for instant
answers to questions about your device and its features.
• For information about your wireless account, service plan or network, visit
att.com/Wireless.
On the phone
Call AT&T Customer Care at 1-800-331-0500 or dial 611 from any AT&T mobile phone
for assistance with your service or device.
On your computer
To view the user manual for your device, insert the Getting Started CD into your
computer and open the guide file.
Find Accessories
Accessories for your smartphone are available at att.com/WirelessAccessories or visit
your local AT&T store.
 Loading...