

Page 1
Your HTC XXXX
User guide
Page 2

2 Contents
Contents
Getting started
Your phone 8
SIM card 9
Battery 10
Switching the power on or off 11
Entering your PIN 11
Finger gestures 12
Setting up your phone for the first time 12
Start screen 12
Basics
Adjusting the volume 14
Sleep mode 14
Lock screen 15
Changing the ringtone 16
Changing the theme 16
Account setup 16
Switching between apps 17
Windows Store 18
Using speech on your phone 18
Phone calls
Making a call 20
Receiving calls 21
What can I do during a call? 21
Starting a conference call 22
Call history 23
Turning airplane mode on or off 24
People
Keeping in touch 25
Importing contacts from your SIM card 25
Adding a new contact 25
Jumping to a section in the contacts list 26
Filtering your contacts list 26
Merging contact profiles 26
Searching, editing or deleting 27
Sharing with a group of contacts in real-time 28
Organizing your contacts into groups 29
What is the Me card? 31
Posting to social networks 31
Page 3
3 Contents
Filtering social updates 33
Keyboard
Using the onscreen keyboard 34
Entering words with predictive text 35
Changing the keyboard language 35
Messaging
Texting and chatting in one place 36
Sharing picture, video, or ringtone in a message 37
Viewing and replying to a message 38
Managing conversations 39
Email
Adding your Windows Live account 40
Adding a POP3/IMAP email account 40
Adding a Microsoft Exchange ActiveSync account 41
Checking email 41
Sending email 42
Managing email messages 43
Changing email account settings 44
Camera
Camera basics 45
Taking a photo 46
Recording video 47
Camera flash doesn't turn on? 47
After capturing 48
Taking a panoramic photo 48
Taking continuous photo shots 49
Photos, videos, and music
Pictures 50
Music + Videos 52
Syncing
Why do I need the Zune software? 54
Installing and setting up the Zune software 54
Syncing pictures, music, and videos 55
Setting up wireless sync 56
Internet connections
Data connection 57
Wi-Fi 58
Using your phone as a mobile hotspot 59
Page 4
6 Conventions used in this guide
Conventions used in this guide
In this user guide, we use the following symbols to indicate useful and important
information:
This is a note. A note often gives additional information, such as what happens
when you choose to do or not to do a certain action. A note also provides
information that may only be applicable to some situations.
This is a tip. A tip gives you an alternative way to do a particular step or procedure,
or lets you know of an option that you may find helpful.
This indicates important information that you need in order to accomplish a certain
task or to get a feature to work properly.
This provides safety precaution information, that is, information that you need to be
careful about to prevent potential problems.
Page 5

7 Other helpful resources
Other helpful resources
For health, safety, and regulatory information, please read the Safety and regulatory
guide that’s included in the box.
In addition to this user guide, you can find help information, FAQs, and more in
www.htc.com/us/support.
To learn a lot more about using Windows® Phone, open Help+Tips on your phone. Or
use your web browser and go to windowsphone.com.
Certain Windows Phone features or Microsoft® services may not be available in
some countries or regions.
Page 6
8 Getting started
Getting started
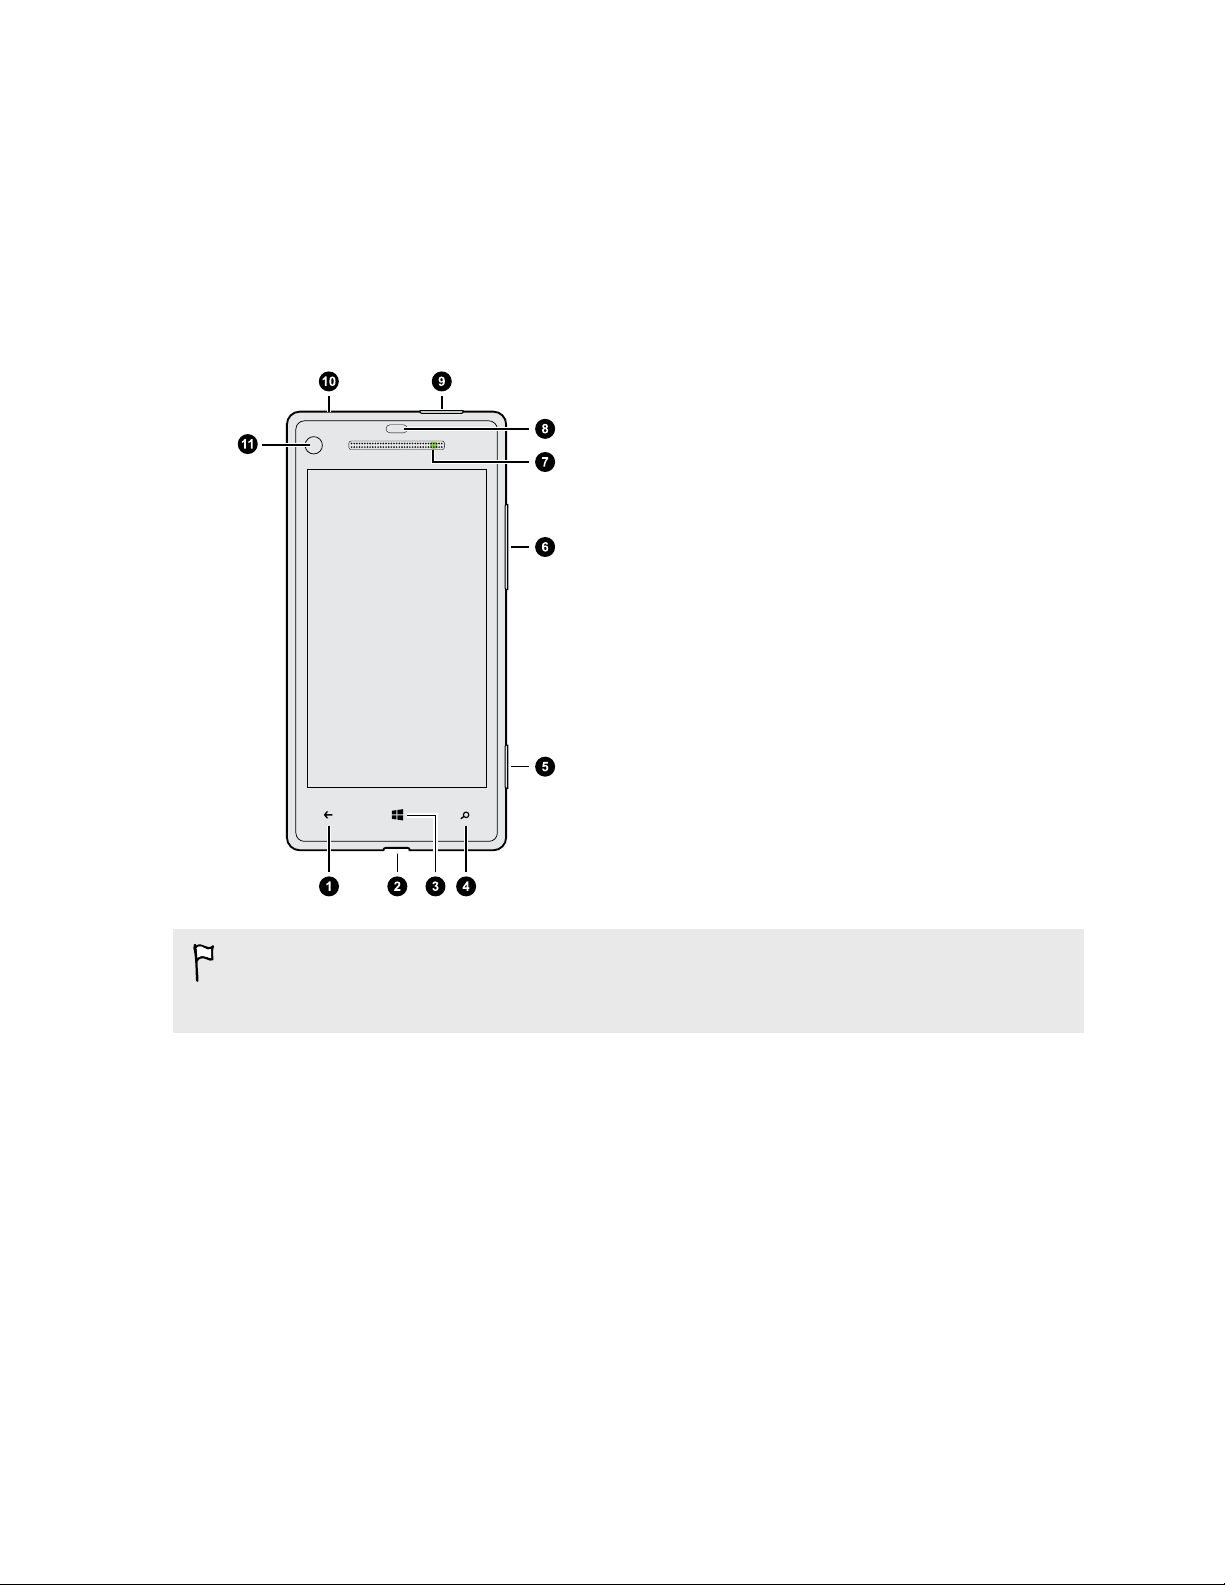
Your phone
1. BACK
2. USB connector
3. START
4. SEARCH
5. Camera button
6. VOLUME
7. Notification LED
8. Proximity sensor
9. POWER
10. 3.5mm headset jack
11. Front camera
If you want to use a screen protector, please don’t cover and block the proximity
sensor. You can purchase the dedicated screen protector for your phone that
already has a small opening for the sensor.
Page 7
9 Getting started
SIM card
The SIM card contains your phone number, service details, and memory for storing
phonebook contacts and/or text messages.
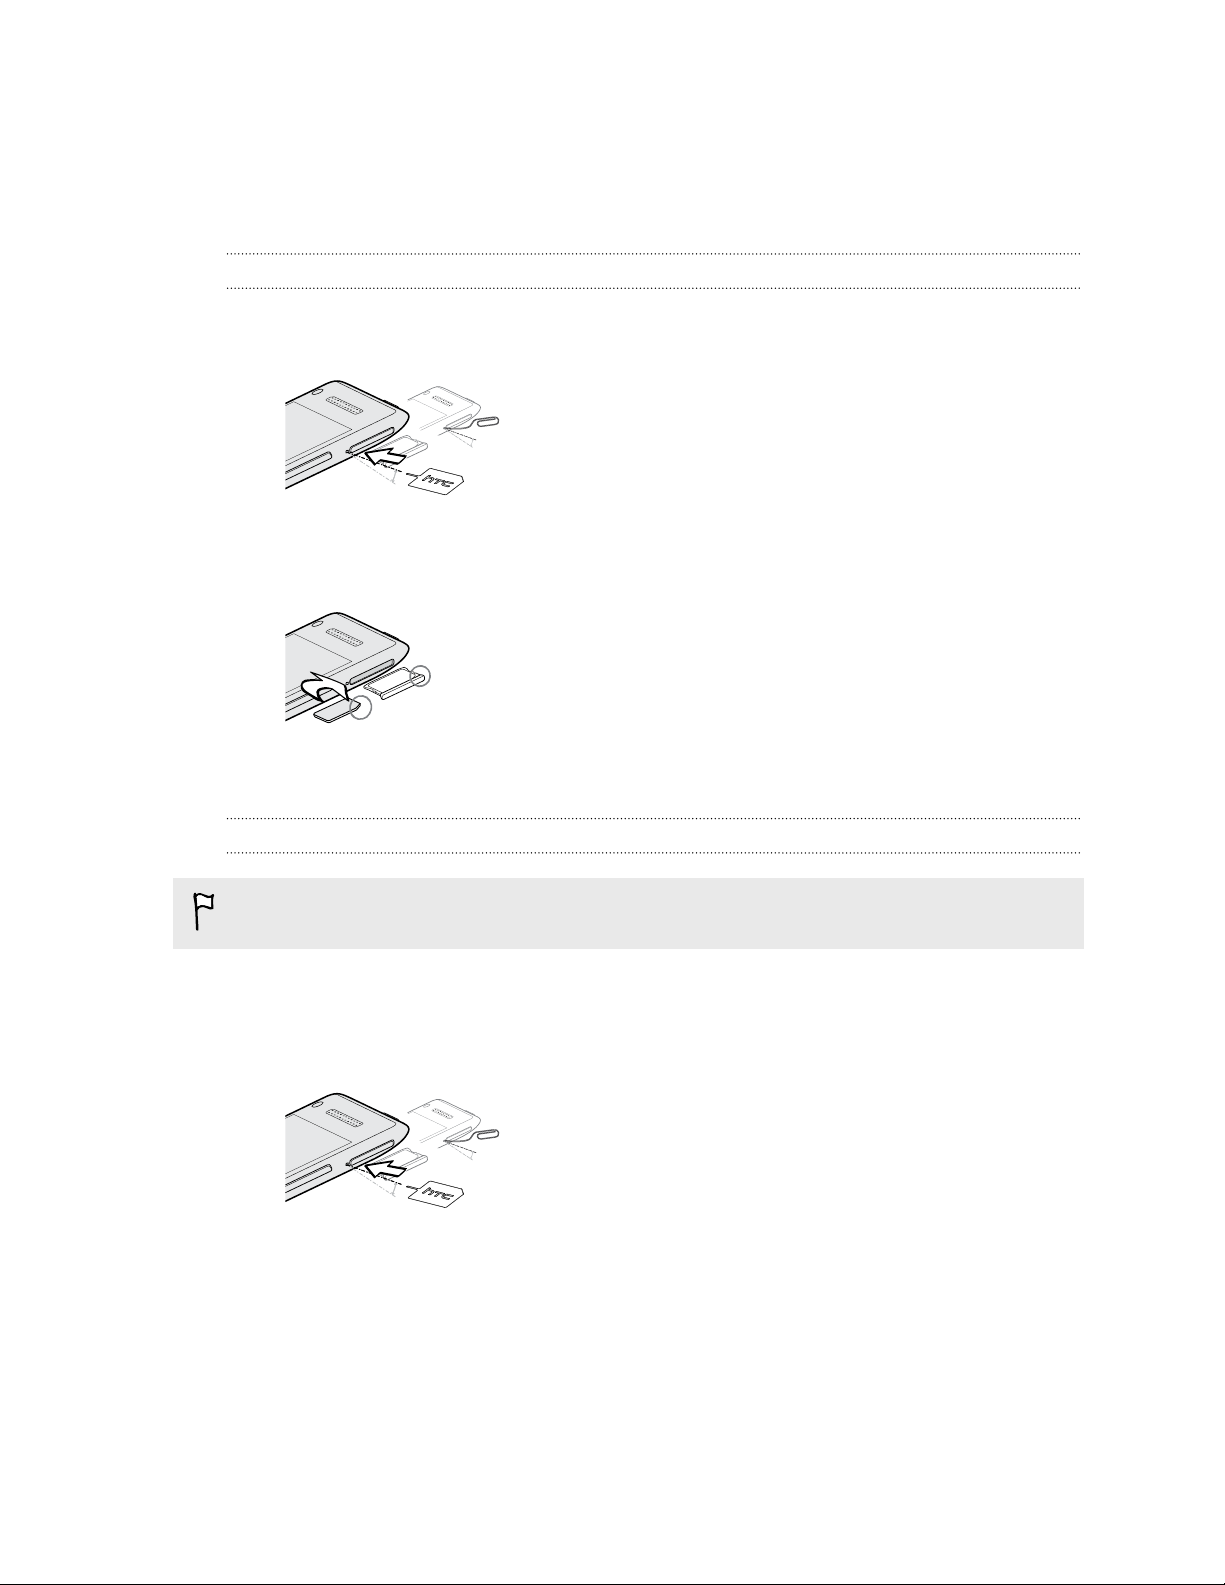
Inserting the SIM card
1. Insert the SIM eject tool (or a small bent paperclip) into the small hole next to
the SIM card tray.
2. Pull the SIM card tray out, and place the SIM card (contacts facing down) into
the tray.
3. Insert the SIM card tray into its slot.
Removing the SIM card
Make sure to switch off your phone before removing your SIM card.
1. Insert the SIM eject tool (or a small bent paperclip) into the small hole next to
the SIM card tray.
2. Pull the SIM card tray out and remove the SIM card.
Page 8
10 Getting started
Battery
Your phone uses a rechargeable, non-removable battery. How long the battery can
last before it needs recharging depends on how you use your phone. The features and
accessories you use can affect battery life. For example, leaving your Bluetooth
connection always on uses more power. Long phone calls and frequent web browsing
use up a lot of battery power. Also, consider your location: poor signal strength from
your mobile network and extreme temperature make the battery work harder.
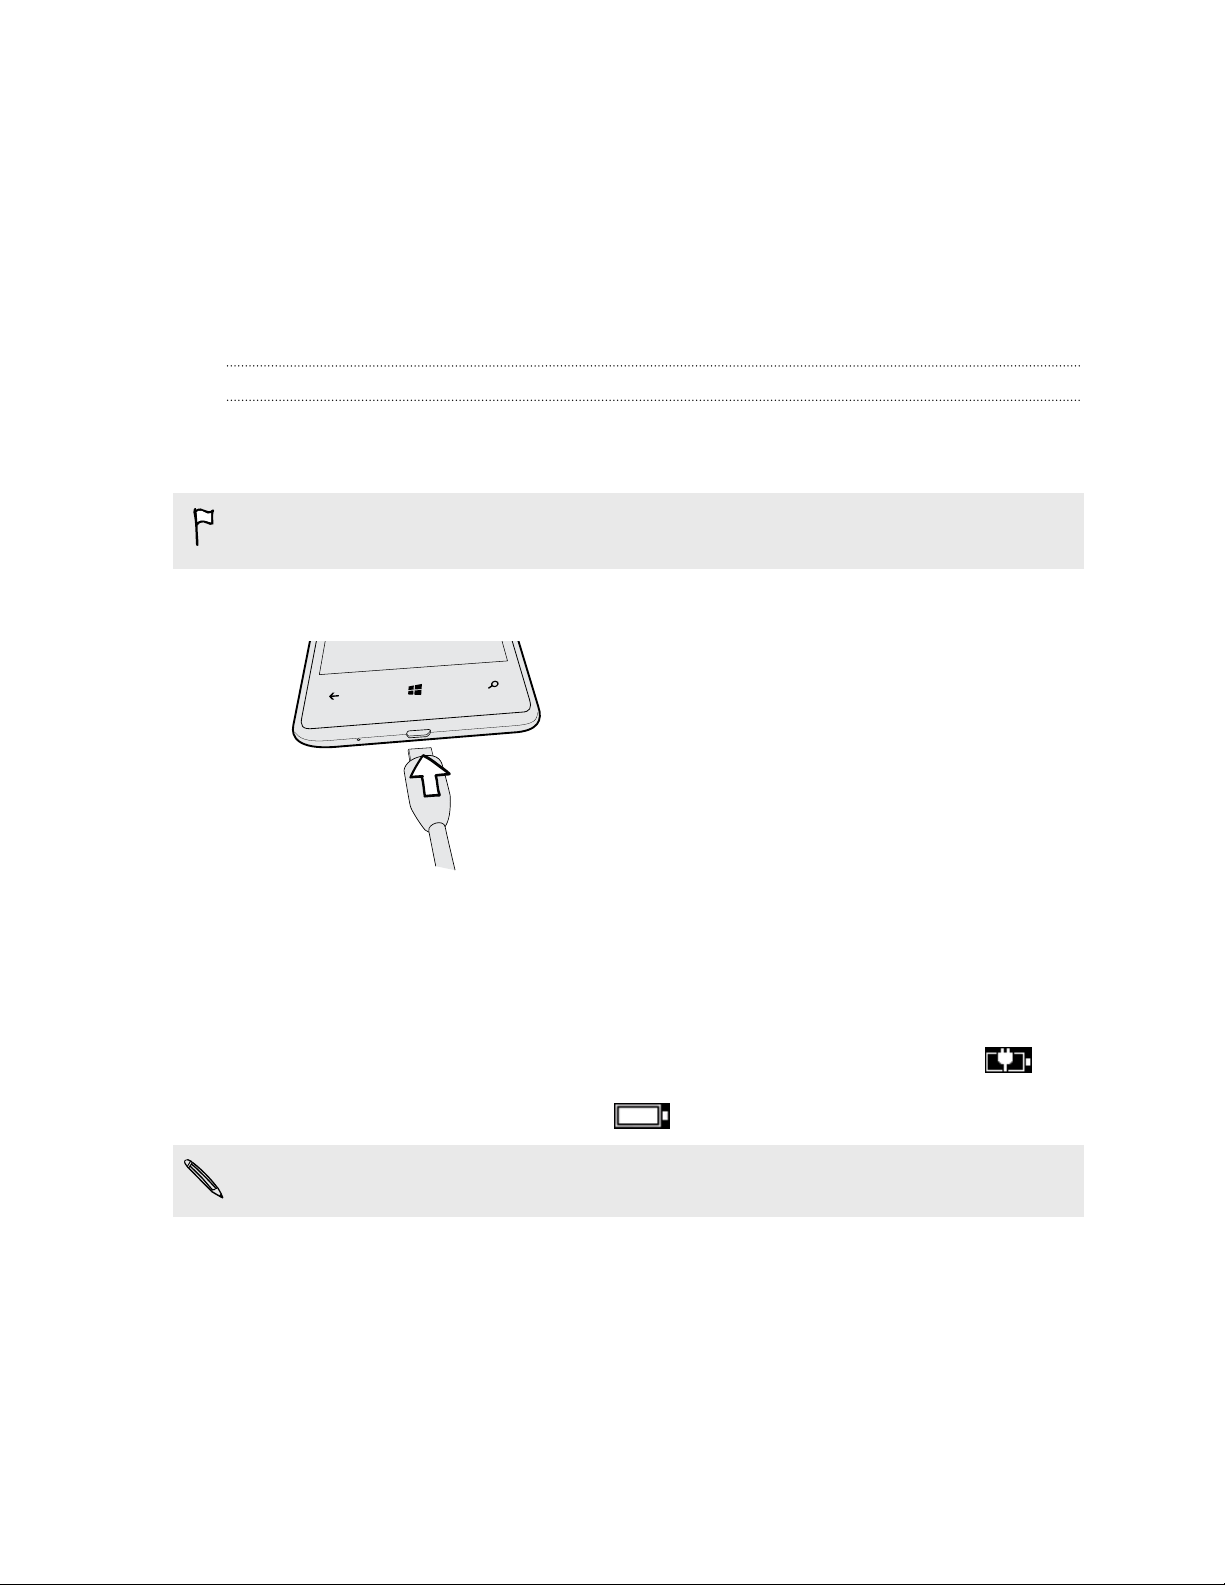
Charging the battery
Before you turn on and start using your phone, it is recommended that you charge
the battery.
Only the power adapter and USB cable provided in the box must be used to charge
the battery.
1. Insert the small end of the USB cable into the USB connector.
®
2. Insert the other end of the USB cable into the power adapter.
3. Plug in the power adapter to an electrical outlet to start charging the battery.
As the battery is being charged, the notification LED shows a solid red light. The light
turns to solid green when the battery is fully charged.
When you charge the battery and the phone is on, the charging battery icon is
displayed in the status bar. After the battery has been fully charged, the charging
battery icon turns to a full battery icon .
As a safety precaution, the battery stops charging when it overheats.
Page 9
11 Getting started
Switching the power on or off
Switching the power on
Press the POWER button. Easy.
When you turn on your phone for the first time, you’ll need to set it up.
Switching the power off
1. If the display is off, press the POWER button to turn it back on, then unlock the
screen.
2. Press and hold the POWER button until you see the message, slide down to
power off.
3. Swipe your finger down the screen.
Phone not responding?
Restart your phone if it doesn't respond when you touch the screen or press
the buttons.
Press and hold the POWER button for at least 12 seconds. Your phone turns
off and then turns back on.
Entering your PIN
Some SIM cards come with a PIN (personal identification number) set by your mobile
operator.
If you’re asked for a PIN, enter it and then tap enter.
If you enter the wrong PIN three times, the SIM card is blocked. If this happens, you
can unblock it with the PUK (PIN Unlocking Key) obtained from your mobile
operator.
Page 10

12 Getting started
Finger gestures
Tap When you want to type using the keyboard, select items onscreen such
as apps and settings, or press onscreen buttons, simply tap them with
your finger.
Press and
hold
Swipe or
slide
Drag Press and hold your finger with some pressure before you start to drag.
Flick Flicking the screen is similar to swiping, except that you need to swipe
Rotate On most screens, you can automatically change the screen orientation
Pinch In some apps, like Pictures or the web browser, you can “pinch” the
To open the available options for an item (for example, a contact or link
in a web page), simply press and hold the item.
To swipe or slide means to quickly drag your finger vertically or
horizontally across the screen.
While dragging, don't release your finger until you have reached the
target position.
your finger in light, quicker strokes. This finger gesture is always in a
vertical direction, such as when flicking the contacts or message list.
from portrait to landscape by turning your phone sideways. When
entering text, you can turn your phone sideways to bring up a bigger
onscreen keyboard.
screen using two fingers (for example, thumb and index finger) to zoom
in or zoom out when viewing a picture or web page.
Setting up your phone for the first time
When you switch on your phone for the first time, you’ll be asked to set it up. Just
follow the onscreen instructions and you’ll be up and running in no time.
Be sure to sign in with your Microsoft account so you can use services such as
Windows Store, Xbox LIVE®, and more.
Start screen
Up front on the Start screen, you'll see live tiles that continuously update and show
what’s most personal to you. You’ll see things like your photo album, how many new
text and email messages you have, and more.
§ Simply swipe your finger up or down to scroll through the tiles.
§ On the Start screen, swipe your finger left to access apps and settings.
§ Tap a letter tile to see all of the alphabet tiles.
§ Tap a highlighted tile to jump to that section.
§ To return to the Start screen, press
.
Page 11

13 Getting started
Rearranging and resizing tiles
1. Press and hold the tile you want to move until it floats.
2. Tap the arrow in the lower right corner to resize the tile.
3. Drag the tile where you want it to go.
4. When you're done moving tiles, press or .
Pinning items to the Start screen
You can pin just about anything you want to the Start screen: apps, pictures, songs,
favorite websites, documents, and even contacts.
For example, when you pin a contact to the Start screen, you’ll get all of that person’s
updates — feeds, email, text messages, and call notifications — right from that tile.
1. To pin something, press and hold it until a menu appears.
2. Tap pin to start.
Unpinning a tile
1. Press and hold the tile you want to remove.
2. Tap .
Page 12

14 Basics
Basics
Adjusting the volume
1. Press the VOLUME UP or VOLUME DOWN button to make the volume bar
appear.
2. Keep pressing until you get the volume level that you want.
Silencing your ringer
1. Press the VOLUME UP or VOLUME DOWN button to make the volume bar
appear.
2. Tap .
If the Vibrate option is on in the settings, your phone will change to vibrate mode. If
it's not, your phone will change to silent mode.
Sleep mode
Sleep mode saves battery power by putting your phone into a low power state while
the display is off. It also stops accidental button presses when your phone is in your
bag or pocket. You’ll still receive messages and calls though.
Switching to Sleep mode
Briefly press the POWER button to turn off the display and switch to Sleep mode.
Your phone also automatically goes into Sleep mode when it’s idle for a while.
Waking up from Sleep mode
To wake your phone up manually, press the POWER button. You’ll need to unlock the
screen.
Your phone automatically wakes up when you have an incoming call.
Page 13

15 Basics
Lock screen
Unlocking the screen
Swipe your finger up to unlock the screen or answer an incoming call.
If you've set up a password in the settings, you'll need to enter it to unlock the
screen.
Changing your lock screen wallpaper
Browse the collection of preset wallpapers or choose from photos that you've taken
with the camera.
1. On the Start screen, slide to the left.
2. Tap Settings > lock screen.
3. Tap the Background box and then choose photo.
4. Tap change photo and select a photo from your albums or tap to take a new
photo.
5. If the photo you selected is bigger than the allowable wallpaper size, crop the
photo.
To crop, drag the photo and position the part that you want to be your
wallpaper inside the crop box, and then tap .
Customizing your lock screen notifications
Get a quick glance of important notifications right on your lock screen.
1. On the Start screen, slide to the left.
2. Tap Settings > lock screen.
3. Choose an app for detailed notifications.
Page 14

16 Basics
4. Choose up to five apps for quick notifications.
5. When you're done, press or .
Changing the ringtone
Choose from the preset ringtones.
1. On the Start screen, slide to the left.
2. Tap Settings > ringtones+sounds.
3. Tap the Ringtone box.
4. Listen to a ringtone by tapping the play icon beside its name.
5. Tap the ringtone you want to use.
Changing the theme
Feeling a little blue? You can change the screen's background and accent colors to
match your mood. The accent color you choose will appear in various places, like the
tiles on the Start screen, app icons, on web links, in messages, and more.
1. On the Start screen, slide to the left.
2. Tap Settings > theme.
3. Choose the background and accent colors that you like by tapping their
respective boxes.
Account setup
Set up your online accounts so you can send and receive email, and more.
Depending on the type of email account that you set up, other items such as contacts,
calendar, or other information can appear on your phone as well. And when you sign
in to your social networking accounts, you'll also get your friends' status updates and
see the pictures they've posted.
Setting up an account
1. On the Start screen, slide to the left.
2. Tap Settings > email+accounts.
3. Tap add an account, and then tap the type of account you want to set up.
Page 15

17 Basics
Syncing an account
If you're not seeing your most recent email messages or status updates in an account,
you can manually sync the account to download them.
1. On the Start screen, slide to the left.
2. Tap Settings > email+accounts.
3. Press and hold the account whose information you want to download, and then
tap sync.
Deleting an account
1. On the Start screen, slide to the left.
2. Tap Settings > email+accounts.
3. Press and hold the account you want to delete, and then tap delete.
Your primary Microsoft account cannot be deleted. You'll need to do a factory reset
to remove it.
Switching between apps
Many apps can run at the same time, and there's an easy way to switch between them
all.
1. Press and hold to see what apps are currently running.
2. Slide left or right across the screen to see all of the open apps, and then tap the
one you want to use.
Page 16
18 Basics
Windows Store
In Windows Store, it’s easy to download and purchase apps that fit your needs. A
wide collection of free and paid apps is available, from everyday apps, powerful
business apps, to fun games. You can also purchase songs.
From the Start screen, slide to the left and tap Store to start shopping.
Using speech on your phone
Make a call, send a text, or find a place by simply using your voice.
The speech feature may not be available in some countries or regions.
1. Press and hold .
If this is your first time using the speech feature, the screen will display some
examples of things you can say. After reading the examples, tap accept (or tap
speak).
2. Say an instruction, for example:
§ To call someone in your contact list, you can say Call Jennifer Singer,
mobile.
§ To open an app such as Calendar, say Open Calendar.
§ To search for something on the Web such as pizza parlors, you can say
Find pizza parlors.
§ If you need help, say What can I say? to view or listen to the various
types of voice instructions you can use.
Turning on more speech commands
You can turn on additional speech commands in the settings, such as saving and
dialing speed dial numbers. You can also set your phone to read aloud text messages
and allow you to dictate your reply message without typing.
1. On the Start screen, slide to the left.
2. Tap Settings > ease of access.
3. Tap the Speech for phone accessibility On/Off switch to turn on additional
speech commands for phone calls. You'll be able to use these commands:
Save speed dial
Call
number
Turn call forwarding on/off
4. Press to return to the settings list.
To assign a speed dial number
To call a speed dial number
To turn call forwarding on or off
Page 17

19 Basics
5. Tap speech.
6. Make sure the Play audio confirmations switch is turned on. This makes your
phone speak aloud to inform you of incoming phone calls.
7. To make your phone read text messages to you, tap the Read aloud incoming
text messages box. Choose whether you want your phone to read text
messages all the time, or only when you're using a Bluetooth or wired headset.
Page 18
20 Phone calls
Phone calls
Making a call
Some SIM cards come with a PIN (personal identification number) set by your
mobile operator. If you’re asked for a PIN, enter it and then tap OK. If you enter the
wrong PIN three times, your SIM card is blocked. Don't worry. Just contact your
mobile operator and ask for the PUK (PIN Unblocking Key).
1. On the Start screen, tap .
2. Tap to open the keypad.
3. Enter the number you want to call and then tap call.
To hang up, tap end call.
If you're ready to hang up but the Phone dialer screen isn't displayed anymore, tap
the notification at the top of the screen, and then tap end call.
Making an emergency call
In some regions, you can make emergency calls even if you don’t have a SIM card
installed or your SIM card has been blocked.
1. On the Start screen, tap .
2. Tap to open the keypad.
3. Dial the emergency number for your locale and then tap call.
If you enabled your password but forgot it, you can still make an emergency call
without entering the password by tapping emergency call on the lock screen and
then dialing the local emergency number.
Making an international call
1. On the Start screen, tap .
2. Tap to open the keypad.
3. Press and hold the 0 key until the + sign appears.
The plus sign (+) shows that you're making an international call (instead of
entering the international access number for the country you're in).
Page 19

21 Phone calls
4. Enter the following on the keypad:
§ Country or region code
§ Area code (without the 0 at the beginning)
§ Phone number
5. Tap call.
Receiving calls
When you receive a phone call, the Incoming call screen appears.
Answering a call
§ Tap answer.
§ Or if the display is off and wakes up when you get a call, slide up from the
bottom to unlock the screen first and then tap answer.
Rejecting a call
§ Tap ignore.
§ Or if the display is off and wakes up when you get a call, slide up from the
bottom to unlock the screen first and then tap ignore.
Muting the ringing sound without rejecting the call
Do one of the following:
§ Place your phone face down on a level surface.
If your phone is already facing down, it will still ring when there are subsequent
incoming calls.
§ Press the VOLUME UP or VOLUME DOWN button.
§ Press the POWER button to silence the ringer and turn the display off.
What can I do during a call?
When a call is in progress, use the onscreen buttons to turn the speaker on, put the
call on hold, and more.
Turning the speaker on during a call
To decrease potential damage to your hearing, do not hold your phone against
your ear when the speaker is on.
On the call screen, tap speaker.
To turn the speaker off, just tap speaker again.
Page 20
22 Phone calls
Putting a call on hold
On the call screen, tap hold.
To resume the call, tap hold again.
Switching between calls
If you’re already in a call and accept another call, you can choose to switch between
the two calls.
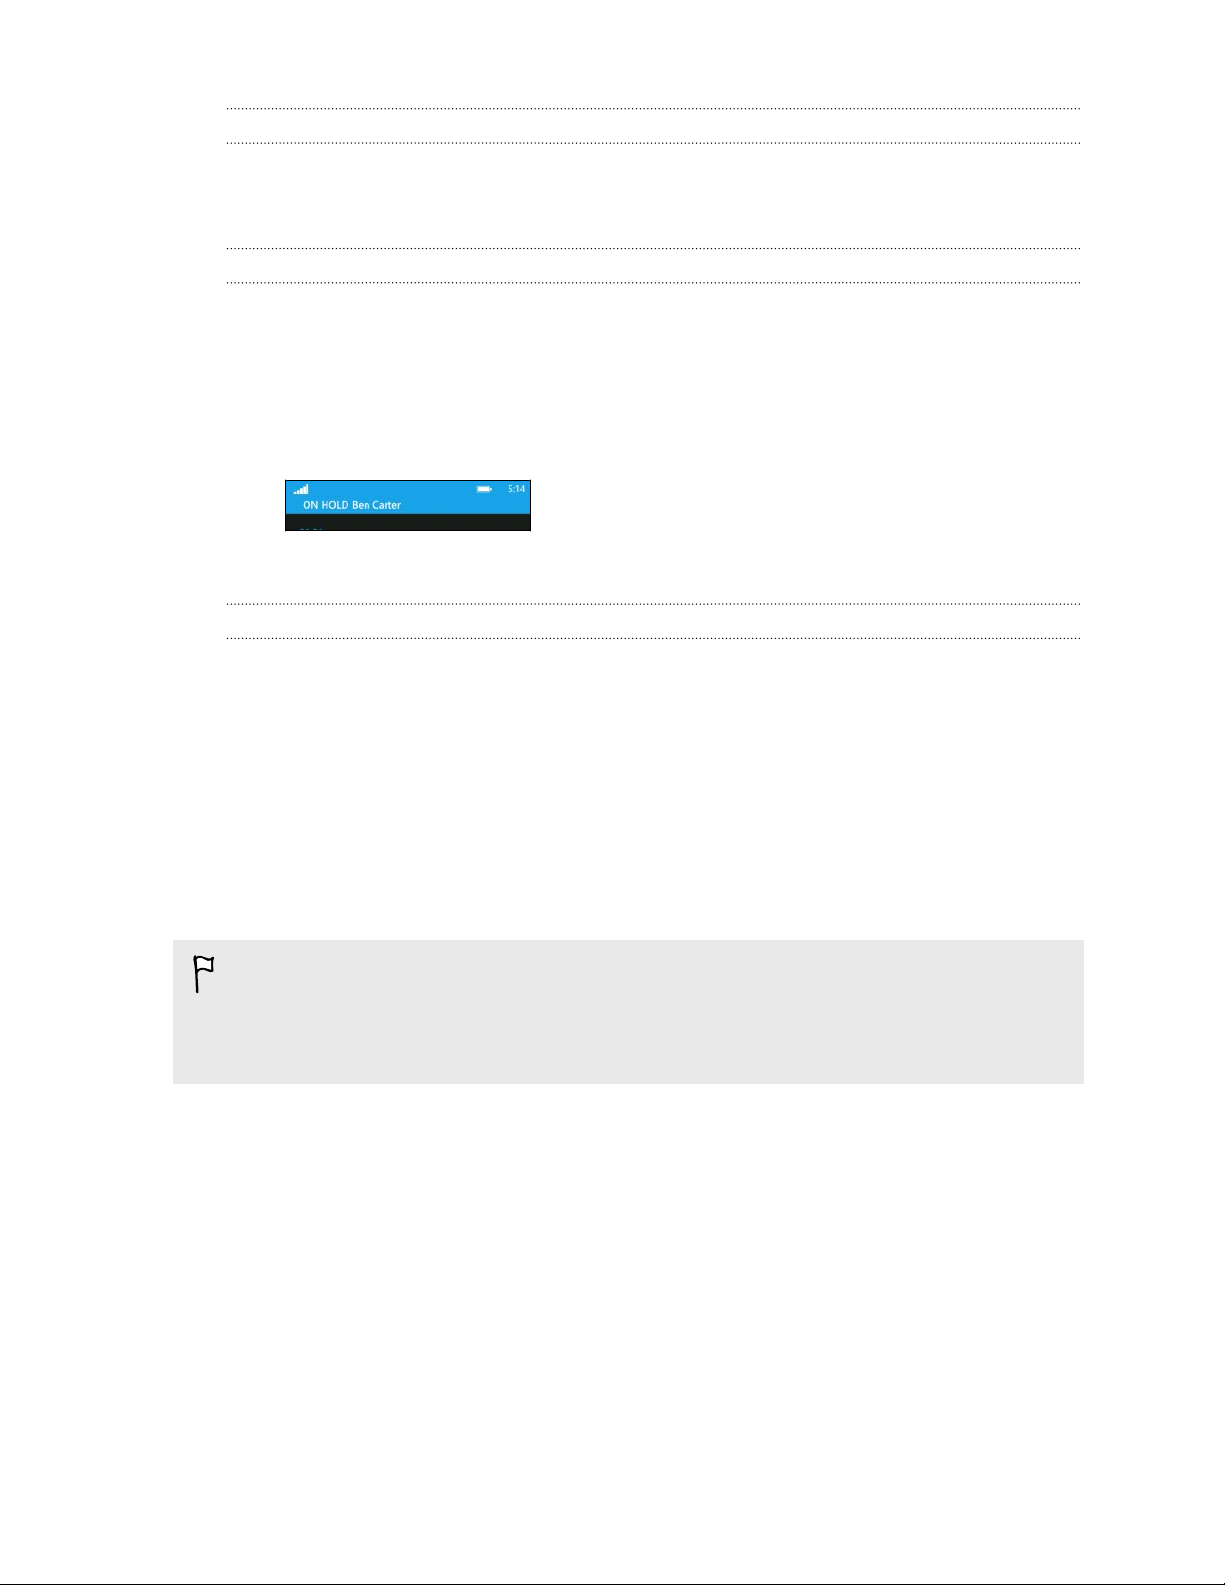
1. When you receive another call, tap answer to accept the second call and put the
first call on hold.
2. To switch between the calls, tap the bar at the top of the screen.
3. To end the current call and return to the other call, tap end call.
Muting the microphone during a call
On the call screen, tap mute.
To turn the microphone back on, tap mute again.
Starting a conference call
Conference calling with your friends, family, or co-workers is easy. Make the first call
(or accept a call), and then simply dial each subsequent call to add it to the
conference.
§ Make sure your SIM card has conference calling service enabled. Contact your
mobile operator for details.
§ The maximum number of people you can have on a conference call varies by
mobile operator.
1. Make a call to the first conference call participant.
2. When connected, tap add call, and then call the second participant.
The first participant is then put on hold.
3. When connected to the second participant, tap merge calls.
4. To add another participant, tap add call, and then call the person you want to
invite.
Page 21
23 Phone calls
5. When connected, tap merge calls.
6. To have a private conversation with someone in the call, tap private, and then
tap the person's name or number.
§ Tap merge calls to merge the other people back and continue the
conference call.
§ Or to end the private conversation, tap end call.
To end the conference call, tap end call.
Call history
Access the call history to check missed calls, your dialed numbers, and received calls.
Checking calls in the call history
1. On the Start screen, tap .
2. In the history list, you can:
§ Press and hold a number or contact name and delete it.
§ Tap a number or contact name to go to the profile list where you can
choose to return the call, send a text message, save the number (if it's not
yet stored in your contacts), and more.
Adding a new phone number from the call history to your contacts
1. On the Start screen, tap .
2. Tap the phone number that you want to save and then tap .
3. Tap to create a new contact.
4. Edit the number if you need to, select the phone number type, and then tap .
5. Add the contact name and other information and then tap .
You can also save a phone number from the call history to an existing contact.
Clearing the call history
In the history list, you can:
Remove a number or name Press and hold the number or name, and then tap delete
item.
Clear the entire history Tap > delete all.
Page 22

24 Phone calls
Turning airplane mode on or off
In many countries, you are required by law to turn off wireless devices while on board
an aircraft. A quick way to turn off wireless functions is to switch your phone to
airplane mode.
When you enable airplane mode, all wireless radios are turned off, including the call
function, data services, Bluetooth, and Wi-Fi®. When you disable airplane mode, the
call function is turned back on and the previous states of Bluetooth and Wi-Fi are
restored.
1. On the Start screen, slide to the left.
2. Tap Settings > flight mode.
3. Tap the Status switch to turn it on or off.
When airplane mode is on, you'll see the icon in the status bar.
Page 23

25 People
People
Keeping in touch
The People hub is more than just your address book. It's also where you can keep up
with your social networks and stay in touch with the people you care about most.
1. On the Start screen, tap the People tile.
2. Slide left and right across the screen to access your contacts list and see what's
happening with your contacts.
all Your contacts list. Just tap a contact to call, text, chat, or view
that person's updates and pictures. Tap a group to send a group
message and see updates and pictures from the group members
what's new Here's where you can check out your contacts' latest updates, all
handily rolled together from your various social network accounts.
recent Here you'll see and get quick access to the contacts you've viewed
or communicated with most recently.
together Here's where you can create private Rooms to chat and share
photos, videos, calendars, and more. You can also create Groups
to make it easier to follow your friends' status updates, send group
text messages, and more.
Importing contacts from your SIM card
When you import contacts from your SIM card, they're automatically synced to your
Microsoft account. They won't be deleted from the SIM card. If you haven't set up a
Microsoft account, your contacts are saved to your phone.
1. On the Start screen, tap the People tile.
2. Tap > settings > import SIM contacts.
Adding a new contact
1. On the Start screen, tap the People tile.
2. In the all contacts list, tap
3. If you have more than one account set up on your phone, tap the account you
want to create the contact in.
.
Page 24

26 People
4. Tap each item (such as name, phone, email) and then enter the information.
After entering information for each item, make sure to tap to save it.
5. Tap add photo to assign a picture or use the camera to take a picture of your
contact.
6. When you're done, tap to save the new contact.
Jumping to a section in the contacts list
1. In the all contacts list, tap a letter tile to display all the alphabet tiles.
2. Tap a letter to quickly jump to the section that has contact names beginning
with that letter.
Filtering your contacts list
You can filter the list to show contacts only from the accounts you choose.
1. In People, tap > settings.
2. Tap filter my contact list.
3. Select the accounts from which you want to show contacts, and then tap .
Merging contact profiles
In People, you might have two or more versions of the same contact. This is usually
because you have the contact's profile on different social network or email accounts.
In most cases, your phone will combine contact profiles automatically. For those that
are not combined, you can link them manually.
1. Tap a contact that has one or more duplicate entries in the all contacts list.
2. Tap
3. You can:
.
§ Under suggested links (if available), tap the one that you want to link to the
contact.
§ Tap choose a contact and then tap one that's a duplicate entry.
Unlinking contact profiles
1. In the all contacts list, tap the contact that has linked profiles.
2. Tap the link icon that shows the number of links .
3. Under linked profiles, tap the one that you want to unlink.
4. Tap unlink.
Page 25
27 People
Searching, editing or deleting
Searching for a contact
If your contacts list is especially long, search is probably the quickest way to find a
contact.
1. In the all contacts list, tap .
2. In the search bar, enter the first few letters of the first or last name of the
contact you're looking for.
Matching contacts are then displayed.
3. Tap the contact to view the person's contact information.
Editing a contact's information
Contacts from Facebook®, Twitter™, or LinkedIn® cannot be edited. But you can add
information, and then save it to a different account (such as your Microsoft
account).
1. In the all contacts list, tap the contact whose information you want to change.
2. Tap .
3. If this is a linked contact (someone with multiple accounts that show up as one
entry in your contacts list), tap the account you want to edit (for example, tap
edit Microsoft account).
4. Edit or add new information for the contact.
After entering new information for an item, remember to tap to apply the
changes.
5. When you're done, press or .
Deleting a contact
While you can't delete a Facebook, Twitter, or LinkedIn contact on your phone, you
can delete contacts from other services. When you do this, the contact will be
deleted both from your phone and from the online service where it's stored.
1. In the all contacts list, tap the contact you want to delete.
2. Tap > delete.
3. If the contact is a linked contact (someone with multiple accounts), choose
which account to remove the contact from.
You can also press and hold a contact and then tap
delete.
Page 26

28 People
Sharing with a group of contacts in real-time
Rooms are places where you can have a group chat, and share photos, videos,
calendars, and more. .
Creating a new room
Only contacts with Windows Phone 8 can participate in a room. When you create a
room, you are the owner of the room. All other room members are guests.
1. On the Start screen, tap the People tile.
2. In the together screen, tap > Room.
3. Enter a name for the room and tap .
4. Tap and then choose a contact to invite to the room.
Repeat this to invite more contacts to the room.
Invites to the room are sent by text message.
5. When you're done, tap .
Inviting contacts to a room
1. Tap the room you want to invite contacts to.
You can't invite unless you are the owner of the room.
2. Tap > .
3. Tap the contact you want to invite.
4. To invite another contact, tap .
5. When you're done, tap .
Rearranging room tiles
Mix things up a bit. You can rearrange the room member tiles any way you like.
1. Tap the room you want to change.
2. Press and hold a contact until the tile floats.
3. Drag the tile to a new location.
4. When you're done, press .
Removing a contact from a room
1. Tap the room you want to remove a contact from.
2. Tap .
Page 27
29 People
3. Tap the contact you want to remove.
4. Tap remove.
5. When you're done, tap .
Leaving a room
1. Tap the room you want to leave.
You can't leave a room if you are the owner.
2.
Tap > leave room > leave.
Renaming a room
1. Tap the room you want to rename.
2. Tap
3. Enter a new name for the room.
4. When you're done, tap .
> rename.
Deleting a room
You can only delete a room you created.
1. Tap the room you want to delete.
2. Tap > delete room > delete.
Organizing your contacts into groups
Groups help you to filter social networking clutter into manageable portions. Groups
also make it easier to send out the same email and text message to more than one
contact. When you create a group, it shows up in the together screen.
Tap it, and you'll see the group members and their social networking updates, along
with options for group email, texting, and chat.
Creating a new group
1. On the Start screen, tap the People tile.
2. In the together screen, tap > Group.
3. Enter a group name and tap .
Page 28

30 People
4. Tap and then choose a contact to add to the group.
Repeat this to add more contacts to the group.
5. When you're done, tap .
Press and hold a group to pin it to the Start screen.
Adding contacts to a group
1. Tap the group you want to add contacts to.
2. Tap > .
3. Tap the contact you want to add.
4. To add another contact, tap .
5. When you're done, tap .
Removing a contact from a group
1. Tap the group you want to remove a contact from.
2. Tap .
3. Tap the contact you want to remove.
4. Tap remove from group.
5. When you're done, tap .
Changing a member's contact preference
Sometimes your contacts have more than one email address or phone number. You
can select a the email address and phone number to use when you send a group email
or text message.
1. Tap the group with the member whose contact preference you want to change.
2. Tap .
3. Tap the member you want to change.
4. Tap the Phone number box or Email address box to change the information.
5. When you're done, tap .
6. Tap to return to the group screen.
Rearranging group tiles
Don't want to view the group members in alphabetical order? You can arrange the
group member tiles any way you like.
1. Tap the group you want to change.
2. Press and hold a contact until the tile floats.
Page 29

31 People
3. Drag the tile to a new location.
4. When you're done, press .
Renaming a group
1. Tap the group you want to rename.
2. Tap > rename.
3. Enter a new name for the group.
4. When you're done, tap .
Deleting a group
1. Tap the group you want to delete.
2. Tap > delete.
What is the Me card?
The Me card is your profile. It's also your one-stop shop for social networking. You can
access the Me card either from the Start screen or the People hub.
§ On the Start screen, tap the Me tile.
§ On the Start screen, tap the People tile. Tap your profile picture.
Here are some things you can do:
§ Post a new message on your social networks.
§ See and comment on social network posts.
§ Like social network posts.
§ Reply to or retweet updates on Twitter.
§ Update your profile picture on Facebook.
§ Update your profile picture on your Microsoft account.
§ Set your chat status. Let other people see when you're available on instant
messaging.
Posting to social networks
You can post messages to your social networks and comment or like other people's
posts. You can also check in to share your location with friends.
Go to Settings > email + accounts to check what types of social network accounts can
be set up on your phone.
Page 30
32 People
Posting a message
1. On the Start screen, tap the Me tile.
2. Tap post an update and then type your message.
3. If you have more than one social network account, tap the Post to text box,
choose which accounts to post to, and then tap .
4. Tap .
Commenting on a post
1. On the Start screen, tap the People tile.
2. Slide left or right to go to what's new so you can see recent posts from your
contacts.
3. When you see a post you want to comment on or like, tap .
4. Tap the box that says add a comment, type your comment, and then tap .
To like a post, tap
(or tap to unlike).
Checking in
When you check in to a place, you share your location with your contacts by posting
it on one or more of your social networks. You can find nearby locations, or you can
add one yourself.
1. On the Start screen, tap the Me tile.
2. Tap check in.
3. Do one of the following:
§ Tap a place in the list to check in from there.
§ If you don't see your location listed, tap to make the app find your
location. Type the name of the place where you're at, and then tap .
§ To search for a nearby place, tap , type the name of the place, and then
tap .
4. Once you've found the place you want to check in from, tap the Post to box to
choose each account you want to check in on.
5. Tap the Share on Facebook with box to set your Facebook privacy level.
6. Tap to check in.
Page 31

33 People
Filtering social updates
Flooded with updates? Try viewing posts from one social network at a time. Or you
can hide the updates from one or more of your social networks.
§ In People, slide left or right to go to what's new. Tap all accounts, and then tap
the account you want to view posts from.
§ Or tap > settings, and then select Hide posts from the contacts I've filtered.
Posts from the social networks you've filtered out of your contacts list will no
longer be visible.
You can also create a group to only see updates from contacts in that group.
Page 32
34 Keyboard
Keyboard
Using the onscreen keyboard
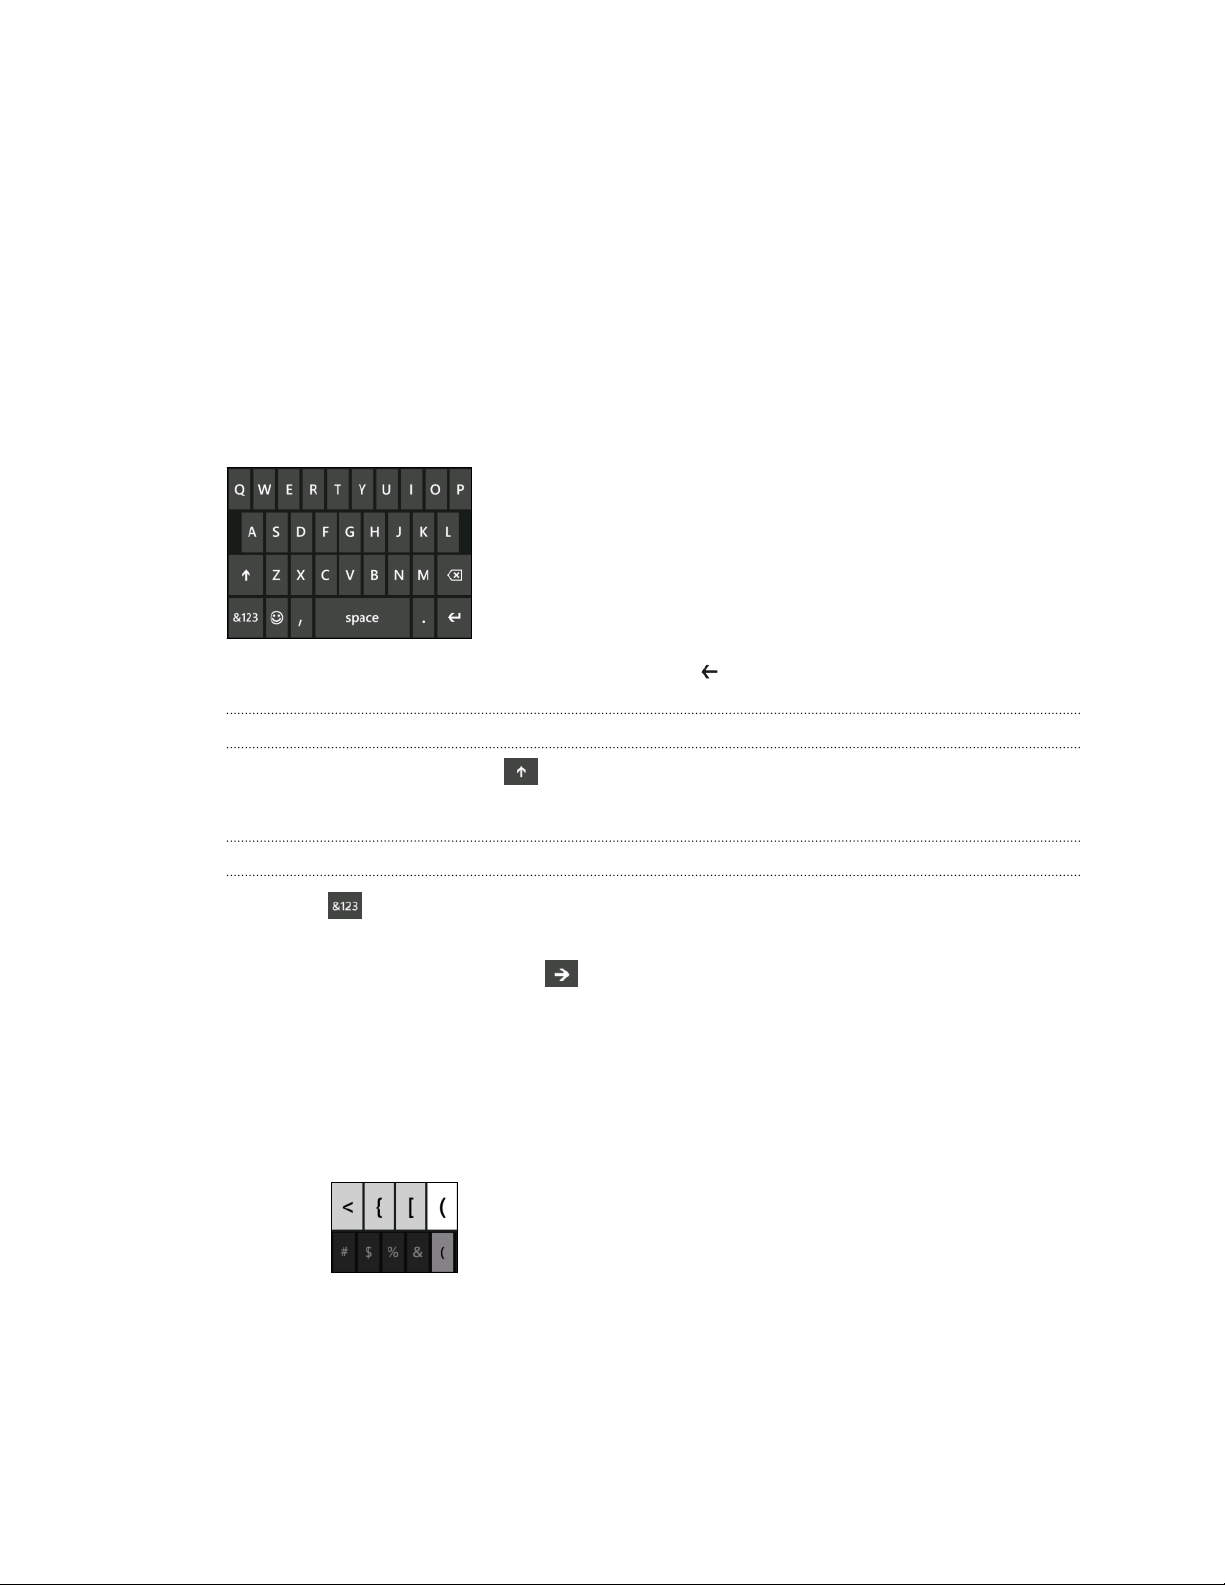
When you start an app or select a field that requires text or numbers, the onscreen
keyboard becomes available.
Tap anywhere onscreen where you can type and the keyboard appears automatically.
After you've finished using the keyboard, press to close it.
Turning caps lock on
Press and hold the shift key for about 1 second or double-tap it. Tap it again to
turn caps lock off.
Entering numbers and symbols
1. Tap to switch to the numeric and symbol keyboard. You'll find numbers,
common punctuation marks, and symbols on the keyboard.
2. To use more symbols, tap .
3. Some of the symbol keys can bring up even more symbols. Press and hold a
symbol for about 1 second to see more.
For example:
§ Press and hold a symbol key such as the left parenthesis key, and then tap
the symbol that you want.
§ Press and hold the period key to bring up some of the common
punctuation options, and then tap the one that you want.
§ Press and hold the $ key to see more options for currency symbols, and
then tap another currency symbol.
Page 33

35 Keyboard
Moving the cursor
To place the cursor in the middle of the text you've already entered, press and hold
near the text you want to change until a cursor appears, and then drag your finger to
move the cursor exactly where you want it.
Entering words with predictive text
The onscreen keyboard has predictive text to help you type quickly and accurately.
Predictive text input is enabled by default, and word suggestions are displayed as you
type.
To enter a word in predictive mode:
§ If you see the word you want highlighted in bold, just tap the space bar to insert
the word into your text.
§ If you see the word you want shown in the suggestions before you have finished
typing the entire word, tap the word to insert it into your text.
§ Slide across the suggestion bar to see more words.
§ If you mistyped something or chose the wrong word, just tap that word to
display the suggestion bar and choose the right word.
Changing the keyboard language
You can choose between a variety of languages, layouts, and regions for your
keyboard. Your phone can provide word suggestions and spelling corrections based
on the language you choose.
1. On the Start screen, slide to the left.
2. Tap Settings > keyboard.
3. Tap add keyboards.
4. Select the languages you'd like to be able to use from the onscreen keyboard.
The next time you use the keyboard, you'll see the language key
The language key will look different depending on the keyboard.
When you're done, tap .
5.
6. While using the onscreen keyboard, tap the language key to switch between
the languages you've selected.
You can also press and hold the language key to see all of the available keyboard
choices.
.
 Loading...