

Page 1
Your HTC phone
For CE / FCC
2011/01/25
User guide
Page 2
Your phone
For CE / FCC
2011/01/25
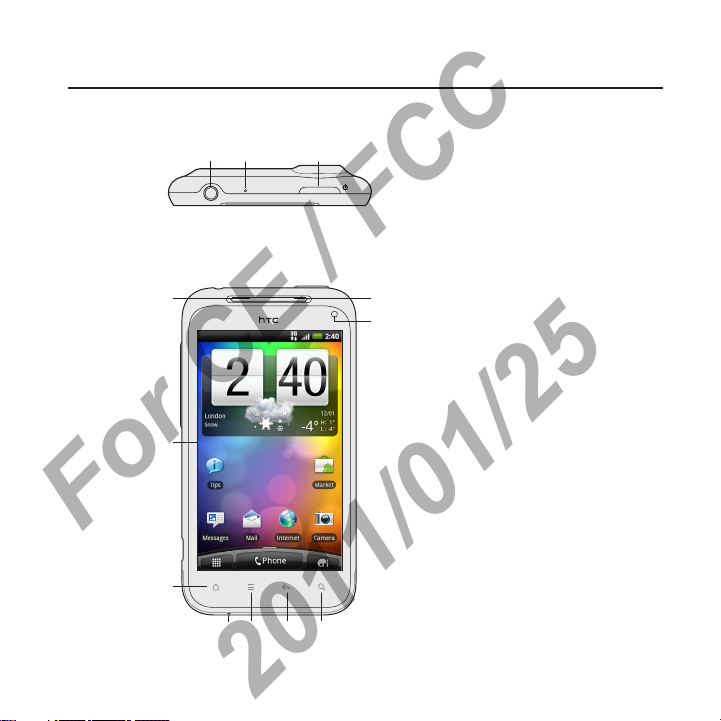
Top panel
2
Front panel
1
2
3
4 5 6 7
31
9
8
1 3.5mm audio jack
2 Microphone
3 POWER/LOCK
1 Earpiece
2 Touch screen
3 HOME
4 Microphone
5 MENU
6 BACK
7 SEARCH
8 1.3 megapixel front
camera
9
Notification LED
* You’ll see the HOME, MENU,
BACK, and SEARCH buttons
when your phone is switched on.
And when you turn your phone
sideways, these buttons rotate
along with the screen.
Basics 3
Page 3
4 Basics
For CE / FCC
2011/01/25
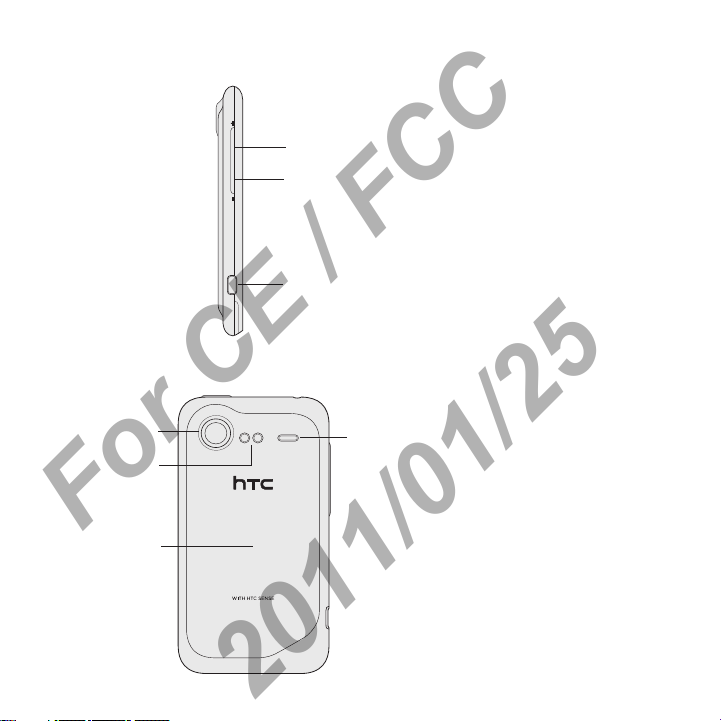
Left panel
Back panel
1 VOLUME UP
2 VOLUME DOWN
1
2
3
3 USB connector
1
2
4
1 8 megapixel camera
2 Dual LED flash
3 Back cover
4 Speaker
3
Page 4
Back cover
For CE / FCC
2011/01/25
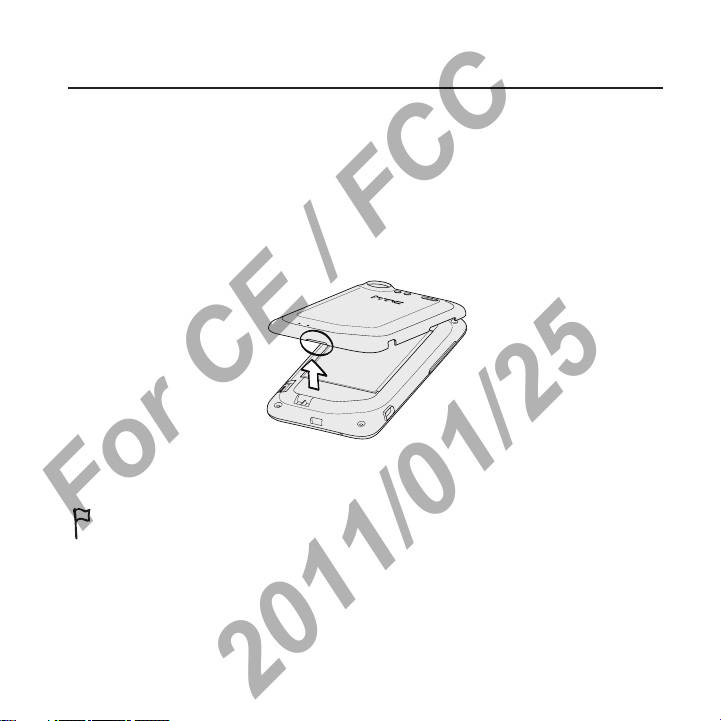
Removing the back cover
Remove the back cover to access the battery compartment and
storage card and SIM card slots.
1.
With the phone switched off, hold your phone securely with the
front facing down.
2.
Starting from the small opening at the bottom of the phone, lift
the back cover and remove it completely.
Replacing the back cover
Please handle the back cover with care since your phone’s antennas are placed
underneath it. Avoid twisting or bending the back cover.
To get the best signal for calls, data connection, or GPS navigation, be sure to
secure the back cover tightly to the phone.
1.
Align the back cover onto the phone’s top panel.
2.
Press all sides of the back cover towards the phone.
You’ll hear clicks when the small tabs underneath the back cover
are locked in place.
Basics 5
Page 5
6 Basics
For CE / FCC
2011/01/25
Battery
Your phone uses a rechargeable battery. Please use only original
batteries and accessories that came with your phone or replacements
that we recommend.
How long the battery can last before it needs recharging depends on
how you use your phone. Among these are the phone features and
accessories you use (for example, leaving your Bluetooth connection
always on uses more power). Long phone calls and frequent web
browsing use up much battery. Also, consider your location: poor
signal strength from your mobile network and extreme temperature
make the battery work harder.
Removing the battery
When you take your phone out from the box, make sure to peel off the thin film
of the battery that’s inside your phone. Pull the flap of the film to release the
battery.
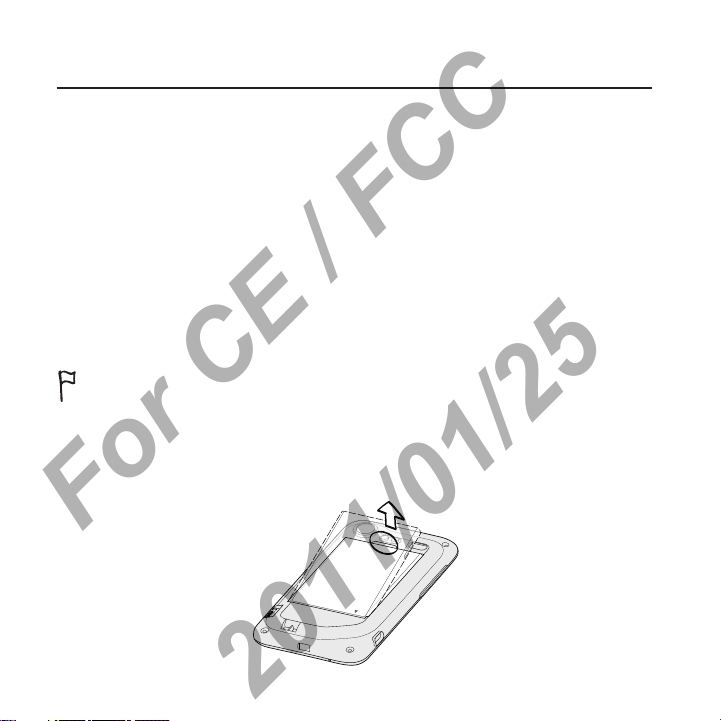
1. Take the back cover off. See “Removing the back cover”.
2. Lift the battery from the groove at the top of the battery
compartment.
Page 6
Inserting the battery
For CE / FCC
2011/01/25
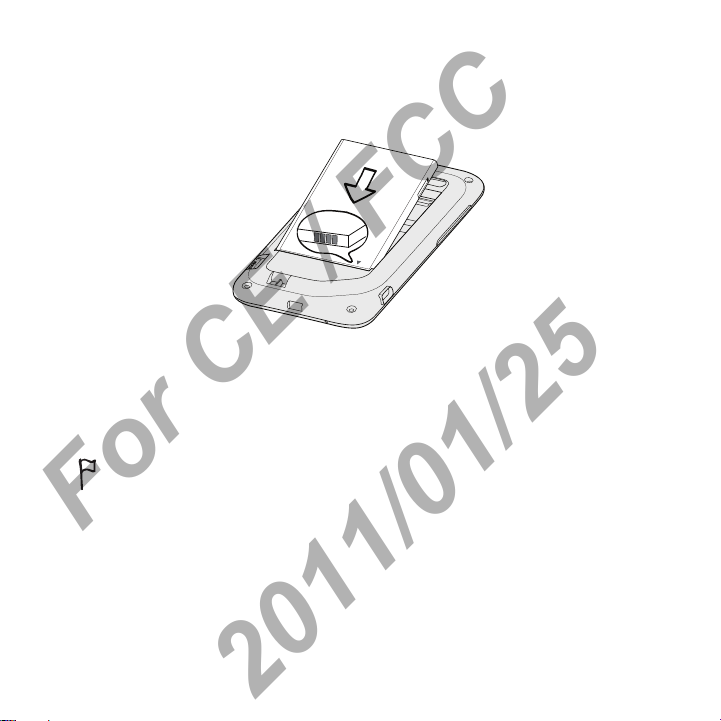
Insert the battery (with its exposed copper contacts first) into the
battery compartment. Then gently push the battery into place.
Charging the battery
The battery is partially charged when shipped. Before you turn on
and start using your phone, it is recommended that you charge
the battery. Some batteries perform best after several full charge/
discharge cycles.
Only the power adapter and USB sync cable provided with your phone
must be used to charge the battery.
Do not remove the battery from the phone while you are charging it using
the power or car adapter.
1. From the adapters that are included in your device package,
select and insert the appropriate adapter to the AC charger.
You can check the wall socket to know which adapter to use.
2. Connect one end of the USB cable to the AC charger.
Basics 7
Page 7
8 Basics
For CE / FCC
2011/01/25
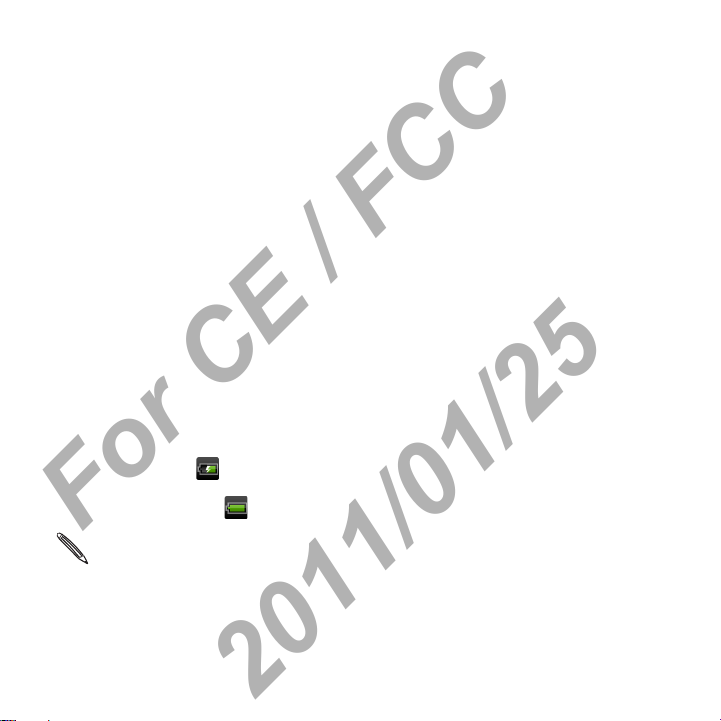
3. Connect the smaller end of the USB cable to the USB Connector
on the left side of your wireless device.
4. Plug in the AC charger to a wall socket to start charging the
battery.
As the battery is being charged, the notification LED shows a solid
orange light. The light turns to solid green when the phone is fully
charged.
When you charge the battery while the phone is on, the charging
battery icon
battery has been fully charged, the charging battery icon turns to a
full battery icon .
is displayed in your phone’s status bar. After the
As a safety precaution, the battery stops charging when it overheats.
Page 8

Switching your phone on or off
For CE / FCC
2011/01/25
Switching your phone on
Press and hold the POWER/LOCK button.
When you turn on the phone for the first time, you’ll need to set it up. See the
Getting started chapter for details.
Switching your phone off
1. If the display is off, press the POWER/LOCK button to turn it
back on, then unlock the screen by sliding down the bar on the
lock screen.
See “Unlocking the screen” in the Getting started chapter for
details.
2. Press and hold the POWER/LOCK button for a few seconds.
3. When the Power options menu appears, tap Power off.
Finger gestures
Tap When you want to type using the keyboard, select items
Press and hold To open the available options for an item (for example, a
onscreen such as application and settings icons, or press
onscreen buttons, simply tap them with your finger.
contact or link in a web page), simply press and hold the
item.
Basics 9
Page 9

10 Basics
For CE / FCC
2011/01/25
Swipe or slide To swipe or slide means to quickly drag your finger
Drag Press and hold your finger with some pressure before you
Flick Flicking the screen is similar to swiping, except that you
Rotate For most screens, you can automatically change the
Pinch In some apps, like Gallery or the web browser, you can
vertically or horizontally across the screen.
start to drag. While dragging, do not release your finger
until you have reached the target position.
need to swipe your finger in light, quicker strokes. This
finger gesture is always in a vertical direction, such as when
flicking the contacts or message list.
screen orientation from portrait to landscape by turning
the phone sideways. When entering text, you can turn the
phone sideways to bring up a bigger keyboard.
“pinch” the screen using two fingers (for example, thumb
and index finger) to zoom in or zoom out when viewing a
picture or a web page.
Page 10

Getting started
For CE / FCC
2011/01/25
Setting up your phone for the first time
When you switch on your phone for the first time, you’ll be asked to
set up your phone. You can choose your language, how you want to
connect to the Internet, and whether you want your current location
to be automatically detected.
If you still have personal contacts and calendar events stored on your
old phone, you can easily transfer them to your new phone through
Bluetooth as well.
Just follow the onscreen instructions and you’ll be up and running
with your phone in no time.
Some features that need to connect to the Internet such as location-based
services and auto-sync of your online accounts may incur extra data fees from
your mobile operator. Don’t worry. You can enable or disable them in your
phone’s settings as you go along later on. To find out how, see the Settings
chapter.
Home screen
Your Home screen is where you make your phone your own. It comes
with a weather clock widget that shows the time and weather in your
current location.
Page 11
12 Getting started
For CE / FCC
2011/01/25
You can also add your favorite apps, shortcuts, folders and widgets so
they’re always just a tap away.
To find out how, see the Personalizing chapter.
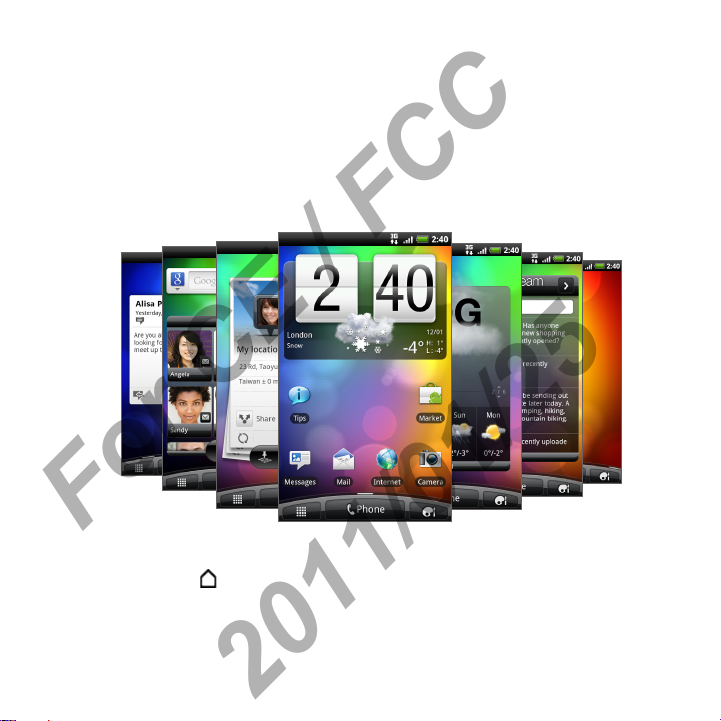
Extended Home screen
As you start to do more things with your phone, you might find that
one Home screen is not enough. No problem. You can use up to six
extra screens. It should be plenty.
Slide your finger horizontally to the left or right and you’ll discover
more space for adding icons, widgets, and more.
Press HOME
home screen).
to return to the main Home screen (that is, the center
Page 12
Getting started 13
For CE / FCC
2011/01/25
Using Leap view
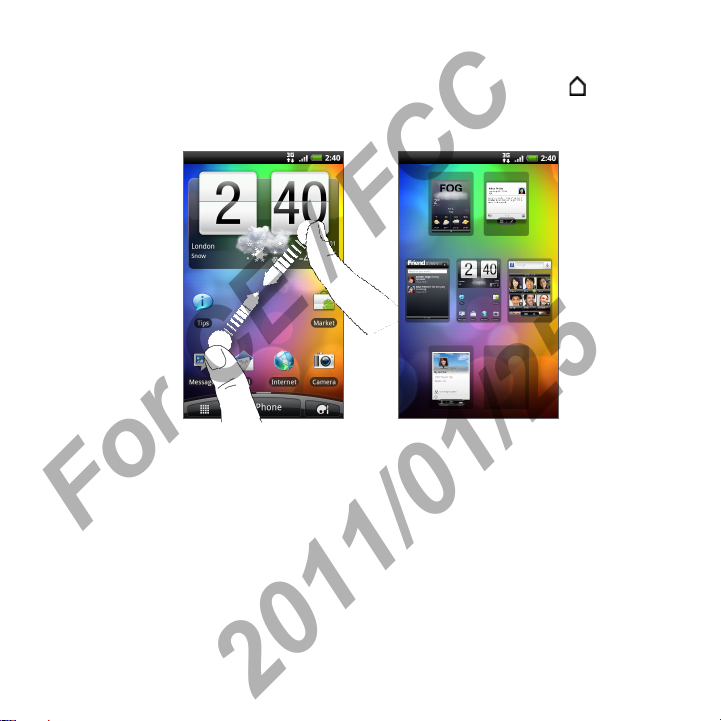
To jump straight to the screen that you want, press HOME while on
the main Home screen or pinch the screen to show the Leap view. It
reveals all seven Home screens as thumbnails.
Just tap the one you want and you’ll leap right there.
Page 13
14 Getting started
For CE / FCC
2011/01/25
Status and notifications
Status icons
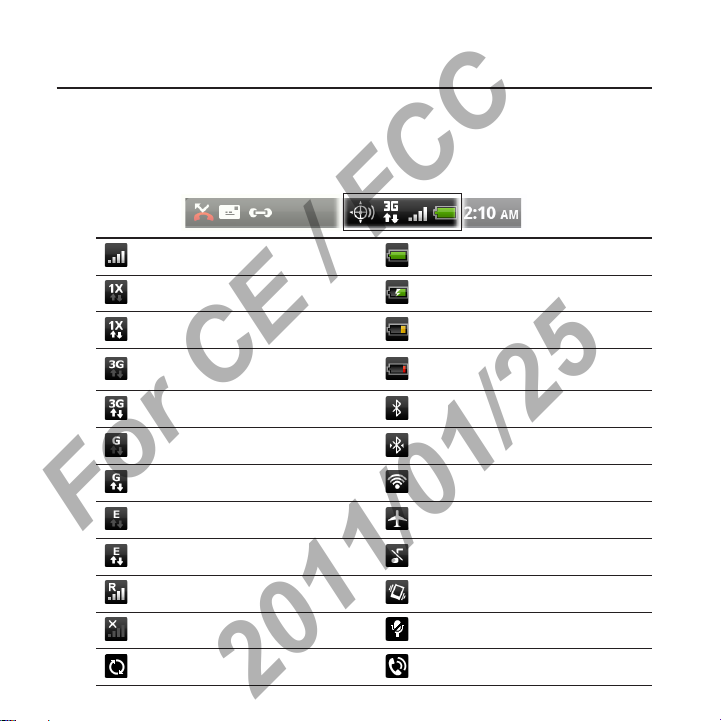
You can tell a lot about your phone by checking the icons in its status
bar. Here’s what each one means:
Signal strength Battery is full
1xRTT connected Battery is charging
1xRTT in use Battery is low (20% remaining)
3G connected
3G in use Bluetooth is on
GPRS connected Connected to a Bluetooth device
GPRS in use Connected to a Wi-Fi network
EDGE connected Airplane mode
EDGE in use Silent mode
Roaming Vibrate mode
No signal Phone microphone is mute
Battery is very low (10%
remaining)
Data synchronizing Speakerphone on
Page 14
Getting started 15
For CE / FCC
2011/01/25
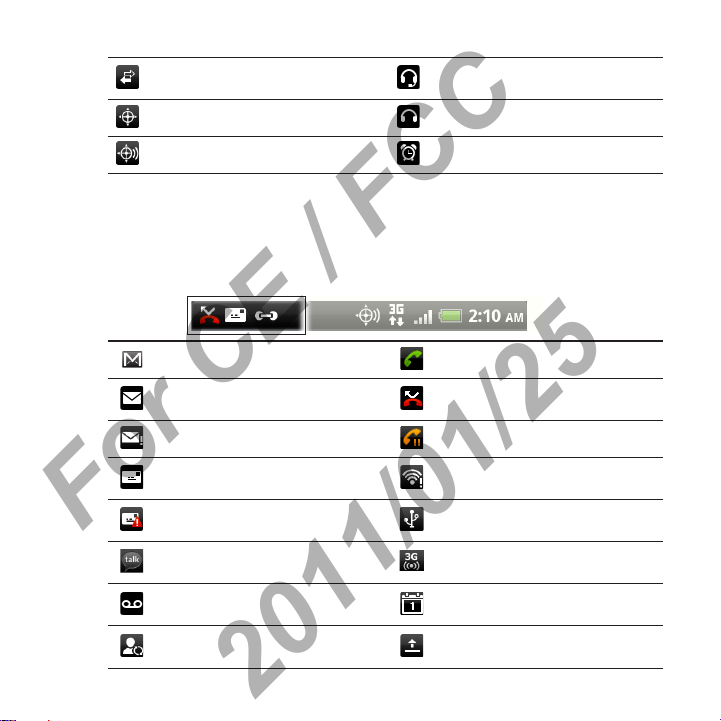
Network sharing is on
Location setting off Wired headset connected
Location setting on Alarm is set
Notification icons
A busy life means a busy phone. Notification icons on the status bar
make it easy for you to keep on top of your messages, calendar events
and alarms. Here’s what each one means:
New Gmail message Call in progress
New Microsoft Exchange
ActiveSync or POP3/IMAP email
Problem with email delivery Call on hold
New SMS/MMS
Problem with SMS/MMS delivery
New Google Talk instant message 3G Mobile Hotspot is on
New voicemail Upcoming event
New updates from your social
networks
Wired microphone headset
connected
Missed call
Wi-Fi is on and wireless networks
are available
The phone is connected to a
computer via USB cable
Uploading data (animated)
Page 15
16 Getting started
For CE / FCC
2011/01/25
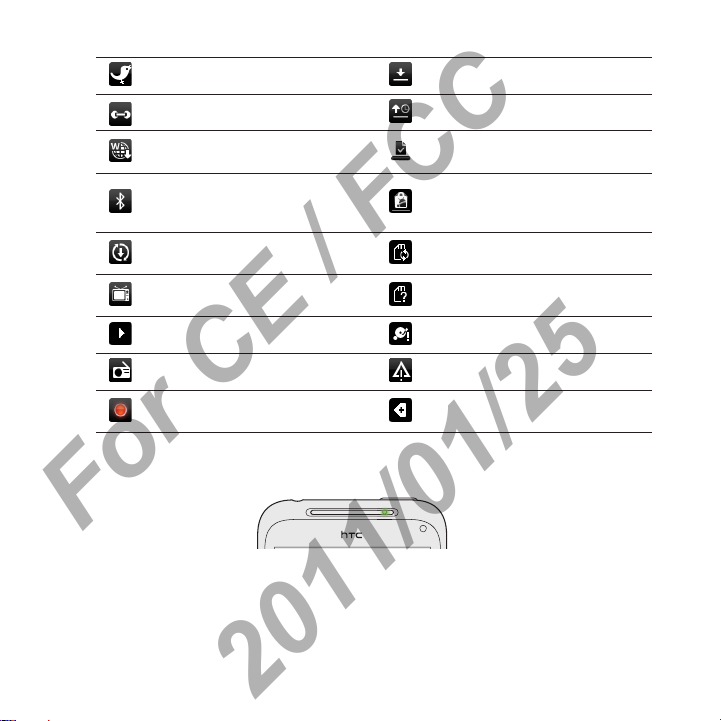
New tweet Downloading data (animated)
Matched contacts suggestion Waiting to upload
New push message
Bluetooth pairing request
Phone software update available
TV out
Song is playing Storage card is low on free space
FM Radio app in use General notification
Voice recording is on
Notification LED
Downloaded Android Market app
installed successfully
Update available for an app
downloaded from Android
Market
Storage card is safe to remove or
storage card is being prepared
No storage card installed on the
phone
More (not displayed)
notifications
The notification LED shows a:
•
Solid green light when the phone is connected to the power
adapter or a computer and the battery is fully charged.
•
Flashing green light when you have a pending notification.
•
Solid orange light when the battery is being charged.
•
Flashing orange light when the battery level reaches very low.
Page 16
Getting started 17
For CE / FCC
2011/01/25
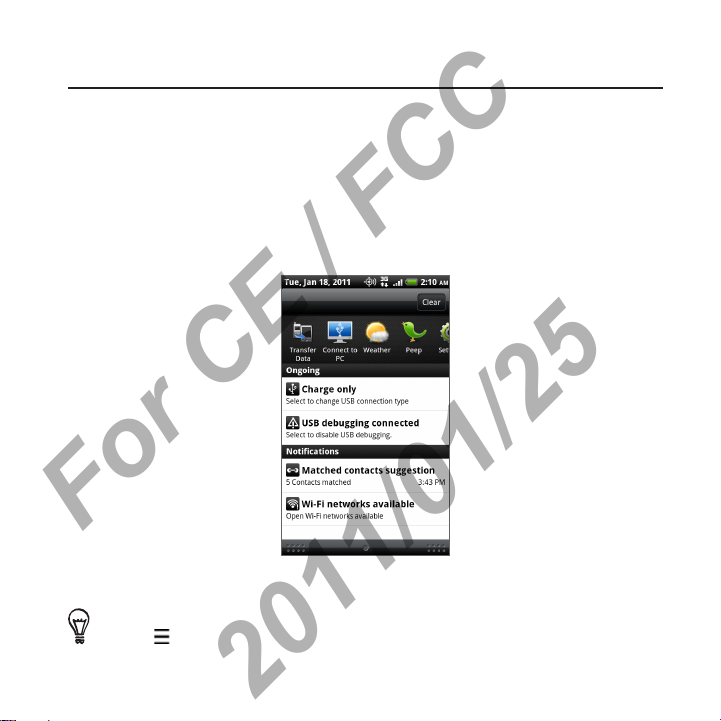
Notifications panel
When you get a new notification, you can open the Notifications panel
to see the message, reminder or event notification. The Notifications
panel also lets you switch between recently-opened apps as quickly as
possible.
Opening the Notifications panel
Press and hold the status bar, then slide your finger downward to
open the Notifications panel.
If you have several notifications, you can scroll down the screen to see
them all.
You can also open the Notifications panel on the Home screen by pressing
MENU and then tapping Notifications.
Page 17
18 Getting started
For CE / FCC
2011/01/25
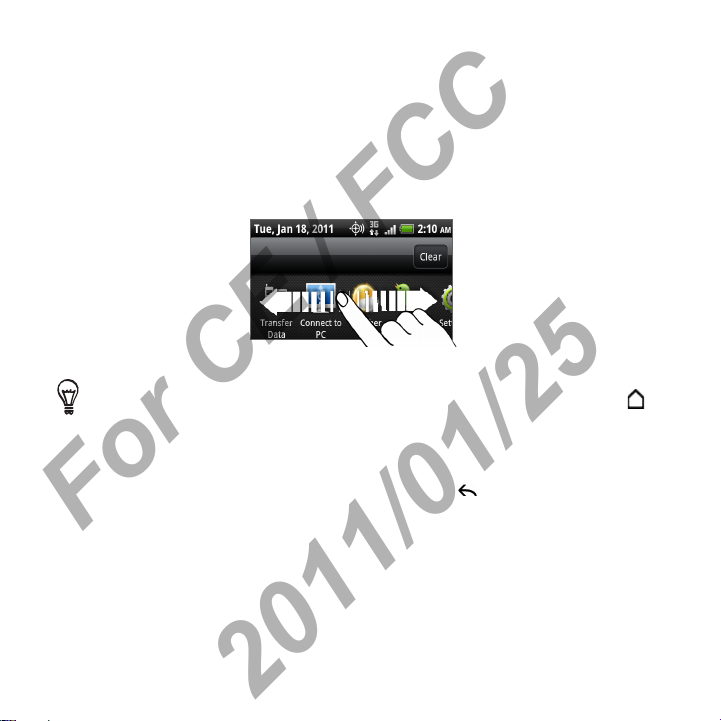
Switching between recently-opened apps
On the Notifications panel, you can easily access up to eight apps you
just recently opened.
1. Press and hold the status bar, then slide your finger downward to
open the Notifications panel.
2. In the Recent apps section, slide your finger left or right to see
recently-opened apps.
3. Tap an app to open it.
You can also go to the Recent apps screen when you press and hold HOME .
Closing the Notifications panel
Press and hold the bottom bar of the Notifications panel, then slide
your finger up the screen. Or just press BACK .
Page 18

Getting started 19
For CE / FCC
2011/01/25
Connecting your phone to a computer
Whenever you connect your phone to a computer using the USB
cable, the Connect to PC screen opens and lets you choose the type
of USB connection. Select one of the following choices, and then tap
Done:
Charge
only
HTC Sync Select this option to synchronize contacts, calendar, and other
Disk drive
Internet
Connection
Mode
Select this option if you only want to charge the battery while
your phone is connected to your computer.
information between your computer and your phone. For more
information, see “Synchronizing with your computer” in the
Accounts and sync chapter.
This mode is available only when there’s a microSD card on your
phone. Select this mode when you want to copy files between
your phone’s storage card and your computer. For more
information, see “Copying files to or from the storage card” in
this chapter.
When Disk drive mode is enabled while your phone is
connected to the computer, you will not be able to use apps on
your phone to access the storage card.
When you do not have Internet connection on your computer,
you can select this mode to share your phone’s mobile data
connection with your computer. For more information, see
“Using your phone as a modem (tethering)” in the Internet
connections chapter.
Page 19
20 Getting started
For CE / FCC
2011/01/25
Media sync Select this mode if you want to synchronize pictures, music, and
Internet
passthrough
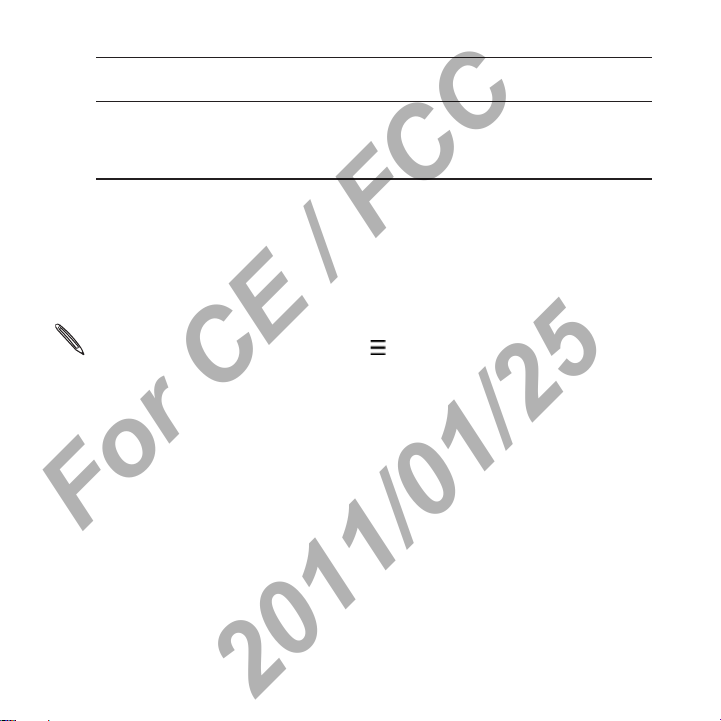
You can also change the type of USB connection on-the-fly, without
having to disconnect and reconnect your phone. Slide open the
Notifications panel, and then tap the notification that says “Select
to change USB connection type” to open the Connect to PC screen
again.
To change the default connection type or choose between showing and hiding
the Connect to PC screen, press MENU from the Home screen, and then tap
Settings > Connect to PC.
videos with your computer.
If you don’t have a data plan for your phone or you don’t have
access to a Wi-Fi network, you can select this mode to share
your computer’s Internet connection with your phone. For more
information, see the Internet connections chapter.
Page 20

Getting started 21
For CE / FCC
2011/01/25
Copying files to or from the storage card
You can copy your music, photos, and other files to your phone’s
storage card.
1. Connect your phone to your computer using the supplied USB
cable.
2. On your phone’s Connect to PC screen, tap Disk drive, and then
tap Done.
On your computer, the connected phone is recognized as a
removable disk.
3. Navigate to the removable disk and open it.
4. Do one of the following:
•
Copy the files from the computer to the phone’s storage
card’s root folder.
•
Copy the files from the phone’s storage card to a folder in
your computer.
5. After copying the files, unmount the removable disk (that is, the
connected phone) as required by your computer’s operating
system to safely remove your phone.
6. Do one of the following:
•
Disconnect the phone from the computer.
•
If you want to keep the phone connected to the computer but
want the phone to be able to access the storage card, open
the Notifications panel, tap Disk drive, select an option except
Disk drive, and then tap Done.
Page 21
22 Getting started
For CE / FCC
2011/01/25
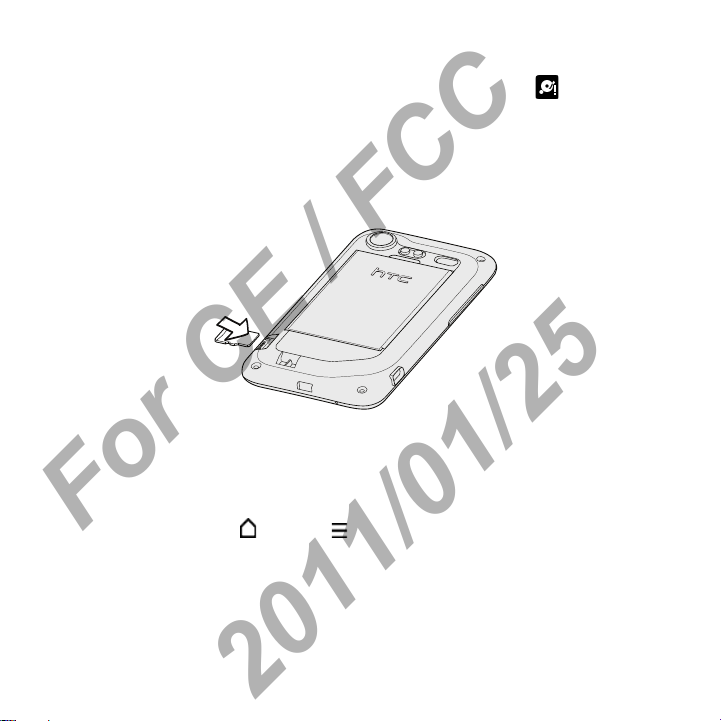
Replacing the storage card
When the storage card is almost full, you’ll see this icon in the
status bar. You can replace the storage card with a new one.
1. With your phone turned off, remove the back cover. Refer to
“Removing the back cover.”
2. Insert the microSD card into the storage card slot with its gold
contacts facing down and push it until it clicks into place.
Removing the storage card while the phone is on
When you need to remove the storage card while the phone is on,
unmount the storage card first to prevent corrupting or damaging the
files in the storage card.
1. Press HOME > MENU , and then tap Settings.
2. Scroll down the screen, and then tap SD & phone storage.
3. Tap Unmount SD card.
4. Remove the storage card.
Page 22
Getting started 23
For CE / FCC
2011/01/25
Searching your phone and the Web
Find all types of information on your phone and the Web. Search
Anywhere sifts through different files, information, and apps on your
phone. You can also choose to search the Web using your favorite
web search service.
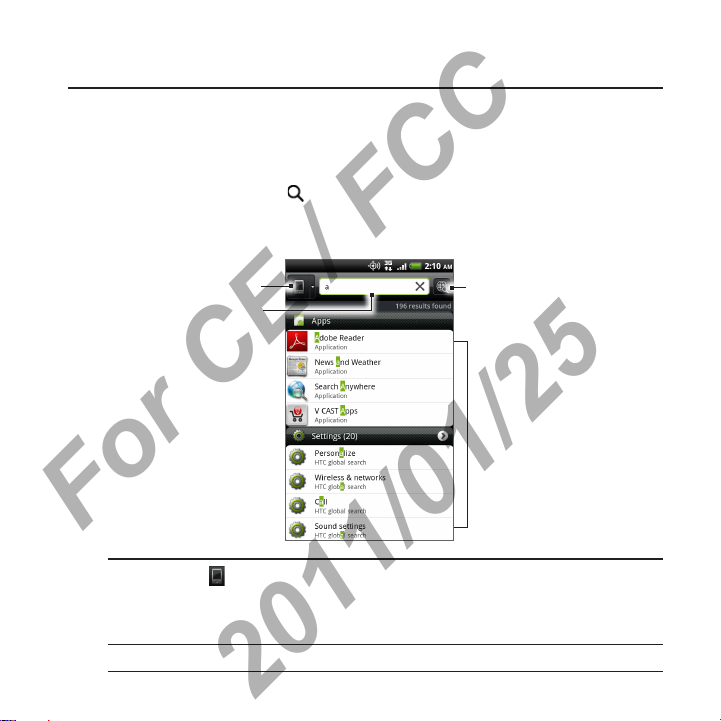
Simply press SEARCH
few letters of what you want to search for. Matching items will be
shown as you type.
from the Home screen. Then enter the first
1
2
4
3
1 This icon indicates that your phone will search for all types of
information.
Tap it if you want to choose and search only for one type of item, for
example, Mail.
2 Type in what you want to search for.
Page 23
24 Getting started
For CE / FCC
2011/01/25
3 Matching search suggestions and results. You can:
Scroll down to see more search results.
Tap
4 After entering a word or phrase in the search box, tap to search the Web
using your favorite search service. To find out how to select a search
service to use, see “Setting your phone’s search options”.
Setting your phone’s search options
From the Home screen, press SEARCH .
1.
2.
When the search box appears, press MENU , and then tap
Settings.
3.
Tap any of the following:
Quickly looking up information on the Web
Quick Lookup helps you learn about something right on the spot.
When you enter a new word or phrase, you can readily look it up in
popular websites or search services such as Google Search, Wikipedia,
YouTube, Google Translate, and Google Dictionary.
1. Press HOME , and then tap > Quick Lookup.
2. If the onscreen keyboard is open, press BACK to close it first
so you’ll see the bottom tabs.
to see more results for a particular category.
Tap a search result item to open its app.
Web search engine Choose a web search service you want to use.
Select areas to
search
Choose the types of items or apps to include in
the search. You can also press and hold
arrange items according to search priority.
and
Page 24
Getting started 25
For CE / FCC
2011/01/25
3. Slide across the tabs to pick where you want to look up
information. Then in the search box, enter what you want to
search for.
If, for example, you’ve found the information you were looking for
in one tab such as Wikipedia, you can switch to the other tabs to
automatically search the same item in Google Search on the Web,
watch related videos in YouTube, or look up translations and meanings
in Google Translate and Google Dictionary.
Translating words to other languages
1. Press HOME , and then tap > Quick Lookup.
2. Press BACK to hide the onscreen keyboard first, then slide to
the Google Translate tab.
3. Under From language, choose the original language, then enter
the word or phrase you want to translate.
4. Under To language, choose from the languages available for
translation.
5. Tap Translate.
Page 25
26 Getting started
For CE / FCC
2011/01/25
Adjusting the volume
Adjusting the ringer volume changes the volume level of the phone
ringtone, while adjusting the media volume changes the volume level
of sound notifications and music or video playback.
Adjusting the ringer volume
•
Press the VOLUME UP or VOLUME DOWN button on the right
panel of the phone to adjust the ringer volume to your desired
level. The Ringer volume window appears on the screen to
display the volume levels.
•
While in the lowest ringer volume level (Silent mode), press
VOLUME DOWN once to set your phone to Vibrate mode. The
phone vibrates and the vibrate mode icon
status bar.
•
While in Vibrate mode, press VOLUME UP once to switch to silent
mode. The speaker mute icon
Adjusting the media volume
When playing music or watching video, press the VOLUME UP or
VOLUME DOWN button on the right panel of the phone to adjust the
media volume. The Media volume window appears on the screen to
display the volume level.
Adjusting the earpiece volume for phone calls
During a phone call, press the VOLUME UP or VOLUME DOWN
button.
displays in the status bar.
appears in the
Page 26
Getting started 27
For CE / FCC
2011/01/25
Adjusting the volume via settings
1. Press HOME > MENU , and then tap Settings > Sound >
Volume.
2. Drag the volume sliders to the left or right to adjust the volume
levels of your phone’s ringtone, media playback, alarms, and
notifications.
Your phone briefly plays a sample tone with the volume being
adjusted as you drag a slider.
3. If you want the same volume for your ringtone and notifications,
select Use incoming call volume for notifications.
4. When you’re done, tap OK.
Sleep mode
Sleep mode saves battery power by putting your phone into a low
power state while the display is off. It also stops accidental button
presses when the phone’s in your bag or pocket. You’ll still receive
messages and calls though.
To change the delay before your screen turns off, see “Adjusting the time before
the screen turns off” in the Settings chapter.
Switching to Sleep mode
Quickly press the POWER/LOCK button to turn off the display and
switch your phone to Sleep mode. Your phone also automatically goes
into Sleep mode when it’s idle for a while.
Page 27
28 Getting started
For CE / FCC
2011/01/25
Waking up from Sleep mode
Your phone automatically wakes up when you have an incoming call.
To wake it up manually, press the POWER/LOCK button. You’ll need to
unlock the screen.
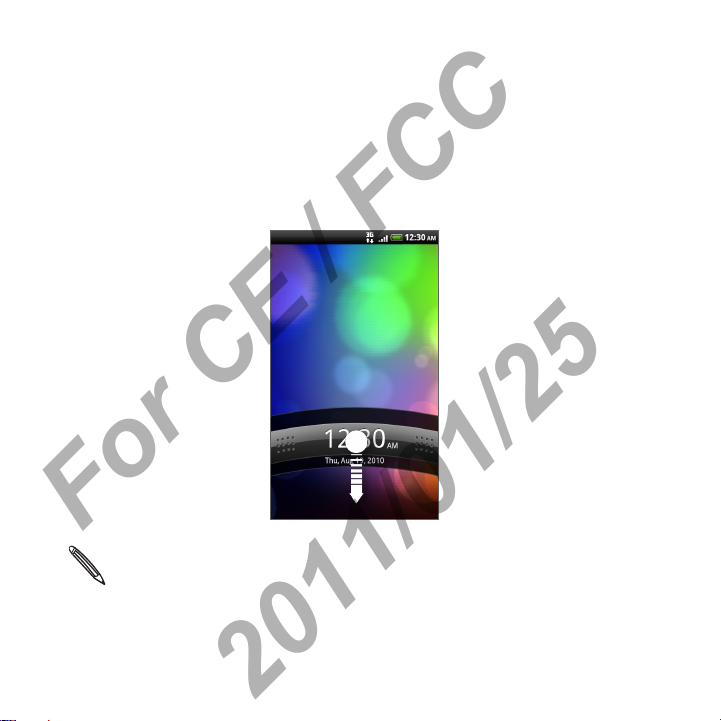
Unlocking the screen
Press the bar on the lock screen and then slide your finger down to
unlock the screen or answer an incoming call.
If you have set up a screen unlock pattern, pin, or password, you will be
asked to draw the pattern on the screen or enter the PIN or password
before it unlocks. See “Protecting your phone with a screen lock” in the
Security chapter for details.
Page 28
Phone calls
For CE / FCC
2011/01/25
Making calls
Your phone’s antennas are placed underneath the back cover. To get the best
signal for calls, be sure to secure the back cover tightly to the phone.
Making a call on the Phone dialer screen
You can either dial a number directly, or use the Smart dial feature to
search and call a stored contact or a number from your call history.
1. Press HOME , then tap Phone.
2. Begin entering the first few digits of a phone number or
characters of a contact name on the phone keypad.
The Phone dialer screen then displays a list of matching numbers
and names.
If you enter a wrong digit or letter, tap to delete it. To erase the
entire entry, press and hold .
3. Tap to close the phone keypad and to see if there are more
matching numbers or contacts. To browse through the filtered
list, flick through the list or slide your finger up or down the list
slowly.
4. To place a call, do one of the following:
Tap a phone number or contact from the list.
•
After entering a complete number, tap Call.
•
Page 29
30 Phone calls
For CE / FCC
2011/01/25
•
To call a different phone number associated with the contact,
you can tap at the right side of the contact name. On the
contact details screen, tap the number you want to call.
While dialing or when the call is in progress, the status bar displays the
Call in progress icon
What is Smart dial?
The phone dialer’s Smart Dial feature makes it quick and easy for you
to place a call. Simply enter the phone number or first few letters of
the person’s name you want to call.
Smart Dial automatically searches and filters your contacts list (stored
on your phone and online accounts such as Google Account and
Exchange ActiveSync) and the phone numbers from the call history.
Making international calls
Your phone lets you make calls from the U.S. to any phone on the
globe. See “Global Phone” in this chapter for more information.
1. Press HOME , then tap Phone.
2. Press and hold “0” on the phone keypad until the plus sign (+)
appears.
3. Enter the full phone number you want to dial. The full phone
number includes the country code, area code (without the
leading zero, if any), and phone number.
4. Tap Call.
.
Page 30

Phone calls 31
For CE / FCC
2011/01/25
Using Speed dial
Use Speed dial to call a phone number with a single tap. For example,
if you assign a contact’s number to the number 2 key, you can simply
press and hold this key on the Phone dialer keypad to dial that
number.
Assigning a speed dial key
1.
Press HOME
2.
Press MENUMENU , and then tap Speed dial > Add new.
3.
Enter the name of the contact you want to add. When the name
comes up in the list, tap the name.
4.
On the Speed dial screen, choose the phone number of the
contact to use, and a speed dial key to assign.
5.
Tap Save.
Calling a speed dial number
1.
Press HOME
2.
On the phone keypad:
•
The number 1 key is generally reserved for your voicemail.
Press and hold this key to call voicemail and retrieve your
voicemail messages.
•
Press and hold the key that is associated with the contact you
want to call.
, then tap Phone.
, then tap Phone.
Page 31
32 Phone calls
For CE / FCC
2011/01/25
Calling using Voice Dialer
The person you want to call should be in your People list.
Press HOME
1.
When the Voice Dialer message box appears and you see
2.
“Listening” on the screen, say “Call [name of person]” in a clear
voice into the phone.
3. A confirmation message will pop up asking if the person to call is
correct. Tap OK if the person is correct or tap Cancel to try again.
If the contact has more than one number, or if the Voice Dialer does not detect
your voice accurately, the confirmation message displays a list of the contact’s
phone numbers or suggested results.
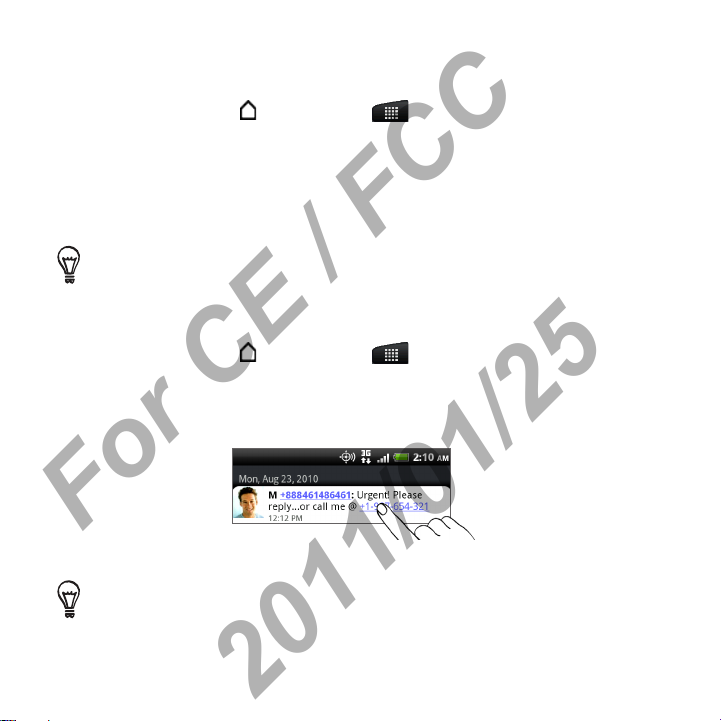
Calling a phone number in a text message
Press HOME , and then tap > Messages.
1.
Tap the number or name of the person who sent you the text
2.
message.
Tap the phone number within the message.
3.
, and then tap > Voice Dialer.
4. Edit the phone number if needed, and then tap Call.
To call the message sender, press and hold the sender or the received message,
and then tap Call on the options menu. To find out more about text messaging,
see the Messages chapter.
Page 32
Phone calls 33
For CE / FCC
2011/01/25
Calling a phone number in an email
1.
Press HOME , and then tap > Mail.
2.
In your email account’s inbox, tap the email that contains the
phone number to call.
3.
In the email body, tap the phone number. A selection menu then
pops up and the phone number is highlighted.
The phone will recognize a number as a phone number if the
number has a minimum of 5 digits and have at least one of the
following:
•
Numbers starting with a plus sign (+). For example,
+1-987-654-321 or +1987654321.
•
Numbers starting with an area or country code enclosed in a
parenthesis. For example, (02)987654321 or (02)987-654-321.
•
Numbers separated by dashes. For example, (02)-987-654-321
or 0987-654-321.
4. Tap Call.
5. When the phone dialer screen opens with the phone number
already entered, tap Call.
To find out more about using email on your phone, see the Email
chapter.
Making an emergency call
1.
Press HOME , then tap Phone.
2.
Dial the international emergency number for your locale (for
example, 000), and then tap Call.
Page 33

34 Phone calls
For CE / FCC
2011/01/25
Using Assisted Dialing
Assisted Dialing allows you to easily dial international calls while
roaming in another country.
Turning Assisted Dialing on
1.
Press HOME
Assisted Dialing.
2.
Select the Enable Assisted Dialing check box.
3.
Under Reference Country, select the country that you want to
call.
Editing a country’s international call settings
1.
Press HOME
Assisted Dialing.
2.
Under Reference Country, select the country whose settings you
want to edit.
3.
Press MENU
4.
Edit the Country Code, IDD Prefix (International Direct Dial),
NDD Prefix (National Direct Dial), Area/City Code and National
Number Length (length of phone number).
5.
Tap Save.
Resetting the Reference Country to the default
1.
Press HOME
Assisted Dialing.
2.
Under Reference Country, select the country whose settings you
want to set to default values.
3.
Press MENU
> MENUMENU , and then tap Settings > Call >
> MENU , and then tap Settings > Call >
and then tap Edit.
> MENU , and then tap Settings > Call >
and then tap Set Default.
Page 34
Phone calls 35
For CE / FCC
2011/01/25
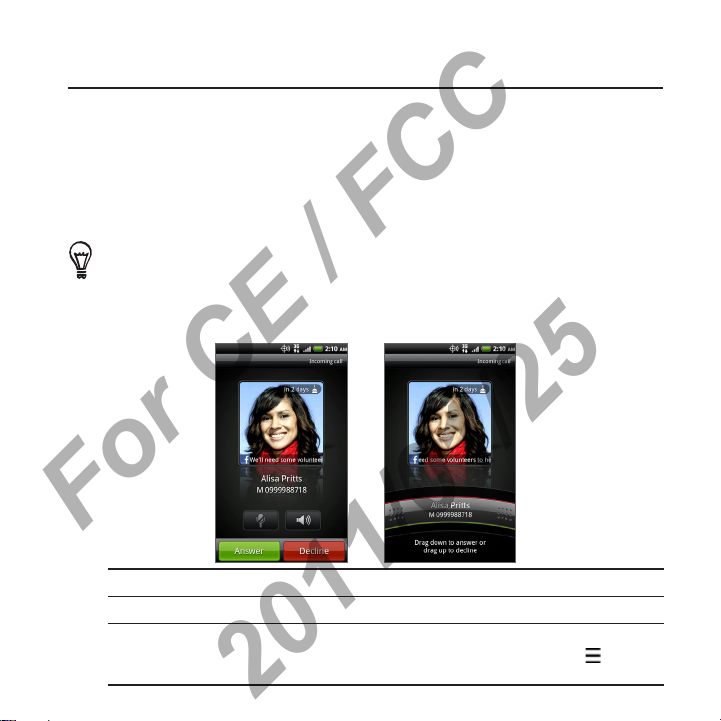
Receiving calls
When you receive a phone call from a contact, the Incoming call
screen appears and displays the caller ID icon, name, and phone
number of the calling party.
When you receive a phone call from someone who is not stored in
People, only the default caller ID icon and phone number appear on
the Incoming call screen.
You can use your phone’s polite ringer and pocket mode features for receiving
calls. To find out how, see the Settings chapter.
Answering or rejecting an incoming call
If To answer the call To reject the call
Display is on Tap Answer. Tap Decline.
Display is off When the Lock screen appears,
drag the bar that shows the caller
name or number downward.
Drag the bar upward.
Or, press MENU
then tap Decline.
and
Page 35

36 Phone calls
For CE / FCC
2011/01/25
You can also do one of the following to reject an incoming call:
Press the POWER/LOCK button twice.
•
To reject the call and send a text message, press MENU
•
then tap Send message.
, and
Changing the text message to send out for rejected calls
1.
On the Phone dialer screen, press MENU
2.
Tap Settings > Edit default message.
3.
Enter the new message, and then tap OK.
Muting the ringing sound without rejecting the call
Do one of the following:
•
Press the VOLUME DOWN or VOLUME UP button.
•
Press the POWER/LOCK button.
•
Place the phone face down on a leveled surface.
If the phone is already facing down, the phone will still ring when there are
subsequent incoming calls.
.
Page 36
Phone calls 37
For CE / FCC
2011/01/25
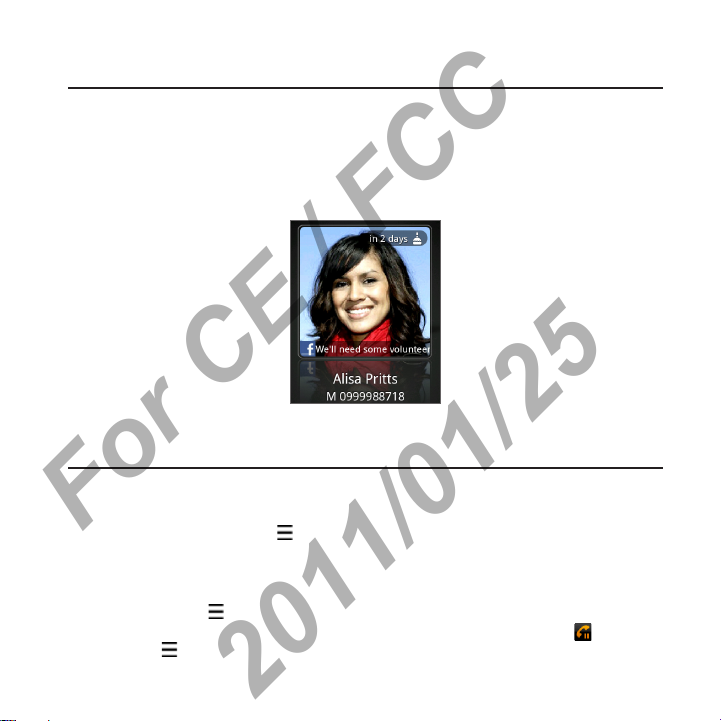
HTC Caller ID
Everytime you make a call or your friend gives you a ring, you get
to see your friend’s latest status update from social networks like
Facebook or Twitter right on the call screen.
You also won’t miss people’s birthdays. You’ll see a birthday reminder,
if your friend’s birthday will occur sometime within the next seven days.
Using in-call options
When a call is in progress, use the buttons onscreen to mute or
unmute the microphone or to turn on or off the speakerphone. You
can also press MENU and choose whether to add a call, mute the
microphone, and more.
Putting a call on hold
Press MENU and then tap Flash to put the call on hold. When you
put a call on hold, the status bar displays the Hold call icon . Press
MENU , and then tap Flash again to resume the call.
Page 37
38 Phone calls
For CE / FCC
2011/01/25
Switching between calls
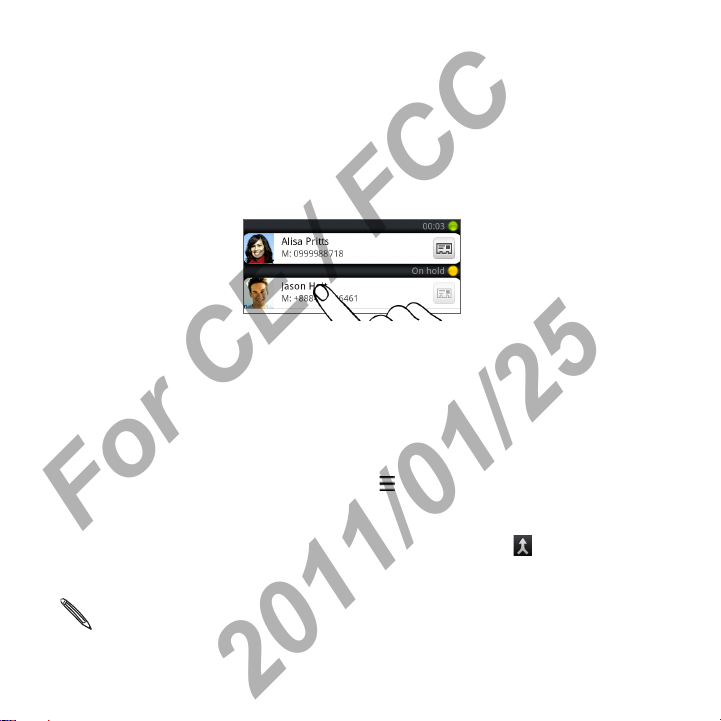
If you’re already on a call and accept another call, you can choose to
switch between the two calls.
1. When you receive another call, tap Answer to accept the second
call, and to put the first call on hold.
2. To switch between the calls, tap the person you want to talk to
on the screen.
3. To end the current call and return to the other call, tap End call.
Setting up a three-way conference call
Conference calling with your friends, family, or co-workers is easy.
Make the first call (or accept a call), and then simply dial each
subsequent call to add to the conference.
Make a call to the first conference call participant.
1.
2.
When connected, press MENUMENU , tap Add call, and then dial the
number of the second participant. The first participant is put on
hold when you dial the second participant.
3.
When connected to the second participant, tap
4. When finished, tap End call.
Not all mobile networks support conference calling. Contact mobile operator
for details.
(merge).
Page 38
Phone calls 39
For CE / FCC
2011/01/25
Turning the speakerphone on or off during a call
To turn the speakerphone on, you can do any of the following:
Flip your phone over during a call (be sure that Flip for speaker is
•
selected in HOME
On the call screen, tap
•
The speakerphone icon appears in the status bar when the
speakerphone is on.
To decrease potential damage to your hearing, do not hold your phone
against your ear when the speakerphone is on.
To turn the speakerphone off, just flip the phone over again, facing it
up. Or tap again.
Muting the microphone during a call
On the call screen, tap to toggle between turning the
microphone on or off. When the microphone is turned off, the Mute
icon appears in the status bar.
Ending a call
Do one of the following to end the call:
On the call screen, tap End call.
•
If the phone display is off, press POWER/LOCK to turn on the
screen so you can tap End call.
Slide open the Notifications panel, then tap
•
If you are using the provided wired headset, press the button to
•
end the call.
If the phone number of the person who called is not in your contacts
list, you can save the number to your contacts list after you hang up.
> MENU > Settings > Sound).
.
.
Page 39
40 Phone calls
For CE / FCC
2011/01/25
Using Call history
Use the Call history to check missed calls, your dialed numbers and
received calls.
Checking a missed call
You will see the missed call icon in the status bar when you miss a
call.
1. Slide open the Notifications panel to check who the caller is.
2. To return the call, tap the missed call notification. Then tap the
caller’s name or number on the Call history screen.
Checking calls in the call history
Press HOME , and then tapand then taptap > Call history.
1.
You can also tap
2. On the Call history screen, you can:
Tap a name or number in the list to call.
•
Press and hold a name or number in the list to display the
•
options menu where you can select to check the call history
details, view contact information (if the number is stored
in your contacts list), send a text message, delete from call
You can also access Call history from the People app. For details, see the
People chapter.
history, or block the caller.
Tap
•
•
to check only the call history of a particular contact.
Press MENU , then tap View to display just a particular type
of calls such as Missed calls or Outgoing calls.
on the Phone dialer screen.
Page 40

Phone calls 41
For CE / FCC
2011/01/25
Adding a new phone number to your contacts from call
history
1.
On the Call history screen, press and hold a phone number that
you want to save to your contacts, and then tap Save to People.
2. Choose whether to create a new contact or to save the number
to an existing contact on your phone.
3. Do any of the following:
When creating a new contact, enter the contact name, contact
•
type, and other information in the blank contact record that
appears. The phone number is automatically added to the
Mobile field in the Phone section.
To store it as another type of number, for example a home
number, tap the Mobile button.
When saving the number to an existing contact, tap a contact
•
stored on your phone, and then select the number type.
4. Tap Save.
To find out how to add new contacts or edit the contact information, see the
People chapter.
Clearing the call history list
On the Call history screen, you can do the following:
•
To remove one name or number from the list, press and hold
the name or number, and then tap Delete from call history.
•
To clear the entire list, press MENU
, and then tap Delete all.
Page 41

44 Phone calls
For CE / FCC
2011/01/25
Call services
Your phone can directly link to the mobile phone network, and enable
you to access and change the settings of various phone services for
your phone. Call services may include call forwarding, call waiting,
voicemail, and more. Contact your mobile operator to find out about
the availability of call services for your phone.
To open call services, press MENU
tap Settings > Call.
Voicemail service Shows the current voicemail service being used.
Voicemail settings Specify another voicemail number.
Clear voicemail
notification
Auto Retry When enabled, the phone automatically redials a
Hearing aids Turn on the Hearing Aid Compliance feature that
Preferred Network Lets you select the type of network your phone
GSM call settings
If you’re using the phone outside of the United States in a GSM coverage area,
you can set the following options:
TTY mode Enable TTY (Teletypewriter) support for your phone.
Caller ID Enable or disable Caller ID.
Call waiting Enable or disable Call waiting.
If you have a notification of a new voicemail, you can
clear the notification with this option.
number when the attempted call fails.
reduces interference to hearing aids.
connects to so you can place phone calls and have data
connection.
from the Home screen, and then
Page 42

Phone calls 45
For CE / FCC
2011/01/25
Cell broadcast Enable or disable receipt of cell broadcast messages
Cell broadcast
settings
CDMA call settings
If you’re using the phone within the United States, or outside of the United
States in a CDMA coverage area, you can set the following options:
TTY mode Enable TTY (Teletypewriter) support for your phone.
NBPCD Set the calling parameters for the current country, such
Voice Privacy Encrypts outgoing voice calls and uses secure channels
from your service provider.
Configure channels and language for cell broadcast
messages.
as country code and IDD prefix.
when available.
Assisted Dialing Assisted Dialing allows you to easily dial international
Phone settings Edit the call reject message, choose whether to open
calls while roaming in another country. See “Using
Assisted Dialing” in this chapter for details.
the message editor when you reject a call with a
message, and choose whether to allow automatic saving
of an unknown contact number when a call with that
number ends.
Page 43
46 Phone calls
For CE / FCC
2011/01/25
Turning Airplane mode on or off
In many countries, you are required by law to turn off the phone while
on board an aircraft. A way to turn off the phone function is to switch
your phone to Airplane mode. When you enable Airplane mode,
all wireless radios on your phone are turned off, including the call
function, data services, Bluetooth, and Wi-Fi.
To turn Airplane mode on or off, you can:
Press and hold POWER/LOCK, and then tap Airplane mode.
•
From the Home screen, press MENU
•
networks, and then select or clear the Airplane mode check box.
When enabled, the Airplane mode icon
bar.
When you disable Airplane mode, the call function is turned back on and the
previous state of Bluetooth and Wi-Fi is restored.
. Tap Settings > Wireless &
is displayed in the status
Page 44
People
For CE / FCC
2011/01/25
About People
With the People app, easily manage your communications with your
contacts via phone, messaging, and email. You can also link your
contacts to their social network accounts like Facebook, Twitter, and
Flickr™ to see their updates and events from these accounts all in one
place.
And that’s not all. If you have the same contacts from different
sources, People lets you merge their contact information so you won’t
have duplicated entries in your contacts list.
Press HOME
Setting up My contact card
My contact card provides a convenient way to store your personal
contact information so that you can easily send it via SMS, MMS, email,
or Bluetooth.
1.
Press HOME
2.
On the All tab of the People screen, tap Me.
If you are logged in to your Facebook account via Facebook
for HTC Sense, instead of Me, you will see the name you use in
Facebook. Tap your name. Then press MENU
3. Enter your name and contact details.
4. Tap Save.
, and then tap > People.
, and then tap > People.
and tap Edit.
Page 45
48 People
For CE / FCC
2011/01/25
Adding a new contact
1.
Press HOME , and then tap > People.
2.
On the All tab, tap Add contact.
3. Select the Contact type, for example Google or Microsoft
Exchange ActiveSync. This determines which account the
contact will sync with. For more information, see “Ways of
getting contacts into your phone” in this chapter.
4. In the Name field, enter the first and last name of the contact,
then tap OK.
5. Enter the contact information in the fields provided.
Press BACK if you want to close the onscreen keyboard first
and easily scroll through the other fields.
6. Tap Save.
Searching for a contact
1.
Press HOME , and then tap > People.
2.
Press SEARCH
first or last name, email, or company name.
You can also type in the first few digits of your contact’s phone
number. Matching contacts are displayed.
3. Tap the contact to open his or her contact details screen. See
“Contact information and conversations” in this chapter for
details.
, then enter the first few letters of a contact’s
Page 46
Filtering your contacts list
For CE / FCC
2011/01/25
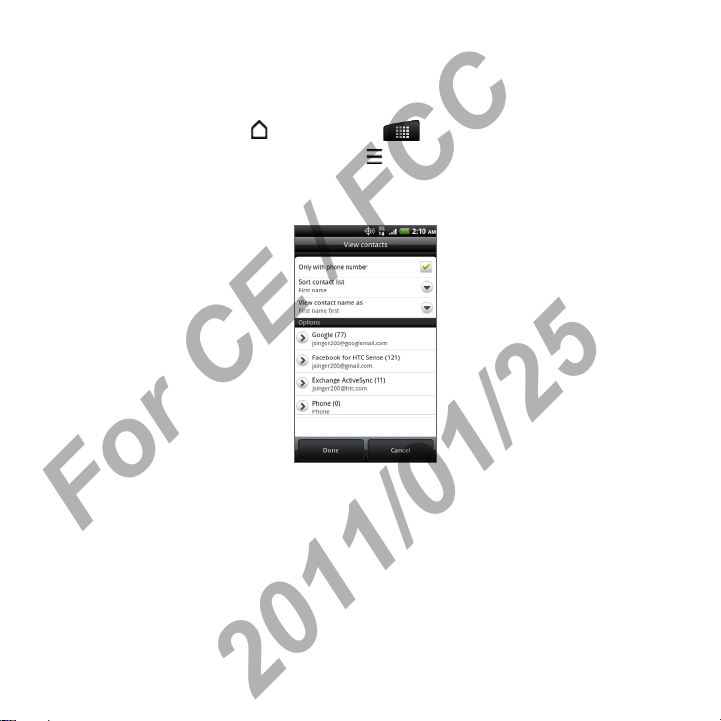
You can choose to display contacts of a particular type only, for
example Google contacts or Facebook contacts.
Press HOME
1.
On the All tab, press MENU
2.
3.
Select the types of contacts you want to show in your contacts
list.
You can also choose how you want to display and sort your
contacts.
4. Tap Done.
, and then tap > People.
, then tap View.
People 49
Page 47
50 People
For CE / FCC
2011/01/25
Backing up your contacts to the storage card
1.
Press HOME , and then tap > People.
2.
Press MENU
3.
Select an account or type of contacts to export, then tap OK.
Importing contacts from the storage card
1.
Press HOME , and then tap > People.
2.
Press MENU
card.
You can only import contacts that were exported to the storage card using
the Export to SD card feature on the phone. See “Backing up your contacts to
the storage card”.
3. If you have Google or Exchange ActiveSync accounts set up on
your phone, tap the type for the imported contacts.
Deleting contacts
1.
Press HOME , and then tap > People.
2.
On the All tab, press MENU
3.
Select the contacts you want to delete, and then tap Delete.
4.
When prompted, tap OK.
, and then tap Import/Export > Export to SD card.
, and then tap Import/Export > Import from SD
, and then tap Delete.
Page 48
Contact groups
For CE / FCC
2011/01/25
Assign contacts to groups so you can easily send a message or email
to a whole group. You can also sync groups on your phone with the
groups in your Google account, accessible via your computer’s web
browser.
We’ve also added the Frequent group as a special group type that
automatically stores the contacts you dial or get calls from the most.
Creating a group
1.
Press HOME , and then tap > People.
2.
On the Groups tab, tap Add group.
3.
Enter a name for the group, and then tap Add contact to group.
4.
Select the contacts you want to add to the group, and then tap
Save.
If your contacts list is long, you can use the search bar to search for contacts
quickly, or press BACK to hide the onscreen keyboard and scroll through
the list.
5. Tap to select a photo for the group.
6. Tap Save.
Editing a contact group
1.
Press HOME , and then tap > People.
2.
On the Groups tab, press and hold the group, and then tap Edit
group.
People 51
Page 49

52 People
For CE / FCC
2011/01/25
3.
You can:
•
Tap the group name to change the name. You can only change
the name for groups that you have created.
•
Tap the icon to the left of the group name to change or
remove the group photo.
•
To add contacts to the group, tap Add contact to group,
select the contacts you want to add, and then tap Save.
•
To remove a contact from the group, tap
of the contact name.
4. Tap Save.
at the right side
Page 50
Keyboard
For CE / FCC
2011/01/25
Using the onscreen keyboard
When you start an app or select a field that requires text or numbers,
the onscreen keyboard becomes available.
After entering your text, you can tap
onscreen keyboard.
Selecting a keyboard layout
You can choose from three different keyboard layouts to suit your
typing style.
1. Press HOME > MENU , and tap Settings > Language &
keyboard > Touch Input.
2. Tap Keyboard types, and then select the keyboard layout that
you want to use. Choose one from the following:
or press BACK to close the
QWERTY This layout is similar to a desktop computer keyboard.
Phone Keypad
Compact
QWERTY
This is the default keyboard layout.
This layout resembles the traditional mobile phone keypad.
This layout features two letters on each key. The key
size is slightly bigger than on the full QWERTY layout.
Page 51
54 Keyboard
For CE / FCC
2011/01/25
Entering text
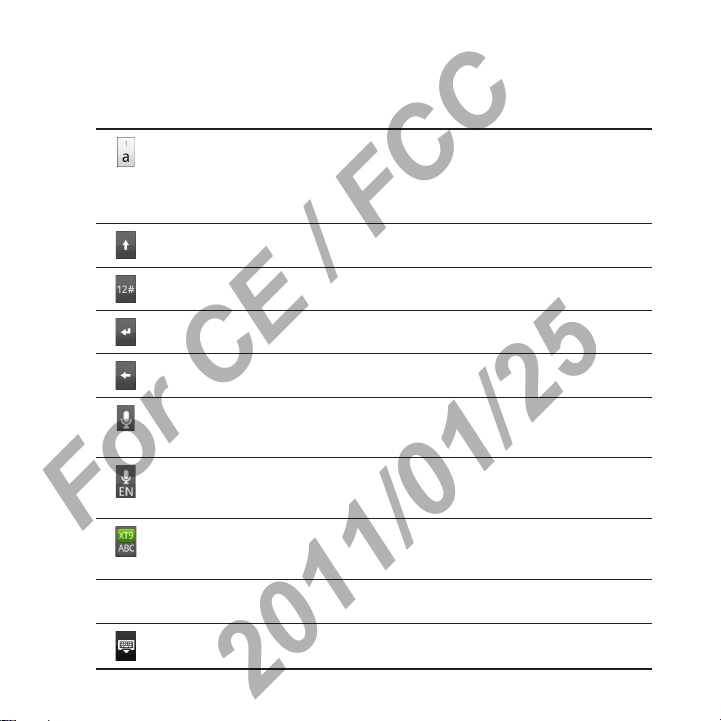
Use the following keys while entering text using the onscreen
keyboard:
Press and hold keys with gray characters at the top to enter numbers,
symbols, or accented letters. The gray character displayed on the key
is the character that will be inserted when you press and hold that
key. Some keys have multiple characters or accents associated with
them.
Shift key. Tap to enter an uppercase letter. Tap twice to turn on caps
lock.
Tap to switch to the numeric and symbol keyboard.
Enter key. Tap to create a new line.
Backspace key. Tap to delete the previous character.
If you only selected one keyboard language, tap this key to enter
text by speaking. For details, see “Entering text by speaking” in this
chapter.
(Available in multi-language keyboard) This key depends on the
keyboard language you are currently using. Tap to switch to another
keyboard language (see “Enabling multiple keyboard languages”).
Tap to toggle between Multitap and XT9 predictive modes when
using the Compact QWERTY or Phone keypad layout. For more
information, see “Entering words with predictive text”.
Tap the Up, Down, Left, or Right key to move the text cursor in the direction
that you want while you are entering or editing text.
Tap to hide the onscreen keyboard.
Page 52

Keyboard 55
For CE / FCC
2011/01/25
Enabling multiple keyboard languages
If there are multiple keyboard languages available on your phone, you
can choose which languages to enable in the onscreen keyboard so
that you can switch to these languages and use them to enter text.
1. Press HOME > MENU , and tap Settings > Language &
keyboard > Touch Input.
2. Tap International keyboard.
3. Choose the languages that you want.
Available languages depend on the region where you purchased
the phone.
Changing to the landscape onscreen keyboard
When entering text, you can choose to use the landscape orientation
of the onscreen keyboard. Turn your phone sideways to use a larger
keyboard for easy typing.
The Auto-rotate screen check box in HOME > MENU > Settings >
Display needs to be selected for the screen orientation to automatically
change.
The landscape orientation keyboard is not supported in all apps.
Page 53
56 Keyboard
For CE / FCC
2011/01/25
Entering words with predictive text
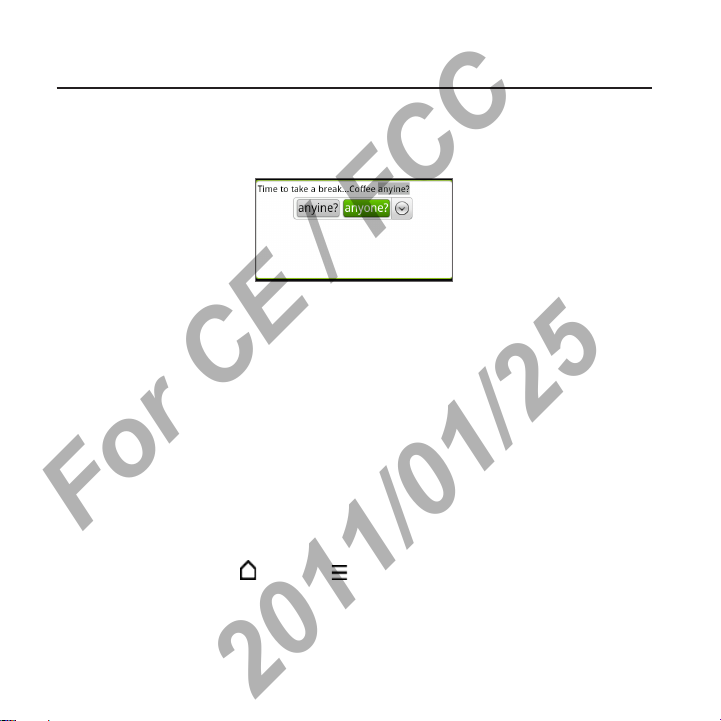
The onscreen keyboard has predictive text to help you type quickly
and accurately. Predictive text input is enabled by default, and word
suggestions are displayed as you type.
To enter a word in predictive mode, do any of the following:
If you see the word you want highlighted in green or orange, you
•
can simply tap the space bar to insert the word into your text.
If you see the word you want shown in the suggestions before
•
you have finished typing the entire word, tap the word to insert it
into your text.
If an arrow is shown to the right of the suggestion list, tap the
•
arrow to see more suggestions.
Setting a second language for the keyboard
Aside from the keyboard language you are currently using, you can
set the predictive text to be bilingual. As you type, you’ll get word
suggestions in two languages that you’ve selected.
1. Press HOME > MENU , and tap Settings > Language &
keyboard > Touch Input.
2. Tap Bilingual prediction, and then choose the language you want.
Page 54

Keyboard 57
For CE / FCC
2011/01/25
Adding a word to the predictive text dictionary
Your phone comes with a list of words that it references for predictive
text suggestions. Sometimes you may need to add a word to the
predictive text dictionary, for example a name or a specialized
technical word.
While entering text using the QWERTY keyboard layout, if you tap any
word on the suggestion list, it is automatically added to the predictive
text dictionary if it was not in the dictionary already.
You can also add a word to the list manually:
From the Home screen, press MENU
1.
Language & keyboard > Touch Input.
2.
Tap Personal dictionary > Edit personal dictionary > Add new.
3.
Enter the word to add, and then tap OK.
Editing or deleting a word in the predictive text
dictionary
You can edit or remove words that you previously added to the
predictive text dictionary.
1.
From the Home screen, press MENU
Language & keyboard > Touch Input.
2.
Tap Personal dictionary > Edit personal dictionary.
•
To edit a word, tap the word itself.
•
To delete words from the dictionary, press MENU
Delete. Then choose the words to remove and tap Delete.
, and then tap Settings >
, and then tap Settings >
and tap
Page 55
58 Keyboard
For CE / FCC
2011/01/25
Backing up your personal dictionary to your storage
card
You can use your storage card to back up the new words you’ve
added to the predictive text dictionary.
From the Home screen, press MENU
1.
Language & keyboard > Touch Input.
Tap Personal dictionary > Sync personal dictionary > Copy to
2.
storage card.
When prompted, tap OK.
3.
Importing your personal dictionary from your storage
card
1.
From the Home screen, press MENU , and then tap Settings >
Language & keyboard > Touch Input.
2.
Tap Personal dictionary > Sync personal dictionary > Restore
from storage card.
3.
When prompted, tap OK.
, and then tap Settings >
Entering text by speaking
No time to type? Try speaking the words to enter it in most text fields
that let you use the onscreen keyboard. Simply tap
for multi-language keyboard. When your phone cues you to
hold
“Speak now”, tell your phone what you want to be typed in.
First make sure to select the language you’ll be using in the Voice input &
output settings. See “Setting the voice input language”.
Since your phone uses Google’s speech-recognition service, you need to be
connected to the Internet to enter text by speaking.
or press and
Page 56
Setting the voice input language
For CE / FCC
2011/01/25
1. From the Home screen, press MENU , then tap Settings > Voice
input & output > Voice recognizer settings.
2. Tap Language, then choose the language you want.
Available languages depend on the voice input languages
supported by Google.
Editing text
You can select, copy, or cut the text you enter using the onscreen
keyboard, then paste it in another text field within or across apps.
Some apps may offer their own way of selecting or copying text.
Selecting text
Highlight a portion of a text or select all that you want to copy or cut.
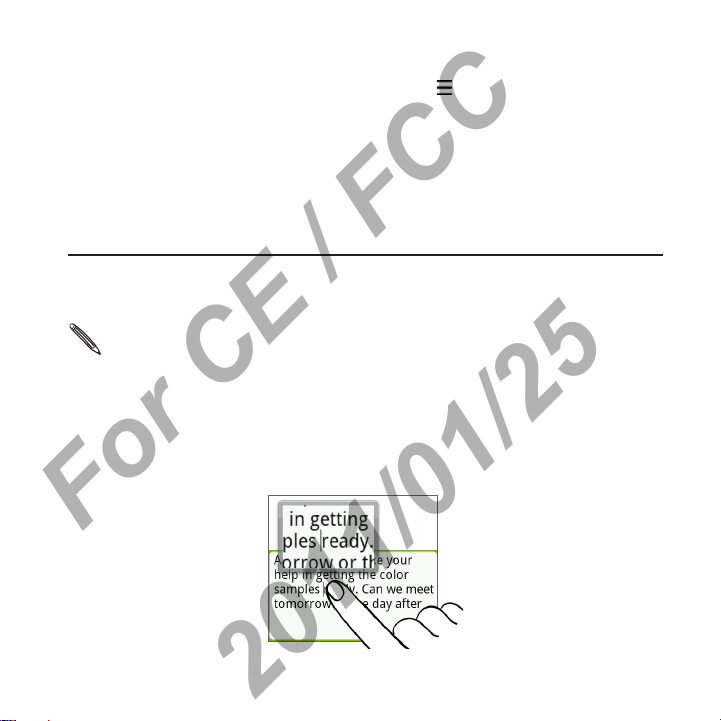
Press and hold the text field that contains the text to select. Don’t
1.
lift your finger just yet to display the magnifier.
Keyboard 59
Page 57
60 Keyboard
For CE / FCC
2011/01/25
2. Drag your finger to move the text cursor to a letter within the
text that you want to select. It should be easy since the magnifier
gives you a bigger view of the text.
3. After positioning the text cursor, lift your finger. The text
selection menu then pops up.
4. Do one of the following:
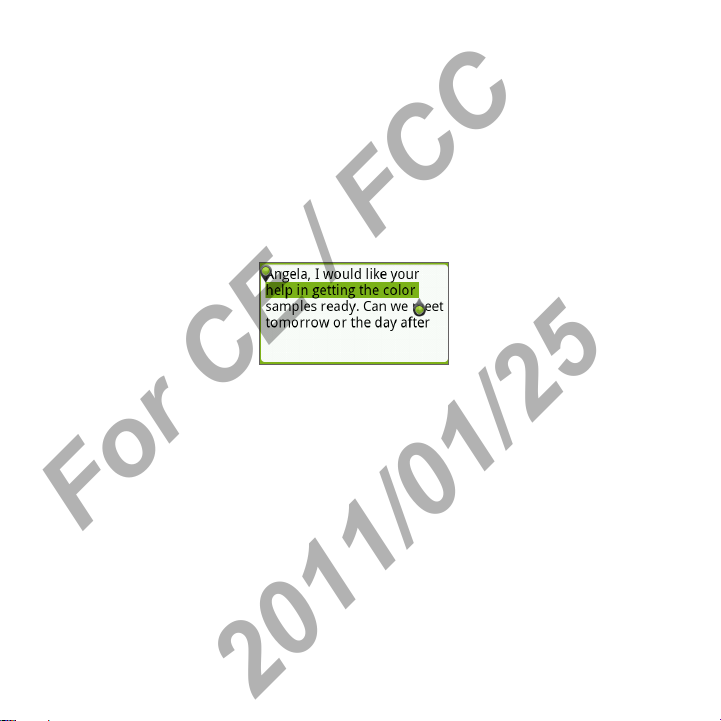
Tap Select text. When the word where you’ve placed the text
•
cursor is highlighted, drag the start and end markers to select
the text you want.
•
Tap Select all to select everything in the text field.
Copying and pasting text
1. After you have selected the text you want to copy, tap Copy or
Cut.
The selected text is then copied to the clipboard.
2. Within the same or another app, press and hold a text field
where you want to paste the text. Don’t lift your finger just yet to
display the magnifier.
3. Drag your finger to move the text cursor to where you want to
paste the text.
4. After positioning the text cursor, lift your finger. The text
selection menu then pops up.
5. Tap Paste.
Page 58
Adjusting touch input settings
For CE / FCC
2011/01/25
To open the Touch Input settings, press HOME , and then tap
MENU and then tap Settings > Language & keyboard > Touch Input.
Touch Input settings
Keyboard types Select the keyboard layout to use. You can choose
International
keyboard
Bilingual prediction Select a secondary keyboard language to use. See
Text input Set text input options when entering text, calibrate
Tutorial Learn how to use the onscreen keyboard with this
Personal dictionary Add, edit or remove words in the predictive text
Text input
QWERTY
Prediction Select to enable the word prediction feature which
from QWERTY, Phone Keypad, or Compact QWERTY.
Add or remove languages from the onscreen
keyboard language list.
“Setting a second language for the keyboard”.
the keyboard, and set a sound and/or vibration
feedback whenever you tap a key. See “Text input”
for details.
interactive tutorial.
dictionary. See “Entering words with predictive text”.
provides a list of possible words that reflect the
characters of the keys you have tapped as well as
characters of nearby keys.
Keyboard 61
Page 59

62 Keyboard
For CE / FCC
2011/01/25
QWERTY
Spell correction Select to correct typographical errors by selecting
Phone keypad & compact QWERTY
Spell correction Select to correct typographical errors by selecting
Word completion When using the Compact QWERTY or Phone keypad,
Other settings
Sound feedback Select to hear a clicking sound whenever you tap a
Vibrate when typing Select to enable vibration feedback whenever you
Finger touch precision
Calibration tool Tap to re-calibrate the keyboard touch accuracy. Re-
Reset calibration Tap to reset the calibration back to factory default.
from a list of possible words that reflect the
characters of the keys you have tapped as well as
characters of nearby keys.
from a list of possible words that reflect the
characters of the keys you have tapped as well as
characters of nearby keys.
lets you select from a list of possible combinations
based on the characters that appear on the keys that
you tapped.
key on the keyboard.
tap a key on the keyboard.
calibrate the keyboard if you feel that the keyboard
keys are not responding accurately to your taps.
Page 60
Messages
For CE / FCC
2011/01/25
About Messages
Keep in touch with important people in your life. Use the Messages
app to compose and send text (SMS) and multimedia messages
(MMS).
Press HOME
On the All messages screen, all your sent and received messages are
neatly grouped into conversations, by contact name or phone number.
You can:
Scroll up or down the list of conversations by swiping your finger
•
on the screen.
Tap a contact name or number to view the exchange of
•
messages.
Sending a text message (SMS)
If you exceed the limit on the number of characters for a single text
message, your text message will be delivered as one but will be billed
as more than one message.
1.
Press HOME
2.
On the All messages screen, tap Compose message.
, and then tap > Messages.
, and then tap > Messages.
Page 61
64 Messages
For CE / FCC
2011/01/25
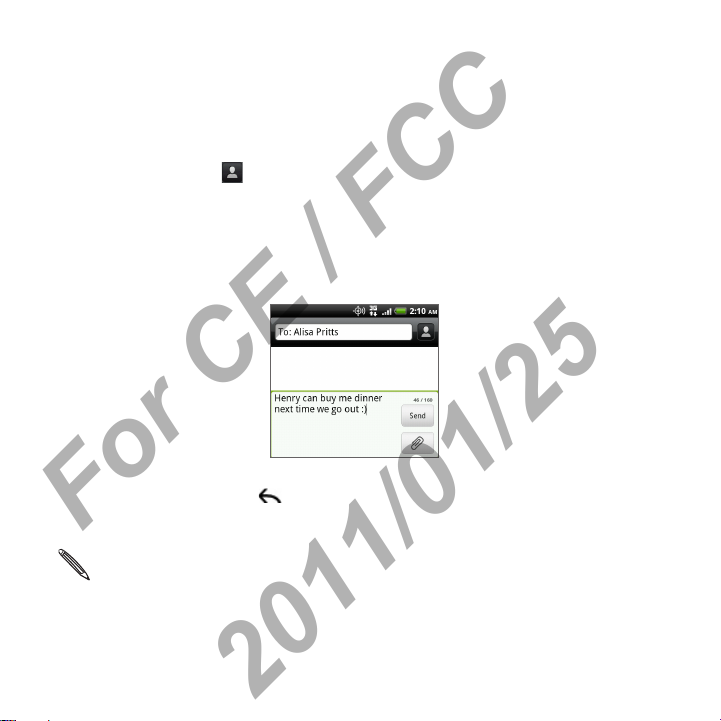
3. Fill in one or more recipients. You can:You can:
Enter the first few letters of a contact name or starting digits
•
of a mobile number. As you type, matching names with phone
numbers from your stored contacts are displayed. Tap a name
or one of the contact’s number.
Tap the
•
contacts to whom you want to send the message. You can
also select contact groups as recipients.
When you have selected all the message recipients, tap Done.
•
Enter the complete phone numbers directly in the To field.
4. Tap the box that says “Add text”, and then enter your message.
5. Tap Send.
Or press BACK
message, see “Resuming a draft message”.
Your text message automatically becomes a multimedia message when you
enter an email address as the recipient, add a message subject, attach an
item, or compose a very long message.
icon, and then select the phone numbers of the
to save it as a draft. To open and edit a draft
Page 62
Sending a multimedia message (MMS)
For CE / FCC
2011/01/25
To compose a multimedia message, start by creating a new text
message. Then choose the type of attachment to include in your
message.
Press HOME
1.
On the All messages screen, tap Compose message.
2.
3. Fill in one or more recipients. You can:
Enter the first few letters of a contact name or starting digits
•
of a mobile number. As you type, matching names with phone
numbers and email addresses from your stored contacts are
displayed. Tap a contact’s number or email address.
Email addresses will be displayed when Show email address
is selected in Recipient list settings. To find out more about
message settings, see “Setting message options”.
Tap the
•
contacts to whom you want to send the message. You can
also select contact groups as recipients.
When you have selected all the message recipients, tap Done.
•
Enter the complete phone numbers or email address directly
in the To field.
4. To add a subject line, press MENU and then tap Add subject.
5. Tap the box that says “Add text”, and then enter your message.
, and then tap > Messages.
icon, and then select the phone numbers of the
Messages 65
Page 63
66 Messages
For CE / FCC
2011/01/25
6. Tap and then choose the type of attachment.
7. To make changes to your attachment, tap or (depending
on the type of file you’ve attached).
You can also press MENU
8. Tap Send.
Or press BACK
message, see “Resuming a draft message”.
Replying to a message
1. On the All messages screen, tap a contact (or phone number) to
display the exchange of messages with that contact.
2. To reply to the message, tap the text box at the bottom of the
screen, then enter your reply message.
You can also reply with a multimedia message. See “Sending a
multimedia message (MMS)” for details.
3. Tap Send.
to save it as a draft. To open and edit a draft
, then tap Remove to start over.
Page 64
Calendar
For CE / FCC
2011/01/25
Creating calendar events
You can create events that sync with your Google Calendar, your
computer’s Outlook Calendar, or Exchange ActiveSync calendar, as
well as events that appear on your phone only.
1. Press HOME , and then tap , and then tap Calendar.
2. On any Calendar view, press MENU and then tap Add event.
When you are in the Month or Agenda view, you can also tap at the bottomright of the screen to create a new event.
3. If you have more than one calendar, select a calendar in which to
add the event:
Select your Google Account to create a Google Calendar
•
event. If you have several Google Calendars on the Web, select
one in which to add your event.
Select PC Sync to create calendar events on your phone.
•
You can sync them with your computer using HTC Sync. For
details, see the Accounts and sync chapter.
Select your Exchange ActiveSync account to create an
•
Exchange ActiveSync calendar event.
4. Enter a name for the event.
5. To specify the date and time of the event, do one of the
following:
Page 65
68 Calendar
For CE / FCC
2011/01/25
•
If there is a time frame for the event, tap the From and To date
and time to set them.
•
If it is a special occasion such as a birthday or a whole-day
event, set the From and To date, then select the All day check
box.
6. Enter the event location and description.
7. Set the reminder time.
You can add another reminder time in a Google Calendar event.
Press MENU and then tap Add reminder.
8. If the event occurs on a regular basis, tap the Repetition box and
then choose how often the event occurs.
9. Tap Save.
Editing an event
1. While viewing an event, press MENU , and then tap Edit event.
2. Make your changes to the event.
3. When you’re done editing, tap Save.
Deleting an event
There are a number of ways to delete an event.
•
While viewing the summary of an event on the Event details
screen, press MENU
•
In Day, Agenda or Week view, press and hold an event and
then tap Delete event.
•
When editing an event, tap Delete.
If the event repeats, you’ll be asked whether you want to delete
just that occurrence, this and all future occurrences, or all past
and then tap Delete event.
Page 66
and future occurrences in your Calendar.
For CE / FCC
2011/01/25
Sharing an event (vCalendar)
You can share a calendar event as a vCalendar to someone’s phone
using Bluetooth or by sending it as a file attachment with your email
or message.
While viewing an event, press MENU
1.
vCalendar.
2.
Do one of the following:
•
Tap Bluetooth. you’ll be asked to turn on Bluetooth on your
phone and connect to the receiving Bluetooth device. Follow
the steps in “Sending information using Bluetooth” in the
Bluetooth chapter.
•
Tap Email. A new message window opens and automatically
includes the vCalendar as an attachment. Your default email
account that’s selected in the Mail app will be used to send.
For more information, see the Email chapter.
•
Tap Message. A new message window opens and
automatically includes the vCalendar as a multimedia
attachment. For more information, see the Messages chapter.
Calendar event reminders
If you have set at least one reminder for an event, the upcoming event
icon
you of the upcoming event.
will appear in the notifications area of the status bar to remind
, and then tap Share
Calendar 69
Page 67

70 Calendar
For CE / FCC
2011/01/25
Dismissing or snoozing event reminders
1. Tap the status bar, then slide your finger down the screen to
open the Notifications panel.
2. Do one of the following:
•
Tap Clear to dismiss event reminders and all other
notifications. Other types of notifications such as new
messages and missed calls will also be deleted.
•
After sliding open the Notifications panel, tap the calendar
event reminder. You’ll then see a list of all pending event
reminders. Tap Snooze all to snooze all event reminders for
five minutes, or tap Dismiss all to dismiss all event reminders.
•
Press BACK
notifications area of the status bar.
to keep the reminders pending in the
Page 68
Clock and Weather
For CE / FCC
2011/01/25
About the HTC Clock widget
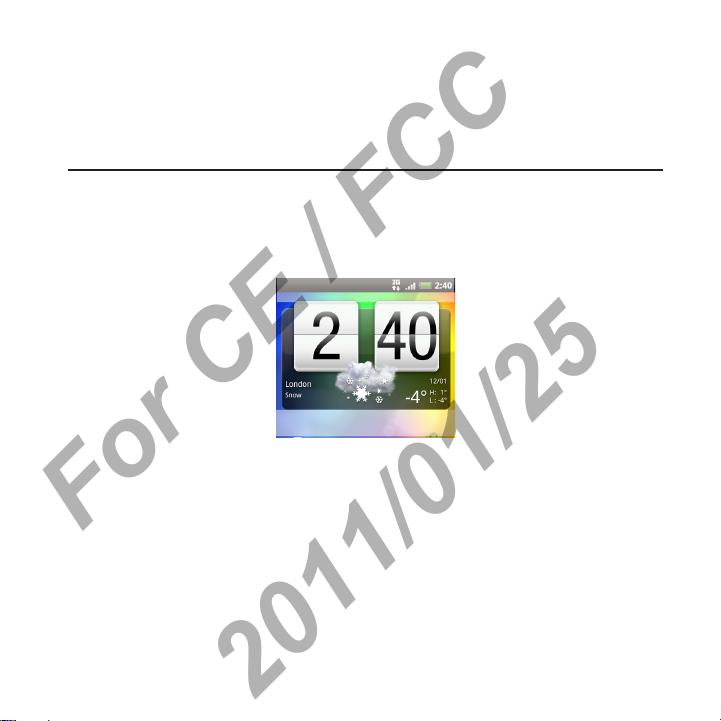
Use the HTC Clock widget to see your current date, time, and location.
It’s added by default on your Home screen. Tap the weather image
to open the Weather app and check for more weather forecasts. See
“Checking weather” for details.
If you want to show the time of another city, you can:
Edit the widget settings. Press and hold the HTC Clock widget on
•
the Home screen, then drag it to the Edit button. Select the city
you want to show.
Add another clock widget to the extended Home screen. Select
•
from a variety of looks and designs. To find out how you can add
a widget, see “Personalizing your Home screen with widgets” in
the Personalizing chapter.
Page 69
72 Clock and Weather
For CE / FCC
2011/01/25
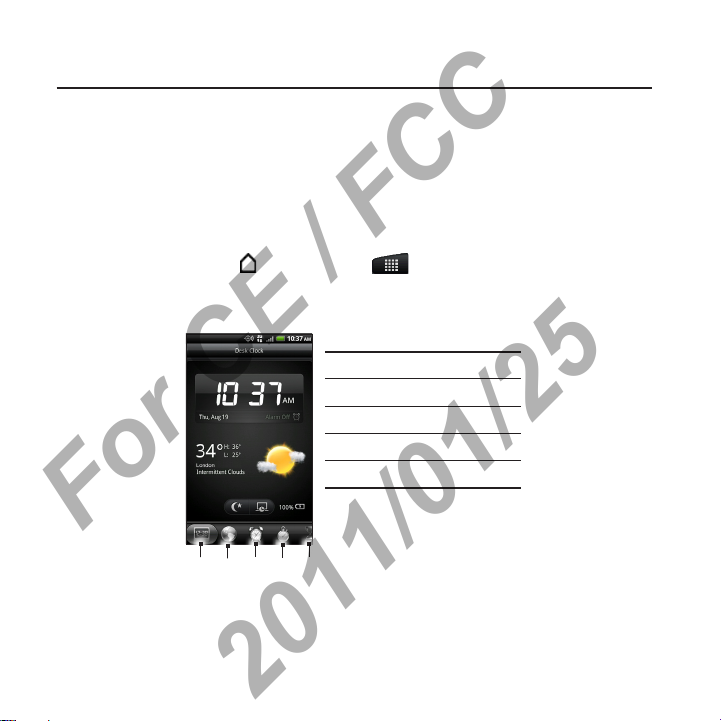
About the Clock app
Get more from the Clock app than just the regular date and time. Use
your phone as a desk clock complete with weather information. Or let
it serve as a night clock or a screensaver. As a world clock, see what
time it is in several cities across the globe. You could also use it as an
alarm clock, stopwatch, and countdown timer.
To open the Clock app, you can:
Tap the HTC Clock widget on the Home screen.
•
Press HOME
•
Tap the tabs at the bottom row or slide your finger across the tabs to
switch between the different functions of the Clock app.
, and then tap > Clock.
1 Desk Clock tab
2 World Clock tab
3 Alarms tab
4 Stopwatch tab
5 Timer tab
5
1 2 3
4
Page 70
Clock and Weather 73
For CE / FCC
2011/01/25
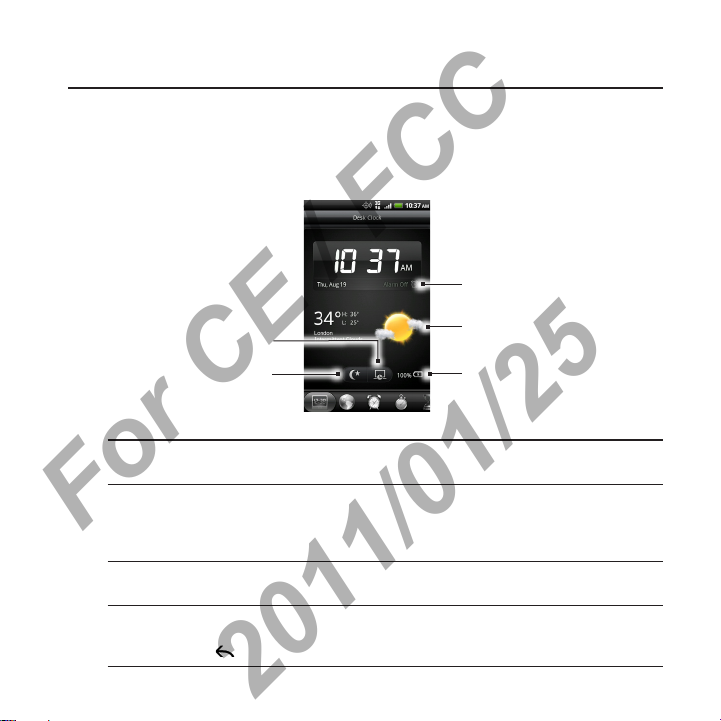
Using Desk Clock
Opening the Clock app brings you directly to the Desk Clock screen.
The Desk Clock displays the current date, time, and weather. It also an
alarm clock indicator and a battery charging indicator. You can dim
the screen to show only the time and date on the Desk Clock.
1
5
4
1 Shows whether the alarm clock is on or off. To find out how to turn on and
set the alarm clock, see “Setting the alarm clock”.
2 Shows the weather information of your current location. Tapping it brings
you to the Weather app where you can see weather forecasts of the
next few days. See “Checking weather” for more information about the
Weather app.
3 Shows the battery charge level. You’ll see it only when your phone is
plugged with the power adapter or connected to your computer.
4 Tap to dim the screen and display only the time and date on the Desk
Clock. To light up the screen again, tap anywhere on the screen or press
the BACK button on your phone.
2
3
Page 71
74 Clock and Weather
For CE / FCC
2011/01/25
5 Tap to dim the screen and go into screensaver mode. When in screensaver
mode, the time and date will change position on the screen after every
few minutes. To light up the screen again, tap anywhere on the screen or
press the BACK button on your phone.
You can change the Desk Clock screen to display the date and time of
another time zone. To find out how to select a different time zone, see
“Setting the time zone, date, and time”.
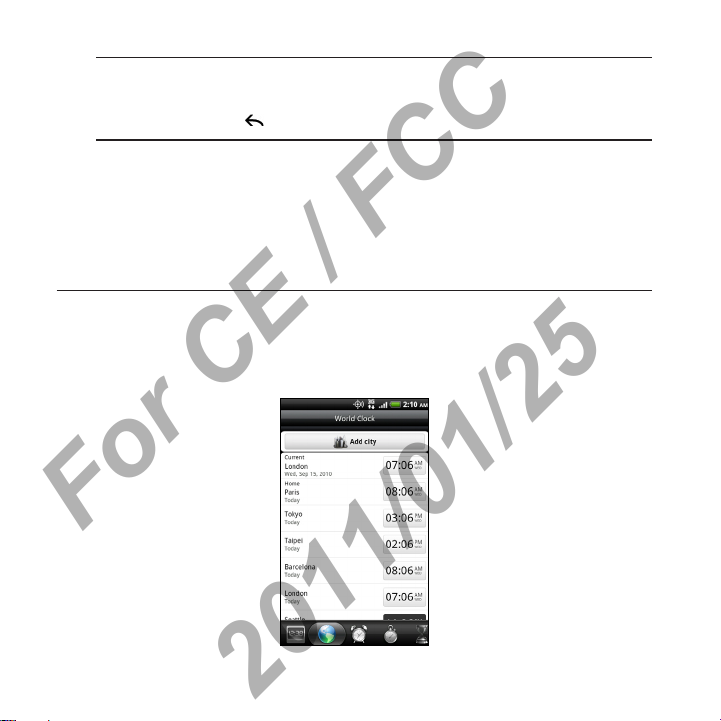
Using World Clock
Use the Clock app’s World Clock screen to check the current time in
several places around the globe simultaneously. You can also set your
home city, add more cities to the world clock list, and manually set
your time zone, date, and time.
Page 72

Clock and Weather 75
For CE / FCC
2011/01/25
Setting your home city
1.
Tap the HTC Clock widget on the Home screen.
2.
Tap the World Clock tab.
3.
Press MENU
4.
Enter your home city’s name. As you enter letters, the list is
filtered to show matching cities and countries.
5.
Scroll through the list and tap your home city.
Setting the time zone, date, and time
To set the time zone, date, and time on your phone manually, you need
to turn off auto time synchronization first.
1.
Tap the HTC Clock widget on the Home screen.
2.
Tap the World Clock tab.
3.
Press MENU
Date & time settings screen.
4.
Clear the Automatic check box.
5.
Tap Select time zone. Scroll through the list and then tap the
time zone that you want.
6.
To change the date, tap Set date. Adjust the date by rolling the
day, month, and year scroll wheels onscreen and then tap OK.
7.
To change the time, tap Set time. Adjust the time by rolling the
hour and minute scroll wheels onscreen and then tap OK.
8.
Tap the Use 24-hour format check box to toggle between using a
12-hour or a 24-hour time format.
9.
Tap Select date format then select how you want dates to be
displayed. (The selected date format also applies to the date
displayed in the alarm clock.)
and then tap Home settings.
and then tap Local time settings to open the
Page 73
76 Clock and Weather
For CE / FCC
2011/01/25
You can also press HOME > MENU and then tap Settings > Date & time
to open the Date & time settings screen.
Adding a city to the World Clock screen
Add more cities to the World Clock screen so you can instantly check
the date and time in these cities. In addition to the current and home
cities, the World Clock screen can display up to 15 cities.
Tap the HTC Clock widget on the Home screen.
1.
Tap the World Clock tab.
2.
Tap Add city. Enter the city name you want to add. As you enter
3.
letters, the list is filtered to show matching cities and countries.
Scroll through the matching list and tap the city that you want to
4.
add.
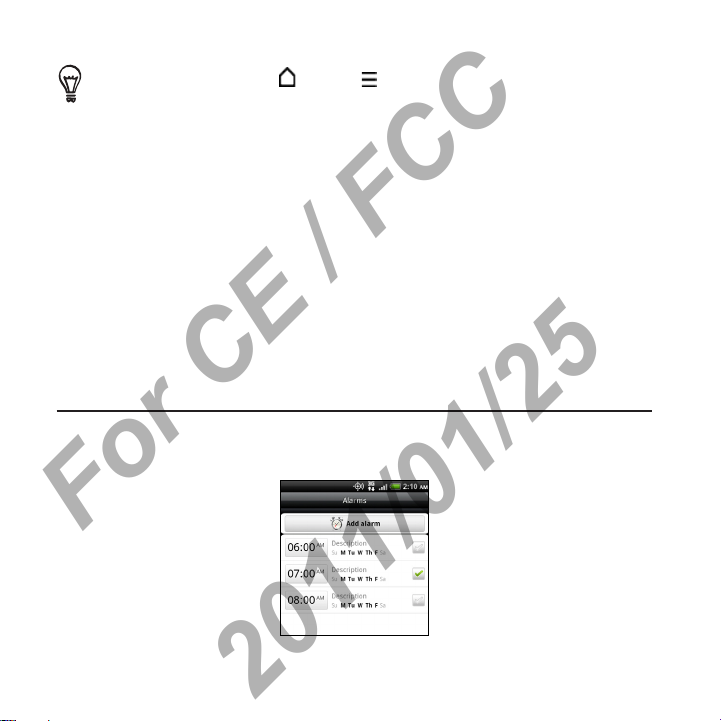
Setting the alarm clock
You can use the Clock app’s Alarms screen to set up one or more
wake-up alarms.
Page 74

Clock and Weather 77
For CE / FCC
2011/01/25
Setting an alarm
1. Tap the HTC Clock widget on the Home screen.
2. Tap the Alarms tab.
3. Select the check box of an alarm, and then tap that alarm.
4. On the Set alarm screen, drag your finger up or down to roll the
time scroll wheels and set the alarm time.
5. Scroll through the Set alarms screen to see all the available alarm
options. You can:
Enter the alarm Description and choose the Alarm sound to
•
use.
Tap Repeat. Select what days of the week to sound the alarm
•
and then tap OK.
Select the Vibrate check box if you want your phone to also
•
vibrate when the alarm goes off.
6. When you’ve finished setting the alarm, tap Done.
To turn off an alarm, clear the check box of that alarm.
If you need to set more than three alarms, press MENU while you’re on
the Alarms screen and then tap Add alarm.
Deleting an alarm
1.
Tap the HTC Clock widget on the Home screen.
2.
Tap the Alarms tab.
3.
On the Alarms screen, press MENU
4.
Select the alarms you want to delete and then tap Delete.
and then tap Delete.
Page 75
78 Clock and Weather
For CE / FCC
2011/01/25
Changing alarm sound settings
If you’ve set one or more alarms, you can change their settings such
as the alarm volume, how long to snooze the alarm, and more.
Tap the HTC Clock widget on the Home screen.
1.
Tap the Alarms tab.
2.
On the Alarms screen, press MENU
3.
can change the following settings:
and then tap Settings. You
Alarm in silent
mode
Alarm volume Set the volume level that you want for the alarm.
Snooze duration Set how long to snooze between alarms.
Side button
behavior
Selected by default, this option allows the alarm
to sound even when your phone’s volume is set
to silent mode. Clear this check box if you want to
silence the alarm when the volume is in silent mode.
Choose what happens to the alarm when pressing
the side button (VOLUME UP/DOWN) of your
phone. You can set the button to snooze, dismiss the
alarm, or disable the button.
The side button works only when the phone’s screen
is not locked. While on the lock screen, tap the
onscreen Snooze button to snooze, or slide down
the screen to dismiss the alarm.
Page 76
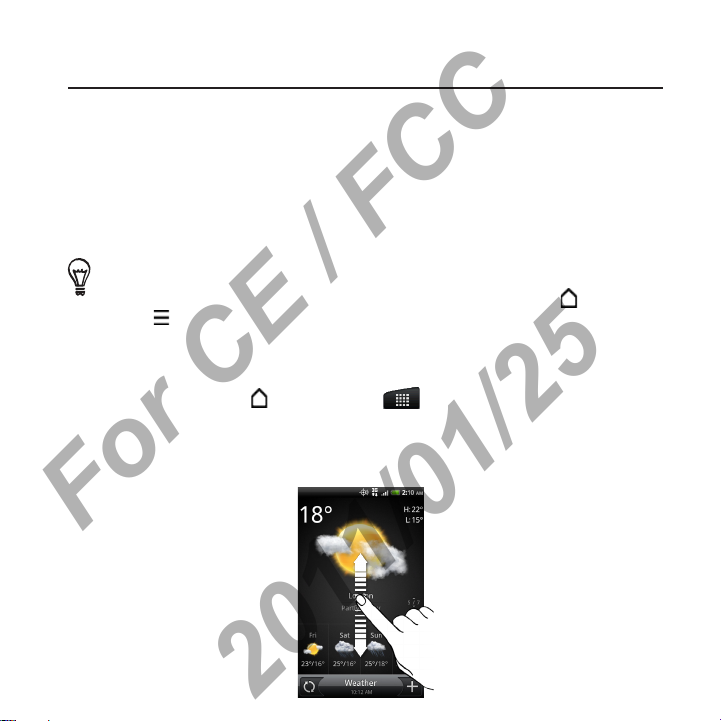
Clock and Weather 79
For CE / FCC
2011/01/25
Checking weather
If you consented to turn location service on when you were setting
up your phone for the first time, you’ll see the weather of your current
location right on the HTC Clock widget of your Home screen.
You can also use the Weather app to check the current weather and
weather forecasts for the next four days of the week. In addition to
your current location’s weather, this app also displays the weather
forecasts of other cities around the globe.
If you declined to turn location service on during first-time setup of your phone,
turn location service on so that you’ll be able to check your current location’s
weather on the HTC Clock widget and Weather app. Press HOME
MENU , and then tap Settings > Location.
1. Connect to the Internet using your phone’s Wi-Fi or data
connection.
2. Press HOME , and then tap > Weather.
3. On the Weather screen, you’ll first see your current location’s
weather. To check the weather in other cities, swipe your finger
up or down the screen.
>
Page 77
80 Clock and Weather
For CE / FCC
2011/01/25
4. The Weather app automatically downloads and displays the
latest weather updates. Tap
anytime.
5. To see more weather details on the Web, tap Weather at the
bottom center of the Weather screen.
Adding a city to the Weather screen
Add more cities to the Weather screen so you can instantly check the
weather forecasts in these cities. In addition to your current location,
the Weather screen can display up to 15 cities.
On the Weather screen, tap
1.
2.
Enter the location you want to add. As you type, the list is filtered
to show the possible locations based on the letters you entered.
3.
Tap the desired city to select it.
Changing the order of cities on the Weather screen
1.
On the Weather screen, press MENU and then tap Rearrange.
2.
Press and hold
When the row is highlighted in green, drag it to its new position,
then release.
3.
Tap Done.
Deleting cities from the Weather screen
1.
On the Weather screen, press MENU and then tap Delete.
2.
Select the cities you want to remove and then tap Delete.
at the end of the item you want to move.
to update the information
.
Page 78

Clock and Weather 81
For CE / FCC
2011/01/25
Changing weather options
1.
On the Weather screen, press MENU and then tap Settings.
2.
You can change the following weather settings:
Update when opened Select this check box to refresh weather
Update automatically Select this check box to automatically
Update schedule Set an auto update schedule.
Temperature scale Choose whether to display weather in Celsius
About the Weather widget
Use the Weather widget to instantly check weather forecasts of your
current location and other cities without having to open the Weather
app. The Weather widget comes in different looks and styles.
You can add this widget to the Home screen, if it’s not yet added. To
find out how you can add a widget, see “Personalizing your Home
screen with widgets” in the Personalizing chapter.
updates every time you open the Weather app.
download weather updates.
or Fahrenheit.
Page 79
Internet connections
For CE / FCC
2011/01/25
Data connection
Your phone will be automatically set up to use your mobile operator’s
data network when you turn on your phone for the first time.
Turning the data connection on or off
Turning your data connection off can help save battery life and save
money on data charges. However, if you don’t have data connection
turned on and you’re also not connected to a Wi-Fi network, you
won’t receive automatic updates to your email, social network
accounts, and other synchronized information.
Press HOME
1.
2.
Tap Wireless & networks.
3.
Select the Mobile network check box to turn on the data
connection; clear the check box to turn off the data connection.
Enabling data roaming
Data roaming lets you connect to your mobile operator’s partner
networks and access data services when you’re out of your mobile
operator’s coverage area.
Using data services while roaming will be costly. Check with your mobile
operator for data roaming rates before you use data roaming.
> MENU , and then tap Settings.
1.
Press HOME > MENU , and then tap Settings.
2.
Tap Wireless & networks > Mobile networks, and then select the
Data roaming check box.
Page 80

Internet connections 83
For CE / FCC
2011/01/25
Selecting the network to connect to when roaming
Your phone is set to Global mode and we’ve designed it to
automatically search for the appropriate network in your location
(CDMA or GSM) and then connect to it.
1.
Press HOME
2.
Tap Wireless & networks > Call > Preferred Network, and then
select CDMA Mode or GSM / UMTS Mode.
3.
If you selected GSM / UMTS Mode, you can choose to connect to:
•
GSM / UMTS Dual. Your phone automatically connects to a 2G
or 3G network, whichever is available.
•
GSM only. Your phone connects only to the 2G (GPRS or
EDGE) network. Choose this option when you don’t need fast
data connection. Your phone will also use less power if you
choose this option.
•
UMTS only
Choose this option when you need fast data connection. Your
phone will also use more power if you choose this option.
> MENU , and then tap Settings.
. Your phone connects only to the 3G network.
Wi-Fi
To use Wi-Fi on your phone, you need access to a wireless access
point or “hotspot”. The availability and strength of the Wi-Fi signal will
vary depending on objects, such as buildings or simply a wall between
rooms, the Wi-Fi signal has to pass through.
Turning Wi-Fi on and connecting to a wireless network
1.
Press HOME > MENU , and then tap Settings.
2.
Tap Wireless & networks, and then select the Wi-Fi check box
Page 81

84 Internet connections
For CE / FCC
2011/01/25
to turn Wi-Fi on. The phone then scans for available wireless
networks.
3.
Tap Wi-Fi settings. The network names and security settings of
detected Wi-Fi networks are displayed in the Wi-Fi networks
section.
4.
If the wireless network you want to connect to is not in the list
of detected networks, scroll down the screen, and then tap Add
Wi-Fi network. Enter the wireless network settings, and then tap
Save.
5.
Tap the Wi-Fi network you want to connect to.
•
If you selected an open network, you’ll be automatically
connected to the network.
•
If you selected a network that is secured with WEP, enter the
key and then tap Connect.
Depending on the network type and its security settings, you may also need
to enter more information or choose a security certificate.
When your phone is connected to a wireless network, the Wi-Fi icon
appears in the status bar and tells you the approximate signal
strength (number of bands that light up).
The next time your phone connects to a previously accessed secured
wireless network, you won’t be asked to enter the key or other
security information again, unless you reset your phone to its factory
default settings.
Connecting to a Wi-Fi network with EAP-TLS security
You may need to install a network certificate (*.p12) to your
phone before you can connect to a Wi-Fi network with EAP-TLS
authentication protocol.
Page 82

Internet connections 85
For CE / FCC
2011/01/25
1.
Save the certificate file to the root folder of the storage card.
2.
Press HOME > MENU , and then tap Settings.
3.
Tap Security > Install from SD card.
4.
Select the network certificate needed to connect to the EAP-TLS
network.
5.
Follow the steps in the previous section to connect to the Wi-Fi
network.
Checking the wireless network status
1.
Press HOME > MENU , and then tap Settings.
2.
Tap Wireless & networks.
3.
On the Wireless & networks screen, tap Wi-Fi settings, and then
tap the wireless network that the phone is currently connected
to.
A message box is then displayed showing the Wi-Fi network name,
status, speed, signal strength, and more.
If you want to remove the wireless network settings on your phone, tap
Forget. You’ll need to enter the settings again if you want to connect to this
wireless network.
Connecting to another Wi-Fi network
1.
Press HOME > MENU , and then tap Settings.
2.
Tap Wireless & networks > Wi-Fi settings. Detected Wi-Fi
networks are displayed in the Wi-Fi networks section.
3.
To manually scan for available Wi-Fi networks, on the Wi-Fi
settings screen, press MENU
4.
Tap another Wi-Fi network to connect to it.
and then tap Scan.
Page 83
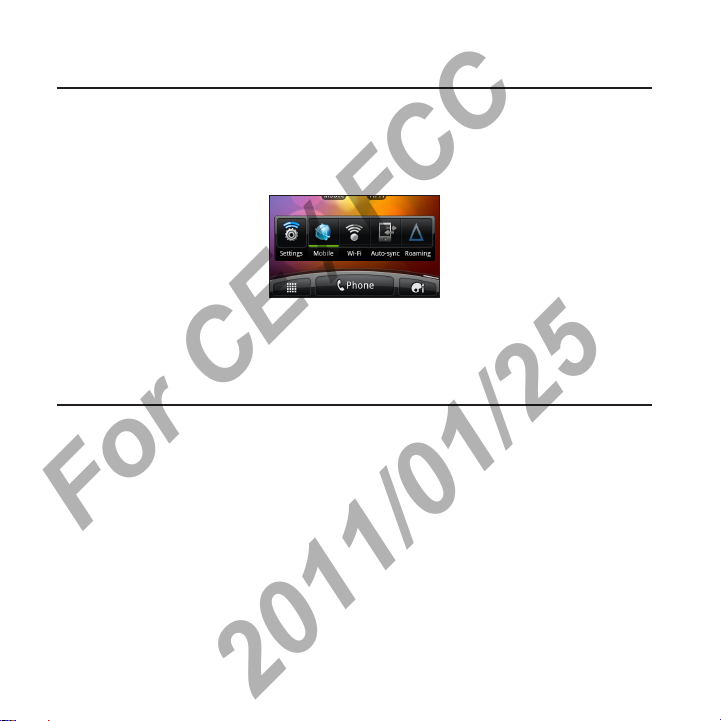
86 Internet connections
For CE / FCC
2011/01/25
Adding connection widgets
Add the Mobile Network and Wi-Fi widgets or the Data dashboard
widget to the Home screen to make it faster for you to turn on or off
these connections. Tap the widget or icon on the dashboard to turn
on or off the connection.
To find out how to add widgets, see “Adding a widget” in the
Personalizing chapter.
Connecting to a virtual private network (VPN)
Add, set up, and manage virtual private networks (VPNs) so you can
connect and access resources inside a secured local network, such as
your corporate network.
Depending on the type of VPN you’re using at work, you may be
asked to enter your login credentials and install security certificates
before you can connect to your company’s local network. You can get
this information from your network administrator.
Also, your phone must first establish a Wi-Fi or data connection
before you can start a VPN connection. For information about setting
up and using these connections on your phone, see “Data connection”
and “Wi-Fi” in this chapter.
Page 84

Internet connections 87
For CE / FCC
2011/01/25
Setting up secure credential storage
If your network administrator tells you to download and install security
certificates, you must first set up the phone’s secure credential
storage.
1.
Press HOME
2.
Tap Security > Set password.
3.
Enter a new password for the credential storage.
4.
Scroll down and confirm the password, and then tap OK.
5.
Select the Use secure credentials check box.
You can then download and install the certificates needed to access
your local network. Your network administrator can tell you how to do
this.
Adding a VPN connection
1.
Press HOME > MENU , and then tap Settings.
2.
Tap Wireless & networks > VPN settings.
3.
Tap Add VPN, and then tap the type of VPN you want to add.
4.
Tap the VPN settings and set them up according to the security
details your network administrator gave you.
5.
Press MENU
The VPN is then added to the VPNs section of the VPN settings
screen.
Connecting to a VPN
1.
Press HOME > MENU , and then tap Settings.
2.
Tap Wireless & networks > VPN settings.
3.
In the VPNs section, tap the VPN that you want to connect to.
> MENU , and then tap Settings.
, and then tap Save.
Page 85
88 Internet connections
For CE / FCC
2011/01/25
4.
When asked, enter your log in credentials, and then tap Connect.
When you’re connected, the VPN connected icon appears in
the notification area of the status bar.
You can then open the web browser to access resources such as your
corporate network intranet.
Disconnecting from a VPN
1.
Press and hold the title bar, and then slide down your finger to
open the Notifications panel.
2.
Tap the VPN connection to return to the VPN settings screen,
and then tap the VPN connection to disconnect from it.
When your phone has disconnected from the VPN, the VPN
disconnected icon
bar.
is displayed in the notification area of the status
Using your phone as a modem (tethering)
No Internet connection available for your computer? No problem.
Use your phone’s data connection to connect your computer to the
Internet.
Before you can use your phone as a modem, be sure to install HTC
Sync on your computer first. To find out how, see “Synchronizing with
your computer” in the Accounts and sync chapter.
1.
Make sure your phone’s data connection is turned on. See
“Turning the data connection on or off” in this chapter for details.
2.
Connect the phone to the computer using the provided USB
cable.
3.
On the Connect to PC screen, select Internet Connection Mode,
and then tap Done.
Page 86
Internet connections 89
For CE / FCC
2011/01/25
Connecting your phone to the Internet through a
computer (Internet Pass-through)
If you don’t have a data plan for your phone or you don’t have access
to a Wi-Fi network, you can still go online on your phone by using
your computer’s Internet connection.
Before you can use your computer as a modem, be sure to install
HTC Sync on your computer first. To find out how to install HTC Sync,
see “Synchronizing with your computer” in the Accounts and sync
chapter.
Make sure your computer is connected to the Internet.
1.
Two things to check for your computer’s Internet connection. One, we
recommend that you turn off your local network’s firewall. Two, if your
computer connects to the Internet via PPP (e.g. Dial UP, xDSL, or VPN),
Internet Pass-through will only support TCP protocol.
2. Connect the phone to the computer using the provided USB
cable.
3. On the Connect to PC screen, select Internet pass-through, and
then tap Done.
4. On the message window, tap OK.
Page 87
90 Internet connections
For CE / FCC
2011/01/25
Using your phone as a wireless router
Use your phone as a wireless hotspot for up to five Wi-Fi enabled
devices with the Portable Wi-Fi Hotspot app.
Press HOME
1.
The first time you open this app, a brief introduction describing
2.
the application is displayed. Tap OK.
Enter a Router name (SSID) to easily identify your phone’s Wi-Fi
3.
network, or use the default name.
SECURITY WARNING: This device allows you to create a hotspot wireless
network, which may be accessible by unauthorized users. It is strongly
recommended that you use a password to help protect your network.
4. Choose the type of Security and set the Password (key) for your
wireless router. If you selected None in Security, you don’t need
to enter a password.
The password is the key other people need to enter on their
device so they can connect and use your phone as a wireless
router.
5. Select the Portable Wi-Fi Hotspot. check box to turn on your
phone’s wireless router.
Your phone is ready to be used as a wireless router when you see
on the status bar. Only two devices can connect to your phone’s
wireless router at one time so if a third device tries to connect to your
phone, it won’t be able to.
This feature is subject to activation and additional service charges.
, and then tap > Portable Wi-Fi Hotspot..
Page 88

Bluetooth
For CE / FCC
2011/01/25
Bluetooth basics
Turning Bluetooth on or off
1.
Press HOME > MENU , and then tap Settings > Wireless &
networks.
2.
Select or clear the Bluetooth check box.
An even easier way to turn Bluetooth on or off is with the Bluetooth
widget or Bluetooth setting shortcut on the Home screen. To find
out how to add widgets and shortcuts to the Home screen, see the
Personalizing chapter.
Turn off Bluetooth when not in use to save battery power, or in places where
using a wireless device is prohibited, such as on board an aircraft and in
hospitals.
Changing the phone name
The phone name identifies your phone to other devices.
1.
Press HOME
networks > Bluetooth settings.
2.
If the Bluetooth check box is not selected, select it to turn
Bluetooth on.
3.
Tap Device name.
4.
Enter the name for your phone in the dialog box, and then tap
OK.
> MENU , and then tap Settings > Wireless &
Page 89

92 Bluetooth
For CE / FCC
2011/01/25
Connecting a Bluetooth headset or car kit
You can listen to music over a Bluetooth stereo headset, or have
hands-free conversations using a compatible Bluetooth headset or car
kit. It’s the same procedure to set up stereo audio and hands-free.
For you to listen to music with your headset or car kit, the
•
headset or car kit must support the A2DP Bluetooth profile.
Before you connect your headset, you need to make it
•
discoverable so your phone can find it. You can find out how
to do this by referring to your headset manual.
1. Press HOME > MENU , and then tap Settings > Wireless &
networks > Bluetooth settings.
2. If the Bluetooth check box is not selected, select it to turn
Bluetooth on.
3. Make sure that the headset is discoverable.
4. Tap Scan for devices. Your phone will start to scan for Bluetooth
devices within range.
5. When you see the name of your headset displayed in the
Bluetooth devices section, tap the name. Your phone then
automatically tries to pair with the headset.
6. If automatic pairing fails, enter the passcode supplied with your
headset.
The pairing and connection status is displayed below the handsfree headset or car kit name in the Bluetooth devices section. When
the Bluetooth headset or car kit is connected to your phone, the
Bluetooth connected icon
on the type of headset or car kit you have connected, you can then
start using the headset or car kit to listen to music and/or make and
receive phone calls.
is displayed in the status bar. Depending
Page 90
Bluetooth 93
For CE / FCC
2011/01/25
Reconnecting a headset or car kit
Normally, you can easily reconnect your headset by switching on
Bluetooth on your phone, and then turning on the headset. However,
you might have to connect manually if your headset has been used
with another Bluetooth device.
1.
Press HOME
networks > Bluetooth settings.
2.
If the Bluetooth check box is not selected, select it to turn
Bluetooth on.
3.
Make sure that the headset is discoverable.
4.
Tap the headset’s name in the Bluetooth devices section.
5.
If prompted to enter a passcode, try 0000 or 1234, or consult the
headset/car kit documentation to find the passcode.
If you still cannot reconnect to the headset or car kit, follow the
instructions in “Unpairing from a Bluetooth device”, and then follow
the steps under “Connecting a Bluetooth headset or car kit”.
> MENU , and then tap Settings > Wireless &
Disconnecting or unpairing from a Bluetooth
device
Disconnecting a Bluetooth device
1.
Press HOME > MENU , and then tap Settings > Wireless &
networks > Bluetooth settings.
2.
In the Bluetooth devices section, press and hold the device to
disconnect.
3.
Tap Disconnect.
Page 91

94 Bluetooth
For CE / FCC
2011/01/25
Unpairing from a Bluetooth device
You can make your phone forget its pairing connection with another
Bluetooth device. To connect to the other device again, you may need
to enter or confirm a passcode again.
1.
Press HOME
networks > Bluetooth settings.
2.
In the Bluetooth devices section, press and hold the device to
unpair.
3.
Tap Disconnect & unpair.
Or, tap Unpair if the Bluetooth device is currently not connected
to your phone.
> MENU , and then tap Settings > Wireless &
Sending information using Bluetooth
You can use Bluetooth to send information from your phone to
another Bluetooth enabled device such as a phone or notebook
computer. You can send the following types of information, depending
on the device you are sending to:
•
Photos and videos
•
Calendar events
•
Before you begin, set the receiving device to discoverable mode. You
may also need to set it to “Receive Beams” or “Receive Files”. Refer to
the device’s documentation for instructions on receiving information
over Bluetooth.
Contacts
•
Audio files
Page 92
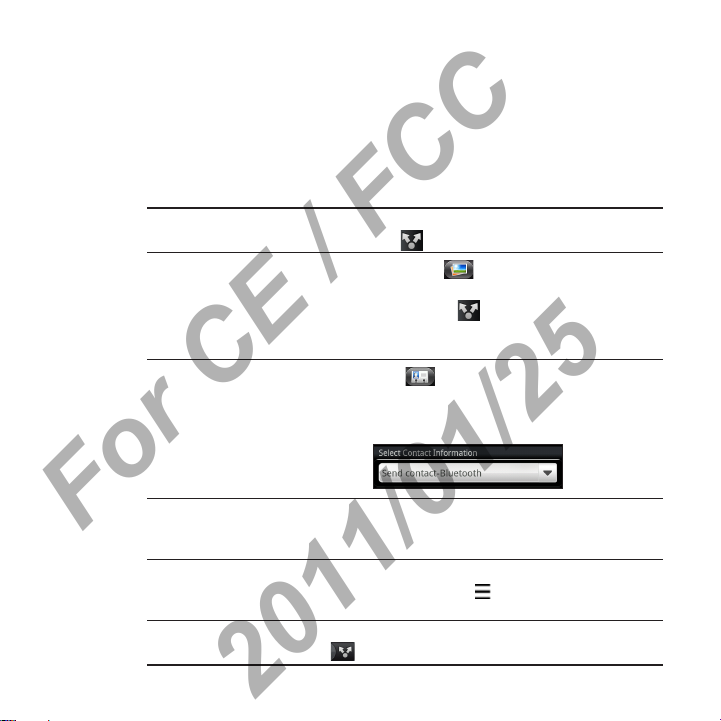
Bluetooth 95
For CE / FCC
2011/01/25
The first time you transfer information between your phone and
another device, you need to enter or confirm a security passcode.
After that, your phone and the other device are paired, and you will
not need to exchange passcodes to transfer information in the future.
1. On your phone, open the app that contains the information or file
you want to send.
2. Follow the steps for the type of item you want to send:
Captured
photo or video
Photos or
videos
Contact
After capturing, on the Camera preview screen, tap
the Share button , and then tap Bluetooth.
1. On the Albums tab of the Gallery app,
choose an album.
2. Tap the Share button , and then tap Bluetooth.
3. Choose the photos and videos you want to share,
and then tap Next.
1.
On the All tab of the People app, press and
hold a contact, and then tap Send contact as vCard.
2. Tap the down arrow icon, and then select
Bluetooth from the displayed list.
Calendar event In Day view, Agenda view, or Week view, press and
Music track With the track displayed on the Music app’s Now
Voice recording On the main Voice Recorder screen, tap the Share
hold the event, and then tap Share vCalendar >
Bluetooth.
playing screen, press MENU
Bluetooth.
button
, and then tap Bluetooth.
, and then tap Share >
Page 93

96 Bluetooth
For CE / FCC
2011/01/25
3. Turn on Bluetooth if you’re asked to do so.
4. If you haven’t paired with the receiving device before, tap Scan
for devices.
5. Tap the name of the receiving device.
6. If prompted, accept the pairing request on your phone and the
receiving device.
Also enter the same passcode on both your phone and the other
device, or confirm the auto-generated passcode.
7. On the receiving device, accept the file.
Where sent information is saved
When you send information from your phone using Bluetooth, the
location where it’s saved depends on the type of information and the
receiving device.
If you send a calendar event or contact, it is normally added directly
to the corresponding app on the receiving device. For example, if you
send a calendar event to a compatible phone, the event is shown in
that phone’s calendar app.
If you send another file type to a Windows computer, it is normally
saved in the Bluetooth Exchange folder within your personal
document folders.
•
On Windows XP, the path may be:
C:\Documents and Settings\[your username]\My Documents\
Bluetooth Exchange
•
On Windows Vista, the path may be:
C:\Users\[your username]\Documents
•
On Windows 7, the path may be:
C:\Users\[your username]\My Documents\Bluetooth Exchange
Folder
Page 94
If you send a file to another device, the saved location may depend on
For CE / FCC
2011/01/25
the file type. For example, if you send an image file to another mobile
phone, it may be saved in a folder named “Images”.
Receiving information using Bluetooth
Your phone is capable of receiving a wide variety of file types with
Bluetooth, including photos, music tracks, and documents such as
PDFs.
The first time you transfer information between your phone and
another device, you need to enter or confirm a security passcode.
After that, your phone and the other device are paired, and you will
not need to exchange passcodes to transfer information in the future.
To receive files using Bluetooth, you need to have a microSD card on
your phone.
Press HOME
1.
networks > Bluetooth settings.
2.
If the Bluetooth check box is not selected, select it to turn
Bluetooth on.
3.
Select the Discoverable check box.
4.
On the sending device, send one or more files to your phone.
Refer to the device’s documentation for instructions on sending
information over Bluetooth.
5. If prompted, accept the pairing request on your phone and the
receiving device.
Also enter the same passcode on both your phone and the other
device, or confirm the auto-generated passcode.
> MENU , and then tap Settings > Wireless &
Bluetooth 97
Page 95

98 Bluetooth
For CE / FCC
2011/01/25
A Bluetooth authorization request is then displayed on your
phone.
6. If you want to automatically receive files from the sending device
in the future, select the Always check box.
7. Tap Accept or OK.
8. When your phone receives a file transfer request notification,
slide down the Notifications panel, tap the incoming file
notification, and then tap Accept.
9. When a file is transferred, a notification is displayed. To open the
file immediately, slide down the Notifications panel, and then tap
the relevant notification.
When you open a received file, what happens next depends on
the file type:
•
Media files and documents are usually opened directly in a
compatible app. For example, if you open a music track, it
starts playing in the Music app.
•
For a vCalendar file, choose the calendar where you want to
save the event, and then tap Import. The vCalendar is added
to your Calendar events. For information on using Calendar,
see the Calendar chapter.
•
For a vCard contact file, if there are multiple vCard files on
your storage card, you can choose to import one, several, or
all of those contacts to your contacts list.
Page 96

Bluetooth 99
For CE / FCC
2011/01/25
Adding the Bluetooth received folder to the Home
screen
You can add a folder to the Home screen that shows all files you have
received with Bluetooth.
1.
Press HOME
2.
On the Personalize screen, tap Folder > Bluetooth received.
3.
Press and hold the Bluetooth received folder icon, and drag it to
the Home screen position you want.
To view the folder contents, tap the folder icon. To open a file, tap the
file name.
, and then tap .
Page 97
Security
For CE / FCC
2011/01/25
Protecting your phone with a screen lock
Protect your personal information and prevent others from using your
phone without your permission by setting a screen lock password, a
PIN, or a lock pattern.
Your screen lock will be asked every time your phone is turned on or
when it’s idle for a certain period of time.
Press HOME
1.
Tap Set up screen lock.
2.
Tap one of the following:
3.
None Disable the screen lock you’ve previously created.
Pattern
PIN Set a numeric password of at least four digits.
Password Set an alpha-numeric password.
4. On the Security screen, tap Lock phone after, then specify the
idle time you can allow before the screen is locked.
You can also clear the Use visible pattern or Visible passwords on the Security
screen if you don’t want your screen lock to display as you enter it onscreen.
> MENU , and then tap Settings > Security.
Set a screen lock pattern by following the onscreen instructions.
Page 98
Changing your screen lock
For CE / FCC
2011/01/25
1.
Press HOME > MENU , and then tap Settings > Security.
2.
Tap Change screen lock.
3.
Enter your current screen lock to confirm that you want to
change it.
4.
Choose a different screen lock type, then enter your new pattern,
PIN, or password.
Or tap None if you don’t want to use a screen lock.
Forgot your screen lock pattern?
If you’ve forgotten your screen lock pattern, you have up to five
attempts to try and unlock your phone. If this fails, you can unlock
your phone by entering your Google Account user name and
password.
1.
On the unlock screen, enter your lock pattern.
2.
After the fifth attempt and you’re asked to wait for 30 seconds,
tap OK.
3.
If the display goes off, press the POWER/LOCK button to turn
the display back on, and then press the bar on the lock screen
and slide your finger down to unlock the screen.
4.
Tap the Forgot pattern? button in the lower right corner when it
appears.
5.
Enter your Google Account name and password, and then tap
Sign in.
You’ll then be asked to create a new screen lock pattern. If you no
longer want to do so, tap Cancel.
Security 101
Page 99
Settings
For CE / FCC
2011/01/25
Settings on your phone
Control and customize phone settings on the Settings screen.
Press HOME
> MENU , and then tap Settings.
Personalize Choose a scene, set the Home screen wallpaper to use,
Wireless &
networks
Call Set up call services such as voicemail, auto retry, preferred
Sound Choose sounds to use for your phone ringtone and
Display Set up display settings such as automatic screen
Accounts & sync Log in or out of your social network accounts, Google
apply a skin, and set sound options.
Configure your phone’s wireless connections, such as
Wi-Fi and Bluetooth, enable the Airplane mode, or set the
options for mobile networks, roaming, and more.
network, and assisted dialing.
•
notifications.
Adjust volume for ringtone, alarm, notification, and
•
media playback.
Set to lower the ring volume when you move the phone
•
when it’s ringing, make the phone ring louder when
inside a bag or pocket, and turn on the speakerphone
when you flip over the phone.
orientation, brightness, screen timeout, and more.
Account, and Exchange ActiveSync account. You can also
manage sync settings for your accounts.
Page 100

Settings 103
For CE / FCC
2011/01/25
Location Select the sources to use when determining your location.
Search Select items to include when you do a search on your
Privacy Choose to automatically back up some settings on the
Connect to PC Set the default USB connection type to use whenever you
Security
Power Turn on power saver to automatically switch to power
Applications Manage running applications, move applications to or from
SD & phone
storage
Date & time Set the date and time, time zone, and date or time format.
Language &
keyboard
phone and set Google search options.
phone (e.g. Wi-Fi passwords or Bookmarks) to Google
servers using your Google Account so you can restore
them when needed.
connect your phone to your computer. Or, select the Ask
me check box to set your phone to always display the
screen for selecting the USB connection type.
Set up a screen lock or manage the phone’s credential
storage.
saving mode when the battery level goes down to the level
that you set.
the storage card, and install or uninstall programs.
Check the available storage card and phone memory.
•
From this screen, be sure to unmount your microSD
•
card before you remove it from your phone.
You can also do a factory reset. See the Update and
•
reset chapter for more details.
You can also turn off auto time synchronization and be
able to manually change time zone settings.
Set the operating system language and region. You can
also set onscreen keyboard options.
 Loading...