


HTC HD2
User Manual

2
Please Read Before Proceeding
INTELLECTUAL PROPERTY RIGHT INFORMATION
Copyright © 2009 HTC Corporation. All Rights Reserved.
The HTC logo, the HTC quietly brilliant logo, and HTC HD2 are trademarks of
HTC Corporation.
Microsoft, Windows, Windows Mobile, Windows XP, Windows Vista, ActiveSync,
Windows Mobile Device Center, Internet Explorer, MSN, Hotmail, Windows Live,
Outlook, Excel, PowerPoint, Word, OneNote and Windows Media are either
registered trademarks or trademarks of Microsoft Corporation in the United
States and/or other countries.
Bluetooth and the Bluetooth logo are trademarks owned by Bluetooth SIG, Inc.
Wi-Fi is a registered trademark of the Wireless Fidelity Alliance, Inc.
Java, J2ME and all other Java-based marks are trademarks or registered
trademarks of Sun Microsystems, Inc. in the United States and other countries.
Copyright © 2009, Sun Microsystems, Inc. All Rights Reserved.
Copyright © 2009, Adobe Systems Incorporated. All Rights Reserved.
microSD is a trademark of SD Card Association.
Google, Google Maps, and YouTube are trademarks of Google, Inc. in the United
States and other countries.
Copyright © 2009, Aplix Corporation. All Rights Reserved.
Opera Mobile from Opera Software ASA. Copyright 1995-2009 Opera Software
ASA. All Rights Reserved.
Copyright © 2004-2009, Ilium Software, Inc. All Rights Reserved.
Facebook is a trademark of Facebook, Inc.
Twitter is a trademark of Twitter, Inc., and is used under license.
Flickr is a trademark of Yahoo! Inc

Licensed by QUALCOMM Incorporated under one or more of the following
patents:
4,901,307 5,490,165 5,056,109 5,504,773 5,101,501 5,778,338
5,506,865 5,109,390 5,511,073 5,228,054 5,535,239 5,710,784
5,267,261 5,544,196 5,267,262 5,568,483 5,337,338 5,659,569
5,600,754 5,414,796 5,657,420 5,416,797
All other company, product and service names mentioned herein are trademarks,
registered trademarks or service marks of their respective owners.
HTC shall not be liable for technical or editorial errors or omissions contained
herein, nor for incidental or consequential damages resulting from furnishing
this material. The information is provided “as is” without warranty of any kind
and is subject to change without notice. HTC also reserves the right to revise the
content of this document at any time without prior notice.
No part of this document may be reproduced or transmitted in any form or
by any means, electronic or mechanical, including photocopying, recording or
storing in a retrieval system, or translated into any language in any form without
prior written permission of HTC.
3

4
Contents
Chapter 1 Getting Started
1.1 Inside the Box ......................................................................................................18
1.2 Getting to Know Your Phone .........................................................................19
Front panel ...................................................................................................................19
Back panel .................................................................................................................. 20
Left panel ...................................................................................................................... 21
Bottom panel ..............................................................................................................21
1.3 Before Charging the Battery and Turning On Your Phone ............... 22
Removing the back cover .................................................................................... 22
Removing the thin film and battery ................................................................22
Inserting the SIM card ............................................................................................23
Inserting the battery ...............................................................................................23
Inserting the microSD card .................................................................................24
Replacing the back cover.....................................................................................24
1.4 Charging the Battery .......................................................................................25
1.5 Starting Up ..........................................................................................................26
Turning the power on .............................................................................................26
Setting up your phone for the first time .......................................................26
Switching to Sleep mode .....................................................................................28
Turning the power off ............................................................................................29
1.6 Home Screen.......................................................................................................29
1.7 Status Icons .........................................................................................................30
1.8 Notifications ........................................................................................................ 32
1.9 Start Screen ......................................................................................................... 33
Moving an icon to the top of the Start screen ...........................................33

1.10 Lock Screen .........................................................................................................34
Locking your phone ............................................................................................... 34
Unlocking your phone ...........................................................................................35
Checking notifications when the phone is locked ...................................35
Receiving a call when the phone is locked ..................................................36
1.11 Adjusting the Volume ...................................................................................... 37
Setting a single volume ......................................................................................... 37
Adjusting the system and ring volumes separately ................................37
Adjusting the phone call volume ......................................................................38
1.12 Using Finger Gestures ..................................................................................... 38
Finger scrolling ..........................................................................................................38
Finger panning ..........................................................................................................39
Pinch zooming ...........................................................................................................39
1.13 Connecting Your Phone to a Computer ....................................................41
Chapter 2 Phone Calls
2.1 Making Calls ........................................................................................................42
Making a call from the Phone dialer screen ................................................42
Calling voicemail ...................................................................................................... 44
Making calls from received messages and calendar reminders ....... 44
Making an emergency call .................................................................................. 45
Making an international call (plus code dialing) ...................................... 45
Home dialing ............................................................................................................. 45
2.2 Answering and Ending Calls .........................................................................47
Accepting or rejecting an incoming call .......................................................47
During a call ............................................................................................................... 49
2.3 Using Call History ............................................................................................... 51
2.4 Speed Dial ............................................................................................................ 52
Creating a Speed Dial entry ................................................................................ 52
Making a call using Speed Dial ..........................................................................53
5

6
2.5 Making Conference Calls ................................................................................ 53
Selecting participants and starting the conference call .......................53
Making the first call and adding calls to the conference ......................55
During the conference call ..................................................................................56
Making a conference call from an email .......................................................57
2.6 Turning the Phone Connection On and Off ............................................ 58
Chapter 3 Using the Home Screen
3.1 About the Home Screen ................................................................................. 59
3.2 Switching Between the Tabs of the Home Screen ...............................60
3.3 Personalizing Home Screen Tabs ................................................................. 61
3.4 Home ....................................................................................................................... 61
Changing the wallpaper ........................................................................................62
Updating weather information ..........................................................................63
Selecting another location to display on the Home tab .......................63
Changing the date and time .............................................................................. 64
Setting the alarm clock .........................................................................................65
Adding quick links .................................................................................................. 66
3.5 People .................................................................................................................... 67
3.6 Messages ..............................................................................................................68
3.7 Mail ..........................................................................................................................69
Adding your Internet email account .............................................................. 69
Adding your Outlook work account .............................................................. 70
Checking and reading email ............................................................................... 72
3.8 Internet .................................................................................................................. 73
Adding Web favorites ...........................................................................................73
3.9 Calendar ................................................................................................................ 74
Creating an appointment .....................................................................................74
Viewing and managing your appointments ................................................75

3.10 Stocks .................................................................................................................... 77
Adding stock quotes and market indexes ...................................................77
Viewing stock information ...................................................................................78
3.11 Photos & Videos ................................................................................................ 79
Portrait view ...............................................................................................................79
Landscape view .......................................................................................................80
3.12 Music .......................................................................................................................81
Playing music in portrait view .............................................................................81
Playing music in landscape view ......................................................................82
Setting repeat and shuffle modes ...................................................................83
Finding albums and music tracks in the Library ...................................... 84
Playlists ........................................................................................................................ 84
3.13 Weather ................................................................................................................86
Adding a city ..............................................................................................................87
Weather settings ......................................................................................................87
3.14 Twitter ...................................................................................................................88
3.15 Footprints ............................................................................................................88
3.16 Settings .................................................................................................................89
Chapter 4 Staying Close
4.1 It’s All About People ........................................................................................90
4.2 Adding and Sharing Your Personal Details .............................................. 91
Adding your personal details ..............................................................................91
Sharing your personal details ............................................................................92
4.3 Adding Contacts to Your Phone .................................................................93
Creating new contacts ..........................................................................................93
4.4 Working With Favorite Contacts ................................................................95
Adding favorite contacts to the People tab ...............................................95
Quickly calling or sending a message to a favorite contact .............. 96
7

8
4.5 Viewing and Managing Your Contacts ...................................................... 97
Browsing and finding contacts ........................................................................ 98
4.6 Viewing Contact Information and Exchange of Communications
With the Contact ...............................................................................................99
Changing the number for sending text and multimedia messages .....
100
4.7 Contact Groups ................................................................................................. 101
Creating a contact group .................................................................................... 101
Sending a text or multimedia message to a group ................................ 101
Filtering the contacts list by group ............................................................... 102
4.8 Facebook Updates and Events .................................................................. 102
Logging in and out of Facebook .................................................................... 102
Checking all Facebook updates and events .............................................103
Checking a contact’s Facebook updates and events ...........................104
Updating your Facebook status .....................................................................105
Chapter 5 Entering Text
5.1 Using the Onscreen Keyboard ...................................................................106
Full QWERTY ...........................................................................................................107
Compact QWERTY ............................................................................................... 107
Phone Keypad..........................................................................................................107
Onscreen navigation pad ...................................................................................108
Entering text .............................................................................................................108
5.2 Using Predictive Mode ................................................................................... 110
5.3 Entering Numbers and Symbols ..................................................................111
5.4 Text Input Settings............................................................................................113
Chapter 6 Synchronizing Information
6.1 Ways of Synchronizing Your Phone .......................................................... 114

6.2 Before Synchronizing With Your Computer ...........................................115
6.3 Setting Up Windows Mobile Device Center on Windows Vista ......116
Setting up synchronization in Windows Mobile Device Center ....... 116
Using Windows Mobile Device Center ...........................................................117
6.4 Setting Up ActiveSync on Windows XP ...................................................118
Setting up synchronization in ActiveSync .................................................. 118
6.5 Synchronizing With Your Computer ..........................................................119
Starting and stopping synchronization ........................................................ 119
Selecting information to sync ..........................................................................120
Troubleshooting sync connection problem ............................................... 121
6.6 Synchronizing via Bluetooth .........................................................................121
6.7 Synchronizing Music and Video .................................................................122
6.8 Synchronizing With Microsoft My Phone ................................................123
Setting up your My Phone account ..............................................................123
Changing sync settings ....................................................................................... 124
Stopping sync partnership with your My Phone Web account ......124
Managing your My Phone Web account from your computer ........ 125
Chapter 7 Exchanging Messages
7.1 Sending Text Messages ..................................................................................126
7.2 Sending Multimedia Messages ....................................................................127
Creating a slideshow ............................................................................................ 128
7.3 How to Know When You Have New Text and Multimedia Messages .
130
7.4 Message Conversations ..................................................................................131
Viewing the exchange of messages with a contact ............................... 131
Replying to the contact in the conversation ............................................ 132
Copying and pasting text to your reply message .................................. 132
Viewing a multimedia message ......................................................................133
9

10
Managing individual messages and message threads ......................... 135
7.5 Text and Multimedia Message Settings ...................................................138
Adding MMS server settings ............................................................................. 138
7.6 Directly Making Calls from Text Messages .............................................139
7.7 Email..................................................................................................................... 140
Synchronizing Outlook email with your computer ................................140
Setting up your Internet email account ....................................................... 141
Creating and replying to email messages ................................................... 141
Adding your signature in sent email ............................................................. 142
Downloading a complete email ......................................................................143
Downloading file attachments .........................................................................143
When viewing email ..............................................................................................144
Directly making calls from email messages ..............................................145
Synchronizing email messages .......................................................................146
Filtering your email inbox .................................................................................. 147
Customizing email settings ............................................................................... 147
Chapter 8 Working With Company Email and Meeting Requests
8.1 Synchronizing With the Exchange Server ............................................. 150
Setting up an Exchange Server connection ............................................. 150
Starting synchronization ....................................................................................150
8.2 Working With Company Email Messages ................................................151
Automatic synchronization through Direct Push .................................... 151
Scheduled synchronization ............................................................................... 152
Instant download through Fetch Mail .......................................................... 153
Searching for email messages on the Exchange Server .....................154
Out-of-office auto-reply ..................................................................................... 154
Flagging your messages ..................................................................................... 155
8.3 Starting a Conference Call from an Email ............................................. 156

8.4 Meeting Requests ............................................................................................158
Sending meeting requests ................................................................................. 158
Replying to meeting requests .......................................................................... 159
8.5 Making a Call from a Meeting Request or Reminder ......................... 160
8.6 Finding Contacts in the Company Directory ..........................................161
When browsing contacts, composing email, or creating a meeting
request.......................................................................................................................... 161
When viewing a received Outlook email message ................................ 162
Chapter 9 Internet and Social Networking
9.1 Ways of Connecting to the Internet .........................................................163
Wi-Fi ............................................................................................................................. 163
GPRS/3G ....................................................................................................................166
Dial-up .........................................................................................................................166
Starting a data connection ................................................................................ 167
9.2 Using Opera Mobile ........................................................................................ 168
The browser screen ...............................................................................................168
Searching for a website and adding it to favorites ...............................169
Mobile view ...............................................................................................................170
Zooming and panning .........................................................................................170
Opera Mobile menu ................................................................................................ 171
9.3 Using Internet Explorer Mobile ...................................................................172
The browser screen ............................................................................................... 172
Entering a website address and adding it to your favorites ............. 173
Zooming and panning ......................................................................................... 174
9.4 Using YouTube ..................................................................................................175
The YouTube main screen .................................................................................. 175
Searching for videos ............................................................................................. 176
Using the Program Guide ................................................................................... 176
Watching videos ..................................................................................................... 177
11

12
9.5 Using Streaming Media ..................................................................................178
9.6 Using Windows Live ........................................................................................179
The Windows Live screen ..................................................................................180
Using Windows Live Messenger .....................................................................180
9.7 Twittering on Your Phone .............................................................................182
Logging in to your Twitter account .............................................................. 182
Viewing tweets ........................................................................................................ 183
Sending tweets .......................................................................................................184
Sending mentions and direct messages ..................................................... 184
Searching for Twitter users to follow ...........................................................184
Sharing a photo in Twitter ................................................................................. 185
Changing Twitter settings .................................................................................. 186
Logging out of Twitter ........................................................................................186
9.8 Sharing Photos and Videos on Facebook, Twitter, and YouTube ..187
Logging into your social networks ................................................................ 187
Uploading photos to Facebook ...................................................................... 187
Uploading a photo to Twitter ........................................................................... 188
Uploading videos to YouTube .......................................................................... 188
9.9 Using Facebook on Your Phone ................................................................ 189
9.10 Using Your Phone as a Modem ....................................................................191
Before you proceed ............................................................................................... 191
Setting up your phone as a USB modem.................................................... 191
Using your phone as a Bluetooth modem ................................................. 192
Ending the Internet connection ...................................................................... 193
9.11 Using Your Phone as a Wireless Router ..................................................193
Setting up your phone as a wireless router ..............................................194
Connecting your computer to your phone’s Wi-Fi network ............. 195
Turning off your phone’s Wi-Fi network ..................................................... 196
Turning on your phone’s Wi-Fi network in Comm Manager .............196

Chapter 10 Bluetooth
10.1 Bluetooth Modes ..............................................................................................197
Turning Bluetooth on and making your phone visible ......................... 198
10.2 Bluetooth Partnerships ................................................................................. 199
Creating a Bluetooth partnership ..................................................................199
Accepting a Bluetooth partnership ............................................................. 200
10.3 Connecting a Bluetooth Hands-free or Stereo Headset .................200
10.4 Sending and Receiving Information Using Bluetooth ...................... 202
Sending information from your phone to a computer .......................202
Sending a file to another Bluetooth-enabled device .......................... 204
Receiving information from another Bluetooth-enabled device .. 204
Changing the folder for saving received files......................................... 204
10.5 Printing via Bluetooth .................................................................................. 205
Printing a photo .....................................................................................................205
10.6 Connecting to Car Kit Phones ................................................................... 206
Chapter 11 Finding and Recording Places
11.1 Guidelines and Preparation for Using GPS ........................................... 207
11.2 Downloading Location Data via QuickGPS .......................................... 208
Changing the download options ...................................................................209
11.3 HTC Footprints ................................................................................................. 210
What is a footprint? ..............................................................................................210
Taking a photo of your location as a footprint ........................................ 210
Selecting and saving a photo from Albums as a footprint................212
Editing a footprint ................................................................................................. 213
Browsing your footprints to find a place you visited ........................... 214
Exporting footprints to your storage card ................................................ 215
Importing footprints from your storage card ........................................... 215
13

14
11.4 Google Maps (Available by Country) .......................................................216
Searching a place of interest ............................................................................ 216
Using Street View...................................................................................................218
Using Layers ............................................................................................................220
11.5 Using Your Phone as a Compass ...............................................................222
Using the compass ............................................................................................... 223
Navigating to a destination .............................................................................. 223
11.6 Using Your Phone with the Car Kit ...........................................................224
Using NaviPanel ..................................................................................................... 224
Auto connecting to a Bluetooth car kit or headset when in car kit
mode ........................................................................................................................... 225
Chapter 12 Camera and Multimedia
12.1 Taking Photos and Videos ...........................................................................227
Changing the capture mode ........................................................................... 227
Zooming ....................................................................................................................228
Using the flash light .............................................................................................229
Capturing photos and videos .......................................................................... 231
Onscreen controls ................................................................................................. 232
Basic settings .......................................................................................................... 233
Advanced settings ................................................................................................234
Closing the Camera .............................................................................................. 236
12.2 Viewing Photos and Videos Using Albums ........................................... 237
Viewing photos ...................................................................................................... 238
Viewing Facebook photos ................................................................................240
Playing videos .........................................................................................................240
Sharing photos and videos ............................................................................... 241
Closing Albums ...................................................................................................... 242
12.3 Using Windows Media Player Mobile.......................................................242
Playing media .......................................................................................................... 242
Synchronizing video and audio files ............................................................243

Creating playlists ...................................................................................................246
Troubleshooting .....................................................................................................246
12.4 Using Audio Booster ......................................................................................247
12.5 Using FM Radio ............................................................................................... 248
Saving presets ........................................................................................................ 249
Minimizing or turning off FM Radio .............................................................249
12.6 Using MP3 Trimmer ...................................................................................... 250
Chapter 13 Other Programs
13.1 Calculator ...........................................................................................................252
Basic Calculator .....................................................................................................252
Scientific Calculator ............................................................................................. 253
13.2 Microsoft Office Mobile ................................................................................ 254
13.3 RSS Hub ..............................................................................................................255
Subscribing to and browsing news channels .......................................... 255
Viewing headlines ................................................................................................. 257
Sharing the headline link ...................................................................................258
13.4 SIM Manager......................................................................................................258
13.5 WorldCard Mobile .........................................................................................260
13.6 JBlend ...................................................................................................................261
Installing and launching MIDlets/MIDlet suites ........................................ 261
13.7 JETCET PRINT ..................................................................................................262
13.8 Windows Marketplace .................................................................................. 264
13.9 Installing and Uninstalling Programs ......................................................264
Chapter 14 Managing Your Phone
14.1 Copying and Managing Files ..................................................................... 266
15

16
14.2 Settings on Your Phone ............................................................................... 268
Personalize ...............................................................................................................268
Wireless controls ...................................................................................................268
Sound & display ..................................................................................................... 269
Data services ...........................................................................................................269
Location .....................................................................................................................270
Security ...................................................................................................................... 270
Application ................................................................................................................ 271
SD card & phone storage ................................................................................... 271
Date & time ............................................................................................................... 271
Locale & text ............................................................................................................. 271
Updates & feedback ............................................................................................ 272
Other ........................................................................................................................... 272
About phone ........................................................................................................... 273
14.3 Basic Settings ...................................................................................................274
Changing sound and display settings ......................................................... 274
Specifying a phone name ................................................................................. 278
Changing settings of phone services .......................................................... 278
14.4 Using Comm Manager ...................................................................................279
14.5 Using Connection Setup ................................................................................281
Selecting another mobile operator ............................................................... 281
Updating the Connection Setup database ................................................ 281
14.6 Using Task Manager .......................................................................................282
14.7 Protecting Your Phone ..................................................................................282
Protecting your SIM card with a PIN ...........................................................282
Protecting your phone with a password ...................................................283
Encrypting files on your storage card ........................................................284
14.8 Resetting Your Phone ....................................................................................285
Performing a soft reset ......................................................................................285
Performing a factory reset ............................................................................... 286

Appendix
A.1 Specifications .................................................................................................. 288
Index 290
17

Chapter 1
Getting Started
1.1 Inside the Box
You will find the following inside the box:
HTC HD2 phone with battery
•
USB sync cable
•
AC adapter
•
Power plug
•
3.5mm stereo headset
•
microSD™ card
•
Pouch
•
Quick Start Guide
•

1.2 Getting to Know Your Phone
Front panel
Notification LED
Touch Screen
Chapter 1 Getting Started 19
Earpiece
TALK/SEND
HOME
Button Function
Notification
LED
This LED shows a:
Flashing green light when there is a missed call, new text
•
message, new email, or other notification.
Solid green light when the phone is connected to the power
•
adapter or a computer and the battery is fully charged.
Solid amber light when the battery is being charged.
•
Flashing amber light when the battery level is very low.
•
END/POWER
BACK
START
20 Chapter 1 Getting Started
Button Function
Earpiece Listen to a phone call from here.
TALK/SEND Press to answer a call or dial out.
HOME Press to return to the Home screen.
START Press to open the Start screen. Press twice to close.
BACK Press to return to the previous screen.
END/POWER While in a call, press to end the call.
•
During a call, press and hold to turn the speakerphone on
•
and off.
While viewing a message, press to call the sender.
•
•
Press to turn the display on or off.
•
Press and hold to display the Quick List and choose whether
•
to turn the power off, lock your phone, set your phone to
vibrate, or disconnect the data connection.
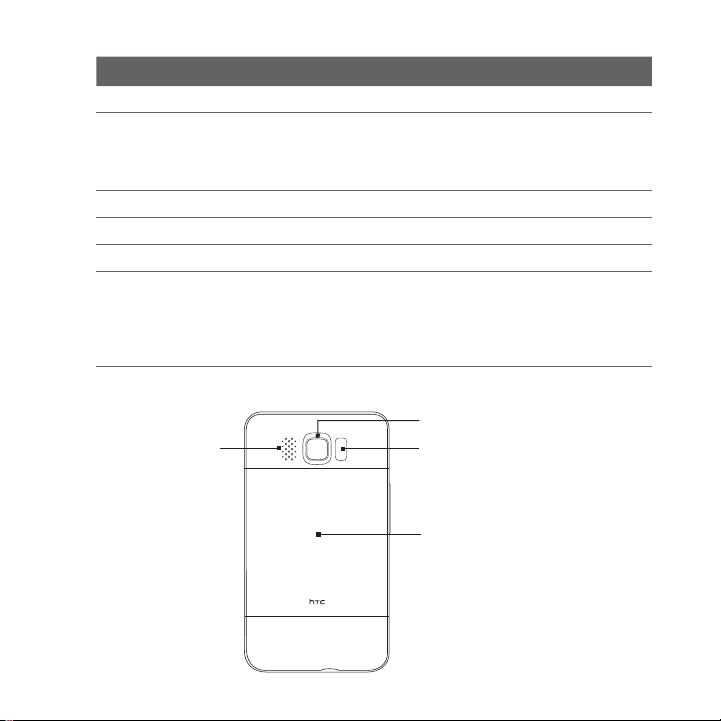
Back panel
Speaker
5 Megapixel Camera
Dual LED Flashlight
Back
Cover

Left panel
VOLUME UP
Press to increase the
earpiece volume during
a call or the speaker
volume.
VOLUME DOWN
Press to decrease the
earpiece volume during a
call or the speaker volume.
Bottom panel
3.5mm Audio Jack
Connect a 3.5mm wired headset
for hands-free conversation or
for listening to music.
Chapter 1 Getting Started 21
Microphone
Sync Connector
Connect the power adapter to recharge the battery.
•
Connect the supplied USB cable to sync your phone
•
with your computer.

22 Chapter 1 Getting Started
m
ic
roSD
1.3 Before Charging the Battery and Turning On
Your Phone
When you take your phone out from the box and remove the back
cover, you will find that the battery is inside the phone, with a thin film
inserted in between the battery and the battery compartment. You
need to remove this film and reinsert the battery before charging or
turning the phone on.
Also install your SIM card and microSD card before turning the phone on.
Removing the back cover
Remove the back cover to access the battery compartment, SIM card
slot, and storage card slot.
1. Hold your phone securely with the front
facing down.
2. With your thumb or finger, open the
back cover by lifting up from the left
side of the cover.
Removing the thin film and battery
After removing the back cover, you will see the upper flap of the thin
film wrapped over the upper half of the battery.
1. Pull the upper flap of the thin film to
disengage the battery from the phone,
along with the film.
2. Remove and discard the film.
3. Remove the battery.
Chapter 1 Getting Started 23
m
icro
S
D
SIM CAR
D
m
ic
roSD
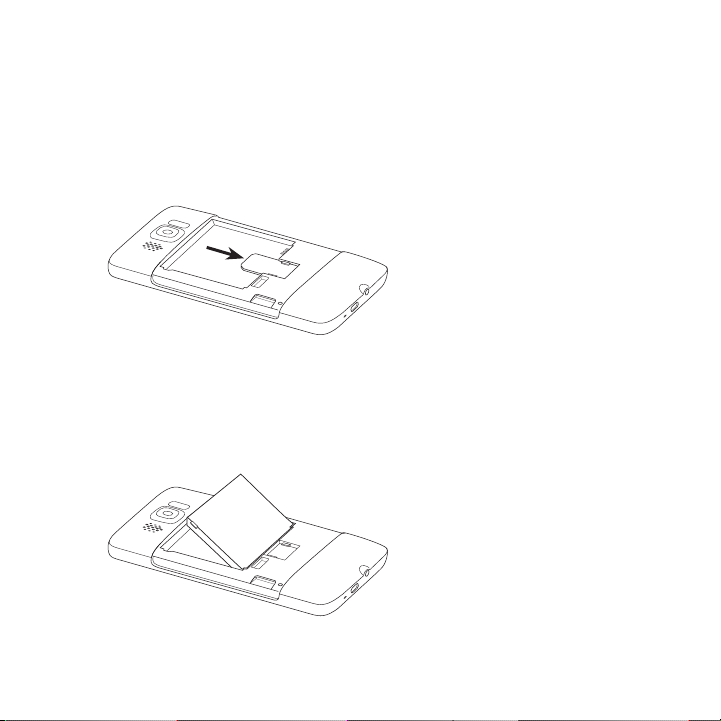
Inserting the SIM card
The SIM card contains your phone number, service details, and
phonebook/message memory. Your phone supports both 1.8V and 3 V
SIM cards.
Note Some legacy SIM cards may not function with your phone. You should
consult with your mobile operator for a replacement SIM card. There
may be fees for this service.
1. Insert the SIM card with its
gold contacts facing down
and its cut-off corner facing
out.
2. Slide the SIM card completely
into the slot.
Inserting the battery
After inserting your SIM card, put the battery back in.
Important If you have not yet removed the thin film that is inserted in between
the battery and the battery compartment, make sure to remove it
first before reinserting the battery. See “Removing the thin film and
battery” for instructions.
1. Align the battery’s exposed
copper contacts with the
battery connectors inside the
battery compartment.
2. Insert the contacts side of the
battery first and then gently
push the battery into place.
24 Chapter 1 Getting Started
m
ic
roSD
SI
M
m
ic
roSD
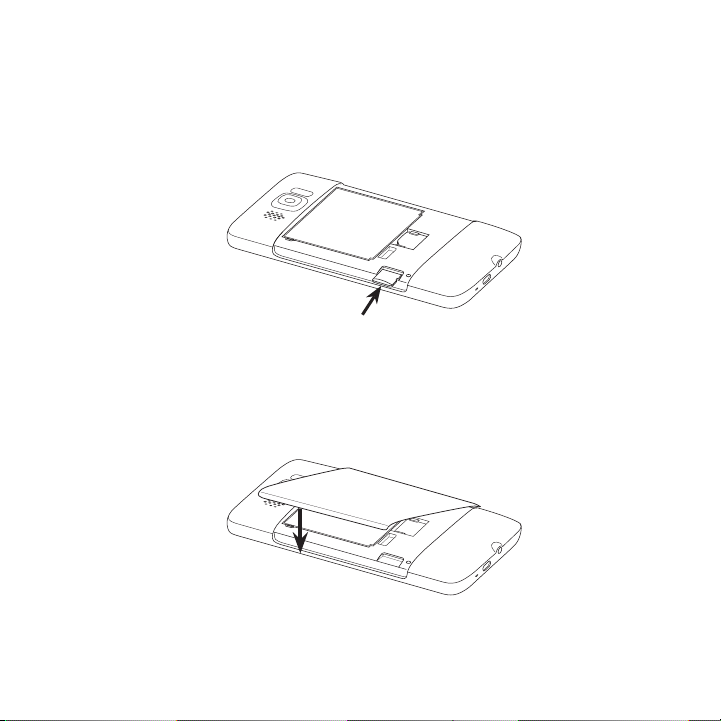
Inserting the microSD card
The storage card slot is located at the lower left side, just below the
battery compartment.
Insert the microSD card into the slot with its gold contacts facing
down and push it in until it clicks into place.
Replacing the back cover
After the thin film has been removed, and the SIM card, battery, and
microSD card have all been inserted, put back the back cover.
Secure the right side of the back cover first and then press down
the cover into place.
Chapter 1 Getting Started 25
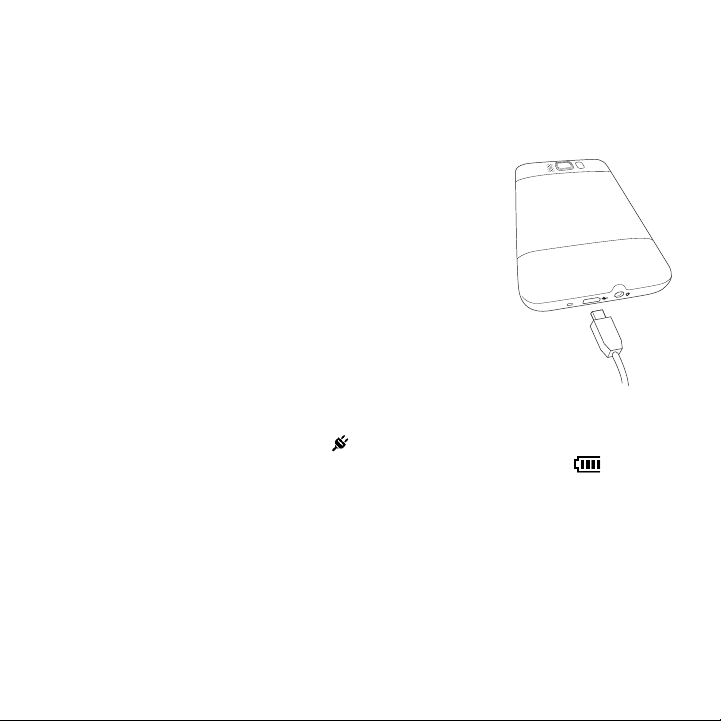
1.4 Charging the Battery
The battery is partially charged. Before you turn on and start using
your phone, it is recommended that you charge the battery. Some
batteries perform best after several full charge/discharge cycles.
1. Attach the power plug to the AC adapter.
2. Connect one end of the USB sync cable to
the sync connector on your phone.
3. Connect the other end of the USB sync
cable to the USB port of the AC adapter.
4. Plug in the AC adapter to an electrical
outlet to start charging the battery.
As the battery is being charged, the notification
LED (located on the left side of the earpiece)
shows a solid amber light when the battery is
being charged. The light turns to solid green
when the phone is fully charged.
When you charge the battery while your phone is turned on, you
will also see a charging icon in the title bar on top of the screen.
After the battery has been fully charged, a full battery icon will be
shown in the title bar.
Important • Only the AC adapter and USB sync cable provided with your
• Do not remove the battery from the phone while you are charging
• As a safety precaution, the battery stops charging when it
phone must be used to charge the battery.
it using the AC or car adapter.
overheats.

26 Chapter 1 Getting Started
Warning! To reduce the risk of fire or burns:
• Do not attempt to open, disassemble, or service the battery pack.
• Do not crush, puncture, short external contacts, or dispose of in
• Do not expose to temperatures above 60oC (140oF).
• Replace only with the battery pack designated for this product.
• Recycle or dispose of used battery as stipulated by local
fire or water.
regulations.
1.5 Starting Up
After installing the SIM card, battery, and microSD card and charging
the battery, you can now power on and start using your phone.
Turning the power on
The rightmost button below the touch screen is the END/POWER
button. Press this button to turn on your phone.
When you are in a phone call, you also press the same button to end
the call. For more information about making and receiving phone calls,
see Chapter 2.
Setting up your phone for the first time
When you turn on your phone for the first time, your phone displays
tutorials and guides you to set up your email accounts and favorite
social networks such as Facebook®, YouTube™, and Twitter™. You can
follow the onscreen instructions to complete the setup, or skip the
setup and do it at another time.
Note If you did not insert your SIM card and you turned on your phone for the
first time, your phone displays a tutorial showing how to install the SIM
card and battery. Turn off your phone, insert your SIM card, and reinsert
the battery before proceeding to use the phone.

Chapter 1 Getting Started 27
1. Your phone first sets up GPRS/3G, MMS, and WAP connections
automatically based on your SIM card. Wait for the setup to
complete.
2. Your phone walks you through a tutorial on how to use the
onscreen keyboard. Follow through the tutorial to learn how to
use the onscreen keyboard.
3. If there are Wi-Fi® networks in range, a message asks you
whether to connect to a Wi-Fi network. Tap OK and then tap the
wireless network that you want, or tap Cancel to set up your WiFi connection at a later time.
4. Some phone features such as Weather and Footprints require
Google’s location service to automatically determine your
current location. On the Google Location screen, you can choose
whether to allow Google’s location service to collect information
about your location.
Note This service may incur additional data transfer fees from your
provider. You can enable or disable this service later in your phone’s
location settings.
5. On the Set Up Accounts screen, choose the type of email
account you want to set up and follow the onscreen instructions
to complete the email setup.
After setting up an account, you will be taken back to the Set Up
Accounts screen so you can set up more email accounts. When
you are done setting up your email accounts, tap Next.
6. On the Set Up Social Networks screen, choose the type of social
network account such as Facebook and YouTube that you want
to access from your phone. Follow the onscreen instructions to
log in to your social network account.
When you are done setting up your accounts, tap Next on the
Set Up Social Networks screen.

28 Chapter 1 Getting Started
7. Your phone then attempts to detect your current time zone and
set your local time automatically.
If auto detection is unsuccessful, tap Local Time Settings to
set your local time.
8. The subsequent screen displays the Web address from which
the PC synchronization software can be downloaded. Note
down the Web address so you can download and install the
synchronization software on your computer later on, and then
tap Next.
9. The final screen shows you where you can learn more about
using your phone. Tap Finish.
Switching to Sleep mode
Briefly press the END/POWER button to turn off the display
temporarily and switch your phone to Sleep mode. Sleep mode
suspends your phone to a low power state while the display is off in
order to save battery power.
Your phone automatically goes into Sleep mode when you leave the
phone idle after a certain period of time. You are still able to receive
messages and calls while your phone is in Sleep mode. Your phone
wakes up automatically when you have an incoming call.
To wake up your phone manually, press the END/POWER button. You
will then see that the phone has locked the screen. To find out how to
unlock the screen, see “Lock Screen” in this chapter.
Tip You can set the display timeout period. For instructions, see “To change
backlight and automatic Sleep mode settings” in Chapter 14.
Chapter 1 Getting Started 29
Turning the power off
If you do not need to use your phone, you can turn the power off to
save battery life.
1. If the display is off, press the END/POWER button to turn the
display back on.
2. Unlock your phone if the Lock screen is displayed. See “Lock
Screen” for details.
3. Press and hold END/POWER for a few seconds.
4. On the Quick List screen, tap Power Off.
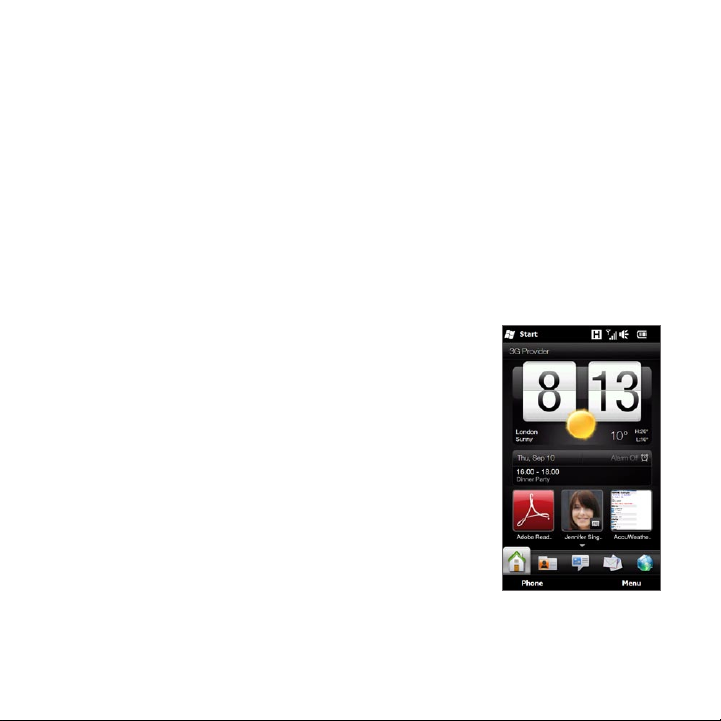
1.6 Home Screen
The Home screen provides you with a weather
clock that shows the time and weather of your
current location and displays your upcoming
appointment. Tap the respective item when
you want to change the weather clock to
display another location, update the weather
information, or access the Calendar.
Essential features that you commonly use,
such as People, Messages, Mail, Internet, and
more, are easily accessed up front on the Home
screen. The tabs at the bottom of the Home
screen correspond to the different phone
features. Simply press and hold on the active
tab and then slide your finger right or left
to the feature you want to use. You can also
directly tap a tab.

30 Chapter 1 Getting Started
You can also personalize the Home screen with an animated or picture
wallpaper (by tapping Menu > Home Wallpaper), rearrange the tabs,
as well as add quick links to people who matter most to you, your
favorite websites, and applications.
For more information about using the Home screen, see Chapter 3.
1.7 Status Icons
Status icons are displayed in the title bar at the top of the screen.
The following are some of the status icons that you may see on your
phone.
Missed call New email
Battery charging HSPA available
Full battery HSPA connected
Very low battery
Sound on WCDMA/UMTS connected
Silent EDGE available
Vibrate EDGE connected
Maximum signal strength GPRS available
WCDMA/UMTS available

Chapter 1 Getting Started 31
Phone connection is off GPRS connected
Searching for phone
service
No phone service Wireless network(s) available
No signal Connected to a wireless network
Voice call in progress Uploading photo or video
Speakerphone on Photo or video upload completed
Multiple notifications Connection is active
Alarm Connection is not active
Wired headset
connected
Bluetooth on Call on hold
Bluetooth visible
mode on
Bluetooth stereo audio Roaming
Bluetooth hands-free Dialing while no SIM card is inserted
New Windows Live
message
New text or multimedia
message received
Multimedia message
successfully sent
Wi-Fi on
Sync in progress
Calls are forwarded
No SIM card inserted
Sending multimedia message

32 Chapter 1 Getting Started
1.8 Notifications
When you tap any of the status icons in the title bar, the Notifications
screen opens and displays the remaining battery status, call duration
of an ongoing phone call, as well as network connection status,
such as Wi-Fi (if your phone is connected to a Wi-Fi network), data
connection usage (if your data connection is on), and other types of
connections. This screen also shows all your pending notifications
including missed calls, new SMS/MMS messages, and more. Tap a
status icon or item on the Notifications screen to open the related
screen.
To close the Notifications screen, tap Close or press the BACK button
on your phone.

Chapter 1 Getting Started 33
1.9 Start Screen
The Start screen gives you one-touch access to the programs and
settings of your phone. To open the Start screen, tap Start ( ) at the
top left corner of the screen, or press the START button ( ).
On the Start screen:
Swipe your finger up or down to scroll
•
through the screen.
Tap the Today icon to return to the Home
•
screen. See “Home” in Chapter 3 for details.
Tap an icon to open the corresponding
•
program or open a folder containing more
programs.
Tap the Settings icon to access the settings
•
of your phone.
Tap Lock at the bottom-left corner of
•
the Start screen to lock your phone. See
“Lock Screen” for details.
Press the START button twice to close
•
the Start screen.
Moving an icon to the top of the Start screen
You can move often used icons to the top of the Start screen for easy
access.
1. Press and hold the icon that you want to move.
2. Tap Move to Top.
The icon is moved to the top of the Start screen.
To return an icon to its original location, press and hold the icon and
then tap Move Down.

34 Chapter 1 Getting Started
1.10 Lock Screen
The Lock screen is displayed whenever your phone is locked. You can
lock your phone to prevent accidental button or touch screen presses
when the phone is in your bag or pocket.
Locking your phone
Your phone automatically locks when one of the following occurs:
The display is turned off (automatically or you have pressed the
•
END/POWER button) and your phone goes to sleep mode. See
“Switching to Sleep mode” earlier in this chapter for details.
Your phone is password protected, and the set idle time has
•
elapsed. Your phone locks itself and requires the correct
password entry to unlock it. For more information about setting
a password and idle time for your phone, see “Protecting your
phone with a password” in Chapter 14.
You can also lock the phone manually. Tap Start and then tap Lock at
the bottom-left corner of the Start screen.

Chapter 1 Getting Started 35
Unlocking your phone
When you see the Lock screen, slide the Lock button ( ) left or
right to unlock your phone.
Note If you have set a password for your phone, you will be prompted for the
password when you unlock the phone. See “Protecting your phone with
a password” in Chapter 14 for information on setting a password.
Checking notifications when the phone is locked
When your phone is locked, you are still notified of missed calls, new
messages, and upcoming appointments. The Lock screen shows the
next upcoming appointment and the Lock button shows the number
of notifications.
To view the notifications
1. On the Lock screen, tap the Lock button ( ). Notification
buttons representing each type of received information, such
as missed calls, new email, and new text messages, are then
displayed below the Lock button.
2. Slide a notification button right or left to view the respective
information. For instance, slide the Missed Call button ( ) to
access the Call History and view the missed calls.

36 Chapter 1 Getting Started
Note If you have set a password for your phone, you will be prompted for
the password before you can view the information. See “Protecting
your phone with a password” in Chapter 14 for information on setting a
password.
Receiving a call when the phone is locked
You can receive and answer calls even when your phone is locked. For
more information about answering calls, see “Answering and Ending
Calls” in Chapter 2.
After you end the call, your phone remains locked and the Lock screen
is displayed. You need to unlock your phone to use it.

Chapter 1 Getting Started 37
1.11 Adjusting the Volume
You can set a single volume for both the system and the ring volume,
or set their volumes separately. You can also separately control the
phone volume of an ongoing call.
Setting a single volume
By default, your phone lets you set a single volume for both the
system (notifications and audio/video playback) and the ring
volume.
1. Press the VOLUME UP/DOWN button on
the left panel of your phone to open the
Volume screen.
2. To increase or decrease the volume level,
drag your finger up or down the volume
bars, or press the VOLUME UP/DOWN
button. You can also:
Tap Silent to mute the volume.
•
Tap Vibrate to switch the phone to
•
Vibrate mode.
3. The Volume screen automatically closes.
You can also tap an empty area of the
Volume screen to close it.
Adjusting the system and ring volumes separately
You need to turn off the Single Volume option first before your phone
can allow you to set different system and ring volumes. See “To adjust
the system and ring volumes separately” in Chapter 14 for details.

38 Chapter 1 Getting Started
Adjusting the phone call volume
Press the VOLUME UP/DOWN button on the left panel of your phone
to adjust the volume during an ongoing call
For more information about making and receiving phone calls, see
Chapter 2.
1.12 Using Finger Gestures
The touch screen of your phone is built for pure finger touch control.
Use finger gestures to scroll, pan, and zoom in and out of the screen.
Finger scrolling
Finger scrolling can be used to scroll up and down Web pages,
documents, and lists such as the contacts list, file list, message list,
calendar appointments list, and more.
To scroll up and down
To scroll down, swipe your finger upward on the touch screen.
•
To scroll up, swipe your finger downward on the touch screen.
To auto-scroll, flick your finger upward or downward on the touch
•
screen. Tap the screen to stop scrolling.
To scroll left and right
To scroll towards the right, swipe your finger to the left.
•
To scroll towards the left, swipe your finger to the right.
To auto-scroll, flick your finger left or right. Tap the screen to stop
•
scrolling.

Chapter 1 Getting Started 39
Finger panning
You can use finger panning to move to and view other parts of a
zoomed photo, Web page, document, or an email. To pan, press and
hold on the touch screen and then drag your finger in any direction.
Pinch zooming
When you are viewing Web pages, photos, messages, or documents,
zoom in and out freely with just a simple pinch of your fingers. Using
your thumb and index finger, press on the touch screen and spread
your fingers apart to zoom in. Pinch your fingers together to zoom
out.
Zooming in Zooming out

40 Chapter 1 Getting Started
On certain screens wherein some onscreen controls or icons appear
small and hard to tap on, you can also use pinch zooming to zoom
in and out. After zooming in, the onscreen control or icon becomes
larger and you can easily tap it with your finger. You will also see
a small preview window, and you can drag your finger around this
window to pan around the zoomed screen.
Normal screen Zoomed screen

Chapter 1 Getting Started 41
1.13 Connecting Your Phone to a Computer
Whenever you connect your phone to the computer with the USB
cable, the Connect to PC screen displays and prompts you to choose
the type of USB connection:
ActiveSync
Select this mode when you need to do the following:
Sync Outlook email messages, contacts, calendar appointments,
•
files, and other data between your phone and your computer.
Have read and write access to the whole phone.
•
For more information about using ActiveSync, see Chapter 6.
Disk Drive
This mode is available for selection only when you installed a microSD
card on your phone. Select this mode when you want to use your
storage card as a USB thumb drive, and copy files between your
phone’s storage card and your computer faster.
When Disk Drive mode is enabled while your phone is connected to
the computer:
You will not be able to use your phone to access files from the
•
storage card or run applications that are installed on the storage
card.
Your computer will only connect to the phone’s storage card.
•
When you access your phone from the computer, you will only
see the contents of the phone’s storage card.
Internet Sharing
When you do not have Internet access on your computer, you can
select this mode to use your phone as a modem for your computer.
For more information about using Internet Sharing, see “Using Your
Phone as a Modem” in Chapter 9.

Chapter 2
Phone Calls
2.1 Making Calls
To make a call, you can either dial a number or select a contact you
want to call. While viewing a message that you received, you can also
directly call the sender of the message if the sender’s phone number
is stored in your contacts.
Before you begin making calls, add contacts to your phone by
creating new contacts or synchronizing contacts to your phone. For
more information about adding contacts, see “Adding Contacts to
Your Phone” in Chapter 4.
Note Most SIM cards are preset with a PIN (personal identification number)
that is provided by your mobile operator. When prompted, enter the
preset PIN and then tap Enter. If you enter the wrong PIN three times,
the SIM card is blocked. If this happens, you can unblock it with the PUK
(PIN Unblocking Key) obtained from your mobile operator.
Making a call from the Phone dialer screen
The Phone dialer’s Smart Dial feature makes it quick and easy for you
to place a call. Simply enter the phone number or first few letters of
the person you want to call. Smart Dial automatically searches and
filters your contacts list (stored on your phone and SIM card) and the
phone numbers from the Call History. From the filtered list, select the
number or contact you want to call.

Chapter 2 Phone Calls 43
1. To open the Phone dialer screen, press the TALK/SEND button
on your phone.
2. Begin entering the first few numbers or letters by tapping the
keys on the Phone keypad. As you enter numbers or letters, the
Phone dialer screen displays matches found.
If you tap a wrong number or character, tap to erase each
subsequent digit or character. To erase the entire entry, press and
hold .
3. Tap to close the keypad and to see if there are more matching
numbers or contacts found. To browse through the filtered list,
flick through the list or slide your finger up or down the list
slowly.

4. To call a number or contact, do one of the following:
Tap the desired phone number or contact from the list.
•
To call a different phone number associated with the contact,
•
tap the contact card icon on the right side of the contact
name. On the contact summary screen, tap the number you
want to call.
Tips • During a call, use the VOLUME UP/DOWN button on the side of your
• To save a phone number to your contacts, tap the Call History button
phone to adjust the phone volume.
( ) that appears on the right side of the phone number, and then
tap Menu > Save to People.
Calling voicemail
Number 1 is generally reserved for your voicemail. Press and hold this
button on the Phone dialer keypad to call voicemail and retrieve your
voicemail messages.
Making calls from received messages and calendar
reminders
While you are viewing a text or email message, you can directly call
the sender of the message if the sender is a stored contact on your
phone. You can also call a phone number that is contained in the body
of the message. For more information about calling from received text
messages, see “Messages” in Chapter 3 and “Directly Making Calls
from Text Messages” in Chapter 7. For more information about calling
from received email, see “Mail” in Chapter 3 and “Directly making calls
from email messages” in Chapter 7.
You can also directly make calls from meeting request email and
calendar reminders. See “Making a Call from a Meeting Request or
Reminder” in Chapter 8 for details.

Chapter 2 Phone Calls 45
Making an emergency call
On the Phone dialer screen, enter the international emergency number
for your locale, and then press the TALK/SEND button on your phone.
Tip Additional emergency numbers may be included in your SIM card.
Contact your mobile operator for details.
Making an international call (plus code dialing)
To make an international call, first press and hold the number 0 key
on the Phone dialer screen until the plus (+) sign appears. The plus
(+) sign replaces the international prefix of the country that you are
calling.
After the plus (+) sign, enter the complete phone number to call,
which includes the country code, area code (without the leading zero,
if any), and phone number. Tap Talk on the screen or press the TALK/
SEND button on your phone to dial the number.
Home dialing
Home dialing is a feature which helps you easily dial a phone number
in your home country while you are roaming internationally.
To make a call using home dialing
Your phone is able to recognize your home country information from
your SIM card and can automatically prepend your country code to
the phone number when you place calls to your home country while
roaming.
1. Simply enter the local phone number in your country without the
plus (+) sign and leading zero, and then tap Talk.
Notes • If you enter a leading zero, it will be removed automatically.
• If you enter a plus (+) sign before the phone number, your phone
will just dial normally using plus code dialing.

46 Chapter 2 Phone Calls
2. The Home Dialing screen then opens and displays the phone
number already prepended with your home country code.
Tap Yes, use number above to dial the displayed number.
•
To change the prepended code to another country, tap the
•
country selection box and choose the country that you want.
The displayed number now changes with the code of your
selected country prepended. Tap Yes, use number above to
dial the displayed number.
To turn off home dialing
If you prefer to use direct dialing (that is, manually entering and
dialing complete numbers) and not home dialing, you can turn the
home dialing feature off.
1. Press the HOME button to return to the Home screen.
2. On the Home screen, slide to the Settings tab and then tap Menu
> All Settings.
3. Tap Personal > Phone.
4. At the bottom of the screen, scroll to the right until you see
the Advanced tab.
5. Tap the Advanced tab and then clear this check box: Add home
country prefix to phone numbers when roaming internationally.
6. Tap OK.

Chapter 2 Phone Calls 47
2.2 Answering and Ending Calls
When you receive a phone call, the Incoming Voice Call screen will
appear, allowing you to either answer or ignore the call.
Accepting or rejecting an incoming call
To answer a call
Press the TALK/SEND button, or fully slide the center button of the
Answer/Ignore bar to the left.
To reject a call
Press the END/POWER button, or fully slide the center button of the
Answer/Ignore bar to the right.
To mute the ring without rejecting the call
Tap Mute Ring or press the VOLUME DOWN button.
When your phone rings, placing the phone face down also mutes the
ringtone.
Note If the phone is already facing down, the phone will still ring when there
are subsequent incoming calls.

48 Chapter 2 Phone Calls
To reject a call and send a text message
When you are busy and unable to take an incoming call, you can send
a text message to the caller and reject the incoming voice call. Tap
Send Text when you have an incoming call, use the preset message or
enter another message, and then tap Send.
To change the preset message for rejecting calls in your phone
settings, open the Phone dialer screen, tap Menu > Options, scroll
down the Phone Settings screen and tap Reject call with Message,
and then enter your new preset message in the provided text box.
To automatically scale down the ring volume when picking up
the phone
You can set your phone to automatically scale down the ring volume
whenever you pick up the phone to answer calls.
1. Press the HOME button to return to the Home screen.
2. On the Home screen, slide to the Settings tab and then tap
Sound & display.
3. Scroll down the screen and then tap Quiet ring on pickup to
turn this feature on.
4. Tap Back to return to the Home screen’s Settings tab.
To automatically increase the ring volume when the phone is in
your pocket
To help avoid missing incoming calls when your phone is in your
pocket or bag, you can set it to gradually increase the ring volume and
vibrate when you receive a call. When not in your pocket or bag, the
phone will ring at the normal volume you set.
1. Press the HOME button to return to the Home screen.
2. On the Home screen, slide to the Settings tab and then tap
Sound & display.

Chapter 2 Phone Calls 49
3. Scroll down the screen and then tap Pocket mode to turn this
feature on.
4. Tap Back to return to the Home screen’s Settings tab.
During a call
When a call is in progress, a shade covers the Phone dialer’s
onscreen buttons to prevent accidental taps. Only the Keypad and
End Call buttons are active.
To access the onscreen buttons, slide your finger down, starting
from the top of the shade. Use these onscreen buttons to put a call
on hold, dial another contact for a phone conference, enter notes
about the conversation, and more.
During the call, you can also browse through the text,
multimedia, and email messages, and other personal details of
this contact by tapping the tabs at the bottom of the screen.
Contact details
Text and multimedia messages
Email
Facebook information (if
the contact has a Facebook
account)
Call history
These tabs show the same information as in
People. See Chapter 4 for details.

50 Chapter 2 Phone Calls
To use the speakerphone
Placing your phone face down automatically turns on the
speakerphone. To turn the speakerphone off, place your phone
face up.
You can also tap the onscreen Speaker button ( ) or press and
hold the TALK/SEND button to turn the speakerphone on or off.
The speakerphone icon
appears in the title bar when the
( )
speakerphone is on.
Warning! To decrease potential damage to your hearing, do not hold the
phone against your ear when the speakerphone is on.
To mute the microphone during a call
Tap the Mute button ( ) to turn the microphone on or off. When
the microphone is turned off, the mute icon ( ) appears on the
screen.
To take two calls and switch between the calls
1. Press the TALK/SEND button to accept a second call, or tap the
Add Call button ( ) to dial a second call. The first call is put
on hold when you accept or dial the second call.
2. To switch between the two calls, tap the Swap button ( ) or
tap the dim area onscreen that shows “On Hold”.
To end calls
To end the current call, tap End Call or press the END/POWER button.
If you have two ongoing calls, tap Menu > End All Calls to end both
calls.

Chapter 2 Phone Calls 51
2.3 Using Call History
The missed call icon ( ) appears in the title bar when you missed a
call. Use the Call History to check who the caller was or view all your
dialed numbers and received calls.
Missed call
Received call
Dialed number
You can access the Call History from People, the Notifications screen,
or from the Phone dialer’s menu:
On the Home screen, slide to the People tab, tap All People, and
•
then tap the Call History tab (rightmost tab).
When you see the missed call icon ( ) in the title bar, tap the
•
title bar to open the Notifications screen, and then tap Missed
Call.
Press TALK/SEND to open the Phone dialer and then tap Menu >
•
Call History.
If you have a long list of calls in the Call History tab, tap Menu > Filter,
and then select the type of call you want to display.

52 Chapter 2 Phone Calls
To view the exchange of calls with a particular contact only, tap the
Contact Card button ( ) that appears to the right of the contact.
2.4 Speed Dial
Use Speed Dial to call frequently-used numbers with a single tap. For
example, if you assign a contact to the location 2 in Speed Dial, you
can press and hold the number 2 key on the Phone dialer keypad to
dial the contact’s number.
Creating a Speed Dial entry
Number 0 and 1 keys are reserved and cannot be assigned as speed
dial keys. The number 1 key is reserved for voicemail. You can set any
number between 2 and 99 as a speed dial key.
1. Press TALK/SEND to open the Phone dialer screen.
2. Tap Menu > Speed Dial. The Speed Dial list will be displayed.
3. Tap Menu > New.
4. Tap a contact, and then select the phone number of the contact
that you want assigned to the speed dial key.
5. In Location, select an available key to use as the speed dial key.
6. Tap OK.
Notes • When you assign a new phone number in an occupied speed dial key,
• To delete a Speed Dial entry, press and hold the entry in the Speed
the new phone number will replace the existing one.
Dial list and then tap Delete.

Chapter 2 Phone Calls 53
Making a call using Speed Dial
Do the following to call the contact that is assigned to a speed dial
key:
On the Phone dialer screen, press and hold the assigned key, if it
•
is a single-digit speed dial number.
To dial a two-digit speed dial number, tap the first number key
•
first, and then press and hold the second number key.
2.5 Making Conference Calls
There are two ways to start a conference call from the Phone dialer
screen. You can choose your participants first before starting the
conference call. You can also dial or accept multiple calls one at a time
and join them into a conference call.
Note Make sure your SIM card is enabled with conference calling service.
Contact your mobile operator for details.
Selecting participants and starting the conference call
You need to enable conference mode in the Phone dialer so you can
choose participants and start the conference call.
1. Press the TALK/SEND button to open the Phone dialer.
2. Tap Menu > Conference Mode.
3. If this is your first time to use conference mode, a message will
be displayed, reminding you that conference calling service
needs to be enabled first by your mobile operator before you can
use it on your phone. If you do not have this service, contact your
mobile operator to have it provisioned in your calling plan.
If you are ready to use conference calling, tap OK to proceed.

54 Chapter 2 Phone Calls
4. Tap to close the Phone dialer keypad so you can scroll and
select from contacts or phone numbers.
5. Select conference call participants by selecting the check boxes
of contacts or phone numbers, and then tap Conference.
The participants list is then displayed.
Tips • If you want to choose from other stored phone numbers of a
participant, tap the Phone Selection button ( ) that appears
next to the participant’s name and then select another number.
• To remove a participant before starting the conference call, tap
Keypad and clear the check box of that participant.
6. Dial the first participant by tapping the Talk button ( ) that
appears to the right of this participant.
7. When the first call is connected, tap the Talk button ( ) of
the second participant to dial the second call. The first call is
automatically put on hold.

Chapter 2 Phone Calls 55
8. When the second call is connected, tap the Join button ( )
to add it to the conference call. After combining the calls to the
conference, dial the next participant.
9. Repeat steps 7 and 8 until all participants are added and
connected to the conference call.
10. While the conference call is in progress, you can still dial and add
more calls. Tap Invite participants ( ) to dial another call. At
most, you can have up to five participants in the conference call.
Making the first call and adding calls to the conference
To set up a conference call, you can make the first call and then dial
each subsequent call to add to the conference.
1. Press the TALK/SEND button to open the Phone dialer.
2. Make a call to the first participant or accept an incoming call.
3. When the first call is connected, accept a second call, or tap the
Add Call button ( ) to call the second participant. The first
participant is put on hold when you accept or dial the second
call.
4. When the second call is connected, tap the Conference button
( ) to start a conference call.
5. To add another participant to the conference call, tap Invite
participants ( ) and then dial another call. The conference
call is put on hold when you dial another call.
6. When connected, tap the Join button ( )to add the participant
to the conference call.
7. Repeat steps 5 and 6 if you want to dial and add more
participants to the conference call. At most, you can have up to
five participants in the conference call.

56 Chapter 2 Phone Calls
During the conference call
You can turn on the speakerphone during the conference call by
simply placing your phone face down.
When you tap a participant while the conference call is in progress,
you will see these buttons:
To talk in private with the selected participant, tap the Private button
( ). This separates the participant from the conference call and puts
the others on hold. When you want to swap between the private call
and the conference call, tap the dim area that shows “On Hold”.
You can end the private call by tapping or the End Call button at
the bottom of the screen.

Chapter 2 Phone Calls 57
To end the conference call and stay connected with the private
call, tap Menu > End Active Calls. To end the private call and the
conference call, tap Menu > End All Calls. If you do not have any
private call, tapping the End Call button at the bottom of the screen
ends the conference call.
Making a conference call from an email
From a received email message, you can directly start a conference
call with the sender and other recipients of the email if you have their
phone numbers stored in your contacts.
For more information about starting a conference call from a received
email, see Chapter 8.

58 Chapter 2 Phone Calls
2.6 Turning the Phone Connection On and Off
In many countries, you are required by law to turn off the phone while
on board an aircraft.
To enable or disable the phone connection
1. On the Home screen, slide to the Settings tab, and then tap
Wireless controls.
2. Tap the Off/On slider at the right side of the Phone option to
enable or disable the phone connection.
To enable or disable Airplane mode
Another way to turn off the phone connection is to switch your phone
to Airplane mode. When you enable Airplane mode, all wireless
radios on your phone are turned off, including the phone connection,
Bluetooth®, and Wi-Fi.
1. On the Home screen, slide to the Settings tab, and then tap
Wireless controls.
2. Tap Airplane mode to enable or disable Airplane mode.
When you disable Airplane mode, the phone connection is turned
back on and the previous state of Bluetooth and Wi-Fi are restored.

Chapter 3
Using the Home Screen
3.1 About the Home Screen
The Home screen is the quickest route to the essential features of your
phone, which include People, Messages, Mail, Internet, and more. The
tabs at the bottom of the Home screen correspond to the different
phone features.
Home Photos & Videos
People Music
Messages Weather
Mail Twitter
Internet Footprints
Home
screen
tabs
Calendar Settings
Stocks

60 Chapter 3 Using the Home Screen
3.2 Switching Between the Tabs of the Home
Screen
To switch between the tabs, you can do one of the following:
Tap the desired tab on the Home screen.
•
Press and hold your finger on the active tab, and then slide your
•
finger right or left over the tabs. Release when you have selected
the desired tab.
Tip While on any other tab or screen, press the HOME button to return to
the Home tab.

Chapter 3 Using the Home Screen 61
3.3 Personalizing Home Screen Tabs
You can move or hide the tabs on the Home screen, except for the
Home tab. The Settings tab can be moved on the Home screen but
cannot be hidden.
1. On the Home tab, tap Menu > Personalize Home Screen Tabs.
2. To move a tab, press and hold the icon before the tab name, and
then drag it up or down the tabs list. Release the icon when you
reach the desired location.
3. To hide a tab, clear the check box at the right of the tab name.
4. Tap Done.
3.4 Home
Check the time and weather of your current location directly from
the Home tab.
On this tab, you will see a flip-style weather clock, the current date,
and an alarm icon that indicates whether the alarm clock is on or off.
Below the date, your upcoming calendar appointment (current day
or next day appointment) or a link to Calendar (if you do not have
an appointment) is shown. Tap the respective item when you want
to change the weather clock to display another location, update
the weather information, set the date or alarm clock, or access the
Calendar.
You can also personalize the Home tab with your own wallpaper and
add quick links to your favorite programs, contacts, and websites.

62 Chapter 3 Using the Home Screen
Weather clock
Date
Calendar
appointment
Alarm icon
Quick links
Changing the wallpaper
On the Home tab, you will see a lifelike animation of your current
weather. You can change the wallpaper of this weather animation
or choose another animated wallpaper for the Home tab.
On the Home tab, tap Menu > Home Wallpaper and do one of the
following:
To choose another wallpaper image for the weather animation,
•
tap Weather Wallpaper. On the subsequent screen, select one of
the presets to use as your wallpaper.
If you have your own custom wallpaper that you want to use, tap
Albums and then tap All. Scroll through the photos stored on
your phone and storage card and then tap the photo that you
want to use.
To choose another animated wallpaper, tap Animated Wallpaper
•
and select one of the preset animations.

Chapter 3 Using the Home Screen 63
To reset the Home tab back to the weather animation, tap Menu >
Home Wallpaper > Weather Wallpaper and select any wallpaper
image.
Updating weather information
Your phone can determine your current location and display your local
time and weather conditions on the weather clock.
If the weather clock does not show the most recent weather
conditions or does not show any weather information for some
reason (such as when the auto download option is disabled), tap the
weather image or the “My Location” text to go to the Weather tab
and then tap Update Now. The most recent weather information of
your location will then show on both the Weather tab and the Home
tab’s weather clock.
You can set the time interval for auto updating weather information on
the Home tab. Press the HOME button to return to the Home tab, tap
Menu > Weather Settings, and then choose a time interval.
For more information about viewing weather information, see
“Weather” later in this chapter.
Selecting another location to display on the Home tab
You can change the Home tab to display the date, time, and weather
information of another location.
1. On the Home tab, tap the clock.
2. The World Clock screen opens. Scroll through the list of cities.
3. If the location that you want is not listed, tap Add City.
On the Add Location screen, enter the first few letters of a
country or city name. The screen then displays a matching list
of locations. Scroll through the list and then tap the name of the
desired city.

64 Chapter 3 Using the Home Screen
4. On the World Clock screen, scroll through the list of cities and select
a city. To select, tap on the circle that appears to the left of the city.
Tips • You can rearrange or remove cities on the World Clock screen. Tap
• Locations that you added to the World Clock screen are also added
Menu > Rearrange Cities and then drag them to the order that you
want. Tap Menu > Remove Cities to delete one or more cities.
to the Weather tab.
Changing the date and time
If you want to change the date shown on the Home tab, tap the date
and then choose another date. When you have finished setting the
date, tap Set.
To change the local time displayed on the Home tab, tap Menu >
Local Time Settings and set the new time. Tap Done to change to the
selected time.
Tip You can also change the date and time from the World Clock screen.

Chapter 3 Using the Home Screen 65
Setting the alarm clock
When the alarm clock is not enabled, “Alarm Off” will be shown on the
Home tab. Tap it to open the Alarm Clock screen so you can turn on
and set the alarm clock.
1. On the Alarm Clock screen, tap an Off/On switch to turn on an
alarm clock. You can turn on and set up to three alarm clocks.
2. Tap the time of one of the alarm clocks that you turned on.
3. On the Set Alarm screen, set the time and days when to
sound the alarm clock.
Tip Select multiple days by tapping each desired day. Tap a selected
day to exclude it from the alarm.
4. You can enter a description and select the alarm clock sound.
You can also choose whether you want your phone to vibrate
when the alarm goes off.
5. Tap Done.
6. To set the other alarm clocks, repeat step 2 to 5.
Note When an alarm goes off, you have the choice to Snooze or Dismiss
the alarm. When you select Snooze, the alarm will sound again after 5
minutes.

66 Chapter 3 Using the Home Screen
Adding quick links
Quick links are shortcuts that give you one-touch access to your
favorite programs, people who matter most to you, and frequentlyvisited websites. Up front on the Home tab, you can add up to nine
quick links.
To add a quick link, tap an empty slot and then choose the type of
shortcut to add to the Home tab.
When the first three slots are occupied, swipe your finger up on the
screen to access more slots for adding quick links.
Note When you swipe your finger up on the screen, the appearance of the
Home tab changes, showing only the date, time, and alarm icon on a
horizontal bar. Tap the horizontal bar when you want to change the
date, time, or alarm clock setting. (Tapping the horizontal bar opens the
World Clock screen.)

Chapter 3 Using the Home Screen 67
3.5 People
Add the people who matter most to you to the People tab so you
can quickly make calls or send text and email messages to them
without going through your contacts list. You need to have contacts
already stored on your phone before you can add them to the
People tab.
From the People tab, you can also set up your own contact card and
share it, add new contacts, and easily view exchanged text, multimedia
and email messages with a contact. If contacts have their own
Facebook account, you can view their Facebook status and updates.
For more information about using the People tab, see Chapter 4.

68 Chapter 3 Using the Home Screen
3.6 Messages
Quickly browse through and read text messages as they arrive directly
from the Messages tab. This tab also displays received multimedia
messages. An attachment icon is shown to indicate that a received
message is a multimedia message. You only see the subject of the
multimedia message.
Text message Multimedia message
On the Messages tab, you can:
Swipe your finger up or down the screen to flip through received
•
text and multimedia messages.
Tap a displayed message to view the entire message thread from
•
the sender.
If the sender is a stored contact, you can press TALK/SEND to
•
automatically fill in the sender’s phone number on the Phone
dialer screen so you can call the sender.

Chapter 3 Using the Home Screen 69
Tap the New Message icon ( ) on the upper right side of the
•
screen to create a new text message.
Tap All Messages to access your inbox and other message
•
folders.
Tap Menu to access more options for handling messages.
•
For more information about working with text and multimedia
messages, see Chapter 7.
3.7 Mail
Set up your email accounts on the Mail tab so you can easily check
your email and send email messages. After selecting an email account,
you can flip and browse through received email by swiping your finger
up or down the screen.
Adding your Internet email account
On the Mail tab, easily add POP3 or IMAP email accounts from popular
Web-based email providers such as Yahoo!® Mail Plus and AOL® or
other email providers.
1. On the Home screen, slide to the Mail tab.
2. If this is your first time to set up an email account, tap the big
email image at the center of the screen or tap Add Account at
the bottom of the screen. Otherwise, tap Menu > Add Account.
3. On the subsequent screen, select an email provider. If your email
provider is not listed, tap Other.
4. Enter your email address and password, and then tap Next.
5. Enter your name and the account display name, and then tap
Next.

70 Chapter 3 Using the Home Screen
If the type of email account you want to set up is not in the
phone database, the subsequent screens will prompt you to
enter more details, such as the incoming and outgoing email
server settings. Obtain these settings from your email provider.
6. If you want your phone to automatically send your email
messages and download received email at a set interval, select
the Send/Receive E-mail automatically check box and then
choose the desired time interval.
7. Tap Done.
Adding your Outlook work account
If you connect to an Exchange Server for your work email, calendar,
contacts, and tasks, you can set up your Outlook work account on
your phone. Although your phone supports multiple email accounts,
you can only have one Outlook account on your phone at a time.
You need to set up and use an Outlook account that syncs with a
server running Microsoft Exchange Server 2003 Service Pack 2 (SP2)
or Microsoft Exchange Server 2007.
1. On the Home screen, slide to the Mail tab.
2. If this is your first time to set up an email account, tap the big
email image at the center of the screen or tap Add Account at
the bottom of the screen. Otherwise, tap Menu > Add Account.
3. On the subsequent screen, tap Outlook.
4. Enter your work email address and password, and then tap Next.
Mail Setup will download Exchange Server settings to your
phone.
Note If Exchange Server settings cannot be downloaded to your
phone, you need to obtain the Exchange Server settings, such
as the domain and Exchange Server address, from your network

Chapter 3 Using the Home Screen 71
administrator and enter them in the provided text boxes. (The server
address must be the Outlook Web Access address.)
Also consult your network administrator if the option, This server
requires an encrypted (SSL) connection, needs to be enabled or
disabled.
5. Select Mail and other information types to sync with the
Exchange Server.
6. By default, your phone is set to use Direct Push so that Outlook
email and other information can be instantly synchronized to
your phone as they arrive or are updated on the Exchange Server
at work.
If you do not want to use Direct Push, you can set a regular
schedule for synchronizing Outlook email and other information
to your phone. Tap Advanced Settings and then set the Peak
time and Non-peak time accordingly.
Tip You can select a shorter interval in the Peak time box and a longer
interval in the Non-peak time box so that Outlook email and other
information are synchronized more frequently during your work
hours.
7. Tap Done. Your phone then syncs with the Exchange Server and
downloads your email messages.

72 Chapter 3 Using the Home Screen
Checking and reading email
When you have newly received or
unread email messages, the icon on
Your email
accounts
After selecting an email account, you can:
Browse through received email messages in the selected account
•
by swiping your finger up or down on the screen.
Tap the displayed email message to open and read the message.
•
If the sender is a stored contact, you can press TALK/SEND to
•
automatically fill in the sender’s phone number on the Phone
dialer screen so you can call the sender.
Tap the New Email icon ( ) to create a new email message.
•
Tap Inbox to access the inbox and other message folders of your
•
account.
Tap Menu to choose whether to add another email account, send
•
and receive email messages, and more.
For more information about working with email messages, see
Chapter 7 and 8.
the Mail tab and the respective icons
of your email accounts will show the
number of new email messages.
The mail icons displayed on the right
side of the screen are your email
accounts. Tap an icon to select an
email account.

Chapter 3 Using the Home Screen 73
3.8 Internet
Easily search for information on the Web. Directly on the Internet tab,
you can enter words on the search bar and then tap the Search icon
( ) to open the Web browser and locate the information that you
want. You can also tap Launch Browser or the globe image to open
the Web browser.
Search bar
Web favorite
Available slot for adding
a Web favorite
For more information about using the Web browser, see Chapter 9.
Adding Web favorites
To quickly access frequently-visited websites, you can add them as
Web favorites to the Internet tab. You can add up to 10 Web favorites.
1. On the Internet tab, tap an empty slot and then tap Add Favorite.
2. Enter a title and the website address, select a folder in which to
save the favorite, and then tap Done.
When the first two slots are occupied, swipe your finger up on the
screen to access more slots for adding Web favorites

74 Chapter 3 Using the Home Screen
3.9 Calendar
Keep track of your important appointments and events with the
calendar.
The Calendar tab displays a monthly calendar with markers to inform
you of the dates that you have appointments and events. You can also
change the tab to display in day, week, year, or agenda view.
Note Agenda view displays appointments for the next seven days, including
the current day.
Creating an appointment
Easily add your appointments and events to the calendar and set
reminders.
1. On the Home screen, slide to the Calendar tab.
2. If you are creating an appointment for the current date, tap
Menu > New Appointment. Otherwise, tap another date on the
calendar and then tap New Appointment.
3. Enter a name for the appointment in the Title box and the
location.
4. Set the Start and End dates and times.
Otherwise, if it is a special occasion such as a birthday or a
whole-day event, select the All Day check box.
5. Under Reminder, choose how soon before the appointment you
want to be notified.
6. Select the type of category for the appointment so that it can
be grouped with other related appointments. Tap the box under
Category, and then select a preset category (Business, Holiday,
Personal, or Seasonal).

Chapter 3 Using the Home Screen 75
7. Fill in the other details of the appointment.
8. When finished, tap Done.
Viewing and managing your appointments
In month view, the highlighted date indicates that it is the current
date. Dates with appointments are indicated by a triangle ( ) at the
upper-right corner of the date box.
To check your appointments
To check what appointments you have during a certain date, tap a
date on the month calendar. The Calendar tab then changes to Day
view and displays all your appointments and the weather information
for that day.
Month view Day view
Note The weather information appears only if you have set your local time
to a city on the World Clock, and if the appointment date is within the
5-day forecast on the Weather tab. See “Home” and “Weather” in this
chapter for details.

76 Chapter 3 Using the Home Screen
In Day view, tap an appointment to view complete details of that
appointment. On the subsequent screen, you can tap Menu to choose
whether to edit or delete the appointment.
When in month view, swipe your finger up or down the screen to
display the next or previous month on the calendar. You can also tap
the Up and Down arrows that appear on the left and right sides of the
month.
To change between different calendar views
On the Calendar tab, tap Menu and then choose whether to display
the calendar in Agenda, Day, Week, Month, or Year view.

Chapter 3 Using the Home Screen 77
3.10 Stocks
Get the latest stock updates by adding your favorite stock quotes and
market indexes to the Stocks tab.
Note Downloading stock or stock market information may incur additional
fees from your mobile operator. Contact your mobile operator for
details.
Adding stock quotes and market indexes
You can add up to 30 stock quotes and market indexes to the
Stocks tab.
1. On the Home screen, slide to the Stocks
tab and then tap Menu > Add Stock.
2. On the Add Stock screen, enter the
company name, stock market index, or
ticker symbol in the search box, and then
tap the Search button ( ).
3. Matched search results will then be
displayed. Swipe upward to scroll down
the screen and access more search results.
4. Tap the company name, stock market
index, or ticker symbol to display it on the
Stock tab.
5. To add another stock quote or stock
market index, repeat steps 1 to 3.

78 Chapter 3 Using the Home Screen
1
Swipe your finger upward to scroll
down the list of stock quotes on the
Stocks tab.
Tap the stock quote or stock market
index name to view its intraday chart
and other details.
2
Shows the time of the last stock
information update. Tap this item or
tap Update Now at the bottom-left
side of the screen to download the
latest stock information.
3
Shows the current trading price or
volume.
4
Tap the green or red box to switch
between showing the change in
points/price or percentage from the
previous trading day.
5
Tap Menu to add, delete or rearrange
the stock quotes and market indexes.
(When rearranging the list, drag
items up or down the list to change
their order.)
Viewing stock information
The Stocks tab lists all your stock quotes and stock market indexes,
including the current price or volume, and the change in price or
volume from the previous trading day. The change in price or volume
box indicates whether the stock or stock market has gained (green) or
declined (red).
1
Stock information are automatically downloaded and displayed on
the Stocks tab at a preset time. If you want to change the download
time or turn off auto download, tap Menu > Settings and change these
download settings. You can also change the color for displaying stock
price increases to red, if that is what’s being used in your country.
2
3
4
5

Chapter 3 Using the Home Screen 79
3.11 Photos & Videos
Get full enjoyment when glancing photos and watching videos with
the extra large screen of your phone. On the Photos & Videos tab, you
can view your photos and videos either in portrait or landscape view.
Portrait view
When you are holding your phone upright,
flip through photos and videos by swiping
your finger up or down the screen.
From the portrait view of the Photos &
Videos tab, you can do the following:
Tap the displayed photo or video to
•
view or play it in full screen.
Tap the Camera button ( ) or Video
•
Camera button ( ) on the right side
of the screen to capture a photo or
video using the Camera.
Tap Slideshow to view the photos
•
as a slideshow. If a video is
selected, tap Play.
Tap Albums to view photos and videos
•
using the Albums program.
(See “Viewing Photos and Videos
Using Albums” in Chapter 12 for
details.)

80 Chapter 3 Using the Home Screen
Landscape view
While you’re on the Photos & Videos tab, turning your phone sideways
to the left changes the screen to landscape view. In landscape
orientation, you get a wider view of the screen and can glide through
your photos and videos with more ease.
To browse through photos and videos
If you have lots of photos and
videos, flick left or right across the
screen to quickly skim through
them.
To browse more slowly through
photos and videos, slide your finger
left or right.
To view photos and videos in full screen
Tap the photo or video that you want to bring it up to the center of
the screen. After the selected photo or video moves to the center, tap
it again to view in full screen.
To play a photo slideshow, tap the Play button ( ) on the bottom
right of the screen. Tap the Albums button ( ) at the bottom left
to use Albums. (See “Viewing Photos and Videos Using Albums” in
Chapter 12 for details.)

Chapter 3 Using the Home Screen 81
3.12 Music
Enjoy listening to music while on the go. Download or copy entire
albums or selected music tracks to your phone and listen to them
using the Music tab.
Note Your phone searches for all supported music files from the following
locations:
Phone: \My Music (including all subfolders)
\My Documents (including all subfolders)
Storage Card: \Storage Card (including all subfolders)
For information about supported music file formats, see “Specifications”
in the Appendix.
Playing music in portrait view
When you are holding your phone upright, swipe your finger up or
down the screen to browse through all music tracks stored in your
phone and storage card and find the music that you want.
1
2
3
4
7
5
6

82 Chapter 3 Using the Home Screen
1
Tap to update album covers. (You can also tap Menu > Update Album Art
and choose what to download and update.)
Note Updating album covers may result in additional data charges.
2
Shows the repeat mode (Repeat All, Repeat One, or Repeat Off).
3
Shows whether shuffle mode is on or off.
4
Press and hold on the thin bar below the album art to display the progress
bar. Drag your finger right or left on the progress bar to move forward or
backward in the current track.
5
Tap the Play button to play the selected music track.
6
Tap the Next button to go to the next music track.
7
Tap the Previous button to go to the previous music track.
Playing music in landscape view
While you’re on the Music tab, turning your phone sideways to the left
changes the screen to landscape view. In landscape orientation, you
get a wider view of the screen and can glide through album covers
with more ease.
To browse through music albums
If you have lots of music albums,
flick left or right across the screen to
quickly skim through them.
To browse more slowly through
music albums, slide your finger left
or right.

Chapter 3 Using the Home Screen 83
To select an album and listen to music
1. Tap the album cover of the music album that you want to bring
up to the center of the screen.
2. After the selected album moves to the center of the screen, tap it
again or tap the Track List button ( ) at the bottom left of the
screen to display the music tracks of this album.
3. Tap the Play button ( ) at the bottom right of the screen to
listen to the whole album. You can also scroll through the music
list first and then tap a music track to play it.
Setting repeat and shuffle modes
Hold your phone upright, tap Menu > Repeat, and then choose
whether to repeat the current track, repeat all tracks in the current
album or playlist, or not to repeat. To turn shuffle mode on or off, tap
Menu > Shuffle.
The icons on the upper-right side of the Music tab show whether
repeat and shuffle modes are enabled.
Repeat One Repeat All Shuffle On

84 Chapter 3 Using the Home Screen
Finding albums and music tracks in the Library
The Library organizes music into categories, such as All Songs,
Artists, Albums, Genres, and more. If you added new albums or
music tracks to your phone, you can find them in the Library.
1. On the Music tab, tap Library.
2. The tabs at the bottom of the Library screen correspond to the
different categories. Select a category.
For example, if you are looking for songs by a particular artist,
slide to the Artists tab and then tap the artist name. To browse
through all music tracks that are stored on your phone and
storage card, slide to the All Songs tab.
3. Tap the first track or any track in the list. The music then begins
playing on the Music tab, starting from the track that you
selected.
Note The Music tab plays music tracks that are in the Now Playing list of the
Library. When you select a category in the Library such as Artists and
play the music, the Now Playing list will be replaced with the music
tracks from that category.
Playlists
There are two types of playlists that can be added to the Library and
played on the Music tab:
Custom playlists ( ) that are created on your phone.
•
Windows Media® Player playlists ( ) that are synchronized
•
with Windows Media Player on your computer. (These playlists
cannot be edited and deleted from your phone.)
Note If a Windows Media Player playlist contains a combination of music,
video and image files, only music files in the playlist are synchronized to
your phone and other media types are filtered out.

Chapter 3 Using the Home Screen 85
To create a playlist
1. On the Music tab, tap Library.
2. Tap or slide to the Playlists tab.
3. Tap Menu > New, enter a playlist name, and then tap Done.
4. On the Playlists screen, tap the playlist you have just created, and
then tap Add Songs.
5. On the subsequent screen, tap or slide your finger across the
tabs to select a category. For instance, to select music tracks
from a certain album, tap the Albums tab and then tap the
album that you want.
6. Select the check boxes of the music tracks that you want to add
to your playlist, or tap Menu > Select All to choose all the music
tracks.
7. Tap Done.
8. Tap Add Songs again and repeat step 5 to 7 to add more music
tracks. When you have finished adding music tracks to your
playlist, tap Back to return to the Playlists screen.
To play back a playlist
1. On the Music tab, tap Library.
2. Tap or slide to the Playlists tab.
3. On the Playlists screen, tap to select a playlist.
4. Tap the first track or any track in the playlist. The Music tab then
plays the tracks from the playlist, starting from the track that you
selected.
Note Playlists are not automatically updated when music files have been
deleted from the phone’s memory or storage card.

86 Chapter 3 Using the Home Screen
3.13 Weather
Your phone automatically connects to the Internet to download
weather information. On the Weather tab, it displays the weather
information of your current location and other preselected cities. The
current day’s weather as well as the weather conditions for the next
four days of the week are displayed.
On the Weather tab, you can:
Swipe your finger up or down the
•
screen to view the weather in other
cities.
Tap Update Now to download the
•
latest weather information.
Tap More Detail Online to open the
•
Web browser and view more weather
information on the website. (This
option is not available when you are
viewing the weather for your current
location.)
Tap Menu and choose to add, remove,
•
or rearrange cities, or change weather
settings.

Chapter 3 Using the Home Screen 87
Adding a city
The Weather tab can display weather information of up to 15 cities,
including your current location. Follow the steps below to add a city
to this tab.
1. On the Weather tab, tap Menu > Add Location.
2. On the Add Location screen, enter the first few letters of a
country or city name. The screen then displays a matching list
of locations. Scroll through the list and then tap the name of the
desired city.
Your phone then downloads the weather information of the city that
you selected and adds it to the Weather tab.
Weather settings
You can change the displayed temperature to Celsius or Fahrenheit
on the Weather tab. You can also enable or disable auto download
options and change the download time.
1. On the Weather tab, tap Menu and then choose whether to
display temperature in Celsius or Fahrenheit.
2. To change other weather settings, tap Menu > Settings and then
choose from the following options:
Download weather automatically. When this option is
•
selected, weather information is automatically downloaded
at the set download time whenever you select the Weather
tab. To change the download time, tap the box that shows the
preset time and then choose another time interval.
Clear this option if you prefer to manually download weather
information.
Download weather when roaming. Select this option only if
•
you want to allow automatic download of weather data when
roaming. This may incur additional data charges.

88 Chapter 3 Using the Home Screen
3.14 Twitter
3.15 Footprints
Enjoy twittering directly from your phone.
On the Twitter tab, you can type in and send
your tweet. This tab also readily displays the
most recent tweets from the people that you
follow.
See “Twittering on Your Phone” in Chapter 9
for details.
Record the chronicles of your life. Wherever
you go, take photos of the places you visited
and store their GPS location and other
details to your phone. From the Footprints
tab, you can then easily flip through the
photos and find your favorite places again.
For more information about using
Footprints, see “HTC Footprints” in
Chapter 11.

3.16 Settings
Chapter 3 Using the Home Screen 89
Changing or tweaking settings is as easy
as one, two, three. With the phone settings
neatly organized on the Settings tab and
labeled with clear descriptions, you can
easily find what you are looking for and just
tap your way to the setting you want to
change.
For more information about changing phone
settings, see Chapter 14.

Chapter 4
Staying Close
4.1 It’s All About People
Bringing people who matter most closer to you – that’s what your
phone is all about.
Add everyone you know to your phone to keep them within reach.
For even faster communication, you can put people you keep in touch
with often up front on your Home screen’s People tab. You can also
add your own personal details to your phone and easily send this
information to others.
Since your phone organizes text and multimedia messages, email
conversations, and phone logs of a person all in one place, you get to
see at a glance all communications with that person. Your phone also
keeps you in tune with your social circles by integrating Facebook
information into the contact details of people on your phone.
In this chapter, learn how to share your personal details, add people’s
contact details to your phone, and put your favorite contacts on the
Home screen’s People tab. Also learn how to view the exchange of
messages and conversations with a contact.
To find out how you can reach out to people and share your thoughts,
photos and videos in social networks such as Facebook, Twitter, and
YouTube, see Chapter 9.

Chapter 4 Staying Close 91
4.2 Adding and Sharing Your Personal Details
You can save your phone number and personal details to your phone
and easily send them to your family, friends, and other people.
Adding your personal details
My Contact Card stores your personal details on your phone. There
are two ways to add your personal details to My Contact Card.
To enter your personal details to My Contact Card
On your phone, enter your personal details directly to My Contact
Card.
1. On the Home screen, slide to the People tab and then tap All
People.
2. Tap Me to open the My Contact Card screen.
3. To add your personal photo, tap the Contact Photo icon ( ) on
the upper-right corner of the My Contact Card screen. Choose
whether to use your Facebook photo, select a photo from
Albums, or take a photo using the Camera.
If you chose to use your Facebook photo, enter the email address
and password that you use for your Facebook account when you
are prompted to log into Facebook.
4. Enter your name, phone number, and email address in the fields
provided. Scroll down the screen and fill in more personal details.
5. Tap Done.

92 Chapter 4 Staying Close
To sync your Outlook contact card from your computer and save to
the phone’s My Contact Card
If you are using Microsoft® Office Outlook® on your computer, you
can create your own contact card containing your personal details on
your computer and sync it along with other Outlook contacts to your
phone. To find out how to sync your computer with your phone, see
Chapter 6.
After synchronization is complete, do the following:
1. On the Home screen, slide to the People tab and then tap All People.
2. Scroll through your contacts list and tap your name.
3. Tap Menu > Save to My Contact Card.
Note You can save any contact or SIM contact to My Contact Card.
Sharing your personal details
Send your personal details in a text or multimedia message to your
family, friends, and people you know so they can easily add you to
their phone.
1. On the Home screen, slide to the People tab and then tap All
People.
2. Tap the Send button ( ) that appears to the right of Me (My
Contact Card).
3. Choose whether to Send by SMS or Send by MMS.
4. Select the Select all check box to share all your personal details,
or select the check boxes of the types of contact information you
want to share.
5. Tap Done. A new message is then created. If you’re sharing your
personal details in a multimedia message, the information will be
included as an attachment in your message.
6. Compose your message and send it. For more information about
sending text and multimedia messages, see Chapter 7.

Chapter 4 Staying Close 93
4.3 Adding Contacts to Your Phone
There are several ways to add contacts to your phone. You can:
Create new contacts on your phone. See “Creating new contacts”
•
for details.
Sync Outlook contacts from your computer to your phone. See
•
Chapter 6 for details.
Sync contacts from your existing Microsoft® My Phone account,
•
if you have one. See “Synchronizing With Microsoft My Phone” in
Chapter 6 for details.
Creating new contacts
On your phone, you can create contacts complete with all sorts of
contact information such as mobile, home, and work phone numbers,
email addresses, home and work street addresses, and more. You can
also create SIM contacts with phone numbers only and store them on
your SIM card.
To create a contact
1. On the Home screen, slide to the People tab and then tap All
People.
2. Tap New to create a new contact.
3. Enter the contact name, mobile phone number, and email
address in the fields provided. To add another phone number, tap
Add Number. To add another email address, tap Add Email.
4. Scroll down the screen and fill in more contact details.
5. To link the contact with his or her Facebook account, tap Link
at the bottom of the New Contact Card screen. (For more
information about Facebook, see “Facebook Updates and
Events” in this chapter.)

94 Chapter 4 Staying Close
6. To add the photo of your contact, tap the Contact Photo icon
( ) on the upper-right corner of the New Contact Card
screen. Choose whether to use the Facebook photo, select a
photo from Albums, or take a photo.
7. When you have finished entering all the contact details, tap
Done.
Tip Tap More at the bottom of the New Contact Card screen to enter
additional contact information.
To create a SIM contact
1. On the Home screen, slide to the People tab and then tap All
People.
2. Tap Menu > New Contact > SIM.
3. Enter the contact name and phone number, and then tap Done.
Tip Importing SIM contacts to your phone results in duplicate contact
names in the contacts list.

Chapter 4 Staying Close 95
4.4 Working With Favorite Contacts
You need to have contacts already stored on your phone before
you can add them as favorite contacts to the Home screen’s People
tab. If there are no existing contacts, create or sync them first on
your phone. See “Adding Contacts to Your Phone” in this chapter for
details.
Adding favorite contacts to the People tab
You can add up to 15 favorite contacts to the Home screen’s People
tab.
Note SIM contacts cannot be added as favorite contacts.
1. On the Home screen, slide to the People tab.
2. Tap an empty slot. (If slots are occupied, scroll down the screen
to find more available slots.)
3. Scroll down the contacts list to find the contact that you want to
add to the People tab. If you have a long list of contacts, you can
filter the list first by entering the first few letters of the person’s
name in the text box on top of the contacts list.
4. When you find the contact that you want, tap the contact name.
5. Select a phone number or email address to use when calling or
sending a message to the selected contact.
6. If this contact does not have an associated photo, the
subsequent screen lets you take a photo of the contact or
select an existing photo.
If you selected the contact photo and it has a large size, you
need to crop the photo. On the subsequent screen, a crop box
appears on the photo. Center this box on the person’s face and
then tap Done.

96 Chapter 4 Staying Close
Tip To remove favorite contacts from the People tab, tap Menu > Remove
Favorite, tap the photos of the contacts you want to remove, and then
tap Done.
Quickly calling or sending a message to a favorite
contact
On the Home screen’s People tab, the following icons are shown on
each photo to indicate the type of contact method that is associated
to each favorite contact.
Mobile phone
Home phone
Work phone
SMS text
messaging
Email
Scroll through your favorite contacts by swiping your finger up or
down the screen. Place a call or create a new message to send to a
favorite contact by simply tapping the person’s photo.

Chapter 4 Staying Close 97
4.5 Viewing and Managing Your Contacts
To look for contacts on your phone, go to the Home screen’s People
tab and then tap All People. The People screen then opens.
On the People screen, tap or slide your finger right or left at the
bottom of the screen to switch between the following tabs:
1 2 3 4 5
1 All Lists all contacts on your phone and on the SIM card. This
2 Favorites Shows the favorite contacts that you have added to the
3 Groups Allows you to create groups of contacts so that you can
4 Updates
and Events
5 Call
History
tab lets you create, delete, or edit a contact, import SIM
contacts to your phone, or save a contact to your SIM card.
Tap a contact to open the Contact Details screen. You can
also use this tab to open or update My Contact Card.
Tip If you imported SIM contacts to your phone and
duplicated contacts are displayed, tap Menu > View >
Contacts to filter and display only contacts stored on
your phone.
Home screen’s People tab. You can also add favorite
contacts through this tab.
easily send text, multimedia and email messages to a group
of people without having to enter each contact one at a
time. See “Contact Groups” in this chapter for details.
Displays notifications when there are updates that
occurred in Facebook. This tab also shows events of your
stored contacts. See “Facebook Updates and Events” in
this chapter for details.
Lists all your dialed numbers, and received and missed
calls. See “Using Call History” in Chapter 2.

98 Chapter 4 Staying Close
1
The “f” icon indicates that the photo is
the contact’s Facebook profile photo.
Note Your phone will use the contact’s
Facebook photo when you have
linked to the contact’s Facebook
profile. If there is a contact
photo already stored on your
phone, the Facebook photo will
not show in your contact even if
you have linked to the contact’s
Facebook profile.
2
The “!” icon appears when:
You receive a new text, multimedia or
email message, or when you miss a
call from the contact.
The contact has new updates or
events in Facebook.
•
•
3
This is a SIM contact.
4
Tap this button to send My Contact Card in a text or multimedia message. See
“Sharing your personal details” in this chapter for details.
5
Tap this button to search for contacts.
6
Use this Quick Scroll bar to quickly scroll to contact names that begin with a certain
letter. Press and hold on the scroll bar and then slide your finger up or down.
7
The Facebook status appears when the contact has a new status message in
Facebook.
8
From the menu, you can choose between creating a phone contact or SIM contact,
delete contacts, filter the contacts list by groups, and more.
Browsing and finding contacts
On the People screen, the All tab shows you the complete list of
contacts that are stored on your phone and your SIM card. Swipe
upward or downward on the screen to scroll through the contacts
list. Use the Quick Scroll Bar or the Search button to quickly find the
contacts that you want.
4
5
1
6
2
3
7
8

Chapter 4 Staying Close 99
4.6 Viewing Contact Information and Exchange
of Communications With the Contact
Your phone organizes contact details, text and multimedia messages,
email conversations, Facebook information, and phone logs of a
contact all in one place. Simply tap a contact name from the contacts
list to view all these information.
After you selected a contact, the Contact Details screen opens. On
this screen, tap or slide your finger right or left at the bottom of the
screen to switch between the following tabs: Details, Messages, Email,
Updates and Events, and Call History.
1 2 3 4 5
1 Details Shows a person’s contact details. From this tab, you can
2 Messages Displays exchanged text and multimedia messages with
3 Email Displays all received email messages from the contact.
4 Updates and
Events
5 Call History Lists all incoming, outgoing, and missed calls to and from
call or send a text, multimedia, or email message to the
contact, edit or delete the contact information, or save the
contact to your SIM card.
the contact. You can also reply with a text message
directly on this tab.
Displays notifications when the contact has updates on
his or her Facebook account. This tab also shows events
of the contact. See “Facebook Updates and Events” in this
chapter for details.
the contact. This tab also lets you call the contact and
delete the phone logs of the contact. See “Using Call
History” in Chapter 2 for details.

100 Chapter 4 Staying Close
Changing the number for sending text and multimedia
messages
By default, the number that’s entered to the Mobile field in the
contact details is the primary phone number to which your text and
multimedia messages are sent when you tap Send Message on the
Contact Details screen.
If a contact has two or more mobile phone numbers for personal use
and work, you can change the primary phone number on the Contact
Details screen for sending messages to the contact.
1. On the Home screen, slide to the People tab and then tap All
People.
2. Tap a contact from the contacts list.
3. On the Contact Details screen, tap the Change number button
( ) that appears on the right side of the Send Message item.
On the subsequent screen, tap another phone number to use for
sending text messages to the contact.
4. A new message is then created. Compose and send your
message. (For more information about sendiing text and
multimedia messages, see Chapter 7.)
 Loading...