

Page 1

Smartphone
Quick Start Guide
Page 2
2
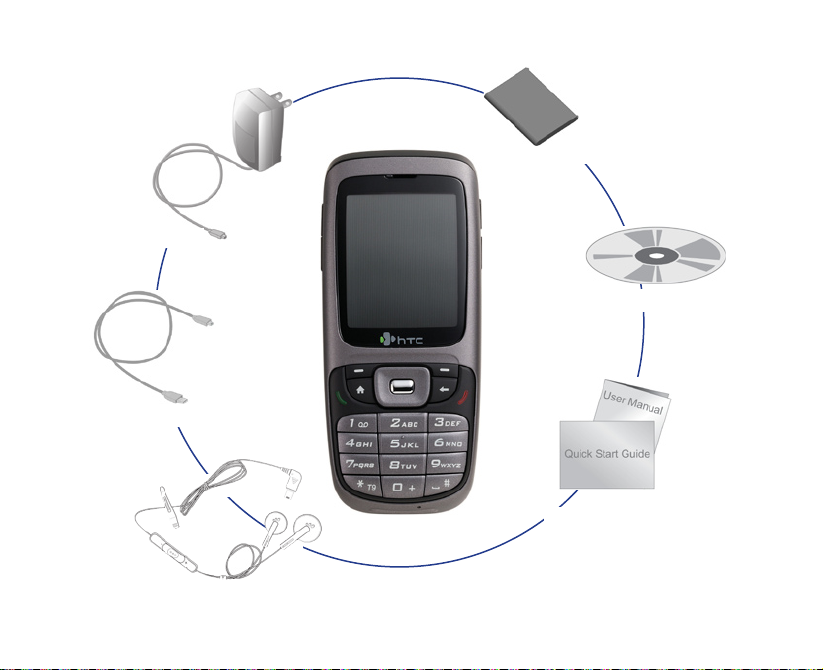
1. What’s in the Box?
AC Adapter
USB Cable
Battery
Getting Started CD
Headset
Phone
User Manual and
Quick Start Guide
Page 3
3
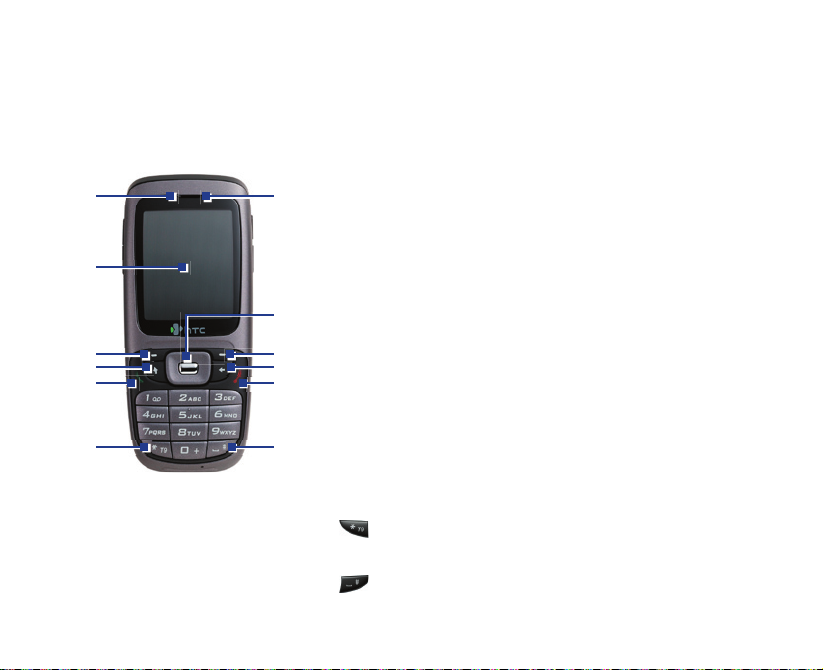
2. Your Phone at a Glance
1
2
3
4
5 6
7
9
8
10
11 12
1. LED Indicator The LED Indicator notifies you of the battery charging
(amber), network status (green) and bluetooth
connectivity status (blue) of your phone respectively.
For more information about LED Indicators, see the
table at the end of this section.
2. Speaker Listen to audio media or a phone call.
3. Display Screen
4. Navigation
Control/ENTER
Use to scroll left/right/up/down or press in to use as
the ENTER button.
5.
Left SOFT KEY
Press to perform the command shown in the label
above the button.
6. Right SOFT KEY Press to perform the command shown in the label
above the button.
7. HOME Press to go to the Home Screen.
8. BACK Press to go to the previous screen, or backspace
over characters.
9. TALK Press to dial a phone number, answer a call or use
in-call options, such as switching to another call or
putting a call on hold. Press and hold to activate/
deactivate speakerphone.
10. END Press to end a call.
Press and hold to lock the phone.
11. Key
Press and switch to different input modes or press
and hold to choose an input mode or symbols from
the list.
12. Key
Press to add a space or press and hold to display a list
of symbols.
Page 4
4
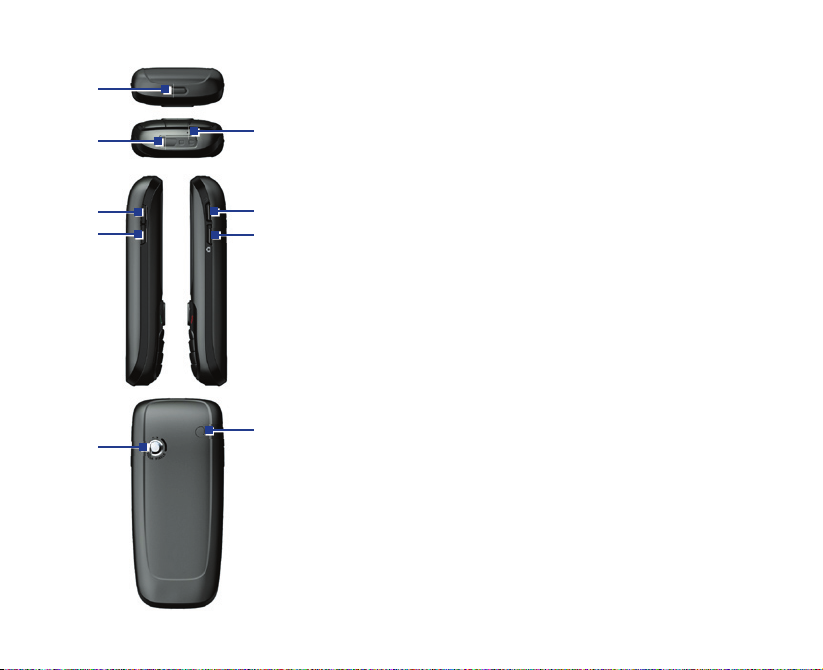
13. Cover Latch Press to open the battery cover.
14. Sync/Earphone/
Power
Connector
Connect the USB cable to synchronize data or
recharge the battery; plug in the provided Stereo
headset to use the hands-free kit or listen to audio
media; alternatively, plug in the AC adapter to
recharge the battery.
15. Microphone Speak into the microphone when receiving or
making a phone call or voice recording.
16. Volume Up/
Voice Notes
Press to increase the earpiece volume during a call.
Press and hold to start the Voice Notes recorder.
17. Volume Down/
Voice Tag
Press to decrease the earpiece volume during a call.
Press and hold to launch the Voice Tag feature.
18. POWER Press to turn the phone on and off.
Or, press and quickly release to display the Quick List,
which allows you to change profiles, open Comm
Manager, enable key lock and device lock.
19. CAMERA Press to launch the camera. If already running, press
to capture an image or start recording a video clip.
20. Camera Lens 1.3 Megapixels CMOS lens.
21. Car Antenna
Connector
Allows you to attach your phone to the car antenna
for better network signal reception. Simply peel
off the rubber cap and connect the antenna jack.
Replace the rubber cap if unused.
15
13
14
16
17
18
19
20
21
Page 5
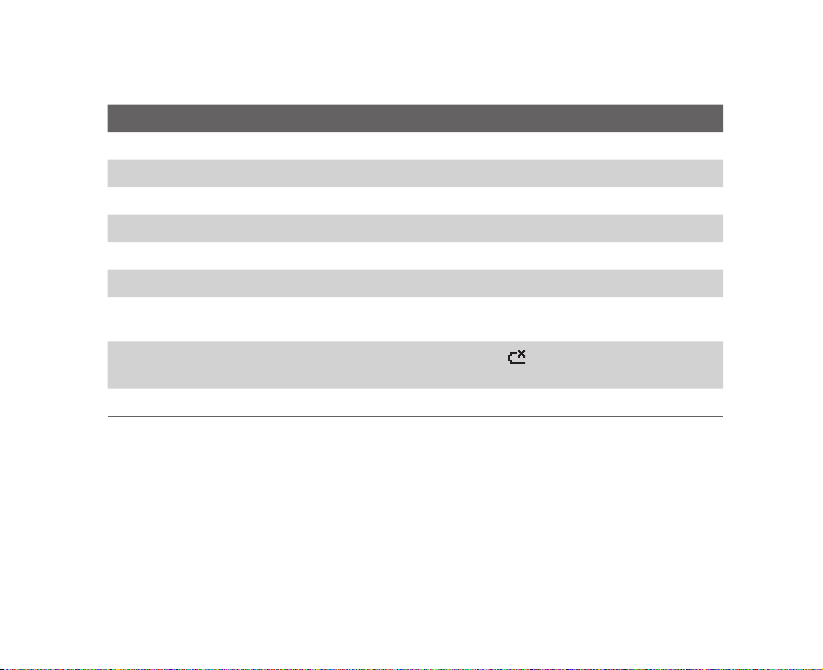
LED indicator lights
Various colors that might display in the LED Indicator are summarized here.
LED indicator Status
Solid green Battery is fully charged.
Blank Battery case is empty.
Solid amber Battery is charging or the phone is using ActiveSync to synchronize with a PC.
Flashing green Connected to the network.
Flashing blue Bluetooth mode set to “On” or “Discoverable” mode.
Flashing red Battery very low (less than 4%).
Flashing amber
Amber/Green LED off
Dim Disconnected from the network.
Battery temperature is hotter or colder than the functional limits of 0 to 48
degrees Celsius, and has stopped charging.
Battery fault. The “Battery Fault” indicator (
flashing green LED can be recovered by unplugging the AC adapter.
) is displayed. In this case, the
5
Page 6
6
3. Set Up Your Phone in 5 Steps
1
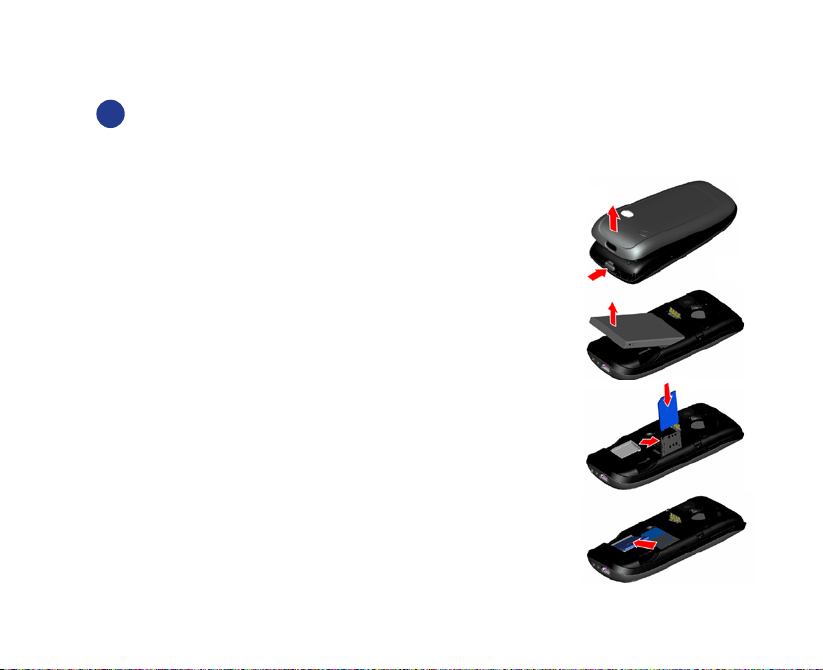
Install the SIM card and miniSD card
Your SIM (Subscriber Identity Module) card is given to you by your wireless service provider and contains
your basic subscriber information, such as your phone number and your address book.
Before you begin, ensure that the phone is turned off.
1. Open the battery cover: Press the cover latch to pry
the battery cover open.
2. Remove the battery: Remove the battery by lifting it
up from the bottom end if you have installed it.
3. Insert the SIM card: Lift up the SIM card holder and
insert the SIM card into the holder with its gold contacts
facing down. When completed, push the holder down.
4. Insert the miniSD card: Insert your miniSD card
(optional) with its gold contacts facing down.
5. Replace the battery and the battery cover.
Page 7
7
2
Install and charge the battery
New batteries are shipped partially charged. Before you can use your phone, you need to
install and charge the battery. To install the battery, remove the battery cover first, and
then insert the battery by aligning the exposed copper part of the battery pack with the
protruding copper conductor of the battery slot. Insert the bottom side of the battery first,
then gently push the battery into place, and replace the battery cover.
Some batteries perform best after several full charge/discharge cycles. You can charge the
battery in two ways:
• Connect your phone directly to an electrical outlet using the AC adapter.
• Connect your phone to the USB port on your PC and using the USB cable.
3
Turn on your phone
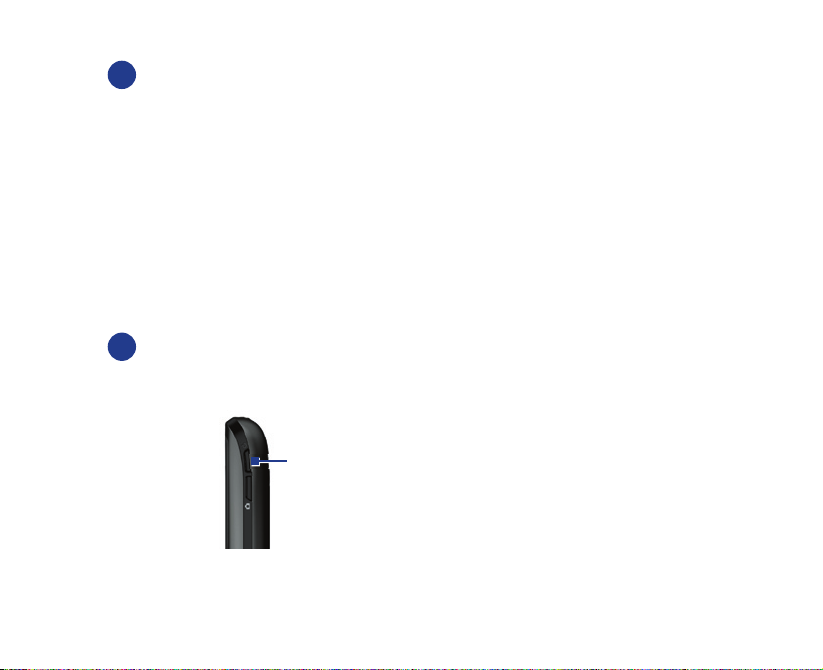
Press and hold the POWER button at the top of the phone to turn it on.
POWER button
Page 8
8
4
Install ActiveSync
ActiveSync synchronizes information between your phone and your PC, keeping information
up to date in both devices. Before you connect your phone to your PC, you must install
ActiveSync on the PC. ActiveSync is already installed on your phone.
1. Insert the Getting Started CD into the CD drive of your PC.
2. Follow the instructions on the installation wizard screen to install ActiveSync.
3. Connect the USB cable to the phone and plug it into the USB port of your PC.
4. Turn on your phone. When the PC detects a USB connection, it starts the ActiveSync
Synchronization Setup Wizard. Follow the instructions on the screen and select the items
you want to synchronize.
5
Make your first phone call
Before you make a phone call, ensure that a SIM card is installed and the battery is sufficiently
charged.
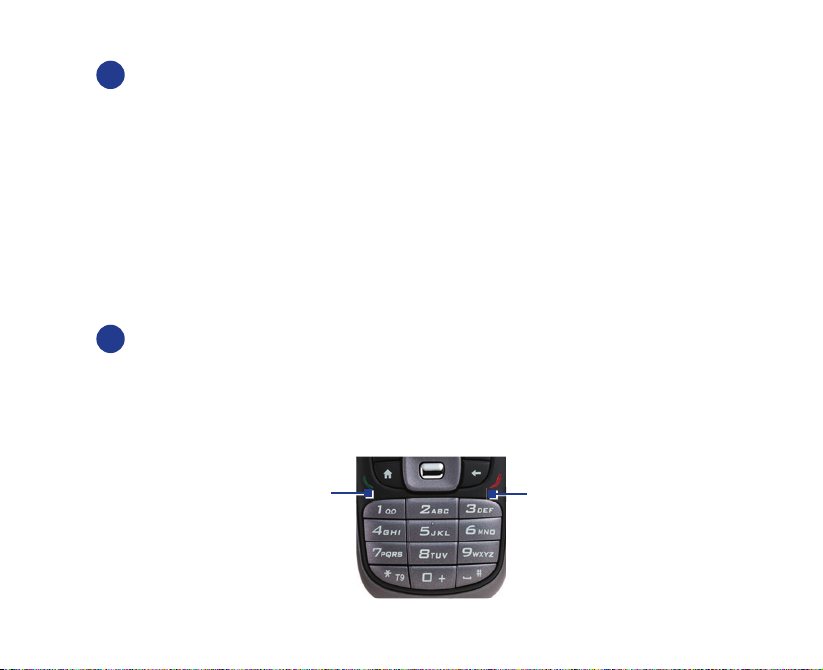
• To make a call, enter the phone number by pressing keys on the keypad and press TALK.
• To end a call, press END.
TALK button
END button
Page 9

4. Set Up an E-mail Account and Send a Message
Your phone can be set up to retrieve e-mails from Outlook e-mail, POP3 and IMAP4 accounts.
However, you need to set up your e-mail account with an Internet service provider (ISP) or an
account that you access using a VPN server connection (typically a work account) before you can
send and receive mail.
To set up a POP3/IMAP4 e-mail account
1. On the Home screen, click Start > Messaging and select Outlook E-Mail.
2. Click Menu > Options > New Account.
3. In Your name, enter your display name for e-mail messages.
4. In E-mail address, enter the e-mail address for this account.
5. Select Attempt to obtain e-mail settings from the Internet and click Next.
6. Auto Setup will help you download necessary e-mail server settings. When completed, click
Finish
.
To send an e-mail message
1. On the Home screen, click Start > Messaging.
2. Select an e-mail account, or select Text Messages. Then, click Select.
3. Click New.
4. Enter the e-mail address or phone number of one or more recipients, separating them with a
semicolon (;). To access addresses and phone numbers from Contacts, in To, press ENTER and
select a recipient from the list.
5. Enter a message.
6. Click Send.
9
Page 10

10
5. Browse the Web
Your phone comes with Internet Explorer Mobile installed. Internet Explorer Mobile is a fullfeatured
Internet browser, optimized for use on your phone.
You can also use ActiveSync to synchronize the Internet Explorer favorites on your PC with your
phone so you can use them with Internet Explorer Mobile as well. For more information, see
ActiveSync Help on your PC.
To open Internet Explorer
• On the Home screen, click Start > Internet Explorer.
Page 11

6. Take a Picture and Send It
Taking photos and shooting video clips with audio is easy with your phone’s built-in camera. To
open Camera or Video Recorder, do any of the following:
• On the Home screen, click Start > Camera.
• On the Home screen, click Start > Video Recorder.
• Press the CAMERA button on your phone.
To exit Camera or Video Recorder, press END.
To capture a still image
• Press the CAMERA button or the ENTER button on your phone.
To record a video clip
• Press the CAMERA button or the ENTER button to start recording a video clip. To stop
recording, press ENTER or CAMERA again to stop recording.
To send pictures and video clips from the Camera program
1. Capture an image or a video clip using the Camera program.
2. On the Review screen, click the Send icon ( ) to send the file via e-mail or MMS.
If the message is to be sent to an e-mail address, it will be sent the next time you synchronize your
phone. If you send an MMS message to a mobile phone, it will be immediately sent.
11
Page 12

12
To use the Pictures & Videos program
• Click Start > Pictures & Videos.
• After capturing image, click the View icon ( ) on the Review screen to switch to Pictures &
Videos.
The Pictures & Videos program allows you to view pictures and play video clips on your phone,
and even view the pictures as a slide show, beam them, send them via a messaging program, edit
them, or set them as the background on the Home Screen.
To send pictures and video clips from the Pictures & Videos program
1. On the Pictures & Videos screen, select the item you want to send.
2. Click Menu > Send.
3. On the Messaging screen, select Outlook E-mail, MMS, or a custom e-mail account. A new
message is created with the item attached.
4. Enter the recipient name and subject, and click Send.
Page 13

7. Personalizing Your Phone
To set up the Home screen
The Home screen is your starting place for most tasks. You can gain access to all features and
programs from the Home screen.
1. On the Home screen, click Start > Settings > Home Screen.
2. In Home screen layout, Color scheme, Background image, and Time out, select the options
you want, and click
You can also set a favorite picture as the Home screen background:
1. On the Home screen, click Start > Pictures & Videos.
2. Select the picture you want to set as the background and then click View or press ENTER to
view the selected picture
3. Click Menu > Use as Home Screen.
4. Use NAVIGATION to select the portion of the picture you want to use. Then click Next.
5. In Adjust the transparency, select a higher percentage for a more transparent picture or a
lower percentage for a more opaque picture.
6. Click Finish.
To set language, locale, and other regional options
Your phone should already be set up with the regional settings that are appropriate for your locale.
However, you can specify the language, locale, date and time style, as well as number and currency
formatting options by doing the following:
1. On the Home screen, click Start > Settings > Regional Settings.
2. In Language, select your preferred language.
Done.
.
13
Page 14

14
3. In Locale, select the locale for the language you selected. The Locale option automatically
changes the format of the remaining options (such as date, time, and currency) according to
the locale you specify. Then, click
Note You must turn your phone off and on again for the changes to take effect.
Done.
To set the date and time
Your phone should already be set up with the regional settings that are appropriate for your locale.
However, you can specify the language, locale, date and time style, as well as number and currency
formatting options by doing the following:
1. On the Home screen, click Start > Settings > Clock & Alarm > Date and Time.
2. In Time zone, select your time zone.
3. In Date, edit the month, day, or year.
4. In Time, edit the hour, minute, and second.
5. Click Done.
To set an alarm
Your phone should already be set up with the regional settings that are appropriate for your locale.
However, you can specify the language, locale, date and time style, as well as number and currency
formatting options by doing the following:
1. On the Home screen, click Start > Settings > Clock & Alarm > Alarm.
2. In Alarm, choose Off/On to turn the alarm off/on.
3. In Alarm time, enter the time for the alarm to go off.
4. Click Done.
Page 15

8. Secure Your Phone
There are several levels of security on your phone. You can protect your phone from unauthorized
use by requiring a type of password called a PIN (personal identification number) in order to make
calls. Your first PIN will be given to you by your wireless service provider. Additionally, you can lock
the entire phone to prevent unauthorized access.
To enable the SIM PIN (Personal Identification Number)
1. On the Home screen, click Start > Settings > Security.
2. Click Enable SIM PIN.
3. Enter your PIN, and click Done.
Note To cancel without enabling the SIM PIN, press HOME.
To disable the SIM PIN
1. On the Home screen, click Start > Settings > Security.
2. Click Disable SIM PIN.
3. Enter your PIN, and click Done.
To lock/unlock the keypad
Locking the keypad turns off keypad functionality. This is a helpful feature if, for example, the
phone is turned on and in your pocket, and you want to prevent accidental keypresses.
On the Home screen, press and hold the HOME button, and click Key lock. Once the keypad is
locked, the left soft key label changes to Unlock
When the keypad is locked, click Unlock and press the
Note You can still receive calls and make emergency calls when the keypad is locked.
.
key to unlock the keypad.
15
Page 16

16
To enable/disable Device Lock
Device Lock is an additional security feature that prevents unauthorized use of your phone. To
enable the function:
1. On the Home screen, click Start > Settings > Security.
2. Click Device Lock.
3. Select the Prompt if device unused for item, then select the amount of time for the phone to
be inactive before automatically locking.
4. Select the Password type (Simple PIN or Strong alphanumeric).
5. Enter and confirm your password.
6. Click Done.
To disable Device Lock, click Start > Settings > Security > Device Lock to enter the setting page
(require the password) and clear the Prompt if device unused for item.
Once you configure the Device Lock setting, you can lock your phone from the Quick List directly
without configuring the settings again.
When the device is locked, click Unlock and enter the password to unlock your device.
Page 17

9. Learn More
For more in-depth instructions refer to the User Manual, or look for information on Microsoft®
Windows Mobile™ Web site (http://www.microsoft.com/windowsmobile/smartphone/
17
).
Page 18

18
 Loading...