

Page 1

get started
guide
HTC One M9
____
Page 2
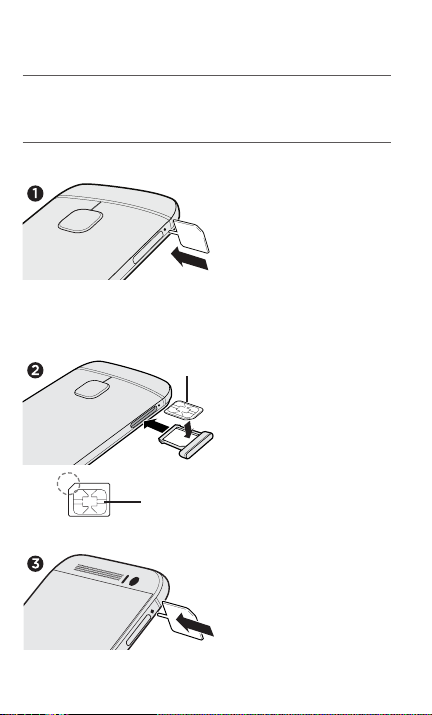
___ Insert your nano SIM and
microSD cards
IMPORTANT: Use a standard nano SIM only.
Don’t cut a micro SIM or regular SIM card and insert
it into the nano SIM slot. It’s thicker than the standard
nano SIM card and may get stuck in the slot.
1. With the phone facing
down, insert the tip of the
tray eject tool that came
with your phone (or a
small bent paperclip) into
the hole next to the nano
SIM card tray that’s on the
left side of the phone.
Push the tip all the way
into the hole until the tray
ejects, and then pull the
nanoSIM
cut-o corner
gold contacts
tray out.
2. Place your nano SIM card
into the tray, with the gold
contacts facing up and
cut-off corner facing out.
When reinserting the
nano SIM tray, make sure
it is facing up so that the
nano SIM card doesn’t fall
out. Slide the tray all the
way into the slot.
3. Flip the phone over
and use the same tray
eject tool to eject the
microSD™ card tray that’s
on the right side of the
phone. Pull the tray out.
2
Page 3
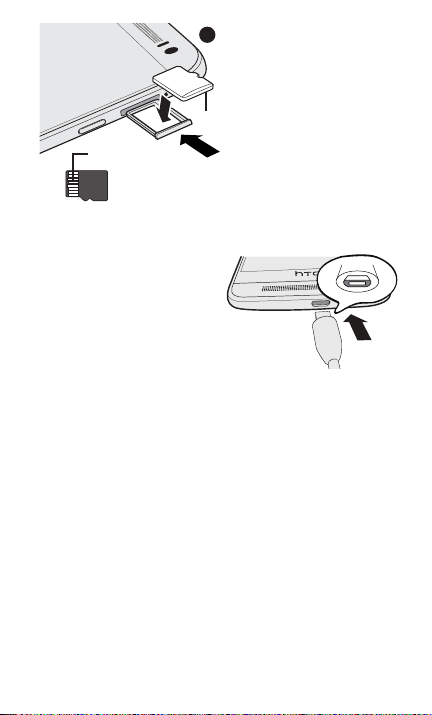
4. With both the phone and
4
the microSD tray facing
up, place your microSD
card into the tray, with
the gold contacts facing
down and the narrow side
microSD
facing in.
gold contacts
To reinsert the microSD
tray, center it first in the
slot, and then slide it all
the way in.
___ Charge the phone
1. Connect the phone to the
power adapter using the
provided USB cable.
2. Plug the power adapter
into an electrical outlet to
start charging.
___ Turn on the phone
• To turn on the phone, press and hold the POWER button.
• When the phone goes to Sleep mode, briefly press the
POWER button and then swipe up on the screen to unlock.
___ Set up your new phone
The first time you switch on your phone, follow the onscreen
instructions to sign in to your Google® Account, transfer
content from your previous phone or restore your backup,
and more.
And, you can use HTC Sync Manager to easily transfer iPhone
photos, text messages, contacts, and more to your phone.
Download the HTC Sync Manager installer from the HTC
support site (www.htc.com/hsm/).
3
Page 4

___ HTC Sense Home widget
Get timely and smart updates on your phone. The HTC Sense™
Home widget automatically adapts to where you are, and
automatically shows apps that you often use at home, work, or
outdoors in the HTC Sense Home widget.
1. On the Home screen, tap Tap to personalize.
2. Tap Let’s explore.
3. Tap your current location.
You can resize or reposition the
HTC Sense Home widget to fit
more apps, shortcuts, and folders.
Over time, the phone learns
which apps you use often
based on where you are and
fills the widget with those apps
automatically.
Also, at mealtimes, the lock
screen will suggest a restaurant
that’s close to your location.
4
Page 5

___ Themes
Make your phone look and sound just the way you want it.
Use the Themes app to apply detailed personalization to your
phone. Along with ringtones, wallpaper, and sounds, Themes
allows you to change the icon color and shape, app theme
color, lockscreen, and more.
On the Home screen, tap , and then find and tap Themes.
Apply a set theme
1. In Themes, tap > Themes.
2. Tap one of the Themes to download it.
3. Tap Apply.
Change your home wallpaper
1. In Themes, tap > Wallpapers.
2. Tap one of the wallpapers to download it.
3. Tap Apply.
4. Choose where you want to apply the wallpaper, such as to
the Home or Lock screen.
Pick ringtones and sounds
1. In Themes, tap > Sounds.
2. Tap one of the sound schemes to download it.
3. Tap Apply.
4. Choose where you want to apply the sound scheme, such
as to the Ringtone or Notifications.
5
Page 6

___ Onscreen navigation buttons
HTC One M9 has onscreen navigation buttons at the bottom
of the screen which rotate when you change the orientation.
Three of the buttons are standard navigation buttons:
Tap to go to the Home screen.
Tap to return to the previous screen.
Tap to show recently used apps.
The fourth button is optional, and can be set to hide the
navigation bar, put your phone into Sleep mode, show the
notification list, or show the Quick Settings.
Swipe up from any of the navigation buttons to access Google
Search.
Configure the onscreen navigation buttons
1. With two fingers, swipe down from the top of the screen to
open Quick Settings.
2. Tap > Personalize > Change navigation buttons.
3. Select the fourth navigation button.
To have only three navigation buttons, make sure none of the
fourth button options are selected .
4. Rearrange the navigation buttons by dragging next to
the button names.
5. Tap Done to save and apply your customization.
6
Page 7

___ Capture all your big moments
HTC One M9 gives you a variety of capture modes to use—
from the basic ones for taking regular photos and videos to
advanced modes such as Pan 360.
After taking some shots, use Photo Editor to apply basic and
advanced edits to your photos.
From the Home screen, tap , and then find and tap Photo
Editor.
___ Want some guidance on using
your phone?
On your phone, check out our friendly walkthroughs and
self-help in troubleshooting basic problems with the HTC
Help app. From the Home screen, tap , and then find and
tap Help.
Or go to www.htc.com/support/ to find tutorials, the user
guide, FAQs, latest news, and more.
Please also read the Safety and regulatory guide that’s
included in the box.
7
Page 8

© 2015 HTC Corporation. All rights reserved.
HTC, the HTC logo, HTC One, the HTC One logo, and HTC Sense are trademarks of HTC
Corporation.
microSD is a trademark of SD-3C LLC.
All other company, product and service names mentioned herein are trademarks, registered
trademarks or service marks of their respective owners.
htc.com
 Loading...