

Page 1

Pocket PC Phone
Quick Start Guide
Read this guide before operating your Pocket PC Phone.
1
Page 2
Warnings – Please Read Before Operating your Device
THE DEVICE IS NOT CHARGED WHEN YOU TAKE IT OUT OF THE BOX;
YOU WILL NOT BE ABLE TO TURN YOUR DEVICE ON UNTIL IT IS FULLY
CHARGED (For information, see “Step 2: Charge the battery” below).
IN MANY COUNTRIES YOU ARE REQUIRED BY LAW TO TURN OFF YOUR
PHONE WHEN YOU FLY. TURNING OFF YOUR POCKET PC DOESN’T
TURN OFF YOUR PHONE; YOU MUST TURN OFF YOUR WIRELESS
CONNECTION TO YOUR OPERATOR’S NETWORK (For information on
doing so see page 12, “Turning your phone on and off”).
WHEN YOU INSERT YOUR SIM CARD MAKE SURE IT CLICKS INTO PLACE
(For more information, see “Step 1: Insert the SIM card” below).
MAKE SURE THE SIM DOOR IS CLOSED – YOUR DEVICE CANNOT BE
TURNED ON IF THE SIM DOOR IS OPEN (For more information, see “Step
1: Insert the SIM card” below).
YOUR WARRANTY IS INVALIATED IF YOU OPEN OR TAMPER WITH THE
DEVICE’S OUTER CASING (For more information, see the enclosed
warranty card).
DAMAGE TO THE MICRO-SWITCH LOCATED BEHIND THE SIM DOOR
WHICH COULD BE CAUSED BY THE INCORRECT POSITIONING OF THE
STYLUS WHEN REMOVING YOUR SIM CARD IS NOT COVERED BY THE
DEVICE WARRANTY (For more information, see “Removing the SIM card”
below).
2
Page 3
Setting Up Your Device
Follow the steps outlined below in order - If you want to utilize your device’s wireless data and/or voice capabilities,
go to
Step 1; if you only plan to use the PDA features jump to Step 2.
You can start using your device’s wireless voice and/or data capabilities at anytime in the future by going through
Step 1.
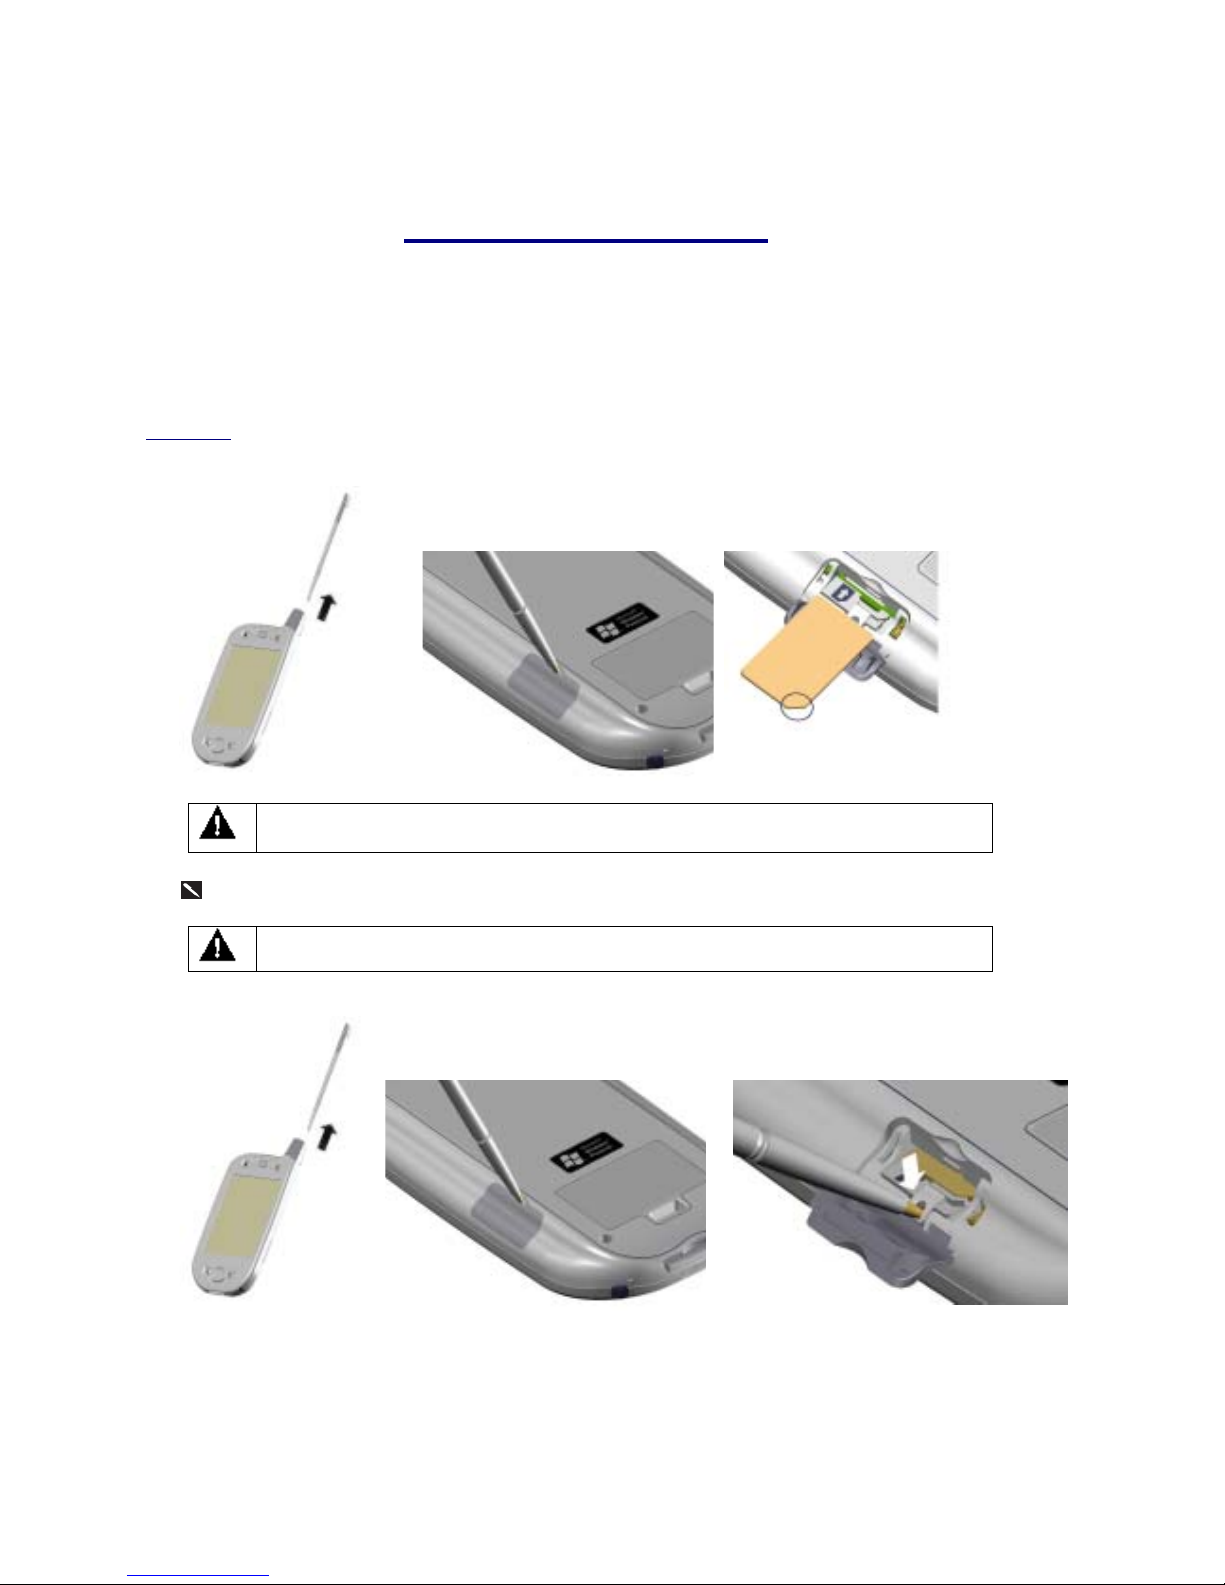
Step 1: Insert the SIM card
♦ Remove the stylus.
♦ Turn over your device and open
the SIM door with the stylus.
♦ Slide the SIM card into the slot until it
clicks into place.
DON’T FORGET TO CLOSE THE SIM DOOR BEFORE PROCEEDING.
Removing the SIM card
MAKE SURE YOU HAVE SAVED ANY DATA IN OPEN PROGRAMS: OPENING THE
SIM DOOR WILL TURN YOUR DEVICE OFF
♦ Remove the stylus.
♦ Turn over your device and open the
SIM door with the stylus.
• Press the point of your stylus into the
hole until the SIM card springs out; then
use your fingers to finish removing.
3
Page 4
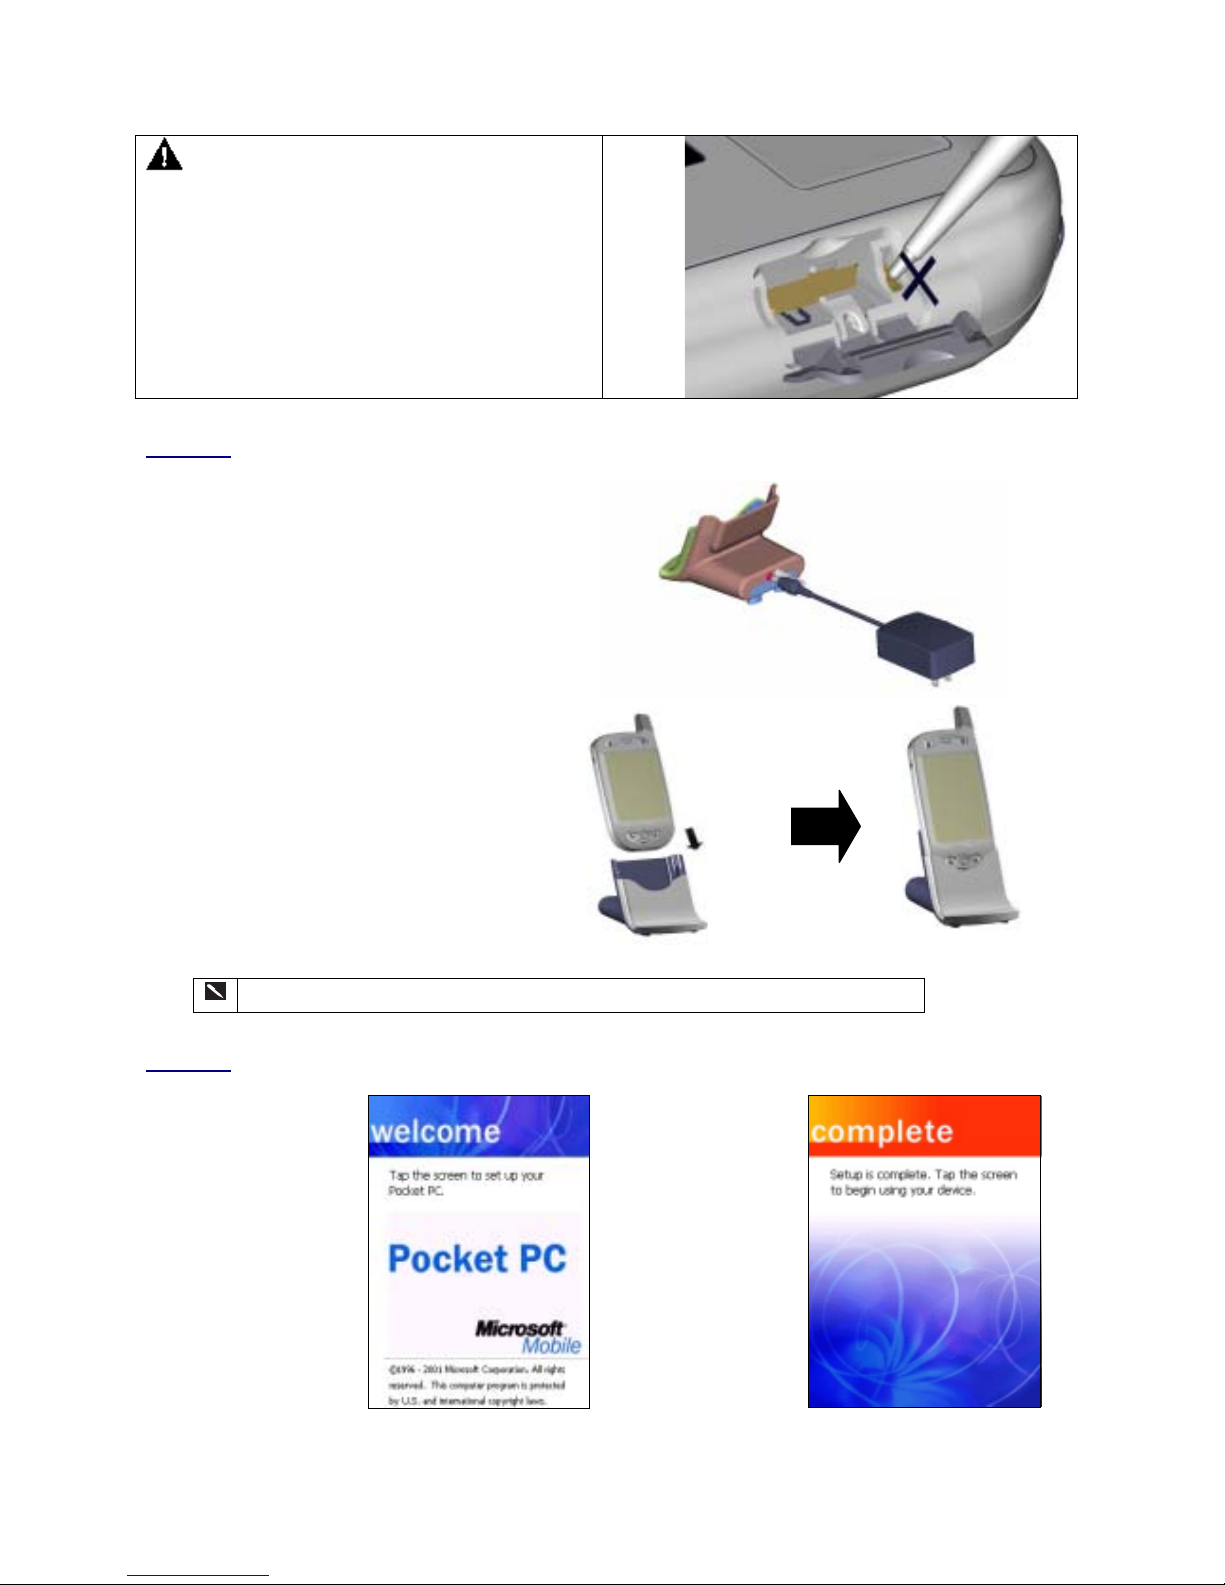
PLEASE PAY PARTICULAR ATTENTION TO
THE STYLUS POSITIONS IN THE PICTURE ABOVE
RELATED TO REMOVING THE SIM CARD, AND IN
THE PICTURE TO THE RIGHT. DO NOT PUT THE
STYLUS IN THE HOLE IN THE PICTURE TO THE
RIGHT: IT WILL CAUSE IRREPARABLE DAMAGE
TO YOUR DEVICE.
SUCH DAMAGE IS CONSIDERED AS MISUSE AND
WILL NOT BE COVERED BY WARRANTY SERVICE.
Step 2: Charge the Battery
♦ Insert the AC adapter into the back of the
cradle, and then plug into the mains.
♦ Dock your Pocket PC in its cradle and fully
charge for 3 hours - A steady amber LED
indicates charging; solid green fully charged.
Check that the SIM door is closed before charging your pocket PC and/or switching on.
Step 3: Follow the Setup Wizard
♦ When the Welcome
Wizard Screen
appears, tap with your
stylus.
♦ The wizard’s
onscreen
instructions will
lead you through
the rest of the
setup process.
♦ Follow the
instructions on
screen, you may
see the screen for
ready to operate.
4
Page 5
Feature Maps
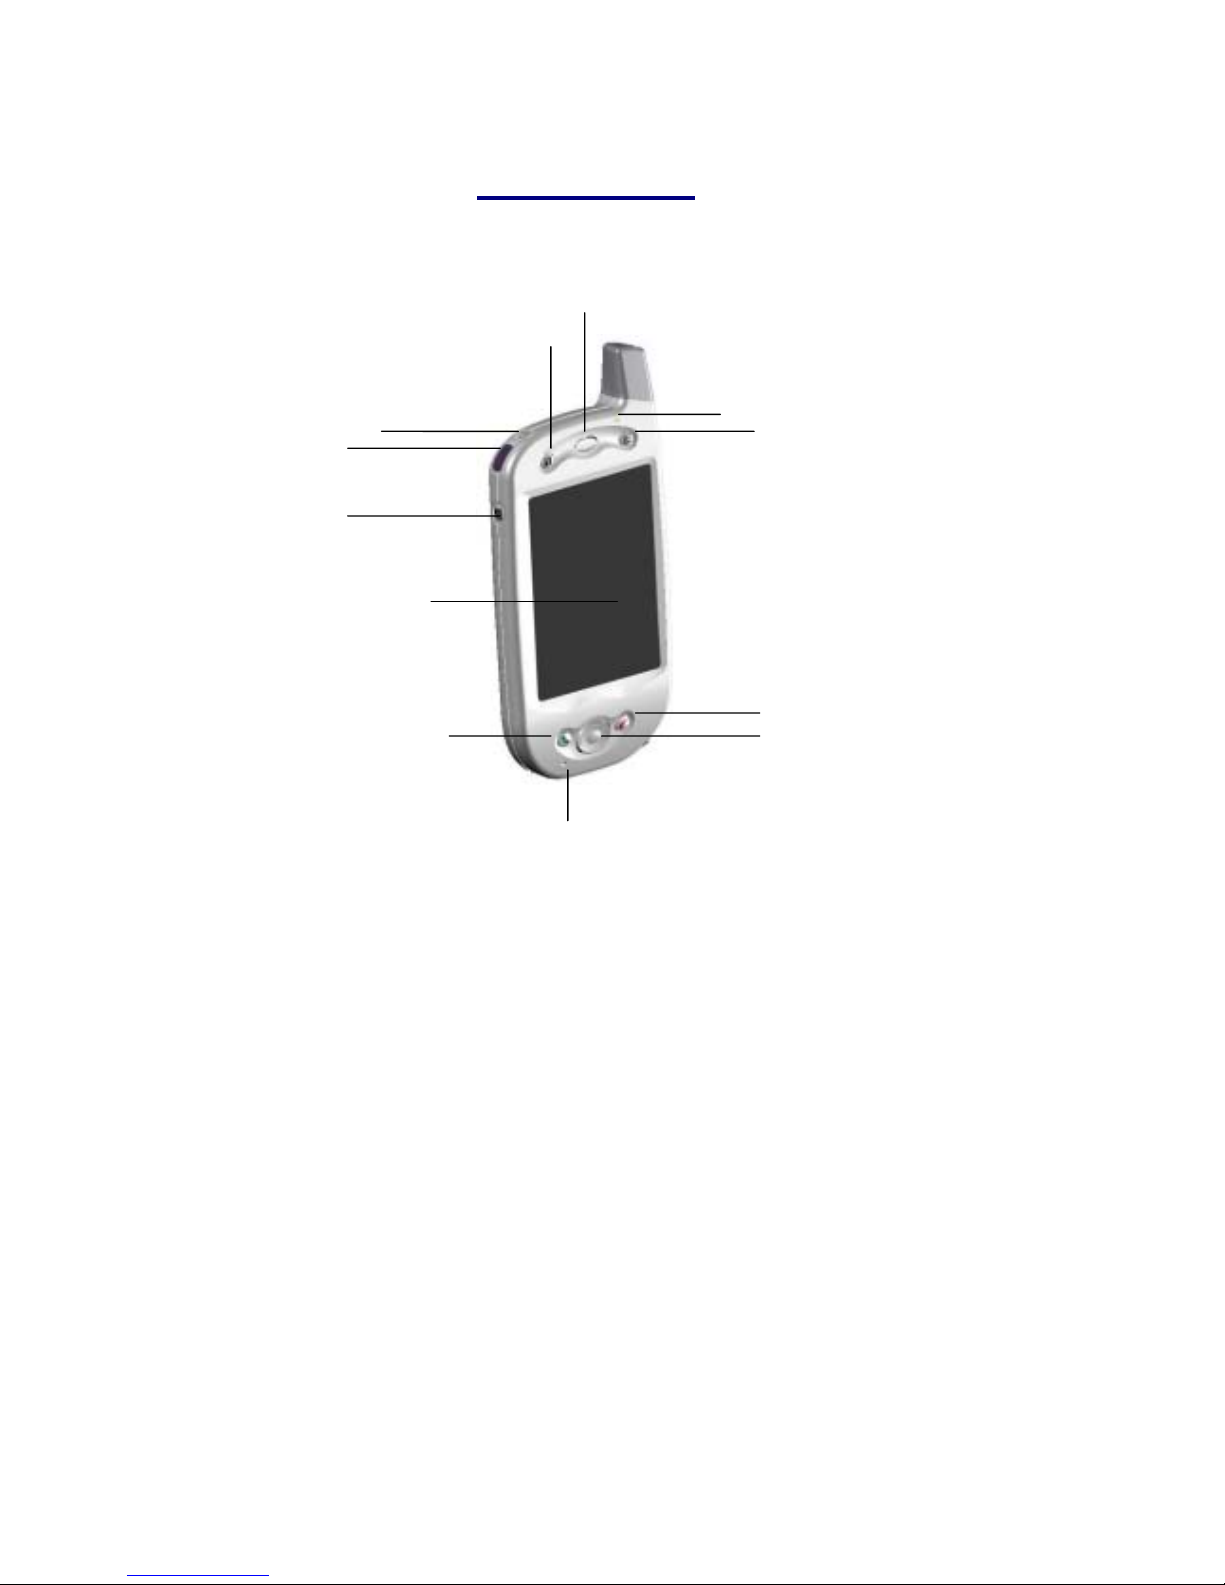
Front Panel Components
1.
2.
3.
5.
8.
9.
4.
6.
11.
12.
7.
10
1
Volume. Press to adjust the volume of your device.
2
Infrared port. Enables you to exchange file(s) or data with other devices without cables/ wires.
3
Power Button. Press to turn on/off your pocket PC
Backlight. Press and hold to turn the back light on/off.
4
Contacts. Press for quick access to your Contacts.
5
Speaker. Listen to audio media or a phone call from here.
6
Notification LED:
a) Flashing Green (Every 3 seconds) – GSM network Signal.
b) Flashing Green (Every second) – Notification Alarm Reminder.
c) Steady Red – Battery empty.
d) Flashing Red – Low battery.
e) Steady Amber – Battery charging.
f) Steady Green – Fully charged.
7
Calendar. Press to quickly access the Calendar.
8
End. Press to end a call.
Phone On/off. Press and hold to turn on/off your device’s phone.
9 Navigation Pad:
Allows you to move up/ down and left/ right through any of the drop down menus or program instructions; select by
pressing in the center.
Left: When in the Dialer screen, press once to access the Speed Dial feature.
Right: When in the Dialer screen, press once to access the Call Log feature.
5
Page 6
10
Microphone. Speak here when receiving/ making a phone call or voice recording.
11
Send: Press to take an incoming call.
Press to dial a number.
Speakerphone. Press and hold for speakerphone mode.
12
Touch Screen. For handwriting, drawing or to make a selection with the stylus.
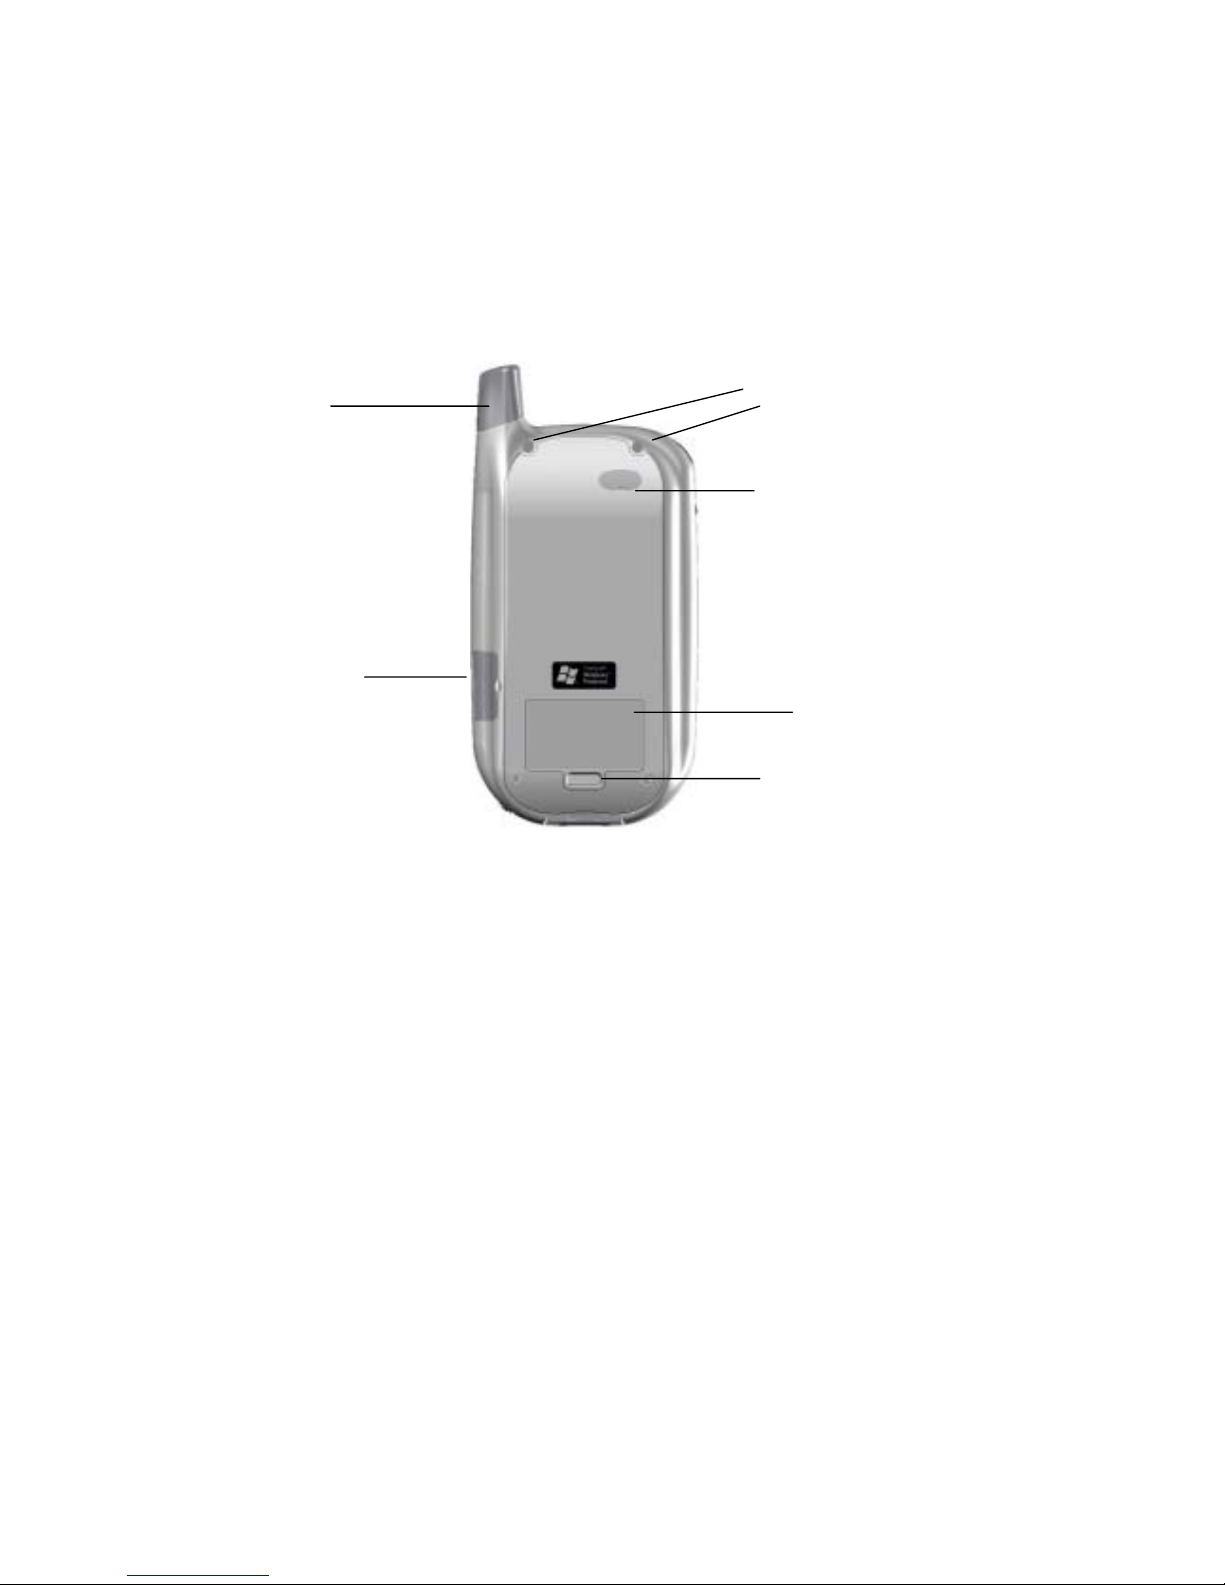
Back Panel Components
2.
3.
4.
5.
6.
1.
1.
SIM card door. Open the rubber door to insert the SIM card.
2.
Antenna, stylus slot and stylus. The antenna has a neatly hidden slot for housing the stylus.
3.
To secure external battery. The optional extended battery should be fastened here.
4.
External battery connector cover. Remove this to uncover the connection between your device and the optional
extended battery.
5.
Main battery unit. The main battery is housed permanently insi de t he device – It shoul d onl y be changed through an
authorized sales center.
6.
External battery clip. Before screwing the extended battery into position please secure the clip on the bottom into
this hole.
6
Page 7
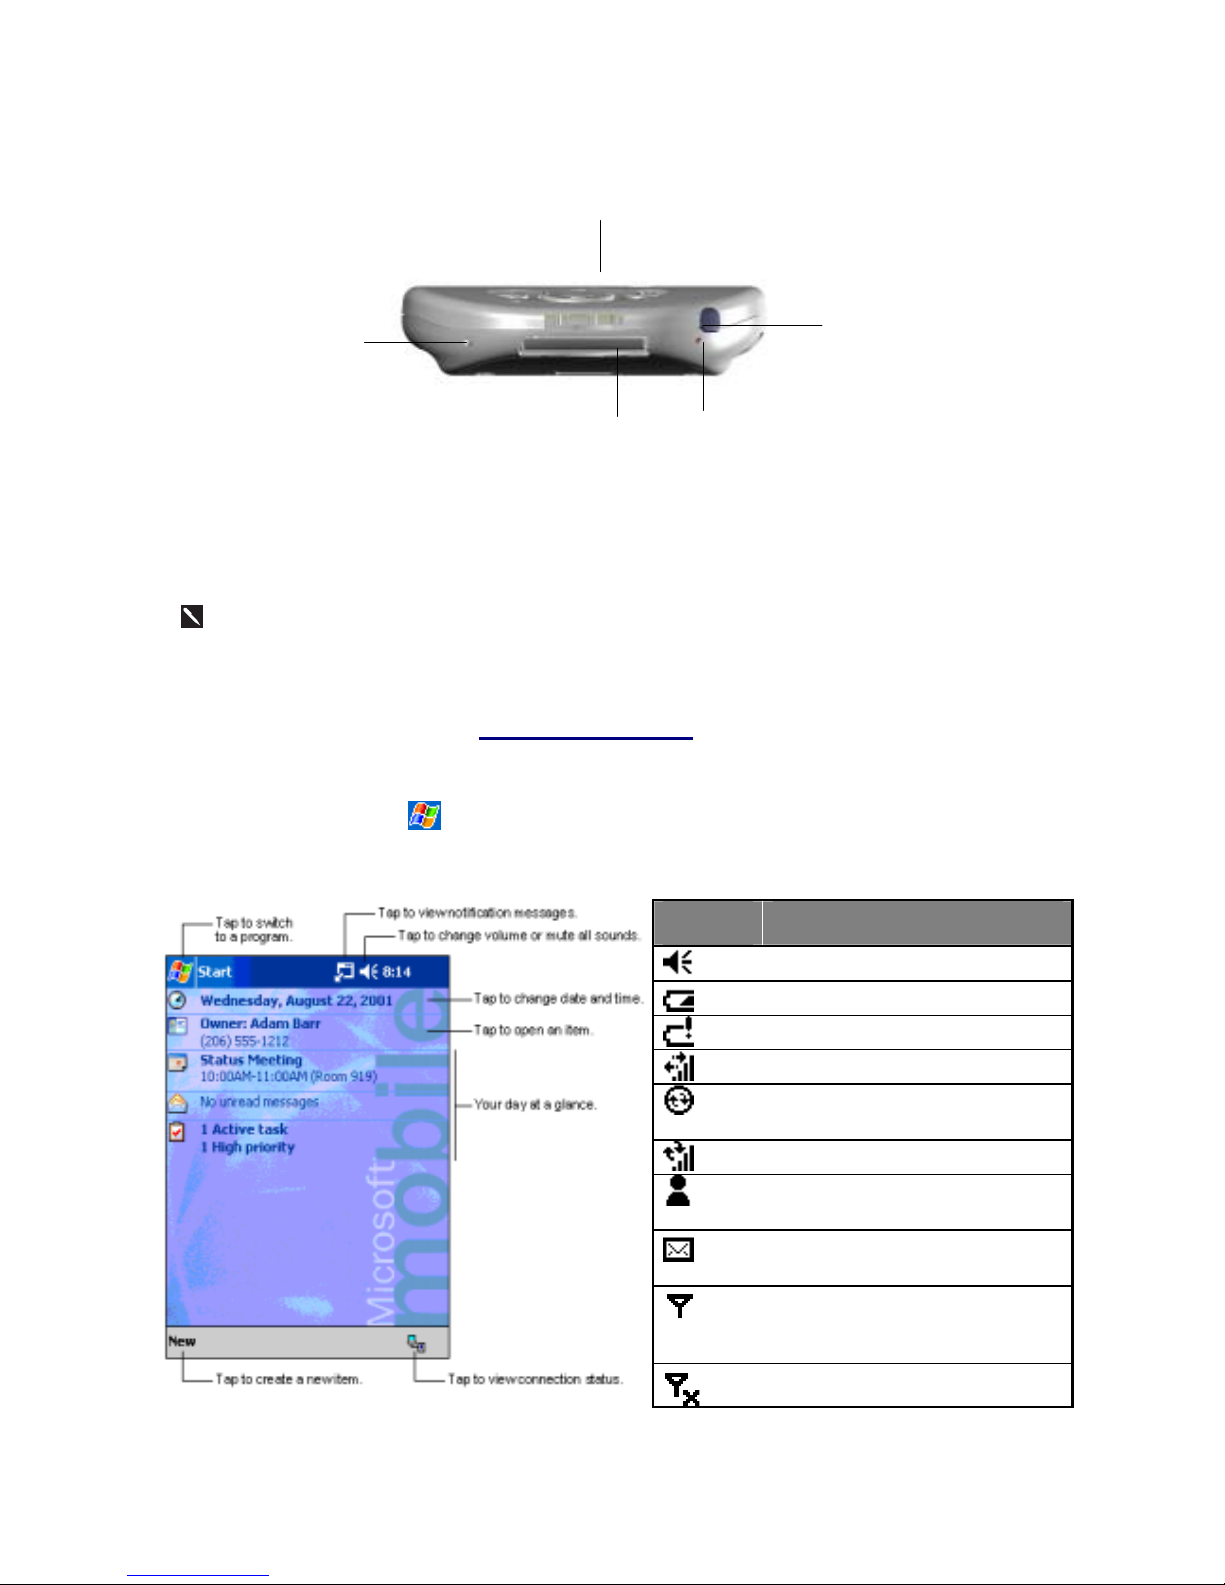
Bottom Edge Components
1
Soft Reset. Press into the hole with the end of your stylus to reset your device.
2
Sync connector. Use this connector when synchronizing/ transmitting data or recharging.
3
Earphone Jack. Allows you to listen to audio media or use the phone hands-free kit.
4
Battery on/ off switch. Press into the hole with the end of the top-half of your stylus to return the device to factory
settings.
Battery off will wipe all the data from your device.
5
MMC and SD card slot. Insert either MMC or SD cards in this slot.
Device Basics
Today Screen
When you turn on your device for the first time each day (or after 4 hours of inactivity), you’ll see the Today screen.
You can also display it by tapping
and then Today. On the Today screen, you can see at glance important
information for the day.
Following are some of the status icons you may see:
Status
Icon
Meaning
Turns all sounds on and off
Main battery low
Main battery very low
Connection is active
Synchronization is beginning or
ending
Synchronization is occurring
Notification that one or more instant
messages were received
Notification that one or more e-mail/
SMS messages were received
Shows the connection to your mobile
phone service provider is on and the
strength of the signal
Indicates your phone is switched off.
5.
1.
4.
2.
3.
7
Page 8
If more notification icons need to be displayed than there is room to display them, the Notification icon,
,
will display. Tap the icon to view all notification icons.
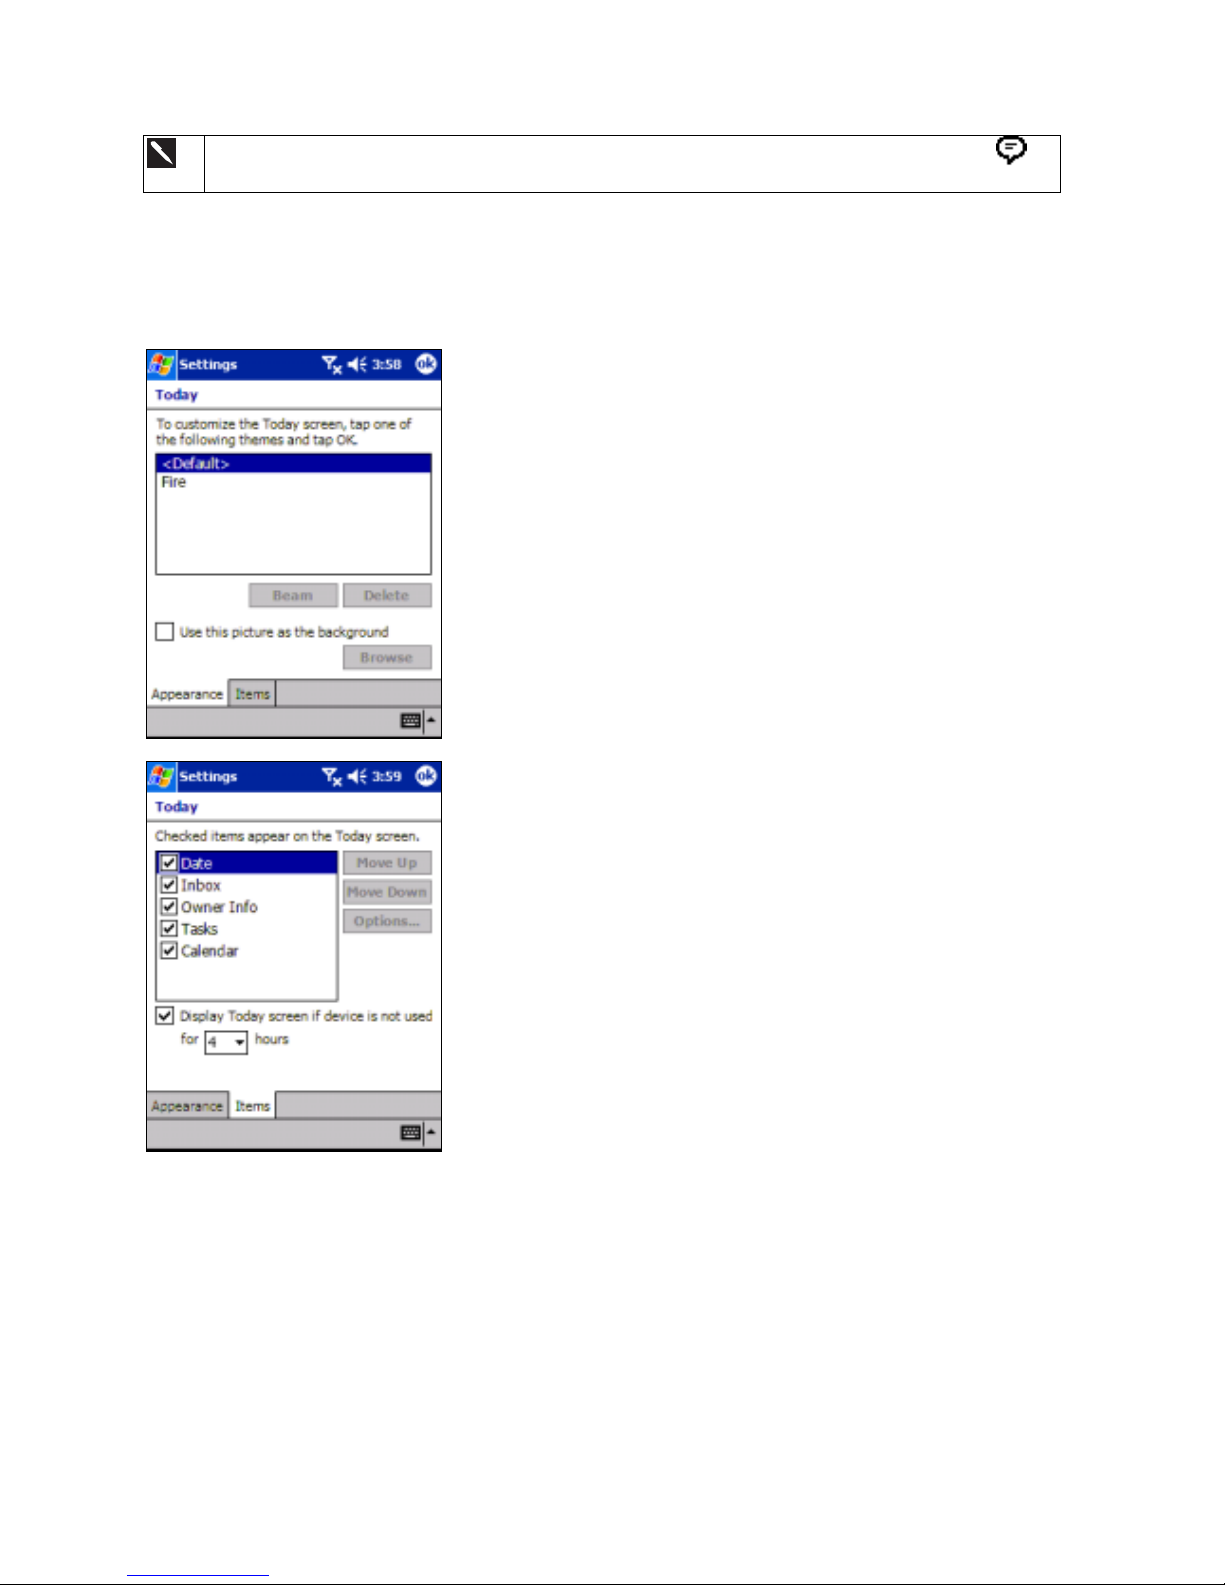
Customizing the Today Screen
You can customize the Today screen in the following ways: change the background picture, select the information
you want displayed and in what order, and further customize to show future appointments.
To change the background:
1. Tap Start, Settings, Personal and then Today.
2. On the Appearance tab, select the desired theme for
the background. To use your own background, select
Use this picture as the background and tap Browse
to locate the desired file.
3. Choose a folder and type and then tap find.
4. Tap the picture you want to use and then tap OK.
To customize the information you want displayed:
1. Tap Start, Settings, Personal and then Today.
2. On the Items tab:
• Uncheck a box to remove its information.
• Select an item and tap Move Up or Move Down
to change its position.
• Choose to select or deselect Display Today
screen if device is not used for, and then select
a number of hours from the box below.
To customize Tasks or Calendar:
1. Select Tasks or Calendar, and then Options to
further customize.
8
Page 9
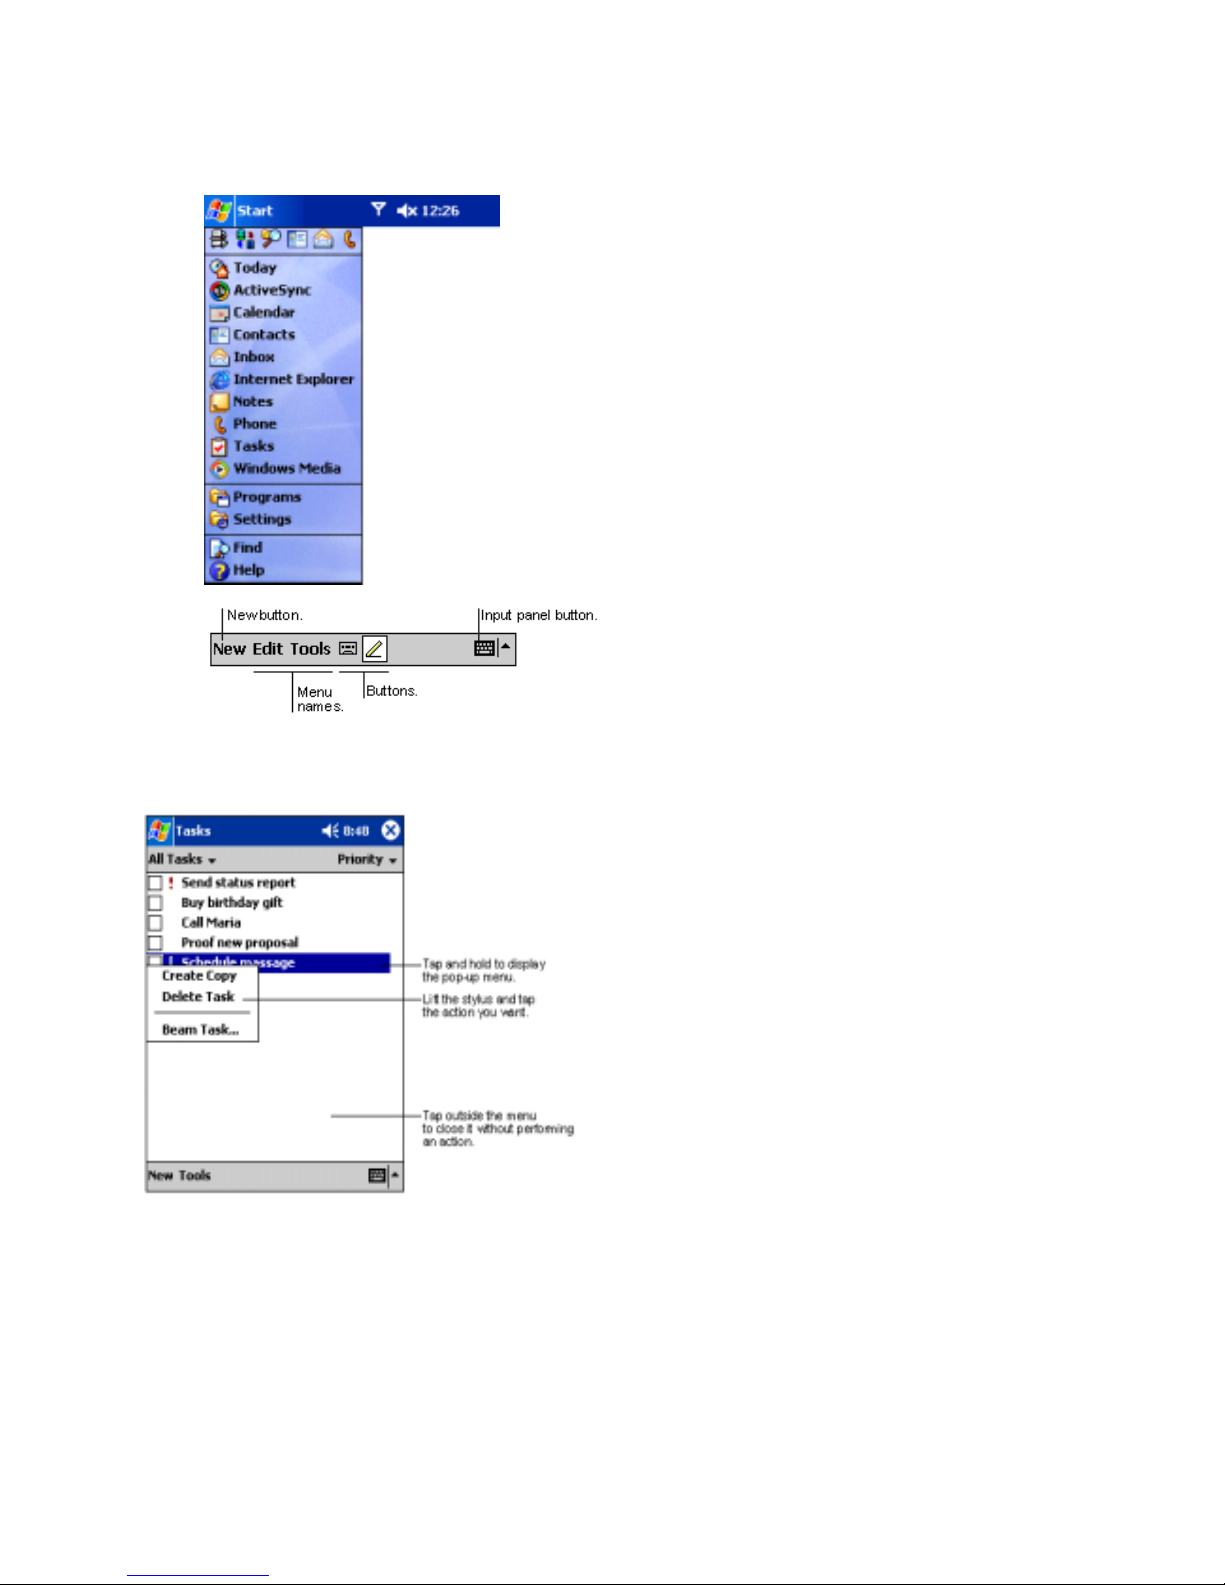
Navigation Bar and Command Bar
• The navigation bar is located at the top of the screen. It
displays the active program and current time, and
allows you to switch to programs and close screens.
• Use the command bar at the bottom of the screen to
perform tasks in programs. The command bar includes
menu names, buttons, and the Input Panel button. To
create a new item in the current program, tap New. To
see the name of a button, tap and hold the stylus on the
button. Drag the stylus off the button so that the
command is not carried out.
Pop up Menus
• With pop up menus, you can quickly choose an
action for an item. For example, you can use the
pop up menu in the contact list to quickly delete a
contact, make a copy of a contact, or send an e-mail
message to a contact. The actions in the pop up
menus vary from program to program. To access a
pop up menu, tap and hold the stylus on the item
name that you want to perform the action on. When
the menu appears, lift the stylus, and tap the action
you want to perform. Or tap anywhere outside the
menu to close the menu without performing an
action.
9
Page 10
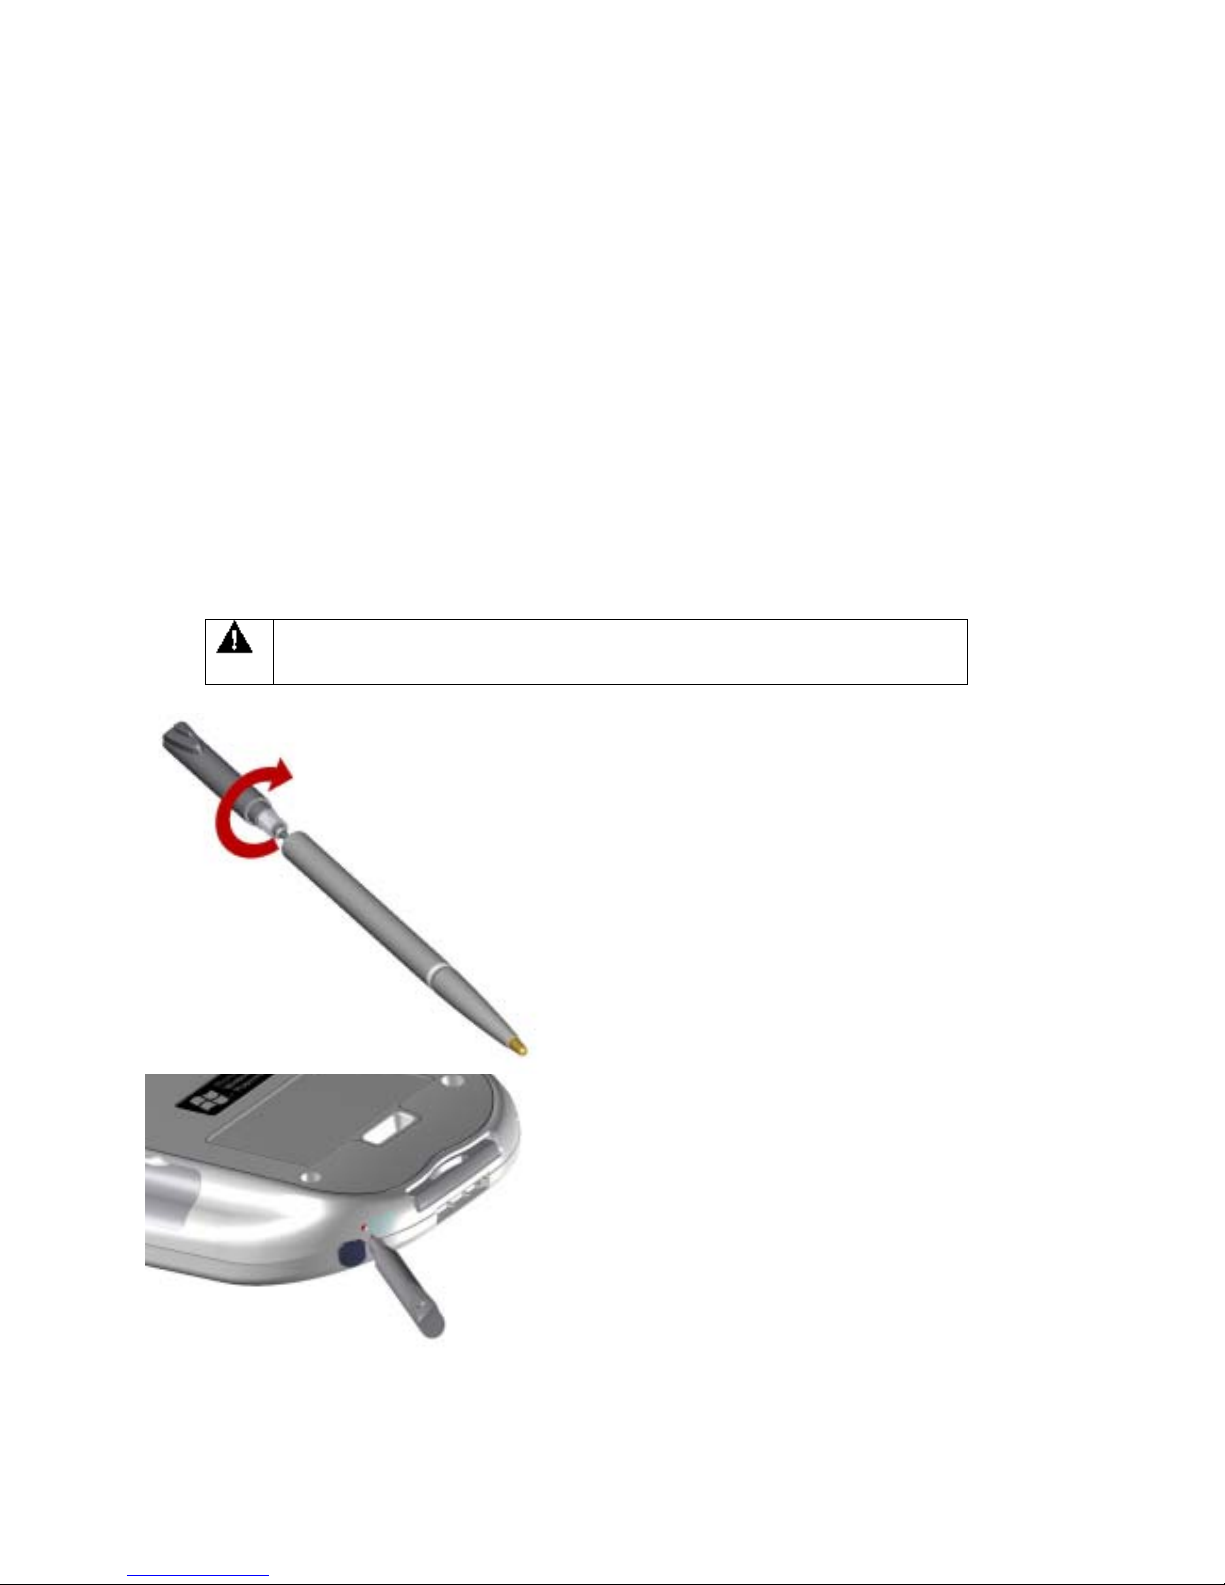
Reset the Pocket PC Phone and Clear Memory
You can perform a soft reset or a full reset – a soft reset restarts your device and a full reset switches the battery off.
The result of a soft reset is that some data may be lost in programs that are open, however, the result of a full reset is
that power is cut, and this will wipe all the data and new programs you have added, and return the device to factory
setting – i.e. it will only have the software that was present when you bought it. On this basis, it is important not to
think about a full reset as you would restarting, shutting down or even switching off improperly your desktop, but
rather like a complete crash requiring you having to wipe your OS. It cannot be stressed enough the importance of
backing up data to a SD card (for more information on SD cards, see “SD and MMC cards” in the Pocket PC Phone
User Manual, P.12) or your PC so in the event you have to perform a full reset your data will not be lost.
To perform a soft reset:
If your Pocket PC Phone responds slowly stops responding or freezes, try soft resetting it. A soft reset causes the
Pocket PC Phone to restart and re-adjust memory allocation. Unsaved data in open windows may be lost.
• Use the stylus to press and hold the Reset button. (For details on finding soft reset, see, “Chapter 2, Bottom
Edge Components.”)
To perform a full reset:
A full device reset clears memory, deletes all data and restores the Pocket PC Phone to
its default settings. Programs installed at the factory remain, while data you have created
and programs you have installed are erased.
1. Unscrew the stylus and use the smaller point of the
top-half.
2. Press the battery switch once to turn it off, and then
once more to turn it back on.
10
Page 11
Using The Phone
The Dialer Interface
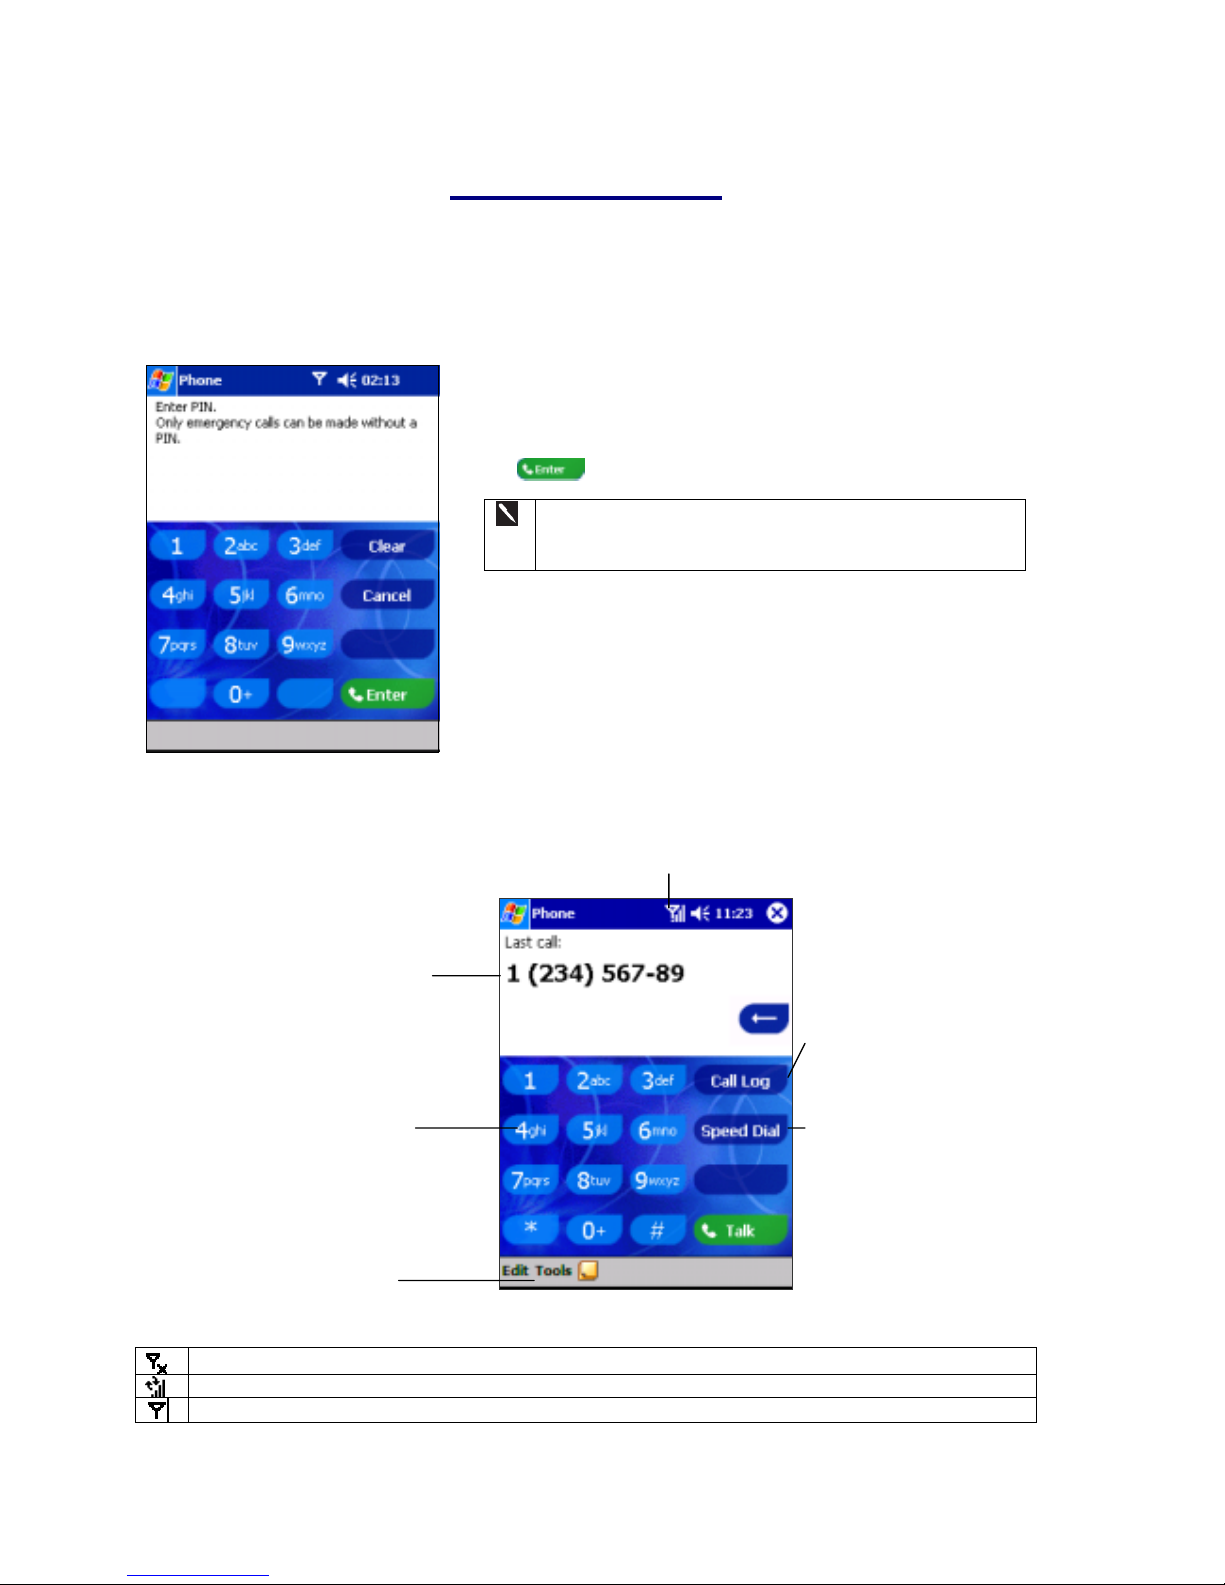
1. Once you have completed the setup process above, your device will automatically try to switch on your phone –
and, if successful you will be asked to enter the PIN provided by your mobile service provider.
1. Enter the preset PIN from your mobile phone service provider (please
contact your mobile service provider).
2. Tap .
If your PIN is entered incorrectly three times, then SIM card
will be blocked. If it happens, you can unblock it with the PIN
Unblocking Key from your mobile phone service provider.
2. The screen below shows your PC Phone dialer interface.
This icon indicates a call is being made and the strength of the signal.
Last number details are displaye
d
here
Keypad for inputting numbers
Click Tools, Options to access
phone setting.
See all calls received, made and missed.
For numbers you call often
The icons listed below may be seen in the top bar of the screen:
Phone off or out of network service, tap this icon to turn on the phone.
Internet connection is in progress, the icon will disappear when you are connected.
The icon indicates that you are connected to the network of your mobile phone operator
11
Page 12
Shows signal is at full strength.
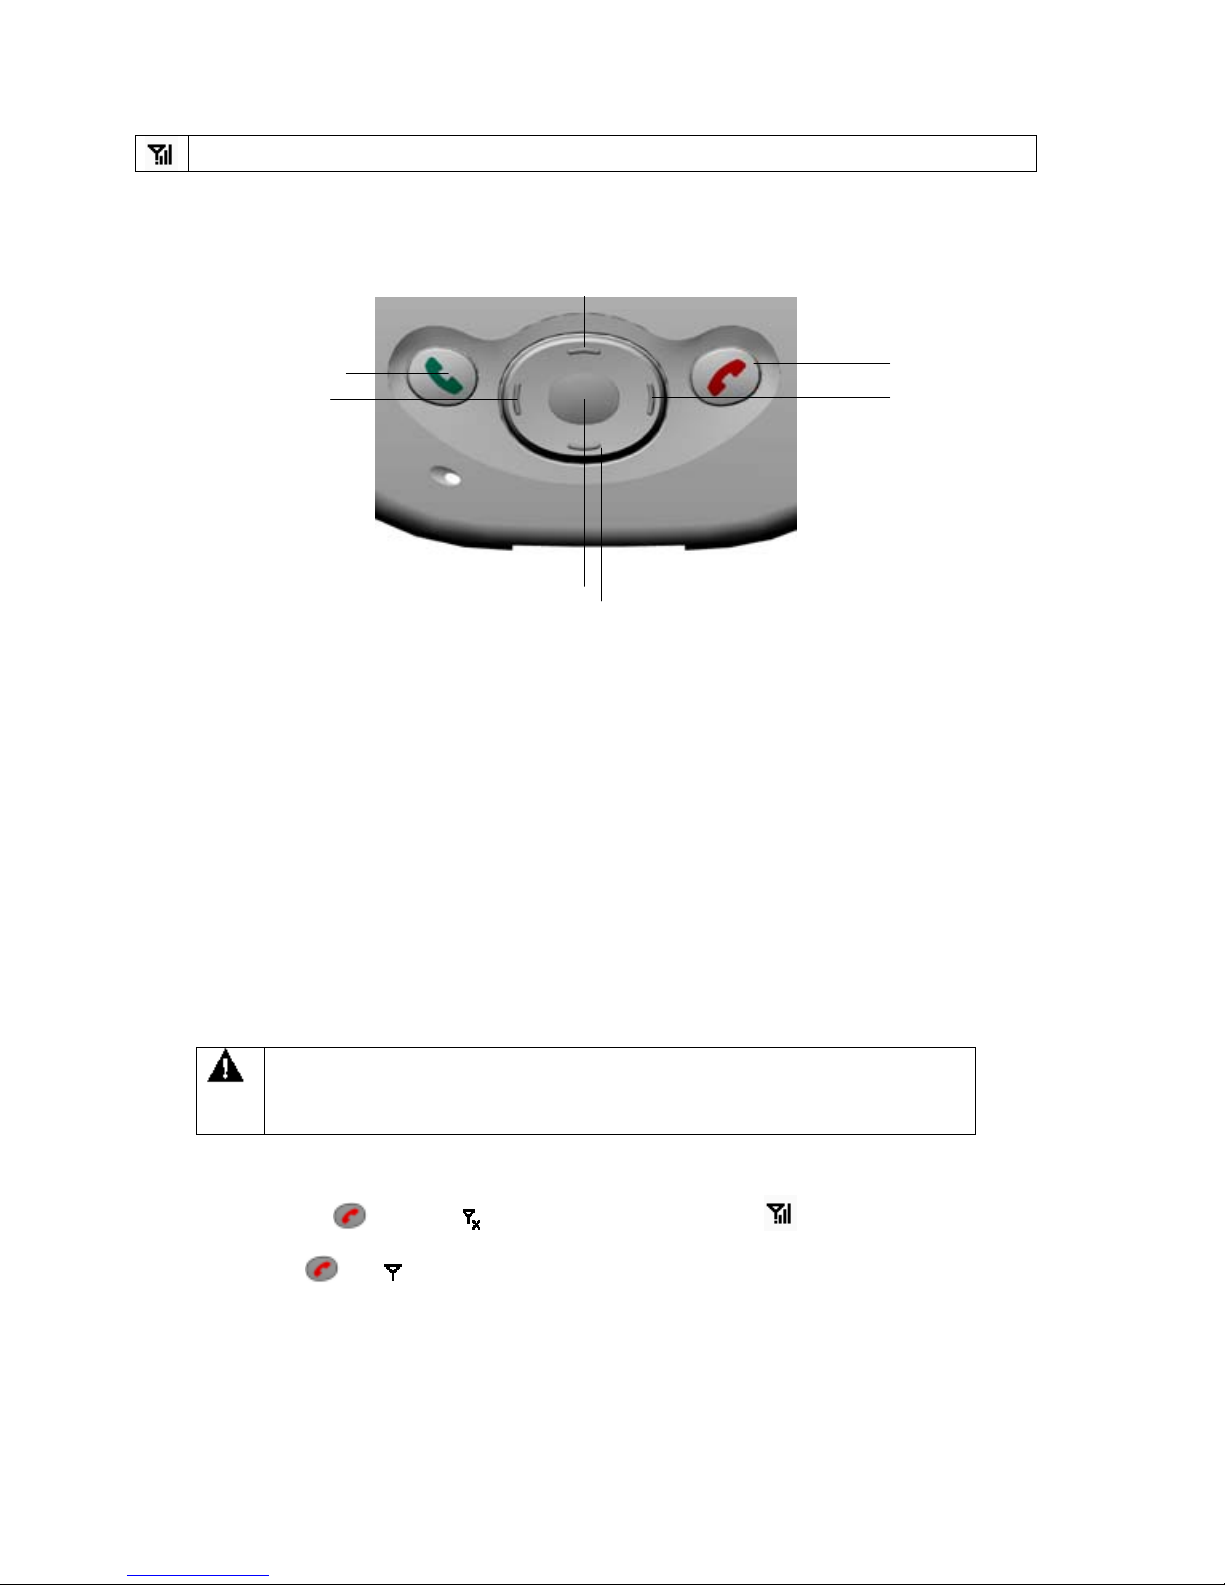
The Navigation Pad and Dialing
2.
7.
6.
4.
3.
1.
5.
1. Take Call – Press to take an incoming call.
Dialer Screen – Press to activate the dialer screen.
Speakerphone – Press and hold to turn on or off the speakerphone.
Dial – Press to dial a number.
2. Scroll Up – Press to scroll up through a list.
3. End Call – Press to end a call.
Phone Signal - Press and hold to turn on and off your phone.
4. Call Log – After launching the dialer screen, press to enter the Call Log feature.
5. Scroll Down – Press to scroll down through a list.
6. Center – Press to select.
7. Speed Dial – After launching the dialer screen, press to enter the Speed Dial feature.
Turning The Phone On and Off
As indicated above your Pocket PC will turn on your phone when you insert a SIM card, however, you can choose
to turn off your phone and just use the Pocket PC features at anytime – and then turn it back on when you want.
IN MANY COUNTRIES YOU ARE REQUIRED BY LAW TO TURN OFF YOUR
PHONE WHEN YOU FLY. TURNING OFF YOUR POCKET PC DOESN’T TURN OFF
YOUR PHONE; YOU MUST TURN OFF YOUR WIRELESS CONNECTION TO
YOUR OPERATOR’S NETWORK.
To turn off the phone:
1. Press and hold the button until appears in the navigation bar. Or tap and then Turn phone off
from the pop-up menu.To turn on the phone:
2. Press and hold until appears in the top toolbar.
Transferring and Organizing Contacts
Before you make any calls you may want to transfer contacts to your device and organize them so that they are easy
to access – Your device is designed to allow you to make a call in five different ways, and to transfer contact details
between dialing features - as well as your device’s memory, the SIM card and a desktop computer.
12
Page 13
Transferring Contacts From SIM:
If you previously used your SIM with another device, or your mobile service provider transferred your old SIM
contact details to your new SIM, it is recommended that you transfer the numbers to Microsoft Contacts:
• Microsoft Contacts has a much more sophisticated system for organizing and finding contact details than the
SIM program, SIM Manager.
• Through Microsoft Contacts you can create a more detailed record, send SMS, email, synchronize with your
desktop and transfer to Speed Dial.
2.
• With Microsoft Contacts you can backup your contacts in the event you lost either your device or your SIM.
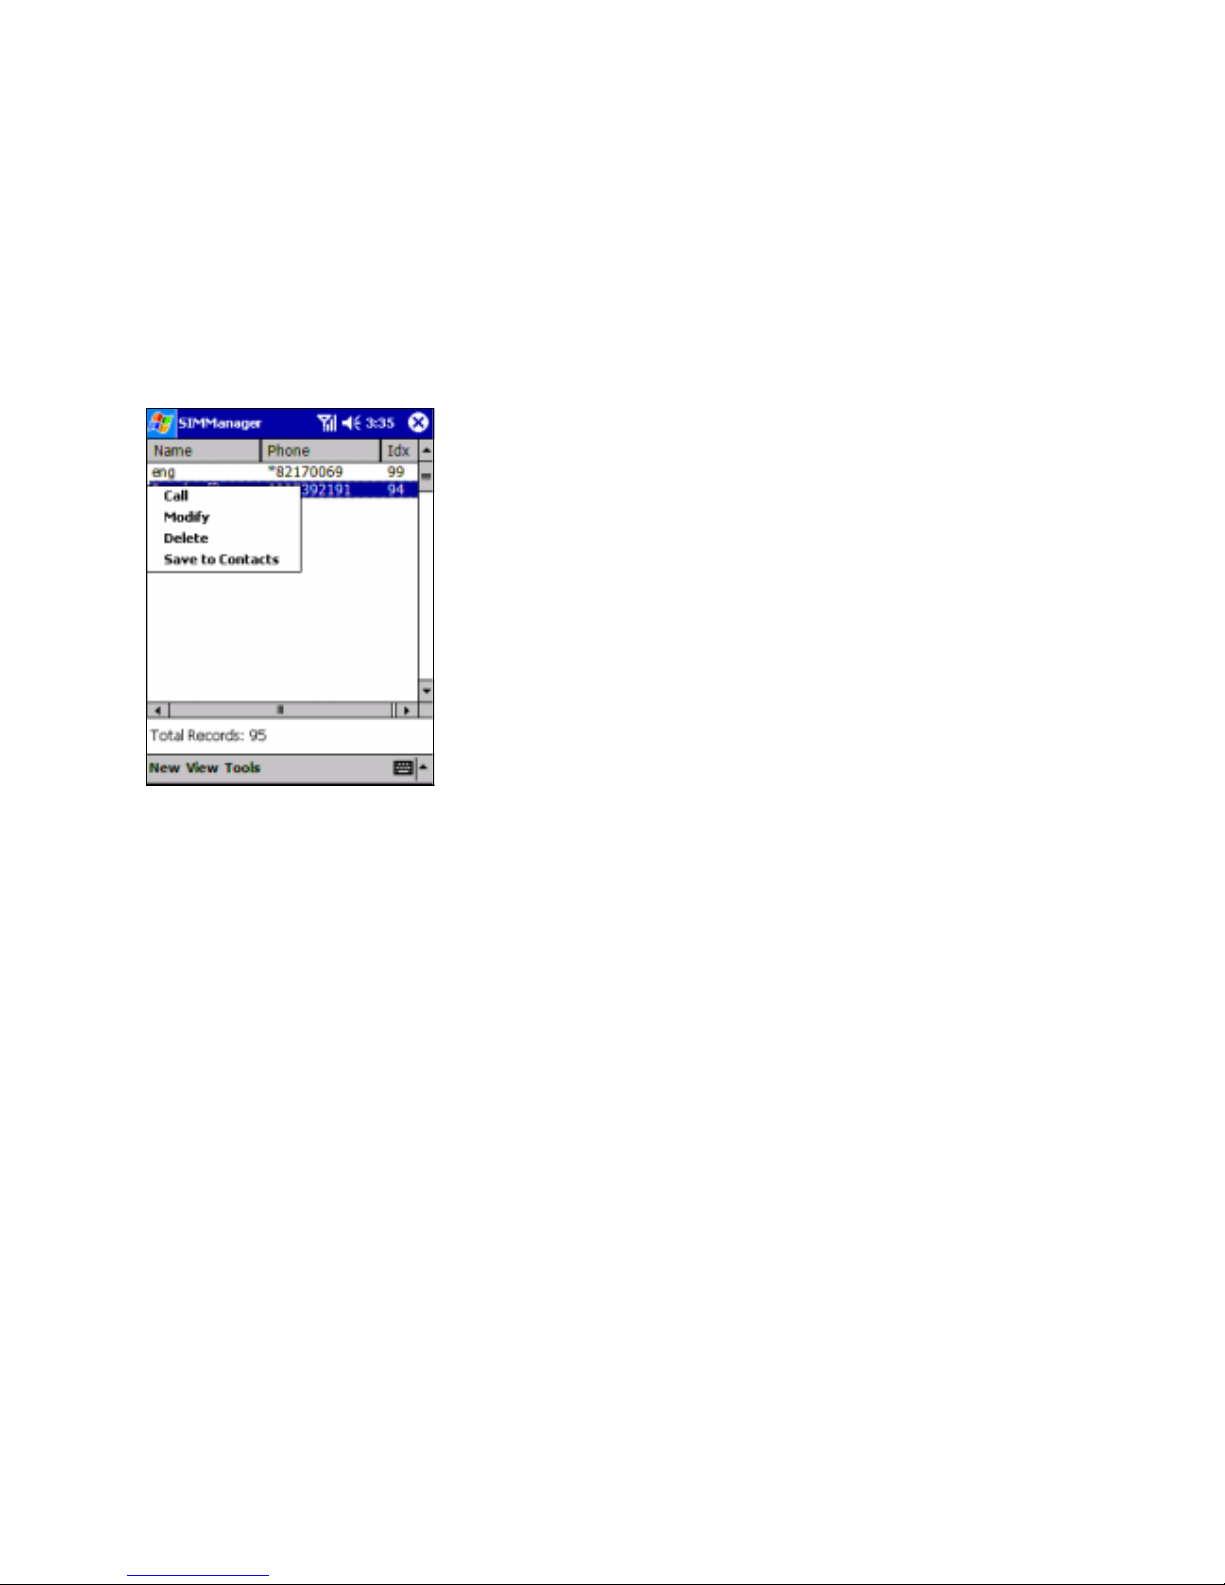
1. Tap Start, Programs, SIM Manager (wait for SIM contents to load).
Either:
Tap Tools, Select All, and then Save to Contacts.
Or:
Press and hold the center of the navigation pad – or tap and hold a
contact from the list - and then select Save to Contacts from the pop
up menu.
Transferring Contacts from Your Desktop
If you previously backed up contact details to your desktop, you will want to perform a synchronization to transfer
those contacts to your Pocket PC Phone. For more information on synchronizing with your computer, see the User
Manual, “Chapter 7: Microsoft ActiveSync”.
Organizing Your Contacts
You can transfer up to 99 of your most commonly dialed numbers to the Speed Dial feature, which allows you to
access and dial these numbers quickly and easily.
13
Page 14
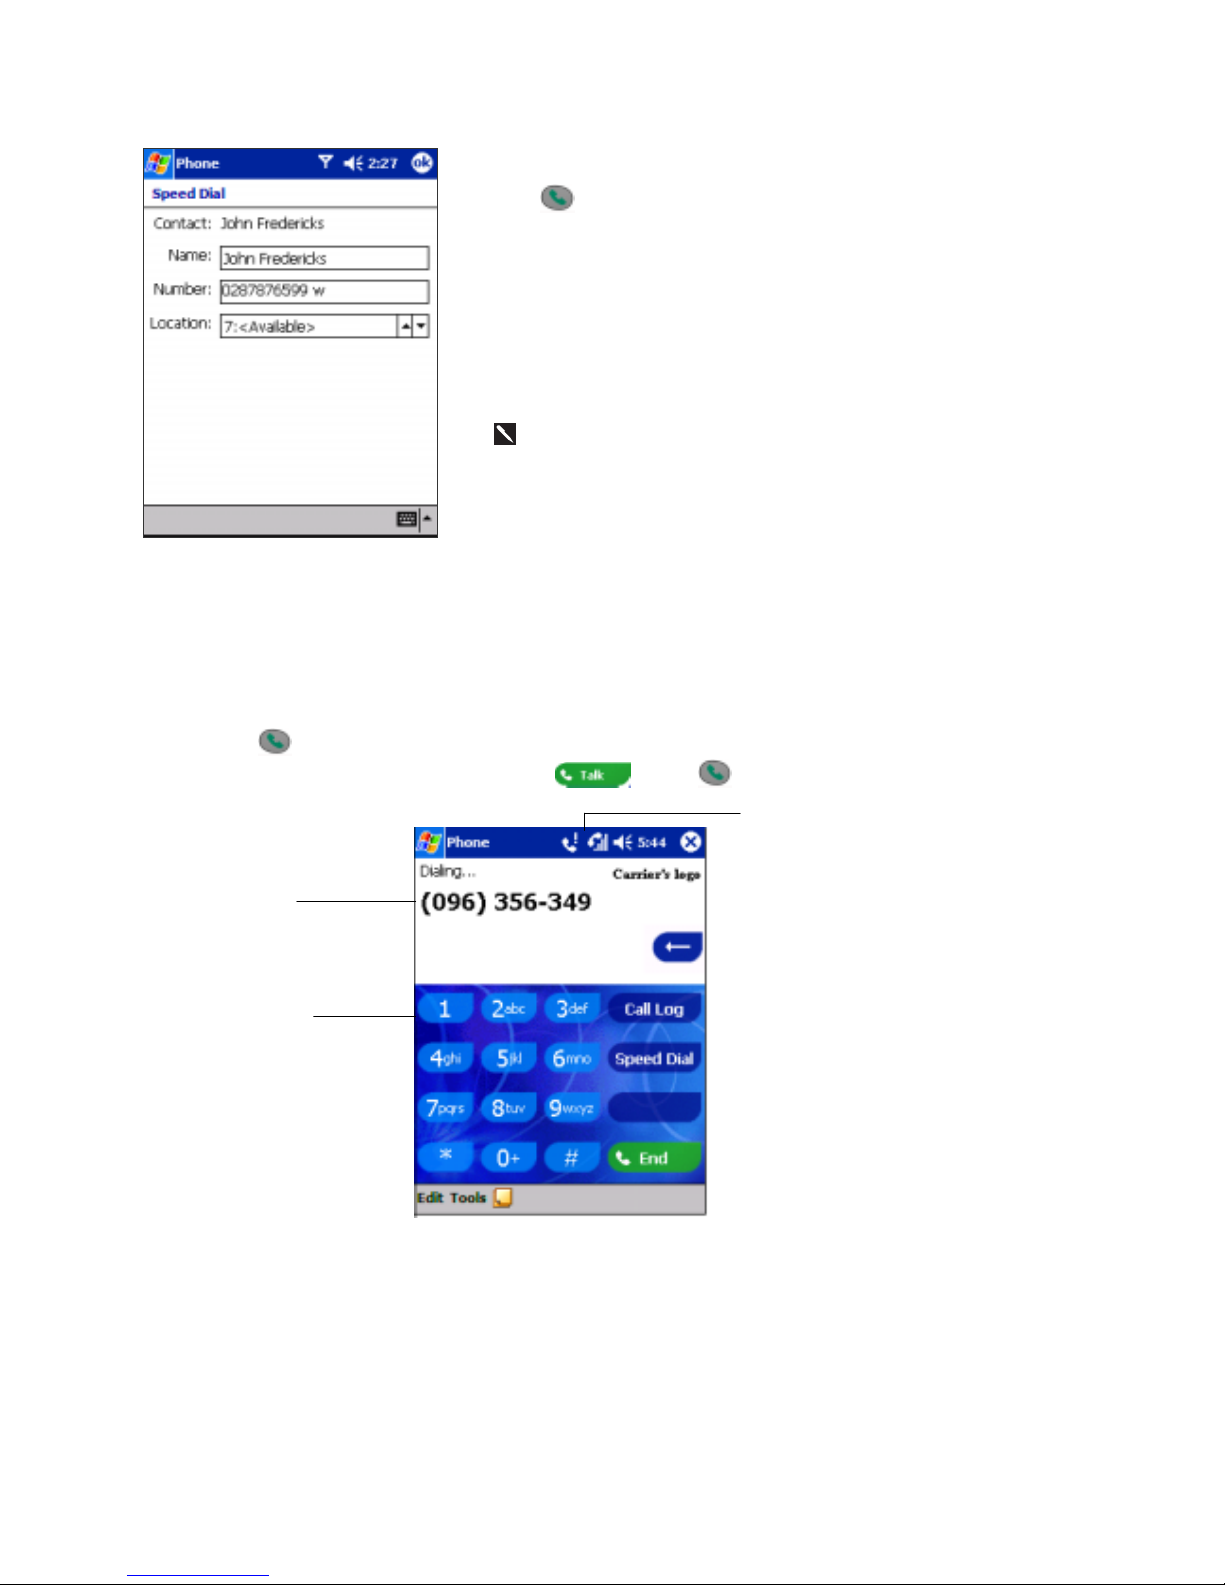
1. Press
then either the left side of the navigation pad or Speed
Dial, and New.
2. Find the contact you want to add, and then press the navigation pad
center.
3. When the contact name and number appears in the screen – as left select an available location using the arrow keys.
By default the Location function will give tell you the next
available position in the Speed Dial list. If you want to put a number
in a position that is already occupied, the new number will replace that
number already there.
Making a Call
With your Pocket PC Phone, you can make a call from the Dialer, Speed Dial, Call Log, Contacts and SIM
Manager. You can also send SMS from the Dialer screen.
To make a call from the Dialer:
1. Press to bring up the dialer screen.
2. Tap the number into the keypad and then tap
or press button.
Tap the
number here
you wish to
The signal icon will change when you
are making a call.
The number
will appear
here.
14
Page 15
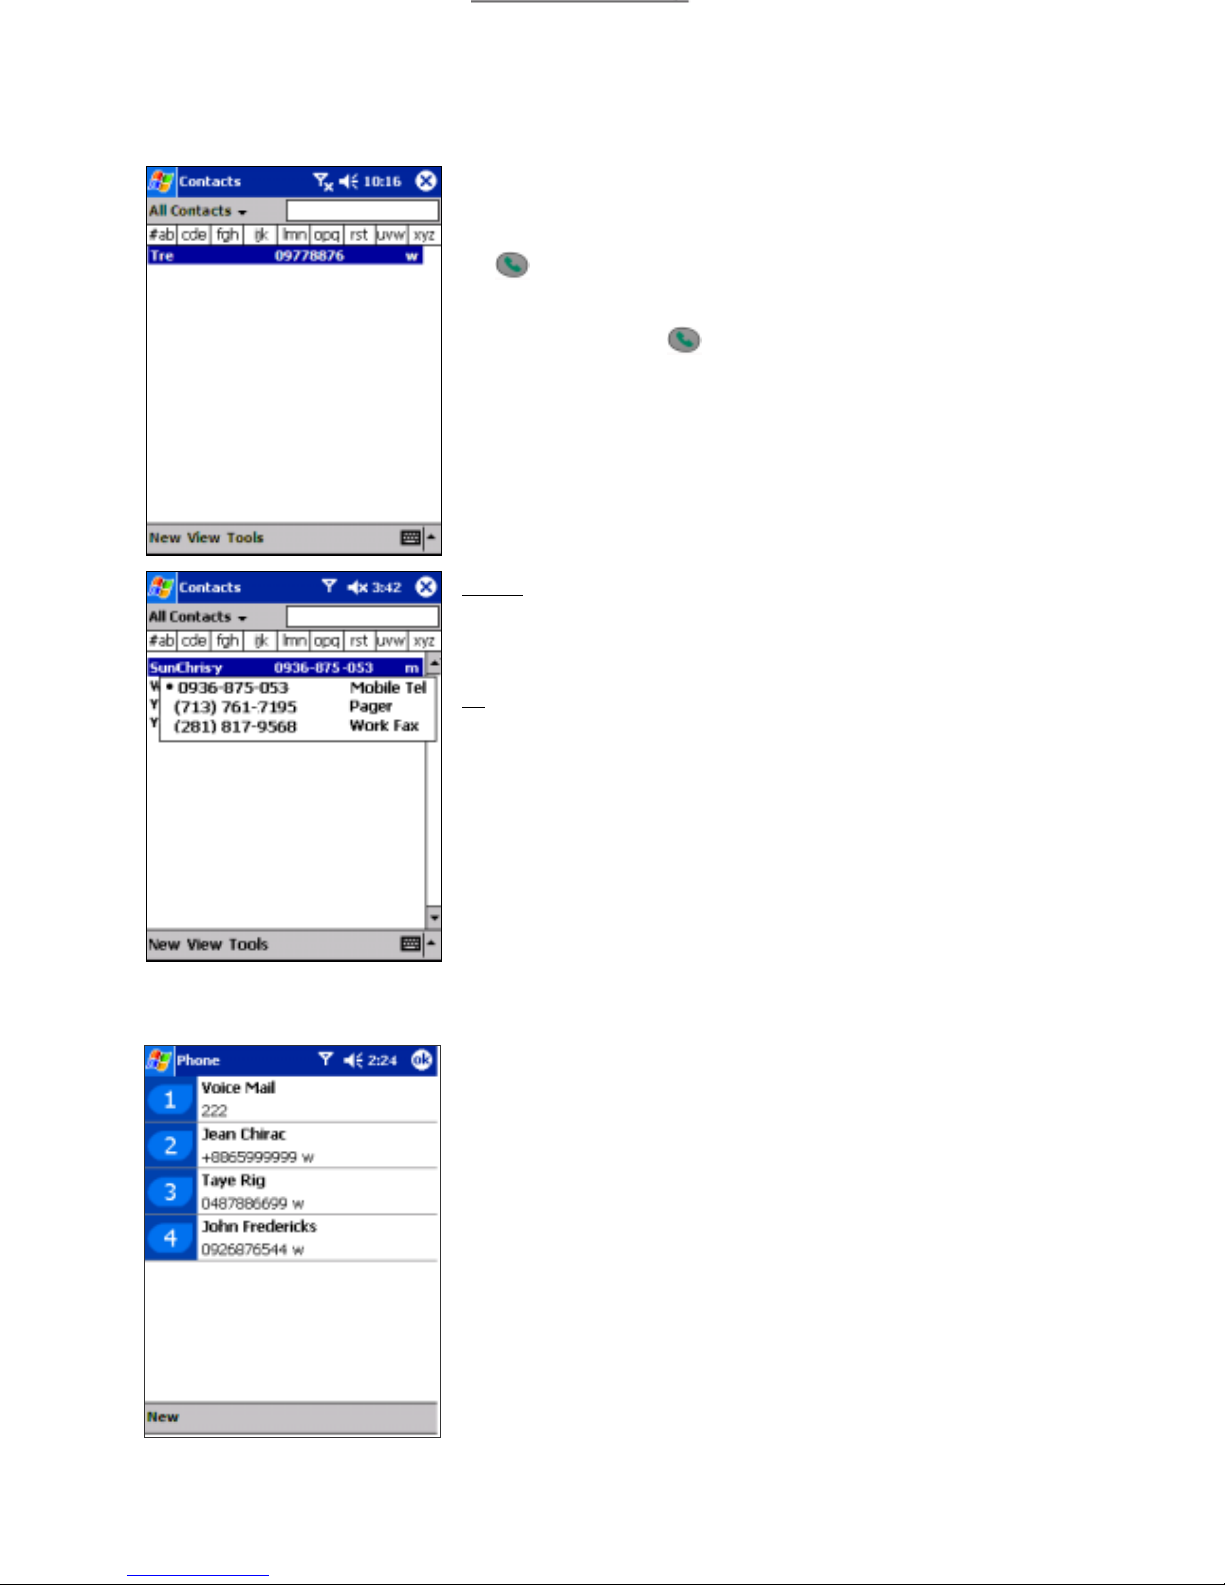
To make a call from Contacts:
You can make a call from Contacts in the following way:
1. Press the Microsoft Contacts Button, find the contact and then tap
twice – once to send to the dialer screen and once to call.
The pop up menu and
button will by default display Call Work
Tel. However, you can customize so that the mobile number or email
is displayed instead:
Either:
1. Select a contact in the contacts list and then press left or right on the
navigation pad – the number on the screen will change.
Or:
1. In the contacts list tap the “w” in the right column next to the number
you want to customize. A pop-up menu will display the phone
numbers and email addresses for this contact with a dot next to the
priority number.
2. In the pop-up menu select a priority – If you selected mobile number,
“m” should now be in the right column next to the contact.
To make a call from Speed Dial (A):
Speed dial is a list you can create of often-dialed numbers. Information on
adding a number to Speed Dial is detailed later in this chapter.
By memorizing the position in the Speed Dial list of a number, you
can dial the number by entering its position number. For example:
In the picture on the left John Fredericks is at position 4. To dial his
number simply tap and hold 4 on the dialer keypad; if the number
holds a position of 10 or more tap the first number, and then tap and
hold the second to dial.
15
Page 16
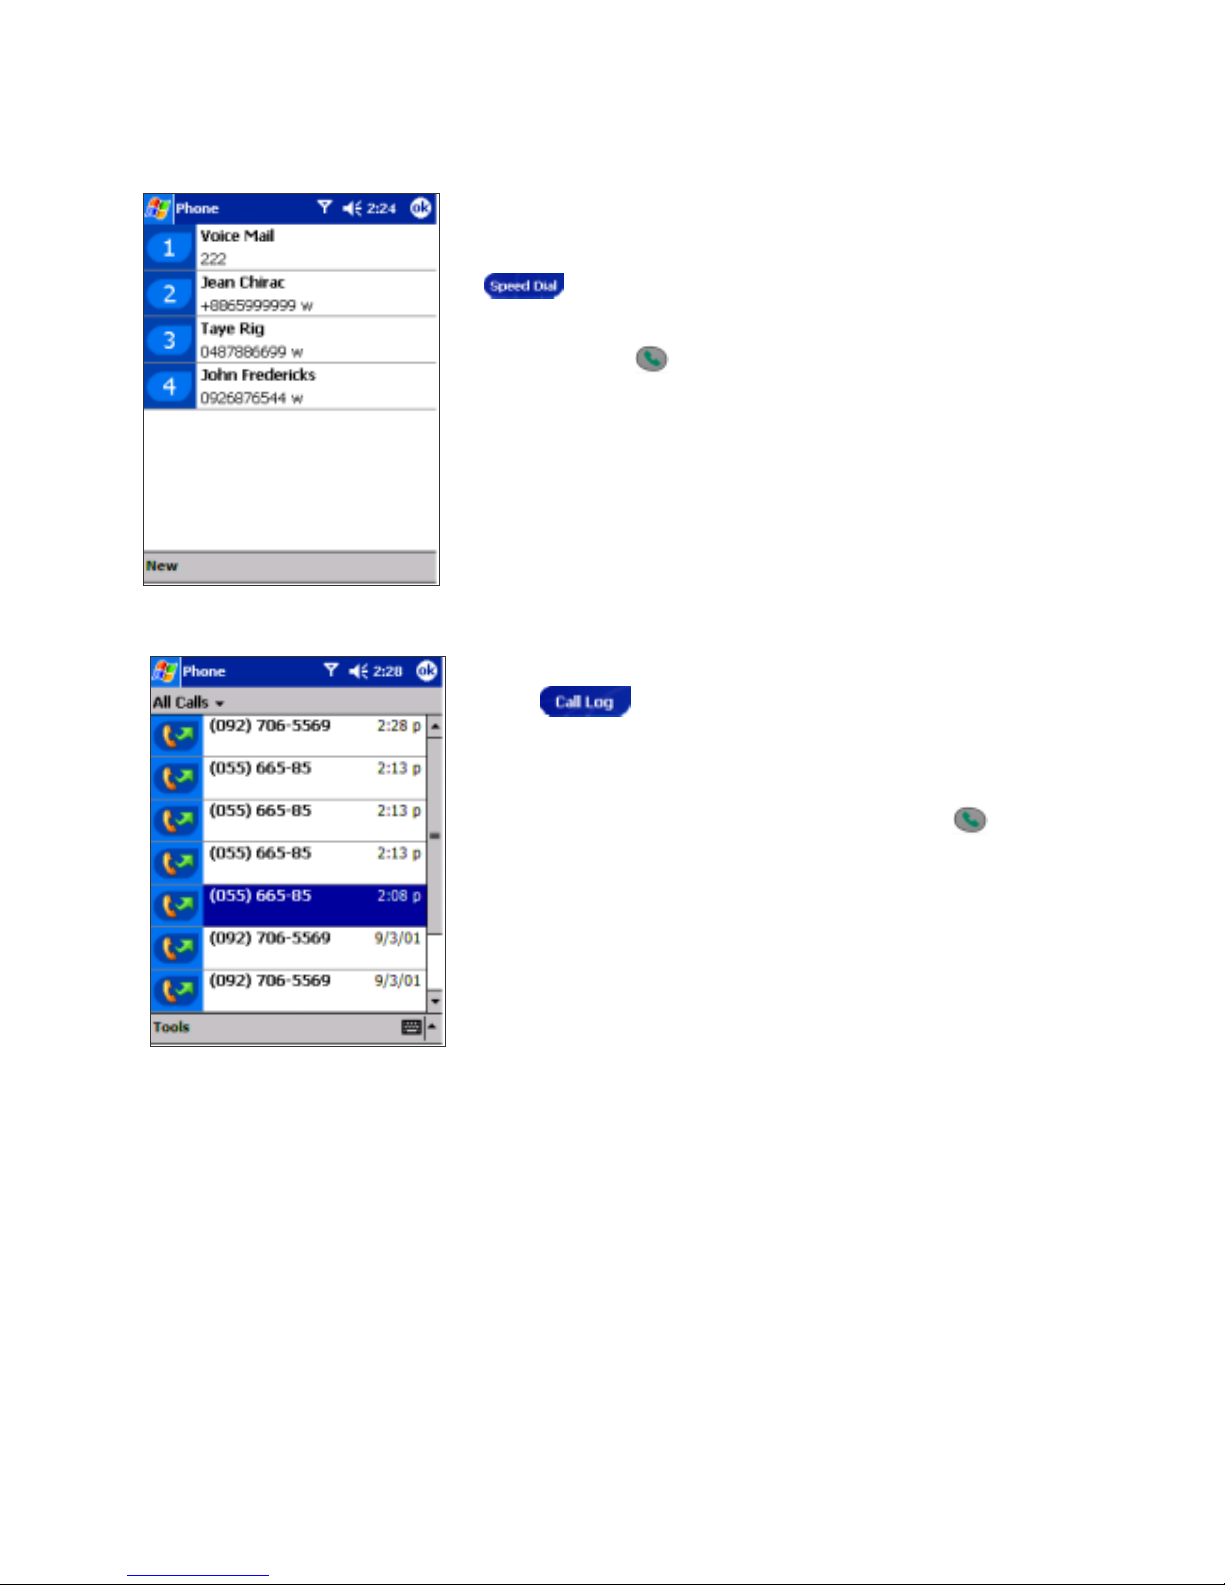
To make a call from Speed Dial (B):
Alternatively, if you don’t remember the position of a number in the Speed
Dial list use the method below:
1. Go to Phone, press once the left side of navigation pad, or tap
.
2. In Speed Dial use the navigation pad to find the number you want to
dial, and then press
.
To make a call from the Call Log:
1. Go to Phone, press the right-side of the navigation pad or tap
.
2. Fin d the call details by first selecting the category it is filed
under. For example, if it is in All calls select All calls from the
drop down menu in the top-left corner.
3. Use the navigation pad to find the number and then tap
or the
icon to the left of the number you wish to call.
16
Page 17
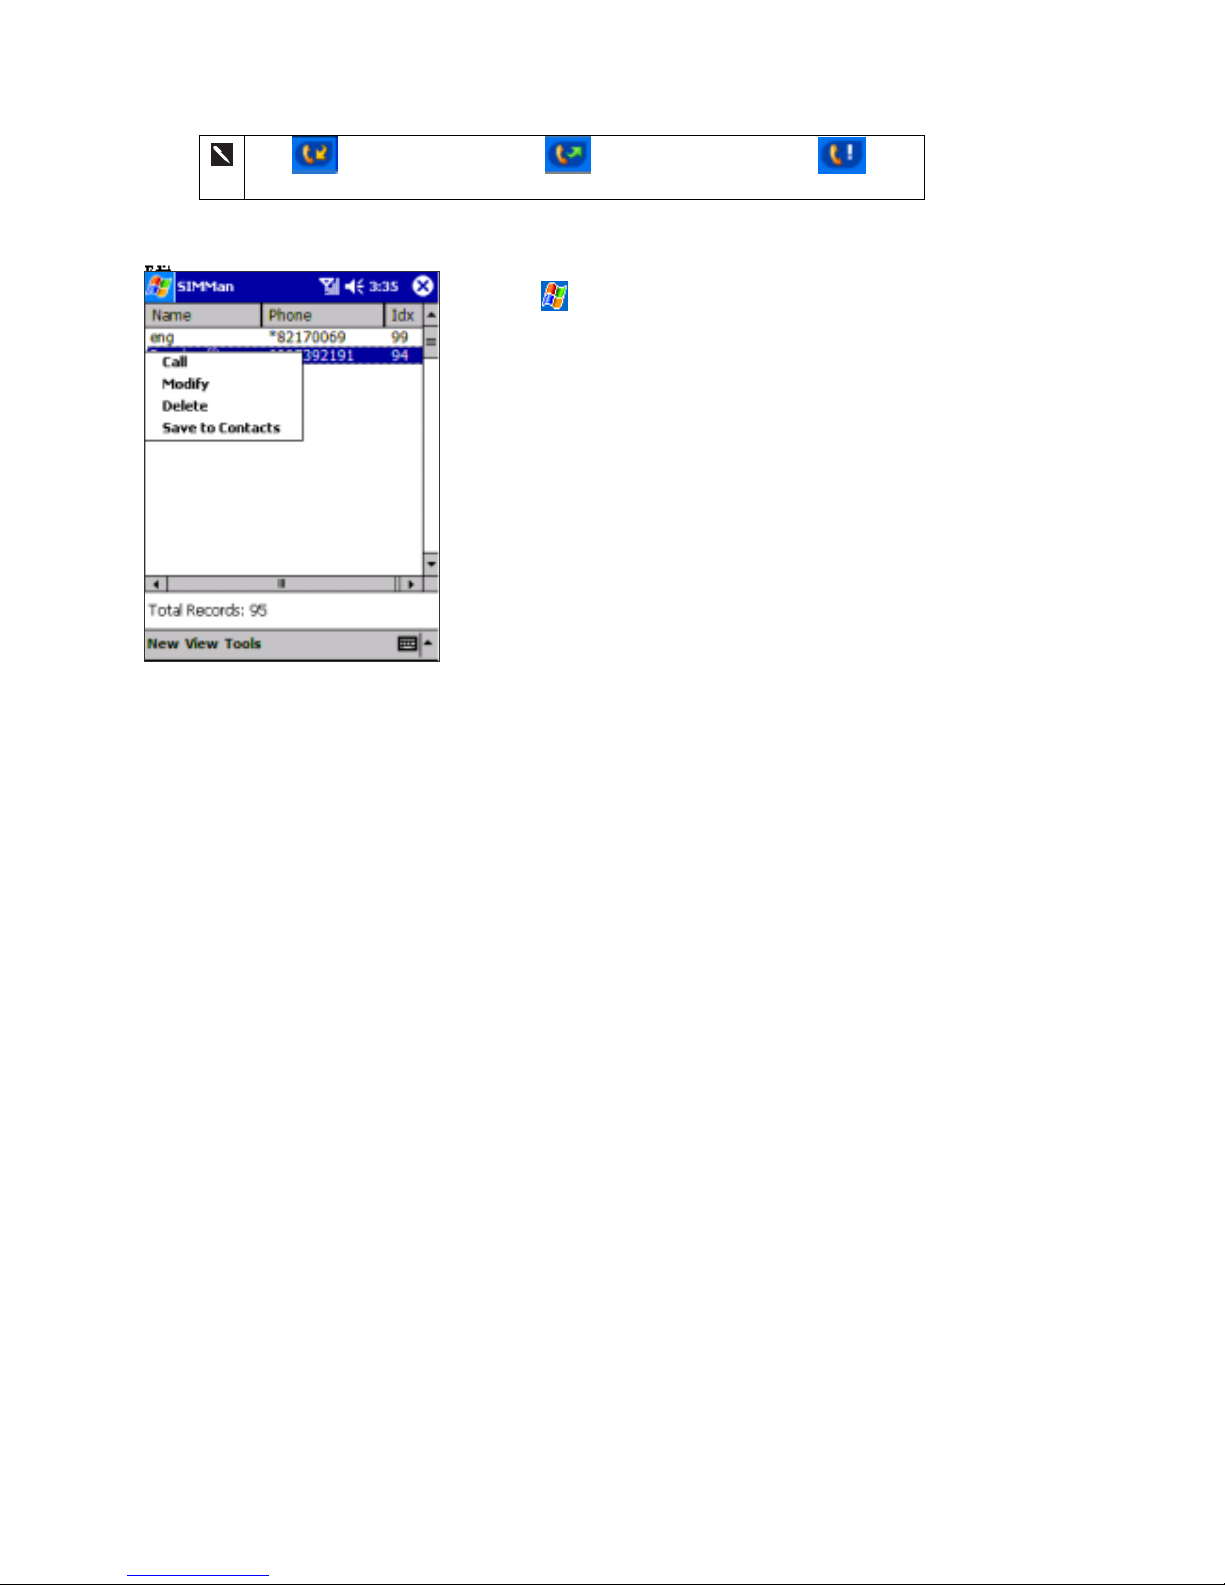
Icon is for incoming calls; icon is for outgoing calls and icon is for
missed calls.
To make a call from SIM Manager:
1. Tap
, Programs, and then tap SIM Manager – wait for your
SIM card contents to load.
2. Tap and hold the name or phone number of the person you wish to
call, and then select Call from the pop-up menu.
17
Page 18
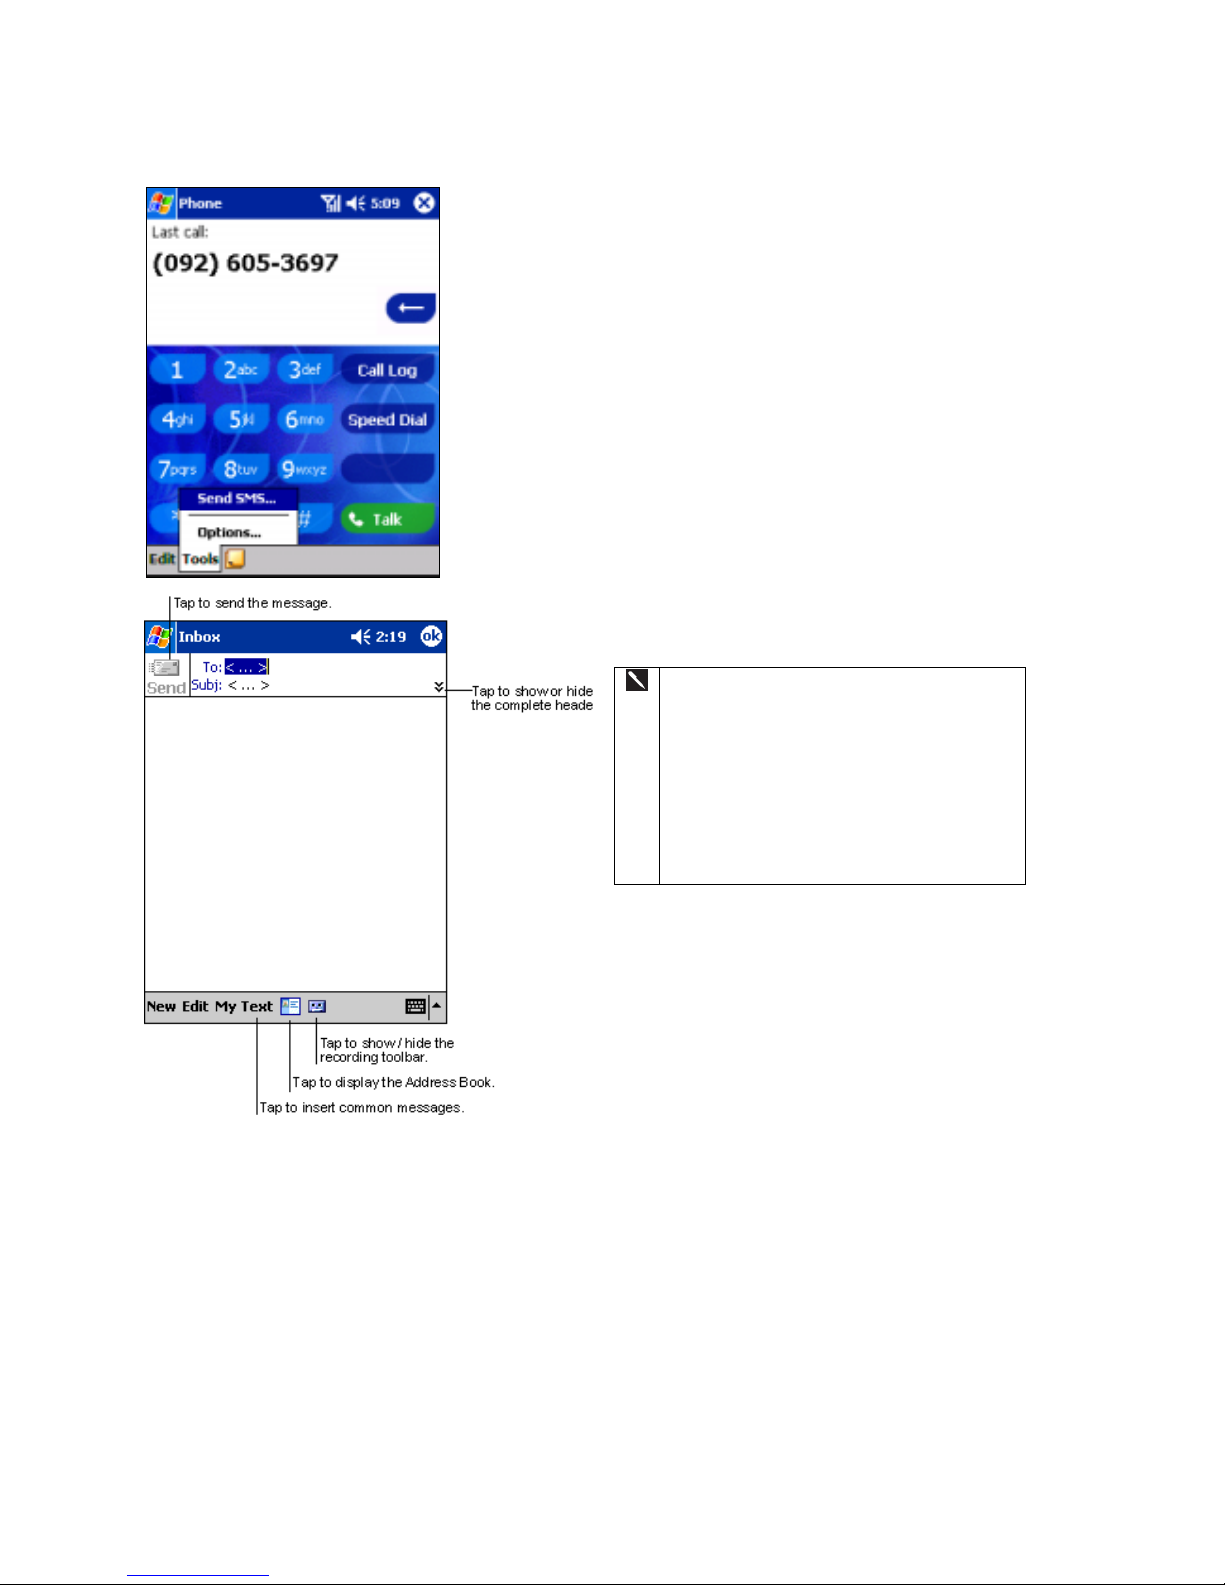
To send SMS in phone dialer:
1. Tap Tools, and then Send SMS.
2. The screen below will appear.
3. Tap New.
4. In the To field, enter either e-mail address or
SMS number of one or more recipients,
separating them with a semicolon, or select a
name from the contact list by tapping the Address
Book button. All e-mail addresses entered in the
e-mail fields in Contacts appear in the Address
Book.
5. Compose your message. To enter preset or
frequently used messages, tap My Text and select
a message.
6. Tap Send when you’ve finished the message. If
you are working offline, the message is moved to
the Outbox folder and will be sent the next time
you connect.
1. Whether you want to send or read E-
mail or a SMS, you can swap it by tap
Services then choose what service you
want.
2. If you are sending an SMS message and
want to know if it was received, tap
Edit, Options, and select Request SMS
text message delivery notification
before sending the message.
18
Page 19
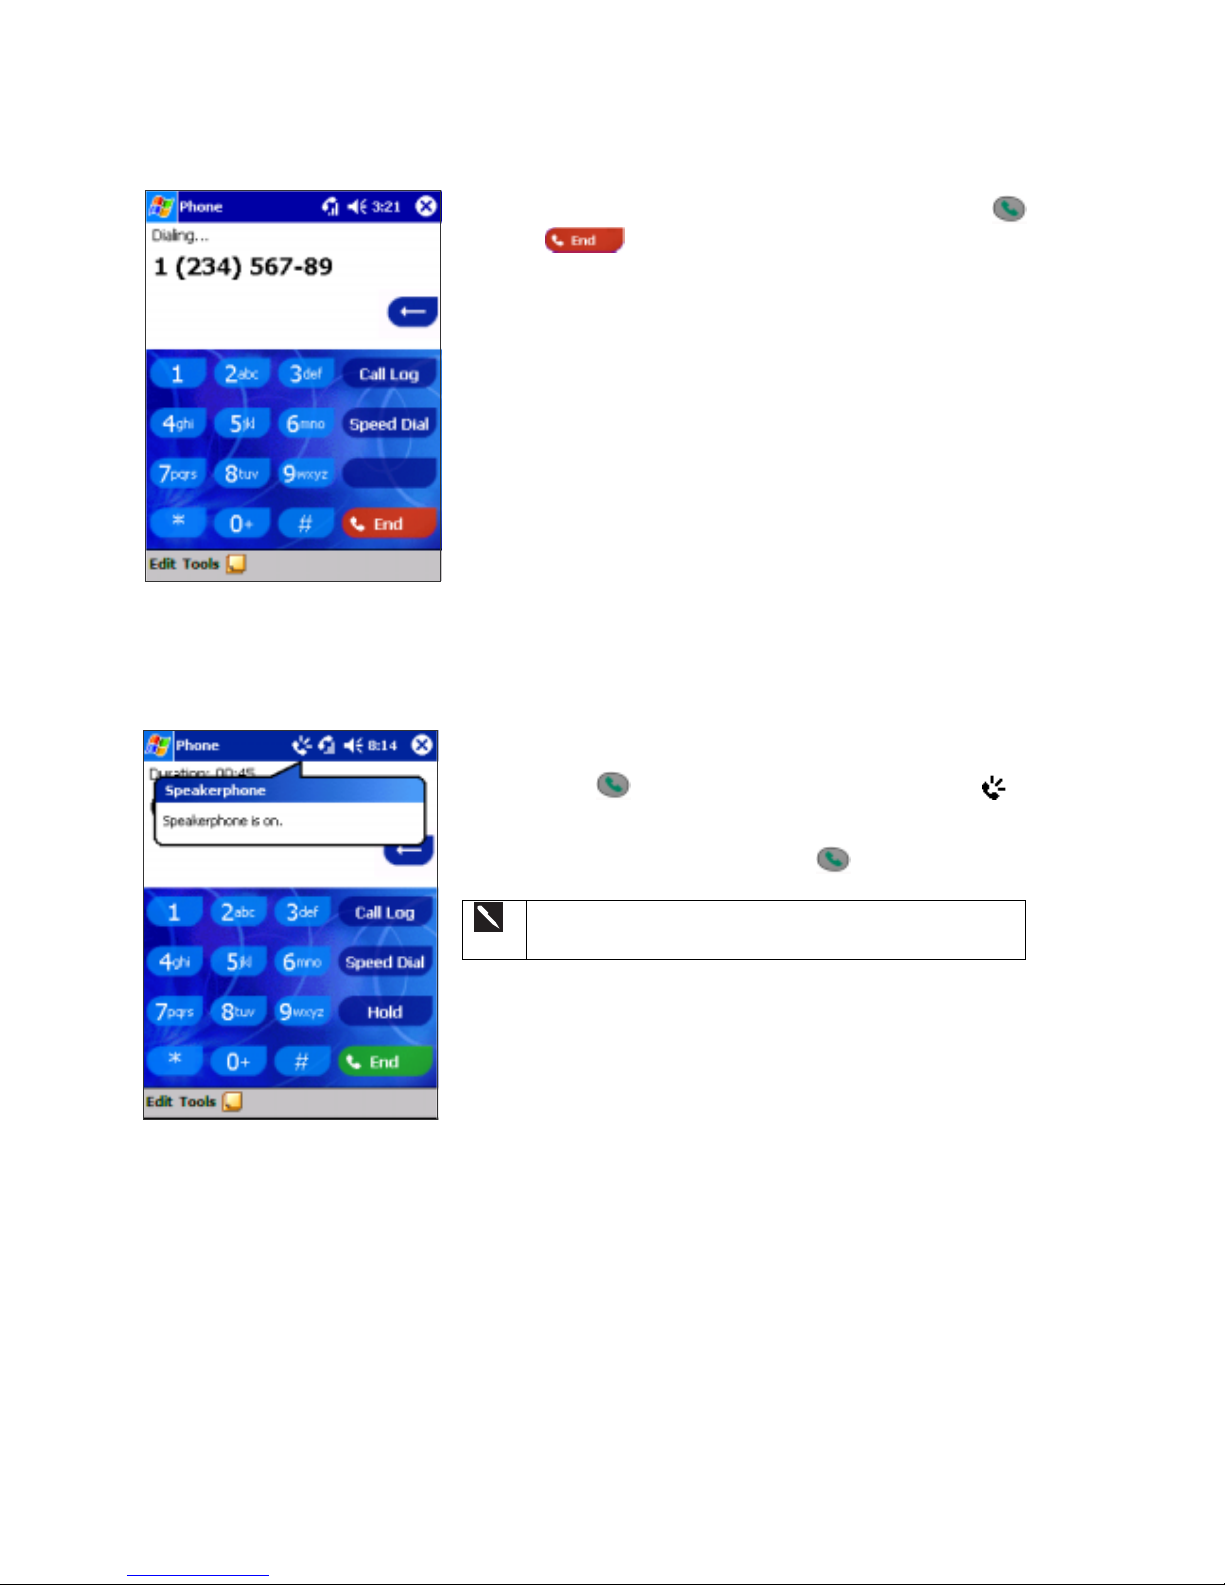
Ending a Call
• Once an incoming or outgoing call is proceeding, you can press
or tap to end the call.
Enabling the Speakerphone Mode
Your device has a speakerphone allowing you to talk hands-free and/or let other people to listen to the caller.
1. Wait until the phone is ringing.
2. Hold down
until the speakerphone comes on and the icon
appears in the top toolbar.
3. To turn off the speakerphone hold down
again.
Do not leave the phone in speakerphone mode and hold it on
your ear; the sound will damage your ear.
19
Page 20
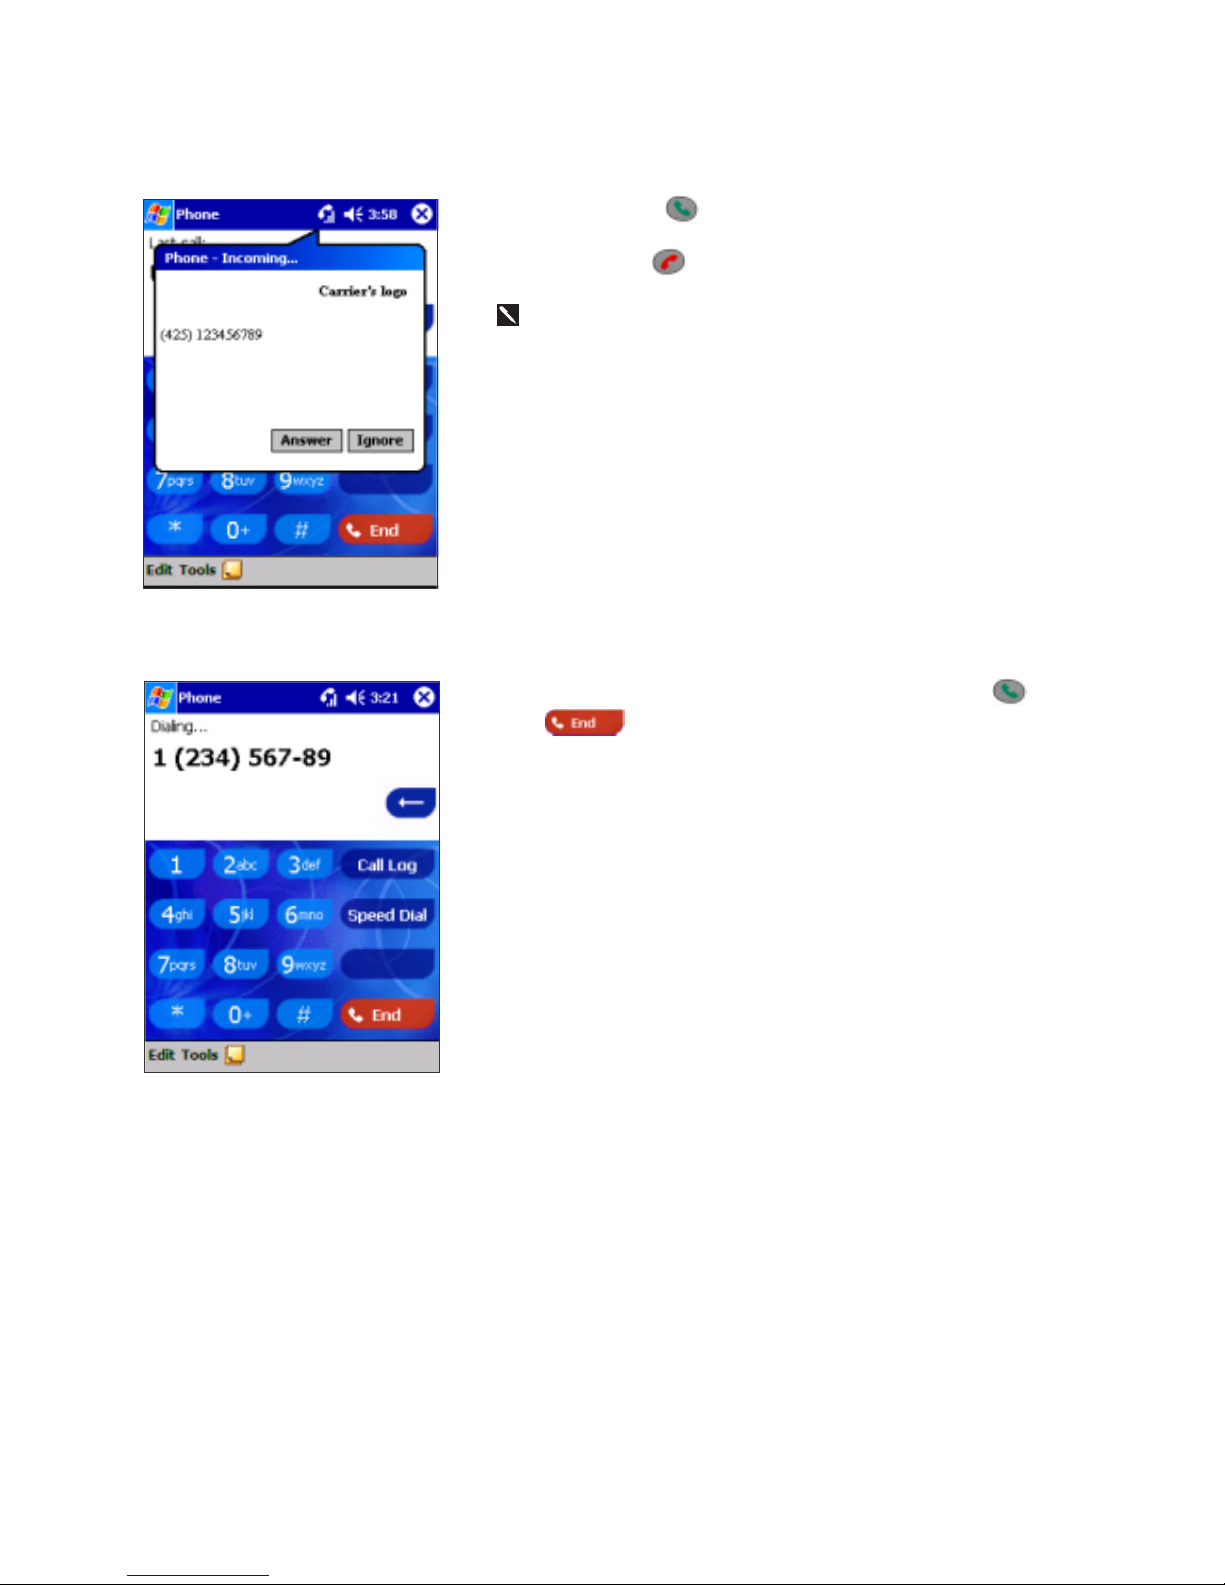
Answering or Rejecting a Call
• Tap Answer, or press
on your device.
• Tap Ignore or press
to reject the call.
If you reject a call the b usy tone will be sent out.
Ending a Call
• Once an incoming or outgoing call is proceeding, you can press
or tap to end the call.
20
Page 21
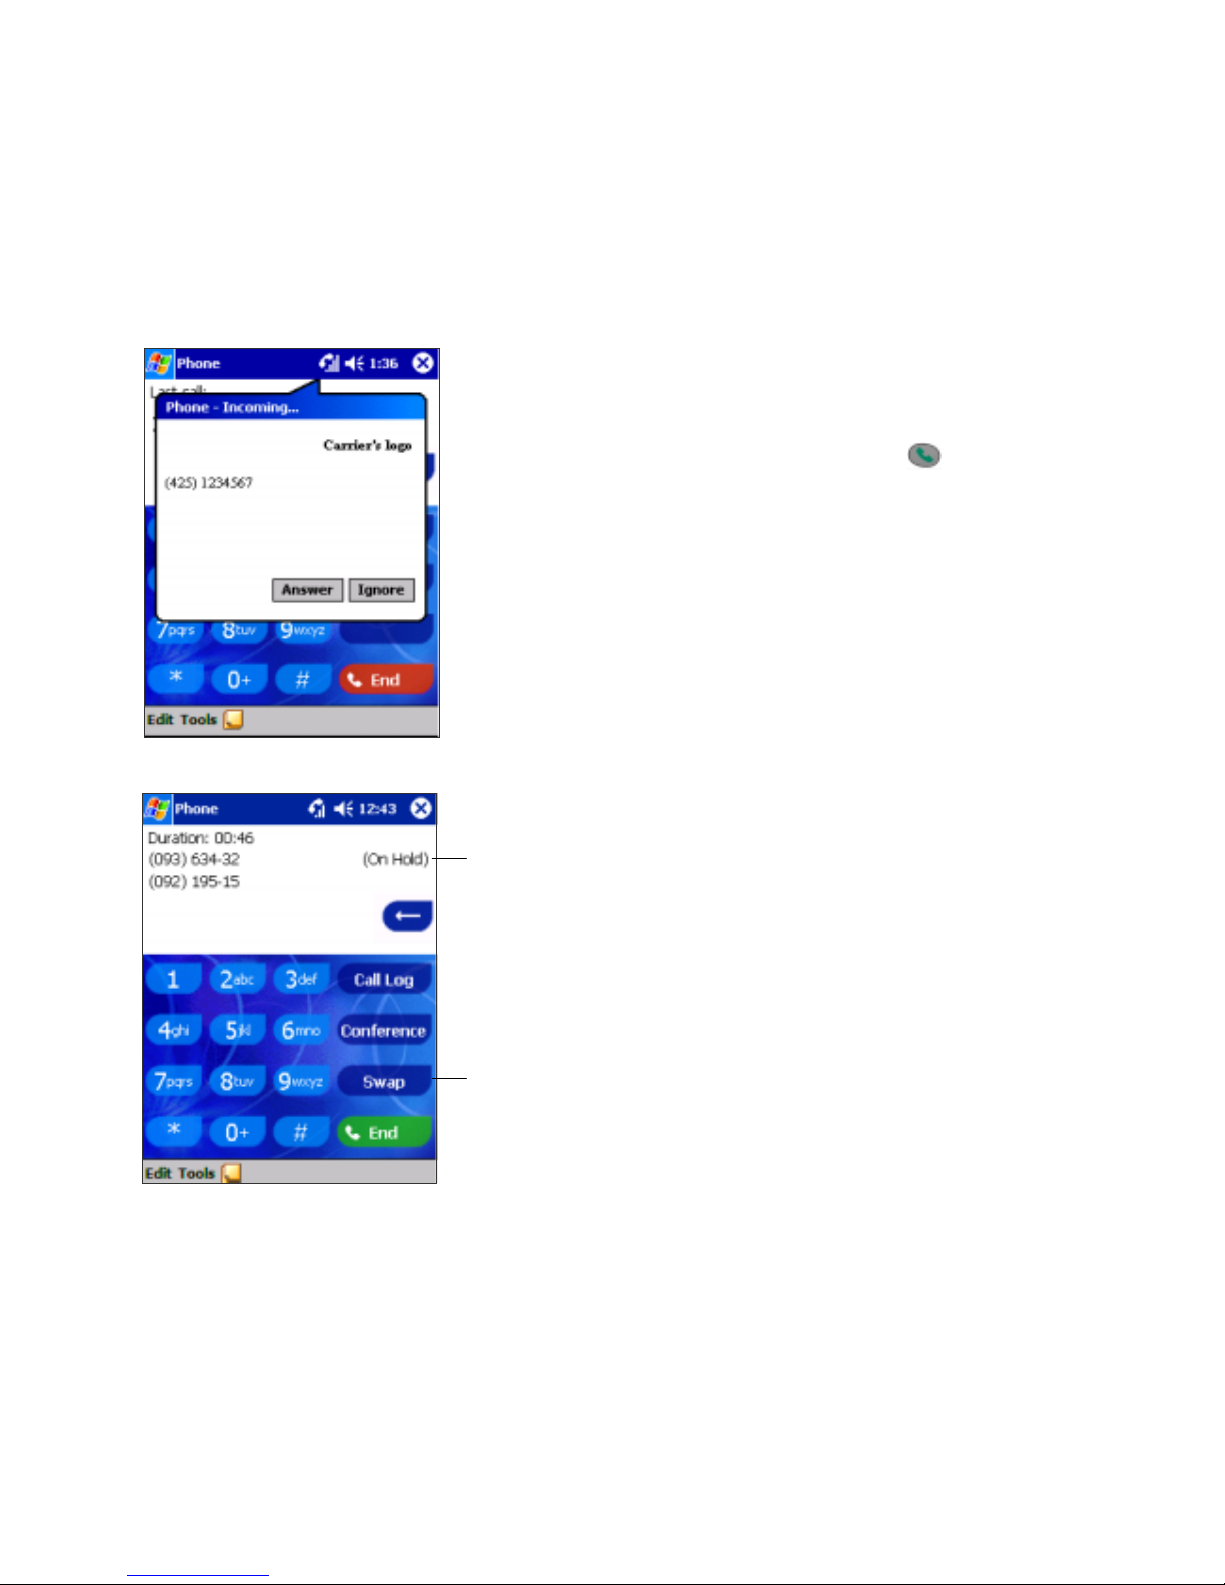
Managing More Than One Call
Your device will notify you when you have another caller and you have the choice of rejecting or accepting
incoming call. If you accept you can then choose to swap between this caller and the original or set up a conference
call between all 3 parties. You can, of course, also initiate the situation above – with conference calling you can
create a conversation between up to 6 people.
Putting a Call on hold:
1.
1. If another person is trying to call you when you are talking on the
phone the screen to the left will pop out.
2. Tap Answer to the take the 2
nd
call and put the 1st on hold.
3. To end the 2
nd
call and go back to the 1st, tap End or .
To swap between calls:
• You can choose to swap backwards and forwards
between 2 callers by pressing Swap.
To change to
the other
caller tap here
Indicates which
number is on
hold
21
Page 22
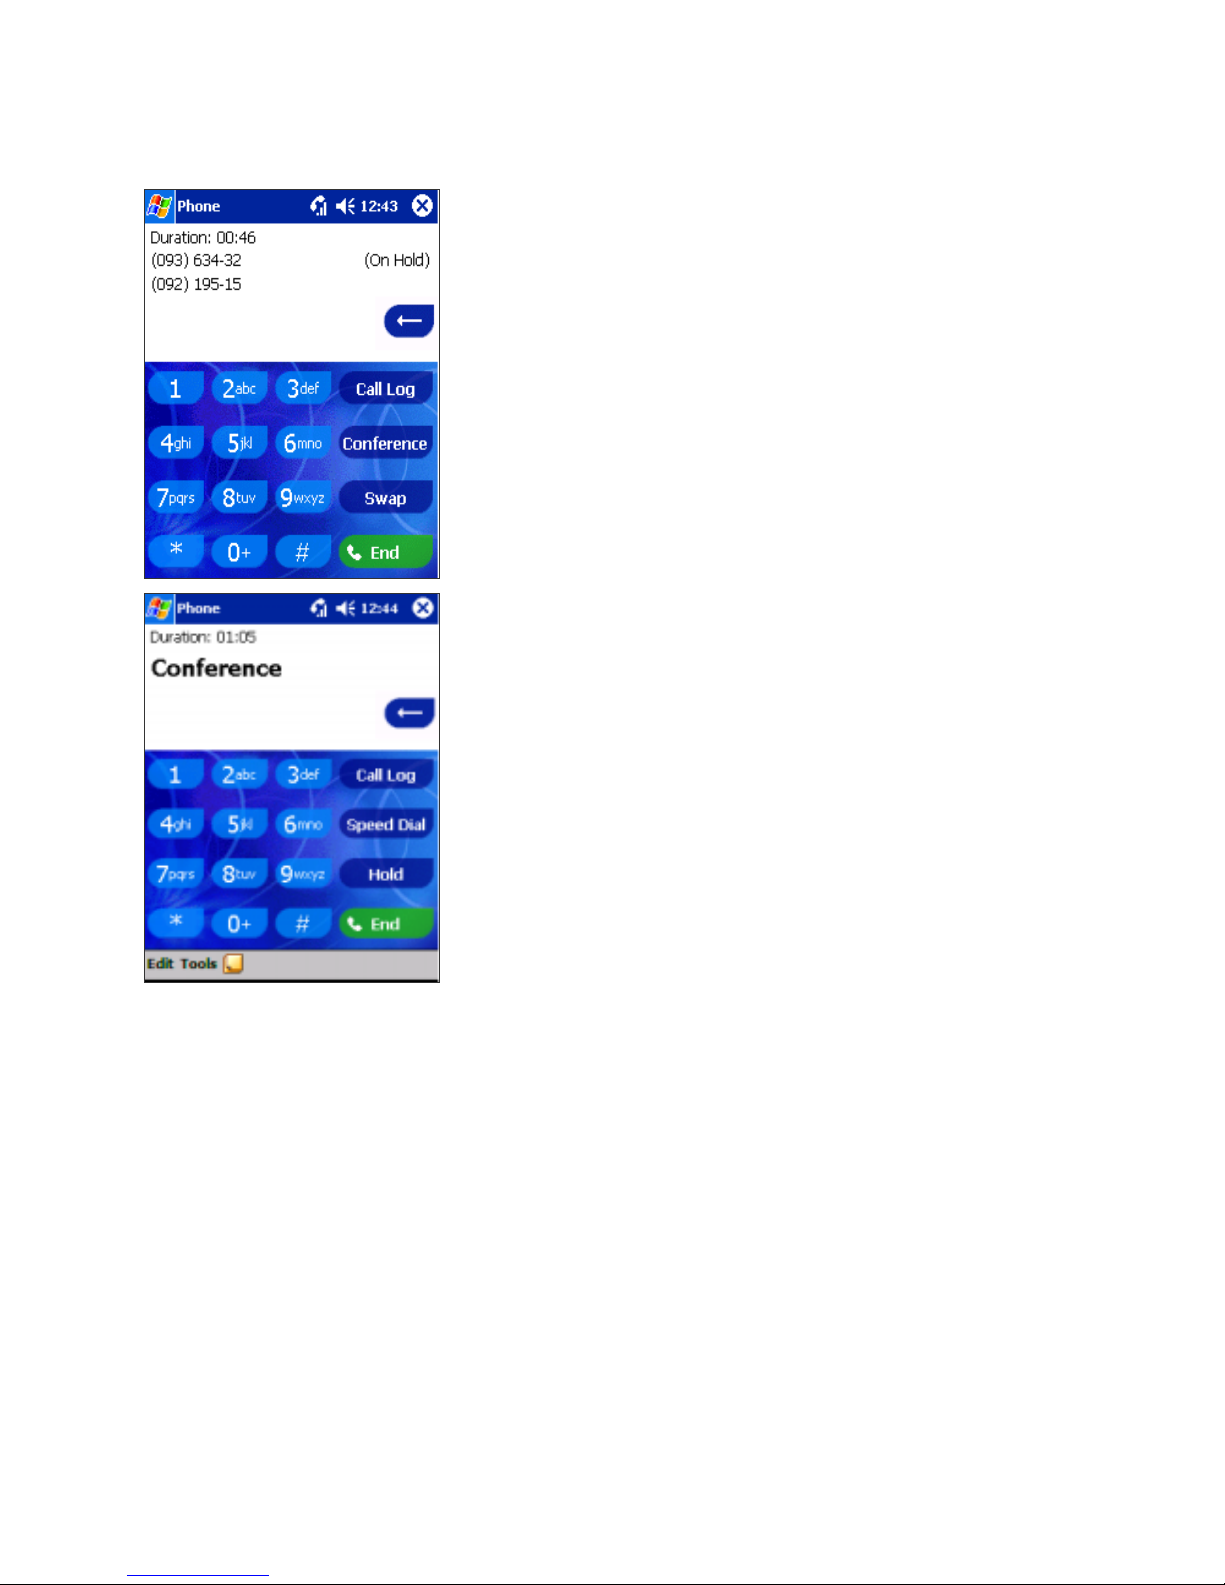
To set up conference calling:
1. Either put a call on hold, dial a 2
nd
number and wait
for it to be picked up. Or, accept a 2nd incoming call
when you already have one in progress.
2. In the screen that appears tap Conference.
3. If the conference connection is successful the word
Conference will appear at the top of the phone dialer
screen (see left).
4. To add additional people to your conference call tap
Hold, key in the number, and then Resume to return
and continue.
22
Page 23
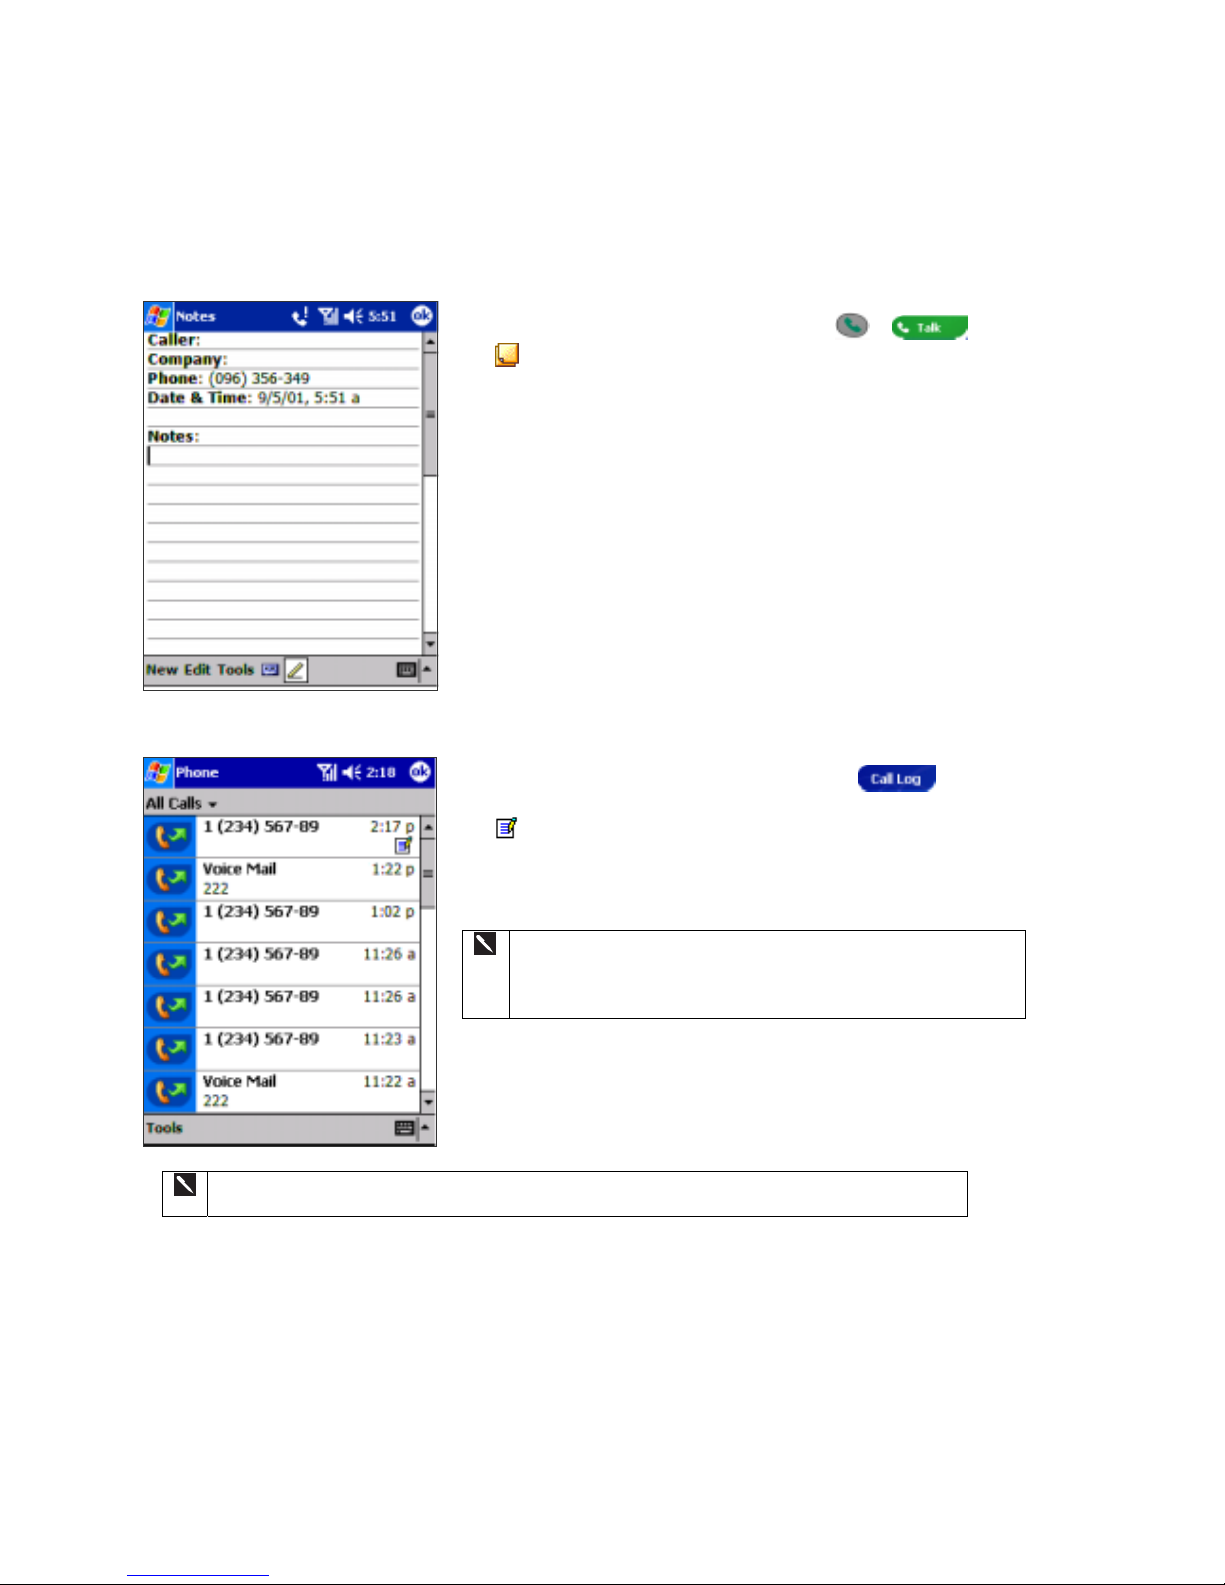
Making a Note
Regardless of whether you call from the Dialer, Contacts, Call Log, Speed Dial or SIM Manager, you can take a
note during a call. After you have finished the note it will be saved as an attachment to your call in one of the Call
Log folders.
To make a note:
1. After you have entered a number and tapped
or , tap the
icon situated at the bottom of the screen.
2. Use any of the input methods to record your note and then tap OK.
You can finish your note during or after the call.
To view a note:
1. Press the right-side of the navigation pad or tap
, tap and
hold the call, and then from the pop up menu tap view note. (The icon
indicates a note).
2. Or, go to Notes, and then tap the name of the file from the list.
If you decide to create a contact for this caller – see “Adding and
Transferring Contacts information” – the call and file names will
be amended to the name of the new contact; the file will be
unaffected.
For more information on advanced features and customizing your phone, see the User Manual,
“Chapter 4: Your Phone”.
23
Page 24
Getting Connected
You can use your device to exchange information with other mobile devices as well as your PC, a network, or the
Internet. You have the following connection options:
• Use the infrared (IR) port on your device to send and receive files between two devices.
• Connect to your mobile Internet service provider (ISP). Once connected, you can send and receive e-mail
messages by using Inbox and view Web or WAP pages by using Microsoft Pocket Internet Explorer. The
communication software for creating a wireless ISP connection is already i nstal l ed on y our devi ce. Your servi ce
provider will provide software needed to install other services, such as paging and fax services.
• Connect to the network at your company or organization where you work. Once connected, you can send and
receive e-mail messages by using Inbox, view Web or WAP pages by using Pocket Internet Explorer, and
synchronize with your PC.
• Connect to the virtual private network (VPN) at the company or organization where you work. Once connected,
the added security of a VPN means that you can access the full resources of your company’s network. For
example, you can use File Explorer to access the files of computers on that network.
Connect Directly to an E-mail Server
You can set up a connection to an e-mail server so that you can send and receive e-mail messages by using a modem
or network connection and Inbox on your device.
The ISP or network must use a POP3 or IMAP4 e-mail server and an SMTP gateway.
You can use multiple e-mail services to receive your messages. For each e-mail service you intend to use, first set up
and name the e-mail service. If you use the same service to connect to different mailboxes, set up and name each
mailbox connection.
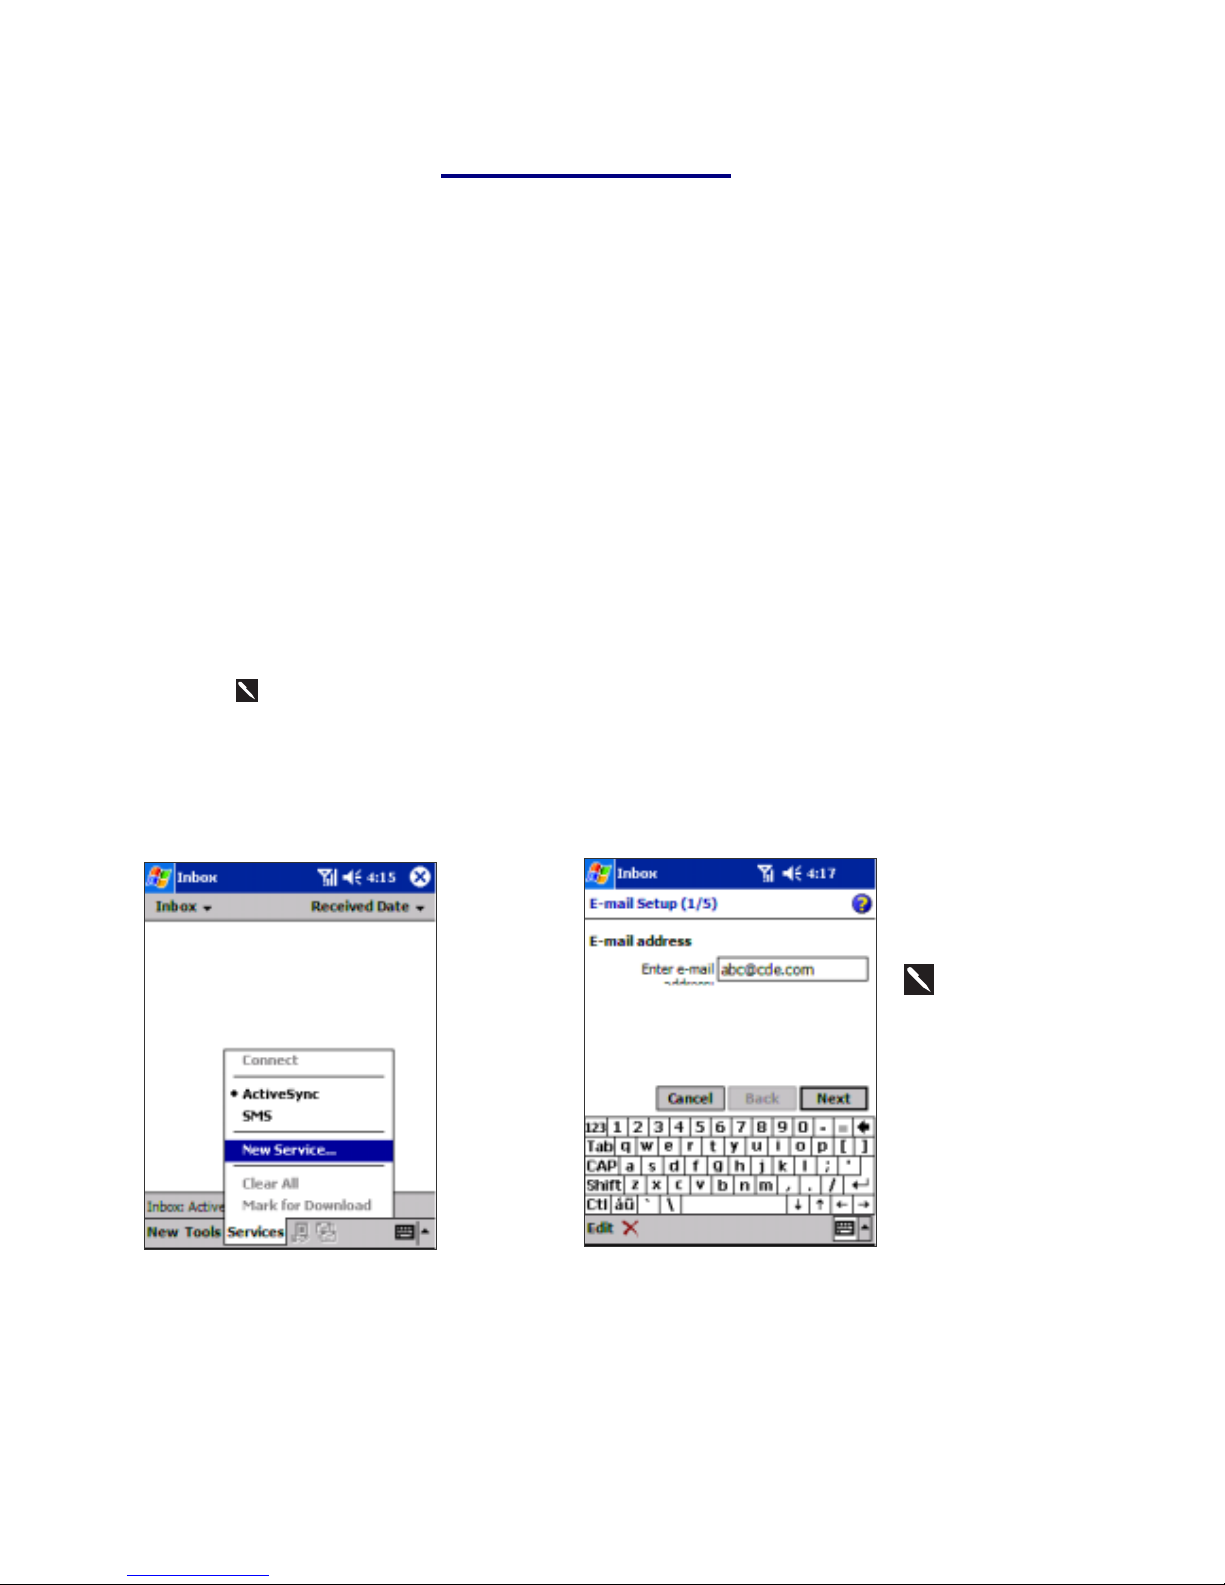
To set up an e-mail service:
1. In Inbox on
your device,
tap Services,
and then
New
Service.
Follow the
directions in
the New
Service
wizard.
2. To fill you e-mail
address in the field,
and then tap Next.
Next will initiate autoconfiguration – which
attempts to connect your
Pocket PC Phone to
your email server and
automatically download
the necessary email
connection settings.
If auto-configuration is
successful you can begin
sending/ receiving
emails straight away.
If unsuccessful you will
need to enter the settings
manually (see screens
4/5 & 5/5).
24
Page 25
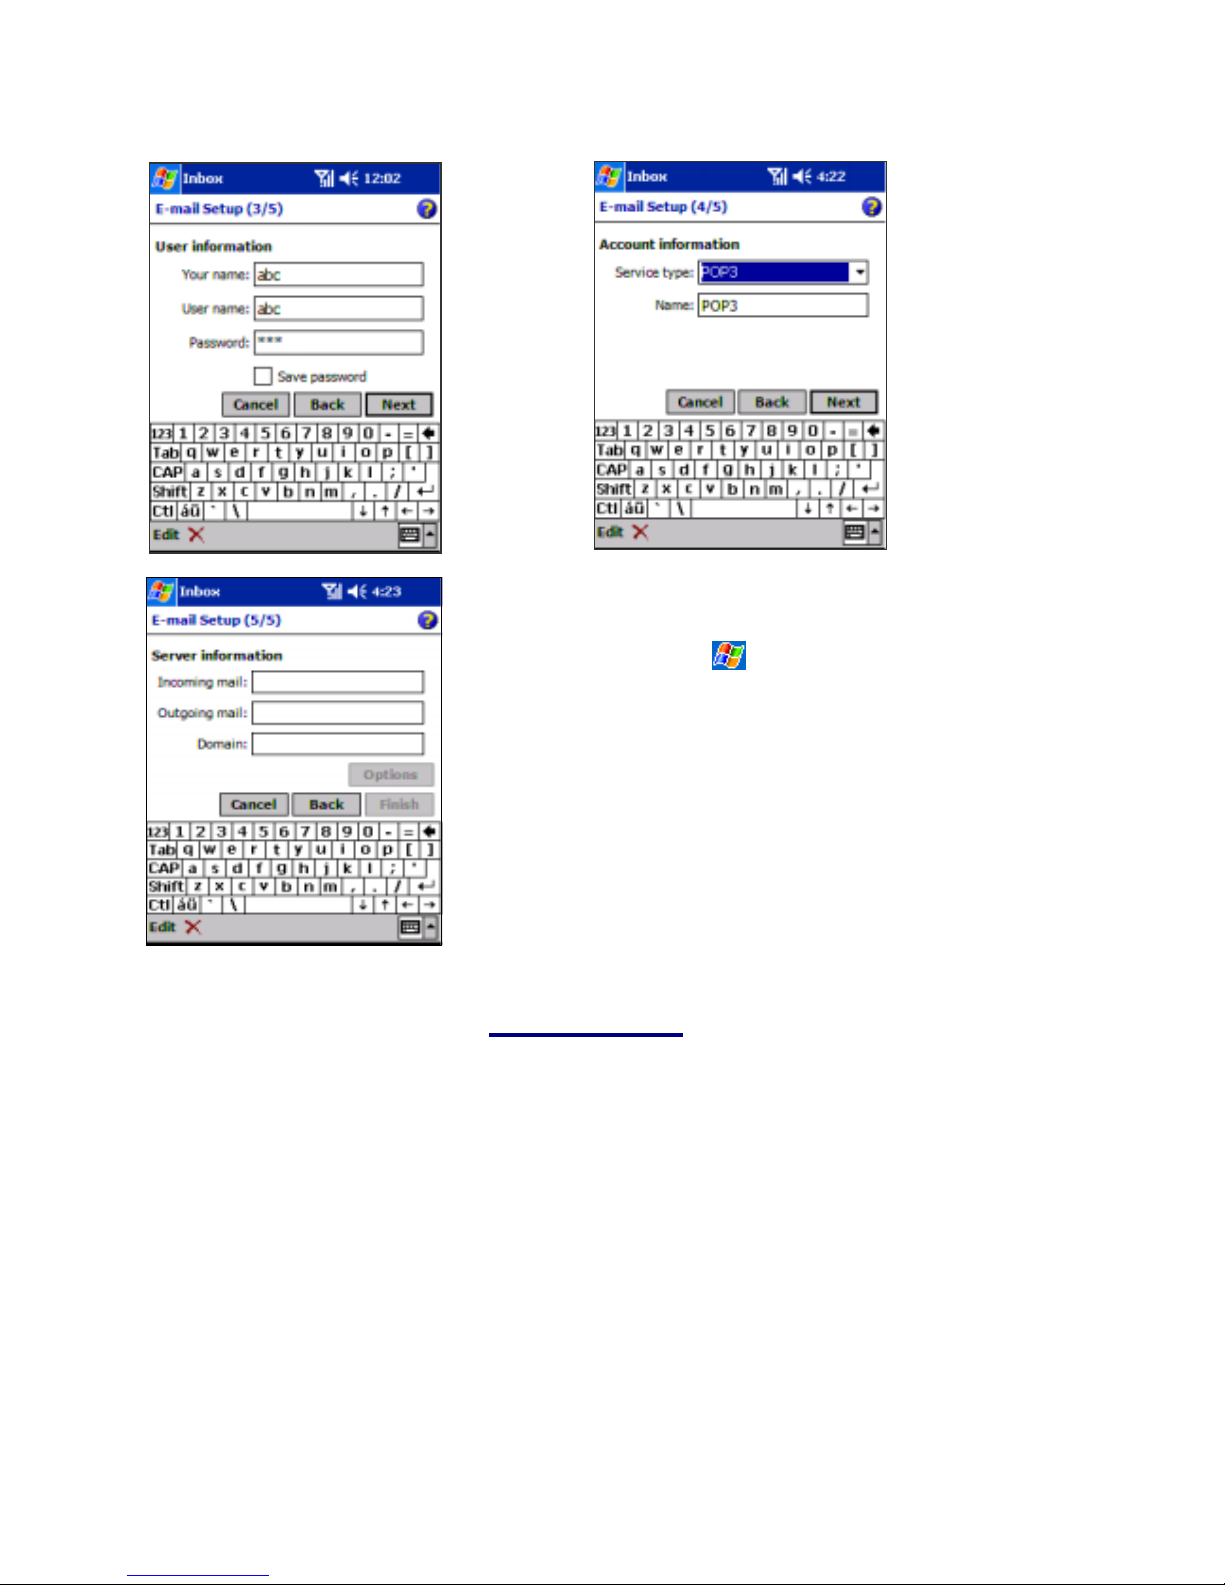
3. Enter “Your
name”, your
“User name”
and
“Password”
then tap
Next..
4. From the drop down
menu select the
“Service type” that
your email provider
supports (POP3 or
IMAP4).
5. Enter a
“Name”
for your email
account
then tap
Next.
6. Enter the your email provider’s server name information for Incoming mail and
Outgoing mail, then tap Finish.
For an explanation of a screen, tap
and then Help. When finished, to connect to
your e-mail server, tap Services and then Connect.
Using Inbox
• You can send and receive e-mail messages by connecting to an e-mail server wirelessly. You’ll need to set up a
remote connection to a network or an ISP, and a connection to your e-mail server. (For information on creating
a connection to the Internet or your company’s network see the accompanying Settings Guide).
• You can also use inbox to send short messages.
25
Page 26
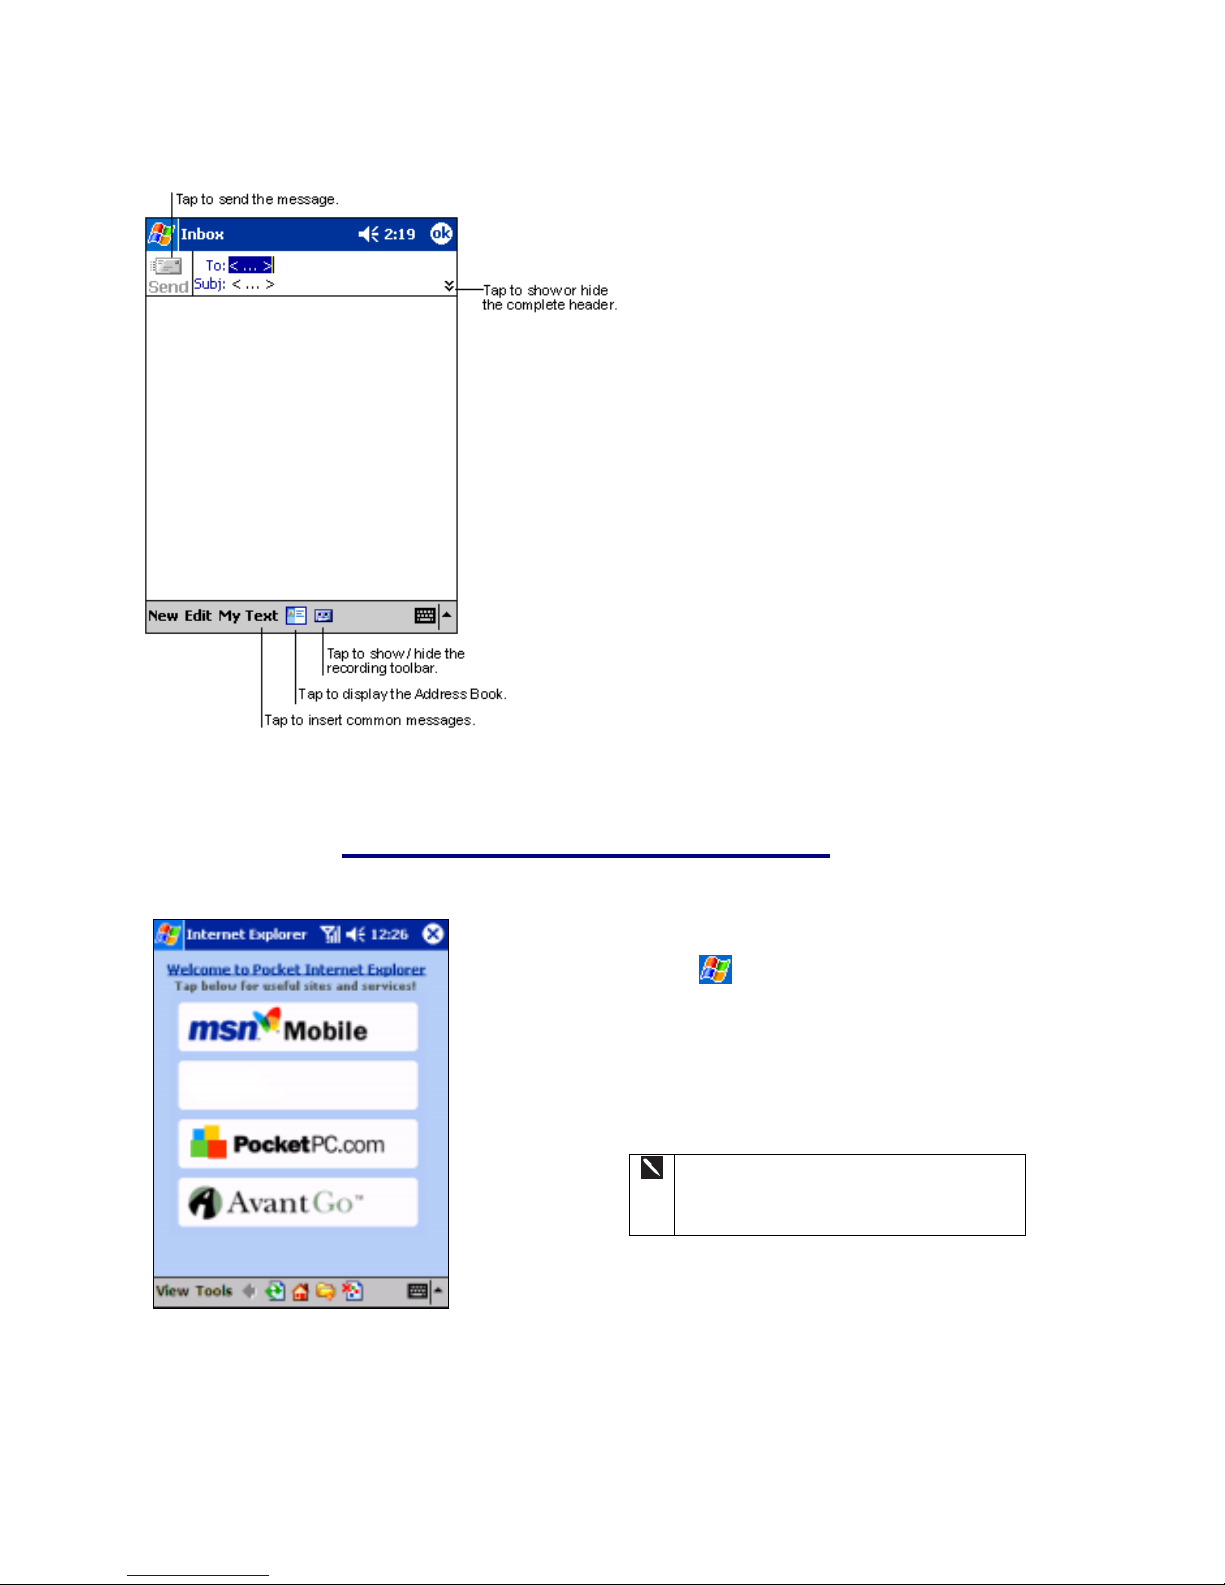
Creating an email:
1. Tap New.
2. In the To field, enter either e-mail address of
one or more recipients, separating them with a
semicolon, or select a name from the contact
list by tapping the Address Book button. All
e-mail addresses entered in the e-mail fields in
Contacts appear in the Address Book.
3. Compose your message. To enter preset or
frequently used messages, tap My Text and
select a message.
4. Tap Send when you’ve finished the message.
If you are working offline, the message is
moved to the Outbox folder and will be sent
the next time you connect.
Using Pocket Internet Explorer
To switch to Pocket Internet Explorer:
• Tap
and then Internet Explorer.
You can use Pocket Internet Explorer to browse
mobile favorites and channels that have been
downloaded to your device without connecting to
the Internet. You can also connect to the Internet
through an ISP or a network connection and browse
the Web/ WAP page(s).
The web page of your operator should
appear in the blank space n the picture to
the left.
26
Page 27
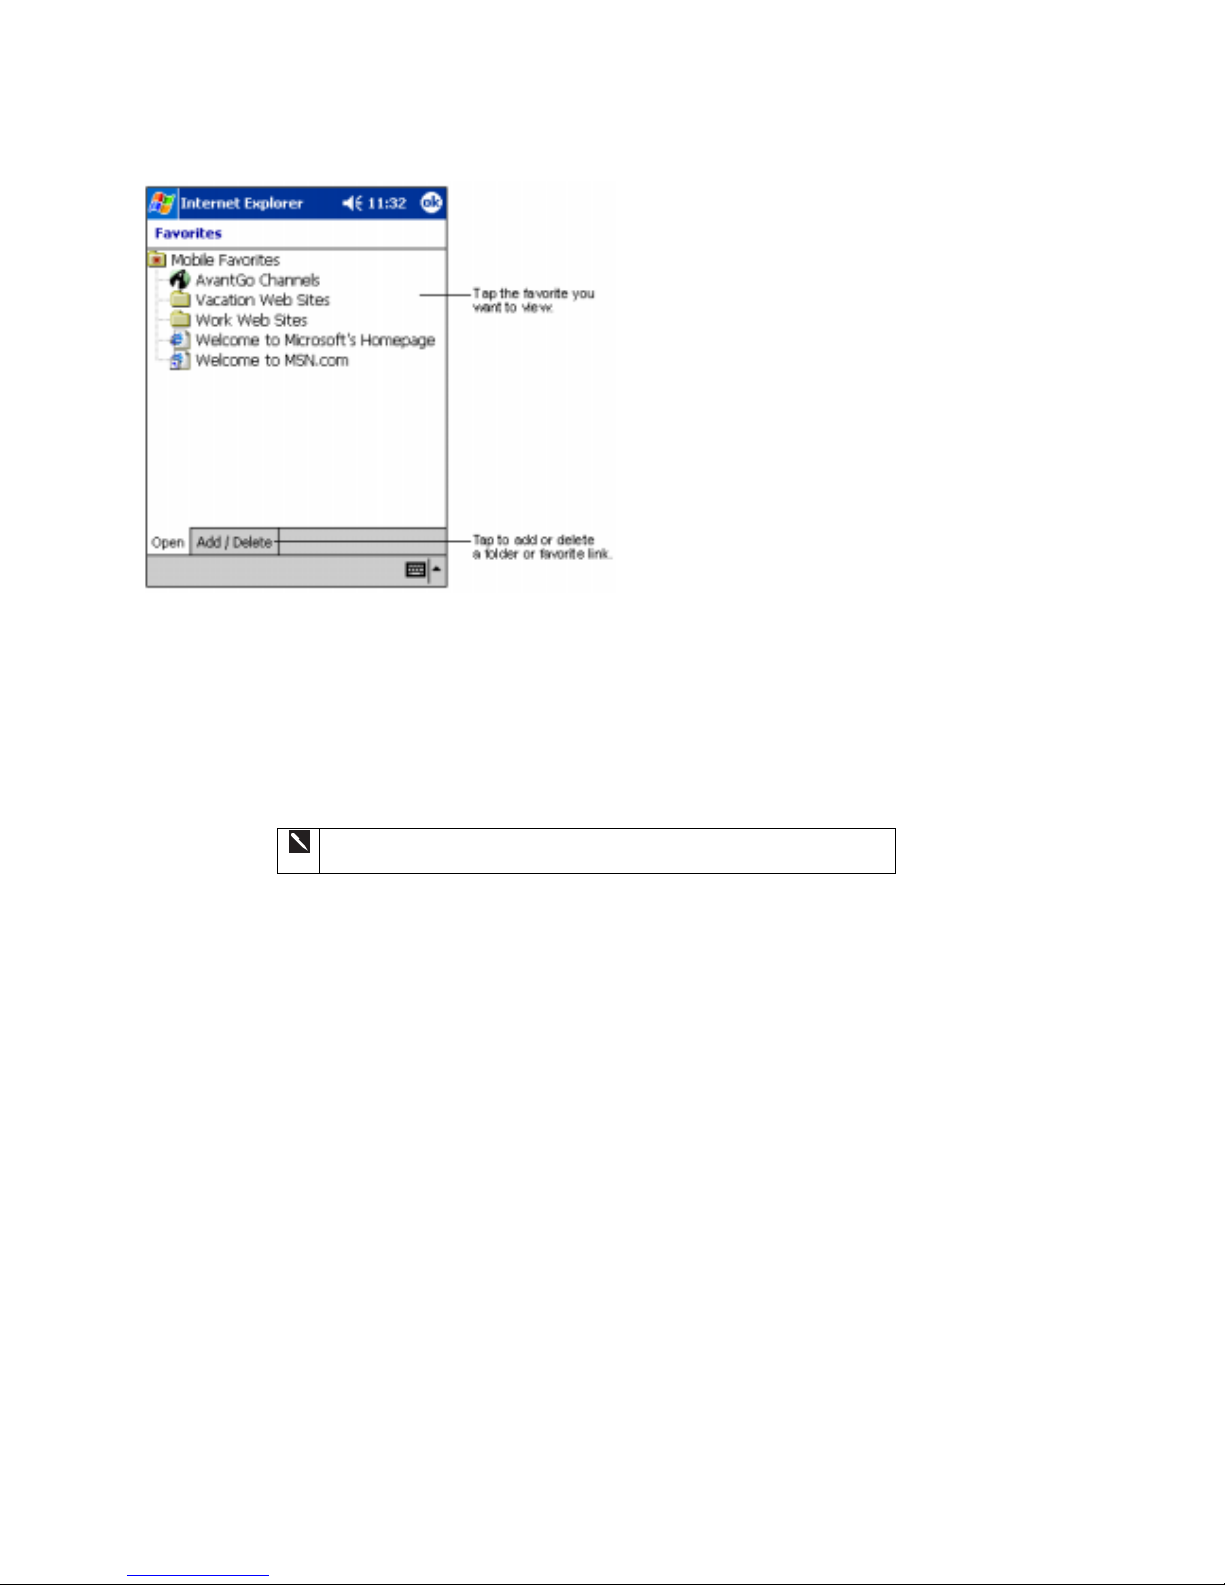
To view mobile favorites and channels:
1. Tap the Favorites button to display your list of
favorites.
2. Tap the page you want to view.
3. You’ll see the page that was downloaded the
last time you synchronized with your PC. If the
page is not on your device, the favorite will be
dimmed. You will need to synchronize with
your PC again to download the page to your
device, or connect to the Internet to view the
page.
To browse the Internet:
1. Set up a connection to your ISP or corporate network using Connections, as described in Settings Guide.
2. To connect and start browsing, do one of the following:
• Tap the Favorites button, and then tap the favorite you want to view.
• Tap View and then Address Bar. In the address bar that appears at the top of the screen, enter the Web address
you want to visit and then tap Go. Tap the arrow to choose from previously entered addresses.
To add a favorite link while using the device, go to the page you want to
add, tap and hold on the page, and tap Add to Favorites.
2001 All rights reserved. Reproduction, adaptation, or translation of this manual is prohibited without prior written permission of the manufacturer except as allowed under the copyright laws.
Microsoft, MS, ActiveSync, Active Desktop, Outlook, Windows, Windows NT, and the Windows CE logo are either registered trademarks or trademarks of Microsoft Corporation in the United
States and/or other countries. Microsoft products are licensed to OEMs by Microsoft Licensing, Inc., a wholly owned subsidiary of Microsoft Corporation. CIC and Jot are registered trademarks
or trademarks of Communication Intelligence Corporation. Product names mentioned herein may be trademarks and/or registered trademarks of their respective companies.
27
 Loading...