

Page 1

Pocket PC Phone User Manual 65
3.9 Securing Your Pocket PC Phone
You can customize the level of security you want to have on your Pocket PC Phone by
locking the keypad, the entire device, or the SIM card.
Locking the keypad
The keypad lock turns off the keypad functionality. This is a helpful feature if, for example,
your Pocket PC Phone is turned off and in your pocket, and you want to prevent accidental keypress.
1. Tap
the Start menu
> Settings > System tab > Button Lock.
2. Select Lock all buttons except Power button.
3. To unlock your keypad, tap Do not lock buttons.
Locking your Pocket PC Phone
Locking your Pocket PC Phone prevents access to personal data. When you enable this
feature, your Pocket PC Phone will automatically lock after a specied time of inactivity.
A screen will be displayed requiring your Pocket PC Phone "lock password" to be entered
before access is granted.
1. Tap
the Start menu
> Settings > Personal > Password.
2. To enable this function, select how long your mobile device must be turned off before the
password is required for using the device, by tapping Prompt if device unused for.
3. Select the type of password you would like to use: Simple 4 digit or Strong alphanumeric.
A strong password must have at least 7 characters that are a combination of uppercase
and lowercase letters, numerals, and punctuation.
4. Enter the password, and if necessary, conrm the password.
NOTE: To unlock your Pocket PC Phone , uncheck Prompt if device unused for.
Page 2

Pocket PC Phone User Manual66
Locking the SIM card
You can protect your Pocket PC Phone from unauthorized use by assigning a PIN (Personal
Identication Number). Your rst PIN is assigned by your operator.
1. On the Pocket PC Phone keypad, tap Tools > Options > Phone tab.
2. Select Require PIN when phone is used.
3. To change the PIN at any time, tap Change PIN.
Page 3

Chapter 4
Synchronizing Information
4.1 Using ActiveSync
4.2 Synchronizing Information
4.3 Infrared and Bluetooth Connection
4.4 ActiveSync Errors
Page 4

Pocket PC Phone User Manual68
Pocket PC Phone User Manual 69
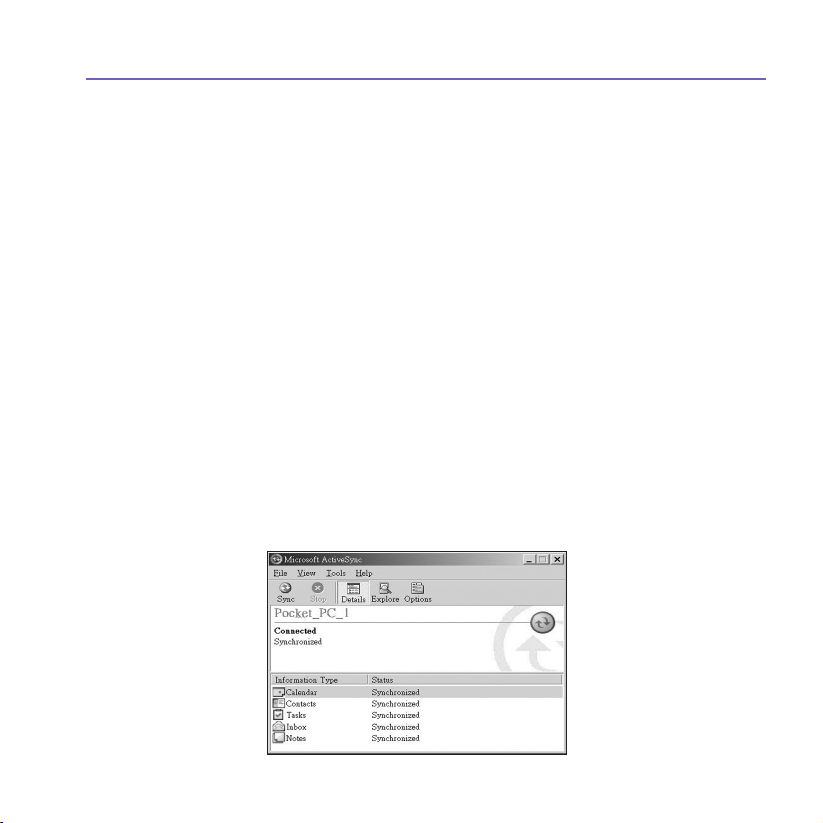
4.1 Using ActiveSync
With ActiveSync on both your PC and your Pocket PC Phone, you can exchange
information between a PC or server and your Pocket PC Phone. This process is called
"synchronization." To synchronize your Pocket PC Phone with your PC, you must install
ActiveSync on the PC. Using ActiveSync, you can:
n Synchronize information between your Pocket PC Phone and PC or server so that you
have the latest information in all locations.
n Change synchronization settings and synchronization schedule.
n Copy les between your Pocket PC Phone and PC.
n Back up and restore information saved on your Pocket PC Phone.
n Add and remove programs on your Pocket PC Phone.
By default, ActiveSync does not automatically synchronize all types of information. Use
ActiveSync options to turn synchronization on and off for specic information types.
You can synchronize information between your mobile device and a server if your company
is running Microsoft Exchange Server with Exchange ActiveSync.
Installing ActiveSync
Before you begin synchronization, install ActiveSync on your PC from the Application
CD. ActiveSync is already installed on your Pocket PC Phone.
Once ActiveSync is installed on your PC, you will be prompted to connect and create a
partnership with your Pocket PC Phone by using a cable, cradle, infrared, or Bluetooth
connection.
Page 5
Pocket PC Phone User Manual 69
Connecting to a PC via a cable or cradle
Please see the Quick Start Guide for information about ActiveSync installation.
1.
Connect your Pocket PC Phone and PC via a cable or cradle to start synchronization.
2. Your rst synchronization will automatically begin when you nish the installation wizard.
After the rst synchronization, you will notice that your Outlook information now appears
on your Pocket PC Phone.
3. To disconnect, remove your Pocket PC Phone from the cradle or detach it from the
cable.
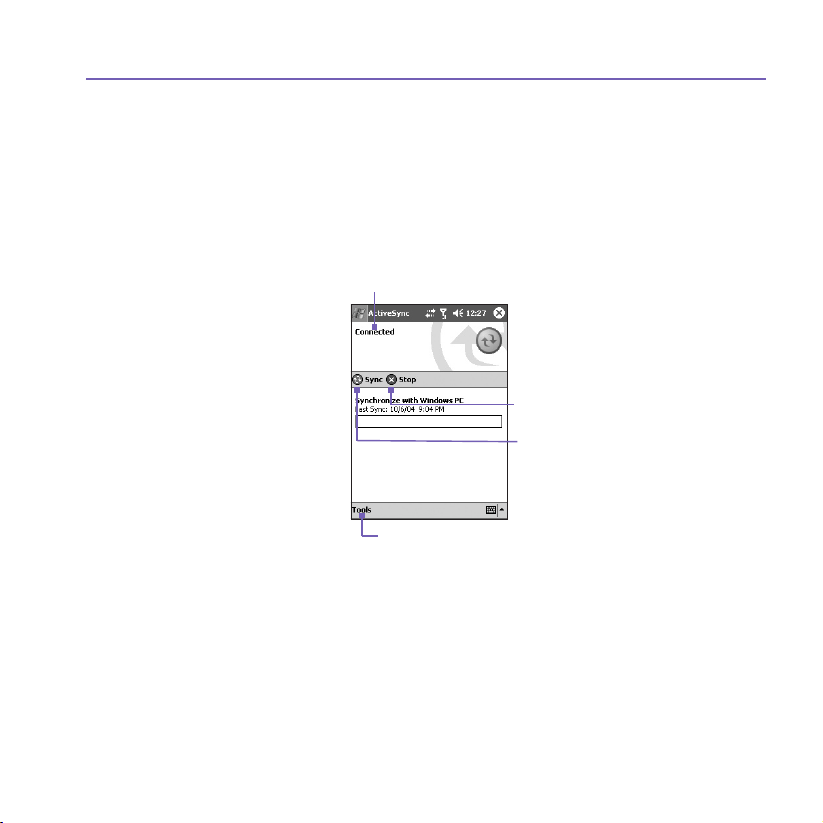
Connecting to a PC by Infrared
You can use an infrared connection to create a direct connection between your Pocket
PC Phone and another IR-enabled mobile device or PC quickly. This method is ideal
for quickly switching between multiple devices since there are no cables or adapters
to change. When creating a partnership, you must connect using infrared, a cable,
or a cradle connection.
Synchronize via IR or change
synchronization settings
View connection status
Connect and
synchronize
S top sy nc
Page 6

Pocket PC Phone User Manual70
Pocket PC Phone User Manual 71
1. Set up an infrared connection. (Install and congure an infrared port on your PC according
to the manufacturer's instructions).
2. Switch to the infrared port on your desktop computer: On the File menu of the ActiveSync
on your PC, click Connection Settings. In the Allow serial cable or infrared connection
to this COM port list, select Infrared Port (IR).
3. Align the infrared ports on your PC and your Pocket PC Phone so that they are unobstructed and within close range.
4.
On your Pocket PC Phone, tap the Start menu > ActiveSync > Tools > Connect via
IR.
4.2 Synchronizing Information
This section provides an overview of the types of Outlook information you can synchronize.
By default, ActiveSync does not automatically synchronize all types of Outlook information.
Use ActiveSync options on your PC to turn synchronization on and off for specic
information types.
Synchronizing Outlook E-mail
After selecting Inbox for synchronization in ActiveSync, Outlook E-mail messages are
synchronized as part of the general synchronization process. During synchronization:
n Messages are copied from the Inbox folder on your PC or the Microsoft Exchange server to
the Inbox folder of the Outlook E-mail account on your device. You can only synchronize
information directly with an Exchange Server if your company is running Microsoft Mobile
Information Server 2002 or later. By default, you’ll receive messages from the last three
days only, the rst 100 lines of each new message, and le attachments of less than
100KB in size.
n Messages in the Outbox folder on your device are transferred to Exchange or Outlook
and then sent from those programs.
n The messages on the two computers are linked. When you delete a message on your
device, it’s deleted from your PC the next time you synchronize.
n Messages in subfolders in other E-mail folders in Outlook are synchronized only if they
have been selected for synchronization in ActiveSync.
Page 7
Pocket PC Phone User Manual 71
For information on initiating Outlook E-mail synchronization or changing synchronization
settings, see ActiveSync Help on the PC or Connections Help. Text messages (SMS)
and Media messages (MMS) are not received through synchronization. Instead, they are
sent to your device via your service provider.
Synchronizing Calendar
n Calendar items stored on your Pocket PC Phone can be synchronized with calendar items
on your PC or Microsoft Exchange Server. You can only synchronize information directly
with an Exchange Server if your company is running Microsoft Mobile Information Server
2002 or later. Calendar synchronization is automatically selected in ActiveSync.
n Calendar items entered on one computer are copied to the other during synchronization.
Handwritten notes and drawings are saved as metales (pictures).
Synchronizing Contacts
n Contacts stored on your Pocket PC Phone can be synchronized with Outlook contacts
stored on your PC or with Mobile Information Server 2002 or later.
n New items entered in one location are copied to the other during synchronization.
Handwritten notes and drawings are saved as pictures when synchronizing with your
PC, but are removed when synchronizing with a server. For more information on
synchronization, see ActiveSync Help on the PC.
Page 8

Pocket PC Phone User Manual72
Pocket PC Phone User Manual 73
Synchronizing Tasks
n Tasks stored on your device can be synchronized with Outlook on your PC. Task
synchronization is automatically selected in ActiveSync.
n New items entered on one computer are copied to the other during synchronization.
Handwritten notes and drawings are saved as metales (pictures). For more information
on synchronization, see ActiveSync Help on the PC.
Synchronizing Notes
Notes can be synchronized between your PC and Pocket PC Phone either through notes
synchronization or le synchronization. Notes synchronization synchronizes the notes on
your Pocket PC Phone with Outlook Notes on your PC. File synchronization synchronizes
all notes on your Pocket PC Phone with the My Documents folder on your PC.
To synchronize your notes through notes synchronization, rst select the Notes information
type for synchronization in ActiveSync. The next time you synchronize, all notes in My
Documents and its subfolder on your device will appear in Outlook Notes on your PC.
Notes that contain only text will appear as regular notes in Outlook on your PC, while
notes containing written text or drawings will appear in the device format. In addition, all
notes in the Notes group in Outlook on the PC will appear in Notes on the device.
To synchronize your notes as les, in ActiveSync, select the Files information type
for synchronization and clear the Notes information type. When you select Files, the
My Documents folder is created on your PC’s desktop. All .pwi les placed in the My
Documents folder on your device and all .doc les placed in the \My Documents folder
on your PC will be synchronized. Password-protected les cannot be synchronized.
ActiveSync converts documents during synchronization. For more information on
synchronization or le conversion, see ActiveSync Help on the PC.
NOTE: When you delete or change an item on either your PC or device, the item is changed
or deleted in the other location the next time you synchronize.
If you synchronize your notes using le synchronization and then later decide to use notes
synchronization, all of your notes will be synchronized with Outlook on your PC and will
no longer be stored in the My Documents folder.
Page 9

Pocket PC Phone User Manual 73
4.3 Infrared and Bluetooth Connection
Infrared
You can use infrared (IR) to send and receive information and les between mobile devices.
If an IR port is installed on your PC, you can send and receive information and les between
your Pocket PC Phone and PC. On your Pocket PC Phone, tap the Start menu > Settings
> the Connections tab > Beam.
By default your device detects incoming infrared
(IR)
and Bluetooth beams and prompts
you to accept them. If you do not want your Pocket PC Phone to detect or receive beams,
clear the Receive all incoming beams check box.
NOTE: If someone attempts to send you an IR beam from an older device, you may not
be prompted to accept it. In this case, before the beam is sent from the other device, tap
Receive an infrared beam at the bottom of the Beam screen.
Bluetooth
1. Make sure that your Pocket PC Phone is congured to receive incoming beams.
2. Make sure that your Pocket PC Phone is turned on, discoverable, and within 10 metres
(about 30 feet) of the other device beaming the information.
3. When prompted to receive an incoming beam, tap Yes to accept the beam.
For more information about Bluetooth and its settings, please see Chapter 6.
Page 10

Pocket PC Phone User Manual74
4.4 ActiveSync Errors
Whenever ActiveSync cannot successfully synchronize your information, it displays an
error on your Pocket PC Phone.
Viewing error information
Press the Action button when the error text is displayed. ActiveSync will then display
more information about the error that occurred.
Some types of errors can interfere with automatic synchronization. If you suspect that a
scheduled automatic synchronization has not occurred, you should attempt to manually
synchronize your information. Successfully completing manual synchronization will reset
automatic synchronization. For more information, see the Synchronizing Information
section of ActiveSync Help on your PC.
Page 11

Chapter 5
Personalizing Your Pocket
PC Phone
5.1 Device Settings
5.2 Phone Settings
Page 12
Pocket PC Phone User Manual76
Pocket PC Phone User Manual 77
5.1 Device Settings
You can adjust the device settings to suit the way you work. To see available options, tap
the Start menu > Settings > the Personal tab or System tab located at the bottom of
the screen.
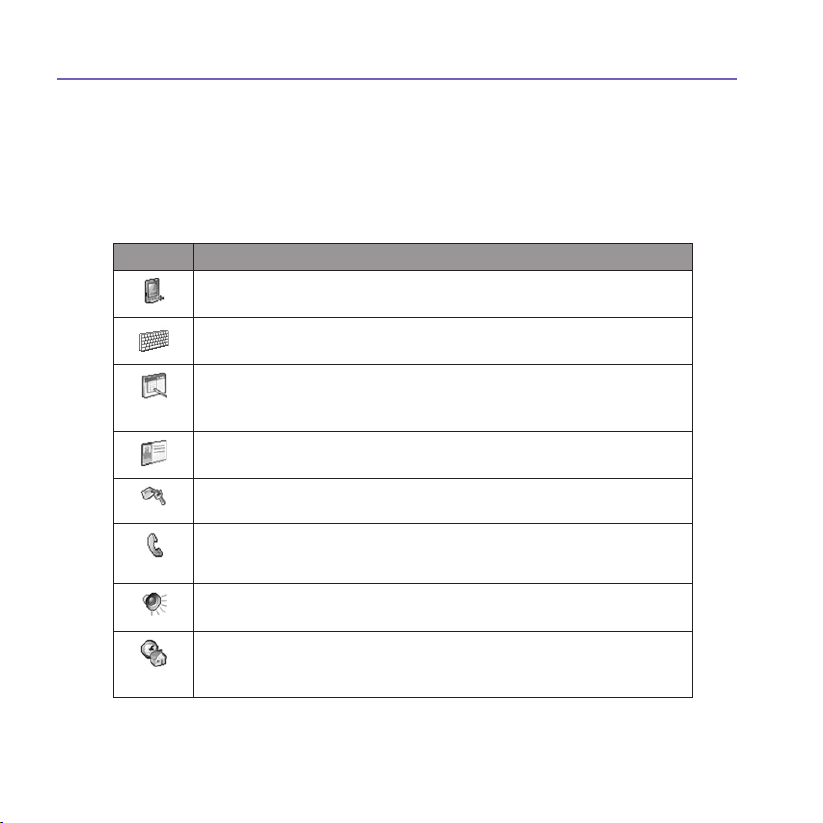
The Personal tab
Icon Program
Button
Assigns an application program to a hardware button.
Input
Sets up the input portion of your device.
Menus
Customizes the menu appearance and enables a pop up menu from the New
button.
Owner Information
Displays your contact information.
Password
Limits access to your device.
Phone
Sets up the phone function of your wireless
feature.
Sounds & Notications
Sets the notication type, event and volume.
Today
Customizes the look and the information that appears on the Today screen.
Page 13
Pocket PC Phone User Manual 77
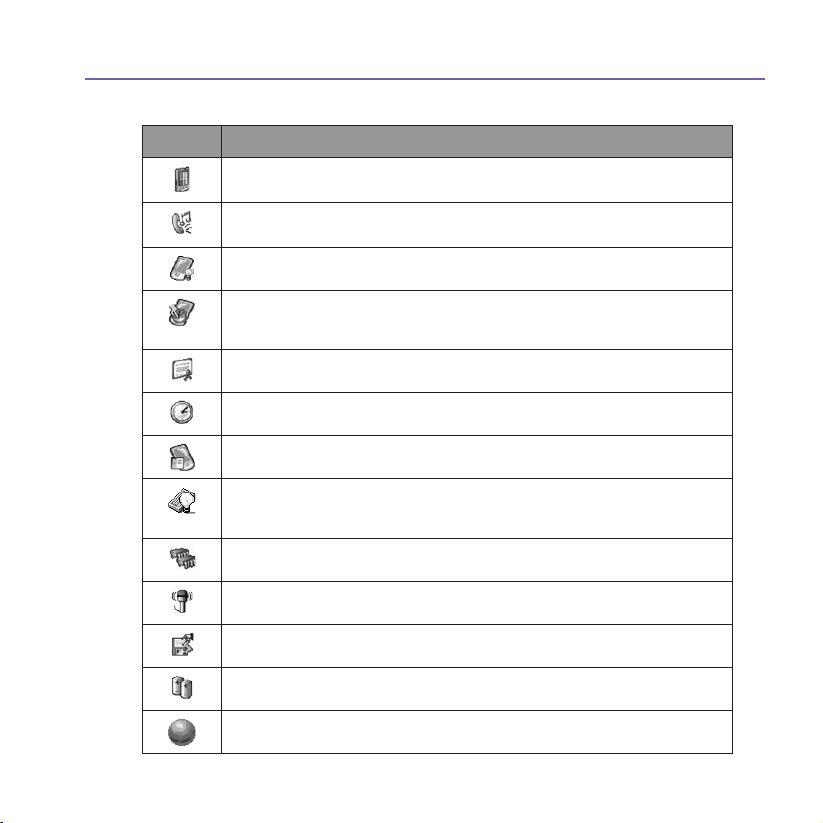
The System tab
Icon Program
About
Displays important device information.
Add Ring Tone
To listen to and select new ring tones.
Backlight
Customizes the backlight and brightness for power saving purposes.
Button Lock
Enables you to lock the buttons on your device except Power button when device
is off.
Certicates
Displays the name of the certicate issuer and the expiration date.
Clock & Alarms
Changes the time and sets alarms.
Device information
Find information about version, hardware, identity, and call duration.
Keyboard
Allows you to customize the keyboard settings, e.g., to switch on/off the keyboard
backlight when a time limit is reached.
Memory
Displays the memory allocation status and current running programs.
Microphone AGC
Adjusts the volume automatically when you are recording.
Permanent Save
Saves contacts to permanent ash memory.
Power
Maximizes battery life.
Regional Settings
Customizes the region and relative format for the region you use.
Page 14
Pocket PC Phone User Manual78
Pocket PC Phone User Manual 79
Icon Program
Remove Programs
Creates more memory by removing programs.
Screen
Re-calibrates the screen and enables/disables Clear Type feature.
Buttons
To customize the program hardware buttons to open your most frequently-used
programs:
1. Tap the Start menu > Settings > the Personal tab > Buttons > the Program Buttons
tab.
2. Under Select a button, tap the button you want to assign a program, and then select a
program from Assign a program.
Default settings:
1 - Contacts
2 - Calendar
3 - Camera
4 - Record
In the Up/Down Control tab, Delay before rst repeat changes the time elapsed before
scrolling begins. Repeat rate changes the time it takes to scroll from one item to the next.
Press and hold the Up/Down control to scroll through the items in a list to adjust.
Input
1. Tap the Start menu > Settings > the Personal tab > Input.
2. On the Input Method tab, select an input method and change desired options. On the Word
Completion tab, select the desired settings for word completion. On the Options tab, select
the desired options for writing and recording. These options apply to any program on the
2
1
3
4
Page 15

Pocket PC Phone User Manual 79
device where you can record or write. These options do not apply to text you enter using
the input panel.
You can also change input options by tapping the arrow and Options.
Menus
Only 7 programs are allowed in the Start Menu. To add the programs you use most often
to the Start menu:
1. Tap the Start menu > Settings > the Personal tab > Menus.
2. Select the programs you want, then tap OK.
3. On the New Menu tab, you can select Turn on New button menu and then select the items
to appear on the menu. When you do this, an arrow appears next to New in the command
bar of certain programs such as Pocket Word, Pocket Excel, Contacts, Calendar and
Tasks. You can tap this arrow and then tap a new item to create.
You can create subfolders and shortcuts to appear under the Start menu. In ActiveSync
on your PC, click Explore > My Pocket PC Phone > Windows > Start Menu.
Owner Information
1. Tap the Start menu > Settings > the Personal tab > Owner Information.
2. On the Identication tab, enter your personal information.
On the Notes tab, enter any additional text you want to display when the device is turned
on, such as: "Reward if found."
On the Options tab, select Identication Information so that if you lose your device, it can
be returned to you.
Password
A strong password must have at least 7 characters that are a combination of uppercase
and lowercase letters, numerals, and punctuation.
1. Tap the Start menu > Settings > the Personal tab > Password.
Page 16

Pocket PC Phone User Manual80
Pocket PC Phone User Manual 81
2. To enable this function, select how long your mobile device must be turned off before the
password is required for using the device by tapping Prompt if device unused for.
3. Select the typ e of password you would lik e to use: Simp le 4 digi t or Strong
alphanumeric.
4. Ent er the password and, if necessary, confirm the
password.
n If your device is congured to connect to a network, use a strong password
to help protect network security.
n If you forget your password, you must clear the memory before you can access
your device. This will erase all les and data you have created and programs
you have installed. For more information about clearing memory, please see
Appendix A.
n If you've used ActiveSync to create a backup le, all of your program data
can be restored. For more information on creating a backup le, also see
Appendix A.
Sounds and Notications
Turning off sounds and the notication light helps conserve battery power.
To change the
ring type and volume:
1. Tap the Start menu > Settings > the Personal tab > Sounds & Notications.
2. On the Sounds tab, you can select the desired actions.
3. On the Notications tab, you can customize how you are notied about different events.
Select the event name and then select the type of reminder. You can select a special sound,
a message, or a ashing light.
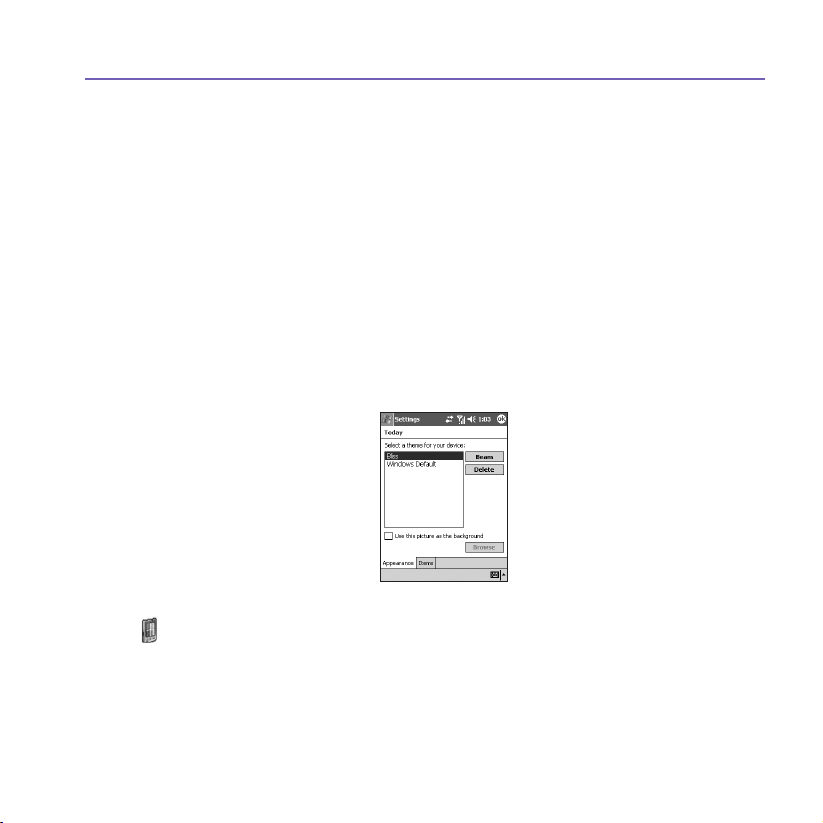
Today
Changing the background:
1. Tap the Start menu > Settings > the Personal tab > Today.
Page 17
Pocket PC Phone User Manual 81
2. On the Appearance tab, select the desired theme for the background. To use your own
background, select Use this picture as the background then tap Browse to locate the
desired le.
3. Choose a folder and tap the le you want, then tap OK.
NOTE: The recommend picture size for the background is 240x320 pixels in jpeg le
format. To beam a favorite theme to a friend, select the desired theme, and tap Beam on
the Appearance tab
Customizing the displayed information:
1. Tap the Start menu > Settings > the Personal tab > Today > the Items tab.
2. Select the information you want displayed on the Today screen.
3. To customize the information further, select an information type, and then tap Options
(not available for all information types).
About
The Version tab displays important device information, including the amount of memory
installed. On the Device ID tab, you may need to change the device name if you are
unable to connect to a network because another device with the same name is already
connected.
Page 18

Pocket PC Phone User Manual82
Pocket PC Phone User Manual 83
Backlight
Using the backlight on battery power substantially reduces battery life. Tap the Start menu
> Settings > the System tab > Backlight.
n Tap the Battery power tab to turn ON/OFF the backlight when using battery power.
n Tap the External power tab to turn ON/OFF the backlight when using external power.
n Tap the Brightness tab to adjust the brightness level.
Clock & Alarms
Tap the Start menu > Settings > the System tab > Clock & Alarms.
n If you visit a particular time zone often, select it as your Visiting time zone on the Time
tab so that you can quickly see the correct date and time.
n You can use your device as a travel alarm clock by setting a wake-up alarm on the Alarms
tab. Tap the alarm icon to select the type of alarm you want.
n To change the way the date or time is displayed on your Pocket PC Phone, go to Regional
Settings by tapping the Start menu > Settings > the System tab > Regional Settings.
Memory
You may need to stop a program if it becomes unstable or the program memory is low.
Tap the Start menu > Settings > the System tab > Memory.
n The Main tab displays the amount of memory the system has allocated to le and data
storage versus program storage. This tab also displays the amount of memory in use versus
the available memory. For information about making memory available, see Appendix A.
Page 19

Pocket PC Phone User Manual 83
n The Storage Card tab displays how much memory is available on the storage card that
is inserted into your device. If you have more than one card inserted, tap the list box and
then the name of the storage card whose information you want to view.
n The Running Programs tab displays the list of currently active programs. You can stop a
program by selecting it in the list and then tapping Stop or just tap Stop All to stop all the
running programs.
You may need to stop a program if it becomes unstable or the program memory is low.
Power
Tap the Start menu > Settings > the System tab > Power.
n The Battery tab displays the amount of battery power remaining. Battery power depends
on the battery type and how the device is being used.
n On the Advanced tab, you can select options for turning off your device to conserve battery
power. To conserve the most power, select the option that turns off the device after 3 minutes
or less.
Permanent Save
You can choose to back up Contacts and Appointments, Tasks, and Connection Setting to non-volatile memory. Backing them up in this way means they will not be lost in the
event your device loses all power and you have to perform a full reset.
To back up to FlashROM:
1. Tap the Start menu > Settings > the System tab > Permanent Save.
2. Select the desired item by checking the boxes. Tap OK.
When you elect to back up Contacts and Appointments, your Pocket PC Phone will
automatically back up newly added contacts, appointments or tasks items. This will not
happen for connection settings if you add new connections you will need to back it up
manually.
Page 20

Pocket PC Phone User Manual84
Pocket PC Phone User Manual 85
To restore to FlashROM:
1. Tap the Start menu > Settings > System tab > Permanent Save.
2. Select the desired item by checking the boxes > OK.
5.2 Phone Settings
You can easily view and change settings, such as the ring type and ring tone to be used
for incoming calls, and the keypad tone to be used when entering phone numbers. You
can also protect your phone from unauthorized use. There are two ways to change phone
settings:
n Tap the Start menu > Settings > the Personal tab > Phone.
n To change the phone settings from the Phone keypad, tap Tools > Options.
Ring type
You can change the way that you are notied of incoming calls. For example, you can
choose to be notied by a ring, a vibration, or a combination of both. Tap the Ring type
list, and select the desired option.
Ring tone
Tap the Ring tone list, then select the sound you want to use.
n To set .wav or .mid les as ring tones, use ActiveSync on your PC to copy the le to the
\Windows\Rings folder on your device. Select the sound from the Ring tone list.
n To download ring tones, you can make a connection to the Internet and then download
ring tones that are compatible with the .wav or .mid formats.
Page 21

Pocket PC Phone User Manual 85
Add ring tone
Add Ring Tone allows you to quickly nd and display all the ring tones stored on your
device, gives you the option to listen, add, or remove them from the Phone Settings list
mentioned above.
1. To display all ring tones on your device, you can tap the Start menu > Settings > System
> Add Ring Tone. The program will automatically list and display all the .wav and .mid
les on your Pocket PC Phone.
2. After the ring tones have loaded, you can see that some are already selected. These ones
are presently listed in the phone settings.
3. To play a ring tone, select one by tapping it, and then tap play. If you don’t like the ring
tone, deselect it. This will add/remove the selected/deselected ring tones from the list in
your phone settings.
Keypad tone
You can change the tone you hear when entering a phone number on the keypad. If set to
Tones, the tone is heard continuously for as long as the number on the keypad is pressed.
If set to Beep, the tone is heard only for one or two seconds.
1. Tap the Keypad list, then select the option you want.
2. To prevent tones from being heard when entering a phone number, select Off.
Network
With network settings, you can view available networks, determine the order in which your
Pocket PC Phone accesses another network if the current one is unavailable, and specify
whether you want to change networks manually or automatically. The current network will
remain active until you change it, lose your signal, or change your SIM card.
n The network currently in use will be listed at the top of the screen.
n When your current network is unavailable, tap Select Network to select an alternate.
Page 22

Pocket PC Phone User Manual86
Services
The Services tabs are primarily used to set options for incoming calls, such as Call
Forwarding, Call Waiting, and Caller ID. To change service settings from the phone dial
screen, tap Tools > Options > the Services tab > select a service > Get Settings.
Feature Function
Call Barring Blocks incoming and/or outgoing calls.
Caller ID Identies caller by displaying their name and/or phone number.
Call Forwarding Forwards all or selected incoming calls to a different number.
Call Waiting Noties of an incoming call while you are on the phone.
Voice Mail/SMS Shows the correct numbers in the phone settings.
More
On the More tab, you can access the settings for Automatic Pickup, and Broadcast
Channels.
You can choose to receive real time news and information such as trafc and weather
reports by enabling the Broadcast Channels. This service is dependent on your mobile
service operator.
Page 23

Chapter 6
Getting Connected
6.1 About Connections
6.2 Connecting to the Internet
6.3 CSD Line Type
6.4 Pocket Internet Explorer
6.5 Network Cards Settings
6.5 Terminal Services Client
6.7 Bluetooth
6.8 Wireless Modem
Page 24
Pocket PC Phone User Manual88
Pocket PC Phone User Manual 89
6.1 About Connections
This device is equipped with powerful networking functions that allow you to connect to
the Internet through a GPRS network or a Bluetooth modem. You can also use an external
modem with this device to access the Internet.
You can set up connections to the Internet and to a corporate network at work to browse
the Internet, send and receive E-mail, use instant messages, and synchronize with
ActiveSync.
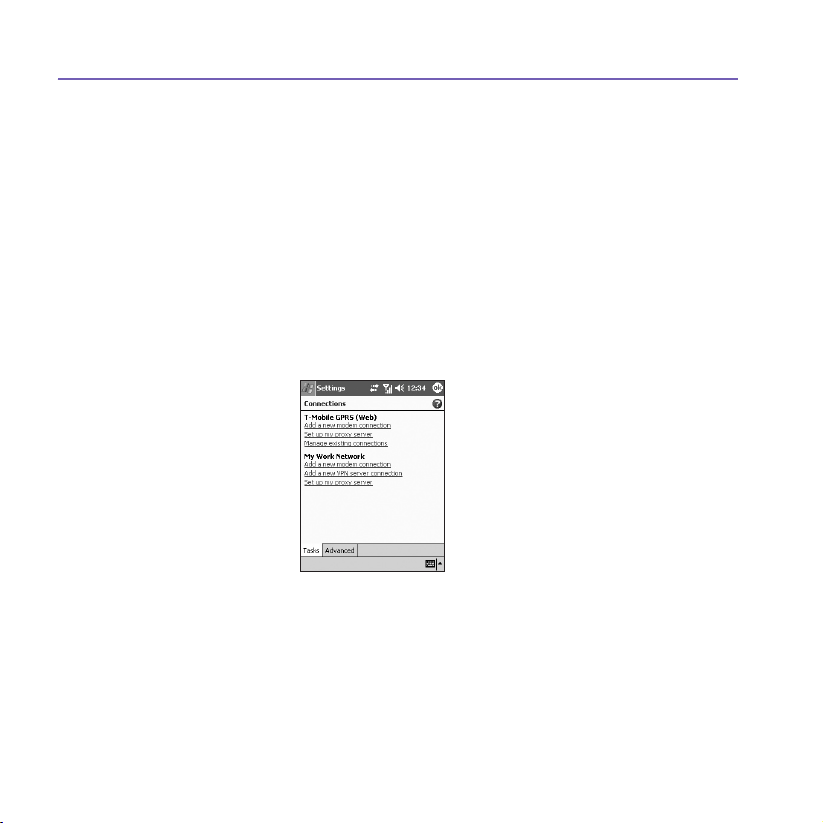
Your Pocket PC Phone has two groups of connection settings: My ISP and My Work
Network. My ISP settings are used to connect to the Internet, and My Work Network
settings can be used to connect to any private network, such as a corporate network. Fill
in the settings and you are ready to connect to the Internet.
6.2 Connecting to the Internet
You can use My ISP settings to connect to the Internet and use different connection methods
to send and receive E-mail messages and surf the Internet.
Page 25

Pocket PC Phone User Manual 89
Connect to the Internet via an ISP:
1.
Obtain the following information from your ISP (Internet Service Provider):
n ISP server phone number.
n User name.
n Password.
n Access point name. (Required for GPRS connection).
2. Tap the Start menu > Settings > the Connections tab > Connections.
3. To create a new connection in My ISP, tap Add a new modem connection, and follow the
instructions in the Make New Connection wizard.
4. Wireless connections can be made via a mobile phone network or GPRS. If you are using
a mobile phone network to connect, tap Cellular Line in the Select a modem list. If you
are using GPRS, tap Cellular Line (GPRS).
n To view additional information for any screen, tap .
n To start the connection, switch to Pocket Internet Explorer and browse to a Web
page. Your device will automatically connect.
To change modem connection settings, in either My ISP or My Work Network, tap Manage
existing connections. Select the desired modem connection, tap Settings, and follow
the instructions on the screen.
Connecting to a private network
1. Obtain the following information from your network administrator:
n Server phone number.
n User name.
n Password.
2. Tap the Start menu > Setting > the Connections tab > Connections.
3. In My Work Network, follow the instructions for each type of connection.
4. To start the connection, start using a related program. For example, switch to Pocket
Internet Explorer and browse to a Web page. Your device will automatically connect.
Page 26

Pocket PC Phone User Manual90
Pocket PC Phone User Manual 91
6.3 CSD Line Type
This program allows you to choose the line type when you make a circuit switch data
connection.
To change a CSD Line type:
1. Tap the Start menu > Settings > Connections > CSD Line Type.
2. In Data rate, select a value. In Connection element, choose a type from that drop-down
menu. Tap OK.
NOTE: The default setting on your Pocket PC Phone is set for the most optimal use. Do
not change this setting unless you have trouble using the circuit switch data connection.
GPRS Settings
This program allow you to choose the GPRS setting method when you make a GPRS
connection. Choose between these two required authentication methods:
n PAP authentication: Password Authentication Protocol is a simple authentication
protocol used to authenticate a user to a remote access server of an ISP (Internet Service
Provider).
n CHAP authentication: Challenge Handshake Authentication Protocol is used to
negotiate the most secure form of encrypted authentication supported by both server
and client.
NOTE: Changing these settings may cause your data communications to no longer operate.
Please consult your service provider before altering these settings.
Page 27
Pocket PC Phone User Manual 91
6.4 Pocket Internet Explorer
Once connected, you can use Pocket Internet Explorer to surf the Internet. While surng,
you can also download les and programs to be installed on your device from the Internet
or intranet.
During synchronization with your PC, download your favorite links and mobile
favorites that are stored in the Mobile Favorites folder in Internet Explorer on the PC.
To
synchronize and download your favorite links from your PC, in your PC's ActiveSync,
select, Favorites in the Tools Menu > Options > Sync Options.
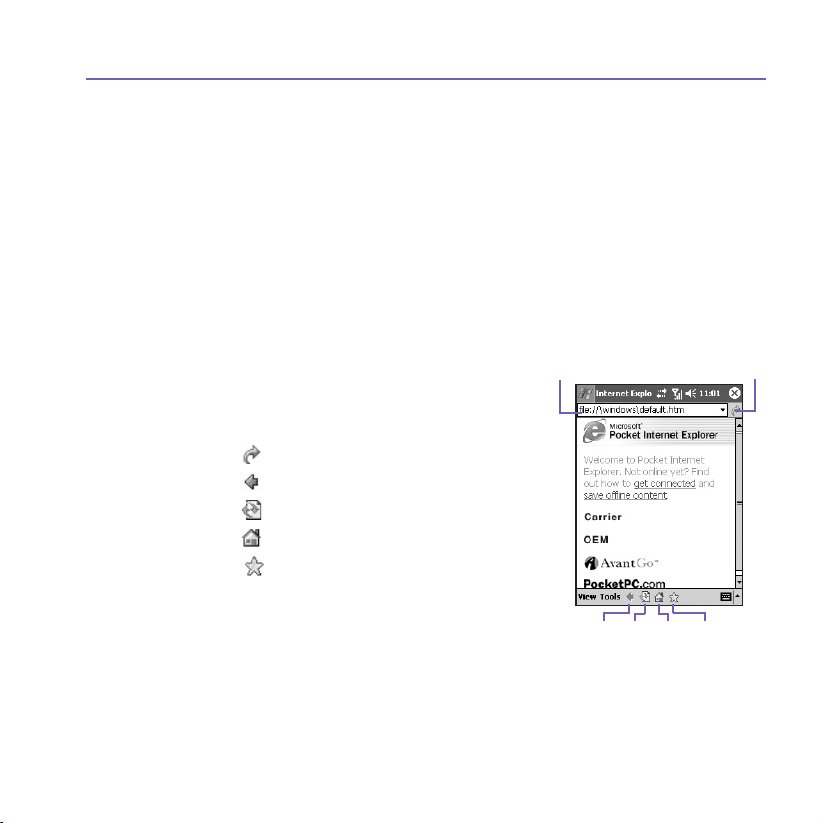
Browsing the Internet
Open the Pocket Internet Explorer screen by tapping the Start menu > Internet
Explorer.
1. In the address bar that appears at the top of
the screen, enter the Web address you want to
connect to. Tap the down arrow to choose from
previously entered addresses.
2. Tap to go to the web address you entered.
3. Tap to go back to the previous page.
4. Tap to refresh the web page on the screen.
5. Tap to go back to the Home page.
6. Tap (the Favorites button), then tap the
favorite address you want to view. To add a
favorite link while using your Pocket PC Phone,
go to the page you want to add, tap and hold on
the page, and tap Add to Favorites on the pop-
up menu.
2
3
4 5 6
1
Page 28

Pocket PC Phone User Manual92
Pocket PC Phone User Manual 93
6.5 Network Cards Settings
Use a network (Ethernet) card to connect directly to a network. Once connected, you can
view the Internet or intranet, or download e-mail. Make sure to purchase and congure a
network card that is compatible with your Pocket PC Phone.
To setup your network card:
1. Insert the network card into your Pocket PC Phone.
2. The rst time you insert the card. Network Settings will appear automatically. Or to change
later, tap the Start menu > Setting > the Connections tab > Network Cards.
3. To enter specic server information, tap the appropriate adapter.
To start a connection, insert the network card, and begin using a desired program.
To change network card settings:
1. Tap the Start menu > Setting > the Connections tab > Network Cards.
2. In the My network card connects to: drop-down box, tap either The Internet or Work.
If you are connecting to your ISP at home, tap The Internet. If you are connecting to a
private network such as a corporate network at work, tap Work.
3. Tap the appropriate adapter in the Tap an adapter to modify settings: box, the IP address
will now appear in the IP Address box on the IP Address tab.
4. To change TCP/IP settings if your ISP or private network does not use dynamically-assigned
IP addresses, tap Use specic IP address and enter the requested information. Contact
your ISP or network administrator to get the IP address, subnet mask, and/or default gateway
(if needed).
5. To change DNS and WINS settings if your ISP or private network does not use dynamically-
assigned IP addresses, tap the Name Servers tab and enter the requested information.
Servers that require an assigned IP address may also require a way to map computer
names to IP address. DNS and WINS are the resolution options supported on your Pocket
PC Phone.
Page 29

Pocket PC Phone User Manual 93
6.6 Terminal Services Client
Using the Terminal Services Client, you can log onto a PC running Terminal Services
or Remote Desktop and use all of the programs available on that PC from your mobile
device. For example, instead of running Pocket Word, you can run the PC version of Word
and access all of the .doc les on that PC from your Pocket PC Phone.
Connecting to a Terminal Server
Start a remote connection to the server via a GPRS or Wireless LAN connection:
1. Tap the Start menu > Programs > Terminal Services Client.
2. To connect to a server you have previously connected to, in Recent Servers, tap a server.
To connect to a new server, enter the server’s name in the Server box. Select the Limit
size of server desktop to t on this screen check box only when using applications that
have been specically sized for use with the Pocket PC Phone.
3. Tap Connect.
NOTE: If the network administrator has congured Terminal Services Client to reconnect
to disconnected sessions, and you previously disconnected from a Terminal Server without
ending the session, the Terminal Services Client reconnects to that session.
Navigating within Terminal Services Client
Once connected to the server, the PC’s screen may more than ll your mobile device’s
screen. If scroll bars are displayed on the server’s screen, you will see more than one set of
scroll bars on your Pocket PC Phone: one to scroll information on the PC, and one to scroll
the PC display through the Terminal Services window in Terminal Services Client.
To ensure you are scrolling the PC display through Terminal Services Client, use the
ve directional buttons at the bottom of the Terminal Services Client screen. To better t
Page 30

Pocket PC Phone User Manual94
Pocket PC Phone User Manual 95
information on your mobile device’s screen, select Limit size of server desktop to t on
this screen. For best effect, programs on the desktop computer should be maximized.
Disconnecting without ending a session
The following commands must be accessed from the Start menu in the Terminal Services
window used to access the PC’s commands. Do not use the Start menu on your Pocket
PC Phone.
1. In the Terminal Services window, tap Start > Shutdown.
2. Tap Disconnect.
If your administrator has congured Terminal Services Client to reconnect to disconnected
sessions, you will be reconnected to this session the next time you connect to this
server.
Disconnecting and ending a session:
1. In the Terminal Services Client window, tap Start > Shutdown.
2. Tap Log Off.
6.7 Bluetooth
Bluetooth is a short-range wireless communications technology. Devices with Bluetooth
capabilities can exchange information over a distance of about 10 metres without requiring
a physical connection.
Unlike infrared, you don't need to line up the devices to beam information with Bluetooth.
The devices only need to be within a range of about 10 metres. You can even beam
information to a device in a different room, as long as it's within range. The software included
with your Pocket PC Phone allows you to use Bluetooth in the following ways :
Page 31

Pocket PC Phone User Manual 95
n Beam information, such as les, appointments, tasks, and contact cards,
between devices that have Bluetooth capabilities. For example, if you and a
co-worker each have a device with Bluetooth, you can beam items between
your devices, such as les, contact cards, appointments, tasks, and so forth.
n Create a dial-up modem connection between your device and a Bluetooth
phone. You can then use the Bluetooth phone as a modem.
To access to the Bluetooth settings screen :
1. To turn on/off the Bluetooth mode and create a new bond with other device, tap Start
menu > Settings > Connections tab >Bluetooth. Alternatively, you can also tap the small
icon for Bluetooth connection settins in the right lower corner on Today screen.
2. To add an extra layer of security when beaming information with others or to set a Bluetooth
syncronization tap Start menu > Settings > System tab > Bluetooth Settings.
Bluetooth modes
To turn on Bluetooth On
Check Turn on Bluetooth option.
To turn off Blue tooth Off
Uncheck Turn on Bluetooth option.
In this mode, you can neither send nor receive information by using Bluetooth. You might
want to turn the radio off at times in order to conserve battery power, or in situations where
radio use is prohibited, for example on airplanes and in hospitals.
By default the Bluetooth radio is turned off. If you turn it on, and then turn off your
device, the Bluetooth radio also turns off. When you turn on your device again, the
Bluetooth radio automatically turns on .
Page 32

Pocket PC Phone User Manual96
Pocket PC Phone User Manual 97
NOTE: In a situation where Bluetooth is on but radio is off, it is not possible to turn on
radio. If you wish to turn on radio, turn off Bluetooth rst, and then turn on radio.
To make your device discoverable
Check Make this device discoverable to other devices option.
The Bluetooth radio is turned on, and all of the other Bluetooth devices within range (about
10 metres) can detect your device and attempt to beam information to it, establish a bond,
or use a Bluetooth service. In this mode, other devices can detect your device whether or
not a bond has been created; however, in order to receive a beam from another device,
you must accept it on your device.
Other Bluetooth devices can now detect your device and attempt to beam information to
it, establish a bond, or use a Bluetooth service. Note that to receive beamed information,
you must accept it on your device.
Selecting Discoverable also turns on your Bluetooth radio.
If you no longer want your device to be discoverable, uncheck Turn on Bluetooth option
or Make this device discoverable to other devices option to leave the radio on, but not
allow detection by other devices.
Bonds
A bond is a relationship that you create between your Pocket PC Phone and another
Bluetooth device in order to exchange information in a secure manner. Creating a bond
involves entering the same personal identication number (PIN) on the two devices you
want to bond. You need only create a bond once between two devices. Once a bond is
created, the devices recognize the bond and are able to exchange information without
your entering a PIN again.
Page 33

Pocket PC Phone User Manual 97
a. To create a Bond:
You can create a bond between your device and another device that has Bluetooth. Once
you do this, Bluetooth doesn’t need to be in discoverable mode in order for you to beam
information between the two devices; the Bluetooth radio only needs to be turned on.
1. Make sure that the two devices are within 10 metres of one another and that Bluetooth is
in discoverable mode on both devices.
2. Tap Start menu > Settings > Connections tab.
3. Tap Bluetooth > Devices tab > New. Your device searches for other Bluetooth devices
and displays them in the list.
4. Tap the name of the other device in the list, and then Next.
5. In PIN, enter a PIN of between 1 and 16 characters and tap Next.
6. Enter the same PIN on the other device.
7. If you want, in Name, edit the name of the other device.
8. Tap Finish.
b. To accept a Bond:
1. Make sure that Bluetooth is turned on and in discoverable mode.
2. When prompted to bond with the other device, tap OK.
3. In PIN, enter a PIN of between 1 and 16 characters, and tap Next. You must enter the same
PIN that was entered on the device requesting the bond.
4. If you want, in Name, edit the name of the device requesting the bond.
5. Tap Finish.
The bond is created. You can now exchange information with the other device.
Page 34

Pocket PC Phone User Manual98
Pocket PC Phone User Manual 99
c. To rename a Bond :
1. Tap Start menu > Settings > Connections tab.
2. Tap Bluetooth > Devices tab.
3. Tap the bond to rename.
4. In Name, enter a new name for the bond.
5. Tap Finish.
d. To delete a Bond :
1. Tap Start menu > Settings > Connections tab.
2. Tap Bluetooth > Devices tab.
3. Tap and hold the bond to delete.
4. Tap Delete.
Beaming Information with Bluetooth
1. Tap and hold an item to beam, such as an appointment in Calendar, a task in Tasks, a
contact card in Contacts, or a le in File Manager.
2. Tap Beam [type of item].
3. Tap the device to which you want to send the beam.
The item is beamed to the device you selected.
If the device that you want to beam to doesn’t appear in the list, make sure that it is
turned on, in discoverable mode, and within 10 metres of your device. Also, make sure
that your Bluetooth radio is turned on.
Page 35

Pocket PC Phone User Manual 99
Receiving a Bluetooth Beam
1. Make sure that your device is congured to receive incoming beams and that Bluetooth
is in discoverable mode.
2. Make sure that your device is within 10 metres of the device beaming the information.
3. When prompted to receive an incoming beam, tap Yes.
The information is now stored on your device.
Using a Bluetooth Phone as a Modem
You can use a phone that has Bluetooth capabilities as a modem for your device. To do this,
you create a Bluetooth modem connection on your device and then send information to the
phone by using Bluetooth. The phone relays the information over the phone line and then
sends back to your device any information that you had requested over the connection.
Once you create a modem connection to the Bluetooth phone, you can reuse it whenever
you want to use the phone as a modem.
1. Make sure that the Bluetooth phone is turned on, that your device’s and the phone’s
Bluetooth radios are turned on, and that your device and the phone are within 10 metres
of one another.
2. If you have not already done so, create a Bluetooth phone connection by following
3. Tap Start menu > Settings > Connections tab.
4. Tap Connections > Add a new modem connection.
5. Enter a name for the connection.
6. In the Select a modem list, tap Bluetooth > Next.
7. Make sure that the phone is discoverable. Some phones may also need to be
pairable in order to accept a bonding request. For more information, see your phone
documentation.
Page 36

Pocket PC Phone User Manual100
Pocket PC Phone User Manual 101
8. If the phone appears in the My Connections list, skip to step 14. If not, tap New and follow
the remaining steps.
9. In the list, tap the phone and then Next.
10. In PIN, enter a PIN of between 1 and 16 characters, and tap Next.
11. Enter the same PIN on the phone.
12. If you want, in Name, edit the name of the phone.
13. Tap Finish.
14. In the My Connections list, tap the phone, and then Next.
15. Enter the phone number to dial for this connection and tap Next.
16. In User name, Password, and Domain, enter the logon information for this connection
and tap Finish.
17. Start using the program that uses the Bluetooth phone connection; for example Inbox to
send and receive e-mail, or Internet Explorer to browse the Web.
6.8 Wireless Modem
This utility will simulate your device as a wireless modem, and let your PC/Notebook be
connected to a wireless network. Before creating a new modem via selected connection
type, you still need to install the drivers on your PC/Notebook. For more details about
the drivers installation and the minimum requirements of your PC/Notebook, please refer
to Application CD.
1. Tap Start menu > Programs > then tap Wireless Modem.
2. Select a connection type.
3. Connect your device via infrared to a note-book or PC, and then tap Start.
Before you press the Start button, please make sure your device is with a GPRS SIM
card and you have connected this device to your PC/Notebook by IrDA connection and
disabled the Activesync.
Page 37

Pocket PC Phone User Manual 101
Settings on your PC
Contact your ISP to get the APN (Access Point Name). Before you start using your
Wireless Modem with a IrDA connection, you need to create a new modem on your PC
rst:
1. Click Start menu > Settings > Control Panel > Phone and Modem Options.
2.
Add a new modem by selecting the Modem tab.
3. Enable the checkbox Don't detect my modem; I will select it from a list.
4. Select Standard Modem Types in the Manufacturers eld, select Standard 33600 bps
Modem, then select Next.
5. Select your modem port and click Next.
6. When a
Modem installation is nished!
screen appears, click Finish to go back to the
Modem tab mentioned in Step 2. Now you can see a Standard 33600 bps Modem in the
modem list.
7. Highlight the modem you just created, click the Properties button, and select the Advanced
tab.
8. Enter the complete string in the Extra initialization commands: eld: AT+CGDCONT=
1,"IP","APN","",0,0
.
9. Remember to click the Change Default Preferences button after entering the required
string as mentioned above.
10. Click the General tab and set the Float control by selecting None from the drop-down
list. Keep pressing OK until the modem installation wizard exits.
A new standard modem is now set up successfully on your PC, but you still need to create
a new dial-up connection:
1. Click Start > Settings > Control Panel > Network and Dial-up Connections > Make
New Connection.
2. To continue, tap Next.
Page 38

Pocket PC Phone User Manual102
Pocket PC Phone User Manual 103
3.
Select Dial-up to the Internet. Tap Next.
4. Enable the option I want to set up my Internet connection manually, or I want to
connect through a local area network (LAN) button, and
Next.
5. Select I connect through a phone line and a modem option, and then
Next.
6. Enable the Use area code and dialing rules checkbox and enter the telephone number
*99#, and then Next.
7. Enter the username and password you use to log on to your ISP, and then click
Next.
8. Enter a name for this connection, and then
Next.
9. Select No when the installation wizard asks you to set up an Internet mail account, and
then click
Next.
10. After the installation is completed, click Finish.
Connecting via USB Port
As with the connection via IrDA, you need to check the following below before you start
using the Wireless Modem on your Pocket PC Phone via USB connection:
n A GPRS enabled SIM card is inserted in your Pocket PC Phone.
n
Disable the ActiveSync com port connection of your PC.
n Disable the Infrared function by tapping the Start menu > Settings > the Connections
tab > Beam, and then uncheck Receive all incoming beams.
n Insert your Pocket PC Phone to your PC USB connection (using the USB sync cable or
cradle).
Before setting up an USB modem, you must verify that you have the two les, USBMDM
and USBModem_Dialer, on the Application CD. Insert the Application CD into the CD-
Rom of your PC and perform the settings as follows:
1. Tap the Start menu > Programs > Wireless Modem.
Page 39

Pocket PC Phone User Manual 103
2. Select the USB connection type from the drop-down list and insert the USB cable
adapter.
3. Tap the Start button on the Wireless Modem screen of your Pocket PC Phone.
4. A Found New Hardware message will pop up on your desktop PC.
5. Select the Display a list of the known drivers for this device so that I can choose a
specic driver option, and then click
Next.
6. Select Modem from the Hardware types list, and then Next.
7. Click the Have Disk button, and then
Next.
8. Select the recognized USB Modem in the Models list, and then
Next.
After the installation
is completed, select Finish.
9. After the installation, a new USB modem will be found in the Modem list by tapping Start
> Settings > Control Panel > Phone and Modem Options on your PC.
10. Double click the USBModem_Dialer le on the Application CD and set the GPRS settings
(enter the APN assigned by your ISP) in the blank text box and press Dial to start the
connection.
Connect via Bluetooth
Before starting to use your Pocket PC Phone as a Bluetooth modem, you must be sure that
your PC is a Bluetooth-enabled device. In addition, you still need to check the following:
n A GPRS enabled SIM card is inserted in your Pocket PC Phone.
n Disable the ActiveSync BT port connection of your PC.
n Disable the Infrared function by tapping the Start menu > Settings > the Connections
tab > Beam. Uncheck Receive all incoming beams.
1. To begin, select the Start menu > Programs > Wireless Modem.
2. Select the Bluetooth connection type from the drop-down list, and tap the Start button.
3. Open your Pocket PC Phone from the Bluetooth application installed on your PC.
Page 40

Pocket PC Phone User Manual104
The interface of the Bluetooth application installed on your PC will vary, depending on
the Bluetooth module embedded or attached in your PC when you purchased it. Follow
the installation instructions of the connected Bluetooth device's manual.
Page 41

Chapter 7
Using Outlook
7.1 Calendar
7.2 Contacts
7.3 Tasks
7.4 Notes
Page 42

Pocket PC Phone User Manual106
Pocket PC Phone User Manual 107
7.1 Calendar
Use Calendar to schedule appointments, including meetings and other events. You can
check your appointments in one of several views (Day, Week, Month, and Agenda) and
set Calendar to remind you of appointments with a sound or other method. Appointments
for the day can be displayed on the Today screen.
If you use Outlook on your PC, you can synchronize appointments between your Pocket
PC Phone and PC. See Using ActiveSync in Chapter 4.
1. Tap to go back to view today's appointment.
2. Tap to display or edit the appointment details.
3. Tap to create a new appointment.
4. Tap to change the appointments in various
displayed views.
Create or change an
appointment:
1. To create an appointment, tap New. To select a
new date from a pop-up calendar, tap the display
date. To enter or select a new time, tap the display
time. Enter the appointment details, and when
nished, tap OK to return to the calendar.
2. If you are working in Day view, tap the time slot
for the new appointment and then New to have
the time automatically entered for you.
3. To change an appointment, tap it in the calendar, and then tap Edit. Change any appointment
detail by tapping it and entering the new information.
When entering a time, you can type military and abbreviated time forms, such as 2300
(becomes 11:00 PM), 913pm (becomes 9:13 PM), 911 (becomes 9:11 AM), and 9p (becomes
9:00 PM).
3
1
4
2
Page 43

Pocket PC Phone User Manual 107
Send a meeting request
You can use Calendar to set up meetings with users of Outlook or Pocket Outlook. The
meeting request will be created automatically and sent either when you synchronize Inbox
or when you connect to your E-mail server.
1. Create an appointment and enter the meeting information.
2. Tap Attendees (you will need to hide the input panel to see this box).
3. Select the meeting attendees from the list of E-mail addresses you’ve entered in Contacts.
Only those contacts with E-mail addresses will be displayed.
4. Select other desired options and then tap OK.
5. Messaging automatically creates a meeting request and sends it to the attendees the next
time you synchronize with your PC. Any textual notes entered in the Notes tab (excluding
writing or recordings) will also be sent.
If you are sending the meeting request through a connection to an ISP or the network, rather
than through synchronization with your PC, tap the Tools > Options > Appointments
tab. In Send meeting requests via, tap the service you want to use to send the meeting
request.
Tap the service
you want to use to
send the meeting
request.
Page 44

Pocket PC Phone User Manual108
Pocket PC Phone User Manual 109
Use the summary screen
When you tap an appointment in Calendar, a summary screen is displayed. To change
the appointment, tap Edit.
Set a reminder for an appointment:
1. In the Calendar, tap the appointment, and then tap the upper portion of the summary screen
when editing the appointment.
2. Tap Reminder and select Remind me.
3. To change how many minutes before the appointment you are to be reminded, tap the
minutes displayed.
To automatically set a reminder for all new appointments, in the calendar, tap the Tools >
Options > the Appointments tab > Set reminders for new items.
Beam an appointment
To beam an appointment, in the calendar list, tap and hold the appointment. On the pop-up
menu, tap Beam Appointment. When using infrared (IR), align the IR ports between the
devices so that they are unobstructed and within close range of each other.
7.2 Contacts
Contacts maintains a list of your friends and colleagues so that you can easily nd the
information you’re looking for, whether you’re at home or on the road. You can enter both
personal and business information.
If you use Outlook on your PC, you can synchronize contacts between your device and
PC. See ActiveSync in Chapter 4.
Page 45

Pocket PC Phone User Manual 109
View contacts:
1. Select the category of contacts you want displayed in the list.
2. Tap and enter part of a name to quickly nd it in the list.
3. Tap letters, such as h (home), w (work), or m (mobile) to the right of the contact to see
additional phone numbers and E-mail addresses.
4. Tap to display or edit the contact details.
5. Tap and hold to display a pop-up menu of available actions.
To change the way information appears in the list, tap Tools and then Options.
Create or change a contact:
1. Tap the Start menu > Programs > Contacts > New.
2. Using the input panel, enter a name and other contact information. You will need to scroll
down to see all available elds.
3. To assign the contact to a category, scroll to and tap Categories and select a category
from the list. In the contact list, you can display contacts by category.
4. To add notes, tap the Notes tab. You can enter text, draw, or create a recording.
5.
To change a contact, tap it in the contact list, and then tap Edit. To cancel edits, tap Edit > Undo.
When nished, tap OK to return to the contact list.
If you enter a name with more than 2 words, the middle word will be recorded as a middle
name. If your contact has a double rst or last name, tap the Name arrow and enter the
names in the proper box.
Page 46

Pocket PC Phone User Manual110
Pocket PC Phone User Manual 111
Find a contact:
n Tap the Start menu > Programs > Find, enter the contact name (rst, last, or middle),
phone number, or address, select Contacts for the type, and then tap Go.
n From Contacts, start typing a contact name until you see it displayed on the screen. To
show all contacts again, tap the text box at the top of the screen and clear the text, or tap
the arrow icon to the right of the text box.
n Tap one of the sets of letters displayed at the top of the contact list. This takes you to the
contact names beginning with those letters.
n In the contact list, tap the category list (labeled All Contacts by default) and tap the category
to which you’ve assigned a contact. To show all contacts again, select All Contacts. To
view a contact not assigned to a category, select No Categories.
n To view the names of companies your contacts work for, in the contact list, tap View > By
Company. The number of contacts that work for that company will be displayed to the right
of the company name.
n Press and hold the top of the navigation pad until alphabetical letters appear on the screen in
large type. Then use the navigation pad to scroll through the alphabet and select a letter.
Beam a contact:
1. To beam a contact, in the contact list, tap and hold the contact. On the pop-up menu, tap
Beam Contact.
2. To beam multiple contacts, tap and drag to select the contacts. Then, tap Tools > Beam
Contacts.
When using infrared (IR), align the IR ports between the devices so that they are
unobstructed and within close range.
Page 47

Pocket PC Phone User Manual 111
Change options:
1. In the contact list, tap Tools > Options.
2. To increase the available space for displaying contacts in the list, clear Show ABC tabs.
3. The area code and country/region for new contacts are automatically entered based on
the information in Country/Region settings.
Using the summary screen
When you tap a contact in the contact list, a summary screen is displayed. To change the
contact information, tap Edit.
7.3
Tasks
Use Tasks to keep track of things you need to do. A variety of task information can be
displayed on the Today screen.
If you use Outlook on your PC, you can synchronize tasks
between your device and PC. See ActiveSync in Chapter 4.
Create or change a task:
1. To create a task with detailed information, such as start and due dates, tap the Start menu
> Programs > Tasks > New.
2. In the task list, you can display tasks by category.
3. To assign the task to a category, tap Categories and select a category from the list. To
create a new category, tap the Add/Delete tab, enter the category name, and then tap
Add. The new category is automatically selected in the Select tab.
4. To add notes, tap the Notes tab. You can enter text, draw, or create a recording. When
nished, tap OK to return to the task list.
5. To change a task, tap it in the task list, and then tap Edit. To quickly create a task, enter
text in the Tap here to add a new task box at the top of the screen. If you don't see this
box, tap Tools > Entry Bar.
Page 48

Pocket PC Phone User Manual112
Pocket PC Phone User Manual 113
Set a reminder for a task:
1. In the task list, tap the task, and then tap Edit.
2. Tap the Due eld and set a due date if you have not already done so.
3. Tap the Reminder eld and select Remind me. You will be reminded at 8:00 in the
morning on the due date.
4. To change the reminder date, tap the date displayed.
To be automatically reminded of new tasks with a due date, in the task list, tap Tools >
Options and select Set reminders for new items.
To choose how you are reminded, for example by a sound, tap the Start menu > Settings
> the Personal tab > Sounds & Notications.
Using the summary screen
When you tap a task in the task list, a summary screen is displayed. To change the task,
tap Edit.
Beam a task
To beam a task, in the task list, tap and hold the task. On the pop-up menu, tap Beam
Task.
7.4 Notes
Notes help you quickly capture ideas, notes, and thoughts. You can create a note using
written and typed text, drawings, and recordings. You can also share your notes with
others through E-mail, infrared, and synchronization with your PC. Please see Chapter 4
for more information.
To create documents with advanced formatting or templates, such as bulleted lists and
tabs, use word processing software developed for your device, such as Pocket Word.
Page 49

Pocket PC Phone User Manual 113
Create a note:
1. Tap the Start menu > Prgrams > Notes > New.
2. Create your note by writing, drawing, typing, and recording, see Entering Information in
Chapter 2 for more information about using the input panel, writing and drawing on the
screen, and creating recordings.
You can insert the date in a note. First, deselect and make sure that no drawings are
selected. Next, tap and hold anywhere on the note and then tap Insert Date.
Send a note by E-mail:
1. If you haven’t already set up Messaging to send and receive messages, please do so now.
See Chapter 8.
2. In the note list, tap and hold the note or recording. To select multiple notes or recordings,
tap and drag. Then, tap and hold the selected items.
3. On the pop-up menu, tap Send via E-mail. A new message is created with the item
attached.
Beam a note
To beam a note, in the note list, tap and hold the note. On the pop-up menu, tap Beam
File.
Change options:
1. In the note list, tap Tools > Options.
2. From the Default template list, you can select a pre-designed template to use with all new
notes.
2. If you store most of your notes and recordings on a storage card, in Save to, tap Storage
card to have new items automatically stored on your storage card.
Page 50

Pocket PC Phone User Manual114
Page 51

Chapter 8
Messaging Features
8.1 E-Mail and Text Messages
8.2 MSN Messenger
8.3 MMS Messages
Page 52

Pocket PC Phone User Manual116
Pocket PC Phone User Manual 117
8.1 E-Mail and Text Messages
You can receive E-mail and text messages in Messaging. E-mail messages are sent by
using an address you receive from your Internet service provider (ISP), an E-mail service
provider, or your employer. Text messages are sent and received through your phone
service provider by using a phone number as the message address.
You can also send and receive E-mail by synchronizing with your PC, or by connecting to a
Post Ofce Protocol 3 (POP3) or Internet Message Access Protocol 4 (IMAP4) mail server.
You need to set up an E-mail account for each method that you use except for an Outlook
E-mail account, which is set up by default. The Outlook E-mail account on your Pocket
PC Phone is used to store messages that you send and receive through synchronization
with a PC. Account names appear when you open the folder list, which is located on the
left, under the navigation bar, in the message list view.
How you download copies of messages depends on how you are receiving messages:
n If you receive E-mail messages through a remote E-mail server, follow the instruction as
described on the next page, under "Downloading messages from a server."
n
If you receive E-mail messages through ActiveSync, begin synchronization. For more
information, please refer to Chapter 4.
n Text messages are automatically received when your phone is turned on. Otherwise,
messages are held by your service provider until the next time your phone is turned on.
With synchronization, messages are synchronized between the Pocket PC Phone Inbox
folder for the Outlook E-mail account and the PC Inbox by using ActiveSync and Microsoft
Exchange or Outlook. For more information, see Chapter 4.
Page 53

Pocket PC Phone User Manual 117
Setting up an account:
Open Messaging on your Pocket PC Phone by tapping the Start menu > Messaging.
Select Outlook E-mail in Accounts. Tap Accounts, New Account to set up an account.
Accounts > New Account. The E-mail Setup wizard will prompt you to ll in the necessary
information to complete the setup.
1. Fill in your E-mail address, then tap Next.
2.
The Auto conguration will attempt to connect your Pocket PC Phone to your E-mail server
and automatically download the necessary connection settings.
If Auto conguration is
unsuccessful, contact your ISP or network administrator.
3. Enter Your name, User name and Password, then tap Next. If you check the Save
password box, your device will not ask for your password the next time you log in to an
E-mail account. However, other people can access your account if you lose the device.
4. Select the appropriate Account type that your E-mail provider supports (POP3 or IMAP4).
E
nter a Name for your E-mail account, then tap Next.
5. Enter your E-mail provider’s server name information for Incoming mail and Outgoing
mail, then tap Finish.
When nished, tap Accounts. Your new E-mail account will be displayed under this menu.
You can start connecting to your E-mail server at this point.
You can set up several E-mail accounts, including your Outlook E-mail account. A Text
Messages account and an MMS account is already pre-congured in Messaging.
Changing options for an account:
1. Tap Accounts > Accounts.....
2. Tap the name of the account, and follow the instructions on the screen.
Page 54

Pocket PC Phone User Manual118
Pocket PC Phone User Manual 119
Deleting an account:
1. Tap Accounts > Accounts....
2. Tap and hold the name of the account > and then tap Delete.
You cannot delete the text messages and MMS account.
Downloading messages from a server
In Messaging, tap Accounts > Connect to open a connection to the Internet or your
corporate network, depending on the account. For more information, see Chapter 6.
1. Tap Accounts and ensure that the account you want to use is selected (marked by a
bullet).
2. Tap Connect. The messages on your device and E-mail server are synchronized. New
messages are downloaded to your Pocket PC Phone Inbox folder, messages in your Pocket
PC Phone Outbox folder are sent, and messages that have been deleted from the server
are removed from your Pocket PC Phone Inbox. Tap a message in the message list to
open it.
3. If you read a message and decide that you need the full copy, tap Edit > Mark for Download
while in the message window. If you are in the message list, tap and hold the message, and
then tap Mark for Download. This will also download message attachments if you selected
those options when you set up the E-mail account. You can also choose to download full
copies of messages by default.
4. When nished, tap Accounts > Disconnect.
Receiving attachments
An attachment sent with an E-mail message or downloaded from the server appears as
an icon at the bottom of the message in its own window pane. Tapping the attachment
icon opens the attachment if it has been fully downloaded. You can mark an attachment
for downloading (IMAP4 account only) the next time you connect.
Page 55

Pocket PC Phone User Manual 119
Through synchronization:
1. Start ActiveSync on your PC.
2. Click File > Mobile Device > and then select your mobile device.
3. Click Tools > and then click Options.
4. Select the message account > Settings, and then select Include File Attachments.
Through a remote IMAP4 E-mail server:
1. From Messaging, tap Accounts > Accounts... > IMAP4.
2. Tap Next until you reach Server Information > and then tap Options.
3. Tap Next twice > Ge t full copy of me ssages and When getti ng full copy get
attachments.
Embedded images and objects cannot be received as attachments. An embedded message
can be viewed as an attachment when using IMAP4 to receive E-mail. However, this feature
does not work if TNEF (Transport Neutral Encapsulated Format) is enabled so that you
can receive meeting requests.
Composing and sending a message:
Text Messages (SMS) cannot be used to send E-mail messages. You can tap the double
arrows next to the Subj. eld to show the complete header. From the Account list, select
an E-mail account.
If you are sending a text message (SMS) and want to know if it was received, before sending
the message, tap Tools > Options > Request message delivery notication.
You can also send a text message from the Phone Dialer Screen by tapping Tools >
Send Text Message. A new message screen will appear in Messaging.
Page 56

Pocket PC Phone User Manual120
Pocket PC Phone User Manual 121
1. In the message list, tap Accounts and select Outlook E-Mail, Text Messages (SMS), or
the desired E-mail account.
2. Tap New.
3. Enter the E-mail address or text message address of one or more recipients, separating
them with a semicolon. To access addresses and phone numbers from Contacts, tap To.
or tap the Address Book button.
4. Enter your message. To quickly add common messages, tap My Text and tap a desired
message.
5. To check spelling, tap Tools > Spell Check.
6. Tap Send. If you are working ofine, the message is moved to the Outbox folder and will
be sent the next time you connect.
Managing Messages and Folders
Each E-mail account and text message account has its own folder hierarchy with ve
default folders: Inbox, Outbox, Deleted Items, Drafts, and Sent Items. The messages
you receive and send through the mail account are stored in these folders. You can also
create additional folders within each hierarchy. The behavior of the folders you create
depends on whether you are using an Outlook E-Mail, Text Messages, POP3, MMS,
or IMAP4 account.
If you use an Outlook E-Mail account, E-mail messages in the Inbox folder in Outlook
E-Mail will automatically be synchronized with your device. You can elect to synchronize
additional folders by designating them for ActiveSync. The folders you create and the
messages you move will then be mirrored on the server.
If you use a Text Messages account, messages are stored in the Inbox folder.
If you use a POP3 account and you move E-mail messages to a folder you created, the
link is broken between the messages on the device and their copies on the mail server.
The next time you connect, the mail server will see that the messages are missing from
Page 57

Pocket PC Phone User Manual 121
the device Inbox folder and delete them from the server. This prevents you from having
duplicate copies of a message, but it also means that you will no longer have access to
messages that you move to folders created from anywhere except the device.
If you use an IMAP4 account, the folders you create and the E-mail messages you move
are mirrored on the server. Therefore, messages are available to you anytime you connect
to your mail server, whether it is from your device or PC. This synchronization of folders
occurs whenever you connect to your mail server, create new folders, or rename/delete
folders when connected.
For all accounts except Outlook E-Mail, you can access folder options by tapping Tools
> Manage Folders.
8.2 MSN Messenger
MSN Messenger features include:
n Seeing who is online.
n Sending and receiving instant messages.
n Having instant message conversations with groups of contacts.
n Notifying contacts of your on-line status.
n Blocking contacts from seeing your status or sending you messages.
To use MSN Messenger, you need a Microsoft Passport account, or a Microsoft
Exchange E-mail account that your employer provides. Once you have one of these
accounts, you will need to:
n Set up an account on MSN Messenger.
n Sign in to MSN Messenger.
Page 58

Pocket PC Phone User Manual122
Pocket PC Phone User Manual 123
Setting up an account
Before you can use MSN Messenger, you must set up the instant messaging account(s)
to use. For MSN Messenger Service, you must have a Microsoft Passport or Hotmail
account. For Exchange Instant Messaging, you must have an Exchange account.
1. To use MSN Messenger Service, set up a connection to the Internet; to use Exchange
Instant Messaging, set up a connection to your corporate network.
2. Tap the Start menu > Program > MSN Messenger.
3. In MSN Messenger, tap Tools > Options > the Accounts tab.
4. Select Enable MSN Messenger Service and/or Enable Exchange Instant Messaging.
5. Enter your sign-in name and password for the selected account(s). Your sign-in name is
usually in the form: username@domain.com.
6. If you selected both accounts, tap Settings, and select which account to sign in to rst.
n To set up a Microsoft Passport account, go to http://www.passport.com.
n To set up a Hotmail account, go to http://www.hotmail.com.
n To set up an Exchange account, see your network administrator.
Signing In and Signing Out
1. To sign in, tap anywhere on the screen. Follow the directions on the screen.
2. To sign out, tap Tools > Sign out.
To sign in as your device is connected to the Internet, tap Tools > Options > the General
tab > and select the Run this program upon connection box.
Signing in to an Exchange account may take several minutes depending upon your
connection speed. Reducing the number of Exchange contacts will decrease your signin time.
Page 59

Pocket PC Phone User Manual 123
8.3 MMS Messages
With the Pocket PC Phone, you can create and share your own MMS messages, complete
with photos, videos, text, and audio to your friends and family. You can even use the
Pocket PC Phone’s camera to snap photos and immediately send them by composing
an MMS message.
Launching the MMS composer screen
MMS is incorporated into the Pocket PC Phone’s Messaging function. You can access
MMS directly by selecting the Start menu > Messaging > Accounts > MMS. Your device
also allows you several ways to launch the MMS composer screen:
n From Album: Select any picture in Album, tap on Tools > Send via MMS. At this point you
will be directed to the MMS composer screen in Messaging.
n From Camera (Optional): Capture a picture or a video clip. A Review mode pop-up menu
will let you select from the four icons after you have captured an image or video clip, one
of which will be Send via MMS.
Creating an MMS Message
MMS messages are created by combing various slides. Each slide can consist of a photo,
an audio or video clip, audio, or text. To begin select the Start menu > Messaging >
Accounts > MMS. In the MMS Inbox, tap New. You may not automatically be taken to
a blank message, but to a page that displays pre-made templates, choose the template
you want. If you would prefer to create a blank message next time, check the “Always
choose custom” box.
Page 60

Pocket PC Phone User Manual124
Pocket PC Phone User Manual 125
Message Boxes
To view message folders:
When the program starts, it will take you to your message boxes.
Use the pull-down to select
the one you wish to view.
To view message options:
Within each message box, you can tap and hold on an individual message to see various
options.
Options Explanations
New Creates a new message.
Delete Removes the message.
Move... Move the selected message to another folder.
Reply Lets you respond to the message by sending one of your
own.
Reply All Responds to everyone included in the initial message.
Forward Sends the message to someone else.
Send/Receive Send or receive the selected message
Mark as Unread Makes the message appear as if it is a newly received
message.
Message Info Displays various message information, such as the sender, the
subject, the date and time it was sent, and the size.
Page 61

Pocket PC Phone User Manual 125
Creating a message
Messages are created by combining various slides. Each slide can consist of a photo or
video, audio, and text. A quick run-down of the Create screen is illustrated as below:
1. Enter the recipient’s phone number or email directly.
Or, tap on the To button to select either - Phone to see your phone
book or Email to see your email address book.
2. Enter a subject for your message.
3. Tap here to choose a photo or video.
4. Tap here to input a text message.
5. Tap here to include an audio clip.
6. When you’re ready, tap Send. Otherwise, tap Cancel.
1 2
3
4
5
6
Page 62

Pocket PC Phone User Manual126
Pocket PC Phone User Manual 127
To add a picture or video clip:
You can add either a still image or a video clip to each individual slide. After you’ve tapped
the area to add a photo or video, you’ll be allowed to select exactly what you want to
include.
1. This pull-down lets you select a specic location that contains photos/videos.
2. Choose either Photos or Videos from this pull-down. You can only add either
a single photo or video clip to each individual slide.
3. Tap the specic photo or video clip that you want to add.
4. Tap the specic photo or video clip that you want to add, then tap to
select.
5. To take a new picture or video clip press the Camera icon The picture or video
clip will be automatically inserted.
Tap and hold on a le to see the File Info and Delete options. File Info displays the le
name, resolution, date, and size of a photo. When viewing video le information, the
duration of the video is also listed. Delete deletes the le.
1
5
4
2
3
Page 63

Pocket PC Phone User Manual 127
To add text:
You can add text to any slide. You can either enter in new text with the keyboard, or use
Canned Text. Canned Text are previously saved words or phrases:
1. Tap the Insert text here box, then enter the text you want to send.
2.
To insert Canned Text, tap the small icon on the right upper corner of the
Insert text here
box, and then select a phrase from the list and tap
to select.
3. To add new, edit or delete existing canned text, tap and hold on the
canned text screen.
To add audio clips:
Single audio clips can be added to each slide. You can either include an existing sound
le, or record a new one.
1. From the drop-down menu, select a location that contains audio les.
2. Tap the le you'd like to use.
3. Preview the audio les by tapping on them. Use the toolbar below to Stop and
Play the le.
4. To insert the clip tap Otherwise, tap .
5. To record a new audio clip, tap the Record icon, then tap to start recording
and to nish. The clip will be automatically inserted.
Page 64

Pocket PC Phone User Manual128
Pocket PC Phone User Manual 129
Menu commands
The following commands are available along the bottom of the screen:
1. Edit
Insert Slide Adds a new, blank slide to your current message.
New From
Template..
Lets you create a new message using a pre-made
template.
Save As Template Lets you save the current message as a template for
later use.
Delete Slide Removes the current slide from your message.
Organize Slides...
Lets you arrange the slide order and display time for each
slide.
Add vCard Attaches a vCard of your choice to the message.
Add vCalendar Attaches an appointment of your choice to the message.
Capture Picture... Lets you take a new picture (optional).
Capture Video... Lets you capture a new video (optional).
Cancel Backs out of the message creation and returns you to
your message box.
2. Options
Text
Choose between “Top” and “Bottom.” This determines where
your included text will appear in the message.
Send
Options...
n Uncheck the “Send the message now” box to manually set
the date and time that you would like the message sent.
n From the “Expiration” pull-down, select how long you’d like
the message to be stored on the server. The server will stop
attempting to deliver the message after the set time expires.
n Set the message priority from the Priority pull-down.Check the
Delivery Report box to be notied when the recipient downloads
your message.
Page 65

Pocket PC Phone User Manual 129
Viewing a message
You have several options when viewing a message that you receive:
1. Use the playback controls (Play/Pause, Stop) to view the message. You can
pause it anytime during playback.
2. Tap Objects to see a list of each le. If you want to save a particular le, tap it,
then choose Save from the Tools menu.
3. You can also view the slides manually. Use the navigation buttons to scroll
through the message.
MMS Settings
To view and edit your MMS Messages, tap on the Tools menu which is located at the
bottom of the screen, and then select MMS Settings.
In the Preferences tab:
n Connect Via: Select your type of network connection from the pull-down.
n Retrieve Messages Immediately: Typically, you receive a notication whenever a new
message is available. Checking this box downloads new messages automatically. You can
also choose to download messages while roaming.
n Save Sent Messages: Check this option to save a copy of messages that you send.
n Attempts Before Giving Up: This value sets the number of times the program will attempt
to send your message before stopping.
n Photo Resolution: Choose the resolution for images that you send. You may want to
decrease below the original resolution to help the send/receive time.
In the Servers tab, it lists all available servers that you can use, or alternatively, you can
set up a new one.
In the About tab, it lists various program information, such as the End User Licence
Agreement,etc.
Page 66

Pocket PC Phone User Manual130
Page 67

Chapter 9
Applications
9.1 Pocket Word
9.2 Pocket Excel
9.3 Windows Media Player
9.4 Pictures
9.5 Truefax
9.6 MIDlet Manager
Page 68

Pocket PC Phone User Manual132
Pocket PC Phone User Manual 133
9.1 Pocket Word
You can create and edit documents and templates in Pocket Word just as you would do in
Word on your PC. Pocket Word documents can be saved as .psw, .doc, .rtf, or .txt les.
You can enter information in a document by typing, writing, drawing, or recording. After
you close a document and name it, the document is automatically placed in the Pocket
Word document list.
Synchronizing Pocket Word documents
Pocket Word documents can be synchronized with Word documents on your PC. To
synchronize les, select the Files type for synchronization in ActiveSync Options settings
on your PC. When you select Files, a \My Documents folder is created on your PC’s
desktop. Place all the les you want to synchronize with the device in this folder. Please
note that password-protected les cannot be synchronized.
All Pocket Word les that are stored in \My Documents and its subfolders are synchronized
with the PC. ActiveSync will convert the documents during synchronization. When you
delete a le on your PC or your device, the le will be deleted in the other location the
next time you synchronize. For more information on synchronization, or le conversion,
see ActiveSync Help on the PC.
Document conversion
The Word documents (.doc) and templates (.dot), created in Word 6.0 or later on the PC,
are converted to Pocket Word documents (.psw) and templates (.psw). The conversion
takes place during the following:
n During le synchronization.
n When you copy a Word le from the PC to your Pocket PC Phone.
n When you open an E-mail message with an attached Word le on your device.
Page 69

Pocket PC Phone User Manual 133
Pocket Word documents are converted to Word documents when they are synchronized
or copied back to the PC. During the conversion from Word to Pocket Word, most simple
text and paragraph formatting will be retained and displayed, but some formatting attributes
could be changed or lost.
9.2 Pocket Excel
You can create and edit workbooks and templates in Pocket Excel just as you would do
in Excel on your PC. Pocket Excel workbooks are usually saved as .pxl les, but you
can also save them in the .xls format. When you close a workbook, it is automatically
named and placed in the Pocket Excel workbook list. You can attach a password to a
workbook to ensure privacy.
Synchronizing Pocket Excel workbooks
Pocket Excel workbooks can be synchronized with Excel workbooks on your PC. To
synchronize les, select the Files type for synchronization in ActiveSync Options settings
on your PC.
When you select Files, a \My Documents folder is created on your PC’s
desktop. Place all the les you want to synchronize with the device in this folder. Passwordprotected les cannot be synchronized.
All Pocket Excel les that are stored in \My Documents and its subfolders are synchronized
with the PC. ActiveSync converts documents during synchronization.
When you delete a le on your PC or your device, the le will be deleted in the other
location the next time you synchronize.
For more information on synchronization or le conversion, see ActiveSync Help on the
PC.
Page 70

Pocket PC Phone User Manual134
Pocket PC Phone User Manual 135
Workbook conversion
The Excel les (.xls) and templates (.xlt), created in Excel version 5.0/95 or later on the
PC, are converted to Pocket Excel workbook (.pxl) or template (.pxt) les. The conversion
takes place during the following:
n During le synchronization.
n When you copy an Excel le to your device from the PC.
n When you open an E-mail message with an Excel le as an attachment.
Pocket Excel workbooks are converted to Excel workbooks when they are synchronized
or copied back to the PC.
During the conversion from Excel to Pocket Excel, most simple text and paragraph
formatting will be retained and displayed, but some formatting attributes could be changed
or lost.
9.3 Windows Media Player
Use Windows Media Player to play audio and video les that are stored on your Pocket
PC Phone, a network, or the Internet.
You can play les in either Windows Media or MP3 format (this includes les with the
extensions .asf, .wma, .wmv, and .mp3.) To nd contents in the Windows Media Format
for your Pocket PC Phone, please go to http://www.windowsmedia.com.
To turn on Windows Media Player on your Pocket PC Phone, tap the Start menu >
Programs > Windows Media.
Page 71

Pocket PC Phone User Manual 135
About the playlist
A playlist is a list of digital media les that play in a specied order. By using playlists, you
can group audio and video les together for convenient playback. For example, you can
create a playlist of your favorite songs by a particular artist or a playlist of work-related
video clips.
For more information about creating and editing a playlist on your Pocket PC Phone, select
Help from the Start menu.
Play a le on a network:
To play streaming media, your device must be connected to a network. See the remote
connection settings in Chapter 6 for more information.
1. In Player Screen, tap Menu > Open URL.
2. Enter a URL in the Location to Open: eld.
9.4 Pictures
Pictures collects, organizes and sorts .jpg picture les on your device. With Pictures,
you can download images to your PC, use ActiveSync to copy the les to your Pocket PC
Phone, and view the images as a slide show.
Pictures can also be stored and transferred to your device from a MMC, SD, or any
storage form factor supported by your digital camera. Insert a card into the memory card
slot and then copy or drag the pictures from your PC to the My Documents directory on
the memory card. (If the memory card does not have a My Documents directory you must
create one rst).
Page 72

Pocket PC Phone User Manual136
Pocket PC Phone User Manual 137
Transferring pictures
Pictures stored on your PC can be synchronized with Pictures on your device. Picture
synchronization is not automatically selected in ActiveSync; you need to tap the sync option
Files in ActiveSync on your desktop PC to activate this function.
Finding and listing pictures:
1. Tap the Start menu > Programs > Pictures.
2. Tap My Pictures and select a folder from the drop-down menu.
Viewing pictures:
1. In Pictures, tap to view pictures as a slide show.
2. Tap to view pictures stored in your My Pictures folder.
3. Tap to view pictures stored on a storage card.
n During the Slide Show, tap anywhere on the screen to display the Slide show toolbar, which you
can use to pause the Slide Show and rotate the view.
n Press the Left/Right controls to move forward or backward through the slides.
Tap to select a folder from the
drop-down menu
1
2
3
Page 73

Pocket PC Phone User Manual 137
Sorting pictures:
1. Tap the Start menu > Programs > Pictures.
2. Tap to select a sorting option such as Name, Date, Size, and Type from the drop-down
menu.
Deleting an image
Hold the stylus rmly on the le name of the picture you want to delete. Select Delete
from the pop-up menu.
Edit pictures
You can rotate, crop, zoom and adjust the brightness and color contrast of your .jpg
pictures. Tap the desired picture, then:
n Tap to rotate a picture 90 degrees counter-clockwise.
n Tap to crop a picture by dragging and selecting the crop area. Tap outside of the box
to stop cropping.
n Tap to display the Zoom panel, from which you can zoom in or out of a picture, or return
a picture to full-screen size.
n Tap Edit > Brightness and Contrast to adjust the brightness and contrast of a picture.
n Tap Edit > Undo to undo an edit, or Redo to redo an edit.
Page 74

Pocket PC Phone User Manual138
Pocket PC Phone User Manual 139
Set pictures as background
You can use one of your own .jpg pictures as the background on the Today screen, and
specify how you want it displayed on the screen, such as adjusting the transparency
level.
1. In Pictures, tap the picture you want to set as the background.
2. Tap Tools > Set as Today Wallpaper.
The default setting for the transparency level of the background picture is 65%. This can be
adjusted in the Set as Today Wallpaper screen.
Customizing pictures
You can launch Pictures automatically when a digital camera storage card is inserted. You
can also set the length of the time delay between slides for a slide show.
To select launch automatically:
1. Tap the Start menu > Programs > Pictures.
2. Tap Tools > Options > the General tab.
3. Check the Detect digital camera storage cards box.
To select the time delay between slides:
1. Tap the Start menu > Programs > Pictures.
2. Tap Tools > Options > the Slide Show tab.
3. Select a number of seconds, then tap OK.
Page 75

Pocket PC Phone User Manual 139
9.5 Truefax
Truefax is a software that allows you to send and receive faxes on your Pocket PC
Phone.
Before you send or receive a fax, make sure that the device is connected to a GPRS
network. The GPRS network status is conrmed by an antenna symbol G on the status
bar. Please note that the performance of fax communication is determined by the relative
strength of the GPRS network signal.
Sending a fax:
1. Tap the Start menu > Programs > Truefax > New.
2. In the Recipient dialog screen, enter the recipient's name and fax number. Alternatively,
you can also choose a contact from Contacts by tapping next to the To: eld. As a
shortcut, Truefax enables the user to access the Contacts to compose the recipient's data.
While working on Contacts, you can select up to 10 names to send the fax to. Check the
Multiple recipients box to list the selected contacts with the multiple recipient mode.
3.
To attach a cover page on your fax document, choose the available type of cover pages from
the drop-down list and tap Next.
A Note dialog box will appear if you choose a coverage
template.
4. Enter a subject of the fax in the Subject eld. Entering a subject in the Subject eld may
help you to manage your faxes later on. In the lower edit eld, you can enter more text that
will also appear on the cover page. Tap Next to continue, or tap Back to modify settings in
a previous dialog. A warning message will appear if you didn't enter the Owner Information
on your device. This information will show in the cover page if you entered your contact
information on the Today screen.
5. To attach a document, tap the Add button, which will display all available documents stored
on your device. Find the le you want to attach, tap OK. Repeat this procedure until you
have completed your selection. Or, you can create a new fax note by tapping New. You can
modify the order in which the documents are to be attached. Tap the Up or Down arrow
next to the attachment list to move the document you have selected. To remove an item
from the list, select the document and tap Delete.
Page 76

Pocket PC Phone User Manual140
Pocket PC Phone User Manual 141
6. After you have completed the selection of your attachment(s) and tapped Next, a
summarized Preview screen will list all the settings of this fax document. A small window
will show you a preview of the fax. Tap this window to open a larger preview screen, which
also enables you to write a note on the documents.
7. Tap Send to connect to your internal modem to send all composed faxes. A duplicate copy
will be stored in the Outbox folder. As soon as the fax sending dialog is opened, the device
will automatically switch to Flight mode. Once the fax is successfully sent, the Flight mode
is automatically switched off and the device will return to normal connectivity status.
Receiving a fax
To receive faxes with Truefax via your
Pocket PC Phone,
you need a special
fax number
assigned by your mobile Pocket PC Phone operator. Currently, it's not possible to receive
faxes through your Pocket PC Phone with a standard mobile phone number. Contact your
mobile operator for the availability of this service. To receive a fax:
1. Tap the Start menu > Programs > Truefax.
2. Tap in the menu bar to open the receipt dialog and to activate the modem. Truefax will
then wait for incoming faxes.
3. After the fax has been received, Truefax will switch to Waiting for incoming call. To close
the receipt dialog, tap the Cancel button and wait until the button changes to Close, which
could take some time.
4. You will nd the document in the fax Inbox folder when a fax has been received.
Finishing
After a fax has been sent or received, the phone module has to be re-activated.
1. Tap the antenna symbol on the task bar to open the connectivity screen of your Pocket
PC Phone.
2. Tap Turn off ight mode in the appearing window.
3.
After a while the "x" at the antenna symbol will be replaced by a "!" and the antenna symbol
with the signal bars will reappear.
Page 77

Pocket PC Phone User Manual 141
In certain situations it is necessary to reenter the PIN code in order to reconnect to a GPRS
network.
Using the Fax Viewer
The fax viewer allows you to look at a fax and draw text or sketches on an existing document
or on a newly created document.
n
You can zoom a document by tapping on the tool bar and choosing the zoom factor from
the opening list.
n With you can choose the pen width, choose between a white or black pen, and select
Clear Page to clear all previous modications on the fax document.
n Tap the Undo or Redo button to reverse what you have done with the pen or to reverse
a rejected action.
n Tap to view your fax documents page by page.
n With , you can:
- Invert to show the actual page inverted. All black points will be white and all white
points will be black.
- Rotate by 180 deg. so that a fax received upside down can be viewed without
rotating the device.
- Show Margins that can be thin borders, drawn in the fax viewer dialog.
- Page Info to display information about the chosen page.
Customized templates
Truefax allows you to customize your documents to tailor a personal or corporate identity
for your faxes. The identication dialog consists of three edit elds to display additional
information about the sender.
Tap the Start menu > Programs > Truefax > Tools >
Identify....
Banner Name and Banner Number are both shown in the banner on the top of each page
of the fax, if you have activated the Send Banner checkbox.
Page 78

Pocket PC Phone User Manual142
Pocket PC Phone User Manual 143
The fax device of the receiver will show the Station ID as the sender number.
Properties:
1. Tap the Start menu > Programs > Truefax > Tools > Properties....
In Logo graphic, you can tap
the File button to choose a bitmap that will be used as a logo representing the sender on
the cover page.
2. Units option enable you to choose the unit you are most familiar with. You can specify
inch or cm (centimetre).
3. The last and bottom part of the properties dialog is for the Fax Viewer customization. In
the properties dialog you can customize the Fax Viewer by selecting:
n Text size: Enlarge the text font when viewing the document.
n Caption word break: make the text break if it does not t into a single line.
n Keep graphics of sent faxes feature: faxes that were already will not be
saved.Assigning every fax a subject should better help you to identify your
sent faxes without storing the fax documents.
4. Tap OK to save the new settings.
Layout
You can customize the appearance of your fax by modifying the settings in the Layout
dialog.
Tap the Start menu > Programs > Truefax > Tool > Layout
.
n In the Font tab, dene the font that will be used for the fax. The only text that won’t be
shown with this font is the text you have written with the quick note feature of the fax
viewer, because this text will be handled as a graphic.
n The Margins tab shows the actual height and width of the margins used for the fax.
Modify these values by choosing one of the given values from the list. The standard
measurement unit can be set in the Properties options.
Page 79

Pocket PC Phone User Manual 143
Fax Options
Tap the Start menu > Programs > Truefax > Tool > Fax
n The Fax options dialog lets you choose the Resolution of your fax. Select the Fine
resolution to generate high-quality faxes, or choose the Normal resolution for optimal
transmission rates.
n Activate the Play sounds after send checkbox to hear a sound prompt after a
completed send or receive action.
9.6 MIDlet Manager
Your Pocket PC Phone supports Java 2 Edition, J2ME. The MIDlet Manager allows you
to download Java applications such as games and tools specically designed for mobile
devices. You will nd that some Java applications and games may have already been
installed on your device. The Java MIDlet Manager gives you the exibility of installing
and managing additional J2ME applications from the Internet.
Installing MIDlets directly from the Internet
You can install MIDlets/MIDlet suites directly from the Internet using Internet Explorer in
conjunction with the MIDlet Manager.
1. Connect to the Internet and locate a MIDlets/MIDlet suite you wish to download (this is
normally a .jad and a .jar le).
2.
Select the MIDlets/MIDlet suite and download it.
3. You will be asked to conrm before the download begins.
4. A progress screen is displayed while the les are being downloaded. You may cancel the
download at any time.
Once your download is completed, the MIDlet Manager will automatically start and prompt
you to install your new MIDlets/MIDlet suite. You must conrm that you want to proceed
Page 80

Pocket PC Phone User Manual144
Pocket PC Phone User Manual 145
and the installation of your MIDlets/MIDlet suite is completed. Alternatively, you can cancel
the installation at any time.
Installing MIDlets from a PC
You can install MIDlets/MIDlet suite onto your Pocket PC Phone from your PC using the
USB sync cable, the optional cradle, infrared or Bluetooth. MIDlets transferred to your
Pocket PC Phone using infrared, Bluetooth, or as E-mail attachments are automatically
saved in the My Documents directory.
To install MIDlets via a physical connection (such as USB sync cable or cradle) use Windows Explorer to copy your MIDlet le(s) from your PC to any of the following temporary
directories, from where they can be installed by the MIDlet Manager.
n Device memory: Mobile Device\My Pocket PC Phone\My Documents\My MIDlets
n Storage card: Mobile Device\My Pocket PC Phone\Storage Card\
If the folder My MIDlets not exist in My Documents, you need to create one with exactly
the same folder name. The folder Storage Card will automatically appear once you insert
the SD card to your Pocket PC Phone.
Once the le(s) have been copied to your Pocket PC Phone or to your storage card, you
must install the MIDlet/MIDlets suite:
1. Tap the Start menu > Programs > MIDlet Manager > Menu > Install.
2. The Install screen will open, containing a list of all available MIDlets/MIDlet suites.
3. Select one and choose Install from the pop-up menu. You will be prompted to conrm your
choice.
Optionally, you can remove the MIDlet les from the temporary folder you used by tapping
Delete from the pop-up menu.
Page 81

Pocket PC Phone User Manual 145
Running MIDlets
The MIDlet Manager enables you to run MIDlets/MIDlet on your Pocket PC Phone. You
can leave MIDlets running in the background while you perform other tasks on your Pocket
PC Phone. You can have multiple MIDlets running at the same time, depending on the
total amount of memory available on your Pocket PC Phone.
1. Tap the Start menu > Programs > MIDlet Manager.
2. Select a suite and tap to run the MIDlet. The MIDlets/MIDlet suite you selected will open
within the MIDlet Manager window.
You can tap Show > Running to display the MIDlets/MIDlet suite currently running on
your Pocket PC Phone. You can also return to a running MIDlet by selecting it from this
screen.
You can also tap the Show > Recent option to display up to the 9 most recently used
MIDlets.
Stopping MIDlets
Some MIDlets have an exit or stop command within their menu structure, which are
determined by the specic software developer.
Stopping a MIDlets/MIDlet suite:
To stop an individual MIDlet, navigate to the Running MIDlets screen:
1. Tap the Start menu > Programs > MIDlet Manager.
2. Tap Show > Running.
3. Tap and hold the MIDlet you want to stop and then select Stop from the pop up menu.
Page 82

Pocket PC Phone User Manual146
Pocket PC Phone User Manual 147
Stopping all MIDlets
To stop all the MIDlets running on your Pocket PC Phone, navigate to the Running
MIDlets screen:
1. Tap the Start menu > Programs > MIDlet Manager.
2. Tap Show > Running.
3. Tap Menu > Stop All.
Once your MIDlets have been stopped, you will be returned to the MIDlet Manager
window.
Managing your MIDlets/MIDlet suites
You can organize your MIDlets into groups and dene custom groups. You can manage
the default settings for MIDlets, including security settings.
Customizing your display settings:
1. Tap Sort By menu on the up-right corner of the MIDlet Manager screen to personalize
your display options.
2. You can choose your MIDlets/MIDlet suite to be sorted by Name (A to Z) or by Size (small
to large).
Changing the display name of your MIDlets
You can change the displayed name of any MIDlet on your Pocket PC Phone. However,
you cannot change the names of MIDlet suites.
1. Tap and hold the MIDlet you wish to change the name of and the then select Rename from
the pop-up menu.
2. Enter the new name for your MIDlet in the dialogue box and press OK to conrm, or Cancel
to abort.
Page 83

Pocket PC Phone User Manual 147
Un-installing MIDlets/MIDlet suites
You can remove MIDlets/MIDlet suites from your Pocket PC Phone’s memory. To do this,
ensure that the MIDlets/MIDlet suite is not running.
1. Select the MIDlets/MIDlet suite in the MIDlet Manager window and choose Un-install.
2. You will be asked to conrm your decision by selecting the OK option. The MIDlet is then
erased from your device's memory.
You cannot un-install a single MIDlet from a MIDlet suite. You must un-install the complete
MIDlet suite.
To assign a group to a MIDlets/MIDlet suite
1. Tap and hold on a MIDlet you wish and choose Group from the pop up menu in the MIDlet
Manager window.
2. The MIDlet Manager window contains a drop down box with a list of group names. Choose
one of these and tap OK.
You can adapt existing groups to meet your needs. Once a MIDlet has been assigned to a
group, that group’s name will appear on the Show menu, and you can choose any group
and view the MIDlets in it.
System Info
You can see the information about the currently used space of the MIDlets/MIDlet suite you
have selected by tapping Menu > System Info. If the manufacturer has limited the total
storage space for MIDlets, the limit and the amount currently available is also shown.
Network Type
Tapping Menu > Choose Network Type enables you to choose your connection from
the available list.
Page 84

Pocket PC Phone User Manual148
Pocket PC Phone User Manual 149
MIDlet Security
You can adjust security settings for each MIDlets/MIDlet suite by selecting a MIDlet and
choosing Security. Note that some features may not be available for all MIDlets/MIDlet
suites.
Security
Option
Description
Net Access Determines whether a MIDlets/MIDlet suite can access
the Internet.
Local
Connectivity
Enables a MIDlets/MIDlet suite to access services such
as RDA and Bluetooth. Refer to your Pocket PC Phone's
manual for the features available on your handset.
App Auto Run Enables a MIDlets/MIDlet suite to run at specied times,
or any time.
Messaging Determines whether a MIDlets/MIDlet suite can send
and/or receive SMS messages.
Multimedia
Recording
Enables a MIDlets/MIDlet suite to record sounds and
images. Refer to your Pocket PC Phone's manual for the
features available on your handset.
Page 85

Pocket PC Phone User Manual 149
Error Messages
Message Meaning
Either RAM shortage, or insufcient
space on the le system
Insufcient memory available on your Pocket
PC Phone.
Network out No network connection available.
The jar size does not match that
specied in the jad
The installation information provided by the
MIDlet manufacturer is inaccurate.
The jar manifest does not match
the jad
The installation information provided by the
MIDlet manufacturer is inaccurate.
Invalid Java application descriptor
(jad)
There is a problem with the installation le
provided by the MIDlet manufacturer.
Invalid Java archive (jar) There is a problem with the installation le
provided by the MIDlet manufacturer.
This Java application is not
compatible with this device
One of more features required by this MIDlet is
not available on your Pocket PC Phone.
Page 86

Pocket PC Phone User Manual150
Page 87

Chapter 10
Using Camera and Album
10.1 About Camera and Album
10.2 Camera
10.3 Album
Page 88

Pocket PC Phone User Manual152
Pocket PC Phone User Manual 153
10.1 About Camera and Album
With Camera Wizard, you can use the attached camera on the back of your device to snap
new photos or shoot video clips with accompanying audio. Album provides many powerful
features to manage, organize, and manipulate the image, video, and audio les.
When in Photo Capture mode, you can capture standard still images. In Video or MMS
Video Capture mode, you can capture “live” video streams (with audio if desired), then
share them with others or play them on your own Pocket PC Phone, or desktop PC.
In Contact Photo Capture mode, you can caputre images for your contacts. Or, in
Picture Theme Capture mode, you can place your captured images into attractive frames
(templates). You can even send the captured les via E-mail, or via MMS. Just Snap and
Send a newly-captured image, or Select and Send an existing image.
Of course, you can also get image, video, and audio les from received E-mail, a Storage
Card, infrared beaming, or synchronized from a PC via ActiveSync, and organize them
into albums and Slide Shows.
File formats supported
File formats that you can browse and view / play in Album include:
File Type Formats
Still-image formats BMP
GIF
JPEG
Animation format Animated GIF
Video formats Motion-JPEG AVI (.avi)
MPEG-4 Simple prole (.mp4)
3GPP-H.263 baseline (.3gp)
Audio formats MPEG-4 AAC (Advanced Audio Coding in .mp4 format)
WAV
MIDI (standard MIDI type 0,1, and SP-MIDI)
Page 89

Pocket PC Phone User Manual 153
NOTE: You can set an audio le to be used as your Pocket PC Phone’s ring tone. For
more information about ring tone settings, please see Chapter 5.
File formats that Camera supports includes:
File Type Formats
Still-image formats BMP
JPEG
Video formats Motion-JPEG AVI (.avi)
MPEG-4 Simple prole (.mp4)
MMS Video formats 3GPP-H.263 baseline (.3gp)
MPEG-4 Simple prole (.mp4)
10.2 Camera
There are two ways to enter the Camera mode :
n Tap the Start menu > Programs > Camera.
n Or just press the uppermost button on the left side of your device.
When you initially enter Camera mode, the Photo Capture mode will be active. The title
at the right lower side of the LCD Display area indicates the current mode. After starting
one capture mode, you can easily switch to another, if desired.
Capture mode Function
Photo capture still images
Video capture video clips
MMS Video capture video clips and send via MMS
Contact Photo take a photo to be used as a Photo ID for a contact entry
Picture Theme capture still images and place in frame
Page 90

Pocket PC Phone User Manual154
Pocket PC Phone User Manual 155
Usage of Buttons in Camera Mode
When in Camera mode, you can press the following buttons on your Pocket PC Phone
as a shortcut
Orientation Toggle
By default, the orientation
is in a Portrait display.
Press this button to
change to a Landscape
orientation.
Camera Settings Screen
Press to toggle the Camera Settings
screen open and closed. If the screen
is open and you have made changes
to the settings, press to save the
settings before closing the screen.
Capture/Action
Button
Capture - Press to take a
picture in still image capture
modes. If in video capture
modes, press this button to
start recording the incoming
video stream, and press it
again to stop the recording
process.
Action - Conrm the selection
you made.
Navigation Pad
Up/Down - Increase/
decrease the zoom
levels.
Left/Right - Switch
between capture
modes.
Camera/Capture
Button
Press to launch Camera.
Press again to take a picture
or to record a video.
Page 91

Pocket PC Phone User Manual 155
Photo Capture Mode
In Photo Capture mode, you can capture a single still image by pressing the Capture button
on your Pocket PC Phone, or the Action button on navigation pad. For the information
on setting output format, resolution and ambience, please see Camera Settings Screen
section.
NOTE: Most of the settings in the LCD Display Panel can be changed using the
Camera Settings screen. Tap on the Camera Settings icon to display the Camera
Settings screen (explained later).
Incoming video stream is shown using the
entire Pocket PC Phone screen. (Icons
superimposed on the screen are not saved
with your captured images/videos.)
The Camera automatically
calculates the number of photos you
can capture, based on the current
settings and the space available. In
this example, 5019 more photos can
be captured. The counter updates
automatically after a photo taking or
the capture size changing.
Capture Sizes are:
n XL = Extra Large (960x1280)
n L = Large (480x640)
n M = Medium (240x320)
n S = Small (120x160)
The current capture size is small.
Exits Camera mode and
returns to the previous
screen.
The word Photo indicates
that you are currently in
Photo Capture mode. Tap
the left or right arrow icon to
change capture mode.
Tap to switch to Thumbnail
View of Album mode.
Tap to open the Camera
Settings screen.
The current zoom is 4x, indicating
viewing 4x of normal size.
The current Ambience setting is
shown at this position. This icon
indicates it has been set to Daylight.
Tap the upward-pointing triangular icon
to Zoom IN, or the downward-pointing
triangular icon to Zoom Out.
This icon indicates a ready
state. It changes to a red dot
during image capture
Page 92

Pocket PC Phone User Manual156
Pocket PC Phone User Manual 157
Video Capture Mode
To start video recording :
1. Switch to Video Capture mode by tapping or icons, or using Left/Right
navigational pad.
2. Press the Action button, or the Capture button on the left side of your Pocket
PC Phone.
To stop recording, press Action or Capture button again. The rst frame of the newlycaptured video le will be displayed, and Review Screen described earlier will be available.
Output format is either Motion-JPEG AVI or MPEG4, based on the Camera Settings.
The Camera automatically calculates
the available duration for a video
recording, based on the current
settings and the space available.
When recording in progress, it
changes to recording timer. Camera
automatically updates the available
duration after a video taking or the
capture size changing.
The green “lmstrip” icon indicates
the camera is in idle/ready state. A
blinking red circle indicates recording
in progress.
In this example, recording has been
in progress for a duration of 21.55
seconds thus far.
Capture Sizes are:
n L = Large (240x320)
n M = Medium (144x176)
n S = Small (96 x128)
The current size is large.
Exits Camera mode
and returns to the
previous screen.
The word Video indicates
that you are currently in
Vid eo Cap tu re mode.
Tap the left or right arrow
to change capture mode.
Left icon: Tap to open the
Camera Settings screen.
Right icon: Tap to switch
to Thumbnail View of
Album mode.
The current zoom is 2x,
indicating viewing 2x of
normal size
The current Ambience
setting is shown at this
location. This icon
indicates it has set to
Auto.
Incoming video stream
is shown using the entire
Pocket PC Phone screen.
Tap the upward-pointing/
downward-pointing triangular
icons to Zoom In/Out.
Page 93

Pocket PC Phone User Manual 157
MMS Video Capture Mode
The MMS Video capture mode is convenient if you want to capture a video le and then
send it via MMS.
To start the video recording, press the Action button, or the Capture button on the left
side of Pocket PC Phone. To stop recording manually, press the Action or Capture button
again.
When you select H.263 as the Capture Format, only Landscape orientation is
available.
Ambience has been set to Auto.
In this example, MPEG-4
is selected as the Capture
Format. When recording in
MPEG-4, you have a choice
of either Portrait or Landscape
orientation. Portrait orientation
is shown here.
Capture Sizes for MPEG-4
video format are:
n L= Large (240 x 320)
n M= Medium (144 x 176)
n S= Small (96 x 128)
This example is medium size.
Capture Sizes for H.263 video
format are:
n M = Medium (176 x 144)
n S = Small (128 x 96)
This example is medium size.
Page 94

Pocket PC Phone User Manual158
Pocket PC Phone User Manual 159
Picture Theme Capture Mode
The Picture Theme Capture mode lets you choose a template in which your captured
still image(s) will be placed. You can think of a template as a kind of frame in which you
would insert a photograph. Several templates are included with Camera Wizard, in the
subfolder named \My Documents\Templates\.
To browse and select different templates, do one of the following:
n Tap buttons to display the previous or next template.
n Tap , select a template from the Template eld.
n Tap , then tap Browse... button to display detailed information of
templates. Tap Previous or Next button to browse the selection under the
current folder. To change the folder, tap Change... button.
This example template
requires two captured
images. “2/2” indicates
that one image has
already been caputred.
Tap these icons to browse
templates.
Page 95

Pocket PC Phone User Manual 159
Review Screen
If the Review after capture checkbox is currently checked in the Gerenal tab of Options
screen, then immediately after you capture an image, it will be displayed on the screen
along with four icons.
1. To return to the previous screen, tap the Camera icon.
2. To immediately send a captured image/video, tap the mail icon then select an
option from the Send File dialog box. If in the Contact Photo mode, display
instead. Tap this icon to assign the captured image to a contact.
3. To delete the image press the rubbish bin option.
4. To view and edit the picture tap, the Album icon (for edit options see Album.)
Send via MMS
The MMS composer screen will open, with the newly-captured le already attached. Simply
compose the MMS message as you normally would and send.
Review Screen:
1 432
Page 96

Pocket PC Phone User Manual160
Pocket PC Phone User Manual 161
Send via E-Mail
This command invokes the compose screen of Inbox, with the newly-captured le already
attached. Just compose and send the E-mail as you normally would.
Zooming In/Out
In all modes, you can press the Up navigational button on your Pocket PC Phone to Zoom
In the incoming video stream. Each time you press the Up button, the enlargement doubles.
When the zoom reaches its limit, a beep will sound.
Maximum zoom limit is different for each capture mode and capture size. The table below
summarizes the Zoom function availability.
Capture Mode Capture Size Setting Zoom Available
Video and
MMS Video
Large (240 x 320) 1.0x to 2.0x
Medium (144 x 176) 1.0x to 4.0x
Small (96 x 128) 1.0x to 4.0x
Photo and
Contact Photo
XL (960x1280) 1.0x (no zoom available)
Large (480 x 640) 1.0x to 2.0x
Medium (240 x 320) 1.0x to 4.0x
Small (120 x 160) 1.0x to 8.0x
Picture Theme Determined by the current
template.
Depends on the size of the
currently loaded template.
Notes: n MMS Video Capture mode in H.263 le format only has Medium and
Small sizes.
n 1x = normal size (no zoom)
2x = double enlargement
4x = quadruple enlargement
8x = octuple enlargement
Page 97

Pocket PC Phone User Manual 161
Camera Settings Screen
When in any of the capture modes (Photo, Video, MMS Video,
Contact Photo or Picture Theme), you can tap to display
the Camera Settings. Or, you can press the Contacts button
at lower left of the front of your Pocket PC Phone.
NOTE: The Capture Size is not available in Pciture Theme
Capture mode. It is replaced by Template drop-down
list and the Browse... button.
Icons on the menu bar are:
1. Switches to the Thumbnail View of Album mode.
2. Switches to the Detailed View of Album mode.
Settings Explanation
Capture Mode Select a mode - Photo, Video, MMS Video, Contact Photo or
Picture Theme.
Capture Format The choices for Capture Format will be different based on
capture modes.
Capture Size The choices for Capture Size will be different based on capture
modes. Higher Capture Size settings produce larger le sizes.
Ambience A list of lighting conditions that lets you adjust the Capture screen
to look its best in various environments.
There are also options that affects the appearance of the
incoming video stream: Grayscale (black and white), Sepia
(reddish tint), Cool (bluish tint), and Negative (darkness and
lightness reversed).
1
2
Page 98

Pocket PC Phone User Manual162
Pocket PC Phone User Manual 163
Tools Menu
The Tools Menu provides many more settings that let you customize the behavior of
Camera mode functions
Adjust...
Adjust... enables you to adjust the display properties: Contrast, Brightness, Saturation,
Hue, and Sharpness.
To open Adjust... screen, tap > Tools > Adjust....
To adjust a display propertye: select a property from Property eld and use the Slider
Bar to adjust the value.
NOTE: The incoming video stream displayed on your screen will immediately show
the effect of any changes you make.
To use original default values, tap Reset button
Options...
The Options screen contains three tabs: General, Image, and Video.
a) General Tab
The General tab includes the following options:
n Disable shutter sound
n Keep backlight on while in viewnder
n Review after capture
n Flicker adjustment (Auto, 50Hz, or 60Hz)
NOTE: Flicker Adjustment refers to the electrical voltage used in your country.
Page 99

Pocket PC Phone User Manual 163
b) Image tab
Here are the options that affects on still image captures.
Options Function
Prex Type and
Prex String
By default, the lename of each new captured image le will
be “image” followed by a sequential number, for example:
image_00001.jpg. If you wish to change this prex to a
different arbitrary text string, select String in the Prex Type
eld and type the desired characters into the Prex String
eld. For example, entering “party” in the Prex String eld
would produce the lename party_00001.jpg.
Alternatively, you can choose Date or Date and Time as the
Prex Type.
Counter Index By default, sequential numbers are automatically incorporated
into each lename for all new image les you capture, such
as 00001, 00002, 00003, etc. The number follows the prex
(explained above).
To reset the numbering to “00001” for your captured image
les, tap Reset counter.
Save to By default, your captured image les will be saved to your
\My Documents\ folder.
Page 100

Pocket PC Phone User Manual164
Pocket PC Phone User Manual 165
c) Video tab
The options on the Video tab affect only your captured video les.
Options Function
Prex Type and
Prex String
By default, the lename of each new captured video le will
be “video” followed by a sequential number, for example:
video_00001.avi. If you wish to change this prex to a different
arbitrary text string, select String in the Prex Type eld and
type the desired characters into the Prex String eld. For
example, entering “vacation” in the Prex String eld would
produce the lename vacation_00001.jpg.
Alternatively, you can choose Date or Date and Time as the
Prex Type.
Counter Index By default, sequential numbers are automatically incorporated
into each lename for all new video les you capture, such
as 00001, 00002, 00003, etc. The number follows the Prex
(explained above). To reset the numbering to “00001” for your
captured video les, tap Reset counter.
Recording with
Audio
When this checkbox is checked, audio will be recorded with
your captured video clips. It is checked by default. Any videos
captured when the checkbox is not checked would be silent (no
accompanying audio).
Save to By default, your captured video les will be saved to your \My
Documents\ folder.
 Loading...