

HTC Magic para Vodafone
Manual de Usuario
April 7, 2009
Android™ mobile technology platform R1.5.0
VodaUM-1.5.0-0.9

Por favor, lea antes de continuar
CUANDO SAQUE EL DISPOSITIVO DE LA CAJA, COMPROBARÁ QUE LA BATERÍA NO ESTÁ CARGADA.
NO QUITE EL PAQUETE DE BATERÍAS CUANDO EL DISPOSITIVO ESTÉ CARGANDO.
SU GARANTÍA QUEDARÁ ANULADA SI ABRE O MANIPULA LA CARCASA EXTERNA DEL DISPOSITIVO.
RESTRICCIONES DE PRIVACIDAD
Algunos países requieren la revelación total de conversaciones telefónicas y estipulan que debe
informar a la persona con la que está hablando de que la conversación está siendo grabada. Siga
siempre las leyes y normativa vigente en su país cuando utilice la característica de grabación de su
dispositivo.
INFORMACIÓN SOBRE DERECHOS DE PROPIEDAD INTELECTUAL
Copyright © 2009 HTC Corporation. Reservados todos los derechos.
HTC, el logotipo de HTC, HTC Magic, ExtUSB, HTC Innovation y HTC Care son marcas comerciales y/o
marcas de servicio de HTC Corporation.
Copyright © 2009 Google Inc. A utilizar bajo autorización.
Google, el logotipo de Google, Android, el logotipo de Android, Android Market, Google Mail, Google
Apps, Google Calendar, Google Checkout, Google Earth, Google Latitude, Google Maps, Google
Talk, Picasa y YouTube son marcas comerciales de Google Inc.
Copyright © Vodafone Group 2009. Vodafone y los logotipos de Vodafone son marcas comerciales
del grupo Vodafone.
Microsoft, Windows y Outlook son marcas registradas o marcas comerciales de Microsoft Corporation
en los Estados Unidos y/o en otros países.
Bluetooth y el logo de Bluetooth son marcas comerciales propiedad de Bluetooth SIG, Inc.
microSD es una marca comercial de SD Card Association.
Con la licencia de QUALCOMM Incorporated al amparo de una o más de las siguientes patentes:
4,901,307 5,490,165 5,056,109 5,504,773 5,101,501 5,778,338
5,506,865 5,109,390 5,511,073 5,228,054 5,535,239 5,710,784
5,267,261 5,544,196 5,267,262 5,568,483 5,337,338 5,659,569
5,600,754 5,414,796 5,657,420 5,416,797
Cualquier otro nombre de empresa, producto o servicio mencionado en este documento se
entenderá como una marca comercial, marca registrada o marca de servicio de su respectivo
propietario.
HTC no se responsabilizará de ningún error técnico o editorial ni de posibles omisiones existentes en
este documento; tampoco se responsabilizará de daños fortuitos o resultantes del seguimiento de este
material. La información se facilita "tal como está" sin garantía de ningún tipo y sujeta a cambios sin
previo aviso. HTC también se reserva el derecho de revisar el contenido de este documento en
cualquier momento y sin previo aviso.
Ninguna de las partes de este documento podrá reproducirse ni transmitirse de modo alguno ni a
través de ningún medio, electrónico o mecánico, incluyendo el fotocopiado, grabación o
almacenamiento en sistemas de recuperación; tampoco se podrá traducir a ningún idioma sin un
permiso previo y por escrito de HTC.
Cupcake User Guide R1.5.0 2 April 7, 2009

Limitación de daños
EN LA MEDIDA EN QUE LO PERMITA LA LEY, HTC Y SUS PROVEEDORES NO SE RESPONSABILIZARÁN BAJO
NINGUNA CIRCUNSTANCIA RESPECTO AL USUARIO O A TERCERAS PARTES DE DAÑOS INDIRECTOS,
ESPECIALES, CONSECUENTES, ACCIDENTALES O PUNITIVOS DE NATURALEZA ALGUNA, YA SEA POR VÍA
CONTRACTUAL O EXTRACONTRACTUAL, INCLUYENDO AUNQUE SIN LIMITARSE A LOS DAÑOS, PÉRDIDA
DE INGRESOS, PÉRDIDA DE BIENES, PÉRDIDA DE OPORTUNIDADES COMERCIALES, PÉRDIDA DE DATOS Y/
O PÉRDIDA DE BENEFICIOS RESULTANTES DE O RELACIONADOS DE MODO ALGUNO CON LA ENTREGA,
CUMPLIMIENTO O NO DE OBLIGACIONES, O EL USO DE LA INFORMACIÓN METEOROLÓGICA, DATOS Y
DOCUMENTACIÓN CONFORME A LO AQUÍ ESTIPULADO E INDEPENDIENTEMENTE DE LA PREVISIBILIDAD
EXISTENTE.
Información importante sobre la salud y medidas de seguridad
Cuando utilice este producto, se deben tener en cuenta las siguientes medidas de seguridad a fin de
evitar posibles responsabilidades y daños legales.
Guarde y siga todas las instrucciones de seguridad y utilización del producto. Cumpla todos los avisos
indicados en las instrucciones de uso del producto.
Para reducir el riesgo de lesiones personales, descarga eléctrica, fuego y daños en el equipo, cumpla
con las siguientes precauciones.
SEGURIDAD ELÉCTRICA
Este producto está destinado al uso con energía procedente de la batería o fuente de alimentación
designada. Otros usos pueden ser peligrosos y anularán cualquier aprobación concedida a este
producto.
MEDIDAS DE SEGURIDAD PARA LA CORRECTA CONEXIÓN A TIERRA
AVISO: La conexión a un equipo de puesta a tierra inadecuado puede ocasionar una descarga
eléctrica en su dispositivo.
Este producto está equipado con un cable USB para conectarlo a un ordenador de sobremesa o
portátil. Compruebe que su ordenador esté correctamente conectado (puesto) a tierra antes de
conectar este producto al ordenador. El cable de la fuente de alimentación de un ordenador de
sobremesa o portátil tiene un conductor y un enchufe de puesta a tierra. El enchufe debe estar
conectado a una toma apropiada que esté correctamente instalada y puesta a tierra según los
códigos y normativas locales.
MEDIDAS DE SEGURIDAD PARA LA UNIDAD DE ALIMENTACIÓN
• Utilice la fuente de alimentación externa apropiada
Un producto sólo debe funcionar con el tipo de fuente de alimentación indicada en la etiqueta
de clasificación eléctrica. Si no está seguro del tipo de fuente de alimentación requerida,
consulte a su proveedor de servicios autorizado o a la compañía eléctrica local.
Si el producto funciona con una batería u otras fuentes, consulte las instrucciones de operación
incluidas con el producto.
Este producto debe utilizarse sólo con la(s) siguiente(s) unidad(es) de alimentación designada(s).
Adaptador de CA
1. Phihong, Modelos PSAA05A-050, PSAA05C-050, PSAA05E-050, PSAA05K-050 y PSAA05S-050.
2. HTC, Modelo TC P300
Cupcake User Guide R1.5.0 3 April 7, 2009
Adaptador para el coche
Phihong, Modelo CLA05D-050
• Manipule los paquetes de baterías con cuidado
Este producto contiene una batería de polímeros de litio. Existe el riesgo de fuego y quemaduras
si la batería se manipula de modo inapropiado. No intente abrir ni reparar el paquete de baterías.
No desmonte, presione, pinche, cortocircuite los contactos externos o circuitos, no los arroje al
fuego ni al agua, y evite la exposición de las baterías a temperaturas superiores a 60°C (140°F).
ADVERTENCIA: Peligro de explosión si la batería no se coloca correctamente. Para
reducir el riesgo de fuego o quemaduras, no desmonte, aplaste ni perfore los
contactos o circuitos externos, evite la exposición a temperaturas superiores a 60°C
(140°F), y no lo arroje al fuego ni al agua. Reemplácela sólo por las baterías
especificadas. Recicle o elimine las baterías usadas según las leyes locales o de
acuerdo con la guía de referencia facilitada junto con el producto.
Nota Este producto debe utilizarse sólo con la(s) siguiente(s) batería(s) designada(s): HTC, Modelo
SAPP160
• Adopte precauciones adicionales
• Mantenga la batería o el dispositivo en un lugar seco y alejado del agua y de cualquier otro
líquido a fin de evitar un posible cortocircuito.
• Mantenga cualquier objeto metálico alejado evitando que entre en contacto con la batería o
sus conectores desencadenando un cortocircuito durante su funcionamiento.
• El teléfono sólo debe conectarse a productos con el logotipo USB-IF o que hayan completado el
programa de conformidad con USB-IF.
• No utilice una batería que esté dañada, deformada o descolorida, ni tampoco una oxidada en
su parte exterior, sobrecalentada o que despida mal olor.
• Siempre mantenga la batería fuera del alcance de los bebés o niños pequeños para evitar que
puedan tragársela. Consulte a su médico de inmediato en caso de tragarse la batería.
• Si la batería tiene fugas:
1. No permita que este líquido entre en contacto con la piel o ropa. En caso de contacto, lave la
zona afectada inmediatamente con agua limpia y solicite asistencia médica.
2. No permita que este líquido entre en contacto con los ojos. En caso de contacto, NO se frote;
lave la zona afectada inmediatamente con agua limpia y solicite asistencia médica.
3. Adopte medidas adicionales para mantener el líquido de la batería alejado del fuego ya que
existe riesgo de explosión o inflamación.
MEDIDAS DE SEGURIDAD PARA LA LUZ DIRECTA DEL SOL
Mantenga este producto alejado del exceso de humedad o de temperaturas extremas. No deje el
producto o su batería en el interior de un vehículo o en lugares donde la temperatura pueda exceder
los 60°C (140°F), como en el salpicadero de un coche, junto a la ventanilla o detrás de un cristal
expuesto a la luz directa del sol o luz ultravioleta fuerte durante períodos prolongados de tiempo. Esto
podría dañar el producto, sobrecalentar la batería o suponer un riesgo para el vehículo.
Cupcake User Guide R1.5.0 4 April 7, 2009
PREVENCIÓN DE LA PÉRDIDA AUDITIVA
AVISO: Se puede sufrir una pérdida permanente de audición si se utilizan los audífonos o
auriculares con un volumen alto durante períodos prolongados.
Nota: En Francia, los audífonos (indicados a continuación) para este dispositivo se han evaluado y
cumplen con los requisitos de nivel de presión acústica detallados en el estándar NF EN 50332-1:2000
y/o NF EN 50332-2:2003 según lo requiere el Artículo francés L. 5232-1.
• Audífono, fabricado por Cotron, Modelo HS S200.
SEGURIDAD EN AVIONES
Debido a la posible interferencia causada por este producto en el sistema de navegación de un
avión y su red de comunicación, el uso de la función de teléfono de este dispositivo a bordo es
contrario a la ley en muchos países. Si desea utilizar este dispositivo cuando esté abordo de un avión,
recuerde apagar su teléfono cambiando al modo Avión.
RESTRICCIONES AMBIENTALES
No utilice este producto en estaciones de gas, depósitos de combustible, plantas químicas o donde
se estén llevando a cabo operaciones de demolición o en atmósferas potencialmente explosivas,
como áreas de repostaje, depósitos de combustible, bajo la cubierta de los barcos, plantas químicas,
instalaciones de transferencia o almacenamiento de combustible o productos químicos y áreas
donde el aire contenga químicos o partículas, como grano, polvo o polvos de metal. Por favor, tenga
en cuenta que las chispas en estas áreas podrían causar una explosión o fuego pudiendo provocar
lesiones personales e incluso la muerte.
ATMÓSFERAS EXPLOSIVAS
Cuando se encuentre en un área con una atmósfera potencialmente explosiva o si hay materiales
inflamables, el producto debería apagarse y el usuario debería cumplir todas las señales e
instrucciones. Las chispas en estas áreas podrían causar una explosión o fuego que acarrease lesiones
personales e incluso la muerte. Se aconseja a los usuarios no utilizar el equipo en puntos de repostaje
como estaciones de servicio o gas y se recuerda que deben cumplir las restricciones sobre el uso de
equipos de radio en depósitos de combustible, plantas químicas o donde se realicen operaciones de
demolición. Las áreas con una atmósfera potencialmente explosiva están a menudo, aunque no
siempre, claramente marcadas. Éstas incluyen áreas de repostaje, bajo la cubierta en barcos,
instalaciones de transferencia o almacenamiento de combustible o químicos, como en grano, polvo
o polvos de metal.
SEGURIDAD VIAL
Los conductores de vehículos no pueden utilizar los servicios telefónicos con dispositivos de mano,
excepto en caso de emergencia. En algunos países se permite el uso de dispositivos de manos libres
como alternativa.
Cupcake User Guide R1.5.0 5 April 7, 2009

MEDIDAS DE SEGURIDAD PARA LA EXPOSICIÓN A RF
• Evite utilizar su teléfono cerca de estructuras de metal (por ejemplo, la estructura de acero de un
edificio).
• Evite utilizar su teléfono cerca de fuentes electromagnéticas intensas, tales como hornos
microondas, altavoces, TV o radio.
• Utilice únicamente accesorios originales aprobados por el fabricante, o accesorios que no
contengan ningún metal.
• El uso de accesorios no originales que no estén aprobados por el fabricante puede incumplir las
directrices de exposición a RF locales y debería evitarse.
INTERFERENCIAS CON LAS FUNCIONES DE EQUIPOS MÉDICOS
Este producto puede interferir en el funcionamiento de equipos médicos. El uso de este dispositivo
está prohibido en la mayoría de hospitales y clínicas médicas.
Si utiliza algún otro dispositivo médico, póngase en contacto con el fabricante del mismo para
determinar si está adecuadamente protegido respecto a fuentes externas de energía de RF. Puede
que su médico le ayude a obtener esta información.
APAGUE su teléfono inmediatamente en instalaciones médicas cuando las normativas de estas zonas
así lo indiquen. Los hospitales o las instalaciones pueden utilizar equipos que podrían ser sensibles a
fuentes externas de energía de RF.
AUDÍFONOS
Algunos teléfonos inalámbricos digitales puede interferir con ciertos audífonos. Si se produce una
interferencia, puede que desee consultar con su proveedor de servicios, o llamar a la línea de servicio
de atención al cliente para buscar alternativas.
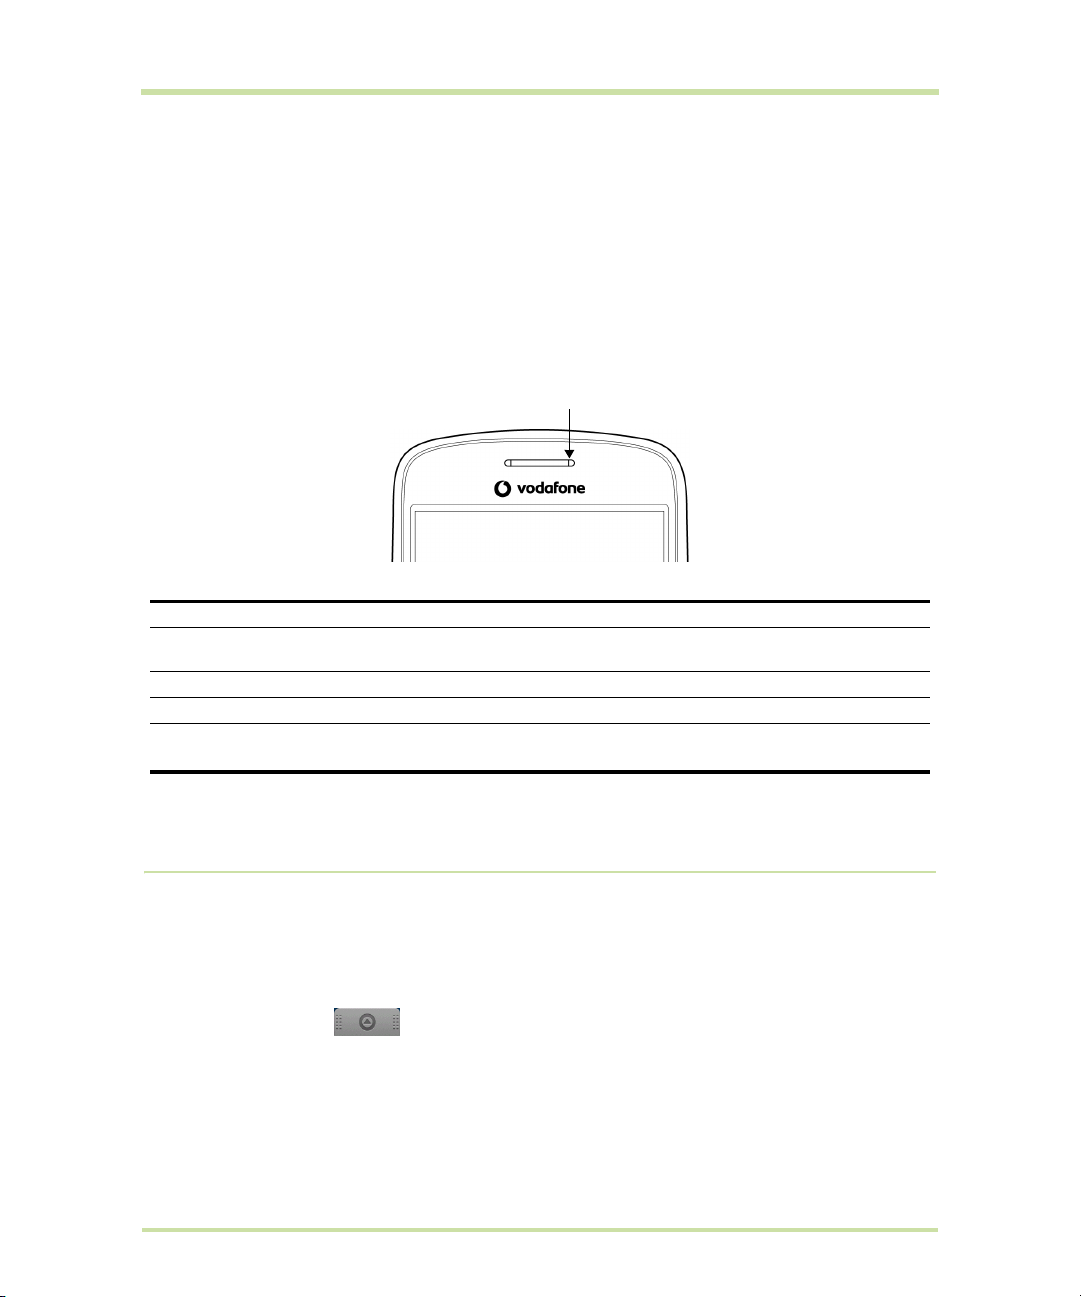
RADIACIÓN NO IONIZANTE
El dispositivo dispone de una antena interna. Este producto deberá utilizarse según su funcionamiento
normal a fin de garantizar el rendimiento radiativo y la seguridad de la interferencia. Al igual que
ocurre con otros equipos de transmisión de radio móvil, se recomienda a los usuarios que para el buen
funcionamiento del equipo y la seguridad del personal no permanezcan cerca de la antena durante
el funcionamiento del equipo.
Utilice sólo la antena integral que se facilita. El uso de antenas no autorizadas o modificadas puede
disminuir la calidad de la llamada y dañar el teléfono, reduciendo el rendimiento y los niveles SAR
superiores a los límites recomendados, además del incumplimiento de los requisitos de regulación
locales de su país.
Para asegurar el funcionamiento óptimo de su teléfono y garantizar que la exposición humana a
energía de RF cumple con las directrices establecidas en los estándares relevantes, utilice siempre el
dispositivo únicamente en su posición de uso normal. El contacto con la zona de la antena podría
disminuir la calidad de la llamada y provocar que el dispositivo funcione a un nivel de energía mayor
del necesario. Al evitar el contacto con la zona de la antena cuando el teléfono está EN USO se
optimiza el funcionamiento de la antena y la duración de la batería.
Cupcake User Guide R1.5.0 6 April 7, 2009
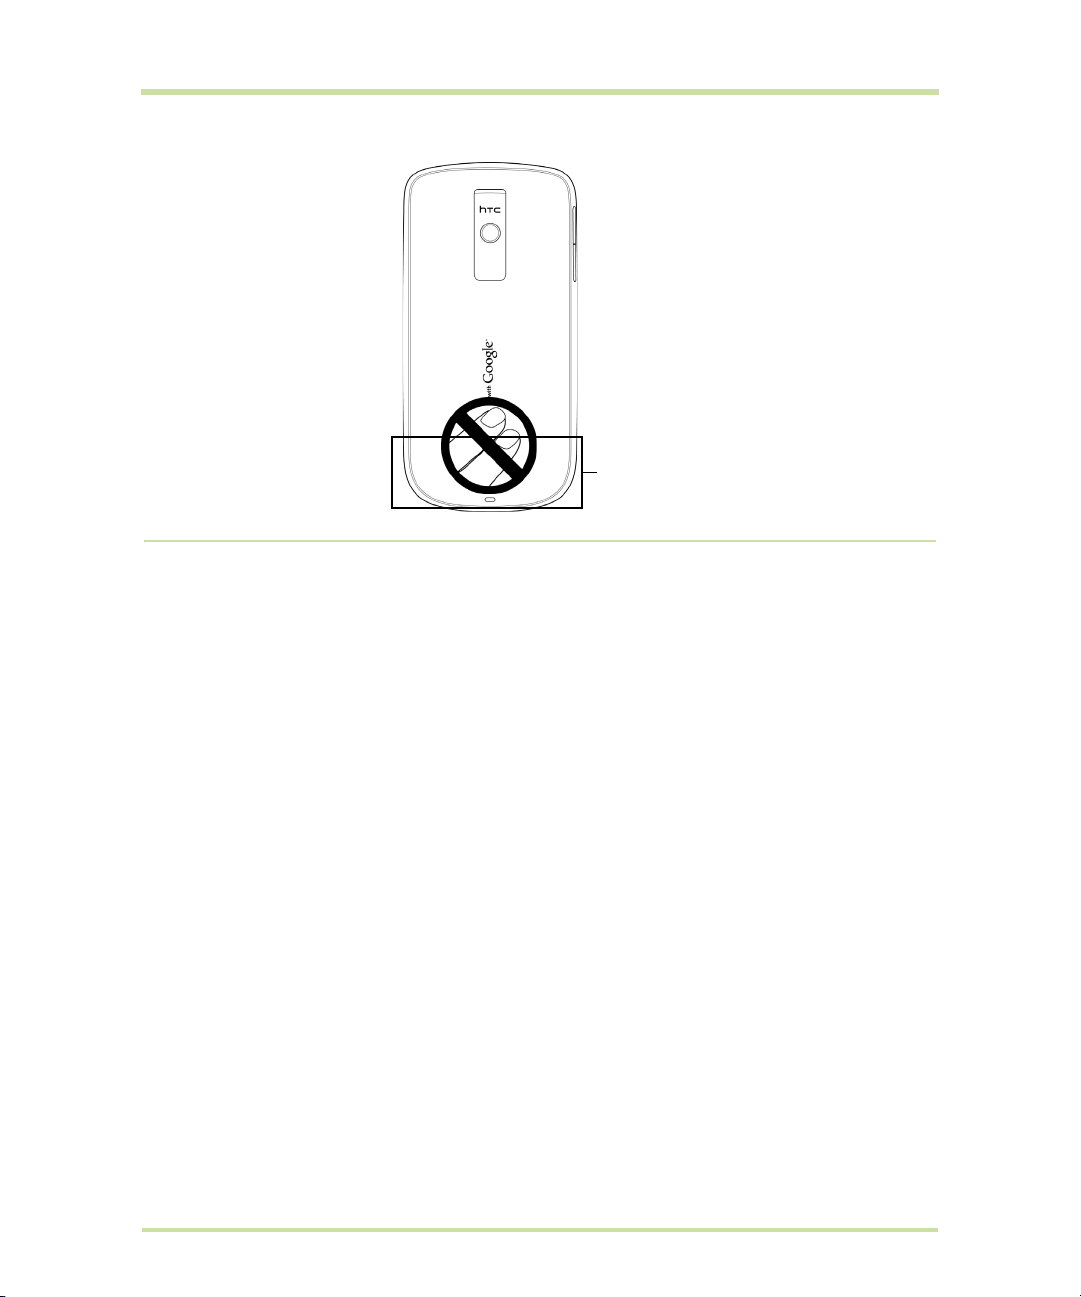
Ubicación
de la
antena
Precauciones generales
• Evite ejercer demasiada presión sobre el dispositivo
No ejerza demasiada presión en la pantalla o en el dispositivo para evitar que se dañen, y saque
el dispositivo del bolso del pantalón cuando se vaya a sentar. También se recomienda que
guarde el dispositivo en el estuche de protección y que sólo utilice el lápiz o el dedo cuando
interactúe con la pantalla táctil. Las pantallas deterioradas debido a una manipulación
incorrecta no estarán cubiertas por la garantía.
•
El dispositivo se calienta si se utiliza durante un período prolongado.
Al utilizar el dispositivo durante períodos prolongados, como al hablar por teléfono, al cargar la
batería o al explorar la Web, éste puede que se caliente. En la mayoría de los casos, esta
situación es normal y por lo tanto no debe interpretarse como un problema del dispositivo.
•
Preste atención a las marcas de reparación
Excepto si se explica en cualquier otro lugar de la documentación sobre operación o servicio, no
repare ningún producto usted mismo. La reparación de los componentes internos del dispositivo
debería realizarla un técnico autorizado o el proveedor.
•
Daños que requieren reparación
Desenchufe el producto de la toma de corriente y solicite su reparación a un técnico autorizado
o a un proveedor en las siguientes condiciones:
• Se ha derramado líquido o ha caído un objeto en el interior del producto.
• El producto ha estado expuesto a la lluvia o al agua.
• El producto se ha caído o se ha dañado.
• Hay signos evidentes de sobrecalentamiento.
• El producto no funciona con normalidad cuando sigue las instrucciones de operación.
•
Evite las áreas calientes
El producto debe colocarse alejado de fuentes de calor como radiadores, registradores de calor,
estufas u otros productos (incluyendo, aunque sin limitarse a, amplificadores) que irradien calor.
Cupcake User Guide R1.5.0 7 April 7, 2009

• Evite las zonas con humedad
Nunca utilice el producto en un lugar húmedo.
•
Evite utilizar su dispositivo tras un cambio brusco de temperatura
Si somete a su dispositivo a importantes cambios de temperatura y/o humedad, puede que se
forme condensación en el dispositivo o dentro de él. Para evitar daños en el dispositivo, deje
transcurrir el tiempo necesario para que la humedad se evapore antes de utilizarlo.
AVISO: Al trasladar el dispositivo de un entorno con temperaturas bajas a otro con temperaturas
más altas, o de un entorno con temperaturas elevadas a un entorno más fresco, deje que el
dispositivo se adapte a la temperatura ambiente antes de encenderlo.
•
Evite introducir objetos en el producto
Nunca introduzca objetos de ningún tipo en el interior de las ranuras de la carcasa u otras
aperturas del producto. Las ranuras y aperturas permiten la ventilación de la unidad. No debe
cubrir ni bloquear estas entradas que refrigeran la unidad.
•
Accesorios de montaje
No utilice el producto en una mesa, carro, estantería, trípode o soporte inestable. Cualquier
montaje del producto debe seguir las instrucciones del fabricante y debería utilizar un accesorio
de montaje recomendado por el fabricante.
•
Evite el montaje en lugares inestables
No coloque el producto en una base inestable.
•
Utilice el producto con el equipo aprobado
Este producto sólo debe utilizarse con ordenadores personales y opcionales identificados como
apropiados para el uso con su equipo.
•
Ajuste el volumen
Baje el volumen antes de utilizar los auriculares u otros dispositivos de audio.
•
Limpieza
Desenchufe el producto de la toma de corriente antes de su limpieza. No utilice limpiadores
líquidos ni aerosoles. Utilice un trapo humedecido para la limpieza, NUNCA utilice agua para
limpiar la pantalla LCD.
•
Niños pequeños
No deje el teléfono o sus accesorios cerca del alcance de los niños pequeños ni permita que lo
utilicen como juguete. Podrían sufrir daños y ocasionar daños a otros, e incluso dañar
accidentalmente el teléfono. Su teléfono consta de piezas pequeñas con bordes cortantes que
pueden ocasionar lesiones o, de desmontarse podrían ocasionar daños por asfixia.
•
Lesiones por movimiento repetitivo
Para minimizar el riesgo de lesión por esfuerzo repetitivo, al enviar mensajes de texto o al utilizar los
juegos del teléfono:
• No agarre el teléfono con demasiada fuerza
• Pulse los botones con cuidado
• Utilice las características especiales del teléfono que minimizan el número de botones que tiene
que pulsar, como las plantillas de mensajes o el texto de predicción.
• Tómese varios descansos para estirarse y relajarse.
•
Destello de luz
Este teléfono puede emitir un destello de luz o se puede usar como una linterna; evite el uso
cerca de los ojos.
•
Uso de maquinaria
Preste máxima atención durante el uso de maquinaria a fin de reducir un posible riesgo de
accidente.
•
Descarga electrostática
No toque los conectores metálicos de la tarjeta SIM.
Cupcake User Guide R1.5.0 8 April 7, 2009

• Ataques/pérdida de conocimiento
Este teléfono puede emitir luces luminosas intermitentes.
•
Sonidos altos
Este teléfono puede producir sonidos altos que podrían dañar la audición.
Llamadas de emergencia
•
Este teléfono, como cualquier teléfono inalámbrico, funciona utilizando señales de radio, lo cual
no garantiza la conexión en todos los casos. Por lo tanto, nunca debe depender exclusivamente
de un teléfono inalámbrico para las comunicaciones de emergencia.
Cupcake User Guide R1.5.0 9 April 7, 2009

Contents
1 Phone Basics . . . . . . . . . . . . . . . . . . . . . . . . . . . . . . . . . . . . . . . . . . . . . . . . . 14
1.1 Getting to Know Your HTC Magic and Accessories. . . . . . . . . . . . . . . . . . . . . . . . . . . . . . . . . . . . .14
Front panel . . . . . . . . . . . . . . . . . . . . . . . . . . . . . . . . . . . . . . . . . . . . . . . . . . . . . . . . . . . . . . . . . . . . .14
Back and left panels . . . . . . . . . . . . . . . . . . . . . . . . . . . . . . . . . . . . . . . . . . . . . . . . . . . . . . . . . . . . .15
Bottom panel . . . . . . . . . . . . . . . . . . . . . . . . . . . . . . . . . . . . . . . . . . . . . . . . . . . . . . . . . . . . . . . . . . .15
Inside the box . . . . . . . . . . . . . . . . . . . . . . . . . . . . . . . . . . . . . . . . . . . . . . . . . . . . . . . . . . . . . . . . . . .15
1.2 Installing the SIM Card, Battery, and Storage Card . . . . . . . . . . . . . . . . . . . . . . . . . . . . . . . . . . . . .16
SIM card . . . . . . . . . . . . . . . . . . . . . . . . . . . . . . . . . . . . . . . . . . . . . . . . . . . . . . . . . . . . . . . . . . . . . . .16
Battery . . . . . . . . . . . . . . . . . . . . . . . . . . . . . . . . . . . . . . . . . . . . . . . . . . . . . . . . . . . . . . . . . . . . . . . . .17
Storage card. . . . . . . . . . . . . . . . . . . . . . . . . . . . . . . . . . . . . . . . . . . . . . . . . . . . . . . . . . . . . . . . . . . .18
1.3 Charging the Battery . . . . . . . . . . . . . . . . . . . . . . . . . . . . . . . . . . . . . . . . . . . . . . . . . . . . . . . . . . . . . .19
1.4 Phone Controls . . . . . . . . . . . . . . . . . . . . . . . . . . . . . . . . . . . . . . . . . . . . . . . . . . . . . . . . . . . . . . . . . . .20
Search button. . . . . . . . . . . . . . . . . . . . . . . . . . . . . . . . . . . . . . . . . . . . . . . . . . . . . . . . . . . . . . . . . . .20
1.5 Getting Around Your Phone . . . . . . . . . . . . . . . . . . . . . . . . . . . . . . . . . . . . . . . . . . . . . . . . . . . . . . . .21
Touch . . . . . . . . . . . . . . . . . . . . . . . . . . . . . . . . . . . . . . . . . . . . . . . . . . . . . . . . . . . . . . . . . . . . . . . . . .21
Touch and hold . . . . . . . . . . . . . . . . . . . . . . . . . . . . . . . . . . . . . . . . . . . . . . . . . . . . . . . . . . . . . . . . .21
Swipe or slide . . . . . . . . . . . . . . . . . . . . . . . . . . . . . . . . . . . . . . . . . . . . . . . . . . . . . . . . . . . . . . . . . . .21
Drag . . . . . . . . . . . . . . . . . . . . . . . . . . . . . . . . . . . . . . . . . . . . . . . . . . . . . . . . . . . . . . . . . . . . . . . . . . .21
Flick . . . . . . . . . . . . . . . . . . . . . . . . . . . . . . . . . . . . . . . . . . . . . . . . . . . . . . . . . . . . . . . . . . . . . . . . . . .21
Rotate . . . . . . . . . . . . . . . . . . . . . . . . . . . . . . . . . . . . . . . . . . . . . . . . . . . . . . . . . . . . . . . . . . . . . . . . .21
Use the Trackball . . . . . . . . . . . . . . . . . . . . . . . . . . . . . . . . . . . . . . . . . . . . . . . . . . . . . . . . . . . . . . . .21
1.6 Getting Started. . . . . . . . . . . . . . . . . . . . . . . . . . . . . . . . . . . . . . . . . . . . . . . . . . . . . . . . . . . . . . . . . . .22
Turn your phone on and off . . . . . . . . . . . . . . . . . . . . . . . . . . . . . . . . . . . . . . . . . . . . . . . . . . . . . . .22
Enter PIN . . . . . . . . . . . . . . . . . . . . . . . . . . . . . . . . . . . . . . . . . . . . . . . . . . . . . . . . . . . . . . . . . . . . . . .22
Set up your phone for the first time . . . . . . . . . . . . . . . . . . . . . . . . . . . . . . . . . . . . . . . . . . . . . . . . .22
Retrieve your Google™ password . . . . . . . . . . . . . . . . . . . . . . . . . . . . . . . . . . . . . . . . . . . . . . . . . .23
Turn off the screen when not in use . . . . . . . . . . . . . . . . . . . . . . . . . . . . . . . . . . . . . . . . . . . . . . . . .23
1.7 Home Screen . . . . . . . . . . . . . . . . . . . . . . . . . . . . . . . . . . . . . . . . . . . . . . . . . . . . . . . . . . . . . . . . . . . .23
Extended Home screen. . . . . . . . . . . . . . . . . . . . . . . . . . . . . . . . . . . . . . . . . . . . . . . . . . . . . . . . . . .24
Customising the Home screen . . . . . . . . . . . . . . . . . . . . . . . . . . . . . . . . . . . . . . . . . . . . . . . . . . . . .24
1.8 Phone Status and Notifications. . . . . . . . . . . . . . . . . . . . . . . . . . . . . . . . . . . . . . . . . . . . . . . . . . . . . .26
Status bar . . . . . . . . . . . . . . . . . . . . . . . . . . . . . . . . . . . . . . . . . . . . . . . . . . . . . . . . . . . . . . . . . . . . . .26
Notifications panel. . . . . . . . . . . . . . . . . . . . . . . . . . . . . . . . . . . . . . . . . . . . . . . . . . . . . . . . . . . . . . .27
Notification LED . . . . . . . . . . . . . . . . . . . . . . . . . . . . . . . . . . . . . . . . . . . . . . . . . . . . . . . . . . . . . . . . .28
1.9 Applications . . . . . . . . . . . . . . . . . . . . . . . . . . . . . . . . . . . . . . . . . . . . . . . . . . . . . . . . . . . . . . . . . . . . .28
Recently-used applications . . . . . . . . . . . . . . . . . . . . . . . . . . . . . . . . . . . . . . . . . . . . . . . . . . . . . . .29
1.10 Settings. . . . . . . . . . . . . . . . . . . . . . . . . . . . . . . . . . . . . . . . . . . . . . . . . . . . . . . . . . . . . . . . . . . . . . . . .29
1.11 Adjusting the Volume . . . . . . . . . . . . . . . . . . . . . . . . . . . . . . . . . . . . . . . . . . . . . . . . . . . . . . . . . . . .30
1.12 Using the Onscreen Keyboard . . . . . . . . . . . . . . . . . . . . . . . . . . . . . . . . . . . . . . . . . . . . . . . . . . . . .31
Adjusting keyboard settings . . . . . . . . . . . . . . . . . . . . . . . . . . . . . . . . . . . . . . . . . . . . . . . . . . . . . . .31
Using the landscape onscreen keyboard. . . . . . . . . . . . . . . . . . . . . . . . . . . . . . . . . . . . . . . . . . . .32
Entering numbers and symbols. . . . . . . . . . . . . . . . . . . . . . . . . . . . . . . . . . . . . . . . . . . . . . . . . . . . .32
1.13 Using the Phone’s Storage Card as a USB Drive. . . . . . . . . . . . . . . . . . . . . . . . . . . . . . . . . . . . . . .33
Cupcake User Guide R1.5.0 10 April 7, 2009

2 Using Phone Features and Managing Contacts . . . . . . . . . . . . . . . . . . . . 34
2.1 Making Calls . . . . . . . . . . . . . . . . . . . . . . . . . . . . . . . . . . . . . . . . . . . . . . . . . . . . . . . . . . . . . . . . . . . . .34
Make a call from the Call log. . . . . . . . . . . . . . . . . . . . . . . . . . . . . . . . . . . . . . . . . . . . . . . . . . . . . .35
Add and call your contacts . . . . . . . . . . . . . . . . . . . . . . . . . . . . . . . . . . . . . . . . . . . . . . . . . . . . . . .35
Add and call favourite contacts . . . . . . . . . . . . . . . . . . . . . . . . . . . . . . . . . . . . . . . . . . . . . . . . . . .35
Call voicemail. . . . . . . . . . . . . . . . . . . . . . . . . . . . . . . . . . . . . . . . . . . . . . . . . . . . . . . . . . . . . . . . . . .35
2.2 Answering or Rejecting Calls. . . . . . . . . . . . . . . . . . . . . . . . . . . . . . . . . . . . . . . . . . . . . . . . . . . . . . . .36
2.3 Call Options. . . . . . . . . . . . . . . . . . . . . . . . . . . . . . . . . . . . . . . . . . . . . . . . . . . . . . . . . . . . . . . . . . . . . .37
Manage multiple calls . . . . . . . . . . . . . . . . . . . . . . . . . . . . . . . . . . . . . . . . . . . . . . . . . . . . . . . . . . . .38
Set up a conference call . . . . . . . . . . . . . . . . . . . . . . . . . . . . . . . . . . . . . . . . . . . . . . . . . . . . . . . . .38
2.4 Using the Call Log. . . . . . . . . . . . . . . . . . . . . . . . . . . . . . . . . . . . . . . . . . . . . . . . . . . . . . . . . . . . . . . . .39
2.5 Adjusting Phone Settings . . . . . . . . . . . . . . . . . . . . . . . . . . . . . . . . . . . . . . . . . . . . . . . . . . . . . . . . . . .40
2.6 Turning the Phone Function On and Off . . . . . . . . . . . . . . . . . . . . . . . . . . . . . . . . . . . . . . . . . . . . . .41
2.7 Creating and Managing Your Contacts . . . . . . . . . . . . . . . . . . . . . . . . . . . . . . . . . . . . . . . . . . . . . .41
Add a new contact. . . . . . . . . . . . . . . . . . . . . . . . . . . . . . . . . . . . . . . . . . . . . . . . . . . . . . . . . . . . . .42
Edit and customise your contacts . . . . . . . . . . . . . . . . . . . . . . . . . . . . . . . . . . . . . . . . . . . . . . . . . .43
Communicate with your contacts. . . . . . . . . . . . . . . . . . . . . . . . . . . . . . . . . . . . . . . . . . . . . . . . . .43
3 Managing Your Time. . . . . . . . . . . . . . . . . . . . . . . . . . . . . . . . . . . . . . . . . . . 45
3.1 Using Calendar . . . . . . . . . . . . . . . . . . . . . . . . . . . . . . . . . . . . . . . . . . . . . . . . . . . . . . . . . . . . . . . . . . .45
Open Calendar . . . . . . . . . . . . . . . . . . . . . . . . . . . . . . . . . . . . . . . . . . . . . . . . . . . . . . . . . . . . . . . . .45
Create events. . . . . . . . . . . . . . . . . . . . . . . . . . . . . . . . . . . . . . . . . . . . . . . . . . . . . . . . . . . . . . . . . . .45
Calendar views. . . . . . . . . . . . . . . . . . . . . . . . . . . . . . . . . . . . . . . . . . . . . . . . . . . . . . . . . . . . . . . . . .46
Event reminders . . . . . . . . . . . . . . . . . . . . . . . . . . . . . . . . . . . . . . . . . . . . . . . . . . . . . . . . . . . . . . . . .46
Synchronise Microsoft® Office Outlook® calendar . . . . . . . . . . . . . . . . . . . . . . . . . . . . . . . . . . . .47
3.2 Using Alarm Clock . . . . . . . . . . . . . . . . . . . . . . . . . . . . . . . . . . . . . . . . . . . . . . . . . . . . . . . . . . . . . . . .47
Set an alarm . . . . . . . . . . . . . . . . . . . . . . . . . . . . . . . . . . . . . . . . . . . . . . . . . . . . . . . . . . . . . . . . . . . .47
Customise Alarm Clock . . . . . . . . . . . . . . . . . . . . . . . . . . . . . . . . . . . . . . . . . . . . . . . . . . . . . . . . . . .48
Delete an alarm . . . . . . . . . . . . . . . . . . . . . . . . . . . . . . . . . . . . . . . . . . . . . . . . . . . . . . . . . . . . . . . . .48
Silence all alarms . . . . . . . . . . . . . . . . . . . . . . . . . . . . . . . . . . . . . . . . . . . . . . . . . . . . . . . . . . . . . . . .48
4 Exchanging Messages . . . . . . . . . . . . . . . . . . . . . . . . . . . . . . . . . . . . . . . . . 49
4.1 Sending Text and Multimedia Messages. . . . . . . . . . . . . . . . . . . . . . . . . . . . . . . . . . . . . . . . . . . . . .49
Open Messaging . . . . . . . . . . . . . . . . . . . . . . . . . . . . . . . . . . . . . . . . . . . . . . . . . . . . . . . . . . . . . . . .49
Create and send SMS and MMS messages . . . . . . . . . . . . . . . . . . . . . . . . . . . . . . . . . . . . . . . . . .49
Receive text and multimedia messages. . . . . . . . . . . . . . . . . . . . . . . . . . . . . . . . . . . . . . . . . . . . .52
Manage messages and message threads . . . . . . . . . . . . . . . . . . . . . . . . . . . . . . . . . . . . . . . . . . .52
Adjust text and multimedia message settings . . . . . . . . . . . . . . . . . . . . . . . . . . . . . . . . . . . . . . . .54
4.2 Using Google Mail™. . . . . . . . . . . . . . . . . . . . . . . . . . . . . . . . . . . . . . . . . . . . . . . . . . . . . . . . . . . . . . .55
Create and send emails . . . . . . . . . . . . . . . . . . . . . . . . . . . . . . . . . . . . . . . . . . . . . . . . . . . . . . . . . .55
Receive and read emails . . . . . . . . . . . . . . . . . . . . . . . . . . . . . . . . . . . . . . . . . . . . . . . . . . . . . . . . .56
Reply to or forward emails . . . . . . . . . . . . . . . . . . . . . . . . . . . . . . . . . . . . . . . . . . . . . . . . . . . . . . . .57
Manage conversations and emails . . . . . . . . . . . . . . . . . . . . . . . . . . . . . . . . . . . . . . . . . . . . . . . . .58
Set Google Mail settings . . . . . . . . . . . . . . . . . . . . . . . . . . . . . . . . . . . . . . . . . . . . . . . . . . . . . . . . . .58
4.3 Using Email. . . . . . . . . . . . . . . . . . . . . . . . . . . . . . . . . . . . . . . . . . . . . . . . . . . . . . . . . . . . . . . . . . . . . . .59
Add an email account . . . . . . . . . . . . . . . . . . . . . . . . . . . . . . . . . . . . . . . . . . . . . . . . . . . . . . . . . . .59
Compose and send emails. . . . . . . . . . . . . . . . . . . . . . . . . . . . . . . . . . . . . . . . . . . . . . . . . . . . . . . .59
Manage emails on your external email account . . . . . . . . . . . . . . . . . . . . . . . . . . . . . . . . . . . . .60
Edit or delete an external email account. . . . . . . . . . . . . . . . . . . . . . . . . . . . . . . . . . . . . . . . . . . .60
Add more email accounts . . . . . . . . . . . . . . . . . . . . . . . . . . . . . . . . . . . . . . . . . . . . . . . . . . . . . . . .60
Cupcake User Guide R1.5.0 11 April 7, 2009

4.4 Using Google Talk™ . . . . . . . . . . . . . . . . . . . . . . . . . . . . . . . . . . . . . . . . . . . . . . . . . . . . . . . . . . . . . . .60
Sign in and chat online . . . . . . . . . . . . . . . . . . . . . . . . . . . . . . . . . . . . . . . . . . . . . . . . . . . . . . . . . . .60
Manage your friends . . . . . . . . . . . . . . . . . . . . . . . . . . . . . . . . . . . . . . . . . . . . . . . . . . . . . . . . . . . . .62
Mobile indicators . . . . . . . . . . . . . . . . . . . . . . . . . . . . . . . . . . . . . . . . . . . . . . . . . . . . . . . . . . . . . . . .63
Adjust instant messaging settings. . . . . . . . . . . . . . . . . . . . . . . . . . . . . . . . . . . . . . . . . . . . . . . . . . .63
Sign out . . . . . . . . . . . . . . . . . . . . . . . . . . . . . . . . . . . . . . . . . . . . . . . . . . . . . . . . . . . . . . . . . . . . . . . .63
5 Getting Connected. . . . . . . . . . . . . . . . . . . . . . . . . . . . . . . . . . . . . . . . . . . . 64
5.1 Connecting to the Internet . . . . . . . . . . . . . . . . . . . . . . . . . . . . . . . . . . . . . . . . . . . . . . . . . . . . . . . . .64
GPRS/3G/EDGE . . . . . . . . . . . . . . . . . . . . . . . . . . . . . . . . . . . . . . . . . . . . . . . . . . . . . . . . . . . . . . . . .64
Wi-Fi . . . . . . . . . . . . . . . . . . . . . . . . . . . . . . . . . . . . . . . . . . . . . . . . . . . . . . . . . . . . . . . . . . . . . . . . . . .64
5.2 Using Browser . . . . . . . . . . . . . . . . . . . . . . . . . . . . . . . . . . . . . . . . . . . . . . . . . . . . . . . . . . . . . . . . . . . .66
View web pages . . . . . . . . . . . . . . . . . . . . . . . . . . . . . . . . . . . . . . . . . . . . . . . . . . . . . . . . . . . . . . . .66
Manage links, history, and downloads . . . . . . . . . . . . . . . . . . . . . . . . . . . . . . . . . . . . . . . . . . . . . .68
Manage bookmarks . . . . . . . . . . . . . . . . . . . . . . . . . . . . . . . . . . . . . . . . . . . . . . . . . . . . . . . . . . . . .70
Adjust Browser settings. . . . . . . . . . . . . . . . . . . . . . . . . . . . . . . . . . . . . . . . . . . . . . . . . . . . . . . . . . . .70
5.3 Using Bluetooth. . . . . . . . . . . . . . . . . . . . . . . . . . . . . . . . . . . . . . . . . . . . . . . . . . . . . . . . . . . . . . . . . . .71
6 Getting Around with Maps . . . . . . . . . . . . . . . . . . . . . . . . . . . . . . . . . . . . . . 73
6.1 Using Maps . . . . . . . . . . . . . . . . . . . . . . . . . . . . . . . . . . . . . . . . . . . . . . . . . . . . . . . . . . . . . . . . . . . . . .73
Enable Location source. . . . . . . . . . . . . . . . . . . . . . . . . . . . . . . . . . . . . . . . . . . . . . . . . . . . . . . . . . .73
Open Maps. . . . . . . . . . . . . . . . . . . . . . . . . . . . . . . . . . . . . . . . . . . . . . . . . . . . . . . . . . . . . . . . . . . . .73
Find your location on the map . . . . . . . . . . . . . . . . . . . . . . . . . . . . . . . . . . . . . . . . . . . . . . . . . . . . .73
6.2 Searching for Places of Interest . . . . . . . . . . . . . . . . . . . . . . . . . . . . . . . . . . . . . . . . . . . . . . . . . . . . .74
6.3 Viewing Maps . . . . . . . . . . . . . . . . . . . . . . . . . . . . . . . . . . . . . . . . . . . . . . . . . . . . . . . . . . . . . . . . . . . .75
Zoom in or out on a map . . . . . . . . . . . . . . . . . . . . . . . . . . . . . . . . . . . . . . . . . . . . . . . . . . . . . . . . .75
Navigate on a map . . . . . . . . . . . . . . . . . . . . . . . . . . . . . . . . . . . . . . . . . . . . . . . . . . . . . . . . . . . . . .75
6.4 Getting Directions . . . . . . . . . . . . . . . . . . . . . . . . . . . . . . . . . . . . . . . . . . . . . . . . . . . . . . . . . . . . . . . .76
6.5 Finding your friends with Google Latitude™. . . . . . . . . . . . . . . . . . . . . . . . . . . . . . . . . . . . . . . . . . .78
Open Latitude . . . . . . . . . . . . . . . . . . . . . . . . . . . . . . . . . . . . . . . . . . . . . . . . . . . . . . . . . . . . . . . . . .78
Share your locations . . . . . . . . . . . . . . . . . . . . . . . . . . . . . . . . . . . . . . . . . . . . . . . . . . . . . . . . . . . . .78
Invite friends . . . . . . . . . . . . . . . . . . . . . . . . . . . . . . . . . . . . . . . . . . . . . . . . . . . . . . . . . . . . . . . . . . . .78
Accept an invitation . . . . . . . . . . . . . . . . . . . . . . . . . . . . . . . . . . . . . . . . . . . . . . . . . . . . . . . . . . . . .78
Show your friends . . . . . . . . . . . . . . . . . . . . . . . . . . . . . . . . . . . . . . . . . . . . . . . . . . . . . . . . . . . . . . . .79
Connect with your friends . . . . . . . . . . . . . . . . . . . . . . . . . . . . . . . . . . . . . . . . . . . . . . . . . . . . . . . . .79
Control what you share. . . . . . . . . . . . . . . . . . . . . . . . . . . . . . . . . . . . . . . . . . . . . . . . . . . . . . . . . . .80
7 Camera and Multimedia . . . . . . . . . . . . . . . . . . . . . . . . . . . . . . . . . . . . . . . 81
7.1 Using Camera and Camcorder . . . . . . . . . . . . . . . . . . . . . . . . . . . . . . . . . . . . . . . . . . . . . . . . . . . . .81
Capture modes . . . . . . . . . . . . . . . . . . . . . . . . . . . . . . . . . . . . . . . . . . . . . . . . . . . . . . . . . . . . . . . . .81
Take pictures. . . . . . . . . . . . . . . . . . . . . . . . . . . . . . . . . . . . . . . . . . . . . . . . . . . . . . . . . . . . . . . . . . . .81
Shoot videos . . . . . . . . . . . . . . . . . . . . . . . . . . . . . . . . . . . . . . . . . . . . . . . . . . . . . . . . . . . . . . . . . . . .82
Post capture . . . . . . . . . . . . . . . . . . . . . . . . . . . . . . . . . . . . . . . . . . . . . . . . . . . . . . . . . . . . . . . . . . . .82
Copying photos and video to storage . . . . . . . . . . . . . . . . . . . . . . . . . . . . . . . . . . . . . . . . . . . . . .82
7.2 Using Gallery . . . . . . . . . . . . . . . . . . . . . . . . . . . . . . . . . . . . . . . . . . . . . . . . . . . . . . . . . . . . . . . . . . . . .83
Work with pictures . . . . . . . . . . . . . . . . . . . . . . . . . . . . . . . . . . . . . . . . . . . . . . . . . . . . . . . . . . . . . . .83
Work with videos. . . . . . . . . . . . . . . . . . . . . . . . . . . . . . . . . . . . . . . . . . . . . . . . . . . . . . . . . . . . . . . . .86
7.3 Viewing Videos on YouTube™ . . . . . . . . . . . . . . . . . . . . . . . . . . . . . . . . . . . . . . . . . . . . . . . . . . . . . .87
Watch YouTube videos . . . . . . . . . . . . . . . . . . . . . . . . . . . . . . . . . . . . . . . . . . . . . . . . . . . . . . . . . . .87
Search for videos . . . . . . . . . . . . . . . . . . . . . . . . . . . . . . . . . . . . . . . . . . . . . . . . . . . . . . . . . . . . . . . .87
Cupcake User Guide R1.5.0 12 April 7, 2009

7.4 Using Music . . . . . . . . . . . . . . . . . . . . . . . . . . . . . . . . . . . . . . . . . . . . . . . . . . . . . . . . . . . . . . . . . . . . . .88
Music library . . . . . . . . . . . . . . . . . . . . . . . . . . . . . . . . . . . . . . . . . . . . . . . . . . . . . . . . . . . . . . . . . . . .88
Play music . . . . . . . . . . . . . . . . . . . . . . . . . . . . . . . . . . . . . . . . . . . . . . . . . . . . . . . . . . . . . . . . . . . . . .89
Use playlists . . . . . . . . . . . . . . . . . . . . . . . . . . . . . . . . . . . . . . . . . . . . . . . . . . . . . . . . . . . . . . . . . . . . .89
Set a song as ring tone . . . . . . . . . . . . . . . . . . . . . . . . . . . . . . . . . . . . . . . . . . . . . . . . . . . . . . . . . . .90
Delete music on the storage card . . . . . . . . . . . . . . . . . . . . . . . . . . . . . . . . . . . . . . . . . . . . . . . . . .90
8 Using Android Market™ . . . . . . . . . . . . . . . . . . . . . . . . . . . . . . . . . . . . . . . . 91
8.1 Using Android Market . . . . . . . . . . . . . . . . . . . . . . . . . . . . . . . . . . . . . . . . . . . . . . . . . . . . . . . . . . . . .91
8.2 Getting help . . . . . . . . . . . . . . . . . . . . . . . . . . . . . . . . . . . . . . . . . . . . . . . . . . . . . . . . . . . . . . . . . . . . .92
8.3 Finding applications. . . . . . . . . . . . . . . . . . . . . . . . . . . . . . . . . . . . . . . . . . . . . . . . . . . . . . . . . . . . . . .92
8.4 Installing an application . . . . . . . . . . . . . . . . . . . . . . . . . . . . . . . . . . . . . . . . . . . . . . . . . . . . . . . . . . .93
8.5 Purchasing an application . . . . . . . . . . . . . . . . . . . . . . . . . . . . . . . . . . . . . . . . . . . . . . . . . . . . . . . . .94
Request a refund . . . . . . . . . . . . . . . . . . . . . . . . . . . . . . . . . . . . . . . . . . . . . . . . . . . . . . . . . . . . . . . .94
8.6 Managing your applications . . . . . . . . . . . . . . . . . . . . . . . . . . . . . . . . . . . . . . . . . . . . . . . . . . . . . . .95
8.7 Uninstalling an application . . . . . . . . . . . . . . . . . . . . . . . . . . . . . . . . . . . . . . . . . . . . . . . . . . . . . . . . .95
9 Managing Your Phone . . . . . . . . . . . . . . . . . . . . . . . . . . . . . . . . . . . . . . . . . 96
9.1 Changing Basic Settings . . . . . . . . . . . . . . . . . . . . . . . . . . . . . . . . . . . . . . . . . . . . . . . . . . . . . . . . . . .96
Set the date, time zone, and time . . . . . . . . . . . . . . . . . . . . . . . . . . . . . . . . . . . . . . . . . . . . . . . . . .96
Display settings . . . . . . . . . . . . . . . . . . . . . . . . . . . . . . . . . . . . . . . . . . . . . . . . . . . . . . . . . . . . . . . . . .96
Ringer settings. . . . . . . . . . . . . . . . . . . . . . . . . . . . . . . . . . . . . . . . . . . . . . . . . . . . . . . . . . . . . . . . . . .97
Phone services . . . . . . . . . . . . . . . . . . . . . . . . . . . . . . . . . . . . . . . . . . . . . . . . . . . . . . . . . . . . . . . . . .97
Language settings . . . . . . . . . . . . . . . . . . . . . . . . . . . . . . . . . . . . . . . . . . . . . . . . . . . . . . . . . . . . . . .98
9.2 Protecting Your Phone. . . . . . . . . . . . . . . . . . . . . . . . . . . . . . . . . . . . . . . . . . . . . . . . . . . . . . . . . . . . .98
Protect your SIM card with a PIN . . . . . . . . . . . . . . . . . . . . . . . . . . . . . . . . . . . . . . . . . . . . . . . . . . .98
Protect your phone with a screen lock . . . . . . . . . . . . . . . . . . . . . . . . . . . . . . . . . . . . . . . . . . . . . .98
9.3 Managing Memory . . . . . . . . . . . . . . . . . . . . . . . . . . . . . . . . . . . . . . . . . . . . . . . . . . . . . . . . . . . . . . .99
9.4 Software Updates. . . . . . . . . . . . . . . . . . . . . . . . . . . . . . . . . . . . . . . . . . . . . . . . . . . . . . . . . . . . . . . .100
9.5 Synchronising Google Applications™ . . . . . . . . . . . . . . . . . . . . . . . . . . . . . . . . . . . . . . . . . . . . . . .100
9.6 Resetting the Phone. . . . . . . . . . . . . . . . . . . . . . . . . . . . . . . . . . . . . . . . . . . . . . . . . . . . . . . . . . . . . .101
10 Apéndice. . . . . . . . . . . . . . . . . . . . . . . . . . . . . . . . . . . . . . . . . . . . . . . . . . 102
10.1 A.1 Especificaciones . . . . . . . . . . . . . . . . . . . . . . . . . . . . . . . . . . . . . . . . . . . . . . . . . . . . . . . . . . . .102
10.2 A.2 Avisos de regulación . . . . . . . . . . . . . . . . . . . . . . . . . . . . . . . . . . . . . . . . . . . . . . . . . . . . . . . .103
Aviso de la Unión Europea . . . . . . . . . . . . . . . . . . . . . . . . . . . . . . . . . . . . . . . . . . . . . . . . . . . . . . .103
Medidas de seguridad para la exposición a radiofrecuencia (RF) . . . . . . . . . . . . . . . . . . . . .105
Información de seguridad sobre la Asociación de Telecomunicaciones e Internet (TIA) . . .106
Aviso de la WEEE . . . . . . . . . . . . . . . . . . . . . . . . . . . . . . . . . . . . . . . . . . . . . . . . . . . . . . . . . . . . . . .106
Cumplimiento con RoHS . . . . . . . . . . . . . . . . . . . . . . . . . . . . . . . . . . . . . . . . . . . . . . . . . . . . . . . . .106
Index . . . . . . . . . . . . . . . . . . . . . . . . . . . . . . . . . . . . . . . . . . . . . . . . . . . . . . . 107
Cupcake User Guide R1.5.0 13 April 7, 2009
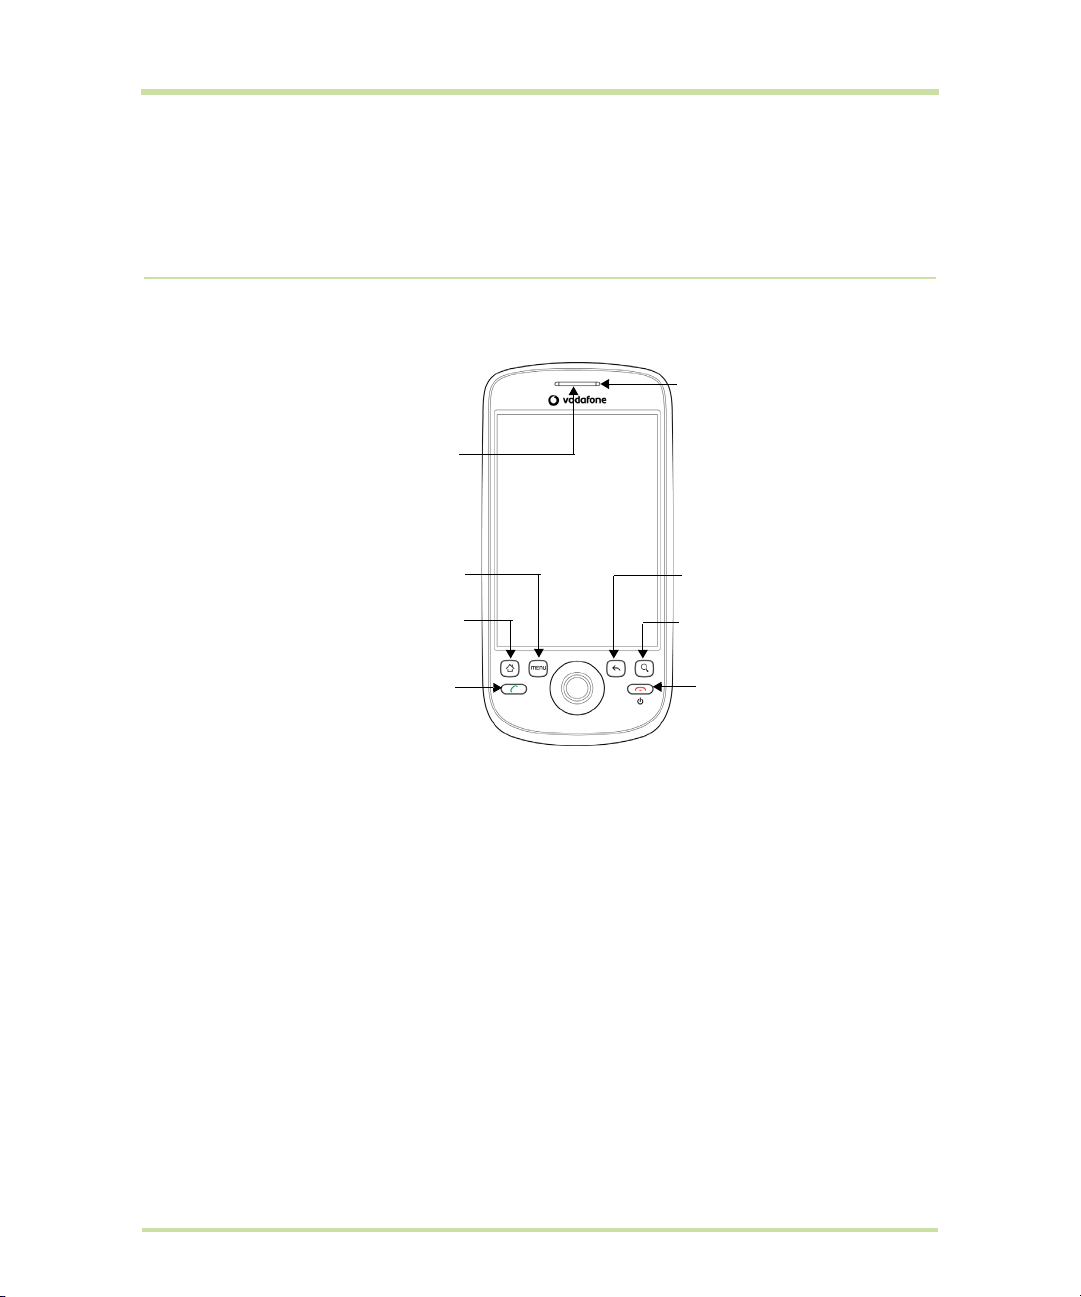
1 Phone Basics
1.1 Getting to Know Your HTC Magic and Accessories
Front panel
Notification LED
See “Phone Status
and Notifications” in
this chapter for
Earpiece
Listen to a phone
call from here
MENU
HOME
CALL
For more information about the functions of the MENU, HOME, CALL, END CALL/POWER, SEARCH and
BACK buttons, refer to “Phone Controls” on page 20 for more details. For more information about the
TRACKBALL, refer to “Use the Trackball” on page 21.
details
BACK
SEARCH
END CALL/
POWER
Cupcake User Guide R1.5.0 14 April 7, 2009
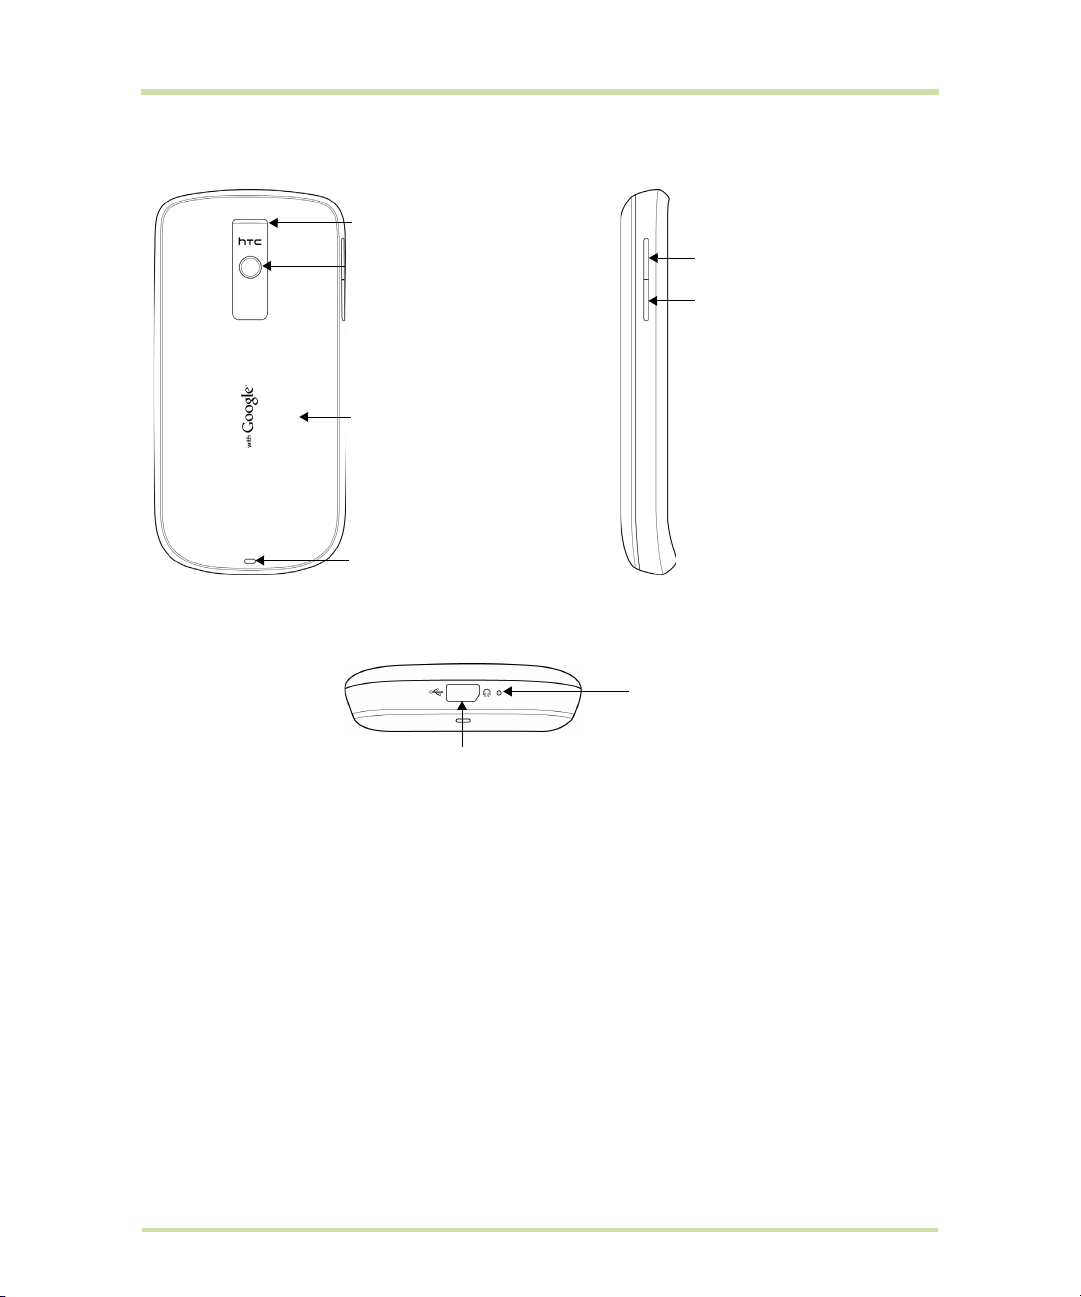
Back and left panels
Bottom panel
Speaker
3.2 Megapixel Camera
See “Using Camera and
Camcorder” on page 81
for details.
Back Cover
Strap Holder
USB connector/Earphone Jack
VOLUME UP
Press to increase the
ringer or media volume.
VOLUME DOWN
Press to decrease the
ringer or media volume.
Microphone
• USB cable to transfer files.
• AC adapter to recharge the battery.
• USB stereo headset for hands-free conversation
or for listening to music and videos.
Inside the box
The product package includes the following items and accessories:
•Battery
•USB cable
• AC adapter
• Wired stereo headset
•Pouch
• 2GB microSD™ card
• Quick Start Guide
Cupcake User Guide R1.5.0 15 April 7, 2009

1.2 Installing the SIM Card, Battery, and Storage Card
Always turn off your phone before installing or replacing the SIM card, battery, and storage card. You
also need to remove the back cover before you can install the SIM card and battery.
To remove the back cover
1 Make sure the phone is turned off.
2 Firmly hold the phone with both hands and the front panel facing down.
3 Push the back cover down with your thumb until it disengages from the phone.
Push down from this corner
SIM card
The SIM card contains your phone number, service details, and phone book/message memory. Your
phone supports both 1.8V and 3V SIM cards.
Note Some legacy SIM cards may not function with your phone. You should consult your wireless
service provider for a replacement SIM card. There may be fees for this service.
To install the SIM card
1 Make sure the phone is turned off.
2 Locate the SIM card slot, then insert the
SIM card with its gold contacts facing
down and its cut-off corner facing out the
card slot.
3 Slide the SIM card completely into the slot.
Cupcake User Guide R1.5.0 16 April 7, 2009
Cut off corner

To remove the SIM card
1 Remove the back cover and the battery if
it is installed.
2 Locate the groove below the SIM card
slot, then push the SIM card out of the slot
with your finger.
Groove
Battery
Your phone comes with a rechargeable Lithium-ion battery and is designed to use only manufacturerspecified original batteries and accessories. Battery performance depends on many factors, including
network configuration, signal strength, the temperature of the environment in which you operate your
phone, the features and/or settings you select and use, items attached to connecting ports, and your
voice, data, and other program usage patterns.
Battery life estimates (approximations):
Talk time:
•Up to
•Up to
Standby time:
•Up to
•Up to
Note Battery life is subject to network and phone usage.
Warning! To reduce risk of fire or burns:
• Do not attempt to open, disassemble, or service the battery pack.
• Do not crush, puncture, short external contacts, or dispose of in fire or water.
• Do not expose to temperatures above 60oC (140oF).
• Replace only with the battery pack designated for this product.
• Recycle or dispose of used battery as stipulated by local regulations.
To install the battery
400 minutes for WCDMA
450 minutes for GSM
660 hours for WCDMA
420 hours for GSM
1 Align the battery’s exposed copper
contacts with the battery connectors
inside the battery compartment.
2 Insert the contact side of the battery first
then gently push the battery into place.
3 Replace the back cover.
Battery contacts
Cupcake User Guide R1.5.0 17 April 7, 2009

To remove the battery
1 Make sure the phone is turned off.
2 Remove the back cover.
3 The top side of the battery has a
protruding grip. Lift the battery from the
grip to remove it.
Protruding grip
Storage card
To store your pictures, music, and applications, install the supplied microSD card into your phone.
Note You need to install the microSD card before you can use the Camera application.
To install the storage card
Insert the microSD card into the slot with its gold contacts facing down.
To remove the storage card
Press the storage card to eject it from the slot.
Note If you want to remove the storage card while the phone is on, see “To safely remove the storage
card while the phone is on” on page 33.
Cupcake User Guide R1.5.0 18 April 7, 2009
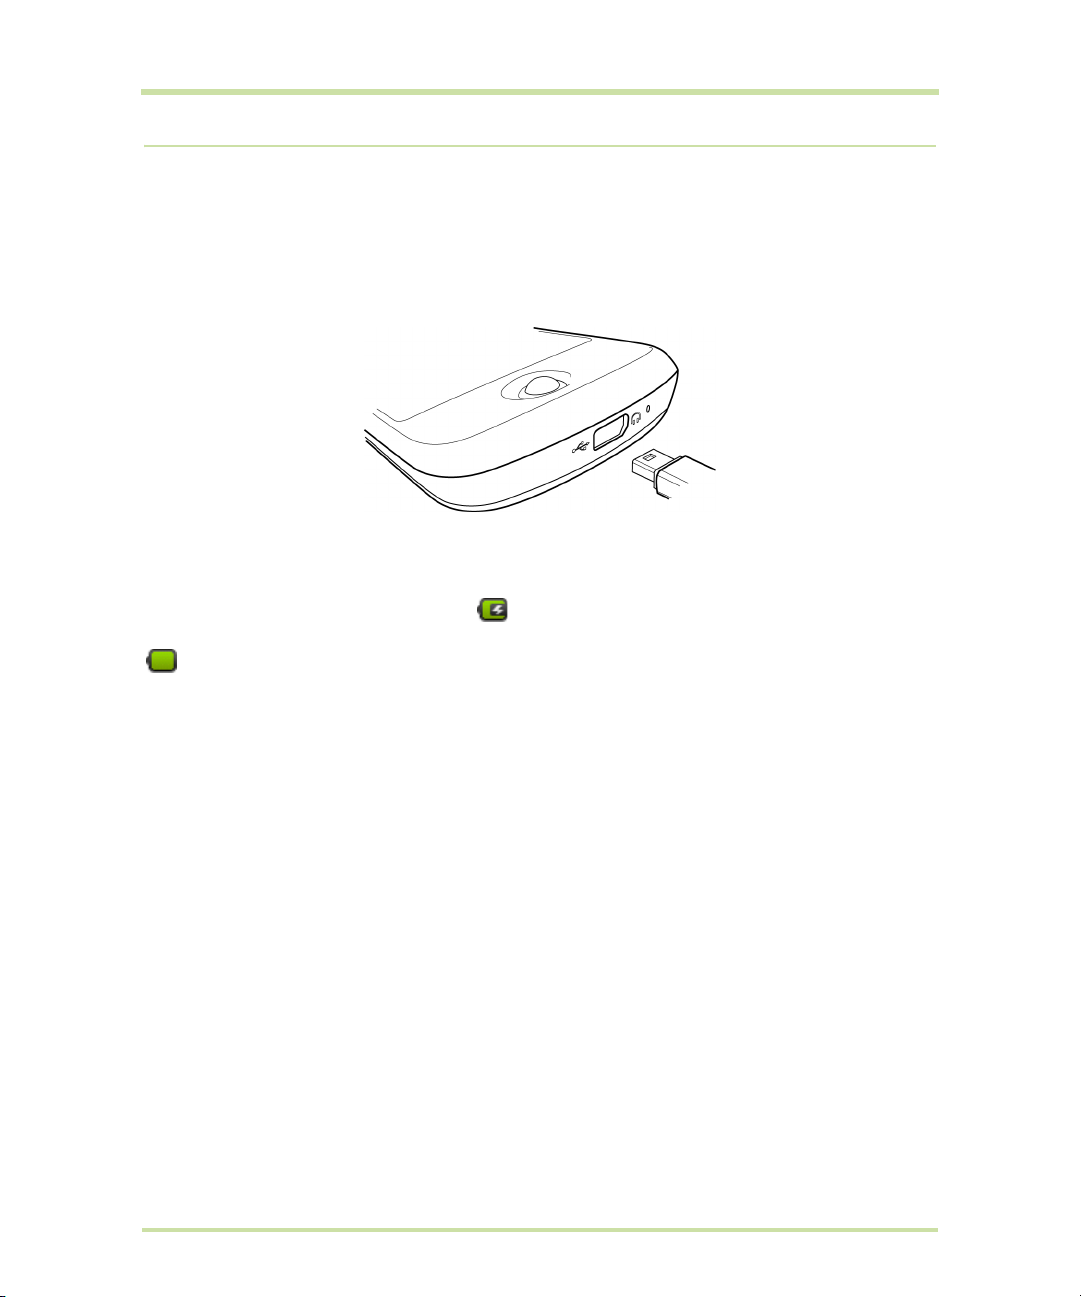
1.3 Charging the Battery
New batteries are not charged when shipped. Before you start using your phone, you need to install
and charge the battery. Some batteries perform best after several full charge/discharge cycles.
To charge the battery
1 Plug the USB connector of the AC adapter to the USB connector at the bottom of your phone.
2 Plug in the AC adapter to an electrical outlet to start charging the battery.
Note Only the AC adapter and USB cable provided with your phone must be used to charge the
battery.
Charging is indicated by a solid red light in the Notification LED. As the battery is being charged while
the phone is on, the charging battery icon is displayed in the status bar of the Home screen. After
the battery has been fully charged, the Notification LED shows a solid green light and a full battery icon
displays in the status bar of the Home screen.
For more information about the Notification LED, refer to “Phone Status and Notifications” on page 26.
Warning:
• Do not remove the battery from the phone while you are charging it using the AC or car adapter.
• As a safety precaution, the battery stops charging when it overheats.
Cupcake User Guide R1.5.0 19 April 7, 2009
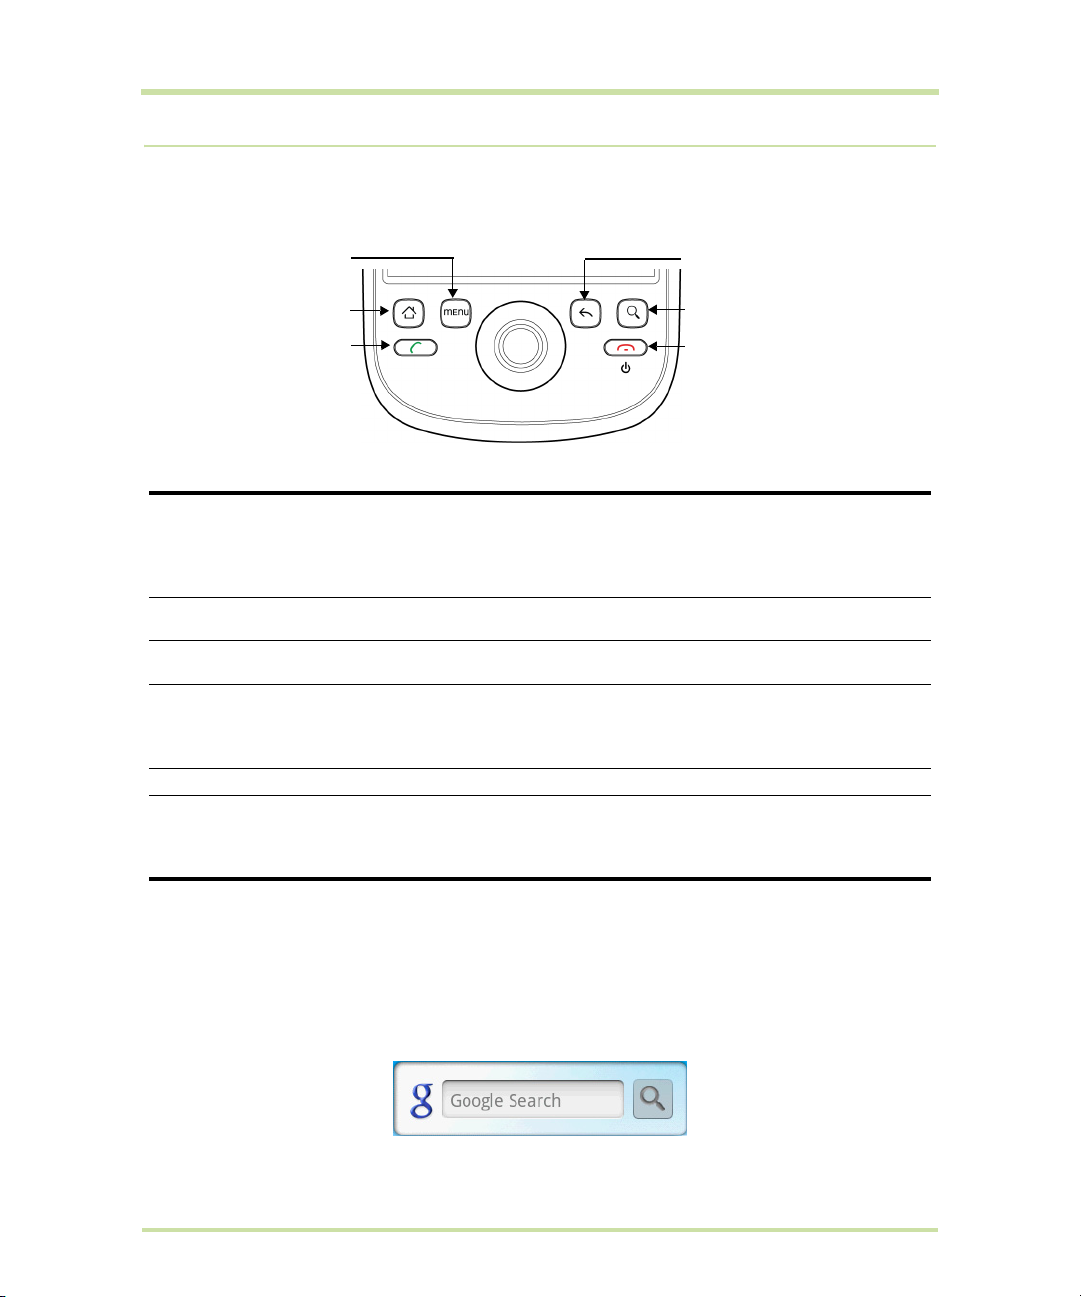
1.4 Phone Controls
Press the control buttons on the front panel of your phone to do the following:
MENU
HOME
CALL
HOME
MENU
BACK
SEARCH
END CALL/POWER
BACK
SEARCH
CALL
• Press to open the Call log screen.
• When a contact, contact number, or phone number is highlighted on the
screen, press to call the contact or phone number.
• If you navigated to another application during a call, press to display the
ongoing call on the screen.
• While on any application or screen, press to return to the Home screen.
• Press and hold to open the recently-used applications window.
Press to open a list of actions that you can do on the current screen or options
menu.
• Press to go back to the previous screen, or to close a dialog box, options
menu, or the Notifications panel.
• Press and hold to return to the main screen of the current application.
• When the onscreen keyboard is open, press to close the onscreen keyboard.
See “Search button” later in this chapter for details.
• While in a call, press to hang up.
• While not on a call, press and hold to open the phone options menu that
allows you to turn off the phone, put your phone in silent mode, or turn on/off
Airplane mode.
END CALL/POWER
Search button
Press SEARCH to search information on the current screen or application. For example, while in the
Contacts tab, press SEARCH to search contact-related information such as names, phone numbers, or
e-mail addresses in your contacts list.
SEARCH while in the Google Maps™ mapping service to search for places of interest. Press
Press
SEARCH while in the Home screen or Browser to launch Google Search™ and search information on
the web.
Cupcake User Guide R1.5.0 20 April 7, 2009

In any search bar, enter the information you want to search, then press SEARCH again, or touch .
You can also use your voice to do a search.
1.5 Getting Around Your Phone
There are different ways to navigate around the Home screen, menus and application screens on your
phone. You can also change the screen orientation of the phone.
Touch
When you want to type using the onscreen keyboard, select items onscreen such as application and
settings icons, or press onscreen buttons, simply touch them with your finger.
Touch and hold
To open the available options for an item (for example, contact or link in a webpage), simply touch
and hold the item.
Swipe or slide
To swipe or slide means to quickly drag your finger vertically or horizontally across the screen.
Drag
Touch and hold your finger with some pressure before you start to drag. While dragging, do not release
your finger until you have reached the target position.
Flick
Flicking the screen is similar to swiping, except that you need to swipe your finger in light, quicker
strokes. This finger gesture is always in a vertical direction, such as when flicking the contacts or
message list.
Rotate
For most screens, you can automatically change the screen orientation from portrait to landscape by
turning the phone sideways. When entering text, you can turn the phone sideways to bring up a bigger
keyboard. Refer to “Using the landscape onscreen keyboard” on page 32 for more details.
Note The Orientation check box in HOME > MENU > Settings > Sound & display needs to be selected
for the screen orientation to automatically change.
Use the Trackball
Roll or press the TRACKBALL to select or highlight items on the screen. The TRACKBALL also flashes
when you receive an incoming call or a notification.
Cupcake User Guide R1.5.0 21 April 7, 2009

1.6 Getting Started
Once you’ve installed your SIM card, battery, and microSD card, you can turn on your phone and start
using it.
Turn your phone on and off
To turn on the phone
Press the
Note When you turn on the phone for the first time, you will be prompted to sign in to your Google™
Account. For more information, refer to “Set up your phone for the first time” on page 22.
To turn off the phone
1 Press and hold the
2 On the options menu, touch
3 Touch
Enter PIN
If your SIM card is preset with a PIN (personal identification number), you will be prompted to enter the
PIN before you can use the phone. Enter the SIM PIN, then touch
the SIM PIN, refer to “Protect your SIM card with a PIN” on page 98.
Important If you entered the wrong PIN three times, the SIM card will be blocked and you will not be
able to use your phone. If this happens, you can unblock it with the PUK (PIN Unblocking Key) obtained
from your wireless service provider. Refer to “To restore a SIM card that has been locked out” on
page 98 to learn how to unblock the SIM card.
Set up your phone for the first time
When you turn on the phone for the first time and after touching the Android™ image, you will be
prompted to sign in to your Google Account. If you decide not to sign in to your Google Account, you
can still use the phone but you won’t be able to use Google services such as Google Talk™, Google
Mail™, and Android Market™.
Important You will need to know your Google password to sign in. If you have forgotten your password,
refer to “Retrieve your Google™ password” on page 23 to learn how to retrieve your password.
Note Make sure that your phone has an active data connection (3G/GPRS) before you sign in to your
Google Account. Refer to “Phone Status and Notifications” on page 26 to know if your phone has an
active data connection.
1 Touch
Tip Touch Begin to view a tutorial on how to use the onscreen keyboard.
2 Read the setup information on the screen, then touch
3 Touch
END CALL/POWER button.
END CALL/POWER button until the options menu opens.
Power off.
OK when prompted to turn off the phone.
OK. To learn how to enable or disable
Skip.
Next.
Sign in. Enter your user name and password, then touch Sign in. After signing in, all emails,
contacts, and calendar events on your Google Account will automatically synchronise with your
phone.
Tips
•Touch Create if you do not have a Google Account yet. You need a Google Account to use
Google services.
•Touch
Skip if you prefer to set up an account at a later time and start using your phone.
Cupcake User Guide R1.5.0 22 April 7, 2009
4 Set up the date and time and then touch Next.
5 Touch
Finish setup.
Retrieve your Google™ password
1 On your computer, open your browser and go to http://google.com.
2 On the upper-right side of the web page, click
3 On the right side of the page, click
4 In the
5 Click
Please select your issue section, select I forgot my password.
Reset your password now, and then follow the procedure for recovering your password.
I cannot access my account.
Sign in.
Turn off the screen when not in use
To save battery power, the phone automatically turns off the screen when you leave it idle after a
certain period of time. You will still be able to receive messages and calls while the phone’s screen is
off.
Tip For information on how to adjust the time before the screen turns off, refer to “To adjust the time
before the screen turns off” on page 96.
You can also turn off the screen by pressing the
END CALL/POWER button. Pressing any of the control
buttons again or incoming calls will turn on your phone screen.
Note If you have set up a screen unlock pattern, you will be prompted to draw the pattern on the
screen before it unlocks. For more information on how to create and enable the screen unlock pattern,
refer to “Protect your phone with a screen lock” on page 98.
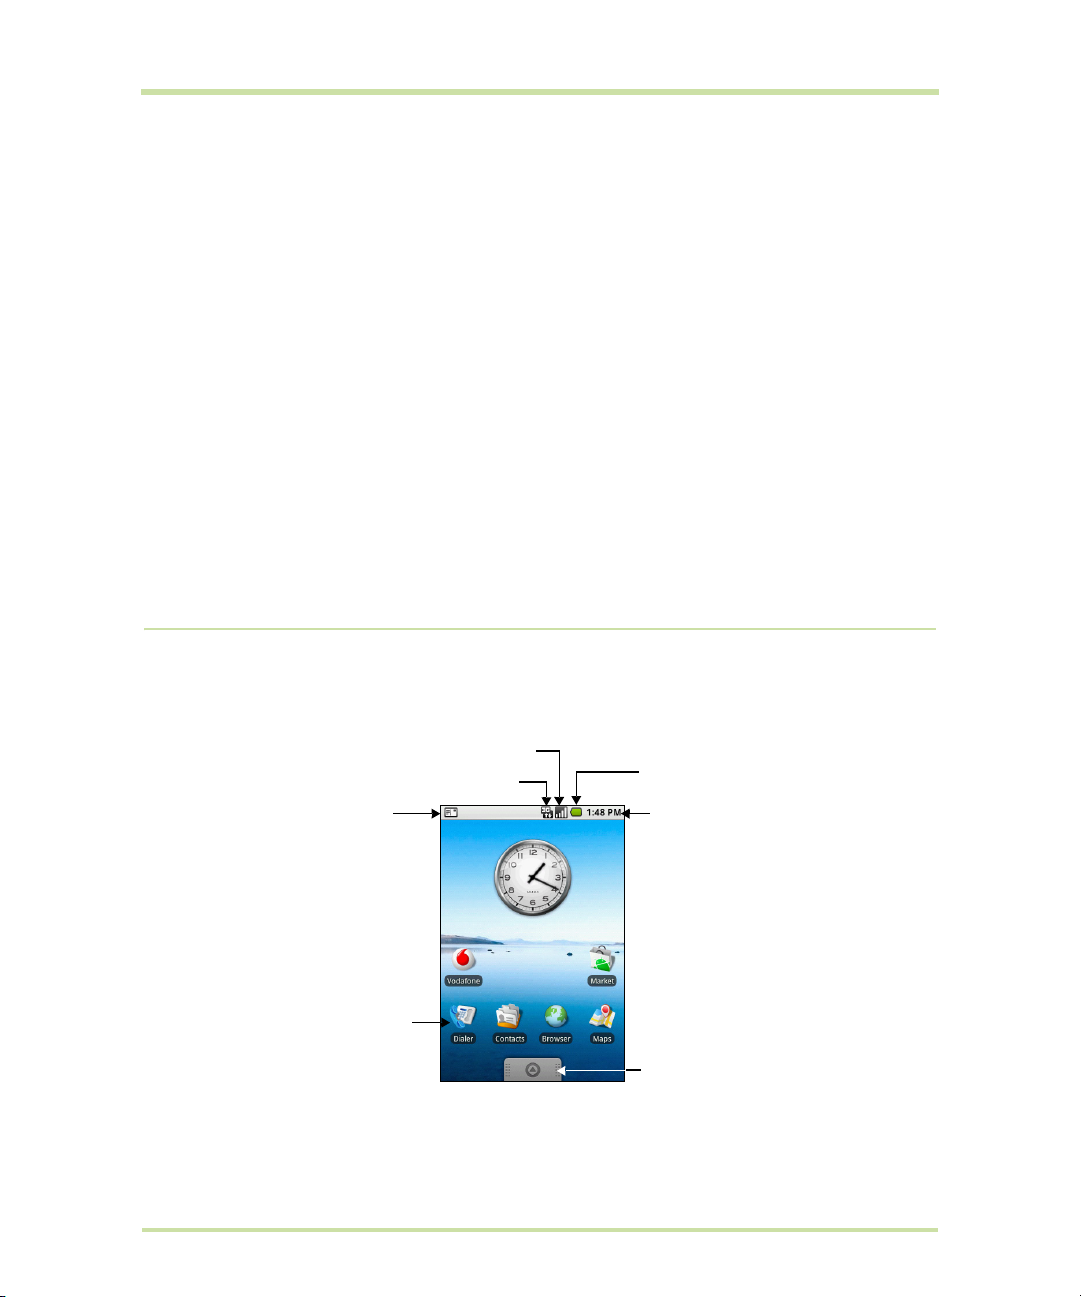
1.7 Home Screen
The Home screen is your starting point for using the applications on your phone. You can customise the
Home screen to display application icons, shortcuts, folders, and widgets.
Signal strength
Battery status
Time
Notifications.
1. See “Phone Status
and Notifications” in this
chapter for details.
2. Touch and hold this
area to display the
date.
Connection status
Touch an icon to open
the related application
Applications tab.
Touch to open and select
an application.
(See “Applications” on
page 28 for details.)
Tip While in any application, press HOME to go back to the Home screen.
Cupcake User Guide R1.5.0 23 April 7, 2009
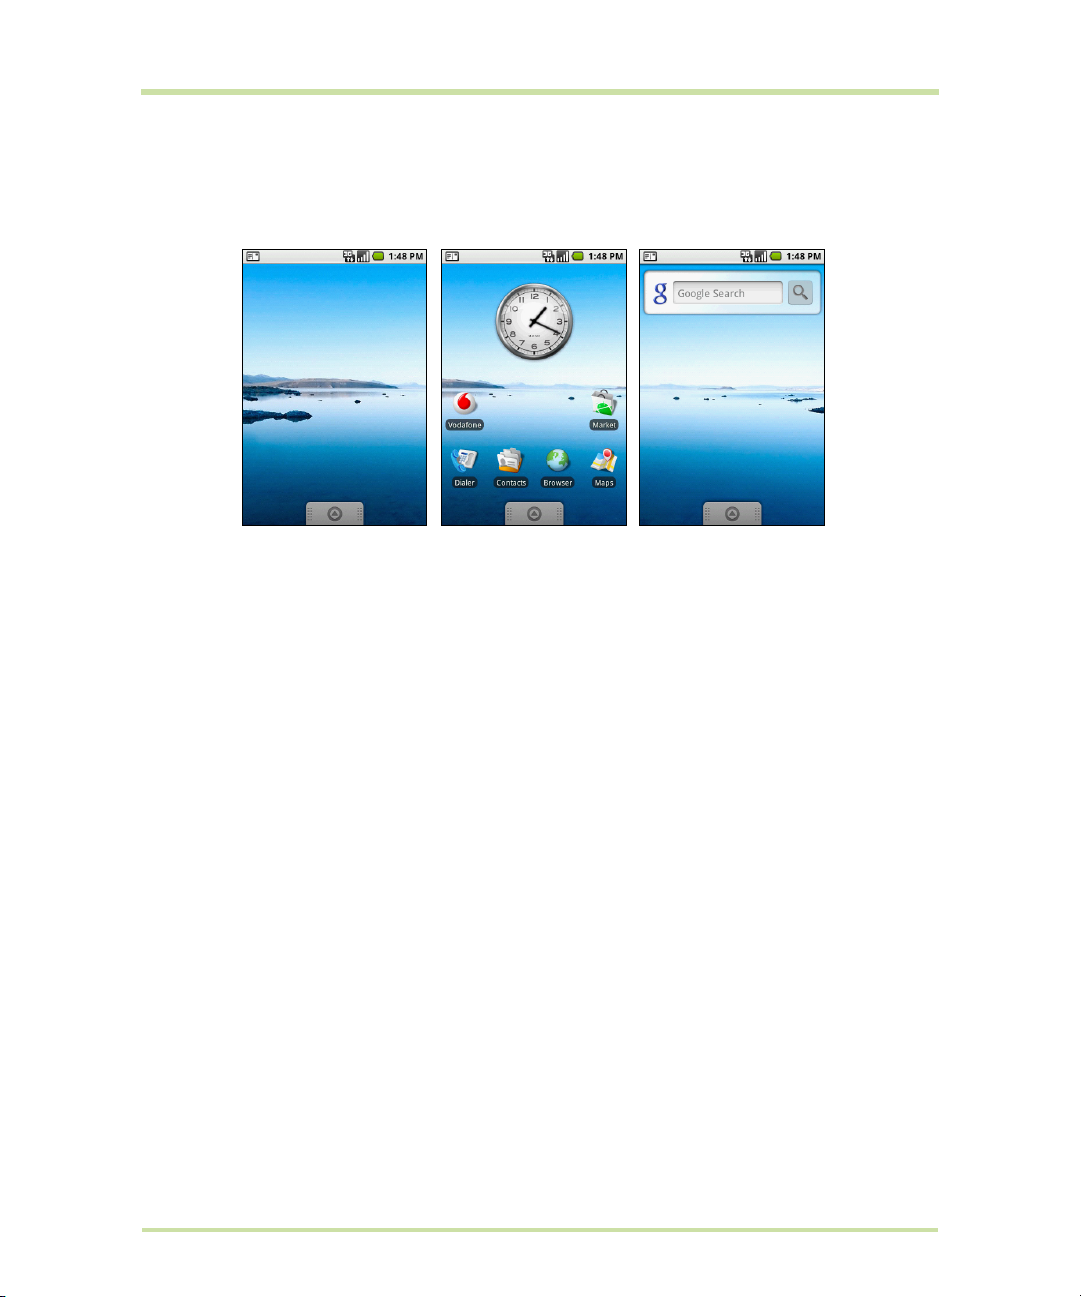
Extended Home screen
The Home screen extends beyond the screen width to provide more space for adding icons, widgets,
and more. Press
of the extended Home screen.
HOME, then slide your finger horizontally across the screen to go to the left or right side
Extended Home screen left
Extended Home screen right
Tip While on an extended Home screen, you can also press HOME to return to the main Home screen.
Customising the Home screen
To add a Home screen item
1 Press
2 When the Add to Home options menu opens, select the item you want to add to the Home screen:
•
•
•
•
HOME, then touch and hold an empty area on the screen.
Shortcuts. Add shortcuts such as applications, a bookmarked web page, a favourite contact, a
Google Mail label, or a music playlist.
Tip To quickly add an application shortcut that is on the Applications tab to the Home screen, touch
and hold an application icon. When the phone vibrates, release the icon on an empty area on the
Home screen.
Widgets. Add a clock, music player, a picture frame, the Google Search bar, or a calendar that
shows upcoming appointments.
Note If you installed applications from Android Market that have widgets, those widgets will also
appear here.
Folders. Add a folder where you can organise Home screen items, a shortcut to all your contacts,
contacts with phone numbers, or starred contacts. Add a shortcut to all your contacts, contacts
with phone numbers, or starred contacts. Contact details are automatically updated when there
are changes in the source.
For more information on how to create folders, refer to “To create a folder and add items to it” on
page 25.
Wallpapers. Change the Home screen wallpaper. For more information about customising the
wallpaper, refer to “To change the Home screen wallpaper” on page 25.
Cupcake User Guide R1.5.0 24 April 7, 2009

To reposition a Home screen item
1 Touch and hold the item on the screen you want to reposition to activate Move mode.
Note When Move mode is activated, the item magnifies and the phone vibrates.
2 Without lifting your finger, drag the icon to the desired position on the screen, then release it.
Note To move an item from the Home screen to an extended Home screen, touch and hold the item
and then drag it to the left or right edge of the screen until the display shifts to the extended Home
screen. Position the item on the screen, then release it.
To remove a Home screen item
1 Touch and hold the item on the screen you want to remove to activate Move mode.
Note When Move mode is activated, the item magnifies and the phone vibrates.
2 Drag the icon to the Applications tab (The Applications tab changes into )
3 When the icon and Application tab turn red, release it.
To change the Home screen wallpaper
1 While on the Home screen, press
2 Touch
3 Touch
To create a folder and add items to it
You can create folders on the Home screen to hold application icons or shortcuts.
1 Press
2 Touch and hold an application icon or a shortcut on the Home screen to activate Move mode, then
To access the items inside a folder, touch the folder to open it and then touch the icon of the
application or shortcut you want to open.
Pictures or Wallpaper gallery.
•Touch
•Touch
Pictures to use a picture that you have captured using the camera or copied to your
phone as a wallpaper. You can crop the picture before setting it as a wallpaper. Refer to “To
crop a picture” on page 85 to learn how to crop the picture.
Wallpaper gallery to use preset wallpapers that came with the phone.
Save or Set wallpaper.
HOME, press MENU, and then touch Add > Folder. A new folder appears on the screen.
drag it on top of the folder.
MENU and then touch Wallpaper.
Tip To delete a folder, follow the same procedure when you want to remove a Home screen item.
Refer to “To remove a Home screen item” on page 25 for details.
To rename a folder
1 Touch the folder to open it.
2 Touch and hold the folder’s title bar to open the Rename folder dialog box.
3 Enter the Folder name and then touch
OK.
Cupcake User Guide R1.5.0 25 April 7, 2009
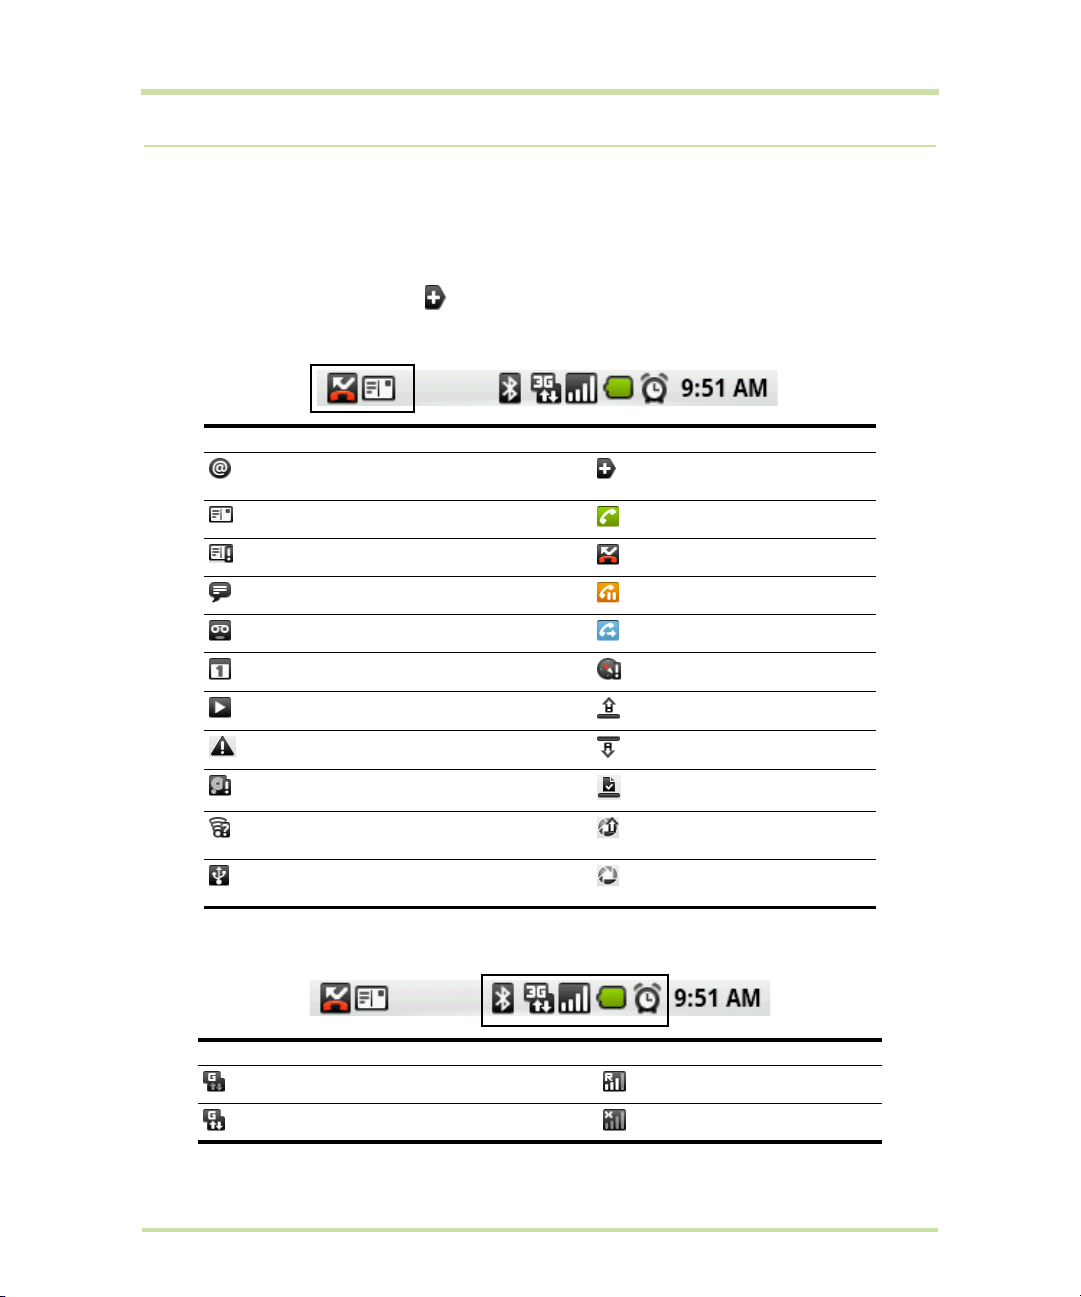
1.8 Phone Status and Notifications
Status bar
On top of the phone screen is the status bar. The left side of the status bar displays notification icons
while the right side of the status bar displays the phone status.
Tip When the status bar is full, touch to display hidden icons/notifications.
Notification icons
These are the icons that may appear on the notifications area of the status bar:
Icons that appear in the boxed area
New email message More (not displayed)
notifications
New SMS/MMS Call in progress
Problem with SMS/MMS delivery Missed call
New instant message Call on hold
New voicemail Call forwarding on
Upcoming event Compass needs orientation
Song is playing Uploading data
Problem with sign-in/sync Downloading data
Storage card is full Content downloaded
Wi-Fi is on and wireless networks are
available
Phone connected to computer via USB
Uploading picture to
Picasa™
Upload to Picasa finished
cable
Status icons
These are the icons that may appear on the status area of the status bar:
Icons that appear in the boxed area
GPRS connected Roaming
GPRS in use No signal
Cupcake User Guide R1.5.0 26 April 7, 2009
Icons that appear in the boxed area
EDGE connected No SIM card installed
EDGE in use Vibrate mode
3G connected Phone speaker is mute
3G in use Phone microphone is mute
Connected to a Wi-Fi network Battery is very low
Bluetooth is on Battery is low
Connected to another Bluetooth device Battery is full
Airplane mode Battery is charging
Alarm is set GPS is on
Signal strength GPS is connected
Speakerphone on Data is syncing
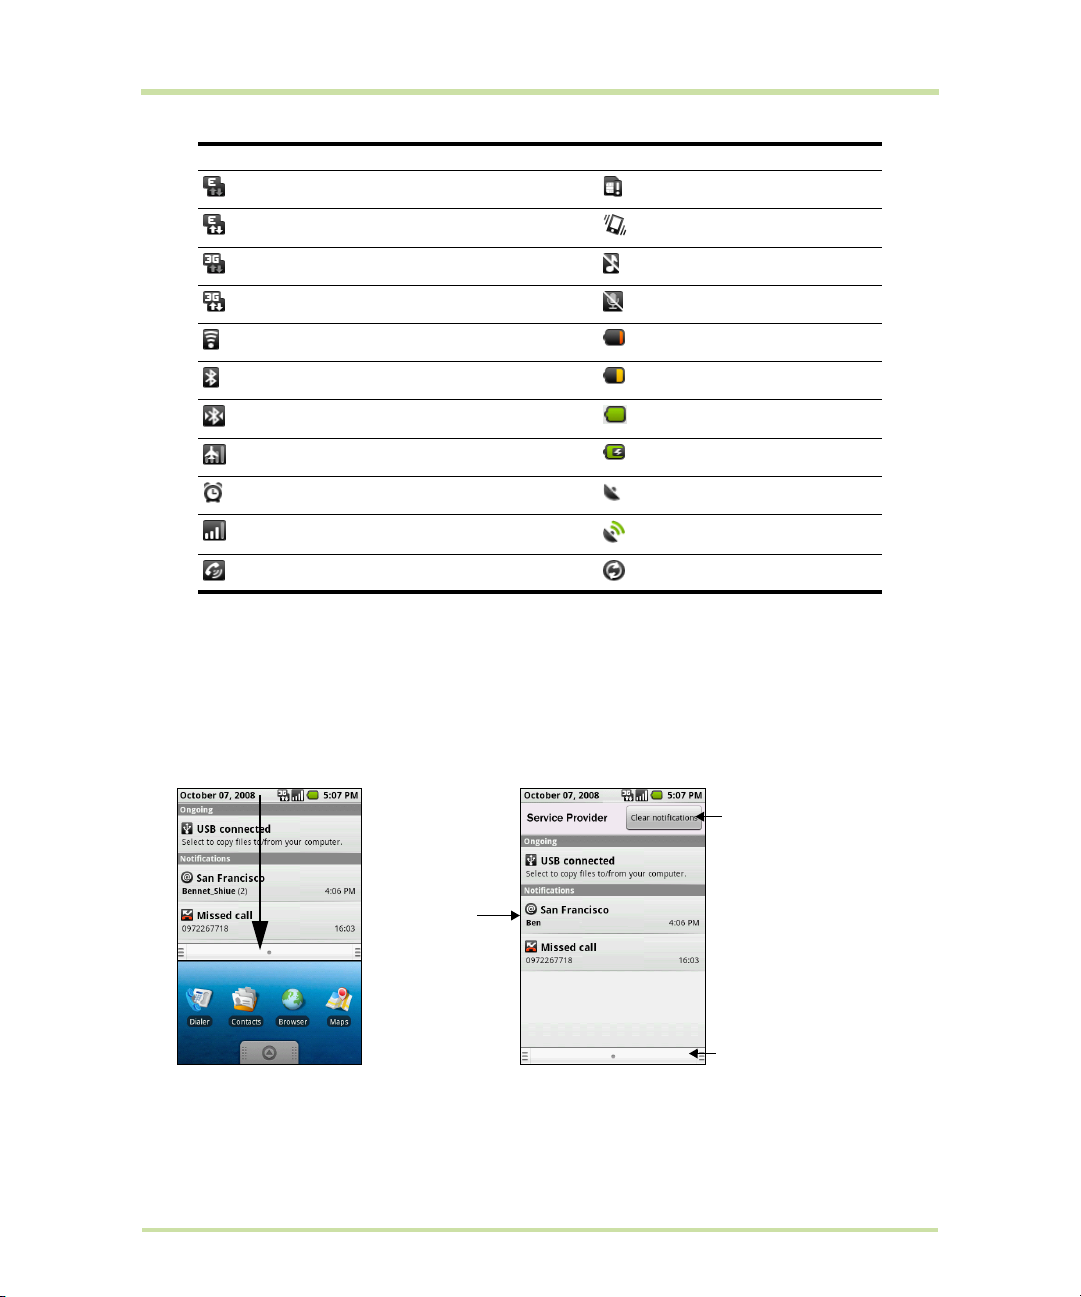
Notifications panel
Notification icons report the arrival of new messages, calendar events, alarms set and ongoing settings
such as when call forwarding is on or the current call status. You can open the Notifications panel to
open the message, reminder, or event notification and see the wireless service provider name.
To open the Notifications panel
When a new notification icon displays in the status bar, touch and hold the status bar, then slide your
finger downward to open the Notifications panel.
Touch to clear all
notifications
Touch a
notification to
open the related
application
Touch and hold, then
slide up to close the
Notifications panel
If you have several notifications, you can scroll down the screen to view more notifications.
Cupcake User Guide R1.5.0 27 April 7, 2009
Tip You can also open the Notifications panel on the Home screen by pressing MENU and then
touching
To close the Notifications Panel
Touch and hold the bottom bar of the Notifications panel, then slide your finger up the screen or press
Notifications.
BACK.
Notification LED
The Notification LED located at the right corner of the earpiece provides information on the phone
status or pending notifications.
Notification LED
LED Status Indication
Solid green
Solid red
Flashing red
Flashing
green
Battery is fully charged (When the phone is being charged using the AC adapter or
connected to the computer).
Battery is charging
Battery is low
You have a pending notification
Note The indicators are listed in order of priority. For example, if your phone is connected to a power
adapter and is charging the battery, the LED will be solid red and will not switch to a flashing green
light even if there is a pending notification.
1.9 Applications
The Applications tab holds all applications on your phone. All applications that you downloaded and
installed from Android Market or from the web are also added to the Applications tab.
To open the Applications tab
Press
HOME, then touch . You can also touch the Application tab and then drag it up to open
it.
Tip To open applications quickly, you can add the icons of frequently-used applications to the Home
screen or to folders which you have created. For details, refer to “Customising the Home screen” on
page 24.
Cupcake User Guide R1.5.0 28 April 7, 2009
To close the Applications tab
Touch .
Recently-used applications
To open a recently-used application
1 Press and hold the
recently-used applications window. The
window displays the last six applications you
have used.
2 Touch an icon in the window to open the
related application.
HOME button to open the
1.10 Settings
Control and customise phone settings on the Settings screen.
To open the Settings screen, do one of the following:
• Press
• Press
Wireless controls
Call settings
Sound & display
Data synchronization
Security& Location
Applications
SD card & phone
storage
Date & time
Locale & text
About phone
HOME, then press MENU, and then touch Settings.
HOME, then open the Applications tab, and then touch Settings.
Configure your phone’s wireless connections, such as Wi-Fi and
Bluetooth, enable the Airplane mode, or set the options for roaming,
networks, and more. See “Getting Connected” on page 64 for details.
Set up call services such as voicemail, call forwarding, call waiting, and
caller ID. See “Using Phone Features and Managing Contacts” on
page 34 for details.
Set the call and notification ring tones, or set the screen brightness and
screen timeout. See “Managing Your Phone” on page 96 for details.
Select which Google™ Applications to synchronise. See “Synchronising
Google Applications™” on page 100 for details.
Select the GPS location source to use, set the screen unlock pattern, or
enable the SIM card lock. See “Getting Around with Maps” on page 73
and “Managing Your Phone” on page 96 for details.
Manage applications and installation of new programs.
Check the available storage card and phone memory, reset the phone
to its factory default settings, or format the SD card. See “Managing
Your Phone” on page 96 for details.
Set the date, time, time zone, and date or time format. See “Set the
date, time zone, and time” on page 96.
Set the operating system language and region. You can also set
onscreen keyboard options.
View the phone status such as the network type, signal strength, battery
power level, and network name. You can also view the legal
information and software version of your phone.
Cupcake User Guide R1.5.0 29 April 7, 2009

1.11 Adjusting the Volume
Adjusting the Ringer volume changes the volume level of the phone ring tone, whereas adjusting the
Media volume changes the volume level of sound notifications and music or video playback. The
ringer volume and media volume can be separately adjusted.
To adjust the Ringer volume
You can adjust the Ringer volume when you are on the Home screen or any application screens
(except during a call or when playing music/video).
1 Press the
volume to your desired level. The Ringer volume window appears on the screen to display the
volume levels.
2 While in the lowest ringer volume level, press
mode. The phone vibrates and the vibrate mode icon appears on the status bar.
3 While in Vibrate mode, press
mute icon displays on the status bar.
Tip To quickly switch your phone to silent mode, press and hold the END CALL/POWER button, then
touch
You can also adjust the ringer volume on the Settings screen. To adjust, press
and then touch
To adjust the media volume
When playing music or watching video, press the
panel of the phone to adjust the media volume. The Music/video volume window appears on the
screen to display the volume level.
You can also adjust the media volume on the Settings screen.
1 Press
2 Touch
3 When the Media volume window appears, move the slider to the left (to lower the volume) or to the
right (to increase the volume).
4 Touch
VOLUME UP or VOLUME DOWN buttons on the left panel of the phone to adjust the ringer
VOLUME DOWN once to set your phone to Vibrate
VOLUME DOWN once to turn off the sound of your phone. The speaker
Silent mode on the options menu.
HOME, then press MENU,
Settings > Sound & display > Ringer volume.
VOLUME UP or VOLUME DOWN buttons on the left
HOME, then press MENU, and then touch Settings.
Sound & display > Media volume.
OK to close the window.
Cupcake User Guide R1.5.0 30 April 7, 2009

1.12 Using the Onscreen Keyboard
When you start a program or select a field that requires text or numbers, the onscreen keyboard
becomes available.
1. Touch to enter letters.
2. Touch and hold to enter
accented letters (when
applicable).
Touch and hold the
left-most word on the
candidate list to save it
to the user dictionary.
1. Touch to enter an
upper case letter.
2. Touch twice to turn
on Caps Lock.
1. Touch to switch to the
numeric and symbol keyboard.
See ““Entering numbers and
symbols” on page 32 for details.
2. Touch and hold to access the
keyboard settings or switch
input methods.
Tips
• When you do not need the keyboard, you can close it by pressing BACK. To show the keyboard
again, touch a text box onscreen or when a text field is selected, press the
• If you need to insert or delete a character, use the
TRACKBALL to position the cursor next to the
character you want to edit.
Note The available keys on the keyboard will be different depending on the current text field selected.
For example, in Browser, when you are in the URL field, some keys at the bottom row are replaced with
alternate keys (for example, .com key) to make it faster for you to type web addresses.
If Word suggestions is enabled,
the suggested word is
highlighted. Touch to
enter the suggested word.
Displays the word candidate
list. Touch a word to insert it
into your text. Touch to
see more candidate words.
Touch to delete the
previous character.
Touch and hold to access
more punctuation marks.
TRACKBALL.
Adjusting keyboard settings
Set onscreen keyboard options such as vibrate and/or emit a sound when you touch a key, autocapitalization, auto-complete, and more.
To set onscreen keyboard options
1 Press
2 Set the options you want to use for the onscreen keyboard.
Tip If you select the Quick fixes, Show suggestions, and Auto-complete options, the phone offers
you smart word suggestions as you type, so you can enter text more quickly and accurately on the
onscreen keyboard.
Cupcake User Guide R1.5.0 31 April 7, 2009
HOME, then press MENU, and then touch Settings > Locale & text > Android keyboard.

Using the landscape onscreen keyboard
When entering text, you can choose to use the landscape orientation of the onscreen keyboard, by
turning the phone sideways, to use a larger keyboard that lets you type easily using two thumbs.
Note The Orientation check box in HOME > MENU > Settings > Sound & display needs to be selected
for the screen orientation to automatically change.
Entering numbers and symbols
Switch to the numeric and symbol onscreen keyboard to let you enter numbers and common symbols
such as parentheses, braces, currency signs, punctuation marks, special characters, and more.
Touch to show
more symbols.
Touch to switch
back to the
alphabet keyboard.
Cupcake User Guide R1.5.0 32 April 7, 2009

1.13 Using the Phone’s Storage Card as a USB Drive
To transfer music, pictures, and other files from your computer to your phone’s storage card, you need
to set the phone’s storage card as a USB drive.
To set the phone’s storage card as a USB drive
1 Connect the phone to the computer using the USB cable. A notification icon appears in the status
bar.
2 Open the Notifications Panel. Refer to “To open the Notifications panel” on page 27 to learn how to
open the Notifications Panel.
3 In the Notifications Panel, touch
When you select
computer. You will not be able to use some of the phone’s applications such as Camera. You need to
turn off USB storage for the phone to recognise the storage card when the phone is connected to a
computer. Refer to the next procedure to learn how to turn off USB storage.
To turn off USB storage
1 Open the Notifications Panel. Refer to “To open the Notifications panel” on page 27 to learn how to
open the Notifications Panel.
2 In the Notifications Panel, touch
To safely remove the storage card while the phone is on
When you need to remove the storage card while the phone is on, you must unmount the storage
card first to prevent corrupting or damaging the storage card.
1 Press
2 Scroll down the screen, then touch
3 Touch
Remove the storage card by following the instructions in “To remove the storage card” on page 18.
To format the SD card
1 Press
2 Scroll down the screen, then touch
3 Touch
4 Touch
HOME, then press MENU, and then touch Settings.
Unmount SD card.
HOME, then press MENU, and then touch Settings.
Unmount SD card. This enables the Format SD card option.
Format SD card > Format SD card.
Mount, the phone will not recognize the storage card when it is connected to a
USB connected and then touch Mount.
Turn off USB storage and then touch Turn Off.
SD card & phone storage.
SD card & phone storage.
Cupcake User Guide R1.5.0 33 April 7, 2009

2 Using Phone Features and Managing
Contacts
2.1 Making Calls
Use the Dialer to enter and call a phone number.
To open the Dialer
Do one of the following:
• On the Home screen, touch
• On the Home screen, touch the Applications tab, then touch
• While on any application screen, press the
To make a call on the Dialer
1 Touch the keys on the dialer to enter the phone number.
If you touch a wrong number, touch to erase digits one by one. To
erase the entire number, touch and hold .
2 Press the
Tip During a call, press the VOLUME UP/DOWN buttons on the left panel of
the phone to adjust the in-call volume.
To make an emergency call
On the
(for example, 000), and then press the
Notes
• When the screen is locked, you need to unlock it first before you can make an emergency call. If
• Additional emergency numbers may be included in your SIM card. Contact your wireless service
CALL button to place the call.
Dialer tab, enter the international emergency number for your locale
your phone is in sleep mode, press any button to wake up the phone and then press the
button to unlock the screen.
provider for details.
Dialer.
Dialer.
CALL button, then touch the Dialer tab.
CALL button on your phone.
MENU
Cupcake User Guide R1.5.0 34 April 7, 2009

To make an international call
1 Touch and hold the number 0 key on the
replaces the international prefix of the country that you are calling.
2 Enter the full phone number that you want to dial, and press the
includes the country code, area code (without the leading zero, if any), and phone number.
Dialer tab until the plus (+) sign appears. The plus (+) sign
CALL button. The full phone number
Make a call from the Call log
While on any application screen, press the CALL button to directly access the Call log tab. You can
then touch a missed call, dialed number, or received call that you want to call back.
For more information about the
Call log tab, refer to “Using the Call Log” on page 39.
Add and call your contacts
Add the phone numbers of your contacts so you can call them more easily.
1 While on any application screen, press the
2 “Creating and Managing Your Contacts” on page 41 describes how to add contacts to this tab.
3 Do one of the following:
• Touch a contact to access the contact details. Then touch the number you want to call.
• Touch and hold the contact you want to call and then from the options menu, touch
Mobile
, Call Work, or Call Home.
CALL button, and then touch the Contacts tab.
Call
Add and call favourite contacts
To quickly find and call contacts who you most frequently communicate with, you can add them in
the
Favorites tab.
1 While on any application screen, press the
2 You need to have at least one favourite contact to make a call from this tab. See “Add and call
favourite contacts” on page 35 for the instructions.
3 Do one of the following:
• Touch a favourite contact to access the contact details. Navigate to the Dial number section,
then touch a phone number that you want to call.
• Touch and hold the favourite contact you want to call and then from the options menu, touch
Call Mobile, Call Work, or Call Home to make the call.
CALL button, and then touch the Favorites tab.
Call voicemail
The voicemail icon appears in the status bar when you have a new voicemail.
To call voicemail
1 Touch and hold the status bar, then slide your finger downward on the screen to open the
Notifications panel.
2 Touch
Cupcake User Guide R1.5.0 35 April 7, 2009
New voicemail to listen to your voicemail.

To use the Dialer to call voicemail
1 Press the
CALL button, then touch the Dialer tab.
2 Touch and hold the number 1 key .
Note If you have not set up your voicemail number, a missing voicemail number error message
appears on the screen when you touch and hold the number 1 key. For more information on how to
set up your voicemail number, refer to “Adjusting Phone Settings” on page 40.
2.2 Answering or Rejecting Calls
When you receive a phone call from someone in Contacts, the Incoming call screen appears and
displays the caller’s caller ID icon, name, and phone number. When you receive a call from someone
who is not stored in Contacts, only the default caller ID icon and phone number appear.
To answer a call
Press the
CALL button.
Caller ID icon
Call duration
Touch to open
the dialpad.
Incoming call screen Answered call screen
To reject a call
Press the
Cupcake User Guide R1.5.0 36 April 7, 2009
END CALL/POWER button to reject a call and redirect the caller to your voicemail.

2.3 Call Options
When a call is in progress, press MENU to open the call options. Touch a button to put a call on hold,
dial another contact for a phone conference, mute the phone microphone, and more.
Call options
Note When the phone is dialing, only the End call and Speaker buttons are enabled.
To hold the call
Press
MENU, then touch Hold to hold the call. Touch this button again to resume the call. When you
hold the call, the Hold call icon appears in the status bar.
To mute the microphone during a call
MENU, then touch Mute to turn the microphone on or off. When the microphone is turned off, the
Press
Mute button indicator lights up green and the mute icon appears in the status bar.
Note If you are using the provided wired headset in a call, you can press the button on the wired
headset to mute the microphone. Press the button again to unmute the microphone.
To turn the speakerphone on or off
During a call, press
indicator lights up green and the speakerphone icon appears in the status bar when the
speakerphone is on.
Warning! To avoid damage to your hearing, do not hold your phone against your ear when the
speakerphone is turned on.
To transfer the call to a Bluetooth headset
When a Bluetooth headset is paired and connected to your phone, you can receive all incoming calls
on the Bluetooth headset for hands-free conversation.
Tip Press MENU, then touch Bluetooth to toggle between the phone speaker and the the paired
Bluetooth phone.
Note For more information on how to connect a Bluetooth headset or a Bluetooth car kit to your
phone, refer to “Using Bluetooth” on page 71.
When the Bluetooth headset is disconnected from your phone, do the following to reconnect it and
transfer the current call:
MENU, then touch Speaker toturn the speakerphone on or off. The Speaker button
Cupcake User Guide R1.5.0 37 April 7, 2009

1 Make sure that Bluetooth on your phone and the Bluetooth headset are on. Refer to “Using
Bluetooth” on page 71 for details.
2 During a call, press
3 Touch
4 In the
5 Press the
6 To transfer the call back to your phone, on the ongoing call screen, press
Wireless controls > Bluetooth settings.
Bluetooth devices section, touch and hold the name of the Bluetooth headset that you have
previously paired and connected to your phone, then touch
connected, the Bluetooth connected icon appears in the status bar. The call is automatically
transferred to the Bluetooth headset.
TALK button to display the current call screen.
HOME > MENU, then touch Settings.
Connect on the options menu. When
MENU, then touch
Bluetooth.
To end a call
When a call is in progress, you can do one of the following to hang up:
• Press the
• Press
• If you are using the provided wired headset, press and hold the button to end the call.
END CALL/POWER button.
MENU, then touch End call.
Manage multiple calls
Your phone notifies you when you have another incoming call, and gives you the option of rejecting or
accepting the call. If you are already on a call and accept the new call, you can choose to swap
between the two callers.
• Press the
MENU and then touch Hold call in progress & answer.
• To end the second call and return to the first call, press the
phone.
• To end the first call and take the incoming call, press
answer
• To swap between two calls, press
CALL button to take the second call, and put the first call on hold. You can also press
END CALL/POWER button on your
MENU, then touch End call in progress &
.
MENU and then touch Swap calls.
Set up a conference call
You can set up a conference call with as many as six participants, including yourself.
Note Not all mobile phone networks support conference calling. Contact your wireless service provider
for details.
1 Make a call to the first conference call participant. See “Making Calls” on page 34 for details.
2 When connected to the first participant, press
3 Enter the phone number of the person you want to add to the conference call and press the
button. Or touch the
participant from the list.
The first call is automatically put on hold.
4 When connected to the second conference call participant, press
to begin the conference call.
5 To add more conference call participants, repeat steps 2 and 3.
Cupcake User Guide R1.5.0 38 April 7, 2009
Call log, Contacts, or Favorites tab and then select the next conference call
MENU and then touch Add call.
CALL
MENU, then touch Merge calls

6 During a conference call, press MENU and touch Manage conference to drop a conference call
participant or to talk privately to one of the participants.
Touch this icon to talk
Touch this icon to drop
this participant from
the conference.
Touch to rejoin the
remaining
conference call
participants.
privately to the
participant and put
other participants on
hold.
To resume the
conference, press
MENU and touch
Merge calls.
7 To end the conference call and disconnect all callers, press the
END CALL/POWER button.
2.4 Using the Call Log
The Call log tab lists all missed calls , dialed numbers , and received calls .
To use the Call log tab
1 While on any screen, press the
2 Do one of the following:
• Touch a name or number in the list to open a screen that gives you options on what you can do
with the contact.
• Touch and hold a name or number in the list to display the options menu where you can call the
contact, view the contact information (if the number is stored in your contacts list), edit the
number before you redial, and more.
CALL button, then touch the Call log tab.
Touch and hold a
name or number
to open the
options menu.
Touch a name or
number to open a
screen that gives
you options on
what you can do.
Cupcake User Guide R1.5.0 39 April 7, 2009

To add a new phone number to Contacts
If the phone number of a person who called is not in your contacts list, you can choose to save the
number after you hang up.
1 While on any screen, press the
2 Touch and hold the received call that you want to save to your contacts list. Then touch
contacts
3 When the Contacts screen appears, touch
automatically added to the
4 Enter other information for the contact, if desired.
5 Scroll down the screen, then touch
.
CALL button, then touch the Call log tab.
Add to
Create new contact. The received call number is
Mobile phone field in the Phone numbers section.
Done.
Note For more information about creating contacts, refer to “Add a new contact” on page 42.
To check a missed call
You will see the missed call icon in the status bar when you missed a call. To check who the caller
was, press the
CALL button, then touch the Call log tab.
Tip You can also touch and hold the status bar, then slide your finger downward on the screen to open
the Notifications panel. The missed call number and/or contact name is displayed.
To clear the Call log
Do one of the following when viewing the
• To remove a name or number, touch and hold on the name or number, then touch
call log
• To clear the entire Call log, press
.
Call log:
Remove from
MENU then touch Clear call log.
2.5 Adjusting Phone Settings
You can adjust the phone settings of your phone such as your voicemail number, or enable additional
call services from your wireless service provider.
To open the
Call settings screen, press HOME > MENU, then touch Settings > Call settings.
Options Description
Fixed Dialing
Numbers
Voicemail
Call forwarding
Additional call
Restrict outgoing calls to a fixed set of numbers. To enable this feature you
must know your SIM card’s PIN2 code. If this feature is supported, obtain
your PIN2 code from your wireless service provider.
Specify another voicemail number aside from the voicemail number on
your SIM card.
Select how you want your phone to handle busy, unanswered, and
unreachable calls. You can also set the call forwarding option for all
incoming calls.
Enable or disable caller ID and call waiting services.
settings
Network operators
Cupcake User Guide R1.5.0 40 April 7, 2009
Scan and select a network operator manually, or set the network selection
to automatic.

2.6 Turning the Phone Function On and Off
In many countries, you are required by law to turn off the phone while on board an aircraft. A way to
turn off the phone function is to switch your phone to
Airplane mode. In Airplane mode, all wireless
radios on your phone are turned off, including the phone function, Bluetooth, and Wi-Fi.
To enable or disable Airplane mode
1 Press
2 Touch
HOME, then press MENU, and then touch Settings > Wireless controls.
Airplane mode to enable or disable it. When enabled, the Airplane mode icon is
displayed in the status bar.
Tip When you disable Airplane Mode, the phone function is turned back on and the previous state of
Bluetooth and Wi-Fi is restored.
2.7 Creating and Managing Your Contacts
Similar to an online address book, the Contacts application gives you quick and easy access to the
people you want to reach. You can view and create contacts on your phone and sync these with your
Google Mail contacts on the web. You can also import contacts stored on your SIM card.
To view your Contacts list
Do one of the following to display your contacts list:
• Press
• Press the
HOME, then touch Contacts.
CALL button, then touch the Contacts tab.
Touch a
contact to
open the
contact details
screen.
Online status. Appears
when the contact is a
Google Talk friend and
you are signed in to
Google Talk. See “Using
Google Talk™” on
page 60 for details.
Touch and hold a
contact to open
the options menu.
Press BACK to
close the
options menu.
Tip When you reply to or forward an email message to an email address that is not in Contacts, the
email address is automatically added to your contacts list.
Cupcake User Guide R1.5.0 41 April 7, 2009

Add a new contact
To add a new contact
1 In the contacts list, press
2 Enter the contact’s name and other contact information such as their mobile phone number, home
phone number, or email address. Slide your finger up or down to see more labels.
Note To change a default information label, for example Home email to Work email, touch the
information label button, then select another label on the menu. You can also touch
menu to create another information label that is not in the list.
MENU, then touch New contact.
Custom on the
Touch to add a
caller ID icon.
Touch to replace
or customise the
information label.
Touch to add
additional
information for
the section.
Touch to delete the
information.
Note If you want all calls from this contact to go directly to your voicemail, select the Incoming calls
check box.
3 When finished, press
To import contacts from the SIM card
You can add contacts saved on your SIM card to your phone’s contacts
list.
1 In the contacts list, press
2 Do one of the following:
• To import a single contact, touch the contact you want to import.
• To import all contacts, press
MENU and then touch Done.
MENU, then touch Import contacts.
MENU, then touch Import all.
Add favourite contacts
Use the
1 In the contacts list, press and hold a contact to open the options menu.
2 Touch
The contact will be added to the contacts list on the
with the contact name in the contact details screen.
Cupcake User Guide R1.5.0 42 April 7, 2009
Favorites tab as a way to filter your contacts list.
Add to favorites.
Favorites tab. A coloured star will also appear

To view favorite contacts
CALL and then touch the Favorites tab. You can also see your frequently called contacts or
Press
numbers on the
To remove a contact from the Favorites tab
On the
Favorites tab, touch and hold the contact you want to remove and then touch Remove from
favorites
Favorites tab.
on the options menu.
Edit and customise your contacts
To edit contact information
You can always make changes to the information you have stored for a contact.
1 In the contacts list, touch and hold the contact whose information you want to edit, then touch
contact
2 Edit the contact information, then touch
changes
To change the contact’s default phone number
The default phone number of a contact appears below the contact’s name in the contacts list. The
default phone number is used when you initiate a call or send a text message from the contacts list (by
touching and holding a contact). You can change the contact’s default phone number.
1 In the contacts list, touch the contact to open the contact details screen.
2 Touch and hold the phone number you want to use as the contact’s default phone number, then
touch
after the phone number.
3 Press
.
Save. To ignore all changes you made, touch Discard
.
Make default number. The default phone number moves on top of the list and appears
BACK when you are done.
Edit
Communicate with your contacts
From the contacts list you can quickly call or send a text
or multimedia message to a contact’s default phone
number.
However, to view all the information you have stored for a
contact, and to initiate other types of communication
with that contact, open the contact details screen.
To open the contact’s details screen, touch the contact
name in the contacts list.
Default phone
number.
To call a contact
Do one of the following:
• In the contacts list, use the
TRACKBALL to navigate to the contact you want to call, then press the
CALL button. The contact’s default phone number is dialed.
• To dial a different number for the contact, touch the contact’s name in the contacts list to open
the contact details screen, then touch a phone number.
Cupcake User Guide R1.5.0 43 April 7, 2009

To send a text or multimedia message to a contact
The contact must have a mobile phone number in their contact details for you to send them a text or
multimedia message.
Do one of the following:
• When the contact’s default number is a mobile phone number, touch and hold the contact’s
name in the list, then touch
• Touch the contact in the list to open the contact details screen, then touch
work
, or another text option.
A compose screen opens for your message.
Send SMS/MMS on the options menu.
Text mobile, Text
Note For more information about composing and sending text and multimedia messages, refer to
“Exchanging Messages” on page 49.
To send an email to a contact
The contact must have an email address in their contact details for you to send them an email.
1 In the contacts list, touch the contact you want to send the email to.
2 When the contact details screen opens, touch
A compose screen opens for your new email.
Email home, Email work, or another email option.
Note If you have more than one email account set up on your phone, you will be prompted to
select which account to use to send the message.
Note For more information about composing and sending email messages, refer to “Exchanging
Messages” on page 49.
Cupcake User Guide R1.5.0 44 April 7, 2009

3 Managing Your Time
3.1 Using Calendar
Use Calendar to create and manage events, meetings, and appointments. Depending on your
synchronisation settings, the Calendar on your phone stays in sync with your Calendar on the web.
Note For more information about Calendar synchronisation, refer to “Synchronising Google
Applications™” on page 100.
Open Calendar
1 Press HOME, then touch the Applications tab to open it.
2 Touch
Create events
To create an event
1 On any Calendar view, press
2 Enter the event name using the keyboard.
3 Do one of the following:
Calendar.
MENU and then touch New event to open the Event details screen.
• If there is a time frame for the event, touch
the
From and To date and time to set them.
• If it is a special occasion such as a birthday
or a whole-day event, set the
date, then select the
All Day check box.
From and To
4 Enter the event location and description.
5 If you have more than one calendar, select the
Note You can create multiple calendars, such as Personal, Business, or Family, using Calendar on the
web. Depending on your synchronisation settings, these calendars are added to your phone when you
synchronise the Calendar. For more information on how to create calendars, go to http://
www.google.com/support/calendar.
6 Set the event reminder time in
7 When finished, touch
Tip To quickly create an event in Day, Week, or Month view, touch and hold an empty time slot, then
New event. A new Event details screen appears with the selected time slot and date in the
touch
From and To fields.
Cupcake User Guide R1.5.0 45 April 7, 2009
Save.
Reminders, then select whether the event is recurring in Repetition.
Calendar where you want to save the event.

Calendar views
You can display the Calendar in daily, weekly, monthly, or agenda view. To change the Calendar
view, press
Day view Week view Month view Agenda view
While in a calendar view you can:
• To quickly view an event’s details while in
MENU, then touch Day, Week, Month, or Agenda (current view is not in the menu.)
Day or Week view, touch it or highlight it using the
TRACKBALL. A quick view window appears on the lower part of the screen.
• Touch the quick view window to view details about the event.
• Touch and hold an event to open a window with options for viewing, editing, or deleting that
event, or creating a new event.
Event reminders
If you set a reminder for an event, the upcoming event icon appears in the notifications area of the
status bar, when the reminder time arrives.
To view, dismiss, or snooze a reminder
1 Touch the status bar, then slide your finger down the screen to open the
Notifications panel.
2 Touch the upcoming event name to display the event.
Note If you have other pending event reminders, these events will also
appear on the screen.
3 Do one of the following:
•Touch
•Touch
• Press
Cupcake User Guide R1.5.0 46 April 7, 2009
Snooze all to snooze all event reminders for five minutes.
Dismiss all to dismiss all event reminders.
BACK to keep the reminders pending in the notifications area of
the status bar.

Synchronise Microsoft® Office Outlook® calendar
You can synchronise Outlook calendar on your computer with Calendar on the web. Since Calendar
on your phone can automatically synchronise with Calendar, you can access your Outlook calendar
appointments and events on your phone anytime.
To learn how to synchronise, go to http://www.google.com/support/calendar.
3.2 Using Alarm Clock
Use your phone as an alarm clock. Alarm Clock lets you set an unlimited number of alarms.
To open Alarm Clock
HOME, then touch the Applications tab and then touch Alarm Clock.
Press
When you open Alarm Clock for the first time, three alarms are set up by default, ready for you to
customise. All three alarms are turned off by default.
Set an alarm
1 Touch one of the available alarms.
2 Touch
Time to set the alarm time. Adjust the time by touching or . Touch AM to change to
PM or vice versa, then touch Set when finished.
Touch an option to
adjust the alarm
settings.
Time left before the
alarm goes off.
3 Touch
Ringtone, then select the alarm ring tone. The ring tone plays when selected.
Note Touch Vibrate if you want the phone to also vibrate when the alarm goes off.
4 Touch
Repeat to select the days you want the alarm to sound, then touch OK.
Note If you do not select any days for the alarm, the word Never will show which means that your
alarm will only go off once.
5 Touch
6 Press
Label to set a name for the alarm.
BACK to return to the Alarm Clock screen.
Note If you need to set more than 3 alarms, you can add more alarms while on the Alarm Clock screen
by pressing
You can temporarily disable an alarm by clearing the check box (by touching it) of the alarm on the
Alarm Clock screen.
Cupcake User Guide R1.5.0 47 April 7, 2009
MENU and then touching Add alarm.

Customise Alarm Clock
You can change the appearance of the clock displayed on the Alarm Clock screen.
1 On the Alarm Clock screen, touch the clock with your finger to open the clock selection screen.
Available clock displays appear at the bottom of the screen.
2 Slide your finger left or right on top of the clock displays to view them.
3 Touch the clock display you want.
Note To hide the clock display, on the Alarm Clock screen, press MENU, then touch Hide clock.
Note To change the date and time format displayed in your alarms, refer to “Set the date, time zone,
and time” on page 96.
Delete an alarm
1 On the Alarm Clock screen, Touch the alarm you want to delete.
2 On the Set alarm screen, press
MENU and then touch Delete alarm.
Silence all alarms
You can set whether alarms sound even when your phone is in Silent mode.
1 On the Alarm Clock screen, press
2 Touch
3 When you are done, press
Alarm in silent mode to set whether alarms play when the phone is otherwise in silent
mode.
MENU and then touch Settings.
BACK.
Cupcake User Guide R1.5.0 48 April 7, 2009

4 Exchanging Messages
4.1 Sending Text and Multimedia Messages
Messaging lets you compose and send text (SMS) and multimedia messages (MMS) to other mobile
phones.
Touch to create a new
text or picture message.
If the list of messages
does not fit on the
screen, you can scroll
up the screen to view
more messages, or roll
the TRACKBALL down.
Open Messaging
Press HOME, then touch the Applications tab, and then touch Messaging. The message list appears.
Message delivery status.
Touch to open the
message or message
thread and read the text or
view the picture message.
Create and send SMS and MMS messages
You can compose text (SMS) messages of up to 160 characters. If you continue to type after the limit is
reached, your message will be delivered as one, but count as more than one message. These are
called concatenated messages.
Multimedia messages, also known as MMS, can contain text and a picture, a recorded voice, an audio
file, or a picture slideshow.
Note Messaging automatically converts a text message into a multimedia message when you entered
an email address in the
Cupcake User Guide R1.5.0 49 April 7, 2009
To field, added a message subject, or attached an item.

To create and send a text message
1 On the Messaging screen, touch
2 Enter the mobile phone number of the message recipient in the
New message. The Compose screen opens.
To field. As you enter the phone
number, matching contacts will appear on the screen. Touch a recipient or continue entering the
recipient’s phone number.
Enter a name to look
up a contact or touch
to enter a phone
number.
Touch to automatically
enter the mobile
phone number of the
matched contact.
Note: The phone
number only appears if
the number was filed
under Mobile in
Contacts.
3 Touch the text box that contains the text “
Type to compose”, then start composing your message.
Enter your text
message here.
Touch to send
the message.
Touch to insert a
smiley face. Touch
and hold to open a
menu where you
can choose a
different smiley to
insert into the
message.
Note As you near the 160-character limit, a counter will appear in the top right corner of the text box
to tell you how much characters are left. Once you go over that limit, a new message is created but
automatically joined into one when received.
4 When done, touch
Send to send the text message. The send progress is displayed at the right side of
the message in the message thread or in the message list.
Note To receive delivery reports and know when a text message is received, in the message list, press
MENU and then touch Settings. In the SMS settings section, select the Delivery reports check box.
To create and send a multimedia (MMS) message
1 On the Messaging screen, touch
2 Enter the mobile phone number or email address of your message recipients in the
New message. The Compose screen opens.
To field. As you
enter the phone number or email address, matching contacts will appear on the screen. Touch a
recipient or continue entering the recipient’s phone number or email address.
Tip You can add a subject line by pressing MENU and then touching Add subject.
3 Touch the text box that contains the text “Type to compose”, then start composing your message.
Note As you near the 160-character limit, a counter will appear in the top right corner of the text box
to let you know how many characters you can still enter before you reach the limit for one message.
4 Press
MENU and then touch Attach.
5 On the Attach window, select from the following file attachments:
•
Pictures. Opens the Gallery application. Touch a picture on the screen to attach it to your
message.
•
Capture picture. Opens the Camera application. Take a picture of your subject, then touch
Attach to attach it to your message. For more information about the Camera application, refer
to “Using Camera and Camcorder” on page 81.
•
Videos. Opens the Gallery application. Touch a video on the screen to attach it to your
message.
•
Capture video. Opens the Camcorder application. Take a video, then touch Attach to attach it
to your message. For more information about the Video application, refer to “Using Camera and
Camcorder” on page 81.
Cupcake User Guide R1.5.0 50 April 7, 2009

• Audio. Opens the Select audio menu. Touch an audio file to select, then touch OK to attach the
file into your message.
•
Record audio. Touch to open the message recorder. Touch to start recording your
message, then touch to stop. To listen to your recording, touch . Touch
recording
•
Slideshow. Touch to open the Edit slideshow screen. Touch Add slide to create a new slide.
Touch the created slide (for example, Slide 1), touch
to attach the recording to your message.
Recording duration
Volume meter
Recording and
playback controls
Add picture, then select the picture you
Use this
want to add to the slide. You can also navigate to the text box and enter a caption for the
picture. Press
change the slide duration or layout. When finished, touch
MENU to preview the slide, remove the picture, add a music, add another slide, or
Done to attach the slideshow to your
message.
Tip You can create a slideshow of up to ten slides. When editing multiple slides, touch to edit the
next slide or touch to return to the previous slide.
Notes
• To view the slideshow, touch the Preview button while editing the slideshow, or touch the Play
button on the Compose screen.
Cupcake User Guide R1.5.0 51 April 7, 2009

• To remove or replace a picture or an audio attachment, on the Compose screen, touch the
Remove button beside the attachment. To remove a slideshow attachment, on the Compose
screen, touch
6 When you are finished composing the multimedia message, touch Send. The send progress is
displayed at the right side of the message in the message thread or in the message list.
Edit, press MENU, then touch Discard slideshow.
Note To receive delivery reports and know when a picture message is received, in the message list,
MENU, then touch Settings. Select the Delivery reports check box below the MMS settings
press
section.
To save a message as a draft
While composing a text or multimedia message, press
draft. To resume composing the message, touch the message in the message list. Continue editing the
message, then touch
Send to send it.
BACK to automatically save your message as a
Receive text and multimedia messages
Depending on your notification settings, the phone will play a ring tone, vibrate, or display the message
briefly in the status bar when you receive a new text or multimedia message. To change the
notification for new text and multimedia messages, refer to “Adjust text and multimedia message
settings” on page 54.
A new message icon also appears in the notifications area of the status bar to notify you of a new
text or multimedia message. To open the message, refer to the next section.
Manage messages and message threads
Text and multimedia messages that are sent to and received from a contact (or a number) are
grouped into conversations or message threads. Threaded text or multimedia messages let you see
exchanged messages (similar to a chat program) with a contact on the screen. Message threads are
listed in order of when you received them, with the latest message on top of the thread.
To open and read a text message
Do one of the following:
• Press
• On the message list, touch the text message or message thread to open and read it.
To return to the message list from a text message thread, press
Notes
• To view the details of a particular message, in the message thread, touch and hold the message
• If a message contains a link to a web page, touch the link to open Browser and view the web
• If a message contains a phone number, touch the message to open Dialer so you can call the
Cupcake User Guide R1.5.0 52 April 7, 2009
HOME, then touch and hold the status bar, and then slide it down to open the Notifications
panel. Touch the new message to open and read it.
MENU and then touch All threads.
to open the options menu, then touch
page.
number.
View message details.

To open and view a multimedia message
1 In the message list, touch a multimedia message or message thread to open it.
2 Touch the
Play button at the right side of a multimedia message to view it.
Tip You can save the file attachment on the multimedia message to the SD card. To save, touch and
hold the file and then touch
Copy attached to SD card on the options menu.
Notes
• When Auto-retrieve in MMS settings is disabled, only the message header is downloaded. To
download the entire message, touch the
Once the message has downloaded, touch the
to “Adjust text and multimedia message settings” on page 54.
• If you are concerned about the size of your data downloads, check the multimedia message size
before you download it.
To reply to a text or multimedia message
1 In the message list, touch a text or multimedia message thread to open it.
2 Use the
and then touch
TRACKBALL to navigate to the text box at bottom of the screen, enter your reply message,
Send.
Download button at the right side of the message.
Play button to view the message. For details, refer
Enter your reply
message here.
Touch to send
your reply.
Tip To reply a text message with a multimedia message, open the text message, press MENU and then
Add subject, or Attach. The text message is automatically converted into a multimedia
touch
message.
To delete a message or a message thread
1 In the message list, touch the message thread that you want to delete.
2 Do one of the following:
• To delete the entire thread, press
confirm, touch
• To delete a message in a thread, touch and hold the message that you want to delete, then
touch
Delete message on the options menu. When prompted to confirm, touch OK.
OK.
MENU and then touch Delete thread. When prompted to
Note To delete all messages on the message list, press MENU on the message list and then touch
Delete threads.
Cupcake User Guide R1.5.0 53 April 7, 2009

Adjust text and multimedia message settings
In the message list, press MENU and then touch Settings to adjust the text or multimedia message
settings. You can set the following options:
SMS settings
Delivery reports
Manager SIM card
messages
MMS settings
Delivery reports
Read reports
Auto-retrieve
Roaming auto-retrieve
Notification settings
Notifications
Select ringtone
Vibrate
Select this option to receive a report on the delivery status of your
message.
Touch to view text messages stored on your SIM card. You can also
delete or copy these messages to your phone’s memory.
Select this option to receive a report on the delivery status of your
message.
Select this option if you want to receive a report whether each
recipient has read or has deleted the message without reading it.
Select this option to automatically retrieve all your MMS messages
completely. When selected, the MMS message header plus the
message body and attachments will automatically download to
your phone. If you clear this check box, only the MMS message
header will be retrieved and shown in your message list.
Clear this option if you only want the MMS message headers to
download while roaming. Select this option to automatically
download your complete multimedia messages even while
roaming.
Select this option if you want to receive a notification in the status
bar when a new text or multimedia message arrives.
If you want the phone to ring when a new message arrives, touch
this option, then select a ring tone that is specific to new text and
multimedia messages. Note that the ring tone briefly plays when
selected.
Select this option if you want the phone to vibrate when a new text
or multimedia message arrives.
Cupcake User Guide R1.5.0 54 April 7, 2009

4.2 Using Google Mail™
Google Mail is Google’s web-based email service. Google Mail is configured when you first set up your
phone. Depending on your synchronisation settings, Google Mail on your phone is automatically
synchronised with your Google Mail account on the web. For more information about synchronisation,
see “Synchronising Google Applications™” on page 100.
To open Google Mail
Press
HOME, then touch the Applications tab, and then touch Google Mail.
The Inbox conversations list (hereinafter referred to as Inbox) is your default Google Mail view. All your
received emails are delivered to your Inbox.
Tip If you rarely perform actions on batches of conversations (that is, multiple conversations that you
check in the left column), you can hide checkmarks in conversation lists by pressing
Settings, and unselecting Batch operations.
To refresh Google Mail
MENU and then touch Refresh to send or receive new emails and to synchronise your emails with
Press
your Google Mail account on the web.
Folder (or Label) and
number of unread email
messages.
Checked email.
Select one or more
emails to apply an
action.
Note: Batch operations
needs to be enabled.
To scroll through the
message list:
Slide your finger up/down
on the screen.
Roll the TRACKBALL up/
down.
Starred email.
Touch and hold a
message to open a menu
where you can add or
remove the star.
Unread messages are
displayed in bold.
Message label
Actions for checked
email(s). This will not
show if there is no item
selected in the inbox.
MENU, touching
Create and send emails
To create and send an email
1 In the Inbox, press
2 Enter the message recipient’s email address in the
recipients, separate the email addresses with a comma. You can add as many message recipients
as you want.
Note If you want to send a carbon copy (Cc) or a blind carbon copy (Bcc) of the email to other
recipients, press
3 Enter the email subject, then compose your email.
Cupcake User Guide R1.5.0 55 April 7, 2009
MENU and then touch Compose.
To field. If you are sending the email to several
MENU and then touch Add Cc/Bcc.

TipIf you want to add a picture attachment, press MENU, touch Attach, and then touch the picture
you want to attach.
Attachment
Enter your
message here.
4 After composing your email, touch
Send.
Touch to remove
the attachment.
Note While composing the message, touch Save as draft to save it as a draft. To view your draft email
messages, in the Inbox, press
MENU and then touch View labels > Drafts.
To add a signature to emails
You can add a signature to email messages that you send.
1 In the Inbox, press
2 Enter your signature in the text box, then touch
MENU and then touch Settings > Signature.
OK.
Tip You can create a signature consisting of multiple lines of text. At the end of each line of text,
touch on the onscreen keyboard to create another line.
To view your sent messages
In the Inbox, press
MENU and then touch View labels > Sent.
Receive and read emails
Depending on your notification settings, the phone plays a ring tone, vibrates, or displays the email
message briefly in the status bar when you receive a new email. A new email message icon also
appears on the notifications area of the status bar to notify you of a new email.
Note For more information on email notification settings, refer to “Set Google Mail settings” on
page 58.
Google Mail groups messages with their responses. This conversation list continues to grow as new
replies arrive, so you can always see your messages in context. Conversations are also referred to as
message threads. A new message or a change to the subject of a current message will begin a new
thread.
Cupcake User Guide R1.5.0 56 April 7, 2009

To view emails
Do one of the following:
• Press
HOME, then touch and hold the status
bar, and then slide down your finger on the
screen to open the Notifications panel.
Touch the new email to view it.
• While in the Inbox, touch the unread email
or the conversation with the unread email to
view it.
Message subject
Message label
Online status.
Appears when the
contact is a Google
Talk friend and you
are signed in to
Google Talk.
To scroll through the
message:
1. Slide your finger up/
down on the screen.
2. Roll the TRACKBALL
up/down.
If the sender of a message is a friend who uses Google Talk, the friend’s status (available, busy, and so on) is indicated by the coloured icon to the left of the friend’s name.
To search for email messages
You can search for a specific email message by sender, by subject, by label, and by using the
advanced search options described on the Google Mail web site. Your searches cover all the email in
your Google Mail account on the web, not just the email you have downloaded to your phone.
1 In the Inbox, press
2 Enter the search keyword in the box, then touch
MENU and then touch Search.
Search.
Reply to or forward emails
1 In the message thread, scroll down to the end
of the conversation.
2 Touch
3 Do one of the following:
4 Touch
Reply, Reply to all, or Forward.
•If you selected
Reply or Reply all, enter
your reply message.
•If you selected
Forward, specify the
message recipients.
Send.
Message options
Thread options
Cupcake User Guide R1.5.0 57 April 7, 2009

Manage conversations and emails
Conversations
In the Inbox, touch and hold the conversation, then touch:
Read to return to the message.
•
Archive to archive the email message.
•
Tip To display your archived messages, in the Inbox, press MENU, then touch View labels > All
Mail
.
Mute to mute the entire conversation.
•
Tip If you're part of a long message conversation that isn't relevant, you can 'mute' the
conversation to keep all future additions out of your inbox.
•
Mark read or Mark unread as desired. Unread messages or threads with unread messages
display in bold in the Inbox.
•
Delete to delete the email message.
Add star or Remove star to assign a star or remove the star on the conversation.
•
Change labels to add or change the label of the conversation.
•
Note You cannot use the phone to create labels; do that on the Google Mail web site.
Report spam to report the conversation as spam.
•
Email messages
In the message thread, navigate to the email header or message using the
and then touch:
Archive to archive the email message.
•
Tip To display your archived messages, in the Inbox, press MENU, then touch View labels > All
Mail
.
Add star or Remove star to assign a star or remove the star on the conversation.
•
Mark read or Mark unread as desired. Unread messages or threads with unread messages
•
display in bold in the Inbox.
•
Change labels to add or change the label of the conversation.
Note You cannot use the phone to create labels.
Delete to delete the email message.
•
More >
•
Back to Inbox to return to your inbox.
•
Mute to mute the entire conversation. When you mute a message, new emails added to the
•
conversation will not go to your inbox anymore. The conversation remains archived.
•
Report spam to report the email message as spam.
TRACKBALL, press MENU
Set Google Mail settings
1 In the Inbox, press MENU and then touch Settings.
2 Set the following options:
•
Signature Touch to enter a signature that is appended at the end of your emails.
Confirm delete Select the check box to show a confirmation box when you delete a
•
conversation.
•
Batch operations Select the check box to show the batch operations feature. The Batch
operations feature lets you archive, delete, or apply a label to multiple emails at once.
Labels Touch to select which Google Mail labels to synchronise.
•
Email notifications Select the check box to show a notification icon on the status bar when you
•
receive a new email.
Cupcake User Guide R1.5.0 58 April 7, 2009

•Touch Select ringtone if you want your phone to ring when a new email message arrives. On the
ring tone menu, select a ring tone specific to new email messages. The ring tone plays briefly
when selected. If you don’t want a ring tone to play when you receive a new email message,
Silent. Then touch OK to confirm your ringtone selection.
touch
• Select
Vibrate if you want your phone to vibrate when you receive a new email message.
4.3 Using Email
The Email application comes with an email wizard that lets you add external POP3 or IMAP email
accounts from popular web-based email service providers such as Yahoo!® Mail Plus, AOL, and more,
on your phone.
To open Email
Press
HOME, then touch the Applications tab, and then touch Email.
Add an email account
1 Press HOME, then touch the Applications tab, and then touch Email.
2 In the Your accounts screen, touch
3 Enter the email address and password of the email account you want to set up and then touch
Next.
Notes
• If the email account you want to set up is not in the phone’s email database, you will be
prompted to manually enter the email account settings, such as the email server, protocol and
more after touching
•Touch
4 Enter the name for the account and the name you want displayed in outgoing emails and then
touch
After creating one email account, you need to press
another email account.
Manual setup instead of Next to directly enter the incoming and outgoing settings for the
email account you are setting up.
Done.
Next.
Next.
MENU, then touch Add account to create
Compose and send emails
1 Press HOME, then touch the Applications tab, and then touch Email.
2 In the Your accounts screen, touch the email account you want to use.
3 In an email account inbox, press
4 Enter the message recipient’s email address in the
contacts will appear on the screen. Touch the recipient or continue entering the email address. If
you are sending the email to several recipients, separate the email addresses with a comma. You
can add as many message recipients as you want.
5 Enter the subject, then compose your message.
6 Touch
Send.
Note Touch Save as draft or press the BACK button to save the message as a draft.
Cupcake User Guide R1.5.0 59 April 7, 2009
MENU, then touch Compose.
To field. As you enter information, matching

Manage emails on your external email account
To delete a message
1 On the email account inbox, touch and hold the email you want to delete.
2 On the options menu, touch
Delete.
Edit or delete an external email account
You can edit or delete an external email account on your phone.
1 Press
HOME, touch the Applications tab, then select Email.
2 Do one of the following:
• To delete, touch and hold the account you want to remove, then touch
the options menu. When prompted to confirm deletion, touch
OK.
• To edit, touch and hold the account you want to edit, then touch
Remove account on
Account settings on the
options menu.
Add more email accounts
On the Your accounts screen, press MENU and then touch Add account.
4.4 Using Google Talk™
Google Talk is Google’s instant messaging program. It lets you communicate with other people that
also use Google Talk on a phone or on the web.
Note The Google Talk account that is set up is based on the Google Account that you used when you
set up the phone.
Sign in and chat online
To sign in to Google Talk
HOME, then touch the Applications tab, and then touch Google Talk.
Press
Touch to change your online status message.
Touch to change
your picture.
Friends list
Cupcake User Guide R1.5.0 60 April 7, 2009
Touch to change your
status.
Opened chats. Touch a
callout to open the chat
screen and start chatting
with your friend.
Online status:
Available
Idle
Busy
Offline

To add a new friend
You can only add people who have a Google Account.
1 In the Friends list, press
MENU and then touch Add friend.
2 Enter the Google Talk instant messaging ID or Google email address of the friend you want to add.
Note When you add a friend with an instant messaging ID and has been saved in your contacts list,
matching contacts will display on the screen as you enter information. You can touch the contact
or continue entering the IM information.
3 Touch
Send invitation.
To view and accept an invitation
1 In the Friends list, press
MENU and then touch Invites. All chat invitations you have sent or received
are listed on the pending invitations screen.
2 Touch a pending invitation, then touch
Accept or Decline.
Note When someone you invite to chat accepts your invitation, the pending invitation disappears from
the list.
To change your online status and message
1 Touch the online status icon beside your name, then select the status you want on the menu.
2 Touch the text box on the left of your online status icon and then enter your status message using the
onscreen keyboard.
3 Touch
Done on the onscreen keyboard.
Tip The status you set in Google Talk, here or on the web, can be displayed to your friends in other
applications, including Google Mail, Google Maps (with Google Latitude™), IM, and Email.
To start a chat
1 Do one of the following:
• Touch the name of a friend in the Friends list.
• Navigate to a friend using the
TRACKBALL, then press the TRACKBALL.
Timestamp. Appears
after every minute
of inactivity.
Enter your
message here.
Touch to send your
message.
2 Chat with your friend by entering text using the onscreen keyboard.
Note To insert a smiley, touch and hold the smiley key to bring up the smiley menu. Touch a smiley to
insert it into your message.
3 After entering your message, touch
Cupcake User Guide R1.5.0 61 April 7, 2009
Send.

To switch between active chats
You can switch between chats if you have more than one chat going.
1 While on a chat screen or in the friends list, press
Switch chats.
touch
2 On the panel that opens, touch the friend you want to chat with.
To close a chat
Do one of the following:
• In your Friends list, touch and hold a friend with an active chat and then touch
menu.
• While on a chat screen, press
MENU and then touch End chat.
MENU and then
End chat on the
Manage your friends
Friends in your friends list is sorted by their online status — active chats, online, busy, and offline. Within
the status groupings, friends are listed alphabetically.
By default, only the friends that you frequently communicate with — the most popular — are in the
Friends list. If you want to display all your friends, press
Tip To switch back to displaying only your most popular friends, press MENU and then touch Most
popular
To find a friend
In the Friends list, start entering the name of your friend to filter your list to show only friends with names
that match what you have entered.
To block a friend
You can block a friend from sending you messages. When blocked, your friend is also removed from
your Friends list.
1 In the Friends list, locate the friend you want to block.
.
Note If you cannot see the friend, Press MENU and then touch All friends.
2 Touch and hold the friend’s name, then touch
list and is added to the blocked friends list.
Note To unblock a friend, in the Friends list, press MENU and then touch Blocked. In the Blocked friends
list, touch the name of the friend you want to unblock, then touch
To pin a friend
You can pin a friend to make sure that friend always appears in your
1 In the Friends list, Touch and hold the friend’s name to open the options menu.
Note If you cannot see the friend, Press MENU and then touch All friends.
2 Touch
Pin friend.
Note To unpin a friend, in the Friends list, touch and hold the friend you want to unpin and then touch
Unpin friend on the options menu.
To show a friend in the Most popular list
1 In the Friends list, touch and hold the friend’s name to open the options menu.
Note If you cannot see the friend, Press MENU and then touch All friends.
2 Touch
Show friend.
MENU and then touch All friends.
Block friend. Your friend is removed from your friends
OK when prompted.
Most popular friends list.
Cupcake User Guide R1.5.0 62 April 7, 2009

Note To keep a friend from appearing in the most popular list, touch and hold the friend’s name, then
Hide friend on the menu. If you pinned the friend, the pin will be removed when you hide the
touch
friend.
Mobile indicators
You can check what type of device your friend is using to chat in Google Talk. In the friends list, check
the image that appears to the right of your friend’s name.
Indicates that the
friend is using an
Android phone.
When you do not see an image, it indicates that your friend signed in last from a computer.
You can also choose to show a mobile indicator. To show:
1 In the Friends list, press
2 Select the
along with your name in other people’s Friends list and will let your friends know what type of mobile
device you are using.
Mobile indicator check box and then press BACK. The mobile indicator icon will display
MENU and then touch More > Settings.
Adjust instant messaging settings
To set notifications for new instant messages
You can set the phone to play a sound, vibrate, or display a notification icon in the status bar each
time you receive a new instant message.
1 In the Friends list, press
2 Do one or all of the following:
• Select the IM notifications check box to receive a notification in the status bar when a new
instant message arrives.
•Touch
• Select the
To sign in automatically
You can sign in to your Google Talk account automatically every time you turn on your phone.
1 In the Friends list, press
2 Select the
3 Press
Select ringtone to select the ring tone to use when a new instant message arrives. The ring
tone briefly plays when selected. If you don’t want a ring tone to play when you receive a new
instant message, select
Vibrate check box to vibrate your phone when you receive a new instant message.
Automatically sign in check box.
BACK to save your setting.
MENU and then touch More > Settings.
Silent.
MENU and touch More > Settings.
Sign out
In the friends list, press MENU and touch More > Sign out when you want to sign out from Google Talk.
Cupcake User Guide R1.5.0 63 April 7, 2009

5 Getting Connected
5.1 Connecting to the Internet
Your phone’s networking capabilities allow you to access the Internet through one of the following
connections:
• GPRS/3G/EDGE
•Wi-Fi
GPRS/3G/EDGE
Your phone will be automatically configured to use your wireless service provider’s GPRS/3G/EDGE
service when you turn on your phone (if the SIM card is inserted) for the first time.
To check the network connection you are using
1 Press
2 Touch
To create a new access point
When you need to add another GPRS/3G/EDGE connection on your phone, obtain the access point
name and settings (including username and password if required) from your wireless service provider.
1 Press
2 Touch
3 On the APNs screen, press
4 In the Edit access point screen, enter the APN settings. Touch the APN setting item to edit it.
5 Press
HOME, then press MENU, and then touch Settings.
Wireless Controls > Mobile networks > Network operators or Access Point Names.
HOME, then press MENU, and then touch Settings.
Wireless Controls > Mobile networks > Access Point Names.
MENU and then touch New APN.
MENU and then touch Save when you finish setting up the new APN.
Wi-Fi
Wi-Fi provides wireless Internet access over distances of up to 300 feet (100 meters). To use Wi-Fi on your
phone, you need access to a wireless access point or “hotspot”.
Note The availability and range of the Wi-Fi signal depends on the number, infrastructure, and other
objects through which the signal passes.
To turn Wi-Fi on and connect to a wireless network
1 Press
2 Select the
3 Touch
4 Touch a Wi-Fi network to connect. When you selected an open network, you will be automatically
Cupcake User Guide R1.5.0 64 April 7, 2009
HOME, then press MENU, and then touch Settings > Wireless controls.
Wi-Fi check box to turn Wi-Fi on. The phone will scan for available wireless networks.
Wi-Fi settings. The network names and security settings (Open network or Secured with WEP)
of detected Wi-Fi networks are displayed in the Wi-Fi networks section.
connected to the network. If you selected a network that is secured with WEP, enter the WEP
(security) key and then touch
Connect.

Notes
• The next time your phone connects to a previously accessed secured wireless network, you will not
be prompted to enter the WEP key again, unless you reset your phone to its factory default
settings.
• Wi-Fi networks are self-discoverable, which means no additional steps are required for your phone
to connect to a Wi-Fi network. It may be necessary to provide a username and password for
certain closed wireless networks.
To check the wireless network status
You can check the current wireless connection status from the following:
•Status bar
When your phone is connected to a wireless network, the Wi-Fi icon appears in the status bar
and tells you the approximate signal strength (number of bands that light up). If
notification
detects an available wireless network within range.
•Wi-Fi networks
On the Wireless controls screen, touch
wireless network that the phone is currently connected to. The Wi-Fi
network name, status, speed, signal strength, security information, and
IP address are displayed.
in Wi-Fi settings is enabled, this icon appears in the status bar whenever the phone
Wi-Fi settings, then touch the
Network
Note If you want to remove the wireless network settings on your phone,
touch Forget on this window. You will need to enter the settings again if
you want to connect to this wireless network.
To connect to another Wi-Fi network
1 On the Wireless controls screen, touch
Wi-Fi networks section.
Wi-Fi settings. Detected Wi-Fi networks are displayed in the
Tip To manually scan for available Wi-Fi networks, on the Wi-Fi settings screen, press MENU and then
Scan.
touch
2 Touch another Wi-Fi network to connect to it.
Note If the wireless network you want to connect to is not in the list of detected networks, scroll down
the screen, then touch
Cupcake User Guide R1.5.0 65 April 7, 2009
Add Wi-Fi network. Enter the wireless network settings, then touch Save.

5.2 Using Browser
Open Browser to start surfing the web. Browser is fully optimised and comes with advanced
functionalities that let you enjoy Internet browsing on your phone.
Note You must have an active data (3G, GPRS), or Wi-Fi connection to access the Internet.
To open Browser
Do one of the following:
• Press
• Press
Note Browser automatically opens when you touch a web link in an email or text message.
To go to a web page
1 On the Browser screen, press
2 Enter the web page address using the keyboard. As you enter the
3 Touch
To set your home page
1 Press
2 Enter the URL of the web site you want to use as your home page and then touch
To go to your home page, press
View web pages
Browser offers a host of features that let you view web pages just like on a desktop computer.
To change the screen orientation to landscape view
Turn your phone sideways to view the web page in landscape mode. The screen orientation
automatically adjusts to how you hold the phone.
Note The Orientation check box in HOME > MENU > Settings > Sound & display needs to be selected
for the screen orientation to automatically change.
To navigate on a web page
You can roll the
other areas of the web page.
You can also use scale and scroll to magnify an area of the web page for easy viewing. To use scale
and scroll:
1 On a web page, press the
HOME, then touch Browser.
HOME, then touch the Applications tab, and then touch Browser.
MENU and then touch Go.
address, matching web page addresses will appear on the screen. Touch
an address to go directly to that web page or continue entering the web
page address.
Go.
MENU and then touch More > Settings > Set home page.
OK.
MENU and then touch More > Home page.
TRACKBALL or slide your finger on the screen in any direction to navigate and view
TRACKBALL twice. The web page zooms out to fit the height of the
screen and the magnifying window appears.
Cupcake User Guide R1.5.0 66 April 7, 2009

2 Touch and hold the magnifying window, then drag it to the area of the page that you want to view
more closely. You can also roll the
TRACKBALL to move the magnifying window on any area of the
screen.
Magnifying
window
3 Release your finger or press the
TRACKBALL to magnify the view. The view is magnified using the
zoom ratio used when you activated scale and scroll.
To zoom in or out on a web page
Slide your finger to one direction on the screen to activate the zoom controls.
Touch to zoom out.
Touch to zoom in.
Touch to resize
the web page to
its actual size.
Touch to activate
scale and scroll.
To open a new browser window
Open multiple browser windows to make it easier for you to switch from one web site to another. You
can open up to 8 browser windows.
To open a new window, press
MENU and then touch New window while browsing a web page. A new
browser window opens and goes to the home page that is set.
Note If you have two or more browser windows opened, press MENU and then touch Windows to let
you add more browser windows.
To switch between browser windows
1 On a browser window, press
MENU and then touch Windows.
Touch to open a
new web page.
Touch to display
the web page in
full screen.
Touch to close
the web page.
2 On the Current windows screen, touch the browser window you want to view.
Cupcake User Guide R1.5.0 67 April 7, 2009

To close a browser window, touch on the browser window you want to close.
To find text within a web page
1 While viewing a web page, press
2 Enter the search item. As you enter characters, matching characters will be highlighted in green.
Touch the left or right arrow to go to the previous or next matching item.
MENU and then touch More > Find on page.
Tip Touch to close the search bar.
To copy text on a web page
Copy text from web pages and then paste them on emails or your SMS/MMS messages.
1 Open the web page where you want to copy text.
2 Locate the text you want to copy and then press
MENU and then touch More > Select text.
Tip Zoom out of the page before you select text.
3 Position your finger at the start of the text you want to copy and then drag to the end of the text you
want to copy. Copied text are highlighted in pink.
4 Release your finger from the screen.
To paste text on a email or SMS/MMS message, touch and hold the text box on a message or email
and then touch
Paste on the options menu.
Manage links, history, and downloads
To select links in web pages
Navigate to links on a web page using the
when selected.
Link What to do
Web page address
(URL)
Cupcake User Guide R1.5.0 68 April 7, 2009
• Touch the link to open the web page.
• Touch and hold the link to open a menu that allows you to open,
bookmark, copy to the clipboard, or share the link via email.
TRACKBALL. Links are enclosed in an orange or green box
Link is not selected
Link is selected

Link What to do
Email address
Browser also recognizes some phone numbers and addresses that allow you to call the phone number
or locate the address in Google Maps™. Recognized phone numbers and addresses are highlighted in
green when navigated to.
• Touch to send an email message to the email address.
• Touch and hold, then touch
address to the clipboard. You can paste the email address later
when creating a new contact or sending a new email message.
Copy on the menu to copy the email
Link What to do
Location address
Phone number
Touch the address to open Google Maps and locate the address.
Touch to open the Phone screen to call the phone number.
Tip When links are too small for touching directly on the screen, highlight it with the TRACKBALL, then
either press the
the menu.
To check Browser history
On the Browser screen, press
the web page.
TRACKBALL to open the link, or press and hold the TRACKBALL to select an option from
MENU and then touch Bookmarks > History tab. Touch an item to open
Tip You can also check your most visited web pages by pressing MENU and then touching Bookmarks
Most visited tab.
>
To allow download of web applications
Before you can download web applications, you must first enable downloading from the phone
settings.
1 Press
2 Select the
3 When the Attention dialog box opens, touch
HOME, then press MENU, and then touch Settings > Applications.
Unknown sources check box.
OK.
Note All downloaded applications are saved to the storage card. Before you download an
application from the web, make sure that you have installed a storage card on your phone. For
information on how to install a storage card, refer to “To install the storage card” on page 18.
Warning! Applications downloaded from the web can be from unknown sources. To protect your
phone and personal data, download applications only from trusted sources such as Android Market.
Refer to “Installing an application” on page 93 for details.
Cupcake User Guide R1.5.0 69 April 7, 2009

To view your downloads
On a browser screen, press
MENU and then touch More > Downloads.
Manage bookmarks
You can store as many bookmarks as you want on your phone.
To bookmark a web page
1 On a browser screen, go to the web page you want to book mark.
2 Press
3 On the
4 Edit the bookmark
To open a bookmark
1 On the Browser screen, press
2 On the
To edit a bookmark
1 On the Browser screen, press
2 On the
3 Touch
4 Enter your changes and touch
MENU and then touch Bookmarks. The bookmarks screen opens.
Bookmarks tab, touch Add bookmark.
Name if needed and then touch OK.
MENU and then touch Bookmarks.
Bookmarks tab, do one of the following:
• Touch the bookmark you want to open.
• Touch and hold the bookmark you want to open, then touch
the options menu.
Open or Open in new window on
MENU and then touch Bookmarks.
Bookmarks tab, touch and hold the bookmark you want to edit.
Edit bookmark on the options menu. The edit bookmark dialog box appears.
OK.
Adjust Browser settings
On the Browser screen, press MENU and then touch More > Settings to set the Browser settings and
options.
Cupcake User Guide R1.5.0 70 April 7, 2009

5.3 Using Bluetooth
Bluetooth is a short-range wireless communications technology that allows Bluetooth devices to
exchange information over a distance of about eight meters without requiring a physical connection.
Bluetooth on your phone operates in three different modes:
On. Bluetooth is turned on. Your phone can detect other Bluetooth-enabled devices, but not vice
•
versa.
•
Discoverable. Bluetooth is turned on, and all other Bluetooth-enabled devices can detect your
phone.
•
Off. Bluetooth is turned off. In this mode, you can neither send nor receive information using
Bluetooth.
Notes
• By default, Bluetooth is turned off. If you turn it on, then turn off your phone, Bluetooth also turns off.
When you turn on your phone again, Bluetooth automatically turns on.
• Turn off Bluetooth when not in use to conserve battery power, or in places where using a wireless
device is prohibited, such as on board an aircraft and in hospitals.
To turn on Bluetooth and make the phone discoverable
1 Press
2 Touch
3 Touch
Important Your phone will be discoverable for up to two minutes.
To change the phone name
The phone name identifies your phone in a Bluetooth network.
1 Make sure that you have turned Bluetooth on.
2 On the Wireless controls screen, touch
3 Enter the name for your phone in the dialog box, then touch
To pair and connect a Bluetooth hands-free headset or car kit
You can connect your phone to a Bluetooth hands-free headset or a Bluetooth car kit and use those
devices to send and/or receive calls. Before you can use a Bluetooth hands-free headset or car kit,
you must pair it first with your phone.
Important The phone supports the following Bluetooth profiles: Headset, Handsfree, A2DP, and AVRCP.
1 Press
2 Touch
3 Touch the hands-free headset or car kit in the list to start pairing.
HOME, then press MENU, and then touch Settings.
Wireless controls, then select the Bluetooth check box to turn on Bluetooth. When on, the
Bluetooth icon appears in the status bar.
Bluetooth settings, then select the Discoverable check box to make the phone
discoverable to other Bluetooth devices that are within range.
Bluetooth settings > Device name.
OK.
HOME, then press MENU, and then touch Settings.
Wireless controls > Bluetooth settings and then select the Bluetooth check box. Your phone
will start to scan for Bluetooth devices within range and will display all detected devices below the
Bluetooth devices section.
Tips
• If you do not find the device in the list, touch
• Make sure that the Bluetooth device that you want to pair with is set to discoverable mode.
Consult the Bluetooth device’s documentation to learn how to set it to discoverable mode.
Scan for devices to scan again.
Cupcake User Guide R1.5.0 71 April 7, 2009

Note For some Bluetooth devices, you need to enter a passcode to pair with the Bluetooth device.
You can try “0000” as the passcode. If that does not work, consult the Bluetooth device’s
documentation.
4 The pairing and connection status will appear below the hands-free headset or car kit name in the
Bluetooth devices list. When the other Bluetooth hands-free headset or car kit is connected to your
phone, the Bluetooth connected icon will appear in the status bar. You can now start using the
hands-free headset or car kit to make and/or receive phone calls.
The icon represents
that the device is a stereo
Bluetooth headset (A2DP
Bluetooth profile).
You need to use a stereo
Bluetooth headset (A2DP
Bluetooth profile) if you
want to listen to music
through a Bluetooth
headset.
The icon represents that
the device is a mono
Bluetooth headset (Headset
and Handsfree Bluetooth
profiles).
Notes
• Pairing between two Bluetooth devices is a one-time process. Once pairing is created, the
devices can recognize the partnership and exchange information without entering a passcode
again.
• If you pair with a second headset while connected to the first, the first headset will be
disconnected. To switch connection back to the first headset, you must manually select that
headset again in the Bluetooth devices list
To disconnect a Bluetooth hands-free headset or car kit
1 Press
2 Touch
HOME, then press MENU, and then touch Settings.
Wireless controls > Bluetooth settings.
3 Navigate to the Bluetooth devices section, then touch and hold the connected hands-free headset
or car kit.
4 Touch
Touch
Disconnect.
Unpair if you want the phone to erase all pairing information with the hands-free headset or car
kit. You will be prompted to enter the passcode again when you connect to that Bluetooth device.
Cupcake User Guide R1.5.0 72 April 7, 2009

6 Getting Around with Maps
6.1 Using Maps
Maps lets you track your current location, view real-time traffic situations, and receive detailed
directions to your destination. It also provides a search tool where you can locate places of interest or
an address on a vector or aerial map, or view locations in street level.
Notes
• You need an active data (3G/GPRS) or Wi-Fi connection to use Maps.
• The Maps application does not cover every country or city.
Enable Location source
Before you open Maps and find your location or search for places of interest, you must enable
Location source.
1 Press
2 Touch
3 Navigate to the My Location sources section, then select
Note Selecting Enable GPS satellites lets you locate places of interest in street-level. However, this
requires a clear view of the sky and more battery power.
Open Maps
Do one of the following:
• Press
• Press
HOME, press MENU and then touch Settings.
Security & location.
satellites
, or both.
HOME, then touch Maps.
HOME, touch the Applications tab and then
Maps.
touch
Use wireless networks, Enable GPS
Find your location on the map
On the Maps screen, press MENU and then touch My
Location
blue dot.
Cupcake User Guide R1.5.0 73 April 7, 2009
. Your location is shown on the map as a blinking
Your current
location

6.2 Searching for Places of Interest
To search for a place of interest
1 On the Maps screen, press
2 Enter the place you want to search in the search box. You can enter an address, a city, or type of
business or establishment (for example, museums in london).
Enter the place
you want to
search here.
Tip As you enter information, a list of all the places which you have searched or visited before
appears on the screen. You can also touch an address on the menu to show its location on the
map.
3 Touch
Search.
4 Touch a place in the list to show its location on the map.
MENU and then touch Search.
Touch to view the
location of the
previous or the next
place in the Search
results screen.
Location of one of
the places in the
Search results list.
Touch to search
the place you
entered.
Touch the place or
touch Show map to
show the location
of the place on the
map.
Touch to edit the search or
search for a new place.
Touch to return to the
Search results screen.
Tip On the map, roll the TRACKBALL left or right to view the location of the previous or the next
place in the Search results list.
5 Touch the call-out on the map to open the location details and options.
Cupcake User Guide R1.5.0 74 April 7, 2009

6.3 Viewing Maps
While viewing a map, take advantage of the following zoom and navigation techniques.
Zoom in or out on a map
Touch the screen to show the zoom controls.
Touch to zoom out.
Touch to zoom out.
Navigate on a map
Roll the TRACKBALL or slide your finger on the screen in any direction to view other areas of the map.
To change a map mode
When viewing a map, you can switch to another map mode. Press
Select from
Map, Satellite, Traffic, or Street View.
Map mode Satellite mode Traffic mode Street view mode
Map mode
This is the default view and displays a map, complete with
names of streets, rivers, lakes, mountains, parks, and boundaries.
MENU and then touch Map mode.
Cupcake User Guide R1.5.0 75 April 7, 2009

Satellite mode
Maps uses the same satellite data as Google Earth™ mapping
service. Satellite images are not real-time. Google Earth
acquires the best imagery available, most of which is
approximately one to three years old.
Traffic mode
(available only in selected
areas)
Street View mode
(available only in selected
areas)
Real-time traffic conditions are displayed over roads as colourcoded lines. Each colour represents how fast the traffic is
moving.
Provides a street-level view of the location. Blue outlined roads
indicate that street view is available on those locations.
While viewing a Street View of a location, press
MENU and then
touch Compass mode to turn Compass mode on. Tilt, pan, or
turn your phone to view the area around the selected location.
6.4 Getting Directions
Use Maps to get detailed directions to your destination.
To get directions
1 While viewing a map in any mode (except in Street View), press
2 Enter the starting point in the first text box, then enter your destination in the second text box.
Touch to switch
your starting point
and destination.
Destination
MENU and then touch Directions.
Starting point
Touch to open
the location
source menu.
Touch to generate a
route to your
destination.
You can also touch to open the location source menu and select a starting point and destination
address.
Cupcake User Guide R1.5.0 76 April 7, 2009

3 Touch Route. The directions to your destination appears in a list.
Distance and time
to destination.
Touch to change
your route.
Touch to show the
location on a map.
Next turn
information.
Touch to show
the directions on
a map.
Touch to show
the previous turn
on the map.
Next turn
Touch to show
the next turn on
the map.
Touch to display
the directions in
a list.
When you are finished viewing or following the directions, press MENU, then More, then touch Clear
map
to reset the map. Your destination is automatically saved in the Maps history.
Cupcake User Guide R1.5.0 77 April 7, 2009

6.5 Finding your friends with Google Latitude™
Google Latitude user location service lets you and your friends share locations and status messages
with each other. It also lets you send instant messages and emails, make phone calls, and get
directions to your friends’ locations.
Your location is not shared automatically. You must join Latitude, and then invite your friends to view
your location or accept their invitations.
Open Latitude
To join Latitude
1 While viewing a map in any mode (except in Street View), press
Latitude
2 Read the privacy policy. If you agree with it, touch
To open Latitude after joining
While viewing a map in any mode (except in Street View), press
.
Agree & share.
Share your locations
After you join Latitude, you can start sharing your locations with your friends. Only friends that you have
explicitly invited or accepted can see your location.
Invite friends
To share your location with friends and request to see their locations
1 In Latitude, press
2 Choose how to add friends:
•
Select from Contacts. Select any number of friends from your Contacts. Friends who already use
Latitude have a icon next to their names.
•
Add via email address. Enter an email address.
3 Touch
4 Touch
Add friends.
OK.
If your friends already use Latitude, they receive an email request and a notification on Latitude. If
they have not yet joined Latitude, they receive an email request that tells them to sign in to Latitude
with their Google Account.
MENU and then touch Add friends.
MENU and then touch Join
MENU and then touch Latitude.
Accept an invitation
When you get a sharing request from a friend, you can:
Accept and share back. You can see your friend’s location, and your friend can see yours.
•
Accept, but hide my location.You can see your friend's location, but they can't see yours.
•
Don't accept. No location information is shared between you and your friend.
•
You can change how your location is shared with each friend at any time. Refer to“To share your
location with friends and request to see their locations” on page 78 for more details.
Cupcake User Guide R1.5.0 78 April 7, 2009

Show your friends
You can show your friends using the map view or the list view.
Map view
When you open Google Maps, it shows your friends’ locations. Each friend is
represented by a photo icon with an arrow pointing at his or her
approximate location. If a friend has opted to enable city-level sharing, his
or her icon will not have an arrow and it appears in the middle of the city.
Refer to “To share your location with friends and request to see their
locations” on page 78 for more details.
If your friends use Google Talk, those friends’ online status (available, busy,
and so on) is indicated by a circular icon below those friends’ pictures. For
more information, see “Using Google Talk™” on page 60.
To see your friend’s profile and connect with him or her, touch the photo. This
will display your friend’s name, then touch the balloon right above his or her
icon.
To see other friends, touch either one of the arrow buttons next to the balloon.
List view
To show a list of your friends, in Maps, press
To see a friend’s profile and connect with him or her, select your friend’s
name from the list.
MENU and then touch Latitude.
Connect with your friends
Touch a friend’s contact details balloon in map view or touch a friend in list view to open the friend’s
profile. In the profile screen, you can communicate with your friend and set privacy options.
Show on map
Chat using Google Talk
Send email
Directions
Hide from this friend
Cupcake User Guide R1.5.0 79 April 7, 2009
Find a friend’s location on the map.
Send an instant message. Google Talk opens a chat window with that
friend.
Send an email. Google Mail opens an email addressed to that friend.
Get directions to the friend’s location.
Stop sharing your location with this friend. Your friend cannot see your
photo icon on the map. To share your location with this friend again,
Unhide from this friend.
touch

Share only city level
location
Remove
Share only the city you are in, not the street-level location. Your friend can
see your photo icon in the middle of the city you are in.
To share more precise location again, touch
Remove the friend from your list and stop sharing locations with him or her
altogether.
Best available location.
Control what you share
You have control over how and when you can be found by your friends. Only the last location sent to
Latitude is stored with your Google Account. If you turn off Latitude or are hiding, no location is stored.
To change your public profile
1 in Maps, press
2 Set the following options to your preferences.
Show on map
Change your status
Change your photo
Edit privacy setting
MENU, touch Latitude, and then touch your contact details balloon.
See your location on a map.
Change the status message, which is shared across other Google
products and features, such as Google Talk and Google Mail.
After you touch
box, and then touch
Change the picture, which is also shared across other Google products
and features.
After you touch
yourself with the phone or select a picture from Gallery. Refer to “Using
Camera and Camcorder” on page 81 and “Using Gallery” on page 83for
more details.
Manage how your location is shared with all your friends. Select one of the
following options:
•
Detect your location. Let Latitude automatically detect and
update your location as you move around. The update frequency is
determined by several factors, such as your phone's battery charge
level and how recently your location has changed.
Change your status, type your new status in the dialog
OK.
Change your photo, you can either take a picture of
Note: You must have My location sources enabled. To learn how to
enable My location sources, refer to “Using Maps” on page 73.
•
Set your location. Manually select a location on the map.
•
Hide your location. Hide your location from all your friends. They will
not be able to see your location on their maps. You can also hide
your location only to certain individuals. Refer to the next section for
more details.
Turn off Latitude. Disable Latitude and stop sharing. Your friends can-
•
not see your location. You can always join Latitude again.
Cupcake User Guide R1.5.0 80 April 7, 2009

7 Camera and Multimedia
7.1 Using Camera and Camcorder
Use Camera or Camcorder to take and share pictures and videos. Your phone comes with a 3.2
megapixel camera with auto-focus feature that lets you capture sharp pictures and videos.
Before you proceed
• You must install a storage card before you use the Camera or Camcorder. All pictures or videos
that you capture on your phone are stored on the storage card. For more information on how to
install a storage card on your phone, refer to “To install the storage card” on page 18.
• The camera lens at the back of the phone is covered by a protective film during shipment. Make
sure that you peel this film off before using the camera.
To open the Camera or Camcorder
Press
HOME, touch the Applications tab and then touch Camera if you want to capture photos or
Camcorder
when you open Camera or Camcorder.
Tip You can easily switch to the other capture mode while you are in Camera or Camcorder. Refer to
“Capture modes” in this chapter for details.
if you want to shoot videos. The screen automatically switches to landscape orientation
Current capture mode.
Touch to take a photo or
start recording video.
To close the Camera or Camcorder
On the Camera screen, press
HOME or BACK.
Capture modes
The phone offers two capture modes: Camera and Video.
To change the capture mode
On the Camera screen, press
MENU and then touch Switch to video or Switch to camera.
Take pictures
1 Press HOME, touch the Applications tab and then touch Camera or if you are in Camcorder, press
MENU and then touch Switch to camera.
2 Frame your subject on the screen.
Cupcake User Guide R1.5.0 81 April 7, 2009

3 Touch onscreen to take the picture.
Shoot videos
1 Press HOME, touch the Applications tab and then touch Camcorder or if you are in Camera, press
MENU and then touch Switch to video.
Tip You can change the capture video quality by pressing MENU and then touching Settings >
Select video quality.
2 Frame your subject on the screen.
3 Touch onscreen to start capturing video. Touch onscreen to stop capturing video.
Recording indicator.
You can also touch to
start or stop recording
video.
Capture duration
Important You can capture a maximum of 10 minutes of video using the phone. When the last minute
is reached, the duration display will change to red and start a countdown.
Post capture
After capturing, a thumbnail of the photo or video you have just captured appears at the upper-left
corner of the screen. Touch the thumbnail to open the post capture icons. The post capture icons let
you view the file in Gallery, set a photo as a contact icon or wallpaper, play back the video file, and
share the file with friends.
Touch to
capture
another
photo.
Touch to
shoot
another
video.
Copying photos and video to storage
To copy pictures and videos into the storage card
1 Set the phone’s storage card as a USB drive. Refer to “Using the Phone’s Storage Card as a USB
Drive” on page 33 for details.
2 On the computer, navigate to the USB drive and open it.
3 Create a folder on the root folder of the storage card.
Tip You can also create and use folders to organise your pictures or videos into albums inside the
folder you have created.
Cupcake User Guide R1.5.0 82 April 7, 2009

4 Copy the files into the folder you have created.
5 After copying the files, unmount or eject the drive as required by your computer’s operating system
to safely remove the phone.
6 Disconnect the phone from the computer.
7.2 Using Gallery
Gallery lets you view photos and play back videos. For photos, you can also do basic editing tasks, set
them as your wallpaper or contact picture, and share to your friends.
To open Gallery
• Press
• While on the Camera screen, press
If you stored your files in folders (directories) on the storage card, Gallery will display these folders as
separate albums. The top left album contains all the pictures in the storage card.
HOME, touch the Applications tab and then touch Gallery.
MENU and then touch Gallery.
This album contains all
This album contains
all the pictures inside
all the albums.
the videos inside all the
albums.
Scroll up the screen or
roll the TRACKBALL down
to view more albums.
Touch to view the files
inside the album.
Album name and
number of files inside.
Note Depending on the number of pictures stored on the storage card, it may take a while to load all
your photos on the screen.
To close Gallery
While in the Gallery screen, press
HOME or BACK to close the application.
Note If you opened Gallery from the Camera application, the screen returns to the Camera screen
when you press
BACK.
Work with pictures
Once you have taken a picture, you can view it or share it with friends.
To view pictures
1 On the Gallery screen, touch an album to view the pictures inside the album
Note If there are no picture albums, slide your finger upward or downward the screen, or roll the
TRACKBALL up or down to browse through individual pictures.
2 Touch a thumbnail to view it in full screen. You can also touch and hold the thumbnail, then touch
View on the options menu to open it.
Cupcake User Guide R1.5.0 83 April 7, 2009

Tip You can choose to display small or large thumbnails or sort your album and display the latest
pictures first or last. On the Gallery screen, press
General settings section, touch
To browse through pictures
When viewing pictures in full screen, do one of the following:
• Touch the left area of the screen to view the previous picture, or touch the right area of the screen
to view the next picture.
• Touch the screen to display the scroll arrows. Touch the left arrow to view the previous picture, or
touch the right arrow to view the next picture.
•Roll the
album or in the pictures list.
To zoom in or out on a picture
Touch the screen to activate the zoom control.
TRACKBALL left to view the previous picture, or roll it right to view the next picture in the
Display size or Sort order, then adjust the settings accordingly.
MENU and then touch Settings. Navigate to the
Touch to zoom out.
To view a picture in landscape orientation
Turn your phone sideways to view the picture in landscape mode. The picture orientation
automatically adjusts to how you hold the phone.
Touch to zoom in.
Notes
•The Orientation check box in Home> MENU > Settings > Sound & display needs to be selected
for the screen orientation to automatically change.
• If you want to rotate the picture and save the rotated state, see “To rotate and save the rotated
state” below.
To rotate and save the rotated state
1 In the Gallery screen, touch and hold the picture you want to rotate or if you are viewing the picture
in full screen, press
2 In the options menu, touch
MENU.
Rotate and then select either Rotate left or Rotate right.
Note The Picture rotates 90 degrees counter-clockwise (Rotate left) or 90 degrees clockwise (Rotate
right) each time you touch one of the Rotate options.
Cupcake User Guide R1.5.0 84 April 7, 2009

To crop a picture
1 While viewing a picture in full screen, press
MENU and then touch Crop. The cropper tool appears.
2 Do one of the following:
• To adjust the cropper size, touch and hold the edge of the cropper tool. When the cropper
arrows appear, drag your finger inward to or outward from the centre of the cropper to resize it.
• To keep the aspect ratio of the cropper while resizing, touch and hold one of the 4 corners.
• To move the cropper to another area on the picture, touch and hold inside the cropper, then
drag it with your finger to the desired position.
3 Touch
Cropper tool
Cropper arrow
Touch to save
the photo.
Save to apply the changes to the picture.
Touch and hold inside
the cropper, then
drag it to any area of
the photo.
Touch to discard
your changes.
Note The cropped picture is saved in the storage card as a copy. The original picture remains
unedited.
To send a picture using Email
1 While viewing a picture in full screen, press
2 When prompted, touch
Email or Google Mail.
3 The picture is automatically attached to your email. Compose your message, then touch
MENU, then touch Share.
Send. For
more information on how to create and send emails, refer to “Using Google Mail™” on page 55.
To send a picture using Messaging
1 While viewing a picture in full screen, press
2 When prompted, touch
Messaging.
3 The picture is automatically attached to your message. Compose your message, then touch
MENU, then touch Share.
Send.
For more information on how to create and send messages, refer to “Sending Text and Multimedia
Messages” on page 49.
To upload a picture to Picasa
You need to be signed in to a Google Account to be able to upload pictures to the Picasa photo
organizing service.
1 While viewing a picture in full screen, press
2 When prompted, touch
3 Enter a
Caption for the picture and select the Album where you want to upload the picture.
Picasa.
MENU and then touch Share.
Tip Touch to create a new album where you can upload the picture.
4 Touch
Upload. You can view the photos online at http://picasaweb.google.com.
Cupcake User Guide R1.5.0 85 April 7, 2009

Tip You can view the upload progress by opening the Notifications panel and then touching
Picasa. Refer to “To open the Notifications panel” on page 27 to learn how to open the
Notifications Panel.
Work with videos
Once you have taken a video, you can view it or share it with friends.
To watch videos
On the main Gallery screen, touch a video album and then touch the video you want to watch to start
playing back the video.
Touch the screen to show the playback controls.
Drag to the left or right
to go back or forward in
the video.
To send a video using Email
There is a 3MB limitation on the size of a video file that can be shared. If you want to share a video that
you captured using the phone, this is approximately 1 minute of high quality or 2 minutes of low quality.
1 While viewing videos in a list, touch and hold the video, and then touch
2 When prompted, touch
3 The video is automatically attached to your email. Compose your message, then touch
more information on how to create and send emails, refer to “Using Google Mail™” on page 55.
To send a video using Messaging
There is a 3MB limitation on the size of a video file that can be shared. If you want to share a video that
you captured using the phone, this is approximately 1 minute of high quality or 2 minutes of low quality.
1 While viewing videos in a list, touch and hold the video, and then touch
2 When prompted, touch
3 The picture is automatically attached to your message. Compose your message, then touch
For more information on how to create and send messages, refer to “Sending Text and Multimedia
Messages” on page 49.
To share videos on YouTube™
You can share your videos by uploading them to the YouTube user-generated content website. Before
you do this, you must create a YouTube account and sign in to that account on your phone. There is a
3MB limitation on the size of a video file that can be shared. If you want to share a video that you
captured using the phone, this is approximately 1 minute of high quality or 2 minutes of low quality.
1 While viewing videos in a list, touch and hold the video, and then touch
2 When prompted, touch
3 Enter a
4 Touch
Title, Description, and Tags for your video. Select the Public check box if you want to share
the video with everyone.
Upload.
Email or Google Mail.
Messaging.
YouTube.
Share on the options menu.
Send. For
Share on the options menu.
Send.
Share on the options menu.
Cupcake User Guide R1.5.0 86 April 7, 2009

Tip You can view the upload progress by opening the Notifications panel and then touching
YouTube. Refer to “To open the Notifications panel” on page 27 to learn how to open the
Notifications Panel.
7.3 Viewing Videos on YouTube™
YouTube is a free online video streaming service that allows you to view, search, and upload videos.
Note You must have an active data (3G/GPRS/EDGE) or Wi-Fi connection to access YouTube.
To open YouTube
Press
HOME, touch the Applications tab and then touch YouTube.
The YouTube screen appears with the videos grouped into categories, such
as
Featured, Most popular, Most viewed, Top rated, and more.
To close YouTube
While on the YouTube screen, press
Watch YouTube videos
1 On the YouTube screen, select a video to watch from the available categories. Touch a category to
see the available videos for that category.
2 Touch a video to play it.
Note The screen automatically switches to landscape orientation when you play a video.
3 Touch the screen to display the playback controls.
HOME or BACK to close YouTube.
Drag to the left or
right to go back or
forward in the video.
BACK to stop playback and return to the videos list.
4.Press
Search for videos
1 On the YouTube screen, press MENU and then touch Search.
2 Enter a search keyword, then touch .
3 The number of search results appears below the status bar. Scroll through the results and touch a
video to watch it.
Cupcake User Guide R1.5.0 87 April 7, 2009

To clear the search history
1 Press
2 Touch
MENU and then touch Settings.
Clear search history and then touch OK when prompted.
7.4 Using Music
Music plays digital audio files from the phone’s storage card. Music supports the following music file
formats: MP3, M4A (iTunes application AAC, DRM-free), AMR, WMA (8), MIDI, WAV, OGG Vorbis.
Since Music only plays audio files saved on the storage card of your phone, you must copy your audio
files to the storage card before you open Music.
To copy music into the storage card
1 Set the phone’s storage card as a USB drive. Refer to “Using the Phone’s Storage Card as a USB
Drive” on page 33 for details.
2 On the computer, navigate to the USB drive and open it.
3 Create a folder on the root folder of the storage card (for example, Music).
Tip You can also create and use folders to organise your music inside the Music folder you have
created.
4 Copy the music into the folder you have created.
5 After copying music, unmount or eject the drive as required by your computer’s operating system to
safely remove the phone.
6 Disconnect the phone from the computer.
To open Music
Press
HOME, touch the Applications tab, and then touch Music. The Music library screen displays.
Music library
Your music is organised into four categories: Artists, Albums, Songs, and Playlists. Touch a category to
view the list within each.
When inside a category, keep touching the screen until you reach the music you want to play. For
example, if you touch
list opens to display the available albums or music. Select an album and the album’s song list displays.
Artists, you will see a list of artists in alphabetical order. If you touch an artist, the
Touch a music category
to open the music file
you want to play.
Music bar
Appears when a
music file is currently
playing. Touch to
open the playback
screen.
Cupcake User Guide R1.5.0 88 April 7, 2009

Play music
Touch a song to play it back.
Touch to view the current playlist.
Touch to turn shuffle on and off.
1. Touch to jump to the
beginning of the song.
2. Touch and hold to rewind the
song.
3. Touch twice to play the
previous song on the album.
Touch and drag to
jump to any part of
the song.
Notes
• Press the
VOLUME UP or VOLUME DOWN button to adjust the playback volume.
• If you are using the provided wired headset to listen to music, press the button to toggle between
playing and pausing playback. Press and hold the button to go to the next track on the playlist.
Tip While on the Music library or playback screen, you can play all songs in your library in random order.
MENU, then touch Party shuffle. The first randomly selected song will play. To turn off Party shuffle,
Press
MENU, then touch Party shuffle off.
press
(Shuffle is off when button is gray.)
Touch to cycle through the
repeat modes.
1. Touch to play the next song on
the album.
2. Touch and hold to fast forward
the song.
Use playlists
Use playlists to organise your music files. You can create as many playlists as you want on your phone.
To create a playlist
1 Touch a category on the Music library screen.
2 In the list that appears, use the
add in the playlist.
3 Touch and hold the artist, album, or song, then touch
4 In the Add to playlist window, touch
Tip If you want to add the artist, album, or song to an existing playlist, touch the playlist’s name in the
Add to playlist options menu.
5 Enter the name for your new playlist and then touch
To manage your playlists
1 Go to the Music library screen and then touch
2 Do one of the following:
• To play the songs in a playlist, touch the playlist name.
• To delete a playlist, touch and hold the playlist, then touch
Cupcake User Guide R1.5.0 89 April 7, 2009
TRACKBALL to navigate to the artist, album, or song that you want to
Add to playlist on the options menu.
New.
Save.
Playlists.
Delete.

• To rearrange the songs or remove a song in a playlist, touch and hold the playlist, then touch Edit
on the options menu. Touch and hold before the song you want to move, drag it to its new
position, then release.
• To delete a song in a playlist, touch and hold the song, then touch
• To rename a playlist, touch and hold the playlist, then touch
the new playlist name, then touch
Save.
Remove from playlist.
Rename on the options menu. Enter
Note The Recently added playlist is a system playlist and cannot be deleted or renamed.
To import a playlist
You can create playlists on your computer, then save these on your storage card. Music can access
the following playlist formats: M3U, WPL, and PLS.
1 On your computer, open a text file for editing.
2 On separate lines, enter all the music file names you want to include
in your playlist.
Notes
• The names you list in the file should be the names that appear
when you view the contents of your storage card through your
computer’s file system, not the names that appear in the list of
songs on your phone.
• Your phone will simplify the names and will not include track
numbers or file extensions (for example, .mp3).
3 Save the playlist file using .m3u as the file name extension (for example, MyMusic.m3u).
4 Copy the playlist file to the Music folder on the storage card. Follow the instructions in “To copy
music into the storage card” section earlier in this chapter.
Tip It is recommended that you create a Playlist folder inside your Music folder in the storage card
to hold all your playlist files.
Set a song as ring tone
You can use songs as your phone ring tone.
1 From the Music library, navigate to the song that you want to use as ring tone.
2 Touch and hold the song, then touch
default incoming call ring tone.
To check if the song was added as a ring tone
1 Press
2 On the Settings screen, touch
HOME, press MENU, and then touch Settings.
option.
Use as phone ringtone on the menu. The song is set as your
Sound & display > Phone ringtone. The song should be listed as an
Delete music on the storage card
You can delete music files on the storage card.
1 On the Music Library screen, touch
2 Touch and hold the artist, album, or song you want to delete, then touch
menu.
3 When prompted, touch
Cupcake User Guide R1.5.0 90 April 7, 2009
OK.
Artists, Album, or Songs.
Delete on the options

8 Using Android Market™
8.1 Using Android Market
Android Market provides direct access to useful applications and fun games which you can download
and install on your phone. Android Market also allows you to send feedback and comments about an
application, or flag an application that you find objectionable or incompatible with your phone.
To open Android Market
1 Press
2 When you open Android Market for the first time, the Terms of Service window will appear. Touch
HOME, then touch the Applications tab, and then touch Market.
Touch the Market
icon to find cool
applications to
download and install.
Accept to continue.
Touch to open
the application
details screen.
Touch a category to
open a sub-category
and view more
applications.
Touch to search
Android Market.
Touch to view your
downloads.
Cupcake User Guide R1.5.0 91 April 7, 2009

8.2 Getting help
If you ever need help or have questions about Android Market, press MENU and touch Help. The
Browser will take you to the Android Market Help webpage.
8.3 Finding applications
The Android Market home page provides several ways to find applications. It showcases featured
applications and includes a list of item applications by category, a list of games, a link to search, and a
link to My downloads.
Scroll horizontally through the featured items or select a category to browse its contents, then select a
subcategory. Within each subcategory you can select to view items sorted
Touch the tab to
sort by popularity
or date
Note All items in a subcategory are listed in each tab; those in the By popularity tab are sorted from
most popular to least popular, and those in the
By date tab are sorted from newest to oldest
By popularity or By date.
Cupcake User Guide R1.5.0 92 April 7, 2009

8.4 Installing an application
To install and open an application
1 Navigate to the item you want to download, and select it.
2 In the item details screen, read more about the application, including its cost, overall rating, and
comments by users. If you scroll down to the About the developer section, you can view more
applications by this developer, visit the developer’s website, and send the developer an email
message.
Important Press MENU and select Security permissions to view the functions and data this item can
access on your phone..
Scroll down to view
more of this developer’s
applications or to email
the developer.
More info about item
Touch and hold a
comment to let
you report a
comment as spam.
3 To install the item, select either
Install (if item is free) or Buy, whichever appears. For instructions on
User comments
about item
how to purchase an application, refer to “Purchasing an application” on page 94.
Important If the application requires either access to any of your data or control of any functions on
your phone, Market tells you what the application can access.
Read it carefully! Be especially cautious with applications that have access to many functions or a
significant amount of your data. Once you select OK on this screen, you are responsible for the
results of using this item on your phone. Touch
OK if you agree to the conditions of the application.
4 To check the progress of the download, open the notifications window. Most applications are
installed within seconds. If you want to stop downloading the item, touch
Download progress appears in
the Ongoing section of the
notifications window.
Once downloaded and installed,
a notification appears.
Cancel download.
5 After the item is downloaded and installed on your phone, the content download icon appears
in the notification area of the status bar.
6 On the Android Market screen, touch
7 Touch the installed application in the list, then touch
My downloads.
Open.
Tip You can also find the icon of the installed application on the Applications tab.
Cupcake User Guide R1.5.0 93 April 7, 2009

8.5 Purchasing an application
If an application has a price associated with it, you have to buy it before you can download it. You
can try it out for 24 hours. Your credit card will be charged unless you ask for a refund within 24 hours of
purchase.
You pay for an application only once. You can uninstall it and download it again later without having
to pay for it again. In addition, if you have multiple Android phones that use the same Google
Account, you can download the purchased application to all of them at no additional cost.
1 Touch the application you want to buy.
2 At the bottom of the screen, touch
3 If you are making a purchase for the first time, log in to Google Checkout™ payment and billing
service.
If you do not have a Google Checkout account, fill out the form. Google Checkout is a fast,
secure, and convenient way to purchase items from your phone. To learn more about Google
Checkout, see https://checkout.google.com.
Important! Your phone remembers your Google Checkout password, so set up a screen lock to
secure your phone. Refer to “Protect your phone with a screen lock” on page 98 for more details.
4 If your Google Checkout account has multiple credit card accounts, select the account that you
want to use.
5 Select the
6 If you agree with the terms of service for Google Checkout, select the check box.
7 Touch
Android downloads the application and takes you back you to the Android Market Home. When
the download and installation are complete, your status bar displays .
Terms of Service link and read the document. When you are done, press BACK.
Buy now at the bottom of the screen.
Request a refund
If you are not satisfied with the application, you can ask for a refund within 24 hours of the purchase.
Your credit card will not be charged and Android will remove the application. If you change your
mind, you can install the application again, but you will not be able to request a refund.
To get a refund and remove an application
1 In Android Market Home, touch
2 Touch the application that you want to uninstall.
3 In the
4 In the survey form, select the answer that best matches your reason, and touch
Uninstall & refund dialog box, touch OK. If the dialog box does not appear, your trial period
has expired.
Buy.
My downloads.
OK.
Cupcake User Guide R1.5.0 94 April 7, 2009

8.6 Managing your applications
From the Android Market Home, touch My downloads to view your downloaded items. From any of
the Android Market screens, press
MENU and touch My downloads to go to the screen.
8.7 Uninstalling an application
To uninstall an application
You can uninstall any application that you have downloaded and installed from Android Market.
1 On the My downloads screen, touch the application you want to uninstall, then touch
2 When prompted, touch
3 Choose the reason for removing the application, then touch
OK to remove the application on your phone.
OK.
Uninstall.
Cupcake User Guide R1.5.0 95 April 7, 2009

9 Managing Your Phone
9.1 Changing Basic Settings
Set the date, time zone, and time
By default, your phone automatically uses the network-provided date, time zone, and time.
To manually adjust the date, time zone, and time
1 Press
2 Scroll down the screen, then touch
3 Clear the
4 Touch
5 Touch
6 Touch
7 Select the
8 Touch
Note For details on how to set an alarm, refer to “Using Alarm Clock” on page 47.
HOME, then press MENU, and then touch Settings.
Date & time.
Automatic check box.
Set date. On the Change date window, touch or to adjust the date, month, and
year, then touch
Set time zone, then select the time zone in the list. Scroll down the list to view more time
zones.
Set time. On the time window, touch or to adjust the hour and minute, then touch
AM to change to PM or vice versa. Touch Set when finished.
Select date format then select how you want dates to display on your phone. The selected
date format also applies to the date displayed in the Alarm Clock.
Set when finished.
Use 24-hour format check box to toggle between using a 12-hour or a 24-hour format.
Display settings
To adjust the screen brightness
1 Press
2 Touch
3 Drag the brightness slider to the left to decrease or to the right to increase the screen brightness.
4 Touch
To adjust the time before the screen turns off
After a period of inactivity, the phone screen turns off to conserve battery power. You can set the idle
time before the screen turns off.
1 Press
2 Touch
3 Scroll down the screen, then touch
4 Touch the time before the screen turns off.
Tip To turn off the screen quickly, press the END CALL/POWER button.
To prevent the screen orientation from automatically changing
By default, the screen orientation automatically adjusts depending on how you hold the phone.
1 Press
Cupcake User Guide R1.5.0 96 April 7, 2009
HOME, then press MENU, and then touch Settings.
Sound & display, scroll down the screen, then touch Brightness.
OK.
HOME, then press MENU, and then touch Settings.
Sound & display.
Screen timeout.
HOME, then press MENU, and then touch Settings.

2 Touch Sound & display.
3 Scroll down the screen, then clear the
To keep the screen on while charging the phone
You can keep the phone from turning off the screen while you are charging the phone.
1 Press
2 Touch
HOME, then press MENU, and then touch Settings.
Applications > Development and then select the Stay awake check box.
Orientation check box.
Ringer settings
To change the ring tone
1 Press
2 Touch
3 Touch the ring tone you want to use, then touch
Tip You can use *.wav, *.mid, *.mp3, *.wma, or other types of sound files that you downloaded from the
Internet or copied from your computer as ring tones. For a complete list of supported audio file formats
for ring tones, refer to “Specifications” in the Appendix.
To enable touch tones
You can set the phone to play a sound when you are using Dialer phone pad and/or touching the
screen.
1 Press
2 Touch
3 Select the
To choose the notification ring tone
You can select the ring tone to play when your phone receives new notifications.
1 Press
2 Touch
3 Select your preferred notification ring tone in the list and then touch
HOME, then press MENU, and then touch Settings.
Sound & display > Phone ringtone.
OK. The ring tone briefly plays when selected.
HOME, then press MENU, and then touch Settings.
Sound & display, then scroll down the screen.
Audible touch tones and/or Audible selection options.
HOME, then press MENU, and then touch Settings.
Sound & display > Notification ringtone.
OK.
Phone services
Your phone can directly link to the mobile phone network, and enable you to access and change the
settings of various phone services for your phone. Phone services may include Call Forwarding, Call
Waiting, Voicemail, and more. Contact your wireless service provider to find out about the availability
of phone services for your phone.
To access and change the phone services settings
1 Press
2 Touch
Note For more information about the phone services on your phone, refer to “Adjusting Phone
Settings” on page 40.
To enable data roaming
Data roaming lets you connect to your wireless service provider’s partner networks and access data
services when you are out of your wireless service provider coverage area.
1 Press
2 Touch
3 Select the
Cupcake User Guide R1.5.0 97 April 7, 2009
HOME, then press MENU, and then touch Settings.
Call settings.
HOME, then press MENU, and then touch Settings.
Wireless controls > Mobile networks.
Data roaming option.

Important Accessing data services while roaming may incur significant charges. Inquire the data
roaming tariffs with your wireless service provider before enabling data roaming.
Language settings
You can change the operating system language of the phone.
To change the language of the operating system
1 Press
2 Touch
HOME, then press MENU, and then touch Settings.
Locale & text > Select locale and then select the language you want to use.
9.2 Protecting Your Phone
Protect your SIM card with a PIN
You can protect your SIM card from unauthorised use by assigning a PIN (personal identification
number).
To enable the SIM card PIN
1 Press
2 Touch
3 Select the
4 Enter the default SIM card PIN using the keyboard, then touch
5 To change the SIM card PIN at any time, touch
Tip Emergency calls can be placed at any time, without requiring a PIN.
To restore a SIM card that has been locked out
If you enter the wrong PIN more times than the maximum number of attempts allowed, your SIM card
will become "PUK-locked." You need a new PUK code to restore access to the device. This code may
have been provided by your operator when you received your SIM card.
Touch
* * 0 5 * [PUK code] * [new PIN] * [new PIN] #
For example, if your PUK code is 888888 and you would like to reset the PIN on your SIM card to 7777,
enter the following into Emergency Dial: **05*888888*7777*7777#
HOME, then press MENU, and then touch Settings.
Security & location, scroll down the screen, then touch Set up SIM card lock.
Lock SIM card option.
OK.
Change PIN code.
Emergency Dial and enter the following sequence on the keypad:
Protect your phone with a screen lock
You can further secure your data by locking the screen and/or requiring a screen unlock pattern every
time your phone is turned on or every time it wakes up from sleep mode (screen is off).
To lock the screen
Press the
phone is in your bag, purse, or pocket.
Note To unlock the screen, press one of the buttons in front of the phone, and then press MENU and
enter your screen unlock pattern.
Cupcake User Guide R1.5.0 98 April 7, 2009
END CALL/POWER button. Locking the screen prevents accidental screen touches when the

To create and enable the screen unlock pattern
You can increase the security of your phone by creating a screen unlock pattern. When enabled, you
have to draw the correct unlock pattern on the screen to unlock the phone’s control buttons and
touch screen.
1 Press
2 Touch
3 Read the information on the screen, then touch
4 Study the example pattern on the screen, then touch
5 Draw the screen unlock pattern by connecting at least four dots in a
HOME, then press MENU, and then touch Settings.
Security & location > Set unlock pattern.
Next.
Next.
vertical, horizontal and/or diagonal direction. Lift your finger from the
screen when finished.
Note You must slide your finger on the screen to create the pattern and
not touch individual dots.
6 The phone records the pattern. Touch
7 When prompted, draw the screen unlock pattern again, then touch
Continue.
Confirm.
Tip Clear the Use visible pattern check box if you do not want the
unlock pattern to display on the screen when you unlock it.
Note To change your unlock screen pattern, press HOME, then press
MENU, and then touch Settings > Security & location > Change unlock pattern.
When you fail to draw the correct unlock pattern on the screen after five attempts, you will be
prompted to wait for 30 seconds before you can try again. If you forgot your screen unlock pattern,
touch
Forgot pattern. You will be prompted to sign in using your Google Account name and
password, and create a new screen unlock pattern before the Home screen displays.
9.3 Managing Memory
To see how much phone memory is available for use
1 Press
2 Scroll down the screen, then touch
To see the available storage card space
1 Press
2 Scroll down the screen, then touch
To clear application cache and data
1 Press
2 In the Manage applications list, touch the application whose cache and/or data you want to
HOME, then press MENU, and then touch Settings.
SD card & phone storage. The available phone memory is
displayed in the Internal phone storage section.
HOME, then press MENU, and then touch Settings.
SD card & phone storage. The total and available storage card
space display in the
SD card section.
HOME, then press MENU, and then touch Settings > Applications > Manage applications.
delete.
Tip Press MENU to bring up sort and filter options.
3 In the Application info screen, touch
Cupcake User Guide R1.5.0 99 April 7, 2009
Clear data and/or Clear cache.

To uninstall applications not from Android Market
You cannot uninstall applications that are preinstalled on the phone.
1 Press
2 On the Manage applications screen, touch the application you want to uninstall.
3 On the Application info screen, touch
To free up more phone memory or storage card space
If your phone is running low on memory, you can try the following:
• In Browser, clear all temporary Internet files and Browser history information. Refer to “Using
• Uninstall programs you downloaded from Android Market that you no longer use. Refer to “To
HOME, then press MENU, and then touch Settings > Applications > Manage applications.
Uninstall.
Browser” on page 66 for more details.
uninstall an application” on page 95 for more details.
9.4 Software Updates
Google might send new or updated versions of your phone’s operating system via over-the-air (OTA)
updates. When your phone receives an OTA update, it will automatically connect to the Internet using
your data connection (3G, GPRS, EDGE, or Wi-Fi) and will download the software update.
Note If you are roaming or if you clear the Background data check box (described in the next
section), you will not receive updates.
9.5 Synchronising Google Applications™
Google Applications on your phone, such as Google Mail, Calendar, and Contacts, give you access
to the same personal information (emails, events, and contacts) that you add, view, and edit on your
computer using Google Mail or Calendar. Synchronise the Google application information you want to
keep up-to-date.
To select which application to synchronise
1 Press
2 Select the
Note If the Auto-sync check box is not selected, you need to touch the Google application in the list
to synchronise it.
HOME, then press MENU, and then touch Settings > Data synchronization.
Background data and Auto-sync check boxes and then select the Google Applications
check boxes you want to be automatically synchronised.
Tip Clear the Background data check box to help save battery power and to lower data
connection usage.
Cupcake User Guide R1.5.0 100 April 7, 2009
 Loading...