

Page 1

HTC Desire 210 dual sim
User guide
Page 2

2 Contents
Contents
Unboxing
HTC Desire 210 dual sim 7
Back cover 8
Dual SIM cards 10
Storage card 11
Battery 12
Switching the power on or off 14
Setting up your phone
Setting up HTC Desire 210 dual sim for the first time 15
Installing an update 15
Checking for updates manually 15
Your first week with your new phone
Basics 16
HTC BlinkFeed 22
Working with text 25
Battery 29
Camera
Using Android Camera 31
Gallery and Video Highlights
Viewing photos and videos in Gallery 32
Editing photos 32
Viewing and editing Video Highlights 32
Personalizing
Making HTC Desire 210 dual sim truly yours 34
Changing your wallpaper 34
Personalizing the launch bar 35
Adding a widget to your Home screen 35
Adding apps and other shortcuts on your Home screen 36
Removing a widget or icon 37
Grouping apps into a folder 37
Adding a Home screen panel 38
Changing your main Home screen 38
Adding a widget on the lock screen 38
Page 3

3 Contents
Phone calls
Making a call 39
Calling a speed dial number 39
Making an emergency call 40
Answering or rejecting a call 40
What can I do during a call? 40
Setting up a conference call 41
Checking calls in the Call History 42
Switching between silent, vibrate, and normal modes 42
Messages
Sending a text or multimedia message via Android Messaging 43
People
Your contacts list 44
Setting up your personal contact information 44
Adding a new contact 45
Editing a contact’s information 45
Getting in touch with a contact 45
Importing contacts from your SIM card 45
Importing contacts from the storage 46
Sending contact information 46
Contact groups 46
Search and web browser
Searching HTC Desire 210 dual sim and the Web 47
Getting instant information with Google Now 48
Browsing the Web 49
Bookmarking a webpage 50
Clearing your browsing history 50
Email
Adding an email account 51
Checking your mail 52
Sending an email message 52
Reading and replying to an email message 53
Searching email messages 53
Viewing your Gmail Inbox 54
Sending an email message in Gmail 54
Replying to or forwarding email messages in Gmail 55
Music
Listening to music 56
Creating music playlists 56
Travel and maps
Turning location services on or off 58
About Google Maps 58
Page 4

4 Contents
Getting around maps 58
Searching for a location 59
Exploring places and activities near you 61
Getting directions 61
Google Play and other apps
Getting apps from Google Play 62
Downloading apps from the web 63
Uninstalling an app 64
Using the Clock app 64
Viewing the Calendar 65
Watching videos on YouTube 66
Internet connections
Data connection 67
Managing your data usage 68
Wi-Fi 69
Connecting to a virtual private network (VPN) 70
Using HTC Desire 210 dual sim as a Wi-Fi hotspot 72
Sharing your phone's Internet connection by USB tethering 72
Bluetooth
Connecting a Bluetooth headset 74
Unpairing from a Bluetooth device 74
Storage
Types of storage 75
Copying files to or from HTC Desire 210 dual sim 75
Encrypting data on HTC Desire 210 dual sim 76
Backup and reset
Backup 77
Reset 77
Settings and security
Adding and syncing an account 79
Removing an account 79
Turning Airplane mode on or off 79
Turning automatic screen rotation off 80
Adjusting the time before the screen turns off 80
Adjusting the screen brightness manually 80
Changing the display language 80
Working with certificates 81
Protecting your SIM card with a PIN 81
Protecting HTC Desire 210 dual sim with a screen lock 82
Managing your SIM cards 82
Trademarks and copyrights
Page 5

5 Contents
Index
Page 6
6 Conventions used in this guide
Safety precautions:
Conventions used in this guide
In this user guide, we use the following symbols to indicate useful and important
information:
This is a note. A note often gives additional information, such as what happens
when you choose to do or not to do a certain action. A note also provides
information that may only be applicable to some situations.
This is a tip. A tip gives you an alternative way to do a particular step or procedure,
or lets you know of an option that you may find helpful.
This indicates important information that you need in order to accomplish a certain
task or to get a feature to work properly.
This provides safety precaution information, that is, information that you need to be
careful about to prevent potential problems.
a) Use a wireless hands-free system (headphone, headset) with a low power
Bluetooth emitter.
b) Make sure the cell phone has a low SAR.
c) Keep your calls short or send a text message (SMS) instead. This advice
applies especially to children, adolescents and pregnant women.
d) Use cell-phone when the signal quality is good.
e) People having active medical implants should preferably keep the cell
phone at least 15 cm away from the implant.
Page 7
7 Unboxing
Unboxing
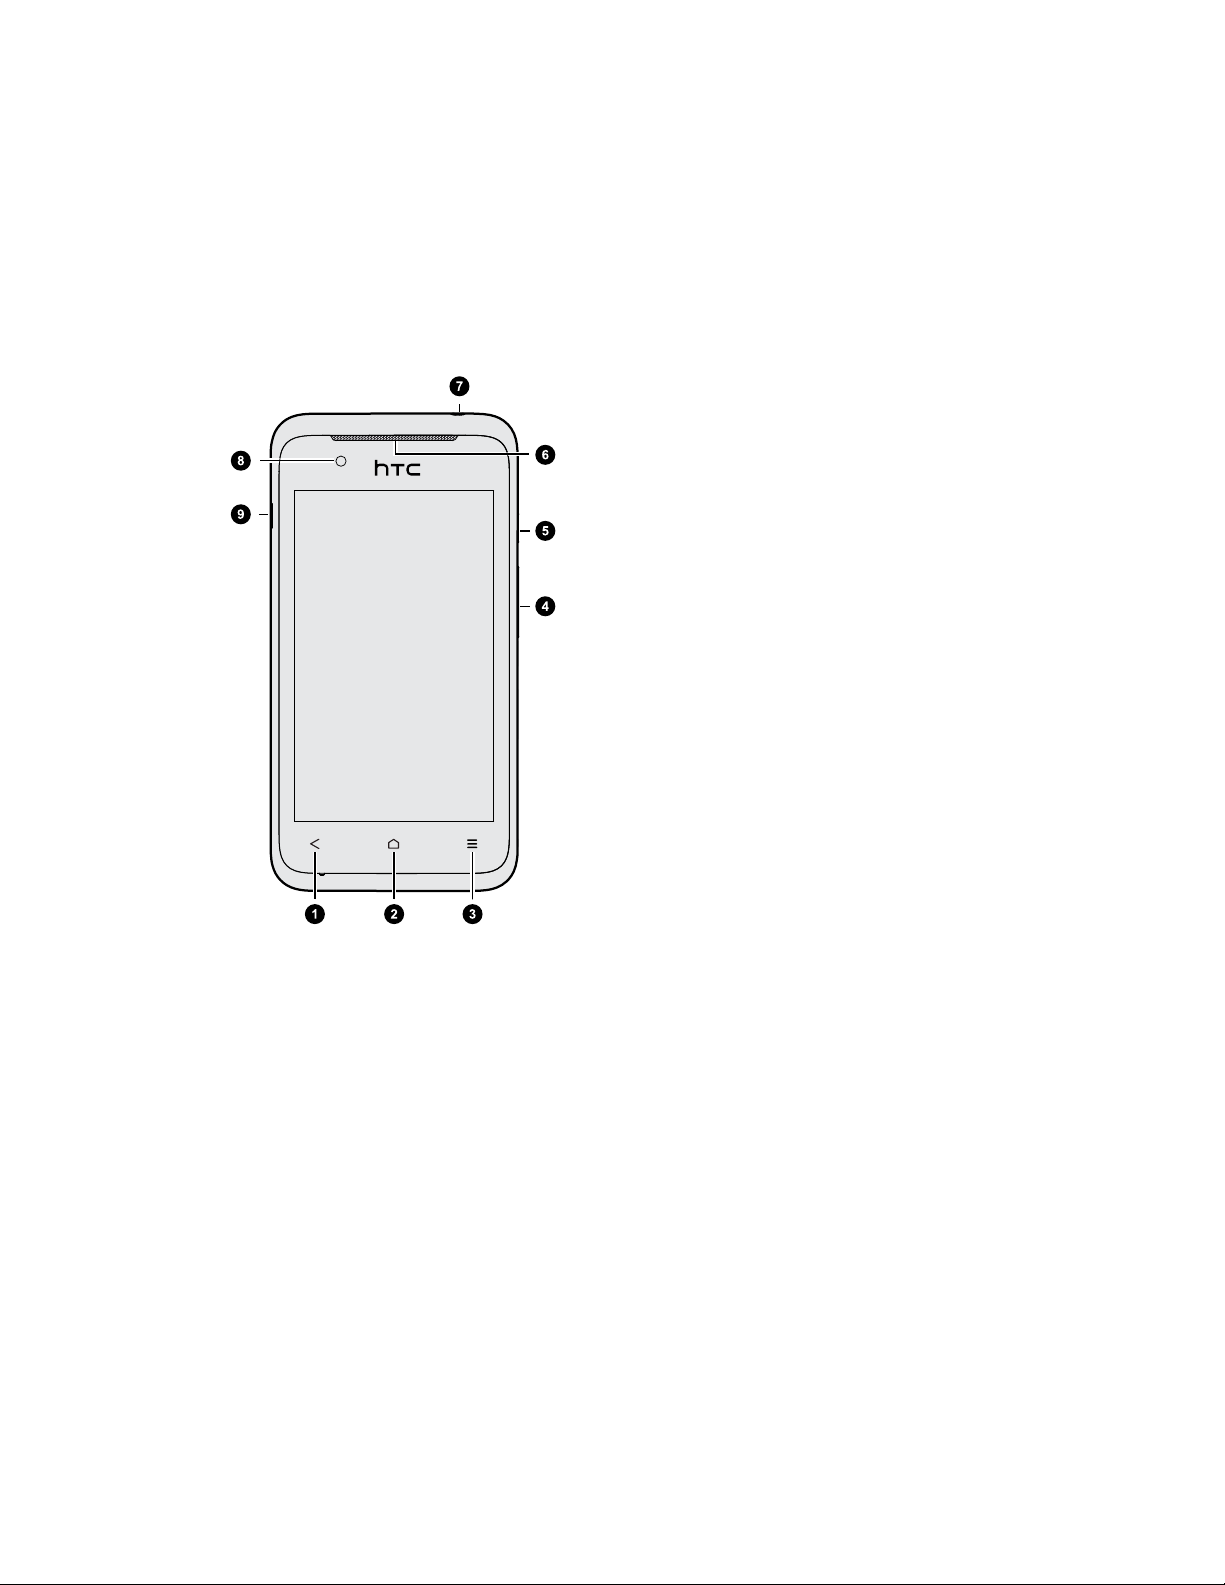
HTC Desire 210 dual sim
1. BACK
2. HOME
3. MENU
4. VOLUME
5. POWER
6. Speaker
7. 3.5mm headset jack
8. Front camera
9. USB connector
Page 8
8 Unboxing
Back cover
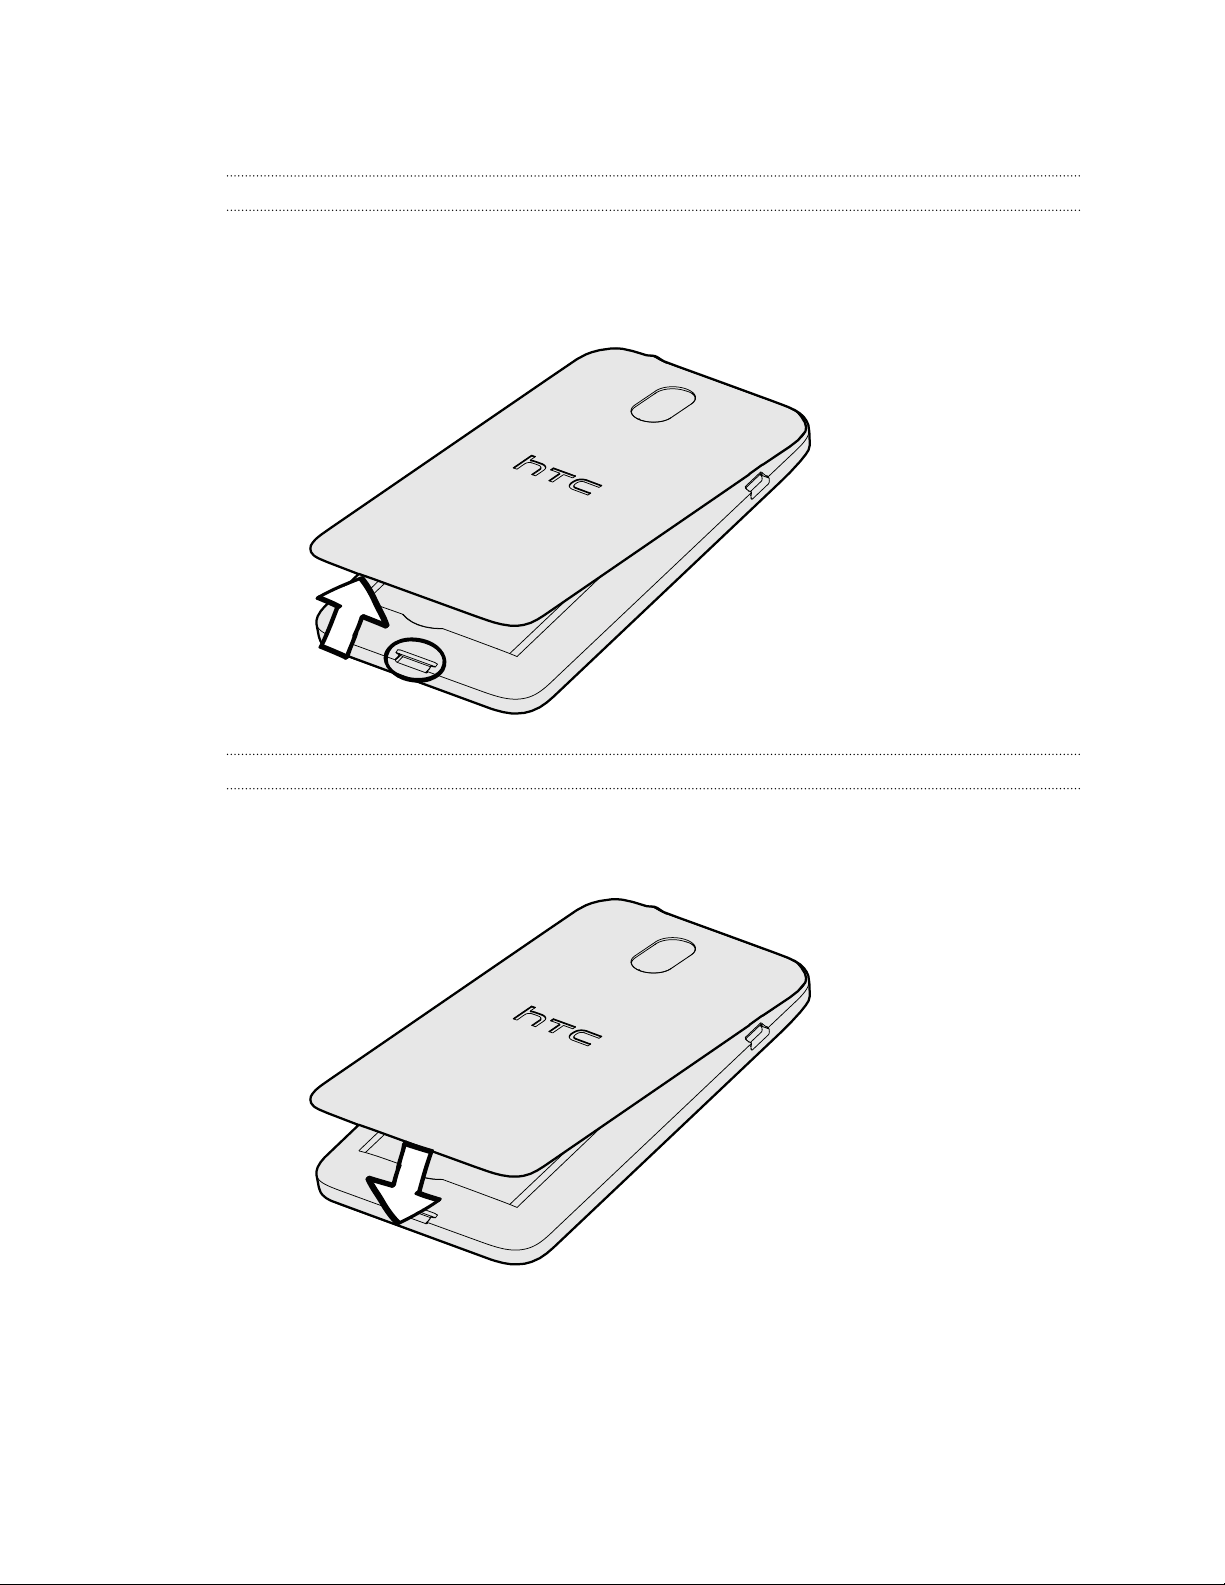
Removing the back cover
1. Securely hold HTC Desire 210 dual sim facing down.
2. With your thumb or finger, open the back cover from the small opening at the
bottom of HTC Desire 210 dual sim.
Replacing the back cover
After installing the SIM or storage card, make sure to replace the back cover properly.
1. Place HTC Desire 210 dual sim face down on a flat and smooth surface.
2. Align the top part of the back cover with the back panel of
HTC Desire 210 dual sim.
Page 9
9 Unboxing
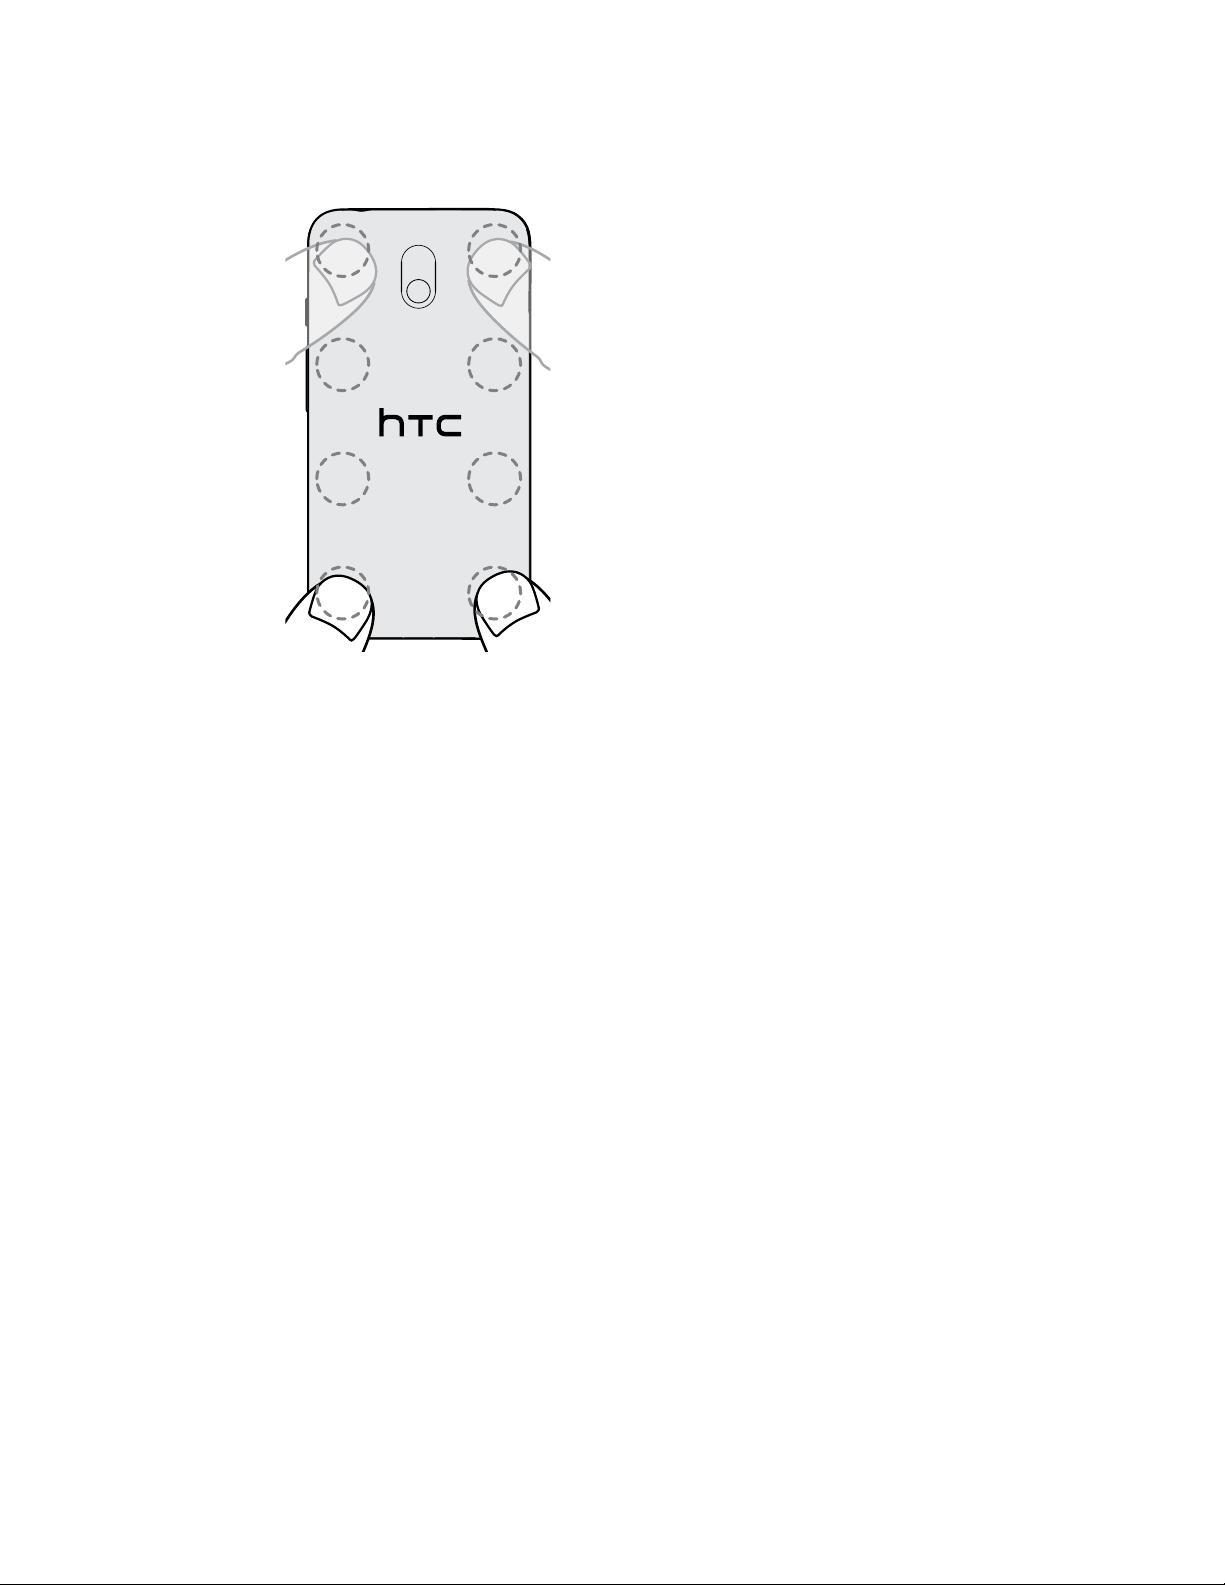
3. Gently press the back cover and then run your thumbs along the sides from the
top to the bottom.
You’ll hear clicks as the back cover locks into place.
4. Make sure that the back cover is tight and there are no gaps or bulges on any
side.
Page 10
10 Unboxing
Dual SIM cards
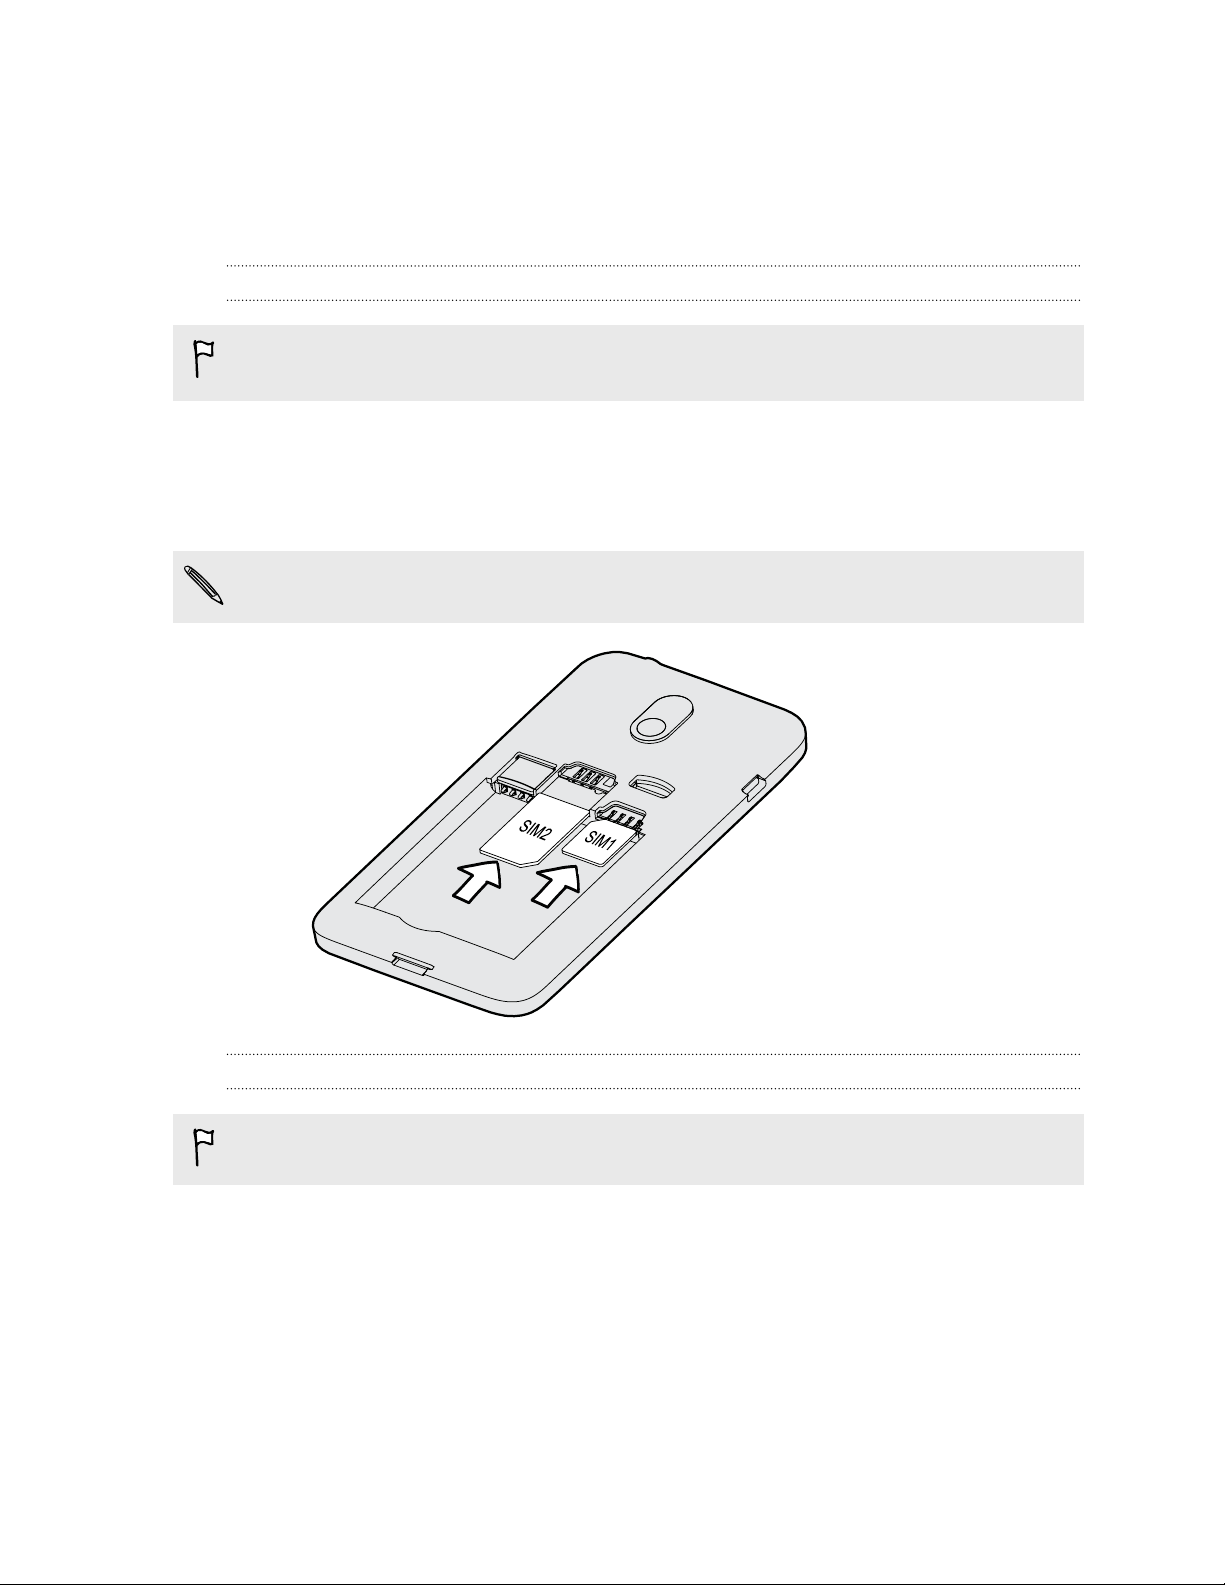
HTC Desire 210 dual sim has two SIM slots.
Slot 1 supports a WCDMA or GSM micro SIM. Slot 2 supports a GSM standard SIM.
Inserting the SIM cards
Inserting a smaller size SIM (such as a nano SIM with an adapter or a modified SIM)
may cause the card to not fit properly or damage the card slot.
1. Take the back cover off.
2. Insert a WCDMA or GSM micro SIM into the SIM 1 slot.
3. Insert a GSM SIM in the SIM 2 slot.
When inserting, make sure the gold contacts on the SIM card are facing down.
Removing the SIM cards
Make sure to switch off HTC Desire 210 dual sim before removing the SIM cards.
1. Take the back cover off.
2. Remove the battery.
3. Slide the SIM cards out from the slots.
Page 11
11 Unboxing
Storage card
Use a storage card to store your photos, videos, and music.
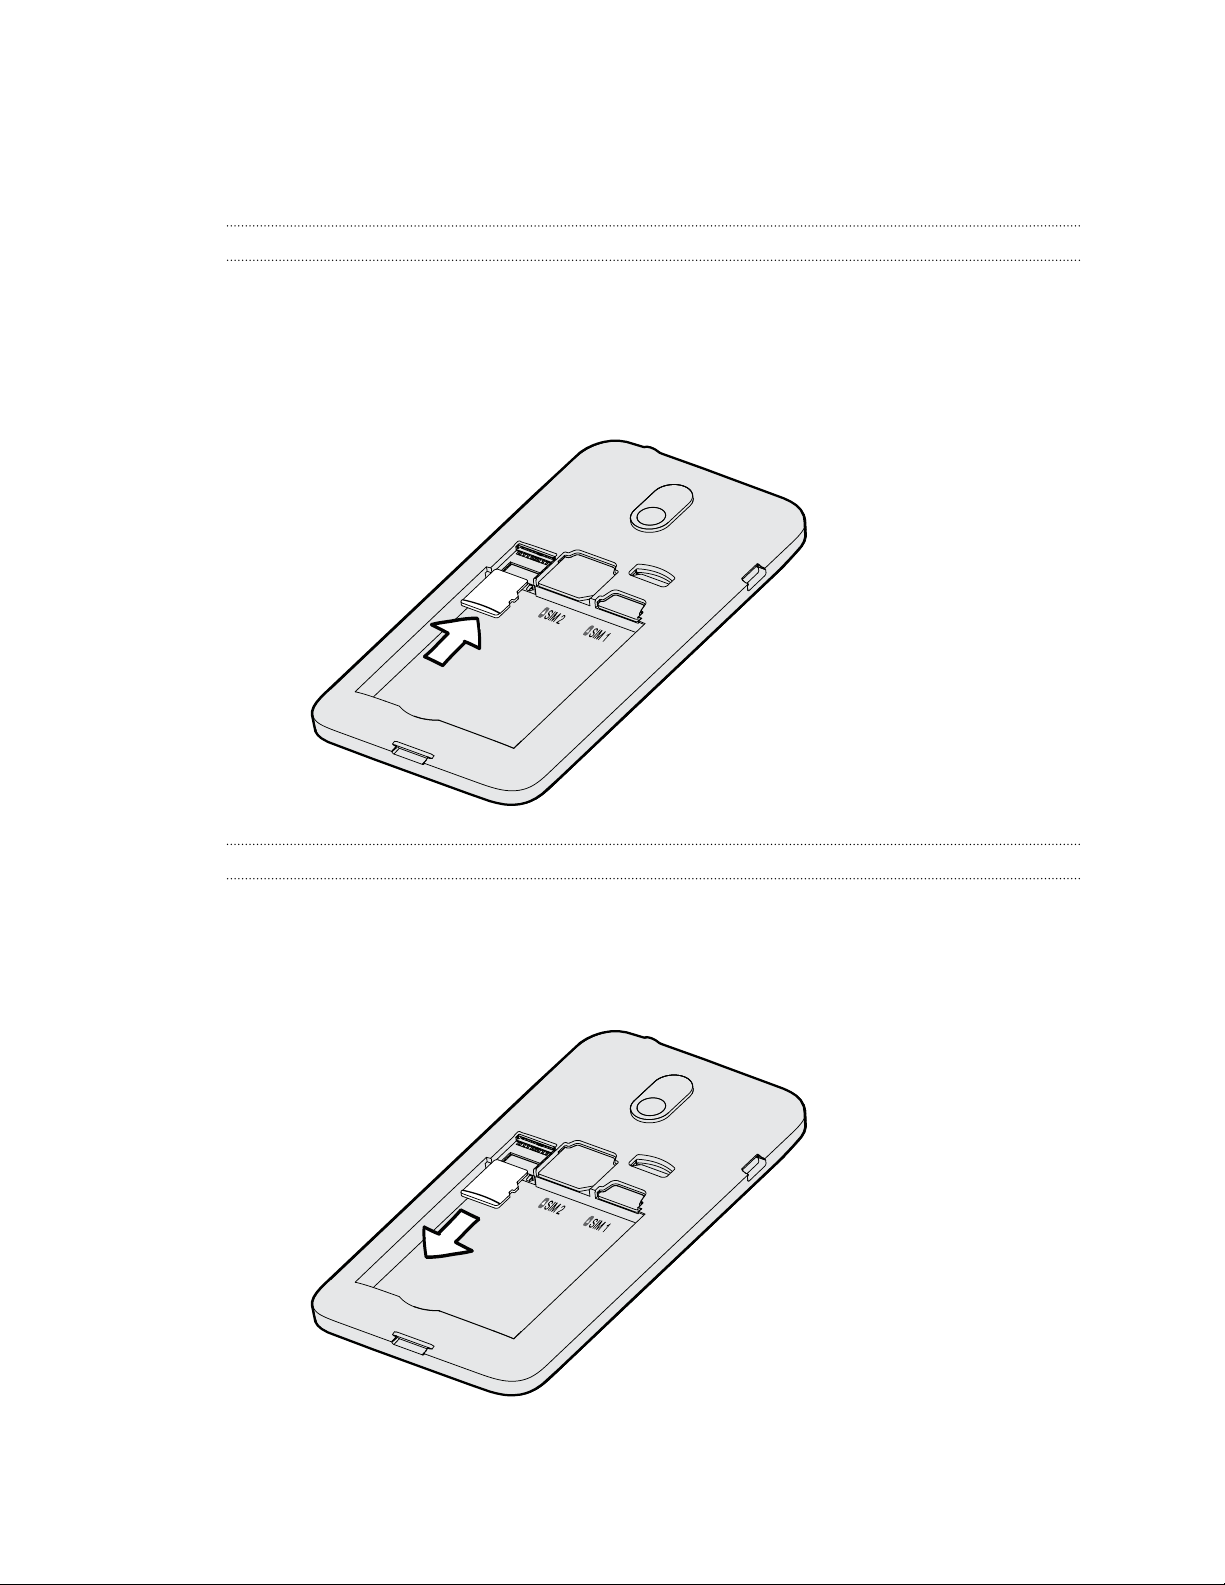
Inserting the storage card
1. Take the back cover off.
2. Make sure to remove the battery first before inserting the microSD™ card.
3. Insert the microSD card into the storage card slot with its gold contacts facing
down and push it all the way in.
Removing the storage card
1. Take the back cover off.
2. Make sure to remove the battery first before removing the microSD card.
3. Slide the microSD card out from its slot.
Page 12
12 Unboxing
Battery
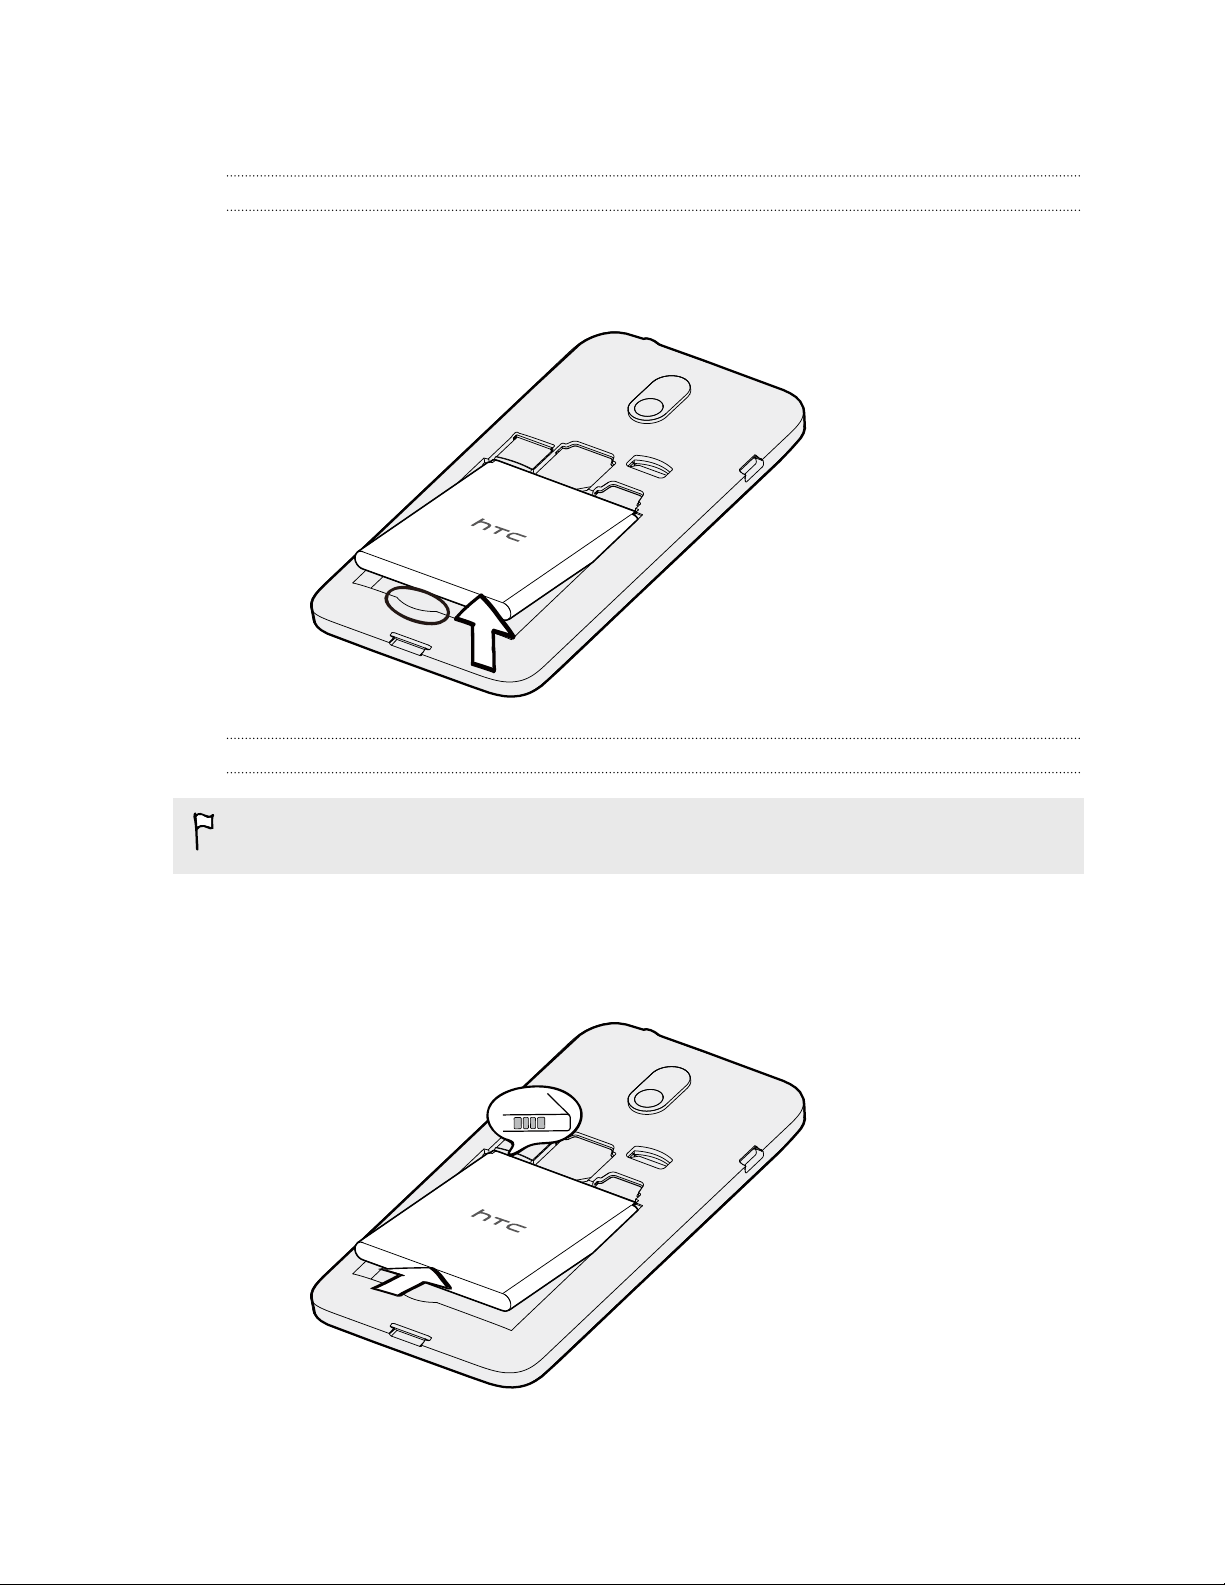
Removing the battery
1. Take the back cover off.
2. With your thumb or finger, lift the battery from the battery compartment.
Inserting the battery
Please use only original batteries that came in the box or replacements that we
recommend.
1. Take the back cover off.
2. Insert the battery (with its exposed copper contacts first) into the battery
compartment.
Page 13
13 Unboxing
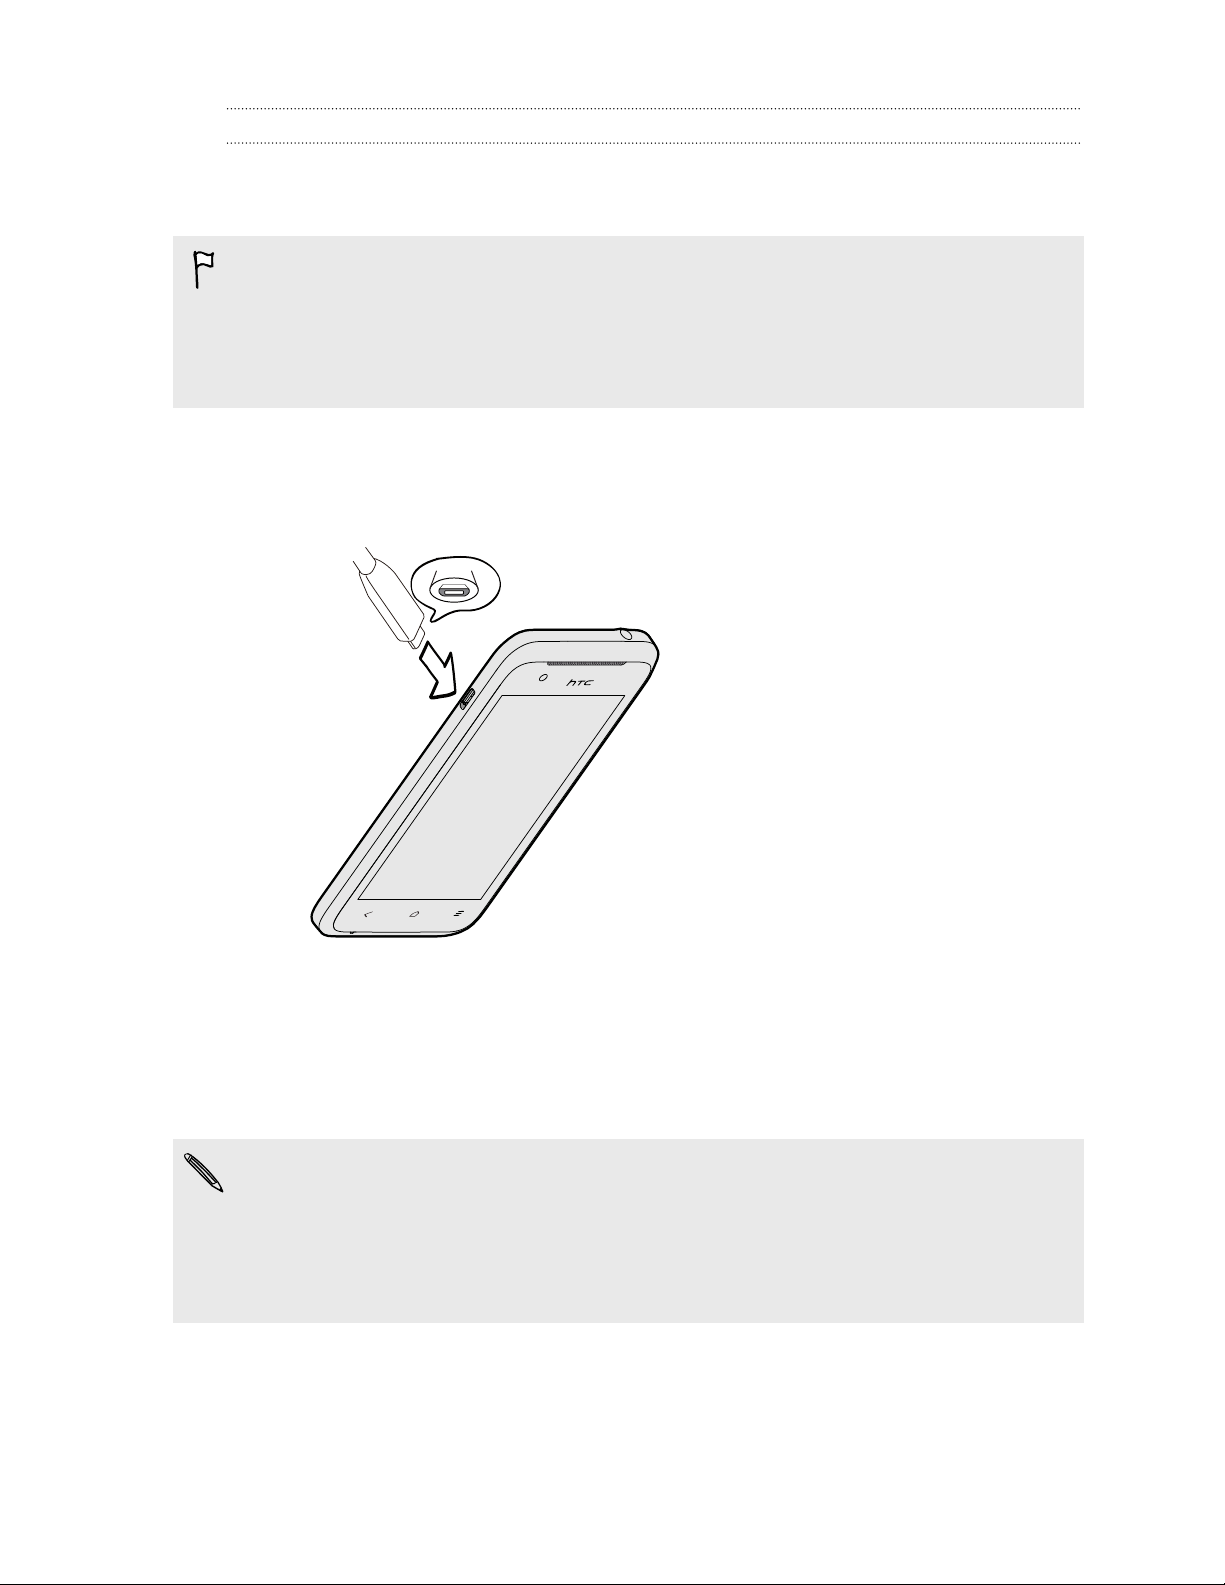
Charging the battery
Before you turn on and start using HTC Desire 210 dual sim, it is recommended that
you charge the battery.
§ Use only the adapter and the USB cable that came with HTC Desire 210 dual sim to
charge the battery. When the battery power is too low, make sure to use the
power adapter to charge, not the USB cable connection with your computer.
§ Do not remove the battery from HTC Desire 210 dual sim while you are charging it
using the power or car adapter.
1. Insert the small end of the USB cable into the USB connector.
2. Insert the other end of the USB cable into the power adapter.
3. Plug in the power adapter to an electrical outlet to start charging the battery.
§ As a safety precaution, the battery may stop charging to avoid overheating.
§ When you're using the Internet and charging the battery, HTC Desire 210 dual sim
may become warmer. This is normal.
§ To conserve energy, unplug the power adapter from the electrical outlet after you
finish charging.
Page 14

14 Unboxing
Switching the power on or off
Switching the power on
Press and hold the POWER button until the screen turns on.
When you turn on HTC Desire 210 dual sim for the first time, you’ll need to set it up.
Switching the power off
1. If the display is off, press the POWER button to turn it back on, then unlock the
screen.
2. Press and hold the POWER button for a few seconds.
3. Tap Power off on the options menu.
4. Tap OK.
Page 15

15 Setting up your phone
Setting up your phone
Setting up HTC Desire 210 dual sim for the first time
When you switch on HTC Desire 210 dual sim for the first time, you’ll be asked to set it
up.
Walk through the on-device setup to choose your Internet connection and more. You
can also sign in to your Google® account.
Some features that need to connect to the Internet such as location-based services
and auto-sync of your online accounts may incur extra data fees. To avoid incurring
these fees, disable these features under Settings.
Installing an update
When Internet connection is on and there's a new software update available, you will
receive a notification.
1. Slide the Notifications panel open, and then tap the system update notification.
2. If you don't want to download the update using your data connection, select
Update over Wi-Fi only.
3. Tap Download.
4. When download is complete, select Install now, and then tap OK.
After updating, HTC Desire 210 dual sim will restart.
Checking for updates manually
1. Go to Settings, and then tap About phone
2. Tap Software updates > Check now. HTC Desire 210 dual sim checks if updates
are available.
If you don't have Internet connection, you'll be prompted to turn on mobile data or
connect to a Wi-Fi® network. Once connected, tap Check now to check for updates.
Page 16
16 Your first week with your new phone
Your first week with your new phone
Basics
Touch gestures
Use touch gestures to get around the Home screen, open apps, scroll through lists,
and more.
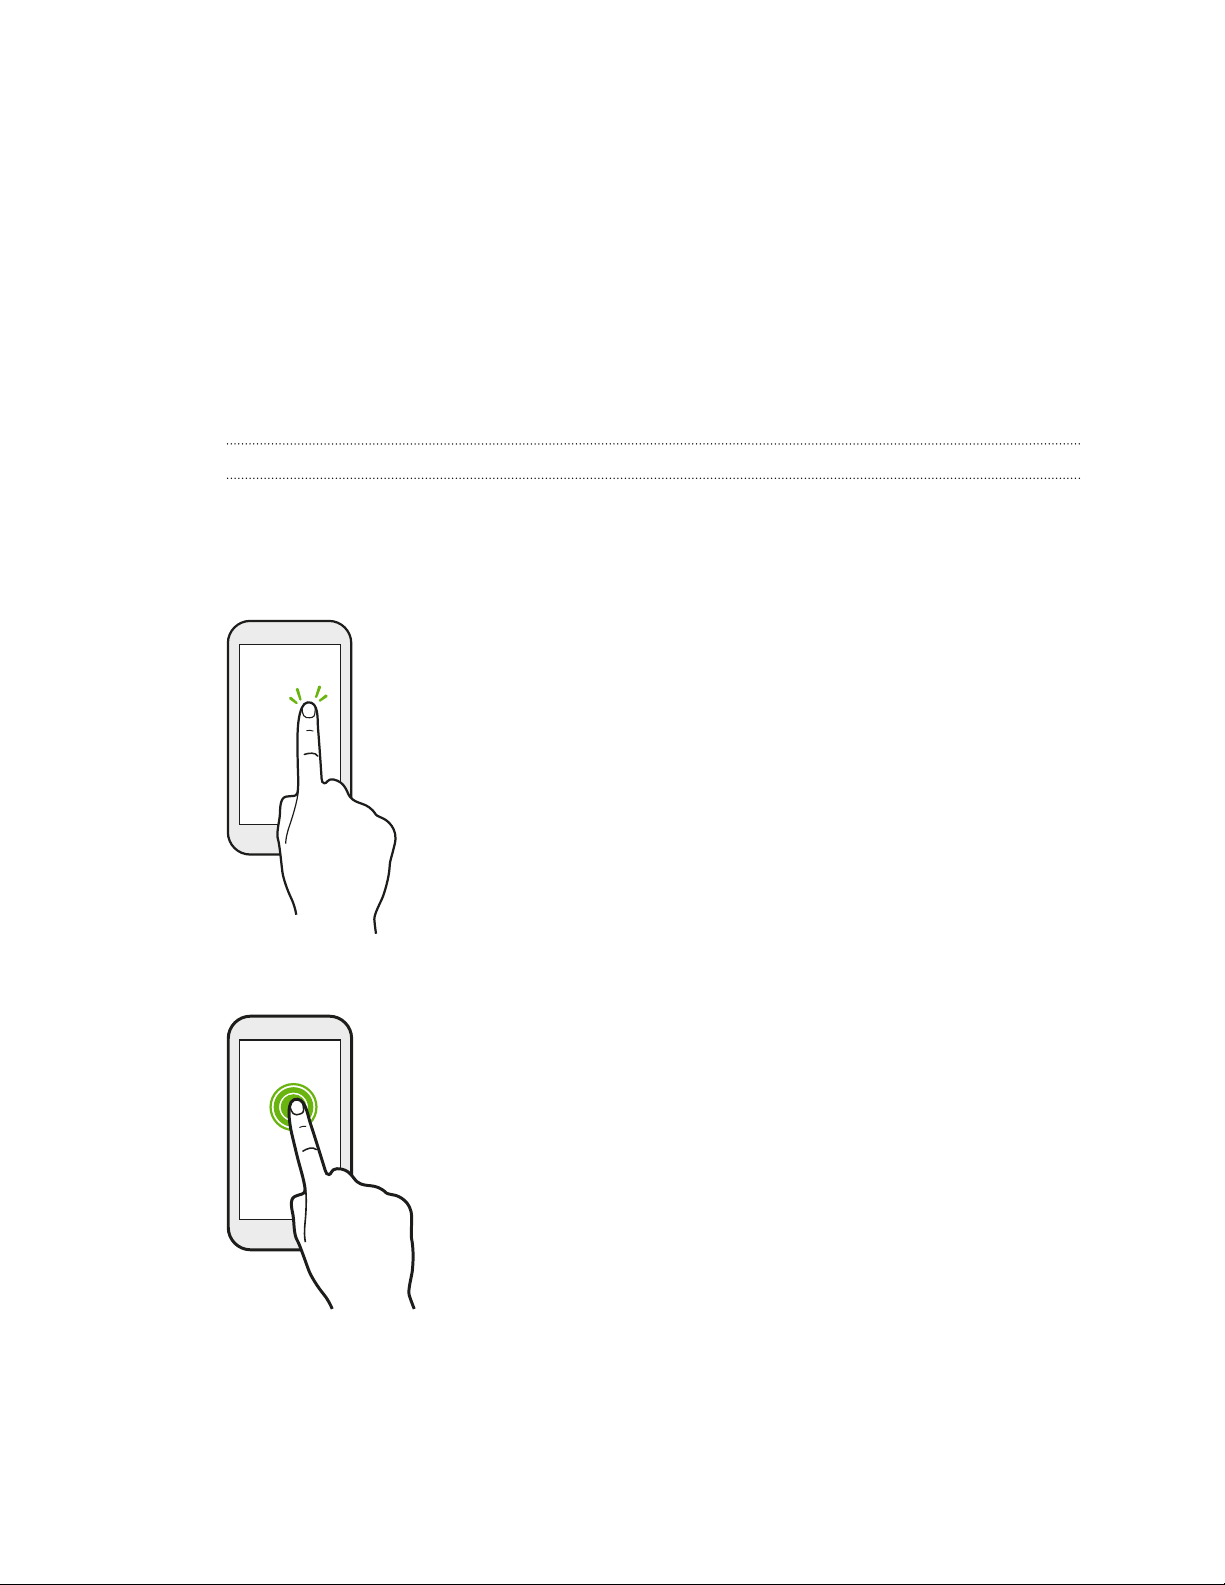
Tap
Tap the screen with your finger when you want to select
onscreen items such as application and settings icons, or press
onscreen buttons.
Press and hold
To open the available options for an item (for example, a text
message), just press and hold the item.
Page 17
17 Your first week with your new phone
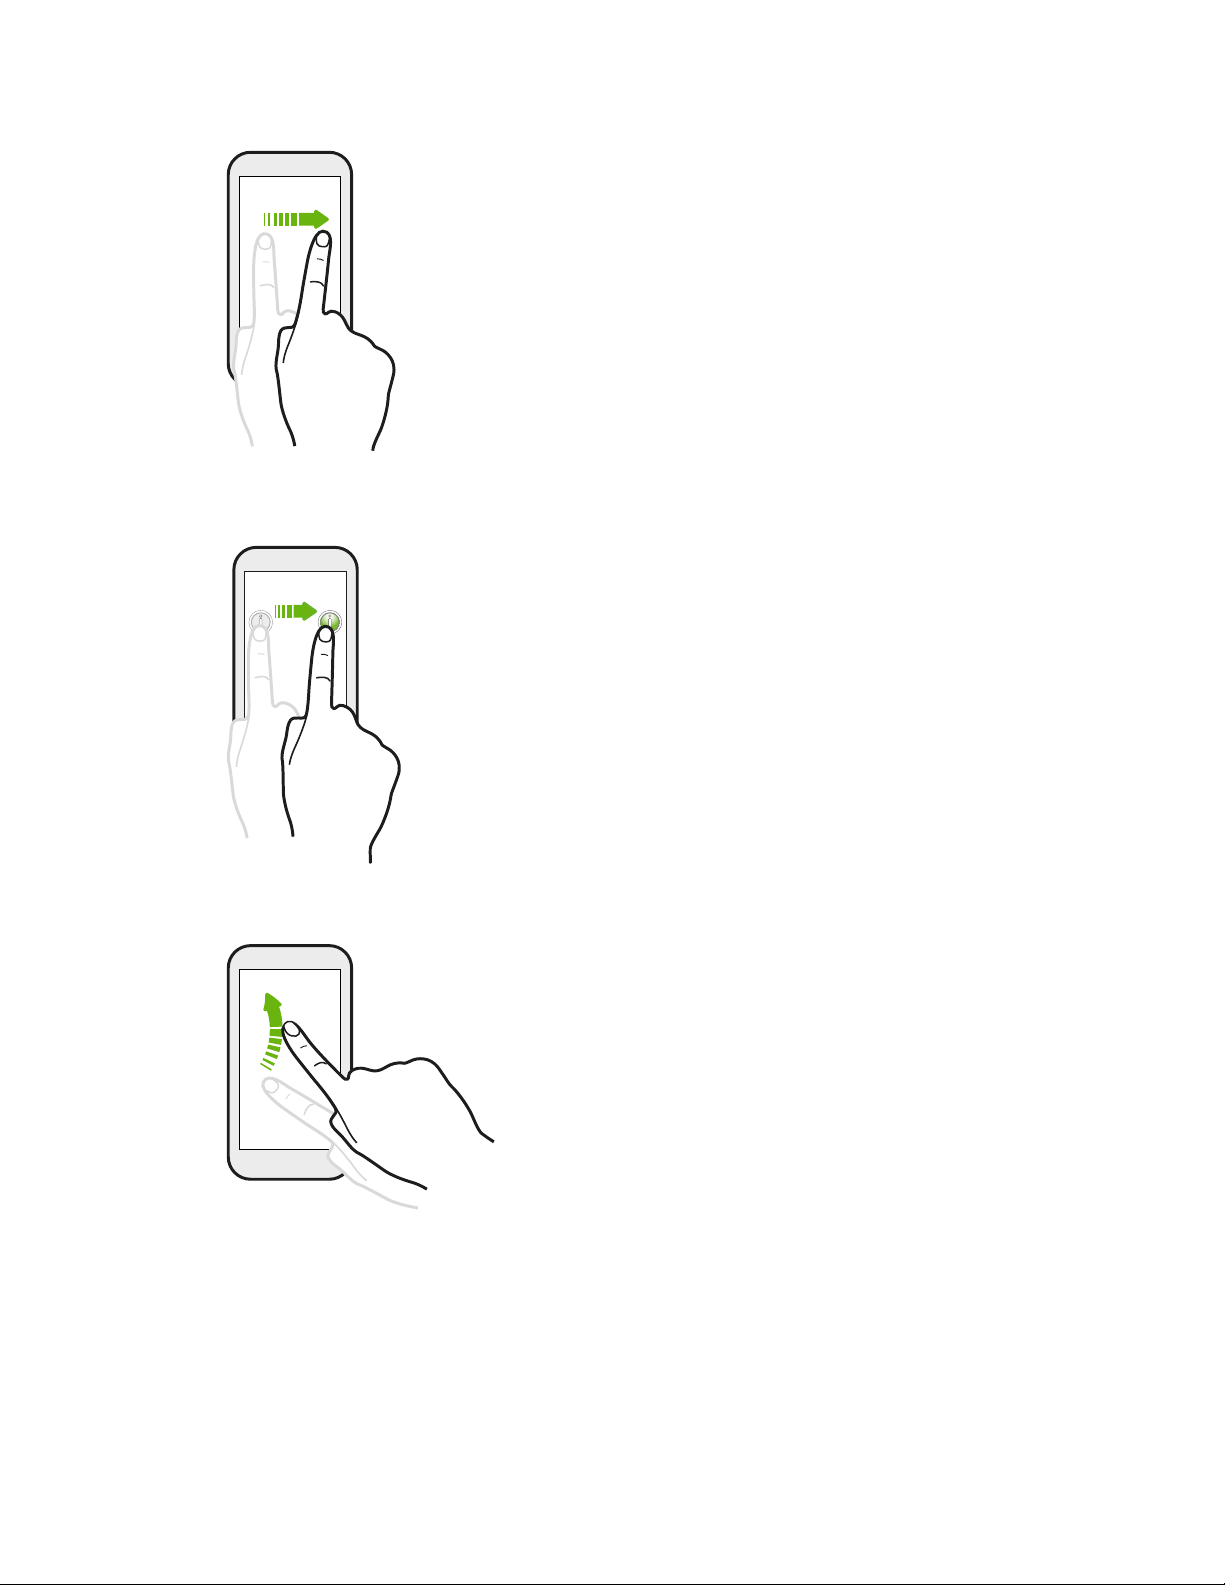
Swipe or slide
Quickly swipe your finger vertically or horizontally across the
screen to go to other Home screen, read the next e-mail, and
more.
Drag
Press and hold your finger with some pressure before you start
to drag. While dragging, don't release your finger until you
have reached the target position.
Flick
Flicking the screen is similar to swiping, except that
you need to swipe your finger in light, quicker
strokes, such as when moving right and left on the
Home screen, or flicking through a contacts or
message list.
Page 18
18 Your first week with your new phone
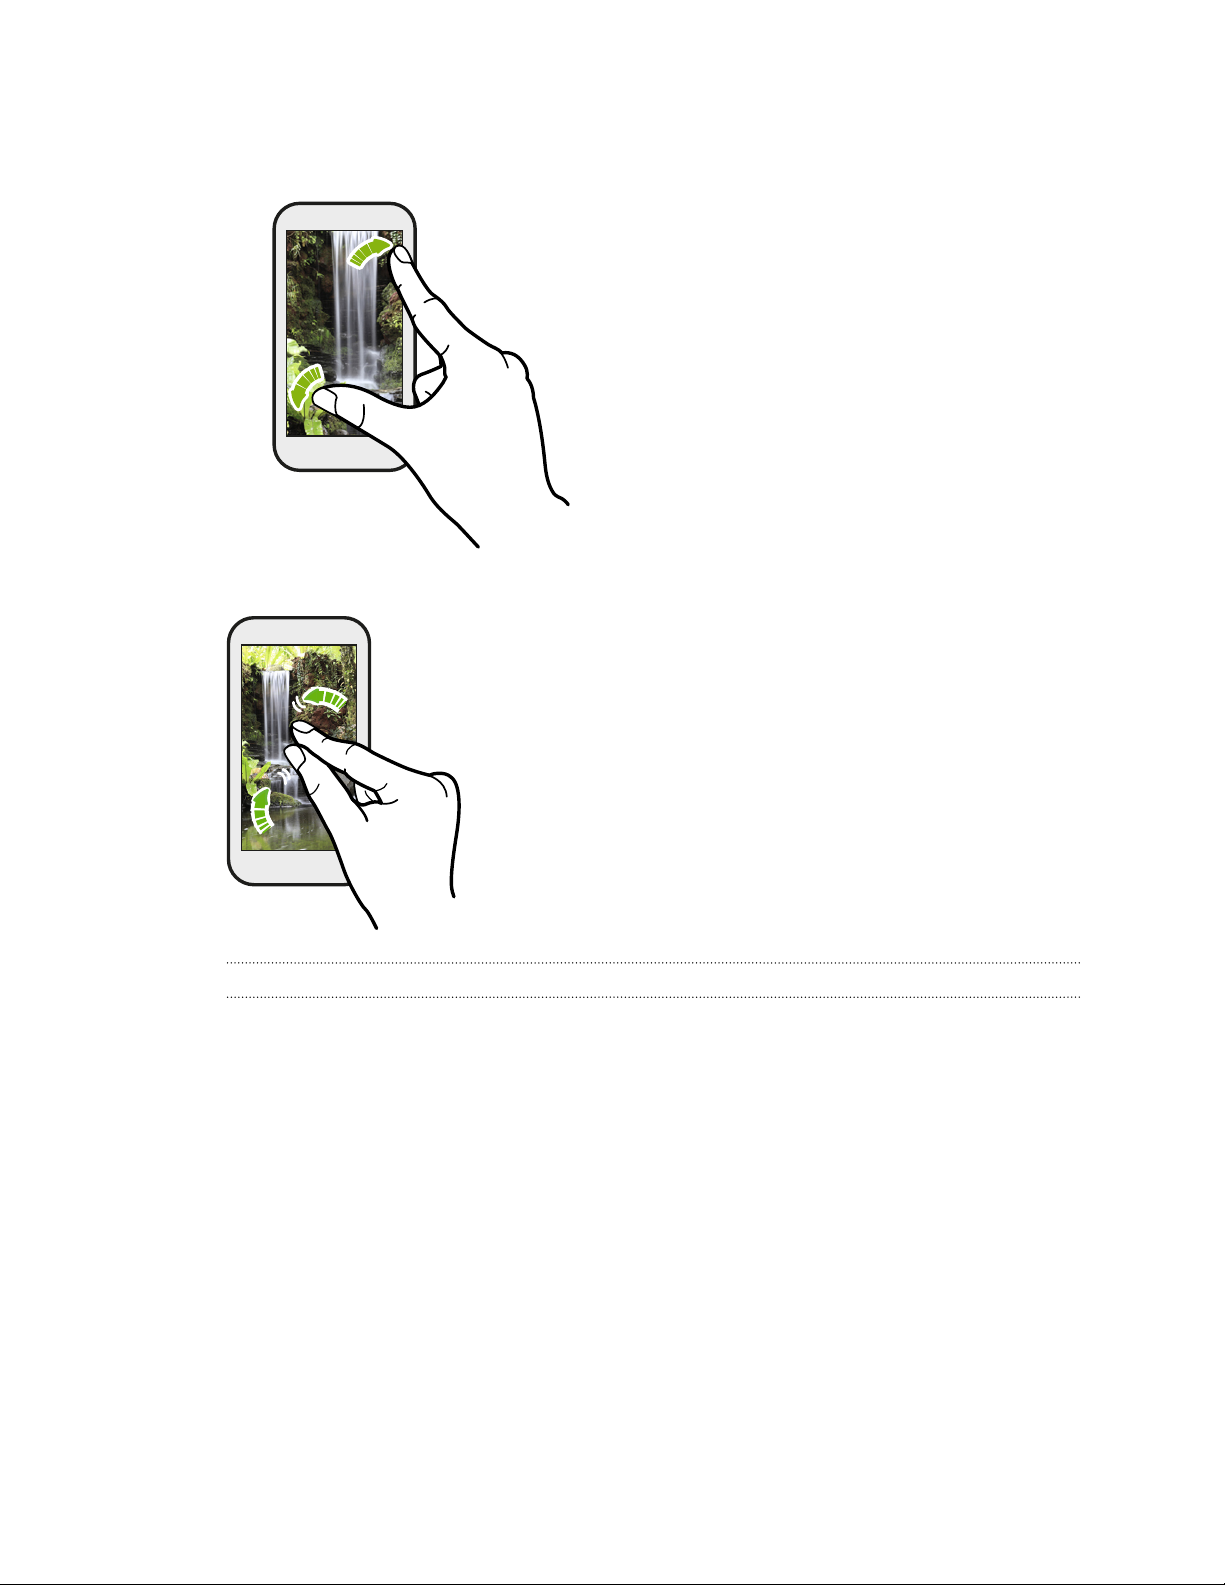
Slide with two fingers
Slide two fingers together to zoom out of the picture or
text.
In some apps, like Gallery or the web
browser, slide two fingers apart to zoom
in when viewing a picture or text.
Sleep mode
Sleep mode saves battery power by putting HTC Desire 210 dual sim into a low power
state while the display is off. It also stops accidental button presses when
HTC Desire 210 dual sim is in your bag.
Switching to Sleep mode
Briefly press the POWER button to turn off the display and switch to Sleep mode.
HTC Desire 210 dual sim also automatically goes into Sleep mode when it’s left idle for
a while.
You can change the time before HTC Desire 210 dual sim sleeps in the Settings >
Display.
Page 19
19 Your first week with your new phone
Waking up from Sleep mode
To wake HTC Desire 210 dual sim up manually, press the POWER button. You may
need to unlock the screen.
HTC Desire 210 dual sim automatically wakes up when you have an incoming call.
Unlocking HTC Desire 210 dual sim
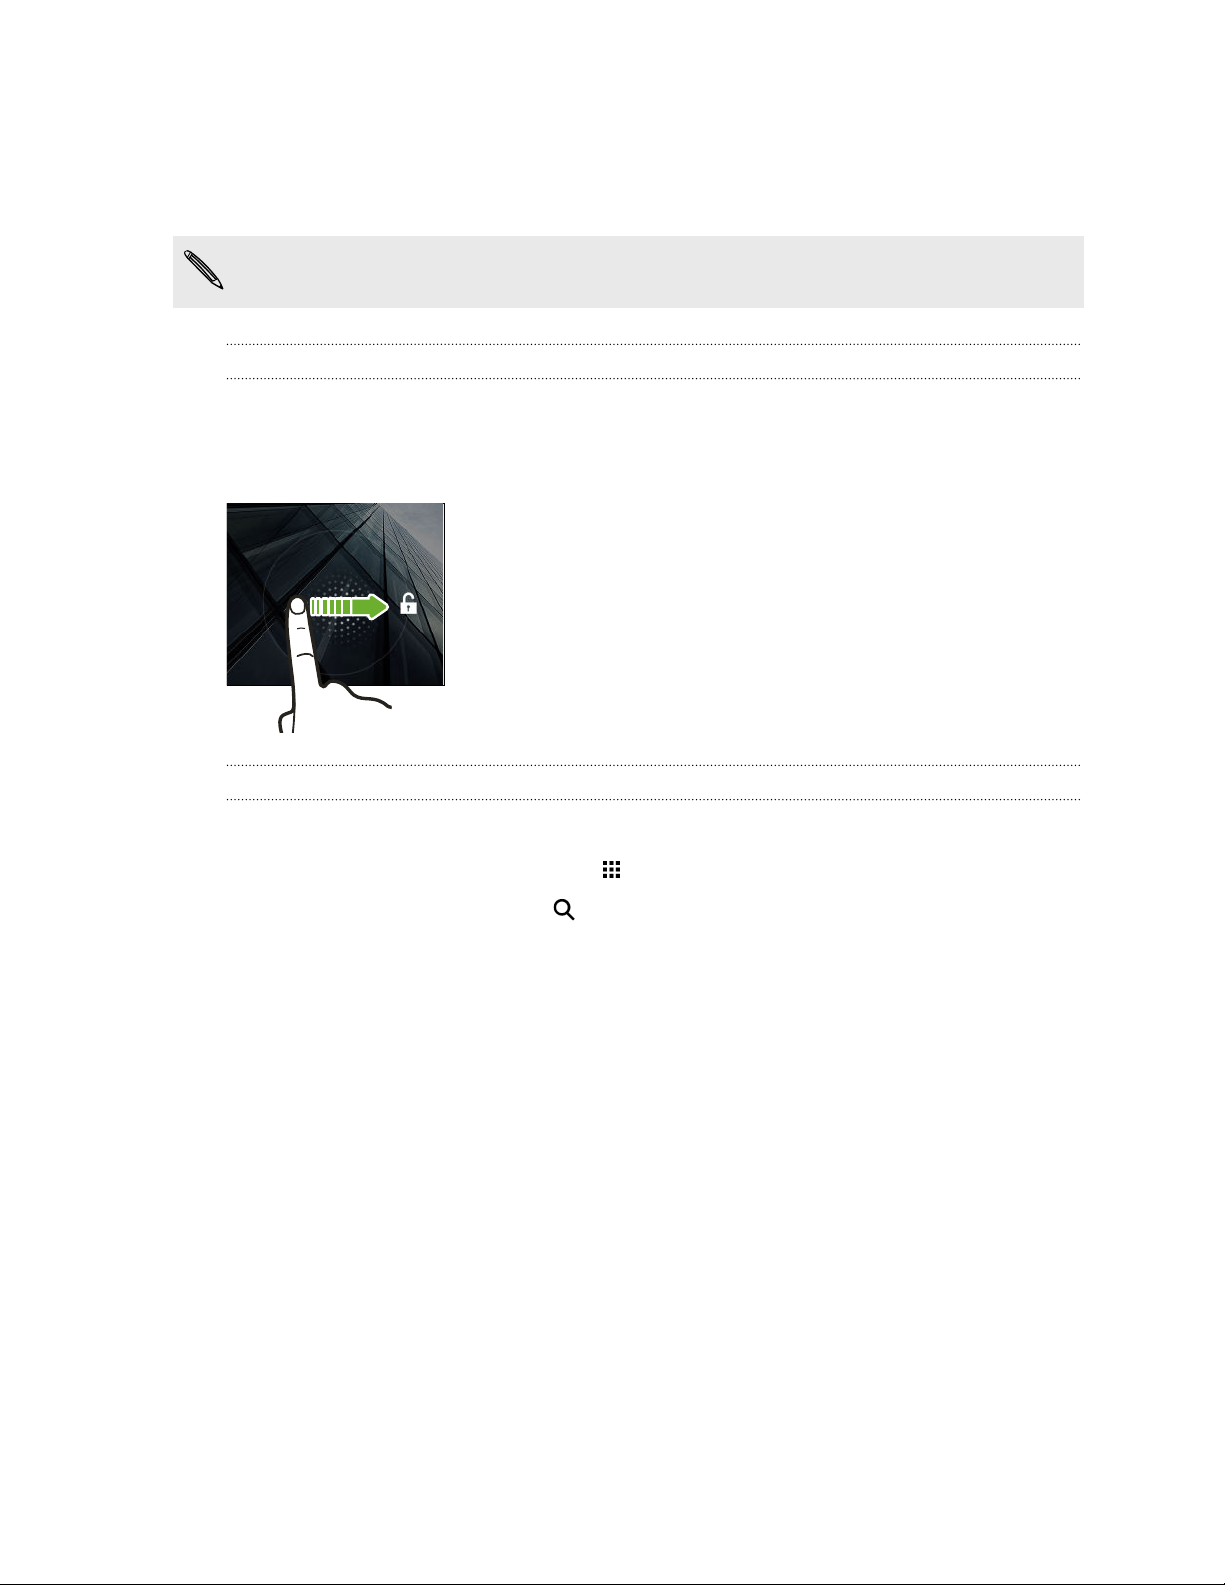
If you're using the default screen lock, you need to unlock HTC Desire 210 dual sim
before you can open HTC BlinkFeed™, app shortcuts on the widget panels, and more.
To unlock, press and hold the lock icon, and then drag it to any direction.
Opening an app
§ Tap an app on the launch bar at the bottom of the Home screen.
§ To see the All Apps screen, tap . Then tap the app you want to use.
§ In the All Apps screen, tap and enter the name of the app you're looking for.
Page 20
20 Your first week with your new phone
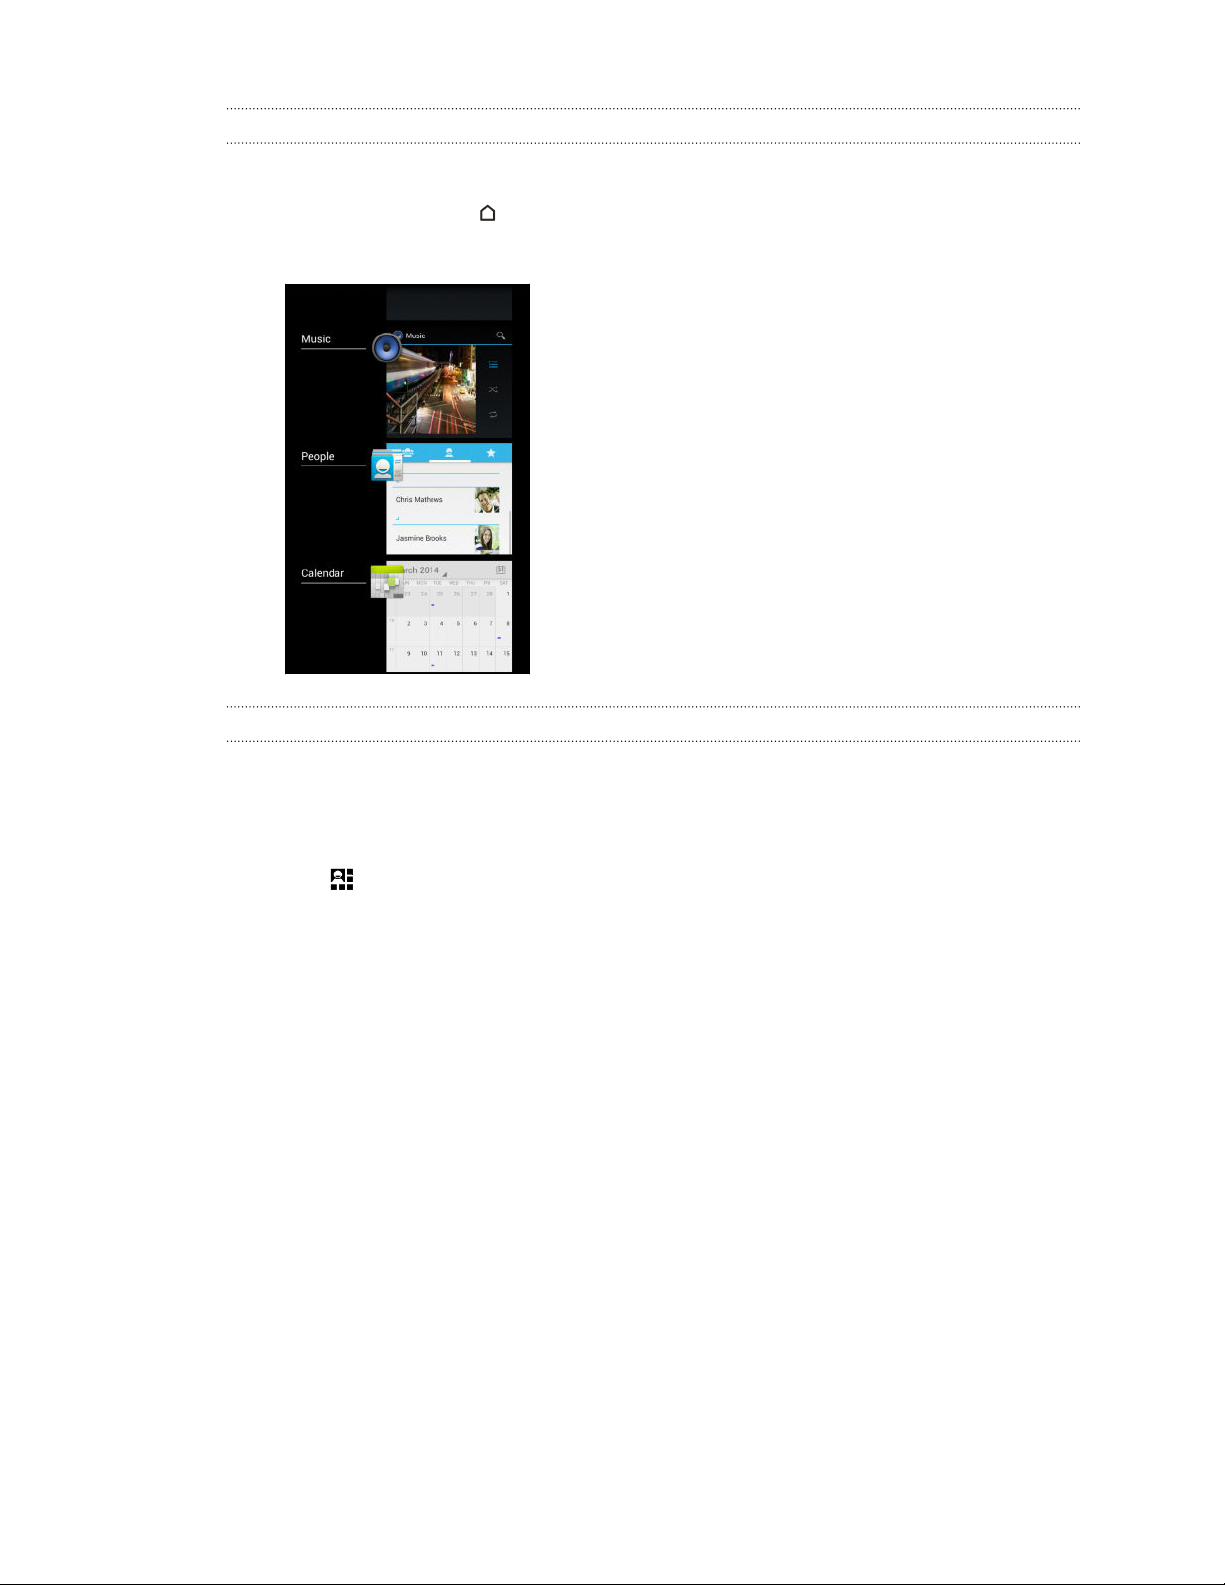
Switching between recently opened apps
You can easily access apps you've just recently opened.
1. Press and hold the button.
2. Slide your finger up or down to see recently-opened apps.
§ To remove an app from the list, drag it left or
right.
§ To switch back to an app, just tap it.
Using Quick Settings
Tap the tiles in Quick Settings to easily turn on Wi-Fi, Bluetooth®, and more. You'll also
find a few shortcuts, such as for viewing your profile in the People app.
1. Swipe down from the status bar to open the Notifications panel.
2. Tap to switch to Quick Settings.
Page 21
21 Your first week with your new phone
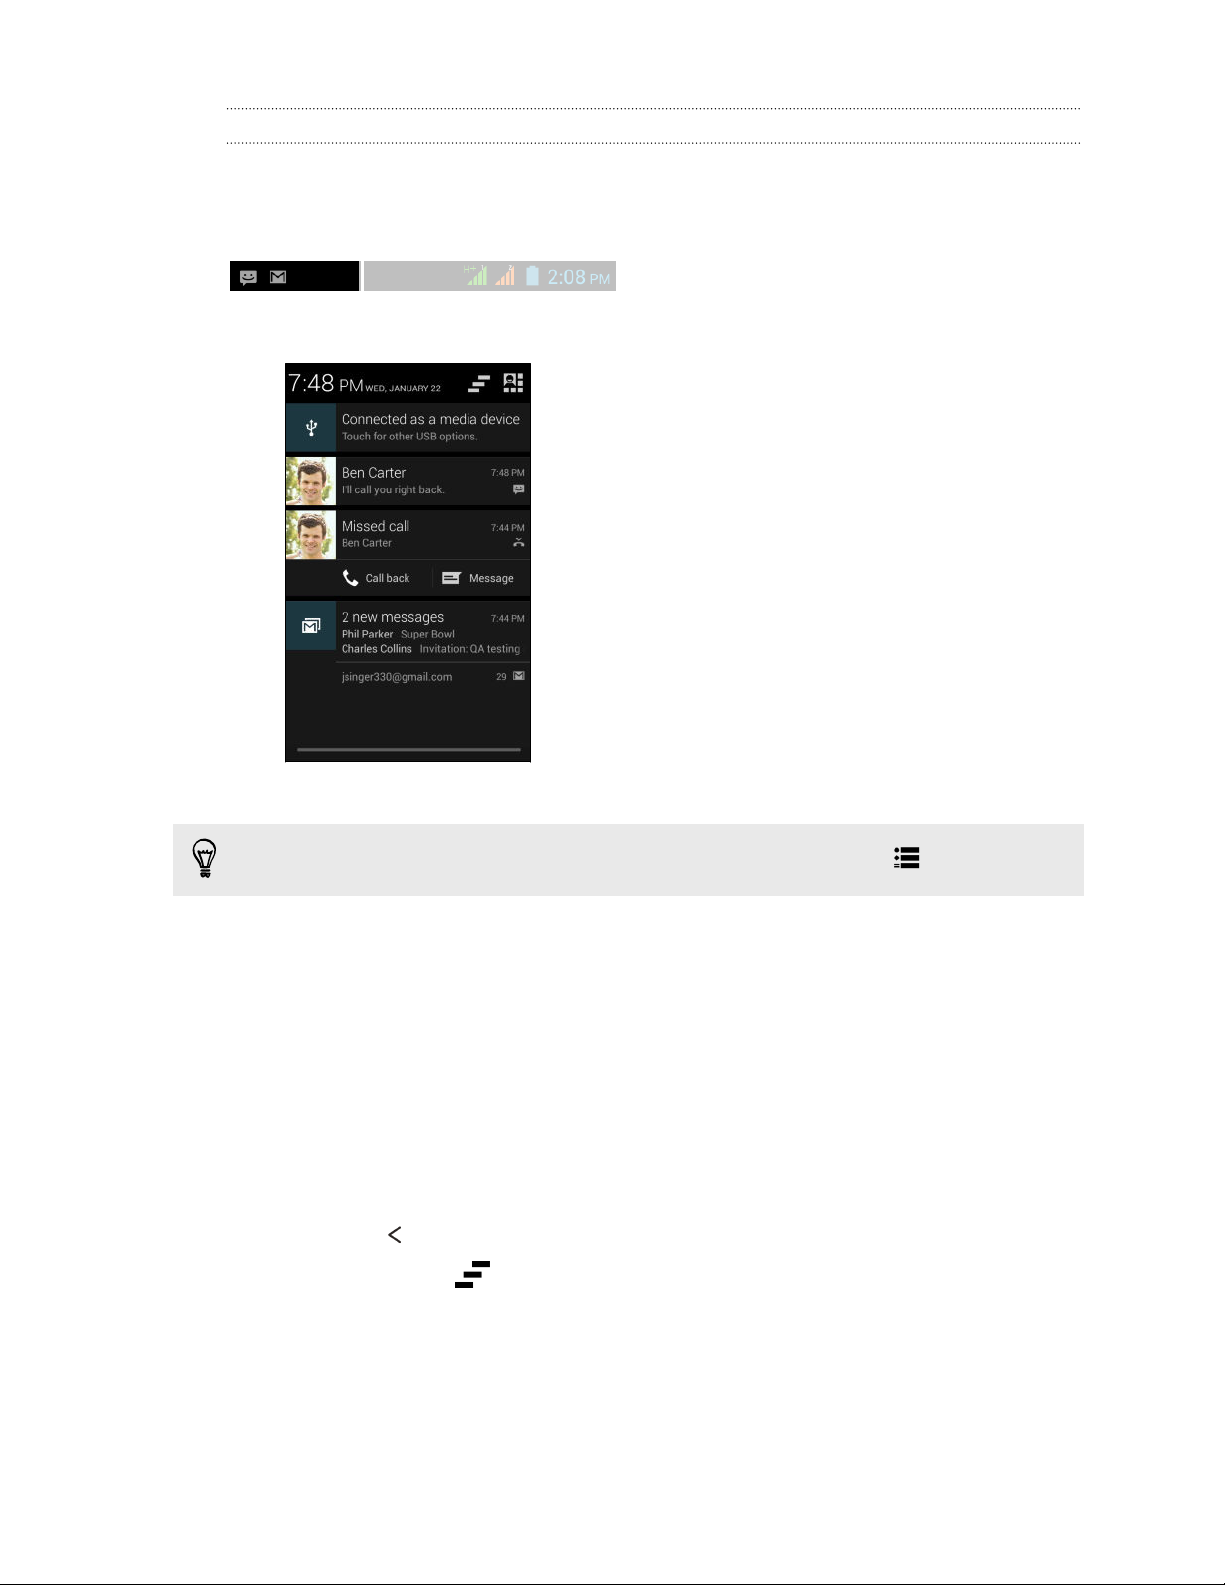
Notifications panel
Notification icons inform you of new messages, calendar events, alarms, and activities
in progress such as files downloading. When you see notification icons, open the
Notifications panel to check out details of the notifications that you've received.
1. To open the Notifications panel, slide down from the top of the screen.
If you have several notifications, scroll down the screen to see them all.
To quickly access the Notifications panel from Quick settings, tap .
2. On the Notifications panel:
§ You can expand certain notifications to see more information, such as email
previews and calendar events. Slide two fingers apart to expand a
notification. To collapse it, slide two fingers together.
§ You'll see icons in some notifications that allow you to take immediate
actions. For example, when you have a missed call, tap the available icons
to return the call or reply with a text message.
§ Tap the notification icon on the left to open the corresponding app.
§ To dismiss just one notification in the list, drag it left or right.
3. To close the Notifications panel, slide up from the bottom bar of the panel or
press the button.
You can also tap to dismiss all notifications and close the Notifications
panel.
Page 22
22 Your first week with your new phone
Capturing the HTC Desire 210 dual sim screen
Want to show off your high game score, write a blog post about
HTC Desire 210 dual sim features, or post a status update about a song you're
playing? It's easy to take a picture of the screen and share it from Gallery.
Simultaneously press and hold POWER and VOLUME DOWN buttons. The screen is
saved in the Screenshot album in Gallery.
Changing your ringtone, notifications, and sounds
1. Go to Settings.
2. Tap Audio profiles > .
3. Tap Phone ringtone for the SIM you want to change the ringtone, or tap Default
notification sound to change it.
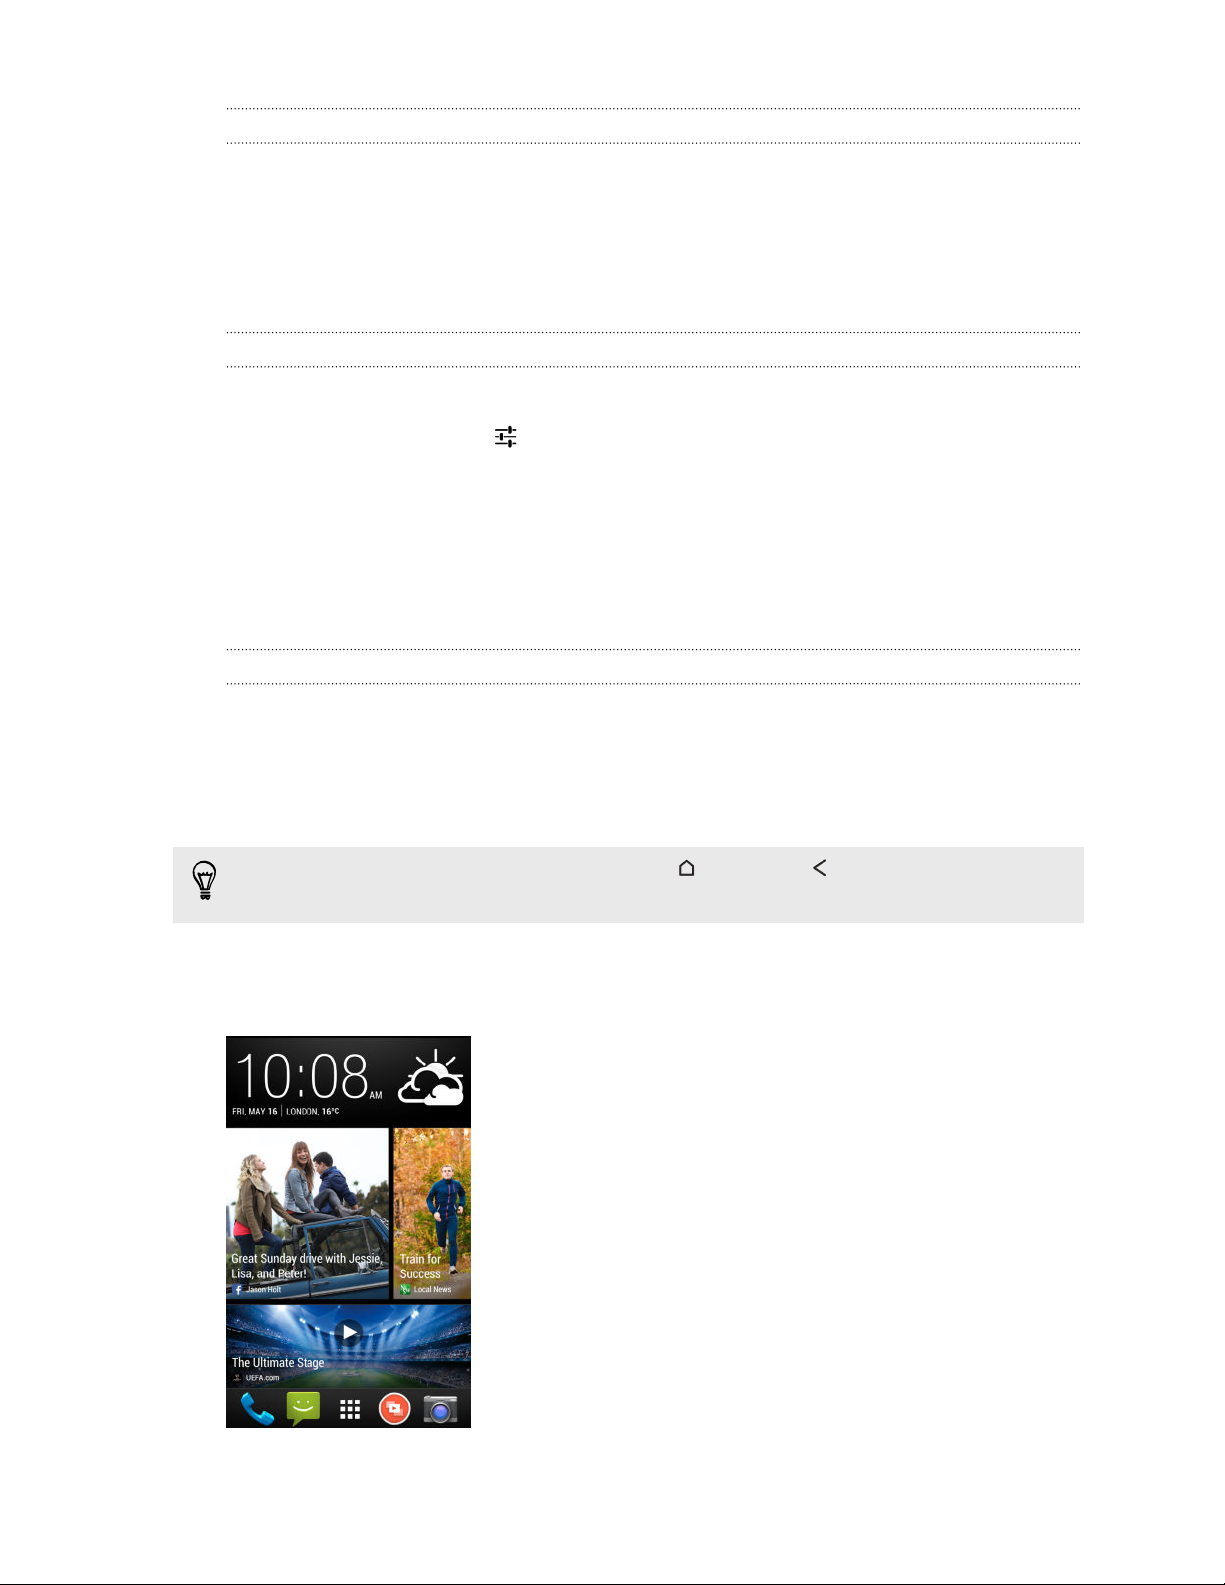
HTC BlinkFeed
Your dynamic Home screen
Stay in touch with friends or get the latest about your interests right on
HTC BlinkFeed. Set up which social networks, news sources, and more will appear.
§ Tap a tile to view the content or to comment on a post or status update.
§ Scroll to the top and pull down on the screen to manually refresh the stream.
While on HTC BlinkFeed, you can press the button or button to scroll to the
top.
§ On HTC BlinkFeed, swipe right to open the slideout menu to choose the type of
feeds to display. Select Highlights to see a mix of articles from selected feeds
and your favorite news sources.
Page 23
23 Your first week with your new phone
Turning HTC BlinkFeed on or off
1. On HTC BlinkFeed or any widget panel, slide two fingers together to customize
the Home screen.
2. Tap BlinkFeed on/off to show or hide the Feeds panel.
Selecting feeds
Get updated with the most relevant content and posts with just a swipe. Choose
which feeds to display on HTC BlinkFeed. You can select popular news channels and
websites or choose a category like Entertainment. You can also show posts from
friends in social networks.
1. On HTC BlinkFeed, swipe right to open the slideout menu.
2. Tap > Topics and services.
The first time you try to select content, you'll be asked if you want to sign in to your
social network account to automatically select content based on your interests.
3. Swipe left or right to choose from the different types of feeds you can display
on HTC BlinkFeed. You can select news media sources, social networks, and
more.
Content from feeds that have just been added may take a few minutes to appear
on HTC BlinkFeed.
Customizing the Highlights feed
When you select topics and services for HTC BlinkFeed, the top trending articles from
the selected sources, recent status updates, and more are shown. If you want to
temporarily show fewer items in your Highlights feed, you can filter out some of your
selected topics and services.
1. On HTC BlinkFeed, swipe right to open the slideout menu.
2. Tap > Settings.
3. Tap Choose Highlights topics.
4. Select the news sources and topics you want to appear in the Highlights feed.
Adding or removing locales
Want to keep up to date on current events in more than one locale? You can add
several locales.
1. On HTC BlinkFeed, swipe right to open the slideout menu.
2. Tap > Topics and services.
3. While on the Featured headlines or Categories tab, press the button, and
then tap Add editions (or Remove editions).
Page 24
24 Your first week with your new phone
Adding topics of your interest
Looking for a more specific topic? Search for and select topics of your interest to
display them on HTC BlinkFeed.
1. On HTC BlinkFeed, swipe right to open the slideout menu.
2. Tap > Topics and services.
3. Swipe to the Custom topics tab, tap and enter the topic you're looking for.
4. Tap a result, and then tap to add it to the Custom topics tab.
Reading articles in HTC BlinkFeed
1. While on HTC BlinkFeed, swipe up or down to find an article you want to read.
2. Tap the tile to view the article.
If related articles are found, you can scroll down to the end to see the links.
Saving articles for later
Don't have time to read that potentially interesting article? You can bookmark articles
to your reading list.
Do one of the following:
§ While viewing an article, tap .
§ On the Feeds panel, press and hold the tile of the article you want to bookmark.
Then tap Read later.
You'll find the reading list in the slideout menu.
Deleting tiles on HTC BlinkFeed
Want to get rid of a tile? Now you can easily remove any tile on HTC BlinkFeed.
1. On HTC BlinkFeed, press and hold the tile you want to remove.
2. Tap Remove.
Posting to your social networks
You can easily post a status update from the Home screen.
1. On HTC BlinkFeed, swipe right to open the slideout menu.
2. Tap > Compose, and then choose a social network.
3. Compose your status update and post it on your social network.
Page 25
25 Your first week with your new phone
Working with text
Selecting, copying, and pasting text
In apps such as the web browser and Email, you can select and copy text, and then
paste or share it.
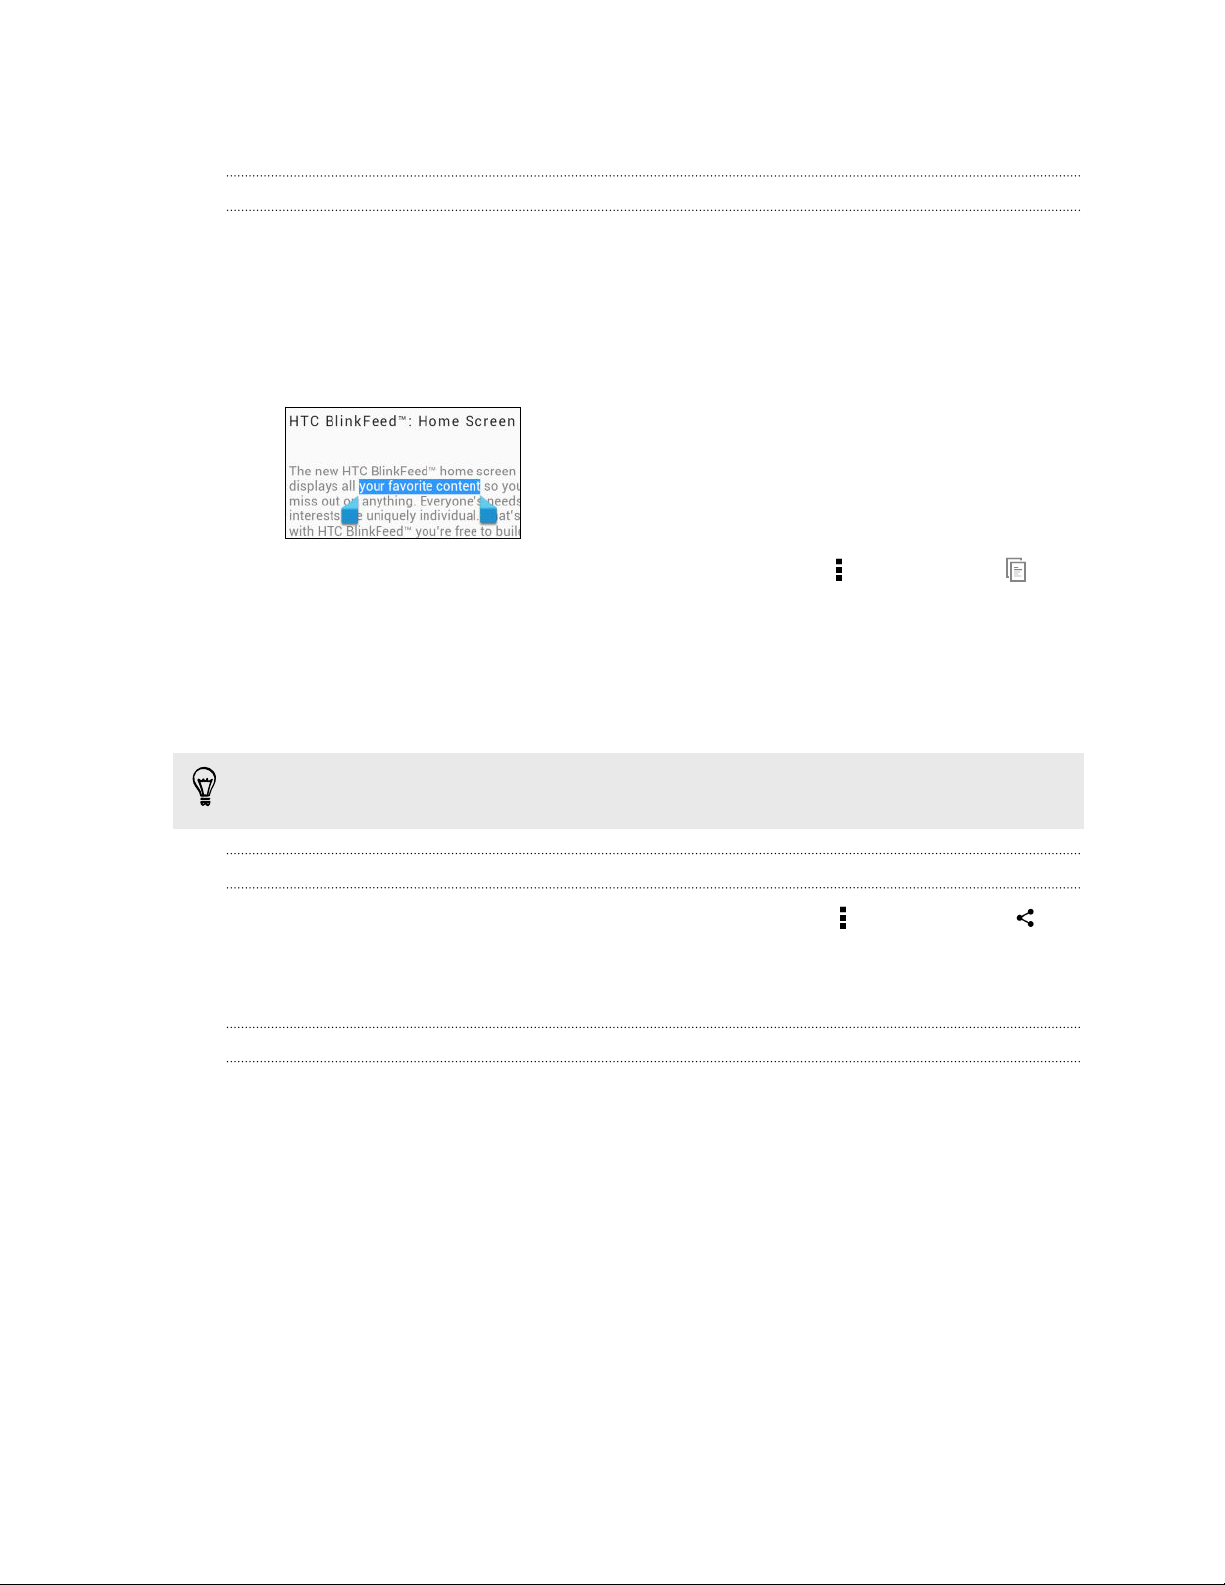
1. Press and hold on a word.
2. Drag the start and end anchors to highlight the surrounding text you want to
select.
3. After you have selected the text you want to copy, tap > Copy (or tap ).
The selected text is then copied to the clipboard.
4. In a text entry field (for example while composing an email), press and hold at
the point where you want to paste the text.
5. Tap Paste.
To copy the address of a linked webpage, press and hold the link, and then tap
Copy link URL (or Copy link address).
Sharing text
1. After you have selected the text you want to share, tap > Share (or tap ).
2. Choose where to paste and share the selected text, such as in an email message
or social network status update.
The HTC Sense keyboard
Typing is fast and accurate with the HTC Sense™ keyboard.
§ Word prediction also saves typing time. As you type, you'll see word
suggestions that you can choose from. You can even add words, phrases, and
shortcuts to the word prediction dictionary. See Entering text with word
prediction on page 27.
§ You can type words by just speaking. See Entering text by speaking on page
29.
§ Turn on the Trace keyboard so you can type words by just sliding your finger
from one letter to another. See Using the Trace keyboard on page 28.
§ Just swipe right to access the numeric and symbol keyboard. Or swipe left to
switch between languages.
Page 26
26 Your first week with your new phone
§ The keys have secondary numbers, punctuation symbols, or other characters
that you can insert without having to switch to the numeric and symbol
keyboard.
For example, just press and hold a key on the first row to insert a number.
§ Choose from a wide selection of emoji.
§ Show or hide navigational arrow keys on the keyboard. If you enable the arrow
keys in Settings, they'll only appear on the portrait keyboard.
Entering text
The onscreen keyboard becomes available when you tap a text field in an app. Enter
letters and numbers, change the keyboard layout or language, and more.
Tap the keys on the onscreen keyboard to enter letters and numbers, as well as
punctuation marks and symbols.
§ Tap to enter an uppercase letter. Tap twice to turn on caps lock.
§ Press and hold keys with gray characters at the top to enter numbers, symbols,
or accented letters. Some keys have multiple characters or accents associated
with them.
§ Swipe right to show number and symbol keys. To return to the main keyboard,
swipe left.
§ Press the button to close the onscreen keyboard.
To open the keyboard settings, press and hold the comma key if you see above
the key. Or go to Settings > Language & input and tap beside HTC Sense Input.
Selecting a keyboard layout
Choose a keyboard layout that suits your typing style.
1. Go to Settings, and then tap Language & input.
2. Tap beside HTC Sense Input.
3. Tap Keyboard selection > Keyboard types.
4. Select the keyboard layout that you want to use.
Choosing and switching between keyboard languages
If multiple keyboard languages are available on HTC Desire 210 dual sim, you can
choose which languages to enable in the onscreen keyboard.
1. Go to Settings, and then tap Language & input.
2. Tap beside HTC Sense Input.
3. Tap Keyboard selection, and then choose the languages you want.
To change the keyboard language, do any of the following:
Page 27
27 Your first week with your new phone
§ Swipe left on the onscreen keyboard (not available if you're using trace
keyboard).
§ Tap the language key (for example, ) until you see the keyboard language
you want to use.
§ Press and hold the language key, and then drag your finger to the keyboard
language you want to use.
Entering text with word prediction
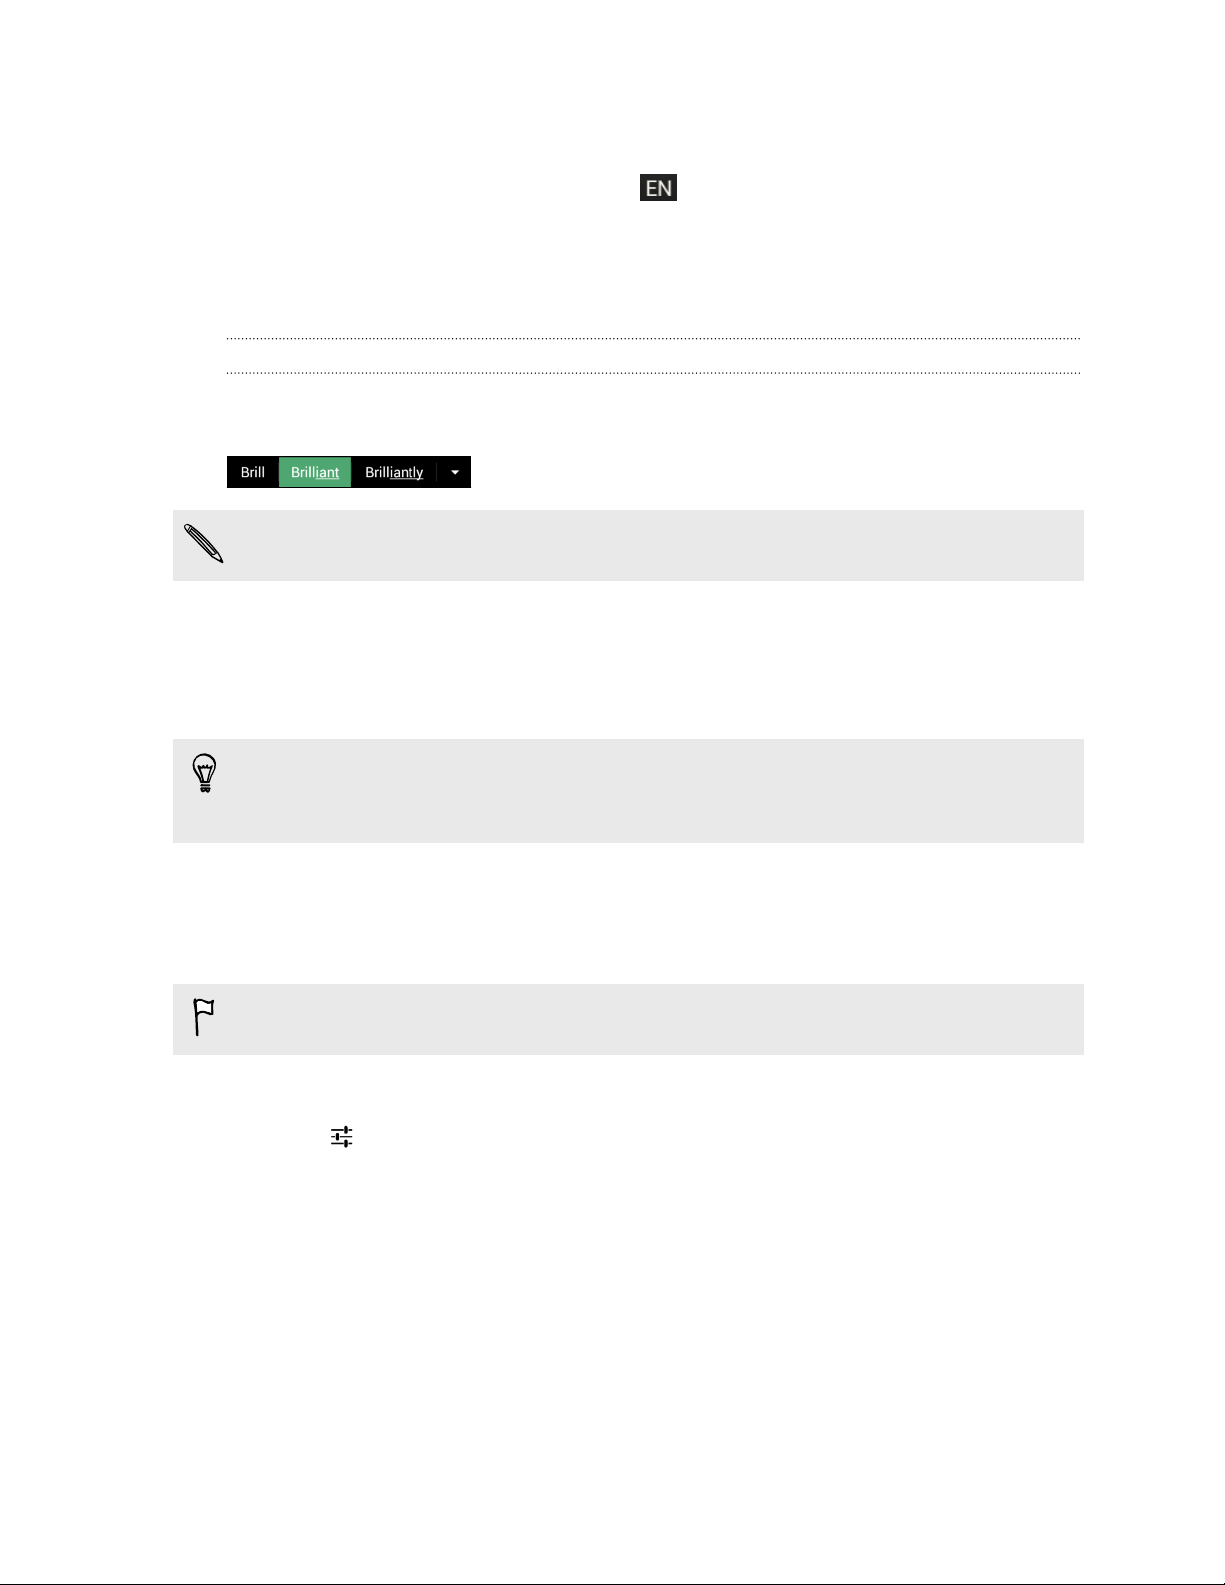
Ever started typing something you weren't sure how to spell? With word prediction,
you'll see suggested words displayed just above the keyboard.
Word prediction and next word prediction are enabled by default.
To enter text in word prediction mode, do any of the following:
§ Tap the space bar to insert a highlighted word in the suggestion list.
§ Tap a word from the suggestion list.
§ Tap the arrow next to the suggestion list to see more choices.
If you've accidentally chosen a wrong word from the suggestion list, you can
always go back and change it by tapping the word and selecting another
suggestion.
Setting a second language for word prediction
You can set the word prediction to be bilingual. As you type, you’ll get word
suggestions in the languages that you’ve selected.
Bilingual prediction is available only when you're using a Latin-based keyboard.
1. Go to Settings, and then tap Language & input.
2. Tap beside HTC Sense Input.
3. Tap Keyboard selection > Bilingual prediction, and then choose the language
you want.
Page 28

28 Your first week with your new phone
Adding words and phrases to the word prediction dictionary
Add frequently-used names, acronyms, and even phrases to the word prediction
dictionary to easily find them in the suggestion list.
Type even faster when you create text shortcuts to words and phrases. Instead of
typing "Talk to you later", save a few keystrokes by adding the ttyl shortcut. In
your message or email, just type "ttyl", and then tap the spacebar to enter the
complete phrase.
1. Go to Settings, and then tap Language & input.
2. Tap beside HTC Sense Input.
3. Tap Personal dictionary > .
4. Enter a word or phrase, and then enter its text shortcut.
5. Tap Add to dictionary.
Editing or deleting words and phrases in the word prediction dictionary
1. Go to Settings, and then tap Language & input.
2. Tap beside HTC Sense Input.
3. Tap Personal dictionary.
§ To edit a word, phrase, or shortcut, tap the item in the list.
§ To delete an item, tap it and then tap .
Using the Trace keyboard
Instead of tapping the keys on the onscreen keyboard, you can "trace" to type words.
You need to turn on the Trace keyboard in Settings > Language & input > HTC
Sense Input.
1. Slide your finger from one letter to the next to enter a word.
2. Lift your finger when the word is completed.
3. If you want to continue entering text, slide your finger over the letters again to
enter the next word.
If the word that appears after you traced isn't the one you want, you can:
§ Tap a word from the suggestion list.
§ Tap the arrow next to the suggestion list to see more choices.
Page 29

29 Your first week with your new phone
Turning Trace keyboard on or off
1. Go to Settings, and then tap Language & input.
2. Tap beside HTC Sense Input.
3. Select or clear the Trace keyboard option.
Entering text by speaking
No time to type? Try speaking the words to enter them.
1. Tap an area where you want to enter text.
2. On the onscreen keyboard, press and hold .
3. When you see the animated microphone button and the words "Speak now",
say the words you want to enter.
To set the voice input language, tap the language bar above the microphone
button. You can choose one or more languages. Available languages may vary.
4. If a word doesn't match what you've spoken and it's underlined, tap the
underlined word to delete it or to see more choices.
5. Enter punctuation marks by saying the name (for example, say "comma").
Battery
Checking battery usage
See a ranking list of apps that are using the battery. You can also see how much and
how long the battery has been used for each app.
1. Go to Settings.
2. Tap Battery.
3. Tap an app to check how it's using the battery. You'll see how much battery
power is used.
Getting the battery to last longer
How long the battery can last before it needs recharging depends on how you use
HTC Desire 210 dual sim.
In times when you need to extend the battery life more, try out some of these tips:
Check your battery usage
Monitoring your battery usage helps you identify what's using the most power so you
can choose what to do about it. For details, see Checking battery usage on page 29.
Page 30

30 Your first week with your new phone
Manage your connections
§ Turn off wireless connections you're not using. Go to Settings to turn on or off
connections such as mobile data, Wi-Fi, or Bluetooth.
§ Turn GPS on only when a precise location is needed.
To prevent some apps from using GPS in the background, keep the GPS
satellites setting off. Turn it on only when you need your precise location while
using navigation or location-based apps. Go to Settings and tap Location access
to turn this setting on or off.
Manage your display
Lowering the brightness and setting the screen timeout to a shorter time help save
battery power.
Manage your apps
§ Install the latest software and application updates. Updates sometimes include
battery performance improvements.
§ Uninstall or disable apps that you never use.
Many apps run processes or sync data in the background even when you're not
using them. If there are apps that you don't need anymore, uninstall them.
If an app came preloaded and can't be uninstalled, disabling the app can still
prevent it from continuously running or syncing data. In Settings > Apps, swipe
to the All tab, tap the app, and then tap Disable.
Limit background data and sync
Background data and sync can use a lot of battery power if you have many apps
syncing data in the background. Determine which apps can be set with longer sync
times, or sync manually.
§ If you have many email accounts, consider manually syncing some accounts.
§ In Google Play™ Store, press the and then tap Settings > Auto-update apps.
Choose to manually update apps.
Other tips
To squeeze in a little bit more battery power, try these tips:
§ Tone down the ringtone and media volume.
§ Minimize the use of vibration or sound feedback. In Settings, tap Audio profiles
> and choose which ones you don't need and can disable.
§ Check your apps’ settings as you may find more options to optimize the battery.
Page 31

31 Camera
Camera
Using Android Camera
You can take photos and videos using Android™ Camera.
1. Open the Camera app.
2. Do one of the following:
§ To take a photo, tap .
§ To capture a panoramic photo, tap , and then tap . Pan
HTC Desire 210 dual sim as smoothly as you can to the direction you want
to capture. Align the two arrows to automatically capture a frame. You can
tap anytime to stop capturing frames.
§ To take a selfie, tap while in the Normal mode. Tap .
§ To start recording video, tap , and then tap to stop recording.
Tap to choose photo and video effects, set the camera to take continuous shots,
and more.
Page 32

32 Gallery and Video Highlights
Gallery and Video Highlights
Viewing photos and videos in Gallery
Remember the good times. Gallery lets you view all the photos and videos on
HTC Desire 210 dual sim. You can also filter by albums, locations, and more.
1. Open the Gallery app.
2. Tap and choose how to filter the photos and videos.
3. Tap a tile to browse the photos and videos inside.
4. Tap a photo or video to view it in full screen.
5. Swipe left to view the next photo or video.
Editing photos
Make your pictures even better. Gallery has an array of editing tools that let you crop,
rotate, and apply effects on your photos.
1. Browse to the photo that you want to edit.
2. Tap . Do one of the following:
§ Choose a photo effect.
§ Tap , and then tap Crop. Drag the crop box over the part of the photo
that you want to crop, or drag the markers to resize the crop box.
§ Tap , and then tap Rotate. Press and drag the top part of the photo in
90-degree increments.
Viewing and editing Video Highlights
Want to share the excitement of the day's events? With Video Highlights, your best
photos and videos (highlights) are automatically compiled into a short video with
background theme and music.
This video is about half a minute long. You can change the content, theme, and music,
and also save or share the video.
1. Open the Video Highlights . Shots taken on the same day are grouped together.
2. Tap a tile. The large tile on top automatically plays a video, showing the
highlights taken on a particular date.
Page 33

33 Gallery and Video Highlights
3. To change the highlights in the video:
§ Tap Content, and then tap a thumbnail to include or exclude it from the
video.
§ Tap to shuffle the highlights.
4. Tap Themes to choose from a variety of color schemes and music themes to
apply to the video.
5. Tap Music to change the default soundtrack to your own music.
To restore the default soundtrack, press the button, and then tap Restore
default track.
Do not reproduce, distribute, or otherwise use copyrighted materials in connection
with the Video Highlights feature unless you have secured the copyright owner’s
permission first.
6. To trim the chosen soundtrack, include audio that was captured with the video,
and enable content to play back chronologically, press the button, and then
tap Video and audio settings.
7. To view the Video Highlights in full screen, hold HTC Desire 210 dual sim in
landscape orientation.
8. To create a video file of the highlights, press the button, and then tap Save.
This will be saved in the Video Highlights album.
9. To share the Video Highlights, tap and then select how to share the video.
Page 34

34 Personalizing
Personalizing
Making HTC Desire 210 dual sim truly yours
Make HTC Desire 210 dual sim look and sound just the way you want it. Personalize it
with a different wallpaper and ringtone, and you can also choose notification sounds
for events such as incoming text, email, and calendar reminders.
Changing your wallpaper
Pick your favorite photo as your Home wallpaper. Choose from the available
wallpapers, or use any photo you've taken with the camera.
1. On a widget panel, tap and hold an empty space on the screen.
2. Tap Select wallpaper.
3. Tap one of the following:
HTC wallpapers Choose a preset wallpaper, and then tap Preview.
Live wallpapers Choose a preset animated wallpaper, and then tap Preview.
Gallery or Photos Choose an existing photo and crop it.
4. Tap Apply or Save.
Page 35

35 Personalizing
Personalizing the launch bar
The launch bar gives you one-touch access to commonly used apps. You can replace
the apps on the launch bar with other apps you often use.
1. Press and hold the app you want to replace, and then drag it out to .
2. Tap to go to the All Apps screen.
3. Press and hold an app, and then drag it to the empty slot on the launch bar.
You can also group apps on the launch bar into a folder.
Adding a widget to your Home screen
Widgets make at-a-glance important information and media content easily available.
Choose from a selection of widgets and add the most useful ones to your Home
screen.
1. On HTC BlinkFeed or any widget panel, slide two fingers together to customize
the Home screen.
2. Tap > Widgets. You can:
§ Swipe to browse through the widgets.
§ Tap to search for specific widgets.
Some widgets are available in different styles and sizes.
3. Press and hold and then drag a widget to a home screen thumbnail where you
want to add it.
You can also add widgets that allow you to quickly switch on or off certain settings
such as Wi-Fi and Bluetooth.
Page 36

36 Personalizing
Changing the settings of a widget
You can modify basic settings of some widgets (for example, the News & Weather
widget).
1. Press and hold a widget on your Home screen, and then drag it to .
2. Customize the widget settings.
Resizing a widget
Some widgets can be resized after you've added them to your Home screen.
1. Press and hold a widget on the Home screen, and then release your finger. If a
border appears, that means the widget is resizable.
2. Drag the sides of the border to enlarge or shrink the widget size.
Adding apps and other shortcuts on your Home screen
Place apps you often use on any widget panel of your Home screen. You can also add
shortcuts to frequently used settings, bookmarked webpages, and more.
1. On HTC BlinkFeed or any widget panel, slide two fingers together to customize
the Home screen.
2. Tap > Apps or Shortcuts. You can:
§ Swipe to browse through the apps or shortcuts.
§ Tap to search for specific apps or shortcuts.
3. Press and hold and then drag an app or a shortcut to a home screen thumbnail
where you want to add it.
To add an app from the All Apps screen, press and hold an app and drag it to .
Drop the app on an empty space on the Home screen.
Page 37

37 Personalizing
Removing a widget or icon
1. Press and hold the widget or icon you want to remove, and then drag it to .
2. When the widget or icon turns red, lift your finger.
Grouping apps into a folder
Use folders to group apps on the launch bar or on your Home screen to free up space
so you can add more apps.
1. Press and hold an app, and then drag it over to another app to automatically
create a folder.
2. Tap the folder to open it.
3. Tap .
4. Select one or more apps that you want to add to the folder.
5. Tap Done.
§ You can also add shortcuts to settings or information. Add a shortcut first to the
Home screen, and then drag it over to the folder.
§ You can also group apps into a folder in the All Apps screen. Tap > Custom.
Press and hold an app and drag it to another app. Do the same for more apps that
you want to group into the folder.
Renaming a folder
1. Tap the folder to open it.
2. Tap the folder window’s title bar.
3. Enter a new folder name.
4. Tap outside the folder to close it.
Removing items from a folder
1. Tap the folder to open it.
2. Press and hold an app, and then drag it out to to remove.
If there's only one item left in the folder, the folder ungroups the last item and
removes itself automatically.
Page 38

38 Personalizing
Adding a Home screen panel
Add a Home screen if you have more widgets, apps, and shortcuts that you want to
access right away.
1. On HTC BlinkFeed or any widget panel, slide two fingers together to customize
the Home screen.
2. Tap . A new Home screen appears. You can start adding widgets, apps, and
shortcuts.
To remove a panel, press and hold and then drag it to .
Changing your main Home screen
1. On HTC BlinkFeed or any widget panel, slide two fingers together to customize
the Home screen.
2. Tap a widget panel that you want to be your main Home screen.
3. Tap Set as home.
Pressing the button from an app will first return you to the last panel you were
in. Just press the button again to go to your main Home screen.
Adding a widget on the lock screen
Choose from our selection of lock screen widgets.
1. On the lock screen, pull from the left edge until you see a icon.
2. Tap .
3. Tap a widget that you want to add to the lock screen.
Page 39

39 Phone calls
Phone calls
Making a call
You can either dial a number directly or browse through your contact list and call logs
to make a call.
1. Open the Phone app.
2. Do any of the following:
§ Enter the phone number, and then tap .
§ Search for a call log in the Call history , and then tap beside the
contact you want to call.
§ In the People tab, tap the contact you want to call.
3. Select the SIM card you want to use.
4. To hang up, tap .
Calling a speed dial number
1. Open the Phone app.
2. On the phone keypad:
§ The number 1 key is generally reserved for your voicemail. Press and hold
this key to call voicemail and retrieve your voicemail messages.
§ Press and hold the key that is associated with the contact you want to call.
3. Select the SIM card you want to use.
Assigning a speed dial key
1. Open the Phone app.
2. Press the button, and then tap Speed dial. You can also press and hold an
unassigned number key.
3. On the Speed dial screen, choose a speed dial key to assign.
4. Select a contact from the list.
Page 40

40 Phone calls
Making an emergency call
In some regions, you can make emergency calls from HTC Desire 210 dual sim even if
you don’t have a SIM card installed or your SIM card has been blocked.
If you don't have a network signal, you won't be able to make an emergency call.
1. Open the Phone app.
2. Dial the emergency number for your locale, and then tap .
If you've enabled but forgotten your lock password or lock pattern, you can still
make emergency calls by tapping Emergency call on the screen.
Answering or rejecting a call
When you receive a phone call from a contact, the Incoming call screen appears.
§ Press and hold to see your call options, and then drag it to or .
§ To decline a call and send a text message to the caller, drag to , and then
select a message to send.
Muting the ringing sound without rejecting the call
Do one of the following:
§ Press the VOLUME DOWN or VOLUME UP button.
§ Press the POWER button.
What can I do during a call?
When a call is in progress, you can turn the speakerphone on, place the call on hold,
and more.
Putting a call on hold
To put the call on hold, tap . To resume the call, tap again.
Page 41

41 Phone calls
Switching between calls
If you’re already in a call and you accept another call, you can switch between the two
calls.
1. When you receive another call, press and hold to see your call options, and
then drag it to to accept the second call and put the first call on hold.
2. To switch between the calls, tap .
Turning the speakerphone on or off during a call
To decrease potential damage to your hearing, do not hold HTC Desire 210 dual sim
to your ear when the speakerphone is on.
§ On the call screen, tap to turn the speakerphone on.
§ To turn the speakerphone off, tap .
Muting the microphone during a call
On the call screen, tap to toggle between turning the microphone on or off.
Setting up a conference call
Conference calling with your friends, family, or co-workers is easy. Make the first call
(or accept a call), and then simply dial each subsequent call to add it to the
conference.
Make sure your SIM card is enabled with conference calling service. Contact your
mobile operator for details.
1. Make a call to the first conference call participant.
2. When connected, tap , and then dial the number of the second participant.
Make sure to select the same SIM card you used to call the first participant.
Page 42

42 Phone calls
3. When connected to the second participant, tap .
4. To add another participant, tap , and then dial the number of the contact.
Make sure to select the same SIM card you used to call the other participants.
5. When connected, tap to add the participant to the conference call.
6. To end the conference call, tap .
Checking calls in the Call History
Use Call History to check missed calls, your dialed numbers, and received calls.
1. Open the Phone app.
2. Swipe to view the Call History tab .
3. Tap a name or number in the list to view a detailed call log. Or, tap beside it
to call.
Adding a new phone number to your contacts from Call History
1. On the Call History tab , tap the phone number, and then tap Add to
contacts.
2. Choose whether to create a new contact or save the number to an existing
contact.
Switching between silent, vibrate, and normal modes
Do one of the following:
§ To change from vibrate to normal mode, press the VOLUME UP button.
§ To change from silent to normal mode, press the VOLUME UP button twice.
§ Press and hold the POWER button for a few seconds, and then select Silent
mode to turn sound on or off.
Page 43

43 Messages
Messages
Sending a text or multimedia message via Android Messaging
1. Open the Messaging app.
2. Tap .
3. Enter a contact name or mobile number in the To field.
4. Tap the box that says Type message, and then enter your message.
§ There is a limit on the number of characters for a single text message. If you
exceed the limit, your text message will be delivered as one but will be billed as
more than one message.
§ Your text message automatically becomes a multimedia message if you enter an
email address as the recipient, add a message subject, attach an item, or compose
a very long message.
5. To add a multimedia attachment, tap , choose an attachment type, and then
select the item to attach.
6. Tap .
7. Select the SIM card you want to use.
To save the message as draft, tap the button.
Viewing and saving an attachment from a multimedia message
§ If there’s a media attachment such as a photo or video in a received message,
tap it to view the content.
§ To save the attachment, press and hold the multimedia message (not the
thumbnail), and then choose to save the attachment from the options menu.
Page 44

44 People
People
Your contacts list
The People app lists all contacts from online accounts you're logged in to.
1. Open the People app.
2. On your contacts list, you can:
§ View your profile and edit your contact information.
§ Create, edit, find, or send contacts.
§ Tap a contact photo to find ways to quickly connect with the contact.
To sort your contacts by their first or last name, press the button, and then tap
Settings > Sort list by.
Filtering your contacts list
When your contacts list gets long, you can choose which contact accounts to show.
1. On the People tab, press the button, and then tap Contacts to display.
2. Choose the accounts that contain the contacts you want to display.
If you want to filter by contact groups, tap Customize and then tap the contact
groups that you want shown.
Searching for contacts
1. Open the People app.
2. Tap , and then enter the first few letters of the contact name.
Setting up your personal contact information
Store your personal contact information (such as mobile and phone numbers, email
addresses, and more) to easily send it to other people.
1. On the People tab, tap Set up my profile.
2. Enter your name and contact details.
3. To add more information (such as your personal website), tap Add another
field.
4. Tap Done.
Page 45

45 People
Adding a new contact
1. On the People tab, tap .
2. Choose where you want to store the new contact.
3. Tap the Name field, and then enter the contact name.
4. Enter the contact information in the fields provided.
5. To add more information, tap Add another field.
6. Tap Done.
Editing a contact’s information
1. On the People tab, tap a contact to view the contact details.
2. Press the button, and then tap Edit.
3. Enter the new information.
4. Tap Done.
Getting in touch with a contact
1. Open the People app.
2. Tap a contact's photo (not the name), and then choose how you want to get in
touch with that contact.
Importing contacts from your SIM card
1. On the People app, press the button, and then tap Import/Export.
2. Select the SIM that contains the contact.
3. If you're signed in to a supported email account, tap which account to use for
storing the imported contacts. You can also store contacts in your Google
account.
4. Tap the contacts you want to import.
Page 46

46 People
Importing contacts from the storage
1. On the People app, press the button and then tap Import/Export.
2. Choose the storage where the contacts are saved.
3. If you're signed in to a supported email account, tap which account to use for
storing the imported contacts. You can also store contacts in your Google
account. HTC Desire 210 dual sim will automatically import contacts from .vcf
files.
Sending contact information
1. On the People app, tap a contact to view the contact details.
2. Press the button, and then tap Share.
3. Choose how you want to share the .vcf file.
Contact groups
Organize your friends, family, and colleagues into groups.
Creating a group
1. On the Groups tab, tap .
2. Choose under which account you want to create the group.
3. Enter a name for the group.
4. Select the contacts you want to add.
You can only add contacts from the same account where you're creating the group.
5. When your group is complete, tap Done.
Editing a group
1. On the Groups tab, tap the group that you want to edit.
2. Press the button, and then tap Edit.
3. You can:
§ Change the group name.
§ Add more contacts to the group.
§ Remove contacts from the group.
4. Tap Done.
Page 47

47 Search and web browser
Search and web browser
Searching HTC Desire 210 dual sim and the Web
You can search for information on HTC Desire 210 dual sim and on the Web by using
Google Search. Start your search by entering a keyword or by using Google Voice
Search™.
Some apps, such as People or Email, have their own search function, which you can
use to search only within those apps.
Performing searches on the Web and HTC Desire 210 dual sim
1. Open the Google app.
2. In the search box, enter what you want to search for. As you type, matching
items on HTC Desire 210 dual sim and suggestions from Google web search are
shown.
To search for the information exclusively on HTC Desire 210 dual sim, tap Search
phone at the bottom of the suggestion list.
3. If what you’re searching for is in the list of suggestions, tap the item to open it in
its compatible app.
Searching the Web with your voice
Use Google Voice Search™ to find information on the Web just by speaking to
HTC Desire 210 dual sim.
1. Open the Google app.
2. Say "Ok Google", and then say what you want to search for. After speaking,
matching items from Google web search are shown.
3. If what you’re searching for is in the list, tap the item to open it in its compatible
app. Otherwise, tap to search again.
Page 48

48 Search and web browser
Setting search options
1. Open the Google app.
2. Press the button, and then tap Settings to set the following options:
Voice Set the Google Voice Search language, speech output, and
more.
Phone search Select which apps on HTC Desire 210 dual sim are included
when doing a search.
Accounts &
privacy
Manage your location history, enable recent web searches to
show, or clear your search history.
Getting instant information with Google Now
Do you want to know the weather or your morning commute time before you start
your day? Google Now™ delivers quick and up-to-date information that matters to you
—all without the search.
Depending on your location, time of day, and previous Google searches, Google Now
displays information cards that include:
§ The day's weather and the weather forecast for upcoming days.
§ The traffic conditions on your way to work or your commute back home.
§ The directions and travel time to your next appointment.
§ The next train or bus arriving at your platform or bus stop.
§ Your favorite team's score and stats while you enjoy the game.
To refresh the information, just pull down the screen.
Setting up Google Now
Before setting up Google Now:
§ Make sure that you're signed in to your Google account.
§ Turn location services on and make sure that you have an Internet connection. For
more information on location services, see Turning location services on or off on
page 58.
1. Open the Google app.
2. Tap Next on the Get Google Now! screen.
Page 49

49 Search and web browser
3. Tap Yes, I'm in. Google Now information cards will start to appear on the
Google search screen.
4. To see all available information cards, swipe up the screen and tap More.
Depending on the information that you've allowed to share, more information cards
will appear on the Google search screen as you use HTC Desire 210 dual sim to search
the Web, create appointments, and more.
Changing card settings
You can easily customize the settings of Google Now cards to suit your information
needs. For example, you can change the weather units in the Weather card or your
transportation mode in the Traffic card. You can also specify the details on certain
cards or keep a card from appearing on the Google search screen.
1. Open the Google app.
2. On a card, tap .
3. Set options for the card.
For certain cards that need specific details, such as your work address or sports
teams and stocks you follow, scroll to the bottom of the screen, and then tap .
Dismissing and hiding cards
1. Open the Google app.
2. Do any of the following:
§ To dismiss a card, swipe it left or right.
§ To keep the card from appearing on the Google search screen, tap on a
card and then choose to not receive updates.
Turning off Google Now
1. Open the Google app.
2. Press the button, and then tap Settings.
3. Tap the On/Off switch next to Google Now, and then tap Turn off.
Browsing the Web
Visit your favorite websites or search the Web using Google Chrome™.
1. Open the Chrome app.
2. Tap the URL box on top of the screen.
3. Enter the webpage address or your search keywords.
Page 50

50 Search and web browser
4. To open more browser tabs, tap .
5. To return to the previous webpage you've viewed, press the button.
Bookmarking a webpage
Add your favorite webpages as bookmarks so you can access them quickly.
1. While viewing a webpage, press the button, and then tap .
2. On the Add Bookmark screen, you can edit the bookmark name and save the
bookmark in a new category folder.
3. Tap Save.
To view and open a bookmark, press the button, and then tap Bookmarks.
Navigate to the bookmark you want to open, and then tap it.
Clearing your browsing history
1. While viewing a webpage, press the button, and then tap Settings > Privacy.
2. Tap Clear browsing data.
3. Choose which types of data to delete, and then tap Clear.
Page 51

51 Email
Adding an email account
Set up email accounts such as a Microsoft® Exchange ActiveSync® account or an
account from a Web-based email service or email provider.
§ If you're adding a Microsoft Exchange ActiveSync or a POP3/IMAP email account,
ask your network administrator or email service provider for additional email
settings that you may need.
§ Some email accounts, such as corporate emails, may require advanced security
administration.
1. Open the Email app.
2. Enter the email address and password for your email account, and then tap
Next.
3. Select an email account type.
4. Set the sync options for this email account, and then tap Next.
5. Enter a name for your email account, and then tap Next.
To add more email accounts in the Email app, press the button, and then tap
Settings > Add account.
Page 52

52 Email
Checking your mail
The Email app is where you read, send, and organize email messages from one or
more email accounts that you’ve set up on HTC Desire 210 dual sim.
1. Open the Email app. The inbox of one of your email accounts appears.
2. Do any of the following:
§ Tap an email message to read.
§ To switch between email accounts, tap the bar that shows the current email
account, and then tap another account.
§ To display email messages in another mail folder, tap , and then tap the
folder you want to view.
§ To view email messages from all your accounts, tap the bar that shows the
current email account, and then tap Combined view.
§ To archive, delete or label multiple conversations, tap the check box before
the email message or conversation. Then tap the onscreen buttons at the
bottom to choose what to do with the selected messages or conversations.
§ To change an email account's settings, select the account, press the
button, and then tap Settings.
Sending an email message
1. Open the Email app.
2. Switch to the email account that you want to use.
3. Tap .
4. Fill in one or more recipients.
Want to loop in more recipients in a carbon copy (Cc) or blind carbon copy (Bcc)
of the email message? Press the button, and then tap Add Cc/Bcc.
5. Enter the subject, and then compose your message.
Page 53

53 Email
6. To add a photo attachment, press the button, and then tap Attach file.
7. Tap .
To save the email as draft and send it later, press the button, and then tap
Save draft. Or press the button.
Resuming a draft email message
1. In an email account inbox, tap > Drafts.
2. Tap the message.
3. When you finish editing the message, tap .
Reading and replying to an email message
1. Open the Email app.
2. Switch to the email account you want to use.
3. In the email account inbox, tap the email message or conversation you want to
read.
4. To reply to the sender, tap . Or, press the button, and then choose
whether to Reply all or Forward.
Searching email messages
1. Tap .
2. In the search box, enter the words you want to search for.
3. Tap a result to open the email message.
Page 54

54 Email
Viewing your Gmail Inbox
All your received email messages are delivered to your Inbox.
1. Open the Gmail app.
2. Do any of the following from your Inbox.
§ Tap an email message (not the sender image or letter tile) to read, forward,
or reply to the message.
§ Tap the inbox at the top bar to switch to your other Gmail™ account or to
display drafts, sent messages, or other email labels.
§ Tap the sender image or letter tile to select one or more messages or
conversations. You can then tap the onscreen buttons at the top bar to
archive, delete, or mark the selected messages or conversations.
Get help in using Gmail by pressing the button and then tapping Help.
Sending an email message in Gmail
1. In the inbox of the Gmail account you want to use, tap .
2. Fill in one or more recipients.
Want to loop in more recipients in a carbon copy (Cc) or blind carbon copy (Bcc)
of the email message? Press the button, and then tap Add Cc/Bcc.
3. Enter the email subject, and then compose your message.
4. If you want to attach a photo or video, press the button, and then tap the
attachment type.
5. Tap to send.
Page 55

55 Email
Replying to or forwarding email messages in Gmail
1. In the Gmail inbox, tap the email message or conversation.
2. To reply to the sender, tap . Or, tap and choose whether to Reply all or
Forward.
3. Do one of the following:
§ If you're replying to the sender or you selected Reply all, enter your reply
message.
§ If you selected Forward, specify the message recipients.
Tap Respond inline if you want to interleave your new message with the received
email. But this removes any attachments or formatting in the original email
message.
4. Tap to send.
Page 56

56 Music
Music
Listening to music
Enjoy your favorite songs on HTC Desire 210 dual sim using the Music app.
1. Open the Music app.
2. Browse by artists, albums, or other categories.
3. Tap a song to play.
4. Use the onscreen icons to control music playback, repeat the song, and more.
Creating music playlists
Personalize your music experience by creating music playlists. Make a playlist
containing just your favorite songs or create one to match your mood for the day.
1. Open the Music app.
2. Press and hold the song that you want to add to a playlist.
3. Tap Add to playlist.
4. Tap New, and enter a playlist name.
5. Browse to other songs and repeat the steps to add them to the playlist.
To view the playlist you've created, on the main screen, tap Playlists.
Page 57

57 Music
Playing the songs in a playlist
1. Open the Music app.
2. Tap Playlists.
3. Tap the playlist, and then tap a song in the playlist to start playing the songs.
Deleting music playlists
1. Open the Music app.
2. Tap Playlists.
3. Press and hold the playlist you want to delete, tap Delete.
Page 58

58 Travel and maps
Travel and maps
Turning location services on or off
In order to find your location on HTC Desire 210 dual sim, you need to enable location
sources.
1. Go to Settings.
2. Tap Location access.
3. Select or clear the location sources you want to turn on or off.
About Google Maps
Google Maps™ lets you track your current location, view real-time traffic situations,
and receive detailed directions to your destination.
It also provides a search tool where you can locate places of interest or an address on
a map, or view locations at street level.
§ To find your location with Google Maps, you need to enable location sources.
§ The Google Maps app does not cover every country or city.
Getting around maps
When you open Google Maps, you can easily find your location on the map or check
out nearby places by panning and zooming in and out on the map.
1. Open the Maps app.
2. Tap to show your current location. The blue marker or shows your
current location on the map.
Page 59

59 Travel and maps
3. Navigate the map using finger gestures.
§ Slide your finger on any direction to pan.
§ Double-tap the map or slide two fingers apart over an area to zoom in.
§ Double-tap the map with two fingers or slide two fingers together over an
area to zoom out.
§ Press and hold an area with two fingers and then drag your fingers in a
circular motion to rotate the map.
4. Tap to turn Compass mode on. In Compass mode, the map orients itself
depending on the direction you're facing. To exit Compass mode, tap .
Add a map view to see more information overlaid on the map. Tap , and then tap
a map view such as Traffic or Public transport. To remove the map view, tap it
again on the map view list.
Searching for a location
Use Google Maps to search for a location, such as an address or a type of business or
establishment (for example, museums).
1. Open the Maps app.
2. Tap the search box and then enter the place you want to search for.
Page 60

60 Travel and maps
3. Tap the Enter key on the keyboard or tap a suggested search item. The first
location on the search appears with a place marker and its info sheet displays
at the bottom of the screen. All other search results are indicated by a red dot
or a smart map icon.
§ To check the next or previous location on the search, swipe the info sheet left or
right.
§ To view the search results list, tap .
4. Tap the info sheet to check the address, get directions, see the location in Street
View (if available), and more.
To clear the map and search another location, swipe down the info sheet (if it's
expanded), and then tap .
Finding services near you
Quickly search for banks, gas stations, grocery stores, and other services nearby.
1. Open the Maps app.
2. Tap
3. Tap the search box and then press the button to hide the keyboard.
4. Tap one of the service icons (such as grocery or bank) or tap to select
other services.
5. Tap the info sheet to check the address, get directions, see the location in Street
View (if available), and more.
to show your current location.
Checking the details of a location
1. Open the Maps app.
2. Press and hold a location on the map. A place marker opens and the location's
info sheet appears at the bottom of the screen.
3. Tap the place marker or the info sheet to call, get directions, view the place in
Street View, and more.
Page 61

61 Travel and maps
Exploring places and activities near you
Google Maps lets you find places of interest where you can dine, sleep, shop, and
more.
This feature may not be available for certain countries and locales.
1. Open the Maps app.
2. Tap to show your current location.
3. Tap the search box and then press the button to hide the keyboard.
4. Tap the Explore nearby card.
5. Tap an activity, and then tap a place of interest from the list. The place is
displayed on the map.
6. Tap the info sheet to check the address, get directions, see the location in Street
View (if available), and more. Scroll down the screen to view more information.
To find another place or activity, press the button twice to return to the Explore
nearby screen.
Getting directions
Get detailed directions to your destination. Google Maps provides travel directions by
car, public transit, bike, or foot.
1. Open the Maps app.
2. Tap .
3. Choose how you want to get to your destination.
4. Use your current location as starting point, or tap My location to enter your
starting point or select a location from your search history.
5. Tap Choose destination, and then enter or select your destination.
If you're taking public transit, tap to set the date and time of travel, or tap
Options to set your route preferences.
6. Tap a route or transit option to view the directions on the map. You'll also see
the travel duration on the info sheet at the bottom of the screen.
7. Tap the info sheet to view the directions in a list.
When you’re finished viewing or following the directions, tap to reset the map.
Your destination is automatically saved in the Google Maps history.
Page 62

62 Google Play and other apps
Google Play and other apps
Getting apps from Google Play
Google Play is the place to go to find new apps for HTC Desire 210 dual sim. Choose
from a wide variety of free and paid apps ranging from productivity apps,
entertainment, to games.
§ A Google Wallet™ payment service is required to purchase a paid app. You will be
asked to confirm method of payment when you purchase an app.
§ The name of the Play Store app may differ depending on your region.
§ The ability to purchase apps varies by region.
Finding and installing an app
When you install apps and use them on HTC Desire 210 dual sim, they may require
access to your personal information or access to certain functions or settings.
Download and install only apps that you trust.
Be cautious when downloading apps that have access to functions or a significant
amount of your data on HTC Desire 210 dual sim. You’re responsible for the results
of using downloaded apps.
1. Open the Play Store app.
2. Browse or search for an app.
3. When you find the app that you like, tap it and read its description and user
reviews.
4. To download or purchase the app, tap Install (for free apps) or the price button
(for paid apps).
5. Tap Accept.
Apps sometimes get updated with improvements or bug fixes. To automatically
download updates, after installing the app, press the button, and then tap Auto-
update.
To open the app, go to the All Apps screen and tap the app.
Page 63

63 Google Play and other apps
Restoring apps from Google Play
Upgraded to a new phone, replaced a lost one, or performed a factory reset? Restore
apps that you previously downloaded.
1. Open the Play Store app.
2. Tap > My apps.
3. Tap to open the slideout menu.
4. Tap My apps, swipe to the All tab, and then tap the app you want to restore.
5. Install the app.
For more details, refer to the Google Play help.
Downloading apps from the web
You can download apps directly from websites.
§ Apps downloaded from websites can be from unknown sources. To help protect
HTC Desire 210 dual sim and your personal data, we strongly recommend that you
only download from websites you trust.
§ Before you can install the downloaded app, make sure that you've set
HTC Desire 210 dual sim to allow installation of third-party apps in Settings >
Security > Unknown sources.
1. Open the browser, and then go to the website where you can download the app
you want.
2. Follow the website's download instructions for the app.
After installing the app, make sure to go back to Settings > Security and clear the
Unknown sources option.
Page 64

64 Google Play and other apps
Uninstalling an app
If you no longer need an app that you've downloaded and installed, you can easily
uninstall it.
Most of the preloaded apps cannot be uninstalled but can be disabled instead.
From the All Apps screen, press and hold the app you want to remove, and then drag
it to Uninstall.
If you purchased an app in Play Store, you can uninstall it for a refund within a
limited time. To know more about the refund policy for paid apps, refer to the
Google Play help.
Disabling an app
If an app cannot be uninstalled, you can disable it instead.
1. Go to Settings > Apps
2. Swipe to the All tab, and then select the app that you want to disable.
3. Tap Disable.
Disabled apps will be removed from the All Apps screen, and will not sync data on the
background anymore.
Using the Clock app
Check the time and set up alarms.
Setting an alarm
You can set up one or more alarms.
1. Open the Clock app.
2. Tap .
3. Tap .
4. Set the time.
5. If you want the alarm for multiple days, choose the Repeat option and select
when the alarm will go off.
Tap the On/Off switch next to the alarm you want to go off.
Page 65

65 Google Play and other apps
Setting the date and time manually
1. Go to Settings.
2. Tap Date & time.
3. Tap Automatic date & time and turn it off.
4. Clear the Automatic time zone option, and then set the time zone, date, and
time as required.
Viewing the Calendar
Use the Calendar app to view your events, meetings, and appointments. If you've
signed into your online accounts, related events will also appear in Calendar.
1. Open the Calendar app.
2. Tap , and then choose a calendar view.
Scheduling or editing an event
You can create or edit events on HTC Desire 210 dual sim, and also sync events with
your Exchange ActiveSync calendar. You can also create, modify, and sync events
with your Google calendar.
Editing events is not supported for all accounts.
1. Open the Calendar app.
2. On any Calendar view, do one of the following:
Create an event Press the button, and then tap New event. Select the
calendar you will add the event to.
Edit an event View an event, and then tap .
3. Enter and set the event details.
4. To invite contacts from your Exchange ActiveSync account, tap Guests. You
can also invite contacts from your Google account.
5. Tap Done.
Choosing which calendars to show
1. In any calendar view, press the button, and then tap Calendars to display.
2. Select or clear an account you wish to show or hide.
You can also choose which calendars to sync with HTC Desire 210 dual sim.
Calendars are synced on HTC Desire 210 dual sim even if they are hidden.
Page 66

66 Google Play and other apps
Watching videos on YouTube
Check out the latest video sensations using the YouTube® app.
1. Open the YouTube app.
2. Browse or search for a video.
3. When you find the video that you like, tap it.
Want to watch the video at a later time instead? Tap > Watch later. You can
access the video again from your account profile's Watch later list.
4. While watching a video, you can:
§ Turn HTC Desire 210 dual sim sideways to watch the video in full screen.
§ Tap the video screen to pause or to resume playback, or drag the slider to
jump to a different part of the video.
§ Scroll down the video information panel to see related videos and
comments from other viewers.
§ Tap to minimize the video screen and browse other videos. To close the
video thumbnail, swipe it left or right.
Minimize the video screen and then tap the to open the slideout menu.
Preloading videos
Set the YouTube app to preload videos so that you can watch them without
interruptions. Videos are preloaded when HTC Desire 210 dual sim is being charged
and is connected to a Wi-Fi network.
For more information about preloading videos, refer to the YouTube help.
1. Open the YouTube app.
2. Press the button, and then tap Settings > Preloading.
3. Select what type of videos to preload.
The videos are preloading when appears on Watch later screen or on the channel
you subscribed to. The icon changes to when the videos are ready.
Page 67

67 Internet connections
Internet connections
Data connection
When you turn on HTC Desire 210 dual sim for the first time, it will be automatically
set up to use your mobile operator's data connection (if the SIM card is inserted in slot
1).
Slot 1 supports WCDMA and GSM. Slot 2 supports GSM.
Turning the data connection on or off
Turning your data connection off saves battery life and money on data charges.
1. Go to Settings.
2. Under Wireless & networks, tap More.
3. Tap Mobile networks > Data connection.
4. Select your mobile operator's name to turn on data connection.
If you don’t have the data connection turned on and you’re also not connected to a
Wi-Fi network, you won’t receive automatic updates to your email, social network
accounts, and other synced information.
Adding a new access point
You can add a new Access Point Name (APN) when roaming or if you have difficulty
establishing a data connection. APNs connect HTC Desire 210 dual sim to data
networks for services such as mobile web browsing.
Before you add another data connection, have the access point name and settings
from your mobile operator ready (including username and password if required).
1. Go to Settings.
2. Under Wireless & networks, tap More.
3. Tap Mobile networks > Access Point Names.
4. Choose which card to configure.
5. Press the button, and then tap New APN.
6. Enter the APN settings.
Page 68

68 Internet connections
7. Press the button, and then tap Save.
8. Select the new APN on the APNs screen.
Managing your data usage
If you're on a limited data allowance, it's important to keep track of the activities and
apps that usually send and receive data, such as browsing the web, syncing online
accounts, and sending email or sharing status updates.
Here are some other examples:
§ Streaming web videos and music
§ Playing online games
§ Downloading apps, maps, and files
§ Refreshing apps to update info and feeds
§ Uploading and backing up your files to your online storage account
§ Using HTC Desire 210 dual sim as a Portable Wi-Fi hotspot
§ Sharing your mobile data connection by USB tethering
To help you save on data usage, connect to a Wi-Fi network whenever possible and
set your online accounts and emails to sync less frequently.
Turning data roaming on or off
Connect to your mobile operator’s partner networks and access data services when
you’re out of your mobile operator’s coverage area.
Using data services while roaming may be costly. Check with your mobile operator
for data roaming rates before you use data roaming.
1. Go to Settings.
2. Tap SIM management > Roaming > Data roaming.
3. Select or clear the card options.
Keeping track of your data usage
Monitor your data usage to help prevent going over your monthly data allowance.
Your actual data usage may differ and may be higher than the data usage
measured by HTC Desire 210 dual sim.
1. Go to Settings.
2. Tap Data usage.
3. Select the tab that displays your mobile operator.
Page 69

69 Internet connections
4. Select Set mobile data limit to automatically disable your data connection when
you reach the set limit.
Then, drag the upper limit line to set your monthly data limit.
5. Drag the lower warning line to set an alert before you reach your monthly data
limit.
6. Drag the vertical line markers to see how much data you've used during a
particular time interval.
If you're connecting HTC Desire 210 dual sim to another portable Wi-Fi hotspot,
press the button, and then tap Mobile hotspots to restrict background data
from downloading that may incur extra data fees.
Viewing the data usage of apps
1. Go to Settings.
2. Tap Data usage.
3. Drag the vertical line markers to see how much data you've used during a
particular time interval.
4. Scroll down the screen to see a list of apps and their data usage info.
5. Tap an app to see more details.
Wi-Fi
To use Wi-Fi, you need access to a wireless access point or “hotspot”.
The availability and strength of a Wi-Fi signal varies depending on objects the Wi-Fi
signal has to pass through (such as buildings or a wall between rooms).
Turning Wi-Fi on and connecting to a wireless network
1. Go to Settings.
2. Tap the Wi-Fi On/Off switch to turn Wi-Fi on.
Page 70

70 Internet connections
3. Tap Wi-Fi.
Detected Wi-Fi networks will be listed.
If the wireless network that you want is not listed, tap to manually add it.
4. Tap the Wi-Fi network you want to connect to. If you selected a secured
network, you'll be asked to enter the network key or password.
5. Tap Connect. You'll see the Wi-Fi icon in the status bar when connected.
The next time HTC Desire 210 dual sim connects to a previously accessed secured
wireless network, you won’t be asked to enter the key or other security information
again.
Connecting to a Wi-Fi network via WPS
If you're using a Wi-Fi router with Wi-Fi Protected Setup™ (WPS), you can connect
HTC Desire 210 dual sim easily.
1. Go to Settings.
2. Tap the Wi-Fi On/Off switch to turn on.
3. Tap Wi-Fi.
4. Tap , and then press the WPS button on your Wi-Fi router. To use the Wi-Fi
Protected Setup (WPS) PIN method, press the button, and then tap WPS Pin
Entry.
Connecting to a different Wi-Fi network
1. Go to Settings.
2. Tap Wi-Fi. Detected Wi-Fi networks are displayed.
To manually scan for available Wi-Fi networks, press the button, and then tap
Scan.
3. Tap a Wi-Fi network to connect to it.
Connecting to a virtual private network (VPN)
Add virtual private networks (VPNs) so you can connect and access resources inside
a secured local network, such as your corporate network.
Before you can connect to your organization's local network, you may be asked to:
§ Install security certificates
§ Enter your login credentials
§ Download and install a required VPN app on HTC Desire 210 dual sim
Page 71

71 Internet connections
Contact your network administrator for details. Also, HTC Desire 210 dual sim must
first establish a Wi‑Fi or data connection before you can start a VPN connection.
Adding a VPN connection
You must first set a lock screen PIN or password before you can use credential
storage and set up the VPN.
1. Go to Settings.
2. Under Wireless & networks, tap More.
3. Tap VPN > .
4. Enter the VPN settings and set them up according to the security details your
network administrator gave you.
5. Tap Save.
The VPN is then added to the VPNs section of the VPN settings screen.
Connecting to a VPN
1. Go to Settings.
2. Under Wireless & networks, tap More.
3. Tap VPN.
4. Tap the VPN that you want to connect to.
5. Enter your log in credentials, and then tap Connect. When you’re connected, the
VPN connected icon appears in the notification area of the status bar.
You can then open the web browser to access resources such as your corporate
network intranet.
Disconnecting from a VPN
1. Slide the Notifications panel open.
2. Tap the VPN connection to return to the VPN settings screen, and then tap the
VPN connection to disconnect from it.
Page 72

72 Internet connections
Using HTC Desire 210 dual sim as a Wi-Fi
hotspot
Share your data connection with other devices by turning HTC Desire 210 dual sim
into a Wi-Fi hotspot.
§ Make sure the data connection is turned on.
§ You must have an approved data plan associated with your account from your
mobile service provider to use this service.
1. Go to Settings.
2. Under Wireless & networks, tap More.
3. Tap Tethering & portable hotspot > WLAN hotspot.
4. Tap Set up Wi-Fi hotspot.
5. Enter a Wi-Fi hotspot name or use the default name.
6. Choose the type of security and set the password (key) for your Wi-Fi hotspot.
If you selected None in Security, you don’t need to enter a password.
The password is the key other people need to enter on their device so they can
connect and use HTC Desire 210 dual sim as a Wi-Fi hotspot.
7. Tap Save.
8. On the Tethering & portable hotspot screen, tap the switch to turn on the Wi-Fi
hotspot.
HTC Desire 210 dual sim is ready to be used as a Wi-Fi hotspot when you see on
the status bar.
Sharing your phone's Internet connection by USB tethering
No Internet connection available for your computer? No problem. Use the data
connection of HTC Desire 210 dual sim to connect to the Internet.
§ Make sure your SIM card is inserted on HTC Desire 210 dual sim and that mobile
data is turned on.
§ You may need to have USB tethering added to your data plan, and it may incur
additional cost. Contact your mobile service provider for details.
1. Connect HTC Desire 210 dual sim to your computer using the provided USB
cable.
2. Go to Settings.
Page 73

73 Internet connections
3. Under Wireless & networks, tap More.
4. Tap Tethering & portable hotspot.
5. Select the USB tethering option.
Page 74

74 Bluetooth
Bluetooth
Connecting a Bluetooth headset
You can listen to music over a Bluetooth stereo headset, or have hands-free
conversations using a compatible Bluetooth headset.
§ To listen to music with your headset, the headset must support the A2DP
Bluetooth profile.
§ Before you connect your headset, make it discoverable so HTC Desire 210 dual sim
can find it. Refer to your headset manual for details.
1. Go to Settings.
2. If Bluetooth is off, tap the Bluetooth On/Off switch to turn it on.
3. Tap Bluetooth. The Bluetooth screen opens.
4. If you don't see your headset listed, tap Search for devices to refresh the list.
5. When you see the name of your headset in the Available Devices section, tap
the name. HTC Desire 210 dual sim pairs with the headset and the headset
connection status is displayed in the Paired Devices section.
If automatic pairing fails, enter the passcode supplied with your headset.
When the Bluetooth headset is connected to HTC Desire 210 dual sim, the Bluetooth
connected icon is displayed in the status bar.
Unpairing from a Bluetooth device
1. Go to Settings.
2. If Bluetooth is off, tap the Bluetooth On/Off switch to turn it on.
3. Tap Bluetooth. The Bluetooth screen opens.
4. In the Paired devices section, tap next to the device to unpair.
5. Tap Unpair.
Page 75

75 Storage
Storage
Types of storage
Want to know what types of storage you can use for your apps, data, and files?
HTC Desire 210 dual sim has these storage types:
Phone
storage
Storage card Use a storage card for storing more files. You can also set apps such
This storage combines both the app storage, where apps, email, data,
and text messages are stored, and the file storage, where photos,
videos, and music files are kept.
as Camera to store directly to the card.
Copying files to or from HTC Desire 210 dual sim
You can copy your music, photos, and other files to HTC Desire 210 dual sim.
1. Connect HTC Desire 210 dual sim to the computer using the supplied USB cable.
2. Slide the Notification panel, and then tap the notification that lets you choose
USB options.
3. Choose a connection type. You can:
§ Choose USB storage to access the storage card only.
§ Choose Media device (MTP) to access both the phone storage and storage
card. You'll see options for viewing or importing files on the computer
screen. Choose to view files.
4. Copy the files from your computer to HTC Desire 210 dual sim, or vice versa.
5. After copying the files, disconnect HTC Desire 210 dual sim from the computer.
Page 76

76 Storage
Encrypting data on HTC Desire 210 dual sim
You can encrypt data such as your online accounts, settings, music files and other
media. After encryption, you will need to enter the screen lock PIN or password to
turn on your phone and access the data.
§ Set a lock screen PIN or password before encrypting your data.
§ Fully charge the battery and keep HTC Desire 210 dual sim connected to the
power adapter during encryption. The encryption process takes about an hour.
§ You cannot undo encryption. If you want to return to an unencrypted phone, you
must perform a factory reset.
1. Go to Settings.
2. Tap Security > Encrypt phone.
3. Tap Encrypt phone.
4. Enter the lock screen PIN or password, and tap Next.
5. Tap Encrypt phone.
Encryption starts and the progress is displayed. The phone may restart a few times.
When the encryption process is complete, enter your PIN or password.
Page 77

77 Backup and reset
Backup and reset
Backup
Backing up settings to Google
You can choose to automatically back up some settings such as Wi-Fi and bookmarks
to Google servers using your Google Account so you can restore them when needed.
1. Go to Settings.
2. Tap Backup & reset, and then select the Back up my data option.
3. Tap Backup account.
4. Choose the Google account you want to use.
Reset
Restarting HTC Desire 210 dual sim (Soft reset)
If HTC Desire 210 dual sim is running slower than normal, is unresponsive, or has an
app that is not performing properly, try rebooting and see if that helps solve the
problem.
1. If the display is off, press the POWER button to turn it back on.
2. Press and hold the POWER button, and then tap Reboot.
If these steps don't work, you can remove and reinstall the battery, and then turn
HTC Desire 210 dual sim on to restart it.
Resetting HTC Desire 210 dual sim (Hard reset)
If HTC Desire 210 dual sim has a persistent problem that cannot be solved, you can
perform a factory reset (also called a hard reset or master reset).
Factory reset will remove apps you’ve downloaded and installed, your accounts, as
well as system and app data and settings. Be sure to back up any data and files you
want to keep before you do a factory reset.
Factory reset may not permanently erase all data from your phone, including
personal information.
Page 78

78 Backup and reset
Performing a factory reset from settings
1. Go to Settings.
2. Tap Backup & reset.
3. Tap Factory data reset.
4. Tap Reset phone, and then tap Erase everything.
Performing a factory reset using hardware buttons
If you can’t turn HTC Desire 210 dual sim on or access settings, you can still perform a
factory reset by using the hardware buttons on HTC Desire 210 dual sim.
1. Remove the battery, wait for a few seconds, then reinsert the battery.
2. Press and hold the VOLUME UP button, and then press and hold the POWER
button.
3. Wait for the screen with the Android image to appear and to be in recovery
mode, and then release the POWER and VOLUME UP buttons.
4. Press the VOLUME DOWN button to select wipe data/factory reset, and then
press the POWER button.
5. Press the VOLUME DOWN button to select Yes--delete all user data, and then
press the POWER button. A message appears when the data has been wiped.
6. Remove the battery, wait for a few seconds, then reinsert the battery.
Page 79

79 Settings and security
Settings and security
Adding and syncing an account
1. Go to Settings.
2. Under Accounts, tap Add account.
3. Choose an account type, and then enter your login information.
4. Choose the types of information that you want to sync on
HTC Desire 210 dual sim.
Removing an account
1. Go to Settings.
2. Under Accounts, tap an account type.
3. Tap the account that you want to remove.
4. Press the button, and then tap Remove account.
Removing an account does not delete information from the online service itself.
Turning Airplane mode on or off
When you enable Airplane (Flight) mode, all wireless radios on
HTC Desire 210 dual sim are turned off, including the call function, data services,
Bluetooth, and Wi-Fi.
When you disable Airplane mode, the call function is turned back on and the previous
state of Bluetooth and Wi‑Fi is restored.
§ You can manually turn Bluetooth and Wi-Fi back on after enabling Airplane mode.
§ If USB tethering is turned on, enabling Airplane mode turns it off. You need to
manually turn USB tethering on after you disable Airplane mode.
Press and hold POWER, and then tap Airplane mode.
When enabled, the Airplane mode icon is displayed in the status bar.
Page 80

80 Settings and security
Turning automatic screen rotation off
Automatic rotation is not supported in all apps.
1. Go to Settings.
2. Tap Display.
3. Clear the Auto-rotate screen option.
Adjusting the time before the screen turns off
After a period of inactivity, the screen turns off to conserve battery power. You can
set the idle time before the screen turns off.
1. Go to Settings.
2. Tap Display, and then tap Sleep.
3. Tap the time before the screen turns off.
Adjusting the screen brightness manually
1. Go to Settings.
2. Tap Display > Brightness.
3. Drag the brightness slider to the left to decrease or to the right to increase the
screen brightness.
4. Tap OK.
Changing the display language
Changing the language adjusts the keyboard layout, date and time formatting, and
more.
1. Go to Settings.
2. Tap Language & input > Language.
3. Tap the language you want to use.
Page 81

81 Settings and security
Working with certificates
Use client and Certificate Authority (CA) digital certificates to enable
HTC Desire 210 dual sim to access VPN or secured Wi-FI networks, and also to
provide authentication to online secure servers. You can get a certificate from your
system administrator or download it from sites that require authentication.
Some apps such as your browser or email client let you install certificates directly in
the app. See the app's help for details.
Installing a digital certificate
You must set a lock screen PIN or password before installing a digital certificate.
1. Save the certificate file in the root folder on HTC Desire 210 dual sim.
2. Go to Settings.
3. Tap Security > Install from SD card.
4. If you have more than one certificate in the root folder, select the certificate you
want to install.
5. Enter a name for the certificate and tap OK.
Protecting your SIM card with a PIN
Add another layer of security for HTC Desire 210 dual sim by assigning a PIN (personal
identification number) to your SIM.
Make sure you have the default SIM PIN provided by your mobile operator before
continuing.
1. Go to Settings.
2. Tap Security > Set up SIM card lock.
3. Choose the SIM card you want to assign a PIN to.
4. Tap Lock SIM card.
5. Enter the default SIM card PIN, and then tap OK.
6. To change the SIM card PIN, tap Change SIM PIN.
Page 82

82 Settings and security
Restoring a SIM card that has been locked out
If you enter the wrong PIN more times than the maximum number of attempts
allowed, your SIM card will become “PUK-locked.”
You need a PUK code to restore access to HTC Desire 210 dual sim. Contact your
mobile operator for this code.
1. On the Phone dialer screen, enter the PUK code for one of the SIM cards, and
then tap .
2. Enter the new PIN you want to use, and then tap .
3. Enter the new PIN again, and then tap OK.
Protecting HTC Desire 210 dual sim with a screen lock
Help protect your personal information and help prevent others from using
HTC Desire 210 dual sim without your permission by setting a screen lock pattern,
face unlock, PIN, or password.
You'll be asked to unlock the screen every time HTC Desire 210 dual sim is turned on
or when it’s idle for a certain period of time.
1. Go to Settings.
2. Tap Security > Screen lock.
3. Select a screen lock option and set up the screen lock.
4. Tap Automatically lock, then specify the idle time before the screen is locked.
You can also clear Make pattern visible or Make passwords visible if you don’t want
your screen lock to display as you enter it onscreen.
Managing your SIM cards
1. Go to Settings.
2. Tap SIM management.
3. You can:
§ Turn both slots on or off.
§ Tap a slot name to rename it.
§ Choose which slot you want to use for voice call, messaging, and data
connection.
Page 83

83 Trademarks and copyrights
Trademarks and copyrights
©
2014 HTC Corporation. All Rights Reserved.
HTC, the HTC logo, HTC Desire, and HTC BlinkFeed are trademarks or service marks
of HTC Corporation.
Google, Android, Android Beam, Android Market, Google Calendar, Google Chrome,
Google Maps, Google Now, Google Play, Google Talk, Google Wallet, Google Voice
Search, Google+, Gmail, and YouTube are trademarks of Google Inc.
Microsoft and ActiveSync are either registered trademarks or trademarks of Microsoft
Corporation in the United States and/or other countries.
The
Bluetooth
SIG, Inc.
Wi-Fi® is a registered trademark of the Wireless Fidelity Alliance, Inc.
® word mark and logos are registered trademarks owned by Bluetooth
microSD is a trademark of SD-3C LLC.
All other company, product and service names mentioned herein are trademarks,
registered trademarks or service marks of their respective owners. Not all marks listed
necessarily appear in this User Guide.
Screen images contained herein are simulated. HTC shall not be liable for technical or
editorial errors or omissions contained herein, nor for incidental or consequential
damages resulting from furnishing this material. The information is provided “as is”
without warranty of any kind and is subject to change without notice. HTC also
reserves the right to revise the content of this document at any time without prior
notice.
No part of this document may be reproduced or transmitted in any form or by any
means, electronic or mechanical, including photocopying, recording or storing in a
retrieval system, or translated into any language in any form without prior written
permission of HTC.
Page 84

84 Index
Index
A
Airplane mode
Alarms
- setting
Android Market
See Google Play
Messages
Apps
- grouping into a folder
- icons on Home screen
- installing
- installing from the web
- on Home screen
- restoring
- uninstalling
79
64
43
37
36
62, 63
63
36
63
64
B
Backup
- restoring backed up apps
Battery
- checking usage
- saving battery power
Bluetooth
- connecting a Bluetooth headset
Browser
- bookmarks
- history
- using
50
49
29
50
63
29
C
Calendar
- creating an event
- views
Camera
- basics
Capture screen
Change phone language
Clock
- alarm
- setting date and time
Conference call
65
31
64
65
22
80
65
41
74
Contacts
- adding
- copying from SIM card
- importing contacts
Copying
- files to computer
- text
45
45
45
75
25
D
Data connection
- access point names (APN)
- data roaming
- sharing
- turning on or off
- usage
Display
- changing the time before the screen
- screen brightness
- screen rotation
- Sleep mode
68
turns off
68
72
67
80
80
80
18
67
E
Email
See Mail
F
Factory reset
Files
- copying to computer
Finger gestures
Folder
- grouping apps
- removing items
- renaming
77
75
16
37
37
37
G
Gallery
- editing
- Video Highlights
- viewing
32
32
32
Page 85

85 Index
Gestures
- touch gestures
Gmail
Google Chrome
Google Maps
Google Now
Google Play
Google Voice Search
GPS (Global Positioning System)
54
- browser
- setting up
- turning off
- installing apps
- refund
See Locations
49
64
16
58
48
49
62
47
H
Hands free
Hard reset
See Factory reset
Headphones
See Bluetooth
Home screen
- widgets
- adding, removing, or arranging
widget panels
- apps
- changing your main Home screen
- folder
- HTC BlinkFeed
- launch bar
- shortcuts
- wallpaper
HTC BlinkFeed
- about
- adding or removing locales
- deleting tiles
- posting to social networks
- reading articles
- saving articles for later
- selecting feeds
- setting up custom topics
- turning on or off
74
35
38
36
37
22
35
36
34
22
23
24
24
24
24
23
24
23
38
- Wi-Fi
- Wi-Fi Hotspot
69
72
K
Keyboard
- dictionary
- entering text
- entering text by speaking
- HTC Sense keyboard
- layout
- multi-language keyboard
- predictive text
- shortcuts
- speech recognition
28
26
29
25
26
26
27
28
29
L
Language
- system language
Locations
- turning on location services
Low battery
29
80
58
M
Mail
- attachments
- carbon copy, blind copy (cc, bcc)
- draft
- replying
- searching
- sending
Making calls
- calling
Maps
- Google Maps
Market
See Google Play
Master reset
See Factory reset
Mobile data
Music
- listening
- playlist
52
39
52
53
53
52
58
67
56
56
52
I
Internet connection
- data connection
- VPN
70
67
P
Pair a Bluetooth headset
People
- adding a new contact
74
45
Page 86

86 Index
- contact groups
- copying contacts
- editing contacts
- filtering your contacts
- groups
- personal profile
- sending contact information
Phone calls
- calling
- conference call
- emergency call
- missed calls
- muting the microphone
- putting a call on hold
- speakerphone
Power
- checking battery usage
- saving power
- sleep mode
Print screen
See Capture screen
PUK (PIN Unblock Key)
46
39
46
46
45
44
44
41
40
39
41
40
41
29
29
18
82
46
SIM card
- SIM PIN
Sleep mode
Slideshow
See Video Highlights
Soft reset
Sound
- switching profiles
Speakerphone
Storage
- copying files
- storage encryption
- types of storage
81
18
77
41
75
T
Tethering
See USB Tethering
U
USB Tethering
72
V
42
76
75
R
Reset
77
S
Screen
- adjusting brightness
- capture
- changing the time before the screen
turns off
- rotation
- Sleep mode settings
Screen shot
See Capture screen
Search
- searching phone and Web
- voice search
Security
- encrypting data
- protecting SIM card with PIN
- security certificates
Settings
- display language
- Storage
Setup
- initial setup
22
80
80
47
75
15
80
80
47
76
81
70
80
Video Highlights
Voice input
Voice search
VPN
- adding a connection
- connecting
- disconnecting
32
29
47
71
71
71
W
Wallpaper
Wi-Fi
- connecting to another network
- connecting via WPS
- turning on
Wi-Fi hotspot
Widgets
- adding
- changing settings
- removing
- resizing
Word prediction
- bilingual prediction
34
70
69
72
35
36
37
36
27
70
Page 87

87 Index
SAR information
Y
YouTube
- preloading
- watching
66
66
Head: 0.95 W/kg@1g
Body: 0.7 W/kg@1g
 Loading...