

Page 1

Your HTC Desire
Quick start guide
Page 2

2 Quick start guide
Before you do anything else, please read this
Charge the battery
The battery in your phone hasn’t been charged yet. While your
phone is charging, it’s important that you do not remove the
battery pack. Doing so can damage your phone. Also, please don’t
try to take your phone apart. (If you do, it may invalidate your
warranty.)
Know about privacy laws
Some countries have strict laws about how and when you can
record phone conversations. For example, you may need to tell the
person you’re speaking to before you start recording. It’s a good
idea to find out what the laws are where you live before you use
your phone’s recording feature.
And finally, a few important words from our legal team
(LIMITATION OF DAMAGES)
To the maximum extent permitted by applicable law, in no event
shall HTC or its affiliates be liable to you, any user, or third party
for any indirect, special, consequential, incidental or punitive
damages of any kind, arising in contract, tort, or otherwise,
including, but not limited to, injury, loss of revenue, loss of
goodwill, loss of business opportunity, loss of data, and/or loss of
profits, regardless of the foresee ability thereof or whether HTC or
its affiliates have been advised of the possibility of such damages.
And in no event shall the total liability of HTC or its affiliates
exceed the amount received from you, regardless of the legal
theory under which the cause of action is brought. The foregoing
does not affect any statutory rights which may not be disclaimed.
Page 3
Quick start guide 3
This quick start guide will help you get started with
your phone. In this guide, we use the following
symbols to indicate important or useful information:
Notes Important information
Tips Safety precaution
For the complete user guide and other helpful
resources, check out the HTC support website at
www.htc.com/support.
Contents
1. What ’s in the box 4
2. Get to k now your p hone 4
3. Befo re you turn on your ph one 5
4. Get started 7
5. Add you r contacts 9
6. Make you r first c all 10
7. Status Bar and Notif icatio ns 10
8. HTC Sen se 11
9. Connect to the I nternet 13
10. Get your m essag es acros s 16
11. Managin g Your Appli cation s 18
12. Stay in touch with fri ends 19
13. Get files into your p hone 2 0
14. Sync your phone with your compute r 21
15. Factory resetti ng 23
16. Troublesho oting tip s 24
Page 4
4 Quick start guide
1. What’s in the box
Here’s what you should find inside the box:
Phone
•
Battery
•
USB cable
•
•
3.5mm stereo headset
Power adapter
•
microSD™ card (pre-
•
installed in the device)
This quick start guide
•
Safety and regulatory
•
guide
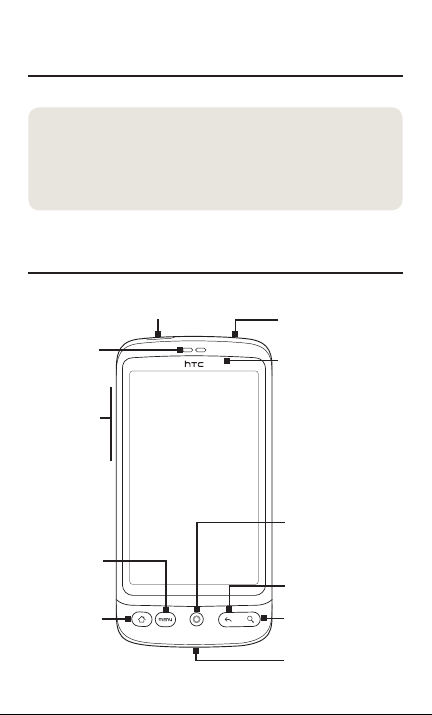
2. Get to know your phone
Earpiece
Volume
Control
MENU
HOME
POWER
Touch Screen
3.5 mm
headset jack
Notification LED
Optical
trackball
BACK
SEARCH
USB connector
Page 5
Quick start guide 5
3. Before you turn on your phone
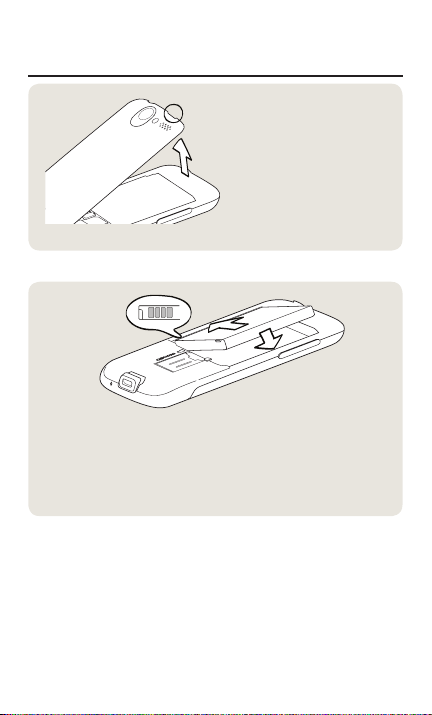
1 Remove the back cover
Lift the top of the back
cover. There’s a narrow
opening (near the POWER
button) where you can use
your finger to remove the
back cover.
2 Insert the battery
Align the battery’s exposed copper contacts with the battery
1.
connectors inside the battery compartment.
Insert the contacts side of the battery first and then gently
2.
push the battery into place.
Page 6
6 Quick start guide
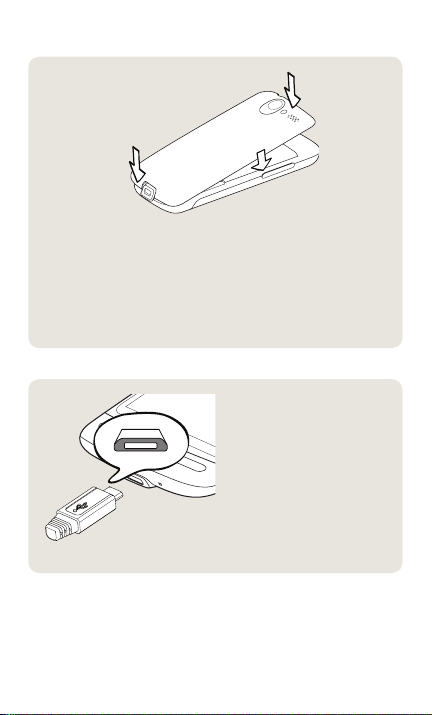
3 Replace the back cover
Secure and press the bottom part of the back cover first by
1.
aligning into the two openings located at the bottom part of
the back of the phone.
Press the sides and the top part of the back cover down to
2.
lock the cover into place. You will hear a click when the back
cover is locked in place.
4 Charge the battery
Plug the power adapter
1.
into the USB connector at
the bottom of your phone.
Plug in the power adapter
2.
to an electrical outlet to
start charging the battery.
It will take about three
hours for the battery to be
fully charged.
After installing and charging the battery, you are now
ready to turn your phone on for the first time. Press the
POWER button to turn on your phone.
Page 7

Quick start guide 7
Read on and start exploring what you can do with your
phone.
4. Get started
On the Home screen, tap > Setup .
1. Choose the phone language you want to use, and
then tap Next.
2. Your phone walks you through a tutorial on how
to use the onscreen keyboard. Follow through the
tutorial to learn how to use the onscreen keyboard.
Tap Skip to not go through the tutorial.
3. On the Internet connection screen, select how you
want to connect to the Internet, and then tap Next.
4. If there are Wi-Fi networks in range, you will be asked
if you want to connect to a Wi-Fi network. Tap Next
and then tap the wireless network that you want, or
clear the Connect to Wi-Fi network checkbox, and
then tap Next to set up your Wi-Fi connection at a
later time.
5. Some phone features such as Weather and Footprints
require Google’s location service to automatically
determine your current location. On the Location
consent screen, you can choose whether to allow
Google’s location service to collect information about
your location. Clear or select the checkbox, and then
tap Next.
6. On the Set up accounts screen, choose the type of
account you want to set up and follow the onscreen
instructions to complete the setup. Tap Skip to set up
accounts at a later time.
Page 8

8 Quick start guide
To set up your Google Account, tap Google
account > Next > Sign in, enter your Google
Account details, and then tap Sign in.
To learn how to set up POP3 and Microsoft
Exchange ActiveSync accounts, see the Sync
and Email chapters to learn how to set up these
accounts.
After setting up an account, you will be taken back
to the Set up accounts screen so you can set up
more accounts. When you are done setting up your
accounts, tap Next
.
7. On the Set up social networks screen, choose the
type of social network account such as Facebook (for
HTC Sense) and Twitter that you want to access from
your phone. Follow the onscreen instructions to log
in to your social network account. Tap Skip to set up
social network accounts at a later time. See the Social
chapter for more information about Facebook for HTC
Sense.
When you are done setting up your accounts, tap
Next on the Set up social networks screen.
Page 9

Quick start guide 9
5. Add your contacts
There are several ways you can add contacts to your
phone.
Adding a new contact
1. On the Home screen, tap > People.
2. On the All tab, tap Add contact.
3. Tap the Name field, enter the first and last name of the
contact, and then tap OK.
4. Tap to hide the onscreen keyboard, tap the
Display name box, and then choose how you want the
contact name to be displayed in your contacts list.
5. Tap OK.
6. Choose the Contact account under which to create
your contact.
7. Enter the rest of the contact information into the
relevant fields.
8. Scroll to the bottom of the screen, and then tap Save.
Synchronizing contacts from other sources
My Contacts Backup application from U.S. Cellular is
preloaded on the device. With My Contacts backup you
can download contacts you have saved from a previous
device using the application and secure your existing
phone contacts.
You can quickly and seamlessly sync your phone
with your contacts in your Google Account, Microsoft
Office Outlook, Outlook Express, Exchange ActiveSync
account, and even Facebook. Take a look at the complete
user guide on our website, www.htc.com/support, to see
how it’s done.
Page 10

10 Quick start guide
6. Make your first call
1. On the Home screen, tap Phone at the bottom of the
screen.
2. Dial the number or contact you want to call, and then
tap Call.
As you tap the keys on the phone dialer, the screen
will display matches found on your phone and call log
based on the keys you have tapped.
3. To hang up, tap End call.
7. Status Bar and Notifications
At the top of your screen you will notice a Status Bar.
On the right side, it shows the time, battery level, signal
strength, data connection status, etc. On the left side will
appear notification icons.
When a new notification icon displays in the status bar,
press and hold the status bar, then slide your finger
downward to open the Notifications panel. Tapping the
individual notification provides more information, such
as opening the message or appointment, or giving you
other options.
To close the Notifications panel, you can either press and
hold the bottom bar of the Notifications panel, then slide
your finger up the screen, or just press the BACK button.
Page 11

Quick start guide 11
8. HTC Sense
Discover HTC Sense™ on your phone, an intuitive,
seamless experience built upon three fundamental
principles — make it mine, stay close, and discover the
unexpected.
Personalized Home screen
The Home screen is highly customizable and extends
beyond the screen width, giving you lots of room to add
the information that matters most to you and tools or
applications that make your life easier. There are up to
seven screens that extend to the left and right sides of
your phone display.
Slide your finger left or
right to go to the other
parts of the extended
Home screen.
OR
Pinch the screen to show
a snapshot of the Home
screen and extended
Home screen, and then
tap a screen thumbnail to
directly to go that screen.
You can press the HOME button anytime, whatever you’re
doing on your phone, and go straight to the Home screen.
Widgets
Widgets put at-a-glance important information and
media content up front on your Home screen. A wide
selection of widgets is available on your phone, or if
that’s not enough, you can download more widgets from
Android Market to add to the Home screen.
Page 12

12 Quick start guide
To add widgets to the Home screen, tap , and then
select Widget.
Scenes
Can’t decide how to set up your Home screen? Check
out Scenes that we’ve included in the phone. Scenes are
preset Home screen layouts that you can quickly apply.
On the Home screen, press MENU, and then tap Scenes
to check out the presets.
After selecting a preset, you can customize it and save it
as a new scene.
1. Customize the Home screen by changing the
wallpaper. You can also add widgets, shortcuts, and
more by tapping the "+" button and selecting the
item you want to add. You can remove an unwanted
item by tapping and holding it's icon, then dragging
it to the trash can. Or you can move it to an unused
position by tapping and holding its icon, then
dragging it to the new location on the screen.
2. After you’re done customizing, press MENU, and then
tap Scenes.
3. Select Current (unsaved), and then tap Save.
4. Enter the Scene name, and then tap Done.
You can rename or delete a custom scene. From the Home
screen, press MENU and tap Settings > Personalize >
Scenes. Under My scenes, press and hold a scene and make
the change you want.
People
Bring the people who matter the most closer. Your
phone organizes all text exchanges, email conversations,
Facebook status, online photo albums and phone logs of
a contact all in one place.
Page 13

Quick start guide 13
Tap the name of a contact and you can see all your
recent communications with that person at a glance.
Friend Stream
Streamline your social network accounts through Friend
Stream. With Friend Stream, you can post what’s on your
mind simultaneously across your social network, view
status updates and tweets, and look through photos
from your social network accounts.
News
Subscribe to news feeds to
keep up with the latest buzz
on the Internet. News monitors
RSS feeds from your favorite
news sites, blogs and more, and
downloads the most current
updates.
Page 14

14 Quick start guide
9. Connect to the Internet
Your phone puts the whole Internet in your pocket. You
can get online using a data connection or Wi-Fi.
Using a data connection
It’s simple. When you turn your phone on for the first
time, it should connect automatically to your mobile
operator’s data service.
If you don’t get a connection automatically, there are two
things to try.
Check that the data connection is turned on.
It may just be that your data connection isn’t turned
on. To check whether it is on:
1. On the Home screen, press MENU, and then tap
Settings.
2. Tap Wireless & networks, and select the Mobile
network check box to turn your connection on.
Check that the right mobile network is selected.
1. On the Home screen, press MENU, and then tap
Settings.
2. Tap Wireless & networks > Mobile networks >
Enable always-on mobile data.
Using Wi-Fi
1. On the Home screen, press MENU, and then tap
Settings > Wireless & networks.
2. Select the Wi-Fi check box to turn Wi-Fi on. The
phone will scan for available wireless networks.
3. Tap Wi-Fi settings. You’ll see the network names and
security settings of any detected Wi-Fi networks.
4. Tap a Wi-Fi network to connect to. If you select an
open network, you’ll be automatically connected. If
Page 15

Quick start guide 15
you select a secured network, enter the key, and then
tap Connect.
Browsing the Web
Your phone’s Browser makes web browsing easy and fun.
1. On the Home screen, tap > Internet.
2. On the Browser screen, press MENU, and then tap the
URL field on top of the screen.
3. Enter the web address. As you enter the address,
matching web addresses will appear on the screen.
Tap an address to go directly to that webpage, or
continue entering the web address of your choice, and
then tap the Enter key .
4. On the webpage, use finger gestures to browse the
webpage or to zoom in or out.
Spread your thumb and index finger across a
webpage to zoom in.
Pinch your thumb and index finger on a webpage
to zoom out.
Page 16

16 Quick start guide
10. Get your messages across
Access your email accounts right from your phone.
Adding a POP3/IMAP email account
1. On the Home screen, tap > Mail.
2. On the Choose a mail provider screen, tap Other
(POP3/IMAP).
If the account type you want to set up isn’t already in
your phone’s database, you’ll be asked to enter a few
more details. Have your incoming/outgoing server
information ready, to save time. Your email provider
can tell you this information if you don’t already
3. Enter the Email address and Password for the email
4. Enter the Account name and Your name, and then tap
Sending an email message
1. On the Home screen, tap > Mail.
2. On the email account Inbox, press MENU and then tap
3. Fill in one or more recipients. You can:
4. Enter the subject, and then enter your message.
5. If you want to add an attachment to your e-mail, press
know it.
account, and then tap Next.
Finish setup.
You can also set up an Exchange ActiveSync account. See
the Email chapter of the user guide on our website to see
how.
Compose.
Enter email addresses directly in the To field.
If you’re sending the email to several recipients,
separate the email addresses with a comma.
Tap the icon, and then select the contacts to
whom you want to send the message. When you
have selected all the message recipients, tap OK.
Page 17

Quick start guide 17
MENU, tap Add attachment, and then tap the type of
attachment to be added. Then follow the prompted
actions based on the type of attachment you selected.
6. Tap Send.
Other types of messages - SMS and MMS
Other types of messages let you send either text-only
messages (SMS) or multimedia messages (MMS) to
other mobile phones.
To send a message, press HOME , tap >
Messages. On the All Messages screen, tap New
Message. Enter one or more recipients, then enter your
message and tap SEND.
To send a multimedia message, while composing your
message, press MENU and tap Attach. Select the type of
multimedia content you want to send (such as a picture,
video, vCard, etc.)
Multimedia messages are limited to 1MB. If your
content is larger than that, you may need to crop
large photos, reduce the resolution, or shorten the
length of the video that you are trying to send.
Page 18

18 Quick start guide
11. Managing Your Applications
Explore the thousands of additional applications for your
device using the Android Market. To access the market,
press HOME , tap >Market. The first time you
access the market, you will have to agree to the terms
and conditions presented. If you have not already set up
your google account, you will also have to do that before
you can access the Android Market.
You can search for an application by tapping the
spyglass icon and entering one or more keywords.
To remove or update applications downloaded from the
Market, tap My apps at the top of the screen. If there
are updates for an application you have downloaded,
you will see a notification on this screen. Tap the
application to begin downloading and installing the
update. To remove an application, tap its name on the
My apps screen, then tap Uninstall. You can reinstall the
application later if you want.
Sharing games and applications
Having fun with a game or application that you
downloaded from Android Market? Share it instantly with
your circle of friends.
For your friends to link to the game or application and
download it from Android Market, they must be using an
Android phone.
1. From the Home screen, tap .
2. Tap App Sharing. Or, press MENU and then tap Share.
You’ll then see the list of games and applications that
you downloaded and installed from Android Market.
3. Tap an application, and then choose how to share it.
When your friends see the link in your sent text, email,
or status update, they can simply tap the link to go
directly to the game or application in Android Market to
download it.
Page 19

Quick start guide 19
12. Stay in touch with friends
Your phone has everything you need to stay in contact
with your friends online. People and Friend Stream give
you direct access to all the leading social networks. You
can update your status on Facebook, look at photos in
your online albums, and follow your tweets on Twitter. It’s
all built in and really easy to use.
See the Social chapter of the user guide on our website
to learn more about Friend Stream, Facebook, and Peep
(the Twitter client on your phone).
Page 20

20 Quick start guide
13. Get files into your phone
Bring your files with you wherever you go. With your
phone, you can view Word, Excel, PowerPoint, and PDF
files. You can also listen to music and look at your prized
gallery of photos and videos.
You’ll need to plug in your microSD card before you can
copy files into your phone.
1. Connect the phone to your computer using the
supplied USB cable.
2. When the Connect to PC dialog box appears, select
Disk drive, and then tap Done.
3. On your computer, the connected phone is recognized
as a removable disk. Go to this removable disk and
open it.
4. Copy the files to the storage card.
5. After copying the files, unmount your phone as
required by your computer’s operating system to
safely remove your phone.
6. Open the Notifications panel on your phone, and then
tap Turn off USB storage. When prompted, tap Turn
Off.
7. Disconnect the phone from the computer.
Page 21

Quick start guide 21
14. Sync your phone with your computer
You can use HTC Sync to sync Outlook contacts and
calendar or Outlook Express contacts between your
computer and your phone.
Installing HTC Sync that came with the microSD card
Use the HTC Sync installer that’s in the supplied microSD
card to install.
1. Make sure the microSD card is inserted on your phone.
2. Connect your phone to your computer using the USB
cable that came with your phone.
3. You’ll see the Connect to PC screen on your phone.
Tap Disk drive and then tap Done.
4. Your computer will treat your phone as a removable
disk (just like any USB drive). Open this removable
disk so you can see what’s inside the microSD card.
5. Copy HTCSync.exe to your computer.
6. Press HOME > MENU and tap Notifications. Then tap
Turn off USB storage and tap Turn off. You can now
unplug your phone from the computer.
7. On your computer, double-click HTCSync.exe and
follow the onscreen instructions to install HTC Sync.
Setting up HTC Sync
After installing, set up HTC Sync to recognize and sync
with your phone.
1. Connect your phone to your computer.
2. On the Connect to PC screen in your phone, tap HTC
Sync and then tap Done. Your phone then attempts
to find HTC Sync on your computer which may take a
few seconds.
If your phone displays a message indicating that
it’s unable to find HTC Sync, try disconnecting and
reconnecting the USB cable, and then repeat step 2.
Page 22

22 Quick start guide
3. When your phone finds HTC Sync, your computer will
display the Phone Connection Wizard. Click Next.
4. Enter a name for your phone, and then click Finish.
5. Check the HTC Sync icon on the computer. If it’s green
in color, that means your phone is connected with
your computer and HTC Sync recognizes the phone.
6. Double-click the green HTC Sync icon. Then click
Synchronize Now (or Sync Manager > Settings).
7. In the Synchronization Settings Wizard, click Next.
8. In the next few dialog boxes, choose whether to
sync Outlook or Outlook Express, select the type of
information to sync (contacts and/or calendar), and
choose to sync them automatically with your phone.
9. Click Finish.
Synchronizing your phone and computer automatically
Do the following first to make sure your phone will sync
automatically with your computer:
1. Press HOME > MENU, and then tap Settings >
Applications > Development.
2. Make sure the USB debugging check box is selected.
Whenever you connect your phone to your computer,
synchronization starts automatically.
Downloading the latest HTC Sync upgrade
Visit the HTC support website (www.htc.com/support)
from time to time to check for the most recent HTC
Sync upgrade so you can download and install it on your
computer. After installing the latest upgrade, follow the
steps again in “Setting up HTC Sync” to set up HTC Sync
to recognize and sync with your phone.
Page 23

Quick start guide 23
15. Factory resetting
Need to start over? If you’re passing your phone on to
someone else or just want a fresh start, you can factory
reset your phone. It’s not a step to be taken lightly.
Factory resetting your phone will delete all your data,
including any applications you’ve downloaded and
installed. It returns the phone to the state it was in before
the first time you turned it on.
Be sure to back up any data that you want to keep before
you factory reset your phone.
Resetting the phone through settings
1. On the Home screen, press MENU, and then tap
Settings > SD & phone storage > Factory data reset.
2. On the Factory data reset screen, tap Reset phone,
and then tap Erase everything.
Resetting the phone using phone buttons
1. With the phone turned off, press and hold the
VOLUME DOWN button, and then briefly press the
POWER button.
2. Wait for the screen with the 3 Android images to
appear, and then release the VOLUME DOWN button.
3. Press VOLUME DOWN to select CLEAR STORAGE,
and then press POWER.
4. When asked to confirm, press VOLUME UP.
Factory resetting your phone does not delete the
contents in your microSD card.
Page 24

24 Quick start guide
16. Troubleshooting tips
If you ever have any problems using your phone, here are
some things you can do to set things right again.
Check whether there is enough free space on the
phone to run the application.
To check free space, go to the Home screen, press
MENU, and then tap Settings > SD card & phone
storage.
Clear your data and cache of applications.
To clear the data and cache, go to the Home screen,
press MENU, and then tap Settings > Applications >
Manage applications. Select application then clear
cache.
Uninstall any third-party applications.
To uninstall third-party applications, go to the
Home screen, press MENU, and then tap Settings
> Applications > Manage applications. Select
application then uninstall.
If your phone becomes unresponsive, remove the
battery, wait for three seconds, then reinsert the
battery and turn the phone on. Or back up your
important data and factory reset the phone.
To factory reset, press HOME > MENU, and then tap
Settings > SD & phone storage > Factory data reset.
Check for additional updates and useful tips on our
website: www.htc.com/support.
Page 25

Quick start guide 25
Page 26

htc.com
91H0xxxx-xxM Rev.A
 Loading...