

Page 1

Experiencing Multimedia 201
To zoom in or out of an image
While viewing an image, scroll the NAVIGATION WHEEL clockwise to zoom in. To zoom out, scroll
the NAVIGATION WHEEL counterclockwise.
Tips • When you zoom in on an image, press CENTER SELECT to automatically zoom out and fit the image
to the screen.
•
When you zoom in on an image, press the NAVIGATION WHEEL up/down/left/right to pan the
image.
To view the images as a slide show
On the Camera Album screen, select Slide Show. While viewing the slide show, you can:
• Press CENTER SELECT to pause and resume the slide show playback.
• Press NAVIGATION WHEEL right or scroll the NAVIGATION WHEEL clockwise to go to the
next image.
• Press NAVIGATION WHEEL left or scroll the NAVIGATION WHEEL counterclockwise to go
back to the previous image.
You can set slide show preferences by selecting Menu > Options on the main Camera Album
screen.
To close Camera Album and go to the Camera program
Go back to the main Camera Album screen and select .
Page 2

202 Experiencing Multimedia
9.3 Pictures & Videos
The Pictures & Videos program lets you view and manage photos, animated GIFs, and video files on
your phone.
Copy pictures, animated GIFs and video clips
You can copy pictures and animated GIFs from your PC or a storage card to the My Pictures folder,
and copy video clips to the My Videos folder on your phone.
For more information about copying files from your PC to your phone, see Windows Mobile®
Device Center or ActiveSync Help on your PC.
Note You can also copy pictures and video files from your PC to your phone using a memory card. Insert the
memory card into the memory card slot on your phone, and then copy them from your PC to the folder
you created on the memory card.
View media files
1. On the Home screen, select Start > Pictures & Videos.
2. Select a media file and then select View (if picture or GIF animation) or Play (if video file) to
view or play back the file.
Page 3
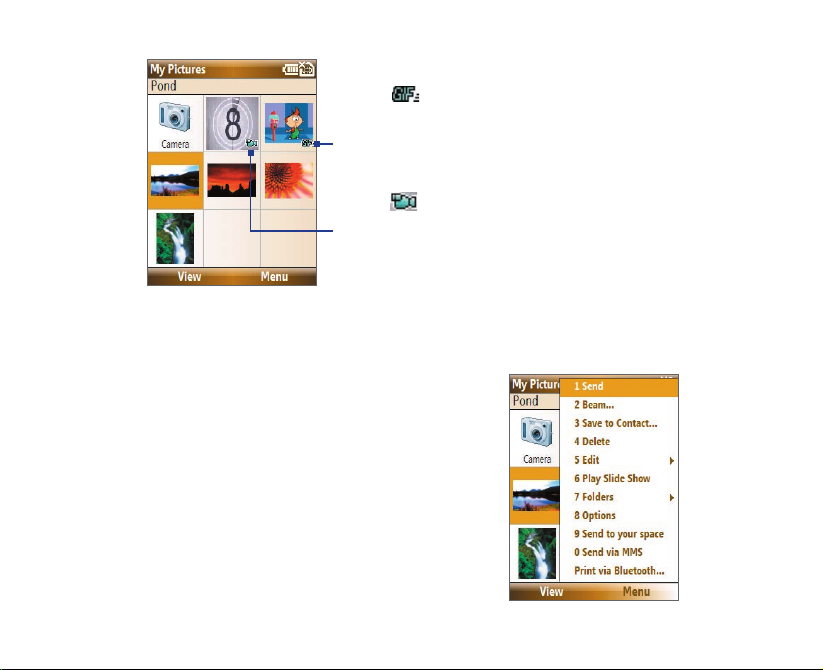
Experiencing Multimedia 203
This icon indicates that
the file is a GIF animation
file. Select View to play back
the file.
This icon indicates that the
file is a video file. Select Play to
play back the file in Windows
Media® Player Mobile.
Note If you cannot find the media file in the default My Pictures folder, select Menu > Folders > My Device
to go to other folders.
Pictures & Videos menu
Select a media file onscreen and then select Menu to
open a list of options that you can do with the selected
media file.
You can choose to send the selected media file via one
of your messaging accounts, beam it to another device,
play the pictures as a slide show, send the picture to
your Windows Live™ MySpace account, and more.
Select Options to customize picture settings and slide
show playback preferences.
Page 4

204 Experiencing Multimedia
Note The available menu options depend on the selected media file.
When viewing a picture file, select Menu > Use as Home Screen to set the picture as your Home
Screen background. You can also do minor touch ups to the picture such as rotate and crop by
selecting Menu > Edit
.
Send photos to your Windows Live™ Space
If you created your own Live Space, you can send pictures from your phone to your Live Space.
To upload a picture to your Live Space
1. On the Home screen, select Start > Pictures & Videos.
2. Select a picture then select Menu > Send to your
space
.
After sending a picture to your Live Space, you can use
Internet Explorer® to sign in to your Live Space and check
whether the picture has been successfully uploaded.
Page 5

Experiencing Multimedia 205
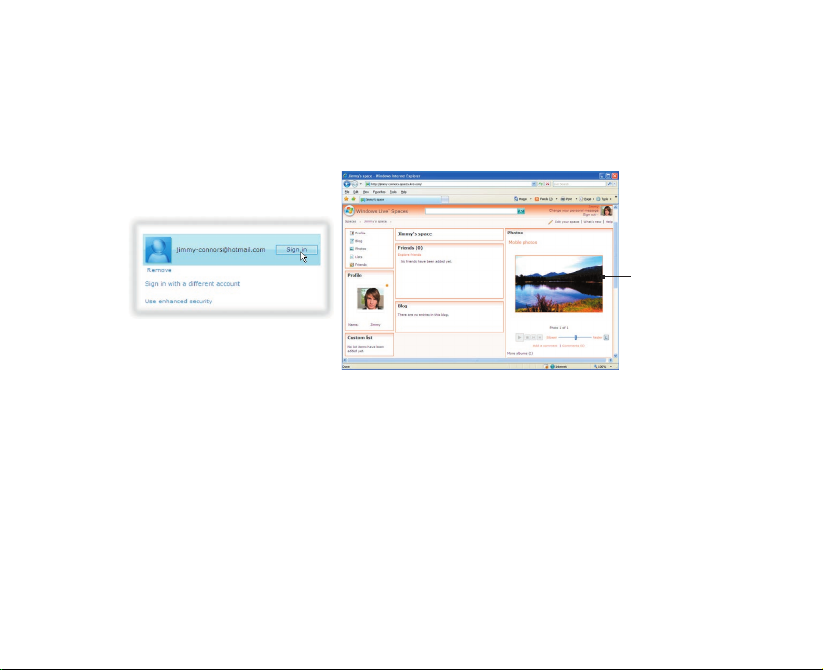
To go to your Live Space on your phone
1. On the Home screen, select Start > Internet Explorer.
2. In Internet Explorer, select Menu > Address Bar. In the
address bar, enter “http://spaces.live.com” and then
select Go.
3. On the Mobile Live Space’s Web page, select Sign in.
4. Enter your E-mail and Password, and then select Log
In
.
5. On the next Web page, select Your space.
6. Wait for your Live Space to be loaded in Internet
Explorer and then select the sharing home page of
your Live Space. The picture will display.
Uploaded picture
Sharing home page of Live
Space link
Page 6
206 Experiencing Multimedia
To go to your Live Space on your computer
1. Open Internet Explorer® on your PC.
2. On the address bar, enter “http://spaces.live.com/“ and then press ENTER.
3. In the Windows Live Space Web site, click Your space.
4. Move the mouse pointer over to your Windows Live ID and then click Sign In.
Uploaded
picture
Page 7

Experiencing Multimedia 207
9.4 Windows Media® Player Mobile
You can use Windows Media® Player Mobile to play digital audio and video files that are stored on
your phone or on a network, such as on a Web site.
To open Windows Media® Player Mobile
Select Start > Windows Media.
About the controls
By default, these hardware buttons are assigned to Windows Media® Player Mobile functions.
Tip To change the assigned hardware buttons, on the Playback screen, select Menu > Options > Buttons.
To Press
Play or pause CENTER SELECT
Skip to a previous file NAVIGATION WHEEL left
Skip to the next file NAVIGATION WHEEL right
Increase the volume NAVIGATION WHEEL up
Decrease the volume NAVIGATION WHEEL down
Turn the sound on or off quickly (mute)
#
Switch to full screen during video playback
0
Change rating
*
Fast-forward a file NAVIGATION WHEEL right (hold)
Rewind a file NAVIGATION WHEEL left (hold)
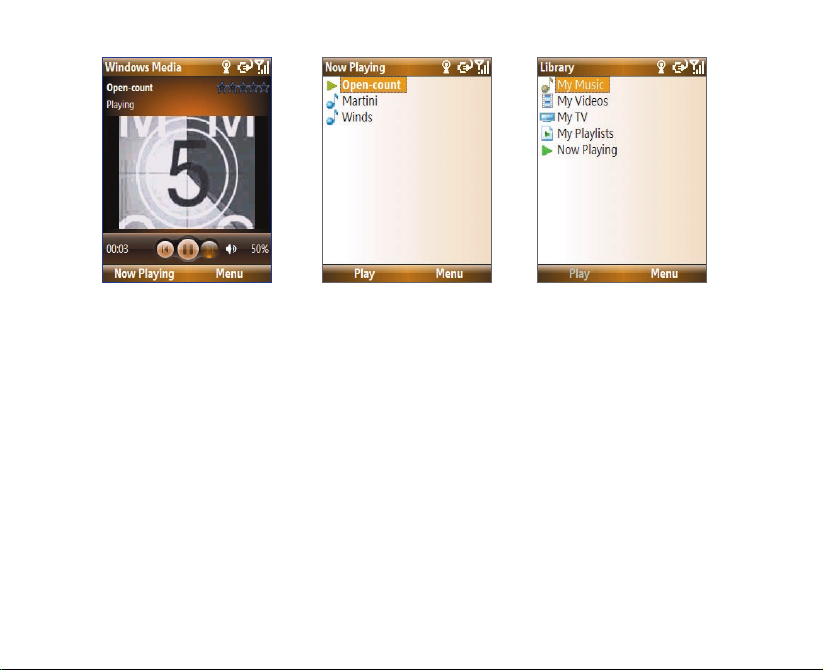
About the screens and menus
Windows Media® Player Mobile has three primary screens:
Page 8
208 Experiencing Multimedia
Playback screen
The default screen that displays
the playback controls and the
video window.
Now Playing screen
This special playlist indicates
the current file being played
and files that are queued up
to play next.
Library screen
The screen that lets you quickly
find your audio files, video files,
and playlists.
When you copy new media files
to your phone, select Menu >
Update Library to update the
library contents.
Select Menu to open a list of options that you can do in a particular screen. The commands on this
menu vary depending upon which screen you are viewing.
Page 9

Experiencing Multimedia 209
About licenses and protected files
Some media files have associated licenses that protect them from being unlawfully distributed or
shared.
If you want to copy a protected file from your PC to your phone, use the Windows Media® Player on
your PC to synchronize the file to your phone. This will ensure that the license is copied along with
the protected file. For more information about synchronizing files to your phone and other mobile
devices, see the “Windows Media® Player Help.”
Note You can view the protection status for a file by checking its file properties (Menu > Properties).
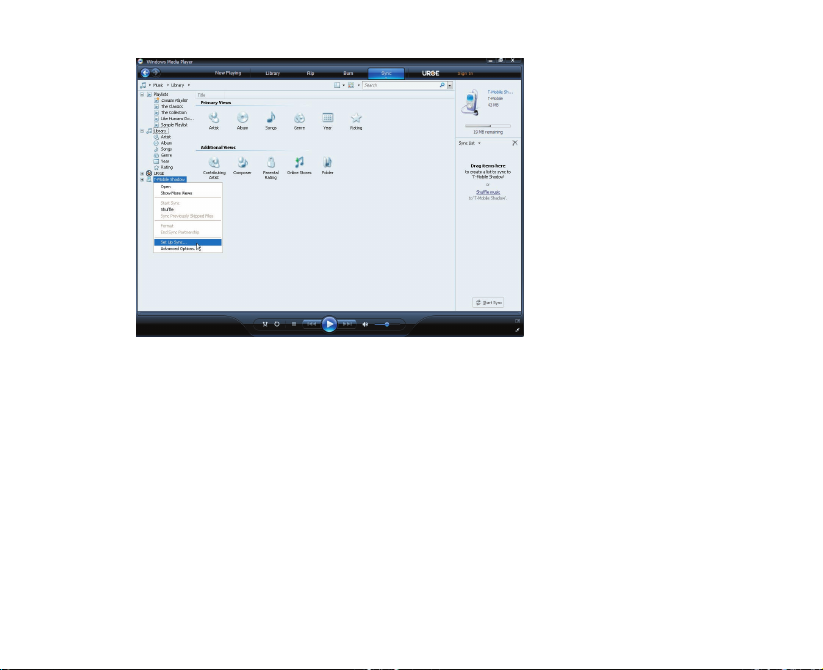
Synchronize video and audio files
Install Microsoft Windows Media® Player 11 on your PC to synchronize digital media files from your
PC to your device. This ensures that protected files and album art (for skins) are copied to your
phone correctly.
To synchronize content to your phone automatically
1. On your PC, start Windows Media® Player and then connect your phone to your PC.
2. In the Device Setup Wizard, select Yes, Search my computer now.
Note Skip this step if you have previously searched your PC for media files using Windows Media Player.
3. The Device Setup Wizard then shows the device name (or shows “Storage Card” if you have
inserted one on your phone). Click Finish
.
4. On the leftmost pane of Windows Media® Player, right-click your phone and then click Set
Up Sync
.
Page 10
210 Experiencing Multimedia
Note You can also sync your storage card if you have one installed on your phone. To set up media
synchronization, right-click Storage Card
and then click Set Up Sync.
5. On the Device Setup dialog box, select Sync this device automatically.
6. If you created your own playlists, select your desired playlist(s) from the list box at the left,
then click Add to add them to the list of playlists to sync on the right.
Page 11

Experiencing Multimedia 211
7. Click Finish.
The files begin synchronizing to your phone. The next time you connect your phone to your PC
while Windows Media® Player is running, synchronization will start automatically.
See “Play media” for instructions on how to play media files.
To synchronize content manually to your phone
1. If you have not set up synchronization between your phone and PC, follow steps 1 through 3
in “To synchronize content to your phone automatically.”
2. Click the Sync tab on the Windows Media® Player.
3. Select a Playlist or a Library on the left panel of the Windows Media® Player.
Page 12

212 Experiencing Multimedia
4. From the content list, drag files you want to sync to your phone to the right panel of the
Windows Media® Player.
5. Click Start Sync to start copying files to your phone.
Playlists and Library list
Start Sync
Playlist or library content list
Drag files from the content
list to sync to your phone
Dragging a file into the
Sync list
Notes
• Use Windows Media® Player 11 or later on your PC to synchronize (copy) media files to your phone.
• Audio files copy faster if Windows Media® Player is configured to automatically set the quality level for
audio files copied to your phone. For more information, see the “Windows Media® Player Help.”
Page 13

Experiencing Multimedia 213
Play media
Use the library to find and play songs, videos, and playlists that are stored on your phone or
storage card.
To update the Library
You need to update the Library in Windows Media® Player Mobile first before you can view and
play media on your device.
1. Select Start > Windows Media.
2. On the Library screen, select Menu > Update Library to update the library list.
Tip If you do not see the Library screen when you open Windows Media® Player Mobile, select Menu >
Library to go to the Library.
3. Select Done.
To play video and audio files on your phone
1. Select a category (for example, My Music or My Playlists).
2. Select the item that you want to play (such as a song, album, or artist name) and then select
Play
.
Note To play a file that is stored on your phone but is not in a library, on the Library screen, select Menu >
Open File. Select the item that you want to play (such as a file or a folder) and then select Play
.
Playlists
A playlist is a list of digital media files that play in a specified order. By using playlists, you can
group audio and video files together for convenient playback.
In Windows Media® Player on your PC, you can create playlists and synchronize them with your
phone.
Page 14

214 Experiencing Multimedia
In Windows Media® Player Mobile on your phone, playlists are available in the Library under the My
Playlists category. There is also a temporary playlist, called Now Playing, which lists the currently
playing file as well as any files that have been queued up to play next. You can create a new playlist
on your device by saving the current Now Playing playlist and giving it a new name.
To save a new playlist
1. If you are not on the Library screen, select Menu > Library.
2. Select a category (for example, My Music or My Playlists).
3. Select a media file that you want and then select Menu > Queue Up. This adds the file to the
Now Playing list.
Repeat this step until you have added all desired media files to the Now Playing list.
Note You cannot select multiple files simultaneously.
4. After adding the media files, select Menu > Now Playing.
5. On the Now Playing screen, select Menu > Save Playlist.
6. Enter the playlist name and then select Done.
7. To play back the playlist you created, select My Playlists in the Library, select your playlist,
and then select Play
.
Troubleshooting
For more information, see the Troubleshooting Windows Media® Player Mobile page at the
Microsoft Web site (http://www.microsoft.com/windows/windowsmedia/player/windowsmobile/
troubleshooting.aspx
).
Page 15

Experiencing Multimedia 215
9.5 Java Applications
MIDlets are Java™-based applications that can run on mobile devices. Your phone supports Java 2
Edition, J2ME™. Java lets you download Java-based applications, such as games and tools that are
specifically designed for mobile devices. Java gives you the flexibility of installing and managing
additional J2ME applications from the Internet.
Install and run MIDlets/MIDlet suite
To install MIDlets from the Internet
1. On the Home screen, select Start > Applications > Java Applications. The Java screen
appears.
2. Select Menu > Install > Download to open Internet Explorer® Mobile.
3. Locate the MIDlet/MIDlet suite while connected to the Internet.
4. Select the MIDlet/MIDlet suite to download.
5. Select Yes to start installing the MIDlet/MIDlet suite.
6. After the MIDlet is installed, you will see a prompt asking you if you want to run the MIDlet,
select Yes
.
Notes
• You can cancel the installation at any time.
• Downloaded MIDlets/MIDlet suites will be automatically saved in the My Documents folder.
To install MIDlets from a
PC
You can install the MIDlets/MIDlet suites on your phone from a PC using the USB sync cable or
Bluetooth. MIDlets copied to your phone using Bluetooth or e-mail attachments are automatically
saved in the My Documents folder.
Page 16

216 Experiencing Multimedia
To install MIDlets from a local folder
1. On the Home screen, select Start > Applications > Java
Applications. The Java screen appears.
2. Select Install > Local Install to install the MIDlets on your
phone.
3. Select the MIDlet/MIDlet suite from the list by using the
NAVIGATION WHEEL and then press CENTER SELECT
.
4. Select Yes.
5. After the MIDlet is installed, you will see a prompt asking
you if you want to run the MIDlet, select Yes
.
To run MIDlets/MIDlet suites on your phone
1. On the Home screen, select Start > Applications > Java Applications. The Java screen
appears.
2. Select a MIDlet/MIDlet suite from the list by using the NAVIGATION WHEEL.
3. Press CENTER SELECT.
Manage MIDlets
You can delete installed MIDlets as well as set program permissions for MIDlet applications.
Select
Menu > Application.
XXX
From here you can do any of the following.
Page 17

Experiencing Multimedia 217
• Delete Uninstall the selected MIDlet.
• Delete All Uninstall all MIDlets.
• Permissions Open a window to set JBlend permissions.
• Info Display MIDlet version information.
• Update Info Update version information.
• Settings Set the connection to use when connecting to the Internet.
Page 18

218 Experiencing Multimedia
Page 19

Chapter 10
Using Other Applications
10.1 Microsoft® Office Mobile
10.2 Microsoft® Office Word Mobile
10.3 Microsoft® Office Excel® Mobile
10.4 Microsoft® Office PowerPoint® Mobile
10.5 Microsoft® Office OneNote® Mobil
e
10.6 Adobe® Reader® LE
10.7 Speed Dial
10.8 Voice Command
Page 20

220 Using Other Applications
10.1 Microsoft® Office Mobile
Microsoft® Office Mobile includes four applications that let you view and edit Microsoft
documents. These four applications are:
• Microsoft® Office Word Mobile lets you view and edit Word documents and text files.
• Microsoft® Office Excel® Mobile lets you view and edit Excel worksheets.
• Microsoft® Office PowerPoint® Mobile lets you view PowerPoint slides.
• Microsoft® Office OneNote® Mobile lets you easily create notes with audio and images.
To learn how to copy files, see “Managing and Backing Up Files” in Chapter 4.
10.2 Microsoft® Office Word Mobile
Microsoft® Office Word Mobile gives you editing and viewing capabilities for your Word documents
and text files.
To open Word Mobile
Select Start > Office Mobile > Word Mobile.
Note Word Mobile does not fully support some features of Microsoft Word. Some data and formatting may
be lost when you save the document on your phone.
View documents
To open a document
1. In Word Mobile, select Menu and choose the location where the .doc, .rtf, or .txt file is saved.
2. Locate the file you want to open and then select Select.
Note You can only open one document at a time. You must close the opened document first before you can
open another document.
Page 21

Using Other Applications 221
To change the zoom ratio
Select View and then on the menu, select the zoom ratio to use.
Select View > Wrap to Window to adjust the text flow so that the text wraps based on the screen
size. This way, you do not need to scroll right to read long paragraphs or sentences.
Note You cannot wrap text in tables.
To change scrolling preference
Select Menu > Scroll Up/Down and then select By Page or By Line.
To find a word in a document
1. Select Menu > Find.
2. Type in the word you want to find in Find What. Select Match case and/or Whole words
only if needed.
3. Select Find.
To close the document
Select Menu > Close File.
Edit and send documents
To edit Word documents or text files, you need to switch to Edit mode. Select Menu > Edit to
switch to Edit mode.
To type words into the document
1. In the document, use the NAVIGATION WHEEL to position the cursor where you want to
insert the text.
Tip Select Menu > Format to change the font format. You can use Bold, Italic, Underline, and
Highlight
.
2. Type in the text using the QWERTY keyboard.
Tip If you are using a formatting style and you want to revert to no formatting style, select Menu >
Format and select the formatting style you are using from the menu.
Page 22

222 Using Other Applications
To save the document
1. Select Menu > File > Save As.
2. Type in the Name you want to use for the edited document and then select the Location
where you want to save the document.
3. Select Save.
To send the document through e-mail
1. Select Menu > File > Send.
2. In the Messaging screen, select the E-mail account you want to use to send the document
and then select Select
.
3. In the e-mail, the file is automatically appended as an attachment.
4. Enter the recipient name and then select Send.
10.3 Microsoft® Office Excel® Mobile
Microsoft® Office Excel® Mobile gives you editing and viewing capabilities for your Excel
worksheets.
To open Excel Mobile
Select Start > Office Mobile > Excel Mobile.
Note Excel Mobile does not fully support some features such as Microsoft Excel. Some data and formatting
may be lost when you save the workbook on your phone.
View worksheets
To open a file
1. In Excel Mobile, select Menu and then choose the location where the .xls file is saved.
2. Locate the file you want to open and then select Select.
Page 23

Using Other Applications 223
Note You can only open one worksheet at a time. You must close the opened worksheet first before you can
open another worksheet.
By default, the worksheet opens in Full Screen mode. To change the view mode, press the left
SOFT KEY to show the View menu and then select View > Full Screen.
To view the contents of a cell
There are times that the text in a cell cannot be fully displayed onscreen. To view the text in the cell
in its entirety, select the cell and then select View > Cell Text
.
To immediately view an area in the worksheet
1. In the worksheet, select View > Overview.
2. Use the NAVIGATION WHEEL to move the rectangular marquee to the area you want to
view.
3. Press CENTER SELECT.
To use Freeze Pane
1. Select the cell that is after and below the row and column you want to freeze.
For example, if you want to freeze column E
and row 4, you should select cell F5.
2. Select View > Freeze Panes. To unfreeze the panes, select View > Unfreeze Panes.
To change the zoom ratio
Select View > Zoom and then select the zoom ratio to use.
To switch to another worksheet
If your Excel file has multiple worksheets, you can go to a different worksheet by selecting View >
Sheet and then select the worksheet you want to view.
Page 24

224 Using Other Applications
Edit and send worksheets
To edit Excel worksheets, you need to switch to Edit mode. Select Menu > Edit to switch to Edit
mode.
To edit the cell text
1. Select the cell whose text you want to edit and then select Menu > Edit > Cell Text.
2. Type in the text and then select Done.
To delete the cell content
Select the cell whose content you want to delete and then select Menu > Edit > Clear Cell.
Tip You can select multiple cells by selecting Menu > Select and then choosing what to select in the
worksheet.
To edit the cell range of a defined name
If your worksheet contains defined names created in Microsoft Excel on the PC, you can edit the
cell range of the defined name.
1. Select Menu > Edit > Define Name.
2. In Range Name, select the name whose cell range you want to change.
3. In Refers to, type in the new cell range.
4. Select Done.
To delete cells
Select the cell you want to delete and then select Menu > Edit > Delete Cells.
Tip You can select multiple cells to delete by selecting Menu > Select and then choosing what to select in
the worksheet.
Page 25

Using Other Applications 225
To copy and paste cell contents
1. Select the cell(s) you want to copy and then select Menu > Edit > Copy.
Tip You can select multiple cells to copy by selecting Menu > Select and then choosing what to select
in the worksheet.
2. Select the cell(s) where you want to copy the cell contents to and then select Menu > Edit >
Paste
.
To insert a row or column
Select the cell where you want to insert a row or column and then select Menu > Insert > Row or
Column. If you insert a row, the row will be inserted above the selected cell; if you insert a column,
the column will be inserted at the left of the selected cell.
Tip You can also shift the contents of a row or column. To shift, select the cell you want to shift and then
select Menu > Insert > Shift Right
or Shift Down.
To go to a cell
1. Select Menu > Tools > Go To and then enter the Cell reference or name.
2. Select OK.
Tip You can also sort and find text in the worksheet by selecting Menu > Tools > Sort or Find.
To undo and redo an action
Select Menu > Undo [Action] or Redo [Action].
To save the worksheet
1. Select Menu > File > Save As.
2. Type in the Name you want to use for the edited worksheet and then select the Location
where you want to save the worksheet.
3. Select Save.
Page 26

226 Using Other Applications
To send the worksheet through e-mail
1. Select Menu > File > Send.
2. In the Messaging screen, select the E-mail account you want to use to send the worksheet.
3. In the e-mail, the file automatically appends as an attachment.
4. Enter the recipient name and then select Send.
10.4 Microsoft® Office PowerPoint® Mobile
Microsoft® Office PowerPoint® Mobile gives viewing capabilities for your PowerPoint presentations.
To open PowerPoint Mobile
Select Start > Office Mobile > PowerPoint Mobile.
To open a file
1. In PowerPoint Mobile, select Menu and then choose the location where the .ppt file is saved.
2. Locate the file you want to open and then select Select.
To go through the slides of the presentation
Press NAVIGATION WHEEL right to go forward in the presentation; press NAVIGATION WHEEL left
to go back to the previous action or slide of the presentation.
You can also go to a particular slide in your presentation by pressing the right
SOFT KEY (to show
the Menu) and selecting Menu > Go to Slide, then choosing the slide to go to.
Page 27

Using Other Applications 227
To view a custom show
You can view custom shows that you created in Microsoft PowerPoint on your computer on your
phone.
1. Press the right SOFT KEY to show the menu.
2. Select Menu > Custom Show and then select the custom show you want to view from the
list.
To zoom in on a slide
1. Press the right SOFT KEY to show the menu.
2. Select Menu > Zoom In.
Note You cannot go to the next or previous slide when you zoom in. You need to zoom out first to go to the
next or previous slide. To zoom out, select Menu > Zoom Out
.
To set PowerPoint Mobile preferences
1. Press the right SOFT KEY to show the menu.
2. Select Menu > Options.
3. Set the Orientation and Playback options, and then select Done.
To show links in a slide
You can show and activate hyperlinks in slides that you created in Microsoft PowerPoint on your
phone.
1. Press the right SOFT KEY to show the menu.
2. Select Menu > Show Links.
3. Press CENTER SELECT to activate the hyperlink. If there is more than one hyperlink on the
slide, use the NAVIGATION WHEEL to select the hyperlink you want to activate.
To end the presentation
Press the right SOFT KEY (to show End) and then select End.
Page 28

228 Using Other Applications
10.5 Microsoft® Office OneNote® Mobile
Microsoft Office® OneNote® Mobile lets you easily create notes with audio and images. Create the
notes in your phone, then synchronize them with your PC to keep your OneNote files current.
Note You need an ActiveSync partnership between your computer, phone, and Microsoft Office OneNote to
synchronize OneNote files.
To open OneNote Mobile
Select Start > Office Mobile > OneNote Mobile.
OneNote Mobile opens with the list of notes in your phone. Select Menu to rename a file and set
the sort order for the list.
To create a new OneNote file
1. In OneNote Mobile, select New.
2. Enter the note by typing in text or by adding pictures or audio. You can do the following
when creating your note.
• To add an audio file into the note, select Menu > Insert Recording.
• To take a picture and add it into the note, select Menu > Take Picture.
• To add a picture from file into the note, select Menu > Insert Picture.
• To create a bulleted or numbered list, select Menu > List > Numbered or Bulleted.
• To change the text format, select Menu > Format.
Tip If you are using a formatting style and you want to revert to no formatting style, select Menu >
Format and then select the formatting style you are using from the menu.
3. After completing the note, select Done.
Page 29

Using Other Applications 229
10.6 Adobe® Reader® LE
Adobe® Reader® LE lets you view Portable Document Format (PDF) files.
When you open a password-protected PDF file, you will be prompted to enter the password before
you can open the file.
To open a PDF file on your phone
1. Select Start > Applications > Adobe Reader LE.
2. Select Open.
3. Browse to a folder and then select the PDF file you want to open.
Note To open another PDF file, select Open > Menu > Browse For File. You can also open a PDF file from File
Explorer by selecting it.
To navigate through a PDF file
You can do any of the following:
• Use the NAVIGATION WHEEL to scroll through the pages.
• Select Menu > Go To and then select an option to go to a specific page in the PDF file.
While reading a PDF file, select Menu to open a list of options that lets you zoom in, directly go to a
bookmark, find text in the file, and more.
Page 30

230 Using Other Applications
10.7 Speed Dial
You can create speed dial entries for frequently called numbers or frequently accessed items so
you can dial a number or access an item by pressing a single key.
To create a speed dial entry for a contact
1. On the Home screen, select Start > Contacts.
2. Select a contact.
3. Press CENTER SELECT to view the contact details.
4. Select the desired phone number and then select Menu > Add to Speed Dial.
5. Enter the appropriate details in the Name, Value, and Keypad assignment.
6. Select Done. To quit at any time during this process, select Menu > Cancel.
To create a speed dial entry for an item
1. On the Home screen, select Start and then choose (just highlight) the item you want.
2. Select Menu > Add Speed Dial.
3. Enter the details in the Name, Value, and Keypad assignment.
4. Select Done. To quit at any time during this process, select Menu > Cancel.
Note The first speed dial location is generally reserved for your voice mail. Speed Dial uses the next available
location by default. If you want to place a number in a location that is already used, the new number
replaces the existing number.
To retrieve a voice mail message
On the Home screen, press and hold to access your voice mailbox, and then follow the
prompts to retrieve your messages.
Page 31

Using Other Applications 231
To make a call or launch a program using Speed Dial
If you have assigned a speed dial (for example, the second location) to a contact or a program in
Speed Dial, you can simply press and hold the
2 key on the phone keyboard to dial the contact’s
number or to open the program.
To delete a speed dial entry
1. On the Home screen, select Start > Speed Dial.
2. Select the desired entry and then select Menu > Delete.
10.8 Voice Command
Voice Command lets you call your contacts, open applications, play back music, and get calendar
information just by using your voice.
Voice Command only responds to a set of predefined commands. You cannot create your custom
commands in Voice Command.
To learn more about the commands that you can use, select Start > Voice Command > Menu >
Help
.
To set the Voice Command button
You need to set a button on your phone as the Voice Command button for you to enable and
disable it. The default button to activate Voice Command is to press and hold the SHORTCUT KEY
.
When Voice Command is activated, the
icon will appear at the top-right corner of the screen.
1. Select Start > Voice Command.
2. In Voice Button, select the button you want to use and then select Done.
You can set other options on the Voice Command screen. To learn about the different options,
consult the Voice Command help.
Page 32

232 Using Other Applications
To call a contact
1. Hold the phone a few inches away from your mouth.
2. Press and hold the SHORTCUT KEY to activate Voice Command.
3. In a clear voice, say “Call [Contact Name].”
4. Voice Command will confirm with you the contact you want to call. After the Voice
Command confirmation, say “Yes” or “Correct.”
Note If Voice Command is wrong about the contact to call, say "No" or "Incorrect" to try again.
5. The phone calls the contact.
To show the contact card of a contact
This will only show contacts that are saved on the phone.
1. Hold the phone a few inches away from your mouth.
2. Press and hold the SHORTCUT KEY to activate Voice Command.
3. In a clear voice, say “Show [Contact Name]” or “Lookup [Contact Name].”
To request information from your calendar
1. Hold the phone a few inches away from your mouth.
2. Press and hold the SHORTCUT KEY to activate Voice Command.
3. In a clear voice, say the information you want to retrieve. For example, “What’s my next
appointment?” or “What’s my next meeting?”
Consult the Voice Command help file to learn the other commands that you can use to retrieve
other Calendar information.
Page 33

Using Other Applications 233
To open a program
1. Hold the phone a few inches away from your mouth.
2. Press and hold the SHORTCUT KEY to activate Voice Command.
3. In a clear voice, say “Open [Program Name].”
Tip You can also say "Show [Program Name]" or "Start [Program Name]" to open programs. Use the
phrase that you are most comfortable with.
To request phone status information
1. Hold the phone a few inches away from your mouth.
2. Press and hold the SHORTCUT KEY to activate Voice Command.
3. In a clear voice, say the phone status information you want to retrieve. For example, say
“What time is it?” or “What date is it?”
Consult the Voice Command help file to learn the other commands that you can use to retrieve
other phone status information.
To get help in using Voice Command
1. Hold the phone a few inches away from your mouth.
2. Press and hold the SHORTCUT KEY to activate Voice Command.
3. In a clear voice, say “Help.”
To use Voice Command with a Bluetooth headset
Activate Voice Command from your Bluetooth headset by pressing the voice dial button on the
Bluetooth headset.
For more information about Voice Command, visit http://www.microsoft.com/windowsmobile/
voicecommand/default.mspx
Page 34

234 Using Other Applications
10.9 RSS Hub
RSS Hub is an RSS reader that lets you download latest news from the Internet. It monitors Internet
news channels and downloads the most current news updates and podcasts so you are instantly
informed of breaking news and events.
For more information and tips on using RSS Hub, see Help on your device.
Note Make sure you have an active Internet connection (e.g. EDGE) before using RSS Hub.
Subscribe to and organize news channels
You must subscribe to news channels before you can receive RSS feeds. Your phone comes
installed with a few preset channels.
To subscribe to new channels
1. Select Start > RSS Hub.
Note The first time you open RSS Hub, there is Welcome screen that introduces RSS Hub, select OK.
2. In the New Channel screen, select the Choose from list, then select Next. A list of RSS
channels is displayed.
Page 35

Using Other Applications 235
Channels
Category
Tap to load pre-selected RSS channels.
Note If the RSS channel you want to subscribe to is not in the list of known channels, select Cancel. In
the RSS Hub screen, select Menu > Channel > New
.
Page 36

236 Using Other Applications
3. Select the checkboxes of the RSS channels you want to subscribe to, then select Done.
Tip Channels are grouped by categories. If you want to select all channels in a category, select the
category check box.
4. The channel list appears. Select Refresh to update the channels.
Tap to cancel
channel updating
Channel is updated.
Tap it to view the
headlines.
Channel is updating
Tap to select the
channel category
to display
Headline count
Tap to update
the channels
Channel list
To filter the channels in the display
In the Channel list, select Menu > View, then select:
• All to display all subscribed channels.
• Updated to display only those channels with unread headlines.
Page 37

Using Other Applications 237
Manage channel categories
To view all the channels in a particular category, select Menu > Categories, then select the
category you want to display.
To add a new category, select Menu > New in the Categories list to display.
To rename or delete a category, select Menu > Delete
or Rename in the Categories list to display.
View and organize headlines
Select a Channel in the channel list to display the headlines for that channel.
Tap a headline to
open the news
summary screen
Headline or news
summary contains
a keyword
Tap to download audio/
video file attachment
Audio/Video/Image
file attachment is
downloading
Tap to play back or view
the file attachment.
Posting date and time
New or unread
headline
Headline has
been read
Tap to return to
the channel list
Indicates the progress
of audio/video/image
file download
New or unread headlines display in bold and are marked with a blue newspaper icon. Headlines
that have been read are marked with a gray newspaper icon.
A headline with the keyword icon indicates that the headline or news summary contains a keyword
that you have specified. To set a keyword, see “Configure RSS Hub” later in this chapter.
Page 38

238 Using Other Applications
To filter the headline list
In the headline list, select Menu > View, then
select:
• New Headlines Only to display only
unread headlines.
• Keyword Matches Only to display only
those headlines with matching keywords.
To refresh the headline list
In the headline list, select Menu > Channel >
Refresh
.
To display the headline lists of other
channels
Press NAVIGATION WHEEL left or right.
View the news summary
Select a headline in the headline list to display the news summary.
Page 39

Using Other Applications 239
Headline and
read status
Audio/Video/Image
file attachment.
Tap to download
the file.
News summary
Tap to open the
news item in Internet
Explorer Mobile. See
Chapter 10 for details.
Channel icon and name
Tap to return to the headline list
To change view options
In the news summary screen, select Menu to change the text size, fit the text to the screen (text
wrap), or enable ClearType for better text readability.
Page 40

240 Using Other Applications
To download, play, or save podcasts
1. When you see an audio or video file
attachment in the news summary, do
one of the following to download the
file:
• Select Menu > Podcasts > Start
Download
.
• Select the Download audio/
Download video link below the
audio/video file icon.
Tip To cancel the file download, select
Cancel download below the audio/
video file icon.
2. After downloading the file, do one of the following:
• Select Play audio/Play video below the audio/video file icon to play back the file.
• Select Menu > Podcast > Save to save a copy of the file to the phone memory or storage
card.
To send the headline link via e-mail
1. In the news summary screen, select Menu > Send Link via Email.
2. Messaging opens and displays the Account Picker screen. Select the account you want to use
to send the headline link.
A new message is then created with the headline link.
3. Specify the recipients, then send it.
Page 41

Using Other Applications 241
To view the next or previous news summary
In the news summary screen, press NAVIGATION WHEEL left or right.
Configure RSS Hub
You can configure RSS Hub to store a list of keywords, download feeds automatically, notify you
when new headlines arrive, and more.
To create a list of keywords
You can create a list of keywords to search for in headlines and news summaries.
1. In the channel list, select Menu > Options > Keyword.
2. Select New, then enter a keyword.
3. Select New to add another keyword, or
select Menu > Done.
After you have created your keyword list,
RSS Hub scans new channel headlines and
news summaries and checks for matches to
the keywords which you specified. When a
headline or news summary contains a keyword
or keywords, the icon you assigned to the
keyword appears before the headline in the
headline list.
In the Keywords screen, click Menu to open a menu where you can rename or delete keywords,
arrange them in priority order, and assign an icon for each keyword.
Page 42

242 Using Other Applications
To automatically update news channels
You can set the RSS Hub to automatically and regularly update your news channels.
1. In the channel list, select Menu > Options > Auto Update.
2. In the Auto Update Mode list, select:
• No auto update to disable auto update. You can update the channels manually by
tapping Refresh in the channel list.
• If ActiveSync available to update your channels only when your device is connected to
your computer via ActiveSync.
• When network available to update your channels when your device is connected to the
Internet.
• Connect automatically to connect to the Internet and update your channels whenever
the auto update period expires.
3. In Time Between Updates, set the time for RSS Hub to wait between updates.
4. Select Done.
To set notifications when new headlines arrive
You can set RSS Hub to notify you when new headlines arrive.
1. In the channel list, select Menu > Options > Notify Options.
2. In Notify when, select New items received to receive notification everytime new headlines
arrive, or select Keyword match received to receive notification everytime a new headline
containing a specified keyword arrives.
3. Select Done.
4. Tap Start > Settings > Sounds & Notifications > Notifications tab. XXX
5. In Event, select RSS Hub: New Items Received.
6. Select how you want to be notified by setting the notification options. You may set the
Page 43

Using Other Applications 243
device to play a sound, display a message on screen, flash a notification LED, or vibrate when
new headlines arrive.
7. Tap OK.
Note You will be notified of new headlines only when RSS Hub is not the current screen on your device.
Page 44

244 Using Other Applications
Page 45

Appendix
A.1 Specifications
A.2 Regulatory Notices
Page 46

246 Appendix
A.1 Specifications
System information
Processor/Chipset • TI’s OMAP™ V1030, 260MHz
Memory • ROM: 256 MB (Standard)
• RAM: 128 MB DDR
• Free memory: 144 MB
• Available program storage: 74 MB
(variable, depending on installed applications)
(The first two figures above are the total ROM and RAM memory available for use
and storage. Since the memory is shared by the Operating System, applications,
and data, the actual available memory is less than what is written).
Operating system
Windows Mobile
® 6.1 Standard
Display
Type 2.6” Transmissive QVGA LCD with white LED back light
Resolution 320 x 240 dots resolution at 65K Colors
GSM/GPRS/EDGE Quad-band module
GSM 850 824 ~ 849, 869 ~ 894 MHz
GSM 900 880 ~ 915, 925 ~ 960 MHz
GSM 1800 1710 ~ 1785, 1805 ~ 1880 MHz
GSM 1900 1850 ~ 1910, 1930 ~ 1990 MHz
Page 47

Appendix 247
Camera module
Type 2 Megapixel CMOS
Resolution • UXGA: 1600 x 1200
• SXGA: 1280 x 1024
• VGA: 640 x 480
• QVGA: 320 x 240
• QQVGA: 160 x120
Connections
I/O port HTC ExtUSB™ : an 11-pin mini-USB and audio jack in one
(ExtUSB is a proprietary connection interface that is trademarked by HTC)
Bluetooth V 2.0 without EDR, Class 2 transmit power
Wi-Fi IEEE 802.11b/g compliant, Internal WLAN antenna
Audio
Headphone AAC/AMR/WMA/WAV/MP3 codec
Ring tone
• Software polyphonic and standard MIDI format 0 and 1 (SMF)/SP MIDI
• MP3, AAC, AAC+, WMA, WAV, and AMR-NB
Physical
Dimension 4.05 inches (L) x 2.05 inches (W) x 0.6 inches (T)
Weight 0.23 lbs with battery pack
Page 48

248 Appendix
Controls and lights
Navigation Navigation wheel with 4-way navigation/Center Select Key
Buttons
• Volume buttons
• Left and Right Softkeys
• Home screen
• Back to previous screen
• Send (start call/answer call)
• End call/Power
• Side Button (Customizable)
• Camera
• 20-key QWERTY keyboard
Lights
• Event notification
• Charge status
• GSM/GPRS/EDGE signals
• Wi-Fi and Bluetooth connections
Expansion slot
microSD slot microSD™ memory card
Power supply
Battery Li-Polymer 1100 mAh removable, rechargeable battery
Talk time GSM/UMA: Up to 8 hours
Standby GSM: Up to 340 hours
UMA: Up to 120 hours
AC adapter
• AC input/frequency: 100 ~ 240 AC, 50/60Hz
• DC output: 5V and 1A
Page 49

Appendix 249
A.2 Regulatory Notices
Regulatory Agency Identifications
For regulatory identification purposes, your product is assigned a model number of CONV100.
To ensure continued reliable and safe operation of your phone, use only the accessories listed
below with your CONV100
.
The Battery Pack has been assigned a model number of CONV160
.
This product is intended for use with a certified Class 2 Limited Power Source, rated 5 Volts DC,
maximum 1 Amp power supply unit.
Federal Communications Commission Notice
This device complies with part 15 of the FCC Rules. Operation is subject to the following two
conditions: (1) This device may not cause harmful interference, and (2) this device must accept any
interference received, including interference that may cause undesired operation.
This equipment has been tested and found to comply with the limits for a Class B digital device,
pursuant to Part 15 of the FCC Rules. These limits are designed to provide reasonable protection
against harmful interference in a residential installation. This equipment generates, uses, and can
radiate radio frequency energy and, if not installed and used in accordance with the instructions,
may cause harmful interference to radio communications. However, there is no guarantee that
interference will not occur in a particular installation. If this equipment does cause harmful
interference to radio or TV reception, which can be determined by turning the equipment on
and off, the user is encouraged to try to correct the interference by one or more of the following
measures:
• Reorient or relocate the receiving antenna.
• Increase the separation between the equipment and receiver.
• Connect the equipment into an outlet on a circuit different from that to which the receiver is
connected.
• Consult the dealer or an experienced radio or television technician for help.
Page 50

250 Appendix
Modifications
The FCC requires the user to be notified that any changes or modifications made to the device that
are not expressly approved by High Tech Computer Corporation may void the user’s authority to
operate the equipment.
Cautions
In August 1996 the Federal Communications Commission (FCC) of the United States with its action
in Report and Order FCC 96-326 adopted an updated safety standard for human exposure to radio
frequency electromagnetic energy emitted by FCC regulated transmitters. Those guidelines are
consistent with the safety standard previously set by both U.S. and international standards bodies.
The design of this phone complies with the FCC guidelines and these international standards. Use
only the supplied or an approved antenna. Unauthorized antennas, modifications, or attachments
could impair call quality, damage the phone, or result in violation of FCC regulations. Do not use
the phone with a damaged antenna. If a damaged antenna comes into contact with the skin, a
minor burn may result. Please contact your local dealer for replacement antenna.
Body-worn operation
This device was tested for typical body-worn operations with the back of the phone kept 1.5 cm
from the body. To maintain compliance with FCC RF exposure requirements, use only belt-clips,
holsters or similar accessories that maintain a 1.5 cm separation distance between the user’s
body and the back of the phone, including the antenna. The use of belt-clips, holsters and similar
accessories should not contain metallic components in its assembly. The use of accessories that do
not satisfy these requirements may not comply with FCC RF exposure requirements, and should be
avoided.
Page 51

Appendix 251
Safety precautions for Radio Frequency (RF) exposure
Use only original manufacturer-approved accessories, or accessories that do not contain any metal
Use of non-original manufacturer-approved accessories may violate your local RF exposure
guidelines and should be avoided.
Exposure to RF Signals
Your device contains a radio transmitter and receiver. The radiated output power is far below the
international radio frequency exposure limits. These limits are part of comprehensive guidelines
and establish permitted levels of RF energy for the general population. The guidelines are based on
the safety standards previously set by international standards bodies:
• American National Standards Institute (ANSI) IEEE. C95.1-1992
• National Council on Radiation Protection and Measurement (NCRP). Report 86. 1986
• International Commission on Non-Ionizing Radiation Protection (ICNIRP) 1996
• Ministry of Health (Canada), Safety Code 6. The standards include a substantial safety margin
designed to assure the safety of all persons, regardless of age and health.
The exposure standard for wireless mobile phones employs a unit of measurement known as the
Specific Absorption Rate, or SAR. The standard incorporates a substantial margin of safety to give
additional protection for the public and to account for any variations in usage.
As with other mobile radio transmitting equipment, users are advised that for satisfactory
operation of the equipment and for the safety of personnel, it is recommended that no part of the
human body be allowed to come too close to the antenna during operation of the equipment.
Your device has an internal antenna. Use only the supplied integral antenna. Use of unauthorized
or modified antennas may impair call quality and damage the phone, causing loss of performance
and SAR levels exceeding the recommended limits as well as result in non-compliance with local
regulatory requirements in your country.
Page 52

252 Appendix
To assure optimal phone performance and ensure human exposure to RF energy is within the
guidelines set forth in the relevant standards; always use your device only in its normal-use
position. Do not touch or hold the antenna area unnecessarily when placing or receiving a phone
call. Contact with the antenna area may impair call quality and cause your device to operate at a
higher power level than needed. Avoiding contact with the antenna area when the phone is IN
USE optimizes the antenna performance and the battery life.
Tests for SAR are conducted using standard operating positions specified by the FCC with the
phone transmitting at its highest certified power level in all tested frequency bands. Although the
SAR is determined at the highest certified power level, the actual SAR level of the phone while
operation can be well below the maximum value. This is because the phone is designed to operate
at multiple power levels so as to use only the power required to reach the network. In general,
the closer you are to a wireless base station antenna, the lower the power output. Before a phone
model is available for sale to the public, it must be tested and certified to the FCC that it does
not exceed the limit established by the government-adopted requirement for safe exposure. The
tests are performed in positions and locations (for example, at the ear and worn on the body) as
required by the FCC for each model. (Bodyworn measurements may differ among phone models,
depending upon available accessories and FCC requirements). For body worn operation, to
maintain compliance with FCC RF exposure guidelines, use only original manufacturer approved
accessories. When carrying the phone while it is on, use the specific original manufacturer supplied
or approved carrying case, holster, or other body-worn accessory.
SAR Information
• 1.38 W/kg @ 1g
Page 53

Appendix 253
Telecommunications & Internet Association (TIA) safety information
Pacemakers
The Health Industry Manufacturers Association recommends that a minimum separation of six
inches be maintained between a handheld wireless phone and a pacemaker to avoid potential
interference with the pacemaker. These recommendations are consistent with the independent
research by and recommendations of Wireless Technology Research. Persons with pacemakers:
• Should ALWAYS keep the phone more than six inches from their pacemaker when the phone
is turned ON.
• Should not carry the phone in a breast pocket.
• Should use the ear opposite the pacemaker to minimize the potential for interference.
If you have any reason to suspect that interference is taking place, turn your phone OFF
immediately.
Hearing Aids
Some digital wireless phones may interfere with some hearing aids. In the event of such
interference, you may want to consult your service provider, or call the customer service line to
discuss alternatives.
Other Medical Devices
If you use any other personal medical device, consult the manufacturer of your device to determine
if they are adequately shielded from external RF energy. Your physician may be able to assist you in
obtaining this information.
Turn your phone OFF in health care facilities when any regulations posted in these areas instruct
you to do so. Hospitals or health care facilities may be using equipment that could be sensitive to
external RF energy.
Page 54

254 Appendix
Heed service markings
Except as explained elsewhere in the Operating or Service documentation, do not service any
product yourself. Service needed on components inside these compartments should be done by
an authorized service technician or provider.
Damage requiring service
Unplug the product from the electrical outlet and refer servicing to an authorized service
technician or provider under the following conditions:
• Liquid has been spilled or an object has fallen into the product.
• The product has been exposed to rain or water.
• The product has been dropped or damaged.
• There are noticeable signs of overheating.
• The product does not operate normally when you follow the operating instructions.
Other tips and cautions
• Avoid using your phone near metal structures (for example, the steel frame of a building).
• Avoid using your phone near strong electromagnetic sources, such as microwave ovens,
sound speakers, TV and radio.
• Avoid using your phone after a dramatic change in temperature.
Page 55

Appendix 255
WEEE Notice
The Directive on Waste Electrical and Electronic Equipment (WEEE), which entered into force as
European law on 13th February 2003, resulted in a major change in the treatment of electrical
equipment at end-of-life.
The purpose of this Directive is, as a first priority, the prevention of WEEE, and in addition, to
promote the reuse, recycling and other forms of recovery of such wastes so as to reduce disposal.
The WEEE logo (shown at the left) on the product or on its box indicates that this product
must not be disposed of or dumped with your other household waste. You are liable
to dispose of all your electronic or electrical waste equipment by relocating over to
the specified collection point for recycling of such hazardous waste. Isolated collection
and proper recovery of your electronic and electrical waste equipment at the time of
disposal will allow us to help conserving natural resources. Moreover, proper recycling
of the electronic and electrical waste equipment will ensure safety of human health and
environment. For more information about electronic and electrical waste equipment
disposal, recovery, and collection points, please contact your local city centre, household
waste disposal service, shop from where you purchased the equipment, or manufacturer
of the equipment.
RoHS Compliance
This product is in compliance with Directive 2002/95/EC of the European Parliament and of
the Council of 27 January 2003, on the restriction of the use of certain hazardous substances in
electrical and electronic equipment (RoHS) and its amendments.
Page 56

256 Appendix
Page 57

Index
Page 58

258 Index
A
Accessibility settings
- confirmation time out 86
- in-call alert volume
86
- multipress time out
86
- system font size
86
ActiveSync
75
- overview 46
- synchronize
76, 142
Add and remove programs
87
Add attachment to message
128
Adobe Reader
46, 227
Alarm 85
Alarm settings
83
Alerts
83
Answer/end call
66
AOL/AIM
126
Attachments 129
Audio Postcards
46, 119
B
Backlight time out 86
Back up files 88
Battery
- battery information
56
- battery management
86
- low battery
57
Beam
- via Bluetooth
178
Block Picture Message 118
Bluetooth
- beaming 178
- Bluetooth modem
172
- hands-free headset
176
- modes 173
- overview
173
- partnerships
174
- stereo headset
176
- synchronize
78
- visible 173
Browsing the Web
169
C
Calculator 45
Calendar
46, 106
Call History
46
Camera
192
- icons and indicators 194
- overview
46
- zoom
196
Camera Album
46
Camera settings
199
Capture formats 193
Capture modes
193
Check battery power
57
Page 59

Index 259
Clear Storage 45
Clock & Alarm
46
Comm Manager 46, 158
Company Directory
151
Compose
- Picture Message 117
Compose messages
128
Conference call 68
Confirmation time out
86
Connecting to Wi-Fi Network
164
Connect phone to Internet
- Dial-up 167
- Wi-Fi 160
Connect phone to private network
167
Contacts
46, 96
- Beam contact information
98
- Call a contact
97
- Create a new contact 96
- Find a contact
97
- Send contact information via a text message
98
- Send contact information via MMS
98
- View and edit a contact 97
Contacts picture (capture mode)
193
Copy
- contacts to SIM card 99
- files between phone and PC
88
- media files from PC to device 206
- pictures, GIF animation, videos
200
- SIM contacts to phone
99
- sound file to phone
84
Currency setting 83
Customize Home screen
82
D
Date setting 83
Device lock
92
Dial-up connection
167
Digitally sign messages
153, 155
Digital Rights Management (DRM) 206
Digital signature
- verify 154
Direct Push
143
Display time out
86
E
E-mail 128
- security
153
- settings (POP3/IMAP4)
132
Emergency call
69
Encrypt messages
153, 155
Enter text and numbers 51
Event notification
83
Excel Mobile
47, 220
Exchange Server
136
- schedule synchronization
143
Exclude e-mail address when replying to all 133
Page 60

260 Index
F
Fetch Mail 145
File Explorer
47, 89
Filter e-mail
129
Find contact
- online 151
Flag your messages 147
Font size (display)
86
Forward message
130
G
Games 47
Getting Started
47
GPRS 166
H
Handango InHand 47
Home screen
- change background 82
- customize
82
- overview
40, 82
HotSpot Settings 49
HotSpot Status
49
I
IMAP4 126, 127
In-call alert volume
86
Insert a long pause in dialing sequence
69
Insert pause in dialing sequence
69
Insert SIM Card
36
Install
- Microsoft ActiveSync
75
Install Micro SD Card
38
Install MIDlets
- from Internet 212
- from PC 212
- locally 213
Instant Messaging
47
International call
69
Internet
159
Internet Explorer Mobile 47, 168
Internet Sharing
45, 171
J
Java
- manage MIDlets/MIDlet suites
214
Java Applications
46, 212
K
Keyboard
- shortcuts 134
Page 61

Index 261
L
Language/locale setting 83
LED indicator lights
34
Licensed and protected media
206
Live Messenger
184
Live Search
47, 189
Live Spaces 202
Lock the phone
92
Lock the phone (Password)
92
M
Make call
- from Call History
64
- from Contacts 64
- from Home Screen
63
- from Speed Dial
65
Managing Meeting Requests
149
Memory
88
Message Options 48
Messaging
48
- overview
114
- Picture messages
116
- Text messages
115
Messenger 48, 184
microSD
33
MMS video (capture mode)
193
Modem
- Bluetooth modem
172
- USB modem 171
Multipress mode 53
Mute call
68
myFaves
48, 101
N
News channels
- filter
234
- manage 235
- subscribe to 232
Number format
83
Numeric mode
56
O
Office Mobile 218
- Excel Mobile
220
- PowerPoint Mobile 224
- Word Mobile
218
OneNote Mobile
47, 226
Operating system version
87
Opera Browser
48
Out-of-office 148
Outlook E-mail
126
Owner information
85
Page 62

262 Index
P
Parts and accessories 30
Pause in dialing sequence
69
PDF 227
Personal information
85
Phone program
61
Phone specification 87
Photo (capture mode)
193
Pictures & Videos
48, 200
Picture Message
116
- Create and send
117
Picture theme (capture mode) 193
PIN 91
Playlists
210
Play media
210
Podcasts
- download
238
POP3 126, 127
PowerPoint Mobile
47, 224
Power management
86
Profile
83
Programs 45
- ActiveSync
46
- Adobe Reader
46
- Audio Postcards
46
- Calculator
45
- Calendar 46, 106
- Call History
46
- Camera
46
- Camera Album
46
- Clear Storage 45
- Clocks & Alarm
46
- Comm Manager
46
- Contacts
46, 96
- Excel Mobile
47
- File Explorer 89
- Games
47
- Getting Started
47
- Handango InHand
47
- HotSpot Settings
49
- HotSpot Status 49
- Instant Messaging
47
- Internet Explorer
47
- Internet Sharing
45, 171
- Java
212
- Java Applications 46
- Live Search
47
- Message Options
48
- Messaging
48, 114
- Messenger
48
- myFaves 48
- OneNote Mobile
47
- Opera Browser
48
- Phone
61
- Pictures & Videos
48, 200
- PowerPoint Mobile 47
- RSS Hub 48
Page 63

Index 263
- Set Up E-Mail 48
- SIM Manager
45, 99
- Speed Dial 48, 228
- T-Mobile HotSpot
49
- Tasks
49, 109
- Task Manager
45, 88
- Video Recorder
46
- Voice Command 49
- Voice Recorder
45
- Windows Live
49, 181
- Windows Media Player Mobile
49, 204
- Word Mobile
47
Put call on hold 67
Q
Quick List 50
Quick Send
196
Quick Settings Menu
195
QWERTY keyboard
51
R
Receive
- call 66
- Picture Message
118
Regional settings
83
Reply
- Picture Message 118
Reply message 130, 133
Reset phone
94
Restart phone
94
Review screen 198
Ring tone
62, 111
RSS Hub 48
- configure settings
239
- Headline List 235
- introduction 232
- news channels
232
- podcasts 238
- set notifications
240
- Summary View
236
Run MIDlets 213
S
Search for e-mails on the Exchange Server 146
Secure/Multipurpose Internet Mail Extension
(S/MIME) 153
Securing Wi-Fi Connection
165
Send
- email/SMS message 128
- Picture message
117
Send and download e-mails
131
Send appointments
108
Send messages
128
Settings 48
Set up ActiveSync on PC
75
Set Up E-Mail
48, 126
Page 64

264 Index
Set up Home screen 82
SharePoint
148
Share contact information 98
Shortcuts
134
Shortcut Bar
41
Shortcut Key
58
SIM Manager
45
- copy contacts to SIM card 99
- copy SIM contacts to phone
99
- create SIM contact
99
Sounds
83
Speakerphone
68
Speed Dial 48, 65, 228
Sports (capture mode)
193
Start menu
50
Status Indicators
58
Stop programs
88
Swap/switch calls 67
Synchronize
- ActiveSync 76
- change information types
77
- music and video 79
- Outlook information with computer 76
- schedule synchronization with Exchange
Server 143
- via Bluetooth
78
- Windows Media Player
79
- Windows Media Player Mobile 206
System font size
86
T
T-Mobile Address Book 48, 110
T-Mobile HotSpot
49
- HotSpot Settings
49
- HotSpot Status
49
t-zones
49
T9 mode 54
Tasks
49, 109
Task Manager
45, 88
Time setting
83
Troubleshooting
- sync connection problems
78
U
Using Instant Messaging 121
- AIM 121
- ICQ
122
- Yahoo!
124
V
Verify digital signature 154
Video (capture mode) 193
Video Recorder
46
View and reply to Picture Messages
118
View your appointments
107
Visible (Bluetooth)
174
Voice Command 49
Page 65

Index 265
Voice Recorder 45, 111
Volume Control
33
W
Web browser 168
Wi-Fi 160
Windows Live 49, 181
Windows Live Mail
126
Windows Live Messenger
184
Windows Live Spaces 202
Windows Media Player
- file formats 204
- menus 205
- overview
49
- troubleshooting 211
Windows Media Player Mobile
- playlists 210
Windows Mobile Device Center
73
Windows Mobile software version
87
Word Mobile 47, 218
Y
Yahoo! 126
Z
Zoom 196
Page 66

266 Index
 Loading...