

Page 1

Smart Phone
User Manual
www.htc.com
Page 2

2
Congratulations on the purchase of your new Windows Mobile™ Smartphone!
Please Read Before Proceeding.
THIS DEVICE IS NOT CHARGED WHEN YOU TAKE IT OUT OF THE BOX.
DO NOT REMOVE THE BATTERY PACK WHEN THE DEVICE IS CHARGING.
YOUR WARRANTY IS INVALIDATED IF YOU OPEN OR TAMPER WITH THE DEVICE’S OUTER
CASING.
PRIVACY RESTRICTIONS
Some countries require full disclosure of recorded telephone conversations, and stipulate
that you must inform the person with whom you are speaking that the conversation is being
recorded. Always obey the relevant laws and regulations of your country when using the
recording feature of your phone.
COPYRIGHT INFORMATION
Microsoft, MS-DOS, Windows, Windows NT, Windows Server, Windows Mobile, ActiveSync,
Excel, Internet Explorer, MSN, Outlook, PowerPoint, and Word are either registered trademarks
or trademarks of Microsoft Corporation in the United States and/or other countries.
Page 3

Important Health Information and Safety Precautions
When using this product, the safety precautions below must be taken to avoid
possible legal liabilities and damages.
Retain and follow all product safety and operating instructions. Observe all
warnings in the operating instructions on the product.
To reduce the risk of bodily injury, electric shock, fire and damage to the
equipment, observe the following precautions.
ELECTRICAL SAFETY
This product is intended for use when supplied with power from the designated
battery or power supply unit. Other usage may be dangerous and will invalidate
any approval given to this product.
SAFETY PRECAUTIONS FOR PROPER GROUNDING INSTALLATION
CAUTION – Improper grounding when connecting the product to an associated
equipment can result in a risk of electric shock. This product is equipped with a
USB cable for connecting the product to a desktop or notebook computer. Be sure
your computer is properly grounded (earthed) before connecting the product
to the computer. The power supply cord of a desktop or notebook computer has
an equipment-grounding conductor and a grounding plug. The plug must be
plugged into an appropriate outlet which is properly installed and grounded in
accordance with all local codes and ordinances.
SAFETY PRECAUTIONS FOR POWER SUPPLY UNIT
• Use the correct external power source
A product should be operated only from the type of power source indicated
on the electrical ratings label. If you are not sure of the type of power source
required, consult your authorized service provider or local power company.
For a product that operates from battery power or other sources, refer to the
operating instructions that are included with the product.
3
This product should be operated only with the following designated power
supply unit(s).
1. Delta, Model ADP-5FH X
2. Tamura, Model JHA050100Uabb
3. Phihong, Models PSAA05X-050 and PSC05R-050
Page 4
4
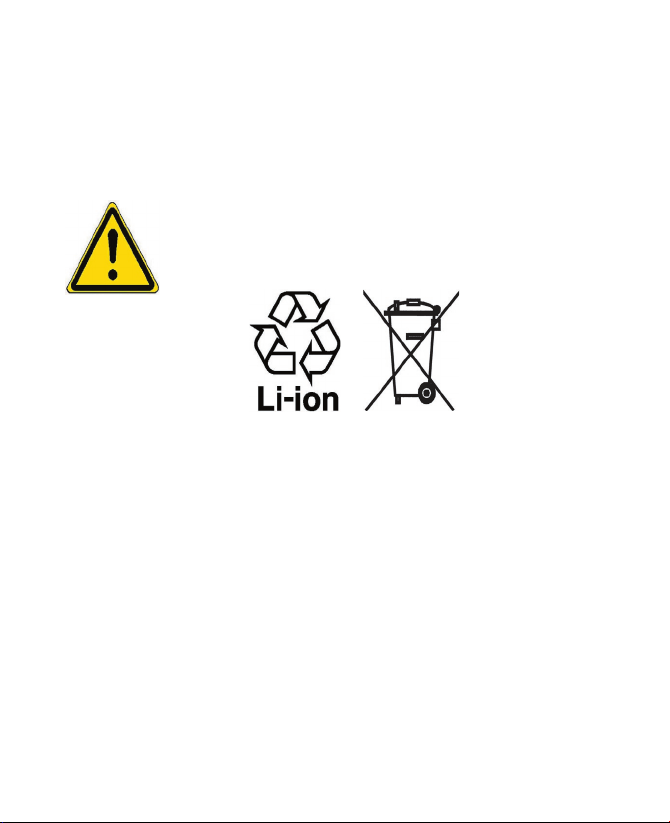
• Handle battery packs carefully
This product contains a Li-ion Polymer battery. There is a risk of fire and
burns if the battery pack is handled improperly. Do not attempt to open or
service the battery pack. Do not disassemble, crush, puncture, short external
contacts or circuits, dispose of in fire or water, or expose a battery pack to
temperatures higher than 60˚C (140˚F).
WARNING! Danger of explosion if battery is incorrectly replaced. To reduce risk of fire
or burns, do not disassemble, crush, puncture, short external contacts,
expose to temperature above 60oC (140oF), or dispose of in fire or water.
Replace only with specified batteries. Recycle or dispose of used batteries
according to the local regulations or reference guide supplied with your
product.
NOTE: This product should be operated only with the following designated
Battery Pack(s).
1. HTC, Model BREE160
2. Dynapack, Model BREE160
3. Celxpert, Model BREE160
SAFETY PRECAUTIONS FOR DIRECT SUNLIGHT
Keep this product away from excessive moisture and extreme temperatures.
Do not leave the product or its battery inside a vehicle or in places where the
temperature may exceed 60°C (140°F), such as on a car dashboard, window sill,
or behind a glass that is exposed to direct sunlight or strong ultraviolet light for
extended periods of time. This may damage the product, overheat the battery, or
pose a risk to the vehicle.
SAFETY PRECAUTIONS FOR ACOUSTIC PRESSURE
CAUTION –Permanent hearing loss may occur if earphones or headphones are
used and prolonged listening at high volume.
Page 5

NOTE: For France, mobile headphones or earphones for this device
(Manufactured by Supplier Name: Merry, Model Numbers: EMC220) has
been tested to comply with the Sound Pressure Level requirement laid
down in NF EN 50332-1:2000 standard as required by French Article L.
5232-1.
SAFETY IN AIRCRAFTS
Due to the possible interference caused by this product to an aircraft’s navigation
system and its communications network, using this device’s phone function on
board an airplane is against the law in most countries. If you want to use this
device when on board an aircraft, remember to turn off your phone by switching
to Flight Mode.
ENVIRONMENT RESTRICTIONS
Do not use this product in gas stations, fuel depots, chemical plants or where
blasting operations are in progress, or in potentially explosive atmospheres such
as fuelling areas, fuel storehouses, below deck on boats, chemical plants, fuel or
chemical transfer or storage facilities, and areas where the air contains chemicals
or particles, such as grain, dust, or metal powders. Please be aware that sparks
in such areas could cause an explosion or fire resulting in bodily injury or even
death.
EXPLOSIVE ATMOSPHERES
When in any area with a potentially explosive atmosphere or where flammable
materials exist, the product should be turned off and the user should obey
all signs and instructions. Sparks in such areas could cause an explosion or
fire resulting in bodily injury or even death. Users are advised not to use the
equipment at refueling points such as service or gas stations, and are reminded
of the need to observe restrictions on the use of radio equipment in fuel depots,
chemical plants, or where blasting operations are in progress. Areas with a
potentially explosive atmosphere are often, but not always, clearly marked. These
include fueling areas, below deck on boats, fuel or chemical transfer or storage
facilities, and areas where the air contains chemicals or particles, such as grain,
dust, or metal powders.
ROAD SAFETY
Vehicle drivers in motion are not permitted to use telephony services with
handheld devices, except in the case of emergency. In some countries, using
hands-free devices as an alternative is allowed.
5
Page 6

6
INTERFERENCE WITH MEDICAL EQUIPMENT FUNCTIONS
This product may cause medical equipment to malfunction. The use of this device
is forbidden in most hospitals and medical clinics.
NONIONIZING RADIATION
This product should be operated in the suggested normal condition only to
ensure the radiative performance and safety of the interference. As with other
mobile radio transmitting equipment, users are advised that for satisfactory
operation of the equipment and for the safety of personnel, it is recommended
that no part of the human body be allowed to come too close to the antenna
during operation of the equipment.
General Precautions
• Heed service markings
Except as explained elsewhere in the Operating or Service documentation,
do not service any product yourself. Service needed on components inside
these compartments should be done by an authorized service technician or
provider.
• Damage requiring service
Unplug the product from the electrical outlet and refer servicing to an
authorized service technician or provider under the following conditions:
• Liquid has been spilled or an object has fallen into the product.
• The product has been exposed to rain or water.
• The product has been dropped or damaged.
• There are noticeable signs of overheating.
• The product does not operate normally when you follow the operating
instructions.
• Avoid hot areas
The product should be placed away from heat sources such as radiators, heat
registers, stoves, or other products (including amplifiers) that produce heat.
• Avoid wet areas
Never use the product in a wet location.
Page 7

• Avoid pushing objects into product
Never push objects of any kind into cabinet slots or other openings in the
product. Slots and openings are provided for ventilation. These openings
must not be blocked or covered.
• Mounting Accessories
Do not use the product on an unstable table, cart, stand, tripod, or bracket.
Any mounting of the product should follow the manufacturer’s instructions,
and should use a mounting accessory recommended by the manufacturer.
• Avoid unstable mounting
Do not place the product with an unstable base.
• Use product with approved equipment
This product should be used only with personal computers and options
identified as suitable for use with your equipment.
• Adjust the volume
Turn down the volume before using headphones or other audio devices.
• Cleaning
Unplug the product from the wall outlet before cleaning. Do not use liquid
cleaners or aerosol cleaners. Use a damp cloth for cleaning, but NEVER use
water to clean the LCD screen.
7
Page 8

8
Contents
Chapter 1 Getting Started 11
1.1 Getting to Know your Phone and its Accessories .......... 12
1.2 Inserting the SIM or USIM Card ....................................... 18
1.3 Installing a Micro SD Card ................................................ 19
1.4 The Home Screen .............................................................. 20
1.5 Status Indicators and Program Icons ..............................
1.6 Using the Start Menu .......................................................
1.7 Using the Quick List ..........................................................
1.8 Entering Information .......................................................
1.9 Battery Information .........................................................
Chapter 2 Using Phone Features 31
2.1 Using the Phone ............................................................... 32
2.2 Making a Voice Call .......................................................... 33
2.3 Receiving a Voice Call ....................................................... 36
2.4 In-Call Options .................................................................. 36
2.5 Additional Dialing Information ....................................... 38
21
24
25
25
29
Chapter 3 Synchronizing Information and
Setting Up E-mail Security 41
3.1 About ActiveSync ............................................................. 42
Page 9

3.2 Setting Up ActiveSync ...................................................... 42
3.3 Synchronizing Information ............................................. 45
3.4 Synchronizing via Infrared and Bluetooth ..................... 50
3.5 Synchronizing Music, Video, and Pictures ......................
3.6 Setting Up E-mail Security ............................................... 52
51
Chapter 4 Managing your Phone 55
4.1 Personalizing your Phone ................................................ 56
4.2 Adding and Removing Programs ....................................
4.3 Using Task Manager
4.4 Managing and Backing Up Files ......................................
4.5 Protecting your Phone .....................................................
4.6 Restarting your Phone .....................................................
4.7 Resetting your Phone ....................................................... 68
and Managing Memory ................. 62
61
63
66
68
Chapter 5 Getting Connected 69
5.1 Connecting to the Internet .............................................. 70
5.2 Using Internet Explorer Mobile ....................................... 74
5.3 Using Wireless
5.4 Using Comm
5.5 Using Bluetooth ................................................................
Modem ..................................................... 76
Manager ...................................................... 81
82
9
Chapter 6 Exchanging Messages and
Using Outlook 91
6.1 Using E-mail and Text Messages ..................................... 92
Page 10

10
6.2 Using MMS Messages ..................................................... 100
6.3 Using Pocket MSN Messenger ....................................... 107
6.4 Using Calendar ............................................................... 109
6.5 Using Contacts ...............................................................
6.6 Using Tasks ......................................................................
6.7 Using Voice Notes ........................................................... 116
Chapter 7 Experiencing Multimedia 117
7.1 Using Camera and Video Recorder ................................ 118
7.2 Using Pictures & Videos ................................................. 128
7.3 Using Windows Media Player ........................................ 132
7.4 Using MIDlet Manager ................................................... 140
Chapter 8 Using Other Applications 147
8.1 Using ClearVue Suite ...................................................... 148
8.2 Using Speed Dial ............................................................ 151
Appendix 155
A.1 Regulatory Notices ......................................................... 156
A.2 PC Requirement to Run ActiveSync 4.x ........................ 161
A.3 Specifications ................................................................. 162
110
115
Index 165
Page 11

Chapter 1
Getting Started
1.1 Getting to Know your Phone and its
Accessories
1.2 Inserting the SIM or USIM Card
1.3 Installing a Micro SD Card
1.4 The Home Screen
1.5 Status Indicators and Program Icons
1.6 Using the Start Menu
1.7 Using the Quick List
1.8 Entering Information
1.9 Battery Information
Page 12
12 Getting Started
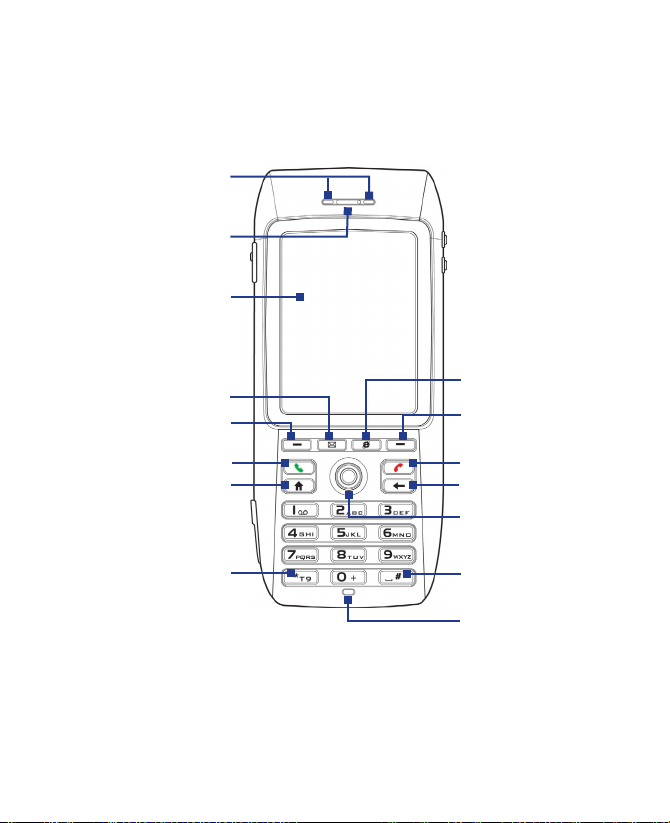
1.1 Getting to Know your Phone and its Accessories
1
2
3
4
5
6
7
8
9
10
11
12
13
14
15
Page 13

Getting Started 13
Item Function
1. LED Indicators
2. Speaker Listen to audio media or a phone call.
3.
Display Screen
4. E-MAIL
5. Left SOFT KEY Press to perform the command shown in the label above the
6. TALK
7. HOME Press to go to the Home Screen or press and hold to open the
8. Key
9. Internet Explorer
10.
Right
SOFT KEY Press to perform the command shown in the label above the
11. END
12. BACK Press to go to the previous screen, or backspace over characters.
13. Navigation Control/
ENTER
14. Key
15. Light Sensor Dark conditions sensed here will activate a backlight under the
The right bi-color LED Indicator (amber/red/green) notifies you
of the battery and network status of your phone respectively,
while the left color indicator (blue) notifies you of Bluetooth
connectivity status. For more information about LED Indicators,
see the table at the end of this section.
Press to open the Outlook Mobile program.
button.
Press to dial a phone number, answer a call, switch to another
call, or put a call on hold. Hold to activate/deactivate loudspeaker
mode
.
Comm Manager.
Press and switch to different input modes or press and hold to
choose an input mode or symbols from the list.
Press to launch Internet Explorer.
button.
Press to end a call, or press and hold to lock the phone.
Use to scroll left, right, up, or down. Or press straight down to
use as the ENTER button.
Press to add a space or press and hold to display a list of
symbols.
keypad, making it easier to see the buttons.
Page 14
14 Getting Started
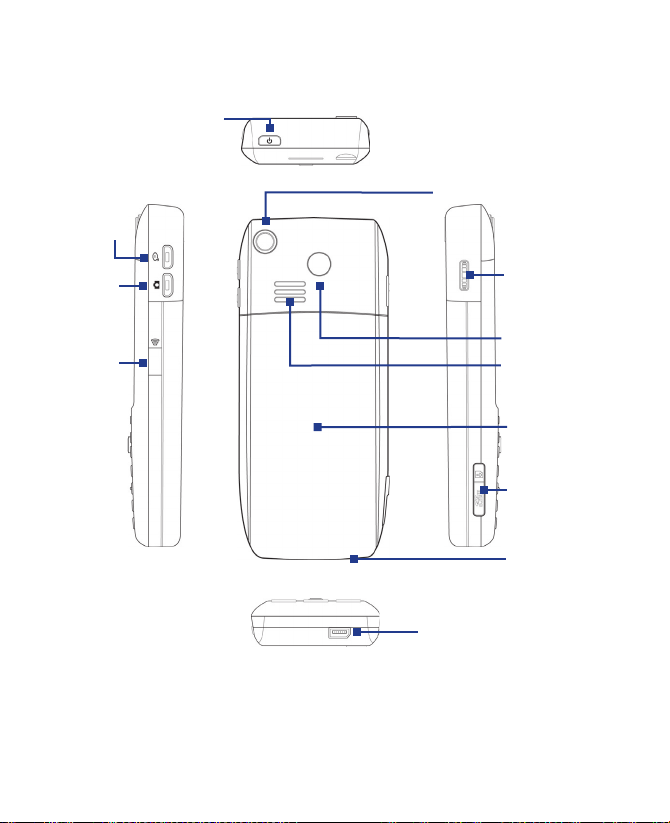
16
19
20
17
18
21
22
23
24
25
26
27
Page 15

Getting Started 15
Item Function
16. VOICE
RECORDER/VOICE
RECONITION
17. CAMERA Press to launch the camera.
18. Infrared Port Lets you exchange files or data with other devices wirelessly.
19. POWER Press to turn on (more than 1 second) and off the phone. Or press
20. Camera Lens
21. JOG WHEEL Scroll up or down to adjust the volume when using the phone
22. Car Antenna
Connector
23. Speakers
24. Back Cover
25. Micro SD slot
26. Microphone Speak into the microphone when receiving or making a phone
27.
Sync Connector/
Earphone Jack
Press to load the voice recognition program; Press and hold to
open Voice Notes.
and quickly release the POWER button to display the Quick List,
which allows you to change profiles, open Comm Manager, and
enable/disable key lock and enable/disable device lock.
or go through the items on-screen. Press to select the item onscreen.
Allows you to attach your phone to the car antenna for better
network signal reception. Simply peel off the rubber cap and
connect the antenna jack. Replace the rubber cap if unused.
Listen to audio media or a phone call.
Remove to insert battery and SIM/USIM card.
Pry open the rubber cover to insert a Micro SD card.
call or voice recording.
Use for synchronizing data or recharging the battery. Connect the
earphone to listen to audio media or use the phone’s hands-free
kit.
Page 16

16 Getting Started
LED indicator lights
Various colors that might display in the two LED Indicators are summarized
here.
Right LED Status
Solid green Battery is fully charged.
Blank Battery case is empty, no SIM/USIM card inserted or phone
Solid amber Battery is charging or the phone is using ActiveSync to
Solid red Battery is not installed or battery is over-discharged.
Flashing green Connected to the network.
Flashing red Battery very low (less than 10%)
Flashing amber Battery temperature is hotter or colder than the functional
Amber/Green LED off Battery fault. The “Battery Fault” indicator
Dim Disconnected from the network.
Left LED Status
Flashing blue Bluetooth mode set to “On” or “Discoverable” mode.
is off.
synchronize with a PC.
limits of 0 to 48 degrees Celsius, and has stopped charging.
( ) is displayed. In this case, the flashing green LED can
be recovered by unplugging the AC adapter.
Page 17
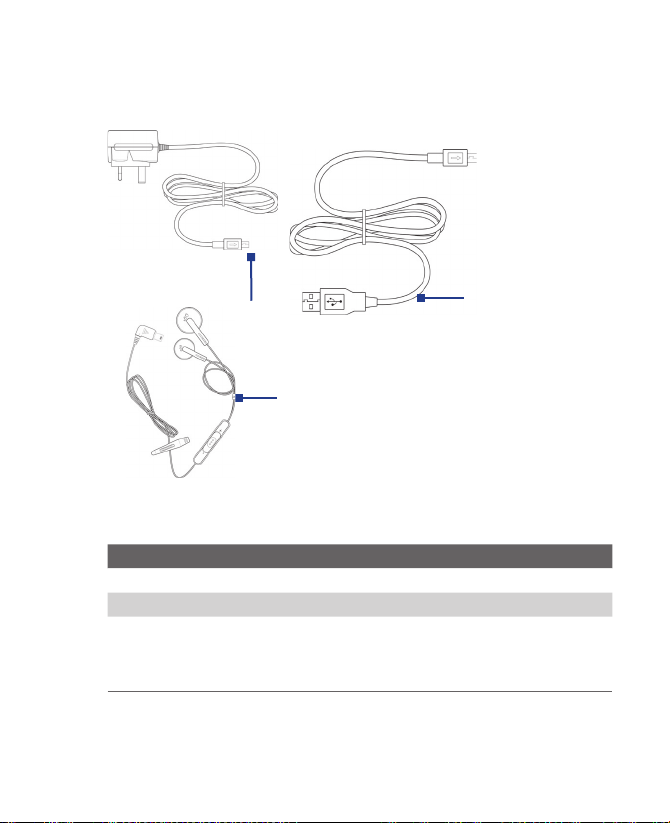
Accessories
The following accessories are provided with the phone:
Getting Started 17
1
2
3
Accessory Function
1. AC adapter Recharge the phone battery.
2. USB cable Connect your phone to a PC and synchronize data.
3.
Stereo headset
Provide a volume control slider and a Send/End button. You
can press the button to pick up a call or put a call on hold or
press and hold the button to end the call. Plug into Earphone
Jack to listen to audio files.
Page 18
18 Getting Started
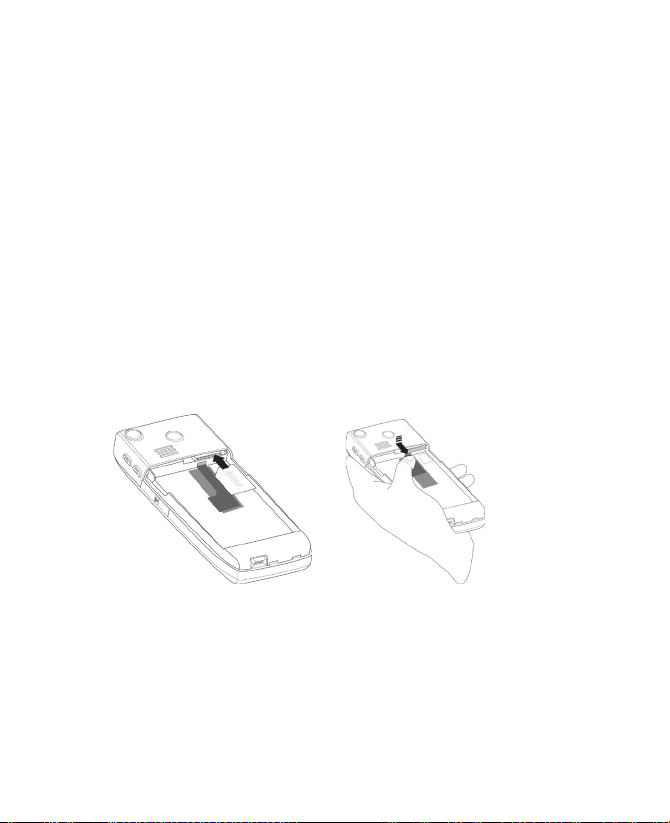
1.2 Inserting the SIM or USIM Card
Your SIM (Subscriber Identity Module) or USIM (Universal Subscriber Identity Module)
card is given to you by your wireless service provider and contains your basic
subscriber information, such as your phone number and your address book.
Before you begin, ensure that the phone is turned off.
Open the cover and remove the battery
1. Hold the phone in one hand with the keypad facing down in the palm
of your hand. With your other hand, press down on the back cover
and slide it open.
2. Remove the battery by lifting it up from the top end.
Insert the SIM/USIM card
• Insert the SIM/USIM card into the slot at the top-right corner with its
gold-plated contacts facing down.
• To remove the SIM/USIM card, press down on the black strip with your
thumb then slide it down.
Page 19
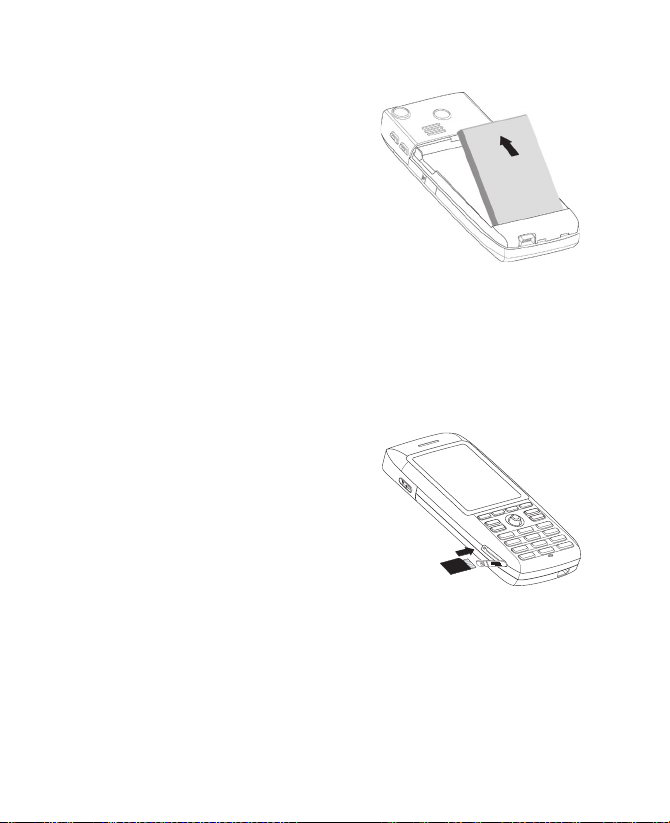
Replace the battery
1. Align the exposed metal
contacts on the edge of the
battery with the prongs in
the body of the phone then
gently push the top of the
battery into place.
2. Slide the cover on the phone.
1.3 Installing a Micro SD Card
You can install a Micro SD (Secure Digital) card in your phone to have an
alternative storage place for your images, video, music, and other phone
data.
To install the Micro SD card
1. Pry open the rubber cover at
the bottom-left side of the
phone.
2. Insert the Micro SD card into
the slot with its gold contacts
facing up.
3. Close the rubber cover.
Getting Started 19
Page 20

20 Getting Started
1.4 The Home Screen
The Home screen displays important information, such as upcoming
appointments, status indicators, the current date, time, and profile, and
icons of programs that you have recently used. You can open a program
directly by selecting its icon and pressing ENTER.
• To access the Home screen from anywhere, press HOME.
• To customize the Home screen display, including the background,
click Start > Settings > Home Screen.
8 9 10
1
2
3
4
5
6
7
Home Screen
11
12
Select a recently-used program, and
1.
open it directly from the Home screen.
Displays the name of your wireless
2.
service provider, date, and the time.
Click to launch the Communication
manager.
Click to view the details of a missed call.
3.
Click to see the time of your next
4.
appointment.
Displays the current profile. Click to
5.
change the profile.
Click to open the Messages folder.
6.
Click to display all program icons.
7.
Displays notifications, such as missed
8.
calls or new messages.
Displays the GPRS or network status.
9.
Displays the power status.
10.
Displays the network signal strength.
11.
Click to open Contacts, Call History, or
12.
Messages.
Page 21
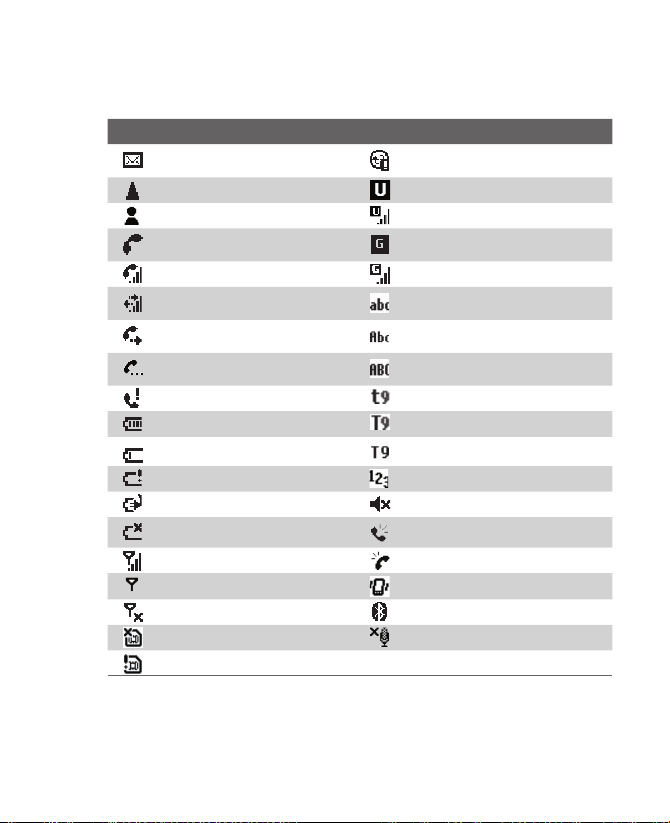
1.5 Status Indicators and Program Icons
The following table lists common status indicators and their meanings.
Icon Description Icon Description
New e-mail or text message
Short Message Service)
Roaming UMTS network available
New MSN Messenger message UMTS in use
Dialing while no SIM/USIM card
is inserted
Voice call in progress GPRS in use
Data call in progress
Calls forwarded
Call on hold
Missed call T9 text input mode, lowercase
Battery level
Low battery T9 text input mode, caps lock
Very low battery Numeric input mode
Battery charging Ringer off
No battery or battery fault Speakerphone on
Signal strength Phone volume
Radio connected or no signal Vibrate call alert
Radio off Bluetooth
No SIM/USIM card installed Microphone muted
SIM/USIM card with fault
(SMS,
Sync error
GPRS available
Multipress text input mode,
lowercase
Multipress text input mode,
uppercase
Multipress text input mode, caps
lock
T9 text input mode, uppercase
Getting Started 21
Page 22
22 Getting Started
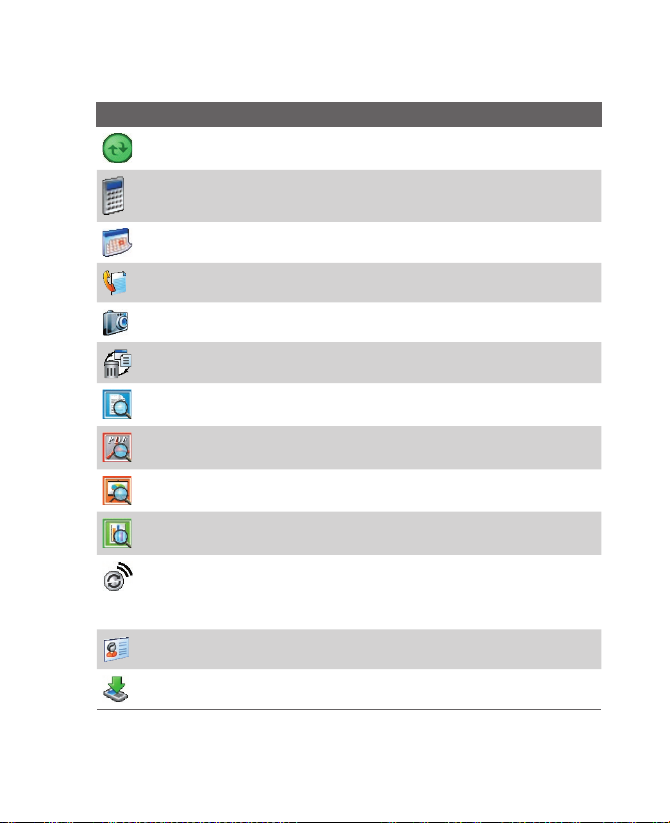
The following table lists icons of the programs that are already installed on
your phone.
Icon Program Description
ActiveSync Synchronizes information between your phone and a PC.
Calculator Performs basic arithmetic and calculations, such as
Calendar Keeps track of your appointments, and creates meeting
Call History Keeps track of all phone calls made, received, and missed.
Camera Captures photos in various modes.
Clear
Storage
ClearVue
Document
ClearVue
PDF
ClearVue
PPT
ClearVue
Worksheet
Comm
Manager
Contacts Keeps track of contact information.
Download
Agent
addition, subtraction, multiplication, and division.
requests.
Clears the memory, restores the phone back to factory
default settings, then restarts the phone.
Lets you view Word documents on your phone.
Lets you view PDF files on your phone.
Lets you view PowerPoint files on your phone.
Lets you view Excel worksheets on your phone.
Lets you easily enable or disable your phone, start or stop
synchronization with your computer, mute your phone,
enable or disable Bluetooth, stop data services and enable
or disable Direct Push.
Provides information about the download status and the
downloaded content from the Internet.
Page 23
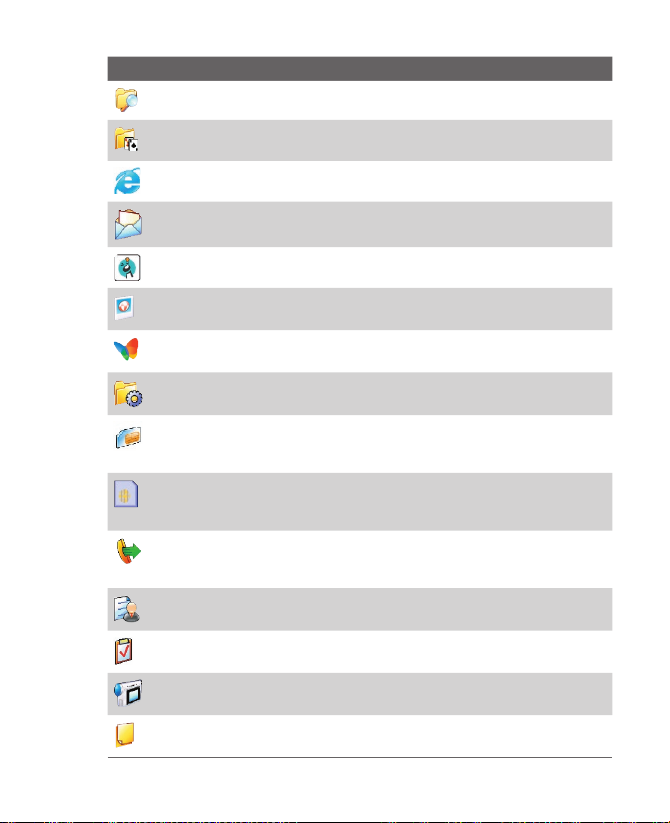
Icon Program Description
File Explorer Lets you organize and manage files on your phone.
Getting Started 23
Games Lets you play two games: Bubble Breaker and Solitaire
Internet
Explorer
Messaging Lets you send and receive e-mails, MMS and text messages.
MIDlet
Manager
Pictures &
Videos
Pocket MSN Lets you send and receive instant messages with your MSN
Settings Personalize your phone to suit the way you use it.
SIM
Manager
STK (SIM
Tool Kit)
Service
Speed Dial Lets you create speed dial entries for dialing frequently-
Task
Manager
Tasks Keeps track of your tasks.
Video
Recorder
Voice Notes Allows you to make short voice recordings.
come with your phone.
Allows you to browse Web and WAP sites, and to download
new programs and files from the Internet.
Lets you download and install Java-based applications,
such as games and tools, on your phone.
Collects, organizes, and sorts media files in the My Pictures
folder on your phone or on a storage card.
Messenger contacts.
Allows you to manage the contacts that are stored on
your SIM card. You can also use this program to copy SIM
contents to Contacts on your phone.
Allows you to access information and other services
offered by your wireless service provider
called phone numbers or for opening frequently-accessed
programs.
Keeps track of your on-going programs.
Captures video clips in various modes and duration.
Page 24
24 Getting Started
Icon Program Description
Windows
Media
Player
Wireless
Modem
Lets you play back video and audio files.
Lets your phone act as an external modem for your
computer by using USB port, Bluetooth or infrared.
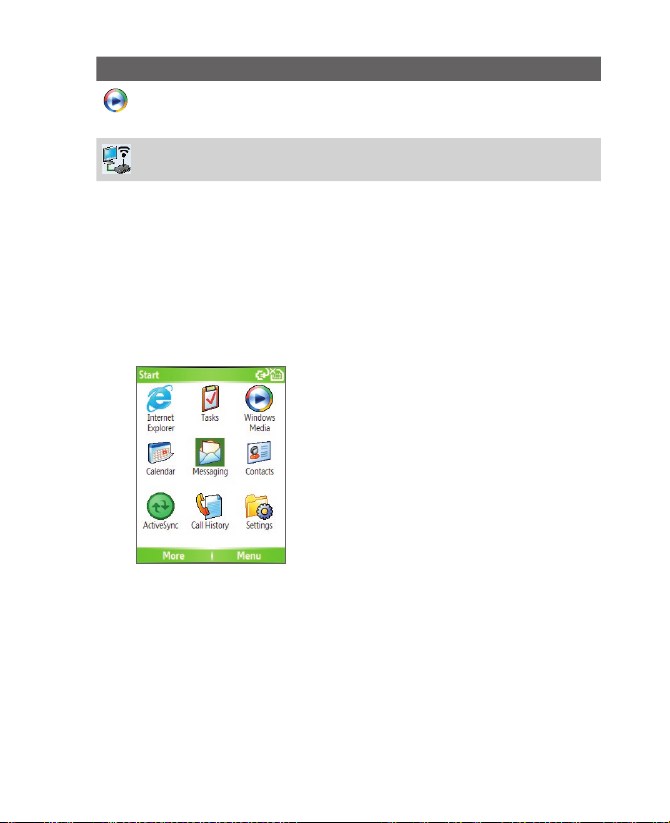
1.6 Using the Start Menu
The Start menu is located at the bottom-left corner of the Home screen and
displays various program icons that are spread across one or more screens.
To see the available programs in the Start menu
• On the Home screen, click Start.
• To see more programs, click Start > More.
Your phone comes with several bundled programs that you can start using
immediately. You can also install additional programs from the included
Windows Mobile™ Getting Started Disc or from the Internet, or purchase
mobile phone software from retail stores and install them to your phone.
Start Menu
Page 25

Getting Started 25
1.7 Using the Quick List
The Quick List offers convenient access to a list of functions, such as locking
your phone, and keypad, opening Comm Manager, and choosing a different
profile. For more information about profiles, see Chapter 4.
To access the Quick List
1. Briefly press (press and quickly release) the POWER button.
Please note that pressing and holding the POWER button turns off the
phone.
2. Scroll through the list and select the desired option. Then, do any of
the following:
• Click Select.
• Press the ENTER button.
• Press the related numeric key on the keypad.
• Press the JOG WHEEL.
3. To exit the Quick List at any time, click Cancel.
1.8 Entering Information
You can enter text and numbers by using the keypad. The phone supports
three input modes for entering text and numbers: Multipress, T9, and
Numeric. Multipress and T9 modes are used for entering text, and Numeric
mode is used for entering numbers.
When you select a field that requires entering text or numbers, the phone
automatically selects the appropriate input mode. The status indicator on
the top-right side of the display screen shows the input mode that you are
currently using.
Page 26

26 Getting Started
To change the input mode
1. Press and hold the * key.
2. On the menu, click the input mode you want.
Using Multipress mode
In Multipress mode, you enter a character by pressing the numeric key on
which the character appears.
To enter text in Multipress mode
• To enter the first character on the numeric key, press once. To enter
the second character on the numeric key, press twice, and so on.
• To enter character that are on the same numeric key, pause after you
enter the first character.
• To enter punctuation, press 1 repeatedly until you see the
punctuation you want.
To change the Multipress time out
You can change the length of time to pause between keypresses on the
same numeric key.
1. On the Home screen, click Start.
2. Click Settings > More > Accessibility.
3. In Multipress time out, select the length of the pause between
keypresses.
Multipress text input mode, lowercase
Multipress text input mode, uppercase
Multipress text input mode, caps lock
T9 text input mode, lowercase
T9 text input mode, uppercase
T9 text input mode, caps lock
Numeric input mode
Page 27

Getting Started 27
Using T9 mode
To form a word in T9 mode, press the numeric keys that contain the letters
you want. As you enter letters, T9 analyzes your keypresses and attempts to
complete the word. For example, to enter the word “shoe,” press 7, 4, 6, 3.
To enter text in T9 mode
1. Press and hold the * key.
2. On the menu, click T9.
3. Do any of the following:
• Enter letters by pressing the keys on which the letters appear.
Press a key only once for each letter. If there is more than one
choice in the T9 dictionary for your entry, a list of available words
is displayed.
• Press the # key to enter a space after the word as entered, or click
one of the available words and the space is added automatically.
• If you do not see the desired word, click Add Word? from the list,
and then enter the word using Multipress.
• To enter punctuation, press 1, and select from a list of common
punctuation.
Using Numeric mode
If a text box permits a numeric entry only, such as a phone number, the
input mode automatically defaults to Numeric mode. However, if you need
to enter numbers within a line of text, change to Numeric mode, and then
change back to Multipress or T9 mode to finish entering the text.
To enter numbers in text boxes
1. Press and hold the * key to change to Numeric mode (123).
2. On the keypad, enter the number or numbers you want.
3. Change back to Multipress or T9 input mode by pressing and holding
the * key, and then finish entering your text.
More text entry tasks
In both Multipress and T9 modes, the first letter of a sentence is by default
capitalized.
Page 28

28 Getting Started
To change between uppercase, lowercase, and caps lock
• Press the * key to change between uppercase, lowercase, and caps
lock within a text input mode.
To delete characters
• To backspace and delete a single character in any input mode, press
BACK.
• To backspace and delete an entire text or numeric field in any input
mode, press and hold BACK.
To enter a space
• In Multipress or T9 mode, press the # key.
To enter a symbol
1. Press and hold the * key.
2. On the menu, click Symbols to display the Symbol page.
3. Select the symbol you want and press ENTER.
To start a new line
In a multi-line text box such as the notes area of a contact or a calendar
appointment, do the following:
• In any input mode, press ENTER.
To enter the plus sign for international calls
• In a numeric entry box, press and hold 0.
Page 29

1.9 Battery Information
Battery performance depends on many factors, including your wireless
service provider’s network configuration, signal strength, the temperature
of the environment in which you operate your phone, the features and/or
settings you select and use, items attached to your phone’s connecting
ports, and your voice, data, and other program usage patterns.
Battery life estimates (approximations):
• Talk time: 5 hours (GSM) ; 1.6 - 4 hours (UMTS)
• Standby time: 145 - 220 hours (GSM) ; 145 - 215 hours (UMTS)
• Playing WMV: 8 hours
• Playing WMA: 12 hours
WARNING! To reduce risk of fire or burns:
• Do not attempt to open, disassemble, or service the battery pack.
• Do not crush, puncture, short external contacts, or dispose of in fire
or water.
• Do not expose to temperatures above 60˚C (140˚F).
• Replace only with the battery pack designated for this product.
• Recycle or dispose of used battery as stipulated by local regulation.
To check the battery power
• On the Home screen, click Start > Settings > Power Management.
Getting Started 29
Page 30

30 Getting Started
To optimize the power performance
• On the Home screen, click Start > Settings > Power Management,
and adjust the backlight, display, and light sensor settings.
To manage a low battery
When the low-battery warning appears, do the following:
1. Immediately save your current data.
2. Synchronize with your PC to charge the battery.
3. Turn off your phone.
For information about charging the battery, see the Quick Start Guide
Power Management
.
Page 31

Chapter 2
Using Phone Features
2.1 Using the Phone
2.2 Making a Voice Call
2.3 Receiving a Voice Call
2.4 In-Call Options
2.5 Additional Dialing Information
Page 32

32 Using Phone Features
2.1 Using the Phone
You can use your phone to make, receive, and keep track of voice calls, and
send text messages (SMS, Short Message Service) and MMS (Multimedia
Messaging Service) messages. You can also dial a phone number directly
from Contacts, and easily copy SIM contacts to Contacts on the phone.
The Phone screen
From the Phone screen, you can open, call, or find a contact, and even
save a new number in Contacts. To access the Phone screen, do any of the
following:
• Press TALK ( ).
• Directly enter the phone number by pressing numeric keys on the
keypad.
Enter your PIN
Most Subscriber Identity Module (SIM) cards are preset with a personal
identification number (PIN) that is provided by your wireless service
provider. You need to enter the PIN whenever you use your phone.
1. On the Home screen, click Start > Settings > Security > Enable SIM
PIN.
2. Enter the preset PIN provided by your wireless service provider.
3. Click Done.
Note If your PIN is entered incorrectly three times, the SIM card will be blocked. If
this happens, you can unblock it with the PIN Unblocking Key (PUK) obtained
from your wireless service provider.
Set ring tones
You can choose how to be notified for incoming calls, reminders, new
messages, alarms, and more.
To set a ring tone for incoming calls
1. On the Home screen, click Start > Settings > Sounds.
2. In the Ring tone list, select a ring tone.
3. Click Done.
Page 33

Using Phone Features 33
If you select Vibrate, the sound is muted and the phone will vibrate when
you receive a call. The Vibrate icon (
) appears in the title bar. Selecting
None in the Ring tone list mutes the phone. For more information about
sounds, see “Choose how to be notified about events or actions” in Chapter
4.
Note To adjust the earpiece volume during a call, scroll up or down the JOG
WHEEL on the phone side panel. Adjusting the volume at any other time can
affect the ring, notification, and MP3 sound levels.
2.2 Making a Voice Call
With your phone, you can make calls from the Home screen, the Phone
screen, from Contacts, Speed Dial, Call History, or SIM Contacts (contacts
stored on your SIM card).
Make a call from the Home screen
• Enter the phone number by pressing keys on the keypad, and press
TALK ( ).
• Press the BACK button if you need to backspace.
Phone Screen
Tip You will notice that when you press a numeric key on the keypad, a list of
names and numbers is displayed as your phone searches Contacts, Call
History, Speed Dial, and your SIM card to find a matching name or number.
For example, when you press a number such as 5, names that begin with J, K,
and L will be displayed as well as phone numbers that start with 5. The next
number you press continues to narrow the search. When you see the name
of the person you want to call, select it, and press TALK (
).
Page 34

34 Using Phone Features
Make a call from Contacts
1. On the Home screen, click Start > Contacts.
2. Select the desired contact, and press TALK ( ).
You can also select the desired contact in the contact list, and press the
ENTER button twice (once to view the contact details, and once to dial the
associated number).
To specify the number to dial
By default, the mobile telephone number (m) of a contact is dialed when
you make a call from Contacts; however, you can choose to dial a different
phone number.
1. On the Home screen, click Start > Contacts.
2. Select the contact.
3. Press NAVIGATION left or right. The letter representing the number
changes to m (mobile), w (work), or h (home).
You can also select a contact in the contact list, and press ENTER to view
details and different numbers associated with the contact. Select a number
and press TALK (
• You may also access the contact list by clicking Contacts on the
Home Screen.
• To view or edit information associated with the selected contact, click
Menu > Edit.
• To save a contact on your SIM card, click Menu > Save to SIM.
Make a call from Call History
1. On the Home screen, click Start > Call History.
2. Select a name or number, and press TALK ( ).
In the Call History screen, press ENTER to view details, such as the dialed,
missed, or received call, call duration, date, and time. Pressing ENTER again
dials the associated number.
) or press ENTER to dial the number.
Page 35

Using Phone Features 35
To customize calls
You can select various options on the Call History screen to customize and
filter the calls made, received, or missed.
• To find a name or number in Contacts, click Menu > Find Contact.
• To send a text message, click Menu > Send Text Message.
• To send an e-mail, click Menu > E-mail.
• To find the duration of a call, click Menu > View Timers.
• To remove a call or number from Call History, click Menu > Delete.
• To remove the list of calls or numbers from Call History, click Menu >
Delete List.
• To save a name or number in Contacts, click Menu > Save to
Contacts.
• To categorize the call or number into various call types, click Menu >
Filter.
Note You can also save a number in Contacts by clicking Save on the Call History
screen.
Make a call from Speed Dial
You can make calls using Speed Dial. To learn how to use Speed Dial, see
“Using Speed Dial” in Chapter 8.
Make a call from SIM Manager
1. Click Start > SIM Manager. Wait for the contents of your SIM card to
load.
2. Choose the contact you want to call and click Menu > Dial.
Page 36

36 Using Phone Features
2.3 Receiving a Voice Call
When you receive a phone call, you have the option to answer it or ignore it.
To answer or ignore an incoming call
•
To answer the call, click Answer, or press TALK ( ).
• To ignore the call, click Ignore, or press END ( ).
To end a call
• Press END ( ).
2.4 In-Call Options
Your phone provides various options for managing multiple calls at the
same time. You are notified when you have another incoming call, and you
have the choice of ignoring or accepting the call. If you are already on a call
and accept the new call, you can choose to switch between the two callers,
or set up a conference call between all three parties.
In-Call Options
To answer another call
1. Click Answer to take the second call and put the first call on hold.
2. To end the second call and return to the first call, press
To switch between calls
• To switch between two calls, click Swap.
END ( ).
Page 37

Using Phone Features 37
To set up a conference call
1. Either put a call on hold and dial a second number, or, answer a
second incoming call during a call.
2. Click Menu > Conference.
Notes
• If the conference connection is successful, the word “Conference” appears at
the top of the screen.
• To add additional persons to your conference call, click Menu > Hold, enter
the phone number, and then click Resume to return to the call.
• Not all service providers support conference call. Contact your service
provider for details.
To turn on and off the Speakerphone
The built-in Speakerphone allows you to talk hands-free or lets other people
listen to the conversation.
• During a call, click Menu > Speakerphone On. The icon appears
at the top of the screen.
• To turn off the Speakerphone during the call, click Menu >
Speakerphone Off. Alternatively, the speakerphone can be toggled
on and off by pressing and holding the TALK key during the call.
WARNING! To avoid damage to your hearing, do not hold your phone against
your ear when the Speakerphone is turned on.
To mute a call
You can turn off the microphone during a call, so that you can hear the
caller but the caller cannot hear you.
• During a call, click Menu > Mute.
When the microphone is turned off, the
icon appears on the screen.
Click Menu > Unmute to turn on the microphone again.
Page 38

38 Using Phone Features
2.5 Additional Dialing Information
Make an emergency call
• Enter the appropriate emergency number for your locale, and press
TALK ( ).
Tip Additional emergency numbers may be included in your SIM card. Contact
your service provider for details.
Make an international call
1. Press and hold on the phone keypad until the sign appears. The
replaces the international prefix of the country that you are calling.
2. Enter the full phone number, and press TALK ( ). The full phone
number includes country code, area code (without the leading zero, if
any), and phone number.
Insert a pause in a dialing sequence
Some international calls require a pause in the dialing sequence in order for
the call to process successfully.
1. On the Home screen, click Start > Contacts.
2. Select the contact entry that contains the phone number into which
you want to insert a pause, and press ENTER to open the contact card.
3. Click Menu > Edit.
4. Position the cursor on the phone number where you want to insert a
pause.
5. Click Menu > Insert Pause.
The letter “p” will appear in the number to indicate where the pause
will occur in the dialing sequence.
6. Click Done.
Page 39

Using Phone Features 39
Insert a longer pause in a dialing sequence
Some phone numbers may require a longer pause than the default pause
in the dialing sequence. In these cases, you can pause as long as you want,
and manually continue the dialing sequence.
Note This feature is not available for contacts stored on the SIM card.
1. On the Home screen, click Start > Contacts.
2. Select the contact entry that contains the phone number into which
you want to insert a longer pause, and press ENTER to open the
contact card.
3. Click Menu > Edit.
4. Position the cursor on the phone number where you want to insert a
longer pause.
5. Click Menu > Insert Wait.
The letter “w” will appear in the number to indicate where the longer
pause (wait) will occur in the dialing sequence.
6. Click Done.
Note When you call a number that contains a longer pause, you must press TALK (
) to continue dialing.
SIM Tool Kit (STK)
A SIM card must be inserted in your device in order to use this feature,
which allows you to access a range of information services provided by your
service provider.
1. On the Home screen, click Start > SIM Tool Kit (STK). A list of
provided services appears.
2. To access a service, click the item in the list.
Page 40

40 Using Phone Features
Page 41

Chapter 3
Synchronizing Information and
Setting Up E-mail Security
3.1 About ActiveSync
3.2 Setting Up ActiveSync
3.3 Synchronizing Information
3.4 Synchronizing via Infrared and Bluetooth
3.5 Synchronizing Music, Video, and Pictures
3.6 Setting Up E-mail Security
Page 42

42 Synchronizing Information and Setting Up E-mail Security
3.1 About ActiveSync
ActiveSync synchronizes information on your phone with information on
your PC such as Outlook content. ActiveSync can also synchronize over
a wireless or cellular network with Exchange Server if your company or
service provider is running Exchange Server with Exchange ActiveSync.
Specifically, you can use ActiveSync to:
• Synchronize information such as Outlook e-mail, contacts, calendar,
or tasks information on your phone with your PC, as well as pictures,
video, and music.
• Synchronize Outlook e-mail, contacts, calendar appointments, and
tasks on your phone directly with Exchange Server so that you can
stay up to date even when your PC is turned off.
• Copy files between your phone and your PC.
• Select which types of information are synchronized and specify how
much information is synchronized. For example, you can choose how
many weeks of past calendar appointments to synchronize.
• Add and remove programs on your phone. For details, see Chapter 4,
“Adding and Removing Programs.”
3.2 Setting Up ActiveSync
To install and set up ActiveSync on the computer
1. Install ActiveSync on your PC, as described on the Windows Mobile™
Getting Started Disc.
2. After Setup completes, the Synchronization Setup Wizard
automatically starts when you connect your phone to the PC. The
wizard will guide you to create a synchronization relationship
between your phone and computer. Click Next.
3. Do not select the Synchronize directly with a server running
Microsoft Exchange Server check box if you will synchronize your
phone with a computer. Just click Next, then skip to step 8.
Page 43

Synchronizing Information and Setting Up E-mail Security 43
4. If you will synchronize your phone with Exchange Server, select the
Synchronize directly with a server running Microsoft Exchange
Server check box, then click Next.
5. On the Exchange server credentials screen, enter the Exchange server
address, your user name and password, and the domain name.
If you do not know what the Exchange server address and domain
name are, you can check with your network administrator, or you can
check them in your computer by doing the following:
• In Outlook, click Tools > E-mail Accounts.
• Select View or change existing e-mail accounts.
• Double-click Microsoft Exchange Server.
• On the Exchange Server Settings screen, you will see the Exchange
Server name.
• To check the domain name, click Start > Settings > Control
Panel, then double-click System.
• In the System Properties dialog box, click the Computer Name
tab. You will then see the domain name.
Page 44

44 Synchronizing Information and Setting Up E-mail Security
6. On your phone, you also need to enter the Exchange server settings.
For information about this, see “Synchronizing directly with Exchange
Server.”
7. On the Synchronization Setup Wizard, click Next.
8. Select the information types to synchronize between your phone and
computer.
If you will synchronize your phone with both your computer and
Exchange Server, do the following:
•
For the Contacts, Calendar, E-mail, and Tasks items, choose whether
to synchronize them with the computer or with the Exchange
Server. These items cannot be synchronized to both.
• Select the check boxes of the other information types if you want
to synchronize them with your computer.
Page 45

Synchronizing Information and Setting Up E-mail Security 45
Information types on the PC and Exchange Server
9. Click Next.
10. Click Finish.
When you finish the wizard, ActiveSync synchronizes your phone
automatically. Once synchronization completes, you can disconnect your
phone from your PC.
3.3 Synchronizing Information
When you connect your phone to the PC, ActiveSync will immediately
synchronize. While the phone is connected, ActiveSync synchronizes every
time you make a change on either the PC or the phone.
To manually start and stop synchronization
1. Connect your phone.
• To synchronize local information on the PC, such as Outlook
information or media files, connect your phone to the PC using
Bluetooth, infrared (IR), or a cable.
• If you are synchronizing directly with Exchange Server, you can
use the connection to the PC to access the network, or you can
synchronize over a cellular network without connecting to the PC.
2. In ActiveSync, click Sync. To end synchronization before it completes,
click Stop.
Page 46

46 Synchronizing Information and Setting Up E-mail Security
Synchronize Outlook information with the computer
If you have set up a synchronization relationship between your phone and
the PC, synchronization keeps Outlook information up-to-date on both of
them.
You can also set up your phone to synchronize with more than one PC,
or with a combination of one or more PCs and Exchange Server. When
synchronizing with multiple computers, the items you synchronize will
appear on all of the computers with which they are synchronized. For
example, if you have set up synchronization with two PCs (PC1 and PC2),
which have different items, and you synchronize Contacts and Calendar on
the phone with both computers, the result is as follows:
Location New state
PC1 All Outlook contacts and calendar appointments that were on PC2 are
PC2 All Outlook contacts and calendar appointments that were on PC1 are
Phone All Outlook contacts and calendar appointments from both PC1 and
Note Outlook e-mail can be synchronized with only one computer.
To change which information is synchronized
ActiveSync synchronizes a limited amount of information by default to save
storage space on your phone. You can change the amount of information
that is synchronized by performing the following steps.
Note Before changing synchronization settings on the phone, disconnect it from
1. On the Home screen, click Start > ActiveSync.
2. In ActiveSync, click Menu > Options.
3. Do one or more of the following:
now also on PC1.
now also on PC2.
PC2 are on the phone.
your PC.
• Select the check box for the items you want to synchronize. If you
cannot select a check box, you might have to clear the check box
for the same information type elsewhere in the list.
Page 47

Synchronizing Information and Setting Up E-mail Security 47
• Clear the check box for any items you want to exclude.
• To customize synchronization of a computer, select the computer
name then click Menu > Settings.
• To customize synchronization of a particular information, select
the information type then click Settings
.
• To stop synchronizing with one computer completely, select the
computer name and click Menu > Delete.
Note Outlook e-mail can be synchronized with only one computer.
Synchronize Outlook information with Exchange Server
You can set up synchronization with Exchange Server on your phone, if
it is available to you through your company or wireless service provider.
However, you should first ask your administrator or check your computer
for the following information and then carry on with the steps: Exchange
Server name, domain name, your user name, and password. (For
information about how to check the Exchange server name and domain on
your PC, see “To install and set up ActiveSync on the computer.”)
Note Before changing synchronization settings on the phone, disconnect it from
your PC.
Page 48

48 Synchronizing Information and Setting Up E-mail Security
To synchronize directly with Exchange Server
1. On the Home screen, click Start > ActiveSync > Menu > Configure
Server. If you have not yet set up synchronization with Exchange
Server, this will say Add Server Source.
2. On the Edit Server Settings screen, enter the name of the server
running Exchange Server in the Server address box, and click Next.
3. On the User Information screen, enter your user name, password, and
domain name.
4. If you want the phone to save your password so that you will not
need to enter it again when connecting, select the Save password
check box. Then, click Next.
5. On the Options screen, select the check boxes of the types of
information that you want to synchronize with the Exchange Server.
6. To customize synchronization of a particular information, select the
type of information then click Menu > Settings.
Note Settings is not available for Contacts and Tasks.
7. To change the rules for resolving synchronization conflicts, click
Menu > Advanced on the Options screen.
8. Click Finish.
Note You can also use the Sync Setup Wizard to set up the phone to synchronize
remotely with the Exchange Server. This wizard is started when you connect
your phone to your PC after installing ActiveSync on the PC.
Schedule synchronization with Exchange Server
You can schedule information to be synchronized automatically between
your phone and the Exchange Server, or schedule synchronization at
regular time intervals. Choose between these two methods, depending on
your e-mail volume and which method you think is more cost-effective.
Page 49

Synchronizing Information and Setting Up E-mail Security 49
To receive e-mails and synchronize other information instantly
The Direct Push technology (Push E-Mail feature) enables you to receive
new e-mails on your phone as soon as they arrive in your Inbox on the
Exchange Server. With this feature, items such as contacts, calendar and
tasks are also immediately updated onto your phone when these items
have been changed or new entries have been added on the Exchange
Server. To make Direct Push work, you need to set up a GPRS connection on
your phone.
The Direct Push feature works for your phone, if your private network such
as your corporate network is using Microsoft Exchange Server Service Pack
2 (SP2) with Exchange ActiveSync, and after your first full synchronization
with the Exchange Server.
Using Comm Manager
1. Click Start > Comm Manager.
2. In the Comm Manager screen, click the Microsoft Direct Push
button. The button
you will receive e-mails as they arrive.
When the button is in the
retrieve your e-mails.
Using ActiveSync
1. In ActiveSync on your phone, click Menu > Schedule.
2. Select As items arrive in the Peak times and Off-peak times boxes.
will turn to , this indicates that
state, you need to manually
Page 50

50 Synchronizing Information and Setting Up E-mail Security
To schedule synchronization at regular time intervals
You can set how often to synchronize during Peak times (which usually
refer to your working hours) when e-mail volume is high, as well as Off-
times when e-mail volume is low.
1. In ActiveSync on your phone, click Menu > Schedule.
2. On the Schedule screen, select a shorter time interval in the Peak
times box for you to be able to receive e-mails more frequently.
3. Select a longer interval in the Off-peak times box.
Tip To set the days and hours that make up your peak and off-peak times, click
Menu > Peak Times on the Schedule screen.
3.4 Synchronizing via Infrared and Bluetooth
You can connect your phone to the PC to synchronize using the local
wireless technologies, infrared (IR) and Bluetooth. These technologies have
similar but slightly different requirements.
To synchronize with a PC via infrared
1. Follow the instructions in ActiveSync Help on the PC for setting up
your PC to receive infrared beams.
2. Line up the infrared (IR) ports according to the instructions in the
manufacturer’s documentation for your phone so that they are
unobstructed and within close range.
3. On the Home screen, click Start > ActiveSync.
4. Click Menu > Connect via IR.
5. Click Sync.
To synchronize with a PC via Bluetooth
1. Follow the instructions in ActiveSync Help on the PC for configuring
Bluetooth on your PC to support ActiveSync.
2. On the Home screen, click Start > ActiveSync.
3. Click Menu > Connect via Bluetooth. Ensure that the phone and the
PC are within close range.
Page 51

Synchronizing Information and Setting Up E-mail Security 51
4. If this is the first time you have connected to this PC via Bluetooth,
you must complete the Bluetooth wizard on the phone and set up a
Bluetooth partnership with the PC before synchronizing.
5. Click Sync.
6. When finished, click Menu > Disconnect Bluetooth.
Notes
• To preserve battery power, turn off Bluetooth when not in use.
• To connect and synchronize your phone with a computer via Bluetooth, your
computer must have a Bluetooth adapter or dongle.
3.5 Synchronizing Music, Video, and Pictures
If you want to take your music or other digital media with you, ActiveSync works with
Windows Media Player to synchronize music, video, and pictures with your phone.
Other than selecting the media information type in ActiveSync to be synchronized,
all media synchronization settings must be set in Windows Media Player. Before
media can be synchronized, you must do the following:
• Install Windows Media Player Version 10 or later on the PC.
• Connect your phone to the PC with a USB cable. If the phone is currently
connected using Bluetooth or infrared, you must end that connection before
media can be synchronized.
• Insert a 32-MB or larger storage card into your phone.
• Set up a sync partnership between the storage card and Windows Media
Player.
Change Media synchronization settings
Once you select the Media information type in ActiveSync to be synchronized, any of
your favorite music, video, and picture files in Windows Media Player playlists can be
synchronized by ActiveSync. All you have to do is set up synchronization in Windows
Media Player for those media files.
Page 52

52 Synchronizing Information and Setting Up E-mail Security
To set up a sync relationship with a storage card
1. On the PC, open Windows
Media Player.
2. Click the Sync tab.
3. Select the storage card.
4. Click Set up Sync.
5. Choose whether to
synchronize automatically
or manually.
For information about using Windows Media Player on the phone, see
“Using Windows Media Player” in Chapter 7.
3.6 Setting Up E-mail Security
Windows Mobile on your phone protects your Outlook e-mails through
Secure/Multipurpose Internet Mail Extension (S/MIME), which allows you to
digitally sign your messages as well as encrypt them.
Using authorization keys and certificates, S/MIME allows you to digitally sign
your e-mail messages to prove your identity to the recipients. Authorization
keys are also used when encrypting messages to improve privacy and
prevent undue tampering or hacking of your messages. You can encrypt
a message with or without a certificate. However, to read an encrypted
message, you need a valid certificate for decrypting e-mail messages.
Note S/MIME encryption and digital signatures for Windows Mobile-based devices
are available only with Exchange Server 2003 Service Pack 2 or a later version
that supports S/MIME. If you aren’t using one of these products, or have not
yet synchronized, these options are unavailable.
Digitally sign and encrypt all messages
ActiveSync allows you to set up S/MIME e-mail encryption and signing. You
will have to obtain a valid certificate for signing or encrypting e-mail before
you will be able to sign or encrypt mail successfully.
1. On the Home screen, click Start > ActiveSync.
2. Click Menu > Options.
Page 53

Synchronizing Information and Setting Up E-mail Security 53
3. Select the E-mail information type, and click Settings. On the E-mail
Sync screen, click Menu > Advanced.
4. Do one or both of the following:
• To sign all your outgoing e-mail messages so that recipients can
be certain that the messages were sent by you and have not been
altered in any way, select Sign messages.
• To encrypt all your outgoing e-mail messages so that the contents
of your messages are protected from being viewed by anyone
other then the intended recipients, select Encrypt messages.
5. Click Menu > Choose Certificate to select a certificate for signing or
encrypting outgoing e-mail messages.
You can select certificates to sign or encrypt e-mail messages
individually if you do not choose to sign or encrypt all outgoing
e-mails. For information about signing and encrypting individual
messages, see “Individually sign and encrypt a message” in Chapter 6.
Page 54

54 Synchronizing Information and Setting Up E-mail Security
Page 55

Chapter 4
Managing your Phone
4.1 Personalizing your Phone
4.2 Adding and Removing Programs
4.3 Using Task Manager and Managing Memory
4.4 Managing and Backing Up Files
4.5 Protecting your Phone
4.6 Restarting your Phone
4.7 Resetting your Phone
Page 56

56 Managing your Phone
4.1 Personalizing your Phone
Set up the Home screen
The Home screen is your starting place for most tasks. You can gain access
to all features and programs from the Home screen.
The top of the Home screen displays icons for the programs that you have
most recently used. The center of the Home screen can display your next
appointment, the number of new messages (voice mail, text, e-mail, or
MMS) that you have received, and other important information. When you
click an icon or item on the Home Screen, the associated program opens.
To customize the Home screen
1. On the Home screen, click Start > Settings > Home Screen.
2. In Home screen layout, Color scheme, Background image, and
Time out, select the options you want, and click Done.
To set a picture as the background
1. On the Home screen, click Start > Pictures & Videos.
2. Select the picture you want to set as the background.
Click View or press ENTER for a larger view of the image
3. Click Menu > Use as Home Screen.
4. Use NAVIGATION to select the portion of the picture you want to use,
and click Next.
5. In Adjust the transparency, select a higher percentage for a more
transparent picture or a lower percentage for a more opaque picture.
6. Click Finish.
Page 57

Managing your Phone 57
Set date, time, language, and other regional options
Your phone should already be set up with the regional settings that are
appropriate for your locale.
To change regional settings
You can specify the language, locale, date and time style, as well as number
and currency formatting options.
1. On the Home screen, click Start > Settings > Regional Settings.
2. In Language, select your preferred language.
3. In Locale, select the locale for the language you selected. The Locale
option automatically changes the format of the remaining options
(such as date, time, and currency) according to the locale you specify.
4. Click Done.
Note
You must turn your phone off and on again for the changes to take effect.
To set the date and time
1. On the Home screen, click Start > Settings > Clock & Alarm > Date
and Time.
2. In Time zone, select your time zone.
3. In Date, edit the month, day, or year.
4. In Time, edit the hour, minute, and second.
5. Click Done.
Choose how to be notified about events or actions
A profile is a group of settings that determine how your phone will alert
you to incoming calls, events such as e-mail receipt notifications, alarms, or
system events. A number of different preset combinations of these settings
are included with your phone. Each profile appears with a descriptive name.
To change the current profile
1. On the Home screen, click Profile [Type]. Example: Profile Normal.
2. Click a new profile, and click Done.
Tip To quickly change the profile, briefly press POWER to display the Quick List,
and click a profile.
Page 58

58 Managing your Phone
To edit a profile
1. On the Home screen, click Profile [Type]. Example: Profile Normal.
2. Select the profile to edit.
3. Click Menu > Edit.
4. Do one of the following:
• Modify the settings, and click Done.
• To cancel without saving changes, click Cancel.
Tip To revert to the default profile settings, click Menu > Reset to default.
To specify the sound for an event
1. On the Home screen, click Start > Settings > Sounds.
2. For the desired event, select a sound. Select None if you do not want
to hear a sound.
3. Click Done.
Note For ring tones, you can use sounds in either .wav, .mid, .wma, or .mp3 file
format. For notifications or reminders, you can use .wav, or .mid files.
Tip When you select a sound, the sound plays. To hear it again, select
Play.
To set sound for the keypad
1. On the Home screen, click Start > Settings > Sounds.
2. In Keypad control, select a sound. Select None if you do not want to
hear any sound while pressing a key.
3. Click Done.
To copy a sound to your phone
After a sound file is located on your phone, you can use it for a ring tone,
notification, or reminder. Sound files in either .wav, .mid, .wma, or .MP3
formats can be used.
1. Connect the phone to your PC using a USB connection.
2. On your PC, copy the sound file you want.
3. In ActiveSync on your PC, click Explore and double-click My
Windows Mobile-Based Device.
4. Do one of the following:
Menu >
Page 59

Managing your Phone 59
• To save the sound file on your phone, double-click Application
Data, double-click Sounds, and paste the file into that folder.
• To save the sound file on your storage card, double-click Storage
Card, and paste the file into the folder you want.
To set an alarm
1. On the Home screen, click Start > Settings > Clock & Alarm > Alarm.
2. In Alarm, choose one of the following:
• Off to turn the alarm off.
• On to turn the alarm on.
3. In Alarm time, enter the time for the alarm to go off.
4. Click Done.
Set personal information
Entering and displaying owner information are best practices; they allow
someone to return the phone to you in case it is lost.
To enter owner information
1. On the Home screen, click Start > Settings > Owner Information.
2. Complete the following:
• In Name, enter your name.
• In Telephone number, enter a number where you can be reached.
• In E-mail address, enter your e-mail address.
• In Notes, enter any other information you want to include.
3. Click Done.
Set performance and maintenance options
To change accessibility settings
1. On the Home screen, click Start > Settings > Accessibility.
2. Select your preference for the following:
• System font size to set the size of the font that is displayed on the
screen.
Page 60

60 Managing your Phone
• Multipress time out to set the length of time between keypresses
when entering text in Multipress mode.
• Confirmation time out to set the delay before an unconfirmed
action times out.
• In-call alert volume to set the volume for incoming call or
receiving new message alerts while you are in a call.
3. Click Done.
To change power management settings
You can use Power Management to check the battery, and configure
settings that prolong battery life.
1. On the Home screen, click Start > Settings > Power Management.
2. Adjust the following:
• In Backlight time out on battery, select the amount of time for
the phone to be idle before the backlight turns off.
• In Backlight time out on AC, select the amount of time for the
phone to be idle before the backlight turns off when using AC
power.
• In Display time out, select the time limit for the phone to be idle
before the screen turns off.
• In Light Sensor Enable, turn it on to see the buttons on the
keypad more easier in the dark.
3. Click Done.
Tip Main battery indicates the amount of battery life remaining.
To find the operating system version number
• On the Home screen, click Start > Settings > About.
The operating system version number installed on your phone along
with the manufacturer copyright information will be listed on the
screen.
To find the phone specification
• On the Home screen, click Start > Settings > System Information.
The System Information screen displays the details about the phone
specification, such as processor, speed, memory, display, model name,
and so on.
Page 61

Managing your Phone 61
To turn on and off error reporting
1. On the Home screen, click Start > Settings > Error Reporting.
2. Do one of the following:
• Select Enable to turn on error reporting.
• Select Disable to turn off error reporting.
3. Click Done.
4.2 Adding and Removing Programs
Before you purchase additional programs for your phone, you should note
the name of your phone, the version of Windows Mobile software running
on it, and the type of processor. This information will help you select a
program that is compatible with your phone. For more information, see “To
find the operating system version number” in this chapter.
Programs available for purchase usually include a Setup program
(commonly named “setup.exe”) that you must first install on your PC. You
can then use ActiveSync to add programs to your phone or add a program
directly from the Internet.
To add programs
1. Download the program to your PC (or insert the CD or disk that
contains the program into your PC). You may see a single *.exe file, a
*.zip file, a Setup.exe file, or several versions of files for different device
types and processors. Be sure to select a program designed for your
phone and processor type.
2. Read any installation instructions or documentation that comes with
the program. Many programs provide special installation instructions.
3. Connect your phone and PC.
4. Double-click the *.exe file.
• If the executable file is an installation wizard, follow the
instructions on the screen. Once the program has been installed
on your PC, the wizard will automatically transfer the program to
your phone.
Page 62

62 Managing your Phone
• If an installation wizard does not start, you will see an error
message stating that the program is valid but that it is designed
for a different type of computer. You will need to copy this
program to your phone. If you cannot find any installation
instructions for the program, use ActiveSync to copy the program
file to the Program Files folder on your phone.
To remove a program
Programs that come with the phone cannot be removed.
1. On the Home screen, click Start > Settings > Remove Programs.
2. Scroll to the program to remove.
3. Click Menu > Remove.
4.3 Using Task Manager and Managing Memory
To see how much memory is available
1. On the Home screen, click Start > Settings > About.
2. Scroll down to Available Memory.
Use Task Manager
Task Manager allows you to view all the programs currently running on your
phone in the form of a list. From Task Manager, you can switch to, activate,
or terminate any currently running program. It also allows you to view the
phone memory status and battery information.
To start Task Manager
• Click Start > Task Manager.
Task Manager
Page 63

Managing your Phone 63
The Task Manager Menu contains the following options.
Option Allows you to
Go To Switch to the selected program.
Refresh Refresh the Task Manager screen to reflect a list of currently running
Stop Stop the selected program. You can view the free memory status at
Stop All Stop all listed programs. Click
Stop All But
Selected
System Info View information about power status, memory usage, flash, and
About View program name, version, and copyright information.
programs.
the bottom of the screen.
OK to confirm that you want to end all
currently running programs. You can view the free memory status at
the bottom of the screen.
Stop all running programs in the list except the one you selected.
phone information.
4.4 Managing and Backing Up Files
You can back up files to your PC using ActiveSync or copy files to a storage
card that is installed by you on your phone. You can also efficiently manage
your files and folders using File Explorer installed on your phone.
Using Microsoft ActiveSync, you can copy or move information from the
PC to the phone and vice versa. Changes you make to the information on
one computer will not affect the information on the other computer. If you
want to automatically update information on both your phone and PC,
synchronize the information instead. For more information about copying
and synchronizing files, see ActiveSync Help on your PC.
To copy a file using ActiveSync
Copying a file results in separate versions of a file on your phone and PC.
Because the files are not synchronized, changes made to one file will not
affect the other.
1. Connect your phone to your PC.
2. In ActiveSync, click Explore, which opens the Mobile Device folder for
your phone.
Page 64

64 Managing your Phone
3. In the Mobile Device folder, go to the file that you want to copy on
your phone or PC.
4. Do one of the following:
• To copy the file to your phone, right-click the file, and click Copy.
Right-click the desired folder on your phone, and click Paste.
• To copy the file to your PC, right-click the file and click Copy.
Right-click the desired folder on your PC, and click Paste.
Use File Explorer
File Explorer provides many easy-to-use features for file and folder
management.
To start File Explorer
• On the Home screen, click Start > File Explorer.
File Explorer operates in the following two views:
• List View
• Icons View
File Explorer displays the entire file structure in your phone’s memory. The
functions focus primarily on folder management. When initially started, File
Explorer is in List View by default. To switch between views, click
View > Icons or List.
Menu >
File Explorer - List View
Page 65

Managing your Phone 65
The File Explorer menu contains the following options:
Option Allows you to
Send Lets you send the selected file through one of the messaging
Beam Lets you send the selected file through Bluetooth or IrDA.
Edit Opens a menu where you can choose to cut, copy, paste, delete or
Properties View information about the selected folder or file.
View Opens a menu where you can switch between the Icons
Sort By Opens a menu where you can choose to sort the files or folders by
My Device Displays the folders and files in the root folder of the phone.
My
Documents
features.
rename a file. You can also create a new folder.
or List view.
Name, Date, Size or Type.
Displays the folders and files in the My Documents folder.
To send a file as an e-mail attachment
1. In File Explorer, select a file.
2. Click Menu > Send.
3. On the Messaging screen, select Outlook E-mail or a custom e-mail
account.
4. The file will automatically be attached to the new message.
Specify the recipient and subject, and type your message.
5. Click Send.
Page 66

66 Managing your Phone
4.5 Protecting your Phone
There are several levels of security on your phone. You can protect your
phone from unauthorized use by requiring a type of password called a PIN
(personal identification number) in order to make calls. Your first PIN will be
given to you by your wireless service provider. Additionally, you can lock the
keypad or the entire phone to prevent unauthorized access.
To enable the SIM/USIM personal Identification number (PIN)
1. On the Home screen, click Start > Settings > Security.
2. Click Enable SIM PIN.
3. Enter your PIN, and click Done.
Note To cancel without enabling the SIM/USIM PIN, press HOME.
To disable the SIM/USIM PIN
1. On the Home screen, click Start > Settings > Security.
2. Click Disable SIM PIN.
3. Enter your PIN, and click Done.
To change the SIM/USIM PIN
Be sure to make a note of your personal identification number (PIN). When
the SIM/USIM PIN is enabled, you must provide this PIN to unlock the
phone.
1. Click Start > Settings > Security.
2. Click Change SIM PIN.
3. In Old PIN, enter the current PIN.
4. Enter and confirm the new PIN, and click Done.
To lock the keypad
Locking the keypad turns off keypad functionality. This is a helpful feature
if, for example, the phone is turned on and in your pocket, and you want to
prevent accidental keypresses.
• On the Home screen, press and hold END.
Once the keypad is locked, the left soft key label changes to Unlock.
Page 67

Managing your Phone 67
Tip To quickly lock the keypad, press POWER briefly to display the Quick List, and
select Key lock.
Note You can still receive calls and make emergency calls when the keypad is
locked.
To unlock the keypad
• On the Home screen, click Unlock and press the * key.
To enable the phone lock
1. On the Home screen, click Start > Settings > Security > Device lock.
2. Select Prompt if device unused for then select the amount of time
for the phone to be inactive before automatically locking.
3. Select the Password type then enter and confirm your password.
4. Click Done.
Notes
• Alternatively, press POWER briefly to display the Quick List and then select
Device lock to configure the phone lock settings.
• Once you configure the phone lock settings, you can enable the phone lock
from the Quick List directly without configuring the settings again.
To disable the phone lock
• Click Unlock then enter the password you have set to unlock your
phone.
Page 68

68 Managing your Phone
4.6 Restarting your Phone
Occasionally, you may want to restart your phone, for example, when a
program is not performing properly or the phone does not respond to any
keypresses.
To restart the phone
1. Remove the battery.
2. Reinsert the battery and turn on your phone.
WARNING! If the phone is restarted while a program is running, unsaved work will
be lost.
4.7 Resetting your Phone
Resetting your phone will remove all the data from its memory which
include contacts, tasks, calendar appointments, and more, and restore the
phone back to the factory default settings.
WARNING! All your data will be deleted, it is recommended that you back up your
To reset your phone
1. Click Start > Accessories > Clear Storage.
2. Follow the on-screen instructions to reset the phone.
The phone will restart after it has been reset.
data first before resetting your phone.
Page 69

Chapter 5
Getting Connected
5.1 Connecting to the Internet
5.2 Using Internet Explorer Mobile
5.3 Using Wireless Modem
5.4 Using Comm Manager
5.5 Using Bluetooth
Page 70

70 Getting Connected
5.1 Connecting to the Internet
Your phone’s powerful networking capabilities allow you to access
the Internet or your corporate network at work through wireless and
conventional connections. Specifically, you can configure your phone to
establish a connection via Dial-up, GPRS, Bluetooth, Virtual Private Network
(VPN), or Proxy.
With an active connection on your phone, you can browse the Web,
download e-mails, or chat using MSN Messenger. Check with your service
provider to see if a connection has already been set up for you, and if overthe-air configuration is supported.
If you need to manually set up a connection, it is important that you obtain
the following information from your Internet Service Provider (ISP) or the
company whose intranet you are trying to access:
• ISP server phone number
• User name
• Password
• Access point name (required for GPRS connection)
• Domain name (required for accessing a corporate network or an
intranet)
Set up a GPRS connection
GPRS is a non-voice value-added service that allows information to be sent
and received across a mobile telephone network. You can use GPRS to
connect to the Internet or to send and receive MMS on your phone. When
you use GPRS, you will be billed per KB (Kilobyte) when sending or receiving
information.
Note Check with your service provider how much it charges for its GPRS service.
If GPRS settings are not preset on your phone, obtain the Access point
name from your wireless service provider. Also, check with your wireless
service provider if a user name and password are required.
Page 71

Getting Connected 71
To set up a GPRS connection
1. On the Home screen, click Start > Settings > Connections > GPRS.
2. Click Menu > Add.
3. In Description, enter a name for the connection.
4. In Connects to, select The Internet.
5. Enter the name of the GPRS Access point of your wireless service
provider.
6. Enter the appropriate information in the remaining fields, if required
by your wireless service provider.
7. Click Done.
To start browsing the Internet, click Start > Internet Explorer.
For information about setting up and sending MMS, see “Using MMS
Messages” in Chapter 6.
Set up a Dial-up connection
When you use your phone to dial up to your ISP and connect to the Internet
or to your corporate network, you will be billed by the number of minutes
that you use.
To establish a dial-up connection on your phone, you need the same
settings that you normally use when you dial up from your computer. This
includes the ISP server phone number, your user name and password.
Page 72

72 Getting Connected
To set up a dial-up connection for browsing the Internet
1. On the Home screen, click Start > Settings > Connections > Dial-up.
2. Click Menu > Add.
3. In Description, enter a name for the connection.
4. In Connects to, select The Internet.
5. Enter the appropriate information in the remaining fields.
6. Click Done. To start browsing the Internet, click Start > Internet
Explorer.
To set up a dial-up connection to your corporate network
1. On the Home screen, click Start > Settings > Connections > Dial-up.
2. Click Menu > Add.
3. In Description, enter a name for the connection.
4. In Connects to, select Work.
5. Enter the appropriate information in the remaining fields.
6. Click Done.
Note You can also add and set up the following connections:
• VPN: A VPN connection is used to access your corporate network by using
an existing Internet connection.
• Proxy: A Proxy connection is used to access the Internet using an existing
connection to your corporate or WAP network.
Page 73

Getting Connected 73
Advanced options
From the Connections screen, you can access advanced options to specify
the service provider, the number of redial attempts, the amount of idle time
to wait before disconnecting, and so on.
1. On the Home screen, click Start > Settings > Connections.
2. Click Menu > Advanced.
3. Select a network service provider for each connection type. You can
choose Automatic to allow the phone to set a service provider for
each connection by default.
4. Click Menu > Options.
5. Choose the appropriate information in the remaining fields.
6. Click Done.
Add a URL exception
Some URLs for Web pages on your company intranet may use periods, for
example: intranet.companyname.com. To view these pages in Internet
Explorer Mobile, you must create a URL exception.
1. On the Home screen, click Start > Settings > Connections.
2. Click Menu > Advanced.
3. Click Menu > Work URL Exceptions.
4. Click Menu > Add.
5. In URL Pattern, enter the URL name.
To add multiple URLs, use a semicolon (;).
6. Click Done.
Note You do not need to create URL exceptions for Internet URLs.
Page 74

74 Getting Connected
5.2 Using Internet Explorer Mobile
Internet Explorer Mobile is a full-featured Internet browser, optimized for
use on your phone.
To open Internet Explorer
• On the Home screen, click Start > Internet Explorer.
To go to a link
1. While on a Web page, scroll vertically or horizontally to see all
available links.
2. Click the link.
To go to a Web page
1. In Internet Explorer, click Menu > Address Bar.
2. Enter the address, and click Go.
To change Web page display options
1. While on a Web page, click Menu > View.
2. Select one of the following:
• One Column. Arranges the content into one column that is as
wide as the screen. This means that you will rarely have to scroll
horizontally.
• Default. Maintains a layout similar to what you see on a desktop
computer, but makes items smaller and arranges the content so
that you can see most of it without having to scroll horizontally.
• Desktop. Keeps the same layout and size as on a desktop
computer, which will require both horizontal and vertical scrolling.
To change the size of text on Web pages
• While on a Web page, click Menu > Zoom and select the size you
want.
To show or hide pictures on Web pages
• While on a Web page, click Menu > View > Show Pictures.
A check mark next to Show Pictures indicates that pictures will be
displayed on Web pages.
Page 75

Getting Connected 75
To view a page in full-screen mode
• While on a Web page, click Menu > View > Full Screen.
Tip To exit full-screen mode, press either SOFT KEY, and then click Menu > View
> Full Screen to cancel the selection.
To add a Web page to the Favorites list
1. To go to the page you want to add, click Menu > Address Bar, enter
the address, and click Go.
2. Click Menu > Add to Favorites.
3. Confirm or change the name and Web page address.
4. In Folder, select a folder for the favorite.
5. Click Add.
Tip A quick way to add favorites to your phone is to synchronize with your PC
using ActiveSync. For more information, see ActiveSync Help on your PC.
To view a favorite
1. While on a Web page, click Favorites.
2. Select a favorite, and click Go.
To move a favorite to a folder
1. Click Favorites.
2. Select the favorite to move.
3. Click Menu > Edit.
4. Under Folder, scroll to the folder to which you want to move the
favorite.
5. Click Done.
To clear history, cookies, or temporary files
1. While on a Web page, click Menu > Tools > Options.
2. Click Memory.
3. Select the type of memory to clear.
4. Click Clear, click Yes, and then click Done.
Page 76

76 Getting Connected
To send a link via e-mail
1. Go to the desired Web page.
2. Click Menu > Tools > Send Link via E-mail.
3. Select Text Messages or Outlook E-mail.
4. A new message is created with the page address inserted in the
message body.
5.3 Using Wireless Modem
With Wireless Modem, you can use your phone as an external modem for
another device such as a PDA or notebook computer.
Note Make sure your phone has a SIM card installed, and you have set up a GPRS
or phone dial-up modem connection on your phone. For information about
setting up GPRS on your phone, see “Set up a GPRS connection” in this
chapter. Also make sure you have connected your phone to a computer
(via infrared, Bluetooth or USB). For information about setting up a dial-up
connection, see "Set up a Dial-up connection."
Set up the phone as a modem
To set up the phone as an infrared modem
1. On the Home screen of your phone, click Start > Accessories >
Wireless Modem.
2. In Connection, select IrDA.
3. To use your phone as a GPRS modem, set the Access point name
(APN). To set, click Menu > APN Setting and enter the access point
name.
4. Point your phone at the infrared port of your notebook.
5. On your notebook, disable ActiveSync.
Note To disable ActiveSync on your computer, click File > Connection Settings
then clear Allow connections to one of the following.
6. Click Menu > Start on your phone.
7. The next thing to do is to add the phone as an infrared modem onto
your notebook. To do this, continue on with the following steps.
Page 77

Getting Connected 77
8. After you click Menu > Start on the Wireless Modem screen of your
phone, the Found New Hardware dialog box will then appear on
Windows on your notebook and will show that your phone has been
detected as an infrared modem. In this dialog box, make sure that
Install the software automatically (Recommended) is selected
then click Next.
9. Wait for Windows to finish installing the infrared modem, then click
Finish.
Note Press Done to exit the Wireless Modem. This will also cut the connection
between your phone and computer.
To set up the phone as a USB modem
1. On the Home screen of your phone, click Start > Accessories >
Wireless Modem.
2. Select USB as the Connection type.
3. To use your phone as a GPRS modem, set the Access point name
(APN). To set, click Menu > APN Setting.
4. On your notebook, disable ActiveSync then plug in the USB cable
adapter between the phone and the notebook.
Note To disable ActiveSync on your computer, click File > Connection Settings
then clear Allow USB connections.
5. Click Menu > Start on your phone.
6. The next thing to do is to add the phone as a USB modem onto your
notebook. To do so, continue on with the following steps.
7. After you click Menu > Start on the Wireless Modem screen of your
phone, your notebook will automatically detect that your phone
has been connected. The Found New Hardware dialog box will then
appear on your notebook.
8. In the Found New Hardware dialog box, select Install from a list or
specific location (Advanced) and click Next.
9. Select Search for the best drivers in these locations.
Page 78

78 Getting Connected
10. Insert the Getting Started Disc into your CD drive. Select the Include
this location in the search check box, then click Browse and choose
the CD drive and root folder where the modem driver is located. Then
click Next.
11. Wait for the installation to complete then click Finish.
12. On your computer, click Start > Settings > Control Panel.
13. Double-click Phone and Modem Options.
14. Click the Modems tab. Select the new modem from the Modems list,
then click OK.
To set up the phone as a Bluetooth modem
You can connect your phone to a computer through Bluetooth and use the
phone as a modem for the computer.
To learn how to set up the phone as a Bluetooth modem, see “Use the
phone as a Bluetooth modem” in this chapter.
Page 79

Getting Connected 79
Dial-up and connect to the Internet
Once the notebook recognizes your phone as a modem, you can now set
up a dial-up connection. You will then be able to access the Internet on your
notebook using your phone.
To dial-up and connect to the Internet
1. On your notebook, click Start > Settings > Control Panel.
2. Double-click Network Connections.
3. Click File > New Connection.
4. In the New Connection Wizard, click Next.
5. Click Connect to the Internet then click Next.
6. Select Set up my connection manually then click Next.
7. Select Connect using a dial-up modem then click Next.
8. Select the modem that you previously installed then click Next.
9. Enter a descriptive name for your ISP then click Next.
10. If you are connecting to the Internet via GPRS, enter the telephone
number as *99#. Otherwise, enter your ISP‘s dial-up phone number
then click Next.
11. Under Internet Account Information, you may not need to enter
a user name and password when using GPRS. Just click Next to
proceed.
12. Click Finish to exit the wizard.
13. The Connect dialog box then opens. Click Dial to dial up and connect
to the Internet.
Page 80

80 Getting Connected
Next time you want to dial up again from your computer, click Start >
Settings > Control Panel, double-click Network Connections, then
double-click the modem connection.
Note To dial up to the Internet, you can also use the dialer program, USBModem_
Dialer.exe, that is included in the Getting Started Disc. You will find it in the
\OEM\APPS\Drivers\GSM USB Modem directory of the CD.
To end the modem session
• On the Wireless Modem screen, click Menu > Stop.
Page 81

Getting Connected 81
5.4 Using Comm Manager
Comm Manager acts like a central switcher that lets you enable or disable
phone features as well as manage your data connections easily.
To open Comm Manager:
Do one of the following:
• Click Start > Comm Manager.
• Press and hold the HOME button.
Simply click the corresponding button to enable or disable a feature.
Click to toggle between enabling or disabling the phone.
1.
Click to toggle between turning on or off Bluetooth. See “Using Bluetooth” for
2.
details. Click Settings
phone.
Click to toggle between automatically receiving (as items arrive) or manually
3.
retrieving Outlook e-mails. For more information, see “To receive e-mails and
synchronize other information instantly” in Chapter 3.
Click to stop active data services (e.g. GPRS). You cannot reconnect data
4.
services in Comm Manager.
Click to toggle between turning on the phone's ringer or setting it to
5.
vibration/mute mode.
Click to open ActiveSync so you can synchronize the phone and computer.
6.
For more information about the configuration settings for ActiveSync, see
Chapter 3.
> Bluetooth Settings to configure Bluetooth on your
Page 82

82 Getting Connected
5.5 Using Bluetooth
Bluetooth is a short-range wireless communications technology. Devices
with Bluetooth capabilities can exchange information over a distance of
about 10 meters without requiring a physical connection. You can even
beam information to a device in a different room, as long as it is within the
Bluetooth signal coverage range.
Bluetooth can be used in the following ways:
• Beam information, such as files, appointments, tasks, and contact
cards, between devices that have Bluetooth capabilities.
• Synchronize information between your phone and computer via
Bluetooth.
• Use a Bluetooth-enabled headset (or other Bluetooth-enabled
hands-free device such as a car kit) with your phone for hands-free
phone conversations. A Bluetooth stereo headset can also be used for
listening to music.
• Use a Bluetooth service. Once you connect your phone to another
device or computer using Bluetooth, you can locate and use any of
the services available on that device.
• Use your phone as a Bluetooth modem for a computer.
Bluetooth modes
Bluetooth on your phone operates in three different modes:
1. On. Bluetooth is turned on. Your phone can detect other Bluetooth-
enabled devices, but not vice versa.
2. Off. Bluetooth is turned off. In this mode, you can neither send nor
receive information using Bluetooth. You might want to turn off the
radio at times to conserve battery power, or in situations where radio
use is prohibited, such as onboard an aircraft and in hospitals.
3. Discoverable. Bluetooth is turned on, and all other Bluetooth-
enabled devices within a range of 10 meters can detect your phone.
Note By default, Bluetooth is turned off. If you turn it on, and then turn off your
phone, Bluetooth also turns off. When you turn on your phone again,
Bluetooth automatically turns on.
Page 83

Getting Connected 83
To turn on or off Bluetooth on your phone
You can enable Bluetooth by clicking the On/Off switch in Comm Manager.
You can also do the following:
1. On the Home screen, click Start > Settings > Connections >
Bluetooth.
2. In Bluetooth, select On.
3. Click Done.
To turn off Bluetooth capabilities on your phone, in Bluetooth
To make your phone discoverable
1. On the Home screen, click Start > Settings > Connections >
Bluetooth.
2. In Bluetooth, select Discoverable.
3. Enter a Bluetooth device name for your phone. This will be the device
name that will be shown on another Bluetooth-enabled device when
it searches and detects your phone.
4. Click Done.
Note Selecting the Discoverable option on the Bluetooth screen also turns on
Bluetooth.
, select Off.
Bluetooth partnerships
A Bluetooth partnership is a relationship that you create between your
phone and another Bluetooth-enabled device in order to exchange
information in a secure manner.
Creating a partnership between two devices involves entering the same
personal identification number (PIN) on both devices, and this is a onetime process. Once a partnership is created, the devices can recognize the
partnership and exchange information without entering a PIN again. Make
sure the two devices are within a range of 10 meters, and Bluetooth is
turned on and in discoverable mode.
To create a Bluetooth partnership
1. On the Home screen, click Start > Settings > Connections >
Bluetooth.
2. Click Menu > Devices.
Page 84

84 Getting Connected
3. Click Menu > New to search for a new device.
Your phone searches for other Bluetooth-enabled devices and lists
them.
4. Select the desired device name in the list.
5. Click Next.
6. Enter a passkey (1 up to 16 characters) to establish a secure
connection, then click Next.
7. Wait for the paired device to accept the partnership:
• If you are creating a Bluetooth partnership between your phone
and another Bluetooth-enabled Pocket PC or phone, the receiving
party needs to enter the same passkey that you specified.
• If you are creating a Bluetooth partnership between your phone
and computer, a balloon message will appear at the bottom-right
of the computer screen, prompting your computer to accept the
partnership. Click the message then enter the passkey.
8. On your phone, a message will appear, indicating that your phone has
connected with the paired device. Click OK.
9. The name of the paired device is then displayed. You may edit and
enter a new name for that device, then click Next
10. Select the check boxes of services that you want to use from the
paired device. Click Done.
To accept a Bluetooth partnership
1. Ensure that Bluetooth is turned on and in discoverable mode.
2. Click Yes when prompted to establish a partnership with the other
device.
3. Enter a passkey (the same passkey that is entered on the device
requesting the partnership) to establish a secure connection.
The passkey must be between 1 and 16 characters.
4. Click Next.
5. A message will appear, indicating that your phone has connected
with the paired device. Click OK.
.
Page 85

Getting Connected 85
6. The name of the paired device is then displayed. You may edit and
enter a new name for that device, then click Next.
7. Select the check boxes of services that you want to use from the
paired device.
8. Click Done.
You can now exchange information with the other device.
To change the display name of a Bluetooth device
1. On the Home screen, click Start > Settings > Connections >
Bluetooth.
2. Click Menu > Devices.
3. Select a detected Bluetooth device.
4. Click Menu > Edit.
5. Enter a new display name for the Bluetooth device, then click Next.
6. Click Done.
To delete a Bluetooth partnership
1. On the Home screen, click Start > Settings > Connections >
Bluetooth.
2. Click Menu > Devices.
3. Select a Bluetooth device.
4. Click Menu > Delete.
5. Click Done.
Connect a Bluetooth hands-free or stereo headset
For hands-free phone conversations, you can use a Bluetooth hands-free
headset such as a car kit with your phone.
Your phone also supports A2DP (Advanced Audio Distribution Profile)
which is for stereo audio over Bluetooth. This means that you can use
a Bluetooth stereo headset with your phone for hands-free phone
conversations as well as for listening to stereo music. Make sure that your
stereo headset also supports A2DP.
Page 86

86 Getting Connected
Just like when connecting to any Bluetooth device, you also need to enter
a passkey when connecting to a Bluetooth hands-free or stereo headset.
The passkey is fixed and cannot be changed on a Bluetooth headset.
Before you connect it with your phone, check for the proper passkey in the
manufacturer’s documentation.
To connect a Bluetooth hands-free or stereo headset
1. Make sure that both your phone and the Bluetooth headset
are turned on and within close range, and that the headset is
discoverable. Refer to the manufacturer’s documentation to find out
how to set the headset in discoverable mode.
2. On the Home screen, click Start >
Settings > Connections.
3. Click Bluetooth > Menu > Devices.
4. Click Menu > New. Your device searches
for other Bluetooth-enabled devices and
displays them in the list.
5. Select the name of the headset, and
click Add.
6. In Passkey, enter the alphanumeric
passkey for the Bluetooth headset, then
click Next.
7. Select the check box for the Hands Free service, and click Finish.
Note If the Bluetooth stereo headset becomes disconnected, turn the headset on
and repeat steps 1 to 3 above. Select the stereo headset and click Menu >
Set as Wireless Stereo.
Page 87

Getting Connected 87
Beam information using Bluetooth
You can beam information, such as contacts, calendar items, and tasks, as
well as files from your phone to your computer or to another Bluetoothenabled device.
Note If your computer does not have built-in Bluetooth capabilities, you need to
connect and use a Bluetooth adapter or dongle on your computer.
To beam information from your phone to a computer
1. Set Bluetooth on your phone to discoverable mode. For information
about this, see “To make your phone discoverable”.
2. Next, set Bluetooth on your computer to discoverable mode, create
a Bluetooth partnership, then enable your computer to receive
Bluetooth beams.
If your computer has Windows XP SP2 and your computer’s built-in or
external Bluetooth adapter is supported by Windows XP SP2, do the
following steps:
• On your computer, open Bluetooth Devices from the Control
Panel then click the Options tab.
• Select the Turn discovery on and the Allow Bluetooth devices
to connect to this computer options.
• Create a Bluetooth partnership between your phone and
computer. For information about creating a partnership, see
“Bluetooth partnerships”.
• In the Options tab of Bluetooth Devices, select Show the
Bluetooth icon in the notification area.
• To enable your computer to receive Bluetooth beams, right-click
the Bluetooth icon at the bottom-right of your computer screen. A
menu then opens. Click Receive a File.
Whereas if the Bluetooth adapter on your computer was installed
using a third-party provided driver, do the following steps:
• Open the Bluetooth software that came with the Bluetooth
adapter. This software varies by manufacturer, but in most cases,
you will find a Bluetooth Configuration utility which you can
open from the Control Panel.
Page 88

88 Getting Connected
• Click the Accessibility tab in the Bluetooth Configuration dialog
box, then select Let other Bluetooth devices to discover this
computer.
• Create a Bluetooth partnership between your device and
computer. For information about creating a partnership, see
“Bluetooth partnerships”.
• Refer to the Bluetooth adapter’s documentation for instructions
on how to enable your computer to receive Bluetooth beams.
3. Now you’re ready to beam. On your phone, select an item to beam.
The item can be an appointment in your calendar, a task, a contact
card, or a file.
4. Click Menu > Beam [type of item].
5. Select the device name to which you want to beam to.
6. Click Beam.
7. If you beamed a calendar, task, or contact item to your computer
and it is not automatically added to Outlook, click File > Import and
Export to import it to Microsoft Outlook on your computer.
To beam information to a Bluetooth-enabled device such as another phone,
create a Bluetooth partnership then do steps 3 to 6 in the above procedure.
Notes
• If the computer or device you want to beam to cannot be detected by your
phone, make sure that it is turned on, discoverable, and within close range
(10 meters) of your phone.
• The default folder on your computer where beamed items are stored may
be
C:\Documents and Settings\your_username\My Documents.
• If your computer’s Bluetooth adapter was installed using a third-party
provided driver, the folder location where it stores beamed items
will be indicated in the Information Exchange tab of the Bluetooth
Configuration utility.
Page 89

Getting Connected 89
Use the phone as a Bluetooth modem
You can connect your phone to a notebook or desktop computer through
Bluetooth and use the phone as a modem for the computer.
To connect your phone to the computer through Bluetooth, you need a
Bluetooth radio adapter (or USB Bluetooth dongle) for your computer.
To set up a Bluetooth connection between the phone and the computer
(in Windows XP SP2)
1. On the phone, turn on Bluetooth and set it to discoverable mode.
2. Connect a Bluetooth radio adapter on your computer. (Refer to the
manufacturer’s documentation for details on how to install.)
After a Bluetooth radio adapter is installed on your computer, the
Control Panel and System Tray will have the Bluetooth Devices icon.
Double-click this icon.
3. In the Bluetooth Devices window, click Add.
4. The Add Bluetooth Device Wizard opens. Select the My device is set
up and ready to be found check box, then click Next.
5. The wizard then detects your phone as a new device and displays its
name in the dialog box. Select the device name, then click Next.
6. Select Let me choose my own passkey, then enter a passkey (1 up to
16 digits) that will serve as an identification number for establishing a
secure connection between the phone and the computer. Click Next.
7. A confirmation message then appears on your phone. Click Yes to
accept the connection, enter the same passkey, then click Next.
8. On the computer, click Finish to exit the wizard.
9. On the phone’s Device Added screen, click OK.
10. Enter a display name for the computer, then click Next.
11. On the Services screen, click Done.
12. On the Home screen of your phone, click Start > Accessories >
Wireless Modem.
13. Select Bluetooth as the Connection type.
Page 90

90 Getting Connected
14. To use your phone as a GPRS modem, set the Access point name
(APN). To set, click Menu > APN Setting and enter the access point
name.
15. On your notebook, disable ActiveSync.
Note To disable ActiveSync on your computer, click File > Connection Settings
then clear Allow connections to one of the following.
16. Click Menu > Start on your phone.
After successfully connecting your phone to the computer via Bluetooth,
the next thing to do is to add your phone as a Bluetooth modem to your
computer.
To add the phone as a Bluetooth modem
1. On the computer, click Start > Control Panel > Phone and Modem
Options.
2. Click the Modems tab. Check if there is a Bluetooth modem, “Generic
Bluetooth Modem” or “Standard Modem over Bluetooth Link”, listed. If
there is, skip to step 6.
3. If there is no Bluetooth modem listed in the Modems tab, click Add.
4. In the Add Hardware Wizard, click Next.
5. In the Select Bluetooth Device screen, select the phone name then
click OK.
6. In the Modems tab, select the Bluetooth modem listed then click
Properties.
7. Click the Advanced tab, then in the Extra initialization commands
text box, enter:
AT+CGDCONT=1,”IP”,”APN”
where APN is the access point name provided by your mobile
network operator to give you access to the Internet. Then click OK.
8. Click OK to exit the Phone and Modem Options.
Your phone is now set up as a Bluetooth modem. For details about how to
connect to the Internet, see “Dial-up and connect to the Internet” in this
chapter.
Page 91

Chapter 6
Exchanging Messages and
Using Outlook
6.1 Using E-mail and Text Messages
6.2 Using MMS Messages
6.3 Using Pocket MSN Messenger
6.4 Using Calendar
6.5 Using Contacts
6.6 Using Tasks
6.7 Using Voice Notes
Page 92

92 Exchanging Messages and Using Outlook
6.1 Using E-mail and Text Messages
Messaging is where all of your e-mail accounts and your text message
account are located. You can send and receive Outlook e-mail, Internet
e-mail through an Internet service provider (ISP), and text messages. You
can also access e-mail from work using a virtual private network (VPN)
connection.
Set up Outlook E-mail
When starting ActiveSync on your computer for the first time, the
Synchronization Setup Wizard prompts you to set up a synchronization
relationship. This allows you to synchronize Outlook e-mail and other
information between your phone and your computer or the Exchange
Server. If you have already set up synchronization through the wizard, then
your phone is ready to send and receive Outlook e-mail. For information
about the Synchronization Setup Wizard, see “To install and set up
ActiveSync on the computer” in Chapter 3.
If you have not set up a synchronization relationship yet, do the following to
set up your phone to synchronize Outlook e-mail:
1. To set up and connect to an over-the-air connection (GPRS or ISP dial-
up) to synchronize remotely, follow the procedures in “Connecting to
the Internet” in Chapter 5.
2. Disconnect your phone from your computer or LAN. (If you have an
over-the-air connection, there is no need to disconnect).
3. Click Start > ActiveSync.
4. If you want to synchronize e-mails directly with the Exchange Server
on a private network such as your corporate network, follow the
steps in “Synchronize Outlook information with Exchange Server” in
Chapter 3.
5. Choose which information types to synchronize. Make sure E-mail is
selected. For details, follow the steps in “To change which information
is synchronized” in Chapter 3.
Page 93

Exchanging Messages and Using Outlook 93
Every time you want to manually send or receive Outlook e-mail on your
phone, just connect your phone to your computer, LAN, or over-the-air
connection, then click Sync on the ActiveSync screen or click Menu > Send/
Receive in Outlook on your phone.
For details about scheduling automatic synchronization or setting
a synchronization time with the Exchange Server, see “Schedule
synchronization with Exchange Server” in Chapter 3.
Set up a POP3/IMAP4 e-mail account
You need to set up an e-mail account that you have with an Internet service
provider (ISP) or an account that you access using a VPN server connection
(typically a work account) before you can send and receive e-mail.
1. On the Home screen, click Start > Messaging and click any item on
the Messaging screen.
2. Click Menu > Options > New Account.
3. In Your name, enter your display name for e-mail messages.
4. In E-mail address, enter the e-mail address for this account.
5. Select Attempt to obtain e-mail settings from the Internet and
click Next.
Auto configuration attempts to download necessary e-mail server settings
so that you do not need to enter them manually. If the account is set up
successfully, you will be prompted to send and receive e-mail.
If Auto configuration is unsuccessful or you have an account you access
using a VPN server connection, contact your ISP or network administrator
for the following information and enter it manually:
Page 94

94 Exchanging Messages and Using Outlook
Setting Description
User name Enter the user name assigned to you by your ISP or network
Password Choose a strong password. You have the option to save your password
Domain Not required for an account with an ISP. May be required for a work
Server type Select POP3 or IMAP4.
Account name Enter a unique name for the account, such as “Work” or “Home.” This
Network Enter the type of network your e-mail server connects to.
Incoming server Enter the name of your e-mail server (POP3 or IMAP4).
Require SSL
connection
Outgoing server Enter the name of your outgoing e-mail server (SMTP).
Outgoing
server requires
authentication
Outgoing server
settings
Use different
user name for
outgoing server
User name Enter your user name for the outgoing e-mail server.
Password Enter your password for the outgoing e-mail server.
Domain Enter the domain of the outgoing e-mail server.
Require SSL
connection
(Outgoing mail
server only)
administrator. This is often the first part of your e-mail address, which
appears before the at sign (@).
so you do not need to enter it each time you connect to your e-mail
server.
account.
name cannot be changed later.
Select this to ensure you always receive e-mail for this account using
an SSL connection. This enables you to receive personal information
more securely. Please note that if you select this and your ISP does not
support an SSL connection, you will not be able to connect to receive
e-mail.
Select this if your outgoing e-mail server (SMTP) requires authentication.
Your user name and password from above will be used.
Your outgoing e-mail server may require different authentication
settings than your incoming e-mail server.
Select this if your outgoing e-mail server requires a different user name
and password than the ones you entered before.
Select this to ensure you always send e-mail from this account using
an SSL connection. This enables you to send personal information
more securely. Please note that if you select this and your ISP does not
support an SSL connection, you will not be able to send e-mail.
Page 95

Exchanging Messages and Using Outlook 95
Send and receive messages
To compose and send an e-mail or text message
1. On the Home screen, click Start > Messaging.
2. Select an e-mail account, or select Text Messages. Then, click Select.
3. Click New.
4. Enter the e-mail address or phone number of one or more recipients,
separating them with a semicolon (;). To access addresses and phone
numbers from Contacts, in To, press ENTER and select a recipient from
the list.
5. Enter a message.
6. Click Send.
Note If you are working offline, e-mail messages are moved to the Outbox
folder and will be sent the next time you connect. Text messages are sent
immediately.
s
Tip
• To set the priority of an e-mail message, click Menu > Message Options.
• To cancel any message, click Menu > Cancel Message.
• If you are sending a text message and want to know if it was received,
before sending the message, click Menu > Message Options. Select
Request message delivery notification.
To reply to or forward a message
1. From an open message, click Reply, or click Menu > Reply All or
Forward.
2. Enter a message in the message area.
3. Click Send.
Note If you are replying to or forwarding e-mail from Outlook E-mail, you will
send less data if you do not edit the original message. This may reduce data
transfer costs based on your rate plan.
Page 96

96 Exchanging Messages and Using Outlook
To exclude your e-mail address when replying to all
When you reply to all the recipients of an e-mail, your own e-mail address
will also be added to the recipient list. You can customize ActiveSync so that
your e-mail address will be excluded from the recipient list.
1. On the Home screen, click Start > ActiveSync.
2. Click Menu > Options.
3. Select Email, and click Settings.
4. Click Menu > Advanced.
5. In the Primary e-mail address text box, enter your e-mail address.
6. Click Done.
To add an attachment to an e-mail message
1. In a new message, click Menu > Insert and then click Picture or
Voice Note.
2. Select the picture you want to attach, or record a voice note.
To download attachments
• In an open message with an attachment, select the attachment. The
attachment is downloaded the next time you synchronize or connect
to your e-mail server and send and receive e-mail.
Download messages
The manner in which you download messages depends on the type of
account you have:
• To send and receive e-mail for an Outlook E-mail account, begin
Page 97

Exchanging Messages and Using Outlook 97
synchronization using ActiveSync. For more information, see “Set up
Outlook e-mail” in this chapter.
•
To send and receive e-mail messages for an e-mail
account that
you have with an Internet Service Provider (ISP) or that you access
using a VPN server connection (typically a work account), download
messages through a remote e-mail server. For more information, see
"To download messages from the server" below.
• Text messages are automatically received when your phone is turned
on. When your phone is in turned off, messages are held by your
service provider until you turn on your phone again.
To download messages from the server
To send and receive e-mail messages for an e-mail account that you have
with an Internet Service Provider (ISP) or that you access using a VPN server
connection (typically a work account), you first need to connect to the
Internet or your corporate network, depending on the account.
1. On the Home screen, click Start > Messaging.
2. Select the e-mail account.
3. Click Menu > Send/Receive. The messages on your phone and e-mail
server are synchronized as follows: new messages are downloaded
to the phone Inbox folder, messages in the phone Outbox folder
are sent, and messages that have been deleted from the server are
removed from the phone Inbox folder.
Tip If you want to download the entire message, select the message and
click Menu > Download Message. The remainder of the message will be
downloaded the next time you send and receive e-mail.
Individually sign and encrypt a message
Encrypting an Outlook e-mail message protects the privacy of the message
by converting it from plain, readable text into cipher (scrambled) text. Only
the recipient who has the authorization key can decipher the message.
Digitally signing a message applies your certificate with the authorization
key to the message. This proves to the recipient that the message is from
you and not from an imposter or a hacker, and that the message has not
been altered.
Page 98

98 Exchanging Messages and Using Outlook
To digitally sign and encrypt a new message
1. In the message list, select Outlook E-mail.
2. Click New.
3. Click Menu > Message Options.
4. In the Security field, select the Encrypt message and Sign message
check boxes then click Done.
Verify the digital signature on a signed message you
receive
To verify a digital signature in the message that you receive, do the
following:
1. Open the Outlook e-mail message that has been digitally signed.
2. At the top of the message, click View Signature Status.
3. Click Menu > Check Certificate.
Page 99

Exchanging Messages and Using Outlook 99
4. To view the details of the certificate in the message, click Menu >
View Certificate.
Note There can be several reasons why a digital signature is not valid. For example,
the sender’s certificate may have expired, it may have been revoked by the
certificate authority, or the server that verifies the certificate is unavailable.
Contact the sender to report the problem.
Manage folders
Each Messaging account has its own folder hierarchy with five default
Messaging folders: Inbox, Outbox, Deleted Items, Drafts, and Sent Items.
The messages you receive and send through the account are stored in these
folders. You can also create additional folders within each hierarchy. Folders
for e-mail accounts behave differently depending on the type of e-mail
account you have.
If you set up an Outlook E-mail account to sync with Exchange Server
or a desktop PC, e-mail messages in the Inbox folder in Outlook will be
synchronized automatically with your phone. You can select to synchronize
additional folders by designating them for synchronization. The folders
you create and the messages you move will then be mirrored on the e-mail
server. For example, if you move two messages from the Inbox folder to a
folder named Family, and you have designated Family for synchronization,
the server creates a copy of the Family folder and copies the messages
to that folder. You can then read the messages while you are away from
your PC. You can only create and delete folders on devices when you are
connected to an Exchange e-mail server.
Similar to the Outlook account, if you set up an account to send and receive
mail using an IMAP4 e-mail server, all messages on the phone are copies of
the messages on the server. The folders you create locally on the phone and
the e-mail messages you move to these folders are mirrored on the e-mail
server. Moving a message on the phone moves the copy on the server the
next time you send and receive e-mail for that account. Therefore, messages
are available to you anytime you connect to your e-mail server, whether it
is from your phone or PC. This synchronization of folders occurs whenever
you connect to your e-mail server, create new folders, or rename/delete
folders when connected. You can also set different download options for
each folder.
Page 100

100 Exchanging Messages and Using Outlook
If you set up an account to send/receive mail using a POP3 e-mail server,
e-mail messages you move to the Deleted Items folder on the phone will
break the link between the messages on the phone and their copies on the
e-mail server. The next time you connect to send and receive mail, the email server will detect the messages that are in the Deleted Items folder on
the phone and will delete those messages from the e-mail server. All other
messages in other folders remain on both the phone and the e-mail server.
6.2 Using MMS Messages
Creating and sending Multimedia Message Service (MMS) messages to
your friends and family is fun and easy. You can include or capture photos
or video clips, include or record audio, add text, then send them along with
your MMS message.
To access MMS
Do any of the following:
• On the Home screen, click Start > Messaging > MMS.
• From the Pictures & Videos program, select a picture in My Pictures,
and click Menu > Send. Select MMS as the messaging account to
send the picture along with the message.
• From the Camera program, capture a photo or an MMS video clip
then click ( ). In the menu, select Send via MMS and click Send.
To access MMS message folders
• Click Start > Messaging > MMS, then click Menu > Folders.
MMS Message Folders
 Loading...