

Page 1

ENGLISH
User manual
Copyright HT ITALIA 2018 Version EN 2.02 - 17/05/2018
Page 2

THT45W-THT46
Table of contents
1 PRECAUTIONS AND SAFETY MEASURES ........................................................................... 2
1.1 During use ........................................................................................................................................ 2
1.2 After use ........................................................................................................................................... 2
2 GENERAL DESCRIPTION ....................................................................................................... 3
3 PREPARATION FOR USE ....................................................................................................... 4
3.1 Initial checks ..................................................................................................................................... 4
3.2 Instrument power supply .................................................................................................................. 4
3.3 Storage ............................................................................................................................................. 4
4 NOMENCLATURE .................................................................................................................... 5
4.1 Instrument description ...................................................................................................................... 5
4.2 Description of function keys ............................................................................................................. 8
4.2.1 Switching on/off the instrument .......................................................................................................... 8
4.2.2 Keys e ...................................................................................................................................... 8
4.2.3 Key ............................................................................................................................................. 8
4.2.4 Key ............................................................................................................................................ 8
4.2.5 Key ............................................................................................................................................... 8
4.2.6 Keys ........................................................................................................................................... 8
4.2.7 T key (Trigger) ................................................................................................................................... 8
5 OPERATING INSTRUCTIONS ................................................................................................. 9
5.1 Description of the main interface ...................................................................................................... 9
5.1.1 Image focusing .................................................................................................................................. 9
5.1.2 Image zoom ..................................................................................................................................... 10
5.1.3 Adjusting the distance of the object in Fusion screens .................................................................... 10
5.2 General menu description .............................................................................................................. 11
5.2.1 Settings Menu .................................................................................................................................. 12
5.2.2 Measurement Menu ......................................................................................................................... 17
5.2.3 Emissivity menu ............................................................................................................................... 18
5.2.4 Image menu ..................................................................................................................................... 20
5.2.4.1 Auto Fusion function (AUF) ......................................................................................................................... 21
5.2.5 Palette Menu .................................................................................................................................... 22
5.2.6 “Range” Menu .................................................................................................................................. 22
5.2.7 Image adjustment ............................................................................................................................ 23
5.3 Saving the image on the display .................................................................................................... 24
5.4 Recording a video on the display ................................................................................................... 24
5.5 Recalling and deleting displayed images and videos .................................................................... 25
5.5.1 Playback of videos on the display .................................................................................................... 26
5.6 Using the instrument ...................................................................................................................... 27
5.7 Transferring images/videos onto the PC ........................................................................................ 29
5.7.1 Displaying an image on the PC in real time ..................................................................................... 30
5.8 HDMI video output ......................................................................................................................... 30
6 USING THE THTVIEW APP ................................................................................................... 31
6.1 Features of THTview APP .............................................................................................................. 31
7 USING THE THTLINK SOFTWARE ....................................................................................... 36
7.1 Minimum system requirements ...................................................................................................... 36
7.2 Installing the THTLink software ...................................................................................................... 36
7.3 Main characteristics of the THTLink software ................................................................................ 36
8 MAINTENANCE ...................................................................................................................... 37
8.1 General information ........................................................................................................................ 37
8.2 Recharging the internal battery ...................................................................................................... 37
8.3 Cleaning the instrument ................................................................................................................. 37
8.4 End of life ....................................................................................................................................... 37
8.5 Accessories .................................................................................................................................... 38
8.5.1 Accessories provided ....................................................................................................................... 38
9 TECHNICAL SPECIFICATIONS ............................................................................................. 39
9.1 Environment ................................................................................................................................... 39
9.1.1 Environmental conditions for use ..................................................................................................... 39
10 SERVICE ....................................................................................................................... ......... 40
10.1 Warranty conditions ........................................................................................................................ 40
10.2 Service ........................................................................................................................................... 40
EN - 1
Page 3
THT45W-THT46
1 PRECAUTIONS AND SAFETY MEASURES
In the whole manual, the word “instrument” generically indicates models THT45W and
THT46, unless otherwise indicated. The instrument has been designed in compliance with
the directives relevant to electronic measuring instruments. For your safety and in order to
prevent damaging the instrument, please carefully follow the procedures described in this
manual and read all notes preceded by the symbol with the ut most attention. Before
and after carrying out the measurements, carefully observe the following instructions:
Do not carry out any measurements in case gas, explosive materials or
flammables are present, or in humid or dusty environments.
Do not carry out any measurement in case you find anomalies in the
instrument such as deformation, breaks, substance leaks, absence of
display on the screen, etc.
Keep the instrument steady during any measuring operation.
Do not carry out any measurements which exceed the working and storage
temperature ranges specified in § 9.1.1.
Only the accessories provided together with the instrument will guarantee
safety standards. They must be used only if in good conditions and
replaced with identical models, when necessary.
Check that the battery is correctly inserted.
Check that the LCD display gives indications consistent with the function
selected.
Do not direct the instrument at very high intensity radiation sources (e.g. the
sun) in order to prevent damaging the IR sensor.
Prevent hits or strong vibrations in order to keep the instrument from
damage.
When bringing the instrument from a cold to a hot environment, leave it on
long enough for condensation water to evaporate.
In this manual, and on the instrument, the following symbols are used:
CAUTION: observe the instructions given in this manual; improper use could
damage the instrument or its components.
This symbol on the display means that the instrument is able to emit a laser
pointer in Class 2. Do not direct the radiation towards the eyes in order to
prevent physical damage to people.
CAUTION
Compliant with European Standards
1.1 DURING USE
CAUTION
Failure to comply with the caution notes and/or instructions may damage
the instrument or be a source of danger for the operator.
Use the instrument only in the temperature ranges indicated in § 9.1.1
1.2 AFTER USE
When measurement is complete, switch off the instrument. If you expect not to use the
instrument for a long period, remove the battery.
EN - 2
Page 4

THT45W-THT46
2 GENERAL DESCRIPTION
The instrument is a digital thermal camera capable of carrying out infrared temperature
measurements of objects and providing thermographic images. It is also very easy to use
and needs little maintenance.
The main characteristics of the instrument are:
Infrared temperature measurement ranging from -20°C to 350°C
Built-in photo camera for a visual image
PiP fusion function
Auto Fusion function (AUF)
3 selectable measuring cursors
Table with emissivity values of common material
4 standard color palettes
Electronic zoom x1-x32
Automatic detection of hot/cold spots of the image
Storage of JPG images on external micro SD card
IR sensor resolution: 80x80pxl (THT45W), 160x120pxl (THT46)
USB port for PC connection and image transfer
WiFi feature for connection with external mobile devices through THTview APP
(THT45W)
MPEG4 video recording on micro SD card
Video and microphone output
Built-in laser pointer and illuminator
Rechargeable Li-ION battery
Analysis and printing of images with the dedicated software provided
The applications of the digital thermal camera are:
Predictive and preventive maintenance of the electrical and mechanical appliances
Monitoring of the temperature of working processes
Maintenance and troubleshooting on forced ventilation ducts
Domestic/industrial use in troubleshooting environmental insulation problems
Safety problems
EN - 3
Page 5

THT45W-THT46
3 PREPARATION FOR USE
3.1 INITIAL CHECKS
Before shipping, the instrument has been checked from an electric as well as mechanical
point of view. All possible precautions have been taken so that it is delivered undamaged.
However, we recommend generally checking the instrument in order to detect possible
damage suffered during transport. In case anomalies are found, immediately contact the
forwarding agent.
We also recommend checking that the packaging contains all components indicated in §
8.5. In case of discrepancy, please contact the Dealer. In case the instrument should be
replaced, please carefully follow the instructions given in §. 10
3.2 INSTRUMENT POWER SUPPLY
The instrument is supplied by a 1x3.7V rechargeable Li-ION battery and AC mains power
supply, which also provides for the recharge of the mentioned battery. Both of these
systems are provided together with the instrument. For battery recharge, please refer to §
8.2.
3.3 STORAGE
In order to guarantee precise measurement, after a long storage time under extreme
environmental conditions, wait for the instrument to come back to normal condition (see §
9.1.1).
EN - 4
Page 6
THT45W-THT46
4 NOMENCLATURE
4.1 INSTRUMENT DESCRIPTION
Fig. 1: Description of the instrument's front and backside
CAPTION:
1 LCD display
2
Function keys
3 Holes for non-slip strap
4 Lens protection cap
5 In-built visual photo camera
6 Laser pointer
7 Built-in illuminator
8 Lens associated with the IR sensor
9 Hole for tripod insertion
10 Trigger key (T)
11 Battery compartment cover
, , , , , ,
EN - 5
Page 7
THT45W-THT46
Fig. 2: Description of the instruments side
CAPTION:
12 Lens focus adjuster
13 Trigger key (T)
14 Instrument's inputs and outputs location
Fig. 3: Description of the instrument's inputs and outputs
CAPTION:
15 Battery charge indicator LED
16 Input for connecting AC adapter/battery charger and micro USB port
17 Audio input for connecting microphone/headphones
18 HDMI video output
19 Input for micro SD card
EN - 6
Page 8
THT45W-THT46
Fig. 4: Description of the instrument's battery compartment
CAPTION:
1 Inside of the battery compartment
2 Battery insertion section
EN - 7
Page 9
THT45W-THT46
4.2 DESCRIPTION OF FUNCTION KEYS
The instrument has 8 function keys indicated as , , , , , , and a trigger
key “T” with multiple functions.
4.2.1 Switching on/off the instrument
Press the button to switch on the instrument. After approx. 10 seconds internal autotest,
the instrument shows its normal measuring screen. To switch off the instrument, press and
hold the key for 2 seconds.
CAUTION
A simple pressing of the key activates the manual calibration of the
instrument, which is necessary if the IR image is out of focus or if you frame a
new subject. The message “Calibration…” is shown on the display for some
seconds.
4.2.2 Keys e
By pressing the keys or you can respectively Zoom in or out the image on the
display (see § 5.1.2). The same keys are also used for the selection of system parameters.
4.2.3 Key
Pressing and hold the key allows activating/deactivating the internal illuminator (see
Fig. 1 – Part 6). The same key is also used for the selection of system parameters.
4.2.4 Key
Pressing and hold the key allows activating/deactivating the laser pointer (see Fig. 1
– Part 7). The same key is also used for the selection of system parameters.
4.2.5 Key
Press the key to access/exit the gallery of images (JPG files) or videos (MP4 files)
available on the micro SD card inserted in the instrument (see § 5.3).
4.2.6 Keys
The keys are used when programming the instrument respectively to enable a
selection of a parameter or to exit and go back to the main screen. With these keys, you
can also select the adjusting mode of the image between Automatic and Manual (see §
5.2.7).
4.2.7 T key (Trigger)
Pressing the T key found in the front part of the instrument allows saving the image shown
on the display on the micro SD card (see § 5.3). Long pressing the T key allows
automatically activating a video (see § 5.4).
EN - 8
Page 10
THT45W-THT46
5 OPERATING INSTRUCTIONS
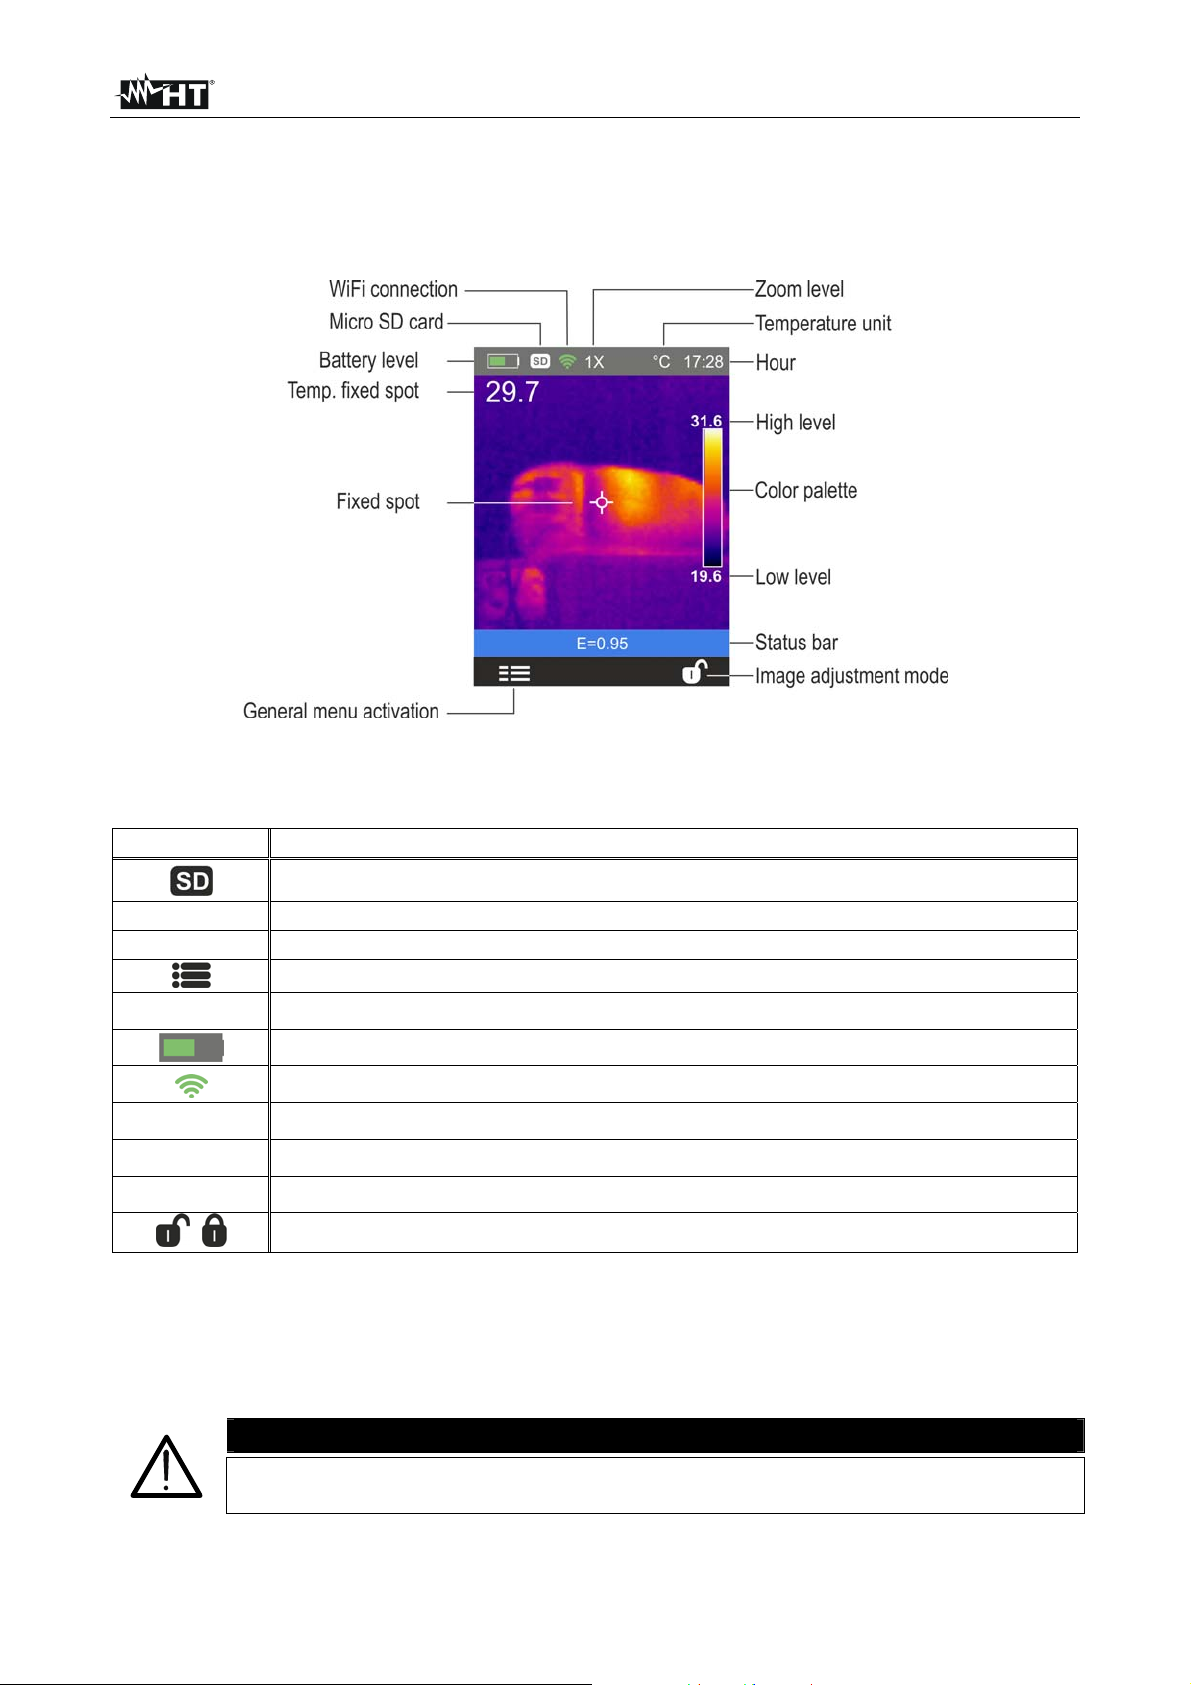
5.1 DESCRIPTION OF THE MAIN INTERFACE
The instrument shows the following main interface on the display:
Fig. 5: Main instrument interface
The meaning of the symbols found on the display is described below.
Symbol Description
E=0.95
°C
1X
17.28
Level
Palette
,
Micro SD card inside the instrument
Set value of object emissivity
Indication of the temperature measuring unit
Access to the functions of the main menu
Indication of the Zoom percentage (x1 x32)
Battery charge level indication (see § 8.2)
Indication of active WiFi connection (only THT45W)
Indication of the system's current time
Indication of temperature levels of the IR image (see § 5.2.7)
Indication of color palette (see § 5.2.5)
Image adjusting mode setting (see § 5.2.7)
5.1.1 Image focusing
Focusing the IR image found on the instrument's display must be performed manually by
rotating the adjuster installed on the front part (see Fig. 2 - Pos. 12). Keep the instrument
steady while performing this operation.
CAUTION
Always focus the image before saving it, in order to perform correct
temperature measurements of the framed object.
EN - 9
Page 11
THT45W-THT46
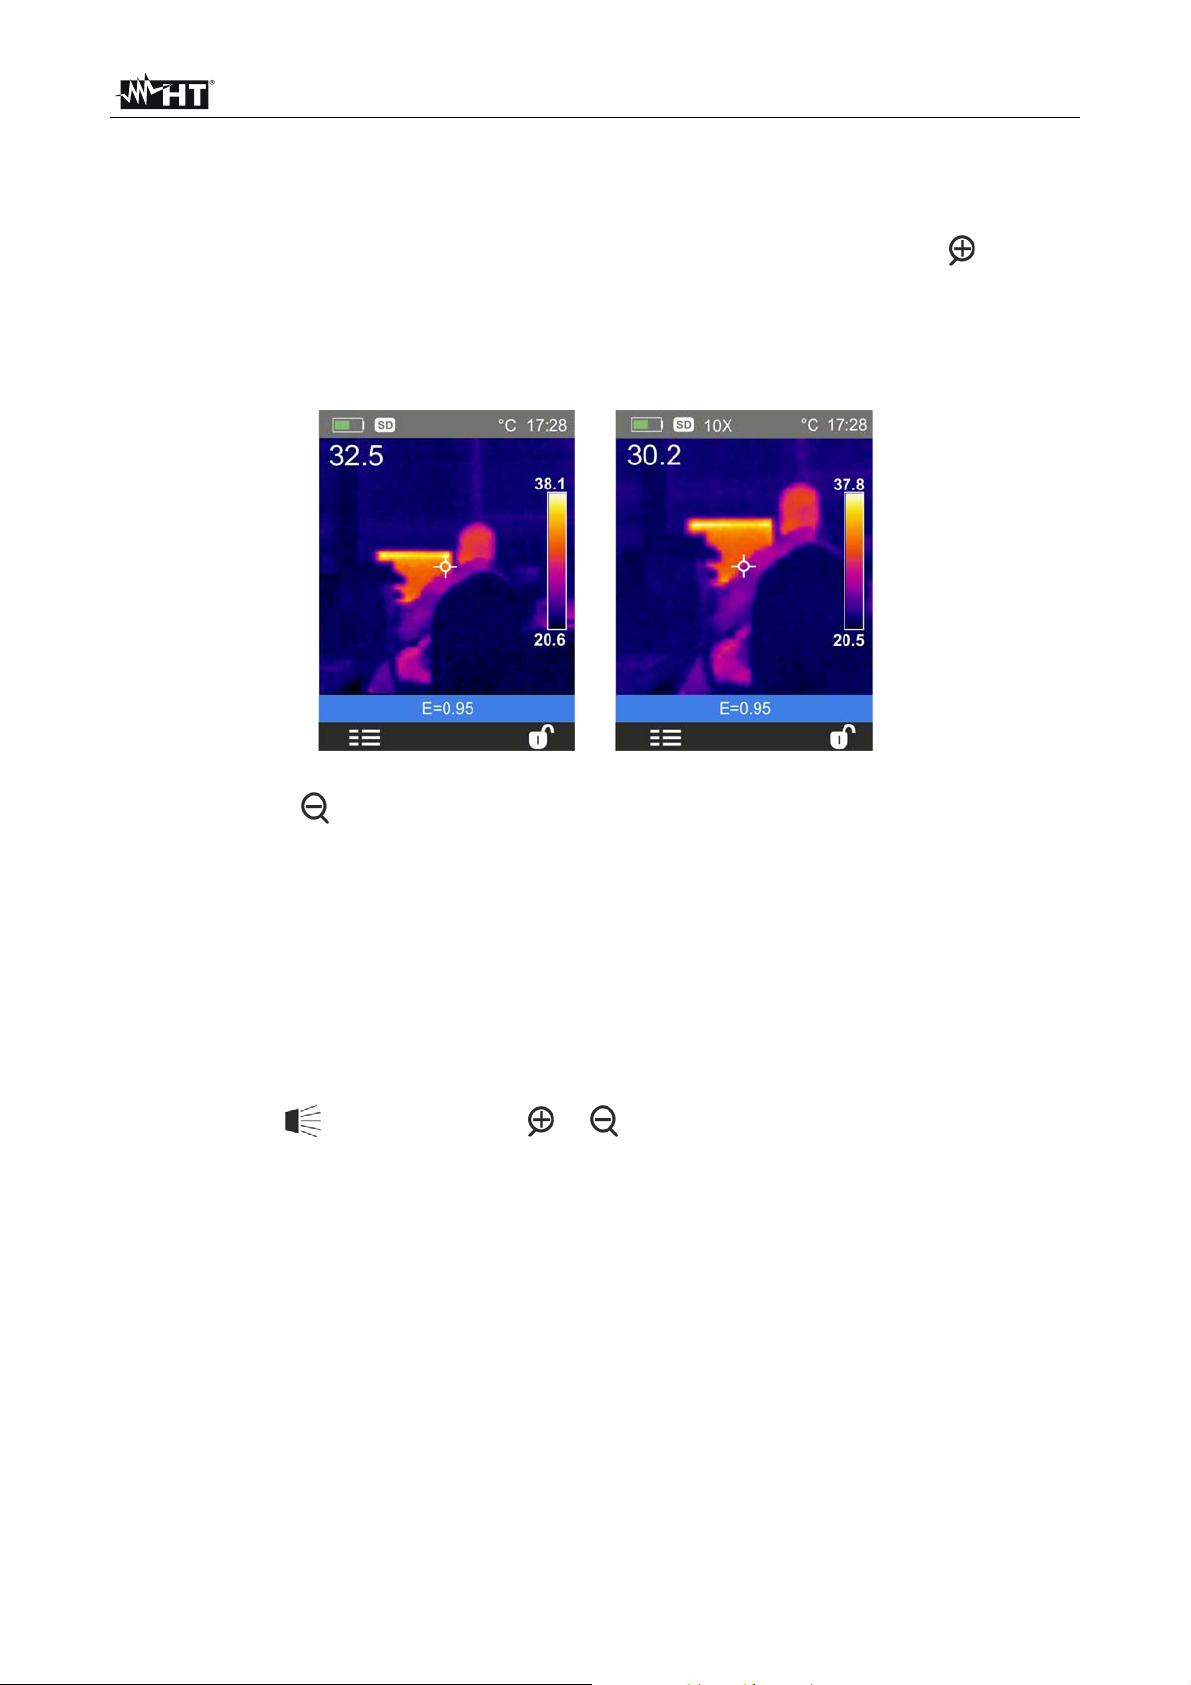
5.1.2 Image zoom
The instrument is provided with an electronic digital zooming function of the IR image and
of the framed visual image. To use this function, proceed as follows:
1. Frame the object to be tested (see Fig. 6 – Left side) and press the key as many
times as you want to zoom the image. Each pressing increases the size of the image
by 10% with respect to the original. The instrument show the zoom value on the top
side of the display (see Fig. 6 – Right side relevant to x10 zoom). Possible options are:
1x 32x
Fig. 6: Setting image zoom
2. Press the key to zoom out until you go back to the original image.
5.1.3 Adjusting the distance of the object in Fusion screens
In “Fusion” display mode (see § 5.2.4), due to the different position of the lens and of the
built-in photo camera, when the object is close to the lens, the visible image tends to
become bigger, while the IR image tends to reduce. When the object is more than 2m far
from the lens, this effect tends to disappear. The instrument allows setting the distance of
the object in order to compensate the effect at distances shorter than 2m. Proceed as
follows:
1. Select the item “Alignment” within the Setting menu (see § 5.2.1).
2. Use the key
and then the keys or to set the value of the distance of the lens
from the object. The following values are available: 0.5m, 1m, 1.5m and >2m
3. Press the key “Select” to confirm or “Close” to exit without saving.
EN - 10
Page 12
THT45W-THT46
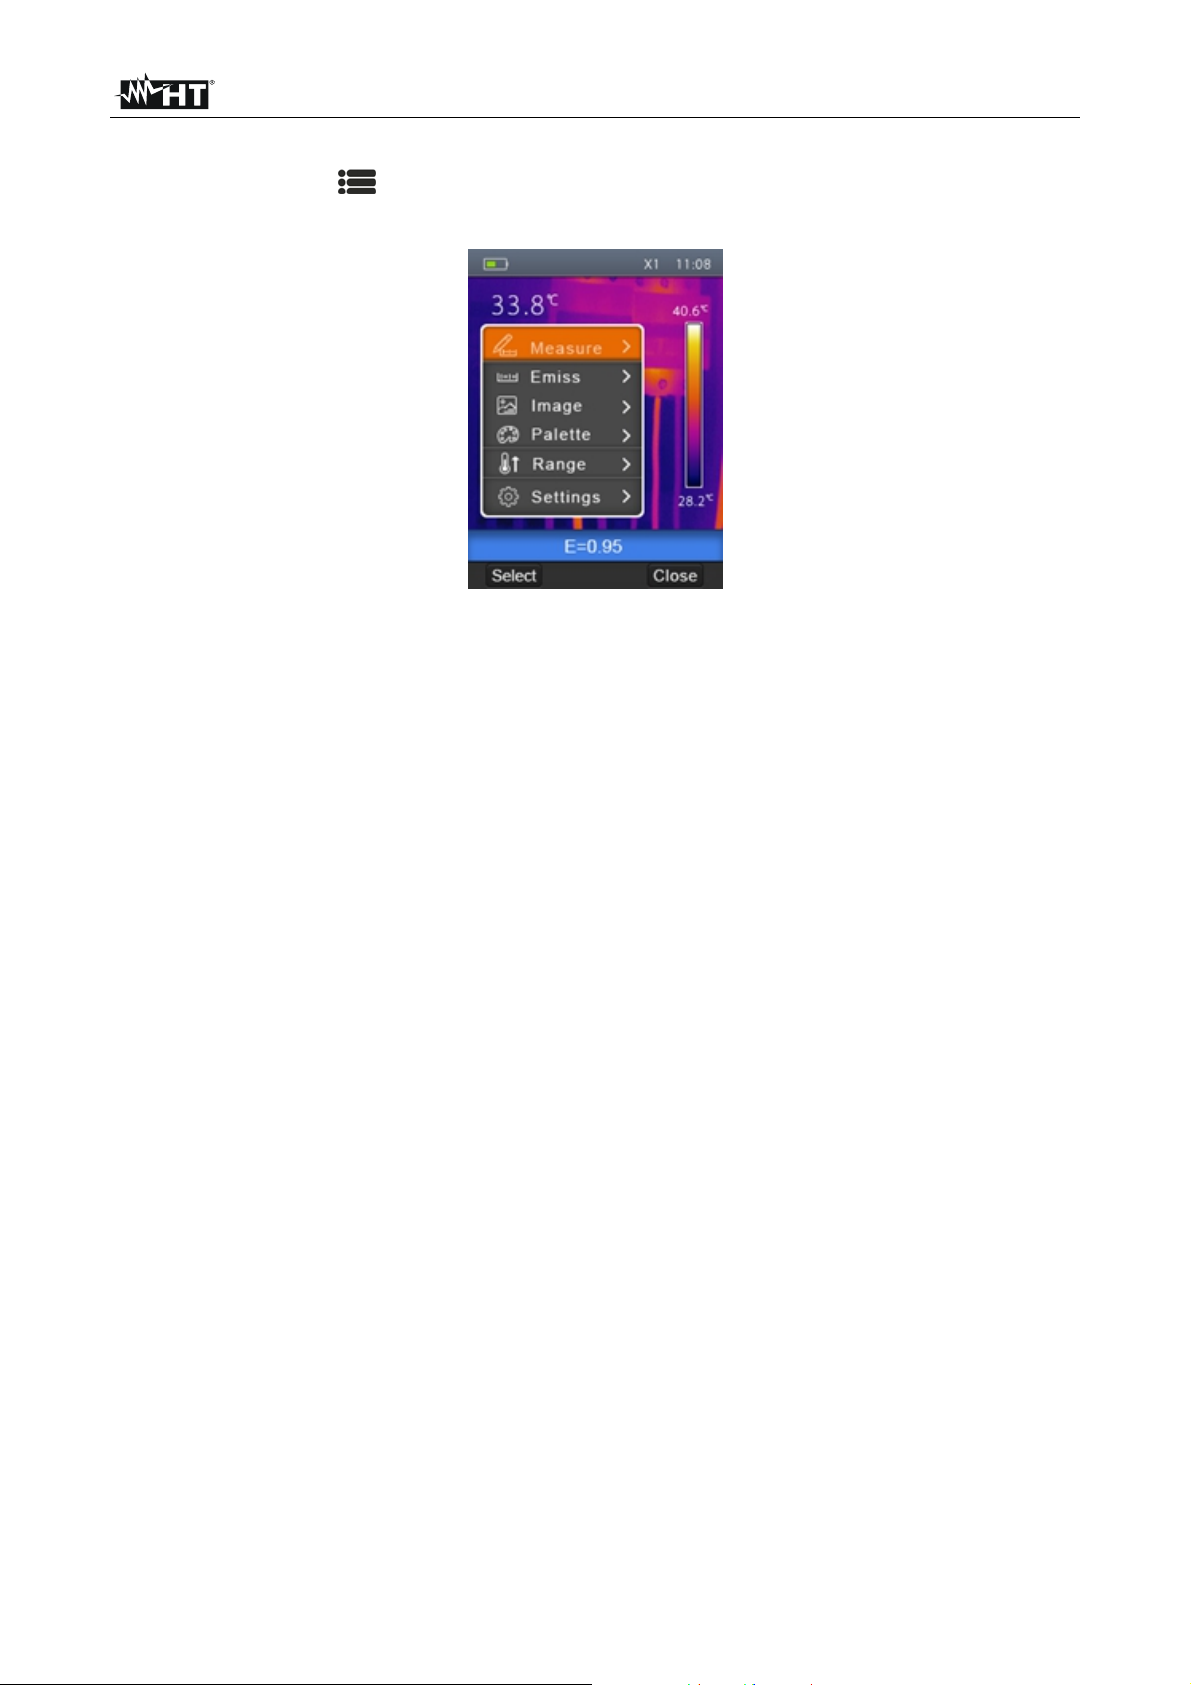
5.2 GENERAL MENU DESCRIPTION
By pressing the key , the instrument shows the following general menu, which allows
accessing the internal functions:
Fig. 7: Instrument general menu
Measure menu defines the selection of the cursors which can be used while measuring
(max 3 cursors)
Emiss menu defines the setting of the emissivity of the object
Image menu defines the display modes of the image
Palette menu defines the selection of the type of palette which can be used on the
instrument
Range menu defines the instrument's measuring range of temperature
Settings menu allows setting system parameters.
EN - 11
Page 13

THT45W-THT46
5.2.1 Settings Menu
By selecting “Settings” with the keys or and pressing the “Select” key or the key ,
the instrument enters the submenu in which you can define the values of system
parameters.
“Language” section
1. Select the item “Language” with the keys or and press the key . The screen
Fig. 8 – Right side is shown on the display.
Fig. 8: System language setting
2. Use the or keys to select the desired language among the ones available.
3. Press the key “Select” to confirm or “Close” to exit without saving.
Section “Temp Unit”
In this section it is possible to define the temperature measuring unit used by the
instrument.
1. Select the item “Temp Unit” with the keys or and press the key . The screen
Fig. 9 is shown on the display.
Fig. 9: Setting the temperature measuring unit
2. Use the keys or to select the measuring unit among the options; °C, °F or °K
3. Press the key “Select” to confirm or “Close” to exit without saving.
EN - 12
Page 14

THT45W-THT46
Section “Factory Set”
In this section it is possible to restore the default conditions of the instrument's parameters.
1. Select the item “Factory Set” with the keys or and press the key . The screen
of Fig. 10 – Right side is shown on the display.
Fig. 10: Setting default conditions on the instrument
2. Press the key “Select” to restore the default conditions (see Table 1) or “Close” to
cancel the operation.
Parameter Default setting
Cursor in the middle of the display On
Max temperature measurement cursor Off
Min temperature measurement cursor Off
Emissivity 0.95
Reflected temperature 25°C
Image display IR
Colour palette Iron
Temperature setting mode Auto
Language English
Laser Off
Illuminatore Off
WiFi (THT45W) Off
Table 1: Default conditions of the instrument
EN - 13
Page 15

THT45W-THT46
“Set Time” section
In this section it is possible to set the system date/time.
1. Select the item “ Set Time” with the keys or and press the key . The screen
Fig. 11 – Right side is shown on the display.
Fig. 11: Setting the instrument's date/time
2. Use the keys or to select the desired formats of date and time
3. Use the keys or to set the desired values of date and time
4. Press the key “Ok” to confirm or “Cancel” to exit without saving.
“Information” section
This section contains general information about the instrument.
1. Select the item “Information” with the keys or and press the key . The screen
Fig. 12 – Right side is shown on the display.
Fig. 12: Instrument information display
2. The information (model, serial number, Firmware internal version, la st calibration date,
residual memory on the micro SD card) are shown on the display.
3. Press the “Close” key to exit and to go back to the previous screen.
EN - 14
Page 16

THT45W-THT46
“Alignment” section
In this section it is possible to define the distance between the lens and the object which
the instrument considers for “Fusion” display (see § 5.1.3).
1. Select the item “Alignment” with the keys or and press the key . The screen of
Fig. 13 – Right side is shown on the display.
Fig. 13: Setting the alignment distance
2. Use the keys or to select the distance among the options; 0.5m, 1m, 1.5m or
>2m
3. Press the key “Select” to confirm or “Close” to exit without saving.
“Auto power off” section
In this section it is possible to enable/disable and adjust the auto power-off time of the
instrument after a period of inactivity.
1. Select the item “Auto power-off” using the keys or and press the key . The
screen Fig. 14 – Right side is shown on the display
Fig. 14: Setting the alignment distance
2. Use the keys or to select the auto power-off time among the options; OFF, 5min,
10min or 30min
3. Press the key “Select” to confirm or “Close” to exit without saving.
EN - 15
Page 17

THT45W-THT46
“Volume” section
In this section it is possible to enable/disable and adjust the volume associated with the
playback of the videos recorded using the instrument (see § 5.5.1).
1. Select the item “Volume” using the keys or and press the key . The screen
Fig. 15 – Right side is shown on the display
Fig. 15: Volume level setting
2. Use the keys or to set the volume level, possibly wearing the provided set of
headphones.
3. Press the key “Select” to confirm or “Close” to exit without saving.
“WiFi” section (only THT45W)
In this section it is possible to enable/disable the WiFi feature for the connection of the
instrument to mobile devices through THTview APP (see § )
1. Select the “WiFi” item using the keys or and press the key . The screen of
Fig. 16 – left side is shown on the display
Fig. 16: WiFi connection setting
2. Use the keys or to set the option “ON” (enable - “ ” symbol is displayed as
shown in Fig. 16 – right side) or “OFF” (disable)
3. Select the RESET” option in case of restore of WiFi default condition (AP mode –
Access Point) and the original password “12345678”
EN - 16
Page 18

THT45W-THT46
5.2.2 Measurement Menu
In this section it is possible to select/deselect the display of the three available measuring
cursors independently. The thermal camera has:
1 steady cursor (point) in the middle of the display
1 dynamic cursor which identifies the temperature of the hottest spot of the image
1 dynamic cursor which identifies the temperature of the coldest spot of the image
1. Select the item “Measurement” with the keys or and press the key . The
screen Fig. 17 – Right side is shown on the display.
Fig. 17: Setting of measuring cursors
2. Use the keys or and press and hold the key “Select” or the key to
select/deselect the desired measuring cursors among the options: Spot (steady white
cursor, marked by the letter “S”), Hot (max value red cursor, marked by the letter “ H”),
Cold (min value blue cursor, marked by the letter “C”). The values of the temperatures
associated with the cursors are found on the top left-hand side of the display.
3. Press the “Close” key to confirm your selection and go back to the general menu.
EN - 17
Page 19

THT45W-THT46
5.2.3 Emissivity menu
In this section it is possible to set the values of the Emissivity and Reflected temperature
parameters which are necessary for possible corrections on the temperature measurement
carried out by the instrument.
Parameter Emissivity
In order to carry out accurate temperature measurements, it is important to define the
correct emissivity value (), which represents the ability of a body to emit infrared radiation,
according to the kind of material the measured object is made of. Table 2 shows the
emissivity values for the most common materials. Emissivity takes values between 0
(mirror or perfectly reflecting surface) and 1 (perfectly radiating blackbody). Most of the
painted or oxydized surfaces have an emissivity value of approximately 0.95.
Material Emissivity
Water 0.96
Stainless steel 0.14
Aluminium foil 0.09
Asphalt 0.96
Cement 0.97
Cast iron 0.81
Rubber 0.95
Wood 0.85
Bricks 0.75
Tape 0.96
Brass foil 0.06
Human skin 0.98
PVC plastic 0.93
Polycarbonate 0.80
Oxydized Copper 0.78
Rust 0.80
Paint 0.90
Earth 0.93
Table 2: Emissivity values of typical materials
Parameter Reflected temperature
Objects with a low emissivity may reflect infrared energy coming from adjacent objects;
this energy is added to the energy of the object itself, thus causing possible measurement
mistakes. In several situations, there are sources of heat with a higher temperature than
the temperature found near the object being measured. In this case, it is necessary to
compensate this reflected energy by entering the presumed temperature value of the
adjacent heat source into the thermal camera. In most of the applications, the reflected
temperature is identical to the environmental temperature and has negligible effects on
temperature measurement on objects with a high emissivity.
EN - 18
Page 20

THT45W-THT46
Emissivity setting
1. Select the item “Emiss” with the keys or and press the key . The screen Fig.
18 – Central part is shown on the display.
Fig. 18: Setting Emissivity on the instrument
2. Use the keys or to select the item “Emissivity” and press the key . The screen
Fig. 18 – Right side is shown on the display
3. Use the keys or to select the emissivity values of materials found in the
integrated table and press the key “Select” to confirm your choice.
4. Select the item “Custom” and confirm your custom setting of the emissivity value with
the “Select” key. Use the keys or to set the value in the range: 0.01 1.00
5. Press the “Close” key to confirm your setting and to go back to the initial screen. The
set emissivity value is displayed in the status bar.
Reflected temperature setting
1. Select the item “T. Refl.” using the keys or and press the key “Select”. The
screen Fig. 19 – Central part is shown on the display
Fig. 19: Setting the Reflected Temperature on the instrument
2. Press the “Select” key to activate the setting of the reflected temperature value. Use
the keys
or to set the desired value of reflected temperature.
3. Press the “Close” key to exit and to go back to the previous screen
EN - 19
Page 21

THT45W-THT46
5.2.4 Image menu
In this section it is possible to select the display mode of IR and visual images.
1. Select the item “Image” using the keys or and press the key . The screen Fig.
20 – Right side is shown on the display
Fig. 20: Selecting the image display mode
2. Use the keys or to select the desired display mode among the options: IR
(infrared image), Visual (visual image), MIX (fusion of IR image into the visual one)
(see Fig. 21) and AUF (Auto Fusion function – see § 5.2.4.1) (see Fig. 20)
Fig. 21: Image display modes
3. With MIX image selected, use the keys or to adjust the IR level inside the
visible image
4. Press the “Select” key or the key to confirm the operation and go back to the
previous screen of the “Close” key to exit without any modification.
EN - 20
Page 22

THT45W-THT46
5.2.4.1 Auto Fusion function (AUF)
The AUF function is a special internal algorithm that allows to the instrument to display
automatically, via comparison of the central spot temperature and the remaining part of the
screen, the optimum level of mixing percentage between IR and visible part of the image.
This allows the saving of better quality pictures even in low-contrast conditions (object
temperature similar to the same of the surrounding environment). This function can be
used with Automatic or Manual image adjustment (see § 5.2.7).
Automatic adjustment
Fig. 22: Visualization of image with AUF function in Automatic adjustment
Manual adjustment
With instrument in Manual adjustment mode (symbol at display), the AUF function
allows to view the IR image with the colors of the selected palette in the points with
temperature range within the lower and upper level interval and view visible image in the
points outside the same interval.
Fig. 23: Visualization of image with AUF function in Manual adjustment
In Fig.22 the instrument shows the IR visualization with "Iron" palette (see § 5.2.5) in the
points of the image with temperatures between 22.0°C and 37.0°C and visible image in the
points outside of this range.
EN - 21
Page 23

THT45W-THT46
5.2.5 Palette Menu
In this section it is possible to select the color palette which can be associated to the IR
image.
1. Select the item “Palette” using the keys or and press the key . The screen Fig.
24 – Right side is shown on the display
Fig. 24: Setting the colour palette
2. Use the keys or to select the desired colour palette among the options: Iron,
Rainbow, Grey and Grey Inv watching the modification of selection on the display.
3. Press the “Select” key or the key to confirm the operation and go back to the
previous screen of the “Close” key to exit without any modification.
5.2.6 “Range” Menu
In this section it is possible to define the temperature measuring range of the instrument.
1. Select the item “Range” using the keys or and press the key . The screen Fig.
25 – Right side is shown on the display
Fig. 25: Setting measuring range on the instrument
2. Use the keys or to select the measuring range among the options; -20°C
150°C or 0°C 350°C.
3. Press the “Select” key or the key to confirm the operation and go back to the
previous screen of the “Close” key to exit without any modification.
EN - 22
Page 24

THT45W-THT46
5.2.7 Image adjustment
In this section it is possible to define the adjusting mode of the temperature associated
with the image framed on the display. The following modes are available:
Auto (default)
Manual
To set Manual mode, proceed as follows:
1. Press the right key and set the symbol on the display.
2. Press and hold the key for 2 seconds. The following screen (see Fig. 26 – Left side)
is shown on the display.
Fig. 26: Setting the adjustment mode of image temperature
2. Use the keys and to set the desired value of the temperature associated to the
minimum level. Press and hold the keys for a quick setting of the value.
3. Press the key to go to the upper level of the color palette (see Fig. 26 – Right side).
4. Use the keys
and to set the desired value of the temperature associated to the
maximum level. Press and hold the keys for a quick setting of the value.
5. Press the “Ok” key to confirm. The values of the set levels are maintained by the
instrument until a new modification is performed.
6. Press the right key
to go back to Auto mode.
CAUTION
Automatic (Auto) mode the minimum and maximum temperature levels
of the framed object on the display and associated with the colour palette
are automatically defined by the instrument and dynamically vary when
moving it. This (default) option, which can be used in most cases, allows for
an optimum display of the IR image in a condition of temperatures equally
distributed within it.
Manual mode the minimum and maximum temperature level of the
object framed on the display are manually set by the user. This mode,
particularly useful to clearly identify only some areas of the image, is
recommended in case of advanced thermographic operations.
EN - 23
Page 25

THT45W-THT46
5.3 SAVING THE IMAGE ON THE DISPLAY
1. Insert the micro SD card into the relevant slot of the instrument (see Fig. 4). The icon
“ ” is shown in the top left-hand part of the display.
2. Select the desired image display mode (see § 5.2.4).
3. Press the T (Trigger) key to freeze the image shown on the display (see Fig. 27).
4. Press the “Save” key to definitively save the image. The message “Save YYYYMMDD
_xxxx.jpg” appears for a moment on the display (“YYYYMMDD” indicates the year,
month and day in which the image was saved while “xxxx” indicates the sequence
number of the image saved).
Fig. 27: Saving the image on the display
5. Press the “Cancel” key to exit without saving.
5.4 RECORDING A VIDEO ON THE DISPLAY
1. Insert the micro SD card into the relevant slot of the instrument (see Fig. 4). The icon
“ ” is shown in the top left-hand part of the display.
2. If necessary, insert the jack of the headphones into the camera (see Fig. 2 – Part 17).
3. Select the desired image display mode (see § 5.2.4).
4. Press and hold the T (Trigger) key for some seconds to activate video recording. The
message “YYYYMMDD _xxxx.mp4” appears in the status bar and the timer appears at
the bottom of the display (see Fig. 28)
Fig. 28: Video recording
5. Talk into the microphone as long as you desire.
6. Press the T (Trigger) key again to stop the video
7. Press the “Save” kay to save the video or the “Cancel” key to exit without saving.
EN - 24
Page 26

THT45W-THT46
5.5 RECALLING AND DELETING DISPLAYED IMAGES AND VIDEOS
The instrument allows recalling and watching on the display every image/video saved on
the micro SD card.
1. Press the key . The instrument displays the last saved image/video (see Fig. 29 –
Left side).
Fig. 29: Recalling an image or video on the display
2. Use the keys or to scroll the images/videos in the gallery on the display.
3. Press the key “Browse” to access the gallery of saved images/videos (see Fig. 29 –
Left side).
4. Press the key “Open” to recall the selected image/video on the display.
5. Press the “Option” key. The following screen appears on the instrument's display:
Fig. 30: Deleting an image or video on the display
6. Select the option “Delete” and press the “Ok” key to delete the selected image/video.
7. Select the option “Delete all” and press the “Ok” key to delete the entire content of the
micro SD card.
8. Select the option “Exit” and press the “Ok” key to exit t he gallery and go back to the
main screen. Press the “Close” key to close the submenu.
EN - 25
Page 27

THT45W-THT46
5.5.1 Playback of videos on the display
To play a video saved on the instrument's micro SD card, proceed as follows:
1. Press the key and recall the video on the display (see Fig. 31 – Left side).
2. If necessary, insert the jack of the headphones into the instrument (see Fig. 2 – Part
17).
3. Adjust the level of sound volume (see § 5.2.1).
4. Press the T (Trigger) key to activate video playback. A cursor and progress bar are
shown on the display (see Fig. 31 – Right side).
Fig. 31: Playback of videos on the display
5. Press the T (Trigger) key again to pause playback.
6. Press the Browse” key to go bac k to the gallery of images/videos or “Exit” key to back
to the main menu
EN - 26
Page 28

THT45W-THT46
5.6 USING THE INSTRUMENT
For a typical use of the instrument, please refer to the following procedure:
1. Switch on t he instrument by pressing the “ ” key. After approx. 20 seconds of internal
autotest, the instrument shows its normal measuring screen. Upon start-up, the
instrument shows a screen like the one shown in Fig. 32.
Fig. 32: Initial screen
2. It takes approx. 30 seconds for the instrument to become fully operating. During this
time interval, the instrument carries out an automatic calibration and the internal
commutations may produce some noise.
CAUTION
The autocalibration sequence (automatic every approx. 10s and not
disabled) starts when the instrument is switched on and continues during
the thermal cameras normal operation, during which the image freezes for a
few seconds in order to eliminate offset errors. The noise produced by the
commutation of internal parts is not to be considered as a problem of the
instrument.
3. Before any measuring operation, correctly focus the thermal camera in order to prevent
having grossly inaccurate measurements and a low quality of the saved image (see §
5.1.1).
4. For accurate temperature measurements, make sure the surface of the measured
object is always bigger than the surface measurable by the instrument, which is given
by the instruments field of view (FOV). The instrument THT45W has a field of view of
17° x 17° and a detection vector of 80x80 (6400) pxl (see Fig. 33).
Fig. 33: Representation of the instruments field of view (FOV) for THT45W
EN - 27
Page 29

THT45W-THT46
The representation of the ratio D (distance from the object) / S (surface of the object) for
an instrument THT45W provided with 9mm lens is described below.
Fig. 34: Representation of the THT45W instrument’s D/S ratio
In the representation, it is possible to see how the IFOV (Instant Field Of View =
geometrical resolution of the instrument = size of the single pxl of the IR sensor) is equal
to 3.78mm at a distance of 1m of the instrument from the object being measured. This
means that the instrument is capable of carrying out correct temperature measurements at
a distance of 1m on objects with a size not lower than 3.78mm.
5. The typical application of thermal cameras is the one in which it is necessary to detect
a temperature difference between two adjacent objects, as this kind of analysis is often
sufficient to identify anomalies in electrical and mechanical appliances, etc. In such
situations, in which an accurate temperature measurement is not strictly necessary,
emissivity value may be set to “1” (see § 5.2.3), it is not necessary to consider the
objects surface, its distance and the field of view). However, if accurate measures are
required (e.g. the temperature of an electric motor), it is necessary to correctly set the
parameters previously described in this manual.
6. Correctly set the temperature range of the image (see § 5.2.1), defining the adequate
values according to the MIN and MAX temperatures detected within the measured
area.
7. Frame the objects to be measured by using the laser pointer, if necessary (see §
4.2.4). The instrument displays the temperature values associated with the measuring
cursors.
8. Use the T (Trigger) key to freeze the image on the display and save it on the external
micro SD card. The instrument saves the images in sequence with file name
“YYYYMMDD_xxxx.jpg”
CAUTION
In the IR and Visible image visualization modes (see § 5.2.4). during the
image saving operation waiting at least 1s after the pressing of “Save” key
before move the camera from the object in front of it in order to avoid the
possible mismatch of IR and visible images inside the gallery section
9. Press the key
to see the saved images again (see § 5.5).
EN - 28
Page 30

THT45W-THT46
5.7 TRANSFERRING IMAGES/VIDEOS ONTO THE PC
The instrument allows saving the images/videos on an external micro SD card and to
transfer them onto the PC by using the USB cable. Both the micro SD card and the cable
are provided with the instrument. Proceed as follows:
1. Insert the micro SD card into the dedicated slot (see Fig. 3 – Part 19).
2. Connect the USB cable to the instrument (see Fig. 3 – Part 16) and to the PC. The
following screen (see Fig. 35 – Left side) is shown on the display:
Fig. 35: Transferring images/videos onto the PC
4. Use the keys or to select the option “PC Transfer” and press the “Select” key.
The screen Fig. 35 – Right side is shown on the display.
5. Inside “My Computer”, search for the removable disk associated to the micro SD card
and copy the files “YYYYMMDD_xxxx.jpg” of the desired images or the files
“YYYYMMDD_xxxx.mp4” of the desired videos contained in two separate folders on the
micro SD card to a PC folder.
6. Disconnect the USB cable to go back to the instrument’s main screen.
EN - 29
Page 31

THT45W-THT46
5.7.1 Displaying an image on the PC in real time
The instrument allows displaying on the PC in real time the image shown on the display.
To carry out this operation, proceed as follows:
1. Connect the USB cable to the instrument (see Fig. 3 – Part 16) and to the PC. The
following screen (see Fig. 36 – Left side) is shown on the display:
Fig. 36: Displaying an image on the PC in real time
2. Use the keys or to select the option “PC Camera” and press the “Select” key.
The screen Fig. 36 – Right side is shown on the display.
3. Inside “My Computer”, search for the “USB video device” which is automatically
recognized by the PC and allows displaying the (IR or visual) image on the instrument’s
display in real time.
4. Disconnect the USB cable to go back to the instrument’s main screen.
5.8 HDMI VIDEO OUTPUT
The video output available in the instrument (see Fig. 2 – Part 18) enables displaying the
IR image acquired on an external monitor/device capable of managing HDMI systems. To
connect the instrument, proceed as follows:
1. Switch on the instrument.
2. Connect the instrument to the external monitor/device using the HDMI video cable
provided.
3. Turn on the external monitor or device.
4. Check for the presence of the IR image both on the instrument's display and on the
monitor or external device with contemporary management of the operations.
5. Detect/monitor the image on the external monitor or device.
6. At the end of the operations, switch off the monitor or external device and disconnect
the HDMI video cable from the instrument.
EN - 30
Page 32

THT45W-THT46
6 USING THE THTVIEW APP
The THT45W instrument allows operation in conjunction with the THTview APP available
for iOS / Android systems freely downloadable from the related stores.
Compliance with Android systems release 4.0 or
higher
Compliance with iOS systems release 8.0 or
higher
iOS Android
6.1 FEATURES OF THTVIEW APP
The THTview APP allows the following features:
Real-time WiFi connection with mobile devices (tablet/smartphone)
Real-time analysis of the images present on the display
Insertion of real-time points / lines / areas for advanced analysis
Changing real-time of color palettes
Saving snapshots within the mobile device
Download images from instrument with USB OTG cable connection
Creation of reports in PDF format
Sharing images / snapshots / reports via email, social networks, etc
WiFi connection (AP mode)
1. Enable the WiFi connection on the instrument (see § 5.2.1)
2. Switch on the mobile device and search for the "THT45W-Camera" instrument in the
WiFi connection settings (see example of Fig. 37)
Fig. 37: Example of WiFi connection of the instrument
3. At the Password request, enter "12345678" and make the connection
4. Start the THTview APP
5. Touch the menu icon and select the "WiFi" option (see Fig. 38 - left side) to
activate the real-time display of the image on the instrument on the mobile device
display. The screen of Fig. 38 - center side is shown
EN - 31
Page 33

THT45W-THT46
Fig. 38: Visualization of image in real time condition
Real-time analysis of IR image
The following functions are available:
Icons Available functions
Visualization of IR image
Visualization of visible image
Visualization of Fusion image (see § 5.2.4)
Visualization of Auto Fusion image (AUF) (see § 5.2.4.1)
Selection of “Iron” palette
Selection of “Rainbow” palette
Selection of “Grey scale” palette
Selection of “Reversed Grey scale” palette
Including “Spot” object on image (see Fig. 38)
Including “Line” object on image (see Fig. 38)
Saving snapshot
Including “Area” object on image (see Fig. 38)
Table 3: List of available function in real-time mode
EN - 32
Page 34

THT45W-THT46
A
Image import by using USB cable
THTview APP allows to import images from the instrument in the following ways:
1. Direct connection of the instrument to the mobile device via the supplied USB/OTG
cable and download of the IR images included in the micro SD card (USB mode)
2. Copy of IR images from PC or micro SD card
Fig. 39: Visualization of images gallery
Analysis and sharing IR images
1. Touch the menu icon and select the "Library" option in order to open the gallery
and select an image
Fig. 40: Image of the gallery open
2. The following functions are available::
Function Description
llows the analysis operations on the image (insertion of spots, lines,
areas, modification of palettes, change of view) as in the real time WiFi
section (see Fig. 41)
EN - 33
Page 35

THT45W-THT46
Fig. 41: Analysis on open image
3. Touch the “ ” icon to exit in the previous menu
Function Description
Allows to view the properties of the open image (name, size, instrument
model)
Allows to delete the open image
Allows to define the name of the report related to the open image and to
export it in PDF format (see Fig. 42)
Fig. 42: Creation of PDF report
EN - 34
Page 36

THT45W-THT46
Funcion Description
Allows you to select the type of image / report sharing program saved on
the mobile device (e-mail, social networks, cloud, etc.)
Fig. 43: Shared of images/report
EN - 35
Page 37

THT45W-THT46
7 USING THE THTLINK SOFTWARE
The software “THTLink” can be used to analyse the images saved on the micro SD card
inserted in the instrument.
7.1 MINIMUM SYSTEM REQUIREMENTS
Hardware: Pentium IV
RAM memory: 512MB
Output interface: USB ports or SD card reader
CD-ROM reader: present
Screen resolution: 800x600
Operating system: Windows XP o higher
Software applications: Microsoft .Net Framework 2.0 or higher
7.2 INSTALLING THE THTLINK SOFTWARE
1. Insert the installation CD-ROM into the reader of the PC.
2. Launch the file “THTLink.exe” found inside the CD-ROM and follow the guided
installation procedure
7.3 MAIN CHARACTERISTICS OF THE THTLINK SOFTWARE
With launched program, the PC shows the following initial screen:
Main characteristics of the THTLink software:
Fig. 44: Starting screen of the THTLink software
Display of IR and visual images
Insertion of advanced analysis tools (points, lines, areas, isotherm lines)
Realization of graphs from IR images
Realization of print reports in RTF and PDF format
Playback of the voice annotations saved on the images
For information about the use of THTLink, please refer to the Help on line of the
software itself
EN - 36
Page 38

THT45W-THT46
8 MAINTENANCE
8.1 GENERAL INFORMATION
1. The instrument you purchased is a precision instrument. While using and storing the
instrument, carefully observe the recommendations listed in this manual in order to
prevent possible damage or danger during use.
2. Do not use the instrument in environments with high humidity levels or high
temperatures. Do not expose to direct sunlight.
3. Always switch off the instrument after use. In case the instrument is not to be used for a
long time, remove the battery to avoid liquid leaks that could damage the instrument’s
internal circuits.
8.2 RECHARGING THE INTERNAL BATTERY
The instrument is designed to be supplied with a Li-ION rechargeable battery. With the
symbol “ ” found on the display, it is necessary to recharge the battery.
The battery must not be removed from the instrument while recharging.
Recharge the battery at environmental temperature and, anyway, in a
range between 0°C and 50°C (32°F and 122°F).
When using the instrument for the first time, recharge the battery for at
least 6 hours.
1. Connect the battery charger provided with the instrument to the AC electric mains and
the mini USB output to the instrument's input (see Fig. 3 – Part 16). Check that the
green LED of battery charge (see Fig. 3 – Part 15) has turned on with steady light.
2. With the instrument turned on, the indicator of the battery charge level takes the
symbols “ ” “” “ ” “” “ ” “” “ ” in a sequence. When the symbol
“ ” appears on the display and the battery charger has been disconnected from the
instrument, the charging process is complete.
3. With the instrument turned off, the charging process is complete when the green LED
of battery charge turns off.
4. Disconnect the battery charger from the instrument and from the electric mains.
8.3 CLEANING THE INSTRUMENT
Use a soft and dry cloth to clean the instrument. Never use wet cloths, solvents, water, etc.
8.4 END OF LIFE
CAUTION: this symbol found on the instrument indicates that the appliance, its
accessories and the batteries must be collected separately and correctly
disposed of.
CAUTION
EN - 37
Page 39

THT45W-THT46
8.5 ACCESSORIES
8.5.1 Accessories provided
Integrated 9mm focal lens
Rechargeable Li-ION battery, 3.7V 2000mAh
AC/DC 100-240V/5V adapter + universal plugs
Micro SD card, 8GB
USB cable
USB OTG cable
HDMI video cable
Set of headphones for intercom
Non-slip strap
CD-ROM with Windows software THTLink
ISO9000 calibration certificate
Quick user guide
User manual on CD-ROM
Soft transport bag
EN - 38
Page 40

THT45W-THT46
9 TECHNICAL SPECIFICATIONS
Range Sensitivity Accuracy (*) Resolution Image frequency
-20°C 350°C
(*) Accuracy referred to environmental temperature within 10°C and 35°C and object temperature >0°C
<0.1°C@30°C
2%reading or 2°C
80x80pxl (THT45W)
160x120pxl (THT46)
General specifications
Type of IR sensor UFPA (80x80pxl, 34m – THT45W)
UFPA (160x120pxl, 25m – THT46)
Spectrum response: 8 14m
Visual range (FOV) / Lens: 17° x 17° (THT45W), 25° x 19° (THT46) / 9mm
IFOV (@ 1m): 3.78mrad (THT45W), 2.78mrad (THT46)
Focusing: manual
Minimum focus distance: 0.5m
Temperature readings: °C, °F, °K
Available colour palettes: 4 (Iron, Rainbow, Grey, Grey Inverse)
Laser pointer: class 2 according to IEC 60825-1
Built-in illuminator: white LED light
Electronic zoom: x1, x32
Emissivity correction: 0.01 ÷ 1.00 in steps of 0.01
Image adjustment mode: Automatic / Manual
Measuring functions: corrections with emissivity and reflected temperature
Measuring cursors: 3 (Fixed, Max Temp., Min Temp.)
Inbuilt photo camera: 1.3Mpxl, FOV 59°
PiP fusion function: IR in Visual and AUF function
Video output: HDMI
IR video recording: micro SD card (MP4, 1280x960@30fps, max 60min)
Memory: micro SD card 8GB (>2k JPG images). Max 32GB
PC interface: USB 2.0 / WiFi (mobile devices – THT45W)
Audio output: Yes
Power supply
Internal supply: rechargeable Li-ION battery, 3.7V 2600mAh
External supply: adapter 100-240VAC (50/60Hz)/5VDC
Battery duration: 4 hours of continuous use
Display
Characteristics: Color, LCD 2.8”, 320x240pxl
Mechanical characteristics
Size (L x W x H): 224 x 77 x 96mm (9 x 3 x 4in)
Weight (battery included): 0.5kg (10lv)
9.1 ENVIRONMENT
9.1.1 Environmental conditions for use
Operating temperature: -15°C ÷ 50°C (5°F ÷ 122°F)
Storage temperature: -40°C ÷ 70°C (-40°F ÷ 158°F)
Allowable relative humidity: 10 ÷ 90%RH
Encapsulation: IP50 according to IEC529
Fall test: 2m
Shock: 25G in compliance with IEC60068-2-29
Vibrations: 2G in compliance with IEC60068-2-6
This instrument complies with Directive EMC 2014/30/EU
This instrument complies the requirements of 2011/65/CE (RoHS) directive and 2012/19/CE
(WEEE) directive
50Hz
EN - 39
Page 41

THT45W-THT46
10 SERVICE
10.1 WARRANTY CONDITIONS
This instrument is warranted against any material or manufacturing defect, in compliance
with the general sales conditions. During the warranty period, defective parts may be
replaced. However, the manufacturer reserves the right to repair or replace the product.
Should the instrument be returned to the After-sales Service or to a Dealer, transport will
be at the Customer's charge. However, shipment will be agreed in advance.
A report will always be enclosed to a shipment, stating the reasons for the product's return.
Only use original packaging for shipment; any damage due to the use of non-original
packaging material will be charged to the Customer.
The manufacturer declines any responsibility for injury to people or damage to property.
The warranty shall not apply in the following cases:
Repair and/or replacement of accessories and battery (not covered by warranty).
Repairs that may become necessary as a consequence of an incorrect use of the
instrument or due to its use together with non-compatible appliances.
Repairs that may become necessary as a consequence of improper packaging.
Repairs which may become necessary as a consequence of interventions performed
by unauthorized personnel.
Modifications to the instrument performed without the manufacturer's explicit
authorization.
Use not provided for in the instruments specifications or in the instruction manual.
The content of this manual cannot be reproduced in any form without the manufacturer's
authorization.
Our products are patented and our trademarks are registered. The manufacturer
reserves the right to make changes in the specifications and prices if this is due to
improvements in technology.
10.2 SERVICE
If the instrument does not operate properly, before contacting the After-sales Service,
please check the conditions of the batteries and replace them, if necessary. Should the
instrument still operate improperly, check that the product is operated according to the
instructions given in this manual.
Should the instrument be returned to the After-sales Service or to a Dealer, transport will
be at the Customer's charge. However, shipment will be agreed in advance. A report will
always be enclosed to a shipment, stating the reasons for the product's return. Only use
original packaging for shipment. Any damage due to the use of non-original packaging
material will be charged to the Customer.
EN - 40
 Loading...