

Page 1
MK 4
Subwoofer Manual
Features
Variable Tuning Hybrid Technology.
“Now you decide how deep to play.” The large flared ports can be re-tuned with the flip of a switch and
ith support for five different operating modes, including ported
al of a por
v
dition or r
the ad
and sealed hybrid modes, this subwoofer offers state-of-the-art performance in virtually all rooms.
emo
t plug(s).
W
Custom built woofers.
“The end of featureless boom.” We design our woofers for sound quality, so you will hear clean and detailed
bass not found in lesser subwoofers.
Powerful BASH amplifiers.
Our custom b
class A/B output stage to provide extremely high fidelity, low distortion, and high output.
uilt amplif
ier
a-high headroom, soft clipping, subsonic filtering, adjustable Q, and
e ultr
v
s ha
Flexible room placement.
The luxurious and smooth non-vin
next to listeners or discreet placement in corners.
yl finish, rounded corners, and overall design allows for close placement
Connects to almost any system.
“Integration is easier than ever.” Thanks to modern receivers that use Dolby Digital, DTS, THX, or Bass
Management, you can connect the subwoofer to your system with one cable. If you have invested in a
stereo-only system, integration is also simple thanks to true 24 dB/Oct low pass filters.
Page 2
2
10. Protect the power cord from being
NO USER SERVICEABLE
PARTS ARE INSIDE.
walked on or pinched particularly at
plugs, convenience receptacles, and the
point where they exit from the apparatus.
11. Unplug this apparatus during
lightning storms or when unused for
long periods of time.
12. Refer all servicing to qualified service
personnel. Servicing is required when
the apparatus has been damaged in any
way, such as power-supply cord or plug
is damaged, liquid has been spilled or
objects have fallen into the apparatus, the
apparatus has been exposed to rain or
moisture, does not operate normally, or
has been dropped.
The lightning flash with arrowhead symbol within an equilateral triangle is
intended to alert the user to the presence of uninsulated “dangerous voltage”
within the product’s enclosur
a risk of electric shock to persons.
Le symbole éclair avec point de flèche à l’intérieur d’un triangle équilatéral
est utilisé pour alerter l’utilisateur de la presence à l’intérieur du coffr
“voltage dangereux” non isolé d’ampleur suffisante pour constituer un risque
d’éléctrocution.
The exclamation point within an equilateral triangle is intended to alert the
user to the presence of important operating and maintenance (servicing)
instructions in the literature accompanying the product.
Le point d’exclamation à l’intérieur d’un triangle équilatéral est employé pour
alerter les utilisateurs de la présence d’instructions importantes pour le
fonctionnement et l’entretien (service) dans le livret d’instruction
accompagnant l’appareil.
e that may be
of sufficient magnitude to constitute
et de
Important Safety Instructions
1. Read these instructions.
2. Keep these instructions.
3. Heed all warnings.
w all instructions.
ollo
4. F
5. Do not use this apparatus
near water.
loth.
6. Clean only with dr
7. Do not block any ventilation
openings. Install in accor
the manufacturer's instructions.
y c
dance with
8. Do not install near an
such as radiators, heat registers, stoves,
or other apparatus (including amplifiers)
that produce heat.
9. Do not defeat the safety purpose of
the polarized or grounding-type plug.
A polarized plug has two blades with
one wider than the other. A grounding
type plug has two blades and a third
grounding prong. The wide blade or
ong ar
the thir
safety. If the provided plug does not fit
into y
for replacement of the obsolete outlet.
d pr
our outlet,
consult an electr
y hea
e provided for your
t sour
ician
ces
13. WARNING: To reduce the risk of fire
or electric shock, this apparatus should
not be exposed to rain or moisture and
objects filled with liquids, such as vases,
should not be placed on this apparatus.
14. To completely disconnect this
equipment from the mains, disconnect
the power supply cord plug from the
receptacle.
15. The mains plug of the power supply
cord shall remain readily operable.
TABLE OF
CONTENTS
UNPACKING . . . . . . . . . . . . . 3
PLACEMENT . . . . . . . . . . . . . 3
HOOKUP . . . . . . . . . . . . . . . . 4
VOLUME LEVEL . . . . . . . . . .5
CROSSOVER . . . . . . . . . . . . 5
FINE TUNING . . . . . . . . . . . . 5
TROUBLESHOOTING . . . . . . 7
REPAIR . . . . . . . . . . . . . . . . . .8
SPECIFICATIONS . . . . . . . . . 9
WARRANTY . . . . . . . . . . . . . .9
Page 3
Set-Up
Step 1: Unpacking
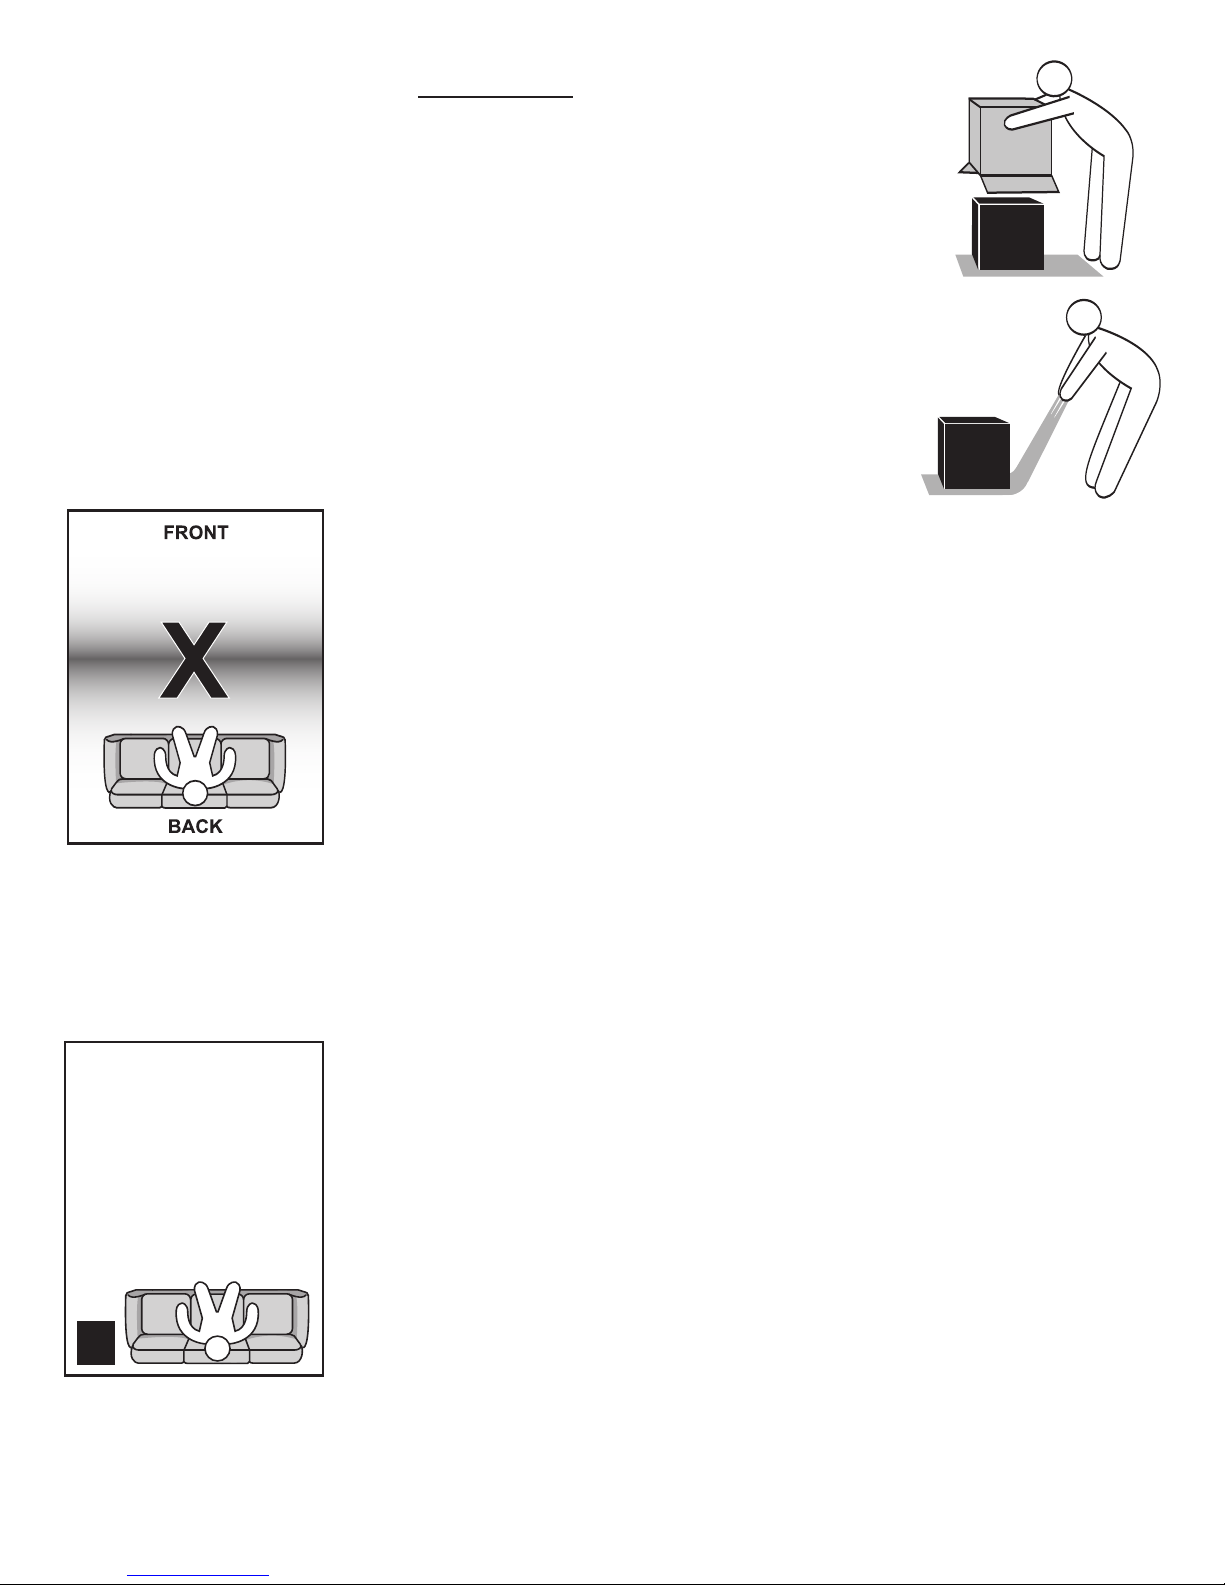
If your room does not have carpeting, unpack the subwoofer on a throw rug or piece of carpeting to avoid
nwanted scuffing or scratching. If the subwoofer is too heavy, please ask for assistance. Find the top of the
u
box and open it. Holding the flaps open, roll the box over until it is upside-down. Lift the box off.
top for a moment to inspect the protective bag for any rips or tears that may have occurred during
S
shipping. If there is damage to the subwoofer underneath, or if there are missing items, notify HSU Research
as soon as possible. We will help you find a solution.
Leave the protective bag on for now because it will protect the subwoofer when you move it into position.
Moving the subwoofer
Pull the subwoofer across a carpeted floor or drag it on a throw rug. Drag it on a flat side, NOT the side
with the woofer or amplifier. Once in place, remove the plastic bag.
Step 2: Placement
Placement is extremely important because it dramatically affects the bass quality. An optimally placed
subwoofer is much more powerful and nice sounding than a poorly placed one. There are many myths
about subwoofer placement. For example, there is no need to center a subwoofer between the left and
right front speakers. Good subwoofers radiate bass in all directions and cannot be located in the room
by sound alone
• Always maintain 3 inches clearance between the port hole on the back of the subwoofer and nearby surfaces.
• Your subwoofer has magnetic shielding, but 3 feet of space is still required between the subwoofer
and a CRT television or other CRT type monitors. Plasma or LCD TVs are not affected by magnetic
fields. Computer hard drives are not in danger of being erased.
.
Important guidelines
3
Avoid placing the subwoofer
halfway between the front
and back walls. Avoid sitting
there as well.
Corner and nearfield
placement usually sound best.
Rules of thumb for placement
• Avoid the center of the room: In general, avoid placing the subwoofer half way between the front
and back walls. This is where you get a strong null from your room’s standing waves. You should
also avoid sitting in that area. No matter how powerful the subwoofer is, there will not be much
bass around the center of the room.
• Use corner placement: Subwoofers usually sound best tucked in a corner. A good corner is far from
wall divisions and has at least 6 feet of wall to either side. If you have more than one good corner, use
ay from large room openings or the one closest to the listener. Keep the subwoofer
w
thest a
the one f
within 1 foot of the wall.
•
Use nearf
added bonus, the subwoofer’s volume level will be lower so neighbors are less disturbed. We strongly
recommend this method if your couch is up against the back wall and your room is over 18 feet deep.
•
Use “subwoofer crawling”: This excellent technique is not as hard as it sounds. The room’s
acoustical reflections are used to your advantage. Place the subwoofer in the listening position, in
a seat, towards ear level. Connect the subwoofer to the system and play some music with steady and
constant bass.
sounds good, crouch down and listen where the subwoofer would normally be. You may use a SPL
meter to measur
be placed ther
If y
•
to potentiall
If y
•
within a f
• You may place a subwoofer inside a cavity in your entertainment center if three inches of space is
maintained around the back and top of the subwoofer, and one inch is maintained around the sides.
You may need to secure items in the cabinet so they don’t vibrate.
ar
er usuall
ield placement:
alk ar
W
e the e
.
e
ou are using two subwoofers, place them side-by-side to maximize headroom, or separate them
y smooth out in-r
ou are not able to place the subwoofer in an ideal location, the subwoofer should be placed
oot of a w
all f
ood subw
A g
ound the r
enness of the bass. Mark the best sounding place. The subwoofer should
v
oom r
or better bass.
oof
oom, listening for the nicest and most even bass. When the bass
esponse
y sounds best close to the listening position. As an
.
Page 4
4
Step 3: Hookup
We will refer to receivers, integrated amplifiers, and preamps as controllers.
Take a look at the back of your controller. The output connectors available
determine the best method of hooking up your subwoofer.
Method A. Connecting to controllers
with a SUBWOOFER or LFE output
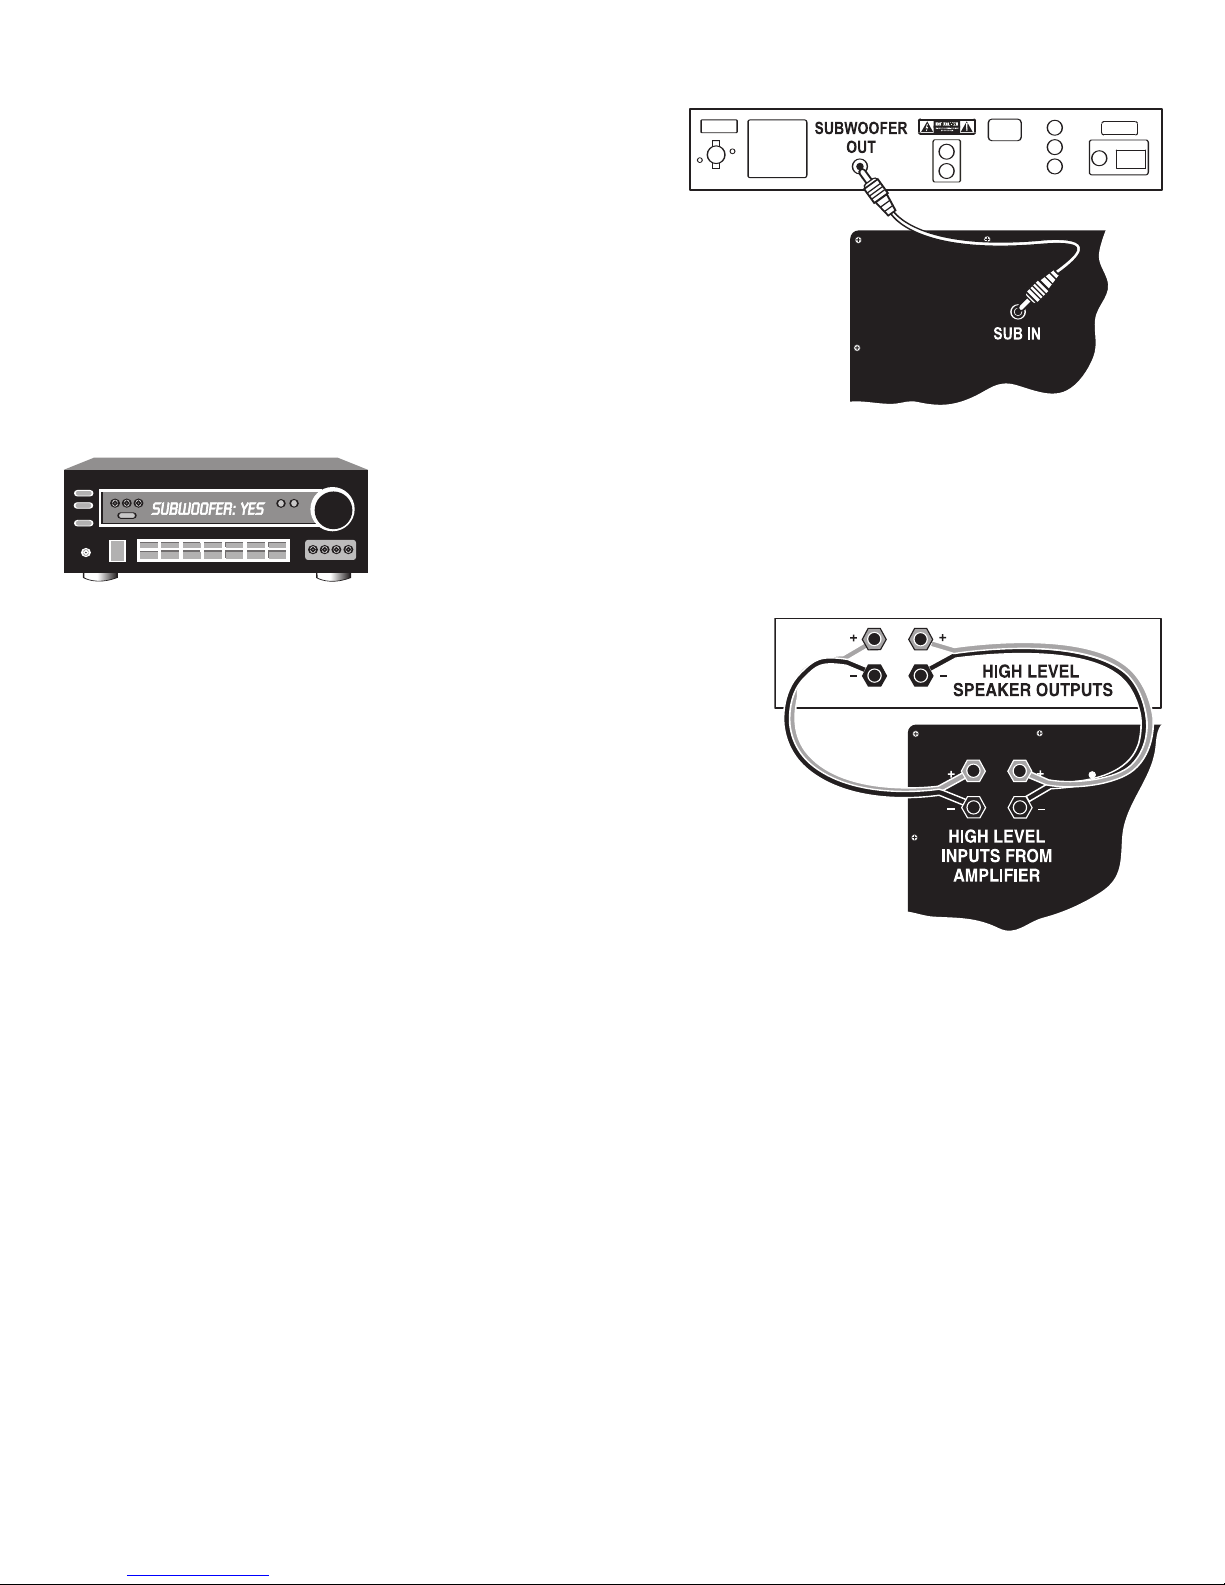
If you have this, you should use it. All Dolby Digital, DTS, THX, and Bass Management
equipped controllers have a low level SUBWOOFER or LFE output. It offers the easiest and
best connection. Run a cable from it to the subwoofer’s low level SUB-IN input. A standard
mono interconnect cable with RCA jacks on both ends can be purchased from electronics
and audio stores. A special subwoofer cable is not needed, and neither is a Y-connector.
When wiring, allow for an extra yard or two. The cables should lie flat with a little bit of
slack to give you some placement flexibility.
Set your controller to enable subwoofer output. To do this, go to the SPEAKER SET-UP or
BASS MANAGEMENT menu and set the SUBWOOFER to ON or YES. All the speakers
should be set to SMALL if possible. This directs the deep bass from the satellites to the subwoofer, freeing them and their amplifiers from the rigorous demands of reproducing bass.
Method B. Connecting to controllers
with HIGH LEVEL speaker outputs.
If your system does not have a SUBWOOFER or LFE output (for example, stereoonly integrated amps or older Dolby Pro Logic receivers) you can use the HIGH
LEVEL speaker outputs. The subwoofer taps the signal from the controller’s amplifier,
letting the subwoofer reproduce the bass of the left and right channels. This method is
also called bass augmentation. Since the subwoofer uses its own amplifier there is no
noticeable drain on your main amplifier.
You will need to run two lengths of two conductor speaker cable or zip cord. This wire is not
included with your subwoofer but can be purchased at electronic or home improvement stores. Strip
1⁄2˝ of insulation from each end of the wire to expose the bare metal. If your speaker wire is fraying, tightly twist the metal. Unscrew the plastic hex nut on the binding post to insert the exposed
wire into the hole. Tighten the binding posts by hand.
Run the wires from your system’s amplifier to the subwoofer’s HIGH LEVEL INPUTS. For each channel, run wire from the red (+) outputs on the amplifier to the subwoofer’s red (+) inputs, and from the black (-) outputs on the amplifier to the subwoofer’s black (-) inputs.
Make sure the black amplifier outputs are “true ground.” Bridged outputs cannot be used.
e to doub
Be sur
tive (-) terminals go to negative (-) terminals. Most wire has some marker to help you keep track of the polarity, such as ribbing, color
coding, or writing on one of the two strands. Tighten the binding posts by hand. If you prefer to terminate your cables, we recommend
ingy banana plugs for a reliable connection. They are available from electronic and audio stores.
spr
or older Dolby Pro-Logic controllers, your center channel must be switched to NORMAL instead of WIDE, or else the bass from the
F
center channel will not be fed into the subwoofer. For Dolby Digital controllers, go to the SPEAKER SET-UP or BASS MANAGEMENT
menu on your controller and turn the subwoofer to NO or OFF and set the left and right channels to LARGE.
We recommend bi-wiring from your main amplifier, i.e., connect your main speakers directly to your main amplifier.
le check all connections for the correct polarity so that the positive (+) terminals go to positive (+) terminals and nega-
Method C. Connecting to controllers with PRE-OUTs.
If you do not have a SUBWOOFER or LFE output but have an extra PRE-OUT, you can use this instead of the speaker outputs. Run a
stereo RCA interconnect from your PRE-OUT to the left and right inputs on the subwoofer. For Dolby Pro-Logic controllers, your center
channel must be switched to NORMAL. For Dolby Digital controllers, the subwoofer must be switched to NO or OFF and the left and
right channels set to LARGE.
If your system (a) has a MAIN-IN connected with a metal jumper to a PRE-OUT, or (b) you have an external amplifier, you can purchase
our HSU High Pass Box for the added benefit of keeping the bass out of your speakers. Please contact HSU Research for details.
Page 5

Turning the subwoofer ON for the first time
On the subwoofer, check that the phase switch is at 0 degrees, the volume level knob is at the minimum, and the crossover is at 90 Hz if using
the subwoofer’s crossover. Run the power cord from the wall to the subwoofer and flip the power switch to the AUTO-ON or ON position.
Step 4: Volume Level
Set the volume knob to the 9 o’clock position to start. Many people use ordinary music recordings or
soundtracks for setting the subwoofer’s volume level. If you are using this method, try adjusting the
subwoofer’s volume level so it matches the main speakers at the listening position. Since most people
do not listen to material at very loud reference levels and the ears are less sensitive to bass at lower levels, some listeners prefer to set the bass level a little higher than the main speakers. A good approach
is to set the subwoofer level to the highest level where it sounds nice and where bass and kick drums
still sound tight and non-boomy. For home theater applications, most prefer to set the subwoofer level
higher than the other speakers. We suggest setting it about 3 dB higher. Some processors/receivers
allow you to set different bass levels for different sources.
Optional: subwoofer integration will be more accurate when using test tones and a SPL meter. See Step 6 (Fine Tuning).
Step 5: Crossover
If you are using the SUBWOOFER or LFE output on your controller, you may optionally set the CROSSOVER switch to OUT. This lets
the controller handle the crossover between the subwoofer and other speakers. However, if the bass sounds boomy, it may sound better
with the crossover switched IN and the CROSSOVER FREQUENCY set to 90 Hz. You may skip the rest of this step.
5
If you are using the HIGH LEVEL speaker connections, you will be using the subwoofer’s crossover. Look up the lowest frequency your
left and right speakers will output (the frequency they are“-3 dB” at) and set the crossover approximately to this point. Play program materials with steady, consistent bass around this frequency such as filtered pink noise or music containing bass drums, double basses, bass
guitar, etc. Turn the crossover to the left until you hear the subwoofer and L/R speakers as separate sources. Slowly turn the control back
to the right until the sound of all three speakers is well integrated. When using tiny front speakers that don’t have much bass, the 90 Hz
setting on the control will probably yield the best results.
Your subwoofer has a sharp 24 dB/octave low pass filter to remove upper bass and midrange from the subwoofer when CROSSOVER
is switched IN. This makes your subwoofer non-directional. Unlike many other subwoofers on the market, the 24 dB/octave slope stays
steep at all available frequencies, not just the high ones.
Step 6: Fine Tuning
Now that the basic setup is complete, it’s time for optimization. Mark down the current volume and crossover settings with a soft pencil
so you can go back to where you started.
Variable Tuning
By adding or removing a foam port plug(s) and flipping a switch on the sub amplifier, the user can operate this subwoofer in one of five
dif
f
erent hybrid operating modes, providing the user with ultimate performance and flexibility for virtually all types of music and movie
program material.
1) Ported Max Output Mode: 2 ports open, and operating mode switch set to ‘EQ2”. This mode is ideal for those with medium-to-large
room sizes who listen at high playback levels and want the strongest mid-bass possible. NOTE: Never operate the subwoofer with 2
por
ts open and oper
ating mode switch set to ‘EQ1’, as this may damage the driver and void the warranty.
2) Ported Max Extension Mode: 1 port open, and operating mode switch set to ‘EQ1’. This mode is ideal for those with medium-to-large
oom sizes, or small to medium rooms but who listen at low-to-moderate playback levels where the rising low bass from room gain
r
or the ear’s insensitivity to bass a
will help compensa
3) Ported Max Headr
large room sizes w
4) Sealed Max Extension Mode:
box sound and deepest bass extension. Not recommended for high SPL operation in this mode as woofer excursion can get excessively
high and can dama
5) Sealed Max Headroom Mode:
box sound and listen a
te f
oom Mode:
ho listen a
oof
e the w
g
t high pla
1 port open, and operating mode switch set to ‘EQ2’. This mode is ideal for those with medium-to-
t high pla
0 por
er.
0 por
ybac
ts open,
ts open, and operating mode switch set to ‘EQ2’. This mode is ideal for those who want the sealed
k le
ybac
t lower levels.
vels and want the deepest bass extension.
k le
h set to
witc
v
els.
and oper
ting mode s
a
‘EQ1’. This mode is ideal for those who prefer a sealed
Page 6

6
Setting the Phase
Depending on the absolute phase of your main speakers and amplifier, and the distances of the subwoofer and the main speakers from
the listening position, the bass in the crossover region may be smoother if you reverse the phase of the subwoofer. Switch the phase switch
to 180 degrees to see if the bass sounds louder in the seating position. Play program materials with steady, consistent bass in the crossover
region (30 – 90 Hz). Filtered pink noise is best, but you may use music containing bass drums, double basses, bass guitar, etc.. The more
ass-heavy setting is where the output of the subwoofer and the main speakers are most in phase. If the 180 degree position is louder, you
b
will need to go back and adjust the volume level (Step 4). Otherwise, just switch the phase switch back to the original position.
Volume fine tuning
For this section, we assume that you have a controller with bass management and you have set the main speakers to small so bass is redirected to the subwoofer. Set the volume on the sub to 9 o'clock, crossover out, sub out level on the receiver to 0 dB.
For the most precise integration with your main speakers, go through test tones with a SPL meter. Setting the level using test tones by ear
may result in misconfiguration, so please use a meter. An analog Radio Shack SPL meter is inexpensive and works better for this application
than the digital Radio Shack SPL meter. It is available at RadioShack.com. Use the “C” weighting and “SLOW” settings and place the meter
at the listening position at ear level. Note that the Radio Shack analog meter is about 12 dB down at 16Hz, 7 dB down at 20Hz, 4 dB
down at 25Hz, and 2 dB down at 31.5Hz. Add these numbers to the readout on the SPL meter to compensate.
1) Using a test disk with one-third octave filtered pink noise or warble tones (such as the Hsu/BAS Test CD-1), play the 50Hz test tone
and adjust the master volume level on the controller so that the SPL meter reads 80 dB at the listening position.
2) Play test tones from 20 Hz up to 200 Hz, and note the SPL reading on the meter at each frequency.
3) Take the average of four test tones below the crossover frequency (ie. 63/50/40/31.5 Hz when using 80 Hz crossover).
4) Take the average of four test tones above the crossover frequency (ie. 100/125/160/200Hz when using 80Hz crossover).
5) Adjust the subwoofer level so that the lower range average equals the upper range average (ie. if the lower range average is 5 dB more
than the upper range average, then adjust the subwoofer level down by 5 dB). If your controller allows you to adjust subwoofer channel
level, use this to adjust the subwoofer level. Otherwise simply adjust the subwoofer volume knob instead.
A less accurate method uses the receiver’s test tones, which are usually not in one-third octave increments. Measure from the listening
position and set the subwoofer volume level to match the other speakers.
Setting the Q Control
We have added an adjustable Q control on the subwoofer amplifier in order to give the user higher headroom, flatter in-room response,
and better ability to take advantage of room gain. Set Q = 0.3 for the highest mid-bass headroom in all room sizes, and for the flattest
deep bass response in small-to-medium room sizes. Set Q = 0.5 for the flattest deep bass response in medium-to-large room sizes. Set
Q = 0.7 for the flattest deep bass response in large room sizes. Note that the low bass is more rolled off in the lower Q settings. This
means that higher Q settings can result in less low bass headroom, ie. the subwoofer will run out of steam in the low bass earlier when
the Q setting is higher
.
Removing buzzes and rattles from the room:
Annoying sounds can be fixed by using adhesives, tape, or felt pads in the area where objects are vibrating against each other.
Equalizing the subwoofer
If you have an equalizer, avoid raising dips in the frequency response. Instead, use the equalizer to remove peaks. This will prevent
potential speaker damage.
ou are using any auto EQ (such as Audyssey) to equalize your subwoofer, set the subwoofer to one port open, EQ1, Q = 0.7, as this
If y
will help to counteract the auto EQ's tendenc
to any mode of your choice.
y to o
er boost v
v
ery low frequencies. After running the auto EQ, you can set the subwoofer
Enhancing performance in the future
The best way to enhance performance in the future is to add a second identical true subwoofer (and/or mid-bass module) to the system.
er in the system, it is very difficult to achieve optimal mid-bass and deep bass performance. The addition of
With a single true subw
a second identical true subw
flatter frequency response in-room due to better ability to optimize for strong mid-bass and deep bass output and response.
oof
er (and/or mid-bass module) r
oof
esults in m
h higher headr
uc
much lower distortion, and potentially much
oom,
Page 7

Troubleshooting
If you think your subwoofer has a problem, please do everything you can to confirm the problem before contacting us for service,
including reading through the troubleshooting section. Many times the problem actually is caused by other items in the system or the
subwoofer’s interaction with those items. Much of the time, the service department will not be able to reproduce the error.
Problem Cause Solution
7
Humming or
buzzing noise
Subwoofer goes into
STANDBY mode
while material is
playing.
You have an amplifier problem.
Your speaker wires or interconnects are
the cause.
A light dimmer or other triac based (SRC)
device is on the same AC circuit.
You have a problem with other equipment.
The source is not providing enough signal.
• Disconnect all interconnects from the amplifier. If still
hums, call/email technical support.
• It is possible that some cables have a poor or broken
ground due to poor construction, oxidation, or damage.
Also, poorly shielded cables can potentially pick up
noise. Try another interconnect or speaker wire. Also,
move the signal cable away from AC cables, power
transformers, or other EMI sources.
• Use an AC line filter or plug the unit into a different circuit.
• If hum goes away when interconnects are disconnected,
the hum is coming from the rest of your equipment.
Add them back one piece at a time. The one that causes
the system to hum is the source of the hum.
• The unit is going into STANDBY mode during the quiet
passages. Try turning the source signal up. On a Dolby
Digital receiver, turn the SUBWOOFER level up in the
SPEAKER SET-UP menu. After you turn the signal up, turn
down the volume knob on the subwoofer to compensate.
AC power is not getting to the amplifier.
No output from the
subwoofer (the LED
light up).
not
does
Amplifier’s is not working.
• An alternative is to turn the subwoofer ON/AUTO/OFF
switch to the ON position. It does not use any more
power and does not af
• Check that the power cord is plugged in securely at both
ends and make sure that the power outlet the subwoofer
is plugged into is working.
• If you have determined that the power outlet has power,
and that the power cord is plugged in properly and the
LED is still not lighting up, the amp needs service.
Call/e-mail technical support for authorization to send
the amplifier back for service.
fect r
eliability.
Page 8

8
Problem Cause Solution
he subwoofer is not receiving a
T
signal.
• Recheck the connections between the source and the subwoofer.
No output from the
subwoofer (LED
lights up red).
No output from the
subwoofer (LED
turns green).
Little or no sound
from one main
speaker..
Subwoofer amplifier is faulty.
Connection between subwoofer
amplifier and woofer is faulty.
Driver or amplifier is faulty.
You used speaker level connections
and have mixed up the polarity of
the wires, thus shorting one channel
of the main amplifier.
• Set the subwoofer level to minimum. Use a different RCA cable to
hook the sub to a DVD player's analog output or to an MP3 player.
Play some music and slowly turn up the volume on the sub. If the
sub plays, then the sub is fine and the problem lies either in the
subwoofer cable or the setting on the receiver, or you have connected to the wrong jack on the receiver. If there is still no noise,
call/e-mail technical support.
• If wire is loose, tighten the connector and reconnect.
Take the driver out of the cabinet and connect to your main amplifier.
•
If it plays fine, then the amp is bad. If it does not play, then the
woofer is bad. Call/e-mail technical support for authorization to
send non-working part back for service.
• Correct the polarity of the speaker wires by matching the +/- from
the receiver/amplifier to the +/- of the subwoofer’s speaker level input.
Bass output from
subwoofer is low
Subwoofer
thumps when the
system is being
turned on and off.
Contact tech support via e-mail (24/7) or call 1-800-554-0150 9am to 5pm Pacific time, Monday through Friday.
.
We will tr
You used speaker level connections
and one or both your main amplifier’s
‘ - ’ are not true ground.
Level on subwoofer or receiver’s
subwoofer output is too low
Noise is being generated by up-
eam equipment.
str
.
• Connect only to the channel that has a true ground ‘ - ’. If neither
channel has a true ground ‘ - ’, e-mail/call technical support.
• Increase the volume of the subwoofer and the subwoofer level or
LFE level on the receiver or other source. It is best to set the level
of the subwoofer relative to the other speakers using a test disk and
a Radio Shack SPL meter, or built-in tones on your pre-amp/processor. See “Volume Level” in Step 4.
• When you shut down your equipment, turn off the subwoofer first.
When powering up, tur
n on the subwoofer last.
Repair
If your unit needs service, please re-review the troubleshooting section first.
espond to emails sent to
y and r
[email protected] within two business days.
Page 9
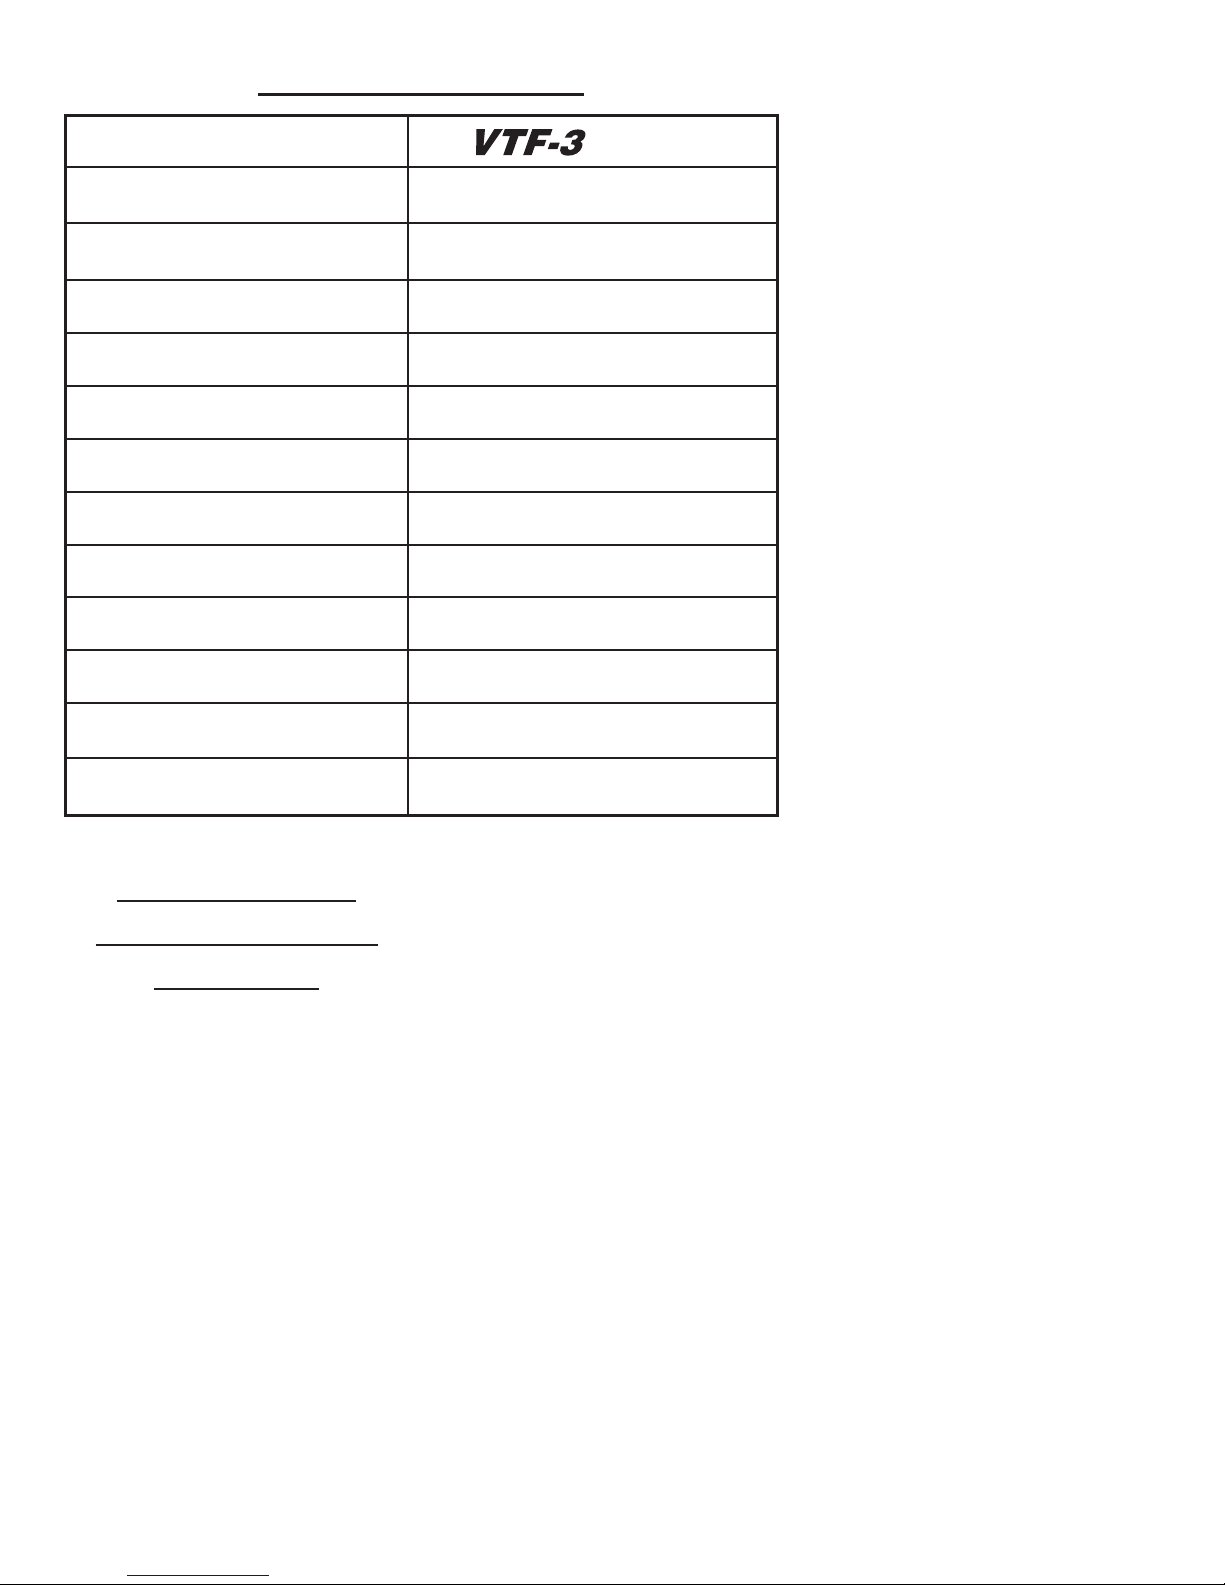
Specifications
9
MK 4
Frequency Response (+/-2 dB)
(
1 Port Open, EQ1, Q = 0.7
Frequency Response (+/-2 dB)
(
2 Ports Open, EQ2, Q = 0.7
Woofer Size
Amplifier Power
Crossover Frequency Range
Crossover Slope
Crossover Type
Q
Phase
Dimensions
Ship Weight
)
)
16 Hz
22 Hz
12 inches
350 Watts
30-90 Hz, bypassable
24 dB/Oct
low pass only
0.3 - 0.7
0°/180°
22.5˝(h)/17˝(w)/25˝(d) with feet
90 lbs
Power Outlet Requirement
HSU Speaker
System Limited
Warranty
If the
speaker system proves to be defective
in materials or workmanship within seven
years from the date of the original customer’s purchase, or the amplifier within
two years, we will, at our option, repair or
replace the defective product.
*DISCLAIMER
ARRANTY ST
THE W
OF ALL OTHER WARRANTIES, EXPRESS OR
IMPLIED, INCLUDING MERCHANTABILITY AND
FITNESS FOR PARTICULAR PURPOSE AND ALL
OTHER LIABILITIES AND OBLIGA
ALL OF WHICH ARE EXPRESSLY DISCLAIMED.
HSU
HAS NOT MADE AND DOES NOT HEREBY
MAKE ANY OTHER REPRESENT
OR COVENANT WITH RESPECT TO THE CONDITION, QUALITY, DURABILITY, DESIGN, OPERATION, CAPACITY, FITNESS FOR USE OR SUITABILITY OF THE SPEAKER SYSTEMS.
ATED HEREIN IS IN LIEU
TIONS OF
TION, W
A
HSU
ARRANTY
,
430 Watts
Exclusion of
Certain Damages
HSU’s liability for any defective product is limited
to repair or replacement of the product at our
option. HSU shall not be liable for incidental or
consequential damages of any kind or character
because of product defects. Some states do not
allow limitations on how long an implied warranty
lasts and/or do not allow the exclusion or limitation
of incidental or consequential damages, so the
above limitations and exclusions may not apply.
This Warranty Does
Not Cover:
Damage caused by abuse, accident, mis-use,
negligence, or improper operation.
Products that have been altered or modified.
Any product whose serial number has been
altered, defaced, or removed.
Normal wear and maintenance.
Damages caused by shipping. (All claims for
shipping damage must be made with the carrier.)
Warranty Service
Warranty service must be performed by
Hsu Research or an authorized service
center.
All warranty repairs must be accompanied
by the original bill of sales. No other
document is acceptable or is required.
This warranty gives you specific legal rights,
and you may also have other rights which
vary from state to state.
Due to our continual efforts to improve product
quality as new technology and techniques become
available, HSU reserves the right to revise its
Speaker Systems specifications without notice.
©2011 HSU Research
Page 10

10
Notes
Page 11

Notes
11
Page 12

12
HSU Research
985 N. Shepard St.
Anaheim, CA 92806
1-800-554-0150
HSURESEARCH.COM
 Loading...