

HSS Hire HW011 Operating & Safety Manual
300AMP MIG
Compact
Welder
A compact MIG Unit featuring
standard, spot and stitch welding
facilities.
Operating & Safety Guide HW011
Feed the wire through the wire feed roller and into
the guide. Close the tensioning roller and set the
tension. Feed the wire through to the gun until
25mm of wire is exposed then re-fit the tip.
The welder offers a range of different settings to
suit the type of welding task being performed.
Work through the following list of options selecting the
settings best suited to the work.
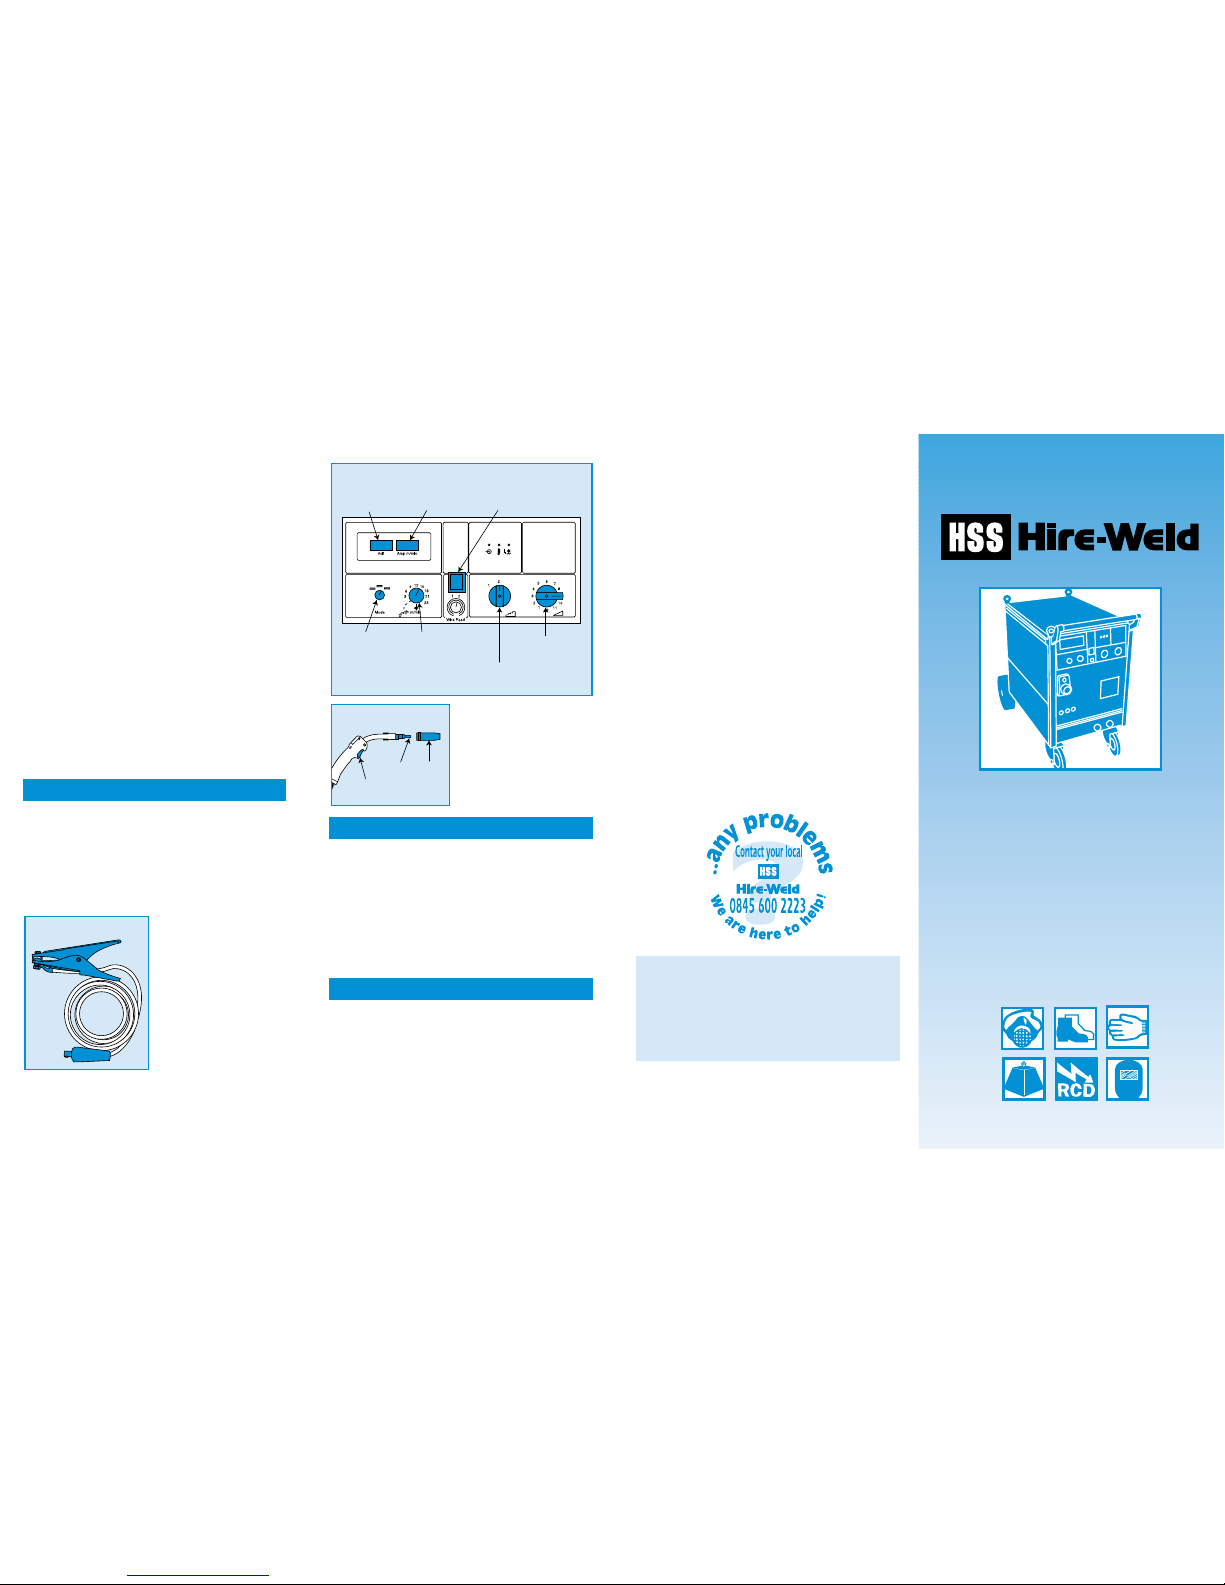
Welding Mode Selector Switch…
This allows you to select one of four welding types.
2-times. Squeeze the torch trigger to begin
welding, release to stop.
Spot. Squeeze the torch trigger to begin
welding, then release. Welding will
stop automatically within the time
selected. See Welding Time.
4-times. Squeeze the torch trigger then release
to begin welding, squeeze the trigger
then release a second time to stop.
Burn Back
(fitted inside the wire feed compartment).
Adjusts the time that the wire continues
to be fed after the welding current has
stopped. The time can be set between
0.05 seconds and 0.5 seconds.
Set the welding voltage and wire speed
appropriate to the total thickness of the metal
being welded.
Clamp the workpieces securely in their final
positions.
Ensure the metal to be welded is clean, dry and
free from rust, paint and grease. Aim to weld only
bright, bare metal.
Clip the earth clamp to
the work, as close to the
proposed weld as
possible to ensure good
electrical contact.
Open the gas regulator
to give a flow rate to suit
the wire speed.
Expose about 25mm of
wire before striking an
arc. Hold the welding
gun at an angle of 60-70
degrees to the surface,
squeeze the trigger to strike an arc.
If you have difficulty in striking an arc, snip off all
but about 25mm of exposed wire and try again.
BASIC TECHNIQUES
Continue holding the
trigger, keeping the arc
about 3mm long and
work slowly along the
line of the joint.
DO NOT allow the tip to
touch the work. At the
end of the weld simply
release the trigger.
Never push the equipment beyond its design
limits. If it will not do what you want with
reasonable ease and speed, assume you have the
wrong type or size of welder for the job. Ask at
your local HSS Hire Weld Depot for advice.
When not in use, store the equipment somewhere
clean, dry and safe
from thieves.
Keep the equipment clean. You will find this less of a
chore if you clean it up regularly rather than wait until
the end of the hire period.
Switch OFF and unplug the unit. Leave everything
to cool then take the earth clamp off the work.
Disconnect all leads and coil them up neatly ready
for return
, to your local HSS Hire Weld Depot.
FINISHING OFF
EQUIPMENT CARE
Code 55165
©HSS Hire Service Group Plc 2000 No. HW011/01
Group Office: 25 Willow Lane, Mitcham, Surrey CR4 4TS
Web Site: http://www.hireweld.com
…any comments?
If you have any suggestions to enable us to improve
the information within this guide please fax your
comments or write to the Product Manager at the
address below
Fax: 020 8687 5001
HW011/01
Wire Feed
Speed Dial
Welding
Voltage
ON / OFF
Switch
Welding
Mode
Selector
Welding AMP
& Wire Speed
Welding Voltage
Selector – Coarse
Welding Voltage
Selector – Fine
Control Panels
Trigger
Tip Shield
Torch
Earth Clamp
For advice on the safety and suitability of this equipment
contact your local HSS Hire Weld Depot.
There is a serious risk of personal injury if you do
not follow all instructions laid down in this guide.
The hirer has a responsibility to ensure that all
necessary risk assessments have been completed
prior to the use of this equipment.
Most welding tasks may be considered as hot work
in site situations and may be subject to specific
permits to work.
This equipment should only be used by an operator
who has been deemed competent to do so by
his/her employer.
This equipment should be used by an able bodied,
competent adult
who has read and understood these
instructions. Anyone with either a temporary or permanent
disability, should seek expert advice before using it.
Keep children, animals and bystanders away from
the work area. Cordon off a NO GO area using
cones and either barriers or tape, available for hire
from your local HSS Hire Weld Depot.
Welding screens are also available for hire from
your local HSS Hire Weld Depot.
Never use this equipment if you are ill,
feeling tired, or under the influence of
alcohol or drugs.
Fumes produced by the welding process, if
inhaled, can be harmful to health.
A suitable
mask must be worn when using this equipment.
Respiratory protective equipment is available for
hire
, contact your local HSS Hire Weld Depot for details.
Skin must be covered – wear practical,
protective clothing, gloves and footwear .
This equipment is heavy
(132kg), never attempt
to lift it on your own, always get help.
A head shield with an 11 EW shade MUST be
worn by anyone in the work area – goggles
are not suitable.
Avoid loose garments and jewellery
that could interfere with the work.
Warning
If you are wearing an electronic life support
device (a heart pacemaker) you must consult
your doctor before going near or working with
this equipment. Magnetic fields associated with
high currents may affect these devices.
GENERAL SAFETY
If the headshield or lens becomes damaged, return
it to your local HSS Hire Weld Depot.
Never use welding equipment near computers or
any sensitive electronic equipment.
Always transport, store and operate the machine
in an upright position.
Keep the power unit’s air vents clear of all
obstructions.
Always switch equipment OFF before making any
adjustments to it. Never leave it switched ON and
unattended.
Ensure the work area is well lit and ventilated,
a
fume extractor or smoke eliminator should be used. If in
doubt, ask about lighting and ventilation equipment at
your local HSS Hire Weld Depot.
Do not work near flammable gases or liquids, petrol
or paint thinner fumes for example
. Keep combustible
materials at a safe distance -
at least 5m.
Make sure you know how to switch this machine
OFF before you switch it ON
in case you get into
difficulty.
Check the condition of the equipment before use.
If it shows signs of damage or excessive wear , return it to
your local HSS Hire Weld Depot.
COSHH information sheets are available from your local
HSS Hire Weld Depot.
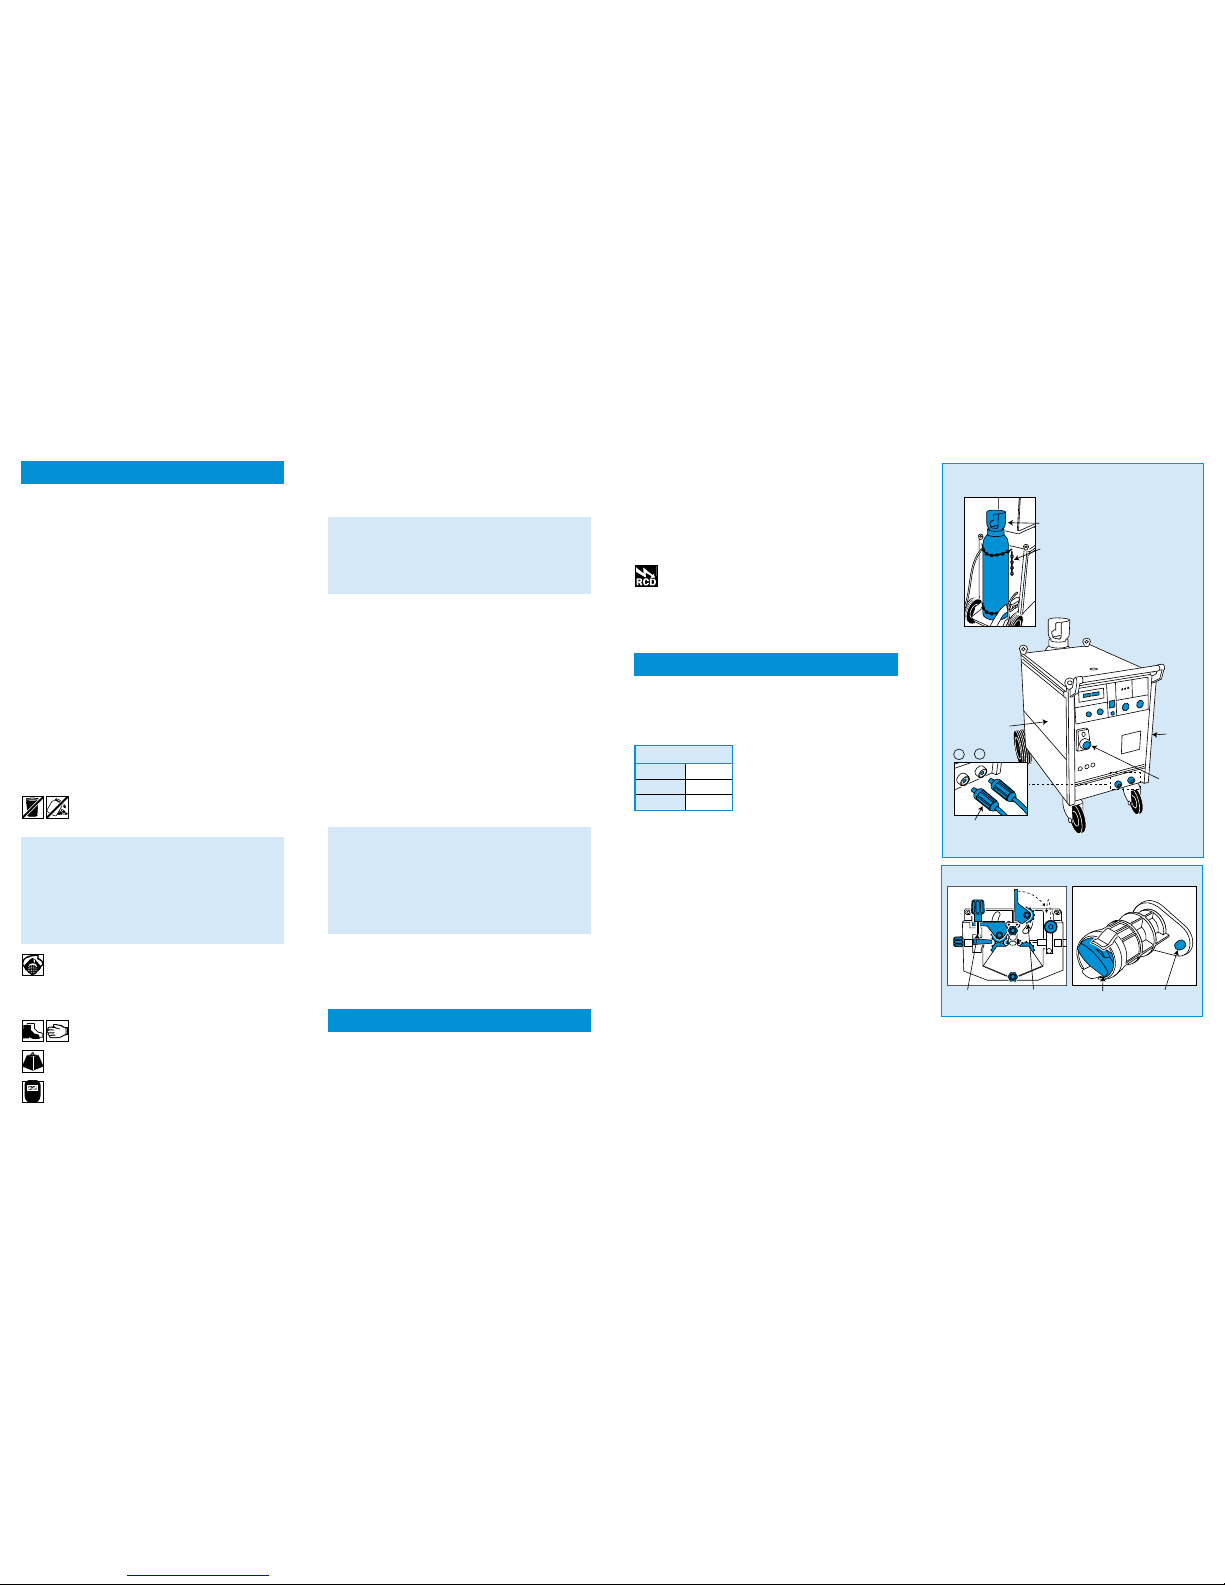
The HSS 300A Welding power unit must be
powered from a 415V-3 Phase NO neutral mains
supply, and all mains connections may only be
made by a qualified Electrician.
If the equipment fails, or if its power supply cable
or plug becomes damaged, return it.
Never try to
repair it yourself.
ELECTRICAL SAFETY
Vehicle Safety
Before carrying out welding work on cars/lorries
and similar vehicles...
Remove the vehicle’s battery and disconnect the
alternator.
Remove all combustible material and other
fire/explosion hazards.
Let It Cool
Handle welding equipment and work with care
– it will be hot. Leave equipment to cool before
changing welding rods, moving earth clamps,
and so on.
Keep cables out of harm’s way,
and clear of the
work area
.
Extension leads should be fully unwound and
loosely coiled, away from the equipment.
Never run
them through water, over sharp edges or where they
could trip someone.
Keep the equipment dry, using electrical equipment
in very damp or wet conditions can be dangerous.
To reduce the risk of electric shock, always use
a suitable RCD
(Residual Current-Operated Device)
available from your local HSS Hireweld Depot. Or power
the equipment from a mains circuit with a built in RCD.
Ensure the welder and the power socket are
switched OFF before plugging into the power
supply.
This guide is designed to help the user to safely set
up and dismantle the welder. It is not intended as
a guide to welding techniques as it is assumed
that the user already has the necessary
training/knowledge and experience.
It is important that the
equipment duty cycle is taken
into consideration when in use.
DO NOT use the unit in the
rain or in extremely damp
environments.
Place the unit on a suitable surface and make sure
that there is a minimum of 200mm clearance
around the unit to allow a good circulation of air.
Ensure that the unit is switched OFF and isolated
from the power supply.
Connect the argon gas supply hose to the
regulator then fit the regulator to the argon
cylinder and secure with the spanner supplied.
Chain the cylinder securely to the rear of the unit.
Attach the MIG torch to the connection socket on
the units’ front panel. Simply align the pipes and
pins, insert and lock in place by turning the collar
clockwise.
Connect the earth clamp cable to the negative (–)
terminal 1 or 2 depending on the wire diameter
being used. Terminal 1 for wire sizes from 0.6mm
to 1.0mm and terminal 2 for wire sizes from1.2mm
to 1.6mm.
Remove the wire feed compartment cover.
Remove the welding guns shield and tip, pull
through any remaining wire and remove any
empty roll.
Place a new roll of wire onto the spool holder
making sure that the wire is fed from the bottom of
the roll.
GETTING STARTED
Ensure the brake location pin fits correctly to the
wire roll.Turn the spool holder securing cap by 90°
to retain the wire roll.
You must now switch the welder ON.
Pull approximately 150mm of wire from the roll
ensuring you DO NOT let go of the wire
(as the wire
will spring loose).
Snip the end of the wire to leave a
straight leading piece.
Duty Cycle
335A 35%
300A 60%
240A 100%
Wire Feed
Compartment
Torch
Connection
Socket
Main
Power
Unit
2
1
Earth
Clamps
Chain
Cylinder
300AMP MIG Welder
Tension
Roller
Tension
Adjuster
Securing
Cap
SPOOL HOLDER
Brake
Location Pin
Wire Feed
 Loading...